Article

Two-Step PM Procedure for Fabrication of Super-Engineering Plastic Gears

1
Surface Engineering Design Laboratory, Shibaura Institute of Technology, Ota, Tokyo 144-0045, Japan
2
Marutaka Industry, Co., Ltd., Aizu-Wakamatsu, Fukushima 965-0845, Japan
3
Isogami Gears, Co., Ltd., Ota, Tokyo 142-0023, Japan
*
Author to whom correspondence should be addressed.
Machines 2024, 12(3), 174; https://doi.org/10.3390/machines12030174
Submission received: 7 January 2024 / Revised: 8 February 2024 / Accepted: 23 February 2024 / Published: 4 March 2024
(This article belongs to the Section Advanced Manufacturing)

Abstract

:
The two-step PM (powder metallurgy)-route procedure was proposed to fabricate a super-engineering plastic gear directly from powder feedstock. Its lightweight, fully dense integrity and high-stiffness has been found to be suitable for reducers in robotics and electric vehicles, as they work even in severe environmental conditions. In this study, the green compaction and sinter-forging processes were used to consolidate the polyimide powder feedstock and to sinter forge the solid preform into the final products. To demonstrate the high density of preforms and sinter-forged gears, a hardness measurement and X-ray computer tomography were employed. The gear-grade balancing was also evaluated to describe the effect of fine sinter-forging conditions on the dimensional quality of polyimide gears. High gear grade with JIS-2 class proved that the polyimide was useful as a matrix of lightweight and high-strength gears.

1. Introduction

Metallic and polymer gears have been used as an essential mechanical element to transfer the rotating and sliding movements to driving mechanisms, as well as to vary their speed as demanded in automotive vehicles and in precise mechanical systems [1,2]. Owing to the strong demand of SDGs (Sustainable Development Goals) and carbon neutrality [3], reducers in robotics and electric vehicles must be designed by lighter weight materials with higher stiffness [4]. The mechanical units working in space must be designed to have sufficient robustness under various radiation conditions in space [5]. The robotics for commissioning the nuclear reactors must have higher anti-radiation proof in their operation [6].
A composite material designs the expecting gears, where a polymer with higher strength, stiffness and radiation toughness is further reinforced by carbon and nano-cellulose fibers [7]. In particular, the polymer matrix has to be changed from the normal epoxy in the normal CFRP (carbon fiber reinforced plastics) to engineering plastics with a higher glass transition temperature [8]. Furthermore, the normal injection molding, autoclaving and hot stamping must also be changed to non-traditional processing for net-shaping the engineering plastic products [9]. Super-engineering plastics with high glass-transition temperature, has been shown to induce severe damages to molds and dies, resulting in less satisfaction of sufficient gear grades in the industrial standard for applications.
In the present study, polyimide powders are used as a matrix material of gear models for fiber reinforcement design [10]. Instead of injection molding, the two-step procedure in the PM (powder metallurgy) route is proposed to attain the polyimide gears with high gear grades, enough to satisfy the accurate dimensions required for the reducers in robotics and electrical vehicles. In this processing, the polyimide powders are consolidated to a preform, which is then sinter-forged to a gear. Hardness testing and X-ray computer tomography are employed to describe the densification process during the PM-route procedure. Japan Industrial Standard gear-grade balancing is used to demonstrate the high dimensional accuracy of the sinter-forged polyimide flat gears even without finishing. Carbon fiber reinforcement is designed in this polyimide gear product. The mass-production procedure is also discussed to fabricate the mm-sized miniature super-engineering gears for precise mechanical systems.

2. Materials and Methods

The initial feed stock was explained with comments on their mechanical and physical properties. The two-step PM procedure consisted of the green compaction and the hot/sinter forging. Their die-sets and experimental setups were explained in detail. Mechanical characterization and nondestructive diagnoses were performed to evaluate the preform and forged gears. Gear-grade balancing was evaluated to describe their geometric and dimensional accuracy.

2.1. Feedstock

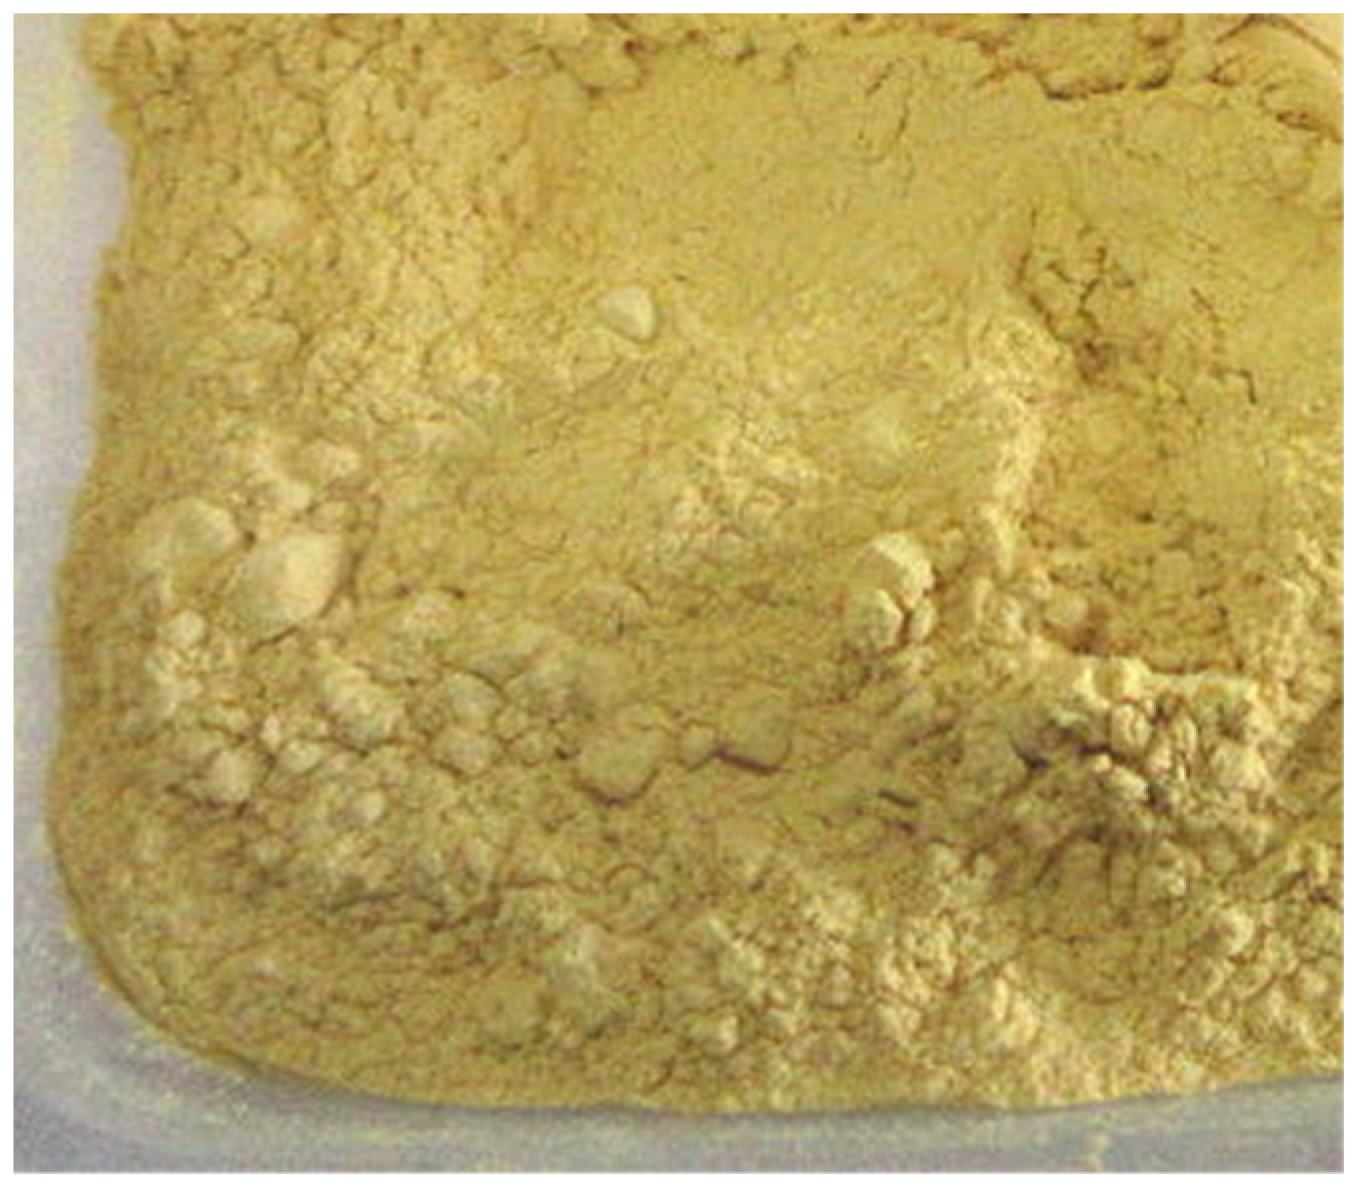
Among several candidate super-engineering plastics, polyimide particles (Aurum-PD450; Mitsui Chemical, Co., Ltd., Chiba, Japan) were selected as a powder feedstock as shown in Figure 1.
Using the ASTM (American Society for Testing and Materials) standard on the plastic materials, various mechanical properties were measured [11]. Tensile strength and ultimate elongation were 90 MPa and 90%, respectively, and measured via ASTM D-638. Bending strength and bending modulus were 140 MPa and 3 GPa, respectively, and measured via ATSM D-790. Izod impact strength was 90 J/m and measured via ASTM D-265. These mechanical properties satisfy mechanical balancing among strength, ductility and toughness. This thermoplastic polyimide has a glass-transition temperature at 518 K (or 245 °C) and a melting point at 661 K (or 388 °C) [12].

2.2. Two-Step PM-Route Procedure

The polyimide powders were poured into a die cavity of lower die set at the first step for consolidation of powders into a green compact, as schematically depicted in Figure 2a. After this green compaction at RT (room temperature), the green preform was at once hot forged above the glass transition temperature and sinter forged below the melting point, as depicted in Figure 2b. Both steps used a CNC (computer numerical control) screw-stamping system with a type of MS-1 (Precise Stamping Laboratory, LLC., Tokyo, Japan). Its maximum loading capacity was 50 kN; the maximum loading velocity was 0.1 m/s.
In the second step, a high-frequency induction heating unit (IH-heating unit; YS-Electric Industry, Co., Ltd., Kofu, Japan) was also used for directly heating the upper and lower dies. Due to IH heating with 500 kHz, the heating rate increased up to 10 K/s by controlling the applied voltage. The thermocouple was inserted into the lower die to monitor the thermal transient during the hot- and sinter-forging processes. No overshooting and undershooting occurred in either the heating or holding steps at thermal transients. The measured temperature in the lower die is often higher than the work temperature because of the viscoplastic flow of work materials above the glass transition temperature.
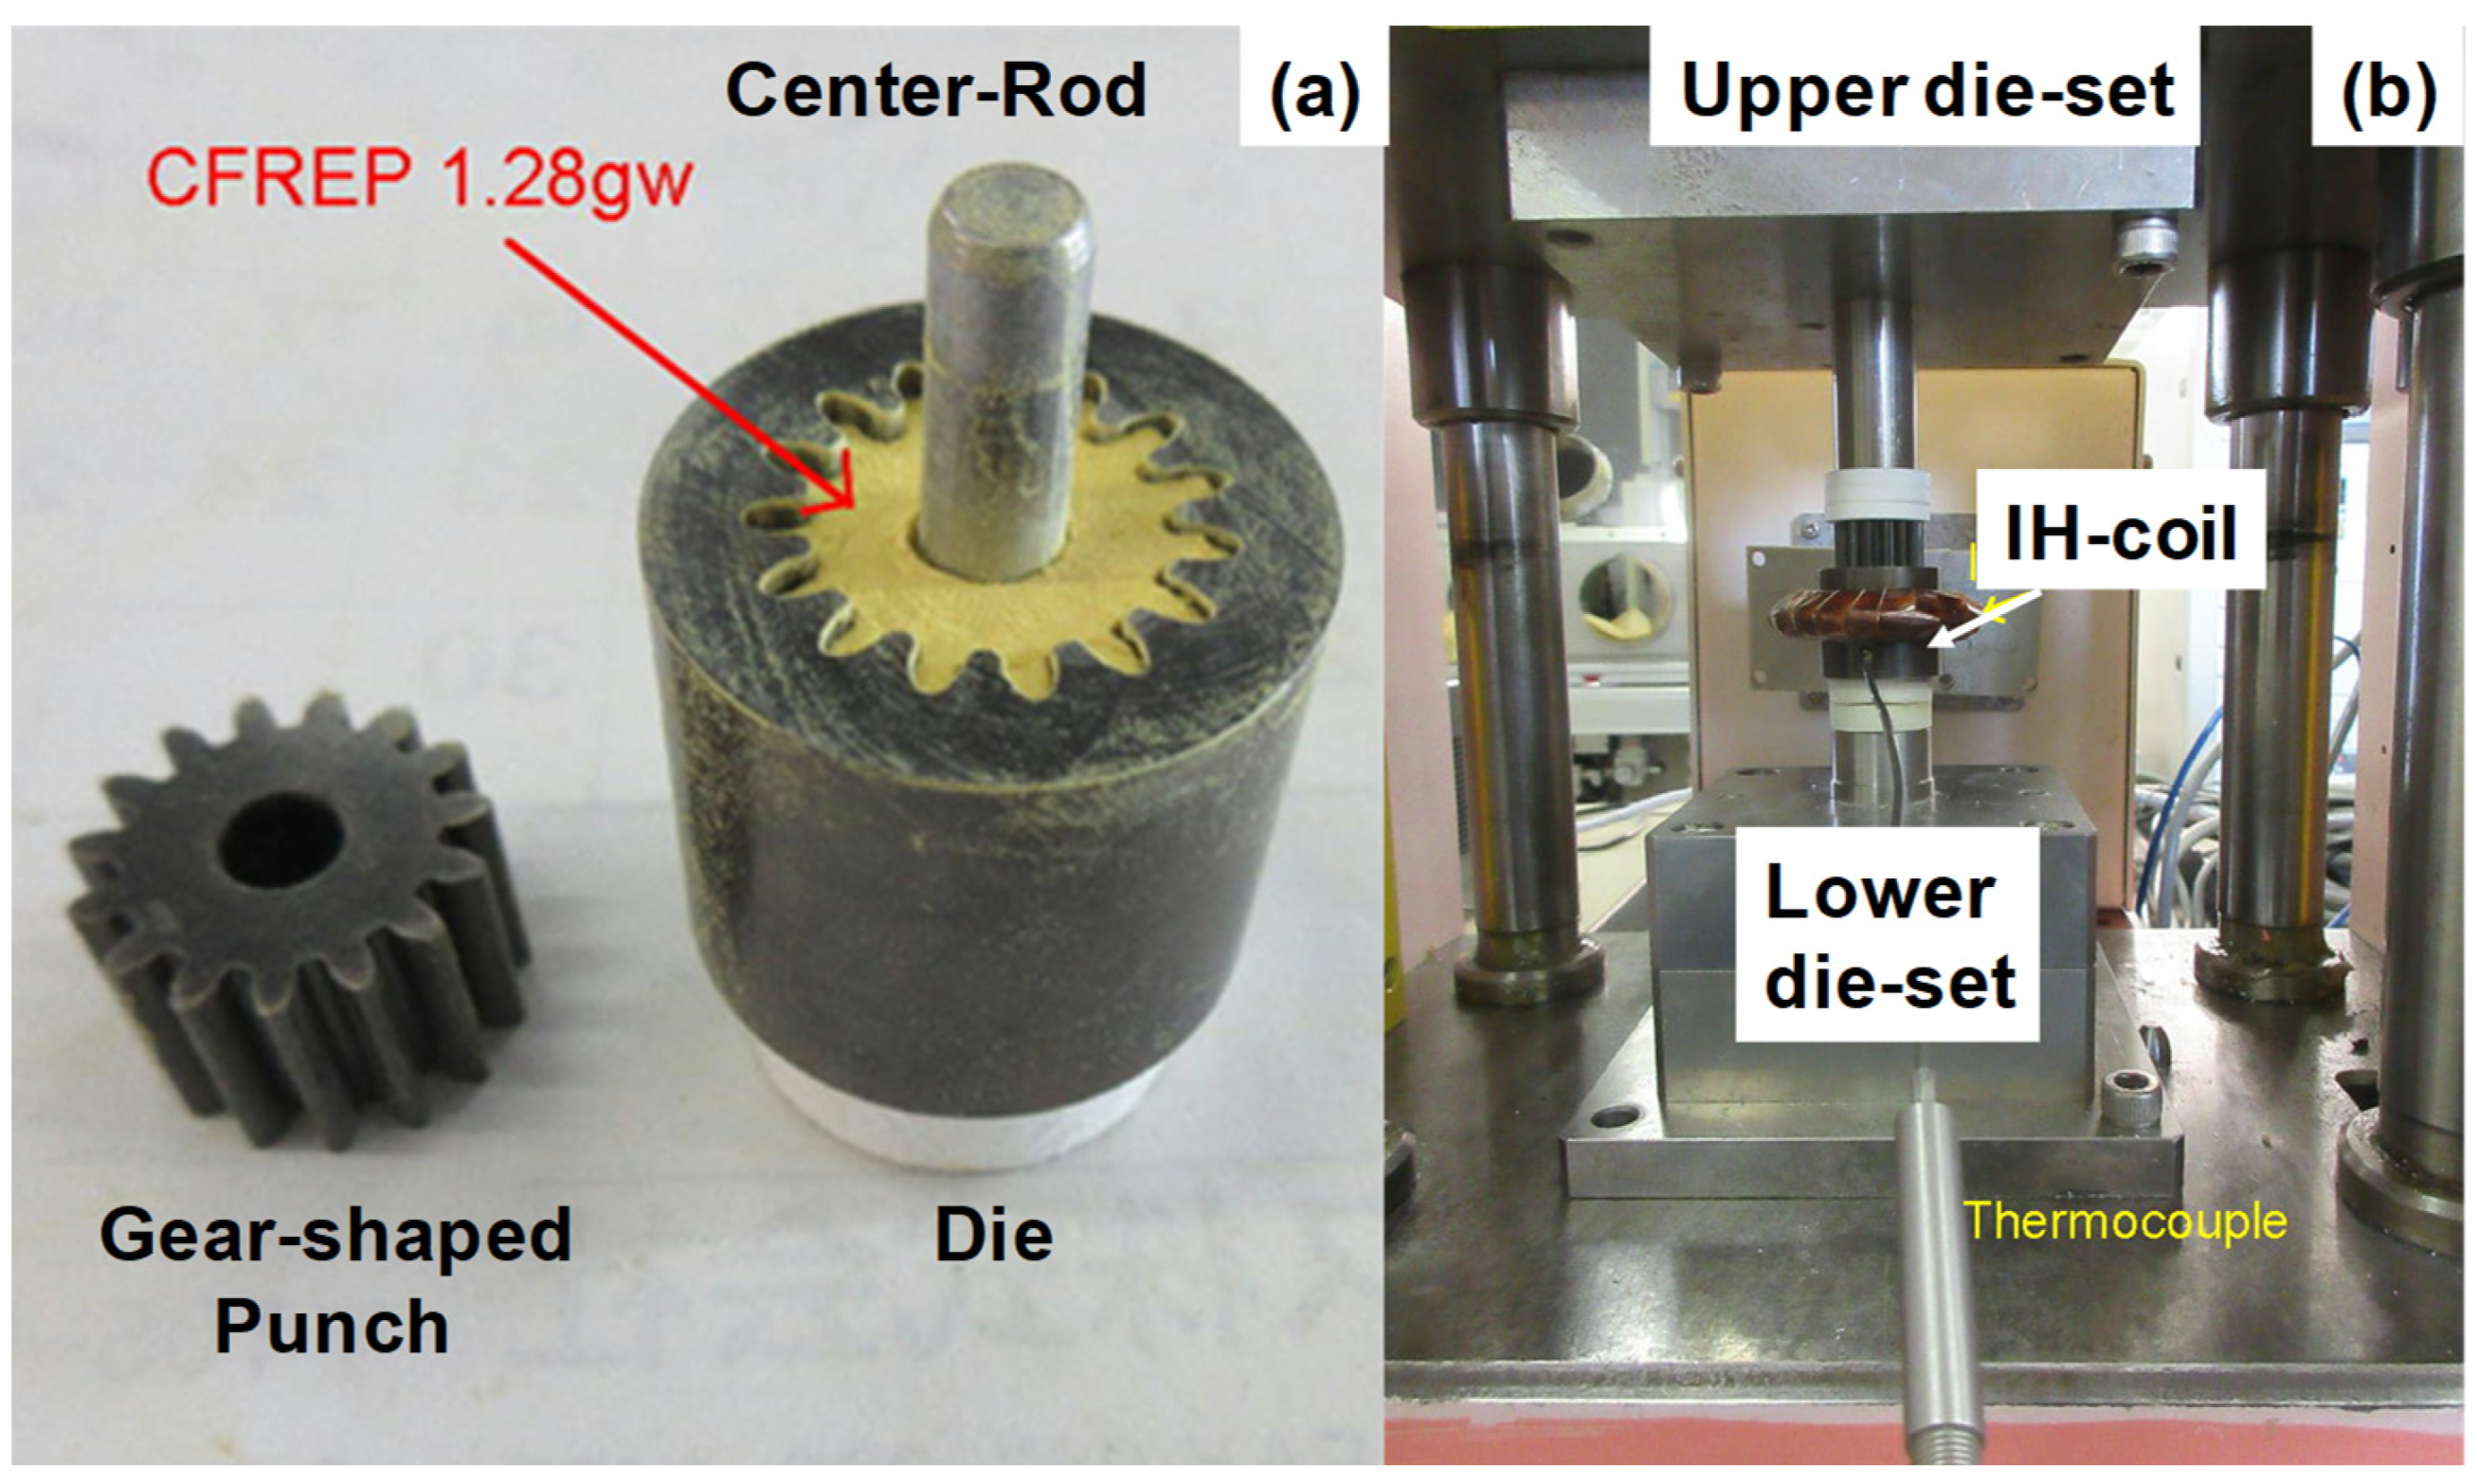
Figure 3a shows the die-set unit, which was used in this two-step procedure. The mass of polyimide powders was measured inline; the average weight was 1.28 g. Figure 3b presents the CNC stamper for the hot- and sinter-forging processes. The loading and stroke sequences were controllable by program in this stamper.
Two alumina plates were placed between the experimental unit and the lower and upper die sets to shield them from heat conduction. This setup neglected the axial heat conduction on both ends of the experimental unit during the hot- and sinter-forging processes.
The temperature difference (ΔT) between the work materials and die was estimated to control the thermal transients of the works. The average ΔT was 50 K in the following hot- and sinter-forging processes. Then, the work temperature was simply estimated by subtracting 50 K from the measured temperature.
Under this thermal control, the holding temperature of work materials was above the glass-transition temperature of polyimide during hot forging and below its melting point during sinter forging, respectively.

2.3. Mechanical Characterization

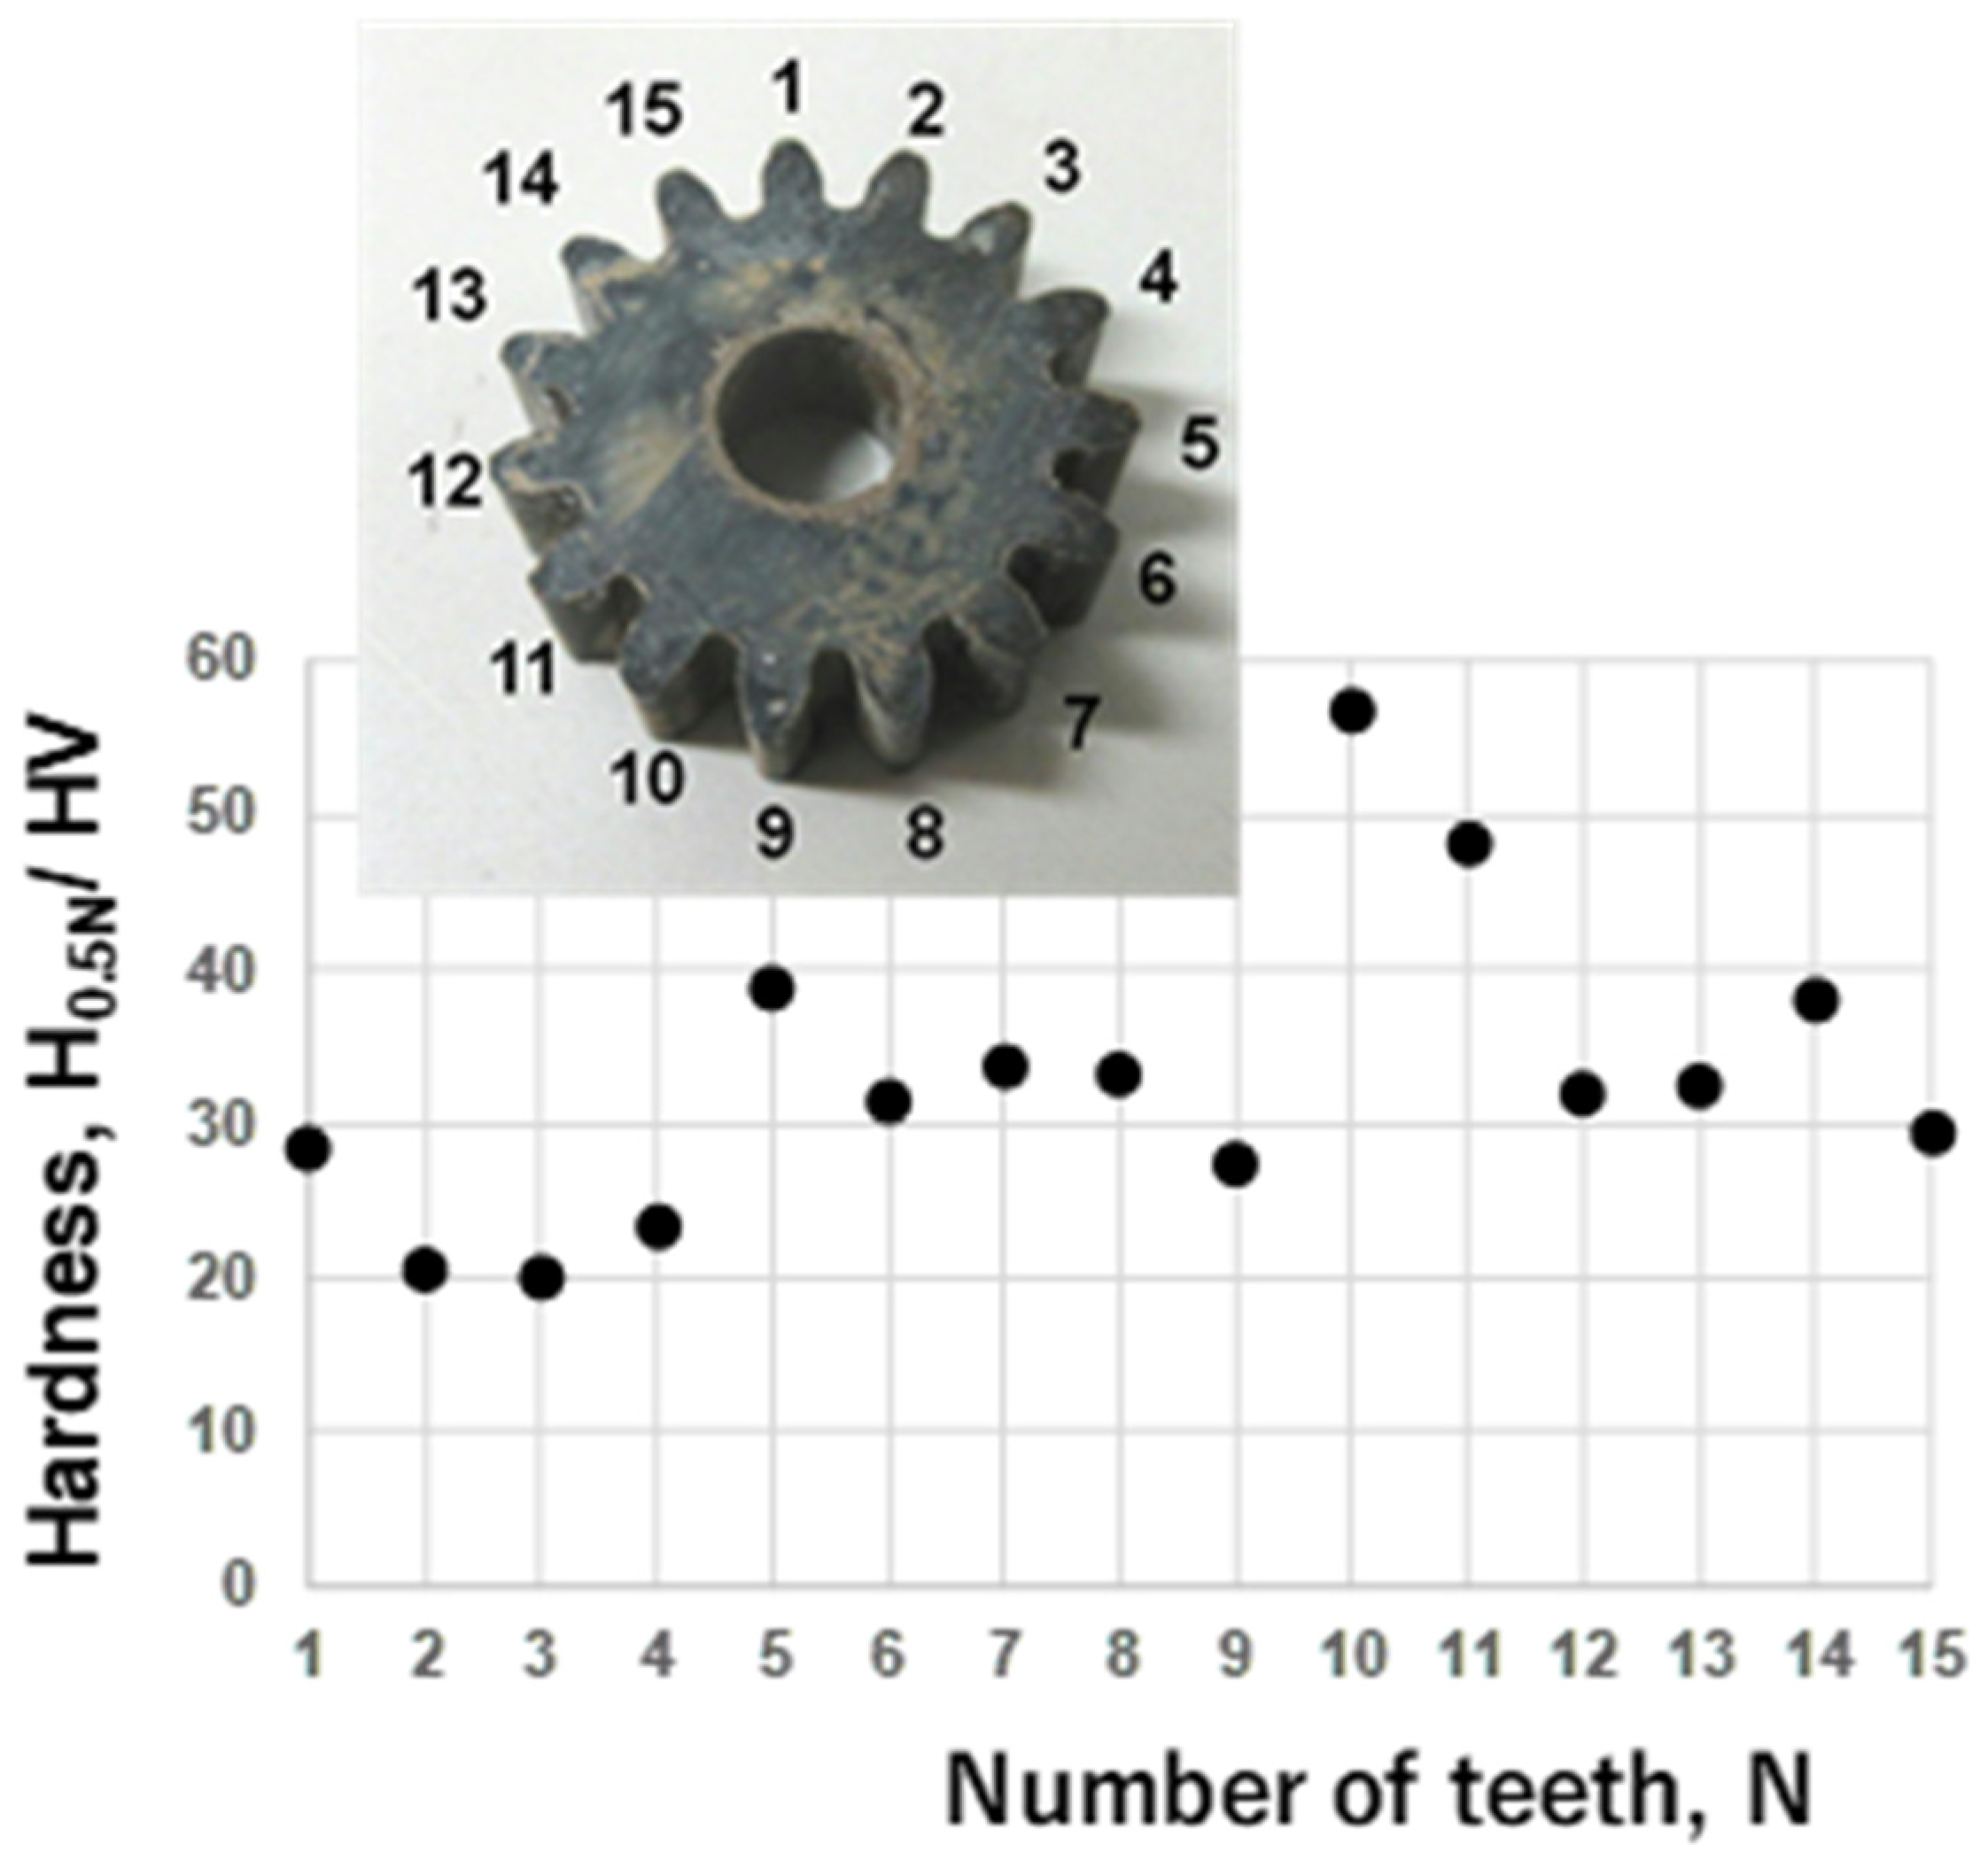
Micro-Vickers hardness testing was used to describe the densification in the two-step processing for forming the gear teeth. At each tooth top of the sinter-forged gear, five positions were selected for hardness measurement. Five raw data were averaged to determine the representative hardness of each tooth.
During these steps, a table-top XCT (X-ray computer tomography; X-1, Ueda, Japan) was used for non-destructive evaluation on the residual pores and defects. The X-ray beam intensity was directly controlled by tuning the applied voltage (Vx) and current Ix. In the following nondestructive diagnosis, Vx was 80 V and Ix was 3 mA, respectively. In addition, the total intensity was also controlled by adding metallic shields. Two copper plates with the thicknesses of 1.0 mm were used to weaken the total beam intensity.
These parameters influenced the spatial resolution in XCT. In the following experiments, the spatial resolution was 50 μm, which was enough to distinguish the expecting porosities as a black dot through XCT imaging. Under this spatial resolution, the densification process can be described during the forging processes using XCT. Finer spatial resolution is needed in the XCT diagnosis on the carbon fiber orientations during the hot-forging process, which will be discussed later in the text.

2.4. Gear-Grade Balancing Evaluation

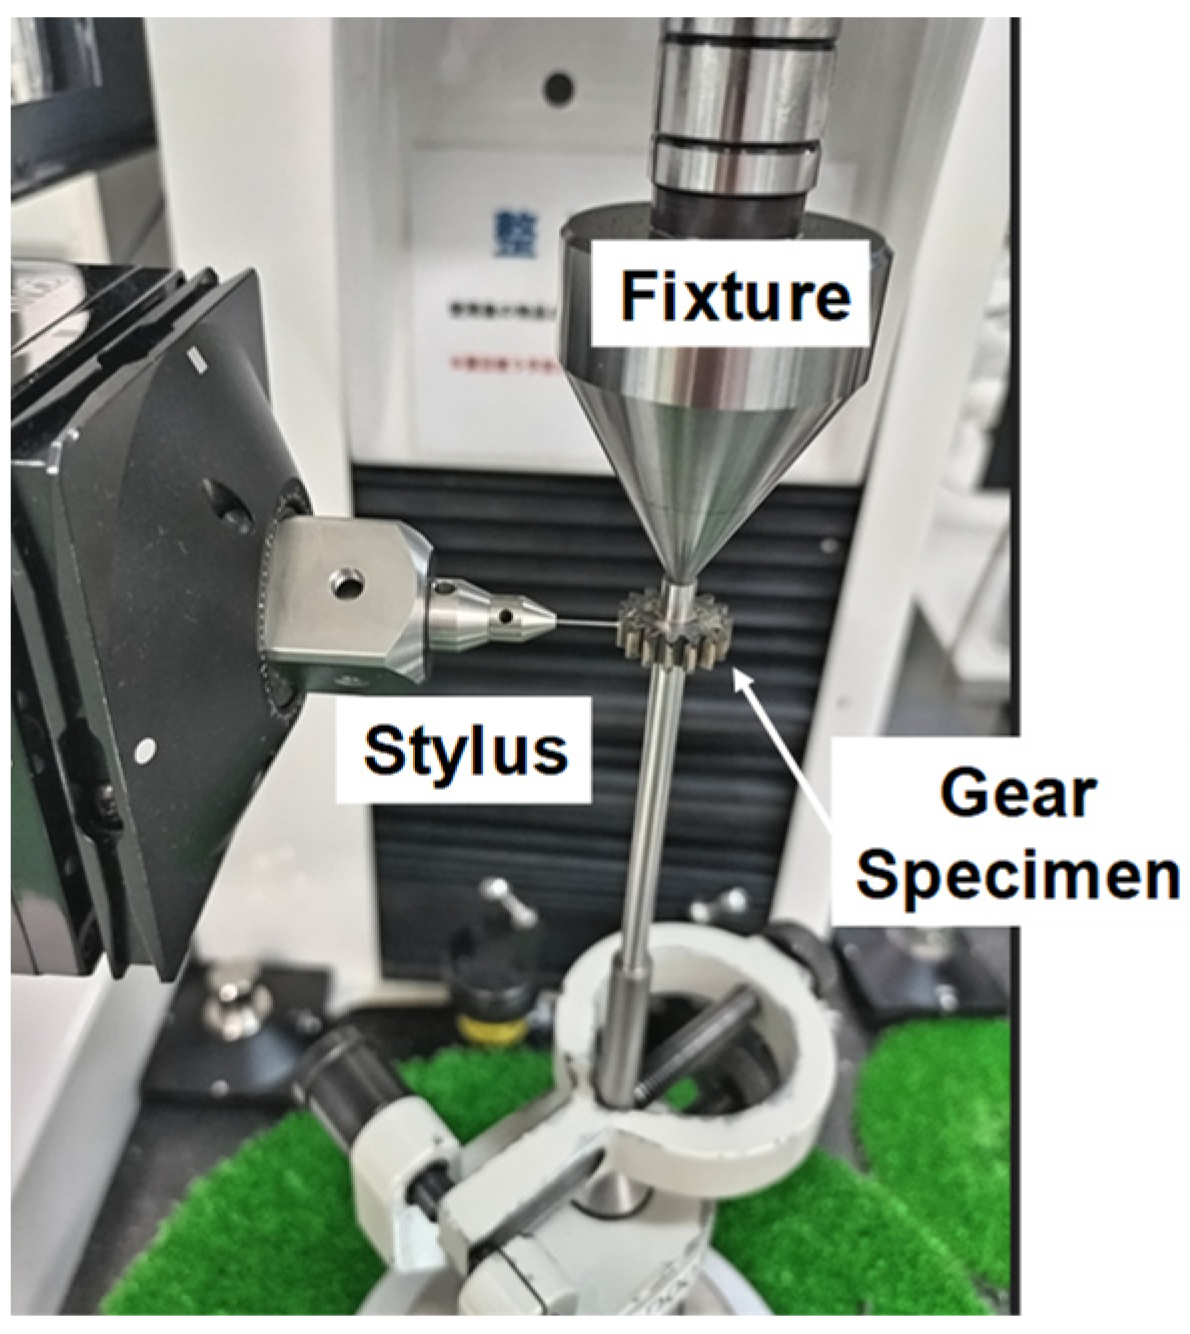
Gear-grade balancing was evaluated by using the coordinate measurement system, as shown in Figure 4. A sinter-forged polyimide gear with a 1.0 module was fixed against the detector with an alignment deviation of less than 1 μm. The three-dimensional gear profiles were measured three times. In addition to the outer, inner and pitch circle diameters, various deviations on the tooth shape were measured for 15 teeth of sinter-forged polyimide gears. These measured geometric profiles for each tooth of gear were statistically edited to deduce the dimensional deviations from the targeting dimension in design. In general, every kind of gear, irrespective of their size and material, was evaluated for classification after the industrial standard. The Japan Industrial Standard (JIS) was employed to classify the accuracy of polyimide gears against each dimension of gear shape [13]. Based on previous studies [14], we selected seven dimensional items as a measure to evaluate gear-grade balancing. FTU-R and FTU-L were an adjacent pitch deviation in the right and left sides of 15 gear teeth, respectively, whereas FTK-R and FTK-L were a single pitch deviation in the right and left sides of 15 gear teeth, respectively. FPK-R and FPK-L were an accumulated pitch deviation in the right and left sides of 15 teeth, respectively. Fr was a run-out deviation. For these 7 items, the JIS grades were determined with reference to JIS regulations [13].
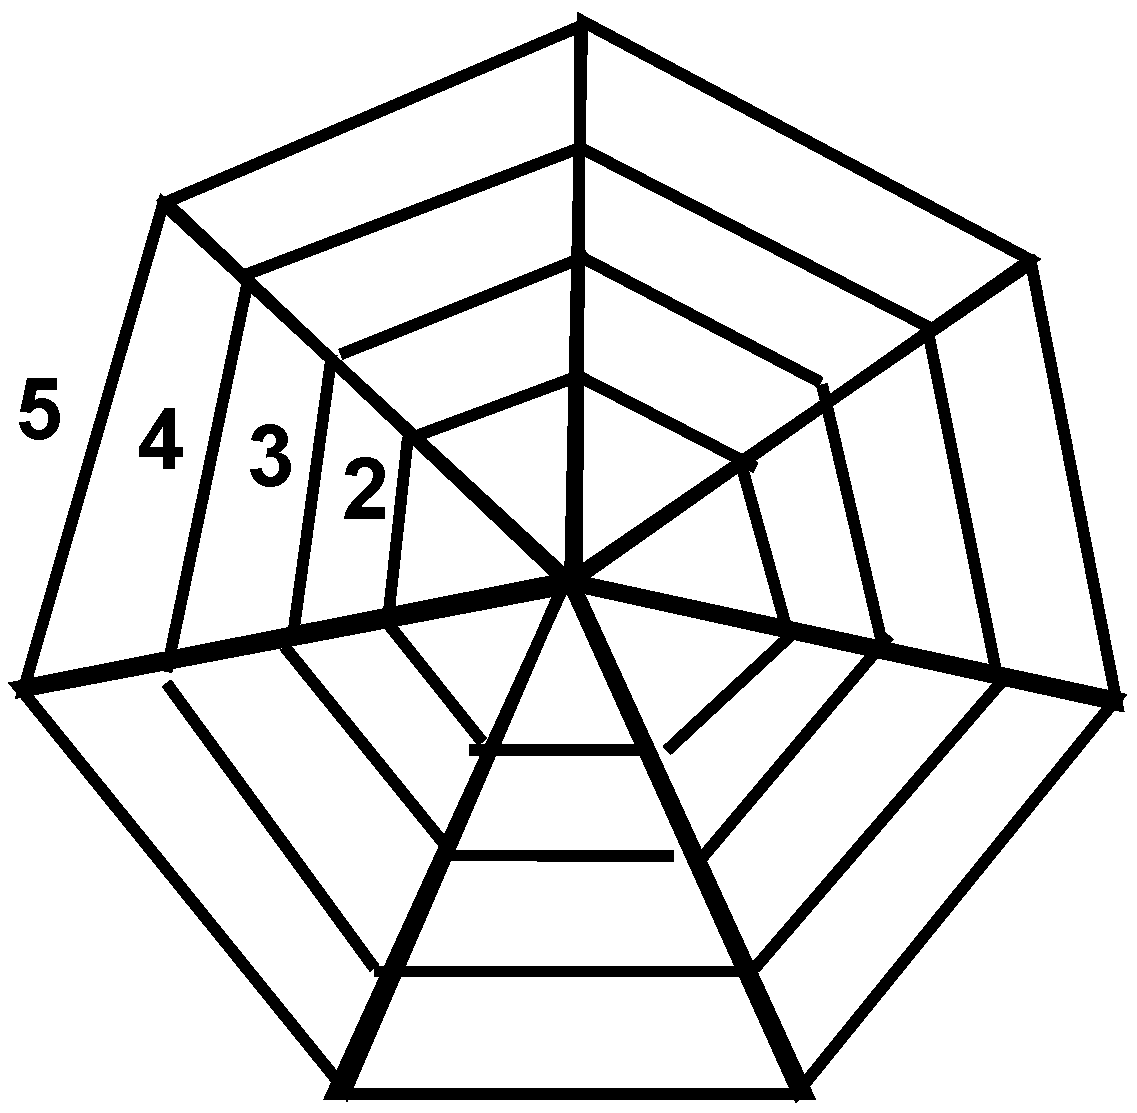
A heptagonal diagram was use to represent the gear-grade balancing of 7 parameters, as depicted in Figure 5. Each axis of heptagon represents each item for 7 parameters. The JIS grade at each parameter coordinates the scale in each axis. Then, a closed heptagon represents the gear-grade balancing among 7 items. Increasing the JIS grade number or worsening the dimensional accuracy of gears, causes the total heptagonal area to expand by themselves. On the other hand, this heptagonal area goes to nearly zero when the whole geometric distortions are minimized within a JIS grade of 0.
In the case of the pure titanium gears fabricated by the fine-blanking procedure, the gear-grade balancing was within JIS-8 and JIS-10 [15] without mechanical finishing. This gear-grade balancing was improved to be within JIS-5 to JIS-10 for the AISI304 stainless-steel gears, which were also fabricated by the fine-blanking procedure [16]. As suggested in [17], the additional machining and finishing processes were needed to improve these metallic gear grades up to higher grades than JIS-5, which the precise mechanical system requires in sophisticated speculation.

3. Results

Hardness measurement and XCT are employed to describe the densification through the two-step procedure. The gear-grade balancing among 15 gear teeth is discussed with the JIS grade classification on the seven axes of dimensional deviations.

3.1. Green Compaction

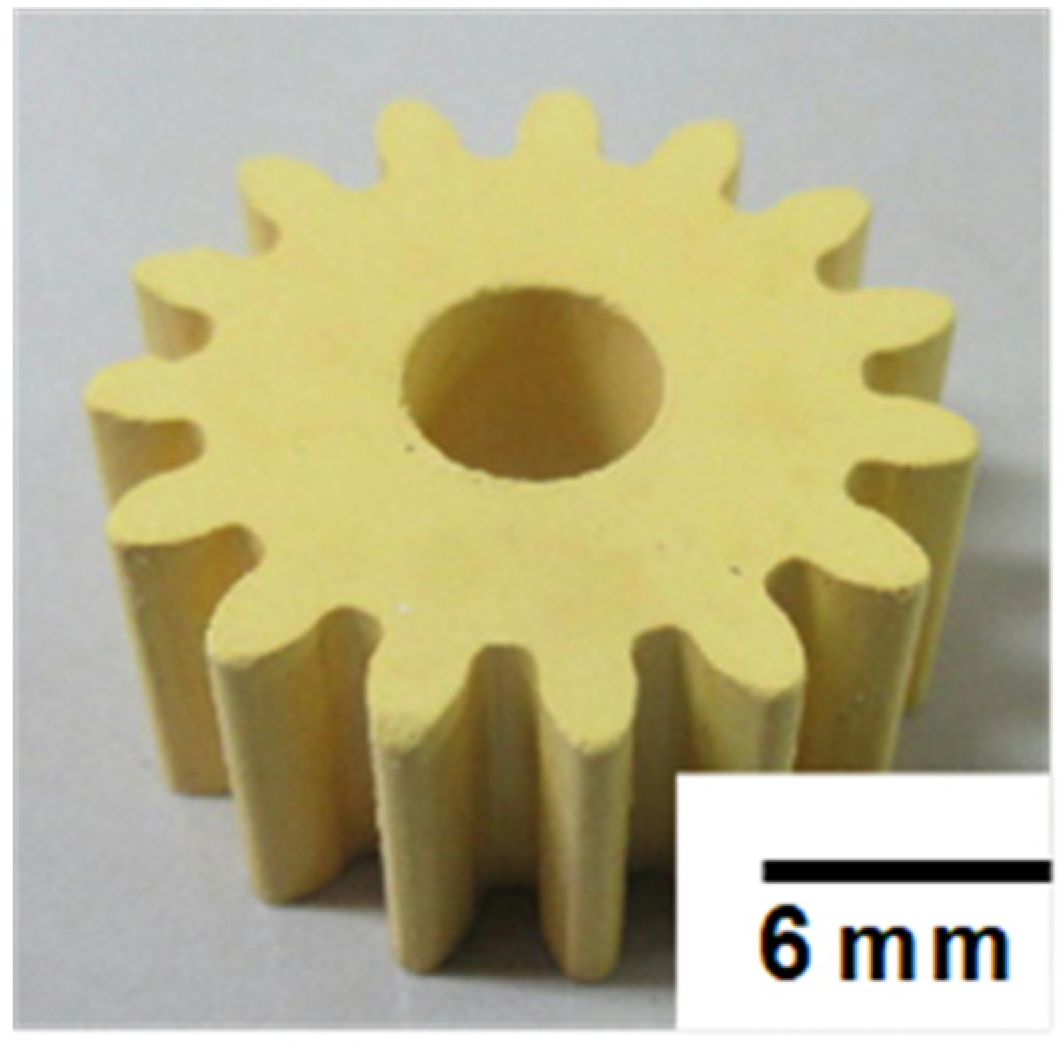
After a previous study [10], the load (P) was applied to consolidate the polyimide powders into a green compact with P > 3 kN in cold. Figure 6 shows a green preform when P = 3 kN. No lubricants were used in this green compaction. The polyimide particles were consolidated and filled into the 15-teeth shaped die cavity.
Hardness testing and X-ray tomography prove that no residual pores and defects were present after this consolidation. On average, the surface hardness reached 20 HV1N for all 15 teeth in the gear preform. In the following step, this green compact was used as a preform to shape the 15-tooth gear in module 1.0 with sufficient dimensional accuracy. The dimensional accuracy of die surfaces was imprinted onto the surface of this preform through this consolidation.

3.2. Sinter-Forging

Figure 7 depicts a sinter-forged polyimide gear at T = 693 K by P = 1 kN for 600 s. The h-BN (hexagonal boron nitride) solid lubricants were sprayed onto the surfaces of the punch and die before forging experiments. The applied load and duration had a primary influence on the consolidation during the sinter-forging process, which was at T = 693 K below the melting point of polyimide.
The hardness testing was first employed to describe the densification of 15 teeth during sinter forging. Figure 8 shows the homogeneous hardness distribution among the 15 teeth in clockwise direction. The average hardness reached 30 HV when the applied load was 0.5 N in testing. The average in hardness among 15 teeth corresponded to the sinter-forged polyimide gear-model in [12]. The sinter-forging conditions must be optimized to increase the average hardness.
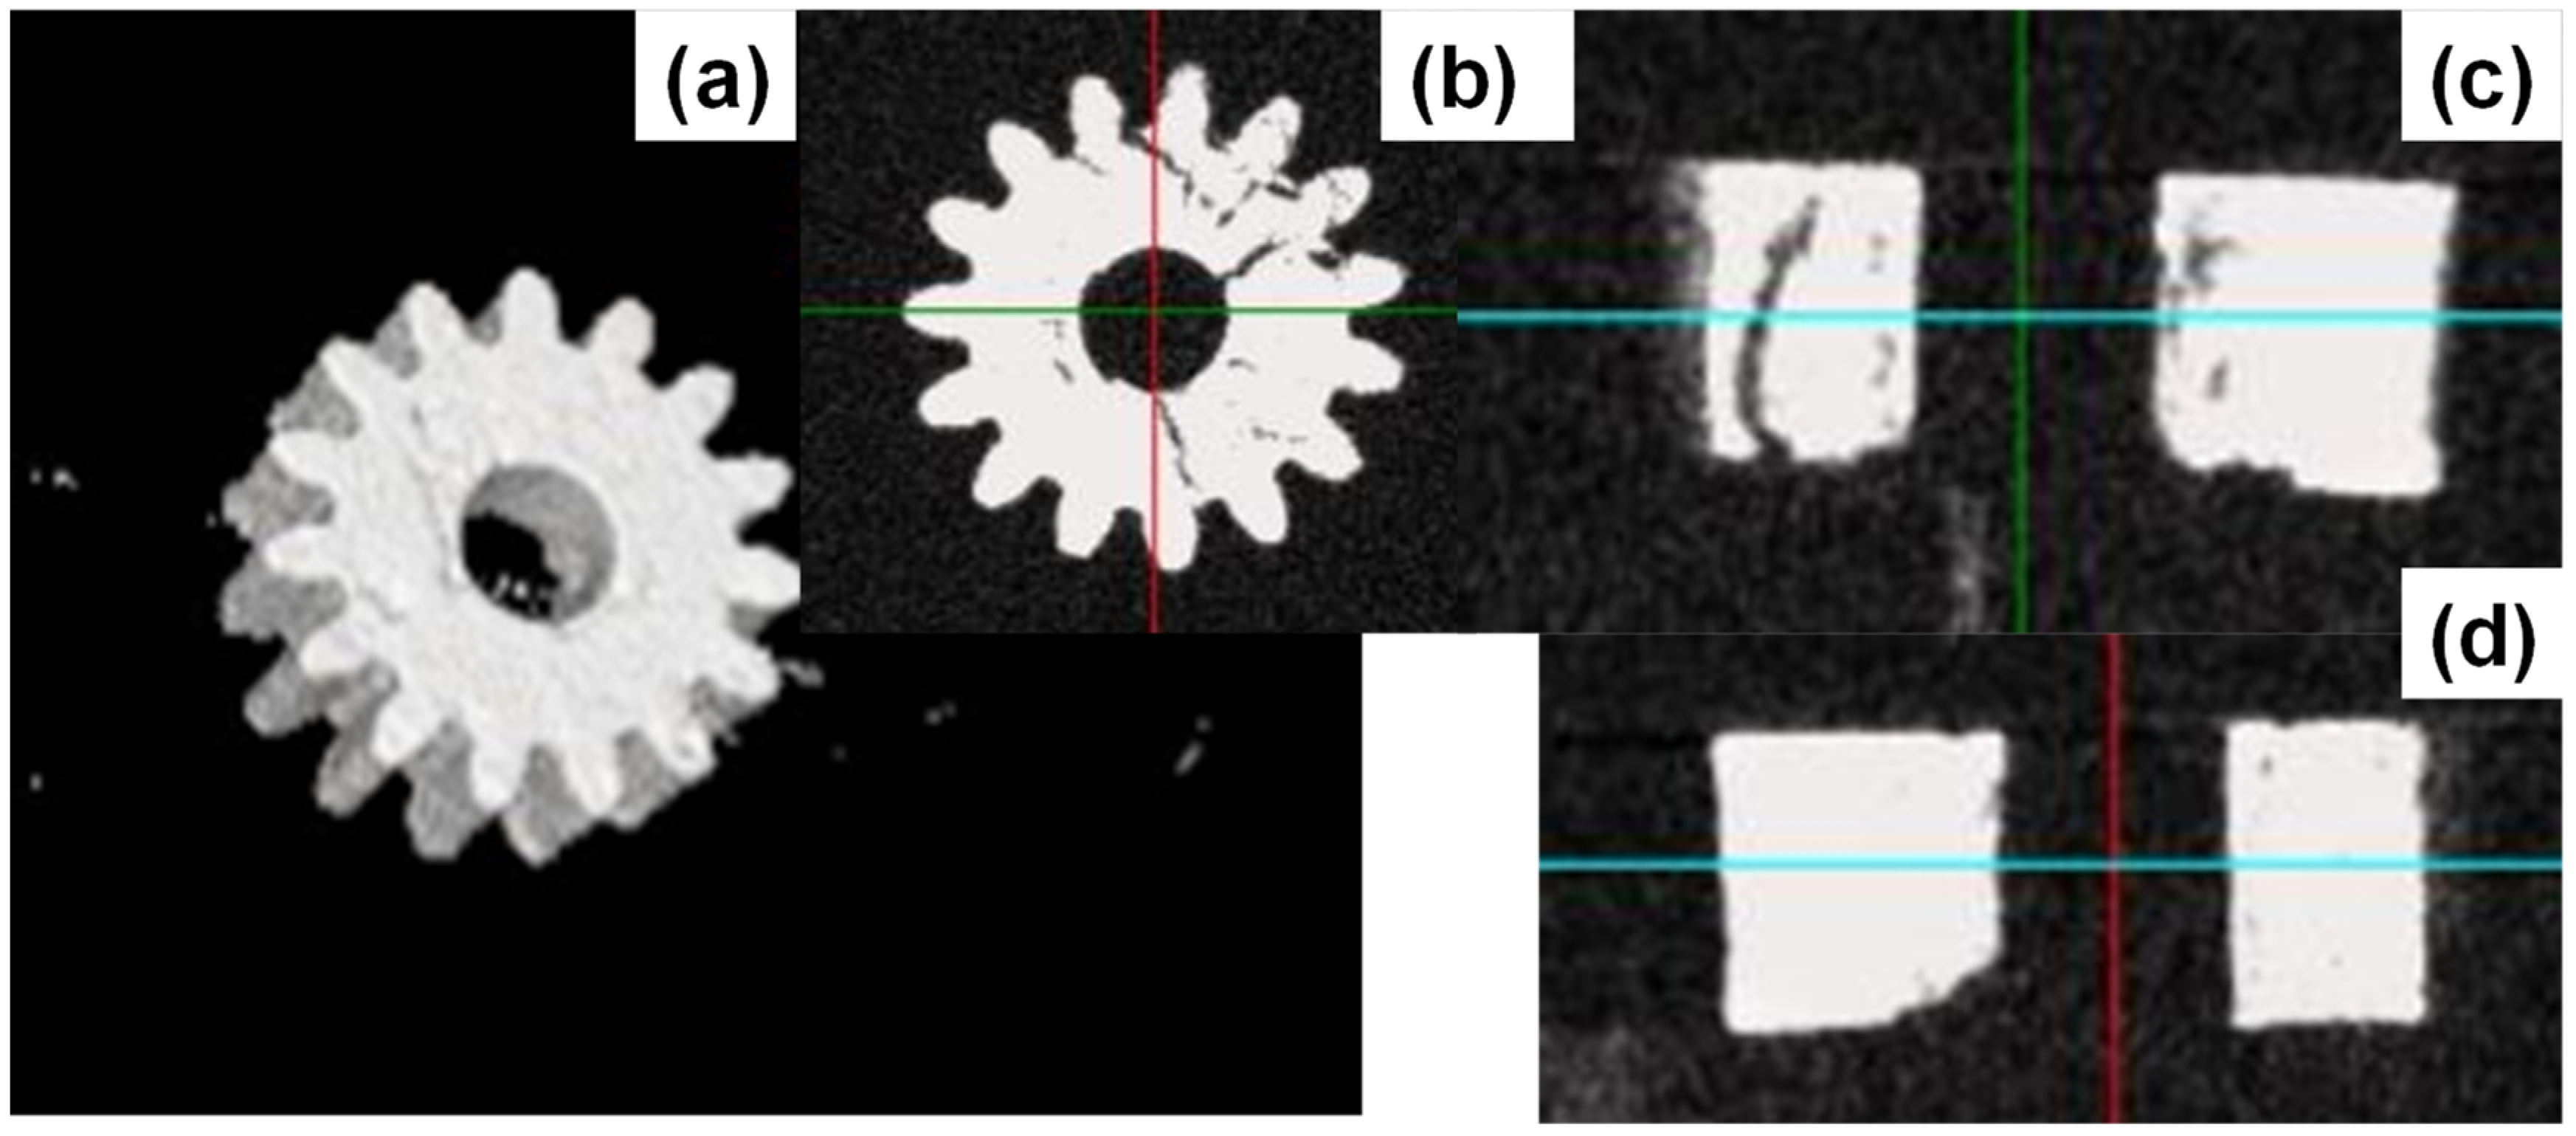
Figure 9 depicts the XCT image on three cross-sectional views of sinter-forged polyimide gear together with the three-dimensional XCT image of gear. Although the noises superposed on the top and left-side views, little residual pores were seen in the image. The particle boundaries were not recognized after sinter forging. This implies that consolidation advances by sintering the neighboring polyimide particles under sinter forging.

3.3. Evaluation on the Gear-Grade Balancing

Gear-grade balancing is the most suitable measurement to evaluate the dimensional accuracy of teeth in gears. As shown in Figure 4, the three-dimensional coordination profiler was employed to first coordinate the sinter-forged gear for standardizing the measurement setup and to then measure the geometric profiles using software to analyze the dimensional distortions after JIS standards.
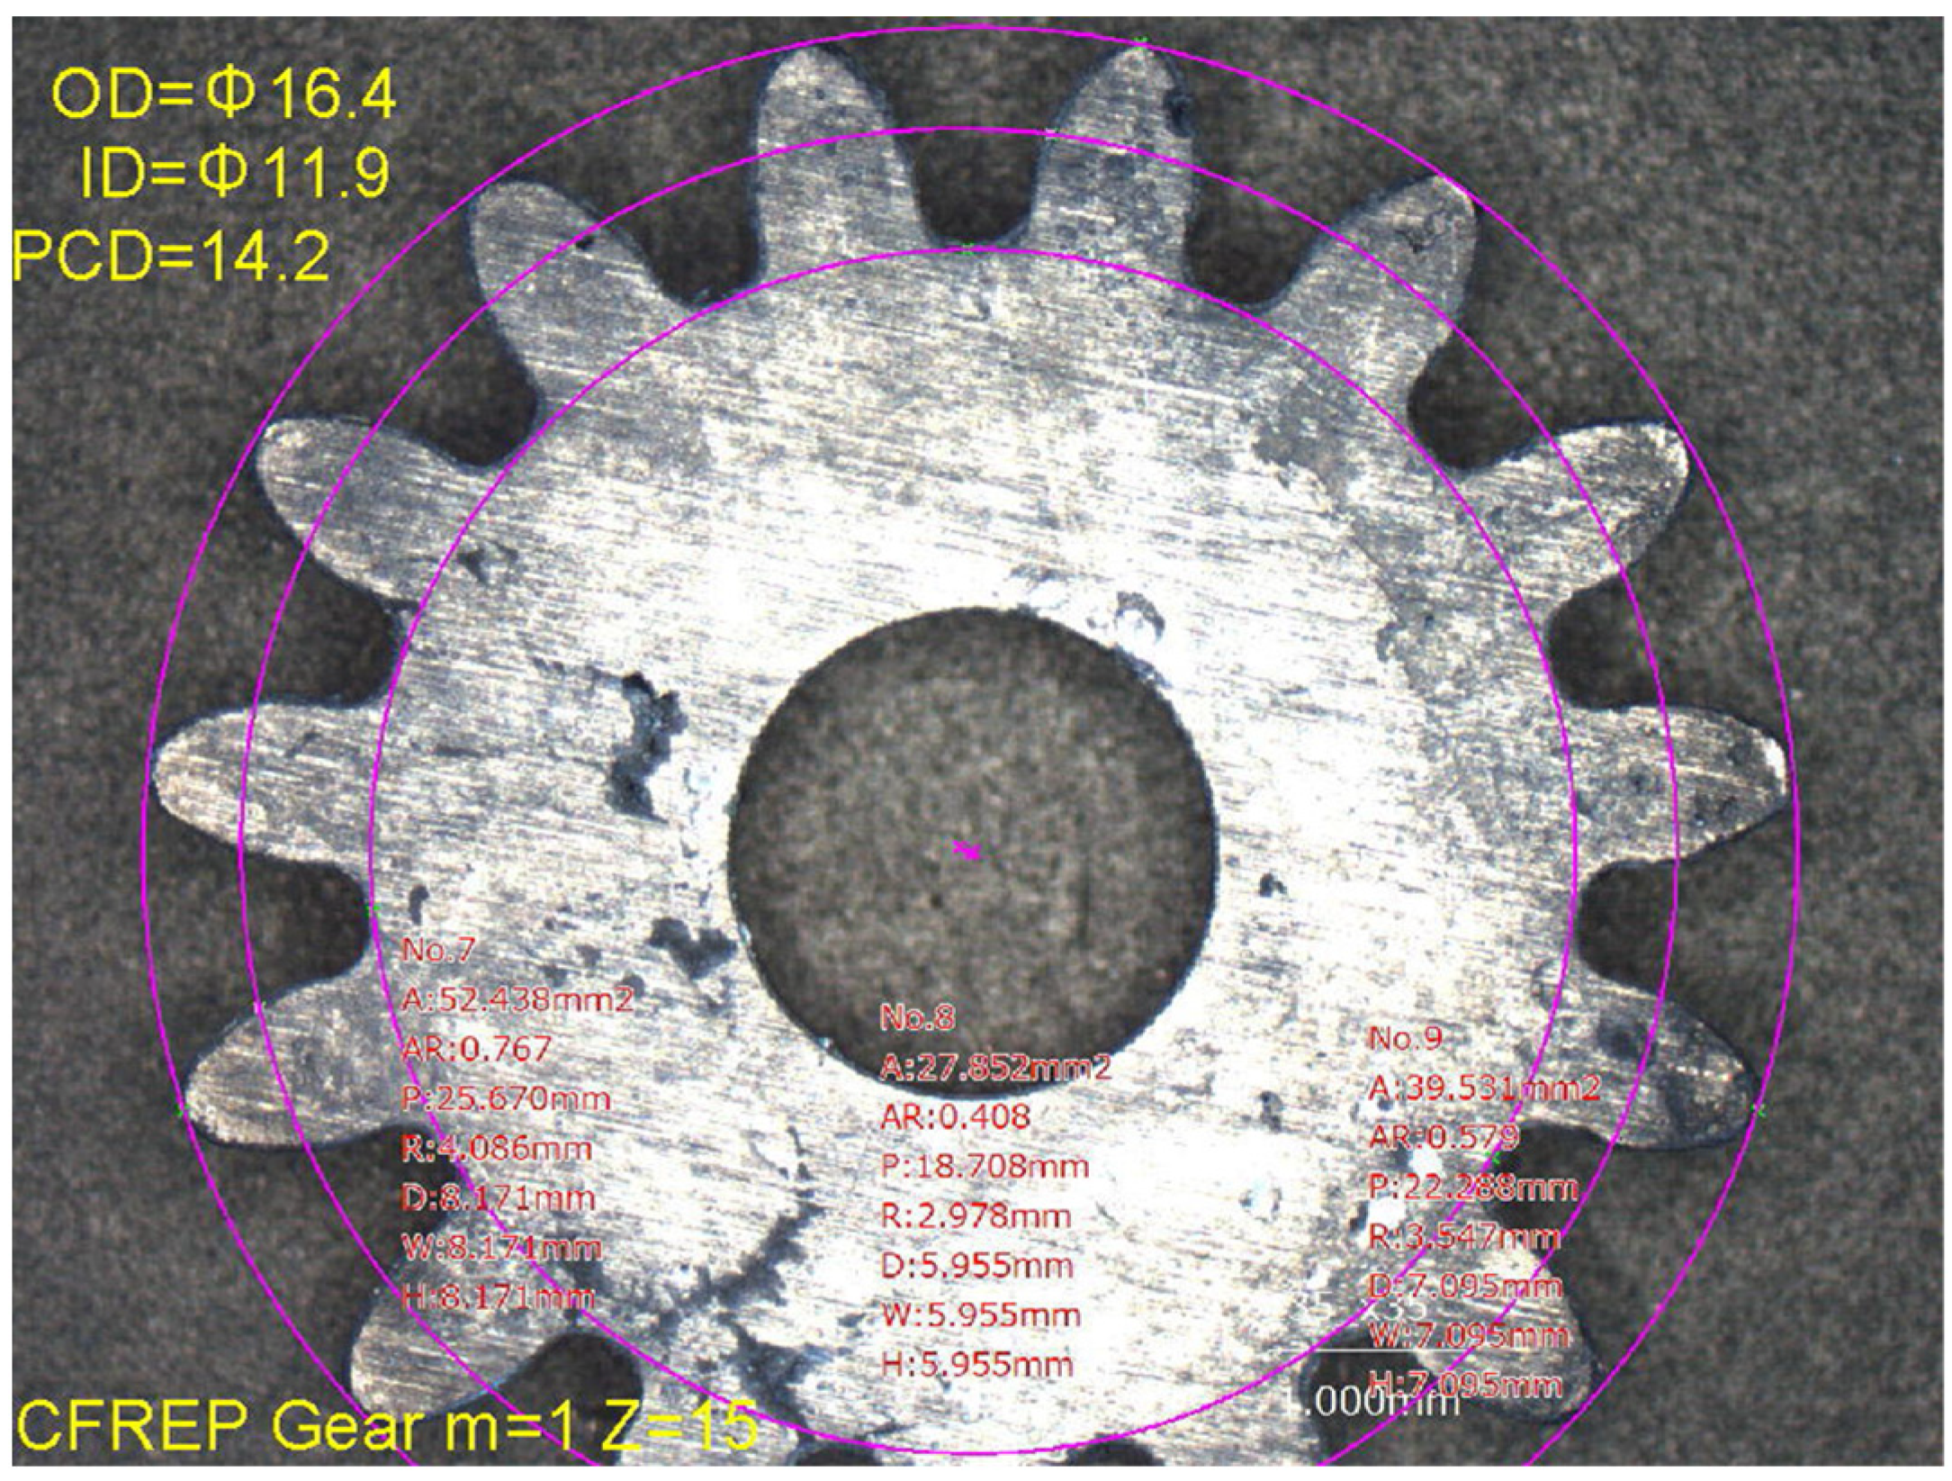
Figure 10 shows a geometric coordination of sinter-forged gear for precise measurement of dimensional profiles on the 15 gear teeth. To determine the positions of 15 gear tops and roots in the following measurements, the outer, inner and pitch circle diameters were measured as 16.4 mm, 11.9 mm and 14.2 mm, respectively. The die and punch surface conditions were imprinted onto these top and bottom gear surfaces. The average surface roughness was measured as 0.5 μm.
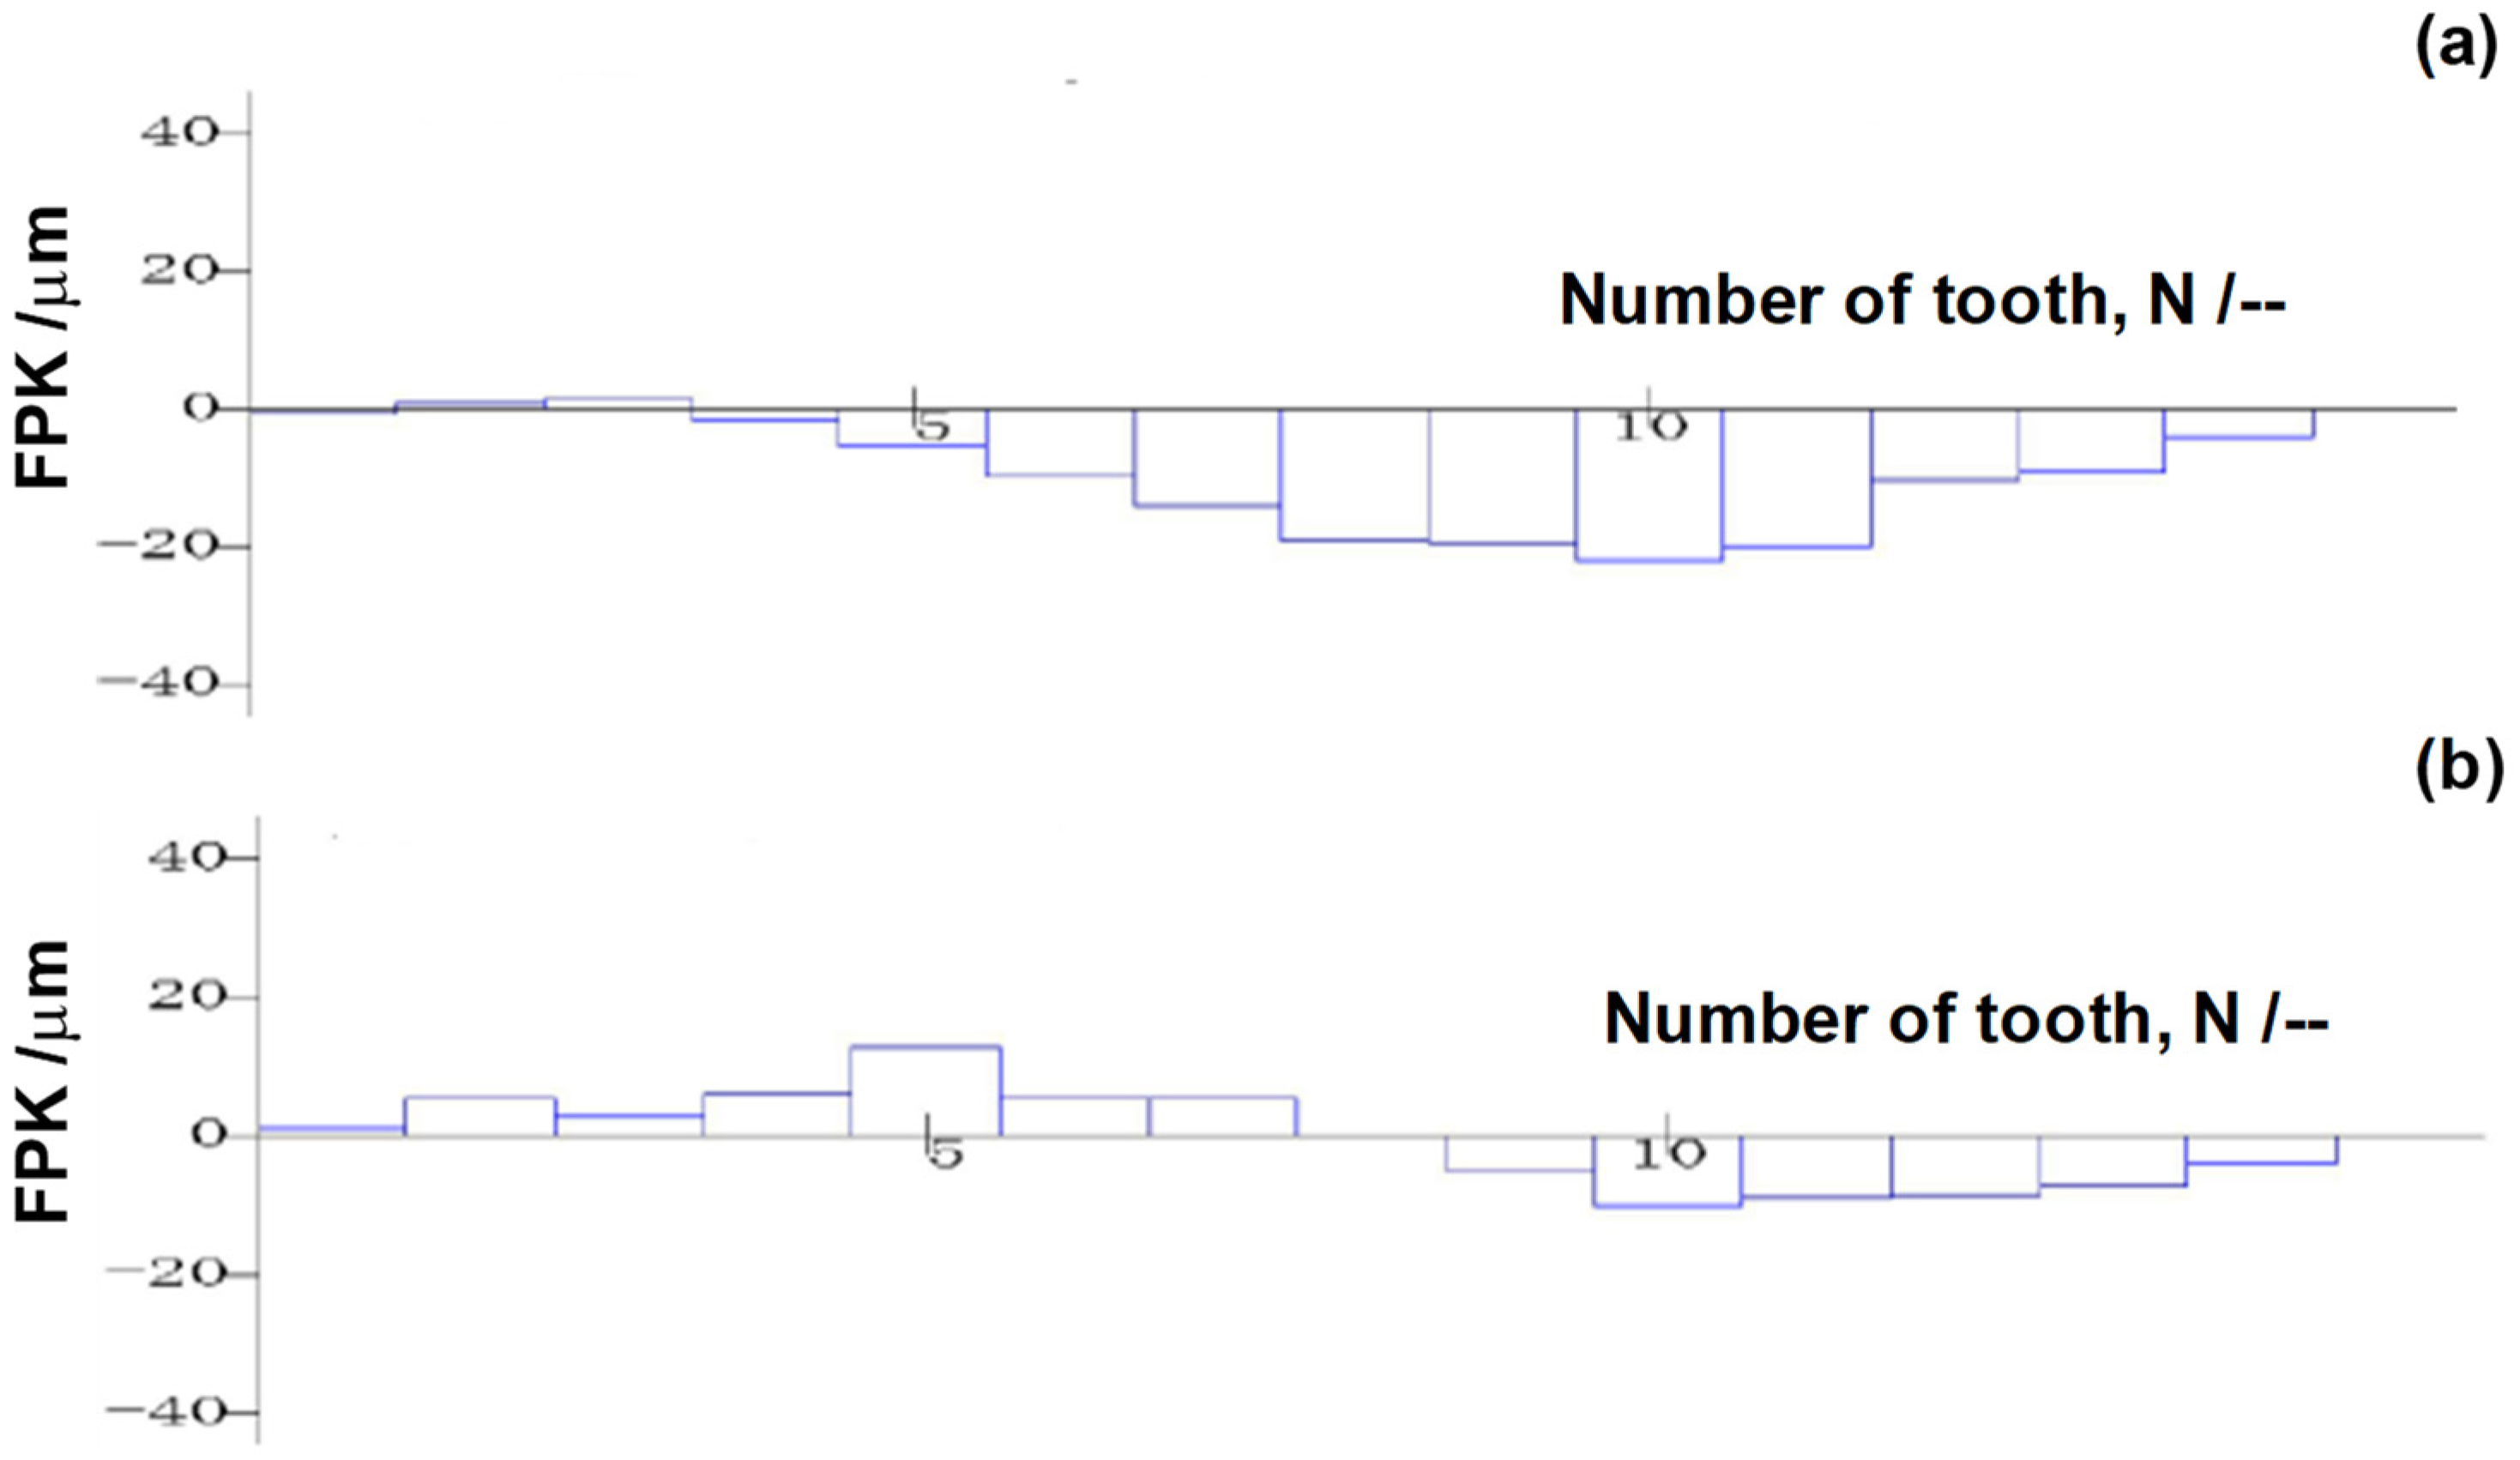
Among these seven parameters, FPK-L and FPK-R were selected to deduce the gear grade after JIS classification [13]. Figure 11 shows the FPK-L and FPK-R dimensional deviations for 15 teeth of sinter-forged gears. In Figure 11a, the cumulative pitch derivatives in the left side nearly became negative from the standard position, with a maximum deviation of −20 μm. On the other hand, the cumulative pitch derivatives in the right side varied in the positive range, with a maximum deviation of +10 μm from teeth 1 through 8. They varied in the negative range when the maximum deviation was −10 μm for teeth 9 through 15.
As previously cited in reference handbook [18], the gears were identified to have a gear-quality with equivalence to a grade of JIS-2 with respect to FPK-L and FPK-R, respectively. This assures that the third-highest gear grade was attained by the present PM-route two-step processing without mechanical finishing, even in comparison to the metallic gears using the fine-blanking procedure [15,16,17].
When including the other five qualified items in the dimensional accuracy of gear teeth, the gear-grade balancing of miniature polyimide gears was defined by a radar diagram in Figure 12. The irregular hexagon revealed that the dimensional distortion was left in the as-forged miniature polyimide gears. The pitch deviation deteriorated the gear-grade balancing of as-forged gears. Hot- and sinter-forging conditions had to be optimized to reduce pitch deviations and to improve JIS grades from 1 and 2 and to improve the total gear-grade balancing among all dimensional accuracies. In addition to the high qualification of polyimide gears, such gears are also adaptive to sustainability and recyclability by the further design of a super-engineering plastic matrix [19].

4. Discussion

In the literature, improvement of relative density in the green compact has been investigated through conventional forging-type consolidation [20]. In the case of the steel powder compaction, the copper addition was necessary to improve the adhesion among steel-powder particles and to increase green density. Very few studies have reported on the green compaction of engineering plastics. As explained in [21], the loading procedure has considerable influence on green density. In the present study, the loading process with constant die velocity was used through the plasma-nitrided SKD11 die and punch. Owing to the higher hardness of 1400 HV1N and the 50 μm-thicker hardened layer at the nitrided dies, the green density improved upon the conventional compaction. After XCT was used on the green compact, the relative density reached 75% to 80% of true density in the present consolidation. No pore and cavies were detected through this XCT, even after increasing the spatial resolution to 50 μm. Under this condition, the granular boundaries were only detected as 5% lower density network than the average relative density.
In general, the green compact shape and hot-forging conditions were seen to have influence on the final product quality [22]. In this hot-forging scheme, the green compact was shaped in near-net to the final product. The viscous flowability of the compact was preserved at a higher holding temperature than the softening point under the applied load. In fact, the polyimide compact was further consolidated using viscous deformation and flow above the glass-transition temperature. The granular boundaries, as shown in the cross-sectional image of XCT green compact, disappeared via hot forging for 180 s under the applied load by 2 kN.
Compared to the sintering process of metallic or ceramic powders, the sinter behavior of non-crystal powders was simpler [23]. The sintering time needed to reach full density, was estimated by viscosity and mean pore size. In the present study, the pore distribution was adjusted to be uniform through hot forging and before sinter forging. During sinter forging under a 1 kN loading condition, no continuous porosities were detected through XCT diagnosis as shown in Figure 9.
The effect of hot- and sinter-forging processes on product densification was also considered. As stated in [24], the laser-sintering process influenced the final density and mechanical properties of the product quality. Figure 7 and Figure 9 proved that the thermally viscous-sintered gear had uniform hardness distribution in its teeth and little geometric distortion. These features suggest that a bulk viscous-sintered polyimide product has higher physical properties than feed stock of a similar manner as well as the laser-sintered polyimide films.
Figure 11 shows that the JIS grade for sinter-forged polyimide gears was higher than JIS-5 even without mechanical finishing. As demonstrated in [25], most engineering plastic gears in commercial products have JIS grades between JIS-5 and JIS-10. Here, the highest gear grade was JIS-2 as shown in Figure 10, which demonstrates that as-sintered polyimide gears must be acceptable as a lightweight product with less geometric distortion and high gear-grade balancing.
Hot- and sinter-forging dies were machined using CAD and CAM so that three-dimensional tooth structures could be accommodated to each die. Variously shaped fat gears with a different amount of gear-module teeth could be fabricated using a similar procedure to this PM-route approach. As suggested in [26,27], the green preform shape must be optimized to homogeneous viscus flow and sintering of polyimide. In particular, local viscous flow and sintering must be controlled by a pulse-wise loading sequence [28].
The carbon fiber reinforcement into the polyimide matrix is essential for improving strength and stiffness without losing lightweight as a gear. The design and optimization of green compact preform as well as the hot- and sinter-forging process parameters, plays a key role in fabricating the carbon fiber-reinforced polyimide gear. As discussed in [29], the PM-route processing procedure must be restructured to control the carbon fiber orientation in the polyimide matrix.
XCT worked well when nondestructively evaluating the density and integrity of preform and forged polyimide gears. As suggested in [29,30], the synchrotron XCT with high X-beam intensity and high spatial resolution is effective in describing the carbon fiber orientation in the polyimide gears and in estimating the real stiffness of carbon fiber reinforced polyimide gears.

5. Conclusions

The super-engineering plastic gear was fabricated as a miniature mechanical element with higher strength and stiffness via the two-step PM-route process. Its high density was demonstrated via hardness testing and X-ray computer tomography. Its dimensional accuracy was shown through a gear-grade balancing measurement using the JIS. High JIS classification gear grades between JIS-2 and JIS-5 were attained only by processing without mechanical machining and finishing.
This PM-oriented two-step procedure can also be readily installed to a multi-part production line. Further experimental study is needed to describe how production efficiency can be preserved with high gear-grade quality. In the carbon fiber reinforcement, the short carbon fibers were included into the feedstock to control their orientation during hot- and sinter-forging processes. Further studies are necessary to describe the in-process orientation of short carbon fibers in carbon fiber-reinforced polyimide gears during these forging steps.
This PM-oriented processing could afford to fabricate the three-dimensional gears such as spur-gears and bevel-gears. With the aid of super-engineering polymer matrix design, their sustainability improved and their anti-radiation toughness increased.
Author Contributions

Conceptualization, T.A. and T.M.; methodology, T.A.; software, K.E.; validation, T.A., T.M. and K.E.; formal analysis, T.M.; investigation, T.A.; resources, T.M.; data curation, T.A.; writing—original draft preparation, T.A.; writing—review and editing, T.M.; supervision, T.M.; project administration, K.E.; funding acquisition, T.M. All authors have read and agreed to the published version of the manuscript.

Funding

This research was funded by Go-Tech Program, grant number 202220703011, METI, Japan.

Data Availability Statement

Data were contained within the article.

Acknowledgments

The authors would like to express their gratitude to S-I. Kurozumi (Nano-Film Coat, LLC.) for his help in experiments, and to Mitsui-Chemicals, Co., Ltd., and Kansai Precision, Co., Ltd. for their help in feedstock supply and in measurement, respectively.

Conflicts of Interest

Author Tomohiro Miyata was employed by the company Marutaka Industry, Co., Ltd. Author Kiyoyuki Endoh was employed by the company Isogami Gears, Co., Ltd. The remaining authors declare that the research was conducted in the absence of any commercial or financial relationships that could be construed as a potential conflict of interest. The authors declare that this study received funding from METI, Japan. The funder was not involved in the study design, collection, analysis, interpretation of data, the writing of this article or the decision to submit it for publication.

References

  1. The Gears for Electric Vehicles. Available online: https://gearmotions.com/electric-vehicle-gears/ (accessed on 18 April 2023).
  2. The Gears for Robotics. Available online: https://www.vexrobotics.com/gears.html (accessed on 18 April 2023).
  3. SDGs for Carbon Neutrality. Available online: https://sdgs.un.org/partnerships (accessed on 18 April 2023).
  4. Ando, K. Future prospects and current situation of the robot reduction gear. J. Robot. 2015, 33, 329–333. [Google Scholar]
  5. Goto, A.; Shimazaki, K.; Kimoto, Y.; Matsumoto, H.; Nagamatsu, A. PHITS simulations for development of space radiation shielding materials. In Proceedings of the 31st ISTS International Symposium on Space Technology and Science, Matsuyama, Japan, 6 June 2017. [Google Scholar]
  6. Tsitsinpelis, I.; Taylor, C.J.; Lennox, B.; Joyce, M.J. A review of ground-based robotic systems for the characterization of nuclear environments. Prog. Nucl. Energy 2019, 111, 109–124. [Google Scholar] [CrossRef]
  7. Tatsuno, D.; Yoneyama, T.; Kuga, M.; Honda, Y.; Akaishi, Y.; Hashimoto, H. Fiber deformation behavior of discontinuous CFRTP in gear forging. Int. J. Mater. Form. 2021, 14, 947–960. [Google Scholar] [CrossRef]
  8. More, C.V.; Alsayed, Z.; Badawi, M.S.; Thabet, A.A.; Pawar, P.P. Polymetric composite materials for radiation shielding: A review. Environ. Chem. Lett. 2021, 19, 2057–2090. [Google Scholar] [CrossRef] [PubMed]
  9. Park, S.J.; Lee, J.E.; Park, J.; Lee, N.-K.; Son, Y.; Park, S.-J. High-temperature 3D printing of polyetheretherketoe products; Perspective on industrial manufacturing applications of super-engineering plastics. Mater. Des. 2021, 211, 110163. [Google Scholar] [CrossRef]
  10. Aizawa, T.; Miyata, T.; Endo, K. Two-step PM forging for precise fabrication of carbon fiber reinforced engineering plastic gears. Mater. Res. Proc. 2023, 28, 1799–1808. [Google Scholar]
  11. Data of Aurum PD450. Available online: https://jp.mitsuichemicals.com/jp/special/aurum/assets/pdf/AURUM-TDS_PL450C_PD450_EN.pdf (accessed on 7 February 2024).
  12. Data of Mechanical Properties of Aurum PD450. Available online: https://jp.mitsuichemicals.com/jp/service/product/aurum.htm (accessed on 24 June 2023).
  13. Measurement Procedure on the Gear Tooth Geometry and Dimension. Available online: http://osk-corp.co.jp/jp/pages/top_page.html (accessed on 6 February 2024).
  14. JIS B 1702-1; Gears. JSA (Japan Standard Association): Tokyo, Japan, 2016.
  15. Aizawa, T.; Fuchiwaki, K. Galling-free fine blanking of titanium gears using carbon-supersaturated YXR7 punch. In Proceedings of the 15th ICTP International Conference on the Technology of Plasticity, Springer Natures, Swizerland AG, Cannes, France, 22 September 2023; pp. 81–88. [Google Scholar]
  16. Aizawa, T.; Fuchiwaki, K. Fine blanking of austenitic stainless steel gears by carbon-supersaturated high-speed tools. Machines 2023, 11, 896. [Google Scholar] [CrossRef]
  17. Feuerhack, A.; Trauth, D.; Mattfeld, P.; Klocke, F. Fine Blanking of Helical Gears. In 60 Excellent Inventions in Metal Forming; Elsevier: Amsterdam, The Netherlands, 2015; pp. 187–192. [Google Scholar]
  18. Gupta, K.; Jain, N.K.; Laubscher, R. Measurement of gear accuracy. Chapter 7. In Advanced Gear Manufacturing and Finishing: Classical and Modern Processes; Academic Press: Cambridge, MA, USA, 2017; pp. 197–218. [Google Scholar]
  19. Park, S.-A.; Jeon, H.; Kim, H.; Shin, S.-H.; Choy, S.; Hwang, D.D.; Koo, J.M.; Jegal, J.; Hwang, S.Y.; Park, J.; et al. Sustainable and recyclable super engineering thermoplastic from biorenewable monomer. Nat. Commun. 2019, 10, 2601. [Google Scholar] [CrossRef] [PubMed]
  20. Luk, S.H.; Chan, F.Y.; Kuzmicz, V. Higher green strength and improved density by conventional compaction. Met. Powder Rep. 1998, 11, 41. [Google Scholar]
  21. Azhdar, B.; Stenberg, B.; Kari, L. Development of a High-Velocity Compaction process for polymer powders. Polymer Testing 2005, 24, 909–919. [Google Scholar] [CrossRef]
  22. Patel, D.B.; George, P.M.; Pandya, V.A. A review on hot forging process analysis and preform optimization. J. Emerging Technol. Innovative Res. 2023, 10, h887–h895. [Google Scholar]
  23. Scherer, G.W. Viscous sintering. In Encyclopedia of Materials: Science and Technology; Academic Press, Inc.: San Diego, CA, USA, 2001. [Google Scholar]
  24. Vasquez, M.; Haworth, B.; Hopkinson, N. Methods for quantifying the stable sintering region in laser sintered polyamide-12. Polym. Eng. Sci. 2013, 53, 1230. [Google Scholar] [CrossRef]
  25. KHK. Available online: https://khkgears.net/new/plastic_gears.html (accessed on 17 December 2023).
  26. Hirschhorn, J.S.; Bargainnier, R.B. The forging of powder metallurgy preforms. JOM 1970, 22, 21–29. [Google Scholar] [CrossRef]
  27. Liu, Y.; Li, F.; Wang, S.; Hu, S.J. Preform design of powder metallurgy turbine disks using equi-potential line method. J. Manuf. Sci. Eng. ASME 2006, 128, 677–682. [Google Scholar] [CrossRef]
  28. Aizawa, T.; Tamaki, M.; Fukuda, T. Large area micro-texture imprinting onto metallic sheet via CNC stamping. Procedia Eng. 2014, 81, 1427–1432. [Google Scholar] [CrossRef]
  29. Aizawa, T.; Miyata, T.; Endoh, K. Two-step forging of polyimide powders into small-/medium-sized gears with and without carbon fiber reinforcement. In Proceedings of the 27th International ESAFORM Conference on Material Forming, Toulouse, France, 24–26 April 2024. (In press). [Google Scholar]
  30. Lomov, S.V. Fiber mis-orientation identified via XCT and structure tensor-based image analysis. In Proceedings of the ESAFORM2023-Webinar, Kraków, Poland, 20 September 2023. [Google Scholar]
Figure 1. Thermoplastic polyimide powders as a feedstock for the PM-route procedure.
Machines 12 00174 g001
Figure 2. Two-step PM-route procedure to fabricate the polyimide gears for its powder feedstock. (a) Cold compaction to green gear-shaped preform and (b) sinter-forging from the preform to the net-shaped polyimide gears. The same die set was utilized in both steps; IH-heating unit was added to the experimental setup for sinter-forging. The load cell was attached to the lower die to measure the load–displacement relationship.
Machines 12 00174 g002
Figure 3. Experimental setup for this two-step procedure. (a) Punch and die set for cold compaction and sinter forging and (b) the whole setup for sinter forging by heating up with the use of IH coil.
Machines 12 00174 g003
Figure 4. Overview on the measurement of the gear-grade balancing for fabricated polyimide gears. Various geometric deviations were measured by three-dimensional coordination.
Machines 12 00174 g004
Figure 5. A heptagonal representation on the gear-grade balancing for evaluation on the JIS grade diagram. The numbers of 2, 3, 4 and 5 denote for JIS-grades, e.g., 2 denotes for JIS-2 grade.
Machines 12 00174 g005
Figure 6. A green compact of polyimide powder feedstock at RT by 3 kN.
Machines 12 00174 g006
Figure 7. A sinter-forged polyimide gear with module 1.0 at 693 K by 1 kN for 600 s below the melting point of polyimide.
Machines 12 00174 g007
Figure 8. Hardness distribution on the 15-teeth tops for the sinter-forged polyimide gear. The numbers from 1, 2, …, 15 denote for the number of teeth N in clockwise.
Machines 12 00174 g008
Figure 9. XCT image on the cross-sections of sinter-forged polyimide gear. (a) Three-dimensional model of sintered gear in the bird-view, (b) top view, (c) left-side view, and (d) right-side view.
Machines 12 00174 g009
Figure 10. The geometric coordination of the sinter-forged gear for precise measurement of dimensional distortions at each item after JIS standard.
Machines 12 00174 g010
Figure 11. The accumulated pitch deviation (FPK) on the 15 teeth of sinter-forged SEP gear. (a) FPK-L on the left-hand side surfaces of 15 teeth and (b) FPK-R on their right-hand surfaces.
Machines 12 00174 g011
Figure 12. Radar diagram for gear-grade balancing of sinter-forged SEP gears without the finishing process.
Machines 12 00174 g012
Disclaimer/Publisher’s Note: The statements, opinions and data contained in all publications are solely those of the individual author(s) and contributor(s) and not of MDPI and/or the editor(s). MDPI and/or the editor(s) disclaim responsibility for any injury to people or property resulting from any ideas, methods, instructions or products referred to in the content.