Article

Prediction of Thermal Deformation and Real-Time Error Compensation of a CNC Milling Machine in Cutting Processes

Department of Mechanical Engineering, National Kaohsiung University of Science and Technology, Sanmin District, Kaohsiung City 80778, Taiwan
*
Author to whom correspondence should be addressed.
Machines 2023, 11(2), 248; https://doi.org/10.3390/machines11020248
Submission received: 27 December 2022 / Revised: 23 January 2023 / Accepted: 4 February 2023 / Published: 7 February 2023
(This article belongs to the Section Material Processing Technology)

Abstract

:
This study constructs a prediction model of thermal deformation with an artificial neural network and implements the real-time error compensation for a three-axis vertical CNC milling machine in cutting processes to improve the thermal error of the workpiece. There are 32 PT-100 thermal sensors installed in key parts of the machine in order to measure the temperature of key machine parts in actual cutting conditions. Pearson’s correlation coefficients are used to select crucial temperature sensors for building the prediction model of thermal deformation. The reduced number of crucial temperature sensors in model construction can simplify the model complexity and speed up the response time of prediction. This study constructs a long short-term memory (LSTM) neural network model to predict the thermal error of the machine in cutting processes. This prediction model of thermal deformation can be further used in real-time error compensation of the workpiece in cutting processes. In an 8 h cutting experiment, the dimensions of the workpiece show that, with real-time error compensation, the thermal error in X-axis decreases from 7 µm to 3 µm, the thermal error in Y-axis decreases from 74 µm to 21 µm, and the thermal error in Z-axis decreases from −64 µm to −20 µm. The results indicate that the prediction model of thermal deformation and the real-time error compensation can significantly reduce the thermal error and improve the dimensional accuracy of the workpiece.

1. Introduction

For the modeling of the thermal error: In 1958, Rosenblatt et al. used the simplest neural network called a perceptron, which learns by fine-tuning the weights to reduce the difference between the actual and desired output [1]. In 1993, Chen used a laser, non-contact capacitive displacement meter sensor to measure the static error and dynamic thermal error of an integrated machining machine on a three-axis machine and simulated these 32 errors as a function of position through neural-like analysis and regression analysis [2]. In 1995, Chen et al. used a three-axis milling machine to model the thermal error [3]. In the paper, a comparison was made between multivariate linear regression analysis (MRA) and artificial neural network (ANN), and the results indicated that multiple thermal error points could be output at one time when using ANN modeling, which has relative advantages over the MRA model, which can only output one thermal error point at a time, and the thermal error was reduced to within 10 µm after the ANN model compensation. In 2012, Otakar et al. used a thermal error modeling (TTF) mathematical model based on the thermal transfer function on a horizontal milling machine [4]. In 2013, Naeem et al. investigated the effect of ambient temperature on the accuracy of a machine, and in the paper, the experimental plan was divided into two seasons, summer and winter, for measurement experiments, and the results were compared with the actual measurement data through FEA [5]. In 2016, Miao et al. used a Leaderway-v450 CNC machining center as the experimental machine and used DS18B20 and an eddy current sensor as the temperature sensor and displacement sensor, and the paper used a distribution lag (DL) algorithm and principal component analysis (PCDL). After comparing the results, the prediction accuracy and robustness of the PCDL algorithm were better than the DL algorithm, and the prediction accuracy was improved by 9 μm [6]. In 2016, Zhang et al. proposed a function modeling method for thermal error transmission, in which it is mentioned that the thermal error of the machine bed is caused by the internal heat source and the ambient temperature, so this method is divided into three steps to calculate the thermal error manually [7]. In 2017, Zhou et al. used Bragg gates to simultaneously measure the temperature variation and deformation of the machine, in which 35 Bragg gates were placed on the machine and a multivariate [8]. The results showed that the thermal deformation of the tool accounted for a large part of the total thermal deformation at the beginning of the machine operation, and finally, a linear regression model was established to predict and compensate for the thermal deformation of the machine. In 2020, Lisa et al. measured thermal deformation caused by ambient temperature change on a five-axis tooling machine with the ambient temperature setting from 15 to 30 degrees and measured the verticality, positioning error, straightness, and rotational error of the machine [9]. In 1999 and 2007, Yang et al. used a new thermal error model to analyze and increase the knowledge of the thermal deformation behavior of a tool milling machine by using a thermal error module for analysis [10]. Donmez et al. proposed a cooling system using the Kehnda cooling effect to reduce the thermal error by using a stable temperature air duct to help the machine to balance the temperature [11]. In 2015, Miao et al. used a Leaderway-v450 CNC machining center as an experimental machine and used a principal component regression (PCR) algorithm for modeling [12]. In 2016, Li et al. used a BHBM200 heavy floor-type milling machine to conduct experiments on temperature field and thermal error [13]. In the paper, a PT-100 temperature sensor and CCD displacement sensor were used to measure the temperature field and thermal error, and 3 out of 23 temperature sensors were selected for modeling the multivariate linear regression model using the class projection method of European distance and correlation coefficient, and the results indicated that the method could reduce the thermal error to 10 μm. In 2018, Cai et al. conducted a thermal deformation experiment using the axial limit operation method, and the experiment was divided into two parts: machining and idling run, and the results showed that this experimental method can effectively measure the thermal error of the machine and model the data [14].
For the selection of temperature-sensitive sensors: In 2016, Liu et al. conducted thermal deformation experiments using machining center CR5116, and in this paper, they used fuzzy clustering and gray correlation for class classification and Bragg gates as temperature sensors, and the results showed that the best prediction performance was achieved when the number of temperature sensors was reduced from 27 to 5 [15]. In the paper, the machine was divided into 4 parts for thermal deformation derivation, and the number of temperature sensors was reduced from 28 to 5, and finally, PLC was used to compensate for the thermal deformation. In 2019, Li et al. established a prediction model of thermal error for a spindle based on the improved particle swarm optimization (IPSO)-optimized backpropagation neural network. In this paper, the temperature measurement sensors were clustered by the SOM neural network, and the correlation analysis method was used to explore the correlation between the thermal sensitive sensors and the thermal error of the spindle. The results showed that the prediction accuracy of the GA-BP model for the spindle thermal error was 93.1%, and the prediction accuracy of the IPSO-BP model was 96.5% [16]. In 2019, Fu et al. applied a chicken swarm optimization algorithm-based radial basic function (CSO-RBF) neural network to integrate thermal error modeling. In this paper, an integrated approach that included k-means clustering, correlation analysis, and radial basis function neural network was proposed to select temperature-sensitive sensors, and the RBF neural network was introduced for thermal error modeling, and the CSO algorithm was used to optimize the initial parameters of the RBF to improve the prediction accuracy of the model, and the results showed that the proposed CSO-RBF model had high accuracy and strong robustness [17]. In 2020, Liu et al. conducted a study on the selection of temperature-sensitive sensors using a three-axis CNC milling machine, and it was mentioned in the paper that the correlation coefficient volatility determination factor (CCVDF) was proposed as the pre-selection algorithm for the temperature sensors, and the failure rate of Z-axis thermal deformation modeling was reduced from 5.1% to 0.5%, and the thermal error was reduced from 39.8 µm to 10.7 µm [18]. In 2020, Yue et al. conducted measurement experiments of a three-axis vertical milling machine spindle system to assess temperature fields and thermal errors. In this paper, the fuzzy clustering and gray correlation algorithms were adopted to cluster the temperature measuring points and identify the temperature-sensitive sensors, and based on the adaptive chaos particle swarm optimization algorithm, thermal error models were established in the axial and radial directions of the spindle system, and the compensation effects were evaluated by the workpiece machining accuracy, and the results showed that the number of temperature measuring points was reduced from 12 to 6, and the residual range of measured and predicted thermal error values in the axial direction was 6.17~4.19 μm, and the modeling accuracy was 95.53%. The radial residual ranges were −2.75~3.05 μm and −2.10~2.15 μm, and the modeling accuracies were 90.74% and 91.10%, respectively [19]. In 2020, Yue et al. conducted experiments on the spindle in a three-axis vertical milling machine both in idling and cutting states. In this paper, the thermal error prediction models of the spindle system in a cutting state with the optimal specific cutting energy were established based on the adaptive chaotic particle swarm optimization algorithm, and the model prediction effects were evaluated, and the results showed that the temperature and thermal error of the spindle system in the cutting state were higher than the idling state, and two temperature-sensitive sensors were selected that not only reduced the redundancy of temperature measuring points but also ensured the model prediction accuracy, and the thermal error model’s prediction accuracy was above 90%, and the root-mean-square error and residual error were better than particle swarm optimization and regression [20]. In 2022, Li et al. proposed a new temperature-sensitive point screening method based on the improved binary grasshopper optimization algorithm (IBGOA) feature selection. In this paper, five spindle thermal experiments were carried out, and the results showed that the root-mean-square error (RMSE) of these models could decrease by 30–50% in the thermal drift error of X-direction, 10–30% in the thermal tilt error of Y-direction, and, generally, 40–60% in the thermal elongation of Z-direction and the thermal drift error of Y-direction compared with the traditional fuzzy C-means clustering (FCM) temperature-sensitive points screening method [21]. In 2022, Kumar et al. proposed an approach to select the optimal number of temperature sensors that could be employed to predict the thermal deformation while maintaining the required prediction accuracy. In this paper, the experiments were conducted to evaluate the thermal heat flux across the spindle at different rotational speeds, and a finite element analysis was performed to simulate the thermal deformation at the tool center point (TCP), and the input parameters considered for predicting the simulated deformation were different temperature sensor data on the motorized spindle and the ambient temperature, and the results showed that the proposed model accuracy was 86.72% with two temperature sensors and 85.99% with one temperature sensor. This indicates that one temperature sensor is sufficient to predict TCP deflection with a compromise of 0.73% in the prediction accuracy level [22].
For the compensation method of thermal errors: In 2002, Pahk et al. proposed a system identification method to compensate for the thermal error [23]. In this paper, 20 temperature sensors were placed on the machine, and infrared temperature sensors were placed around the machine tool, and the measured data were input into the PLC for calculation and compensation of the tool tip point, and the results showed that the thermal error could be reduced from 40 µm to 15 µm by using this method. In 2014, Zhang et al. used an inverted neural network to compensate for the thermal error of a vertical machining machine, and an AD592AN contact temperature sensor was used for temperature measurement [24]. In 2018, Chung et al. used an artificial neural network to model and compensate for the thermal error of a plane processing machine [25]. In 2020, Huang et al. presented a new modeling method for compensation of the thermal errors on cradle-type five-axis CNC machine tools (FAMTs). In this paper, they used an artificial neural network and shark smell optimization (SSO) algorithm to evaluate the performance of FAMT and to develop the thermal error compensation system. The compensation model was verified by machining experiments, and the results showed a 32% reduction in machining error after compensation [26]. In 2021, Mares et al. presented compensation for the main internal and external heat sources affecting a five-axis machine tool structure, including spindle rotation, three linear axes movements, rotary C axis, and time-varying environmental temperature influence for the cutting process. In this paper, a mathematical model using transfer functions was implemented directly into the control system of a milling center to compensate for thermal errors in real-time using Python programming ce, and the inputs of the compensation algorithm were indigenous temperature sensors used primarily for diagnostic purposes in the machine, and the results showed reductions in thermal error of 62%, 56%, and 73% in the X, Y, and Z directions, respectively, in comparison with the uncompensated state [27].
For the LSTM networks: In 2018, Huang et al. used a backpropagation (BP) neural network and long short-term memory (LSTM) neural network to model the thermal error and showed that after training and comparison, the backpropagation neural network had better training results for a single operating condition, but the LSTM had better training results for a complex operating condition [28]. In 2021, Liu et al. conducted error compensation from the view of the error mechanism of the spindle systems. In this paper, the hysteresis effect of the thermal expansion was revealed with the theoretical modeling of the error mechanism, and the long-term memory characteristics of thermal error on historical thermal information were demonstrated, and long short-term memory neural networks were introduced into error modeling and compensation, and error compensation was realized with variational mode decomposition (VMD)–grey wolf (GW)–LSTM neural networks, and the results showed that the compensation rates of the VMD-GW-LSTM network model were 77.78%, 75.00%, and 77.78% for Sizes 1, 2, and 3, respectively [29]. In 2022, Cheng et al. investigated the thermal error analysis and modeling of high-speed motorized spindles based on LSTM-CNN. The results indicated that the proposed thermal error model was significantly better than the conventional model [30]. In 2022, Guo et al. presented a novel static thermal deformation modeling method based on a hybrid CNN-LSTM model with spatiotemporal correlation (ST-CLSTM) in a milling machine running idly. The experimental results showed that the ST-CLSTM model obtained higher prediction accuracy in X, Y, and Z directions [31]. LSTM can rapidly deal with long-term memory problems and has been widely used in many fields. Due to the thermal hysteresis effect and the thermal deformation accumulation process, the thermal error is not only related to the temperature state at the current moment but also related to the temperature state at the historical moment. The same temperature characteristics may produce different thermal errors at different moments [30]. Therefore, to extract the temporal characteristics of the thermal error data, the LSTM with memory characteristics is used in the prediction model of thermal errors.
From the abovementioned pieces of research on thermal deformation in machine tools, it can be understood that the majority of the research on the compensation of thermal error concentrated only on the idle running of the machine without any material cutting. In addition, the LSTM exhibited good performance in comparison with other comparative algorithms, especially in processing time series data. It is, therefore, worth exploring how to design appropriate LSTM networks in the prediction model of the thermal error to facilitate milling machine applications. This study tries to explore the first-ever real-time thermal error compensation of a CNC milling machine using an LSTM model in real cutting processes. This study uses Pearson’s correlation coefficient to select the crucial temperature sensors with the highest correlation with thermal deformation, and it uses a long- and short-term memory neural network to construct the prediction model of the thermal error. A series of cutting experiments for collecting the data of thermal deformation are executed to train and test the prediction model of the thermal error. Finally, this study conducts two cutting experiments to verify the final results of the thermal error in three-axis directions without/with real-time error compensation.

2. Thermal Error Compensation for a CNC Milling Machine

2.1. CNC Three-Axis Milling Machine

The experimental machine in this study is the TMV-720A numerically controlled vertical machine center produced by Tongtai Machine & Tool co., ltd., and the controller is a 21 MB PC-based numerical controller produced by New Generation Technology. The controller supports the Yaskawa Mechatrolink-II serial communication servo system, and the communication bandwidth is greatly increased to 100 Mbps, and the resolution can support up to 24 bits, which can effectively improve the smoothness of processing.

2.2. Thermal Deformation Principle

The main cause of the thermal error of the machine is the phenomenon of thermal expansion and contraction of the material because the parts of different materials will produce different deformations under different temperature changes and geometric dimensions, as shown in Equation (1):
Δ L = L × α × Δ t
where Δ L represents the deformations (mm), L represents the size of the parts (mm), α represents the coefficient of the thermal expansion of material (1/°C), and Δ t represents the temperature change (°C).
Therefore, the temperature of each part of the machine (spindle, overhang, column, base, worktable, etc.) is different during the operation of the machine, causing different thermal expansions of each part, which affects the relative displacement between the tool center point (TCP) of the spindle and the workpiece material and further causes the error of the machining accuracy, as shown in Figure 1. Figure 2 depicts the baseline of a three-axis milling machine before the thermal deformation.

2.3. Temperature Sensors

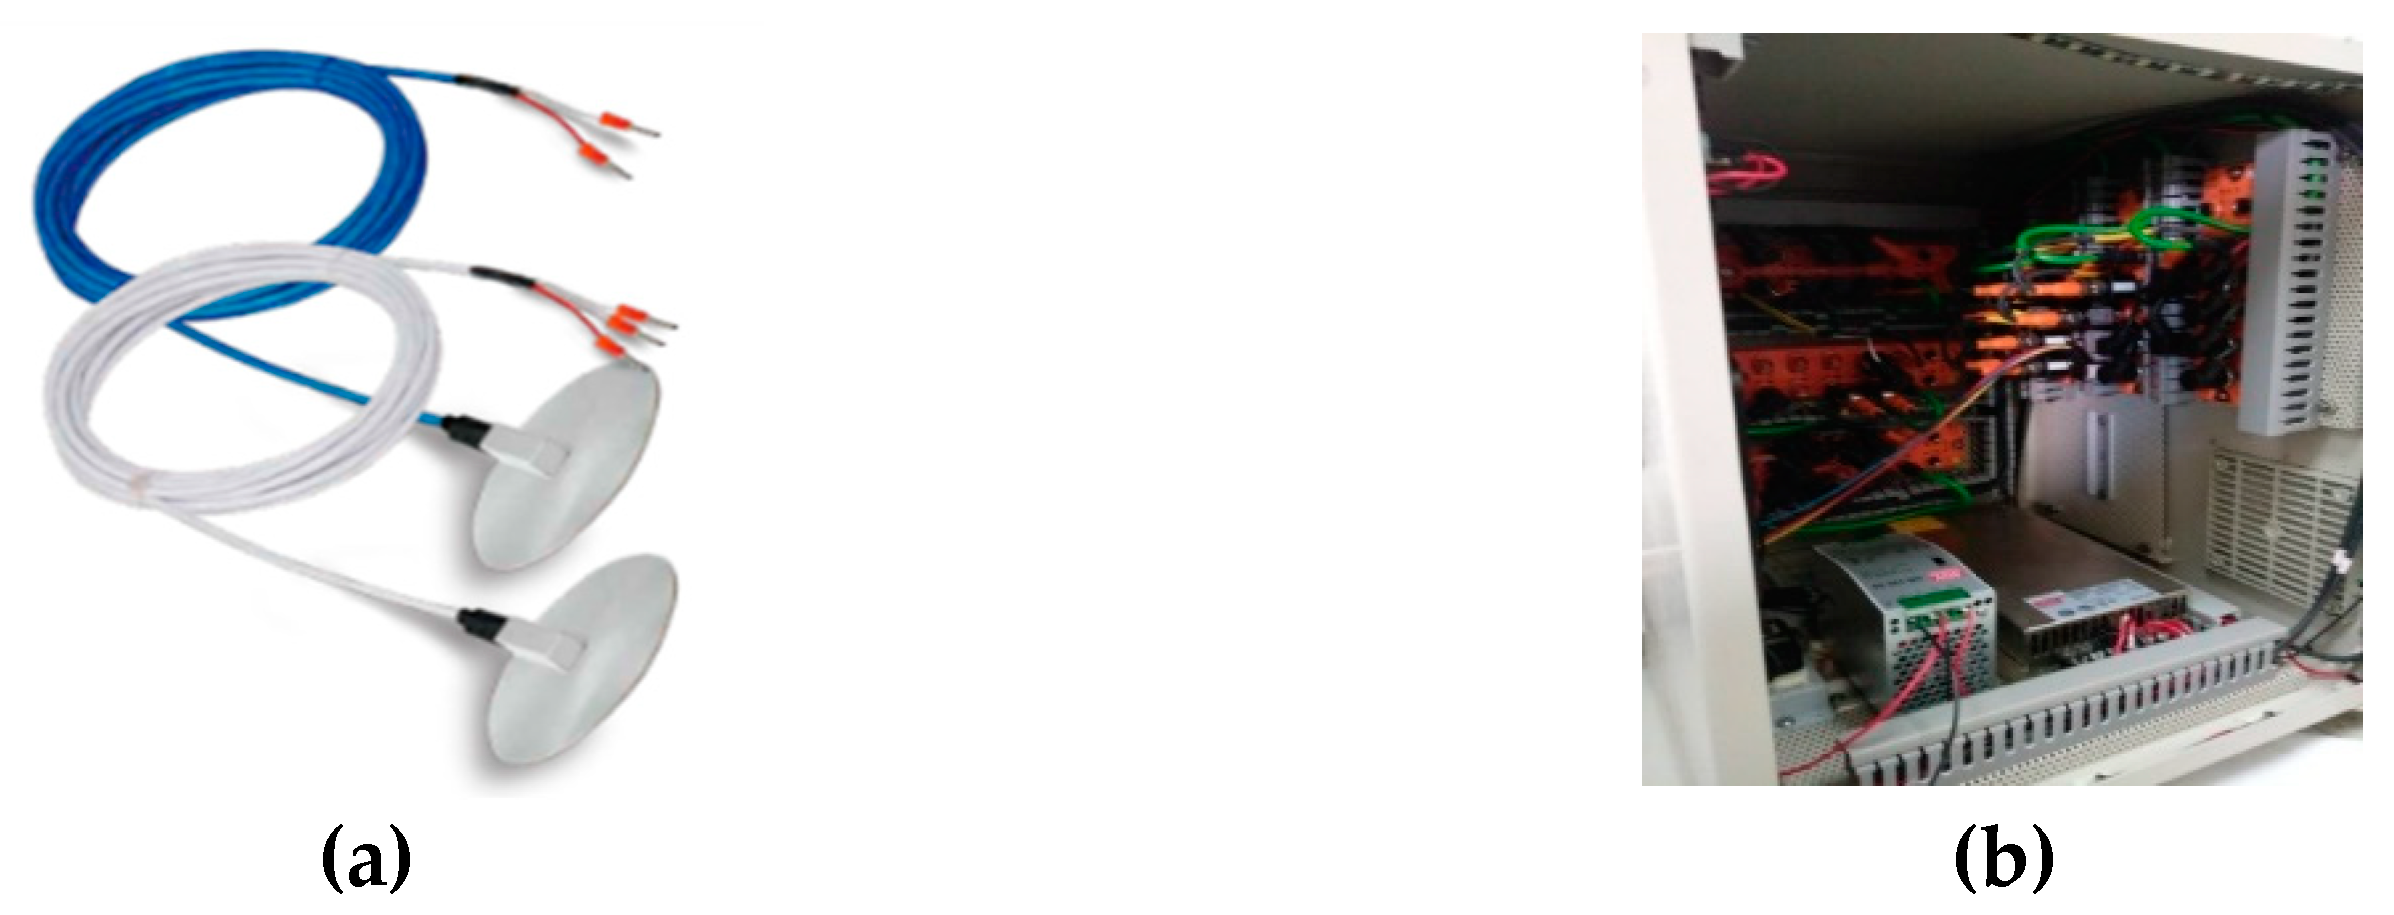
In order to receive real-time temperature data during machine operation and cutting processes, 32 temperature sensors were installed on the experimental machine for measurement, and the temperature sensor, PT-100, is shown in Figure 3a. The data acquisition module of the temperature sensors is shown in Figure 3b.

Installation Location of Temperature Sensors

In this study, the installation location of the temperature sensors on the machine and the selection of temperature sensors have a great influence on building the prediction model of thermal error. The locations used to install the temperature sensors are key machine components, such as the spindle, linear-guideway sliders, servo-motors, ballscrews, etc., which may generate lots of heat during the cutting processes. During the machining operation, the different temperature rises in machine components may cause the thermal displacement of the tool cutting point of the milling machine. In order to increase the completeness and accuracy of the prediction model, 32 temperature sensors were installed on the machine to measure the various temperature points of the machine, as shown in Figure 4.

2.4. Compensation of Thermal Errors

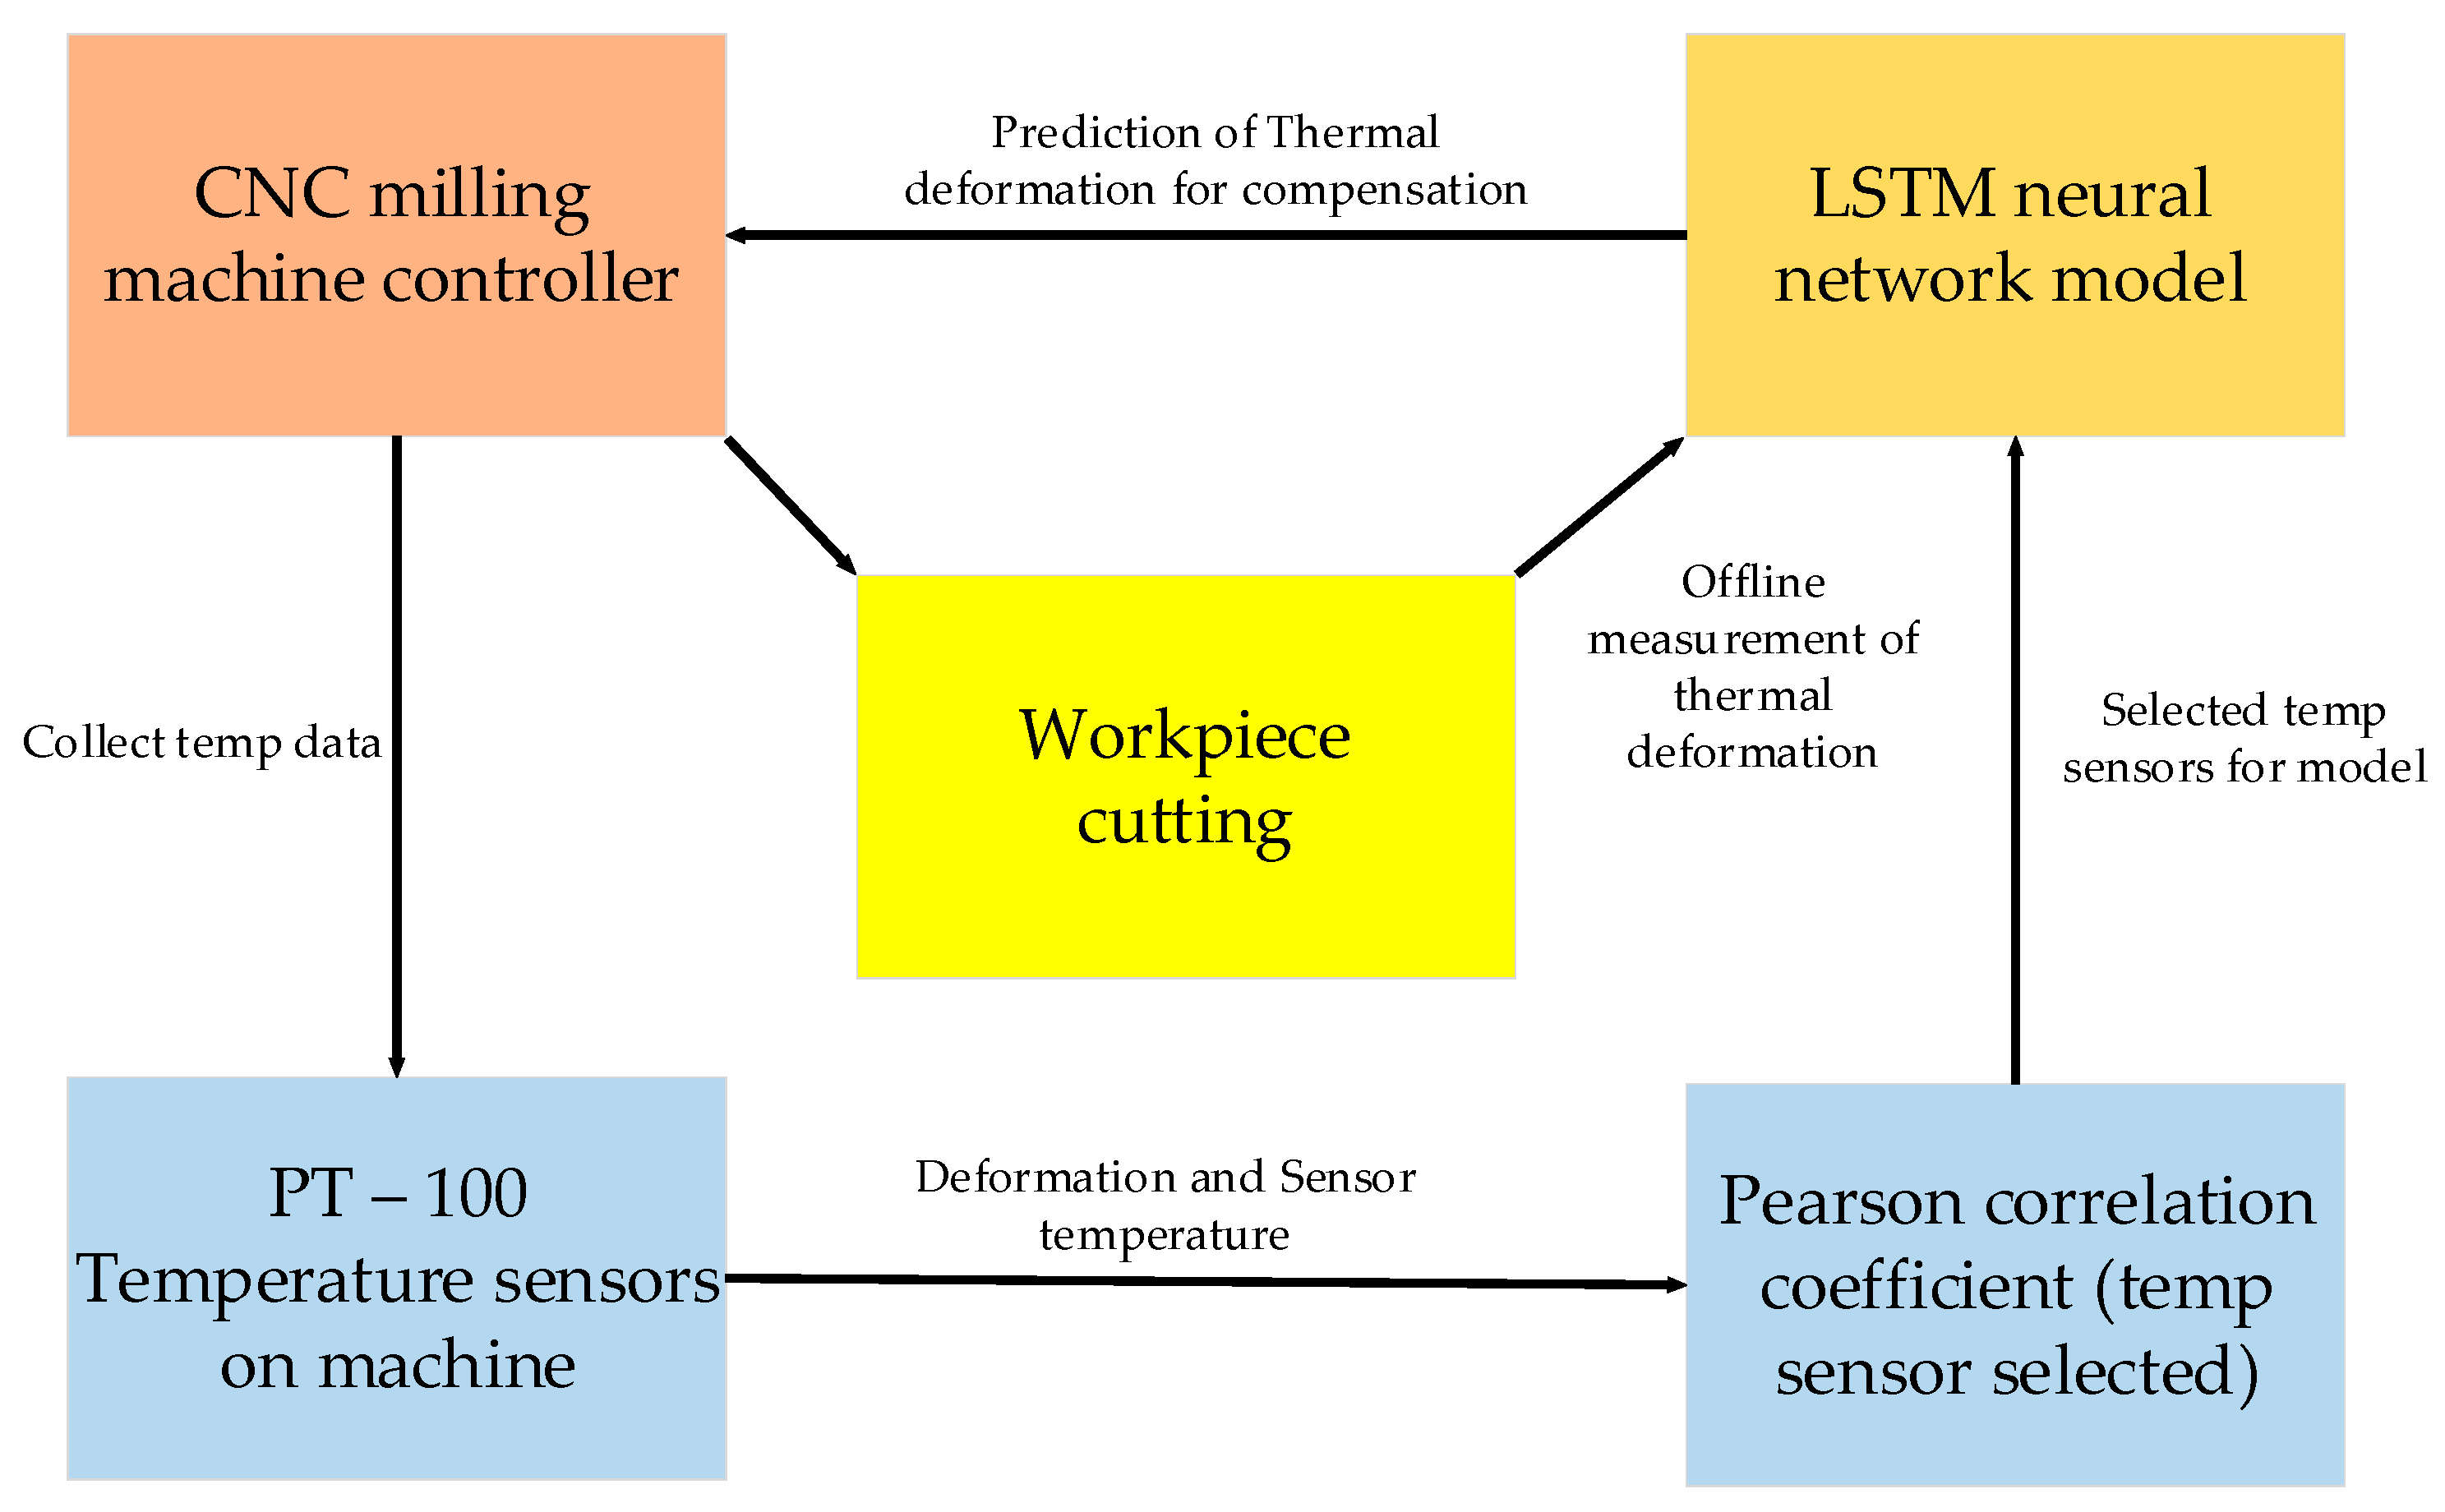
In this study, the temperature sensors mentioned above were used to collect the temperature rises in key components of the experimental machine under different working conditions, and the temperature data were used as the modeling data for the prediction model of thermal error. This study used Pearson’s correlation coefficient to select the crucial temperature sensors with the highest correlation with the thermal deformation of the machine. This approach was necessary because the reduced number of temperature sensors in the model construction can significantly decrease the time for computation and data processing of predicting thermal error. This is an essential step for the further implementation of real-time error compensation. Figure 5 shows a schematic diagram of the implementation of the real-time compensation of thermal deformation.

3. Thermal Deformation Experiment of Actual Cutting Processes

3.1. Experiments of Thermal Deformation Measurement

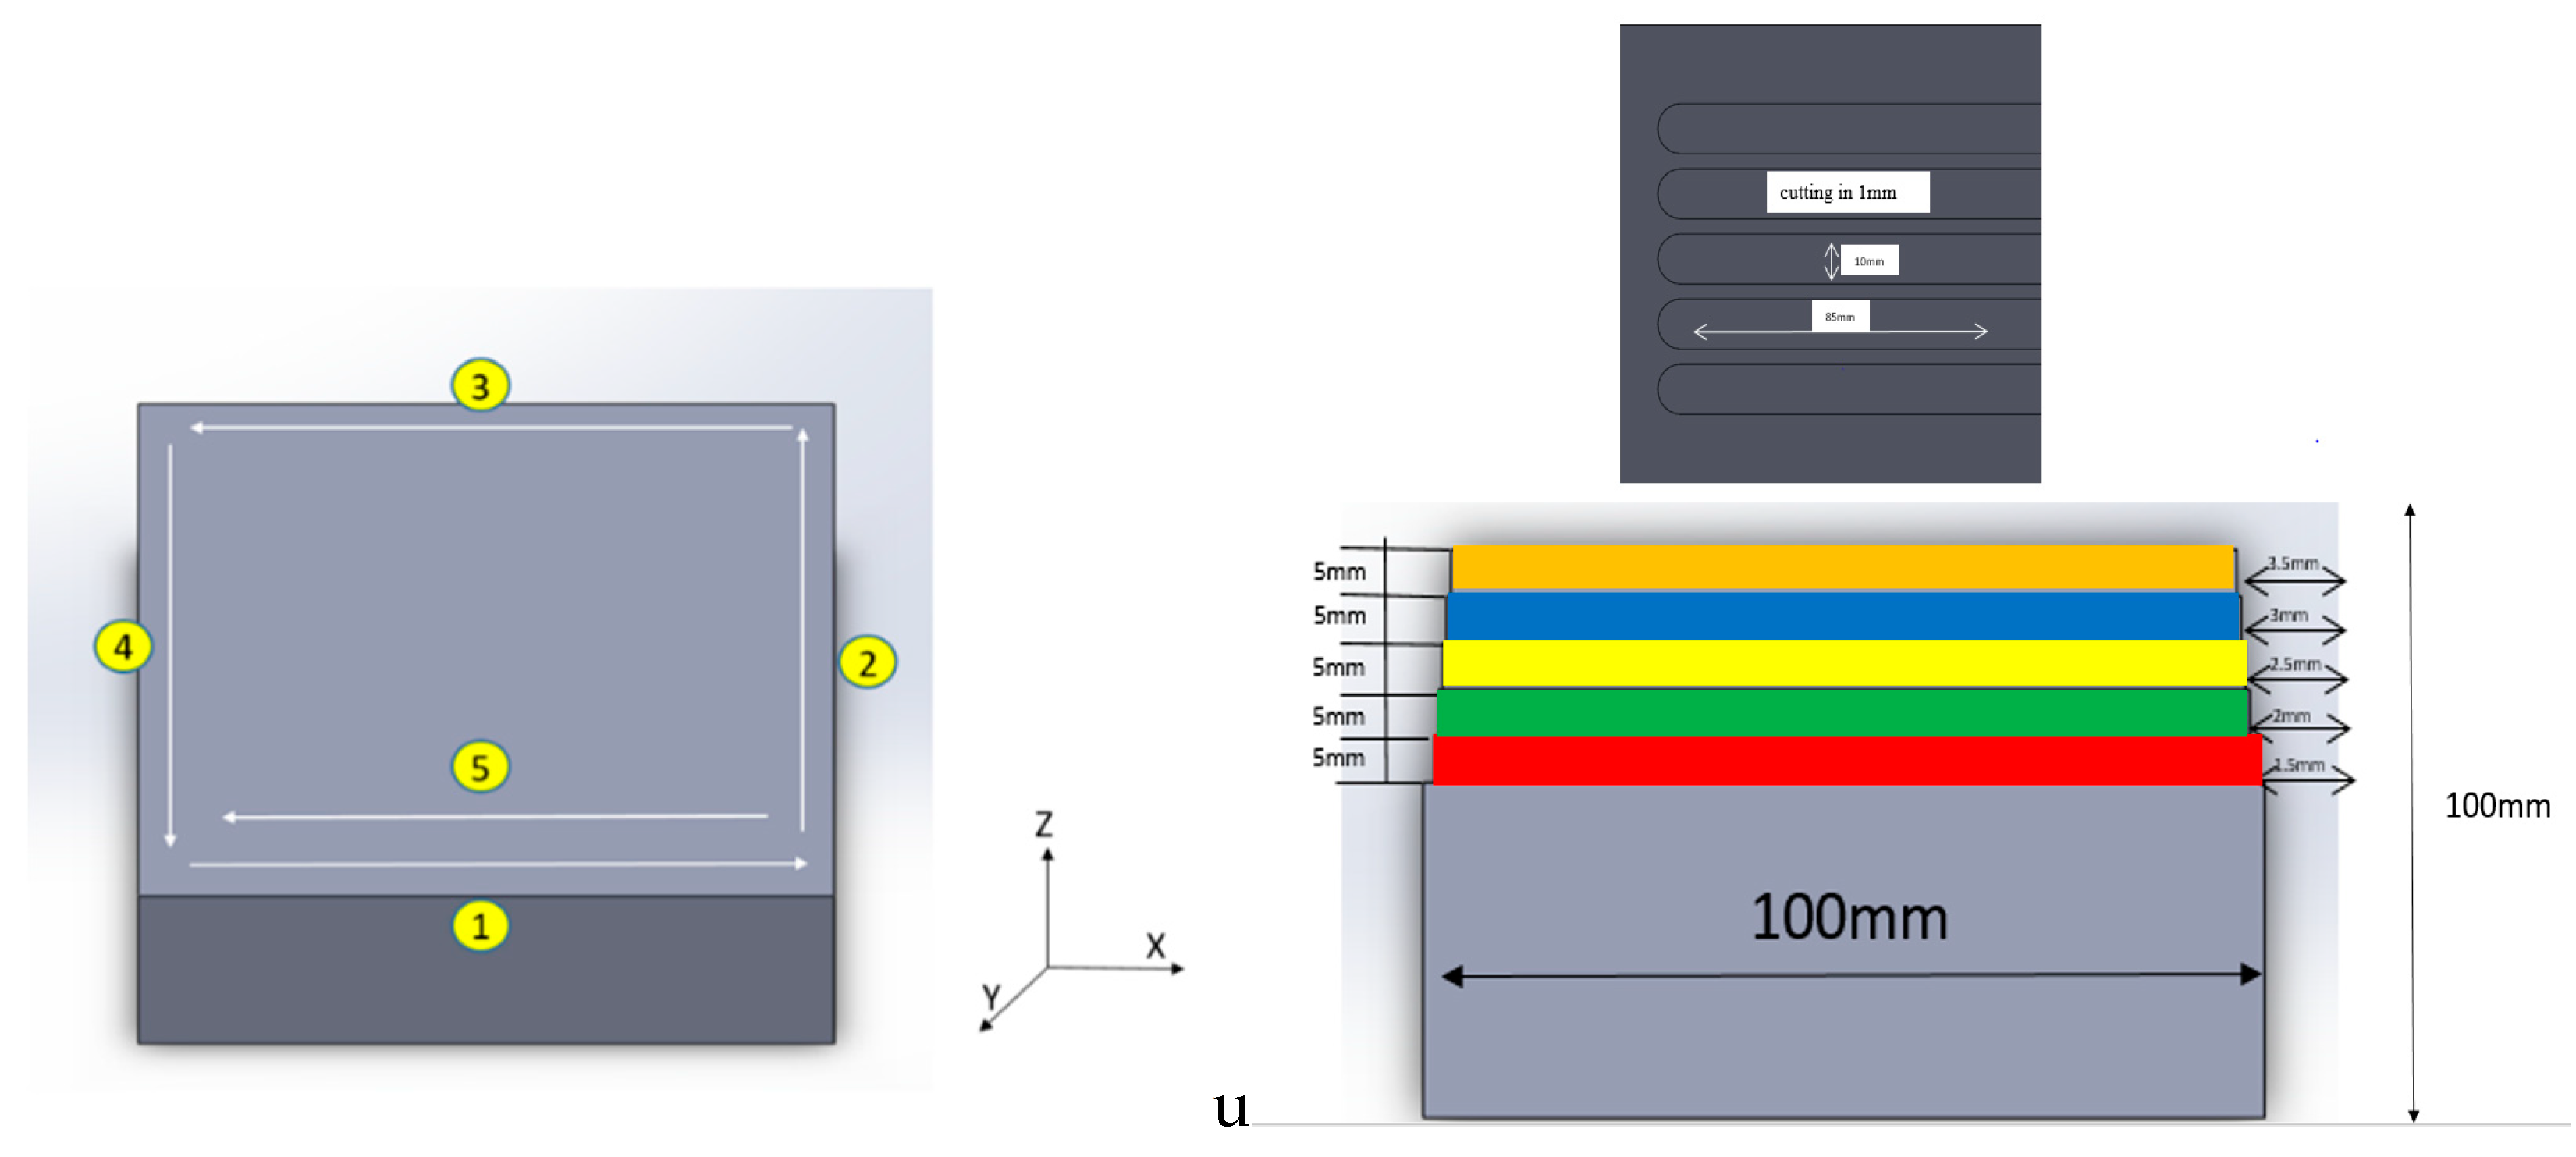
In order to ensure the accuracy of the temperature sensor, the experiment of thermal deformation was planned by dividing the experiment into three phases: "idling", "stopping", and "cutting". Firstly, the machine was left cold for a period of time to wait for the machine components to reach thermal equilibrium before the actual cutting, and the tool paths of X-axis and Y-axis were carried out by means of round-about ladder cutting, and the tool paths of Z-axis were carried out by means of straight cutting. The workpiece material for this study was an aluminum block (AL6061 100 × 100 × 100 mm), and the cutting tools were three-flute Tungsten Carbide end mills with a diameter of 10 mm. Figure 6 shows a schematic diagram of the workpiece cutting path in five cuts for the thermal deformation experiment.
After the experiment started, firstly, one surface was cut as the reference surface for thermal deformation measurement, and then, another surface was cut as the measured surface for the thermal deformation measurement after each operation period. The cutting experiment was continued until all the cutting paths were completed, as shown on the right-hand side in Figure 6. After the cutting paths were completed, the workpiece was sent to measure its dimensions in the coordinate measurement machine (Mitutoyo Crysta-Apex V), the measurement was performed in multiple positions in each direction, and the averaged thermal error of the workpiece in three axial directions could be identified with respect to the temperature data and current machining parameters. The experiment was repeated three times with a spindle speed of 5000 rpm, 6000 rpm, and 7000 rpm. Figure 7 shows the experimental flow-chart of thermal deformation. The machining parameters of this flow-chart are spindle speed, 5000 rpm~7000 rpm; feed rate, 3000 mm/min; X-axis travel, 0~−720 mm; Y-axis travel, 0~−430 mm; and Z-axis travel, 0~−500 mm.

3.2. Experimental Procedure of Thermal Deformation

Before the experiment started, the data acquisition module of temperature sensors was turned on, and the temperature was collected for a period of time to confirm whether the temperature of each component of the machine reached thermal equilibrium, on the one hand, and to ensure that each temperature sensor collected the temperature data on the machine smoothly, on the other hand, and the milling machine was started after the confirmation. Figure 8 shows the experimental procedure of thermal deformation. After the machine was started, the workpiece was fixed on the worktable, and the machine was calibrated to ensure the correct position of each axis of the machine, the first cutting (cutting benchmark, i.e., the reference surface) was performed after the machine was calibrated, and the thermal deformation experiment was started.

3.3. Cutting Experiments of Thermal Deformation

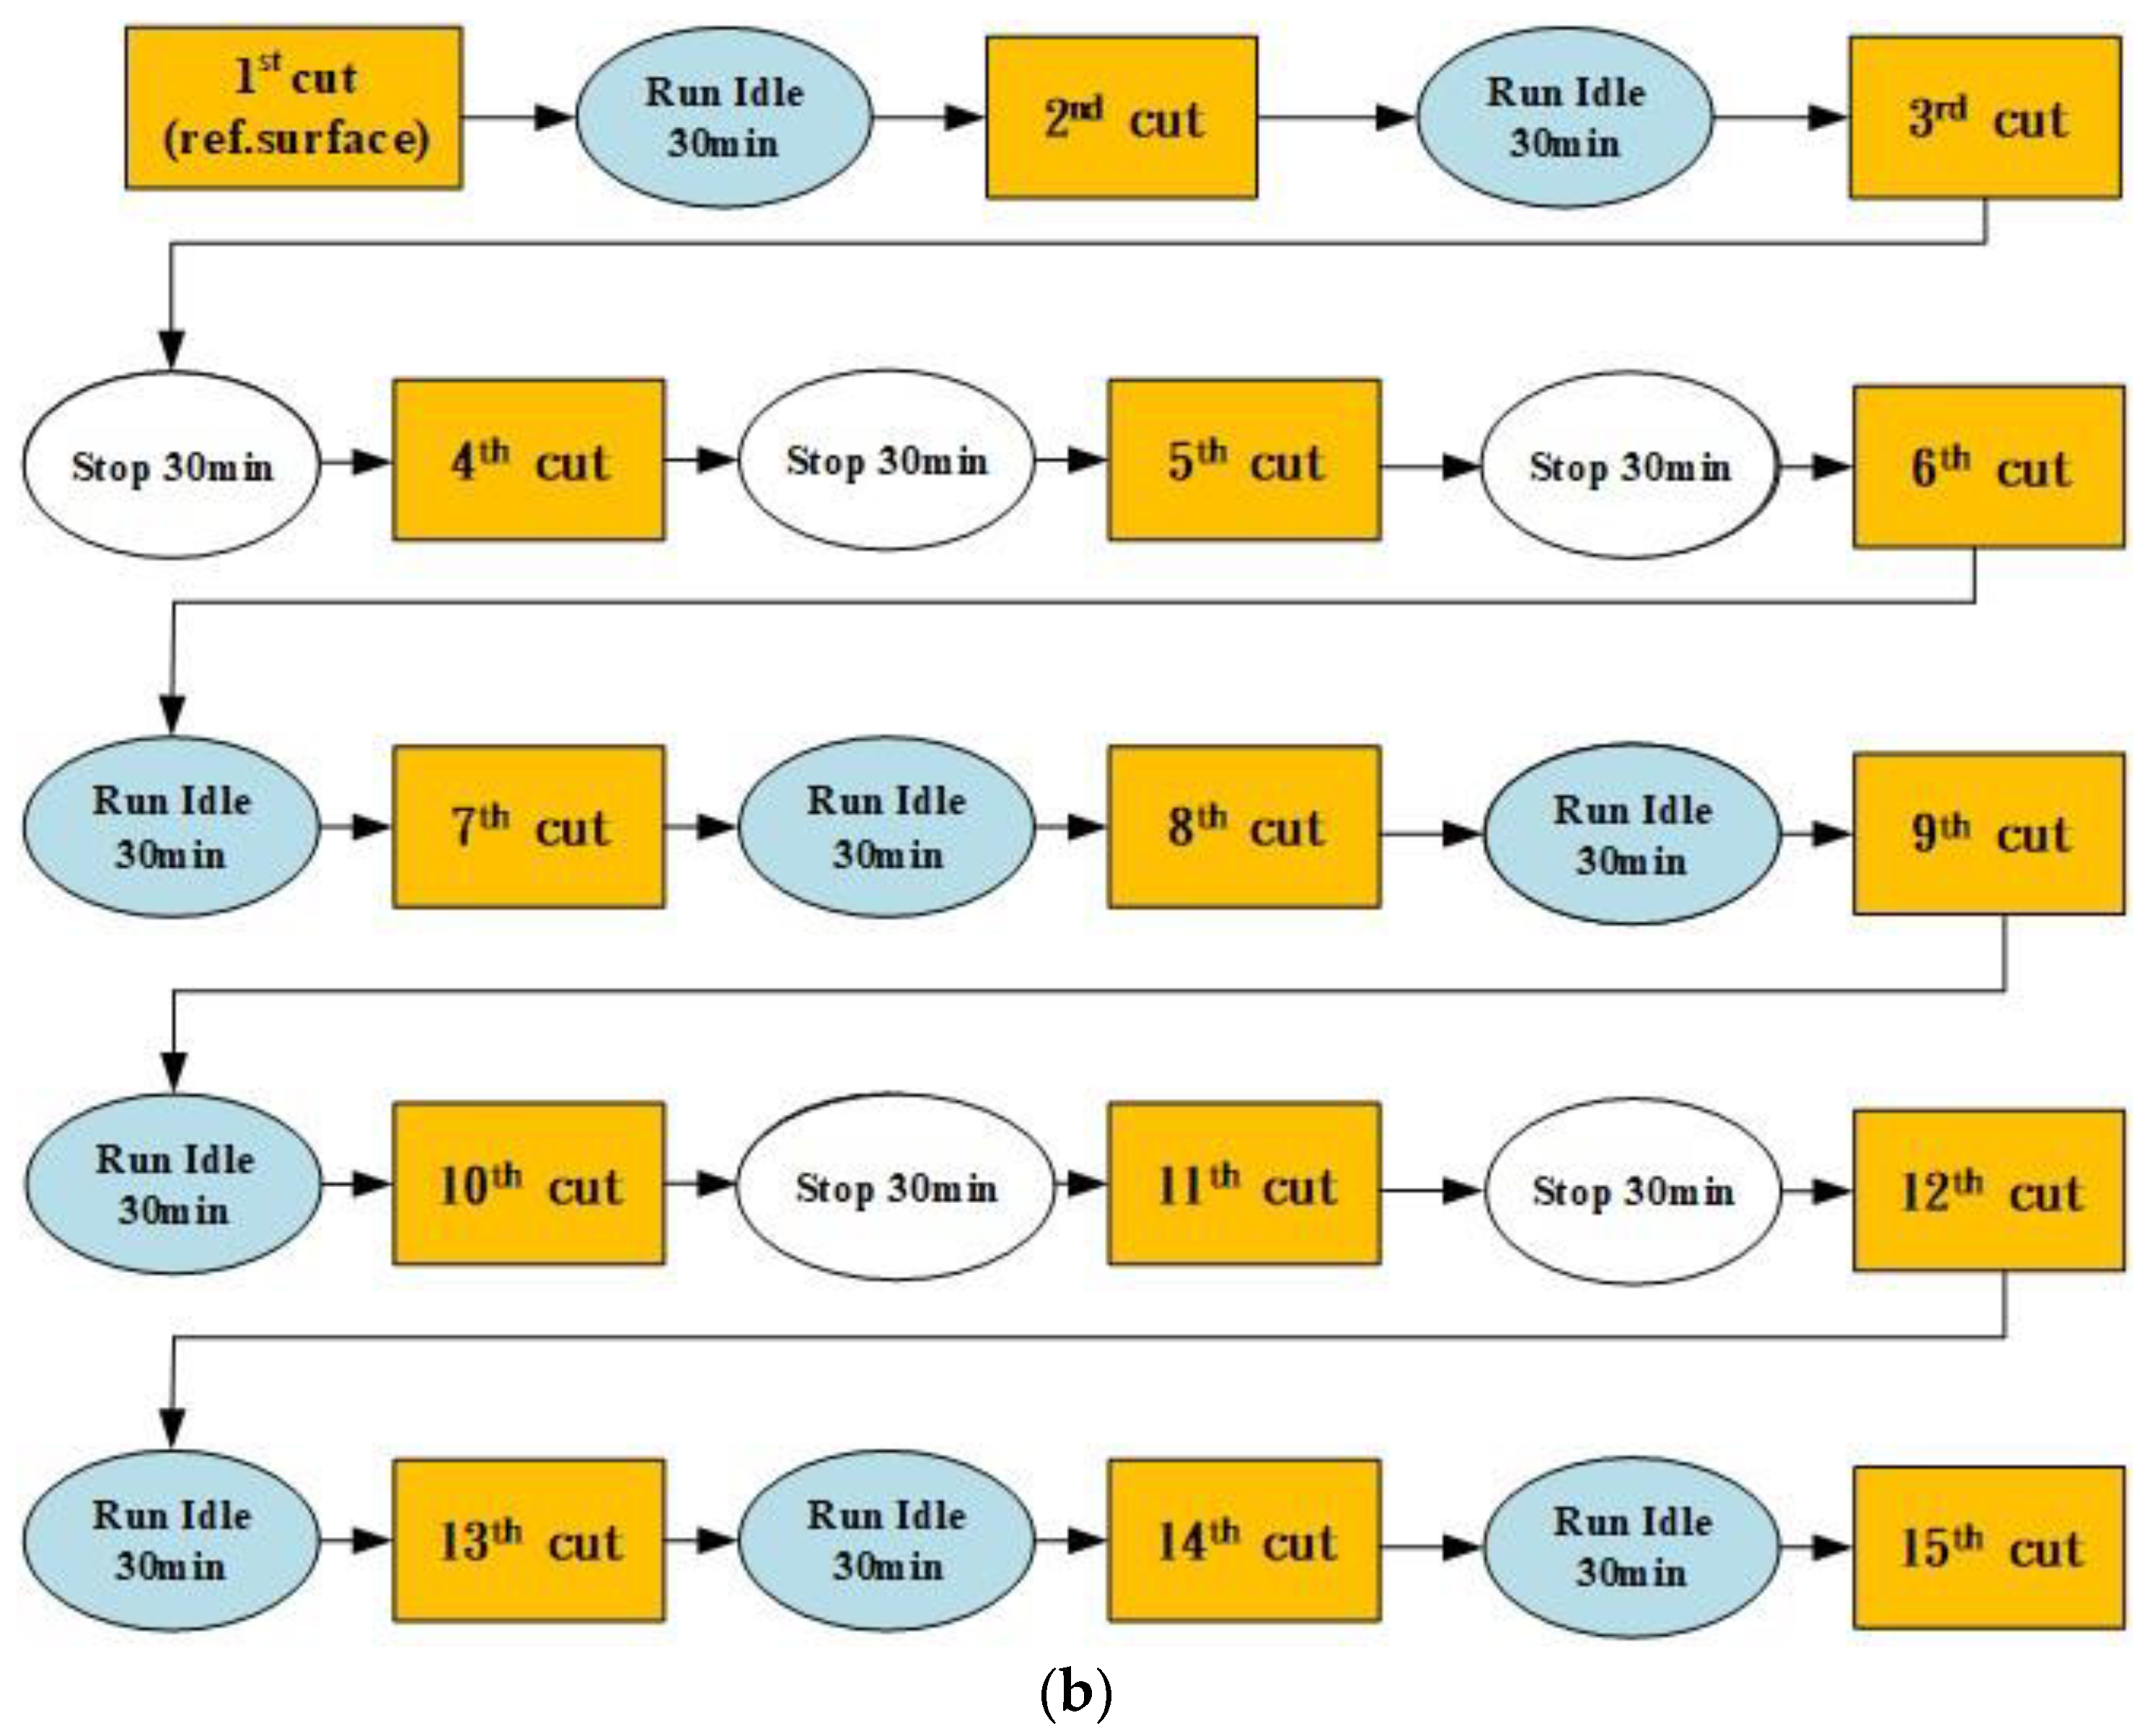
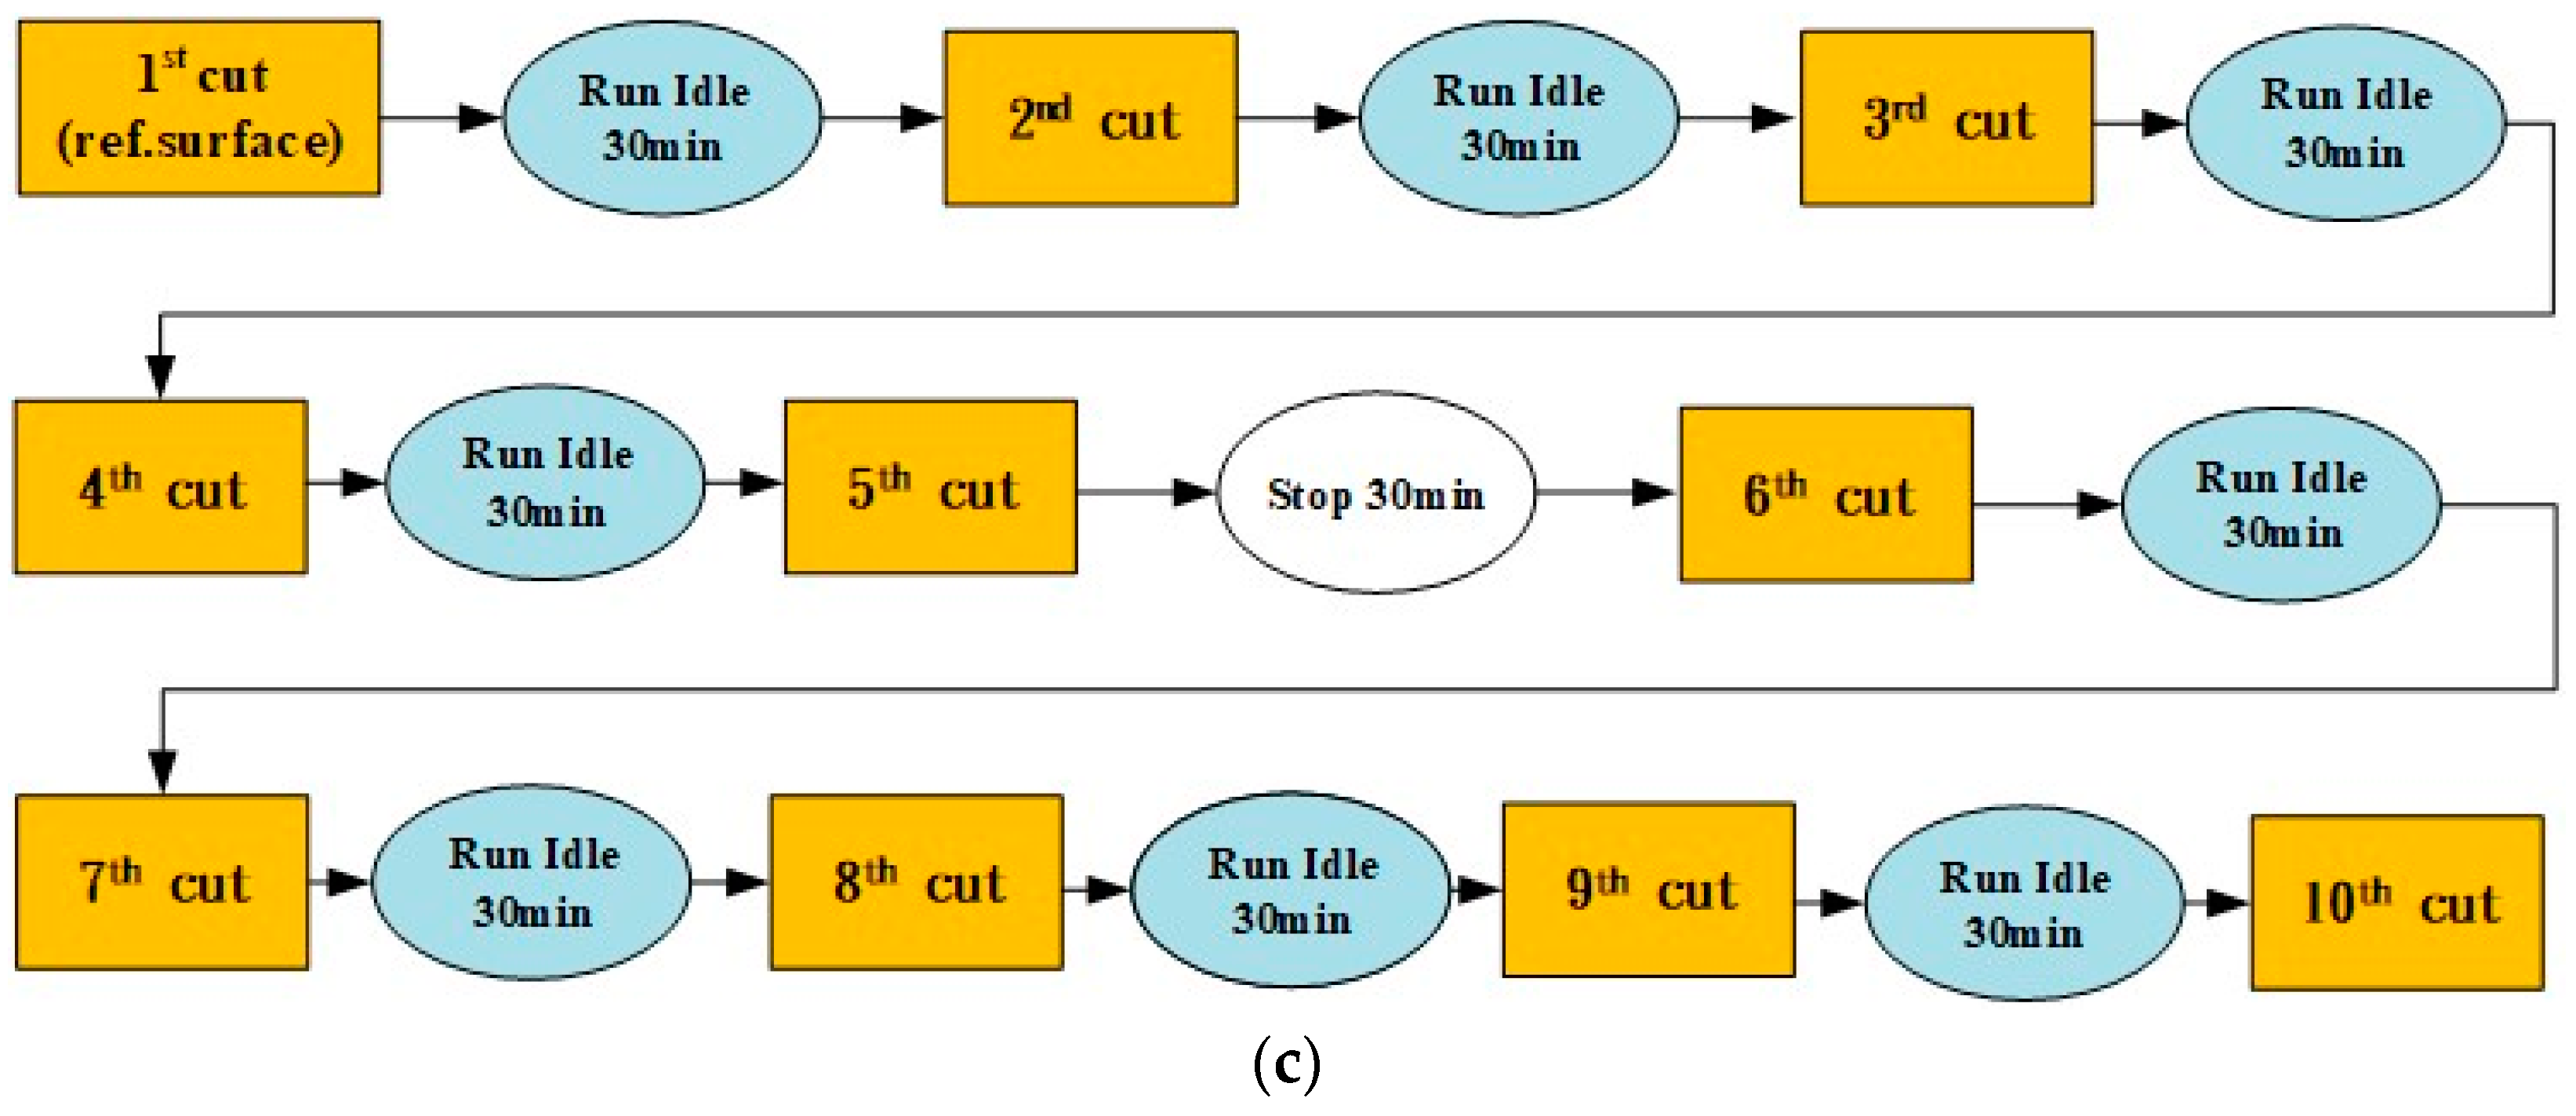
The first cutting experiment of thermal deformation was conducted for 7 h, and this experiment used the machining parameters of spindle speed at 7000 rpm and feed at 3000 mm/min for different working conditions, and a flow-chart of the first cutting experiment of thermal deformation is shown in Figure 9a. The machining parameters of the first experiment are spindle speed, 7000 rpm; feed rate, 3000 mm/min; X-axis travel, 0~−720 mm; Y-axis travel, 0~−430 mm; and Z-axis travel, 0~−500 mm. The second cutting experiment of thermal deformation was conducted for 7 h, and this experiment used the machining parameters of spindle speed at 5000 rpm and feed at 3000 mm/min for different working conditions, and a flow-chart of the second cutting experiment of thermal deformation is shown in Figure 9b. The third cutting experiment of thermal deformation was conducted for 4.5 h, and this experiment used the machining parameters of spindle speed at 6000 rpm and feed at 3000 mm/min for different working conditions, and a flow-chart of the third cutting experiment of thermal deformation is shown in Figure 9c.

4. Pearson’s Correlation Coefficients and Selection of Critical Temperature Sensors

4.1. Pearson’s Correlation Coefficient Formula

Pearson’s correlation coefficient, r, between the two variables can be expressed by Equation (2) [32]:
r = C o v a r i a n c e   o f   x   a n d   y s t a n d a r d   d e v i a t i o n   o f   x   ×   s t a n d a r d   d e v i a t i o n   o f   y
Suppose the values of the two variables are (x1, y1), (x2, y2), (x3, y3),...... (xn, yn), then the sample covariance SXY is given in Equation (3) [32]:
S X Y = i = 1 n ( x i x ¯ ) ( y i y ¯ ) n 1
where x ¯ represents the arithmetic mean of X variables; y ¯ represents the arithmetic mean of Y variables.
When the sample covariance SXY is greater than 0, it means that X, Y is greater than the mean at the same time, or X, Y is smaller than the mean at the same time, which means that there is a positive correlation between the two variables X, Y. Conversely, when the sample covariance SXY is less than 0, it means that X is greater than the mean, and Y is smaller than the mean, or X is smaller than the mean, and Y is greater than the mean, which means that the relationship between the two variables X, Y is negative. The standard deviations of X and Y, SX and SY, are shown in Equations (4) and (5) [32]:
S X = i = 1 n ( x i x ¯ ) 2 n 1
S Y = i = 1 n ( y i y ¯ ) 2 n 1
After understanding the above definition of Pearson’s correlation coefficient, the formula of Pearson’s correlation coefficient r can be obtained as in Equation (6) [32]:
r = ( x i x ¯ ) ( y i y ¯ ) x i x ¯ 2 y i y ¯ 2

4.2. Selection of Crucial Temperature Sensors

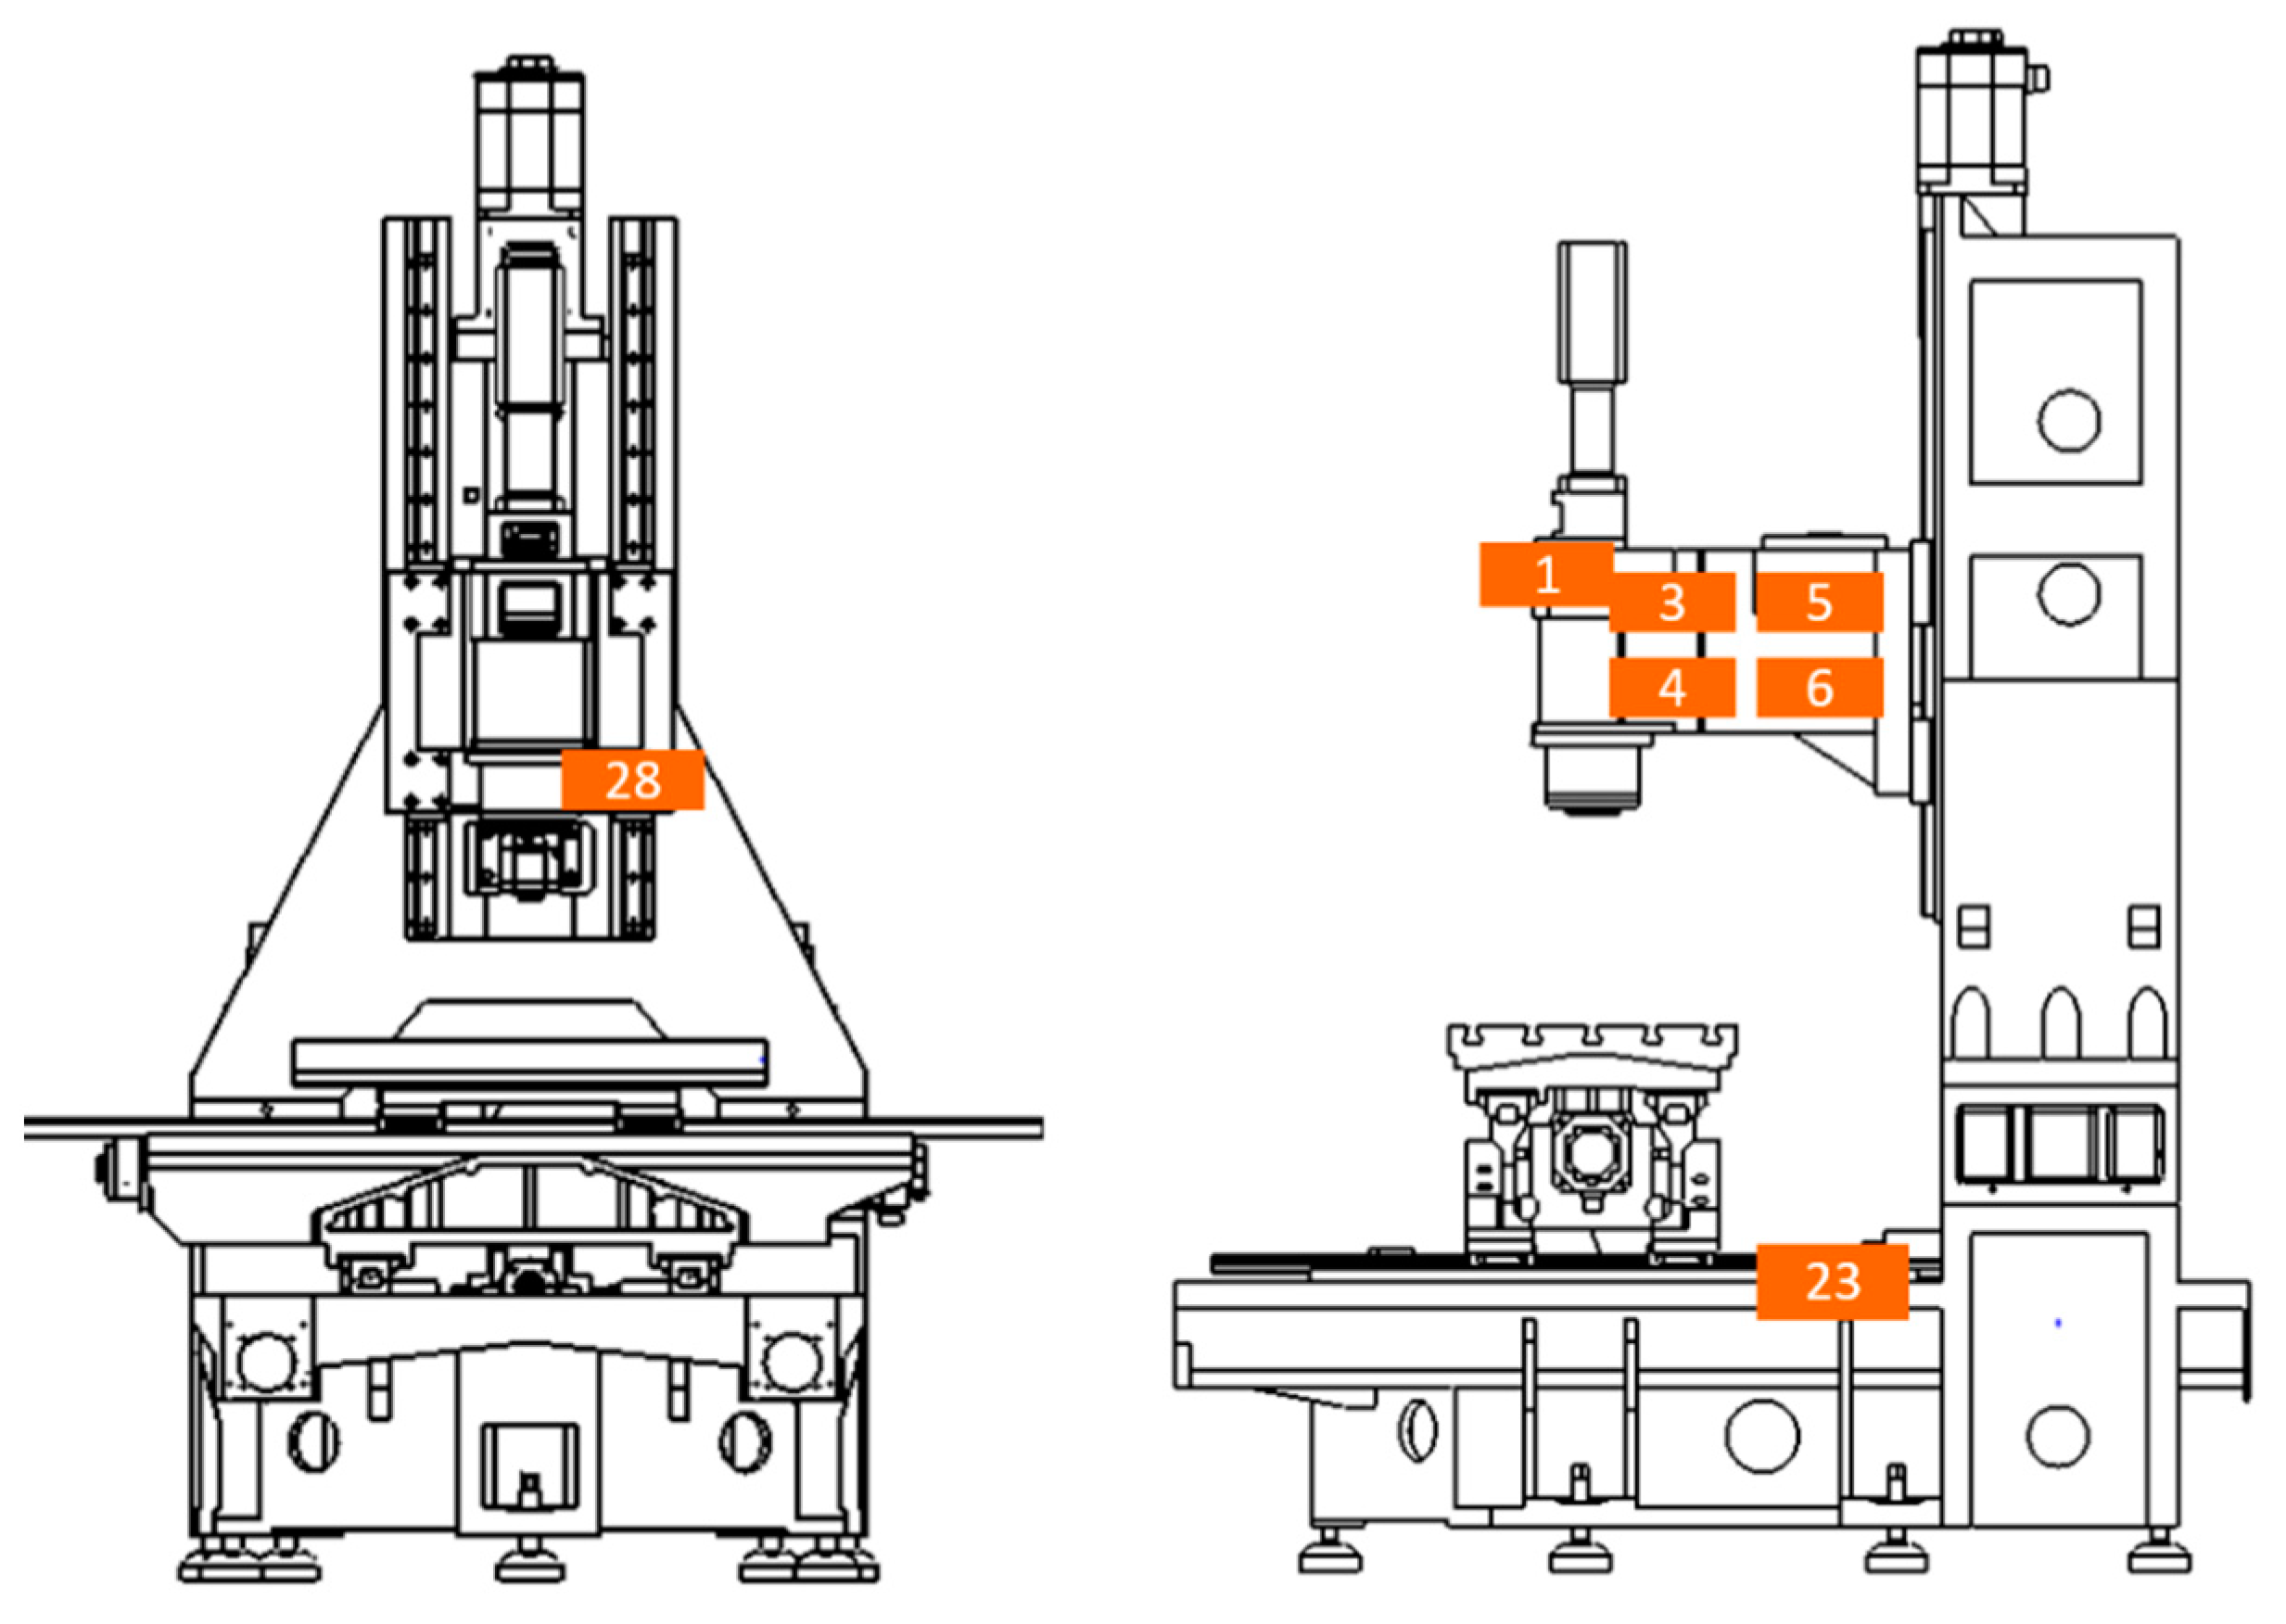
From the previous formula of Pearson’s correlation coefficient in Equation (6), 32 temperature sensors and thermal deformation were substituted into the formula to calculate the correlation degree. After calculating Pearson’s correlation coefficients, Pearson’s correlation coefficients were ranked from the highest to the lowest, and the seven highest-temperature sensors were selected as crucial temperature sensors to construct the prediction model of the LSTM neural network according to the reference literature [18,32]. Figure 4 shows the overall locations of the temperature sensors in the machine. Figure 10 depicts the selected seven crucial temperature sensors and one ambient temperature sensor. Table 1 shows the locations of seven crucial temperature sensors.

5. Prediction Model of Thermal Error

In this study, the input value of the model is the temperature measured by the PT-100 sensor in the machine during the experiment, and the output value of the model is the amount of thermal error measured in the machined workpiece. The trained model is then brought into the controller using the predicted thermal error for real-time compensation.

5.1. Long- and Short-Term Memory (LSTM) Neural Network

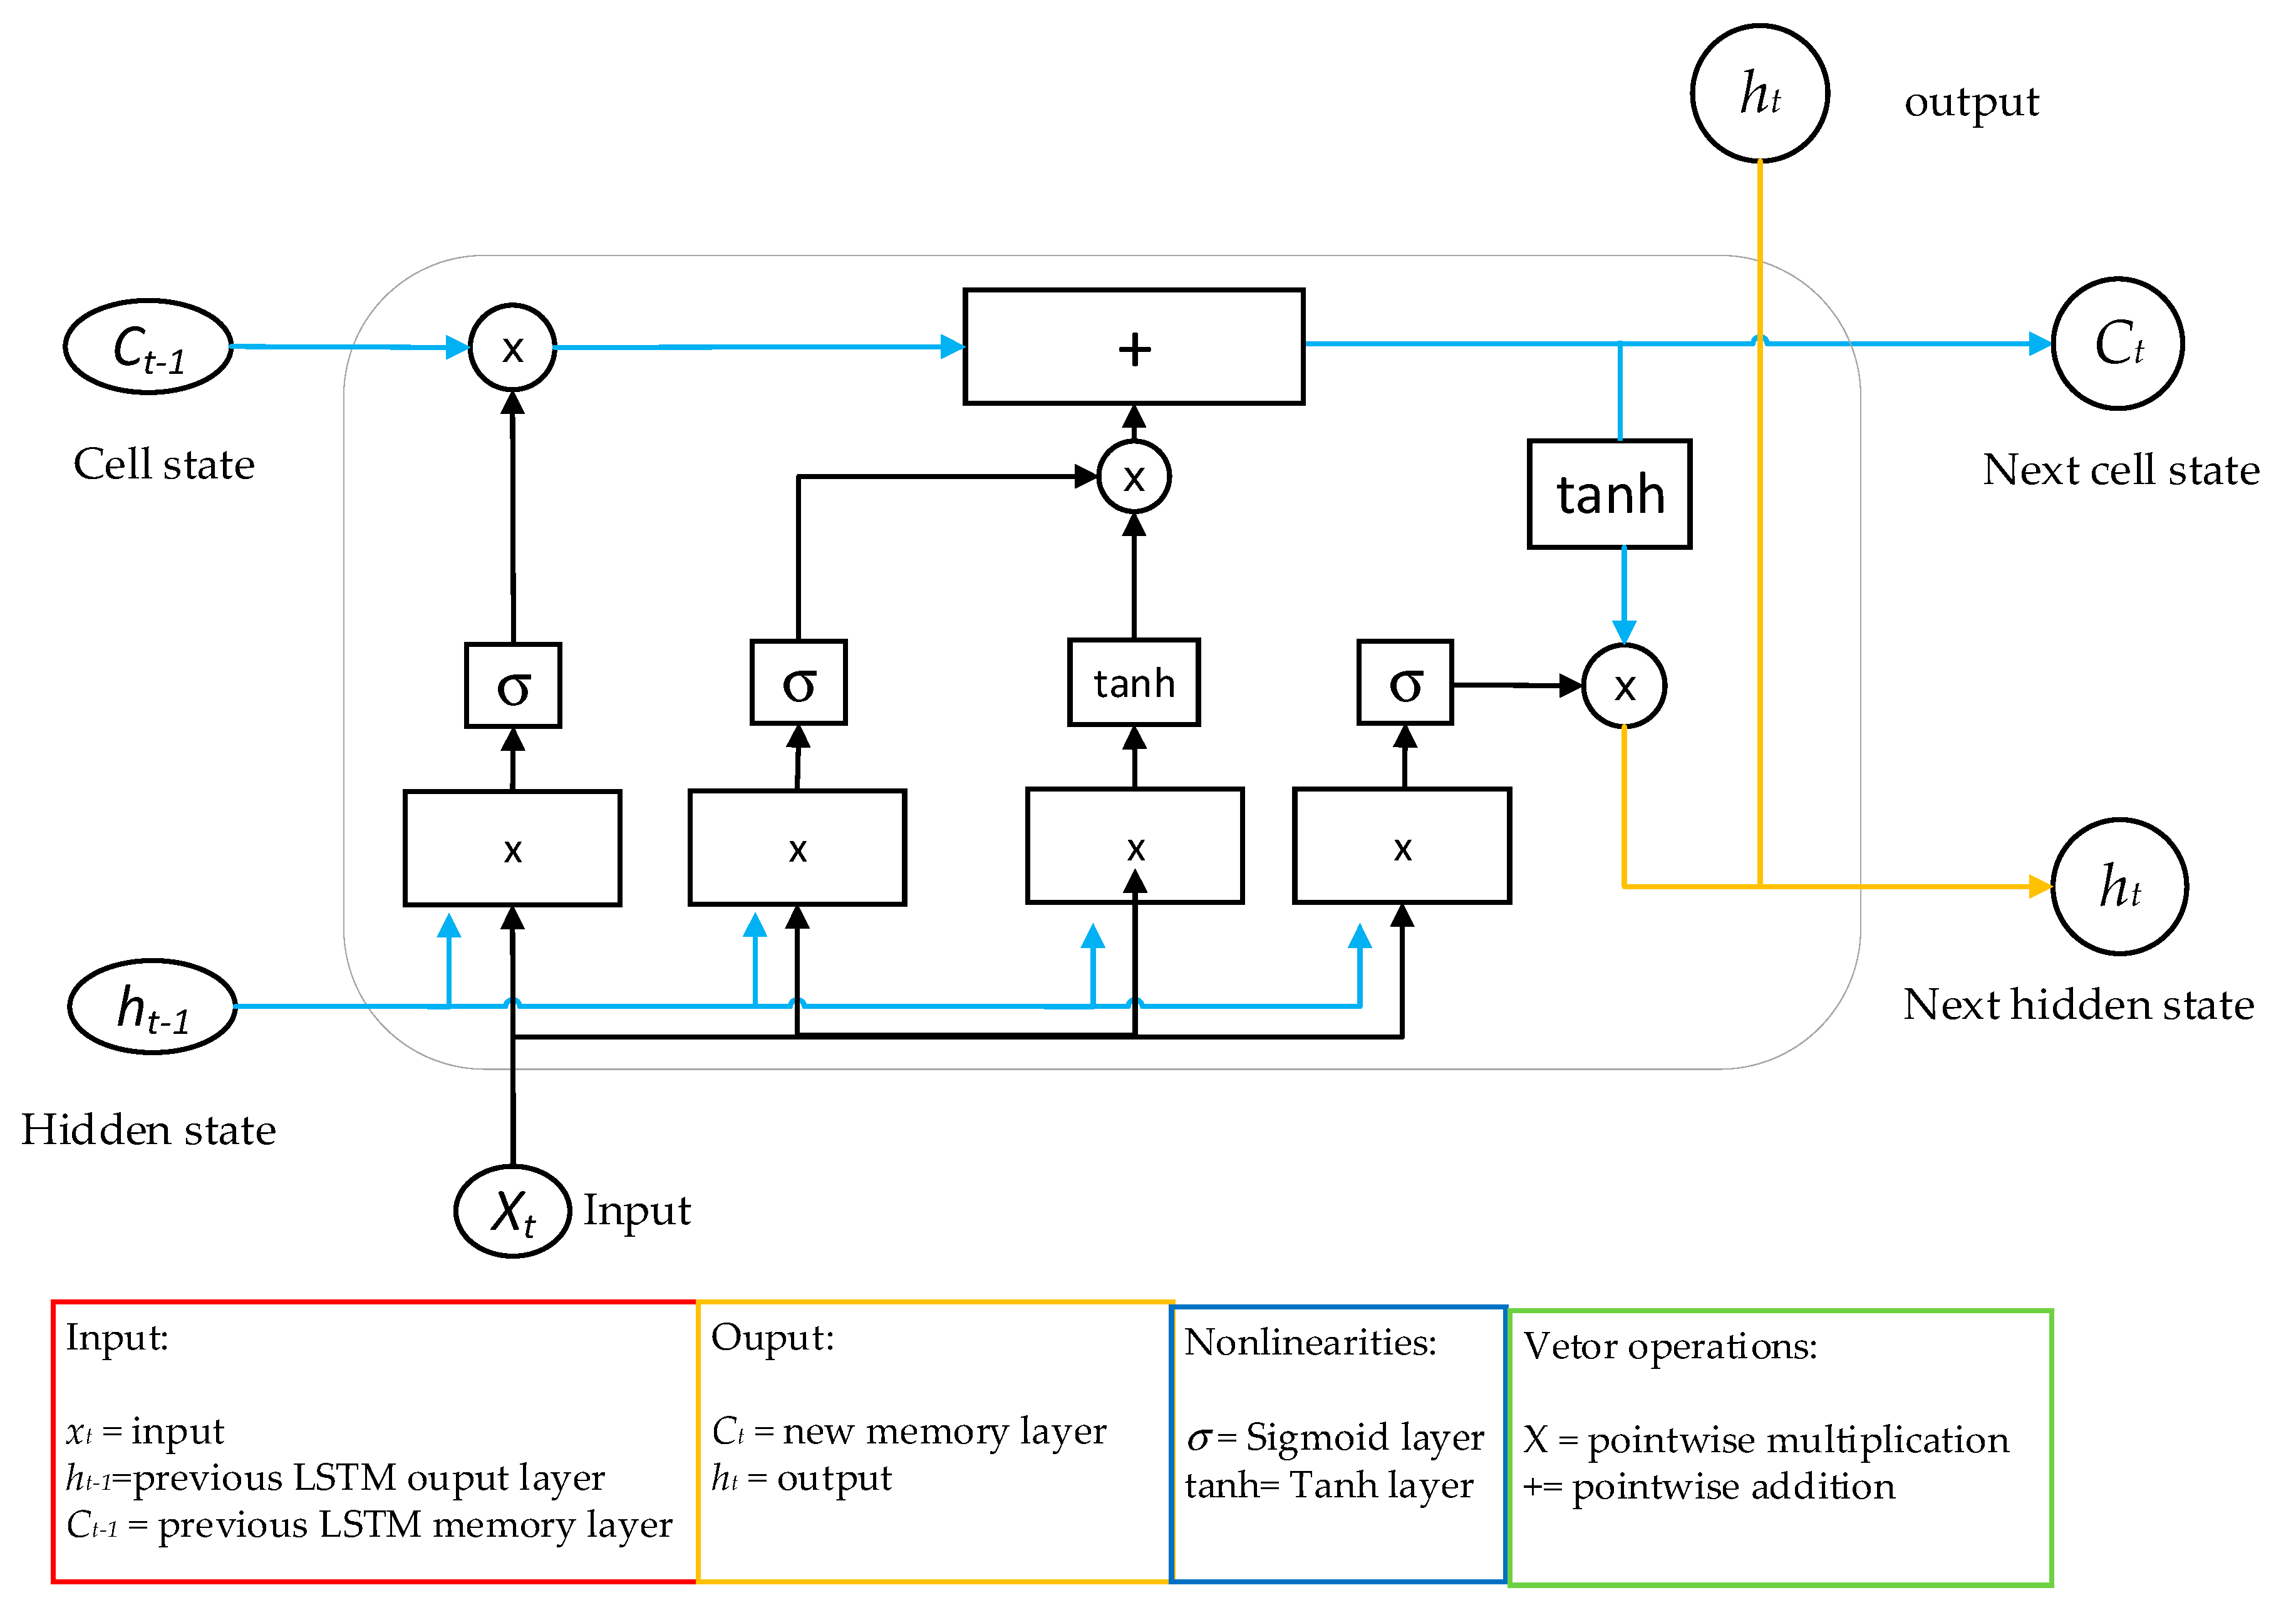
The LSTM neural network was proposed as a type of neural network generated by a recurrent neural network (RNN) to improve the defects in the training of long sequence data, so LSTM can perform better in long sequence data compared to the common RNN model. Figure 11 shows the LSTM neural network architecture [33,34].

5.2. AI Model of This Study

This study uses an LSTM neural network to build the prediction model of the thermal error of the machine. The cutting experiments of thermal deformation are applied to collect the temperature data and the data of thermal deformation of the workpiece in three axial directions. The input of the LSTM neural network is the temperature of the eight crucial sensors, and the output is the thermal deformation in X, Y, and Z—three axial directions. A single-layer LSTM neural network model is used to train the prediction model of thermal deformation, two temperature data are used to predict one thermal deformation during the training process. The sigmoid is used as the activation function for the input, forgetting, and output valves, and the mean squared error (MSE) is used as the loss function to calculate the model error.
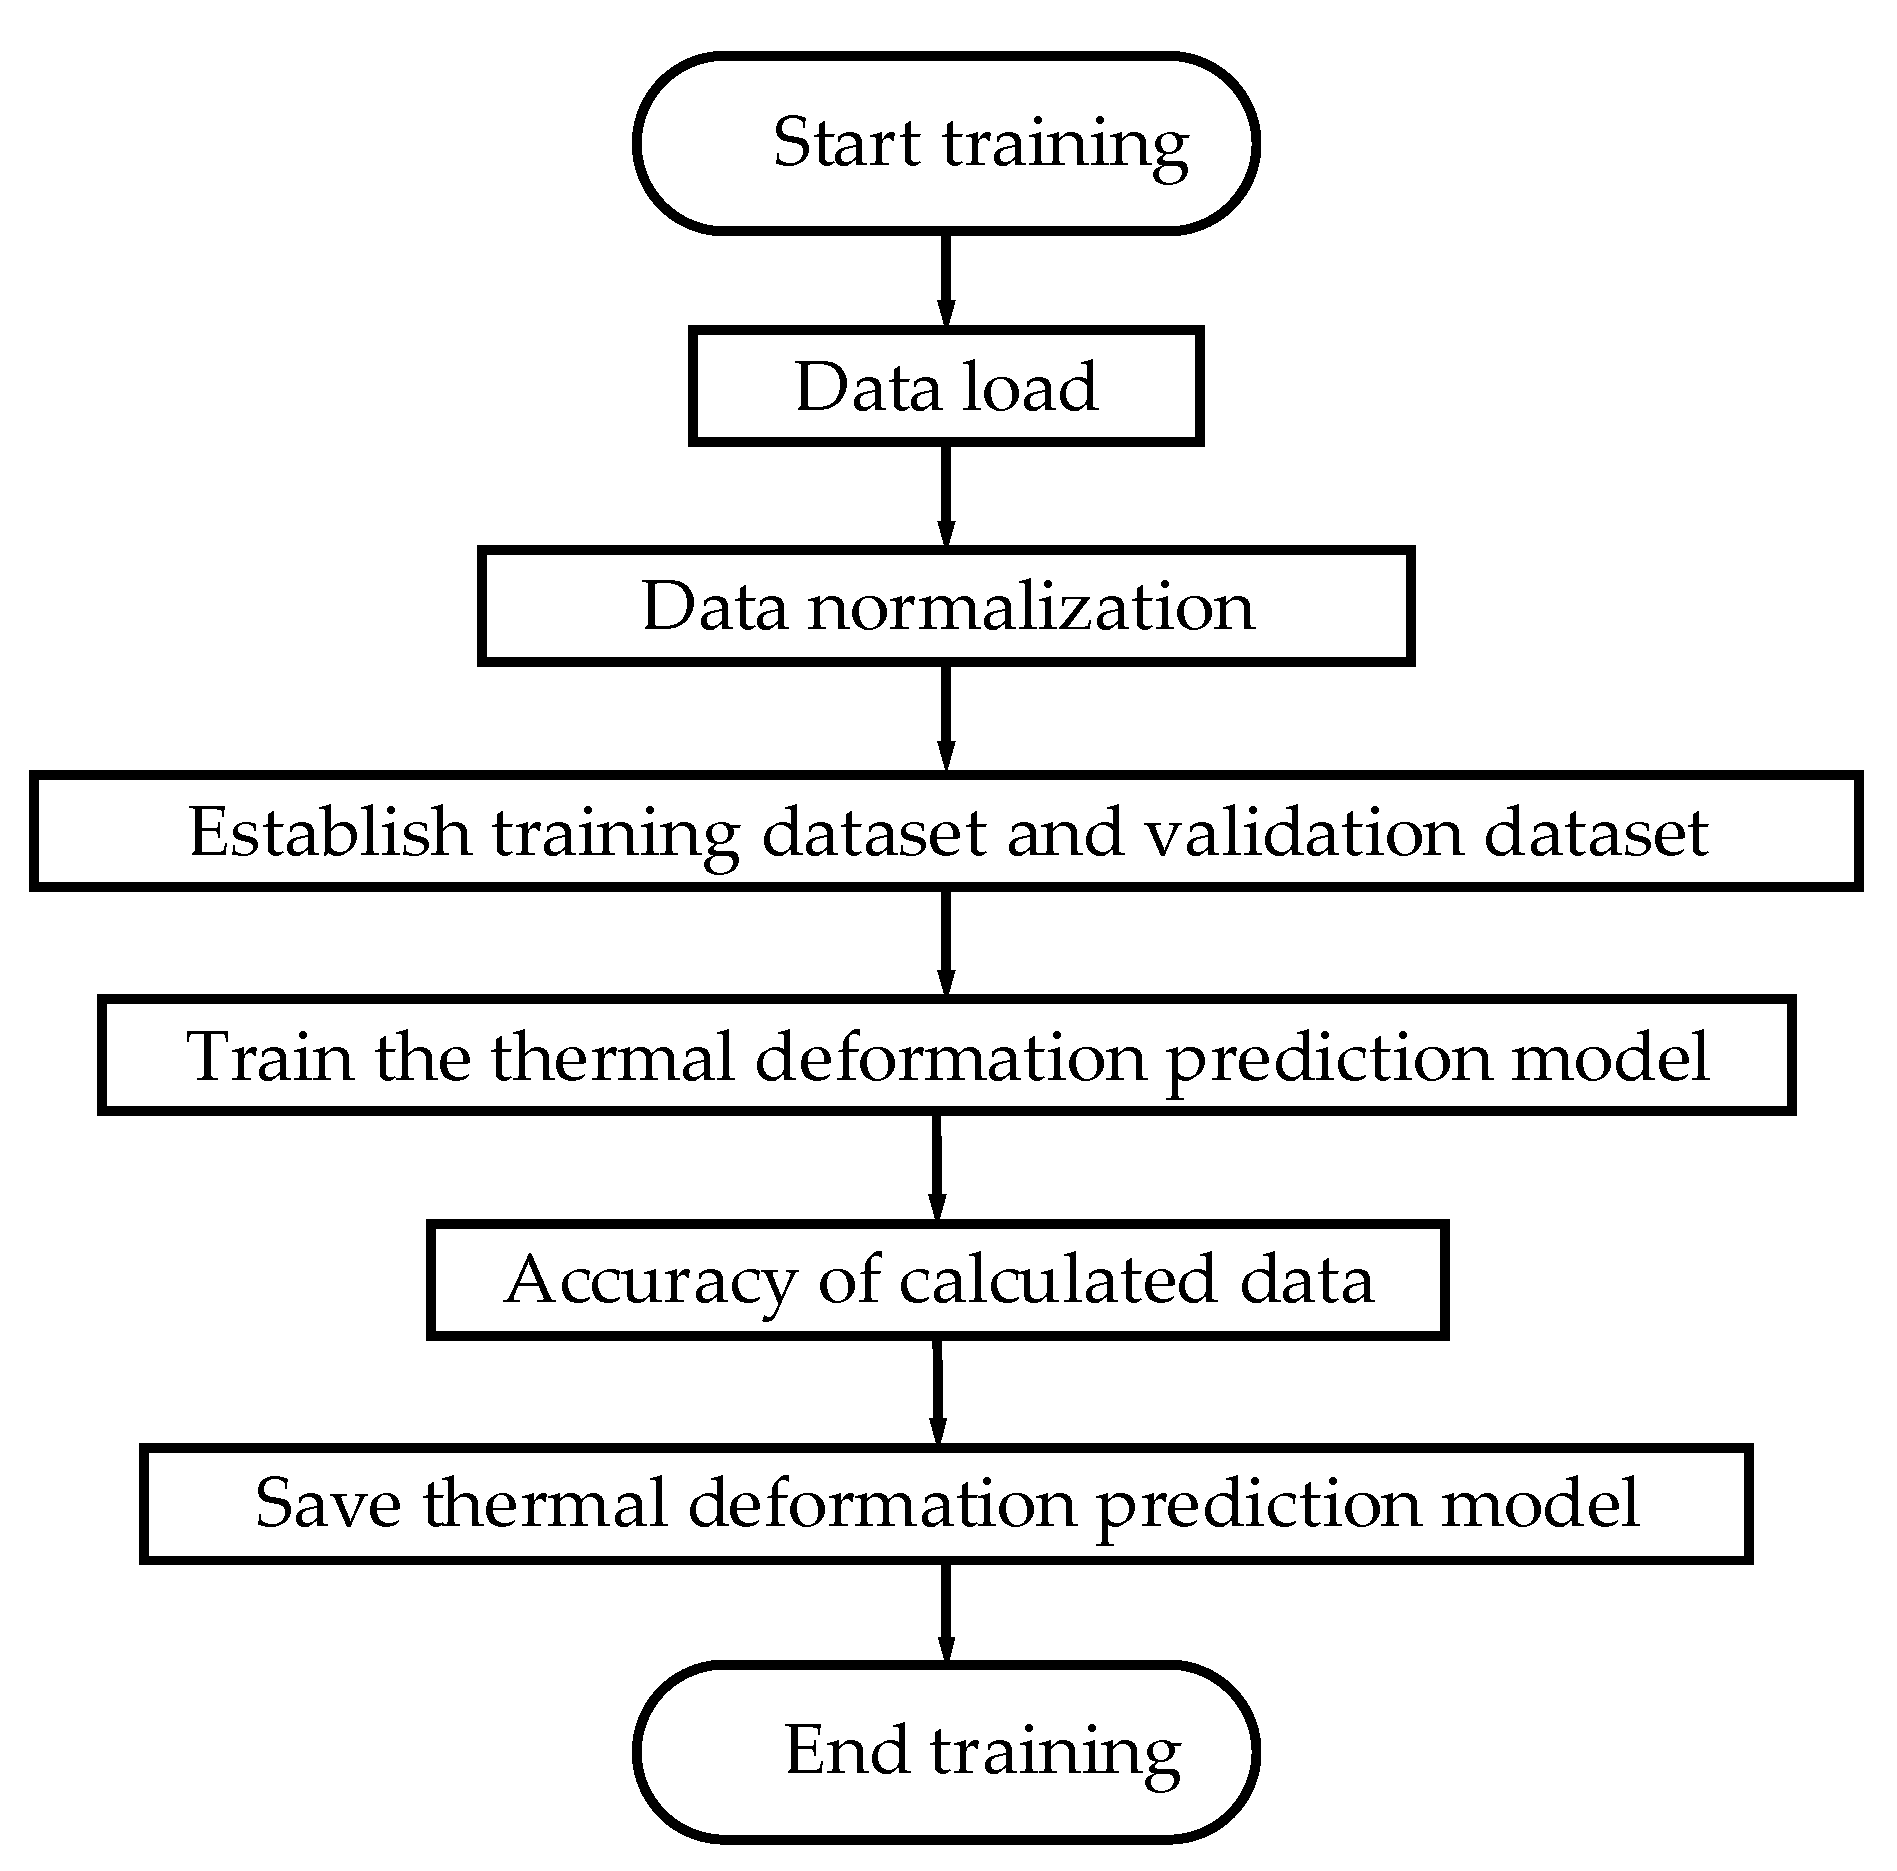
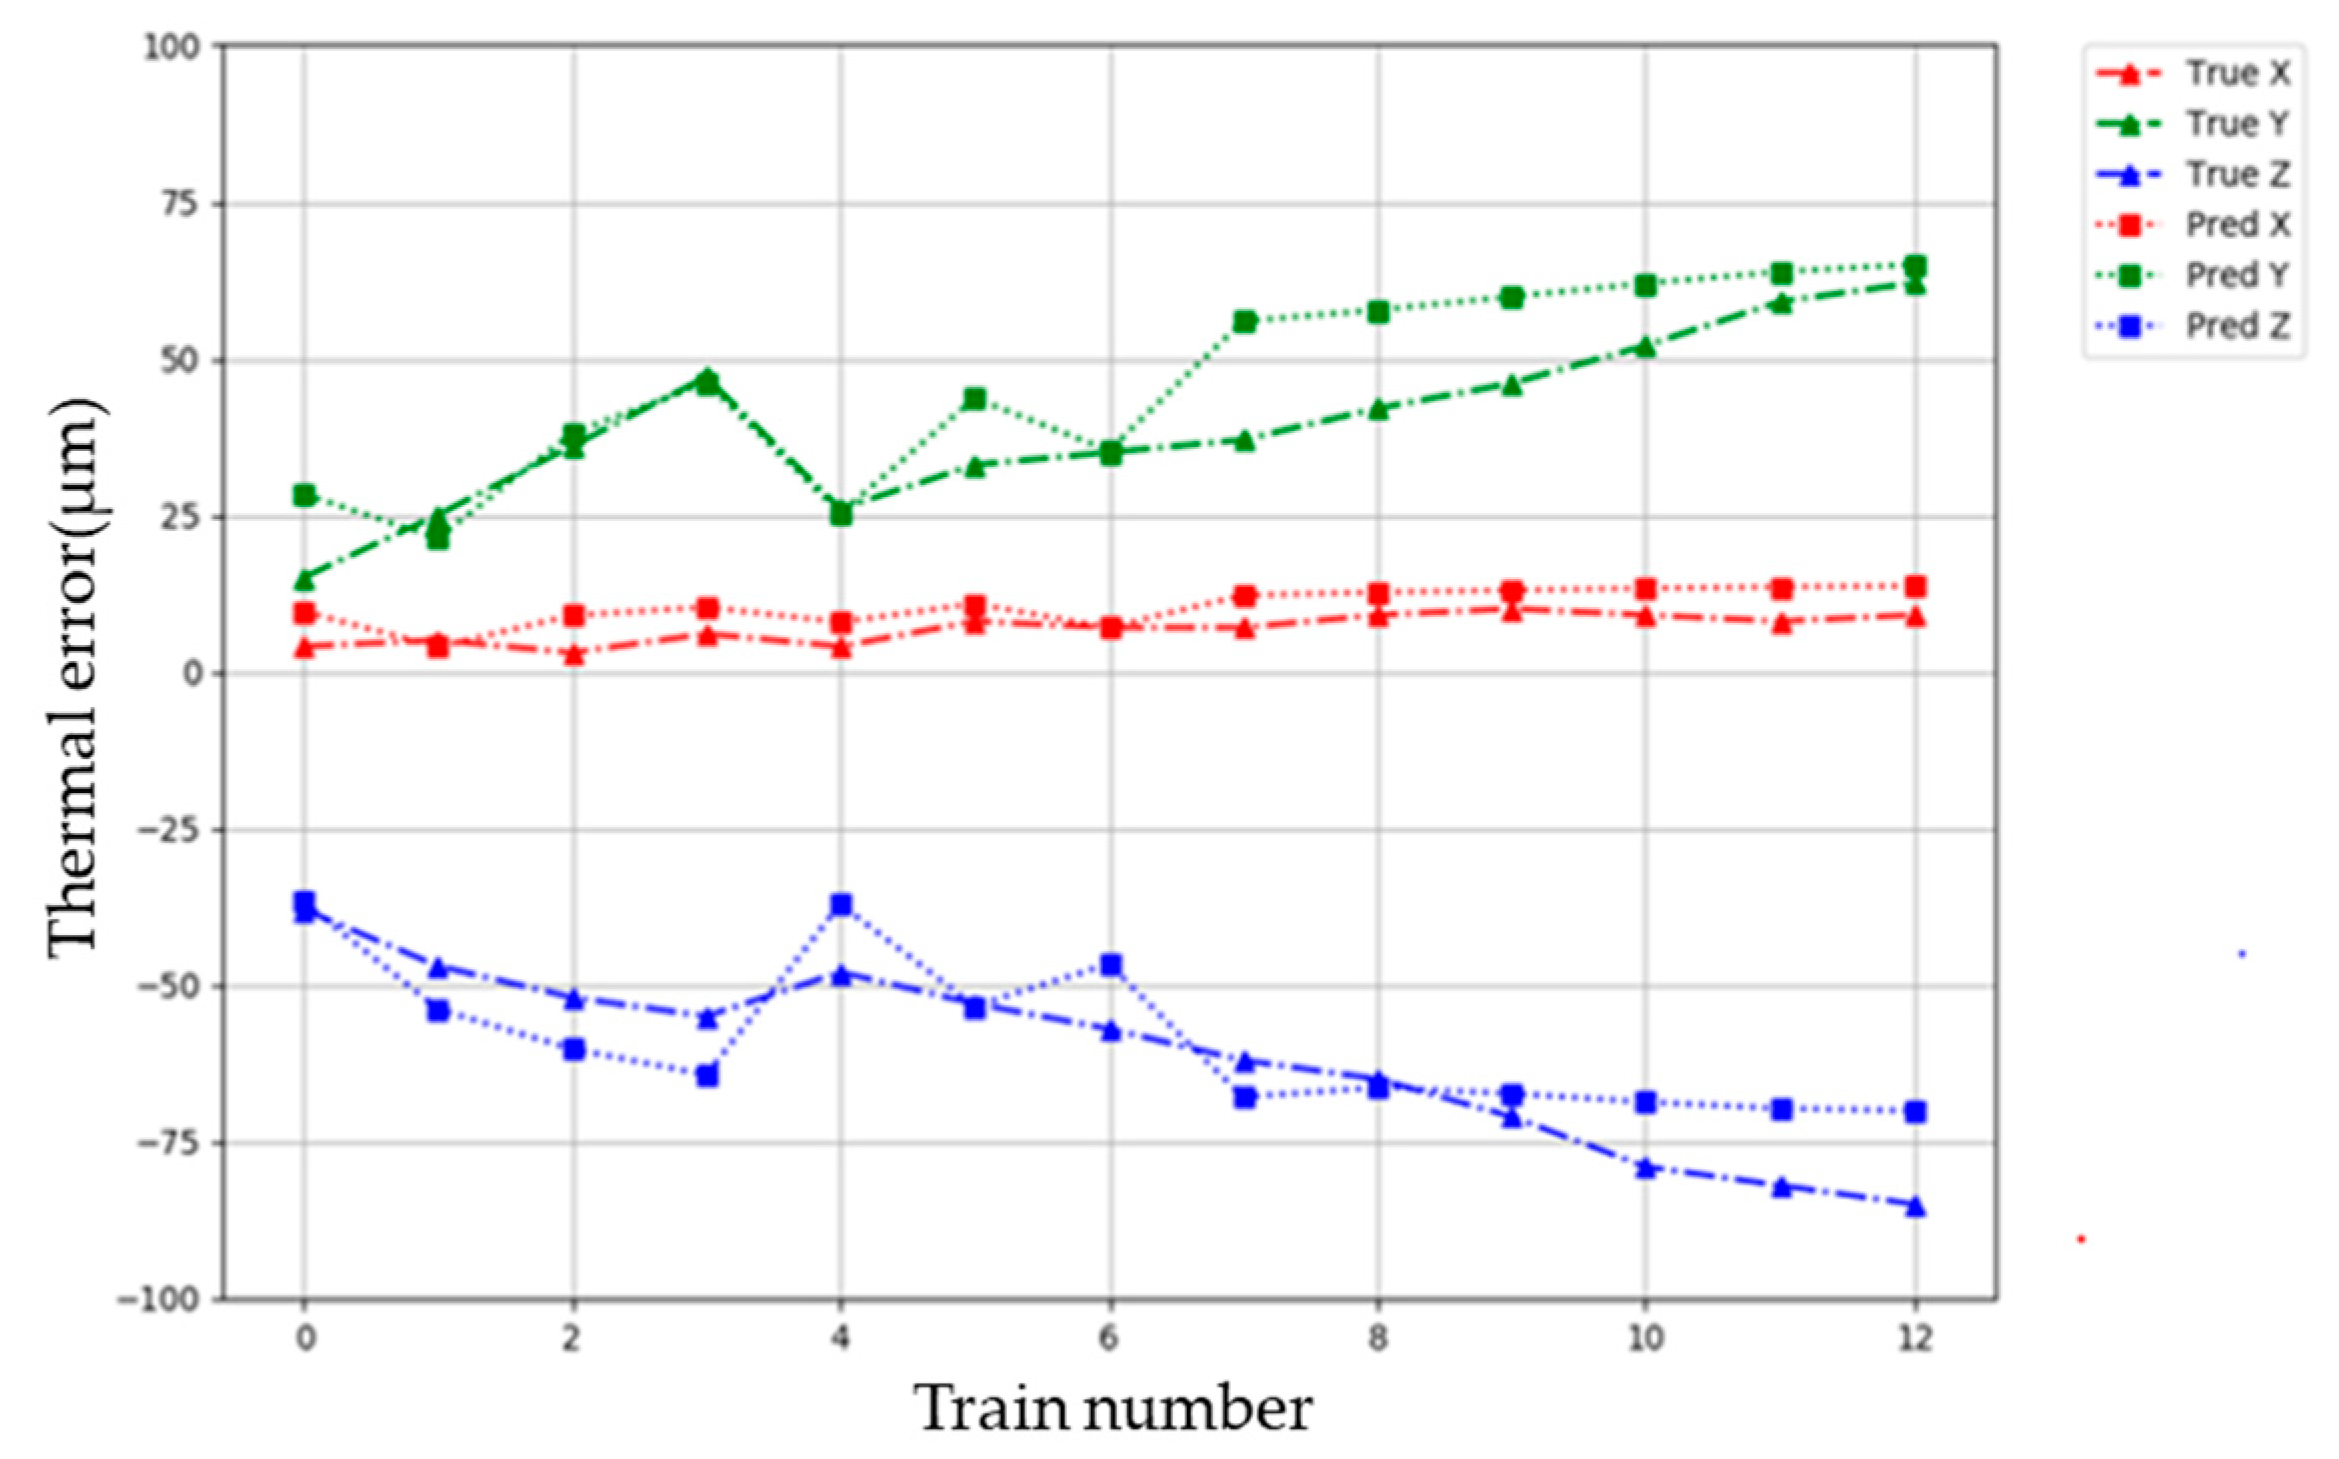
In this study, the input layer of LSTM is the temperature data of seven crucial temperature sensors selected by Pearson’s correlation coefficient and one ambient (environmental) temperature sensor, and the output layer is the three-axis thermal deformation measured by a coordinate measurement machine. Figure 12 shows the training procedure of the LSTM neural network prediction model of thermal deformation. Figure 13 depicts a comparison of the predicted thermal error with true thermal error from cutting experiments in three axial directions with respect to 12 training numbers.

6. Prediction Model of Thermal Error Verified by Actual Cutting Experiments

After the model training was performed, two cutting experiments of thermal deformation were conducted for verification. Two sets of cutting experiments were performed to check the feasibility of the prediction model of thermal error: one with an idle time of 1 h and another with an idle time of 8 h. Figure 14 shows the experimental procedure of the cutting processes with an idle time of 1 h. The machining parameters of this experiment are spindle speed, 600 rpm; feed rate, 300 rpm; X-axis travel, 0~−720 mm; Y-axis travel, 0~−430 mm; and Z-axis travel, 0~−500 mm. Figure 15 shows the temperature of the crucial temperature sensors of the cutting processes with an idle time of 1 h.

7. Real-Time Compensation of Thermal Errors

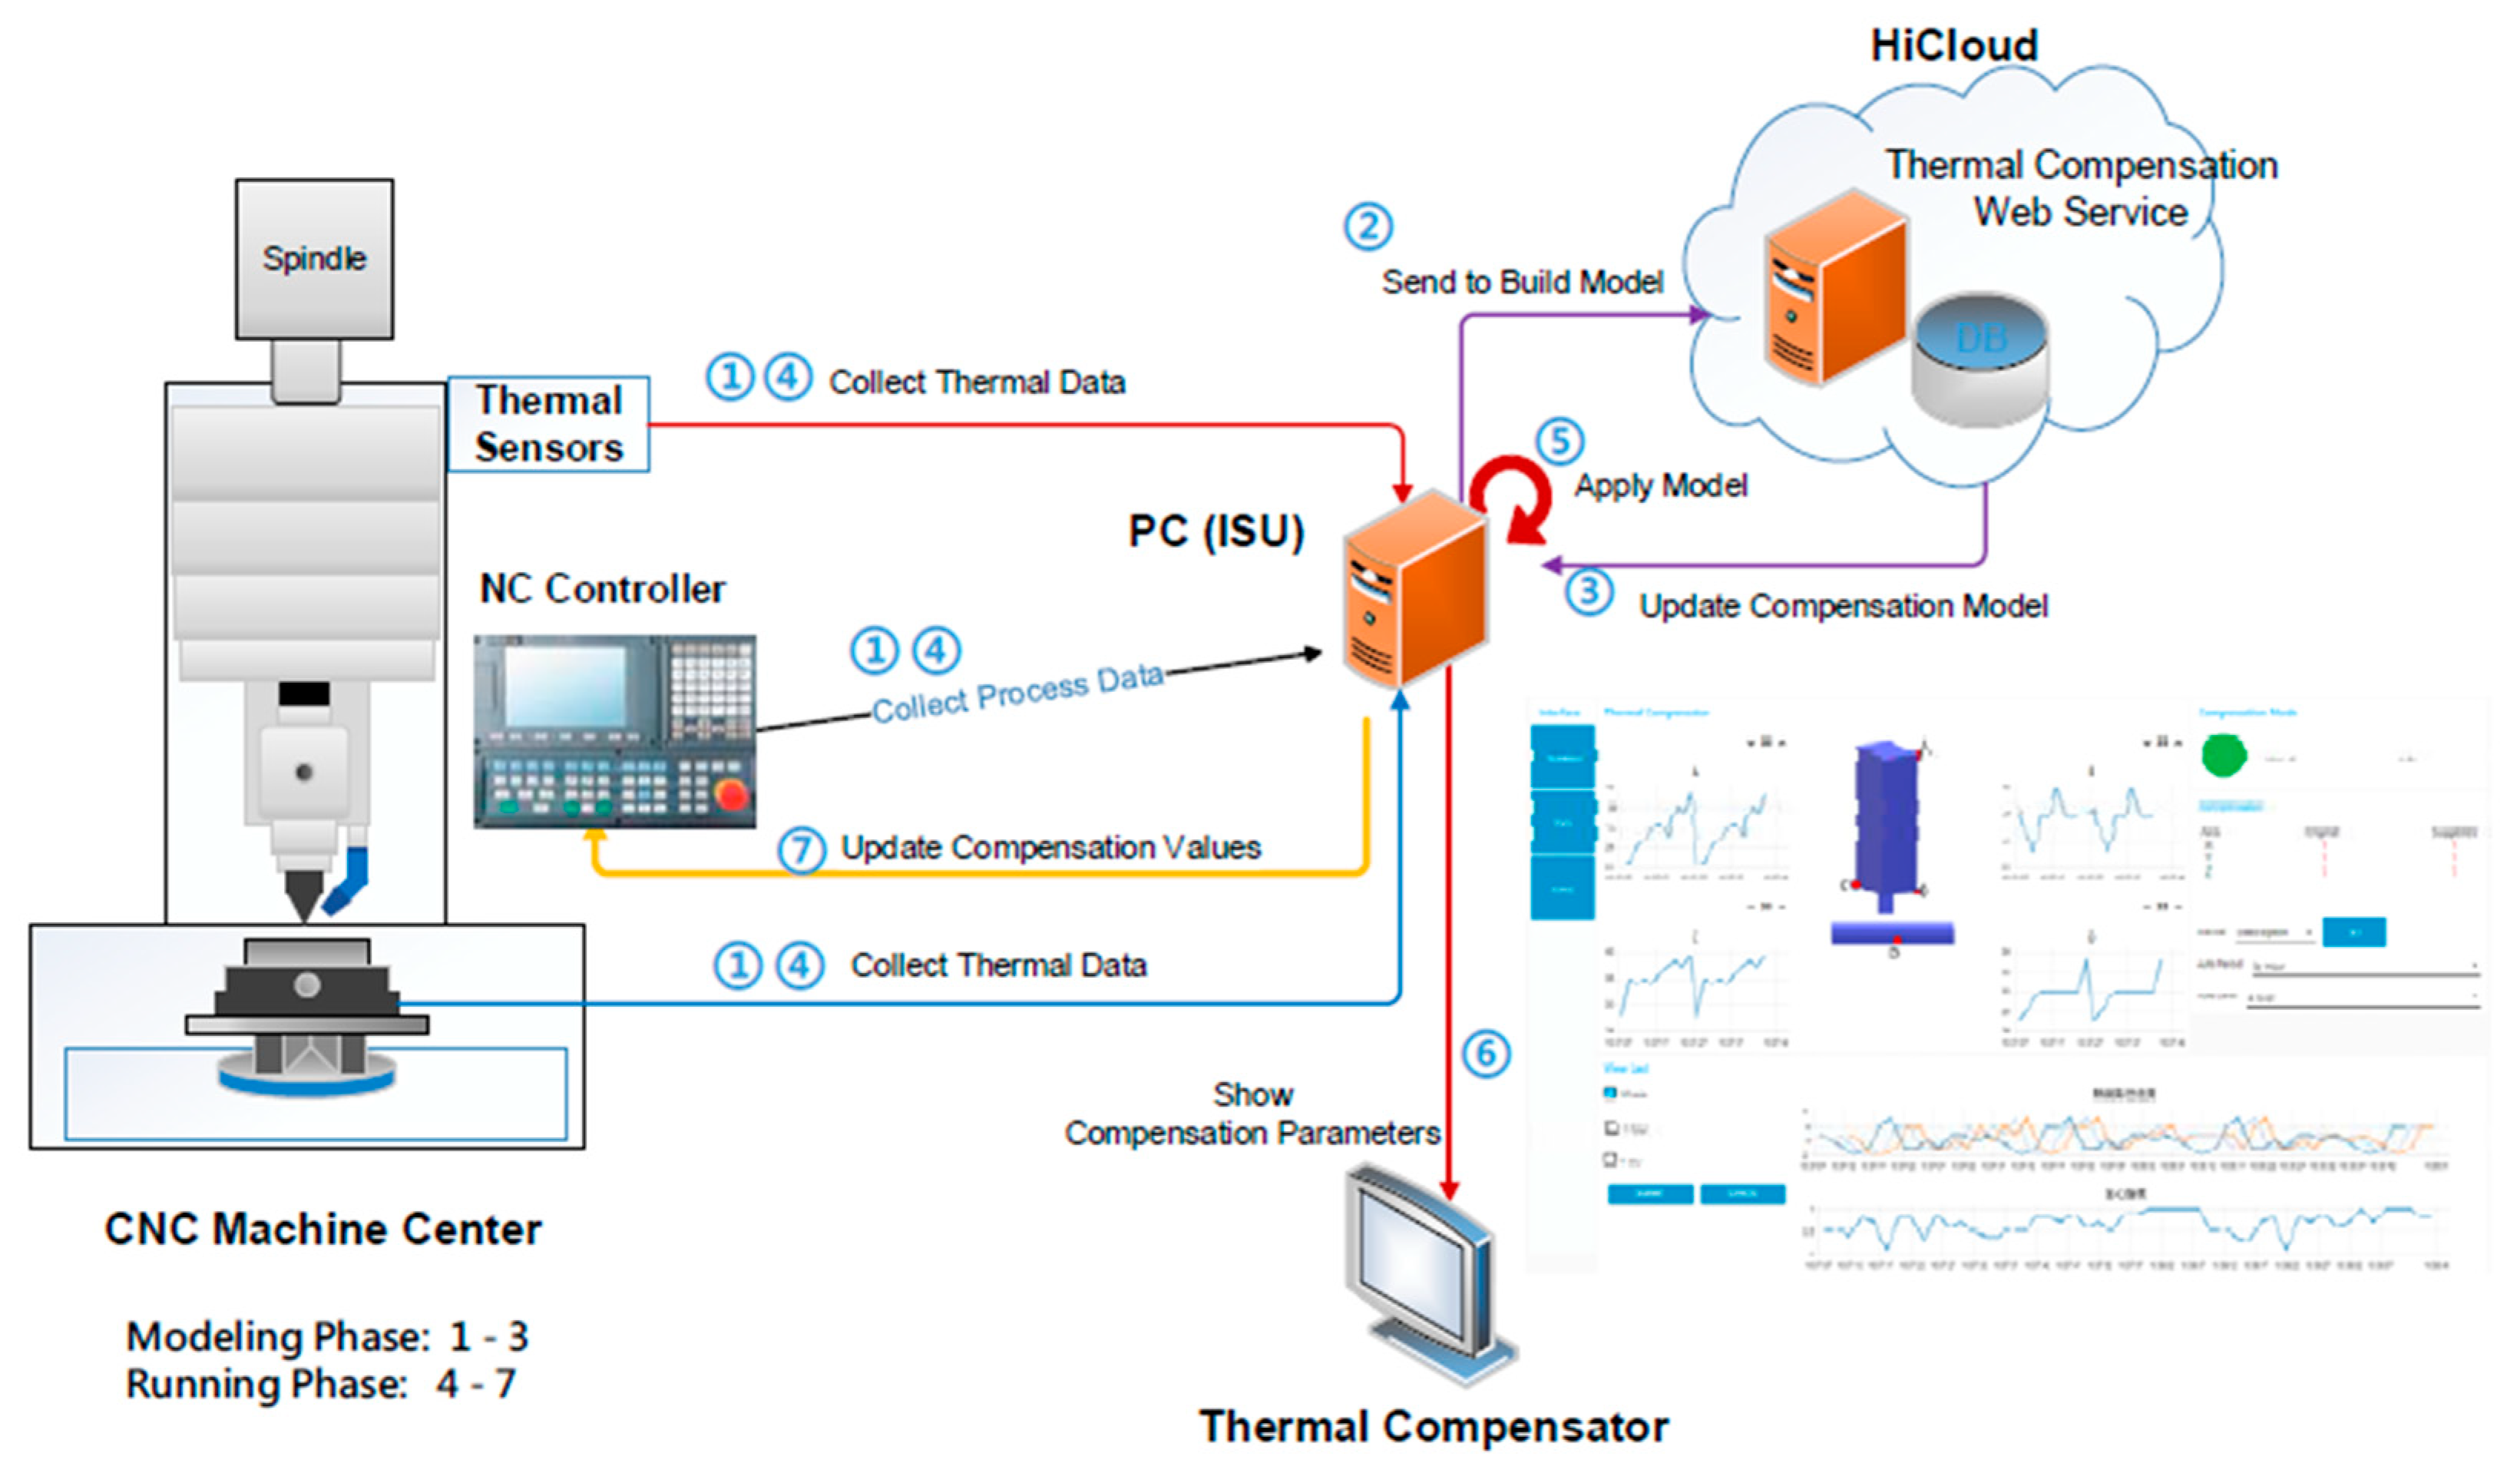
This study uses OPC Unified Architecture, a machine-to-machine network transmission protocol, together with a Python program code, to communicate with the machine controller and substitute the new coordinate of the tool cutting point by subtracting the thermal error in three axial directions estimated from the prediction model to perform the real-time error compensation. Figure 16 depicts the implementation architecture of the real-time compensation of thermal errors in this study. In this figure, there are seven steps to implement the real-time compensation of thermal errors.
Table 2 indicates the data of thermal error with/without real-time compensation in the cutting processes with an idle time of 1 h. Figure 17 depicts the variations in thermal error with/without real-time compensation in cutting processes with an idle time of 1 h in three axial directions. From Table 2 and Figure 17, it can be demonstrated clearly that, without real-time error compensation, the thermal errors in X, Y, and Z axial directions are 11, 35, and −51 µm, respectively; however, with real-time error compensation, the thermal errors in X, Y, and Z axial directions drop to 6, 3, and −24 µm, respectively. This experiment proves that real-time error compensation through adopting the prediction model of thermal error can effectively reduce the thermal error of the workpiece and achieve better dimensional accuracy.
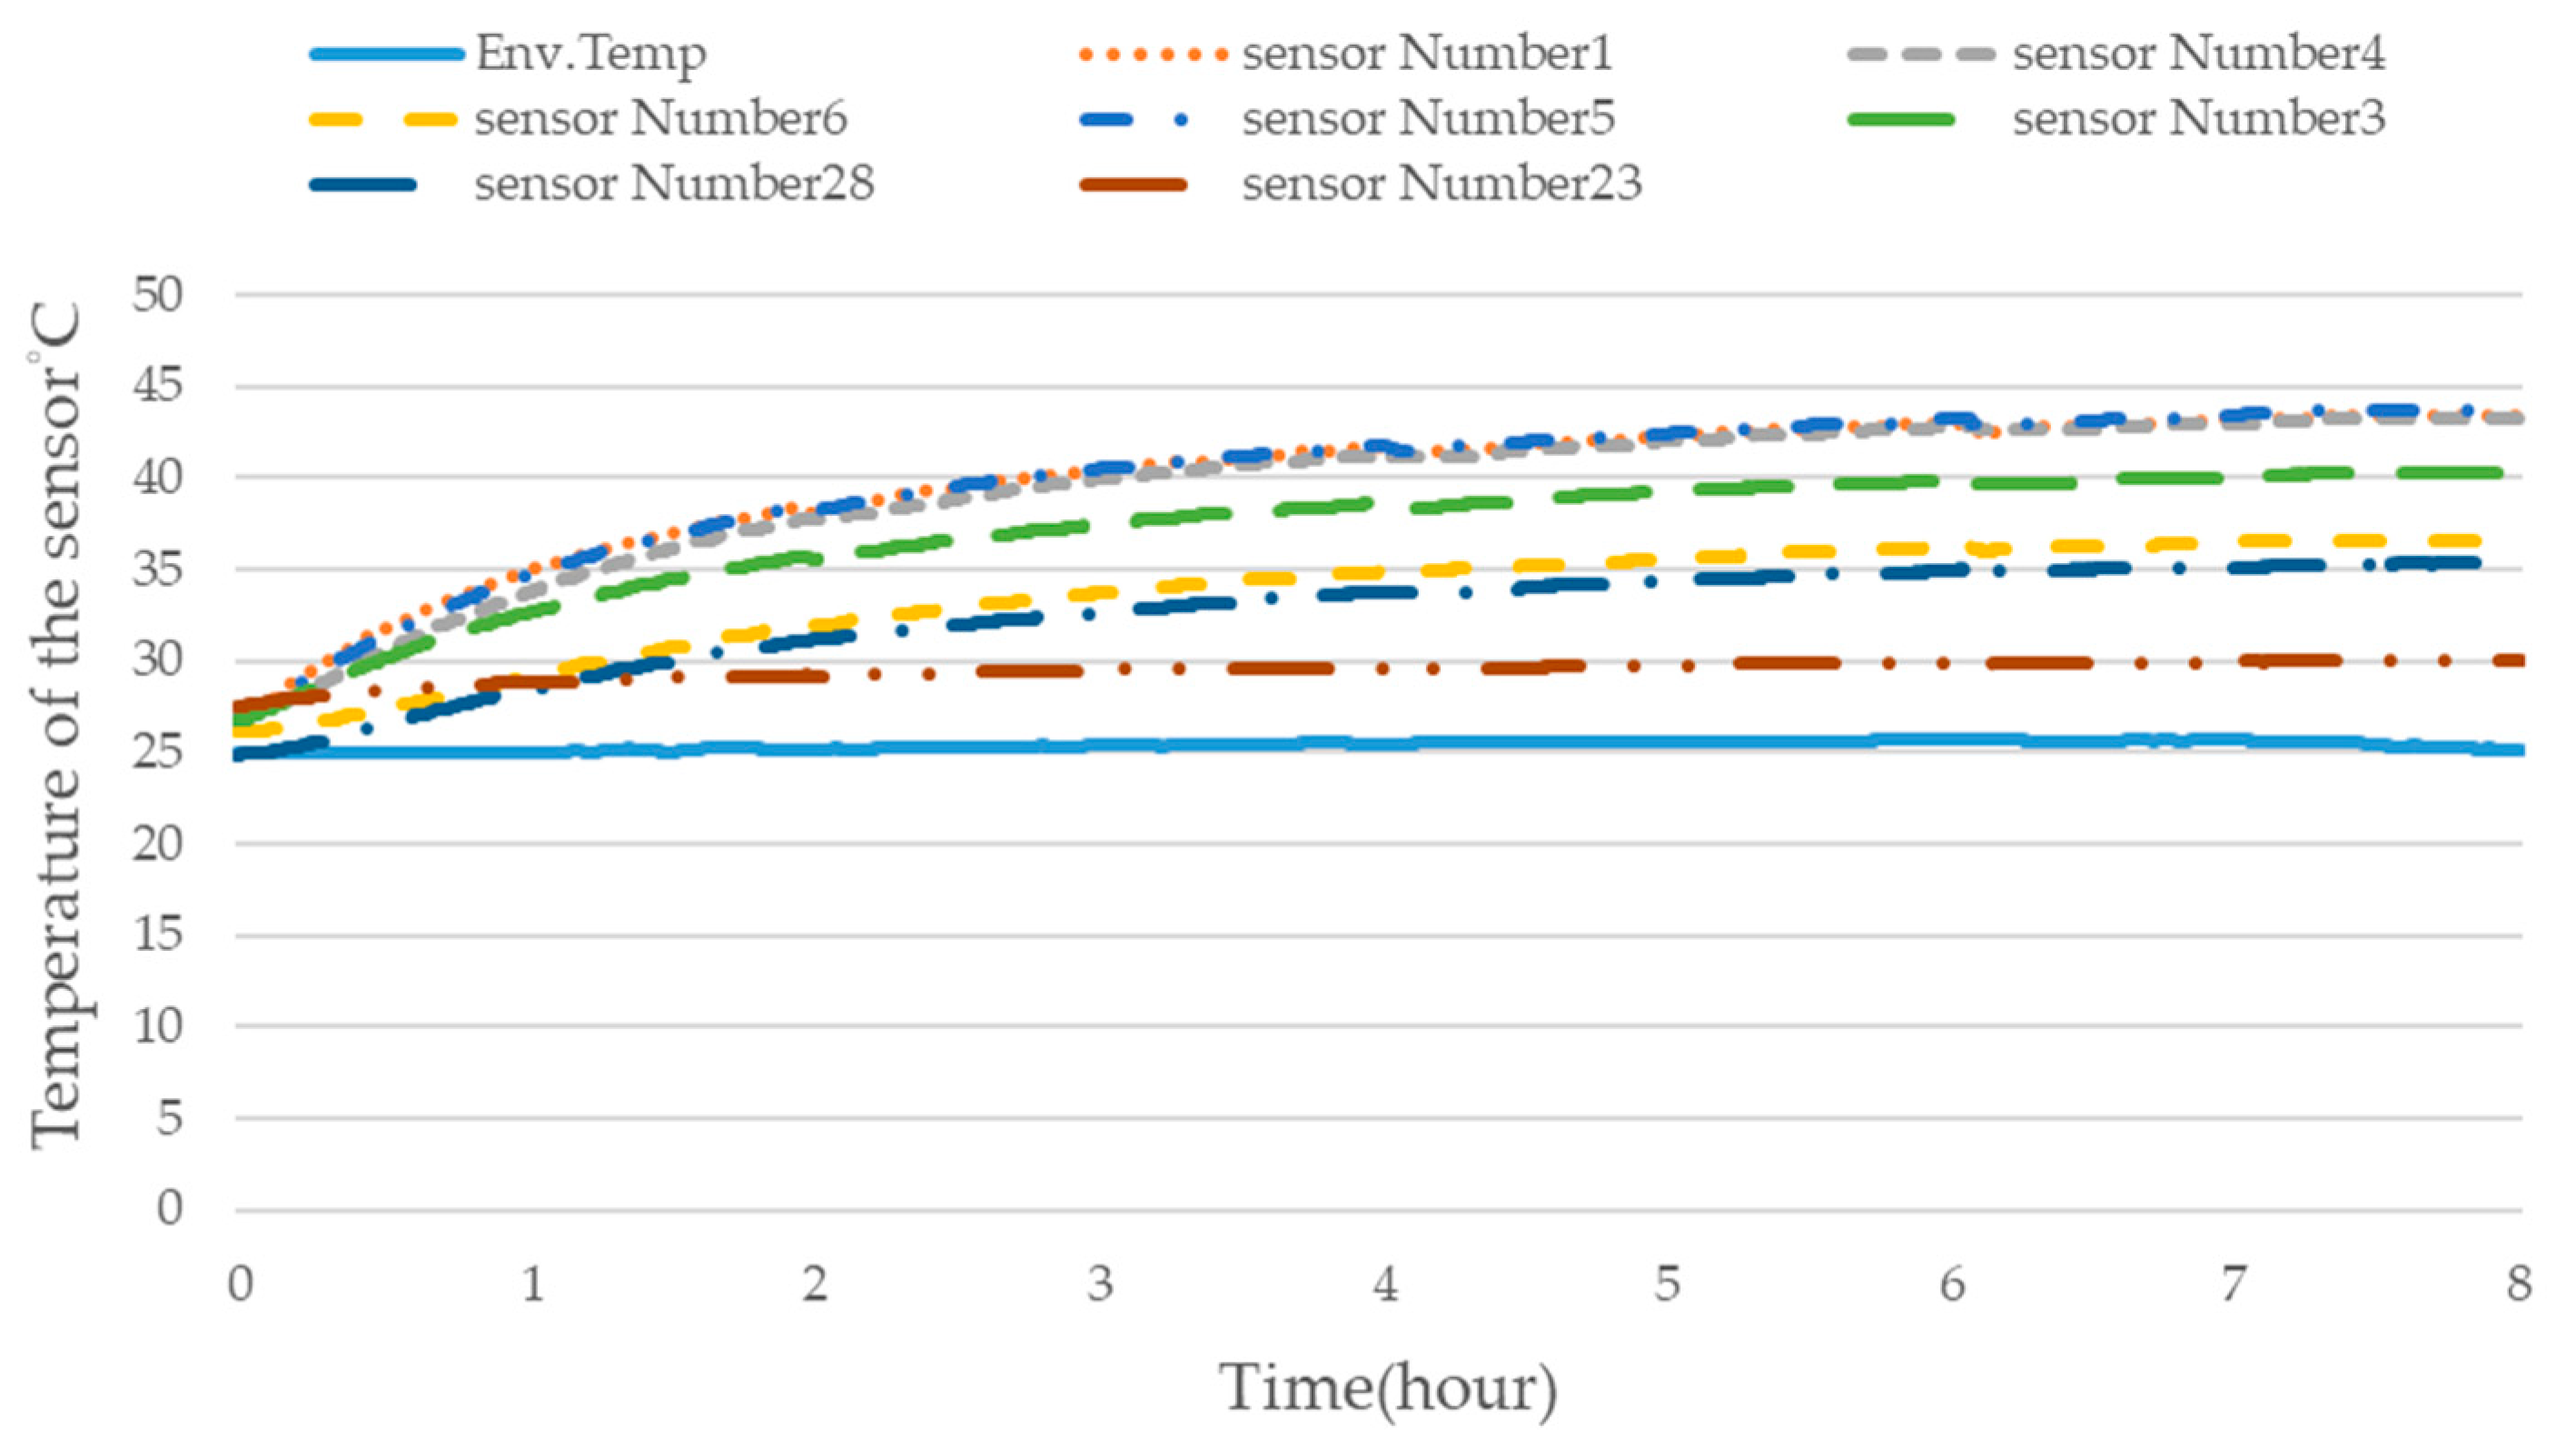
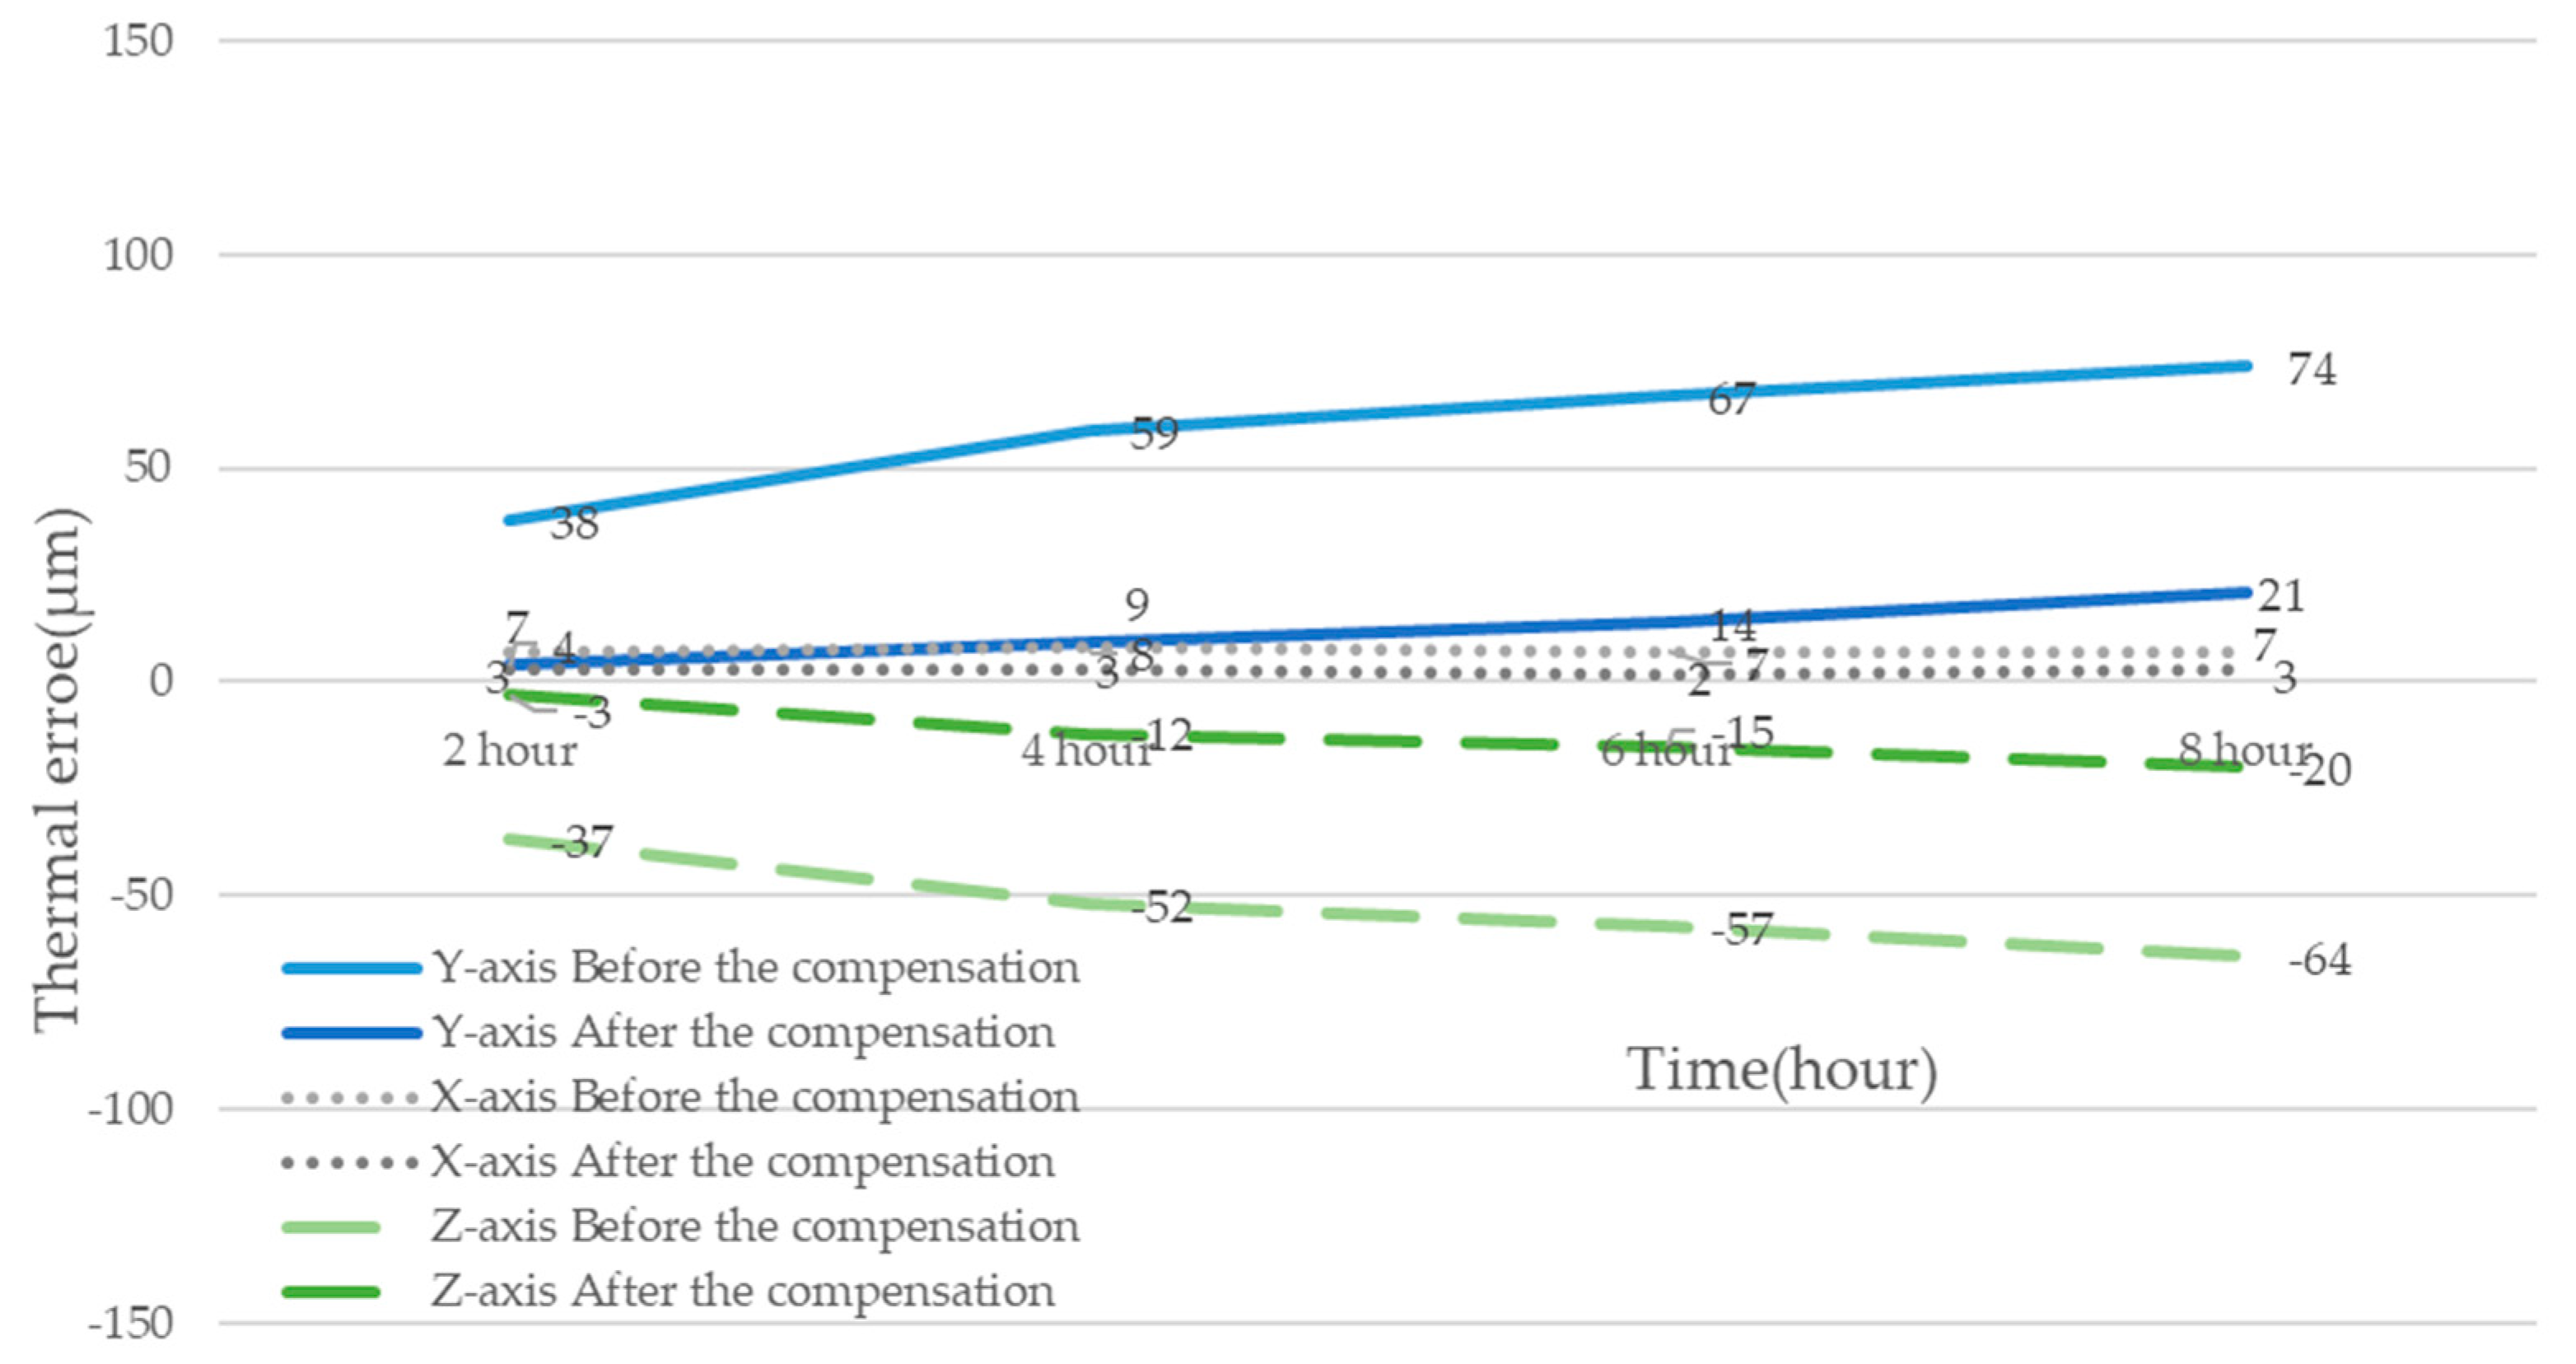
Figure 18 shows the experimental procedure of actual cutting processes with an idle time of 8 h. The machining parameters of this experiment are spindle speed, 5000 rpm; feed rate, 300 mm/min; X-axis travel, 0~−720 mm; Y-axis travel, 0~−430 mm; and Z-axis travel, 0~500 mm. Figure 19 shows the temperature of the crucial temperature sensors of the cutting processes with an idle time of 8 h. Table 3, Table 4 and Table 5 show the data of thermal errors in the X-axis, Y-axis, and Z-axis, respectively, with/without real-time compensation with an idle time of 8 h. Figure 20 shows the variations in thermal error with/without real-time compensation in cutting processes with an idle time of 8 h in three axial directions. The results from Table 3, Table 4 and Table 5 and Figure 20 show that, with real-time error compensation, the thermal error of X-axis is reduced from 7 µm to 3 µm, the thermal error of Y-axis is reduced from 74 µm to 21 µm, and the thermal error of Z-axis is reduced from −64 µm to −20 in the 8 h time. This experiment confirms that the real-time error compensation via the prediction model of thermal error can effectively reduce the thermal error under a cutting operation, especially for a long period of time.

8. Conclusions

This study constructed the prediction model of thermal deformation with an artificial neural network and implemented the real-time error compensation for a three-axis vertical CNC milling machine in cutting processes. It obtained some conclusions, as follows:
  • A three-axis vertical CNC milling machine was used as the experimental machine, and 32 PT-100 temperature sensors were installed inside the machine parts to measure the temperature of key machine parts under different working conditions in cutting processes. Seven crucial temperature sensors, which have a high correlation with the thermal deformation of the machine, were selected by Pearson’s correlation coefficient. With one additional sensor of ambient temperature, in total, eight temperature sensors were used to construct the prediction model of thermal error.
  • This study demonstrates that an LSTM neural network, adopted as the prediction model of thermal error, can perform very well in real-time error compensation of a CNC milling machine. This methodology should be able to be implemented in other CNC cutting machine tools.
  • In an 8 h cutting experiment, the dimensions of the workpiece showed that, with real-time error compensation, the thermal error in X-axis decreased from 7 µm to 3 µm, the thermal error in Y-axis decreased from 74 µm to 21 µm, and the thermal error in Z-axis decreased from −64 µm to −20 µm. The results show that the prediction model of thermal error and the real-time error compensation can significantly reduce the thermal error and improve the dimensional accuracy of the workpiece.
  • Future work on related research topics includes the exploration of other selection methods in temperature-sensitive sensors and compensation results of long machining sequences, i.e., 12 h or 18 h continuous machining processes.

Author Contributions

Preparation of manuscript/drawing and data validation: D.-K.N. Conceptualization, methodology, supervision, and writing—original draft: H.-C.H. Hardware, formal analysis, investigation, visualization, and data analysis: T.-C.F. All authors have read and agreed to the published version of the manuscript.

Funding

The financial support of this research from the Ministry of Science and Technology of Taiwan (project no. MOST 109-2218-E-992-005) is gratefully acknowledged.

Data Availability Statement

Not applicable.

Acknowledgments

The experimental machine of this study (TMV-720A numerically controlled vertical machine center) was donated by Tongtai Machine & Tool co., ltd., and is gratefully acknowledged.

Conflicts of Interest

The authors declare no conflict of interest.

References

  1. Rosenblatt, F. A probabilistic model for information storage and organization in the brain. Psychol. Rev. 1958, 65, 386–408. [Google Scholar] [CrossRef]
  2. Chen, J.S.; Yuan, J.X.; Ni, J.; Wu, S.M. Real-time compensation for time-variant volumetric errors on a machining center. J. Eng. Ind.-T ASME 1993, 115, 472. [Google Scholar] [CrossRef]
  3. Che, J.S. Study of thermally induced machine tool errors in real cutting conditions. Int. J. Mach. Tools Manuf. 1996, 36, 1401–1411. [Google Scholar]
  4. Horejša, O.; Mareša, M.; Novotnýa, L. Advanced modelling of thermally induced displacements and its implementation into standard cnc controller of horizontal milling center. Proc. Cirp 2012, 4, 67–72. [Google Scholar] [CrossRef]
  5. Mian, N.S.; Fletcher, S.; Longstaff, A.P.; Myers, A. Efficient estimation by FEA of machine tool distortion due to environmental temperature perturbations. Precis. Eng. 2013, 37, 372–379. [Google Scholar] [CrossRef]
  6. Miao, S. Improvement of the robustness of thermal error time series model prediction for CNC machine tools. Precis. Eng. 2016, 24, 10. [Google Scholar]
  7. Zhang, C.; Gao, F.; Yan, L. Thermal error characteristic analysis and modeling for machine tools due to time-varying environmental temperature. Precis. Eng. 2016, 47, 231–238. [Google Scholar] [CrossRef]
  8. Zhou, Z.D.; Gui, L.; Tan, Y.G.; Liu, M.Y.; Liu, Y.; Li, R.Y. Actualities and development of heavy-duty cnc machine tool thermal error monitoring technology. Chin. J. Mech. Eng. 2017, 30, 1262–1281. [Google Scholar] [CrossRef]
  9. Groos, L.; Held, C.; Keller, F.; Wendt, K.; Franke, M.; Gerwien, N. Mapping and compensation of geometric errors of a machine tool at different constant ambient temperatures. Precis. Eng. 2020, 63, 10–17. [Google Scholar] [CrossRef]
  10. Yang, J.; Yuan, J.; Ni, J. Thermal error mode analysis and robust modeling for error compensation on a cnc turning center. Int. J. Mach. Tools Manuf. 1999, 39, 367–1381. [Google Scholar] [CrossRef]
  11. Donmez, M.A.; Hahn, M.H.; Soons, J.A. A novel cooling system to reduce thermally-induced errors of machine tools. CIRP Ann. 2007, 56, 521–524. [Google Scholar] [CrossRef]
  12. Miao, E.; Liu, Y.; Liu, H. Study on the effects of changes in temperature-sensitive points on thermal error compensation model for CNC machine tool. Int. J. Mach. Tools Manuf. 2015, 97, 50–59. [Google Scholar] [CrossRef]
  13. Li, F. Research on modeling and prediction methods of thermal errors in heavy CNC machine tools. J. Mech. Eng. 2016, 52, 11. [Google Scholar]
  14. Tsai, H.C. Thermal Deformation Prediction of Three-Axis CNC Tooling Machine Based on Full Machine Temperature Rise Model. Master’s Thesis, Institute of Electrical Engineering, National Kaohsiung First University of Science and Technology, Kaohsiung, Taiwan, 2018. [Google Scholar]
  15. Liu, Q.; Yan, J.; Truong, D.C.; Zhou, Z.; Xu, W.; Ji, C. Identification and optimal selection of temperature-sensitive measuring points of thermal error compensation on a heavy-duty machine tool. Int. J. Adv. Manuf. Tech. 2016, 85, 345–353. [Google Scholar] [CrossRef]
  16. Li, B.; Tian, X.; Zhang, M. Thermal error modeling of machine tool spindle based on the improved algorithm optimized BP neural network. Int. J. Adv. Manuf. Tech. 2019, 105, 1497–1505. [Google Scholar] [CrossRef]
  17. Fu, G.; Gong, H.; Gao, H.; Gu, T.; Cao, Z. Integrated thermal error modeling of machine tool spindle using a chicken swarm optimization algorithm-based radial basic function neural network. Int. J. Adv. Manuf. Tech. 2019, 105, 2039–2055. [Google Scholar] [CrossRef]
  18. Liu, H.; Miao, E.; Zhang, L.; Li, L.; Hou, Y.; Tang, D. Thermal error modeling for machine tools: Mechanistic analysis and solution for the pseudocorrelation of temperature-sensitive. IEEE Access 2020, 8, 63497–63513. [Google Scholar] [CrossRef]
  19. Yue, H.T.; Guo, C.G.; Li, Q.; Zhao, L.J.; Hao, G.B. Thermal error modeling of CNC milling machining spindle based on an adaptive chaos particle swarm optimization algorithm. J. Braz. Soc. Mech. Sci. Eng. 2020, 42, 427. [Google Scholar] [CrossRef]
  20. Yue, H.T.; Gua, C.G.; Li, Q.; Zhao, L.J.; Hao, G.B. Thermal error modeling of CNC milling machine tool spindle system in load machining: Based on optimal specific cutting energy. J. Braz. Soc. Mech. Sci. 2020, 46, 2020. [Google Scholar] [CrossRef]
  21. Li, G.; Tang, X.; Li, Z.; Xu, K.; Li, C. The temperature-sensitive point screening for spindle thermal error modeling based on IBGOA-feature selection. Precis. Eng. 2022, 73, 140–152. [Google Scholar] [CrossRef]
  22. Kumar, S.; Srinivasu, D.S. Optimal number of thermal hotspots selection on motorized milling spindle to predict its thermal deformation. Mater. Today-Proc. 2022, 62, 3376–3385. [Google Scholar] [CrossRef]
  23. Pahk, H.J.; Lee, S.W. Thermal error measurement and real time compensationsystem for the cnc machine tools incorporating the spindle thermal error and the feed axis thermal error. Int. J. Adv. Manuf. Tech. 2002, 20, 487–494. [Google Scholar] [CrossRef]
  24. Chang, Y.T. Application of Inverted Transfer Class Neural Network for Thermal Displacement Measurement and Compensation of Vertical Machining Machines. Master’s Thesis, Department of Mechanical Engineering, National Chin-Yi University, Taiwan, 2014. [Google Scholar]
  25. Chung, M.S. Application of Neural-like Network for Thermal Error Compensation of a CNC Flat-Processing Machine. Master’s Thesis, Department of Information Engineering, School of Electrical Engineering, National Chin-Yi University, Taiwan, 2018. [Google Scholar]
  26. Huang, L.; Liu, Y.; Du, L.; Yang, H. Thermal error analysis, modeling and compensation of five-axis machine tools. J. Mech. Sci. Technol. 2020, 34, 4295–4305. [Google Scholar] [CrossRef]
  27. Mares, M.; Horejs, O.; Havlik, L. Thermal error compensation of a 5-axis machine tool using indigenous temperature sensors and CNC integrated Python code validated with a machined test piece. Precis. Eng. 2021, 66, 21–30. [Google Scholar] [CrossRef]
  28. Huang, T.C. Deep Neural Networks for Thermal Error Estimation On a Dual-Axis Platform. Master’s Thesis, Institute of Mechanical Engineering, National Chung Cheng University, Taiwan, 2018. [Google Scholar]
  29. Liu, J.; Ma, C.; Gui, H.; Wang, S. Thermally-induced error compensation of spindle system based on long short term memory neural networks. Appl. Soft Comput. 2021, 102, 107094. [Google Scholar] [CrossRef]
  30. Cheng, Y.; Zhang, X.; Zhang, G.; Jiang, W.; Li, B. Thermal error analysis and modeling for high-speed motorized spindles based on LSTM-CNN. Int. J. Adv. Manuf. Tech. 2022, 121, 3243–3257. [Google Scholar] [CrossRef]
  31. Guo, J.; Xiong, Q.; Chen, J.; Miao, E.; Wu, C.; Zhu, Q.; Yang, Z.; Chen, J. Study of static thermal deformation modeling based on a hybrid CNN-LSTM model with spatiotemporal correlation. Int. J. Adv. Manuf. Tech. 2022, 119, 2601–2613. [Google Scholar] [CrossRef]
  32. Pearson’s Correlation Coefficient. Available online: https://chih-sheng-huang821.medium.com (accessed on 26 December 2022).
  33. Deep Learning—LSTM Model Solution. Available online: https://antkillerfarm.github.io/dl/2017/06/22/Deep_Learning_7.html (accessed on 26 December 2022).
  34. Hochreiter, S.; Schmidhuber, J. Long short-term memory. Neural Comput. 1997, 9, 1735–1780. [Google Scholar] [CrossRef]
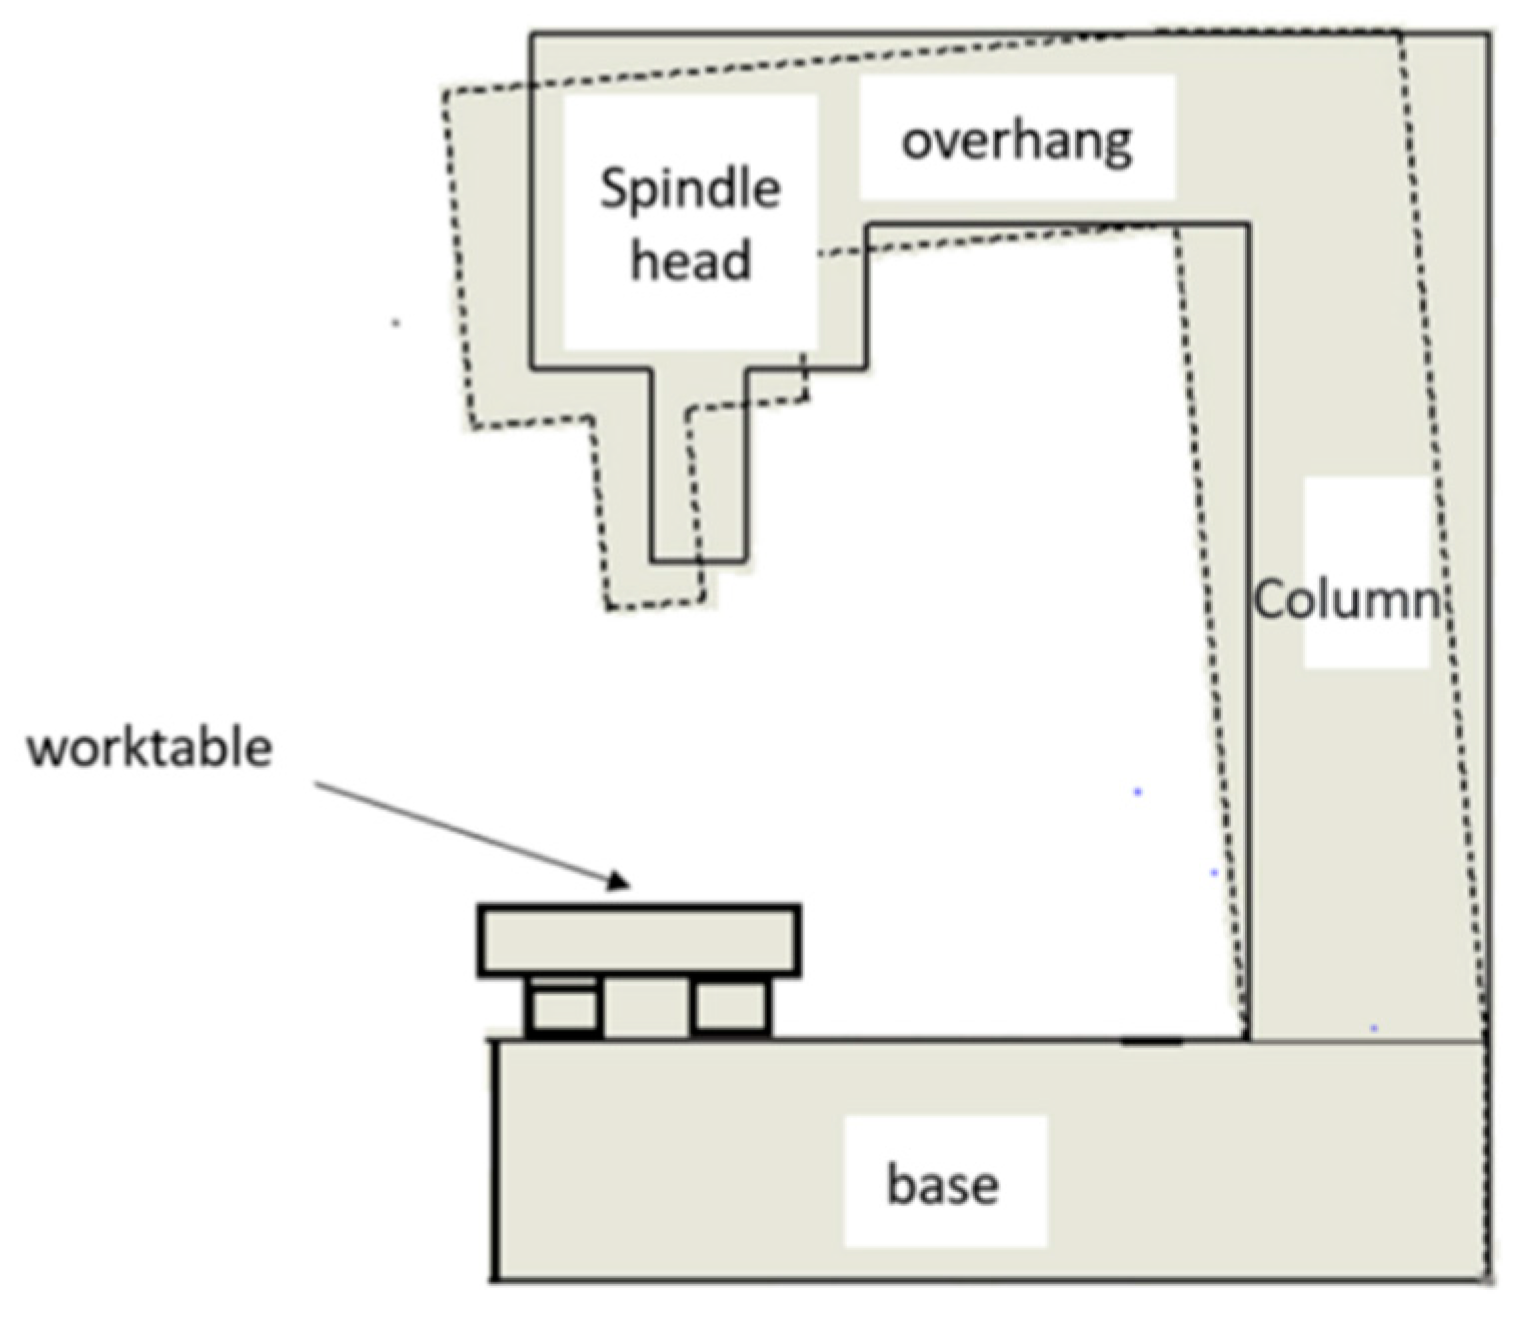
Figure 1. Thermal deformation of a milling machine.
Machines 11 00248 g001
Figure 2. Baselines of a three-axis milling machine.
Machines 11 00248 g002
Figure 3. (a) PT-100 temperature sensor and (b) data acquisition module of temperature sensors.
Machines 11 00248 g003
Figure 4. Schematic diagram of temperature sensors in the machine.
Machines 11 00248 g004
Figure 5. Implementation of real-time compensation of thermal deformation.
Machines 11 00248 g005
Figure 6. Schematic diagram of workpiece cutting path.
Machines 11 00248 g006
Figure 7. Experimental flow-chart of thermal deformation.
Machines 11 00248 g007
Figure 8. Experimental procedure of thermal deformation.
Machines 11 00248 g008
Figure 9. (a) Flow-chart of the first cutting experiment of thermal deformation. (b) Flow-chart of the second cutting experiment of thermal deformation. (c) Flow-chart of the third cutting experiment of thermal deformation.
Machines 11 00248 g009aMachines 11 00248 g009bMachines 11 00248 g009c
Figure 10. Schematic diagram of the locations of crucial temperature sensors.
Machines 11 00248 g010
Figure 11. LSTM neural network architecture.
Machines 11 00248 g011
Figure 12. Training procedure of the LSTM neural network model.
Machines 11 00248 g012
Figure 13. Comparison of predicted thermal error with true thermal error in three axial directions with respect to 12 training numbers.
Machines 11 00248 g013
Figure 14. Experimental procedure of the cutting processes with an idle time of 1 h.
Machines 11 00248 g014
Figure 15. Temperatures of crucial temperature sensors of the cutting processes with an idle time of 1 h.
Machines 11 00248 g015
Figure 16. Implementation architecture of real-time compensation of thermal errors.
Machines 11 00248 g016
Figure 17. Thermal error with/without real-time compensation with an idle time of 1 h.
Machines 11 00248 g017
Figure 18. Experimental Procedure of the cutting processes with an idle time of 8 h.
Machines 11 00248 g018
Figure 19. Temperatures of crucial temperature sensors of actual cutting processes with an idle time of 8 h.
Machines 11 00248 g019
Figure 20. Thermal errors of three axes with/without compensation with an idle time of 8 h.
Machines 11 00248 g020
Table 1. Locations of seven crucial temperature sensors.
Crucial Temperature Sensors
Sensor No.Location
1Upper spindle
3Upper overhang
4Lower overhang
5Upper overhang
6Lower overhang
23Y-axis bearing
28Z-axis slider
Table 2. Thermal error with/without real-time compensation with an idle time of 1 h.
Axial DirectionThermal Error without Real-Time Compensation (µm)Thermal Error with Real-Time Compensation (µm)
X11 µm6 µm
Y35 µm3 µm
Z−51 µm−24 µm
Table 3. Thermal error in the X-axis with/without real-time compensation with an idle time of 8 h.
X-Axis
TimeThermal Error without Real-Time CompensationThermal Error with Real-Time Compensation
2 h73
4 h83
6 h72
8 h73
Table 4. Thermal error in the Y-axis with/without real-time compensation with an idle time of 8 h.
Y-Axis
TimeThermal Error without Real-Time CompensationThermal Error with Real-Time Compensation
2 h384
4 h599
6 h6714
8 h7421
Table 5. Thermal error in the Z-axis with/without real-time compensation with an idle time of 8 h.
Z-Axis
TimeThermal Error without Real-Time CompensationThermal Error with Real-Time Compensation
2 h−37−3
4 h−52−12
6 h−57−15
8 h−64−20
Disclaimer/Publisher’s Note: The statements, opinions and data contained in all publications are solely those of the individual author(s) and contributor(s) and not of MDPI and/or the editor(s). MDPI and/or the editor(s) disclaim responsibility for any injury to people or property resulting from any ideas, methods, instructions or products referred to in the content.