Article

Investigation on Dynamic Characteristics of Spur Gear Transmission System with Crack Fault

1
School of Mechanical and Electrical Engineering & Henan Key Laboratory of Intelligent Manufacturing of Mechanical Equipment, Zhengzhou University of Light Industry, Zhengzhou 450002, China
2
School of Food and Bioengineering, Zhengzhou University of Light Industry, Zhengzhou 450002, China
3
State Key Laboratory of Mechanical Transmission, Chongqing University, Chongqing 400044, China
4
School of Mechanical Engineering, Zhengzhou University, Zhengzhou 450001, China
*
Author to whom correspondence should be addressed.
Machines 2022, 10(8), 664; https://doi.org/10.3390/machines10080664
Submission received: 14 July 2022 / Revised: 30 July 2022 / Accepted: 3 August 2022 / Published: 6 August 2022
(This article belongs to the Section Machines Testing and Maintenance)

Abstract

:
To study the dynamic characteristics of spur gears with crack faults, it is essential to establish the meshing stiffness model accurately. In this paper, the time-varying meshing stiffness (TVMS) model and load-sharing ratio (LSR) model of spur gears were established by the potential energy method, and the correctness of the TVMS model was verified by KISSsoft. The influence of gear crack depth and crack angle on TVMS and LSR was analyzed by introducing gear crack into the TVMS model. The multi-degree of freedom dynamics model of spur gears with centralized parameters was established. The time-domain characteristics of vibration of different crack fault systems were discussed, and statistical indicators were introduced to quantitatively evaluate the gear crack faults. The results show that TVMS decreases due to crack propagation, and the vibration impact increases with crack propagation. The sensitivity of crack depth propagation to gear fault characteristics is higher than that of crack angles; the statistical indicators can be used to monitor the propagation of early crack faults. The research results can provide a reference for the research of gearbox dynamic characteristics and fault diagnosis.

1. Introduction

Spur gears are widely used in automobile gearboxes, wind power energy, aviation equipment, and other precision instruments [1,2]. Due to gear overload and poor working conditions, the gearbox will fail. The gear faults mainly include tooth fracture, tooth surface pitting, tooth-root crack [3,4,5,6,7,8,9], and tooth surface wear [10,11,12]. In recent years, gearbox fault diagnosis has become a hot research area.
The TVMS is the main internal excitation of the gearbox. It can be combined with the gear lumped parameter model or finite element model to estimate the vibration response to judge the fault characteristics of the gearbox [13]. The approach to calculating TVMS can be divided into three categories: the experimental method [14,15,16,17], the finite element method (FEM) [18,19,20,21], and the analytical method (AM) [22]. The experimental method is accurate, but it has not become popular because it requires sophisticated experimental tables and equipment and it is relatively expensive. Compared with the AM, the FEM is time-consuming and has stricter requirements in terms of hardware, but the calculation results of this method are more accurate. The FEM is the most effective method to calculate meshing stiffness. It considers both the influence of the tooth profile error and the influence of gear flexibility. It has been used by many people in the study of the TVMS of gears [22]. The finite element model is divided into 2D and 3D models, but the error of the 2D model is significant. Timo Kiekbusch et al. [18] established 2D and 3D spur gear models using APDL language to solve the torsional meshing stiffness of a pair of gears and found that the 3D model was the most advantageous in predicting gear TVMS. Zhan et al. [19] proposed a new method for computing TVMS based on NX, ANSYS Workbench, and the quasi-static algorithm (QSA). Then, the authors analyzed the influence of tip radius and gear pair misalignment on gears. Liang et al. [20] proposed three finite element models and improved the second and third models on the basis of the first model. This method assumes that the surface of the gear hole is rigid, limits the driven gear of all degrees of freedom, and keeps only the drive gear of a rotational degree of freedom, and constant torque is used to solve the TVMS problem of spur gears. The simulation verifies the accuracy of this method. Wu et al. [21] referred to the method of Liang [20], introduced strain measurement technology, modified the finite element model parameters, and obtained the actual stiffness result. Yogesh Pandya et al. [14] used a 2D fracture analysis code finite element program based on linear elastic fracture mechanics to conduct a numerical simulation of single tooth crack growth in spur gear roots.
Chaari et al. [5] proposed a gear crack analysis model to quantify the gear meshing stiffness caused by tooth cracks and compared it with the finite element model to verify the correctness of the analysis formula. However, they did not consider the axial compression stiffness of the tooth. Chen [4] and Liang [6] both established analytical models of gear TVMS when gear cracks occur, but their specific work and models are different. Their studies complement Chaari [5]; in their work, the sheer energy, axial compression energy, and fillet stiffness were taken into account to make the model more accurate. In Chen’s work, he established the crack as a parabolic function related to the crack depth and solved the TVMS of spur gears [4]. The TVMS model with cracks established by Liang [6] did not consider the transition fillet stiffness of the root circle. In Refs. [9,23], the TVMS was taken as the main time-varying parameter, and the stiffness change and dynamic response under different types of pitting failure were analyzed. Liu et al. [7] derived the equation of the fracture curve by analytic geometry. The meshing stiffness of the faulty gear was deduced by the potential energy method. Some researchers have studied the effect of gear wear on the time-varying mesh stiffness. Chen et al. [10] considered the gear wear evolution process and used the potential energy method to calculate the mesh stiffness of gears with grinding wheel faults. Liu et al. [11] proposed a dynamic wear prediction method to study the coupling effect between surface wear and spur gear system dynamics. Shen et al. [12] used the Archard wear equation to calculate the tooth surface wear depth and theoretically deduced an analytical expression for the modified mesh stiffness considering tooth wear.
The remaining work of this paper is as follows: in part 2, the TVMS model and LSR model of spur gears without faults and with cracks are established. In part 3, the influence of crack depth and crack angle on TVMS and LSR is investigated. In part 4, the gear dynamics model is established, the vibration response of the gear is solved, and the crack fault is quantitatively analyzed by introducing statistical indicators. Finally, the work is summarized.

2. TVMS Model Based on the Potential Energy Method

TVMS is one of the indispensable excitation sources in the gear transmission system, and it is the most typical characteristic. The research on natural characteristics and dynamic characteristics is based on TVMS [24,25]. Especially in gear fault diagnosis, TVMS plays a crucial guiding role, so it is necessary to study on gear TVMS.

2.1. TVMS Model of Health Gears

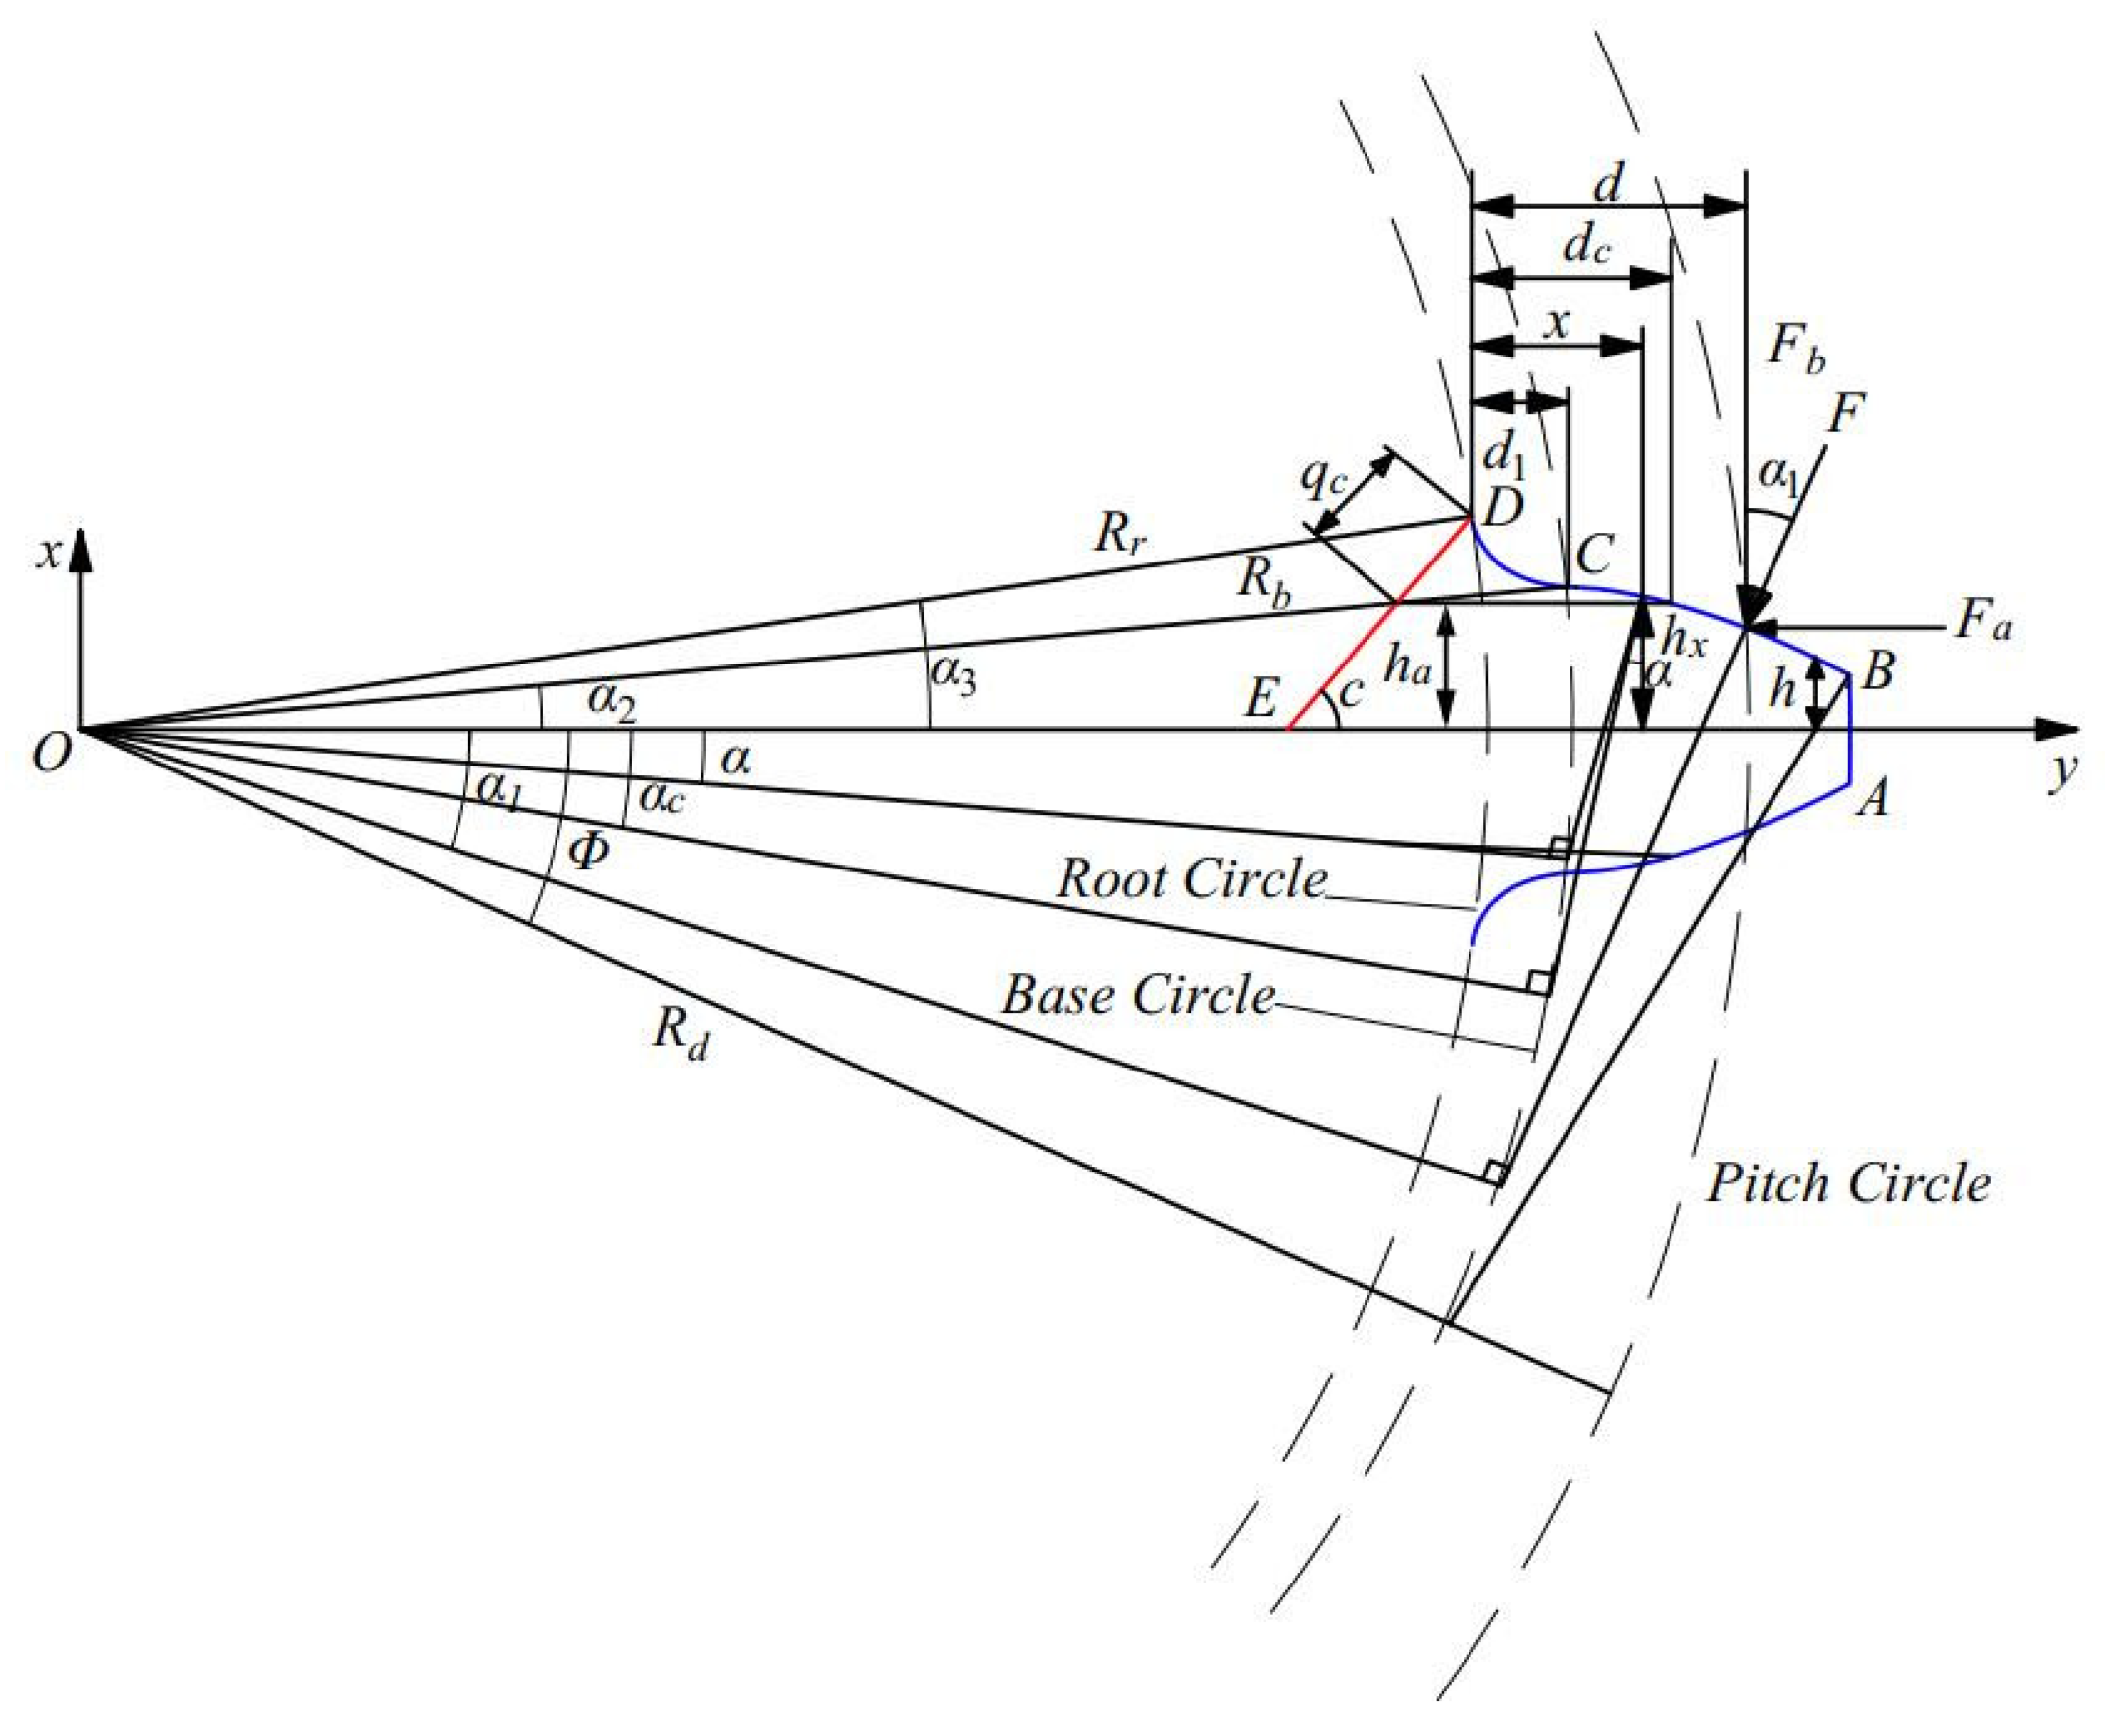
The TVMS model was established by referring to elasticity, material mechanics, and Timoshenko beam theory. The transition fillet was taken into account, and the gear tooth is seen as an uneven cantilever beam with a variable cross section, so the TVMS of the gear was calculated and predicted. The geometric structure and parameters of gear teeth are shown in Figure 1, where the tooth profile is composed of a tip curve AB, involute curve BC, and transition circle curve CD. Here, Figure 1 and other notational explanations of the paper can be found in Appendix A.
The transition curve is formed by the tip of the gear cutter when machining the gear. Its shape depends on the condition of the direction of the gear cutter. The size of the transition curve has a great relationship with the tip shape. When the cutter tip shape is an ordinary rounded corner, it is assumed that the actual transition circle curve is a central curve with a long involute, and the corresponding parameter equation of the transition circle curve CD is:
{ x = R d sin ϕ ( a 1 / sin γ + R ρ ) cos ( γ ϕ ) y = R d cos ϕ ( a 1 / sin γ + R ρ ) sin ( γ ϕ )
R ρ = c * m 1 sin α 0
a 1 = ( h a * + c * ) m r ρ
b 1 = π m / 4 + h a * m tan α 0 + R ρ cos α 0
ϕ = ( a 1 / tan γ + b 1 ) / r
where R d is the radius of the pitch circle, a 1 is the length between the tip fillet and center line, R ρ is the radius of the tip fillet, b1 is the length between the center of the cutter tip fillet and the centerline of the cutter groove, γ is the variable parameter, α 0 γ π / 2 , α 0 is the gear pressure angle, α 1 is the rotation angle, α 2 is the half tooth angle on the base circle, α 3 is the approximated half tooth angle on the root circle, h is the distance from the tooth central line to the gear contact point, h = R b [ ( α 1 + α 2 ) cos α 1 sin α 1 ] , d is the distance from the gear root to the gear contact point, and d = R b [ ( α 1 + α 2 ) sin α 1 + cos α 1 cos α 2 ] .
According to the elastic theory, the relationship between the bending stiffness Kb, shear stiffness Ks, axial compression stiffness Ka, hertz contact stiffness Kh, transition circular angle stiffness Kf and bending energy Ub, shear energy Us, axial compression energy Ua, hertz energy Uh, and circular angle foundation energy Uf can be expressed as follows:
U b = F 2 2 K b , U s = F 2 2 K s , U a = F 2 2 K a , U h = F 2 2 K h , U f = F 2 2 K f
where F is the total force acting on the gear tooth contact.
The bending stiffness Kb, shear stiffness Ks, axial compression stiffness Ka, and hertz contact stiffness Kh can be calculated as follows:
1 K b = 0 d ( ( d x ) cos α 1 h sin α 1 ) 2 E I x d x
1 K s = 0 d 1.2 cos 2 α 1 G A x d x
1 K a = 0 d sin 2 α 1 E A x d x
1 K h = 4 ( 1 υ 2 ) π E L
When gear meshing, the tooth body will be deformed [1]. Assuming that there are linear and persistent stress changes at the root circle caused by the deformation of the gear body tooth deflection, the analytical formula can be derived as:
δ f = F cos 2 α 1 E L [ ( u f S f ) 2 L * + ( u f S f ) M * + ( 1 + Q * tan 2 α 1 ) P * ]
The values of L*, M*, P*, and Q* can be obtained from the following formula:
X * ( h f , θ f ) = A / θ f 2 + B h f 2 + C h f / θ f + D / θ f + E h f + F
The coefficients in Formula (12) can be obtained from Table 1, and the remaining parameters are shown in Figure 2.
The fillet stiffness Kf of the gear can be calculated as:
K f = F δ f
1 K f = cos 2 α 1 E L [ ( u f S f ) 2 L * + ( u f S f ) M * + ( 1 + Q * tan 2 α 1 ) P * ]
In the above formula, E is the Young’s modulus, G is the shear modulus, υ is the Poisson’s ratio, α 1 is the gear rotation angle, Ix is the moment of inertia of the gear section at the tooth surface and the tooth root point x, and Ax is the corresponding cross-sectional area.
The shear modulus can be calculated by the formula:
G = E 2 ( 1 + υ )
The calculation formula of the gear tooth surface area and the moment of inertia is:
A x = 2 h x L
I x = ( 2 h x ) 3 L / 12
where hx is the length from a point x on the tooth profile line to the tooth center line. The tooth surface curve is composed of the involute function of the BC section and the transition circle curve of the CD section. The value of hx of the CD section can be obtained by the x-axis coordinate of the parameter equation of the transition circle curve, and the value of hx of the BC section can be obtained by the involute function, so the value of hx can be expressed by the piecewise function:
h x = { R d sin ϕ ( a 1 / sin γ + R ρ ) cos ( γ ϕ ) 0 x d 1 R b [ ( α 2 α ) cos α + sin α ] d 1 x d

2.2. TVMS Model of Gears with Cracks

Gear crack fault is one of the most common faults in gear transmission. Because of the influence of the gear’s overload, the gear tooth root is prone to crack. In Ref. [26], the author approximated the crack to a straight line, this research will continue to adopt the conclusion.
Suppose the crack is a straight line and that the crack is distributed uniformly along with the crack depth within the tooth width, as shown in Figure 3, where qc is the crack depth and c is the crack angle. When the gear has a crack fault, the bending stiffness and shear stiffness will vary. This research only studies the fault in which the crack depth qc is at the initial stage of the crack and the crack does not exceed the gear midline, which can be divided into two cases.
Case 1: hah, α1 > αc,
A x = { ( h a + h x ) L                         ( x d v ) 2 h x L                                               ( x > d v )
I x = { ( h a + h x ) 3 L / 12                         ( x d v ) ( 2 h x ) 3 L / 12                                       ( x > d v )
Case 2: hah, α1αc,
A x = ( h a + h x ) L
I x = ( h a + h x ) 3 L / 12
where h a = R b sin α 2 q c sin c .

2.3. Calculation of TVMS and LSR

2.3.1. Calculation of TVMS

The meshing stiffness of a single tooth of the gear pair can be calculated as the sum of the axial compression stiffness, fillet stiffness, shear stiffness, bending stiffness, and hertz stiffness. The calculation formula is as follows:
K = 1 1 K b 1 + 1 K s 1 + 1 K a 1 + 1 K f 1 + 1 K b 2 + 1 K s 2 + 1 K a 2 + 1 K f 2 + 1 K h
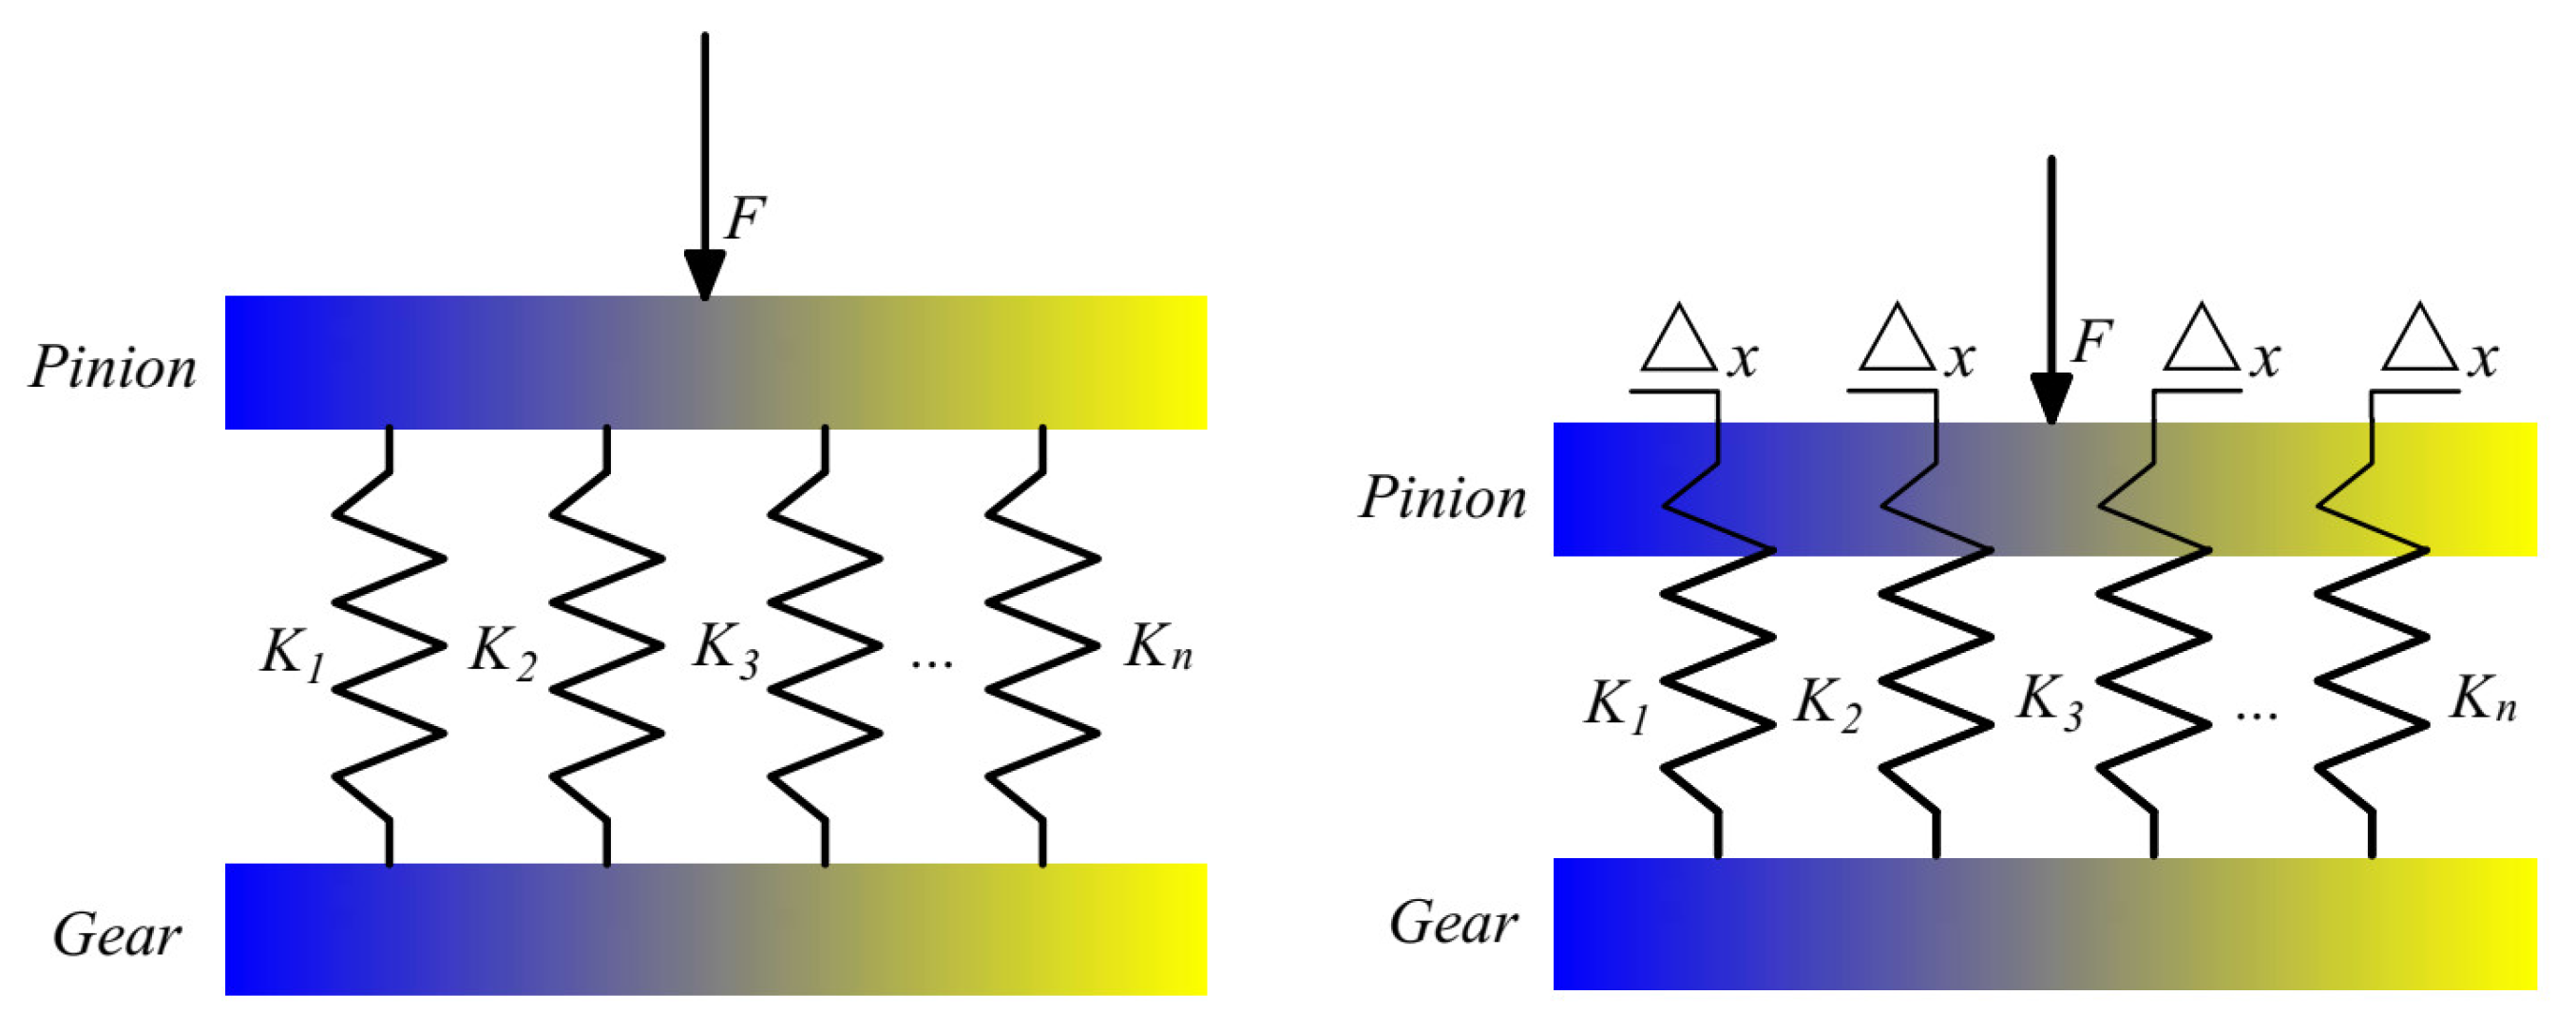
As shown in Figure 4, Kijn represents the stiffness of each gear tooth, and i = (b, s, a, f, h) represents the bending stiffness, shear stiffness, axial compression stiffness, fillet stiffness, and hertz contact stiffness of each gear tooth. j = (1,2) represents the driving and driven gear; n = (1,2) represents the single tooth meshing and double tooth meshing. The total TVMS of the gear pair in the meshing cycle with a contact ratio of 1–2 is:
K 12 = i = 1 j K i , ( j = 1 , 2 )
where K12 is the total TVMS of gears in the meshing period, and j is the number of teeth engaged simultaneously.

2.3.2. Calculation of Gear LSR

The LSR represents the stress of the contact teeth of a pair of gears and is calculated on the basis of TVMS. Figure 5 is the load sharing model, and Ki (i = 1,2) is the TVMS of the gear pair. Assuming that Ki is not related to force F, the LSR can be calculated by the following formula:
LSR i = { 1 K i x F = K i x i = 1 n K i x = K i i = 1 n K i
When the gear pairs engage with one tooth, the LSR is 1. When two teeth engage, the formula is used to calculate.

2.4. Solution and Verification of TVMS

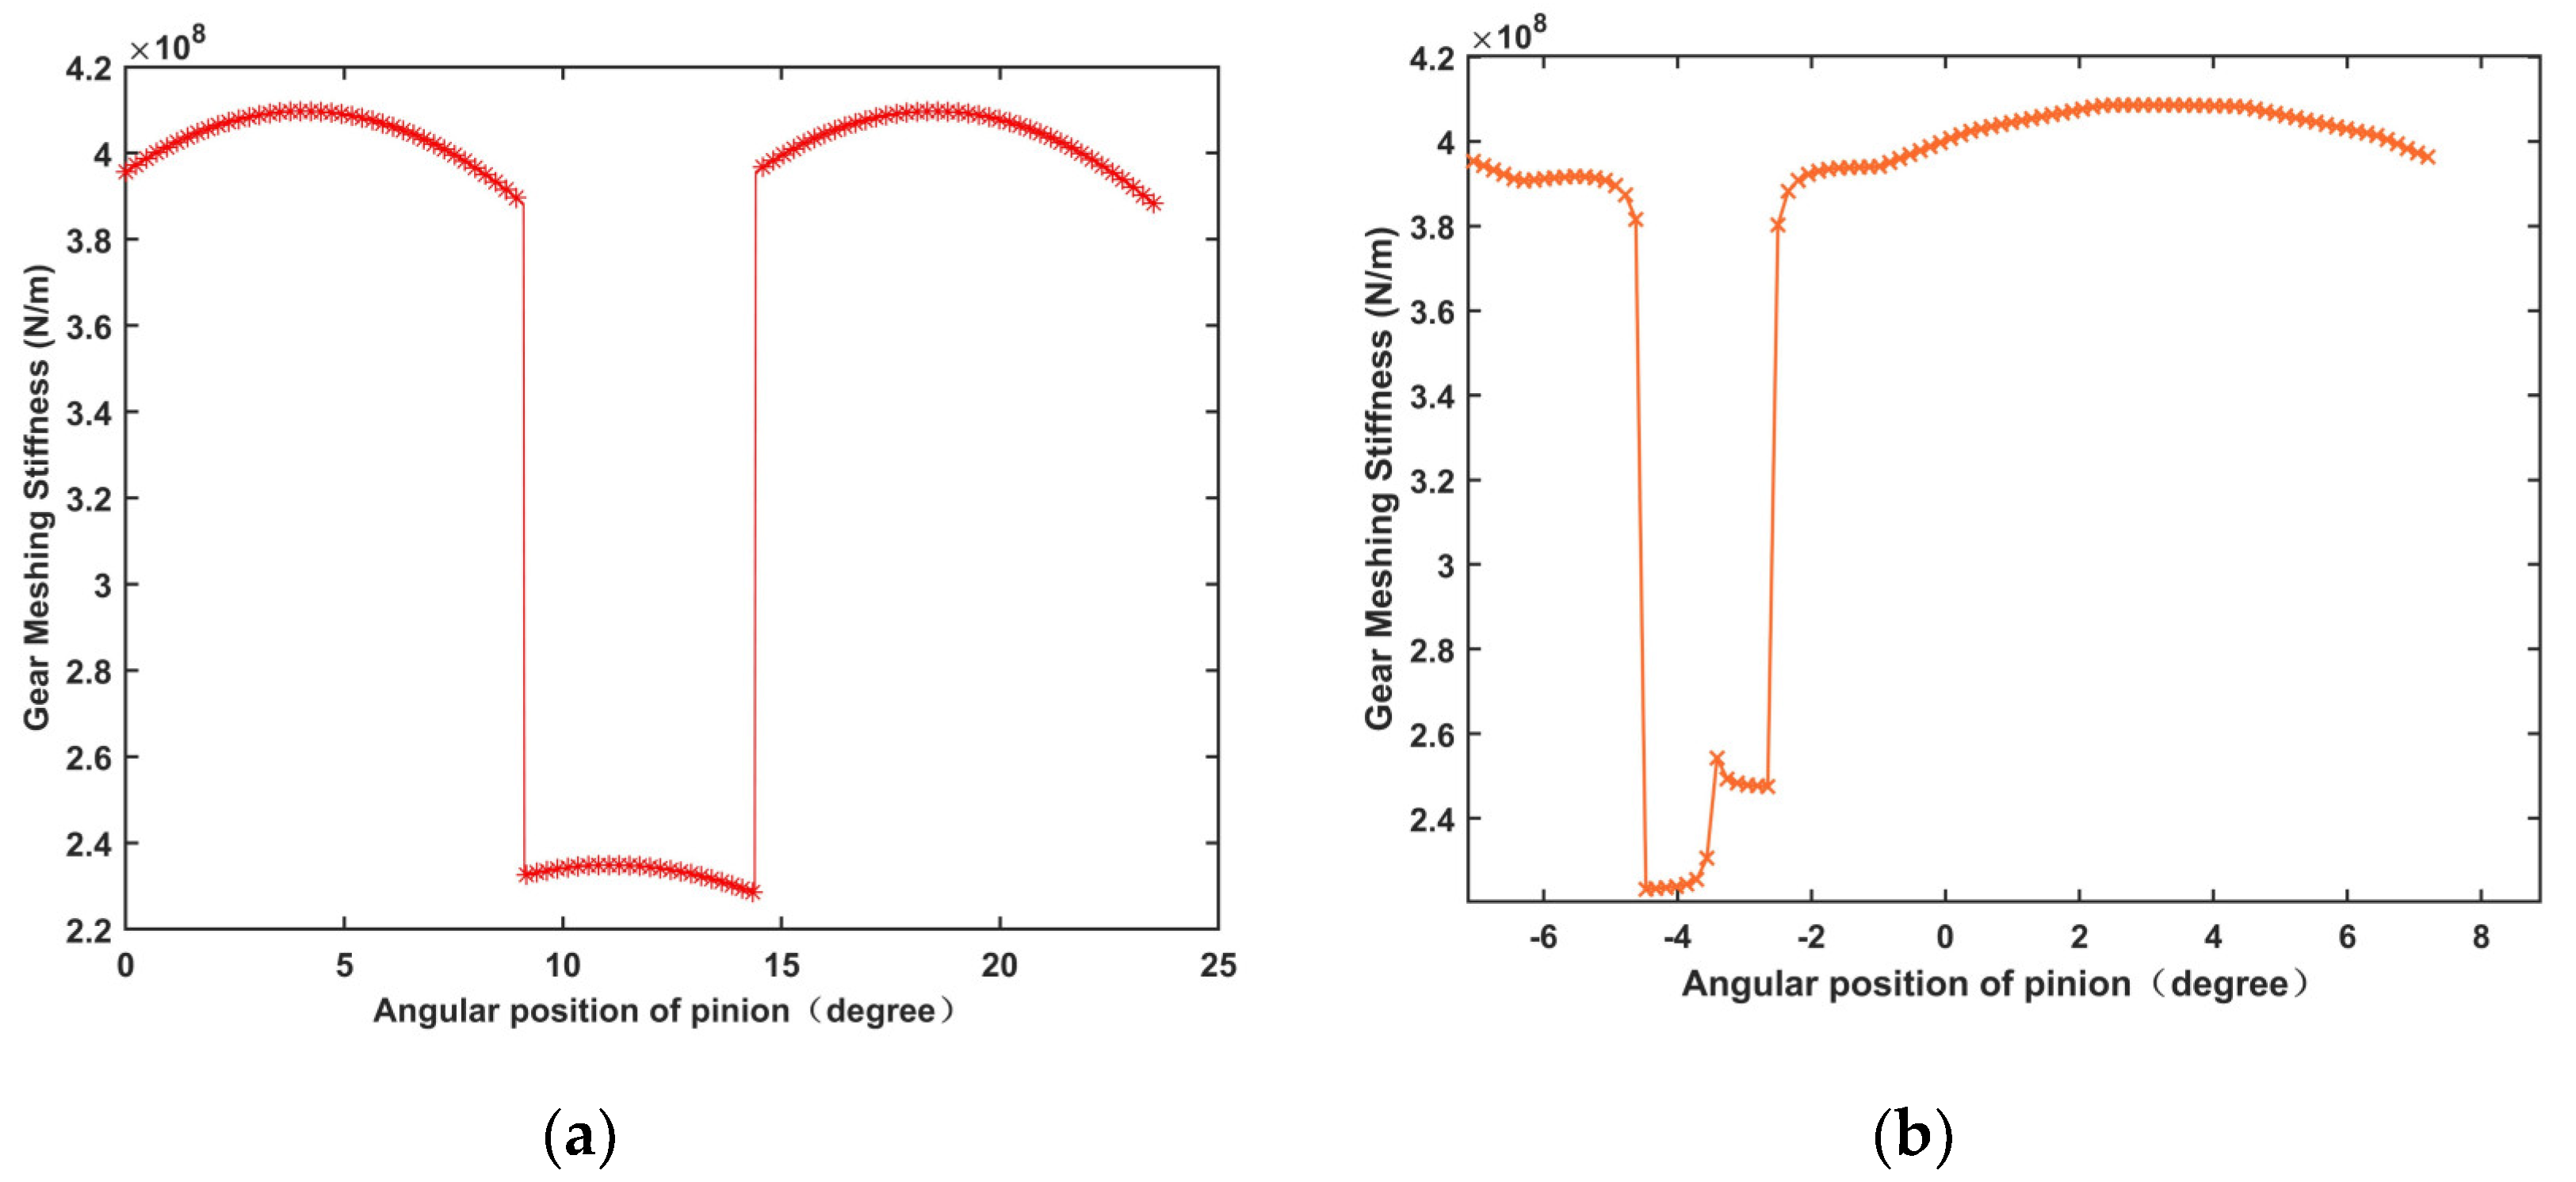
The parameters of the spur gear are shown in Table 2. According to the solution model developed in Part 2.1, the TVMS and the LSR of a pair of spur gears are solved, and the TVMS curve and LSR curve are obtained, as shown in Figure 6.
As the FEM has high requirements on computer hardware, a long calculation time, and a low fault tolerance when solving the TVMS, this paper proposes a way to verify the TVMS by using the commercial software KISSsoft. This study found that KISSsoft calculated TVMS more quickly than the FEM. The TVMS results obtained by the analytical method are shown in Figure 6a, with an average mesh stiffness of 3.65 × 10⁸ N/m. Figure 6b shows the TVMS solved by KISSsoft, with an average stiffness of 3.77 × 10⁸ N/m, and the error between the two results is 3.3%, which proves the accuracy of the established TVMS model. Then, the parameters in Ref. [4] and Ref. [27] are introduced to the stiffness model in this paper for calculation. Compared with the references results, the obtained results have similar rules and trends, which demonstrates the precision of the established TVMS model again.

3. Influence of Gear Crack on TVMS and LSR

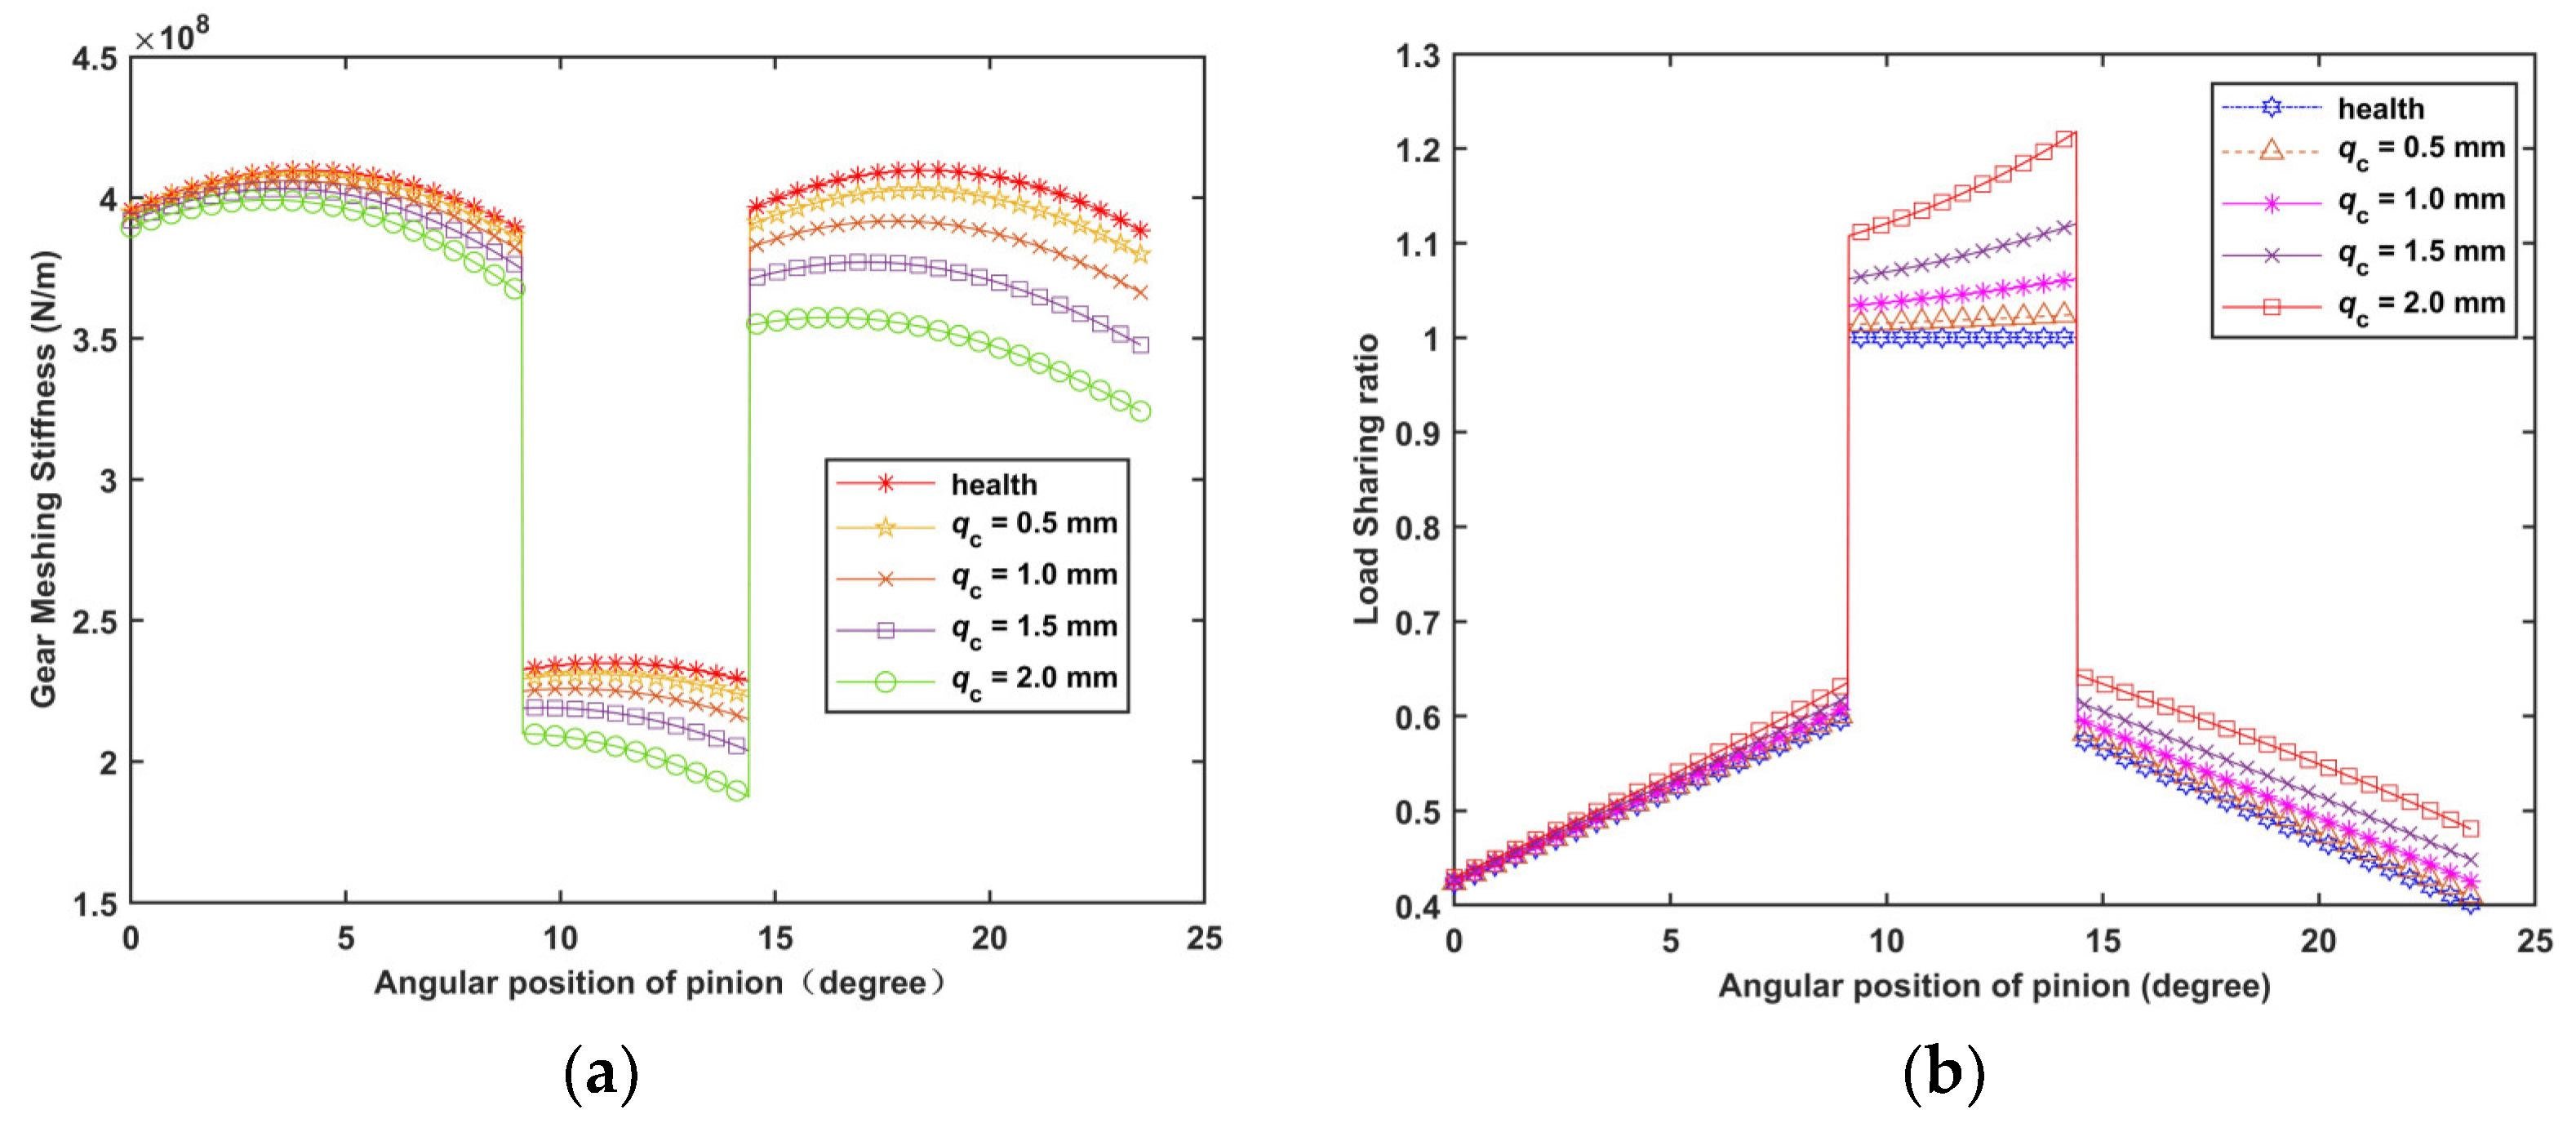
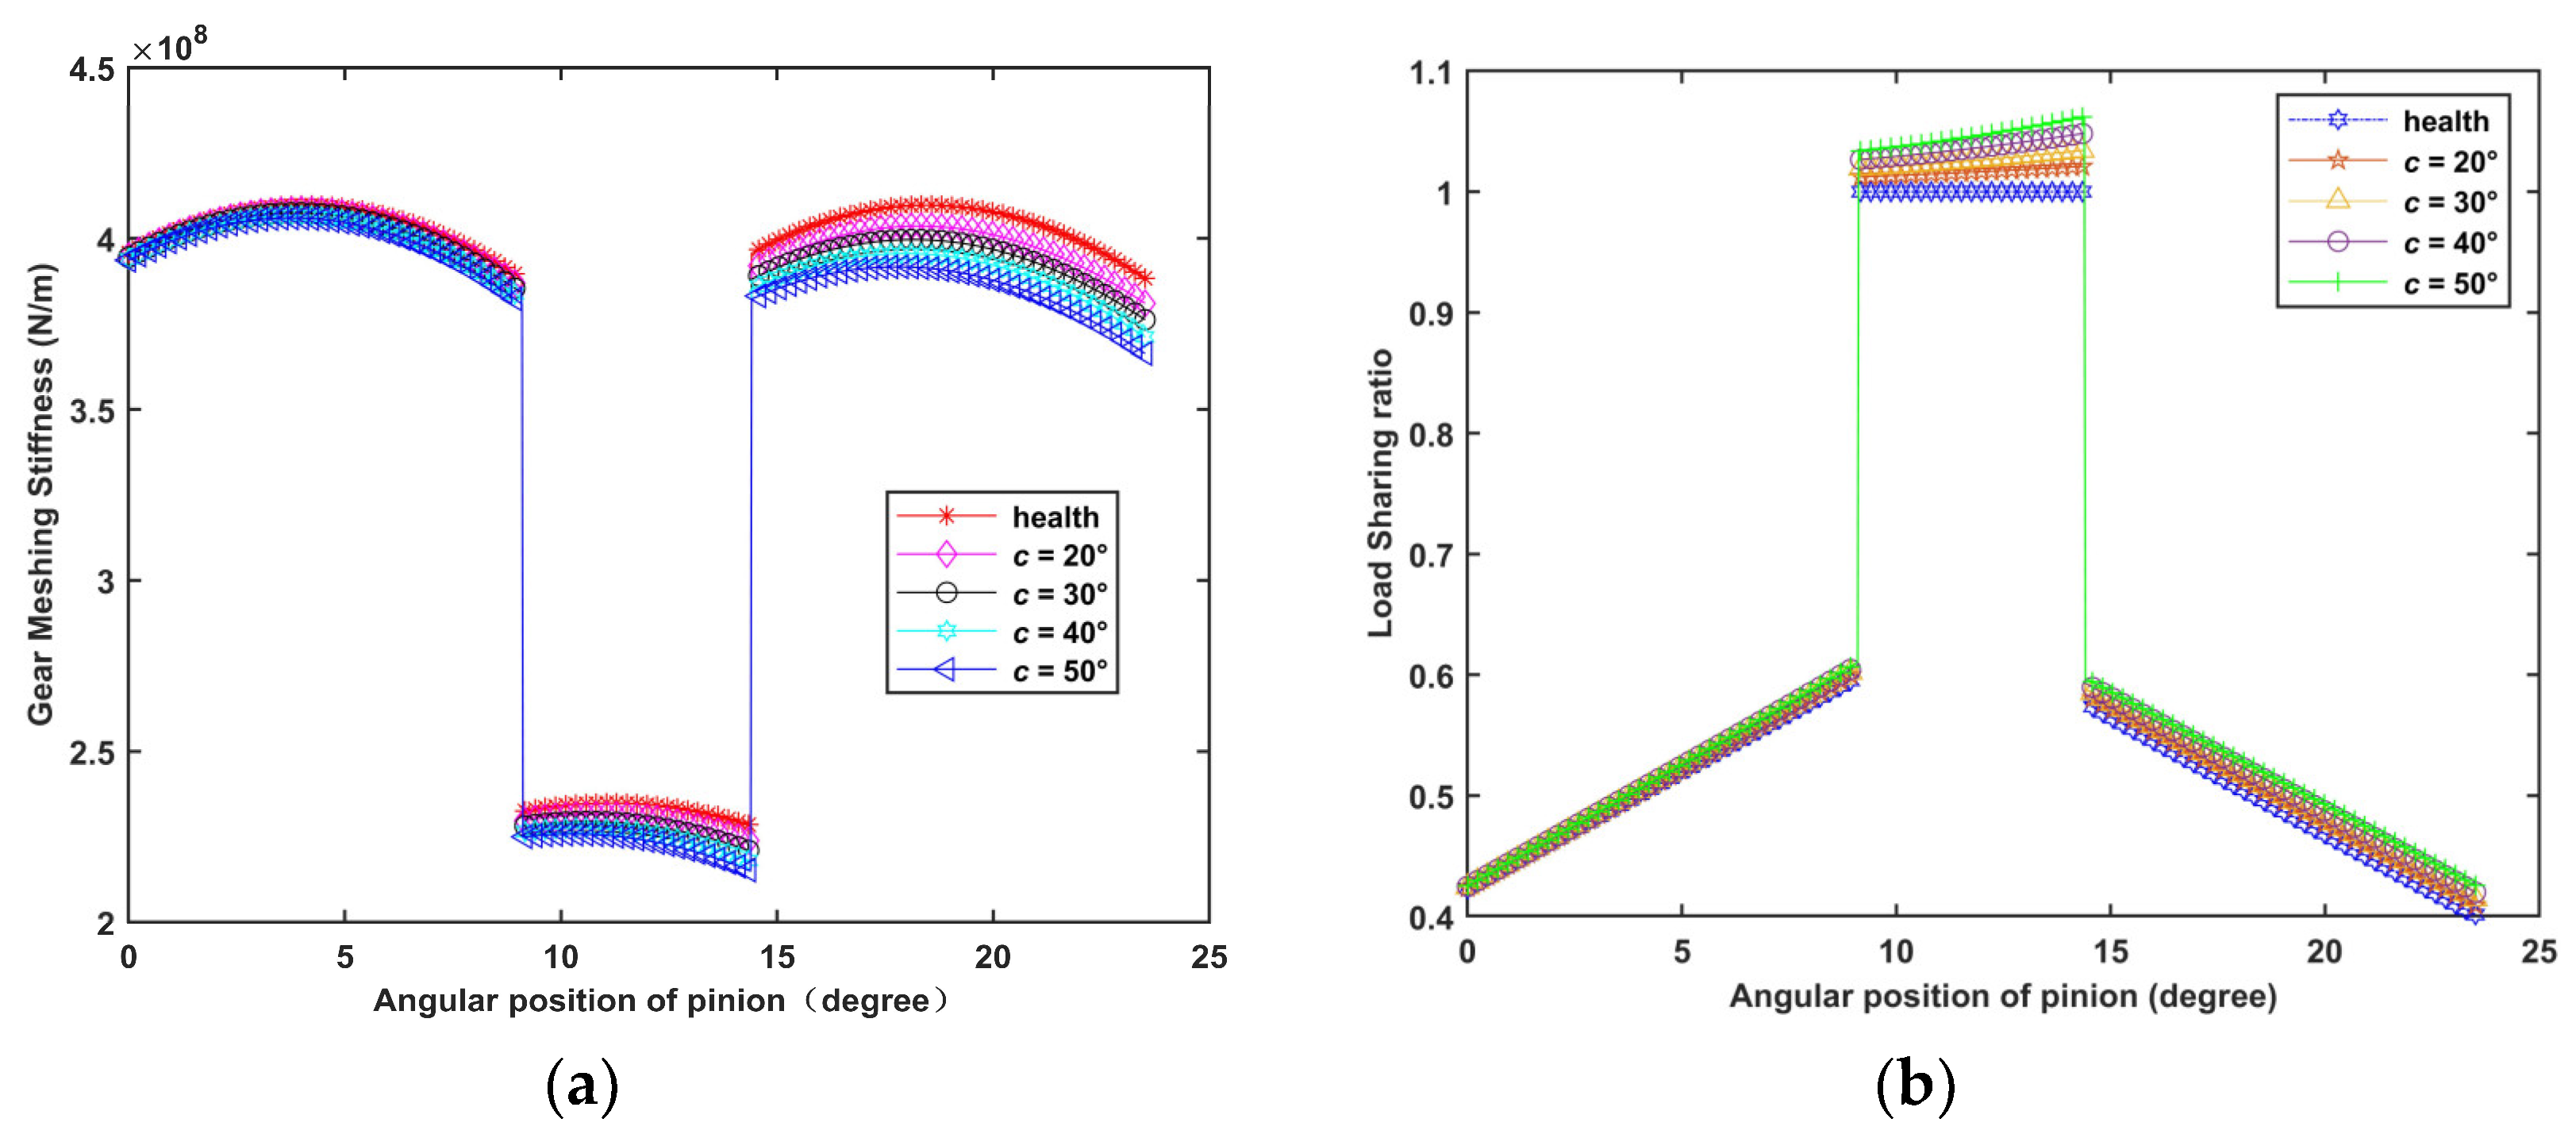
Based on the analytical model of TVMS, four different crack depths were respectively chosen, four different crack angle stiffnesses were calculated, and the TVMS and LSR were calculated. In comparison to the results of the health gear, the results are shown in Figure 7 and Figure 8.

3.1. Different Crack Depths

Figure 7a shows the TVMS of gears with four kinds of crack depths (qc =0.5 mm, 1.0 mm, 1.5 mm, 2.0 mm) and the healthy state, the crack depth changes; the crack angle c is 50°. As the crack depth increases, the TVMS decreases. The first time occurred at the position where the gear entered the meshing, but the decreasing amplitude of the stiffness was not significant. The second time happened at the place where the single gear meshed and the double gear meshed, and the decreasing value of the stiffness was more noticeable this time. The third time occurred at the meshing place of the gear at the end of the meshing, and the decreasing value of the stiffness was the largest. However, qc does not influence the meshing period of single and double meshing. Figure 7b shows the gear health status and the existing four kinds of crack depths of the LSR. With the increase in crack depth, the LSR changes obviously and is mainly focused on the single tooth and the tooth out of the meshing position. The change is evident in the single meshing place; as the crack depth increases, the LSR increases most at the single tooth meshing position.

3.2. Different Crack Angles

Figure 8a,b respectively shows the TVMS curve and LSR curve when the gear is healthy, and there are four crack angles (c = 20°, 30°, 40°, 50°). The crack depth is set as 1.0 mm. It can be seen that when the crack angle increases, the characteristics are the same as those of the crack depth. The comprehensive TVMS decreases and the LSR increases, but the overall impact on the stiffness and LSR is not as significant as that for the crack depth.

4. Analysis of the Dynamic Response Characteristics of Gears with Crack Faults

4.1. Gear Dynamics Model

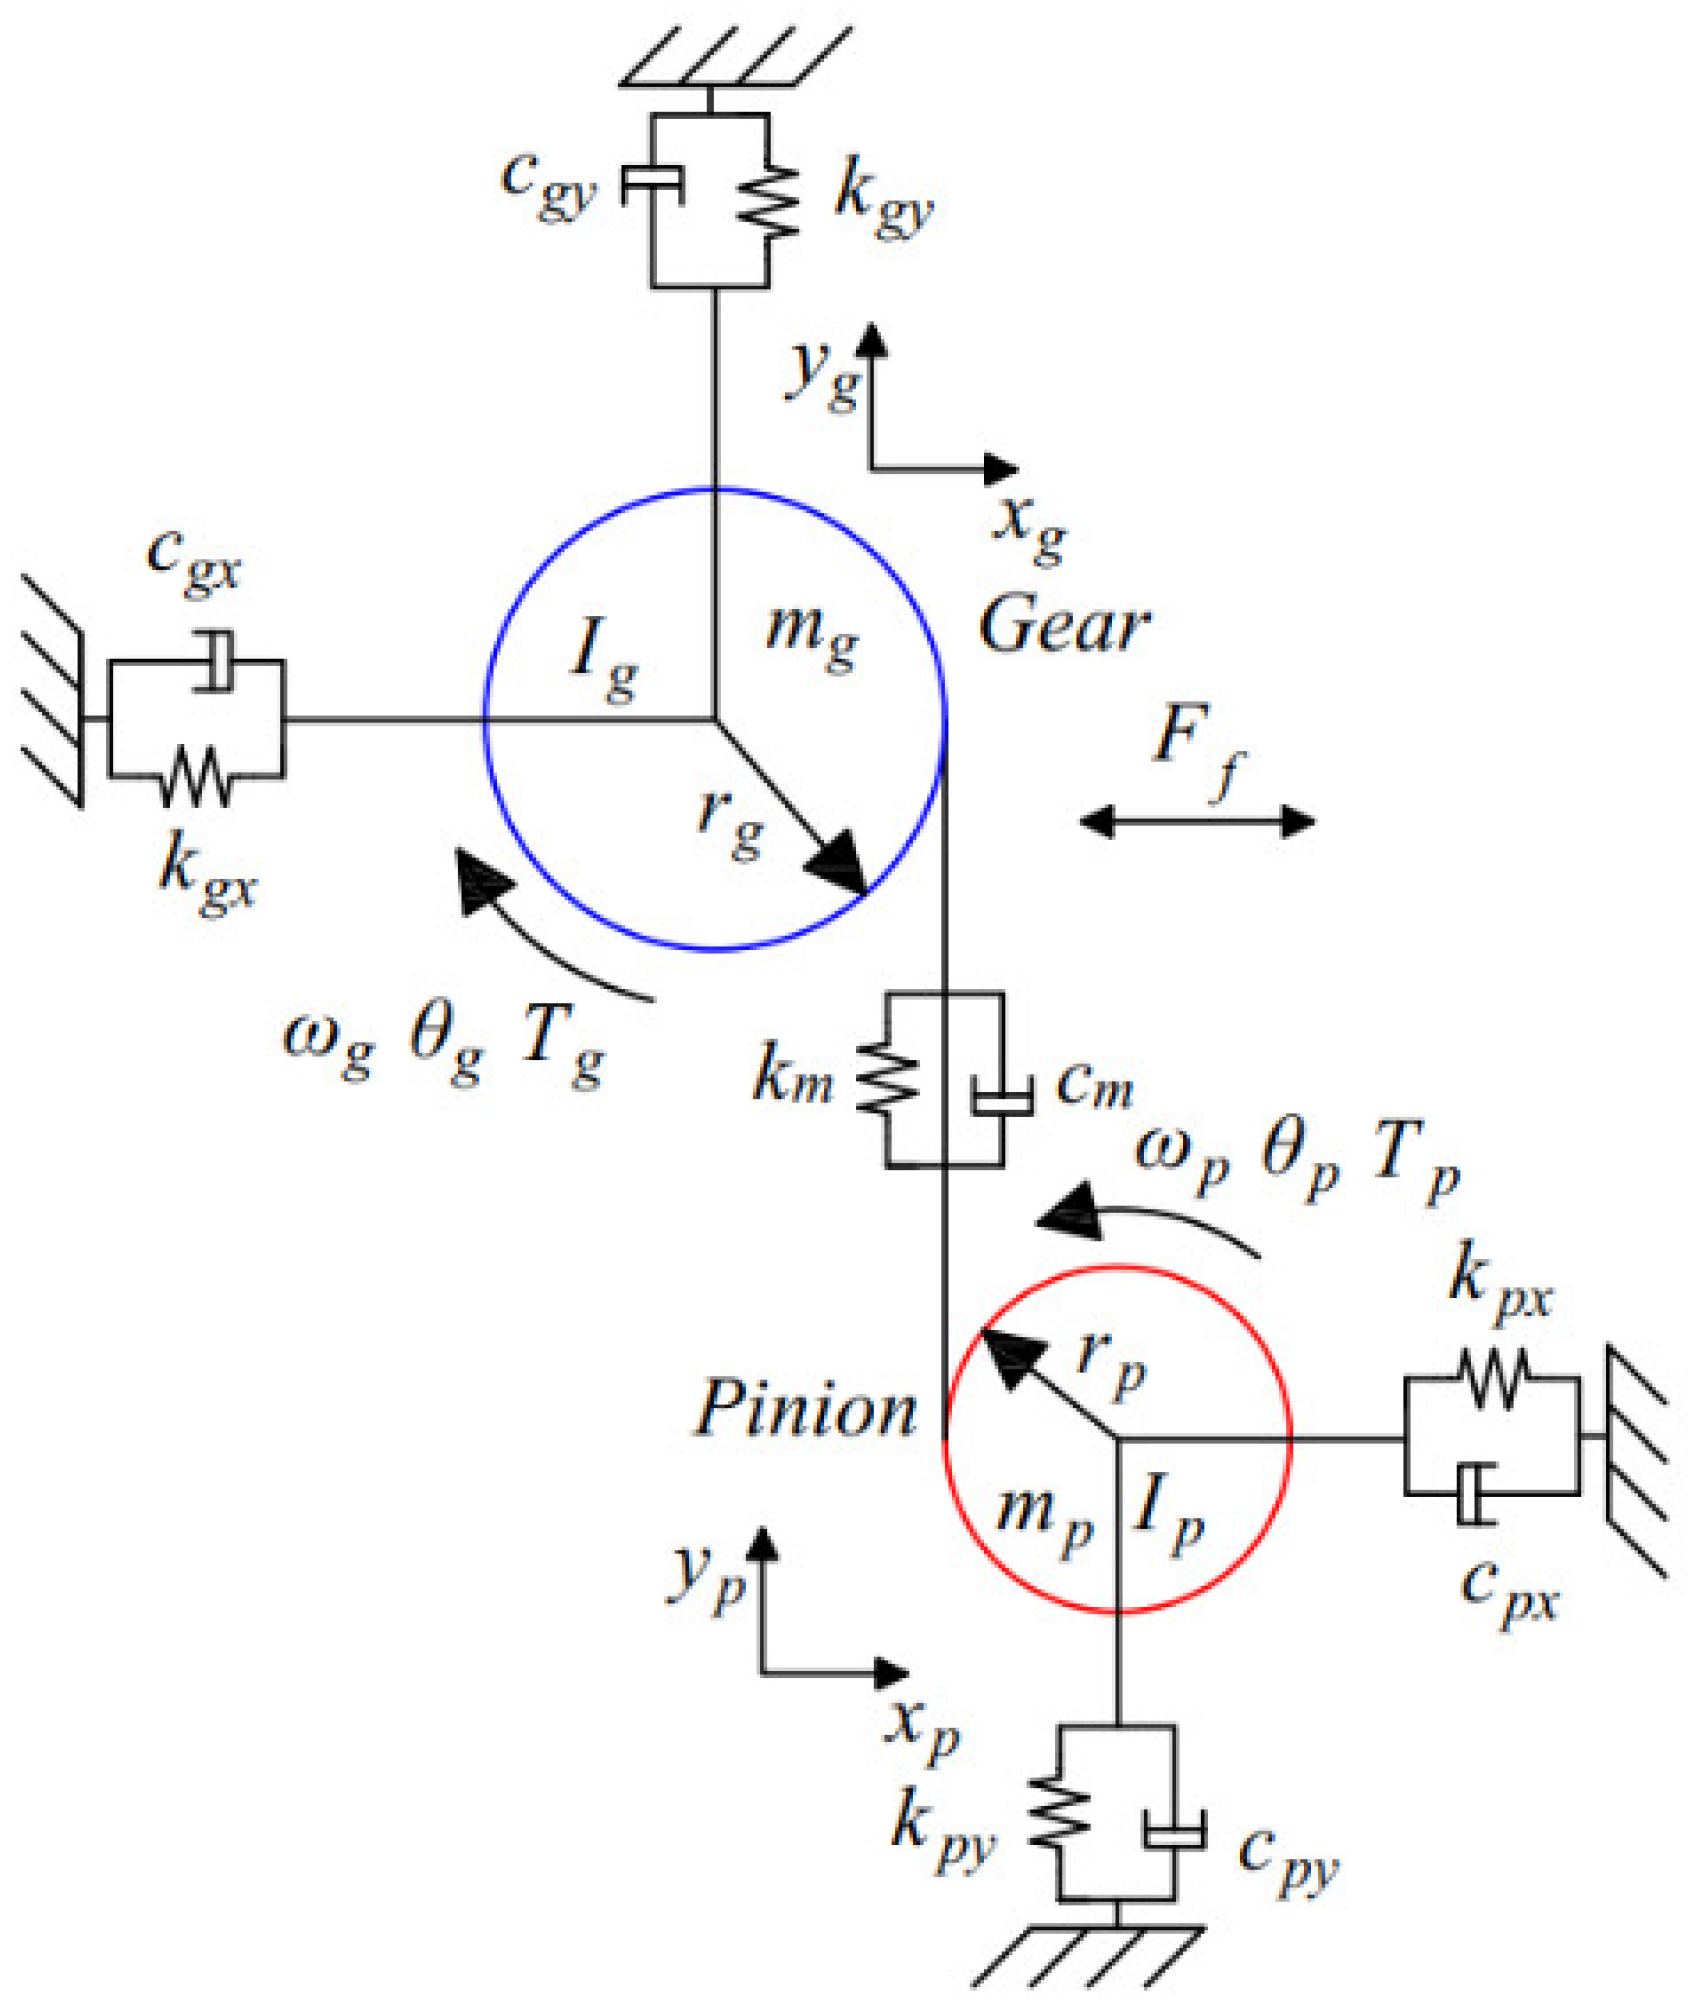
The centralized parameter model of the system multi-DOF spur gear transmission system is established, as shown in Figure 9. This model has been used to solve the vibration response of spur gears [1]. The power is input by the driving gear p and output by the driven gear g. In the figure, ω, m, I, and T respectively represent the angular velocity, gear mass, gear moment of inertia, and torque. kpx, kpy, kgx, and kgy respectively represent the support stiffness of the driving gear and the driven gear in the x direction and the y direction. cpx, cpy, cgx, and cgy respectively represent the support damping in the x and y directions of the driving gear and the driven gear. km and cm represent TVMS and meshing damping. The specific parameters are shown in Table 2.
The model ignores the transmission error and other nonlinear factors, introduces the friction coefficient f, and considers the friction force. Considering the degree of freedom of the gear translation in the x direction and y direction and the torsion in the θ direction, the centralized parameter model of the gear system can be established as follows:
{ m p x ¨ p + c p x x ˙ p + k p x x p = F f m p y ¨ p + c p y y ˙ p + k p y y p = k m y c m y ˙ m g x ¨ g + c g x x ˙ g + k g x x g = F f m g y ¨ g + c g y y ˙ g + k g y y g = k m y + c m y ˙ I p θ ¨ p r p ( k m y + c m y ˙ ) M p = T p I g θ ¨ g r g ( k m y + c m y ˙ ) M g = T g
where Ff is the tooth surface friction force, Mp and Mg are the moments generated by the friction force, rp and rg are the radii of the indexing circle of the main driving gear and the driven gear, and y is the relative slip of the tooth surface, which can be expressed as:
y = y p y g + r p θ p r g θ g
where yp and yg represent the vibration displacement of the driving gear and the driven gear in the y direction and θ p and θ g represent the angular displacement [28,29].
The formula for calculating the friction force Ff is:
F f = f F p g
F p g = k m [ ( y p y g ) ( r p θ p r g θ g ) ] + c m [ ( y ˙ p y ˙ g ) ( r p θ ˙ p r g θ ˙ g ) ]
c m = 2 ξ k m r p 2 r g 2 I p I g r p 2 I p + r g 2 I g
where f is the friction coefficient, the driving gear and the driven gear mesh with each other, and the sliding directions are opposite. In Ref. [1], the friction coefficient is regarded as a certain value, and its method will continue to be used in this study. Take the friction coefficient as 0.03. Fpg is the gear tooth meshing force, km is the TVMS, cm is the meshing damping and is in the form of proportional damping [30], and ξ is the meshing damping ratio of the gear pair. In general, the value range is from 0.03 to 0.1.

4.2. Dynamic Model Solution

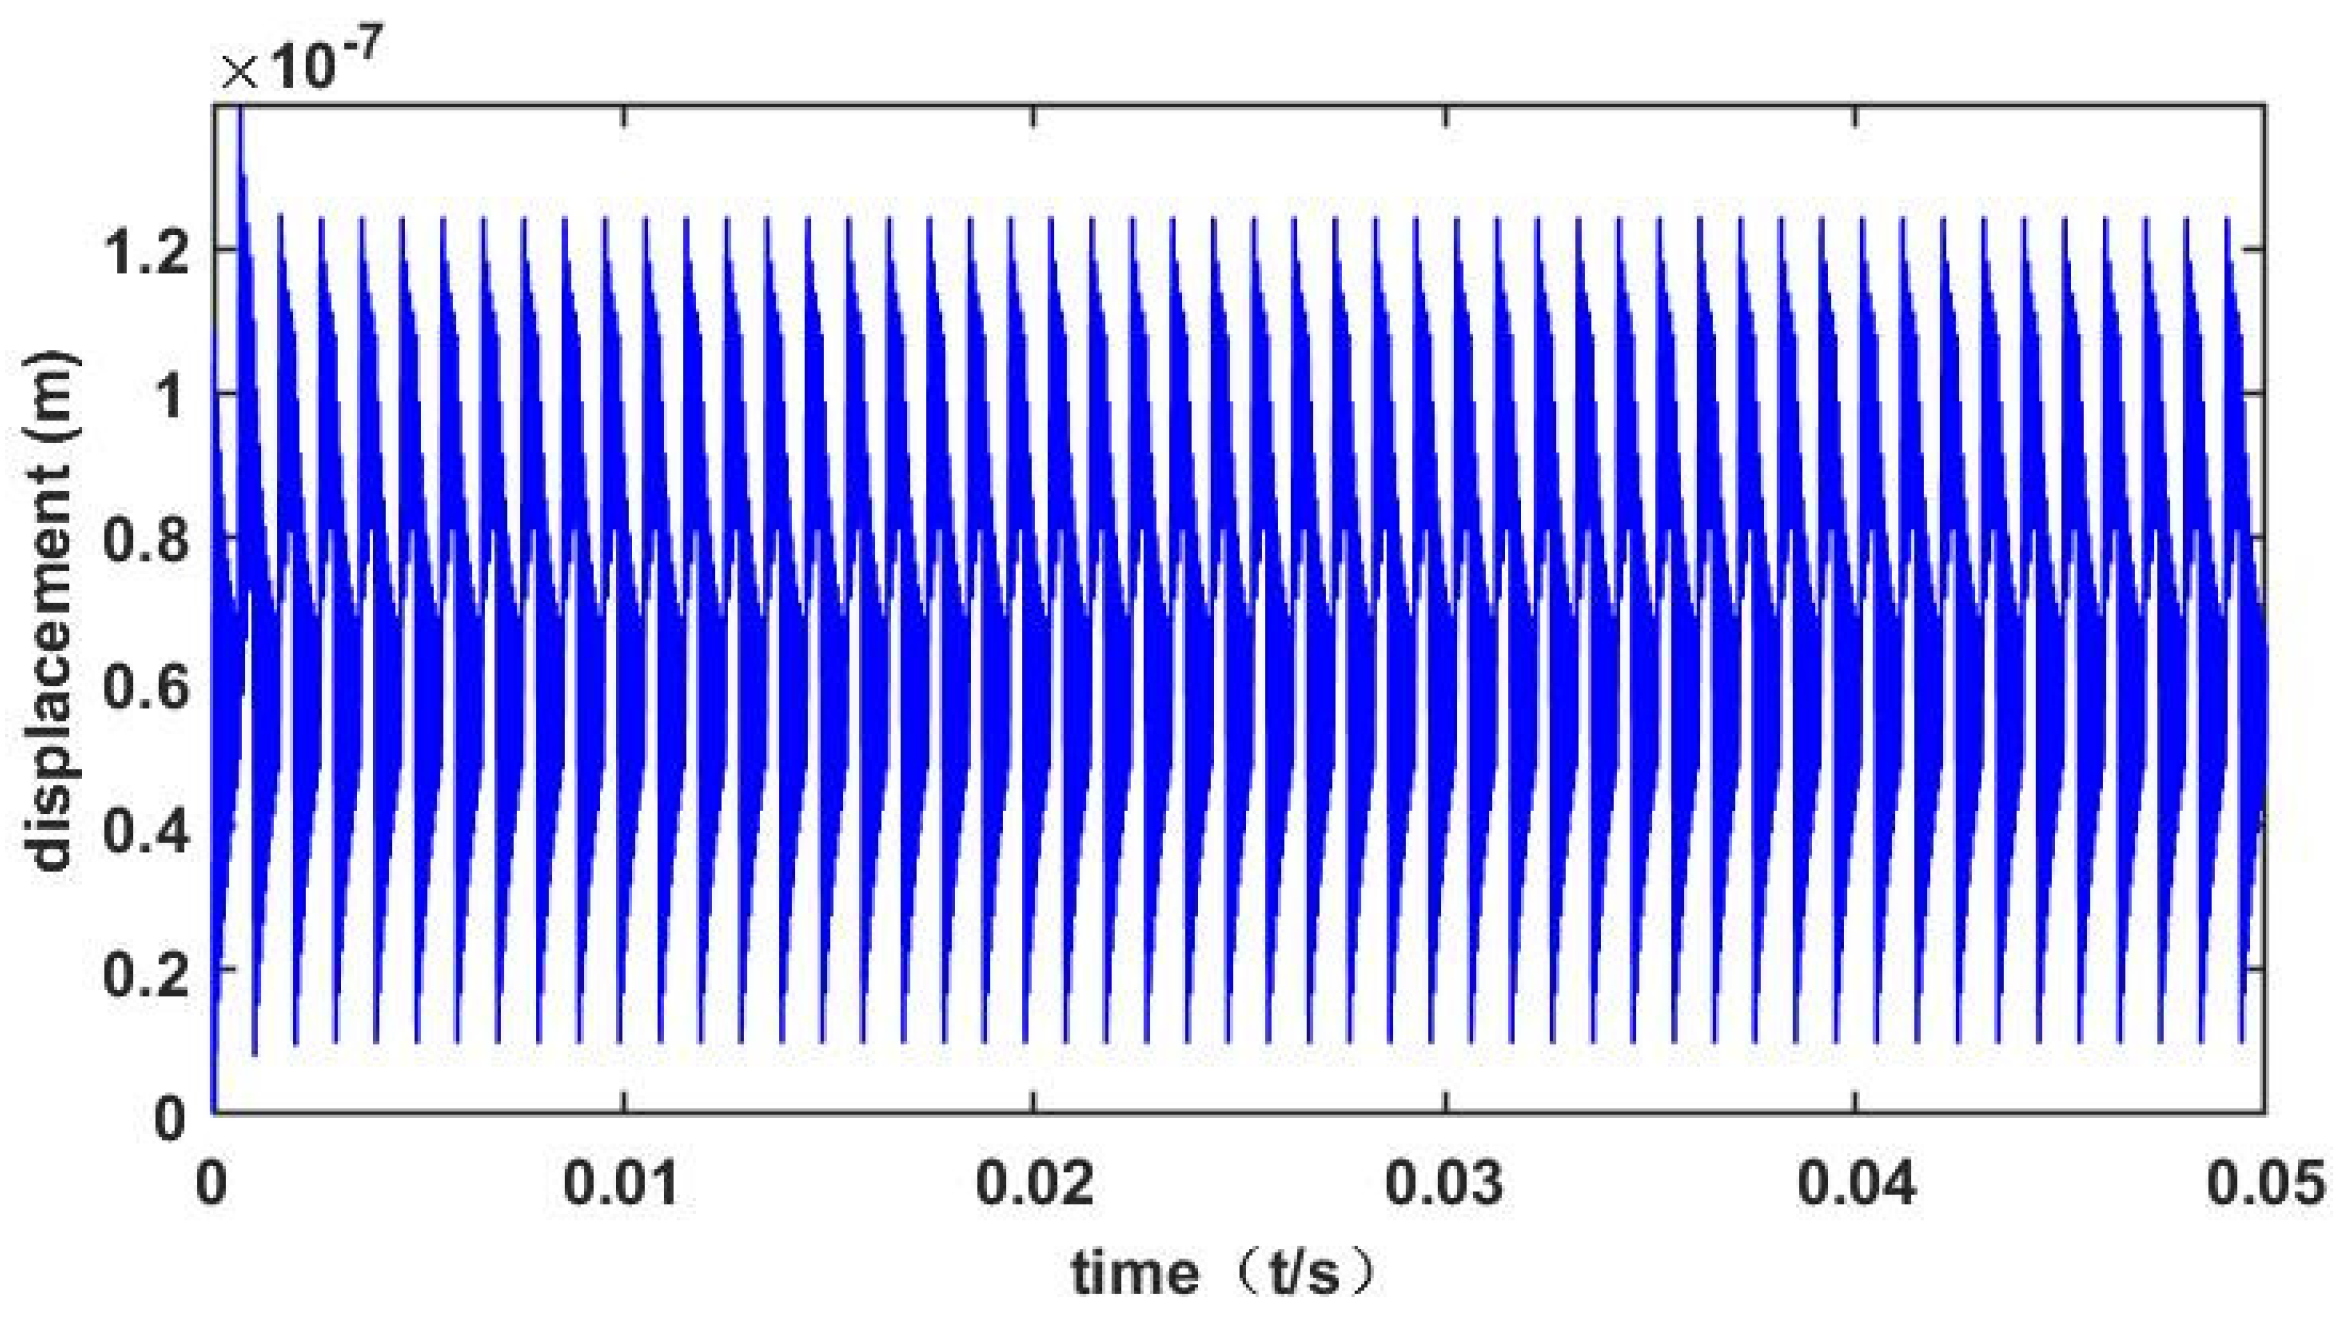
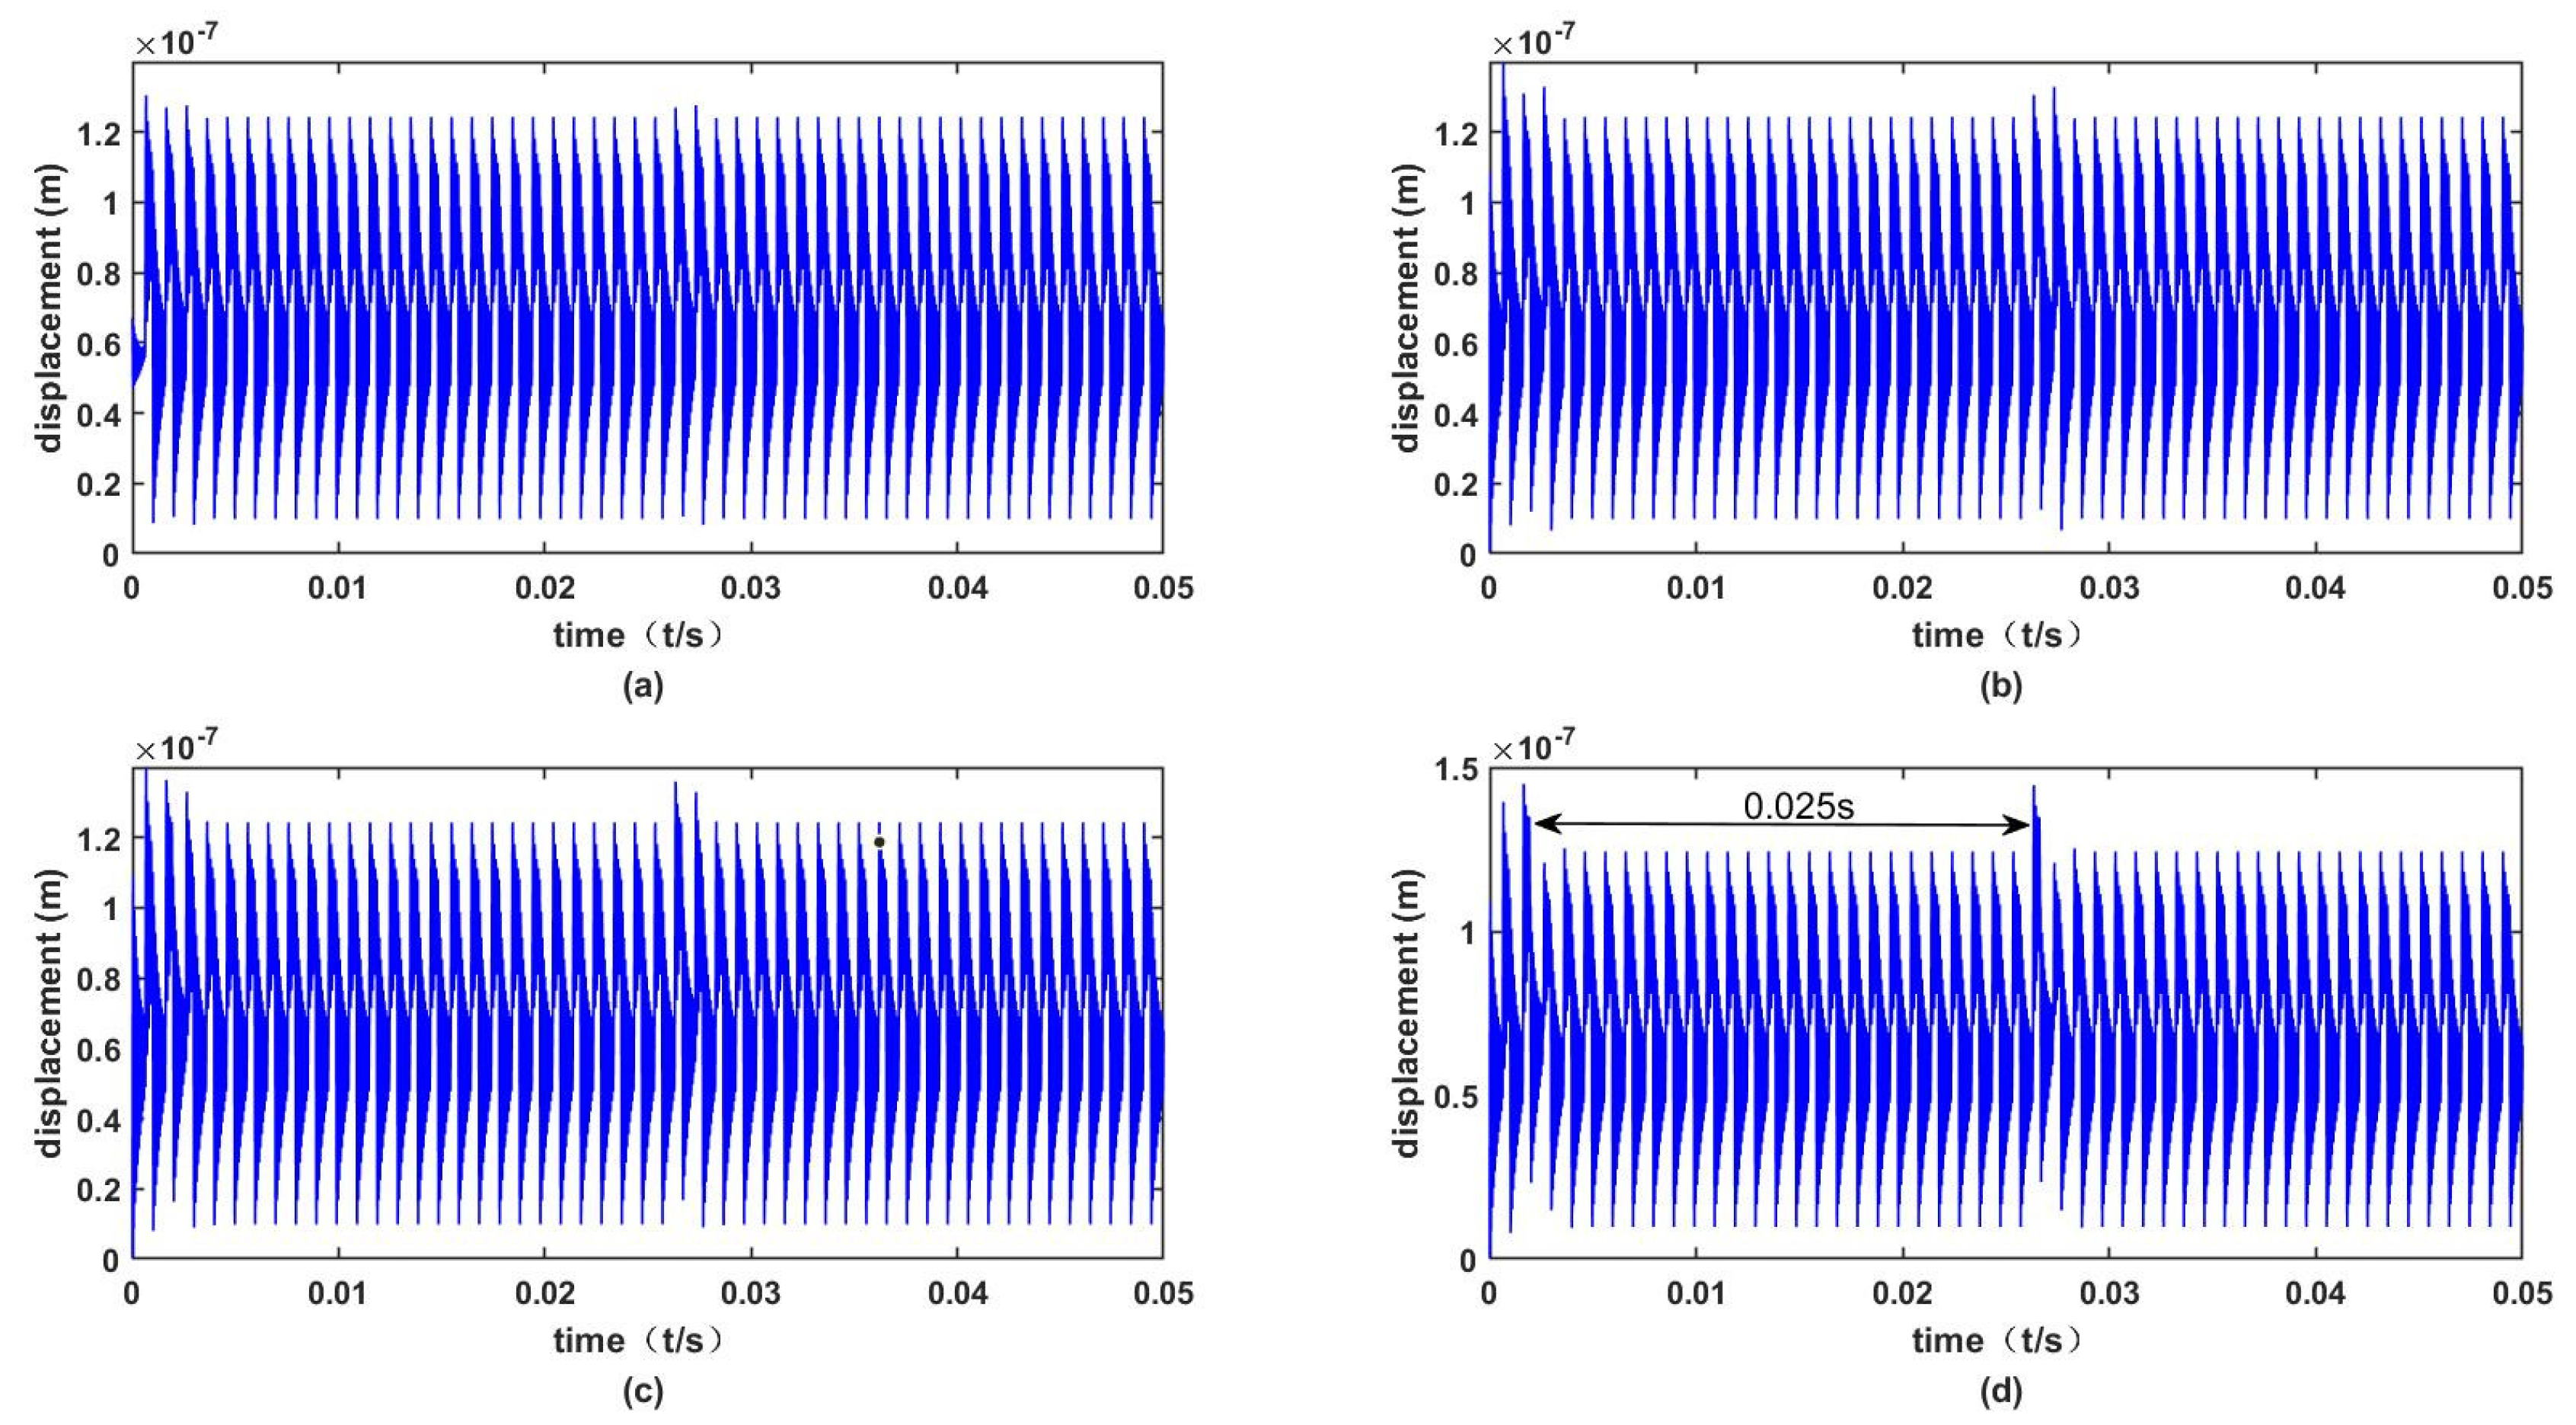
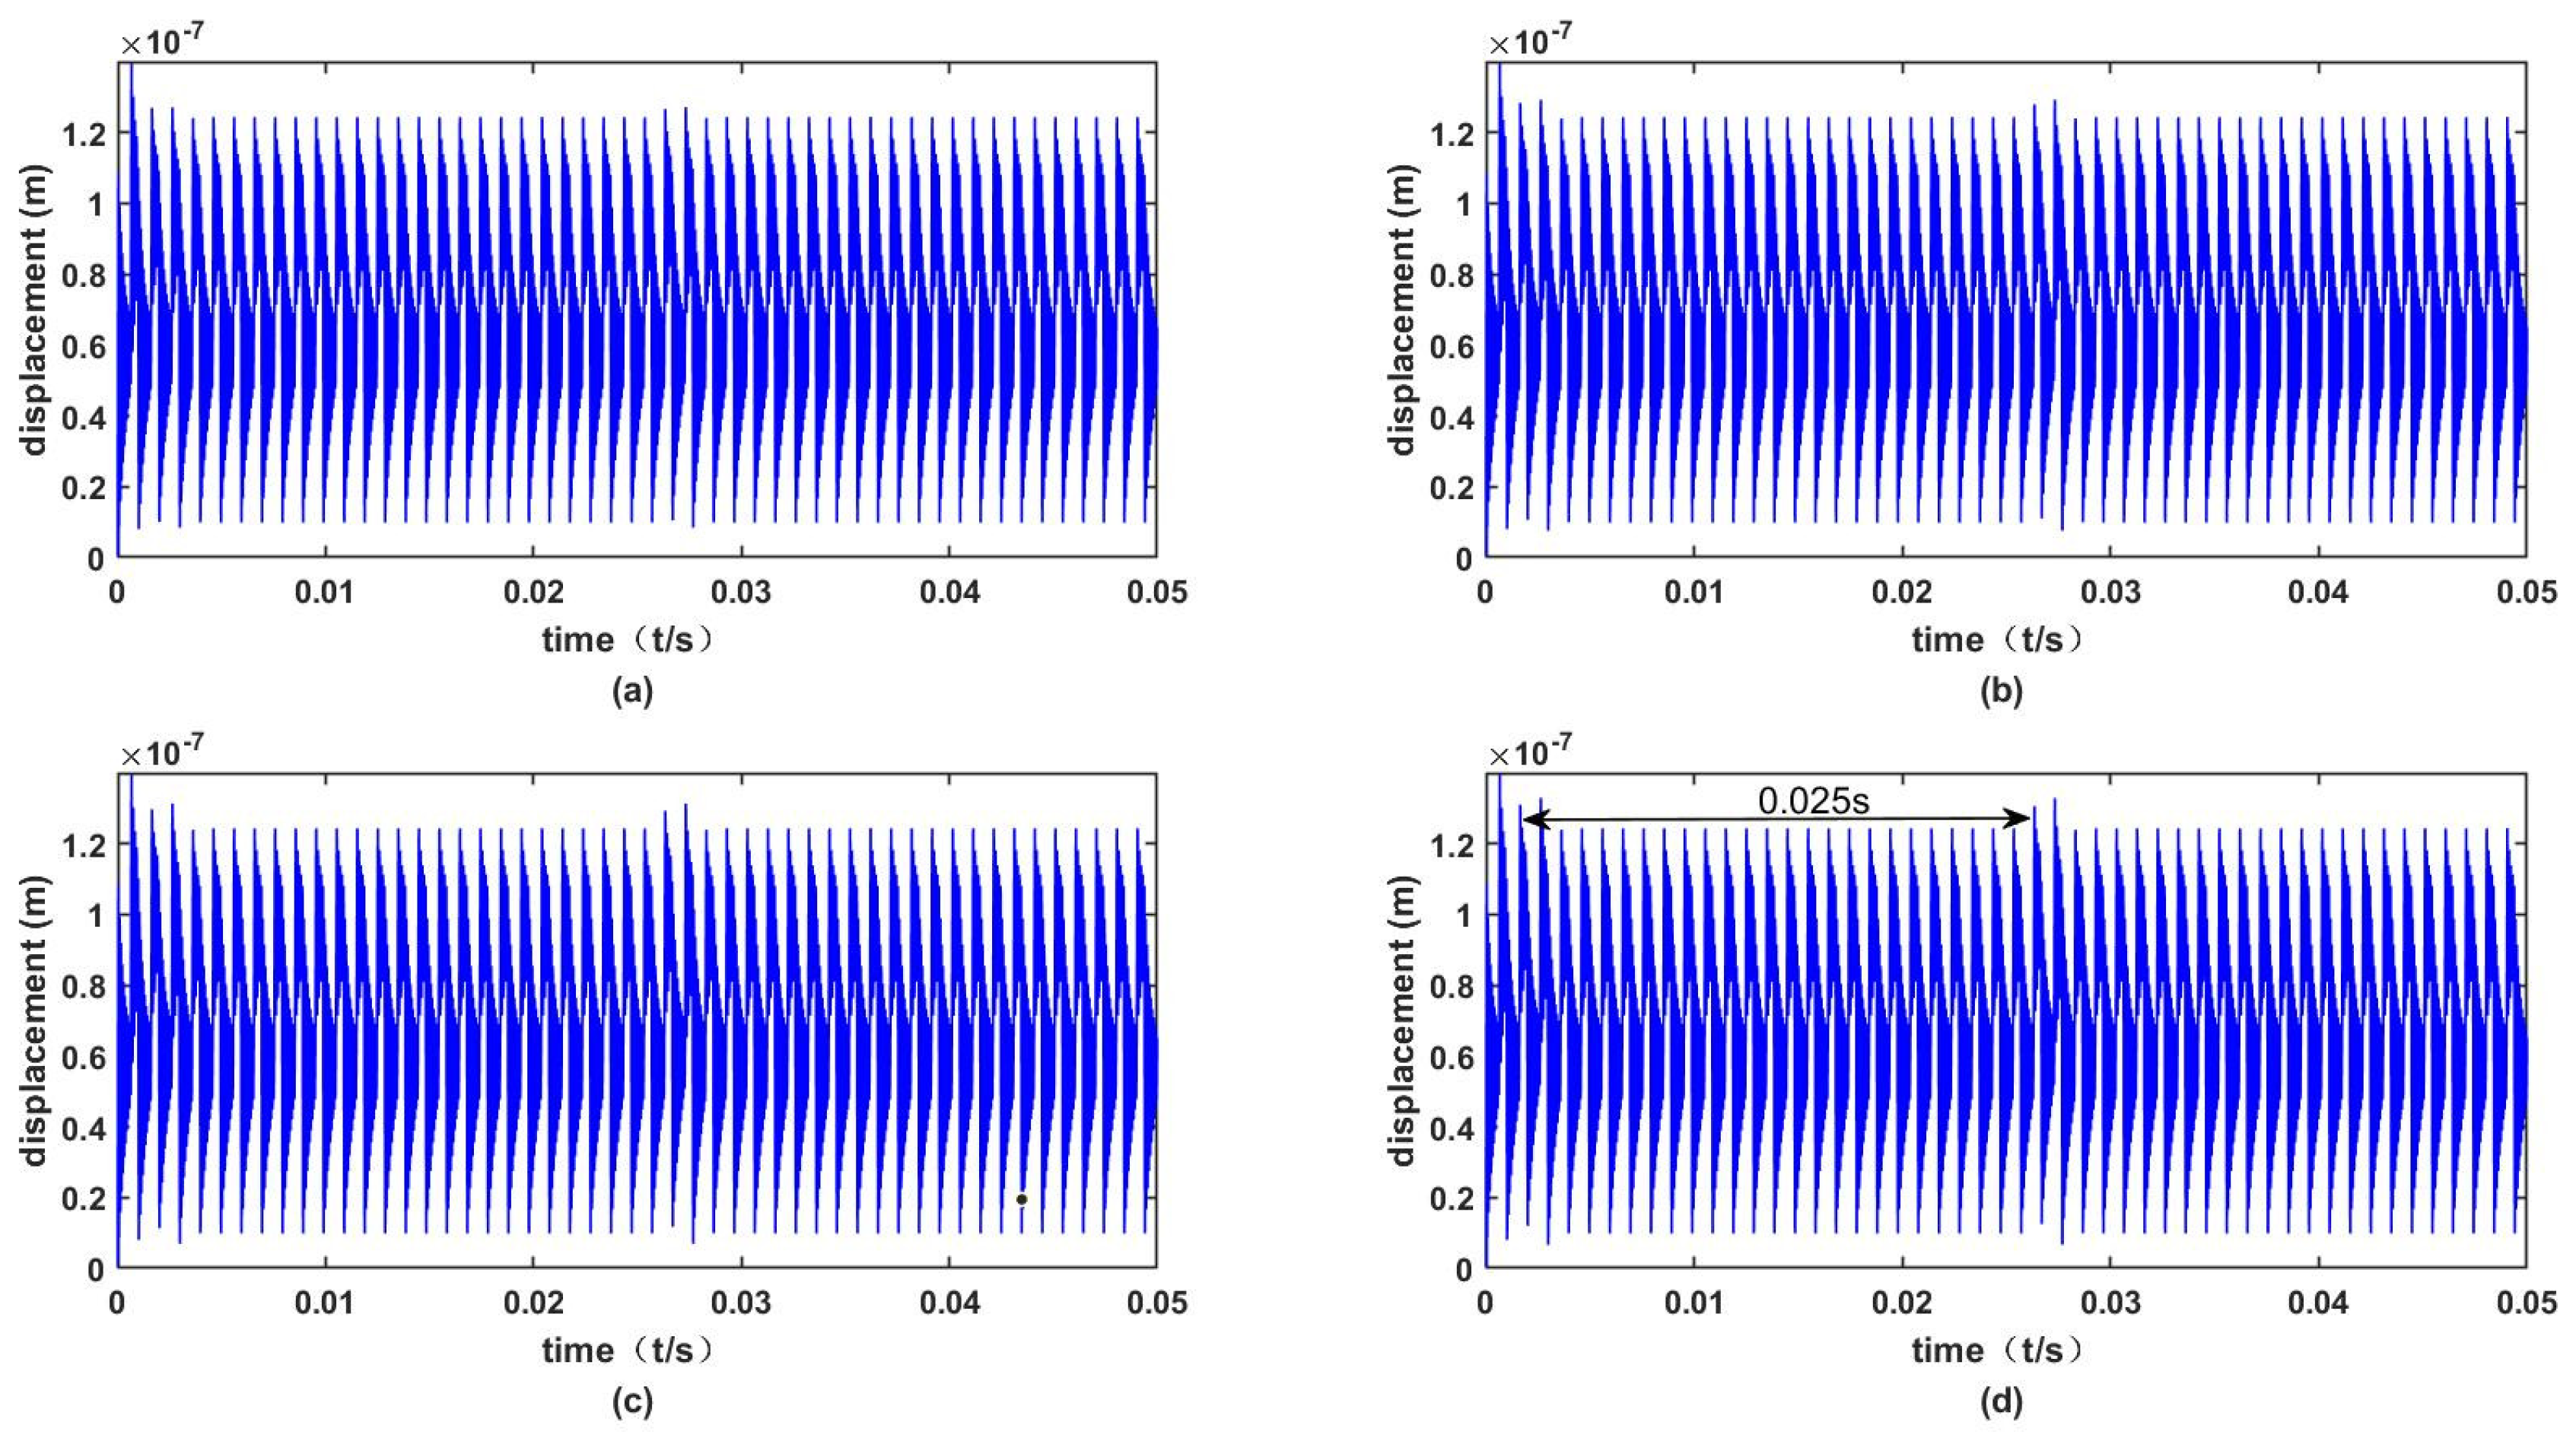
The calculated TVMS of the driving gear with different crack depths and angles was loaded into the centralized parameter solution model, and the Newmark numerical solution method was used to solve the model. It is assumed that a tooth of the driving gear has a crack and runs two revolutions at a specific time. The vibration response results obtained are shown in Figure 10, Figure 11 and Figure 12. It can be seen that when there is a crack fault in the gear, the periodic impact amplitude appears in the vibration signal, and the period is about 0.025 s, corresponding to the rotation period of the driving gear. As the crack expands, the vibration impact increases. There are 50 vibration signal amplitudes in the time domain signal corresponding to the engagement between the driving gear teeth and the driven gear for 50 times, and the driving gear works twice.
When the crack depth is 0.5 mm and the crack angle is 20°, the fault characteristics of the vibration signal are not obvious, indicating that the fault characteristics of the gear crack are very weak at the initial stage. When the crack angle is unchanged and the crack depth is 0.5 mm, the maximum vibration displacement is 1.28 × 10⁻⁷ m; when the crack depth is 1 mm, the maximum vibration displacement is 1.32 × 10⁻⁷ m; when the crack depth is 1.5 mm, the maximum vibration displacement is 1.36 × 10⁻⁷ m and the crack depth is 2 mm. The maximum vibration displacement is 1.45 × 10⁻⁷ m. When the crack depth increases from 0.5 mm to 2.0 mm, the maximum vibration displacement increases by about 13.3%. When the crack depth is 1 mm and the crack angle is 20°, the maximum vibration displacement is 1.27 × 10⁻⁷ m; when the crack angle is 30°, the maximum vibration displacement is 1.29 × 10⁻⁷ m; when the crack angle is 40°, the maximum vibration displacement is 1.31 × 10⁻⁷ m; when the crack angle is 50°, the maximum vibration displacement is 1.33 × 10⁻⁷ m. When the crack angle increases from 20° to 50°, the maximum vibration displacement increases by about 4.7%.
It can be seen that the vibration impact caused by the crack angle propagation is less obvious than that caused by the crack depth propagation, indicating that the damage caused by the crack depth propagation is more serious than that caused by the crack angle propagation. This is consistent with the law of TVMS reduction caused by cracks. By comparing it with the vibration signal of the gear without fault, the propagation degree of the gear crack can be identified, and the working state of the gear box can be monitored and warned. The dynamic response results obtained are similar to those in Ref. [1]. Compared with the results in Ref. [1], the dynamic response obtained by this model has more obvious pulse characteristics, which is more convenient for tooth crack fault diagnosis. The fault signal of the gear vibration response based on the TVMS is relatively obvious, so it is feasible to diagnose and predict the gear fault from the vibration signal time domain.

4.3. Discussions

Based on the mesh stiffness calculation methods and the dynamic model of spur gear transmissions, the effect of the tooth root crack on the dynamic response can be revealed. To summarize, it can be seen that the crack fault has a certain influence on the time-varying mesh stiffness and vibration response of the gear, and the crack fault will reduce the time-varying mesh stiffness and increase the vibration amplitude. However, when the crack depth and crack angle are small, these failure characteristics are not obvious. Therefore, it is necessary to find a method to highlight the fault characteristics of minor faults.
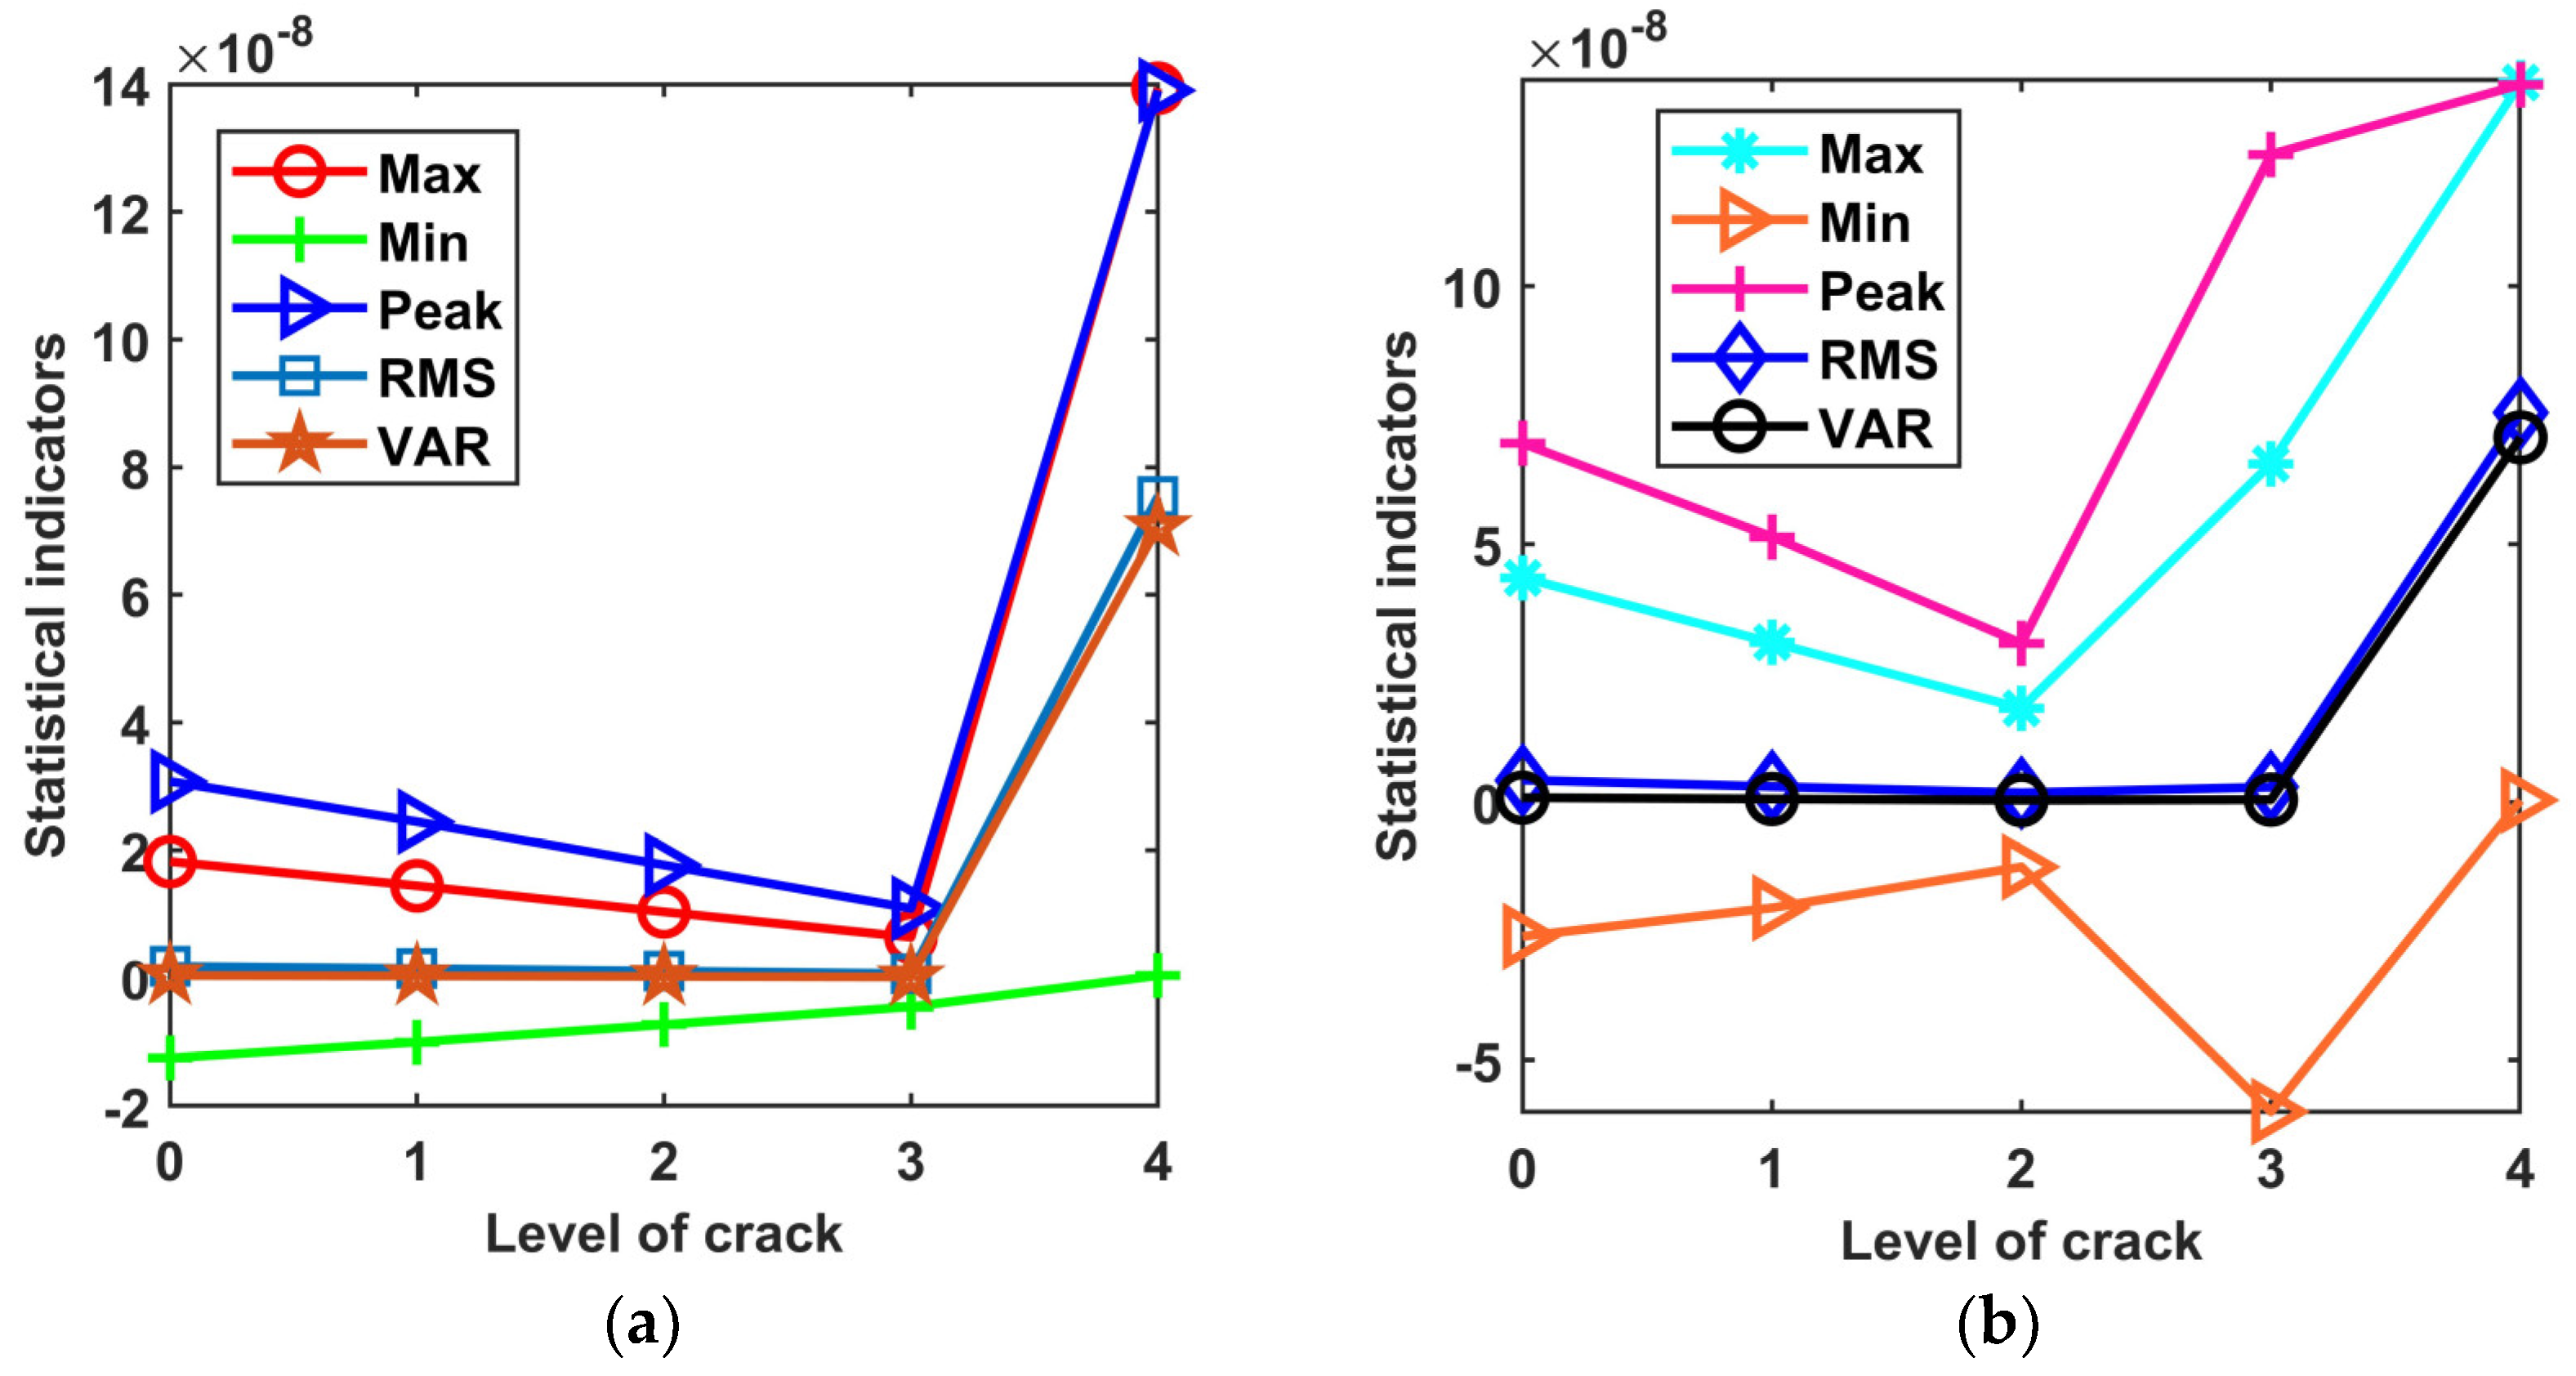
In order to further investigate the tooth crack effect, some statistical indicators are often used to evaluate the vibration level and fault characteristics. This method is extremely effective for monitoring tiny gear cracks. The original signals obtained in healthy conditions were regarded as regular signals, and the regular signals were removed from the original signals in fault conditions to remove the influence of regular vibration. The signal component generated by crack propagation is highlighted. In this study, residual signals are generated by this method, and five statistical indicators—namely, Max value, Min value, Peak value, RMS, and Variance—are used to assess the sensitivity of different crack faults to fault characteristics.
The crack depth and crack angle propagation were divided into five grades, with grade 0 representing the absence of faults in the system and grades 1–4 representing the propagation of the crack depth or angle. The statistical indicators of gears with different crack faults were calculated respectively, and the calculation results are shown in Figure 13. It can be seen that the variation of statistical indicators with the crack angle and crack depth has a similar regularity. As can be seen from Figure 13a, as the crack depth expands, all statistical indexes except for the minimum value decrease continuously and change significantly until the third crack level is reached. During the transition from level 3 to level 4, all statistical indicators except for the minimum showed an upward trend. The variation rules of the statistical indexes in Figure 13b are basically the same as those in Figure 13a, but the variation regularity of the statistical indexes with the crack depth is more obvious than that with the crack angle. The results show that the Max, Min, Peak, RMS, and Variance values are more sensitive to the early failure of gear cracks, which can be used to detect the early propagation of gear cracks and prevent the further deterioration of the crack fault. These results are expected to provide some theoretical guidance on the monitoring and diagnosis of gear tooth faults.

5. Conclusions

In this paper, the time-varying mesh stiffness model of spur gears is established by the potential energy method, and then a lumped parameter model is established. By introducing gear cracks into the model, the effects of gear crack depth and crack angle propagation on the time-varying mesh stiffness and vibration response are analyzed. Finally, statistical indexes are introduced to quantitatively evaluate the gear crack failure. The main conclusions are as follows:
(1)
The TVMS of gears is periodic, and the load sharing among healthy gears is uniform. It is feasible to use KISSsoft to verify the TVMS of gears.
(2)
As the crack expands, the TVMS of the gear reductions and the single tooth stiffness on both sides of the cracked region are also affected, increasing the gear LSR. The increase in crack depth has a more significant effect on the TVMS and LSR than on the crack angle. The most obvious reduction in stiffness occurs at the end of tooth engagement, and the LSR increases in the single tooth meshing area.
(3)
The fault characteristics of cracks highlighted by time-domain vibration signals are obvious, and the vibration impact of gears increases along with the increase in the crack depth and angle. The sensitivity of crack angle propagation to gear fault characteristics is lower than that of crack depth propagation. The fault signals of gear vibration responses based on TVMS are obvious, and it is feasible to diagnose and predict gear faults from time domain vibration signals.
(4)
The Max value, Min value, Peak value, and other statistical indicators are sensitive to the crack fault. These statistical indicators can be used to track the early development of gear cracks and prevent the further deterioration of the crack fault.

Author Contributions

Conceptualization, F.R. and D.W.; Methodology, G.S.; Software, D.W.; Formal Analysis, D.W.; Writing—Original Draft, D.W. and F.R.; Writing—Review & Editing, F.R., G.S. and X.W.; Language Revision and Polishing, G.S.; Data Curation and Visualization, D.W.; Supervision, F.R., G.S. and X.W.; Funding Acquisition, F.R. All authors have read and agreed to the published version of the manuscript.

Funding

This research was funded by the Science and Technology Research Project of Henan Province (Grant Nos. 202102210085, 172102210056), the Open Funding of Henan Key Laboratory of Intelligent Manufacturing of Mechanical Equipment (Grant No. IM201912), and the Doctoral Science Research Foundation of Zhengzhou University of Light Industry (Grant No. 2015BSJJ030).

Institutional Review Board Statement

Not applicable.

Informed Consent Statement

Not applicable.

Data Availability Statement

Not applicable.

Acknowledgments

The authors thank the editors and reviewers for their comments and help. All authors agree to submit for publication.

Conflicts of Interest

The authors declare no conflict of interest.

Appendix A

TVMSthe time-varying meshing stiffness
LSRthe load-sharing ratio
FEMthe finite element method
AMthe analytical method
a1the length between the tip fillet and center line
hthe distance from the tooth central line to the gear contact point
hxthe height of the section of which the distance from the tooth root is x
dthe distance from the gear root to the gear contact point
Lthe tooth width
R ρ the radius of the tip fillet
R r the radius of the root circle
R b >the radius of the base circle
R d the radius of the pitch circle
b1the length between the center of the cutter tip fillet and the centerline of the cutter groove
γthe variable parameter
α 0 the pressure angle
α 1 the rotation angle
α 2 the half tooth angle on the base circle
α 3 the approximated half tooth angle on the root circle
Kbthe bending stiffness
Ksthe shear stiffness
Kathe axial compression stiffness
Khthe hertz contact stiffness
Kfthe transition circular angle stiffness
Ubthe bending energy
Usthe shear energy
Uathe axial compression energy
Uhthe hertz energy
Ufthe circular angle foundation energy
Ethe Young’s modulus
Gthe Shear modulus
υ the Poisson’s ratio
Ixthe moment of inertia of the gear section
Axthe cross-sectional area
qcthe initial stage of the crack
cthe crack angle
Kijnthe stiffness of each gear tooth
fthe friction coefficient
Ffthe tooth surface friction force
rp, rgthe radius of the indexing circle of the main driving and driven gear
ythe relative slip of the tooth surface
Fpgthe meshing force
kmthe TVMS
cmthe meshing damping
ξ the meshing damping ratio of the gear pair
Mp, Mgthe moments generated by the friction force
ωthe angular velocity
mthe gear mass
Ithe gear moment of inertia
Tthe torque
kpx, kpy, kgx, kgythe support stiffness
cpx, cpy, cgx, cgythe support damping

References

  1. Meng, Z.; Shi, G.; Wang, F. Vibration response and fault characteristics analysis of gear based on time-varying mesh stiffness. Mech. Mach. Theory 2020, 148, 103786. [Google Scholar] [CrossRef]
  2. Xie, C.; Hua, L.; Lan, J.; Han, X.; Wan, X.; Xiong, X. Improved analytical models for mesh stiffness and load sharing ratio of spur gears considering structure coupling effect. Mech. Syst. Signal Processing 2018, 111, 331–347. [Google Scholar] [CrossRef]
  3. Pandya, Y.; Parey, A. Simulation of crack propagation in spur gear tooth for different gear parameter and its influence on mesh stiffness. Eng. Fail. Anal. 2013, 30, 124–137. [Google Scholar] [CrossRef]
  4. Chen, Z.; Shao, Y. Dynamic simulation of spur gear with tooth root crack propagating along tooth width and crack depth. Eng. Fail. Anal. 2011, 18, 2149–2164. [Google Scholar] [CrossRef]
  5. Chaari, F.; Fakhfakh, T.; Haddar, M. Analytical modelling of spur gear tooth crack and influence on gearmesh stiffness. Eur. J. Mech. a-Solids 2009, 28, 461–468. [Google Scholar] [CrossRef]
  6. Liang, X.; Zuo, M.J.; Pandey, M. Analytically evaluating the influence of crack on the mesh stiffness of a planetary gear set. Mech. Mach. Theory 2014, 76, 20–38. [Google Scholar] [CrossRef]
  7. Liu, Y.; Shi, Z.; Shen, G.; Zhen, D.; Wang, F.; Gu, F. Evaluation model of mesh stiffness for spur gear with tooth tip chipping fault. Mech. Mach. Theory 2021, 158, 104238. [Google Scholar] [CrossRef]
  8. Ren, F.; Wang, D.; Shi, G.; Liang, D.; Wang, N.; Wang, Q. Dynamic Analysis of Herringbone Planetary Gear Transmission System with Pitting Failure. J. Zhengzhou Univ. (Eng. Sci.) 2022, 43, 71–77. [Google Scholar] [CrossRef]
  9. Jiang, H.; Shao, Y.; Mechefske, C.K. Dynamic characteristics of helical gears under sliding friction with spalling defect. Eng. Fail. Anal. 2014, 39, 92–107. [Google Scholar] [CrossRef]
  10. Chen, W.; Lei, Y.; Fu, Y.; Hou, L. A study of effects of tooth surface wear on time-varying mesh stiffness of external spur gear considering wear evolution process. Mech. Mach. Theory 2021, 155, 104055. [Google Scholar] [CrossRef]
  11. Liu, X.; Yang, Y.; Zhang, J. Investigation on coupling effects between surface wear and dynamics in a spur gear system. Tribol. Int. 2016, 101, 383–394. [Google Scholar] [CrossRef]
  12. Shen, Z.; Qiao, B.; Yang, L.; Luo, W.; Chen, X. Evaluating the influence of tooth surface wear on TVMS of planetary gear set. Mech. Mach. Theory 2019, 136, 206–223. [Google Scholar] [CrossRef]
  13. Ma, H.; Zeng, J.; Feng, R.; Pang, X.; Wang, Q.; Wen, B. Review on dynamics of cracked gear systems. Eng. Fail. Anal. 2015, 55, 224–245. [Google Scholar] [CrossRef]
  14. Pandya, Y.; Parey, A. Experimental investigation of spur gear tooth mesh stiffness in the presence of crack using photoelasticity technique. Eng. Fail. Anal. 2013, 34, 488–500. [Google Scholar] [CrossRef]
  15. Raghuwanshi, N.K.; Parey, A. Experimental measurement of gear mesh stiffness of cracked spur gear by strain gauge technique. Measurement 2016, 86, 266–275. [Google Scholar] [CrossRef]
  16. Raghuwanshi, N.K.; Parey, A. Mesh stiffness measurement of cracked spur gear by photoelasticity technique. Measurement 2015, 73, 439–452. [Google Scholar] [CrossRef]
  17. Karpat, F.; Yuce, C.; Dugan, O. Experimental measurement and numerical validation of single tooth stiffness for involute spur gears. Measurement 2020, 150, 107043. [Google Scholar] [CrossRef]
  18. Kiekbusch, T.; Sappok, D.; Sauer, B.; Howard, I. Calculation of the Combined Torsional Mesh Stiffness of Spur Gears with Two- and Three-Dimensional Parametrical FE Models. Stroj. Vestn.-J. Mech. Eng. 2011, 57, 810–818. [Google Scholar] [CrossRef] [Green Version]
  19. Zhan, J.; Fard, M.; Jazar, R. A CAD-FEM-QSA integration technique for determining the time-varying meshing stiffness of gear pairs. Measurement 2017, 100, 139–149. [Google Scholar] [CrossRef]
  20. Liang, X.; Zhang, H.; Zuo, M.J.; Qin, Y. Three new models for evaluation of standard involute spur gear mesh stiffness. Mech. Syst. Signal Processing 2018, 101, 424–434. [Google Scholar] [CrossRef]
  21. Wu, J.; Yang, Y.; Wang, P.; Wang, J.; Cheng, J. A novel method for gear crack fault diagnosis using improved analytical-FE and strain measurement. Measurement 2020, 163, 107936. [Google Scholar] [CrossRef]
  22. Ma, H.; Zeng, J.; Feng, R.; Pang, X.; Wen, B. An improved analytical method for mesh stiffness calculation of spur gears with tip relief. Mech. Mach. Theory 2016, 98, 64–80. [Google Scholar] [CrossRef]
  23. Luo, W.; Qiao, B.; Shen, Z.; Yang, Z.; Cao, H.; Chen, X. Investigation on the influence of spalling defects on the dynamic performance of planetary gear sets with sliding friction. Tribol. Int. 2021, 154, 106639. [Google Scholar] [CrossRef]
  24. Zhang, K.; Zhou, T.; Shao, Y.; Wang, G. The influence of time-varying mesh stiffness on natural characteristics of planetary gear system. J. Phys. Conf. Ser. 2021, 1948, 012079. [Google Scholar] [CrossRef]
  25. Xiao, Z.; Cao, J.; Yu, Y. Mathematical Modeling and Dynamic Analysis of Planetary Gears System with Time-Varying Parameters. Math. Probl. Eng. 2020, 2020, 1–9. [Google Scholar] [CrossRef] [Green Version]
  26. Ma, H.; Song, R.; Pang, X.; Wen, B. Time-varying mesh stiffness calculation of cracked spur gears. Eng. Fail. Anal. 2014, 44, 179–194. [Google Scholar] [CrossRef]
  27. Jiang, H.; Liu, F. Analytical models of mesh stiffness for cracked spur gears considering gear body deflection and dynamic simulation. Meccanica 2019, 54, s11012–s11019. [Google Scholar] [CrossRef]
  28. Li, S.; Kahraman, A. A tribo-dynamic model of a spur gear pair. J. Sound Vib. 2013, 332, 4963–4978. [Google Scholar] [CrossRef]
  29. Zong, M.; Guixia, S.; Fulin, W.; Xuyang, Z.; Fengjie, F. Vibration Characteristic Analysis of Cracked Gear Based on Time-varying Meshing Stiffness. J. Mech. Eng. 2020, 56, 108–115. [Google Scholar] [CrossRef]
  30. Mo, S.; Zhang, Y.; Wu, Q.; Houjoh, H.; Matsumura, S. Research on natural characteristics of double-helical star gearing system for GTF aero-engine. Mech. Mach. Theory 2016, 106, 166–189. [Google Scholar] [CrossRef]
Figure 1. Geometric diagram of a gear tooth profile.
Machines 10 00664 g001
Figure 2. Geometric parameters of fillet foundation deflection.
Machines 10 00664 g002
Figure 3. Geometric diagram of gear teeth with cracks.
Machines 10 00664 g003
Figure 4. Time-varying mesh stiffness model of the spur gear.
Machines 10 00664 g004
Figure 5. Load sharing model of the gear pair.
Machines 10 00664 g005
Figure 6. TVMS of gears: (a) The result of the current method; (b) KISSsoft result.
Machines 10 00664 g006
Figure 7. TVMS and LSR with different crack depths: (a) TVMS; (b) LSR.
Machines 10 00664 g007
Figure 8. TVMS and LSR with different crack angles: (a) TVMS; (b) LSR.
Machines 10 00664 g008
Figure 9. Dynamic model of the spur gear transmission system.
Machines 10 00664 g009
Figure 10. Time domain diagram of fault-free vibration.
Machines 10 00664 g010
Figure 11. Vibration response with different crack depths. (a) Crack depth 0.5 mm. (b) Crack depth 1.0 mm. (c) Crack depth 1.5 mm. (d) Crack depth 2.0 mm.
Machines 10 00664 g011
Figure 12. Vibration response with different crack angles. (a) Crack angle 20°. (b) Crack angle 30°. (c) Crack angle 40°. (d) Crack angle 50°.
Machines 10 00664 g012
Figure 13. Statistical indicator curves. (a) Different crack depths. (b) Different crack angles.
Machines 10 00664 g013
Table 1. Coefficient values of the analytical formula for gear deflection (Reprinted/adapted with permission from Ref. [5], 2009, Chaari, F.)
ABCDEF
L*−5.574 × 10⁻⁵−1.9956 × 10⁻³−2.3105 × 10−44.77021 × 10−30.02716.8045
M*60.11 1 × 10−528.1 × 10⁻³−8.3431 × 10⁻⁴−9.9256 × 10−30.16240.9086
P*−50.95 2 × 10−5188.50 × 10−30.0538 × 10−453.300 × 10−30.28950.9236
Q*−6.204 2 × 10−59.0889 × 10−3−4.0964 × 10−47.8297 × 10−3−0.14720.6904
Table 2. Design parameters for the pinion and gear.
ParameterPinionGear
Module (mm)22
Number of teeth2530
Teeth width (mm)2020
Pressure angle20°20°
Young’ modulus E (N/mm2)2 × 1052 × 105
Poisson’s ratio0.30.3
Mass (kg)0.310.44
Radial stiffness in x, y direction (N/m)6.7 × 1086.7 × 108
Radial damping in x, y direction N/(m/s)1.8 × 1031.8 × 103
Publisher’s Note: MDPI stays neutral with regard to jurisdictional claims in published maps and institutional affiliations.