Article

Development and Experimental Verification of a High-Temperature and In-Plane Biaxial Testing Apparatus

1
School of Mechanical and Aerospace Engineering, Jilin University, Changchun 130022, China
2
Key Laboratory of CNC Equipment Reliability, Ministry of Education, Jilin University, Changchun 130022, China
3
Chongqing Research Institute, Jilin University, Chongqing 401120, China
*
Author to whom correspondence should be addressed.
Machines 2022, 10(11), 1054; https://doi.org/10.3390/machines10111054
Submission received: 30 September 2022 / Revised: 4 November 2022 / Accepted: 7 November 2022 / Published: 10 November 2022
(This article belongs to the Section Material Processing Technology)

Abstract

:
Given the lack of primary data on heat-resistant composites under high-temperature conditions, the focus of this paper is the development of an in-plane biaxial apparatus under high temperatures and complex loads. Besides loading complex loads up to 80 kN, the apparatus can load under high-temperatures up to 2500 °C. A C/C tensile/compression test at 1700 °C illustrates the successful use of high-temperature digital speckle pattern technology to evaluate the in-plane mechanical properties of heat-resistant composites at 1700 °C under biaxial stress. A high-temperature impact test of a graphite specimen at 2500 °C shows that this apparatus can load at a high temperature in a vacuum and inert gas atmosphere. The yield characteristics of the Q235 steel sheet under in-plane stress show that the apparatus can conduct various mechanical loads, including tension–tension, tension–compression, and compression–compression loads. The proposed equipment can measure the in-plane mechanical properties of composite materials, particularly heat-resistant composites. The obtained results can be applied to structural design, life prediction, and reliability evaluation, as well as for the development, research, and design of aerospace instruments and critical materials.

1. Introduction

As aerospace science and technology advance, critical components are exposed to high temperatures and complex stresses, resulting in rigorous demands on the service characteristics, durability, and strength of heat-resistant composites. Typically, heat-resistant composites are found in components such as aeroengine turbine blades, brake pads on space shuttles, solid rocket engine tailpipes, engine tailpipes, and missile nose cones, which are subjected to high temperatures and complex stresses.
Research into the mechanical properties of heat-resistant composites is a top priority worldwide. Heat-resistant composites are commonly used as surfaces for critical components to isolate high temperatures. The in-plane biaxial stress is the closest to that experienced in service by heat-resistant composites. To ensure that heat-resistant composites remain stable, reliable, and durable throughout their service life, it has become essential to develop a testing apparatus capable of effectively testing their mechanical properties under high temperatures and in-plane biaxial stresses (HTIPTA).

1.1. Test Methods of Biaxial Stress

The strength of a material under complex stress is used to evaluate a product’s strength. The study of strength theory includes the evaluation of yield and failure criteria, multiaxial fatigue and creep conditions, and constitutive materials models. Complex stress strength theory faces challenges owing to the lack of testing methodologies. Developing a solid understanding of strength theory is essential both in theory and engineering practice to predict the behavior of materials under complex stresses.
The in-plane properties of composites and sheet metal could be more accurately predicted by in-plane biaxial testing. Biaxial or multiaxial stress should be studied to understand the mechanical properties of composite materials [1]. The automotive, aerospace, and aviation industries heavily rely on composite materials. Obtaining data on the multiaxial mechanical properties of composites is challenging, owing to the lack of evaluation methods for composites under complex stresses [2]. Extrapolation of multiaxial failure criteria from uniaxial test results is not recommended.
Identifying the evolution law of mechanical properties of sheet metal materials under a biaxial stress condition is crucial to speed product development and enhance product quality at a reduced cost [3,4]. Sheet metal materials are subjected to standard uniaxial tensile tests to gather information regarding their strength and durability in response to mechanical loads, including yield strength, tensile strength, and work-hardening index. Deformation caused by biaxial stresses cannot be assessed using uniaxial tensile tests because most metal forming occurs under biaxial stresses [5].
Various methods have been used to induce biaxial stresses in materials. The definition of stress state by biaxial testing is essential to the design of an in-plane biaxial testing apparatus. The following methods have been used to determine biaxial stress states:
(1)
Biaxial stresses can be induced by bending through beams and thin plates [6,7]. An aluminum alloy was tested by Hazell using a diamond-shaped composite plate made of glass fiber honeycomb structures sandwiched between two thin aluminum plates, which allowed for examination of the material mechanical properties in two-dimensional stress spaces in the second and fourth quadrants [8].
(2)
Biaxial stress can be generated by the bulging test. Such tests were conducted by the American scholar Bird and the Russian scholar Lukyanov on round and flat oval specimens [9,10,11].
(3)
Biaxial stress states can be generated by tensile, compressive, or torsional loads applied to thin-walled tubes [12]. Despite the flexibility of this test, as it allows any continuous stress or strain ratio to be used, achieving any stress or strain path for a principal stress direction is impossible.
(4)
The most realistic way to create biaxial stress conditions in plates is to apply in-plane loads to the arms of a cruciform specimen in two vertical directions. Various types of load application apparatus have been proposed [2,12,13,14,15].
Biaxial stress has been produced using experimental procedures and specimens. There are two types of loading apparatus [16]: (a) a single loading apparatus or (b) multiple independent loading apparatus. Tests involving bending of cantilever beams and plastic bending of diamond composite plates [8], as well as bulging tests [10], are examples of the first category [8,9,10]. Biaxial stress can be achieved with in-plane stresses applied along both vertical arms of a cruciform specimen. Hayhurst (1973) developed a biaxial creep testing apparatus using a deadweight lever that applies load and strain to a rope between pulleys [17]. When only one actuator is used for each loading direction [18], the specimen’s center changes during testing, which may cause it to bend. Using two actuators [19] and a closed-loop servo control, the University of Brussels [20] and Qinetiq (Farnborough, Hampshire, England) [21] developed a biaxial testing apparatus that allows the specimen center to remain fixed throughout the testing process.
Table 1 summarizes the advantages and disadvantages of the four methods that can be used to generate biaxial stress.

1.2. In-Plane Biaxial Test Apparatus

In-plane biaxial testing allows a cruciform specimen to be stressed and stretched simultaneously in two directions, which enables the evaluation of the specimen’s stress–strain curve under different stress ratio/strain ratios and variable path loadings. According to Green (2004) [4], relatively few studies have been conducted on the properties of sheet metal under biaxial tension. Different directions of the plane biaxial mechanical property testing apparatus are independently controlled. The difficulties in developing an in-plane biaxial apparatus lie in designing a loading apparatus that can realize bidirectional loading and ensuring that the loading axis has sufficient loading coaxiality; the four actuators remain in synchronous motion during the loading process.
A biaxial apparatus are classified according to installation direction, dynamic transposition, test temperature, etc. Biaxial plane apparatus are divided into horizontal and vertical structures based on the installation direction of the frame. Room temperature and a high temperature are determined by testing the temperature.

1.2.1. Horizontal Structure

Makinde (1992) developed a biaxial testing machine comprising two primary parts: a loading apparatus and a measurement and control apparatus [13]. Cruciform specimens have been tested with the above biaxial equipment under low and high strains. The characteristics of the forming limit curve (FLC) of sheet metal were studied using a servohydraulic testing machine developed by Liu (2016) that is equipped with four actuators that can be controlled independently [22]. There are six independent controlled shafts on Wu’s biaxial tensile tester, and each shaft is driven by a hydraulic cylinder [12].
The design of a cruciform biaxial tensile testing machine requires that the center of the specimen remains unchanged during the experiment. To solve this problem, a uniaxial testing machine with a load capacity of 10 kN is available [23]. Changing the angle of this mechanism enables control of the load on each arm. Through experiments, Kuwabara (1998) et al. clarified the elastic and plastic deformation behavior of cold-rolled low-carbon steel under biaxial tension. Kuwabara developed a servo-type horizontal frame biaxial tensile testing apparatus [24]. Each hydraulic cylinder in the same loading direction is connected to the same hydraulic pipeline to ensure that the same load is applied to each cylinder; the same servo controller controls the hydraulic pipeline.

1.2.2. Vertical Structure

Boehler developed an independent apparatus to generate biaxial force (1994) et al. Located on an octagonal vertical frame, the apparatus comprises four double-acting, screw-driven pistons [2]. Two double-acting screws drive the piston in each direction to prevent specimen movement during the test.
A planar biaxial test apparatus developed by Lin (1995), which comprises two end plates, four tie bars, a counterweight, and a manual actuator connected to load cells [25]. Two chains apply vertical and horizontal loads to the cruciform specimen. In contrast to the testing machine mentioned above, two drivers are mounted vertically in the cross-tensile testing machine, and specimens are positioned parallel to the horizontal plane. Each specimen clamp is hinged to achieve self-exchange, enabling independent measurement of the friction loss in each cross-shaped specimen.
Owing to its stability and balance, the vertical frame has become the standard planar biaxial testing apparatus design. The stress–strain curve and initial yield surface of stainless steel were determined using a plane tension/compression testing apparatus developed by Kulawinski (2015) [26]. Lamkanfi (2015) developed another plane biaxial testing apparatus with a maximum load of 1500 kN [27].
Table 2 summarizes the advantages and disadvantages of vertical and horizontal biaxial testing equipment.

1.3. High-Temperature In-Plane Biaxial Apparatus

Terriault (2003) developed a cruciform biaxial tensile apparatus for high temperatures. High-temperature apparatus have been used to investigate the biaxial tensile strength of metal plates [28]. Brunschi (2014), an Italian scholar, conducted a biaxial tensile test using a laser beam, a heating gun, and other methods [29]. Geiger (2005) [30] heated an alloy specimen made from magnesium alloy to 350 °C using a laser beam.
Chevalie (2017) examined the effect of temperature regulation on the dispersion of test results using infrared lamps [31]. Farha used hot air guns to examine the quasistatic deformation behavior of AA5083, Mg AZ31B, and TWIP steels at 300 °C, covering the specimen’s measurement area and reaching temperatures of 350 °C; this method can also be used for high-temperature tests [32].
A high-power heating apparatus has been used to reach the high recrystallization temperatures required for some materials. Kulawinski (2014) et al. used a servohydraulic biaxial plane tension–compression machine and a cylindrical induction coil to heat a specimen before the gauge length area [33]. K-type thermocouples were used to measure temperature and feed into a temperature controller. Temperatures up to 650 °C were reached during the test.
Xiao Rui developed an in-plane biaxial testing apparatus with a maximum loading temperature of 800 °C and an environmental chamber for high-temperature testing [34]. Located on the horizontal workbench of the machine, the high-temperature environment box produces a high-temperature atmosphere with temperatures ranging from average to 800 °C.
Hot-stamping and cold die-quenching processes have been tested using a new biaxial testing apparatus [35]. Using an infrared thermal imaging (IRT) apparatus, researchers used a two-dimensional thermal diffusion equation to reconstruct the heat source corresponding to the temperature field on the specimen surface [36].
Table 3 summarizes the advantages and disadvantages of different heating methods for cruciform specimens.
In-plane mechanical properties of heat-resistant composites and metal sheets are vital for the design of structures and products, the manufacturing of national defense equipment, prediction of life expectancy, and evaluation of reliability. In this paper, we address the development of an in-plane biaxial tension/compression testing apparatus under high-temperature conditions. The development of a in-plane biaxial test apparatus described herein will provide the basis for understanding the evolution law of material strength and the design of heat-resistant composites subjected to complex loads and high temperatures.

2. Development of the HTIPTA

The biaxial tension/compression loading should achieve quasistatic loading at low speeds with adequate loading capacity and compact structure. The proposed test point should always be centrally located within the field of view of the digital speckle imaging system. During high-temperature loading, the gauge zone of the cruciform specimen will be heated to 2500 °C, and the coil current will reach temperatures of 2500 °C or higher.

2.1. General Principle

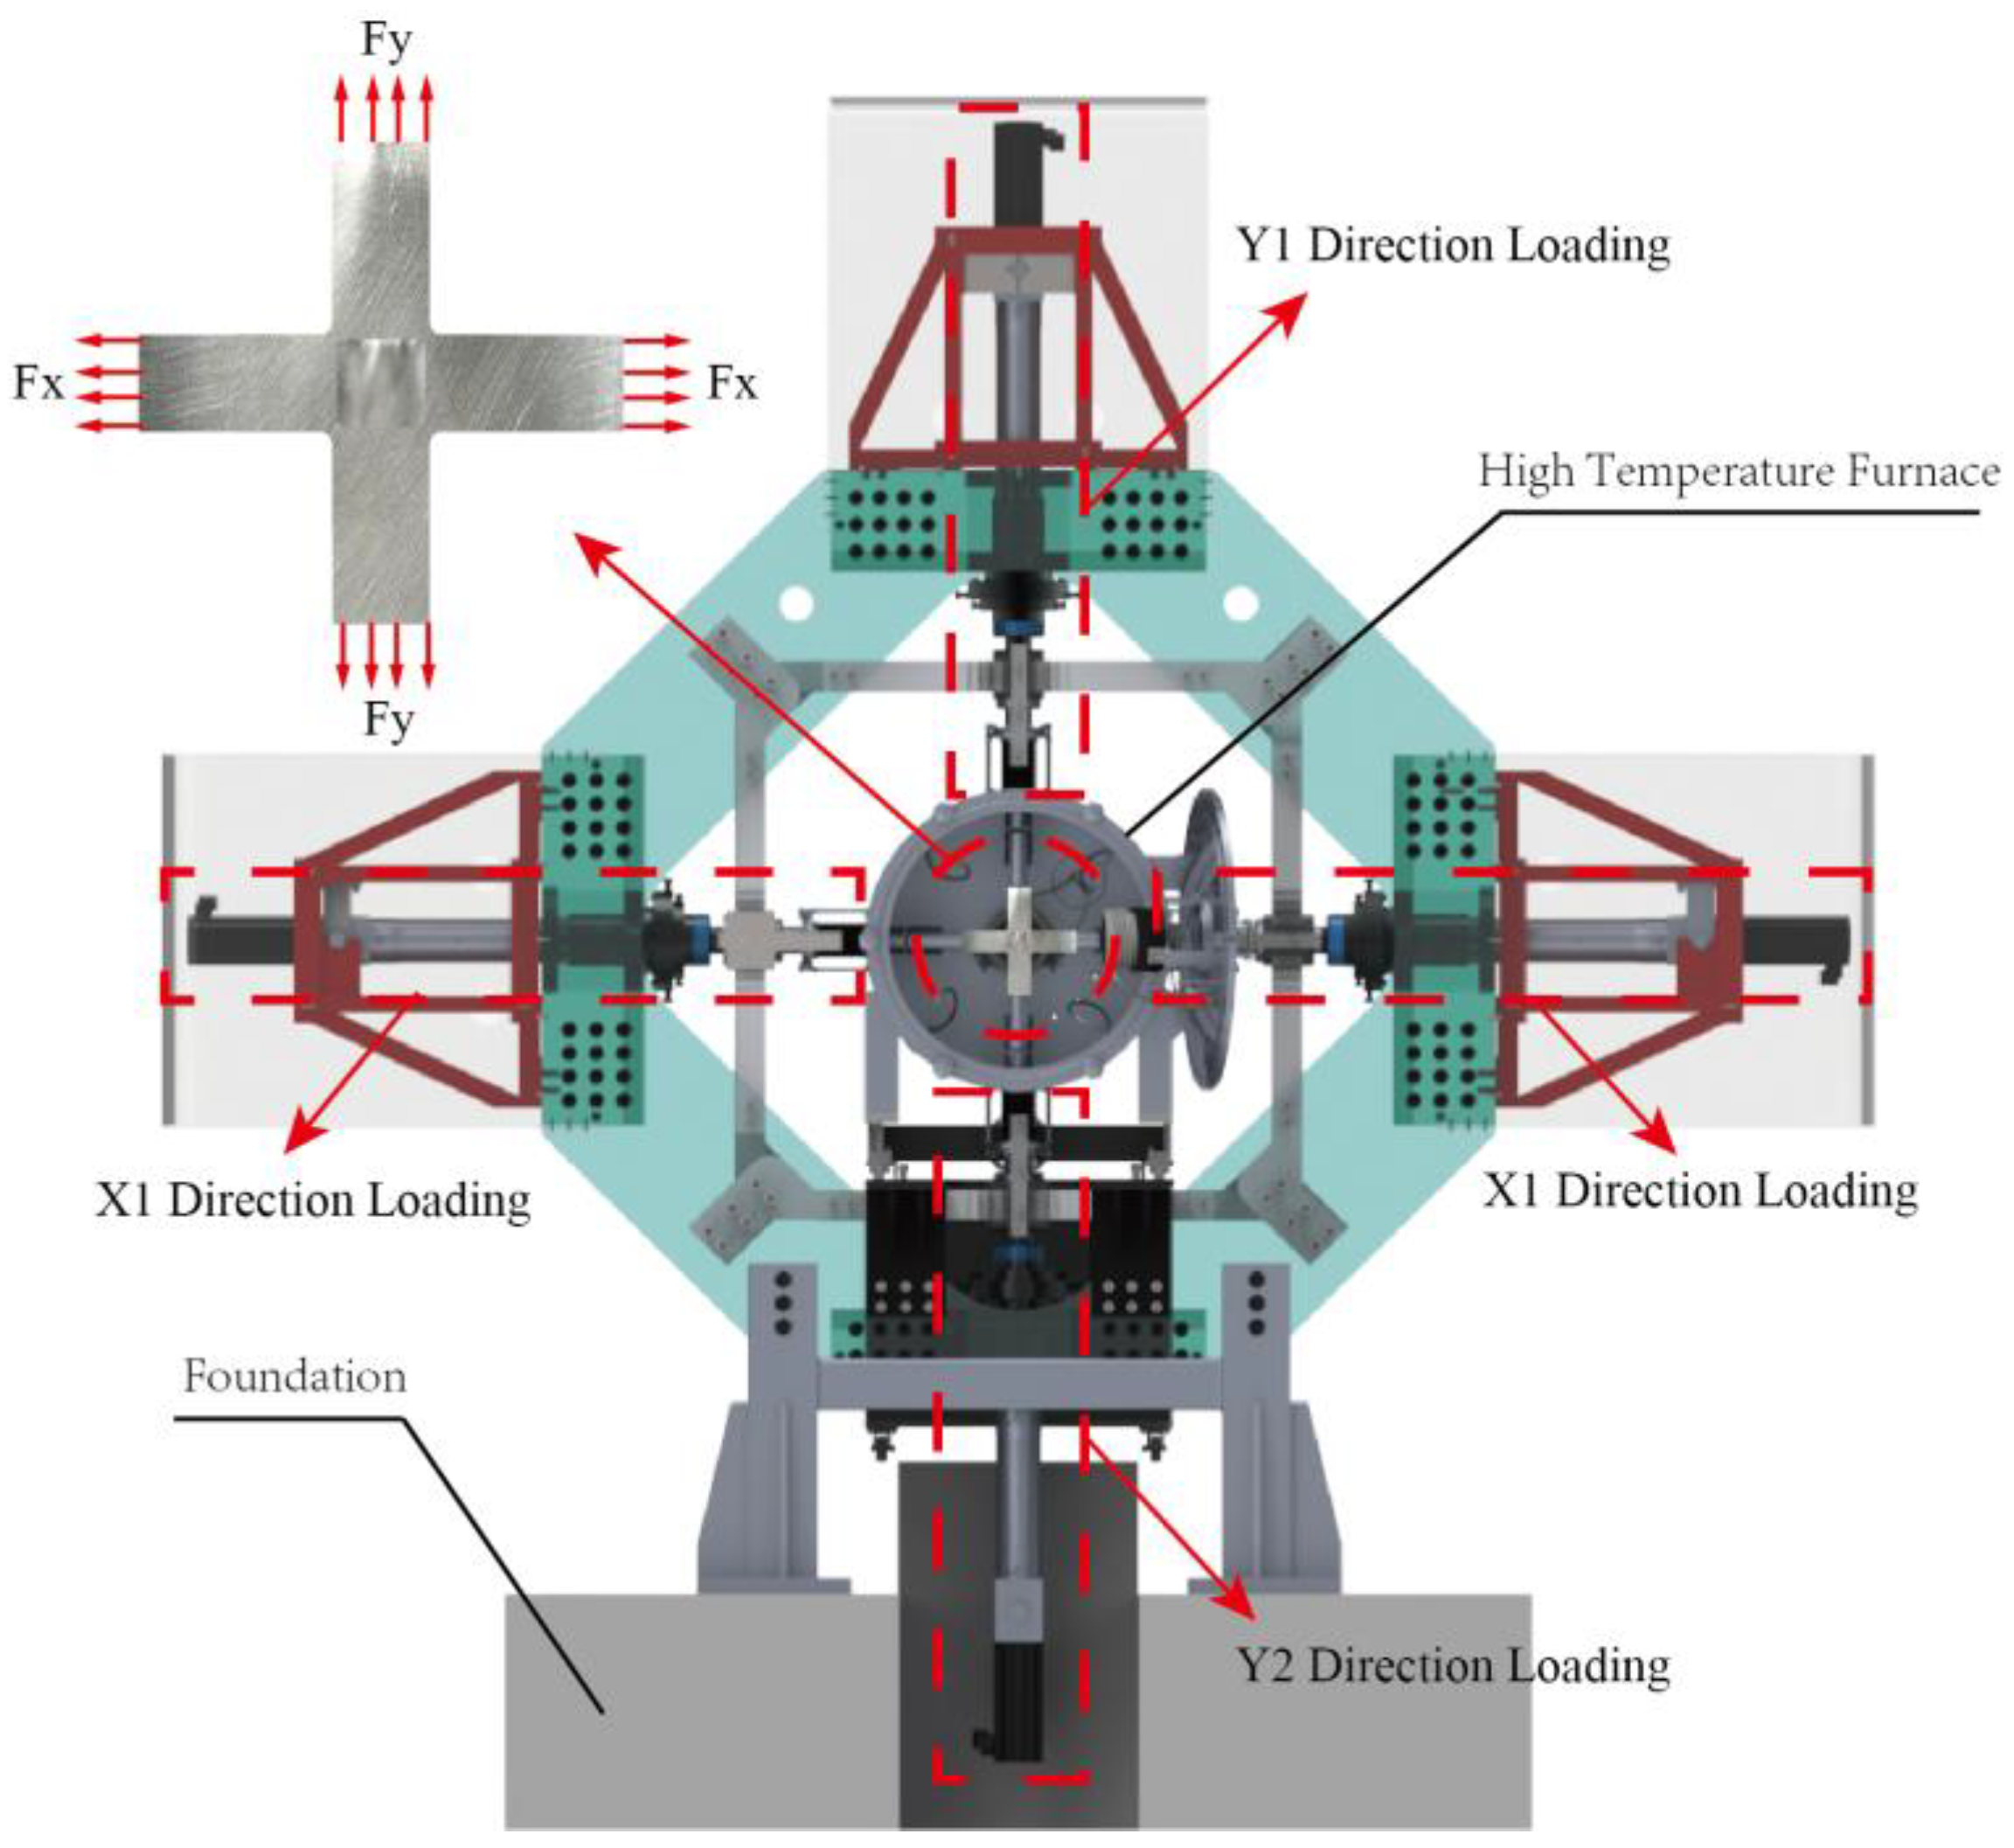
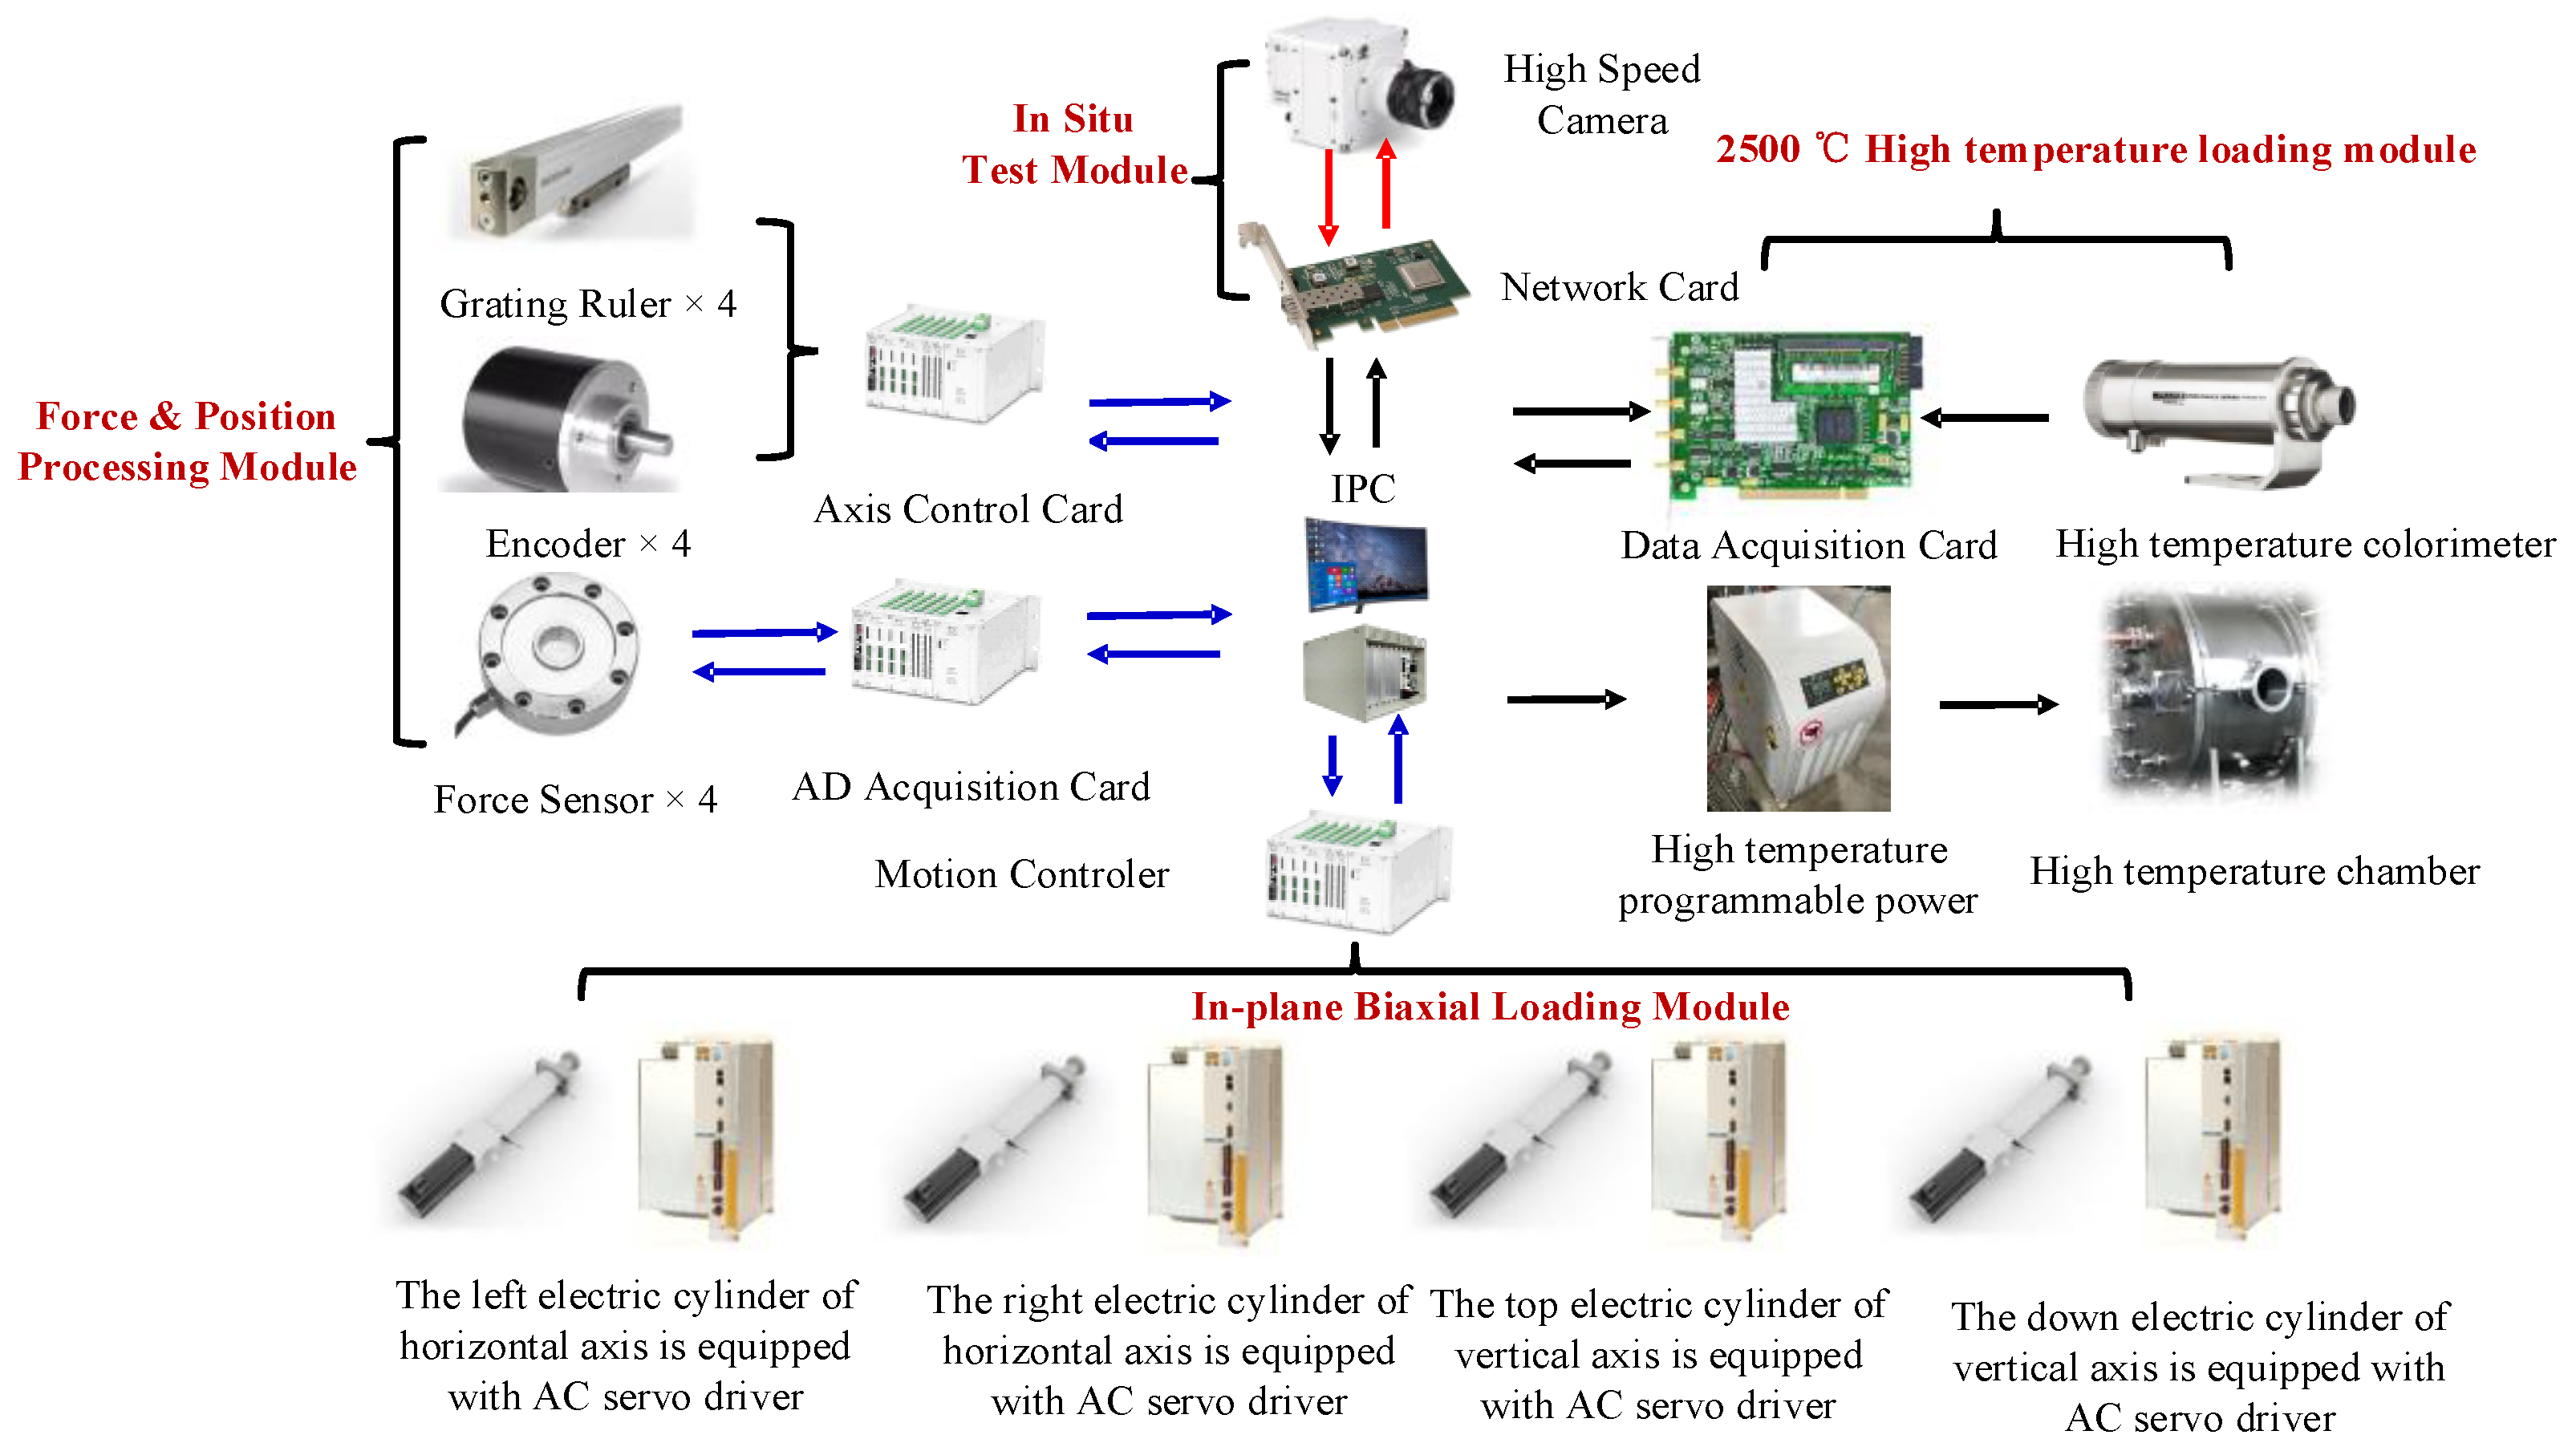
Figure 1 illustrates the apparatus used to test the mechanical properties of materials at high temperatures and in planes. The in-plane mechanical properties of materials are measured with a biaxial material property testing apparatus comprising a modular structure with a seamless heavy frame. To ensure that the host frame complies with biaxial loading requirements, all components should be carefully checked and calculated. An electric cylinder is used as a driving technology in power apparatus. The test apparatus utilizes a nonlinear sensor calibration detection technology to ensure long-term stability and accurate motion transmission. The equipment is capable of conducting a biaxial tensile/compression test with an 80 kN static load and a 30 kN dynamic load (loading frequency, 15 Hz; amplitude, 1 mm). As part of the mechanical testing process, various materials, such as C/C (carbon matrix, continuous carbon fiber reinforcement), SiC/SiC (silicon carbide matrix, continuous silicon carbide reinforcement), SiC/C (carbon matrix, continuous silicon carbide reinforcement), and C/SiC (silicon carbide matrix, continuous carbon fiber reinforcement) can be tested at high temperatures and under complex stress for the purpose of determining their mechanical properties.

2.2. In-Plane Biaxial Loading Mold

Thermal protection composite material is critical to the design and development of advanced thermal protection apparatus. The working conditions of heat-resistant composites are harsh and subject to complex stresses. In this paper, we discuss the development of a biaxial test apparatus that simulates the actual service conditions of heat-resistant composites under complex loading conditions and high temperatures to determine their mechanical properties. While performing biaxial tension and compression tests, it is possible to load complex loads (tension–tension, tension–compression, and compression–compression), ensuring that the test point is always in the center of the digital correlation imaging field of view.
The characteristics of the biaxial material mechanical property testing apparatus are analyzed in horizontal and vertical configurations using the specific requirements and test conditions described in this paper. The biaxial material mechanical property testing apparatus developed in this paper has a vertical configuration owing to the combination of in situ testing technology, the experimental site, and the high-temperature test of heat-resistant composite materials.
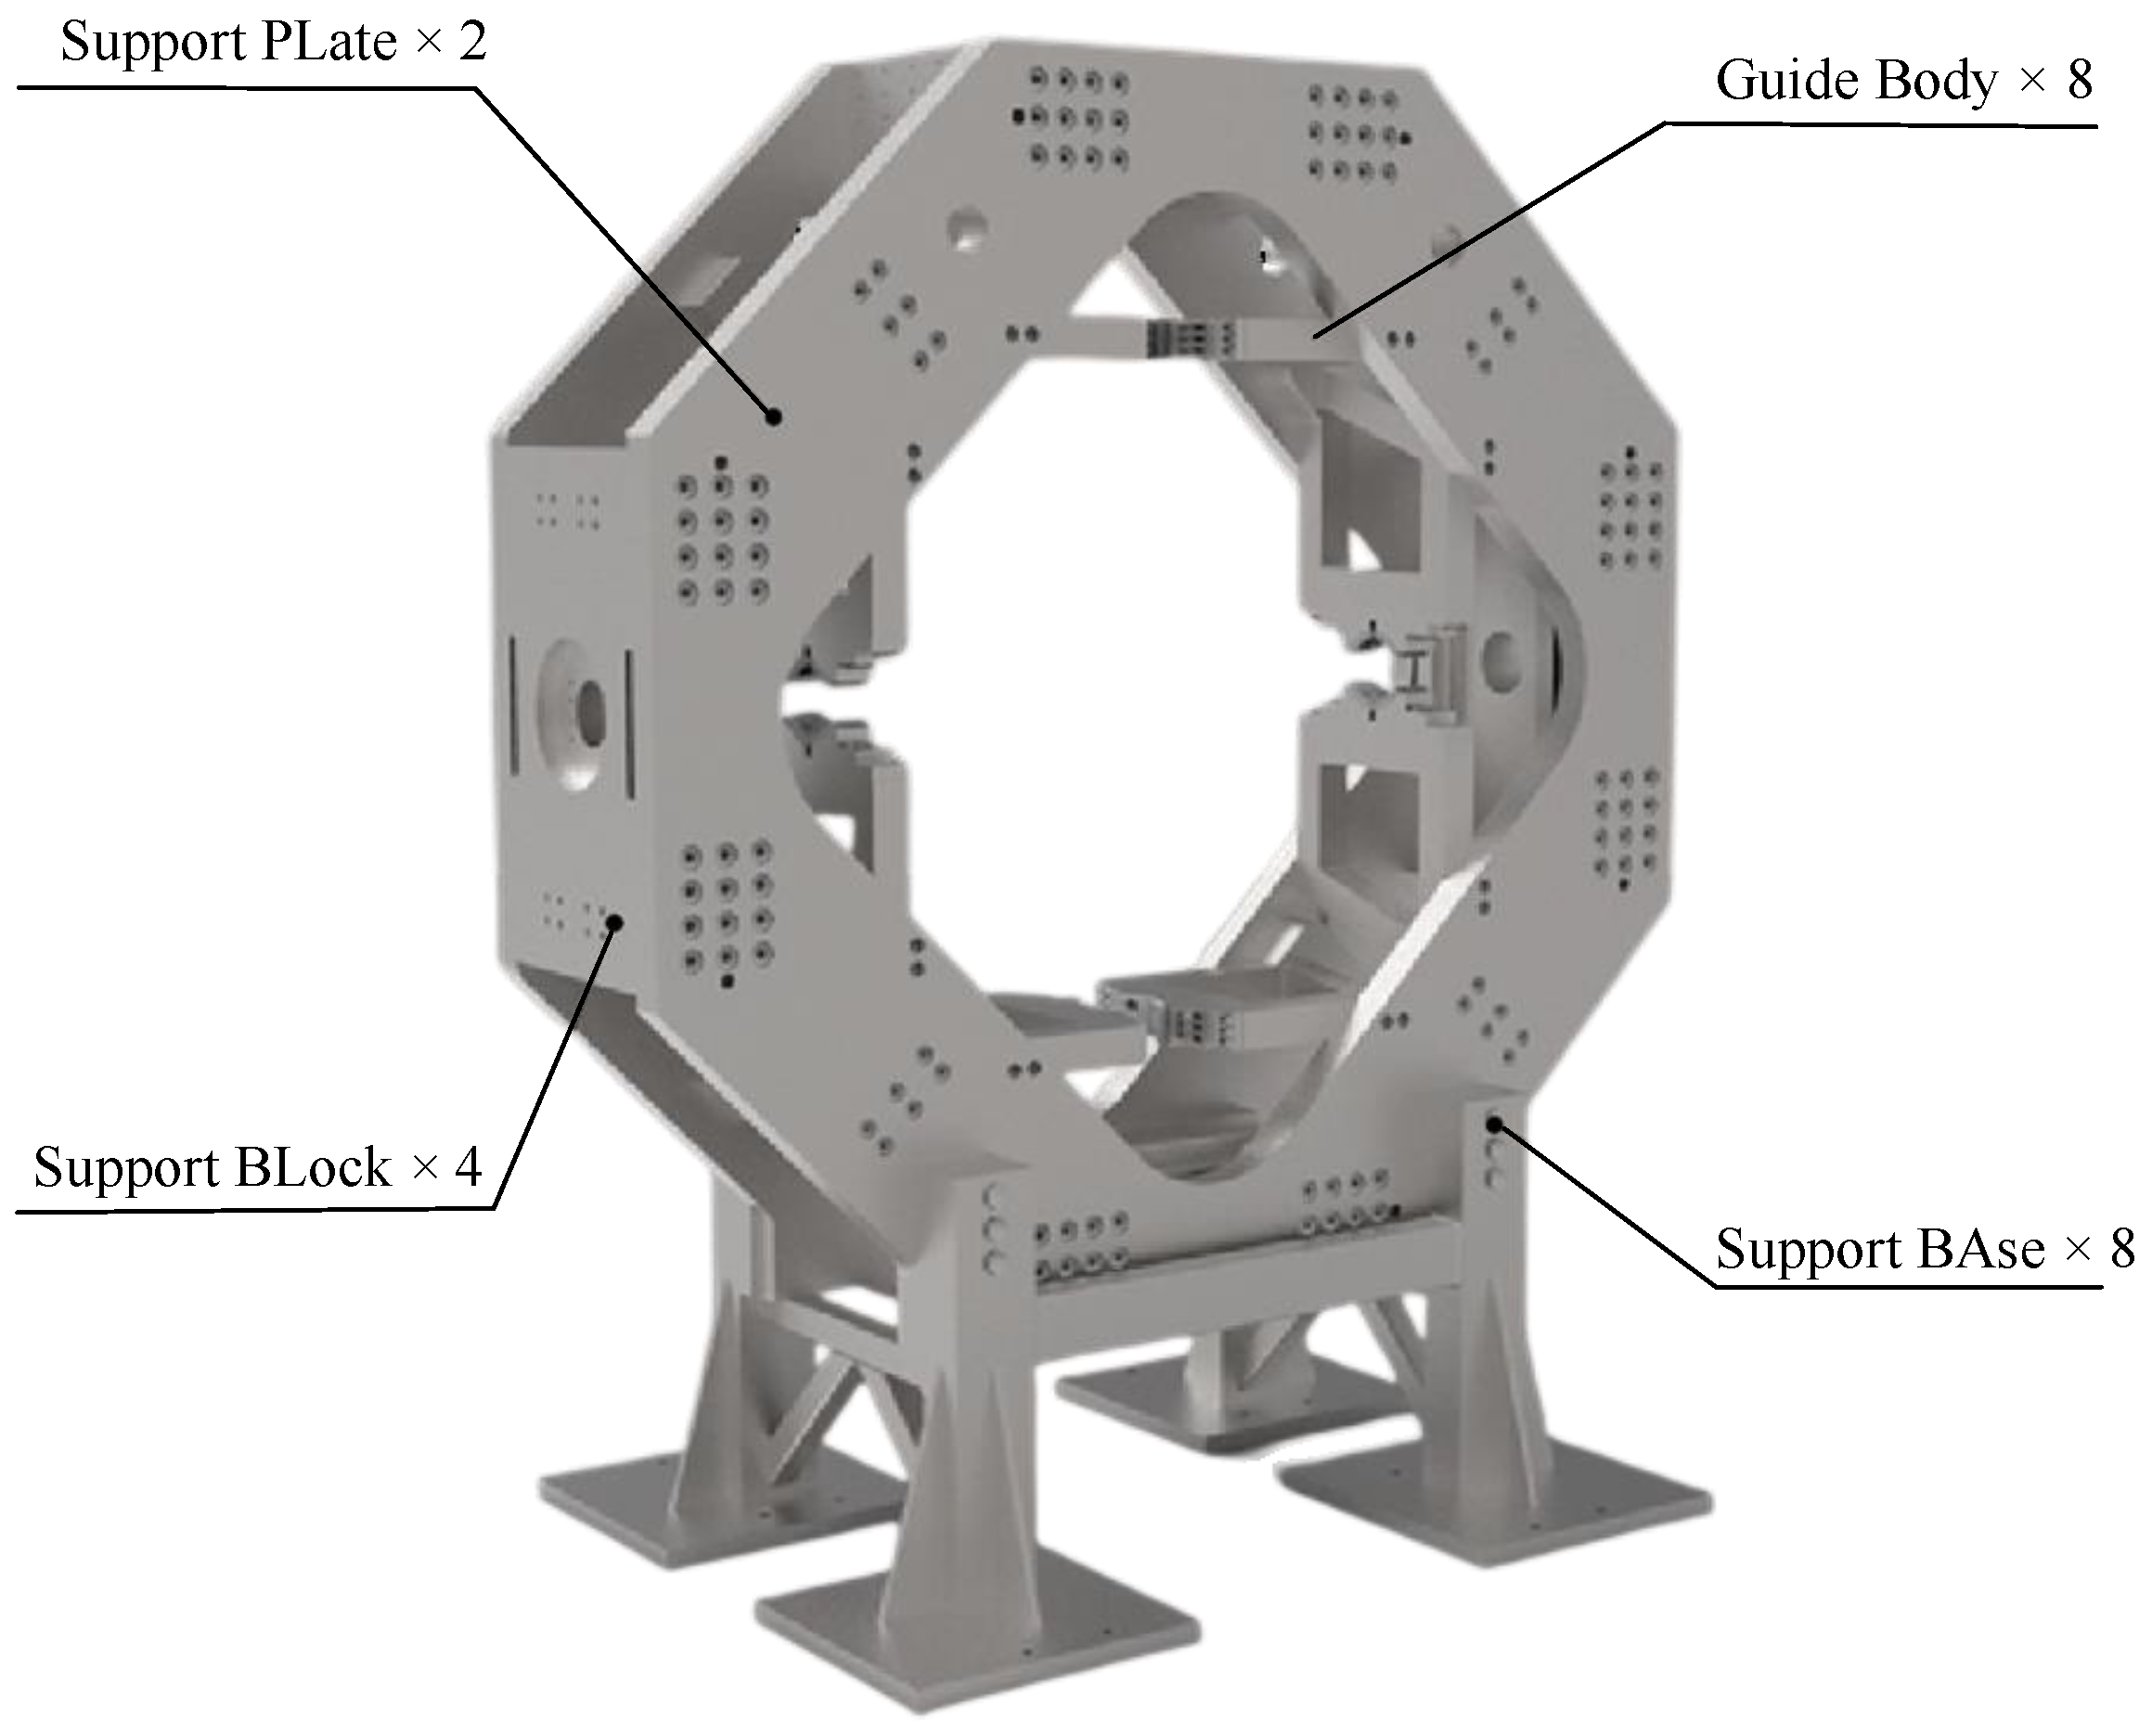
Figure 2 illustrates the frame of the biaxial mechanical property test apparatus. The apparatus frame support structure comprises front and rear support plates, protective covers for the electric cylinders, support blocks, guide frames, mobile apparatus, and supports legs. Four actuators are fixed on four support blocks by screws; the four support blocks are connected to the front and rear panels by screws; the support legs are fixedly connected to the predrilled threaded holes on the front and rear panels by screws; the support legs are fixed to the foundation by screws. A mobile apparatus with the capability of moving the high-temperature furnace facilitates the integration, installation, and debugging of the high-temperature vacuum furnace and locates the high-temperature furnace in the rack. The apparatus is supported by two adjustable feet at the back, and its front is fixed to the front support plate by screws.
Electric cylinders are proposed as power output apparatus for the biaxial loading of specimens. The electric cylinder is a modular product that incorporates a servomotor and a lead screw. This device can transform a servo motor’s rotary motion into a linear motion. As a result, the servomotor speed, rotation, and torque can be precisely controlled.
Through the interference fit of the spline, the motor and roller lead screw are directly connected to the transmission link to reduce transmission errors; to reduce the lead, the output load is increased, the thread clearance is eliminated, and the electric cylinder is equipped with a high load double-nut roller lead screw. Compared with the same ball screw, the double-nut roller screw can eliminate the thread clearance by pre-tightening, whereas the electric cylinder provides high load, rigidity, and long service life, owing to its low pitch.
The output shaft of the electric cylinder is positioned in the middle position, and the stroke is 100 mm. To ensure the safety and reliability of the motion control, two photoelectric limit switches are placed at the two limit positions.
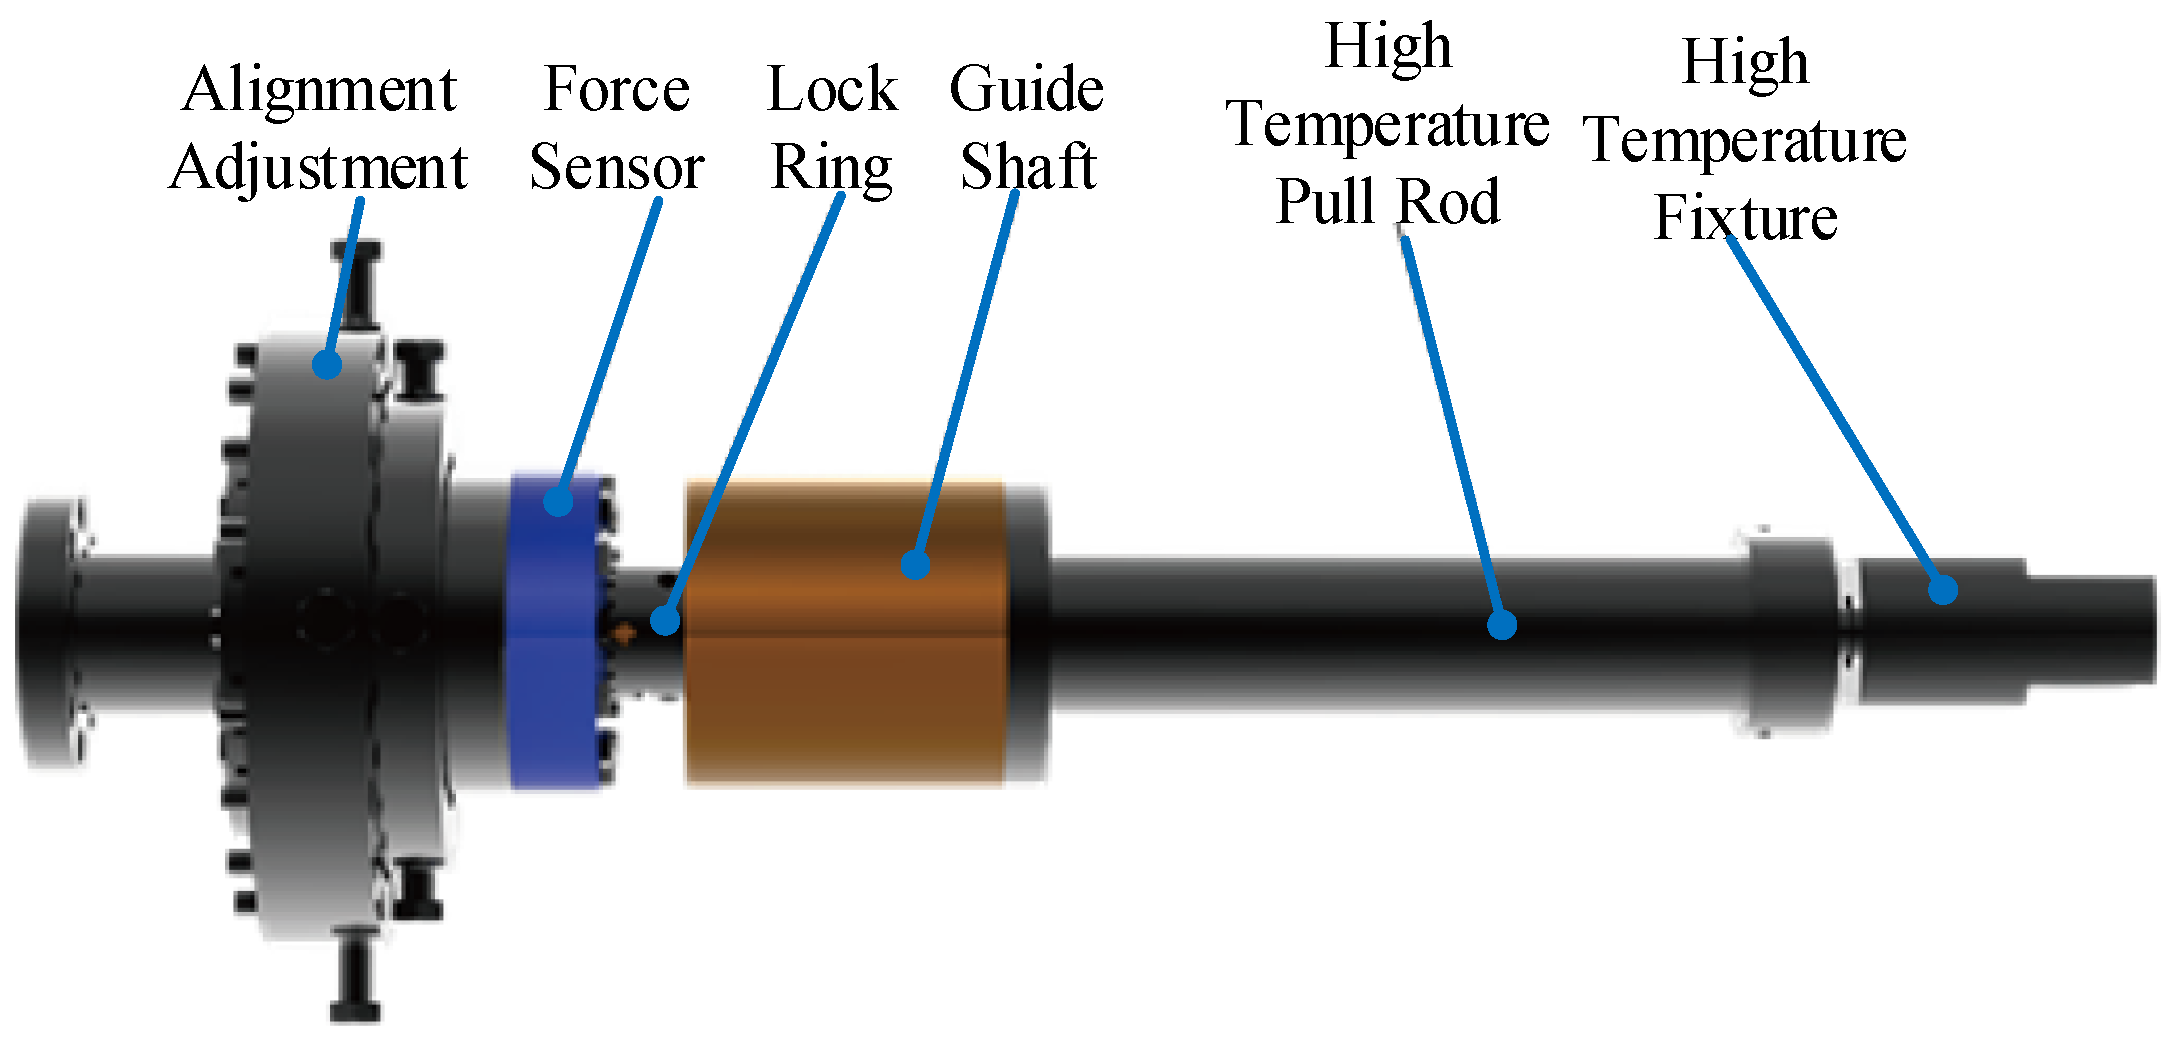
Figure 3 illustrates the mechanical loading apparatus structure of the biaxial material mechanics test apparatus. The actuator comprises a centering change apparatus, a force sensor, a locking ring, a guide shaft, a high-temperature pull rod, and a water-cooled clamp. Electric cylinders transmit power generated by servo motors to the centering change apparatus, force sensor, guide shaft, high-temperature pull rod, and water-cooled clamp through roller lead screw nut pairs, connecting sleeves, and connecting flanges.
Four sets of water-cooled fixtures are installed to prevent overheating of the fixture as a result of the high temperature in the central test area. The four actuating elements are coordinated so that the cruciform specimen can be stretched and compressed in two mutually perpendicular directions.
Based on the design results of the power apparatus and transmission apparatus, the frame support structure was carefully designed, considering the structural dimensions of the high-temperature furnace and the convenience of man–machine interaction. Figure 4 illustrates the frame support structure of the high-temperature/biaxial loading module, which is primarily composed of a support plate, support block, guide frame, and support leg.
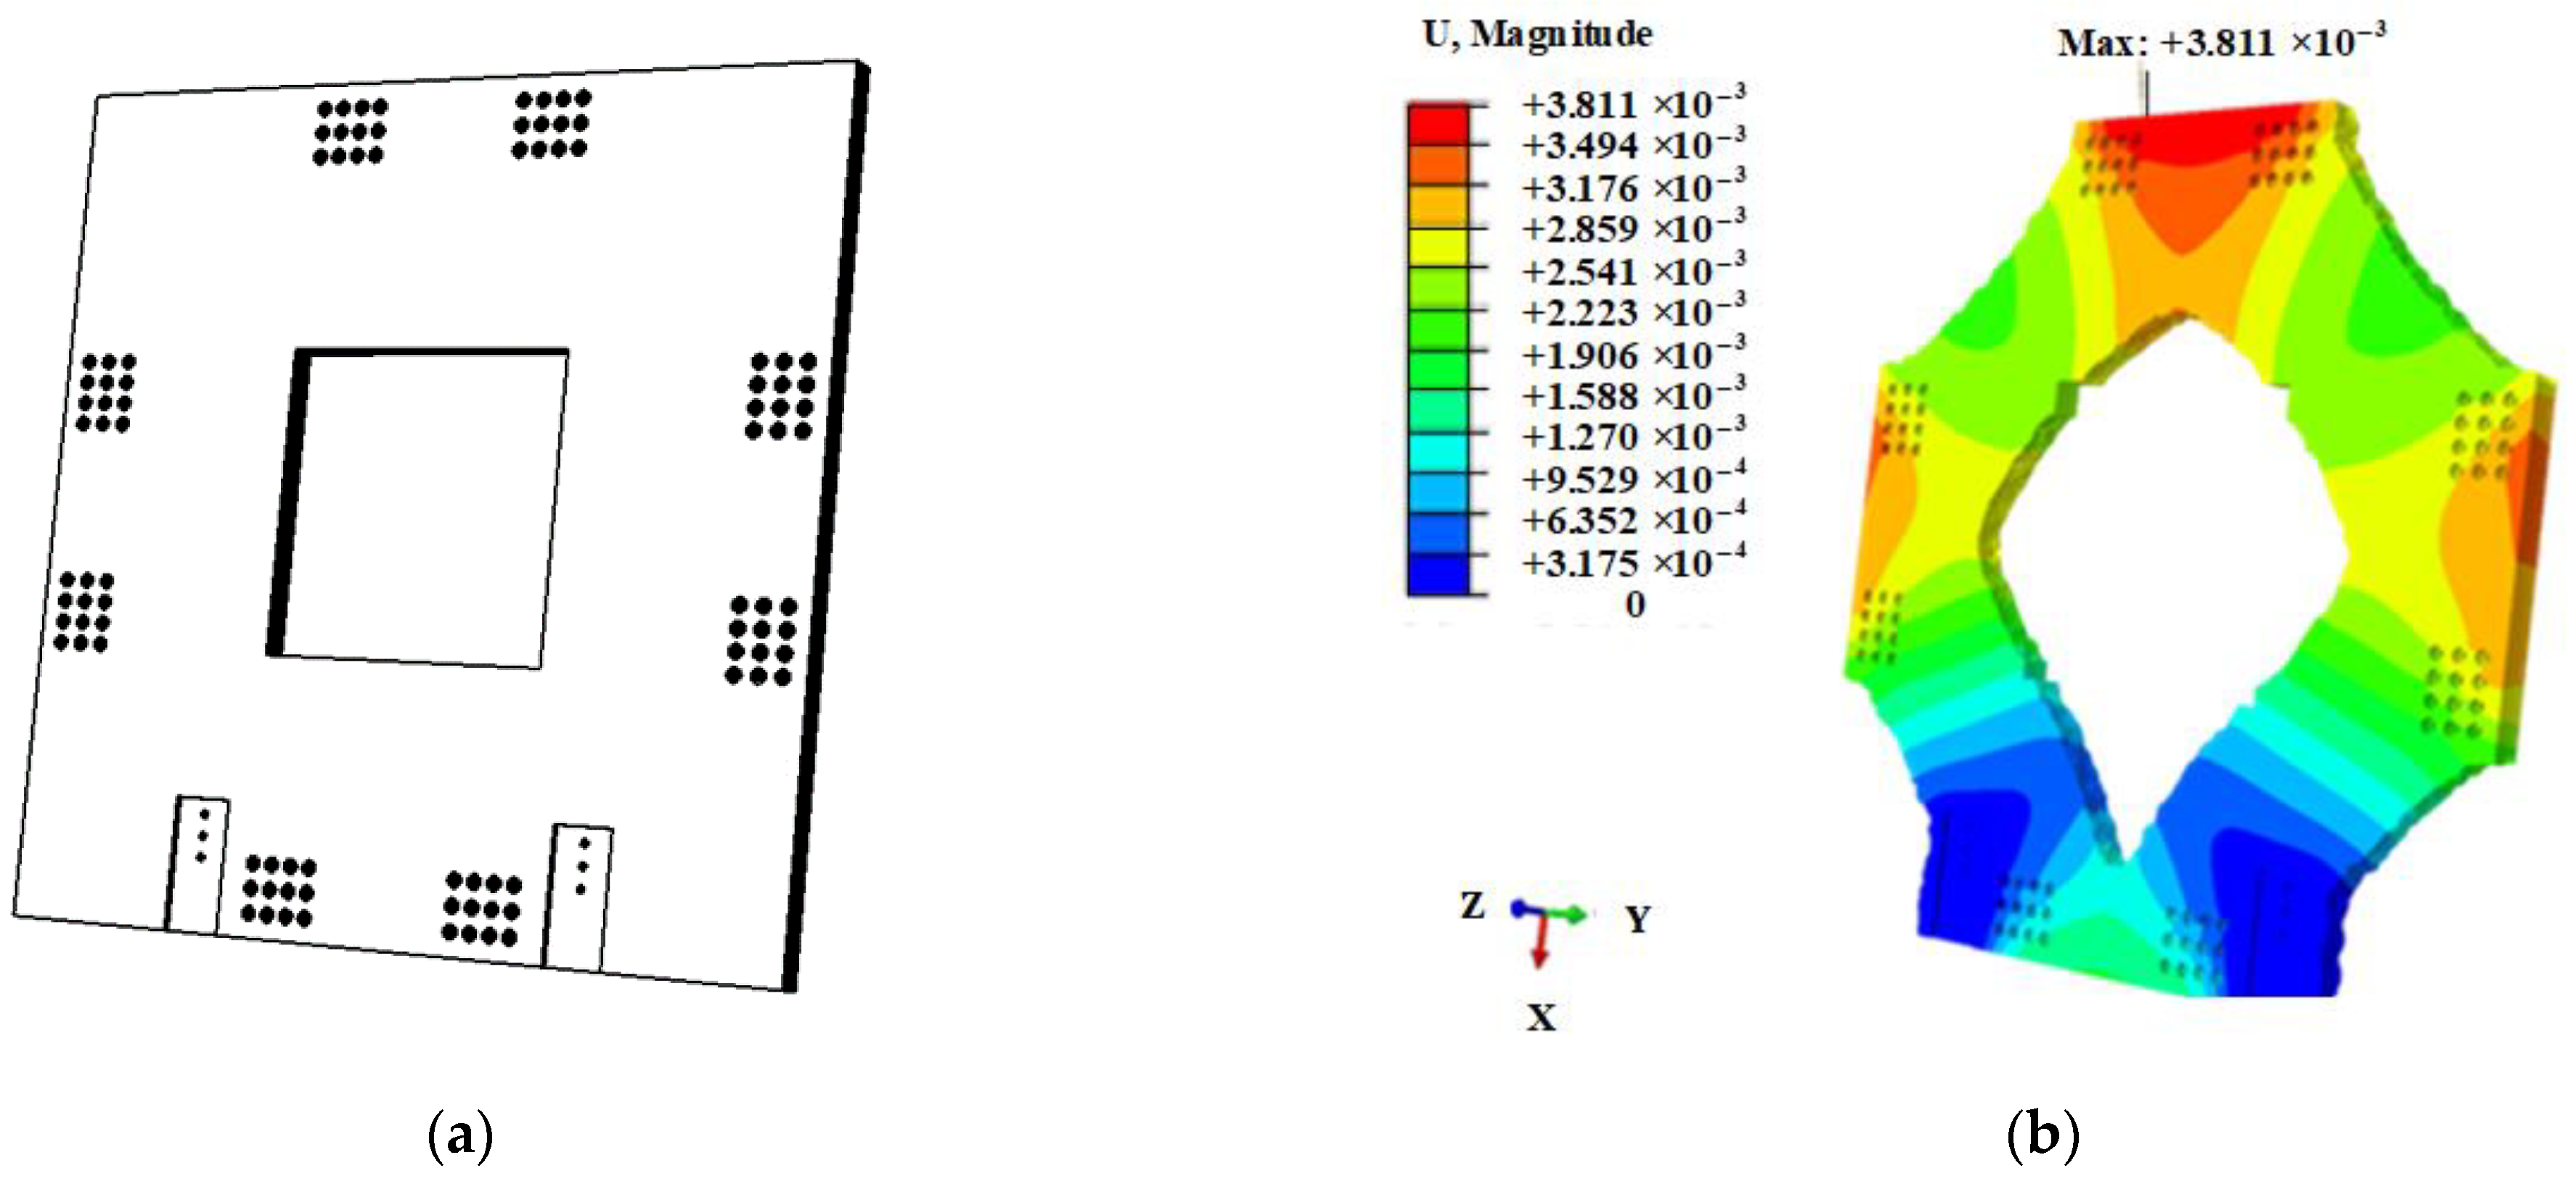
The internal structure and shape of the support plates were designed using topology optimization. A topology optimization model was established, and the structure of the support plate of the test device was optimized to meet and optimize the requirements of tension, compression, and dynamic load tests of the test device. Designing the support plate structurally with a topology optimization method can maximize the plate’s bearing capacity and reduce the weight of the whole machine by improving the load transfer path. Figure 5a illustrates the geometry of the support plate before optimization. Figure 5b illustrates the optimized geometry of the support plate at 45% of the original volume. According to Figure 5b, the material reduction in the optimized support plate is mainly concentrated in the four right angles and the center of the plate compared to the optimized initial conditions. This optimized support plate has an octagonal outer contour and a rhombic inner contour.
Considering the deformation during biaxial loading, the connection between the support plate and the loading shaft, and the position relationship between the electric cylinder and the loading shaft, we recommend that the size of the support plate be selected according to the interface size and space requirements (Figure 5). The design of the guide frame considers the safety of the critical components of the biaxial loading apparatus. Coordination between the guide frame and the guide shaft, the size of the connection plate, the structural size, and the spatial layout were designed. The structure and size of the support leg were designed based on the convenience of man–machine operation, the dynamic performance of the entire machine, the connection with the ground, and the stability of the support, as well as the connection and change with the ground.
Figure 6 shows a schematic diagram of the motion control system. Given that the center of the cruciform specimen should not move, the biaxial material mechanical property testing apparatus can realize the loading function for complex mechanical loads under the condition that the center does not move. To achieve high-precision synchronous movement of the electric cylinders, the apparatus’s mechanical loading control apparatus must be able to control the four electric cylinders in real time. To realize the high-precision synchronous movement of the four electric cylinders, in this paper, we discuss dual-axis load-driving linkage control technology and mechanical loading of the cruciform specimen, which includes tension–tension, tension–compression, and compression–compression loads on the dual-axis load-driving linkage control system.
The control apparatus for the biaxial material mechanical property test apparatus achieves micron-level accuracy in displacement control. To ensure the accuracy of displacement control, we independently developed a multi-axis motion control algorithm. A self-developed position control and force control algorithm was used to achieve the complex mechanical loading function of the cruciform specimen. The hardware components of the control apparatus include an IPC, a controller, a driver, a servo motor, a ball screw, an encoder, a pull/pressure sensor, an amplifier for the force sensor, grating rulers, and limit switches. In terms of hardware, the control apparatus can be divided into two parts: the upper computer apparatus and the lower computer apparatus. An upper computer apparatus is typically used to compile, debug, and direct motion commands to a biaxial apparatus to determine the mechanical properties of materials and to process the results of the tests. Besides processing control instructions sent from the upper computer to the lower computer, the lower computer apparatus is also used to control four sets of actuators co-operatively to carry out the daily maintenance of the apparatus and the biaxial tensile/compression test.

2.3. High-Temperature Loading Mold

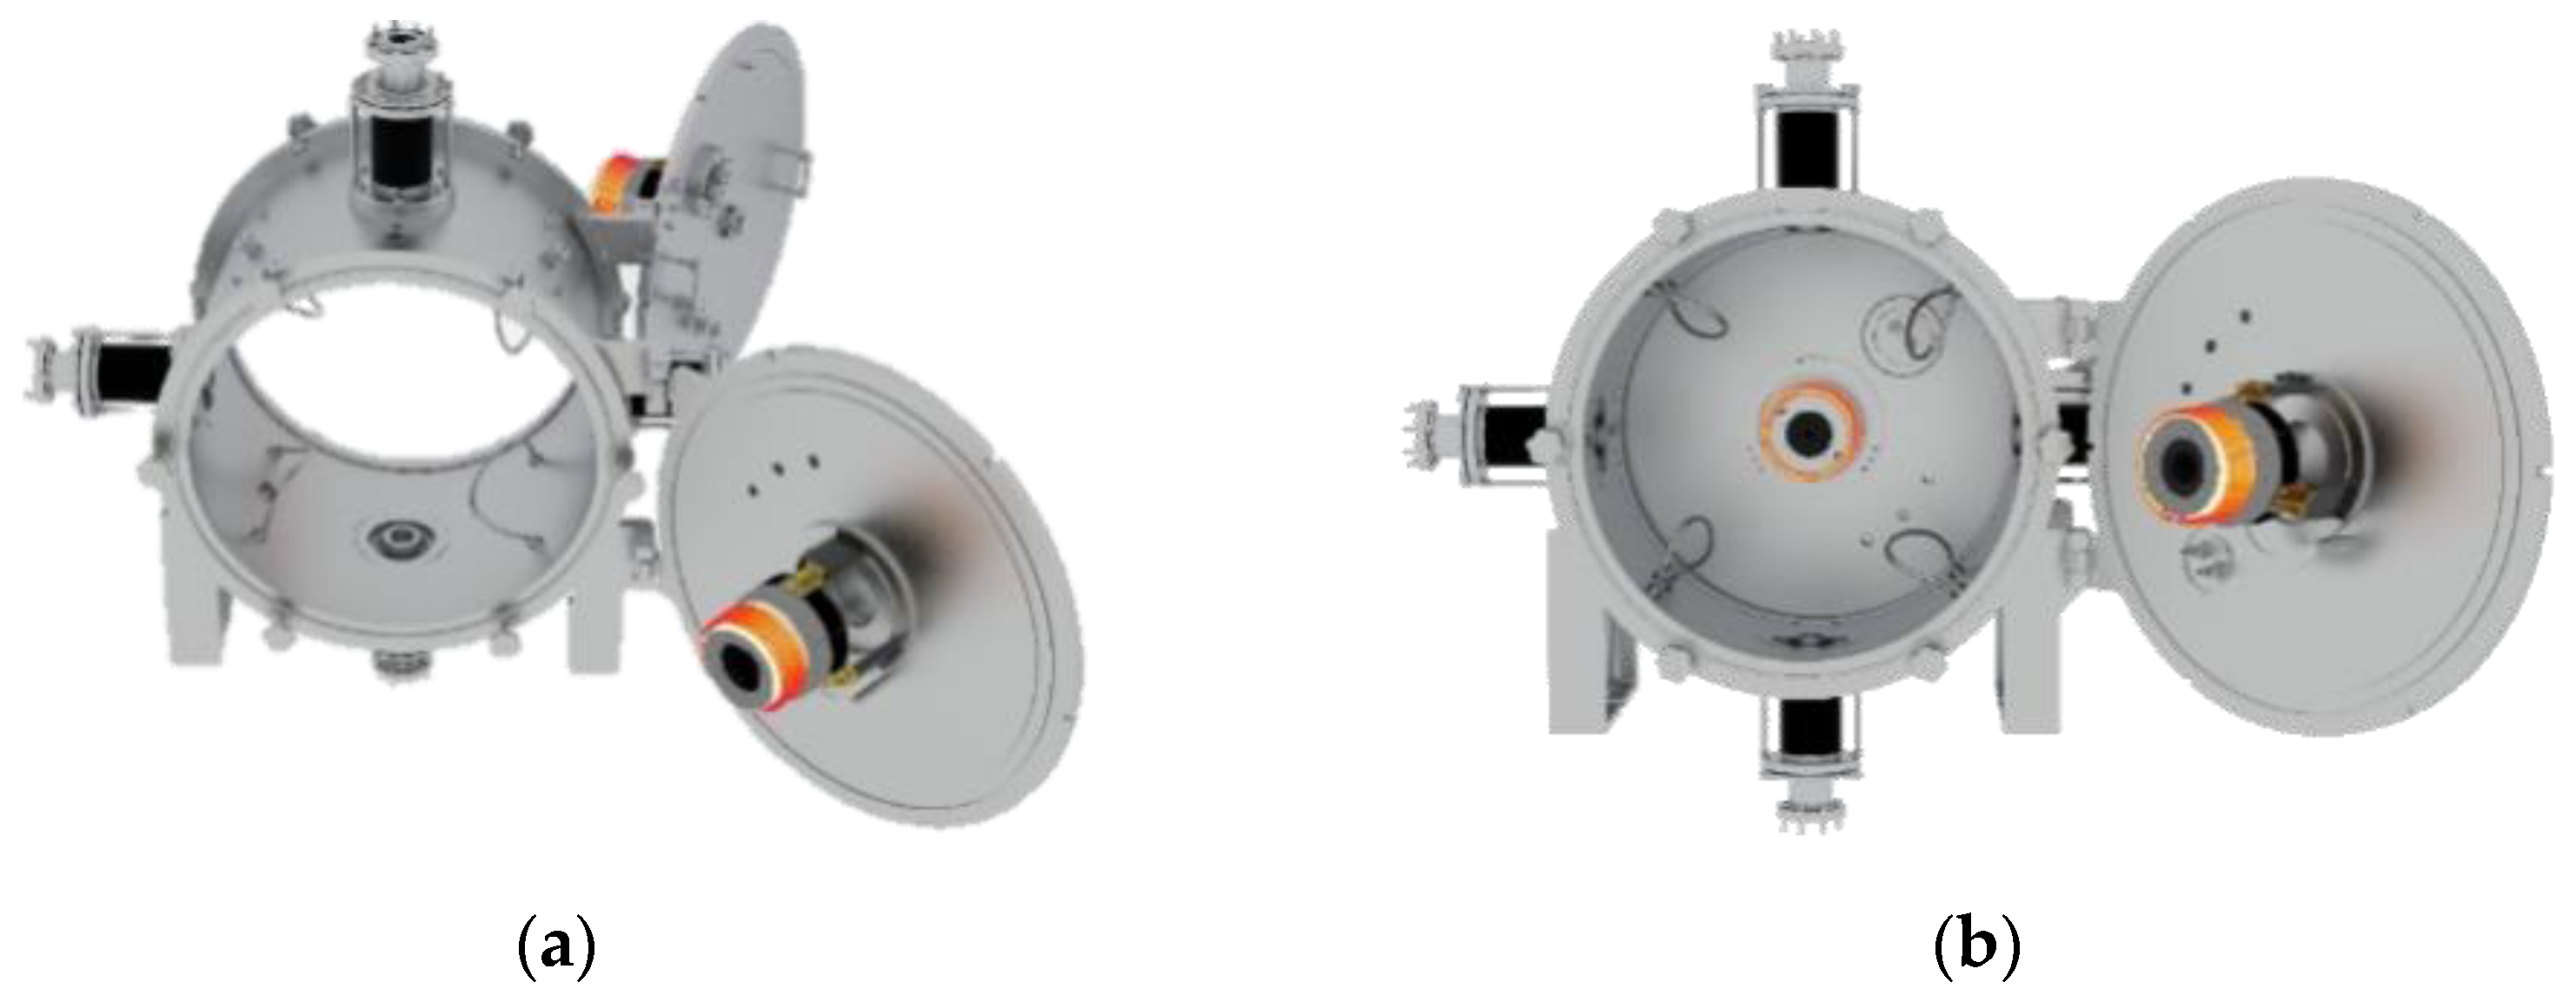
The furnace structure integrates a digital speckle apparatus, a high-temperature colorimeter, and other in situ testing in the vacuum high-temperature furnace. An innovative high-temperature, medium-frequency induction split-heating mode was proposed to ensure the maximum temperature uniformity of the observation area. The split-heating mode ensures the temperature uniformity of the specimen gauge area more than the one-sided heating mode, conveniently integrating a high-temperature colorimeter and a digital speckle apparatus for in situ testing, as shown in Figure 7.
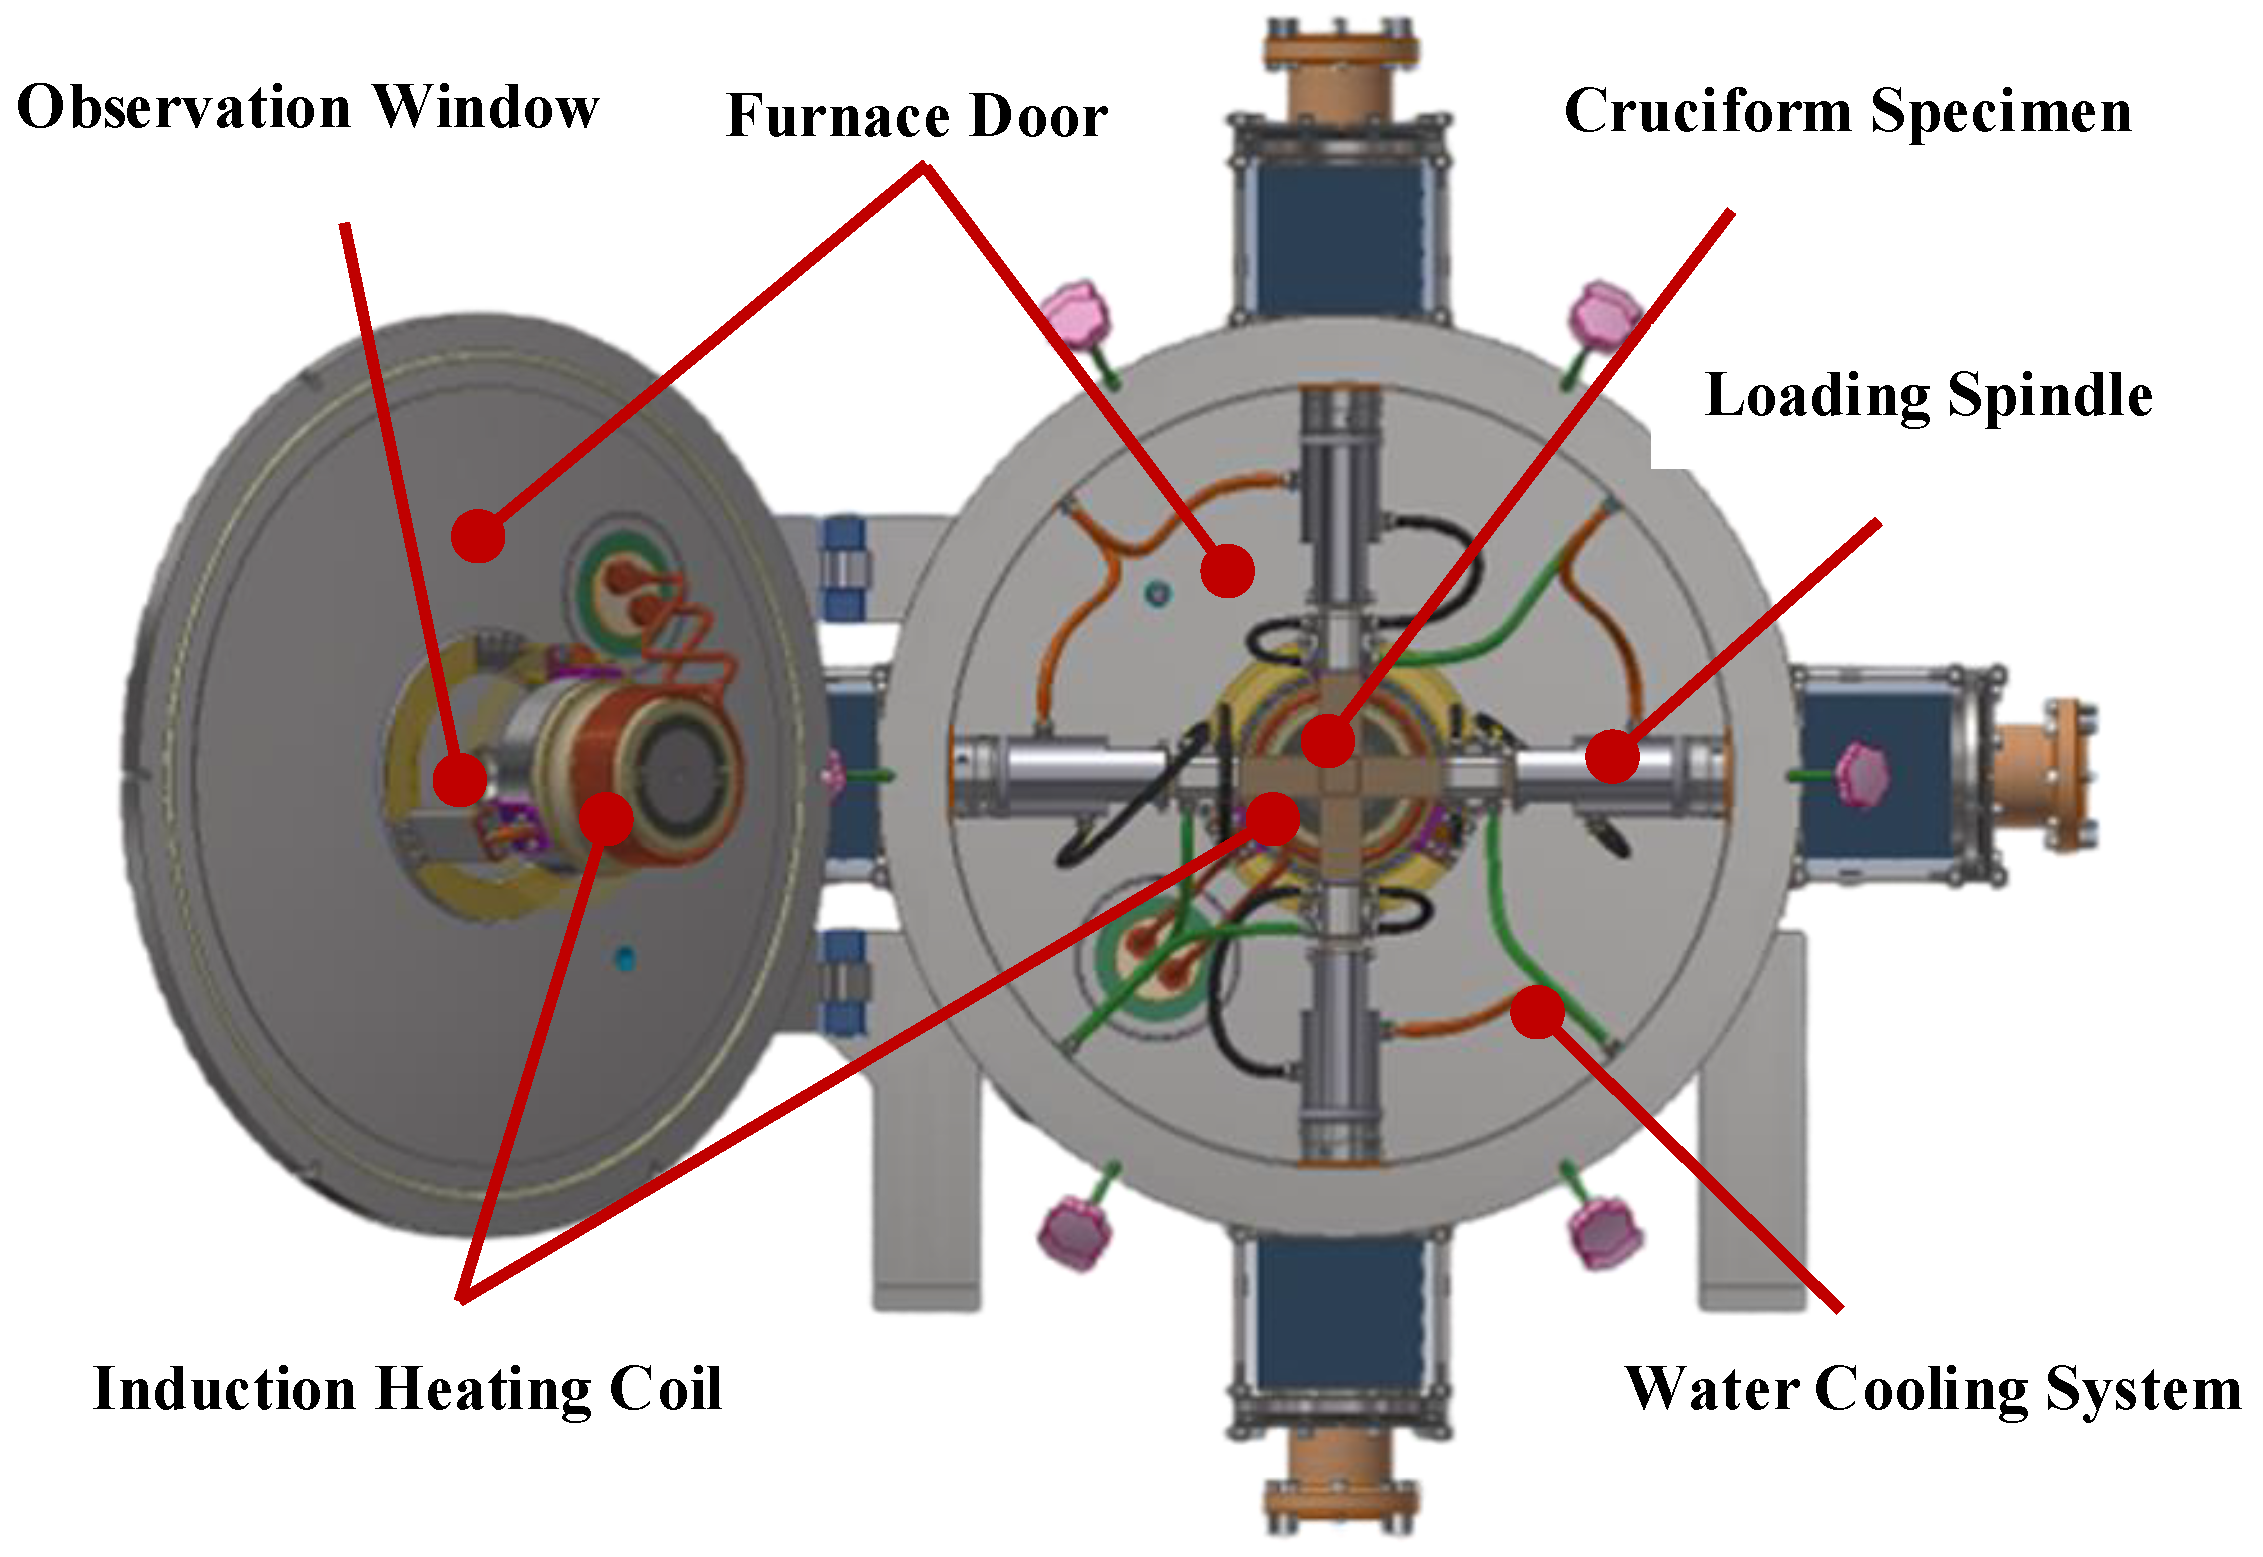
The furnace body of the high-temperature furnace is cylindrical and welded with double-layer 304 stainless steel, as shown in Figure 8. A support wall with a cage-type curve design is set between the two layers. It is used to support the circulation direction of the cooling water and the double wall, maintain the shape of the double wall to ensure the strength and stiffness of the furnace body, and prevent deformation and damage caused by high temperatures. The furnace body is equipped with a front door and a rear door that can be opened and closed at 180° to facilitate the clamping and disassembly of cruciform composite material specimens. The external interface of the pressure gauge, the interface of the vacuum pumping apparatus, and the interface of the biaxial loading apparatus are available on the external wall of the high-temperature furnace, forming a modular design conducive to the installation, replacement, and maintenance of each component. The front door is equipped with a φ 50 mm double-layer quartz glass observation window with a high-temperature shielding rotary vane on the inner side of the observation window to prevent damage caused by intense light shining in the operator’s eyes during operation. There are also thermocouple outlet holes on the furnace wall. The connected thermocouples are used to measure composite material specimens, and there is a manual vent valve, which is suitable for quickly balancing the atmospheric pressure after forming a vacuum and stabilizing the internal and external air pressure.
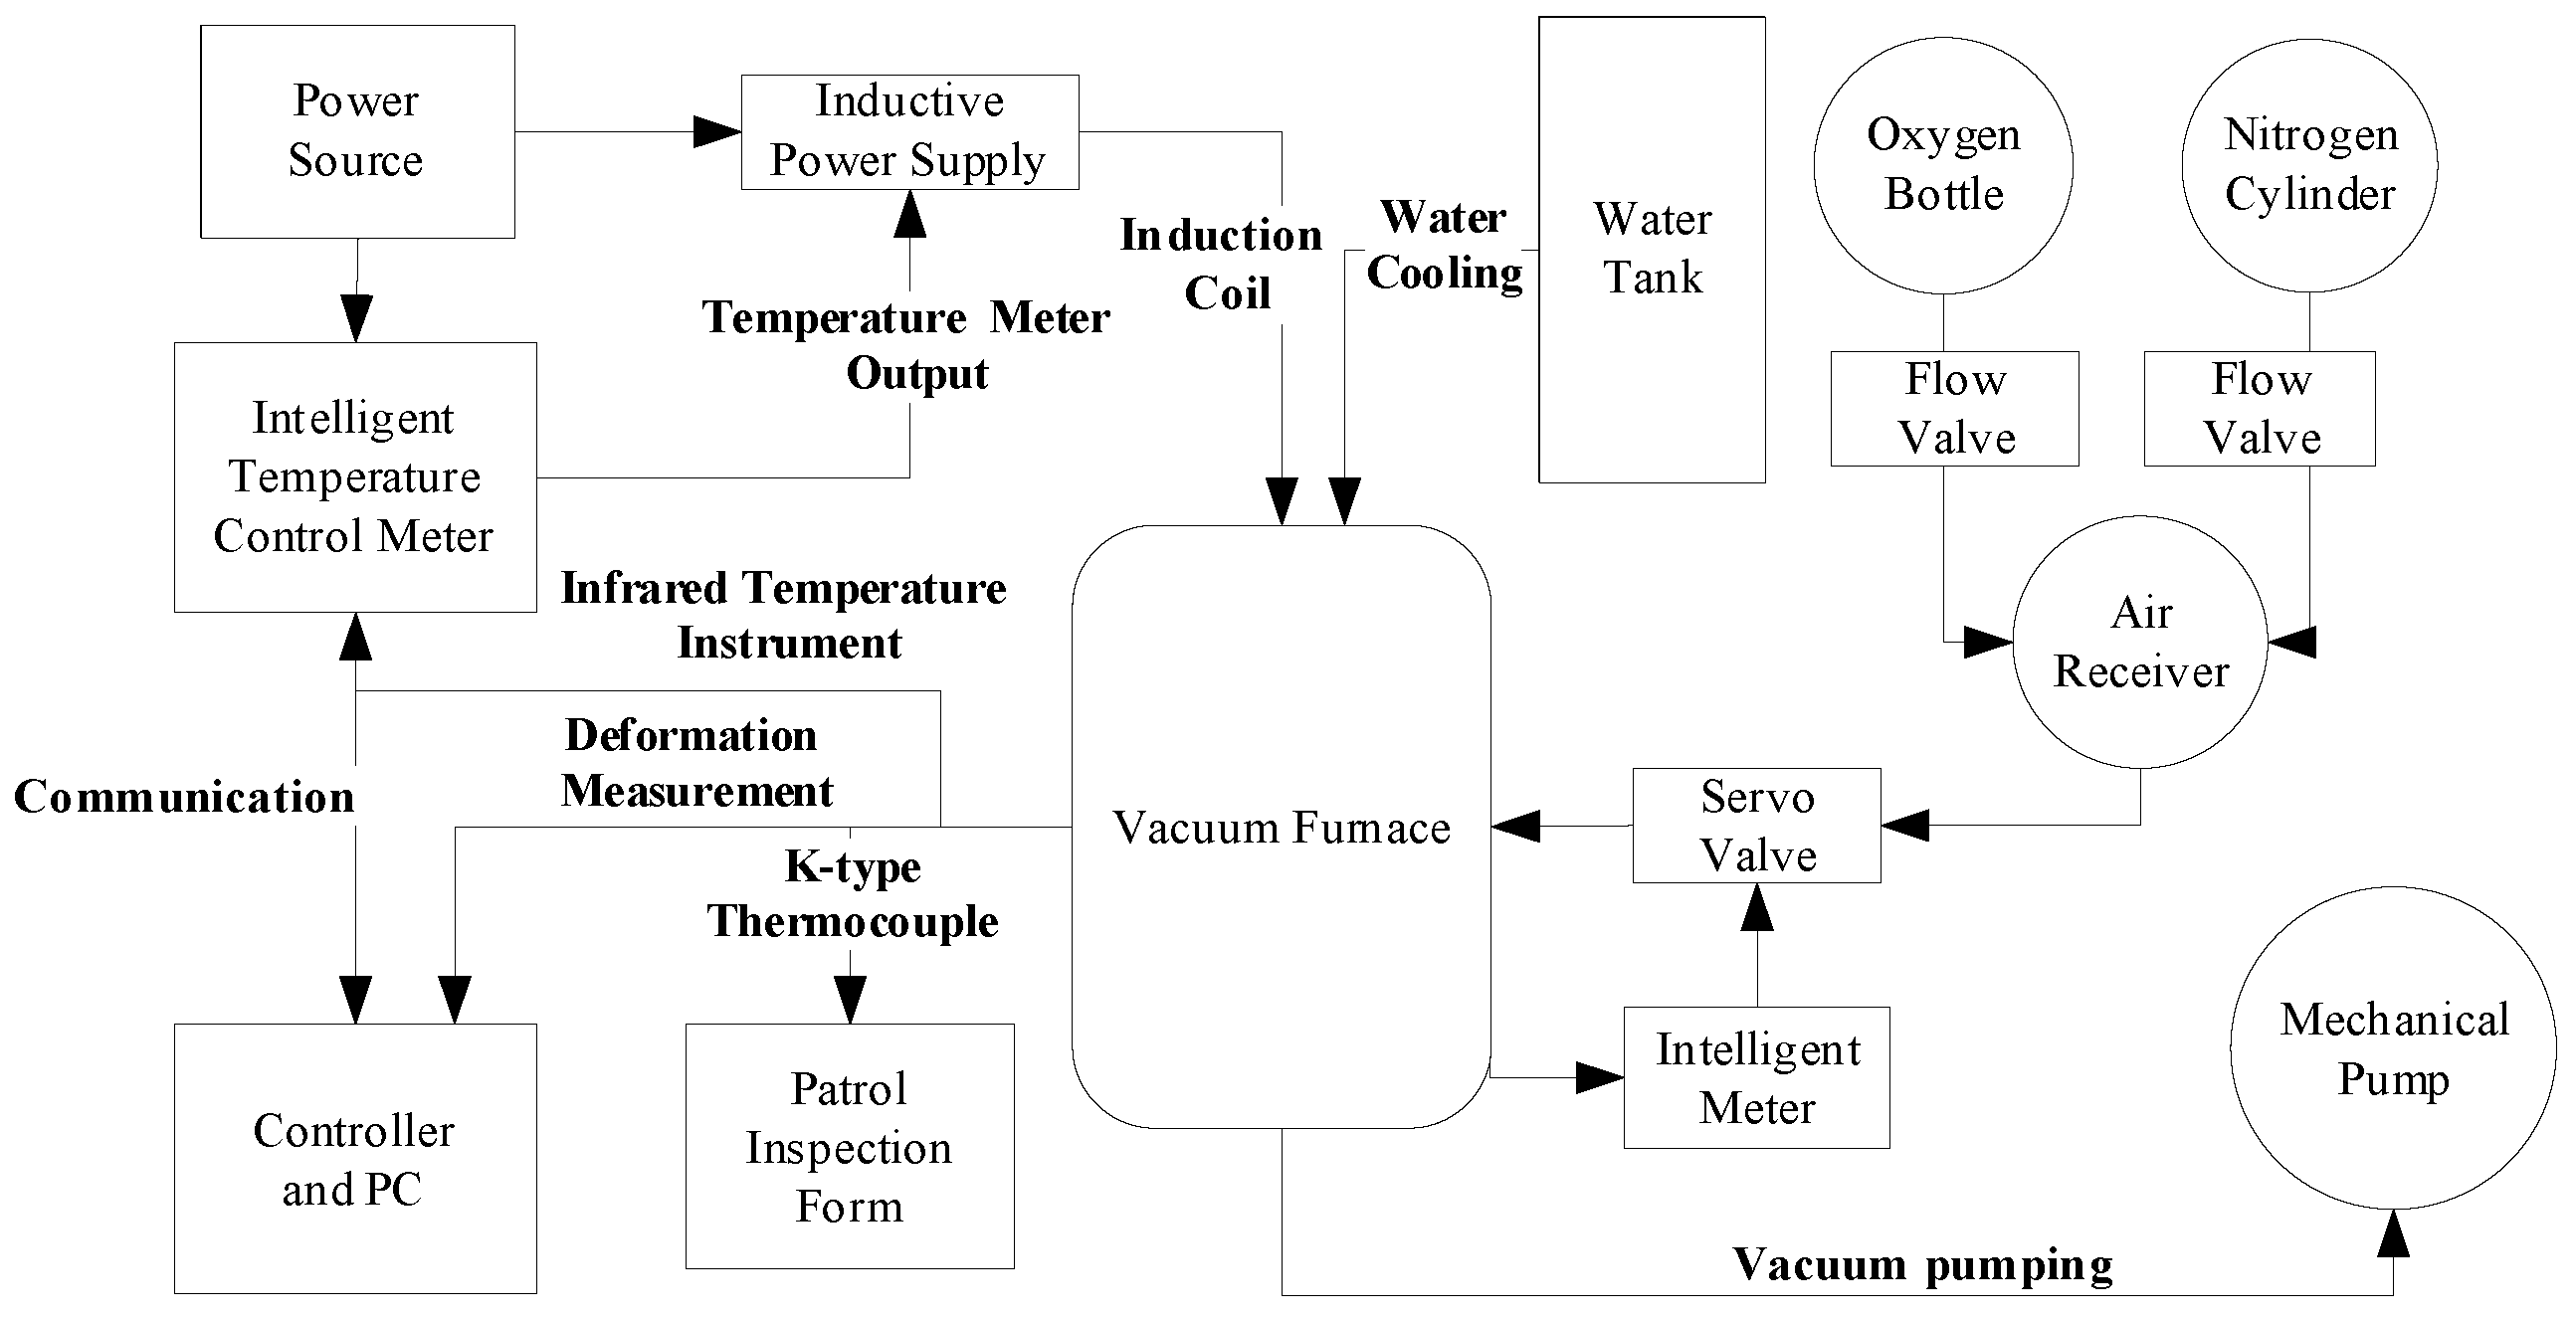
The intelligent temperature control apparatus adopts artificial intelligence control and regulation (Figure 9). Artificial intelligence control and regulation use fuzzy logic proportion–integration–differentiation (PID) control and a parameter self-tuning control algorithm, enabling real-time temperature regulation and control according to the temperature data measured by thermocouples and the high-temperature colorimeter intelligent control method with fast response speed and slight overshoot. The temperature control meter controls the conduction amplitude of the silicon-controlled rectifier and the primary voltage of the transformer through a phase-shifting trigger to control the voltage at both ends of the induction coil in order to adjust the ambient temperature of the specimen. Temperature control can be precisely adjusted through the program based on slope, trapezoidal loading, or other loading patterns. The temperature module must be set appropriately to accomplish the above functions.

2.4. In Situ Detection Module

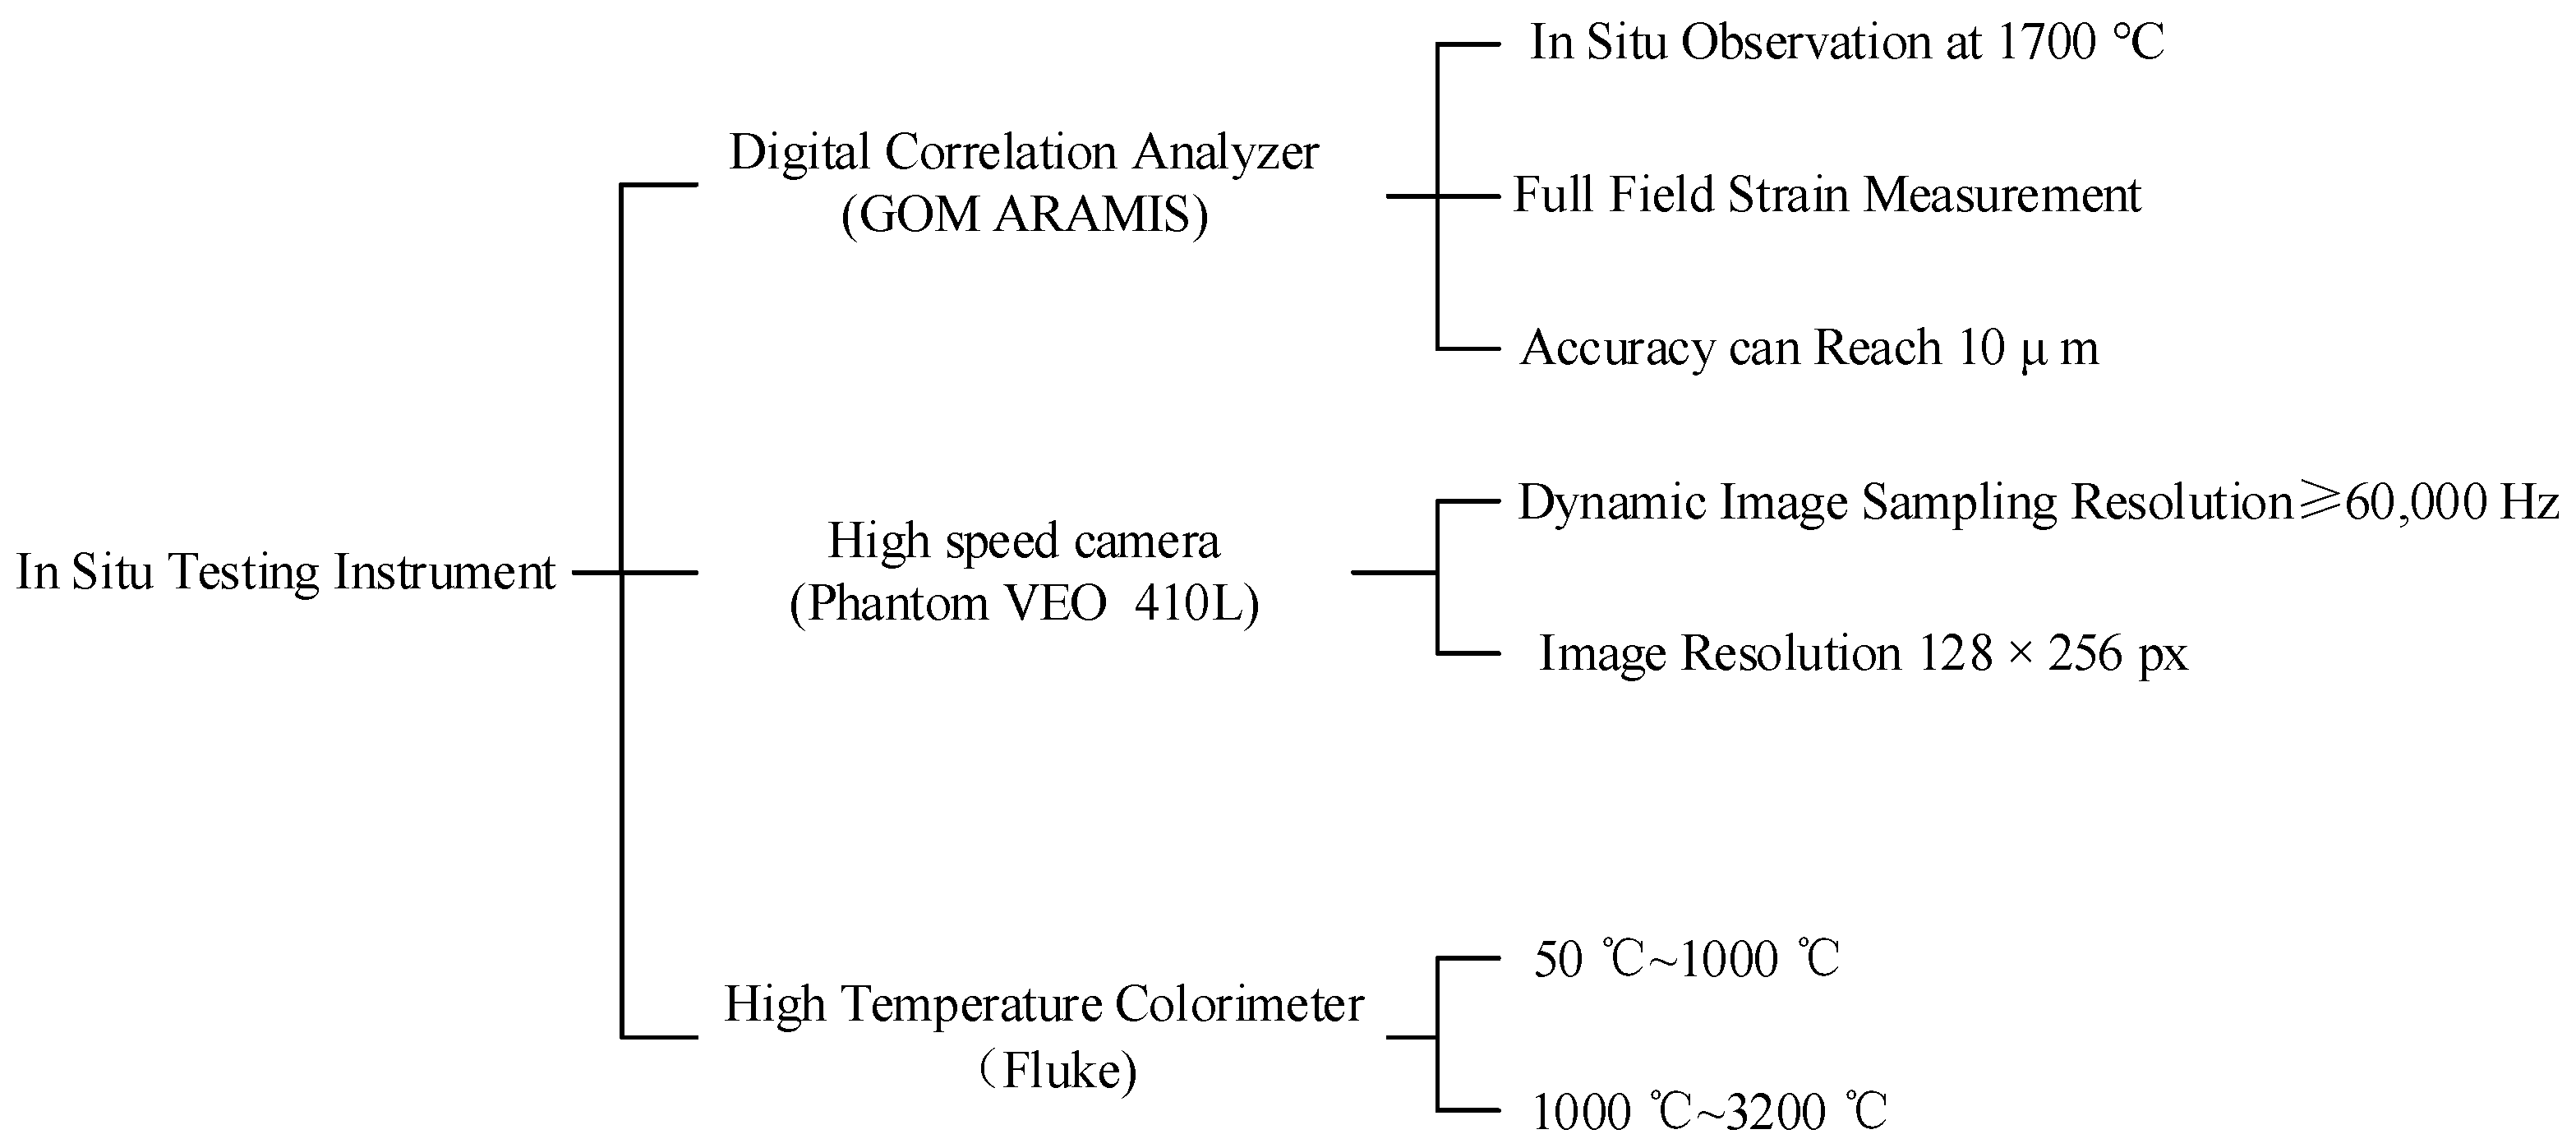
In situ observation apparatus include digital speckle strain measuring apparatus, visual extensometers, and high-speed cameras (Figure 10). The digital speckle observation apparatus enables in situ observation of specimen strains at high temperatures in the whole field. By combining a high-speed camera and digital speckle observation apparatus with a visual extensometer, in situ observations can be conducted at 2500 °C under high-temperature impact. High-temperature Fluke colorimeters are included in this apparatus to measure temperatures from 50 °C to 3200 °C.
The furnace structure incorporates a digital speckle detector, a high-temperature colorimeter, and other in situ testing devices (Figure 11). A medium-frequency induction split heating mode was proposed to achieve maximum temperature uniformity in the observation area. Compared to a one-sided heating mode, split heating provides a more uniform temperature distribution within the specimen gauge area and the convenience of connecting the high-temperature colorimeter with the digital speckle apparatus for in situ testing.

2.5. Calibrations and Corrections of the HTIPTA

2.5.1. Force Calibration of the Force Sensors

Calibration was conducted in a room with a temperature of 20.0 °C and relative humidity of 23%. Fixed forces of 0 kN, 12 kN, 20 kN, 30 kN, 40 kN, 60 kN, 80 kN, 100 kN, and 125 kN were applied to the standard machine, the output voltage of the sensor process was measured, the force repeatability error was calculated, and the linearity of the sensor force value was evaluated. Table 4 summarizes the results of the tests. In each force sensor group, a process return test was conducted, and the force repeatability was determined: R1 (%) = 0.10, R2 (%) = 0.05, R3 (%) = 0.06, and R4 (%) = 0.14. The force return errors were v1 (%) = 0.21, v2 (%) = −0.36, v3 (%) = 0.51, and v4 (%) = 0.58, meeting the requirements.

2.5.2. Strain Calibration of the Digital Correlation Apparatus

The accuracy of the speckle measurement system is 10 με. The uncertainty is 3 με; meeting the ≤20 με requirements (Table 5).

2.5.3. Calibration of the High-Temperature Colorimeter

The calibration method uses the heating body of the high-temperature furnace to measure the temperature of the heating body through thermocouples and infrared thermal imagers and to accurately control the temperature through the temperature control system and keep the temperature uniform for a specific time. The radiation coefficient of the high-temperature colorimeter is adjusted by comparing the readings of the high-temperature colorimeter and the those of the thermocouple, then verified by an infrared thermal imager. Finally, the detection device of the high-temperature loading system calibrated. As shown in Table 6, the results of calibrated temperature measurement points meet the calibration accuracy requirements and are less than ±0.3% FS.

2.5.4. Alignment Deviation Calibration

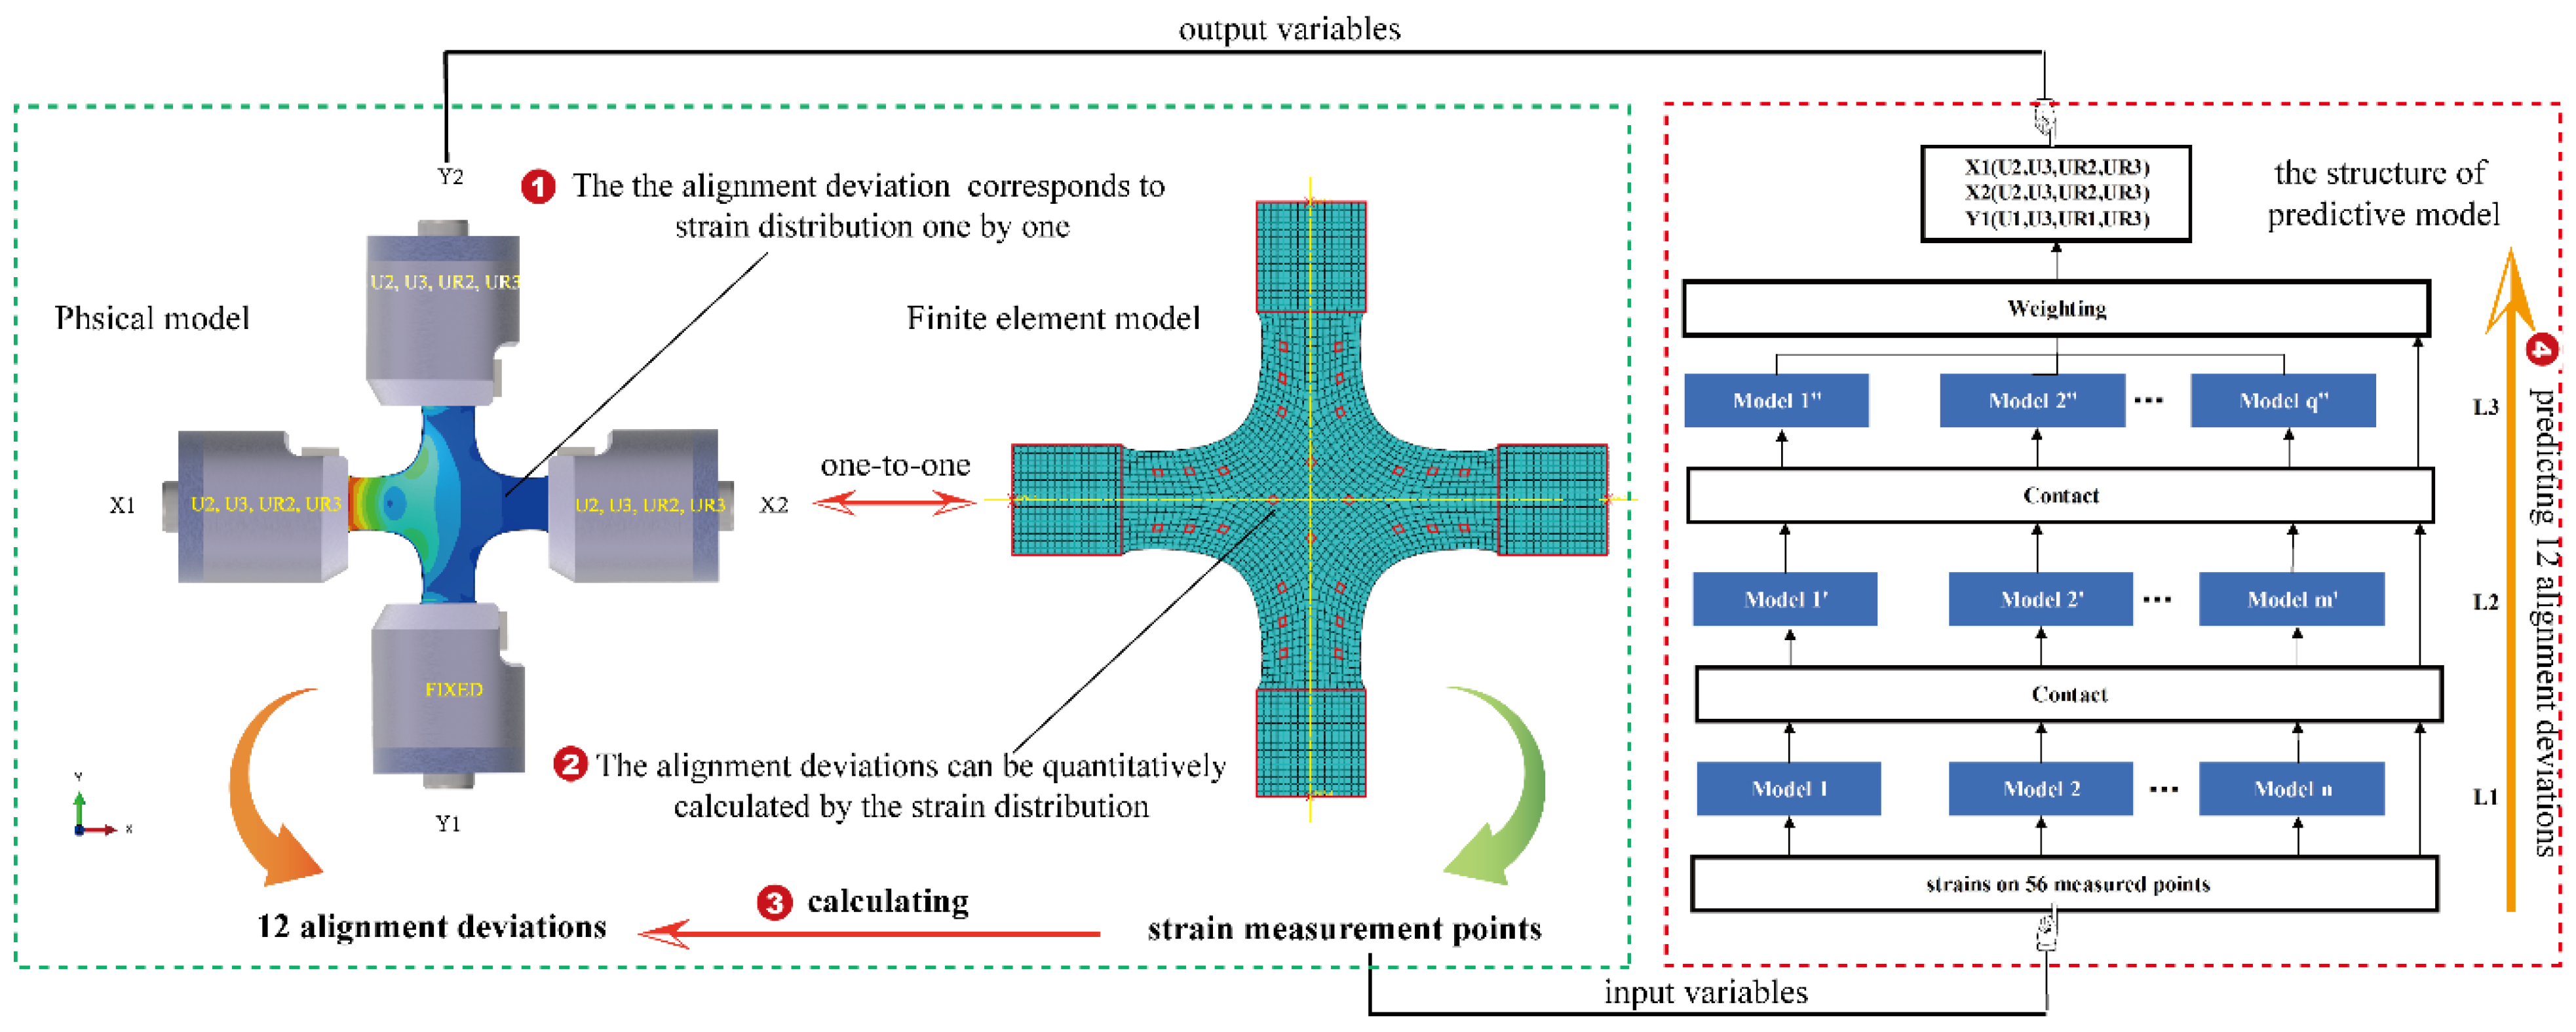
The loading coaxiality of an in-plane biaxial test system and the structure of a cruciform specimen markedly affect the test results. However, owing to the lack of methods for correcting the loading coaxiality and designing a cruciform specimen, the data scatter of the test results of the in-plane biaxial test systems varies from the between the laboratory and various tests. A model was developed to calculate alignment deviations with strain distribution for the shape-optimized cruciform specimen using automated machine learning (AutoML). Our alignment of the developed high-temperature, dual-axis equipment was adjusted based on the alignment deviation prediction algorithm. Our equipment ensures a concentricity deviation of less than ±0.02 mm and a deviation of less than ±0.01° to ensure that it fulfils the requirements.
The essential element of the process of alignment deviation change is quantification of the planar biaxial tensile testing machine. Figure 12 shows the steps of centering deviation quantification.

3. Test Procedure of the HTIPTA

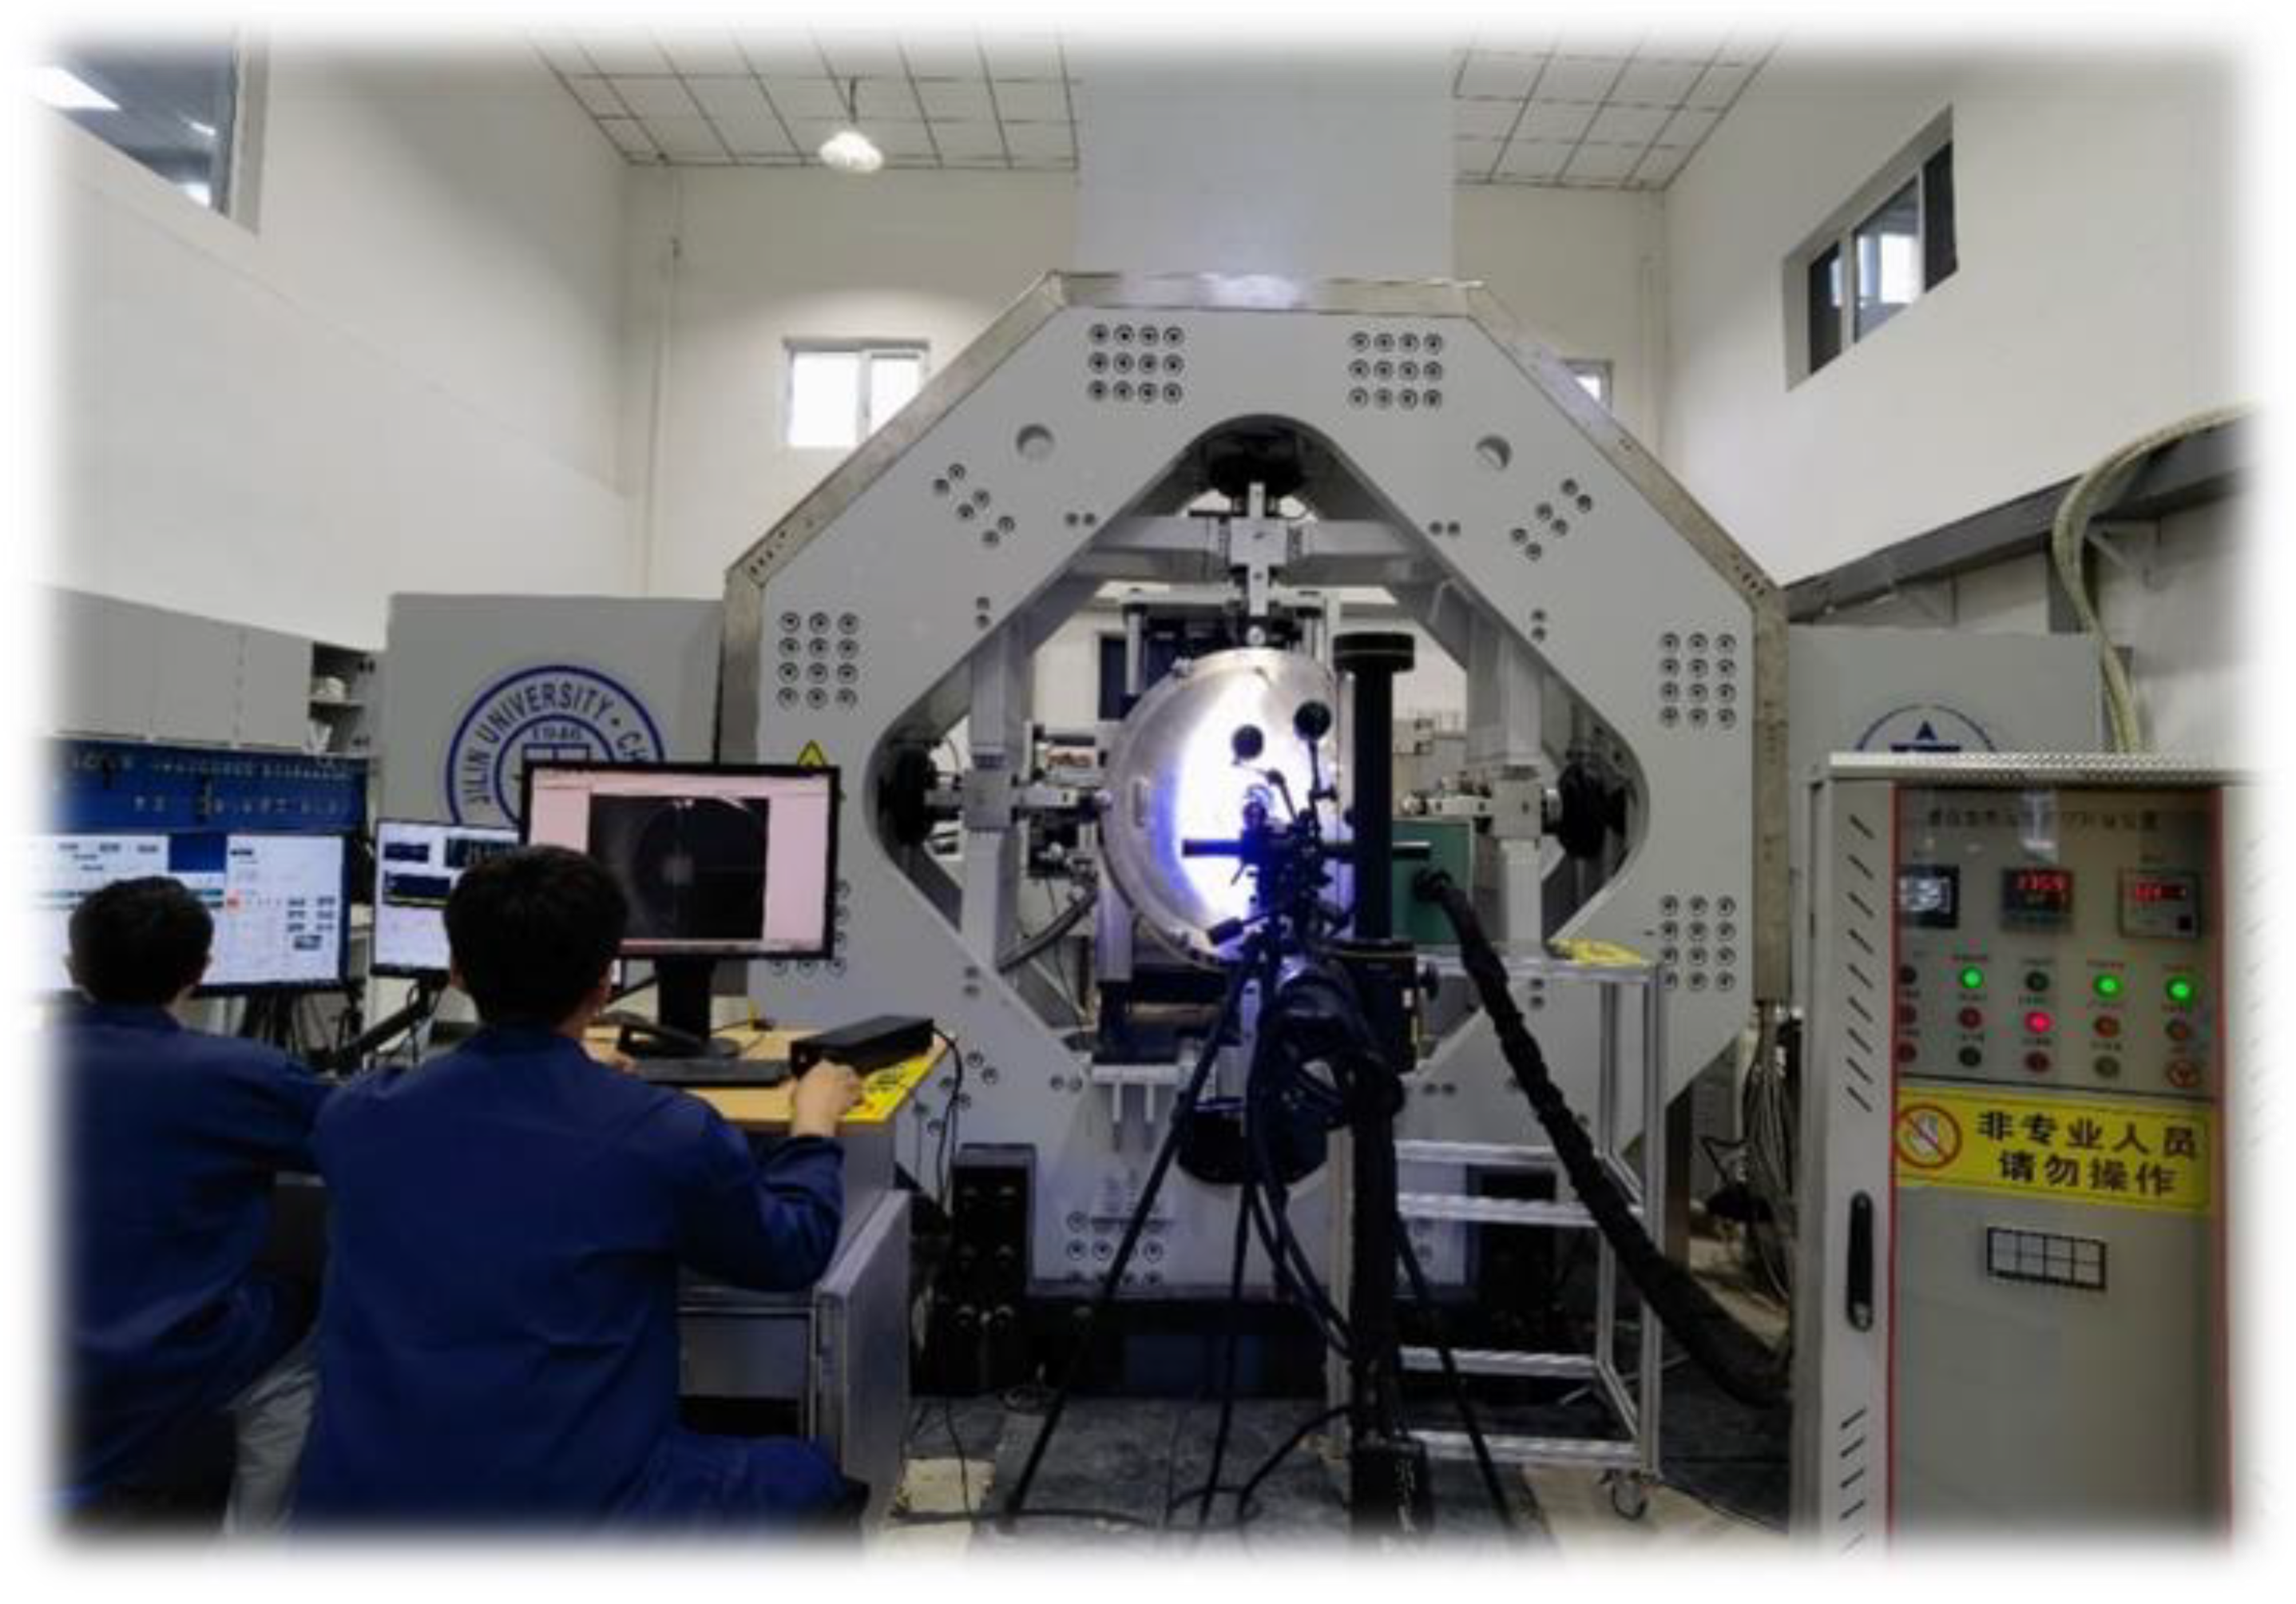
Figure 13 provides a schematic representation of the test procedure using the HTIPTA.

3.1. Specimen Clamping

A check of the position of the mechanical loading shaft must be performed before clamping the cruciform specimen to ensure that the clamp is positioned correctly. A careful inspection of the bellows and high-temperature chamber should be performed to ensure that they are not bent or in contact with the walls of the high-temperature furnace. The wedge clamp block should be coated with epoxy resin high-temperature adhesive for the cruciform specimen to be attached. After the adhesion process has been completed, the test piece should be held for more than 24 h to ensure that the specimen and wedge clamp block have thoroughly combined. When installing cruciform specimens, care should be taken not to touch the surface of the speckle spraying. To ensure that the central axis of the test piece is perfectly aligned with the axis of the corresponding loading chain, rotate the specimen to ensure that it is installed on the specified scale line on the fixture and ensure that the center of the specimen is at the center of the heating body.

3.2. High-Temperature Field Building

An inspection of the heating and insulation structure in a high-temperature furnace is required, including the position and complete shape of the heating body, carbon felt, ceramic chips, and other apparatus, and a stable connection between the heating power supply, the position of the colorimeter, as well as the heating conditions, should be verified. PID controls are used to heat induction coils. The colorimeter maintains the target value as the temperature changes steadily during the control process. An appropriate power setting for heating is between 20 and 40 kW.
Once the vacuum pump is started, pump it down to less than 10 Pa (if it cannot be reached or air leakage occurs, shut down for inspection). After vacuum pumping has been completed, tighten the furnace door handle again. Turn on two high-temperature heaters and water-cooled motors, verify that their usual operation, and turn on the control software. High-temperature loading should be performed first, followed by heating; then, start and heat again. Heating power should be adjusted according to the loading process (using software to determine the temperature rise curve). Inspect the temperature of the water tank, the pressure of the water separator, and the flow meter during the testing process. During the test, focus on the indication of the force sensor, establish a force control relationship, automatically adjust the displacement of the electric cylinder, reduce the impact of stress caused by thermal expansion and cold contraction, and ensure that the indication of the force sensor does not exceed 100 N during the temperature rise and cooling process. Heat the specimen to 2500 °C at a rate of 30 °C/min, turn on the heating power supply before and after raising the temperature to the test temperature, and observe the test results. Conduct the material mechanical property test experiment, maintain the temperature for approximately half an hour, and conduct the experiment after ensuring the specimen’s temperature is balanced.

3.3. In-Plane Biaxial Loading

Upon completion of high-temperature field loading, the hydraulic cylinder components of the tension/compression unit can apply tension loads simultaneously. When stretching the specimen, the gauge length should not be moved. Besides load cells, grating rulers can measure tensile displacement.
Turn on the camera and adjust the specimen’s position after removing the blocking block from the front observation window. The mechanical loading module software should be started once the hardware and software settings are correct (displacement control mode or force control mode). Before loading, check the loading shaft and the high-temperature furnace body for any problems. When abnormalities are detected, the loading process must be ceased, the high-temperature loading must be ceased, and the precautions and methods for handling the failure should be summarized. To prevent data from becoming unreadable, cease mechanical and high-temperature loading and begin cooling. After cooling has been completed, turn off the vacuum pump and water cooler power supplies, ensure the mechanical loading and high-temperature loading power supplies are off, open the furnace door upon confirmation, examine the furnace body, take photographs of the specimens, and save them; check the electrical and water connections after the test is complete. The loading spindle should be returned to the furnace after resuming the loading process, closing the door, and maintaining vacuum and pressure.

3.4. In Situ Monitoring

To remove oil stains, absolute ethanol should be wiped over the specimen in the clamping position. Once the cruciform specimen has been installed, align the center of the speckle lens with the specimen center and prepare the digital speckle. Polarizers and filters are used to minimize the effect of thermal radiation on the cruciform specimen when heated to high temperatures in the furnace. Blue light is also required to supplement the narrow band filter because of its significant filtering effect. An optical filter of the same wavelength is used with a blue light source of 455 nm to obtain a clear and high-quality speckle pattern. Using a computer and software for post-processing, image information is analyzed and processed to determine the deformation and strain of the sample. The speckle effect can be activated by pressing the “Start Test” button on the upper part of the computer control panel. To observe force changes throughout the experiment, the software can be used to open the experimental data recorded in the past and establish the displacement force coordinate system.
The specimen’s comprehensive mechanical properties and the force values recorded at each stage are determined. Data should be extracted as soon as the test is completed. The actuator performs a reset of the upper computer and shutdown of the electric control cabinet.

4. Experimental Results

4.1. In Situ Tests under Combined In-Plane Tension Loads

The maximum mechanical load of a C/C material is considerably less than 80 kN. Therefore, it cannot be verified that the maximum mechanical load of the equipment is 80 kN. To verify that the mechanical loading capacity of the equipment can reach 80 kN, the Q235 in-plane biaxial mechanical property test is supplemented.
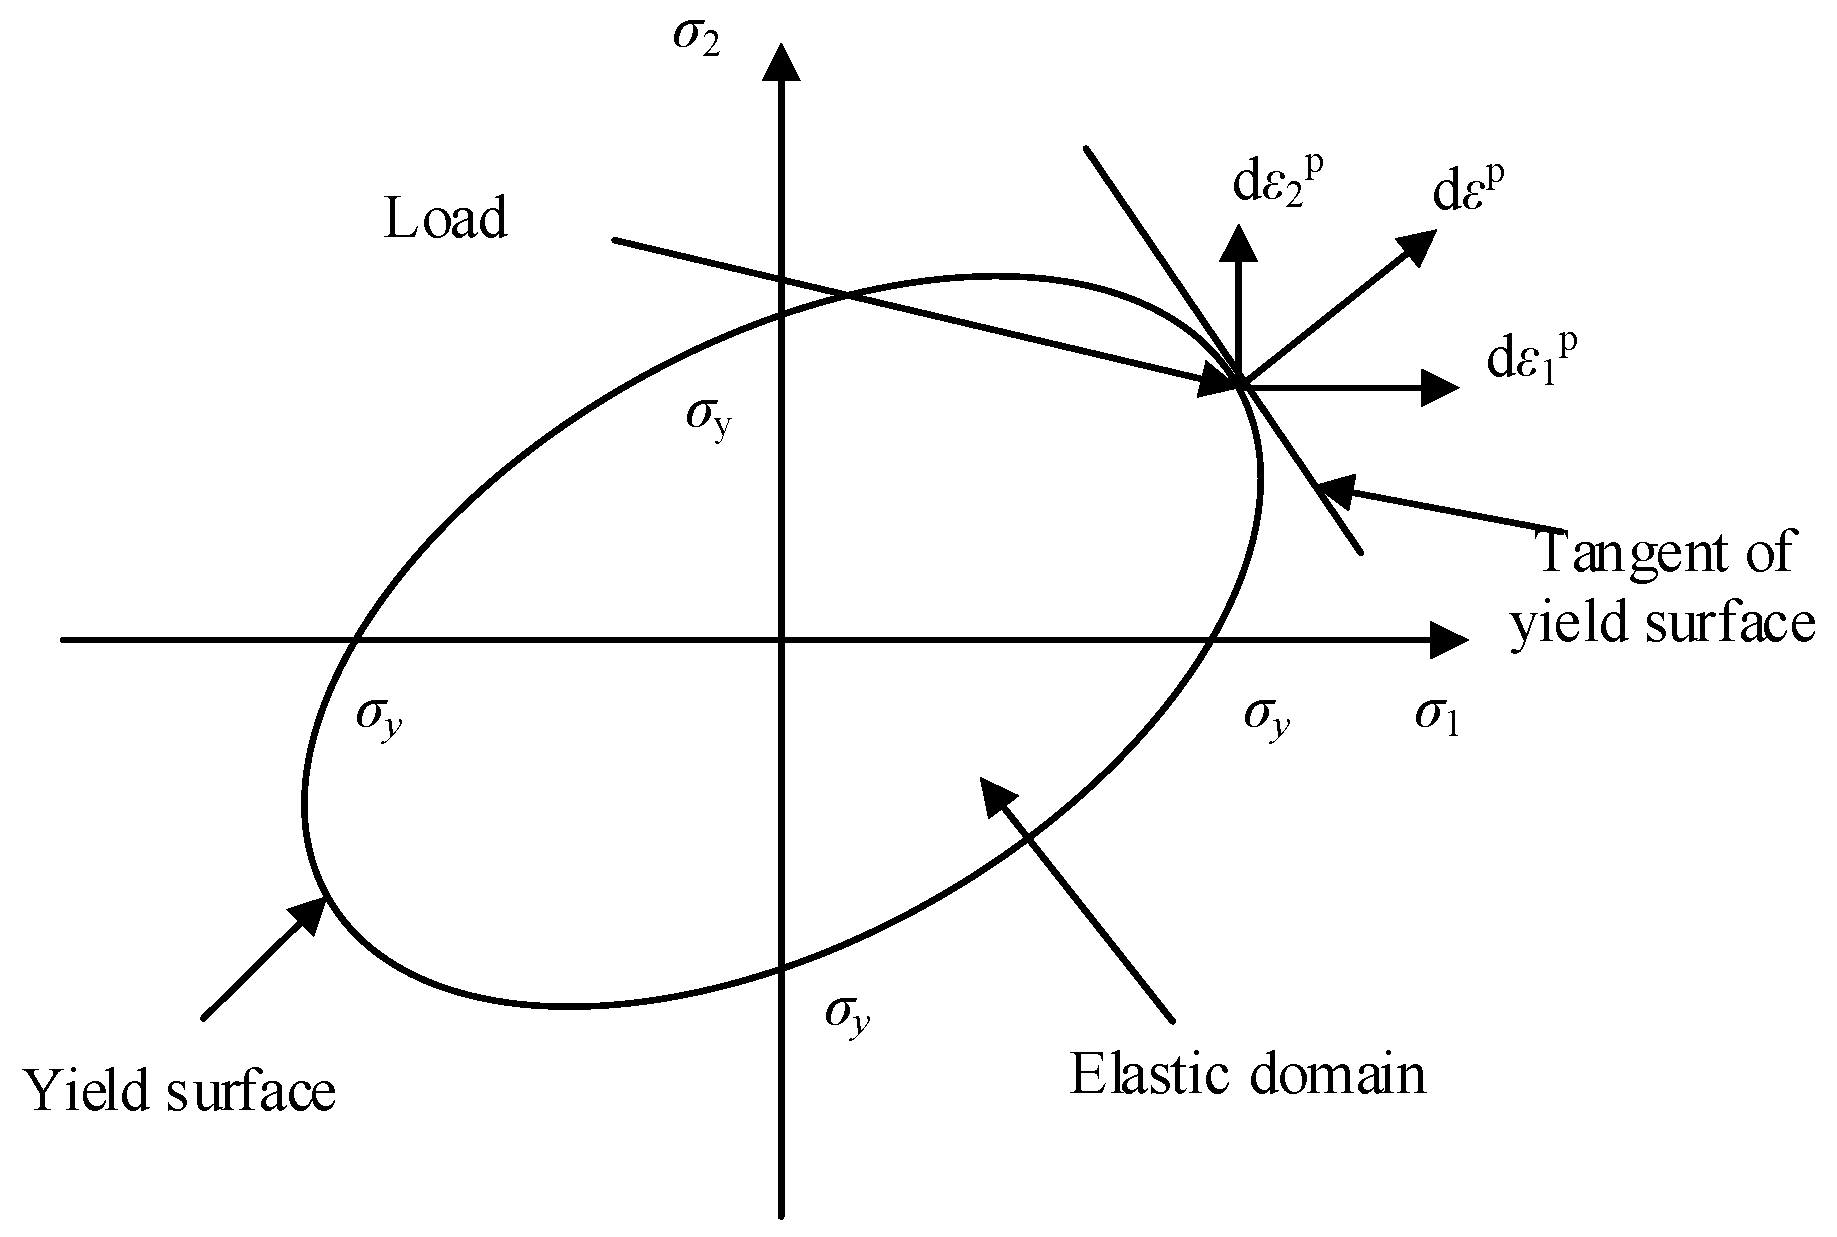
In this section, we discuss von Mises yield characteristics for a Q235 steel plate under in-plane stress. The stress space is limited to the two-dimensional principal stress space (σ3 = 0), for which subscripts 1, 2, and 3 represent the x, y, and z directions, respectively (Figure 14).
A yield characteristic solution under a plane stress state consists primarily of resolving the intersection surface of the von Mises cylinder plane and σ3 = 0. Figure 14 illustrates the von Mises yield criterion under plane stress. The yield function under the plane stress state has the following principal stress expression:
f = 1 2 [ ( σ 1 σ 2 ) 2 + σ 2 2 + σ 1 2 ] 1 / 2 σ y
Under in-plane stress, the equivalent plastic strain expression is:
ε p = 3 2 [ ( ε 1 p ε 2 p ) 2 + ( ε 1 p ε 3 p ) 2 + ( ε 2 p ε 3 p ) 2 ] 1 / 2
The displacement of the cross-arm end is measured using a grating ruler. The measurement and control systems specify the displacement ratio, displacement rate, and displacement on cross arms. The displacement of the grating ruler provides negative feedback to the PID controller, which provides real-time feedback on the displacement, force, and strain of the loading devices.
Plane biaxial tensile tests of cruciform specimens were conducted on a self-built high-temperature biaxial apparatus at various displacement ratios in the X and Y directions. A center-reduced cruciform specimen was used to test the plane characteristics of a Q235 steel plate, as it can significantly improve stress uniformity in the center gauge area. Using the experimental results, the yield surfaces of Q235 steel plates were plotted at plastic strains of 0.001, 0.002, 0.005, and 0.01. The strain information was collected for uniaxial and biaxial specimens, as shown in Figure 15.
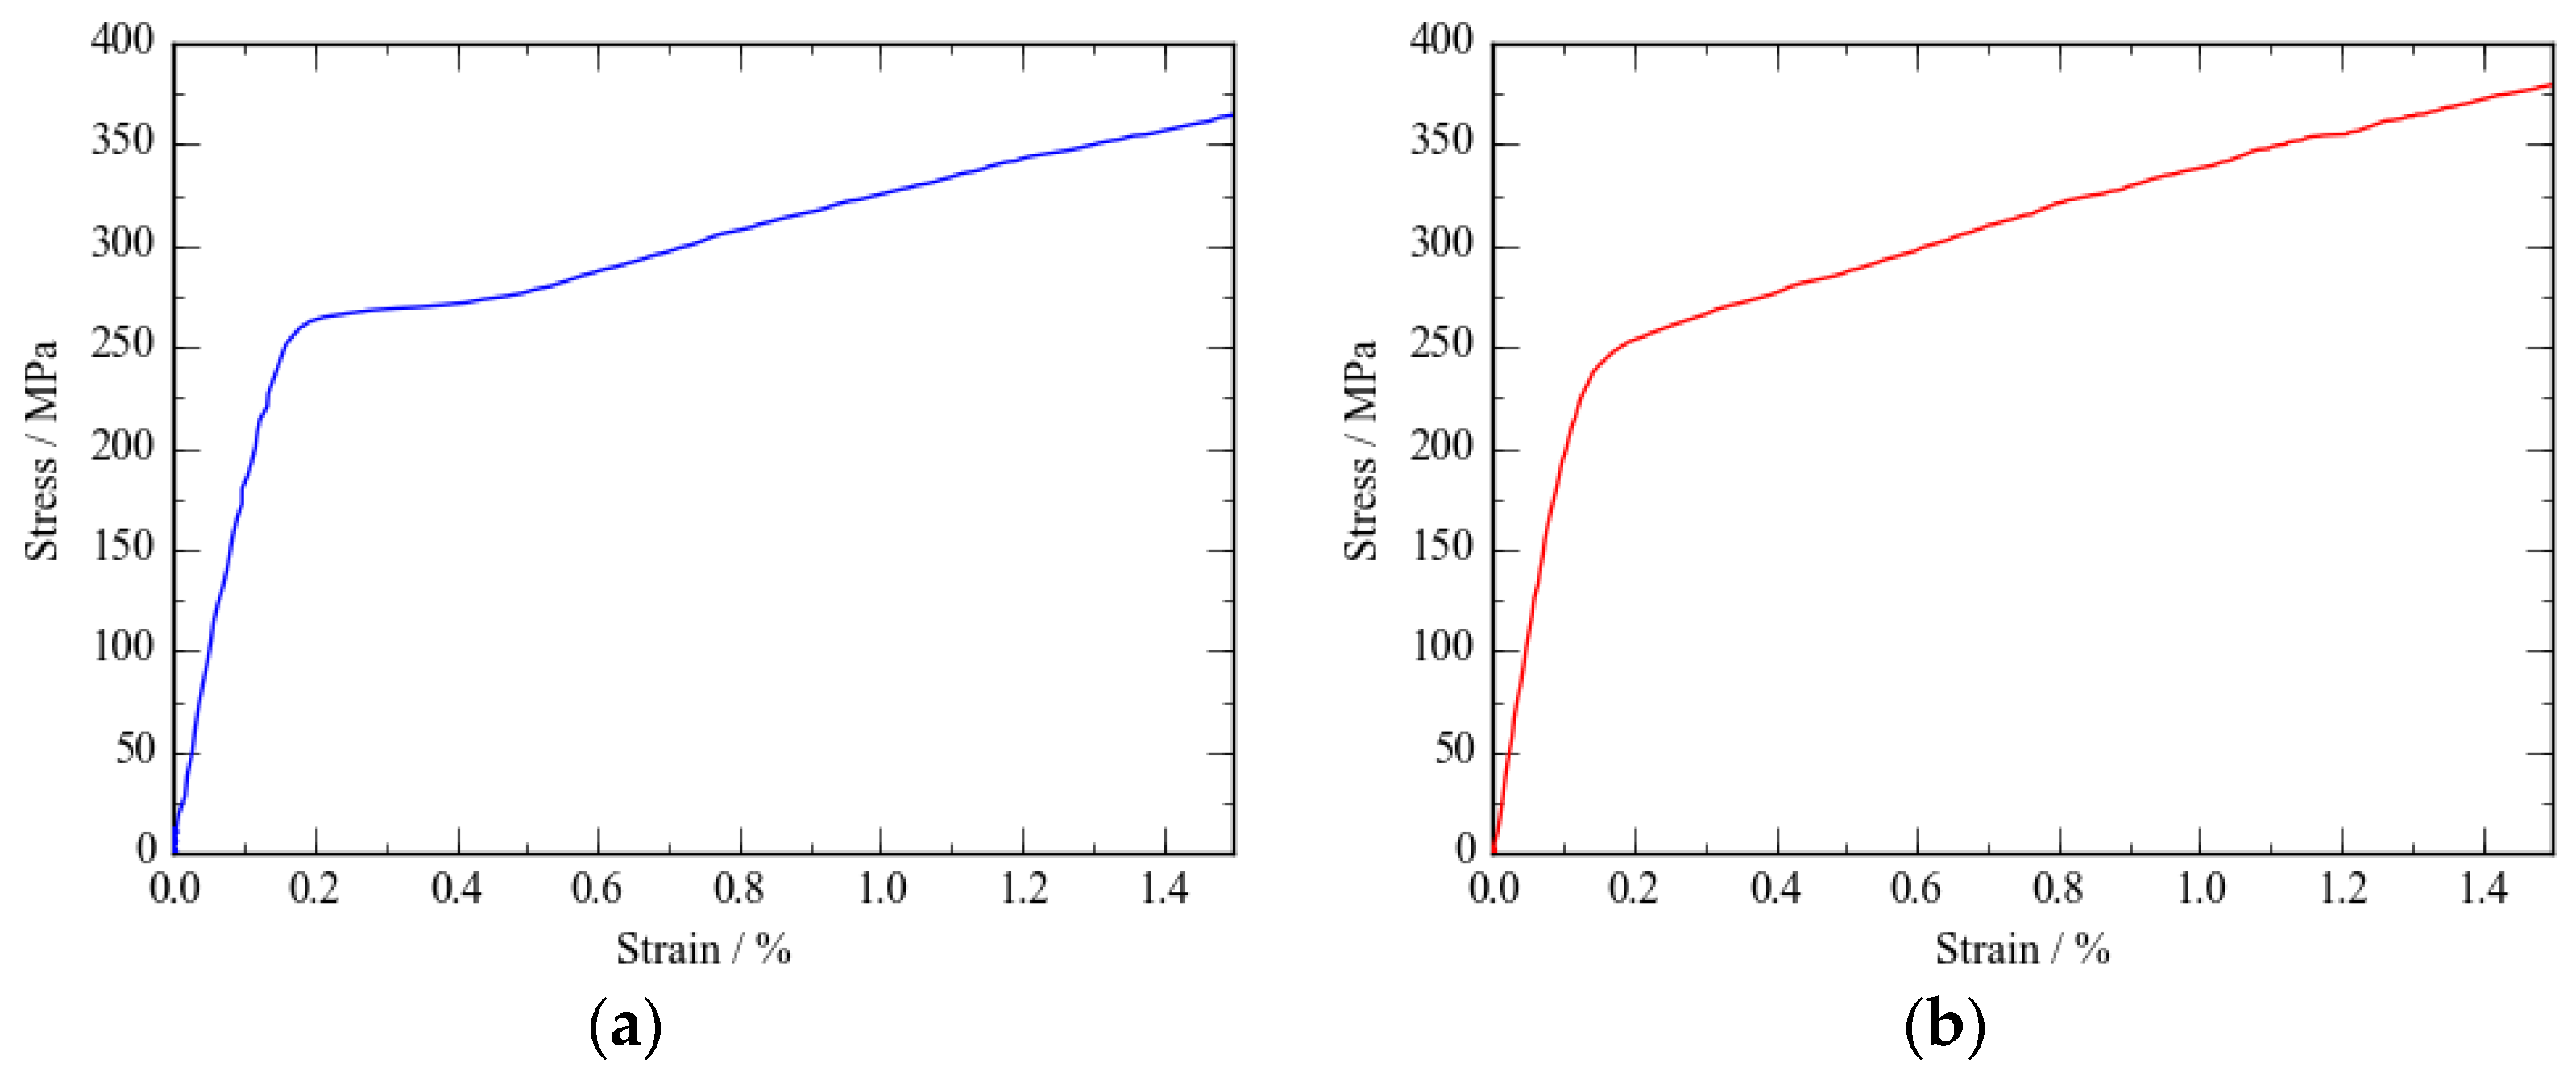
The stress–strain relationship for the Q235 steel plate at 0° and 90° was calculated using a uniaxial tensile test (Figure 16). The Steel plates roll in the 0° direction, whereas 90° is perpendicular. Q235 in the 0° direction did not show evident plastic strengthening at the initial yield stage, although the stress–strain curves in the above two directions are roughly similar in the uniaxial test.
Figure 17 illustrates the displacement ratios for a plane biaxial tensile test on a cruciform specimen with a reduced square center. Under in-plane biaxial loading, various displacement ratios result in varying stresses and strains, suggesting that Q235 responds differently to loads in different directions, indicating that prediction of in-plane biaxial mechanical properties of Q235 based solely on uniaxial test results may cause deviations.
Figure 18 illustrates the relationship between stress and strain in the central gauge area at different displacement ratios. The Q235 yield surface information was obtained by evaluating the stress–strain relationship under different displacement ratios. Using the plane yield property of the Q235 steel plate as an example, the plane biaxial equipment developed in this paper was used to characterize the plane properties of materials.

4.2. Impact Test of a Graphite Cruciform Specimen at 2500 °C

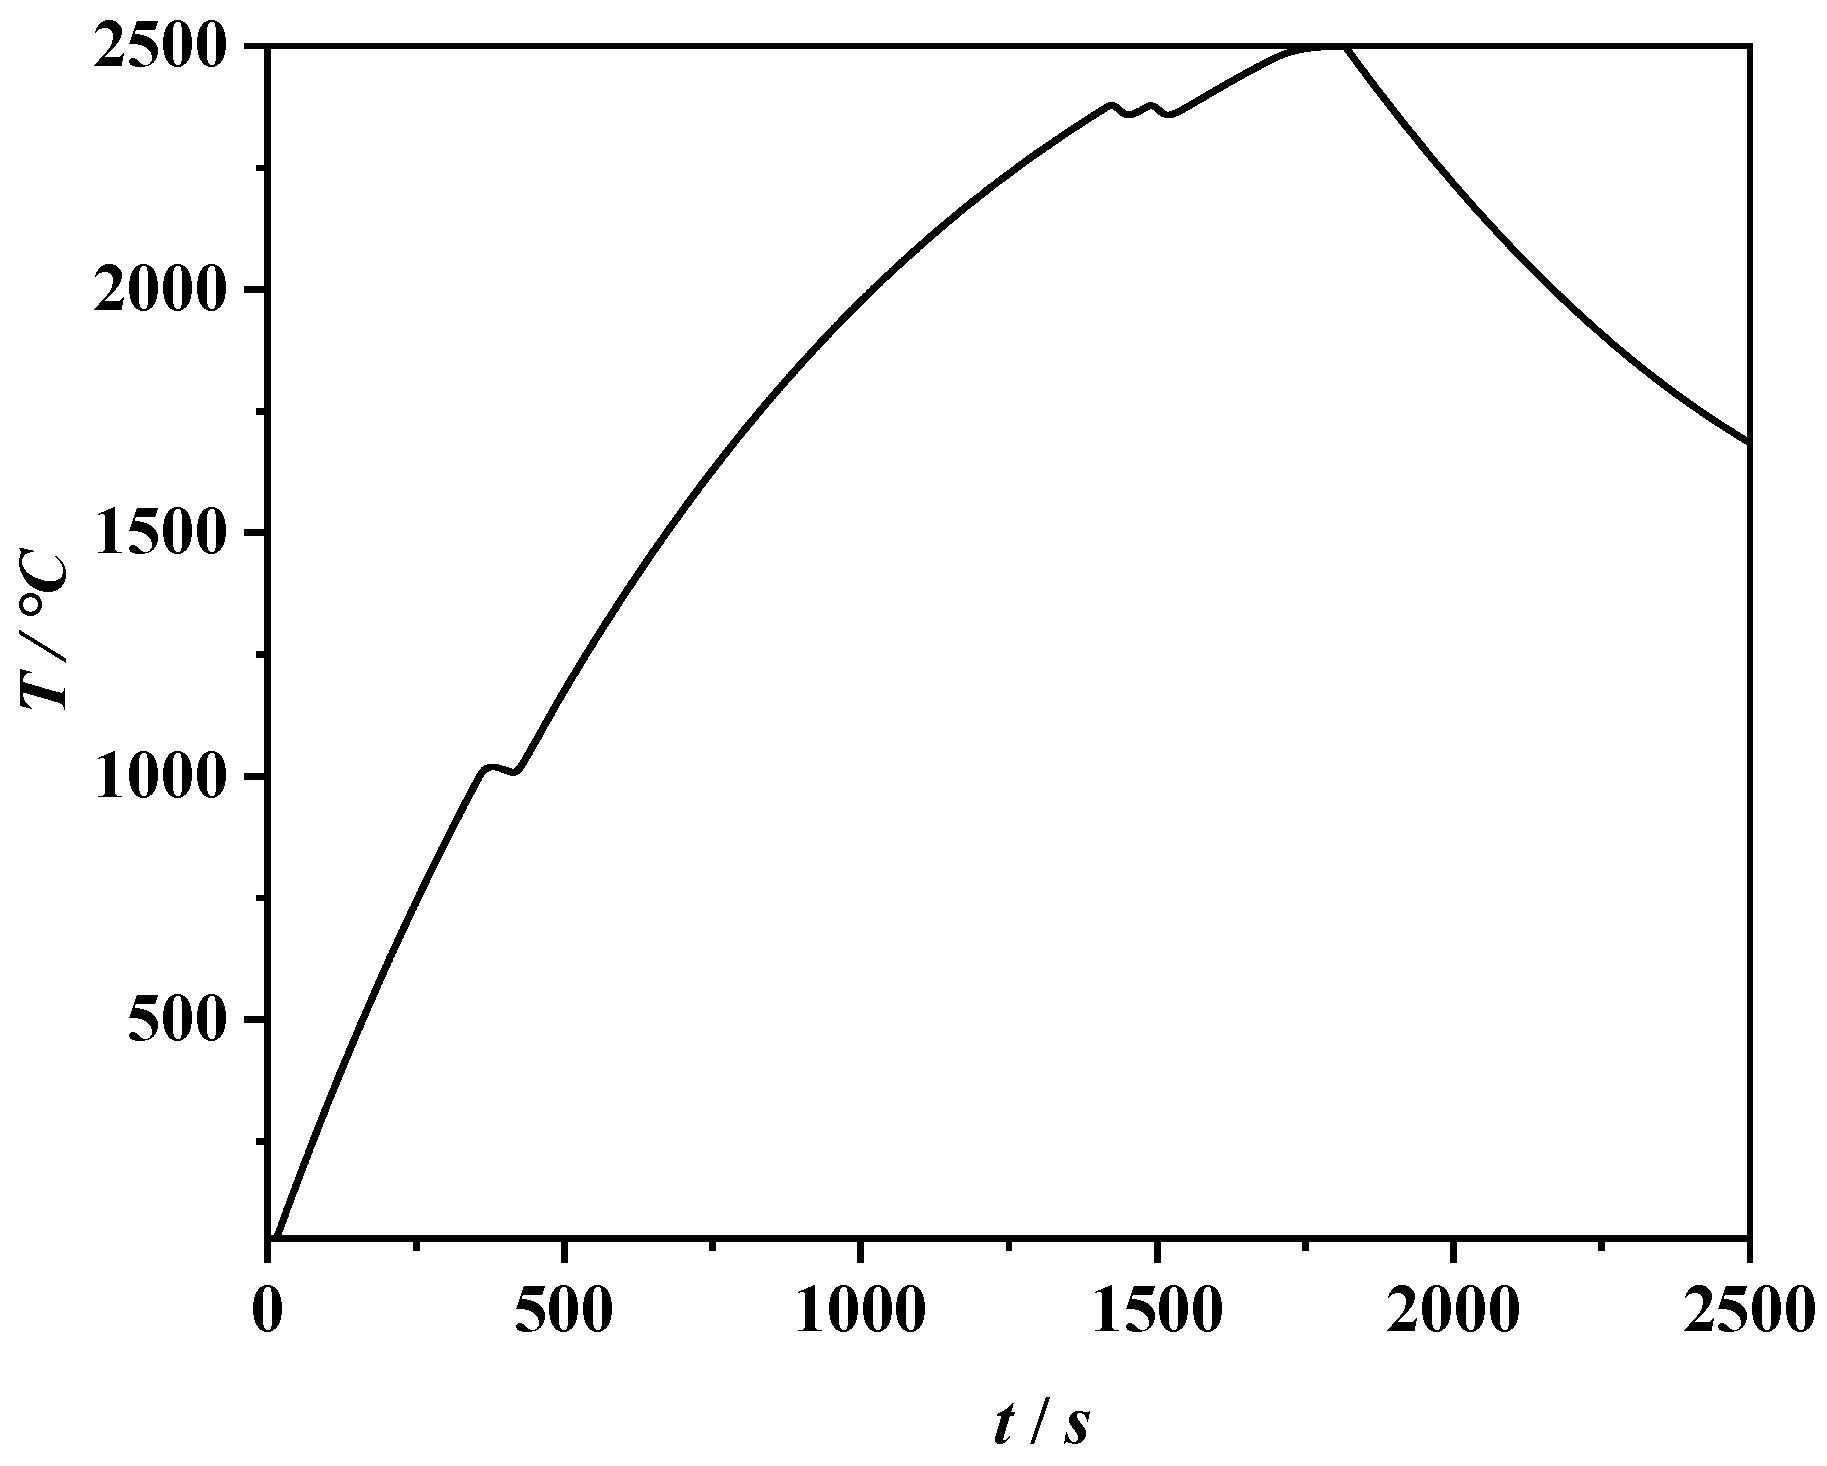
A high-temperature impact test of graphite specimens was conducted to verify that the maximum loading temperature of the developed equipment can reach 2500 °C (Figure 19). Upon loading the high-temperature load to 1700 °C, the temperature rise rate of the high-temperature load gradually decreases. The induction power supply is increased to 50% of its power to achieve the high-temperature impact target of 2500 °C; the temperature decreases after an impact that reaches 2500 °C for one minute.

4.3. In Situ Tests under Combined Tension–Compression Loads at 1700 °C

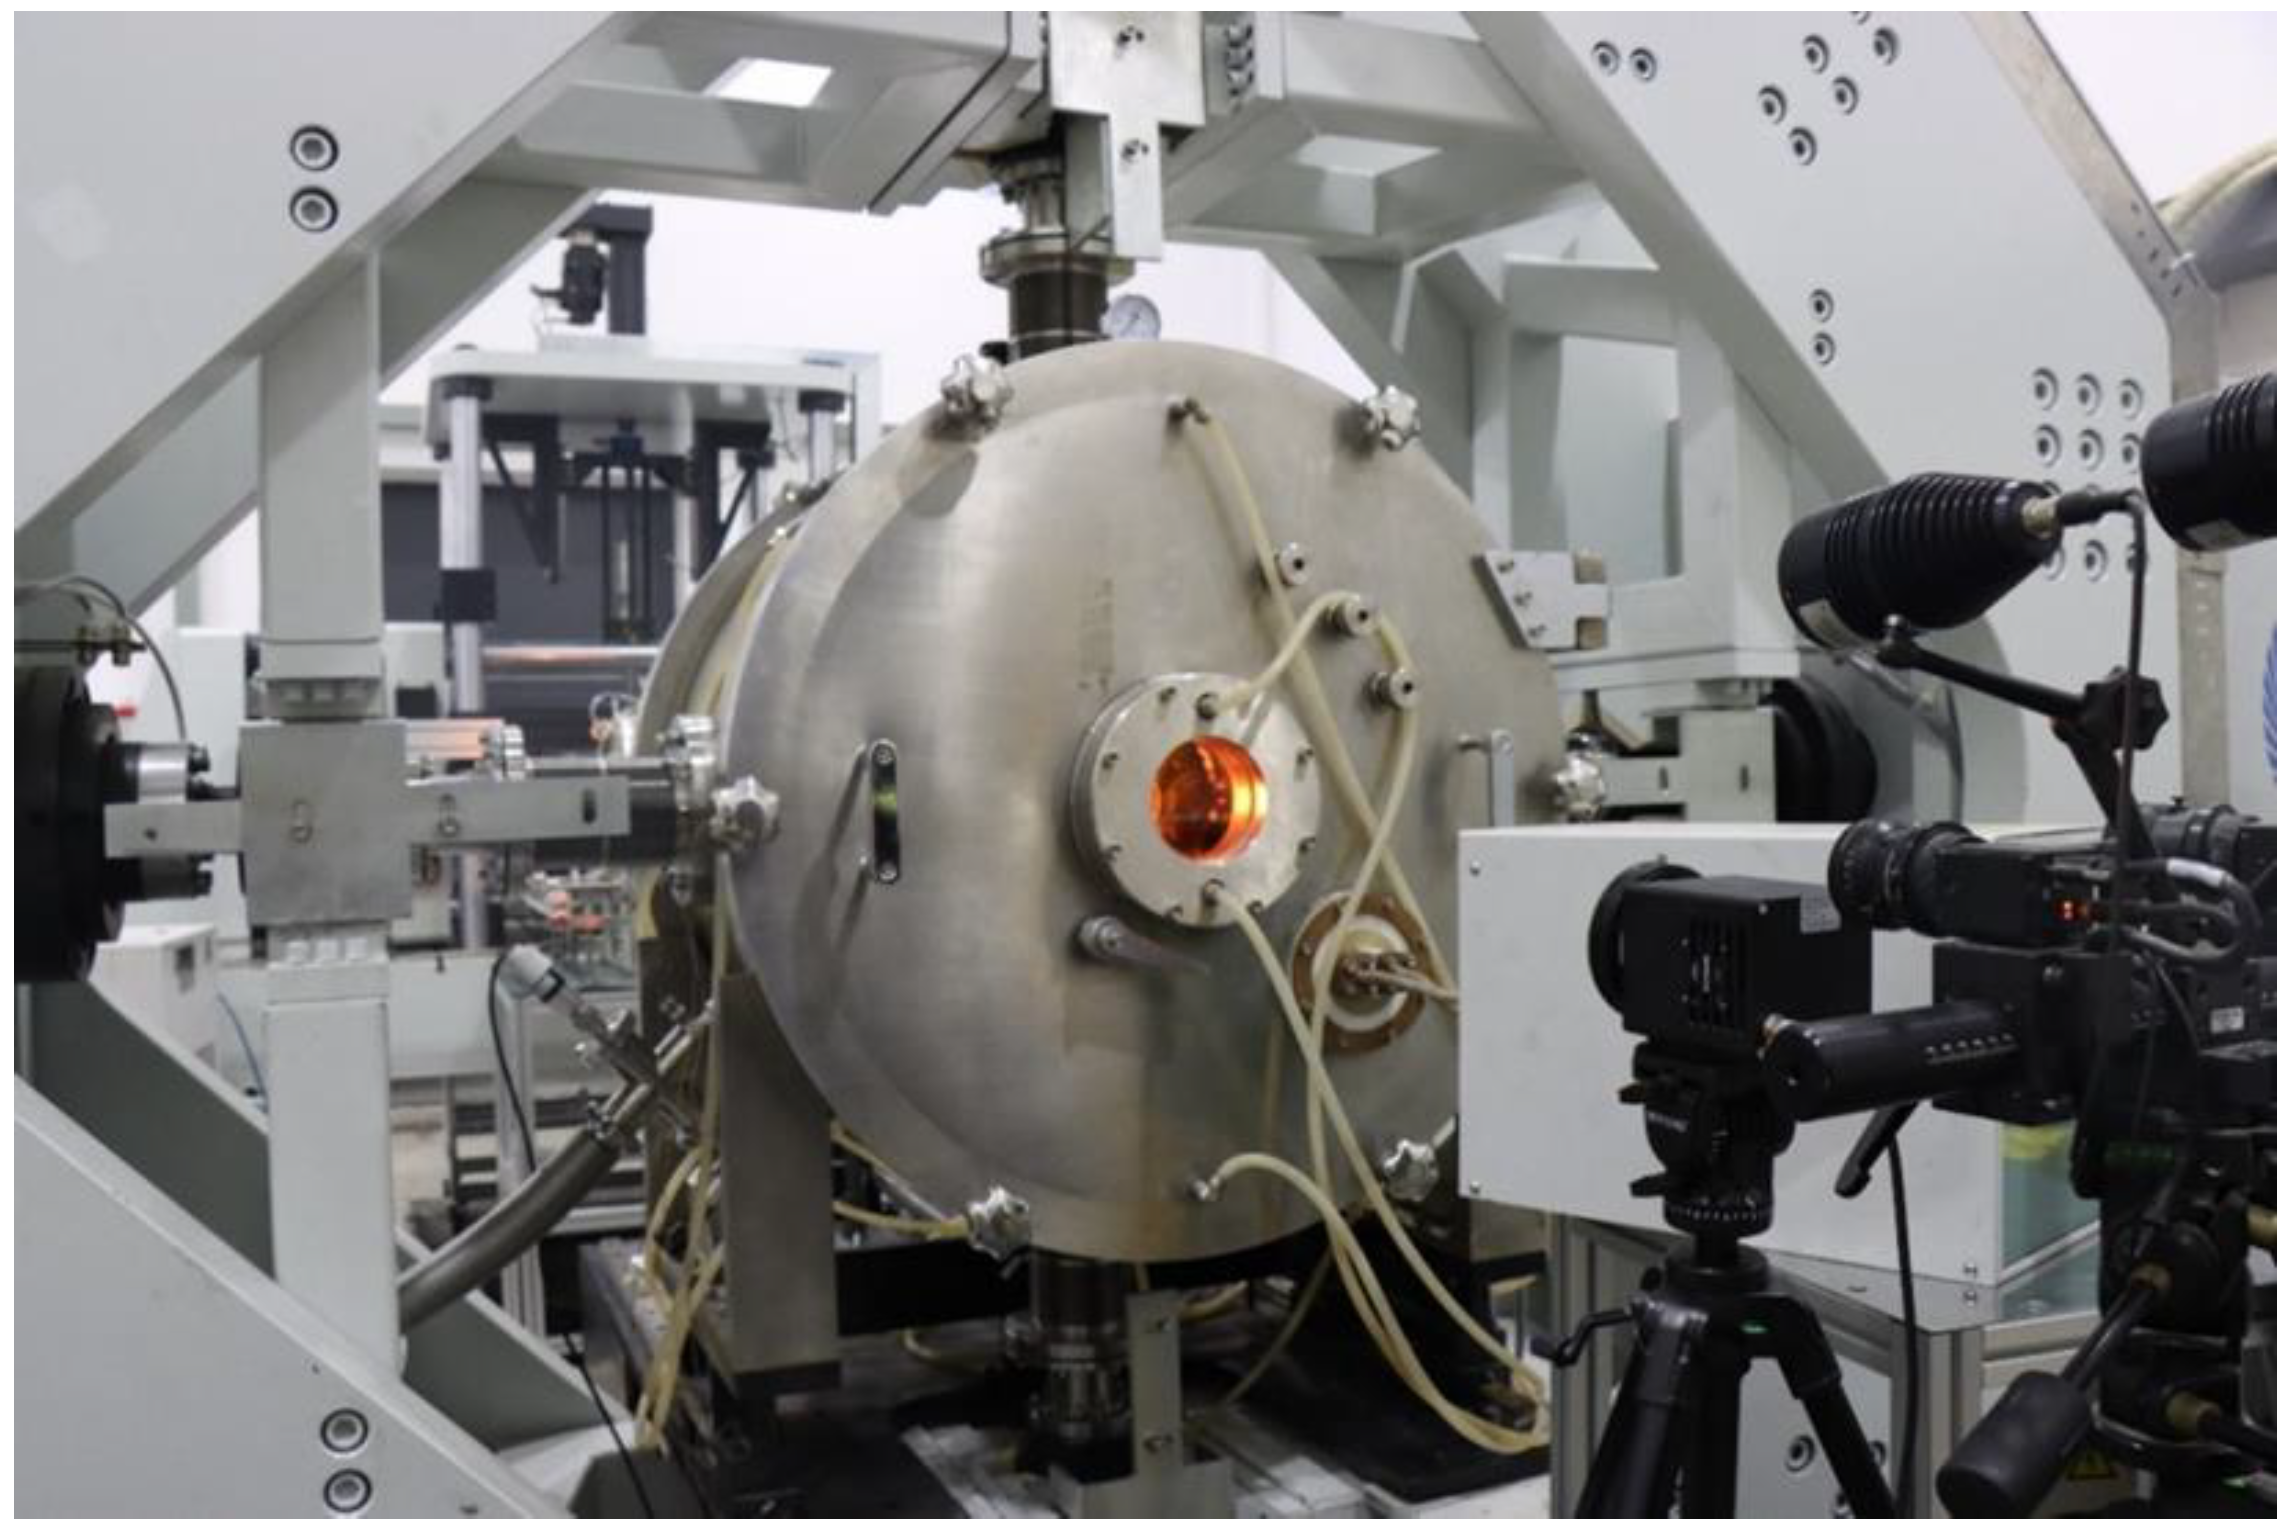
The cruciform specimen should be placed in an induction heater set at a high temperature as soon as it has been cleaned (Figure 20). The temperature can be measured using high-temperature colorimeter. Insulation above 1700 °C shall not be shorter than 2 h. A calibrated apparatus loading module must be used under high temperatures to perform complex loads, including tension–tension, tension–compression, and compression–compression loads. The digital speckle lens should be aligned with the polarizer and filter so that only narrow bands of light are transmitted to the center of the cruciform specimen by a narrow band filter. The thermal radiation light should be supplemented with blue light. Digital speckle patterns allow for real-time strain measurements at temperatures above 1700 °C. A stress–strain curve can be calculated by combining the load data extracted by the force sensor with the in-plane stress–strain curves of the C/C composites.
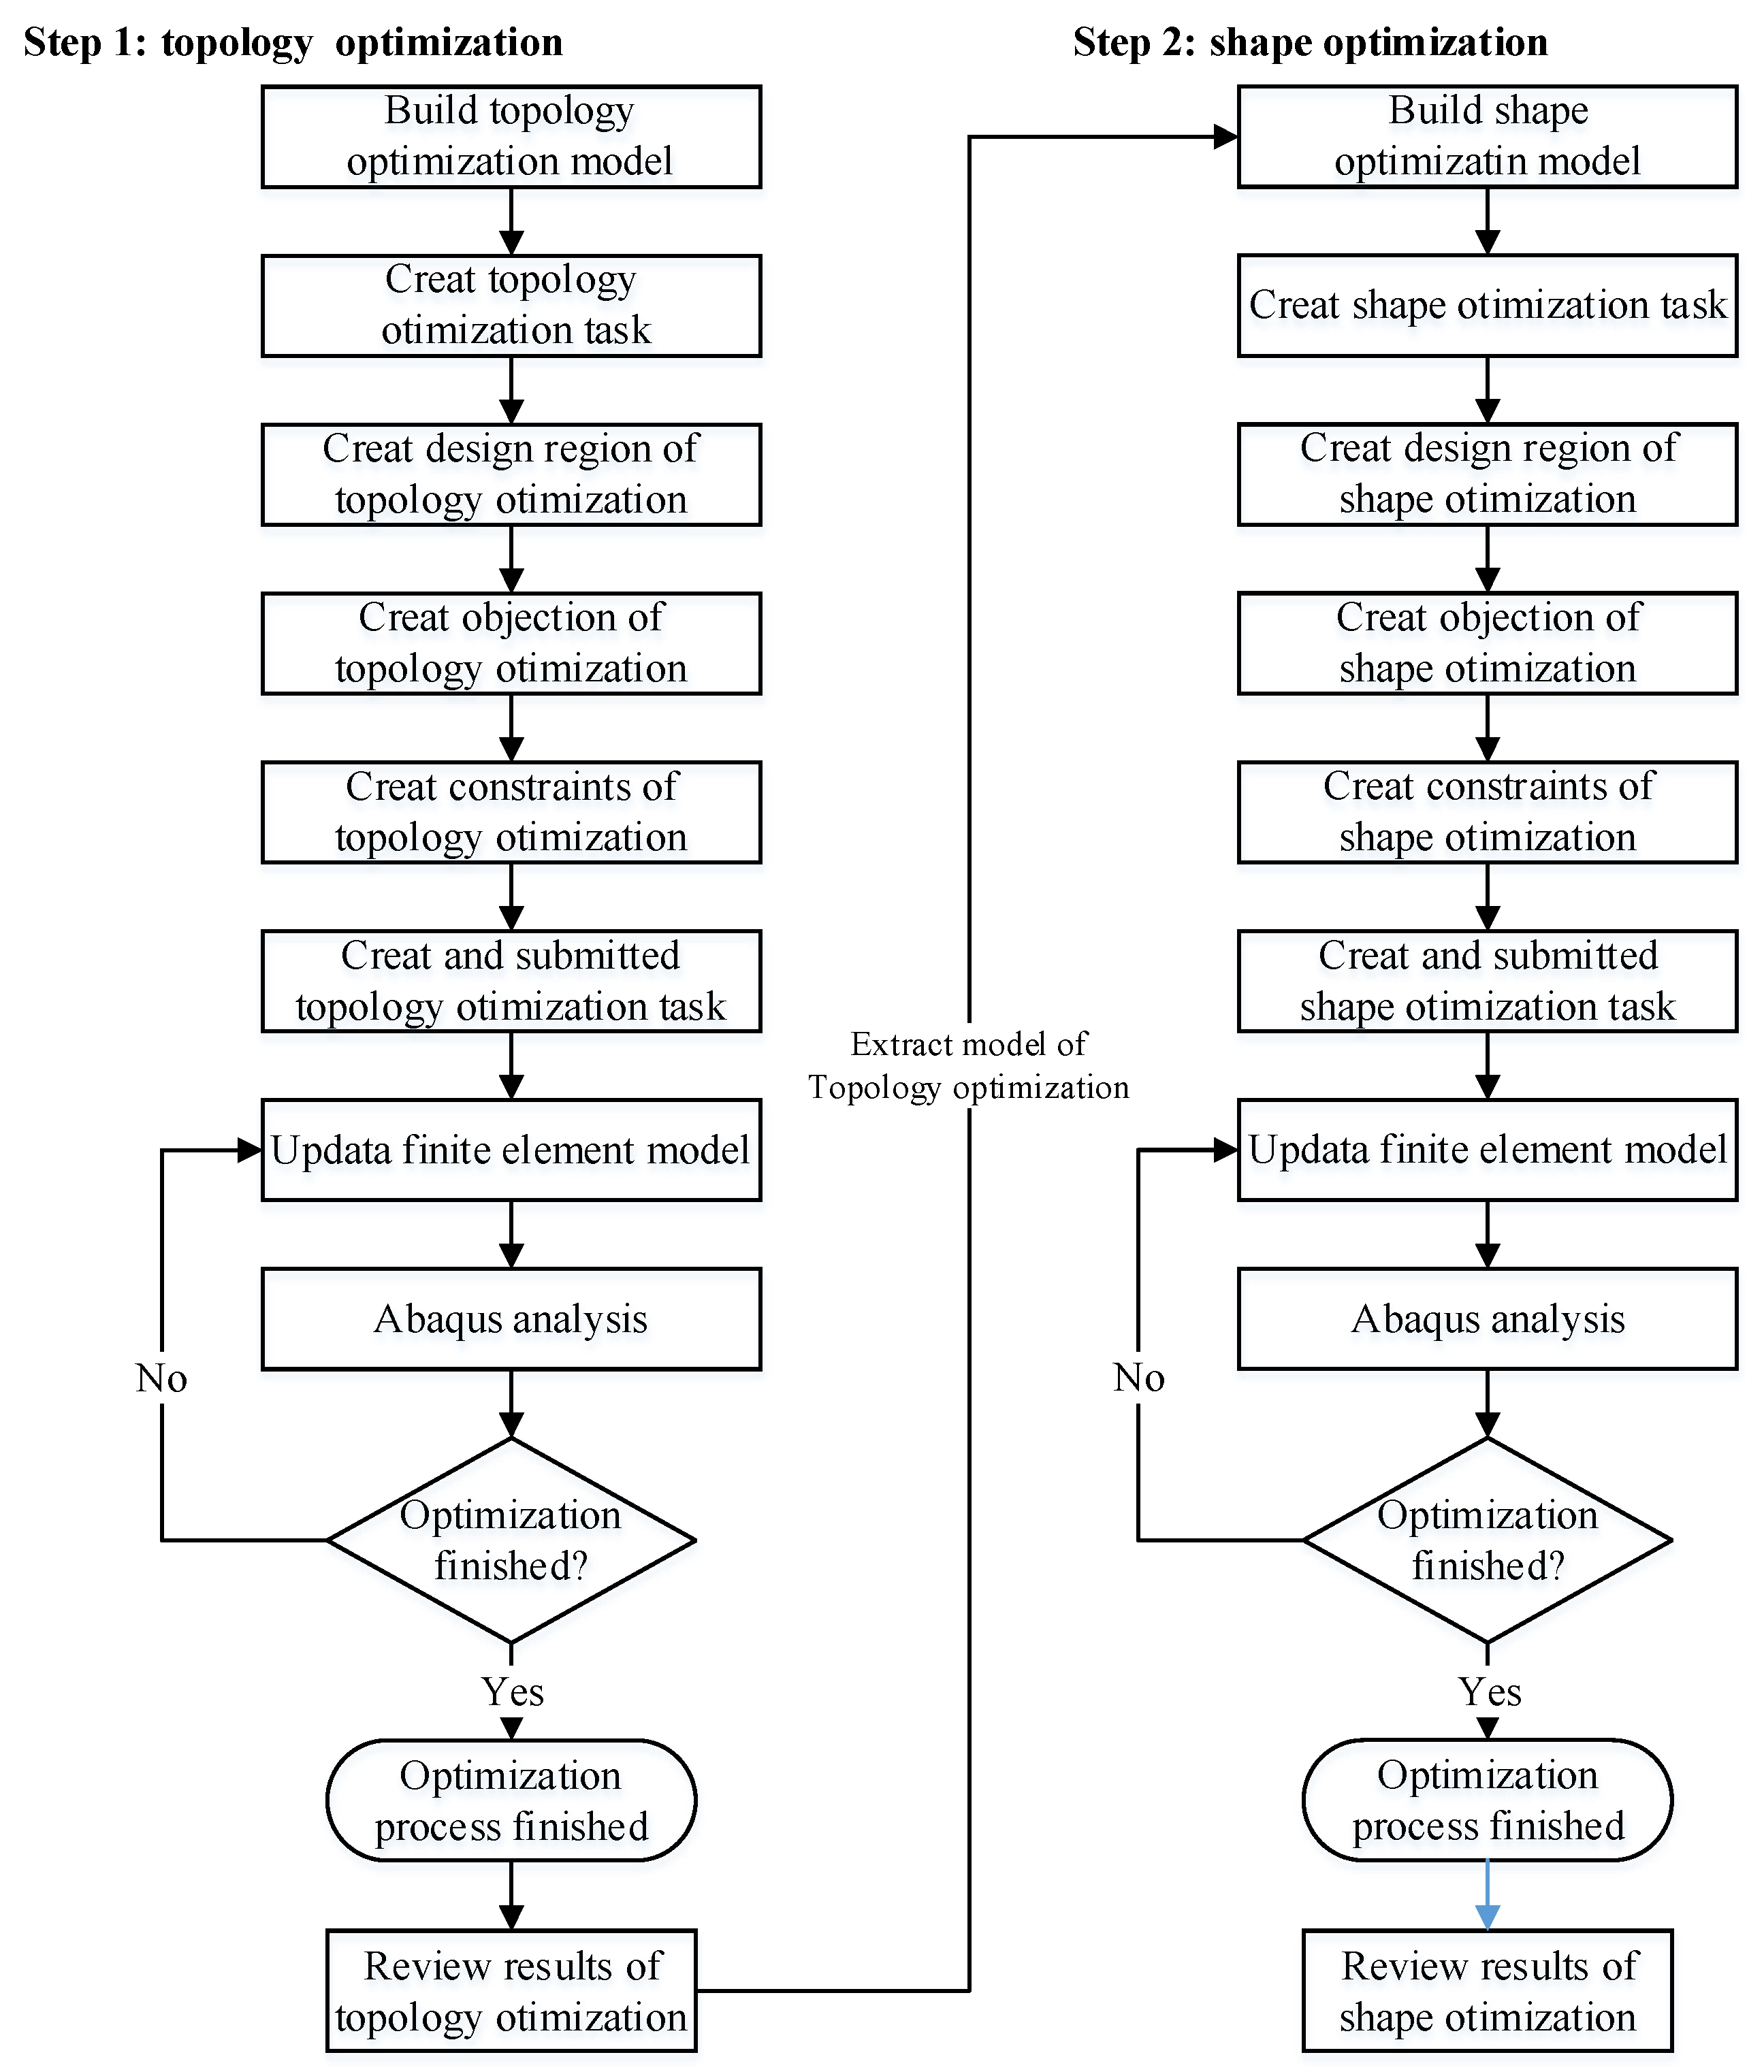
Using the finite element method, a center-reduced cruciform specimen was constructed through topology optimization and shape optimization. This improved the stress uniformity in the gauge length area and reduced the stress concentration on the cross arm (Figure 21). By designing the specimen with a cross shape, the first failure at the intersection of the cross arms can be prevented, and an improved representation of the nominal stress can be achieved. The cruciform specimen was optimized according to the method described in Ref. [37].
Figure 22 shows the cruciform specimen for the in-plane biaxial test at 1700 °C. Four clamps were used to clamp the cross arm of the cruciform specimen, and the control mode was set to force control. Tests of cruciform specimens with different force proportions under 1700 °C can be carried out by specifying force values in both horizontal and vertical directions.
The X and Y directions shown in Figure 22 bear an isometric tensile load. The force ratio (X/Y) in both directions is R = 1:1, demonstrating a zigzag fluctuation of the curve as a result of an interlaminar fracture of braided materials under tension–tension composite loading at 1700 °C, followed by brittle material fracture. With a force ratio (X/Y) of 1:2, a C/C composite under tension–compression loading at 1700 °C exhibits brittle fracture failure mode under high-temperature compression. At each end of the cruciform specimen, apply a compression–compression load with a force ratio (X/Y) of R = 1:2, and extract the stress–strain curve. The stress state directly affects a material’s unidirectional elastic modulus and fracture strength.

5. Conclusions

This work addresses the challenge of developing heat-resistant composites and sheet metal apparatus under high-temperature and complex loads. Our team has developed a high-temperature biaxial material testing apparatus capable of testing complex mechanical loads, such as vacuum and atmosphere, under 2500 °C with a force of 80 kN to test tension–tension, tension–compression, and compression–compression loads. In situ tests, such as digital speckle patterns and high-temperature colorimeters, were conducted under high-temperature conditions. Under in-plane loads, the mechanical properties of C/C materials were characterized at 1700 °C, demonstrating the ability of the apparatus to test the mechanical properties of heat-resistant composites under high temperatures and in-plane stresses. A high-temperature impact test of graphite at 2500 °C confirms that the proposed apparatus can test specimens at temperatures of at least 2500 °C. During room temperature measurements, yield characteristics of the Q235 steel sheet were measured under in-plane stresses, illustrating the ability of the apparatus to characterize mechanical properties not only at high temperatures but also at room temperature for in-plane analysis of metals and other materials.
The high-precision synchronous motion of four axes is required to ensure material testing under a fixed load/strain ratio. Future work involves incorporating cross-coupling and deviation-coupling strategies in multi-axis testing to increase multi-axis synchronous motion precision; intelligent control is included in the verified control strategy to respond to nonlinear problems in multi-axis synchronous motion.

Author Contributions

Conceptualization, J.C.; Data curation, J.C.; Formal analysis, J.C.; Investigation, J.Z. and H.Z.; Methodology, J.C.; Project administration, H.Z.; Resources, H.Z.; Validation, J.C.; Visualization, J.Z.; Writing—original draft, J.C.; Writing—review and editing, J.Z. and H.Z. All authors have read and agreed to the published version of the manuscript.

Funding

This research was funded by the National Science Fund for Distinguished Young Scholars (51925504), the Foundation for Innovative Research Groups of the National Natural Science Foundation of China (52021003), and the Pre-research of equipment of the General Armaments Department (41422050301).

Institutional Review Board Statement

Not applicable.

Informed Consent Statement

Not applicable.

Data Availability Statement

Not applicable.

Acknowledgments

We would like to thank the postgraduate students Zhangyong Pan, Ningyu Li, and Lilin Dai for their outstanding contributions to the development of the high-temperature and in-plane biaxial testing apparatus.

Conflicts of Interest

The authors declare that they have no known competing financial interests or personal relationships that could have influenced the work reported in this paper.

References

  1. Lin, W.-P.; Hu, H.-T. Parametric Study on the Failure of Fiber-Reinforced Composite Laminates under Biaxial Tensile Load. J. Compos. Mater. 2002, 36, 1481–1503. [Google Scholar] [CrossRef]
  2. Boehler, J.P.; Demmerle, S.; Koss, S. A new direct biaxial testing machine for anisotropic materials. Exp. Mech. 1994, 34, 1–9. [Google Scholar] [CrossRef]
  3. Blümel, K.W.; Gerlach, J. Biaxial Experimental Approach to Characterize Formability of Steel Sheet Metals; SAE International: Warrendale, PA, USA, 1998. [Google Scholar] [CrossRef]
  4. Green, D.E.; Neale, K.W.; MacEwen, S.R.; Makinde, A.; Perrin, R. Experimental investigation of the biaxial behaviour of an aluminum sheet. Int. J. Plast. 2004, 20, 1677–1706. [Google Scholar] [CrossRef]
  5. Jones, C. Biaxial testing of polymer composites. Mater. World 2001, 9, 19–21. [Google Scholar]
  6. McDiarmid, D. A new analysis of fatigue under combined bending and twisting. Aeronaut. J. 1974, 78, 325–329. [Google Scholar] [CrossRef]
  7. Quaresimin, M.; Susmel, L.; Talreja, R. Fatigue behaviour and life assessment of composite laminates under multiaxial loadings. Int. J. Fatigue 2010, 32, 2–16. [Google Scholar] [CrossRef]
  8. Hazell, C.R.; Marin, J. A possible specimen for the study of biaxial yielding of materials. Int. J. Mech. Sci. 1967, 9, 57–63. [Google Scholar] [CrossRef]
  9. Bird, J.E.; Duncan, J.L. Strain hardening at high strain in aluminum alloys and its effect on strain localization. Metall. Trans. A 1981, 12, 235–241. [Google Scholar] [CrossRef]
  10. Luk’Yanov, V.F.; Lyudmirskij, Y.G.; Naprasnikov, V.V. Testing components of shell structures in the biaxial stressed state; Pruefung der Komponenten von Kesselmantelstrukturen im biaxialen Spannungszustand. Zavod. Lab 1986, 52, 63–65. [Google Scholar]
  11. Dudderar, T.D.; Koch, F.B.; Doerries, E.M. Measurement of the shapes of foil bulge-test samples. Exp. Mech. 1977, 17, 133–140. [Google Scholar] [CrossRef]
  12. Yu, Y.; Wan, M. Design of a cruciform biaxial tensile specimen for limit strain analysis by FEM. J. Mater. Process. Technol. 2002, 123, 67–70. [Google Scholar] [CrossRef]
  13. Makinde, A.; Thibodeau, L.; Neale, K.W. Development of an apparatus for biaxial testing using cruciform specimens. Exp. Mech. 1992, 32, 138–144. [Google Scholar] [CrossRef]
  14. Welsh, J.S.; Adams, D.F. Development of a True Triaxial Testing Facility for Composite Materials. In Proceedings of the Symposium on Multiaxial Fatigue and Deformation, Seattle, WA, USA, 19–20 May 1999; American Society Testing and Materials: Seattle, WA, USA, 2000; pp. 423–437. [Google Scholar] [CrossRef]
  15. Welsh, J.S.; Adams, D.F. Development of an electromechanical triaxial test facility for composite materials. Exp. Mech. 2000, 40, 312–320. [Google Scholar] [CrossRef]
  16. Zouani, A.; Bui-Quoc, T.; Bernard, M. A Proposed Biaxial-Tensile Device for Fatigue Testing; American Society of Mechanical Engineers: New York, NY, USA, 1996. [Google Scholar]
  17. Hayhurst, D. A biaxial-tension creep-rupture testing machine. J. Strain Anal. 1973, 8, 119–123. [Google Scholar] [CrossRef]
  18. Fessler, H.; Musson, J. A 30 ton biaxial tensile testing machine. J. Strain Anal. 1969, 4, 22–26. [Google Scholar] [CrossRef]
  19. Shiratori, E.; Ikegami, K. A new biaxial tensile testing machine with flat specimen. Bull. Tokyo Inst. Technol. 1967, 82, 5–18. [Google Scholar]
  20. Smits, A.; Van Hemelrijck, D.; Philippidis, T.P.; Cardon, A. Design of a cruciform specimen for biaxial testing of fibre reinforced composite laminates. Compos. Sci. Technol. 2006, 66, 964–975. [Google Scholar] [CrossRef]
  21. Williamson, C.; Cook, J.; Clarke, A. Investigation into the Failure of Ppen and Filled Holes in CFRP Laminates under Biaxial Loading Conditions; QinetiQ Ltd.: Farmbrough, UK, 2004; Available online: http://www.escm.eu.org/docs/eccm/C209.pdf (accessed on 29 September 2022).
  22. Liu, W.; Guines, D.; Leotoing, L.; Ragneau, E. Identification of strain rate-dependent mechanical behaviour of DP600 under in-plane biaxial loadings. Mater. Sci. Eng. A 2016, 676, 366–376. [Google Scholar] [CrossRef]
  23. Güler, B.; Efe, M. Forming and fracture limits of sheet metals deforming without a local neck. J. Mater. Process. Technol. 2018, 252, 477–484. [Google Scholar] [CrossRef]
  24. Kuwabara, T.; Ikeda, S.; Kuroda, K. Measurement and analysis of differential work hardening in cold-rolled steel sheet under biaxial tension. J. Mater. Process. Technol. 1998, 80–81, 517–523. [Google Scholar] [CrossRef]
  25. Lin, S.B.; Ding, J.L. Experimental study of the plastic yielding of rolled sheet metals with the cruciform plate specimen. Int. J. Plast. 1995, 11, 583–604. [Google Scholar] [CrossRef]
  26. Kulawinski, D.; Ackermann, S.; Seupel, A.; Lippmann, T.; Henkel, S.; Kuna, M.; Weidner, A.; Biermann, H. Deformation and strain hardening behavior of powder metallurgical TRIP steel under quasi-static biaxial-planar loading. Mater. Sci. Eng. A. Mater. Prop. Microstruct. Process. 2015, 642, 317–329. [Google Scholar] [CrossRef]
  27. Lamkanfi, E.; Van Paepegem, W.; Degrieck, J. Shape optimization of a cruciform geometry for biaxial testing of polymers. Polym. Test. 2015, 41, 7–16. [Google Scholar] [CrossRef]
  28. Tierriault, P.; Settouane, K.; Brailovski, V. Biaxial Testing at Different Temperatures of Cruciform Ti-Ni Samples. In Proceedings of the International Conference on Shape Memory and Superplastic Technologies; SMST Society Inc.: Menlo Park, CA, USA, 2003; pp. 247–257. [Google Scholar] [CrossRef]
  29. Bruschi, S.; Altan, T.; Banabic, D.; Bariani, P.F.; Brosius, A.; Cao, J.; Ghiotti, A.; Khraisheh, M.; Merklein, M.; Tekkaya, A.E. Testing and modelling of material behaviour and formability in sheet metal forming. CIRP Ann. 2014, 63, 727–749. [Google Scholar] [CrossRef]
  30. Geiger, M.; van der Heyd, G.; Merklein, M.; Hussnaetter, W. Novel Concept of Experimental Setup for Characterization of Plastic Yielding of Sheet Metal at Elevated Temperatures. In Sheet Metal 2005; Geiger, M., Duflou, J., Kals, H.J.J., Shirvani, B., Singh, U.P., Eds.; Trans Tech Publications Ltd.: Stafa-Zurich, Switzerland, 2005; Volume 6–8, pp. 657–664. [Google Scholar] [CrossRef]
  31. Chevalier, L.; Marco, Y. Identification of a strain induced crystallization model for PET under uni- and bi-axial loading: Influence of temperature dispersion. Mech. Mater. 2007, 39, 596–609. [Google Scholar] [CrossRef]
  32. Abu-Farha, F.; Hector, L.G.; Khraisheh, M. Cruciform-Shaped Specimens for Elevated Temperature Biaxial Testing of Lightweight Materials. Jom 2009, 61, 48–56. [Google Scholar] [CrossRef]
  33. Kulawinski, D.; Henkel, S.; Holländer, D.; Thiele, M.; Gampe, U.; Biermann, H. Fatigue behavior of the nickel-base superalloy Waspaloy™ under proportional biaxial-planar loading at high temperature. Int. J. Fatigue 2014, 67, 212–219. [Google Scholar] [CrossRef]
  34. Xiao, R.; Li, X.X.; Lang, L.H.; Chen, Y.K.; Yang, Y.F. Biaxial tensile testing of cruciform slim superalloy at elevated temperatures. Mater. Des. 2016, 94, 286–294. [Google Scholar] [CrossRef]
  35. Shao, Z.; Li, N.; Lin, J.; Dean, T.A. Development of a New Biaxial Testing System for Generating Forming Limit Diagrams for Sheet Metals Under Hot Stamping Conditions. Exp. Mech. 2016, 56, 1489–1500. [Google Scholar] [CrossRef]
  36. Le Cam, J.-B.; Robin, E.; Leotoing, L.; Guines, D. Calorimetric analysis of Portevin-Le Chatelier bands under equibiaxial loading conditions in Al–Mg alloys: Kinematics and mechanical dissipation. Mech. Mater. 2017, 105, 80–88. [Google Scholar] [CrossRef] [Green Version]
  37. Chen, J.; Zhang, J.; Zhao, H. Designing a Cruciform Specimen via Topology and Shape Optimizations under Equal Biaxial Tension Using Elastic Simulations. Materials 2022, 15, 5001. [Google Scholar] [CrossRef] [PubMed]
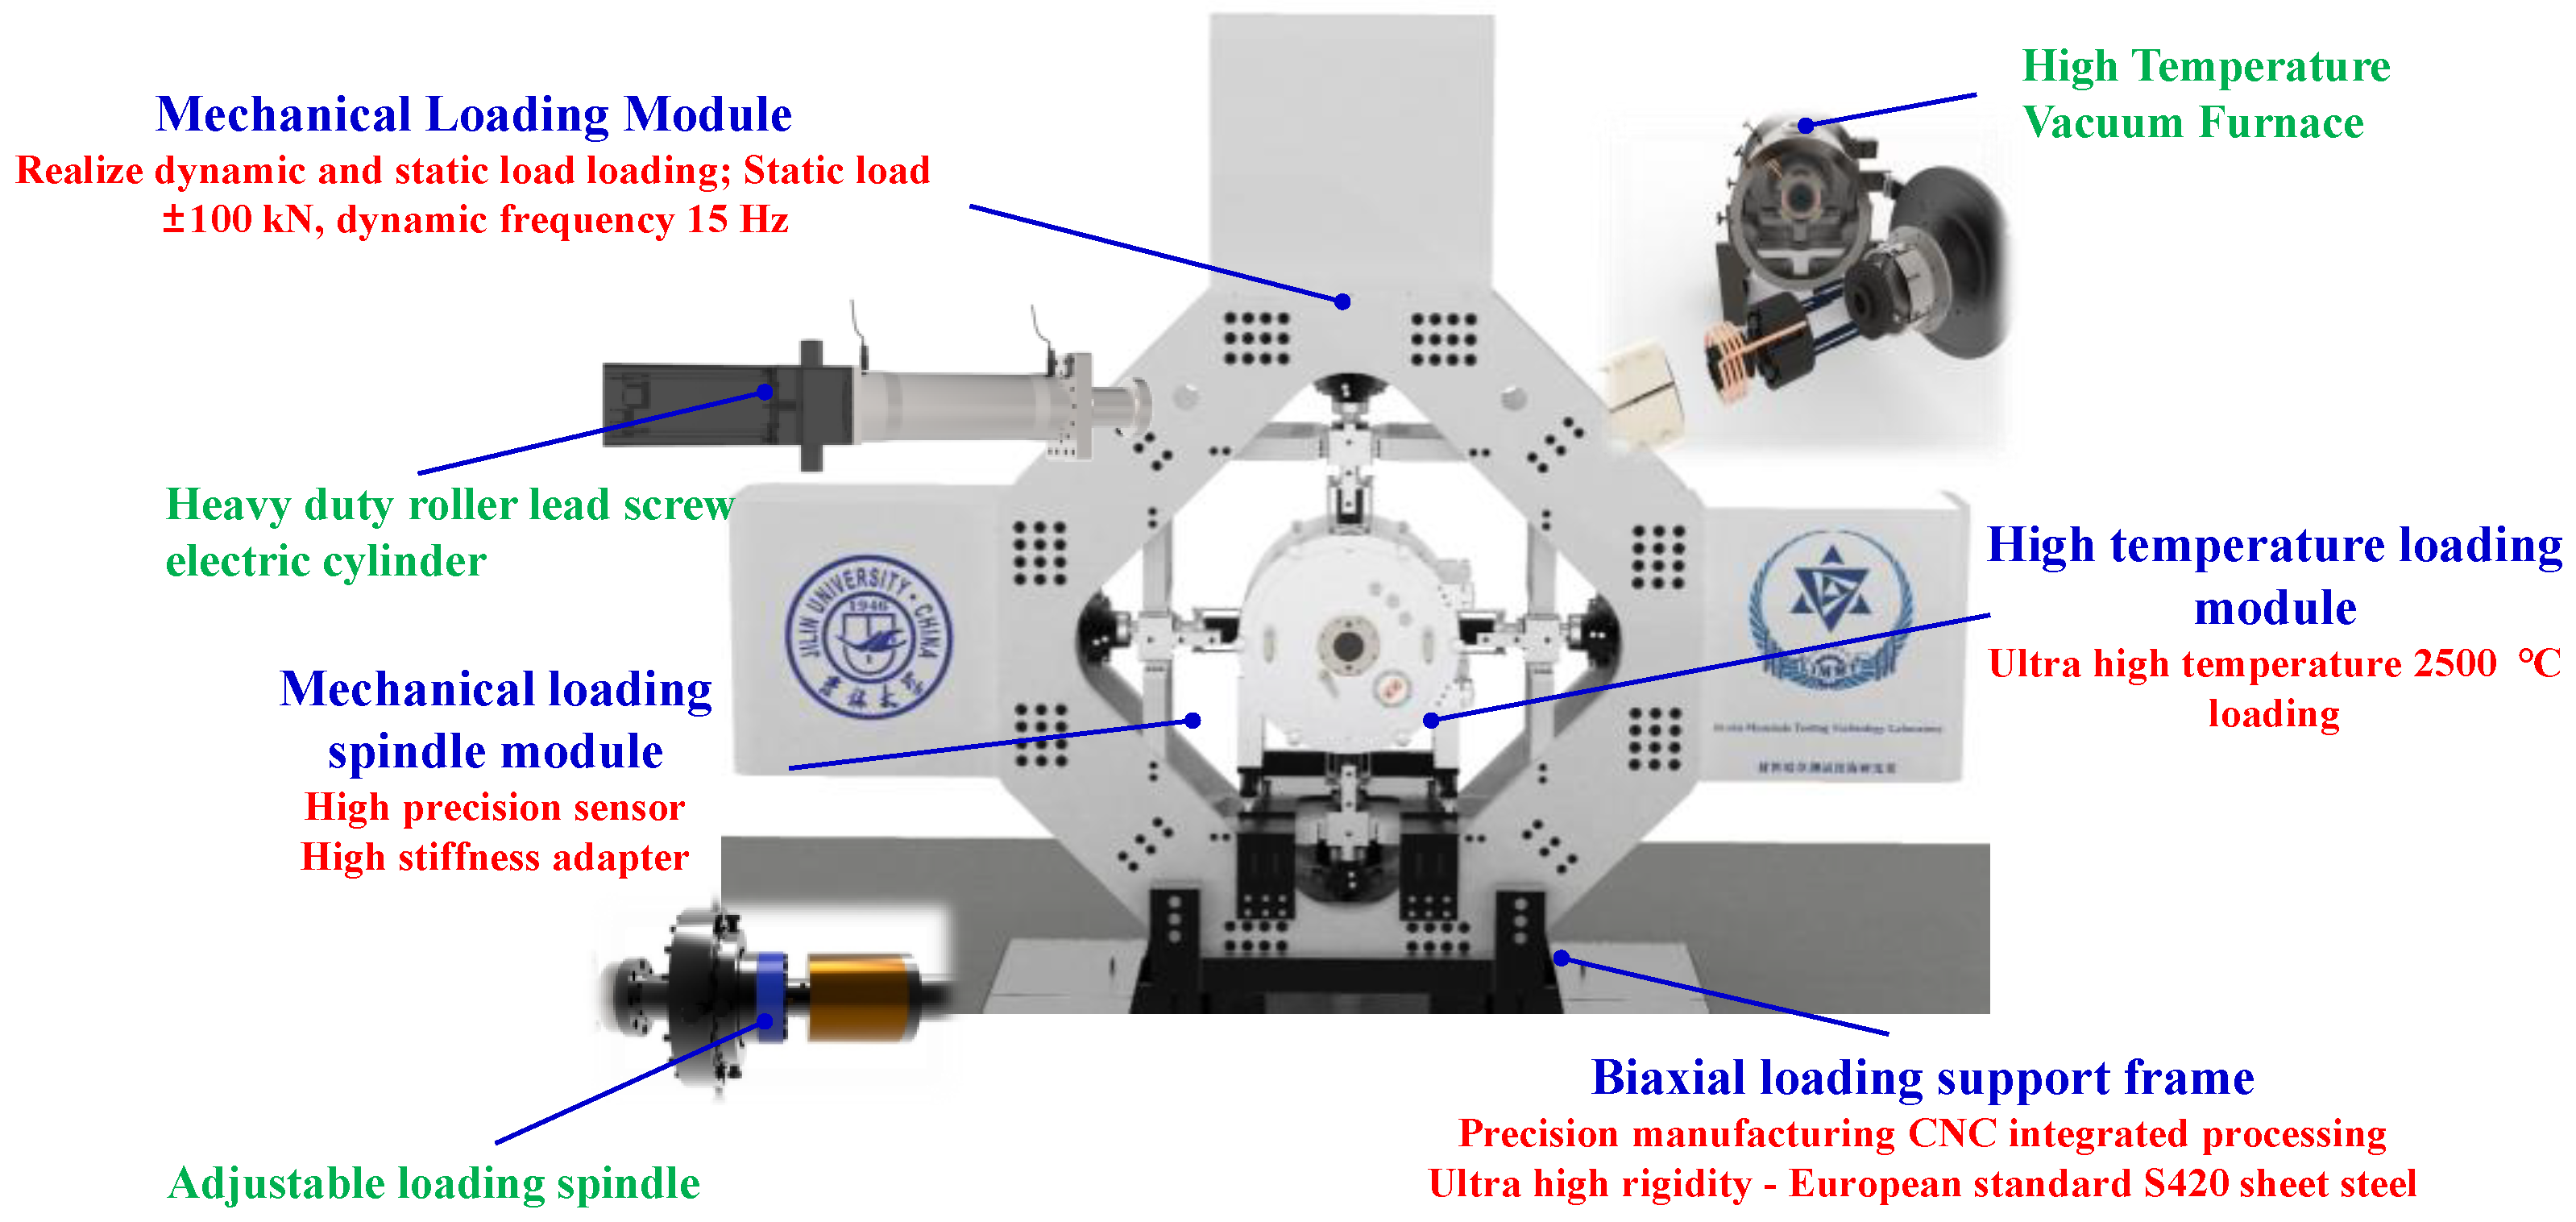
Figure 1. In-plane biaxial and high-temperature mechanical properties test apparatus.
Machines 10 01054 g001
Figure 2. Rack of the biaxial material mechanical properties test apparatus.
Machines 10 01054 g002
Figure 3. Composition of the loading connection structure.
Machines 10 01054 g003
Figure 4. Composition of the high-temperature/biaxial loading module frame support.
Machines 10 01054 g004
Figure 5. Topological optimization of the support plate of high-temperature/biaxial tensile test device. (a) Geometric model before optimization; (b) optimized geometric model.
Machines 10 01054 g005
Figure 6. Detailed design scheme of the motion control apparatus.
Machines 10 01054 g006
Figure 7. High-temperature cavity design model. (a) Double test door opening; (b) main heating side door opening.
Machines 10 01054 g007
Figure 8. Internal structure of the high-temperature furnace.
Machines 10 01054 g008
Figure 9. Schematic diagram of the temperature controller.
Machines 10 01054 g009
Figure 10. In situ testing device of the high-temperature in-plane biaxial apparatus.
Machines 10 01054 g010
Figure 11. Schematic diagram of in situ observation. (a) Equipment placement position; (b) window limit size simulation.
Machines 10 01054 g011
Figure 12. Prediction process of biaxial alignment deviation of the plane biaxial tensile testing machine.
Machines 10 01054 g012
Figure 13. Experimental setup of the HTIPTA.
Machines 10 01054 g013
Figure 14. Schematic diagram of von Mises yield criterion under plane stress state.
Machines 10 01054 g014
Figure 15. Uniaxial and biaxial specimens used for the test. (a) Uniaxial specimens; (b) cruciform specimens (displacement ratio (X/Y): 4:3).
Machines 10 01054 g015
Figure 16. Stress–strain relationship in 0° and 90° directions. (a) Stress-strain relationship in 0° direction; (b) stress–strain relationship in 90° direction.
Machines 10 01054 g016
Figure 17. Stress–strain relationship under different displacement ratios (X/Y). (a) Displacement ratio of 1:1; (b) displacement ratio of 4:3; (c) displacement ratio of 2:1; (d) displacement ratio of 4:1.
Machines 10 01054 g017
Figure 18. Q235 steel sheet yield surface.
Machines 10 01054 g018
Figure 19. Temperature change of 2500 °C high-temperature impact test.
Machines 10 01054 g019
Figure 20. High-temperature tensile composite loading test of C/C composites.
Machines 10 01054 g020
Figure 21. Topology and shape optimizations of the cruciform specimen.
Machines 10 01054 g021
Figure 22. Cruciform specimen of C/C composites.
Machines 10 01054 g022
Table 1. Advantages and disadvantages of four methods for generating biaxial stress.
MethodAdvantagesShortcomings
Induced bending of beams and plates
(1)
Easy to implement;
(2)
Low test cost.
(1)
One specimen corresponds to one loading ratio;
(2)
Significant stress gradient in the thickness direction;
(3)
One pull and one press (two to four quadrants).
Bulging test
(1)
Low specimen manufacturing cost;
(2)
Easy to control test conditions.
(1)
Stress gradient in the thickness direction;
(2)
Unable to load with variable load ratio;
(3)
The material applies only to films.
Thin-walled tubes subjected to tensile or compressive and torsion stress
(1)
Low test cost;
(2)
Various stress states can be generated;
(3)
Minimal requirements for test conditions.
(1)
Existing stress gradient in the radial direction;
(2)
Loading with a variable load ratio is not allowed;
(3)
Anisotropy cannot be compared.
In-plane biaxial tension/compression test
(1)
A Uniform stress field can be produced;
(2)
Four quadrants can be tested;
(3)
Variable load ratio and strain ratio;
(4)
The material type is widely applicable.
(1)
Long equipment development cycle;
(2)
Difficulty in equipment manufacturing;
(3)
Rigorous requirements for multi-axis synchronous control.
Table 2. Advantages and disadvantages of vertical and horizontal structure plane biaxial testing equipment.
Structure of Plane Biaxial Test EquipmentAdvantagesShortcomings
Horizontal structure
(1)
Simple structure;
(2)
Convenient for installation and commissioning of equipment;
(3)
Satisfactory frame rigidity.
(1)
Large footprint;
(2)
Difficult to install the specimen;
(3)
Inconvenient to observe the specimen;
(4)
Challenging to integrate in situ tests.
Vertical structure
(1)
Easy to install the specimen;
(2)
Convenient to observe the specimen;
(3)
Small footprint;
(4)
Convenient to integrate in situ tests.
(1)
Inconvenient for transportation and assembly;
(2)
Low frame stiffness;
(3)
Inconvenient for integrated debugging of equipment.
Table 3. Advantages and disadvantages of different heating methods.
Heating ModeAdvantagesShortcomings
Laser, halogen lamp, and hot air directly applied to the heat the gauge zone
(1)
Low test cost;
(2)
No damage to the accessories.
(1)
Difficult to control the temperature;
(2)
Uneven temperature in the gauge zone;
(3)
Limited maximum heating temperature.
Induction heating
(1)
Fast heating speed;
(2)
Easy to control the temperature.
(1)
Significant temperature gradient on the specimen;
(2)
Only conductive materials can be tested;
(3)
The maximum heating temperature is lower than 650 °C.
Non-vacuum, high-temperature environment chamber
(1)
Easy to control the temperature;
(2)
Relatively uniform temperature;
(1)
High-temperature chamber manufacturing;
(2)
It takes a long time to reach the thermal equilibrium;
(3)
The maximum heating temperature is lower than 800 °C.
Heat conduction
(1)
Fast heating speed;
(2)
Low test cost.
(1)
Complex temperature control system;
(2)
Challenging to test non-thermally conductive materials
Table 4. Sensor calibration parameters (mV/V).
Force Value (kN)Force
Sensor-1
Forward
Force
Sensor-1
Backward
Force
Sensor-2
Forward
Force
Sensor-2
Backward
Force
Sensor-3
Forward
Force
Sensor-3
Backward
Force
Sensor-4
Forward
Force
Sensor-4
Backward
000.0000200.0000100.0000200.00002
120.195360.195300.205050.204320.193290.193700.197260.19841
200.325830.326300.339860.339110.322490.323670.328980.32935
300.489850.490860.507680.506650.485270.487720.491140.49263
400.654880.656190.674930.673520.649990.653090.656820.65824
600.986040.987301.008631.006900.981130.984500.986980.98785
801.317691.318381.342151.341291.313061.314591.317211.31711
1001.649461.649901.675561.675291.645241.645711.647831.64728
1252.06440/2.09254/2.06079/2.06106/
Initial zero (mV/V): 0.02217, 0.02790, 0.02790, 0.01987
Repeatability: R1 (%) = 0.10, R2 (%) = 0.05, R3 (%) = 0.06, R4 (%) = 0.14
Relative tolerance between forward and backward: v1 (%) = 0.21, v2 (%) = −0.36, v3 (%) = 0.51, v4 (%) = 0.58
Measurement uncertainty: U1 = 2.0 × 10⁻⁴ (k = 2), U2 = 1.8 × 10⁻⁴ (k = 2), U3 = 1.8 × 10⁻⁴ (k = 2), U4 = 2.3 × 10⁻⁴ (k = 2)
Table 5. Strain calibration results.
NumberStandard Value/μεMeasured Value/μεIndication Error/με
130,02630,0359
260,02160,0309
390,04090,0488
4120,041120,0498
5150,285150,2938
6180,226180,2359
7210,630210,6388
8240,209240,21910
9270,322270,33210
10300,072300,08210
Table 6. Calibration parameters of a high-temperature colorimeter (mV/V).
Blackbody Temperature
°C/°F
Test Temperature
°C/°F
Blackbody
Temperature
°C/°F
Test Temperature
°C/°F
69.7 °C/157.5 °F69.9 °C/157.8 °F900.1 °C/1652.2 °F900.0 °C/1652.1 °F
99.9 °C/211.8 °F99.8 °C/211.7 °F1000.0 °C/1832.0 °F999.9 °C/1831.8 °F
148.9 °C/300.0 °F148.8 °C/299.9 °F1100.0 °C/2012.0 °F1099.9 °C/2011.9 °F
200.0 °C/392.0 °F200.1 °C/392.1 °F1200.1 °C/2192.2 °F1200.1 °C/2192.1 °F
300.1 °C/572.2 °F300.0 °C/572.1 °F1300.1 °C/2372.2 °F1300.0 °C/2372.0 °F
500.0 °C/932.0 °F500.0 °C/932.0 °F1500.0 °C/2732.0 °F1500.0 °C/2732.1 °F
600.0 °C/1112 °F600.0 °C/1112.1 °F1600.1 °C/2912.0 °F1600.0 °C/2912.0 °F
700.0 °C/1292 °F700.0 °C/1292.1 °F1700.0 °C/3092.0 °F1700.1 °C/3092.0 °F
792.0 °C/1457.6 °F791.9 °C/1457.4 °F1800.0 °C/3272.1 °F1800.0 °C/3272.0 °F
Publisher’s Note: MDPI stays neutral with regard to jurisdictional claims in published maps and institutional affiliations.