1. Introduction
The structural integrity of critical engineering components is frequently compromised by the initiation and propagation of fatigue cracks. While Linear Elastic Fracture Mechanics (LEFMs) has long served as the cornerstone for predicting fatigue life, it relies on the assumption that the bulk of the material remains elastic. However, it is well established that the high stress concentration at the crack tip invariably induces a region of irreversible deformation known as the plastic zone [
1].
Nickel-based superalloys, including Haynes 230, are extensively used in demanding environments due to their exceptional high-temperature strength, oxidation resistance, and thermal stability [
2,
3]. However, the complex microstructural features and operating conditions often lead to fatigue crack growth under mixed-mode loading, resulting in non-linear, curvilinear crack paths that are challenging to predict accurately [
4].
The theoretical foundation for fatigue life prediction is primarily rooted in LEFM, which uses the stress intensity factor range as the governing parameter for crack growth rate, as described by the Paris–Erdogan law [
5]. The validity of LEFM relies on the SSY law where the plastic zone at the crack tip is very small compared with the crack size and the remaining ligament [
6,
7,
8]. The stress intensity factor range is used to estimate analytically the size of the Cyclic Plastic Zone (CPZ), which is a region of reversed plastic deformation localized ahead of the crack tip. If the size of crack plastic zone (CPZ) fails the small scale yielding (SSY) criterion, the crack enters the large scale yielding (LSY) zone and the EPFM parameters, namely, the J-integral range [
9] have to be used. Understanding the progress of the CPZ is consequently crucial for determining the applicability of LEFM and for accurate fatigue life estimation [
10]. Precise modeling of curvilinear crack paths under mixed-mode loading has been a major focus of computational fracture mechanics. Traditional Finite Element Method (FEM) approaches often need vast re-meshing at each crack growth increment, which is computationally expensive and can introduce numerical errors [
11,
12,
13]. To deal with this, eXtended Finite Element Method (XFEM) and Cohesive Zone Models (CZM) have been developed [
14,
15]. The XFEM has been employed in engineering designs extensively in discontinuity modeling without imposing the mesh along the crack path [
15]. Despite the advantages of XFEM, many researchers still encounter challenges implementing it.
The ANSYS SMART Crack Growth feature has emerged recently as a robust and easy-to-use remeshing-based solution for simulating crack growth along curvilinear fatigue crack paths [
16,
17]. The SMART feature has been validated by several studies for mixed-mode loading of different materials. The SMART feature shows the ability to correctly predict the kink and growth direction of cracks based on the maximum tangential stress (MTS) criterion [
16,
18]. The reference material of the current study, Haynes 230, has undergone a number of fatigue studies on high-temperature low-cycle fatigue (LCF) and fatigue crack growth (FCG) [
19,
20]. The complex cyclic plastic behavior of this material and the requirement for true modeling of the plastic zone is manifested from these studies [
21,
22].
The reference work by Wagner [
23] used a complicated multi-stage numerical approach (ZFEM-TERF and FRANC3D) to model the curvilinear crack path in the modified CT specimen. While this work provided valuable experimental data, the numerical predictions deviate significantly from the experimental path of the crack at later stages of propagation. The gap identified reveals a persistent research gap in the capacity of current numerical frameworks to reliably predict mixed-mode brittle cracking in superalloys.
The main goal of this research is to implement and validate a high-fidelity numerical model to simulate curvilinear fatigue crack growth (FCG) of a modified Haynes 230 Compact Tension specimen using ANSYS SMART Crack Growth [
24]. By comparing simulated trajectories against established experimental data for three distinct configurations, this study demonstrates a more accurate method for tracking complex paths. Additionally, this work provides a detailed parametric analysis of CPZ evolution under varying stress ratios (R = 0.5 and R = −1), establishing a clear protocol for identifying the boundary conditions of LEFM validity in superalloy components. Advanced numerical techniques like XFEM and ZFEM are readily available; however, a gap still exists between performing accurate, computationally efficient and user-friendly simulation of the complex curvilinear fatigue crack paths in nickel-based superalloys with mixed-mode loading [
25]. The divergence observed in the numerical findings of the reference study [
23] signals the inadequacy of previous methods in tracking the exact path, especially when the crack is affected by a complicated shape and stress fields. Moreover, crack path predictions are often made without a thorough understanding of CPZ evolution, which governs LEFM to EPFM transition. The core novelty of this study is the robust validation of the ANSYS SMART Crack Growth feature for predicting curvilinear mixed-mode fatigue crack growth (FCG) in the Haynes 230 superalloy. This methodology was more accurate in tracing the crack path than both the difficult ZFEM-TERF method and the FRANC3D method previously given in the literature [
23]. Additionally, the effective application of ANSYS SMART enabled a detailed parametric analysis of the CPZ size evolution.
2. Overview of ANSYS SMART Technology
SMART, which stands for Separating, Morphing, Adaptive, and Remeshing Technology, is a highly efficient, remeshing-based method available within the ANSYS Workbench 19.2 for simulating both static and fatigue crack propagation.
SMART’s principal advantage lies in its targeted approach to mesh adaptation. The simulation of crack growth necessarily involves the separation of two surfaces and a change in the geometry of the crack front. Unlike older techniques that might require global remeshing, SMART automatically uses a combination of morphing, adaptive meshing, and remeshing techniques but limits these computationally intensive operations to the crack-front region only. This localized change accommodates crack growth efficiently, thereby minimizing the computational overhead traditionally associated with tracking complex three-dimensional crack paths. This focus on localized mesh maintenance is the architectural basis for why SMART is strongly recommended for large, complex 3D models. SMART is defined by its ability to automatically update the mesh as the crack propagates. The core algorithm follows a sequential process in a step-by-step manner:
Stress Intensity Factors are calculated along the existing crack front.
The chosen fatigue law (e.g., Paris’ Law) determines the crack extension (da), corresponding to an increment in cycles (dN).
Crack Extension: The crack extends by the calculated crack extension, often corresponding to the size of one element at the crack tip.
The mesh around the newly extended crack front is automatically separated, morphed, and remeshed to maintain a high-quality, higher-order tetrahedral element structure. The calculation then repeats. This localization of mesh modification is the key to SMART’s computational efficiency. The solver automatically modifies the minimum and maximum crack extension increments to ensure a robust mesh adaptation, especially when the ‘Cycle by Cycle’ methodology is used and the user-specified number of cycles is too large or too small relative to the crack front element size. This constraint means that the accuracy of the physical prediction (fatigue life) is constantly balanced against the need for numerical stability (mesh quality).
The trajectory of fatigue crack growth was governed by the Maximum Tangential Stress (MTS) criterion, a widely accepted theoretical framework for predicting both the initiation and subsequent direction of crack advancement under mixed-mode loading conditions. The fundamental premise of the MTS criterion is that, for isotropic materials, the crack will propagate along the path where the tangential tensile stress at the crack tip is maximized. This direction is mathematically equivalent to the path perpendicular to the maximum tangential tensile stress. The resulting crack growth angle, expressed in radians, is then determined by the following formula [
26].
where
KI and
KII represent the Stress Intensity Factors (SIF) corresponding to the opening mode and the in-plane shear mode, respectively.
The relationship between the fatigue crack growth rate and the equivalent stress intensity factor range is established through a modified version of the Paris–Erdogan law. This methodology, often credited to the foundational work of Tanaka [
27], effectively extends the applicability of the classic Paris law to mixed-mode loading scenarios. The core modification involves substituting the traditional Mode I SIF range with an equivalent SIF range. This critical relationship is formally expressed as:
where
represents the equivalent stress intensity factor range, the variables
a and
N correspond to the crack length and the number of fatigue life cycles, while
C and
m are the material-dependent Paris constant and Paris exponent.
4. Results and Discussion
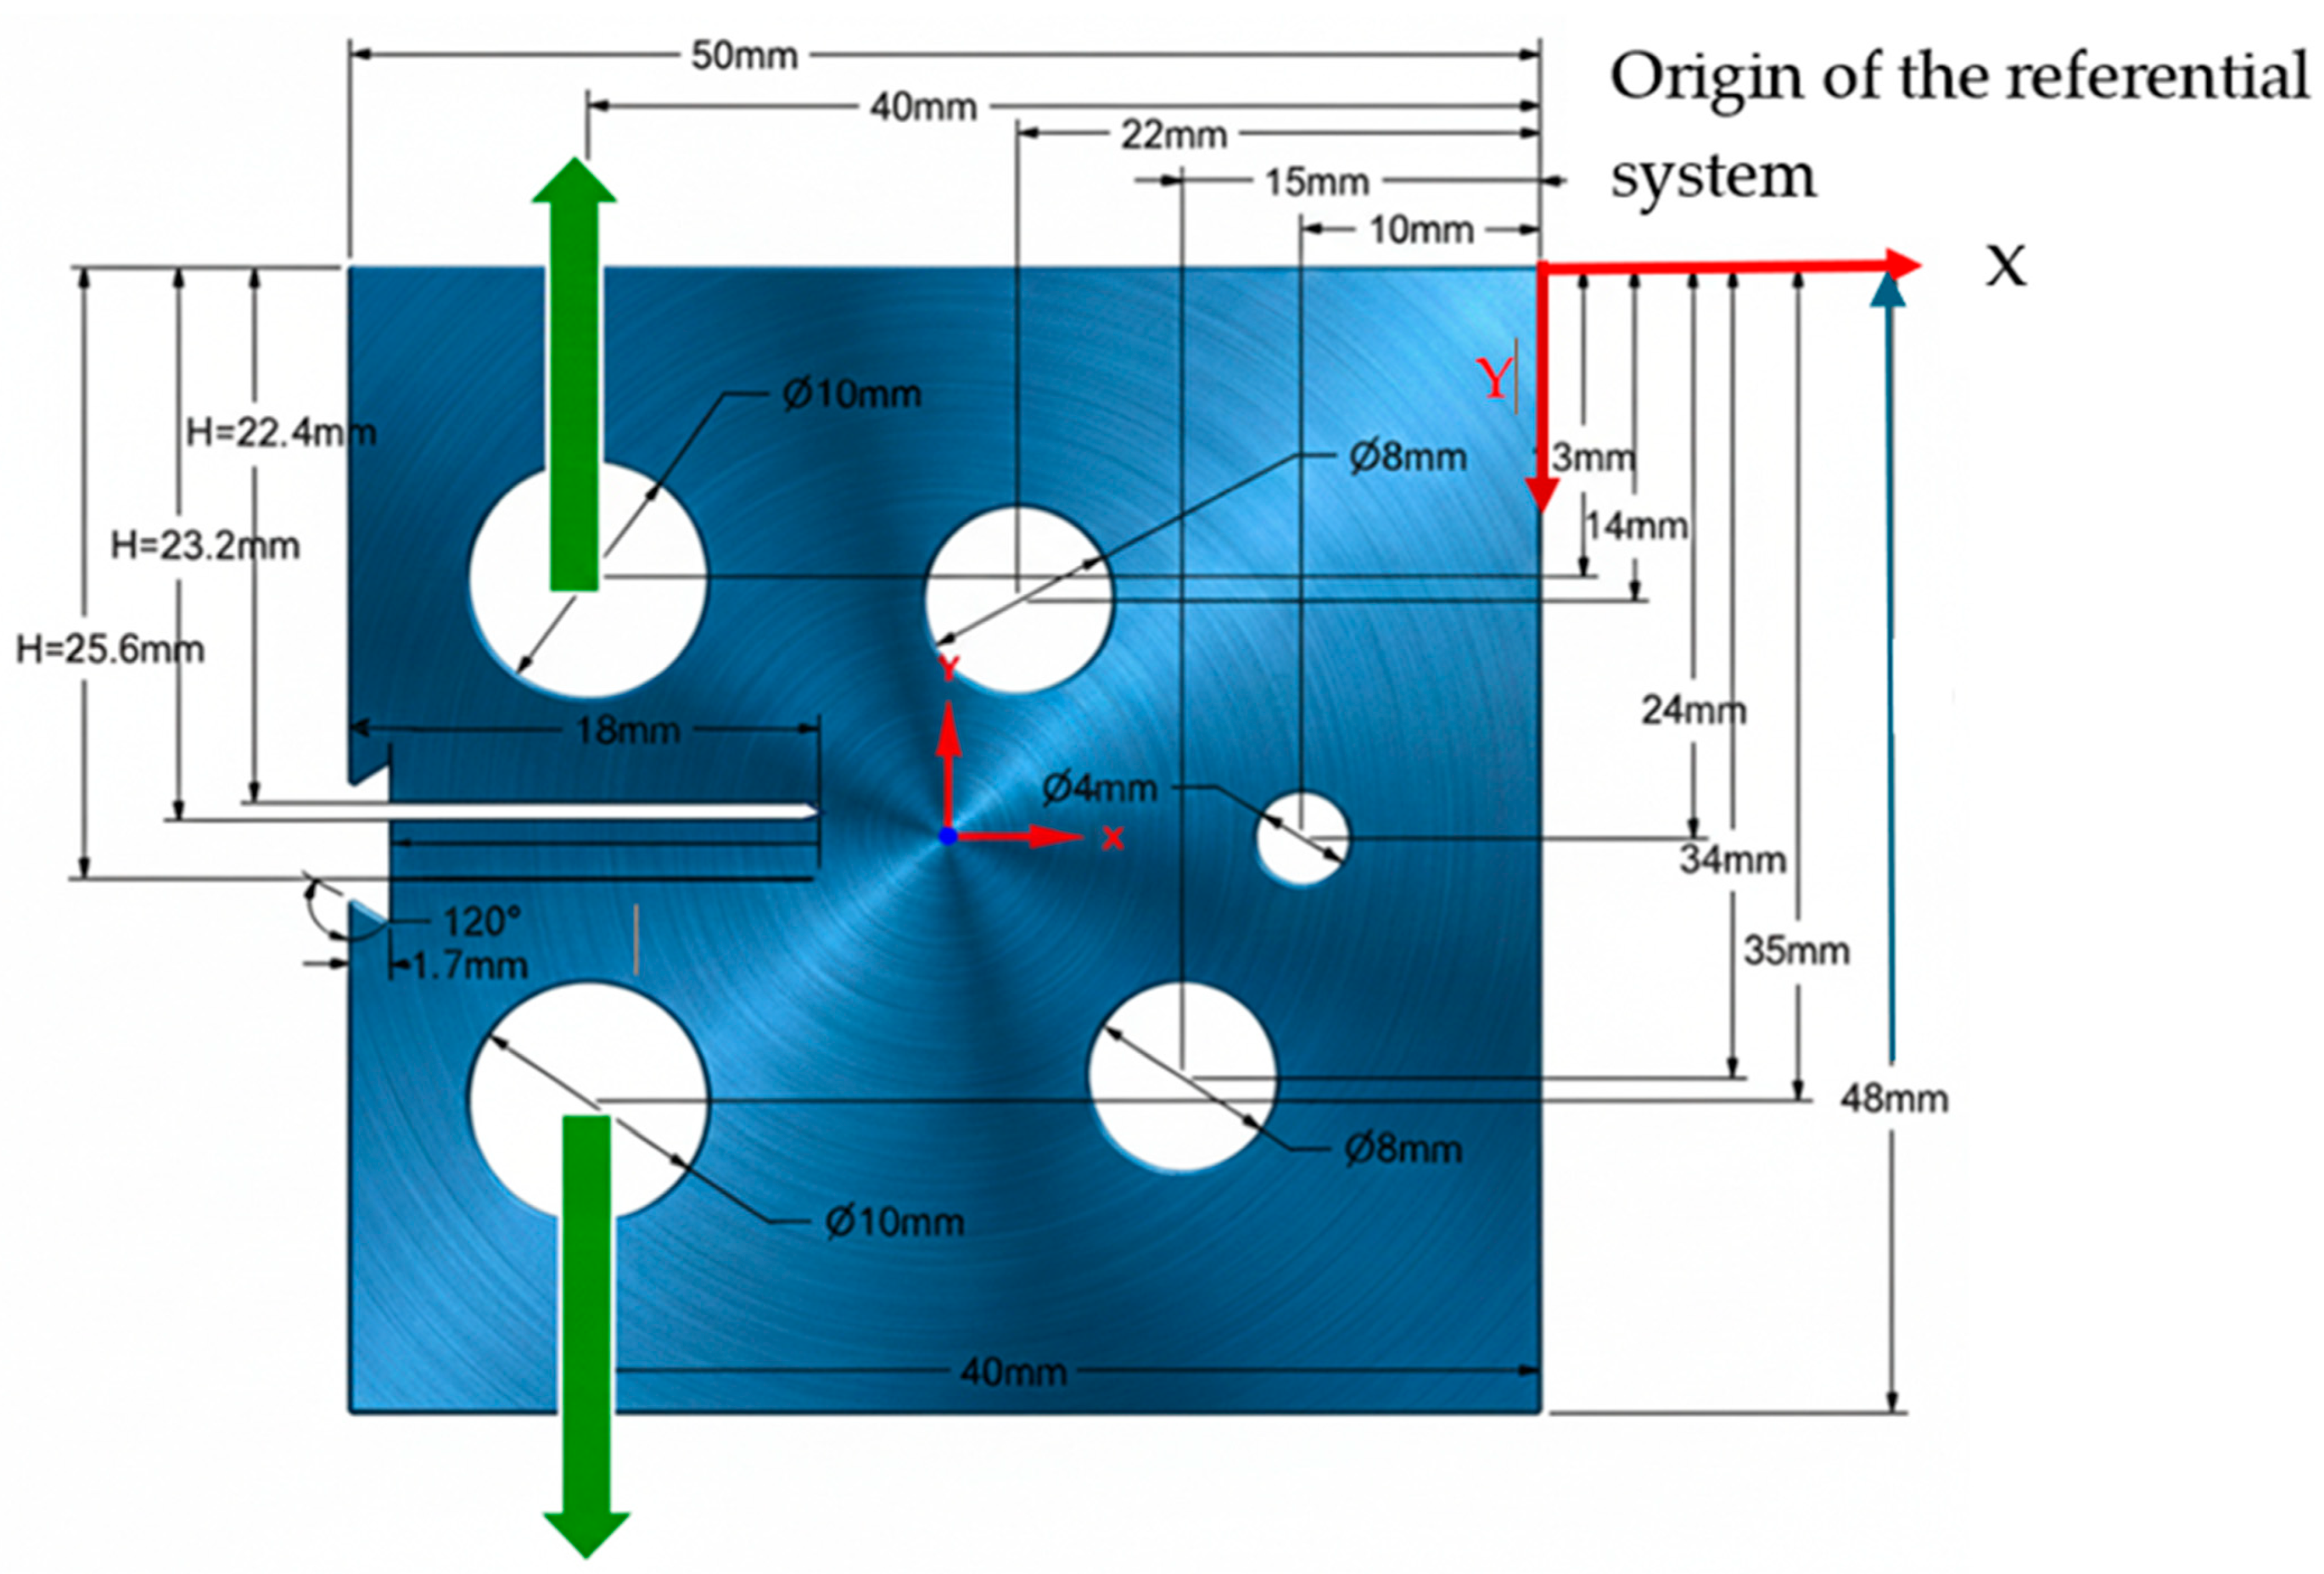
One of the most significant discoveries concerning plastic zones is their fundamental role in plasticity-induced crack shielding. The plastic zone enveloping a fatigue crack exerts substantial shielding effects, reducing the effective stress intensity factor experienced by the crack tip. The effectiveness of plastic zone shielding is highly material-dependent, varying significantly with material properties and loading conditions. The present study investigated a modified compact tension (CT) specimen in three distinct configurations as displayed in
Figure 1. This modified design differs from standard specimens by incorporating three extra holes, which break the normal symmetry and compel the fatigue cracks to follow curvilinear pathways. The numerical simulation was conducted using a Haynes 230 nickel-based superalloy defined by an elasticity modulus 211 GPa and a Poisson’s ratio of 0.3 under plane stress condition. The material displays a yield strength of 422 MPa and an ultimate strength of 838 MPa. Furthermore, the fatigue crack growth is governed by Paris’ law constants at room temperature, utilizing a coefficient (
C) of 1.02 × 10
−11 and an exponent (
m) of 2.5. In the experimental fatigue testing by Wagner [
23], a cyclic load (P) of 1.4 kN was employed, operating at a stress ratio (
R) of 0.1 and a repetition frequency of 20 Hz. Crucially, the crack growth trajectory was controlled by shifting the vertical position of the original notch (H) either up or down relative to the specimen’s centerline. The resulting actual crack initiation points were compared to the nominal notch positions, and three distinct crack growth scenarios emerged, all stemming from the vertical notch location H, which is defined relative to the top edge (
Table 2).
The initial pre-crack is modeled purely as a geometric discontinuity (a sharp notch) in the numerical setup. While acknowledging the physical differences between a machined notch and a ‘natural’ fatigue crack, this modeling choice is appropriate because the study focuses on the stable fatigue crack growth regime. In this phase, the crack tip mechanics are governed by the accumulation and reversal of cyclic plasticity, effectively overwhelming and distinguishing the behavior from that of the initial notch mechanics.
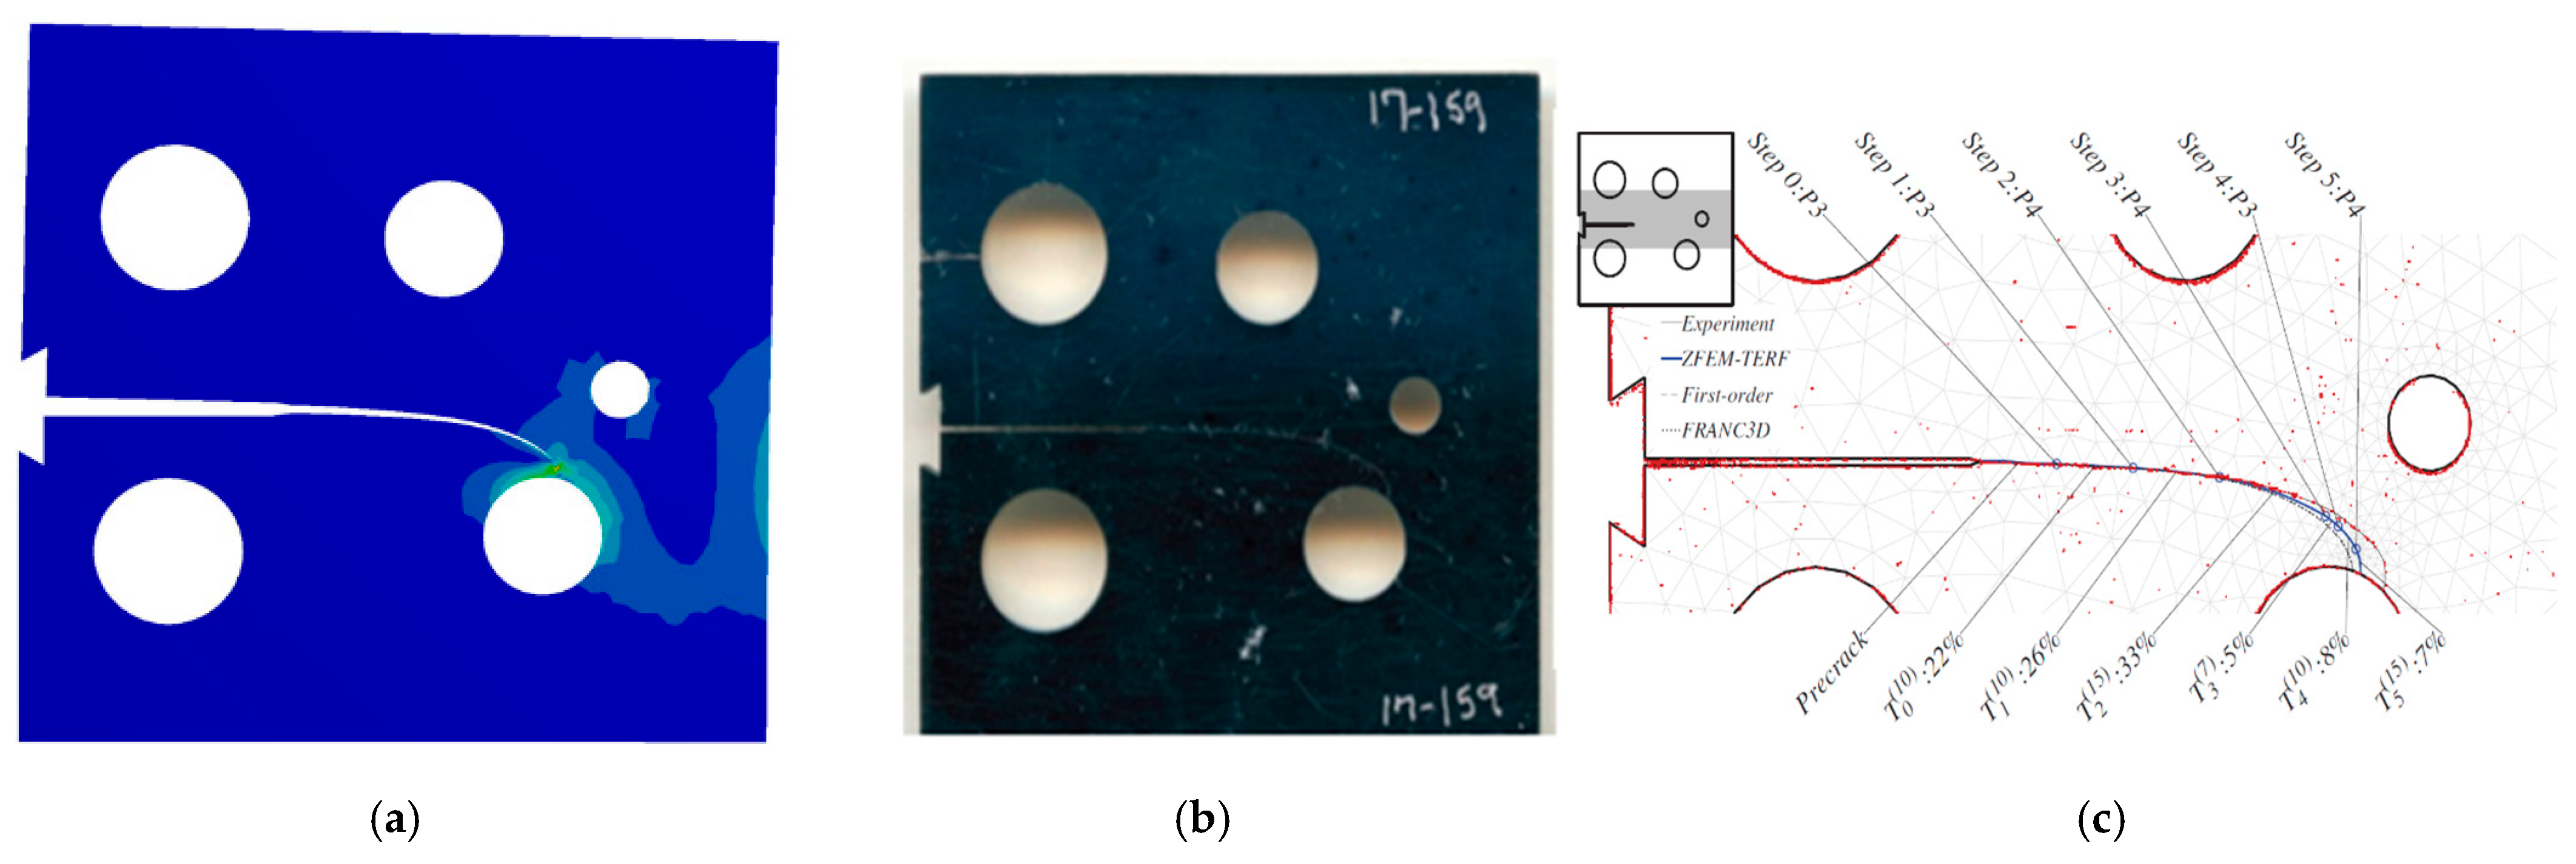
For the first specimen, the initial crack was situated 25.6 mm from the top edge. As illustrated in
Figure 2, the ANSYS simulation used in this study achieved a closer match to the experimental baseline [
23] than the comparative numerical study of the same author. The numerical trajectory predicted by Wagner [
23] exhibited a tighter curvature that diverged from the experimental results, whereas the current model maintained high accuracy.
The pre-existing crack in the second specimen was positioned 22.4 mm from the upper edge.
Figure 3a–c presents a comparison between the crack propagation path simulated in this study (using ANSYS Workbench 19.2), the experimental and numerical data derived from Wagner [
23]. The reference numerical study [
23] utilized a multi-stage approach involving a hypercomplex finite element method (ZFEM) technique to estimate curvilinear segments, followed by modeling in FRANC3D (V.2) and solving via ABAQUS 6.12. However, as indicated by
Figure 4a,b, the trajectory predicted by the current ANSYS model demonstrates a much stronger correlation with the experimental path [
23] than the path generated by the ZFEM-TERF and FRANC3D protocols provided by Wagner [
23].
The third specimen featured an initial crack at a depth of 23.2 mm. As evidenced in
Figure 4, the crack propagation path estimated here is highly consistent with the experimental path [
23]. This contrasts with the numerical predictions from [
23] using ZFEM-TERF and FRANC3D, which notably drifted away from the actual experimental trajectory.
The successful application of LEFM is predicated on the assumption of Small-Scale Yielding (SSY). This condition mandates that the size of the plastic zone at the crack tip must be negligible compared to the characteristic dimensions of the cracked body, specifically the crack length and the remaining uncracked ligament. To ensure the validity of the LEFM framework for the current study, the two established SSY criteria, as summarized in
Table 2, were rigorously applied. The calculated plastic zone radius for specimen 1 was systematically compared against the limits imposed by these two criteria for two distinct loading conditions, characterized by a positive stress ratio of 0.5 and a negative stress ratio of −1. The detailed comparative data is presented in
Table 3.
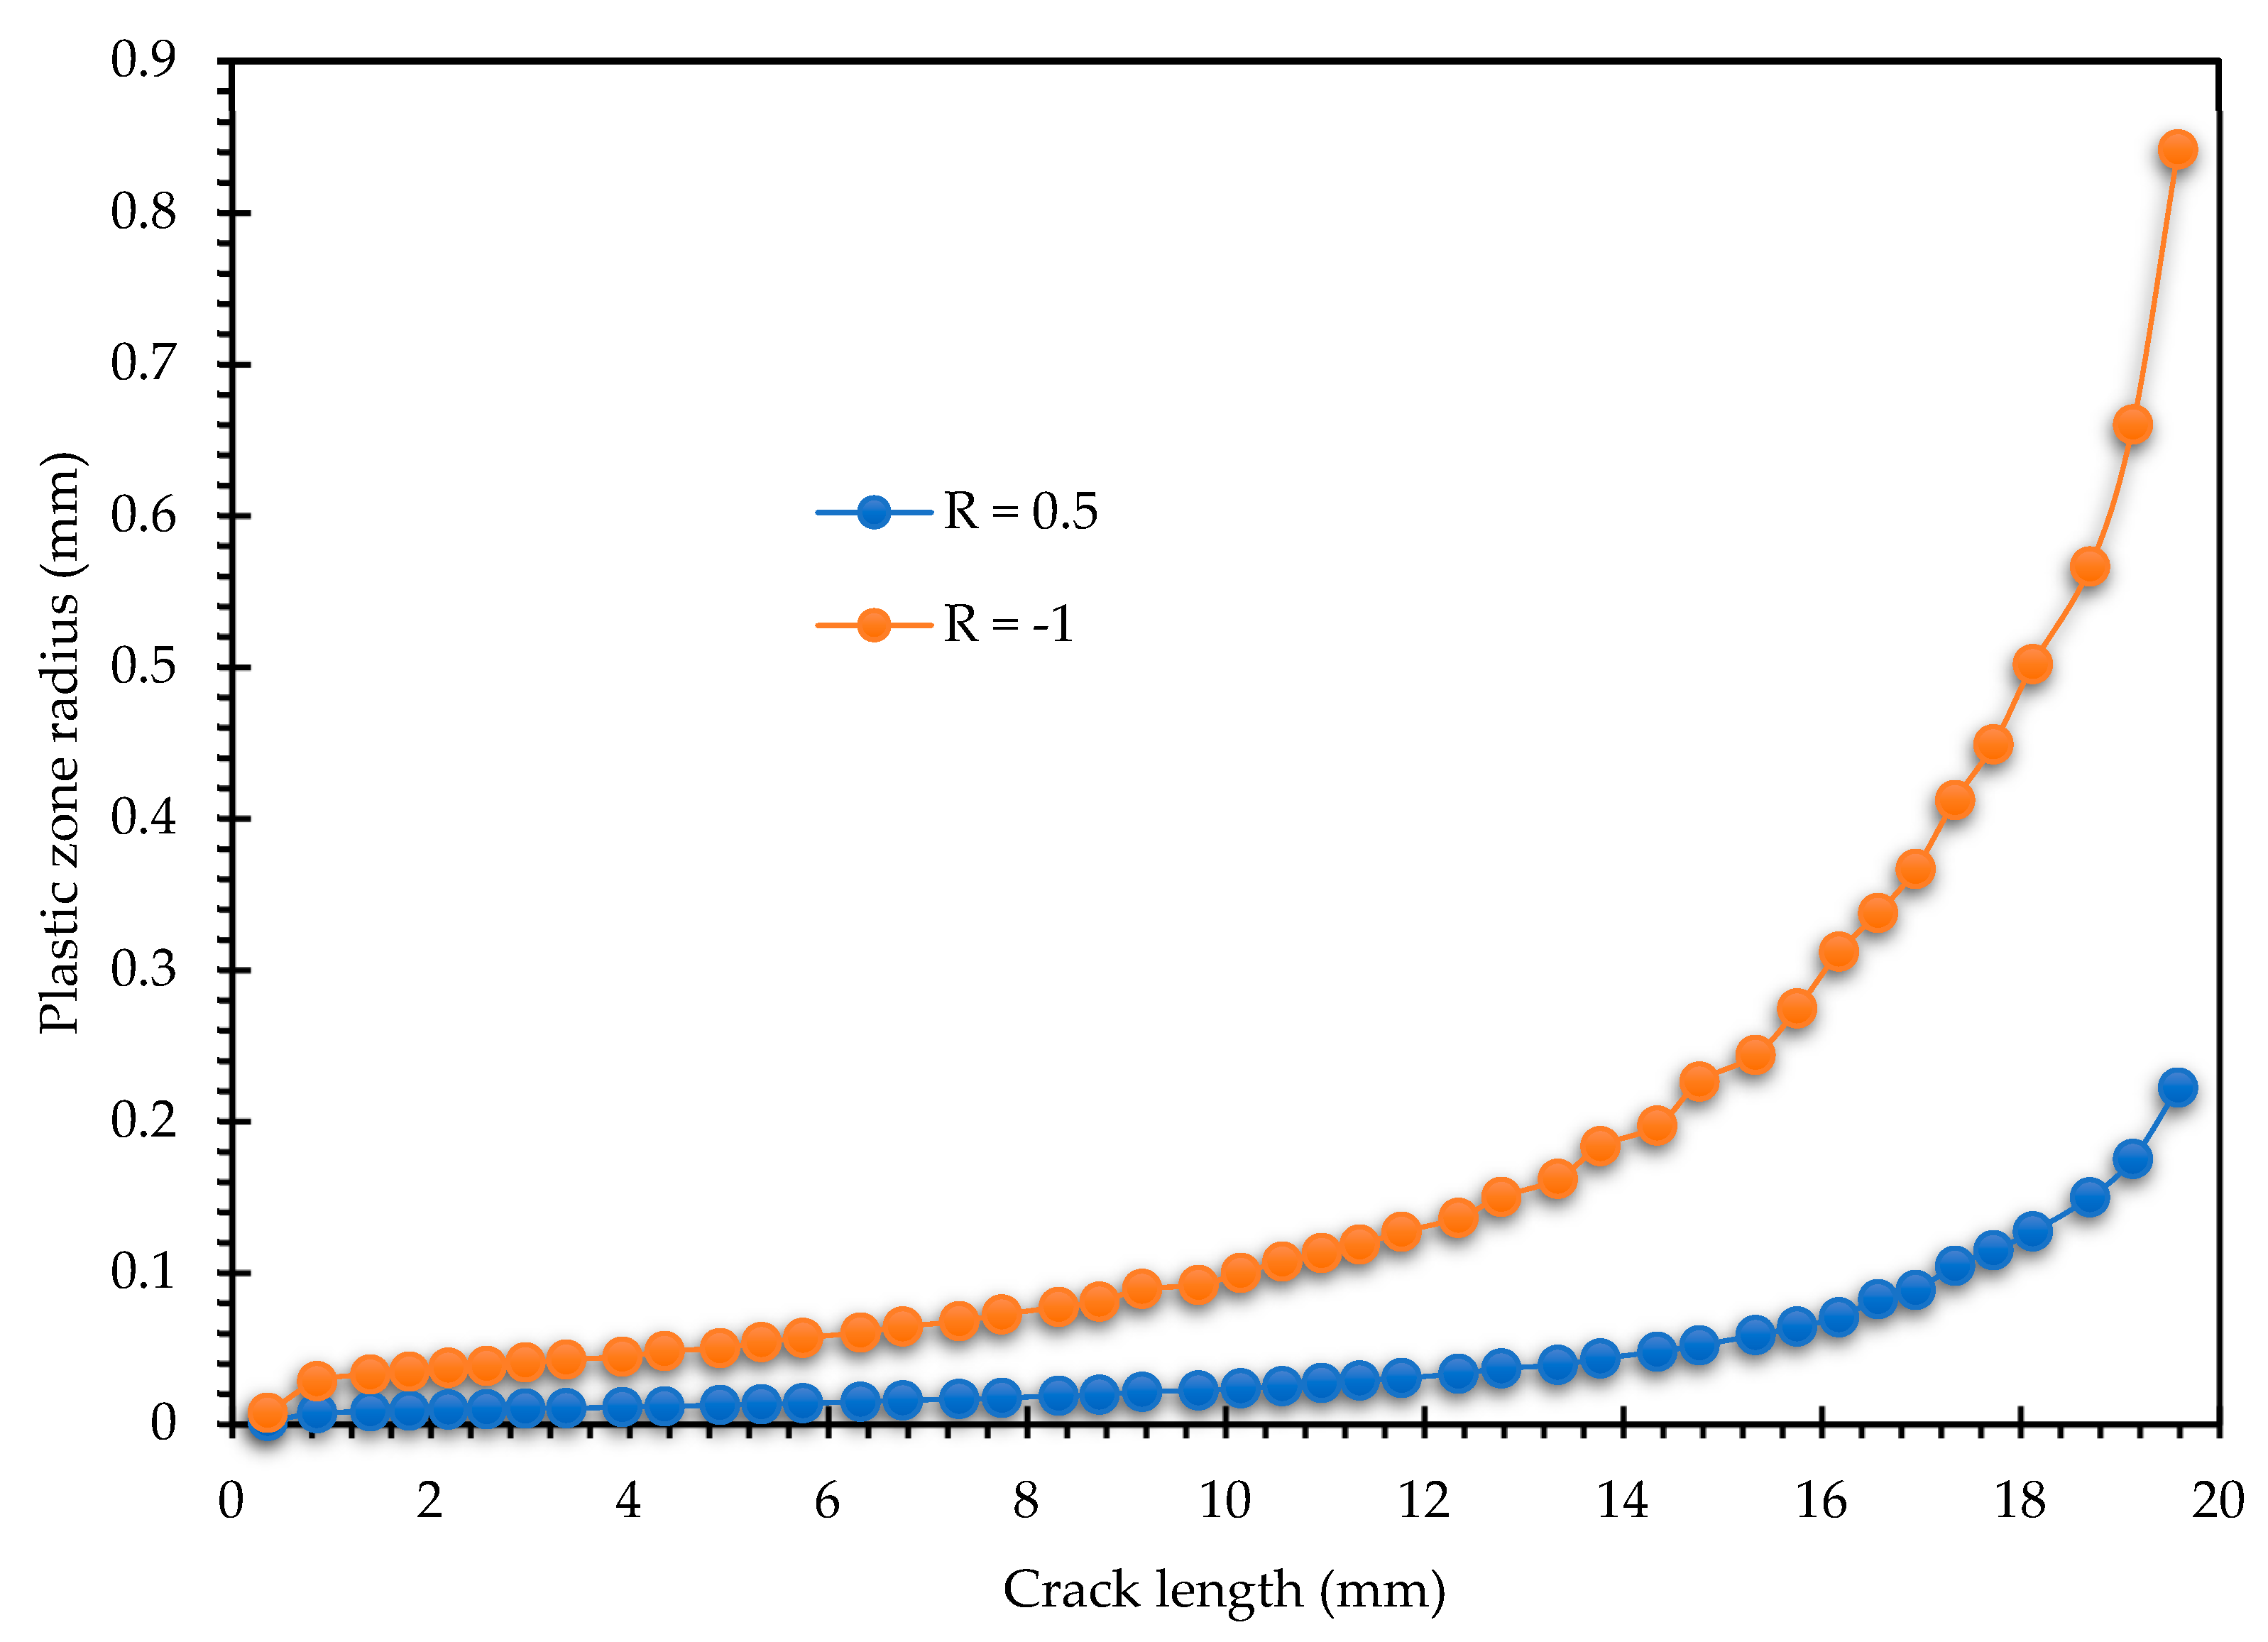
The results reveal a clear and critical dependence on the stress ratio. For the positive stress ratio of 0.5, the plastic zone radius remained consistently below the limits defined by both the crack length and the ligament size criteria throughout the entire recorded crack growth history. This outcome unequivocally confirms that the SSY conditions were fully satisfied, thereby validating the use of the LEFM approach for fatigue crack growth analysis under this specific loading regime. The numerical results for Specimen 1 at a crack length of 19.826 mm and a stress ratio of R = 0.5 affirm the continued validity of LEFM, as the calculated cyclic plastic zone radius
rp = 0.22211 mm) remains strictly below the ligament size criterion of 0.2482 mm. While the ligament size criterion inevitably decreases as the crack propagates, the Small-SSY condition for R = 0.5 is maintained even at this advanced stage of growth. In contrast, the data for the negative stress ratio of −1 indicates a significant violation of the SSY assumption during the latter stages of crack propagation. Specifically, the plastic zone radius exceeded the ligament size criterion (
) when the crack length reached 16.571 mm. Furthermore, the crack length criterion (
) was also violated, though this occurred only at the final recorded step of the crack growth process. This indicates that the plastic zone began to interact with the back face of the specimen, leading to a loss of constraint and a transition towards net-section yielding. This effect is often observed in the final stages of fatigue life and results in an accelerated, non-LEFM-governed crack growth rate. This breakdown suggests that for the negative stress ratio of −1, the LEFM model becomes increasingly non-conservative and potentially invalid as the crack approaches the specimen boundary. The validation results presented have profound implications for the interpretation and reliability of the fatigue crack growth data, particularly concerning the influence of the stress ratio. The successful adherence to SSY criteria for the positive stress ratio of 0.5 is typical for tensile–tensile loading where the crack faces remain open. Under these conditions, the plastic zone is primarily driven by the maximum stress intensity factor, and its size is relatively stable and contained, confirming the validity of the stress intensity factor field dominance. However, the violation of the SSY criteria for the negative stress ratio of −1 is a critical finding. This stress ratio represents a fully reversed loading cycle (tension-compression). In compression, the crack faces close, leading to phenomena such as crack closure and the development of a residual plastic wake. It is important to note that a separate, complementary analysis covering the entire positive stress ratio range (R = 0 to R = 0.8), detailing the corresponding effects on fatigue life cycles and other key results, has already been performed by the corresponding author [
17].
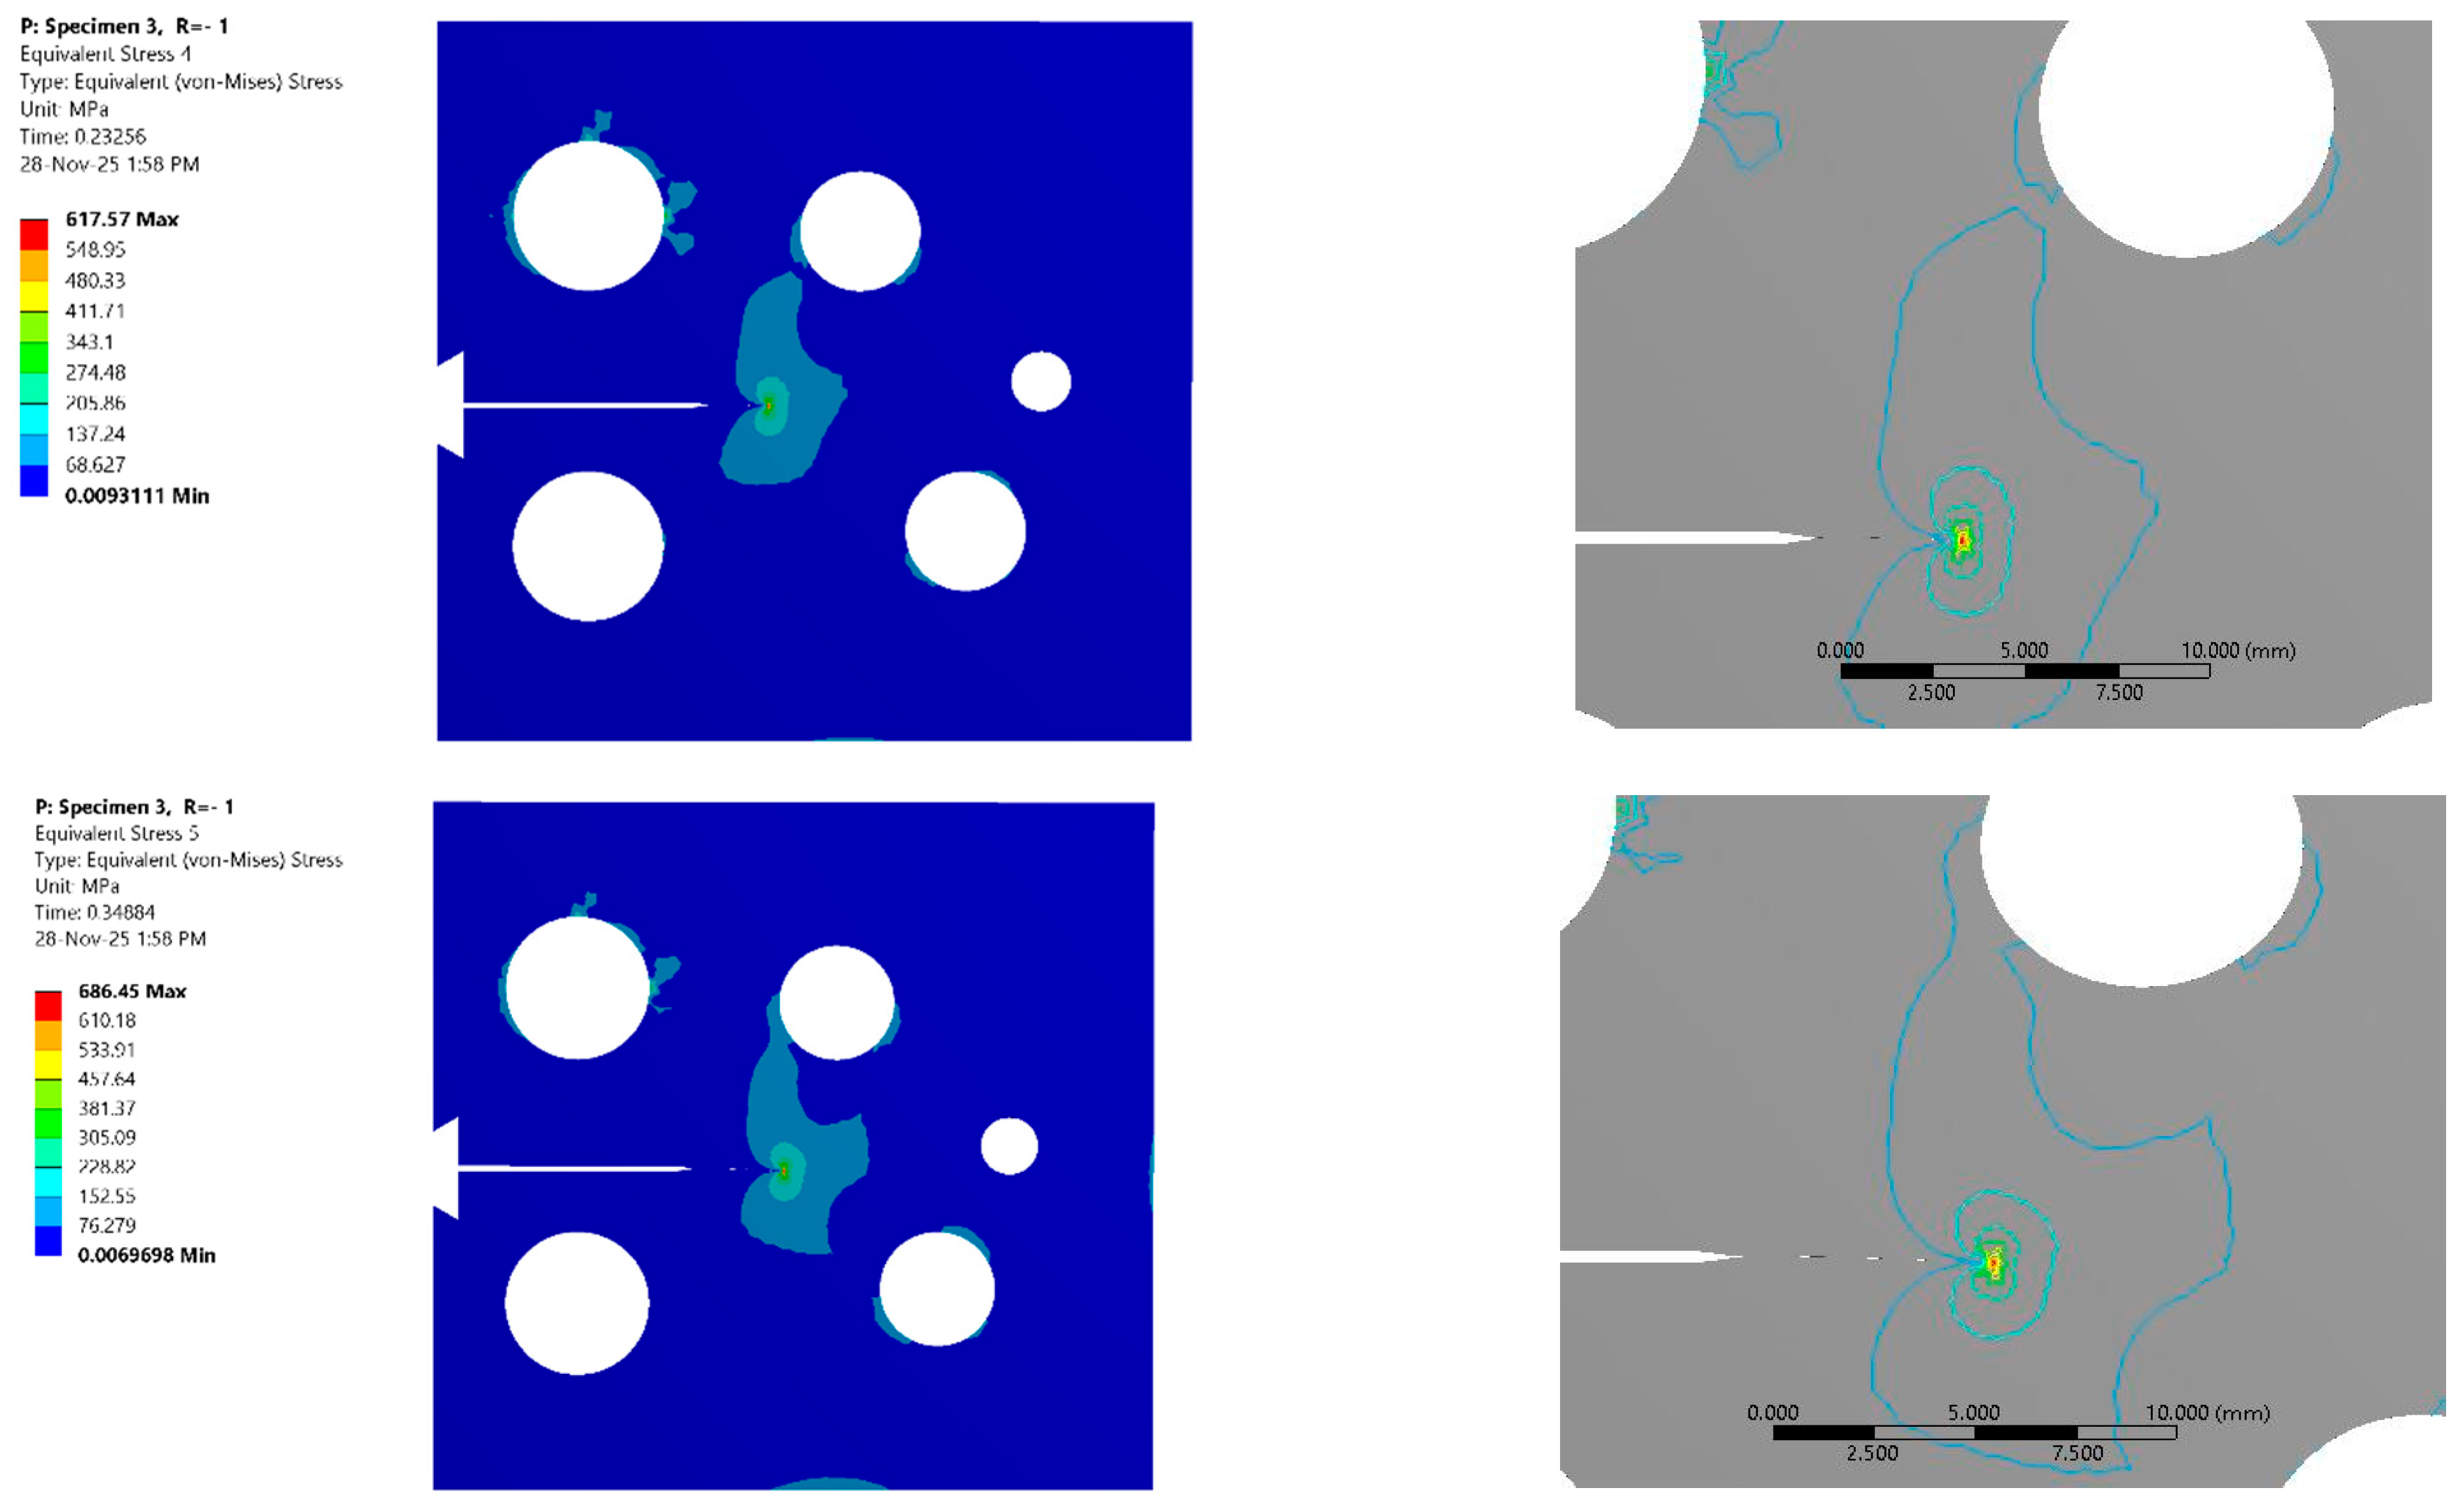
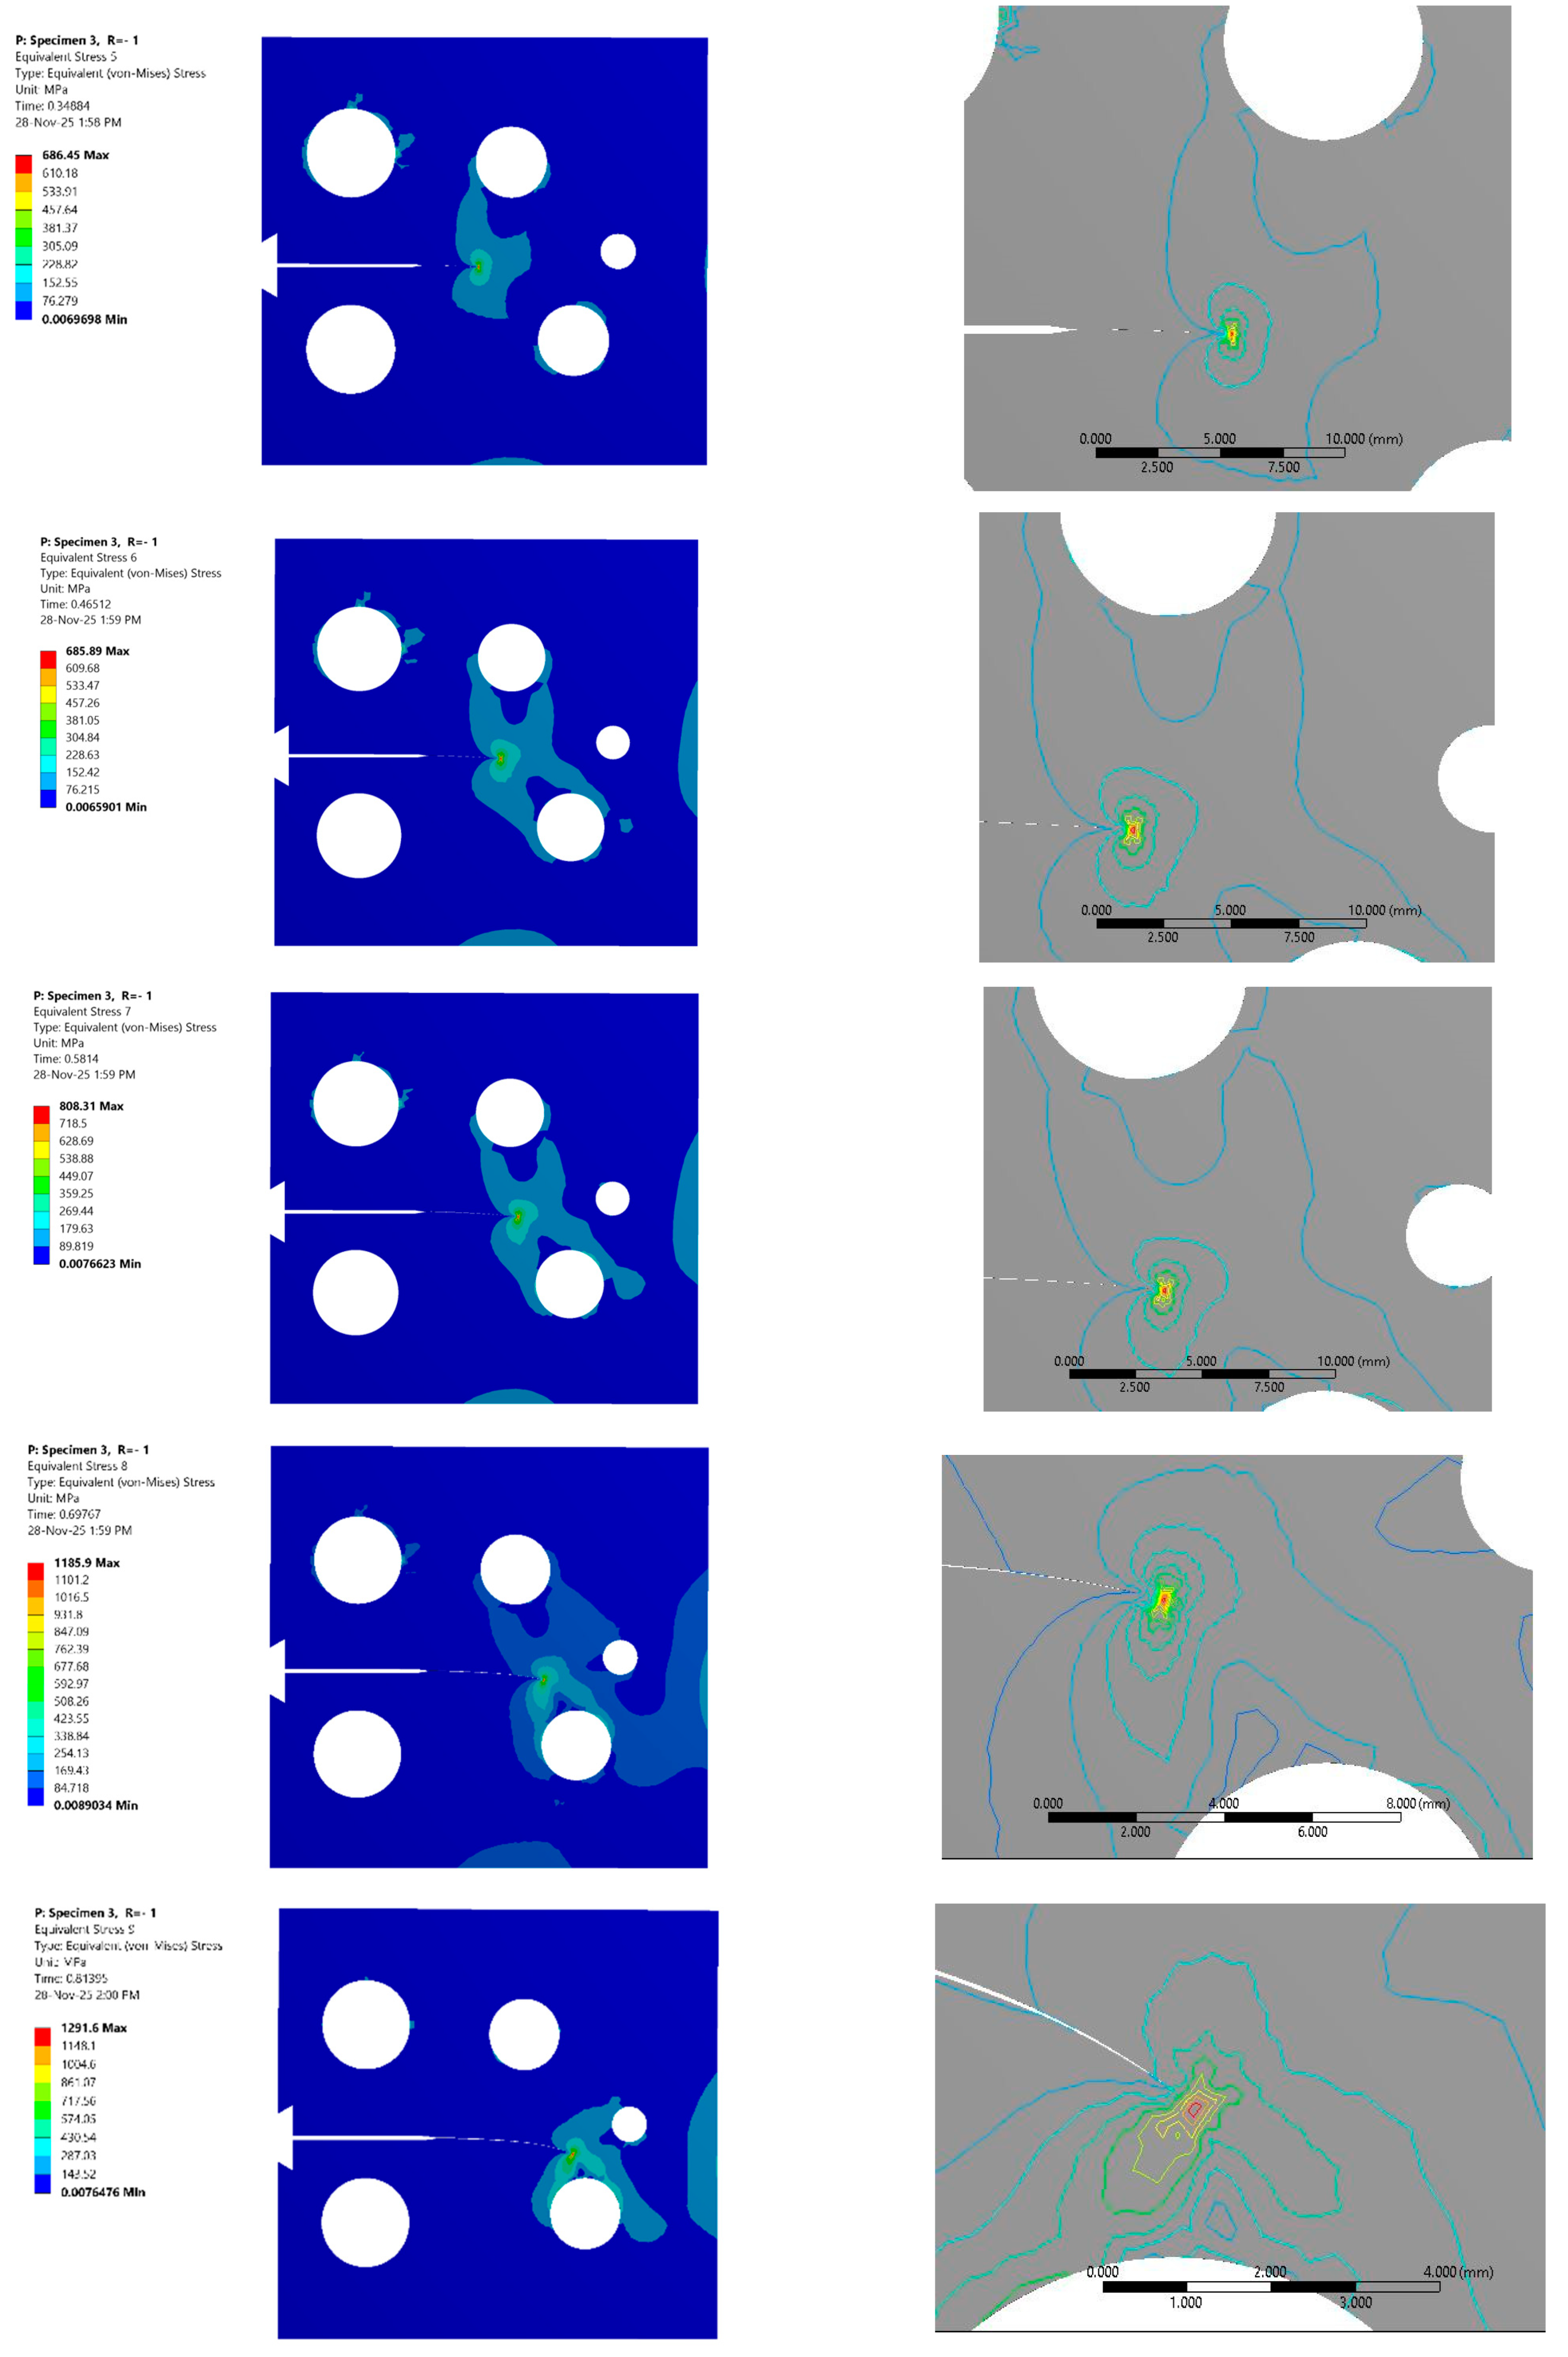
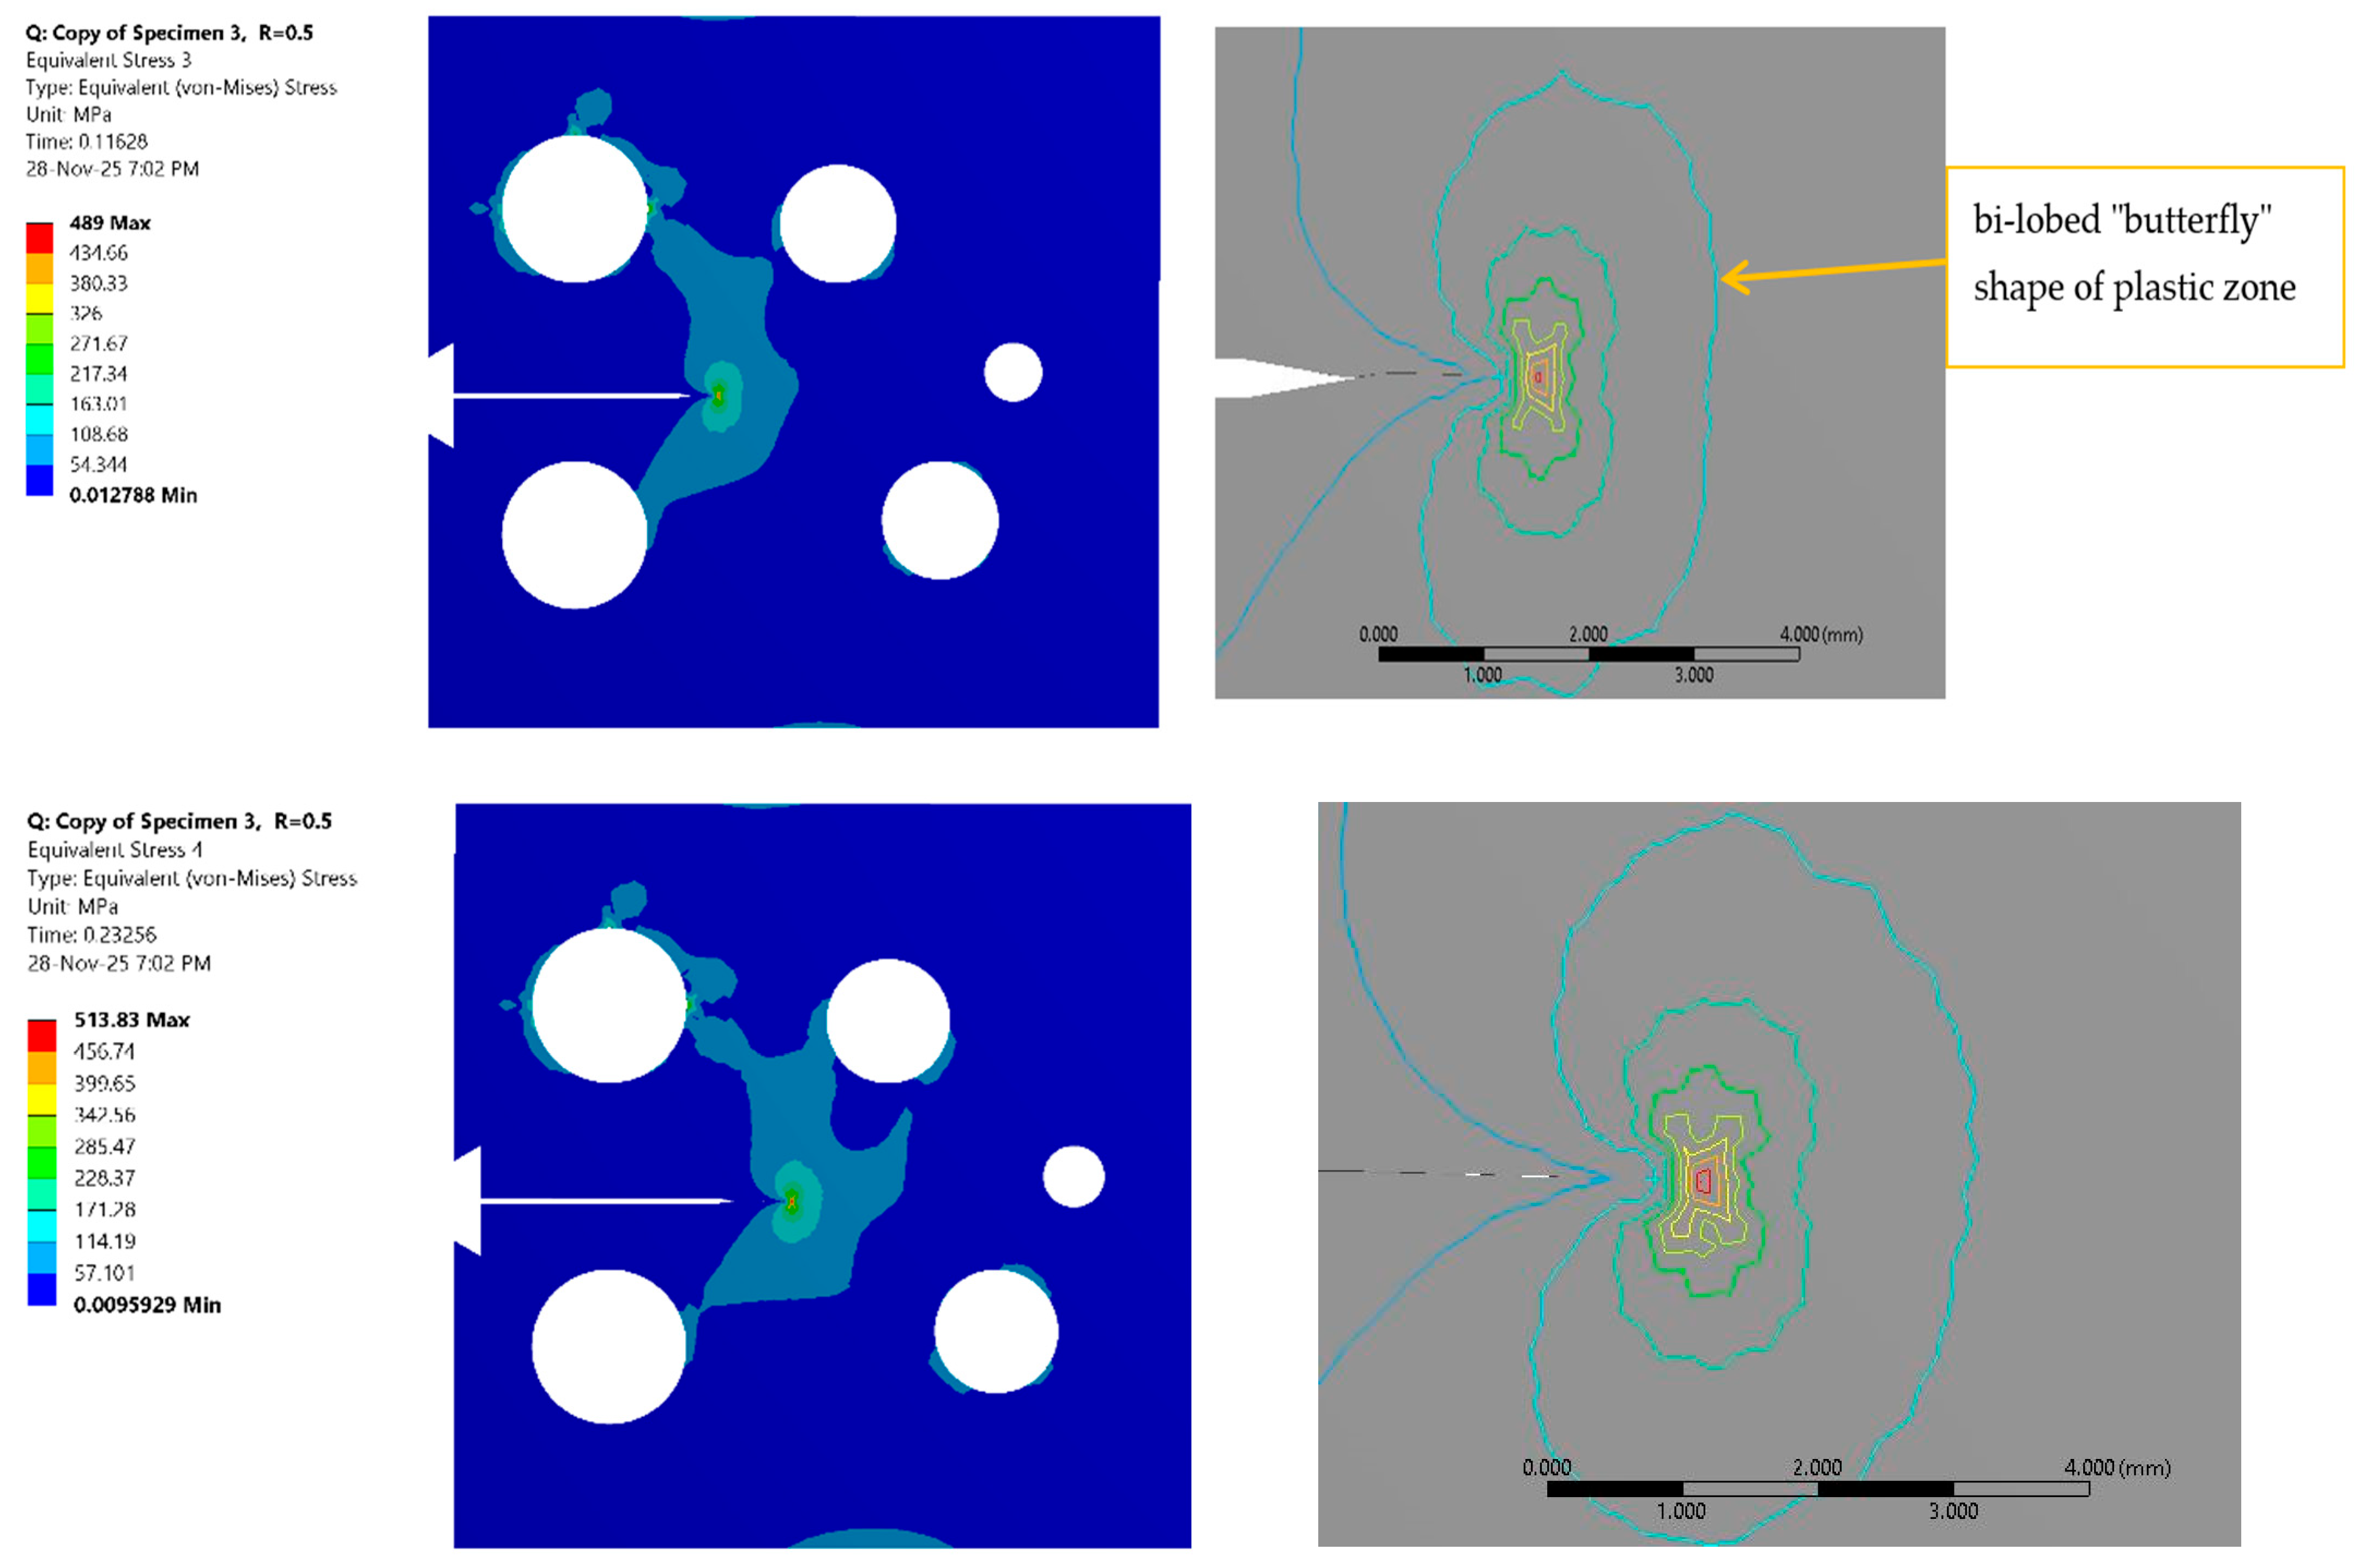
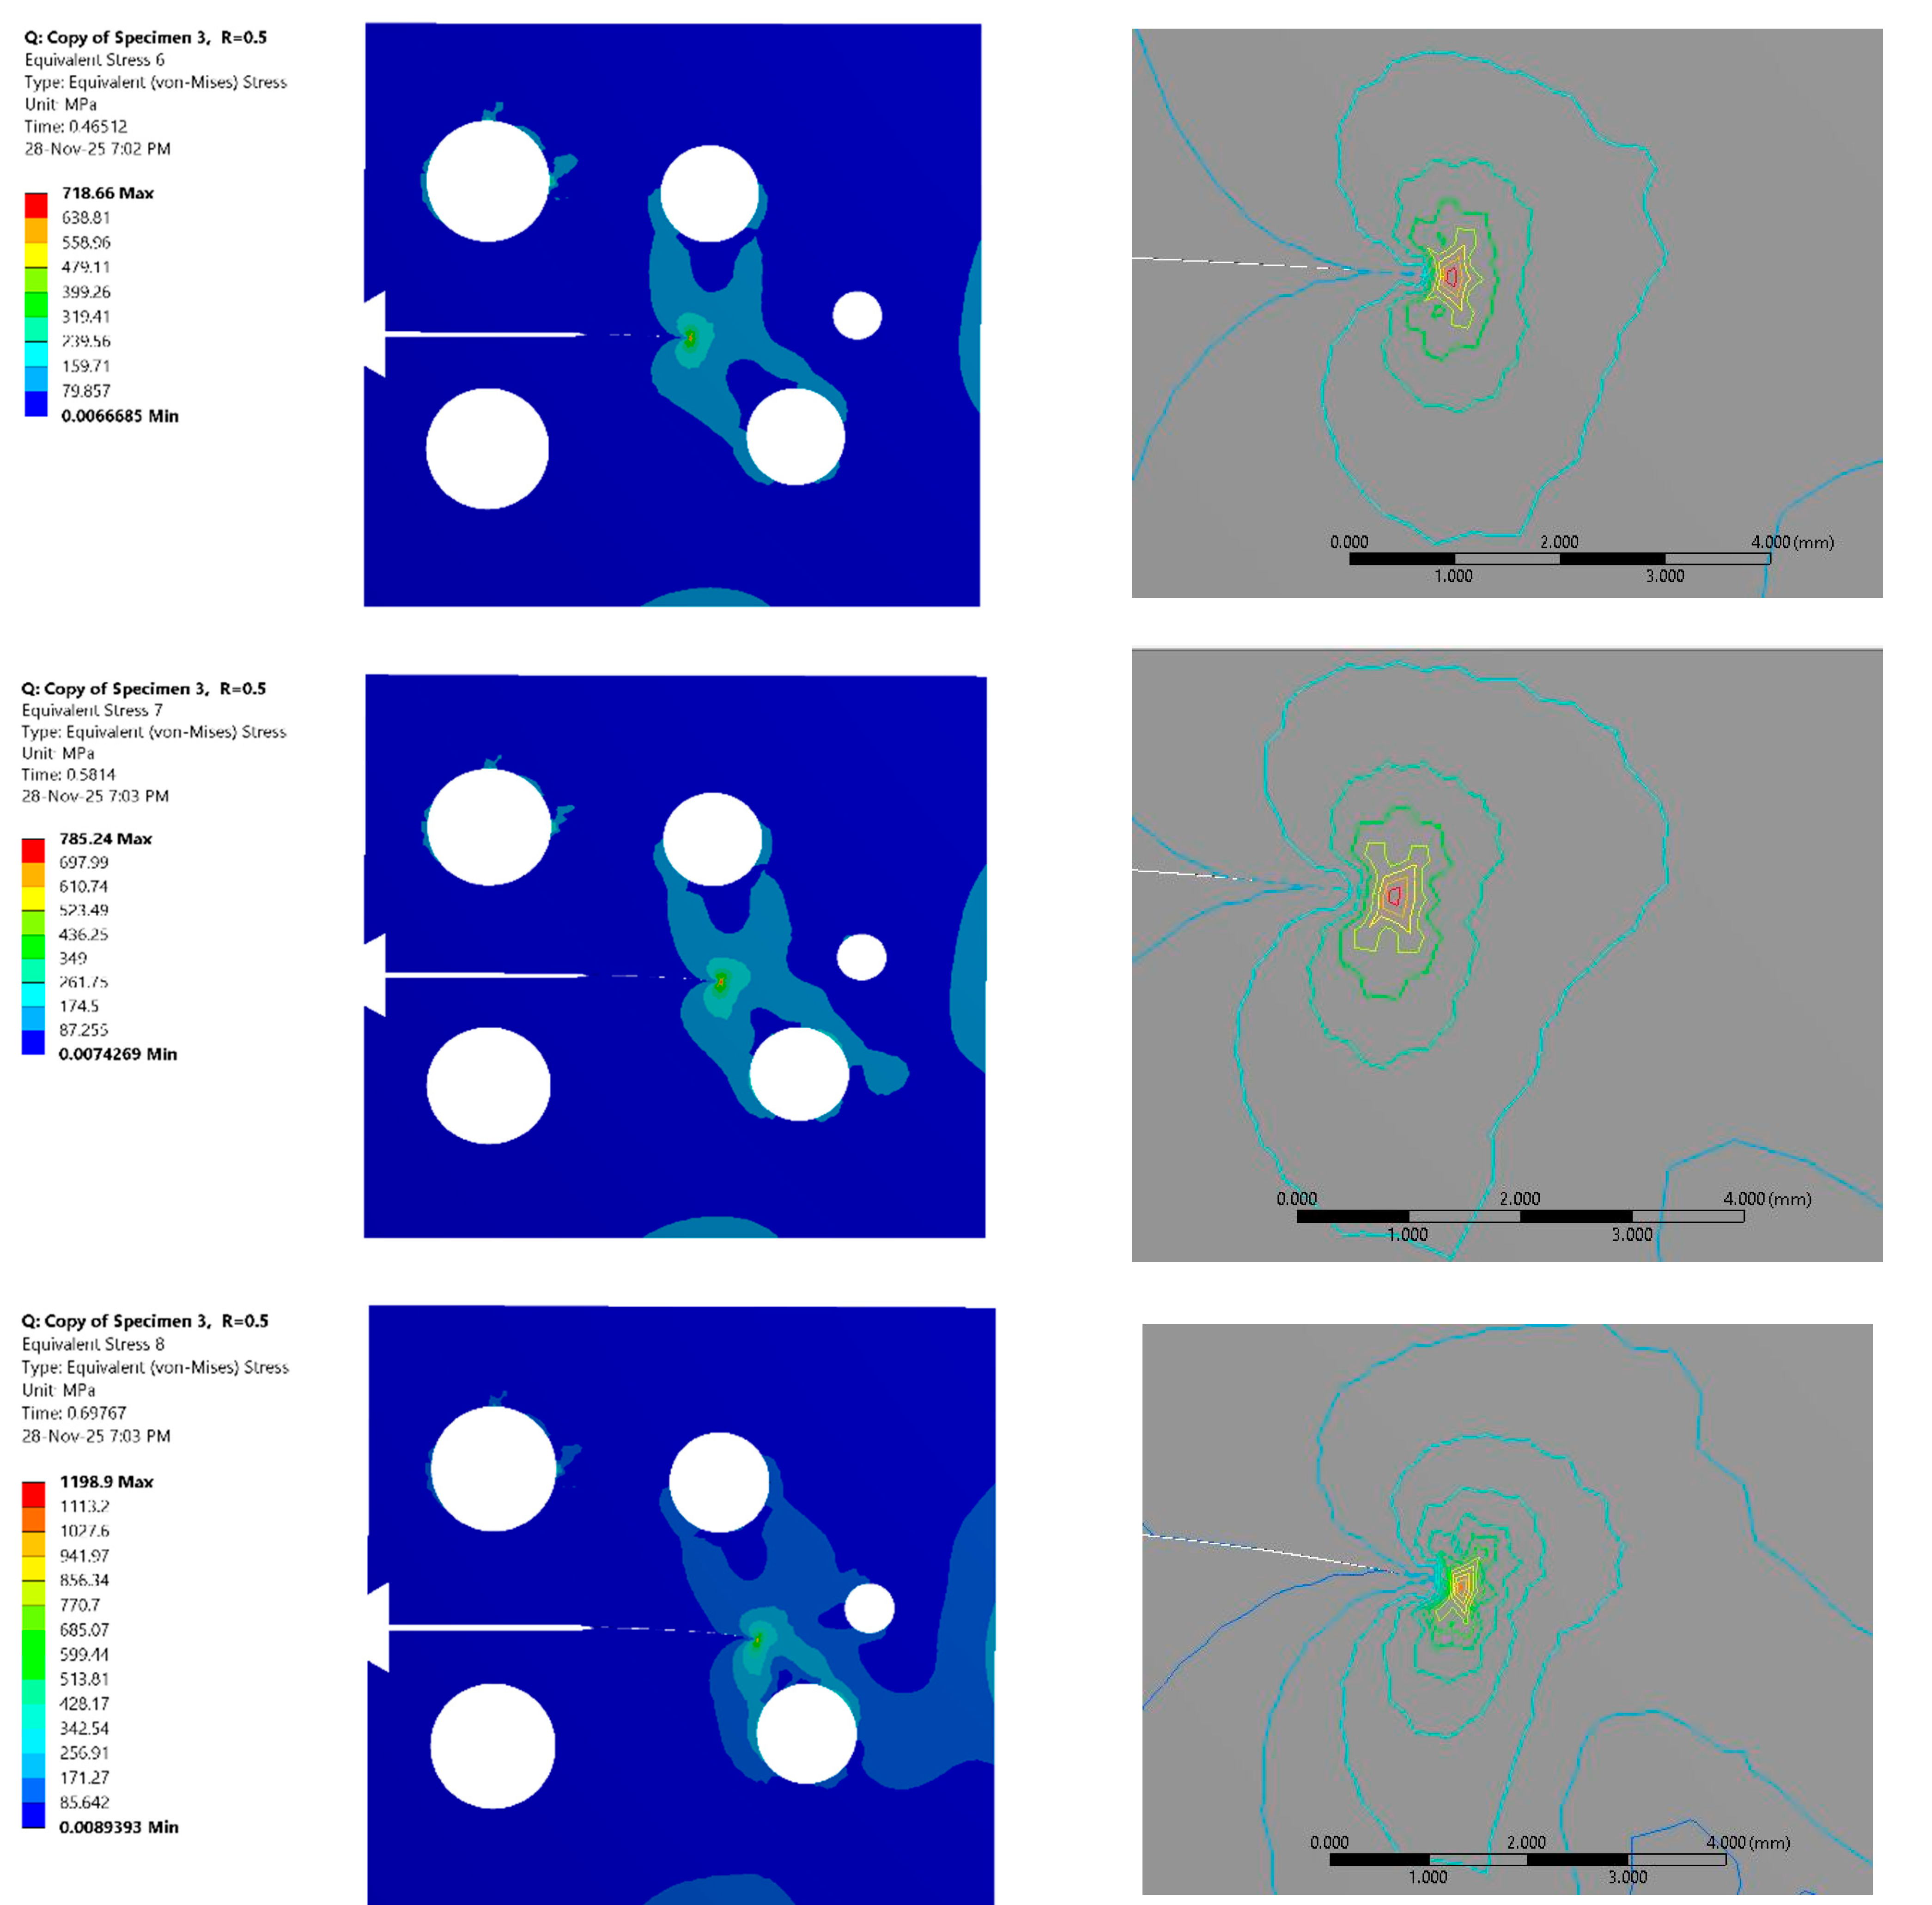
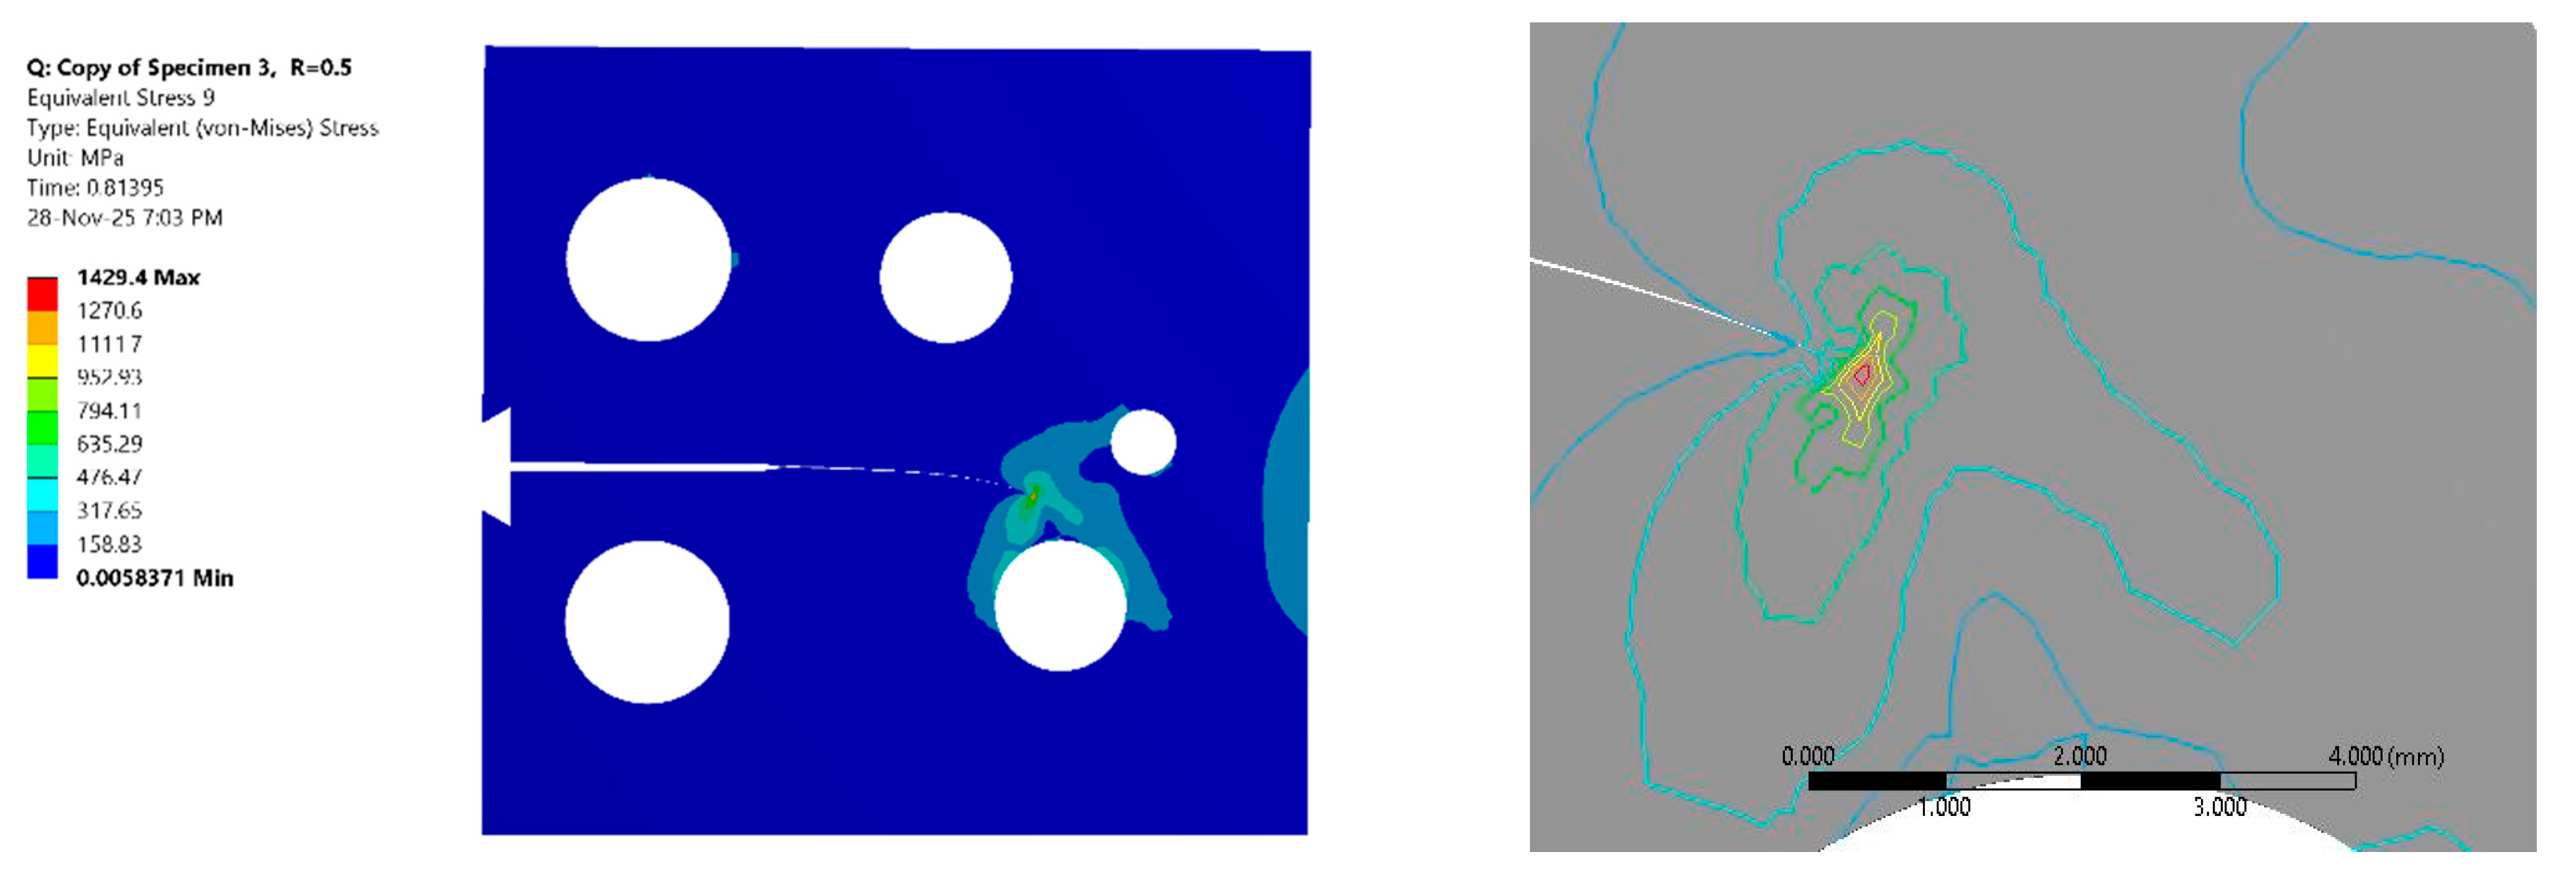
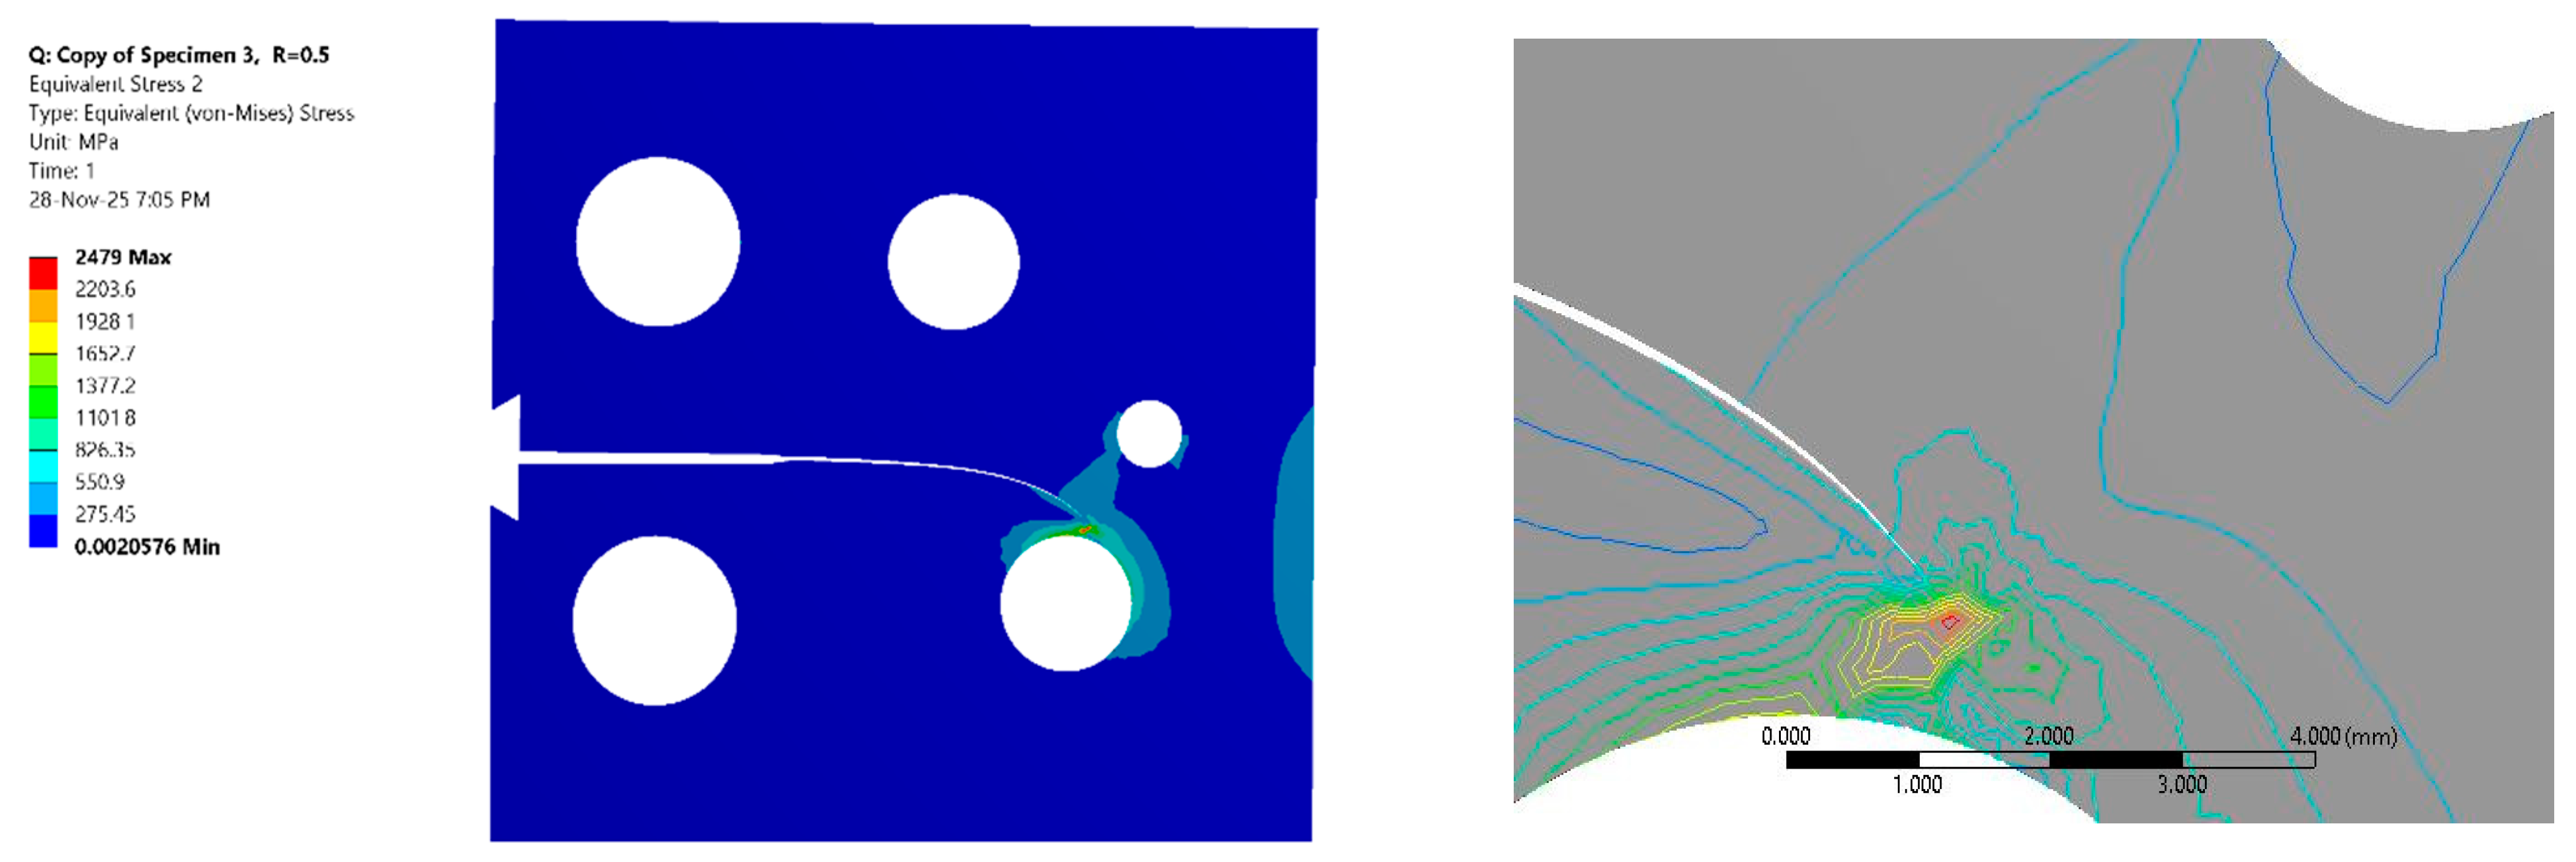
Figure 5 and
Figure 6 illustrate the crack tip stress state during crack growth, specifically showing the von Mises stress distribution for eight selected steps, covering stress ratios of 0.5 and −1. The color maps vividly illustrate the intensity of the stress singularity, while the iso-line contour distributions provide a critical qualitative boundary of the yielding region. These iso-contours demarcate the shape and extent of the plastic zone, revealing the characteristic bi-lobed “butterfly” shape associated with plane stress conditions in fracture mechanics. As the crack propagates, the evolution of these contours visually confirms the progressive expansion of the damage zone ahead of the crack tip. A comparison of the stress maps between the two loading conditions visually suggests a more extensive region of high stress and yielding in the fully reversed cases compared to the tensile–tensile cases. The qualitative observations from
Figure 5 and
Figure 6 are confirmed quantitatively in
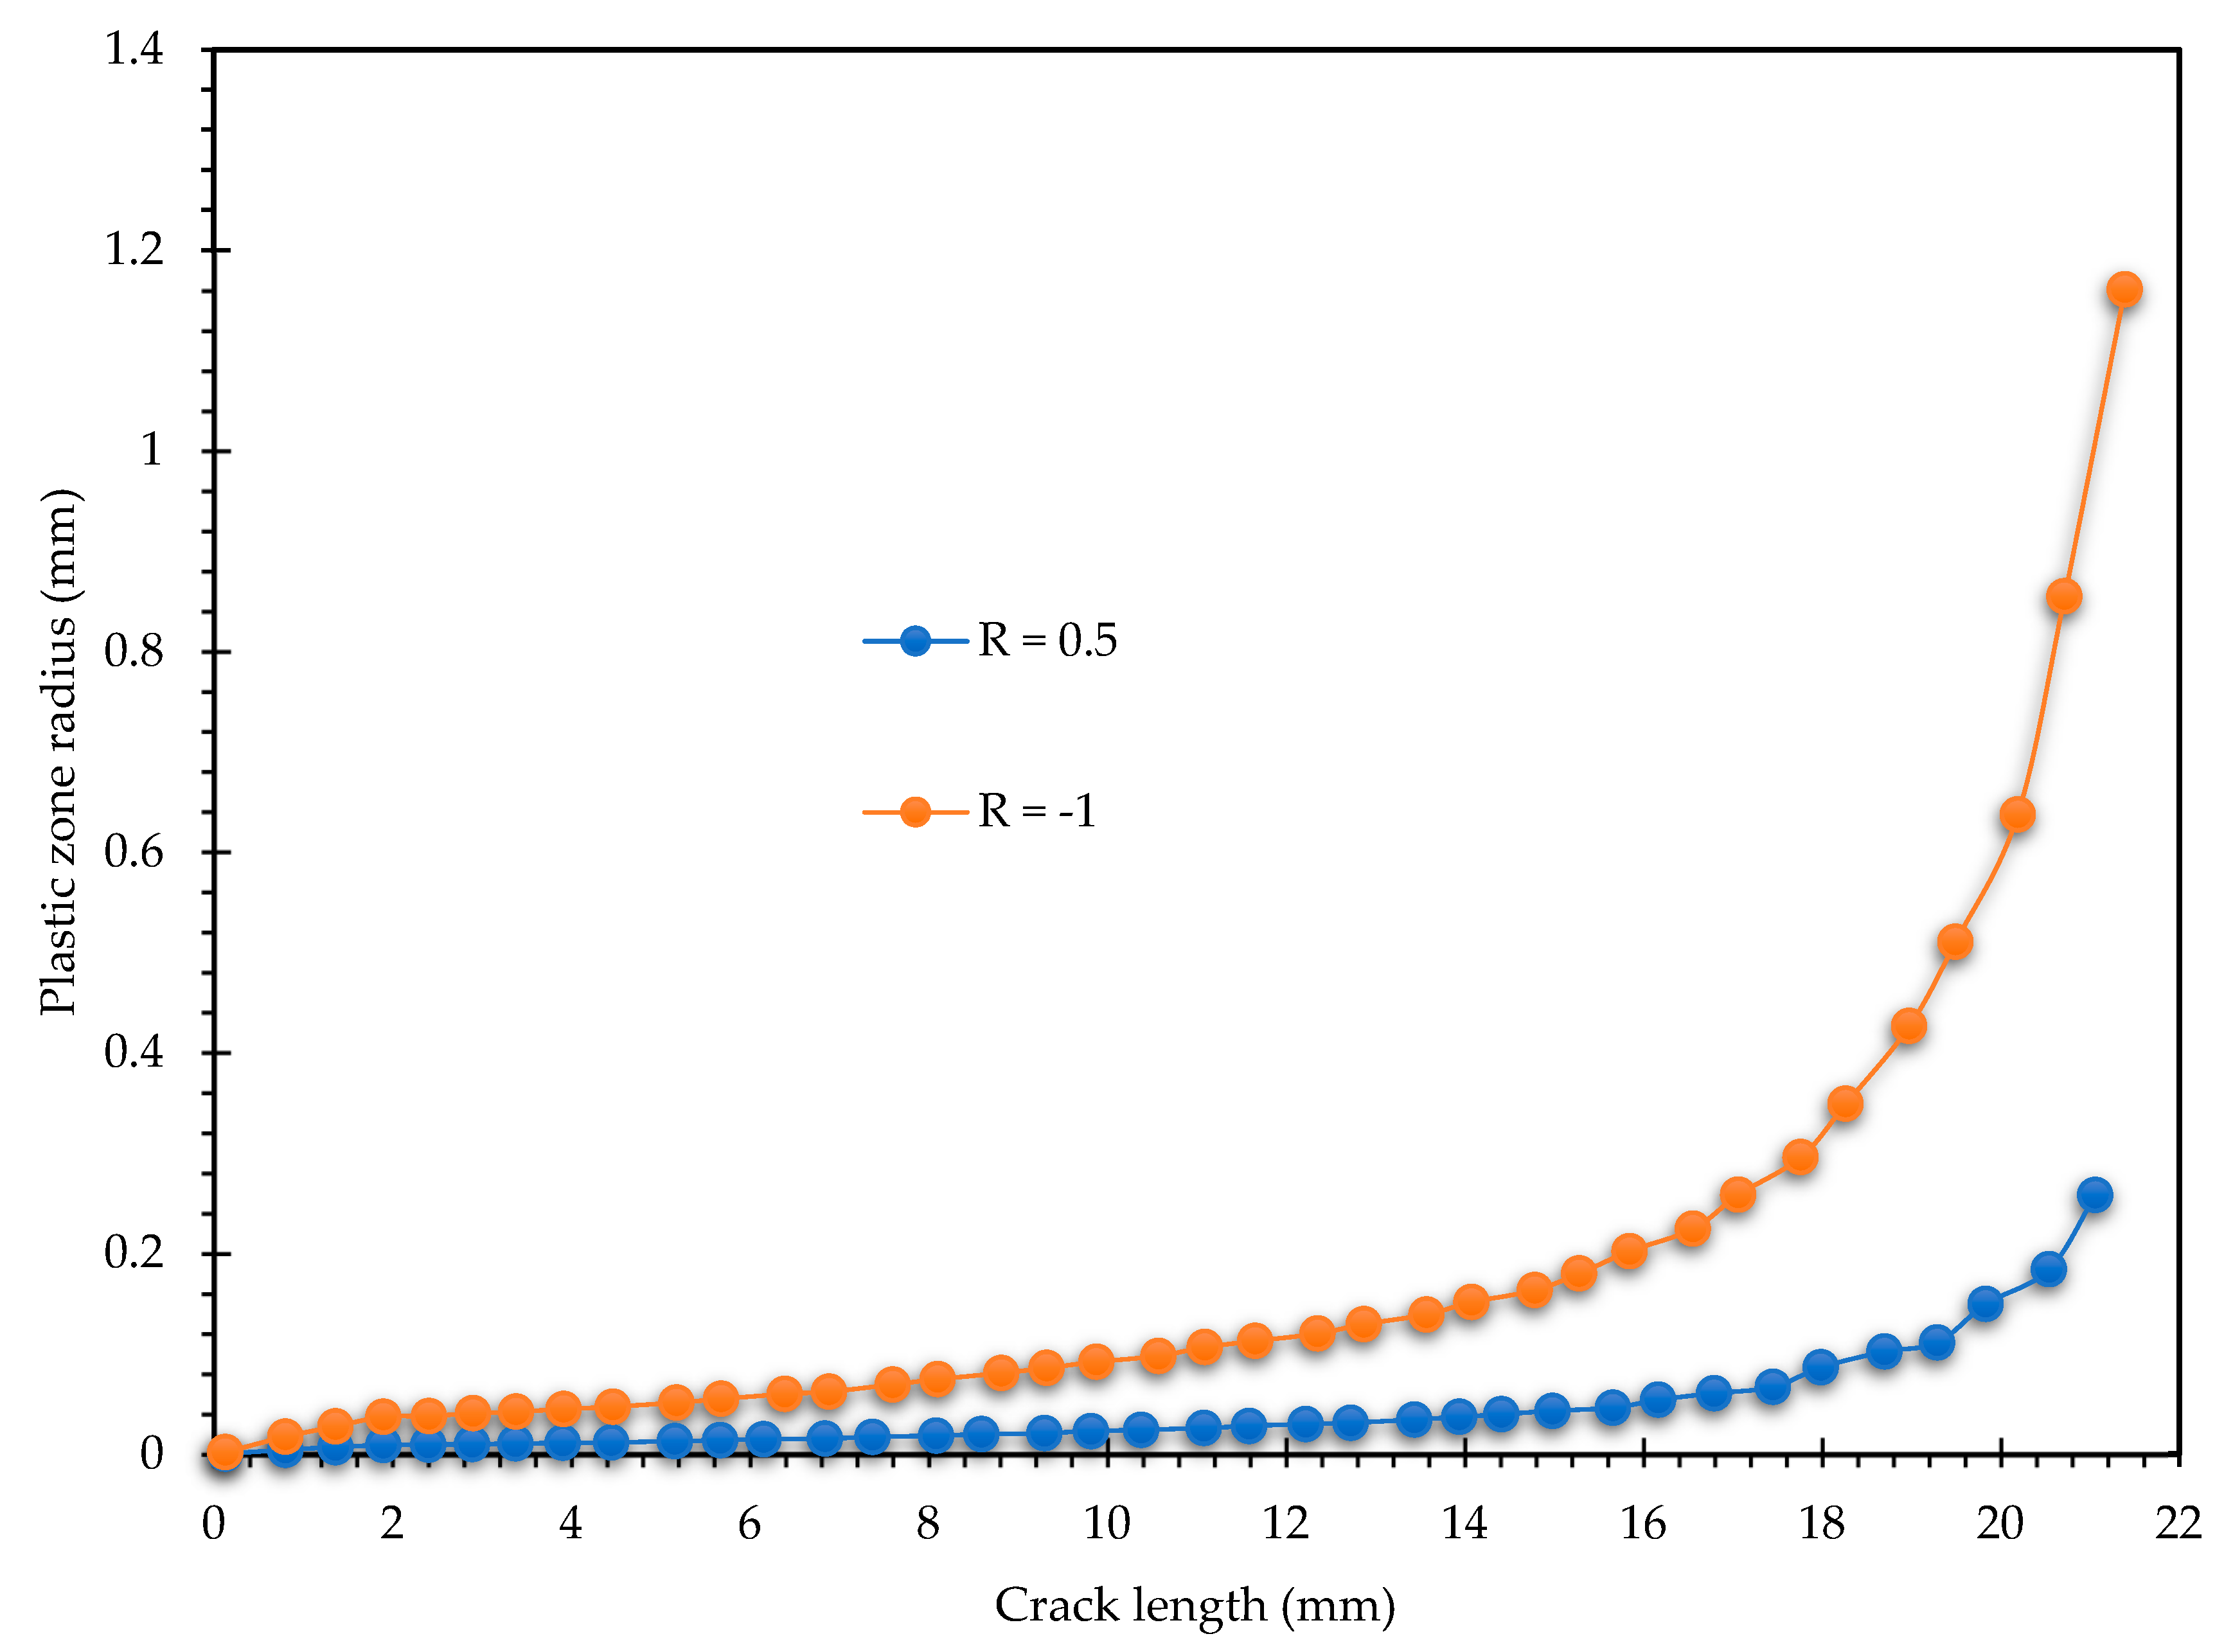
Figure 7, which plots the evolution of the plastic zone radius. The data reveals that the plastic zone radius for the fully reversed loading condition is consistently and significantly larger than that for the tensile–tensile condition across the entire range of crack growth. This substantial increase in the plastic zone size for R = −1 is attributed to the mechanics of the reversed load cycle. Unlike the R = 0.5 cycle, which remains in tension, the R = −1 cycle includes a compressive phase that induces reversed yielding at the crack tip. This cyclic plasticity leads to a larger accumulation of plastic strain and a consequently larger calculated plastic zone. This expanded plastic zone is indicative of higher irreversible energy dissipation per cycle, suggesting a transition away from SSY dominance and towards a regime where plasticity plays a more critical role in material degradation.
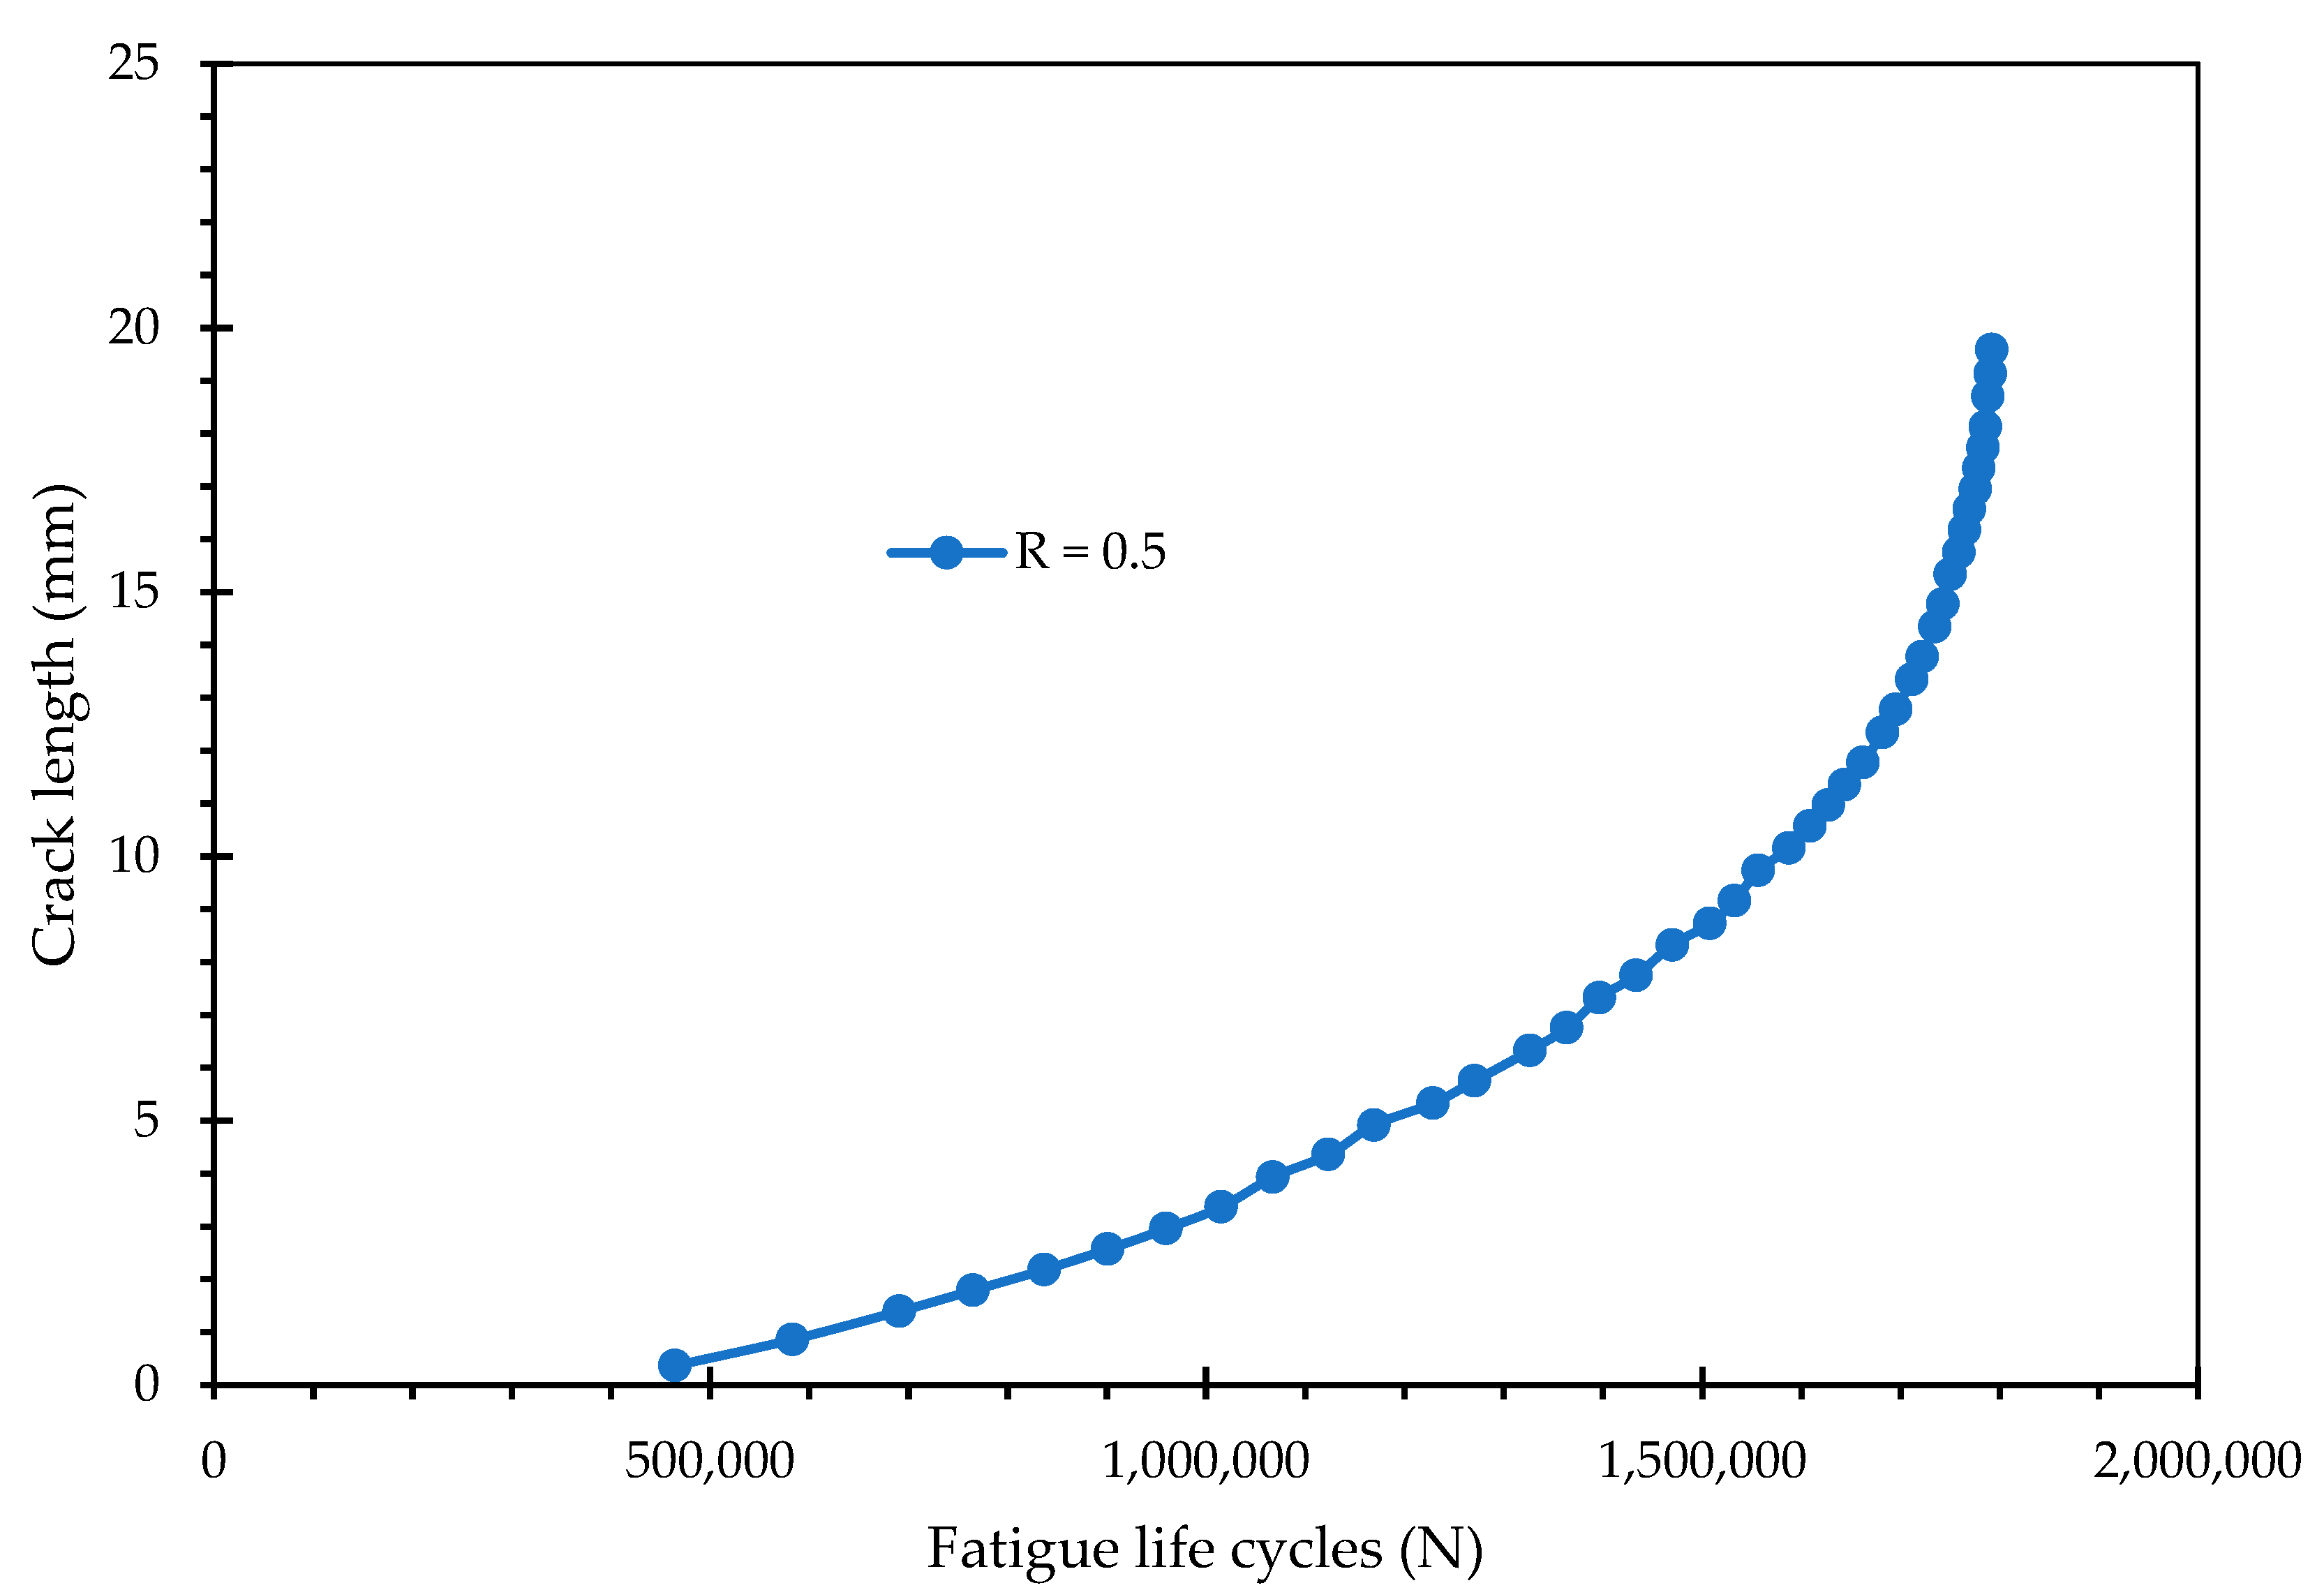
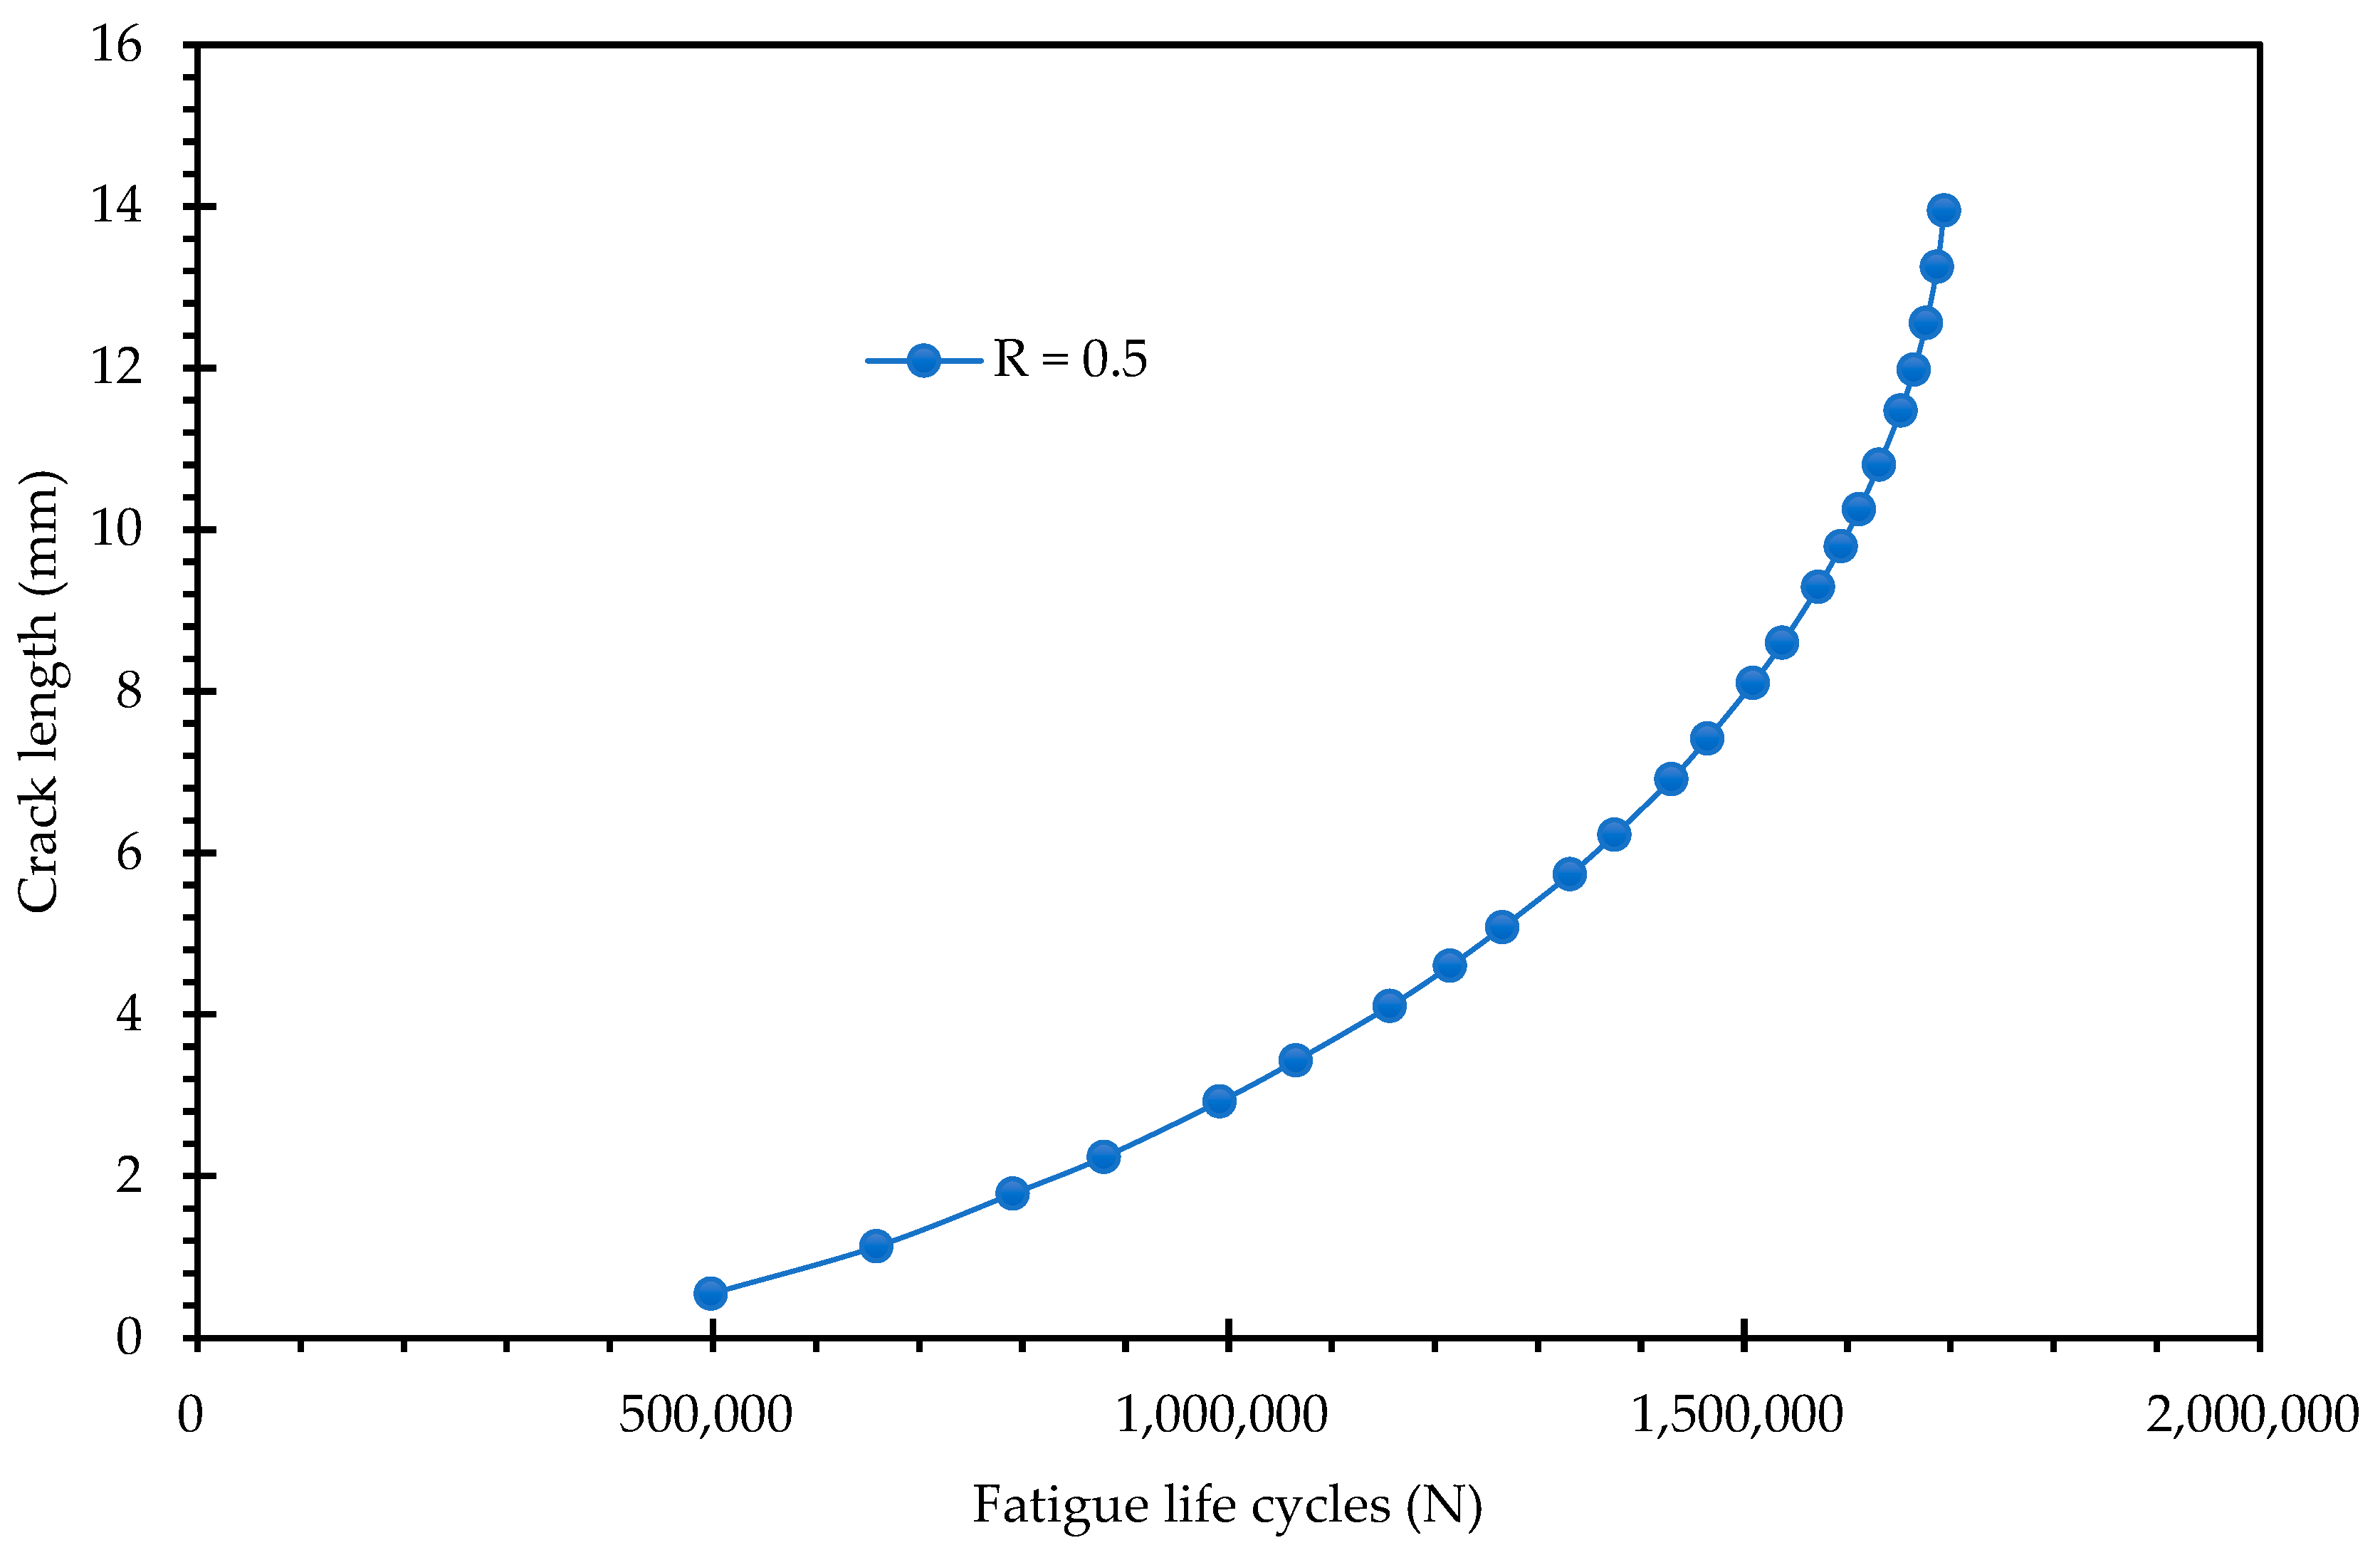
Figure 8 and
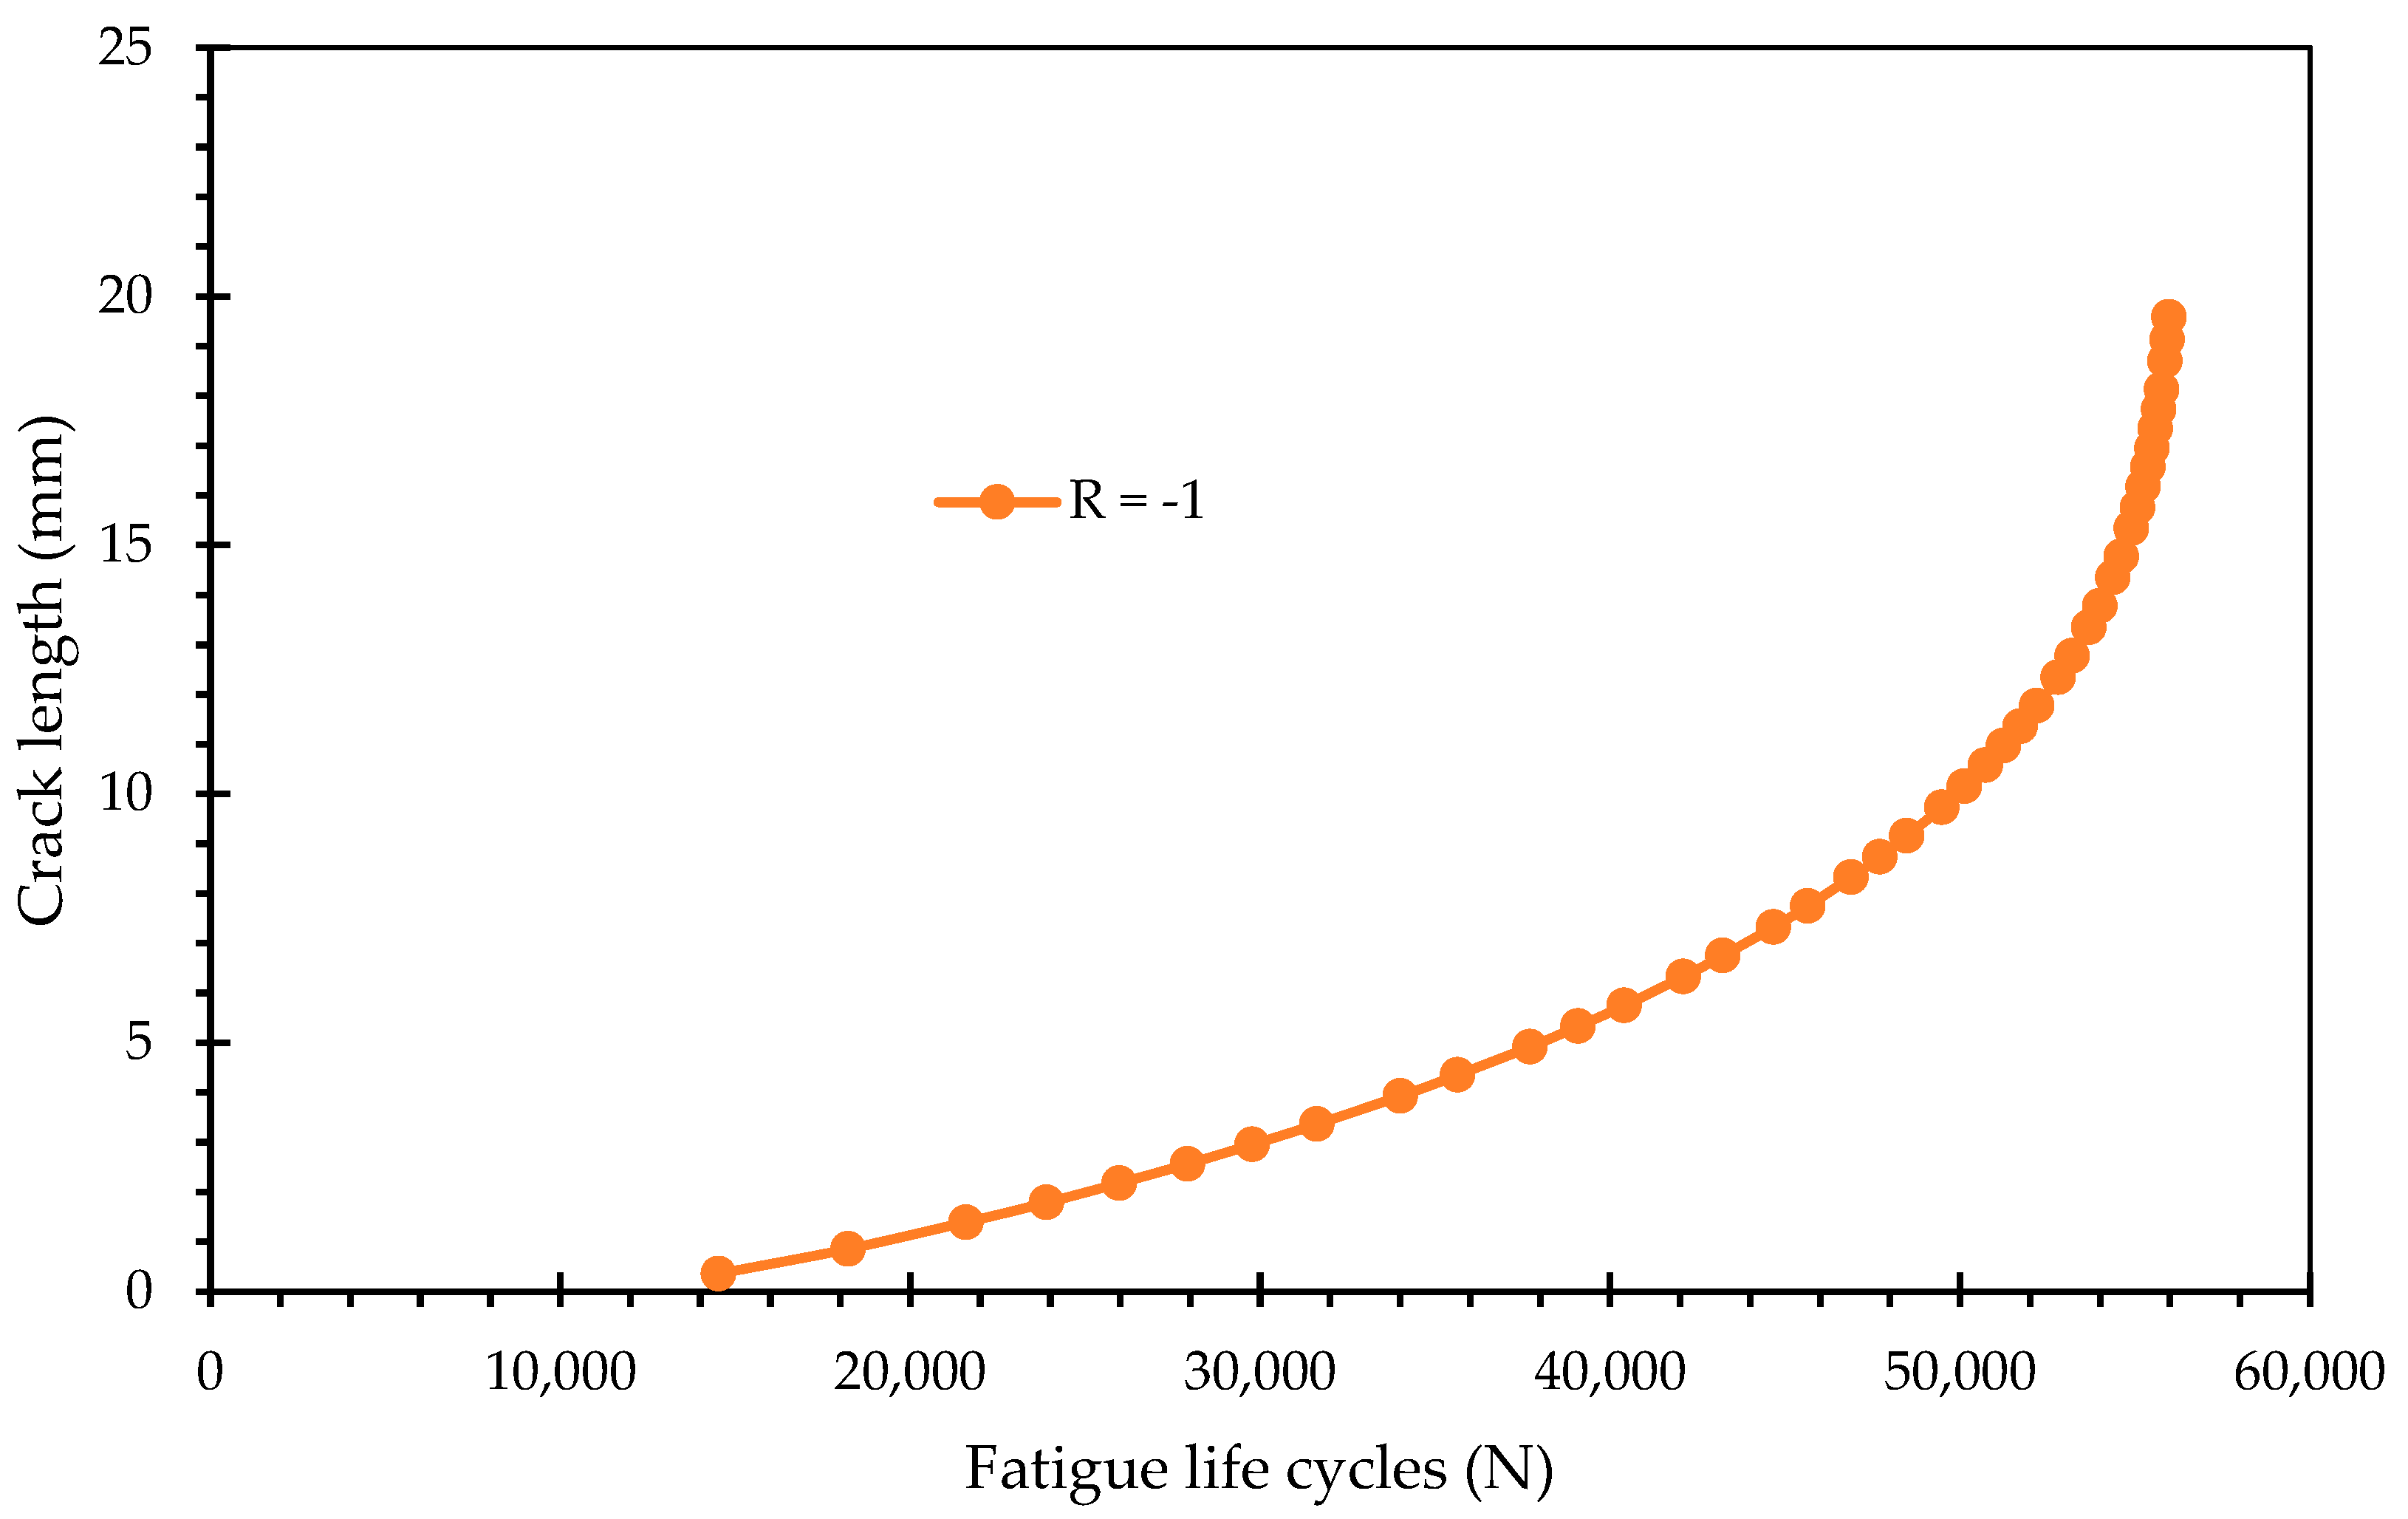
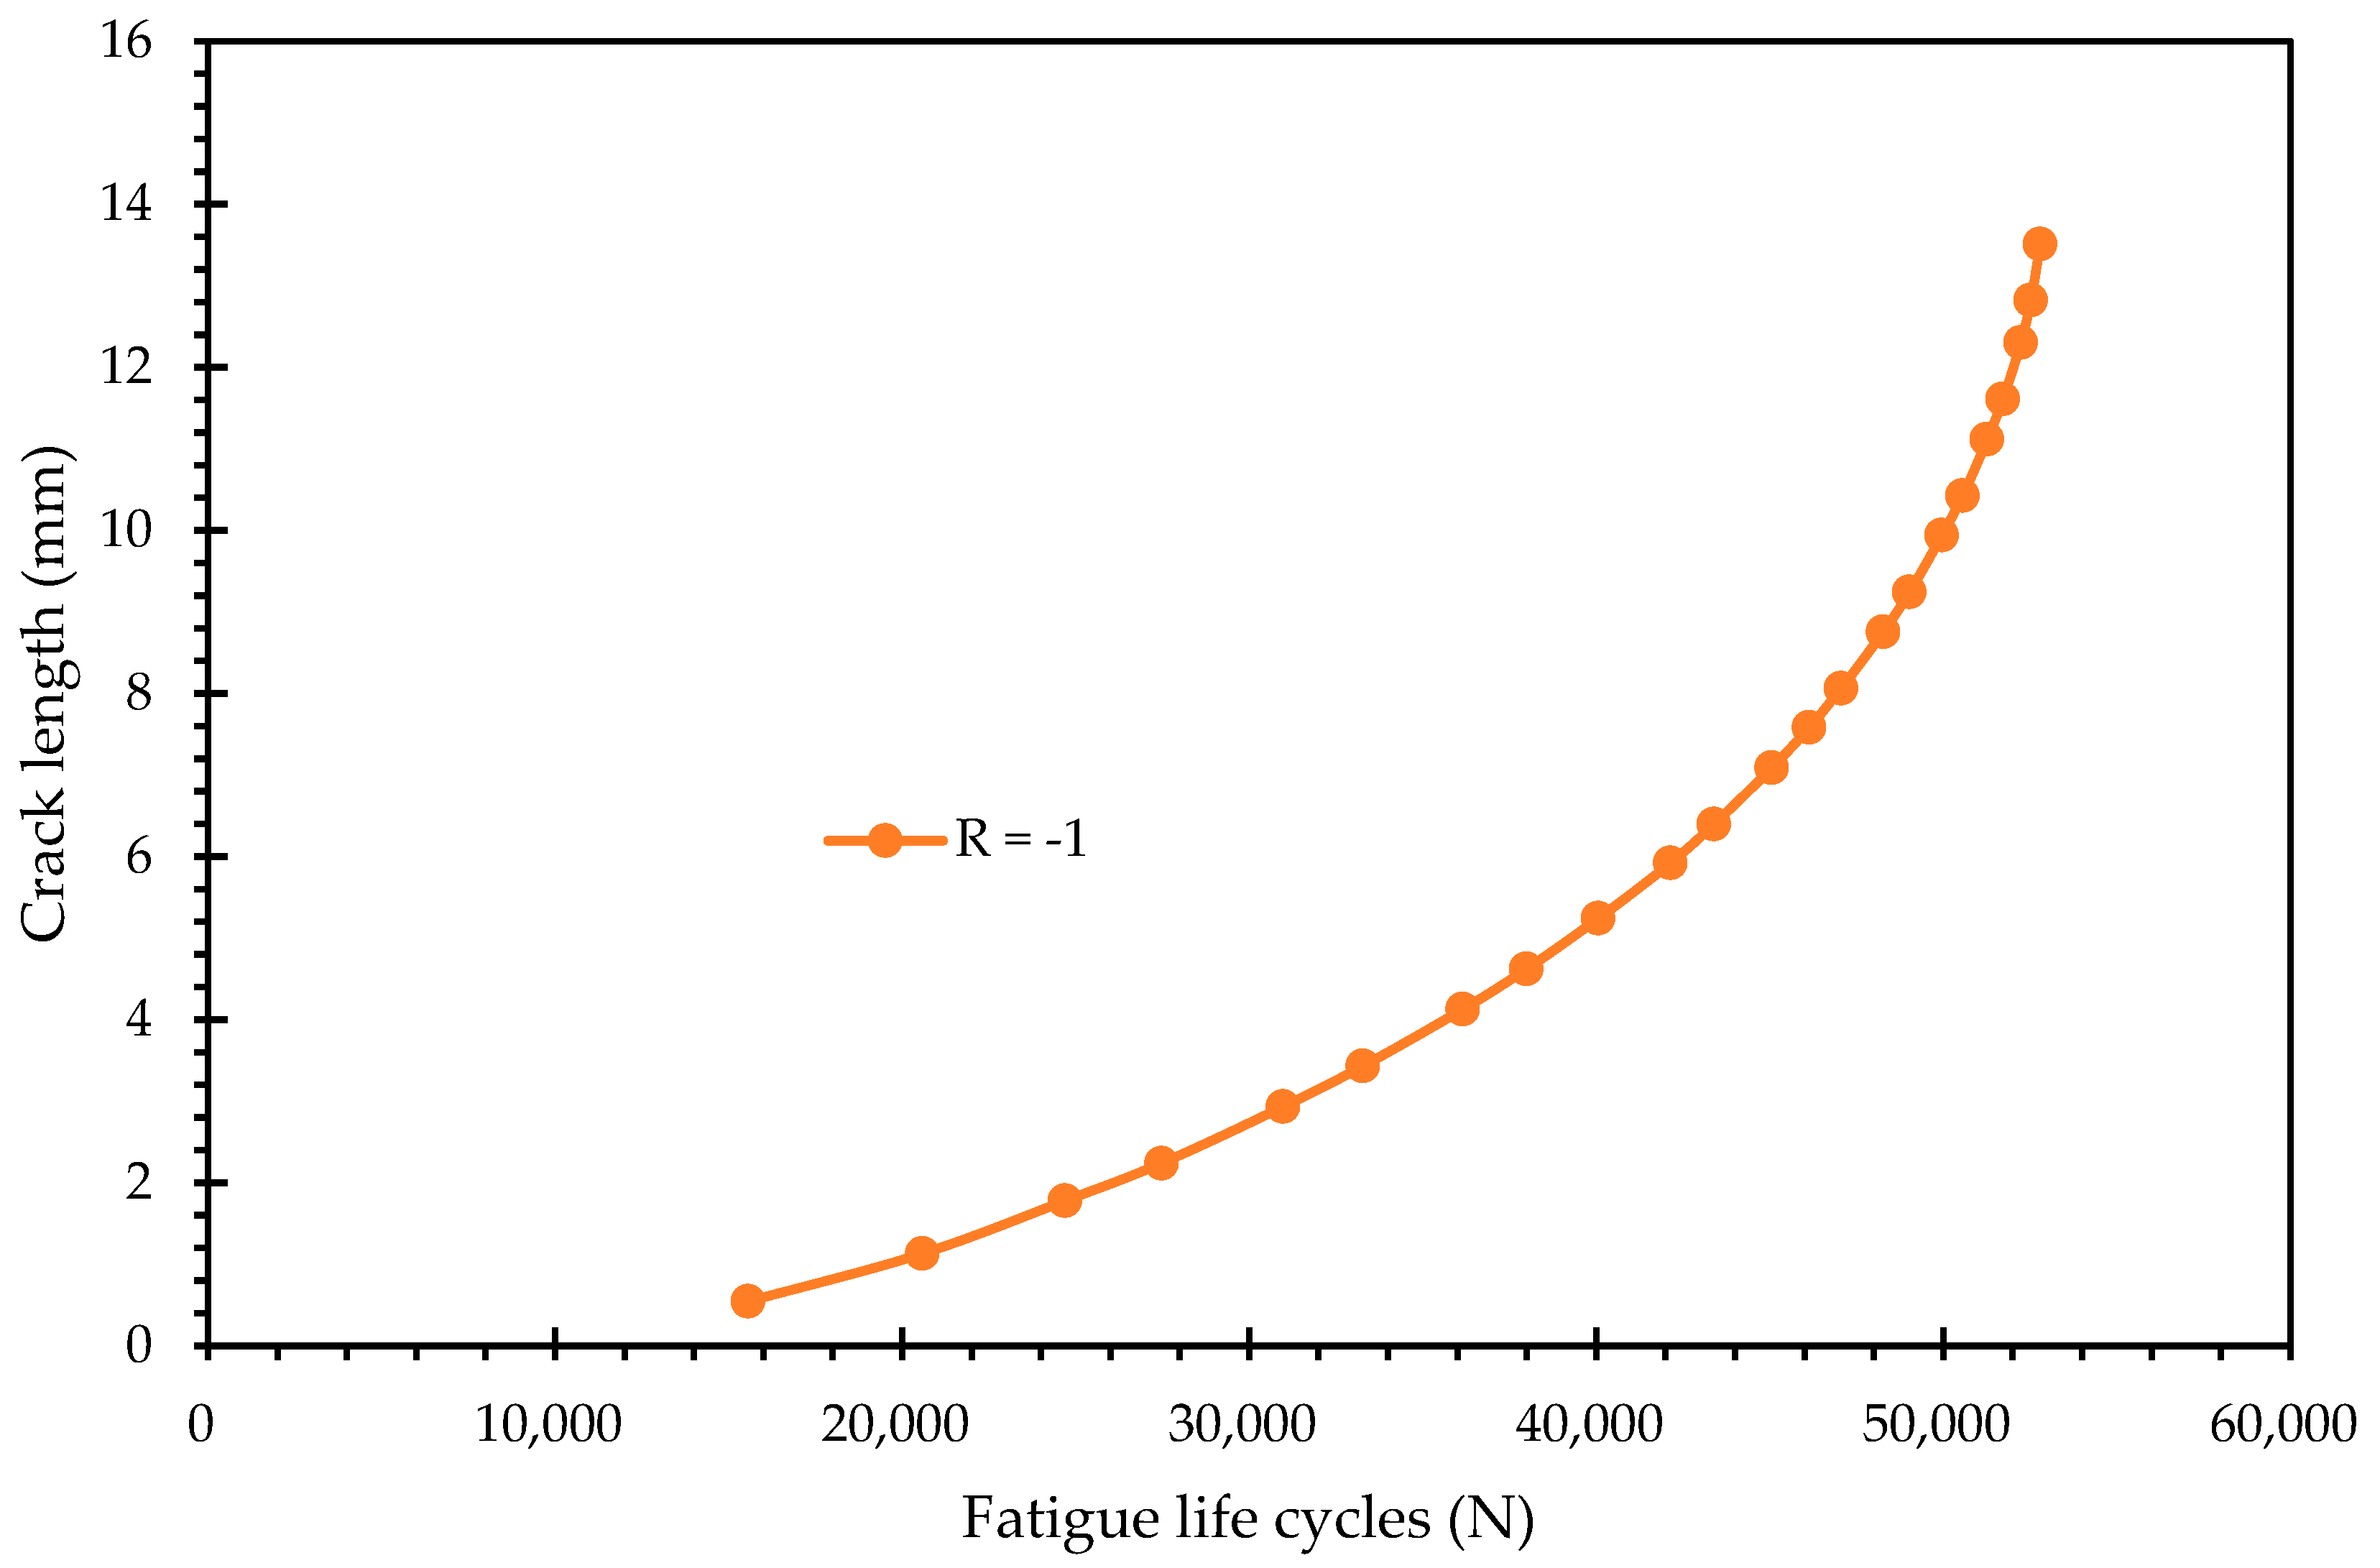
Figure 9 present the fatigue life curves, quantifying the total cycles to failure for both stress ratios 0.5 and −1, respectively. The results demonstrate a drastic difference in fatigue performance between the two conditions:
Tensile–Tensile Loading (R = 0.5): The specimen exhibited a significantly extended fatigue life, reaching a maximum of 1,791,900 cycles.
Fully Reversed Loading (R = −1): The specimen failed much earlier, with a maximum fatigue life of only 55,971 cycles.
These results establish a clear physical correlation with the plastic zone analysis in
Figure 5 and
Figure 6. The condition that generated the larger plastic zone (R = −1) corresponds to the significantly shorter fatigue life. This confirms that the expanded plastic zone observed in the fully reversed loading is not merely a shielding mechanism (crack closure) but rather a region of intense cyclic damage. The reversed yielding inherent to the R = −1 cycle accelerates the accumulation of fatigue damage ahead of the crack tip, leading to faster crack propagation rates and a reduction in total life by an order of magnitude compared to the R = 0.5 condition. Conversely, the smaller plastic zone in the R = 0.5 case indicates less localized damage accumulation per cycle, allowing the material to sustain the load for nearly 1.8 million cycles.
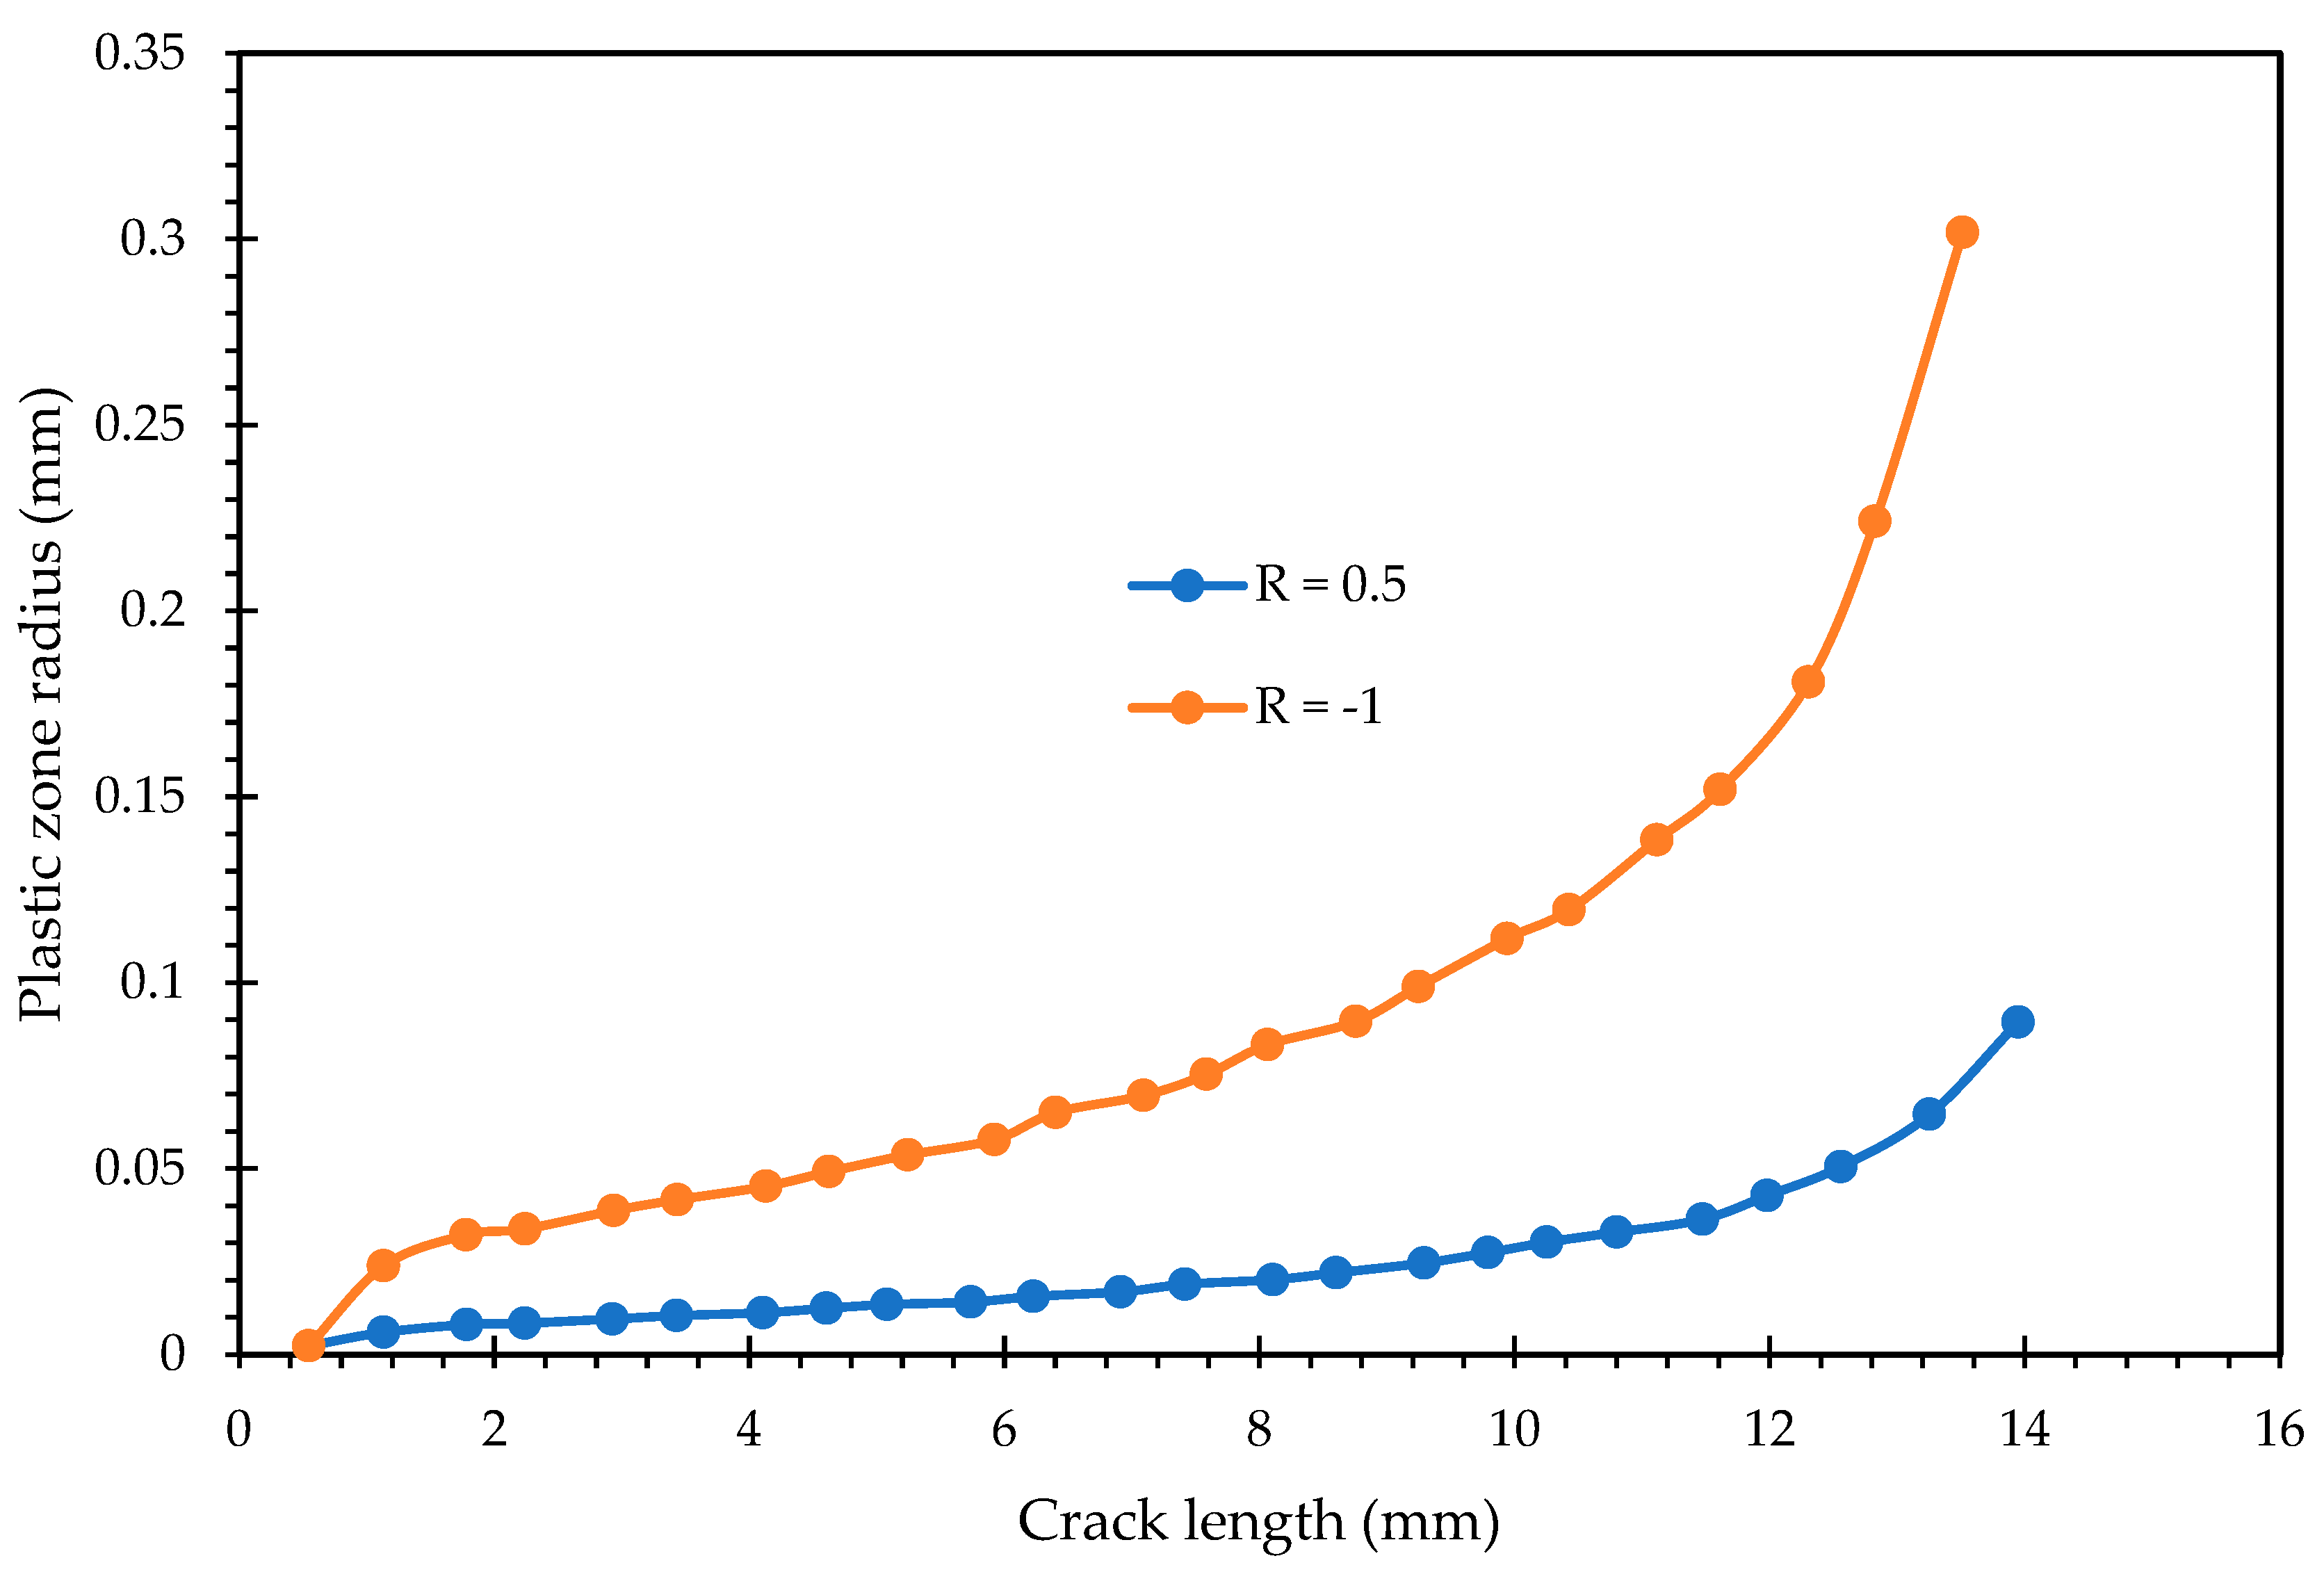
Figure 10 and
Figure 11 extend the plastic zone analysis to the remaining specimen configurations under the two distinct stress ratios.
Figure 10 displays the plastic zone radius versus the crack length trend for Specimen 2, and
Figure 11 presents the corresponding trend for Specimen 3. These figures allow for a comprehensive assessment of how specimen geometry, constraints, or slight manufacturing variations might influence the localized stress state. Typically, the plastic zone radius versus the crack length curve exhibits a characteristic three-stage progression: an initial stage where
rp slowly increases, a transitional region of rapid growth, and a final region of accelerating growth corresponding to the onset of final fracture. The data from Specimens 2 and 3 are likely to follow the same general trend observed in
Figure 4 that
rp increases as the crack grows. However, their comparison against the baseline (Specimen 1,
Figure 7) is crucial. Any deviation in the absolute size or the rate of increase in the plastic zone radius between specimens points to a sensitivity to configuration. For instance, if Specimen 3 showed a consistently larger
rp for a given crack length compared to Specimen 2, it would suggest that the specific design or configuration of Specimen 3 promotes greater localized plasticity and a potentially earlier transition failure, warranting further investigation into its structural integrity. These figures confirm the robust observation that plastic zone size is a direct, measurable indicator of the crack tip’s localized severity, which dictates the macro-scale fatigue performance. In all configurations, the fully reversed loading consistently resulted in a significantly larger plastic zone radius compared to the tensile–tensile loading.
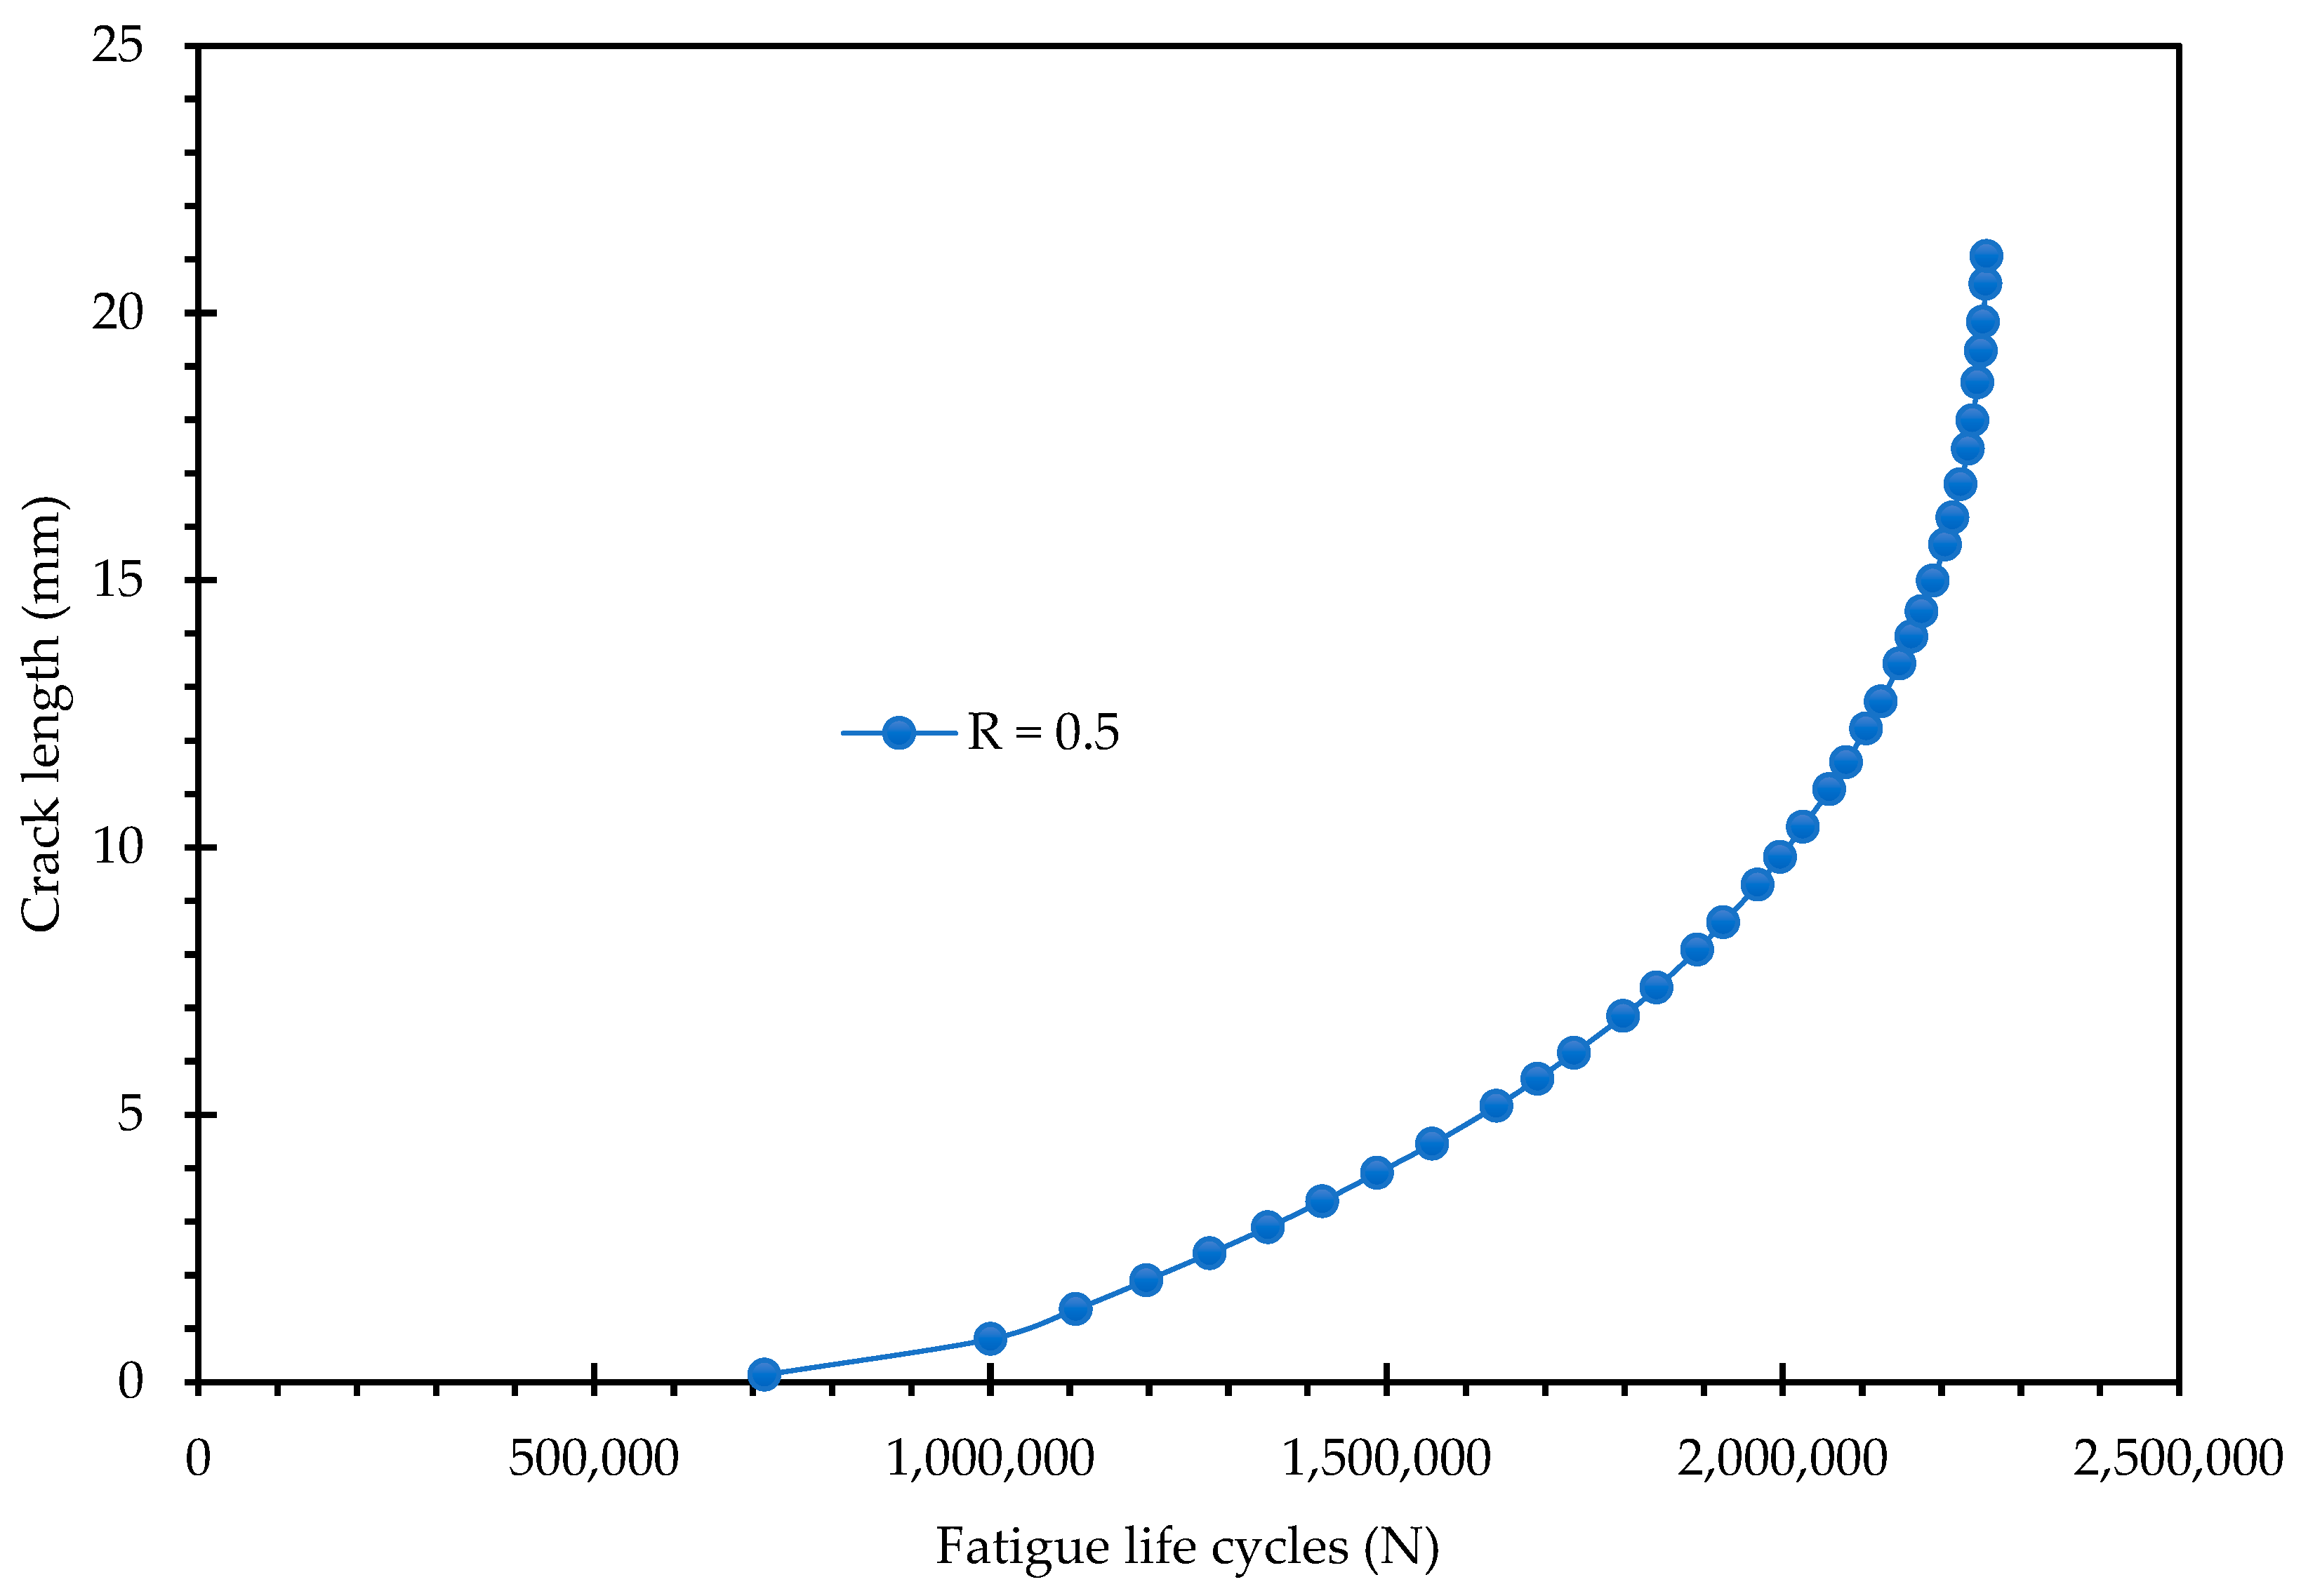
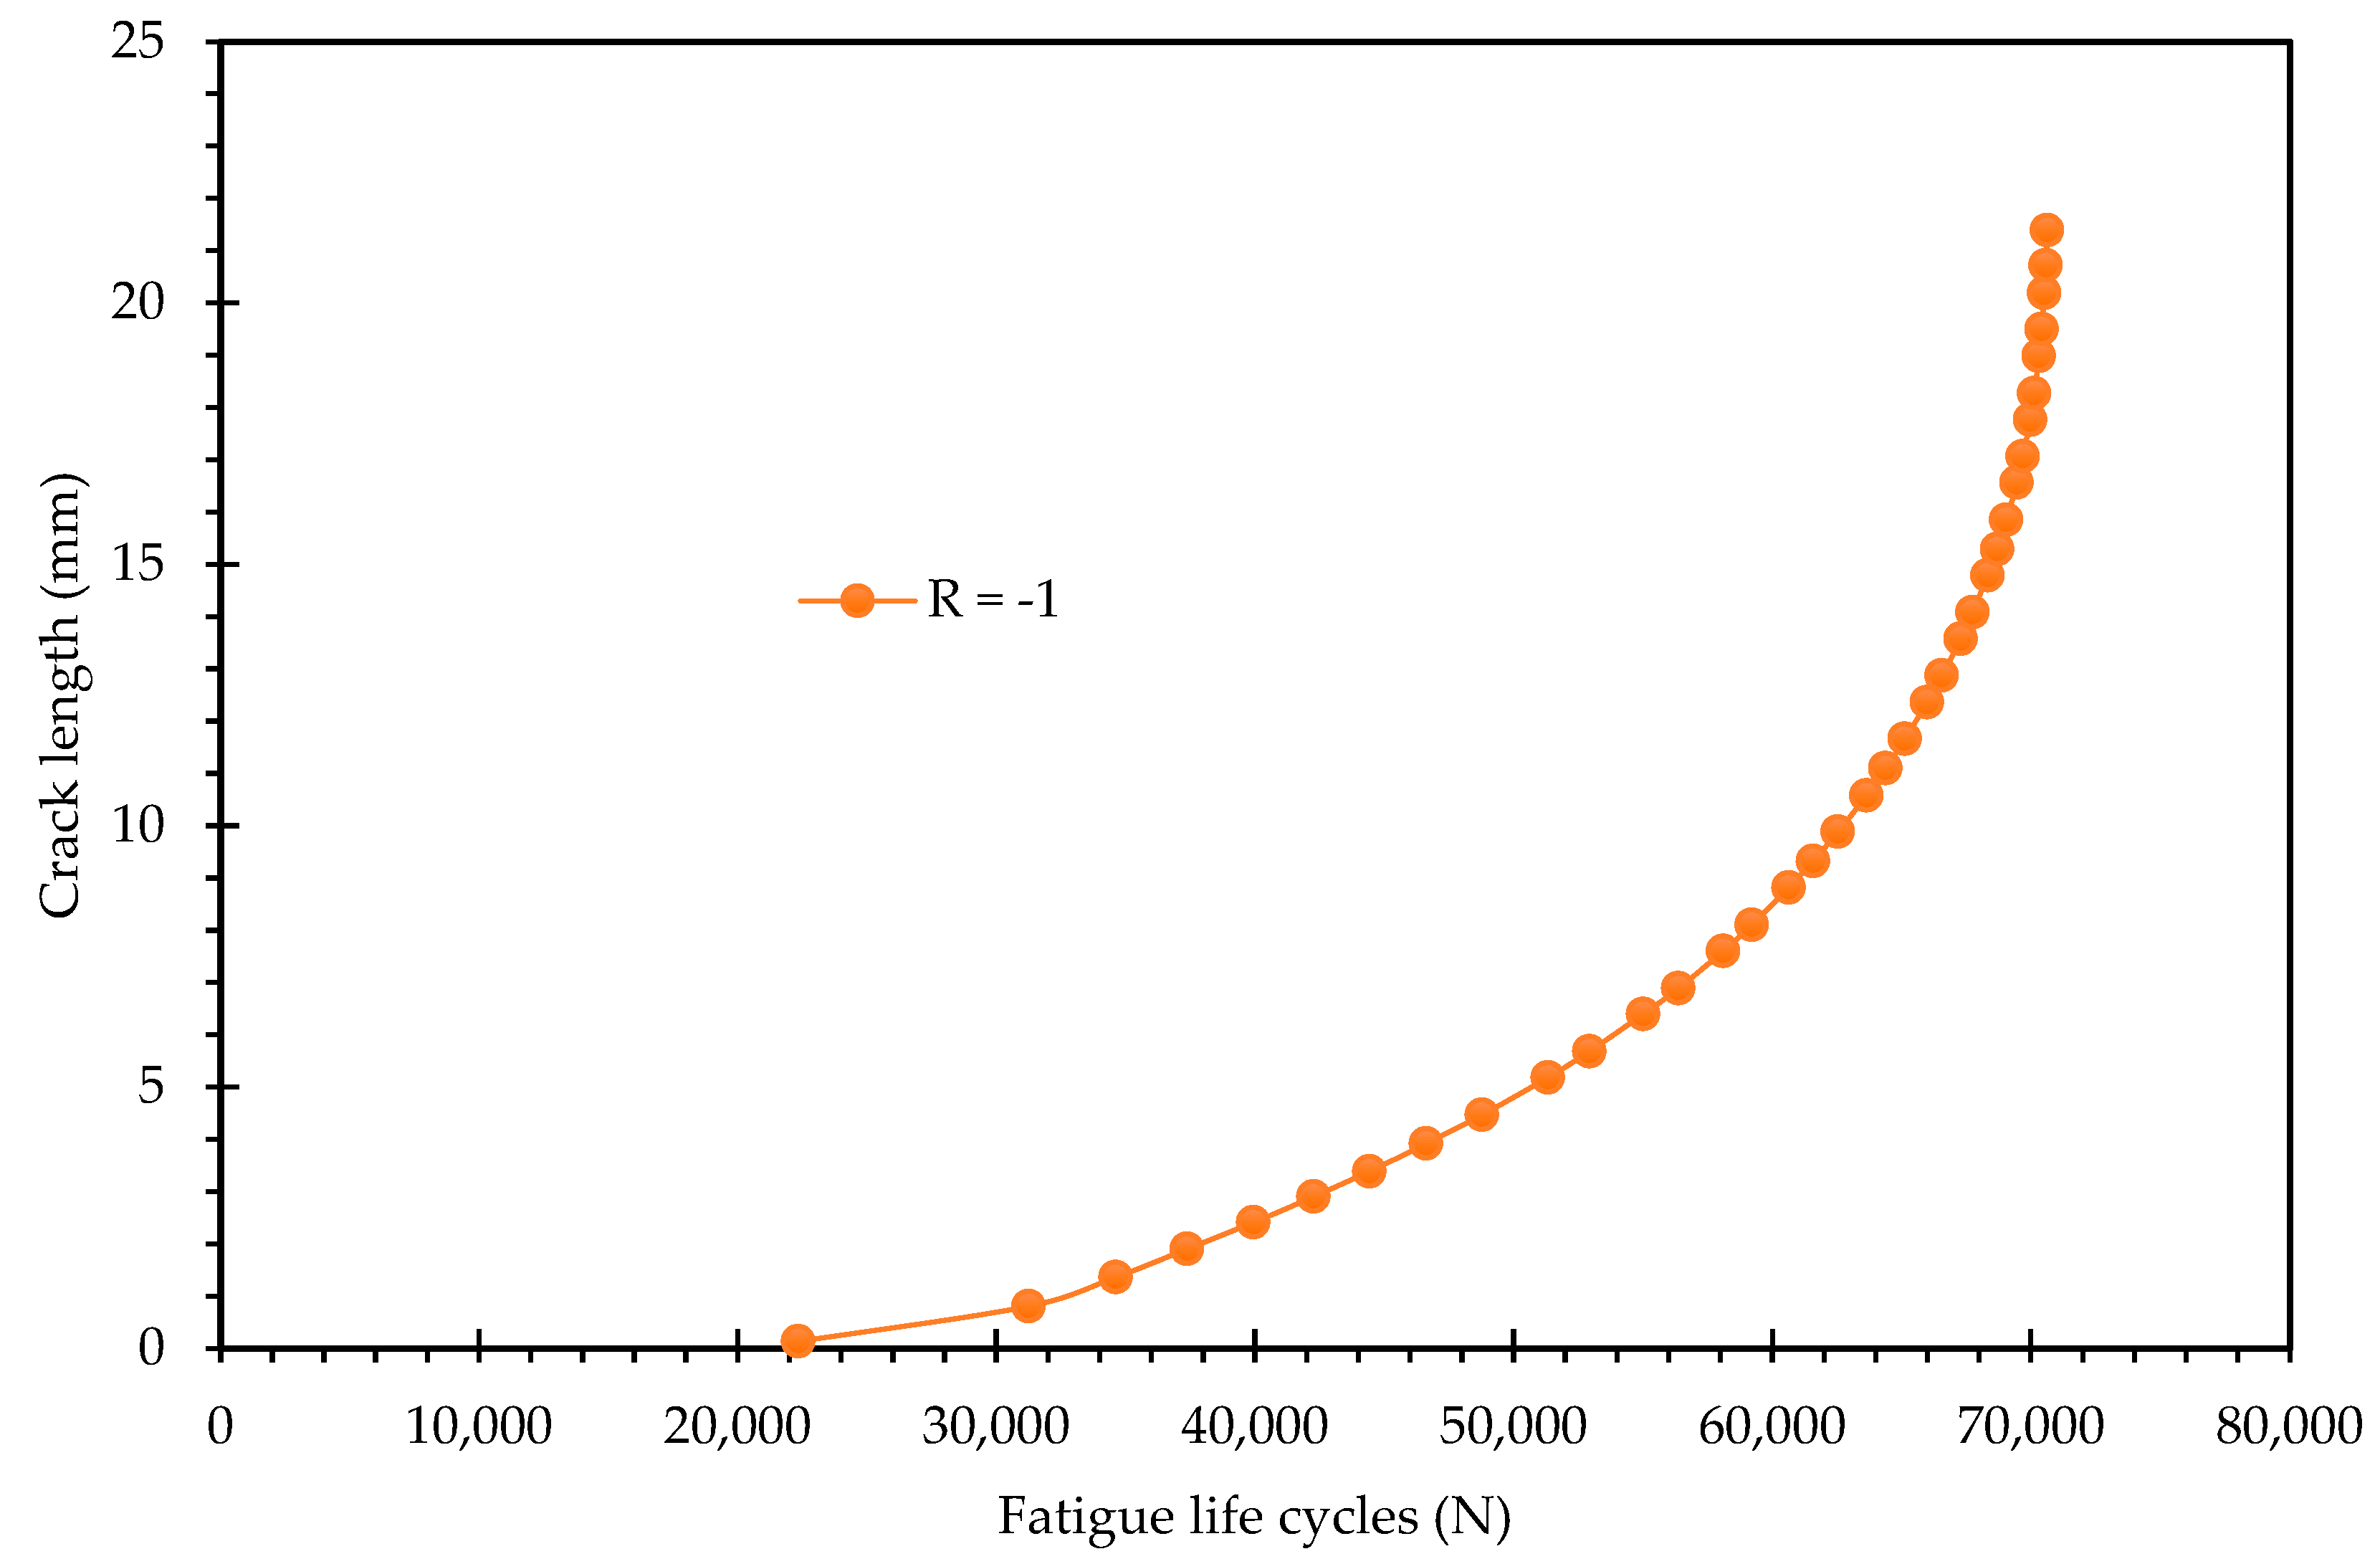
Figure 12,
Figure 13,
Figure 14 and
Figure 15 present the crack length versus fatigue life cycles curves for Specimen 2 and Specimen 3 under both tensile–tensile and fully reversed loading conditions. These figures are crucial for validating the robustness and repeatability of the key findings established with Specimen 1 (
Figure 8 and
Figure 9) and for quantifying the influence of specimen-to-specimen variations on the overall fatigue performance. The most dominant and consistent observation across all specimens is the profound difference in fatigue life dictated by the stress ratio. The tensile–tensile loading, shown in
Figure 12 and
Figure 14, results in an extended fatigue life, with Specimen 2 achieving approximately 1.69 × 10
6 cycles and Specimen 3 reaching approximately 2.26 × 10
6 cycles. In stark contrast, the fully reversed loading (R = −1), presented in
Figure 13 and
Figure 15, leads to a significantly accelerated failure, with total lives of approximately 52,800 cycles for Specimen 2 and 70,623 cycles for Specimen 3. This reduction in fatigue life by nearly two orders of magnitude confirms the central conclusion of the study: the fully reversed loading condition is substantially more damaging. This is directly attributable to the larger plastic zone and the violation of the SSY criteria under R = −1, which promotes plasticity-dominated, accelerated crack growth. While the trend is consistent, a notable specimen-to-specimen variation is evident, particularly when comparing Specimen 3 to the baseline Specimen 1 and the highly repeatable Specimen 2.
Specimen 2 demonstrates excellent repeatability with Specimen 1, validating the numerical methodology and the consistency of the material properties. However, Specimen 3 exhibits a significantly extended fatigue life, approximately 28% longer for R = 0.5 and 34% longer for R = −1 and a larger final crack length before final fracture. This discrepancy strongly suggests that the specific initial crack configuration of Specimen 3 (H = 23.2 mm) induced a unique interaction between the propagating crack and the specimen’s geometric features. The three additional holes in the modified CT specimen create a complex, non-uniform stress field. The curvilinear crack path originating from the H = 23.2 mm position appears to have navigated this stress field more favorably than the paths in the other two specimens. The specific trajectory of the crack in Specimen 3 may have experienced a more pronounced “crack shielding” effect from the compressive stress fields surrounding the nearby holes. This would effectively lower the stress intensity factor at the crack tip, retard the crack growth rate, and extend the fatigue life. The larger final crack length in Specimen 3 suggests a potentially larger initial ligament or a slightly thicker specimen, which would increase the resistance to final fracture.
In conclusion, the data from
Figure 12,
Figure 13,
Figure 14 and
Figure 15 collectively reinforces the critical and dominant role of the stress ratio in determining fatigue performance, while simultaneously providing a quantitative measure of the inherent scatter and specimen sensitivity in fatigue testing. The overall finding remains robust: the fully reversed loading drastically reduces fatigue life, a phenomenon directly linked to the increased plasticity and SSY violation observed in the plastic zone analysis for this condition. The observed scatter in Specimen 3 highlights the necessity of conducting multiple tests to ensure the reliability of fatigue life predictions. Although the ANSYS SMART framework is robust for simulating crack growth, it is important to clarify that its standard implementation does not incorporate the discrete contact and friction effects associated with crack closure under compressive loading.
