Article

Microstructure Effects on the Machinability of AM-Produced Superalloys

1
College of Science and Engineering, School of Engineering, University of Derby, Kedleston Rd., Derby DE22 1GB, UK
2
Department of Mechanical Engineering, University Carlos III of Madrid, 28911 Leganés, Spain
3
Laboratory of Microstructure Studies and Mechanics of Materials, UMR-CNRS 7239, Lorraine University, 57073 Metz, France
4
Faculty of Mechatronics, Armament and Aerospace, Military University of Technology, ul. Gen. S. Kaliskiego 2, 000908 Warsaw, Poland
*
Author to whom correspondence should be addressed.
Crystals 2023, 13(8), 1190; https://doi.org/10.3390/cryst13081190
Submission received: 7 July 2023 / Revised: 25 July 2023 / Accepted: 27 July 2023 / Published: 31 July 2023
(This article belongs to the Special Issue Deformation and Recrystallization Behaviour of Alloys)

Abstract

:
This paper discusses the microstructure effects on the machinability of Inconel 718 by conducting machining tests on an additively manufactured (AM) workpiece with a strongly textured grain structure and a wrought workpiece incorporating a finer and more equiaxed grain structure. The AM workpiece was produced as a thin tube using Laser Melting Powder Bed Fusion and optimal processing conditions for this alloy. A lathe was used to conduct instrumented orthogonal machining tests on the two workpiece materials under dry cut and coolant conditions using a semisynthetic emulsion coolant. The process parameters studied were feed from 0.05 to 0.15 mm/rev and cutting speed from 60 to 120 m/min with a cut time of 2 sec duration for each process condition. Measures for each process condition included cutting forces in the feed and main cut direction, and images of chip forms were obtained. The grain structures of the workpiece materials were characterized using Electron Back Scattered Diffraction (EBSD). New findings suggest that grain structures can significantly affect the machinability of the superalloy at a higher feed for all cutting speeds studied, and insights into the cause are discussed. Other important findings comment on the effectiveness of the coolant as a lubricant for reducing friction in machining.

1. Introduction

Machining of materials is often termed a subtractive process in which products can achieve the necessary final shape to the precision required by removing stock. Still today over 80% of goods are machine finished. Nickel (Ni)-based superalloys find use where a high temperature and corrosion resistance are required such as in gas turbines, heat exchangers and nuclear containers [1]. More than 50% of the component weight of a gas turbine engine is fabricated from Ni-based superalloys, and these alloys will continue to be used into the foreseeable future. Traditional manufacturing processes have used forgings and investment casting extensively to fabricate turbomachinery engine components. Additive manufacturing (AM) of engine components is slowly making advances into gas turbine engines [2,3]. AM-produced components may still require a machining finish to meet the requirements. Of the wide range of Ni-based superalloys, Inconel 718 finds frequent use [4].
Inconel 718 retains its high strength to more than 600 °C. Furthermore, because the alloy has low thermal conductivity, the cutting tool exhibits high rates of tool wear, and for this reason, it is referred to as hard to machine [5]. It is acknowledged that a lot of research has been conducted on Ni-based alloys, and Inconel 718 is not an exception. For example, notable earlier works include those published by Rahman et al. [6], and a thorough review by Ezugwu et al. [7]. Of the variables studied in [6] in turning Inconel 718 using a constant depth of cut of 2 mm, the side cutting edge angles, cutting speed and feed rates were all found to have a significant on the tool life of an insert. Of several important findings in the review of [7], the dominant tool failure mode for different cutting tool materials was identified as notching due to the work-hardened layer that develops in the workpiece, although flank wear and chipping/fracture were also identified as tool-life-limiting factors. Of the findings, the coolant was also determined to have an important role in reducing the overall temperature of the cutting area and fatigue induced by irregular contact of the hot chip on the cutting tool.
More recent works that focused on the machinability of AM-produced Inconel 718 are those of Kaynak and Tascioglu [8], and Wood et al. [9]. The former examined the finish turning of 16 mm diameter rods produced by Laser Powder Bed Fusion (L-PBF) on residual stress, surface roughness and subsurface hardness, and found an increased feed rate resulted in surface and subsurface work hardening. The latter work [7] studied the effect of porosity defects on the machinability of L-PBF Inconel 718 under a dry cut condition by measuring the orthogonal cutting forces in turning 60 mm diameter tubes at a constant feed of 0.1 mm/rev and a cutting speed range of 60 to 120 m/min. It was found that the cutting force decreased with increasing porosity, but the coefficient of friction increased and was attributed to a higher rate of BUE formation on the tool.
The effect of a very small surface grain size on the machinability of Inconel 718 in the range from 26 nm to 9.6 μm was studied for ultrahigh precision machining by Renjie et al. [10], and they found that the average cutting force increased with a reduced surface grain size. For larger size grains, the effect of grain refinement on the machinability of a Ni-based superalloy K4169, which is a castable grade with composition equivalent to Inconel 718, was studied [11,12]; the grain sizes obtained in cast samples were much larger with a range from 73 μm to 3.2 mm, and reducing the grain size was found to improve the machinability by reducing the milling forces by more than 50%.
The developed microstructure of L-PBF Inconel 718 alloy is uniquely associated with the processing conditions [13] due to the very high solidification rate of the melt pool and cooling of the order 105 to 106 K/s. For this alloy in the as-printed condition, the microstructure was highly textured with mechanical properties on the build axis markedly different from those in the build plane [14,15,16,17,18]. The preferred orientation of grains in the L-PBF of Inconel 718 was studied by Ni et al. [15], and using EBSD, the pole figures for the γ, γ′ and γ″ phases indicated a strong {100} fiber texture in the build direction. Moreover, the γ″ phase was distributed along grain boundaries, whilst the γ′ phase was more uniformly dispersed in the γ phase. Whilst age hardening heat treatments [19,20] and especially homogenisation [21,22] can reduce anisotropy, the alloy at a higher strength can be more difficult to machine.
This paper investigates the microstructure effects on the machinability of IN718 by conducting machining tests on an additively manufactured (AM) workpiece with a strongly textured grain structure and a wrought (WR) workpiece incorporating a finer more equiaxed grain structure due to the method of processing the material. A method frequently used to conduct machinability studies of alloys is orthogonal cutting, which uses a tube workpiece and a single edge of the cutting tool. The tool feed motion engages the workpiece on the length axis of the tube. The tool edge cuts across the full tube thickness normal to the long axis of the tube so the width of the chip is nominally equal to the tube thickness. The depth of cut in this arrangement is equal to the feed rate.

2. Materials and Methods

2.1. Workpiece Materials for Investigation

Three tube workpieces were printed in Inconel 718 with the same process parameters using a Renishaw AM250 Selective Laser Melting machine (Renishaw, Gloucestershire, United Kingdom) at the University of Derby in UK. The machine used a fibre laser with pulse modulation and spot size 70 µm. Scan velocity is determined by the point distance on the same line scan path divided by the time of exposure. The Inconel 718 powder material was supplied by Renishaw with particle diameter size between 15 and 45 µm, and chemical composition is displayed in Table 1.
Each tube with nominal dimensions measuring (mm) 60 outer diameter, 2 wall thickness and 55 height was printed on the same build plate with the major axis of each tube aligned to the vertical orientation (Z) as shown in Figure 1. The tube workpieces were built on support structures at a height of 6.5 mm from the surface of the build plate. The build plane (XY) is perpendicular to the vertical build axis Z. Meander scanning was used for the volume fill of each layer. With each layer, the volume was scanned first, followed by the internal and outer borders. The inner and outer borders were offset by the border distance and the laser scan paths. The laser spot scans each layer at an angle of 67° with respect to the previous one [24]. The process parameters used for the laser scanning are displayed in Table 2. Common process parameters that were used for the fill and border scan were the laser power set to 200 W, layer height at 30 μm, hatch spacing at 90 μm and beam compensation at 60 μm. These AM process parameters for this alloy have been shown to be the optimum combination that delivers minimal porosity and defects to maximise the integrity of 3D-printed thin-walled sections [13]. The build processing time was approximately 23 h. An argon purge pressure atmosphere in the build chamber maintained an oxygen content <1000 ppm (0.1%).
After completing the build process, the tubes were stress relieved whilst still attached to the build plate at 982 °C for 1 h under vacuum followed by a slow ramp cool 10 °C/min to 600 °C, then cooled to below 60 °C under argon gas. The AM tubes were neither subjected to Hot Isostatic Pressing HIP nor to strength hardening heat treatments. Inductively Coupled Plasma and Optical Emission Spectrometry (ICP-OES) was used to confirm the chemical composition of small pieces of a 1 cm square printed cube sample using the same process parameters to print the tubes. The results of the chemical analysis are displayed in Table 1 and confirm the specifications of the alloy are in accord with standards.
The wrought (WR) Inconel 718 tube was supplied by Technalloy, Spain, with certificate of conformance for Haynes (R) 718 Alloy Seamless Tube (Spec 5589) with batch code number 750712000. The chemical composition given in Table 1 confirms equivalence between the powder and the wrought stock for the main alloy elements. The tube was in the fully annealed condition to AMS 5663 with yield strength, tensile strength and elongation, respectively, 74,900 PSI (516 MPa), 128,000 PSI (883 Mpa) and 46.4%. The hardness was 98.5 HRB (~22 HRC). The grain size was ASTM 8, which is equivalent to a mean intercept grain spacing of 20 μm. The tube supplied had an outer diameter of 57 mm and wall thickness 5.5 mm. Using coolant at pressure 7.5 bar, the tube outside diameter was turned down to 50 mm to obtain 2 mm wall thickness over a length of 60 mm using cutting speed (Vc) = 45 m/min, feed (f) = 0.1 mm/rev and depth of cut = 0.5 mm.

2.2. Microstructure Analysis

A Zeiss Supra 40 equipped with an EBSD detector (Zeiss, Oberkochen, Germany) at the University of Lorraine was used to generate images of grain structures aligned to the Z-axis, which is direction of print displayed in Figure 1. The EBSD maps were created using ATEX Software [25] to determine the crystal orientation.

2.3. Microhardness Measurements

Vickers microhardness testing was carried out on the build plane XY using the Qness Q10 A+ Micro Hardness Tester ATM Qness GmbH, part of Verder Scientific, Maastricht, The Netherlands) at the Military University of Technology in Poland. The test was conducted at 10 positions equally spaced between indents around the circumference at approximately 1 mm spacing with a load of 5 kg (HV5) and loading time of 10 s for each single indentation. The results for the WR and AM material are shown in Table 3. The results were converted to the HRC scale to enable more universal comparison. The average hardness of the AM material was 279 HV5 (27.7 HRC). For the WR tube the average hardness was 288 HV5 (29.1 HRC). The microhardness of the AM material was lower by a margin. The coefficient of variation (CoV) obtained is the standard deviation (σ) divided by the arithmetic mean (m) and it is noted the CoV was significantly higher for the WR material. The microhardness measurement obtained for the WR tube was higher than indicated in the mill certificate (22 HRC) that used a standard industrial method of hardness testing. Nonetheless, the hardness of both materials was significantly below 42 HRC suggesting the alloy was in a condition suitable for finishing processes such as machining.

2.4. Porosity Measurements

Porosity measurements on the build plane were performed using a Keyence VHX6000 digital light microscope (Keyence International, Osaka, Japan) using a low magnification lens at ×500. The measured porosity in the AM tube did not exceed 0.04%, which is consistent with other findings [13], whilst in the WR tube, porosity was not detected at this magnification level.

2.5. Mechanical Properties of the AM Material

The AM material was mechanically tested using the tensile test method, and the method and results are described in [13]. Summarizing the results of [13], for the AM tube, a quasi-static engineering stress versus strain curve obtained for a horizontal (XY) and vertical (ZY) test piece at room temperature is displayed in Figure 2. The average quasi-static tensile properties obtained in XYave and ZYave from 4 test pieces in each direction are displayed in Table 4. The XYave displays significantly higher yield strength at 728 MPa than ZYave at 641 MPa, but lower tensile ductility at 21.6% than ZY at 39.4% as reported in [13]. The directional properties of this material in the as-built condition have been widely reported [13,14,15,16,17,18,19,20], and these results are in accord with the powder supplier’s technical specification for the Inconel 718 alloy in the as-built condition with stress relief and 30 μm layering [23].
As stated in [13], XY is orientated to the circumferential and radial axes of the tube, whilst ZY is along the Z-axis.

2.6. Experimental Plan for Machining

A lathe was used to conduct instrumented orthogonal machining tests on the two workpiece materials under dry cut and coolant conditions. The main cutting speed (Vc) was varied in the range 60 to 120 m/min, feed/rev (f) between 0.05 and 0.15 mm/rev, whilst width of cut was constant and equal to the nominal tube thickness of 2 mm. The depth of cut in orthogonal machining of tubes is the feed. The Vc was calibrated to the tube outer diameter, which was 60 mm for the AM material and 50 mm for the WR material. Coolant and dry cutting experiments were performed using the same process parameters. Cutting forces in the tangential and feed direction were measured for a 2 s cut time using a new tool tip for each test. The experimental plan for the machining process parameters is given in Table 5. The machining was conducted at the University Carlos III in Spain on one prepared tube sample, and it was estimated up to 35 mm of tube length was needed to complete the experiments on each material.

2.7. Machine and Tool Set-Up for Experiments

Orthogonal turning tests were performed using a Pinacho SmartTurn 6/165 lathe (Pinacho, Huesca, Spain). The cutting and feed forces were measured at 1000 Hz simultaneously using a multi-component Kistler dynamometer type 9257B (Kistler, Winterthur, Switzerland). The recording instrument was an 8-channel amplifier Kistler 5070 and data acquisition card Ni USB 6361.
A SECO TS200 carbide tool tip incorporating a TiAl/TiAlN coating (SECO tools, Fagersta, Sweden) was used for light cut machining. The carbide tip geometry has an 80° included tip angle, 0.4 mm nose radius, 16° rake angle, 7° relief angle and a cutting edge tip radius of 25 µm between the rake face and flank of 25 mm. In earlier studies, it was demonstrated [26,27] that the tool life in the conditions to be studied for the Inconel 718 alloy was 30 min. To minimize tool wear, the duration of each test cut was 2 s, after which a new tip edge was used for the next test. The coolant was a water miscible, semisynthetic micro-fine emulsion Cimcool CimVantage 48FF [28], diluted to 7% concentration and delivered through tool at 1.2 L/min at 7.5 bar pump pressure. At the end of each test, the tool was inspected to ensure there was no sign of wear or damage. The tube workpiece was secured in a 3-jaw chuck with stick out length of 60 mm. Initially, the workpiece was lightly skimmed on the face to remove the skin and clean the face for orthogonal turning.

2.8. Chip Samples Images

Chip samples were collected from the machining trials for each material and machining condition. Images of the chip for selected machining conditions were captured using an optical microscope at ×150, with extended depth of focus set to fine. The width of chip samples for the WR and AM materials using coolant were measured; respectively, the means were (mm) 2.078 and 2.031 and standard deviations (σ) 0.067 and 0.056. This way, it was confirmed that the WR material work piece was fractionally thicker than the AM tube but with the absolute difference <2.5%.

3. Results and Discussion

3.1. Analysis of Cutting and Feed Forces

The mean values of the main cutting (Ft) and feed (Ff) forces obtained in the stable region for each test cut of 2 s were obtained from the experimental results. In Figure 3a, the effect of feed rate (f) on Ft for the WR material suggests a linear relationship over the f range studied. For Ft, the WR and AM results suggest no statistical difference between the use of coolant and dry cutting. At the highest f = 0.15 mm/rev, Ft for the WR and AM materials diverge with the latter displaying a much lower Ft. It is noted at f = 0.15 mm/rev that there is a slight dependence of cutting speed (Vc) on Ft, which reduces as Vc increases for both materials. Figure 3b shows the effect of f on Ff, and the trend is also linear when fitted to the WR material results, both with and without coolant, although overall variability is higher than observed for Ft. When f = 0.15 mm/rev, there is a slight reduction in Ff for the AM material compared to WR, but not as significant as observed for Ft. We are confident that the fractionally higher tube thickness of the WR material, determined by the average chip width, did not cause significant bias to the results obtained in Figure 3a,b. Otherwise, it would be necessary to normalise Ft and Ff by dividing by the respective average chip width.
From the measured cutting force results, the edge forces were determined by the intercept on the ordinate in accord with Altintas [29]. The measured force in the cutting direction (Ft) is the sum of the cutting force (Ftc) and the flank edge friction force (Fte) and
Ft = Ftc + Fte
where Fte is the linear intercept on the ordinate determined from Figure 3a by linear regression as follows:
Ft = ktc·f + Fte
where ktc is the linear gradient and f is the feed/rev, and when f = 0, Ft = Fte. Using Equation (1), for the WR material, ktc = 4739 and Fte = 146 N.
The measured feed force is the sum of the feed (Ffc) and normal flank edge force (Ffe).
Ff = Ffc + Ffe
where Ffe is the linear intercept on the ordinate determined from Figure 3b by linear regression as follows:
Ff = kfc·f + Ffe
where kfc is the linear gradient and f is the feed/rev, and when f = 0, Ff = Ffe. Using Equation (2), for the WR material, kfc = 1155 and Ffe = 212 N.
The difference between the intercept Fte obtained for the WR material with and without coolant was found to be small, <4%, although it was slightly higher for Ffe.
The derived flank friction coefficient for the WR material µflank = Fte/Ffe = 0.69. For convenience, µflank is assumed to be the same for both materials with and without coolant, being justified by the overlapping Ft and Ff results shown in Figure 3a,b at f = 0.05 and 0.1 mm/rev. As f reduces to 0.05 mm/rev, Ftc is 237 N and Fte is 146 N. The significance of Fte is that it contributes proportionally more to Ft, and when f increases, the converse. As f reduces, it causes more ploughing and rubbing and inefficient cutting. Furthermore, because the cutting edge of the tool is not perfectly sharp, at f = 0.05 mm/rev, it is close to the small cutting edge tip radius of 25 µm. As flank wear advances, it is expected that Fte and Ffe will steadily increase.
Although the cut time was 2 s, an observation in Figure 3 is the that lubricating function of the coolant was less significant in reducing friction, but that the coolant may perform an important function of cooling the tool over a longer cut duration.

3.2. Coefficient of Friction between Chip and Tool

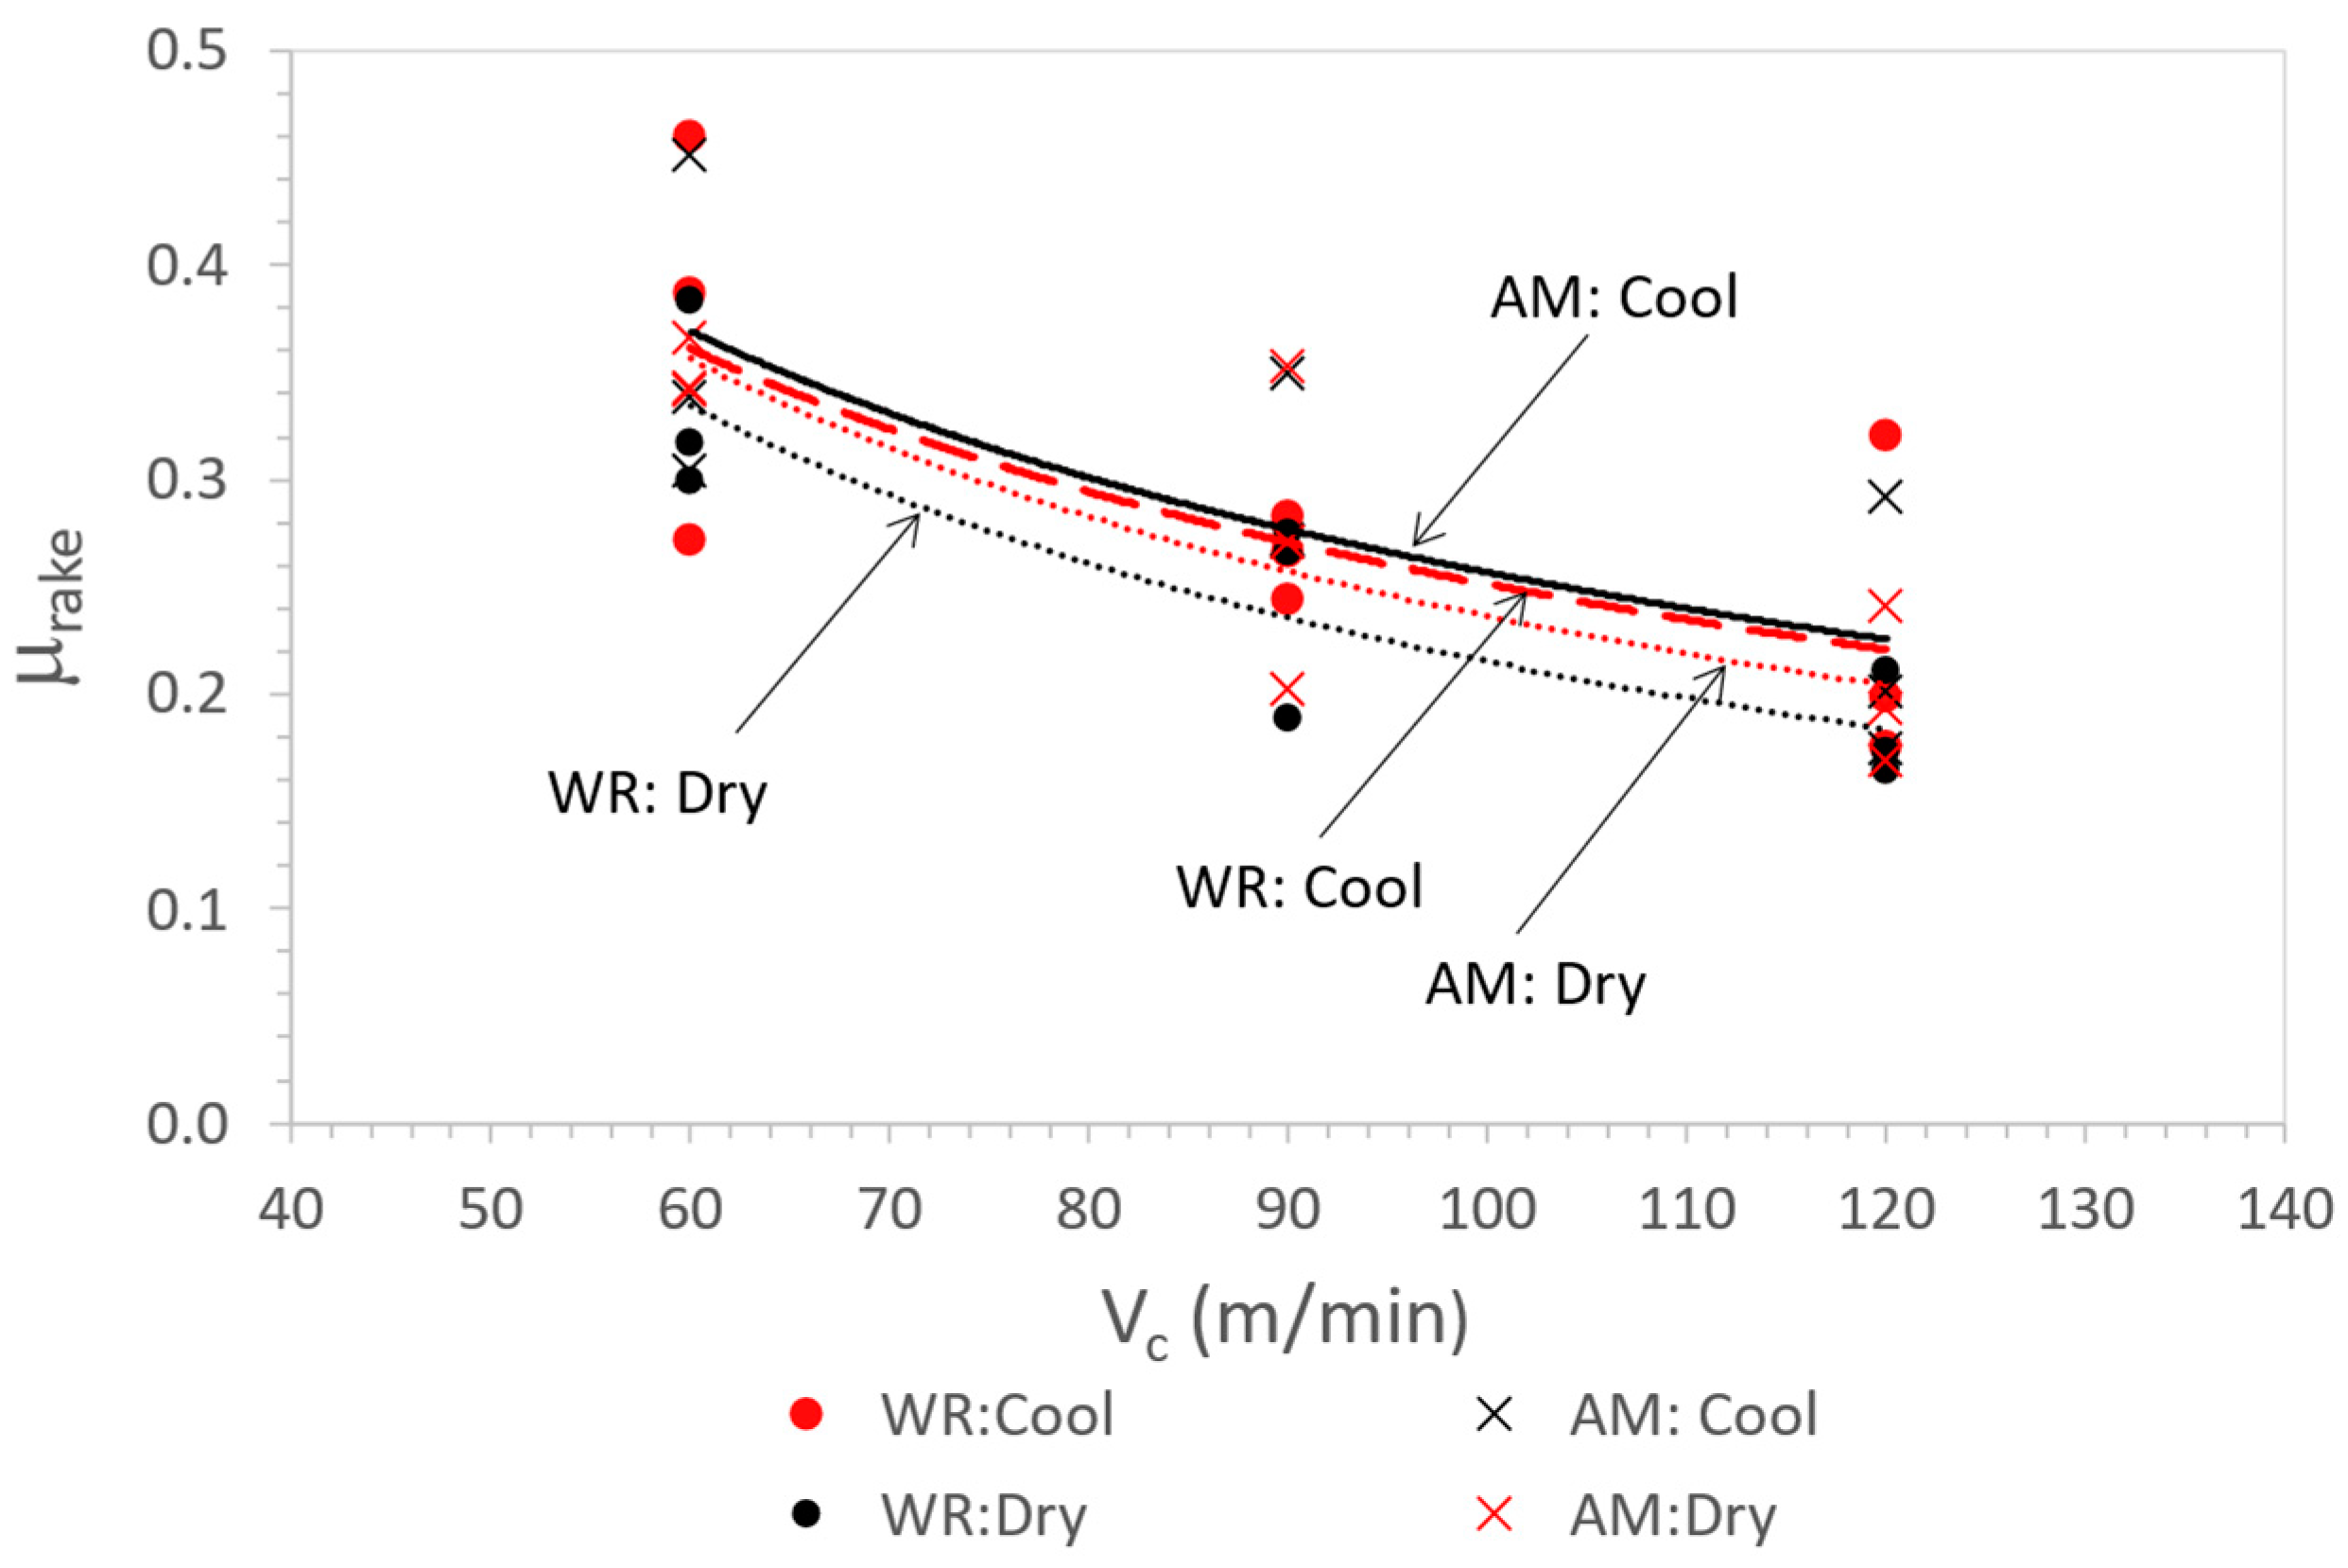
Subtracting Fte and Ffe, respectively, from Ft and Ff, an approximation of the friction at the rake face (µrake) between the chip and the tool can be obtained by dividing Ffc by Ftc. Figure 4 displays the effect of Vc on µrake. A similar trend and values for the friction coefficient was observed by Grzesik and Rech [30] who studied the effect of sliding velocity on the friction coefficient for numerous combinations of metals and alloys over a wide sliding speed range.
Because Fte and Ffe were subtracted from Ft and Ff, it is expected that the µrake results in Figure 4 have low dependency on f, and this was confirmed by plotting a graph replacing Vc with f on the abscissa. In Figure 4, a simple decaying power law fitted over the Vc range for the two materials with and without coolant was chosen for convenience with µrake = k1(Vc)n. The fitting constants for the four curves are shown in Table 6. It is observed that µrake reduces rapidly from 60 to 90 m/min and then starts to stabilise quickly from 90 m/min. Despite the variability, Figure 4 suggests there is no difference between the WR and AM materials using coolant. This is confirmed by the k and n values displayed in Table 6 for WR: Cool (k = 6.60; n = 0.71) and AM: Cool (k = 6.81: n = 0.71). It is to be noted that n is a negative value in the equation for µrake. The µrake for WR and AM materials without coolant, respectively, WR: Dry (k = 11.5; n = 0.86) and AM: Dry (k = 9.52; n = 0.80), gave slightly lower values with WR the lowest. The slightly lower µrake obtained without coolant can be explained by the higher temperature generated by friction contact. The coolant reduces the temperature of the chip and the workpiece material. It has been shown [31] that as temperature increases, friction can decrease, even for a relatively narrow range of temperatures. For the two materials and using coolant, there is confidence that friction behaviour is not the cause of the lower Ft obtained for the AM material at 0.15 mm/rev shown in Figure 3a.

3.3. Analysis of Chip Morphology

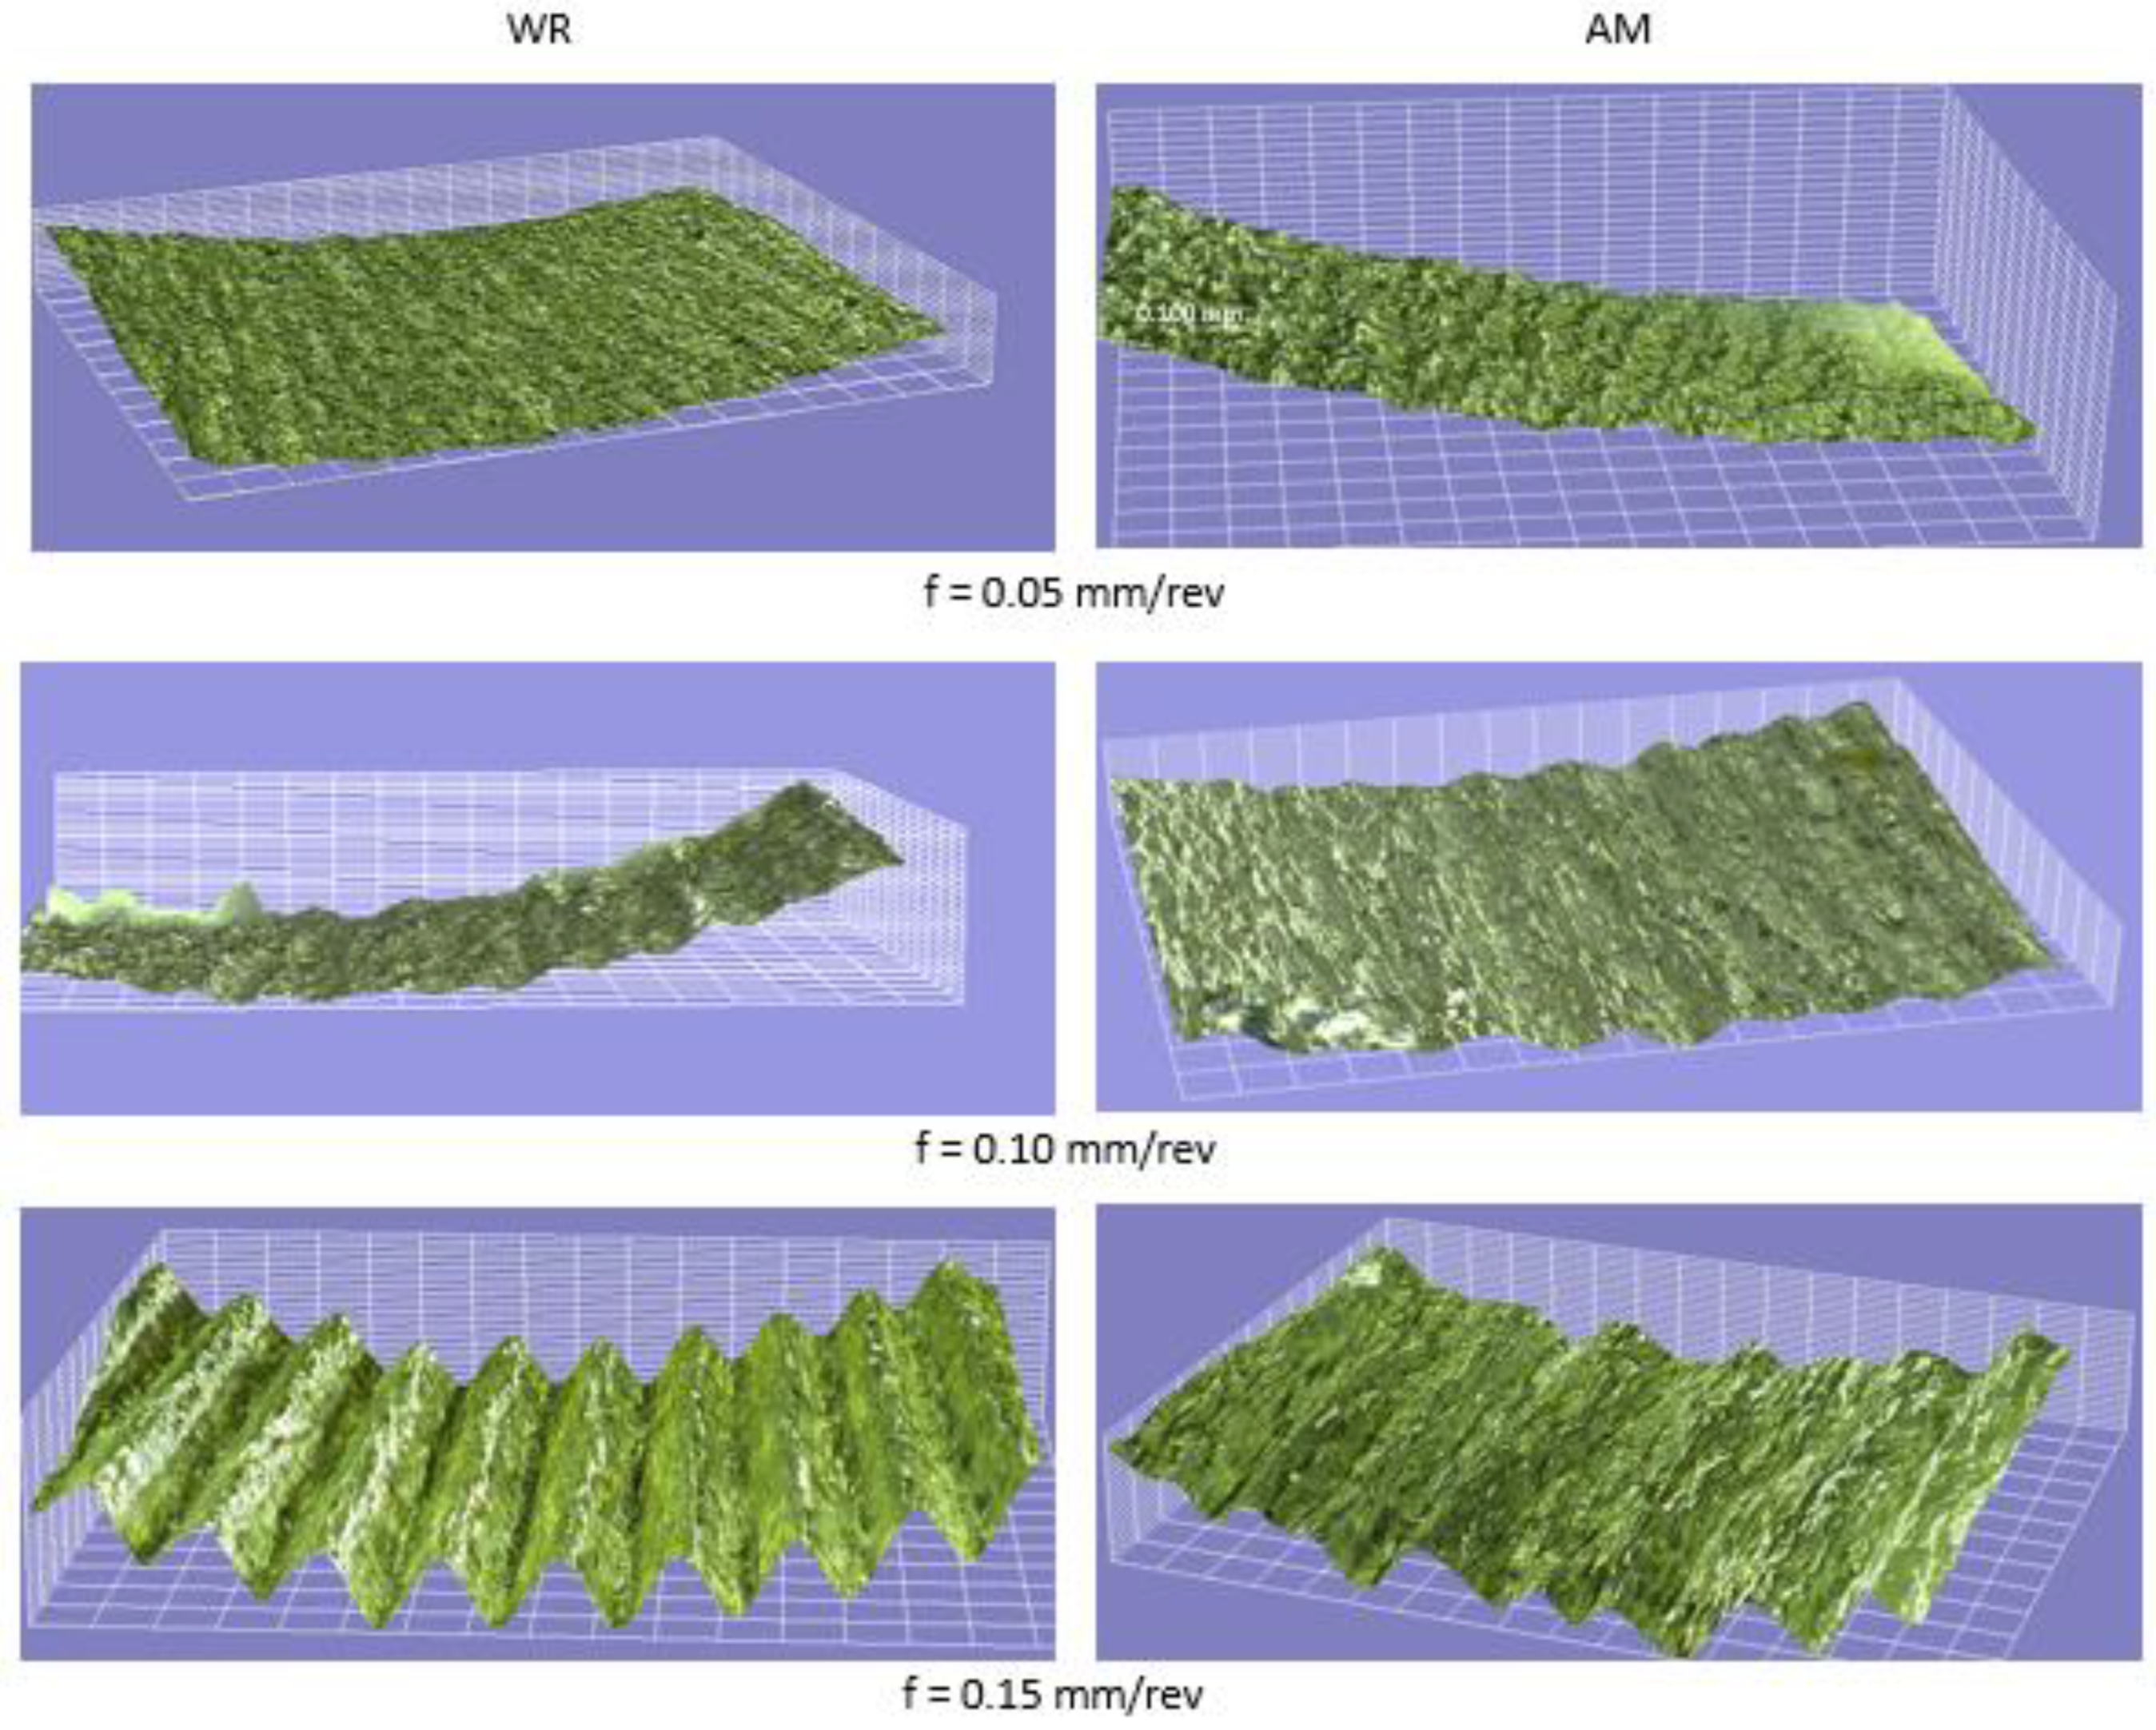
For continuous chips, the chip compression ratio [29] together with the rake angle has been used to reasonably predict the shear plane angle. However, Inconel 718 can readily develop serrated chip forms [5], also called segmented chips, and the evidence indicates [32,33,34,35] they develop from a thermal softening instability in hard to machine alloys, termed adiabatic shear band. For Inconel 718, Kaynak [5] found serrated chip forms became more pronounced under cryogenic cooling conditions in a turning 32 mm Inconel 718 bar in the age-hardened condition with f = 0.075 mm/rev and Vc = 60 m/min. As such, the shear plane angle could be a more useful indicator of the efficiency of the cutting process when serrated chips develop. The characteristics of the chip form can display high variability depending on the edge condition of the chip even after mounting and polishing. In this paper, an optical microscope was used to obtain a digital image of the surface topology of serrated chips at a resolution appropriate for comparing their characteristics over the f and Vc range studied. Figure 5 displays the surfaces for the WR and AM materials machined with coolant with different f at a constant Vc of 60 m/min. It is observed that the amplitude of the wave form increases with f for both materials.
In orthogonal cutting, the angle of the shear plane [29] is measured between the main cutting direction of the tool on the workpiece and the plane of shear that develops to cut the chip from the workpiece. Based on the findings of Rahman [36] in machining a Ti-6Al-4V alloy, a relationship exists between the shear plane angle and the tilted angle of the serrated chip form. In Figure 5, the wave form features of the serrated chips are most prominent at the higher f = 0.15 mm/rev and display the highest amplitude, whilst at the lowest f = 0.05 mm/rev, their amplitude and wavelength can just be discerned. Based on these images, the shear plane angle appears larger at lower f for both the WR and AM materials. In other works [37], the shear plane angle was found to increase at lower f under both dry and cryogenic conditions when machining Ti-6Al-4V. At Vc = 60 m/min in Figure 4, µrake is significantly higher, and this might influence the developed chip form by compressing the serrations and reducing periodicity. Furthermore, the flank edge rubbing forces in the tertiary deformation zone at low f may increase the shear plane temperature at the tool tip where a fracture starts, and this could influence the developed chip form; when f = 0.05 mm/rev, it approached the size of the small tip edge radius ~25 µm between the rake face and flank of the tool.
At a constant f = 0.15 mm/rev and increasing Vc from 60 to 120 m/min, Figure 6 displays images of the surface character of the WR and AM materials. The amplitude of the serrations at this f was higher for all Vc and similar in both materials; at Vc = 60 m/min, it was ~68 µm reducing linearly to ~35 µm at Vc = 120 m/min for both materials with measurement error < 20%. The wavelength was roughly constant with an average ~149 µm obtained with a similar measurement error. Using trigonometry, the shear plane angle was calculated to be 48° and 65°, respectively, for Vc = 60 and 120 m/min. In other works [38], the shear angle of serrated chips in a hardened Fe-9.7%Ni-0.1%C alloy was shown to increase with Vc, but on attaining a microstructural softening point, it started to decrease with a further increase in Vc. In Figure 3a, a reduction in Ft is observed at the highest f = 0.15 mm/rev for the WR and AM materials as Vc increased from 60 to 120 m/min, and this observation is consistent with an increase in the shear plane angle at a higher Vc observed for both materials.
It is important to note that as the chip is cut from the work piece, it will slide along the rake face of the tool. The resulting chip curl will develop on two axes to cause a normal curl and side curl. The latter is due to the slight difference between the surface speeds between the outer and inner diameter. Both a normal and side curl would cause distortion to the angle of the serrations. Therefore, only the relative value of the shear plane angle obtained from the chip can be compared. The chip forms studied, however, did not explain the significant reduction in Ft obtained for the AM material at the highest feed at all three cutting speeds studied. Etching the microstructure of the chips to study the shear band under the microscope may reveal different characteristics that could help explain the lower Ft obtained for the AM material at f = 0.15 mm/rev.

3.4. Microstructures of the IN718 Materials

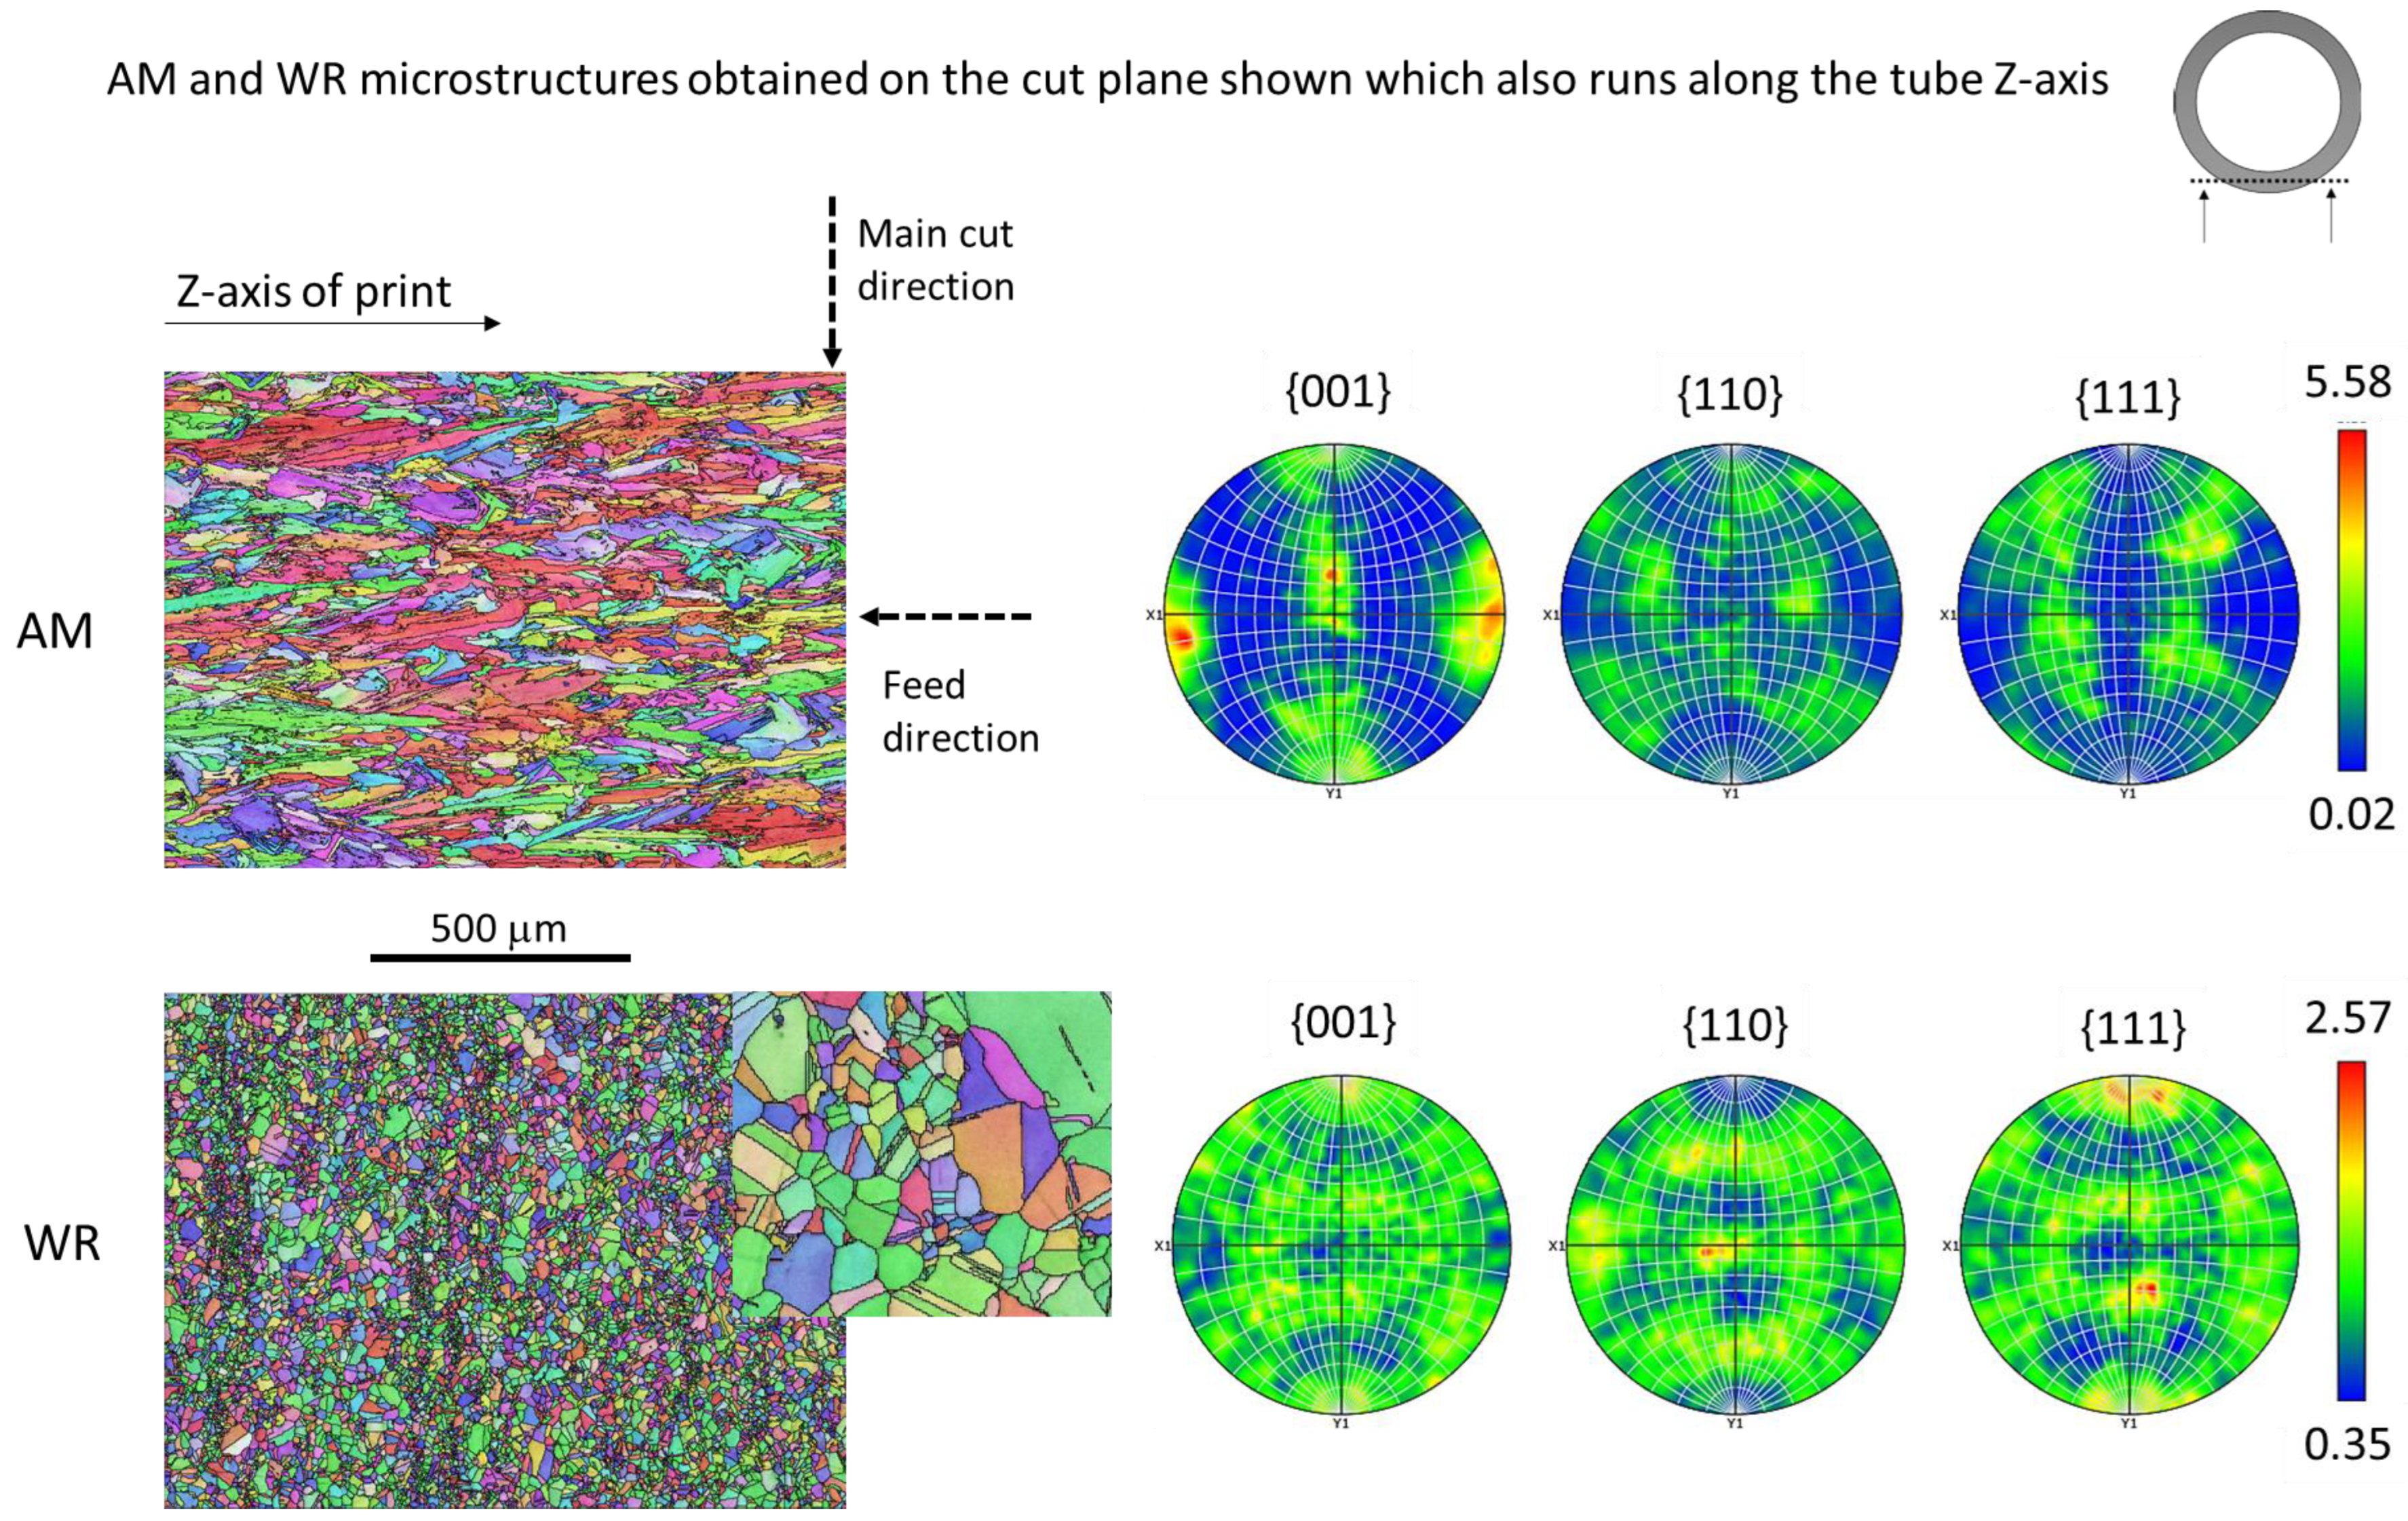
Although the AM material had fractionally lower microhardness, this difference does not explain the significantly lower cutting forces obtained for the AM material at f = 0.15 mm/rev over the Vc range examined. Neither did μrake derived from the measured Ft and Ff and the analysis of chip forms characterised using surface topology explain the cause of the reduction in machining forces for the AM material. Figure 7 shows the cut plane that was used to slice the tube to determine the microstructures of the WR and AM materials and their crystallographic orientation with respect to the machining tests. The cut plane shown on top of the tube extends into the tube height, which is the vertical build axis (Z). The unique microstructure of the AM material develops from epitaxial grain growth during solidification of the melt pool, and thereafter, rapid cooling in the order of 105 to 106 K/s [13].
In the WR material, grains are equiaxed with a medium grain size of 12.9 µm, a right skew distribution and a maximum grain size of 55.7 µm. Many grains were subdivided into twins as shown in the enlarged view. The pole figures for the WR material suggest a weak texture in the 001, 110 and 111 planes shown (max = 2.57; min = 0.35). It is also observed that bands of fine grain structures are visible in the WR material amongst larger neighbouring grains. This feature could be attributed to a more rapid recrystallization of grain structures during annealing that were in a more severely cold worked state from producing the tube, leading to different rates of grain growth in the population.
In the AM microstructure, some of the columnar grains exceed 500 µm on the Z-axis, and the 001-plane pole figure displays a strong crystallographic texture (max = 5.58; min = 0.02) but a weaker texture in the other planes. Due to this microstructure, the mechanical properties have directional dependency, and this is shown in Figure 2. Orthogonal cutting of the AM tube is transverse to the long columnar grains that are in the build plane. For the WR material, the medium and maximum grain sizes were significantly below the f = 0.15 mm/rev, suggesting that Ft increases with smaller grain structures, especially when the grain size is significantly below the depth of cut. The depth of cut in the orthogonal machining of tubes is the feed. We associate higher cutting forces with reduced machinability because many machining studies of superalloys have shown a correlation between cutting forces and tool wear.
In cutting transverse to the long columnar grains of the AM material with fewer grain boundaries, the shearing and crack propagation process is therefore mainly intergranular, whilst for much smaller equiaxed grain structures, it could increasingly become trans-granular. The work of Renjie et al. [10] found an increase in the number of grain boundaries at the nanometer scale in Inconel 718 caused higher cutting forces, which is consistent with the findings in this paper. However, for larger grain structures, the converse was observed [10,12]. From a mechanistic perspective, the shear plane angle of the chip is the plane where intense shear takes place, and from the analysis of the serrated chip forms, it increased with f and Vc for both materials. The softest slip system in FCC materials is {111}<110>, and the slip caused by intense shear takes place mostly along the shear plane. As the angle of the shear plane increased, it tilted more to the Z-axis, and in this axis, the strength of the AM material was shown to be lower than in the XY plane, see Figure 2.
The image of the elongated grain structures of the AM material shown in Figure 8 is along the build axis (Z), which is the same orientation shown in Figure 6, but normal to the tube thickness as shown by the cut plane. The grain structure is typically symmetric around the mid-tube thickness. On the left is the tube outer diameter, and on the right, the inner diameter. It is observed that three zones of different grain structures are present at the outer and inner diameter. The grain structure at zone C is associated with the inner volume fill scan, zone B the inner border scan and zone A the outer border scan. These microstructure features were observed recently [39] in 1 mm wide Inconel 718 AM-fabricated struts. The nano hardness measurements obtained were sensitive to the position of these zones with different grain structures. In zone C, the average nano hardness was 4.2 GPa, whilst in zone B it was 3.9 GPa and with higher variability. In future machining studies of AM material, the effect of the border should be considered. For example, it may be better to print material samples with and without a border scan to establish this effect on machinability and, if needed, to design the AM process for machine finishing.
It is noted that although the microhardness of the WR material was only fractionally higher than the AM material with both results obtained in the build plane, the variability observed for the WR material, however, was 4.7 times higher than the AM material, with HRC max to min (range) = 9 and the AM material HRC range = 1.9. With a typical indent size of 180 µm, this can span several grains and grain boundaries in the WR material compared to the AM material, and we note that nano hardness was sensitive to different grain structures [39].

4. Conclusions

The range of process parameters used in the instrumented orthogonal cutting tests on the WR and AM material, enabled decomposition and the quantification of friction at the flank and rake face of the tool for the dry cut and coolant conditions. An average value of μflank was determined at 0.69 for both materials, whilst μrake displayed a dependency on Vc, significantly reducing from 60 to 90 m/min with and without coolant, and thereafter stabilising for both materials. Using coolant, no significant difference in μrake was observed for the two materials. Overall, the findings suggest that the lubricating function of the semisynthetic emulsion coolant diluted at 7% had only a relatively small effect on reducing friction over the cut duration studied. However, the coolant may serve an important role over a longer cut duration.
As Vc increased from 60 to 120 m/min, a reduction in Ft at the highest f = 0.15 mm/rev was observed for both the WR and AM materials, and this correlated with an increase in the tilted angle of the serrated chip form that was shown [36] to correlate with the shear plane angle. In this paper, a higher Ft was associated with reduced machinability. At higher f = 0.15 mm/rev and for all Vc, the AM material displayed a significantly lower Ft than the WR material.
It was found that smaller grain structures were shown to increase Ft when the grain size was significantly below the depth of cut. In cutting transverse to the long columnar grains of the AM material with fewer grain boundaries, the shearing and crack propagation process is mainly intergranular, whilst for much smaller equiaxed grain structures, it can increasingly become trans-granular. From a mechanistic perspective, as the angle of the shear plane increased, it tilted more to the Z-axis, and in this axis, the strength of the AM material was shown to be lower than in the XY plane.
Presently, it is unclear as to the effect the microstructure from border scanning has on machinability. In future machining studies of AM material, the effect of the border should be considered. For example, it may be better to fabricate material samples with and without a border scan to establish this effect on machinability and, if needed, to design the AM process for machine finishing.
From a practitioner’s perspective, to establish a process window for machine finishing the AM-produced Inconel 718 material, further work is needed, for example, tool wear studies and a workpiece surface integrity analysis for a reduced set of process parameters. Nonetheless, f = 0.15 mm/rev is a good starting point for this task.

Author Contributions

Conceptualization, P.W., A.R., M.H.M. and J.D.-Á.; methodology, J.D.-Á., A.D.-Á., S.B., J.S. and U.G.; validation, J.D.-Á., S.B., P.P. and P.W.; formal analysis, P.W., Y.L., J.D.-Á. and A.D.-Á.; investigation, J.D.-Á., A.D.-Á., S.B., J.S. and U.G.; resources, P.W., A.R., M.H.M., P.P. and J.D.-Á.; data curation, P.W. and J.D.-Á. writing—original draft preparation, P.W.; writing—review and editing, J.D.-Á., U.G., Y.L., A.R. and M.H.M.; visualization, P.W. and P.P.; supervision, P.W., A.R. and M.H.M.; project administration, P.W., A.R. and M.H.M. All authors have read and agreed to the published version of the manuscript.

Funding

Authors gratefully acknowledge the financial support through the grant PID2020-112628RA-I00 and PID2020-118480RB-C22 both funded by MCIN/AEI/10.13039/501100011033.

Data Availability Statement

The data that support the findings of this study are available from the corresponding author, J.D.-Á., upon reasonable request.

Acknowledgments

We thank the Universidad Carlos III de Madrid and the University of Derby’s College of Science and Engineering for funding the development of this paper. We thank Wayne Carter for his work on imaging the chip forms at UoD and Gavin Williams also at UoD for designing and printing the AM material samples used in this paper.

Conflicts of Interest

The authors declare no conflict of interest.

Abbreviations

AMAdditive manufacturing
WRWrought tube
DryCoolant not applied
CoolCoolant applied
L-PBFLaser Melting Powder Bed Fusion
EBSDElectron Back Scattered Diffraction
VcCutting speed
fFeed rate (Feed/rev)
FtMeasured main cutting force (N)
FfMeasured feed force (N)
FtcCutting force (N)
FteFlank edge friction force (N)
FfcFeed force (N)
FfeNormal flank edge force (N)
ktcGradient of Ftc with respect to f obtained by linear regression
kfcGradient of Ffc with respect to f obtained by linear regression
µrakeFriction between tool rake face and chip
µflankFriction between tool flank and workpiece
kFitting constants in power law equation
nExponent in power law equation
aveAverage or mean
σStandard deviation
CoVσ/mean

References

  1. Ezugwu, E.O. Key improvements in the machining of difficult-to-cut aerospace superalloys. Int. J. Mach. Tools Manuf. 2005, 45, 1353–1367. [Google Scholar] [CrossRef]
  2. Siemens Additive Manufacturing: Siemens Uses Innovative Technology to Produce Gas Turbines. Available online: https://press.siemens.com/global/en/feature/additive-manufacturing-siemens-uses-innovative-technology-produce-gas-turbines (accessed on 23 June 2023).
  3. GENERAL ELECTRIC. Aviation and Aerospace Industry. GE Addit 2023. Available online: https://www.ge.com/additive/additive-manufacturing/industries/aviation-aerospace (accessed on 23 June 2023).
  4. Ezugwu, E.O.; Bonney, J.; Yamane, Y. An overview of the machinability of aeroengine alloys. J. Mater. Process. Technol. 2003, 134, 233–253. [Google Scholar] [CrossRef]
  5. Kaynak, Y. Evaluation of machining performance in cryogenic machining of Inconel 718 and comparison with dry and MQL machining. Int. J. Adv. Manuf. Technol. 2014, 72, 919–933. [Google Scholar] [CrossRef]
  6. Rahman, M.; Seah, W.K.H.; Teo, T.T. The machinability of inconel 718. J. Mater. Process. Technol. 1997, 63, 199–204. [Google Scholar] [CrossRef]
  7. Ezugwu, E.O.; Wang, Z.M.; Machado, A.R. The machinability of nickel-based alloys: A review. J. Mater. Process. Technol. 1999, 86, 1–16. [Google Scholar]
  8. Kaynak, Y.; Tascioglu, E. Finish machining-induced surface roughness, microhardness and XRD analysis of selective laser melted Inconel 718 alloy. Procedia CIRP 2018, 71, 500–504. [Google Scholar] [CrossRef]
  9. Wood, P.; Díaz-álvarez, A.; Díaz-Álvarez, J.; Miguélez, M.H.; Rusinek, A.; Gunputh, U.F.; Williams, G.; Bahi, S.; Sienkiewicz, J.; Płatek, P. Machinability of INCONEL718 alloy with a porous microstructure produced by laser melting powder bed fusion at higher energy densities. Materials 2020, 13, 5730. [Google Scholar] [CrossRef]
  10. Renjie, J.I.; Zheng, Q.; Yonghong, L.I.U.; Hui, J.I.N.; Zhang, F.; Shenggui, L.I.U.; Baokun, W.A.N.G.; Shuaichen, L.U.; Baoping, C.A.I.; Xiaopeng, L.I. Effect of grain refinement on cutting force of difficult-to-cut metals in ultra-precision machining. Chin. J. Aeronaut. 2022, 35, 484–493. [Google Scholar]
  11. Hou, J.Z.; Zhao, Z.L.; Yan, G.M. Effect of grain refinement on machining performance of superalloy K4169. Met. Funct. Mater. 2007, 14, 11–14. [Google Scholar]
  12. Yang, F.H.; Zhao, Z.L.; Yan, G.M. Comparative study on machining properties of superalloy K4169 with different grain sizes. Mech. Des. Manuf. 2007, 201, 102–104. [Google Scholar]
  13. Wood, P.; Rusinek, A.; Platek, P.; Janiszewski, J.; Sienkiewicz, J.; Gunputh, U.F.; Rajkowski, K.; Miguélez, M.H. High strain rate effect on tensile ductility and fracture of AM fabricated Inconel 718 with voided microstructures. Mater. Des. 2021, 208, 109908. [Google Scholar] [CrossRef]
  14. Wang, Z.; Guan, K.; Gao, M.; Li, X.; Chen, X.; Zeng, X. The microstructure and mechanical properties of deposited-IN718 by selective laser melting. J. Alloys Compd. 2012, 513, 518–523. [Google Scholar] [CrossRef]
  15. Ni, M.; Chen, C.; Wang, X.; Wang, P.; Li, R.; Zhang, X.; Zhou, K. Anisotropic tensile behavior of in situ precipitation strengthened Inconel 718 fabricated by additive manufacturing. Mater. Sci. Eng. A 2017, 701, 344–351. [Google Scholar] [CrossRef]
  16. Trosch, T.; Strößner, J.; Völkl, R.; Glatzel, U. Microstructure and mechanical properties of selective laser melted Inconel 718 compared to forging and casting. Mater. Lett. 2016, 164, 428–431. [Google Scholar]
  17. Choi, J.P.; Shin, G.H.; Yang, S.; Yang, D.Y.; Lee, J.S.; Brochu, M.; Yu, J.H. Densification and microstructural investigation of Inconel 718 parts fabricated by selective laser melting. Powder Technol. 2017, 310, 60–66. [Google Scholar] [CrossRef]
  18. Sangid, M.D.; Book, T.A.; Naragani, D.; Rotella, J.; Ravi, P.; Finch, A.; Kenesei, P.; Park, J.S.; Sharma, H.; Almer, J.; et al. Role of heat treatment and build orientation in the microstructure sensitive deformation characteristics of IN718 produced via SLM additive manufacturing. Addit. Manuf. 2018, 22, 479–496. [Google Scholar]
  19. Zhang, D.; Niu, W.; Cao, X.; Liu, Z. Effect of standard heat treatment on the microstructure and mechanical properties of selective laser melting manufactured Inconel 718 superalloy. Mater. Sci. Eng. A 2015, 644, 32–40. [Google Scholar] [CrossRef]
  20. Deng, D.; Peng, R.L.; Brodin, H.; Moverare, J. Microstructure and mechanical properties of Inconel 718 produced by selective laser melting: Sample orientation dependence and effects of post heat treatments. Mater. Sci. Eng. A 2018, 713, 294–306. [Google Scholar]
  21. Mostafa, A.; Rubio, I.P.; Brailovski, V.; Jahazi, M.; Medraj, M. Structure, texture and phases in 3D printed IN718 alloy subjected to homogenization and HIP treatments. Metals 2017, 7, 196. [Google Scholar] [CrossRef] [Green Version]
  22. Fayed, E.M.; Saadati, M.; Shahriari, D.; Brailovski, V.; Jahazi, M.; Medraj, M. Effect of homogenization and solution treatments time on the elevated-temperature mechanical behavior of Inconel 718 fabricated by laser powder bed fusion. Sci. Rep. 2021, 11, 2020. [Google Scholar] [CrossRef]
  23. Renishaw. Data Sheet—In718-0405 Powder for Additive Manufacturing (AM250) 2017. Available online: https://www.renishaw.com/resourcecentre/en/details/Data-sheet-In718-0405-powder-for-additive-manufacturing--94192?lang=English (accessed on 3 January 2023).
  24. Pitassi, D.; Savoia, E.; Fontanari, V.; Molinari, A.; Luchin, V.; Zappini, G.; Benedetti, M. Finite Element Thermal Analysis of Metal Parts Additively Manufactured via Selective Laser Melting. Finite Elem. Method—Simul. Numer. Anal. Solut. Tech. 2018, 113, 114. [Google Scholar]
  25. Beausir, B.; Fundenberger, J.-J. Analysis Tools for Electron and X-ray DIFFRACTION, ATEX—Software; Université de Lorraine: Metz, Frence, 2017. [Google Scholar]
  26. Díaz-Álvarez, J.; Díaz-Álvarez, A.; Miguélez, H.; Cantero, J. Finishing Turning of Ni Superalloy Haynes 282. Metals 2018, 8, 843. [Google Scholar]
  27. Díaz-Álvarez, A.; Díaz-Álvarez, J.; Cantero, J.L.; Miguélez, H. Sustainable high-speed finishing turning of haynes 282 using carbide tools in dry conditions. Metals 2019, 9, 989. [Google Scholar] [CrossRef] [Green Version]
  28. Venten. Cimvantage. CIMVANTAGE 31-48—POOLSÜNTEETILISE EMULSIOONI KONTSENTRAAT, 200L. Available online: https://www.venten.ee/cimvantage-31-48-poolsunteetilise-emulsiooni-kontsentraat-200l-13973.html (accessed on 2 July 2023).
  29. Altintas, Y. Manufacturing Automation: Metal Cutting Mechanics, Machine Tool Vibrations, and CNC Design, 2nd ed.; Cambridge University Press: Cambridge, UK, 2012; ISBN 9781107001480. [Google Scholar]
  30. Grzesik, W.; Rech, J. Influence of machining conditions on friction in metal cutting process—A review. Mechanik 2019, 92, 242–248. [Google Scholar] [CrossRef] [Green Version]
  31. Pearson, S.R.; Shipway, P.H.; Abere, J.O.; Hewitt, R.A.A. The effect of temperature on wear and friction of a high strength steel in fretting. Wear 2013, 303, 622–631. [Google Scholar] [CrossRef]
  32. Recht, R.F. Catastrophic Thermoplastic Shear. J. Appl. Mech. 1964, 31, 189–193. [Google Scholar] [CrossRef]
  33. Mills, B.; Redford, A.H. The Assessment of Machinability BT—Machinability of Engineering Materials; Mills, B., Redford, A.H., Eds.; Springer: Dordrecht, The Netherlands, 1983; pp. 33–58. ISBN 978-94-009-6631-4. [Google Scholar]
  34. Miguélez, M.H.; Soldani, X.; Molinari, A. Analysis of adiabatic shear banding in orthogonal cutting of Ti alloy. Int. J. Mech. Sci. 2013, 75, 212–222. [Google Scholar]
  35. Molinari, A.; Soldani, X.; Miguélez, M.H. Adiabatic shear banding and scaling laws in chip formation with application to cutting of Ti-6Al-4V. J. Mech. Phys. Solids 2013, 61, 2331–2359. [Google Scholar] [CrossRef]
  36. Rahman, M.F. Stress and Strain Distributions during Machining of Ti-6Al-4V at Ambient and Cryogenic Temperatures. Master’s Thesis, University of Windsor, Windsor, ON, Canada, 2014. [Google Scholar]
  37. Bermingham, M.J.; Kirsch, J.; Sun, S.; Palanisamy, S.; Dargusch, M.S. New observations on tool life, cutting forces and chip morphology in cryogenic machining Ti-6Al-4V. Int. J. Mach. Tools Manuf. 2011, 51, 500–511. [Google Scholar]
  38. Subramanian, S.V.; Gekonde, H.O.; Zhu, G.; Zhang, X. Role of Microstructural Softening Events in Metal Cutting. Mach. Sci. Technol. 2002, 6, 353–364. [Google Scholar]
  39. Delcuse-Robert, L. Processing Effects on the Structure and Behavior of Nickel Based alloys Produced by Additive Manufacturing. Ph.D Thesis, Universite de Lorraine, Lorraine, Frence, 2021. [Google Scholar]
Figure 1. Additive manufacturing (AM) of tube workpieces on 250 × 250 mm build plate.
Crystals 13 01190 g001
Figure 2. Engineering stress versus strain curves of AM Inconel 718 alloy fabricated in XY and ZY [13].
Crystals 13 01190 g002
Figure 3. Effect of f on Ft (a) and Ff (b).
Crystals 13 01190 g003
Figure 4. Effect of Vc on µrake for WR and AM materials.
Crystals 13 01190 g004
Figure 5. Effect of f on chip forms with Vc = 60 m/min for WR and AM materials using coolant. (optical microscope at ×150 magnification).
Crystals 13 01190 g005
Figure 6. Effect of Vc on chip forms at constant f = 0.15 mm/rev for WR and AM materials using coolant (optical microscope at ×150 magnification).
Crystals 13 01190 g006
Figure 7. Grain structures and textures of the AM and WR materials.
Crystals 13 01190 g007
Figure 8. Grain structure of the AM material normal to the tube thickness.
Crystals 13 01190 g008
Table 1. Composition of the IN718 powder and small printed cube (in percent weight).
Element (m%)AlCCoCrCuFeMnMoNiSSiTi
Ex0.530.0530.4018.30.0518.60.243.0452.3<0.0020.091.10
AM0.470.0530.0918.40.0118.00.013.0853.7<0.0030.030.95
Renishaw powder (0405) [23]0.2
to 0.8
0.02 to 0.05<1.017.0 to 21.0<0.3Balance<0.352.8 to 3.350.0
to
55.0
<0.015<0.350.65 to
1.15
Table 2. AM processing parameters used to fabricate the tube workpieces.
UnitsFill HatchOuter BorderInner Border
Laser powerW200200200
Exposure timeµs705070
Point distanceµm702070
Scan speedmm/s10004001000
Energy densityJ/mm374.118574.1
Table 3. Microhardness results for the two materials.
Wrought Material (WR)Additive Material (AM)
HRCHVHRCHV
Maximum33.031728.8285
Minimum24.025626.9274
Standard deviation (σ)3.319.70.674.01
Arithmetic mean (m)29.128827.7279
Coefficient of Variation (CoV)0.110.070.020.01
Table 4. Average static tensile properties and sample standard deviation of AM Inconel 718 alloy obtained from 4 tests in each direction.
Yield Strength (0.2%) (MPa)Tensile Strength (MPa)Elongation at Fracture (%)
XYave738103221.6
XYσ199.42.2
ZYave64194839.4
ZYσ20191.2
Table 5. Experimental plan of machining process parameters.
f
(mm/rev)
Vc (m/min)
6090120
Dry0.05111
0.1111
0.15111
Cool0.05111
0.1111
0.15111
Table 6. Coefficients in equation for rake face friction (µrake) in speed range 60 to 120 m/min.
WR:DryAM:DryWR:CoolAM:Cool
k11.59.526.606.81
n0.860.800.710.71
Disclaimer/Publisher’s Note: The statements, opinions and data contained in all publications are solely those of the individual author(s) and contributor(s) and not of MDPI and/or the editor(s). MDPI and/or the editor(s) disclaim responsibility for any injury to people or property resulting from any ideas, methods, instructions or products referred to in the content.