Abstract
One of the key aspects in additive manufacturing of stainless steels is the relationship between process parameters and the resulting microstructure. The selected process parameters typically cause a rapid solidification of the material, which leads to a microstructure that is highly textured both morphologically and crystallographically. While the morphological texture is characterised by a mainly columnar shape of the grains, the crystallographic texture is marked by a preferred grain orientation in the <001> direction (fibre texture). Due to the texture effects, pronounced anisotropic mechanical properties are present in the material. In this report, a series of virtual microstructures with different morphological and crystallographic features are generated to develop a fundamental understanding of the individual texture effects on the mechanical properties. The grain morphology is based on Voronoi tessellations, and the crystallographic texture is captured with crystal plasticity. Furthermore, the numerical predictions are compared with experimental studies. The mechanical properties predicted on the basis of the virtual microstructures show that the crystallographic effect is much more dominant than the morphology of the individual grains. Consistent with the experiments, the highest load-bearing capacity of the material occurs when the macroscopic loading acts under an angle of 45 to the preferred orientation of the crystals.
1. Introduction
Stainless steels are one of the first and most popular metallic materials used in additive manufacturing within the laser powder-bed fusion technology [1,2,3,4,5,6,7]. This is due to the fact that stainless steels have an excellent processability and a good resistance in a highly corrosive environment. The additively manufactured stainless steel AISI 316L (or 1.4404) is an important representative of this steel group [8]. Its chemical composition is shown in Table 1. While the alloying elements Cr and Mo are added to establish the corrosion resistance, Ni and Mn are responsible for the purely austenitic microstructure, if they are in the solid solution. Up to a temperature of 750 C, the homogeneous microstructure remains stable.

Table 1.
Chemical composition of the austenitic stainless steel AISI 316L/1.4404 in wt.-%, balance Fe.
Conventionally and additively manufactured stainless steels can considerably differ in their microstructure. Probably the most significant difference lies in the grain morphology (shape of the grains). The layer-by-layer build technology in additive manufacturing can lead to a unidirectional anisotropic microstructure, which is formed by elongated and fine columnar grains aligned in the build direction [9,10,11,12,13,14]. In contrast, the grains of conventionally manufactured austenitic stainless steels are usually equiaxed and coarser. Figure 1 shows the electron backscatter diffraction (EBSD) image of such a morphological textured microstructure in its as-built state. It can be clearly seen that most of the grains are elongated in the build direction (z-direction). After localised melting, the majority of these grains rapidly solidify in the build direction because the maximum temperature gradient prevails here. In some regions, however, columnar grains are found that are slightly offset from the build direction. In addition, some regions of mixed columnar and equiaxed grains are present in the microstructure [15]. It is well-known that microstructural features have a significant influence on the mechanical properties of materials. The grain morphology, for example, can have a considerable impact on the hardening behaviour [16]. For conventionally produced stainless steels (non-age-hardenable), alloying by interstitially dissolved nitrogen, work hardening and grain refining are the only means to increase the rather low yield strength of the material [17].
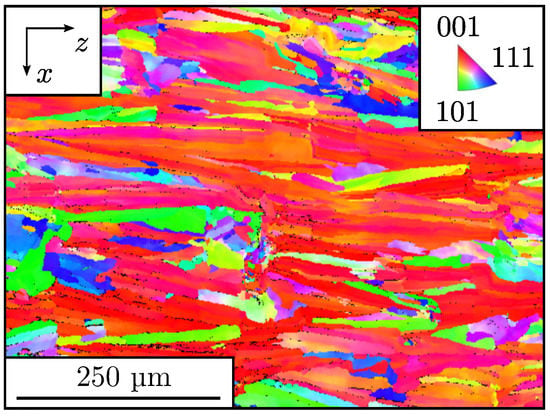
Figure 1.
EBSD inverse pole figure mapping showing the morphologically and crystallographically highly textured stainless steel microstructure processed by laser powder-bed fusion. The grains are elongated in the build direction (z-direction) and exhibit a preferred orientation in the <001> direction.
In general, stainless steels processed by additive manufacturing have a higher strength, especially superior yield strength, without loss of ductility and fracture toughness [18,19,20]. Furthermore, some works report that the ratio between yield strength and tensile strength (hardening ability) is significantly increased (roughly by a factor of two), which is relevant for lightweight material design [2,21]. However, the published reports also indicate that the experimentally obtained mechanical properties widely scatter.
One reason for the increase in strength might lie in the numerous solidification cells, which are a few micrometers in size and also extend in the direction of the elongated grains [3,22]. Another reason for the increase in yield strength is attributed to the fine-grained austenitic microstructure present. Following the Hall-Petch relation, the strength in polycrystalline materials increases with decreasing grain size as the number of grain boundaries and, thus, potential dislocation obstacles increase. In addition, Wang et al. [23] explain the increase in strength due to low-angle grain boundaries and dislocations arising during the additive manufacturing process. It should be mentioned that further improvement of the mechanical properties is conceivable, as the microstructure can be tailored by adjusting the process parameters, e.g., laser power or scanning speed, during the additive fabrication [24]. Materials, for example, produced in this manner with a gradient in the microstructure are referred to as functionally graded alloys [25].
Besides its morphological texture, the 316L microstructure also exhibits a pronounced crystallographic texture after additive manufacturing. The crystals often show a preferred orientation in the <001> direction, which is parallel to the build direction [14,26]. This situation is also illustrated in Figure 1 (coloured inverse pole figure map). In reference to fibrous materials, this specific orientation is referred to as a <001> fibre texture. Caused by the crystal growth in the direction of the positive temperature gradient, the crystallographic texture is considered to be an important source for the anisotropic mechanical properties [27]. The temperature gradient emerges from the movement of the heat source (laser) in the build environment. By deliberately altering the movement of the heat source (scanning strategy), however, it is reported that a strong crystallographic texture can also be prevented [11]. This was successfully demonstrated by Sun et al. [28].
In the present report, special attention is paid to the modelling of various stainless steel microstructures. This allows to investigate the additive manufacturing induced texture effects on the mechanical properties most efficiently. Therefore, after introducing the experimental methodology, the first two parts of the report address an adequate constitutive description of the material and the geometric arrangement of the individual synthetic grains. The subsequent parts discuss the results of the virtual and experimental material testing in detail.
2. Experimental Material Testing
To complement the virtual material testing, experimental tensile test studies of the laser powder-bed fused stainless steel 316L are adopted from Hitzler et al. [2]. Figure 2 shows the geometry and positioning of the flat tensile specimens utilised in the experimental studies. As known in the laser powder-bed fusion technology, the geometry is represented by individual scan tracks and layers, according to a specific irradiation strategy. A substrate plate provides the foundation for the layer-by-layer construction of the samples. To obtain their final shape, the tensile specimens are milled to the desired dimensions (DIN 50125—Type E ) in a finishing step. Full details of the selected fabrication parameters can be found in Reference [2] and are briefly summarised in Table A1. The selected parameters ensure the formation of the dendritic grain growth towards the heat source, as already indicated by the microstructure shown in Figure 1. It should be mentioned that the microstructure presented in Figure 1 belongs exactly to one of the tensile specimens tested in Reference [2].
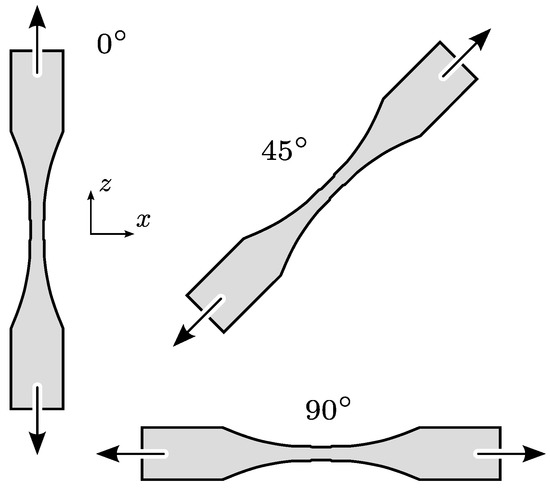
Figure 2.
Flat tensile specimens with different orientations to the build direction (z-direction). The exact orientations are specified by the angles 0, 45, and 90 in the x-z plane. Note that the designations for the 0 and 90 loading have been reversed compared to the experiment [2].
Quasistatic loading conditions are specified for the destructive tensile testing of the material. For each orientation (0, 45, and 90), six tensile specimens were tested to determine the averaged elastic and strength properties, e.g., Young’s modulus and yield strength. Both extensometer and strain gauges are set up at the tensile specimens to measure the material deformation. In this study, predominantly the results obtained via the extensometer are taken into account to measure the longitudinal and lateral deformation. Details of the complete tensile testing setup are also available in Reference [2]. A random occurrence of failure along the gauge length is observed across in all tested tensile specimens. This confirms the presence of a homogeneous microstructure. Therefore, the deviations of the results discussed later are attributed exclusively to the inherent directional dependencies of the material.
3. Constitutive Description of the Material
To fully capture the macroscopic plastic deformation of crystalline materials, such as the stainless steel 316L, it is necessary to consider the microscopic behaviour of the individual crystals (grains) under mechanical loading [29]. The mechanical behaviour of a single crystal or grain depends on its crystallographic orientation. Experiments show that plastic deformation occurs predominantly by glide of dislocations in crystallographic slip planes, which are planes of high atomic density [29]. An entire slip system is constituted if, in addition to the slip plane, the direction of the slip is known. Austenite with its face-centered cubic (fcc) lattice structure features a total of twelve slip systems. Hence, the macroscopically observable plastic deformation occurs through superposition of shear stress in active slip systems [30]. Slip systems are active for which the shear stress exceeds a critical shear stress (local yield stress). Consequently, phenomena due to the crystallographic texture produced by additive manufacturing can be modelled by simply specifying the predominant orientation of the grains [31,32]. Among the available constitutive laws, the phenomenological crystal plastic approach currently offers the best possible compromise between accuracy and computational effort. For solving the mechanical boundary value problem, the commercial finite element software Abaqus is used in this work [33]. The crystal plasticity model is embedded through a user material subroutine [34,35,36]. For a more in-depth discussion on the implementation of the constitutive model, interested readers are referred to the work of Reference [32]. It should also be noted that the austenite grains in the model are firmly attached to each other, i.e., without further constitutive laws, such as cohesive interfaces between the grains [37].
3.1. Principles of Continuum Mechanics
To describe the mechanical behaviour, the crystal plasticity model is usually formulated in a continuum mechanical framework. This will be shortly recalled in parts in the following for the purposes of the present work [38,39,40]. The deformation gradient is used in continuum mechanics to fully describe the local deformation of a material point in a body and to calculate a stress response. The deformation gradient maps the line segment in infinitesimal neighbourhood to the material point from the reference configuration to in the current configuration of the material point . Since the deformation of a body can occur in different manners, a multiplicative decomposition of the deformation gradient is performed:
This not only reveals the components of the deformation gradient of the elastic and the plastic deformation but also the contribution of the eigenstrain . The latter can be caused, for example, as a result of temperature changes and contributes to the isotropic thermal expansion of the material. The individual components of the deformation gradient must be determined through an iterative scheme in such a way that they correspond to the prescribed total deformation. For further literature on this topic, the work of Reference [32] is recommended. The plastic component is derived from a constitutive law for plastic flow; see Equation (5). The plastic velocity gradient necessary for this is defined by:
where takes the role of the evolution of the plastic deformation gradient. On the basis of the known deformations, suitable stress and strain measures can now be formed. As an example, the elastic Green-Lagrange strain in the plastic configuration with the unity tensor is mentioned here:
3.2. Phenomenological Constitutive Law
A first step towards identifying the crystal plasticity material response is to define the stress state. The second Piola-Kirchhoff stress associated with the elastic Green-Lagrange strain, shown in Equation (3), is provided by the elasticity law. According to this, only the elastic strain component causes stress. Following Hooke’s generalised law, the stress is consequently calculated by:
where is the elastic stiffness of the material and contains the symmetry properties of the underlying crystal lattice. In the present cubic crystal lattice of the austenitic material, only three elastic constants (, and ) are required when making use of the symmetric properties [29]. The values of the elastic constants for the stainless steel 316L are provided by [23] and can be found in Table 2.

Table 2.
Constitutive parameters for the mechanical behaviour of the stainless steel 316L. The values for the elastic constants and the Hall-Petch constant are taken from Wang et al. [23].
In line with the classical concept of the mechanics of large deformations [38], as indicated in the previous section, a multiplicative decomposition of the total deformation gradient is used. The plastic velocity gradient , shown in Equation (2), is to be described by the plasticity law as a function of the applied stress, and it is introduced as the sum of the shear rate over all twelve slip systems of the underlying fcc lattice structure:
where and denote the slip direction and the slip plane normal of a slip system i, respectively. The main trigger for the shear rate is the effective shear stress, which is determined by Schmid’s shear stress law as follows:
As the elastic deformation is usually small in metallic materials relative to the entire deformation, the contribution due to the elastic deformation gradient can be neglected. Slip is first activated in those slip systems that have the largest Schmid factor or, in the present case, Schmid tensor . The Schmid factor becomes maximal (0.5) when both slip direction and slip plane normal include an angle of 45 with the macroscopic loading direction [41]. In summary, the applied external stress is, thus, transferred to the individual slip systems, in form of the effective shear stress. The shear rate for a given slip system evolves according to the widely used phenomenological power law formulation of Kalidindi, Hutchinson, and Peirce et al. [42,43,44]:
This relationship comprises the critical shear stress and the stress exponent n. The latter ensures a strain rate-dependent behaviour of the material. The values of the stress exponent for cold forming of high-alloy steels are in the range of [45]. Hence, a common value of 20 is assumed for the austenitic stainless steel leading to a relatively weak rate-dependent behaviour. The evolution of the critical shear stress is calculated using the following relation:
where is called the hardening matrix and is constructed from:
The hardening matrix captures the micromechanical interaction of the different slip systems i and j, where the matrix provides for self-hardening and latent hardening behaviour. The latent hardening takes place between the individual slip systems. In contrast, the hardening of a slip system by slip in the same slip plane is called self-hardening [30]. The entries of the matrix have the value 1.0 for the coplanar slip systems i and j (self-hardening). In all other cases, a value of 1.4 is assumed (latent hardening) making the hardening model anisotropic [46]. While the latent hardening is physically motivated by cutting of dislocations, the weaker self-hardening is driven by the interaction between dislocations in parallel slip planes. In addition, , a, and are hardening parameters that are assumed to be identical for all slip systems in the fcc lattice structure. The parameter specifically ensures that the critical shear stress is limited to a saturation value and determines the maximum possible hardening in the material. The saturation is physically caused by the fact that the increasing dislocation density associated with further deformation also leads to mutual annihilation of dislocations [30].
The grain size dependence is captured in the present model using the aforementioned Hall-Petch relation [47,48]. Hence, changes in grain size can be accounted for by scaling the critical shear stress by the following dependence:
where is the respective shear stress at a very large grain size d and (Hall-Petch constant) can be understood as the efficiency measure of the grain boundaries as dislocation obstacle [49]. Larger values of correspond to a stronger increase in strength due to grain refinement. For austenitic steels, the value of is typically in the order of 8 ; see Table 2 [23]. To further approximate the considered virtual microstructure to the actual stainless steel microstructure, the equivalent grain diameter (diameter of a sphere with the same volume) of each synthetic grain can be scaled by a measured mean grain size diameter [35]. As a result, the mean values of the virtual and the actual grain size distributions coincide. Together with the different orientations of the individual grains, the extent of plastic deformation differs in the grains.
The remaining parameters of the constitutive model are reconciled with the result of experimental tensile tests using the virtual microstructure set up as presented in the next section. The stress-strain behaviour is extracted from the aforementioned experimental work of Hitzler et al. [2]. Since it is difficult to determine a unique set of parameters for complex material models, such as the crystal plasticity approach, the identified constitutive parameters are also compared to available data from literature [5,23] and deemed valid. Table 2 summarises the identified parameter set on which all numerical studies are based.
4. Virtual Material Testing
While most metallic materials might appear macroscopically homogeneous at first sight, on the microscopic scale they are known to contain heterogeneities, such as grain boundaries or different crystal lattice structures and orientations [50]. This is also true for stainless steels processed by additive manufacturing. The study of virtual microstructures has established itself in recent years as an extremely useful tool to systematically investigate the influence of these heterogeneities on the macroscopic mechanical response. Hence, tailor-made microstructures can be identified for specific loading conditions. A wide range of materials have been investigated so far using this approach, such as dual-phase steels [32] or nickel-based alloys [34,35]. An excellent overview of current applications is given in Reference [32]. However, the modelling of additively manufactured stainless steels only plays a minor role [5,51,52,53]. The micro-macro transition of the mechanical properties is called homogenisation [50,54,55]. For homogenisation, the microstructural domain to be considered must be sufficiently large and representative. This is referred to as a representative volume element [48,54,55,56,57,58,59,60]. In general, the length scale can be separated into three independent domains:
with the characteristic length of the heterogeneities , the characteristic length of the volume element , and the macroscopic component scale . In the present work, the volume element is found to be sufficiently large to obtain representative results, if it comprises at least 150 grains [61].
4.1. Voronoi Tessellation
Tessellation with a standard Voronoi algorithm is employed to construct the virtual microstructures [62,63,64,65]. In short, the algorithm divides a unit cell into a desired number of polyhedra [66]. The individual polyhedra have an irregular shape and approximate a grain in the stainless steel microstructure. In contrast to the method of digitising actual microstructure images, this algorithm enables systematic parametric studies, to study the influence of grain size and shape and crystallographic orientation on mechanical properties.
Special emphasis is placed on the geometric periodicity of the microstructure, which allows applying periodic displacement boundary conditions on the outer faces of the representative volume element. Compared to other displacement boundary conditions, periodic boundary conditions allow to minimise the size of the virtual microstructure [67], which reduces the computational effort. The periodic continuation of boundary grains is achieved by duplicating all the seed points (starting points of the tesselation) and spreading them around the inner volume element. However, at the beginning, the individual seed points are first placed sequentially and randomly into the unit cell. If the random placing is constrained to two directions, e.g., the x-y plane, the result is a microstructure composed of purely columnar grains. Such an arrangement is shown in Figure 3 (microstructure A) and represents a first approximation of the additively manufactured stainless steel grain structure.
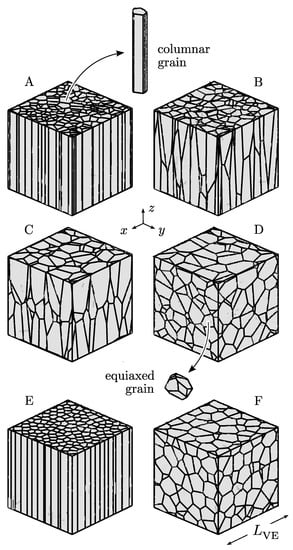
Figure 3.
Virtual microstructures of an austenitic stainless steel consisting of 150 grains with a columnar (A), a mixed columnar/equiaxial (B,C), and an equiaxial shape (D). This is completed by a strongly regular columnar (E) and an equiaxial grain shape (F) with respect to grain size. Both, a columnar and an equiaxed grain, are highlighted.
If, on the other hand, the random placing occurs in all three spatial directions in the full range of , the result is a microstructure that resembles a conventional steel production due to its equiaxed grains (microstructure D). Intermediate configurations, which can also occur after additive manufacturing, consisting of mixed columnar and equiaxed grains (microstructures B and C) can be realised by allowing random out-of-plane placing in z-direction. This placing happens in a small range roughly in the order of . The larger this range (), the more the grains tend to adopt an equiaxed shape. With the four virtual microstructures, A to D, a comprehensive study of the texture effect by grain morphology is given.
In order to create grains with stronger similarity and to control the grain size distribution to a certain extent, a minimum distance is set between the seed points. The minimum distance also has a positive impact on the subsequent meshing by finite elements, since the number of small edges that are difficult to mesh is significantly reduced. If a single seed point falls below the specified minimum distance, it is ignored and replaced by a new seed point. Two microstructures, E and F, with a more regular size of the columnar and equiaxed grains, derived from microstructure A and D, are also shown in the figure. For the more regular size of the grains, the minimum distance is increased roughly by a factor of 10. Such microstructures can be achieved in practise, for example, by a subsequent heat treatment after additive manufacturing within the laser powder-bed fusion.
The achieved grain size distributions of the individual stainless steel microstructures are presented in Figure 4 in a range from 0 m to 80 m. All virtual microstructures have an average grain diameter of 30 m, which is a typical value for such kind of material. Several characteristics can be read from the distributions. First, the virtual microstructure C differs from the other distributions by a rather high amount of very small grains and in addition, a small number of very large grains. While the frequency distribution in microstructure C tends to approach a slightly bimodal distribution, all others follow a positive skewed unimodal distribution. The unimodal distribution is commonly found for polycrystalline materials and referred to as lognormal distribution, when a logarithmic scale for the grain size is used. Moreover, the synthetic microstructures E and F demonstrate the desired strongly regular grain size. This is evident from the small scatter of the grain size. Besides that, Figure 4 illustrates the experimentally obtained grain size distribution, which matches the EBSD image in Figure 1. The experimental grain size distribution is similar to that of microstructure C with an increasing frequency from large to small grains. From the EBSD analysis, the average grain diameter for this tensile sample is 19 m with quite a large standard deviation of 18 m.
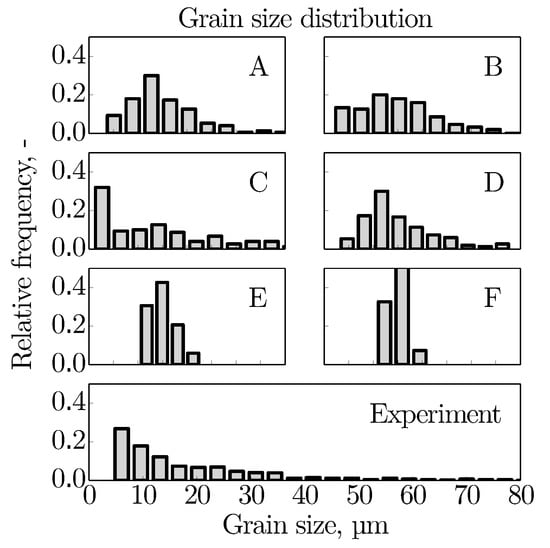
Figure 4.
Grain size distribution of the virtual stainless steel microstructures (A)–(F), together with the experimental data obtained from the EBSD analysis. Note that all distributions consistently range from 0 m to 80 m.
4.2. Meshing and Boundary Conditions
Based on higher-order tetrahedral elements (C3D10), an unstructured finite element meshing approach is used. Unlike the structured, voxel-based approach, the unstructured meshing ensures an exact geometric representation of the grain boundaries and, thus, a sufficiently accurate mapping of the local stress and strain fields. Existing reports on the numerical modelling of laser powder-bed fused stainless steel microstructure are exclusively restricted to unstructured meshing due to the reduced computational effort [5,51,52,53,68,69]. Hence, this work also aims to compensate this shortcoming. Each grain is made up of about 800 finite elements. At this level of refinement, the simulation results remain unaffected by the finite element meshing.
The macroscopic deformation of all virtual microstructure is controlled by three reference points that are connected to the outer faces of the unit cell. A macroscopic strain of 20% is applied under quasistatic conditions. Later, at these reference points, the reaction forces can be tapped to assess, for example, the average macroscopic stress-strain behaviour. To determine the directional dependence of the mechanical behaviour and consistent with the experiment, three different loading directions are considered in the x-z plane (0, 45, and 90). Taking the z-axis as a reference, a uniaxial tensile load in the z-direction results for 0. In this case, the grain boundaries for microstructure A are predominantly parallel to the direction of loading.
5. Results and Discussion
In the following, the predicted results on the effect of grain morphology (Section 5.1) and crystallographic orientation (Section 5.2) are discussed. For this purpose, macroscopic quantities (Young’s modulus, yield strength, hardening rate), as well as quantities on the microscopic level (stress distribution), are considered. The results of the experimental material testing are used to validate the numerical predictions.
5.1. Morphological Effects
For the grain morphology studies, all virtual microstructures are subjected to a random assignment of the crystallographic orientation. Therefore, the experimentally observed preferred orientation of the crystals in the <001> direction is neglected at first. Consideration of the experimental results is deferred to the next section.
Figure 5 compares the Young’s modulus for the different microstructures and loading directions (0 and 90). When looking at the different microstructural realisations, it is found that microstructure C provides the lowest resistance against elastic deformation (135 GPa), irrespective of the direction of macroscopic loading. This low resistance could be explained by the wide scatter of the grain size with a few relatively large grains (>100 m) present in the mixed columnar/equiaxed structure. Microstructure B, on the other hand, offers the highest resistance against elastic deformation (140 GPa) due to its almost perfectly columnar structure. When looking at microstructures E and F, which are characterised by a more regular grain shape (low scatter of the grain size) compared to microstructures A and D, no significant differences in the Young’s modulus can be observed. With respect to the directional dependence of the elastic material response, it can be observed that higher stiffnesses are consistently achieved for loading under 90. In this loading direction (x-direction), a larger number of grain boundaries can be found for the non-equiaxed structures compared to the loading under 0. This explains the higher values of the Young’s modulus. For microstructures D and F, with their purely equiaxed structure, the number of grain boundaries should approximately be the same in both directions. In this case, differences arise only from the crystallographic orientation. To assess the influence of the random orientation assignment, the results of the two microstructures E and F are each based on five calculations with different random orientations assigned to the grains to find the mean value and the standard deviation. Both grain structures appear almost independent of the variation of the random orientation assignment. This is evident from the very low scattering of the Young’s modulus (maximum ± 1 GPa). In addition, microstructures E and F display the lowest elastic anisotropy (nearly perfectly isotropic). As an interim conclusion it can be stated that the grain morphology exerts only a minor effect on the elastic material behaviour. This is true for most cubic metals.
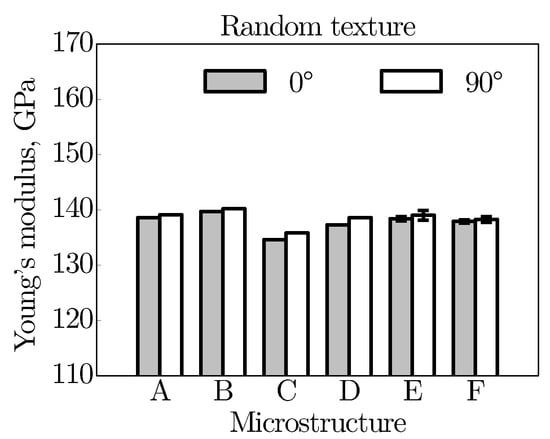
Figure 5.
Young’s modulus for different virtual microstructures and loading directions with error bars for microstructures E and F. All microstructures feature a random crystallographic texture.
Figure 6 addresses the plastic anisotropy of the individual microstructures. For this, the yield strength at 0.2 % plastic deformation is evaluated for the two known loading directions. The overall picture is similar to that of the elastic material response. By far, the lowest yield strength (484 MPa to 495 MPa) can be found for microstructure C. The grains present in this microstructure, which in some cases are extremely large, cause a significant reduction in strength according to the Hall-Petch relation. In contrast, the highest resistance against plastic deformation is achieved by the strongly columnar microstructures A, B, and E (515 MPa). When considering the direction of loading, the 90 direction always produces a higher strength. The increase in strength is again linked to the large number of grain boundaries being present for this loading direction. The greatest change under the partially or completely columnar grain structures and, hence, a strong plastic anisotropic behaviour occurs for microstructure C, where the difference in yield strength reaches 11 MPa. This corresponds to a yield strength ratio of 1.02 (yield strength at 90 divided by yield strength at 0). Microstructure F, on the other hand, is characterised by nearly isotropic behaviour, which further proves the initial assumption of 150 grains in the volume element to be sufficient to achieve representative results. Compared to the microstructures A and D, the regular grain shape present in the corresponding variants E and F provides a slight decrease in the yield strength under 90 loading. Unlike the elastic material response, a clear scattering of the plastic material behaviour can now be recognised for microstructures E and F as indicated by the error bars in Figure 6. Here, it is worth mentioning that the plastic material properties scatter significantly under 90 loading (maximum ± 7 MPa). The larger scatter is due to the weak statistical compensation of the anisotropy of the individual crystals as a result of the small number of grains present in this direction.
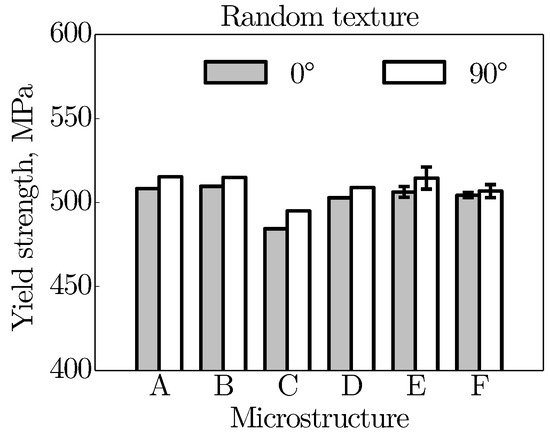
Figure 6.
Yield strength for different virtual microstructures and loading directions considered, with error bars for microstructures E and F. All microstructures feature a random crystallographic texture.
To examine the effect of the grain morphology on the hardening behaviour of the stainless steel material, Figure 7 shows the complete macroscopic stress-strain behaviour. The stress-strain behaviour is shown for the two microstructures E and F. In addition, the presented results indicate the mean value and the standard deviation in form of a scatter band. The magnified hardening range reveals that the hardening rate, especially at the beginning of the plastic deformation, is the highest in case of the elongated grains (microstructure E) under 90 loading. Hence, not only the yield strength, as already shown, but also the hardening behaviour is influenced by the grain boundary structure. The increase in the hardening rate with columnar grains is also reflected by the microstructures A to D under the same loading direction (90). Of these microstructures, the fully columnar microstructure A reveals the most pronounced hardening behaviour. From Figure 7, it also becomes apparent that microstructure E even has a lower hardening ability than microstructure F when subjected to a loading parallel to the build direction (0). The reduced hardening ability can be explained by the fact that the small number of grain boundaries in this direction leads to a reduced possibility of hardening of a slip system by slip on the same or another slip system. As a further conclusion, it can be noted that the grain morphology exerts a visible effect on the plastic material response.
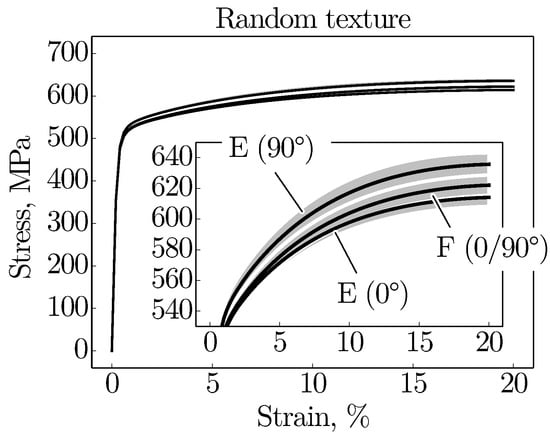
Figure 7.
Macroscopic stress-strain behaviour of the virtual microstructures E and F under the loading directions 0 and 90 with magnification of the hardening behaviour. All microstructures feature a random crystallographic texture.
5.2. Crystallographic Effects
For the grain orientation studies, the grains in microstructures A, B, C, and E are assigned with the experimentally observed <001> fibre texture. These microstructures come closest to reality. The remaining fully equiaxed microstructures D and F still exhibit a random texture.
In the same way as before, Figure 8 first compares the Young’s modulus for the different microstructures and loading directions (0 and 90). The fibre texture shows a tendency to slightly decrease the elastic material properties compared to the results for the purely random texture; see Figure 5. The Young’s modulus of microstructure A, for example, drops from 139 MPa to 134 MPa under 90 tensile loading. The slight decrease of the elastic material properties is related to the minimum stiffness of the single crystal in the <001> direction. Furthermore, the elastic anisotropy, i.e., the difference in the Young’s modulus in both directions, appears to increase. The predicted elastic behaviour corresponds qualitatively well with the experimental findings, which are also shown in Figure 8. Higher material stiffnesses are also obtained in the experiment when loading is perpendicular to the grain growth direction (90). Furthermore, the elastic anisotropy is in the same range as in microstructure A. The main reason for the high scatter of experimental results is possibly due to residual stresses, incomplete fusion of scan tracks or layers, or the existence of pores in the as-built state [2].
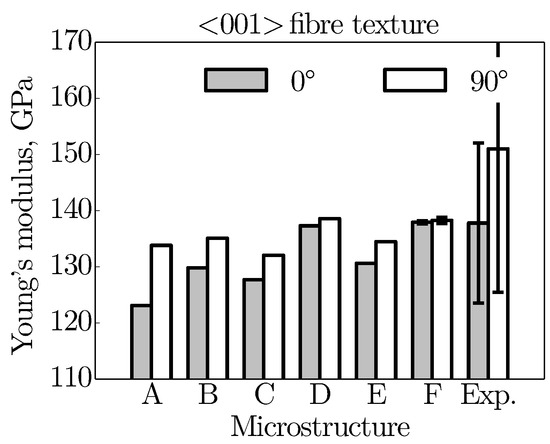
Figure 8.
Young’s modulus for different virtual microstructures and loading directions considered, with error bars for microstructures E and F. While most of the microstructures possess a <001> fibre texture, microstructures D and F are assigned a random grain orientation. Experimental results are taken from Reference [2].
In the following, Figure 9 takes a closer look on the yield strength of the individual microstructures. Again, the predicted results show a similar trend as the elastic material behaviour. All <001> textured microstructures experience a considerable decrease in strength compared to the calculated results of the random texture in Figure 6.
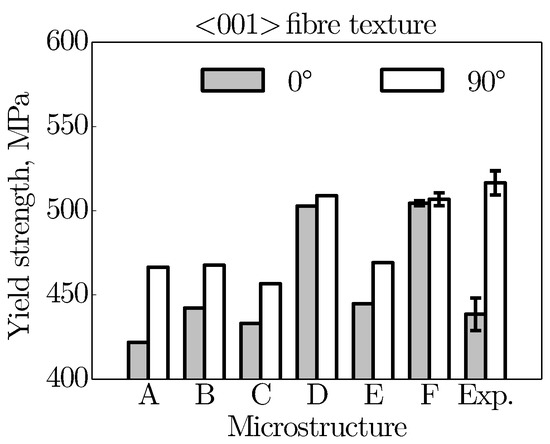
Figure 9.
Yield strength for different virtual microstructures and loading directions considered, with error bars for microstructures E and F. While most of the microstructures possess a <001> fibre texture, microstructures D and F are assigned a random grain orientation. Experimental results are taken from Reference [2].
For example, the yield strength of the fully columnar microstructure A decreases drastically from 515 MPa to 466 MPa under the 90 loading. The significant loss of strength is due to the higher Schmid factors (i.e., kinematically softer crystallographic orientation) along this loading direction. On account of the higher Schmid factors, a large number of dislocations are initially activated, which means that the critical shear stress for a slip system is already reached at smaller macroscopic loads. Looking at the related fully columnar microstructures A and E, it is observed that the mechanical behaviour is quite similar, as already seen in the previous section. Under the 0 loading, the yield strength of microstructure E is somewhat higher. Furthermore, the difference in strength between the two considered loading directions (plastic anisotropy) of the individual microstructures becomes much greater. The maximum strength difference is 45 MPa for microstructure A which gives a yield strength ratio of 1.11. This marked plastic anisotropy is confirmed by the experimental material testing, which is also presented in Figure 9. In the experiment, the direction-dependent yield strength diverges even more with a yield strength ratio of about 1.18. Hence, the plastic anisotropy seems to be favoured by additional effects apart from the morphological and crystallographic texture. For instance, it is reported that the plastic deformation mechanisms for additively manufactured parts are different in different directions due to the grain sizes and the ability of the dislocations to move freely [70].
The fact that the hardening ability is also strongly influenced by the preferred crystallographic orientation is proven in Figure 10 by the overall stress-strain behaviour of microstructure E. In comparison to the random texture (microstructure F), the hardening behaviour is reduced. The hardening saturates at rather low strains for both loading directions (0 and 90). Similar to the random texture of microstructure E (see Figure 7), the material strengthens more under the 90 loading at the beginning of the plastic deformation. These results also apply to the fully or partially columnar grain structures A, B, and C.
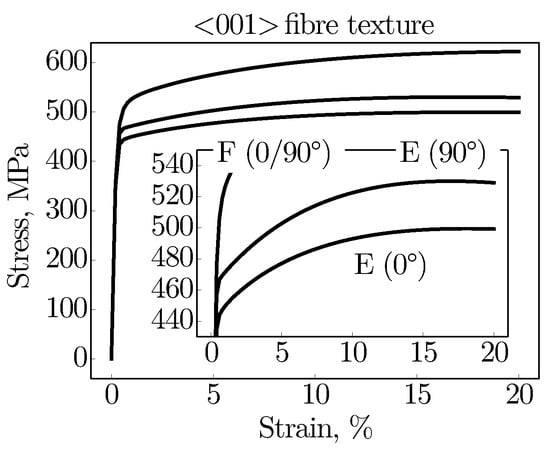
Figure 10.
Macroscopic stress-strain behaviour of the virtual microstructures E and F under the loading directions 0 and 90 with magnification of the hardening behaviour. While microstructure E possesses a <001> fibre texture, microstructure F is assigned a random grain orientation.
Figure 11 shows that this direction-dependent hardening behaviour of the material is also reflected in the experiment, where the macroscopic stress-strain curves for all three loading orientations are plotted. Under the 90 loading, the hardening rate of the material is significantly higher than under the 0 loading. However, even higher rates are achieved under the 45 loading. According to the experiment, the material also exhibits the highest strength and elongation at fracture for this 45 orientation. The reason for these superior mechanical properties will be discussed in the following.
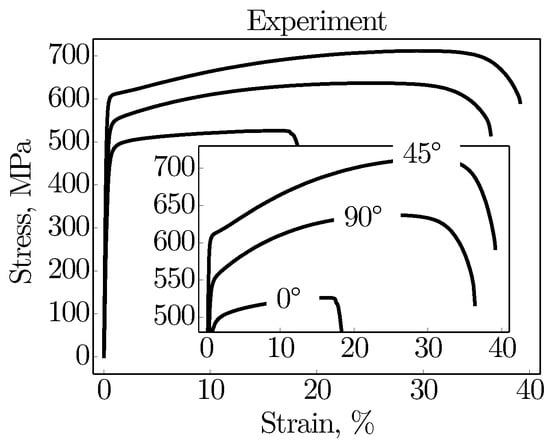
Figure 11.
Experimentally determined macroscopic stress-strain behaviour for the loading directions 0, 45, and 90 with magnification of the hardening behaviour. Experimental results are taken from Reference [2].
While the emphasis of the virtual studies so far has been placed on the 0 and 90 loading, which leads to uniaxial tension of the virtual microstructure, Figure 12 addresses the loading under 45. The 45 loading imposes a pure shear loading of the virtual microstructure matching to the <110> direction of the crystals.
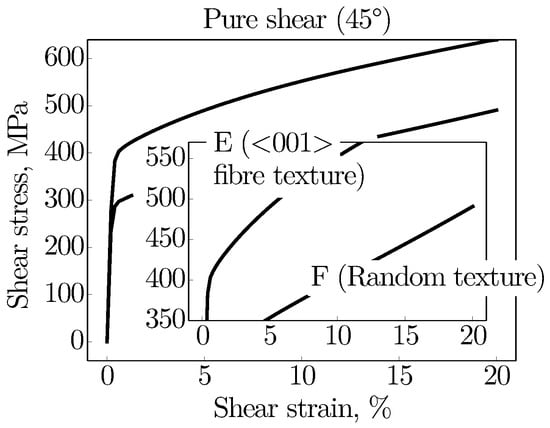
Figure 12.
Macroscopic shear stress-strain behaviour of the virtual microstructures E and F under pure shear loading (45) with magnification of the hardening behaviour. While microstructure E possesses a <001> fibre texture, microstructure F is assigned a random grain orientation.
It is worth noting that, although pure shear is present, simple tension and compression act in the centre of the microstructure, which correspond to the principal stress values. The results given in Figure 12 display the predicted shear stress-strain curves for microstructure E with a <001> fibre texture and again as reference for microstructure F with a random texture. At first glance, the outstanding mechanical properties of the fibre-textured grain structure stand out, which is consistent with experimental observations in Figure 11. Relative to the random texture, the strength increases by as much as 153 MPa, which is equivalent to an increase of about 38%. At the early state of plastic deformation, the strong fibre texture also causes a higher hardening rate in the austenitic stainless steel. The substantial improvement in strength is attributed to the lower Schmid factors (i.e., kinematically harder crystallographic orientation) along this loading direction. Due to the low Schmid factor, only few dislocations are activated initially, which means that the critical shear stress for a slip system is only reached at higher macroscopic loads. It is worth mentioning that microstructures A to C, which are also assigned with the fibre texture, exhibit a similar mechanical behaviour as microstructure E. However, both strength and hardening rate of these microstructures drop slightly, with microstructure C predicted to have the largest decrease. In general, it can be stated that the effect of the preferred crystal orientation on the plastic material response is far stronger than that of the grain morphology.
Finally, Figure 13 depicts the stresses acting at the microscopic level within microstructures E and F under pure shear loading. In each case, the von Mises stress distribution at a macroscopic strain of 20% is shown. In addition, the associated deformed microstructures are highlighted, with stresses ranging from 0 MPa (white) to 1400 MPa (black). The crystallographically strongly textured microstructure E of purely columnar grains exhibits an average stress of 1080 MPa. Its standard deviation is 104 MPa. In contrast, the randomly textured microstructure of purely equiaxed grains shows a somewhat lower average stress of 906 MPa. In addition, the standard deviation is clearly more pronounced with 152 MPa. The macroscopic ultimate tensile strength determined from experimental studies is in the order of 500 MPa to 700 MPa for the additively manufactured, as well as conventionally manufactured, stainless steel [1,6]. Therefore, local failure due to the formation of microscopic cracks is expected at highly stressed sites of the two microstructures. While the highly stressed sites in microstructure F are locally very limited, they often extend in microstructure E over the entire length of the columnar grains; see deformed microstructures in Figure 13. It is also worth noting, that the stress distribution characteristic mentioned above applies in the same way for the local strain distribution. Hence, the columnar grains in microstructure E cause at the same time a higher average strain level with a low deviation.
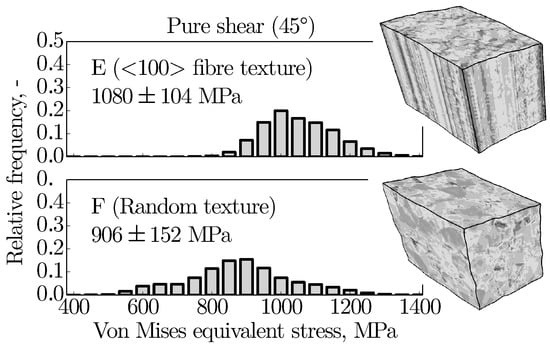
Figure 13.
Relative frequency of the von Mises stress distribution within the virtual microstructures E and F under pure shear loading (45) at a macroscopic strain of 20%. While microstructure E possesses a <001> fibre texture, microstructure F is assigned a random grain orientation. The von Mises stresses shown in the deformed microstructure range from 0 MPa (white) to 1400 MPa (black).
6. Conclusions
The present report demonstrates that the proposed virtual material testing provides an excellent tool for predicting the structure-property relationship of the additively manufactured stainless steel 316L. Using a series of virtual microstructures with different morphological and crystallographic features, it is found that the effect of the crystallographic texture (<001> fibre texture) is significantly more dominant than that of the morphological texture consisting of columnar grains. Hence, the greatest possible increase in strength is achieved when the <001> fibre-textured virtual microstructure encloses an angle of 45 with the macroscopic loading direction. In this way, the lowest Schmid factors are realised. However, it should be kept in mind that angles deviating from 45, e.g., 0 and 90, can reduce the strength owing to the kinematically softer behaviour of the crystals in this orientation.
Author Contributions
Conceptualization, T.F., L.H., and E.W.; methodology, T.F. and L.H.; software, T.F.; validation, T.F., L.H., and E.W.; formal analysis, T.F.; investigation, T.F. and L.H.; resources, L.H. and E.W.; data curation, T.F.; writing—original draft preparation, T.F.; writing—review and editing, T.F., L.H., and E.W.; visualization, T.F.; supervision, L.H. and E.W.; project administration, E.W.; funding acquisition, E.W. All authors have read and agreed to the published version of the manuscript.
Funding
This research received no external funding.
Institutional Review Board Statement
Not applicable.
Informed Consent Statement
Not applicable.
Data Availability Statement
The raw/processed data required to reproduce these findings cannot be shared at this time as the data also forms part of an ongoing study.
Acknowledgments
The authors appreciate the excellent EBSD measurements carried out by our esteemed colleague Z. Wang. In addition, the authors would like to thank the Max-Planck-Institut für Eisenforschung for making the crystal plasticity simulation kit available. We also thank M. Merkel and J. Tomas from the Aalen University of Applied Sciences for providing us with the tensile samples.
Conflicts of Interest
The authors declare no conflict of interest.
Appendix A

Table A1.
Parameter sets employed for irradiation in laser powder-bed fusion for processing of the austenitic stainless steel AISI 316L/1.4404 [2]. Common to all parameter sets is a layer thickness of 30 m, mounting plate temperature of 200 C, nitrogen as the inert gas, and a scan vector length of 10 mm.
| Parameter | Scan | Laser | Hatch | Rotation | Energy |
|---|---|---|---|---|---|
| Set | Speed, mm/s | Power, W | Dist., mm | Angle Inc., | Density, J/mm |
| Contour | 400 | 100 | 0.09 | – | 92.6 |
| Core | 800 | 200 | 0.12 | 33 | 69.4 |
| Final layer | 400 | 300 | 0.10 | – | 250.0 |
| Support | 875 | 200 | – | – | – |
References
- Hitzler, L.; Hirsch, J.; Tomas, J.; Merkel, M.; Hall, W.; Öchsner, A. In-plane anisotropy of selective laser-melted stainless steel: The importance of the rotation angle increment and the limitation window. J. Mater. Des. Appl. 2018, 233, 1419–1428. [Google Scholar] [CrossRef]
- Hitzler, L.; Hirsch, J.; Heine, B.; Merkel, M.; Hall, W.; Öchsner, A. On the anisotropic mechanical properties of selective laser melted stainless steel. Materials 2017, 10, 1136. [Google Scholar] [CrossRef] [PubMed]
- Bajaj, P.; Hariharan, A.; Kini, A.; Kürnsteiner, P.; Raabe, D.; Jägle, E. Steels in additive manufacturing: A review of their microstructure and properties. Mater. Sci. Eng. A 2019, 772, 138633. [Google Scholar] [CrossRef]
- Brenne, F.; Niendorf, T. Damage tolerant design by microstructural gradation—Influence of processing parameters and build orientation on crack growth within additively processed 316L. Mater. Sci. Eng. A 2019, 764, 138186. [Google Scholar] [CrossRef]
- Charmi, A.; Falkenberg, R.; Avila, L.; Mohr, G.; Sommer, K.; Ulbricht, A.; Sprengel, M.; Saliwan Neumann, R.; Skrotzki, B.; Evans, A. Mechanical anisotropy of additively manufactured stainless steel 316L: An experimental and numerical study. Mater. Sci. Eng. A 2019, 799, 140154. [Google Scholar] [CrossRef]
- Wang, X.; Muñiz-Lerma, J.A.; Shandiz, M.A.; Sanchez-Mata, O.; Brochu, M. Crystallographic-orientation-dependent tensile behaviours of stainless steel 316L fabricated by laser powder bed fusion. Mater. Sci. Eng. A 2019, 766, 138395. [Google Scholar] [CrossRef]
- Hegele, P.; von Kobylinski, J.; Hitzler, L.; Krempaszky, C.; Werner, E. In-Situ XRD Study of Phase Transformation Kinetics in a Co-Cr-W-Alloy Manufactured by Laser Powder-Bed Fusion. Crystals 2021, 11, 176. [Google Scholar] [CrossRef]
- Hitzler, L.; Merkel, M.; Hall, W.; Öchsner, A. A Review of Metal Fabricated with Laser- and Powder-Bed Based Additive Manufacturing Techniques: Process, Nomenclature, Materials, Achievable Properties, and its Utilization in the Medical Sector. Adv. Eng. Mater. 2018, 20, 1700658. [Google Scholar] [CrossRef]
- Suryawanshi, J.; Prashanth, K.; Ramamurty, U. Mechanical behavior of selective laser melted 316L stainless steel. Mater. Sci. Eng. A 2017, 696, 113–121. [Google Scholar] [CrossRef]
- Yasa, E.; Kruth, J.P. Microstructural investigation of Selective Laser Melting 316L stainless steel parts exposed to laser re-melting. Procedia Eng. 2011, 19, 389–395. [Google Scholar] [CrossRef]
- Yu, H.; Yang, J.; Yin, J.; Wang, Z.; Zeng, X. Comparison on mechanical anisotropies of selective laser melted Ti-6Al-4V alloy and 304 stainless steel. Mater. Sci. Eng. A 2019, 695, 92–100. [Google Scholar] [CrossRef]
- Herzog, D.; Seyda, V.; Wycisk, E.; Emmelmann, C. Additive manufacturing of metals. Acta Mater. 2016, 117, 371–392. [Google Scholar] [CrossRef]
- Blinn, B.; Klein, M.; Gläßner, C.; Smaga, M.; Aurich, J.; Beck, T. An Investigation of the Microstructure and Fatigue Behavior of Additively Manufactured AISI 316L Stainless Steel with Regard to the Influence of Heat Treatment. Metals 2018, 8, 220. [Google Scholar] [CrossRef]
- Riemer, A.; Leuders, S.; Thöne, M.; Richard, H.; Tröster, T.; Niendorf, T. On the fatigue crack growth behavior in 316L stainless steel manufactured by selective laser melting. Eng. Fract. Mech. 2014, 120, 15–25. [Google Scholar] [CrossRef]
- Durga, A.; Pettersson, N.H.; Malladi, S.B.A.; Chen, Z.; Guo, S.; Nyborg, L.; Lindwall, G. Grain refinement in additively manufactured ferritic stainless steel by in situ inoculation using pre-alloyed powder. Scr. Mater. 2021, 194, 113690. [Google Scholar] [CrossRef]
- Shamsujjoha, M.; Agnew, S.R.; Fitz-Gerald, J.M.; Moore, W.R.; Newman, T.A. High strength and ductility of additively manufactured 316L stainless steel explained. Metall. Mater. Trans. A 2018, 49, 3011–3027. [Google Scholar] [CrossRef]
- Werner, E. Solid solution and grain size hardening of nitrogen-alloyed austenitic steels. Mater. Sci. Eng. A 1988, 101, 93–98. [Google Scholar]
- Guan, K.; Wang, Z.; Gao, M.; Li, X.; Zeng, X. Effects of processing parameters on tensile properties of selective laser melted 304 stainless steel. Mater. Des. 2013, 50, 581–586. [Google Scholar] [CrossRef]
- Saeidi, K.; Gao, X.; Zhong, Y.; Shen, Z. Hardened austenite steel with columnar sub-grain structure formed by laser melting. Mater. Sci. Eng. A 2015, 625, 221–229. [Google Scholar] [CrossRef]
- Yin, Y.; Sun, J.; Guo, J.; Kan, X.; Yang, D. Mechanism of high yield strength and yield ratio of 316L stainless steel by additive manufacturing. Mater. Sci. Eng. A 2019, 744, 773–777. [Google Scholar] [CrossRef]
- Lewandowski, J.J.; Seifi, M. Metal additive manufacturing: A review of mechanical properties. Annu. Rev. Mater. Res. 2016, 46, 151–186. [Google Scholar] [CrossRef]
- Röttger, A.; Boes, J.; Theisen, W.; Thiele, M.; Esen, C.; Edelmann, A.; Hellmann, R. Microstructure and mechanical properties of 316L austenitic stainless steel processed by different SLM devices. Int. J. Adv. Manuf. Technol. 2020, 180, 769–783. [Google Scholar] [CrossRef]
- Morris Wang, Y.; Voisin, T.; McKeown, J.T.; Ye, J.; Calta, N.P.; Li, Z.; Zeng, Z.; Zhang, Y.; Chen, W.; Roehling, T.T.; et al. Additively manufactured hierarchical stainless steels with high strength and ductility. Nat. Mater. 2018, 17, 36–71. [Google Scholar]
- Todd, I. Printing steels. Nat. Mater. 2018, 17, 13–14. [Google Scholar] [CrossRef]
- Zhang, C.; Chen, F.; Huang, Z.; Jia, M.; Chen, G.; Ye, Y.; Lin, Y.; Liu, W.; Chen, B.; Shen, Q.; et al. Additive manufacturing of functionally graded materials: A review. Mater. Sci. Eng. A 2019, 764, 138209. [Google Scholar] [CrossRef]
- Niendorf, T.; Leuders, S.; Riemer, A.; Richard, H.A.; Tröster, T.; Schwarze, D. Highly anisotropic steel processed by selective laser melting. Metall. Mater. Trans. B 2013, 44, 794–796. [Google Scholar] [CrossRef]
- Gorsse, S.; Hutchinson, C.; Gouné, M.; Banerjee, R. Additive manufacturing of metals: A brief review of the characteristic microstructures and properties of steels, Ti-6Al-4V and high-entropy alloys. Sci. Technol. Adv. Mater. 2017, 18, 584–610. [Google Scholar] [CrossRef]
- Sun, S.H.; Ishimoto, T.; Hagihara, K.; Tsutsumi, Y.; Hanawa, T.; Nakano, T. Excellent mechanical and corrosion properties of austenitic stainless steel with a unique crystallographic lamellar microstructure via selective laser melting. Scr. Mater. 2019, 159, 89–93. [Google Scholar] [CrossRef]
- Hornbogen, E.; Eggeler, G.; Werner, E. Werkstoffe—Aufbau und Eigenschaften von Keramik-, Metall-, Polymer- und Verbundwerkstoffen, 12th ed.; Springer Vieweg: Berlin/Heidelberg, Germany, 2019. [Google Scholar]
- Sedláček, R. Finite Elemente in der Werkstoffmechanik; Verlag Dr. Hut: München, Germany, 2009. [Google Scholar]
- Diehl, M.; Niehuesbernd, J.; Bruder, E. Quantifying the contribution of crystallographic texture and grain morphology on the elastic and plastic anisotropy of bcc steel. Metals 2019, 9, 1252. [Google Scholar] [CrossRef]
- Roters, F.; Diehl, M.; Shanthraj, P.; Eisenlohr, P.; Reuber, C.; Wong, S.L.; Ma, D.; Jia, N.; Kok, P.; Fujita, N.; et al. DAMASK—The Düsseldorf Advanced Material Simulation Kit for Modelling Multi-Physics Crystal Plasticity, Damage and Thermal Phenomena from the Single Crystal up to the Component Scale. Comput. Mater. Sci. 2019, 158, 420–478. [Google Scholar] [CrossRef]
- Smith, M. ABAQUS/Standard User’s Manual, Version 6.9; Dassault Systèmes Simulia Corp: Providence, RI, USA, 2009. [Google Scholar]
- Fischer, T.; Ulan kyzy, S.; Munz, O.; Werner, E. Structure-property relationship of a nickel-based honeycomb sealing composite. Comput. Mater. Sci. 2021, 190, 110270. [Google Scholar] [CrossRef]
- Fischer, T.; Werner, E.; Ulan kyzy, S.; Munz, O. Microstructure-based modelling of rubbing in polycrystalline honeycomb structures. Contin. Mech. Thermodyn. 2020, 32, 1371–1383. [Google Scholar] [CrossRef]
- Javanbakht, Z.; Öchsner, A. Advanced Finite Element Simulation with MSC Marc, 1st ed.; Springer International Publishing: Cham, Switzerland, 2017. [Google Scholar]
- Magee, A.C.; Ladani, L. Representation of a microstructure with bimodal grain size distribution through crystal plasticity and cohesive interface modeling. Mech. Mater. 2015, 82, 1–12. [Google Scholar] [CrossRef]
- Dunne, F.; Petrinic, N. Introduction to Computational Plasticity, 1st ed.; Oxford University Press: New York, NY, USA, 2005. [Google Scholar]
- Altenbach, H.; Öchsner, A. Encyclopedia of Continuum Mechanics, 1st ed.; Springer: Berlin/Heidelberg, Germany, 2020. [Google Scholar]
- Altenbach, H. Kontinuumsmechanik—Einführung in die Materialunabhängigen und Materialabhängigen Gleichungen, 3rd ed.; Springer: Berlin/Heidelberg, Germany, 2015. [Google Scholar]
- Schmid, E.; Boas, W. Kristallplastizität—Mit Besonderer Berücksichtigung der Metalle; Springer: Berlin/Heidelberg, Germany, 1935; Volume 17. [Google Scholar]
- Kalidindi, S. Incorporation of deformation twinning in crystal plasticity models. J. Mech. Phys. Solids 1998, 46, 267–271. [Google Scholar] [CrossRef]
- Hutchinson, J. Bounds and self-consistent estimates for creep of polycrystalline materials. Proc. R. Soc. A Math. Phys. Eng. Sci. 1976, 348, 101–127. [Google Scholar]
- Peirce, D.; Asaro, R.; Needleman, A. Material rate dependence and localized deformation in crystalline solids. Acta Metall. 1983, 31, 1951–1976. [Google Scholar] [CrossRef]
- Kalpakjian, S.; Schmid, S.; Werner, E. Werkstofftechnik, 5th ed.; Pearson Studium: München, Germany, 2011. [Google Scholar]
- Roters, F.; Eisenlohr, P.; Bieler, T.; Raabe, D. Crystal Plasticity Finite Element Methods: In Materials Science and Engineering, 1st ed.; Wiley-VCH: Weinheim, Germany, 2010. [Google Scholar]
- Petch, N.J. The Cleavage Strength of Polycrystals. J. Iron. Steel Res. Int. 1953, 174, 25–28. [Google Scholar]
- Werner, E.; Siegmund, T.; Weinhandl, H.; Fischer, F.D. Properties of Random Polycrystalline Two-Phase Materials. Appl. Mech. Rev. 1994, 47, 231–240. [Google Scholar] [CrossRef]
- Werner, E.; Stüwe, H.P. Phase boundaries as obstacle to dislocations motion. Mater. Sci. Eng. 1985, 68, 175–182. [Google Scholar] [CrossRef]
- Gross, D.; Seelig, T. Bruchmechanik—Mit einer Einführung in die Mikromechanik, 6th ed.; Springer: Berlin/Heidelberg, Germany, 2016. [Google Scholar]
- Rodgers, T.M.; Lim, H.; Brown, J.A. Three-dimensional additively manufactured microstructures and their mechanical properties. JOM 2020, 72, 75–82. [Google Scholar] [CrossRef]
- van Nuland, T.; van Dommelen, J.; Geers, M. Microstructural modeling of anisotropic plasticity in large scale additively manufactured 316L stainless steel. Mech. Mater. 2021, 153, 103664. [Google Scholar] [CrossRef]
- Biswas, A.; Prasad, M.R.G.; Vajragupta, N.; ul Hassan, H.; Brenne, F.; Niendorf, T.; Hartmaier, A. Influence of Microstructural Features on the Strain Hardening Behavior of Additively Manufactured Metallic Components. Adv. Eng. Mater. 2019, 21, 1900275. [Google Scholar] [CrossRef]
- Werner, E.; Wesenjak, R.; Fillafer, A.; Meier, F.; Krempaszky, C. Microstructure-based modelling of multiphase materials and complex structures. Contin. Mech. Thermodyn. 2015, 28, 1325–1346. [Google Scholar] [CrossRef]
- Gänser, H.P.; Fischer, F.; Werner, E. An iterative method for coupling of deformation and failure mechanisms on different length scales. Int. J. Numer. Methods Eng. 2000, 48, 595–611. [Google Scholar] [CrossRef]
- Taxer, T.; Schwarz, C.; Smarsly, W.; Werner, E. A finite element approach to study the influence of cast pores on the mechanical properties of the Ni-base alloy MAR-M247. Mater. Sci. Eng. A 2013, 575, 144–151. [Google Scholar] [CrossRef]
- Fillafer, A.; Krempaszky, C.; Werner, E. On strain partitioning and micro-damage behavior of dual-phase steels. Mater. Sci. Eng. A 2014, 614, 180–192. [Google Scholar] [CrossRef]
- Böhm, H.J. A Short Introduction to Continuum Micromechanics. In Mechanics of Microstructured Materials. International Centre for Mechanical Sciences (Courses and Lectures); Böhm, H.J., Ed.; Springer: Vienna, Austria, 1998; pp. 1–40. [Google Scholar]
- Fillafer, A.; Werner, E.; Krempaszky, C. On phase transformation induced effects controlling the initial flow behavior of ferritic-martensitic dual-phase steels. Mater. Sci. Eng. A 2017, 708, 556–562. [Google Scholar] [CrossRef]
- Hedström, P.; Han, T.S.; Lienert, U.; Almer, J.; Odén, M. Load partitioning between single bulk grains in a two-phase duplex stainless steel during tensile loading. Acta Mater. 2010, 58, 734–744. [Google Scholar] [CrossRef]
- Fischer, T.; Werner, E.; Ulan kyzy, S.; Munz, O. Crystal plasticity modeling of polycrystalline Ni-base superalloy honeycombs under combined thermo-mechanical loading. Contin. Mech. Thermodyn. 2019, 31, 703–713. [Google Scholar] [CrossRef]
- Voronoï, G. Nouvelles applications des paramètres continus à théorie des formes quadratiques. Deuxiéme Mémoire. Recherches sur les paralléloèdres primitifs. J. Für Die Reine Und Angew. Math. 1909, 1909, 67–182. [Google Scholar] [CrossRef]
- Nygårds, M.; Gudmundson, P. Three-dimensional periodic Voronoi grain models and micromechanical FE-simulations of a two-phase steel. Comput. Mater. Sci. 2002, 24, 513–519. [Google Scholar] [CrossRef]
- Boåsen, M.; Dahlberg, C.; Efsing, P.; Faleskog, J. A weakest link model for multiple mechanism brittle fracture—Model development and application. J. Mech. Phys. Solids 2021, 147, 104224. [Google Scholar] [CrossRef]
- Dahlberg, C.; Faleskog, J. Strain gradient plasticity analysis of the influence of grain size and distribution on the yield strength in polycrystals. Eur. J. Mech. A. Solids 2014, 44, 1–16. [Google Scholar] [CrossRef]
- Rycroft, C. Voro++: A three-dimensional Voronoi cell library in C++. Chaos 2009, 19, 041111. [Google Scholar] [CrossRef]
- Geers, M.; Kouznetsova, V.; Matouš, K.; Yvonnet, J. Homogenization methods and multiscale modeling: Nonlinear problems. In Encyclopedia of Computational Mechanics, 2nd ed.; John Wiley & Sons: Hoboken, NJ, USA, 2017; pp. 1–34. [Google Scholar]
- Kergaßner, A.; Mergheim, J.; Steinmann, P. Modelling additive manufactured materials using a crystal plasticity model. Proc. Appl. Math. Mech. 2016, 16, 355–356. [Google Scholar] [CrossRef]
- Amir H. Motaman, S.; Roters, F.; Haase, C. Anisotropic polycrystal plasticity due to microstructural heterogeneity: A multi-scale experimental and numerical study on additively manufactured metallic materials. Acta Mater. 2020, 185, 340–369. [Google Scholar] [CrossRef]
- Ladani, L. Local and Global Mechanical Behavior and Microstructure of Ti6Al4V Parts Built Using Electron Beam Melting Technology. Metall. Mater. Trans. A 2015, 46, 3835–3841. [Google Scholar] [CrossRef]
Publisher’s Note: MDPI stays neutral with regard to jurisdictional claims in published maps and institutional affiliations. |
© 2021 by the authors. Licensee MDPI, Basel, Switzerland. This article is an open access article distributed under the terms and conditions of the Creative Commons Attribution (CC BY) license (https://creativecommons.org/licenses/by/4.0/).