Article

Tensile Deformation of Ultrafine-Grained Fe-Mn-Al-Ni-C Alloy Studied by In Situ Synchrotron Radiation X-ray Diffraction

1
Department Materials Science and Engineering, Kyoto University, Kyoto 606-8501, Japan
2
Elements Strategy Initiative for Structural Materials (ESISM), Kyoto University, Kyoto 606-8501, Japan
3
J-PARC Center, Japan Atomic Energy Agency, Ibaraki 319-1195, Japan
4
Department of Materials and Synchrotron Radiation Engineering, Graduate School of Engineering, University of Hyogo, Himeji 671-2280, Japan
5
Japan Synchrotron Radiation Research Institute (JARSI), Sayo-gun, Hyogo 679-5198, Japan
*
Author to whom correspondence should be addressed.
Crystals 2020, 10(12), 1115; https://doi.org/10.3390/cryst10121115
Submission received: 6 October 2020 / Revised: 27 November 2020 / Accepted: 3 December 2020 / Published: 7 December 2020
(This article belongs to the Special Issue Crystal Plasticity at Micro- and Nano-scale Dimensions)

Abstract

:
Intermetallic compounds are usually considered as deleterious phase in alloy designing and processing since their brittleness leads to poor ductility and premature failure during deformation of the alloys. However, several studies recently found that some alloys containing large amounts of NiAl-type intermetallic particles exhibited not only high strength but also good tensile ductility. To clarify the role of the intermetallic particles in the excellent tensile properties of such alloys, the tensile deformation behavior of an ultrafine-grained Fe-Mn-Al-Ni-C alloy containing austenite matrix and B2 intermetallic particles was investigated by using in situ synchrotron radiation X-ray diffraction in the present study. The elastic stress partitioning behavior of two constituent phases during tensile deformation were quantitively measured, and it was suggested that B2 particles played an important role in the high strength and large tensile ductility of the material.

Graphical Abstract

1. Introduction

Intermetallic compounds with coarse particle size are usually avoided in the alloy designing, because their brittleness often leads to poor deformability at room temperature. However, recent studies showed that some steels and alloys containing intermetallic compounds as second phase exhibited excellent combination of tensile strength and ductility, even at room temperature. Furuta et al. [1] reported that a heavily deformed Fe-Ni-Al-C alloy containing NiAl-type B2 intermetallic compound particles showed a yield strength of 2.2 GPa, whilst still keeping a 25% tensile elongation. Kim et al. [2] developed an Fe-Mn-Al-Ni-C light-weight steel composed of ultrafine-grained austenite and B2 intermetallic compounds phase that exhibited quite high specific strength and good tensile elongation. In addition, B2 phase has also been frequently observed in high entropy or multi-component alloys having high strength and good tensile elongation [2,3,4,5,6]. It was believed that the B2 phase played an important role in the excellent mechanical properties of those materials. Yang et al. [7] studied the strain hardening behavior of Fe-Mn-Al-Ni-C steel and suggested that the high back stress, rising from the incompatibility between the matrix and B2 phase, accounted for the high strain hardening rate and the excellent tensile properties of the material. The present author studied tensile properties of an ultrafine-grained dual-phase Fe-24Ni-6Al-0.4C alloy composed of ultra-fine grained (UFG) austenite and B2 phase and suggested that B2 phase was somehow important to the high strength of the material [8]. More recently, Kim et al. [9] argued that at least in the Fe-Mn-Al-Ni-C system, the high strain hardening rate was largely attributed to the intensive planar slip of dislocations in the austenite matrix that was enhanced by the short-range ordering of the Mn-C, rather than the existence of B2 particles. Those studies, mostly using post-mortem microstructure characterization, are either qualitative or indirect. The role of B2 phase in the tensile properties of the materials has not yet been dynamically evaluated during deformation. In situ diffraction measurement has been proven as an appropriate tool to study the deformation behavior of alloys consisting of multiple phases for its capability to follow and distinguish the evolution of the stress state and phase volume fraction of different constituent phases during mechanical test [8,9,10,11,12,13,14,15]. In the present study, a tensile test with in situ synchrotron radiation X-ray diffraction measurement was carried out on an ultrafine-grained Fe-Mn-Al-Ni-C alloy containing B2 particles, in order to elucidate the contribution of B2 phases to the tensile properties of the material.

2. Materials and Methods

An Fe-20%Mn-8%Al-5%Ni-0.8%C (mass%) was used in the present study, which has a chemical composition similar to that used in previous studies by Kim et al. and Yang et al. [16,17]. An as-received ingot having dimension of 100 mm (length) × 50 mm (width) × 20 mm (thickness) was cut into small blocks with 10 mm in thickness, and then solution-treated at 1280 °C for 1 h in argon atmosphere followed by water quench. After that, the plate was cold-rolled from 10 to 1.2 mm by multiple rolling passes, which corresponded to an 88% rolling reduction in thickness. The cold-rolled specimen was annealed at 850 °C for 120 min in a salt bath and then quenched into water. Tensile test specimens having 7.5 mm in gauge length, 2.5 mm in gauge width, and 1.2 mm thick were cut from the annealed sheet, with the tensile axis parallel to the rolling direction (RD) of the sheets. The surface perpendicular to the normal direction (ND) of the sheet specimen was decorated by white and black paint, and a CCD camera was used to record the images of the surface during the tensile test. Those images were analyzed afterwards by a digital image correlation (DIC) software (VIC2D) to obtain the precise tensile elongation and strain localization behaviors during the tensile deformation. The details about the DIC system used in the present experiments were described in Reference [18]. Tensile tests were carried out at room temperature at an initial strain rate of 8.3 × 10⁻⁴ s−1. Microstructures of the specimen were observed from the transverse direction (TD) of the specimens by a scanning electron microscope (SEM) equipped with an electron backscatter diffraction (EBSD) system (JSM-7100F, JOEL Ltd., Tokyo, Japan), using an acceleration voltage of 15 kV and a scan step size of 50 nm.
To investigate the individual deformation behavior of constituent phases in the material during tension, another tensile test with in situ X-ray diffraction (XRD) was conducted at the beam line BL46XU of SPring-8 in Harima, Japan. The experimental setup of the in situ XRD measurement is schematically illustrated in Figure 1. The energy of the X-ray was 30 keV, corresponding to a wavelength of 0.0413 nm. The incident X-ray beam having a size of 0.5 × 0.3 mm was irradiated perpendicular to the tensile test specimen during tensile deformation, and the diffracted X-ray in the diffraction angle (2θ) from 9.8° to 40.3° was detected by a one-dimensional detector composed of six MYTHEN detectors (DECTRIS Ltd., Baden-Daettwil, Switzerland) arranged in a line. The exposure time for each X-ray diffraction profile was set to 1 s. The tensile test specimen described earlier was further polished to 0.5 mm in thickness to ensure the penetration of the X-ray beam, and a strain rate of 8.3 × 10⁻⁴ s−1 was applied for the tensile test. After the tensile test, the diffraction peaks in a profile were fitted using the pseudo-Voigt function. For more details of the in situ XRD measurements in BL46XU, one can refer to References [19,20,21].

3. Results and Discussions

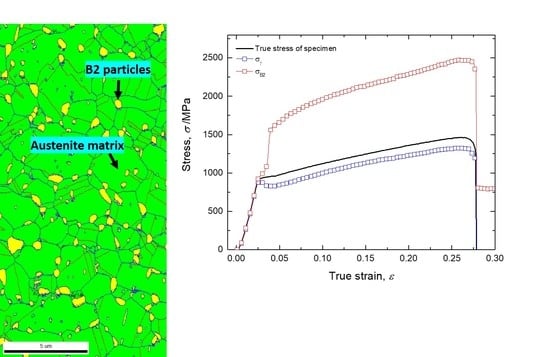
Figure 2 shows the EBSD grain boundary map superimposed on the phase map of the specimen. It is seen that after annealing, the microstructures were composed of fully recrystallized equiaxed austenite grains with face centered cubic (FCC) structure (green) and fine yellow particles with body centered cubic (BCC) structure that primarily located at the austenite grain boundaries and grain boundary triple junctions. Although EBSD mapping could not identify an ordered structure, it was later confirmed by in situ XRD measurement that the yellow BCC particles were B2 phase. The area fraction of the B2 phase was measured as 0.09 (9%) and the average grain size of the austenite matrix and B2 phase was 1.2 µm (including annealing twin boundary) and 0.3 µm, respectively. Although some very fine B2 particles could be observed in the interior of austenite grains, as was also observed in similar alloys [16], the majority of the B2 particles had coarse sizes. It has been shown that the B2 particles in the alloy were not brittle but plastically deformable [22,23]. Therefore, in the present study, the specimen was considered as a dual-phase alloy having ultrafine-grained microstructures rather than a precipitation strengthened alloy, as was also suggested in Reference [17].
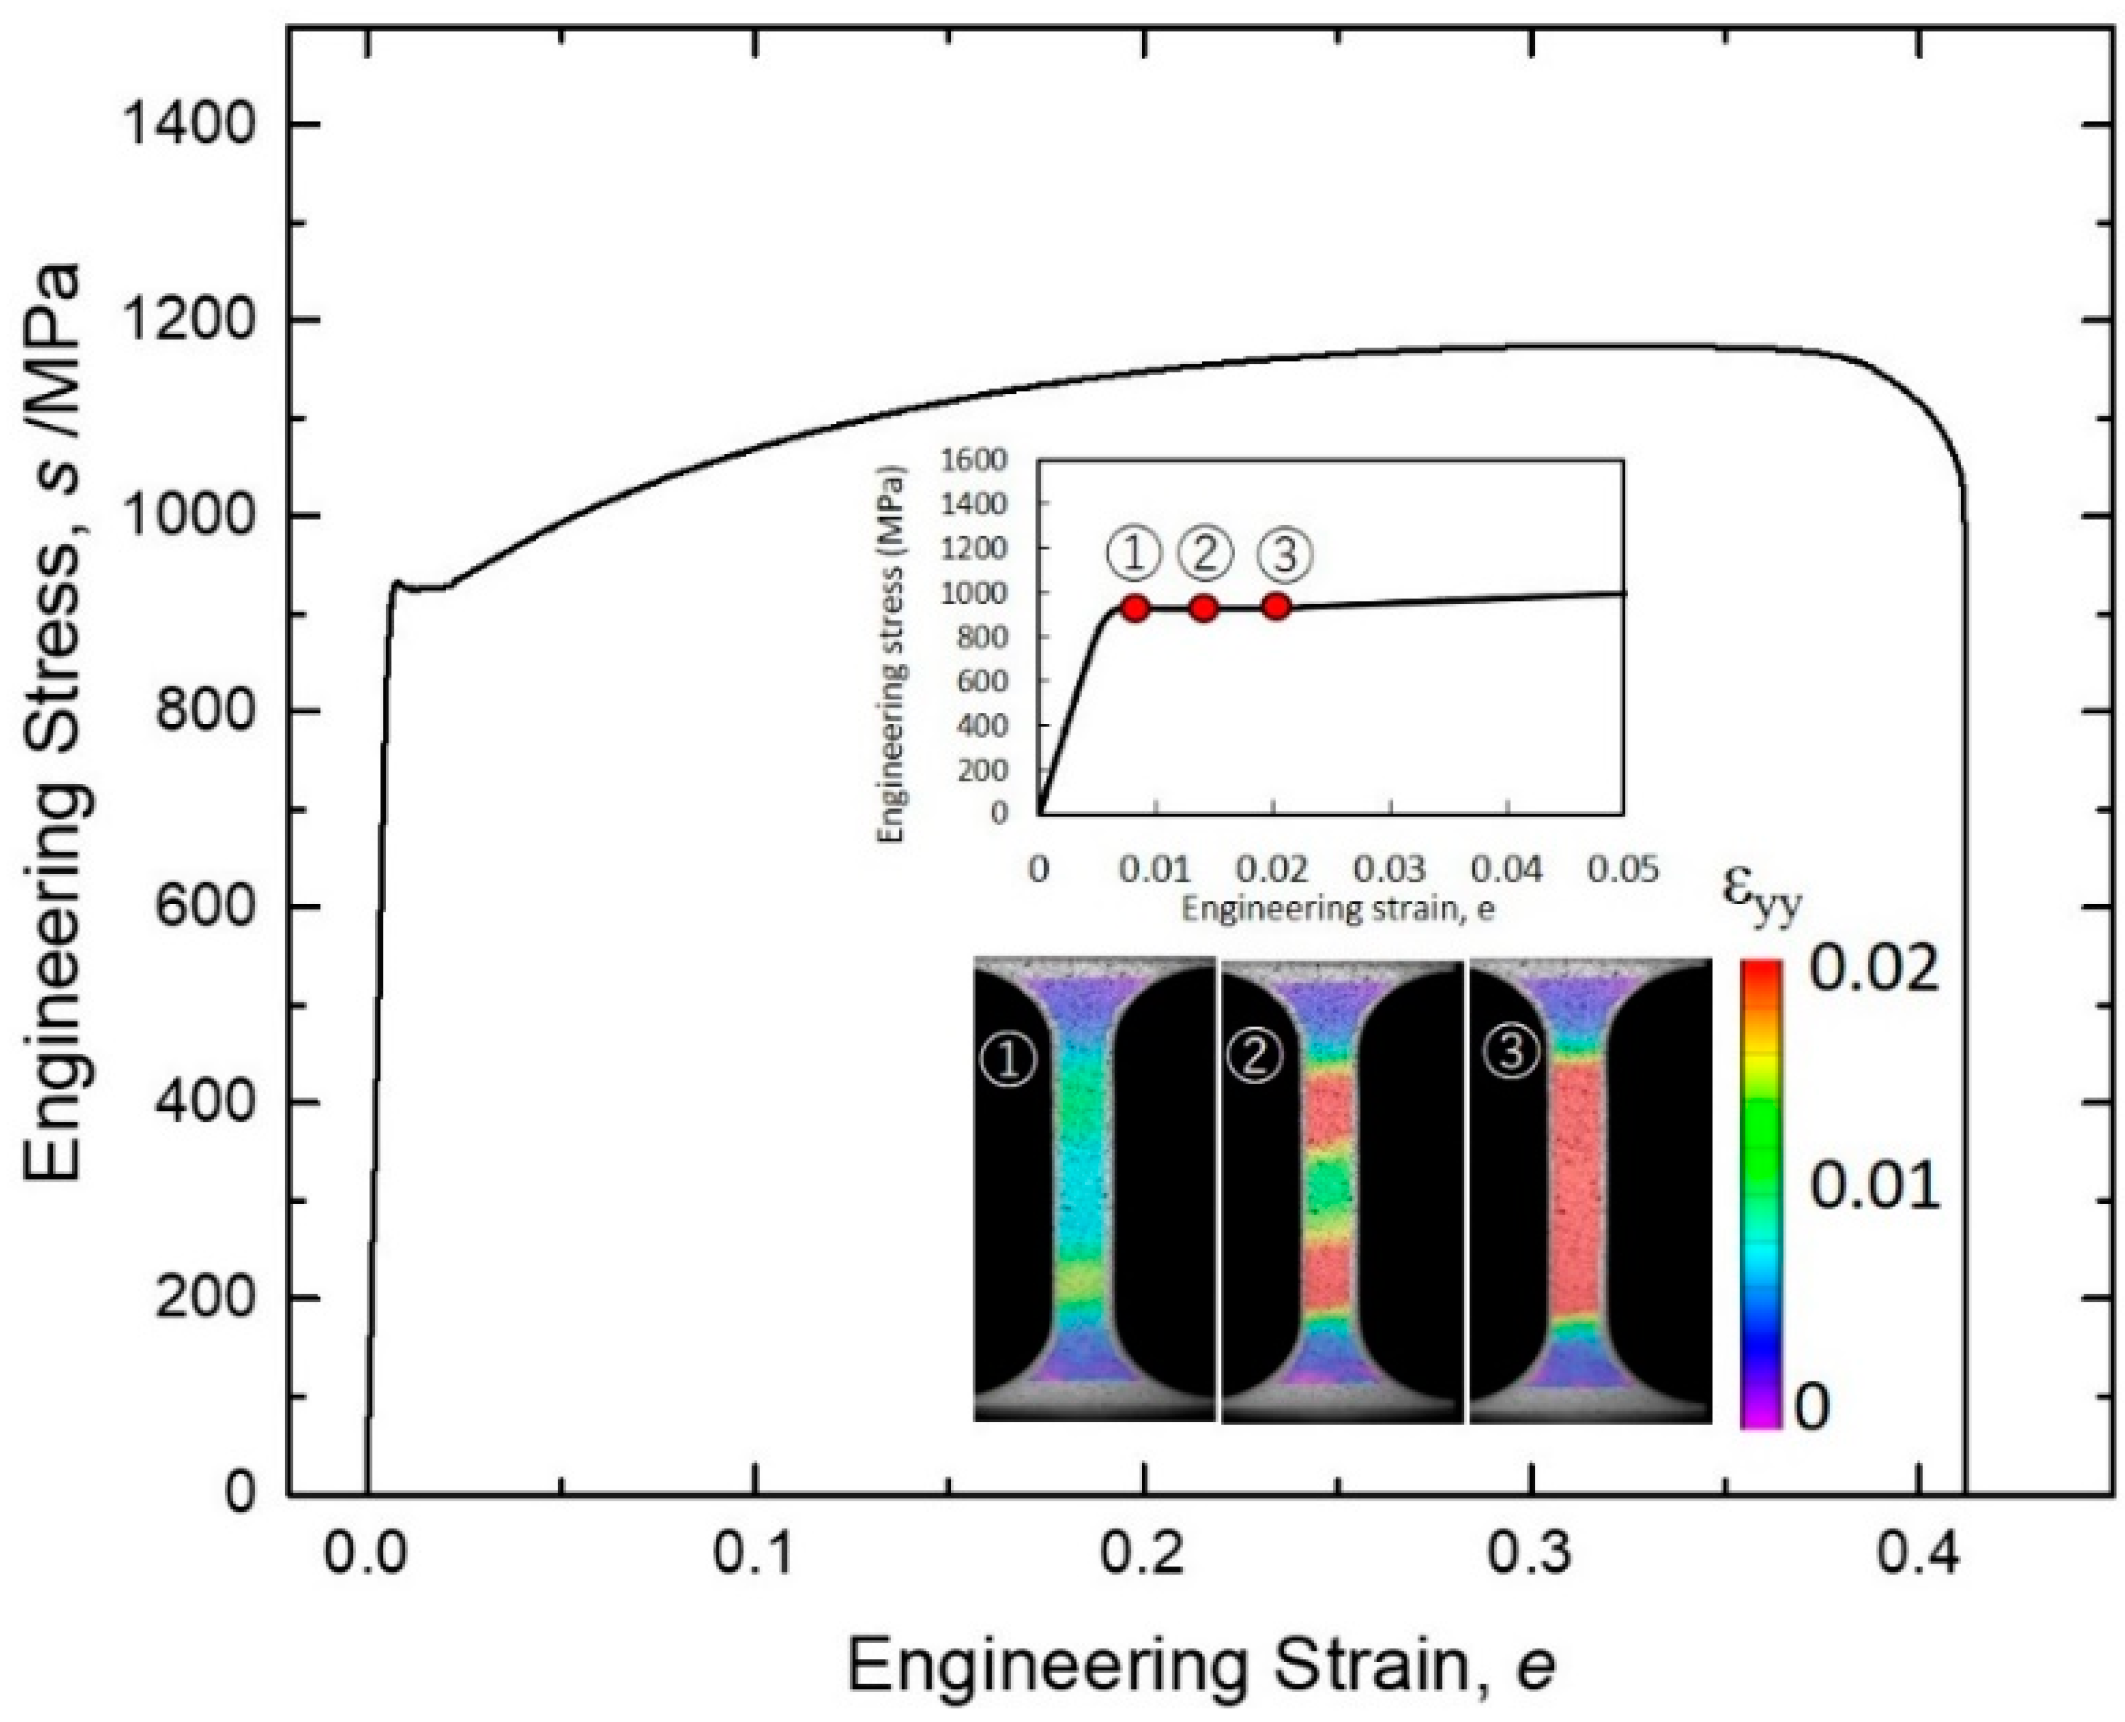
The tensile stress-strain curve of the annealed specimen is shown in Figure 3. The specimen exhibited an excellent combination of strength and tensile ductility, with upper yield stress of 932 MPa, ultimate tensile strength (UTS) of 1174 MPa, uniform elongation of 31%, and total elongation of 42%. It should be noted that, as shown in the insets of Figure 3, the stress-strain curve at the beginning of the tensile test showed a yield plateau, and the strain contour maps of the specimen surface obtained by the DIC analysis confirmed that the yield plateau corresponded to the initiation and propagation of two Lüders bands initiated from upper and lower sides of the specimen gauge. The Lüders band deformation is well-known to appear in low carbon ferritic steels showing discontinuous yielding due to the Cottrell atmosphere formed by impurity atoms around dislocations. In recent years, it has been shown that the Lüders bands’ deformation can appear in most of the polycrystalline metals and alloys when their grain sizes are decreased down to an ultra-fine range below 1–2 μm [24,25,26,27,28,29,30,31,32]. The discontinuous yielding in UFG metals is probably because the number of mobile dislocations within each grain becomes too small to initiate the plastic deformation of the specimen in a continuous manner [28,33]. This seems to be the case in the present observation, since both the austenite matrix and B2 particles have quite fine mean grain sizes. The strain in the area swept by the Lüders band reached to 0.02 measured from the DIC local strain mapping, which agreed with the magnitude of the Lüders strain measured on the stress-strain curve. After the Lüders band deformation, the specimen showed continuous strain hardening behavior until the UTS was reached, and then macroscopic necking occurred followed by tensile failure.
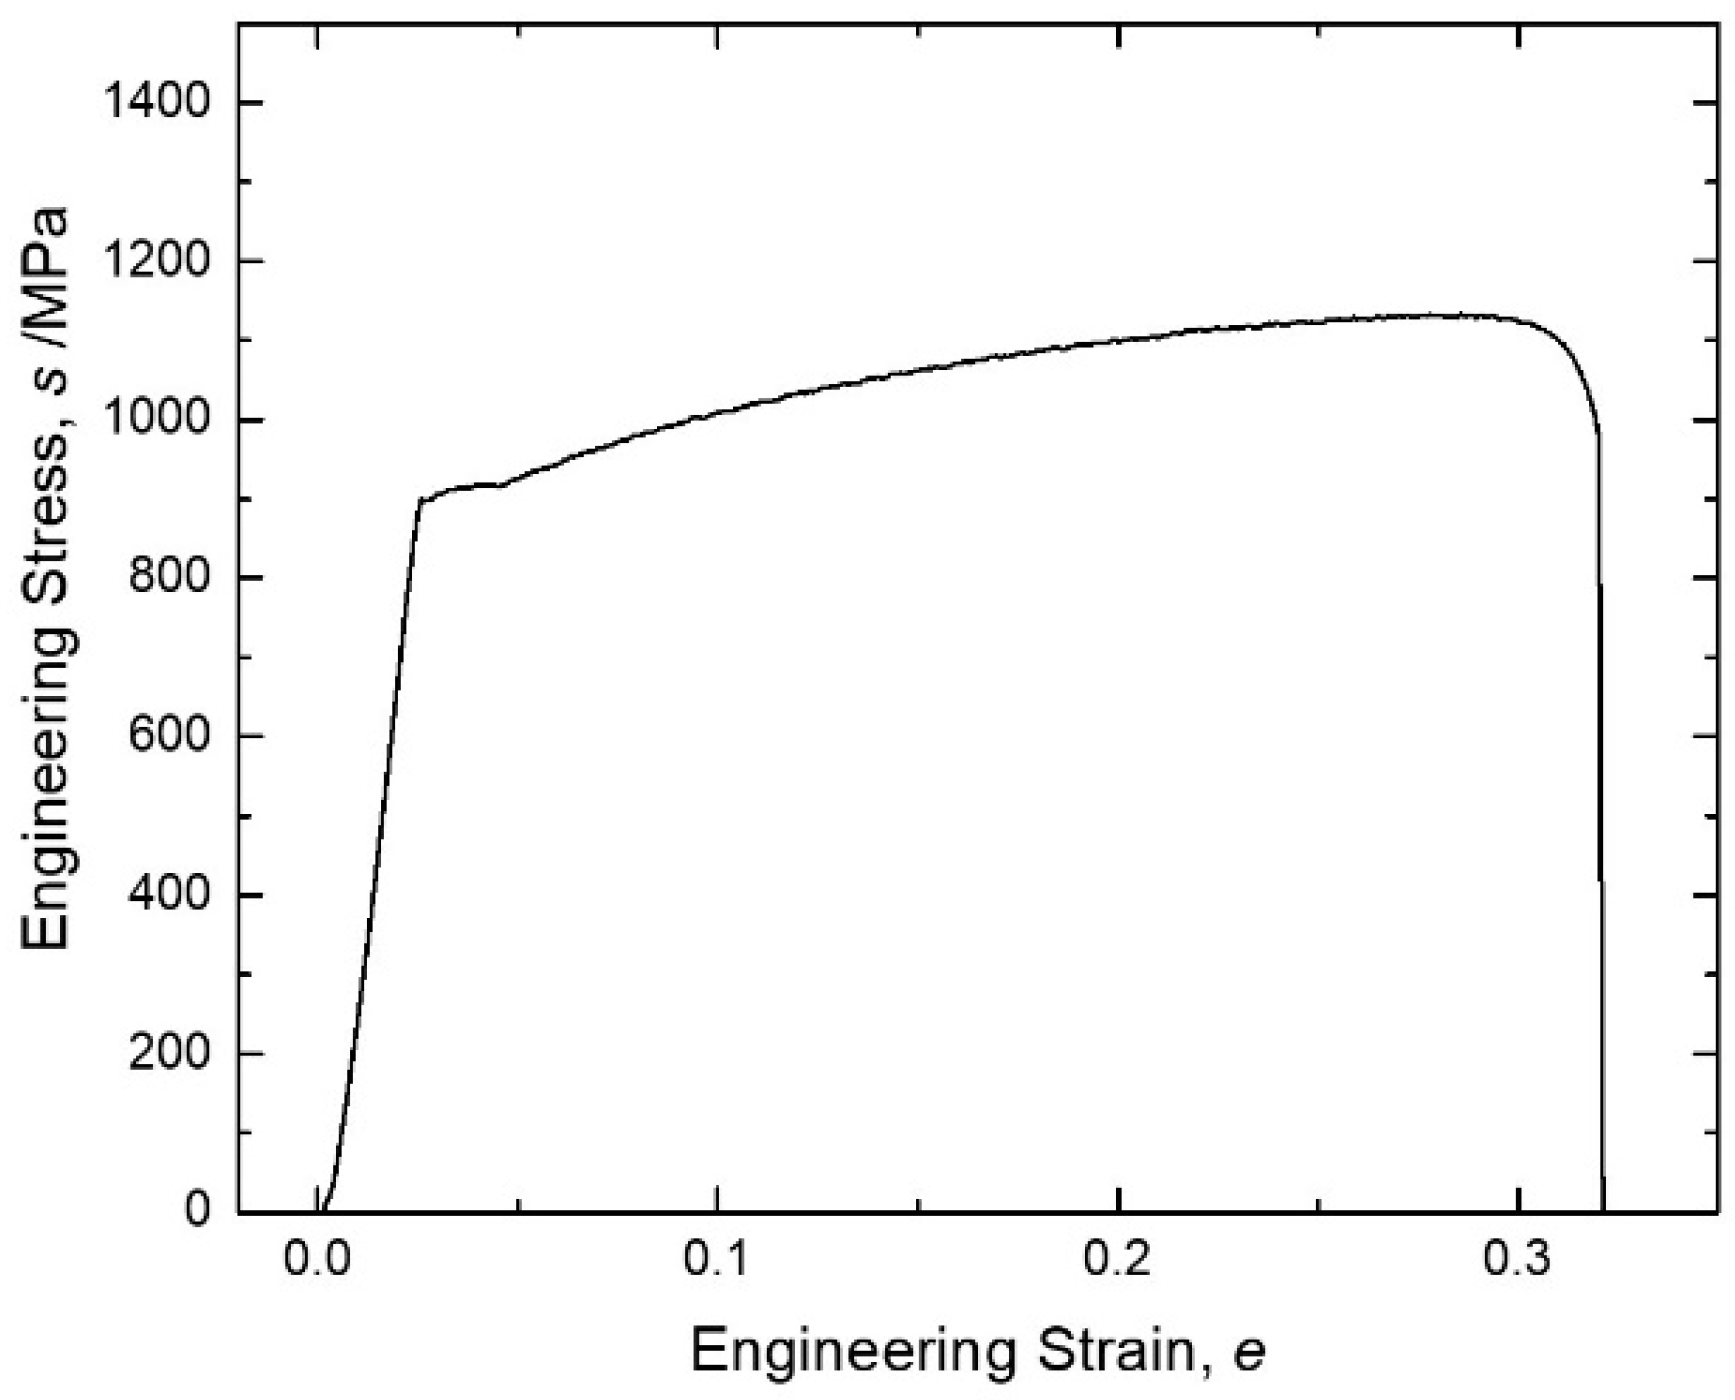
The tensile stress-strain curve obtained during the in situ X-ray diffraction experiments is shown in Figure 4. The curve showed quite similar tensile properties to those shown in Figure 3, except for a smaller total tensile elongation of 32% and a slightly lower UTS of 1130 MPa. This was probably due to the specimen size effect on the total elongation and tensile strength [34], given that the thickness of the tensile specimen gauge was decreased to 0.6 mm for the in situ XRD experiment. XRD profiles obtained by the in situ X-ray diffraction measurement are shown in Figure 5. For the diffraction profile of the specimen before the tensile test, diffraction peaks of (hkl) planes of austenite and B2 phase were indexed, including the (100) superlattice peak of B2 phase. The volume fraction of the B2 phase was calculated, using integrated intensity of the diffraction peaks according to the following equation [35]:
f B 2 = 1 m i = 1 m I i , B 2 R i , B 2 1 n j = 1 n I j , γ R j , γ + 1 m j = 1 m I i , B 2 R i . B 2
where I is the integrated intensity of the diffraction peak, R is the material scattering factor, and m and n are the numbers of diffraction peaks used for B2 and austenite phases. The volume fraction of B2 phase calculated was 0.089 (8.9%), which was quite close to the area fraction (9%) measured from the EBSD map (Figure 2). Changes of (111)γ diffraction peak during tensile deformation are exhibited in the inset of Figure 5. In elastic deformation under a stress of 500 MPa, the (111)γ peak shifted to smaller diffraction angle, i.e., the lattice spacing of (111)γ planes increased, in response to the external tensile stress. As the tensile deformation continued to the plastic region (ε = 5%), the peak broadening was recognized in addition to the peak shift, which was due to the inhomogeneous micro-strains caused mainly by increasing dislocation densities.
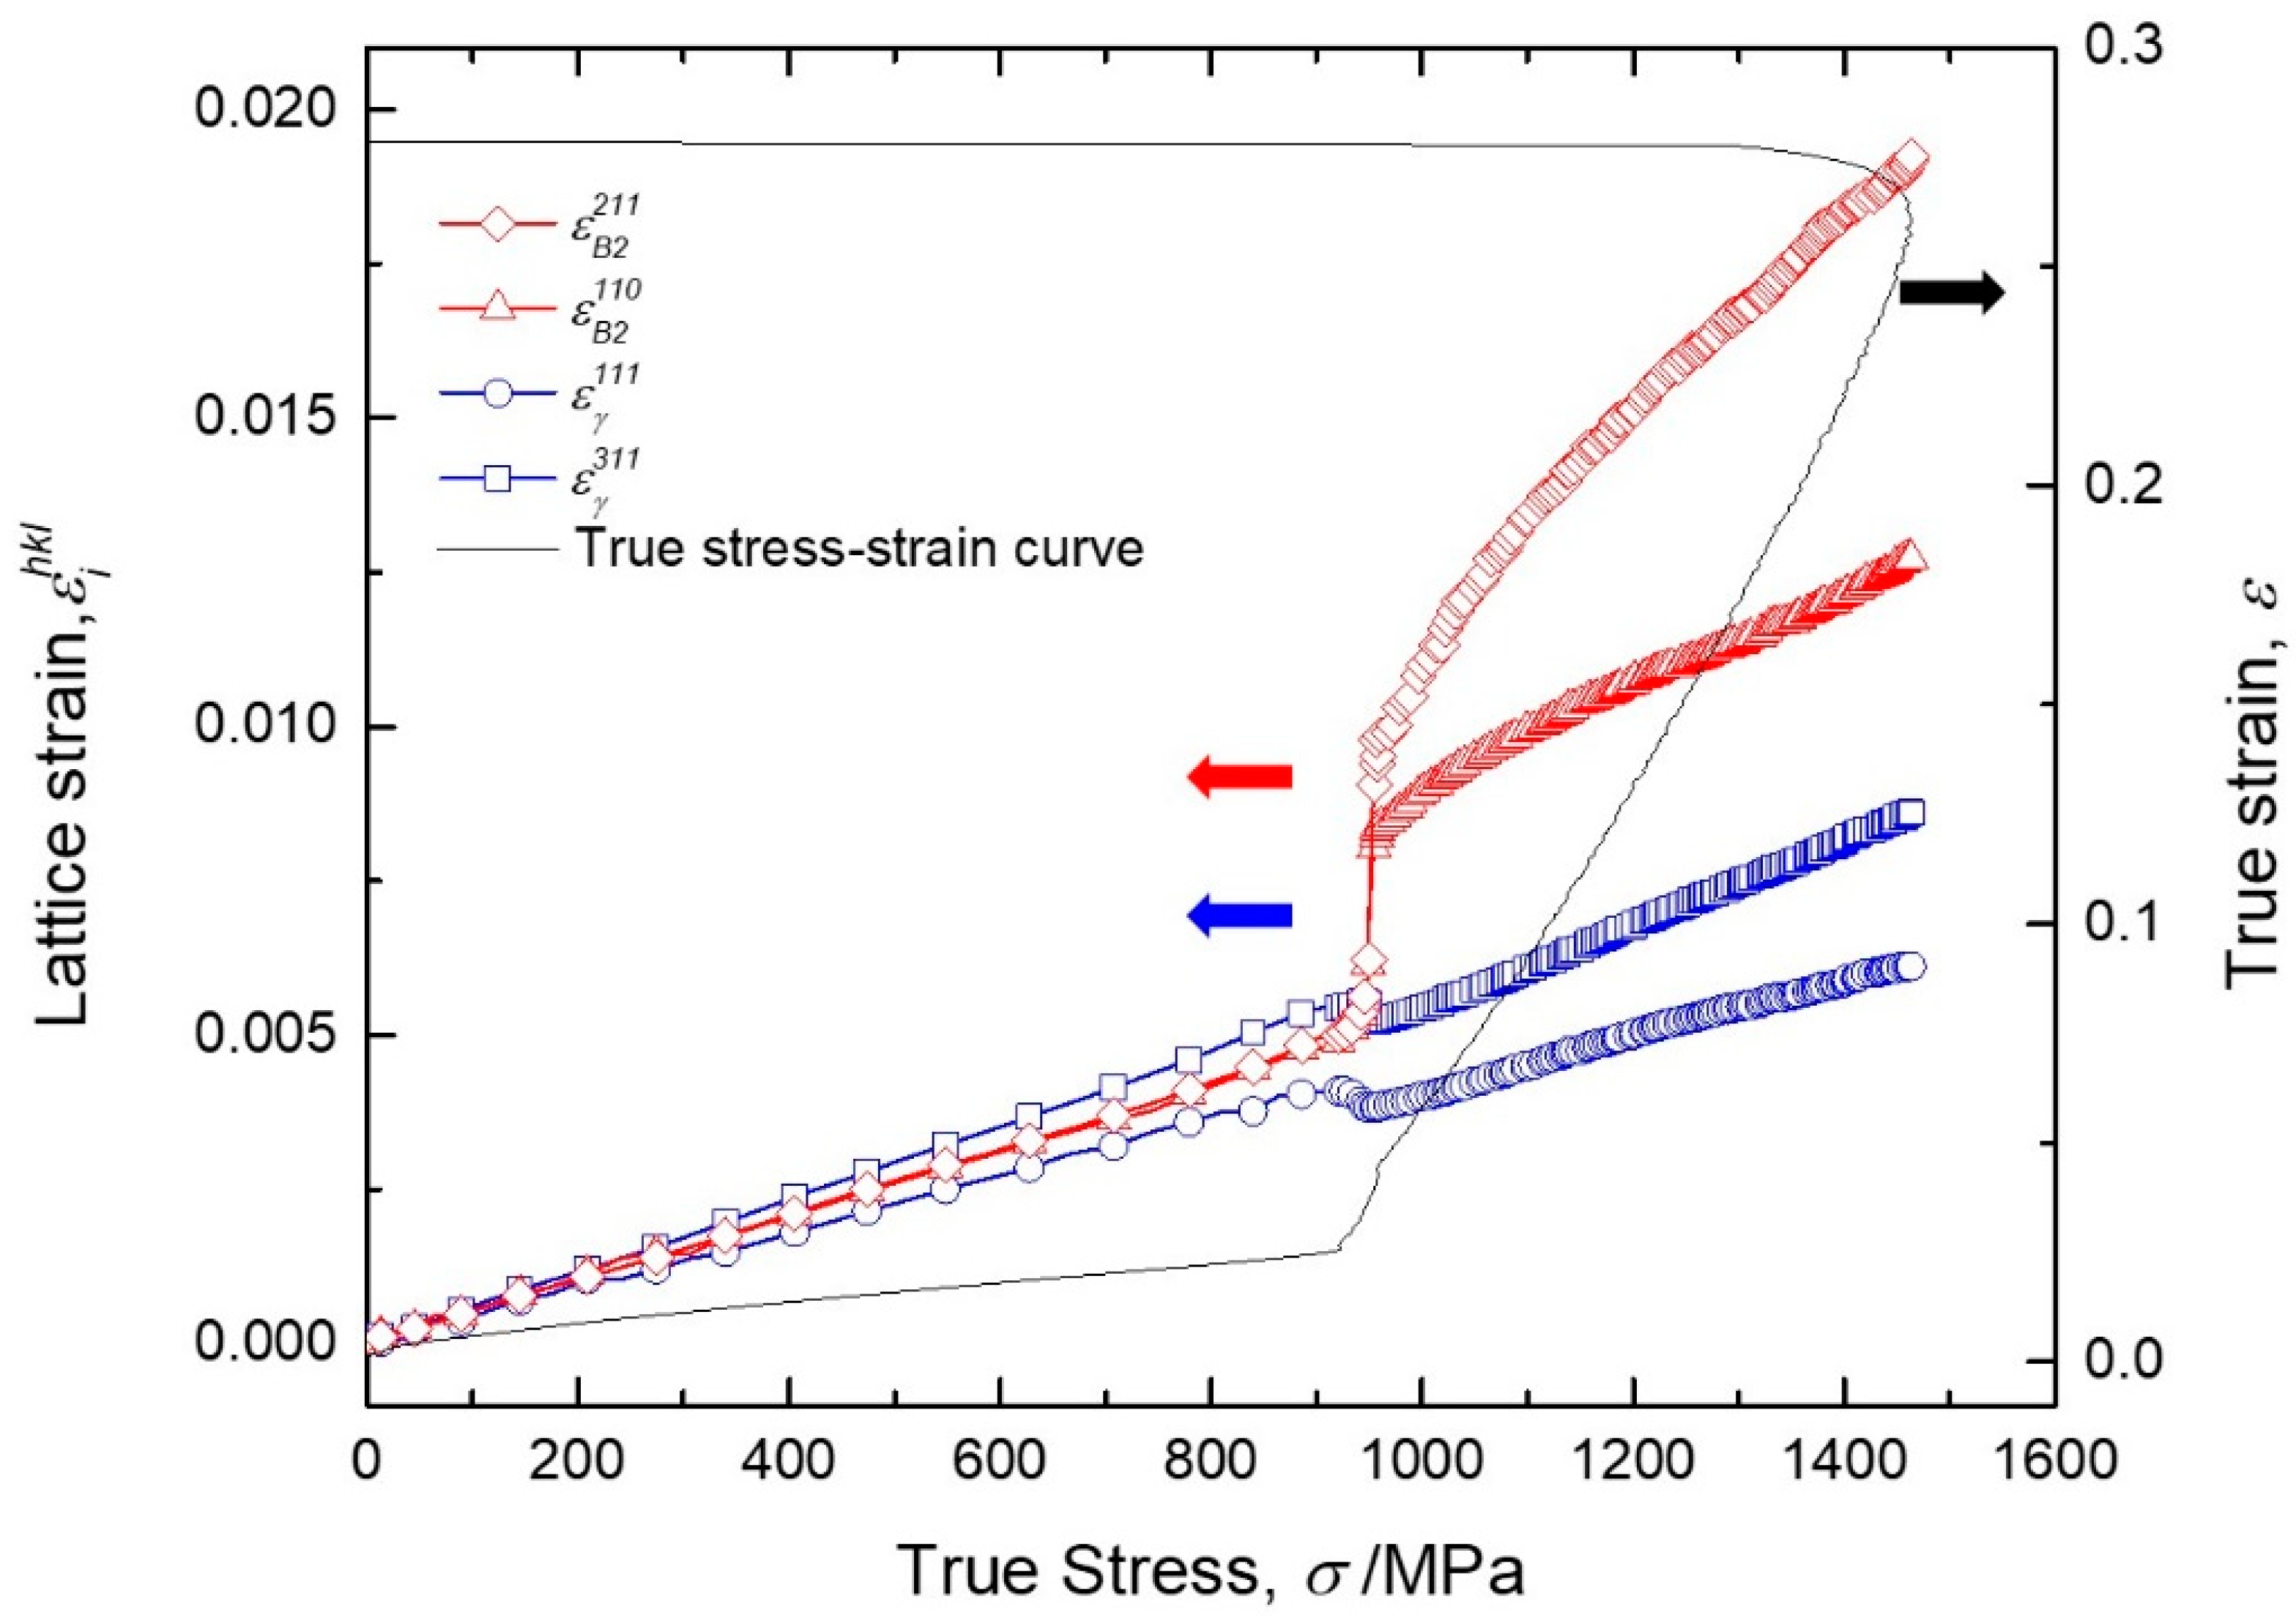
The stress partitioning behavior during tensile deformation between different phases can be analyzed by measuring the lattice strain evolution of the phases. The lattice spacing d of (hkl) planes during tensile deformation can be estimated from the peak shift by the use of the Bragg’s law, 2dsinθ = λ, and the lattice strain of (hkl) plane of a constituent phase i during tensile loading, ε i h k l , is calculated by the following equation:
ε i h k l = d i h k l d i ,   0 h k l d i , 0 h k l  
where   d i h k l is the lattice spacing of the (hkl) lattice plane of a constituent phase i measured during the tensile test, and d i , 0 h k l   is the reference lattice spacing corresponding to its stress-free state. The lattice spacing before the tensile test was regarded as its stress-free state, although upon quenching, residual stress might arise because of the different coefficient of the thermal expansion of the two phases. In the present study, the angle between the scattering vector and the tensile axis, namely θ, was generally small, owing to the short wavelength of the X-ray and the transmission geometry of the measurement. Therefore, the measured lattice strains of the (hkl) planes were regarded approximately equal to the elastic strains in the crystal family grains whose <hkl> directions are oriented to the tensile direction, and this approximation was more accurate for the (hkl) planes having smaller diffraction angles, such as for (111)γ planes and (110)B2. The changes of lattice strains in austenite and B2 phase are plotted as a function of the tensile true stress in Figure 6, with the superimposition of the true stress-strain curve of the specimen. It could be seen that the lattice strains of both phases increased linearly with the true stress in the elastic deformation region. The measured slope of ε γ 111 and ε γ 311 , i.e., the diffraction elastic moduli E γ 111 and E γ 311 , are 216 and 166 GPa, which were comparable with those of another austenitic steel (245 and 187 GPa, respectively) reported in a previous study [10]. The E B 2 110 and E B 2 211 were measured to be 194 and 185 GPa, which were about 30 GPa lower than those reported for BCC iron (221 and 221GPa, respectively) [36]. Such a difference in the elastic modulus between different grain families is attributed to the elastic anisotropy of crystalline materials. When the yield stress was achieved, the lattice strains of two phases exhibited a dramatic separation, where ε γ 111 and ε γ 311 decreased, while ε B 2 110 and ε γ 211 rapidly increased. It has been well-established that such a separation of the lattice strains of different phases or different grain families of single phase in the plastic region indicates the occurrence of stress partitioning between different phases or grain families [9,37,38]. In such a case, the internal stress was transferred from the soft domain (phase or grain families) to the hard domain, due to larger amounts of plastic deformation in the softer domain. However, such a dramatic lattice strain partitioning at the beginning of tensile deformation observed in Figure 6 has not commonly been reported in other dual-phase alloys [37,39]. It was noteworthy that the rapid partitioning of lattice strains coincided with the Lüders plateau on the true stress-strain curve. Considering that the Lüders band deformation occurred in a manner of propagating localized deformation region in the specimen gauge, as shown in the DIC contour map inserted in Figure 3, it was suggested that the dramatic stress partitioning behavior between the austenite and B2 phases at the beginning of plastic deformation was associated with the rapid sweeping of the plastic-strain localized band over the region on which the X-ray beam was irradiated. In addition, it should be noted that the lattice strains of austenite phase decreased, while those of B2 phase increased during the Lüders deformation, suggesting that the stress was transferred from the soft austenite grains to the hard B2 particles during the discontinuous yielding. After the Lüders band deformation, the lattice strains of two phases started to increase with the tensile true stress. Meanwhile, the separation in the lattice strains increased between different grain families within each phase, which indicated the occurrence of stress partitioning and therefore the plastic deformation progressing not only in the austenite phase but also in the B2 phase. These results, along with the observations on the deformed microstructures of B2 phase in similar alloys [22,23], suggested that the B2 phase in the present alloy was essentially not brittle and was capable for plastic deformation.
The elastic stress in each constituent phase, i.e., the so-called phase stress [37,40,41], can be evaluated from the phase strains using Hook’s law and Poisson’s ratios. A simplified estimation is often used, under the assumption that the phase strain can be represented by the lattice strain of certain (hkl) planes, for evaluating the phase stress when the strain in the transverse direction is not available [41]:
σ i = E i h k l ε i h k l
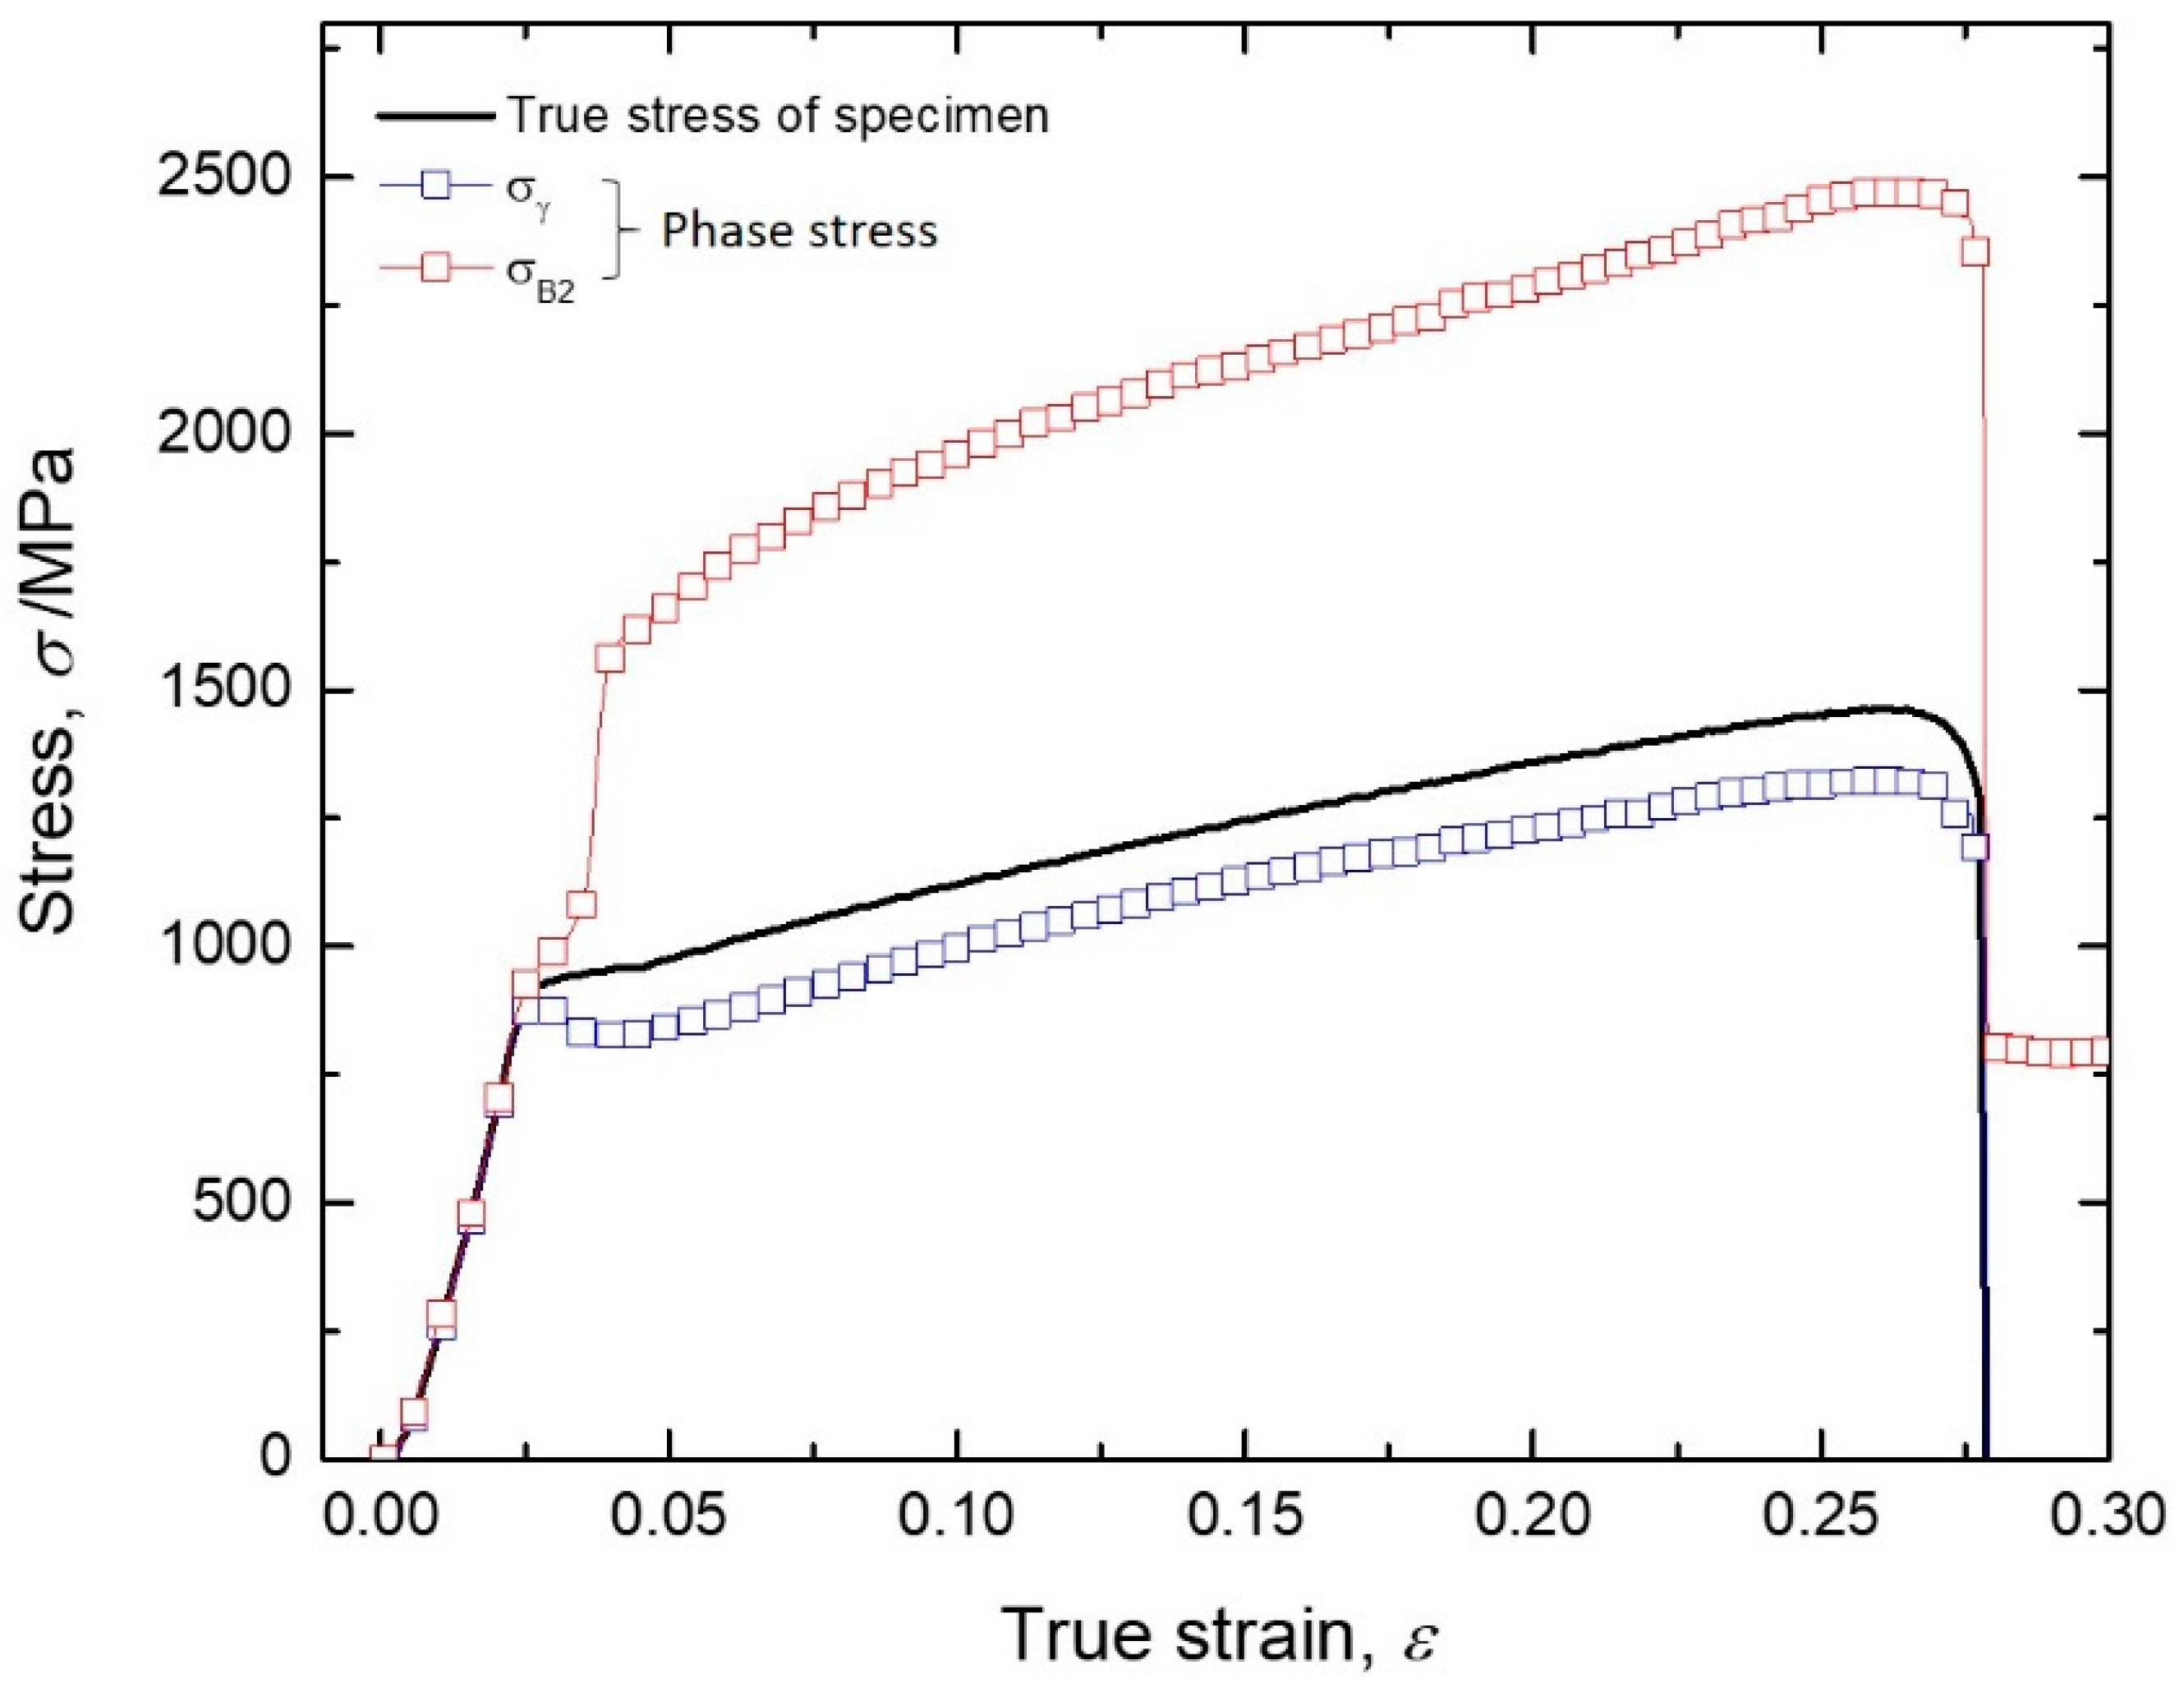
where i represents austenite or B2 phase in the present case. In the present study, the (111)γ and (110)B2 were used to calculate the phase stress of the austenite and B2 phases. The calculated values are plotted as a function of the tensile true strain of the specimen in Figure 7. A dramatic separation of phase stresses was observed at the beginning of plastic deformation, which corresponded with the Lüders deformation mentioned earlier. After that, the phase stresses in both phases increased with increasing tensile true strain, and the B2 phase bore significantly higher phase stress, nearly twice that in the austenite in the entire plastic region, presumably because the B2 phase was plastically much harder than the austenite phase. These results clearly demonstrated that the present alloy should be understood as a dual-phase alloy rather than a precipitation/dispersion hardened alloy with the matric involving finely dispersed second phase. It was also interesting to note that the increasing rate of σ B 2 was higher than that of σ γ , especially in the later part of the tensile deformation.
In order to evaluate the contribution from each constituent phase to the total tensile flow stress, the fraction-weighted phase stress was calculated by the following equation [41]:
σ c o n t , i = σ i f i
where σ i and f i are the phase stress and volume fraction of phase i. In addition, the fraction-weighted average flow stress of the specimen σ F can be calculated by summing up the contributed stress of the two phases as a composite model using the following equation [41]:
σ F = σ c o n t , γ + σ c o n t , B 2 = σ γ f γ + σ B 2 f B 2
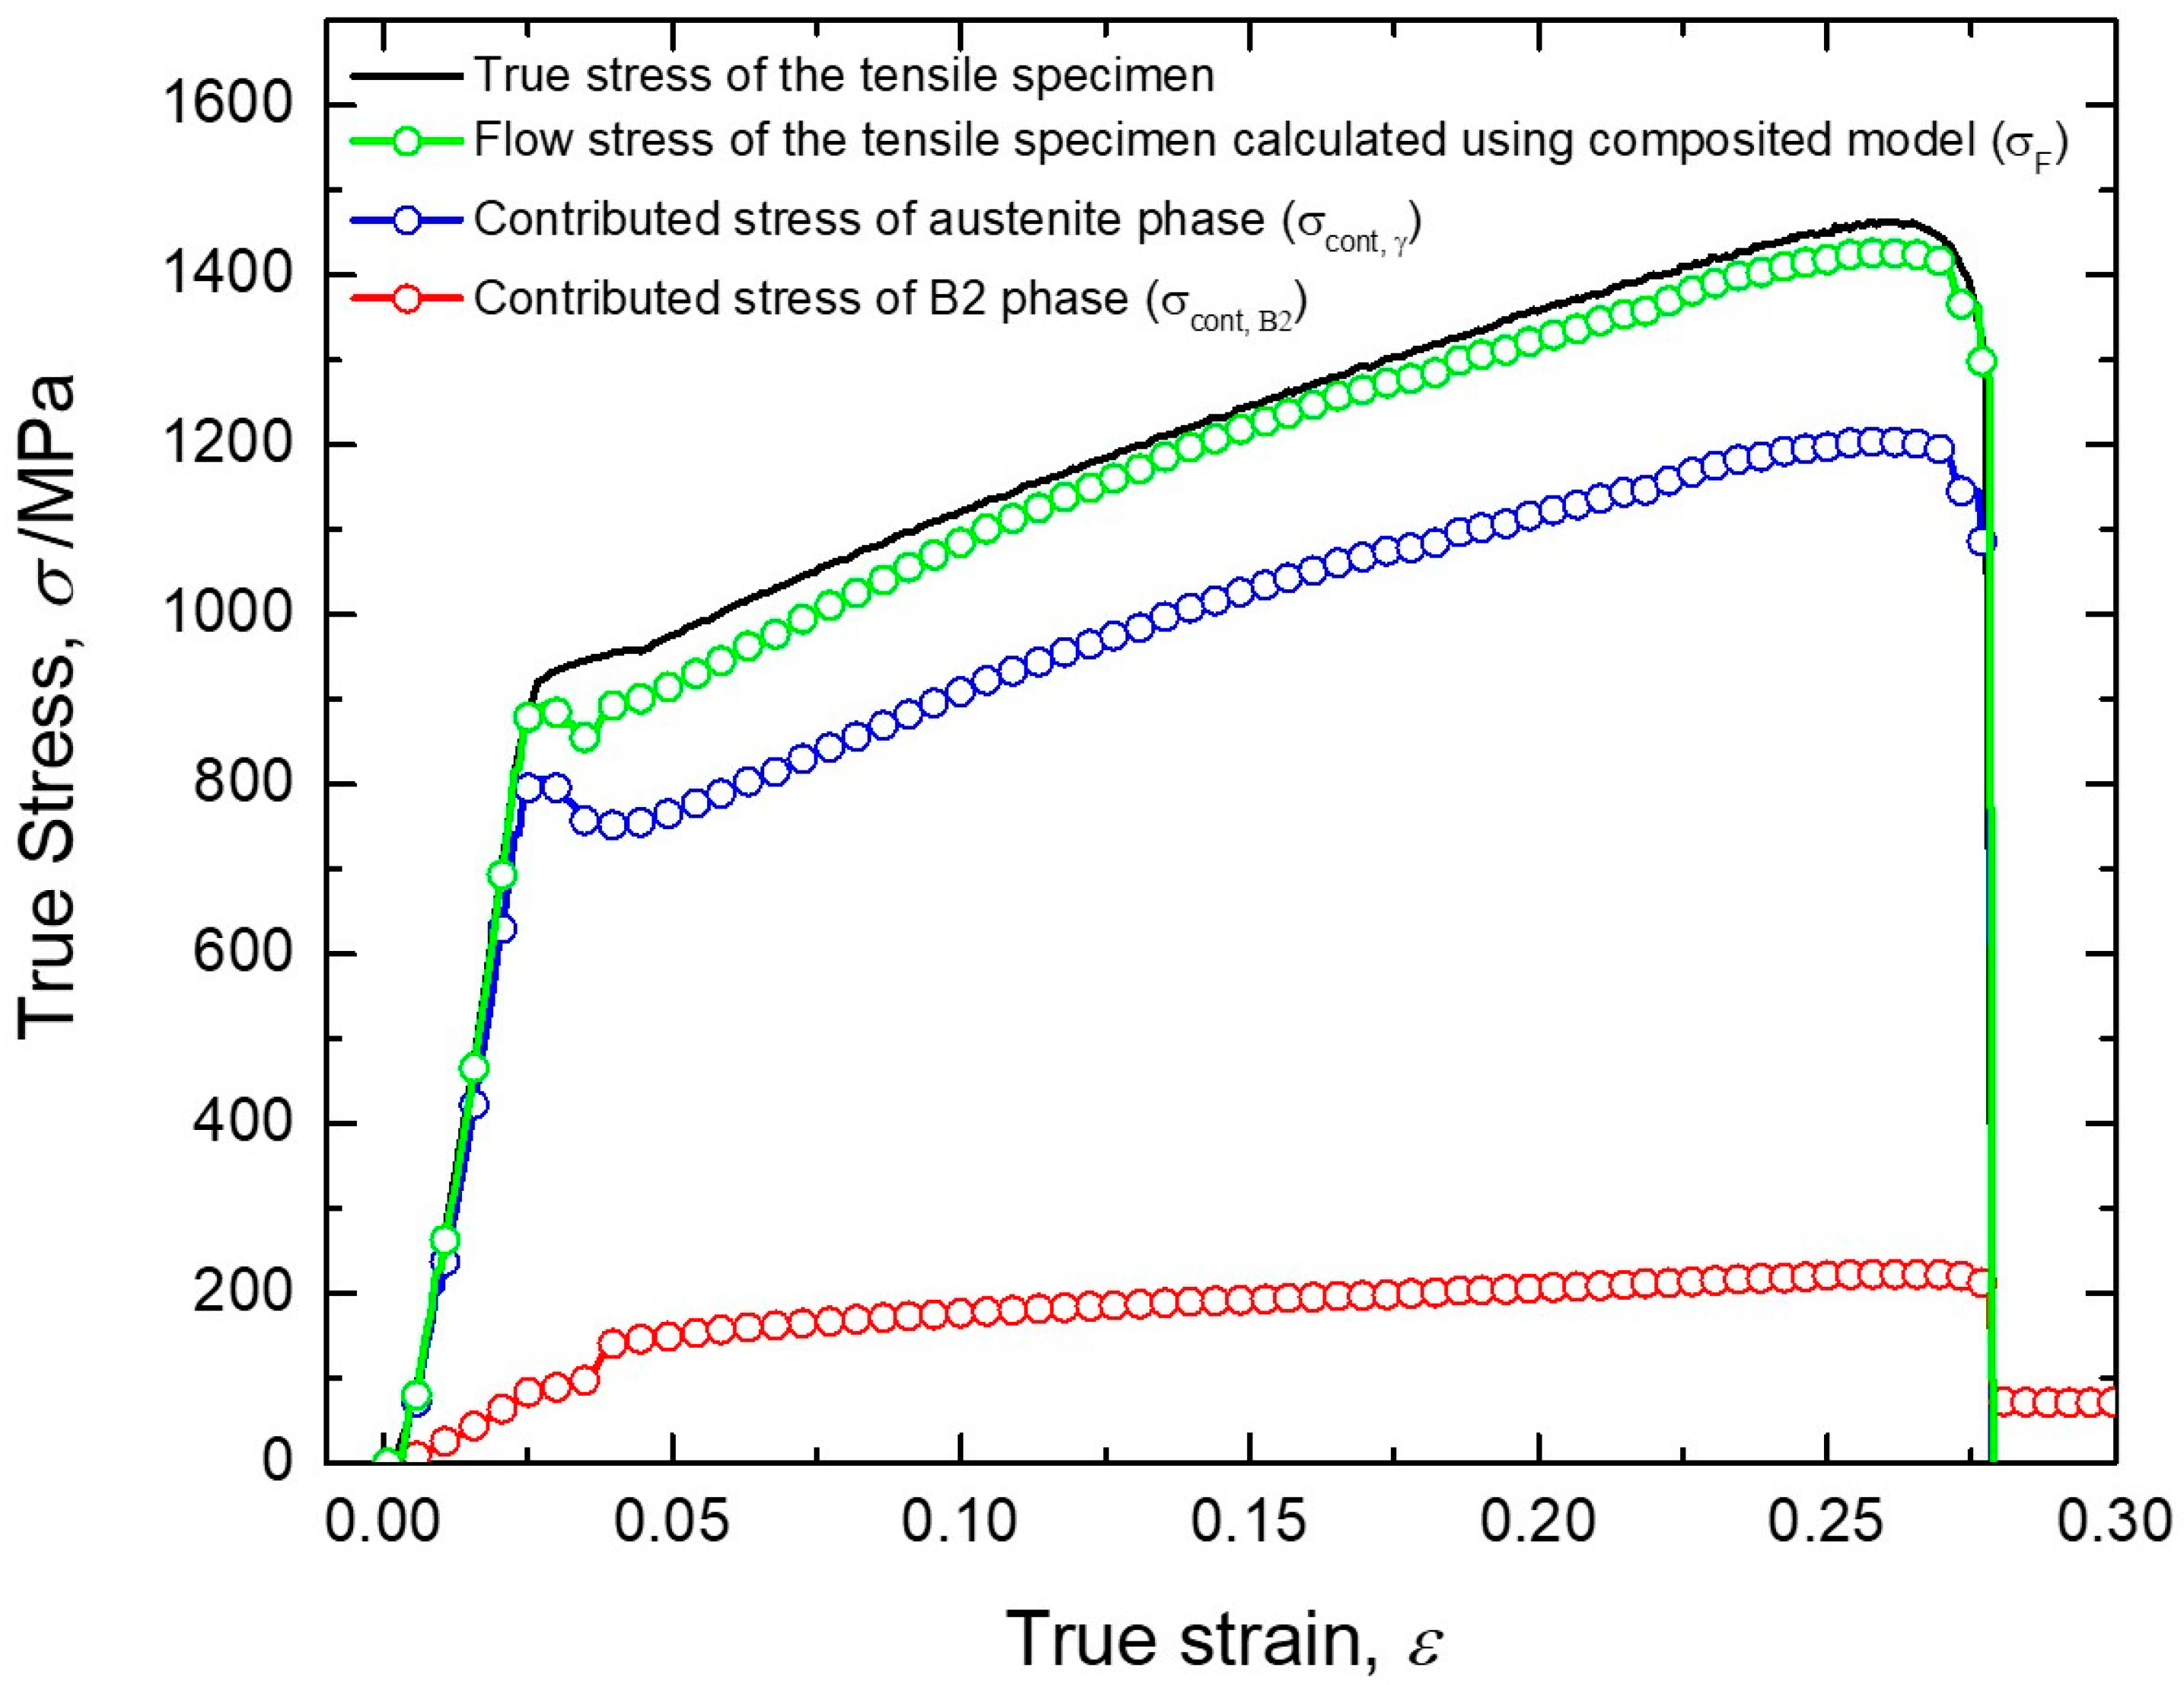
The obtained σ c o n t , γ , σ c o n t , B 2 , and σ F are plotted as a function of tensile true strain in Figure 8, with the experimental tensile true stress-strain curve superimposed. The calculated flow stress ( σ F ) showed a good agreement with the experimentally obtained global true stress of the specimen, and a slight difference between them was probably associated with the fact that the lattice strain measured by diffraction was not exactly parallel to the tensile direction, which caused an underestimation of the phase stress along the tensile direction. It was obvious that the austenite phase contributed to the large majority of the tensile flow stress in the entire stages of the tensile test, owing to its high volume fraction of 0.91 (91%) and essentially good strain hardening ability. However, it should also be noted that the B2 phase with a small volume fraction of only 0.09 (9%) withstood more than 15% of the flow stress of the specimen during the tensile deformation.
The uniform tensile ductility of the material, i.e., the onset of necking, is determined by the Considère plastic instability criterion:
( d σ d ϵ ) σ
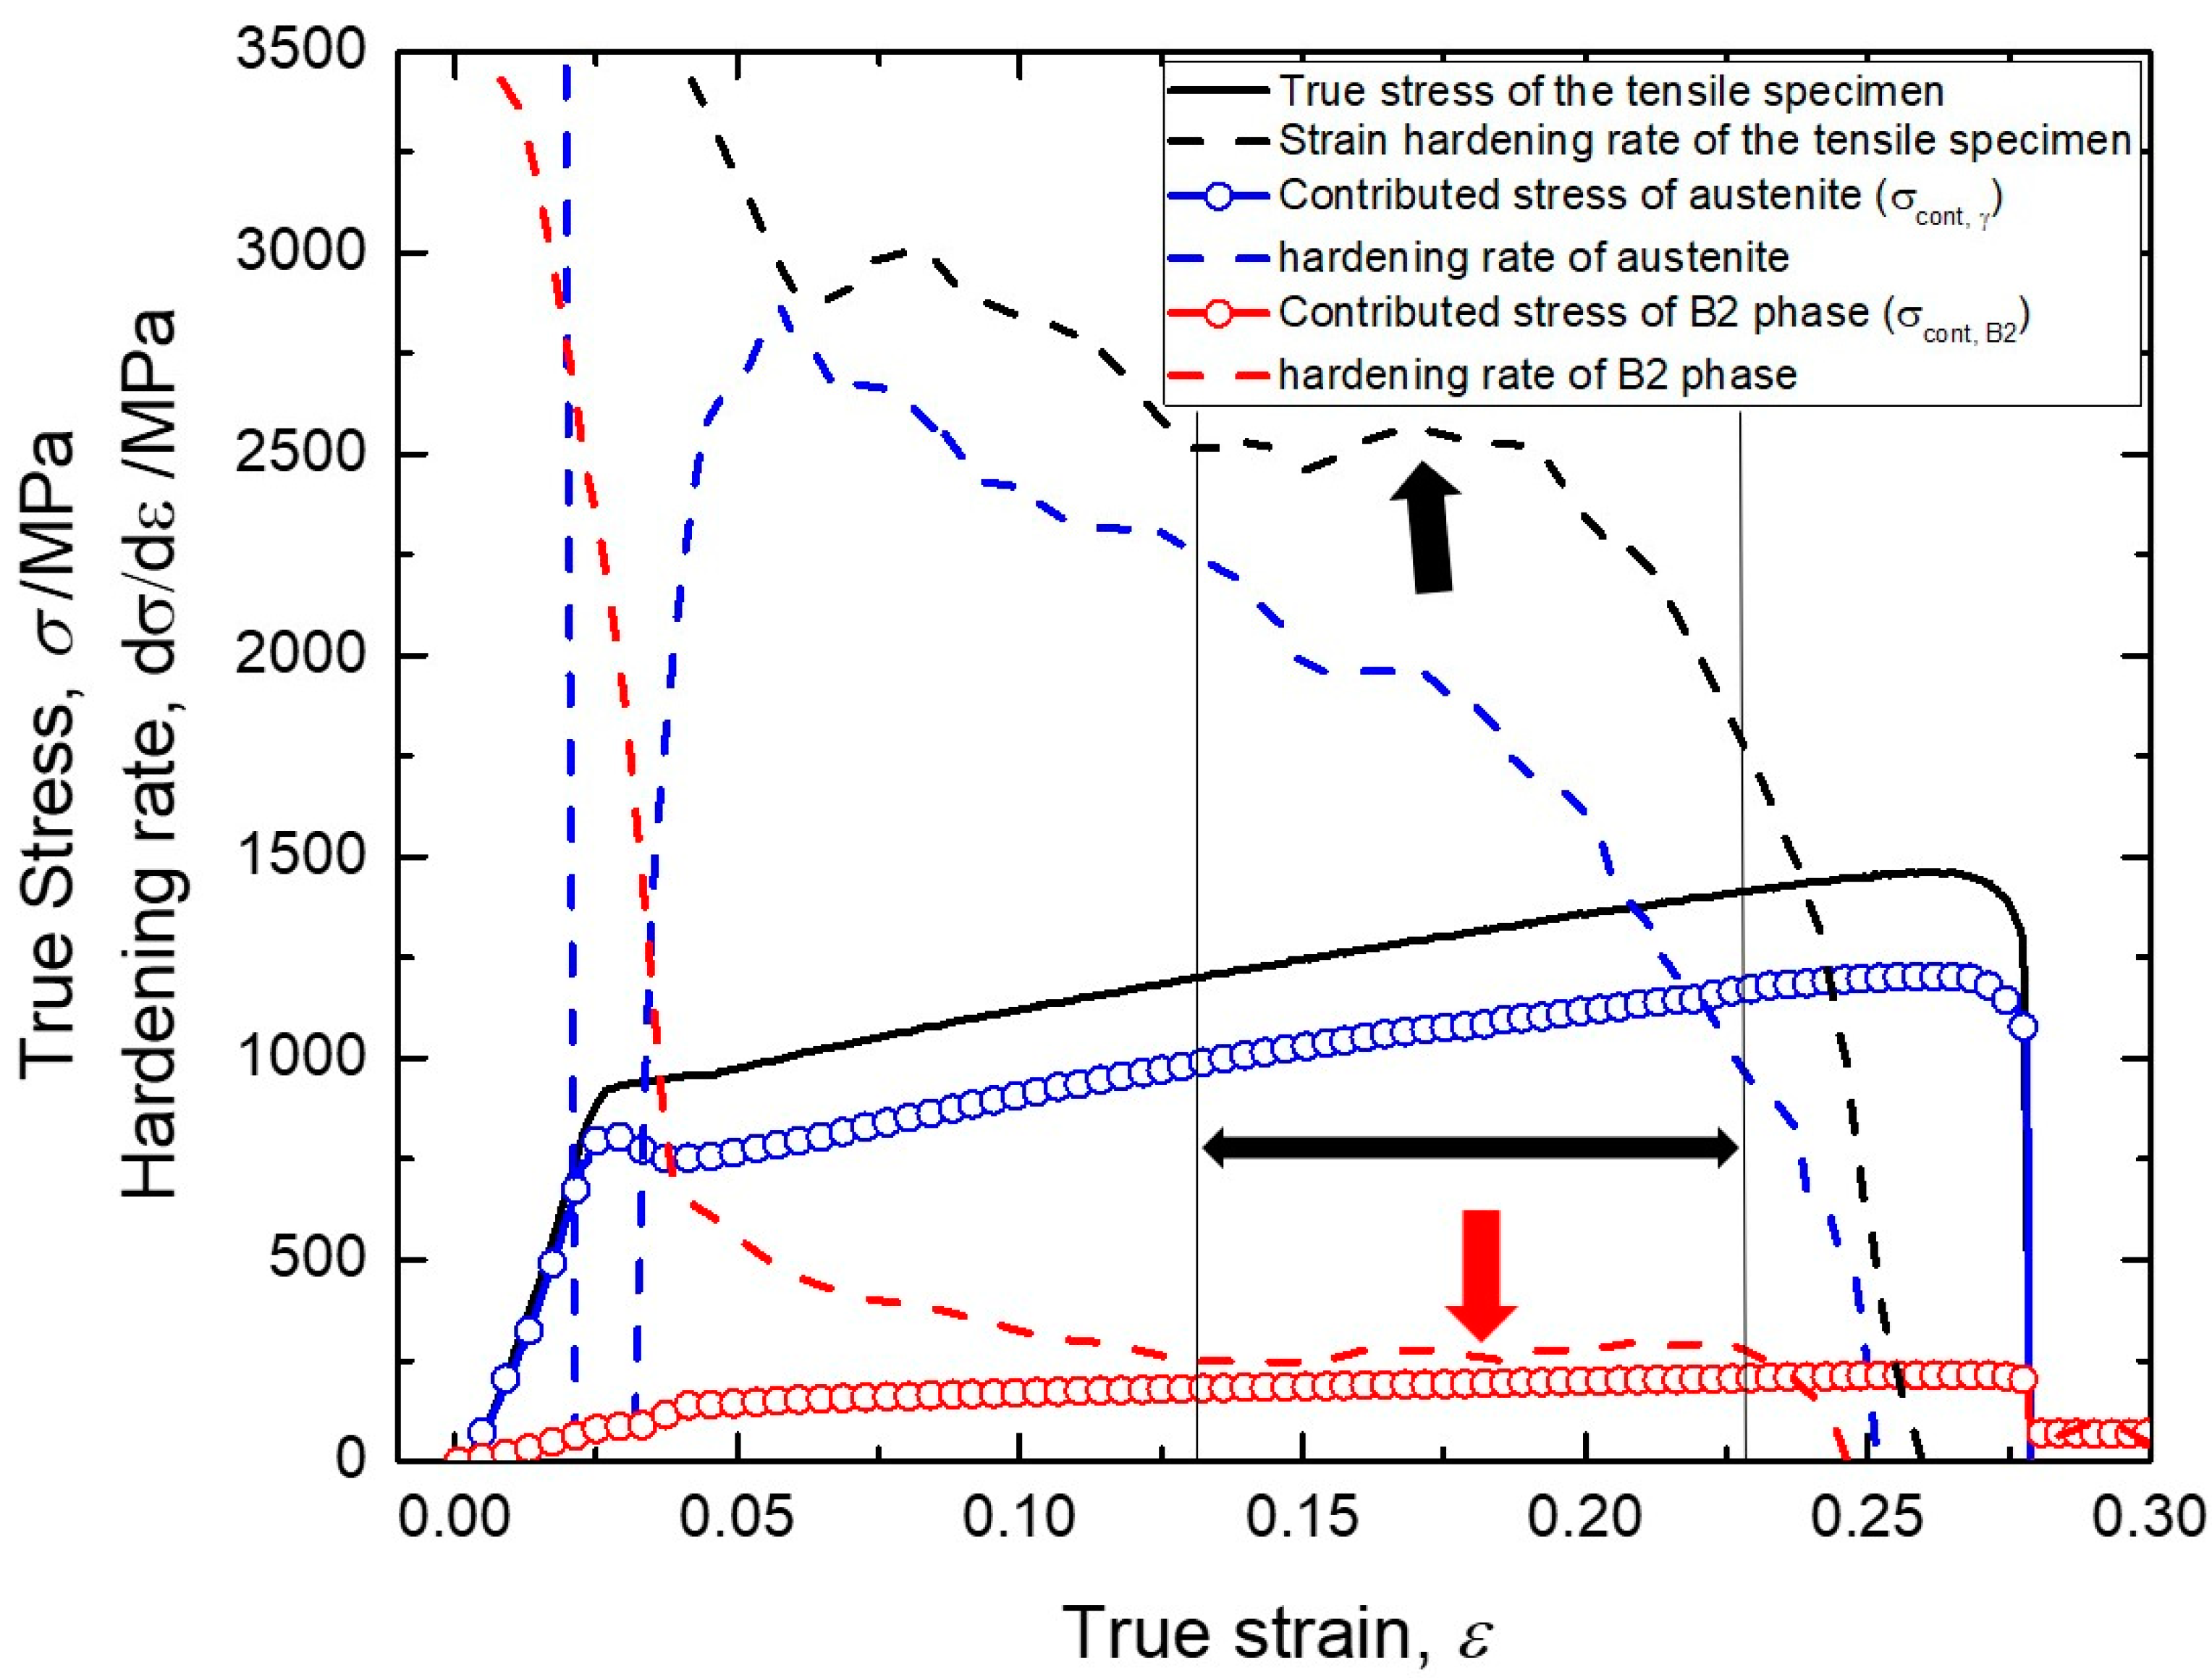
where σ is the flow stress, and dσ/d ϵ is the strain hardening rate which is critical to the plastic instability. To further understand the role of B2 phase during the tensile deformation, the slope of σ c o n t , γ and σ c o n t , B 2 , namely d σ c o n t , γ / d ϵ and d σ c o n t , B 2 / d ϵ , are plotted as a function of tensile true strain in Figure 9, together with the experimental true stress-strain curve and the strain hardening rate ( d σ / d ϵ ) of the specimen. It should be noted that d σ c o n t , γ / d ϵ and d σ c o n t , B 2 / d ϵ did not represent the strain hardening behavior of the individual constituent phase, since partitioning of plastic strain usually takes place between the constituent phases during deformation and the exact strain in each phase cannot be directly measured. Nevertheless, the slope can be regarded as the hardening rate contributed by a constituent phase to the whole specimen at a given global strain. It could be seen in Figure 9 that d σ /d ϵ started to decrease with the true strain after the Lüders band deformation, meanwhile the d σ c o n t ,   γ / d ϵ and d σ c o n t , B 2 / d ϵ also decreased with the true strain, and the decreasing rate was similar to that of d σ /d ϵ . However, the decreasing rate of d σ / d ϵ notably slowed down when the tensile true strain increased from 0.13 to 0.23 (indicated by the black arrow), which was found to interestingly coincide with the level off of the   d σ c o n t , B 2 / d ϵ   (indicated by the red arrow) in the same region of tensile strain; meanwhile, the hardening rate of austenite phase was still in a deacceleration at high values. This result implies that the level off in the hardening rate of B2 phase slowed down the decreasing of the strain hardening rate of the whole specimen in the same tensile strain region, and therefore delayed the onset of plastic instability (necking) of the specimen afterwards, as readily exhibited by the black dashed line. These results suggested that although the B2 phase withstood a small portion of the total flow stress in the whole material, B2 provided a proper hardening rate in deformation of the specimen, especially at the later stage of deformation, which effectively delayed the onset of plastic instability (macroscopic necking) and led to a large tensile ductility of the specimen. The reason for this unique hardening behavior of the B2 phase is not yet understood, but it is considered to associate with the plastic deformation in the B2 particles during tensile deformation.
The diffraction line profile analysis was carried out in order to reveal the plastic deformation of each constituent phase during the tensile test. The evolution of full width at half maximum (FWHM) of the diffraction peaks during the tensile test is illustrated in Figure 10. It is seen that the FWHM of the diffraction peaks in both phases increased rapidly during the Lüders deformation, suggesting a strain broadening and/or a size broadening caused by a rapid generation of defects and/or a reduction of crystallite size. It should be noted that the synchrotron X-ray beam was irradiated at a particular region in the tensile specimen, so that such a rapid increase in the FWHM during the Lüders deformation was due to the quick sweeping of the Lüders front, where plastic strain was localized, on the X-ray irradiated region. After the Lüders deformation, the increasing rate of FWHM gradually slowed down with increasing the tensile strain.
The dislocation density of each constituent phase was estimated by the classical Williamson-Hall method [42] shown as:
Δ 2 θ c o s θ λ = 0.9 D   + 2 ε sin θ λ
where λ is the wavelength of the incident X-ray,   θ   is   the diffraction peak angle, Δ 2 θ   is the FWHM, D is the crystallite size, and   ε   is   the inhomogeneous strain. The   ε   and D are the slope and intercept of the linear relationship by plotting   Δ 2 θ cos θ / λ   against   2 sin θ / λ for each diffraction peak. The dislocation density,   ρ , was then estimated from the average values of the crystallite size and inhomogeneous strain by the following equation [43,44]:
ρ = 3 2 π ε D b  
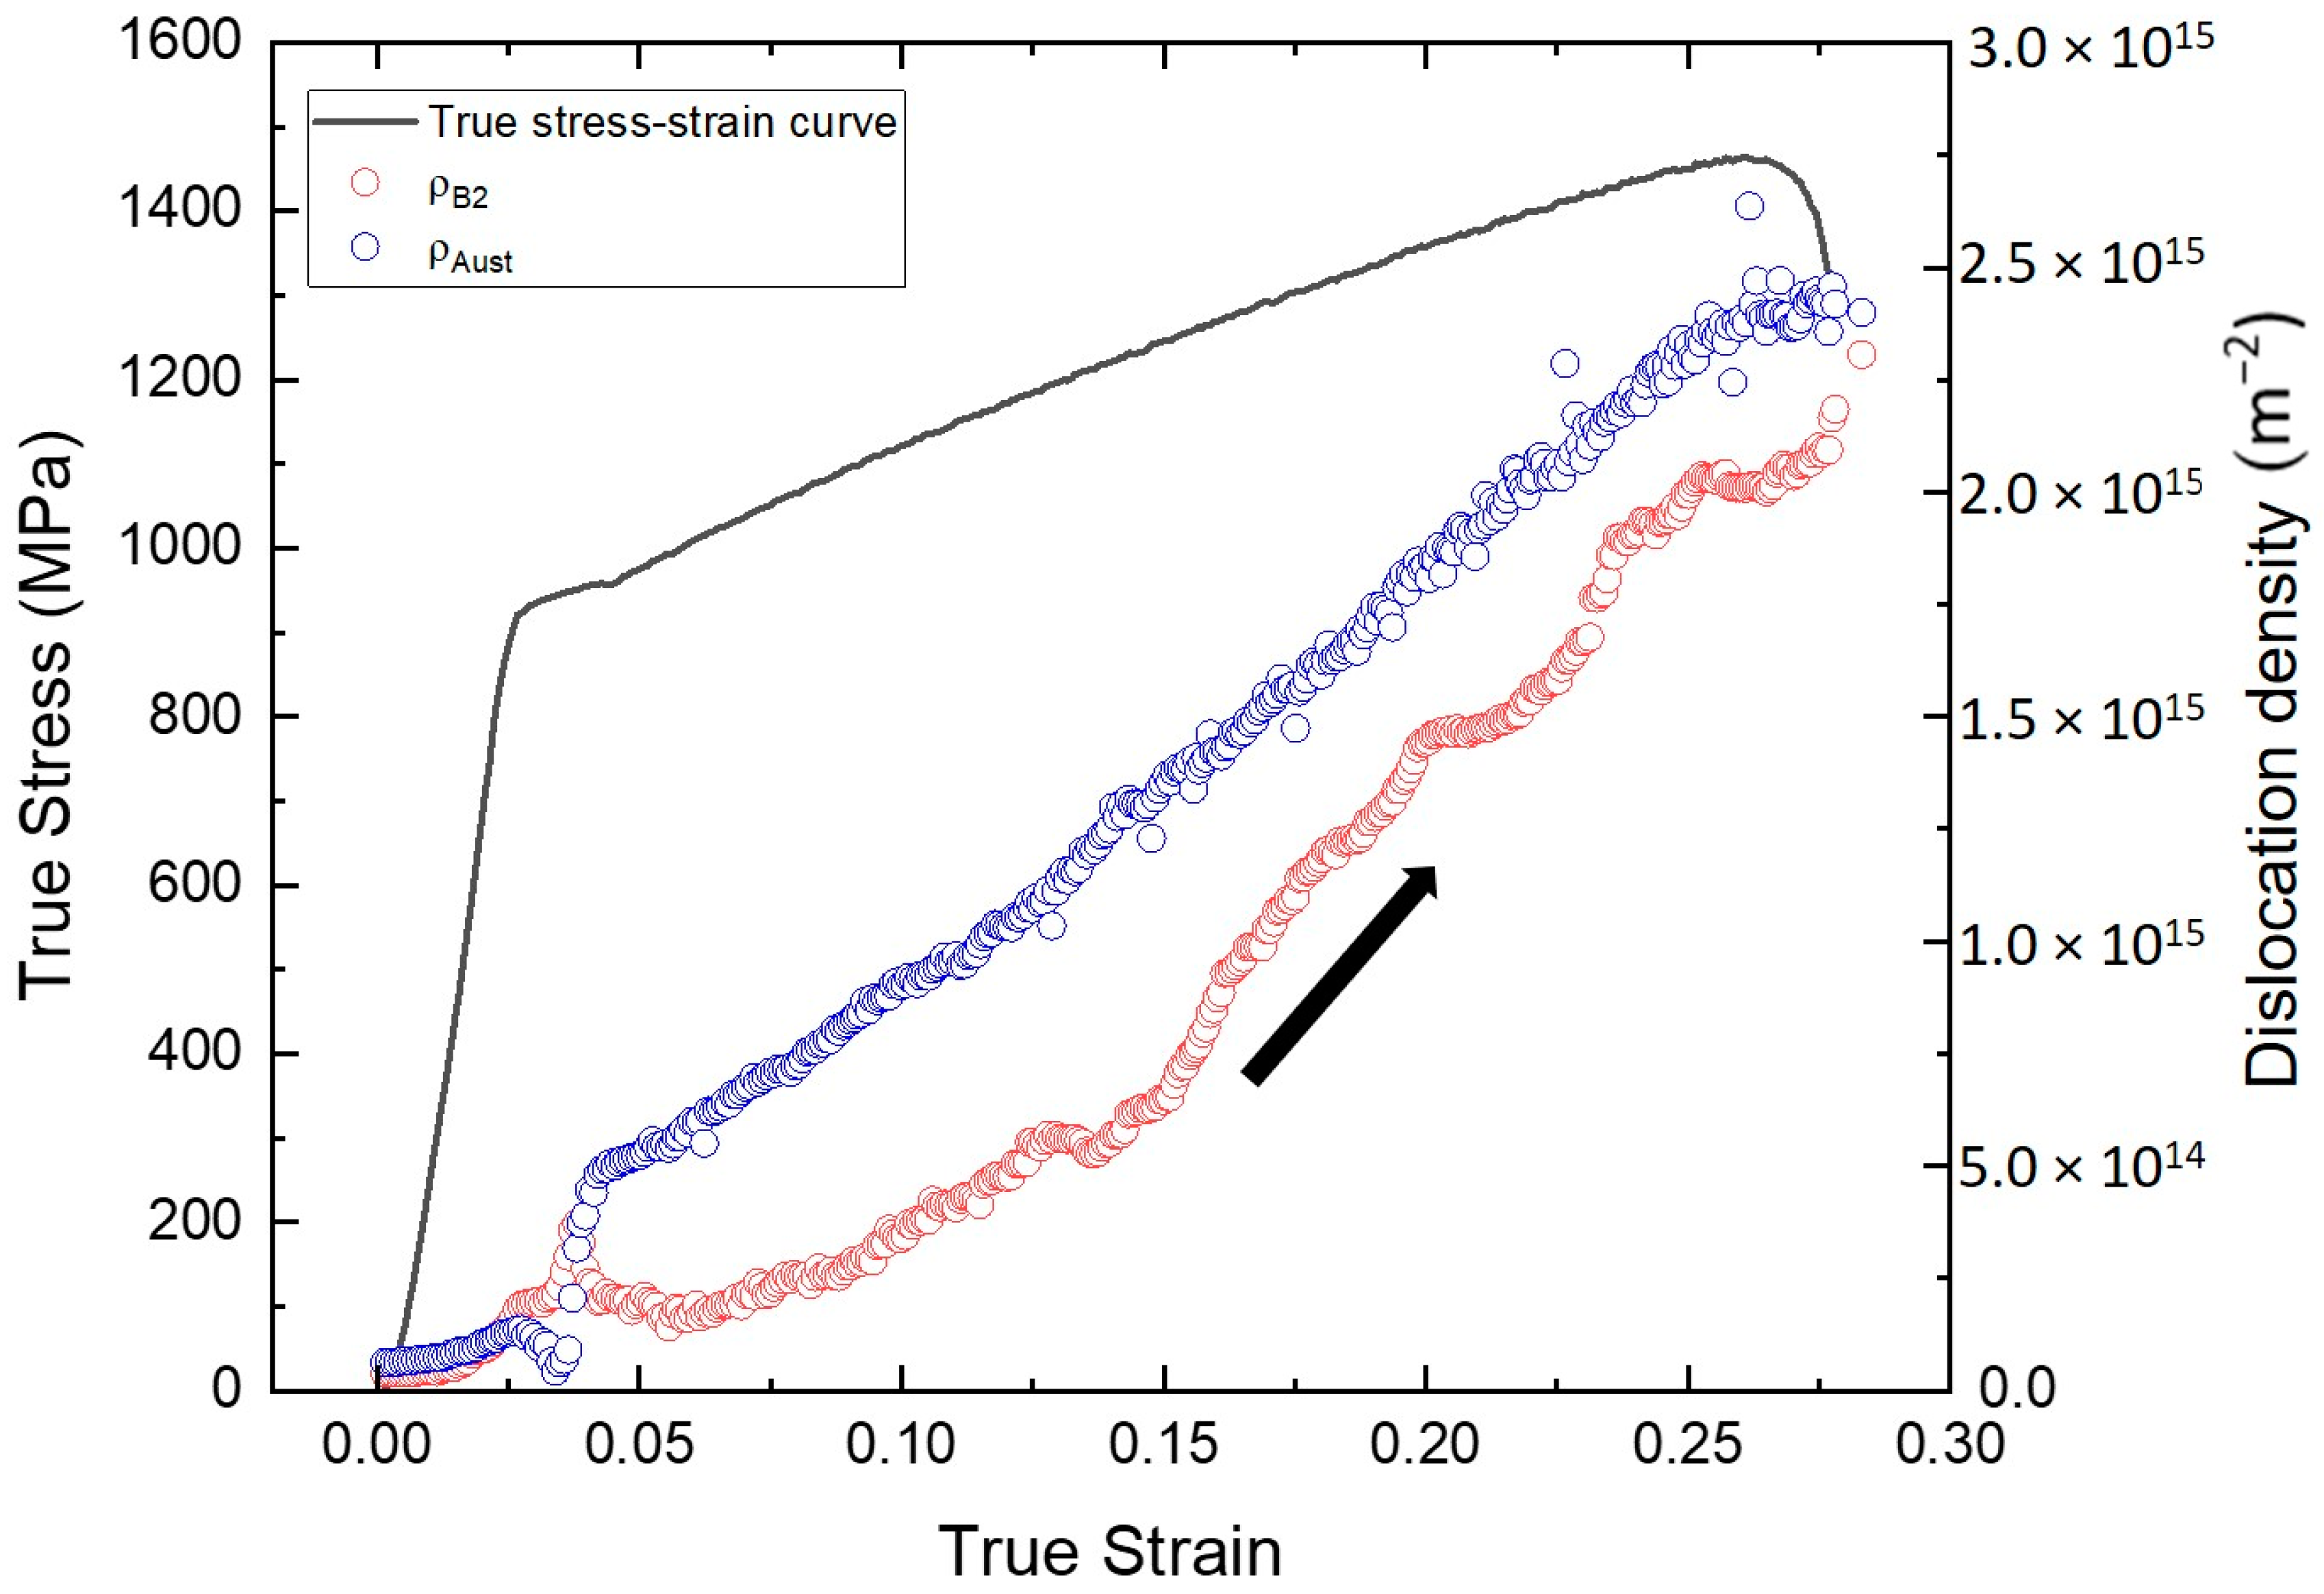
where b is the Burgers vector of the material. The Burgers vectors of 0.258 and 0.25 nm were respectively used for austenite and B2 phase, assuming a/2<110> dislocations for austenite and a/2<111> dislocations for B2 phase. The estimated dislocation densities in austenite phase and B2 phase during tensile deformation are plotted in Figure 11. Before the tensile test, the dislocation densities in austenite phase and B2 phase were 6.0 × 10¹³ m−2 and 4.5 × 10¹³ m−2, which were close to the values in fully recrystallized metals previously reported [21,45]. During the Lüders deformation, the dislocation densities in both phases rapidly increased, which was similar to the tendency of the FWHM evolution. After the Lüders deformation, the dislocation density in austenite phase almost linearly increased with increasing the tensile strain until tensile fracture occurred. Such linear relationship between the dislocation density and tensile strain in austenite phase has been reported by Dini et al. in an Fe–31Mn–3Al–3Si austenitic steel [46]. On the other hand, the dislocation density in the B2 phase increased at a similar rate to that in the austenite phase after the Lüders deformation, while the increasing rate was notably enhanced when the tensile strain reached 0.13 until tensile fracture. This enhanced dislocation accumulation rate in B2 phase interestingly coincided with the slowing down of the decreasing rate in the hardening rate of B2 phase in the same strain range shown in Figure 9, suggesting that the dislocation activities in B2 phase played an important role in hardening of B2 phase, especially in the later stage of tensile deformation. The reason for the enhanced increasing rate of dislocation density in B2 phase might result from mechanical interaction between B2 and austenite phases at their interfaces, which needs to be further clarified through microstructures’ observations. It should be noted that the value of average dislocation densities in austenite and B2 phases are not directly related to the amount of plastic strain in each phase, because the grain size of the two phases are different and the increasing rate of geometrically necessary dislocations with plastic strain can be significantly different [47].
The dislocation density can be related to the flow stress, σ F , according to the Bailey-Hirsh equation [48]:
σ F =   σ 0 + M α G b ρ
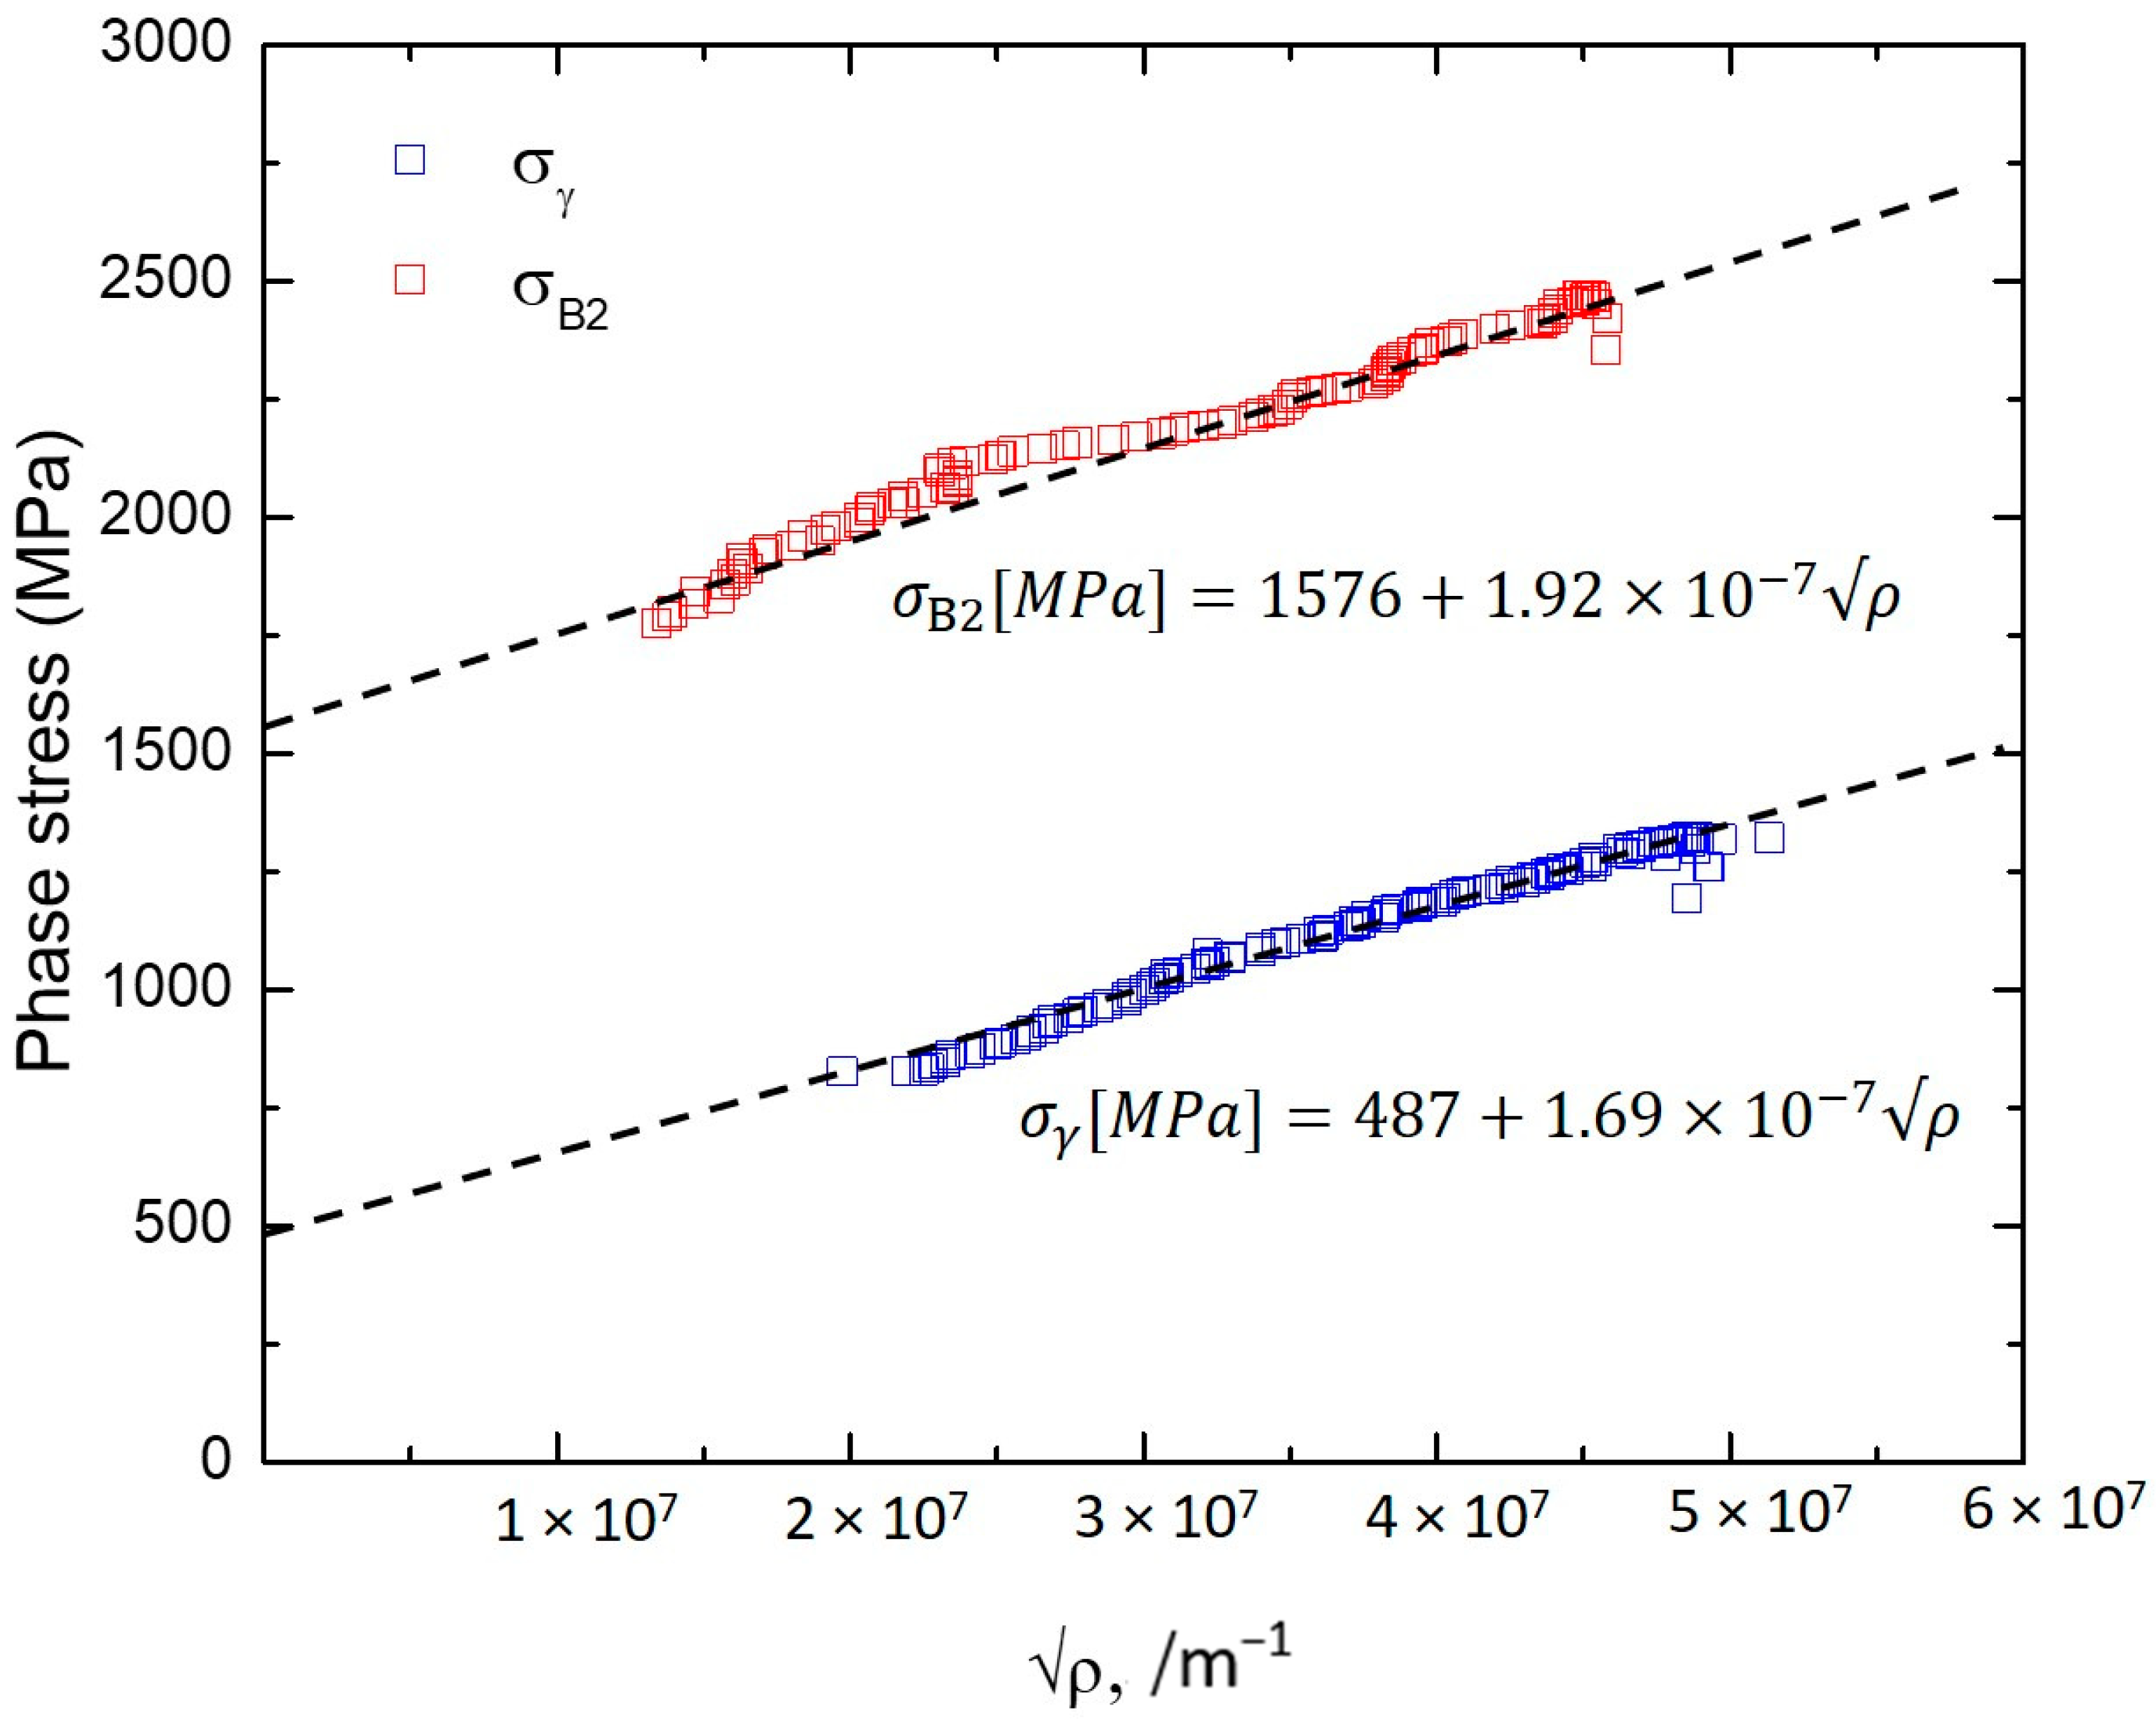
where G is the shear modulus, b is the Burgers vector, M is the average Taylor factor, and α is a constant depending on the dislocation interaction in the material. σ 0 is generally considered to be the additivity of the stresses associated with other strengthening mechanisms, such as friction stress, grain boundary strengthening, and precipitation strengthening. In the present analysis, the phase stress of each constituent phase in the range from ε = 0.05 (after Lüders deformation) to ε = 0.26 during tensile deformation is plotted against the square root of their respective dislocation densities in Figure 12. Good linear relationships were realized in both phases, suggesting that the increasing of dislocation density could account for the phase stress increment in both austenite and B2 phase during tensile deformation. By extrapolating the fitted linear relationships, the value of σ 0 was determined to be 487 MPa for the austenite and 1576 MPa for the B2 phase. The σ 0 of the austenite is in a reasonable agreement with the estimated yield strength of a Fe-22Mn-0.6C austenitic steel, having a similar mean grain size ( σ y = 563   MPa , d = 1.2 μm) estimated from its Hall-Petch relationship ( σ y   ( MPa ) = 133 + 472 · d 1 / 2 ) [49]. The σ 0 of the B2 phase in the present study was comparable with the estimated yield strength of a B2 Fe-Al alloy having a similar mean grain size ( σ y = 1747   MPa , d = 0.3 μm, σ y   ( MPa ) = 386 + 745 · d 1 / 2 ) [50]. These results support that the σ 0 obtained through the extrapolation of the Bailey-Hirsh relationship can be regarded as the additivity of the lattice friction stress and the grain size refinement strengthening in the present alloy. Considering the values of lattice friction stress of austenitic steels and other FCC alloys [49,51] as well as those of B2 alloys [50,52], significant grain refinement strengthening is expected in the austenite and B2 phase having ultrafine grain sizes in the present specimen, although the exact values of grain size refinement strengthening are difficult to separate from the σ 0 .

4. Conclusions

In conclusion, an excellent combination of strength and tensile ductility was achieved in the ultrafine-grained Fe-Mn-Ni-Al-C alloy containing B2 intermetallic compounds as second phase particles. The tensile test with in situ X-ray diffraction measurement revealed a rapid stress partitioning between austenite phase and B2 phase at the very beginning of plastic deformation, which was associated with the Lüders band deformation of the specimen. In addition, through the stress partitioning analysis, it was found that the B2 particles, although they took only 0.09 (9%) volume fraction of the material, withstood very high phase stress during tensile deformation. More importantly, the B2 phase exhibited a unique hardening behavior that could effectively slow down the decrease of the strain hardening rate of the whole specimen and delayed the onset of plastic instability, suggesting an importance of the hard B2 phase in the strength and ductility synergy of the material. Through the Williamson-Hall analysis, it was found that the dislocation accumulation rate in the B2 phase was enhanced during tensile deformation, which seemed to interpret the unique hardening rate of the B2 phase. Further studies should be focused on clarifying the interaction between B2 particles and austenite grains through microstructures’ observations.

Author Contributions

Conceptualization, S.G. and N.T.; methodology, T.Y., W.M., Y.B., W.G., M.-h.P., H.A., M.S. and A.S.; writing—original draft preparation, S.G. and N.T.; writing—review and editing, N.T. All authors have read and agreed to the published version of the manuscript.

Funding

This research received no external funding.

Acknowledgments

The present study was financially supported by JST CREST (JPMJCR1994), Elements Strategy Initiative for Structural Materials (ESISM, No. JPMXP0112101000), and KAKENHI (Grant-in-Aid for Scientific Research from JSPS; No.15H05767 and No.20H00306) all through the Ministry of Education, Culture, Sports, Science and Technology (MEXT), Japan. The synchrotron radiation experiments (beam-time No. 2018B1760) at SPring–8 were performed with the approval of the Japan Synchrotron Radiation Research Institute (JASRI). The alloy used in this study was kindly provided by Dmitri LOUZGUINE from Advanced Institute for Materials Research in Tohoku University. The authors gratefully appreciate all the support.

Conflicts of Interest

The authors declare no conflict of interest.

References

  1. Furuta, T.; Kuramoto, S.; Ohsuna, T.; Oh-Ishi, K.; Horibuchi, K. Die-hard plastic deformation behavior in an ultrahigh-strength Fe-Ni-Al-C alloy. Scr. Mater. 2015, 101, 87–90. [Google Scholar] [CrossRef]
  2. Wang, Z.; Baker, I. Effects of annealing and thermo-mechanical treatment on the microstructures and mechanical properties of a carbon-doped FeNiMnAl multi-component alloy. Mater. Sci. Eng. A 2017, 693, 101–110. [Google Scholar] [CrossRef] [Green Version]
  3. Wang, Z.; Baker, I.; Cai, Z.; Chen, S.; Poplawsky, J.D.; Guo, W. The effect of interstitial carbon on the mechanical properties and dislocation substructure evolution in Fe40.4Ni11.3Mn34.8Al7.5Cr6 high entropy alloys. Acta Mater. 2016, 120, 228–239. [Google Scholar] [CrossRef] [Green Version]
  4. Wang, Z.; Wu, M.; Cai, Z.; Chen, S.; Baker, I. Effect of Ti content on the microstructure and mechanical behavior of (Fe36Ni18Mn33Al13)100−xTix high entropy alloys. Intermet 2016, 75, 79–87. [Google Scholar] [CrossRef] [Green Version]
  5. Wani, I.S.; Bhattacharjee, T.; Sheikh, S.; Lu, Y.P.; Chatterjee, S.; Bhattacharjee, P.; Guo, S.; Tsuji, N. Ultrafine-Grained AlCoCrFeNi2.1Eutectic High-Entropy Alloy. Mater. Res. Lett. 2016, 4, 174–179. [Google Scholar] [CrossRef] [Green Version]
  6. Bhattacharjee, T.; Wani, I.S.; Sheikh, S.; Clark, I.T.; Okawa, T.; Guo, S.; Bhattacharjee, P.; Tsuji, N. Simultaneous Strength-Ductility Enhancement of a Nano-Lamellar AlCoCrFeNi2.1 Eutectic High Entropy Alloy by Cryo-Rolling and Annealing. Sci. Rep. 2018, 8, 1–8. [Google Scholar] [CrossRef]
  7. Tomota, Y.; Lukas, P.; Harjo, S.; Park, J.-H.; Tsuchida, N.; Neov, D. In situ neutron diffraction study of IF and ultra low carbon steels upon tensile deformation. Acta Mater. 2003, 51, 819–830. [Google Scholar] [CrossRef]
  8. Gao, S.; Bai, Y.; Shibata, A.; Tsuji, N. Microstructures and mechanical property of a Fe-Ni-Al-C alloy containing B2 intermetallic compounds. Mater. Sci. Eng. 2017, 219, 012020. [Google Scholar] [CrossRef] [Green Version]
  9. Asoo, K.; Tomota, Y.; Harjo, S.; Okitsu, Y. Tensile Behavior of a TRIP-aided Ultra-fine Grained Steel Studied by Neutron Diffraction. ISIJ Int. 2011, 51, 145–150. [Google Scholar] [CrossRef] [Green Version]
  10. Harjo, S.; Abe, J.; Aizawa, K.; Gong, W.; Iwahashi, T. Deformation Behavior of An Austenitic Steel by Neutron Diffraction. In Proceedings of the Proceedings of the 12th Asia Pacific Physics Conference (APPC12), Makuhari, Japan, 14–19 July 2013; Volume 014017, pp. 1–6. [Google Scholar]
  11. Fu, S.; Bei, H.; Chen, Y.; Liu, T.; Yu, D.; An, K. Deformation mechanisms and work-hardening behavior of transformation-induced plasticity high entropy alloys by in -situ neutron diffraction. Mater. Res. Lett. 2018, 6, 620–626. [Google Scholar] [CrossRef] [Green Version]
  12. Sun, Z.; Song, G.; Sisneros, T.A.; Clausen, B.; Pu, C.; Li, L.; Gao, Y.; Liaw, P.K. Load partitioning between the bcc-iron matrix and NiAl-type precipitates in a ferritic alloy on multiple length scales. Sci. Rep. 2016, 6, 23137. [Google Scholar] [CrossRef]
  13. Saleh, A.A.; Brown, D.W.; Pereloma, E.V.; Clausen, B.; Davies, C.; Tomé, C.N.; Gazder, A.A. An in-situ neutron diffraction study of a multi-phase transformation and twinning-induced plasticity steel during cyclic loading. Appl. Phys. Lett. 2015, 106, 171–911. [Google Scholar] [CrossRef] [Green Version]
  14. Shibata, A.; Takeda, Y.; Park, N.; Zhao, L.; Harjo, S.; Kawasaki, T.; Gong, W.; Tsuji, N. Nature of dynamic ferrite transformation revealed by in-situ neutron diffraction analysis during thermomechanical processing. Scr. Mater. 2019, 165, 44–49. [Google Scholar] [CrossRef]
  15. Bae, J.W.; Kim, J.G.; Park, J.M.; Woo, W.; Harjo, S.; Kim, H.S. In situ neutron diffraction study of phase stress evolution in a ferrous medium-entropy alloy under low-temperature tensile loading. Scr. Mater. 2019, 165, 60–63. [Google Scholar] [CrossRef]
  16. Kim, S.-H.; Kim, H.; Kim, N.J. Brittle intermetallic compound makes ultrastrong low-density steel with large ductility. Nat. Cell Biol. 2015, 518, 77–79. [Google Scholar] [CrossRef] [PubMed]
  17. Yang, M.; Yuan, F.; Xie, Q.; Wang, Y.; Ma, E.; Wu, X. Strain hardening in Fe–16Mn–10Al–0.86C–5Ni high specific strength steel. Acta Mater. 2016, 109, 213–222. [Google Scholar] [CrossRef] [Green Version]
  18. Zhao, L.; Park, N.; Tian, Y.; Chen, S.; Shibata, A.; Tsuji, N. Novel thermomechanical processing methods for achieving ultragrain refinement of low-carbon steel without heavy plastic deformation. Mater. Res. Lett. 2016, 5, 61–68. [Google Scholar] [CrossRef] [Green Version]
  19. Miyajima, Y.; Okubo, S.; Miyazawa, T.; Adachi, H.; Fujii, T. In-situ X-ray diffraction during tensile deformation of ultrafine-grained copper using synchrotron radiation. Philos. Mag. Lett. 2016, 96, 294–304. [Google Scholar] [CrossRef]
  20. Adachi, H.; Miyajima, Y.; Sato, M.; Tsuji, N. Evaluation of dislocation density for 1100 aluminum with different grain size during tensile deformation by using In-situ X-ray diffraction technique. J. Jpn. Inst. Light Met. 2014, 64, 463–469. [Google Scholar] [CrossRef] [Green Version]
  21. Adachi, H.; Karamatsu, Y.; Nakayama, S.; Miyazawa, T.; Sato, M.; Yamasaki, T. Elastic and Plastic Deformation Behavior Studied by In-Situ Synchrotron X-ray Diffraction in Nanocrystalline Nickel. Mater. Trans. 2016, 57, 1447–1453. [Google Scholar] [CrossRef] [Green Version]
  22. Hwang, J.; Trang, T.; Lee, O.; Park, G.; Zargaran, A.; Kim, N.J. Improvement of strength – ductility balance of B2-strengthened lightweight steel. Acta Mater. 2020, 191, 1–12. [Google Scholar] [CrossRef]
  23. Liu, X.; Xue, Q.; Wang, W.; Zhou, L.; Jiang, P.; Ma, H.; Yuan, F.; Wei, Y.; Wu, X. Back-stress-induced strengthening and strain hardening in dual-phase steel. Materialia 2019, 7, 100–376. [Google Scholar] [CrossRef]
  24. Gao, S.; Chen, M.; Joshi, M.; Shibata, A.; Tsuji, N. Yielding behavior and its effect on uniform elongation in IF steel with various grain sizes. J. Mater. Sci. 2014, 49, 6536–6542. [Google Scholar] [CrossRef]
  25. Tian, Y.; Gao, S.; Zhao, L.; Lu, S.; Pippan, R.; Zhang, Z.; Tsuji, N. Remarkable transitions of yield behavior and Lüders deformation in pure Cu by changing grain sizes. Scr. Mater. 2018, 142, 88–91. [Google Scholar] [CrossRef]
  26. Tsuji, N.; Ito, Y.; Saito, Y.; Minamino, Y. Strength and ductility of ultrafine grained aluminum and iron produced by ARB and annealing. Scr. Mater. 2002, 47, 893–899. [Google Scholar] [CrossRef]
  27. Zheng, R.; Bhattacharjee, T.; Shibata, A.; Sasaki, T.; Hono, K.; Joshi, M.; Tsuji, N. Simultaneously enhanced strength and ductility of Mg-Zn-Zr-Ca alloy with fully recrystallized ultrafine grained structures. Scr. Mater. 2017, 131, 1–5. [Google Scholar] [CrossRef]
  28. Kamikawa, N.; Huang, X.; Tsuji, N.; Hansen, N. Strengthening mechanisms in nanostructured high-purity aluminium deformed to high strain and annealed. Acta Mater. 2009, 57, 4198–4208. [Google Scholar] [CrossRef]
  29. Terada, D.; Inoue, S.; Tsuji, N. Microstructure and mechanical properties of commercial purity titanium severely deformed by ARB process. J. Mater. Sci. 2007, 42, 1673–1681. [Google Scholar] [CrossRef]
  30. Zheng, R.; Du, J.-P.; Gao, S.; Somekawa, H.; Ogata, S.; Tsuji, N. Transition of dominant deformation mode in bulk polycrystalline pure Mg by ultra-grain refinement down to sub-micrometer. Acta Mater. 2020, 198, 35–46. [Google Scholar] [CrossRef]
  31. Schwab, R. Understanding the complete loss of uniform plastic deformation of some ultrafine-grained metallic materials in tensile straining. Int. J. Plast. 2019, 113, 218–235. [Google Scholar] [CrossRef]
  32. Schwab, R.; Ruff, V. On the nature of the yield point phenomenon. Acta Mater. 2013, 61, 1798–1808. [Google Scholar] [CrossRef]
  33. Tsuji, N.; Ogata, S.; Inui, H.; Tanaka, I.; Kishida, K.; Gao, S.; Mao, W.; Bai, Y.; Zheng, R.; Du, J.-P. Strategy for managing both high strength and large ductility in structural materials–sequential nucleation of different deformation modes based on a concept of plaston. Scr. Mater. 2020, 181, 35–42. [Google Scholar] [CrossRef]
  34. Zhao, Y.; Guo, Y.; Wei, Q.; Topping, T.; Dangelewicz, A.; Zhu, Y.; Langdon, T.; Lavernia, E. Influence of specimen dimensions and strain measurement methods on tensile stress–strain curves. Mater. Sci. Eng. A 2009, 525, 68–77. [Google Scholar] [CrossRef]
  35. De, A.K.; Murdock, D.C.; Mataya, M.C.; Speer, J.G.; Matlock, D.K. Quantitative measurement of deformation-induced martensite in 304 stainless steel by X-ray diffraction. Scr. Mater. 2004, 50, 1445–1449. [Google Scholar] [CrossRef]
  36. Takaki, S.; Akama, D.; Jiang, F.; Tsuchiyama, T. Correction of the Williamson-Hall Plots by the Diffraction Young’s Modulus. J. Soc. Mater. Sci. Jpn. 2018, 67, 383–388. [Google Scholar] [CrossRef] [Green Version]
  37. Tomota, Y.; Lukas, P.; Neov, D.; Harjo, S.; Abe, Y. In situ neutron diffraction during tensile deformation of a ferrite-cementite steel. Acta Mater. 2003, 51, 805–817. [Google Scholar] [CrossRef]
  38. Morooka, S.; Tomota, Y.; Kamiyama, T. Heterogeneous Deformation Behavior Studied by in Situ Neutron Diffraction during Tensile Deformation for Ferrite, Martensite and Pearlite Steels. ISIJ Int. 2008, 48, 525–530. [Google Scholar] [CrossRef] [Green Version]
  39. Jia, N.; Cong, Z.; Sun, X.; Cheng, S.; Nie, Z.; Ren, Y.; Liaw, P.; Wang, Y.D. An in situ high-energy X-ray diffraction study of micromechanical behavior of multiple phases in advanced high-strength steels. Acta Mater. 2009, 57, 3965–3977. [Google Scholar] [CrossRef]
  40. Oliver, E.; Daymond, M.R.; Withers, P.J. Interphase and intergranular stress generation in carbon steels. Acta Mater. 2004, 52, 1937–1951. [Google Scholar] [CrossRef]
  41. Harjo, S.; Tsuchida, N.; Abe, J.; Gong, W. Martensite phase stress and the strengthening mechanism in TRIP steel by neutron diffraction. Sci. Rep. 2017, 7, 1–11. [Google Scholar] [CrossRef]
  42. Williamson, G.; Hall, W. X-ray line broadening from filed aluminium and wolfram. Acta Met. 1953, 1, 22–31. [Google Scholar] [CrossRef]
  43. Smallman, R.E.; Westmacott, K.H. Stacking faults in face-centred cubic metals and alloys. Philos. Mag. 1957, 2, 669–683. [Google Scholar] [CrossRef]
  44. Williamson, G.K.; Smallman, R.E. III. Dislocation densities in some annealed and cold-worked metals from measurements on the X-ray debye-scherrer spectrum. Philos. Mag. 1956, 1, 34–46. [Google Scholar] [CrossRef]
  45. Zhong, Z.Y.; Brokmeier, H.-G.; Gan, W.M.; Maawad, E.; Schwebke, B.; Schell, N. Dislocation density evolution of AA 7020-T6 investigated by in-situ synchrotron diffraction under tensile load. Mater. Charact. 2015, 108, 124–131. [Google Scholar] [CrossRef]
  46. Dini, G.; Ueji, R.; Najafizadeh, A.; Monir-Vaghefi, S. Flow stress analysis of TWIP steel via the XRD measurement of dislocation density. Mater. Sci. Eng. A 2010, 527, 2759–2763. [Google Scholar] [CrossRef]
  47. Ashby, M.F. The deformation of plastically non-homogeneous materials. Philos. Mag. 1970, 21, 399–424. [Google Scholar] [CrossRef]
  48. Bailey, J.E.; Hirsch, P.B. The dislocation distribution, flow stress, and stored energy in cold-worked polycrystalline silver. Philos. Mag. 1960, 5, 485–497. [Google Scholar] [CrossRef]
  49. Tian, Y.; Bai, Y.; Zhao, L.; Gao, S.; Yang, H.; Shibata, A.; Zhang, Z.; Tsuji, N. A novel ultrafine-grained Fe 22Mn 0.6C TWIP steel with superior strength and ductility. Mater. Charact. 2017, 126, 74–80. [Google Scholar] [CrossRef]
  50. Crimp, M.A.; Vedula, K.M. The relationship between cooling rate, grain size and the mechanical behavior of B2 Fe-Al alloys. Mater. Sci. Eng. A 1993, 165, 29–34. [Google Scholar] [CrossRef]
  51. Yoshida, S.; Bhattacharjee, T.; Bai, Y.; Tsuji, N. Friction stress and Hall-Petch relationship in CoCrNi equi-atomic medium entropy alloy processed by severe plastic deformation and subsequent annealing. Scr. Mater. 2017, 134, 33–36. [Google Scholar] [CrossRef]
  52. Baker, I.; Nagpal, P.; Liu, F.; Munroe, P. The effect of grain size on the yield strength of FeAl and NiAl. Acta Met. Mater. 1991, 39, 1637–1644. [Google Scholar] [CrossRef]
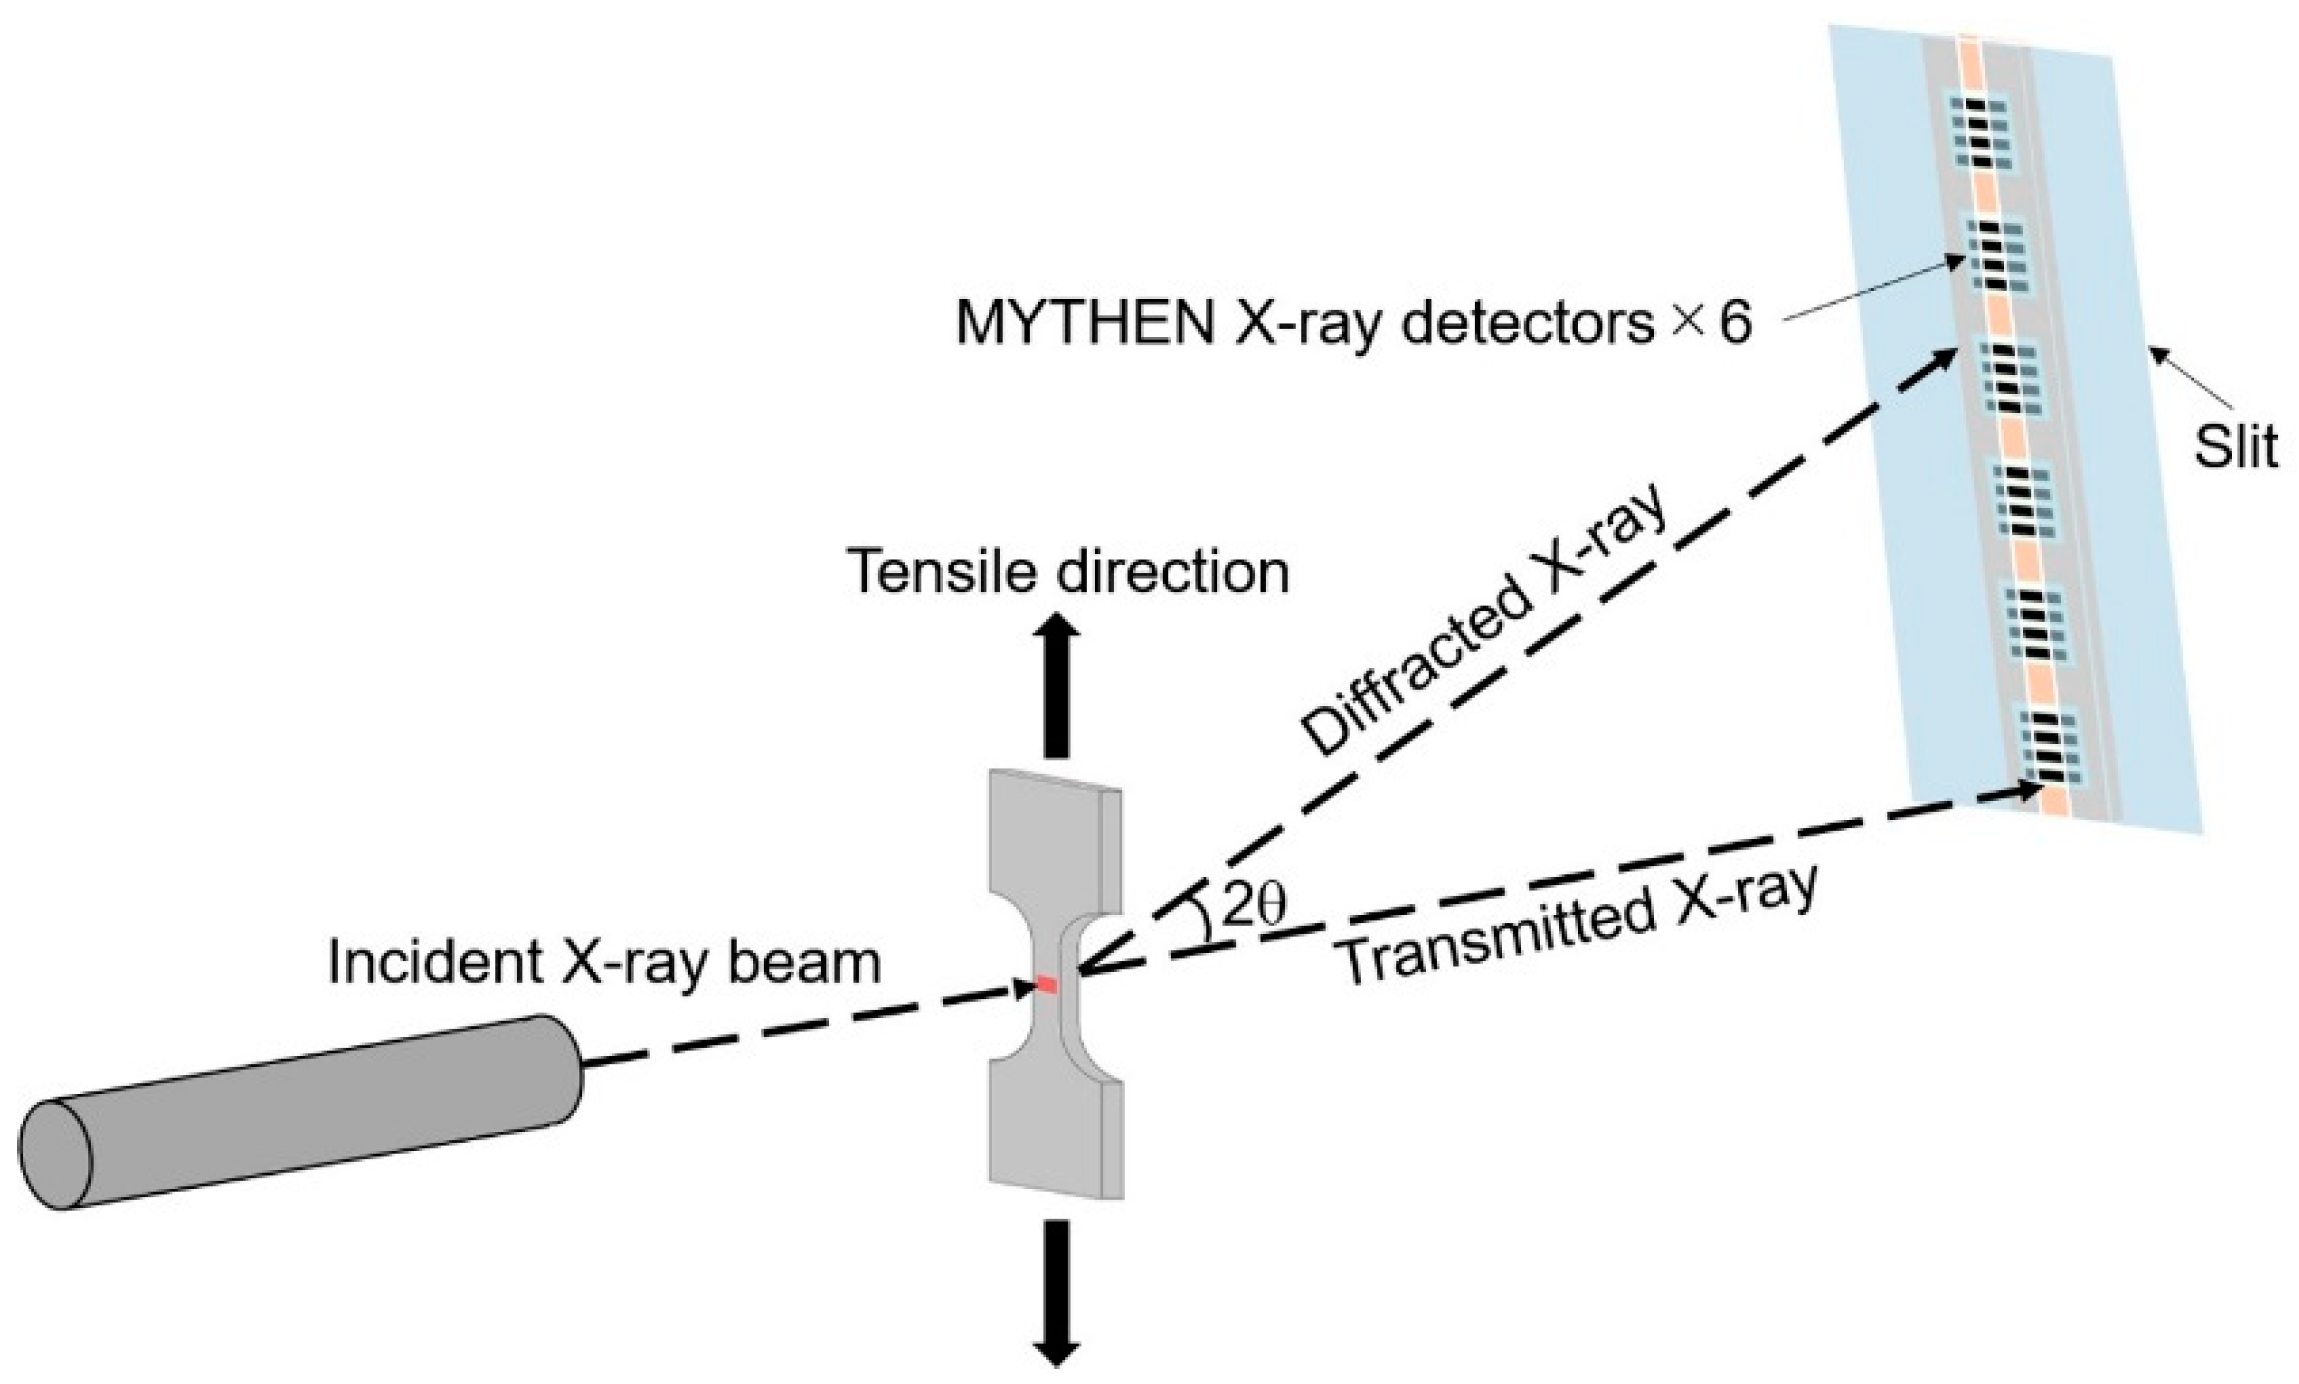
Figure 1. Schematic illustration of the in situ X-ray diffraction (XRD) measurement system in SPring-8.
Crystals 10 01115 g001
Figure 2. Grain boundary map superimposed with phase map of the dual-phase ultrafine-grained (UFG) Fe-20Mn-8Al-5Ni-0.8C alloy, observed by SEM-EBSD. Low-angle grain boundaries (15° > θ ≥ 2°), high-angle grain boundaries (θ ≥ 15°), and twin boundaries (Σ3) are respectively indicated by black, blue, and red lines. The grain and yellow background represent austenite phase and B2 phase, respectively. The B2 phase in the material was indexed as BCC (α) phase by EBSD because they have quite similar Kikuchi patterns.
Crystals 10 01115 g002
Figure 3. Nominal stress-strain curve of the UFG dual-phase Fe-20Mn-8Al-5Ni-0.8C alloy. The insets show the enlarged stress-strain curve at the beginning of tensile deformation and the corresponding strain contour on the surface of the specimen measured by the DIC method. The Lüders plateau can be clearly seen in the enlarged stress-strain curve, and the three strain contour maps corresponding to the points ①, ②, and ③ in the stress-strain curve show the initiation and propagation of the Lüders bands on the specimen.
Crystals 10 01115 g003
Figure 4. Nominal stress-strain curve of the UFG dual-phase Fe-20Mn-8Al-5Ni-0.8C alloy measured during the tensile test in situ XRD measurement system in SPring-8.
Crystals 10 01115 g004
Figure 5. A diffraction profile measured before loading of the UFG Fe-20Mn-8Al-5Ni-0.8C alloy during the tensile test with in situ XRD measurements. The changing of the (111) peak of austenite (γ phase) during the tensile test is shown in the insets, in which the peak shifting and peak broadening during the tensile test are illustrated.
Crystals 10 01115 g005
Figure 6. Changes in the (111) and (311) lattice strains of austenite phase, and the (110) and (211) lattice strains of B2 phase as a function of tensile true stress. The true stress-strain curve is superimposed in the figure. The lattice strain after tensile fracture is not shown in the figure for the sake of simplicity.
Crystals 10 01115 g006
Figure 7. Calculated phase stresses of austenite and B2 phase are plotted as a function of tensile true strain. The true stress-strain curve of the specimen is also plotted. A significant stress partitioning between the austenite phase and the B2 phase during plastic deformation can be readily observed.
Crystals 10 01115 g007
Figure 8. The contributed flow stress of the austenite phase and B2 phase, and the flow stress calculated using a composited model, are plotted as a function of the tensile true strain. The experimental tensile true stress-strain curve is also plotted. A good agreement is noticed between the calculated flow stress and the experimental flow stress.
Crystals 10 01115 g008
Figure 9. The contributed flow stress of austenite phase and B2 phase, the experimental tensile flow stress, and their slopes are plotted as a function of the tensile true strain. The region indicated by the double arrow corresponds to where the decreasing of the hardening rate of B2 phase (red dashed line) slowed down, so that the decreasing of strain hardening rate of the tensile test specimen (black dashed line) in the region was slowed down.
Crystals 10 01115 g009
Figure 10. The full width at half maximum (FWHM) of the diffraction peaks of austenite and B2 phase are plotted as a function of the tensile true strain. The global true stress-strain curve is also superimposed.
Crystals 10 01115 g010
Figure 11. The estimated dislocation densities of austenite phase (blue circle) and B2 phase (red circle) during tensile deformation are plotted as a function of the tensile true strain. The increasing of dislocation accumulation rate in the B2 phase from a tensile strain of 0.13 is indicated by the arrow.
Crystals 10 01115 g011
Figure 12. The phase stresses of austenite phase (blue square) and B2 phase (red square) during tensile deformation are plotted as a function of the square root of their dislocation densities. Good linear relationships between the phase stress and dislocation density are recognized, suggesting that the incremental phase stress in each constituent phase during tensile deformation can be explained by dislocation accumulation. /m−1.
Crystals 10 01115 g012
Publisher’s Note: MDPI stays neutral with regard to jurisdictional claims in published maps and institutional affiliations.