Article

Three-Dimensional Unique-Identifier-Based Automated Georeferencing and Coregistration of Point Clouds in Underground Mines

by
Sarvesh Kumar Singh
1,
Bikram Pratap Banerjee
1,2 and
Simit Raval
1,*
1
School of Minerals and Energy Resources Engineering, University of New South Wales, Sydney, NSW 2052, Australia
2
Agriculture Victoria, Grains Innovation Park, 110 Natimuk Road, Horsham, VIC 3400, Australia
*
Author to whom correspondence should be addressed.
Remote Sens. 2021, 13(16), 3145; https://doi.org/10.3390/rs13163145
Submission received: 14 June 2021 / Revised: 6 August 2021 / Accepted: 6 August 2021 / Published: 9 August 2021
(This article belongs to the Special Issue Remote Sensing Solutions for Mapping Mining Environments)

Abstract

:
Spatially referenced and geometrically accurate laser scans are essential for mapping and monitoring applications in underground mines to ensure safe and smooth operation. However, obtaining an absolute 3D map in an underground mine environment is challenging using laser scanning due to the unavailability of global navigation satellite system (GNSS) signals. Consequently, applications that require georeferenced point cloud or coregistered multitemporal point clouds such as detecting changes, monitoring deformations, tracking mine logistics, measuring roadway convergence rate and evaluating construction performance become challenging. Current mapping practices largely include a manual selection of discernable reference points in laser scans for georeferencing and coregistration which is often time-consuming, arduous and error-prone. Moreover, challenges in obtaining a sensor positioning framework, the presence of structurally symmetric layouts and highly repetitive features (such as roof bolts) makes the multitemporal scans difficult to georeference and coregister. This study aims at overcoming these practical challenges through development of three-dimensional unique identifiers (3DUIDs) and a 3D registration (3DReG) workflow. Field testing of the developed approach in an underground coal mine has been found effective with an accuracy of 1.76 m in georeferencing and 0.16 m in coregistration for a scan length of 850 m. Additionally, automatic extraction of mine roadway profile has been demonstrated using 3DUID which is often a compliant and operational requirement for mitigating roadway related hazards that includes roadway convergence rate, roof/rock falls, floor heaves and vehicle clearance for collision avoidance. Potential applications of 3DUID include roadway profile extraction, guided automation, sensor calibration, reference targets for a routine survey and deformation monitoring.

1. Introduction

Point clouds obtained from terrestrial or mobile laser scanning play a critical role in infrastructure mapping and development projects, and are well suited for civil, mining and transportation industries. Particularly in underground mines, point clouds obtained from laser scanning are used to identify and mitigate roadway related hazards. The main applications of laser scanning in underground mines include measuring roadway convergence rate [1], identifying changes and deformations [2], comparing current development with mine plan [3], assessing construction performance [3], keeping track of mine logistics [4] and localising platforms during search and rescue missions [5]. Most of the mentioned applications either require a georeferenced point cloud for absolute location or multitemporal point cloud coregistration for detecting changes and deformations.
In an underground mine, direct georeferencing of the 3D point cloud is challenging due to the absence of a global navigation satellite system (GNSS) signal. The predominant practice under such a situation is to transfer datum from a GNSS-aided environment to a GNSS-denied environment using conventional survey methods. In the process, a few easily distinguishable control points are installed inside the GNSS-denied environment and are tagged by a total station survey to obtain global three-dimensional (3D) coordinates. Correspondence between local and global coordinate system is then established by recognising the control points in the point cloud [6,7]. The process involves manual identification of installed control points from the scanned point cloud, which is often time-consuming and potentially erroneous. Other studies have partially automated the process by georeferencing point clouds using coregistration of subsequent laser frames by matching installed control points [8,9]. The accuracy of georeferencing usually depends on how correctly the control points are identified in the LiDAR data and has an irrefutable impact on localisation and change detection capability in multitemporal data [10,11]. In the absence of ground control targets (GCTs), multitemporal datasets are coregistered using algorithms such as iterative close point (ICP) or normal distribution transform (NDT) to obtain mutually aligned point clouds [12]. However, coregistration depends on several factors essential for cloud matching, such as the presence of discriminative features, surface reflectivity, structure repeatability and geometrical symmetry in the environment. In mobile laser scanning, environments with symmetrical and repeatable layouts, such as an underground mine, lead to aliasing issues, i.e., false laser scan matches in coregistration due to the absence of an adequate number of distinct features [13]. The aliasing issues results in inaccurate localisation, mapping drift and distorted objects in spatiotemporal point cloud data [14]. Researchers have progressively developed techniques to improve coregistration using point descriptors, which are generated for individual points in the point cloud to uniquely highlight characteristics such as curvature, local point geometry and surface variation in the environment [15]. Some of the widely used descriptors include eigenvalue descriptor [16,17], fast point feature histogram [18], radial surface descriptors [19], height gradient histogram [20] and scale-invariant feature transform [21]. Point descriptors though mostly effective are computationally intensive to generate and can produce unreliable results for environments with a low number of distinguishable features. Consequently, the generation of descriptors is avoided when real-time or rapid solutions are required. Alternatively, in a featureless and GNSS-denied environment, additional information is acquired either through multisensor integration, using a combination of additional sensors such as optical camera, inertial measurement unit, odometer and radio detection and ranging (RADAR), or by introducing artificially induced discernible active or passive GCTs through manual installation. The use of discernible GCTs is a widely used simple and effective approach.
The GCTs are of mainly two categories, active and passive. Active GCTs require electrical power to operate, such as wireless sensors that require a continuous supply of power, or are stimulated in presence of an external active power source, such as radio frequency identification tags (RFID). Existing research based on active tag sensing primarily includes RFID tags, or a wireless sensor network [22,23]. RFID tags together with RFID reader are used to map the drift in the underground mine [24,25]. Coordinates of the installed location of tags (can be global or local depending on georeferencing or coregistration) are stored in the internal memory of the chipsets along with its unique identifier (ID), which are then used in georeferencing and coregistration of multi spatiotemporal point clouds. In coregistration, the process involves the initial alignment of multiple point clouds using tag’s coordinates, then a fine refinement is performed using the iterative closest point (ICP) algorithm. When using simultaneous localisation and mapping (SLAM) to scan a large underground mine, the inertial measurement unit (IMU) sensors tend to accumulate error over time that results in an inaccurate 3D map. Previous research indicates that the installation of RFID tags can be useful along long sections of the underground roadway to reduce inaccuracies [24]. Combining data from RFIDs, odometer and IMU has been found effective to reduce IMU drift incurred for localisation and mapping [26]. A few studies have targeted avoiding using inertial sensors altogether and focused solely on using a laser scanner and RFIDs for accurate localisation and mapping [24,27,28]. Inconsistencies in laser frame stitching were observed when separations between installed RFID tags were large. Although active GCTs are accurate, they need electrical power to operate. For operational scenarios posing strict intrinsic safety requirements, statutory regulations or fire-related hazards, such as an active underground coal mine, the use of active sensors is often a constraint. Under such scenarios, passive GCTs provide a sensible alternative tool for 3D mapping.
Passive GCTs do not require power and can be recognised through optical cameras or laser scanners using the spectral or geometrical characteristics of the target, respectively. GCT with retroreflective materials exhibit higher intensity than the background structures which in turn aids/helps the process of georeferencing and coregistration of the point clouds [29,30,31]. An approach based on intensity relies on the reflectivity of retroreflective GCTs, which is likely to attenuate over time due to corrosion and dust. Additionally, the intensity-based approach is only suitable if the laser scanner is equipped to capture the intensity information. Therefore, geometric GCTs such as panels and spheres are often preferred over reflective targets for georeferencing and coregistration [32,33,34]. The recognition of geometric centres for spherical GCTs is achieved using surface reconstruction, which are then tagged with associated coordinates. The method is effective even for a low-resolution point cloud (5 cm to 20 cm point spacing) provided enough points are captured on the sphere for surface reconstruction. However, identical GCTs which are symmetrical in structure are virtually indistinguishable, therefore supervised labelling of GCTs is necessary based on field notes detailing the local environment of the installed location. The technique is often tedious, error-prone and unsuitable at large scale for automated georeferencing and data coregistration applications when scan length is not similar. Further, such GCT’s are unsuitable for featureless environments as they do not augment additional information. The necessity of unique identifiers as GCTs led to the development of a 3D barcode that was shown to reduce lateral and axial error in localisation of a vehicle [35]. However, the showcased 3D barcode was rarely used in future research due to its arduous construction and recognition challenges in the noisy and sparse point cloud. As a result, a complementary optical camera sensor was introduced for recognising 2D barcode/QR code patterns instead of 3D for localisation [36,37,38]. The outcome of an optical camera-based approach depends on the lighting condition and GCT recognition is often compromised in suboptimally lit underground or indoor space. Further, the use of complementary sensors increases system costs. Therefore, GCTs must be recognised directly from the 3D point cloud without relying on additional sensors for recognition while keeping the identity of each target intact. An approach involving 3D geometric structures placed opposite to each other on the mine wall was presented for accurate localisation and mapping using triangulation, where the geometric targets were identical, but the lengths of edges were varied to attach a unique identity [39]. The georeferencing of the point cloud was achieved by surveying targets using a total station and then recognising the targets in the point cloud to establish correspondence. Most of the passive target-based approaches use an optical camera to detect a 2D pattern or rely on the intensity of the retro-reflective target in case of laser scanning [29,36,37]. A major limitation of such a system is that it fails in a dark environment and is often affected by dust and dirt. Other types of GCTs, such as 3D barcodes or those presented in [39], which can be recognised in 3D point clouds are either difficult to construct due to complex geometrical structure or hard to decode because of inaccuracy in edge identification [35,39].
Monitoring of underground mines, particularly coal mines, is still a challenge due to major difficulties such as suboptimal lighting, fire-related hazards, regulatory requirements on the use of active GCT’s due to intrinsic safety and lack of a global frame of reference. This study develops and proposes a three dimensional unique identifier, referred to as 3DUID, to solve georeferencing and data coregistration of point clouds in sensitive underground mines for automated monitoring applications. The developed 3DUID is passive in nature, easy to construct, easily decodable, low-cost, has attributes for ease in surveying, and is robust against minor noise which is typical in point clouds for recognition purposes. Moreover, complementary optical sensors are not needed, and the recognition is accomplished directly in a 3D point cloud. A robust workflow, called three-dimensional unique-identifier-based registration and georeferencing (3DReG), is developed which extracts and decodes 3DUID and automatically georeferences the scanned point cloud or mutually coregisters multiple point clouds. The experiment was conducted in an operational underground coal mine, which had mapping challenges including repetitive sections, suboptimal lighting and low material reflectivity. Results demonstrate the efficacy of 3DReG in obtaining accurate georeferencing and data coregistration. Further, automatic extraction of mine roadway profile, mainly horizontal and vertical clearance, has also been demonstrated which was compared against the ground truth data for validation. The main aim of the study was not to improve the simultaneous localisation and mapping algorithm (SLAM) but to develop a spatial referencing framework for accurate and automated georeferencing and coregistration of point clouds.

2. Materials and Methods

The study consisted of three main steps: (1) development of 3DUID based on mapping characteristics of employed laser scanner, (2) development of 3DReG workflow for georeferencing and coregistration of multitemporal point clouds, and (3) field demonstration of automated georeferencing, coregistration and roadway profile extraction. A detailed explanation of individual steps is given in Section 2.1 to Section 2.3. A SLAM-based mobile laser scanner (ZebRevo, GeoSlam, Denver, CO, USA) was used to acquire point cloud data in preliminary experiments and field implementation. The scanner has a measurable range of 30 m with a laser pulse of 905 nm wavelength, classified as a reasonably safe to use class 1 laser product. The scan rate of the scanner is around 43,200 points/s with a range error of ±3 cm [40].

2.1. 3DUID Development

Three laboratory tests were conducted to identify the dimensions and the suitability of a material required for construction (Figure 1). In the first laboratory test, several patterns in the form of a barcode carved on a polystyrene board and < shaped structure were used. Rectangular blocks with spacing varying from 1 mm to 25 mm (Figure 1a, Row 1) as well as the spacing of 30 mm, 40 mm and 50 mm (Figure 1a, Row 2) were created with a depth of 30 mm. The < shaped pattern was also created with spacing ranging from 1 mm to 60 mm and depth of 30 mm (Figure 1a, Row 3). The test was designed to aid in determining the separation threshold needed between individual elements or block of 3DUID for effective pattern recognition as it depends on the distance from the scanner and specifications of the laser scanner such as scanning rate, range accuracy and point density. Choosing an optimal 3DUID dimension based on environmental characteristics and laser scanner property is essential for accurate recognition. For the selected mine environment, the distance between the opposite walls was within the range of 5 m. As the laser equipment scanned the mine from within the tunnel, the maximal possible distance between the laser and 3DUID at the moment of the closest pass was always less than 5 m. Therefore, the scanning distance between the sensor and potential targets during the testing and development of 3DUID was kept at 5 m. In the generated point cloud, the structures with separation less than 22 mm were not observed and the < shaped pattern showed that the minimum measurement required for discernible separation was 30 mm (Figure 1d). Since the recognition capability of an object depends on the scan rate and scanning distance, as point density varies on the object, the choice of case-specific scanning distance helped in assessing required point cloud resolution under extreme underground conditions for a given mobile laser scanner. For laser scanners with high scan rates (>100,000 points/s) and low range error (<1 cm), the detection of 3DUID would be invariably better. However, manufacturer specified point density and accuracy terms are less reliable in designing 3DUIDs, as the accuracy parameters are measured in a controlled environment, requiring a preliminary test as described herein.
A second laboratory test was conducted to observe the effect of material reflectivity on the separation threshold. Two ∧ shaped patterns, coated with moderately and highly reflective materials, were installed and scanned from a distance of 5 m (Figure 1b). Reflective materials usually provide better laser backscatter, aiding in increasing the number of scanned points, which in turn enable better characterisation and segregation of scanned objects. However, very highly reflective materials could behave like a ‘mirror’, leading to specular reflections causing multipath which increases noise in the point cloud. The separation observed in ∧ shaped pattern was 29 mm and 52 mm for moderately reflective and highly reflective material, respectively (Figure 1e).
To verify the results from the first and second tests, a third laboratory test was undertaken where several square blocks with dimensions ranging from 5 mm to 45 mm were installed at a separation of 30 mm. The three columns of blocks consisted of polystyrene panels covered with a moderately reflective, highly reflective and very highly reflective material (Figure 1c). The square blocks with a dimension greater than 3 cm were identified with confidence although in the case of high and very high reflective material the incurred noise made it hard to segregate the square blocks (Figure 1f). It was verified that using a high reflective material for recognition is not ideal given incurred noise caused by the multipath of laser rays between spaced adjacent blocks due to specular reflection [41]. The multipath leads to false range measurement as the signal return is misdirected and reception time is prolonged leading to distorted geometry of the target.
The overall results indicated a block size of 30 mm (approx.) as the minimum detectable linear unit using point cloud scans from a distance of 5 m. To account for uncertainties in physical deployment and laser scanning of 3DUID inside a mine with dusty conditions, the dimension of elemental blocks was fixed to 6 cm (double the minimum mappable unit) for efficient recognition.
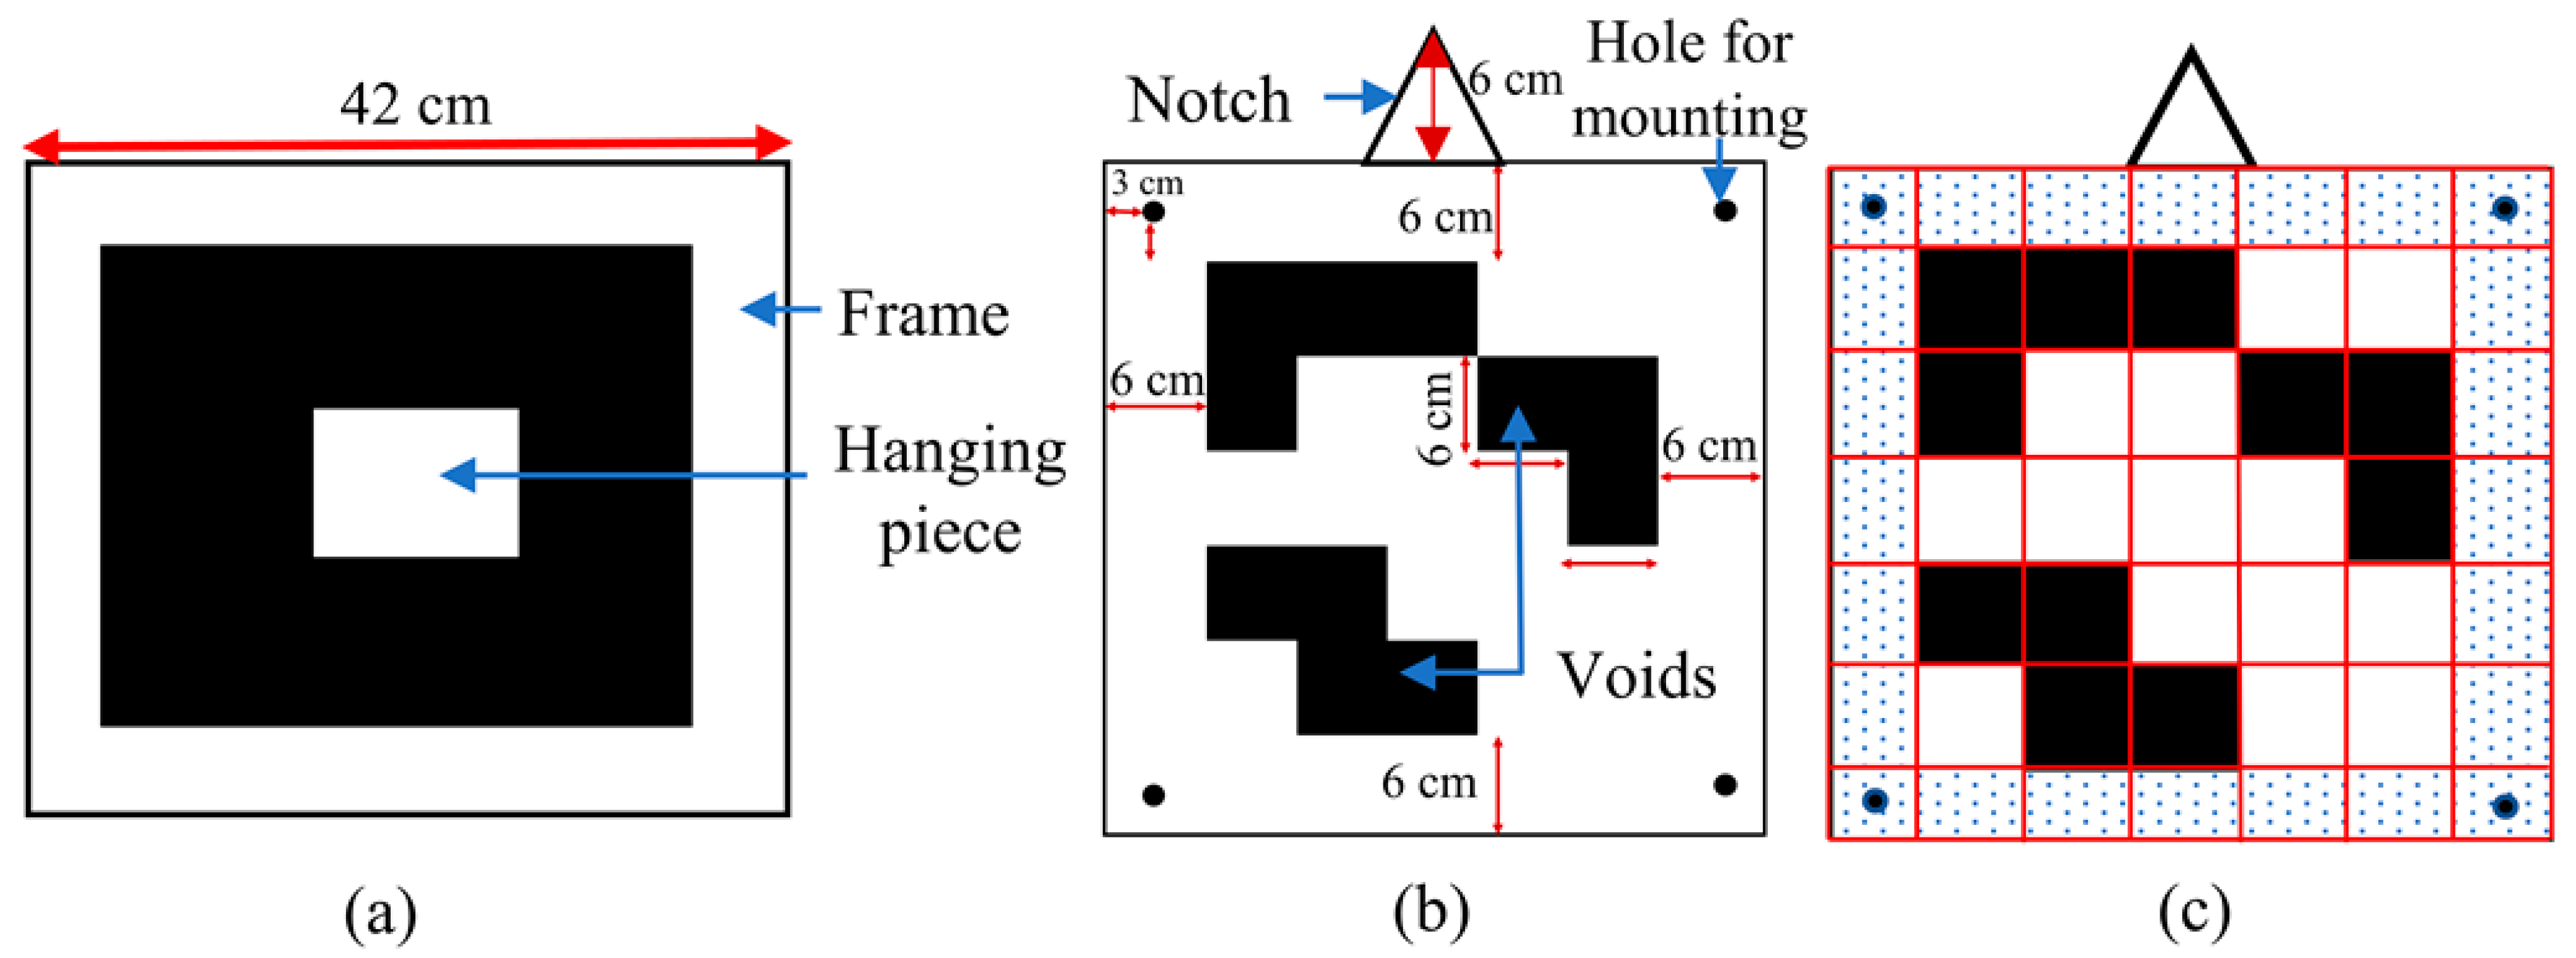
Based on the shape, dimensions and material obtained through experiments, the size of the 3DUID pattern was computed. To generate several unique 3DUID tags, a simplistic algorithm shown in Algorithm 1 was developed. A window size of 5 × 5 was selected for generating a unique pattern, where each grid of the window corresponds to either 0 (absent or missing block space) or 1 (present block space) as an index value. Since a total of 25 blocks were available, index values for each block were systematically generated using computational combinations from 25C1 to 25C25. A boundary frame was attached to the generated pattern by adding 1’s at the edges of the 5 × 5 pattern (Figure 2). While generating a unique pattern, the algorithm checks for ‘hanging pieces’, i.e., the blocks of 1’s not connected to any edge (Figure 2a). It is physically impossible to create these virtual algorithmic constructs with hanging pieces in the 3DUIDs, therefore, patterns with hanging pieces were filtered using a connected component algorithm (Algorithm 1, line 8). A conceptual view of the prototype pattern is shown in Figure 2b. With a window size of 5 × 5 and removal of hanging pieces, the 3DUID generator algorithm was able to simulate over 23.7 million unique patterns of potential 3DUID. The window size can be varied depending on the requirements of a given site. For instance, the size of window can be lowered to 3 × 3 to generate 496 unique patterns and save on material cost in construction of 3DUIDs. The red arrowed lines in Figure 2b represent dimensions obtained after experimental tests. During the construction of 3DUID, ‘0’ shown in black results in a void in the 3DUID, i.e., the material has been removed at those locations from a solid panel. The voids are aimed at decoding the pattern through 3D depth perception in the point cloud (Figure 2c).
Algorithm 1. 3DUID pattern generation.
Input: Window size (m × m)
Output: All the possible 3DUID patterns
1: Generate a grid of m + 2 × m + 2, where the factor ‘2’ is grid associated with boundary frame
2: Store 1 in the boundary grids, i.e., pad first row, last row, first column and last column with ‘1’
3:   for i = 1 to m × m
4:      index = m × mCi
5:      Store 1 at given index location in m × m pattern and 0 elsewhere
6:      Check for hanging pieces using connected component (pattern of 1 not connected to edge in m + 2 × m + 2 pattern)
7:      if   number of connected component > 1
8:            ignore pattern and continue loop
9:   else
10:         store 3DUID pattern
11:   end if
12:   end for
13: Scale pattern or modify dots per inch (dpi) to convert the pattern to world dimensions for 3D printing or laser cutting (optional)
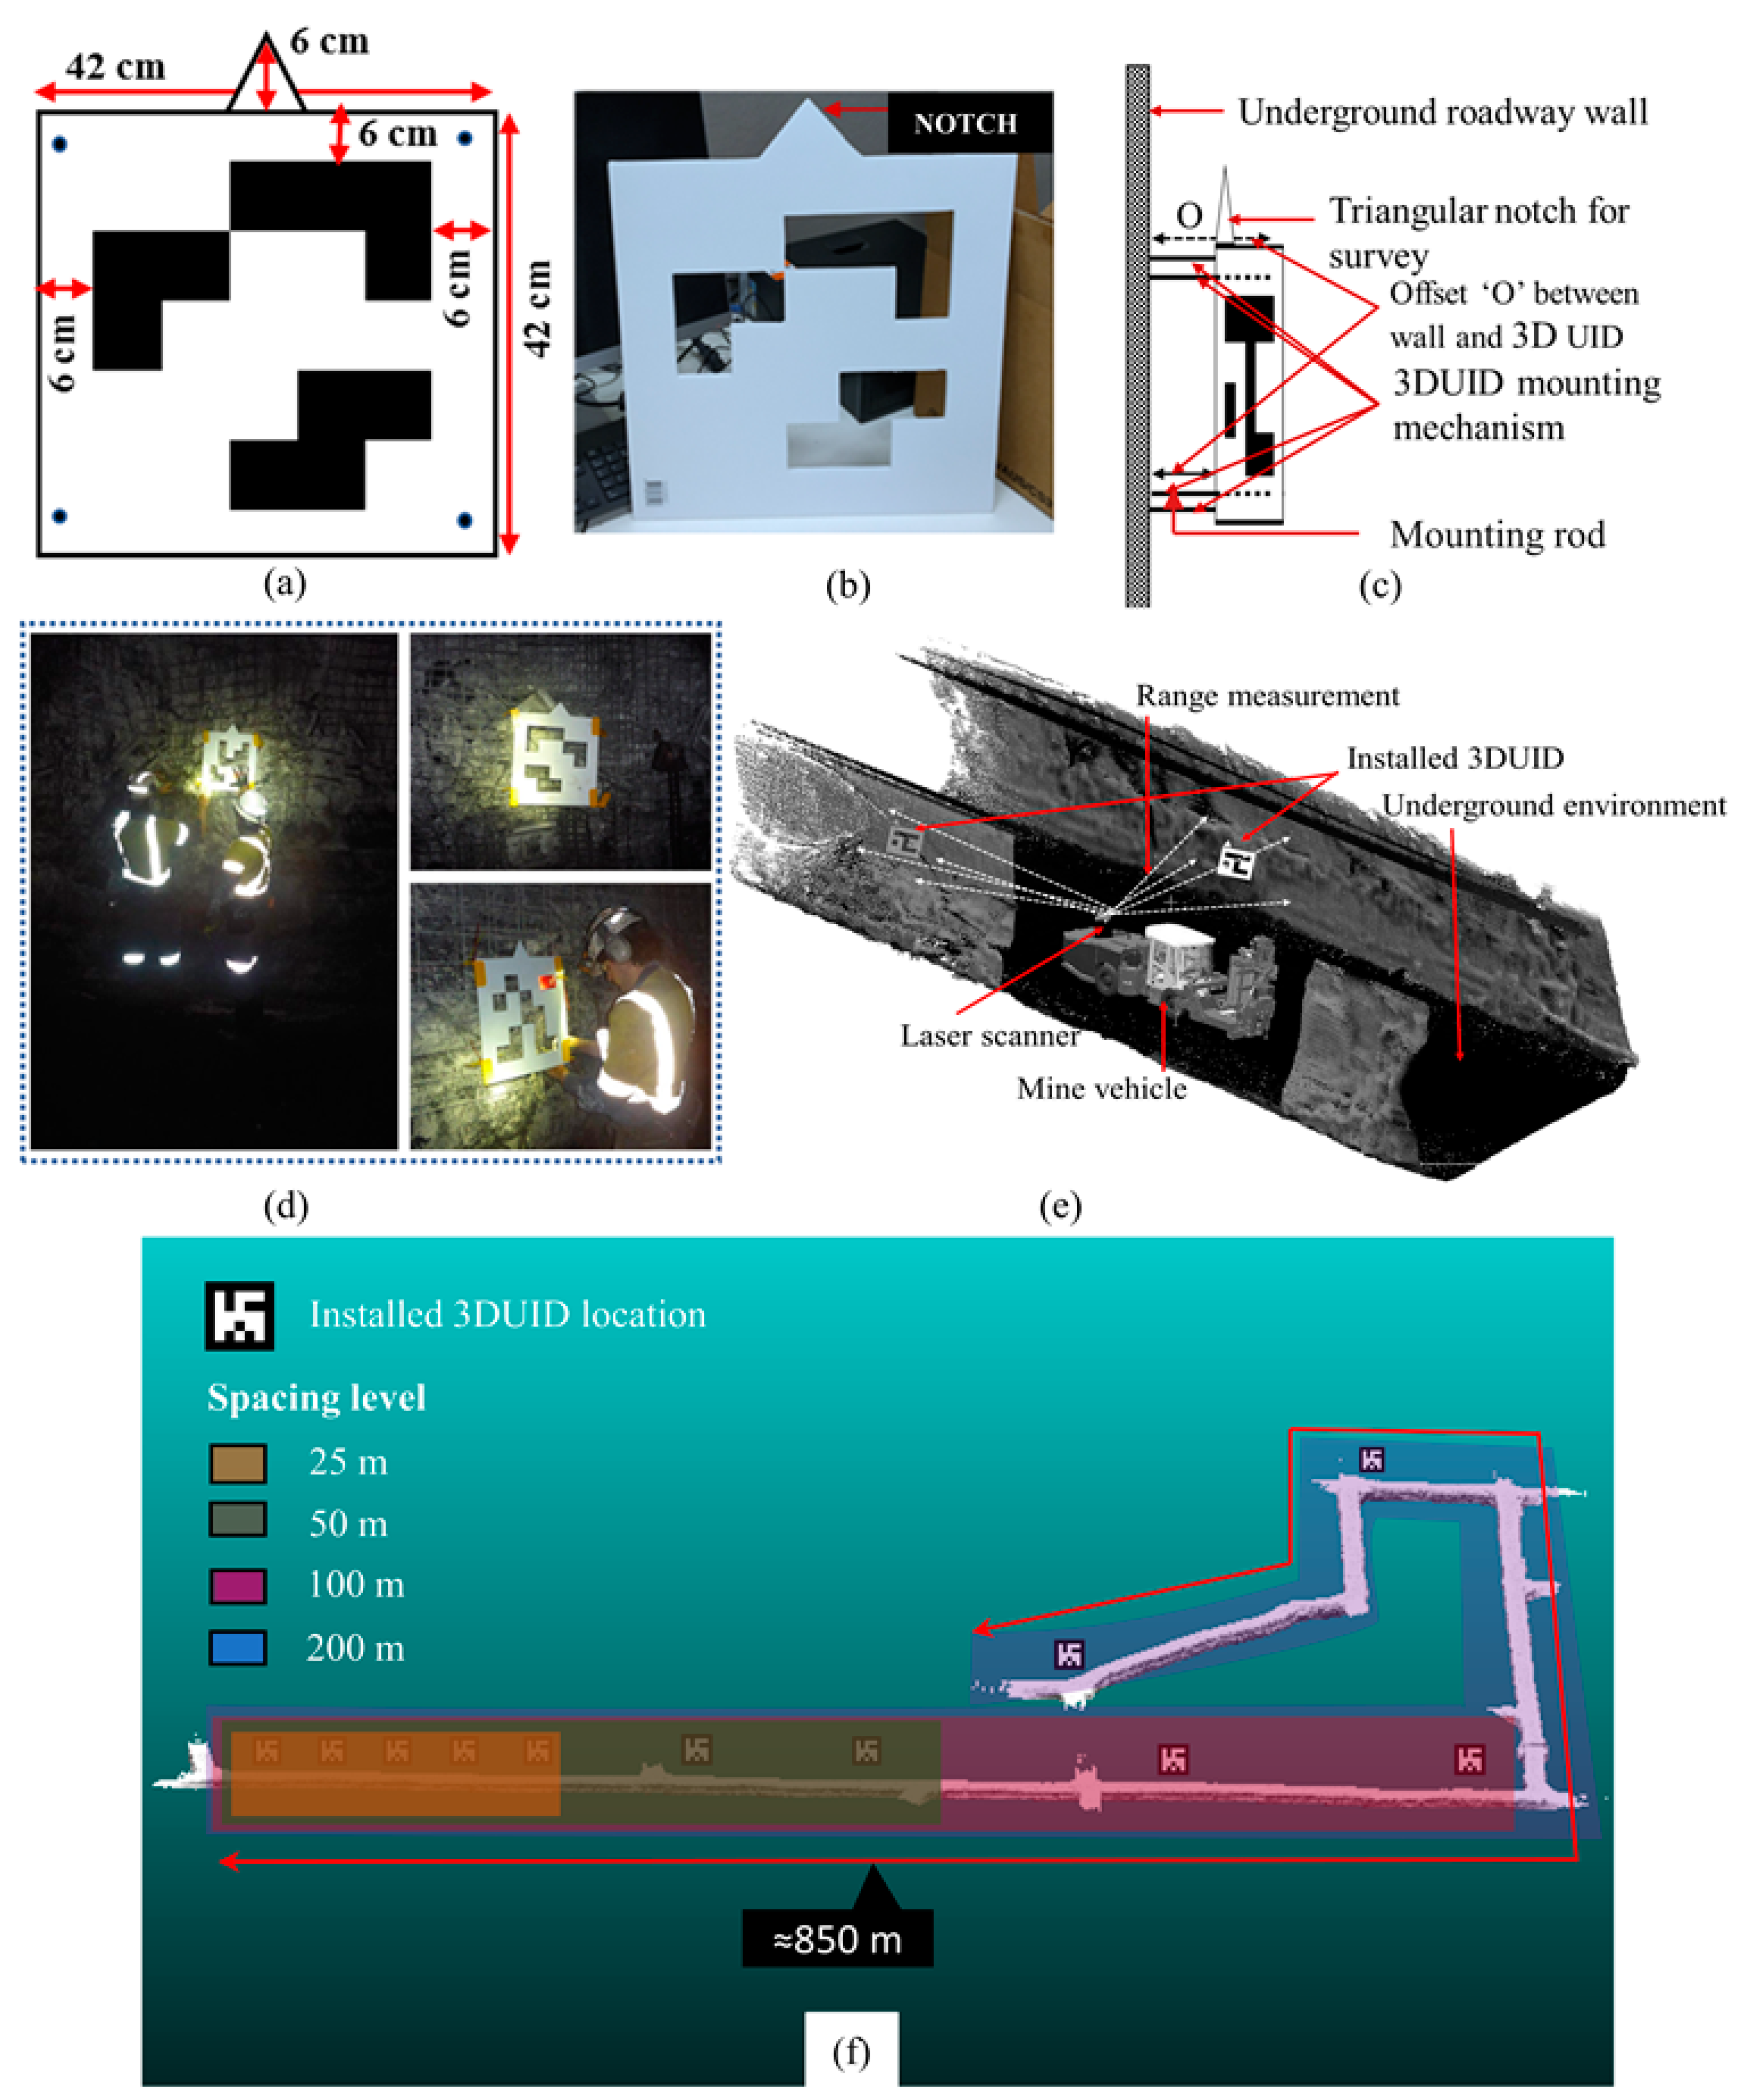
A 1.5 cm-thick opaque white acrylic panel was used for 3DUID construction, and the selected pattern was carved by laser cutting for the voids. Since the obtained minimum mappable unit was 3 cm from a scanning distance of 5 m, the size of each grid in 5 × 5 pattern was kept to 6 cm, accounting for uncertainties at an operational mine site (Figure 3a). Thus, the panel had a dimension of 42 cm × 42 cm including extra grids on the boundary for structural support (Figure 3a). An equilateral triangular notch of 6 cm was added at the apex for ease in surveying, automated georeferencing and coregistration process. Holes were drilled on the four corners to support the mounting mechanism. A prototype of the generated 3DUID patterns is shown in Figure 3b.

2.2. Study Area, 3DUID Installation and Laser Scanning

The study area was a section of an underground coal mine located in Southern Coalfields, New South Wales, Australia. The study area, approximately 850 m long, was selected to test the 3DUID in a range of challenging conditions such as unavailability of GNSS signals, intrinsic safety/fire-related hazards, limited to no lighting, repetitive geometry, lack of discriminative features, low surface reflectivity and dusty environment. The experimental conditions were ideal for testing the efficacy of 3DUID assisted and unassisted scan registrations. A total of thirteen unique 3DUID patterns were generated, constructed and installed against the wall at an offset distance of 10–15 cm to enable depth perception for pattern recognition at the mine site (Figure 3c). Each 3DUID tag was installed over the underground wired mesh support using tie-on metal wires hooked at four corners (Figure 3d). A laser scanner mounted on a mining vehicle performs an ordinary pass-by scan of the tunnel in areas with the installed 3DUID (Figure 3e). The accuracy of georeferencing and data coregistration depends on the number and distribution of 3DUID tags across the section of the tunnel. Increasing the number of installed 3DUIDs as GCTs is expected to increase both accuracy and cost. Therefore, a variably spaced strategic installation of 3DUIDs was adopted in this study to identify the optimal spacing in terms of both accuracy and cost-effectiveness (Figure 3f). Four discrete spacing levels were defined, i.e., 25 m, 50 m, 100 m and 200 m, such that for each spacing level a total of five 3DUID tags were available, this also facilitated leave-one-out cross validation. For georeferencing, a surveying exercise was undertaken where the notch on the top of each 3DUID tag was surveyed with a total station (Trimble M3, California, CA, USA). The coordinate system used was the map grid of Australia 1994 (MGA94) which is based on the geocentric datum of Australia 1994 (GDA) and the Australian height datum (AHD).
The mobile laser scanner was mounted on a mining vehicle which was driven at an average speed of 10 km/h for acquiring point cloud data. The vehicle speed was kept at the most practical low pace to avoid IMU error induced mapping drift that might be incorporated due to sudden jerks or low point density in individual laser frames. Furthermore, the vehicle was slowed down to 5 km/h at the 3DUID location to capture more points or finer details on 3DUID for improved recognition. Two datasets were collected on the same day while avoiding any environmental change to evaluate georeferencing and coregistration processes. The collected point clouds of two scans were postprocessed using the SLAM algorithm provided by GeoSLAM [40].

2.3. Methodology for 3DReG

A robust workflow was developed to identify 3DUID in point cloud data (Figure 4). The SLAM-processed raw point cloud was first filtered to remove noise and outliers, and then an algorithmic data segmentation was performed to reduce processing time for 3DUID identification. In the segmented point cloud, a 3DUID recognition algorithm was executed for automated georeferencing and data coregistration. The detailed explanation of workflow is presented in Section 2.3.1, Section 2.3.2, Section 2.3.3 and Section 2.3.4.

2.3.1. Filtering

The filtering step is essential to remove erroneous or noisy points in the dataset which might have been captured due to false range and IMU measurements. The factors leading to range and IMU error include specular reflection, beam divergence, multipath, sensor perturbation, sudden jerks and low reflectivity of the surface [42]. The presence of noise in the dataset has a considerable impact on accuracy and hence must be removed [43]. Three filters K-nearest neighbour (KNN), range filter and moving least squares filter were applied in sequence to remove noise in the dataset. KNN filter is one of the most common point cloud filtering techniques, which removes selective outliers based on the distribution of ‘K’ nearest points around a query point [44]. If the distance of query point is greater than mean distance plus certain times the standard deviation (where K = 10 and σ = 1), in this study), then the point is flagged as noise. The point cloud also contained a high number of points with range based uncertainties which were removed using a range limiting filter. Since the spatial error in a point depends on the maximum measurable range of the scanner, therefore, the points which are scanned from a farther distance tends to incorporate more error due to sensor beam divergence [45,46]. Consequently, the scanned point cloud remains less effective in mapping fine level structural details, which also impacts the recognition of 3DUID and subsequent georeferencing accuracy. Moreover, such points cause unevenness in the surface leading to high variation in surface normal vectors and curvatures affecting the data coregistration [47]. For the range limiting filter, in a small spherical region, the range values of points were adjudged and points with a range greater than mean range plus one standard deviation were removed. Finally, a moving least square filter was applied to project the remaining erroneous points towards a best fit first-order polynomial surface, until they were within the specified threshold of mean distance plus one standard deviation [48,49]. For each of the three filters, the radius of the spherical region of interest to compute standard deviation at a query point was set to 0.04 m, which is neither too big nor too small to vary the geometrical characteristic of the scanned tunnel surfaces. The radius of the spherical region was chosen based on the nominal point spacing of point cloud (≈18 mm) and the dimension of 3DUID grids (60 mm), such that the region contains enough points for noise removal.

2.3.2. Roof, Floor and Wall Segmentation

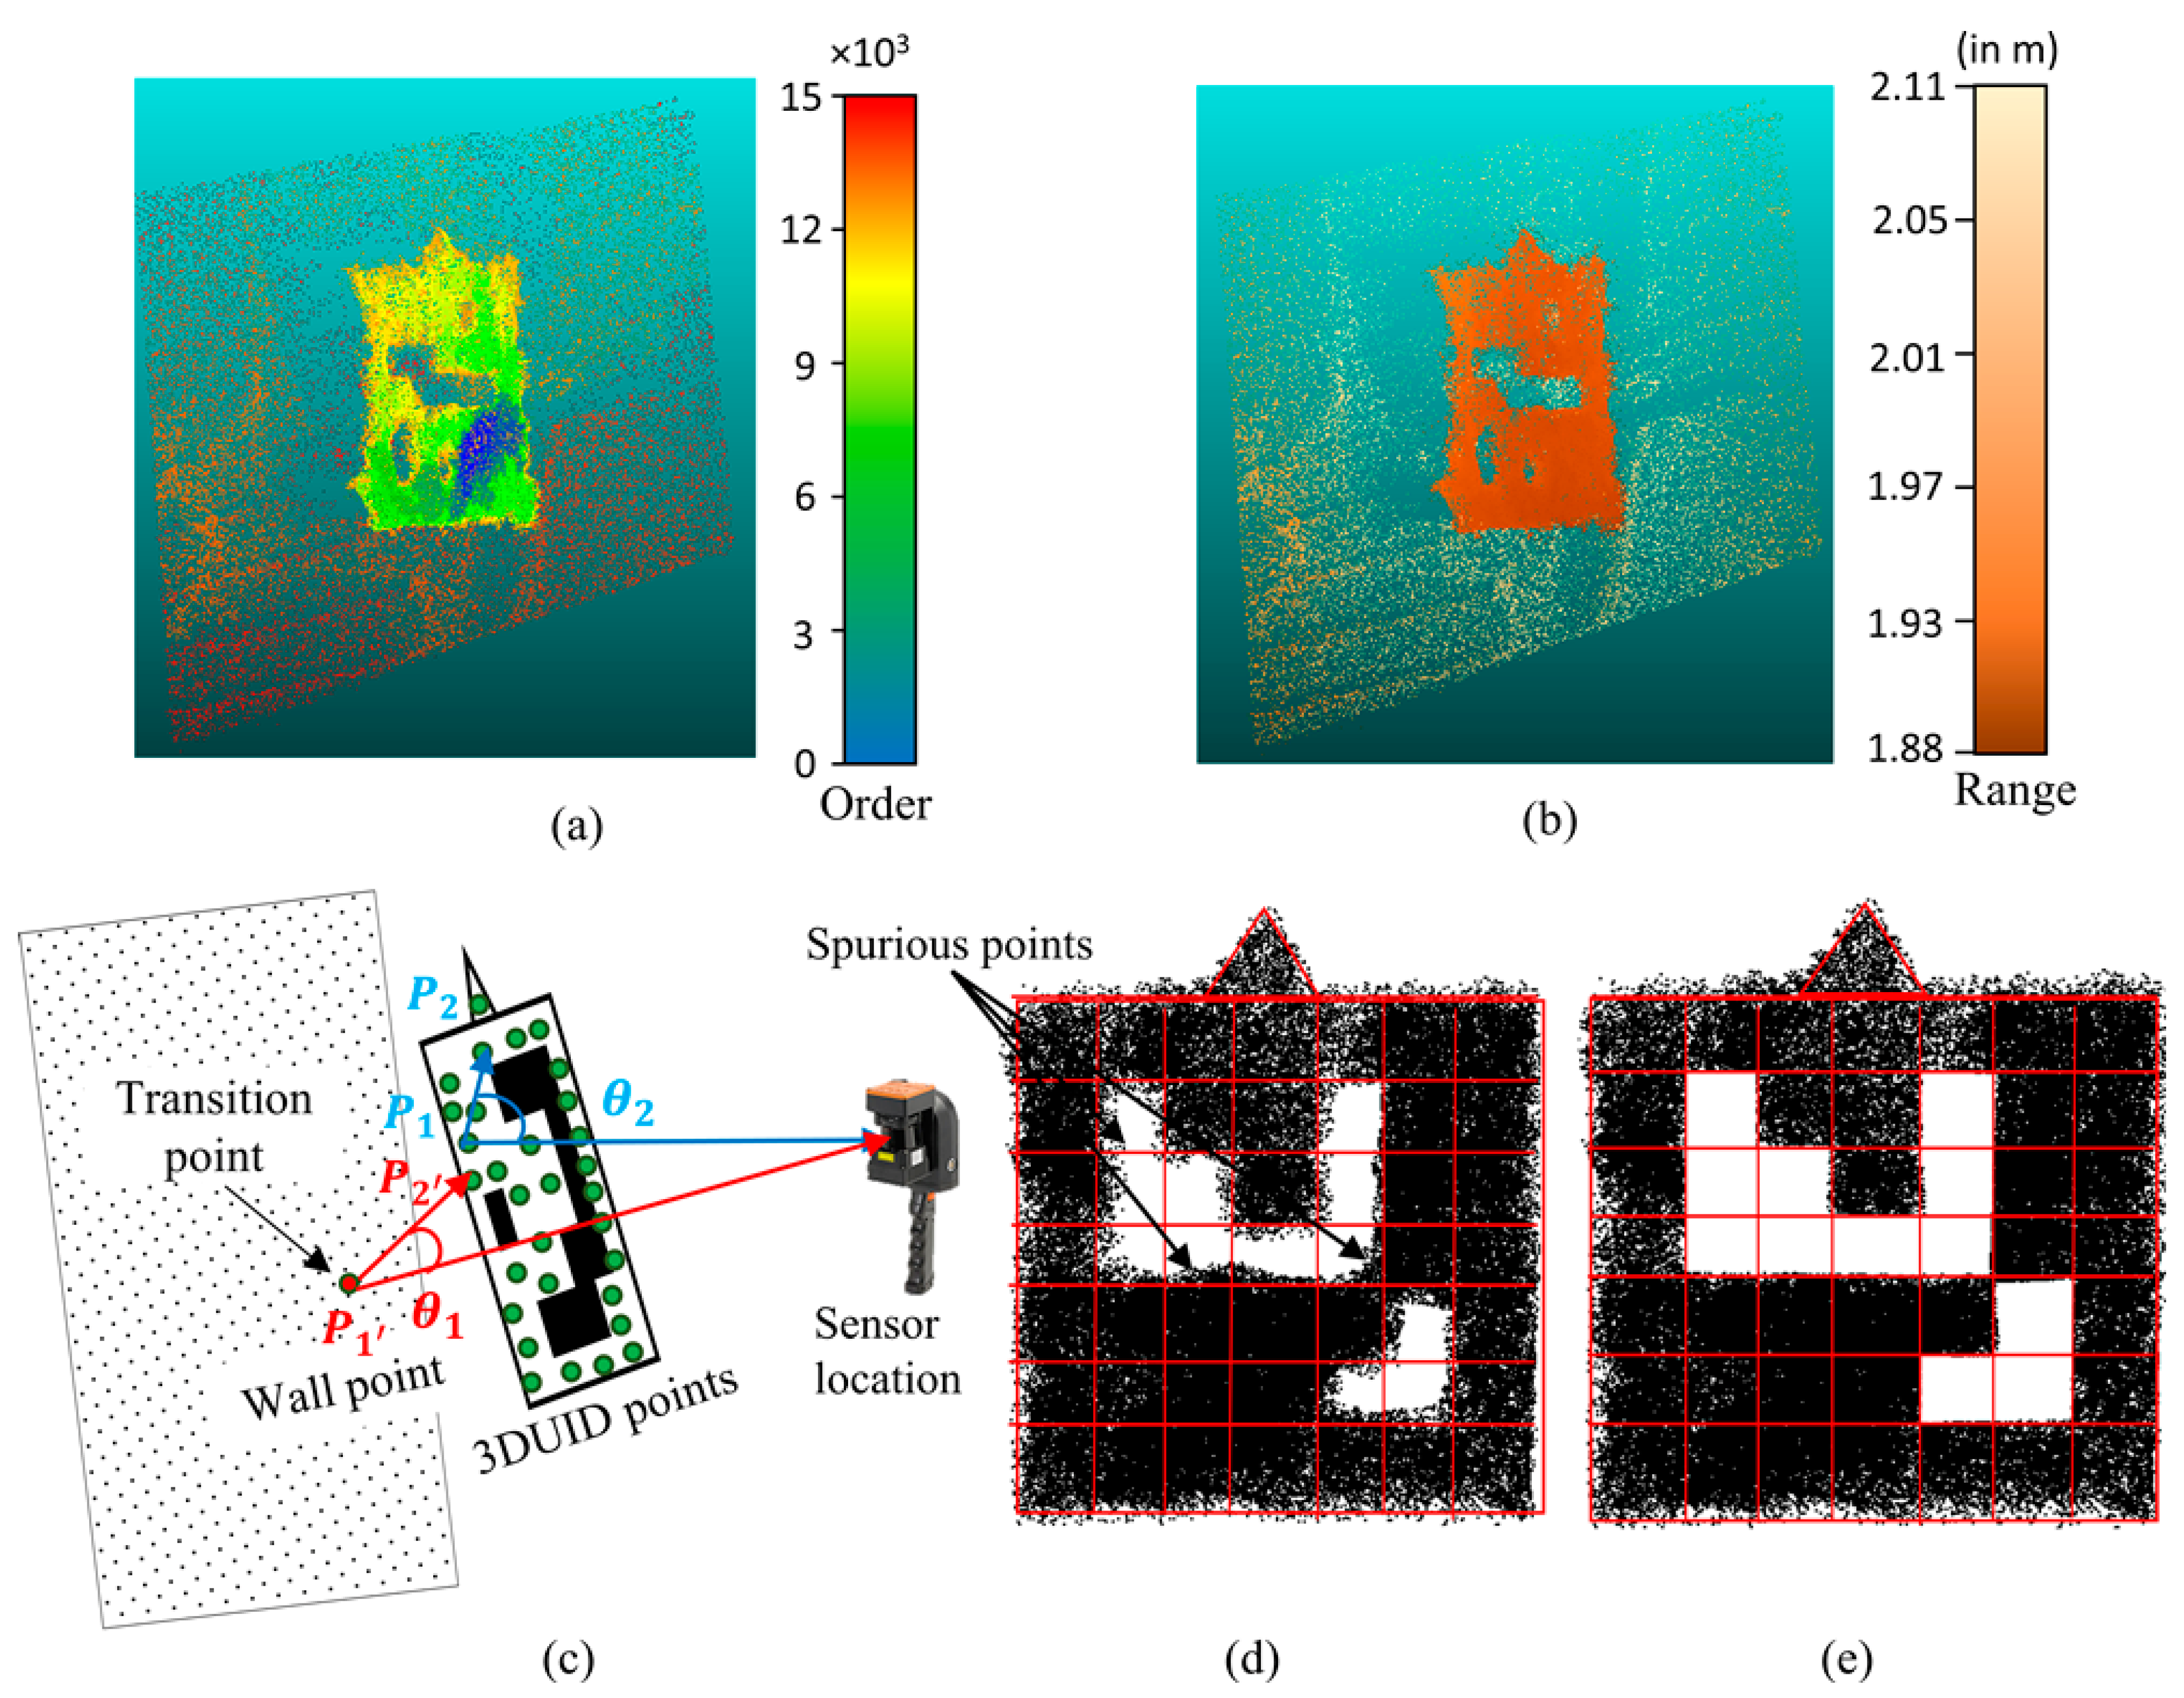
Recognition of 3DUID tags, installed on tunnel walls, was done by masking irrelevant roof and ground points to reduce computation time. The laser scanners trajectory was used in the process to measure the angle projected at a point between the nearest sensor location and the XY plane (Figure 5a), using Equation (1).
A n g l e = | t a n 1 ( Z p Z s ) ( ( X p X s ) 2 + ( Y p Y s ) 2 ) 0.5 |
where, p represents a point, s represents the nearest sensor location, and X, Y, Z are three axial coordinates.
If the projected angle at a point was greater than 30° or less than −30° then the point belonged to the roof or floor otherwise it belonged to the wall. The threshold was chosen such that the 3DUID always falls within the specified angle irrespective of the sensor trajectory. After all the points were checked using the angle threshold, the two walls, roof and floor gets segmented (Figure 5b). The two walls, and the floor and roof were separated using a connected component filter [50] and was given a false colour for better visualisation. The point cloud of two walls was used in further processing for 3DUID recognition.

2.3.3. 3DUID Recognition and Decoding

The point cloud of the wall was used in processing for 3DUID recognition. As a final filtering step to effectively recognise 3DUID, all the points which were nonplanar were removed using a plane fitting algorithm [51]. This helped in removing the support mechanism consisting of a small rod-like structure that connects 3DUID to the wall (Figure 3c). This produced an offset between the 3DUID and the wall in the point cloud for recognition. A connected component based segmentation was initially tested to separate 3DUIDs against the wall. However, the connected component based segmentation missed several 3DUID tags in the point cloud when the variation in the surface around 3DUID tags was large. Therefore, a new algorithm called 3DReG, which uses an ordered point cloud, was developed for more robust recognition.
Locating and identifying patterns is challenging in an unordered point cloud due to uneven point densities and unknown relative positions between the structures [52]. Therefore, the point cloud was first ordered using the “ordering of points to identify the clustering structure” (OPTICS) algorithm which helps in visualising the density based clustering structure of the point cloud [53]. In this study, a modified version of OPTICS algorithm using a perimeter of a triangle was employed [54]. Clustering was performed on an ordered point cloud based on three handcrafted parameters between subsequent point including Euclidean distance, range difference and point angle. Range difference (|R|) is measured between the range of the first point and the second point, where the range is measured in terms of Euclidean distance from the point to the nearest trajectory. Point angle (θ) denotes the angle between a line joining the first point (P1) and the second point (P2), and a line joining the first point (P1) and the nearest sensor location (S). Since 3DUID was located at an offset distance from the wall, the Euclidean distance between the transition point on the wall and the 3DUID should be large. A transition point refers to the point where a transition occurs from one structure to another when moving subsequently in the ordered point cloud. In an ordered point cloud, a uniform transition between points, shown with a colour scale, can be observed (Figure 6a). The range values of all the points lying on the 3DUID are deemed to vary considerably when compared to other points in the surrounding (Figure 6b). In Figure 6c, θ1 represents the point angle between transition point P1′ on the wall and P2′ on the 3DUID whereas θ2 represents the point angle between points P1 and P2 on the 3DUID. Trigonometrically, the angle θ1 will always be small in comparison to θ2 due to offset between 3DUID and wall. A multiple threshold criterion with |ED| > 8 cm, |R| > 8 cm and A < 45° or A > 135° was used to segment 3DUIDs from the point cloud. The thresholds were defined based on installation offset (≈ 15 cm) between 3DUID and the wall.
In the clustered data, a best-fit rectangle was computed for each cluster that was verified against the known 3DUID dimensions to identify potential 3DUIDs. A tolerance of ± 3 cm in the length and width of the fitted rectangle was set to account for probable sensor range errors. Henceforth, the point cloud cluster of potential 3DUID was divided into 6 cm × 6 cm grids, where the grid with points represented ‘1’ and void of points represented ‘0’ (Figure 6d). Due to the range uncertainty of the laser scanner some spurious points were encountered in the void region that affected pattern recognition (Figure 6d). Applying a simple threshold, efficiently helped in overcoming this issue and the pattern was simply decoded through binary conversion (Figure 6e). Whenever there were less than 50 points in a grid it was considered ‘0’ or else ‘1’. The threshold was chosen based on the number of points present in the occupied 3DUID grid. Though 50 was chosen as a threshold number of points to suppress spurious points, it was empirically found that any value sufficiently large but less than the average points present in 3DUID boundary grids works. Upon matching of binary pattern with the installed 3DUID patterns, the point cloud of 3DUID and the corresponding tags were stored. The topmost point in the recognised 3DUID, denoting the tip of the notch, was obtained using singular value decomposition [55] for automated georeferencing.

2.3.4. Georeferencing, Coregistration and Accuracy Analysis

A rigid body translation and rotation of the scanned point cloud was carried out to establish a relationship between local and global coordinate systems utilising surveyed notch of 3DUID as GCT. The local coordinates of 3DUID’s were obtained automatically using the recognition algorithm presented in Section 2.3.3 while global coordinates were obtained using the total station survey. Horn’s quaternion-based algorithm was implemented to achieve a transformation matrix between the two coordinate systems [56]. In Horn’s quaternion approach, the best translation offset is the difference between the centroid of the coordinates in the reference system and the centroid of the coordinates in the transformed system, i.e., rotated and scaled. The best scale coefficient is obtained through the ratio of root mean square deviations, of coordinates in two (reference and transformed) systems from their respective centroids. Additionally, the best rotation matrix is represented by the unit quaternion obtained from the eigenvector associated with the highest eigenvalue of a symmetric 4 × 4 matrix. The elements of the symmetric matrix are formed by the combinations of sums-of-products of corresponding coordinates of the points between reference and transformed systems [56]. Horn’s quaternion approach is preferred over other iterative empirical, graphical and numerical procedures as it is noniterative, does not require an initial approximation and provides the best possible transformation directly in a single step with statistical measures of points in two coordinate systems.
Assessment of error in georeferencing is typically measured at a set of check GCTs when registration is performed using a set of reference GCTs. A leave-one-out cross-validation (LOOCV) procedure was adopted to estimate the performance of georeferencing of point cloud scans using 3DUID tags, at four discrete spacing levels (Figure 3f). In the process, the georeferencing error was calculated for each possible combination by selecting four 3DUID as reference GCTs to obtain a conversion matrix, and then determining error on the converted coordinate for the fifth 3DUID as check GCT. The mean absolute error (MAE) from all possible combinations was used in the assessment of georeferencing accuracy. Additionally, a mutual cloud-to-cloud (C2C) distance assessment was performed for the two georeferenced point cloud scans collected from the same area. The C2C distance was measured for each of the four discrete spacing levels using all of the five 3DUID’s as reference GCTs.
Automated coregistration of point clouds without point picking is computationally intensive. A commonly practiced solution is to downsample the point cloud for performing a quick sparse registration, followed by a subsequent fine registration [57,58]. In this study, the automated data coregistration using 3DReG was achieved by first recognising 3DUID tags in two different point clouds using the algorithm mentioned in Section 2.3.3, and then establishing a correspondence through Horn’s quaternion-based approach using coordinates of unique 3DUID tags. The two point clouds were then coarsely aligned considering one of the point clouds as reference. The roughly aligned point clouds were finely registered using a rigid coregistration through iterative closest point algorithm (ICP). The ICP algorithm iteratively minimises the root means square error calculated from Euclidean distances between points in the two point clouds [59]. The algorithm requires a rough initial alignment of point clouds for an accurate result which was provided using unique 3DUID tags. A nonrigid coregistration algorithm was avoided for fine refinement as it distorts the original/natural characteristics of the point cloud to match the reference point cloud, which is unsuitable for an application like change detection. The error in coregistration was evaluated by calculating the median of C2C distances between the reference and transformed point clouds.
The output of 3DReG algorithm was compared against two widely used coregistration algorithms ICP and normal distribution transforms (NDT) which were implemented independently without the aid of 3DUID in the process. In NDT, the point cloud is divided into voxel and then a normal distribution, which locally models the probability of measuring a point, is assigned to each voxel [12,60,61]. A Newton’s algorithm is then used to match other scans using piecewise continuous and differential probability density. The NDT algorithm does not require initial alignment of point clouds, and the accuracy and processing time depends on the defined voxel size (0.5 m in this study). The two algorithms were chosen for comparison due to their efficiency in processing time. NDT algorithm was avoided in 3DReG workflow for coregistration as NDT does not depend on initial point cloud alignment, and the performance and computation time is subjective to chosen voxel size. ICP algorithm was preferred in 3DReG workflow as it exploits the similarity between the two point clouds using rough initial alignment given by 3DUID tags for quick convergence.

2.3.5. Extraction of Roadway Clearance

Assessment and routine monitoring of roadway profile, mainly horizontal and vertical clearance, is essential to estimate constructional requirement for vehicle passage and measure changes, such as convergence and floor heave, resulting from mining activities. The automated monitoring of roadway profiles has been a challenging task due to incorrect correspondences and comparisons of multitemporal data due to lack of reference points. The 3DUID tags play a crucial role in providing reference and the roadway profile between two 3DUID tags can be efficiently compared. In the experiment, the profile of a roadway between first 3DUID and last 3DUID was automatically extracted from the 3D point cloud and was compared against the ground truth measurement collected every 10 m using laser distometer (Leica Geosystems, St. Gallen, Switzerland).

3. Results

The two scanned point clouds, approximately 850 m in length, after SLAM processing contained a total of 37.6 million and 46.6 million points with a point density of 3156 and 3341 points/m2, respectively. A slight difference in point density was observed due to minor variation in vehicle speed between two scans, affecting the total time taken to scan the given area, with a slower vehicle speed run increasing the point density. To assure that the two point clouds do not have mapping drifts, the distances between subsequent 3DUID tags in the two datasets were compared mutually, and verified against the ground truth distances obtained through a total station survey. The MAE was 0.14 m between the point clouds, 0.20 m between the first point cloud and total station survey, and 0.28 m between the second point cloud and total station survey. Since the two point clouds had a small MAE using 3DUID tags, it can be concluded that the mapping drift incurred was small. A relatively more MAE between a dataset and total station survey might be due to surveying errors.

3.1. 3DUID Recognition

The raw point cloud obtained from SLAM was preprocessed and segmented for 3DUID recognition using the automated approach presented in Section 2.3.3. The recognised 3DUID tags in the point cloud were uniquely colour-coded to represent unique identities for visualisation purpose (Figure 7). The offset present between the wall and installed 3DUID tags enabled pattern decoding using depth perception. To reduce the computation time of the OPTICS algorithm, irrelevant roof and floor points were strategically omitted (Section 2.3.2). Out of the thirteen 3DUID tags installed across the mine section, all of them were recognised using 3DReG giving a detection and recognition accuracy of 100%. The employed pattern recognition technique was robust and performed well under existing challenging conditions. In contrast, the alternative connected-component-based segmentation missed five out of thirteen 3DUID tags and only provided a recognition accuracy of 61.54 %. Local variations on surfaces were present around 3DUID which affected connected component based segmentation (Figure 7). Such erroneous variations were filtered in the ordered point cloud using multiple thresholds. The 3DUID tags were installed at the turning/intersection/crosscuts and along the longer section of the mine roadway.

3.2. Georeferencing

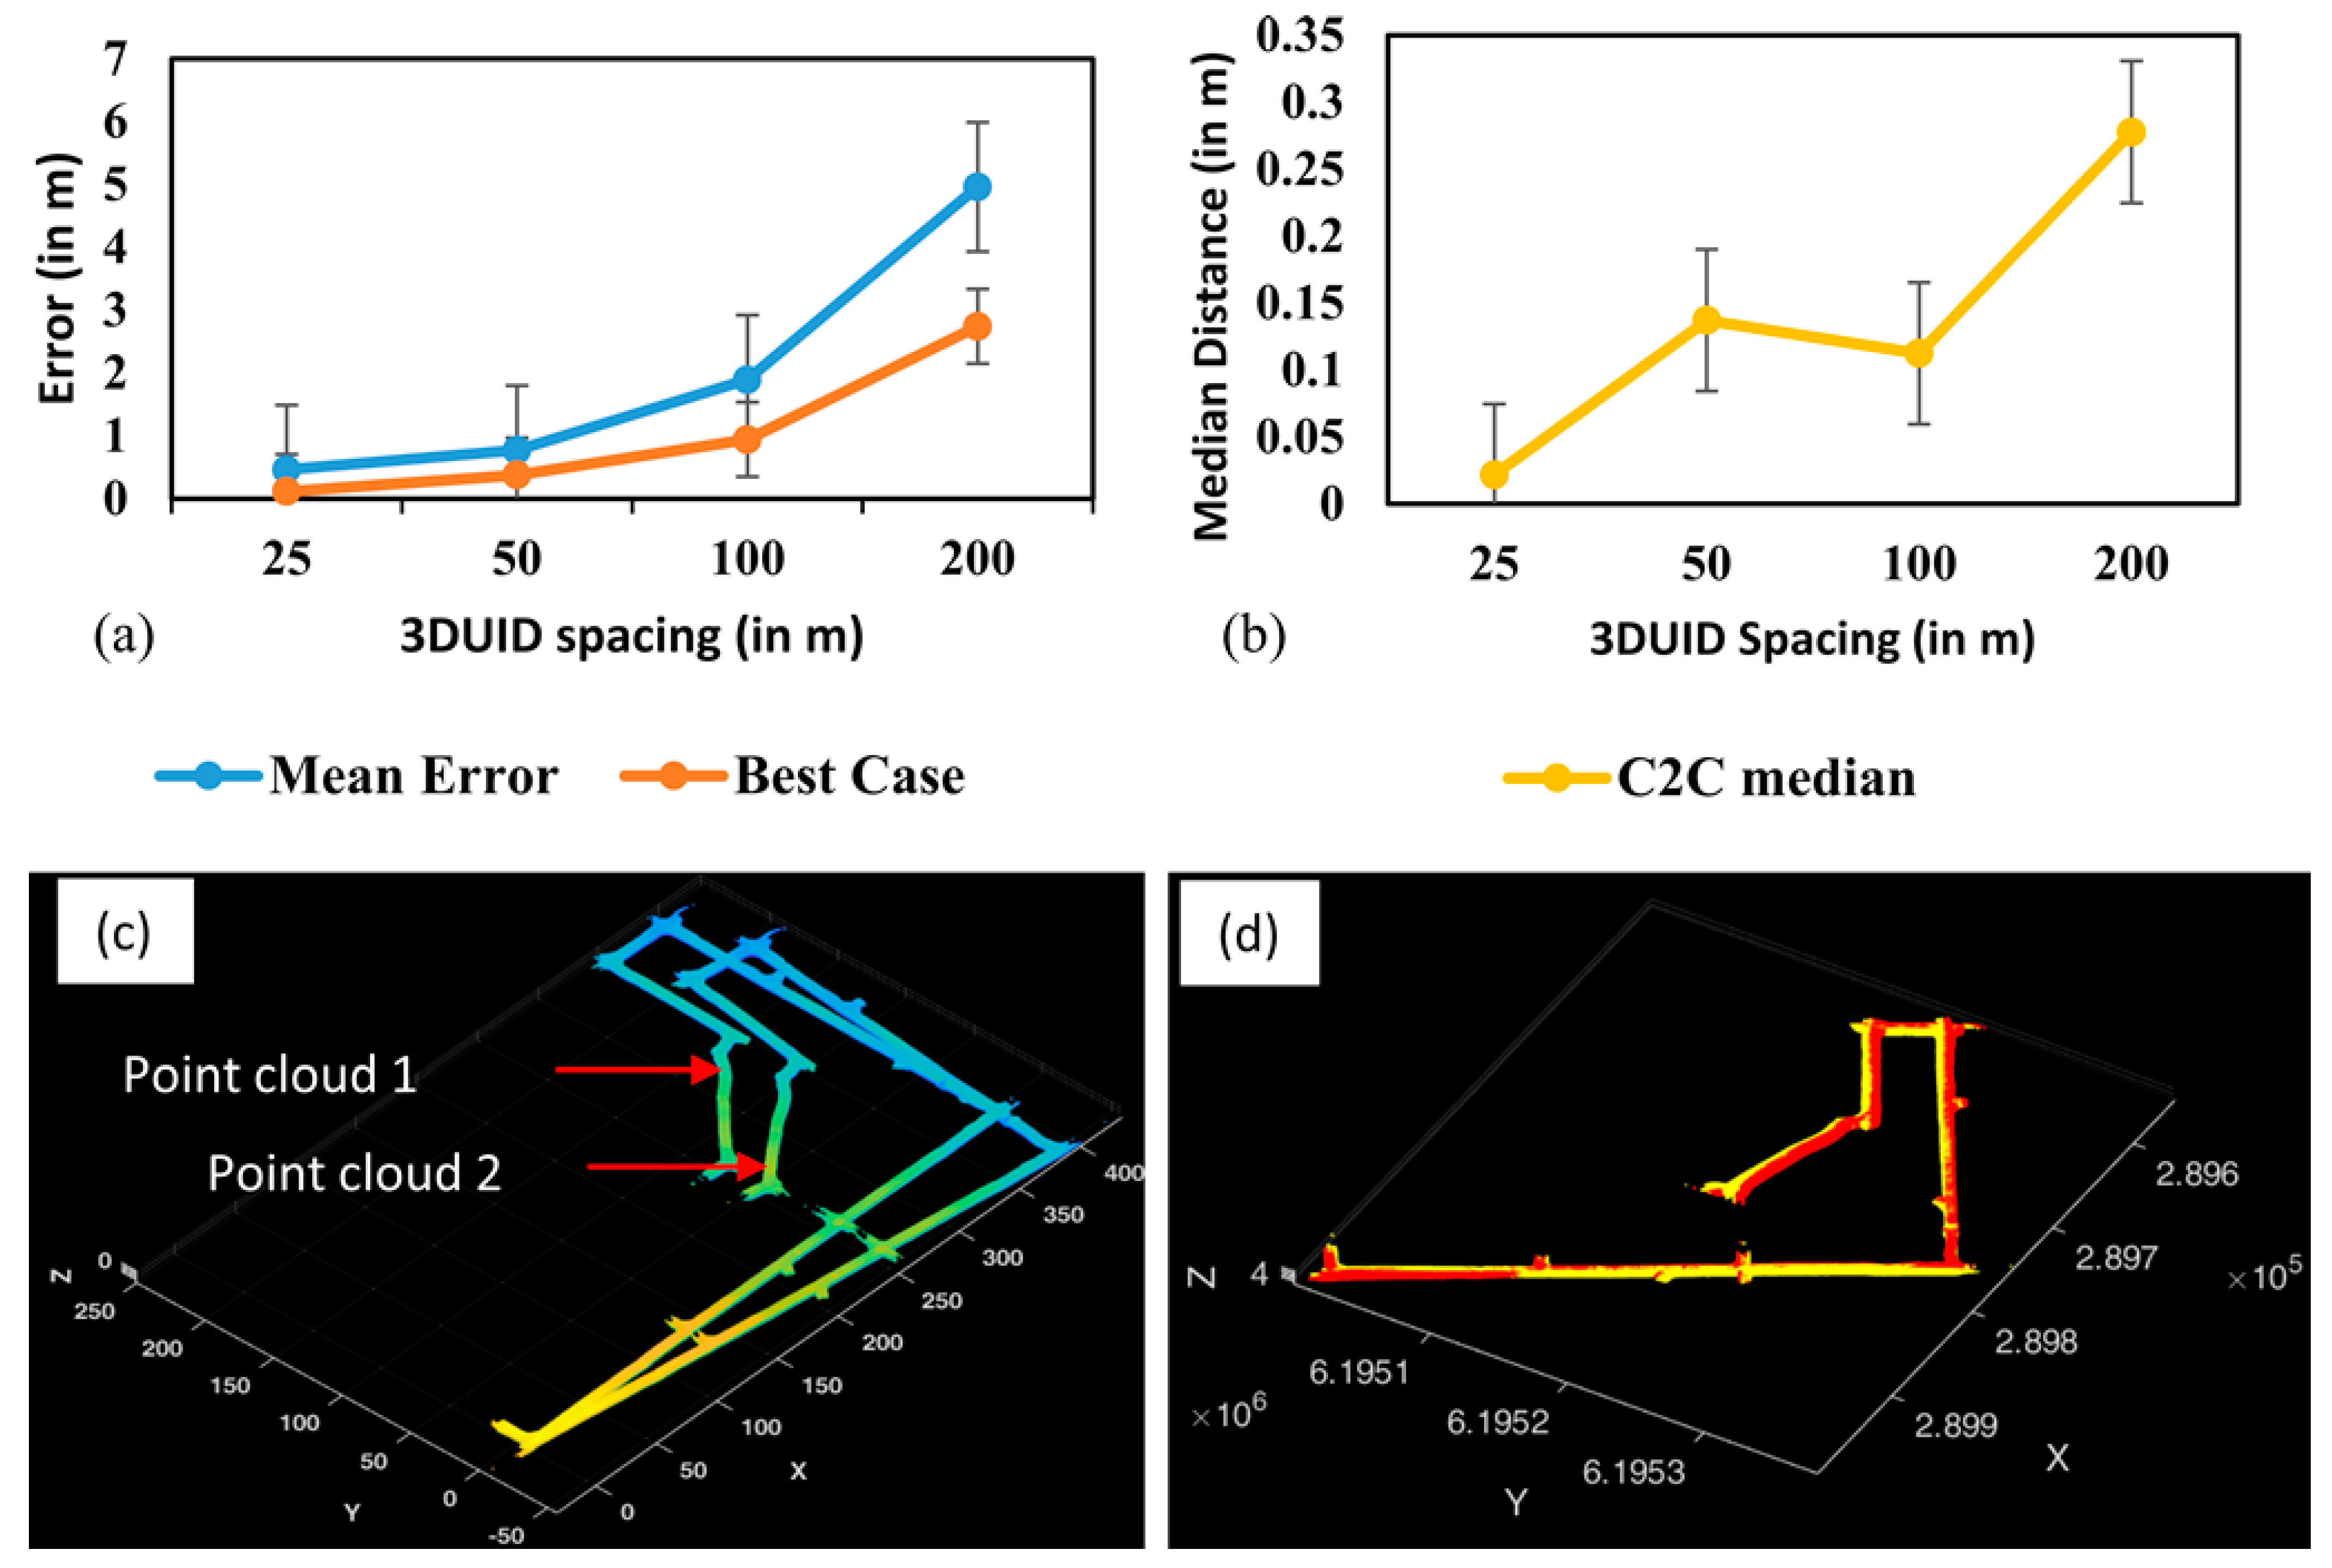
The georeferencing of sections with different 3DUID spacing was analysed with a LOOCV approach for each section. The mean and best case results obtained for various subsections are shown in Figure 8a. The MAE represents the average of absolute errors achieved after evaluating five different combinations according to LOOCV analysis for five 3DUIDs (see Figure 3f). A measure of best case absolute error was also provided to represent the most accurate georeferencing amongst the five possible combinations. A systematic increase in error was observed with an increase in spacing between 3DUID tags with a substantial increase beyond 100 m spacing (Figure 8a). To further evaluate the georeferencing accuracy, a median of C2C distances between the two georeferenced datasets for subsections with different 3DUID spacing was computed. The C2C distance increased gradually with minor variations between 25 m and 100 m spacing levels, and followed a sharp increase beyond 100 m (Figure 8b). Table 1 reflects quantitative estimates of errors for various spacings levels between 3DUIDs. The MAE in georeferencing was within 1.89 m using LOOCV while the best case error was within 1 m when 3DUIDs were installed at a distance of 100 m or less. Since spacing becomes nonuniform in LOOCV when one of the tags is omitted, the error increases. An error of <1.89 m can be expected when 3DUIDs are spaced uniformly. The georeferencing error showed increment with 3DUID spacing and exceeded 2 m for 200 m spacing. Based on these results, nine 3DUID tags installed at 100 m apart were used for final georeferencing of the entire 850 m point cloud scan. The MAE between the surveyed coordinates and the transformed point cloud coordinates was 1.76 m. The last 3DUID exhibited the highest error in the georeferenced coordinate, the absolute deviation was 1.83 m along x-axis, 0.82 m along y-axis and 0.014 m along z-axis. This could be due to the error accumulated in total station survey which increases with survey distance along the lengthwise direction of the tunnel i.e., the x-axis. The two point clouds in their independent local coordinate system are shown in Figure 8c, while the two point clouds after georeferencing using 3DReG are shown in Figure 8d. The median of C2C distances between the two point clouds after georeferencing was 0.5 m indicating a good match between the two point cloud scans.

3.3. Coregistration

In this study, three rigid coregistration methods, ICP, NDT and 3DReG were evaluated. The accuracy of the three approaches was evaluated by comparing the median of cloud-to-cloud (C2C) distances between the coregistered point clouds. The reference and transformed point clouds are shown in Figure 8c. The NDT algorithm was not able to align point clouds and there was a substantial mismatch between the reference and the aligned point cloud (Figure 9a). In contrast, the ICP algorithm had a better performance; however, a misalignment was observed at some cross-cuts of the mutually aligned point cloud (shown with a close-up view in Figure 9b). The 3DReG algorithm, which uses 3DUID tags for coarse alignment and ICP for fine refinement, provided the best result with near perfect alignment between the two point clouds (Figure 9c). The difference in the achieved coregistration can be observed visually through the close-up view of the cross cuts (Figure 9b,c) and quantitatively through Table 2, which lists the median of C2C distances observed in two georeferenced point clouds and coregistered point clouds. The median of C2C distances for the 3DReG algorithm was 0.16 m, which was a significant improvement over ICP and NDT coregistration algorithms that exhibited an error exceeding 0.5 m. Georeferencing of two point clouds using surveyed 3DUID tags had the second best performance in terms of the median of C2C distance at 0.50 m.

3.4. Roadway Profile Extraction

An assessment of consistency between cross-sectional profile extracted automatically from point cloud using 3DUID and in situ ground truth measurement was performed. This was primarily to ascertain the efficacy of extracting reliable cross-sectional profiles using point cloud scans, which is often a compliance and operational requirement for mitigating roadways collision hazards to moving vehicles or mine personnel and measuring convergence or floor heave rate. The cross-sectional profile obtained from the point cloud was validated by comparing vertical and horizontal clearance between the first and the last 3DUID against the field measurements collected using a laser distometer at every 10 m. The point cloud and extracted cross-sections at 10 m spacing are shown in Figure 10a,b, respectively. The values of vertical and horizontal clearance along with error observed in measurement from a point cloud, represented with corresponding profile and error bar plots at each measurement point, are shown in Figure 10c. The blue plot with red dotted points denotes vertical clearance while the orange plot with black dotted points indicates horizontal clearance. The horizontal clearance is usually more than the vertical clearance to allow passage of incoming and ongoing vehicles without impedance. When summarised, the point cloud exhibited a root mean square error of 0.048 m and 0.065 m in vertical and horizontal clearance, respectively. The minimum and maximum errors in the measurement of vertical clearance from the point cloud were 0.001 m and 0.120 m, while in horizontal clearance they were 0.001 m and 0.150 m, respectively.

4. Discussion

4.1. 3DUID Recognition

With an increase in scanning distance, the laser rays begin to diverge leading to uncertain points. The extent of beam divergence and in turn uncertainty depends on the maximum measurable range of the scanner. The initial laboratory tests provided a suitable benchmark of dimensions required for 3DUID development based on the characteristics of the mobile laser scanner used in this study. For instance, the ZebRevo user manual lists the range accuracy of the scanner to be ± 3 cm for a scanning distance of 15–20 m; however, the minimum mappable unit for a scanning distance of 5 m achieved through laboratory tests was still 3 cm. Further, the highly retroreflective material was found ineffective as it increased the noise because of specular reflection and led to many false points in the void region of 3DUID. The incurred noise affected the pattern decoding capability in the lab experiment.

4.2. Georeferencing and Coregistration

The accuracy of georeferencing of a point cloud relied on the number of 3DUID reference tags and the spacing level. When 3DUID tags are placed closer (<25 m) to each other, the MAE can be reduced to as low as 0.1 m. A systematic increase in the MAE was observed with an increase in spacing between the 3DUID tags as the local drift in scanning between the 3DUID tags is not captured. Therefore, based on the maximum permissible error limit for any particular application, the spacing between the tags should be decided. For instance, the change detection of a few centimetres in magnitude can be captured by placing 3DUID tags in close proximity. Conversely, for applications such as volumetric analysis where an error up to few metres are permissible, the 3DUID tags can be placed further apart.
The installation of 3DUID also facilitated the validation of georeferencing through the verification of horizontal and vertical clearance. In a GNSS-denied and symmetrical environment, there is scarcity of reference points with respect to which the cross-sectional profile can be measured along the mine roadway. As such, it is challenging to match the cross-sectional profile in the two datasets that may provide crucial information on occurring changes in the sensitive mine environment. The 3DUID tags in such a case provide a reference and profile between two 3DUID tags can be accurately and automatically matched. In this study, the matching of the cross-sectional profile validated the georeferencing where the minimum absolute error and maximum absolute error in the measured profile was 0.001 m and 0.15 m, respectively.
The coregistration of point clouds was addressed using the rigid transformation algorithms such as ICP and NDT instead of nonrigid algorithms as they do not distort the natural geometry of point cloud to match the collected scan with the reference scan. In the proposed 3DReG algorithm ICP was preferred over NDT because ICP utilises the initial alignment of two point clouds, obtained using 3DUID tags, to quickly converge to a better coregistration solution. Amongst all the evaluated coregistration algorithms, the NDT was found least accurate, as it determined the transformation matrix based on the voxels that exhibited similar probability density ultimately leading to a mismatch between the point cloud. Furthermore, the result of NDT depends on the selected voxel size and results in inaccuracy for larger voxel sizes. Therefore, the user performing coregistration must be well aware of the point cloud resolution to select the optimal voxel size for better performance of NDT [62]. The coregistration results of the ICP algorithm depend on the coarse initial alignment of point clouds and often produces false results in absence of it. Although the point clouds in this study had some initial alignment, the algorithm could not provide accurate coregistration due to structure similarity, repetitive features and lack of distinguishable points. Such conditions caused aliasing where false point matches led to minimisation of the distance between the point clouds. Therefore, a mismatch was observed at some of the crosscuts in the mine section. The aliasing issue was successfully resolved in 3DReG algorithm by accurate point-to-point matching using correspondence between unique 3DUID tags. Unlike ICP and NDT, the 3DReG algorithm is unaffected by the presence of discriminative features in the environment and can provide reliable results even when the environment is symmetric, feature deficient or highly repetitive. The accuracy of the 3DReG algorithm is dependent on the spacing and distribution of 3DUID tags and the inter 3DUID distance should be kept low, preferably within 100 m, to keep the MAE in coregistration within 1 m for a point cloud of length 850 m. It was also observed that the installation of tags along the longer sections of the tunnel may not improve coregistration or georeferencing of point clouds, as linearly placed GCTs are unable to constrain the coregistration solution of a 3D point cloud. Therefore, GCTs need to be well distributed in the scanned environment, which can be achieved by installing 3DUID tags along the intersections and turns.

4.3. Improvement over the Conventional Approach

In GNSS-denied as well as complex mining spaces, achieving a state-of-the-art performance for georeferencing and coregistration is challenging. It is evident from the results that a sufficient number of discriminative features are required in the environment for accurate coregistration using conventional algorithms. The variations in the local environment are usually captured by defining several descriptors such as point normal, curvature, fast point feature histogram, eigenvalue descriptor, histogram of normals, anisotropy, scale invariant feature transform and rotation invariant feature transform to uniquely identify a place. Previous studies have mostly exploited handcrafted descriptors mentioned above or use machine learning algorithms such as deep convolutional neural networks on known objects that are likely to be encountered for accurate coregistration [13,47]. For environments that possess high structural symmetry and similarity, the use of hand-crafted descriptors does not add benefit. Moreover, for the environment with no prior training data or a limited number of defined objects such as in underground mines, machine-learning-based coregistration cannot be achieved. An alternative option in the absence of distinguishable features is to provide additional information either through the use of multisensors that may include laser scanners, radar, inertial measurement unit, odometer, optical camera and infrared camera [63,64] or through modification of the environment itself by adding distinguishable features such as GCTs [38,65]. The former addresses the concerns to some extent, but the cost and power consumption increase. Further, the use of additional power is constrained in a sensitive environment like an underground mine due to fire-related hazards. Therefore, it is necessary that accurate mapping be achieved without relying on complementary sensors for additional information. The latter “GCT-based approach” is an attractive option as the targets once installed can help in accurate mapping using a limited number of sensors thereby reducing system cost. The 3DUID tags proposed in this study effectively overcome previous challenges in underground space and leads to relatively accurate coregistration with an error as low as 0.16 m. The entire process from 3DUID recognition to coregistration was automated and point clouds of up to 850 m lengths were coregistered within one minute on a system with a 32-Core Processor 3.69 GHz and 256 GB memory (AMD Ryzen Threadripper 3970X, California, CA, USA). The conventional algorithms such as NDT and ICP, as well as those using local descriptors, have a high computation time which is proportional to selected hyperparameters such as the number of points, voxel size and dimensionality of descriptors. The descriptor generation, in particular, is one of the most time-consuming steps where the processing is done on individual points or selected key points in the point cloud that may take up to hours to process depending on the system configuration. Coregistration using 3DUID tags overcomes time constraints while resulting in the least MAE, as the point clouds of only 3DUID tags are used for initial coarse registration which geometrically aligns the point clouds within 3 s. Since the point cloud already gets aligned, the time required by ICP for fine refinement reduces considerably and can be achieved in minutes. Moreover, the georeferencing and coregistration process usually requires a minimum of four uniformly distributed GCTs; however, a higher number of GCTs are preferred for a least-squares error solution. The selection of passive GCTs over active GCTs provides a significant cost advantage as higher per-unit cost can become very expensive for a large number of GCTs. In this study, each passive 3DUID incurred a manufacturing cost of approximately $10.

4.4. Potential Issues and Scope for Further Improvement

The concept of using 3DUID in georeferencing and coregistration of point clouds can be applied in both surface and underground environments. However, the proposed 3DReG method was particularly developed to solve georeferencing and coregistration challenges in underground mines. Nevertheless, the algorithm can be modified for universal applicability. Some of the parameters in the processing workflow, such as range threshold or distance offset for 3DUID identification and angle threshold for wall segmentation, were selected based on prior information about the mining environment, employed laser scanner and 3DUID installation procedure. The algorithmic parameters were chosen to suit the need of typical longwall coal mines. For other conditions where the scanned environment or employed laser scanner is different, the parameters might need to be modified. A preliminary investigation of the laser scanner for mapping characteristics (which could also be obtained from the user manual of the laser scanner) and some prior information on installation procedures of 3DUID tags, such as offset distance from the wall, could aid in setting threshold parameters for success of the method. The algorithm workflow could be further optimised to conform to diverse underground environments. For instance, 3DUID panels could be extracted and decoded using local point descriptors or deep learning models by training them through 3DUID point clouds (which can be obtained through simulation or laser scanning) in advance. Moreover, such methods might not require segmentation of LiDAR data into walls, floor and roof, which was mainly done to reduce computation time. Although 3DUID panels were mounted on the walls, there is no restriction on the placement provided they are non-colinear. The recognition of 3DUID depends on point cloud resolution and dimensions used in this study may not work for laser scanners having low scan rates (20,000 points/s). Alternatively, selecting appropriate 3DUID dimensions taking into account the worst-case scenario could potentially solve size issues. Acrylic material was preferred to construct 3DUID, which is slightly expensive, but any Lambertian surface (causing diffused reflection), such as marine plywood, could be used depending on the environment for cost reduction. Another way of cutting costs could be to reduce the dimension by using fewer grids in generating patterns. For example, using three grids instead of five can generate 496 patterns which should be sufficient to cover a large section of the mine. In future, the algorithm needs to be modified for almost real-time recognition of 3DUID for georeferencing and coregistration of point clouds.

4.5. Future Application of 3DUID

The main application of 3DUID is to achieve accurate georeferencing and data coregistration which are fundamental aspects in 3D mapping required for localisation [66], surface reconstruction [67], change detection [68] and deformation monitoring [69]. The 3DUID tags proposed in this study need to be surveyed only once after installation and then all the point clouds can be automatically georeferenced or coregistered, which enables multitemporal change detection without having to manually register multiple datasets. In the absence of surveyed coordinates for 3DUIDs, the proposed solution is still effective, as one of the scans can be used as a reference to automatically align other scans using 3DUID tags. Further, with the distances between all 3DUID tags known, either through a survey or based on a reference map, relative movements (such as roadway tunnel subsidence, floor heaving and fracturing) occurring in an area can be efficiently tracked by measuring relative movement in the 3DUID tags or using change detection algorithms. An alternate use case benefit may involve a set of 3DUID tags installed at a stable location to act as an anchor point, with respect to which movement of surrounding structures could be effectively mapped with robustness. Furthermore, roadway profiles often get deformed in tunnels and underground mines due to compressive stress in rock mass activated as a result of removal of excavated materials, leading to floor or roof heaving and closure between walls. Routine measurement and monitoring of deformation in the roadway profiles has been challenging. Current practices still often involve manual in-field measurement approaches or include in-situ movement loggers such as extensometers [70,71] and closure meters [72]. These approaches are limited to provide a spatially sparse sampling of rock mass movement patterns. Numerical modelling and rock mechanics are dedicated fields of research built on such in-field observations [73,74]. Laser scanning has been able to provide complementary data to enrich convergence modelling through rock mass stress prediction using numerical models. However, the laser scanning methods often become tedious with terrestrial laser scanners requiring frequent repositioning, extended duration of scanning and processing time involved in manual registration of scanned point clouds. Mobile laser scanning together with improvement in SLAM has addressed field-related challenges in data acquisition to a large extent, however, effective utilisation of point cloud scans has remained a challenge in terms of manual georeferencing and coregistration. The proposed 3DReG algorithm with infield installed 3DUIDs is promising to address these existing limitations. The approach is deemed useful in providing better laser scanning capabilities to aid in monitoring and rock mass failure predictions, which is critical in avoiding expensive downtimes, and potentially fatal or nonfatal injuries.
Data processing in GNSS-denied space involves two major components: (1) frame-by-frame laser scan coregistration for simultaneous localisation and mapping (SLAM), and (2) georeferencing and coregistration of multitemporal data for change detection applications. The study addresses the latter, however, the former can be achieved following the presented approach for 3DUID recognition. SLAM based on GCTs is a well-researched topic [75]. However, the focus has been more on algorithmic improvement rather than the improvement in GCTs itself for quick recognition. In the past, GCTs were either too hard to decode, difficult to construct and lacked a unique identity or relied on an additional sensor such as an optical camera for decoding [36,37,39]. The 3DUID tags presented in this study are easy to construct, simple to decode and do not require additional sensor apart from the laser scanner for recognition. The 3DReG algorithm proposed can be integrated into the SLAM algorithm for achieving accurate mapping and localisation through accurate loop closure detection. The subsequent laser frame matching can be done quickly and 3DUID tags can be stored as nodes, which can be used for feature matching and loop closure detection.
Underground mine automation has recently acquired significant interest for developing continuous miners, excavators and roadways haul vehicles. For efficient excavations, these machineries need to know their precise location with respect to the global mine map. Development of parallel technologies in driverless car industry such as laser sensing and autonomous navigation systems [76,77] is expected to benefit mining with the adoption of these technologies in underground spaces, leading towards safer mining operations. The 3DUID tags can play a pivotal role in such cases where the accurate 3D georeferenced map obtained from on-board laser scanners sensors will help in localising the mine machinery or autonomous hauling vehicles.

5. Conclusions

Mapping of underground mines still poses specific challenges due to the unavailability of a sensor positioning framework (GNSS), complicated structurally symmetric layouts, complex interactions between objects or repetitive features and occlusions. The presented study was aimed at overcoming practical challenges in seamless registration of point cloud scans collected in a complex underground mining tunnel. The solution involved employing a set of 3DUID tags used as unique and automatically recognisable GCTs to achieve reliable georeferencing and coregistration accuracy. The developed 3DUID tags are simple to design, construct, easy to install, do not require power to function and are intrinsically safe for adoption in safety-sensitive mining environments. A dedicated 3DUID recognition algorithm was developed to reliably extract and decode the 3DUIDs from the point cloud, with a hundred-percent success rate. Furthermore, a simple and robust 3DReG algorithm was also designed to accurately georeference and coregister point cloud scans. The minimum requirements for success of the proposed approach are the installation of surveyed 3DUID tags (for georeferencing) in the environment and the availability of a laser scanner. The proposed approach overcomes the limitations of the conventional manual point picking method that include laborious and time-intensive point cloud browsing causing human-induced error and bias in the results. The proposed solution is automated and could significantly bring down the mine monitoring cost by (1) reducing the requirement of a routine survey, (2) reducing time spent by mine personnel on-site and off-site for collecting and processing data thereby ensuring safety, and (3) decreasing human-induced bias through automated applications to provide results with high confidence.
Application specific utilisation of laser scanning could be streamlined by incorporating 3DUIDs and 3DReG algorithm in data collection and pre-processing pipelines, respectively. In this study, the application focused on mining examples of streamlined use case scenarios including modelling rock mechanics behaviour to predict structural failures, which provide an effective means to routinely monitor the condition of underground mines, and favour development of autonomous excavators and road haul vehicles. However, the demonstrated 3DUID technology could be used across other sectors requiring seamless mapping and reconstruction of the built environment. The utilisation of 3DUIDs is not limited to active laser scanning systems. In contrast, passive imaging systems such as optical, multispectral, hyperspectral and thermal sensors could be equally used. Potential research involving 3DUIDs remains open with opportunities in multimodal sensor fusion and direct scene registration in SLAM.

Author Contributions

Conceptualization, S.K.S., B.P.B. and S.R.; methodology, S.K.S. and B.P.B.; software, S.K.S.; validation, S.K.S.; formal analysis, S.K.S.; investigation, S.K.S. and B.P.B.; resources, S.R.; data curation, S.K.S.; writing—original draft preparation, S.K.S.; writing—review and editing, B.P.B. and S.R.; visualization, S.K.S.; supervision, B.P.B. and S.R.; project administration, S.R.; funding acquisition, S.R. All authors have read and agreed to the published version of the manuscript.

Funding

This research was funded by the Australian Coal Industry’s Research Program (ACARP), Project number C27057.

Institutional Review Board Statement

Not applicable.

Informed Consent Statement

Not applicable.

Data Availability Statement

Data are not available due to non-disclosure agreements.

Acknowledgments

We thank Kanchana Gamage (Technical Officer, School of Minerals and Energy Resources Engineering, UNSW) for help in constructing 3DUIDs and other experimental activities.

Conflicts of Interest

The authors declare no conflict of interest.

References

  1. Kukutsch, R.; Kajzar, V.; Konicek, P.; Waclawik, P.; Ptacek, J. Possibility of convergence measurement of gates in coal mining using terrestrial 3D laser scanner. J. Sustain. Min. 2015, 14, 30–37. [Google Scholar] [CrossRef] [Green Version]
  2. Jiang, Q.; Zhong, S.; Pan, P.-Z.; Shi, Y.; Guo, H.; Kou, Y. Observe the temporal evolution of deep tunnel’s 3D deformation by 3D laser scanning in the Jinchuan No. 2 Mine. Tunn. Undergr. Space Technol. 2020, 97, 103237. [Google Scholar] [CrossRef]
  3. Gikas, V. Three-dimensional laser scanning for geometry documentation and construction management of highway tunnels during excavation. Sensors 2012, 12, 11249–11270. [Google Scholar] [CrossRef] [PubMed] [Green Version]
  4. Baiden, G.; Bissiri, Y.; Luoma, S.; Henrich, G. Mapping Utility Infrastructure via Underground GPS Positioning with Autonomous Telerobotics. In Pipelines 2012; American Society of Civil Engineers: Reston, VA, USA, 2012; pp. 1377–1390. [Google Scholar]
  5. Dang, T.; Mascarich, F.; Khattak, S.; Nguyen, H.; Nguyen, H.; Hirsh, S.; Reinhart, R.; Papachristos, C.; Alexis, K. Autonomous Search for Underground Mine Rescue Using Aerial Robots. In Proceedings of the 2020 IEEE Aerospace Conference, Big Sky, MT, USA, 7–14 March 2020; pp. 1–8. [Google Scholar]
  6. Fan, L.; Smethurst, J.A.; Atkinson, P.M.; Powrie, W. Error in target-based georeferencing and registration in terrestrial laser scanning. Comput. Geosci. 2015, 83, 54–64. [Google Scholar] [CrossRef] [Green Version]
  7. Riquelme, A.; Cano, M.; Tomás, R.; Abellán, A. Identification of Rock Slope Discontinuity Sets from Laser Scanner and Photogrammetric Point Clouds: A Comparative Analysis. In Proceedings of the ISRM European Rock Mechanics Symposium-EUROCK, Ostrava, Czech Republic, 20–22 June 2017; Elsevier Ltd.: Amsterdam, The Netherlands, 2017; Volume 191, pp. 838–845. [Google Scholar]
  8. Bae, K.H.; Lichti, D.D. A method for automated registration of unorganised point clouds. ISPRS J. Photogramm. Remote Sens. 2008, 63, 36–54. [Google Scholar] [CrossRef]
  9. Letortu, P.; Costa, S.; Maquaire, O.; Delacourt, C.; Augereau, E.; Davidson, R.; Suanez, S.; Nabucet, J. Retreat rates, modalities and agents responsible for erosion along the coastal chalk cliffs of Upper Normandy: The contribution of terrestrial laser scanning. Geomorphology 2015, 245, 3–14. [Google Scholar] [CrossRef]
  10. Abellán, A.; Calvet, J.; Vilaplana, J.M.; Blanchard, J. Detection and spatial prediction of rockfalls by means of terrestrial laser scanner monitoring. Geomorphology 2010, 119, 162–171. [Google Scholar] [CrossRef]
  11. Milan, D.J.; Heritage, G.L.; Hetherington, D. Application of a 3D laser scanner in the assessment of erosion and deposition volumes and channel change in a proglacial river. Earth Surf. Process. Landf. 2007, 32, 1657–1674. [Google Scholar] [CrossRef]
  12. Magnusson, M.; Lilienthal, A.; Duckett, T. Scan registration for autonomous mining vehicles using 3D-NDT. J. Field Robot. 2007, 24, 803–827. [Google Scholar] [CrossRef] [Green Version]
  13. Dong, Z.; Liang, F.; Yang, B.; Xu, Y.; Zang, Y.; Li, J.; Wang, Y.; Dai, W.; Fan, H.; Hyyppäb, J.; et al. Registration of large-scale terrestrial laser scanner point clouds: A review and benchmark. ISPRS J. Photogramm. Remote Sens. 2020, 163, 327–342. [Google Scholar] [CrossRef]
  14. Raval, S.; Banerjee, B.P.; Kumar Singh, S.; Canbulat, I. A Preliminary Investigation of Mobile Mapping Technology for Underground Mining. In Proceedings of the International Geoscience and Remote Sensing Symposium (IGARSS), Yokohama, Japan, 28 July–2 August 2019; Institute of Electrical and Electronics Engineers Inc.: Piscataway, NJ, USA, 2019; pp. 6071–6074. [Google Scholar]
  15. Bueno, M.; González-Jorge, H.; Martínez-Sánchez, J.; Lorenzo, H. Automatic point cloud coarse registration using geometric keypoint descriptors for indoor scenes. Autom. Constr. 2017, 81, 134–148. [Google Scholar] [CrossRef]
  16. Vandapel, N.; Huber, D.F.; Kapuria, A.; Hebert, M. Natural terrain classification using 3-D ladar data. In Proceedings of the IEEE International Conference on Robotics and Automation, New Orleans, LA, USA, 26 April–1 May 2004; pp. 5117–5122. [Google Scholar]
  17. Singh, S.K.; Raval, S.; Banerjee, B. Roof bolt identification in underground coal mines from 3D point cloud data using local point descriptors and artificial neural network. Int. J. Remote Sens. 2021, 42, 367–377. [Google Scholar] [CrossRef]
  18. Rusu, R.B.; Blodow, N.; Beetz, M. Fast Point Feature Histograms (FPFH) for 3D registration. In Proceedings of the IEEE International Conference on Robotics and Automation, Kobe, Japan, 12–17 May 2009; pp. 3212–3217. [Google Scholar] [CrossRef]
  19. Marton, Z.C.; Pangercic, D.; Blodow, N.; Kleinehellefort, J.; Beetz, M. General 3D Modelling of Novel Objects from a Single View. In Proceedings of the 2010 IEEE/RSJ International Conference on Intelligent Robots and Systems, Taipei, Taiwan, 18–22 October 2010; pp. 3700–3705. [Google Scholar] [CrossRef] [Green Version]
  20. Zhao, G.; Yuan, J.; Dang, K. HeIght Gradient Histogram (HIGH) for 3D Scene Labeling. In Proceedings of the 2014 2nd International Conference on 3D Vision, Washington, DC, USA, 8 December 2014; pp. 569–576. [Google Scholar] [CrossRef]
  21. Eo, Y.D.; Pyeon, M.W.; Kim, S.W.; Kim, J.R.; Han, D.Y. Coregistration of terrestrial lidar points by adaptive scale-invariant feature transformation with constrained geometry. Autom. Constr. 2012, 25, 49–58. [Google Scholar] [CrossRef]
  22. Mishra, P.K.; Stewart, R.F.; Bolic, M.; Yagoub, M.C.E. RFID in underground-mining service applications. IEEE Pervasive Comput. 2014, 13, 72–79. [Google Scholar] [CrossRef]
  23. Muduli, L.; Mishra, D.P.; Jana, P.K. Application of wireless sensor network for environmental monitoring in underground coal mines: A systematic review. J. Netw. Comput. Appl. 2018, 106, 48–67. [Google Scholar] [CrossRef]
  24. Lavigne, N.J.; Marshall, J.A. A landmark-bounded method for large-scale underground mine mapping. J. Field. Robot. 2012, 29, 861–879. [Google Scholar] [CrossRef]
  25. Lavigne, N.J.; Marshall, J.A.; Artan, U. Towards Underground Mine Drift Mapping with RFID. In Proceedings of the Canadian Conference on Electrical and Computer Engineering, Calgary, Alberta, BC, Canada, 2–5 May 2010; pp. 1–6. [Google Scholar]
  26. Digiampaolo, E.; Martinelli, F. Mobile robot localization using the phase of passive UHF RFID signals. IEEE Trans. Ind. Electron. 2014, 61, 365–376. [Google Scholar] [CrossRef]
  27. Lemus, R.; Díaz, S.; Gutiérrez, C.; Rodríguez, D.; Escobar, F. SLAM-R algorithm of simultaneous localization and mapping using RFID for obstacle location and recognition. J. Appl. Res. Technol. 2014, 12, 551–559. [Google Scholar] [CrossRef] [Green Version]
  28. Motroni, A.; Buffi, A.; Nepa, P. A survey on Indoor Vehicle Localization through RFID Technology. IEEE Access 2021. [Google Scholar] [CrossRef]
  29. Ahmed, S.; Gagnon, J.D.; Makhdoom, M.; Naeem, R.; Wang, J. New Methods and Equipment for Three-Dimensional Laser Scanning, Mapping and Profiling Underground Mine Cavities. In Proceedings of the First International Conference on Underground Mining Technology, Sudbury, ON, Canada, 11–13 October2017; pp. 467–473. [Google Scholar]
  30. Pesci, A.; Teza, G. Terrestrial laser scanner and retro-reflective targets: An experiment for anomalous effects investigation. Int. J. Remote Sens. 2008, 29, 5749–5765. [Google Scholar] [CrossRef]
  31. Schaer, P.; Vallet, J. Trajectory Adjustment of Mobile Laser Scan Data in Gps Denied Environments. ISPRS Int. Arch. Photogramm. Remote Sens. Spat. Inf. Sci. 2016, XL-3/W4, 61–64. [Google Scholar] [CrossRef] [Green Version]
  32. Zhang, M. Accurate Sphere Marker-Based Registration System of 3D Point Cloud Data in Applications of Shipbuilding Blocks. J. Ind. Intell. Inf. 2015, 3, 318–323. [Google Scholar] [CrossRef]
  33. Wang, Y.; Shi, H.; Zhang, Y.; Zhang, D. Automatic registration of laser point cloud using precisely located sphere targets. J. Appl. Remote Sens. 2014, 8, 083588. [Google Scholar] [CrossRef]
  34. Shi, G.; Tang, J.; Guan, Y.; Cheng, X. Target Selection and Development in 3D Laser Scanning Based on Sampling Interval. In Proceedings of the 2nd International Conference on Information Science and Engineering, Hangzhou, China, 3–5 December 2010; pp. 4110–4112. [Google Scholar]
  35. Yang, C.; Liu, L.; Luo, W.; Meng, Y.; Su, W. Identification of Barcode Beacon and Its Application in Underground Mining. In Proceedings of the ICACTE 2010 3rd International Conference on Advanced Computer Theory and Engineering, Chengdu, China, 20–22 August 2010; Volume 1. [Google Scholar]
  36. Li, Z.; Huang, J. Study on the use of Q-R Codes as Landmarks for Indoor Positioning: Preliminary Results. In Proceedings of the 2018 IEEE/ION Position, Location and Navigation Symposium, PLANS 2018, Monterey, CA, USA, 23–36 April 2018; Institute of Electrical and Electronics Engineers Inc.: Piscataway, NY, USA, 2018; pp. 1270–1276. [Google Scholar]
  37. Lin, G.; Chen, X. A robot indoor position and orientation method based on 2D barcode landmark. J. Comput. 2011, 6, 1191–1197. [Google Scholar] [CrossRef]
  38. Zhang, H.; Zhang, C.; Yang, W.; Chen, C.Y. Localization and Navigation Using QR Code for Mobile Robot in Indoor Environment. In Proceedings of the 2015 IEEE International Conference on Robotics and Biomimetics, Zhuhai, China, 6–9 December 2015; Institute of Electrical and Electronics Engineers Inc.: Piscataway, NY, USA, 2015; pp. 2501–2506. [Google Scholar]
  39. Simela, J.V.; Marshall, J.A.; Daneshmend, L.K. Automated Laser Scanner 2D Positioning and Orienting by Method of Triangulateration for Underground Mine Surveying. In Proceedings of the ISARC 2013 30th International Symposium on Automation and Robotics in Construction and Mining, Montreal, QB, Canada, 11–15 August 2013; Volume 30, pp. 708–717. [Google Scholar]
  40. GeoSLAM. ZEB-REVO User Manual. 2017. Available online: http://download.geoslam.com/docs/zeb-revo/ZEB-REVO User Guide V3.0.0.pdf (accessed on 25 August 2020).
  41. Tan, K.; Cheng, X. Specular Reflection Effects Elimination in Terrestrial Laser Scanning Intensity Data Using Phong Model. Remote Sens. 2017, 9, 853. [Google Scholar] [CrossRef] [Green Version]
  42. Baltsavias, E.P. Airborne laser scanning: Basic relations and formulas. ISPRS J. Photogramm. Remote Sens. 1999, 54, 199–214. [Google Scholar] [CrossRef]
  43. Soudarissanane, S.; Lindenbergh, R.; Menenti, M.; Teunissen, P. Scanning geometry: Influencing factor on the quality of terrestrial laser scanning points. ISPRS J. Photogramm. Remote Sens. 2011, 66, 389–399. [Google Scholar] [CrossRef]
  44. Rusu, R.B.; Cousins, S. 3D is here: Point Cloud Library (PCL). In Proceedings of the IEEE International Conference on Robotics and Automation, Shanghai, China, 9–13 May 2011. [Google Scholar]
  45. Banerjee, B.P.; Raval, S.; Cullen, P.J.; Kumar Singh, S. Mapping of Complex Vegetation Communities and Species Using UAV-LIDAR Metrics and High-Resolution Optical Data. In Proceedings of the International Geoscience and Remote Sensing Symposium (IGARSS), Yokohama, Japan, 28 July–2 August 2019; Institute of Electrical and Electronics Engineers Inc.: Piscataway, NY, USA, 2019; pp. 6110–6113. [Google Scholar]
  46. Singh, S.K.; Raval, S.; Banerjee, B.P. Automated structural discontinuity mapping in a rock face occluded by vegetation using mobile laser scanning. Eng. Geol. 2021, 106040. [Google Scholar] [CrossRef]
  47. Persad, R.A.; Armenakis, C. Automatic co-registration of 3D multi-sensor point clouds. ISPRS J. Photogramm. Remote Sens. 2017, 130, 162–186. [Google Scholar] [CrossRef]
  48. Breitkopf, P.; Naceur, H.; Rassineux, A.; Villon, P. Moving least squares response surface approximation: Formulation and metal forming applications. Comput. Struct. 2005, 83, 1411–1428. [Google Scholar] [CrossRef]
  49. Singh, S.K.; Raval, S.; Banerjee, B. A robust approach to identify roof bolts in 3D point cloud data captured from a mobile laser scanner. Int. J. Min. Sci. Technol. 2021. [Google Scholar] [CrossRef]
  50. Su, Y.-T.; Bethel, J.; Hu, S. Octree-based segmentation for terrestrial LiDAR point cloud data in industrial applications. ISPRS J. Photogramm. Remote Sens. 2016, 113, 59–74. [Google Scholar] [CrossRef]
  51. Li, L.; Yang, F.; Zhu, H.; Li, D.; Li, Y.; Tang, L. An improved RANSAC for 3D point cloud plane segmentation based on normal distribution transformation cells. Remote Sens. 2017, 9, 433. [Google Scholar] [CrossRef] [Green Version]
  52. Dong, Z.; Yang, B.; Liang, F.; Huang, R.; Scherer, S. Hierarchical registration of unordered TLS point clouds based on binary shape context descriptor. ISPRS J. Photogramm. Remote Sens. 2018, 144, 61–79. [Google Scholar] [CrossRef]
  53. Ankerst, M.; Breunig, M.M.; Kriegel, H.P.; Sander, J. OPTICS: Ordering Points to Identify the Clustering Structure. SIGMOD Rec. (ACM Spec. Interes. Gr. Manag. Data) 1999, 28, 49–60. [Google Scholar] [CrossRef]
  54. Kalita, H.K.; Bhattacharyya, D.K.; Kar, A. A new algorithm for Ordering of Points to Identify Clustering structure based on perimeter of triangle: OPTICS (BOPT). In Proceedings of the 15th International Conference on Advanced Computing and Communications, Guwahati, India, 18–21 December 2007; Institute of Electrical and Electronics Engineers Inc.: Piscataway, NY, USA, 2007; pp. 523–528. [Google Scholar]
  55. Oomori, S.; Nishida, T.; Kurogi, S. Point cloud matching using singular value decomposition. Artif. Life Robot. 2016, 21, 149–154. [Google Scholar] [CrossRef]
  56. Horn, B.K.P. Closed-form solution of absolute orientation using unit quaternions. J. Opt. Soc. Am. A 1987, 4, 629. [Google Scholar] [CrossRef]
  57. Wang, J.; Huo, S.; Liu, Y.; Li, R.; Liu, Z. Research of fast point cloud registration method in construction error analysis of hull blocks. Int. J. Nav. Archit. Ocean. Eng. 2020, 12, 605–616. [Google Scholar] [CrossRef]
  58. Liu, Y.; Wang, C.; Song, Z.; Wang, M. Efficient global point cloud registration by matching rotation invariant features through translation search. In Proceedings of the European Conference on Computer Vision (ECCV), Munich, Germany, 8–14 September 2018; Volume 11216 LNCS, pp. 460–474. [Google Scholar]
  59. Besl, P.; McKay, N. A method for registration of 3D shapes. IEEE Trans. Pattern Anal. Mach. Intell. 1992, 14, 239–256. [Google Scholar] [CrossRef]
  60. Hong, H.; Lee, B.H. Probabilistic normal distributions transform representation for accurate 3D point cloud registration. In Proceedings of the IEEE International Conference on Intelligent Robots and Systems, Vancouver, BC, Canada, 24–28 September 2017; Institute of Electrical and Electronics Engineers Inc.: Piscataway, NY, USA, 2017; Volume 2017, pp. 3333–3338. [Google Scholar]
  61. Biber, P. The Normal Distributions Transform: A New Approach to Laser Scan Matching. In Proceedings of the IEEE International Conference on Intelligent Robots and Systemsm, Las Vegas, NV, USA, 27–31 October 2003; Volume 3, pp. 2743–2748. [Google Scholar]
  62. Magnusson, M.; Nüchter, A.; Lörken, C.; Lilienthal, A.J.; Hertzberg, J. Evaluation of 3D Registration Reliability and Speed-A Comparison of ICP and NDT. In Proceedings of the IEEE International Conference on Robotics and Automation, Kobe, Japan, 12 May 2009; pp. 3907–3912. [Google Scholar]
  63. Kaasalainen, S.; Ruotsalainen, L.; Kirkko-Jaakkola, M.; Nevalainen, O.; Hakala, T. Towards multispectral, multi-sensor indoor positioning and target identification. Electron. Lett. 2017, 53, 1008–1011. [Google Scholar] [CrossRef] [Green Version]
  64. Ruotsalainen, L.; Kirkko-Jaakkola, M.; Rantanen, J.; Mäkelä, M. Error modelling for multi-sensor measurements in infrastructure-free indoor navigation. Sensors 2018, 18, 590. [Google Scholar] [CrossRef] [Green Version]
  65. Hu, E.; Deng, Z.; Hu, M.; Yin, L.; Liu, W. Cooperative indoor positioning with factor graph based on FIM for wireless sensor network. Futur. Gener. Comput. Syst. 2018, 89, 126–136. [Google Scholar] [CrossRef]
  66. Peel, H.; Luo, S.; Cohn, A.G.; Fuentes, R. Localisation of a mobile robot for bridge bearing inspection. Autom. Constr. 2018, 94, 244–256. [Google Scholar] [CrossRef]
  67. Guo, J.; Tsai, M.J.; Han, J.Y. Automatic reconstruction of road surface features by using terrestrial mobile lidar. Autom. Constr. 2015, 58, 165–175. [Google Scholar] [CrossRef]
  68. Czerniawski, T.; Ma, J.W. Fernanda Leite Automated building change detection with amodal completion of point clouds. Autom. Constr. 2021, 124, 103568. [Google Scholar] [CrossRef]
  69. Hu, H.; Fernandez-Steeger, T.M.; Dong, M.; Azzam, R. Numerical modeling of LiDAR-based geological model for landslide analysis. Autom. Constr. 2012, 24, 184–193. [Google Scholar] [CrossRef]
  70. Forbes, B.; Vlachopoulos, N.; Diederichs, M.S.; Hyett, A.J.; Punkkinen, A. An in situ monitoring campaign of a hard rock pillar at great depth within a Canadian mine. J. Rock Mech. Geotech. Eng. 2020, 12, 427–448. [Google Scholar] [CrossRef]
  71. Gage, J.R.; Fratta, D.; Turner, A.L.; MacLaughlin, M.M.; Wang, H.F. Validation and implementation of a new method for monitoring in situ strain and temperature in rock masses using fiber-optically instrumented rock strain and temperature strips. Int. J. Rock Mech. Min. Sci. 2013, 61, 244–255. [Google Scholar] [CrossRef]
  72. Spearing, A.J.S.; Hyett, A. In situ monitoring of primary roofbolts at underground coal mines in the USA. J. South. African Inst. Min. Metall. 2014, 114, 791–800. [Google Scholar]
  73. Esterhuizen, G.S.; Gearhart, D.F.; Klemetti, T.; Dougherty, H.; van Dyke, M. Analysis of gateroad stability at two longwall mines based on field monitoring results and numerical model analysis. Int. J. Min. Sci. Technol. 2019, 29, 35–43. [Google Scholar] [CrossRef]
  74. Xing, Y.; Kulatilake, P.H.S.W.; Sandbak, L.A. Investigation of Rock Mass Stability Around the Tunnels in an Underground Mine in USA Using Three-Dimensional Numerical Modeling. Rock Mech. Rock Eng. 2017, 51, 579–597. [Google Scholar] [CrossRef]
  75. Cadena, C.; Carlone, L.; Carrillo, H.; Latif, Y.; Scaramuzza, D.; Neira, J.; Reid, I.; Leonard, J.J. Past, present, and future of simultaneous localization and mapping: Toward the robust-perception age. IEEE Trans. Robot. 2016, 32, 1309–1332. [Google Scholar] [CrossRef] [Green Version]
  76. Toth, C.; Jóźków, G. Remote sensing platforms and sensors: A survey. ISPRS J. Photogramm. Remote Sens. 2016, 115, 22–36. [Google Scholar] [CrossRef]
  77. Bimbraw, K. Autonomous Cars: Past, Present and Future: A Review of the Developments in the Last Century, the Present Scenario and The Expected Future of Autonomous Vehicle Technology. In Proceedings of the ICINCO 2015 12th International Conference on Informatics in Control, Automation and Robotics, Colmar, France, 21–23 July 2015; Volume 1, pp. 191–198. [Google Scholar]
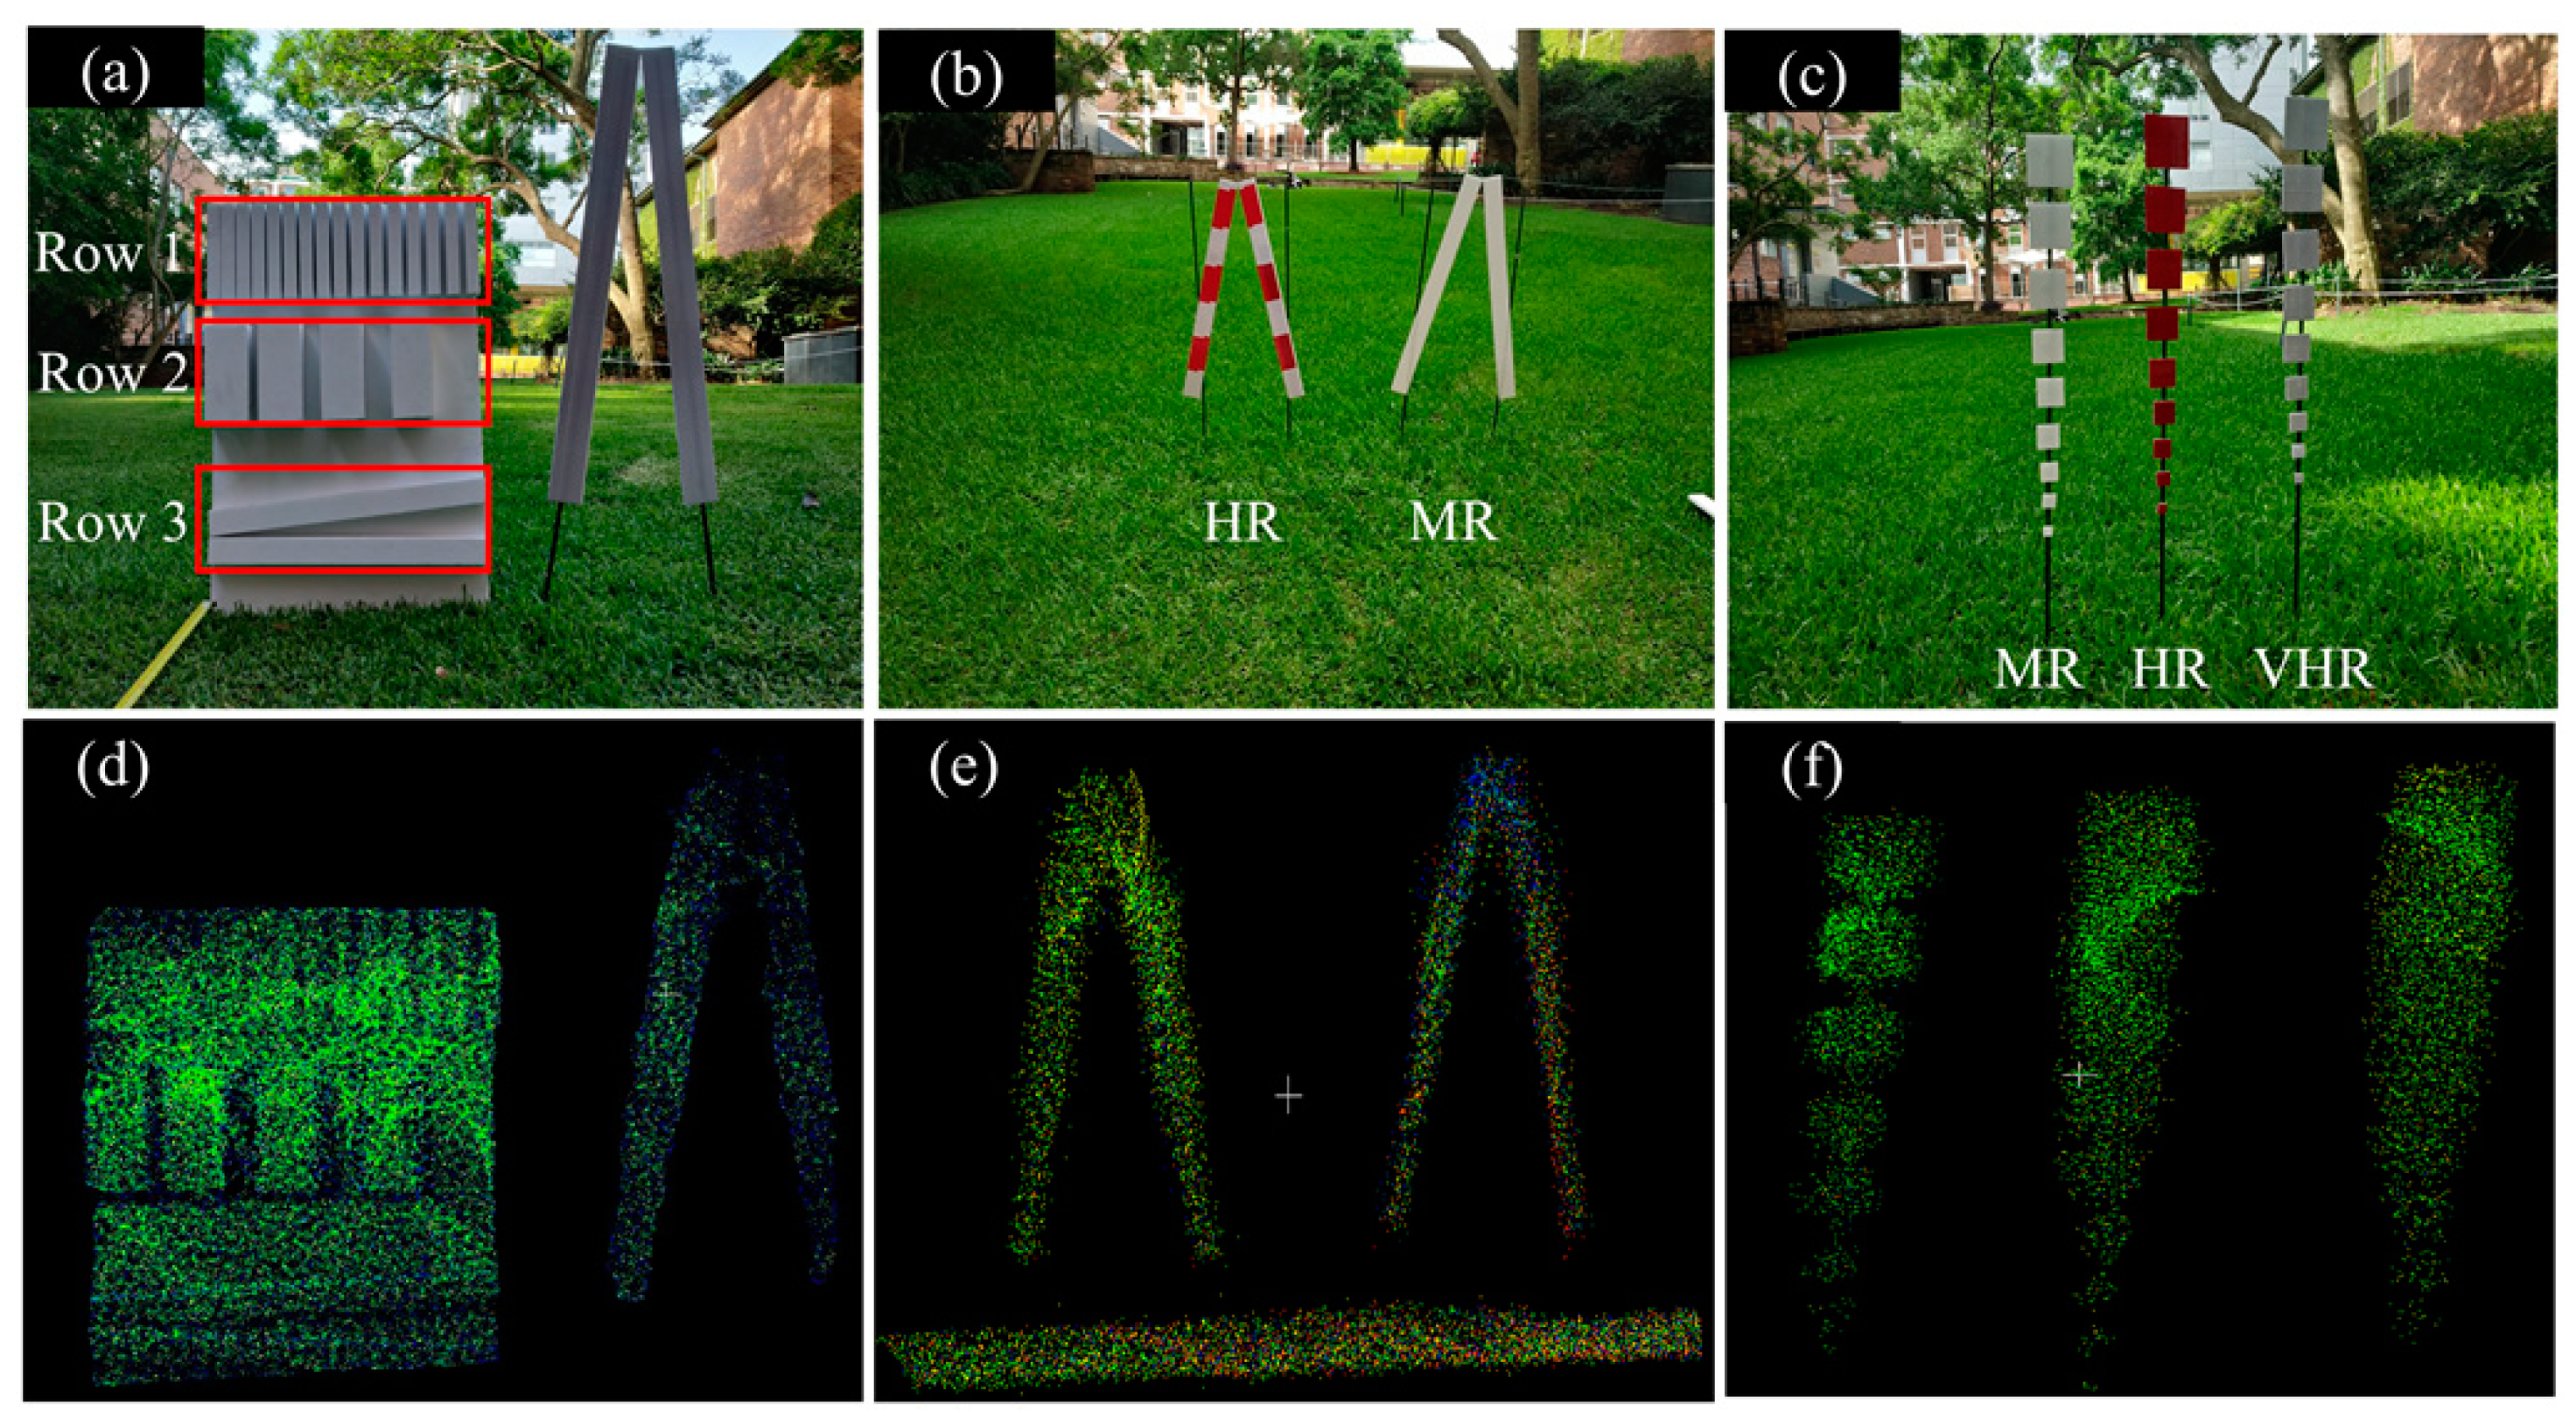
Figure 1. Experimental tests for prototype development: (a) A barcode pattern with different length and spacing. Row 1 has spacing ranging from 1 mm to 25 mm, row 2 has spacing 30, 40 and 50 mm, and row 3 is a < shaped pattern. (b) A ∧ shaped pattern with highly reflective (HR) and moderately reflective material (MR), and (c) a square block with 30 mm spacing made of moderately (MR), highly (HR) and very highly reflective (VHR) material was placed in a well-lit environment. (d) Point cloud corresponding to figure (a), (e) point cloud corresponding to figure (b), and (f) point cloud corresponding to figure (c).
Remotesensing 13 03145 g001
Figure 2. (a) Boundary frame of the 3DUID and the hanging piece, which is to be avoided during construction, and (b) a conceptual 3DUID prototype with red lines indicating the dimension obtained using a minimum mappable unit, and a triangular notch on the top for automated georeferencing and coregistration. The black blocks represent voids where the material has been removed. (c) Gridding approach for coding and decoding 3DUID.
Remotesensing 13 03145 g002
Figure 3. (a) Selected dimensions for 3DUID construction shown with an example, (b) developed prototype with a triangular notch on top, (c) schematic view of 3DUID installation at an offset distance from the wall for depth perception, (d) actual installation of 3DUID at the mine site, (e) conceptual scanning of installed 3DUID, and (f) division of study area into several subsections to investigate the impact of inter 3DUID spacing on georeferencing and data coregistration.
Remotesensing 13 03145 g003
Figure 4. Stages of 3DReG workflow to facilitate automated georeferencing and data coregistration. (a) Filtering of point cloud data to remove erroneous and uncertain points, (b) segmentation of roof, floor and wall to reduce the processing time for 3DUID recognition, (c) processing workflow for 3DUID recognition using ordered point cloud obtained from OPTICS algorithm, and (d) georeferencing using surveyed 3DUID and multiple point cloud coregistration through 3DUID correspondence.
Remotesensing 13 03145 g004
Figure 5. (a) Angle projected at a point between the nearest sensor location and the XY plane (shown with green shaded area). Whenever this angle was less than the specified threshold value, the point was stored. The process quickly segments the wall which may contain potential 3DUID. (b) The segmented roof, floor and walls shown with different colours for better visualisation.
Remotesensing 13 03145 g005
Figure 6. (a) An ordered point cloud with point transitions shown using a colour scale, (b) point cloud coloured with respect to range showing the variability of 3DUID points with respect to surrounding points, (c) concept of point angle showing the angle of point transition with respect to the nearest sensor location. Transition point shown in red denotes that after this point transition from wall to 3DUID occurred. (d) Some of the spurious points encountered in the void region of 3DUID due to sensor range inaccuracy, and (e) point cloud of 3DUID after removing spurious points using threshold number of points in a grid.
Remotesensing 13 03145 g006
Figure 7. Recognised 3DUID patterns are shown in yellow bounding boxes in the point cloud of an underground mine. The colour of 3DUID in the point cloud represents a unique identity tag associated with 3DUID.
Remotesensing 13 03145 g007
Figure 8. (a) Error between georeferenced coordinate and corresponding surveyed coordinate through LOOCV error analysis for different 3DUID spacing, (b) a cloud-to-cloud distance comparison between two georeferenced point clouds achieved using 3DUID tags with varying spacing, (c) the two point clouds in local coordinate system achieved after SLAM processing, and (d) georeferenced/globally aligned point cloud.
Remotesensing 13 03145 g008
Figure 9. (a) Point cloud coregistered using NDT algorithm. An inaccurate alignment of two point clouds can be observed. (b) Point clouds coregistered using the ICP algorithm. Mismatching can be seen at some cross-cuts in the mine section. (c) Point cloud coregistered using 3DReG where 3DUID is used for initial alignment followed by a fine refinement of the point cloud using ICP. A perfect overlap between two point clouds is visible.
Remotesensing 13 03145 g009
Figure 10. (a) Point cloud of the test area, (b) cross-sections extracted at every 10 m starting from the first 3DUID and ending at last 3DUID, and (c) the observed error in actual vertical and horizontal clearance shown with box plot for the given length of the mine section.
Remotesensing 13 03145 g010
Table 1. Mean absolute error in georeferencing for sections with different 3DUID spacing levels.
3DUID Spacing (in m)MAE of LOOCV
(in m)
Best Case Absolute Error in LOOCV
(in m)
Median of C2C Distance between the Two Datasets
(in m)
250.460.110.02
500.780.380.14
1001.890.940.11
2004.962.740.28
Table 2. A cloud-to-cloud distance comparison between coregistered and georeferenced point clouds.
Georeferencing and Coregistration MethodMedian C2C Distance (in m)TimeIterationsSampling
Georeferencing Using Surveyed 3DUID0.505 s0-
ICP0.6917.4 s1001,000,000
NDT6.9332 min1001,000,000
3DReG0.1620 s1001,000,000
Publisher’s Note: MDPI stays neutral with regard to jurisdictional claims in published maps and institutional affiliations.