Review

A Comprehensive Review of Steel Wire Rope Degradation Mechanisms and Recent Damage Detection Methods

Department of Machinery Engineering and Transport, Faculty of Mechanical Engineering and Robotics, AGH University of Science and Technology, 30-059 Krakow, Poland
Sustainability 2023, 15(6), 5441; https://doi.org/10.3390/su15065441
Submission received: 7 February 2023 / Revised: 5 March 2023 / Accepted: 17 March 2023 / Published: 20 March 2023

Abstract

:
Steel wire ropes are the vital load-bearing element in many rope transport devices, such as mine hoists, personal lifts, bridges and cableways. Non-destructive fault detection is a crucial issue for safety and reliability. This paper presents a comprehensive review covering three areas: damage mechanisms for steel wire ropes, physical phenomena used for diagnostics of steel wire ropes and practical applications of magnetometers. The advantages and disadvantages of each group of sensors, such as the induction coil, Hall element, magnetoresistance and optically pumped magnetometers, are presented. The author indicates the direction of the development of signal analysis techniques. In summary, the challenges and future directions for the development of wire rope flaw detection in practical applications are presented, especially considering the future of passive magnetic methods.

1. Introduction

The United Nations Brundtland Commission defined sustainability in 1987 as “meeting the needs of the present without compromising the ability of future generations to meet their own needs”. The easiest way to maintain sustainable development is to save available resources. A method that may be conducive to this is non-destructive testing of elements for which suitability is not certain. This article focuses on the non-destructive testing of wire ropes. Replacing them prematurely can lead to overuse and overproduction. With each such exchange, there is also an energy demand. There is, moreover, no doubt that more frequent replacement of steel wire ropes can cause problems with their disposal, especially for ropes in the form of belts or steel ropes with a polyurethane cover.
Steel wire rope is one of the most commonly used load-bearing elements in industry. The very high strength of the wires allows the ropes to transfer high tensile and bending forces by bending through pulleys with relatively small diameters. This very high strength, which impacts the spread of ropes, has been known for over a hundred years since an exceptional heating and drawing process was patented. Many books describe, with a broader or narrower scope, aspects related to the production and use of steel ropes. Their production began on a large scale in 1834 thanks to Oberbergrat Wilhelm August Julius Albert. One of the first relevant books was Benoit’s published in 1935; the studies by Verreet (1988), Sayeng (1997, 2003), Feyer (2017) [1] and Tytko (2021) [2] deserve attention. Each of these items is extensive, and the approach to ropes is treated holistically. In this work, I present only selected essential facts from a practical point of view.
The world’s first steel rope, the so-called “Albert’s rope”, was 18 mm in diameter; it consisted of three strands of four wires, each with a diameter of approx. 3.5 mm. Interestingly, it was twisted by hand. On 23 July 1834, in the Karolina mine near Clausthal, at a depth of 484 m, it successfully performed its function. Undoubtedly, the most significant advantage of this rope was that each of its wires was visible from the outside, allowing it to be effectively diagnosed and replaced at the right time. The development of industry forced the creation of new rope structures with larger diameters and more significant numbers of wires. The concept of placing a wire/strand in the centre and the other wires/strands around it was born. Basic structures of steel wire ropes and strands are shown in Figure 1. From the perspective of diagnostics, this was unfavourable—it was no longer possible to inspect all wires, especially the central one (core), which was utterly invisible [3]. Undoubtedly, this provided the impulse for the development of other methods of wire rope diagnostics.
The most systematized study on the diagnosis of steel wire ropes is [4]. This work describes in detail the known methods of wire rope diagnostics and presents the sensors’ characteristics, thoroughly analysing their disadvantages, advantages and potential for use. It is crucial to describe signal analysis techniques. Unfortunately, this work does not contain basic information about steel ropes—the damage mechanisms and the different types of work in other environments. This information appears in [5]. The authors of the work quite thoroughly show the types of damage steel ropes can sustain, for which they indicate the appropriate diagnostic method. However, this work is not very up-to-date; the development of steel rope diagnostics is very dynamic. Much new research has been undertaken to support the development of diagnostics. Ref. [6] deserves special attention. This work only focuses on magnetic sensors, but the review is comprehensive and meticulous. It includes sensors using the following phenomena: the Hall effect, tunnel magnetoresistance, anisotropic magnetoresistance and giant magnetoimpedance. Complementary in the context of steel rope diagnostics is [6]. In this work, the researchers present, in addition to a detailed description of the mechanisms of steel rope wear and their causes, supported by physical explanations, a rich review of the literature in which the given issue is discussed.
The aim of this work was to provide an even more thorough systematization and update of the information included in the previously mentioned publications. An essential aspect of this publication is the combination of information on both wire ropes and their diagnostic methods. However, the work focuses on the most dynamically developing branch of diagnostic methods using passive magnetic techniques. The author’s contribution to the development of this field of diagnostics is presented. The directions of development of the methods described in detail are also indicated, including their opportunities and threats for application in industry. An inseparable element of the work is the aspect concerning sustainable development of the environment, which, through skilful diagnostics of steel ropes, will allow for less frequent replacement of load-carrying strands. Currently, installed rope-transport devices—especially steel wire ropes, ropes with polyurethane coatings, and belts with plastic coatings [7]—are becoming increasingly popular. Their premature replacement and associated disposal is a problem that can be solved thanks to the research described here.

2. Damage Mechanisms for Steel Wire Ropes

2.1. Basic Information about Steel Wire Ropes

Depending on the use of wire ropes, they must meet certain requirements. These requirements impose a specific structure, diameter and strength to be selected when designing a given system [1]. The primary division of steel ropes by application is shown in Figure 2.
The wire systems used in fatigue tests, zones of maximum stress amplitudes in the wire cross-section, stress amplitudes and average amplitudes are presented in Table 1. Knowing this information allows us to predict the life of a rope and plan diagnostic tests [1].

2.2. Damage Mechanisms for Steel Wire Ropes

Steel wire ropes are subject to damage during regular operation, which reduces their strength and threatens systems’ safety. The most common reason for replacing wire ropes is damage to only a specific section where the number of wire breaks exceeds the acceptable level. This negatively impacts sustainable development—in many cases, these ropes are automatically scrapped, but large sections (separate from the damaged ones) could still be successfully used for operations. This highlights the importance of the development of wire rope diagnostics [8].
Damage to steel ropes can be divided into two groups: local damage (local faults/local flaws (LFs)) and loss of cross-section (loss of metallic area (LMA)) [9]. LFs are defined as short discontinuities in wire ropes, such as wire breakage, welded wire, corrosion pitting or nicks between the strands. LMA is a change in the metallic cross-sectional area expressed as a percentage of the nominal metallic cross-sectional area relative to the new rope [10]. This type of damage to steel ropes is described in [11].
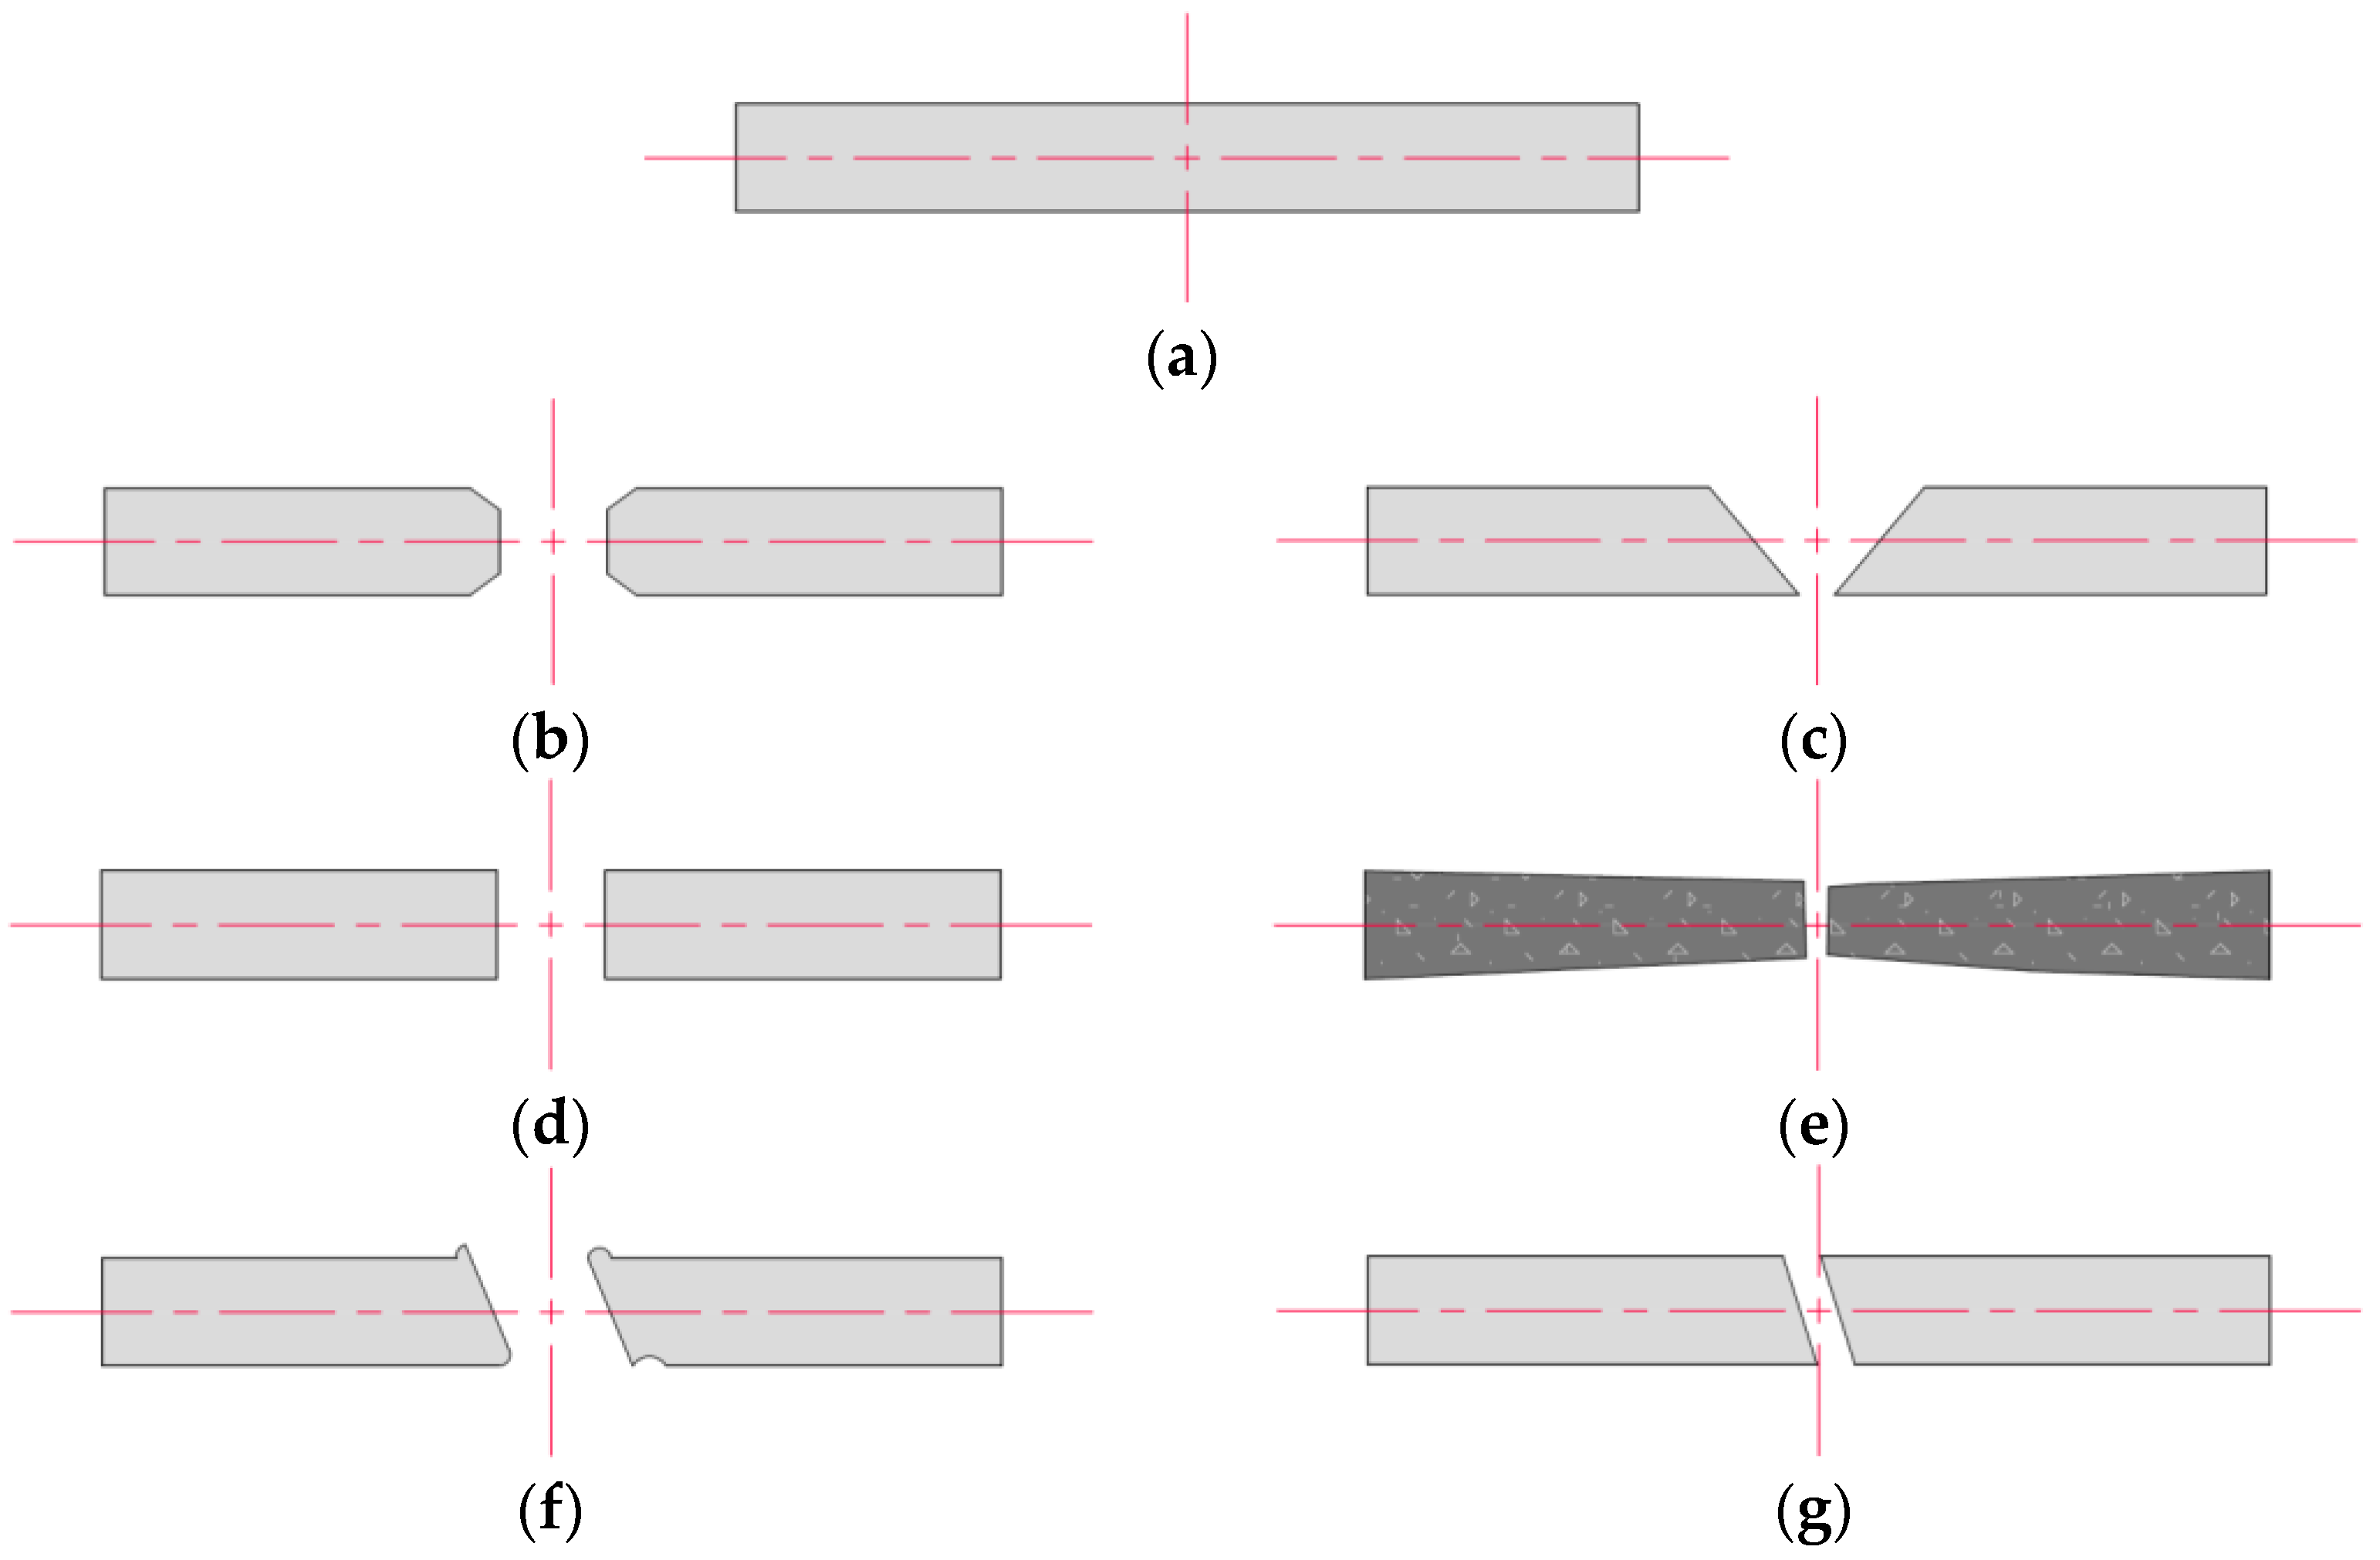
Types of wire damage (local damage) are shown in Figure 3.
Wire ropes are used in almost every industry and have many different applications. As a result of continuous use, they inevitably degrade. This degradation is often caused by four phenomena: fatigue, frictional fatigue, wear and corrosion. These phenomena may occur alone, but they almost always occur in various combinations and with varying intensity [12].
Sudden breakage of a rope can endanger people’s lives and health and cause costly downtime. Therefore, accidents resulting from damage to steel ropes are a severe problem and a challenge for designers and constructors, especially regarding the safety of human life. The basis for improving the efficiency of rope use is increasing safety and a good knowledge of the degradation process. The fatigue processes above have the most significant impact on the development of degradation [6]. The most common degradation mechanisms are presented in Table 2.

2.3. Previous Research on the Propagation of Damage in Steel Ropes

The wearing of steel ropes results in the deterioration of their operational parameters, which may threaten the safety of people using rope-transport devices. The authors of [13] proved that surface wear contributes to crack propagation. This is a scary situation, which, in the worst case, may result in the strand or the entire rope breaking. Broken wires in wire rope affect the tension state of the entire rope, concentrating the propagation of cracks. This leads to faster wear and the need to replace the rope. The currently used criterion for the rejection of steel ropes consisting of counting broken wires is inadequate for actual conditions, resulting in premature replacement of ropes [14]. Undoubtedly, such a solution disrupts the sustainable development of the environment because these are not exceptional situations but the currently used standard. The still unresolved problem of effective diagnostics for steel ropes in mine hoists forces the search for new solutions. One such solution is the proposal described in [15]. The authors present a model that uses the principle of balancing the magnetic field to design a structural model of magnetic focusing. This solution seems to be particularly useful for ropes with large diameters. Unfortunately, this is an active method that requires an external source of magnetization, which is contrary to the sustainable development of industry. In subsequent work, the authors attempted to diagnose steel ropes using real objects in real time. For diagnostic and operational reasons, it is not only the discontinuities in the rope (damage) that are important but also the stresses occurring. The authors of [16] describe the use of a sensor with a vibration dissipation function. This is very important for the diagnostics of working objects: vibrations effectively hinder correct diagnostics. Unfortunately, the obtained results are not satisfactory. The authors of [17] analyse the external magnetic field’s influence on ferromagnetic material’s stress intensity factor. It has been proved that magnetic field disturbances are greatest in the initial stage of mechanical loading. Ferromagnetic structures are already magnetized at the manufacturing stage. The change in magnetization (Hp) in the initial phase is linear. Plastic deformation reduces magnetic permeability, and self-magnetization of local stress concentration zones develops, causing nonlinear changes [18]. In [19], theoretical and experimental studies were conducted to determine fatigue life as a criterion for laying down a non-swivel rope with alternate bending. As a result of the experimental research, it was proved that the life of the Na rope decreased with the load and the decrease in the diameter of the pulley through which it was bent. A very high correlation between the experimental results, the artificial neural network (ANN) and the results of the proposed regression model was shown. Nevertheless, an unsolved problem in the diagnosis of steel ropes is the diagnosis of the inner strands of steel ropes and the core. In [20], the authors conducted experimental tensile tests on steel ropes with modelled damage. Ye Duyi damage models and the Weibull distribution were adopted. Both models describe the behaviour of the core well and make it possible to predict the critical areas of ropes. The fault detection algorithm proposed here was based only on statistical analysis and works well in general. Ropes have complex states of stress and different degrees of damage to individual strands, disqualifying this method for use as part of diagnostics in industry. Publication [21] analysed in detail fatigue tests for steel ropes. The sequence of damage growth was presented. Cracks are a complex effect of fatigue, bending and contact stresses. A model of the steel rope was even developed and subjected to numerical analyses, which were confirmed by the conducted research. In [22], attention was paid to the corrosion of steel rope wires and its impact on the rope’s life. Tests showed that the maximum strength and crack resistance decreased with increasing immersion time in a 30% sulphuric acid solution. Among the various models, Erismann’s law was chosen as the one that could best describe the life curve of a steel rope in corrosive conditions. Similar research was described in [23], except that the focus was on a single wire in this case. Fatigue tests were carried out on wires with various degrees of corrosion. A model describing the durability of the steel wire, taking into account the influence of corrosion, was also proposed. The analysis described in [24] aimed to comprehensively examine the degree of fatigue damage to steel ropes, considering torsional stresses. For this purpose, a fatigue machine was built and measurements were carried out. Wire breakage develops slowly at the beginning of the fatigue stage but rapidly when fatigue times exceed 60,000 cycles. In [25], it was shown that the transverse angle between wires significantly impacts the wear marks and the mechanical properties of the wires. The test results in [26] showed three types of component stresses in the rope cross-section: tensile, shear and bending. In most previous studies, only tensile stress was considered when investigating strength and fatigue. However, bending and shear stresses were also found to be important factors here.

3. Non-Destructive Detection Methods for Wire Ropes

The primary non-destructive testing methods currently known and used for wire-rope testing are magnetic flux leakage (MFL), eddy current testing (ECT), acoustic emission (AE), ultrasonic guided waves (UGWs), radiography and vision testing. Each method uses different physical phenomena, and there is intensive research being conducted on almost every method.

3.1. Magnetic Flux Leakage (MFL) Method

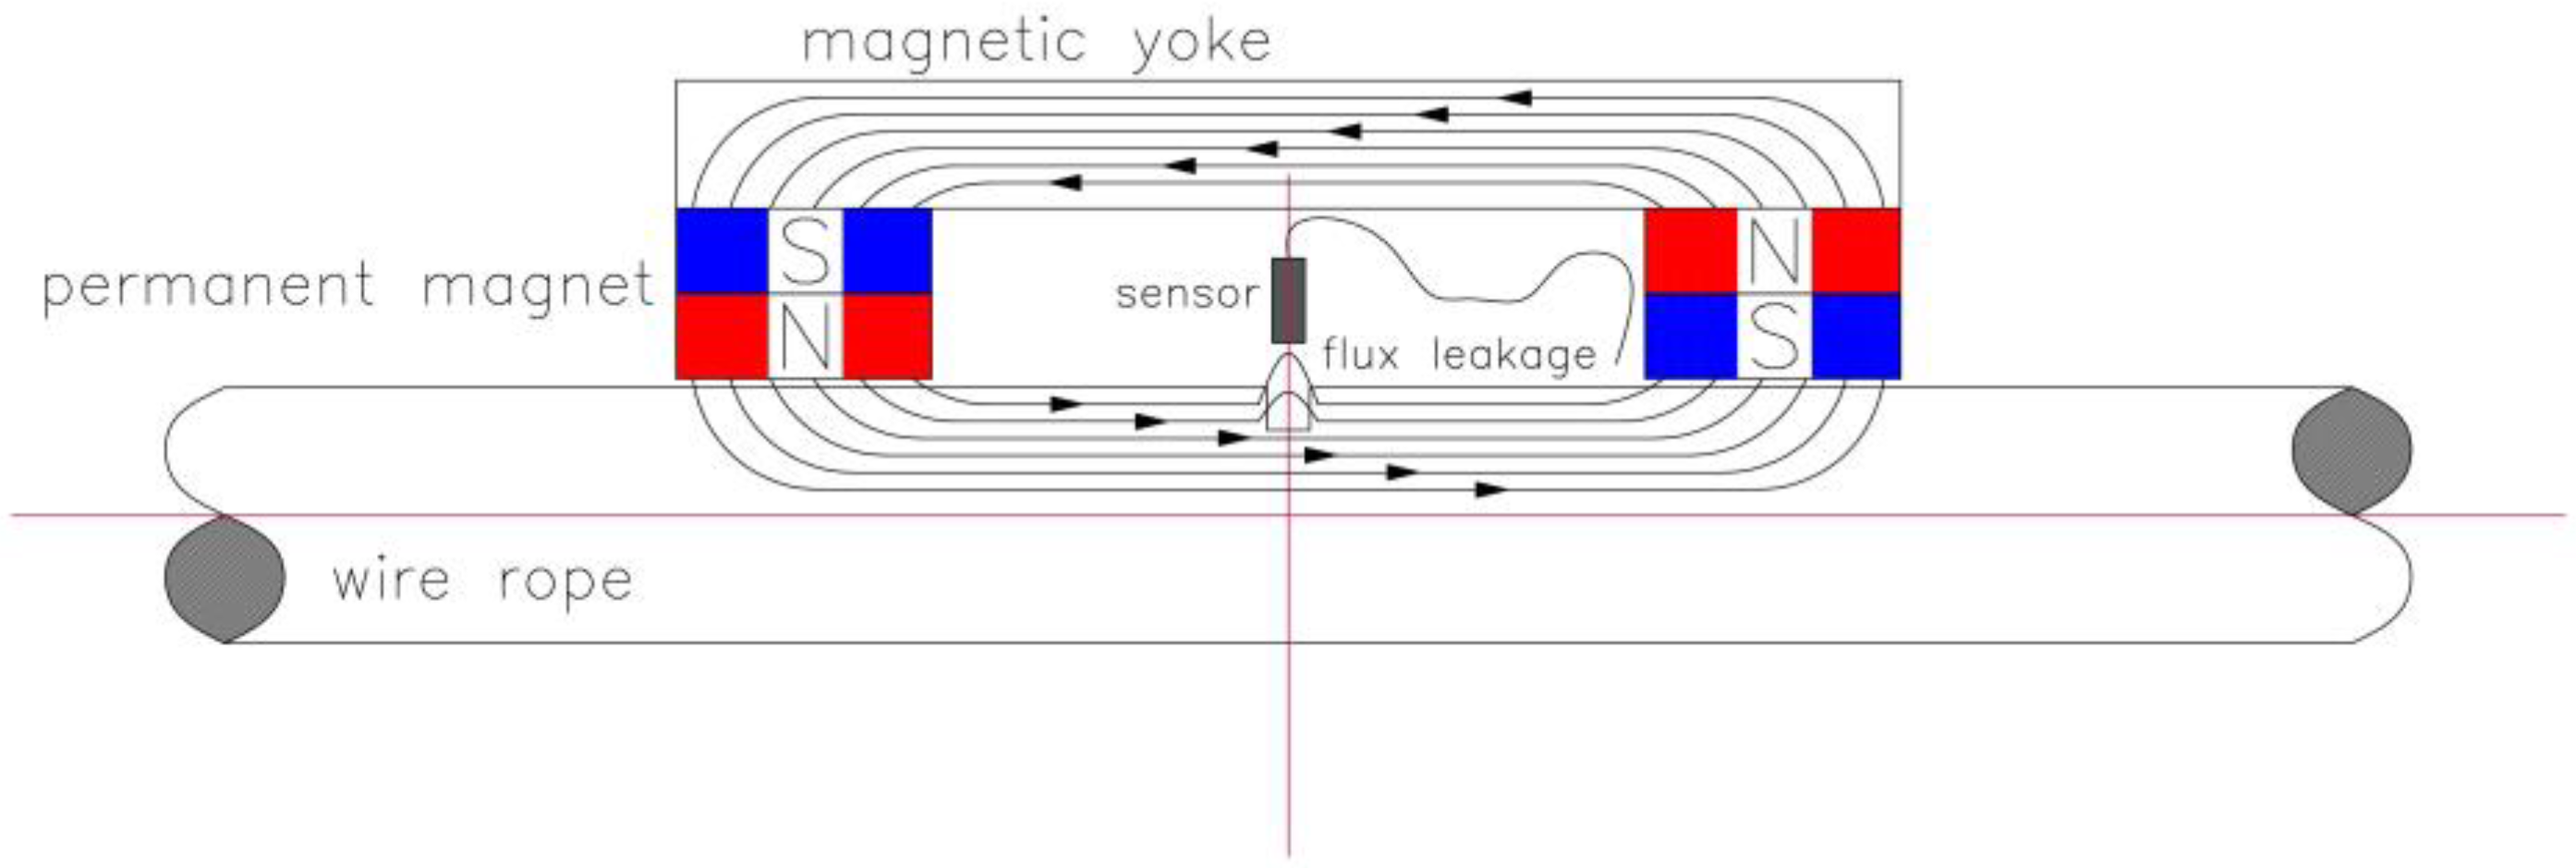
Magnetic flux leakage is one of the most commonly used methods for wire rope diagnostics [27]. This method is also used in many other industries where the reliability of ferromagnetic components is essential, such as for the diagnosis of steel pipes [28,29] or bridge support components [30]. A rope with LF- or LMA-type defects is subjected to magnetization by a strong external magnetic field. It is possible to pinpoint defect locations by changing the magnetic resistance with suitable sensors, such as an induction coil or Hall effect sensor [31]. The operating principle is illustrated in Figure 4.
The magnetic flux leakage used for wire rope diagnostics is described in [32]. The authors demonstrated high sensitivity and repeatability for their measurements, but the method used permanent magnets for additional magnetization. This affected the size of the measuring system. In [33], a numerical simulation was carried out to identify the value of and variation in magnetic flux density with regard to defect depth. Unfortunately, the tests were carried out for a steel bar, which is a homogeneous material. Therefore, the results for steel wire rope may differ from those obtained. The authors of [34] proposed a novel magnetic shielding (MS) technology that should improve the quality of the magnetic flux leakage (MFL) signal. Unfortunately, inconsistencies between the experimental results and the simulation significantly limit the application of this technology. Researchers are looking for reasons for these discrepancies. The shielding effect is most effective for long faults with shallow depth. The high speed of wire ropes results in vibrations, making it challenging to carry out meaningful measurements. Worse still, it can result in skewed results and wrong decisions regarding rope operations. The authors of [35] proposed a radial magnetic concentrator supported by theoretical analyses. Undoubtedly, this is a crucial step in diagnostics, but the fact remains that a large-scale apparatus must be used for the test, requiring the magnetization of the test object with a strong magnetic field. This contradicts the aims of sustainability. The authors of [36] used magnetic flux leakage (MFL), introducing the slotted ferromagnetic lift-off layer. Compared to the conventional method with an air gap present, the ferromagnetic gap has been proven to be more effective. The gap occurring in the ferromagnetic layer enhances the diagnostic signal. However, a problem arises when diagnosing complex components and components with defects, as the introduced ferromagnetic layer could be damaged during the measurement. In [37], an alternating current magnetic flux measurement (AC-MFM) method was compared with the permanent magnet magnetic flux measurement (PM-MFM) method. The superiority of the PM-MFM method over the AC-MFM method was demonstrated, mainly due to the speed of the measurements. The experimental analysis confirmed that the proposed PM-MFM sensor was compatible with various ferromagnetic materials, allowing broad industrial applications.

3.2. Eddy Current Testing (ECT) Method

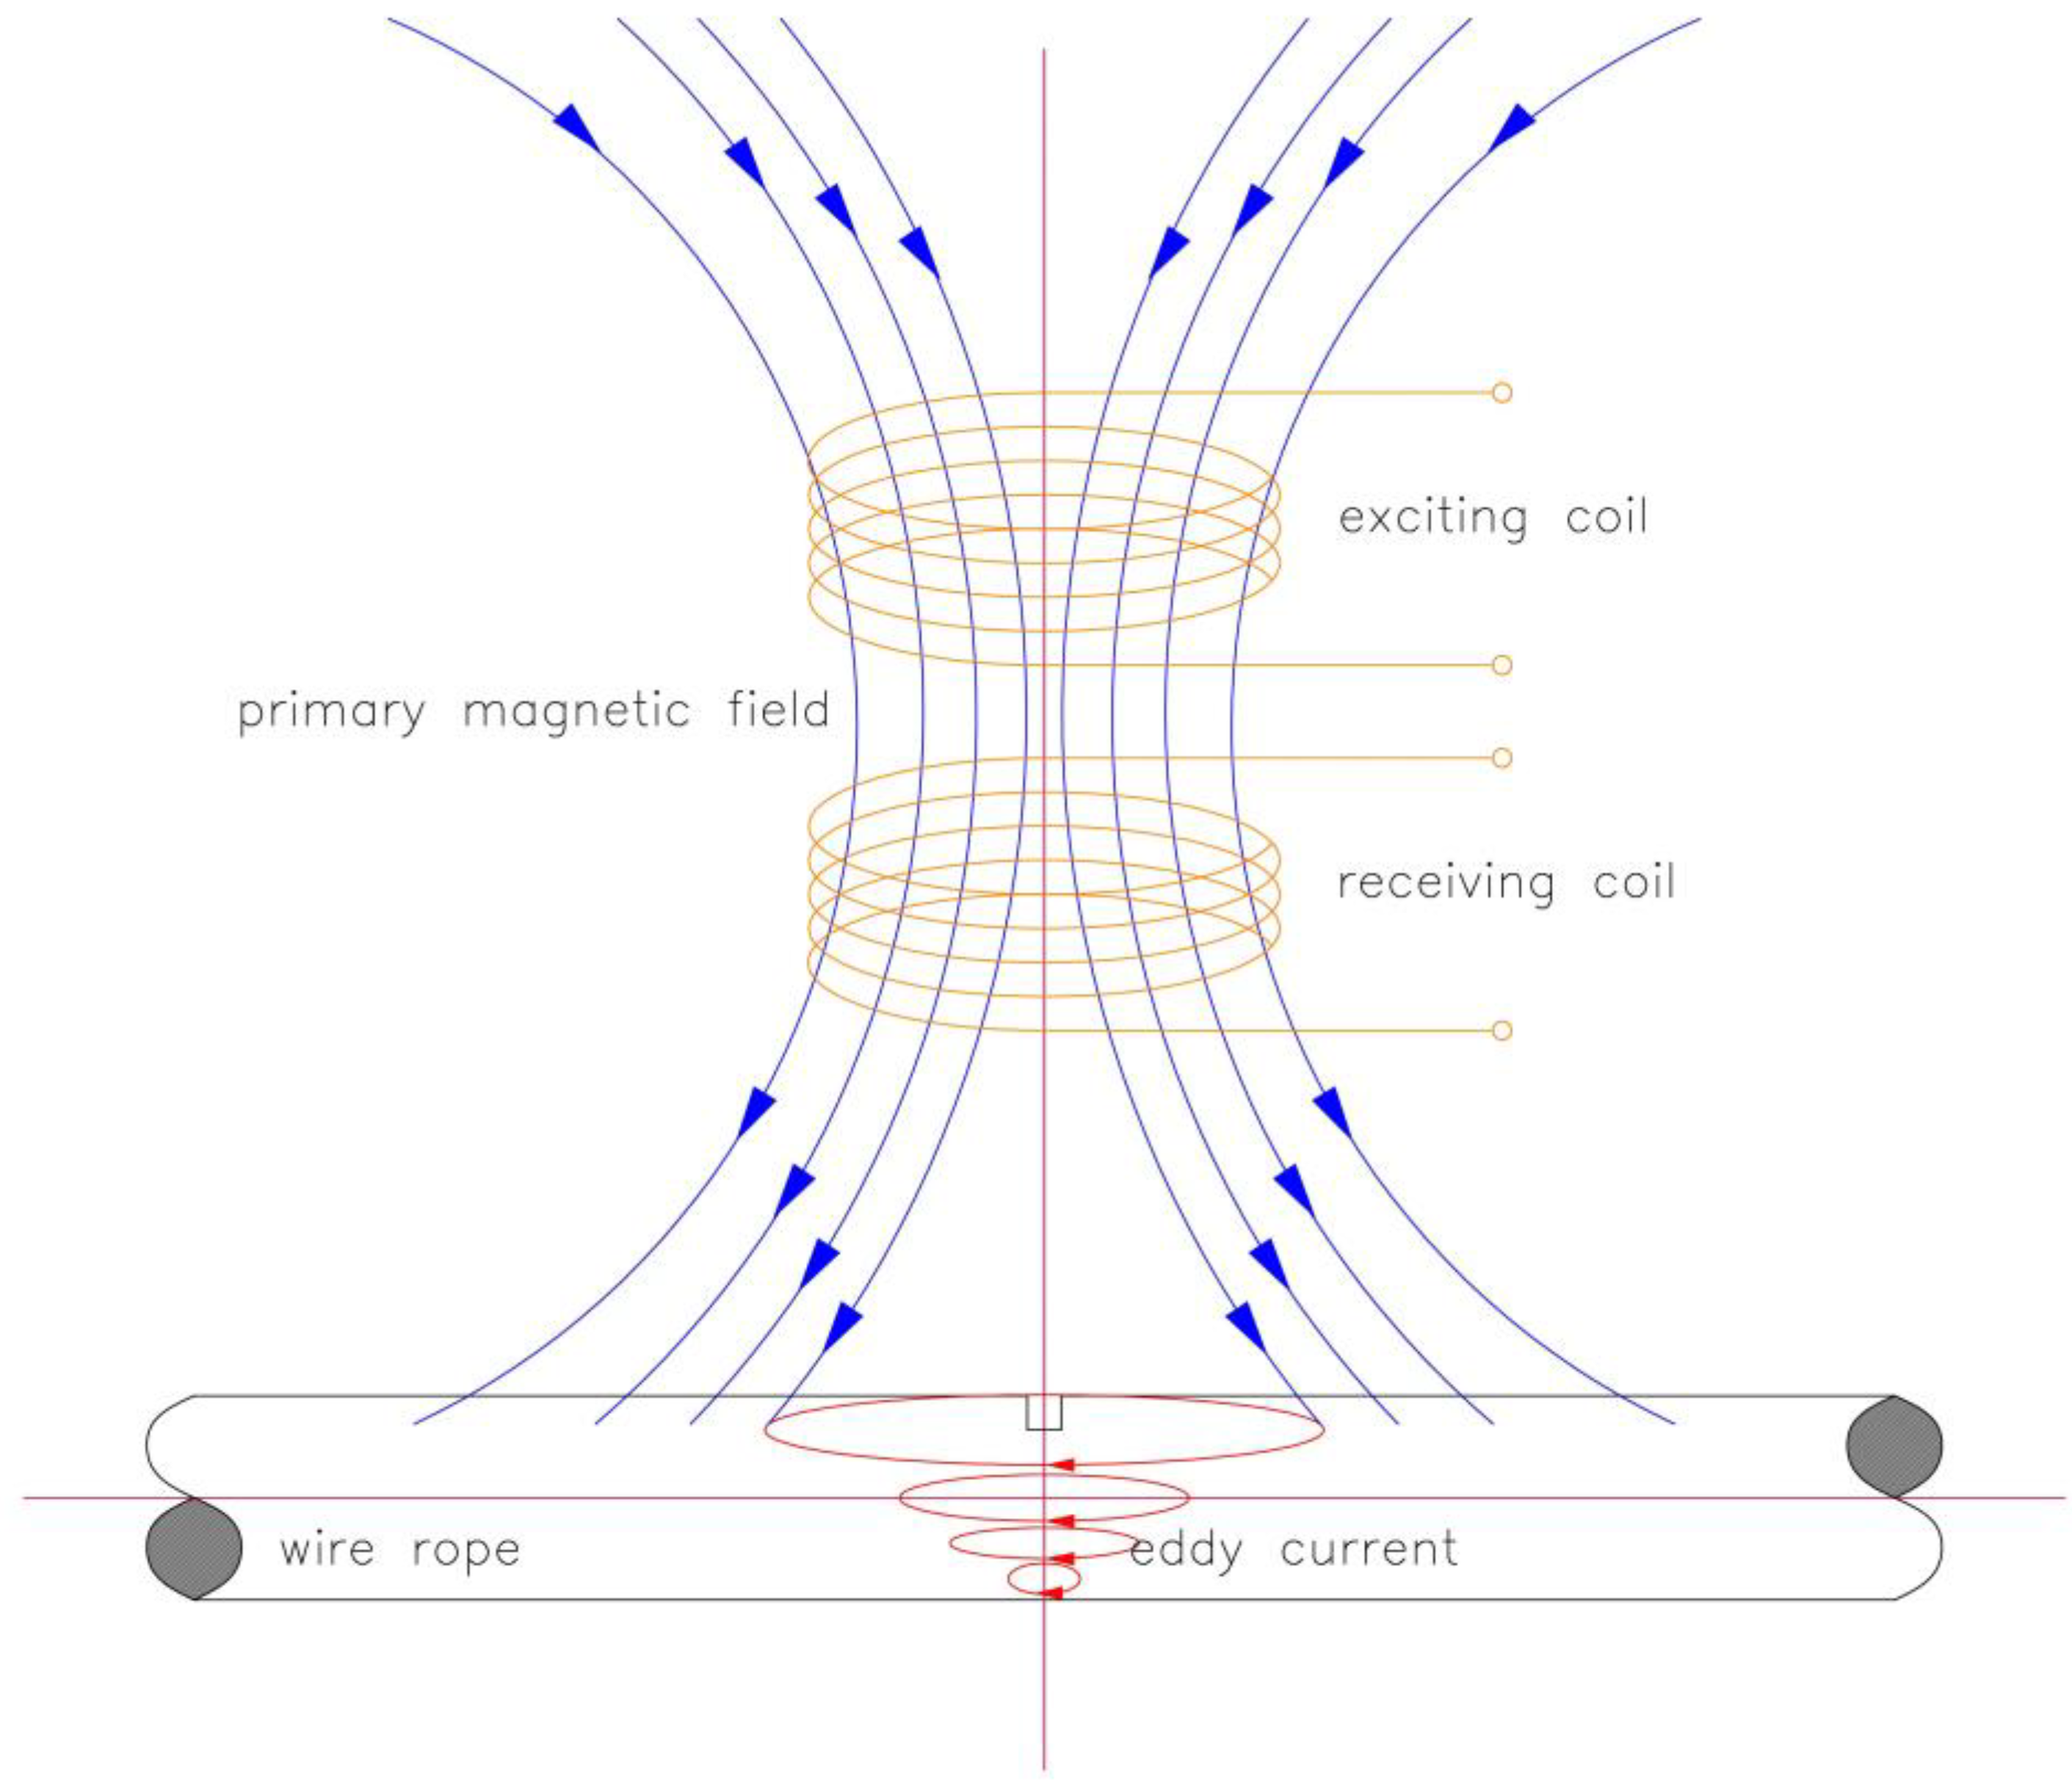
Eddy current testing (ECT) is a commonly used non-destructive testing technique for detecting defects in metal structures. In [38], the researchers developed miniaturized single-channel and dual-channel probes based on tunnel magnetoresistance. The application of this method to wire rope diagnostics is described in detail in [39]. The principle of operation is described in detail in [40] and schematically illustrated in Figure 5.
The authors of [41] used different eddy current-based probe designs for defect detection: total and commercial reflection. The experimental results showed that the absolute probe was suitable for detecting cracks and holes, while the reflection probe was more suitable for detecting subsurface defects, such as small-diameter blind holes. This is a fundamental observation in the context of detecting defects both on the surface and in the interior of the test object. Article [42] addresses the problem of detecting defects with different orientations relative to the direction of the eddy currents. The authors designed a special probe based on a triaxial magnetic sensor. Simulation results confirmed the superior performance relative to the uniaxial sensors most commonly used in industry. The effectiveness of the triaxial magnetometer was also proven in [43]. The application of ECT for further research on wire ropes requires solving the problems related to skin effects and eddy current losses.

3.3. Acoustic Emission (AE) Method

The acoustic emission method has been successfully used to diagnose high-pressure pipes [44]. Due to the physical mechanisms causing defects in steel cables (cracks, stress concentrations, corrosion), even small changes can be detected by a sensor built with piezoelectric transducers. Many authors are working on the development of this method [45]. The principle of operation is described in [46] and schematically shown in Figure 6.
The development of this method for wire rope diagnostics has been noticeable in recent years. Most authors focus on signal analysis [47,48]. Of particular interest in relation to acoustic emission methods is the phenomenon of Barkhausen noise. The authors of [49,50] investigated the correlation between corrosion defects and Barkhausen noise. Unfortunately, this method does not work well for different wire thicknesses and diameters and in situations involving accumulated defects, especially under harsh operating conditions (corrosion, grease, etc.).

3.4. Ultrasonic Guided Wave (UGW) Method

In contrast to acoustic emission, the ultrasonic guided wave method is a non-destructive active method. Its operating principle is shown in Figure 7 [51]. The most important part of the system is the piezoelectric transducer, which is used to generate and detect the guided wave [52].
An ultrasonic testing technique to identify individual damaged wires inside the internal structure of strands was developed [53] and verified experimentally. Longitudinal guided waves for wire rope diagnostics were described in [54]. The authors noted a difference in the results obtained depending on the rope’s tension. A detailed analysis would require further research focusing on the appropriate polarisation of the magnetic field. Article [55] presents a detailed analysis of magnetic field reconstruction using pulse-wire methods. This is an innovative method, the results of which depend on the pulse length. The results obtained in this study could be more reliable, despite the numerical simulations performed. The method needs to be refined. The authors of [56] pointed out the disadvantages of the proposed innovative pulse-wire magnetic method. Due to the frame’s unique design, it is impractical for measurements of real objects and costly. The method is also fraught with internal sources of error that disturb the results’ reliability level. Despite the signal analysis algorithm proposed by the authors, this method still requires very detailed analysis for practical use.

3.5. Radiography

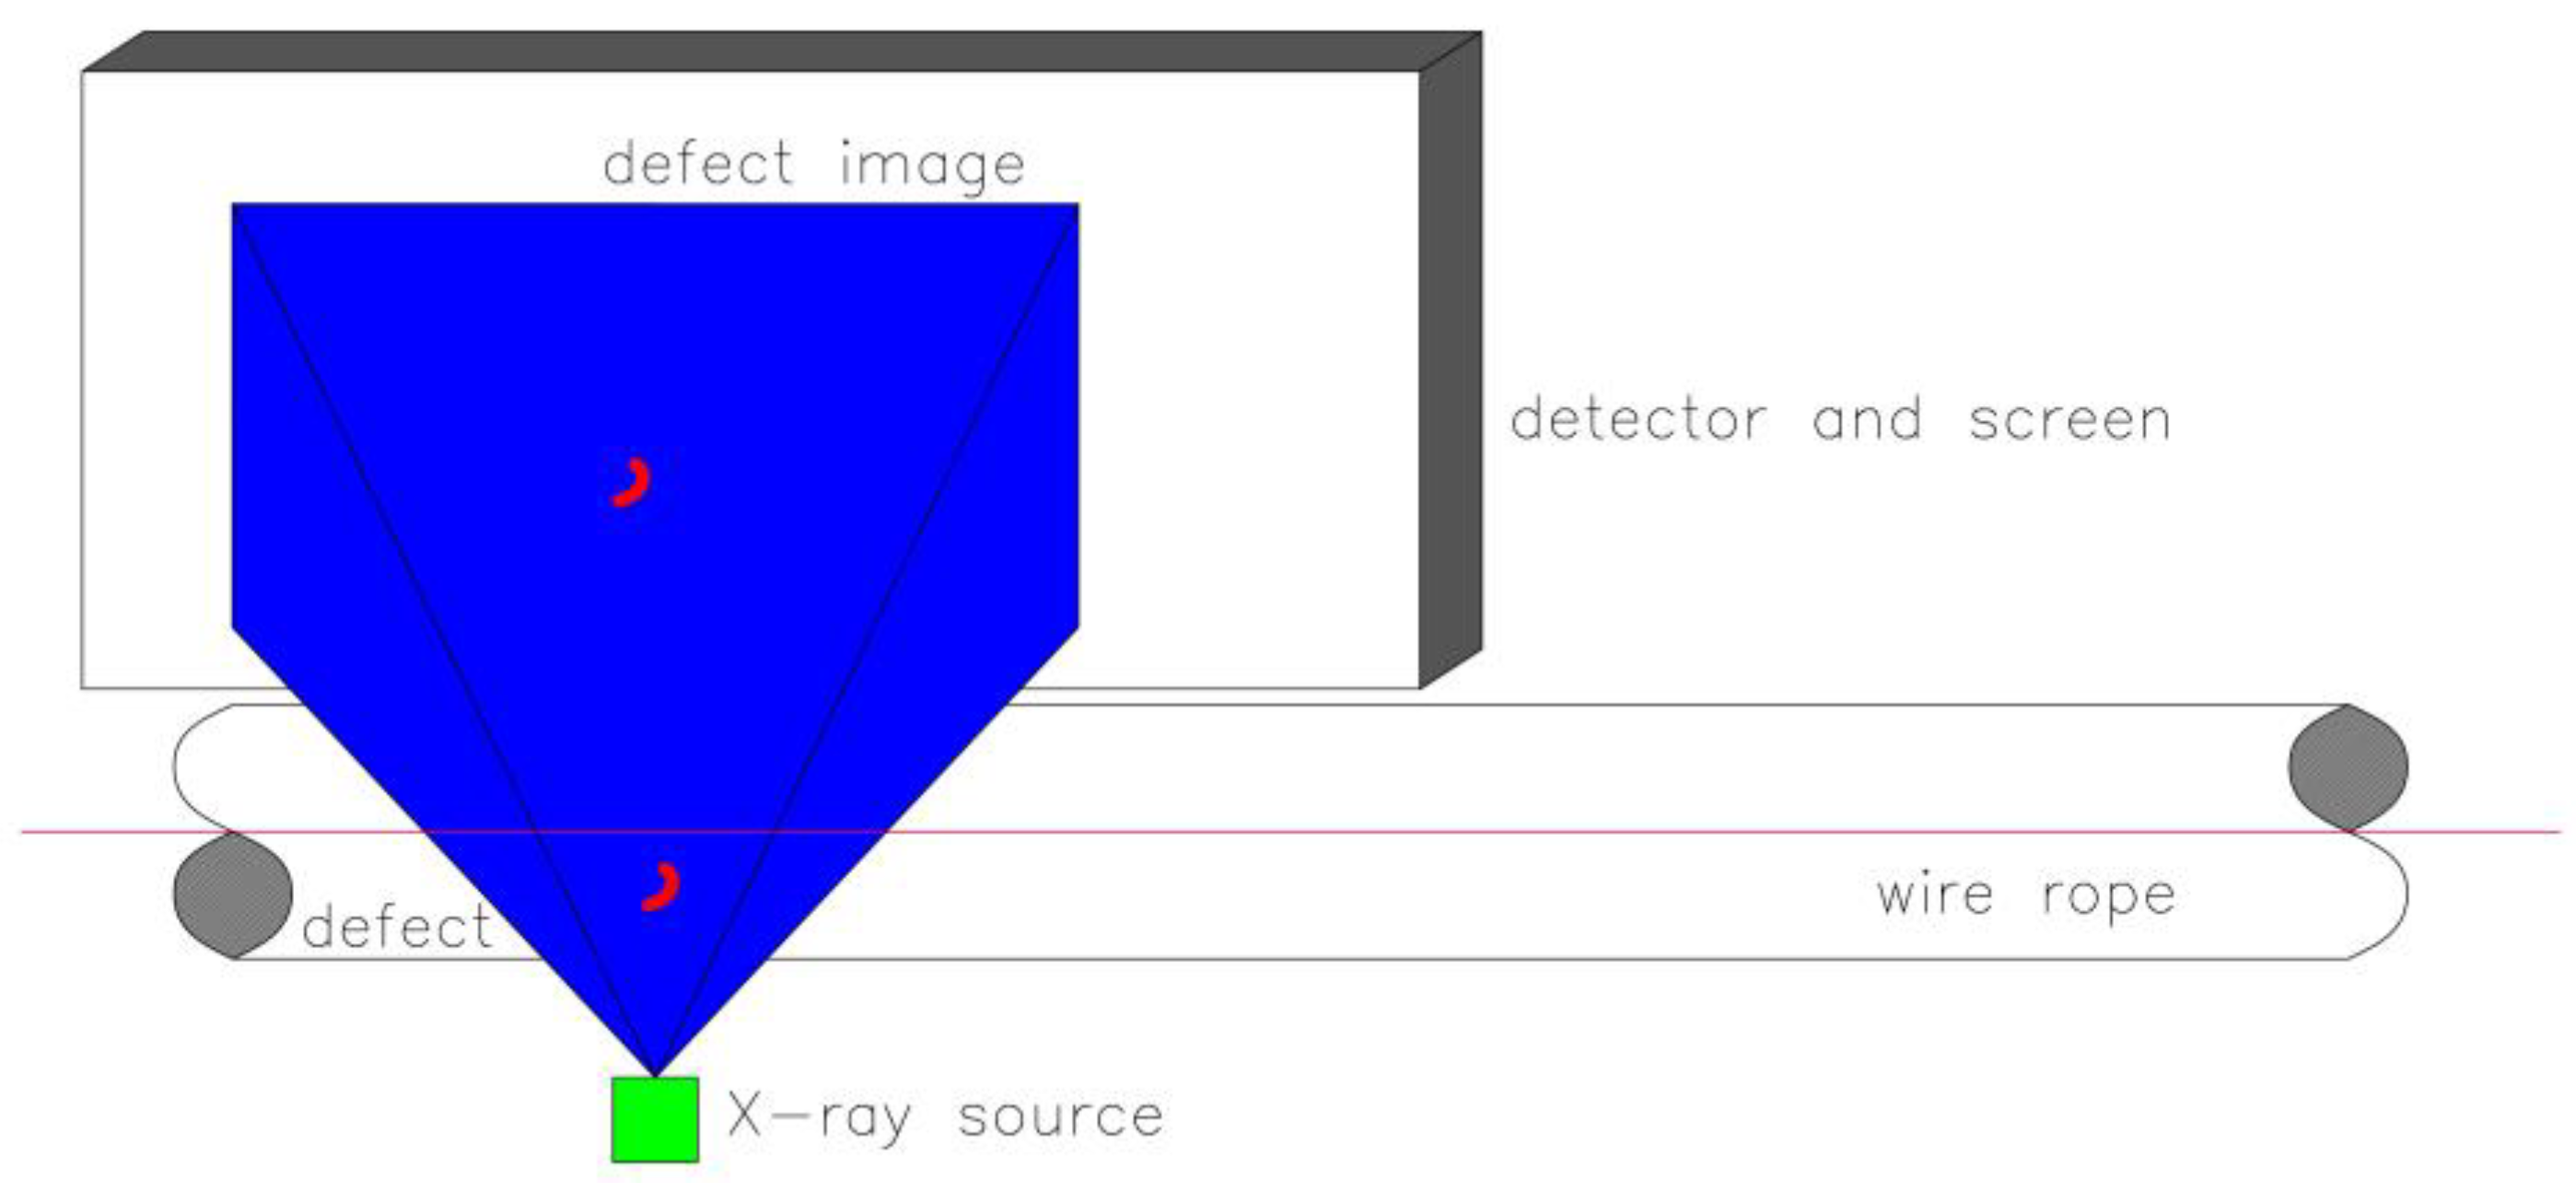
Radiographic testing is a standard non-destructive testing method that has also found applications in the diagnosis of steel wire ropes. The steel wire rope absorbs part of the radioactivity; the rest of it penetrates through the tested rope and is projected onto a film, where a defect image is produced. The degree of absorption and penetration of steel rope radiation depends on many factors relating to the material being tested, such as the density, diameter, construction, and air gaps. Depending on the radiation source, the method can be divided into two groups: X-rays [57] and gamma rays. The detailed principle of the method is illustrated in Figure 8.
This method’s basics are thoroughly described in [58]. The authors pointed out how important it is to select the proper test objects. Gamma radiation has been successfully used to diagnose steel bridge cables [59]. The use of this method in wire rope diagnostics is manifesting as a development trend. However, as radiation can cause harmful effects on human health and the test equipment is of considerable size, there are many challenges and problems to be addressed [60].

3.6. Visual Inspection/Thermal Imaging

Visual testing is undoubtedly one of the non-destructive methods of wire rope diagnostics [61]. Unfortunately, visual inspection is often insufficient to visualize all defects [62]. Machine vision support (the machine vision method) [63,64] or thermal imaging studies are often required [65]. Termovision tests are also used to determine the service life of wire rope [66] and evaluate geometric parameters [67]. The principle of operation is described in [68] and schematically shown in Figure 9.
The experiments conducted in [69] showed that, as the load on the steel cables increases, the temperature also rises through the increase in stress. These tests require other measurements, as thermal imaging alone is insufficient to unambiguously determine the critical cross-section of the test object. Thermal imaging, due to its elementary operating principle and, especially, its independence from the rope materials’ mechanical, electrical and magnetic properties, is suitable for rapidly detecting highly loaded load-bearing ropes with different cross-sections. The studies in [70] showed that the thermo-elastic effect occurs in compacted ropes during uniaxial loading. Measurements of the average surface temperature of the specimens between loading cycles showed that the processes occurring in the internal structure of the rope during elongation (mainly friction) caused temperature changes. Magnetic thermography testing (MTM) signals caused by the leakage of residual magnetic flux from corrosion defects in the tube were confirmed with experimental testing. As the distance and propagation of the defect signal increase, the amplitude decreases and the risk of interference from nearby ferromagnetic objects increases. Weak defect signals at large distances and the possibility of interference from relatively distant ferromagnetic objects, such as bolts, nuts, etc., are likely reasons for the high false-connection rate observed in some trials of this technique [71]. One of the most recent methods of wire rope diagnostics is infrared thermography. An experiment in [72] showed how many factors affect the measurement result. In addition to the structural parameters of the rope, these factors include the ambient temperature, the temperature of the sample and the reflection temperature. This is not a significant problem under laboratory conditions, but performing this type of test under natural conditions may result in a significant measurement error. Another problem is the proper calibration of the camera, which also affects the measurement result. In [73], a novel approach was proposed to diagnose wire ropes based on texture features. Attention was paid to the choice of illumination and appropriate filtering algorithms. Unfortunately, these algorithms only focus on defects occurring in the outer strands of the ropes and do not consider defects occurring in the wires inside the ropes.

3.7. Comparison of Wire Rope Diagnostic Methods

Using the appropriate method for a specific application requires the diagnostician to have extensive knowledge and experience. It also requires basic physical knowledge regarding each of the mentioned methods. Including all of this here would make comprehension much more difficult. Therefore, in Table 3, only the shortcomings, advantages and applications of particular methods and the possibilities for quantitative and qualitative assessment are presented. However, this does not indicate the limits of these methods’ diagnostic capabilities; depending on the knowledge and experience of the diagnostician, it is possible to detect defects not described in this table.

4. Recent Passive Magnetic Techniques and Sensors

According to the characterization presented in the previous section, there is no doubt that magnetic methods are the most popular among non-destructive methods for wire rope diagnostics. It is complicated to provide a systematic classification of magnetic sensors. According to [74], the most popular magnetic NDT methods can be divided into magnetic flux leakage (MFL), magnetic Barkhausen noise (MBN) and metal magnetic memory (MMM). This is a division from 10 years ago when the diagnostic capabilities of metal magnetic memory were beginning to be discovered. From the perspective of wire rope diagnostics, it seems much more reasonable to divide them into two groups: active techniques requiring the magnetization of the test object with a strong external magnetic field and passive techniques using the test object’s magnetic scattering field.

4.1. Active Magnetic Techniques and Sensors Used

One of the first studies detailing the active magnetic methods in wire rope diagnostics was [75]. In many countries, state criteria for the diagnosis of rope-handling equipment are based on tests using this technique [76]. An overview of the sensors used in China can be found in [77]. According to [78], selecting a suitable sensor depends on the fault that is sought: for LF-type faults, inductive sensors should be used, while for LMA-type faults, Hall sensors should be used.

4.1.1. Inductive Sensors

Inductive sensors use Faraday’s law of electromagnetic induction. In diagnostic practice, many different types of induction coil are used: planar coils, Rogowski coils, triaxial coils and flexible printed coils [79]. A detailed overview of the different types with descriptions is presented in [80]. New sensor designs based on electromagnetic induction have not been reported recently. The biggest problem is the low sensitivity and accuracy of microcrack detection, which all researchers strive to improve [81]. Furthermore, a new trend for the future of non-destructive testing is represented by radio-frequency ID (RFID) inductively powered devices and sensors. All use the induction coil method as part of the core and improve the range of applications and the detection sensitivity [82]. Induction coils are also sensitive to single-wire features and noise signals, which increases the difficulty of distinguishing wire rope damage signals. In addition, induction coils are also sensitive to changes in the speed of the detectors from which they are formed, making the output signal more complex to analyse. As a result, they are challenging to use for online wire rope monitoring and inspection due to the varying operating speeds.

4.1.2. Hall Effect Sensors

Another important magnetic sensor in wire rope diagnostics is the Hall effect sensor, which is mainly based on the Hall effect. According to the principle of the Hall effect, the Hall sensor and the control signals are independent of the scanning speed. This is particularly useful for online wire rope testing and identifying defect sizes in quantitative non-destructive testing. Furthermore, the output signals of the Hall element are directly related to the absolute magnetic field strength, which makes the Hall sensor particularly suitable for metal cross-sectional area (LMA) loss detection of defects such as abrasion and corrosion. Research on the Hall element has mainly focused on improving the sensor’s sensitivity, and the measurement dimensions have been increased from one to three. Hall sensor arrays have also been widely used for complex sensing conditions, such as high temperatures and speed. In [83], a magnetic concentration sensor was comprehensively investigated for the detection of wire rope damage. The sensor used a concentrator to help the Hall component collect the MFL caused by the defects. Simulation results showed that the magnetic concentration sensor could collect the MFL produced by the defects more effectively. The newly designed excitation system proposed in [84] has a much lower weight and size than the classical sensor. The newly designed system suppresses the signal noise well, thus improving the defect signal to magnetic image noise ratio. All simulated defects were identified, and defects in the same axial position could be distinguished. Despite the size reduction, the technique still requires magnetization with an external magnetic field, and the device’s size makes it challenging to carry out measurements of real objects.

4.2. Passive Magnetic Techniques and Sensors Used

The metal magnetic memory (MMM) technique was first developed by Dubov [85]. This method is based on the principle of self-magnetic flux leakage (SMFL), which is similar to that of MFL, but it does not involve actively magnetizing the sample [86]. It uses the Earth’s magnetic field as the only external source. In addition to the Earth’s magnetic field, there are also internal sources of magnetization, such as permanent magnetization due to remanence and stress magnetization [87,88]. The metal magnetic remanence technique, compared to the traditional magnetic method based on magnetic field flux leakage, has a lower cost and easier handling. The number of studies on self-magnetic flux leakage needs to be increased, and controversy around this method still exists. In [89], the relationship between the magnetic signal and the existing stress state was presented. In recent years, interest in this method has increased, as evidenced by the rapidly increasing number of publications on the subject [90,91,92,93]. The physical basis of this method has been successfully used to measure stresses [94,95], as well as for the measurement of discontinuities [96]. In the field of wire rope diagnostics, these sensors are used to determine the condition of ropes [97,98]. They have been successfully used both to assess the strain in wire ropes due to bending and to detect broken wires. They allow qualitative and quantitative assessments [99,100]. The main types of sensors in the field of passive magnetic diagnostics are magnetoresistive and optically pumped sensors.

4.2.1. Magnetoresistive Sensors

A magnetoresistive (MR) sensor consists of two thin layers of magnetic material separated by a layer of non-magnetic metallic material. Naturally, the MR sensor can be used for effective detection of wire rope defects due to its mechanism of changing resistance and thus producing current when the magnetic field detected by the sensor changes. With the identification of the MR effect, various MR sensors have been proposed, such as the giant magnetoresistance (GMR) sensor, tunnel magnetoresistance (TMR) sensor and anisotropic magnetoresistance (AMR) sensor, based on the physical phenomena of giant magnetoresistance, tunnel magnetoresistance and anisotropic magnetoresistance, respectively, and they have significantly improved the sensitivity of magnetic field detection. The structures of three typical MR sensors are shown schematically in Figure 10. Some researchers are still engaged in optimization of MR sensors and new MR sensor designs, aiming to improve the inspection system’s stability further and develop MR theory. With regard to the sensors reported in the literature, the sensitivity is highest for GMI sensors but, due to their size and high cost, they have yet to find applications in wire rope diagnostics [101]. They are followed by TMR, AMR, and GMR sensors, which are significantly ahead of Hall sensors. Among MR sensors, TMR sensors are the most effective [102]. Unsurprisingly, the TMR sensor is also the most expensive. GMR sensors perform better than AMR sensors. Hall sensors have the lowest sensitivity and resolution; however, they make up for this by offering a high dynamic range at a low cost. Low cost, adequate performance and high availability make the Hall effect sensor the most popular magnetic field sensor on the market [103]. The challenges for these sensors are described in detail in [104,105]. Different structures of MR sensors are described in detail in [106] and schematically presented in Figure 10.

4.2.2. Optically Pumped Magnetometers

The article [107] presents a highly sensitive, miniature, scalar optical atomic magnetometer configured to operate in the Earth’s magnetic field. Its operating principle is based on the optical pumping of caesium atoms undergoing Larmor precession in the presence of a magnetic field at a frequency proportional to the magnitude of the measured magnetic field. The two sensors can operate together without interference with a sensor distance of only 2.5 cm. Together with a sensitivity of 1 pT/Hz, this allows measurements of tiny signals from local sources in the presence of significant common magnetic field disturbances from distant sources. Measurements as diverse as the human heart’s magnetic field and ferrous contaminants in food are now possible without the need for cryogenics or a specialized magnetic shielding environment. Optically pumped sensors use atoms as the magnetic sensing element. The magnetic field exerts a torque on the magnetic moment. Thus, atoms with a precession of magnetic moments in the presence of a magnetic field that have a frequency proportional to the magnitude of the magnetic field possess what is known as the Larmor frequency. Accurate measurements of the Larmor frequency of an ensemble of atoms provide a reliable measure of the magnitude of the magnetic field, which is largely insensitive to the orientation of the sensor in relation to the direction of the magnetic field. In thermal equilibrium, the magnetic moments or spins of individual atoms in the assembly are randomly oriented. The atomic spins must first be aligned with an optical pumping process using pump light to produce a macroscopic polarisation spin. This polarisation of the ensemble spin is then optically probed using probe light, with the intensity or polarisation modulated at the Larmor frequency depending on the detection scheme used. This method was first presented by Bell and Bloom in 1961 [107]. In [108], the authors compared measurements made with an optically pumped magnetometer and a sensor using SQUID technology. Very high correlations were seen, but this requires further research. The authors of [109] investigated the primary sources of error in optically pumped magnetometers with intense off-resonance pumping in the Earth’s magnetic field. Nonlinear Zeeman splitting and magnetic orientation-dependent light shifting were the two leading causes. The theoretical analysis was confirmed experimentally, and the authors concluded that compensation coefficients must be developed.

5. Development Trends in Diagnostics

5.1. Signal Filtering

One of the most significant drawbacks of the measured signal is the high degree of noise. The authors of [110] proposed filtering based on wavelet decomposition. Experimental results showed that this analysis was practical with the Elman recognition network. The results obtained were quantitative, and it was difficult to decipher the nature of the damage from them. In [111], a wavelet filter algorithm based on ensemble empirical model decomposition (EEMD) was proposed with which system noise was effectively suppressed. Compared to the algorithm described in [112], the solution has the following advantages: higher computation speed, better filtering effect and high signal-to-noise ratio (SNR). The authors of this paper both located the wire rope defects and quantified them. This solution provides reliable evidence of the degree of wire rope damage, allowing criteria for the rope’s decommissioning to be determined. To solve the diagnostic problems associated with signal analysis, such as the low defect recognition rate, poor signal denoising effect and long testing time, the authors of [113] proposed an algorithm combining a kernel extreme learning machine (KELM) with a compressed sensing wavelet (CSW). The article describes normalization, segmentation and positioning methods, effectively improving classification accuracy for cracked wires. However, this method does not recognize fatigue wear or the influence of corrosion cavities. The authors of [114] paid particular attention to the appropriate analysis of the obtained wire rope diagnostic signal. Eight different methods of de-noising and signal processing were proposed: low-pass, Butterworth, median and mean filtering; Gaussian and polynomial fitting; and wavelet and empirical mode decomposition (EMD). The best performance was shown by the Gaussian filtering method. Unfortunately, not enough different wire rope designs have been investigated, and this cannot be translated as a universal algorithm. The paper’s authors emphasized that there is a need to combine different signal analysis methods, which requires further work and research. In [115], a prototype device based on measuring the residual magnetic field (RMF) components was designed. The authors proved that the proposed model was superior to traditional wire rope discontinuity detection methods due to its high accuracy and negligible sensor size. This paper proposed an algorithm based on Hilbert–Huang transform (HHT) wavelet filtering and compressed sensing (CS). Experimental results showed very high convergence of the damage indicated by the filtering with the actual damage. By using digital image processing, accuracy higher than 90% was achieved. However, the work needs to be improved. The authors ignored the direction of the damage at the perimeter of the rope. In engineering practice, this is extremely important, as damage distributed around the circumference of the rope is less threatening during operation than damage in the same direction. The work also does not consider the rope pitch: the spiral resulting from twisting the strands that make up the rope. An interesting approach is shown in [116]. This paper proposes a three-dimensional method for imaging inverted magnetic sources in a near field of unknown shape, position and magnetization. The method transforms the total anomalies of the observation surface into the sum of the field vector anomalies and then constructs a function to minimize the deviations between measured and predicted magnetic anomalies. The principle of magnetic dipole equivalence is used for the calculation. The Gauss–Newton and coupled gradient algorithms are used for the inversion optimization process. This method has been used to identify steel pipes but, for wire rope damage detection, its accuracy needs to be higher.

5.2. Intelligent and Quantitative Rope Inspection

In [117], a new visual method for detecting wire rope defects was proposed that combines the convolutional denoising autoencoder (CDAE) and IsolationForest (iForest). Previous methods have focused on the manual analysis of defects; the classifier constructed in this study allows this process to be automated. Unfortunately, there are limitations for the applicability of this algorithm relating to vibrations, grease, dust and different light intensities. An even more complicated limitation is the need to prepare a sufficient number of Dan defects to train the system. An obvious limitation that disqualifies the above algorithm is the fact that it can only be applied to the outer layer of wire rope wires. Ref. [118] describes a template for segmenting wire rope surface defects. The method proposed can adapt well to the surfaces of test objects and, in contrast to previous work, does not require any defect samples. As in previous work, only defects in the rope’s outer layer can be detected with this method. The authors of [119] focused on the quantitative diagnosis of discontinuities. Instead of a traditional Hall sensor array, they used a magnetic concentrator, which allowed for comprehensive data collection. Experimental tests were carried out for discontinuities ranging from one to five wires. The analysis of the results needs to be more conclusive, and additional studies are required to implement the proposed method successfully. Although the processing of the Hall sensor signal is complicated, the signal can contain more information than a magnetic concentration sensor. Using information fusion methods [120], deep learning [121,122] and multisensor Hall array signals, the sensor can be helpful for fault location recognition. It is vital to develop a fault recognition model for processing faulty signals from two sensors in further research. The article [123] focuses on the analysis of the tensile and bending stresses of a wire rope. The experimental results and the finite element methods show that the numerical model presented in the article can reflect the failure process in steel wire rope slings. Finally, the fracture in the steel wire rope sling was photographed using an electron microscope.

6. Conclusions

This article comprehensively systematized the knowledge about wire rope diagnostics. Using brief descriptions, important studies on wire rope operations were listed. Rope degradation mechanisms and the characteristics of diagnostic methods were described in detail. A new division of magnetic rope diagnostic methods into active and passive methods was presented. Development trends in filtering the received signal were also described, and the future of intelligent systems was analysed. As a conclusion to this paper, several observations automatically emerge:
  • The development of wire rope diagnostics is an issue of great importance for the safety of people using wire rope transport equipment;
  • There are many methods of wire rope diagnosis: magnetic flux leakage (MFL), eddy current testing (ECT), acoustic emission (AE), ultrasonic guided waves (UGWs), radiography and vision testing. Each method uses different physical phenomena, and intensive research is being conducted on almost every method;
  • It is crucial in the context of wire rope diagnostics to understand the mechanisms of degradation. These mechanisms are closely related to the physical phenomena that accompany them;
  • It is impossible to indicate a single effective method for wire rope diagnosis. The characteristics—advantages and disadvantages—of each method presented here demonstrate that, for a comprehensive analysis, testing must be carried out using various methods. Of all the methods presented and described in detail, magnetic methods using the phenomenon of magnetic flux leakage are the most prevalent;
  • The most intensive research is currently being conducted on passive magnetic methods using the self-magnetic flux leakage (SMFL) phenomenon;
  • The selection of a suitable test method for a particular defect in a wire rope must be accompanied by the selection of a suitable sensor in terms of its operating mechanism and measuring range;
  • The resulting diagnostic test signal must be appropriately filtered to assess the true extent of damage to the test object;
  • In parallel with the development of passive magnetic methods, intelligent techniques are needed to assist in assessing the technical conditions of steel wire ropes;
  • Safe steel-wire-rope working environments and a comprehensive inspection programme are essential for future practical applications.

Funding

This research received no external funding.

Institutional Review Board Statement

Not applicable.

Informed Consent Statement

Not applicable.

Data Availability Statement

Not applicable.

Conflicts of Interest

The authors declare no conflict of interest.

References

  1. Feyrer, K. Wire Ropes: Tension, Endurance, Reliability; Springer: New York, NY, USA, 2007; ISBN 978-3-540-33821-5. [Google Scholar]
  2. Tytko, A. Liny Stalowe: Budowa, Właściwości, Eksploatacje, Zastosowania; Wydawnictwo Naukowe PWN: Warszawa, Poland, 2021; ISBN 978-83-01-21450-0. [Google Scholar]
  3. Wehking, K.-H.; Feyrer, K.; Klöpfer, A.; Moll, D.; Verreet, R.; Vogel, W.; Winter, S. Laufende Seile: Bemessung und Überwachung; Narr Francke Attempto Verlag: Tübingen, Germany, 2018; ISBN 978-3-8169-8363-7. [Google Scholar]
  4. Liu, S.; Sun, Y.; Jiang, X.; Kang, Y. A Review of Wire Rope Detection Methods, Sensors and Signal Processing Techniques. J. Nondestruct. Eval. 2020, 39, 85. [Google Scholar] [CrossRef]
  5. Zhou, P.; Zhou, G.; Zhu, Z.; He, Z.; Ding, X.; Tang, C. A Review of Non-Destructive Damage Detection Methods for Steel Wire Ropes. Appl. Sci. 2019, 9, 2771. [Google Scholar] [CrossRef] [Green Version]
  6. Mouradi, H.; El Barkany, A.; Biyaali, A. Investigation on the main degradation mechanisms of steel wire ropes: A literature review. J. Eng. Appl. Sci. 2016, 11, 1206–1217. [Google Scholar]
  7. Mazurek, P.; Kwaśniewski, J.; Roskosz, M.; Siwoń-Olszewski, R. The use of a magnetic flux leakage in the assessment of the technical state of a steel wire rope subjected to bending. J. KONBiN 2018, 48, 493–513. [Google Scholar] [CrossRef] [Green Version]
  8. Yuan, Y.; Wang, K.; Chen, B.; Qiu, Y. Nondestructive Testing of Coal Mine Wire Ropes Based on Magnetic Sensors. Int. Trans. Electr. Energy Syst. 2022, 2022, e1066163. [Google Scholar] [CrossRef]
  9. EN 12927; Safety Requirements for Cableway Installations Designed to Carry Persons—Ropes. iTeh Standards: Toronto, ON, Canada, 2019. Available online: https://standards.iteh.ai/catalog/standards/cen/392a2e7b-40c5-4aaa-97ba-b31653b7962e/en-12927-2019 (accessed on 22 January 2023).
  10. ISO 4309 2017(en); Cranes—Wire Ropes—Care and Maintenance, Inspection and Discard. ISO: Geneva, Switzerland, 2017. Available online: https://www.iso.org/obp/ui/#iso:std:iso:4309:ed-5:v1:en (accessed on 22 January 2023).
  11. Kaur, D.; Arora, R.; Chhabra, S.; Sharma, S. Characterization of LF and LMA Signal of Wire Rope Tester. Int. J. Adv. Res. Comput. Sci. 2017, 8, 1395–1400. [Google Scholar]
  12. Houda, M.; Abdellah, E.B.; Ahmed, E.B. Steel wire ropes failure analysis: Experimental study. Eng. Fail. Anal. 2018, 91, 234–242. [Google Scholar]
  13. Chang, X.; Peng, Y.; Zhu, Z.; Cheng, D.; Lu, H.; Tang, W.; Chen, G. Tribological behavior and mechanical properties of transmission wire rope bending over sheaves under different sliding conditions. Wear 2022, 514–515, 204582. [Google Scholar] [CrossRef]
  14. Zhang, D.; Feng, C.; Chen, K.; Wang, D.; Ni, X. Effect of broken wire on bending fatigue characteristics of wire ropes. Int. J. Fatigue 2017, 103, 456–465. [Google Scholar] [CrossRef]
  15. Hongyao, W.; Jie, T.; Guoying, M. A sensor model for defect detection in mine hoisting wire ropes based on magnetic focusing. Insight Non-Destr. Test. Cond. Monit. 2017, 59, 143–148. [Google Scholar] [CrossRef]
  16. Lei, G.; Xu, G.; Zhang, X.; Zhang, Y.; Song, Z.; Xu, W. Study on Dynamic Monitoring of Wire Rope Tension Based on the Particle Damping Sensor. Sensors 2019, 19, 388. [Google Scholar] [CrossRef] [Green Version]
  17. Xie, Z.; Shi, P.; Li, Q.; Chen, Z. A study on influence of magnetic field on fracture of ferromagnetic material due to magneto-mechanical coupling effects. Int. J. Appl. Electromagn. Mech. 2019, 59, 235–245. [Google Scholar] [CrossRef]
  18. Yao, K.; Deng, B.; Wang, Z.D. Numerical studies to signal characteristics with the metal magnetic memory-effect in plastically deformed samples. NDT E Int. 2012, 47, 7–17. [Google Scholar] [CrossRef]
  19. Onur, Y.A.; İmrak, C.E.; Onur, T.Ö. Discarding lifetime investigation of a rotation resistant rope subjected to bending over sheave fatigue. Measurement 2019, 142, 163–169. [Google Scholar] [CrossRef]
  20. Mouhib, N.; Wahid, A.; Sabah, F.; Chakir, H.; ELghorba, M. Experimental characterization and damage reliability analysis of central core strand extracted from steel wire rope. Eng. Fail. Anal. 2021, 120, 105103. [Google Scholar] [CrossRef]
  21. Zhang, J.; Wang, D.; Song, D.; Zhang, D.; Zhang, C.; Wang, D.; Araújo, J.A. Tribo-fatigue behaviors of steel wire rope under bending fatigue with the variable tension. Wear 2019, 428–429, 154–161. [Google Scholar] [CrossRef]
  22. Youssef, B.; Meknassi, M.; Achraf, W.; Gugouch, F.; Lasfar, S.; Kane, C.S.E.; Kartouni, A.; Elghorba, M. The analysis of the corrosion effect on the wires of a 19*7 wire rope by two methods. Eng. Fail. Anal. 2022, 144, 106816. [Google Scholar] [CrossRef]
  23. Xue, S.; Shen, R.; Chen, W.; Miao, R. Corrosion fatigue failure analysis and service life prediction of high strength steel wire. Eng. Fail. Anal. 2020, 110, 104440. [Google Scholar] [CrossRef]
  24. Hu, Z.; Wang, E.; Jia, F. Study on bending fatigue failure behaviors of end-fixed wire ropes. Eng. Fail. Anal. 2022, 135, 106172. [Google Scholar] [CrossRef]
  25. Chen, Y.; Zhang, Y.; Qin, W. Mechanical analysis of non-perpendicularly crossed steel wires in frictional wear. Int. J. Mech. Sci. 2019, 156, 170–181. [Google Scholar] [CrossRef]
  26. Tang, Y.; He, X.; Li, Y.; Zhang, R.; Hu, Z. Stress Analysis of Wire Strands by Mesoscale Mechanics. J. Ocean Univ. China 2022, 21, 1118–1132. [Google Scholar] [CrossRef]
  27. Zhang, E.; Zhang, D.; Pan, S. Magnetic Flux Leakage Testing of Wire Rope Defects with Denoising. In Proceedings of the 2019 IEEE 3rd Information Technology, Networking, Electronic and Automation Control Conference (ITNEC), Chengdu, China, 15–17 March 2019; pp. 1574–1577. [Google Scholar]
  28. Shi, Y.; Zhang, C.; Li, R.; Cai, M.; Jia, G. Theory and Application of Magnetic Flux Leakage Pipeline Detection. Sensors 2015, 15, 31036–31055. [Google Scholar] [CrossRef] [PubMed] [Green Version]
  29. Lay-Ekuakille, A.; Telesca, V. Flow distribution imaging and sensing for leaks in pipelines using decimated signal diagonalization. Meas. Sens. 2020, 7–9, 100014. [Google Scholar] [CrossRef]
  30. Ni, Y.; Zhang, Q.; Xin, R. Magnetic flux detection and identification of bridge cable metal area loss damage. Measurement 2021, 167, 108443. [Google Scholar] [CrossRef]
  31. Kim, J.-W.; Park, S. Magnetic flux leakage-based local damage detection and quantification for steel wire rope non-destructive evaluation. J. Intell. Mater. Syst. Struct. 2018, 29, 3396–3410. [Google Scholar] [CrossRef]
  32. Zhong, X.Y.; Zhang, X.H. Research of Non-Destructive Testing of Wire Rope Using Magnetic Flux Leakage. Appl. Mech. Mater. 2012, 189, 255–259. [Google Scholar] [CrossRef]
  33. Park, J.; Kim, J.-W.; Kim, J.; Park, S. A Study on MFL Based Wire Rope Damage Detection. In Proceedings of the Sensors and Smart Structures Technologies for Civil, Mechanical, and Aerospace Systems 2017, Portland, OR, USA, 26–29 March 2017; Volume 10168, pp. 427–431. [Google Scholar]
  34. Hao, S.; Shi, P.; Su, S.; Liang, T. A magnetic shielding strategy for magnetic sensor in magnetic flux leakage testing. J. Magn. Magn. Mater. 2022, 563, 169888. [Google Scholar] [CrossRef]
  35. Tian, J.; Wang, W.; Wang, H.; Bai, Q.; Zhou, Z.; Li, P. Enhancing Wire-Rope Damage Signals Based on a Radial Magnetic Concentrator Bridge Circuit. Sensors 2022, 22, 3654. [Google Scholar] [CrossRef]
  36. Tang, J.; Wang, R.; Qiu, G.; Hu, Y.; Kang, Y. Mechanism of Magnetic Flux Leakage Detection Method Based on the Slotted Ferromagnetic Lift-Off Layer. Sensors 2022, 22, 3587. [Google Scholar] [CrossRef]
  37. Zhang, J.; Shi, Y.; Huang, Y.; Liang, C.; Dong, Y.; Kang, Y.; Feng, B. A Displacement Sensing Method Based on Permanent Magnet and Magnetic Flux Measurement. Sensors 2022, 22, 4326. [Google Scholar] [CrossRef]
  38. Tsukada, K.; Hayashi, M.; Nakamura, Y.; Sakai, K.; Kiwa, T. Small Eddy Current Testing Sensor Probe Using a Tunneling Magnetoresistance Sensor to Detect Cracks in Steel Structures. IEEE Trans. Magn. 2018, 54, 6202205. [Google Scholar] [CrossRef]
  39. Yanfei, K.; Jiujiang, G.; Jingjing, L.; Shaoni, J.; Jiquan, L.; Zhiwei, Y.; Kun, Z. A New Detection Method of the Surface Broken Wires of the Steel Wire Rope Using an Eddy Current Differential Probe. IEEE Access 2022, 10, 63619–63625. [Google Scholar] [CrossRef]
  40. Mirzaei, M.; Ripka, P.; Chirtsov, A.; Grim, V. Eddy current speed sensor with magnetic shielding. J. Magn. Magn. Mater. 2020, 502, 166568. [Google Scholar] [CrossRef]
  41. Farag, H.E.; Toyserkani, E.; Khamesee, M.B. Non-Destructive Testing Using Eddy Current Sensors for Defect Detection in Additively Manufactured Titanium and Stainless-Steel Parts. Sensors 2022, 22, 5440. [Google Scholar] [CrossRef] [PubMed]
  42. Betta, G.; Ferrigno, L.; Laracca, M.; Rasile, A.; Sangiovanni, S. A novel TMR based triaxial eddy current test probe for any orientation crack detection. Measurement 2021, 181, 109617. [Google Scholar] [CrossRef]
  43. Sheinker, A.; Frumkis, L.; Ginzburg, B.; Salomonski, N.; Kaplan, B.-Z. Magnetic Anomaly Detection Using a Three-Axis Magnetometer. IEEE Trans. Magn. 2009, 45, 160–167. [Google Scholar] [CrossRef]
  44. Mostafapour, A.; Davoudi, S. Analysis of leakage in high pressure pipe using acoustic emission method. Appl. Acoust. 2013, 74, 335–342. [Google Scholar] [CrossRef]
  45. Zejli, H.; Gaillet, L.; Laksimi, A.; Benmedakhene, S. Detection of the Presence of Broken Wires in Cables by Acoustic Emission Inspection. J. Bridge Eng. 2012, 17, 921–927. [Google Scholar] [CrossRef]
  46. Li, S.; Wu, Y.; Shi, H. A novel acoustic emission monitoring method of cross-section precise localization of defects and wire breaking of parallel wire bundle. Struct. Control Health Monit. 2019, 26, e2334. [Google Scholar] [CrossRef]
  47. Salamone, S.; Bartoli, I.; Phillips, R.; Nucera, C.; di Scalea, F.L. Health Monitoring of Prestressing Tendons in Posttensioned Concrete Bridges. Transp. Res. Rec. 2011, 2220, 21–27. [Google Scholar] [CrossRef]
  48. Drummond, G.; Watson, J.F.; Acarnley, P.P. Acoustic emission from wire ropes during proof load and fatigue testing. NDT E Int. 2007, 40, 94–101. [Google Scholar] [CrossRef]
  49. Neslušan, M.; Bahleda, F.; Trojan, K.; Pitoňák, M.; Zgútová, K. Barkhausen noise emission in over-stressed steel wires. J. Magn. Magn. Mater. 2020, 513, 167134. [Google Scholar] [CrossRef]
  50. Neslušan, M.; Bahleda, F.; Minárik, P.; Zgútová, K.; Jambor, M. Non-destructive monitoring of corrosion extent in steel rope wires via Barkhausen noise emission. J. Magn. Magn. Mater. 2019, 484, 179–187. [Google Scholar] [CrossRef]
  51. Raisutis, R.; Kazys, R.; Mazeika, L.; Samaitis, V.; Zukauskas, E. Propagation of Ultrasonic Guided Waves in Composite Multi-Wire Ropes. Materials 2016, 9, 451. [Google Scholar] [CrossRef] [Green Version]
  52. Rostami, J.; Tse, P.W.; Yuan, M. Detection of broken wires in elevator wire ropes with ultrasonic guided waves and tone-burst wavelet. Struct. Health Monit. 2020, 19, 481–494. [Google Scholar] [CrossRef]
  53. Raišutis, R.; Kažys, R.; Mažeika, L.; Žukauskas, E.; Samaitis, V.; Jankauskas, A. Ultrasonic guided wave-based testing technique for inspection of multi-wire rope structures. NDT E Int. 2014, 62, 40–49. [Google Scholar] [CrossRef]
  54. Xu, J.; Li, Y.; Chen, G. Effect of Tensile Force on Magnetostrictive Sensors for Generating and Receiving Longitudinal Mode Guided Waves in Steel Wires. J. Sens. 2019, 2019, e9512190. [Google Scholar] [CrossRef] [Green Version]
  55. Baader, J.E.; Casalbuoni, S. Magnetic field reconstruction using the pulsed wire method: An accuracy analysis. Measurement 2022, 193, 110873. [Google Scholar] [CrossRef]
  56. Ebbeni, M.; Gehlot, M.; Holz, M.; Tarawneh, H. A flexible approach on pulsed wire magnetic measurement method. Measurement 2022, 199, 111438. [Google Scholar] [CrossRef]
  57. Osipov, S.P.; Klimenov, V.A.; Batranin, A.V.; Shtein, A.M.; Prishchepa, I.A. Digital radiography and x-ray computerized tomography in building construction and construction materials science. Vestn. Tomsk. Gos. Arkhitekturno-Stroit. Univ. J. Constr. Archit. 2015, 6, 116–127. [Google Scholar]
  58. Poranski, C.; Ham, Y.; Greenawald, E.; Draper, C.; Chow, J.; Levenberry, L. X-ray backscatter tomography for nondestructive evaluation at the Naval Research Laboratory. In Proceedings of the SPIE Nondestructive Evaluation of Aging Infrastructure, Oakland, CA, USA, 6–8 June 1995; Volume 2459. [Google Scholar]
  59. Peng, P.C.; Wang, C.Y. Use of gamma rays in the inspection of steel wire ropes in suspension bridges. NDT E Int. 2015, 75, 80–86. [Google Scholar] [CrossRef]
  60. Heinzl, C.; Kastner, J.; Firsching, M.; Nachtrab, F.; Uhlmann, N.; Takman, P.; Holmberg, A.; Krumm, M.; Sauerwein, C.; Lichau, D.; et al. Laboratory X-Ray Tomography for Non-Destructive Testing of Specimens and Materials at the Nanoscale. In Proceedings of the Digital Industrial Radiology and Computed Tomography (DIR 2015), Ghent, Belgium, 22–25 June 2015. [Google Scholar]
  61. Zhang, J.; Wang, S. Nondestructive Testing of Wire Ropes Based on Image Fusion of Leakage Flux and Visible Light. J. Fail. Anal. Prev. 2019, 19, 551–560. [Google Scholar] [CrossRef]
  62. Shi, H.; Zheng, L.; Sun, S.; Zhang, L.; Wang, L. Research on wire rope wear detection based on computer vision. J. Eng. 2020, 2020, 517–519. [Google Scholar] [CrossRef]
  63. Pan, F.; Ren, L.; Zhou, J.; Liu, Z. Fault classification based on computer vision for steel wire ropes. J. Phys. Conf. Ser. 2022, 2184, 012035. [Google Scholar] [CrossRef]
  64. Novak, G. Camera-Based Visual Rope Inspection. InnoTRAC J. 2020, 1, 55–63. [Google Scholar] [CrossRef]
  65. Zhou, P.; Zhou, G.; Wang, S.; Wang, H.; He, Z.; Yan, X. Visual Sensing Inspection for the Surface Damage of Steel Wire Ropes with Object Detection Method. IEEE Sens. J. 2022, 22, 22985–22993. [Google Scholar] [CrossRef]
  66. Battini, D.; Solazzi, L.; Lezzi, A.M.; Clerici, F.; Donzella, G. Prediction of steel wire rope fatigue life based on thermal measurements. Int. J. Mech. Sci. 2020, 182, 105761. [Google Scholar] [CrossRef]
  67. Sioma, A.; Tytko, A. Vision methods for assessing the geometrical parameters of steel ropes. Acta Mech. Autom. 2012, 6, 63–67. [Google Scholar]
  68. Xia, H.; Yan, R.; Wu, J.; He, S.; Zhang, M.; Qiu, Q.; Zhu, J.; Wang, J. Visualization and Quantification of Broken Wires in Steel Wire Ropes Based on Induction Thermography. IEEE Sens. J. 2021, 21, 18497–18503. [Google Scholar] [CrossRef]
  69. Krešák, J.; Peterka, P.; Kropuch, S.; Novák, L. Measurement of tight in steel ropes by a mean of thermovision. Measurement 2014, 50, 93–98. [Google Scholar] [CrossRef]
  70. Szade, P.; Szot, M.; Kubiś, B. Thermoelastic effect in compacted steel wire ropes under uniaxial loading. Quant. InfraRed Thermogr. J. 2021, 18, 252–268. [Google Scholar] [CrossRef]
  71. Li, Z.; Jarvis, R.; Nagy, P.B.; Dixon, S.; Cawley, P. Experimental and simulation methods to study the Magnetic Tomography Method (MTM) for pipe defect detection. NDT E Int. 2017, 92, 59–66. [Google Scholar] [CrossRef]
  72. Heinz, D.; Halek, B.; Krešák, J.; Peterka, P.; Fedorko, G.; Molnár, V. Methodology of measurement of steel ropes by infrared technology. Eng. Fail. Anal. 2022, 133, 105978. [Google Scholar] [CrossRef]
  73. Zhou, P.; Zhou, G.; He, Z.; Tang, C.; Zhu, Z.; Li, W. A novel texture-based damage detection method for wire ropes. Measurement 2019, 148, 106954. [Google Scholar] [CrossRef]
  74. Wang, Z.D.; Gu, Y.; Wang, Y.S. A review of three magnetic NDT technologies. J. Magn. Magn. Mater. 2012, 324, 382–388. [Google Scholar] [CrossRef]
  75. Wait, J.R. Review of electromagnetic methods in nondestructive testing of wire ropes. Proc. IEEE 1979, 67, 892–903. [Google Scholar] [CrossRef]
  76. Tytko, A. Modelowanie Zużycia Zmęczeniowego I Diagnostyka Lin Stalowych; Wydawnictwa AGH: Kraków, Poland, 1998. [Google Scholar]
  77. Tian, J.; Zhou, J.; Wang, H.; Meng, G. Literature Review of Research on the Technology of Wire Rope Nondestructive Inspection in China and Abroad. MATEC Web Conf. 2015, 22, 03025. [Google Scholar] [CrossRef] [Green Version]
  78. Kwaśniewski, J. Badania Magnetyczne Lin Stalowych: System Certyfikacji Personelu W Metodzie MTR; Wydawnictwa AGH: Kraków, Poland, 2010; ISBN 978-83-7464-348-1. [Google Scholar]
  79. Ripka, P. Magnetic Sensors and Magnetometers; Artech House: Boston, MA, USA; London, UK, 2001; ISBN 978-1-58053-057-6. [Google Scholar]
  80. Tumanski, S. Induction coil sensors—A review. Meas. Sci. Technol. 2007, 18, R31. [Google Scholar] [CrossRef]
  81. Yan, X.; Zhang, D.; Zhao, F. Improve the signal to noise ratio and installation convenience of the inductive coil for wire rope nondestructive testing. NDT E Int. 2017, 92, 221–227. [Google Scholar] [CrossRef]
  82. Rose, D.P.; Ratterman, M.E.; Griffin, D.K.; Hou, L.; Kelley-Loughnane, N.; Naik, R.R.; Hagen, J.A.; Papautsky, I.; Heikenfeld, J.C. Adhesive RFID Sensor Patch for Monitoring of Sweat Electrolytes. IEEE Trans. Biomed. Eng. 2015, 62, 1457–1465. [Google Scholar] [CrossRef]
  83. Zhang, Y.; Jing, L.; Chen, C.; Bai, X.; Tan, J. A comprehensive study of the magnetic concentrating sensor for the damage detection of steel wire ropes. Mater. Res. Express 2020, 7, 096102. [Google Scholar] [CrossRef]
  84. Zhang, D.; Zhang, E.; Pan, S. A new signal processing method for the nondestructive testing of a steel wire rope using a small device. NDT E Int. 2020, 114, 102299. [Google Scholar] [CrossRef]
  85. Dubov, A.A. A study of metal properties using the method of magnetic memory. Met. Sci. Heat Treat. 1997, 39, 401–405. [Google Scholar] [CrossRef]
  86. Mazurek, P.; Roskosz, M. Influence of the Earth’s magnetic field on the diagnosis of steel wire rope by passive magnetic methods. J. Magn. Magn. Mater. 2022, 547, 168802. [Google Scholar] [CrossRef]
  87. Dubov, A.A. Development of a metal magnetic memory method. Chem. Pet. Eng. 2012, 47, 837–839. [Google Scholar] [CrossRef]
  88. Dubov, A.A. Detection of Metallurgical and Production Defects in Engineering Components Using Metal Magnetic Memory. Metallurgist 2015, 59, 164–167. [Google Scholar] [CrossRef]
  89. Yang, L.J.; Liu, B.; Chen, L.J.; Gao, S.W. The quantitative interpretation by measurement using the magnetic memory method (MMM)-based on density functional theory. NDT E Int. 2013, 55, 15–20. [Google Scholar] [CrossRef]
  90. Li, Z.; Dixon, S.; Cawley, P.; Jarvis, R.; Nagy, P.B.; Cabeza, S. Experimental studies of the magneto-mechanical memory (MMM) technique using permanently installed magnetic sensor arrays. NDT E Int. 2017, 92, 136–148. [Google Scholar] [CrossRef] [Green Version]
  91. Li, Z.; Dixon, S.; Cawley, P.; Jarvis, R.; Nagy, P.B. Study of metal magnetic memory (MMM) technique using permanently installed magnetic sensor arrays. AIP Conf. Proc. 2017, 1806, 110011. [Google Scholar] [CrossRef] [Green Version]
  92. Shi, P.; Su, S.; Chen, Z. Overview of Researches on the Nondestructive Testing Method of Metal Magnetic Memory: Status and Challenges. J. Nondestruct. Eval. 2020, 39, 43. [Google Scholar] [CrossRef]
  93. Shi, P.; Jin, K.; Zheng, X. A magnetomechanical model for the magnetic memory method. Int. J. Mech. Sci. 2017, 124–125, 229–241. [Google Scholar] [CrossRef]
  94. Zhu, S.G.; Tian, G.Y.; Zhou, S.Q. Metal magnetic memory testing technique for stress measurement. In Proceedings of the 17th World Conference on Nondestructive Testing, Shanghai, China, 25–28 October 2008; Available online: https://eprints.ncl.ac.uk (accessed on 27 January 2023).
  95. Roskosz, M.; Bieniek, M. Analysis of the universality of the residual stress evaluation method based on residual magnetic field measurements. NDT E Int. 2013, 54, 63–68. [Google Scholar] [CrossRef]
  96. Ma, X.; Su, S.; Wang, W.; Yang, Y.; Yi, S.; Zhao, X. Damage location and numerical simulation for steel wire under torsion based on magnetic memory method. Int. J. Appl. Electromagn. Mech. 2019, 60, 223–246. [Google Scholar] [CrossRef]
  97. Mazurek, P.; Roskosz, M. Residual magnetic field as a source of information about steel wire rope technical condition. Open Eng. 2022, 12, 640–646. [Google Scholar] [CrossRef]
  98. Mazurek, P.; Roskosz, M.; Kwaśniewski, J. Novel Diagnostic of Steel Wire Rope with Passive Magnetic Methods. IEEE Magn. Lett. 2022, 13, 2500705. [Google Scholar] [CrossRef]
  99. Mazurek, P.; Roskosz, M.; Kwaśniewski, J. Influence of the Size of Damage to the Steel Wire Rope on the Magnetic Signature. Sensors 2022, 22, 8162. [Google Scholar] [CrossRef] [PubMed]
  100. Mazurek, P.; Roskosz, M.; Kwaśniewski, J.; Wu, J.; Schabowicz, K. Detecting Discontinuities in Steel Wire Ropes of Personal Lifts Based on the Analysis of Their Residual Magnetic Field. Sustainability 2022, 14, 14641. [Google Scholar] [CrossRef]
  101. Pacheco, S.; Cabrera, L.S.B.; da Silva, E.C.; Costa Monteiro, E. Design and evaluation of closed-loop GMI magnetometer for biomedical applications. Meas. Sens. 2021, 18, 100297. [Google Scholar] [CrossRef]
  102. Willing, S.; Schlage, K.; Bocklage, L.; Ramin Moayed, M.M.; Gurieva, T.; Meier, G.; Röhlsberger, R. Novel Tunnel Magnetoresistive Sensor Functionalities via Oblique-Incidence Deposition. ACS Appl. Mater. Interfaces 2021, 13, 32343–32351. [Google Scholar] [CrossRef]
  103. Tavassolizadeh, A.; Rott, K.; Meier, T.; Quandt, E.; Hölscher, H.; Reiss, G.; Meyners, D. Tunnel Magnetoresistance Sensors with Magnetostrictive Electrodes: Strain Sensors. Sensors 2016, 16, 1902. [Google Scholar] [CrossRef]
  104. Conca, A.; Paul, J.; Schnieders, C.; Traute, J.; Lehndorff, R.; Leven, B.; Hillebrands, B.; Casper, F.; Jakob, G.; Kläui, M. Sensors Based on Tunnel Magnetoresistance—New Technology, New Opportunities. In Proceedings of the AMA Conferences 2015, Nürnberg, Germany, 19–21 May 2015. [Google Scholar] [CrossRef]
  105. Wu, B.; Wang, Y.J.; Liu, X.C.; He, C.F. A novel TMR-based MFL sensor for steel wire rope inspection using the orthogonal test method. Smart Mater. Struct. 2015, 24, 075007. [Google Scholar] [CrossRef]
  106. Bao, S.; Fu, M.; Hu, S.; Gu, Y.; Lou, H. A Review of the Metal Magnetic Memory Technique. J. Nondestruct. Eval. 2016, 39, 11. [Google Scholar] [CrossRef]
  107. Bell, W.E.; Bloom, A.L. Optically Driven Spin Precession. Phys. Rev. Lett. 1961, 6, 280–281. [Google Scholar] [CrossRef]
  108. Oelsner, G.; IJsselsteijn, R.; Scholtes, T.; Krüger, A.; Schultze, V.; Seyffert, G.; Werner, G.; Jäger, M.; Chwala, A.; Stolz, R. Integrated optically pumped magnetometer for measurements within Earth’s magnetic field. arXiv 2020, arXiv:200801570. Available online: http://arxiv.org/abs/2008.01570 (accessed on 9 December 2020). [CrossRef]
  109. Oelsner, G.; Schultze, V.; IJsselsteijn, R.; Wittkämper, F.; Stolz, R. Sources of heading errors in optically pumped magnetometers operated in the Earth’s magnetic field. Phys. Rev. A 2019, 99, 013420. [Google Scholar] [CrossRef] [Green Version]
  110. Zhang, J.; Lu, S.; Gao, T. Quantitative Detection of Remanence in Broken Wire Rope Based on Adaptive Filtering and Elman Neural Network. J. Fail. Anal. Prev. 2019, 19, 1264–1274. [Google Scholar] [CrossRef]
  111. Zhang, J.; Zheng, P.; Tan, X. Recognition of Broken Wire Rope Based on Remanence using EEMD and Wavelet Methods. Sensors 2018, 18, 1110. [Google Scholar] [CrossRef] [Green Version]
  112. Zhang, J.; Tan, X. Quantitative Inspection of Remanence of Broken Wire Rope Based on Compressed Sensing. Sensors 2016, 16, 1366. [Google Scholar] [CrossRef] [PubMed]
  113. Li, X.; Zhang, J.; Shi, J. A new quantitative non-destructive testing approach of broken wires for steel wire rope. Int. J. Appl. Electromagn. Mech. 2020, 62, 415–431. [Google Scholar] [CrossRef]
  114. Liu, S.; Sun, Y.; Jiang, X.; Kang, Y. Comparison and analysis of multiple signal processing methods in steel wire rope defect detection by hall sensor. Measurement 2021, 171, 108768. [Google Scholar] [CrossRef]
  115. Zhang, J.; Tan, X.; Zheng, P. Non-Destructive Detection of Wire Rope Discontinuities from Residual Magnetic Field Images Using the Hilbert-Huang Transform and Compressed Sensing. Sensors 2017, 17, 608. [Google Scholar] [CrossRef] [PubMed] [Green Version]
  116. Xinjing, H.; Chunxing, J.; Jian, L. Susceptibility inversion of near-field magnetic sources and its application. J. Magn. Magn. Mater. 2019, 490, 165547. [Google Scholar] [CrossRef]
  117. Zhang, G.; Tang, Z.; Zhang, J.; Gui, W. Convolutional Autoencoder-Based Flaw Detection for Steel Wire Ropes. Sensors 2020, 20, 6612. [Google Scholar] [CrossRef] [PubMed]
  118. Zhang, G.; Tang, Z.; Fan, Y.; Liu, J.; Jahanshahi, H.; Aly, A.A. Steel Wire Rope Surface Defect Detection Based on Segmentation Template and Spatiotemporal Gray Sample Set. Sensors 2021, 21, 5401. [Google Scholar] [CrossRef]
  119. Zhang, Y.; Jing, L.; Xu, W.; Zhan, W.; Tan, J. A Sensor for Broken Wire Detection of Steel Wire Ropes Based on the Magnetic Concentrating Principle. Sensors 2019, 19, 3763. [Google Scholar] [CrossRef] [Green Version]
  120. Jing, L.; Wang, T.; Zhao, M.; Wang, P. An Adaptive Multi-Sensor Data Fusion Method Based on Deep Convolutional Neural Networks for Fault Diagnosis of Planetary Gearbox. Sensors 2017, 17, 414. [Google Scholar] [CrossRef] [Green Version]
  121. Zhang, W.; Peng, G.; Li, C.; Chen, Y.; Zhang, Z. A New Deep Learning Model for Fault Diagnosis with Good Anti-Noise and Domain Adaptation Ability on Raw Vibration Signals. Sensors 2017, 17, 425. [Google Scholar] [CrossRef] [Green Version]
  122. Jing, L.; Zhao, M.; Li, P.; Xu, X. A convolutional neural network based feature learning and fault diagnosis method for the condition monitoring of gearbox. Measurement 2017, 111, 1–10. [Google Scholar] [CrossRef]
  123. Xue, S.; Shen, R.; Shao, M.; Chen, W.; Miao, R. Fatigue failure analysis of steel wire rope sling based on share-splitting slip theory. Eng. Fail. Anal. 2019, 105, 1189–1200. [Google Scholar] [CrossRef]
Figure 1. Basic structures of steel wire ropes/strands: (a) structure of Albert’s rope; (b) strand 1 + 6; (c) strand 1 + 6 + 12.
Sustainability 15 05441 g001
Figure 2. Types of ropes according to their use: (a) running rope; (b) stationary rope; (c) track rope; (d) rope sling.
Sustainability 15 05441 g002
Figure 3. Types of LF loss: (a) no loss; (b) overload; (c) wear; (d) fatigue; (e) rust; (f) kink; (g) cut.
Sustainability 15 05441 g003
Figure 4. Principles of typical MFL testing method for wire rope.
Sustainability 15 05441 g004
Figure 5. Principles of typical ECT method for wire rope.
Sustainability 15 05441 g005
Figure 6. Principles of typical AE testing method for wire rope.
Sustainability 15 05441 g006
Figure 7. Principles of typical UGW testing method for wire rope.
Sustainability 15 05441 g007
Figure 8. Principles of typical radiography testing (X-ray source) method for wire rope.
Sustainability 15 05441 g008
Figure 9. Principles of typical induction thermography method for wire rope.
Sustainability 15 05441 g009
Figure 10. Different structures of MR sensors.
Sustainability 15 05441 g010
Table 1. Wire systems used in fatigue tests, zones of maximum stress amplitudes in the wire cross-section, stress amplitudes and average amplitudes.
TensionSimple BendingReverse BendingRotary Bending
Wire arrangements for testingSustainability 15 05441 i001Sustainability 15 05441 i002Sustainability 15 05441 i003Sustainability 15 05441 i004
Zone of maximum fluctuating stressSustainability 15 05441 i005Sustainability 15 05441 i006Sustainability 15 05441 i007Sustainability 15 05441 i008
Stresses
Stress amplitude σ a = σ t , a σ a = σ b 2 σ a = σ b σ a = σ b
Middle stress σ m = σ t , m σ m = σ t , m + σ b 2 σ m = σ t , m σ m 0
Table 2. Main degradation mechanisms for steel wire rope.
Degradation MechanismsMain CausesDominant ParameterApplication Areas
Tension–tension fatigueChanges in the axial tensile loadingTensile load rangeLifting and hoisting applications, including mine hoisting
Bending-over-sheaves fatigueLocal changes in wire curvature as the rope adapts to the radius of a sheave or drumThe D/d ratio (the ratio of the sheave diameter to the rope diameter)
Tensile load
Lifting and hoisting applications
Mooring ropes
Free-bending fatigueSystem dynamics or lateral oscillationTensile loadThe cables of cable-stayed suspension bridges
Torsion fatigueAbsence of restriction on rotation under the attachments at either end
No compliance with the restraint
Twist amplitudeMooring of floating offshore systems
Lifting and hoisting applications
Fretting fatigueFriction between contacting wiresCoefficient of frictionAll rope applications
CorrosionTemperature, pollutants in the air and waterWater temperatureMooring ropes
The cables of cable-stayed suspension bridges
WearFriction between wires
Bending of the rope
Coefficient of friction
Bending stresses over sheaves or drums
Lifting and hoisting applications
Mooring ropes
Table 3. Main methods of wire rope diagnostics.
MethodAdvantagesDisadvantagesApplication AreasAssessment
MFL
Inexpensive
Straight
Reliable
Suitable for initial quantitative measurements
Possibility of online testing
Defects inside the rope are difficult to distinguish
The distance from the sensor plays an important role
Time-consuming study
Broken wires/strands
Wear
Clash
Corrosion
Quantitative assessment (the value of the difference in magnetic induction corresponds to the size of the damage)
ECT
Sensitive to metal materials
Suitable for high speeds
Suitable for high temperatures
Skin effect
Limited to the detection of defects on the surface only
Low effectiveness of inspections
Surface defects
Pitting
Qualitative assessment
AE
Suitable for composite materials
Detection of defects at an early stage
Is only applicable to dynamic processes
Very low signal-to-noise ratio
Broken wires/strands
Stress concentration
Corrosion
Qualitative assessment
UGV
Detects defects inside the rope
Only for qualitative assessment
Details of a defect are complex to explain
Broken wires/strands
Corrosion
Qualitative assessment
Radiography
Intuitive test results
Reliable
Costs (expensive research equipment)
Harmful to health
Environmental pollution
Broken wires/strands
Qualitative assessment
VT
Ease of implementation
Low cost
High detection rate
Control of near-surface defects
Need for good lighting
The test surface must be cleaned
Broken wires/strands
Corrosion
Qualitative assessment
Disclaimer/Publisher’s Note: The statements, opinions and data contained in all publications are solely those of the individual author(s) and contributor(s) and not of MDPI and/or the editor(s). MDPI and/or the editor(s) disclaim responsibility for any injury to people or property resulting from any ideas, methods, instructions or products referred to in the content.