Article

Continuous Improvement for Cost Savings in the Automotive Industry

Department of Industrial Engineering, Faculty of Engineering, Stellenbosch University, Private Bag X1, Matieland, Stellenbosch 7602, South Africa
*
Author to whom correspondence should be addressed.
Sustainability 2022, 14(22), 15319; https://doi.org/10.3390/su142215319
Submission received: 11 October 2022 / Revised: 14 November 2022 / Accepted: 15 November 2022 / Published: 18 November 2022
(This article belongs to the Section Resources and Sustainable Utilization)

Abstract

:
Today’s manufacturing environment is characterized by rising production costs. Automotive companies are faced with a challenge of meeting the ever-changing customer needs at the minimum possible cost. Reducing the production costs is of paramount importance for a company to remain competitive in a turbulent environment. How can companies in the automotive industry increase cost savings? This paper focuses on continuous improvement for cost savings in the automotive industry. This was conducted at an automotive production line using the work-study technique. Time and method studies were conducted on the production line of one of the products. This was done under these objectives: to identify excess raw material input and non-value adding activities in the product line, to determine current factory capacity, to determine factory capacity utilization, and to implement improvements on the product line so as to increase productivity. The daily target at the company was eight complete units per shift, and the research explored the potentials of increasing that daily target with little to no increase in the number of operators and workstations. The results demonstrate an increase in productivity by 50% by adding one more workstation and one more operator at the surface finishing station. This was successfully implemented and the company is now producing 12 units per shift.

1. Introduction

Today’s manufacturing environment is characterized by rising production costs. The automotive sector is an industry that is constantly growing, but keeping up with customer needs at the lowest possible cost is a challenge for many companies. To remain competitive in a turbulent environment, a company must reduce its production costs. How can an automotive company realize profits in such an uncertain business environment? That is, how can a company operate efficiently and increase productivity despite the turbulence? This research focuses on continuous improvement, which is also referred to as rapid improvement.
William Edwards Deming, famous for his 14 Total Quality Management (TQM) principles, described continuous improvement as “improvement initiatives that increase successes and reduce failures” [1]. Continuous improvement is an ongoing effort to improve products, services, or processes [2]. It is built upon kaizen, which is a Japanese philosophy that seeks to improve productivity by continuously improving product quality, while at the same time reducing cost and production time [3]. As a structured world-class manufacturing system, continuous improvement involves every employee from the management to the shop floor and it targets the elimination of waste from all the production processes and systems without making huge financial injections [4].
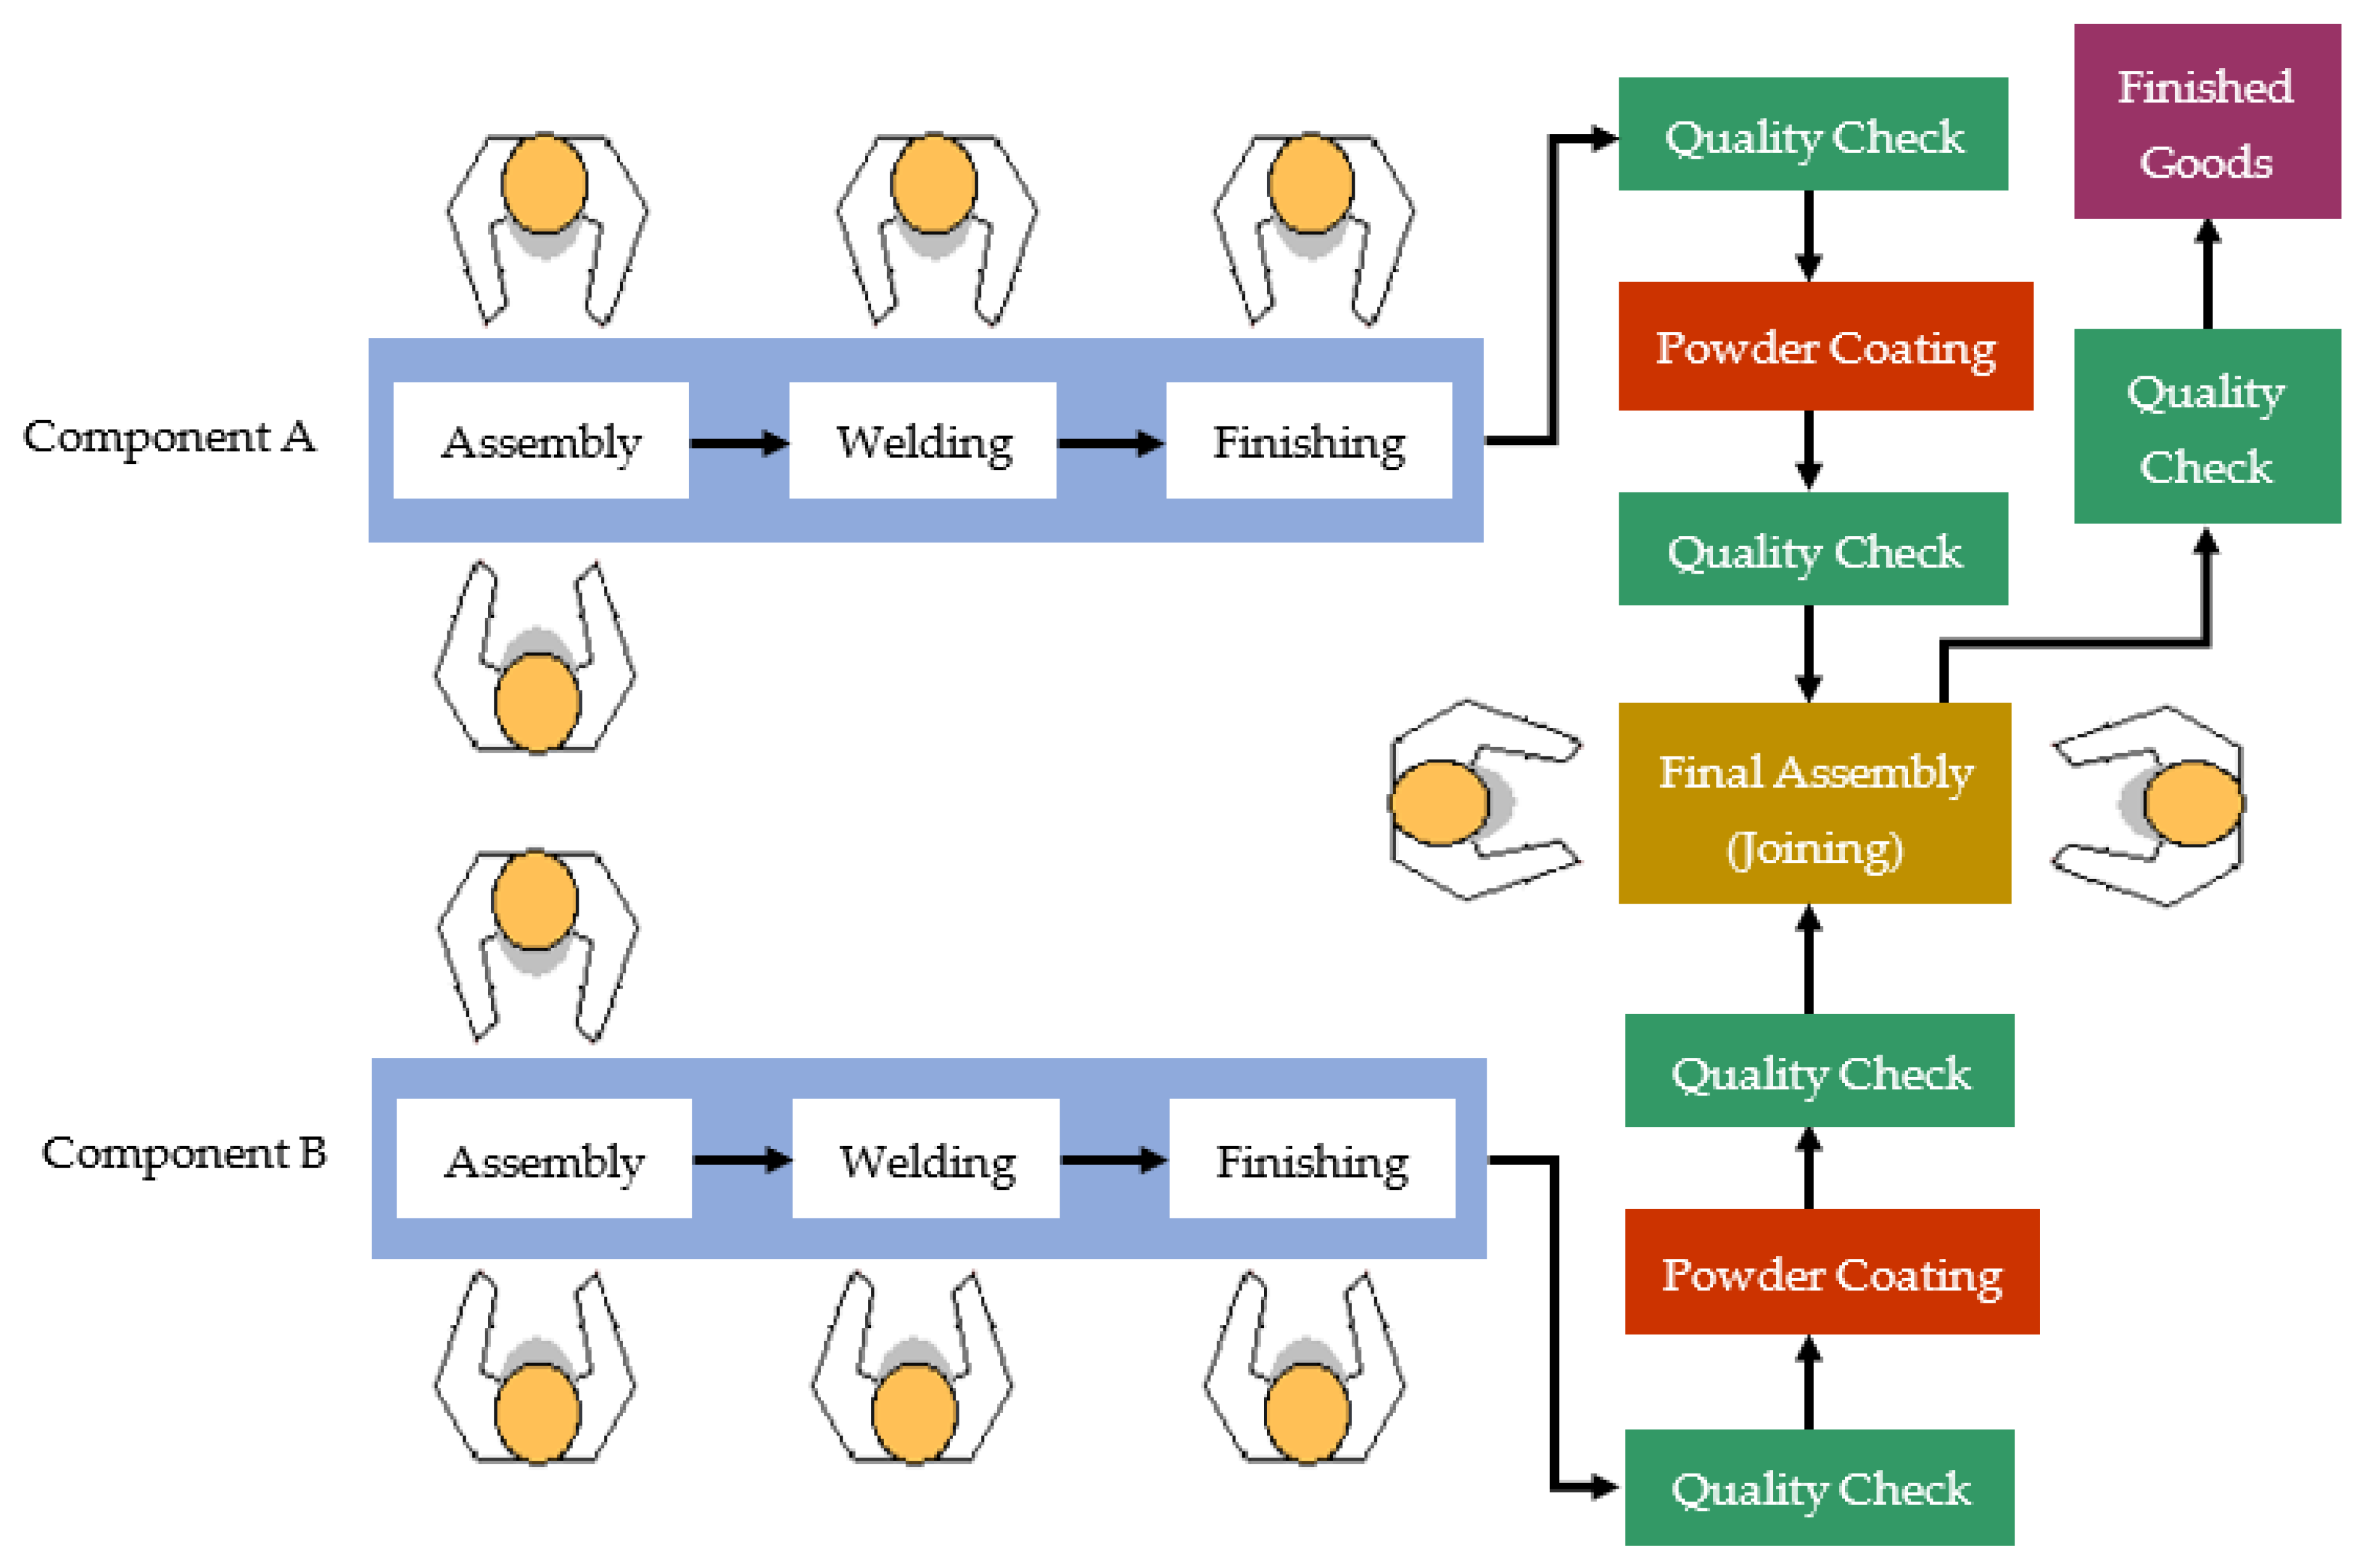
Continuous improvement is an important tool for identifying bottlenecks, eliminating non-value-adding activities, and reducing processing cycle time. This improves productivity. A case study was done by Jayakumar and Kumar [5], whose aim was to increase the overall productivity in paint booth assembly. This was achieved through reducing the non-value-adding activities, thereby reducing the cycle time. It is well known that productivity increases when uptime is increased, and downtime and cycle time are reduced. However, most of the conventional production systems are not equipped to record this data set. Won et al. [6] used the Internet of Everything (IoE) to derive the set of data from the existing fault-monitoring data. They remodelled the production line, leading to up to 10% improvement in productivity. El-Khalil [7] utilized discrete simulation modelling and analysis to improve productivity through determining bottlenecks and recommending the optimization of buffer stations to improve throughput. Holtskog [8] did a survey which shows that continuous improvement feels like a natural part of the tasks in the daily work–life of the automotive industry. By so doing, continuous improvement is essential for making products and processes better in order to counter the challenge of today’s turbulent environments [9]. Not much research was found on the application of continuous improvement tools for improving productivity for a reduced number of operators on the shopfloor. This paper therefore focuses on continuous improvement and cost savings in the automotive industry. It is based on an approach done at an automotive production line using the work-study technique. The company has over 450 employees who are stationed in 10 factories, and has a product range of 10 products. One product is selected for this study, and the product has two distinct components, component A and component B. The components are manufactured separately and joined together at final assembly at the end of the production line. Each component goes through three similar processes: assembly, welding and surface finishing. Upon completion of these processes, component A and component B are cured at powder coating, and then joined together at final assembly, and the final complete unit is realized.
Flow charts are used to demonstrate the process flows and to identify and excess raw material input and process steps that do not add value to the product. Industrial productivity is the ratio between the output (goods and services) and the input (labour, materials, energy, and other resources) used to produce them [10]. It is linked to time and motion. As such, time studies are done on the aforementioned processes. This is to determine the current factory capacity, which is then compared with the current output to determine the factory capacity utilization. The initial target was eight complete units per shift. The research explores the potentials of increasing the target with little to no increase in the number of operators and workstations. The objectives of this research can be summarized as follows:
  • To identify excess raw material input and non-value adding activities in the product line.
  • To determine current factory capacity.
  • To determine factory capacity utilization.
  • To implement improvements on the product line, which will increase productivity.
The following sections are organized as follows: after this introduction, the next section is the methodology, which focuses on the experimental procedure. This is followed by the results obtained from the research, which is combined with discussion. Lastly, the research is concluded.

2. Materials and Methods

2.1. Work Study

According to the International Labour Organisation (ILO) handbook, work study is a term used to embrace the techniques of method study and work measurement, which are used to ensure the best possible use of human and material resources in carrying out a specific activity [11]. These resources are people, materials, machines and money. Companies in the automotive industry are in stiff competition for customers because of globalization and technological advancement. It is difficult to produce exactly what the customer values at the lowest cost of production. Work study therefore helps companies to increase the production process efficiency.
As a continuous improvement technique, work study measures, simplifies and standardizes the production floor activities. It is widely used to increase the production output with little or no capital investment [12]. It is divided into method study and work measurement. Method study is the systematic recording and critical examination of ways of doing things in order to make improvements. Work measurement is the application of techniques designed to establish time for a qualified worker to carry out a task at a defined rate of working [13]. These two are closely related and this is diagrammatically represented in Figure 1.
Work study involves changes to the different processes and ways of doing things. This may be faced with resistance to change. As such, this calls for worker motivation and helping them to understand that the proposed way will be beneficial to them and the company.

2.2. Method Study

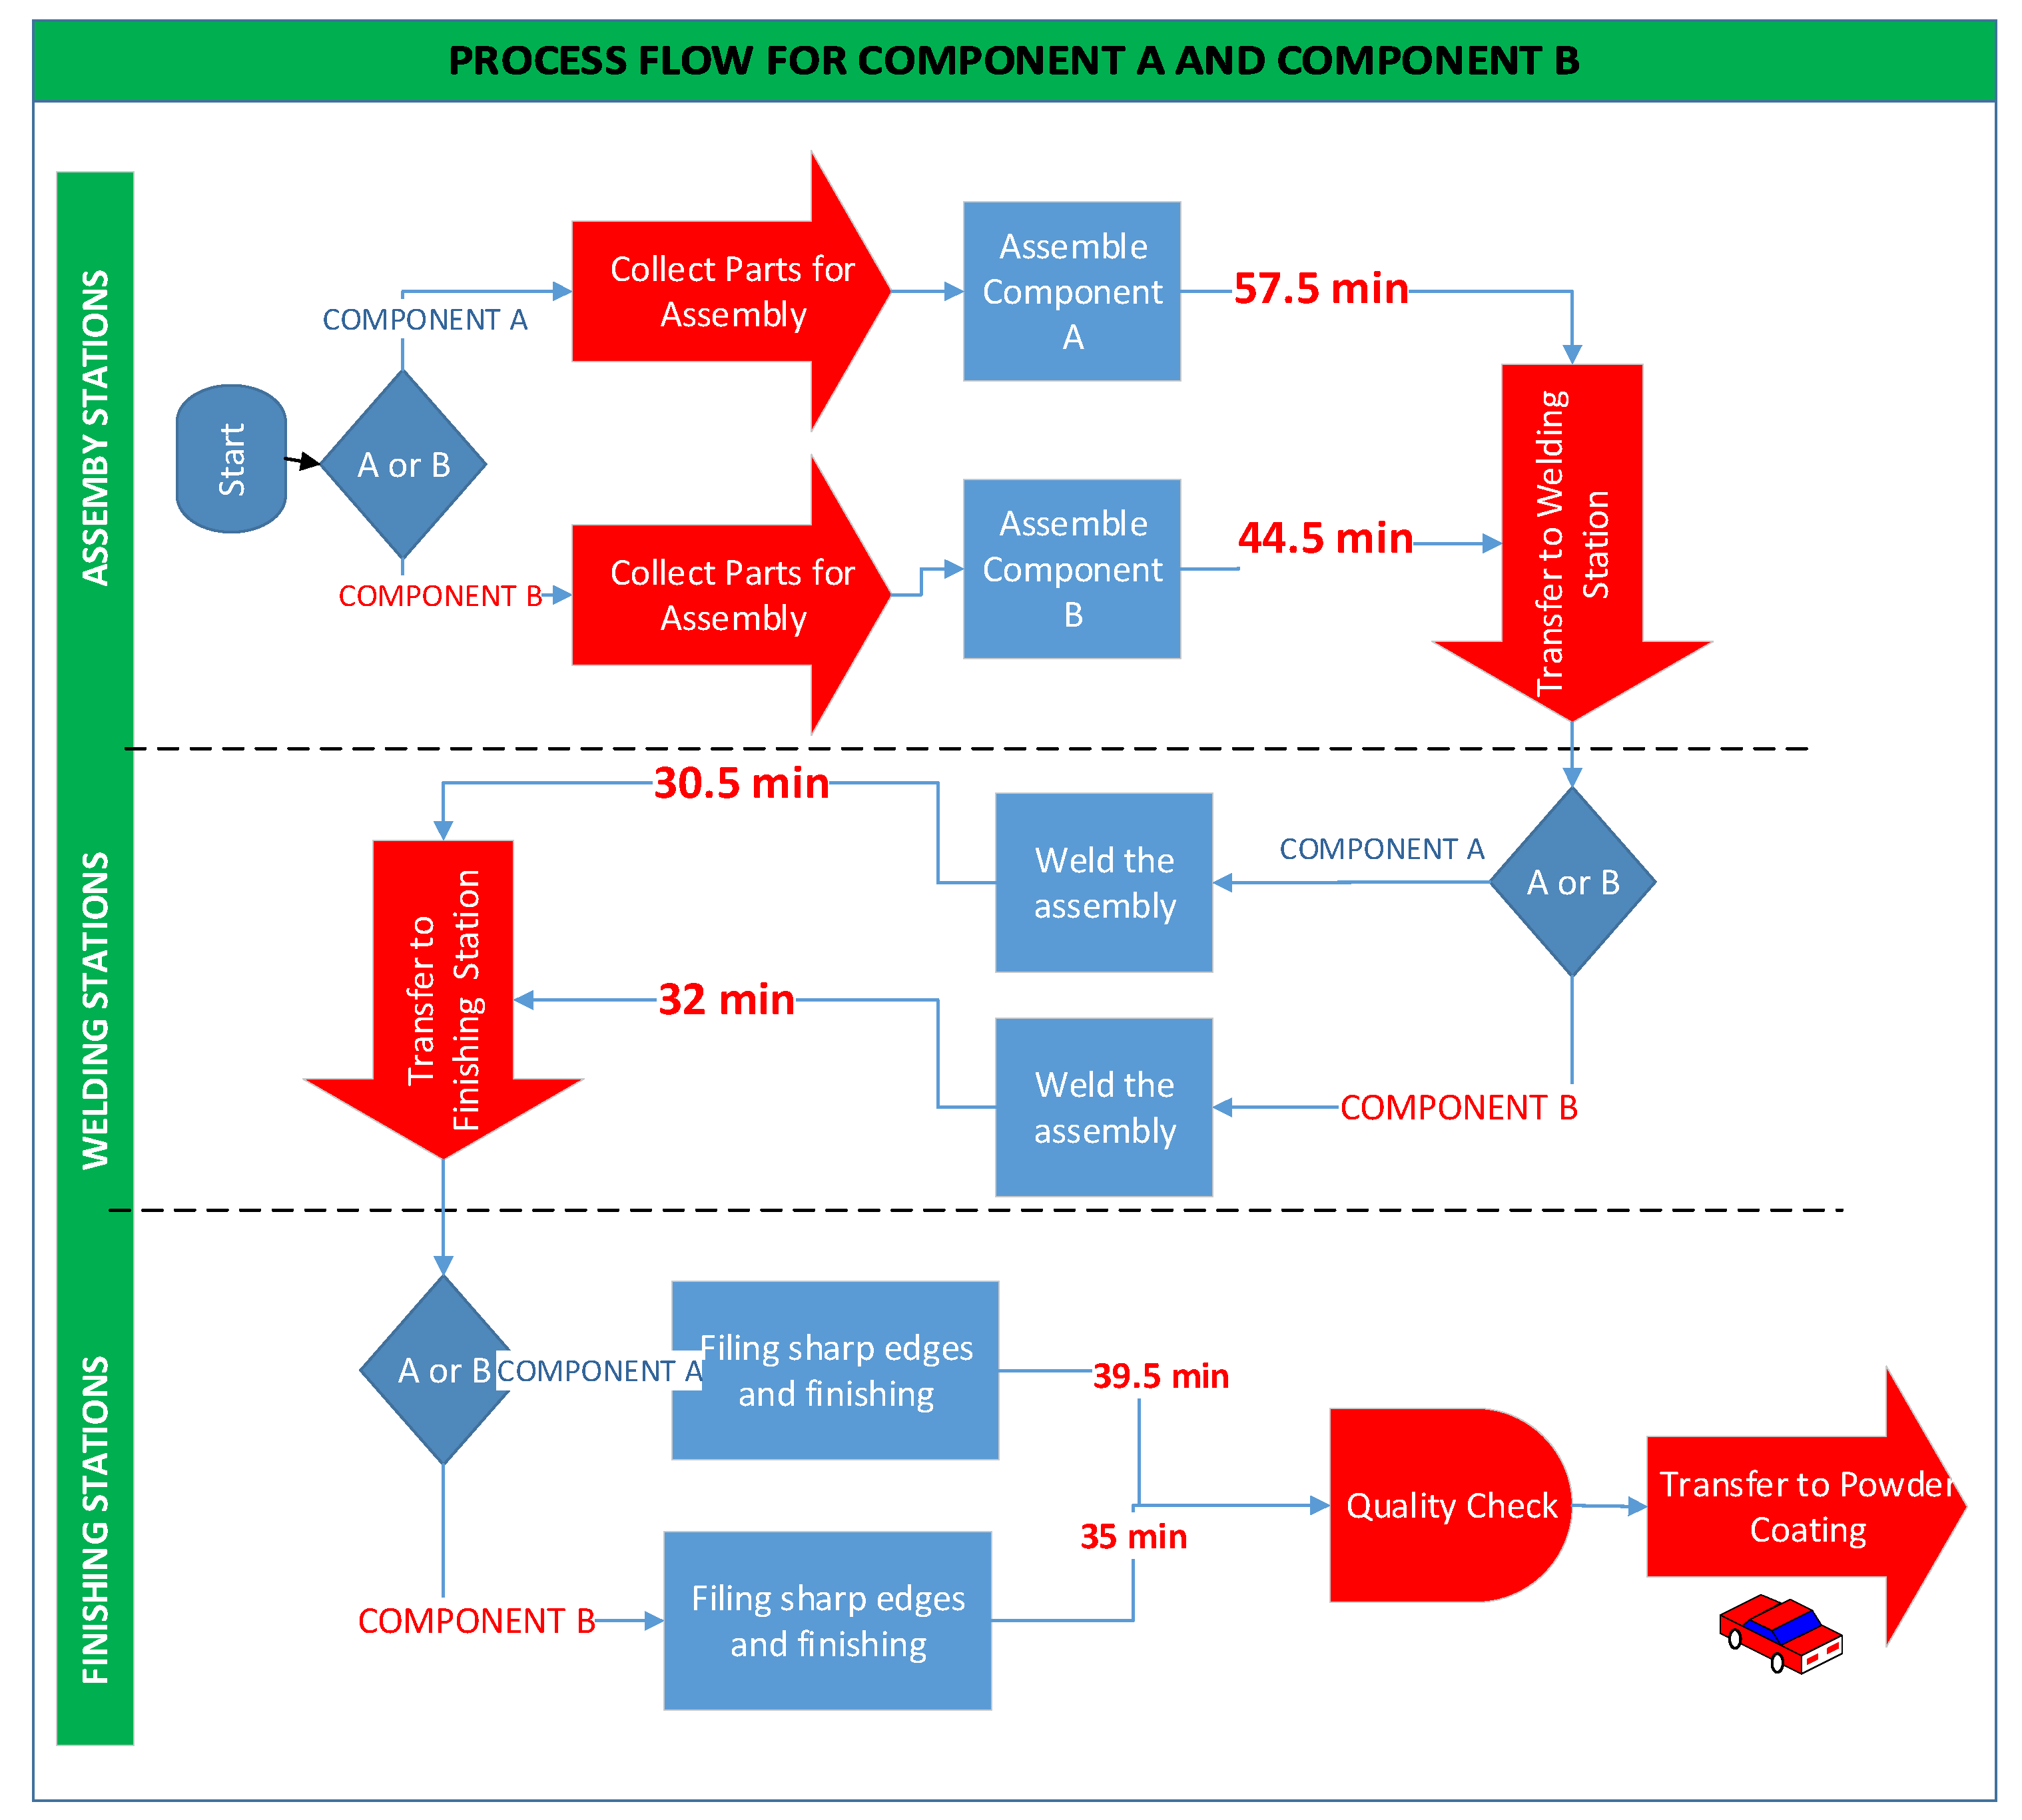
Method study examines the manner in which a task is performed and simplifies the job through eliminating non-value-adding activities. It is sometimes referred to as motion study, method analysis, or method engineering. The goal is to develop and apply easier and more effective methods and to reduce costs [14]. As per objectives of the research, method study was carried out to identify excess raw material input and non-value-adding activities in the product line. This would assist in line balancing, where the workload was balanced between workers to reduce idle time. This made the work to flow more smoothly and increased productivity. As stated earlier, component A component B undergo similar processes. The processes for both components were simplified as assembly, welding, and surface finishing. These components go through the curing process at the powder coating station before they are joined together at final assembly to produce the final product. The final product is taken to finished goods for storage. Quality checks are done after every major process to ensure conformity to the requirements. The tools used in method study include process flow charts, operation charts, flow diagrams, and string diagrams. Figure 2 below shows the process flow chart that demonstrates the processes that component A and component B go through from assembly up to the stage where the product is taken to finished goods.

2.3. Time Study (Work Measurement)

While method study focuses on the manner in which a task is performed, time study measures the time content of a task. Originated by Frederick Winslow Taylor in 1881, time study is a work measurement technique for recording the times and rates of doing work for the elements of a specific job carried out under specific conditions and for analysing the data so as to obtain the time necessary for carrying out the job at a defined level of performance [11]. As per objectives of the research, video and on-site time studies were conducted to serve as input in:
  • Determining the current factory capacity.
  • Determining the factory capacity utilization.
Production planning and control is not possible when one does not know how long it will take to perform the job. The time study technique sets standard times for processes to control performance [15]. The following procedure was taken:
  • Identification of the number of operators.
  • Identification of the number of workstations.
  • Analysis of work for component A and component B.
  • Determine the sequence of operations to produce component A and component B.
  • Standardization of methods.
  • Conducting the video and on-site time studies.
CCTV camera footages were used for the video time studies. Additionally, on site time studies were conducted. The operators were informed that the time studies were for the improvement of their work and the betterment of the processes. They were advised not to be nervous, but to work normally as they would do when performing their daily duties. This procedure was conducted using the methodology presented in Figure 3.
The planning stage involved the identification of the operators and the identification of workstations. Once this was done, the next stage was the data collection stage. This is when the motion and time studies were conducted. The data was analysed on the third stage. The next stage involved data verification where data was checked for accuracy and consistency with what was happening on the factory floor. In the case of inconsistency, more data was collected and analysed. Once data was analysed and verified to be free of errors, the next stage was the presentation of results. These are the results which were used to determine the factory capacity and the capacity utilization.

3. Results and Discussion

3.1. Time and Motion Studies on the Production Line

Time and motion studies were done for component A and component B. To run a successful time study, the number of observations were 15 for component A, and 15 for component B. All the 9 available workstations and the 11 employees were observed. The average processing times for these three processes after the stoppages were subtracted are illustrated in Figure 4 below.
The summary of the illustrated times is tabulated in Table 1 and Table 2 below.
The results show that the assembly process takes more time than any other process. This is because a total of 42 single parts comprising sheet metal plates and brackets are bolted and riveted together. The surface finishing process also takes a lot of time because it involves smoothening rough sections over a large product surface area (2.3 m by 1.4 m). As expected, the welding process takes the least time. These processing times were used to determine the factory capacity, and for the flow simulation.

3.2. Factory Capacity Determination and Capacity Utilization

The time and motion studies were used to determine the factory capacity. The following was also taken into consideration:
  • Available time per workstation per shift.
  • Number of workstations dedicated to each process.
  • Number of shifts per day.
  • Number of operators.
The total time per shift per workstation is 8 h 45 min. This time represents the maximum time that can be obtained from each workstation on a given shift. It is however critical to consider the downtime that occurs due to set up, changeovers, waiting to get tools, and slowing down due to fatigue or material supply shortages. Hence, the resource utilization of 75% was adopted. Anything more than that puts the operator at the risk of burning out. Therefore, the available time per workstation was calculated as:
Available   time   per   shift   per   workstation
= 75 %   of   8   h   45   min
= 6   h   33   min
= 393   min
This is the available time which was used for all the calculations to follow. Table 3 shows the available times for the assembly, welding, and surface finishing processes.
The workstations are not dedicated. Component A and component B are processed one after the other on the same workstations.
  • Let component A be represented by x 1
  • Let component B be represented by x 2
Using the values obtained from Table 1, Table 2 and Table 3, three equations can be formulated and these are:
Assembly :   57.5   x 1 + 44.5   x 2     1572   min
Welding :   30.5   x 1 + 32.0   x 2     1179   min
Finishing :   39.5   x 1 + 35.0   x 2     786   min
Subject to: x 1 = x 2 (complete units are manufactured).
x 1 and x 2 are positive integers.
Solving for x,
  • Equation (1) (assembly): x 1 = x 2 = 15.
  • Equation (2) (welding): x 1 = x 2 = 18.
  • Equation (3) (finishing): x 1 = x 2 = 10.
The surface finishing station has the capacity to complete 10 units, which happens to be the least. Hence, it is the bottleneck. This means that the factory capacity is 10 complete units per shift. At a production was 8 units per day, the company was operating at 80% efficiency. The study seeks to improve productivity. Hence, an investigation is made on the potential of adding another workstation at the surface finishing station, which was the bottleneck. Equations (1) and (2) remain unchanged. Equation (3) becomes:
Finishing :   39.5   x 1 + 35.0   x 2     1179   min
Subject to: x 1 = x 2 (complete units are manufactured).
x 1 and x 2 are positive integers.
Solving for x,
  • Equation (4) (finishing): x 1 = x 2 = 15.
Therefore, adding 1 more workstation at the surface finishing station increases the capacity from 10 complete units per shift to 15 complete units (50% increase) per shift.

3.3. Buffer Stock

The results from the time studies show that there is difference in the total time taken in each of the stations. This means that the operators finish at different times. This can create idle time as the operators in the next workstations wait for the assembled parts. In order to maintain a smooth flow, a buffer stock was set up to cater for the workstations. Component A and component B have different processing times. Hence, the average time was first determined. This is illustrated in Table 4 and serves as input in the determination of the buffer.
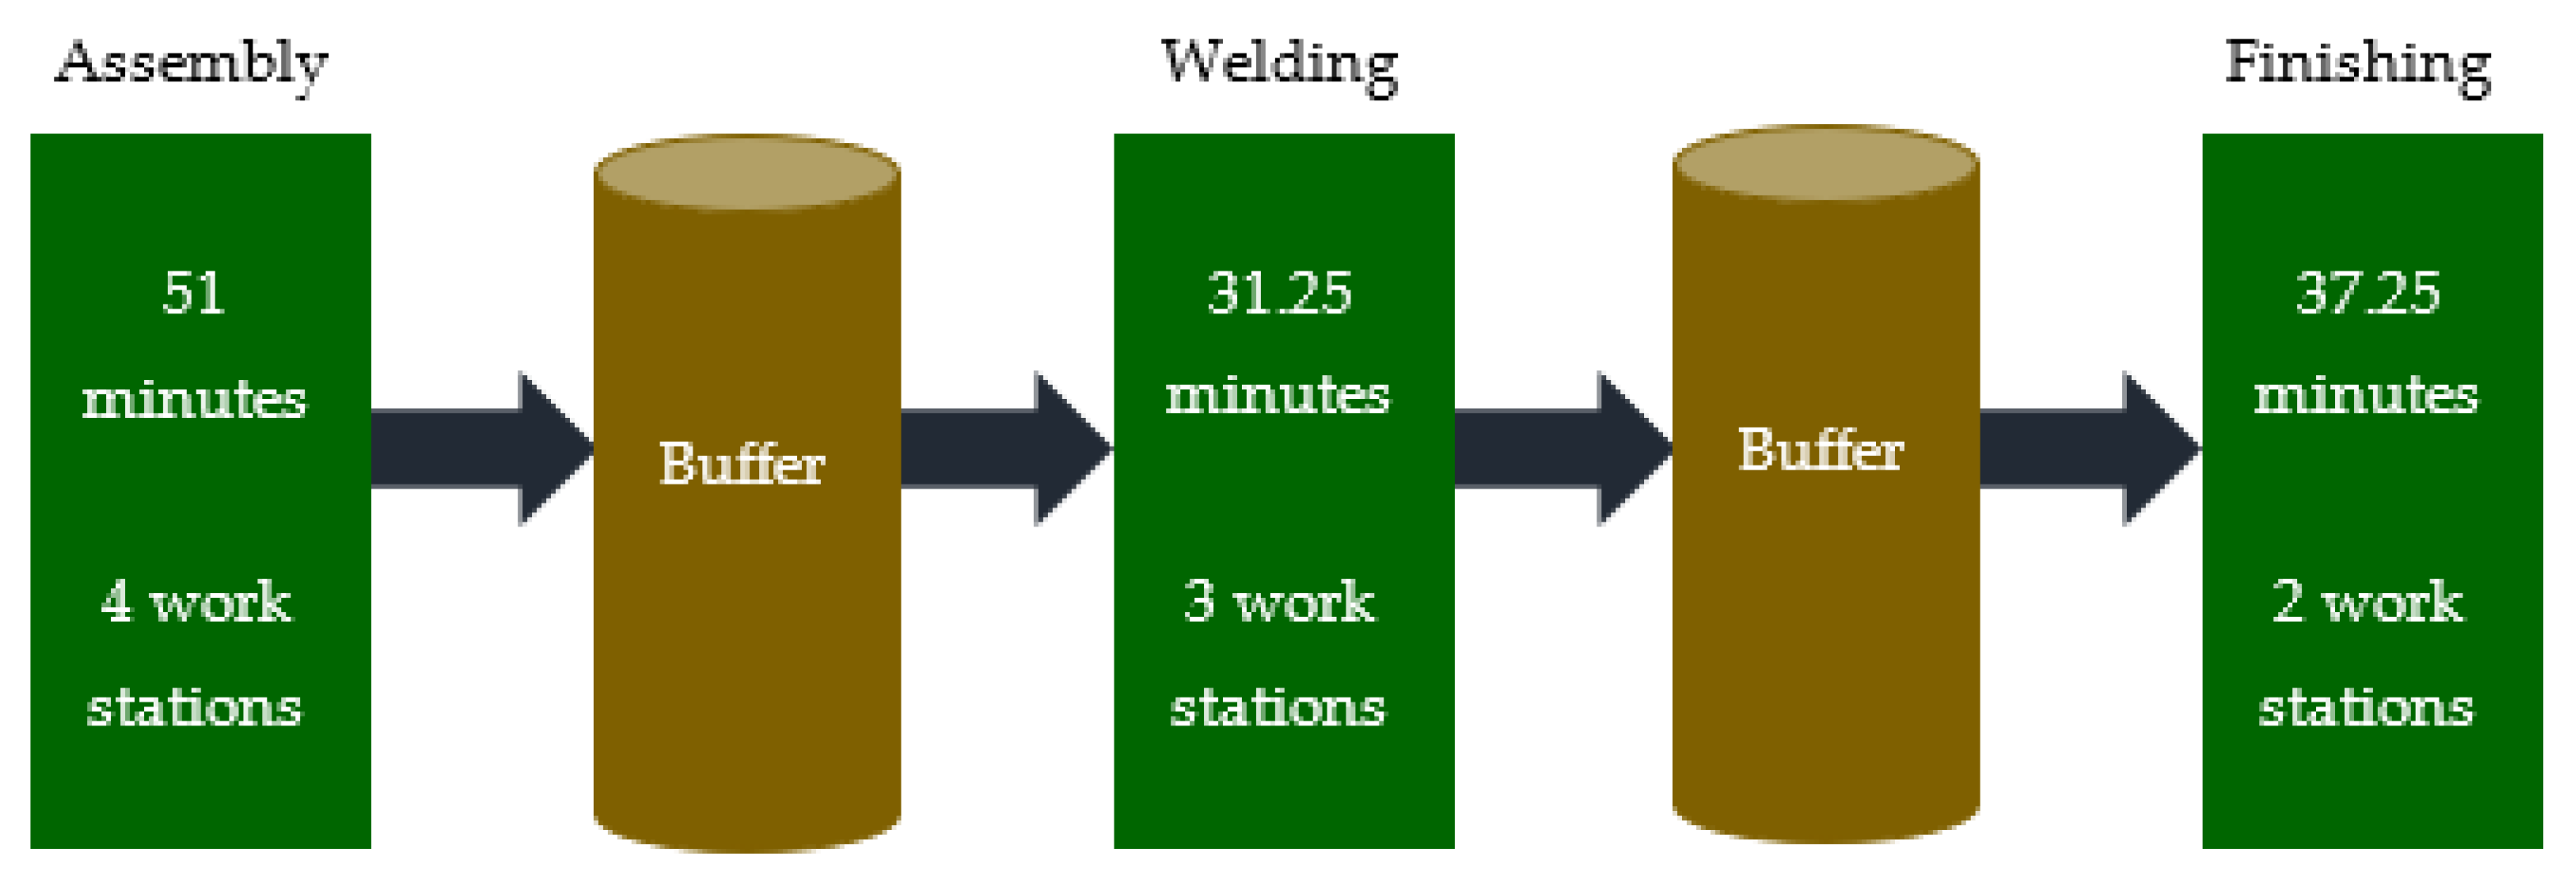
The welding process takes the least time. The assembly takes the most time. This makes them the determining processes in the determination of the buffer. The difference in times between the welding (fastest operation) and assembly (slowest operation) should be the buffer to cater for smooth flow. Figure 5 shows the determination of the buffer.
The buffer is therefore determined as follows.
  • Available time per shift per workstation T w o r k s t a t i o n = 393 min
  • Number of welding workstations N w e l d i n g = 3
  • Average welding time T w e l d i n g = 31.25 min
  • Number of assembly workstations N a s s e e m b l y = 4
  • Average assembly time T a s s e m b l y = 51 min
    Buffer = T w o r k s t a t i o n × N w e l d i n g T w e l d i n g T w o r k s t a t i o n × N a s s e m b l y T a s s e m b l y
    Buffer = 393 × 3 31.25 393 × 4 51 = 6.9
    Buffer = 7   ( r o u n d e d   u p )
The buffer stock is seven units. Buffer management is important for continuity of flow.

3.4. Types of Waste Identified and Eliminated

The three types of waste which the research focused on are based on the Toyota Production System (TPS) in 1992. These are Muda, Muri and Mura [16].
Muda, which means wastefulness, useless and futility, is any work that does not add value to the product [17]. Value in this case refers to what the customer is willing to pay for. All non-value adding activities were identified and eliminated.
Muri, which means overburden or unreasonable, is overloading employees of machines beyond their capacity [18]. This results in downtime, defects, and delays. The competition in the automotive industry is very stiff and any loss of production time is costly.
Mura which means unevenness, is waste caused by inconsistent production volume. This is as a result of variation in production scheduling and/or uneven production targets [19]. Companies need to constantly maintain a low cost of quality (COQ), reduce waste, eliminate unnecessary production routes and reduce production time [20].

3.5. Proposed Target and Flow

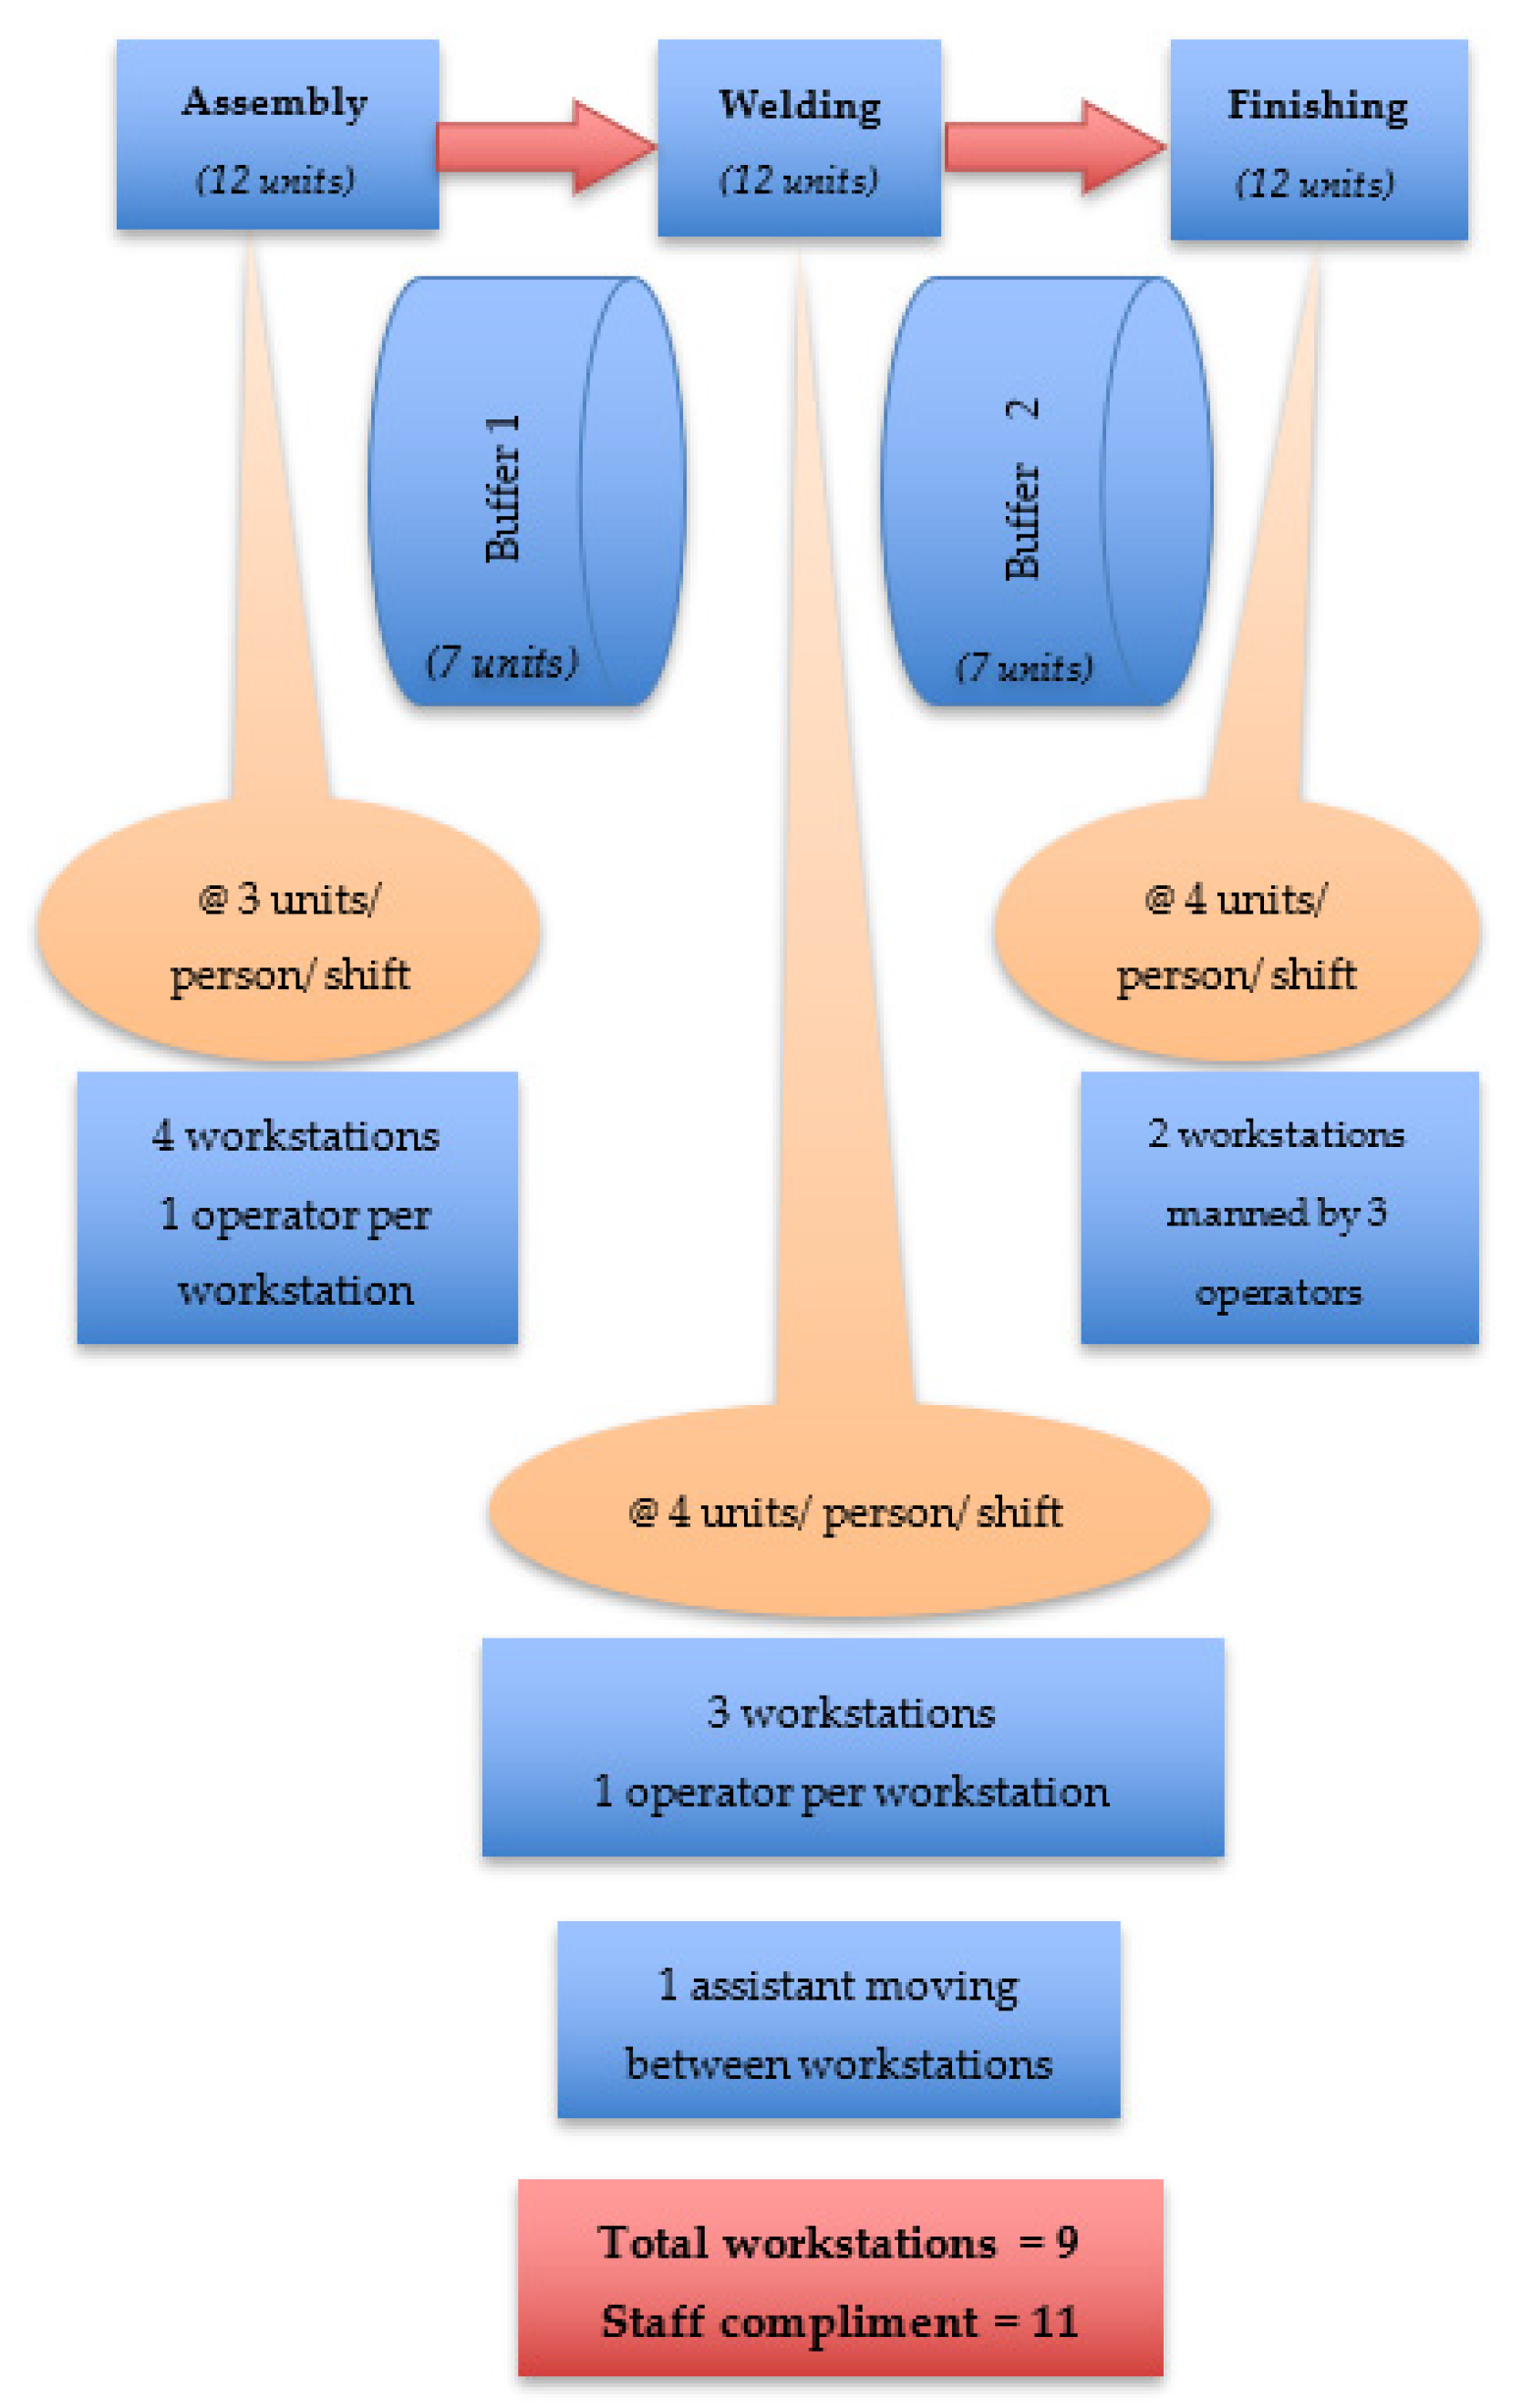
Figure 6 illustrates the proposed process flow and targets. A simulation was conducted on site and the desired results were obtained. This was successfully implemented and the company is now producing 12 units per shift. This represents a 50% increase in productivity.

4. Conclusions

A lot of turbulence is present in today’s manufacturing environment. It is a daily challenge for companies in the automotive industry to meet the demands of customers while keeping costs to a minimum. Continuous improvement through work study techniques of method study and time study can lead to huge cost savings and increase in productivity. Companies can make improvements to the production line to eliminate non-value-adding activities and increase productivity. This paper introduced continuous improvement that was conducted for cost savings in an automotive company. The daily target at the company was eight complete units per shift. The research explored the potentials of increasing that daily target with little to no increase in the number of operators and workstations. The application of the results obtained from the study demonstrated a 50% increase in productivity, efficiency, and quality, and a reduction in production time and waste by adding 1 more workstation and 1 more operator at the surface finishing station. This was successfully implemented and the company is now producing 12 units per shift. Future work involves the applying this experimental procedure on the other nine products of the company.

Author Contributions

Conceptualization, G.P.C. and B.S.; methodology, G.P.C. and B.S.; validation, G.P.C., B.S. and S.M.; formal analysis, G.P.C. and B.S.; investigation, G.P.C. and B.S.; resources, S.M.; data curation, G.P.C.; writing—original draft preparation, G.P.C.; writing—review and editing, G.P.C. and B.S.; visualization, G.P.C.; supervision, S.M. All authors have read and agreed to the published version of the manuscript.

Funding

This research received no external funding.

Institutional Review Board Statement

Not applicable.

Informed Consent Statement

Not applicable.

Data Availability Statement

Not applicable.

Acknowledgments

The authors would like to extend their gratitude to Stellenbosch University, South Africa. Opinions expressed, and conclusions arrived at, are those of the authors and are not necessarily to be attributed to the institution.

Conflicts of Interest

The authors declare no conflict of interest.

References

  1. Juergensen, T. Continuous Improvement: Mindsets, Capability, Process, Tools and Results; The Juergensen Consulting Group Inc.: Indianapolis, IN, USA, 2000. [Google Scholar]
  2. Reid, R.A. Productivity and quality improvement: An implementation framework. Int. J. Product. Qual. Manag. 2006, 1, 26–36. [Google Scholar] [CrossRef]
  3. Marin-Garcia, J.A.; Garcia-Sabater, J.J.; Bonavia, T. The impact of Kaizen Events on improving the performance of automotive components’ first-tier suppliers. Int. J. Automot. Technol. Manag. 2009, 9, 362–376. [Google Scholar] [CrossRef] [Green Version]
  4. Bhuiyan, N.; Baghel, A. An overview of continuous improvement: From the past to the present. Manag. Decis. 2005, 43, 761–771. [Google Scholar] [CrossRef] [Green Version]
  5. Jayakumar, P.; Kumar, V.R.S. A case study on improving productivity in paint booth assembly. Mater. Today Proc. 2022, 62, 1054–1059. [Google Scholar] [CrossRef]
  6. Won, Y.; Kim, S.; Park, K.J.; Eun, Y. Continuous Productivity Improvement Using IoE Data for Fault Monitoring: An Automotive Parts Production Line Case Study. Sensors 2021, 21, 7366. [Google Scholar] [CrossRef] [PubMed]
  7. El-Khalil, R. Simulation analysis for managing and improving productivity: A case study of an automotive company. J. Manuf. Technol. Manag. 2015, 26, 36–56. [Google Scholar] [CrossRef]
  8. Holtskog, H. Continuous improvement beyond the lean understanding. Procedia CIRP 2013, 7, 575–579. [Google Scholar] [CrossRef] [Green Version]
  9. Bessant, J.; Caffyn, S. High-involvement innovation through continuous improvement. Int. J. Technol. Manag. 1997, 14, 7–28. [Google Scholar] [CrossRef] [Green Version]
  10. Stevenson, W.J.; Hojati, M.; Cao, J.; Mottaghi, H.; Bakhtiari, B. Operations Management; McGraw-Hill Irwin: Boston, MA, USA, 2007. [Google Scholar]
  11. International Labour Organisation. Introduction to Work Study, 3rd ed.; National Book Foundation: Lahore, Pakistan, 1983. [Google Scholar]
  12. Kiran, D.R. Work Organization and Methods Engineering for Productivity; Butterworth-Heinemann: Oxford, UK, 2020. [Google Scholar]
  13. Kanawaty, G. Introduction to Work Study; International Labour Office: Geneva, Switzerland, 1992. [Google Scholar]
  14. Prokopenko, J. Productivity Management: A Practical Handbook; International Labour Organization: Geneva, Switzerland, 1987. [Google Scholar]
  15. Telsang, M.T. Industrial Engineering and Production Management, 3rd ed.; S. Chand Publishing: New Delhi, India, 1998. [Google Scholar]
  16. Mor, R.S.; Bhardwaj, A.; Singh, S.; Sachdeva, A. Productivity gains through standardization-of-work in a manufacturing company. J. Manuf. Technol. Manag. 2019, 30, 899–919. [Google Scholar] [CrossRef]
  17. Rother, M.; Shook, J. Learning to See: Value Stream Mapping to Add Value and Eliminate Muda; Lean Enterprise Institute: Cambridge, MA, USA, 2003. [Google Scholar]
  18. Domingo, R.T. Identifying and eliminating the seven wastes or muda. Asian Inst. Manag. 2015, 1–4. [Google Scholar]
  19. Pieńkowski, M. Waste measurement techniques for lean companies. Int. J. Lean Think. 2014, 5, 9–24. [Google Scholar]
  20. Singh, J.; Singh, H. Continuous improvement philosophy–literature review and directions. Benchmarking Int. J. 2015, 22, 75–119. [Google Scholar] [CrossRef]
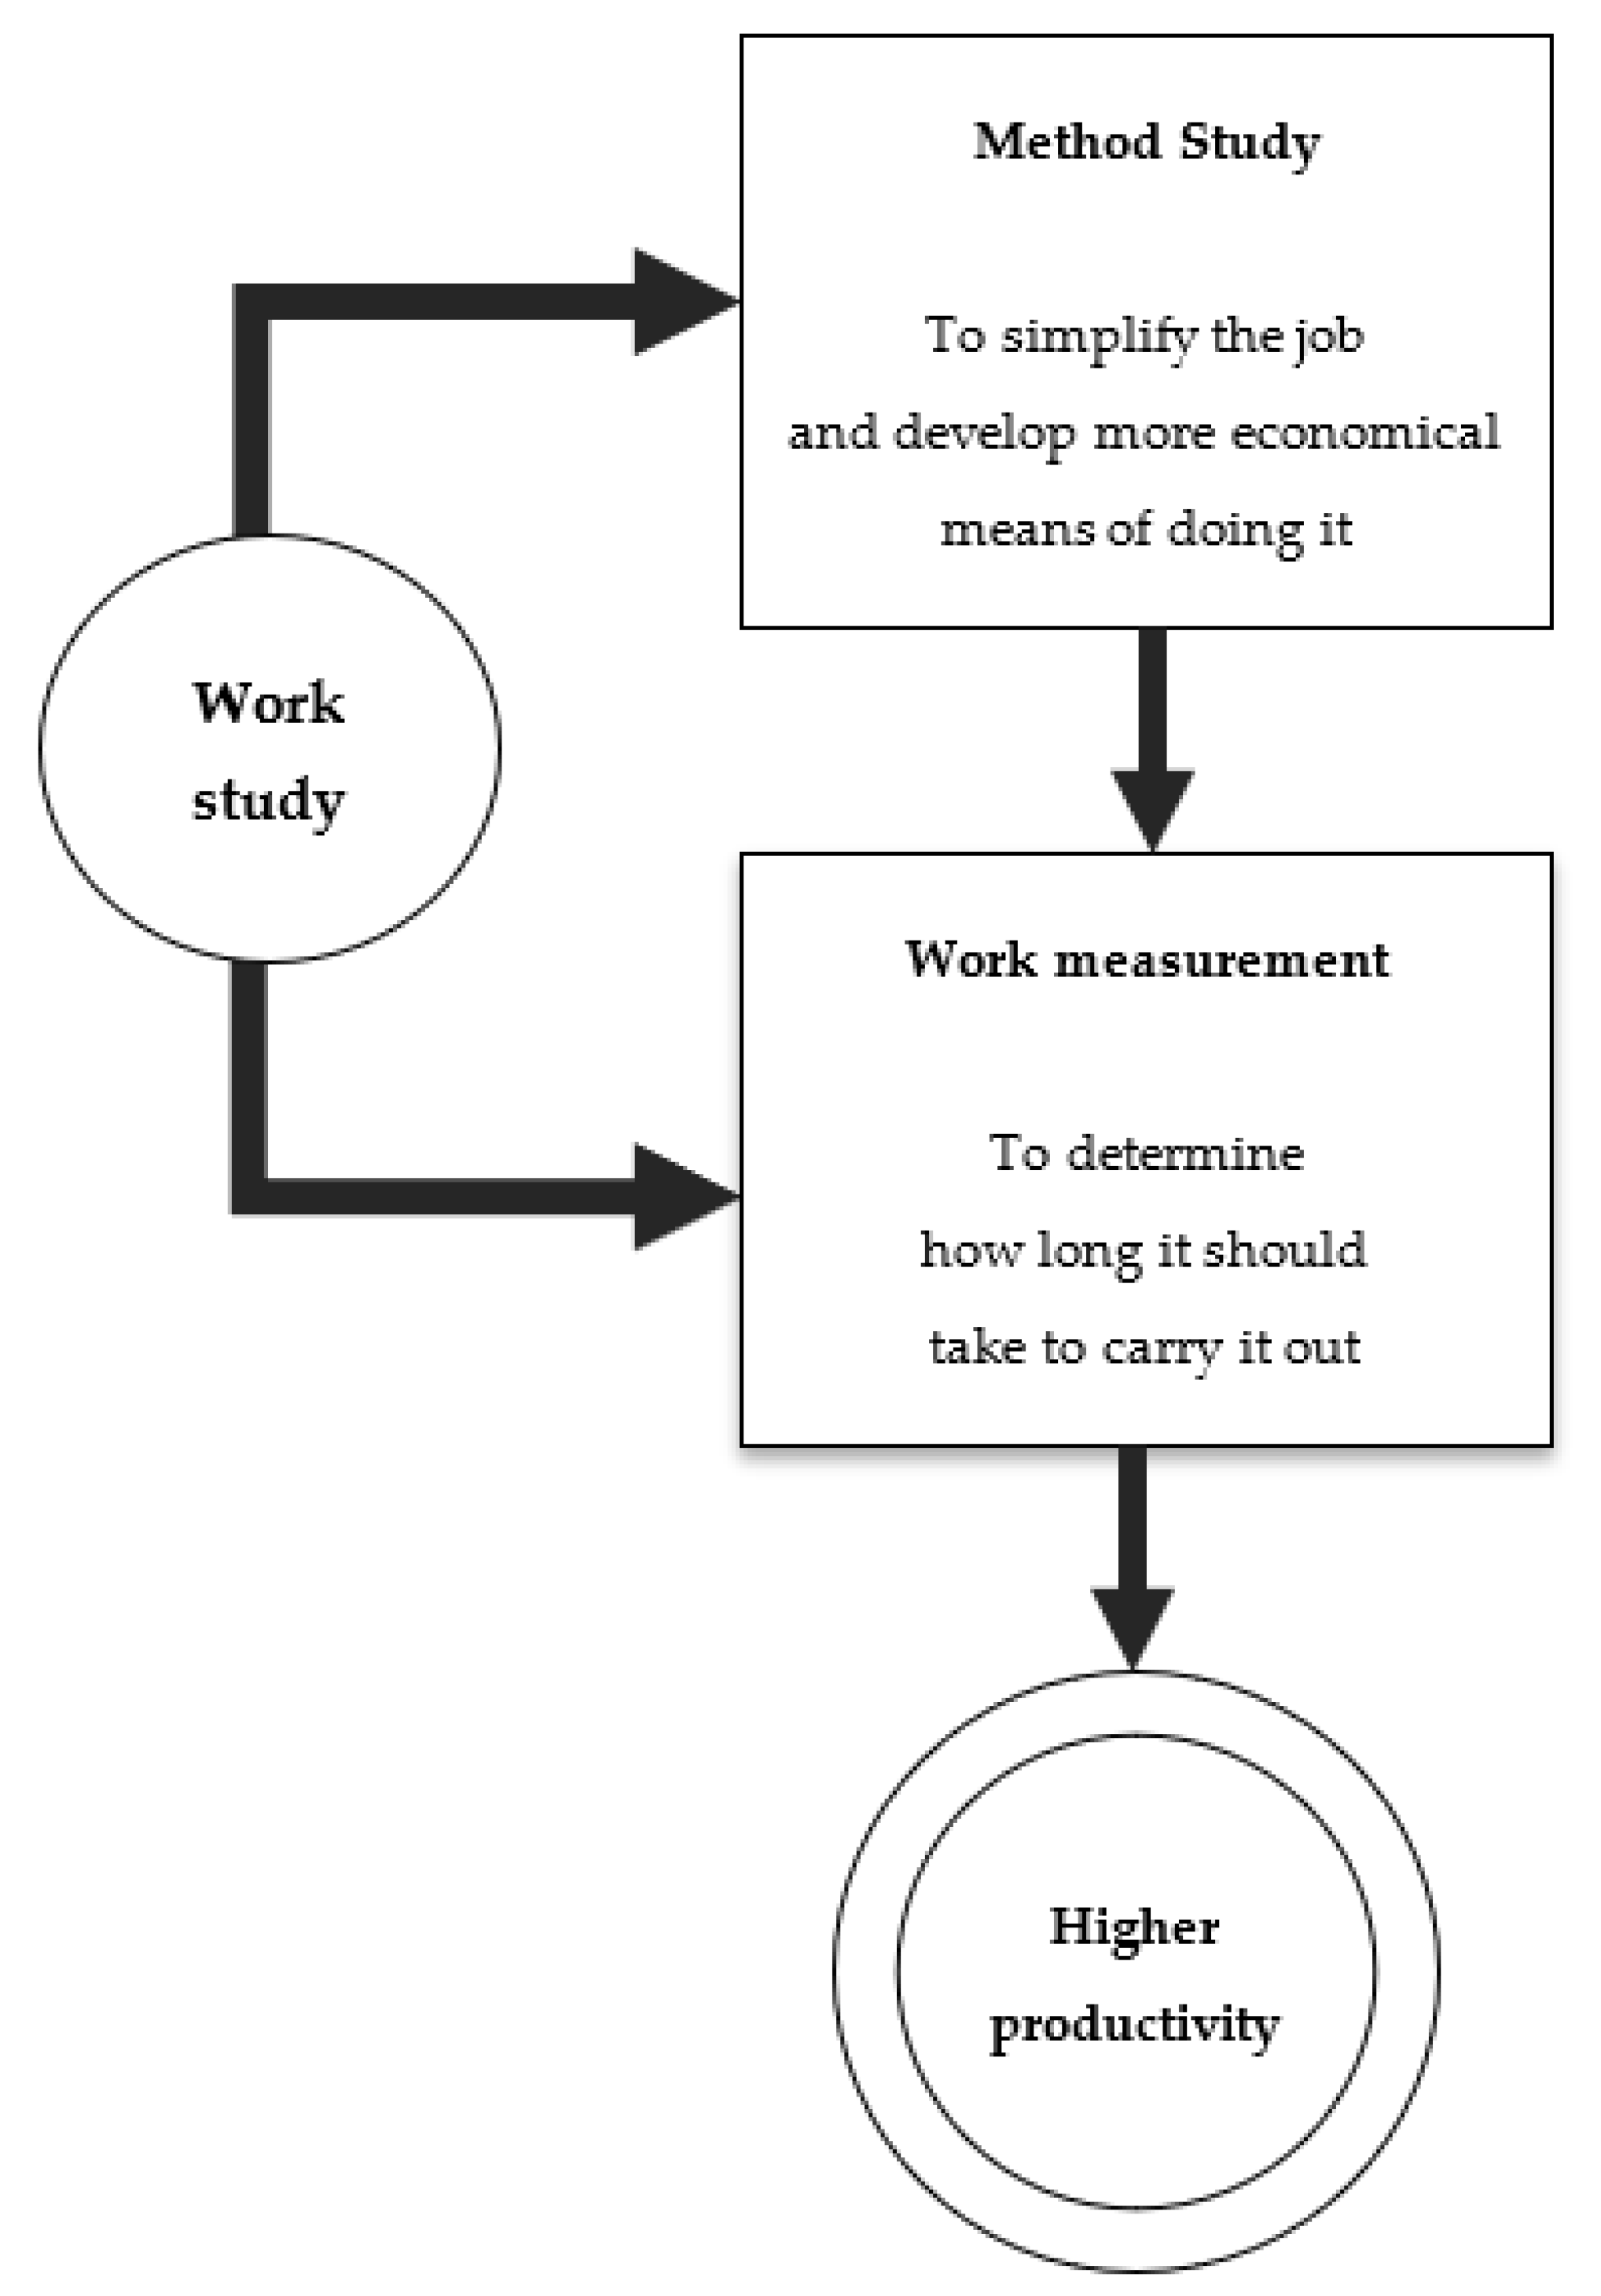
Figure 1. Work study [13].
Sustainability 14 15319 g001
Figure 2. Process flow chart for component A and component B.
Sustainability 14 15319 g002
Figure 3. Methodology.
Sustainability 14 15319 g003
Figure 4. Average processing times for component A and component B.
Sustainability 14 15319 g004
Figure 5. Determination of the buffer.
Sustainability 14 15319 g005
Figure 6. Proposed process flow and targets.
Sustainability 14 15319 g006
Table 1. Average processing times for component A.
Process Average Time (min)
Assembly57.5
Welding30.5
Finishing39.5
Table 2. Average processing times for component B.
ProcessAverage Time (min)
Assembly44.5
Welding32.0
Finishing35.0
Table 3. Available times for the assembly, welding, and surface finishing processes.
ProcessNumber of WorkstationsAvailable Time per Shift (min)
Assembly4393 × 4 = 1572
Welding3393 × 3 = 1179
Finishing2393 × 2 = 786
Table 4. Average times for the assembly, welding, and surface finishing processes.
ProcessComponent A Processing Time (min)Component B Processing Time (min)Average Time (min)
Assembly57.544.551
Welding30.532.031.25
Finishing39.535.037.25
Publisher’s Note: MDPI stays neutral with regard to jurisdictional claims in published maps and institutional affiliations.