3.1. Experimental Results
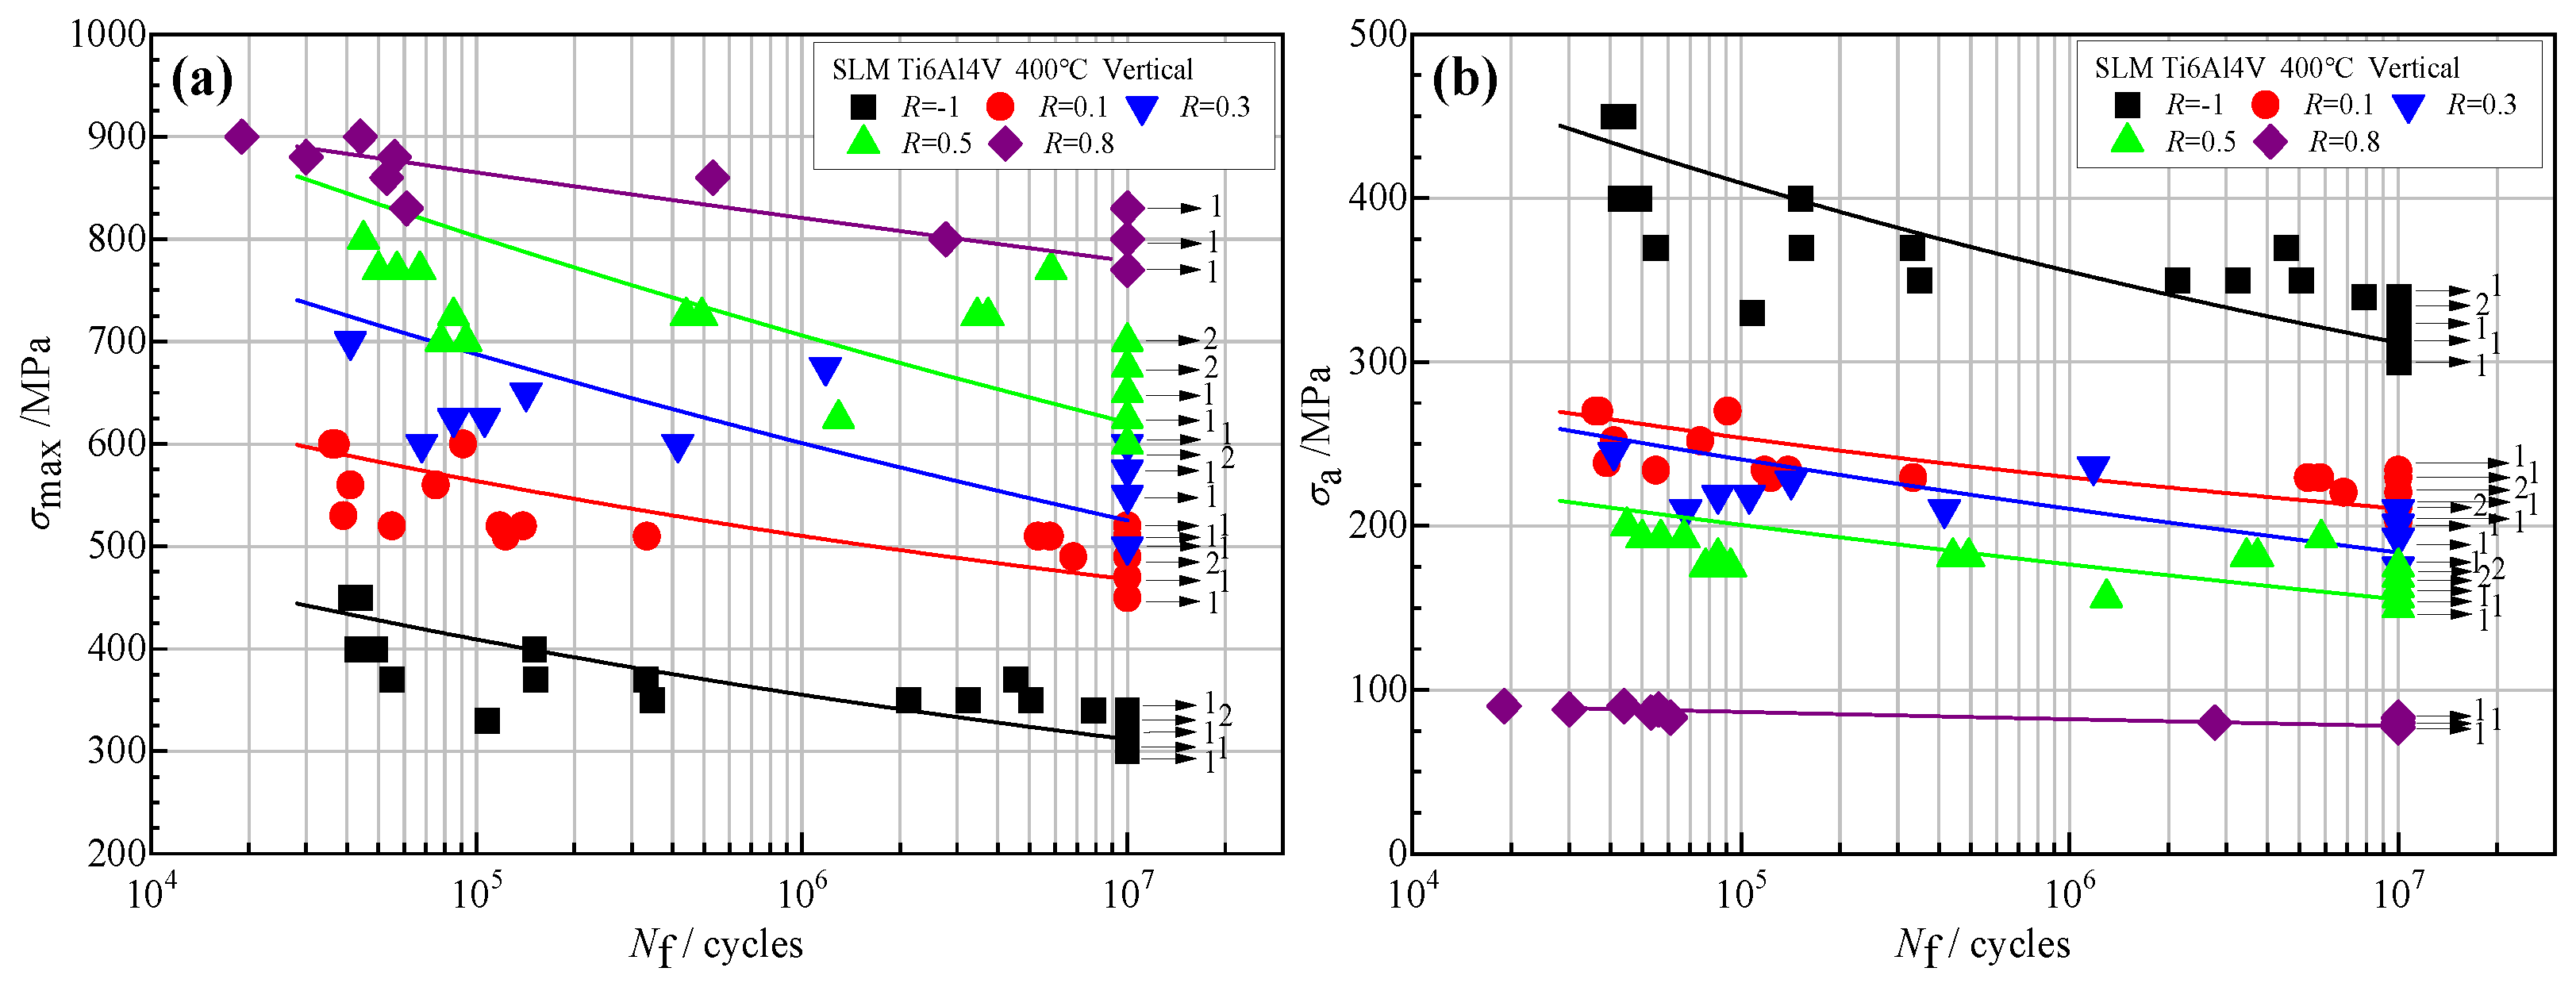
The results of the HCF test at 400 °C are shown in
Figure 4 (the arrows in the figure represent the data points where no fracture occurred in 1 × 10
7 cycles during the experiment, and the numbers behind represent the number of unbroken points at the corresponding stress levels). In the figure, the square symbol
![Materials 18 05678 i001 Materials 18 05678 i001]()
represents the fatigue data of the stress ratio −1, the round symbol
![Materials 18 05678 i002 Materials 18 05678 i002]()
represents the fatigue data of the stress ratio 0.1, and the inverted triangle symbol
![Materials 18 05678 i003 Materials 18 05678 i003]()
; represents the fatigue data of the stress ratio 0.3. The triangular symbol
![Materials 18 05678 i004 Materials 18 05678 i004]()
represents fatigue data with a stress ratio of 0.5, and the diamond symbol
![Materials 18 05678 i005 Materials 18 05678 i005]()
represents fatigue data with a stress ratio of 0.8.
To analyze the results under different stress ratios, this paper adopts the following three-parameter power function, Equation (1), for data fitting to obtain the fatigue
S-
N curve of the alloy.
In the formula, σmax represents the maximum stress, σf is the fatigue limit, m and C are material constants related to the stress ratio, and Nf stands for fatigue life.
The corresponding logarithmic expression is:
In the formula, the material parameters are
B1 = lg
C,
B2 = −
m, and
B3 =
σf. The fitting parameters are shown in
Table 3.
It was shown that in
Figure 4a, at the same stress level
σmax, the fatigue life of this alloy shows a gradually increasing trend with the increase in the stress ratio, which is mainly caused by the difference in stress amplitude
σa, as shown in
Figure 4b. When
σmax is the same and with the increase of stress ratio, the stress amplitude
σa (
σa =
σmax·(1 −
R)/2) will decrease, and it will reduce the damage of the alloy during a single fatigue cycle. According to the principle of consistent total damage, the fatigue life of the alloy increases under higher stress ratio conditions. At the same time, it can also be seen from the figure that the fatigue life data of the alloy has the characteristic of high dispersion, and the degree of dispersion is related to the stress ratio to a certain extent. In high-stress ratios such as
R = 0.8, the fatigue life dispersion is relatively small. Meanwhile, in low-stress ratios such as
R = −1 and 0.1, the dispersion is relatively large, especially in the region near the fatigue limit stress level, and the difference in fatigue life between fractured and unfractured samples can reach several million cycles.
3.2. Fracture Surface Observation and Analysis
The fatigue performance of Ti6Al4V alloy by AM is jointly affected by multiple factors including defects, surface roughness, and residual stress. Studies have shown that the main defects in AM Ti6Al4V are porosity defects (including nearly spherical pores, irregular pores, and lack of fusion), with a small amount of spherical inclusions and microcracks caused by residual stress [
13,
17,
18,
20,
21,
22,
26,
33,
34]. Due to the stress concentration at the defect site, the material is prone to develop into a crack source during the process of fatigue loading. Also, stress concentration can occur due to the high surface roughness with the “as-built” state, which indicates that there is no subsequent processing on the surface in AM Ti6Al4V. Yu et al. [
22] compared the fatigue performance of SLM Ti6Al4V in its “as-built” state with that after different processing methods (turning, grinding, sandblasting after grinding, and polishing). The results showed that as the surface roughness decreased, the fatigue performance of the material increased successively. They believed that polishing was a more effective method to reduce surface roughness.
In this paper, the surface roughness of the specimens is uniformly polished to 0.25 to eliminate the influence of surface roughness on the fatigue performance of the specimens. And the fracture surfaces of the samples were observed and analyzed further to obtain the fracture mechanism of the material. The results show that there were three types of fatigue crack source characteristics: (1) surface and subsurface pore defects which come from the gas-entrapped during the AM process; (2) surface slips; and (3) internal pores, among which the first type of fatigue initiation feature is the most common, accounting for nearly 85% of the broken samples. Taking the fracture of a sample at
R = 0.1 (
σmax = 490 MPa,
Nf = 6.8 × 10
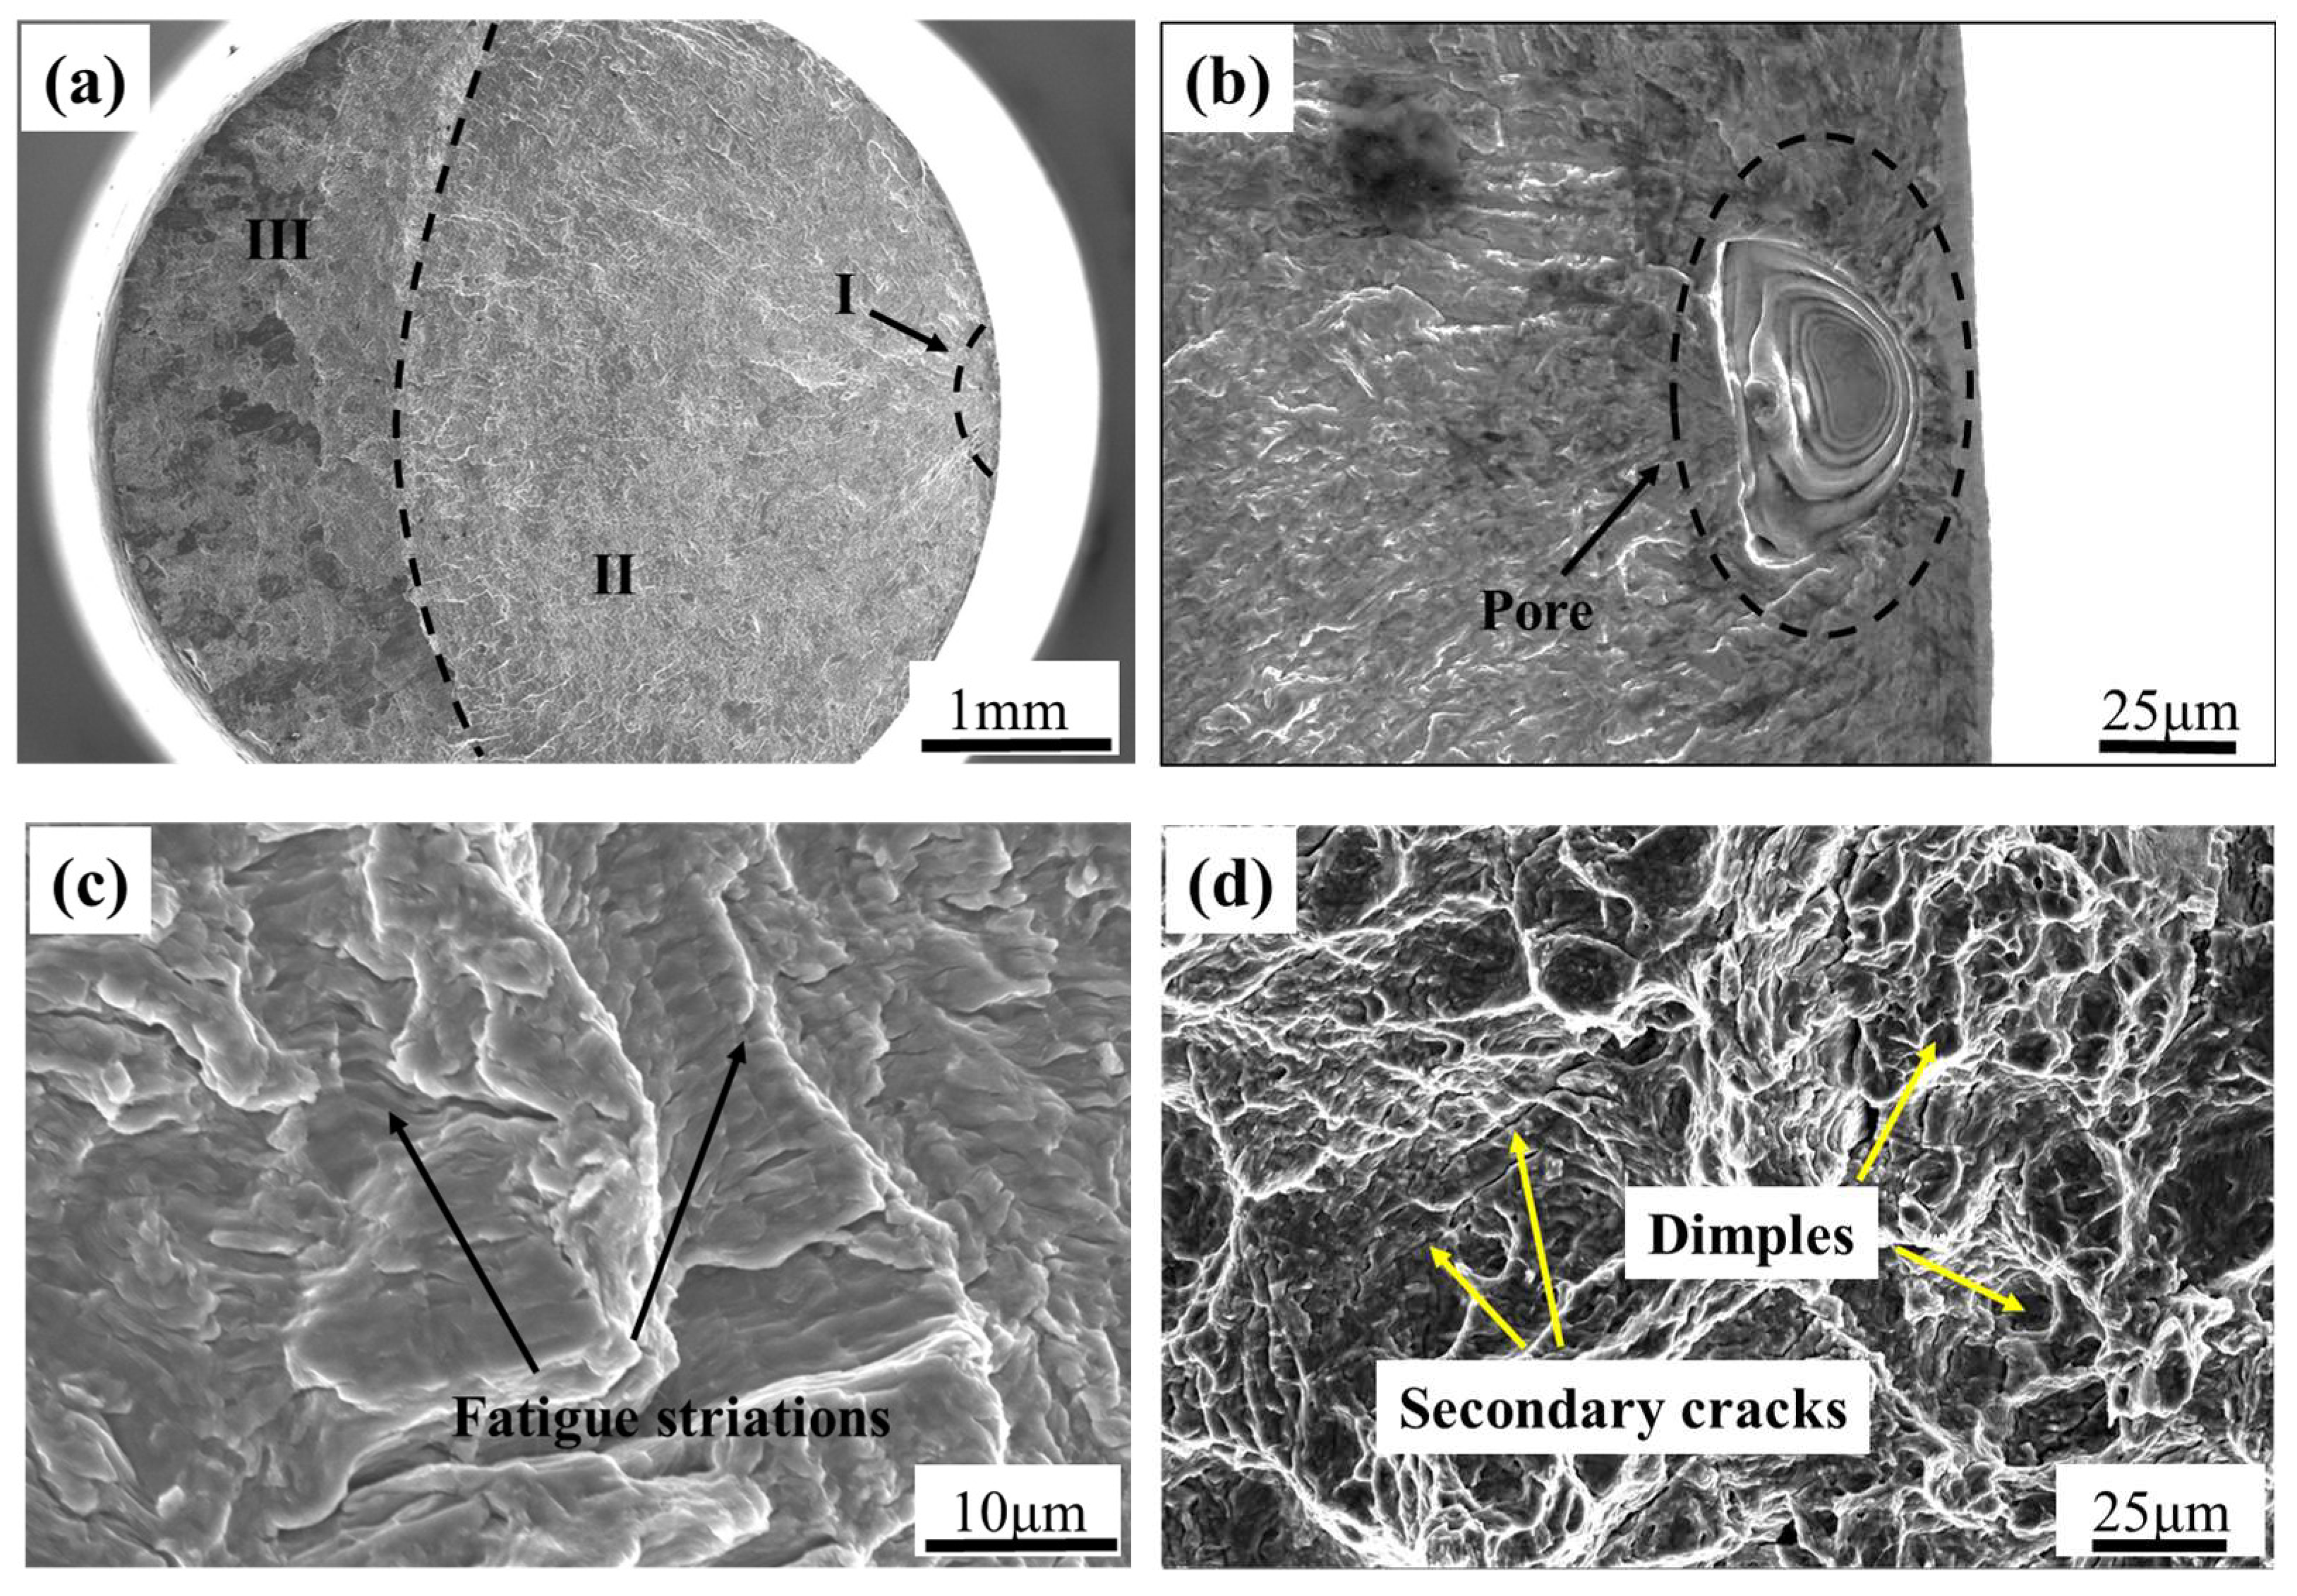
6 cycles) as an example for illustration, as shown in
Figure 5, the macroscopic morphology of the fracture surface shown in
Figure 5a can be divided into three regions: the fatigue source region (I), crack propagation region (II), and transient fracture region (III). The crack source is a single crack source. The crack propagation region is relatively flat with multiple radial ridges visible, while the instantaneous fracture region is rough and uneven.
Figure 5b shows the magnified morphology of the crack source area. The crack originates from the elliptical pores on the surface. Due to the easy occurrence of stress concentration at the defect site, the local stress increases, so the crack is prone to start from the defect site.
Figure 5c shows the morphology of the crack growth zone, with distinct fatigue striations visible. At this point, the crack growth has entered a stable stage.
Figure 5d shows the morphology of the final fracture zone, which has the characteristics of tensile fracture, with dimples of varying sizes and depths visible, showing a ductile fracture model.
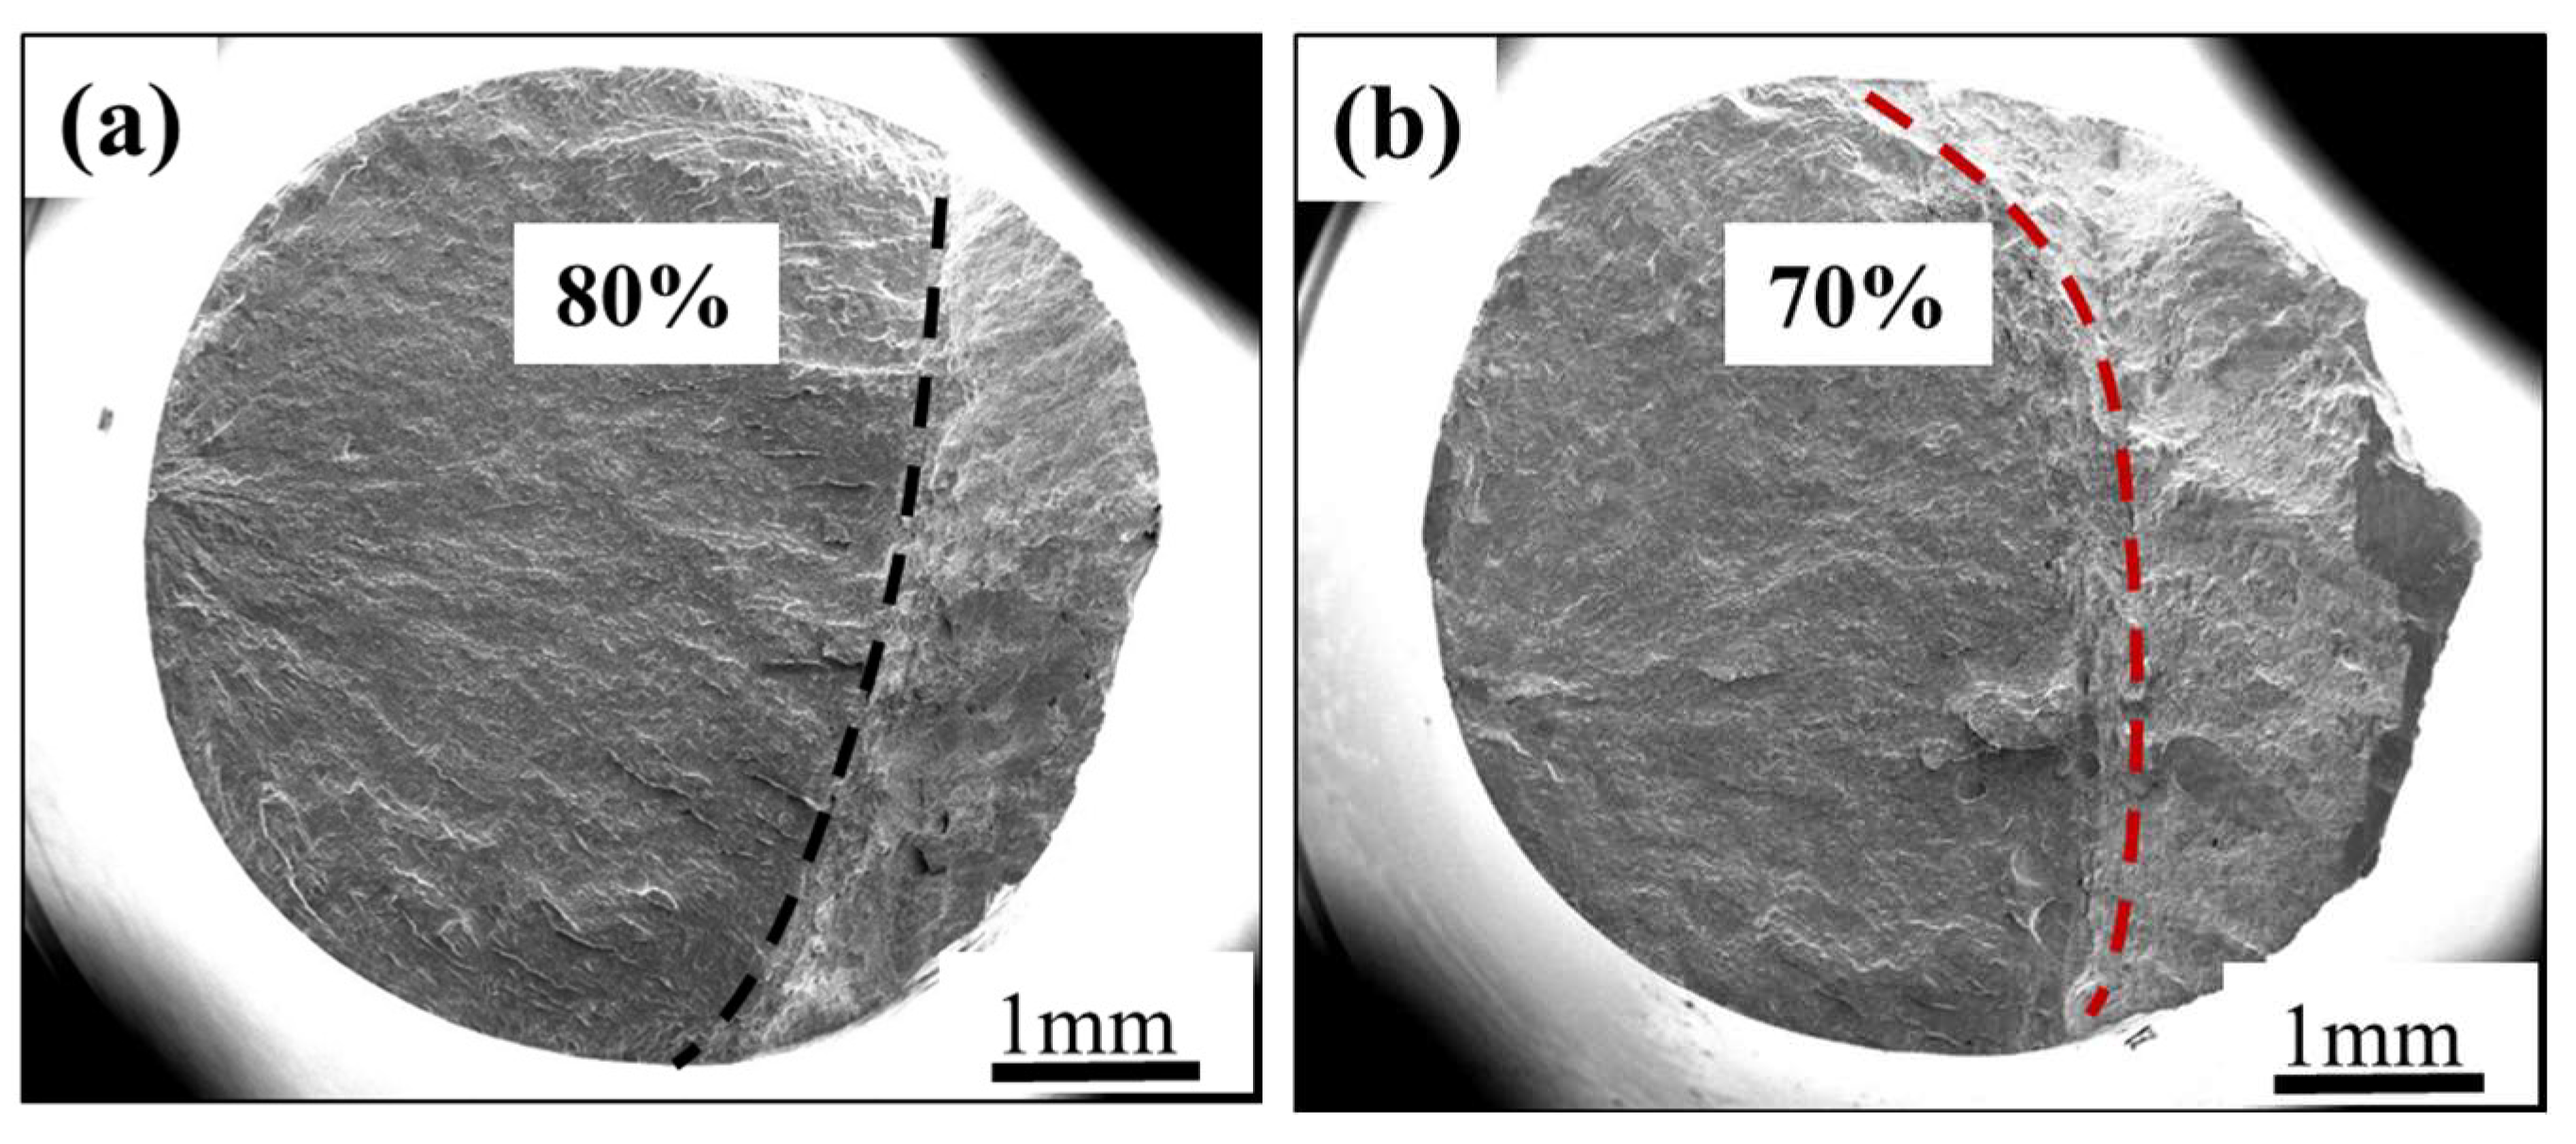
The macroscopic morphologies of the fracture surface when the fatigue life is approximately 1 × 10
5 cycles under different stress ratios are shown in
Figure 6.
Figure 6a shows the macro fracture morphology of the sample
R = −1. Through the observation of the fracture surface, and based on the discussion in
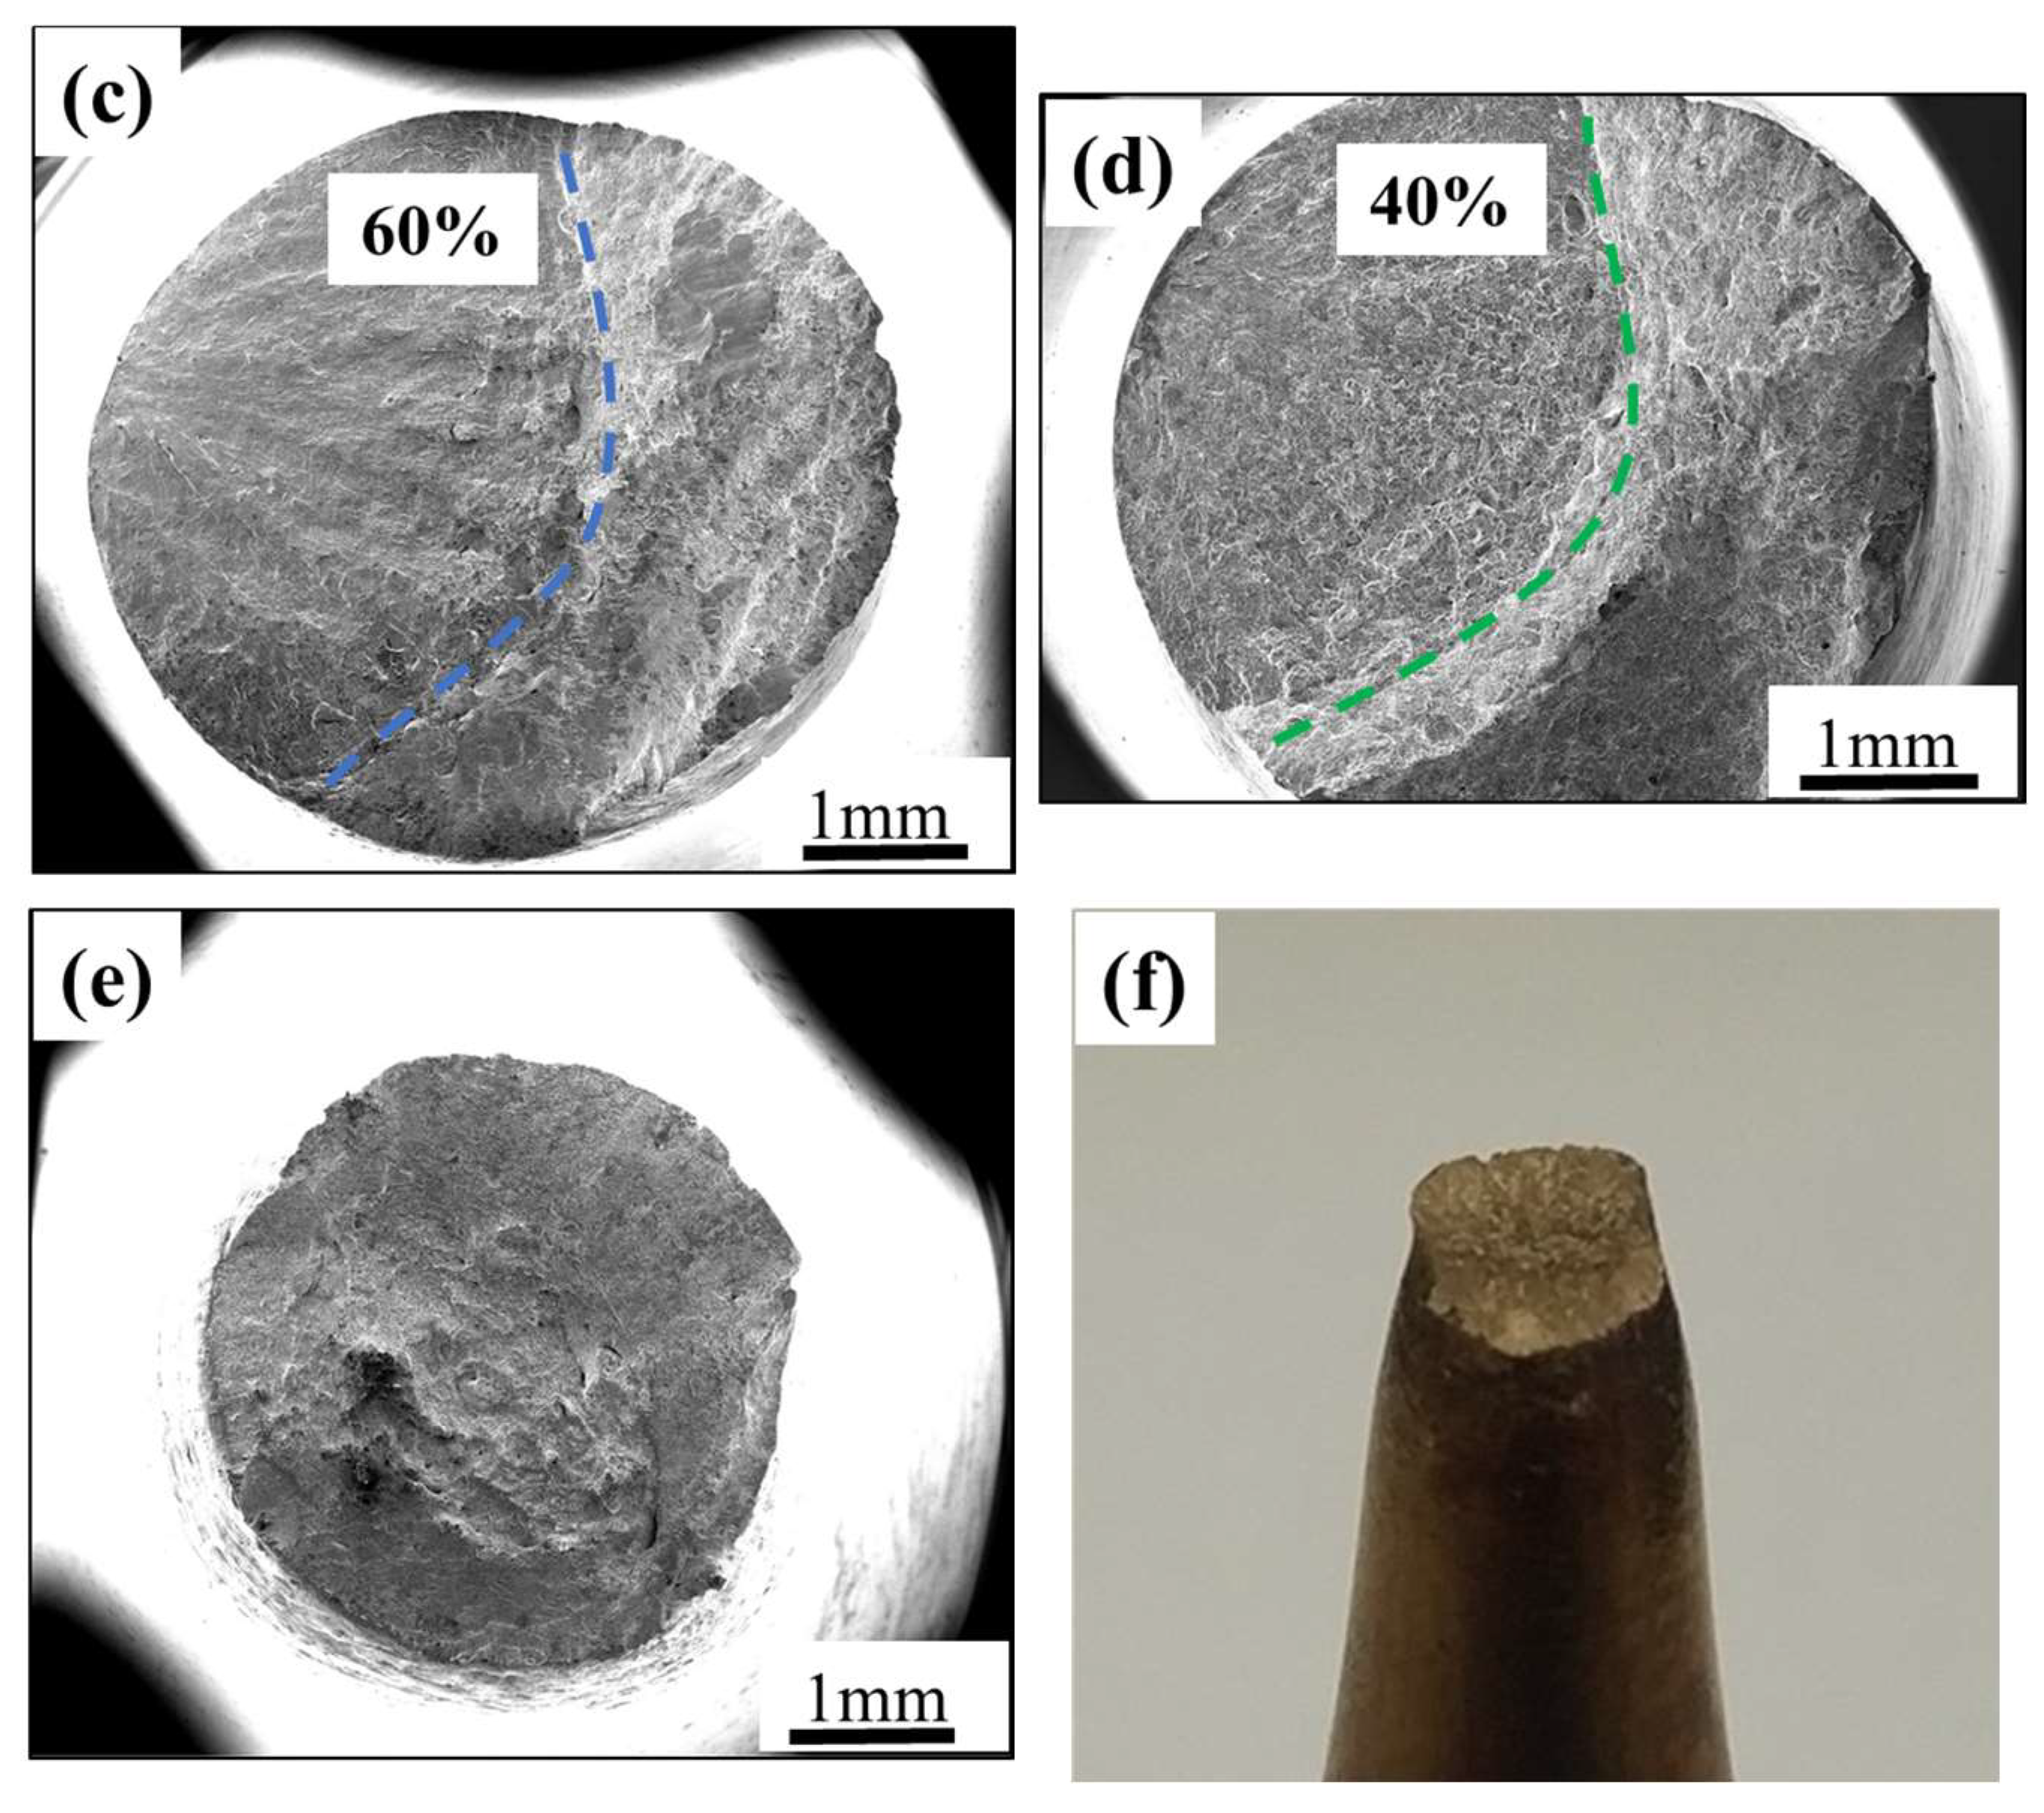
Figure 5 above, it can be known that the fatigue failure area accounts for approximately 80% of the total fracture area. By analogy, the proportions of fatigue failure zones on the fracture surface when the stress ratios are 0.1, 0.3, and 0.5 can be obtained, which are 70%, 60%, and 40%, respectively, as shown in
Figure 6b–d. As for
R = 0.8, the macro fracture morphology of the sample is shown in
Figure 6e, and the fatigue failure area of fracture morphology is not as obvious as that under other stress ratio conditions. The fracture has necking deformation, as shown in
Figure 6f, and its shape is a cup-cone, with coarse fiber in the middle and a smooth shear lip around it. The fracture morphology is characterized by both fatigue failure and static tensile endurance fracture.
From the observation of the fracture morphology, it can be found that as the stress ratio increases, the fatigue failure area of the sample’s fracture surface gradually decreases. Especially at high stress ratio such as 0.8, the fatigue failure characteristics are no longer obvious, and instead, tensile endurance fracture characteristics take their place. This transformation is mainly influenced by the mean stress. When
R = −1, 0.1, and 0.3, the mean stress is low; most of the fatigue cracks originate from the defects on the subsurface of the fatigue samples, and the fracture morphology shows obvious fatigue failure characteristics. However, under the condition of high stress ratio, such as
R = 0.8, the mean stress is higher than the low stress ratio. On the one hand, during the fatigue loading process, the high mean stress will continuously load, causing the sample to be subjected to a fixed tensile load. On the other hand, at 400 °C, the continuous high mean stress may also lead to the occurrence of creep damage, so that at high stress ratios, the fracture surface of the sample shows a mixed mode of fatigue failure characteristics and tensile endurance fracture characteristics. Generally speaking, Ti6Al4V has sufficient creep resistance below 400 °C, and during use, the failure mode is generally fatigue failure. Above 400 °C, with the operating temperature increases, creep performance [
35] increasingly becomes a key factor restricting the performance and service life. Therefore, for the life prediction of high-cycle fatigue of SLM Ti6Al4V, the influence of mean stress or creep damage generated under high mean stress should be considered.
 represents the fatigue data of the stress ratio −1, the round symbol
  represents the fatigue data of the stress ratio 0.1, and the inverted triangle symbol
  ; represents the fatigue data of the stress ratio 0.3. The triangular symbol
  represents fatigue data with a stress ratio of 0.5, and the diamond symbol
  represents fatigue data with a stress ratio of 0.8.
