Article

The Influence of the Depth of Grinding on the Condition of the Surface Layer of 20MnCr5 Steel Ground with the Minimum Quantity Lubrication (MQL) Method

by
Wojciech Stachurski
1,*,
Jacek Sawicki
2,
Bartłomiej Januszewicz
2 and
Radosław Rosik
1
1
Institute of Machine Tools and Production Engineering, Lodz University of Technology, Stefanowskiego 1/15, 90-537 Lodz, Poland
2
Institute of Materials Science and Engineering, Lodz University of Technology, Stefanowskiego 1/15, 90-537 Lodz, Poland
*
Author to whom correspondence should be addressed.
Materials 2022, 15(4), 1336; https://doi.org/10.3390/ma15041336
Submission received: 6 January 2022 / Revised: 6 February 2022 / Accepted: 8 February 2022 / Published: 11 February 2022

Abstract

:
This paper describes the research on abrasive machining conditions and their influence on microhardness and residual stresses distribution in the technological surface layer of 20MnCr5 steel. The roughness of ground samples was also measured. Samples underwent a vacuum carburizing process (LPC) followed by high-pressure gas quenching (HPGQ) in a 4D quenching chamber. Processes were realized with a single-piece flow method. Then, the flat surfaces of samples were ground with a Vortex type IPA60EH20VTX alumina grinding wheel using a flat-surface grinder. The samples were ground to three depths of grinding (ae = 0.01; 0.02; 0.03 mm) with grinding fluid supply using either flood method (WET) or minimum quantity lubrication (MQL) method. The condition of the technological surface layer was described using microhardness and residual stresses, as well as some selected parameters of surface roughness. The results obtained revealed that changes in microhardness as compared to microhardness of the material before grinding were lower in samples ground with grinding fluid supplied with MQL method. At the same time, the values of residual stresses were also better for samples ground using MQL method. Furthermore, the use of grinding fluid fed with MQL method produced lower values of surface roughness compared to the parameters obtained with WET method. It was concluded that for the tested scope of machining conditions, the MQL method can be a favourable alternative to the flood method of supplying grinding fluid into the grinding zone.

1. Introduction

The grinding process can change surface layer properties such as fatigue strength, corrosion resistance and abrasion resistance [1,2]. Parameters like residual stress distribution, microhardness and surface roughness can determine the condition of the technological surface layer to a significant degree.
Microhardness and residual stresses are influenced, among other things, by the type of heat treatment before grinding as well as the properties of the grinding wheel, especially the type of abrasive material. The surface roughness obtained as a result of grinding is influenced by the active roughness of the grinding wheel corresponding to its topography and the specific volumetric productivity of grinding, which results from adopted setting values. Among these setting values, the grinding depth ae is of significant importance [3,4], just next to the workpiece speed vw.
The analysis of information on the types of heat treatment currently applied before grinding shows that carburising followed by quenching is one of the most commonly used methods of the surface heat treatment. Low-pressure carburising [5,6] is superior to conventional carburizing [7,8] in terms of efficiency and features a number of advantages, including lack of internal oxidation and higher uniformity of obtained layers. It should be remembered that residual stresses that have arisen as a result of thermochemical treatment (TCT) are present in the base and surface layers. The analysis of residual stresses is crucial due to their influence on, among others, fatigue strength, tribological wear, corrosion, brittle fracture and contact fatigue [9]. This influence may be beneficial, but it may also lead to the destruction of an element or the whole device, depending on the type of stresses and their superposition with operating stresses originating from external forces. The occurrence of compressive stresses in the surface layer compensated by tensile stresses in the core is believed [10,11] to contribute to the fatigue strength.
The grinding process that follows the thermochemical treatment is often carried out using grinding wheels with Al2O3 abrasive grains. Grinding wheels used in grinding of this type increase the grinding power resulting from the increased efficiency, which leads to temperature increment in the surface layer of the workpiece [1,3,4]. This is one of the reasons for changes in residual stresses and microhardness distribution in the material after heat treatment. Thermal loads cause both disadvantageous tensile stresses presence and microhardness changes in depth of the technological surface layer which reduces fatigue strength of dynamic loaded machine parts [2,12].
Furthermore, increasing grinding efficiency, e.g., by increasing the depth of grinding, also leads to the increased roughness of the machined surface. The size and shape of surface roughness influence on, among other things, the functional properties of the surface: abrasion resistance, suitability for transferring constant or variable loads, corrosion resistance, fatigue strength (decreases as the roughness increases). The deepest irregularities of roughness act in a notch-like manner, causing stresses concentration in locations of reduced cross-section and lowering them to the values at which micro-cracks are initiated. Corrosion foci are also formed in the recesses of the rough surface without the presence of variable loads [13]. It should be noted that reliable results can only be obtained on the basis of correctly measured and properly processed measurement data [14]. In addition, power spectral density (PSD) methods can be used for a detailed analysis of surface roughness [15].
With regard to the above, this article describes research works carried out on the influence of the depth of grinding as one of the important input parameters of the grinding process, which is crucial for its efficiency, on the condition of the technological surface layer 20MnCr5 alloy steel. This steel is designed for carburizing and is widely used in wind energy, automotive, aviation, and machinery. It is one of the most commonly used materials for the commercial production of transmission components (shafts, gears) that are subjected to high Hertz loads. In order to fully utilize the potential of this material, it is necessary to consciously shape the properties of its surface layer in both machining and abrasive machining. The authors of the work [16] point the need to ensure appropriate cutting conditions, giving special emphasis to the proper selection of cutting parameters and the type of tool material and their impact on the durability of the cutting tool during gear hobbing. In another study devoted to gear hobbing, the purposefulness of using the minimum GF flow rate supply by the MQL method, was demonstrated [17].
MQL (Minimum Quantity Lubrication) method involves the continuous generation of oil mist and feeding it directly into the grinding zone, usually onto the active surface of the grinding wheel. The most commonly used lubricating media are synthetic esters or fatty alcohols. For some time, mainly for ecological reasons [18,19], vegetable oils have also been used as a lubricating medium in the MQL method [20,21]. The flow of the lubricating medium is assisted by a transferring medium—a stream of compressed air [22,23], which, to a small extent, also acts as a cooling agent [24]. Published data indicate that in the MQL method, the lubricant is supplied in quantities of 10–500 mL/h [25,26,27]. In comparison, water-oil emulsions in the flood method are used in amounts exceeding 120,000 mL/h, whereas while grinding, the amount ranges from 300,000 to 1,200,000 mL/h, depending on the process technology.
It should be noted that the addition of Cr and Mn to the 20MnCr5 steel increases the hardenability, ensuring appropriate strength properties of the core and reducing the hardening stresses in the carburized layer. This makes abrasive machining of this steel difficult and requires appropriate conditions for the machining process. The works to date in this area [28,29] were devoted to the determination of the effect of the type of abrasive grain used on the microhardness and residual stress when applying GF by the flooding method and the MQL method. The conclusions presented in these papers show that the MQL method may, under certain processing conditions, be an alternative to the flood method. These conclusions are also confirmed by other studies [30,31], which show that the MQL method can improve the effectiveness of the GF reaching the contact zone between active abrasive grains and the ground surface and thus reducing the risk of an unfavorable thermal impact on the top layer.
The review of available literature has shown that the application of the MQL method during grinding is diversely evaluated in terms of the condition of the technological surface layer of the machined materials [32,33]. This is clearly understandable as the types of the grinding process and the conditions under which they are carried out may differ significantly [34,35,36]. Thus, it is not possible to directly implement the results of the research on the application of the MQL method done for a specific type of grinding process into the other types of grinding processes and to generalise them.
Accordingly, experimental tests, described in this article, were carried out with regard to the application of MQL method at different grinding depths ae when grinding flat samples made of 20MnCr5 steel (820 ± 10 HV). It should be expected that the use of the MQL method can provide machining conditions comparable or better to those provided by the flood (WET) method. Therefore, the purpose of this research was to determine the influence of selected abrasive machining conditions on the value and distribution of microhardness and residual stresses formed in the technological surface layer, as well as on the surface roughness after machining. The samples were vacuum carburised (LPC) first, using a single-piece flow method; then, high-pressure gas quenched (HPGQ), and then ground with a Norton Vortex-type alumina grinding wheel. During the grinding process, conventional GF was delivered with the WET method and with the MQL method. Section 2 presents the experimental test conditions along with a description of the test stands. Test results and their analysis are discussed in Section 3, while Section 4 provides the final conclusions.

2. Experimental Tests

2.1. Vacuum Carburising with Single-Piece Flow Method and Heat Treatment

The innovative vacuum UCM furnace made by SECO/WARWICK (Poland) shown in Figure 1 was used for the thermochemical treatment.
The special feature distinguishing this furnace from other vacuum furnaces is that the thermochemical treatment is carried out using the “single-piece flow” method rather than the batch method used so far. The furnace′s innovative design incorporates three process chambers (heat-up, LPC, diffusion) connected in parallel with each other, with individual workpieces moving in a flow. These chambers are configured in a horizontal layout and placed in a common vacuum space with gas tight separation. Transportation chambers (elevator) equipped with loading and unloading systems to cooperate with individual process chambers are built-in at the ends of these chambers. External access to transportation chambers is ensured by loading and unloading locks. The “single piece flow method” is that individual workpiece passes through similar process conditions and positions in the furnace [37,38]. The method provides high precision and repeatability in comparison to conventional carburizing methods. The 4D quenching chamber for individual high-pressure gas quenching (HPGQ) of single element allows controlling the cooling curve and achieving optimum properties of treated materials. A rotating table (4D) with the workpiece placed on together with application of uniformly distributed around cooling nozzles ensure even flow of gas and cooling ratios comparable to oil systems without the need of applying helium gas as cooling media.
Ring-shaped flat samples with an outer diameter of 96 mm, inner diameter of 30 mm and thickness of 10 mm were selected for experimental testing. The samples’ dimensions resulted from the construction of the elements of the mechanism that transports them inside the UCM furnace. Samples were carburised at 920 °C reaching the effective thickness of a layer ECD = 0.4 mm. Next, the samples were quenched in a quenching chamber at 7 bar and then tempered at 190 °C for 3 h. The parameters of the thermochemical treatment are presented in Table 1.

2.2. Grinding

The purpose of experimental testing of grinding flat surfaces was to determine the influence of changes in the grinding conditions, such as the depth of grinding and the method of GF supply, on the resultant process parameters in terms of microhardness, residual stresses and roughness of the ground surfaces.
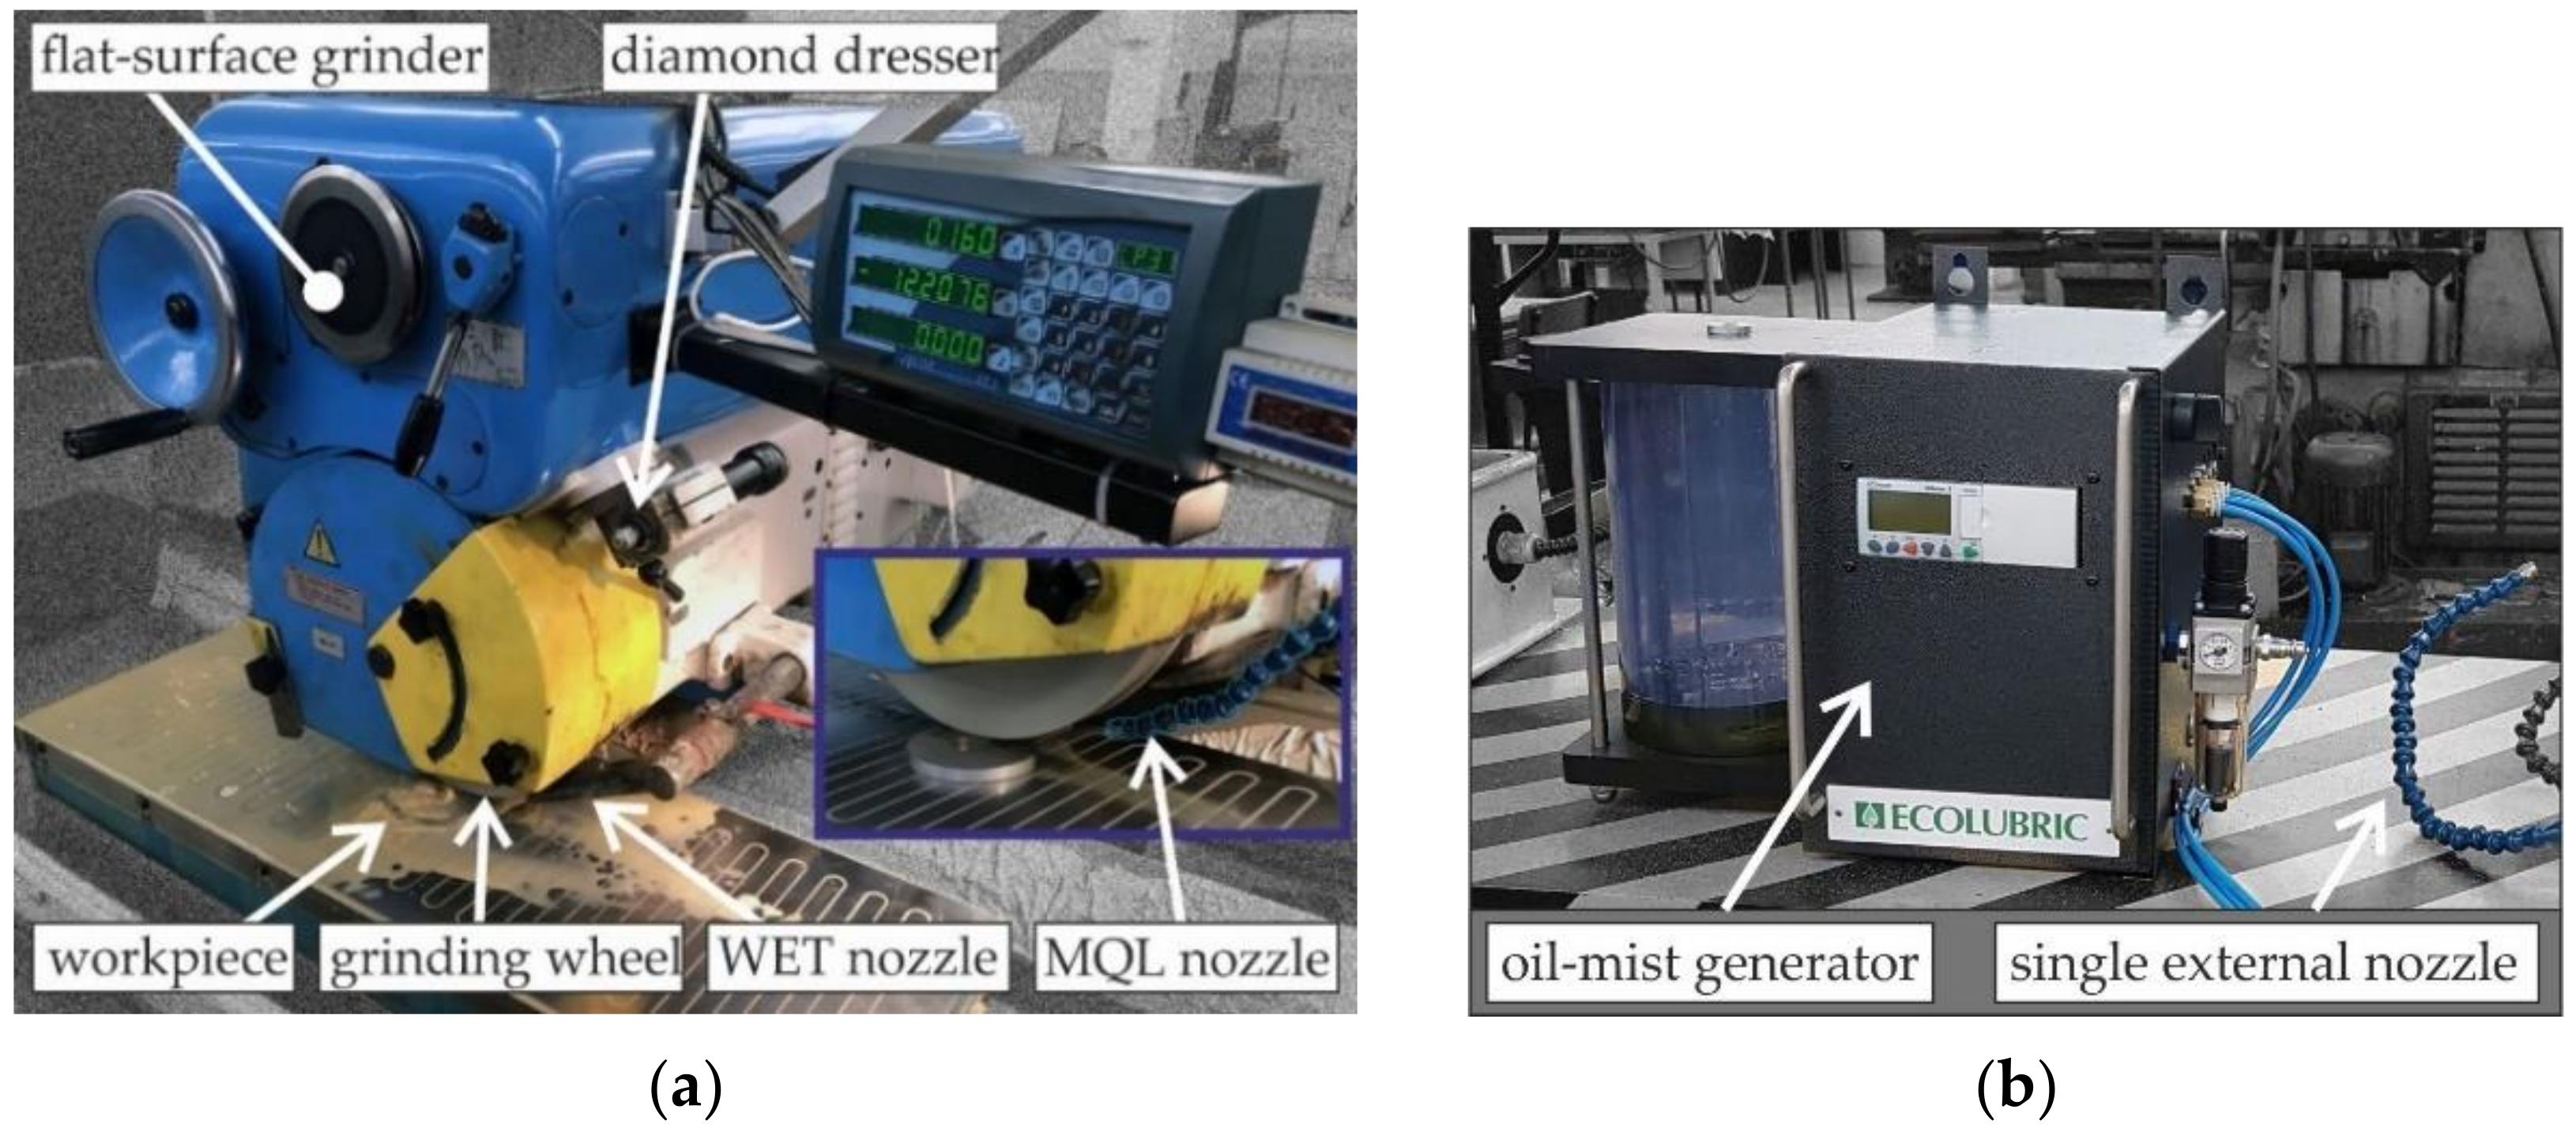
Grinding was carried out on samples made of 20MnCr5 steel (820 ± 10 HV) that had previously been submitted to the thermochemical treatment process described in the previous subchapter. Table 2 shows the chemical compositions of 20MnCr5 steel. Grinding tests were carried out during the process of circumferential grinding of flat surfaces using a conventional flat-surface grinder of SPD-30B type (Jotes Inc., Lodz, Poland). View of test stand is presented in Figure 2a.
During the test the Vortex type grinding wheel made of alumina abrasive grains and ceramic binder—IPA60EH20VTX (Norton Saint-Gobain Ltd., Koło, Poland) were used. It is a hard grinding wheel with an open structure and increased porosity (so-called large-pore grinding wheel). The grinding wheel was dressed prior to each grinding test, using a single grain diamond dresser type M1020. Table 3 shows the grinding conditions employed during the experimental tests.
Grinding parameters used in tests are typical parameters used during circumferential grinding of flat surfaces. Machining allowance was removed in a single pass (concurrent direction), applying three grinding depths: ae1 = 0.01 mm, ae2 = 0.02 mm and ae3 = 0.03 mm. A constant value of the circumferential speed of the grinding wheel vs = 30.2 m/s and the workpiece speed vw = 18 m/min were assumed for the tests.
The test samples were ground with GF supplied by the WET method and with the MQL method. A water-oil emulsion using Emulgol ES-12 oil (5%) was used as the conventional grinding fluid in the flood method and it was fed into the grinding zone through a single nozzle with a flow rate of QWET = 4 L/min (Figure 2). An external Ecolubric MQL Booster device (Accu-Svenska AB, Västerås, Sweden) shown in Figure 2b [39] was used to generate oil mist in the MQL method. During the tests, a single spray nozzle positioned tangentially to the active surface of the grinding wheel was used and GF was delivered at a flow rate of QMQL = 100 mL/h (Figure 2a). Ecolubric E200L rapeseed oil, supplied by the machine manufacturer [40], was applied as the grinding fluid in the MQL method. Table 4 presents the technical characteristics of this oil.
Table 5 shows the set of variable machining conditions applied in the tests described above.

2.3. Microhardness Measurement

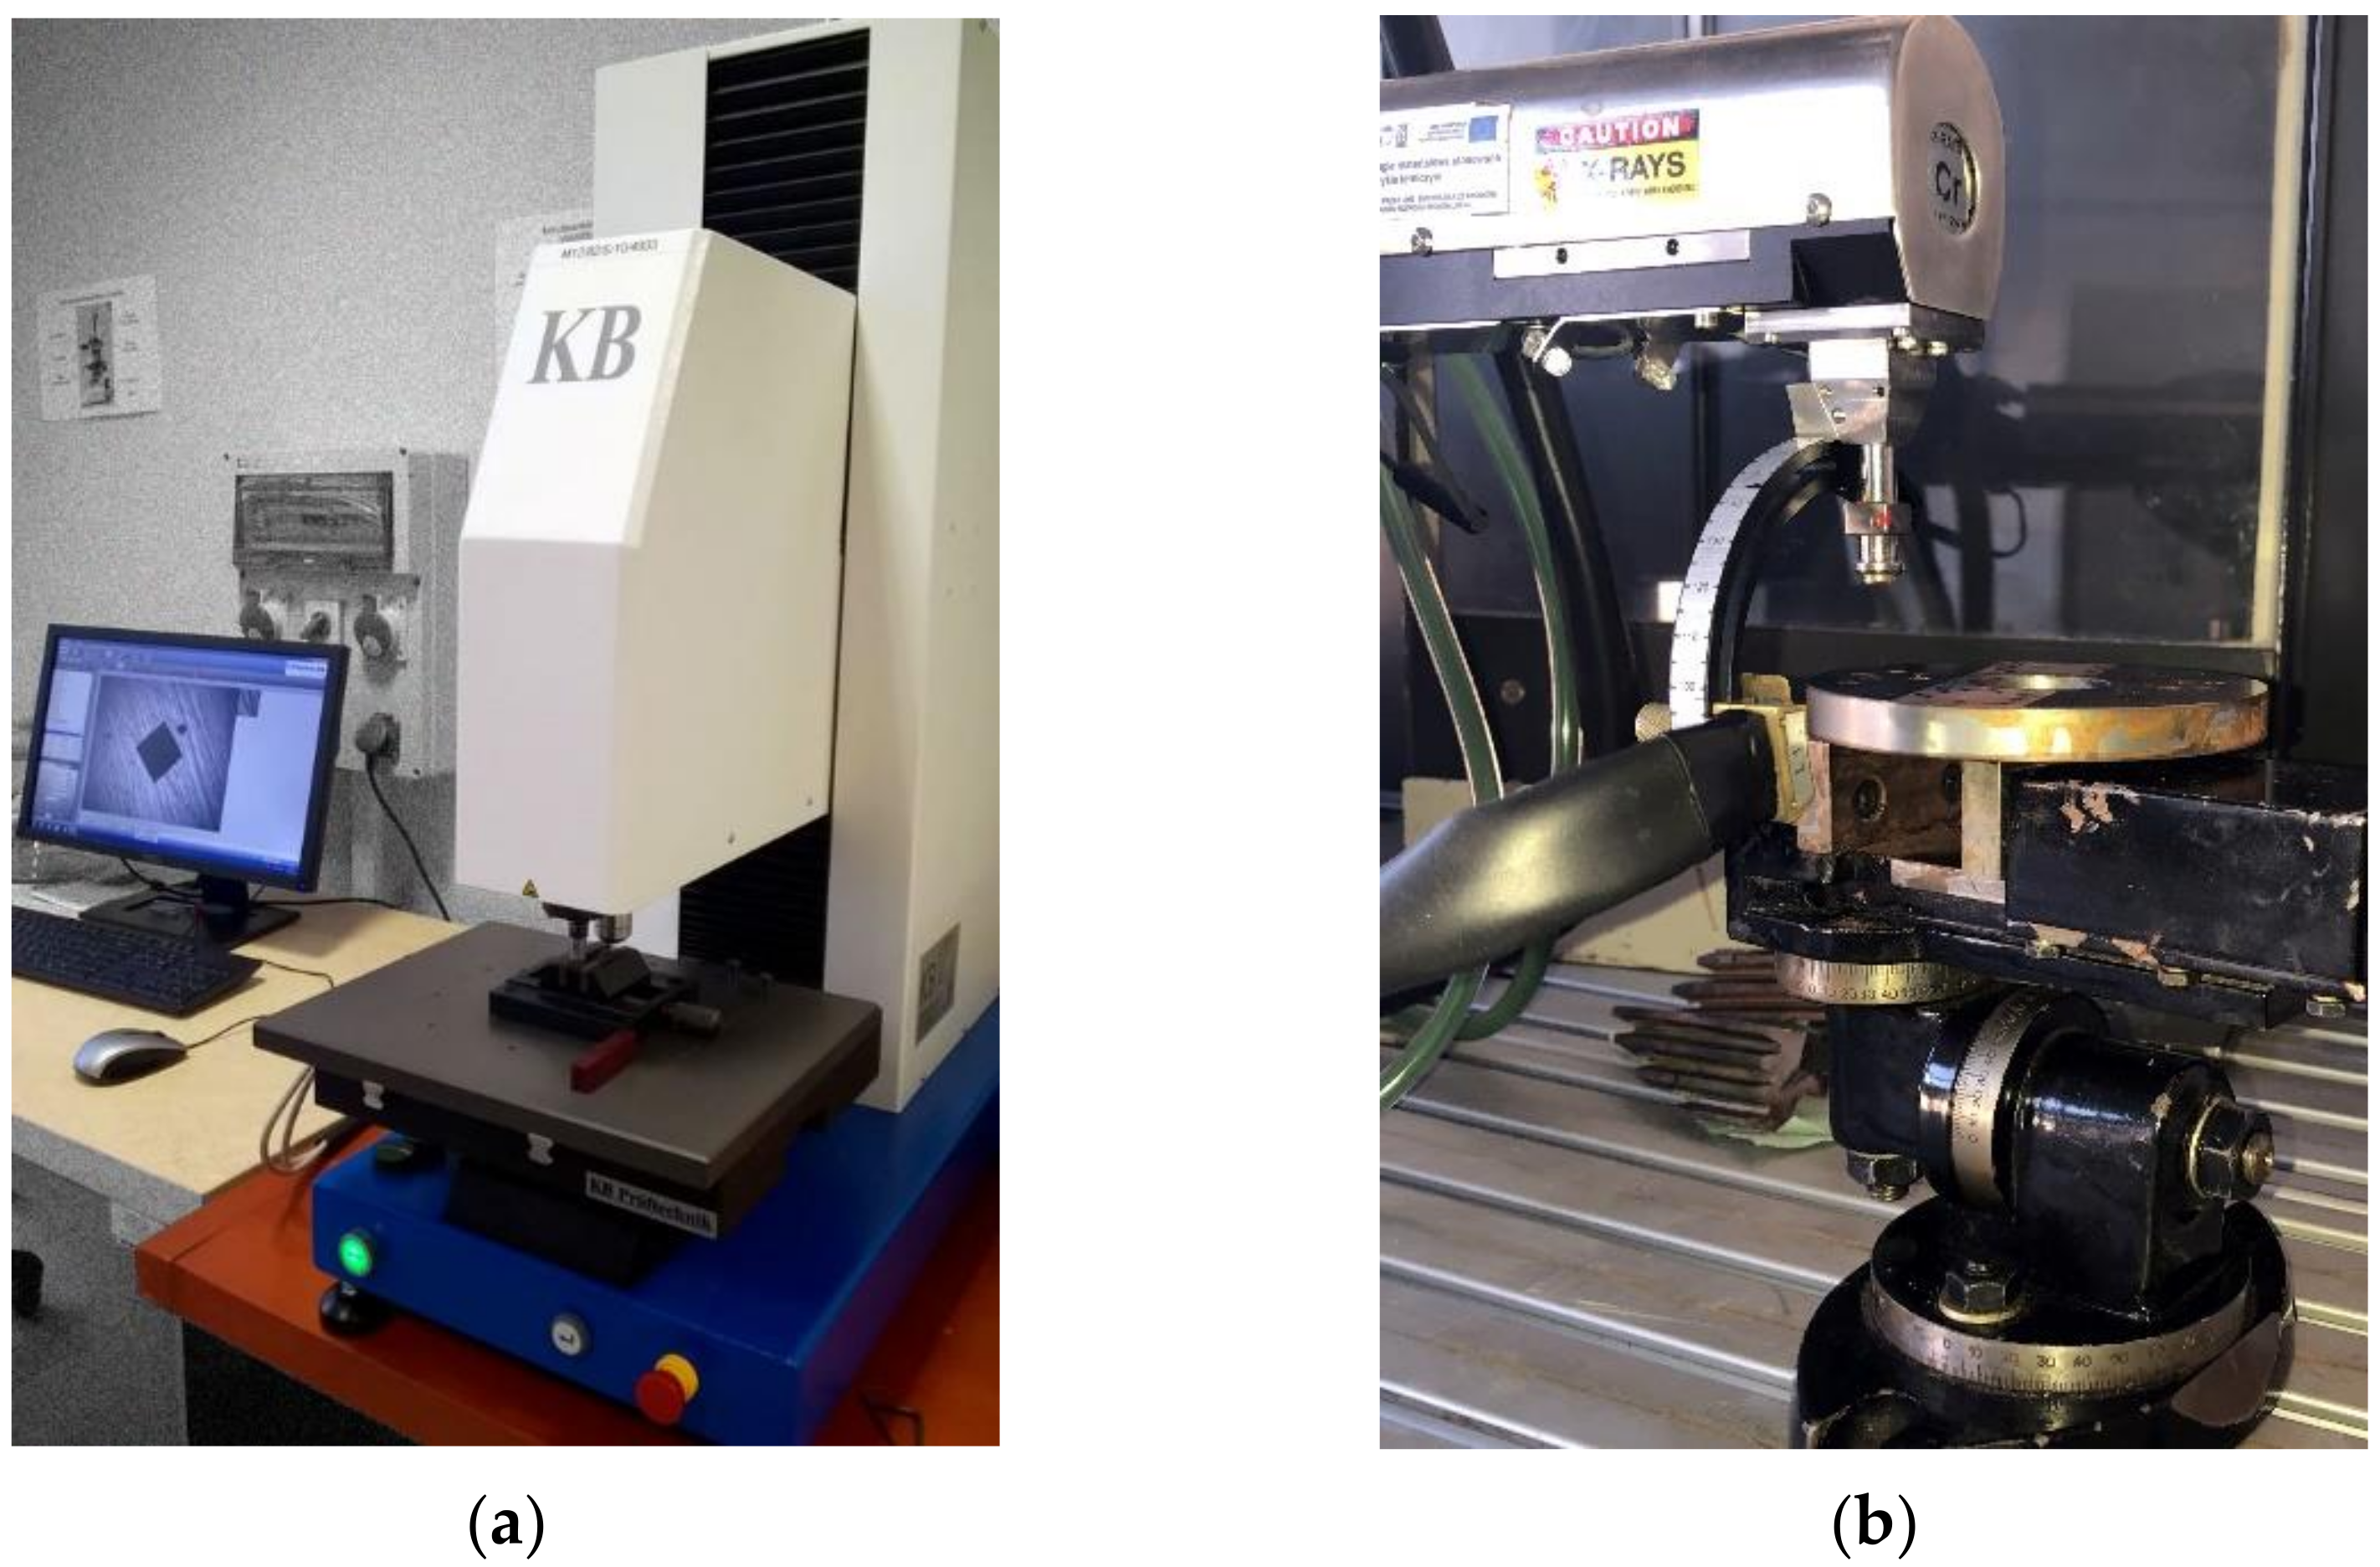
Microhardness of the ground samples was measured with KB10BVZ-FA microhardness tester (KB Prüftechnik GmbH, Hochdorf-Assenheim, Germany), presented in Figure 3a. Microhardness distribution was assessed in accordance with PN-EN ISO 6570 at a load of 0.9807 N. Three microhardness distribution curves were collected on each sample to the depth 1 mm. The mean results obtained were interpolated using B-spline functions.

2.4. Residual Stress Measurement with Roentgen Method

Residual stress distributions were measured on the ground samples using PROTO iXRD apparatus (Figure 3b). An X-ray tube emitting characteristic Cr Kα radiation with wavelength λ = 2.29 A was used. Measurements were carried out in accordance to EN 15,305 standard using sin2ψ method in ω geometry. Changes in the position of iron (211) peak were recorded. X-ray diffractometric constants ½ S2 = 5.92 1/TPa and S1 = −1.27 TPa were taken for stress values calculation. The area measured was limited by a collimator 2 mm in diameter. The in-depth distribution of the residual stresses was obtained by successive electrochemical spot etching with the use of an 8818-V3 electropolisher delivered by PROTO.

2.5. Surface Roughness Measurement

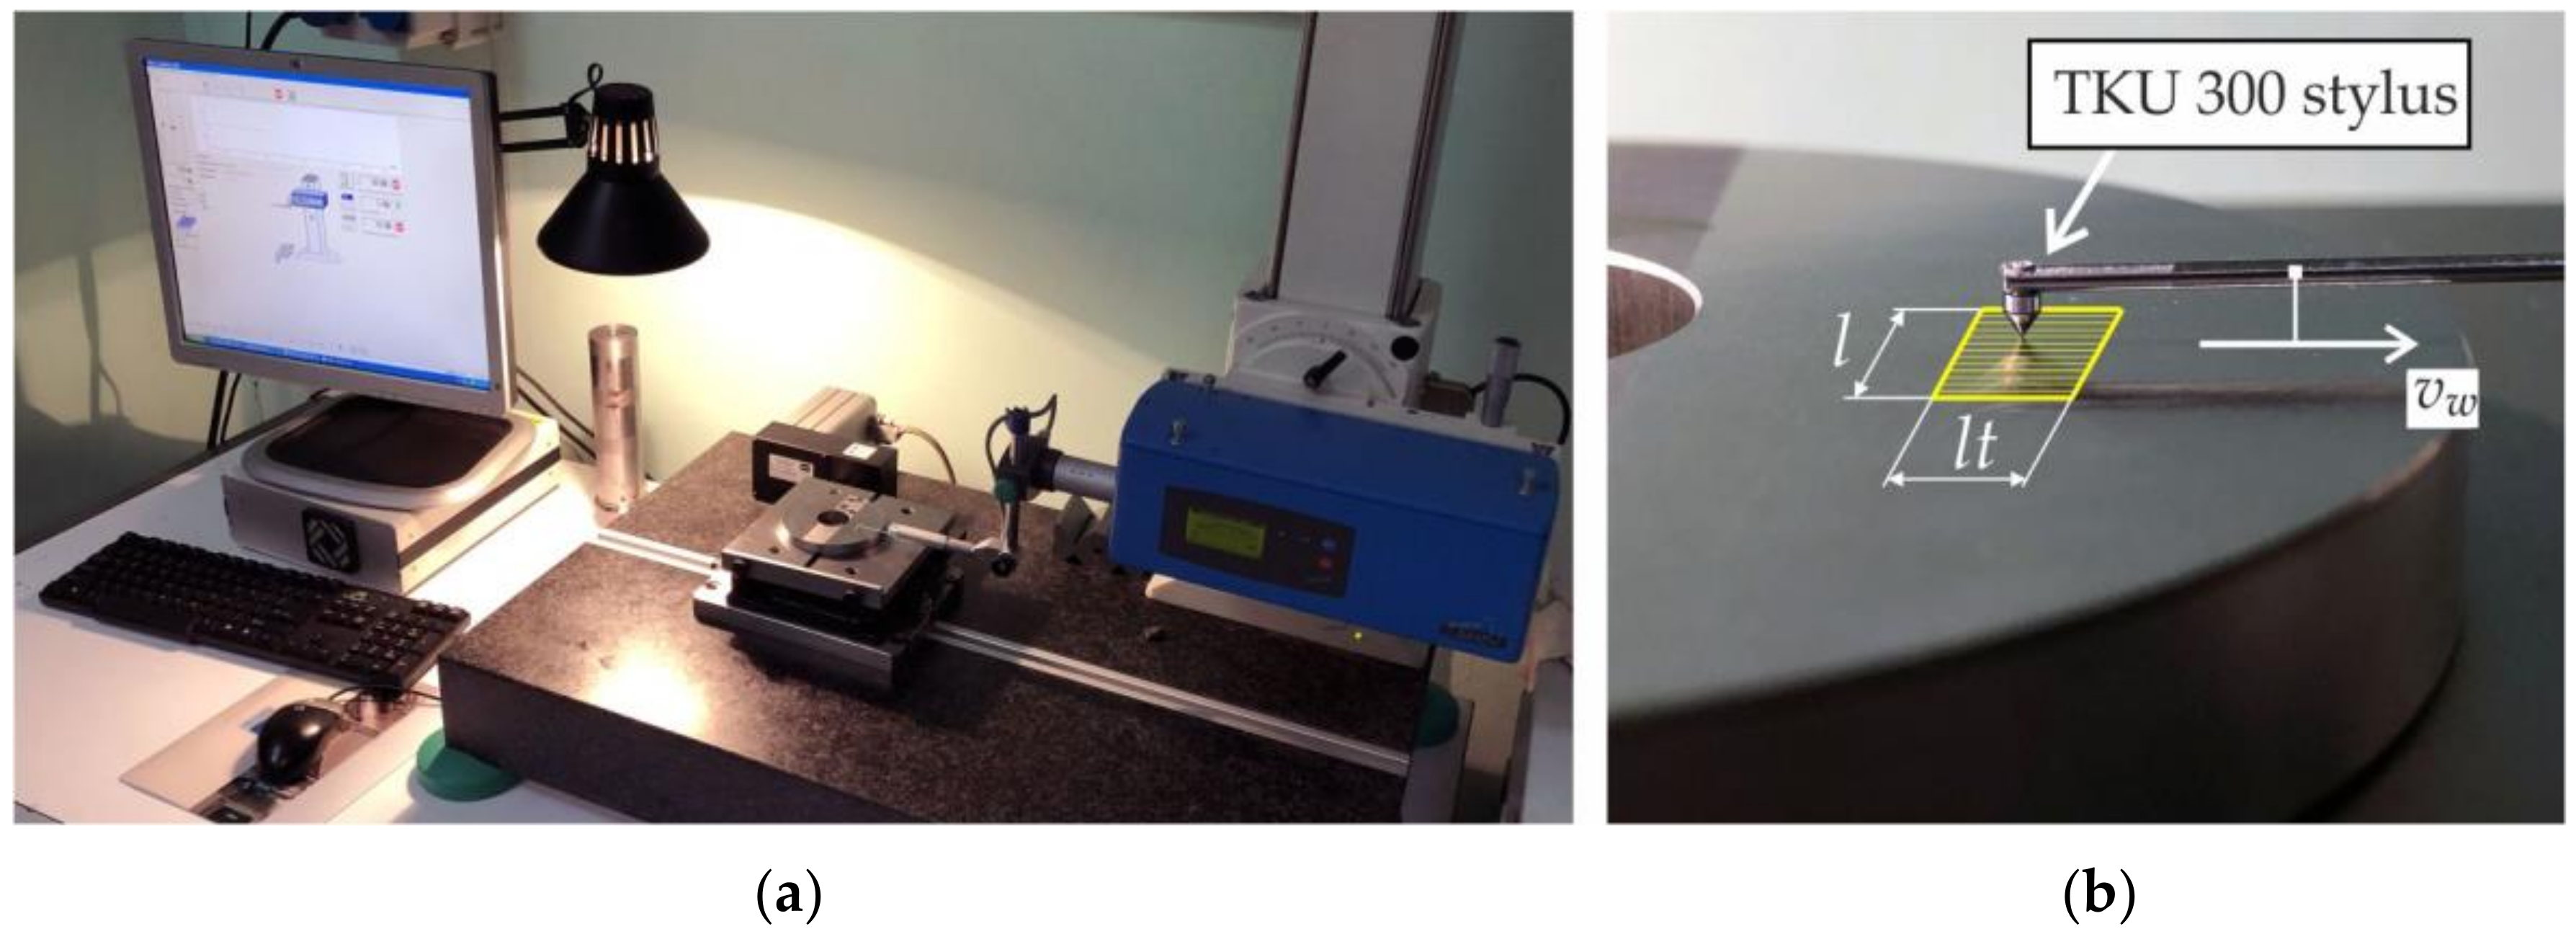
Surface roughness measurements of the samples after grinding were made with a Hommel Tester T8000 profilometer (Hommelwerke GmbH, Schwenningen, Germany), which is presented in Figure 4a.
The measurement conditions were established in accordance with PN-EN ISO 3274:2011 and PN-EN ISO 4288:2011 and are presented in Table 6. 2D parameters, determined from the roughness profile, and 3D parameters, obtained as a result of surface topography measurements, were used to describe the roughness of the ground surface (Figure 4b). The following parameters were used as 2D parameters (according to PN-EN ISO 4287:1999/A1:2010): the value of the maximum height of the roughness profile Rz, the value of the highest peak of the profile Rp and the value of depth of the lowest valley of the profile Rv. The values of R parameters for each sample were calculated as the arithmetic mean of five measurements made on its ground surface. The amplitude parameters—Sz, Ssk and the parameters of the material ratio curve—Sk and Spk were used as 3D parameters (according to PN-EN ISO 25178:2019). It should be noted that the selection of roughness parameters was dictated by the requirements of the industrial project under which the tests were carried out. The literature provides information on the method of selecting parameters, e.g., parameters of the material ratio curve [41].

3. Results and Discussion

3.1. Microhardness

Microhardness tests carried out after grinding showed that the smallest changes (by about 7 to 50 HV near the surface) as compared to the microhardness of the material before grinding, are obtained when grinding with grinding fluid fed with MQL method (Figure 5b). Examination of the sample ground with grinding fluid supplied with WET method revealed microhardness reduction near the surface by approximately 65 to 120 HV (Figure 5a).
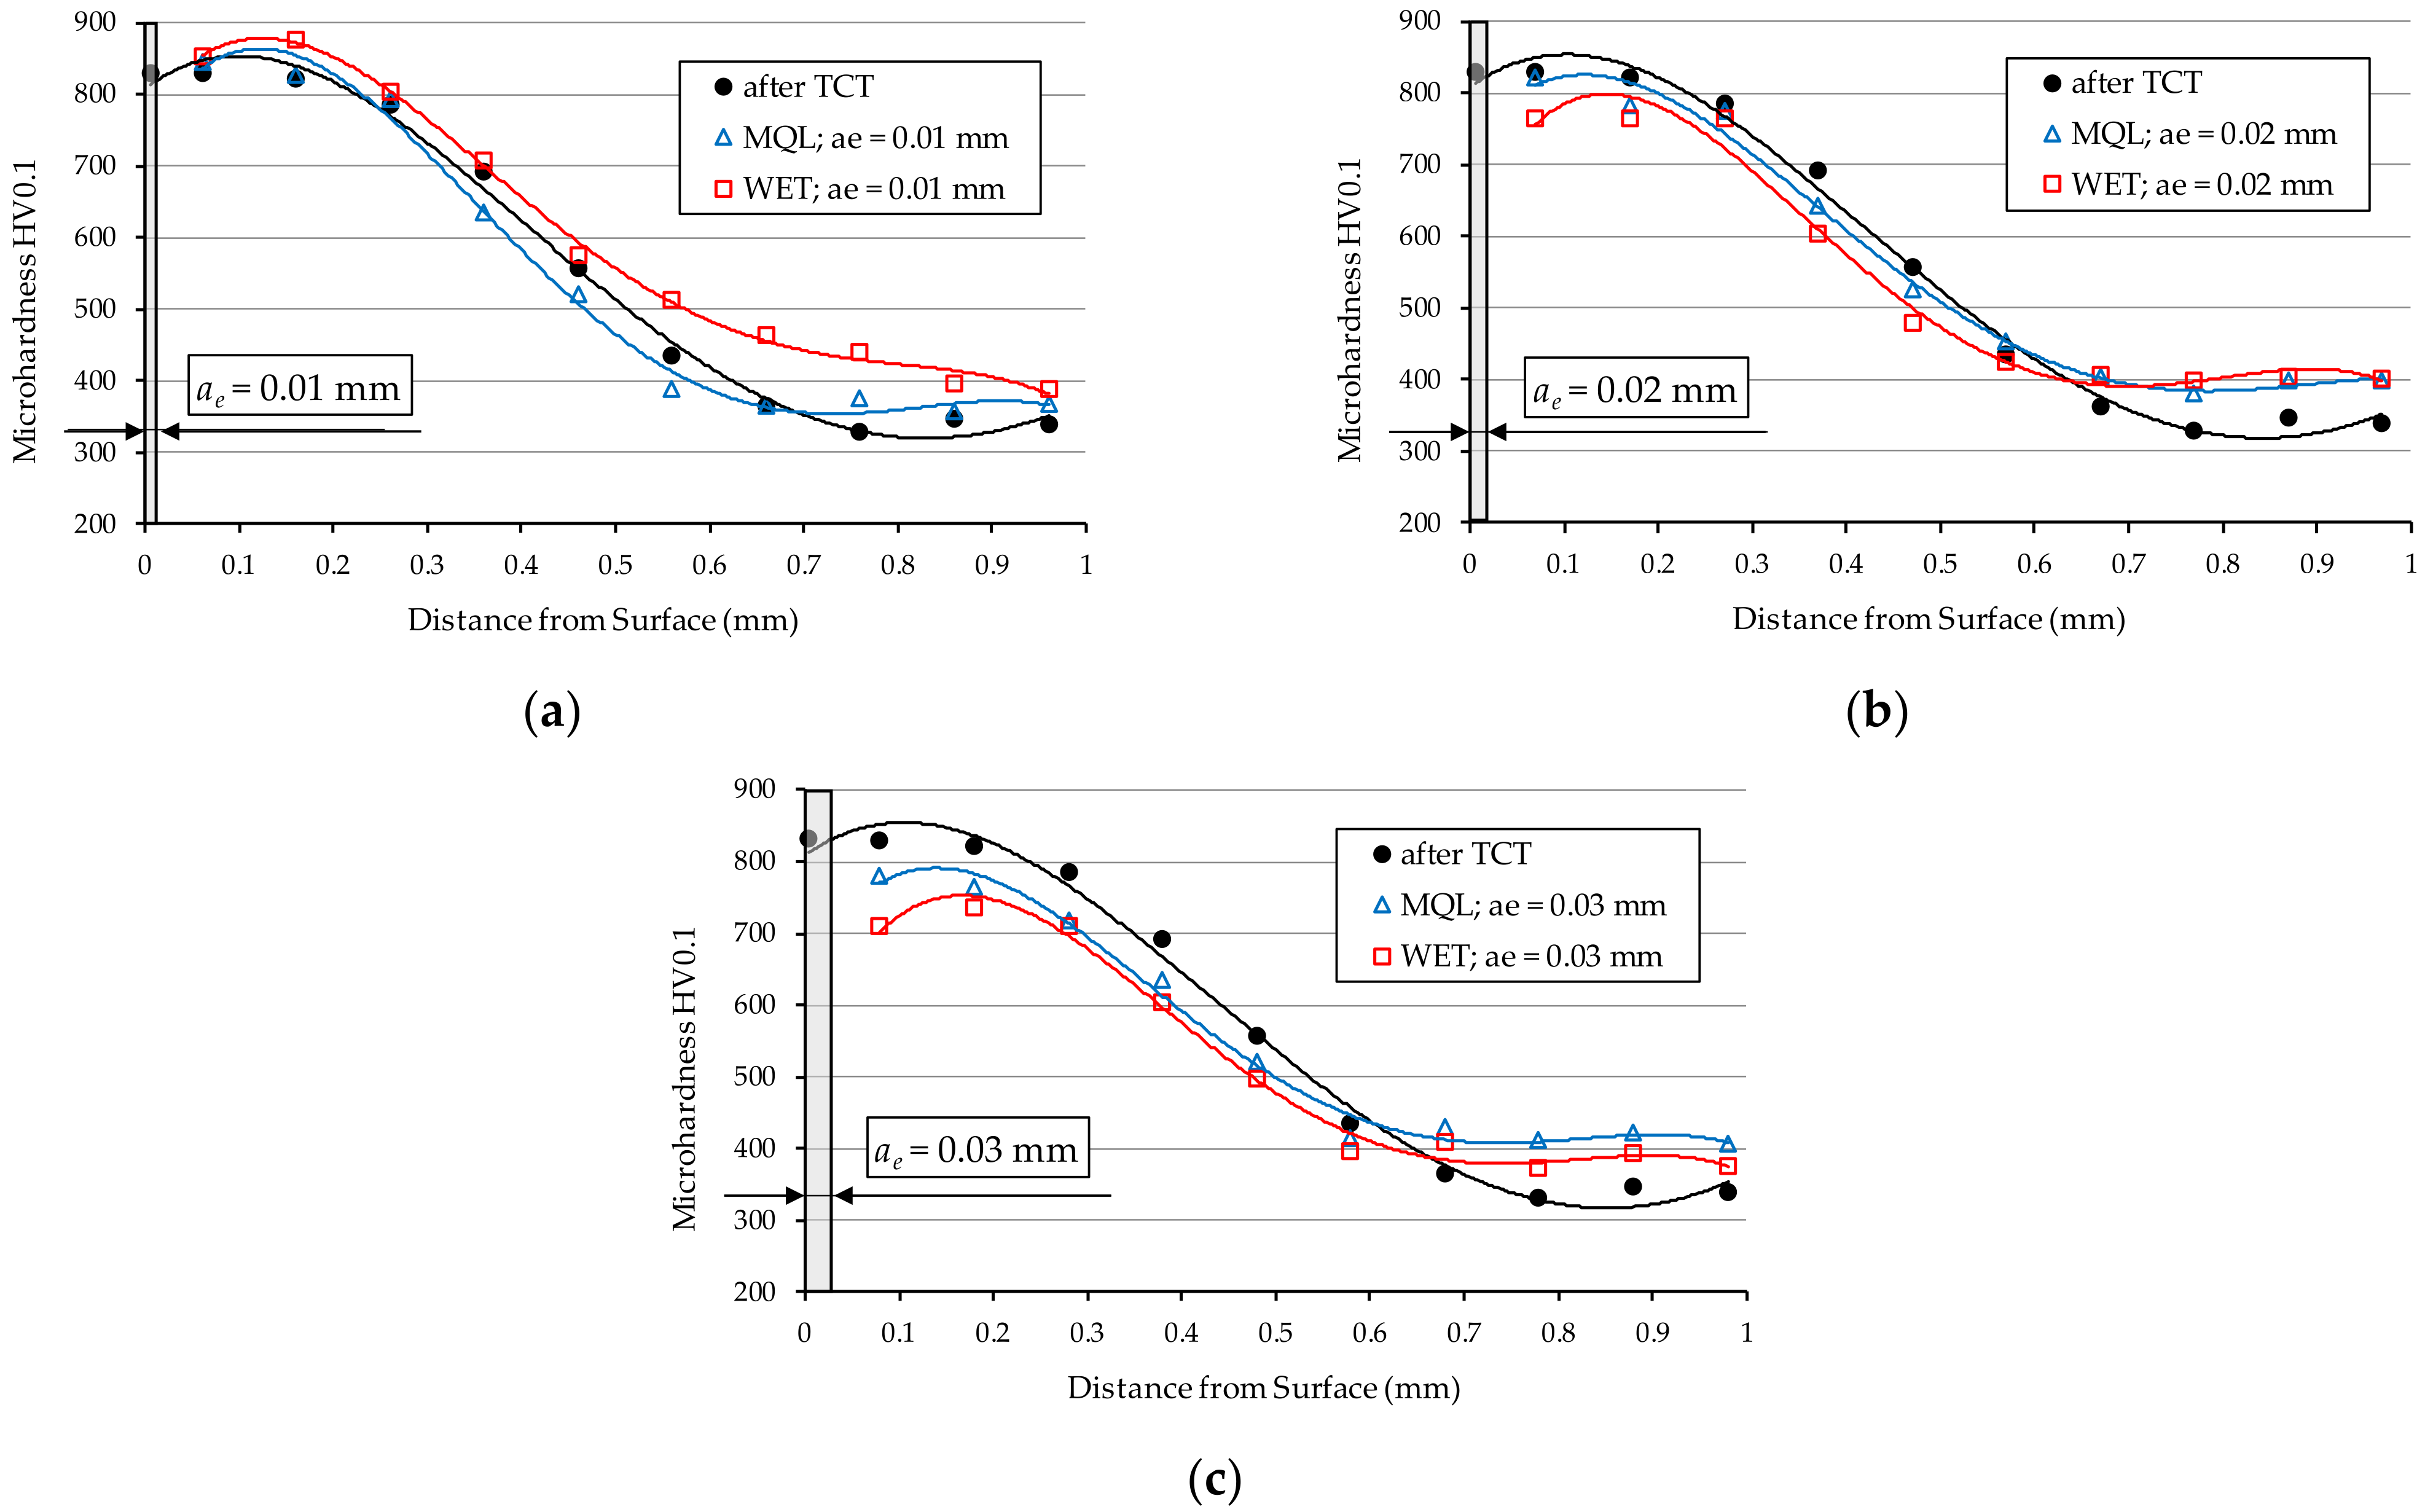
At the same time, as shown by the microhardness distributions presented in Figure 6, the greatest changes in microhardness values for both analysed grinding fluid feeding methods were observed for the grinding depth: ae3 = 0.03 mm (Figure 6c). These changes were present starting from the surface down to the depth of 0.4 mm. In the case of grinding fluid fed with the MQL method, the reduction in microhardness ranged from 50 HV at the surface to 65 HV at a depth of 0.35 mm, as compared to the initial material. In the case of grinding fluid fed with the WET method, these values ranged from 120 HV to 90 HV, respectively.
Furthermore, the microhardness distribution obtained for the grinding depth ae1 = 0.01 mm and shown in Figure 6a, showed no significant differences compared to the material after thermochemical treatment. In case of depth ae2 = 0.02 (Figure 6b), the greatest changes in microhardness were observed on the surface of the sample ground using the WET method. The decrease in microhardness occurs up to a depth of 0.2 mm and is over 60 HV compared to the material after TCT.

3.2. Residual Stresses

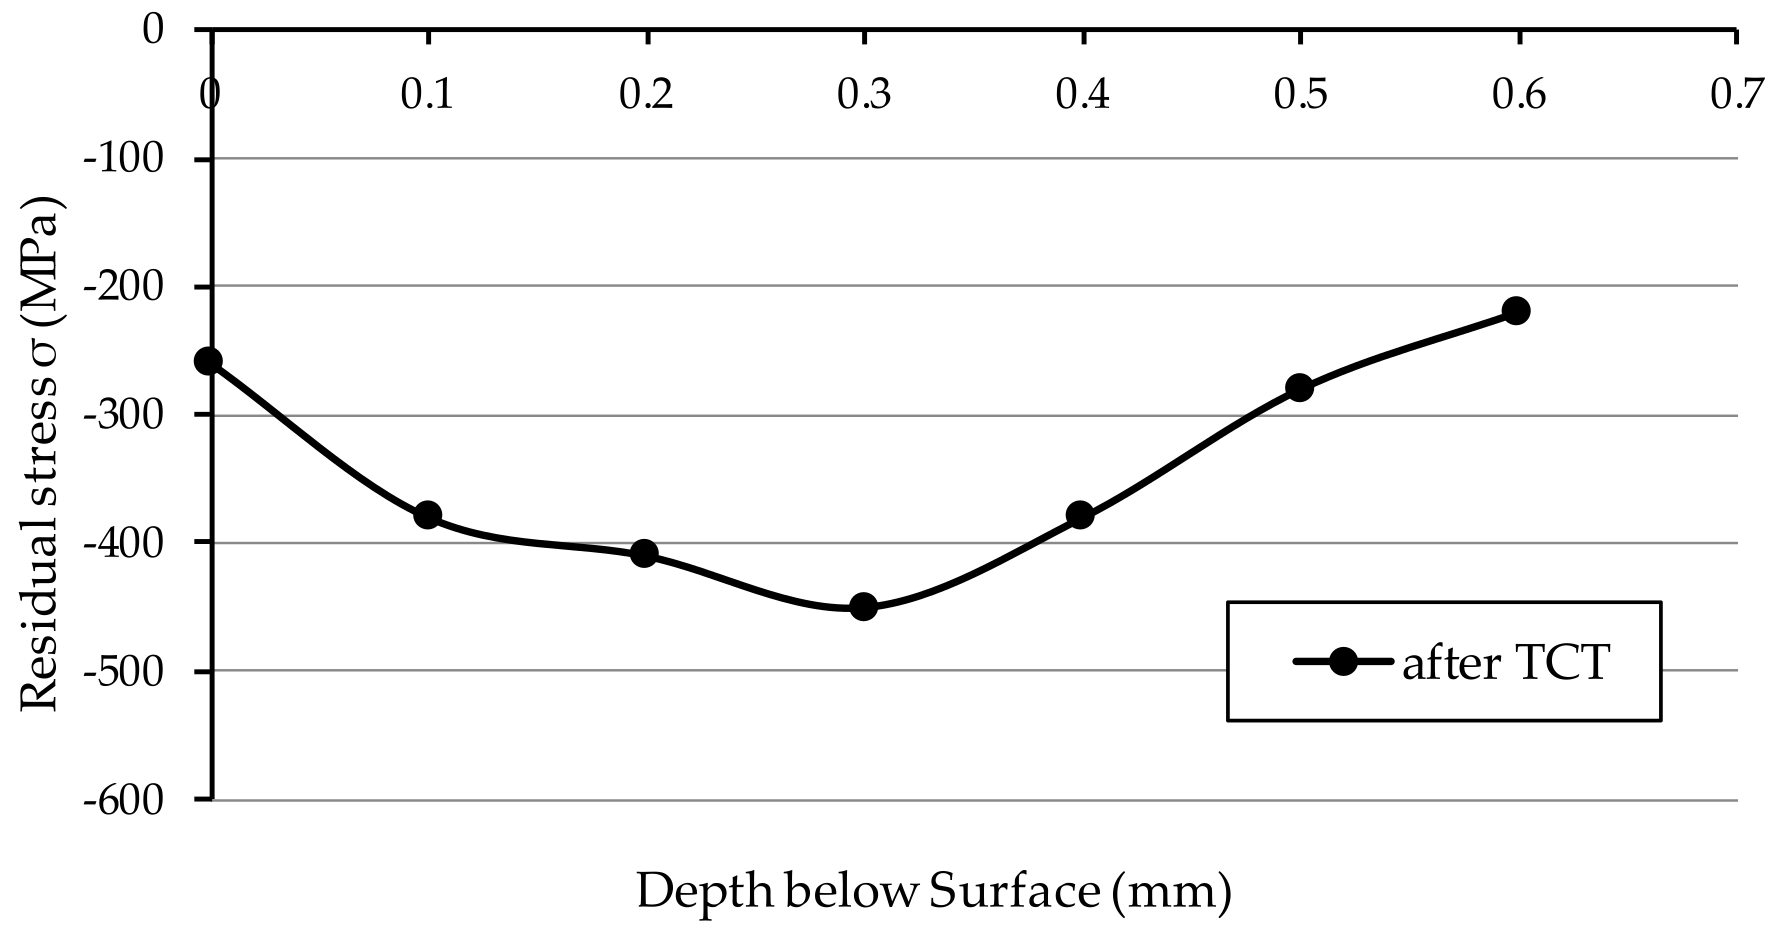
Figure 7 shows the results of residual stresses measurements presented as the mean value of the three measurements in samples after TCT, before grinding. The value of the residual stresses on the surface of the vacuum carburised samples was −260 MPa. Subsequently, as it can be seen from the graph, these stresses increased monotonically as the distance from the surface increased, reaching a value of −450 MPa at a depth of 0.3 mm, and then reaching a value of −220 MPa at a depth of 0.6 mm.
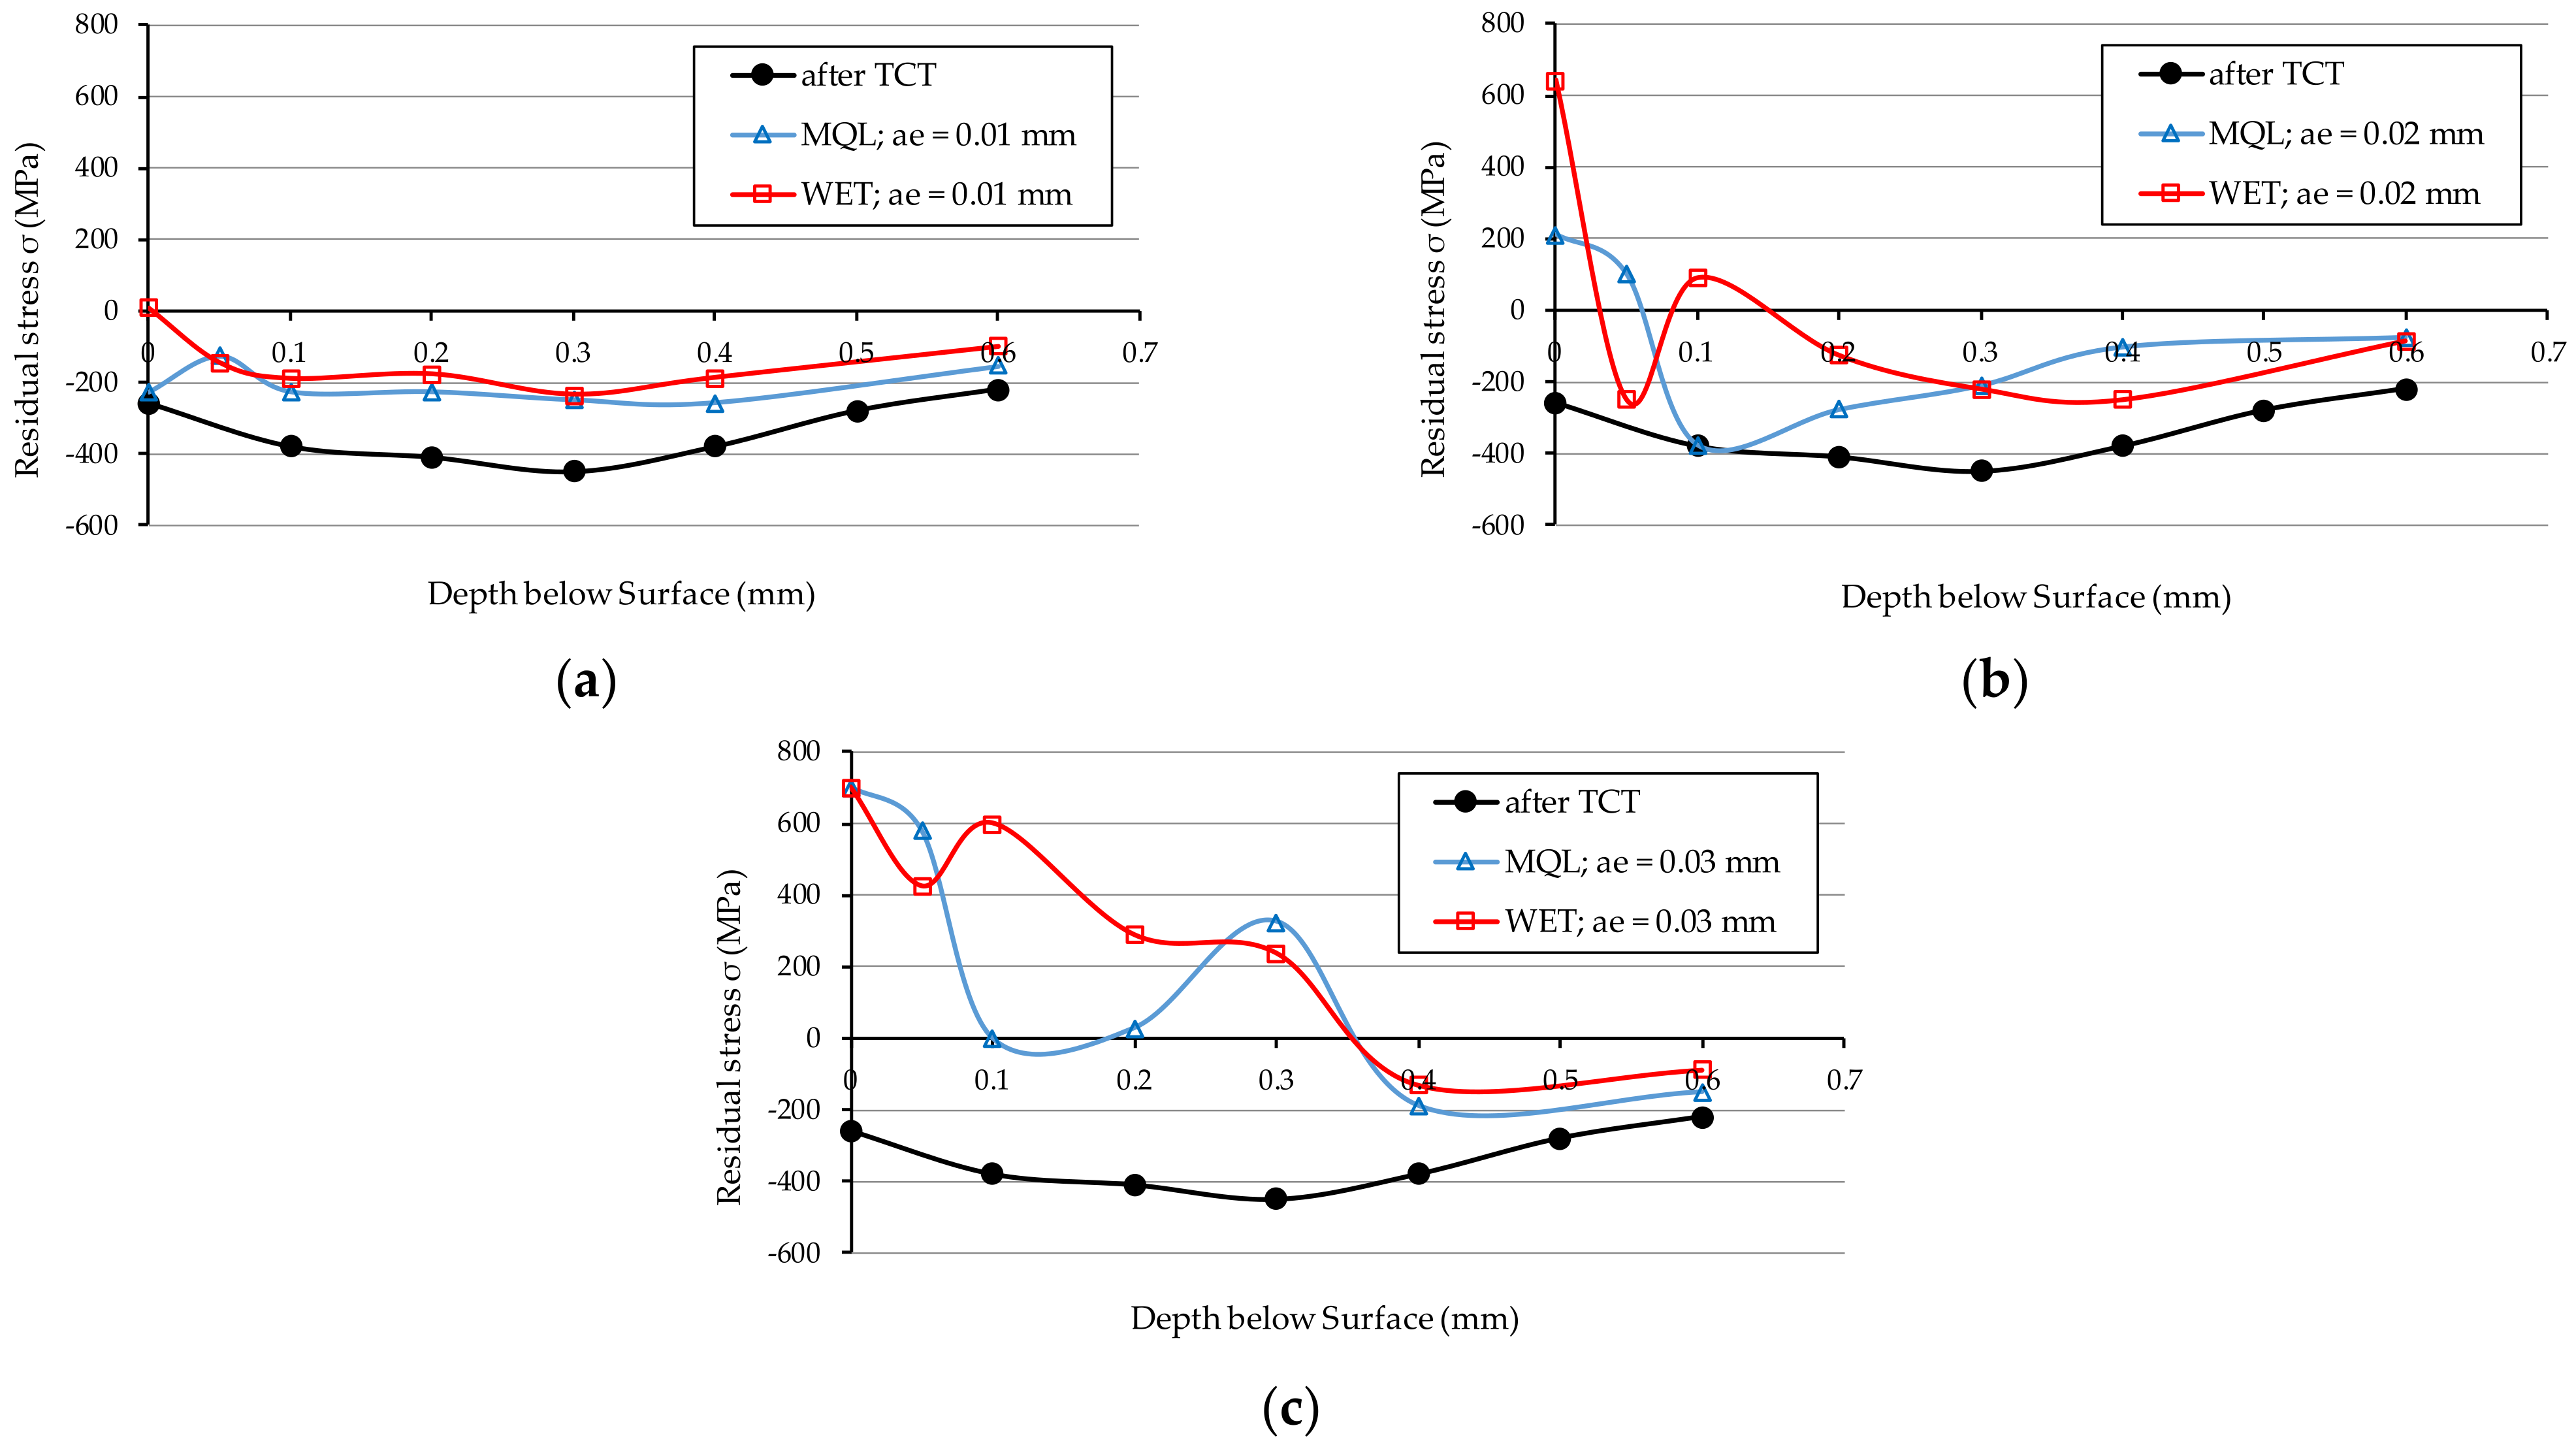
Figure 8 presents the stress distribution in the surface layer of vacuum carburised samples and then ground with a Vortex type IPA60EH20VTX grinding wheel using a grinding fluid supplied with the flood method—WET (Figure 8a) and with the MQL method (Figure 8b). Figure 9 shows the stress distribution for the same samples, at three ae grinding depths: 0.01 mm (Figure 9a), 0.02 mm (Figure 9b) and 0.03 mm (Figure 9c). A curve representing the residual stresses in the samples after TCT, before grinding, was also drawn in all the graphs.
As shown in Figure 8, grinding with the IPA60EH20VTX grinding wheel deteriorates the residual stress conditions compared to the material after thermochemical treatment (before grinding). This observation applies to the samples ground using the WET method and the MQL method.
For grinding depths ae2 = 0.02 mm (Figure 9b) and ae3 = 0.03 mm (Figure 9c), unfavourable tensile residual stresses were obtained just below the surface of the samples. This property applies to both methods of supplying the grinding fluid to the grinding zone. This is due to a large amount of heat transferred to the workpiece and the relatively high grinding temperatures causing unfavourable structural changes (among other things, tempering of steel). Grinding to a depth of ae1 = 0.01 mm (Figure 9a) using the GF supply with MQL method slightly changed the compressive stress values compared to the condition of the sample material after TCT. In contrast, the use of the WET method of supplying GF at this depth of grinding on the surface only resulted in the generation of low-value tensile stresses of 10 MPa, which at a depth of 0.05 mm transform into compressive stresses of −145 MPa and have a similar distribution pattern to those obtained using the MQL method.
As it can be seen in Figure 9a,b, more favourable values of residual stresses were obtained for samples ground with GF fed by the MQL method. This proves that the lubrication ability of this method is better than that of the WET method. In the authors’ opinion, the aforementioned property is a result of the porous structure of the Vortex-type IPA60EH20VTX grinding wheel featuring large inter-grain spaces and good penetration properties of such a structure by the oil sprayed at a high velocity through the nozzle of the oil mist generator in the MQL method. As a result, a large amount of lubricant is supplied to the contact zone between the active abrasive grains and the workpiece material, which reduces friction and leads to the reduction of the grinding temperature. As a consequence, lowering the friction ratio between the active abrasive grains and the workpiece surface leads to a lower grinding temperature, which has a great impact on the values of residual stresses occurring in the technological surface layer.
In the case of grinding at a depth of ae3 = 0.03 mm (Figure 9c), the GF supply method had no effect on the stress distribution, and in both cases (WET and MQL), significantly high tensile stresses were obtained, which have a very negative effect on the ground sample. This phenomenon is mainly due to the considerable depth of grinding, which creates material compaction, and, at the same time, no effective heat evacuation is ensured from the grinding zone.
The spikes visible on graph representing changes in residual stress values with depth are the result of synergistic interaction of the following processes: possible tempering and point re-hardening of the surface in contact with grinding wheel and cooling media, phase changes in the region of the heat-affected zone, namely tempering of existing martensite together with transforming retained austenite into martensite. In addition, the preexisting residual stresses state also takes part in the creation of the final measured values in general in a very unpredictable way. These lead to violently occurring changes of residual stresses state in depth of measured volume.

3.3. Surface Roughness

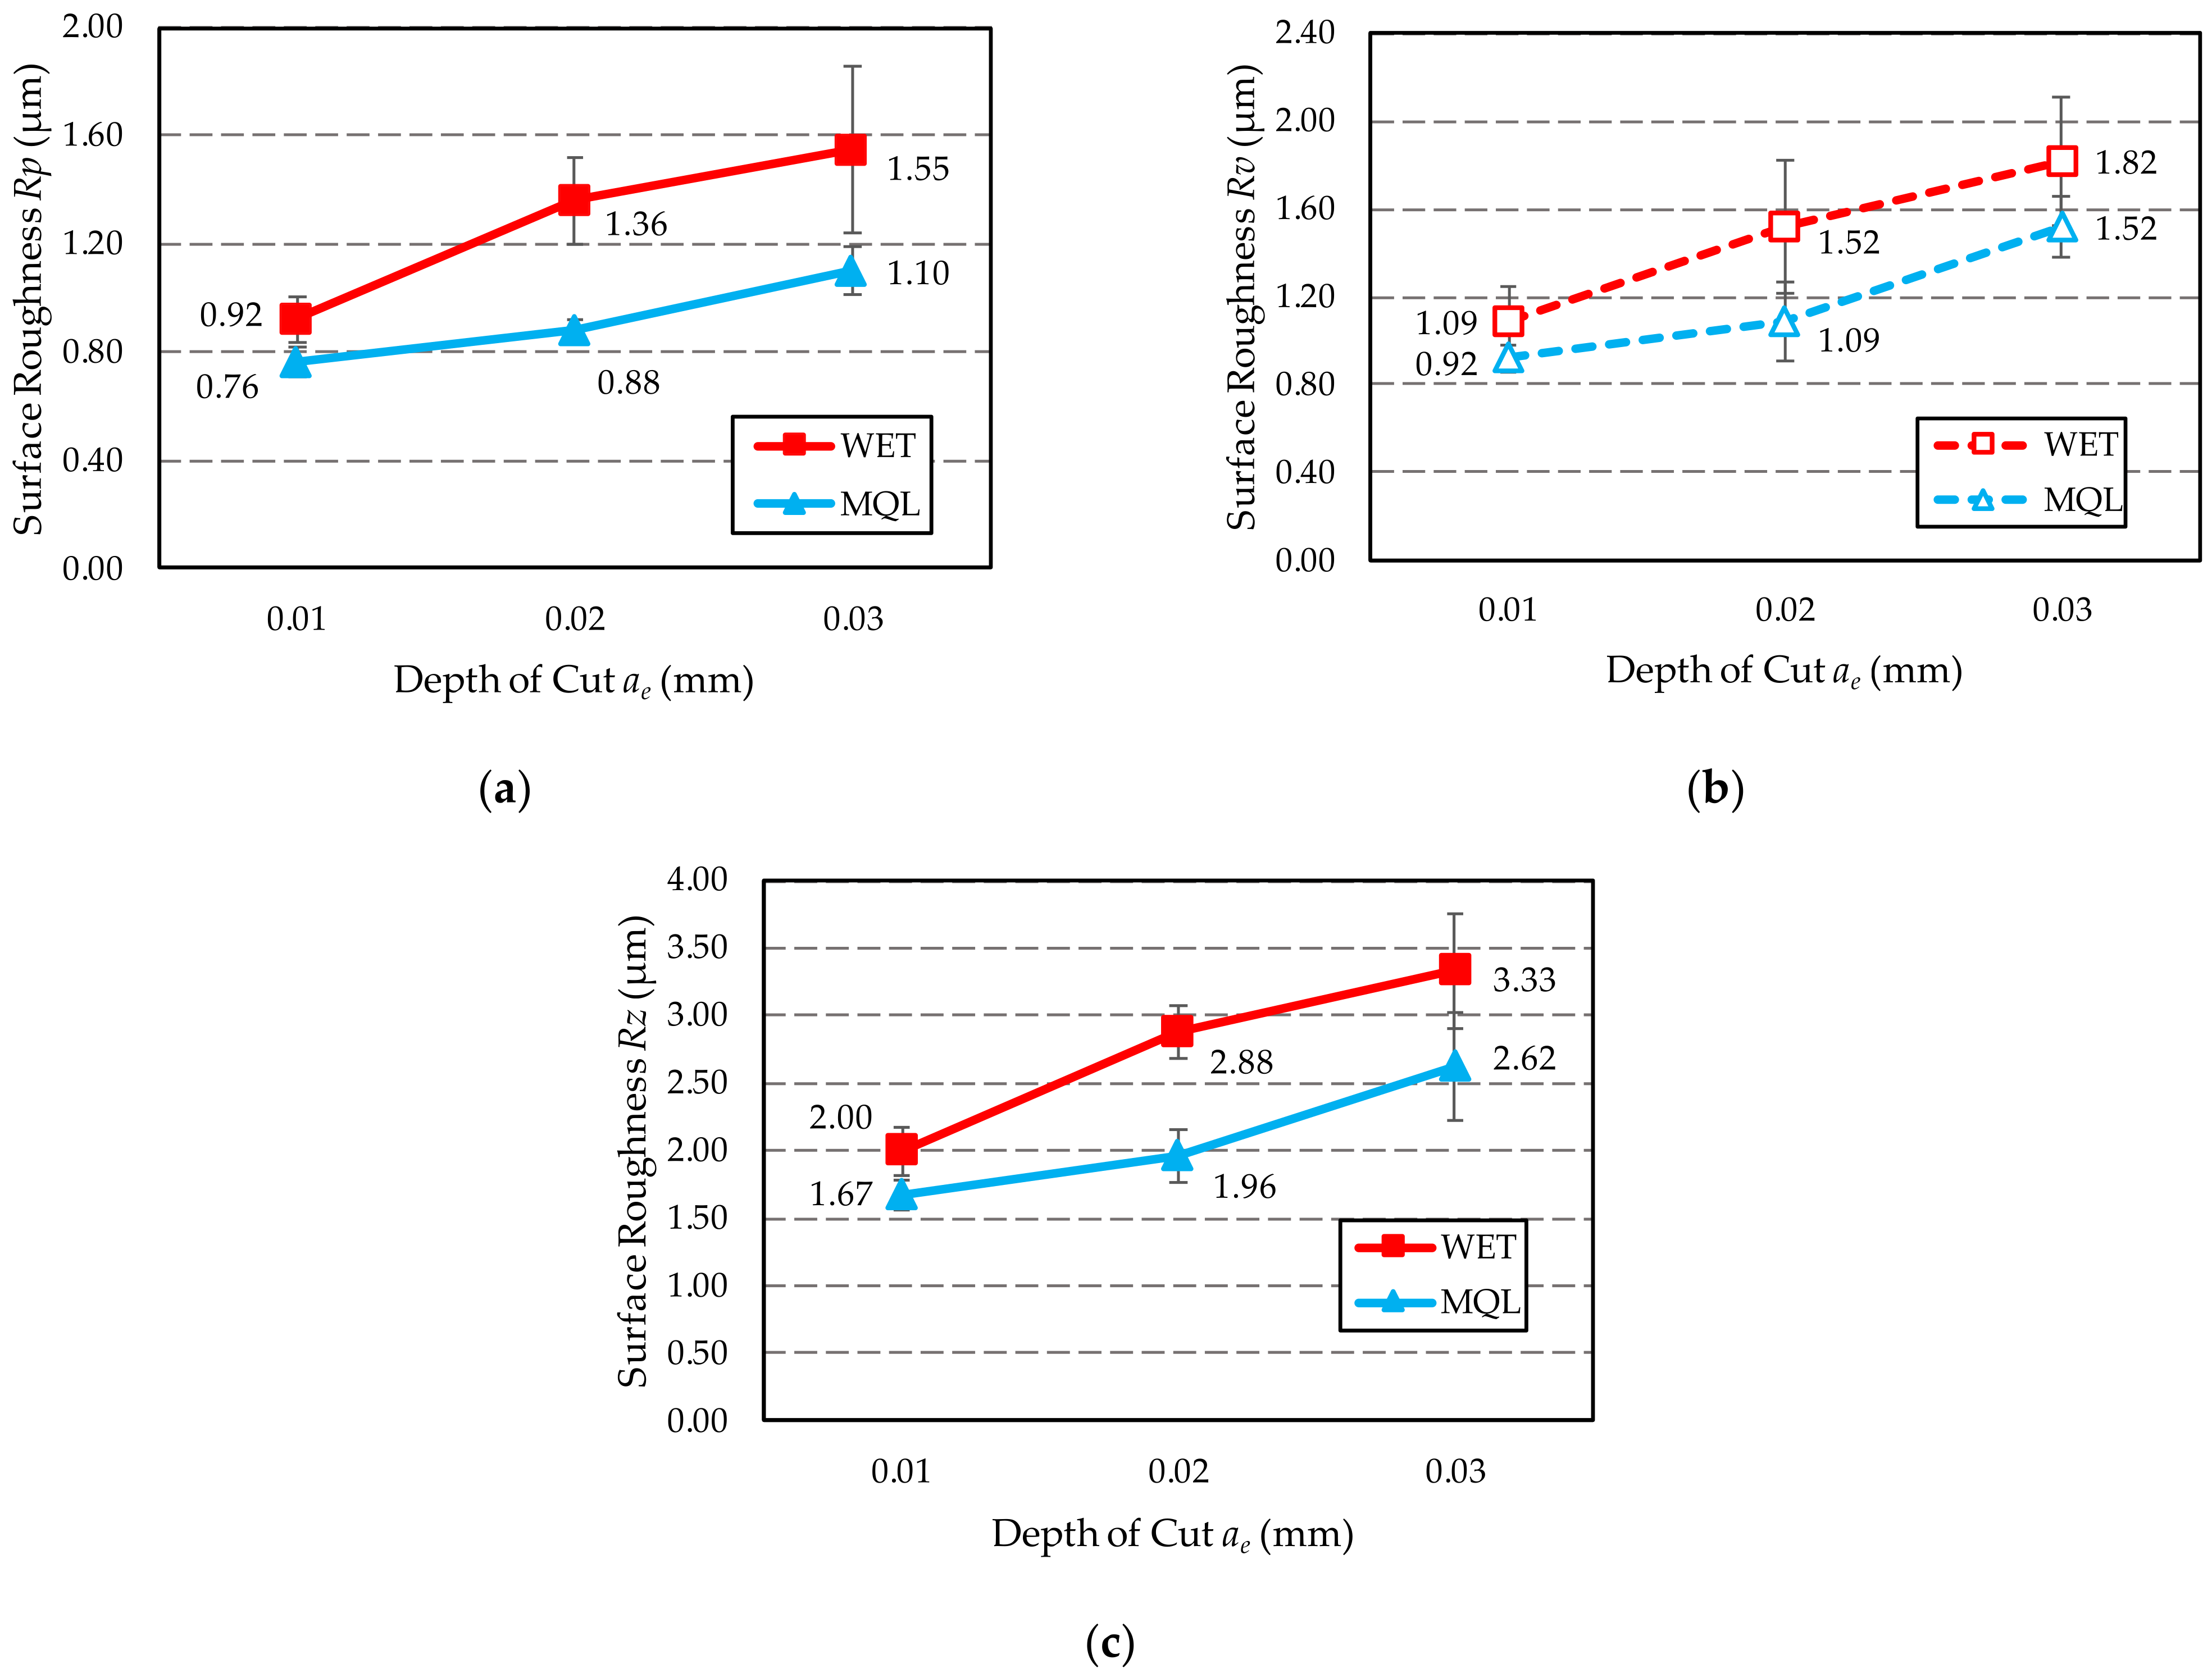
Table 7 compares the results of surface roughness measurements described by amplitude 2D parameters of the roughness profile—Rp, Rv and Rz. Figure 10 presents a graphical representation of the obtained results in the form of graphs.
The obtained results proved that for each of the three ae grinding depths, the lowest values of the Rz parameter (Figure 10c) were measured on the surface ground when Ecolubric E200L oil was fed with the MQL method. In the case of the water-oil emulsion fed with WET method, the obtained surface roughness is 20–47% higher compared to the surface roughness after grinding with GF fed using the MQL method. The gap between the compared roughness values depends on the depth of grinding. The lowest difference was obtained for the grinding depth ae1 = 0.01 mm.
The above observations indicate that within the range of the examined machining conditions, the GF feeding with MQL method ensures better lubrication in the contact zone between the tips of active abrasive grains and the workpiece, which translates into lower surface roughness. This may be explained by the fact that in this method, as a result of supplying the grinding fluid at a high speed to the grinding zone, oil particles can more effectively penetrate into free spaces between abrasive grains of the active surface of the grinding wheel. As a result, it ensures better friction conditions in the contact area of the grinding wheel with the ground surface compared to grinding using the flood method. Higher friction in the grinding zone in the case of the WET method, causes the high temperature in the surface layer of the workpiece to induce tempering of the surface, which is evidenced by the measured microhardness value (Figure 5c and Figure 6). In this type of surface, increased elastic deformation occurs during grain infeed, manifested by the formation of high lateral bumps and the occurrence of furrowing. This makes roughness increase in the ground surface. It should also be noted that when the surface is tempered, shavings adhere to it and cause surface abrasion, which also increases the roughness of the ground surface.
It is worth noting that the microhardness of the surface layer of the workpiece ground with a grinding depth ae1 = 0.01 mm using both methods of GF supply, did not significantly decrease compared to the microhardness of the material before grinding (Figure 6a). In view of the above, there were fewer elastic deformations in the shavings formation zone compared to the displacement occurring when higher grinding depths were used (ae2 = 0.02 mm and ae3 = 0.03 mm). Under these conditions, as the active abrasive grains move through the material, they form flakes of smaller height and a greater proportion of the volume of removed material is converted into shaving by micro-cutting. This results in lower values of the parameter Rz of the surface roughness.
Figure 11 shows a graph of changes in the values of the surface roughness parameters Rp and Rv depending on the GF supply method used: WET (Figure 11a) and MQL (Figure 11b).
The Rp and Rv parameters provide good information about the shape of the profile and are useful for abrasion resistance testing. For both methods of supplying GF to the grinding zone, low values of the Rp parameter and high values of the Rv parameter were obtained. Such parameters characterise surfaces with wide peaks (profile with rounded ridges) and narrow valleys, i.e., surfaces with good abrasion resistance.
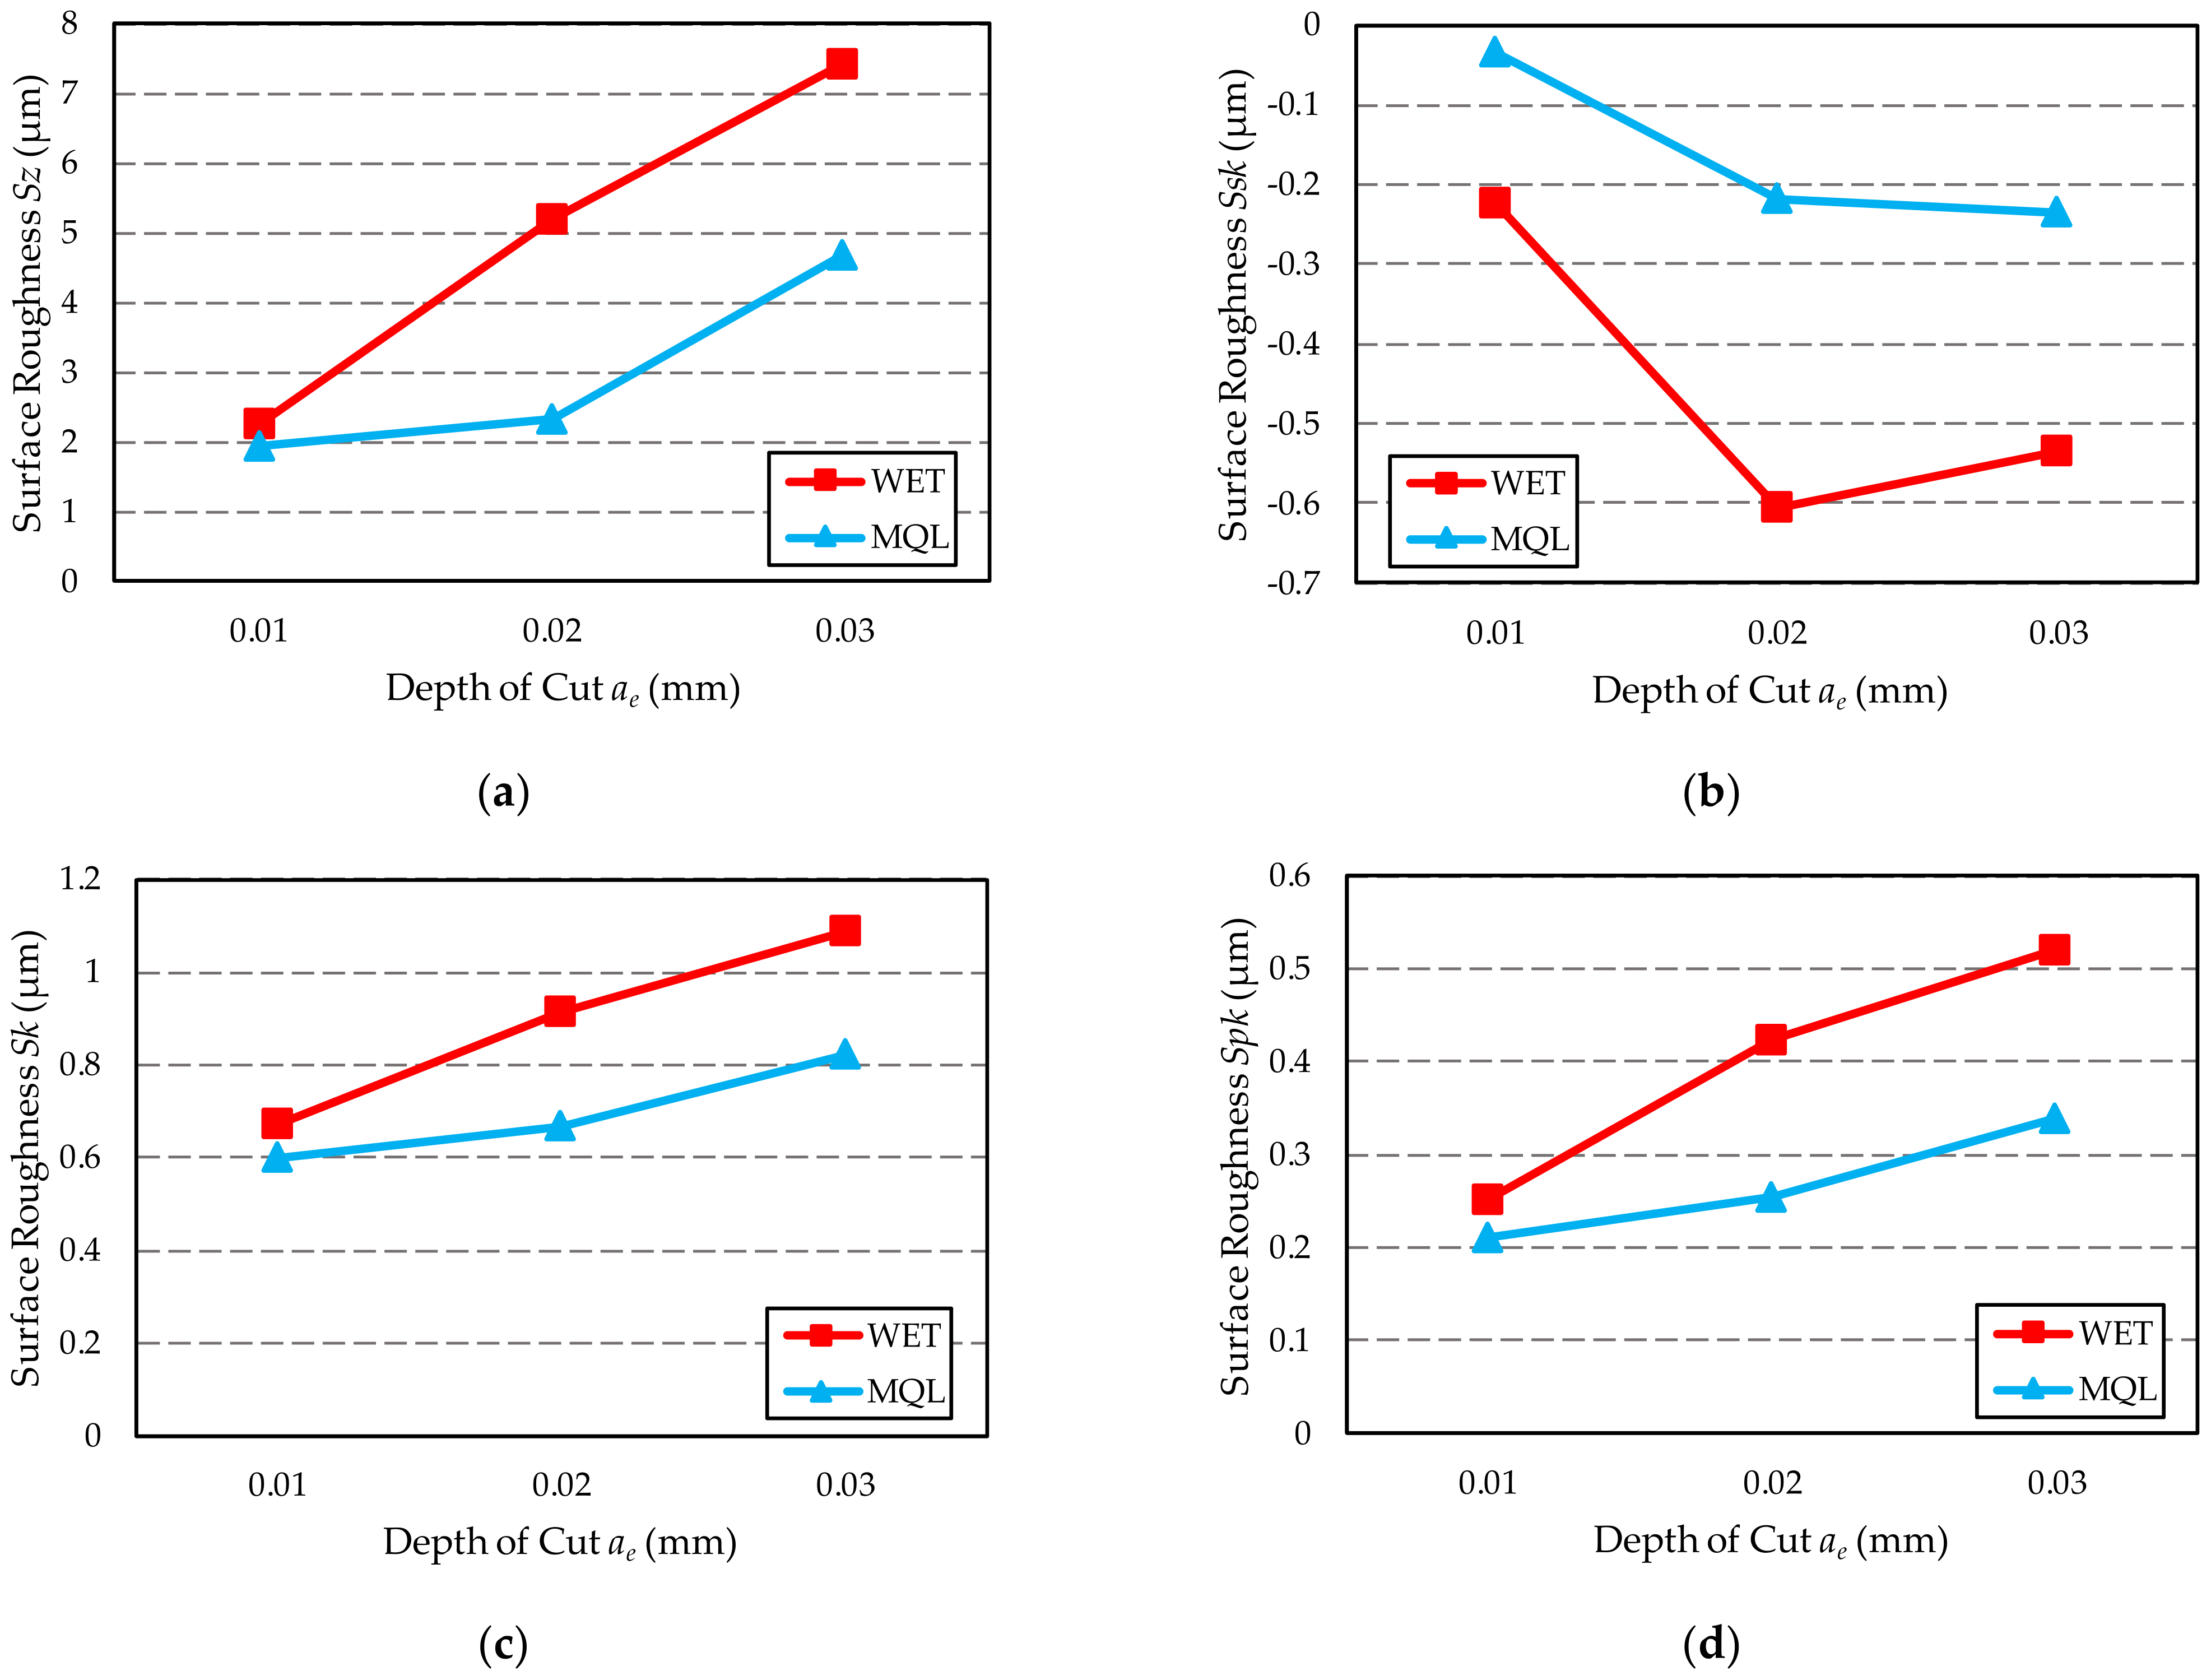
Table 8 presents the results of measurements of the surface topography described by the 3D amplitude parameters—Sz, Ssk, and the parameters of the material ratio curve—Sk and Spk. Figure 12 presents a graphical representation of the obtained results in the form of graphs.
In the case of Sz parameter (Figure 12a), which has a high generalisation capacity due to its insensitivity to the influence of individual random peaks and valleys, its lower values were observed, same as for Rz parameter, for surfaces ground using the MQL method. In case of the water-oil emulsion fed by the WET method, the obtained surface roughness is 15 to as much as 124% higher when compared to the surface roughness after grinding with GF feeding using the MQL method. The gap between the compared roughness values depends on the depth of grinding. Similarly to the Rz parameter, the lowest difference was obtained for the grinding depth ae1 = 0.01 mm.
Negative values of the skewness coefficient Ssk (Figure 12b) indicate that surfaces with plateau-like peaks were obtained. At the same time, similar values of Ssk indicate that the tested surfaces were free of accidental extreme deviations of the unusual local valleys or peaks. The only exception is the surface ground to a depth of ae1 = 0.01 mm using the MQL method. It must be remembered; however, that skewness is very sensitive to random extreme deviations of the surface, which may significantly influence the Ssk value while having no effect at all on the functional properties of the surface.
Comparison of the obtained values of the Sk parameter (Figure 12c), which determines the value of roughness of the core and can represent a measure of the effective depth of roughness after the sanding period, showed that Sk for the ground surfaces is close to each other. The difference between the minimum and maximum values is 0.491 μm.
The lowest values of the reduced peaks height Spk (Figure 12d) were measured for all surfaces ground with GF fed using the MQL method and for the surface ground to a depth of ae1 = 0.01 mm with GF fed using the WET method. This proves the high abrasion resistance of the tested contact surfaces. It should be remembered that the lower the value of this parameter, the better the abrasion resistance of the geometric structure of the surface (ST), which is important in the case of surfaces that work in contact.
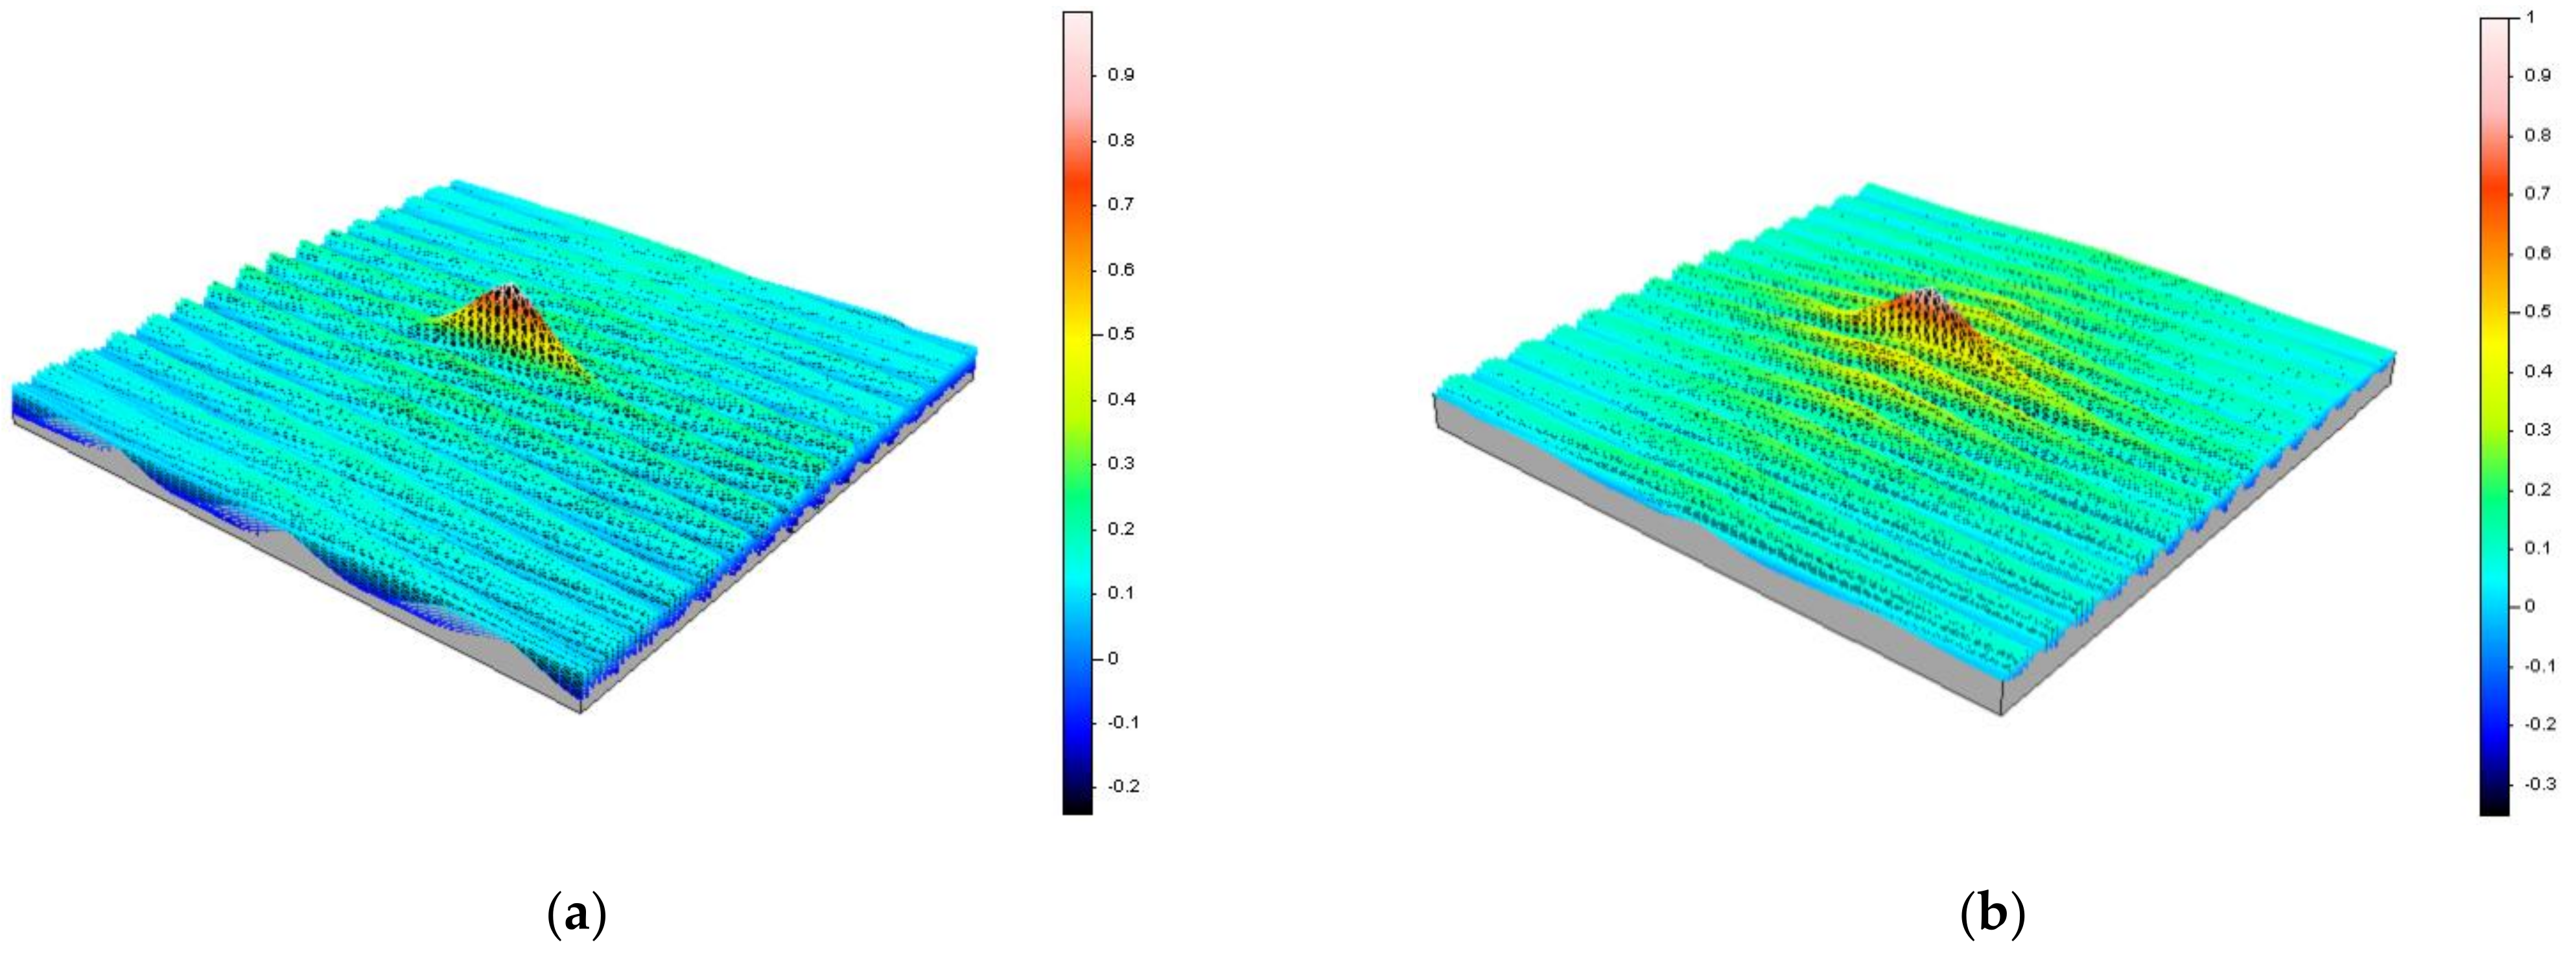
Figure 13 shows illustrative images of the autocorrelation function of the measured surfaces. Due to high similarity between the images, the images were limited to the ones obtained for a grinding depth ae1 = 0.01 mm and using both grinding fluid supply methods: the WET method (Figure 13a) and the MQL method (Figure 13b). As it can be seen from the presented images, the autocorrelation functions are exponentially and periodically vanishing, which is characteristic for a random anisotropic surface generally obtained after abrasive machining. Surfaces of this type may have various design purposes, both as contact surfaces (moving and non-moving) and as non-contact surfaces, mainly dynamically or statically loaded.
The anisotropic properties of the tested surfaces are confirmed by the Str texture aspect ratio, whose values are listed in Table 9. All the obtained Str values are close to 0, which is typical for anisotropic surfaces. It should be noted that for both GF supply methods (WET and MQL), the smallest values of Str parameter were obtained for the smallest grinding depth ae1 = 0.01 mm. For the remaining two grinding depths, the values of the Str parameter are similar and greater than the smallest value by 86–90% for the WET method and 96–117% for the MQL method.
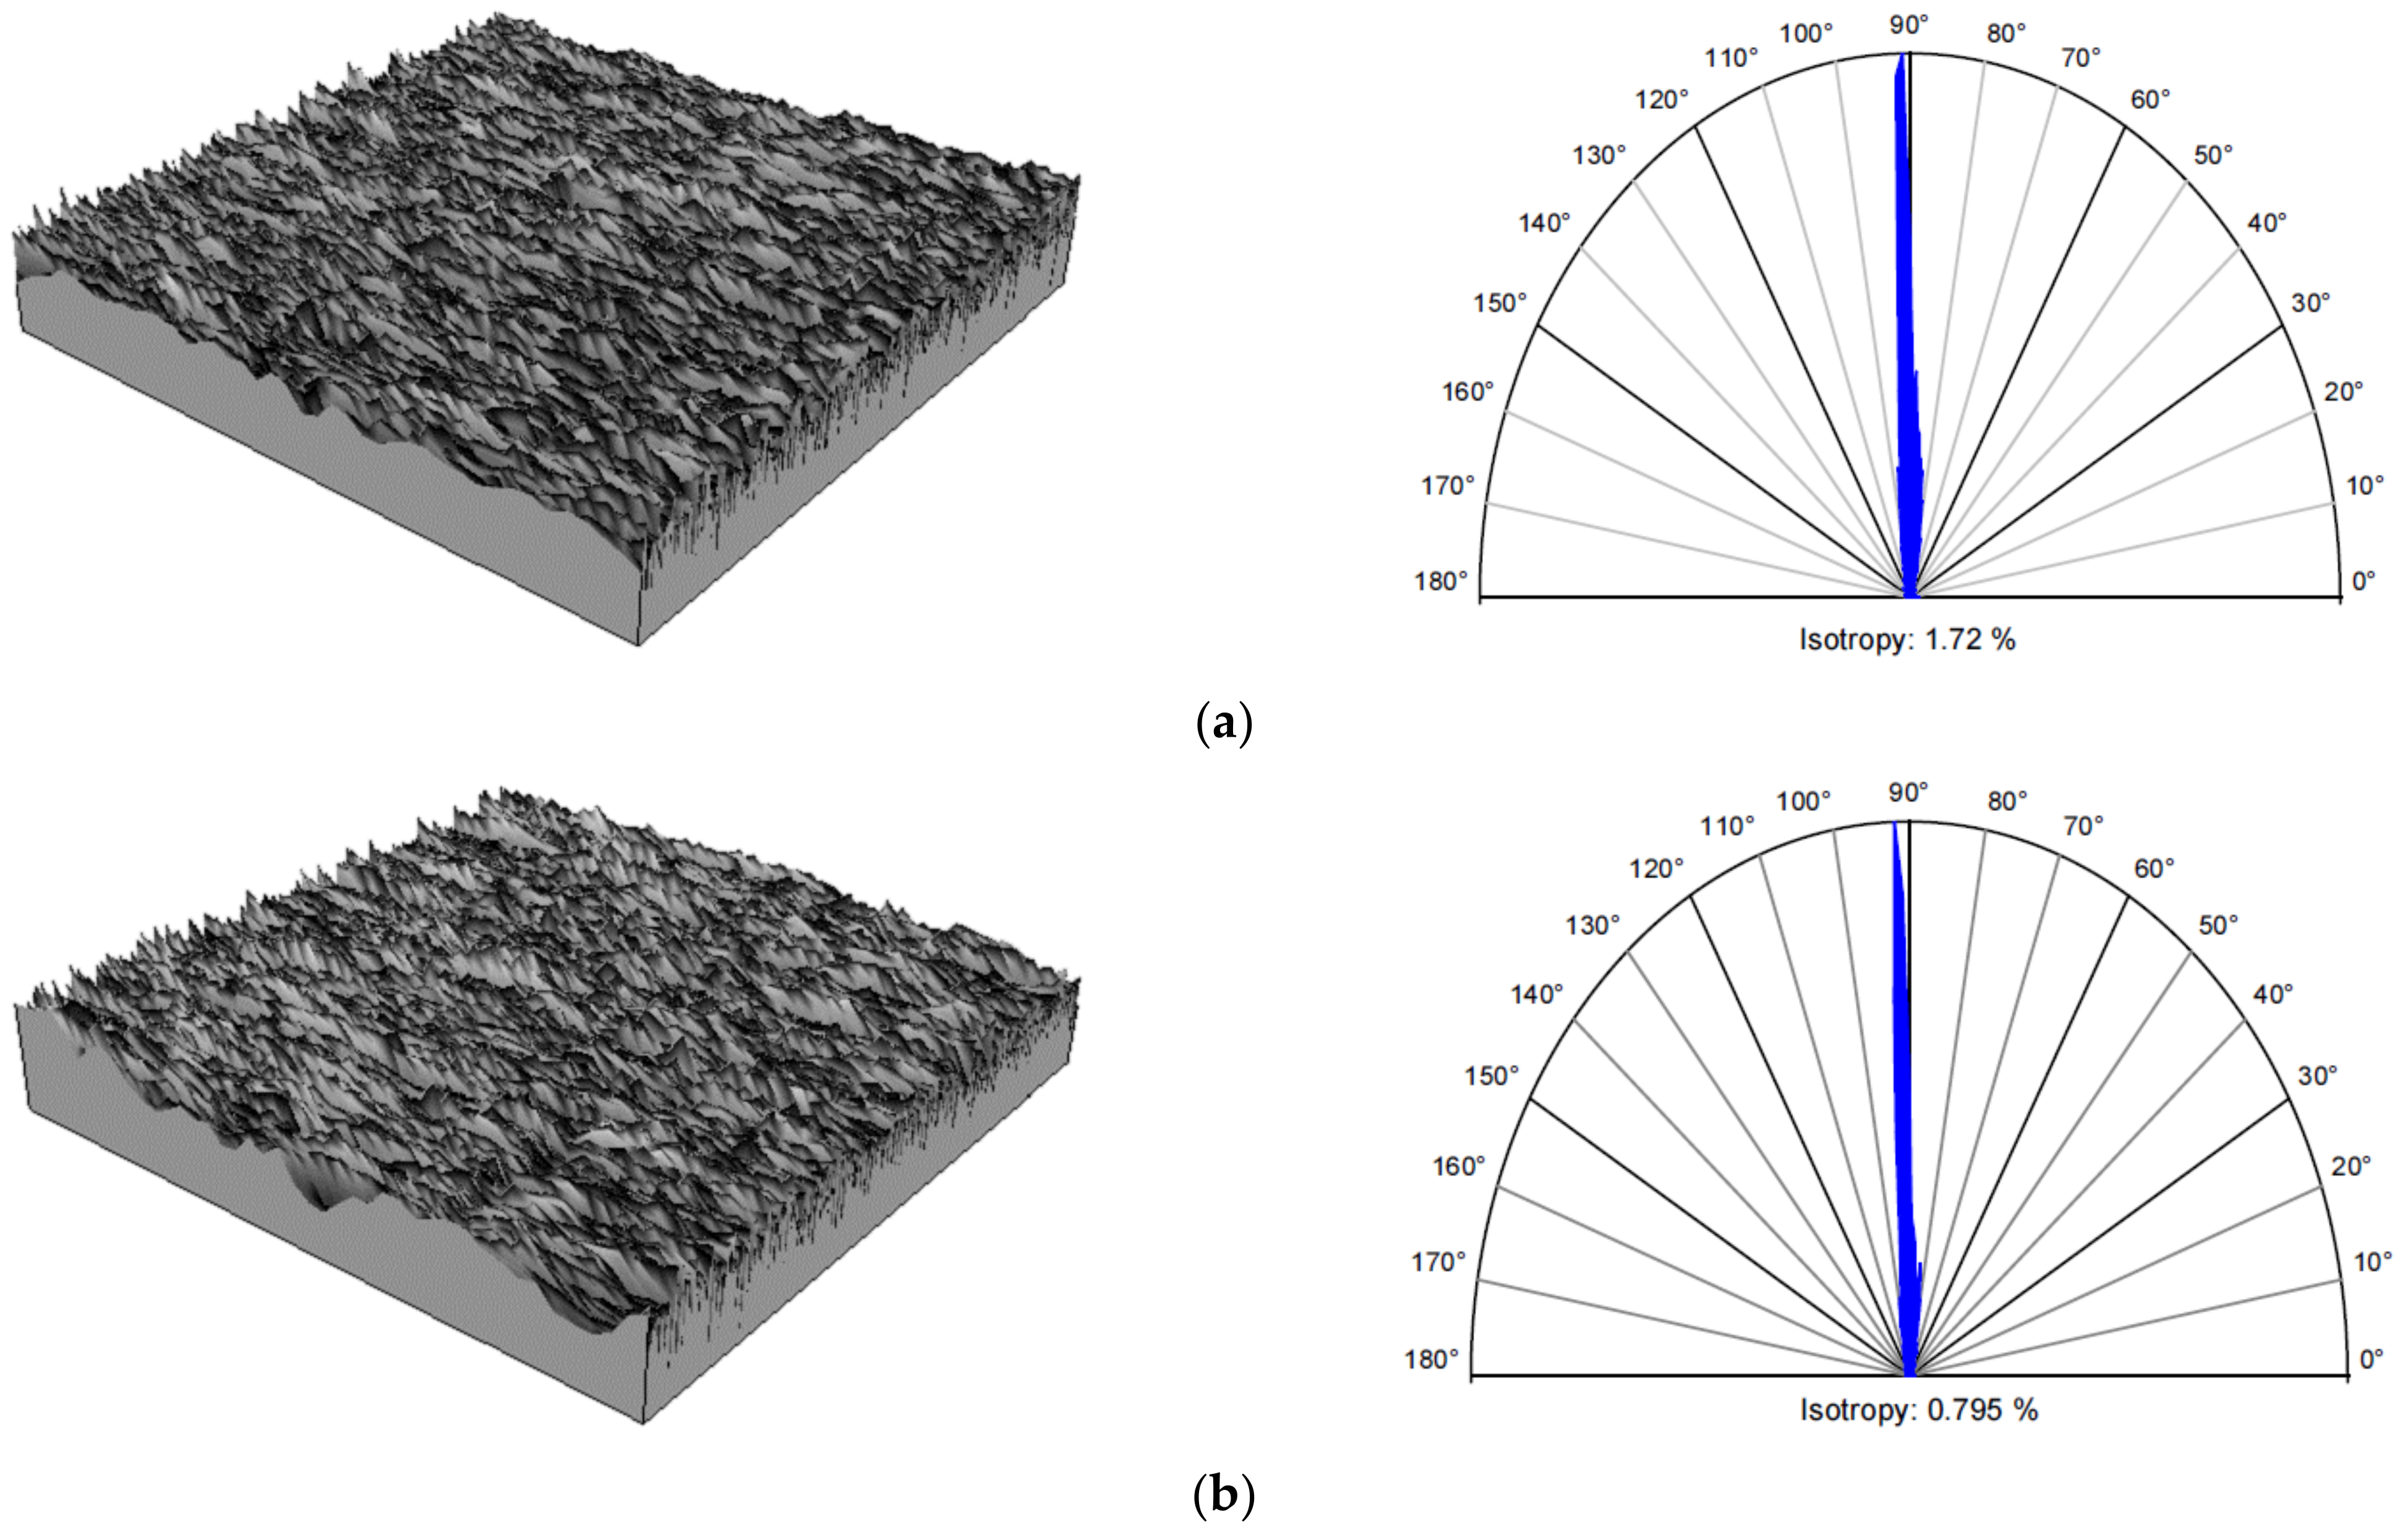
In addition, the values of the Str parameter obtained for the same grinding depths are greater when GF is applied by the WET method. Another confirmation of the anisotropy of the obtained surfaces is the values of isotropy listed in Table 9. It is worth mentioning that isotropy is expressed in percentage: from 0% for the completely anisotropic surface to 100% for the completely isotropic surface. In our case, all isotropy values are close to 0%, not exceeding 3.32%. Figure 14 shows examples of isotropy of surfaces ground to a grinding depth of ae1 = 0.01 mm with grinding fluid supplied using the flood method (Figure 14a) and using the MQL method (Figure 14b). For each case, the surface appearance and the direction indicator showing the main surface texture directions are shown.

4. Conclusions

The article describes experimental research aimed at determining the effect of the applied grinding depth ae on the selected parameters describing the technological condition of the surface layer of flat samples made of 20MnCr5 steel. The samples were vacuum carburised (LPC) in a single-piece flow method and high-pressure gas quenched (HPGQ) in a 4D Quenching chamber. Then the samples were ground with Vortex type, IPA60EH20VTX alumina grinding wheel. The samples were ground at three depths of grinding with grinding fluid supply using either flood method (WET) or with minimum quantity lubrication (MQL) method. The condition of the technological surface layer was described using microhardness and residual stresses, as well as some selected parameters of surface roughness.
Based on the results obtained for the experimental conditions applied, it can be concluded that:
  • For each of the three ae grinding depths, lower (more favourable) changes in microhardness compared to the microhardness of the material before grinding occur in the surface layer of samples ground with GF fed using MQL method.
  • For both GF supply methods (WET and MQL), the microhardness distribution in the material of samples ground with the smallest grinding depth (0.01 mm) showed no significant differences with respect to the microhardness distribution in the material of these samples after vacuum carburising treatment.
  • The vacuum carburising process carried out by the “single-piece flow” method enables favourable, i.e., compressive distribution of residual stresses to be obtained in the technological surface layer.
  • In general, the grinding process with an alumina grinding wheel causes the residual stresses in the material to deteriorate in comparison with the sample material after vacuum carburising treatment and before grinding.
  • The least unfavourable changes in residual stresses occur during grinding with the lowest grinding depth (0.01 mm), for which residual stresses remain within the range of favourable compressive stresses. For greater grinding depths (≥0.02 mm), the residual stresses move into the unfavourable area of tensile stresses. The above observations apply to both methods (WET and MQL) of supplying GF to the grinding zone.
  • For each of the three ae grinding depths, lower surface roughness values are obtained after grinding with GF fed with MQL method.
  • For each of the three grinding depths ae, the obtained values of 3D surface roughness parameters indicate that for both methods of feeding GF into the grinding zone (WET and MQL), random anisotropic surfaces with good abrasion resistance, i.e., with wide peaks and narrow valleys, are obtained.
The conclusions presented above indicate that the MQL method in the studied range of grinding conditions is an alternative to the conventional flood method. Therefore, the amount of GF can be significantly reduced, which is important due to the ecological aspect of the machining. The obtained results are also the basis for further research, taking into account the use of hybrid methods of delivering GF to the grinding zone [42].
The test results and conclusions may be useful for technologists designing manufacturing processes with the use of grinding flat surfaces of samples made of 20MnCr5 steel.

Author Contributions

Conceptualization, W.S.; methodology, W.S. and J.S.; software, W.S., J.S., B.J. and R.R.; validation, W.S. and J.S.; formal analysis, W.S. and J.S.; investigation, W.S., J.S., B.J. and R.R.; resources, W.S.; data curation, W.S. and J.S.; writing—original draft preparation, W.S.; writing—review and editing, W.S.; visualization, W.S.; supervision, W.S.; project administration, W.S.; funding acquisition, W.S. and J.S. All authors have read and agreed to the published version of the manuscript.

Funding

The research was financed by the National Centre for Research and Development as part of project no. POIR.04.01.04-00-0087/15 entitled: “Equipment for high performance and precise heat treatment with a quenching deformation reduction system for direct application in downstream production chains of mechanical gearing and bearings”.

Institutional Review Board Statement

Not applicable.

Informed Consent Statement

Informed consent was obtained from all subjects involved in the study.

Data Availability Statement

All data generated or analysed during this study are included in this article.

Conflicts of Interest

The authors declare no conflict of interest.

Nomenclature

ECDEffective case depth
GFGrinding fluid
HPGQHigh-pressure gas quenching
HVHardness in the Vickers scale
LPCLow pressure carburising
MQLMinimum quantity lubrication
PSDPower spectral density
TCTThermochemical treatment
WETFlood method using water emulsion as coolant
aeWorking engagement (depth of cut), mm
adDressing allowance, mm
idNumber of dressing passes
lEvaluation width, mm
ltTracing length, mm
lnEvaluation length, mm
lrSampling length, mm
nsGrinding wheel rotational speed, rpm
PSupply air pressure (MQL method), MPa
rtipStylus tip radius, μm
RpValue of the highest peak of the profile, μm
RvValue of depth of the lowest valley of the profile, μm
RzMaximum height of the roughness profile, μm
SkCore roughness depth, μm
SpkReduced peak height, μm
SskSkewness, μm
StrTexture direction
SzMaximum height of surface, μm
QdDresser weight, kt
QMQLMQL flow rate, mL/h
QWETConventional GF flow rate, L/min
vfdAxial table feed speed during dressing, mm/min
vsGrinding wheel peripheral speed, m/s
vsdGrinding wheel peripheral speed during dressing, m/s
vtTracing speed, mm/s
vwWorkpiece peripheral speed, m/min
λcLong-wave profile filter, mm

References

  1. Kruszyński, B.W.; Wójcik, R. Residual stress in grinding. J. Mater. Process. Technol. 2001, 109, 254–257. [Google Scholar] [CrossRef]
  2. Ding, W.; Zhang, L.; Li, Z.; Zhu, Y.; Su, H.; Xu, J. Review on grinding-induced residual stresses in metallic materials. Int. J. Adv. Manuf. Technol. 2017, 88, 2939–2968. [Google Scholar] [CrossRef]
  3. Marinescu, I.D.; Hitchiner, M.P.; Uhlmann, E.; Rowe, W.B.; Inasaki, I. Handbook of Machining with Grinding Wheels, 2nd ed.; CRC Press: Boca Raton, FL, USA, 2016. [Google Scholar]
  4. Grzesik, W.; Kruszyński, B.; Ruszaj, A. Surface integrity of machined surfaces. In Surface Integrity in Machining; Davim, J.P., Ed.; Springer: London, UK, 2010. [Google Scholar] [CrossRef]
  5. Korecki, M.; Wołowiec-Korecka, E.; Sut, M.; Brewka, A.; Stachurski, W.; Zgórniak, P. Precision case hardening by low pressure carburizing (LPC) for high volume production. J. Heat Treatm. Mater. 2017, 72, 175–183. [Google Scholar] [CrossRef] [Green Version]
  6. Gräfen, W.; Edenhofer, B. New developments in thermo-chemical diffusion processes. Surf. Coat. Technol. 2005, 200, 1830–1836. [Google Scholar] [CrossRef]
  7. Kula, P.; Dybowski, K.; Wolowiec, E.; Pietrasik, R. “Boost-diffusion” vacuum carburizing—Process optimisation. Vacuum 2014, 99, 175–179. [Google Scholar] [CrossRef]
  8. Sawicki, J.; Kruszyński, B.; Wójcik, R. The influence of grinding conditions on the distribution of residual stress in the surface layer of 17CrNi6-6 steel after carburizing. Adv. Sci. Technol. Res. J. 2017, 11, 17–22. [Google Scholar] [CrossRef] [Green Version]
  9. Webster, G.A. Role of residual stress in engineering applications. Mater. Sci. Forum 2000, 347–349, 1–11. [Google Scholar] [CrossRef]
  10. Sawicki, J.; Siedlaczek, P.; Staszczyk, A. Finite-element analysis of residual stresses generated under nitriding process: A three-dimensional model. Met. Sci. Heat Treat. 2018, 59, 799–804. [Google Scholar] [CrossRef]
  11. Sawicki, J.; Siedlaczek, P.; Staszczyk, A. Fatigue life predicting for nitrided steel–finite element analysis. Arch. Metall. Mater. 2018, 63, 917–923. [Google Scholar] [CrossRef]
  12. Rowe, W.B. Principles of Modern Grinding Technology, 2nd ed.; Elsevier: Oxfort, UK, 2014. [Google Scholar]
  13. Burakowski, T.; Wierzchoń, T. Surface Engineering of Metals: Principles, Equipment, Technology; CRC Press: Boca Raton, FL, USA, 1999. [Google Scholar]
  14. Krolczyk, G.M.; Maruda, R.W.; Nieslony, P.; Wieczorowski, M. Surface morphology analysis of Duplex Stainless Steel (DSS) in Clean Production using the Power Spectral Density. Measurement 2016, 94, 464–470. [Google Scholar] [CrossRef]
  15. Podulka, P. Comparisons of envelope morphological filtering methods and various regular algorithms for surface texture analysis. Metrol. Meas. Syst. 2020, 27, 243–263. [Google Scholar] [CrossRef]
  16. Troß, N.; Brimmers, J.; Bergs, T. Tool wear in dry gear hobbing of 20MnCr5 case-hardening steel, 42CrMo4 tempered steel and EN-GJS-700-2 cast iron. Wear 2021, 476, 203737. [Google Scholar] [CrossRef]
  17. Kharka, V.; Jain, N.K.; Gupta, K. Sustainability and performance assessment of gear hobbing under different lubrication environments for manufacturing of 20MnCr5 spur gears. Sustain. Mater. Technol. 2022, 31, e00388. [Google Scholar] [CrossRef]
  18. Arsene, B.; Pasca Pascariu, G.; Sarbu, F.A.; Barbu, M.; Calefariu, G. Green manufacturing by using organic cooling-lubrication fluids. IOP Conf. Ser. Mater. Sci. Eng. 2018, 399, 012001. [Google Scholar] [CrossRef]
  19. Silva, L.R.; Corrêa, E.C.S.; Brandão, J.R.; de Ávila., R.F. Environmentally friendly manufacturing: Behavior analysis of minimum quantity of lubricant-MQL in grinding process. J. Clean. Prod. 2020, 256, 103287. [Google Scholar] [CrossRef]
  20. Lawal, S.; Choudhury, I.; Nukman, Y. A critical assessment of lubrication techniques in machining processes: A case for minimum quantity lubrication using vegetable oil-based lubricant. J. Clean. Prod. 2013, 41, 210–221. [Google Scholar] [CrossRef]
  21. Srikant, R.R.; Rao, P.N. Use of vegetable-based cutting fluids for sustainable machining. In Sustainable Machining; Davim, J.P., Ed.; Springer Nature: Cham, Switzerland, 2017. [Google Scholar] [CrossRef]
  22. Sharma, V.S.; Singh, G.; Sørby, K. A review on minimum quantity lubrication for machining processes. Mater. Manuf. Process. 2015, 30, 935–953. [Google Scholar] [CrossRef]
  23. Stachurski, W.; Sawicki, J.; Wójcik, R.; Nadolny, K. Influence of application of hybrid MQL-CCA method of applying coolant during hob cutter sharpening on cutting blade surface condition. J. Clean. Prod. 2018, 171, 892–910. [Google Scholar] [CrossRef]
  24. Stachurski, W.; Sawicki, J.; Krupanek, K.; Nadolny, K. Application of numerical simulation to determine ability of air used in MQL method to clean grinding wheel active surface during sharpening of hob cutters. Int. J. Precis. Eng. Manuf. Green Technol. 2021, 8, 1095–1112. [Google Scholar] [CrossRef]
  25. Kananathan, J.; Samykano, M.; Sudhakar, K.; Subramaniam, S.R.; Selavamani, S.K.; Kumar, N.M.; Keng, N.W.; Kadirgama, K.; Hamzah, W.A.W.; Harun, W.S.W. Nanofluid as coolant for grinding process: An overview. IOP Conf. Ser. Mater. Sci. Eng. 2018, 342, 012078. [Google Scholar] [CrossRef]
  26. Madanchi, N.; Kurle, D.; Winter, M.; Thiede, S.; Herrmann, C. Energy efficient process chain: The impact of cutting fluid strategies. Procedia CIRP 2015, 29, 360–365. [Google Scholar] [CrossRef]
  27. Said, Z.; Gupta, M.; Hegab, H.; Arora, N.; Khan, A.M.; Jamil, M.; Bellos, E. A comprehensive review on minimum quantity lubrication (MQL) in machining process using nano-cutting fluids. Int. J. Adv. Manuf. Technol. 2019, 105, 2057–2086. [Google Scholar] [CrossRef]
  28. Stachurski, W.; Krupanek, K.; Januszewicz, B.; Rosik, R.; Wójcik, R. An effect of grinding on microhardness and residual stress in 20MnCr5 following single-piece flow low-pressure carburizing. J. Mach. Eng. 2018, 18, 73–85. [Google Scholar] [CrossRef]
  29. Zgórniak, P.; Wołowiec-Korecka, E.; Januszewicz, B.; Sikora, M.; Rosik, R. The influence of grinding wheel type on microhardness and residual stresses in vacuum-carburised 20MnCr5 steel using the single-piece flow method. IOP Conf. Ser. Mater. Sci. Eng. 2020, 743, 012049. [Google Scholar] [CrossRef] [Green Version]
  30. Gupta, M.K.; Khan, A.M.; Song, Q.; Zhanqiang, L.; Khalid, Q.S.; Jamil, M.; Kuntoğlu, M.; Usca, Ü.A.; Sarikaya, M.; Pimenow, D.Y. A review on conventional and advanced minimum quantity lubrication approaches on performance measures of grinding process. Int. J. Adv. Manuf. Technol. 2021, 117, 729–750. [Google Scholar] [CrossRef]
  31. Khan, A.M.; Jamil, M.; Mia, M.; Pimenow, D.Y.; Gasiyarov, V.R.; Gupta, M.K.; He, N. Multi-objective optimization for grinding of AISI D2 steel with Al2O3 wheel under MQL. Materials 2018, 11, 2269. [Google Scholar] [CrossRef] [Green Version]
  32. Nadolny, K.; Kieraś, S. Experimental studies on the centrifugal MQL-CCA method of applying coolant during the internal cylindrical grinding process. Materials 2020, 13, 2383. [Google Scholar] [CrossRef]
  33. Nadolny, K.; Kieraś, S.; Sutowski, P. Modern approach to delivery coolants, lubricants and antiadhesives in the environmentally friendly grinding process. Int. J. Precis. Eng. Manuf. Green Technol. 2021, 8, 639–663. [Google Scholar] [CrossRef]
  34. Silva, L.R.; Bianchi, E.C.; Fusse, R.Y.; Catai, R.E.; França, T.V.; Aguiar, P.R. Analysis of surface integrity for minimum quantity lubricant-MQL grinding. Int. J. Mach. Tools Manuf. 2007, 47, 412–418. [Google Scholar] [CrossRef]
  35. Lopes, J.C.; Garcia, M.V.; Volpato, R.S.; Mello, H.J.; Ribeiro, F.S.F.; Sanchez, L.E.A.; Rocha, K.O.; Neto, L.D.; Aguiar, P.R.; Bianchi, E.C. Application of MQL technique using TiO2 nanoparticles compared to MQL simultaneous to the grinding wheel cleaning jet. Int. J. Adv. Manuf. Technol. 2020, 106, 2205–2218. [Google Scholar] [CrossRef]
  36. Shao, Y.; Fergani, O.; Li, B.; Liang, S.Y. Residual stress modelling in minimum quantity lubrication grinding. Int. J. Adv. Manuf. Technol. 2016, 83, 743–751. [Google Scholar] [CrossRef]
  37. Korecki, M.; Wołowiec-Korecka, E.; Glenn, D. Single-Piece, High-Volume, Low-Distortion Case Hardening of Gears. Thermal Processing. September 2016, pp. 32–39. Available online: www.thermalprocessing.com (accessed on 27 December 2021).
  38. Stachurski, W.; Zgórniak, P.; Sawicki, J.; Przybysz, M. Hardening-related deformations of gear wheels after vacuum carburising and quenching in a 4D quenching chamber. Adv. Sci. Technol. Res. J. 2017, 11, 237–245. [Google Scholar] [CrossRef] [Green Version]
  39. ECOLUBRIC® MQL System. Available online: www.accu-svenska.se/mql-system/ecolubric-® (accessed on 5 January 2022).
  40. ECOLUBRIC E200L, Safety Data Sheet. Available online: www.accu-svenska.se/safety-datasheets (accessed on 5 January 2022).
  41. Pawlus, P.; Reizer, R.; Wieczorowski, M.; Krolczyk, G. Material ratio curve as information on the state of surface topography–A review. Precis. Eng. 2020, 65, 240–258. [Google Scholar] [CrossRef]
  42. Rodriguez, R.L.; Lopes, J.C.; Garcia, M.V.; Ribeiro, F.S.F.; Diniz, A.E.; Sanchez, L.E.A.; Mello, H.J.; Aguiar, R.; Bianchi, E.C. Application of hybrid eco-friendly MQL+WCJ technique in AISI 4340 steel grinding for cleaner and greener production. J. Clean. Prod. 2021, 283, 124670. [Google Scholar] [CrossRef]
Figure 1. General view of UCM furnace (SECO/WARWICK) for low-pressure carburising.
Materials 15 01336 g001
Figure 2. The experimental test stand with (a) an SPD-30B flat-surface grinder (Jotes Inc., Lodz, Poland) and (b) ecolubric MQL Booster applicator (Accu-Svenska AB, Västerås, Sweden).
Materials 15 01336 g002
Figure 3. Measurement stands. (a) KB10BVZ-FA microhardness tester (KB Prüftechnik GmBH, Hochdorf-Assenheim, Germany); (b) PROTO iXRD X-ray diffractometer (Proto Manufacturing Ltd., LaSalle, ON, Canada).
Materials 15 01336 g003
Figure 4. Surface roughness measurement. (a) General view of Hommel Tester T8000 profilometer; (b) Scheme of surface topography measurement.
Materials 15 01336 g004
Figure 5. Microhardness distribution in 20MnCr5 steel ground with GF supplied with the following method: (a) WET; (b) MQL.
Materials 15 01336 g005
Figure 6. Microhardness distribution in 20MnCr5 steel ground with GF supplied with WET and MQL methods for grinding depth ae, which is: (a) 0.01 mm; (b) 0.02 mm; (c) 0.03 mm.
Materials 15 01336 g006
Figure 7. Residual stress in 20MnCr5 steel—after TCT, before grinding.
Materials 15 01336 g007
Figure 8. Residual stresses in 20MnCr5 steel ground with GF supplied with the following method: (a) WET; (b) MQL.
Materials 15 01336 g008
Figure 9. Residual stresses in 20MnCr5 steel after grinding to the ae depth: (a) 0.01 mm; (b) 0.02 mm; (c) 0.03 mm.
Materials 15 01336 g009
Figure 10. Value of 2D parameters determining the roughness of ground surface with WET and MQL methods: (a) Rp; (b) Rv; (c) Rz.
Materials 15 01336 g010
Figure 11. Comparison of surface roughness Rp and Rv parameters obtained with two methods of GF supply: (a) WET; (b) MQL.
Materials 15 01336 g011
Figure 12. Value of 3D parameters determining the roughness of ground surface with WET and MQL methods: (a) Sz; (b) Ssk; (c) Sk; (d) Spk.
Materials 15 01336 g012
Figure 13. Autocorrelation functions of surfaces obtained by grinding at a grinding depth ae1 = 0.01 mm: (a) WET; (b) MQL.
Materials 15 01336 g013
Figure 14. Surface texture and polar graph of the texture directions after grinding with a grinding depth ae1 = 0.01 mm: (a) WET; (b) MQL.
Materials 15 01336 g014
Table 1. Thermochemical treatment (TCT) conditions.
TreatmentProcess ParametersValue
Vacuum carburisingTemperature920 °C
QuenchingMediumNitrogen
Pressure7 bar (0.7 MPa)
Precooling850 °C
TemperingTemperature190 °C
Time180 min
Table 2. Chemical composition of the 20MnCr5 steel.
Content of Elements (wt.%)
CMnCrSiNiCuPS
0.201.351.120.180.110.100.0150.022
Table 3. Grinding conditions.
Grinding modeSingle-pass longitudinal circumferential surface grinding
Grinding machineFlat-surface grinder SPD-30B (Jotes Inc., Lodz, Poland)
Workpiece material20MnCr5, carburized and hardened with 820 ± 10 HV
Grinding wheelIPA60EH20VTX (Vortex type)
Grinding wheel rotational speedns = 1650 rpm
Grinding wheel peripheral speedvs = 30.2 m/s
Workpiece peripheral speedvw = 18 m/min
Working engagement (machining allowance)ae1 = 0.01 mm
ae2 = 0.02 mm
ae3 = 0.03 mm
DresserSingle grain diamond dresser type M1020
Dresser weightQd = 2.0 kt
Grinding wheel peripheral speed while dressingvsd = 10 m/s
Dressing allowancead = 0.02 mm
Axial table feed speed while dressingvfd = 5.0 mm/min
Number of dressing passesid = 4
EnvironmentsWET—conventional fluid
MQL—minimum quantity lubrication
Conventional grinding fluid (GF)Emulgol ES-12 in a 5% concentration
Conventional GF flow rateQWET = 4 L/min
MQL systemEcolubric MQL Booster—oil-mist generator with single external nozzle
MQL fluidEcolubric E200L—cold-pressed rapeseed oil without additives
MQL flow rateQMQL = 100 mL/h
MQL supply air pressureP = 0.6 MPa
Table 4. Characteristics of Ecolubric E200L rapeseed oil applied in the research.
PropertiesDescription
Chemical descriptionA fraction of natural triglycerides, easily biodegradable substances
Density at 0 °C0.9273 g/cm3
Dynamic viscosity at 0 °C2.881 N s/m2
Ignition point365 °C
Flash point325 °C
Partition coefficient<3%
Health hazardNot hazard to human health
Table 5. Variable grinding conditions applied in the research.
Number of SamplesGrinding Depth ae (mm)Method of Coolant-Lubricant Supply
1-W0.01WET
1-MMQL
2-W0.02WET
2-MMQL
3-W0.03WET
3-MMQL
Table 6. Surface roughness measuring conditions.
Type of ProfilometerHommel Tester T8000 (Hommelwerke GmbH, Schwenningen, Germany)
Stylus typeTKU 300
Tracing lengthlt = 4.8 mm
Evaluation lengthln = 4.0 mm
Sampling lengthlr = 0.8 mm
Evaluation width (3D measurements)l = 5 mm
Number of stylus passes (3D measurements)51
Distance between stylus tracks (3D measurements)0.1 mm
Stylus tip radiusrtip = 2 μm
Stylus tip angle90°
Tracing speedvt = 0.05 mm/s
Long-wave profile filter (cutoff)λc = 0.8 mm
Measuring range±80 μm
Table 7. Surface roughness 2D parameters.
Method of
Coolant-Lubricant
Supply
Grinding Depth
ae (mm)
Surface Roughness (μm)
RpRvRz
WET0.010.921.092.00
0.021.361.522.88
0.031.551.823.33
MQL0.010.760.921.67
0.020.881.091.96
0.031.101.522.62
Table 8. Surface roughness 3D parameters.
Method of
Coolant-Lubricant
Supply
Grinding Depth
ae (mm)
Surface Roughness (μm)
SzSskSkSpk
WET0.012.25−0.2230.6730.252
0.025.20−0.6060.9160.424
0.037.42−0.5341.0900.520
MQL0.011.95−0.0340.5990.211
0.022.32−0.2180.6690.254
0.034.69−0.2340.8200.340
Table 9. Surface roughness 3D parameters.
Method of
Coolant-Lubricant Supply
Grinding Depth
ae (mm)
Texture Aspect RatioIsotropy (%)
Str (-)
WET0.010.01721.72
0.020.03203.20
0.030.03323.32
MQL0.010.00790.80
0.020.01721.72
0.030.01551.55
Publisher’s Note: MDPI stays neutral with regard to jurisdictional claims in published maps and institutional affiliations.