Article

Experimental Investigation of the Friction Stir Weldability of AA8006 with Zirconia Particle Reinforcement and Optimized Process Parameters

1
Department of Mechanical Engineering, Saveetha School of Engineering, Saveetha Institute of Medical and Technical Sciences (SIMATS), Chennai 602105, Tamil Nadu, India
2
Department of Mechanical Engineering, P.A. College of Engineering (Affiliated to Visvesvaraya Technological University, Belagavi), Mangaluru 574153, Karnataka, India
3
Centre for Materials Engineering and Regenerative Medicine, Bharath Institute of Higher Education and Research, Chennai 600073, Tamilnadu, India
4
Department of Mechanical Engineering, Jeppiaar SRR Engineering College, Chennai 603103, Tamilnadu, India
5
Engineering Management Department, College of Engineering, Prince Sultan University, P.O. Box 66833, Riyadh 11586, Saudi Arabia
6
Mechanical Engineering Department, College of Engineering, Taif University, P.O. Box 11099, Taif 21944, Saudi Arabia
*
Authors to whom correspondence should be addressed.
Materials 2021, 14(11), 2782; https://doi.org/10.3390/ma14112782
Submission received: 13 April 2021 / Revised: 15 May 2021 / Accepted: 19 May 2021 / Published: 24 May 2021

Abstract

:
A lightweight, highly corrosive resistant, and high-strength wrought alloy in the aluminum family is the Aluminium 8006 alloy. The AA8006 alloy can be formed, welded, and adhesively bonded. However, the recommended welding methods such as laser, TIG (Tungsten Inert Gas welding), and ultrasonic are more costly. This investigation aims to reduce the cost of welding without compromising joint quality by means of friction stir welding. The aluminum alloy-friendly reinforcement agent zirconia is utilized as particles during the weld to improve the performance of the newly identified material AA8006 alloy in friction stir welding (FSW). The objectives of this research are to identify the level of process parameters for the friction stir welding of AA8006 to reduce the variability by the trial-and-error experimental method, thereby reducing the number of samples needing to be characterized to optimize the process parameters. To enhance the quality of the weld, the friction stir processing concept will be adapted with zirconia reinforcement during welding. The friction stir-processed samples were investigated regarding their mechanical properties such as tensile strength and Vickers microhardness. The welded samples were included in the corrosion testing to ensure that no foreign corrosive elements were included during the welding. The quality of the weld was investigated in terms of its surface morphology, including aspects such as the dispersion of reinforced particles on the welded area, the incorporation of foreign elements during the weld, micro defects or damage, and other notable changes through scanning electron microscopy analysis. The process of 3D profilometry was employed to perform optical microscopy investigation on the specimens inspected to ensure their surface quality and finish. Based on the outcomes, the optimal process parameters are suggested. Future directions for further investigation are highlighted.

1. Introduction

The solid-state welding method of Friction Stir Welding (FSW) is a newly modified process. This process is effectively utilized for altering surface structures and improving materials’ physical properties. The term friction stir processing (FSP) refers to surface modification through reinforcements in addition to friction stir welding [1,2,3,4,5,6,7,8,9,10]. This research investigates the effects of the novel reinforcement of zirconia particles on the welding zone of the friction stir welding process of the AA8006 work material. Various research findings support the continuous improvement of this process and describe the effective welding of similar and dissimilar metals by friction stir welding. The term friction stir processing (FSP) refers to surface modification by means of reinforcement in addition to friction stir welding. Abhishek et al. [1] analyzed the joining of the AA 6061 alloy by FSP and utilized silicon carbide-graphite as a reinforcement to form a hybrid composite weld material, finding that the strength of the weld improved. The uniform dispersion of the reinforcement agent was ensured by microstructural investigation. It was reported that the stirring speed is a major influencing factor and is responsible for modifying the mechanical properties of hybrid composite welds. The use of a high rotational speed of 2200 rpm at 25 mm/min for traverse speed forms a strong weld. Kan et al. [2] recommends the use of FSP, as it develops a defect-free weld and can form a composite weld material at joints with excellent hardness and wear properties. It was found that though the tool pin was considered durable, it suffers from wear over time and such wear is unavoidable due to friction and heat while stirring. Such wear will increase the tool and welding cost. Apart from the use of aluminum metal matrix composite weld metal on aluminum welding joints, Palanivel et al. [3] introduced a hybrid Aluminium Matrix Composites (AMC) (reinforced with titanium boride boron nitride) composite weld material. This is titanium boride and boron nitride introduced as a tribo film form in the FSP of aluminum alloy 6082 on a welding zone to form a hybrid AMC composite weld material. It was found that TiB2 particles were broken and boron nitride particles were not broken on the weld material. This method can improve the wear resistance. Boron nitride reduces the debris in the wear caused by the iron content and could possibly also reduce the counter face wear. Harikrishna Rana and Vishvesh Badheka et al. [4] welded AA7075 work materials with boron carbide reinforcement using FSP and created an aluminum matrix composite weld material at the joint. The maximum stirring speed and frequently changes the traverse speed, producing more heat, it can be reduced the wear resistance. As tool pin profile is a major influencing factor, Saravanan et al. [5,6] optimized the tool pin profile to improve the welding quality. They utilized the FSW of the dissimilar aluminum alloys of AA 2014 and AA 7075. In their investigation, they made only three joints by varying the stirring speed of the tool pin, altering the fixed material’s situation at withdrawing as well as progressing sides, and achieved a maximum rigidity of 207 MPa. Pandiyarajanet al. [7] investigated the joining of AA6061 plates by FSP with zirconia reinforcement and ensured that the reinforcements showed a uniform distribution of ZrO2 on the weld material through Scanning Electron Microscopy (SEM) analysis; the hardness at the joints significantly improved. Sivaraman et al. [8] also investigated the development of the dissimilar metals AA 2014 and AA 7075 through friction stir welding. They altered the rotational speed and material position to obtain a better impact and tensile strength. Ramamoorthi et al. [9] analyzed the friction stir welding of the dissimilar metals, AA5086 and AA6063, by varying the axial force, and reported that axial force strongly influenc was the mechanical properties of the welded joints. Fakkir Mohamed et al. [10] also investigated the FSW of the dissimilar metals AA5083 and AA6061 by varying three important parameters: load, feed, and speed. The speed is a more influential parameter than the other two in producing a high standard of welding. Ref. [11] achieved a high UTS of 920 MPa with 37% elongation in the FSW of Al0.3CoCrCu0.3FeNi high-entropy alloy through the microstructure of the stir zone, which was partially re-crystallized and fine grained. This investigation utilized a novel approach toAA8006 welding by means of FSP with zirconia particle reinforcement. The aluminum alloy AA8006 is usually used in costly welding methods such as ultrasonic welding, laser welding, and Tungsten Inert Gas (TIG) welding. This investigation aims to reduce the cost of welding AA8006 without compromising the weld quality by FSP. Hence, this investigation is completely unique, as we attempt to use new techniques to increase the applications of AA8006. It is important to investigate this material because, compared to other aluminum alloys, the 8006 alloy possesses superior corrosion resistance and high strength. It is a category of wrought alloys that can be treated thermo-mechanically to improve their strength.

2. Materials and Methods

2.1. Base Material

Aluminium 8006 alloy is a high-strength (elastic modulus 70MPa) and highly corrosive resistant alloy. It is often referred as a wrought alloy. The AA 8006 was named a medium-strength alloy; it is used in many different applications, such as in making containers, heat exchanger units, tin boxes, and cable covers, etc. This material has a great formability, with a good mechanical strength. The constituents of the AA8006 alloy are presented in Table 1.

2.2. Reinforcement Agent

In this study, the AA8006 aluminum alloy is taken as a base alloy and the packing of reinforced material such as zirconia and the fabrication can be carried out by the use of FSP technology. The reinforcement of zirconium dioxide is preferred, as it possesses an excellent stability against mechanical stresses and is resistant to cracking and crack growth. Apart from its high flexural strength (up to 1000 MPa), it has a fracture toughness of 10 MPa M1/2 at 20 °C, a tensile strength of 30 Mpa, and an elastic modulus of up to 250 GPa. Zirconia is an inorganic metal oxide that can act as a successful reinforcement material for the property enhancement of aluminum alloys. It has proven inclusion effects in many aluminum metal matrix composites as well as in FSP. Zirconia is mainly utilized in the reinforcement of ceramic materials; it is mainly applied in the production of abrasive parts, dental applications, and fuel cells [7].

2.3. Experimentation

As described above, the number of process variables was reduced by trial-and-error experiments, because to our best knowledge no previous work on AA8006 has been reported so far in the literature. Therefore, the weldability was justified by trial-and-error experimentations. To enhance the quality of the weld, the friction stirs processing concept was adapted with zirconia reinforcement at the weld. We utilized 6 mm-thick, 150 × 75 mm rectangular-shaped samples plates for FSP. The American Society for Testing Materials ASTM D638 standard was adhered to and a computer-controlled 100 KN capacity Universal Testing Machine (model: SICMUTM-01, manufacturer: Shambhavi, city: Navi, state: Mumbai) was employed in this investigation [12,13,14,15].
FSP is a novel route developed from the origin of the FSW process, the reinforcement tactic used to modify the surface microstructure of the material while in FSP. Table 2 shows the different ranges of tool pin speed, traverse speed, tool downward force, and tool tilt angle. Five samples in each experimental group (stirring speed setting) were investigated and the average of their values were considered for evaluation and in drawing conclusions.
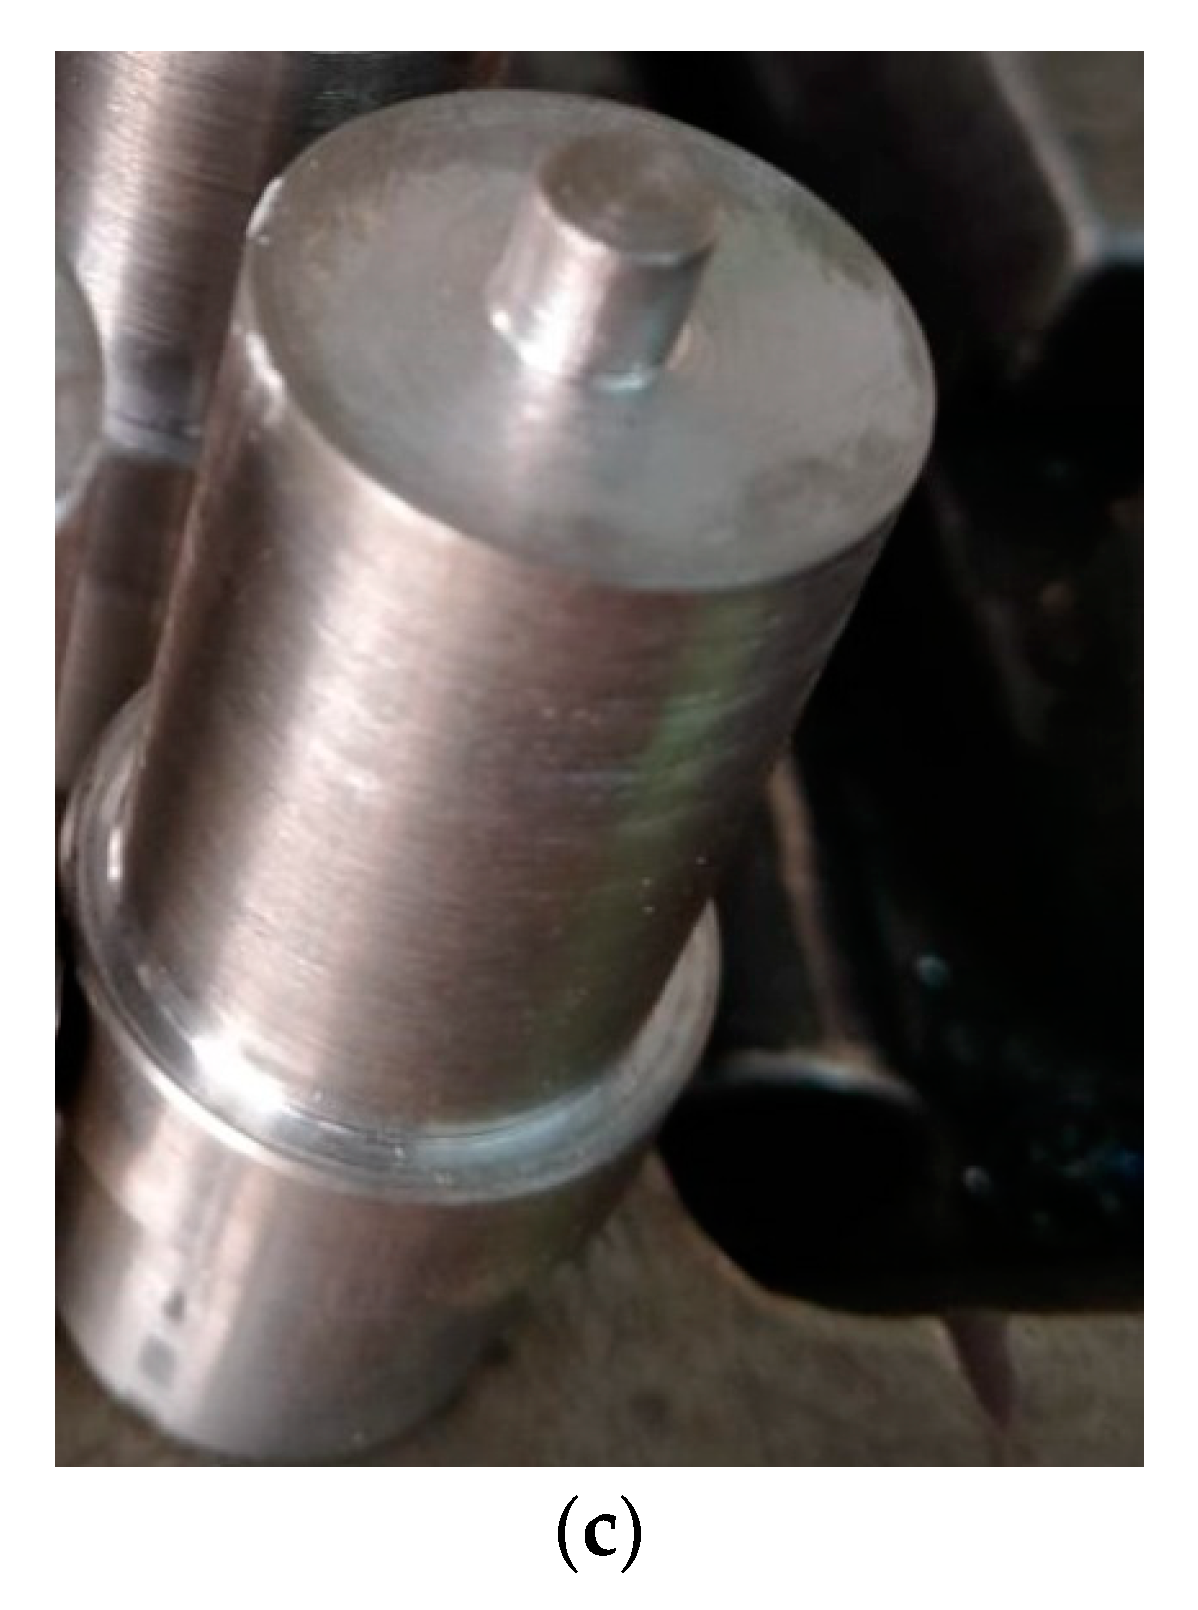
The designed tool shoulder and straight cylindrical tool pin are depicted in Figure 1. Figure 1a shows a conceptual design of the FSP tool and compacting tool. Its dimensional features are shown in Figure 1b and the actual fabricated tool is depicted in Figure 1c. Tools are utilized in a Computerized Numerical Control (CNC), (model: JV 30, manufacturer: Lakshmi Machine works, city: Coimbatore, state: Tamil Nadu) machine and the tool is made out of high-carbon high chromium steel.
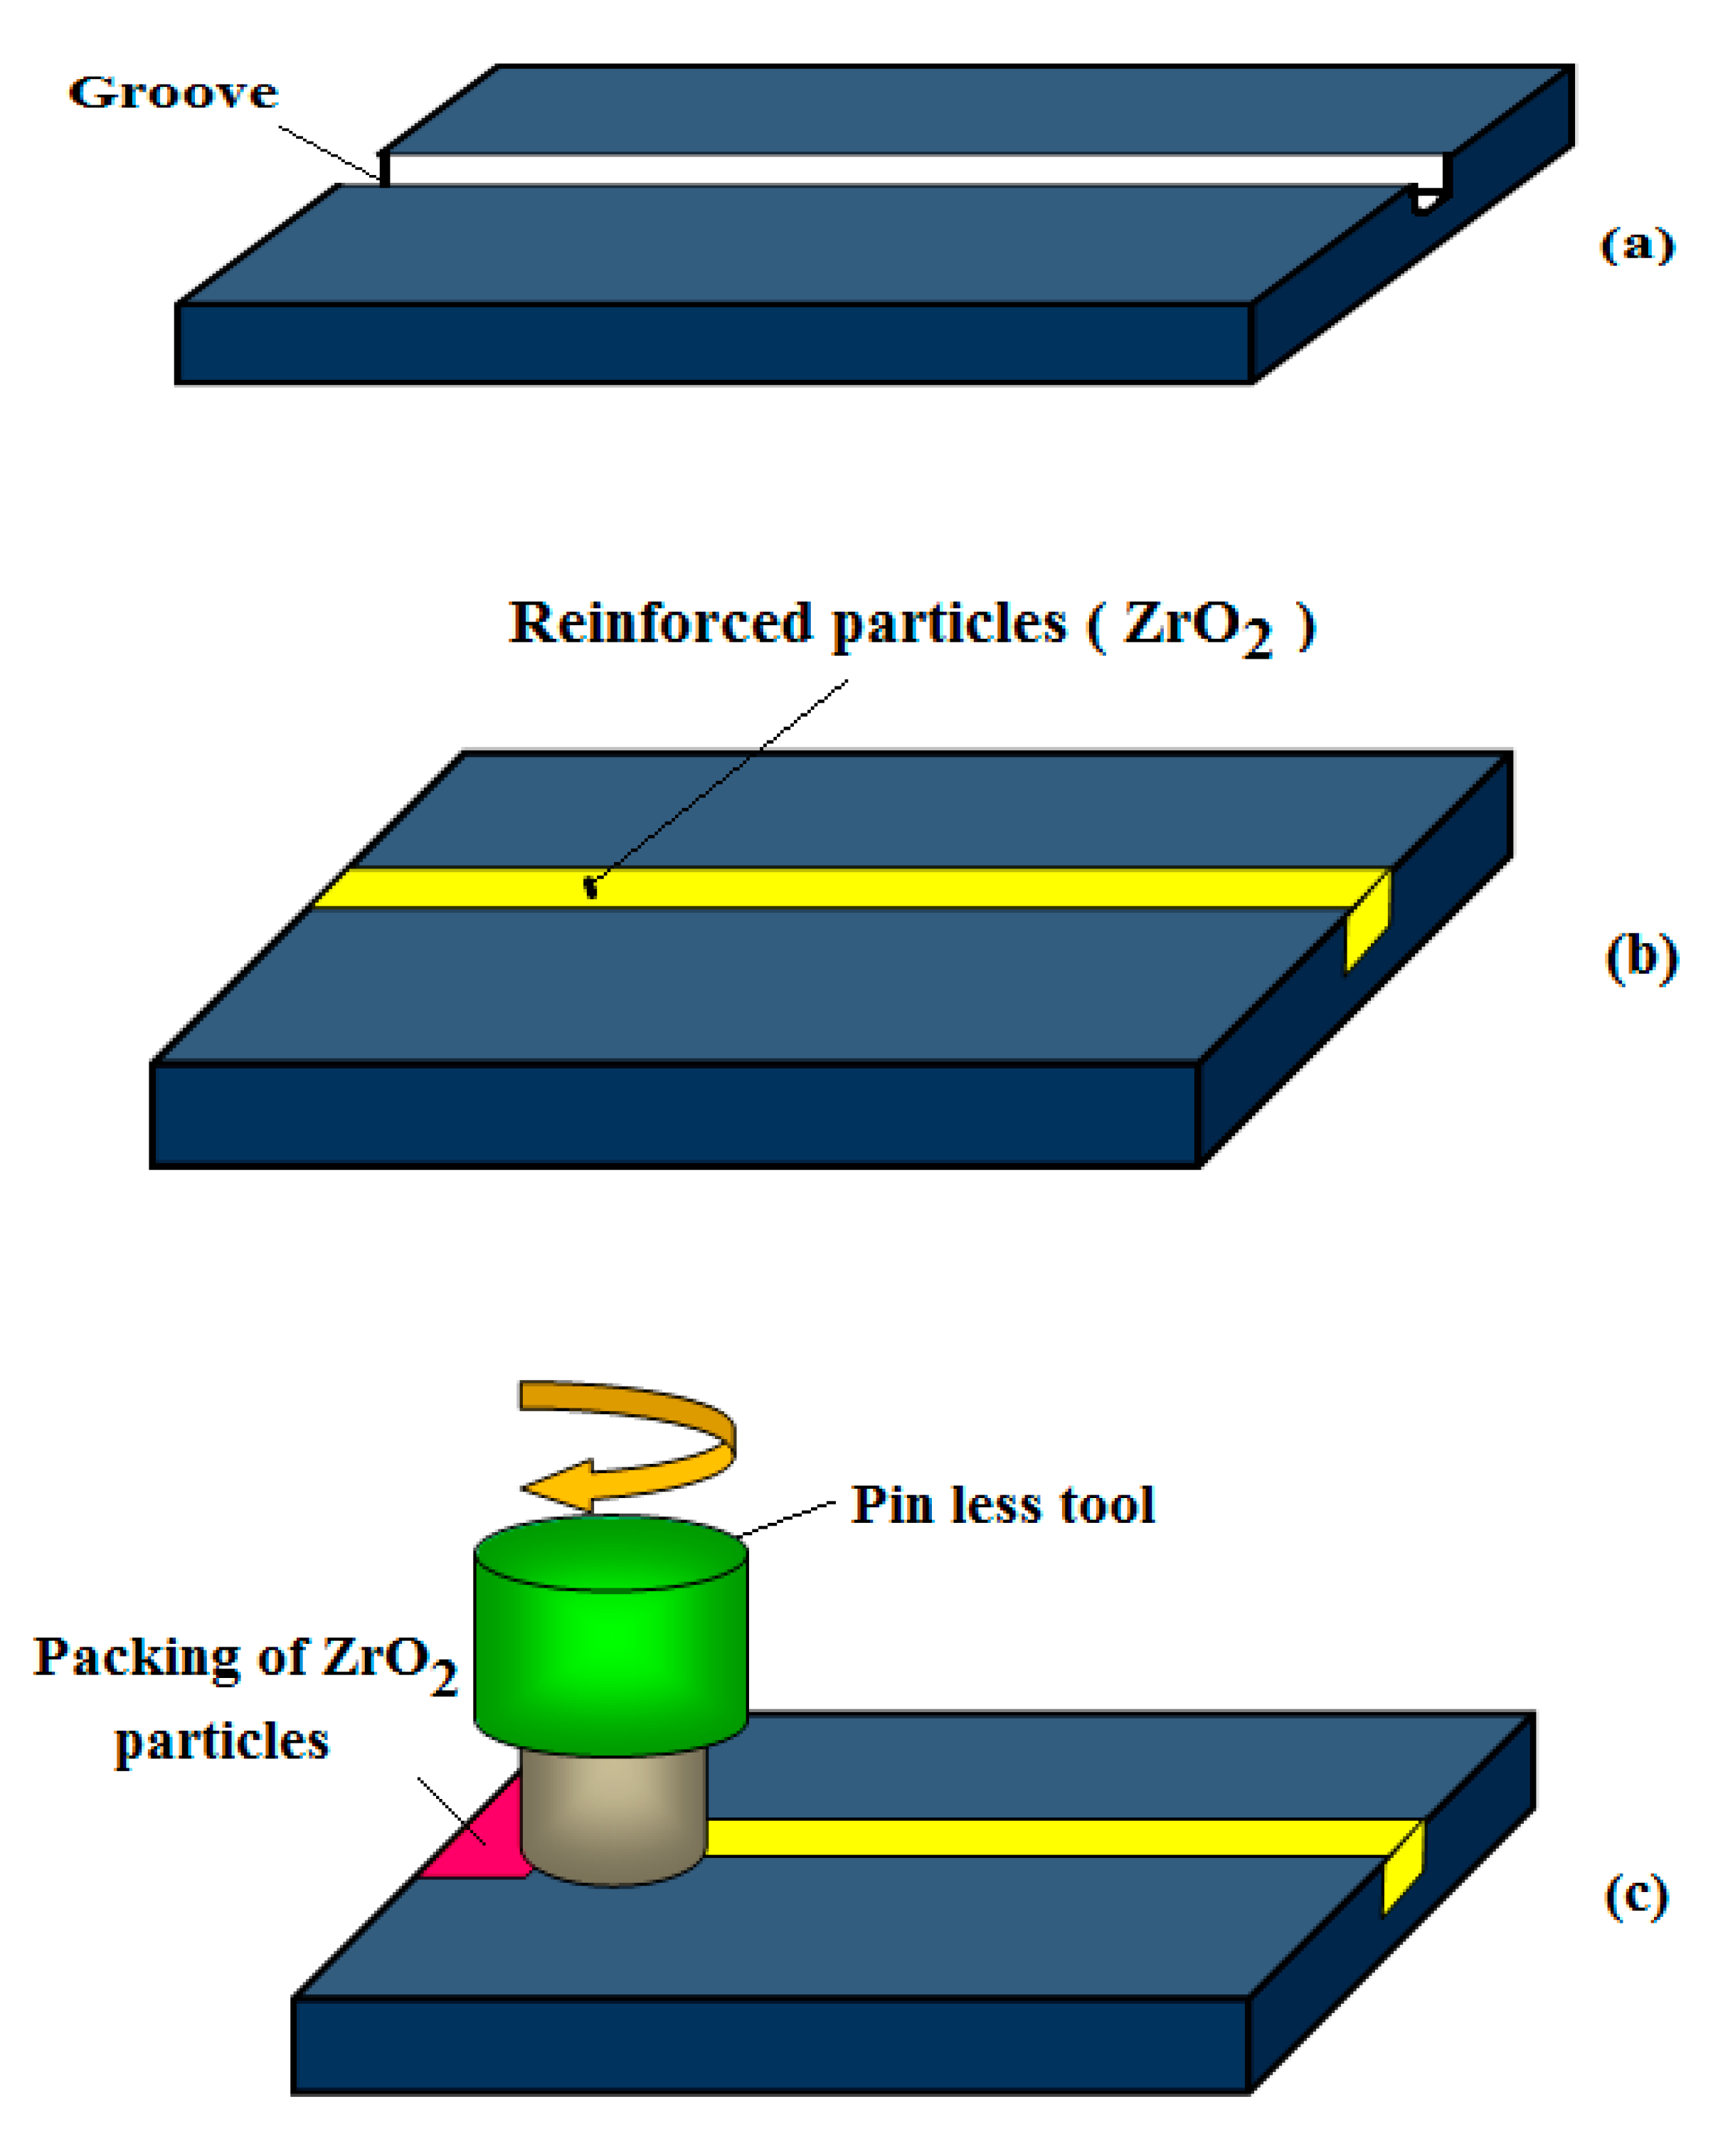
The base material of the AA 8006 has the dimensions of 200 × 100 × 10 mm. The top surface of the samples has a square groove depth of 5 mm and width of 3 mm, which are cut using the wire EDM process, as shown in Figure 2a. The next stage of the reinforced particles of zirconium dioxide is filling in the groove on the base material surface and tightly compressing them, as shown in Figure 2b.
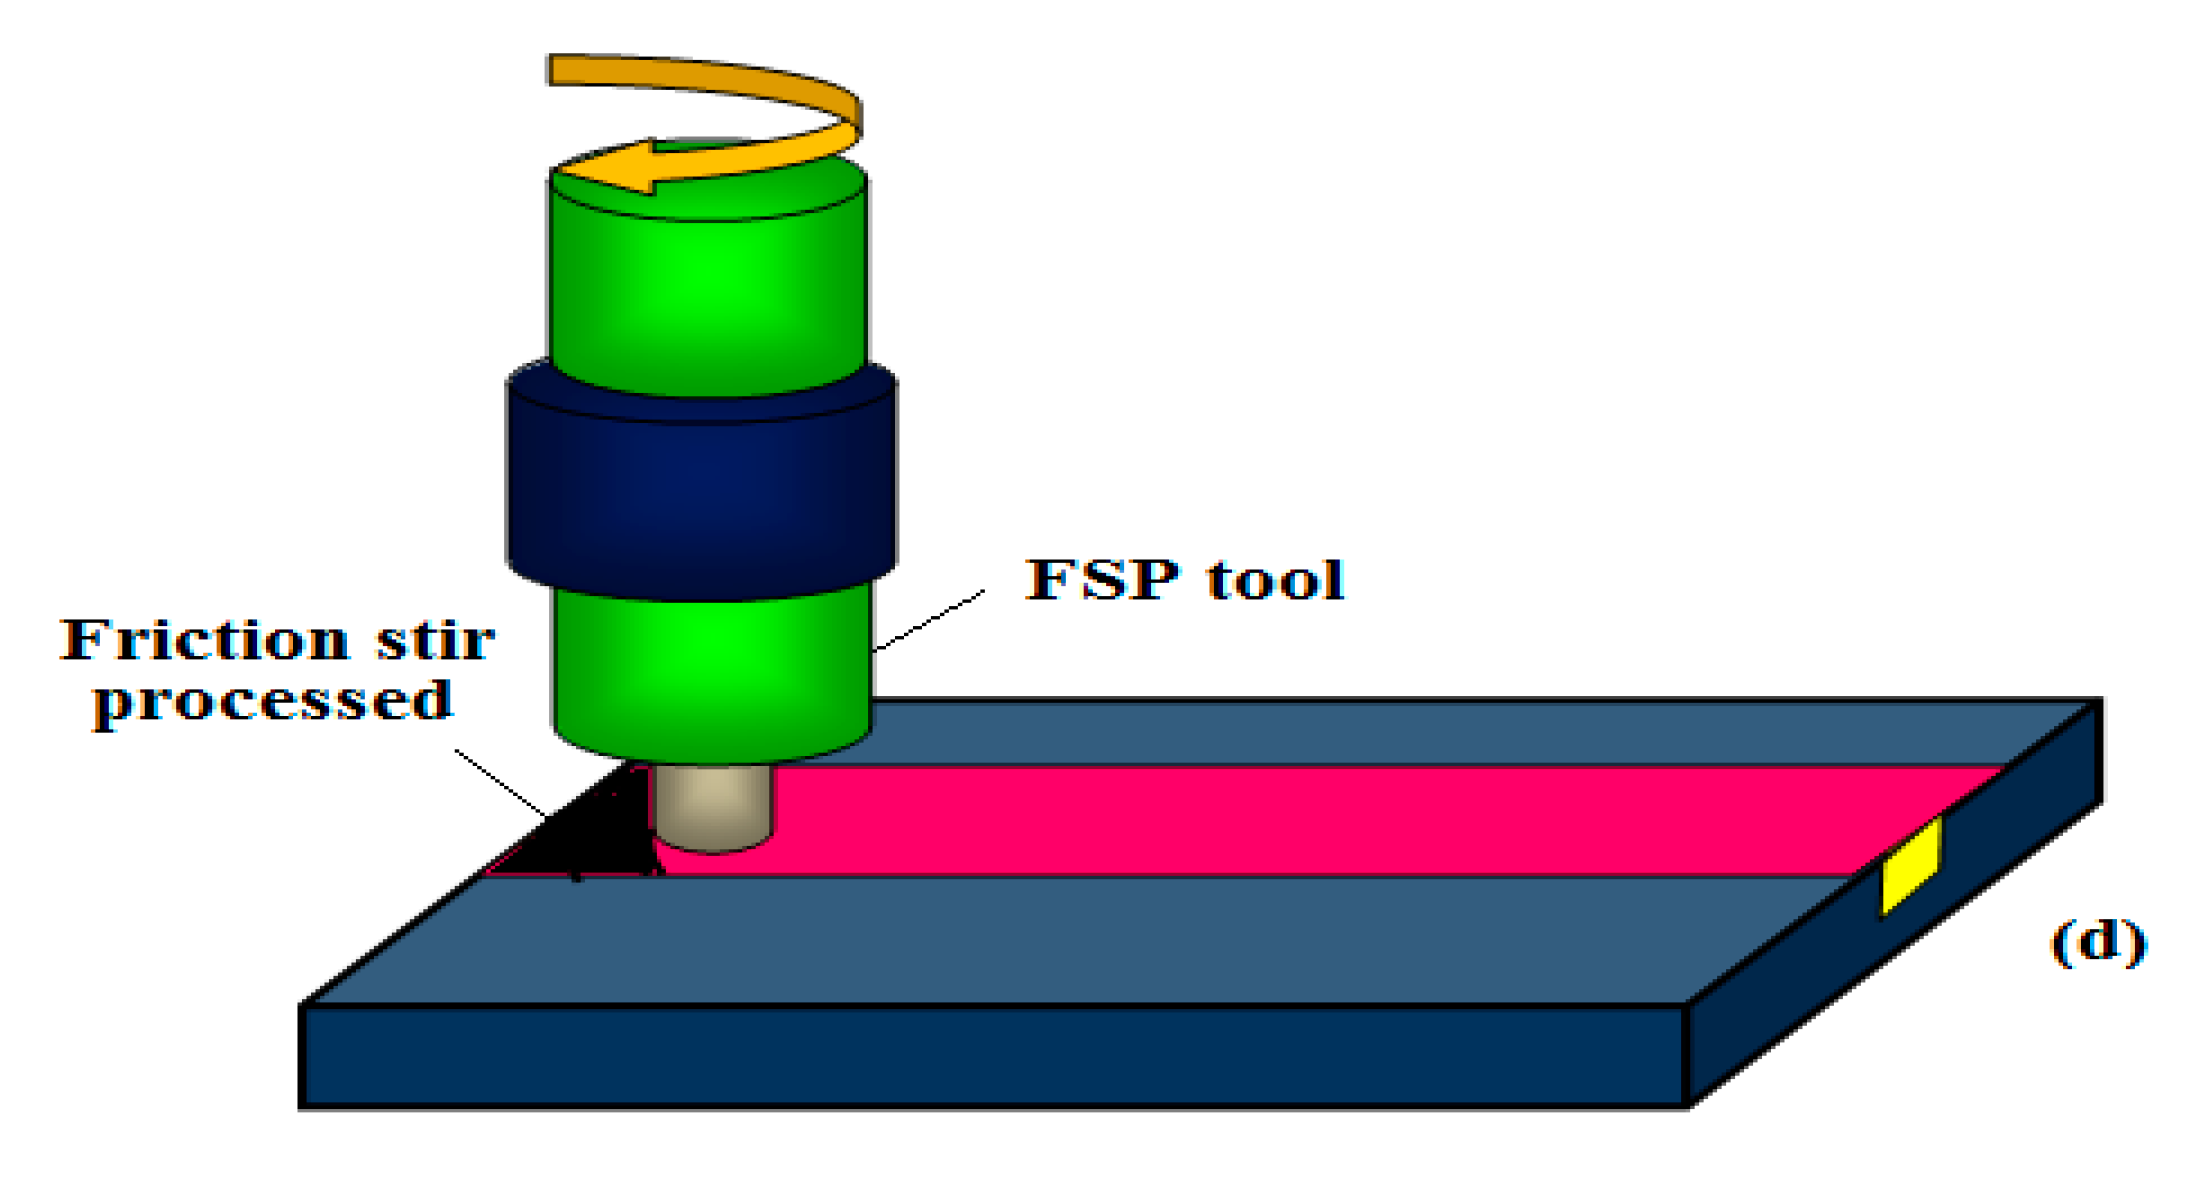
The packing of reinforced particles in the groove was achieved with the help of a pinless tool, as shown in Figure 2c. A CNC vertical milling machine was used to rotate the pinless tool, pressing the particles tightly and closing the groove without the reinforced particles escaping. The FSP process was carried out finally with the assistance of a straight cylindrical pin tool, as shown in Figure 2d. The FSP process mixed the zirconium dioxide particles into base materials with a different tool rotational speed; due to the heat generation, the particles are mixed well into base materials [15].

2.4. Characterization for Tensile Strength of Welded Samples

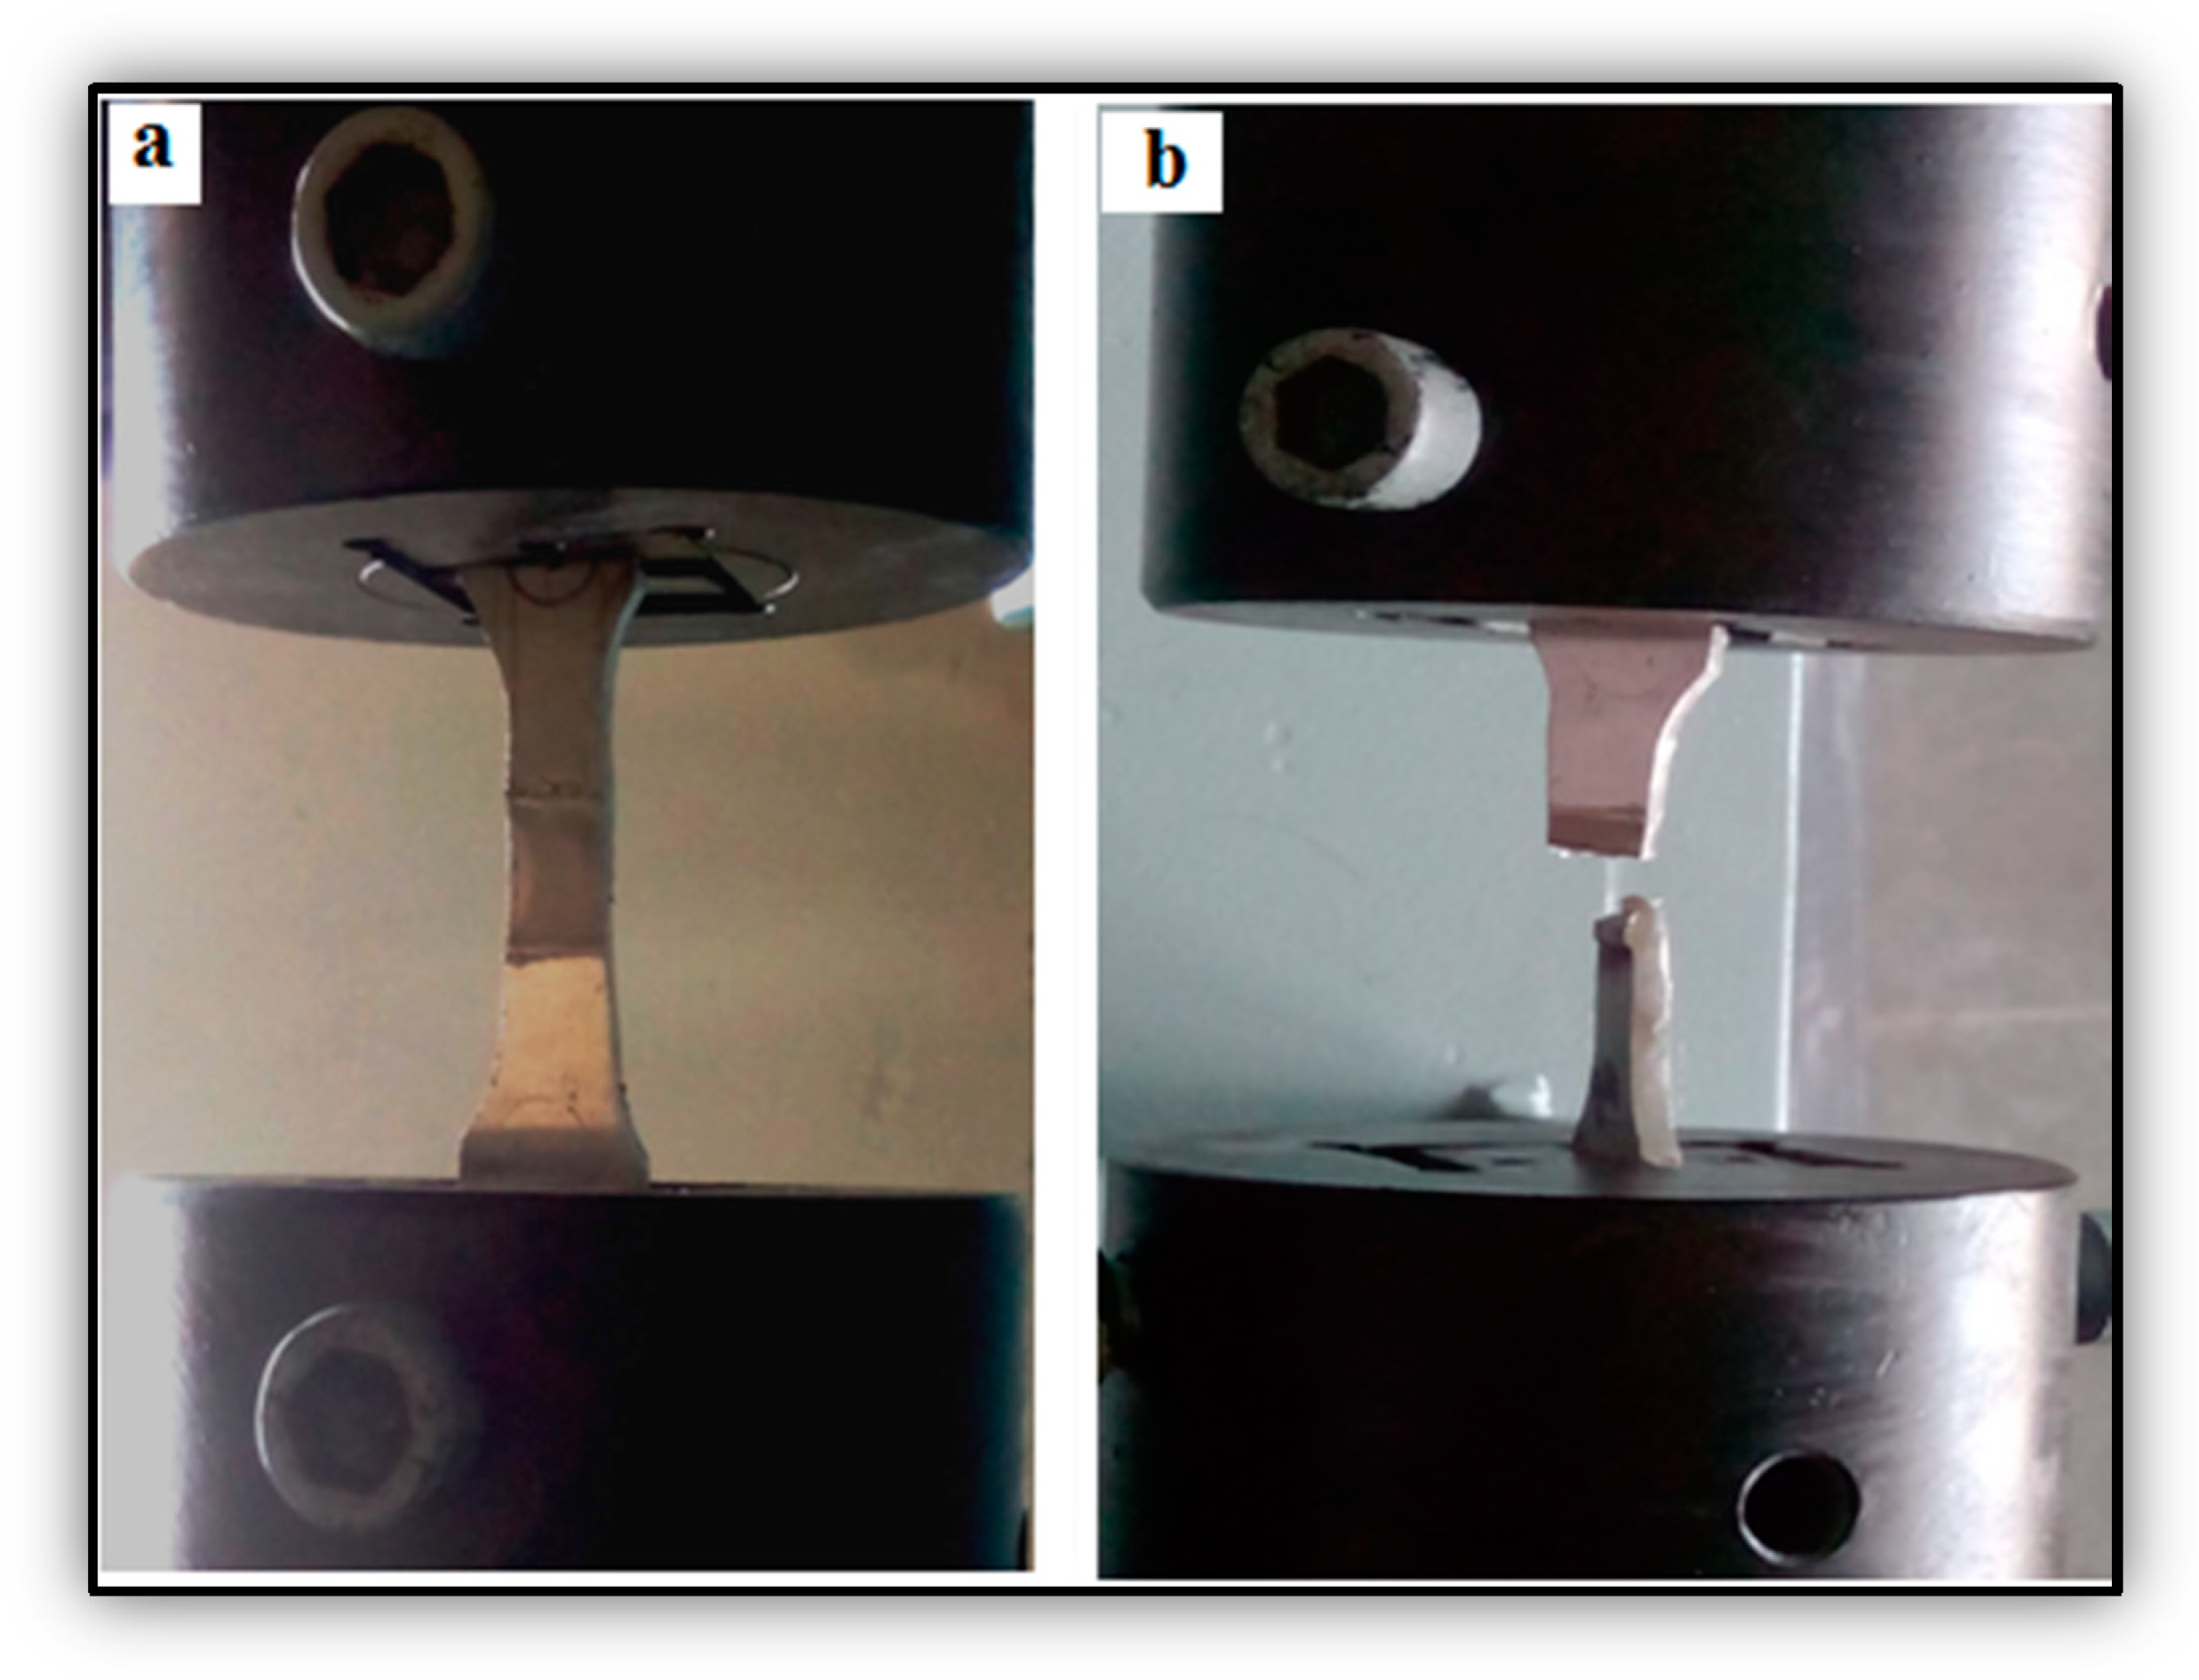
The upgrading of the surface structure by FSP increased the strength of the specimens to a maximum level. The four samples were tested to see if they met the ASTM E8M-04 standard; the 40-ton capacity of Universal Testing Machine (UTM) was used, Figure 3 was illustrates to employed for conducting tensile strength testing on the samples. The strain rate was measured with the aid of an extensometer [16,17,18]. The four samples were tested at 1100 rpm. The FSP showed that, the sample tensile strength was moderately increased, proving that a higher tool rotational speed drastically modified the surface structure. The thickness of the specimen was 3 mm. The sample width and length were 25 and 240 mm, respectively. The specimen was loaded vertically along the loading direction and gripped. A uniform displacement of 0.02 cm per min was applied. The dimensions of the broken area were measured with a vernier caliper and the cross section was calculated.

2.5. Characterization for Hardness of Welded Samples

In this section, the microhardness of the specimens at various locations from the welded zone is analyzed. We examined how the microhardness varied from the center of the weld with respect to a uniform distance to the extreme edges of the plate. The FSP zone was the center of the weld, the thermo-mechanically affected zone was the portion that suffered heat and mechanical force over the tool head, the heat-affected zone was next to the welded area that suffered heat generated during the FSP, and the unaffected zone was next to the heat-affected zone and the edge of the plates. The Vickers microhardness tester (model: BHT 1000, manufacturer: Acme Engineers, city: Dhayari, state: Pune) was employed for this investigation. The preparation of the samples included them being finished and polished using a fine 800 grit emery sheet. The hardness measurement was taken in all the zones mentioned. Different test conditions were applied for a load of 400 g and maintained for 20 s; the indentation was analyzed in all samples and the microhardness values were recorded [19].

2.6. Characterization for Corrosion on Welded Samples

The immersion corrosion test was conducted effectively with the specified ASTM standards G31-72; samples were prepared with dimensions of 20 × 15 × 6 mm from each specimen (see Figure 4) at the FSP zone. The surface of the specimens was polished using a 800 grit emery and cleaned by kerosene medium. The mass loss of all the specimens was measured directly by a digital weight balance; the samples were weighted before and after immersion.
The corrosion characteristics of the samples were analyzed by way of an immersion test. The corrosion medium was prepared at a 3.5% NaCl level and all the samples were immersed individually in the corrosion solution. The immersion time period maintained for the test was 48, 72, 96, and 120 hrs. After finishing the immersion time period, the samples were taken out, allowed to dry, then weighted [20].
The formula used for finding the corrosion rate of the specimens was:
Corrosion   rate   mm / yr = k   × Δ W   a c ×   t e ×   ρ ,
where k = 8.76 × 10⁴,te = time of exposure (hours), ac = cross sectional area of the specimen (cm2), ∆W = reduction in specimen weight (g), ρ = mass density of the material (g/cm3).

3. Results and Discussion

Different speeds (800, 900, 1000, and 1100 rpm) were used to produce the FSP samples for the tensile test. The specimens were tested, and the tensile strength of each specimen is shown in Table 3.

3.1. Tensile Strength of Friction Stir Processed Samples

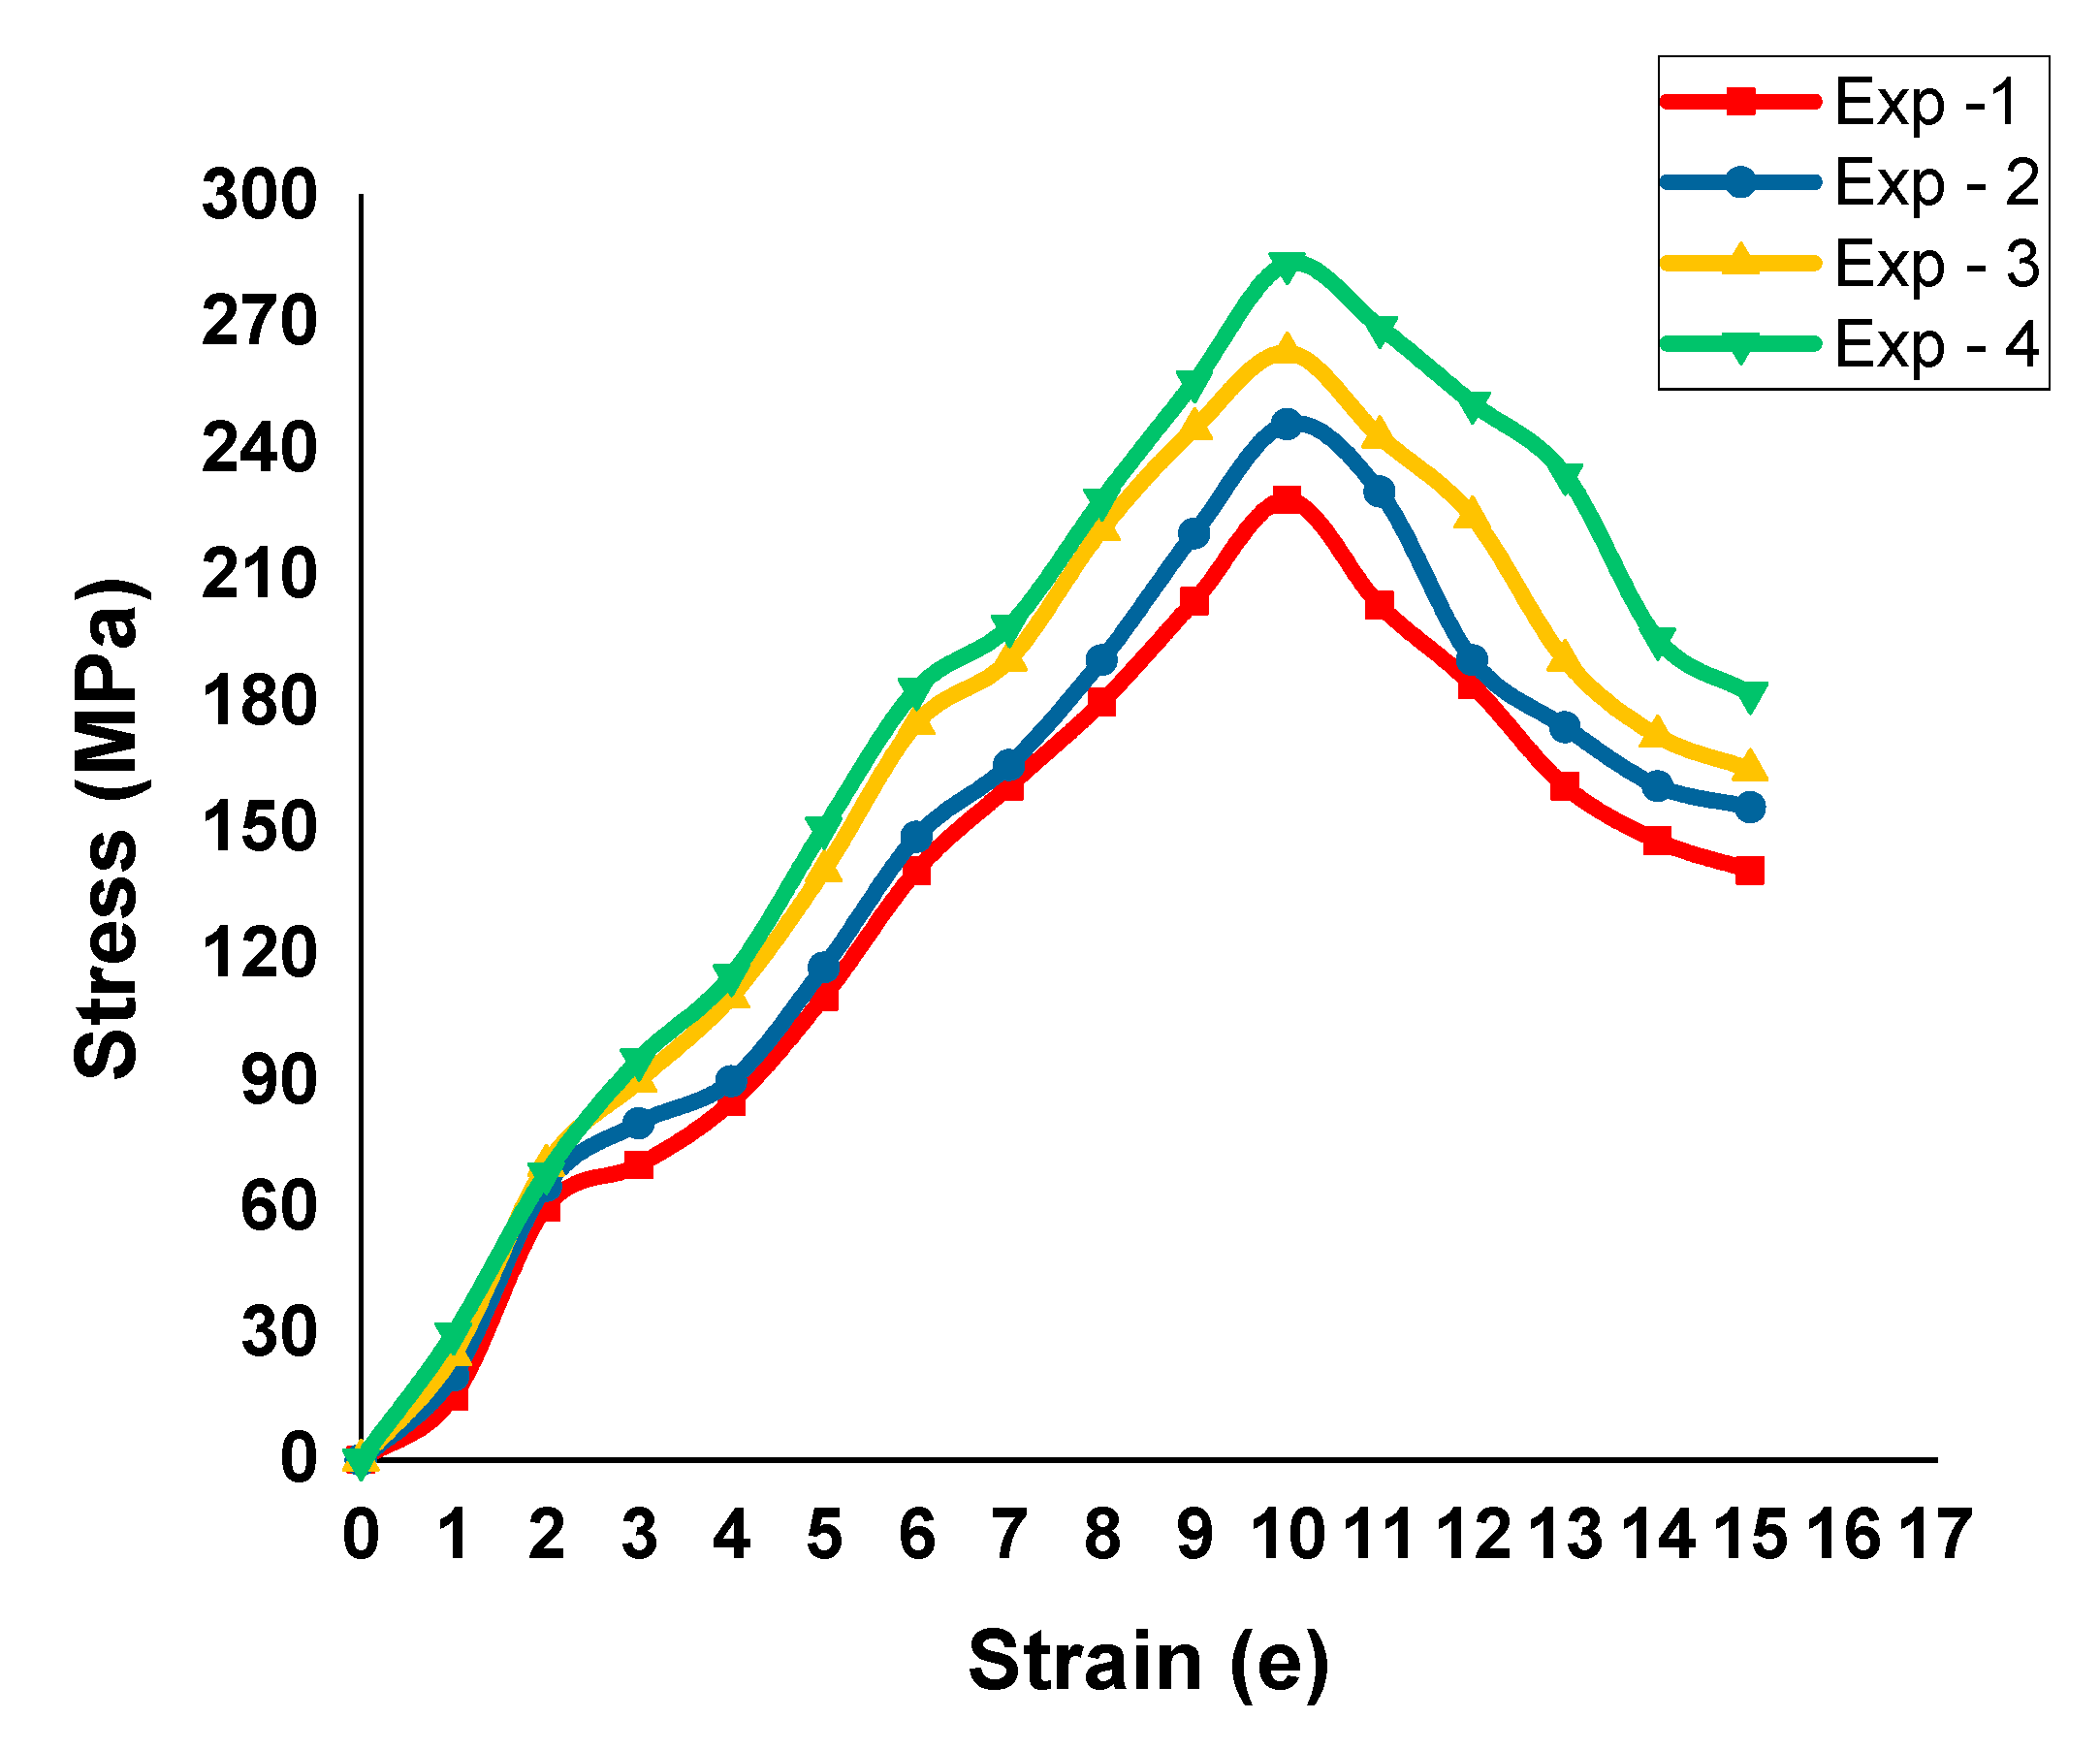
From the tensile test, Figure 5 shows the connection between the stirring speed (tool rotational) and the respective tensile strength of the weld produced on the sample. The four samples and their tensile strengths were analyzed; the maximum tensile strength of 284 MPa was reached for specimens which experienced a stirring speed of 1100 rpm. The increase in stirring speed increased the strength of the welding, helping it to withstand tensile loads, and vice versa. High speeds induced a fine grain structure in the FSP zone. Table 3 shows the details of the process parameters employed in each experiment. Four samples were prepared and tested.
Figure 6 presents the stress–strain curve of the tensile test specimens. From the four tool speeds, the maximum tool speed (1100 rpm) was produced the best tensile strength in the specimens. In the four tensile tests, the maximum tensile strength was recorded as 284 MPa and the minimum tensile strength was registered as 228 MPa.

3.2. Hardness on Friction Stir Processed Samples

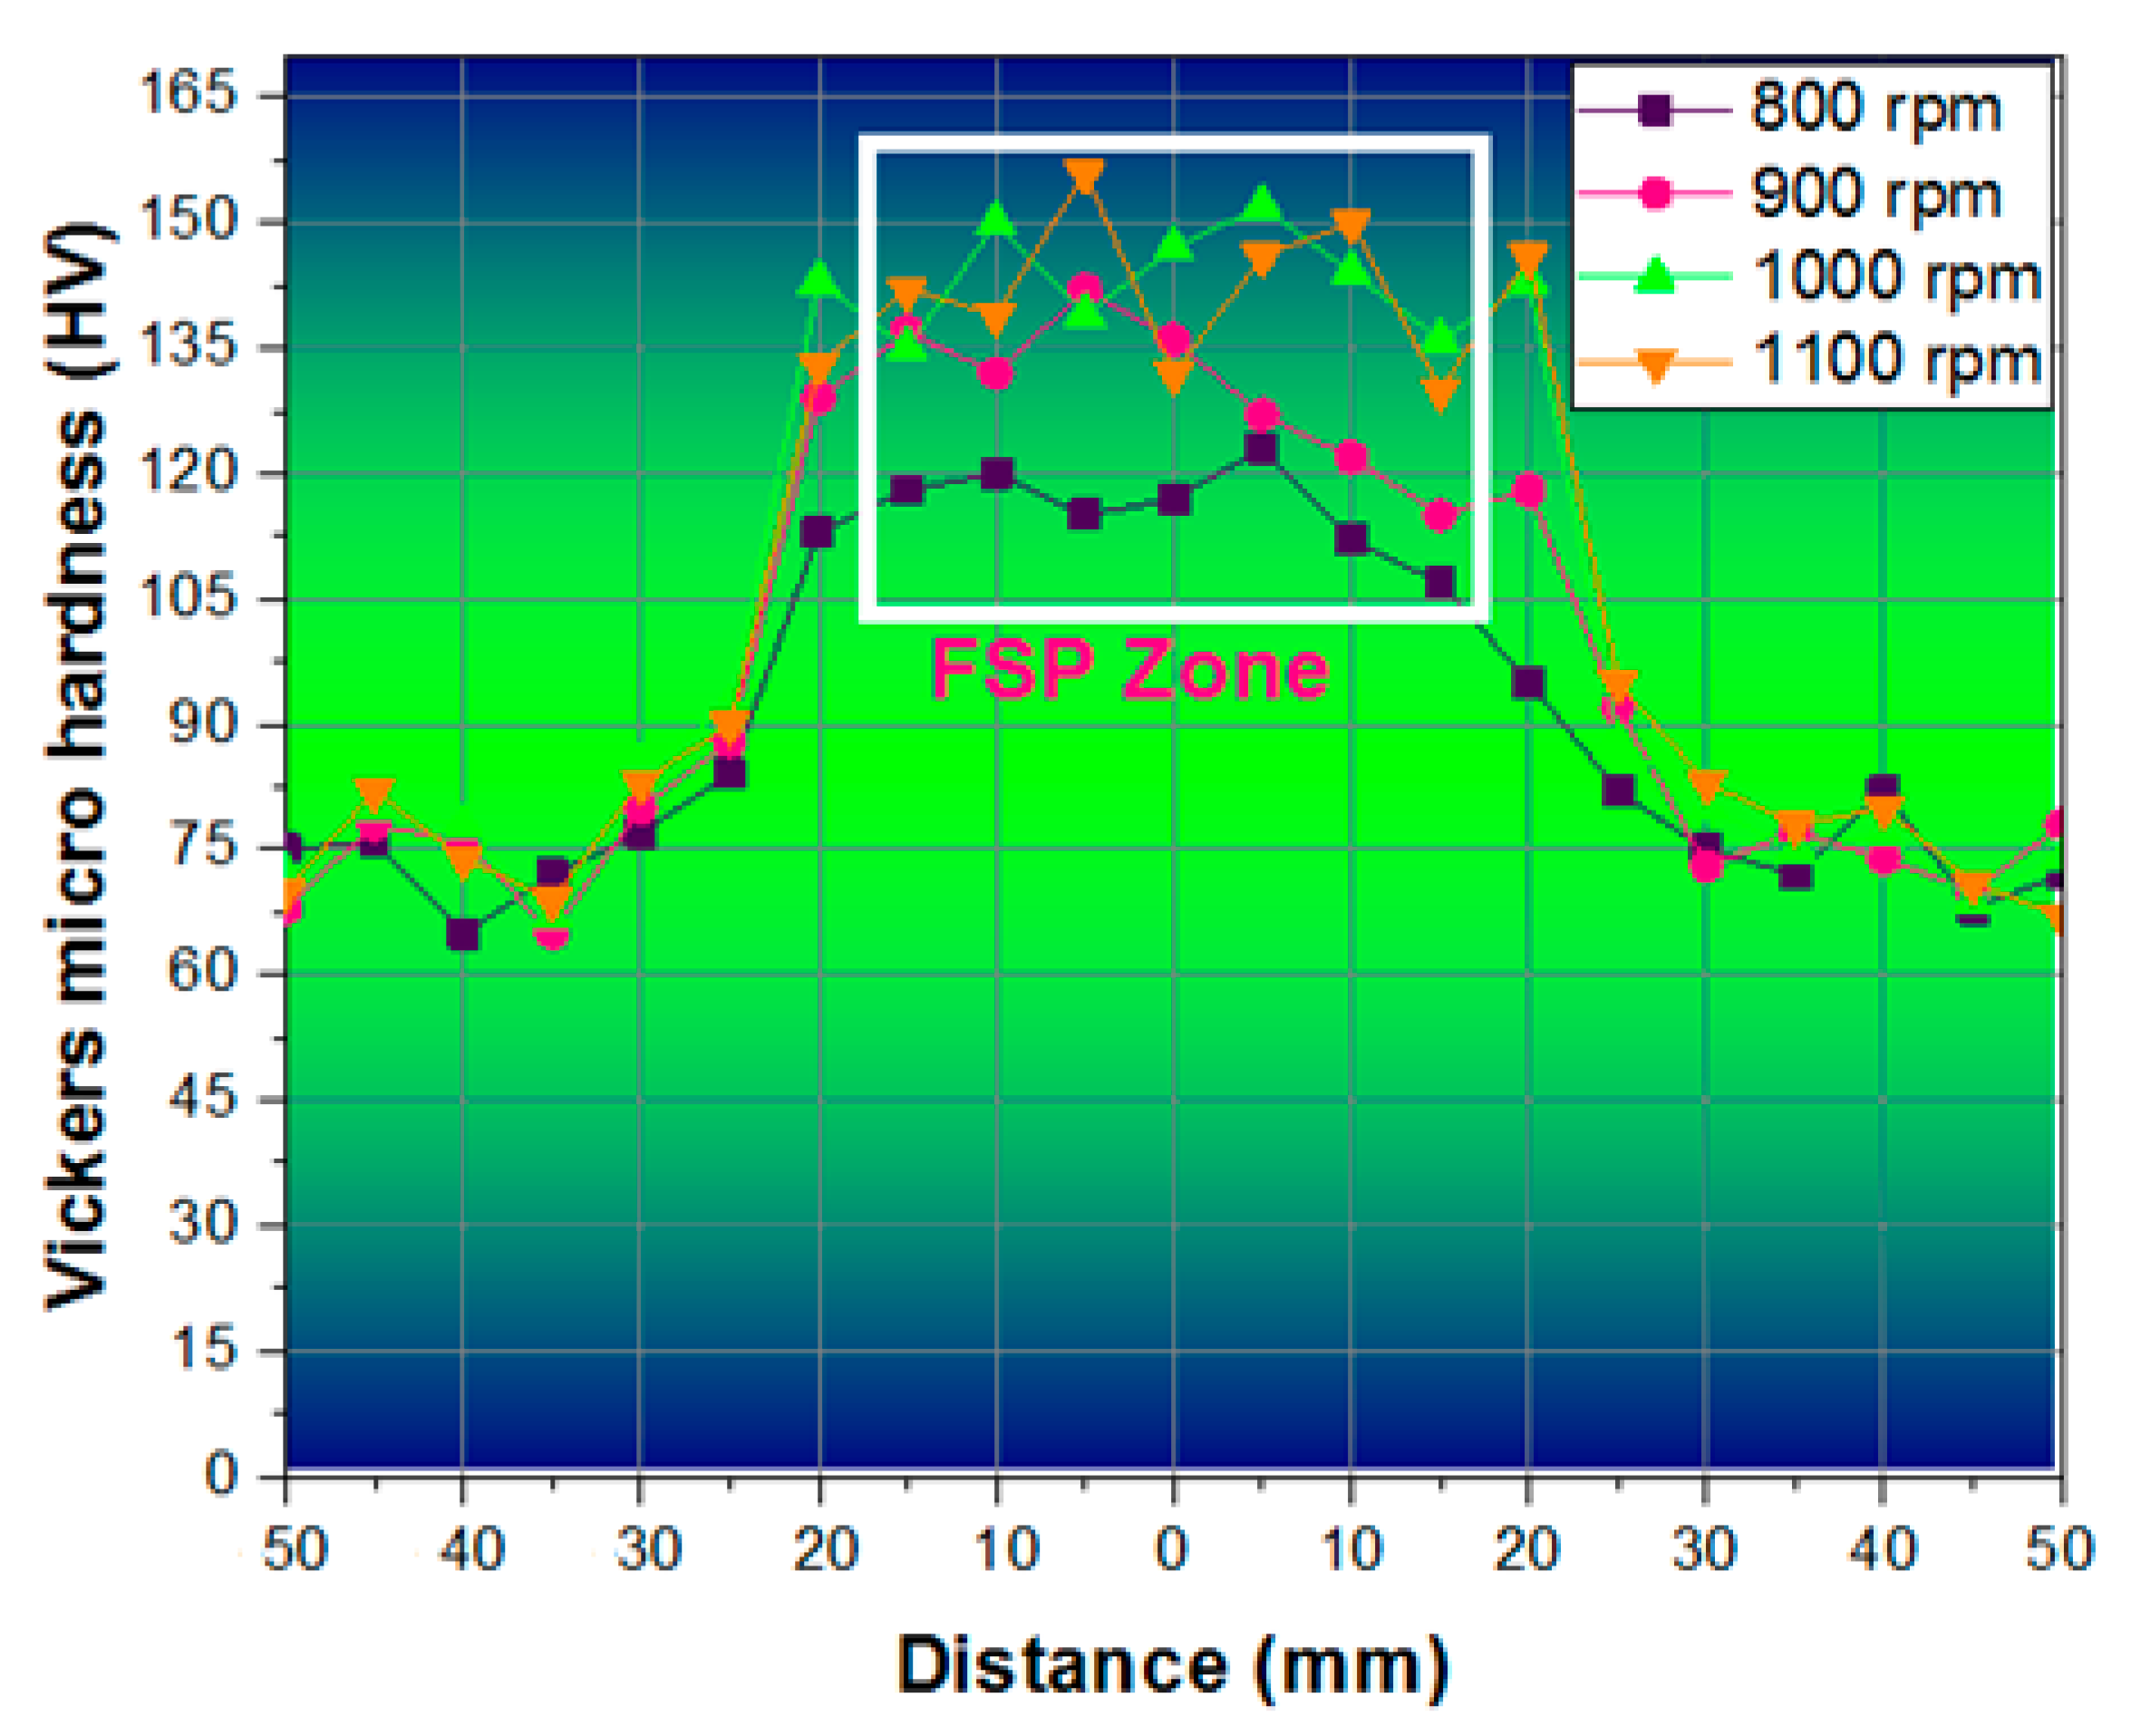
Table 4 presents the microhardness values for the various zones of the FSP using different tool speeds. Among the four speeds used, using a tool speed of 1100 rpm produced a high microhardness value of 148 Vickers Hardness Number (VHN) in the FSP zone. In the thermo-mechanically affected zone, it was 145 VHN; in the heat-affected zone, it was 142 VHN; and in the unaffected zone, it was 84 VHN.
The influence of FSP on the samples in terms of microhardness variation from the center of the weld to the extreme edges of the plate was investigated and presented in graphical form in Figure 7. The hardness was measured in the FSP zone (that is, the center of the weld), the thermo-mechanically affected zone (that is, the portion that suffered heat and mechanical force over the tool head), the heat-affected zone (next to the welded area that suffered heat generated during the FSP), and the unaffected zone (next to the heat-affected zone to edge of the plates). From the welding zone to the edge of the specimens, the length was divided into 10 equal distances on both sides (5 mm per division) and measurements were carried out.
The maximum hardness values were found in the friction stir processing zone. In the base (parent) material zone, the value of hardness was obtained in the range of 60 to 80 HV, but in the FSP zone the range was from 115 to 155 HV [21]. During FSP, high tool speeds broke the hard grains to form fine grains in the structure at the zone of stirring, thus improving the hardness. An excellent hardness value of 156 HV was found in the zirconia loaded on the groove between the sample edges (the FSP stirring zone) with regard to the tool rotational speed (1100 rpm). The zirconium dioxide intensified the hardness value in the FSP zone [22].

3.3. Corrosion Test Results of Friction Stir Processed Samples

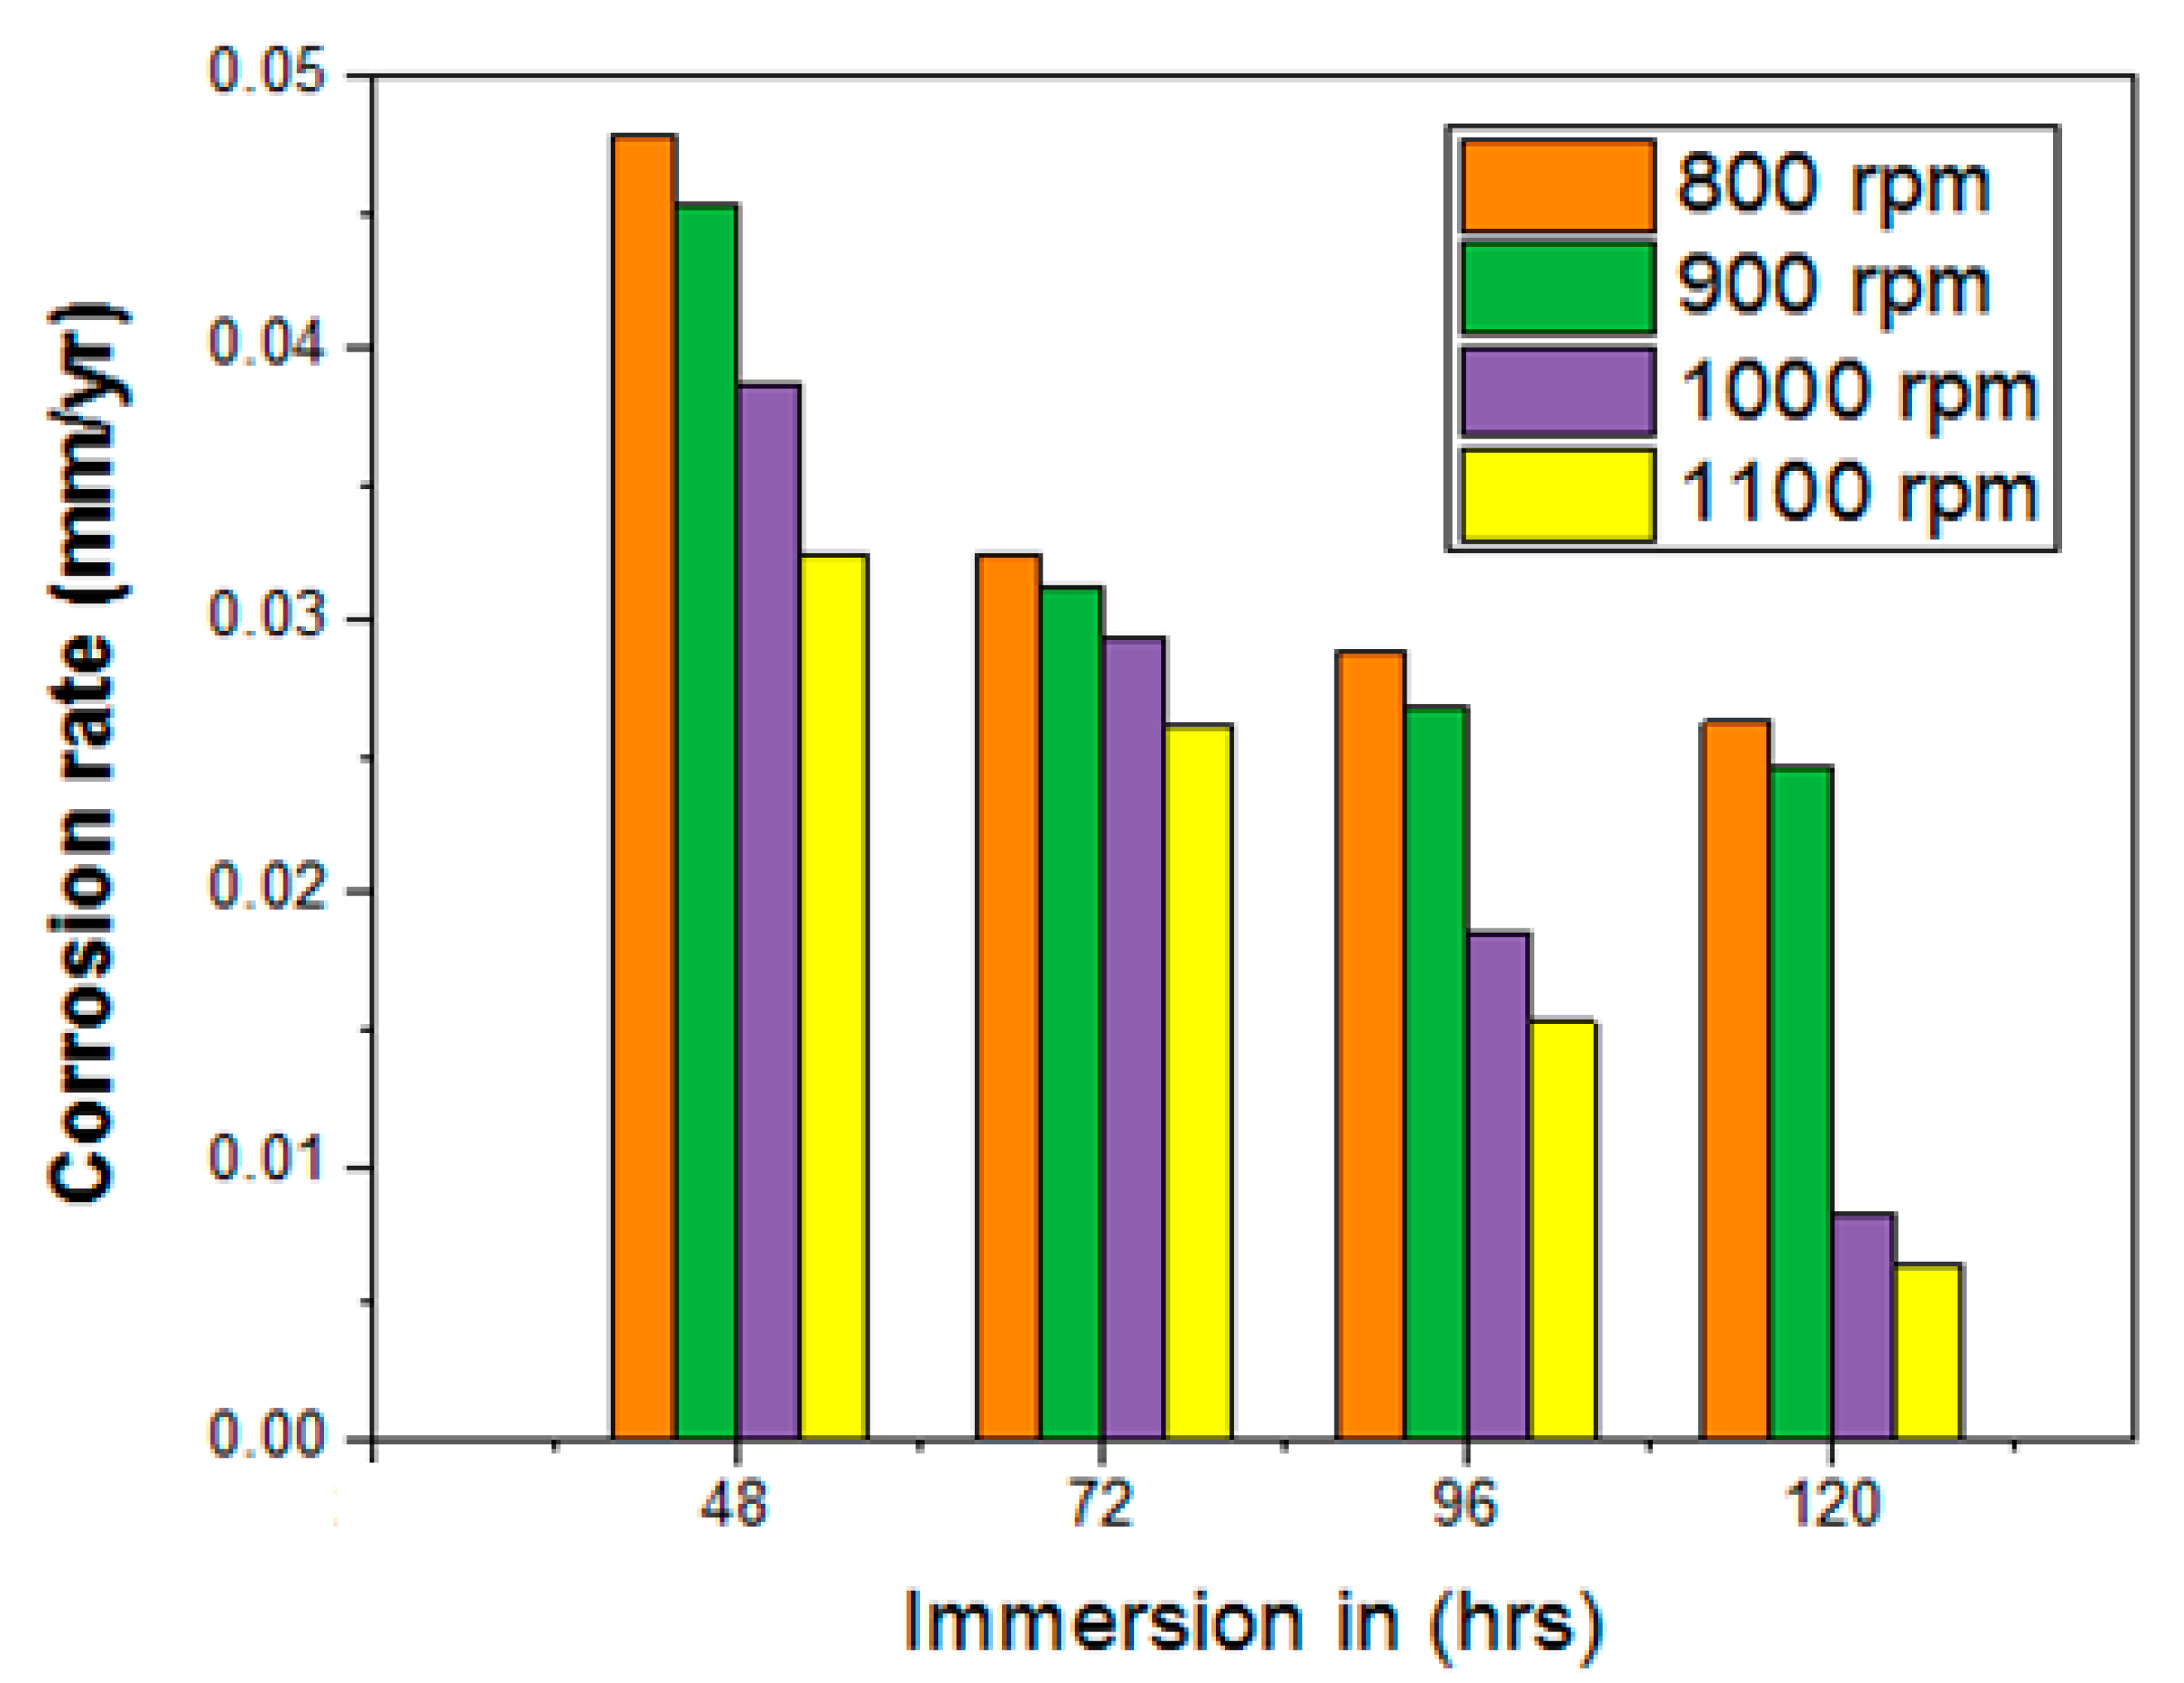
Immersion corrosion testing was carried out at different time periods with 3.5% of NaCl corrosion medium, as illustrated in Table 5. The tool rotational speed and corrosion rate are shown in Table 4.
The highest corrosion rate was obtained at the start of the test. Further increasing the time period caused the corrosion rate of the all samples to decrease consistently. The lowest corrosion rate of 0.0064 mm/yr was attained when a higher stirring speed (tool rotational) of 1100 rpm was influenced. Figure 8 shows the relationship between the immersion and corrosion rate in relation to the stirring speed (tool rotational). Hence, it is understood that an increase in stirring speed reduces the corrosion rate significantly. Across the whole immersion time period, the sample for which a 1100 rpm tool rotational speed was used attained an excellent corrosion resistance. Microstructure alteration increases the corrosion resistance, suggesting that tool speed is the major factor in FSP [23,24,25,26,27,28].

3.4. Results of Optical Microscopic Analysis on Friction Stir Processed Samples

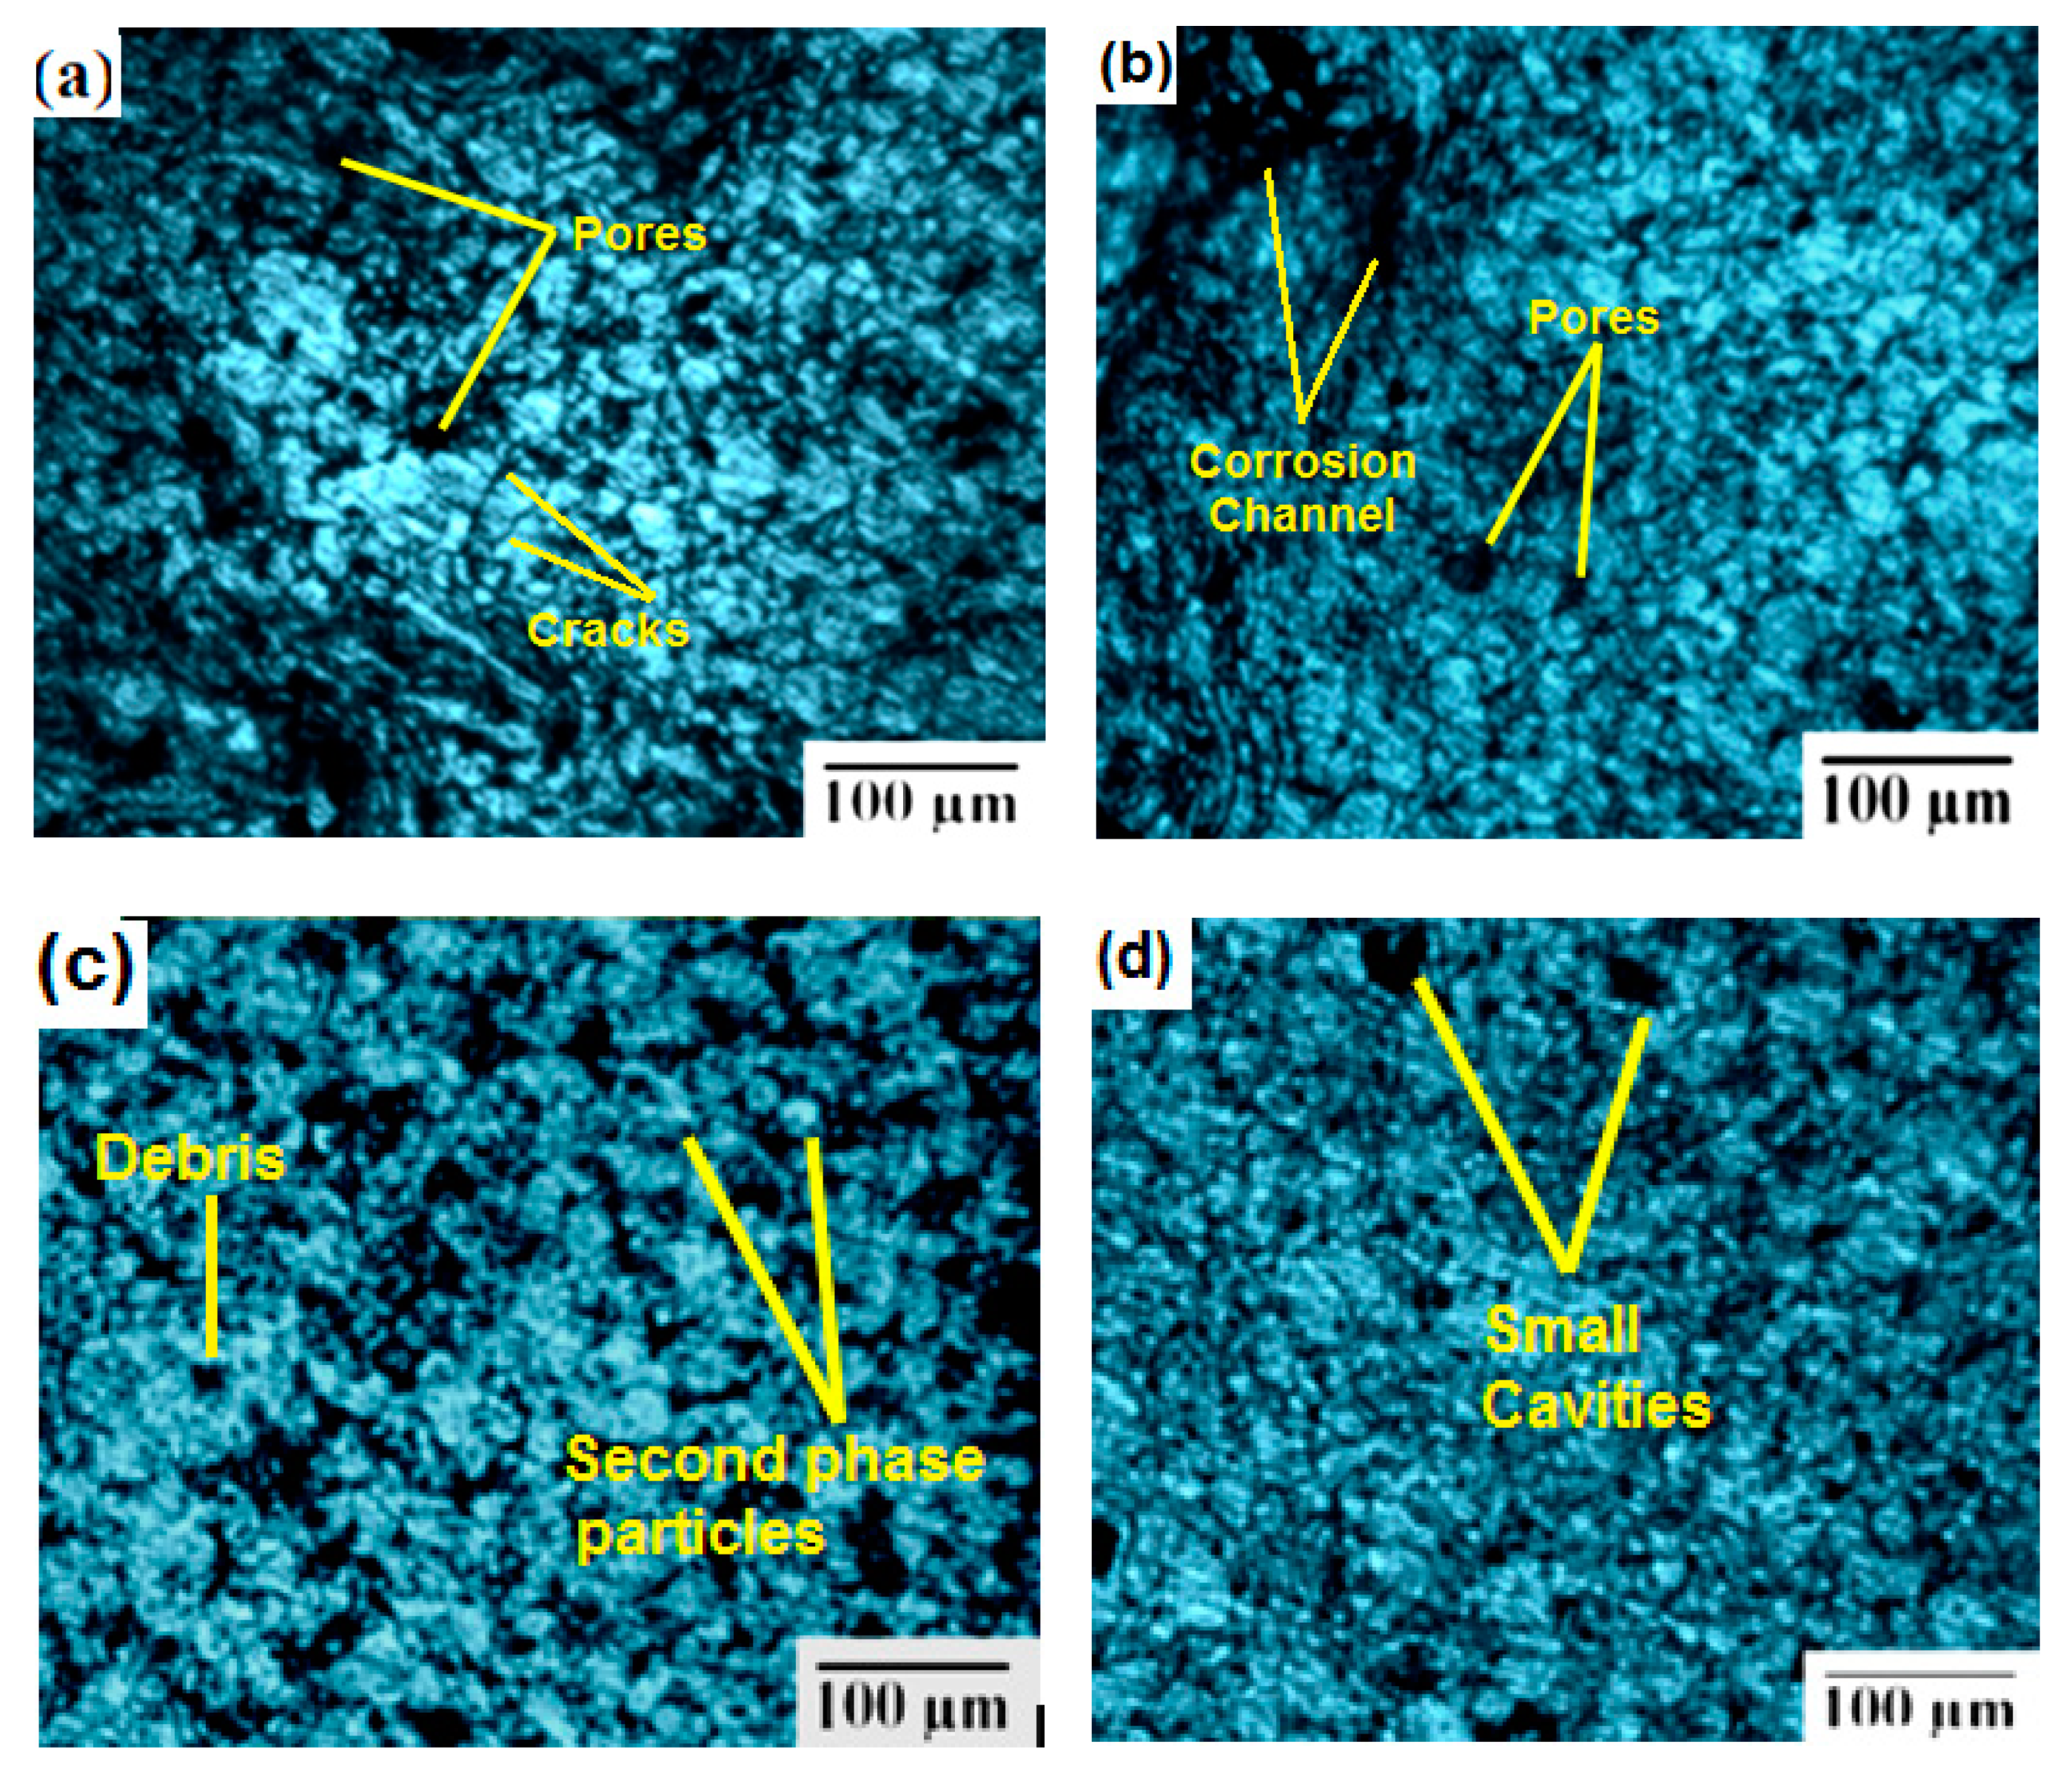
Optical microscopic images of the immersion corrosion test specimens were obtained. Figure 9 presents the four SEM images of the after-corrosion test specimens. These images show that the use of different tool speeds causes various defects on the corroded specimens. Defects of small holes due to variation in the melting of the grains are shown in Figure 9a–d. The images in Figure 9a,b show that the corrosion takes place evenly and that the zirconium dioxide particles are mixed well and appear on the surface randomly. In Figure 9c, it can be seen that the zirconium oxide particles are mixed uniformly and only a small amount of corrosion takes place. From Figure 9d, it can be seen that surface alteration can be performed effectively and very little corrosion occurs in the FSP zone. Different defects were identified in the images, such as pores, cracks, corrosion channels, second phase particles, small cavities, and debris. The corrosion varied based on the tool speed. A high tool speed offered low corrosion defects.

3.5. Surface Morphological Investigation on Samples with 2D Profilometry Images

In Figure 10a, it can be seen that the lack of stirring action in the bottom area causes a higher corrosion rate compared to the other samples. Figure 10b shows that a reasonable corrosion rate was attained due to low rotational speed, due to lack of grain modification in the FSP and it shown in a blue color. Figure 10c,d show that the corrosion takes place only in small amounts due to the high speed involved; the blue color is lightly shown in the image.

3.6. Surface Morphological Investigation on Samples with 3D Profilometry Images

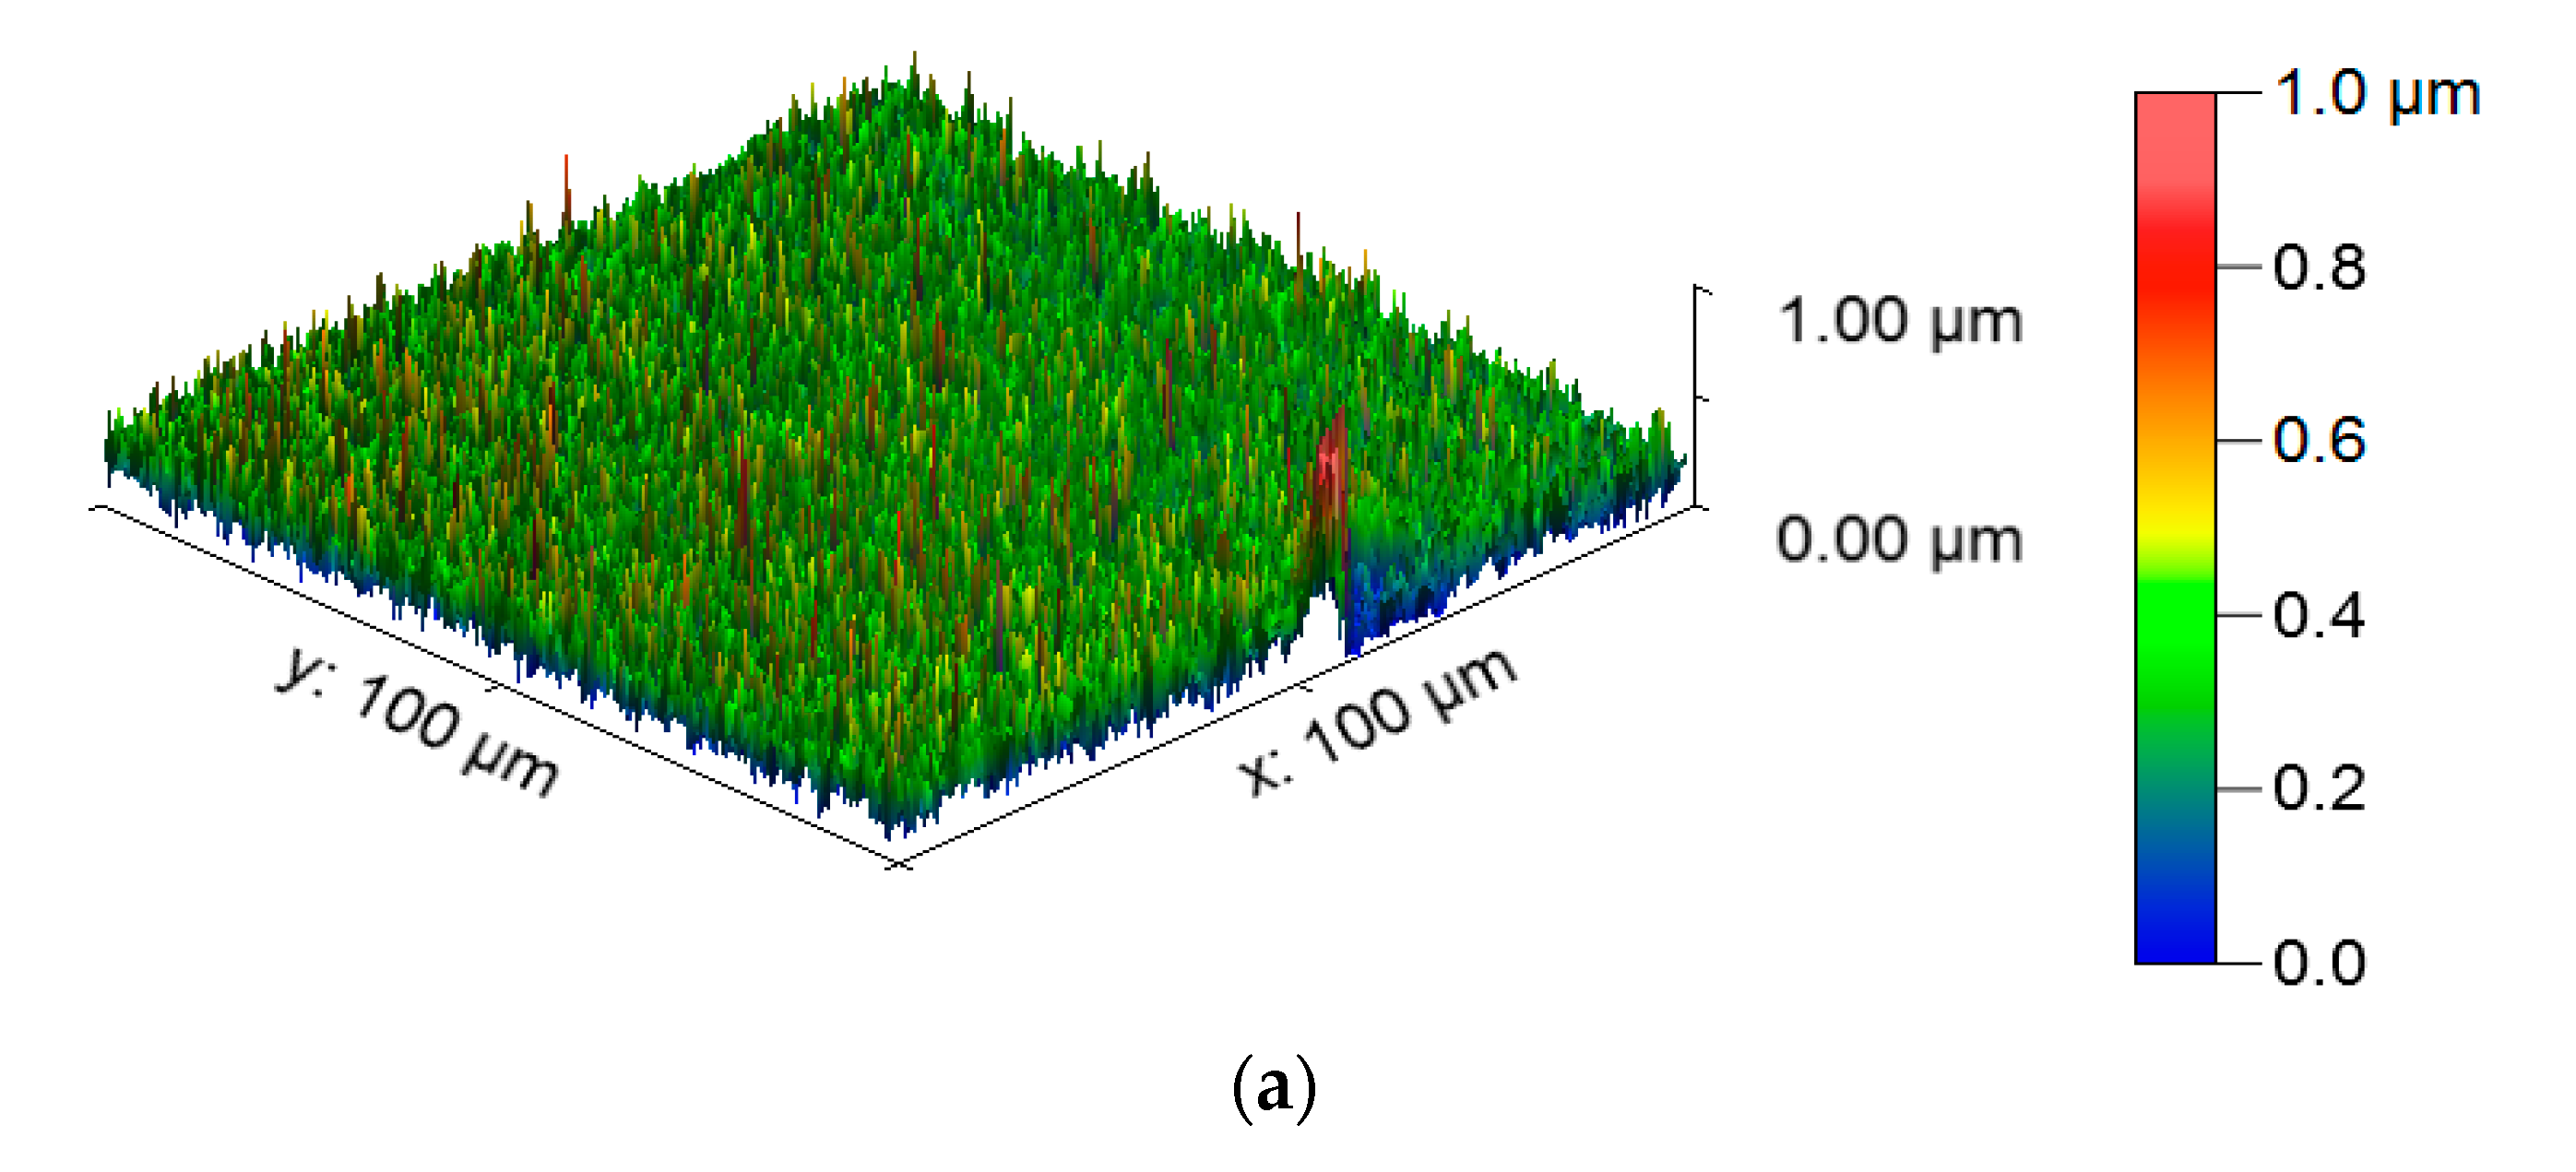
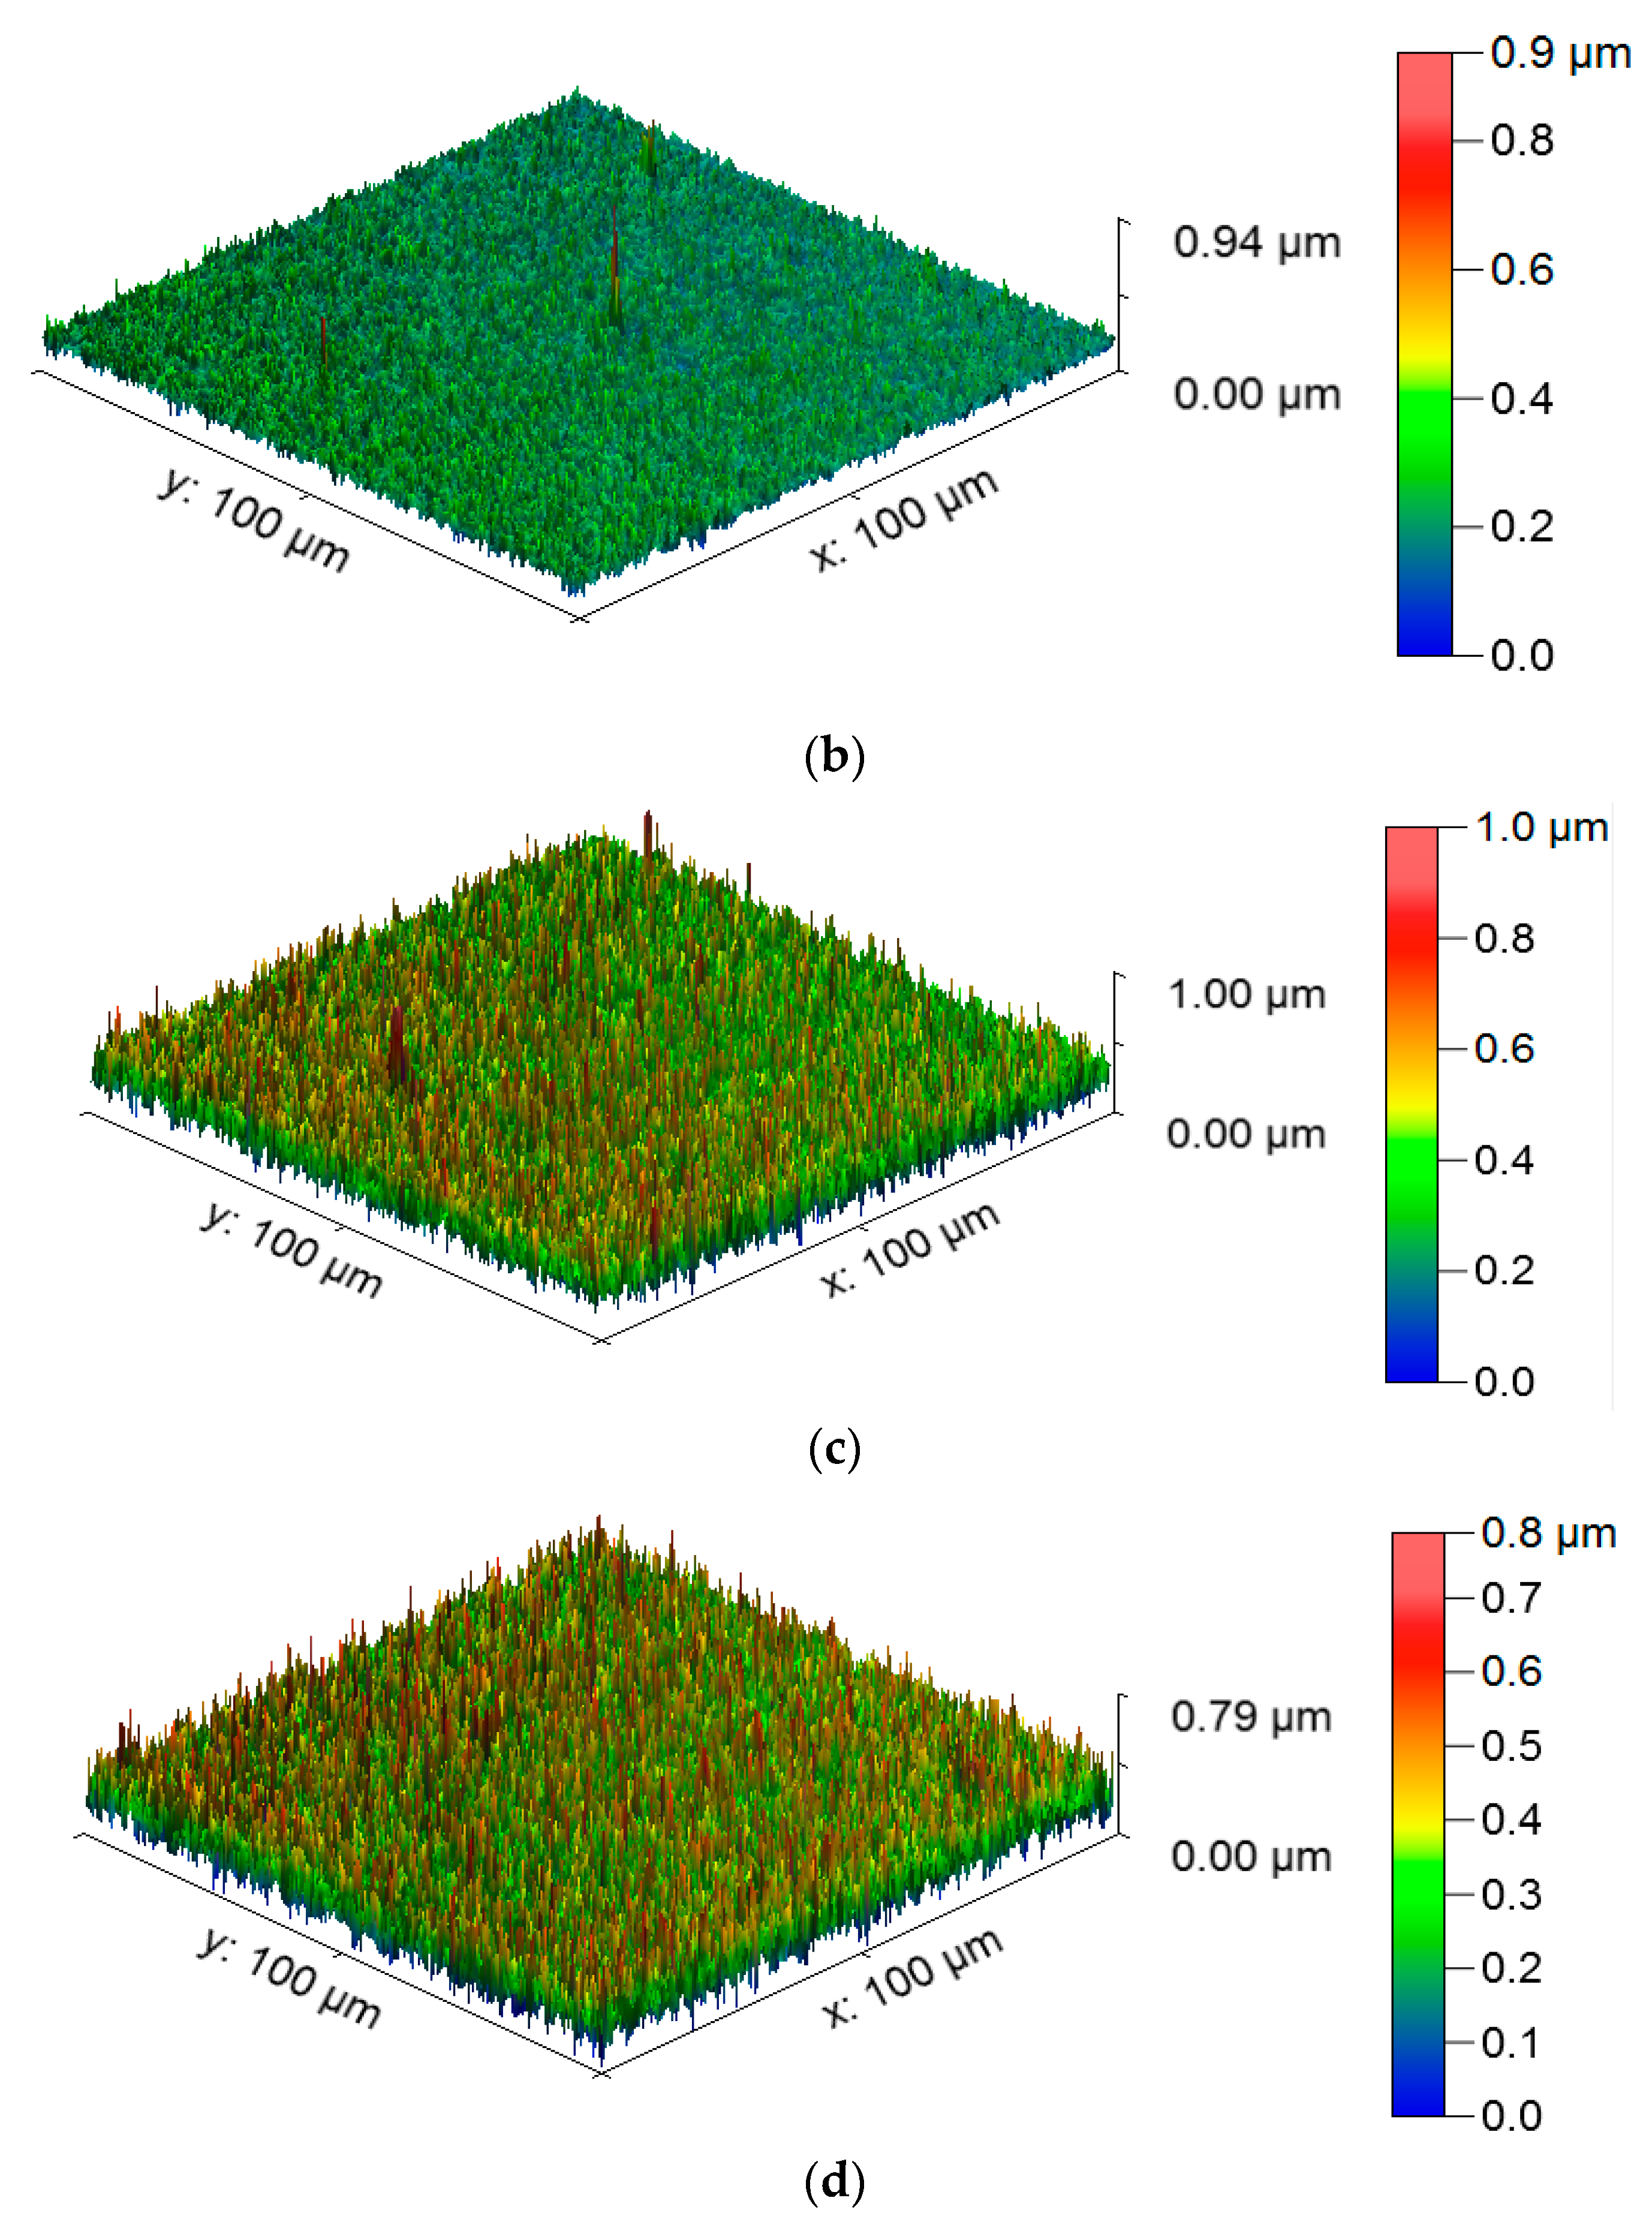
The SEM images (SEM; HITACHI, tested at AC Tech., Anna University, Chennai, India) were converted into 3D profilometry images of the corrosion test specimens; these are shown in Figure 10. The color scale bar indicates the blue, green, brown, and red colors for identifying the corrosion rate. In Figure 11a, the blue color shown in the bottom area shows that a large amount of corrosion took place. The small amount of blue color in Figure 11b denotes that the area was moderately corroded. Figure 11c,d shows a little blue color, meaning a small amount of corrosion took place. From all the images, it can be seen that a high tool rotational speed decreased the corrosion rate and increased the corrosion resistance due to the sufficient alteration in the grain structure.

4. Conclusions

The novel approach of friction stir processing for AA8006 with zirconium dioxide (zirconia) was carried out using a straight cylindrical tool. The investigations of the tensile strength corrosion resistance and the Vickers microhardness were conducted and the values were measured. The outcomes of this research are as follows:
  • In the tensile test, all four specimens were tested, and all the specimens’ tensile strength increased with the increase in the stirring (tool rotational) speed. The maximum tensile strength obtained was 284 MPa with a stirring speed of 1100 rpm. This clearly confirms that an increased speed and high temperature modify the grains in the surface structure.
  • The hardness development in the FSP samples revealed an improved Vickers microhardness of 156 HV at the friction stir processing zone for a higher stirring speed of 1100 rpm. The investigation results show that there was an increase in the Vickers microhardness at the friction stir processing zone with an increase in the stirring speed. The microhardness of the base materials also improved a little.
  • The investigation of corrosion resistance in the friction stir processed samples revealed that the corrosion resistance could be altered by altering the stirring speed. The corrosion rate increased then gradually decreased when the length of immersion increased. The minimum corrosion rate achieved was 0.0064 mm/yr with a 1100 rpm stirring speed.
  • OM and SEM images of the 2D and 3D profilometry were taken to see whether the corrosion resistance of the all specimens was improved by the friction stir processing, It was found that using a lower stirring speed causes small holes in the friction stir-processed specimens.
  • Our findings are that the AA8006 material is friction stir weldable. The quality of the weld can be improved by friction stir processing. The rate of stirring decides the corrosion resistance, tensile strength, and microhardness in the welded zone. That is, the process can be controlled by altering the stirring speed to obtain the desired corrosion resistance, tensile strength, and microhardness.
  • This investigation utilized the well-known reinforcement agent zirconia for friction stir processing. Our investigation will be extended with some other reinforcements. This investigation considered AA8006 alloy plates with a fixed thickness for FSP. The thickness will be altered and standardized for commercial use.

Author Contributions

Conceptualization, T.S. and A.R.R.K.; data curation, V.M.; formal analysis, K.A., A.A. (Asif Afzal), and M.B.; funding acquisition, A.A. (Asif Afzal); investigation, M.B.; methodology, A.A. (Abdul Aabid) and T.S.; project administration, K.A.; resources, B.S. and M.B.; software, M.B. and B.S.; supervision, A.A. (Asif Afzal), T.S., and M.B.; writing—original draft, B.S. and V.M.; writing—review and editing, A.R.R.K. and T.S. All authors have read and agreed to the published version of the manuscript.

Funding

This research is supported by the Structures and Materials (S&M) Research Lab of Prince Sultan University. Furthermore, the authors acknowledge the support of Prince Sultan University for paying the article processing charges (APC) of this publication.

Institutional Review Board Statement

Not applicable.

Informed Consent Statement

Not applicable.

Data Availability Statement

Raw data available from the corresponding authors upon request.

Acknowledgments

This study is supported by Taif University Researchers Supporting Project number (TURSP-2020/49), Taif University, Taif, Saudi Arabia. The authors would like to thank Taif University for financial support.

Conflicts of Interest

The authors declare no conflict of interest.

Nomenclature

MPaMega Pascal
rpmrevolution per minute
Mm/minmillimeter per minute
FSPFriction Stir Processing
FSWFriction Stir Welding
SEMScanning Electron Microscopy
ONOptical Microscopy
kNkilo-Newton
teTime of Exposure
accross sectional area
∆Wreduction in specimen weight
ρ mass density
NaClsodium chloride
ASTMAmerican Society for Testing and Materials
GGrams
UTM Universal Testing Machine
CNC Computer Numerical Control
ZrO2 zirconia (or) zirconium dioxide
TIGTungsten Inert Gas
AMCaluminum metal matrix composite
TiB2titanium diboride
BNboron nitride
Al0.3CoCrCu0.3FeNi   a kind of high-entropy alloy

References

  1. Sharma, A.; Sharma, V.M.; Mewar, S.; Pal, S.K.; Paul, J. ‘Friction stir processing of Al6061-SiC-graphite hybrid surface composites. Mater. Manuf. Process. 2017, 1–9. [Google Scholar] [CrossRef]
  2. Li, K.; Liu, X.; Zhao, Y. Research status and prospect of friction stir processing technology. Coatings 2019, 9, 129. [Google Scholar] [CrossRef] [Green Version]
  3. Palanivel, R.; Dinaharan, I.; Laubscher, R.F.; Davim, J.P. Influence of boron nano particles on microstructure and wear behavior of AA6082/ TiB2 hybrid aluminium composites synthesized by friction stir processing. Mater. Des. 2016, 106, 195–204. [Google Scholar] [CrossRef]
  4. Rana, H.; Badheka, V. Influence of Friction stir processing conditions on the manufacturing of Al Mg-Zn-Cu alloy/boron carbide surface composite. J. Mater. Process. Technol. 2018. [Google Scholar] [CrossRef]
  5. Saravanan, R.; Rao, M.S.; Malyadri, T.; Sunkara, N. Profile optimization in tooltip for FSW process—A numerical investigation. In Recent Trends in Mechanical Engineering. Lecture Notes in Mechanical Engineering; Narasimham, G., Babu, A., Reddy, S., Dhanasekaran, R., Eds.; Springer: Singapore, 2020; pp. 373–385. [Google Scholar] [CrossRef]
  6. Sivaraman, P.; Nithyanandhan, T.; Karthick, M.; Kirivasan, S.M.; Rajarajan, S.; Sundar, M.S. Analysis of tensile strength of AA 2014 and AA 7075 dissimilar metals using friction stir welding. Mater. Today Proc. 2020, 37, 187–192. [Google Scholar] [CrossRef]
  7. Pandiyarajan, R.; Maran, P.; Marimuthu, S.; Arumugam, K. Mechanical and metallurgical characterization of friction stir welded AA6061-ZrO2-C hybrid MMCs. Mater. Today Proc. 2019, 19, 256–259. [Google Scholar] [CrossRef]
  8. Sivaraman, P.; Prabhu, M.K.; Nithyanandhan, T.; Mohammed Razzaq, M.; Kousik, K.; Abraham, D.D. Development of aluminum based AA 2014 and AA 7075 dissimilar metals for aerospace applications. Mater. Today Proc. 2021, 37, 522–526. [Google Scholar] [CrossRef]
  9. Ramamoorthi, R.; Yuvaraj, K.P.; Gokul, C.; Eashwar, S.J.; Arunkumar, N.; Dheen, S.A.T. An investigation of the impact of axial force on friction stir-welded AA5086/AA6063 on microstructure and mechanical properties butt joints. Mater. Today Proc. 2020. [Google Scholar] [CrossRef]
  10. Mohamed, M.F.; Yaknesh, S.; Kumar, C.A.; Rajadurai, J.G.; Janarthanan, S.; Vignes, A.V. Optimization of friction stir welding parameters for enhancing welded joints strength using Taguchi based grey relational analysis. Mater. Today Proc. 2020, 39, 676–681. [Google Scholar] [CrossRef]
  11. Lin, P.T.; Liu, H.C.; Hsieh, P.Y.; Wei, C.Y.; Tsai, C.W.; Sato, Y.S.; Chen, S.C.; Yen, H.W.; Lu, N.H.; Chen, C.H. Heterogeneous structure-induced strength-ductility synergy by partial recrystallization during friction stir welding of a high-entropy alloy. Mater. Des. 2021, 197, 109238. [Google Scholar] [CrossRef]
  12. Sanusi, K.O.; Akinlabi, E.T. Friction-stir processing of a composite aluminum alloy (AA 1050) reinforced with Titanium carbide powder. Mater. Techol. 2017, 3, 427–435. [Google Scholar] [CrossRef]
  13. Selvakumar, S.; Dinaharan, I.; Palanivel, R.; Babu, B.G. Development of stainless steel particulate reinforced AA6082 aluminum matrix composites with enhanced ductility using friction stir processing. Mater. Sci. Eng. A 2017, 685, 317–326. [Google Scholar] [CrossRef]
  14. Sivanesh Prabhu, M.; Elaya Perumal, A.; Arulvel, S.; Franklin, I.R. Friction and wear measurements of friction stir processed aluminium alloy 6082/CaCO3 composite. Measurement 2019, 10–20. [Google Scholar] [CrossRef]
  15. Thangarasu, A.; Murugan, N.; Dinaharan, I.; Vijay, S.J. Synthesis and characterization of titanium carbide particulate reinforced AA6082 aluminium alloy composites via friction stir processing. Arch. Civil Mech. Eng. 2014. [Google Scholar] [CrossRef]
  16. Suvarna, R.L.; Kumar, A. Influence of Al2O3 particles on the microstructure and mechanical properties of copper surface composites fabricated by friction stir processing. Def. Technol. 2014, 10, 375–383. [Google Scholar] [CrossRef] [Green Version]
  17. Sudhakar, I.; Reddy, G.M.; Rao, K.S. Ballistic behavior of boron carbide reinforced AA7075 aluminium alloy using friction stir processing—An experimental study and analytical approach. Def. Technol. 2016, 12, 25–31. [Google Scholar] [CrossRef] [Green Version]
  18. Du, Z.; Tan, M.J.; Guo, J.F.; Bi, G.; Wei, J. Fabrication of a new Al-Al2O3-CNTs composite using friction stir processing (FSP). Mater. Sci. Eng. A 2016, 667, 125–131. [Google Scholar] [CrossRef]
  19. Dinaharan, I.; Akinlabi, E.T.; Hattingh, D.G. Microstructural characterization and sliding wear behavior of Cu/TiC copper matrix composites developed using friction stir processing. Metallogr. Microstruct. Anal. 2018, 7, 464–475. [Google Scholar] [CrossRef]
  20. Liu, D.; Xin, R.; Zhao, L.; Hu, Y.; Zhang, J. Evaluation of corrosion and wear resistance of friction stir welded ZK60 alloy. Sci. Technol. Weld. Joining 2017, 22, 601–609. [Google Scholar] [CrossRef]
  21. Abreu, C.M.; Acuña, R.; Cabeza, M.; Cristóbal, M.J.; Merino, P.; Verdera, D. Microstructure and mechanical properties of Al/SiC composite surface layer produced by friction stir processing. Ciencia Tecnol. Mater. 2017, 29, e82–e86. [Google Scholar] [CrossRef]
  22. Rana, H.G.; Badheka, V.J.; Kumar, A. Fabrication of Al7075 / B4C surface composite by novel Friction Stir Processing (FSP) and investigation on wear properties. Proc. Technol. 2016, 23, 519–528. [Google Scholar] [CrossRef] [Green Version]
  23. Chaluvaraju, B.V.; Afzal, A.; Vinnik, D.A.; Kaladgi, A.R.; Alamri, S.; Tirth, V. Mechanical and corrosion studies of friction stir welded nano Al2O3 reinforced Al-Mg matrix composites: RSM-ANN modelling approach. Symmetry 2021, 13, 537. [Google Scholar] [CrossRef]
  24. Nagaraja, S.; Nagegowda, K.U.; Kumar, V.A.; Alamri, S.; Afzal, A.; Thakur, D.; Kaladgi, A.R.; Panchal, S.; Saleel, C.A. Influence of the fly ash material inoculants on the tensile and impact characteristics of the aluminum AA 5083/7.5SiC composites. Materials 2021, 14, 2452. [Google Scholar] [CrossRef]
  25. Sharath, B.N.; Venkatesh, C.V.; Afzal, A.; Ahmed, M.; Baig, A.; Kumar, A.P. Study on effect of ceramics on dry sliding wear behaviour of Al-Cu-Mg based metal matrix composite at different temperature. Mater. Today Proc. 2021. [CrossRef]
  26. Sharath, B.N.; Jeevan, T.P.; Baig, M.A.; Ashrith, H.S.; Afzal, A.; Reddy, A.R. Machinability studies on boron carbide and graphite reinforced aluminium hybrid composites. Mater. Today Proc. 2021. [Google Scholar] [CrossRef]
  27. Guggari, G.S.; Shivakumar, S.; Nikhil, R.; Manjunath, G.A.; Afzal, A.; Saleel, C.A. Experimental investigation of mechanical properties of Acrylonitrile Butadiene Styrene ( ABS ) based polymer for Submersible pumps Experimental investigation of mechanical properties of Acrylonitrile Butadiene Styrene ( ABS ) based polymer for Submersible. IOP Conf. Ser. Mater. Sci. Eng. 2021, 1065, 12035. [Google Scholar] [CrossRef]
  28. Kaladgi, A.R.; Rehman, K.F.; Afzal, A.; Baig, M.A.; Soudagar, M.E.; Bhattacharyya, S. Fabrication characteristics and mechanical behaviour of aluminium alloy reinforced with Al2O3 and coconut shell particles synthesized by stir casting Fabrication characteristics and mechanical behaviour of aluminium alloy reinforced with Al2O3 and c. IOP Conf. Ser. Mater. Sci. Eng. 2021, 1057. [Google Scholar] [CrossRef]
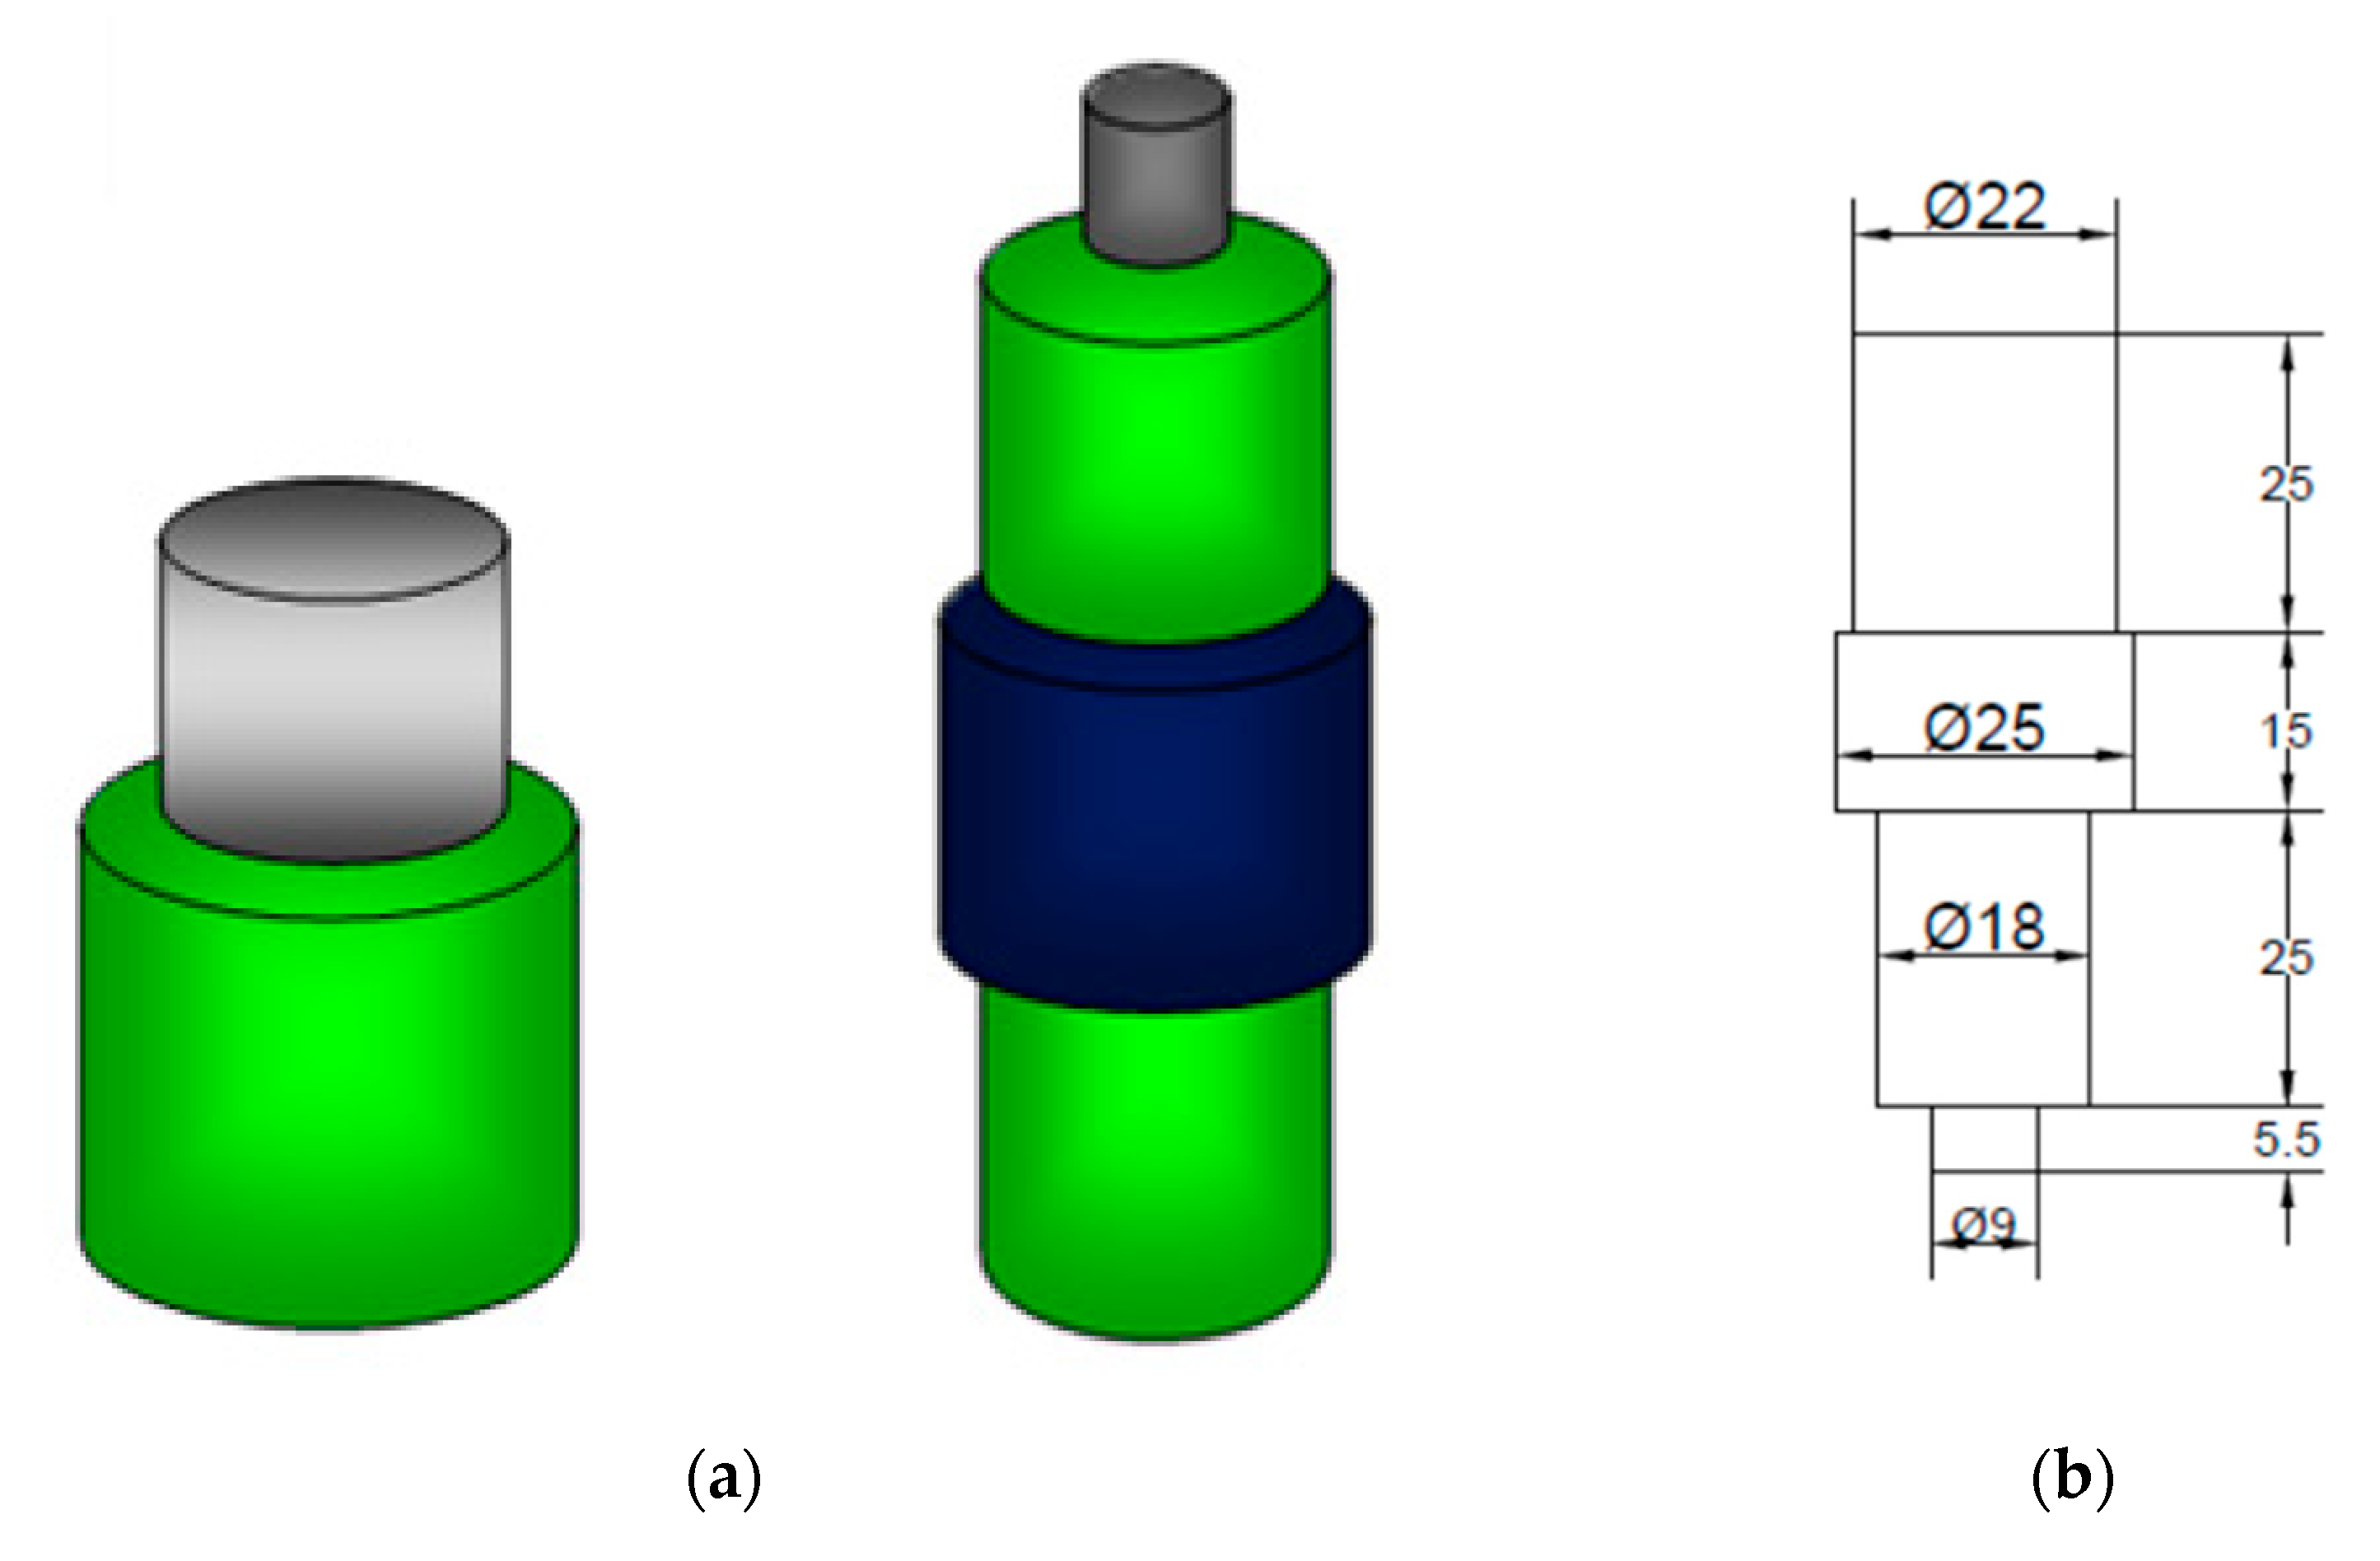
Figure 1. FSP tool: (a) compacting and FSP tool shape feature; (b) dimensional feature of FSP tool; (c) fabricated FSP tool.
Materials 14 02782 g001aMaterials 14 02782 g001b
Figure 2. FSP process procedure: (a) square groove on the base material; (b) reinforced particles filling in the groove; (c) compaction process using a pinless tool; and (d) FSP process.
Materials 14 02782 g002aMaterials 14 02782 g002b
Figure 3. Image of tensile test (a) before fracture, (b) after fracture.
Materials 14 02782 g003
Figure 4. Corrosion tested samples of (a) Expt. 1, (b) Expt. 2, (c) Expt. 3, and (d) Expt. 4.
Materials 14 02782 g004
Figure 5. Average tensile strength of the welded joints at various stirring speeds.
Materials 14 02782 g005
Figure 6. Stress strain curves of the different specimens.
Materials 14 02782 g006
Figure 7. Vickers microhardness test graph (distance vs. microhardness).
Materials 14 02782 g007
Figure 8. Corrosion test graph, immersion vs. corrosion rate.
Materials 14 02782 g008
Figure 9. Optical microscopic image of corrosion test specimen: (a) Expt. 1, (b) Expt. 2, (c) Expt. 3, and (d) Expt. 4.
Materials 14 02782 g009
Figure 10. 2D laser profilometry of the corrosion test. (a) Expt. 1, (b) Expt. 2, (c) Expt. 3, and (d) Expt. 4.
Materials 14 02782 g010
Figure 11. 3D laser profilometry of the corrosion test: (a) Expt. 1, (b) Expt. 2, (c) Expt. 3, and (d) Expt. 4.
Materials 14 02782 g011aMaterials 14 02782 g011b
Table 1. Constituents of the AA8006 alloy.
Name of the Constituent in AA8006 AlloyChemical SymbolPercentage of Contribution
ZincZn0.75%
MagnesiumMg0.69%
CopperCu0.27%
SiliconSi0.36%
IronFe1.60%
ManganeseMn0.58%
AluminumAl95.60%
Other Elements Each-0.04%
Total Sum of Others-0.11%
Table 2. Description of theprocess parameters used for FSP.
Experimental. Index.Stirring (Tool Pin Rotational) Speed (rpm)Traverse Speed of Tool Head (mm per min)Compressive Force on Tool (kN)Tool Tilt Angle in Degree
18004032
29004032
310004032
411004032
Table 3. Friction stir processing parameters used.
Experimental. IndexStirring (Tool Pin Rotational) Speed (rpm)Traverse Speed of Tool Head (mm per min)Compressive Force on Tool (kN)Tool Tilt Angle in Degrees
18004032
29004032
310004032
411004032
Table 4. Microhardness for the various zones of the FSP using different tool speeds.
Average Microhardness Values in Various Zones
Expt.
Index
Tool Pin Rotational Speed (rpm)Unaffected ZoneHeat-Affected ZoneThermo-Mechanically Affected ZoneFSP Zone
180075109114115
290077120122124
3100080133138141
4110084142145148
Table 5. Summary of the corrosion test.
Specimen No.Tool Pin Rotational Speed (rpm)Corrosion Rate (mm/yr)
48 h72 h96 h120 h
18000.04780.03240.02890.0263
29000.04530.03120.02680.0247
310000.03870.02940.01860.00821
411000.03240.02620.01530.0064
Publisher’s Note: MDPI stays neutral with regard to jurisdictional claims in published maps and institutional affiliations.