WEDM Used for Machining High Entropy Alloys
Abstract
:1. Introduction
Literature Review
2. Experimental Setup and Material
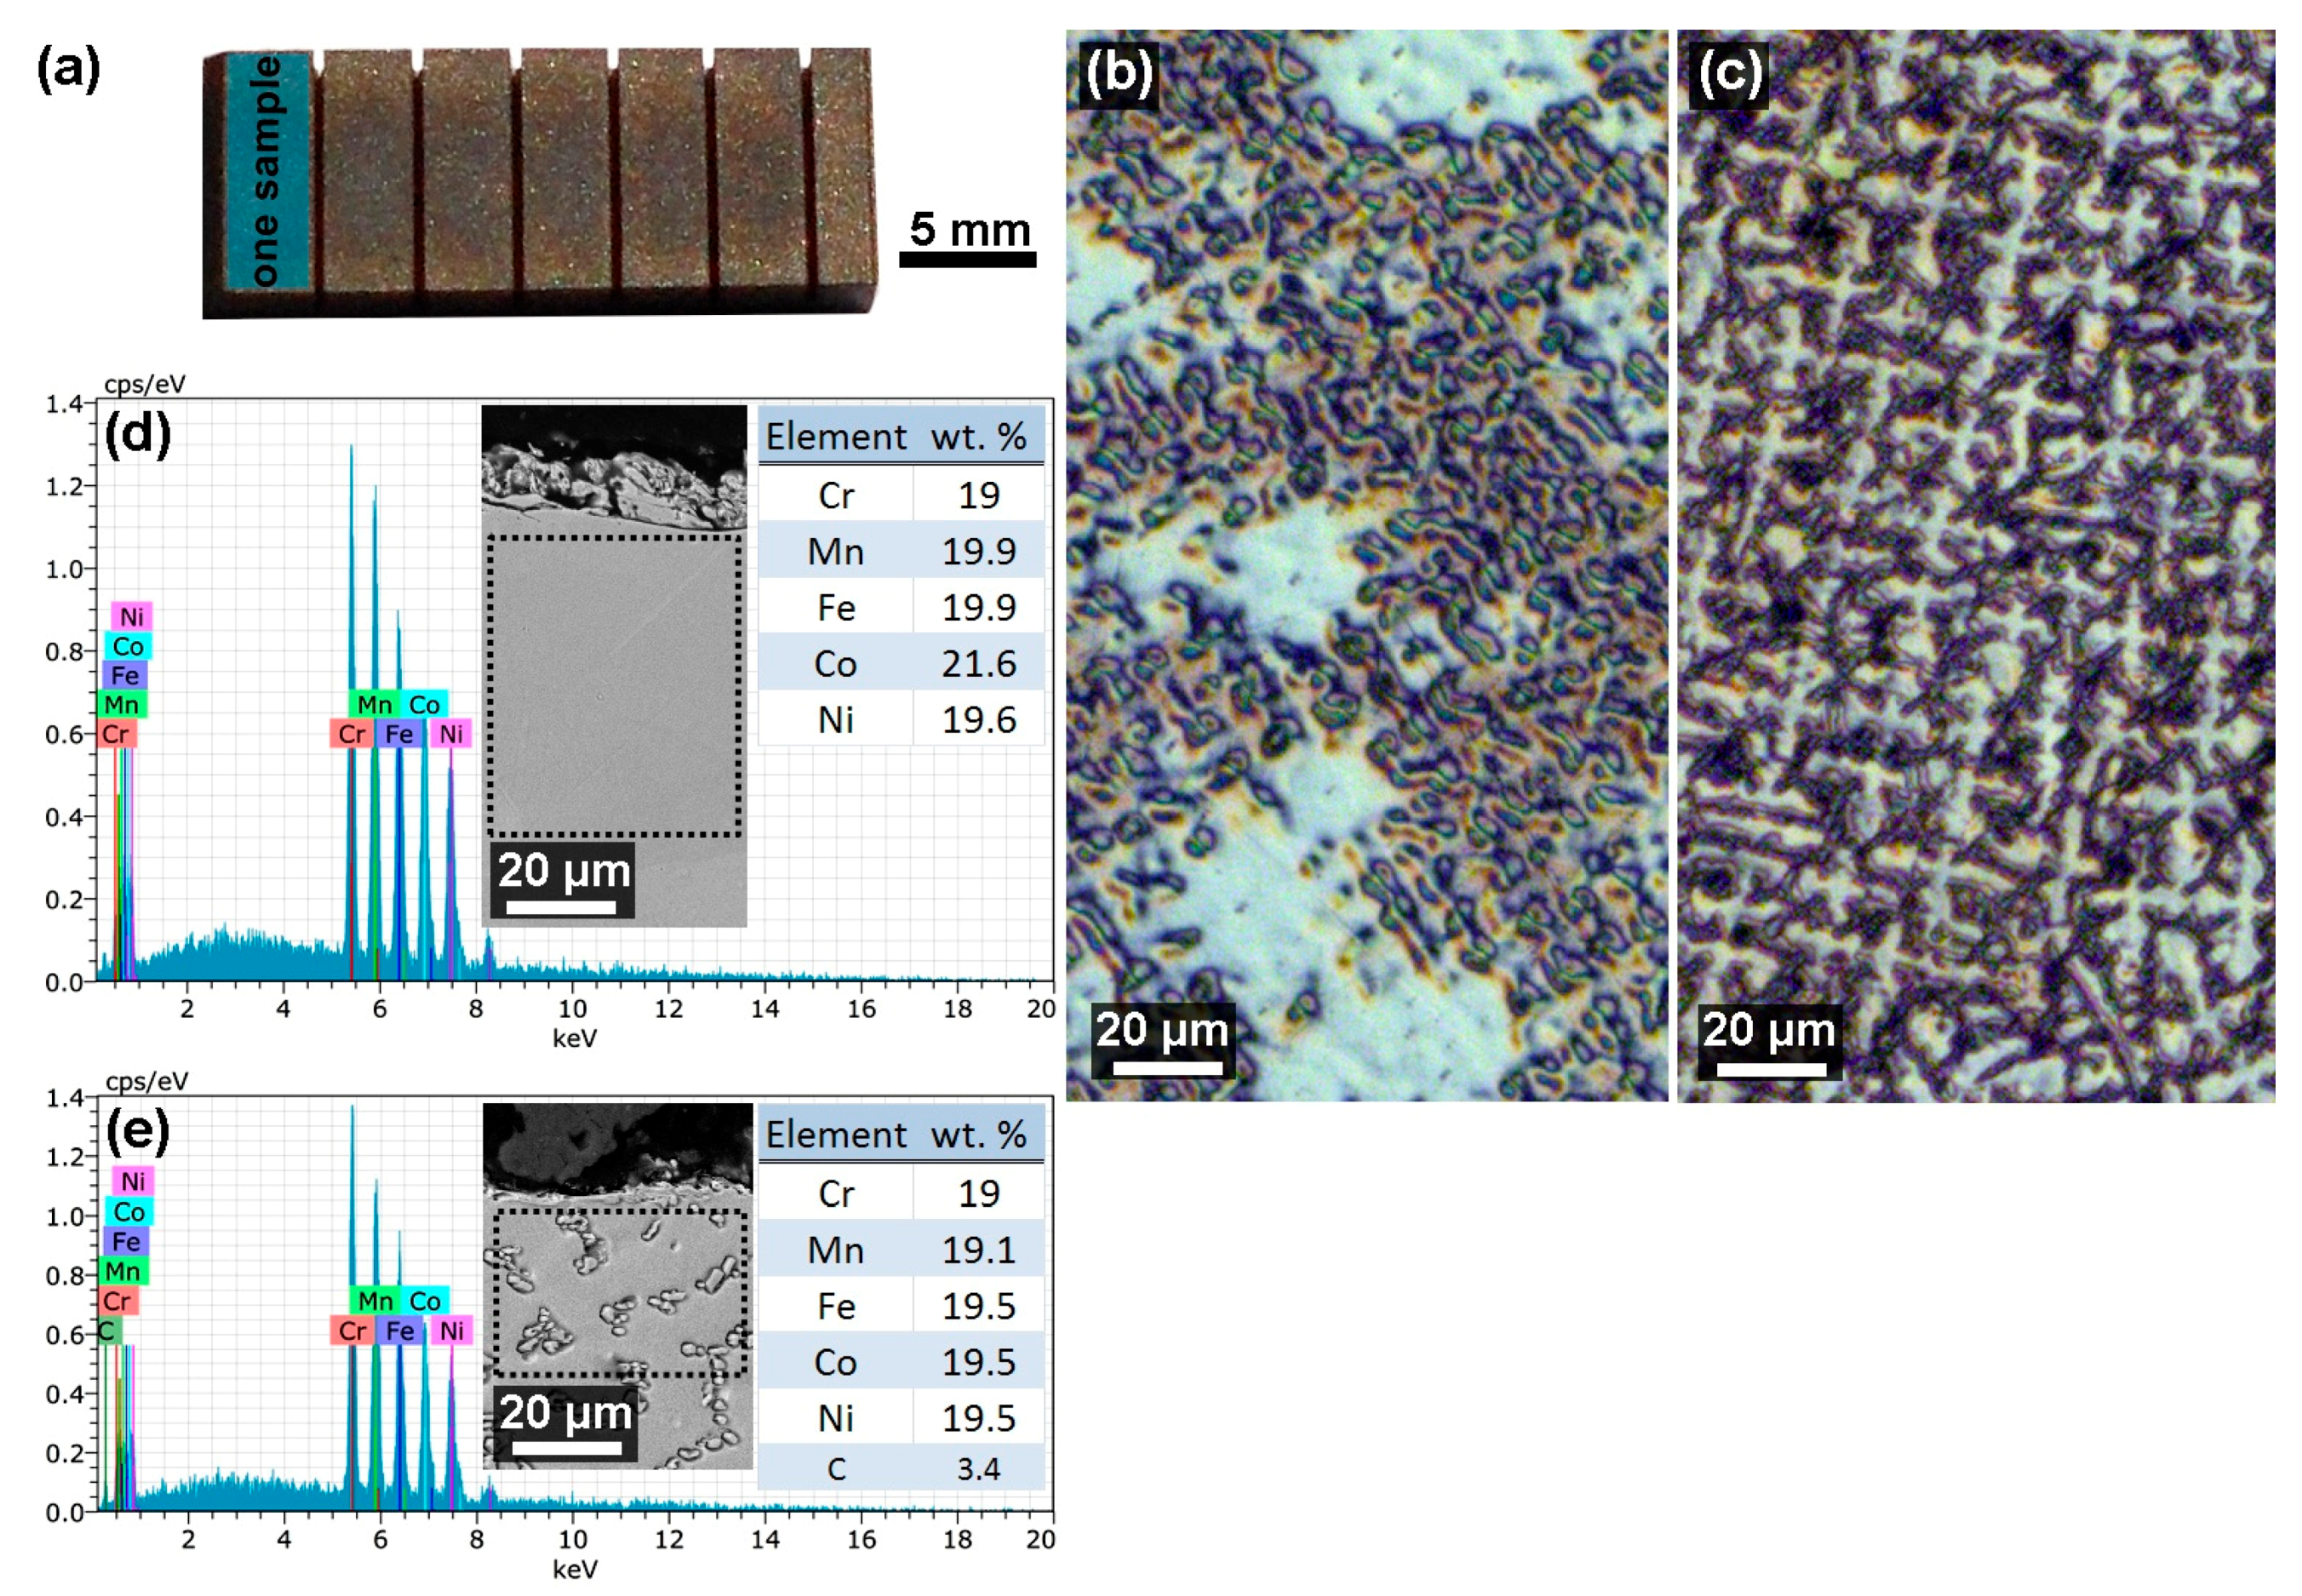
2.1. Experimental Material
2.2. WEDM Machine Setup
- “Half factorial design 25-1”, this design is created as a systematic selection of half of the vertices of a five-dimensional cube representing the investigated space of input variables;
- 10 axial points, which represent the centres of the walls of this five-dimensional cube in the input variables;
- 7 centre points, which represent repeated measurements in the centre of this five-dimensional cube of input variables, are used to capture the repeatability of the experiment and to describe the curvature of the response area.
3. Results and Discussion
3.1. Experimental Methods
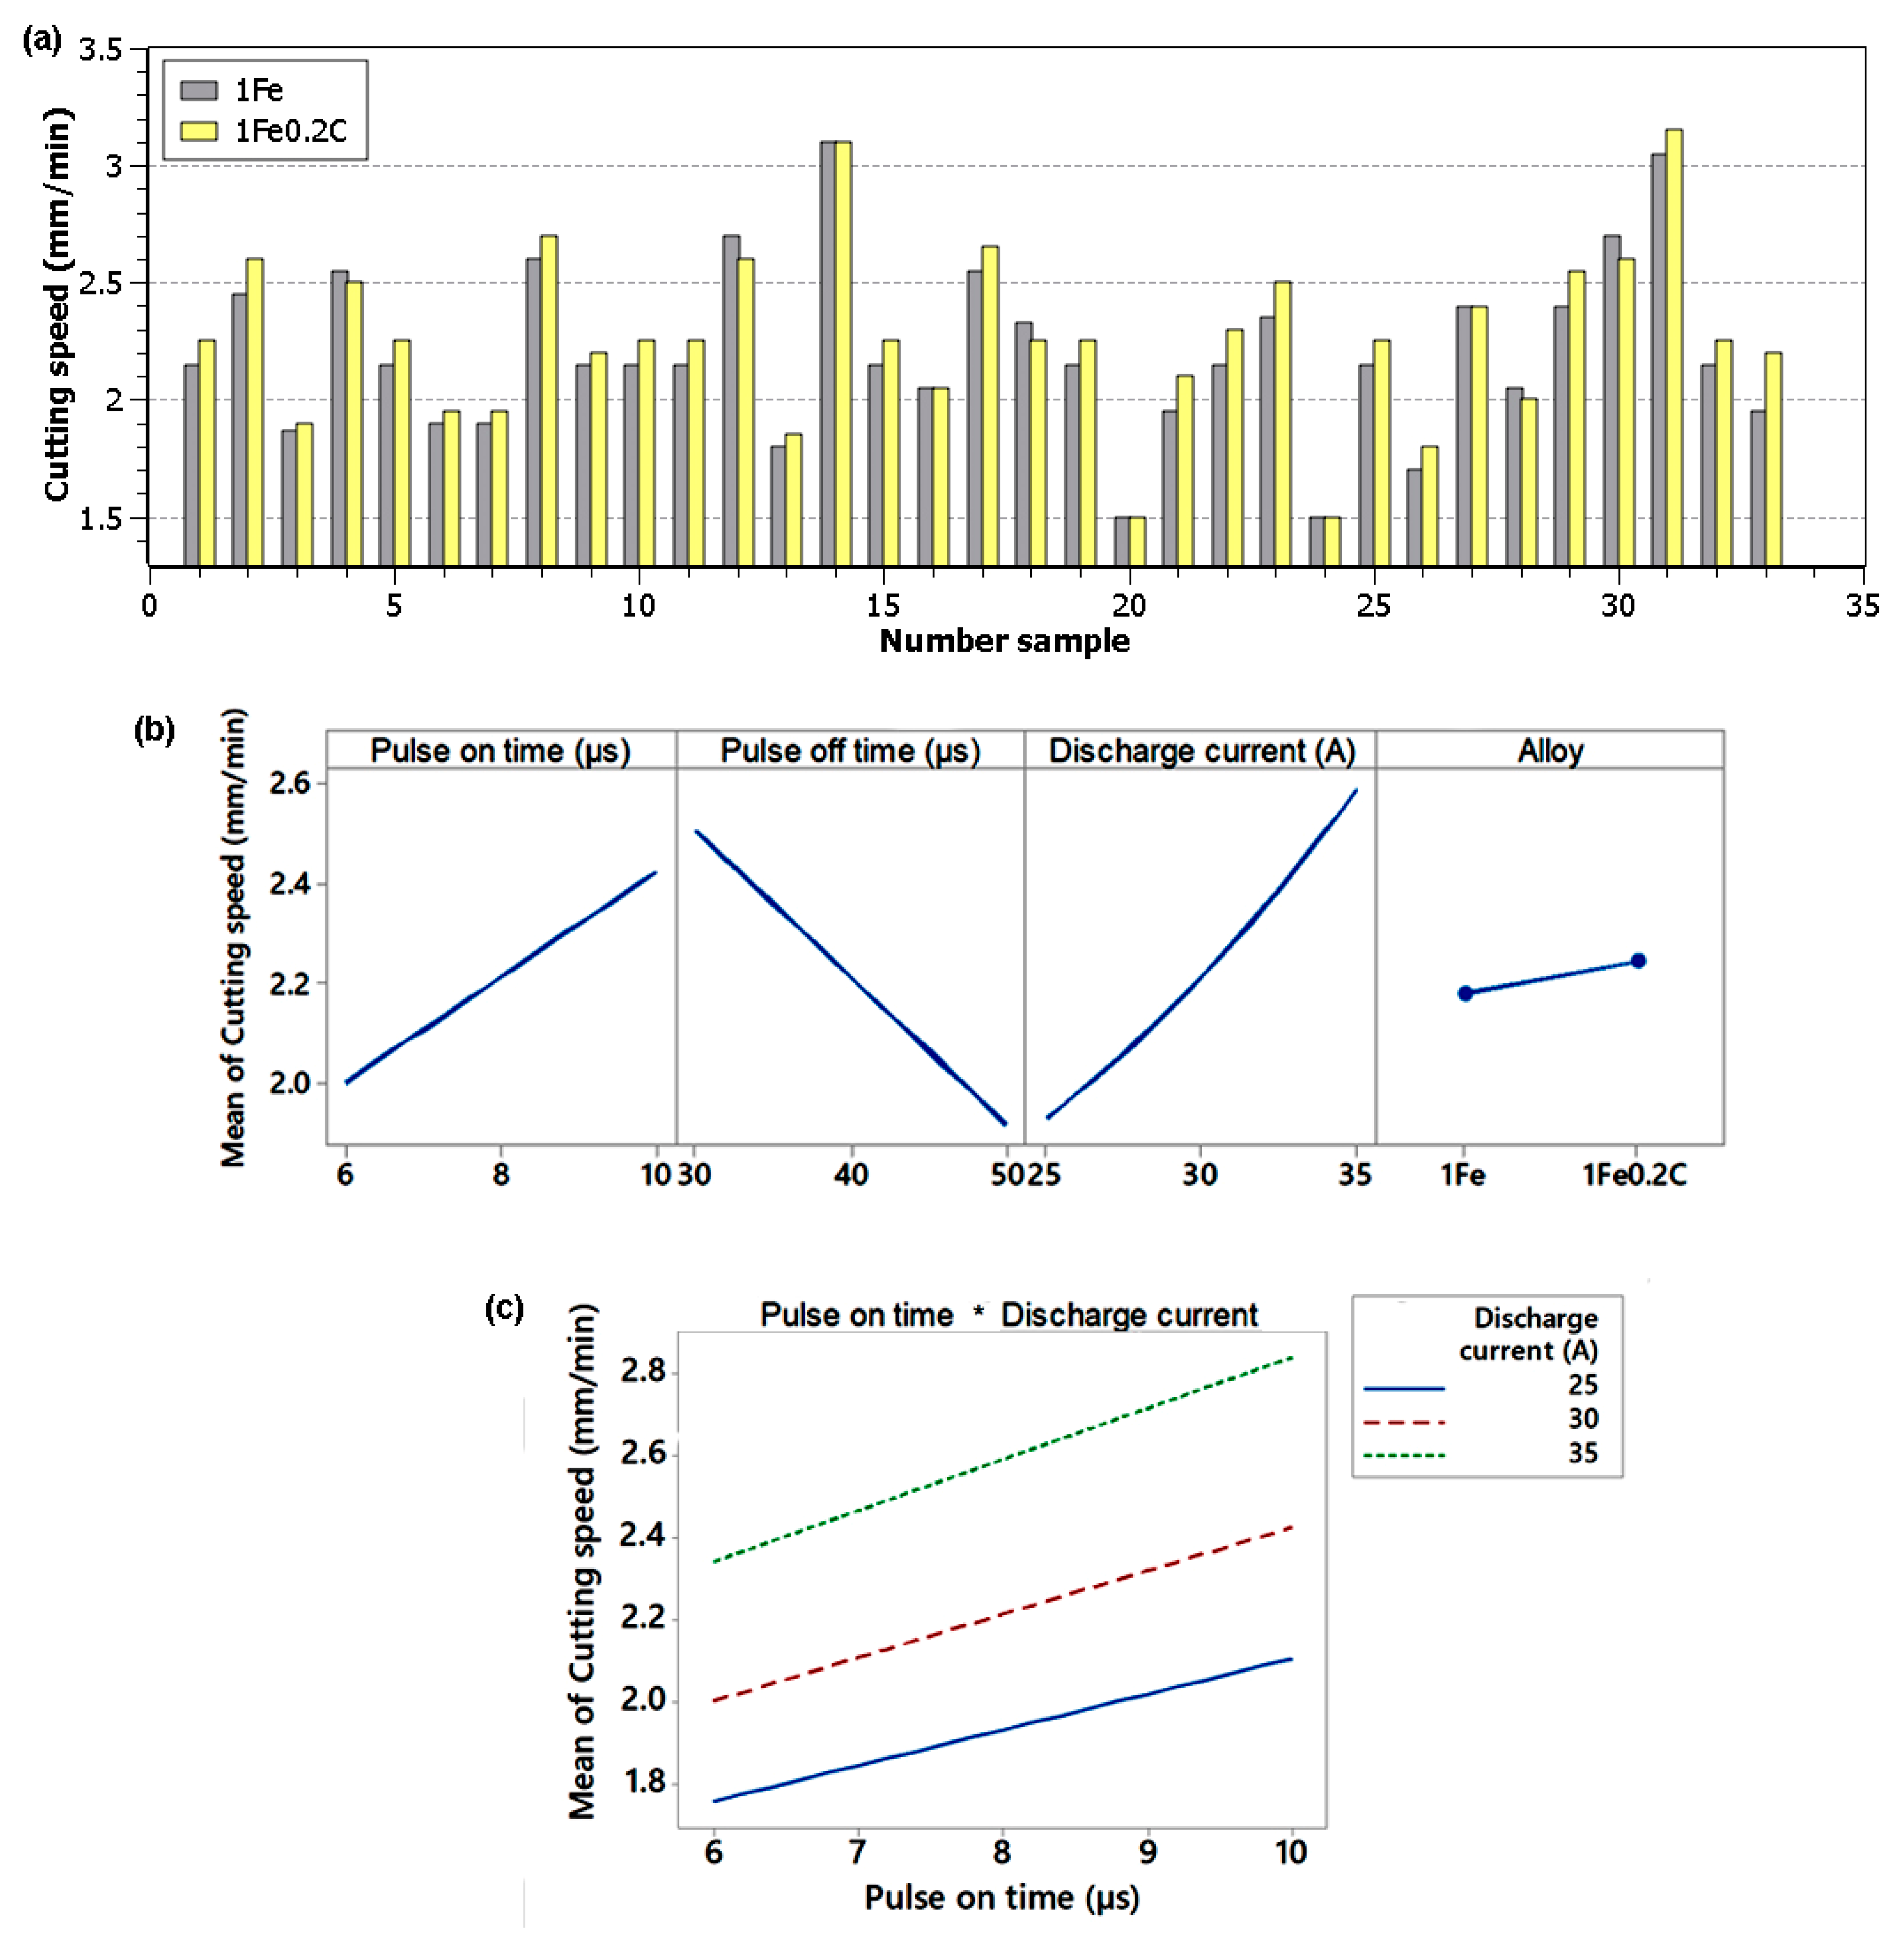
3.2. Statistical Evaluation of the Cutting Speed
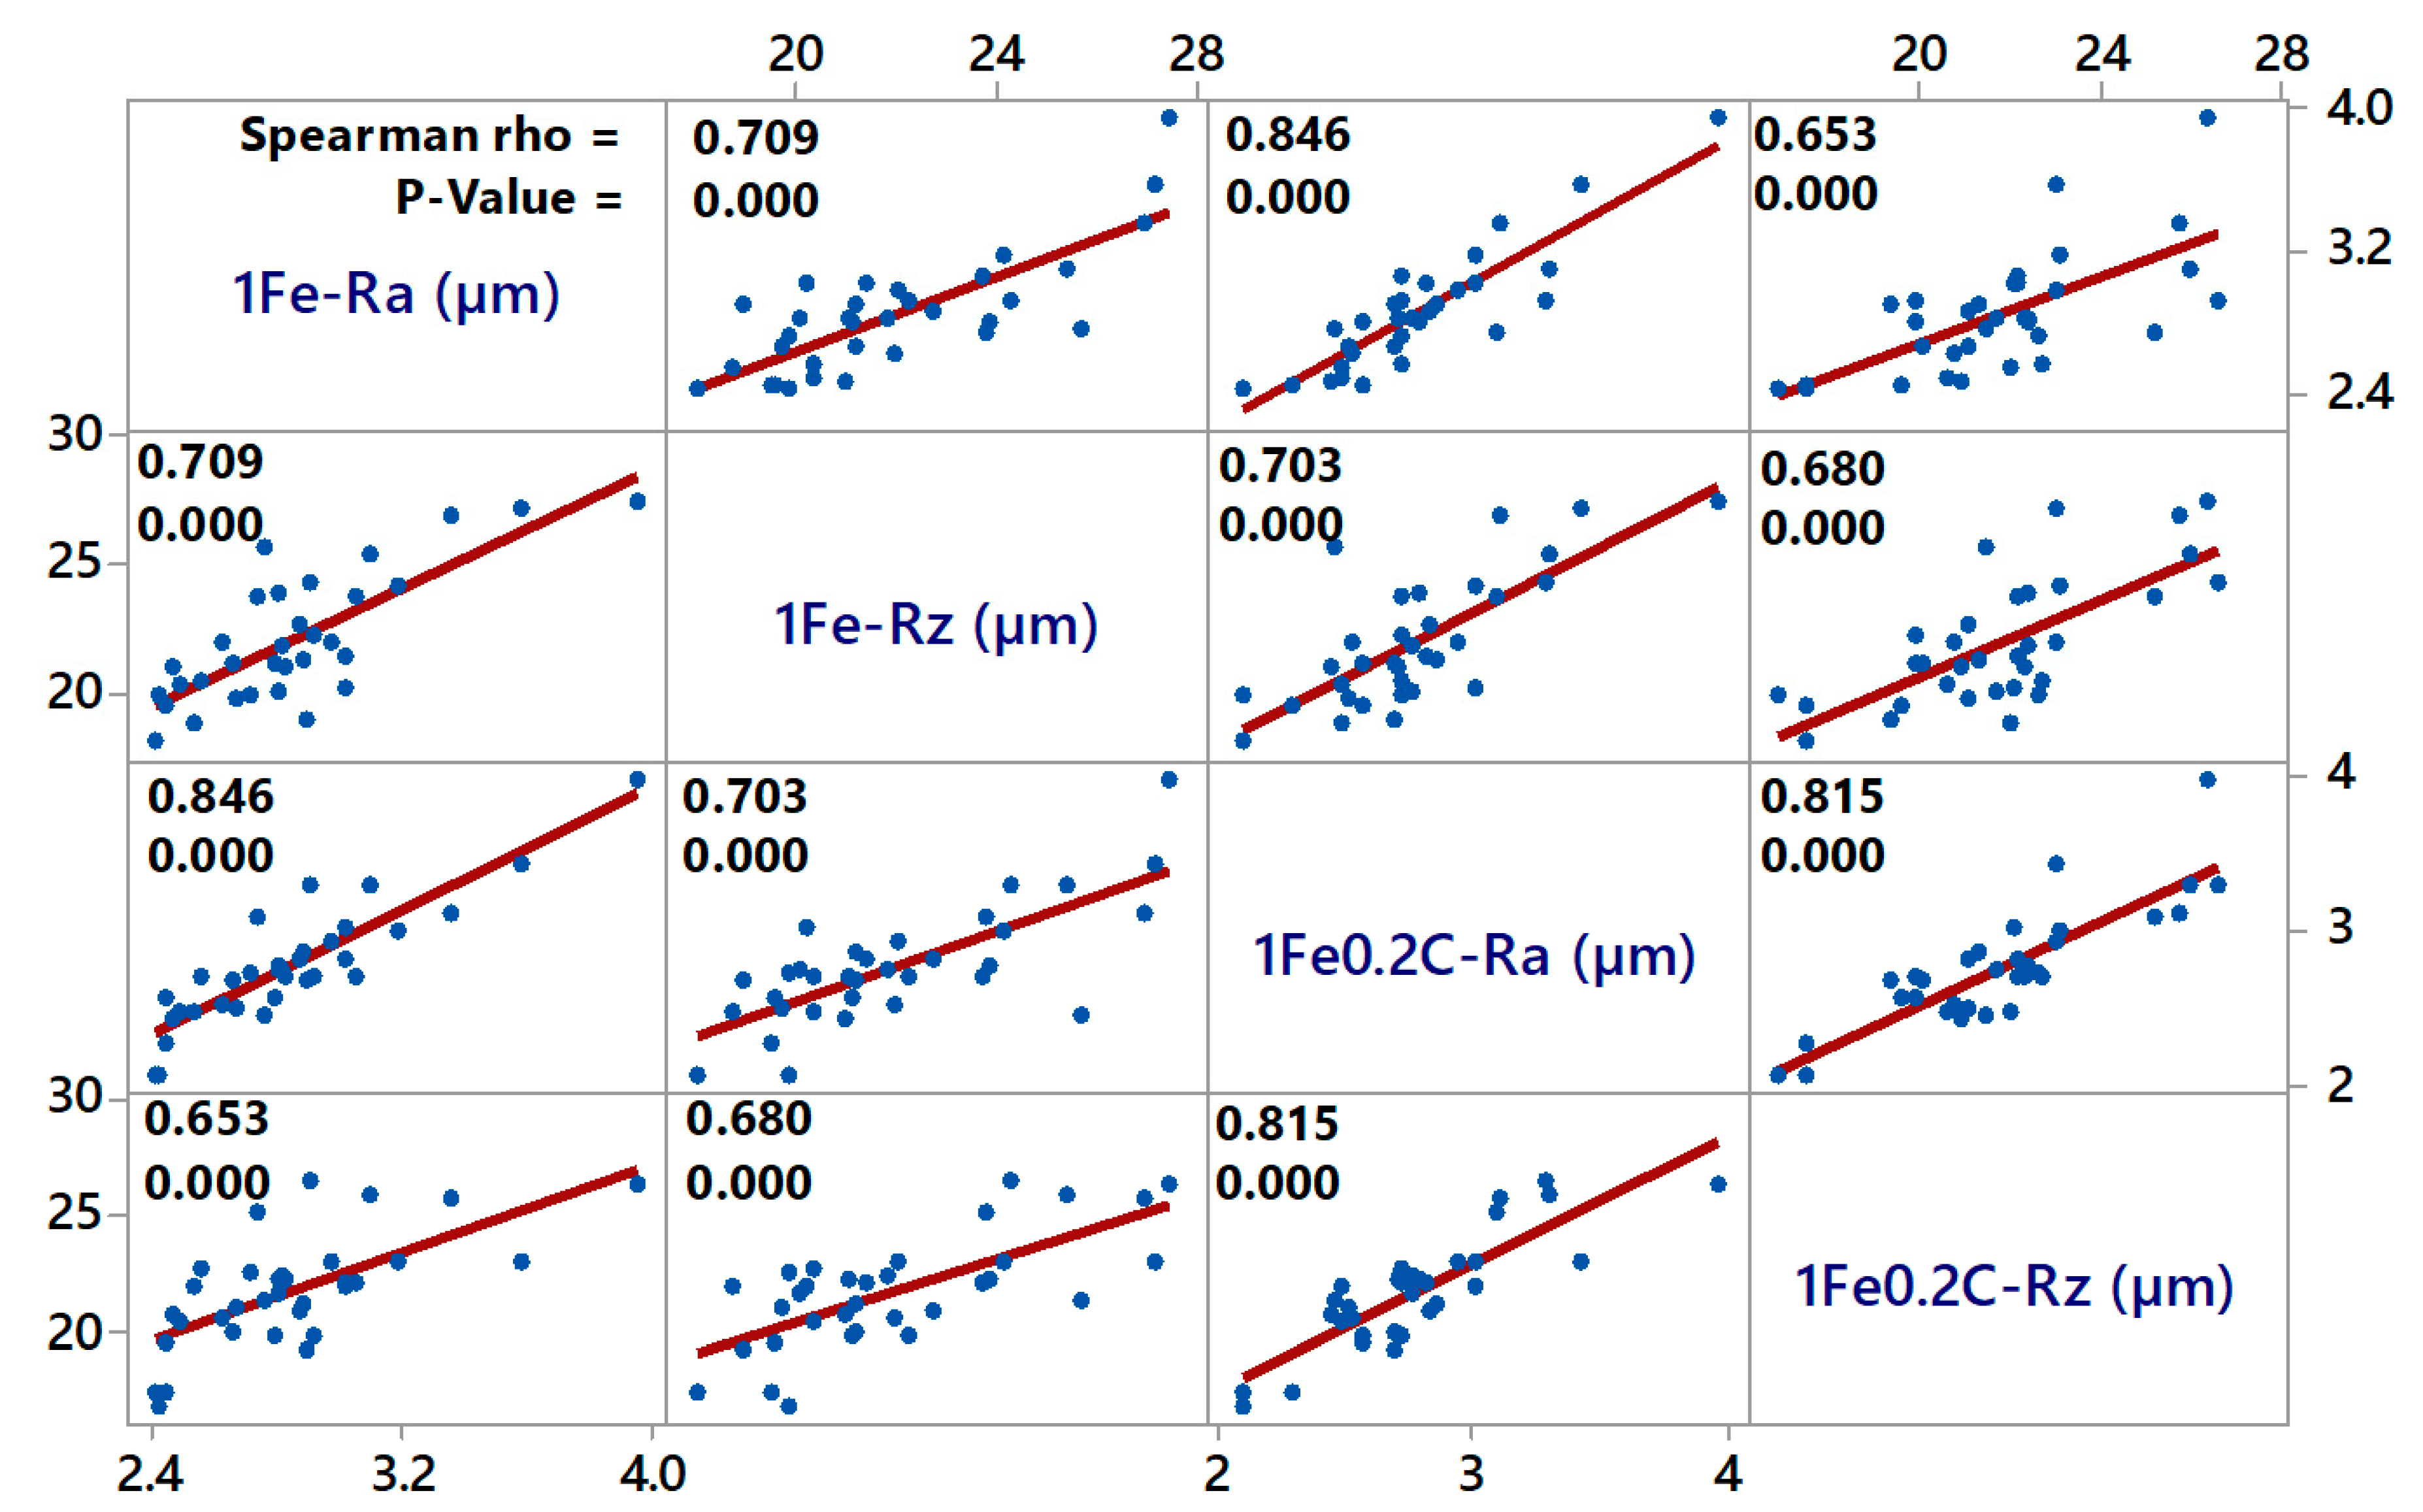
3.3. Statistical Evaluation of Sample Surface Topography
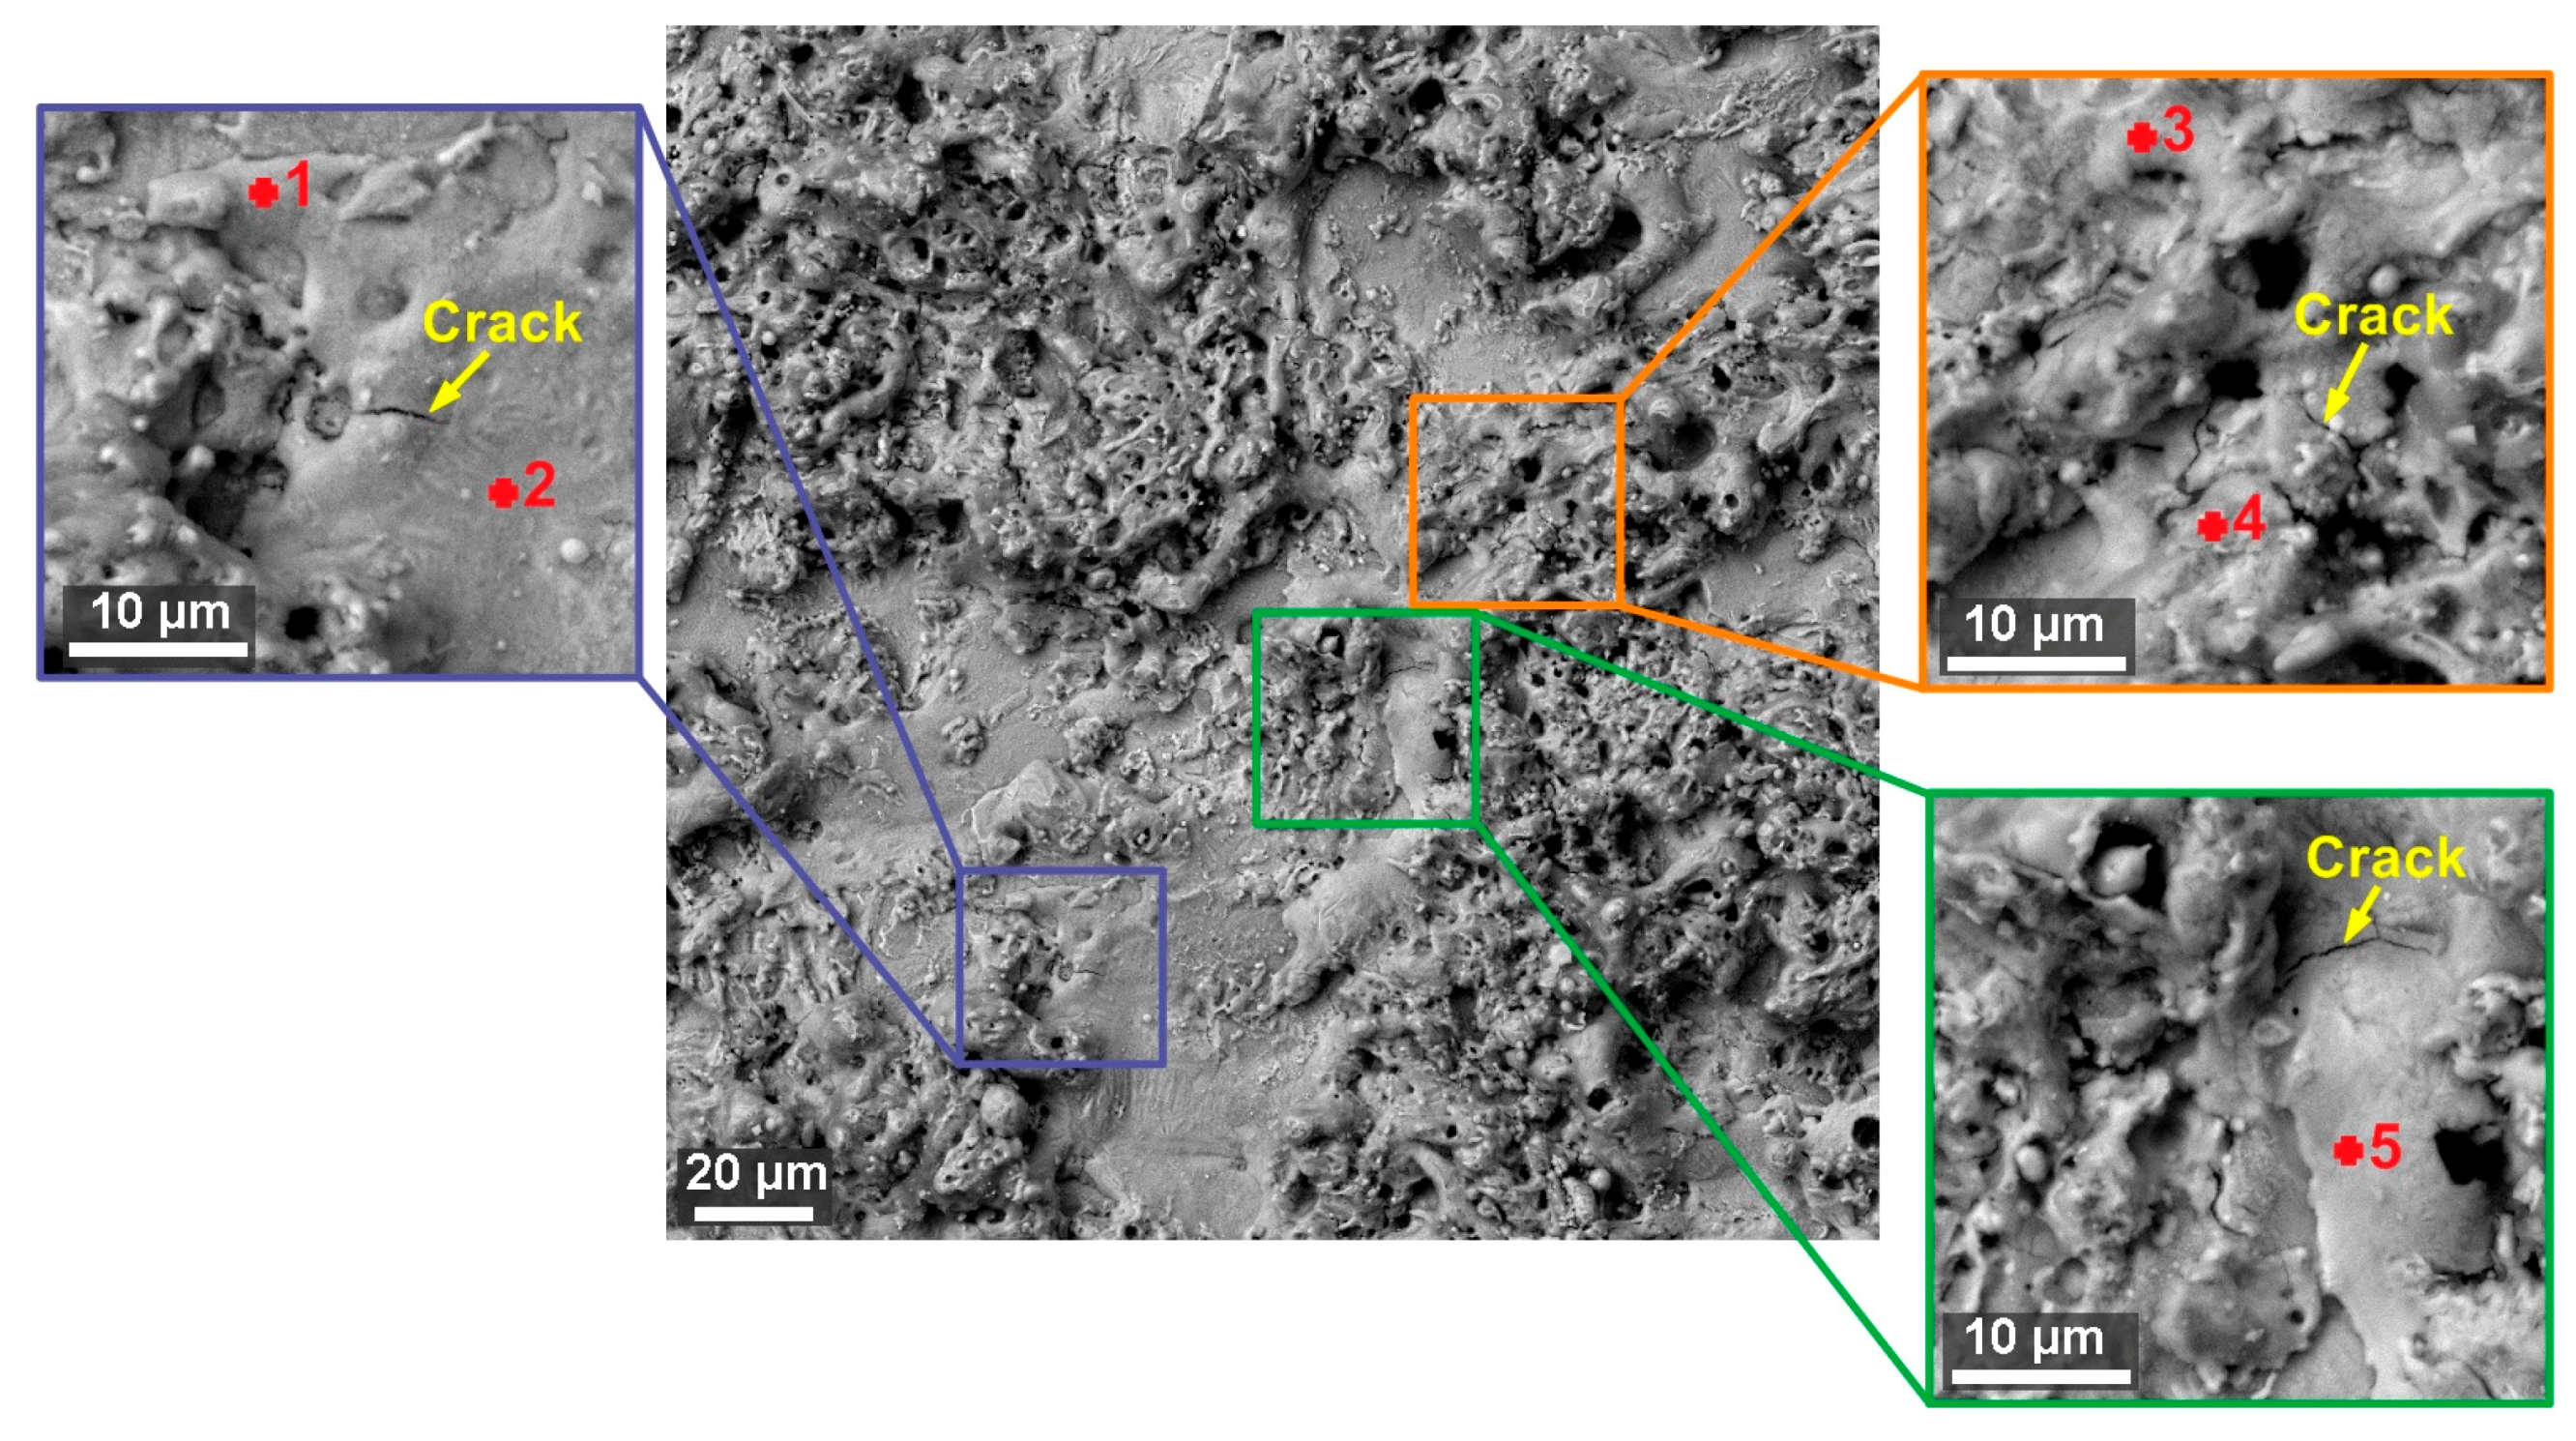
3.4. Morphology of Machined Surfaces, Analysis of Chemical Composition, and Subsurface Area
3.5. The Analysis of TEMLamella
4. Conclusions
- Sample 31 made of the material FeCoCrMnNiC0 was cut with the highest speed of 3.15 mm/min 2 with the setting of the machine parameters: U = 50 V, Ton = 10 µs, Toff = 30 µs, v = 14 m/min, and I = 35 A;
- Based on the measured outputs, a regression model was constructed describing the cutting speed of individual samples, with the model describing 97.7% of the variability of the monitored cutting speeds;
- The machine setting parameters pulse on time and discharge current have a positive effect on the cutting speed and pulse off time has a negative effect, while the alloy type itself (FeCoCrMnNi or FeCoCrMnNiC0.2) is not significant in comparison with these factors, although its effect is statistically significant;
- The lowest parameters of the surface topography (Ra 2.08 µm) were achieved for a sample made of FeCoCrMnNiC0.2 alloy according to the settings for Sample 20 with the setting of machine parameters: U = 70 V, Ton = 6 µs, Toff = 50 µs, v = 14 m/min, and I = 25 A;
- Regression models for the topography parameters Ra and Rz for both alloys were compiled, while the input parameters of the machine settings pulse on time and discharge current have the greatest influence on them;
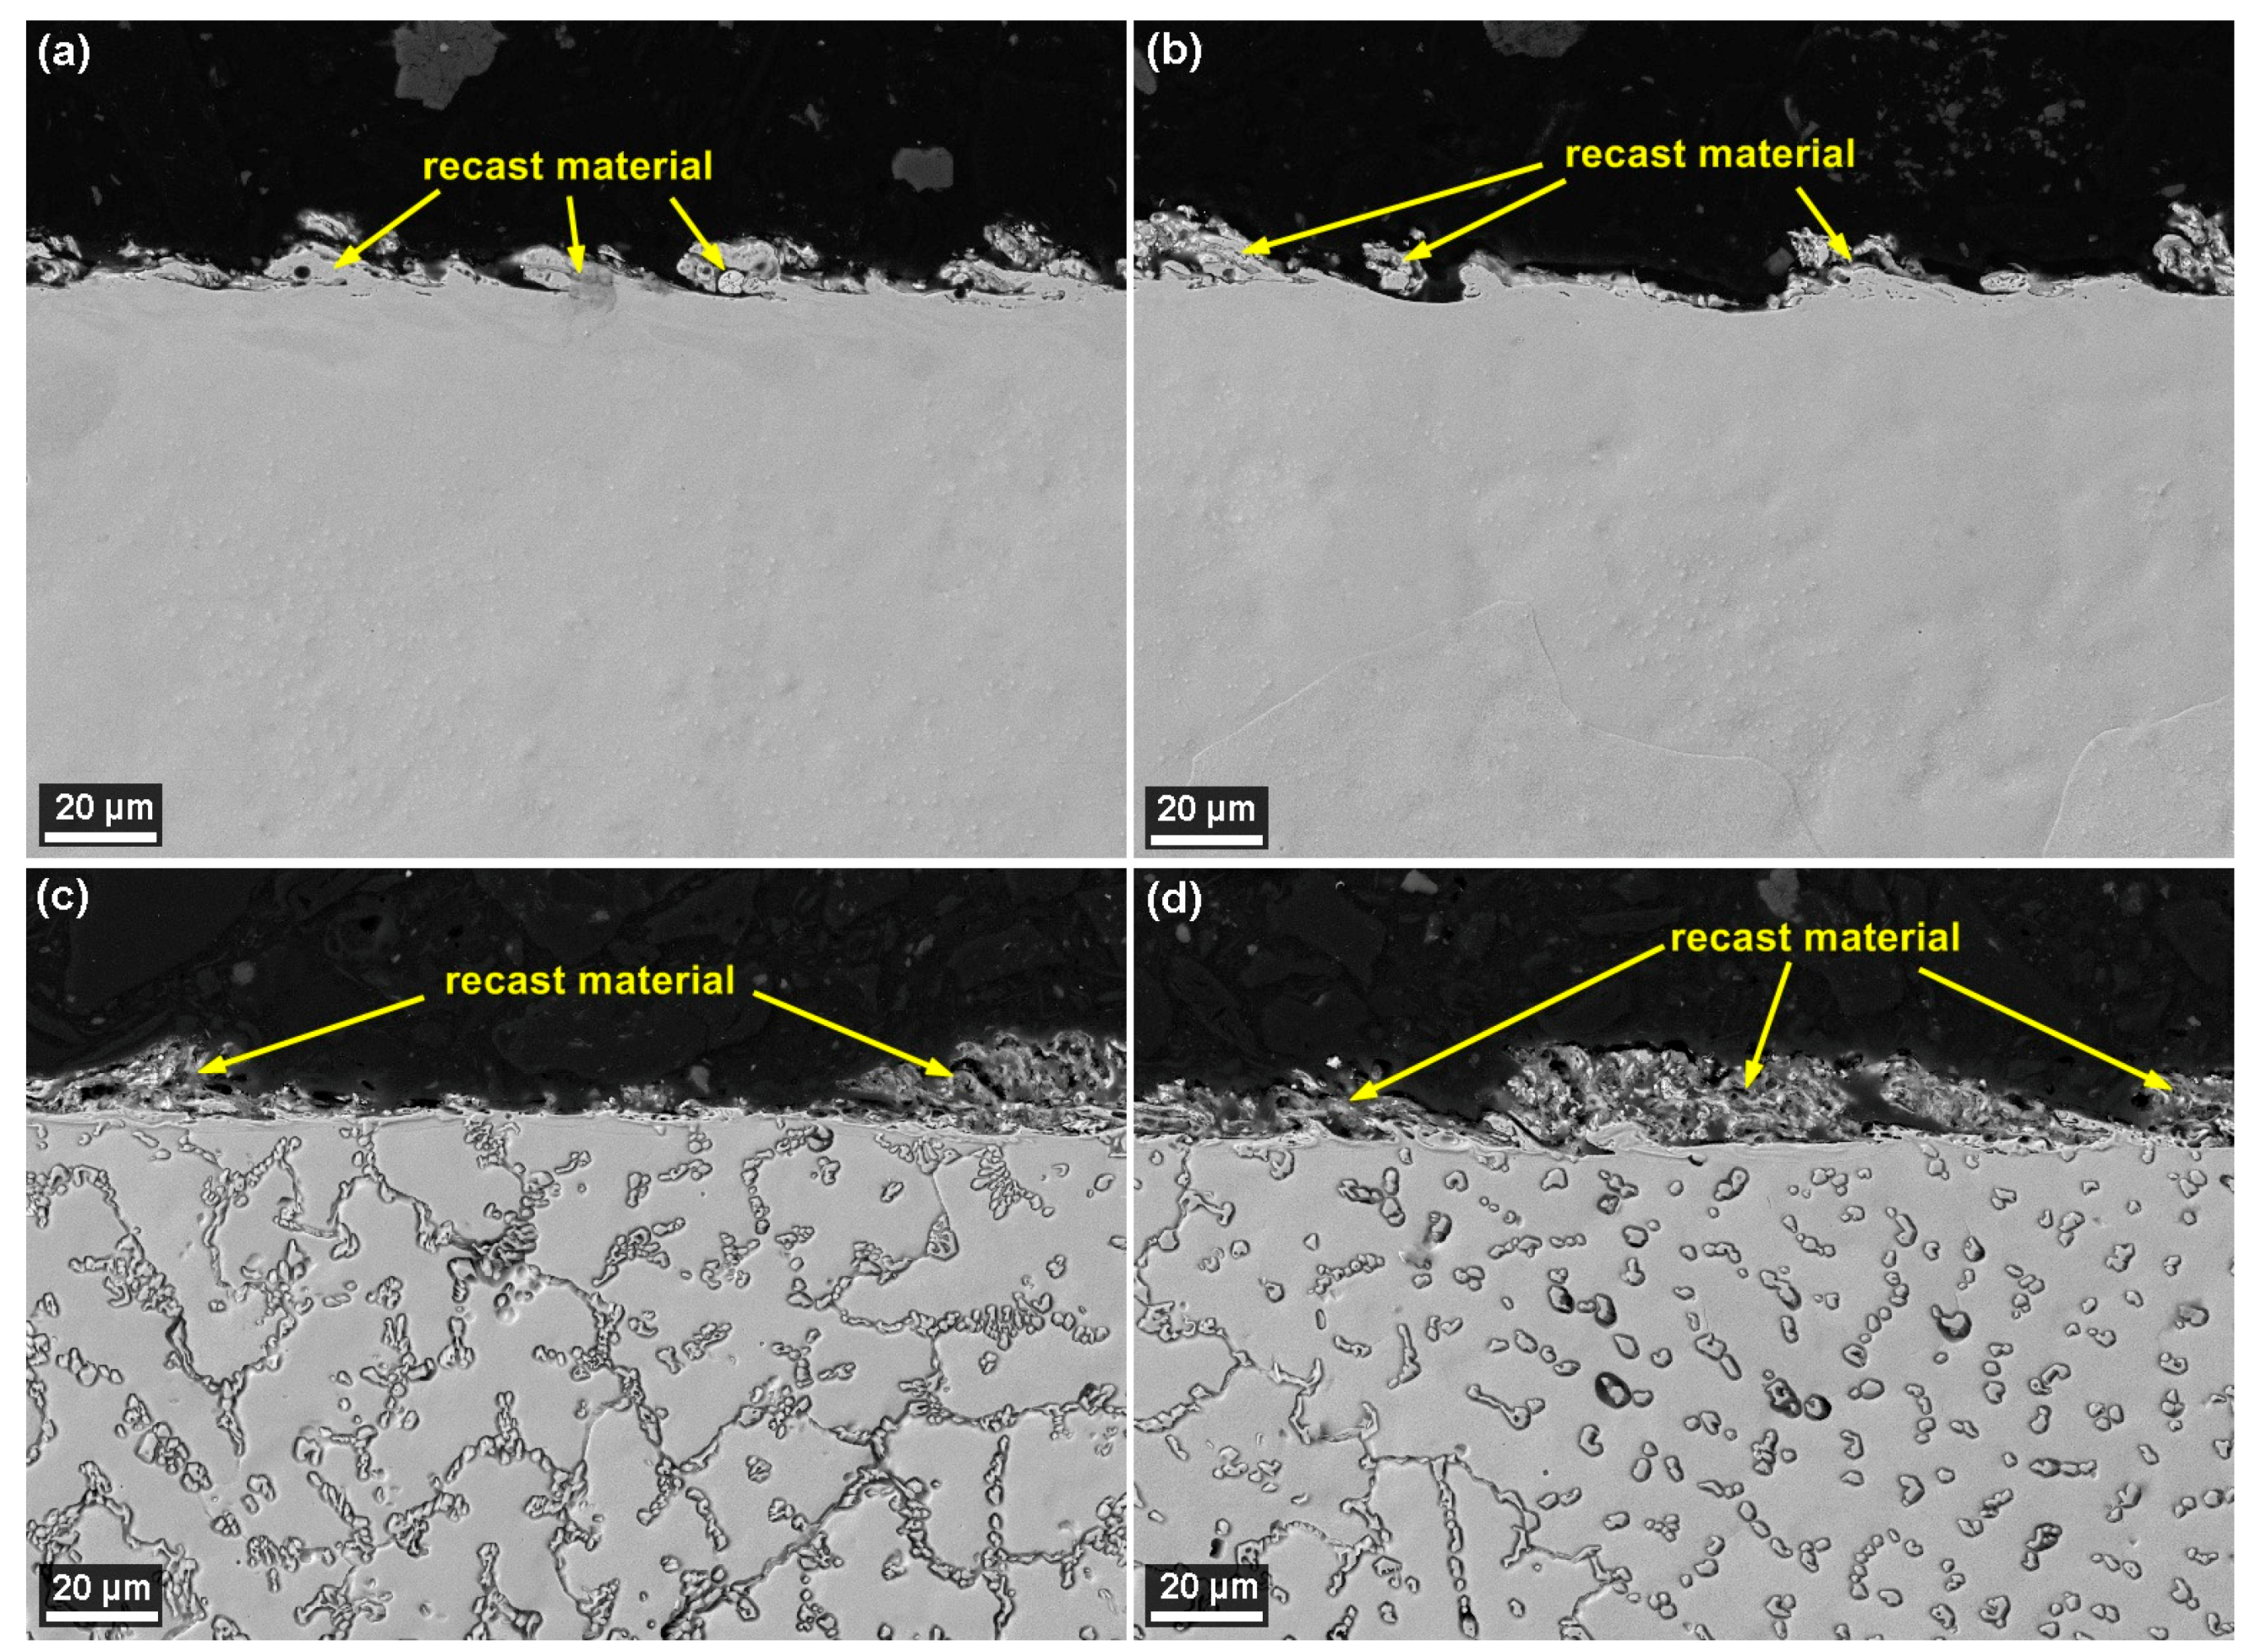
- The analysis of morphology revealed the occurrence of small cracks up to 10 µm in length on the surface of all samples from both alloys, but these cracks are only occasional and it is clear from the crosssection of the sample that they have only a surface character and do not extend to the depth;
- For FeCoCrMnNi alloy samples, approximately 30% of the surface was formed by smooth craters, where there was no significant diffusion of wire electrode elements and their content is up to 3.3 wt.% of copper and 2.1 wt.% of zinc, while on the contrary, FeCoCrMnNiC0.2 samples were covered by a significantly larger number of smooth places, which here accounted for about 60% of the entire surface;
- Crosssections of all samples clearly excluded the presence of any subsurface defects;
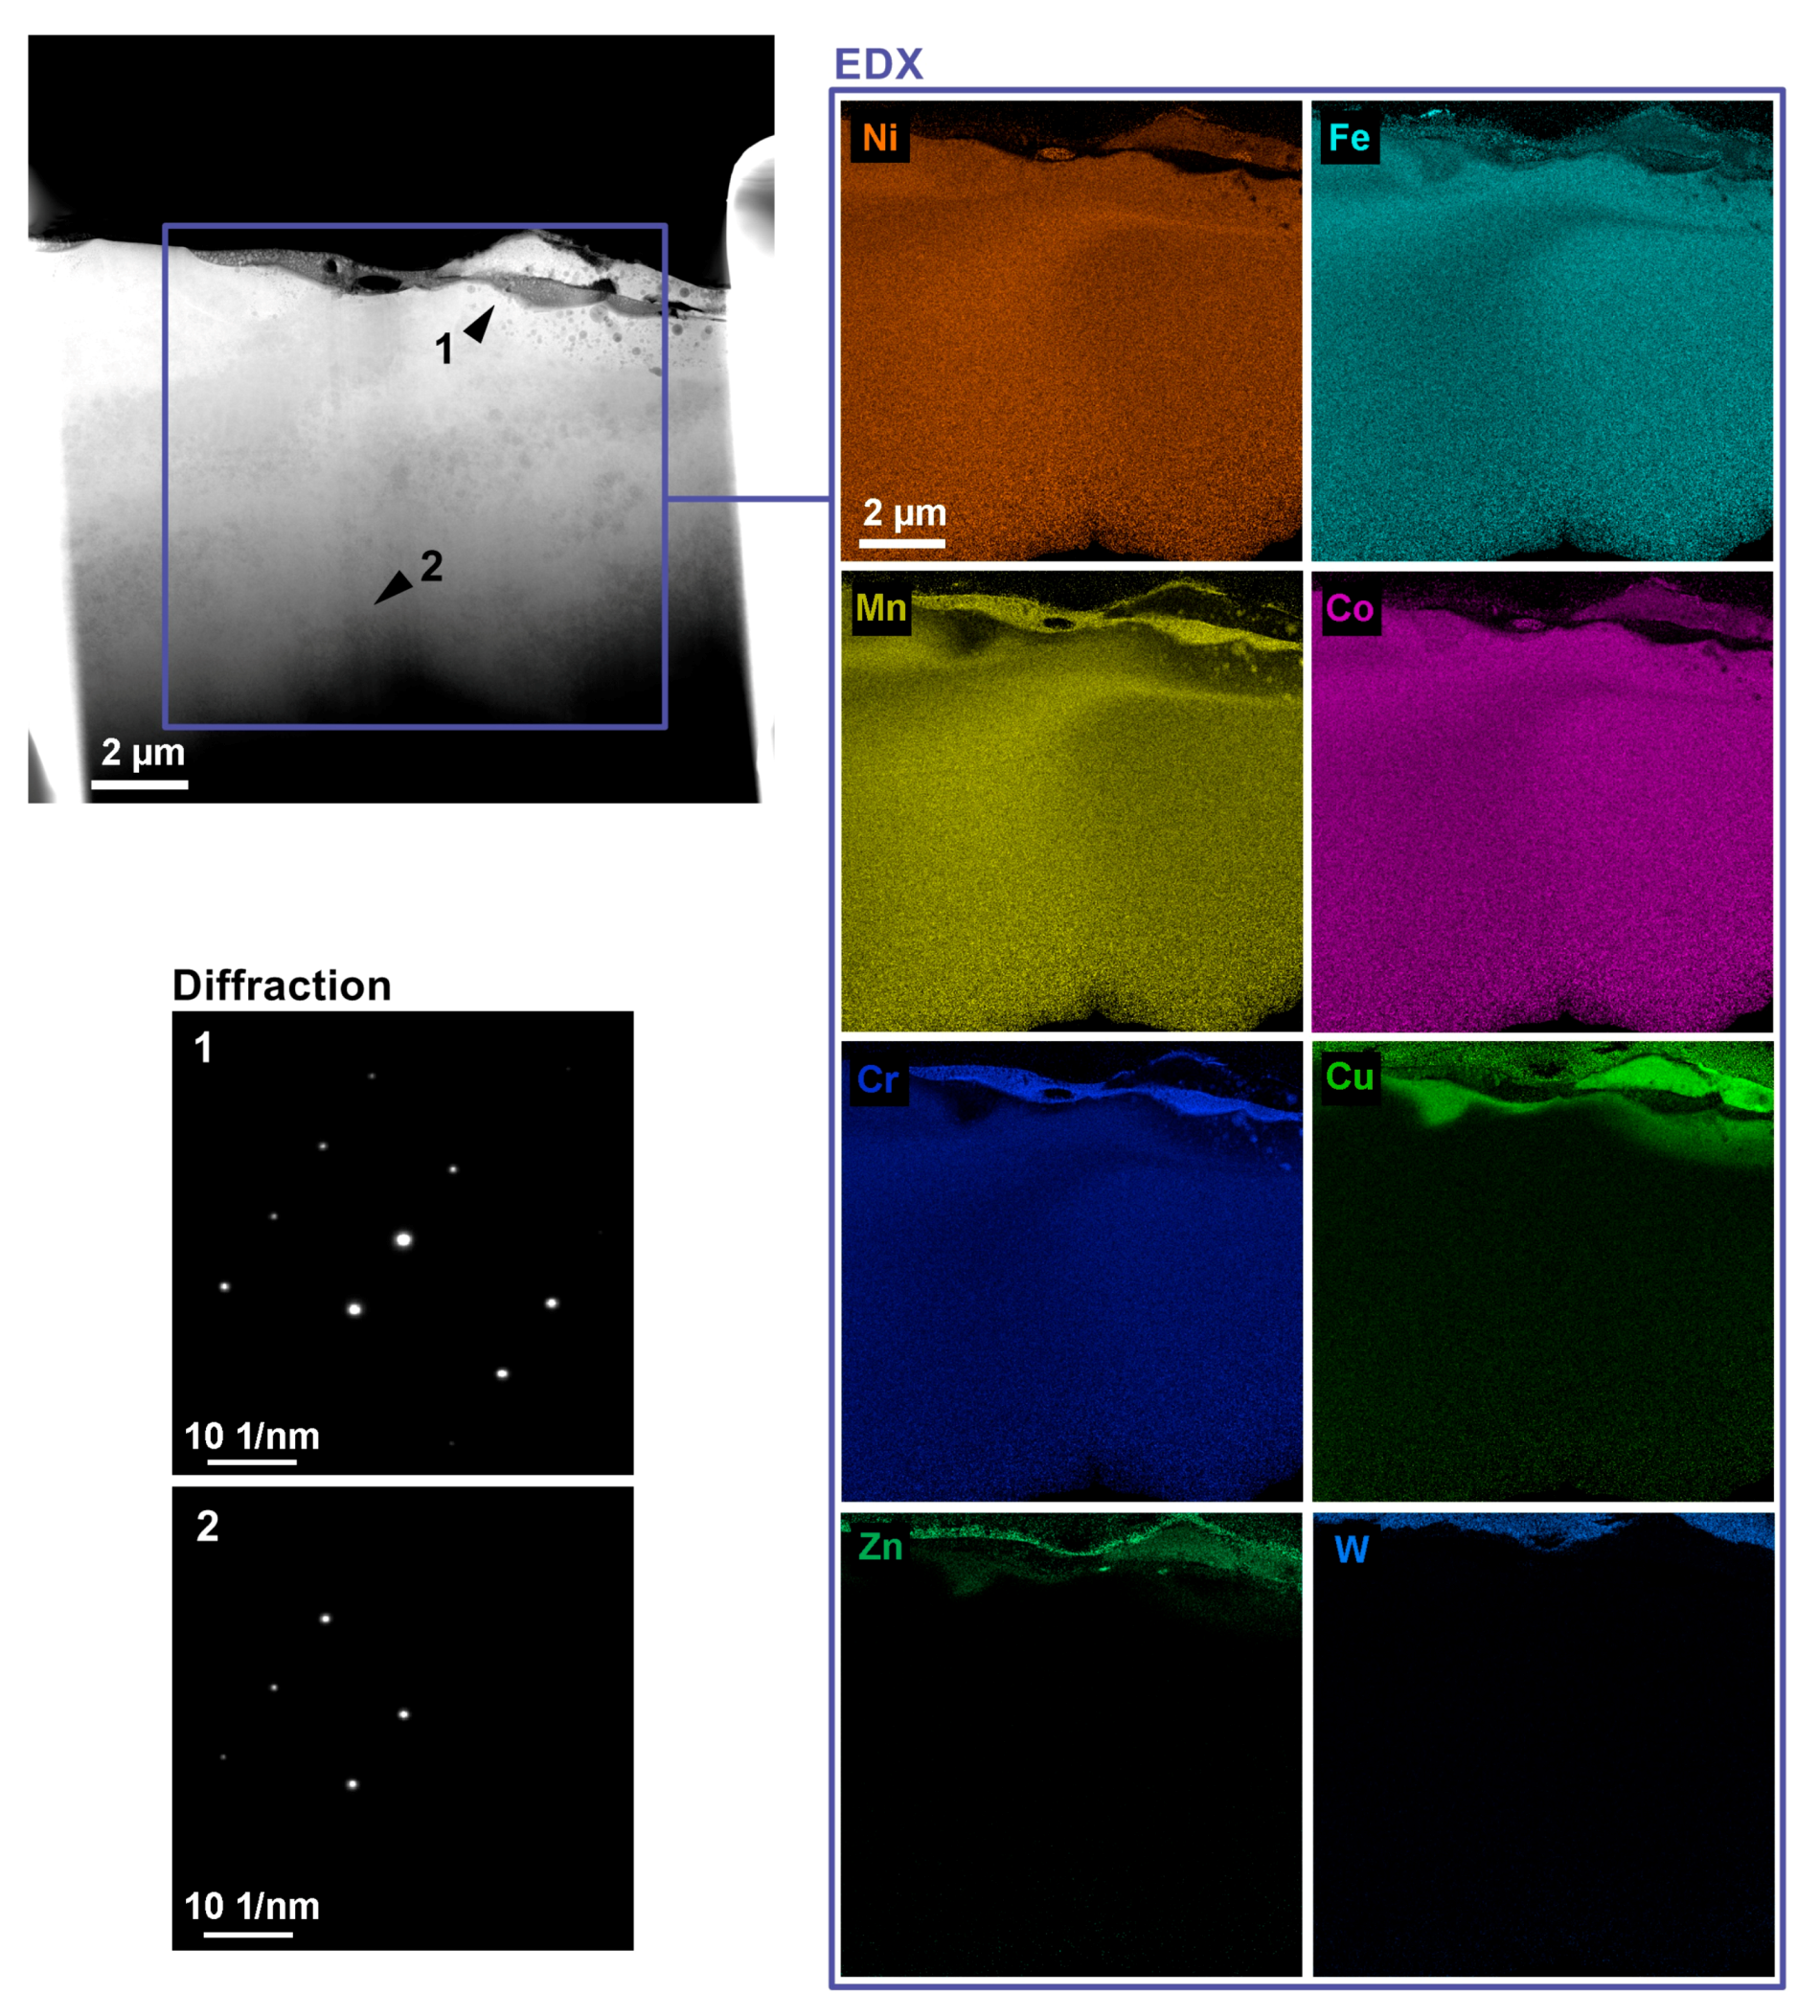
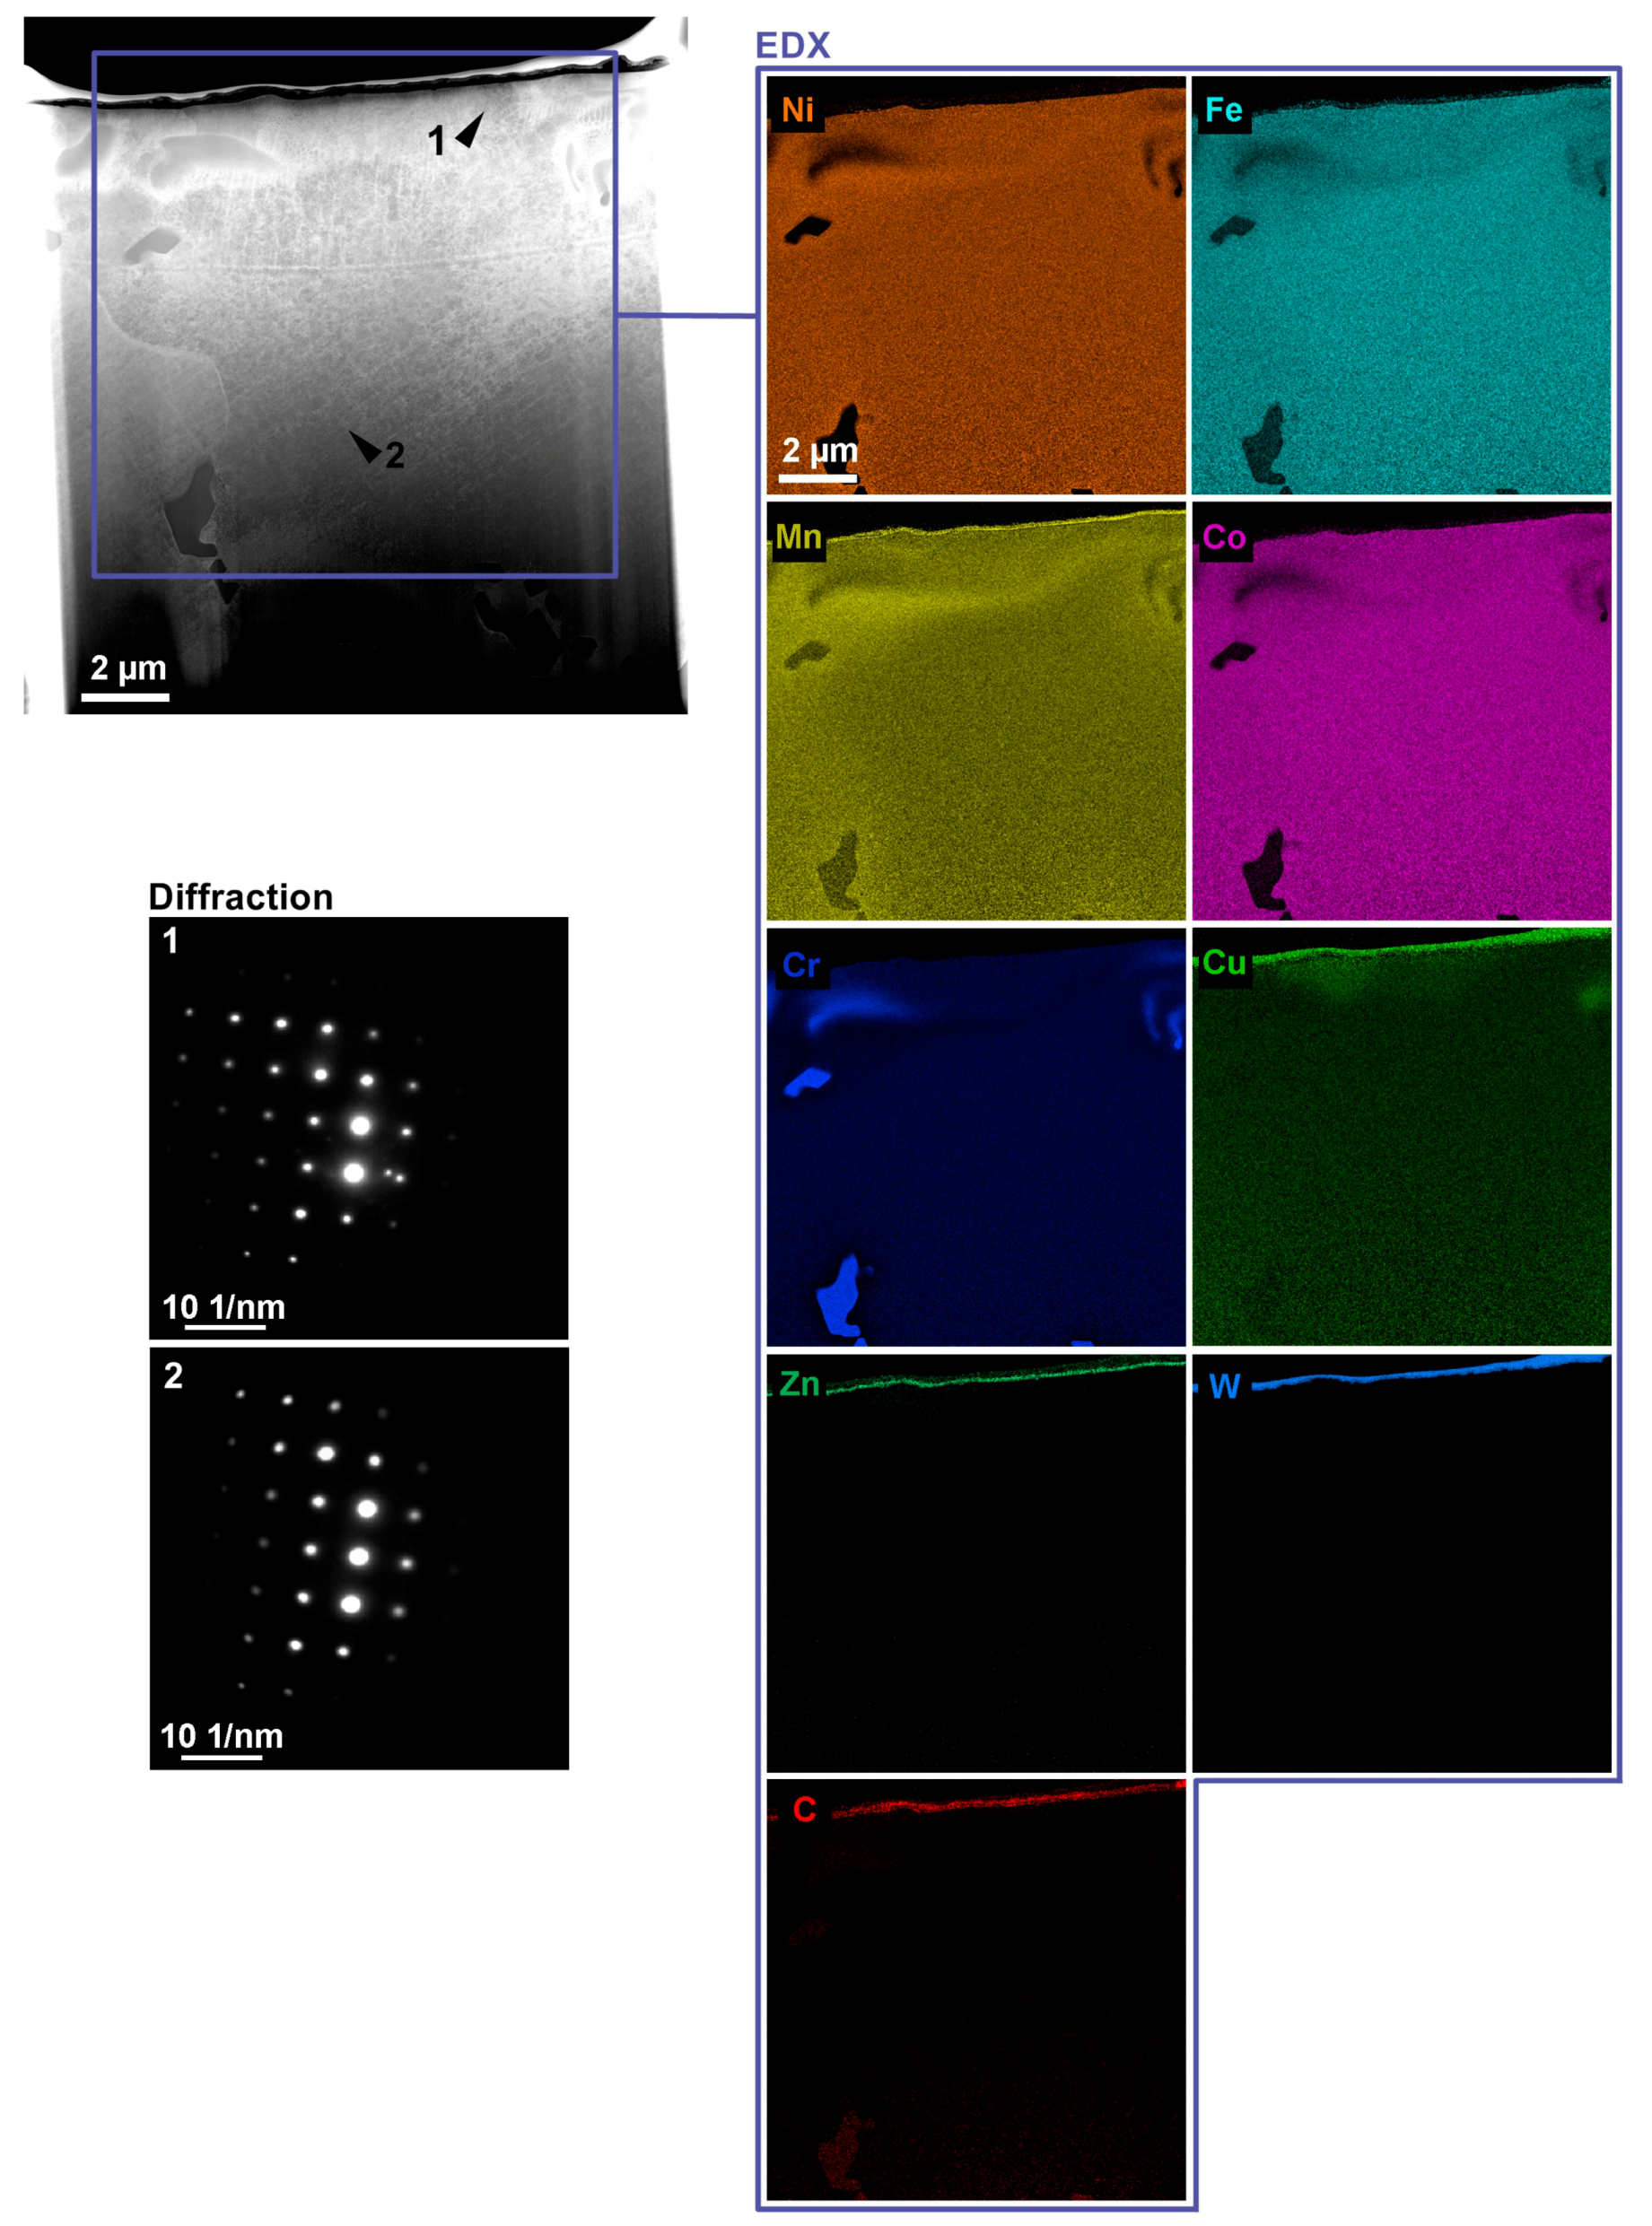
- Manufactured TEM lamellas showed diffusion of elements from the wire electrode and discovered the presence of places with the increased concentration of some elements.
Author Contributions
Funding
Conflicts of Interest
References
- Jameson, E.C. Electrical Discharge Machining; Society of Manufacturing Engineers: Southfield, MI, USA, 2001; ISBN 08-726-3521-X. [Google Scholar]
- Sidpara, A.M.; Malayath, G. Micro Electro Discharge Machining: Principles and Applications; CRC Press: Boca Raton, FL, USA, 2019; ISBN 13-978-1-138-61307-2. [Google Scholar]
- Gore, A.S.; Patil, N. Wire electro discharge machining of metal matrix composites: A review. Procedia Manuf. 2018, 20, 41–52. [Google Scholar] [CrossRef]
- Vates, U.K. Wire-EDM Process Parameters and Optimization; Springer: Berlin/Heidelberg, Germany, 2018; ISBN 978-620-2-30578-5. [Google Scholar]
- Trčka, T.; Polzer, A.; Sedlák, J. End mills with PCD inserts sharpened by different electrical technologies. MM Sci. J. 2018, 2018, 2192–2197. [Google Scholar] [CrossRef]
- Murty, B.S.; Yeh, J.-W.; Ranganathan, S.; Bhattacharjee, P.P. High-Entropy Alloys, 2nd ed.; Elsevier: Amsterdam, The Netherlands, 2019. [Google Scholar] [CrossRef]
- Mouralova, K.; Benes, L.; Zahradnicek, R.; Bednar, J.; Hrabec, P.; Prokes, T.; Matousek, R.; Fiala, Z. Quality of surface and subsurface layers after WEDM aluminum alloy 7475-T7351 including analysis of TEM lamella. Int. J. Adv. Manuf. Technol. 2018, 99, 2309–2326. [Google Scholar] [CrossRef]
- Mouralova, K.; Benes, L.; Prokes, T.; Bednar, J.; Zahradnicek, R.; Jankovych, R.; Fries, J.; Vontor, J. Analysis of the Machinability of Copper Alloy Ampcoloy by WEDM. Materials 2020, 13, 893. [Google Scholar] [CrossRef] [PubMed] [Green Version]
- Mouralova, K.; Prokes, T.; Benes, L.; Sliwkova, P. Analysis of subsurface defects occurrence in abrasion resistant Creusabro steel after WEDM including the study of morphology and surface topography. Mach. Sci. Technol. 2019, 24, 274–290. [Google Scholar] [CrossRef]
- Mouralova, K.; Prokes, T.; Benes, L.; Bednar, J. The Influence of WEDM Parameters Setup on the Occurrence of Defects When Machining Hardox 400 Steel. Materials 2019, 12, 3758. [Google Scholar] [CrossRef] [PubMed] [Green Version]
- Mouralova, K.; Benes, L.; Bednar, J.; Zahradnicek, R.; Prokes, T.; Matousek, R.; Hrabec, P.; Fiserova, Z.; Otoupalik, J. Using a DoE for a comprehensive analysis of the surface quality and cutting speed in WED-machined hadfield steel. J. Mech. Sci. Technol. 2019, 33, 2371–2386. [Google Scholar] [CrossRef]
- Koch, L.; Granberg, F.; Brink, T.; Utt, D.; Albe, K.; Djurabekova, F.; Nordlund, K. Local segregation versus irradiation effects in high-entropy alloys: Steady-state conditions in a driven system. J. Appl. Phys. 2017, 122, 105106. [Google Scholar] [CrossRef]
- Guo, J.; Goh, M.; Zhu, Z.; Lee, X.; Nai, M.L.S.; Wei, J. On the machining of selective laser melting CoCrFeMnNi high-entropy alloy. Mater. Des. 2018, 153, 211–220. [Google Scholar] [CrossRef]
- Shen, W.-J.; Tsai, M.-H.; Yeh, J.-W. Machining Performance of Sputter-Deposited (Al0.34Cr0.22Nb0.11Si0.11Ti0.22)50N50 High-Entropy Nitride Coatings. Coatings 2015, 5, 312–325. [Google Scholar] [CrossRef] [Green Version]
- He, J.; Wang, H.; Huang, H.L.; Xu, X.; Chen, M.; Wu, Y.; Liu, X.; Nieh, T.; An, K.; Lu, Z. A precipitation-hardened high-entropy alloy with outstanding tensile properties. Acta Mater. 2016, 102, 187–196. [Google Scholar] [CrossRef] [Green Version]
- Pickering, E.; Muñoz-Moreno, R.; Stone, H.; Jones, N. Precipitation in the equiatomic high-entropy alloy CrMnFeCoNi. Scr. Mater. 2016, 113, 106–109. [Google Scholar] [CrossRef]
- Zhang, F.; Wu, Y.; Lou, H.; Zeng, Z.; Prakapenka, V.B.; Greenberg, E.; Ren, Y.; Yan, J.; Okasinski, J.S.; Liu, X.; et al. Polymorphism in a high-entropy alloy. Nat. Commun. 2017, 8, 15687. [Google Scholar] [CrossRef] [PubMed] [Green Version]
- Laplanche, G.; Kostka, A.; Horst, O.; Eggeler, G.; George, E. Microstructure evolution and critical stress for twinning in the CrMnFeCoNi high-entropy alloy. Acta Mater. 2016, 118, 152–163. [Google Scholar] [CrossRef] [Green Version]
- Yao, Y.; Huang, Z.; Xie, P.; Lacey, S.D.; Jacob, R.J.; Xie, H.; Chen, F.; Nie, A.; Pu, T.; Rehwoldt, M.; et al. Carbothermal shock synthesis of high-entropy-alloy nanoparticles. Science 2018, 359, 1489–1494. [Google Scholar] [CrossRef] [PubMed] [Green Version]
- Otto, F.; Dlouhý, A.; Pradeep, K.; Kuběnová, M.; Raabe, D.; Eggeler, G.; George, E. Decomposition of the single-phase high-entropy alloy CrMnFeCoNi after prolonged anneals at intermediate temperatures. Acta Mater. 2016, 112, 40–52. [Google Scholar] [CrossRef] [Green Version]
- Tracy, C.L.; Park, S.; Rittman, D.R.; Zinkle, S.J.; Bei, H.; Lang, M.; Ewing, R.C.; Mao, W.L. High pressure synthesis of a hexagonal close-packed phase of the high-entropy alloy CrMnFeCoNi. Nat. Commun. 2017, 8, 15634. [Google Scholar] [CrossRef] [Green Version]
- Wani, I.S.; Bhattacharjee, T.; Sheikh, S.; Lu, Y.P.; Chatterjee, S.; Bhattacharjee, P.P.; Guo, S.; Tsuji, N. Ultrafine-Grained AlCoCrFeNi2.1Eutectic High-Entropy Alloy. Mater. Res. Lett. 2016, 4, 174–179. [Google Scholar] [CrossRef] [Green Version]
- Nagase, T.; Kakeshita, T.; Matsumura, K.; Nakazawa, K.; Furuya, S.; Ozoe, N.; Yoshino, K. Development of Fe-Co-Cr-Mn-Ni-C high entropy cast iron (HE cast iron) available for casting in air atmosphere. Mater. Des. 2019, 184, 108172. [Google Scholar] [CrossRef]
- Mouralova, K. Moderní Technologie Drátového Elektroerozivního Řezání Kovových Slitin. Ph.D. Thesis, Technical University Brno, Brno, Czech Republic, 2015. [Google Scholar]
- Montgomery, D.C. Design and Analysis of Experiments; John Wiley & Sons Inc.: Hoboken, NJ, USA, 2017; ISBN 9781119113478. [Google Scholar]
- Manoj, I.V.; Joy, R.; Narendranath, S. Investigation on the Effect of Variation in Cutting Speeds and Angle of Cut during Slant Type Taper Cutting in WEDM of Hastelloy X. Arab. J. Sci. Eng. 2020, 45, 641–651. [Google Scholar] [CrossRef]
- ISO. Geometrical Product Specifications (GPS)—Surface Texture: Profile Method—Terms, Definitions and Surface Texture Parameters; ISO 4287: Geneva, Switzerland, 1997. [Google Scholar]
- Tosun, N.; Çogun, C.; Inan, A. The Effect of Cutting Parameters on Workpiece Surface Roughness in Wire EDM. Mach. Sci. Technol. 2003, 7, 209–219. [Google Scholar] [CrossRef]
- Aspinwall, D.; Soo, S.; Berrisford, A.; Walder, G. Workpiece surface roughness and integrity after WEDM of Ti–6Al–4V and Inconel 718 using minimum damage generator technology. CIRP Ann. 2008, 57, 187–190. [Google Scholar] [CrossRef]
- McGeough, J.A. Advanced Methods of Machining; Springer Science & Business Media: Berlin, Germany, 1988. [Google Scholar]
- Newton, T.R.; Melkote, S.N.; Watkins, T.; Trejo, R.M.; Reister, L. Investigation of the effect of process parameters on the formation and characteristics of recast layer in wire-EDM of Inconel 718. Mater. Sci. Eng. A 2009, 513, 208–215. [Google Scholar] [CrossRef]
- Kumar, A.; Kumar, V.; Kumar, J. Surface crack density and recast layer thickness analysis in WEDM process through response surface methodology. Mach. Sci. Technol. 2016, 20, 201–230. [Google Scholar] [CrossRef]
- Rupajati, P.; Soepangkat, B.O.P.; Pramujati, B.; Agustin, H.K. Optimization of Recast Layer Thickness and Surface Roughness in the Wire EDM Process of AISI H13 Tool Steel Using Taguchi and Fuzzy Logic. Appl. Mech. Mater. 2014, 493, 529–534. [Google Scholar] [CrossRef]
- Azam, M.; Jahanzaib, M.; Abbasi, J.A.; Abbas, M.; Wasim, A.; Hussain, S. Parametric analysis of recast layer formation in wire-cut EDM of HSLA steel. Int. J. Adv. Manuf. Technol. 2016, 87, 713–722. [Google Scholar] [CrossRef]
- Huang, C.; Hsu, F.; Yao, S. Microstructure analysis of the martensitic stainless steel surface fine-cut by the wire electrode discharge machining (WEDM). Mater. Sci. Eng. A 2004, 371, 119–126. [Google Scholar] [CrossRef]
- Klocke, F.; Hensgen, L.; Klink, A.; Ehle, L.; Schwedt, A. Structure and Composition of the White Layer in the Wire-EDM Process. Procedia CIRP 2016, 42, 673–678. [Google Scholar] [CrossRef]
- Kumar, A.; Kumar, V.; Kumar, J. Investigation of microstructure and element migration for rough cut surface of pure titanium after WEDM. Int. J. Microstruct. Mater. Prop. 2013, 8, 343. [Google Scholar] [CrossRef]



| Alloys | Alloys (abbr.) | Mass Percent (mass%) | |||||
|---|---|---|---|---|---|---|---|
| Fe | Co | Cr | Mn | Ni | C | ||
| FeCoCrMnNi | 1Fe | 19.92 | 21.02 | 18.54 | 19.59 | 20.93 | |
| FeCoCrMnNiC0.2 | 1Fe0.2C | 19.75 | 20.84 | 18.39 | 19.43 | 20.75 | 0.85 |
| Parameter | Gap Voltage | Pulse on Time | Pulse off Time | Wire Speed | Discharge Current |
|---|---|---|---|---|---|
| (V) | (µs) | (µs) | (m/min) | (A) | |
| Level 1 | 50 | 6 | 50 | 10 | 25 |
| Level 2 | 60 | 8 | 40 | 12 | 30 |
| Level 3 | 70 | 10 | 30 | 14 | 35 |
| Number of Sample | Gap Voltage (V) | Pulse on Time (µs) | Pulse off Time (µs) | Wire Speed (m/min) | Discharge Current (A) | Number of Sample | Gap Voltage (V) | Pulse on Time (µs) | Pulse off Time (µs) | Wire Speed (m/min) | Discharge Current (A) |
|---|---|---|---|---|---|---|---|---|---|---|---|
| 1 | 70 | 8 | 40 | 12 | 30 | 18 | 60 | 8 | 40 | 12 | 30 |
| 2 | 60 | 8 | 30 | 12 | 30 | 19 | 60 | 8 | 40 | 12 | 30 |
| 3 | 60 | 8 | 40 | 12 | 25 | 20 | 70 | 6 | 50 | 14 | 25 |
| 4 | 60 | 10 | 40 | 12 | 30 | 21 | 50 | 6 | 30 | 14 | 25 |
| 5 | 50 | 8 | 40 | 12 | 30 | 22 | 60 | 8 | 40 | 12 | 30 |
| 6 | 60 | 8 | 50 | 12 | 30 | 23 | 70 | 10 | 30 | 14 | 25 |
| 7 | 60 | 6 | 40 | 12 | 30 | 24 | 50 | 6 | 50 | 10 | 25 |
| 8 | 60 | 8 | 40 | 12 | 35 | 25 | 60 | 8 | 40 | 12 | 30 |
| 9 | 60 | 8 | 40 | 10 | 30 | 26 | 50 | 10 | 50 | 14 | 25 |
| 10 | 60 | 8 | 40 | 14 | 30 | 27 | 50 | 10 | 30 | 10 | 25 |
| 11 | 60 | 8 | 40 | 12 | 30 | 28 | 50 | 6 | 50 | 14 | 35 |
| 12 | 50 | 6 | 30 | 10 | 35 | 29 | 50 | 10 | 50 | 10 | 35 |
| 13 | 70 | 10 | 50 | 10 | 25 | 30 | 70 | 6 | 30 | 14 | 35 |
| 14 | 70 | 10 | 30 | 10 | 35 | 31 | 50 | 10 | 30 | 14 | 35 |
| 15 | 60 | 8 | 40 | 12 | 30 | 32 | 60 | 8 | 40 | 12 | 30 |
| 16 | 70 | 6 | 50 | 10 | 35 | 33 | 70 | 6 | 30 | 10 | 25 |
| 17 | 70 | 10 | 50 | 14 | 35 |
| Source | Contribution | p-Value |
|---|---|---|
| Model | 97.70% | 0.000 |
| Pulse on time (µs) | 17.90% | 0.000 |
| Pulse off time (µs) | 34.82% | 0.000 |
| Discharge current (A) | 43.36% | 0.000 |
| Alloy | 0.71% | 0.000 |
| Discharge current (A)*Discharge current (A) | 0.41% | 0.002 |
| Pulse on time (µs)*Discharge current (A) | 0.50% | 0.001 |
| Source | 1Fe-Ra (µm) | 1Fe-Rz (µm) | 1Fe0.2C-Ra (µm) | 1Fe0.2C-Rz (µm) |
|---|---|---|---|---|
| Model (R2) | 78.61% | 82.15% | 94.33% | 80.26% |
| Linear | 71.77% | 69.00% | 88.71% | 72.68% |
| Gap voltage (V) | 7.64% | 11.87% | 3.47% | 0.41% |
| Pulse on time (µs) | 25.10% | 35.44% | 17.38% | 26.73% |
| Pulse off time (µs) | Non-significant | 1.22% | 9.80% | 9.56% |
| Discharge current (A) | 39.03% | 20.41% | 57.81% | 35.98% |
| Two-way interactions | 6.85% | 13.15% | 5.62% | 7.58% |
| Element | Place of Measurement | ||||
|---|---|---|---|---|---|
| 1 | 2 | 3 | 4 | 5 | |
| Cr | 17.4 | 14.2 | 15.7 | 15.3 | 18.9 |
| Mn | 19.4 | 10.8 | 15.9 | 11.1 | 20.5 |
| Fe | 17.2 | 12.1 | 16.5 | 9.8 | 18.4 |
| Co | 17.5 | 9.1 | 16.7 | 7.5 | 16.3 |
| Ni | 16.8 | 8.8 | 15.9 | 6.9 | 18.9 |
| C | 3.5 | 7.2 | 6.1 | 13.4 | 3.2 |
| O | 5.2 | 14.1 | 7.8 | 22.5 | 3.8 |
| Cu | 3 | 20.3 | 3.3 | 9.2 | |
| Zn | 3.4 | 2.1 | 4.3 | ||
| Element | Place of Measurement | ||||
|---|---|---|---|---|---|
| 1 | 2 | 3 | 4 | 5 | |
| Cr | 17 | 16.4 | 11.4 | 10.8 | 16.8 |
| Mn | 16.4 | 16.9 | 9.8 | 7.9 | 17.4 |
| Fe | 19 | 18.3 | 8.3 | 7.4 | 17.8 |
| Co | 17.6 | 17.5 | 7.7 | 8.3 | 18.3 |
| Ni | 16.2 | 15.9 | 9.3 | 10.2 | 16.7 |
| C | 3.5 | 3.1 | 15.2 | 16.8 | 2.1 |
| O | 4.4 | 6.8 | 18.9 | 14.3 | 7.8 |
| Cu | 3.6 | 3.1 | 13.7 | 19.5 | 2.7 |
| Zn | 2.3 | 1.8 | 5.7 | 4.8 | 0.4 |
Publisher’s Note: MDPI stays neutral with regard to jurisdictional claims in published maps and institutional affiliations. |
© 2020 by the authors. Licensee MDPI, Basel, Switzerland. This article is an open access article distributed under the terms and conditions of the Creative Commons Attribution (CC BY) license (http://creativecommons.org/licenses/by/4.0/).
Share and Cite
Mouralova, K.; Benes, L.; Zahradnicek, R.; Bednar, J.; Zadera, A.; Fries, J.; Kana, V. WEDM Used for Machining High Entropy Alloys. Materials 2020, 13, 4823. https://doi.org/10.3390/ma13214823
Mouralova K, Benes L, Zahradnicek R, Bednar J, Zadera A, Fries J, Kana V. WEDM Used for Machining High Entropy Alloys. Materials. 2020; 13(21):4823. https://doi.org/10.3390/ma13214823
Chicago/Turabian StyleMouralova, Katerina, Libor Benes, Radim Zahradnicek, Josef Bednar, Antonin Zadera, Jiří Fries, and Vaclav Kana. 2020. "WEDM Used for Machining High Entropy Alloys" Materials 13, no. 21: 4823. https://doi.org/10.3390/ma13214823
APA StyleMouralova, K., Benes, L., Zahradnicek, R., Bednar, J., Zadera, A., Fries, J., & Kana, V. (2020). WEDM Used for Machining High Entropy Alloys. Materials, 13(21), 4823. https://doi.org/10.3390/ma13214823


