Technical Note

Modular, Physically Motivated Simulation Model of an Ultrasonic Testing System

by
Marius W. Schäfer
* and
Sarah C. L. Fischer
Fraunhofer IZFP, Campus E3.1, 66123 Saarbrücken, Germany
*
Author to whom correspondence should be addressed.
NDT 2024, 2(3), 330-346; https://doi.org/10.3390/ndt2030020
Submission received: 25 July 2024 / Revised: 20 August 2024 / Accepted: 22 August 2024 / Published: 29 August 2024

Abstract

:
The increasing complexity of material systems requires an extension of conventional non-destructive evaluation methods such as ultrasonic testing. Many publications have worked on extending simulation models to cover novel aspects of ultrasonic transducers, but they do not cover all components of the system. This paper presents a physically motivated, modular model that describes the complete signal flow with the aim of providing a platform for optimizing ultrasonic testing systems from individual components to the whole system level. For this purpose, the ultrasonic testing system is divided into modules, which are described by models. The modules are each parameterized by physical parameters, characteristics of real components as provided by datasheets, or by measurements. In order to validate the model, its performance is presented for three different configurations of a real test system, considering both classical sinusoidal excitation and a chirp signal. The paper demonstrates the modularity of the model, which can be adapted to the different configurations by simply adapting the modified component, thus drastically reducing the complexity of modeling a complex ultrasonic system compared to State-of-the-Art models. Based on this work, ultrasonic inspection systems can be optimized for complex applications, such as operation with coded excitation, which is a major challenge for the system components.

1. Introduction

Ultrasonic testing is a widely used technique with applications ranging from medical diagnostics to industrial quality control [1,2]. In non-destructive testing, many ultrasonic techniques are based on time-of-flight measurements in contact mode. An ultrasonic transducer is coupled to a test object, a stimulation sequence is excited, and one or more backwall echoes are measured. Depending on the application, the time-of-flight provides information on material properties, material thickness, defects or stress states in the material. As the complexity of inspection systems and objects increases, so does the need to adapt ultrasonic techniques, and optimizing such systems for specific applications requires expert knowledge.
The field of material science is undergoing tremendous development, producing new complex structures, or metamaterials, to meet the demands of industry. Whereas in the past the composition and microstructure of materials were the key elements to tuning mechanical properties, metamaterials derive their properties from three-dimensional architectures [3]. This enables the integration of completely new functions into components but also requires advances in the understanding of material physics to develop suitable characterization techniques. As materials develop, the field of non-destructive testing will need to expand.
In ultrasonic testing, several aspects can be addressed to adapt the methods to more complex testing problems. There are two distinct approaches: On the one hand, the resulting signals can be analyzed with advanced data science methods to extract information or identify false signals [4,5,6]. On the other hand, the stimulation sequence can be modified into much more complex sequences, called coded excitation sequences, to maximize echo information, signal-to-noise ratio or unambiguity [7,8,9,10,11]. However, while sequences can be selected on the basis of their auto-correlation functions, this approach has been found to have limitations and places high demands on the understanding of the interplay between ultrasound, test system and test object [12]. All components of an ultrasonic testing system are limited in their ability to transmit signals, e.g., bandwidth or voltage range, and affect the echo deformation. For the development of ultrasonic testing methods for complex materials, all components of an ultrasonic testing system must be included in a complete system description that provides a basis for the development of tailored excitation sequences. For individual test cases, optimization can be performed manually, but this is only valid as long as all system components, including the test object, remain unchanged [12].
Many publications have worked on the development and extension of ultrasonic transducer simulation models, covering more and more aspects and parameters [13,14,15,16,17,18,19,20,21], but failing to cover all the components of the ultrasonic testing system, including the test object, the electrical power stage and the receiver amplifier.
The aim of this work is to develop a physically motivated modular model based on State-of-the-Art methods covering all components of an ultrasonic testing system, thus combining the description of electronic circuits [22] with the modeling of ultrasonic transducers. The Krimholtz–Leedom–Matthaei (KLM) model is used to model the ultrasonic transducer [15]. The KLM model is a commonly used State-of-the-Art model with physically motivated parameters [21,23] and the aim of this work is to implement a modular model with variable parameters that reflect a real test system. The physically motivated modeling requires a connection of all elements of the setup including the test object. After the theoretical description of the components, the implementation is adapted to the components of real ultrasonic test systems with three different configurations and evaluated with two test sequences.
Using this model, it is possible to design ultrasonic testing systems and evaluate the performance of different methods and inspection strategies. Individual components can be interchanged and their effect on system performance can be evaluated because of the modular structure. For example, before building a custom ultrasonic inspection system that allows for high quantization and bandwidth stimulation, the applicability of coded stimulation to an application can be evaluated.

2. Materials and Methods

Calculations and model implementations were performed using Matlab2020b (Mathworks Inc., Natick, MA, USA).
The specimen is designed to meet the requirements described in Section 2.1.2. In summary, this is a specimen with boundary conditions that provide low distortion and an almost homogeneous grain structure. It is a 250 mm × 250 mm × 120 mm block machined from 1.0045/S355JR steel and heat treated at 850 °C in an inert gas atmosphere to provide a homogeneous internal structure. It should be noted the test object considered is purposefully kept simple to emphasize the description and modelling of all the system’s components. In order to generalize the model to any test object and material, the representation of the test object has to further include nonlinear effects and validated on more complex objects in the future.
The validation of the model is based on a customized ultrasonic test environment [24]. Figure 1 shows the components of the test system. The digital system is covered by an FPGA board connected to custom-built ultrasound electronics developed at Fraunhofer IZFP. The piezoelectric transducers are also custom-built at Fraunhofer IZFP, as the matching of the model parameters to the built transducer requires knowledge of the design parameters of the transducer. They contain a 3-1 composite piezoelectric plate and a backing layer of a mixture of Al2O3 and araldite. The frequency range in which a piezoelectric transducer can be used for ultrasonic testing is described by the center frequency and a bandwidth. The center frequency is where the highest signal level is reached, and the bandwidth describes a frequency range around the center frequency until the signal level decreases to a certain amount—usually the 3 dB bandwidth is given in datasheets. For transducer selection, these values are determined by the material and thickness of the piezoelectric plate and are influenced by the backing layer. The parameters of the piezoelectric transducers are summarized in Table 1. The selected components result in a center frequency of 5 MHz for Transducer 1 and 4 MHz for Transducer 2.
Note that for reasons of model complexity and applicability, we limit the scope of the paper to linear models. As such, all models and transfer functions are linear approximations. This point is further discussed in Section 4.

2.1. Theoretical Base of Component Modeling

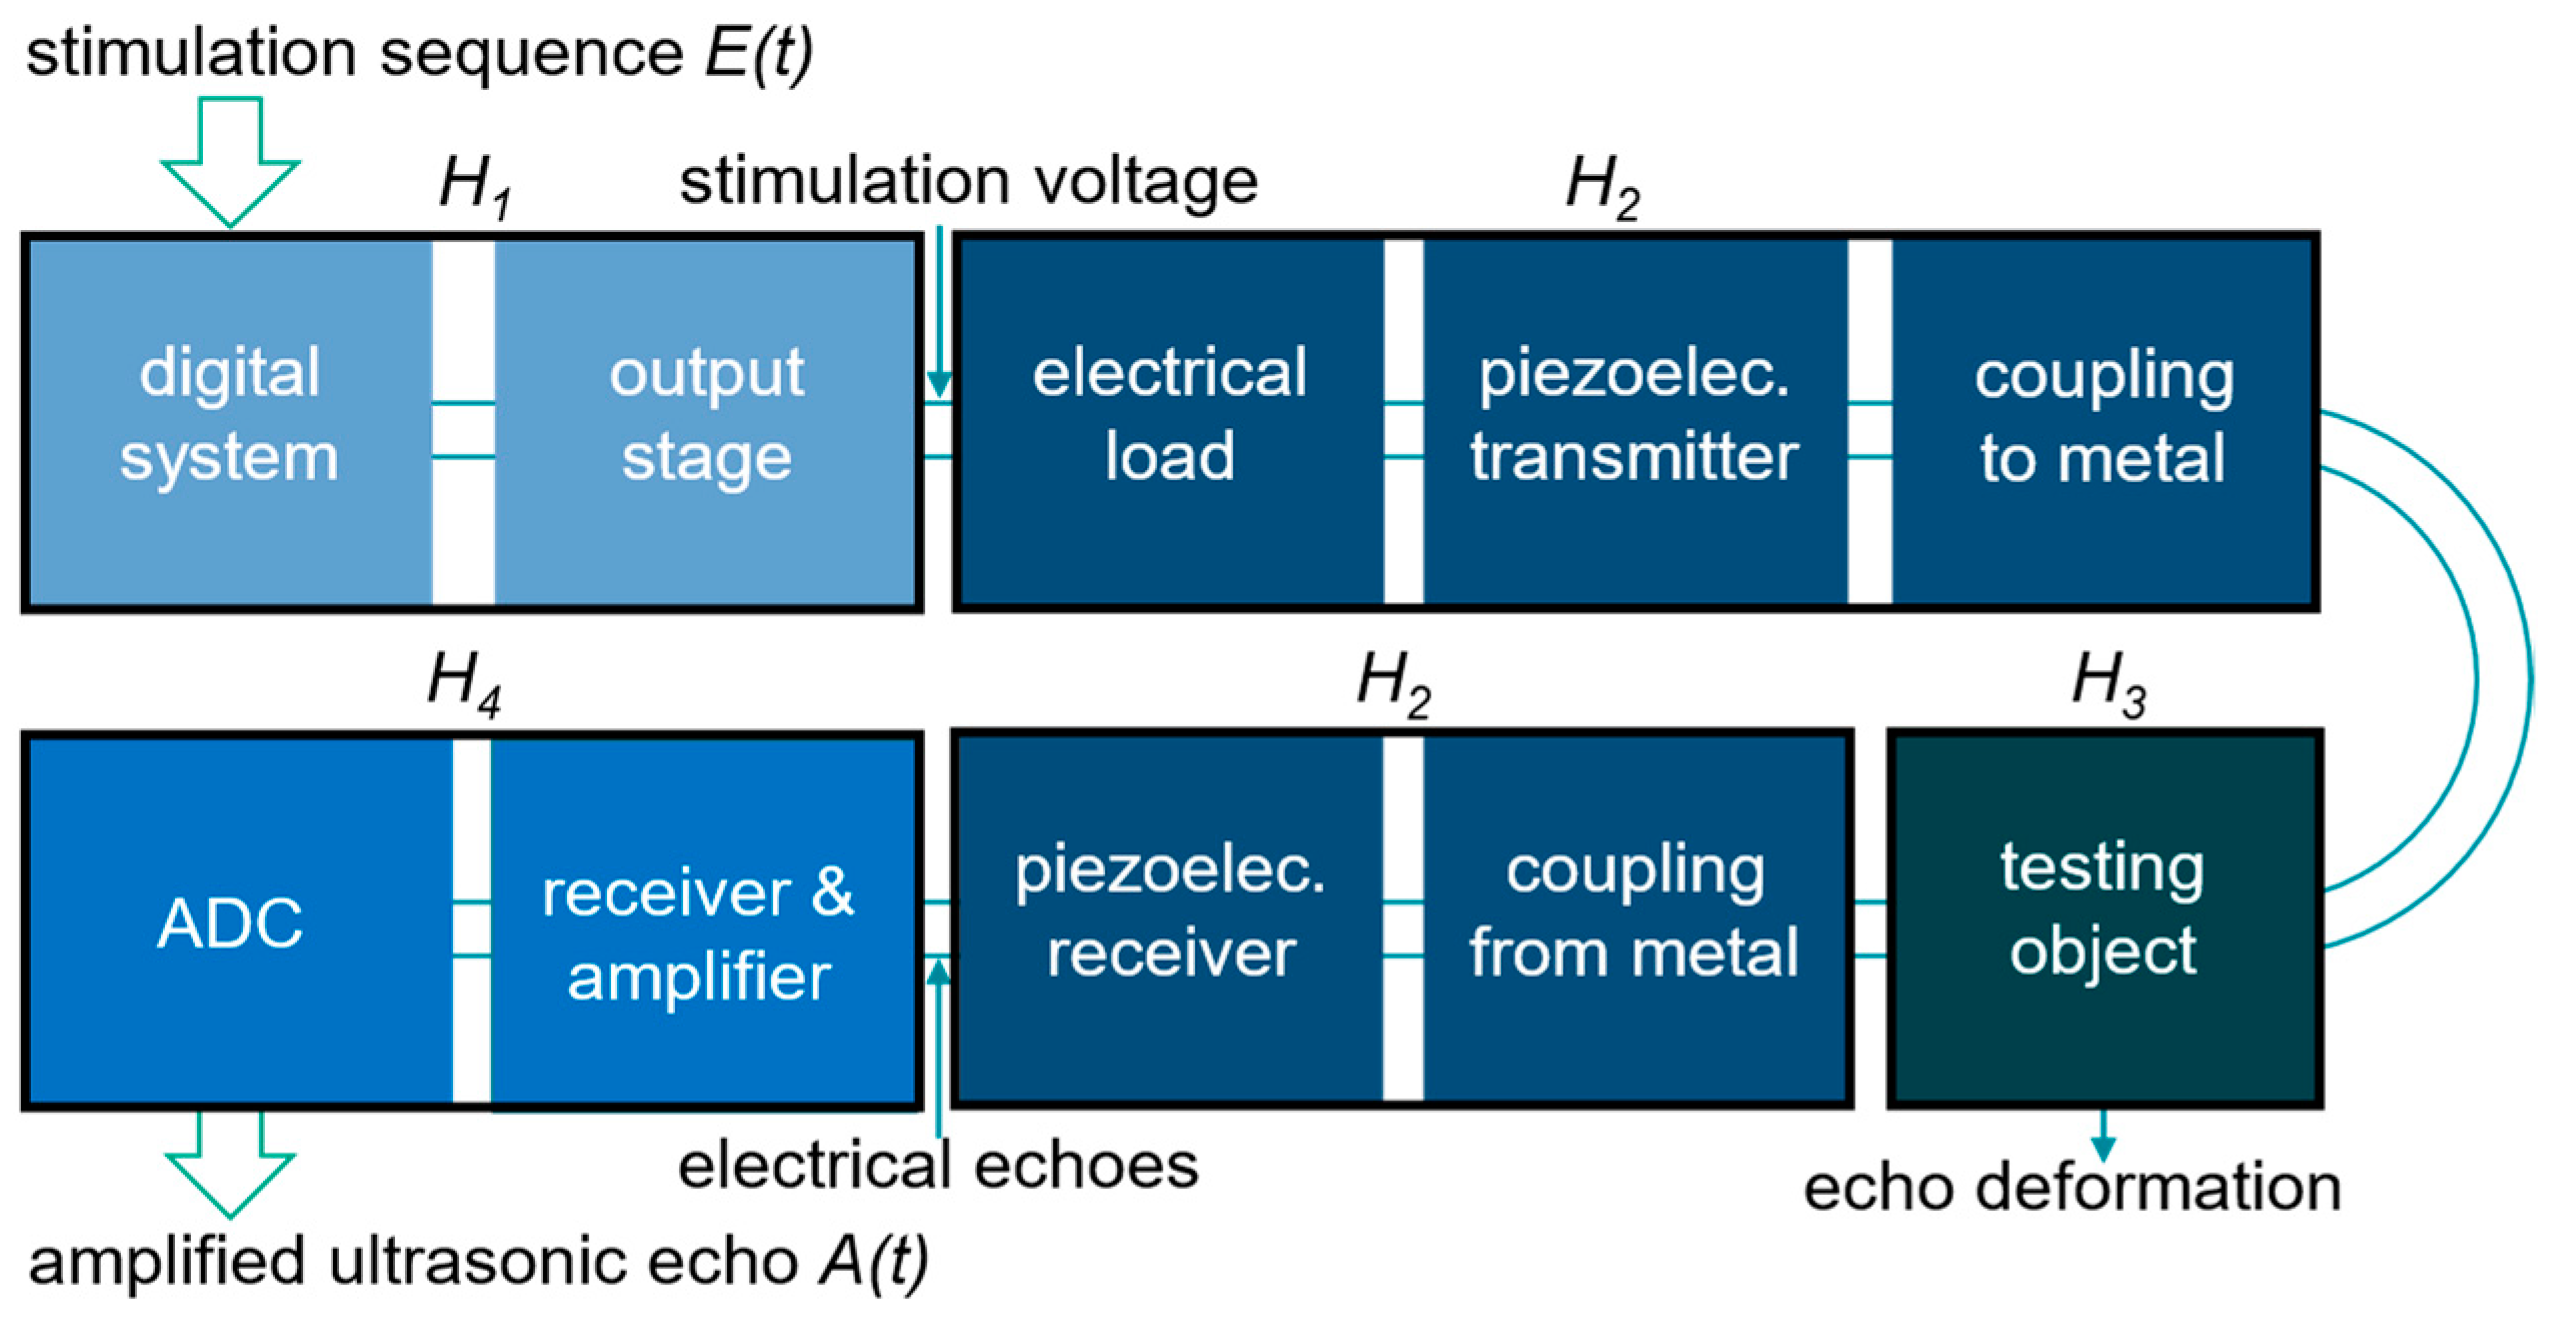
This section deals with the theoretical modeling of functions describing groups of components of an ultrasonic testing system. To develop a modular model covering several grouped components, we must first consider the structure of the system and the signal flow. A typical ultrasonic testing system can be broken down into the components shown in Figure 2. Since the function of some components is interrelated, these components are grouped and described by a single model.
The signal flow shown in Figure 2 shows several steps and elements in the conversion from electrical voltage to acoustic wave and back to electrical signal. Each group represents a transfer function, and to calculate the amplified ultrasonic echo (A(f)), all transfer functions (H1(f) − H4(f)) are applied by spectral multiplication to the input sequence (E(f)) as shown in (1). E(f) and A(f) are the spectral representations of the time signals E(t) and A(t). Since multiplication is a commutative operation, it does not matter which operation is performed first.
A f = E f H 1 f H 2 f H 3 f H 4 ( f )
In terms of signal flow, the input to the system is an arbitrary stimulation sequence. Depending on the system components used and the test application, the sequence used to stimulate the system may change. Switching to a different transducer may change the center frequency of the sequence, and switching to complex test cases may benefit the application by using complex sequences with frequency, phase, pulse width, or amplitude modulation [25,26,27].
The stimulation sequence is transmitted to the output stage where it is amplified. The output voltage is the actual stimulation voltage of the piezoelectric transducer, which is converted into a sound wave that travels through the subject. In our case, the same transducer is used to transmit and receive ultrasound. An emitted sound wave is reflected at the boundaries of the test object. These reflections travel back to the position of the transducer and are converted back into electrical signals. These signals are quite low amplitude and require amplification before evaluation can take place. After amplification, the data is digitized and made available for visualization.
The description of the groups shown in Figure 2 and the theoretical implementation of the models representing these groups is explained in the following subsections.

2.1.1. Digital System and Output Stage

The first group of components covers the conversion from the digital stimulation sequence to the stimulation voltage. This group includes the conversion by the digital-to-analog converter (DAC) and the analog amplification by the output stage.
The basic function of the DAC is to convert quantized and sampled digital data into an analog signal. The integration of the DAC means a limitation of the data quantization due to the bit width of the DAC and produces a signal with a bandwidth limited to half the sampling frequency. The second element is the power stage. In a linear ultrasonic inspection system, the output stage provides an analog amplification of the stimulation sequence.
Common descriptions of analog amplifiers and filter structures are amplitude and phase responses [22]. The transfer function for the output stage can be constructed by combining the amplitude and phase responses of the components used (op-amps, transformers, etc.) from datasheets with filter functions of discrete components. In practice, the transfer function is obtained by measuring with a network analyzer to cover the tolerances of the components.
The design of an output stage is aimed at an application. The stimulation of a piezoelectric transducer requires an output stage capable of meeting its electrical requirements. It should at least be able to transmit signals up to the center frequency of the transducer and be able to handle capacitive loads.

2.1.2. Testing Object

In the signal flow shown in Figure 2, the test object splits the group describing the piezoelectric transducer into two parts. Since we want to calculate the transducer component as a single transfer function, and since the evaluation of the transducer necessarily involves the test object, the calculation of the test object is performed first. The basic deformation occurring in each specimen can be described by (2) [28].
p ( f , z ) = p 0 π N z e ( a + b f ) z
Equation (2) describes the sound pressure at a distance z from the transducer and for a frequency f. This is a simplified equation that is only valid in the far field of the ultrasonic transducer used (z > 3 N [28]). The only effects considered here are the transducer aperture and the grain scattering caused by the material.
The beam opening is an effect based on the near field range N of the transducer, a constant based on the geometry of the transducer and the distance to the transducer z. Grain scattering is an exponential attenuation function.
Apart from the first effect, grain scattering consists of an attenuation component a, which is based only on the distance between two points, and a component b, which is influenced by the frequency and a distance. The scattering coefficients depend on the material properties and the grain structure. Measurement [29] or experimental approximation can be used to accurately determine the appropriate values for the specimen.
In the case of ultrasonic testing of a given object, the travel distance is the parameter to be evaluated and a transfer function over a usable frequency range is required. For more complex targets, other effects such as multipath scattering need to be considered, which will be part of future work.

2.1.3. Transducer KLM Model

A piezoelectric transducer can contain different layers and materials. Figure 3a shows a simplified diagram of a piezoelectric transducer and the basic electrical circuit model for the piezoelectric transducer.
The central component is the piezoelectric element. It is connected to the electrical port via the backing layer to the acoustic back port and via one or more matching layers to the acoustic front port. The acoustic front port is coupled to the device under test. The mathematical implementation of this structure works by converting the piezoelectric element and the other layers into an electrical circuit model [15], as shown in Figure 3b. The input capacitance C1, the complex impedance X1 and the transformer are based on the parameters of the piezoelectric element only. The circuit elements ZTL include the piezoelectric element and the backing layer, while ZTR is calculated from the piezoelectric elements and the matching layers. The main parameters for the model are the physical parameters of the piezoelectric element and the other layers such as thickness t, radius r, sound velocity c and density ρ. Additional parameters used within the model implementation are the electrical damping for the piezoelectric element, the mechanical damping for each layer and the coupling coefficient kt. The implementation of this model also includes the complex electrical voltage divider for transmission and reception. Therefore, the electrical impedance of the output stage and the receiver amplifier are also relevant.
Figure 4 shows the amplitude response of the implementation of the KLM model with air coupling using the parameters presented in Table 1, including the influence of parameter variation on the amplitude response. The two parameters t and c affect the center frequency of the transducer. The center frequency increases with increasing sound velocity and decreasing thickness. Other parameters have a different effect. Increasing kt also increases the maximum intensity, whereas increasing ρ increases the maximum intensity but reduces the bandwidth.
The radius of the transducer has a major influence on the impedance of the transducer. Figure 5 shows that the impedance of the transducer decreases as the radius increases.
The impedance of the transducer is relevant to the voltage divider in transmit and receive. This effect affects the overall gain but not the center frequency or bandwidth of the transducer.
The primary objective in designing the matching layer is to find the optimum thickness and acoustic impedance to achieve either maximum power or maximum bandwidth. For the backing layer, the acoustic impedance is relevant to the maximum performance of the transducer. In addition to optimizing efficiency, the main purpose of the underlayer is to eliminate reverberation. Several studies have shown that the precise design of the matching and backing layers has a huge influence on the performance and bandwidth of the transducer [16,19]. These layers can be modeled using an extended model [13,19,21].

2.1.4. Amplifier and ADC

For the last component, the electrical amplifier and the analog-to-digital converter (ADC), the theoretical considerations from Section 2.1.1 also apply to this component. The ADC does the opposite of the DAC. The analog signal at the input of the ADC is converted into digital data, depending on the quantization and sampling rate. The analog amplifier has different requirements than the output stage, but the implementation in terms of the simulation model is again an amplitude and phase response.
Earlier, we mentioned that in the ultrasonic testing system, the same transducer is used for transmitting and receiving ultrasound. If the same transducer is used, it is inevitable that the transmit and receive electronics will be coupled. In ultrasonic testing, the expected echoes are of very small amplitude. Peaks of less than 1 mV are common. The dynamic range of the ADC should be exploited to achieve the maximum dynamic range in data evaluation. In our test case, a gain of about 30 dB is required to amplify the echoes, but the coupling to the output stage applies the full stimulation voltage to the input of the receiver electronics. To cover both cases, the receiver electronics must be protected against overload. To give a few examples, this could be a protection circuit using depletion mode MOSFets (Metal Oxide Semiconductor Field-Effect Transistors) [30] or the use of disengageable amplifiers at the input of the electronics. Using these technologies, or driving the analog amplifiers to overload, results in a dead time for the receiver when no valid signals are being measured. This is important for the minimum size of DUTs or the refresh rate of the test system.
Apart from these special situations, the implementation of the analog amplifier is given by an amplitude and phase response as mentioned above. In detail, several amplifier stages are implemented. The transducer can be connected either differential or single-ended. The first stage is built twice in parallel as a non-inverting amplifier with a shutdown option for overload protection during transmission. The second stage is a differential to single-ended converter. The third stage is a variable gain amplifier that allows the gain to be adjusted based on the signal strength. A non-inverting ADC driver is used before reconnecting to the ADC. A more detailed description, including a schematic, can be found in [24]. After the amplification, the analog signal is converted by the ADC and is the data available for visualization and evaluation.

3. Results

3.1. Validation of the Group Modeling

In this section, the validation of the models described in Section 2.1 is performed by adapting the model to fit the testing system and comparing the calculation results to actual measurements.

3.1.1. Validation of the Digital System and the Output Stage

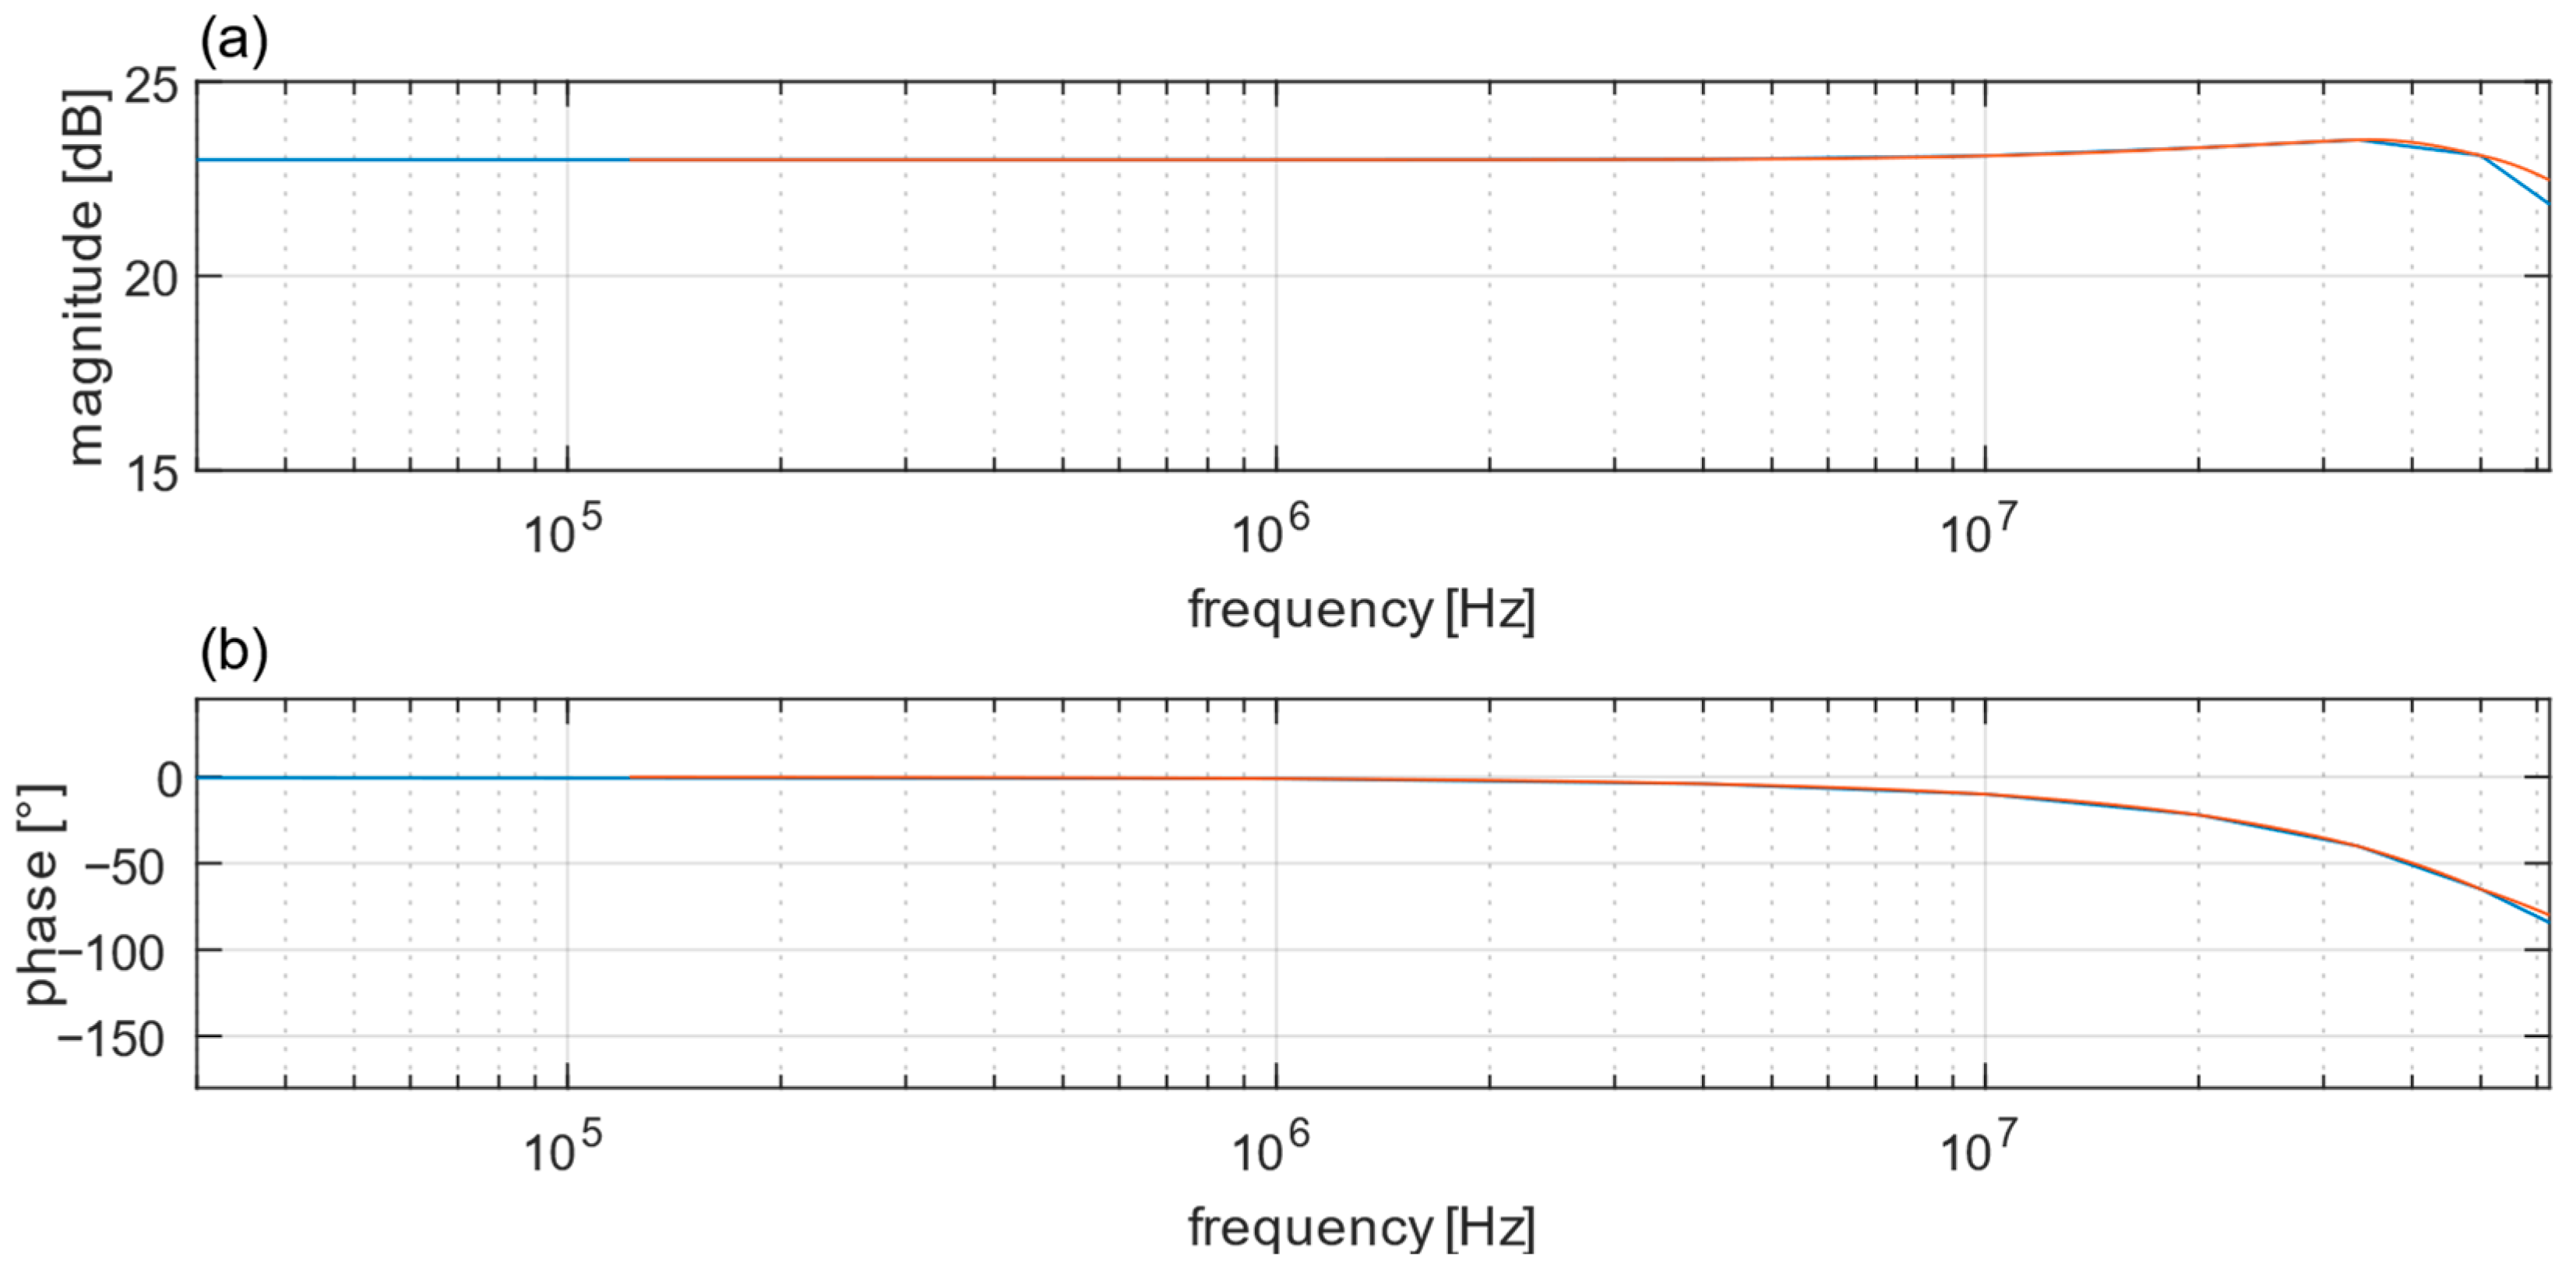
As described in Section 2.1.1, to cover the component tolerances, a measurement of the whole group is made using a network analyzer. Figure 6 shows the measurement of the transfer function of the actual test system and the fitted function used for the simulation. The Matlab function interp1 was used to interpolate the magnitude and phase response. The options ‘maxima’ and ‘extrap’ were used for the magnitude and ‘linear’ and ‘extrap’ for the phase.
The interpolation shows good agreement with the measured transfer function of this component. A deviation is visible in Figure 6a for frequencies above 40 MHz, but the effect is negligible because the main operation of the device is below 20 MHz.
Figure 7 shows the calculation of the expected stimulation voltage. The fit is almost perfect for evaluating the device using a 50 Ω load and a signal generator.

3.1.2. Validation of the Testing Object

The test object was designed to cover the basic function described in Section 2.1.2 while avoiding other effects such as multipath scattering. The test object is designed and implemented with a thickness of 120 mm. The first ultrasonic echo must travel this distance twice to reach the transducer again, so the effective distance is 240 mm. The implementation of a transfer function based on (2) is shown in Figure 8. The experimental evaluation of (2) gave a = 6–10 1/m and b = 6–10 s/m.
Each ultrasonic echo measured at the output of the system is influenced by all the components in the system, but the difference between one backwall echo and the next backwall echo is caused by the material alone. To compare the implementation with the real test object, the material transfer function is applied to the first ultrasonic backwall echo to calculate the second. Figure 9 shows this operation in spectral and time comparison.
The spectral comparison of the second ultrasonic echo, displayed in Figure 9a, matches the calculated curve based on the first echo. The overall fit shows slight deviations for low and high frequencies, but these areas are outside the relevant bandwidth (piezoelectric transducer with center frequency at 5 MHz and bandwidth of ±1 MHz) and therefore do not affect the actual echo prediction. Figure 9b shows the time-based comparison. Based on the previous results, the time-based comparison is expected to be in near-perfect agreement.

3.1.3. Validation of the Transducer

Analyzing the fit of the transducer model to the real piezoelectric transducer is not so straightforward. Measuring the transfer function of the transducer is not easy because the system response is the ultrasonic echo, which has a huge delay compared to electrical circuits. Instead, the electrical impedance is measured. The KLM model represents the acoustic part of the piezoelectric transducer as electrical components, allowing its electrical impedance to be calculated, considering the mechanical impedance. The signal transformation is calculated using the same elements used to calculate the impedance of the transducer, allowing the transfer function to be verified by comparing the measured and calculated impedance.
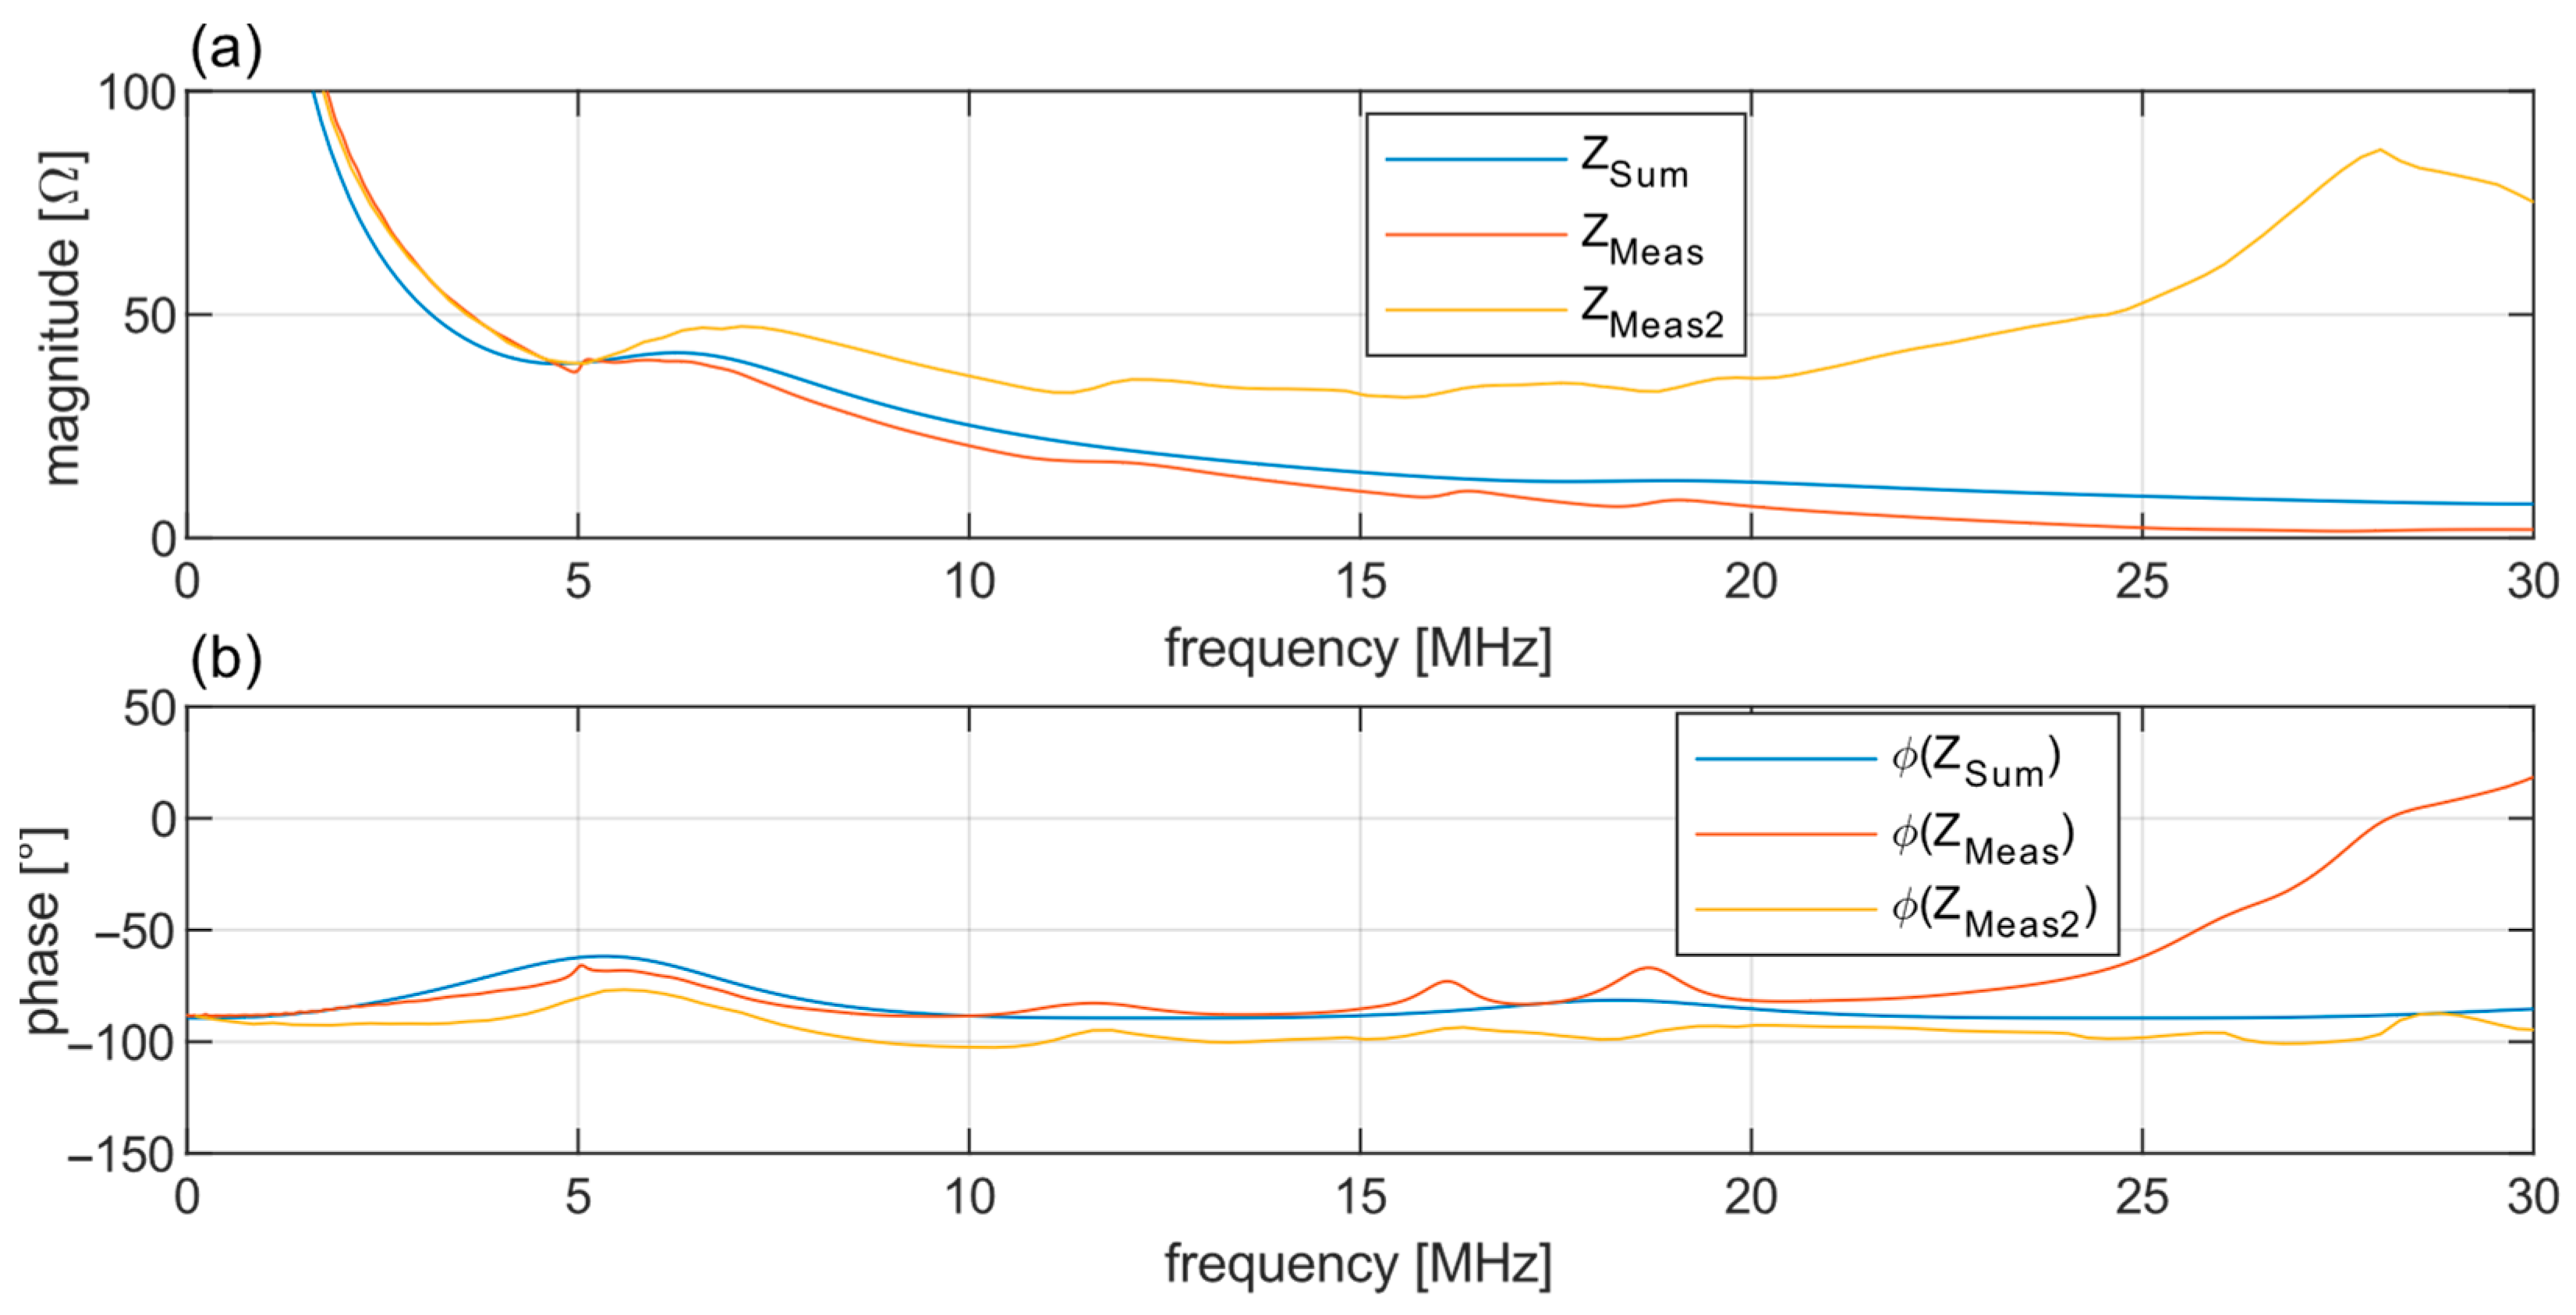
Figure 10a,b shows the electrical impedance of two piezoelectric transducers manufactured with the same specification and the model implementation based on the physical parameters of these transducers. The impedance of the transducers is measured using an impedance analyzer.
There is a deviation between transducers manufactured to the same specification due to manufacturing tolerances. The deviation in magnitude starts at higher frequencies, around 7 MHz and the model fits in the middle between the two transducers. The phase shows a similar pattern with an offset between the transducers and the model. The modeled transducer transfer function and the actual measurement show similar behavior. The bandwidth for the echo is limited and the deviation in magnitude occurs in a frequency range that is not relevant for the calculation (piezoelectric transducer with center frequency at 5 MHz and bandwidth of ±1 MHz).
In Figure 11, the signal prediction shows some slight deviations at the beginning and end of the waveform. As expected, the model agrees best at the center frequency and shows increasing deviation with spectral distance from the center frequency. For the waveform tested, the model and measurements are in good agreement. For stimulation sequences requiring a wider bandwidth, larger deviations will result in a non-negligible evaluation error.

3.1.4. Validation of the Amplifier and the ADC

For the last component, the same operations as in Section 3.1.1 apply. The electronics have been measured using a network analyzer and the transfer function has been adjusted so that it is ready to be used for signal prediction.
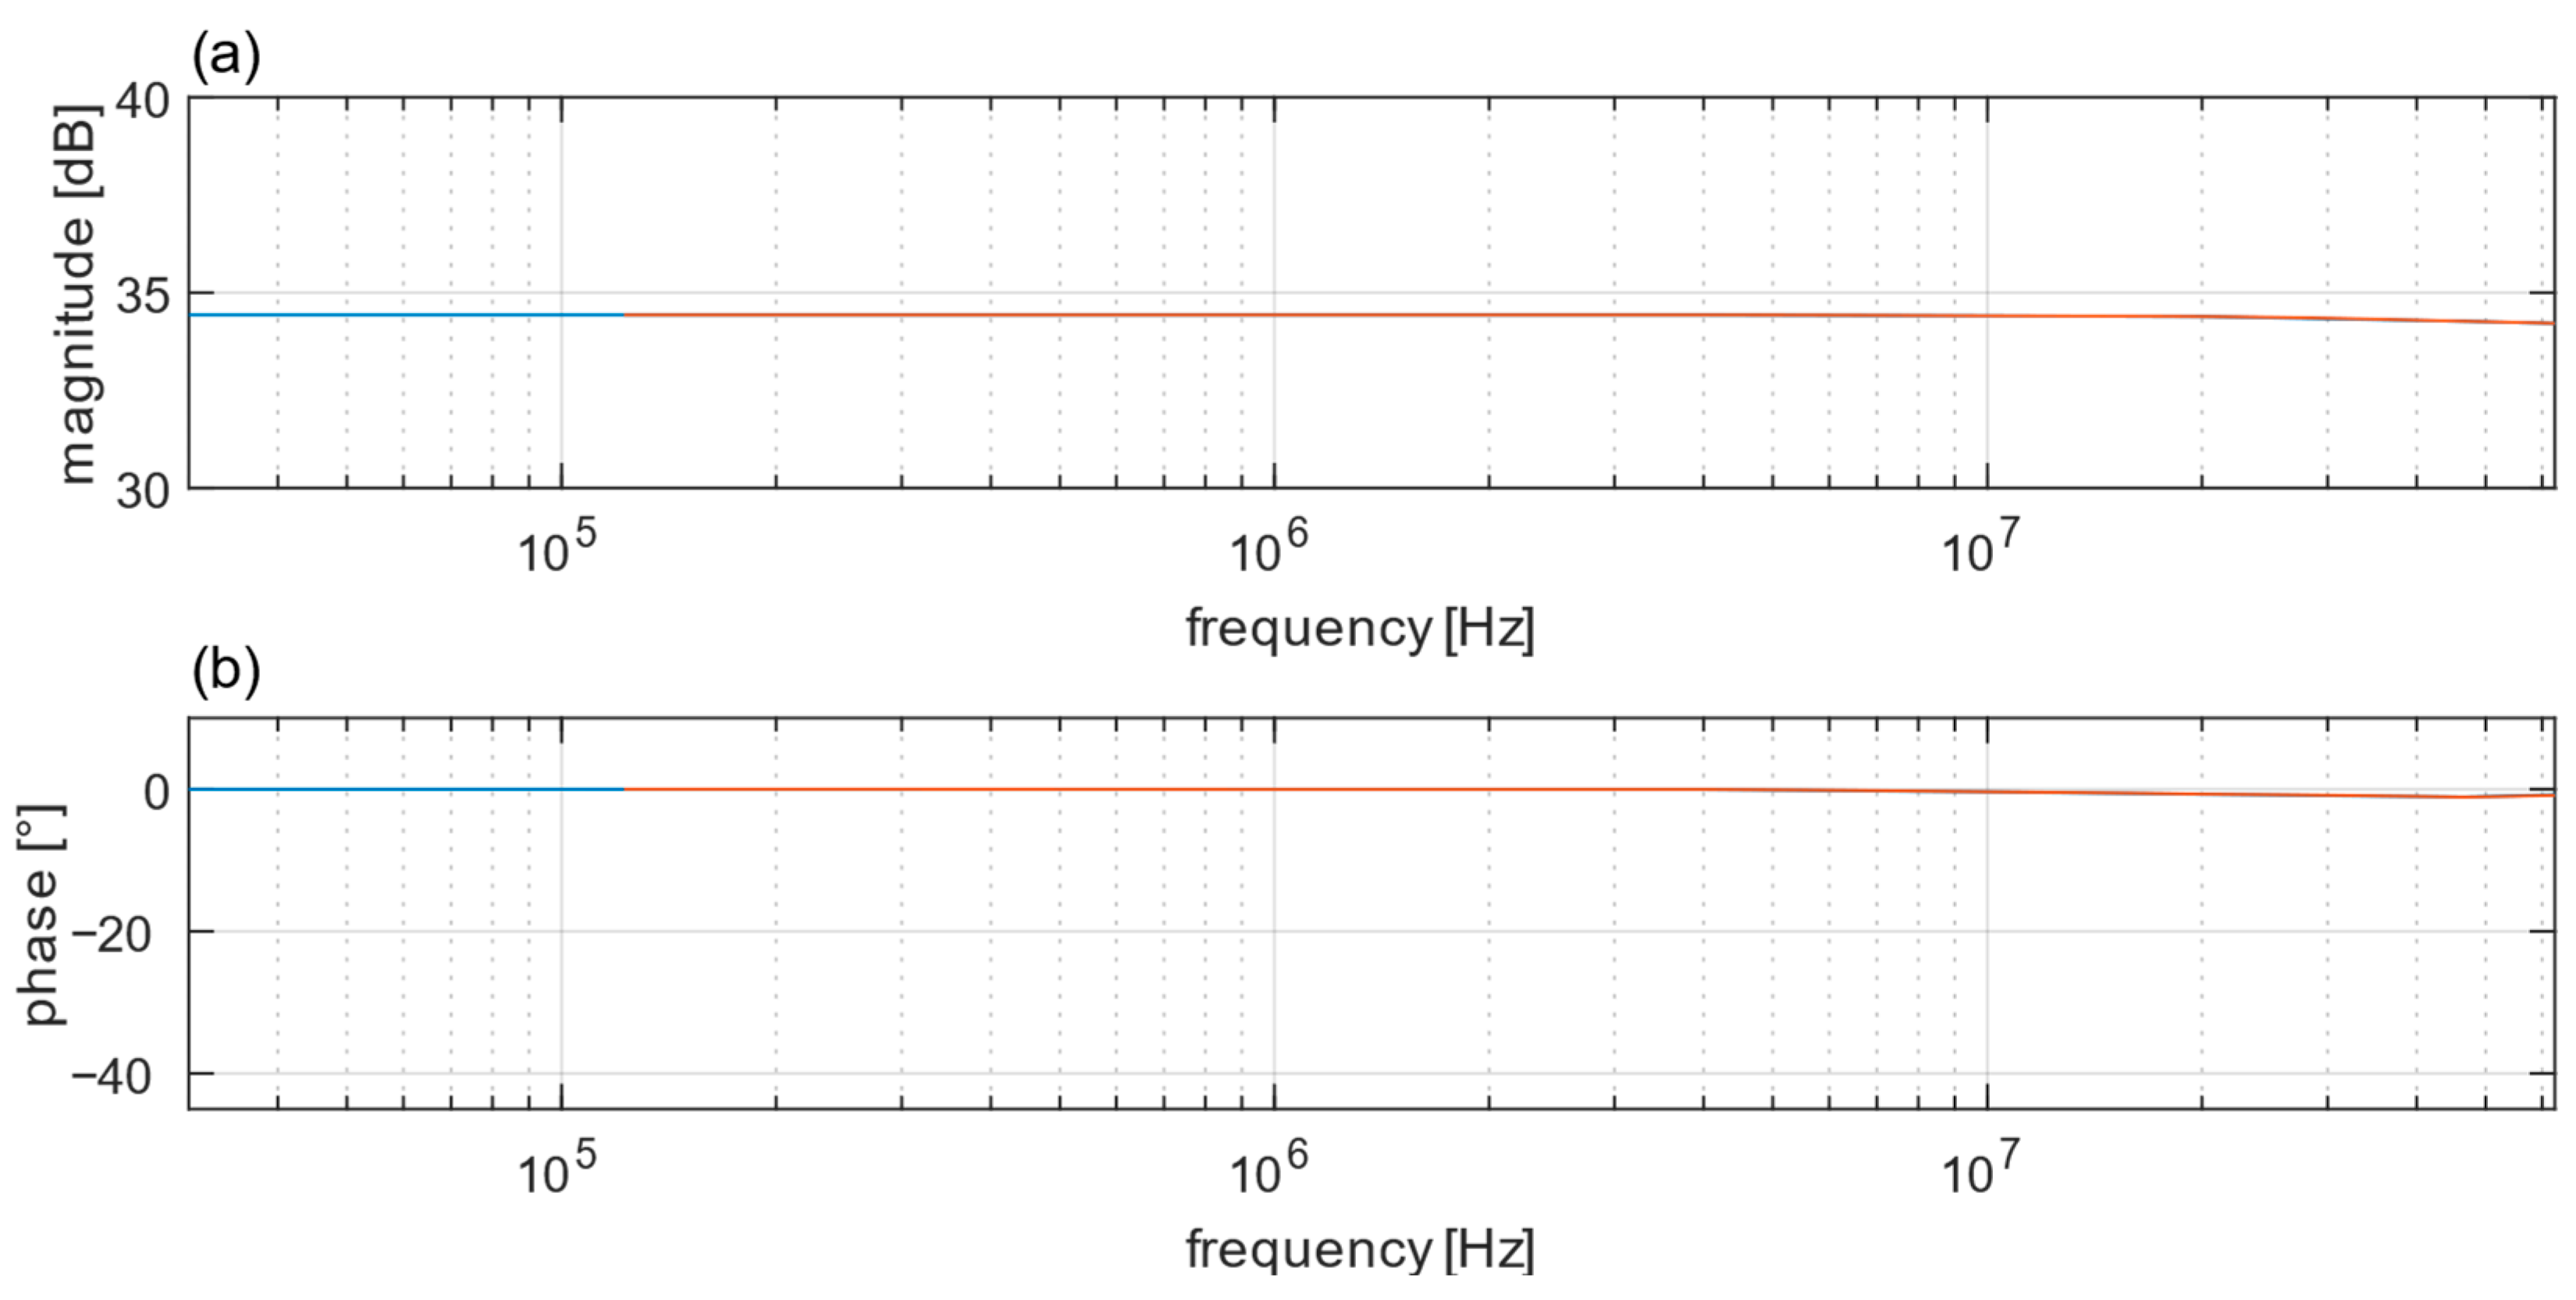
The fit of the transfer function and signal calculation for the electrical amplifier are shown in Figure 12 and Figure 13, the comparison of the calculated and the measured signals.
The implementation covers the system behavior well and the calculation agrees very well with the measurement and no relevant deviation is visible.

3.2. Total System Validation, Component Variation and Echo Prediction

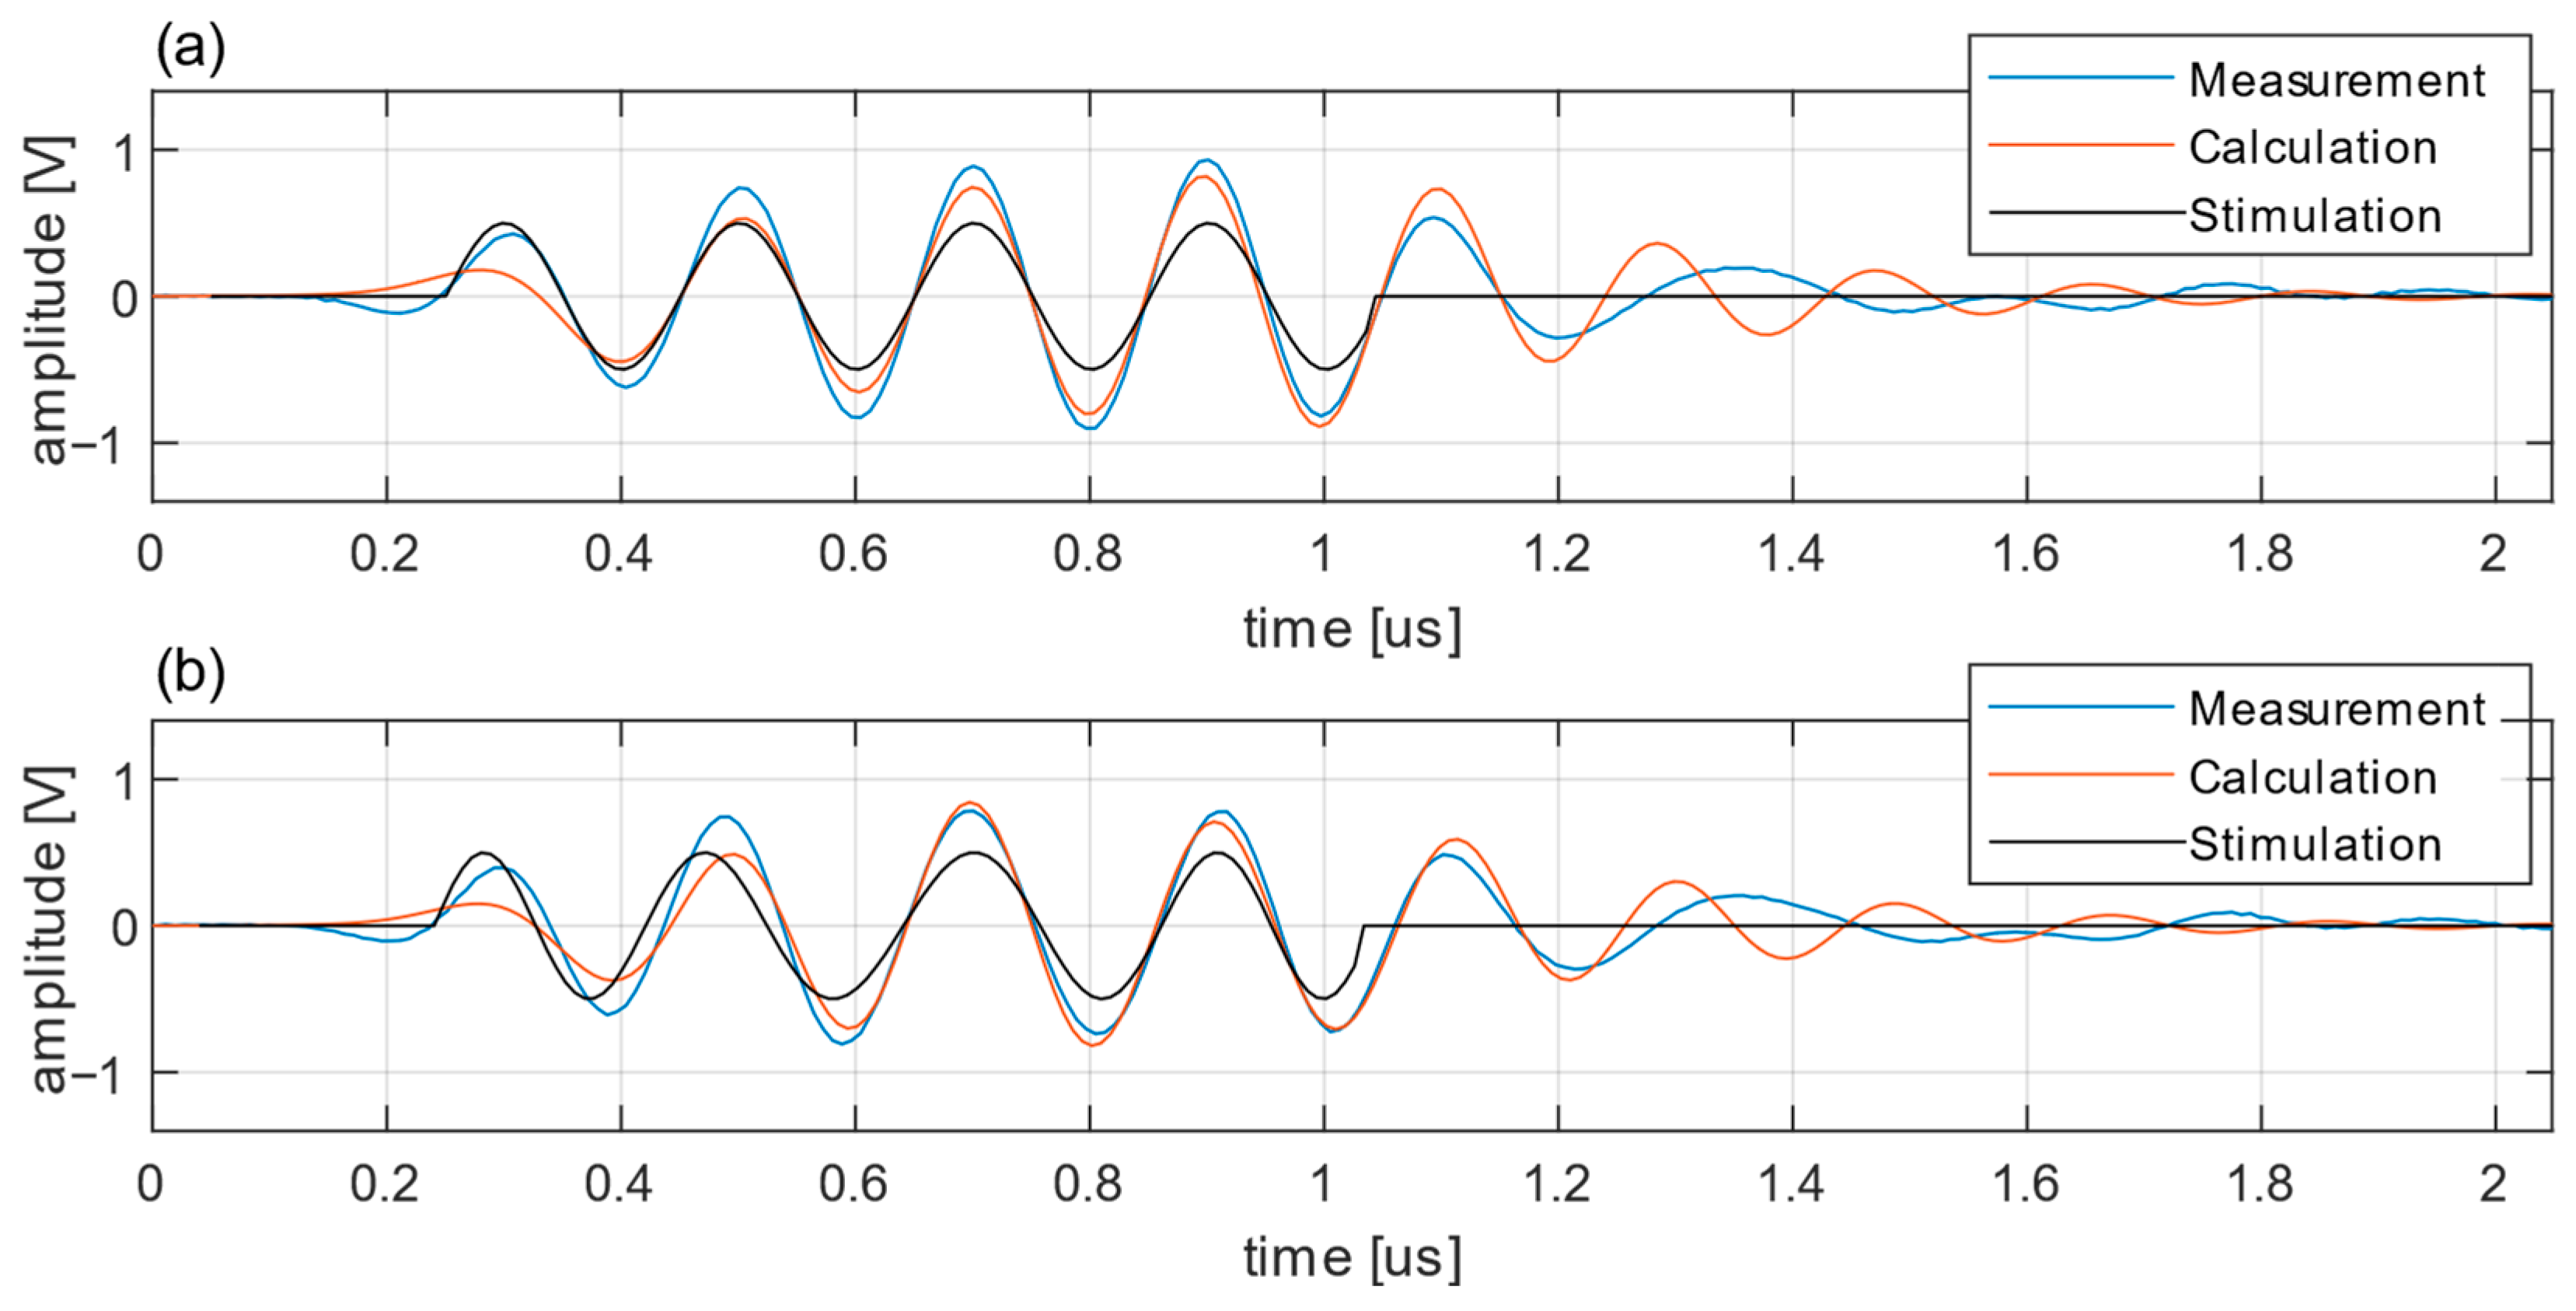
At this point, a physically motivated, generalized transfer function is established that includes all the components of an ultrasonic system. With all the components matched to the actual inspection system, a combined application is ready for inspection. In the actual application, an ultrasonic testing system only provides access to the stimulation sequence and outputs the amplified ultrasonic echoes digitized by the ADC. The resulting echo can then be predicted based on the system parameters and the original excitation sequence. This is the basis for optimizing excitation sequences for specific targets. The effect of the system parameters and the resulting echoes are illustrated for a sine wave (4 periods, f = 5 MHz) and a chirp (4 oscillations, 5 MHz–3.5 MHz–5 MHz) for three system configurations based on the transfer function developed above:
Configuration 1: ultrasonic testing system parameterized with the transfer functions shown in Section 3.1 and a transducer with a center frequency of 5 MHz.
Configuration 2: identical to configuration 1, but using a different transducer with a center frequency of 4 MHz and a reduced excitation voltage.
Configuration 3: identical to configuration 1 except that a different output stage is used with linearly decreasing gain over the frequency range.
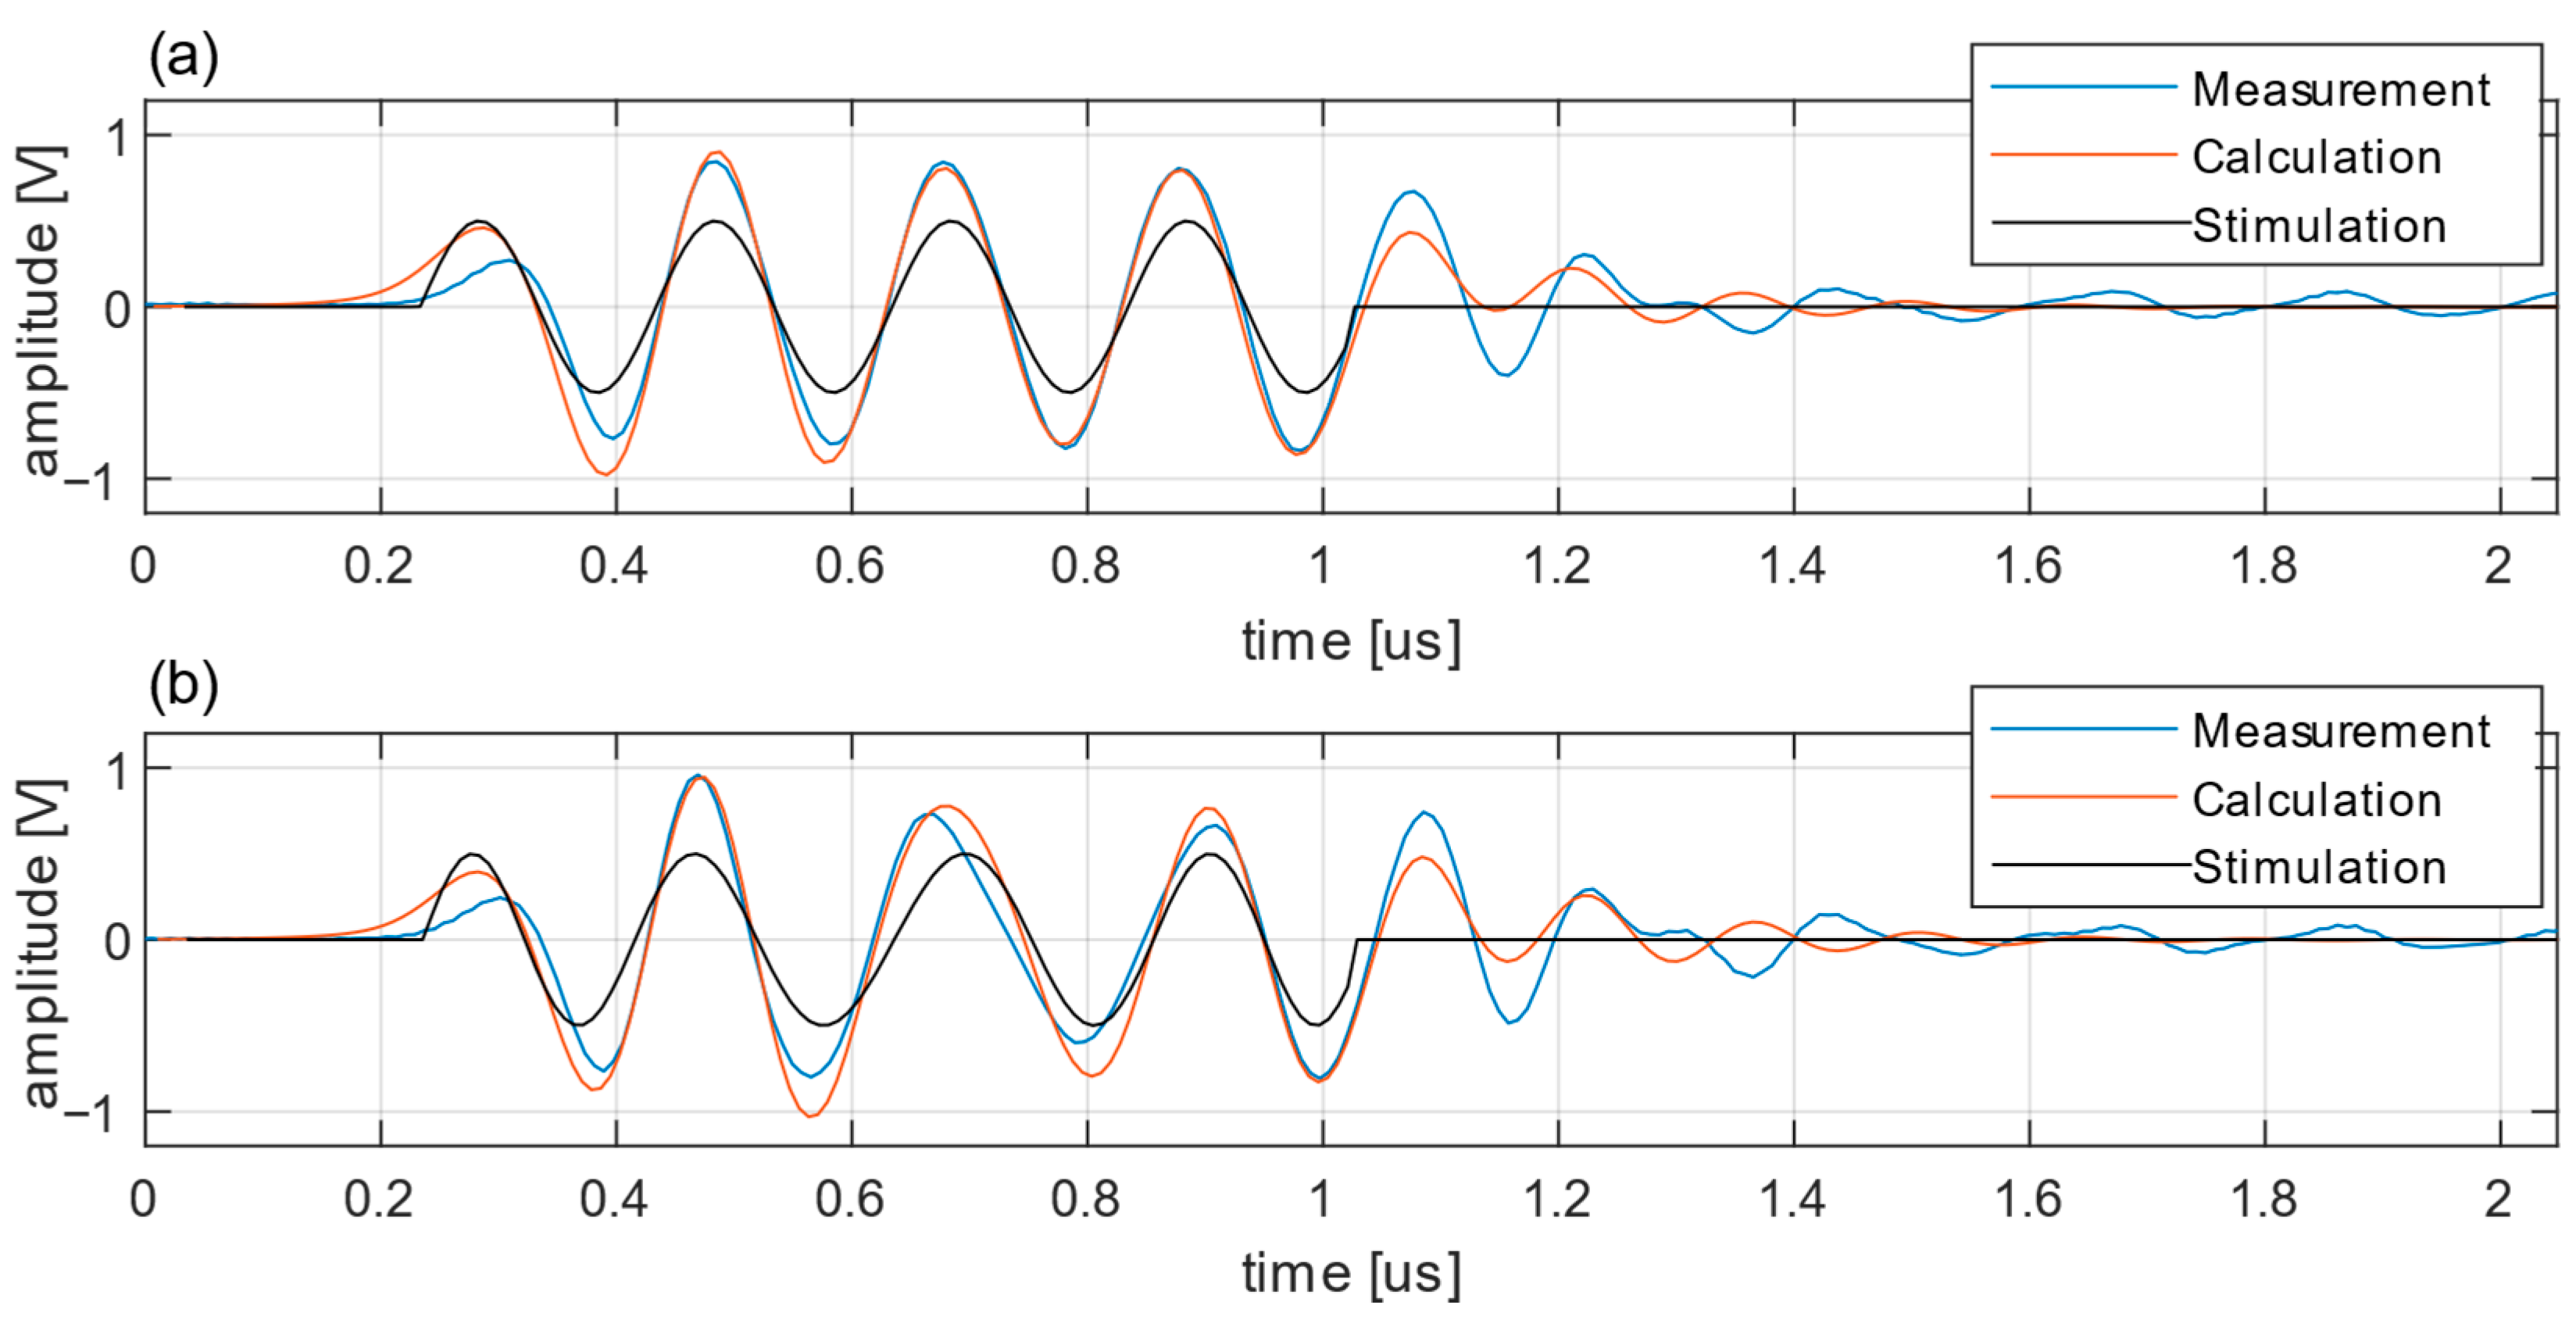
For configuration 1, Figure 14a shows the results for sinusoidal stimulation. The overall fit between calculation and measurement is good, with only minor deviations in the onset and offset of the ultrasound echo. For the chirp stimulation in Figure 14b, there is an additional deviation in the lower frequencies. The largest deviation is around 0.7 s, the center of the stimulation sequence, where the chirp stimulation has the lowest frequency. This result confirms that the limited bandwidth of the transducer results in a decreasing gain with increasing distance from the center frequency of 5 MHz.
As the transducer used in configuration 2 provides a higher energy transfer, the stimulation amplitude has been reduced to stay within the dynamic range of the ADC.
The calculations for configuration 2 are shown in Figure 15. The fit for the sinusoidal stimulation is worse than for configuration 1. The model for the second transducer has the best match at its center frequency and shows deviation at higher frequencies. This results in a higher amplitude mismatch than for configuration 1.
For the chirp stimulation, the match is better because the frequency is varied around the center frequency of this transducer and the transmission of the sequence is also better than for the 5 MHz transducer.
For configuration 3, the receiver amplifier has been replaced with a low pass with a cut-off frequency of 1 MHz. Figure 16 shows the results for configuration 3.
The effect of the low pass characteristic is a decreasing gain and phase shift for frequencies above the cut-off frequency. This results in a smaller amplitude and time delay compared to configuration 1.

4. Discussion

The results presented demonstrate the modular nature of the transfer function as it can be adapted to different system configurations and echo types. The approach is successfully validated with real test system configurations. We show that, although the transducer is the central component in an ultrasonic testing system, the other components are also important and can significantly affect the generation of ultrasonic echoes.
The modular structure of the system description allows one to replace single components while leaving the rest unchanged. In this work, a simple test object was used. After verification of the other components, the test object can be replaced to calculate more complex objects, such as metamaterials. Such complex objects can have multipath and edge effects, inhomogeneous grain structure, etc.
Furthermore, this work demonstrates that real test system components are subject to manufacturing tolerances. Even nominally similar components have variations that affect the accuracy of the models. To achieve an optimal match of a model to real components, many parameters must be considered, and the actual manufactured properties of the components must be accurately determined, rather than using only the specification.
The aim of this work is to implement physically motivated transfer functions and models to gain a better understanding of the system components and their influence on signal deformation. For effective use in echo computation, only one transfer function is required to cover all components. The implementation of real components using model approximations always leads to deviations, as not all effects are covered in detail and manufacturing is subject to tolerances. At the current stage of modeling, we can only implement components that have been analyzed in detail. For the ultrasonic transducers, there is often very little information available about the design.
The modeling approach can be used to design an ultrasonic testing system and evaluate the performance of different methods and testing strategies. The modular structure allows the replacement of individual components and the evaluation of their influence on system performance. For applications operating near center frequency, the presented component models perform well and show negligible deviation. For more complex applications requiring a wide bandwidth, the deviation increases, and the transducer model must be extended to cover a wider bandwidth. For example, the usability of coded stimulation can be evaluated for an application before building a custom ultrasonic inspection system that allows stimulation requiring large quantization and bandwidth. A drawback of the current State of the Art is that accurate representation of complex components requires complex models. To get an idea of the general function and usability of a method, basic models based on datasheet information are sufficient according to the principle presented in this paper. However, these models are limited in their ability to provide an accurate digital representation of the testing system under all operating conditions. If this level of accuracy and ideal representation is required, more detailed information about the actual manufactured components is needed, or even a measurement of the components must be performed, allowing a digital representation of the actual part to be integrated into the system model, limited only by the signal-to-noise ratio.
Because we limited the transfer functions and models to linear approximations, nonlinear effects cause miscalculations. For each component, such effects can occur depending on the component’s characteristics or operating conditions. For example, a misconfigured output stage may cause the voltage to reach the op-amp rail, resulting in clipping of the output signal. Other output technologies, such as switch-based, produce different impedance states. The analog electrical system has a different impedance when the positive or negative voltage is switched and when no switch is activated. These effects cannot be captured by a one-dimensional linear model.
Modeling the test object can become much more complex and many factors must be considered. As long as the sound path is linear and in the domain of linear acoustics, a linear model can cover the object description. Even multiple sound path interactions and superpositions are covered by a linear description because the acoustic signal superposition is integrated over the transducer surface. Inhomogeneous and anisotropic materials are more challenging and require more complex models [31]. A simple model also does not cover angle-dependent effects such as mode conversion or total reflection. When using multiple transducers or high voltage, the sound pressure in the test object may exceed the linear elastic range and introduce nonlinear effects that cannot be covered by a linear description.
The ultrasonic transducer is also subject to nonlinear effects. Initially, the model is only an approximation of the transducer, providing a fit around the center frequency of the transducer. As the distance from the center frequency increases, the fit becomes worse. Furthermore, not all effects are covered by the presented KLM model, and many more effects, including multiple relationships, can improve the model’s performance. Regarding the nonlinear effects, the piezoelectric plate shows a larger perturbation with increasing voltage [32].
The receiver amplifier will experience nonlinear effects when it reaches the amplifier rail again. Configuring too much gain can quickly lead to clipping of the recorded signals. While nonlinear effects are beyond the scope of this work, it is still possible to replace components with more complex models that include nonlinear behavior. As long as the connection between the components remains linear and one-dimensional, the structure and the other components can be retained. For example, when moving to a material model that includes a three-dimensional wave equation, the connection to the ultrasonic transducer must be extended from a one-dimensional electrical signal to a three-dimensional surface displacement of the transducer area.
An important consideration in evaluating the sensitivity and accuracy of an ultrasonic inspection system is the signal-to-noise ratio. While this topic is outside the scope of this manuscript, the modular structure of the system model provides the ability to include noise or other types of distortion functions either for the entire system or for each component separately.
For future work, the results of this work can also be used to optimize the system for the use of coded excitation functions. The bandwidth of the current transducer can be increased to allow greater variation in pulse width. Further work will also look at other ways of obtaining the transfer function of the system components and the whole system and using this to calculate echoes for more complex stimulation sequences with optimized echo characteristics. Another important goal of subsequent work is the analysis and implementation of more complex models covering test objects with complex geometry or internal structures up to metamaterials.

Author Contributions

M.W.S.: Writing—original draft, Visualization, Validation, Software, Methodology, Formal analysis, Conceptualization; S.C.L.F.: Writing—review and editing, Supervision, Methodology, Funding acquisition, Conceptualization. All authors have read and agreed to the published version of the manuscript.

Funding

This research was supported by Fraunhofer Internal Programs under Grant No. Attract 025-601314 awarded to S.C.L. Fischer.

Conflicts of Interest

The authors declare no conflict of interest.

References

  1. Honarvar, F.; Salehi, F.; Safavi, V.; Mokhtari, A.; Sinclair, A.N. Ultrasonic monitoring of erosion/corrosion thinning rates in industrial piping systems. Ultrasonics 2013, 53, 1251–1258. [Google Scholar] [CrossRef] [PubMed]
  2. Yang, S.; Zhang, L.; Fan, J. Measurement of Axial Force of Bolted Structures Based on Ultrasonic Testing and Metal Magnetic Memory Testing. In Advances in Condition Monitoring and Structural Health Monitoring: WCCM 2019; Gelman, L., Martin, N., Malcolm, A.A., Liew, C.K., Eds.; Springer: Singapore, 2021; pp. 625–635. ISBN 978-981-15-9199-0. [Google Scholar]
  3. Fischer, S.C.L.; Hillen, L.; Eberl, C. Mechanical Metamaterials on the Way from Laboratory Scale to Industrial Applications: Challenges for Characterization and Scalability. Materials 2020, 13, 3605. [Google Scholar] [CrossRef]
  4. Medak, D.; Posilovic, L.; Subasic, M.; Budimir, M.; Loncaric, S. Automated Defect Detection From Ultrasonic Images Using Deep Learning. IEEE Trans. Ultrason. Ferroelectr. Freq. Control 2021, 68, 3126–3134. [Google Scholar] [CrossRef] [PubMed]
  5. Meraj, T.; Alosaimi, W.; Alouffi, B.; Rauf, H.T.; Kumar, S.A.; Damaševičius, R.; Alyami, H. A quantization assisted U-Net study with ICA and deep features fusion for breast cancer identification using ultrasonic data. PeerJ Comput. Sci. 2021, 7, e805. [Google Scholar] [CrossRef] [PubMed]
  6. Herter, S.; Youssef, S.; Becker, M.M.; Fischer, S.C.L. Machine Learning Based Preprocessing to Ensure Validity of Cross-Correlated Ultrasound Signals for Time-of-Flight Measurements. J. Nondestruct. Eval. 2021, 40, 20. [Google Scholar] [CrossRef]
  7. Misaridis, T.; Jensen, J.A. Use of modulated excitation signals in medical ultrasound. Part II: Design and performance for medical imaging applications. IEEE Trans. Ultrason. Ferroelectr. Freq. Control 2005, 52, 192–207. [Google Scholar] [CrossRef]
  8. Pedersen, M.H.; Misaridis, T.X.; Jensen, J.A. Clinical evaluation of chirp-coded excitation in medical ultrasound. Ultrasound Med. Biol. 2003, 29, 895–905. [Google Scholar] [CrossRef]
  9. Vienneau, E.; Byram, B. Compound Barker-Coded Excitation for Increased Signal-to-Noise Ratio and Penetration Depth in Transcranial Ultrasound Imaging. In Proceedings of the 2020 IEEE International Ultrasonics Symposium (IUS), Virtual, 6–11 September 2020. [Google Scholar]
  10. Zetik, R.; Sachs, J.; Thomä, R. UWB short-range radar sensing—The architecture of a baseband, pseudo-noise UWB radar sensor. IEEE Instrum. Meas. Mag. 2007, 10, 39–45. [Google Scholar] [CrossRef]
  11. Herzel, F.; Ergintav, A.; Fischer, G. A novel approach to fractional-N PLLs generating ultra-fast low-noise chirps for FMCW radar. Integration 2021, 76, 139–147. [Google Scholar] [CrossRef]
  12. Schäfer, M.; Theado, H.; Becker, M.M.; Fischer, S.C.L. Optimization of the Unambiguity of Cross-Correlated Ultrasonic Signals through Coded Excitation Sequences for Robust Time-of-Flight Measurements. Signals 2021, 2, 366–377. [Google Scholar] [CrossRef]
  13. Castillo, M.; Acevedo, P.; Moreno, E. KLM model for lossy piezoelectric transducers. Ultrasonics 2003, 41, 671–679. [Google Scholar] [CrossRef] [PubMed]
  14. Kažys, R.; Lukoševičius, A. Optimization of the piezoelectric transducer response by means of electrical correcting circuits. Ultrasonics 1977, 15, 111–116. [Google Scholar] [CrossRef]
  15. Krimholtz, R.; Leedom, D.A.; Matthaei, G.L. New equivalent circuits for elementary piezoelectric transducers. Electron. Lett. 1970, 6, 398. [Google Scholar] [CrossRef]
  16. Liu, Y.; Sun, Y.; Huang, Z.; Wang, Y.; Zeng, D.; Yang, Z. The vibro-acoustic analysis of a matching layer attached on a 1–3 piezoelectric composite transducer. J. Electroceram. 2022, 48, 102–109. [Google Scholar] [CrossRef]
  17. Merks, E.J.W.; Borsboom, J.M.G.; Bom, N.; van der Steen, A.F.W.; de Jong, N. A KLM-circuit model of a multi-layer transducer for acoustic bladder volume measurements. Ultrasonics 2006, 44 (Suppl. 1), e705–e710. [Google Scholar] [CrossRef] [PubMed]
  18. Sherrit, S.; Wiederick, H.D.; Mukherjee, B.K.; Sayer, M. An accurate equivalent circuit for the unloaded piezoelectric vibrator in the thickness mode. J. Phys. D Appl. Phys. 1997, 30, 2354–2363. [Google Scholar] [CrossRef]
  19. Nascimento, V.; Button, V.; Maia, J.M.; Tavares Costa, E.; Oliveira, E.J.V. Influence of backing and matching layers in ultrasound transducer performance. In Proceedings of the SPIE Medical Imaging 2003: Ultrasonic Imaging and Signal Processing, 15–20 February 2003; pp. 86–96. [Google Scholar]
  20. Willatzen, M. Ultrasound transducer modeling--general theory and applications to ultrasound reciprocal systems. IEEE Trans. Ultrason. Ferroelectr. Freq. Control 2001, 48, 100–112. [Google Scholar] [CrossRef]
  21. Zipparo, M.J. Computer modeling of ultrasonic piezoelectric transducers. J. Acoust. Soc. Am. 1994, 96, 1204. [Google Scholar] [CrossRef]
  22. Göbel, H. Frequenzverhalten analoger Schaltungen. In Einführung in die Halbleiter-Schaltungstechnik; Springer: Berlin/Heidelberg, Germany, 2019; pp. 241–275. Available online: https://link.springer.com/chapter/10.1007/978-3-662-56563-6_9 (accessed on 25 January 2023).
  23. Silk, M.; Weight, J. Ultrasonic Transducers for Nondestructive Testing; Adam Hilger: Bristol, UK, 1984. [Google Scholar]
  24. Schäfer, M.W.; Fischer, S.C.L. Inverse stimulation enables ultrasonic binary coding for NDE using a custom linear testing system. Ultrasonics 2024, 141, 107341. [Google Scholar] [CrossRef]
  25. Cong, S.; Gang, T.; Zhang, J. Ultrasonic Time-of-Flight Diffraction Testing with Linear Frequency Modulated Excitation for Austenitic Stainless Steel Welds. J. Nondestruct. Eval. 2015, 34, 8. [Google Scholar] [CrossRef]
  26. Smith, P.R.; Cowell, D.M.J.; Freear, S. Width-modulated square-wave pulses for ultrasound applications. IEEE Trans. Ultrason. Ferroelectr. Freq. Control 2013, 60, 2244–2256. [Google Scholar] [CrossRef] [PubMed]
  27. Tischer, R.M.; Higuti, R.T.; Kitano, C.; Prado, V.T. Improving Ultrasonic Imaging of Aluminum Plates using Phase Modulation. JICS 2020, 15, 1–5. [Google Scholar] [CrossRef]
  28. Krautkrämer, J.; Krautkrämer, H. Werkstoffprüfung mit Ultraschall, Zweite Neubearbeitete Auflage; Springer: Berlin/Heidelberg, Germany, 1966; ISBN 9783662134269. [Google Scholar]
  29. Choi, S.; Ryu, J.; Kim, J.-S.; Jhang, K.-Y. Comparison of Linear and Nonlinear Ultrasonic Parameters in Characterizing Grain Size and Mechanical Properties of 304L Stainless Steel. Metals 2019, 9, 1279. [Google Scholar] [CrossRef]
  30. Sanchez, J.L.; Leturcq, P.; Austin, P.; Berriane, R.; Breil, M.; Anceau, C.; Ayela, C. Design and fabrication of new high voltage current limiting devices for serial protection applications. In Proceedings of the 8th International Symposium on Power Semiconductor Devices and ICs. ISPSD’96, Proceedings, Maui, HI, USA, 23 May 1996. [Google Scholar]
  31. Lhuillier, P.E.; Chassignole, B.; Oudaa, M.; Kerhervé, S.O.; Rupin, F.; Fouquet, T. Investigation of the ultrasonic attenuation in anisotropic weld materials with finite element modeling and grain-scale material description. Ultrasonics 2017, 78, 40–50. [Google Scholar] [CrossRef]
  32. Pérez Alvarez, N.; Noris Franceschetti, N.; Adamowski, J.C. Effects of nonlinearities in power ultrasonic transducers using time reversal focalization. Phys. Procedia 2010, 3, 161–167. [Google Scholar] [CrossRef]
Figure 1. Ultrasonic testing system including custom build electronics, the piezoelectric transducer and the testing object.
Ndt 02 00020 g001
Figure 2. System structure and signal flow.
Ndt 02 00020 g002
Figure 3. (a) Simplified diagram of an ultrasonic transducer. (b) Basic electric circuit model for piezoelectric transducers.
Ndt 02 00020 g003
Figure 4. Amplitude response of a piezoelectric transducer implemented using the KLM model with air coupling (blue). A variation of the parameters t and c (….) results in a horizontal displacement of the center frequency (red t = 0.00022 m). With rising kt, the total gain is increased (yellow kt = 0.625) and for ρ, the maximum intensity rises but the bandwidth decreases (purple ρ = 5000 kg/m3).
Ndt 02 00020 g004
Figure 5. Decreasing impedance of the transducer with increasing radius r (red: larger radius; blue: smaller radius).
Ndt 02 00020 g005
Figure 6. (a) Magnitude and (b) phase response of the output stage. The measured transfer function (blue) and the fitted function used for the simulation (red) show negligible deviations.
Ndt 02 00020 g006
Figure 7. Voltage measurement (blue) and calculation (red) of the output stage using a 50 Ω load and a signal generator for stimulation. Almost perfect match for the calculation and the measurement of the output signal.
Ndt 02 00020 g007
Figure 8. Effects of material damping. (a) Depending on the frequency f with a distance z = 240 mm; with rising frequency, the damping effect is increased. (b) Depending on the distance z (invalid range below 3⋅N marked as transparent, here about 60 mm) with a frequency f = 5 MHz; with rising distance, the damping effect is increased.
Ndt 02 00020 g008
Figure 9. Measurement of the second ultrasonic backwall echo (blue) and first echo with applied material transfer function (red). (a) Spectral and (b) time-based comparisons.
Ndt 02 00020 g009
Figure 10. (a) Impedance and (b) phase of the model implementation and two transducers manufactured with the same specification (air coupling). The manufactured transducers show deviations but match the model up to 7 MHz.
Ndt 02 00020 g010
Figure 11. Signal prediction inclusive of material deformation (metal coupling). The echo calculation (red) shows slight deviations but the overall fit to the measurement (blue) is good.
Ndt 02 00020 g011
Figure 12. (a) Amplitude and (b) phase response of the receiver amplifier. The measurements of the transfer function (blue) and the fit (red) match perfectly.
Ndt 02 00020 g012
Figure 13. Voltage measurement (blue) and calculation (red) of the receiver amplifier using a 50 Ω load and a signal generator for stimulation. The fit in the transfer function and the signal calculation show an optimal cover.
Ndt 02 00020 g013
Figure 14. Calculations for configuration 1 for (a) the sine wave and (b) the chirp stimulation. The results provide a good match for both calculations with slight deviations mostly in swing-in and swing-out.
Ndt 02 00020 g014
Figure 15. Calculations for configuration 2 (reduced stim voltage) for (a) the sine wave and (b) the chirp stimulation. The calculation for the sine stimulation matches worse and the calculation for the chirp stimulation matches better than for configuration 1.
Ndt 02 00020 g015
Figure 16. Calculations for configuration 3 for (a) the sine wave and (b) the chirp. The calculations are comparable to those of configuration 1, with reduced amplitude and a delay of the signal.
Ndt 02 00020 g016
Table 1. Parameters of the piezoelectric transducers.
SymbolDescriptionValue for Transducer 1Value for Transducer 2
rradius0.005 m0.005 m
tthickness0.0029 m0.00041 m
csound velocity3580 m/s4000 m/s
ρdensity3100 kg/m34100 kg/m3
mbbacking weight0.020 kg0.020 kg
cbsound velo. backing3200 m/s3200 m/s
ρbdensity backing2680 kg/m32680 kg/m3
ktcoupling factor0.5250.47
Qmpmechanical damping5080
Qmeelectrical damping100100
Disclaimer/Publisher’s Note: The statements, opinions and data contained in all publications are solely those of the individual author(s) and contributor(s) and not of MDPI and/or the editor(s). MDPI and/or the editor(s) disclaim responsibility for any injury to people or property resulting from any ideas, methods, instructions or products referred to in the content.