Article

In Situ Validation Methodology for Weighing Methods Used in Preparing of Standardized Sources for Radionuclide Metrology

1
Laboratório Nacional de Metrologia das Radiações Ionizantes, IRD/CNEN, Rio de Janeiro 22780-160, Brazil
2
Laboratório de Massa, Inmetro, Duque de Caxias 25250-020, Brazil
*
Author to whom correspondence should be addressed.
Metrology 2022, 2(4), 446-478; https://doi.org/10.3390/metrology2040027
Submission received: 22 August 2022 / Revised: 14 October 2022 / Accepted: 20 October 2022 / Published: 4 November 2022

Abstract

:
High-accuracy source standards preparation in radionuclide metrology is based on a properly described and reliable weighing procedure able to achieve relative standard uncertainties below 0.1%. However, the results of uncertainty budget comparison CCRI(II)-S7 put in check the ability of the former pycnometer and substitution weighing methods to attain this goal. As a result, a question arises about the validation of mass measurements performed from the elimination weighing method when appropriate uncertainties are required. In order to address this problem, a comprehensive in situ validation methodology is proposed for the results of the pycnometer, substitution, elimination and modified elimination (MEM) methods. Mass comparisons are applied to evaluate the compatibility between weighing methods’ results. It is possible due to a developed weighing sequence, which allows for the performing of all methods by only one drop deposition in the range of mass from 10 mg to 200 mg. As a result, the high degree of compatibility between the MEM and elimination method for uncertainties below 0.1% has been achieved, as well as for higher uncertainties to pycnometer and substitution methods. Numerical simulations indicate that the validation results remain valid on improved technical implementations for these last two methods.

1. Introduction

In radionuclide metrology, quantitative sources are prepared for activity measurements then serving as an activity concentration standard, in Becquerel (Bq) per mass unit. In order to prepare high-accuracy source standards by gravimetry, the sampling from a master solution is performed by drop deposition to a source mount using a polyethylene pycnometer, which employs a weighing procedure [1] able to achieve relative standard uncertainties below 0.1% [2]. This goal is important when it is a required uncertainty in activity concentration from 0.2% to 2.5%, mainly for radionuclide standards, for which it is intended to reach the lower limit where uncertainty in weighing can be most significant [3].
The international comparison coordinated by the Consultative Committee for Ionizing Radiation (CCRI) CCRI(II)-S7, on the analysis of uncertainty budgets for 4πβ-γ coincidence counting, evaluated the proficiency of the laboratories in uncertainty evaluation focused in two dominant uncertainty components: efficiency-extrapolation and weighing [4]. The relative mass uncertainties reported from the same measurement data set obtained from the application of the pycnometer [5,6] or substitution [7] weighing methods resulted in a mean of 0.11% and standard deviation of 0.06%. Although the uncertainties are mostly comparable, results of half or less than the mean or even more than twice as much have been reported. This non-uniformity in proficiency, which reflects the diversity of the evaluation methods employed, could be caused by various reasons [8].
In order to provide guidance to achieve relative standard uncertainties below 0.1%, Lourenço and Bobin have shown in a detailed way the uncertainty evaluation for the elimination method [9] as applied in the Laboratoire National Henri Becquerel (LNHB). This method allows for checking results for effects in weighing such as drift of the zero of the balance, evaporation in the pycnometer or drying of a drop left in the capillary stem during the weighing process, etc. [10]. Certainly, if all national metrology institutes (NMIs) apply this method, the compatibility in an uncertainty evaluation could be improved. However, in the CCRI(II)-S7 comparison, some laboratories were able to achieve relative standard uncertainties of less than 0.1% with the former pycnometer and substitution methods. Thus, these methods, which are the more widely used, should not be discarded to prepare sources with reduced uncertainties. On the contrary, studies still pending on how to achieve these target uncertainties with these methods should be presented in order to confirm their capabilities. Indeed, the uncertainty evaluation for the elimination method was not addressed in the CCRI(II)-S7 comparison; however, there is no doubt that it would provide uncertainties of less than 0.1% given the data provided in the comparison protocol [11].
The pycnometer, substitution and elimination methods have been available for use in the preparation routines for radioactive sources for a long time, and much effort was invested to characterize the systematic effects that act on these methods [5,9]. Despite that, in this situation where only one method is described to achieve uncertainties lower than 0.1% and where pycnometer and substitution methods are not described to confirm their achievable capacities, a reasonable doubt arises about the compatibility between the mass values provided by them. In fact, one can argue that due to their weighing sequences, the application of the elimination and substitution methods allows for checking the results in relation to the pycnometer method, based on the difference between the weighing of the pycnometer before and after the drop deposition. However, this has not been a requirement for the acceptance of mass values from these methods. Regardless, such criteria also relies on a suitable description for the uncertainty evaluation of the pycnometer method, which can reach uncertainties lower than 0.1%. So far, a new method, which is properly described, should be introduced for method validation purposes at these lower uncertainties, as required by good laboratory practices [12].
Recently, the modified elimination method (MEM) was proposed for source preparation, and its development was motivated by the conclusions of the comparison CCRI(II)-S7 as well as by studies of activity concentration deviation [13]; it has been structured for some time [14]. Despite its name, the MEM has conceptual and experimental characteristics that clearly distinguish it from the elimination method. It has shown outstanding results, achieving uncertainties below 0.1% by the determination of the repeatability from weighing in course [15]. Based on these preliminary results, a comprehensive campaign for the method validation of the MEM, which also has covered pycnometer, substitution and elimination methods, was undertaken at the radionuclide laboratory facilities of the Laboratório Nacional de Metrologia das Radiações Ionizantes (LNMRI) with the aid of laboratories from the Instituto Nacional de Metrologia, Qualidade e Tecnologia (Inmetro) in order to establish their performance properly.
In this article, the in situ validation methodology is shown, which is grounded on comparison of the mass measured by the MEM, pycnometer, elimination and substitution methods from a drop deposition common to all of them. It is possible due to the establishment of a weighing sequence, which allows to carry out the four weighing methods by the same drop deposition in the range of mass from 10 mg to 200 mg. Indeed, since mass comparisons yield deviations between the mass measured from each method and the reference value, all methods can be validated by the same measurement data.
For this purpose, the mass measurement model and the uncertainty evaluation considering common uncertainty contributions considered on peer review assessment are set in a detailed way for each weighing method. This description provides a clear uncertainty evaluation for the MEM, pycnometer and substitution methods as well as in a complementary way for the elimination method. The underlying parameters were estimated by measurements of evaporation, repeatability, linearity and density. The buoyancy corrections and weighing results were determined with the aid of a Labview application, which has implemented simultaneous data acquisition of the microbalance readings and environmental data of an Arduino-based environmental sensoring system.
Hypothesis tests of type T for the mean in the elimination method and type F for the variance in the MEM were used to set the limits to check for adverse effects on weighing, in order to establish a reliable set of weighing sequences suitable for mass comparisons. For each accepted weighing sequence, deviation from the reference value for the mass of the drops was estimated considering correlations introduced by buoyancy and weighing sequence framework.
Since the comparisons’ reference values rely on measurement uncertainties, they can be changed in a different experimental set-up for which improved uncertainties for some methods can be achieved. Thus, in order to test the validity of the validation results, mass comparisons were simulated with reduced uncertainties for such methods.
Although the method validation problem could be solved only by mass comparison encompassing the elimination method and MEM, the chosen way to address it provides an overview of the capacities of the weighing methods used in preparing radionuclide sources by including pycnometer and substitution methods. The presented propositions of a methodology for validation and approaches for uncertainty evaluation for the different weighing methods are based on international references from both metrology areas: radionuclide and mass. In this way, state-of-the-art information about this issue is provided, which can improve the knowledge and reliability of the laboratories regarding execution, results and uncertainty evaluation for the implemented weighing methods. Furthermore, it can help them to properly select weighing methods for their tasks as well as contribute to harmonize uncertainty budgets.
Here, the focus on weighing intends to avoid misinterpretation in reporting mass uncertainty evaluation according to the framework of the Guide to the Expression of Uncertainty in Measurement (GUM), clearly distinguishing it from others related to the preparation of radionuclide standards [16].

2. Modeling

2.1. Mass Measurement

Radionuclides are unstable atoms characterized by the number of neutrons and protons in their nucleus (nuclides), which decay into stable or unstable nuclides, and the activity quantity, A, whose SI unit is the becquerel, is applied for measurements of spontaneous and random nuclear transformations in radionuclide nuclei. Detection systems are used for activity measurements, and in order to provide traceability to them, liquid sources are employed as activity concentration standards. Once these sources are standardized, aliquots from these sources with measured mass or volume will have known activity values.
In radionuclide metrology, the standardization of high-accuracy liquid radionuclide sources requires sampling for activity and mass determination by weighing. In this process, microdroplets from radionuclide sources are sampled with the aid of polyethylene pycnometers made in a way that their manipulation allows for a control of the size of these microdrops.
For NMIs, the microweighing required for source sampling is a secondary but very important measurement, which is not submitted to direct validation by measurement comparisons exercises. The reliability of the weighing tasks is checked by periodical peer review or accreditation body assessments [17]. Thus, a reliable mass of drops measurements is grounded on a well-trained and experienced technical staff and a properly set [18] and maintained weighing device.
Balance care should include but not be limited to: avoiding vibration and direct sunlight; installation on a clean, air-conditioned room that is away from traffic and reasonably free of air drafts; to keep leveling and prevent accumulated electrostatic charge; keeping relative humidity about 50% or higher. It is also important during weighings to avoid the drying of the drop on the pycnometer tip. Pycnometer handling should be performed using gloves and long forceps to avoid static charge or thermal effects. An appropriate waiting time before weighings allows for thermal equilibrium between the balance, technician and pycnometer room [2,10,19]. Microdrop weighing performed on electronic analytical balances should prevent magnetic interaction between their electromagnetic force compensation systems and ferrous materials used in procedures [20].
Furthermore, to keep weighing reliability requires balance calibration in a suitable reading range with standard weights [21] from an accredited body or equivalent organization, intermediate checks for non-linearity effects, weighing range adjustment and repeatability tests [22]. An appropriate frequency to perform these tests should be established, e.g., by control charts [23], as well as a balance preventive/corrective maintenance program.
Microdrop weighing is a carefully performed task in which evaporation from the pycnometer and splashing and drying of a drop should be prevented, touching the pycnometer tip on the source mount.
Once the preceding steps have been taken, the mass of the deposited microdrop can be obtained from the weighing result Δw and the air buoyancy effect Bu, as in the Euramet Guideline on the Calibration of Weighing Instruments [24], (1):
m = Δ w × 1 + ρ a 1 ρ 1 ρ c B u
The buoyancy effect Bu relies, respectively, on the air density ρa, the solution density ρ and conventional standard weight density ρc = 8000 kg m−3 [25]. The air density is determined by measurements of temperature t (°C), relative humidity hr (%) and barometric pressure p (Pa) applied to a simplification of CIPM air density equation [26], (2) in kg m−3:
ρ a = 0.34848 p 0.009 h r exp ( 0.061 t ) 273.15 + t ε
Here, ε accounts for the approximation error using a simplified density equation. Usually, the correction for this deviation is considered null, but some uncertainty value is attributed to it.
This equation is valid in the range of environmental parameters 600 hPa ≤ p ≤ 1100 hPa, 20% ≤ hr ≤ 80% and 15 °C ≤ t ≤ 27 °C.
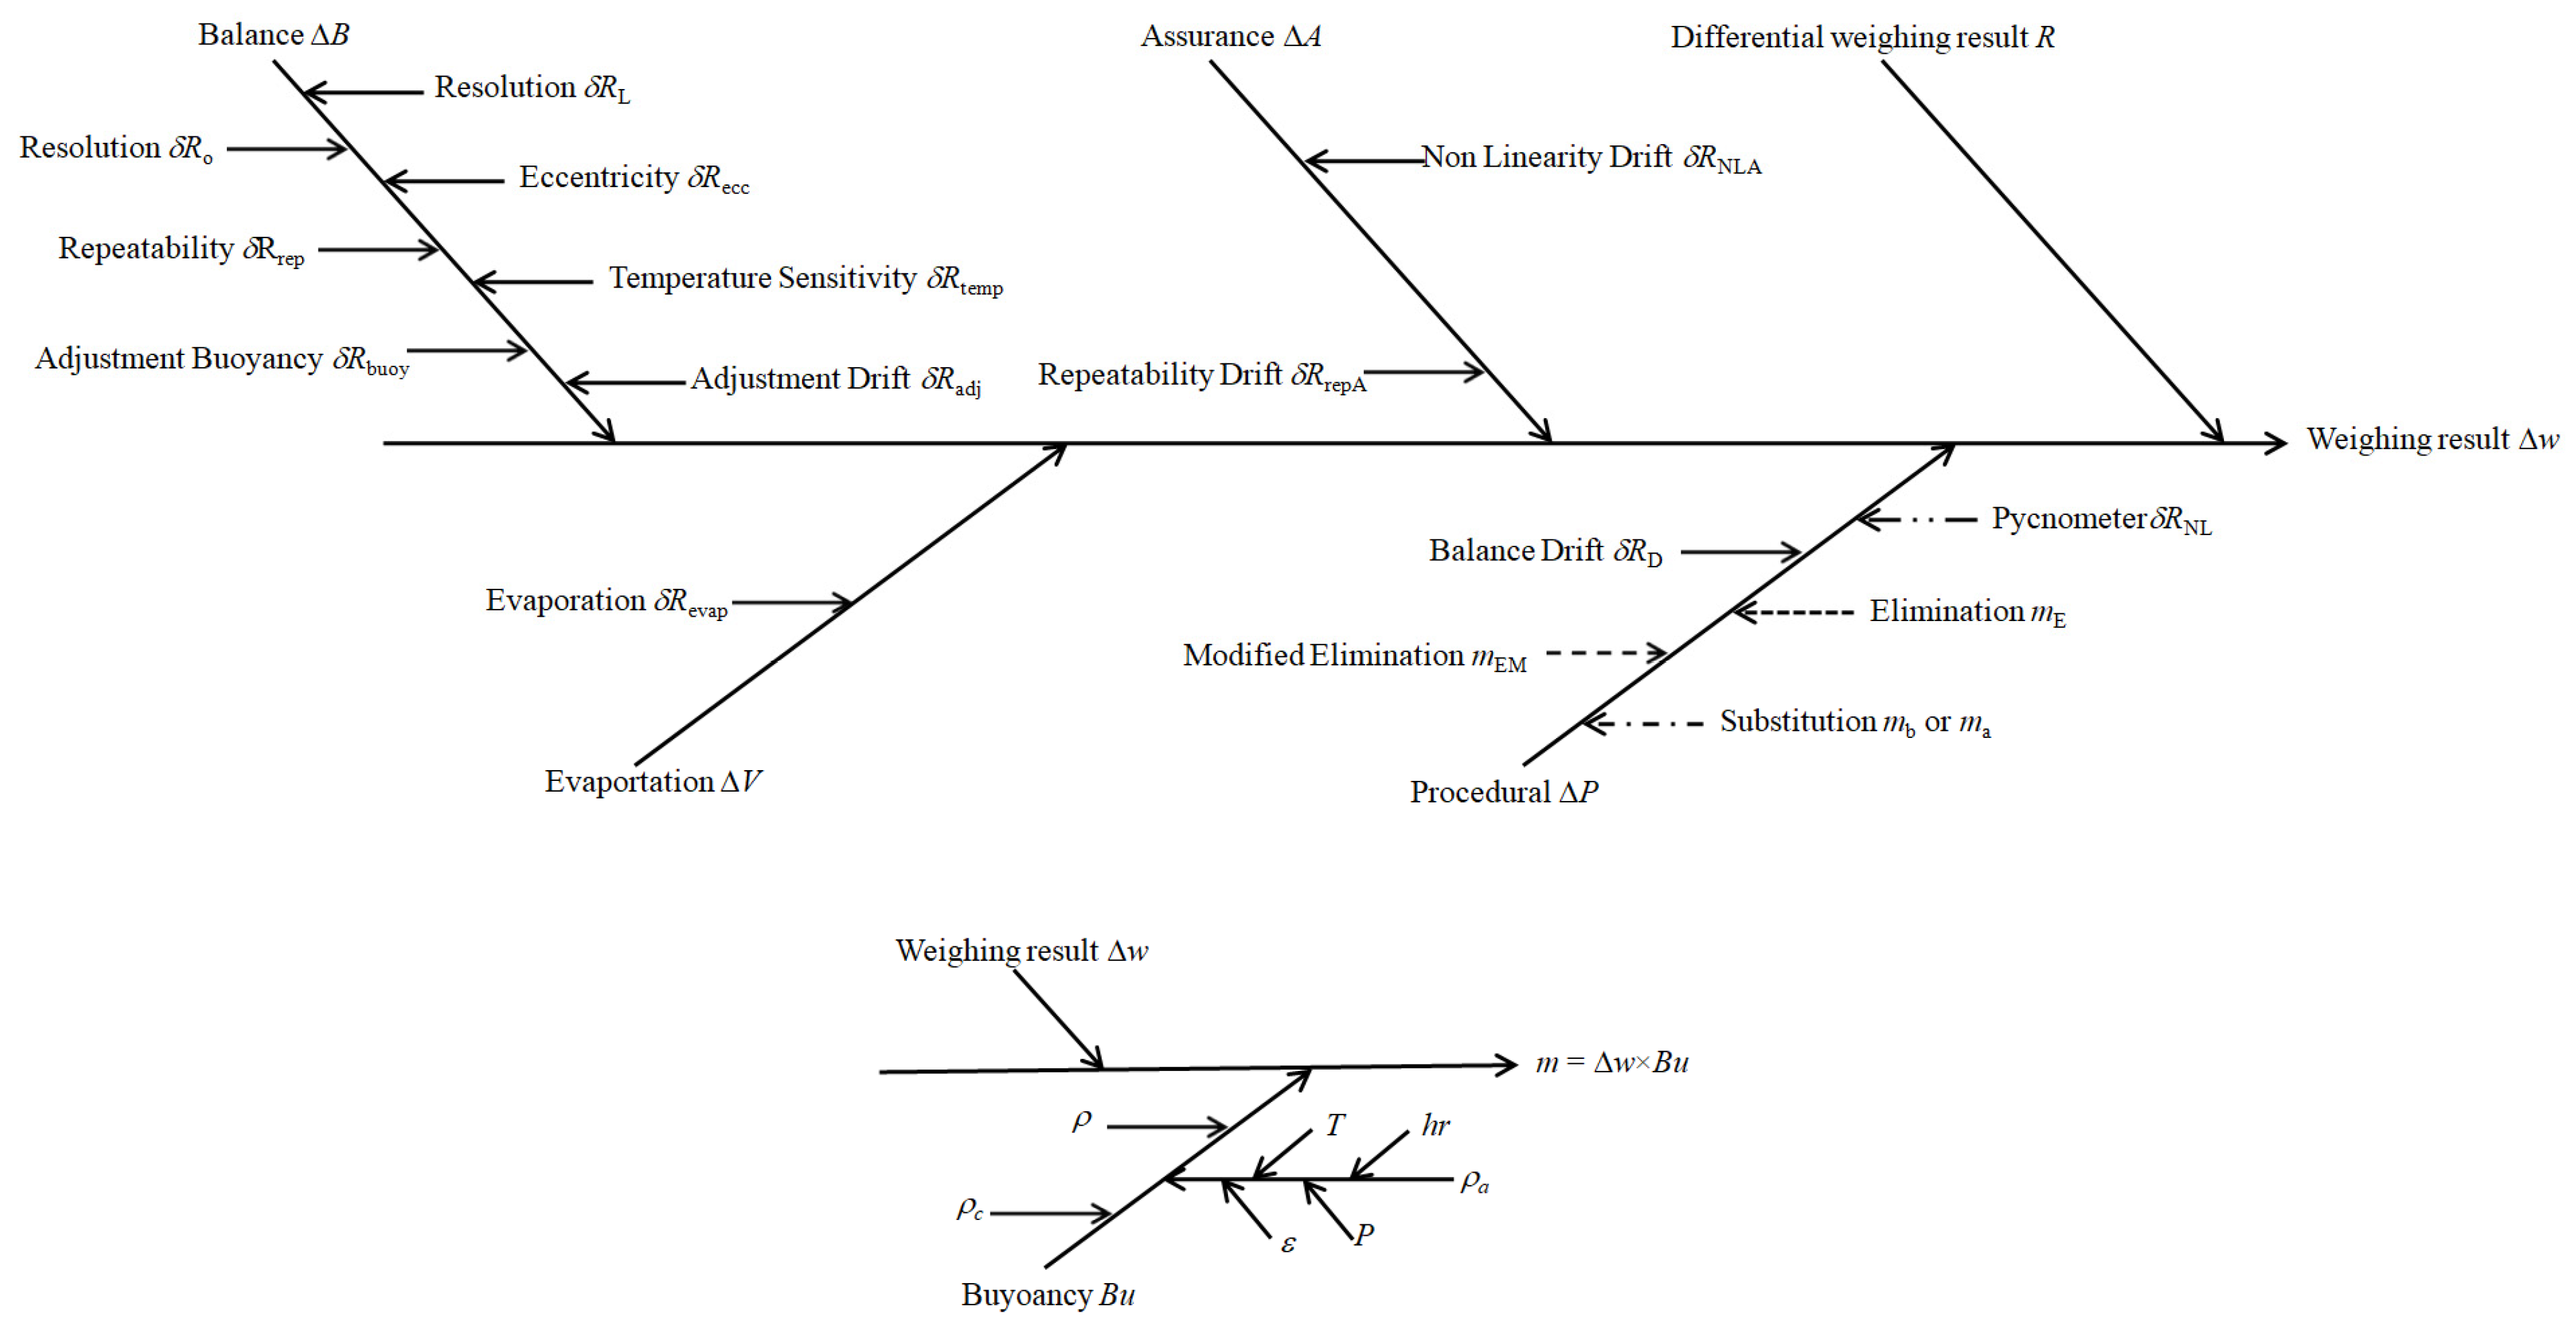
Although care had been taken, systematic and random effects still affected the results of weighing methods. Balance, ΔB, pycnometer evaporation, ΔV, procedural, ΔP, and assurance, ΔA, effects acting on weighing should be corrected [27] in the weighing result. Considering R as the numerical result of the specific differential method, the weighing result Δw can assume the model (3):
Δ w = R Δ B + Δ V + Δ P + Δ A
Balance effects can be divided into two groups: indication and instrumental effects. On a differential weighing, indication effects are: δR0, accounting for rounding of first indication; δRL, accounting for rounding of second indication; δRecc, accounting for net load eccentricity; δRrep, accounting for method repeatability. Instrumental effects account for environmental and drift changes on the adjustment and sensitivity of balance, δRtemp accounts for balance sensitivity changes due to ambient temperature, δRbuoy accounts for a change in the adjustment of the balance due to the variation of the air density in the buoyancy effect since the last adjustment and δRadj accounts for a time variation in the balance adjustment [24,28]. The values of these effects are considered null but some uncertainty should be attributed to this assumption. Here, one is able to write the balance effect ΔB as in (4):
Δ B = δ R 0 + δ R L + δ R ecc + δ R rep + δ R temp + δ R buoy + δ R adj
The rate of evaporation from pycnometers is normally so small (~20 μg h−l) [29] that the effect δRevap introduced in weighing is negligible. However, an uncertainty for the effect should be estimated, (5):
Δ V = δ R evap
Procedural effects arise from the manner by which one deals with non-linearity and zero-drift effects on balance indication.
The pycnometer method is performed by a differential weighing of the pycnometer before and after drop deposition on the source mount, and the result RP in (6) is obtained from the difference between the respective indications Ib and Ia:
R P = I b I a
Although the linearity error δRNL between the indications could be not significant, mainly in the measuring range from 10 mg to 200 mg, some uncertainty should be estimated for it [30].
In the elimination method, three weighings are performed: pycnometer weighing before and after aliquoting, and the last one, which is carried out by adding to a standard weight to the weighing pan, keeping the pycnometer on the load receptor after the second weighing. The standard weight is chosen such that the last indication is close to the first one. From this method, three indications, Ib, Ia and Iw1, are recorded, but only two are used to determine the method result RE, (7). The indication Ia is used to evaluate errors on weighing:
R E = I b I w 1
The mass of the standard weight mE used to compensate non-linearity effects should be included in the weighing result as a correction.
The substitution method is based on the difference between two complete mass measurements of the pycnometer. After each weighing of the pycnometer (before and after drop deposition), a set of mass standards is weighted, and their conventional masses are chosen such that the obtained indications from these weighings Is1 and Is2 are close to the indications obtained for the pycnometer before Ib and after Ia drop deposition, respectively. Therefore, two differential method results Rs1 and Rs2 are obtained from indications, as shown in (8):
R s 1 = I b I s 1 R s 2 = I a I s 2
The usage of mass standards with mass ms1 and ms2 for each pycnometer weighing avoids non-linearity effects. However, each result Rs1 and Rs2 should be corrected by the respective conventional mass value ms1 and ms2 in order to obtain, respectively, the two weighing results Δw1 and Δw2. The two differential weighings are performed in sequence, and thus insignificant changes in environmental parameters occur; therefore, the buoyancy effect can be considered constant. In this way, the value of the difference between the mass of the pycnometer before and after deposition can be obtained as the net weighing result Δw1 − Δw2 multiplied by the buoyancy effect, according to Equation (1).
In the MEM, the pycnometer is weighed three times, before drop deposition Ib, after drop deposition together with a standard weight Iw1, and the third weighing is a repetition of the second one Iw2; see Figure 1. This new method takes advantage of the knowledge of the technician about the mass per drop previously to quantitative drop deposition in order to set the required standard weight to limit non-linearity effects.
Two weighing differences, R1 as in (9) and R2 as in (10), can be obtained to estimate the mass of the drop:
R 1 = I b I w 1
R 2 = I b I w 2
The method result RM is reached from the average of R1 and R2, (11):
R M = R 1 + R 2 2 = I b I w 1 + I w 2 2
As in the elimination method, the method result should be corrected for the mass of the used standard weights mEM.
Usually, weighing procedures are applied to avoid drift errors as zeroing the balance indication with no load before each weighing or not zeroing the balance indication for all weighing, and one records the numerical value for each indication obtained with load and no load on the weighing plate. Thus, only a residual zero-drift effect δRD is expected, and some uncertainty should be regarded for its correction.
The procedural effect ΔP accounting for zero-balance drift and linearity errors are written according to each weighing method in (12):
Δ P = δ R D + δ R NL ( pycnometer ) m E ( elimination ) m s 1 and m s 2   ( substitution ) m EM   ( modified   elimination )
Here, assurance effects account for uncertainty due to the estimation of repeatability uncertainty and time changing of the non-linearity effect. Despite these variations, δRRepA and δRNLA can be within the metrological requirements established for use [31], and it should be considered in order to improve the reliability at the time of weighing. These errors are considered null, but their uncertainty should be taken into account. Further, as non-linearity affects the pycnometer method, a change of non-linearity is considered in assurance effect ΔA, (13):
Δ A = δ R repA + δ R NLA ( pycnometer ) 0 ( other methods )
Similarly, the methods in which standard weights are used to avoid the non-linearity effect should account for mass drift between calibration [32]. No correction is applied to the mass of the standard weight, but a mass drift uncertainty component is combined with the measurement uncertainty in order to obtain the measurement uncertainty in use.
From the defined effects and numerical results, the weighing results and the mass of the deposited drop can be determined for each method. This procedure is summarized in Figure 2. Differently from the other methods, in the substitution method this procedure should be applied twice since the deposited mass is obtained from the net weighing result Δw1 − Δw2; the difference between the weighing results before and after aliquoting.
In Equations (3) and (12), corrections applied to R are supposed to cancel out the effects, hence the minus sign on them. However, due to the lack of knowledge about the true values of effects, the validity of this assumption is supported by an uncertainty assignment considered as a range of values, which one expects to cover the true values of effects.

2.2. Uncertainty Evaluation for Mass Measurement

As the first step to achieve the standard uncertainty for mass measurement, GUM’s uncertainty propagation principle should be applied to Equation (1) and to the underlying Equations (2)–(4), (12) and (13). Thus, mass measurement standard uncertainty u(m) in (14) can be reported in terms of buoyancy u(Bu) and weighing uw) uncertainties:
u m = B u 2 × u 2 Δ w + Δ w 2 × u 2 B u
In the following uncertainty evaluation, the available information for the values of the input quantities states either lower and upper limits or a best estimate and associated standard uncertainty, thus assigning to them probability distributions, rectangular and normal (Gaussian), respectively [33].

2.3. Uncertainty Evaluation for Buoyancy

Buoyancy uncertainty is expressed in (15) by:
u ( B u ) = u 2 ρ a 1 / ρ 1 / ρ c 2 + ρ a 2 u 2 ( ρ ) / ρ 4
The unique variable with no uncertainty in the above equation is the conventional density for standard weight ρc, which is taken as an estimate for the density of the balance adjustment weights ρs. Nevertheless, the density of the adjustment weights is a variable with non-zero uncertainty whose contribution for mass measurement relies on procedure for balance adjustment.
A complete measurement mass equation is provided in the appendix of reference [34], in which the density of the balance adjustment weights is the variable ρs. However, the difference from Euramet’s approach used here in the contribution for mass measurement uncertainty from buoyancy due to the density of balance adjustment weights uρs(m) is 4 × 10⁻⁷ × Δw, in the worst case. Thus, it is not significant for microdrop deposition on micro- or ultra-microanalytical balances in the weighing range from 10 mg to 200 mg where one can use ρc without uncertainty.
The mentioned worst case was set under these conditions: air density at the lowest valid pressure p = 600 hPa, aqueous solution density ρ = 1000 kg m−3, density of balance adjustment weight ρs = 8000 kg m−3 (=ρc) with u(ρs) = 200 kg m−3 and the most conservative adjustment assumption, balance not adjusted before use or calibration. The estimative for value and uncertainty of ρs is based on the method used for the adjustment process, which allows balance indication in conventional mass as required by OIML R76 [35]. This adjustment method could be either external with stainless steel standard weights, which comply with OIML R111 [21], or internal using the balance’s adjustment device.
The density of the solution ρ and its uncertainty u(ρ) could be estimated from chemical handbooks or the manufacturer’s specification; however, usually no uncertainty is available. The best estimate is obtained from density measurement methods, which may depend on the solution pH.
In (16), air density uncertainty is obtained from the uncertainties for environmental parameters and approximation error:
u ( ρ a ) = ρ a a p 2   u 2 ( p ) + a h r 2   u 2 ( h r ) + a t 2   u 2 ( t ) + u 2 ( ε )
where u(p) in hPa, u(hr) in % and u(t) in °C, the sensitivity coefficients are aP = 1 × 10⁻³ hPa−1, ahr = 9 × 10⁻⁵, at = 4 × 10⁻³ °C−1. The uncertainty for approximation error is u(ε) = 2.4 × 10⁻⁴.
It is considered that temperature and air humidity values are limited by the mid-range of maximum variation in the balance room, respectively, ±Δt/2 and ±Δhr/2, so the uncertainty can be estimated as in (17) and (18), respectively:
u ( t ) = Δ t / 12
u ( h r ) = Δ h r / 12
A typical uncertainty for atmospheric pressure at any given location is u(p) = 10 hPa. An alternative to estimate pressure values instead of performing measurements can be from the place’s sea level height hSL, in meters, (19):
p = 1013.25 hPa × exp h SL × 0.00012 m 1
When instrumental, traceability and assurance uncertainties of environmental parameters measurements are much lower than the above conservative estimates, they should not be accounted for. However, it is necessary to maintain a periodic calibration program to assure these assumptions and to determine the corrections to be applied to the measurements.
Before starting the weighings, the pycnometer should be maintained close to the balance for some time to thermal stabilization. Due to the magnetic force compensation weighing cell, the temperature inside the weighing chamber of the balance can be higher than the room air temperature. However, this difference of temperatures is not enough to cause significant heat exchange by thermal conduction or convection between the balance and pycnometer provided that the weighings do not take too long. Nevertheless, the air temperature to be considered in estimation of the buoyancy effect should be the one inside the weighing chamber. Thus, when one uses room air temperature to estimate the buoyancy effect, it should be ensured that the temperature gradient is lower than temperature uncertainty estimates.

2.4. Uncertainty Evaluation for Weighing

Uncertainty of the weighing result (Equation (3)) relies on uncertainties of the effects, as in Equations (20)–(24), which are grounded on uncertainties of the input variables:
u Δ w = u 2 ( Δ B ) + u 2 ( Δ V ) + u 2 ( Δ P ) + u 2 ( Δ A )
u Δ B = u 2 ( δ R 0 ) + u 2 ( δ R L ) + u 2 ( δ R ecc ) + u 2 ( δ R rep ) + u 2 ( δ R temp ) + u 2 ( δ R buoy ) + u 2 ( δ R adj )
u Δ P = u 2 ( δ R D ) + u 2 δ R NL ( pycnometer ) u 2 m E ( elimination ) u 2 m b or u 2 m a ( substitution ) u 2 m EM ( modified   elimination )
u Δ V = u ( δ V )
u Δ A = u 2 ( δ R repA ) + u 2 ( δ R NLA ) ( pycnometer ) 0 ( other methods )
As one can see in Equation (20), there is no uncertainty term for numerical result R, which includes the true value for effects on weighing, by nature unknown. Effect variables ΔX or δRX are explicitly already included in Equations (4), (5), (12) and (13), so they should not be considered again in R. Thus, even though R is a measurement model variable, it is not an uncertainty variable.

2.4.1. Resolution

The rounding effects on the last digit of balance display at load δRL or no load δR0 are limited to ± d0/2, where d0 is the balance resolution; thus, the related uncertainties are considered as in (25):
u ( δ R 0 ) = u ( δ R L ) = d 0 / 12

2.4.2. Eccentricity

δRecc accounts for the balance reading error caused by the load placement off-center on load receptor. Since a trained operator always tries to place the load as close to the center as possible, this effect is small. In differential weighing, the effect variability is proportional to the result R, and it is limited by ± R × │ΔIeccmax/(2Lecc), (26):
u ( δ R ecc ) = R × Δ I ecc max / 2 L ecc 3
Here, ΔIeccmax is the maximum difference in off-center indication obtained in an eccentric test at load Lecc.

2.4.3. Repeatability

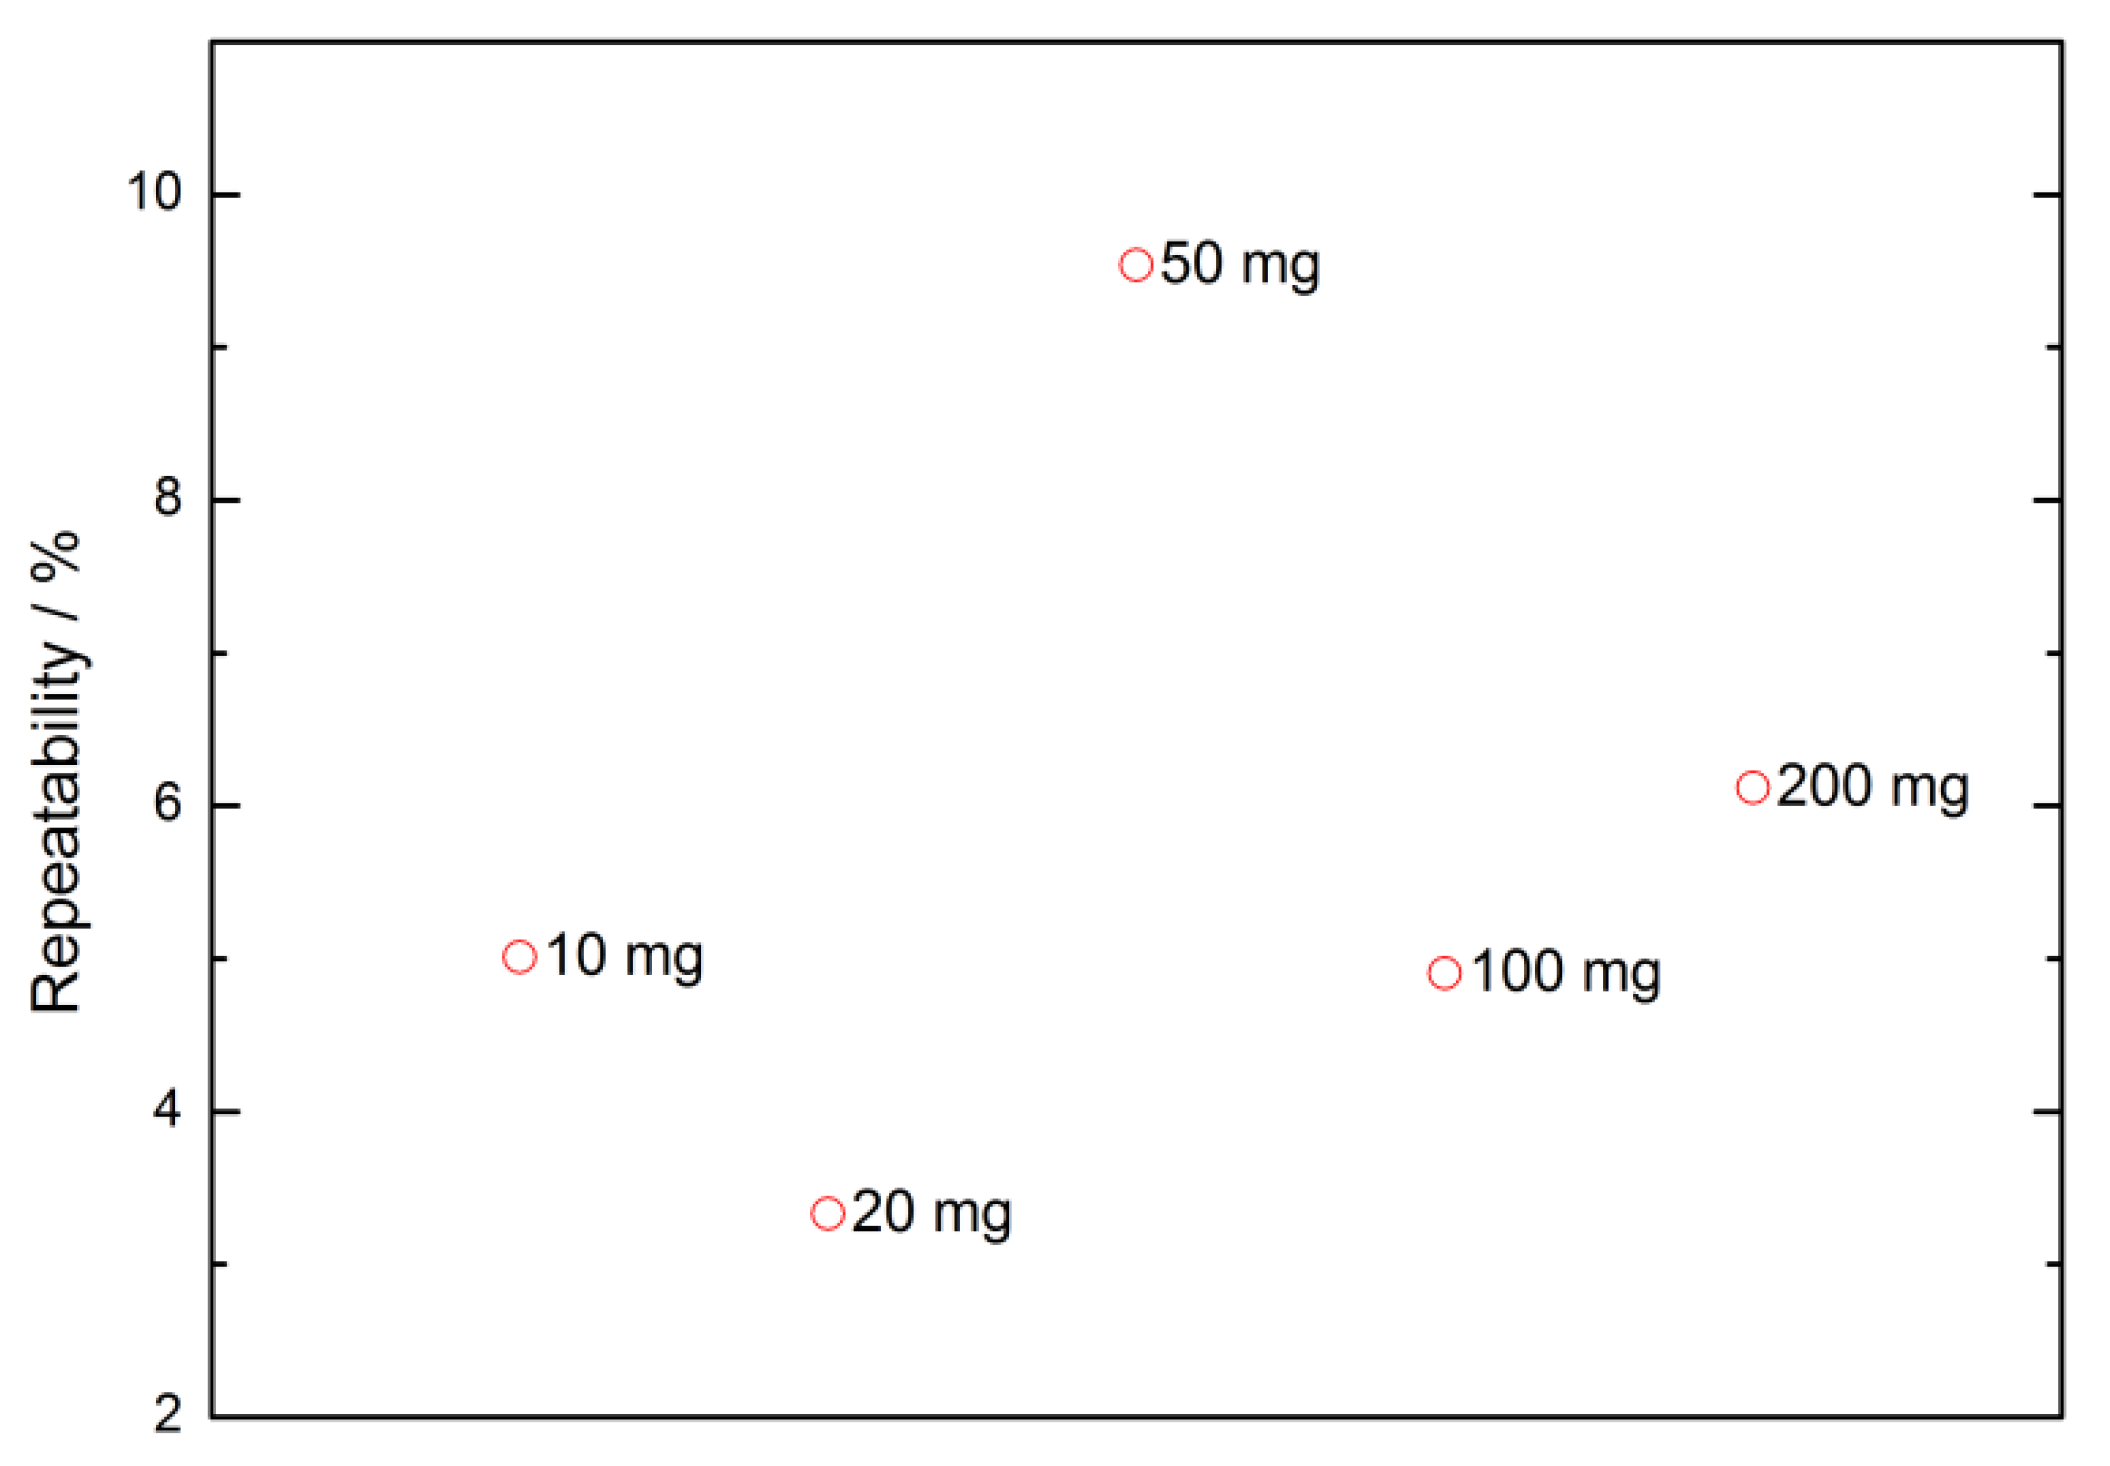
In radionuclide metrology, drop deposition is a non-repetitive task (single event), due to the limited control of the pressing force applied to the pycnometer even for an experienced weighing technician. Under repeatability conditions [36], the relative repeatability (estimated by the relative sample standard deviation) can be greater than the specified uncertainty limit. As shown in Figure 3, repeatability obtained from repetitive drop deposition in the weighing range from 10 mg to 200 mg can reach 10%.
Even though the weighing repeatability cannot be estimated based on repetitive deposition, the weighing method repeatability effect that arises from the balance random effects on each weighing should be accounted for in an uncertainty evaluation. In this case, the uncertainty of repeatability should be based on the results of the weighing methods’ execution instead of that obtained just from repetitions of the single weighing [37].
In the modified elimination method, it is considered that the repeatability effects on readings provided by the balance are normally distributed with a population standard deviation σ. Thus, it can be assumed that repeatability effects on reading values Ib, Iw1 and Iw2 represent a random sample from this normal distribution. Because of this, the repeatability effect on weighing differences R1 and R2 are also normally distributed with the same population standard deviation σ1 = σ2 = √2 × σ, once they are obtained from the difference between readings [38]. The covariance between the repeatability effects on R1 and on R2 σ12 = σ2 is only due to the first weighing reading Ib, common to the two differences. As the method result of the weighing sequence RM (Equation (11)) is obtained by the average of R1 and R2, the population standard deviation σrep of the repeatability effect on the method result δRrep can be determined by Equation (27):
σ r e p = σ 1 2 + σ 2 2 + 2 × σ 12 2
Once δRrep is set from the sum or subtraction operations on repeatability effects on differences R1 and R2, it is also normally distributed. The standard deviation σrep in terms of the repeatability effect on the individual reading population standard deviation σ is given by (28):
σ r e p = 3 2 × σ
The two repeated weighing readings Iw1 and Iw2, complying with repeatability conditions (weighing the pycnometer about the same load, same environmental conditions, same operator, etc.), can be used in order to estimate σ, in the usual way, from the sample standard deviation s. Thus, an estimate for repeatability uncertainty can be reached based on the estimated s, (29):
u ( δ R rep ) = 3 2 × s
In terms of readings Iw1 and Iw2, the standard deviation is written as in (30):
s = I w 1 I w 2 2
Different from the MEM, for the pycnometer, substitution and elimination methods, the repeatability should be based on the standard deviation obtained from previous repeatability tests. For some disambiguation, since the weighing method results are based on one differential weighing, repeatability from tests is estimated by the sample standard deviation, not by the sample standard deviation of the mean.
It is worth mentioning that as the uncertainty components are associated with systematic effects, repeatability based on repeatability tests are type B evaluated, since no measurement of the effect is performed on the weighing process application. In this case, the degrees of freedom of repeatability are usually obtained from the number of repetitions in these previous tests. Further, for a well-characterized measurement under statistical control, standard deviation should be based on the squared root of pooled variance sh2 (typical variance) obtained from the historical series of repeatability tests, with a greater degree of freedom than the repeatability of only a single repeatability test, thus making it more reliable [27]. On the other hand, in the modified elimination method, it is possible to perform a type A evaluation for the repeatability uncertainty component. However, based on two repetitions, just one degree of freedom is associated to the estimated repeatability. The composition of this degree of freedom with those from the activity measurement reduces the effective degrees of freedom associated with the measurement of activity concentration. Nevertheless, in the other methods, the value of repeatability at the time of drop deposition weighing is not known; thus, considering the degrees of freedom from the repeatability tests as they were obtained at the time of drop deposition weighings, it is presumed to be a knowledge that, in fact, one does not have. Therefore, when based on repeatability tests, the degrees of freedom considered for uncertainty determination for activity concentration should be reduced. If it is done, since degrees of freedom indicate knowledge about the measurement process, the evaluation of the repeatability for the MEM is more reliable than those for the other methods. Moreover, since the dominant component for activity concentration uncertainty is activity measurement, which is based on several counts, reducing the degree of freedom from weighing can be not meaningful.

2.4.4. Temperature Sensitivity

This effect concerns the variation of the balance sensitivity with the ambient temperature on weighing result R. The limiting values for δRtemp are ± R × (KT Δt/2); thus, uncertainty is expressed by Equation (31):
u ( δ R temp ) = R   K T   Δ t / 12
This effect is due to thermal expansion effects and thermal variation on the magnetic system of the weighing cell. KT is the sensitivity of the instrument to temperature variation and can be obtained from the balance manufacturer’s specification. Δt is the maximum temperature variation at the instrument location, and it should be estimated from the range of air temperature variation in the balance room. When triggered adjustment devices are used, temperature variation Δt could be estimated by the trigger thresholds.

2.4.5. Buoyancy Adjustment

The air density variation between the last adjustment and the time of weighing affects the weighing reading. Thus, in order to properly apply the buoyancy effect correction to the weighing result as in Equation (1), it is required to correct the numerical result R from the effect δRbuoy. When the balance is not adjusted before the use and an estimate for air density variation Δρa in the balance site is available, the uncertainty contribution is as in (32):
u ( δ R buoy ) = R Δ ρ a / ρ c 3

2.4.6. Drift Adjustment

The adjustment changing of the balance is due to drift, wear and tear. It can be estimated from the largest difference │ΔE(max)│ in calibration errors obtained at or near the maximum capacity max between any two consecutive calibrations. The numerical value for δRadj is in the range ± R × │ΔE(max)│/max, where max is the balance maximum capacity. The standard uncertainty is expressed by (33):
u ( δ R adj ) = R Δ E m a x / m a x 3
When automatic internal adjustment is set to a suitable frequency regarding balance usage, this uncertainty component could be negligible. However, balance sensitivity should be checked in order to ensure that it is closer to the unit than │ΔE(max)│/max.

2.4.7. Evaporation

The pycnometer is prepared with a very fine stem so that in differential weighing performed without significant changes in air humidity or temperature, the evaporation effect on each single weighing performed under the same period of time is approximately constant. Thus, the evaporation effect on the weighing result δRevap can be assumed to be a residual effect. The associated standard uncertainty should be determined by the multiplication of the evaporation rate and the period of time for the weighing method execution.

2.4.8. Non-Linearity

This effect acts only on the pycnometer method result and its contribution for weighing uncertainty may be insignificant [39]. Thus, linearity error δRNL and the standard uncertainty estimation could be based on the limits set in the manufacturer’s specification (in the worst case), the calibration curves from balance calibration in the interest range or the errors provided on the calibration report. However, the most accurate estimate would be obtained by the balance calibration in the mass of drops range with the balance loaded with a mass close to the pycnometer mass before deposition. In this case, an estimate for δRNL and its standard uncertainty can be determined from the result of the calibrations performed by the laboratory itself besides those of accredited laboratories.

2.4.9. Balance Drift

Zero drift is the result of other effects such as the warm up of the balance weighing cell, environmental parameters change, air draft and heat exchange between balance, pycnometer, technician and environmental conditions. Usually, before weighing procedures are applied to avoid drift, the effect is negligible. It is possible just to say that the residual effect δRD is lower than d0, and is thus assumed to be in the range ± d0/2. The considered balance drift uncertainty is shown in (34):
u ( δ R D ) = d 0 / 12
When drift elimination procedures are available, the agreement of the results obtained by them is expected. Thus, it should be checked to guarantee such an assumption.

2.4.10. Standard Weights Mass

The mass of the standard weights is known from its calibration report, which also provides the standard uncertainty u(ms). Usually, it is the maximum for the accuracy class according to the OIML R111 weights. A possible mass drift would be due to the standard weight usage. If a drift measurement is not available and so this effect is not corrected, it is assumed to be zero limited in ±u(ms) when a calibration frequency proper to the use is set. The overall standard uncertainty for the mass standard uoverall(ms) used in elimination, modified elimination or in substitution methods is given in (35) by:
u overall ( m s ) = 2 u ( m s ) / 3
In the substitution method where the mass of the drop msubs is determined from the difference between the pycnometer weighing results before Δw1 and after Δw2 deposition, the covariance uw1, Δw2) between these measurements should be accounted for in uncertainty as presented in (36):
u ( m subs ) = u 2 ( Δ w 1 ) + u 2 ( Δ w 2 ) 2 × u ( Δ w 1 , Δ w 2 )
The covariance term is due to the use of the same standards in the set of mass standards used in the method application. Thus, uw1, Δw2) can be estimated as in (37) from the covariance u(ms1, ms2) between the mass ms1, the set of standard used before drop deposition and that used after ms2.
u ( Δ w 1 , Δ w 2 ) = u ( m s 1 , m s 2 )
Once the same standards i are identified, u(ms1, ms2) is only the quadratic sum of the individual standard uncertainties ui(ms), (38):
u ( m s 1 , m s 2 ) = u i 2 m s

2.4.11. Non-Linearity Drift

In order to guarantee the value of linearity error used at the time of weighing is safe, the time variation of differential linearity error δRNLA should be accounted for in the uncertainty evaluation [40]. The limiting values for these errors are estimated from the maximum change of the differential errors in relation to the historical mean error ±│ΔE│ obtained from the history of calibrations and intermediate checks. The considered uncertainty is shown in (39):
u ( δ R NLA ) = Δ E / 3

2.4.12. Repeatability Uncertainty Estimate

The changing of the method result precision should be checked in order to evaluate the compliance with the metrological requirement and to properly estimate the uncertainty components [41]. Although this variation can be within the limits of the metrological requirements established for normal use, it should be considered in order to improve the reliability of the weighing.
The repeatability effect accounted for in the measurement model is used to represent the possible range of true values of the repeatability effect in the numerical value R. When the repeatability is based only on the typical variance sh2, it means that the occurrence of a certain range of values of the repeatability effect is more likely than values outside it. However, information on the maximum variance smax2 in the historical series of variances means values outside that range, covered by the typical variance, may be more likely to occur than is expected. Thus, to take into account in the uncertainty calculation the information about the maximum variance, the effect of variation of repeatability δRRepA is introduced in a complementary way to the effect of repeatability δRRep. The true value of the method’s repeatability effect is modeled as δRRep│true = δRRep + δRRepA so that the variances are related by u2(δRRep│true) = u2(δRRep) + u2(δRRepA). Since u2(δRRep) = sh2, and the repeatability of the method could have a value as high as u2(δRRep│true) = smax2; then, one can think that the maximum value for the variance of the repeatability variation effect is u2(δRRepA) = smax2sh2. Therefore, based on all available information about δRRepA, its zero mean and the maximum value of the standard deviation Δsmax = √ smax2sh2, it can only be said that the values of the effect δRRepA are within the interval ± Δsmax, and a rectangular distribution is assumed. Equation (40) shows how the related standard uncertainty is estimated:
u ( δ R repA ) = Δ s max / 3
In this way, the maximum variance of repeatability tests are introduced in the uncertainty calculation as the variance of the repeatability variation effect. This approach has the advantage of recognizing the typical variance as the most likely value associated with the method’s repeatability, which would not occur if the repeatability variation effect was not considered and if only the maximum variance was assumed instead of the typical variance in the uncertainty calculation.
In fact, the maximum variance of repeatability is less than or equal to the control limit established in the historical series for variance and on which the CMCs for services offered to external customers must be based. Thus, the approach considered here allows to obtain lower repeatability uncertainties than CMCs, as is expected for primary standards.

2.5. Check for Non-Expected Effects

Although every care is taken when weighing or during drops deposition, some effects could still occur such as evaporation changes and deviation from zero of the balance, which is not considered in modeling.
In the elimination method, three readings are obtained Ib, Ia and Iw1 from the weighing sequence. Each indication could include such effects θb, θa and θw1, which are added to the corrected indication values Ibc, Iac and Iw1c, as set in (41)–(43):
I b = I b c + θ b
I a = I a c + θ a
I w 1 = I w 1 c + θ w 1
The method result RE shows an effect dependence, (44):
R E = I b c I w 1 c + θ b θ w 1
In this method, each reading is recorded at approximately the same time interval. Thus, the first reading is taken in a time interval equal to the weighing time of the pycnometer T after being placed in the load receiver. The second reading is recorded in approximately the same time interval T, which again corresponds to the weighing time of the pycnometer in the second weighing. However, in the third weighing, which is carried out with the addition of standard weights, and in which the pycnometer is kept on the load receiver since the second weighing, the reading is taken after a time interval T of placing the standards, but it is also taken after a 2T weighing time of pycnometer, which corresponds to the total weighing time of the pycnometer only.
Thus, if constant effects acts on each pycnometer weighing, θb = θa and θw1 = θa, since a constant effect does not change its magnitude with time. Therefore, θaθb = θw1, and no effect acts on result RE. This is the underlying assumption of this checking method. Constant effects arise; for example, from very small drop drying, tangential force on the load receptor and thermal equilibrium of the weighing cell. On the other hand, if there is a time linear effect such as balance zero drift due to environmental changes or pycnometer evaporation affects weighing, then θb = θa, since the weighing time before placing the pycnometer on the load receptor is the same. However, θw1 = 2θa, since at the end of the third weighing the total time of the pycnometer on the load receptor is about the double the time at the end of second weighing. In this case, the method result RE is affected for an unavoidable effect, as in (45), which is the alternative assumption of this checking:
R E = I b c I w 1 c θ a
In order to control the magnitude of this remaining effect θa, in checking is used in the difference between indications Ia and Iw1 to estimate it as a test variable of hypothesis testing. Since the difference between the corrected indications is the conventional mass of the standard weight mE, (46):
θ a = I w 1 I a I w 1 c I a c m E
In this control methodology, the underlying assumption should be accepted, since θa value is lower than the expanded uncertainty of the standard weight 2u(mE), as presented in (47):
I w 1 I a m E 2 u m E
This control criteria means that when it is not possible distinguish between a remaining time linear effect and a possible variability of the standard weight mass, this effect should be not present. Effects which occur at an irregular time as balance zero drift are followed by fast restoration to zero or very fast large evaporation, even if the nonlinear will be prevented.
In this checking approach, limits vary with the uncertainty of the standard due to its mass, so it is more restrictive the smallers the mass of the drops deposited. Therefore, variations of indication that are not acceptable for weighing drops of 10 mg may be acceptable at 200 mg mass.
Once the mass measurements here are intended to determine the activity concentration (activity per mass), this feature allows to reduce the relative effect introduced in the activity concentration originated by the same magnitude systematic effects that affect the whole weighing range.
In the MEM, three readings are obtained—Ib, Iw1 and Iw2—from three pycnometer weighings performed at about the same weighing time. Again, each weighing could be affected by effects θb, θ w1 and θw2 added to corrected indications Ibc, Iw1c and Iw2c, as set in (48)–(50):
I b = I b c + θ b
I w 1 = I w 1 c + θ w 1
I w 2 = I w 2 c + θ w 2
In the MEM, the method result RM considering the effects is expressed by Equation (51):
R M = R 1 + R 2 2 = I b I w 1 + I w 2 2 + θ b θ w 1 + θ w 2 2
This method is based on the same general assumption considered for the elimination method; thus, θb = θw1 = θw2 regardless of whether the effects are constant, linearly or not over approximately equal weighing times. In other words, it is important that the effects are equal in each weighing. Whenever it occurs, the method result is unaffected by these effects.
In order to evaluate the underlying assumption, the sample repeatability u(δRrep) can be used as a test variable of hypothesis testing. From Equations (29), (30) and (48)–(50), the effects can be introduced in expression for sample repeatability as in (52):
u ( δ R rep ) = 3 2 I w 1 c I w 2 c + θ w 1 θ w 2
Once all care is taken in drop deposition, it is expected │θw1θw2│ ≈ 0; thus, the historical measured repeatability sh is not affected by these effects. Thus, since sh is close to the population repeatability σrep, the ratio u2(δRrep)/sh2 is Chi-squared distributed, and a bilateral interval of confidence for u(δRrep) can be set, (53):
s h Q 1 α / 2 , 1 u ( δ R rep ) s h Q α / 2 , 1
Here Q(1 − α/2,1) and Q(α/2,1) are the quantiles of a Chi-squared distribution with 1 − α confidence level and 1 degree of freedom from the two repeated readings. In order to use this interval for purposes of checking effects, it is required that its length is small enough in order to evidence the effects. Thus, a confidence level of 1 − α = 68% was chosen instead of the usual 95%, resulting in Q(84%,1) = 0.04 e and Q(16%,1) = 1.97 for quantiles values. For one significant digit in rounding, the interval is 0 ≤ u(δRrep) ≤ sh.
Thus, in the modified elimination method, when the sample repeatability is lower than the typical one, the underlying assumption is accepted. This criteria means that when the difference between the effects is not distinguishable from the natural random effects on weighing, no effect affects the result RM. By this checking methodology, effects which change the magnitude at regular times are prevented.
By the framework of this checking control, it is assured within the typical randomness of the MEM that the relative effects in mass introduced in activity concentration are close to zero in the whole range.
It is important to clarify that while the MEM searches for variation on the magnitudes of effects between weighings in the elimination method, the magnitude of the effect is itself evaluated.

3. Materials and Methods

3.1. Experimental Set Up

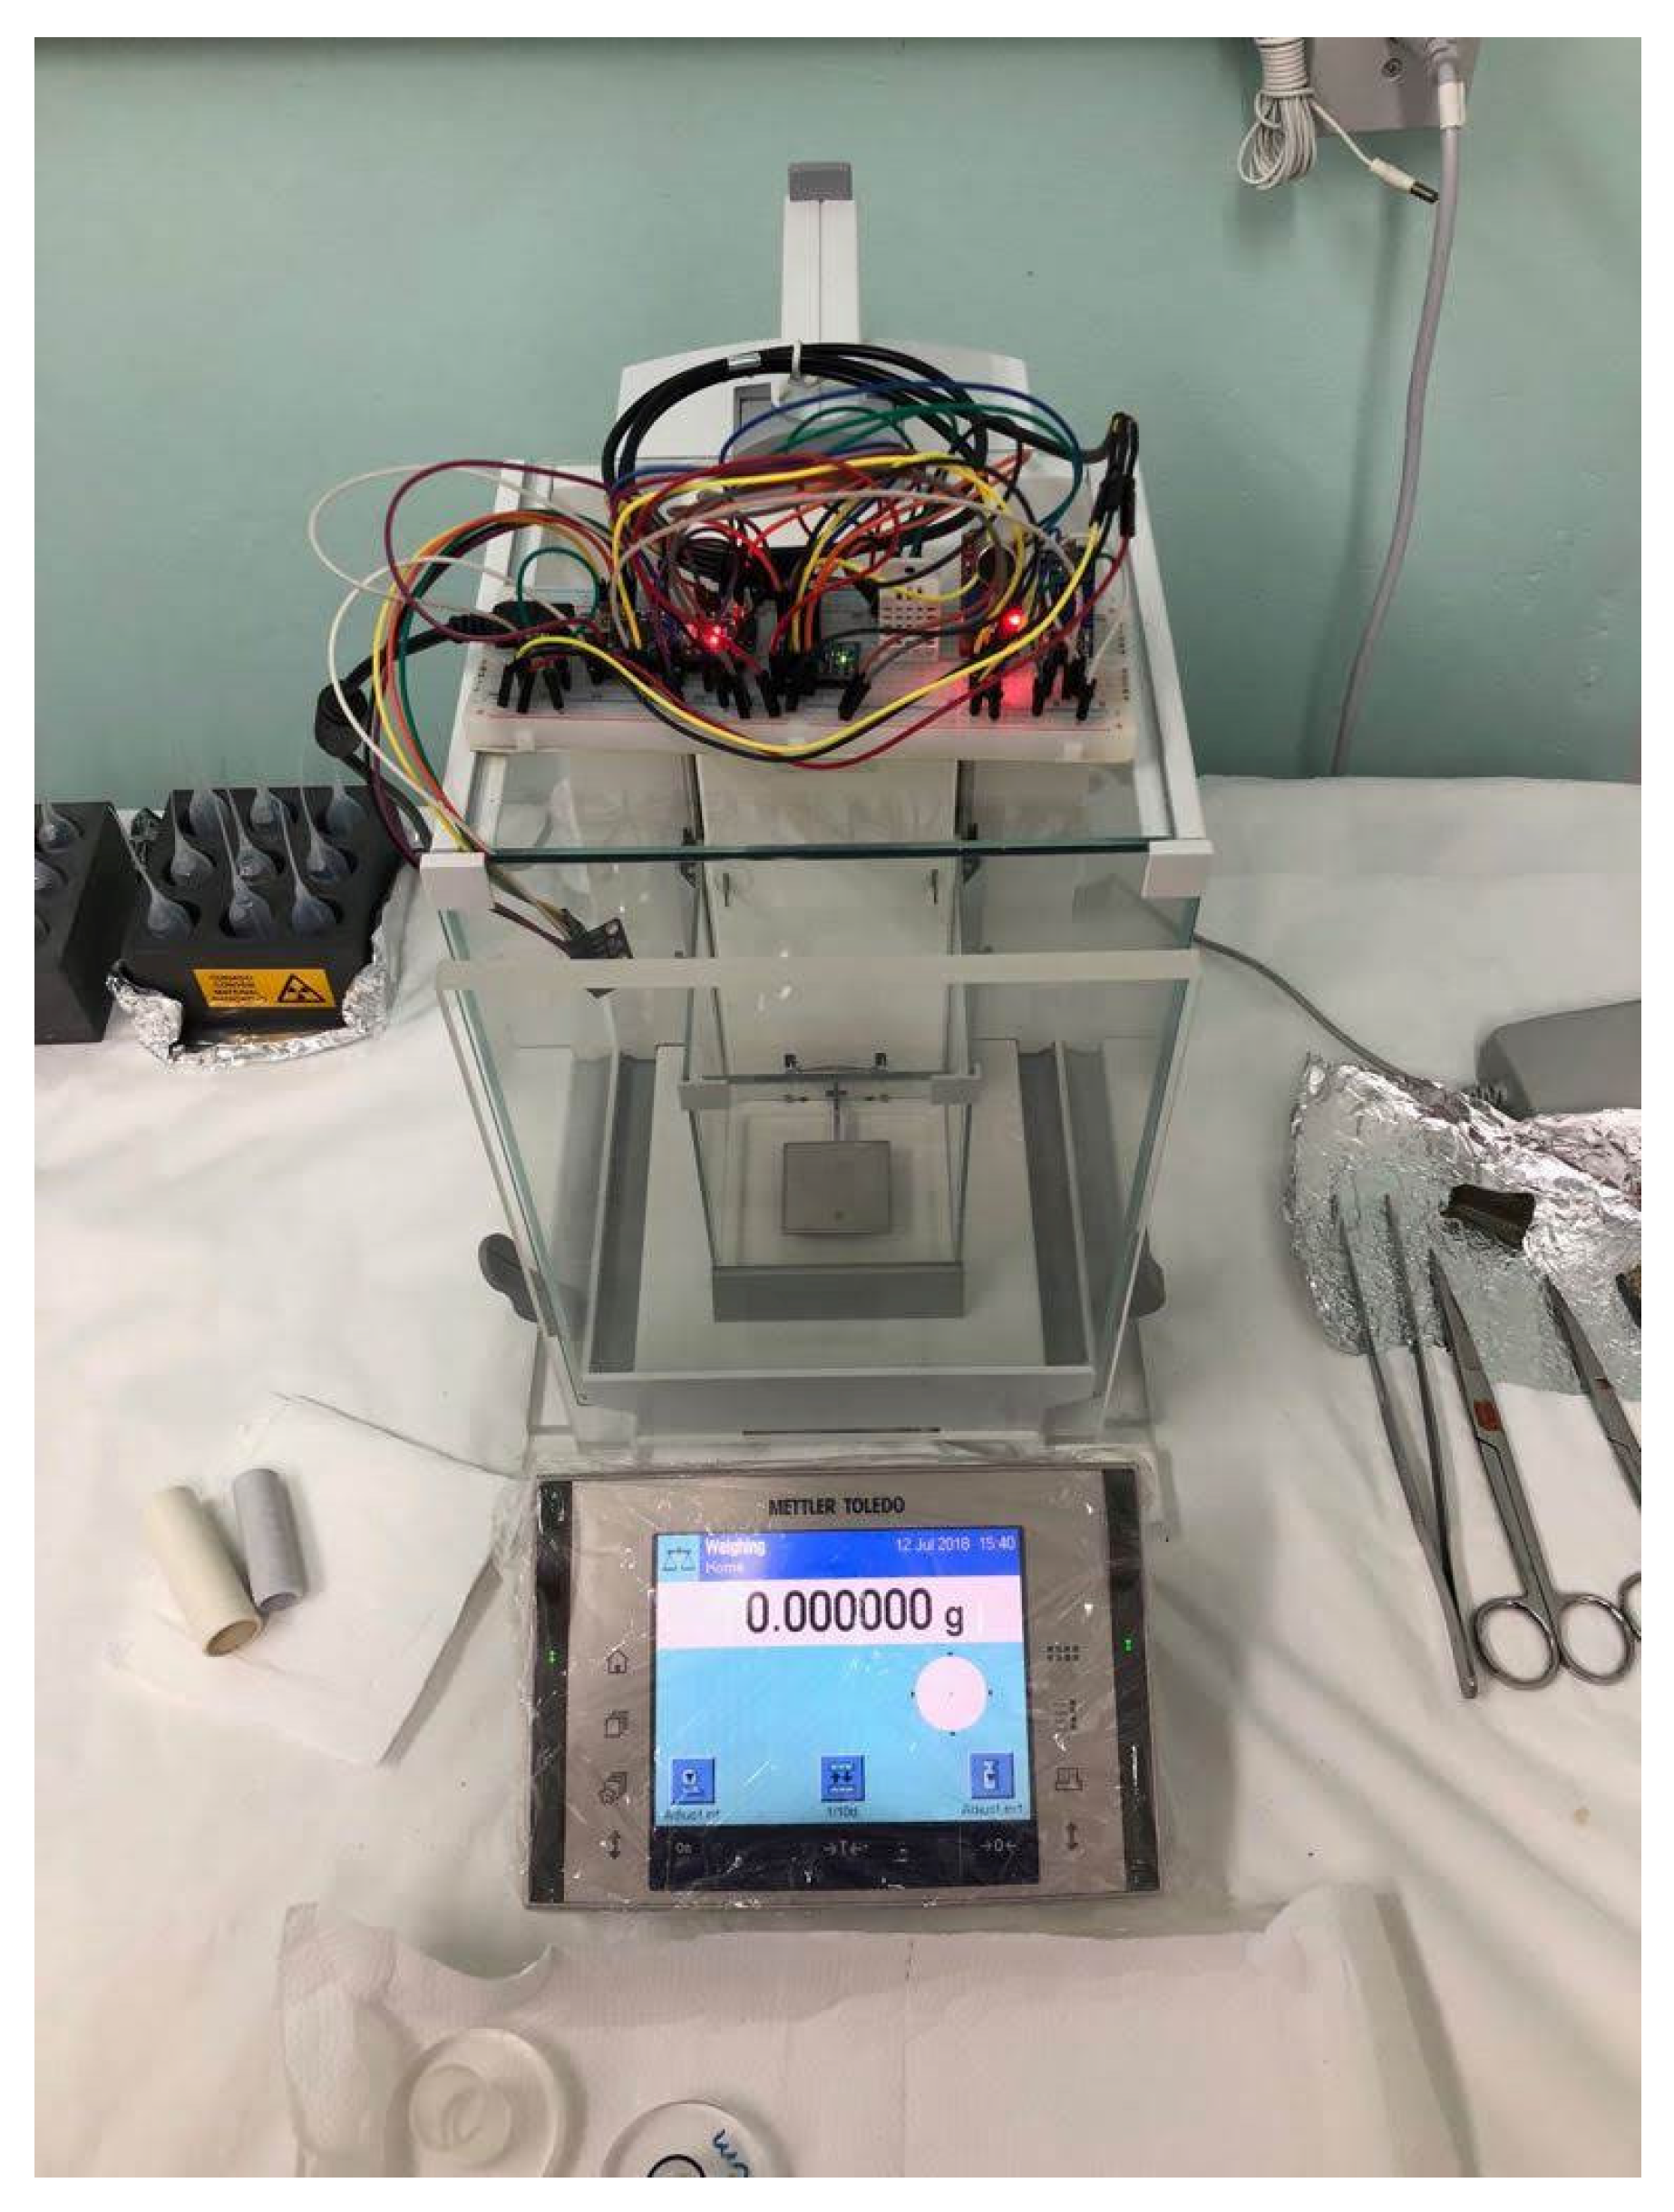
In order to obtain the several parameters required for mass measurement and uncertainty estimation, a full range Mettler Toledo XP56 balance was set up with several sensors, as shown in Figure 4. The environmental conditions of temperature, relative humidity and pressure were recorded by sensors integrated in an in-house-developed Arduino nano-microcontroller board [42]. Automatic data acquisition of indications provided by sensors and the balance was carried out by an in-house-developed Labview application, which triggers data communication via serial ports. The balance communication was implemented by using a specific Labview VIs for Mettler balances, while libraries written in C or C++ were recorded in the Arduino processor to allow sensor reading. Data acquisition and recording every 2 s allowed to check for some effects on results.
The microbalance properties are: maximum capacity max = 52 g, resolution d0 = 0.001 mg and temperature sensitivity parameter KT = 1 × 10⁻⁶ °C−1 [43]. Balance was not adjusted before weighings, since no adjustment was performed beforehand in loco external calibration by an accredited laboratory calibration, thus preventing changes in calibration errors, which could put calibration in check. Previously to performing weighing, the balance was warmed up and indications were taken when the stability indicator was displayed.
Three sensors were employed to measurements: a BME280 [44], for measurement of environmental conditions inside the weighing chamber and a DHT22 [45] for humidity along with a BMP180 [46], for temperature and pressure outside the weighing chamber. These sensors were calibrated at hygrometry and pressure laboratories of Inmetro. The environmental sensors’ resolutions are 0.1 °C, 0.1% and 0.01 hPa.
The density determinations of samples were performed on a Mettler Toledo DA-310M digital densimeter [47], installed at Inmetro’s fluids laboratory. This densimeter is properly for neutral or acid samples with densities ranging from 0.7 g cm−3 to 1.6 g cm−3 at temperatures from 15 °C to 25 °C. Readings with resolution 1 × 10⁻⁵ g cm−3 were obtained at sound indication. The samples were prepared in the form of liquid hydrochloric acid in concentrations of 0.1 mol L−1, 0.5 mol L−1 and 1 mol L−1, as they are required the most accurate standardized radionuclides 60Co, 68Ge, 137Cs and 241Am at LNMRI. Carriers and radionuclides were not used because their concentration in radioactivity solutions are too low to appreciably change the diluent density [48,49]. Sampling was performed with the aid of a syringe. Between measurements of different concentrations of samples measures, the densimeter was cleaned with distilled water and isopropyl alcohol to prevent cross-contamination.
The 5 mL pycnometers manufactured to order are made of polyethylene with chemical composition 6C (96.3%) 8O (3.3%), 24Cr (0.1%), 55Fe (0.1%) and 11Na (0.1%), checked by X-ray fluorescence. Their density ranges from 0.88 g cm−3 to 0.91 g cm−3, as determined by hydrostatic weighing. These pycnometers were employed in evaporation test and for weighing methods, and they were prepared by stretching the stem, warming and gently rotating the pycnometer, while the tip of the stem was pulled with tweezers to form a capillary so its tip was cut.
Pycnometers were filled with deionized water in evaporation test, repeatability test and in execution of weighing methods.
In performing tests based on weighing two set of stainless steel, standards weights were used. One OIML F1 set of two individual weights 20 g and 50 g was used for eccentricity tests and for repeatability measurement required for non-linearity determination at max. The other set, a 1 mg to 50 g E2 accuracy class was employed for differential non-linearity, method’s repeatability, drift measurements and in performing weighing methods. These sets were calibrated twice by the mass laboratory of Inmetro. The two sets were maintained at the weighing room to achieve thermal stabilization. Handling of mass standards was performed properly, using non-metallic tweezers, gloves and lint-free tissue paper.

3.2. Environmental Parameters

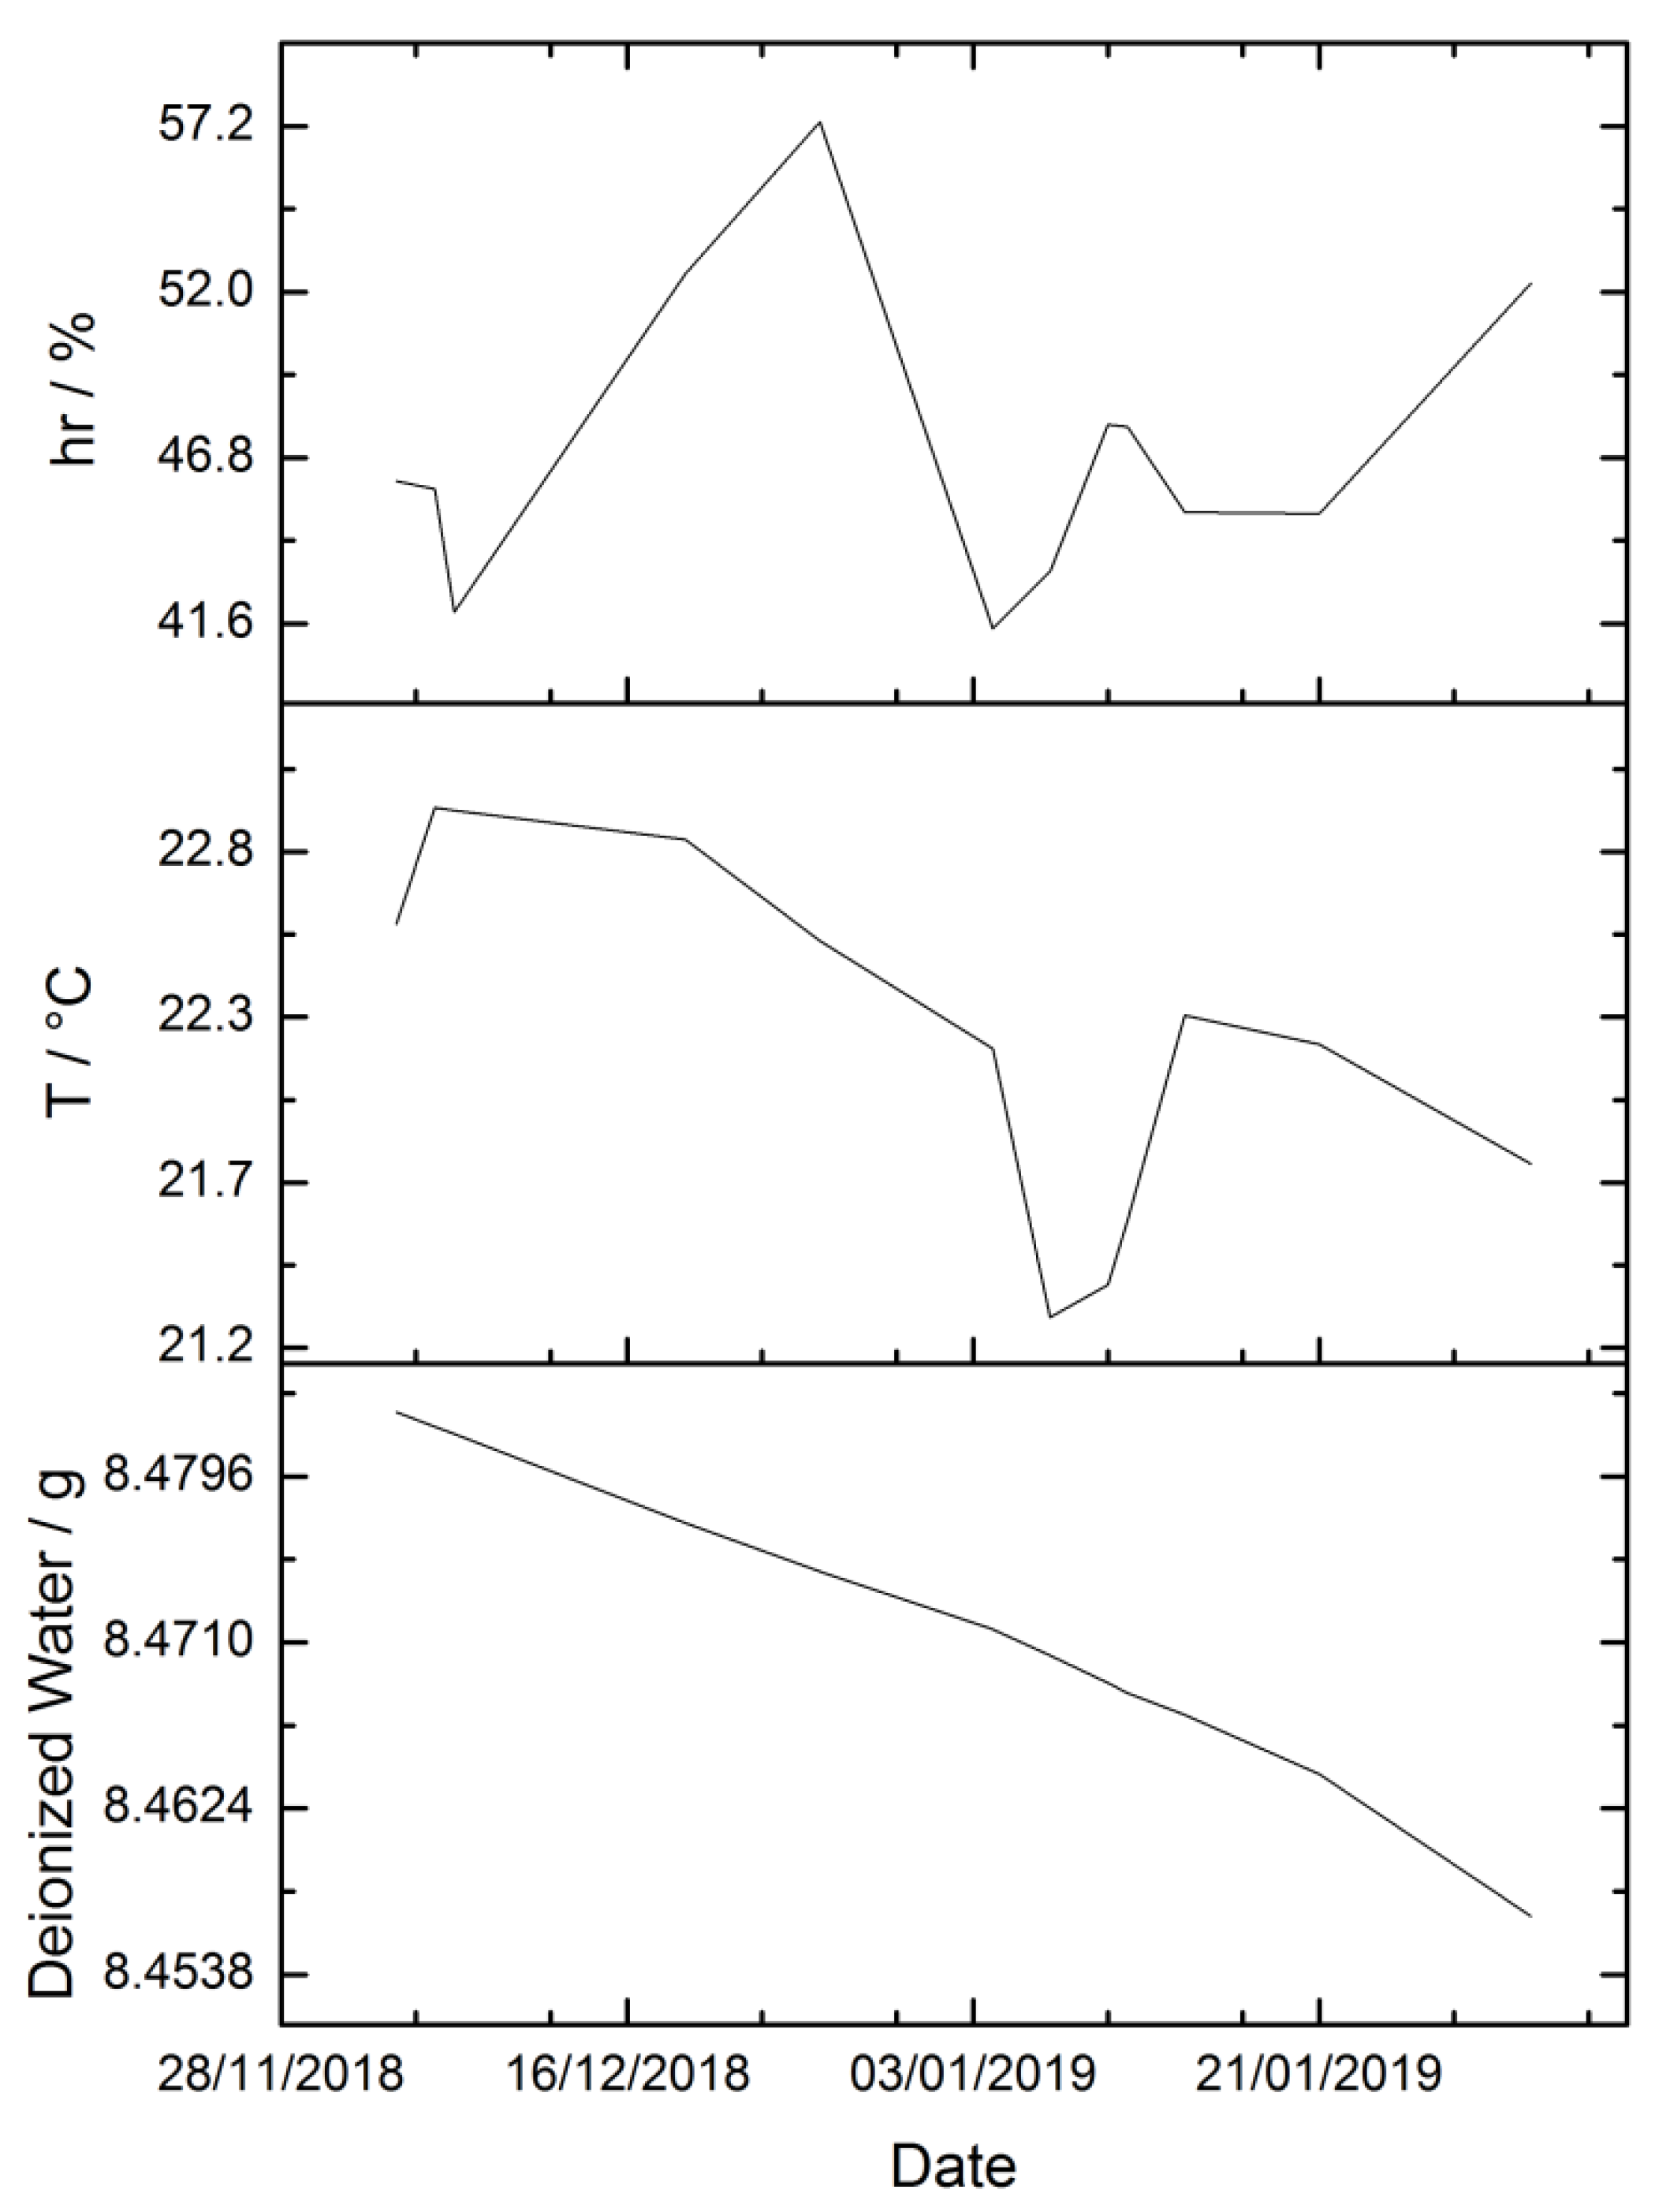
The environmental parameters were taken for about one year and a 3 million data set includes data taken when the air conditioning system was off. The maximum variations of temperature, humidity and air density in Figure 5 were Δt = 5.7 °C, Δhr = 47% and Δρa = 0.04 kg m−3.
The calibration results for sensors inside the weighing chamber were (−1.9 ± 0.2) °C, (11 ± 2)%, (−1.3 ± 0.2) hPa and for the outside sensors were (−0.4 ± 0.2) °C, (3 ± 2)%, (−2.4 ± 0.2) hPa. The uncertainties also include the stability component. From these results for humidity and pressure sensors, neither correction nor uncertainty should be accounted for. However, the correction for temperature should be applied. The temperature gradient measured inside the weighing chamber was 0.5 °C; thus, the uncertainty estimated by Δt/2 covers gradient and traceability uncertainty sources.

3.3. Radionuclide Solution Parameters

3.3.1. Density

Previously, to carry out density measurements, amber glasses filled with the acid samples with different concentrations were shaken to homogenize. Measurements were performed at drop deposition work temperatures of about 19 °C, 20 °C and 21 °C. In order to prevent the bias resulting from executing density measurements in only increasing or decreasing temperature, temperature point order was chosen in a random way. Three cycles of three repeated density measurements were obtained at each temperature point for each sample. Regardless of temperature, the density values varied linearly with concentration in the range from (1.004 ± 0.004) g cm−3 to (1.020 ± 0.004) g cm−3. The density thermal expansion coefficient was (−2 ± 2) × 10−4 g cm−3 °C−1; thus, no significance in the temperature working range. For buoyancy correction purposes, a density ρ = 1.00 g cm−3 limited by ±0.02 g cm−3, is enough for working concentrations and temperatures. Thus, density standard uncertainty is u(ρ) = 0.01 g cm−3. These density results cover deionized water density also measured in the same temperature range (1.002 ± 0.004) g cm−3.

3.3.2. Evaporation

The evaporation rate of the pycnometer filled with deionized water was evaluated by weighing. Water was used because it has an average evaporation rate close to that of HCl in concentration range from 0.1 mol L−1 to 1 mol L−1 [50]. The filled pycnometer was maintained in the weighing room so it was kept in thermal stability with ambient air. As shown in Figure 6, no correlation between readings with temperature or relative humidity was observed. The measured evaporation rate was −0.0003 mg min−1, so in a 7 min drop deposition the evaporation error is δRevap = −0.002 mg. However, due to the very low error value, it is assumed in mean δRevap = 0 mg with a standard uncertainty u(δRevap) = 0.002 mg.

3.4. Balance Parameters

3.4.1. Standard Weights

For each set of standards, the expanded uncertainty U(k = 2) for individual standards was close to the maximum for its accuracy class, equal to one third of the maximum permissible error according to OIML R-111. The obtained standard uncertainty u(ms) was about half of this value.
Table 1 provides error and the overall expanded uncertainty obtained from calibration data.
Some standard weights do not have errors limited by OIML E2 or F1 class. However, it is not a problem, since these errors are considered in mass values determinations, and the mass drift is maintained under control.
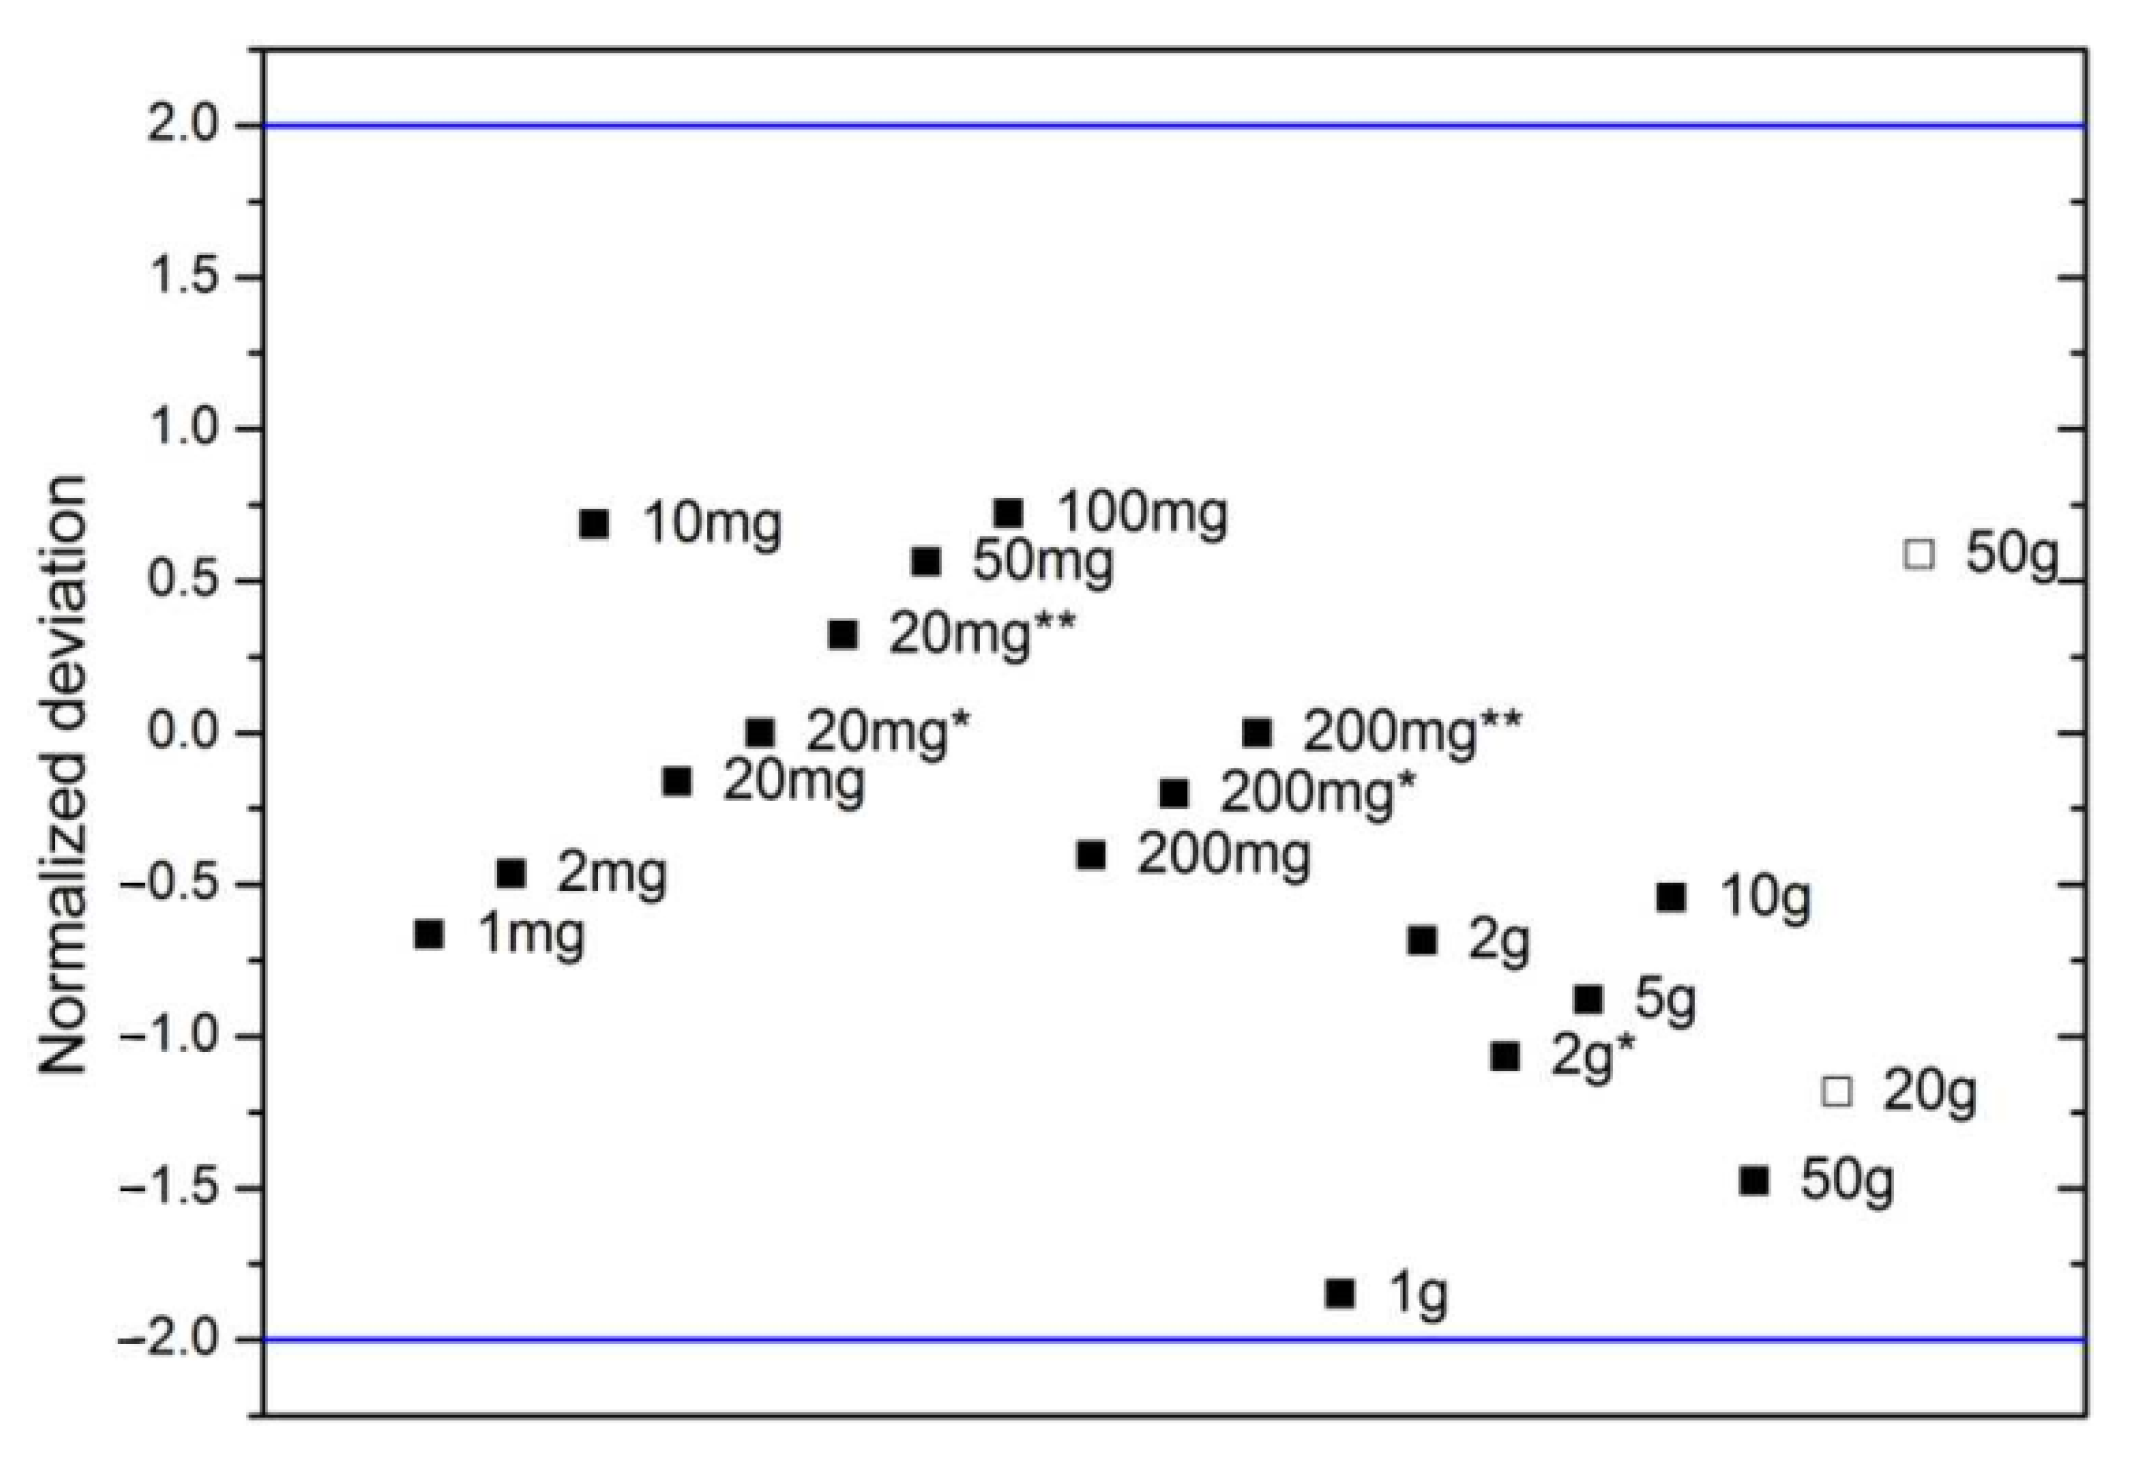
Figure 7 shows the normalized deviation between calibrations of the mass standards. This consistency evaluation took into account the covariance introduced by the same reference standards used in both calibrations [51]. The covariance term for each nominal value of the standards was estimated as the squared one third of the overall standard uncertainty, according to OIML R111, one third rule between accuracy classes [21].
Indeed, consistency is confirmed since all normalized deviations are in the range ±2.
Furthermore, negative drift is the predominant observed trend and may be due to wear resulting from weights usage. However, the calibration frequency of one year seems sufficient when all standard weights tests presented in this work were executed.

3.4.2. Eccentricity Test

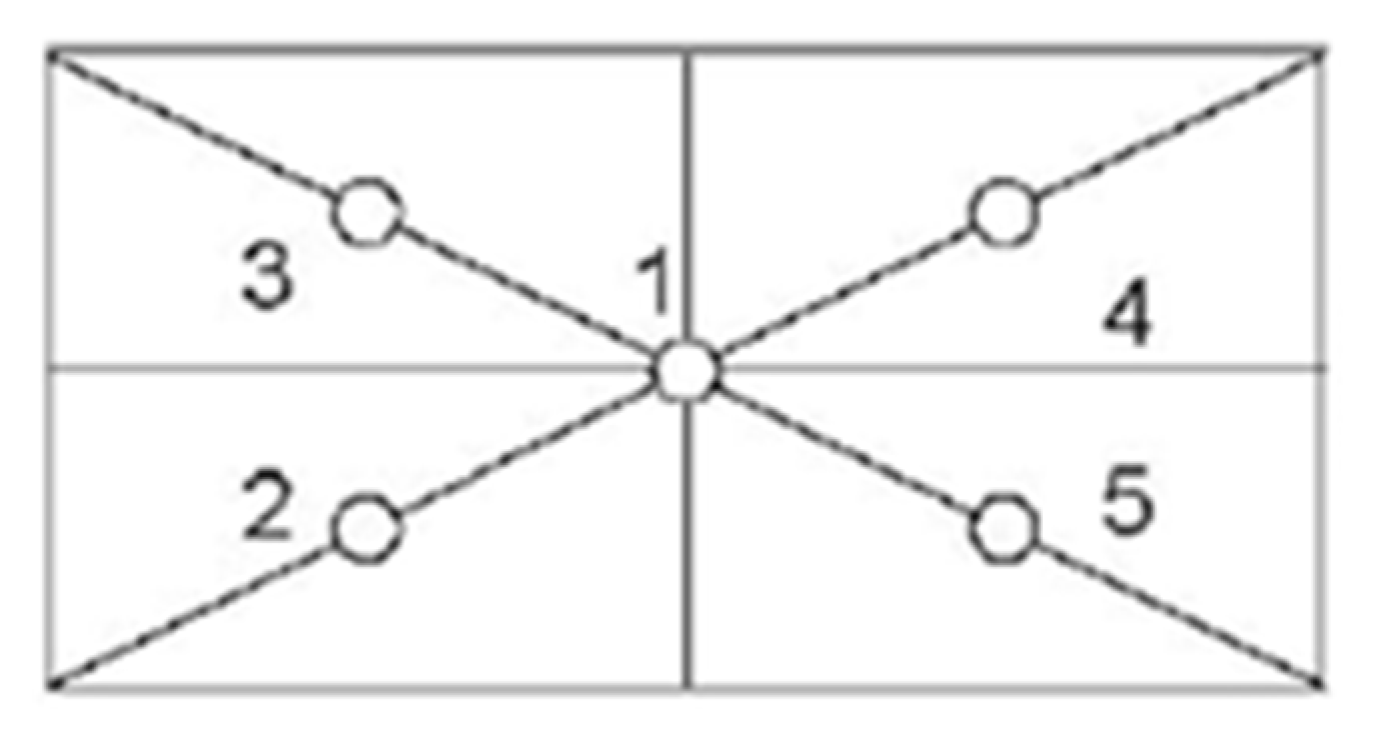
The eccentricity of loading on the weighing pan was measured by the four methods specified by Euramet, by weighing a load of Lecc = 20 g at the five points indicated in Figure 8. Among the four methods, the maximum difference in off-center indication was │ΔIeccmax = 0.036 mg. The difference from this maximum and those obtained by the other three methods was about 0.016 mg, so it is not significant for weighings ranging from 10 mg to 200 mg.

3.4.3. Non-Linearity Checks

In order to determine linearity error at max = 50 g and the differential errors in the milligram range, the balance calibrations were performed according to specifications by Euramet.
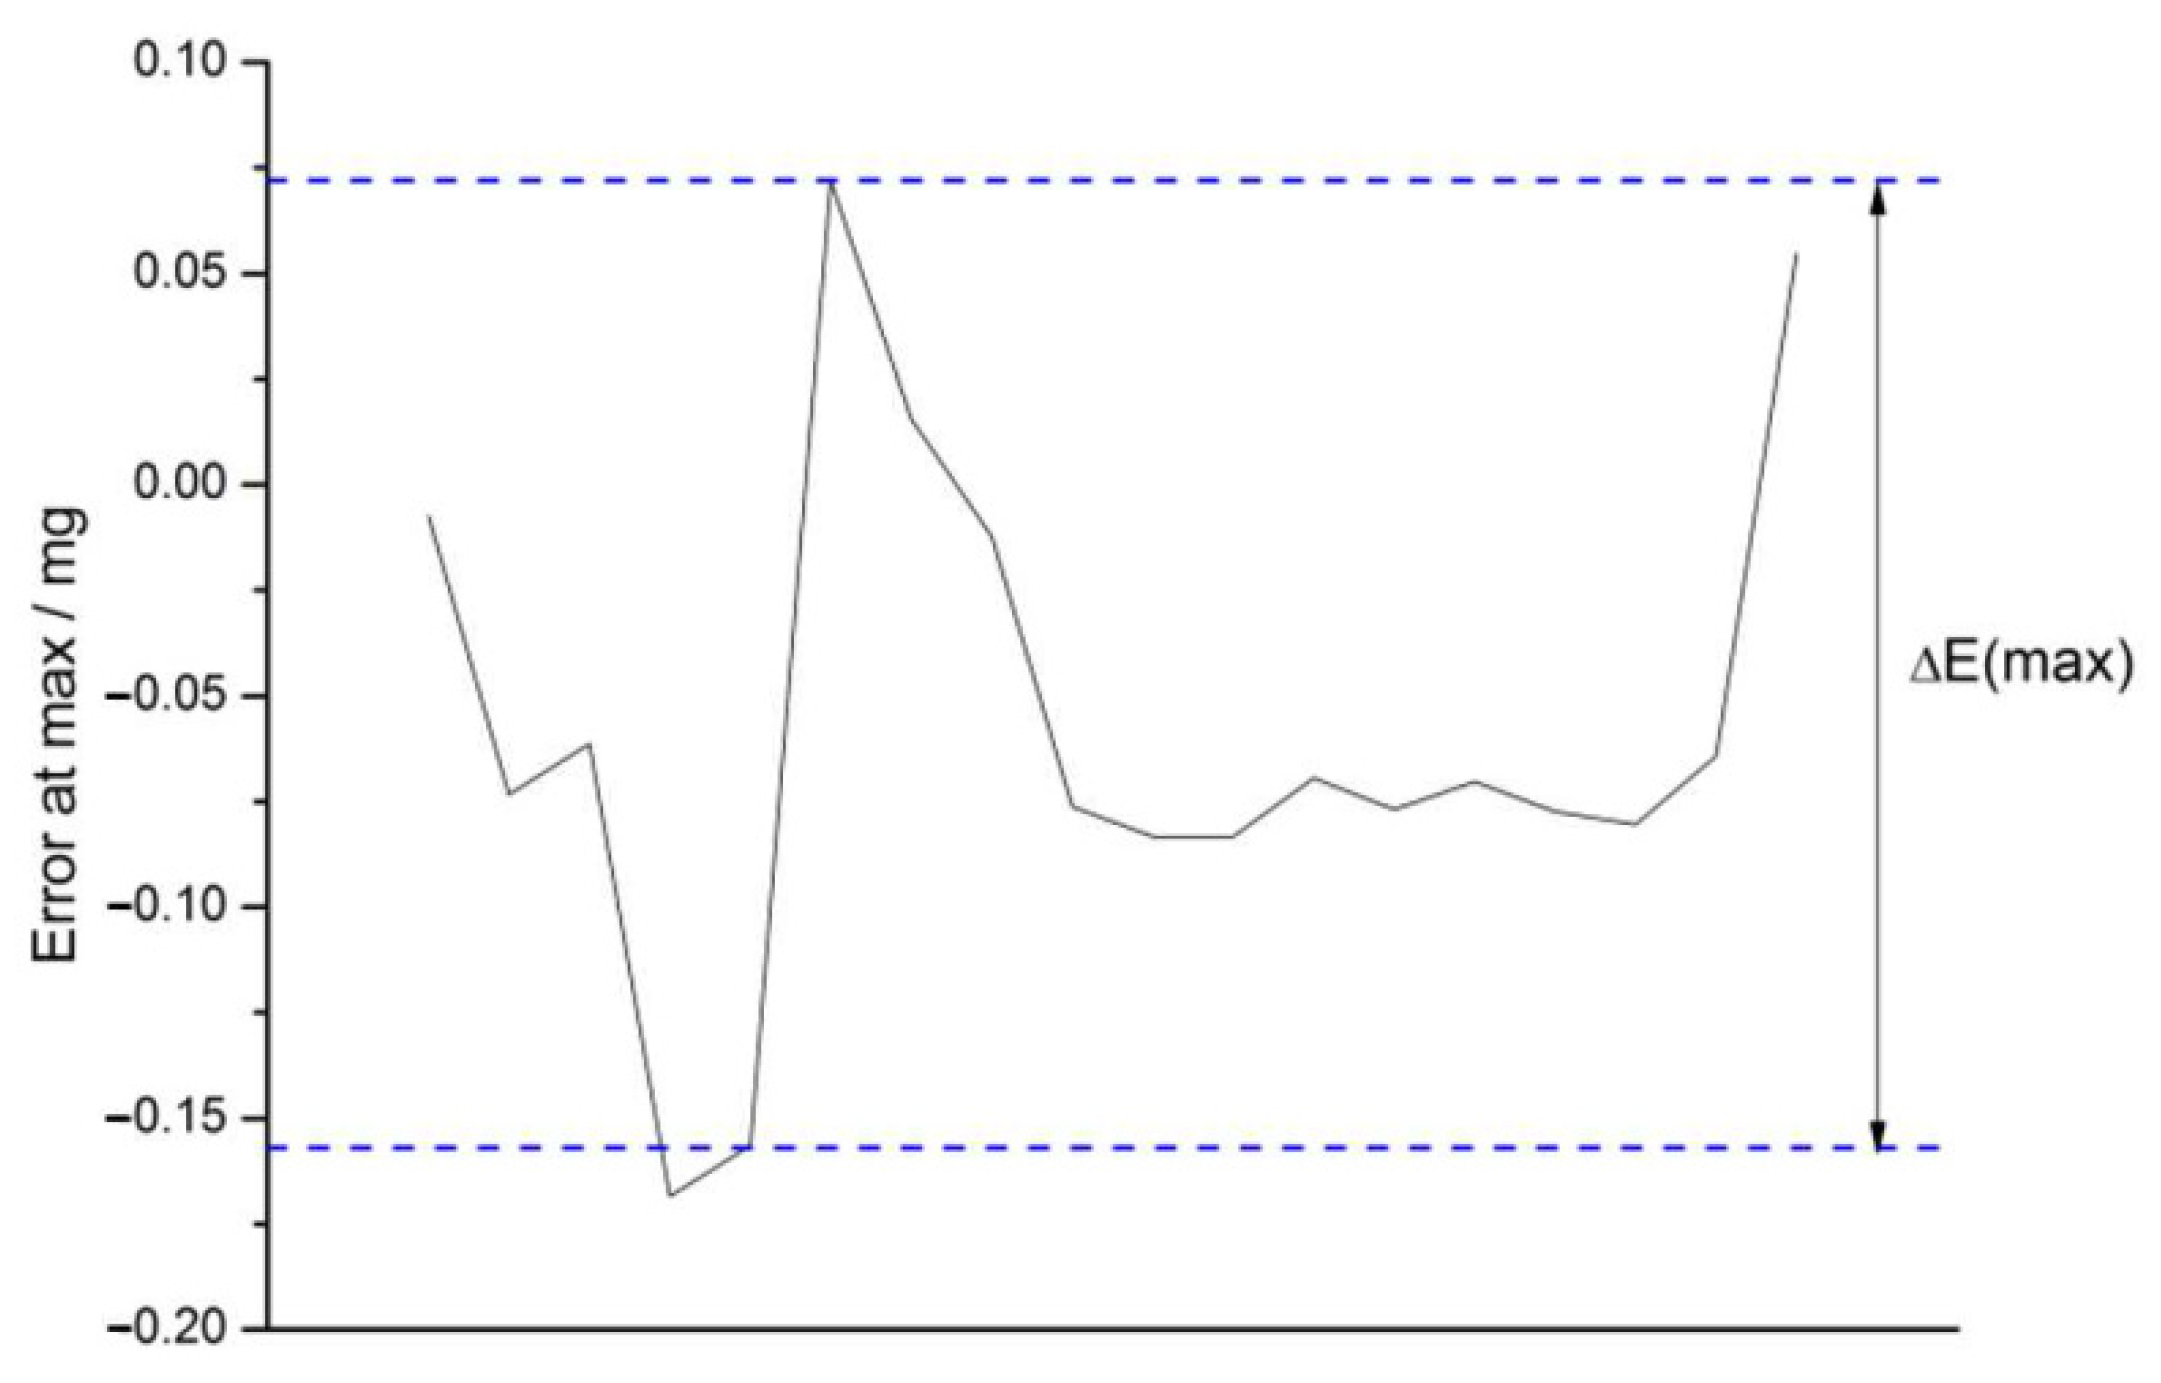
Figure 9 shows the largest difference in calibration errors at the maximum capacity as required for adjustment drift uncertainty estimation. The largest difference value is │ΔE(max)│ = 0.23 mg. This value is expected since periodic internal adjustment was not triggered.
In drop deposition, the pycnometer weighs about 3 g, so the calibration was performed in the range from 10 mg to 100 mg with the balance not loaded, and also loaded with standard weights in the range from 1 g to 10 g. As shown in Figure 10, mean differential linearity varies very little with load and calibration point.
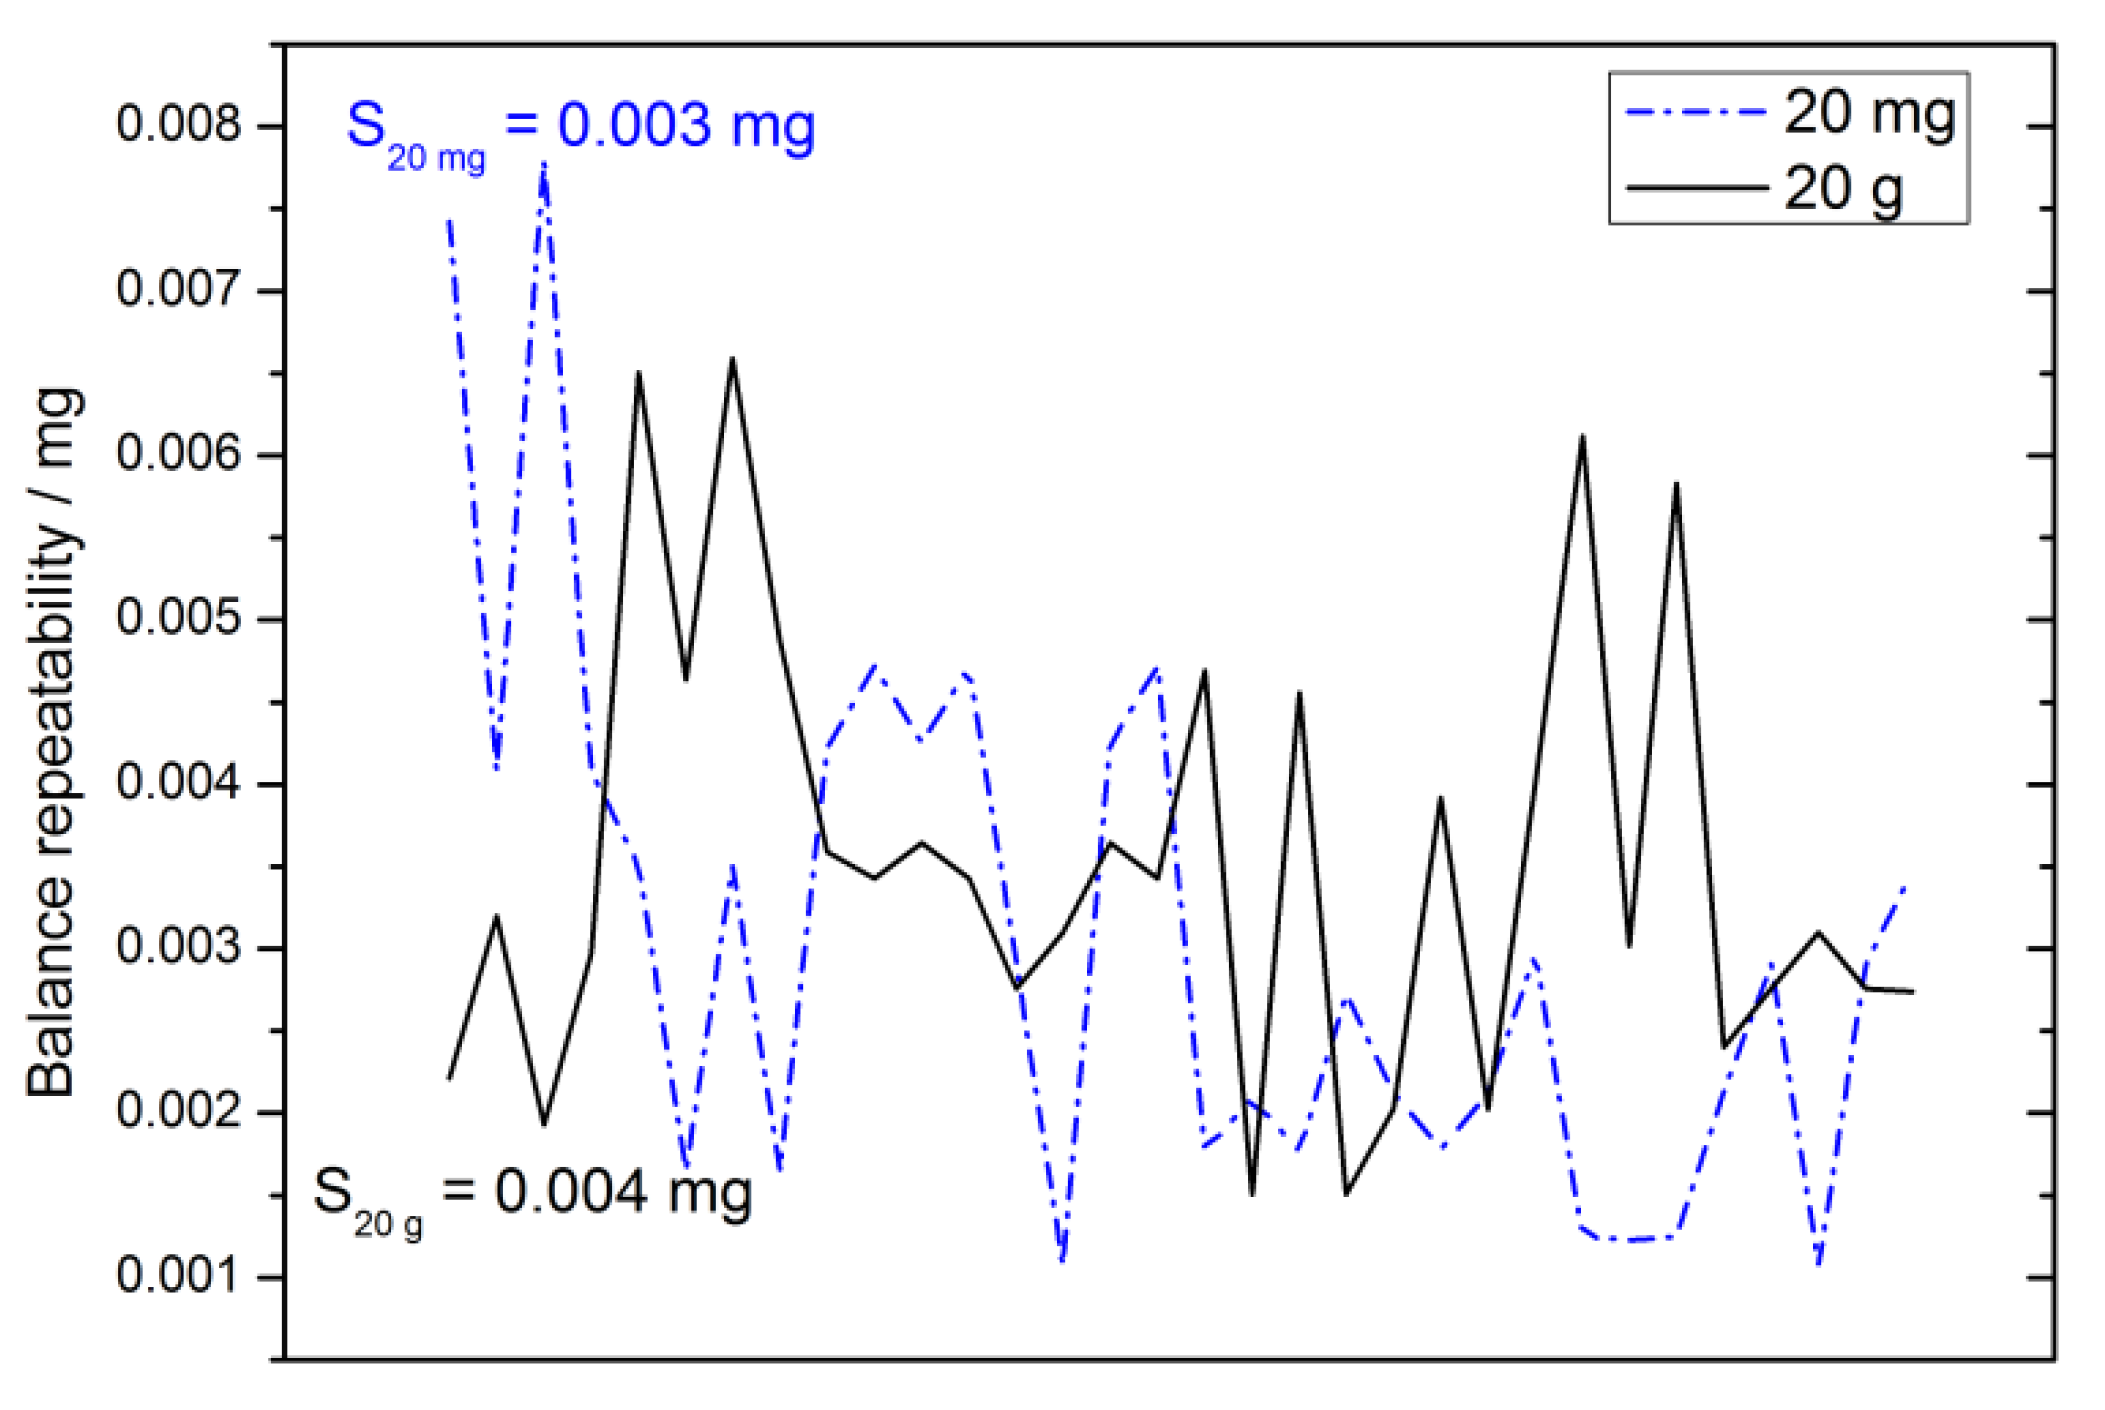
Repeatability tests with standard weights 20 mg and 20 g were performed in order to determine the balance repeatability required to determine the calibration uncertainty. As shown in Figure 11, the typical repeatability for a sequence of 10 repeated weighings is the same for both weights. The maximum repeatability is lower than the manufacturer’s specification 0.006 mg.
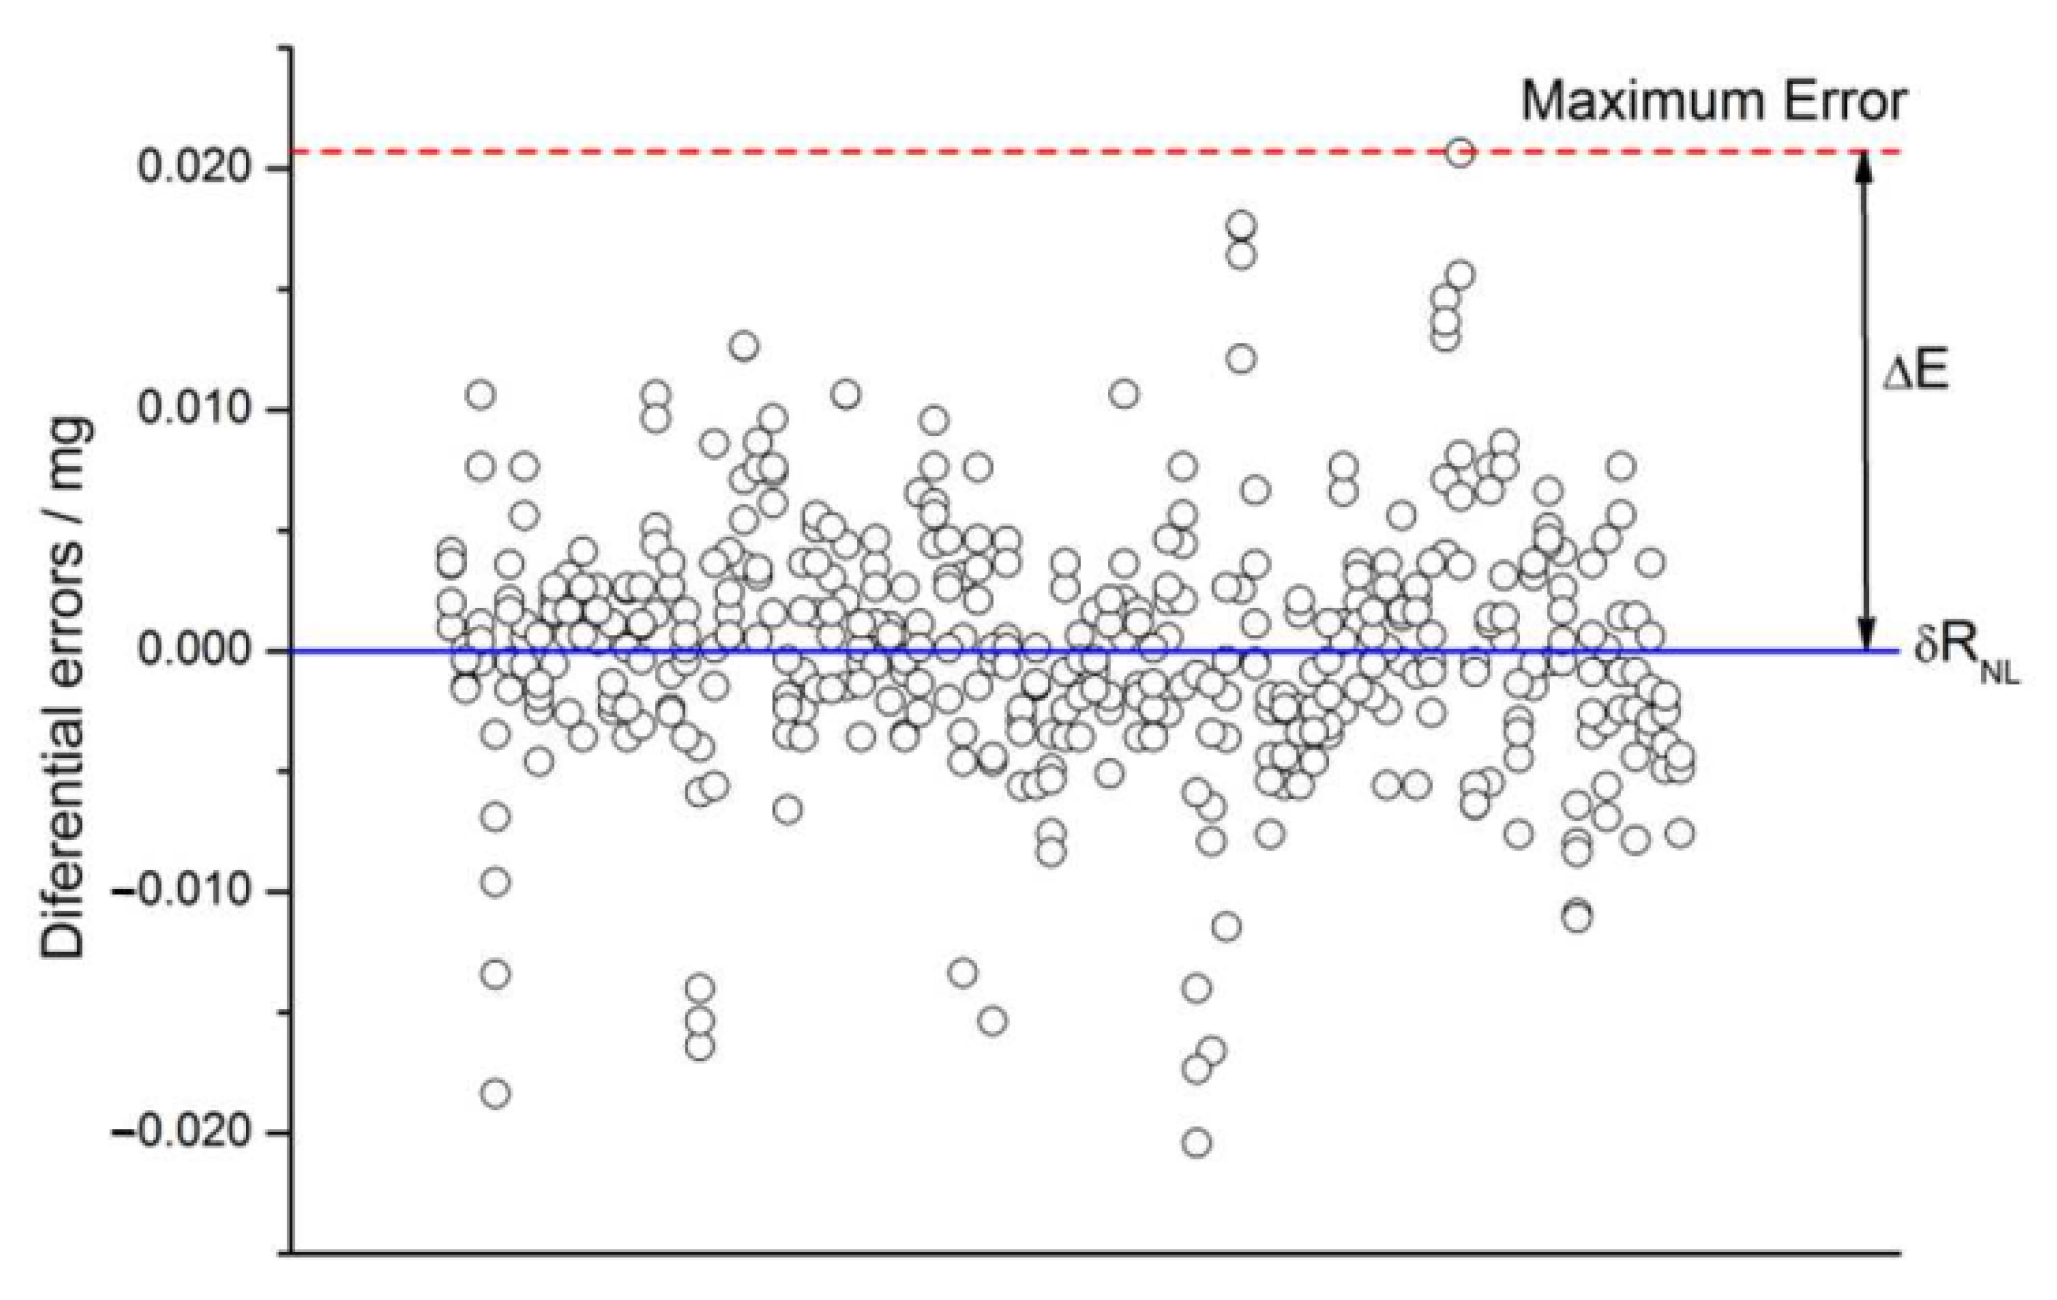
In Figure 12, all differential errors obtained from differential calibrations are shown. As one can see, the maximum calibration error is close to the maximum linearity deviation on the manufacturer’s specification 0.020 mg.
Surely, differential linearity variations of │ΔE│ = 0.021 mg in the load range from 1 mg to 100 mg are not expected, even when weighed together with tare weights of 1 g, 2 g, 5 g and 10 g, besides the unloaded balance. It is known that linearity decreases as the load is reduced [52].
However, for this microbalance the manufacturer’s smaller linearity deviations values are not provided for different load ranges as for the older one [53], meaning that this value is possible for the full load range. Indeed, from the 475 measured errors, values out of range ± 0.010 mg occurred in less than 7%. Therefore, although such a high-variation value is possible for that load range, it is unlikely to be obtained. Thus, someone could consider the uncertainty estimation based on measured maximum linearity drift very conservatively, but it is half of the routinely suggested for linearity uncertainty based on the manufacturer’s specification [54], currently considered to be overestimated [22,39].

3.4.4. Balance Drift Avoiding Procedures

Drift elimination is carried out by two procedures applied in sequence: zeroing between each weighing and not zeroing, but recording the reading with unloaded balance before and after weighing.
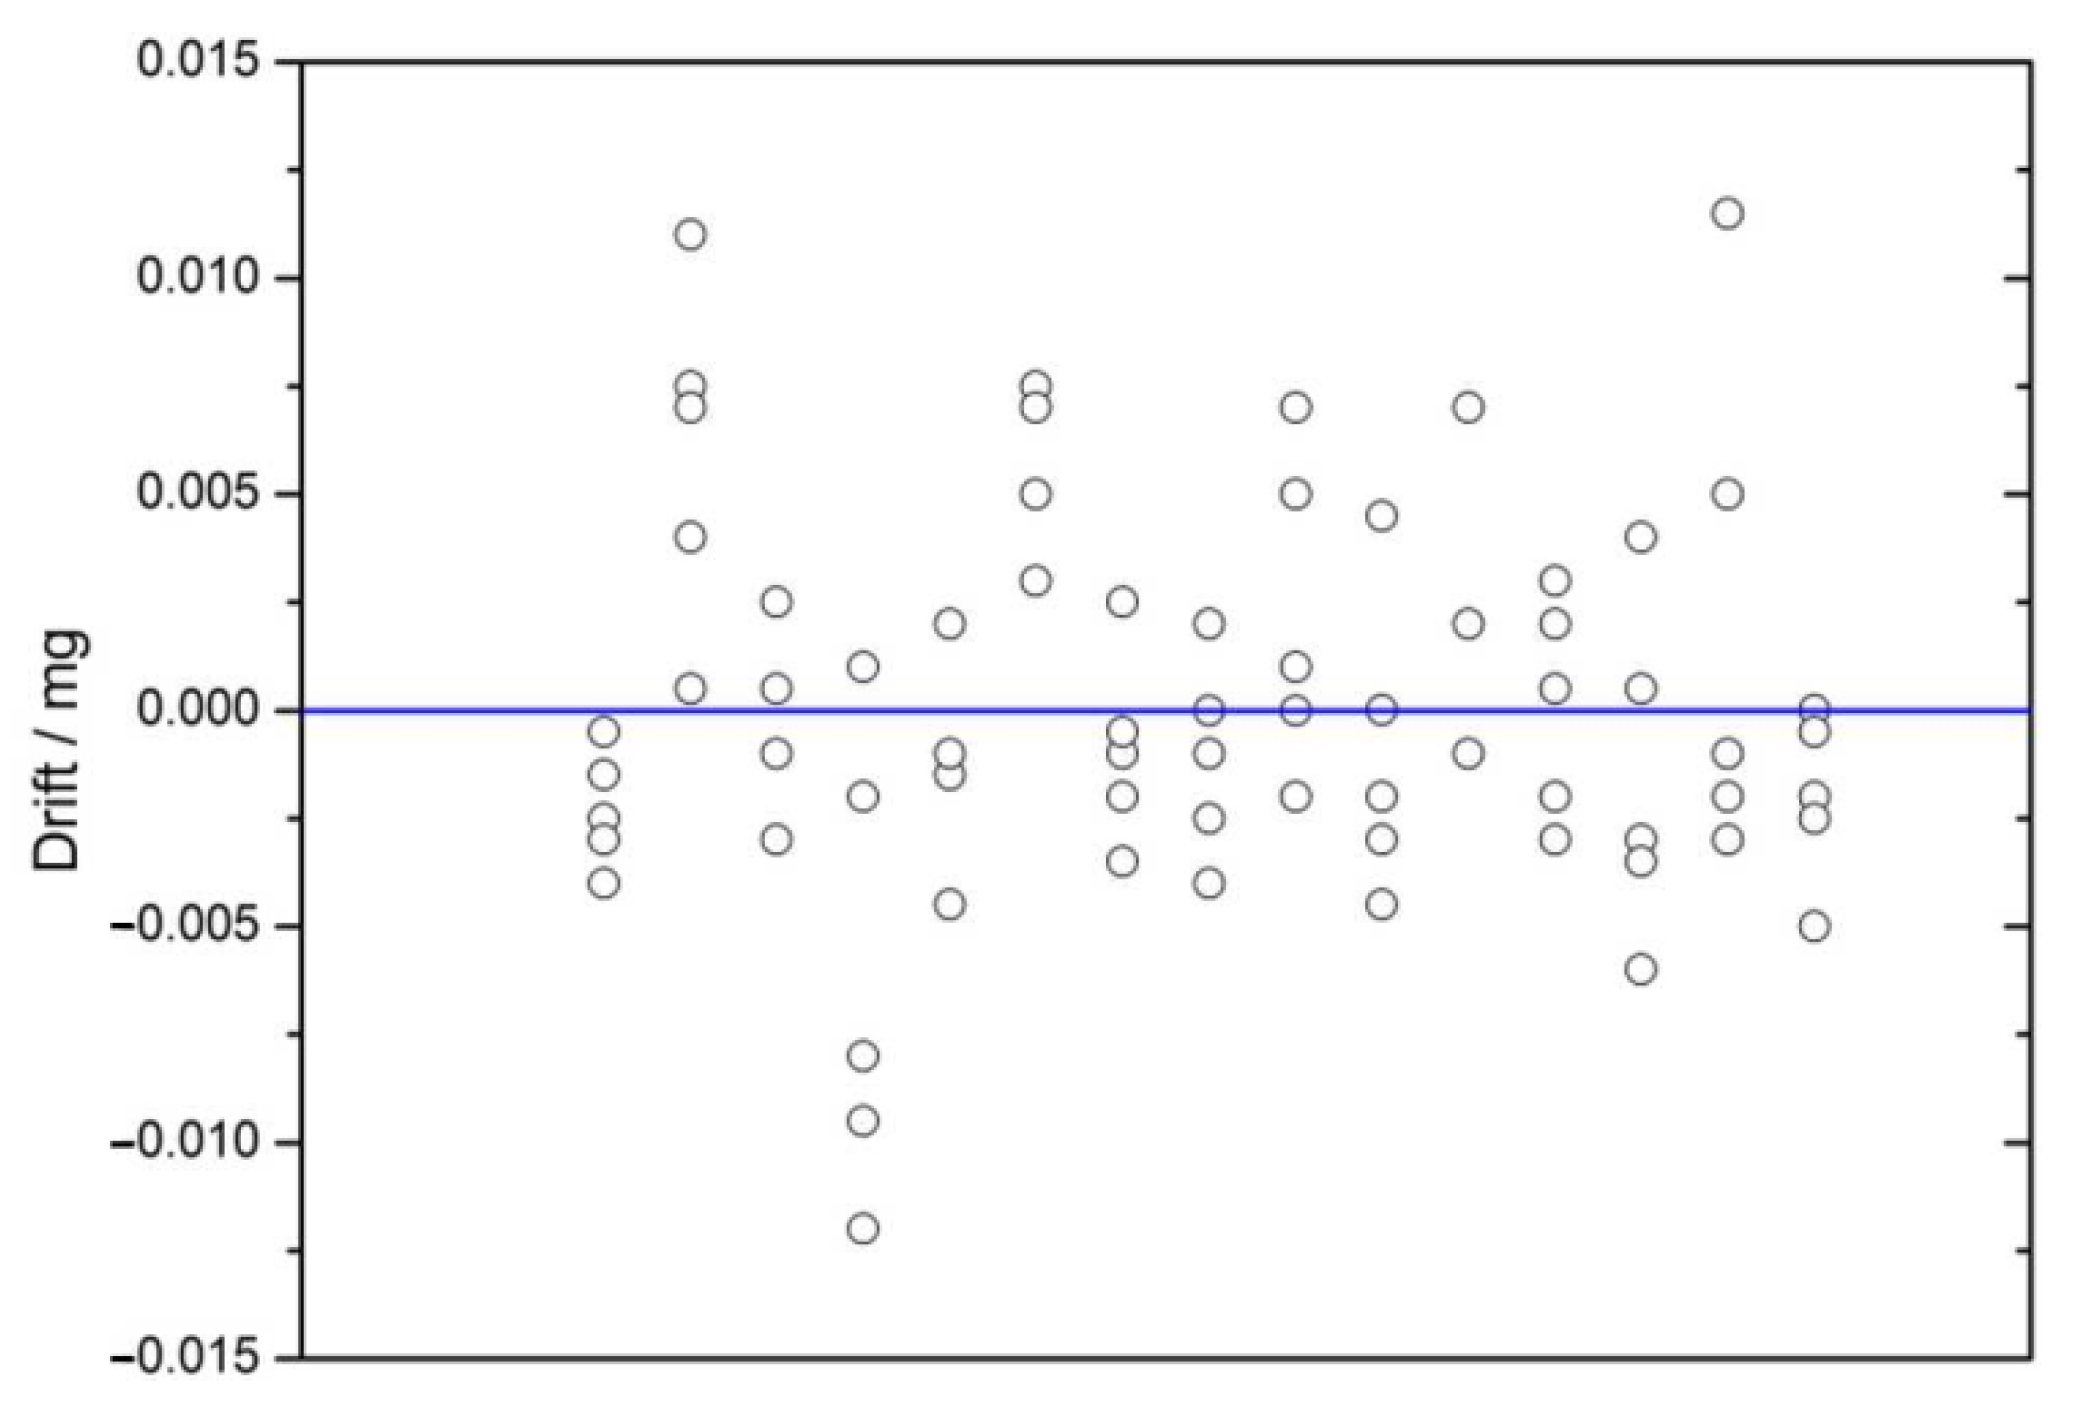
They were performed on some weighings used to determine differential errors in the last section. In the first procedure, the indication is that obtained with balance loaded; in the second one, the indication is the result of the difference between the reading when balance is loaded and the average of the two recorded no load readings. The difference between indications obtained by each procedure is shown in Figure 13.
The average of indications difference is null, so both eliminations procedures are very effective to avoid drift. The standard deviation of these differences is 0.004 mg, which is equal to the pooled standard deviation of typical repeatability shown in Figure 14, obtained from repeatability tests performed by each avoiding drift procedure.

3.4.5. Weighing Methods Repeatability

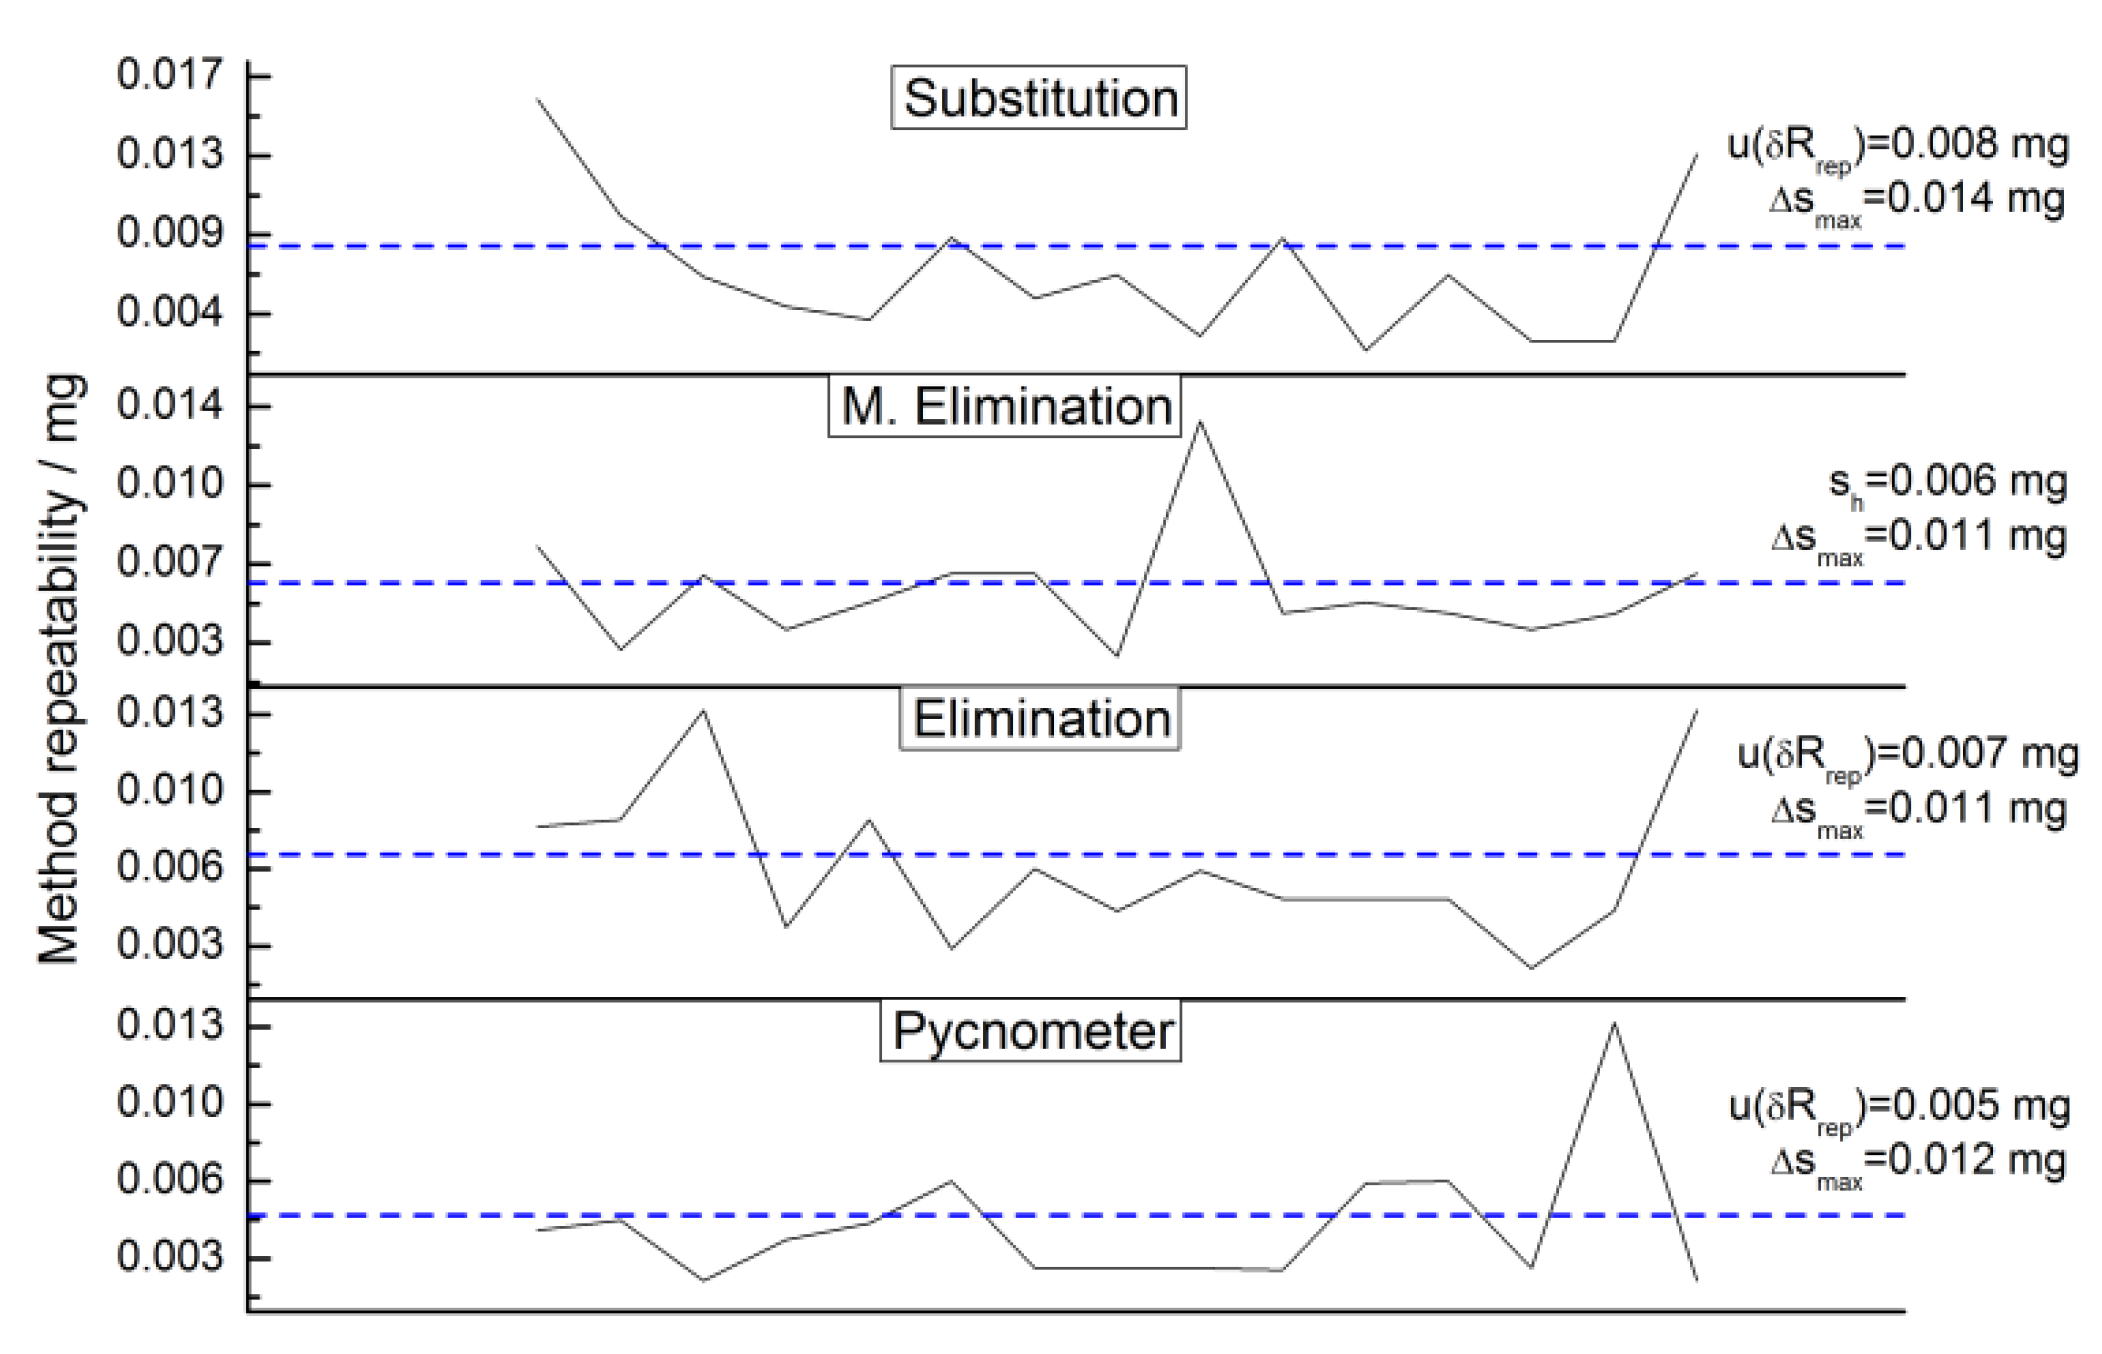
Repeatability tests were performed in order to achieve typical repeatability and maximum standard deviation variation. All weighings were carried out with a filled pycnometer whose mass was about 3 g.
In the repeatability test for the pycnometer method, the first weighing was with pycnometer along with a 20 mg weight simulating a drop, and the second was the pycnometer alone.
In the elimination method, the first weighing was only the pycnometer, and the second was the pycnometer with a 2 mg weight, simulating a possible difference between the two indications required for this method. MEM repeatability test was carried out in the same way of the elimination method, just with an additional weighing of the pycnometer together with the weight. For the substitution method, the first weighing is of the pycnometer alone, and the second one is of a set of standards whose weighing reading is close to the first.
Figure 15 shows the repeatability values obtained from tests for each method. Blue segment lines indicate the typical repeatability, in general a little more than balance repeatability. Substitution method shows higher typical repeatability and maximum repeatability among the methods, due to the handling of several weights required by this method.
Repeatability test in 20 mg only is justified because there are no procedural differences in performing any deposition method in the range from 10 mg to 200 mg. Moreover, it is expected that in this range a single typical repeatability characterizes each method, since, as already mentioned, the repeatability of the method is a consequence of the repeatability of the balance, and the latter is unique in this range.
In contrast to other methods, MEM allows to determine repeatability from its application, so typical repeatability means the historical one, which is required for checking errors in weighing.

4. Measurement

4.1. Weighing

In order to evaluate the capability in drops deposition of the weighing methods by mass comparison, the weighing sequence shown in Figure 16 was executed, and it allowed to determine the mass of the drop from the same aliquoting of solution.
Before drop deposition, the indication of the balance is zeroed and the pycnometer is weighted, obtaining the reading Ib. Then, the pycnometer is removed and the balance zeroed again. Next, a set of standard weights is placed on the weighing pan to get an indication Is1 close to the first one. Following this, the weights are removed from the weighing pan, and then drop deposition in the pycnometer is performed, and the balance is zeroed. One more time the pycnometer is weighed to get the reading Ia after deposition. Maintaining the pycnometer on the weighing pan one or a small set of standard weights is added to obtain reading Iw1 close to Ia. The pycnometer and the weight(s) are removed, the balance is zeroed, and they are replaced on the weighing pan to have the reading Iw2. Lastly, the pycnometer and weights are removed, the balance is zeroed and a set of standard weights which yield Is2 close to Ia is placed on weighing pan. The complete execution of this weighing sequence took around 7 min.
The weighings were performed using deionized water, since density and evaporation properties are close to those of the liquid hydrochloric acid very often used in source preparation tasks. Furthermore, water usage complies with the Alara principle [55]. A 15-minutes wait time was applied for the thermal stabilization between the balance, pycnometer, environment and balance operator. Balance was zeroed before each weighing.
The indications obtained in this weighing sequence are shown in Table 2. According to that specified in Section 2.1, they were used together with environmental parameters to determine mass values and the associated standard uncertainties.
Table 3 shows the set of mass standards applied to the substitution, elimination and modified elimination methods. The set used to form the mass of standards after deposition ma is obtained from the set before deposition mb by including (+) or excluding (−) standards. The same set of standards was used to perform elimination mE or modified elimination mEM methods.

4.2. Checks for Errors

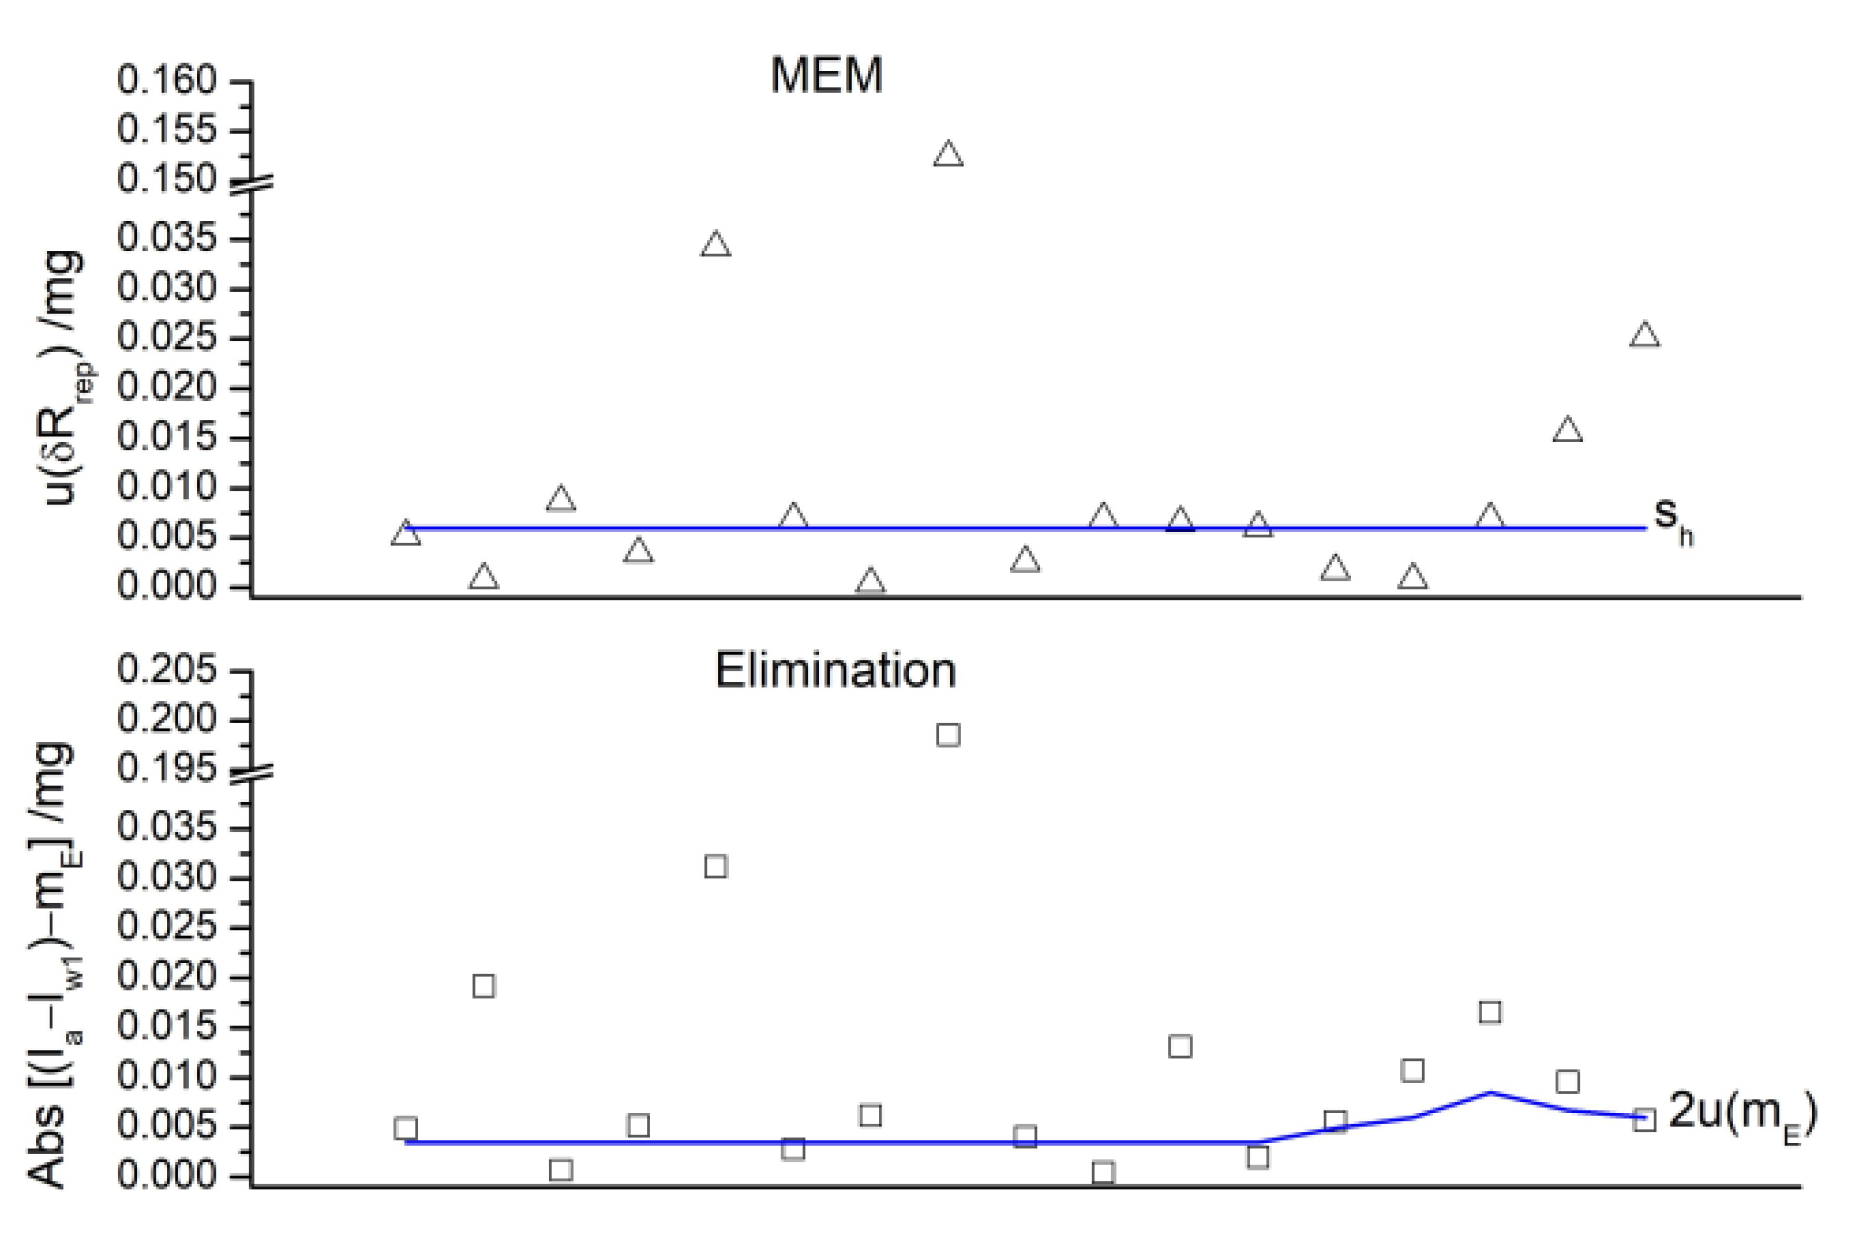
Figure 17 shows the check for errors results for the MEM and elimination method. Despite all the care taken, some effects on weighing were still detected. From the analysis of the recorded data, a meaningful evaporation effect in results 5 and 8 in Table 2 was observed.
In checking for the elimination method, acceptance happens when the effects are constant θb = θa = θw1, which means they are always accepted by checking regardless of their magnitude or if they vary linearly with time, recalling θw1 = 2θa and θb = θa, since the absolute magnitude for θa is lower than the threshold.
In the MEM, acceptance is obtained, since θb = θw1 = θw2 is assured by the sample repeatability being lower than the typical one, regardless of the effect nature. However, due to the weighing sequence framework, the reading Iw1 is common for both the elimination method and MEM, and so it is for θw1. Thus, it is possible sometimes to argue about the magnitudes for θa and θw2.
When both checking results are accepted, θa is lower than the limits 2u(mE) and sh. Moreover, when elimination is accepted and the MEM is not, it means some irregular effect θw2 happened on the third weighing, which could not be due to the weighing sequence itself. However, if elimination is not accepted, which could be due to large (non)linear time-depending effects, it is not possible to conclude on the magnitude of θa because θw1 = 2θa cannot be true anymore.
However, once θw1θa is higher than the elimination checking limit, it is not possible to say if θw1 or θa or both could be affected by an unexpected effect.
Indeed, an unavoidable drawback in the weighing sequence is due to the weighing order, since some effects that could affect some weighing may not affect the following one. Thus, since the pycnometer and substitution methods rely on reading Ia, they are affected by θa, and the MEM relies on θw1, which is an unacceptable value for θw1θa checked by the elimination method that could affect the results of the mass comparison of the MEM, pycnometer and substitution methods. Nevertheless, we can, in fact, only say that the result of the check associated with the method of elimination concerns only the weighing of this method, not the others. Thus, mass comparison analysis will be performed for these three methods when only the elimination method checking has indicated an unacceptable weighing. In the same way, mass comparison analysis will be performed for elimination, the pycnometer and substitution when only the MEM checking has indicated an unacceptable weighing. The weighing sequences that will be submitted to mass comparison have been accepted for both or only one of the two checking methods and corresponds to that for which data is under or at least touching the blue line (checking limit) in Figure 17, namely 1 to 4, 6, 7, 9 to 15 and 17 in Table 2.

4.3. Mass Comparison

As an example, Table 4 shows the uncertainty budget for the 12th weighing sequence in Table 2. The estimates for input quantity values and contributions to mass uncertainty were determined by applying the described in Section 2 to data in Section 3 and Section 4. All values are in milligrams except for the covariance in squared milligram, buoyancy effect in “unit” and relative uncertainty in %.
Some uncertainties components are negligible due to the low values of the differential method results such as eccentricity, temperature sensitivity and adjustment and buoyancy and drift.
For the pycnometer method, assurance uncertainty components are the most significative. Moreover, for the MEM, elimination and substitution methods repeatability drift is an important uncertainty contribution. However, these components could be improved in other weighing systems and with a higher frequency of intermediate balance checking.
Mass standards uncertainty is the meaningful contribution for substitution method, although correlation between weighing results Δw1 and Δw2 reduces this contribution significantly. In order to improve uncertainty, technical changes, which facilitate the mass standards manipulation, such as reducing the amount of weights by using mass standards with a non-standardized nominal value, could be implemented for the substitution method.
The mass values and standard uncertainties (in parentheses) for drop deposition from the selected weighing sequences are shown in Table 5.
In the present implementation, weighing uncertainties for the pycnometer and substitution methods are not suitable for the microdrop mass below to 15 mg, when 0.1% is the upper limit for relative uncertainty. This observation is compatible with what was concluded from the uncertainties provided for the CCRI(II)-S7 comparison. In contrast, the MEM and elimination method reach uncertainties lower than 0.1% in all weighing sequences. Furthermore, the MEM shows the smallest uncertainties in the range of 0.01% to 0.09% in almost all weighing sequences.
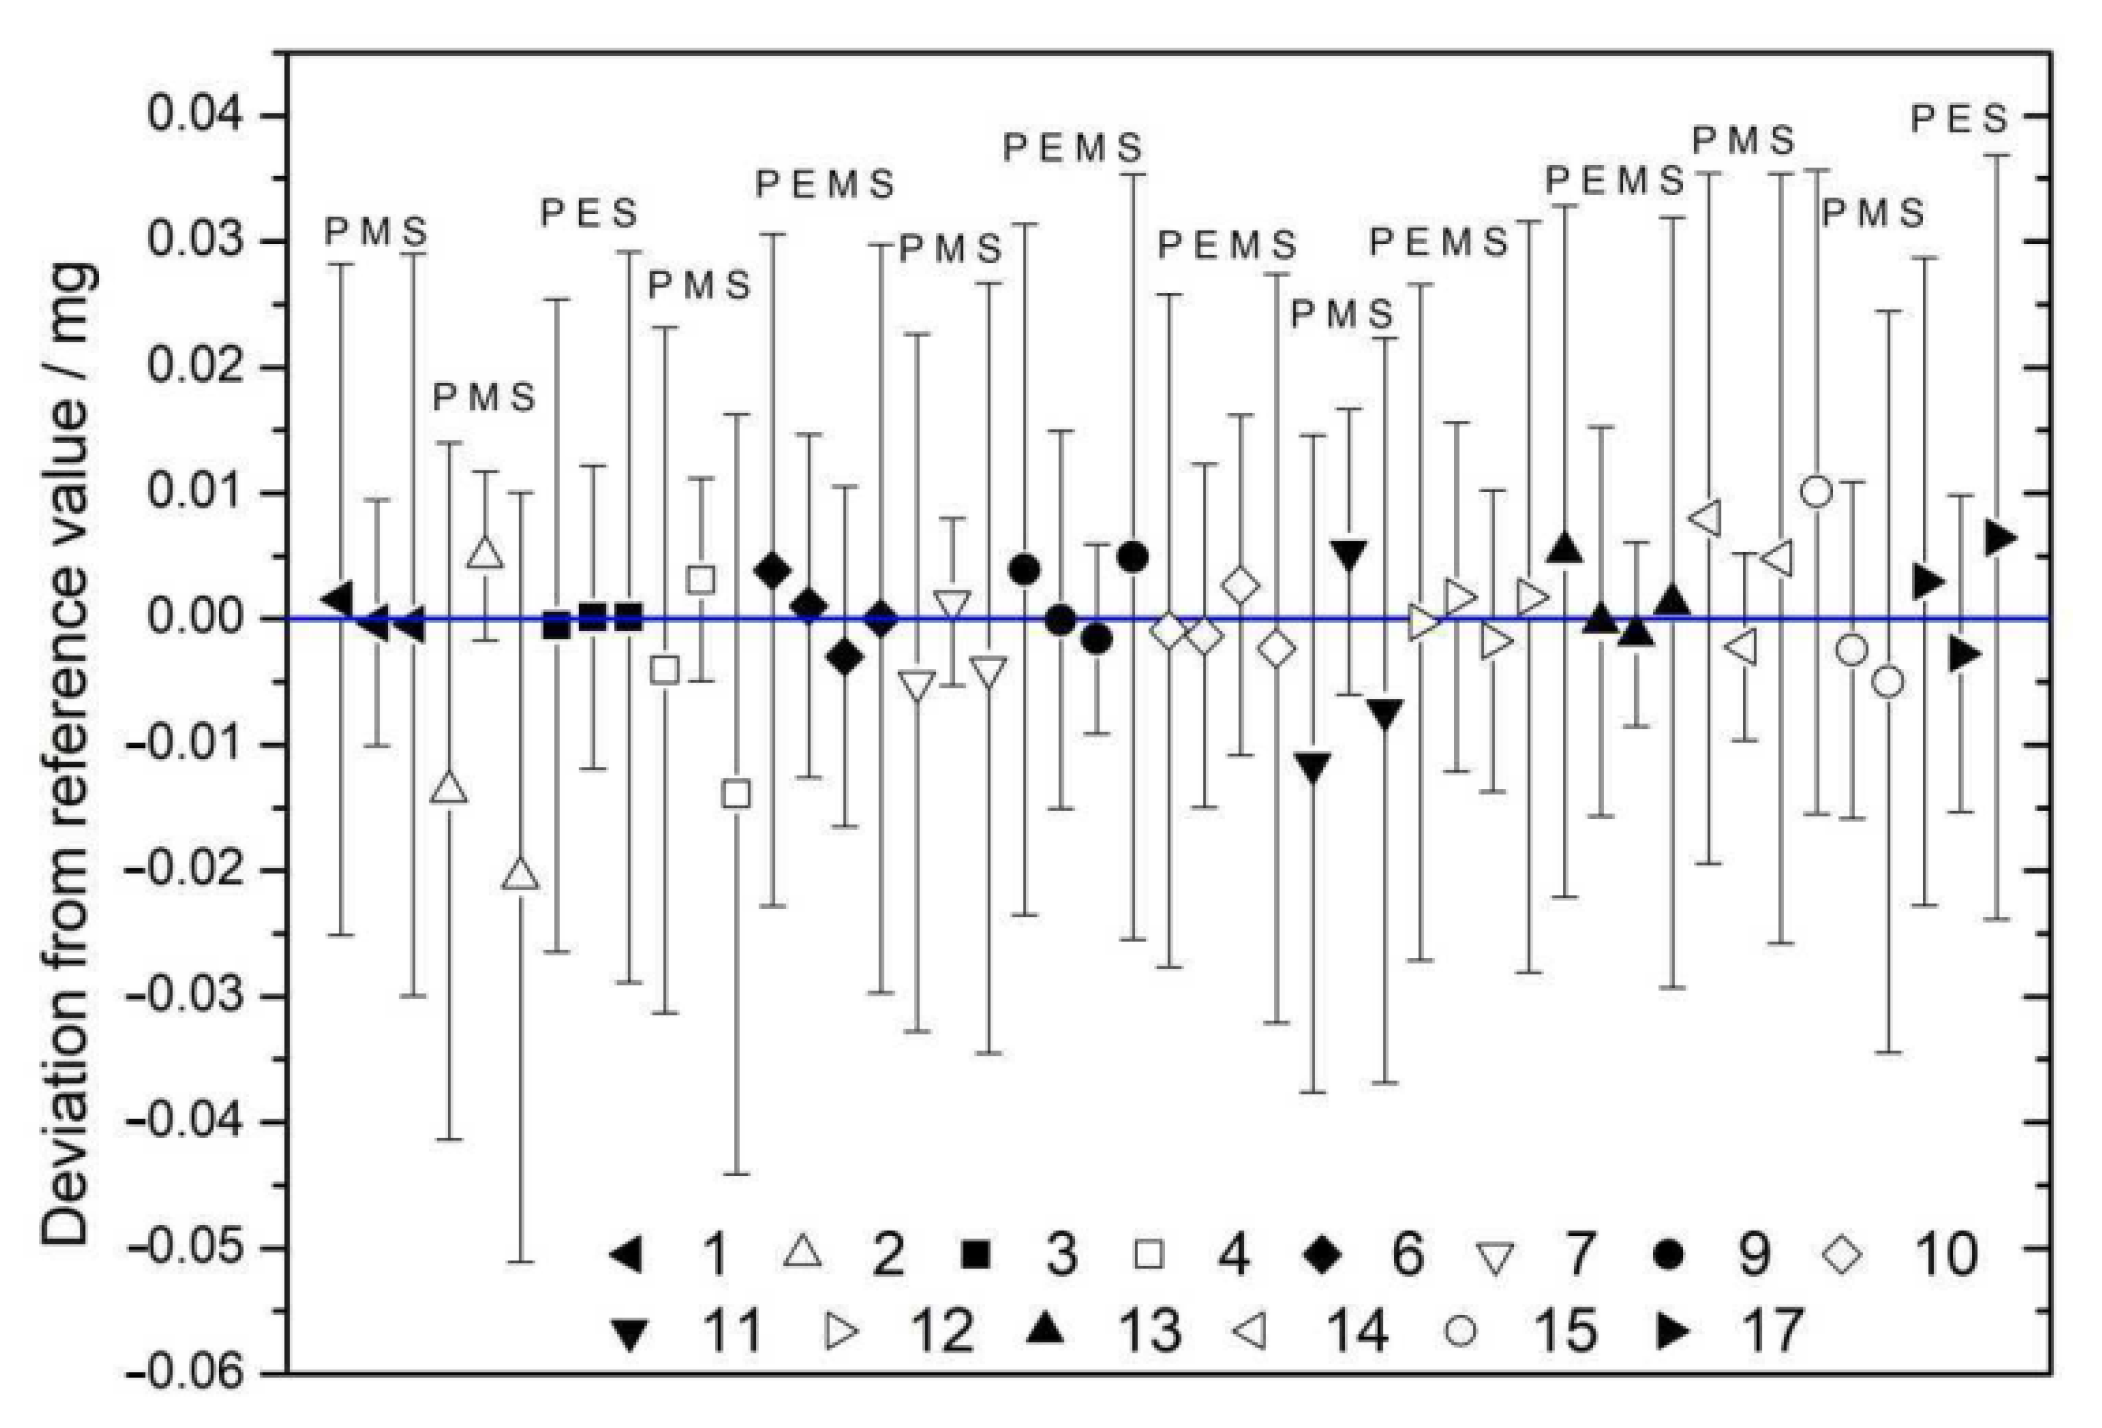
Figure 18 shows mass deviation from reference values for each method and for each weighing sequence in Table 5, where error bars are expanded uncertainties.
Since mass determinations for each weighing sequence rely on the same buoyancy correction, they are correlated. Due to the weighing sequence framework, the measured mass of the drops obtained from the pycnometer and substitution methods depend on the indication difference IbIa, so the covariance between these methods is estimated by the combined variance of all uncertainty components for the pycnometer method, with the exception of linearity and linearity drift. In the same way, the MEM and elimination method depend on IbIw1, so the covariance is the half of combined variance of all uncertainty components for the elimination method.
Additionally, uncertainty components proportional to weighing differences are due to effects that are proportional to the load with the same proportionality constant over the entire weighing range. Thus, the four methods are correlated too. The mean correlation values for mass measurements are r(mPyc, mElim) = 0.00, r(mPyc, mMEM) = 0.01, r(mPyc, mSubs) = 0.31, r(mElim, mMEM) = 0.60, r(mElim, mSubs) = 0.00, r(mMEM, mSubs) = 0.01. The observed χ2 consistency parameter for mass comparisons in each weighing sequence was at most 2.4. When considering comparisons only with the MEM and elimination method, this value is reduced to 0.17.
Mass values from the MEM, pycnometer, elimination and substitution methods are compatible with the reference value for all weighing sequences; thus, they are validated. The compatibility evaluated by bilateral normalized deviation or degree of equivalence between pairs of mass measurements [56,57,58,59] in each weighing sequence is always lower than 0.71, and between the MEM and elimination method, it is lower than 0.17. Thus, the compatibility of results obtained from any two validated methods in use is assured. Furthermore, the MEM and elevation method are validated for uncertainties below 0.1%.
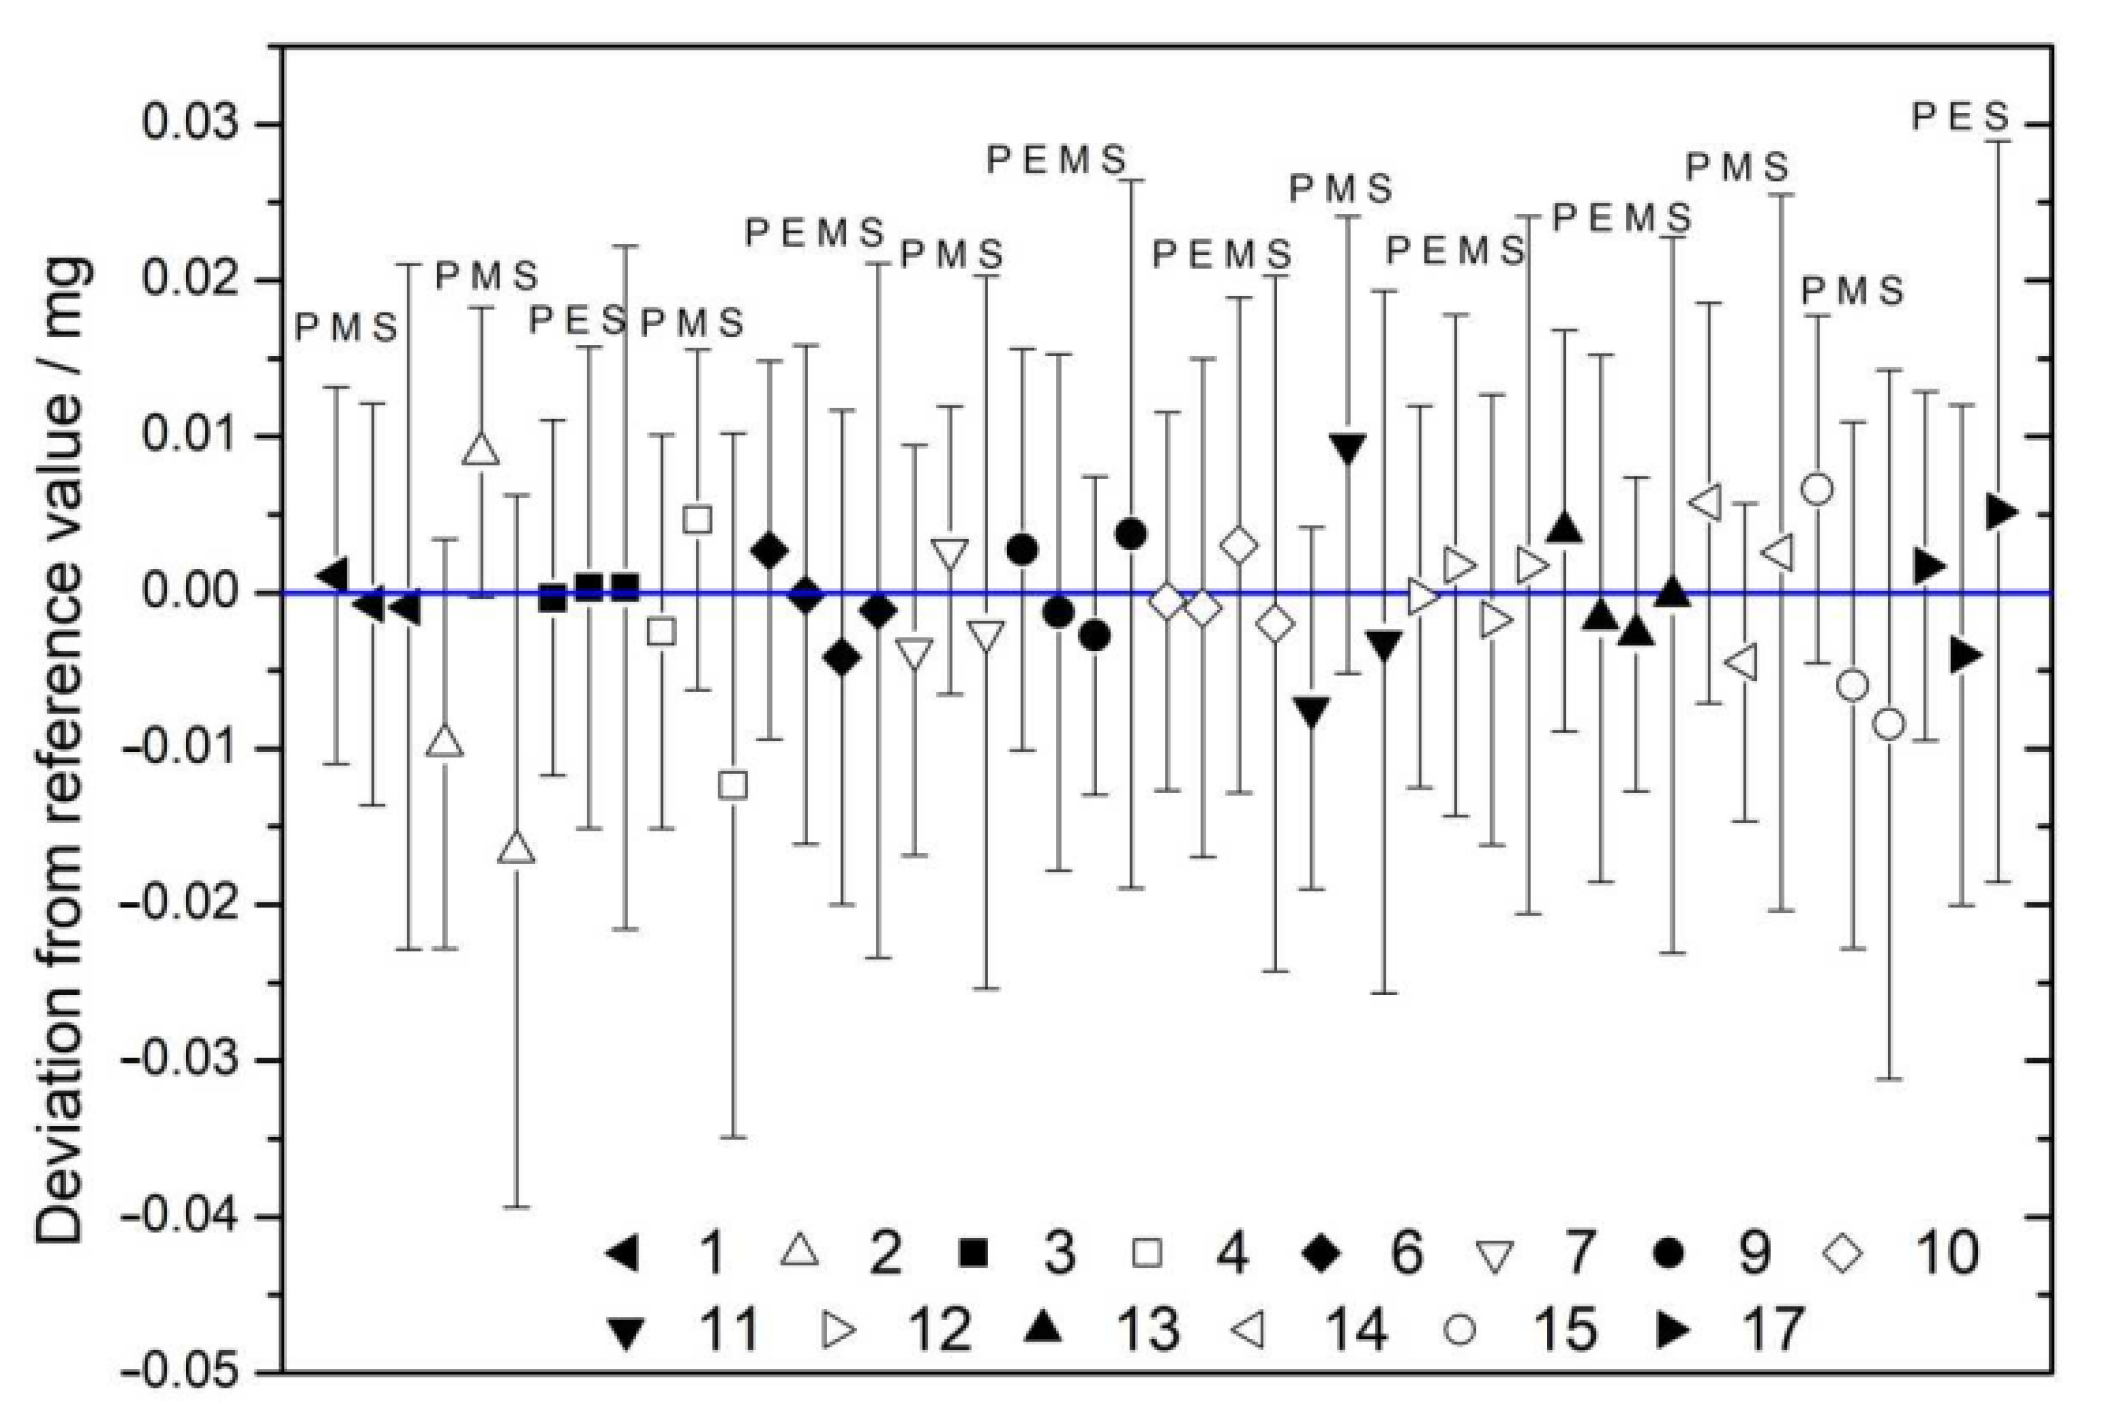
Since the reference values are influenced by the mass values uncertainties and it would be possible to reduce it by reducing the former methods uncertainty in other implementations of this validation methodology, it is important to simulate this condition in order to conclude adequately about the validity of the results. Figure 19 shows mass deviation considering the pycnometer and substitution methods’ mass uncertainty reduced for reasonable values at about 0.008 mg and 0.013 mg, respectively, which complies with the uncertainty threshold of 0.1% in almost all weighing ranges. These uncertainty values could be obtained from the improvement of the non-linearity drift and repeatability drift components in the pycnometer method and the repeatability and repeatability drift components in the substitution method.
As the consequence of the mass uncertainty reduction, the maximum value observed for the consistency parameter χ2 in this case is 4.0, and the correlations between the mass measurements do not change significantly.
In this case, once again, the methods are validated, and a degree of equivalence, at most 0.89, is reached for the four methods. Thus, even when all methods achieve relative uncertainties lower than 0.1%, it is expected that the validation is maintained valid and compatibility in use is assured.
These results ensure the mass measurements by the MEM and the elimination method complies with the requirements of good laboratory practice, as well that the mass measurements by the pycnometer and substitution methods can achieve suitable uncertainties for source preparation. Furthermore, it can be expected that these validation results remain valid even when all methods reach uncertainties lower than 0.1%. This frame evidences the robustness of the in situ validation methodology.

5. Conclusions

Procedures employed to prepare high-accuracy source standards should be based on weighing methods properly described and validated, which can achieve an uncertainty lower than 0.1%. However, the results of the CCRI(II)-S7 comparison have introduced doubts regarding the ability of the pycnometer and substitution methods to achieve this target uncertainty, and therefore, it cannot be assured that the elimination method is adequately validated as required by good laboratory practices to provide uncertainties in this range.
This problem was addressed in a broader way from the proposed in situ validation methodology, which includes descriptions for the evaluation of uncertainty for the pycnometer and substitution methods, rather than discarding them. In this way, it became possible to characterize their capabilities and define their applicability for the preparation of high-accuracy sources from the joint validation exercise with the MEM and the elimination methods.
The experimental measurements were performed in order to estimate the mass and uncertainty of the same deposited microdrops by the different weighing methods. Thus, it was possible to establish the validation of the MEM and the elimination method by the compatibility in their mass measurements to uncertainties lower than 0.1%. Furthermore, for higher uncertainty values, the pycnometer and substitution methods are also validated. Under the implementation conditions for which the pycnometer and the substitution methods are able to achieve uncertainties lower than 0.1%, it can be expected that the validation results for all methods will remain valid. However, in this case, it should be noted that the data used for validation were selected from the adverse error checking methodologies available only for the elimination method and the MEM; therefore, they should be preferentially chosen for preparing reliable high-accuracy radionuclide sources.
The introduced in situ validation methodology can help to improve the reliability of mass measurements and uncertainty evaluations established in technical procedures of laboratories and still be used as a methodology to ensure the validity of measurement results. In this way, it contributes to the harmonization of the uncertainty budgets as required by the final report of the CCRI(II)-S7 comparison. It also contributes to the harmonization of measurements, as required by the MRA (mutual recognition arrangement), when these procedures are submitted to periodical peer review evaluation or accreditation-body assessment processes. Certainly, a new comparison of uncertainty budgets using this methodology would be a beneficial work to confirm its performance.

Author Contributions

Conceptualization, F.C. and J.U.D.; methodology, F.C., J.U.D. and J.R.; validation, F.C. and J.R.; formal analysis, F.C.; investigation, F.C., J.U.D., V.L. and J.R.; resources, J.U.D. and V.L.; data curation, F.C.; writing—original draft preparation, F.C. and V.L.; writing—review and editing, F.C. and V.L.; supervision, J.U.D.; project administration, F.C. All authors have read and agreed to the published version of the manuscript.

Funding

This research received no external funding.

Informed Consent Statement

Not applicable.

Acknowledgments

One of the authors wishes to thank Pronametro/Inmetro and CNEN/IRD for the financial scholarship sponsor.

Conflicts of Interest

The authors declare no conflict of interest.

References

  1. Campion, P.J. Procedures for Accurately Diluting and Dispensing Radioactive Solutions; Monographie BIPM-l: Sèvres, France, 1975. [Google Scholar]
  2. Sibbens, G.; Altzitzoglou, T. Preparation of radioactive sources for radionuclide metrology. Metrologia 2007, 44, S71–S78. [Google Scholar] [CrossRef]
  3. Thiam, C.; Bobin, C.; Maringer, F.; Peyres, V.; Pommé, S. Assessment of the uncertainty budget associated with 4πγ counting. Metrologia 2015, 52, S97. [Google Scholar] [CrossRef]
  4. Bailat, C.J.; Keightley, J.; Nedjadi, Y.; Mo, L.; Ratel, G.; Michotte, C.; Roteta, M. International comparison CCRI(II)-S7 on the analysis of uncertainty budgets for 4πβγ coincidence counting. Metrologia 2014, 51, 06018. [Google Scholar] [CrossRef]
  5. Campion, P.; Dale, J.; Williams, A. A study of weighing techniques used in radionuclide standardization. Nucl. Instrum. Methods 1964, 31, 253–261. [Google Scholar] [CrossRef]
  6. van der Eijk, W.; Moret, H. Precise determination of drop weights. In Standardization of Radionuclides, Proceedings of A Symposium on Standardization of Radionuclides, Vienna, Austria, 10–14 October 1967; International Atomic Energy Agency: Vienna, Austria, 1967; p. 529. [Google Scholar]
  7. Van Der Eijk, W.; Vaninbroukx, R. Sampling and dilution problems in radioactivity measurements. Nucl. Instrum. Methods 1972, 102, 581–587. [Google Scholar] [CrossRef]
  8. Pommé, S. When the model doesn’t cover reality: Examples from radionuclide metrology. Metrologia 2016, 53, S55–S64. [Google Scholar] [CrossRef] [Green Version]
  9. Le Gallic, Y. Problems in microweighing. Nucl. Instrum. Methods 1973, 112, 333–341. [Google Scholar] [CrossRef]
  10. Lourenço, V.; Bobin, C. Weighing uncertainties in quantitative source preparation for radionuclide metrology. Metrologia 2015, 52, S18–S29. [Google Scholar] [CrossRef]
  11. The CIPM MRA Database (KCDB) CCRI(II)-S7 Technical Protocol. Available online: https://www.bipm.org/kcdb/comparison?id=1417 (accessed on 18 August 2022).
  12. ISO/IEC 17025; General Requirements for the Competence of Testing and Calibration Laboratories. International Organization for Standardization: Geneva, Switzerland. Available online: https://en.wikipedia.org/wiki/ISO/IEC_17025 (accessed on 22 August 2022).
  13. Cacais, F.L.; Delgado, J.U.; Loayza, V.M.; Rangel, J.A. Bayesian estimation of the relative deviations between activities in the radionuclide standardization. Braz. J. Radiat. Sci. 2019, 7, 1–14. [Google Scholar] [CrossRef]
  14. Cacais, F.L.; Delgado, J.U.; Loayza, V.M. Uncertainty evaluation of a modified elimination weighing for source preparation. J. Phys. Conf. Ser. 2018, 975, 012057. [Google Scholar] [CrossRef]
  15. Cacais, F.L.; Delgado, J.U.; Loayza, V.M.; A Rangel, J. Comparison between three weighing methods for source preparation in radionuclide metrology. J. Phys. Conf. Ser. 2021, 1826, 012038. [Google Scholar] [CrossRef]
  16. Fitzgerald, R.; Bailat, C.; Bobin, C.; Keightley, J. Uncertainties in 4πβ–γ coincidence counting. Metrologia 2015, 52, S86–S96. [Google Scholar] [CrossRef]
  17. CIPM Mutual Recognition Arrangement (CIPM MRA) CMC Approval Process. Available online: https://www.bipm.org/en/cipm-mra/approval-process.html (accessed on 18 August 2022).
  18. Cacais, F.L.; Delgado, J.U.; Loayza, V.M. Taking degrees of freedom from uncertainty into minimum weight estimate for analytical balances. J. Phys. Conf. Ser. 2018, 1044, 012063. [Google Scholar] [CrossRef]
  19. Reichmuth, A. Weighing Small Samples on Laboratory Balances. In Transverse Disciplines in Metrology, Proceedings of the 13th International Metrology Congress, Lille, France, 1 May 2007; Wiley: Hoboken, NJ, USA, 2007; pp. 641–656. [Google Scholar]
  20. Glaser, M. Magnetic interactions between weights and weighing instruments. Meas. Sci. Technol. 2001, 12, 709–715. [Google Scholar] [CrossRef]
  21. OIML R111; Weights of Classes E1, E2, F1, F2, M1, M1-2, M2, M2-3, M3 Part 1: Metrological and Technical Requirements. International Organization of Legal Metrology: Paris, France, 2014. Available online: https://www.oiml.org/en/files/pdf_r/r111-p-e04.pdf (accessed on 18 August 2022).
  22. Fritsch, K. GWP®—The Science-Based Global Standard for Efficient Lifecycle Management of Weighing Instruments. NCSLI Meas. 2013, 8, 60–69. [Google Scholar] [CrossRef]
  23. ISO 7870; Control Charts Series. International Organization for Standardization: Geneva, Switzerland, 2014.
  24. Euramet Calibration Guide No.18 Guidelines on the Calibration of Non-Automatic Weighing Instruments. Version 4.0. 2015. Available online: https://www.euramet.org/Media/docs/Publications/calguides/I-CAL-GUI-018_Calibration_Guide_No._18_web.pdf (accessed on 18 August 2022).
  25. OIML D28; Conventional Value of the Result of Weighing in Air. International Organization of Legal Metrology: Paris, France, 2004. Available online: https://www.oiml.org/en/files/pdf_d/d028-e04.pdf (accessed on 18 August 2022).
  26. Picard, A.; Davis, R.S.; Gläser, M.; Fujii, K. Revised formula for the density of moist air (CIPM-2007). Metrologia 2008, 45, 149–155. [Google Scholar] [CrossRef]
  27. JCGM 100:2008; Evaluation of Measurement Data—Guide to the Expression of Uncertainty in Measurement. Joint Committee for Guides in Metrology: Sèvres, France, 2008. Available online: https://www.bipm.org/utils/common/documents/jcgm/JCGM_100_2008_E.pdf (accessed on 1 May 2022).
  28. Wunderli, S.; Fortunato, G.; Reichmuth, A.; Richard, P. Uncertainty evaluation of mass values determined by electronic balances in analytical chemistry: A new method to correct for air buoyancy. Anal. Bioanal. Chem. 2003, 376, 384–391. [Google Scholar] [CrossRef]
  29. Merritt, J.S. Present status in quantitative source preparation. Nucl. Instrum. Methods 1973, 112, 325–332. [Google Scholar] [CrossRef]
  30. Reichmuth, A. Non-Linearity of Laboratory Balances and Its Impact on Uncertainty. In Proceedings of the NCSL International 2000 Workshop and Symposium, Toronto, ON, Canada, 16–20 July 2000. [Google Scholar]
  31. ISO 10012; Measurement Management Systems—Requirements for Measurement Processes and Measuring Equipment. International Organization for Standardization: Geneva, Switzerland, 2003.
  32. Nielsen, L. Evaluation of mass measurements in accordance with the GUM. Metrologia 2014, 51, S183–S190. [Google Scholar] [CrossRef]
  33. JCGM 101:2008; Evaluation of Measurement Data—Supplement 1 to the ‘Guide to the Expression of Uncertainty in Measurement’—Propagation of Distributions Using a Monte Carlo Method. Joint Committee for Guides in Metrology: Sèvres, France, 2008. Available online: https://www.bipm.org/utils/common/documents/jcgm/JCGM_101_2008_E.pdf (accessed on 18 August 2022).
  34. Malengo, A. Buoyancy effects and correlations in calibration and use of electronic balances. Metrologia 2014, 51, 441–451. [Google Scholar] [CrossRef]
  35. OIML R76; Non-Automatic Weighing Instruments Part1: Metrological Requirements—Tests. International Organization of Legal Metrology: Paris, France, 2006. Available online: https://www.oiml.org/en/files/pdf_r/r076-p-e06.pdf (accessed on 18 August 2022).
  36. JCGM 200:2012; International Vocabulary of Metrology—Basic and General Concepts and Associated Terms (VIM 3rd ed.). Joint Committee for Guides in Metrology: Sèvres, France, 2012. Available online: http://www.bipm.org/utils/common/documents/jcgm/JCGM_200_2012.pdf (accessed on 1 May 2022).
  37. Reichmuth, A. Weighing accuracy with laboratory balances. In Transverse Disciplines in Metrology, Proceedings of the 13th International Metrology Congress, Lille, France, 1 May 2007; Wiley: Hoboken, NJ, USA, 2007; p. 38. [Google Scholar]
  38. Migon, H.; Gamerman, D. Statistical Inference: An Integrated Approach; Arnold Publishers: London, UK, 1999. [Google Scholar]
  39. Fritsch, K. Personal Communication; Mettler-Toledo GmbH: Greifensee, Switzerland, 2017. [Google Scholar]
  40. Janβen, H. Uncertainties in Weighing; Presentation; VERMI Young Researchers Workshop: Geel, Belgium, 2004. [Google Scholar]
  41. Clark, J.P.; Shull, H. Reproducibility: A Major Source of Uncertainty in Weighing; Report in Conjunction with Contract No.DE-AC09-96SR18500 with the U.S. Department of Energy; U.S. Department of Energy: Washington, DC, USA, 2001.
  42. Arduino Reference. Available online: https://www.arduino.cc/ (accessed on 7 May 2019).
  43. Mettler-Toledo. Excellence Plus Analytical Balances XP Models, Operating Instructions. Available online: https://www.mt.com/dam/P5/labtec/02_Analytical_Balances/03_XP/03_Documentations/03_Operating_Instructions/OI_XP_Analytical_Part_1_EN.pdf (accessed on 18 August 2022).
  44. BOSCH. Humidity Sensor BME280. Available online: https://www.bosch-sensortec.com/products/environmental-sensors/humidity-sensors-bme280/ (accessed on 18 August 2022).
  45. Arduino. Temperature Monitoring with DHT22. Available online: https://create.arduino.cc/projecthub/projects/tags/dht22 (accessed on 18 August 2022).
  46. Arduino. BMP180 Interfacing with Arduino in Depth. Available online: https://create.arduino.cc/projecthub/weargenius/bmp180-interfacing-with-arduino-in-depth-68595b (accessed on 18 August 2022).
  47. Mettler-Toledo. DA-310M Density Meter. Available online: https://www.mt.com/au/en/home/phased_out_products/PhaseOut_Ana/DA310M.html (accessed on 18 August 2022).
  48. NCRP-Report-58—Techniques for the Preparation of Standard Sources for Radioactivity Measurements. In A Handbook of Radioactivity Measurements Procedures (Report 58), 2nd ed.; National Council on Radiation Protection and Measurements: Bethesda, MD, USA, 1985.
  49. Letho, J.; Hou, X. Chemistry and Analysis of Radionuclides. In Laboratory Techniques and Methodology; Wiley: Weinheim, Germany, 2011. [Google Scholar]
  50. Rizzuto, A.M.; Cheng, E.S.; Lam, R.K.; Saykally, R.J. Surprising Effects of Hydrochloric Acid on the Water Evaporation Coefficient Observed by Raman Thermometry. J. Phys. Chem. C 2017, 121, 4420–4425. [Google Scholar] [CrossRef]
  51. Nielsen, L. Identification and Handling of Discrepant Measurements in Key Comparisons; Technical Report DFM-02-R28; Danish Institute of Fundamental Metrology Denmark: Hørsholm, Denmark, 2002. [Google Scholar]
  52. Reichmuth, A. Non-Linearity of High Resolution Laboratory Balances; South Yorkshire Trading Standards Unit: Sheffield, UK, 2000. [Google Scholar]
  53. Mettler-Toledo AT/MT/UMT Balances Technical Specifications and Accessories. Available online: http://www.dragon.lv/exafs/equipment/at-mt-umt-tez-e-703466.pdf (accessed on 18 August 2022).
  54. Reichmuth, A.; Wunderli, S.; Weber, M.; Meyer, V.R. The Uncertainty of Weighing Data Obtained with Electronic Analytical Balances. Mikrochim. Acta 2004, 148, 133–141. [Google Scholar] [CrossRef]
  55. IAEA. Optimization of Radiation Protection in the Control of Occupational Exposure; Safety reports series No. 21; International Atomic Energy Agency: Vienna, Austria, 2002. [Google Scholar]
  56. Nielsen, L. Methods for the Evaluation of Key Comparisons; Euromet Mass & Related Quantities TC Meeting: Bern, Switzerland, 2003. [Google Scholar]
  57. Ratel, G.; Michotte, C.; Courte, S.; Kossert, K. Update of the BIPM Comparison BIPM.RI(II)-K1.Ho-166m Activity Measurements of the Radionuclide 166mHo for the PTB (Germany), with Linked Results for the EURAMET.RI(II)-K2.Ho-166m Comparison. Metrologia 2015, 52, 06006. [Google Scholar] [CrossRef] [Green Version]
  58. Becerra, L.O.; Orys, M.; Chung, J.W.; Davidson, S.; Fuchs, P.; Jacques, C.; Jian, W.; Kubarych, Z.J.; Kumar, A.; Malengo, A.; et al. Final report on CCM.M-K4: Key comparison of 1 kg stainless steel mass standards. Metrologia 2014, 51, 07009. [Google Scholar] [CrossRef]
  59. Molloy, E.; Koo, A.; Hall, B.D.; Harding, R. The Statistical Power and Confidence of Some Key Comparison Analysis Methods to Correctly Identify Participant Biases. Metrology 2021, 1, 4. [Google Scholar] [CrossRef]
Figure 1. MEM weighing sequence: (a) weighing of pycnometer before drop deposition; (b) balance is unloaded and indication is zeroed; (c) 1st weighing of pycnometer together with the standard weight before drop deposition; (d) balance is unloaded and indication is zeroed; (e) 2nd weighing of pycnometer together with the standard weight before drop deposition.
Metrology 02 00027 g001
Figure 2. Cause-and-effect diagram for mass values determination to the weighing methods.
Metrology 02 00027 g002
Figure 3. Relative repeatability (standard deviation).
Metrology 02 00027 g003
Figure 4. Experimental set-up used for measurements.
Metrology 02 00027 g004
Figure 5. Variation range of environmental parameters.
Metrology 02 00027 g005
Figure 6. Simultaneous variation of relative humidity, temperature and balance reading.
Metrology 02 00027 g006
Figure 7. Consistency of mass values between calibrations, * and ** represent marking on the weight surface used to distinguish weights with the same nominal value.
Metrology 02 00027 g007
Figure 8. Eccentricity test position on a rectangular balance load receptor.
Metrology 02 00027 g008
Figure 9. Errors variation between calibrations at 50 g.
Metrology 02 00027 g009
Figure 10. Mean differential errors.
Metrology 02 00027 g010
Figure 11. Repeatability variations in 20 mg and 20 g.
Metrology 02 00027 g011
Figure 12. Individual differential calibration errors. Blue line is the mean value.
Metrology 02 00027 g012
Figure 13. Differences of readings obtained from drift elimination procedures. Blue line is the mean value.
Metrology 02 00027 g013
Figure 14. Repeatability values obtained from each drift elimination procedure.
Metrology 02 00027 g014
Figure 15. Repeatability for each weighing method blue line is the typical one.
Metrology 02 00027 g015
Figure 16. Weighing sequence scheme, with exception between weighing to obtain reading Ia, and Iw1 balance is zeroed before being loaded.
Metrology 02 00027 g016
Figure 17. Checking results.
Metrology 02 00027 g017
Figure 18. Deviation between results and the comparison reference value (blue line). P —pycnometer, E—elimination, M—MEM and S—substitution.
Metrology 02 00027 g018
Figure 19. Deviation from reference value (blue line) for pycnometer and substitution reduced mass uncertainties.
Metrology 02 00027 g019
Table 1. Calibration error (E) and expanded uncertainty U(k = 2) for standard weights, * and ** represent marking on the weight surface used to distinguish weights with the same nominal value.
Nominal ValueE ± U(k = 2)/µg
1 mg−2 ± 3
2 mg−42 ± 3
10 mg−14 ± 3
20 mg−3 ± 3
20 mg *−16 ± 3
20 mg **−327 ± 3
50 mg5802 ± 5
100 mg−64 ± 5
200 mg−8 ± 6
200 mg *−3 ± 6
200 mg **−7 ± 6
1 g−8166 ± 12
2 g−13,455 ± 14
2 g *−10,259 ± 14
5 g−11,810 ± 20
10 g−30 ± 20
50 g −150 ± 30
20 g F1−73,810 ± 90
50 g F1−78,230 ± 120
Table 2. Balance reading and environmental parameters obtained for each weighing sequence.
Sequence Ib/gIs1/gIa/gIw1/gIw2/gIs2/gp/hPahr/%t/°C
13.3984453.3815873.3742283.3939063.3939003.3815851011.44720.7
23.4106883.4012583.3962063.4158603.4158613.3815781014.85120.8
33.4285613.4012523.4106863.4303593.4303693.3815801015.25220.9
43.3194943.3011973.2931263.3127963.3127903.2815141014.55221.1
53.3382143.3011993.3196253.3392673.3392283.2815201014.55021.0
63.3084343.3012003.2728603.2925363.2925423.2815231012.54621.1
73.3045713.3011953.2915543.3112213.3112213.2815231012.54621.0
83.3286223.3115013.3155863.3253733.3251973.3015161013.05421.1
93.3145403.3115023.2902653.3102653.3102693.2915061012.95221.3
103.2902783.2915083.2792353.2892213.2892153.2815211012.95021.3
113.2792353.2915093.2666123.2765853.2765773.2815151013.05121.4
123.5585463.5583153.5369143.5569093.5569153.5383201014.05820.1
133.5369263.5344463.5249903.5369383.5369413.5224981013.95720.4
143.3788013.3783003.3534933.3764573.3764563.3573141018.25720.5
153.3534943.3344453.1136833.3536733.3536673.1144531018.65820.3
163.7756873.7773163.7094773.7752743.7752563.7114921015.25919.7
173.6841773.6815243.6608873.6838463.6838753.6603471015.45819.6
Table 3. Used standard weights in each sequence and by weighing method, * and ** represent marking on the weight surface used to distinguish weights with the same nominal value.
#mbmamE, mEM
12 g *, 1 g, 200 mg, 200 mg *mb20 mg **
22 g *, 1 g, 200 mg, 200 mg *, 20 mg **mb − 20 mg **20 mg **
32 g *, 1 g, 200 mg, 200 mg *, 20 mg **mb − 20 mg **20 mg **
42 g *, 1 g, 200 mg *, 100 mg, 20 mg **mb − 20 mg **20 mg **
52 g *, 1 g, 200 mg, 200 mg *, 20 mg **mb − 20 mg **20 mg **
62 g *, 1 g, 200 mg *, 100 mg, 20 mg **mb − 20 mg **20 mg **
72 g *, 1 g, 200 mg, 200 mg *, 20 mg **mb − 20 mg **20 mg **
82 g *, 1 g, 200 mg *, 100 mg, 20 mg, 10 mgmb − 10 mg10 mg
92 g *, 1 g, 200 mg *, 100 mg, 20 mg, 10 mgmb − 20 mg20 mg
102 g *, 1 g, 200 mg *, 100 mg, 20 mg, 10 mgmb − 20 mg10 mg
112 g *, 1 g, 200 mg *, 100 mg, 20 mg, 10 mgmb − 20 mg − 10 mg + 20 mg *10 mg
122 g *, 1 g, 200 mg, 200 mg *, 100 mg, 50 mg, 20 mg, 1 mgmb − 20 mg20 mg
132 g *, 1 g, 200 mg, 200 mg *, 100 mg, 20 mg *, 20 mg, 10 mg, 2 mg, 1 mgmb − 10 mg − 2 mg10 mg, 2 mg
142 g *, 1 g, 200 mg, 100 mg, 50 mg, 20 mg *, 20 mg, 1 mgmb − 20 mg * − 1 mg20 mg, 2 mg, 1 mg
152 g *, 1 g, 200 mg, 100 mg, 20 mg *, 20 mg, 10 mg, 2 mg, 1 mgmb − 200 mg − 20 mg *200 mg, 20 mg *, 20 mg
162 g *, 1 g, 200 mg, 200 mg *, 200 mg **, 100 mg, 50 mg, 20 mg *, 20 mgmb − 50 mg − 20 mg + 10 mg50 mg, 10 mg
172 g *, 1 g, 200 mg, 200 mg *, 200 mg **, 100 mgmb − 100 mg + 50 mg + 20 mg + 2 mg + 1 mg20 mg, 2 mg, 1 mg
Table 4. Uncertainty budget *.
PycnometerEliminationM. EliminationSubstitution
BeforeAfter
Quantity (X)Valueu(X)Valueu(X)Valueu(X)Valueu(X)Valueu(X)
Resol at 000.000300.000300.000300.000300.0003
Resol at L00.000300.000300.000300.000300.0003
Eccentricity00.000000.000000.000000.000000.0000
Repeatability00.005000.007000.006100.008000.0080
Temp sensit 00.000000.000000.000000.000000.0000
Adj buoy00.000100.000000.000000.000000.0000
Adj drift00.000100.000000.000000.000000.0000
Evaporation00.002100.002100.002100.002100.0021
Balance drift00.000300.000300.000300.000300.0003
Repeat drift00.006900.006400.006400.008100.0081
Linearity00.0020not applicable
Linear drift00.0121
Std weight 19.99700.001719.99700.00173558.29700.01133538.30000.0112
Meth result 21.6320 1.6370 1.6335 0.231 −1.406
Weigh result 21.63200.015121.63400.009821.63050.00923558.52800.01623536.89400.0161
Cov/mg2not applicable0.0001
Bu = 1.00105u(Bu) = 0.00002
Drop mass21.6550.01521.6570.01021.6530.009 21.6570.016
Rel uncert 0.07% 0.05% 0.04% 0.08%
* Unless otherwise stated, all values are in milligrams. Value zero for the effects are shown in order to avoid any doubt about how they were considered for each method.
Table 5. Mass of drops and standard uncertainty /mg.
#mPycmElimmMEMmSubsmRV
124.242 ± 0.015 24.240 ± 0.00924.240 ± 0.01624.241 ± 0.007
214.497 ± 0.015 14.516 ± 0.00714.490 ± 0.01614.511 ± 0.006
317.894 ± 0.01517.894 ± 0.010 17.894 ± 0.01617.894 ± 0.008
426.396 ± 0.015 26.403 ± 0.00826.386 ± 0.01626.400 ± 0.007
635.611 ± 0.01535.608 ± 0.01035.604 ± 0.01035.607 ± 0.01635.607 ± 0.007
713.030 ± 0.015 13.037 ± 0.00713.031 ± 0.01613.035 ± 0.006
924.300 ± 0.01524.296 ± 0.01024.294 ± 0.00724.301 ± 0.01624.296 ± 0.006
1011.055 ± 0.01511.054 ± 0.01011.058 ± 0.01011.053 ± 0.01611.055 ± 0.007
1112.636 ± 0.015 12.653 ± 0.01012.640 ± 0.01712.648 ± 0.008
1221.655 ± 0.01521.657 ± 0.01021.653 ± 0.00921.657 ± 0.01621.655 ± 0.007
1311.949 ± 0.01511.943 ± 0.01011.942 ± 0.00711.945 ± 0.01711.944 ± 0.006
1425.335 ± 0.015 25.324 ± 0.00725.331 ± 0.01725.327 ± 0.006
15240.063 ± 0.016 240.050 ± 0.011240.048 ± 0.017240.053 ± 0.009
1723.314 ± 0.01523.308 ± 0.010 23.317 ± 0.01723.311 ± 0.008
Publisher’s Note: MDPI stays neutral with regard to jurisdictional claims in published maps and institutional affiliations.