Article

Shear Mechanism Differentiation Investigation of Rock Joints with Varying Lithologies Using 3D-Printed Barton Profiles and Numerical Modeling

1
The Second Engineering Co., Ltd. of Ctec Group, Suzhou 215131, China
2
China Railway Academy Group Co., Ltd., Chengdu 610032, China
3
Northwest Research Institute Co., Ltd. of C.R.E.C, Lanzhou 730030, China
4
School of Civil Engineering, Central South University, Changsha 410075, China
*
Author to whom correspondence should be addressed.
Geotechnics 2026, 6(1), 8; https://doi.org/10.3390/geotechnics6010008
Submission received: 21 August 2025 / Revised: 16 December 2025 / Accepted: 19 December 2025 / Published: 15 January 2026

Abstract

To investigate the shear behavior of rock mass joint surfaces with varying roughness and lithology, this study introduces a novel experimental framework that combines high-precision 3D printing and direct shear testing. Ten artificial joint surfaces were fabricated using Barton standard profiles with different joint roughness coefficients (JRC) and were cast using two representative rock-like materials simulating soft and hard rocks. The 3D printing technique employed significantly reduced the staircase effect and ensured high geometric fidelity of the joint morphology. Shear tests revealed that peak shear strength increases with JRC, but the underlying failure mechanisms vary depending on the lithology. Experimental results were further used to back-calculate JRC values and validate the empirical JRC–JCS (joint wall compressive strength) model. Numerical simulations using FLAC3D captured the shear stress–displacement evolution for different lithologies, revealing that rock strength primarily influences peak shear strength and fluctuation characteristics during failure. Notably, despite distinct lithologies, the post-peak degradation behavior tends to converge, suggesting universal residual shear mechanisms across rock types. These findings highlight the critical role of lithology in joint shear behavior and demonstrate the effectiveness of 3D-printing-assisted model tests in advancing rock joint characterization.

1. Introduction

The existence of a joint surface leads to the existence of an incomplete and discontinuous joint rock mass, and the shear behavior of the weak plane plays a decisive role in the instability and failure mode of the rock mass. Therefore, it is necessary to accurately grasp the shear behavior of the joint surface of the rock mass and the geometric morphology of the joints [1,2,3]. In actual engineering, a practical way to evaluate the geometrical morphology of rock joints is by using the roughness coefficient of the rock mass joint surface (JRC). Many scholars have performed research on the evaluation of the weak plane shear performance of rock masses. The bilinear failure model by Patton [4] and the interlocked sawtooth failure model by Ladanyi [2] and Barton [5,6] et al. were used to carry out a large number of joint shear tests. These researchers proposed the JRC-joint wall compressive strength (JCS) model for evaluating the shear performance of rock mass joint surfaces based on the roughness coefficient of the joint surfaces [5,6]. At present, the methods to determine the roughness of rock discontinuities mainly include the visual contrast method, theoretical estimation method and back calculation method. The visual comparison method is relatively subjective, and the theoretical estimation method to determine the JRC value of the joint surface through the structure function and autocorrelation function has particular uncertainties. Among them, the inverse calculation method of the JRC value of the joint surface, based on the relevant parameters determined by the material direct shear test, inclination test and tensile test, exhibits a relatively high recognition.
The geometric morphology of rock joint surfaces is characterized by convex bodies with complex geometric characteristics [7]. The meso-mechanical behavior of these convex bodies directly affects the shear strength of joint surfaces. Therefore, many scholars have studied the shear mechanical behavior of the rock joint plane, including the slip and shear behavior, the influence of a convex dip angle [2,4] and normal stress on the shear mechanical behavior [8], and the transformation mode of shear mechanical behavior [9]. In direct shear tests, the shape of a convex body affects the characteristics of rock joints and the shear strength [10]. Tensile failure plays an important role in the failure mechanism and shear mechanical behavior of regular joints. However, these studies were based on an assumed convex shape of regular joints. Neither the triangular shear teeth nor the convex shape of periodic curve contours can objectively characterize the geometric shape of real rock joints. In addition, the rock strength and normal stress state of the material wall of rock joint surfaces are closely related to the shear mechanical behavior of the joint [11]. It is generally believed that the entire process of joint initiation, expansion and connection is due to the discontinuous deformation caused by the tension of intact and continuous rock mass. Therefore, the rock mass interface is in a low normal stress state when it is sheared.
In fact, the instability or failure of engineering rock masses is mostly triggered by increased driving forces acting on the joint surface during events such as earthquakes or seepage. Most existing studies tend to assume that the strength of the structural plane is equivalent to that of the intact rock mass. Nevertheless, this assumption often diverges from actual engineering observations, particularly in strongly weathered rock masses where the structural plane’s strength is notably lower than that of the surrounding rock mass. In addition, there is little research on the difference in failure mode between the weathered or weakened structural plane and the original rock structural plane. The main difficulty is how to reproduce the failure characteristics of a weathered weak structural plane.
The reconstruction of a rock mass joint surface using 3D printing technology can completely replicate the irregular morphology, which is beneficial for accurately carrying out shear tests on the joint surface. Three-dimensional printing technology is widely used in the study of rock joints [12]; many researchers use 3D printing molds to pour jointed rock mass for experimental research. Kim et al. [13] studied the basic friction angle of the plaster poured specimens, whose joint surface of the specimens was based on different Barton JRC curve profiles printed by 3D printing technology. However, his study is only about the estimation of JRC value and the basic friction angle, without further study on the geometric morphology and shear behavior of joints. DU et al. [14] used 3D printing technology to construct a shear test of a joint surface and simulate the real joint plane of the rock mass. However, the specimen-making process was complicated and could not be efficiently produced in batches, which was not conducive to parallel tests. Therefore, the method of using 3D printing technology to make molds and repouring to make specimens has been gradually adopted by an increasing number of scholars. Xiong et al. [15] used 3D printing molds to cast and reconstruct rock mass discontinuities, so the discretization was relatively small. Based on 3D printing technology, Pei-tao [16] studied the shear properties of joint rocks with different JRC but did not carry out an in-depth quantitative comparative analysis.
Combined with 3D printing technology, this paper introduces the detailed process of the high-precision reconstruction of the profile curves of a rock mass joint surface with different JRC values and the means of printing precision control. Then, the shear test of the joint surface was conducted on the premise that the strength of the specimen was guaranteed by standard maintenance. Multiple groups of parallel tests were carried out for each group of JRC-joint surface contour curves to ensure the accuracy of the test data. In addition, direct shear tests of the two materials in the next section under the same loading conditions were performed to compare and analyze the influence of different JCS values on the shear behavior of the weak plane of the rock mass. The JRC corresponds to the peak stress, and different materials in the Barton empirical formula of the rock weak plane were extracted by the inverse calculation of the JRC values. To verify this Barton JRC-JCS model analysis, the whole process of the rock mass joint surface geometry morphology and weak surface shear performance was used for quantitative research. The results of the study on the engineering practice of rock mass joint surface JRC values are of great significance. Furthermore, following the completion of the shear tests on rock joint specimens, numerical simulations were conducted to perform parameter inversion related to the shear mechanical behavior of rock joints. On one hand, the influence of rock lithology on the shear performance of jointed rock masses was investigated. On the other hand, a parameter sensitivity analysis was carried out for each lithology to obtain more detailed insights into the shear mechanical characteristics of rock joints.
Recent studies have increasingly emphasized that the shear behavior of rock joints is governed by the coupled evolution of surface morphology, asperity damage, and normal stress conditions [17,18]. Advances in experimental testing and numerical modeling have led to the development of new predictive frameworks capable of accounting for asperity-scale deformation, shear-induced dilation, and surface degradation, offering improved accuracy over classical empirical criteria. Research on weak or weathered rocks further indicates that the performance of traditional JRC–JCS–based models [19,20] can vary significantly with material strength and weathering grade, prompting modifications or the introduction of new strength criteria. Meanwhile, progress in three-dimensional surface scanning has enabled more quantitative characterization of joint morphology, facilitating the establishment of refined morphological indices and peak shear strength models with enhanced predictive capability. Numerical simulations and controlled shear tests also reveal that variations in joint undulation and normal stress can induce transitions in failure mechanism—from slip-dominated to compression-induced fracturing—highlighting the multi-scale complexity of joint shear behavior [21,22,23]. Collectively, these advancements underscore the importance of integrating joint morphology, asperity damage, and material properties, while also revealing that lithology remains an insufficiently explored factor affecting shear strength evolution. This motivates further investigation into how lithological characteristics interact with joint morphology to control the mechanical response of rock structural planes.

2. Molding and Experiment

2.1. 3D-Printed Pattern

2.1.1. Printing Model Generation

The joint surface shapes corresponding to different Barton JRC values were taken as the reconstruction indexes of the 2D rock mass joint surfaces [24]. First, the point acquisition software was used to digitally process the Barton curve. The approximately 100 mm long Barton standard curve was divided into nearly 10,000 points. From these, 201 points were evenly sampled to construct the joint surface curve, resulting in a sampling resolution of approximately 1/500. This resolution specifically indicates the digital precision of the curve reconstruction, not a physical scaling factor for the specimens. Therefore, the physical 3D models were subsequently generated and tested at the full, approximately 100 mm length of the standard Barton curve, effectively avoiding geometric scaling that would introduce size effects. The obtained data were used to reconstruct the contour curves with different JRC values (Figure 1). Based on the digital Barton curves (Figure 1b), the printable 3D model (Figure 1d) can be generated by stretching in thickness and height.

2.1.2. Printing Process and Parameters

A liquid crystal display (LCD) photolithography system (iSUN3D Tech (ShenZhen) Co., Ltd., Shenzhen, China, UV light resin LCD photocurable 3D printer) was used to print the joint surfaces. The LCD photolithography system can cure resin layer-by-layer compared to line-by-line polymerization on laser-based systems [25]. The LCD screen consisted of 1440 × 2560 pixels (69 mm × 120 mm), and the layer thickness was set to 0.1 mm. The printing material was white photosensitive resin, which is sensitive to 405 nm wavelength near ultraviolet (UV) light. To increase the adhesive strength of the object to the printing platform, the first 5 layers (denoted ‘bottom layers’) were exposed to UV light for 60 s each. The other layers were exposed for 10 s per layer to achieve the high speed and high accuracy of printing. Each newly cured layer was separated from the bottom film of the resin tank by lifting the printer platform 4 mm upward at a speed of 80 mm/min.
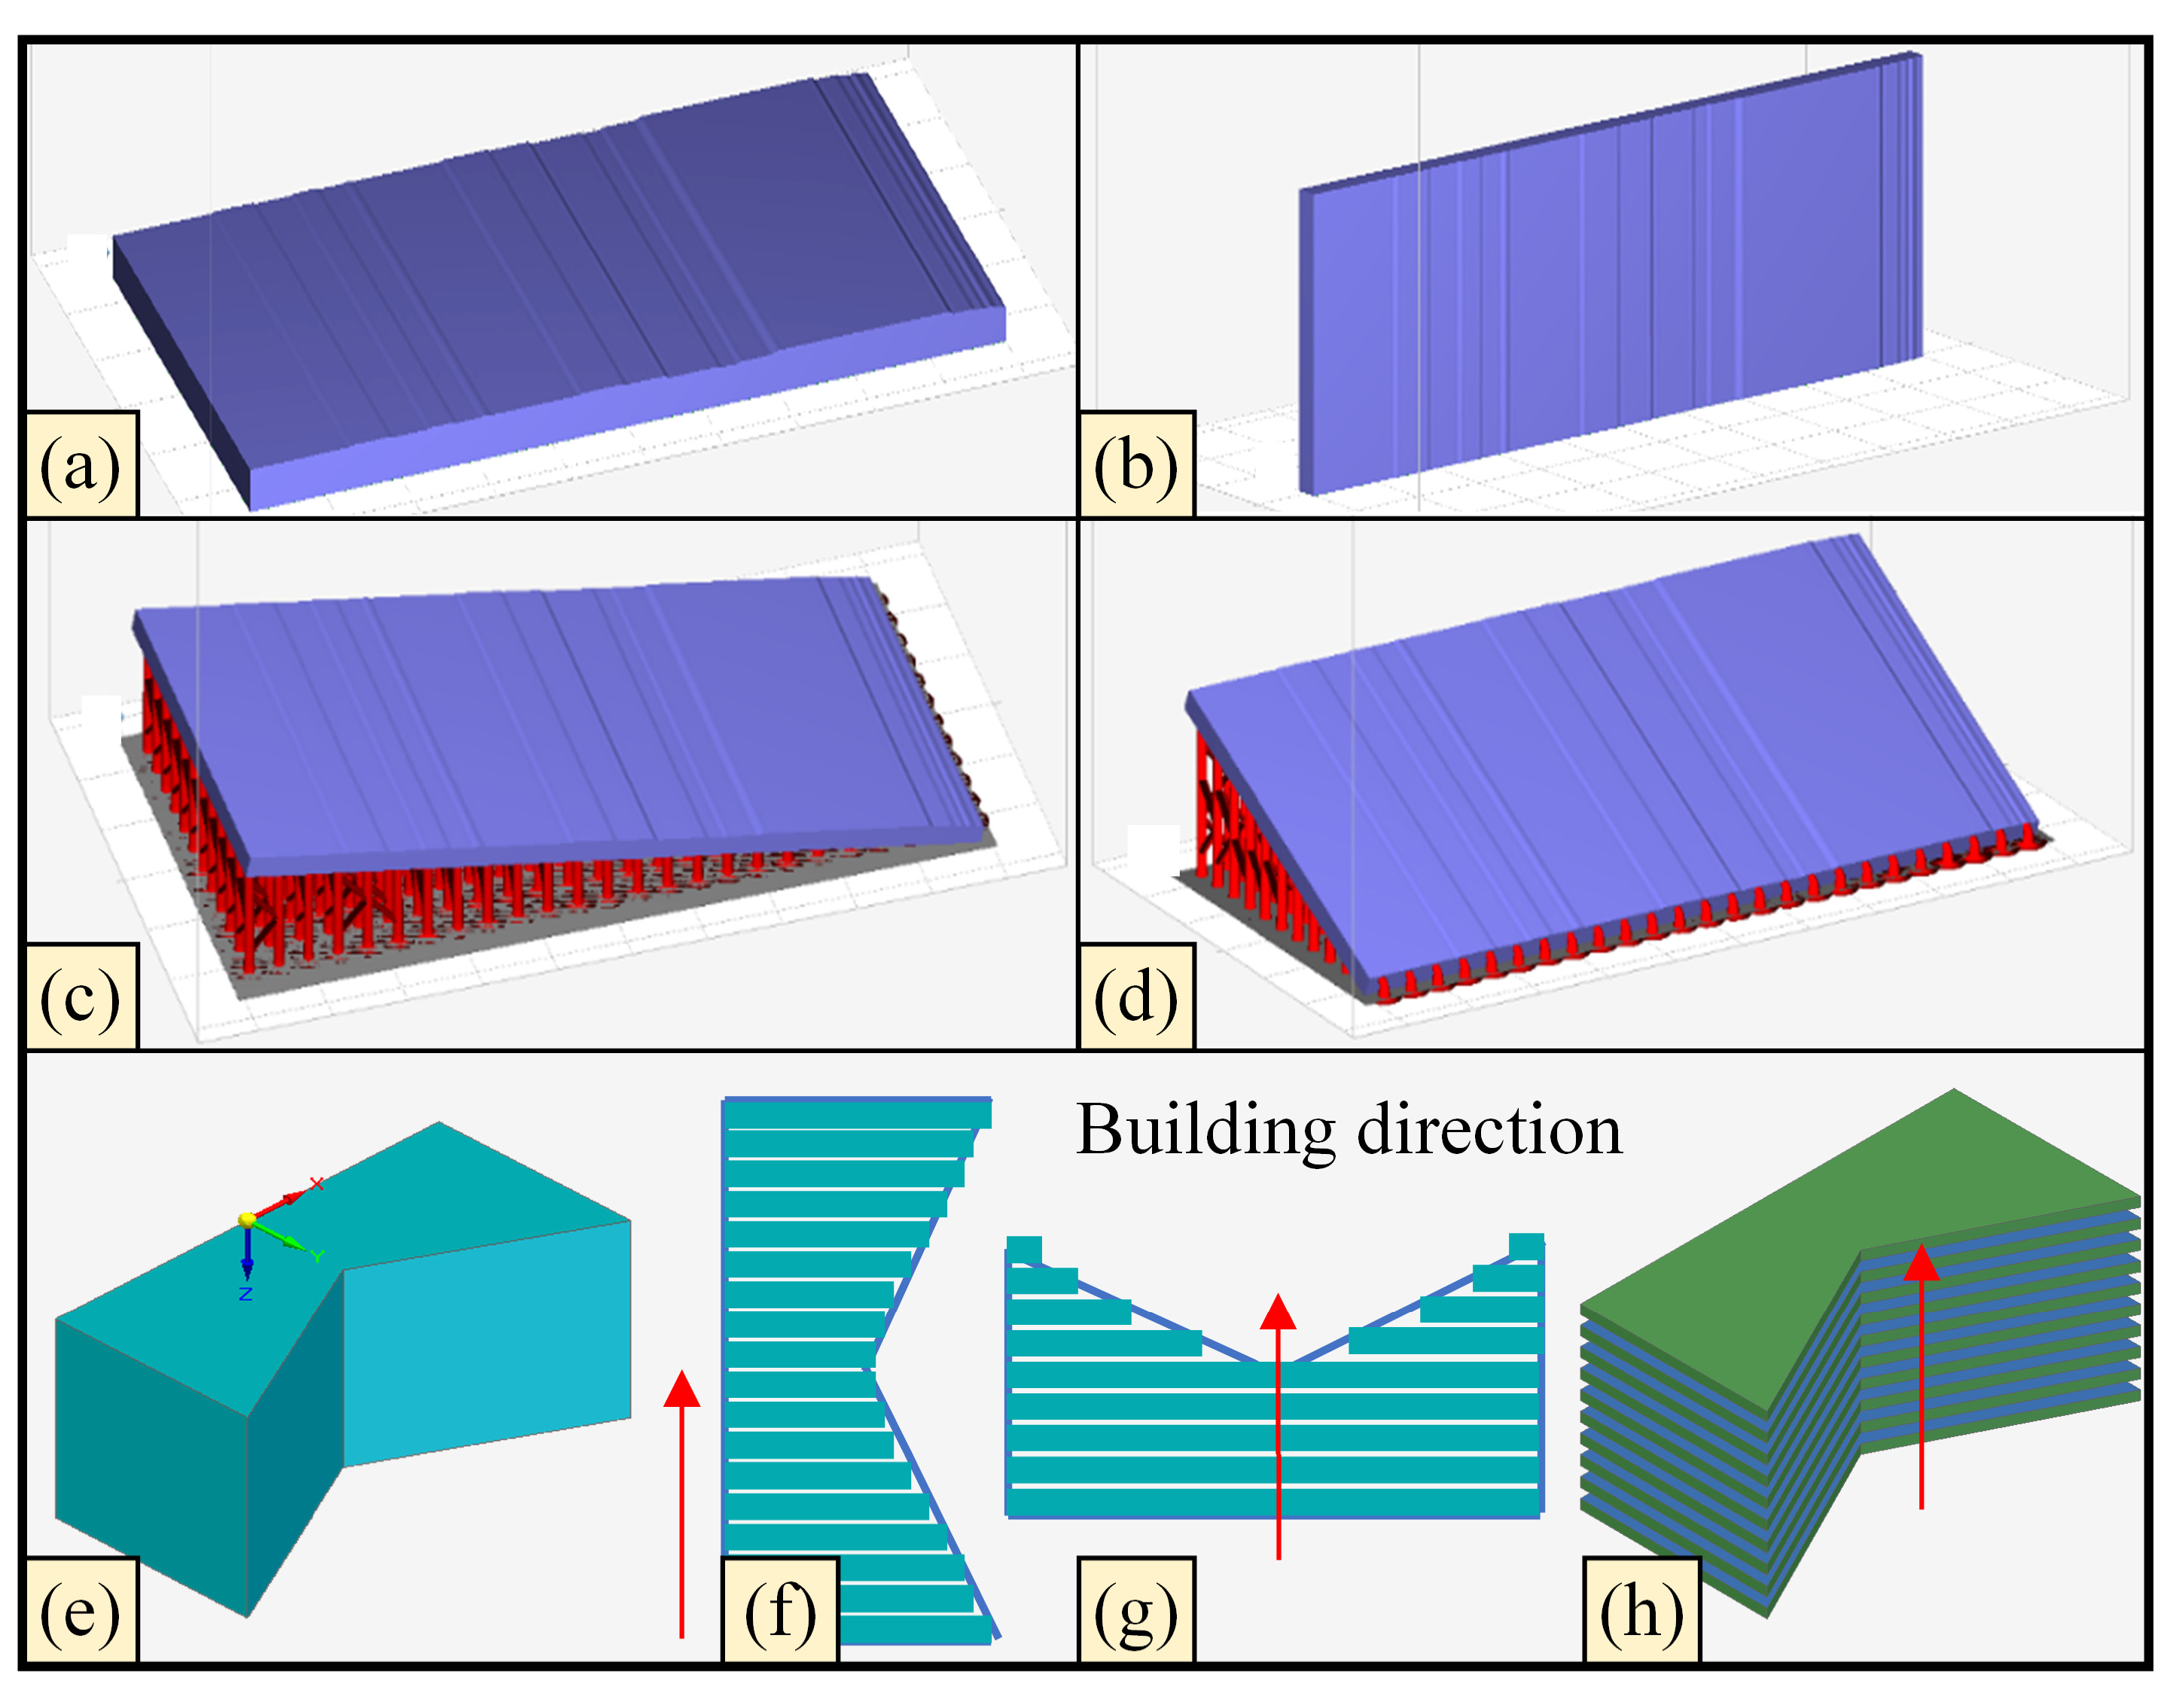
The dimensions of the joint surfaces were 100 mm × 50 mm × 3 mm. Given the size of the printer platform and the dimensions of the patterns, four different printing orientations were designed (Figure 2a–d). Orientations (a) and (b) do not require supports, while orientations (c) and (d) require supports.
The staircase effect, shown in Figure 2f,g, occurs in almost every 3D printing method if the printing surface has a slope in the building direction. In additive manufacturing (3D printing), the ‘staircase effect’ specifically refers to the visible, step-like ridges or jagged edges formed on curved or inclined surfaces due to the layer-by-layer fabrication process. This phenomenon arises from the approximation of continuous geometries by discrete, stacked layers, directly impacting the printed part’s surface finish, dimensional accuracy, and, in some cases, mechanical properties. When printing the patterns with the orientation shown in Figure 2a, the staircase effect is noticeable, particularly on surfaces with shallow slopes relative to the building platform. The result of the staircase effect generates dimensional errors between the printed part and its engineering model (Figure 2f,g). In addition to the staircase effect, orientations (c) and (d) require the printing of extra support structures. The support structures will result in resin waste, which might damage the object during removal after printing.
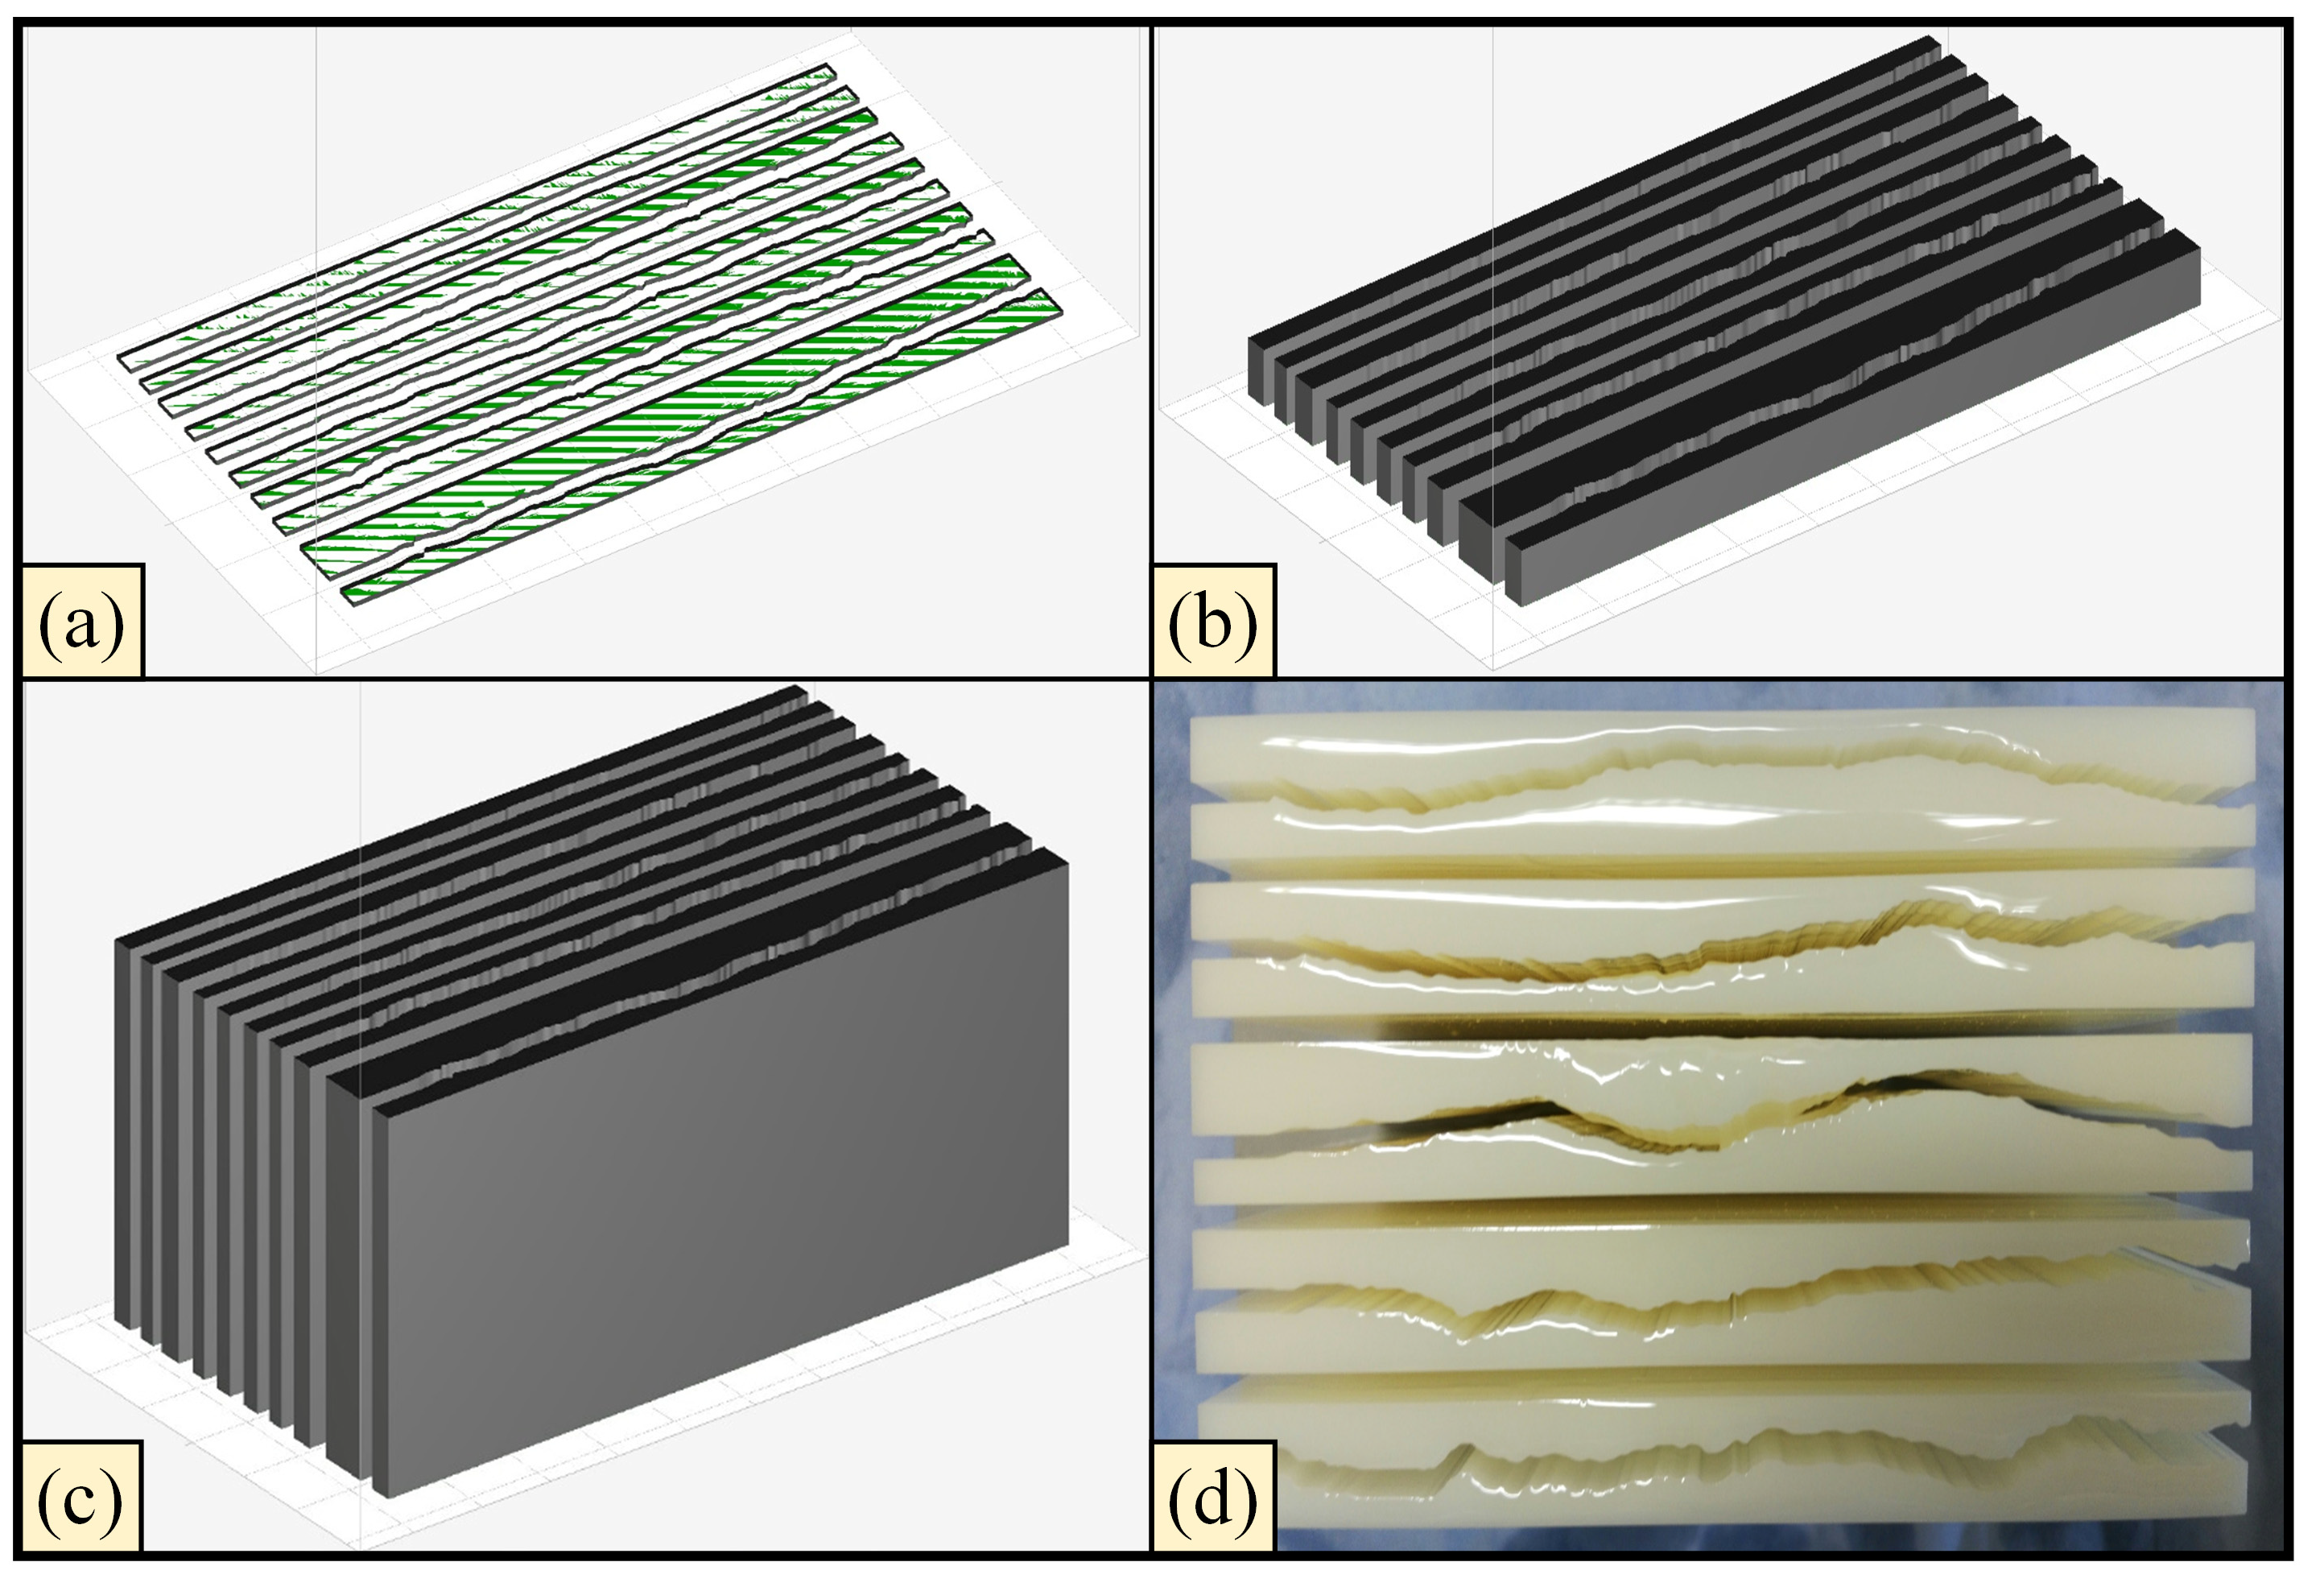
When printing the orientation (Figure 2b), the profile of the surface with small joints is constant along the building direction, thereby minimizing the staircase effect. Therefore, orientation (b) was chosen for the 3D printing fabrication process. The total printing time of the 10 patterns was 2 h and 51 min. The front and top views of the printed patterns are shown in Figure 3a–c, respectively. All printed parts were cleaned with IPA and postcured for 8 h under UV light.

2.1.3. Print Accuracy Evaluation

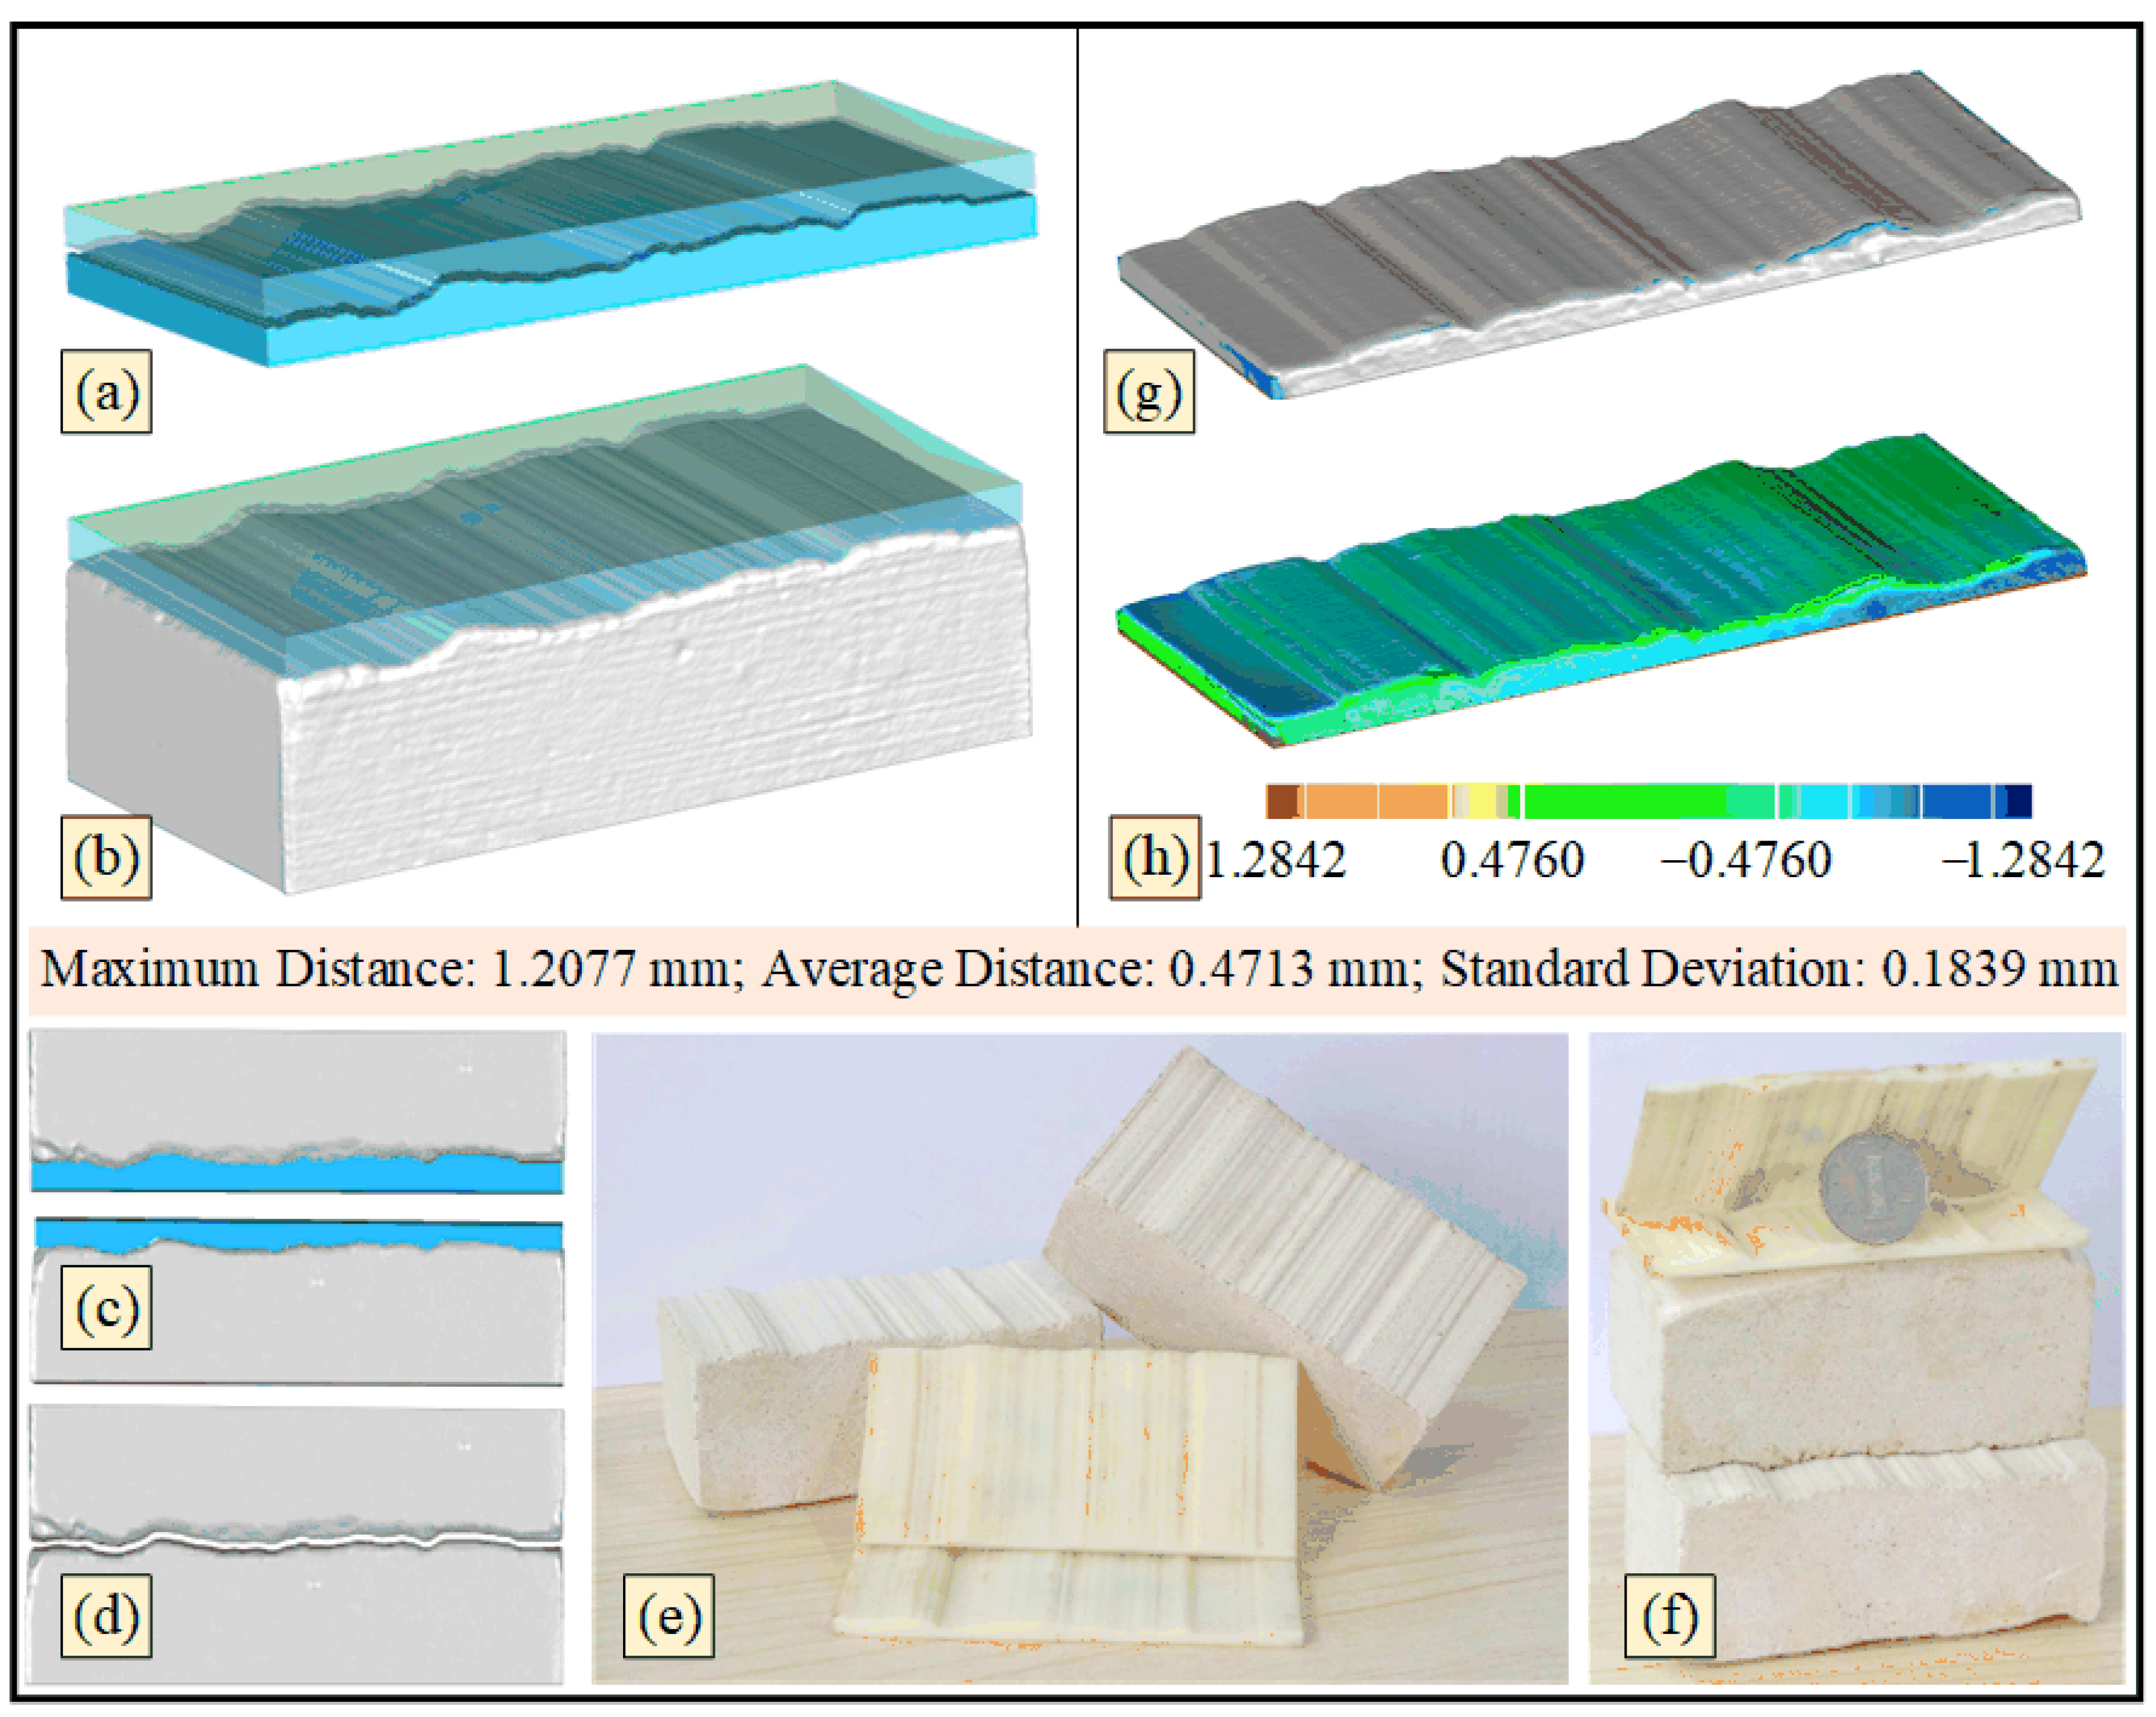
Checking the accuracy of the model included two parts; the first part was the matching check between the virtual specimens generated on the entity corresponding to the numerical template constructed by the specified JRC value [26]. In Figure 4a,b are the virtual entities of the joint surface generated by numerical template matching, c and d are geometric matching and verification were conducted between the scanning-imaged and 3D-printed joint surface models, and between the upper and lower surfaces of the same joint. The second part was to check the matching accuracy between the scanning point cloud model of the joint surface of the specimen poured by the 3D printing template and the joint surface of the virtual specimen. The specific process is shown in Figure 4g,h. Through matching and comparison, the maximum distance between the scanning point cloud and the numerical joint surface of the pouring joint surface was 1.2077 mm, the average distance was 0.4713 mm, and the standard deviation was 0.1839 mm. The results showed that the printing accuracy was high, and the composite test accuracy was required. By this method, the accuracy of the joint surface was checked, and some specimens whose accuracy did not meet the requirements were excluded. It is important to clarify that this accuracy assessment specifically quantifies the geometric fidelity of the joint surface of the final concrete specimen (cast using the 3D-printed template) when compared to the original numerical design. This comprehensive metric inherently accounts for the precision of the 3D printing process for the template and the subsequent casting process, ensuring that the actual experimental surfaces closely match the intended design. While more detailed roughness parameters like RMS slope and Z2 could offer further insights into surface morphology, the reported average deviation of 0.4713 mm for the final specimen surfaces is considered highly accurate for replicating critical roughness features in rock mechanics experiments.

2.2. Experiment

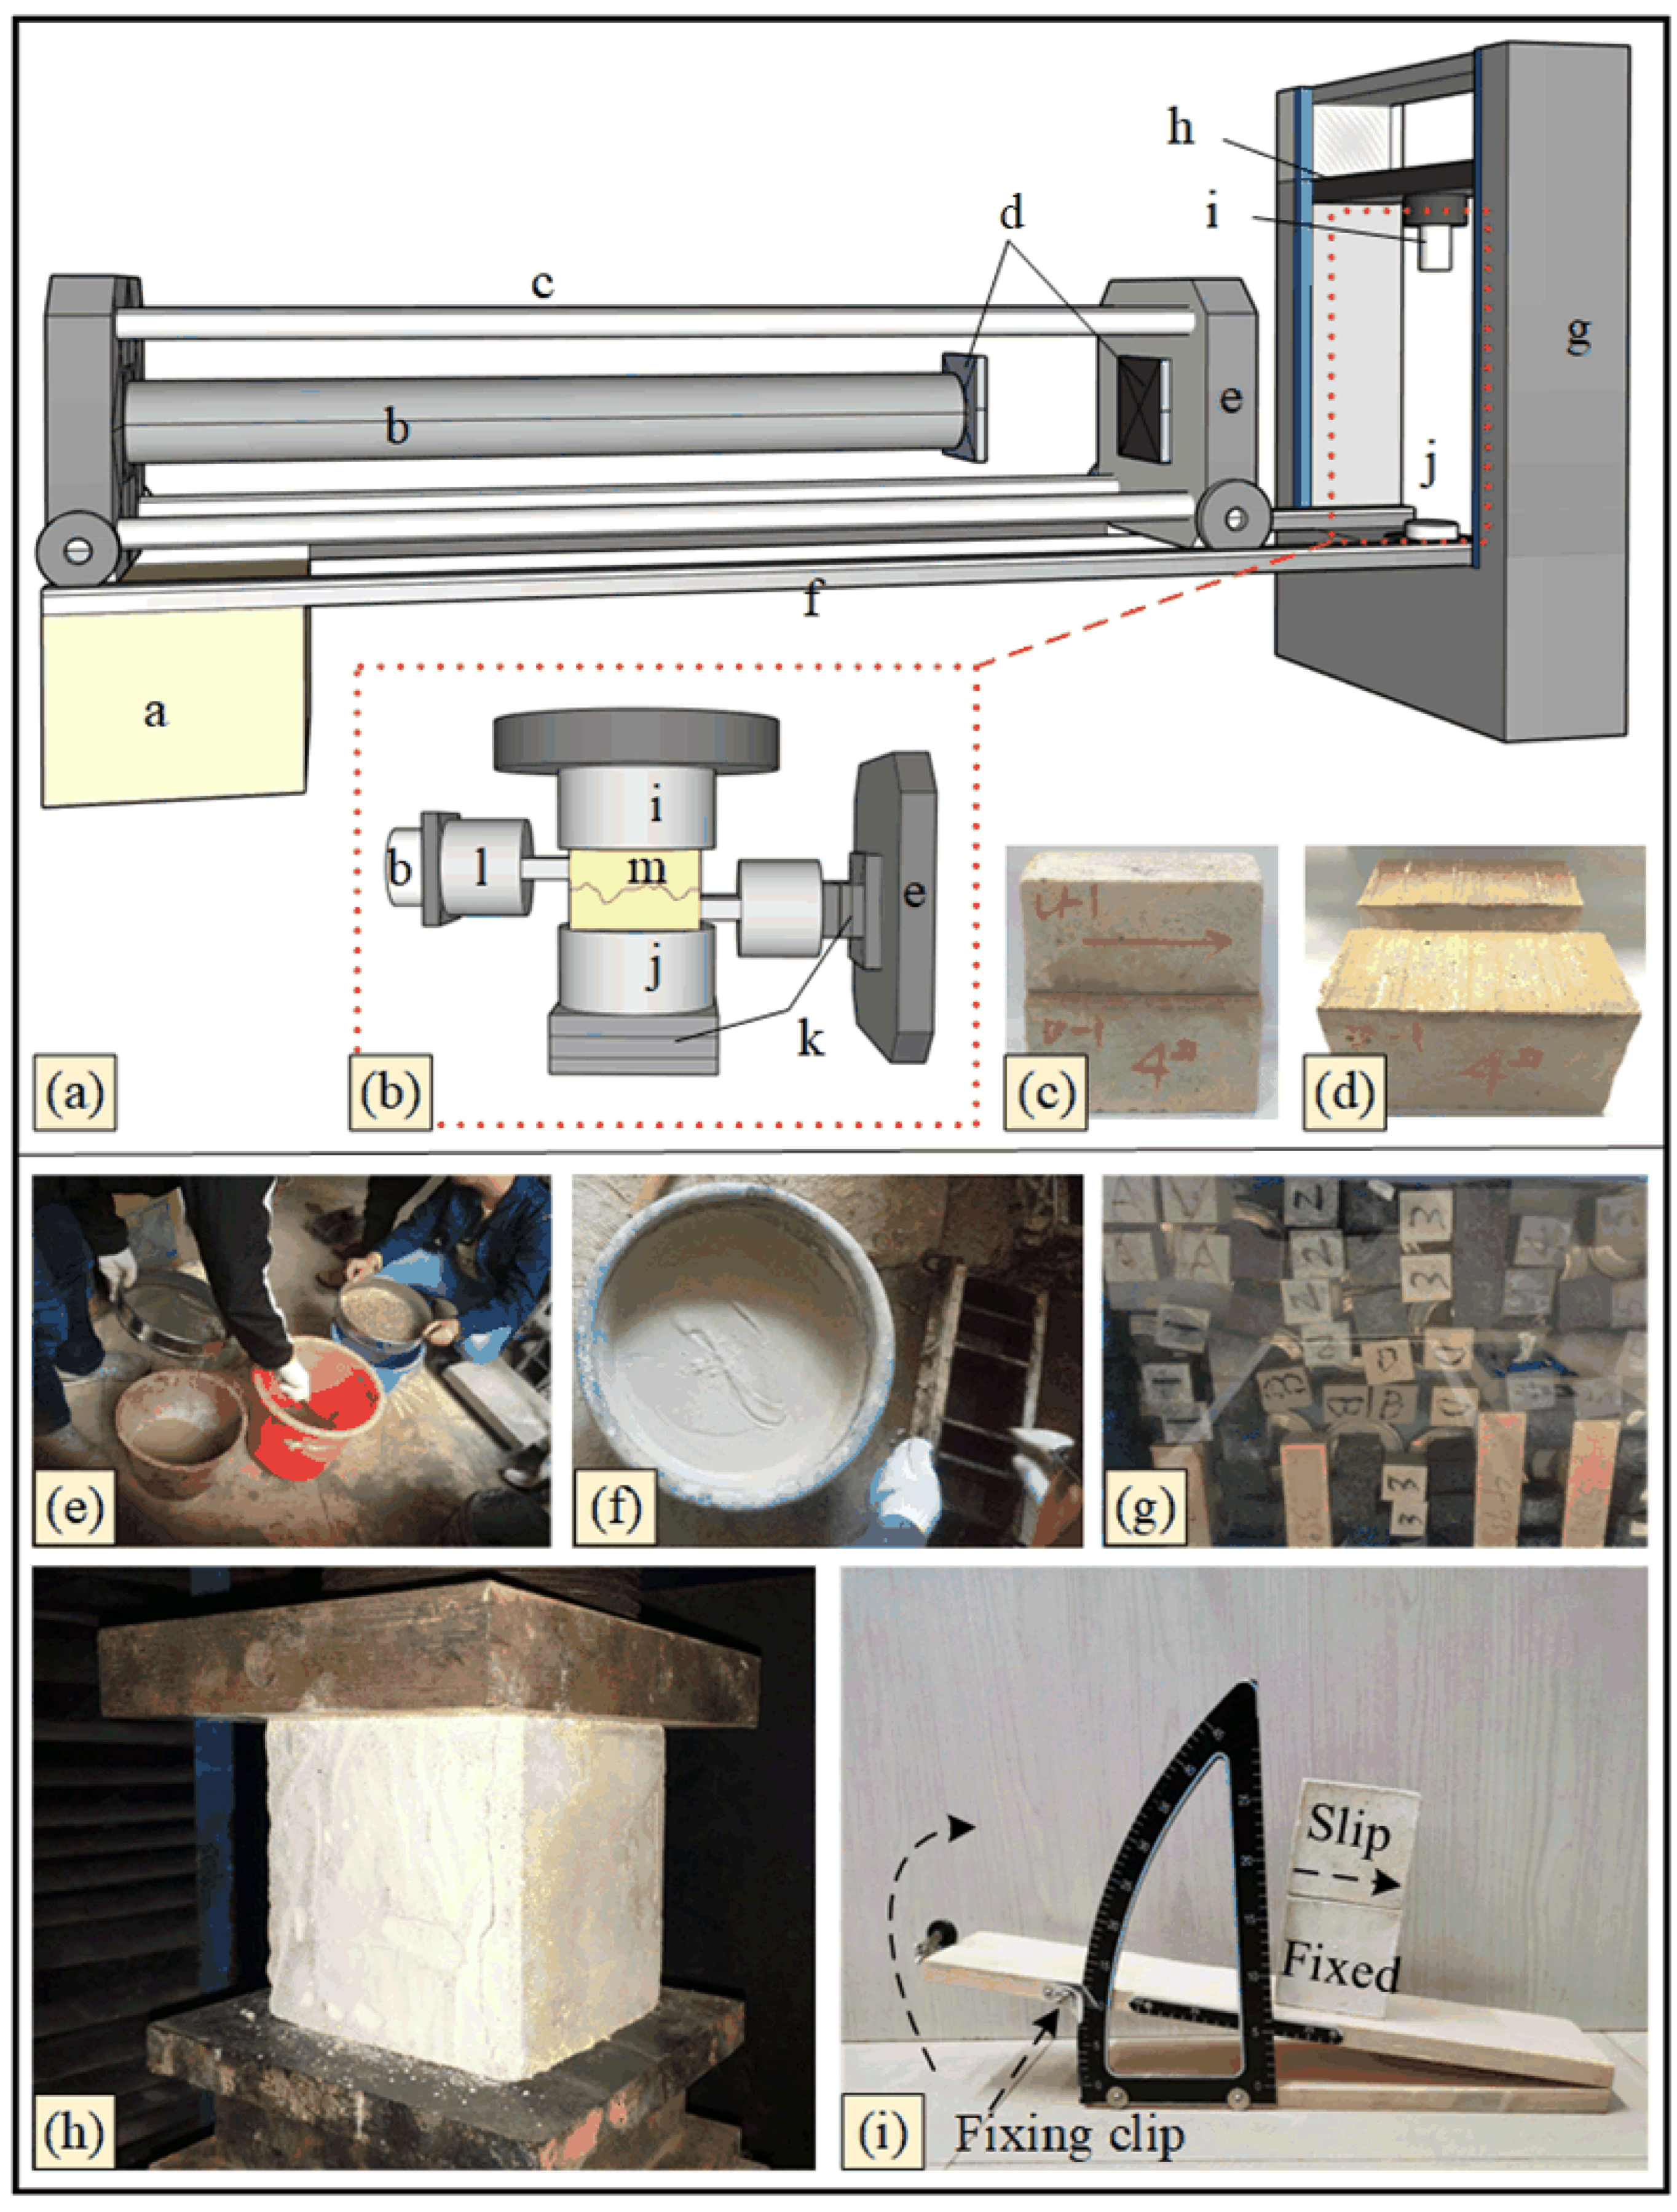
All relevant tests are shown in Figure 5.

2.2.1. Molding Process

Based on the 3D printing template described in the previous section, the specimens were poured according to the process shown in Figure 5. Before pouring, the fine sand was screened, ensuring it passed through the 16-mesh sieve to remove impurities and coarse particles. For the physical shear tests, two distinct cement mortar mixes, designated as Material A and Material B, were prepared to represent different rock strength levels. In this study, two distinct mortar mixes, designated as Material A and Material B, were prepared for the physical shear tests to represent two different rock strength levels. Both materials were composed of cement, fine sand, silica fume, water, and a water-reducing agent.
The mixture proportion of the rock-like similar material was determined with reference to previous studies, so as to achieve mechanical properties comparable to those of natural rock and ensure the reliability of the physical modeling tests [27]. The mass ratios for Material A were optimized as cement: fine sand/silica fume/water/water-reducing agent = 1:1.5:0.1:0.4:0.018. This mix was designed to simulate a relatively softer rock. For Material B, the mass ratios were set as 1:1.0:0.2:0.3:0.012, designed to simulate a harder rock. The main mineral components of these similar materials were calcium oxide, calcium hydroxide, ettringite, calcium silicate hydrate, etc. To ensure the accurate replication of the 3D-printed joint surface details and to minimize void formation within the specimens, particular attention was paid to the flowability and compaction of the mortar. The water-to-binder ratio for both Material A and Material B was carefully selected to provide sufficient workability for filling the intricate mold geometries while maintaining adequate strength. Furthermore, a water-reducing agent was incorporated into the mix designs to enhance fluidity without increasing the water content, thus helping to reduce potential internal pores. After mixing, the mortars were poured into molds according to the experimental design conditions. After pouring, the specimens were demolded 24 h later and cured for 28 days under standard curing conditions (e.g., 20 °C and 95% relative humidity). The final poured specimens are shown in Figure 5c. The cast shear specimens have a length of 100 mm along the shear direction, a dimension of 100 mm in the axial compression loading direction (perpendicular to shear), and a thickness of 50 mm perpendicular to the shear direction.

2.2.2. Determination of the Wall Rock Strength

Two kinds of cementitious materials with obvious differences were selected for rock mass pouring, which are represented by material A and material B in this paper. The wall rock strength of the specimens was measured after pouring. The JCS values in Barton’s JRC-JCS model were taken as the measured parameters of the specimens to ensure the accuracy of the test data and calculation results. The test process is shown in Figure 5d, and the results are shown in next section.

2.2.3. Determination of the Basic Friction Angle

To calculate the rock mass joint surface JRC values of the Barton model, the materials need to be characterized. The basic friction angle was measured using the test equipment shown in Figure 5e. For this measurement of the two different materials, the bottom specimen was fixed on a retaining plate. Then, the plate was slowly lifted until the upper block slipped. At this point, the numerical value on the scale plate was read and recorded. To minimize potential influences from the testing device’s contact surface conditions, all contact interfaces were thoroughly cleaned, and the equipment components were designed to ensure consistent and minimal extraneous friction. Multiple groups of parallel tests were carried out repeatedly, and the average value was finally taken. The basic friction angle of material A was 32°, and that of material B was 32.9°.

2.2.4. Joint Surfaces Shear Test

A maximum axial load of 980 kN could be applied to the axial compression system, and a maximum thrust of 600 kN. Crucially, all shear tests were conducted under a Constant Normal Load (CNL) condition applied to the thrust system. Each group of pressures was stably applied to the specimen through preset values. In addition, the loading space between the specimen and the loading system was adjusted by the corresponding position of cushion block, roller plate, etc., which increased the compatibility of the testing machine for different sizes of specimens.
The rock shear rheological testing machine is shown in Figure 5f, where i is the axial force arm. In the direct shear test, it is necessary to cooperate with the roller plate to apply axial force to the test to ensure that the relative displacement between the specimens will not be affected by the friction between the specimen and the axial force arm, resulting in test error. At the beginning of the test, the auxiliary steel plate and shear ejection block were first fixed on the d through a hanging fastener between the steel plates. The spacing between b and e on the left was adjusted to an appropriate position, and then the whole shearing apparatus was pushed to an appropriate position in the axial force loading cabinet. A backing plate was added at the bottom, the shear position of the specimen was adjusted to an appropriate height, and then the axial force transverse brace h was gradually reduced so that the axial force arm i just contacts the test block. The position of the test block was rechecked, and an axial force was applied before starting the shear test after confirming that there were no issues.
As shown in Figure 5h,i, two test blocks marked with clear positions in advance were accurately installed. In the figure, “U” in “U-1” represents the word “UP”, indicating that the test block is located at the upper part of the test. The number “1” represents the second group of tests, and “#4” represents the contour curve of the joint surface of the seventh group, corresponding to the JRC number in Figure 1. The shear rheological testing machine, with a computer, a steel plate (different thicknesses), one ball disk, one shear steel block, and other auxiliary pads were used for the experiments. The peak shear strength and peak shear displacement of specimens were measured.
Regarding the system stiffness, the maximum normal test force (vertical) is 600 kN, and the maximum lateral test force (shear) is 400 kN. The test force measurement error is ≤±1%, and the shear deformation measurement error is ≤±0.5%. While the machine possesses capabilities for applying confining pressure (maximum 60 MPa) and pore water pressure (maximum 50 MPa), these functions were not utilized in the present direct shear study. The material’s shear stiffness was not directly measured during the physical tests but is incorporated and derived through the subsequent numerical inversion process.

3. Test Results and Analysis

3.1. Test Results and Analysis of the Wall Rock Strength and Basic Friction Angle

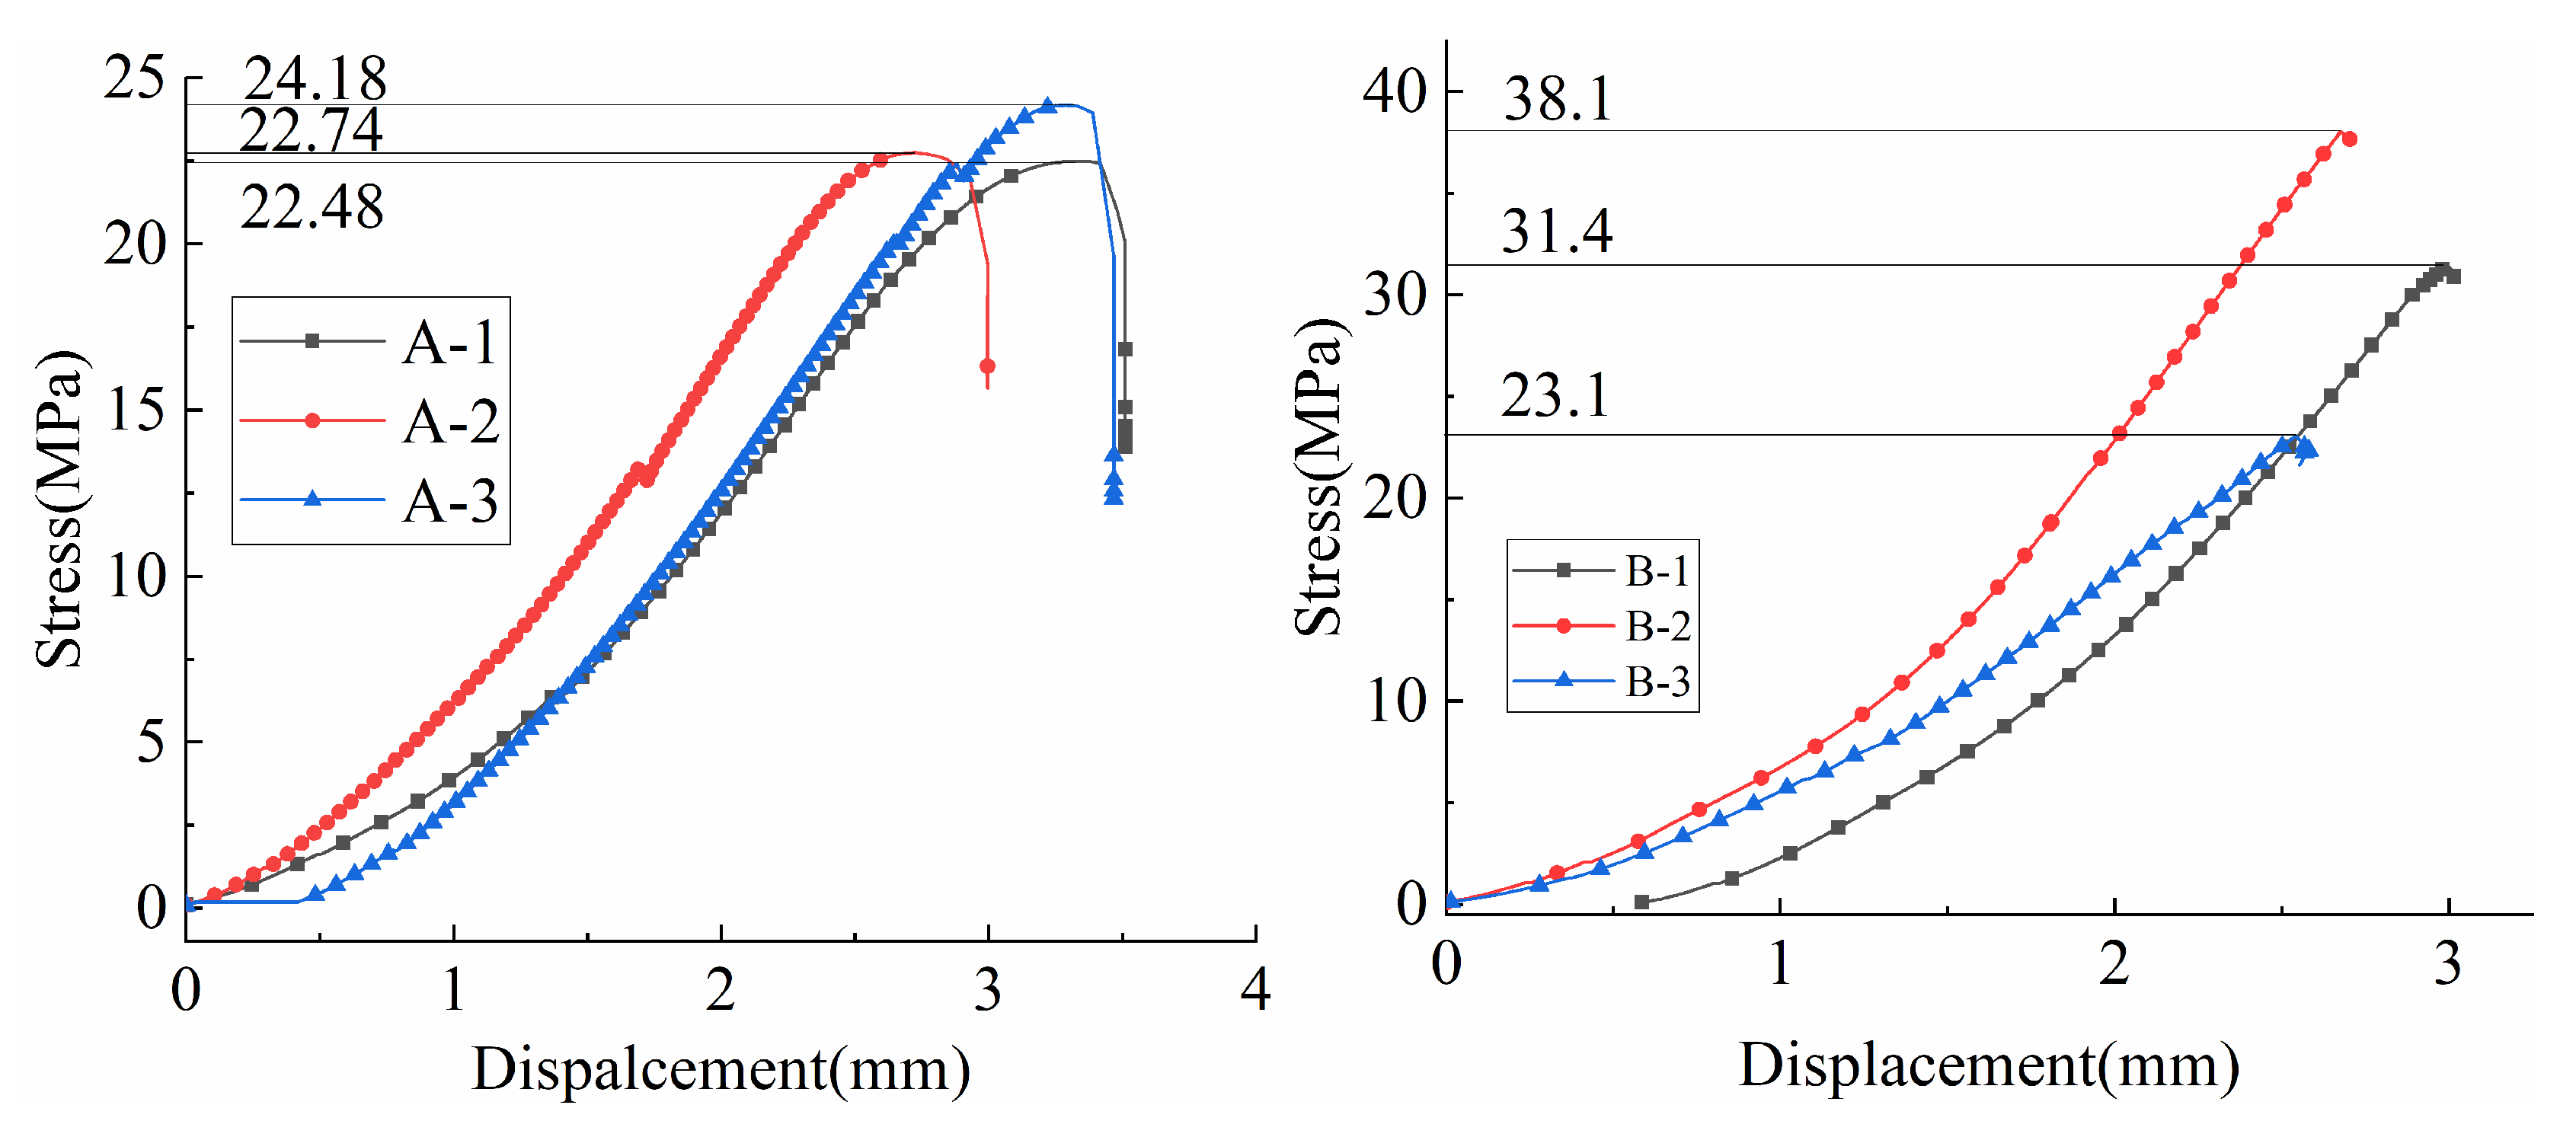
Two kinds of materials were selected for the casting of the artificial rock specimens, which were carried out simultaneously as a contrast test. The JCS values of the two kinds of materials were measured by uniaxial compression experiments.
As shown in Figure 6, according to the JCS test results, the average value of the material was calculated. The uniaxial compressive strength of material A is 23.1 MPa, and the uniaxial compressive strength of material B is 30.85 MPa. This value was used as the JCS value (material wall rock strength) in the calculation process.
Material A, with its lower UCS, was designed to simulate a relatively softer rock, while Material B, with its higher UCS, simulated a harder rock. The brittleness of Material A was found to be comparable to that of typical sandstone, which is suitable for rock similarity simulation, while Material B exhibited higher brittleness consistent with stronger rocks. These calibrated properties provided the basis for our physical shear tests and served as reference points for the subsequent numerical simulations.

3.2. Shear Test Results and Analysis

3.2.1. Shear Displacement and Shear Stress

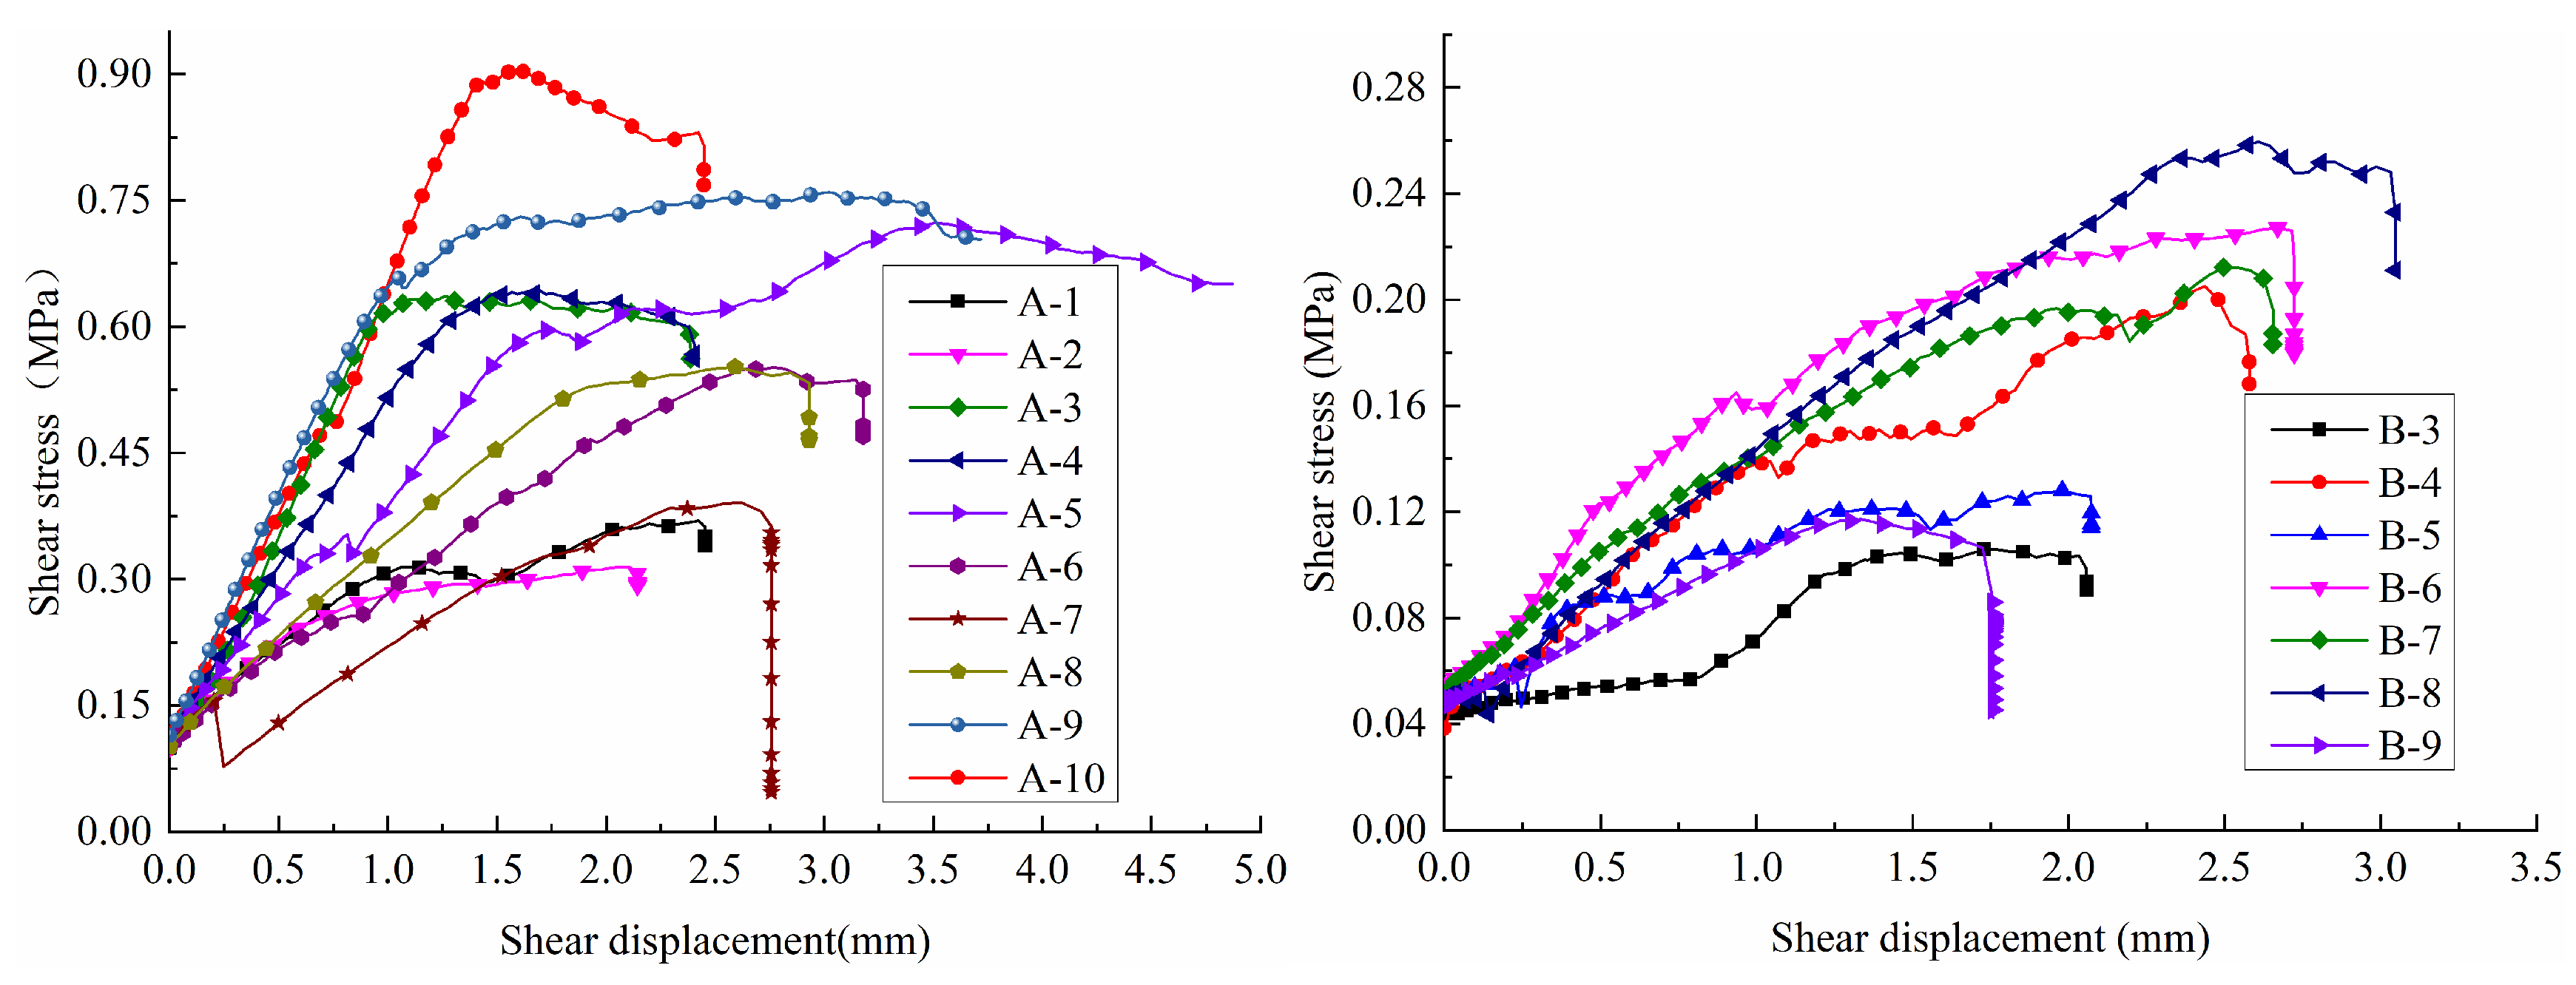
The results in the Figure 7 show the following: (1) in the direct shear test, with increasing shear displacement, the shear stress required by the displacement of the artificial rock mass joint surface reconstructed by the casting of 3D-printed molds first increases gradually and then decreases rapidly after reaching the peak shear stress. With increasing JRC value of the joint surface, the shear stress required by the same shear displacement increases gradually. On the one hand, the joint surface contour occlusion effect is satisfactory; that is, the 3D printing reconstruction accuracy of the joint surface is relatively accurate. On the other hand, the results also prove the accuracy of the test. (2) For joints of the same material with different JRC values, a clear relationship is observed between the JRC value and the peak shear stress on the joint surface. Specifically, as the JRC value increases, the peak shear stress generally increases, indicating that a larger JRC value leads to greater shear resistance at the same shear displacement. (3) Our experimental results, as presented in Figure 7, indicate that for two joint surfaces of different materials with the same JRC, material A requires significantly higher shear stress than material B at the same shear displacement. This observation, while seemingly counter-intuitive given material A’s lower uniaxial compressive strength, can be attributed to the specific mechanical properties of its joint wall asperities. Despite a lower bulk UCS, the effective joint wall compressive strength (JCS) of material A’s asperities, or their resistance to degradation and interlocking efficiency under shear, appears to be relatively higher or more effective at early shear displacements compared to material B. This leads to a steeper initial rise in shear stress for material A, contributing to the observed higher shear stress at equivalent shear displacements.
The analysis results show that (1) the main difference between materials A and B lies in the uniaxial compressive strength, so the reason that the peak shear stress of material A corresponding to the joint surface is higher than that of material B corresponding to the joint surface under the same other conditions is mainly attributed to the difference in the value of the compressive strength of the material. (2) For the same material in joint surfaces with different JRC values, it is not evident that the larger the JRC value is, the greater the peak shear stress of the joint surface. Therefore, the shear performance of the rock mass on the joint surface is greatly related to the detailed microscopic characteristics of the contact of the joint surface.

3.2.2. Peak Shear Stress and Inverse Calculation

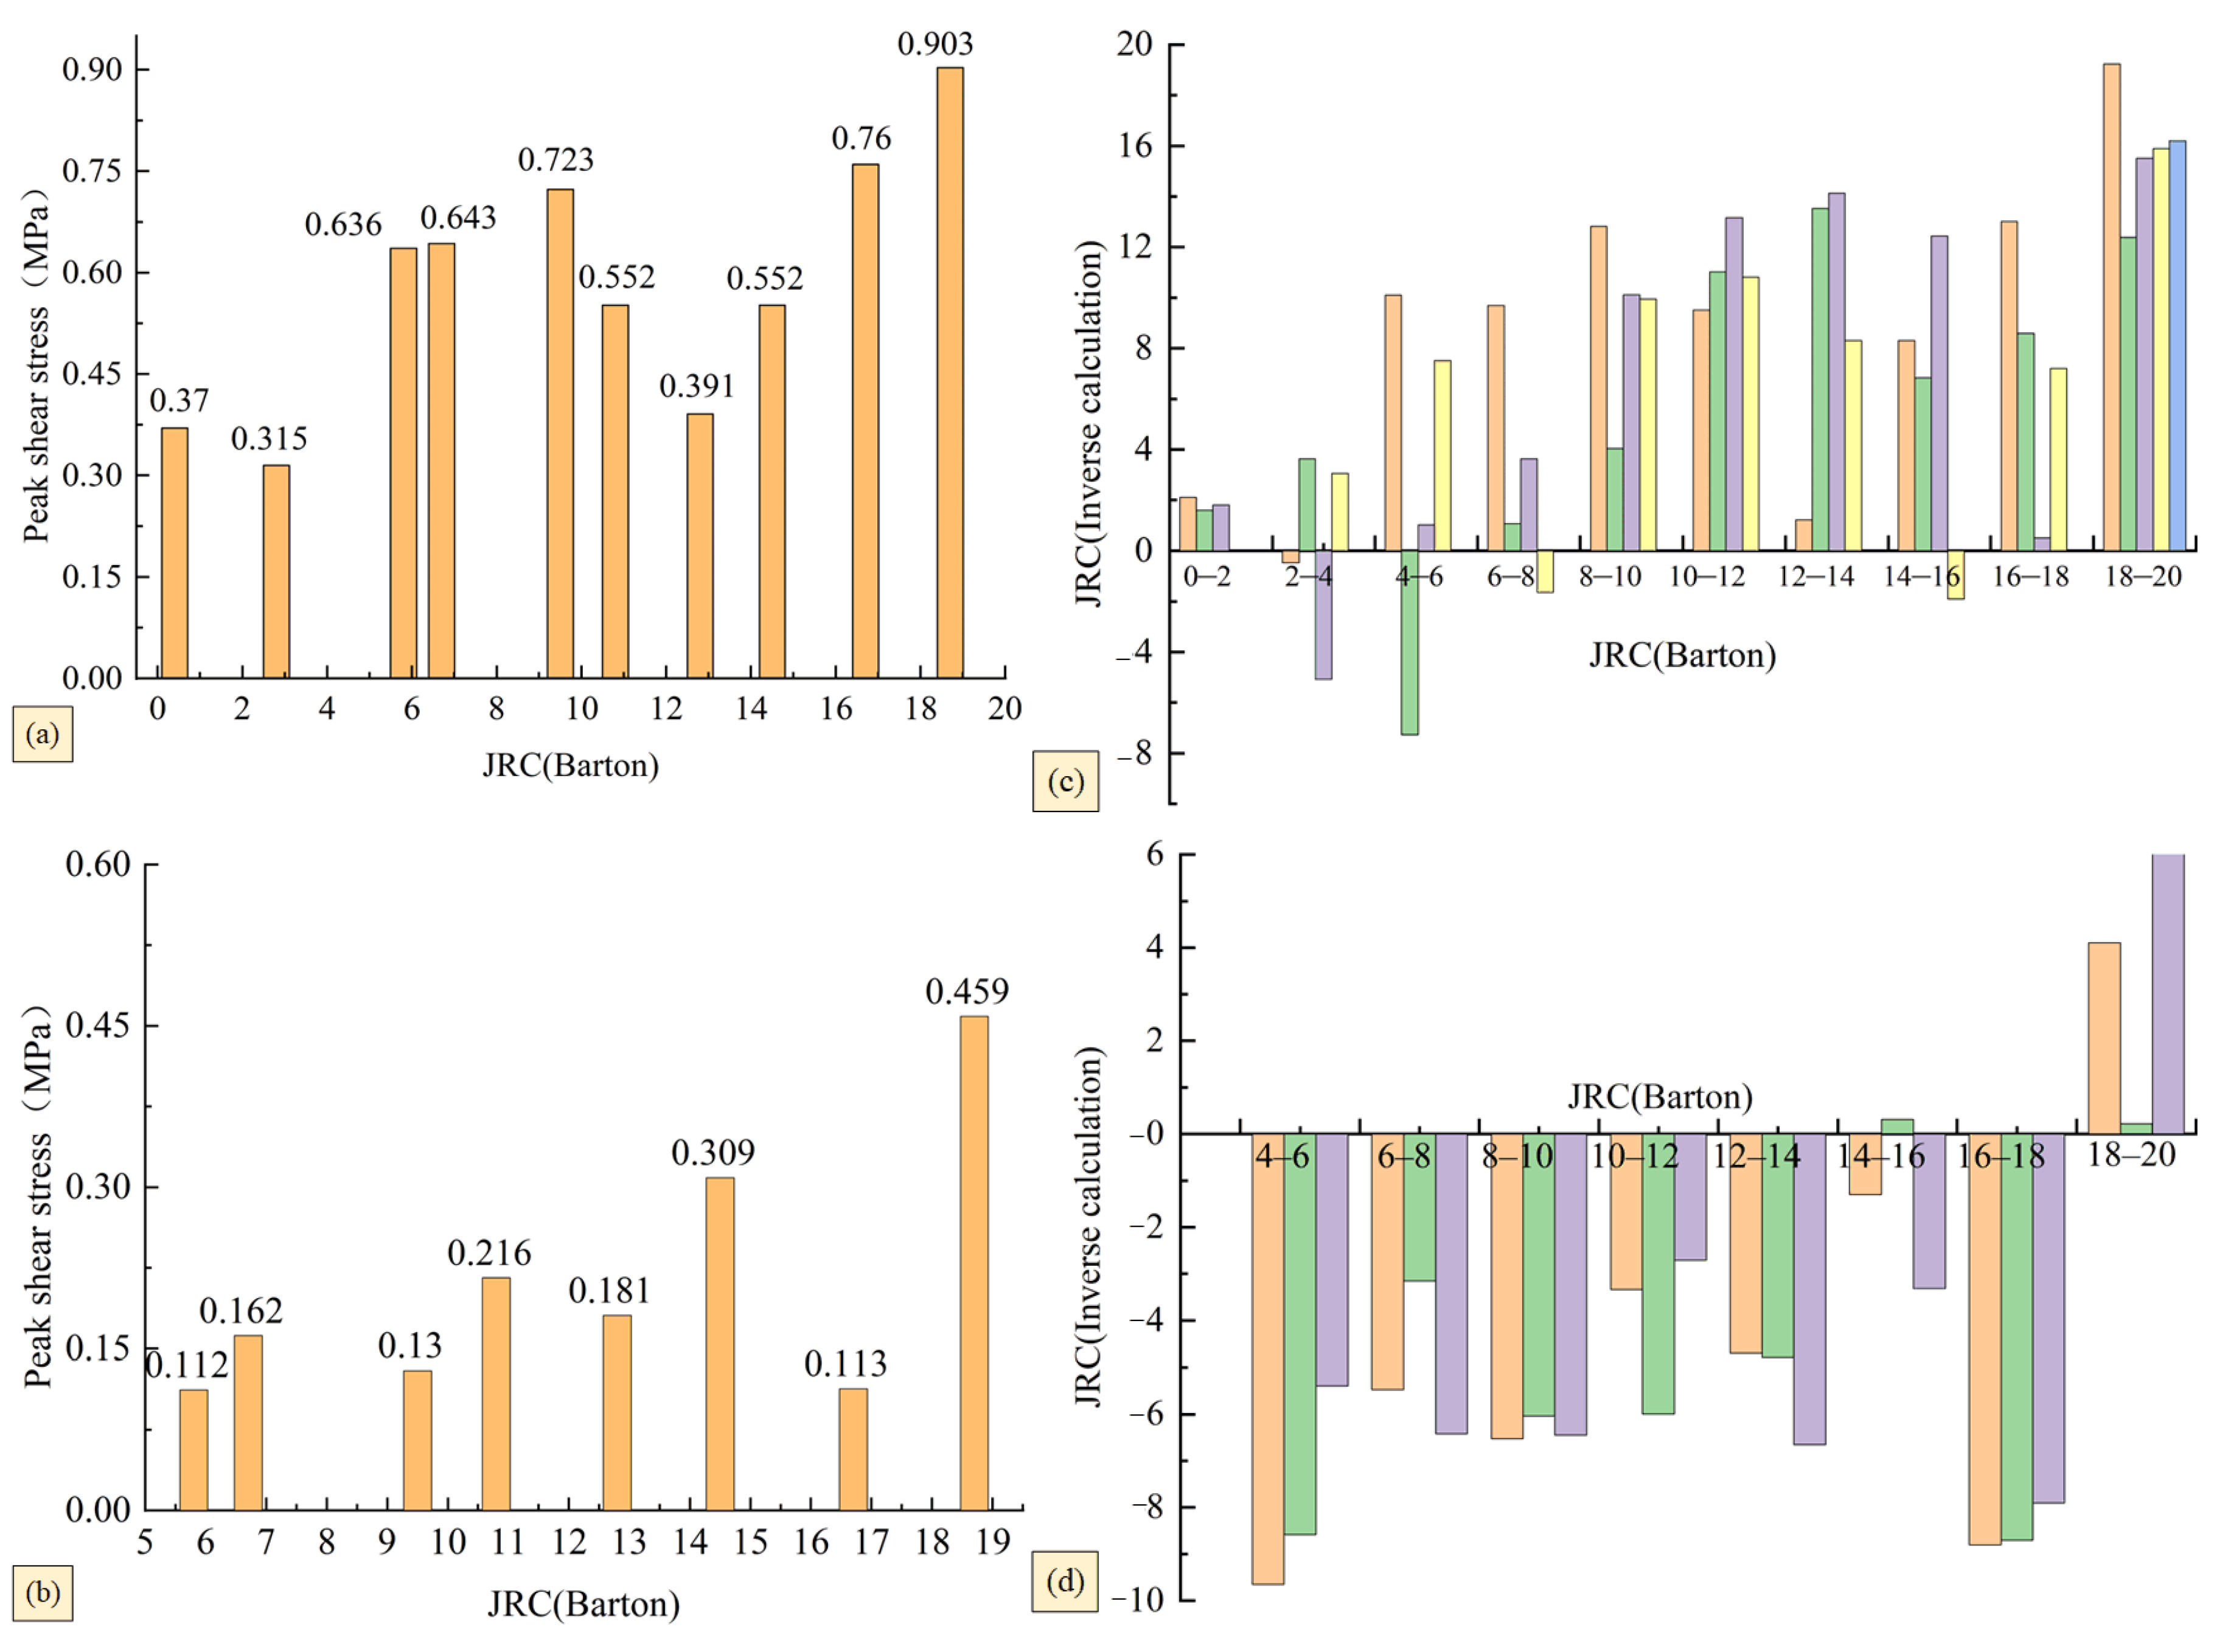
To verify this analysis, the peak strength of joint surfaces with different JRC values of different materials was extracted and compared, as shown in Figure 8a,b.
According to the above figures, the peak shear strength of the artificial rock joint surface increases with increasing JRC value under the same axial compression conditions (0.5 MPa for all). However, the peak shear stress of the JRC-joint surface corresponding to different materials is abnormal. (1) The peak shear stress of material A shows an increasing trend for joint groups 1–5 and 7–10, but the peak shear stress of joint surfaces A-3, A-4 and A-5 is higher than that of A-6, A-7 and A-8. The peak shear stress of material B increases with increasing JRC value, but the peak shear stress of joint surface B-9 drops sharply. (2) The compressive strength of material A is 23.1 MPa, and the compressive strength of material B is 30.85 Mpa. However, the peak shear stress of the joint surface corresponding to any JRC value of material B is much smaller than that of material A, and its proportion varies from 1/6 to 1/2.
To further verify the shear strength calculation theory of the Barton joint profiles with different JRC values by using the test results, according to the peak shear stress of the test specimen, the JRC value of the joint surface is calculated by using Formulas (1) and (2).
JRC inverse calculation formula of the Barton model:
τ = σ n tan JRC log 10 JCS σ n + ϕ r
JRC = arctan ( τ / σ n ) ϕ r log 10 ( JCS / σ n )
τ: Represents the shear strength of the rock joint (with units of MPa).
ϕr: Denotes the residual friction angle (with units of degrees).
σn: Indicates the normal stress applied during shearing (with units of MPa).
JCS: Refers to the joint wall compressive strength, which is typically approximated by the uniaxial compressive strength of the intact rock material (with units of MPa).
JRC: Joint Roughness Coefficients, is a dimensionless empirical index that quantifies the surface roughness of a rock joint.
The calculation results are shown in Figure 8c,d.
The results show that (1) the JRC value of material A measured by the shear strength of the joint surfaces is close to the theoretical value, although the JRC values of the joint surfaces of groups 8 and 9 are relatively small; (2) the JRC value of material B measured by the shear strength of the joint surface has a large deviation from the theoretical value, which does not match the theoretical value.
The analysis shows that (1) the peak shear stress of the rock mass joint surface with the same JCS does not follow the simple relation that the greater the JRC value is, the greater the shear strength. A more detailed and accurate judgment index of the joint surface shear strength should be used as the basis for determining the joint surface shear strength, and the deformation mechanism of the joint surface after shear, namely interlocking, wear, shear off, shear failure etc., should also be considered. Sliding, separation and degradation [28]. (2) When the JCS value of the rock mass is high, the brittle failure of the joint surface is the main failure of the weak convex plane, which may lead to the poor shear performance of the weak plane. Therefore, the peak shear stress of the joint surface of the artificial rock mass of material A is higher than that of material B. (3) There are differences in the JRC numerical back calculation for group 8 and 9 joint planes of material A, mainly considering the shear mechanical behavior differences in the joint surface details. Although the compressive strength value of material B is relatively high, the shear behavior of convex joint surfaces is mainly the shear tensile failure of the convex joint surfaces; thus, the shear strength of the joint surfaces is generally low, and other properties of the material need to be further considered.

4. Shear Failure Mode Analysis of Joint Surface Details

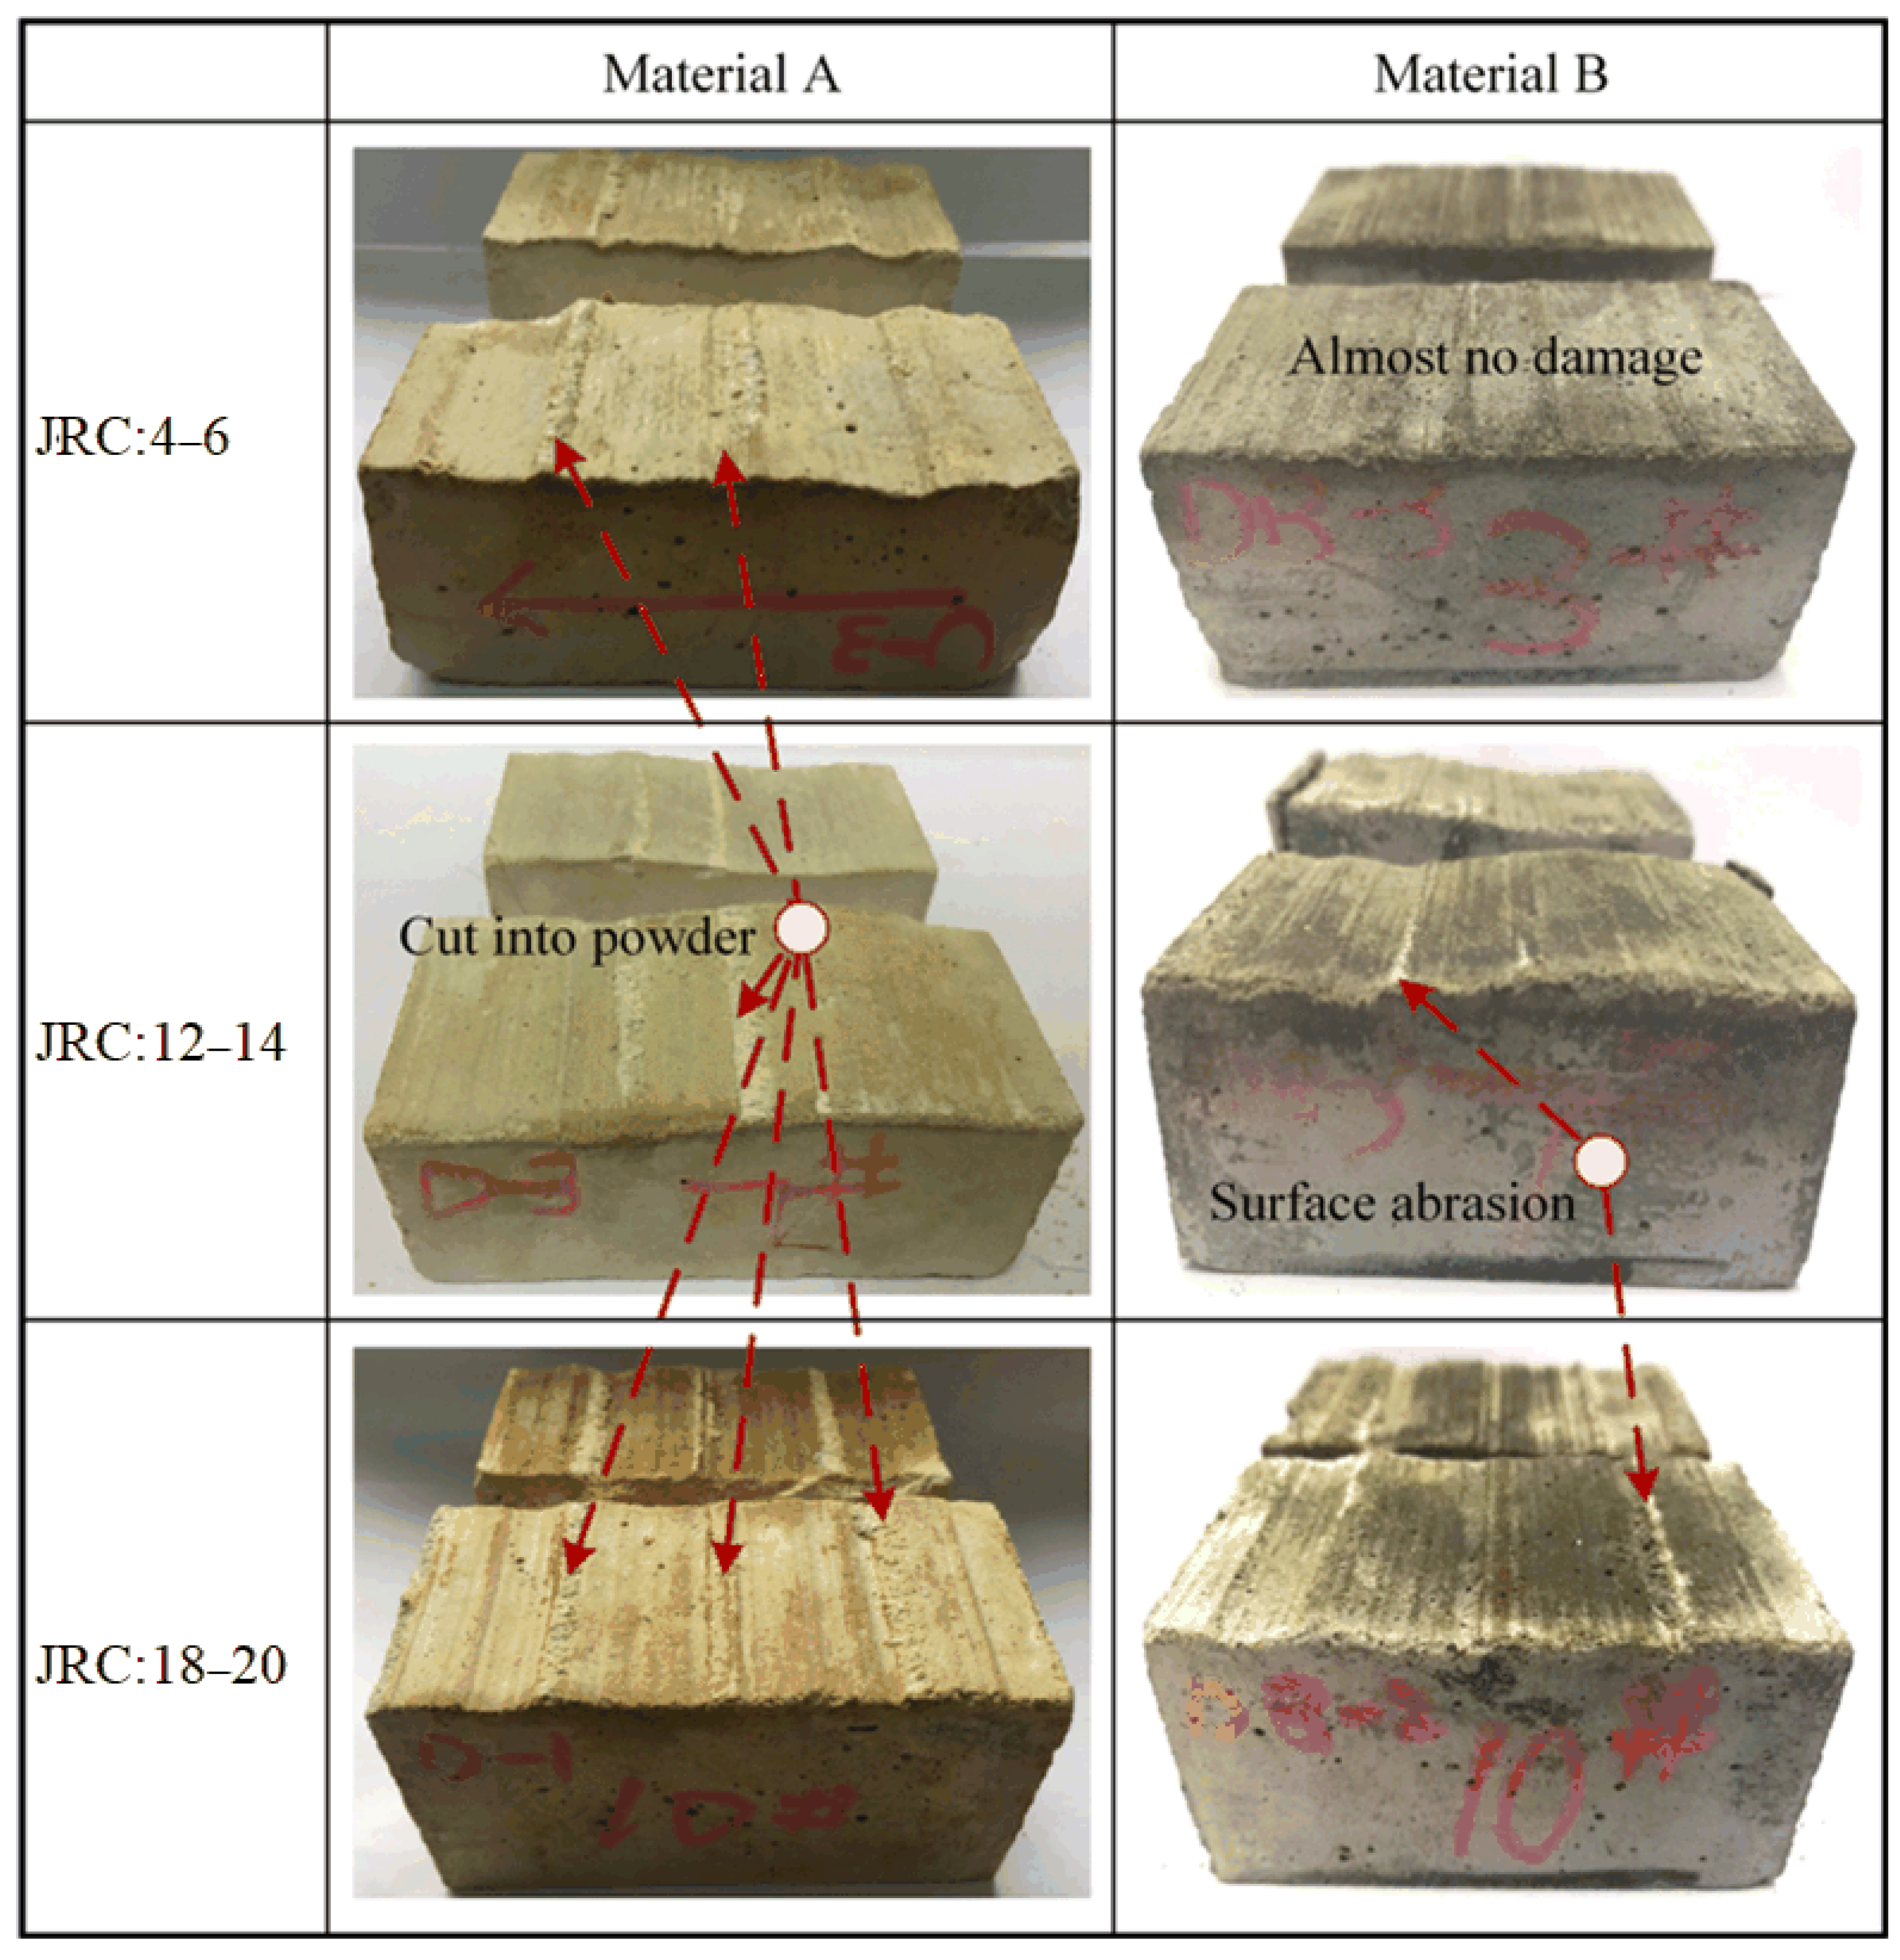
The joint surface shear JRC values of the two materials are obviously different, and the details of the joint surface failure modes of the different materials are shown in Figure 9.
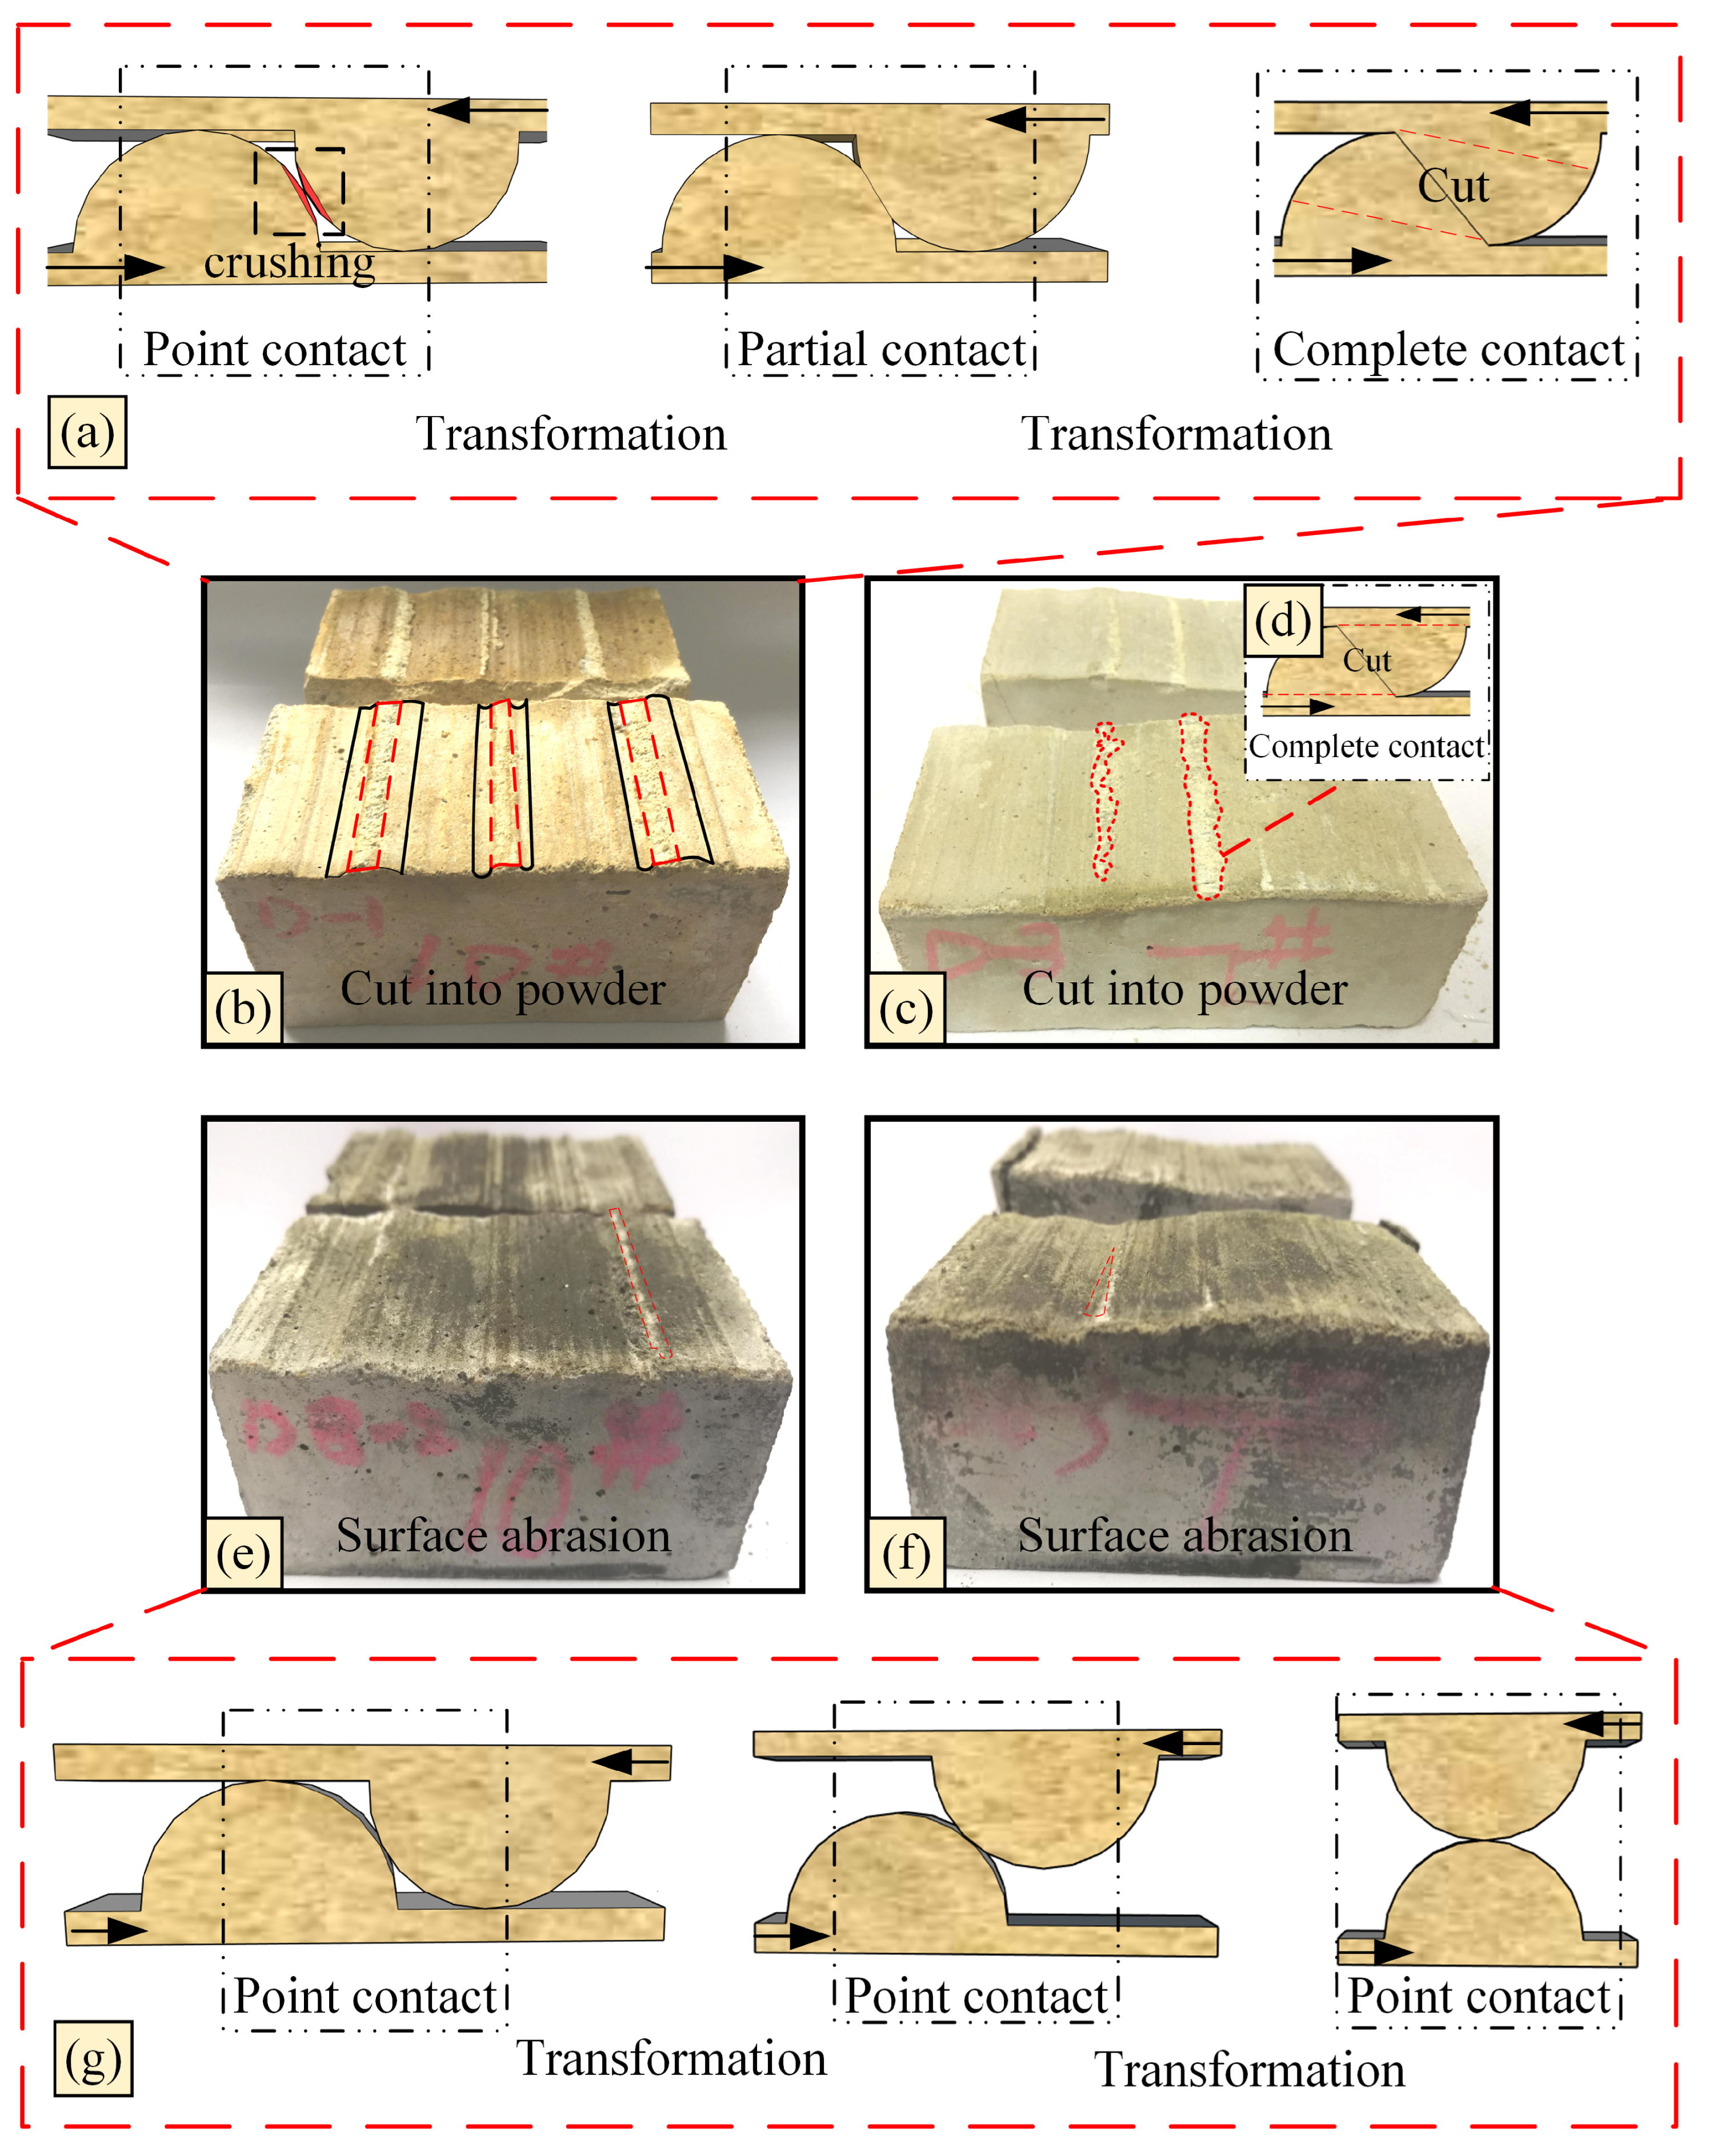
By comparing the shear failure mode of material A and material B in Figure 9 and the shear mechanical behavior of the joint surface details, it is found that (1) the shear behavior of the joint surface is mainly caused by the friction shear of the convex joint surface, and the friction behavior of the concave joint surface is not obvious. (2) After the shear test of the joint surface poured with material A, the raised part in the joint surface is sheared and crushed into a powder. After the shear test of the joint surface poured with material B, the shear behavior of the raised part in the joint surface is not obvious compared with that of material A, and its shear behavior is mainly the increased friction of the raised part of the joint surface between the test blocks.
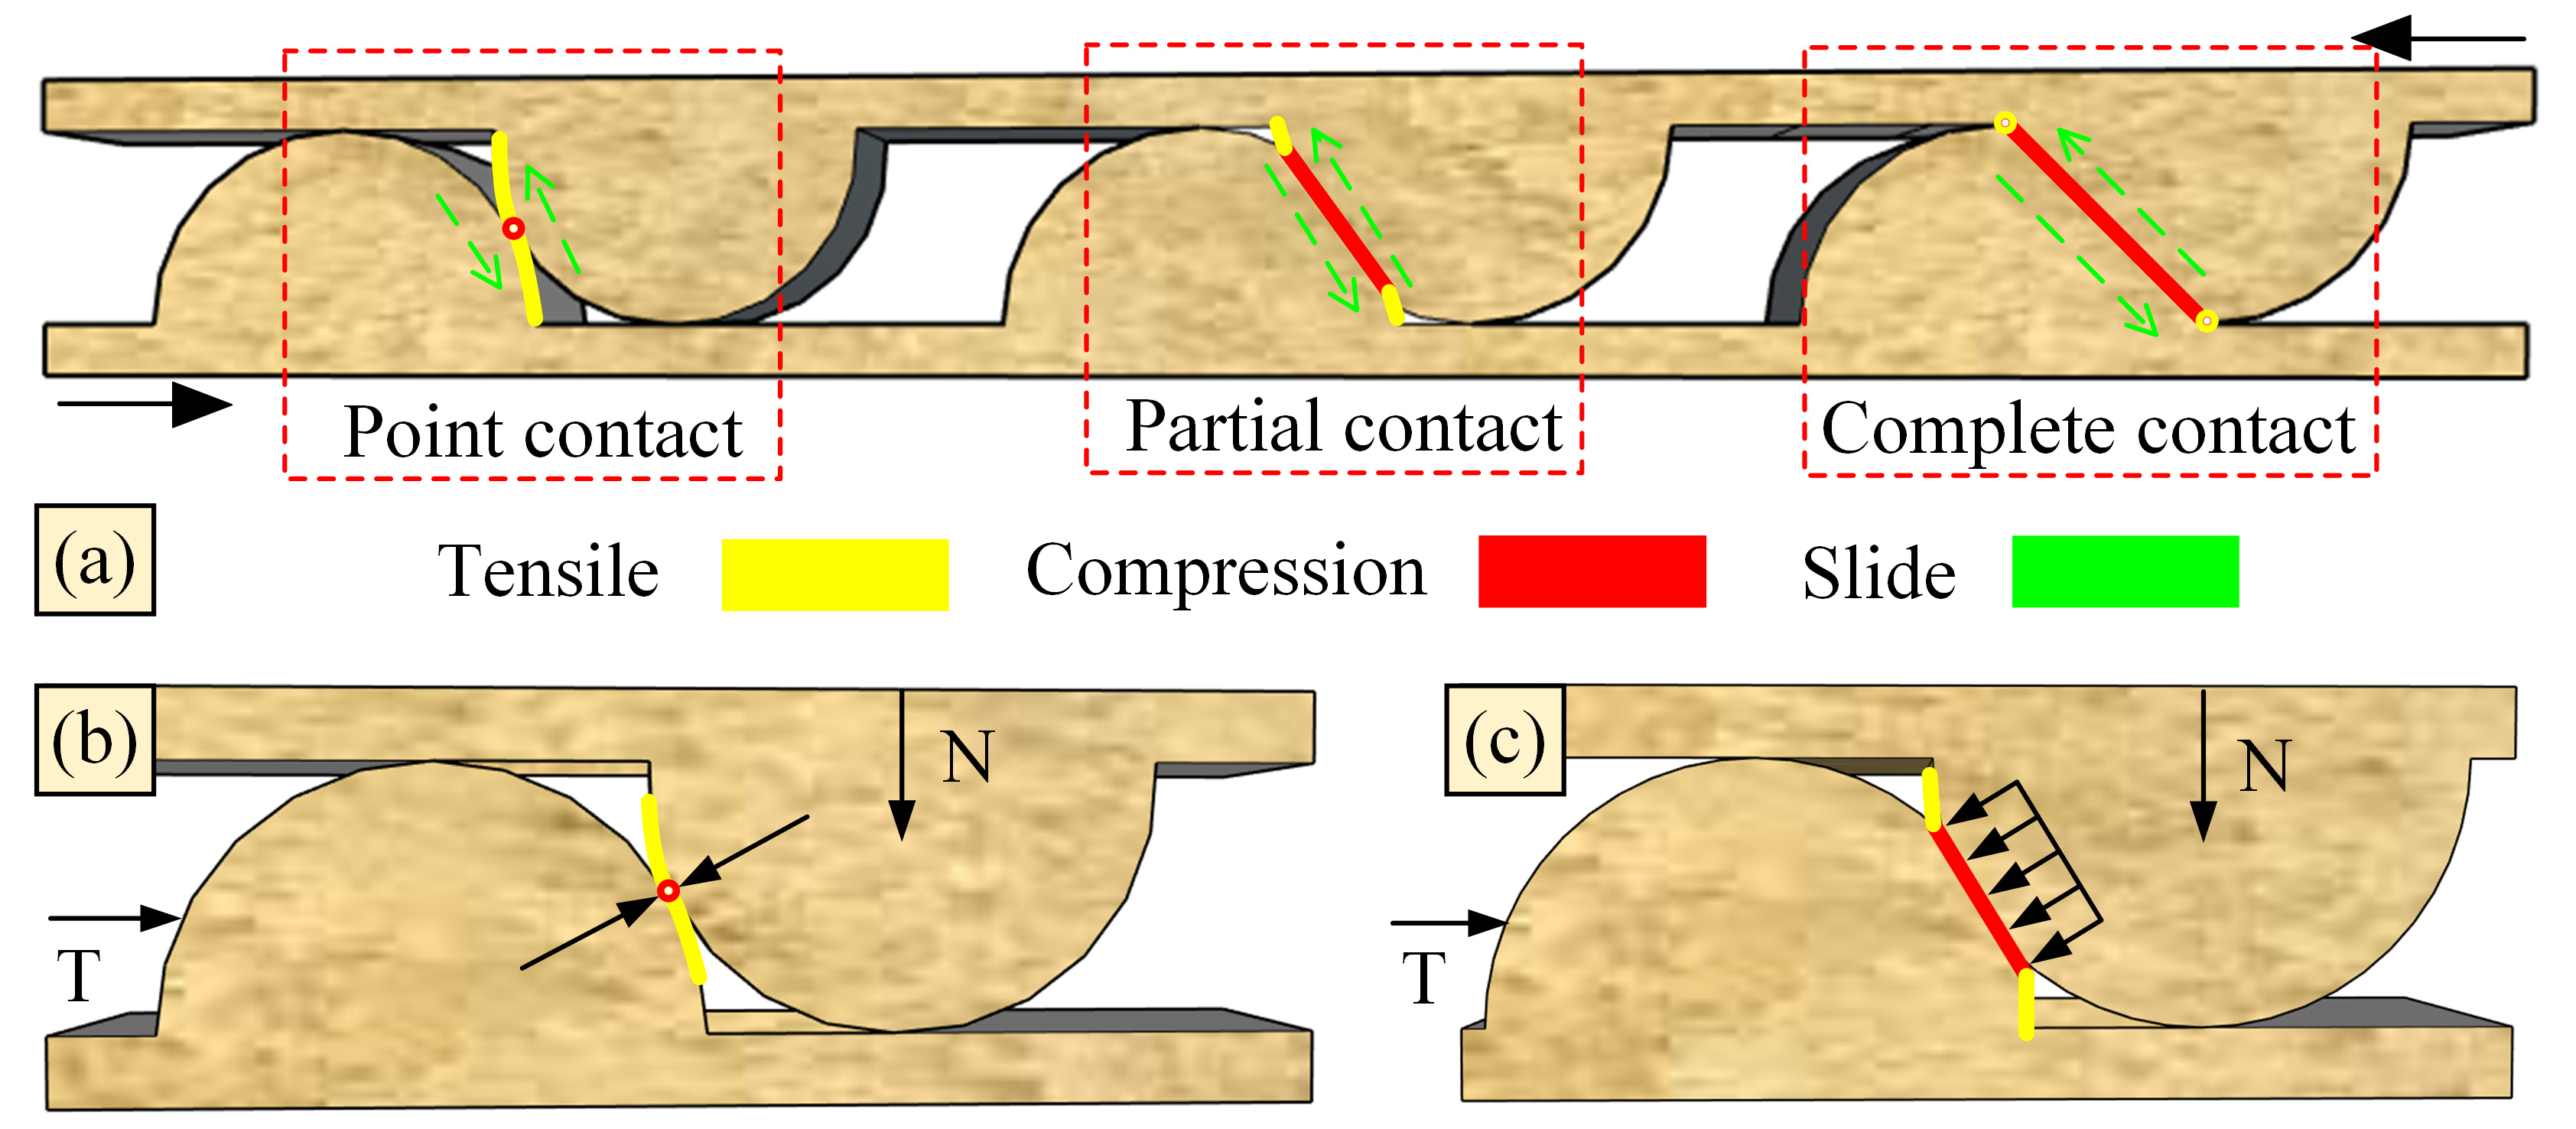
The simplified shear behavior of the joint surface is shown in Figure 10. The shear contact modes of the convex joint surface can be divided into point contact, complete bite and local contact. Each contact mode corresponds to different failure modes of the convex joint surface. Similarly, the detailed mechanical behavior of the convex joint surface is different because of different contact modes. The tensile failure, compression failure and the only slip trend after shear of the relative joint surface are complex. It is necessary to further verify and analyze whether the relative slip is a complex process.
To accurately analyze the failure mode of the uplift shear mechanics after shear of joint surface material A and material B, it can be concluded that (1) the relationship between the shear peak shear stress values of the joint surfaces with different JRC values of material A are abnormal. On the one hand, because of the differences in the convex joint surface of different JRC values, differences in the damage failure mode occur after the local shear of the joint surface of the sample, On the other hand, the material itself has good continuity at the macro scale, but as a material for artificial pouring, its micro continuity is different from the rock mass formed by several years of deposition, which leads to differences in the shear performance of the joint surface. (2) The shear properties of the joint surface with the same JRC value of material A and material B are cast and reconstructed, which can be seen in Figure 9. Moreover, the compressive properties of the two materials are quite different. When the joint surface is sheared, the compressive performance of the convex joint surface has an obvious influence on the mechanical behavior of the joint surface as a whole, that is, the joint surface of material A in Figure 9 is obviously crushed. When the joint surface is sheared, the mechanical behavior of the convex joint surface will change with the development of shear displacement. As shown in Figure 10, the compressive strength of the two materials is obviously different. Therefore, the “stress mode” changes obviously after the reconstruction of the joint surface of material A. After the contact mode of material B, the shear may be mainly relative slip. The results of Figure 11 verify this idea.
According to Figure 5a,b, the shear displacement and shear stress analysis of joints of different materials on the artificial rock mass shows that the compressive strength of material A is lower; thus, the shear strength of the convex part of the joint surface of material A is lower than that of material B, which leads to the different shear behavior modes of the two materials corresponding to the joint surface at the same normal stress of 0.5 MPa. Moreover, material A exhibits convex shear failure on the joint surface, and material B exhibits sliding friction of the raised part of the joint surface. Therefore, under the same curve profile of the JRC value, the peak shear stress of the joint surface cast by material B is lower than that of material A. An examination of the post-shear asperity degradation shown in Figure 11 revealed that Material A exhibited significant shearing-off and wear, whereas Material B only presented superficial scratches. This distinct difference indirectly implies that the harder material (Material B) likely experiences more pronounced dilation during shearing, consequently influencing its overall shear mechanical response.

5. Analysis of Shear Mechanical Behavior of Joint Surface in Rock Masses with Different Hardness Levels

Based on the analysis of experimental results, significant differences in shear characteristics and failure mechanical behavior between material A and material B are evident, particularly in the shear failure behavior of micro-convex joint surfaces. It is hypothesized that the contact mode of the joint surface is the primary factor influencing these distinct shear mechanical behaviors. This variation in contact mode is primarily attributed to differences in material hardness levels. To further investigate the impact of material property differences on shear mechanical behaviors, numerical simulations of joint surface shear at various hardness levels were conducted using FLAC 3D. FLAC 3D has been proven effective in simulating the shear behavior of rock joints [29]; additional detailed validation simulations are not repeated in this study due to space limitations [30]. In these simulations, the structural plane has dimensions of 0.005 m in thickness and 0.1 m in length. The material parameters for the numerical models, including those representing a spectrum from soft to hard rocks, were systematically varied based on established rock mechanics principles. These numerical parameters were carefully calibrated and validated against the experimental results obtained from Material A and Material B, allowing for a comprehensive analysis of lithological influence across a broader range of strengths. Additional material parameters are detailed in Table 1, and all parameter calculations in the table are based on previous studies [5,31].
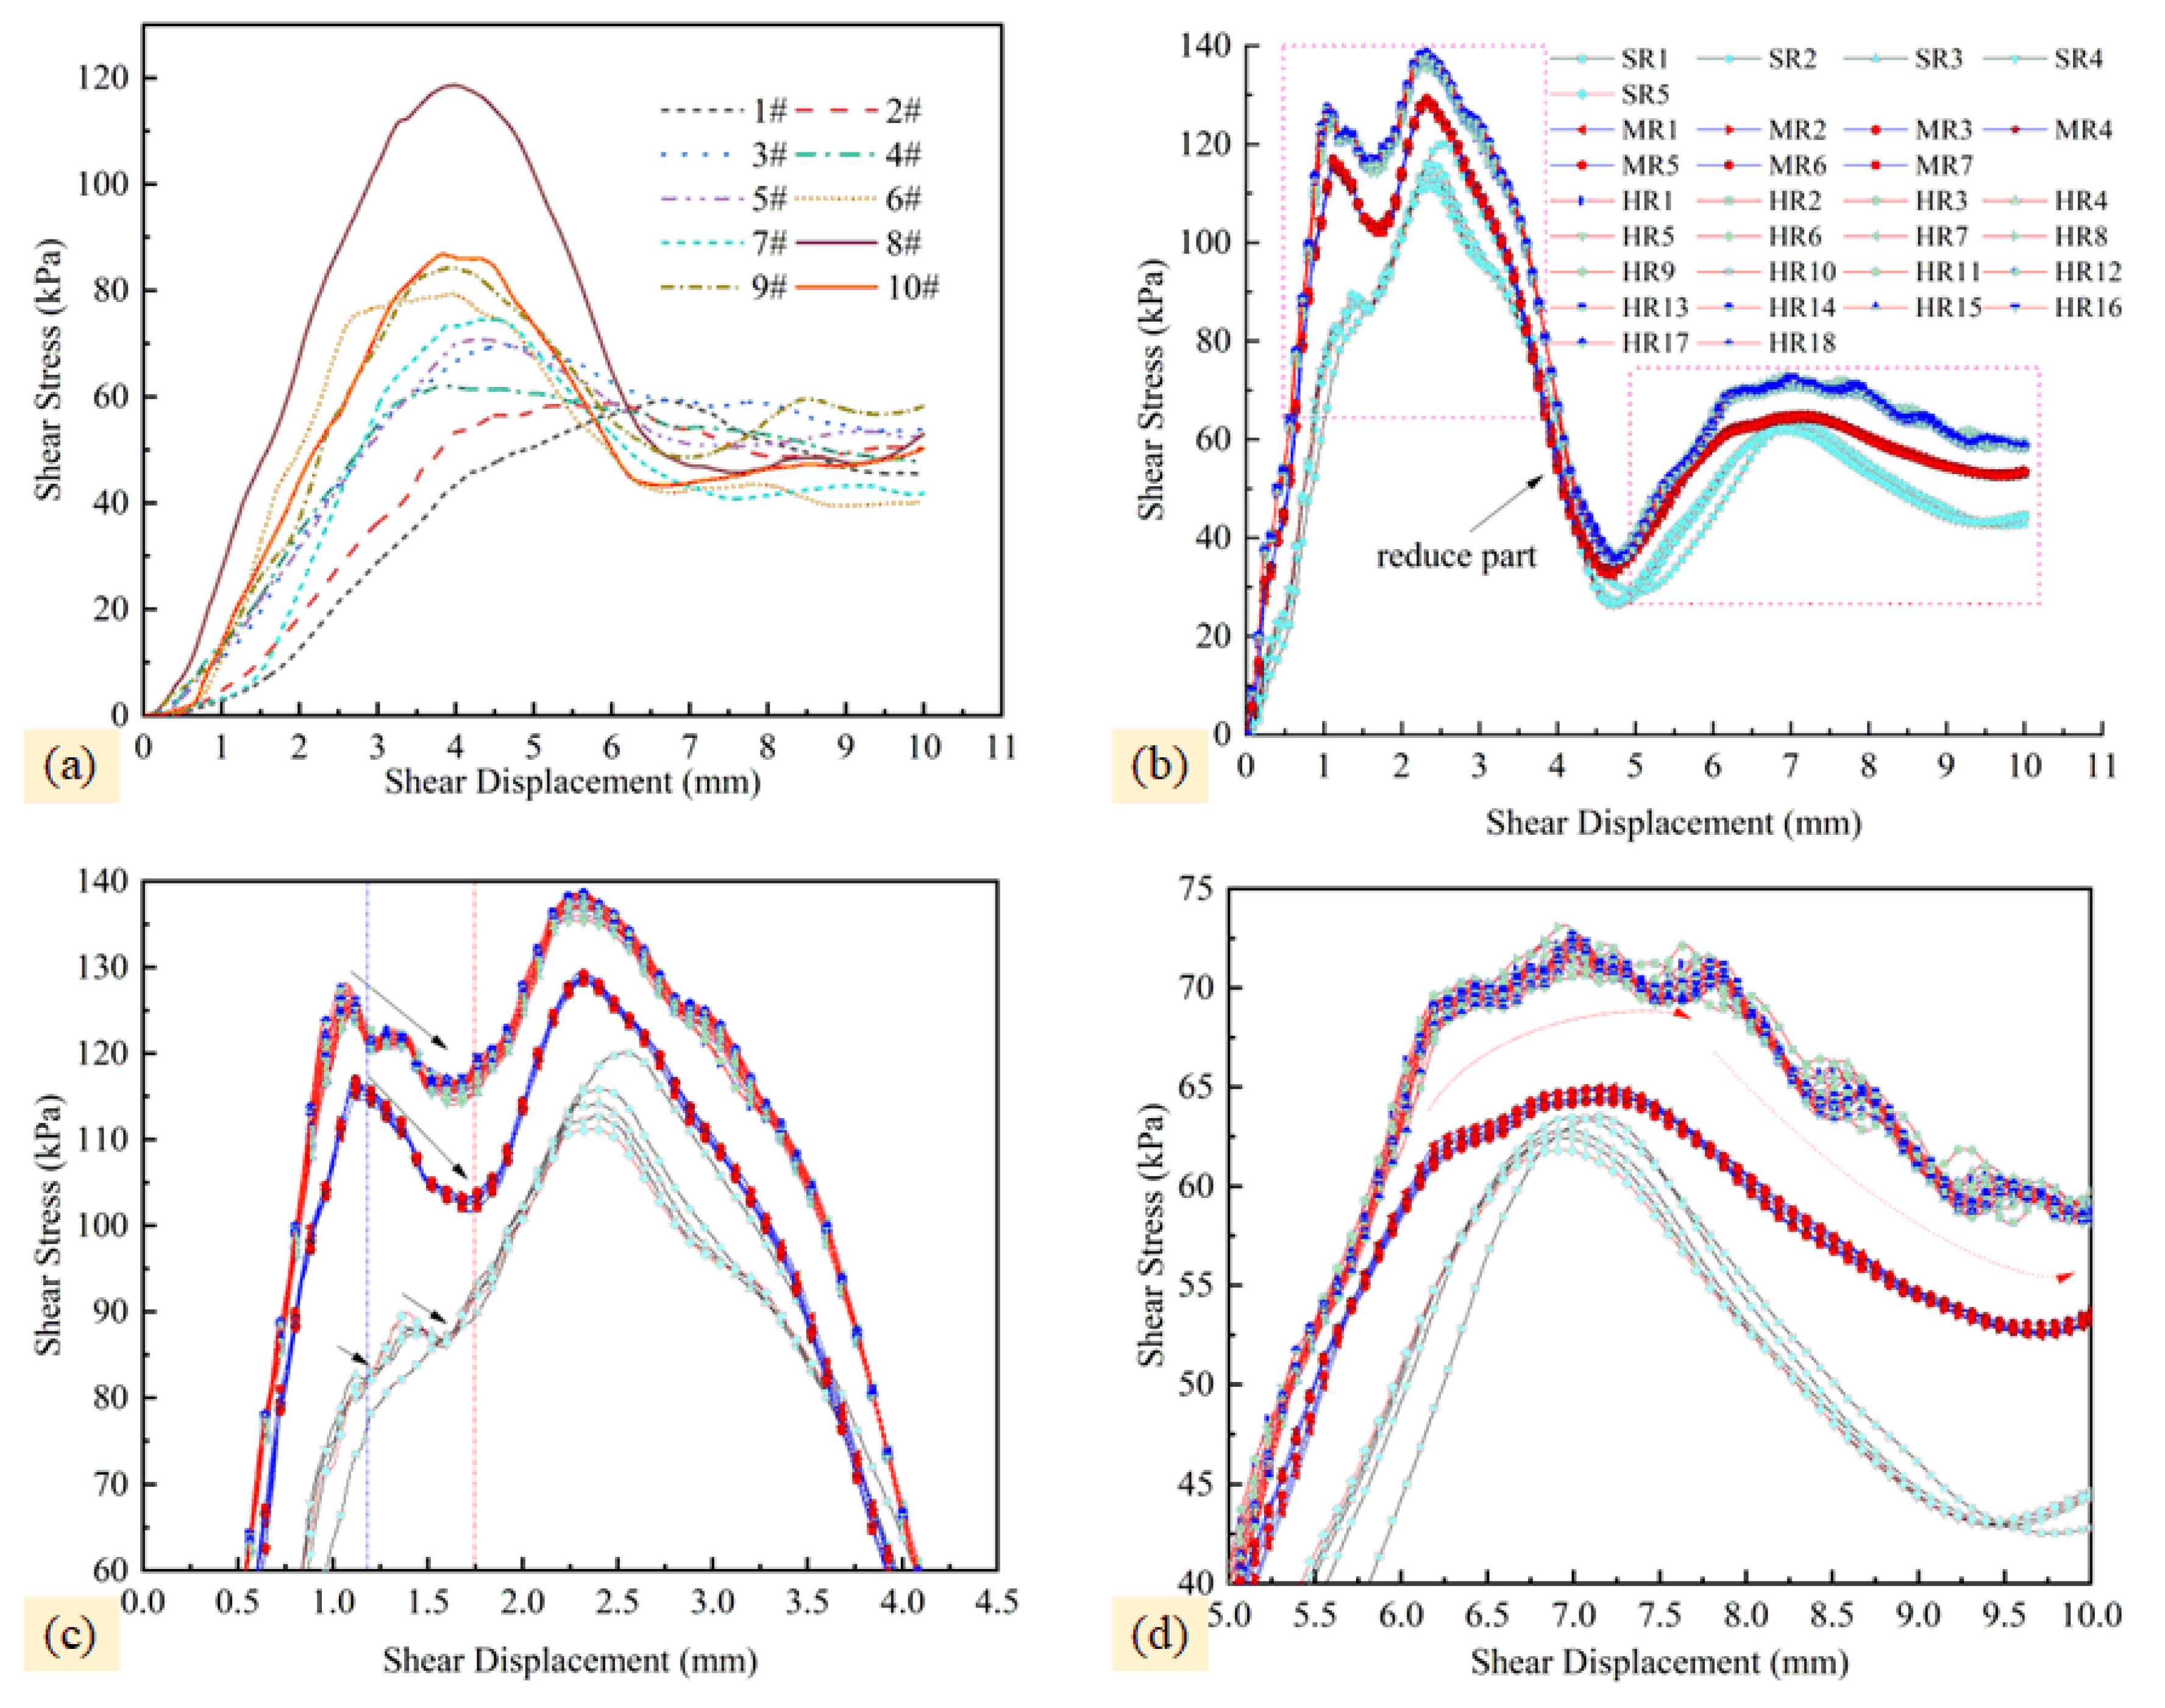
Numerical joint shear simulations were carried out under the same loading conditions, and the numerical results are shown in Figure 12.
To begin with, shear curve comparisons were conducted for 10 Barton joint models using medium-hard rock parameters. One representative model was then selected to analyze the influence of lithological differences on the shear behavior of structural planes, in order to achieve the goal of controlling variables. Upon comparison, the shear behavior was found to be consistent with existing studies [25]. Accordingly, the Barton 8# joint model was chosen for further analysis of lithological variation.
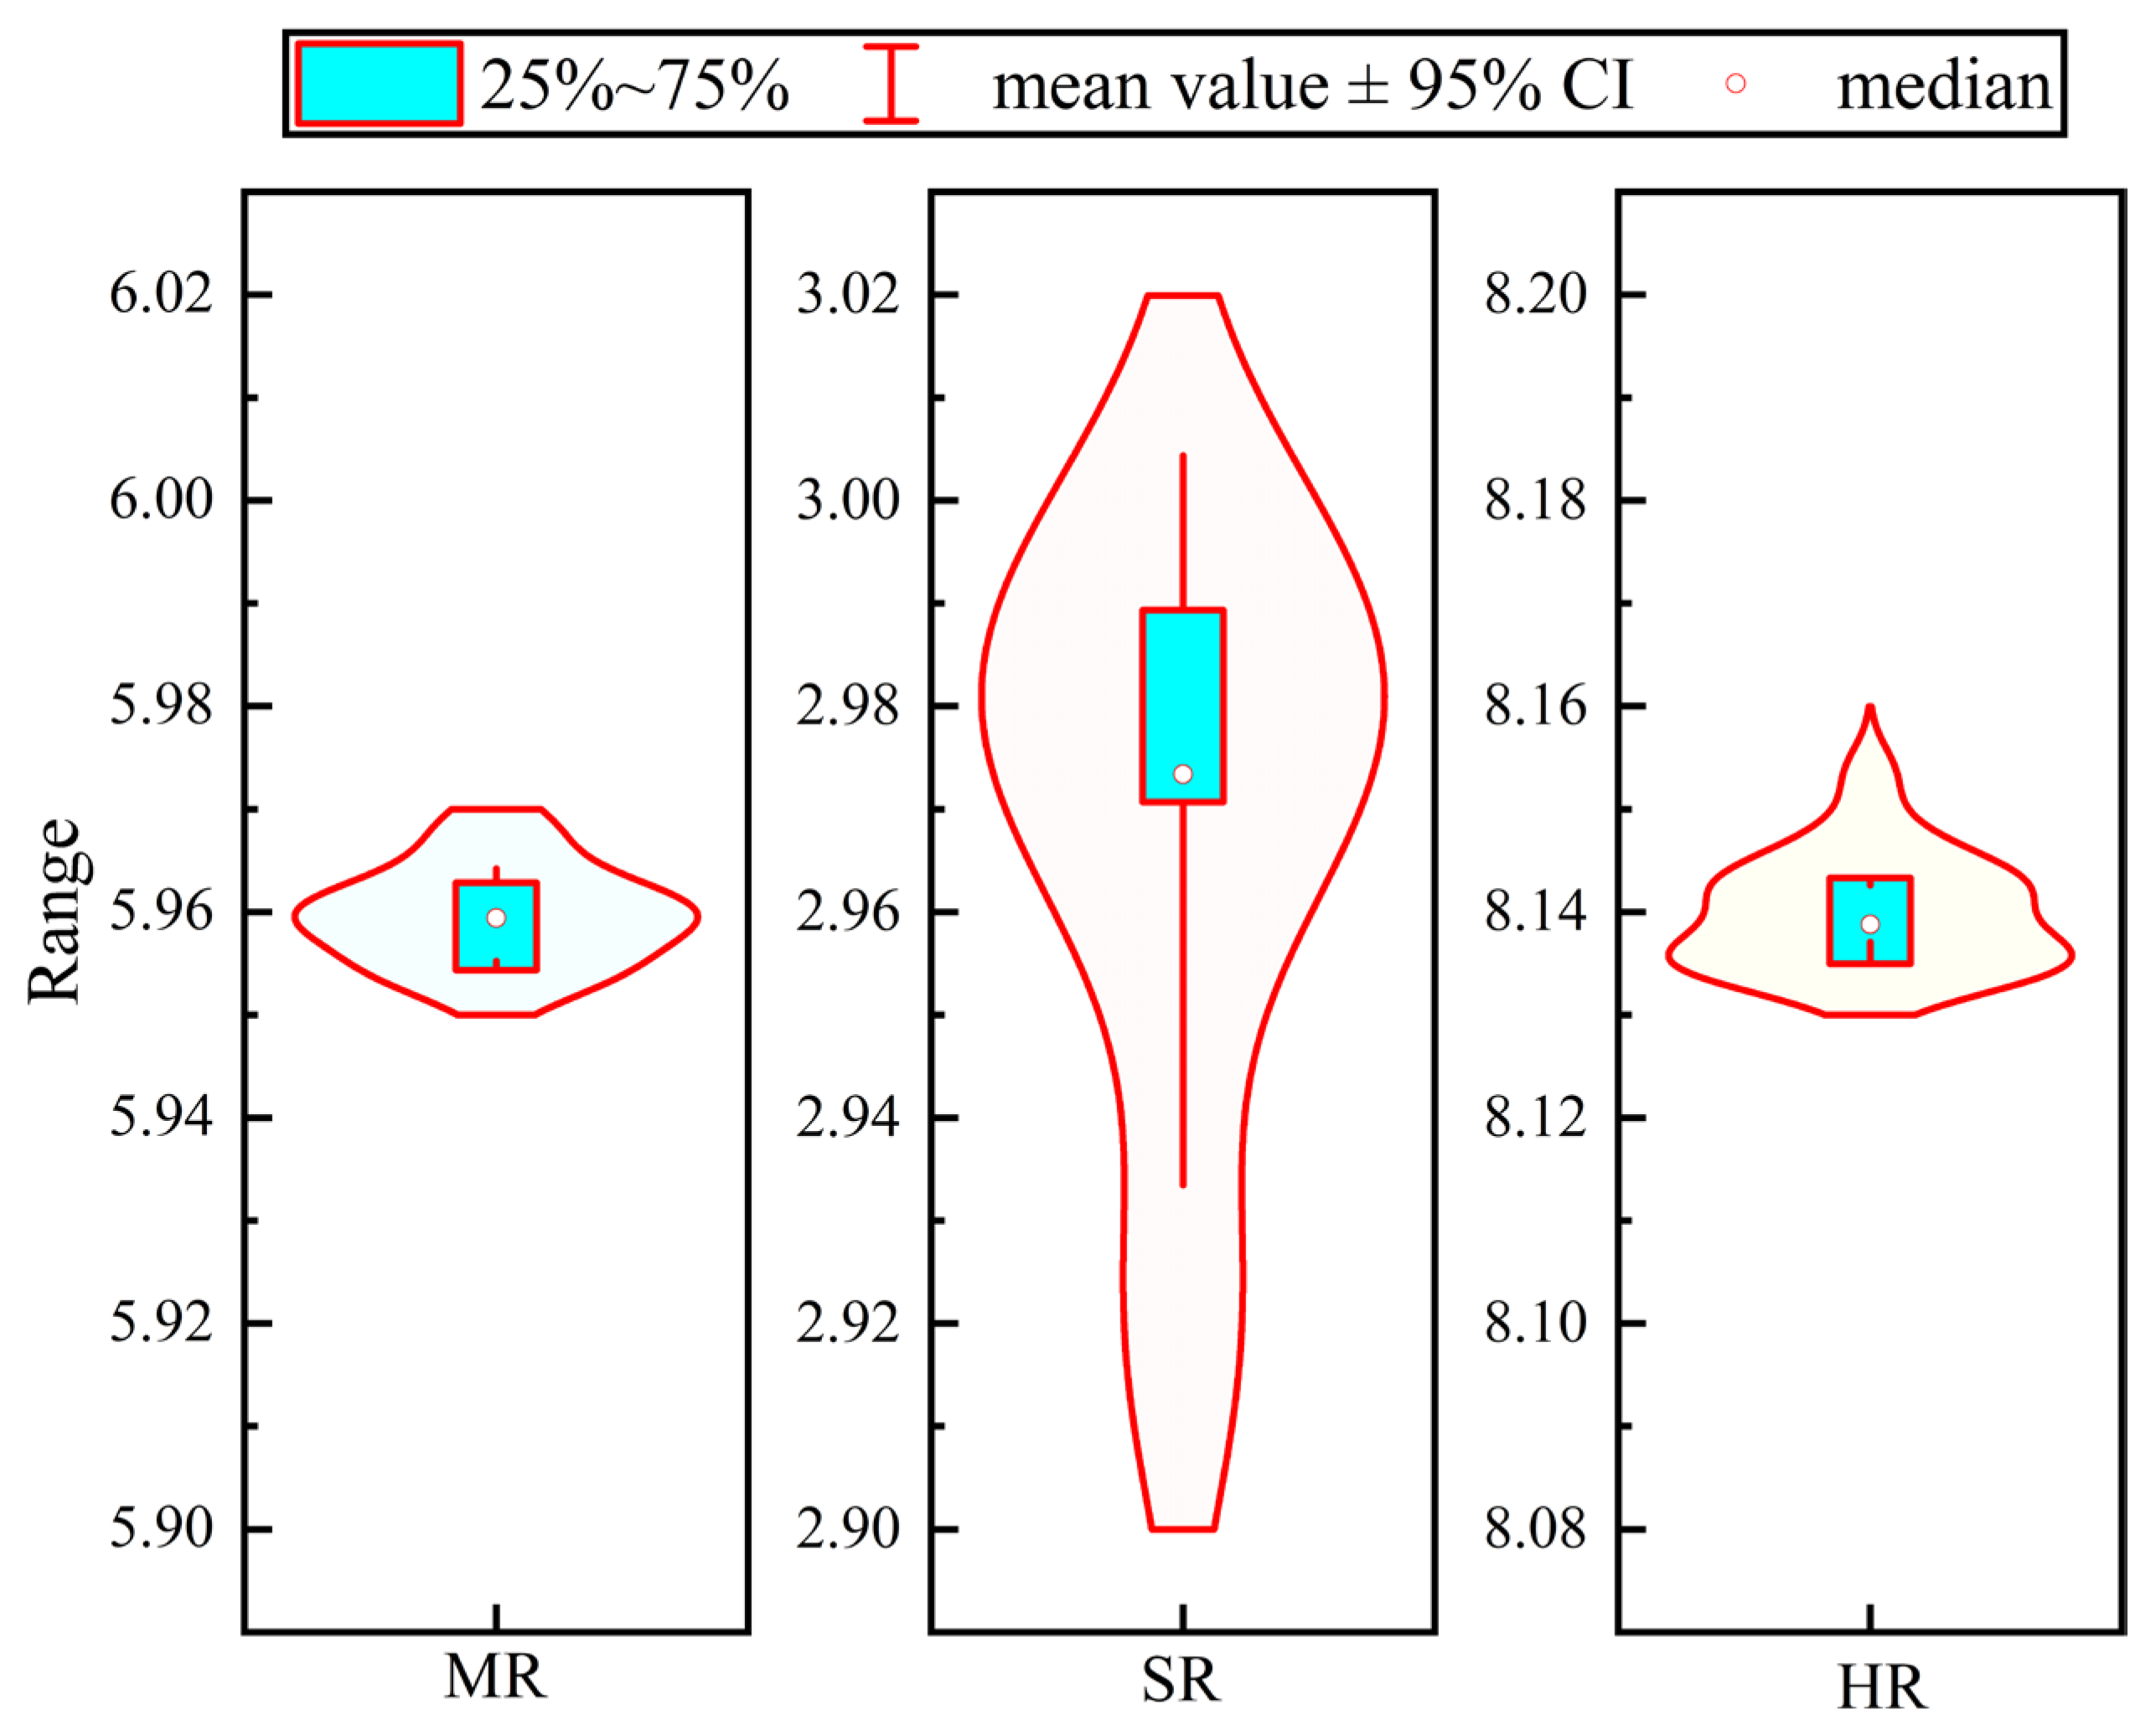
Analysis of shear curves under different lithologies reveals that the strength of the rock (i.e., its hardness or softness) is one of the primary factors affecting joint shear behavior. Interestingly, while the overall shear strength tends to diverge among different lithologies, the strength values and curve characteristics during the post-peak strength reduction phase are quite similar. The key differences are reflected in the following aspects: (1) Peak shear strength: As shown in Figure 12b, the lithology of the joint directly influences the peak shear strength of the structural plane. Harder rocks exhibit significantly higher peak shear strength compared to softer ones. (2) Characteristics of the peak strength interval: As illustrated in Figure 12c, the lithology also affects the fluctuation pattern during the peak strength phase. Joints in harder rocks tend to show more pronounced fluctuations (i.e., less smooth transitions during loading and unloading), whereas joints in softer rocks may exhibit weakened or even absent peak-transition characteristics on certain shear curves. (3) Residual strength and transition behavior: Lithology also impacts the residual strength stage after shear. Harder rock joints tend to maintain higher residual shear strength, and the transition into the residual stage shows more noticeable undulations. These trends are similar to those observed in the peak strength interval. (4) According to Figure 13, the peak shear stress from numerical simulations of joint surfaces shows the highest variability in soft rocks, while medium-hard and hard rocks exhibit more consistent results. This suggests that the microscale mechanical behavior of soft rock joints is subject to more complex influencing factors.
To further elaborate on the observed lithological dependence, it is crucial to understand the interplay between interfacial friction and asperity shearing, particularly how they contribute to peak shear strength. In softer rocks, the asperities are more prone to crushing and wear at relatively lower normal stresses and shear displacements. This rapid degradation of asperities reduces their interlocking capability, thereby diminishing the contribution from asperity shearing to the overall shear strength. Consequently, the shear behavior of softer rock joints becomes predominantly governed by the basic friction between the crushed rock particles and the intact joint surfaces, meaning interfacial friction plays a more significant role in their shear strength, especially after initial asperity degradation. This leads to a lower peak shear strength and a smoother, less fluctuating shear curve. In contrast, harder rocks possess asperities with higher compressive and shear strength, making them more resistant to crushing and abrasion. This allows the asperities to maintain their interlocking and dilatancy effects for a longer duration and under higher shear stresses. Therefore, the shear strength of harder rock joints is largely dominated by the shearing and overriding of these robust asperities, which contribute substantially to the peak shear strength. The pronounced fluctuations observed in harder rock joints during the peak strength phase (Figure 12c) are direct evidence of this asperity shearing mechanism, where individual asperities or groups of asperities are sheared off or overcome, leading to sudden drops and rises in shear stress before reaching the residual state. This mechanism enables harder rocks to achieve significantly higher peak shear strength.

6. Discussion

In the experiment of the rock mass joint surface shear stress versus the shear displacement change, before the peak shear stress, the JRC values are not obvious. That is, part of the joint surface is faster, with an obvious shear strength, and in contrast, tests of the performance of a different material (material A and B), the phenomenon is more obvious. In terms of the difference in the shear strength, the peak shear stress of the artificial rock mass joint surface is lower in the specimens corresponding to the JRC value of groups 6~9 of the joint surface. According to the analysis, among the joint surfaces with different JRC values in the Barton curve, the curve fluctuation of the whole joint surface of the 6th, 7th, 8th, and 9th groups is larger than that of the other groups, so the test results deviate obviously from the theoretical values. Therefore, we can attempt to study the relationship between the weak plane shear properties and the JRC value of more materials with obvious property differences (rock masses with different JCS values) or study the weak plane shear properties of rock masses under the premise of considering the fluctuation of joint.
Our observation that the ‘curve fluctuation of the whole joint surface of the 6th, 7th, 8th, and 9th group is larger than that of the other groups’ is based on a visual and qualitative assessment of the standard Barton JRC reference profiles. This characteristic, combined with the experimental finding that JRC 6–9 specimens exhibited generally higher peak shear stresses than might be expected from a simple linear relationship with JRC, prompted our discussion regarding potential ‘anomalous’ behavior. We hypothesize that the inherent geometric complexity or more pronounced undulations represented by these JRC values could lead to distinct shear mechanisms, such as more complex asperity interlocking or crushing, thereby influencing the overall shear strength. This discussion serves to highlight a potential factor contributing to the observed deviations from theoretical predictions and underscores the need for future research incorporating detailed 3D surface characterization of actual rock joints to quantitatively link geometric descriptors with mechanical responses.
The shear behavior of the convex joint surface directly affects the shear performance of the rock joint surface. The shear behavior of the convex joint surface mainly considers two cases: the shear tension failure of the shear part and the local crushing shear behavior. Different joint surface protrusion morphologies have different shear failure modes under the same axial pressure and shear action. When the shear displacement or time is the same, the failure state of the joint surface protrusion is different, as shown in Figure 10a. When the peak shear strength of the relatively small joint surface in the convex part is reached, all shear failure modes described in Figure 9 have been transformed, and the convex joint surface has been sheared into powder. When the peak shear strength of the relatively thick joint surface of the convex part is reached, it mainly enters into the pathological contact state, that is, a portion of the convex part of the joint is sheared and rolled into powder, but not all of the failure is completed. The subsequent failure mode of the joint is rolling of the convex part and friction of the contact surface. The different geometric shapes of the joint surfaces directly affect the shear failure mode of the joint surfaces.
In the evaluation of rock joint shear strength, Barton’s Joint Roughness Coefficient (JRC) continues to be widely employed as a roughness assessment and model parameter reference. This is largely due to its intuitive definition, operational simplicity, and proven applicability in engineering practice. With advancements in measurement techniques, researchers have proposed extended JRC formulations suitable for 3D joint surfaces and established empirical relationships between JRC and quantitative morphological parameters such as RMS slope and Z2 based on digital scan results, thereby partially enhancing its descriptive capability. However, JRC is fundamentally an empirical, comprehensive index, and its numerical value remains susceptible to measurement resolution, evaluation scale, and method selection. Furthermore, it struggles to fully reflect the 3D anisotropy and local structural characteristics of joint surfaces. Therefore, while JRC retains its reference value in engineering applications and for model comparison, serving as a macroscopic indicator of roughness, a more rational approach for the precise description of surface morphological mechanisms and the establishment of robust strength prediction models involves integrating it with more quantitative and repeatable 3D parameters, such as frequency domain features or statistical roughness indices.

7. Conclusions

Combined with 3D printing technology, direct shear tests of artificial rock joint surfaces with different JRC values were carried out, and the relationship between the geometric morphology of artificial rock joints and the shear performance of weak planes of rock mass was quantitatively studied
(1)
The innovative application of high-precision 3D printing allows for accurate reproduction of standard roughness profiles, significantly reducing model variability in physical shear tests. This ensures reliable insights into the role of joint geometry in shear behavior.
(2)
The peak shear strength of joint surfaces increases with JRC, but the failure mechanisms differ by lithology: soft rocks rely more on interfacial friction, whereas in harder rocks, bulge shearing dominates. Thus, the influence of material strength must be considered alongside geometric parameters like JRC.
(3)
Shear curves exhibit lithology-dependent characteristics: harder rocks show higher peak and residual strengths and more pronounced stress fluctuations during loading, while softer rocks display smoother transitions and less prominent peak intervals. However, it is important to note that specific material properties, such as the effective joint wall compressive strength (JCS) and asperity degradation resistance, can lead to exceptions. As discussed and exemplified by Material A in Figure 7, a material with lower bulk uniaxial compressive strength (UCS) can still exhibit higher peak shear strength under certain conditions due to superior asperity interlocking and resistance to degradation at the joint surface.
(4)
Despite lithological differences, the residual shear behavior of joint surfaces tends to follow a similar trend across materials, suggesting that the post-peak phase may be governed by universal mechanical processes related to surface degradation and friction mobilization.

Author Contributions

Conceptualization, G.L., L.L. and L.Z.; Methodology, G.L.; Software, G.L.; Validation, G.L., Q.D. and L.L.; Formal analysis, G.L.; Investigation, G.L.; Resources, G.L.; Data curation, G.L. and Q.D.; Writing—original draft preparation, Y.C.; Writing—review and editing, Y.W.; Visualization, Y.L.; Supervision, L.Z.; Project administration, L.Z.; Funding acquisition, L.Z., Y.C., Y.W. and Y.L. All authors have read and agreed to the published version of the manuscript.

Funding

This study was financially supported by many institutions, including the National Natural Science Foundation of China General Project (No. 52378383), the Science and Technology Research and Development Plan of China Railway Co Ltd. (No. 2022-Major Project-07), and the Graduate Innovation Project of Central South University (No. 14). All financial support is greatly appreciated. The authors are also immensely grateful for the editor’s and reviewers’ constructive comments, which helped to enhance the contents and presentation of this article.

Institutional Review Board Statement

Not applicable.

Informed Consent Statement

Not applicable.

Data Availability Statement

The data that support the findings of this study are available from the corresponding author upon reasonable request.

Conflicts of Interest

Author Yue Chen was employed by the company The Second Engineering Co., Ltd. of Ctec Group; Author Yinsheng Wang was employed by the company China Railway Academy Group Co., Ltd.; Author Yongqiang Li was employed by the company Northwest Research Institute Co., Ltd. of C.R.E.C;. The remaining authors declare that the research was conducted in the absence of any commercial or financial relationships that could be construed as a potential conflict of interest.

References

  1. Grasselli, G.; Egger, P. Constitutive law for the shear strength of rock joints based on three-dimensional surface parameters. Int. J. Rock Mech. Min. Sci. 2003, 40, 25–40. [Google Scholar] [CrossRef]
  2. Ladanyi, B.; Archambault, G. Simulation of Shear Behavior of a Jointed Rock Mass. In Proceedings of the 11th U.S. Symposium on Rock Mechanics (USRMS), Berkeley, CA, USA, 16 June 1969; pp. 105–125. [Google Scholar]
  3. Zhang, X.; Jiang, Q.; Chen, N.; Wei, W.; Feng, X. Laboratory Investigation on Shear Behavior of Rock Joints and a New Peak Shear Strength Criterion. Rock Mech. Rock Eng. 2016, 49, 3495–3512. [Google Scholar] [CrossRef]
  4. Patton, F.D. Multiple modes of shear failure in rock. In Proceedings of the 1st ISRM Congress, Lisbon, Portugal, 25–29 September 1966; pp. 509–513. [Google Scholar]
  5. Barton, N.; Bandis, S. Review of predictive capabilities of JRC-JCS model in engineering practice: Barton, N; Bandis, S Proc International Symposium on Rock Joints, Loen, 4–6 June 1990P603–610. Publ Rotterdam: A A Balkema, 1990. Int. J. Rock Mech. Min. Sci. Geomech. Abstr. 1991, 28, A209. [Google Scholar] [CrossRef]
  6. Barton, N.; Bandis, S.; Bakhtar, K. Strength, deformation and conductivity coupling of rock joints. Int. J. Rock Mech. Min. Sci. Geomech. Abstr. 1985, 22, 121–140. [Google Scholar] [CrossRef]
  7. Tang, Z.C.; Jiao, Y.Y.; Wong, L.N.Y. Theoretical model with multi-asperity interaction for the closure behavior of rock joint. Int. J. Rock Mech. Min. Sci. 2017, 97, 15–23. [Google Scholar] [CrossRef]
  8. Yang, Z.Y.; Chiang, D.Y. An experimental study on the progressive shear behavior of rock joints with tooth-shaped asperities. Int. J. Rock Mech. Min. Sci. 2000, 37, 1247–1259. [Google Scholar] [CrossRef]
  9. Asadi, M.S.; Rasouli, V.; Barla, G. A laboratory shear cell used for simulation of shear strength and asperity degradation of rough rock fractures. Rock Mech. Rock Eng. 2013, 46, 683–699. [Google Scholar] [CrossRef]
  10. Tang, Z.-C.; Liu, Q.-S.; Liu, X.-Y. Shear behavior of rock joints and comparative study on shear strength criteria with three-dimensional morphology parameters. Chin. J. Geotech. Eng. 2014, 36, 873–879. [Google Scholar] [CrossRef]
  11. Barton, N.; Choubey, V. Shear Strength of Rock Joints in Theory and Practice. Rock Mech. 1977, 10, 1–54. [Google Scholar] [CrossRef]
  12. Head, D.; Vanorio, T. Effects of changes in rock microstructures on permeability: 3-D printing investigation. Geophys. Res. Lett. 2016, 43, 7494–7502. [Google Scholar] [CrossRef]
  13. Kim, D.H.; Gratchev, I.; Hein, M.; Balasubramaniam, A. The Application of Normal Stress Reduction Function in Tilt Tests for Different Block Shapes. Rock Mech. Rock Eng. 2016, 49, 3041–3054. [Google Scholar] [CrossRef]
  14. Du, S.; Huang, M.; Luo, Z.; Jia, R. Similar material study of mechanical prototype test of rock structural plane. Chin. J. Rock Mech. Eng. 2010, 29, 2263–2270. [Google Scholar]
  15. Xiong, Z.Q.; Jiang, Q.; Gong, Y.H.; Song, L.B.; Cui, J. A method for preparing natural joints of rock mass based on 3D scanning and printing techniques and its experimental validation. Yantu Lixue/Rock Soil Mech. 2015, 36, 1557–1565. [Google Scholar] [CrossRef]
  16. Wang, P.; Huang, Z.; Ren, F.; Zhang, L.; Cai, M. Research on direct shear behaviour and fracture patterns of 3D-printed complex jointed rock models. Rock Soil Mech. 2020, 41, 46–56. [Google Scholar] [CrossRef]
  17. Buzzi, O.; Jeffery, M.; Moscato, P.; Grebogi, R.B.; Haque, M.N. Mathematical Modelling of Peak and Residual Shear Strength of Rough Rock Discontinuities Using Continued Fractions. Rock Mech. Rock Eng. 2024, 57, 851–865. [Google Scholar] [CrossRef]
  18. Yan, B.; Song, Z.; Zou, L.; Li, B. A Shear Behavior Prediction Model for Fresh Sedimentary Rock Fractures Considering Relation Between Shear Energy and Asperity Damage. Rock Mech. Rock Eng. 2025, 58, 7287–7305. [Google Scholar] [CrossRef]
  19. Liu, Q.; Tian, Y.; Liu, D.; Jiang, Y. Updates to JRC-JCS model for estimating the peak shear strength of rock joints based on quantified surface description. Eng. Geol. 2017, 228, 282–300. [Google Scholar] [CrossRef]
  20. Ram, B.K.; Basu, A. A modified JRC-JCS model and its applicability to weathered joints of granite and quartzite. Bull. Eng. Geol. Environ. 2019, 78, 6089–6099. [Google Scholar] [CrossRef]
  21. Diaz, M.; Kim, K.Y.; Yeom, S.; Zhuang, L.; Park, S.; Min, K.-B. Surface roughness characterization of open and closed rock joints in deep cores using X-ray computed tomography. Int. J. Rock Mech. Min. Sci. 2017, 98, 10–19. [Google Scholar] [CrossRef]
  22. Dong, S.; Peng, Y.; Lu, Z.; Zhang, H.; Hou, W.; Su, A. Shear characteristics and shear strength model of rock mass structural planes. Sci. Rep. 2022, 12, 13637. [Google Scholar] [CrossRef]
  23. Solak, K.C.; Tuncay, E. An evaluation on Barton-Bandis shear strength criterion for discontinuities in weak materials under low normal stresses. Bull. Eng. Geol. Environ. 2023, 82, 411. [Google Scholar] [CrossRef]
  24. Zhao, L.; Zhang, S.; Huang, D.; Zuo, S.; Li, D. Quantitative characterization of joint roughness based on semivariogram parameters. Int. J. Rock Mech. Min. Sci. 2018, 109, 1–8. [Google Scholar] [CrossRef]
  25. Bos, F.; Wolfs, R.; Ahmed, Z.; Salet, T. Additive manufacturing of concrete in construction: Potentials and challenges of 3D concrete printing. Virtual Phys. Prototyp. 2016, 11, 209–225. [Google Scholar] [CrossRef]
  26. Zhao, L.; Huang, D.; Chen, J.; Wang, X.; Luo, W.; Zhu, Z.; Li, D.; Zuo, S. A practical photogrammetric workflow in the field for the construction of a 3D rock joint surface database. Eng. Geol. 2020, 279, 105878. [Google Scholar] [CrossRef]
  27. Tang, Q.; Xie, W.; Jing, S.; Wang, X.; Su, Z. Experimental and Numerical Investigation on the Mechanical Behavior of Rock-Like Material with Complex Discrete Joints. Rock Mech. Rock Eng. 2024, 57, 4493–4511. [Google Scholar] [CrossRef]
  28. Ueng, T.S.; Jou, Y.J.; Peng, I.H. Scale effect on shear strength of computer-aided-manufactured joints. J. GeoEng. 2010, 5, 29–37. [Google Scholar] [CrossRef]
  29. Lai, X.; Yuan, W.; Wang, W.; Sun, R.; Du, P.; Lin, H.; Fu, X.; Niu, Q.; Yin, C. The Influence of Different Shear Directions on the Shear Resistance Characteristics of Rock Joints. Buildings 2023, 13, 2556. [Google Scholar] [CrossRef]
  30. Wang, X.; Wang, R.; Zhang, Z. Numerical Analysis Method of Shear Properties of Infilled Joints under Constant Normal Stiffness Condition. Adv. Civ. Eng. 2018, 2018, 1642146. [Google Scholar] [CrossRef]
  31. Singh, P.; Spearing, A.J.S.; Jessu, K. Analysis of the Combined Load Behaviour of Rock Bolt Installed Across Discontinuity and Its Modelling Using FLAC3D. Geotech. Geol. Eng. 2020, 38, 5867–5883. [Google Scholar] [CrossRef]
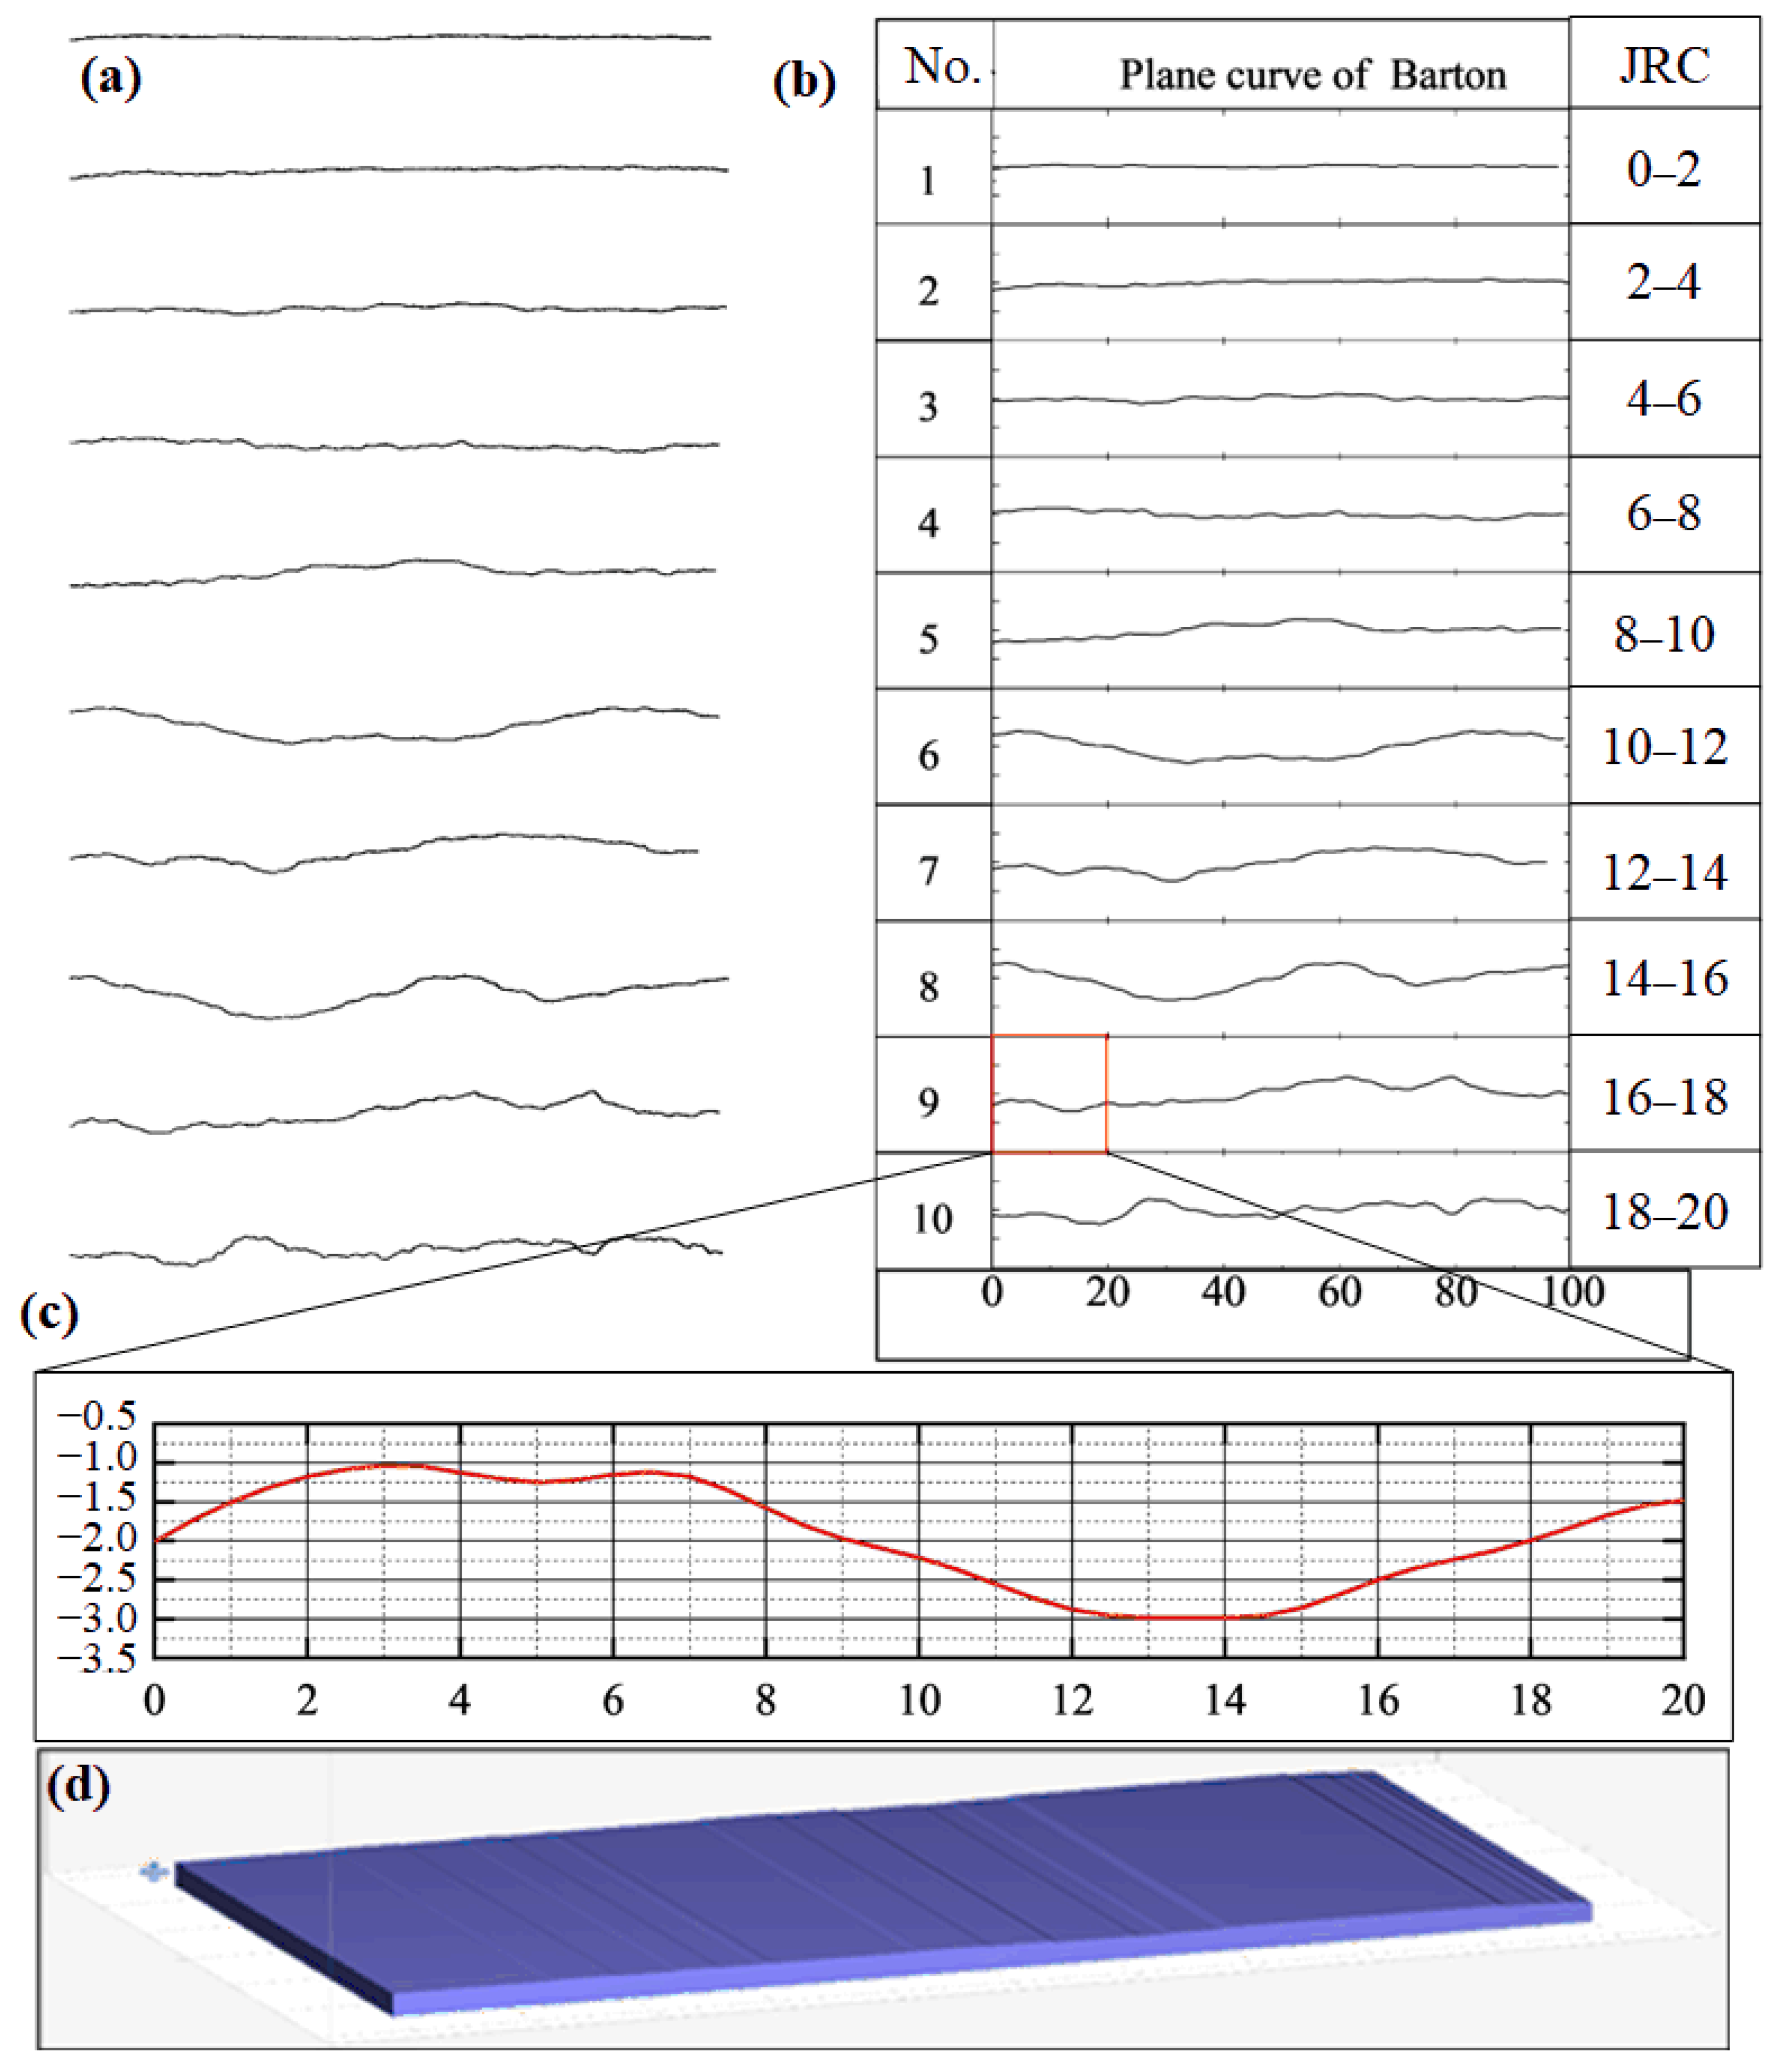
Figure 1. Numerical reproduction of the joint curve profiles with different JRC values in Barton and 3D model generation. (a) Original Barton curves. (b) Digital Barton curves with different JRC values. (c) Partial amplification of the curves of the JRC = 16–18. (d) 3D printable model generated from contour curves.
Geotechnics 06 00008 g001
Figure 2. Different printing orientations and staircase effect along the building direction. The pattern is (a) placed flat on the platform; (b) placed vertically along the short edge; (c) placed tilted along the long edge; and (d) placed tilted along the short edge. (eh) An example model printed in three different directions.
Geotechnics 06 00008 g002
Figure 3. The printing model and printed patterns: (a) 1st layer; (b) 50th layer; (c) built layout of 10 patterns; (d) 3D-printed patterns (top view).
Geotechnics 06 00008 g003
Figure 4. Template accuracy verification process: (a) matching and verification of the 3D printing numerical model generated by joints, (b) matching verification of the 3D printing numerical template (top) and actual pouring joint surface scanning imaging numerical model (bottom). (c) Matching and checking of the joint surface scanning imaging numerical model and 3D printing numerical model, respectively, (d) matching and verification of the scanning imaging numerical model of the upper and lower joint surface of the same joint. (e) Matching and checking of the joint model and formwork after pouring, (f) matching verification of joint specimens after pouring. (g) Quantitative check between the 3D printing numerical model and scanning imaging value model on the same side of the joint, and (h) the 3D printing numerical model on the same side of the joint, the numerical models of scanning images are quantitatively matched and checked, and the differences are quantified.
Geotechnics 06 00008 g004
Figure 5. Experiment process. (a) Shear rheological testing machine: a. cap, b. shear arm, c. reaction arm, d. roof, e. reaction wall, f. guide rail, g. loading cabinet, h. axial brace, i. axial force arm, j. axial force pressure pad, k. auxiliary steel plate, l. shear jacking block, and m. specimen, (b) shear test details, (c) specimens before shearing, (d) specimens after shearing. (e) Material selection, (f) mixing and pouring, (g) standard curing. (h) Determination of the wall rock strength. (i) Basic friction angle test of the rock mass material.
Geotechnics 06 00008 g005
Figure 6. Test results of the material wall rock strength: test results of material A on the left and test results of material B on the right.
Geotechnics 06 00008 g006
Figure 7. Relationship between the shear displacement and shear stress: material A and material B. “A” and “B” are two materials, and the serial number is the value of the joint curve corresponding to different JRC values in Figure 1.
Geotechnics 06 00008 g007
Figure 8. Shear results and Inverse calculation: (a) Joint surface peak shear strength of material A, (b) Joint surface peak shear strength of material B, (c) Inverse calculation of the JRC value for material A, (d) Inverse calculation of the JRC value for material B.
Geotechnics 06 00008 g008
Figure 9. Shear failure mode of the joint surface of different material corresponding to different JRC value curve profiles.
Geotechnics 06 00008 g009
Figure 10. Shear contact mode of the convex joint surface, (a): three simplified contact modes when rock joints are sheared, (b): mechanical behavior of point contact, (c): mechanical behavior of partial contact.
Geotechnics 06 00008 g010
Figure 11. Stress mode transformation of the convex joint surface, (a): the transformation mode of the shear mechanical behavior of the10th and 7th rock joints with material A, (b,c): the shear phenomenon of the10th and 7th rock mass joints with material A (d): the transformation mode of the 7th specimen corresponding to the last stage in (a), (e,f): the shear phenomenon of the10th and 7th rock mass joints with material B (g): transformation mode of the shear mechanical behavior of the10th and 7th rock joints with material B.
Geotechnics 06 00008 g011
Figure 12. Numerical results of joint shear tests: (a) Shear calculation results using the Barton joint model; (b) Shear calculation results of Barton 8# joint model with different materials (varying rock mass strength); (c) Characteristics of the peak strength interval in shear calculations of Barton #8 joint model with different materials (varying rock mass strength); (d) Characteristics of the residual strength interval in shear calculations of Barton #8 joint model with different materials (varying rock mass strength), the arrows in panels (c,d) indicate the characteristic trends of the data.
Geotechnics 06 00008 g012
Figure 13. Variability characteristics of peak shear stress from numerical simulations of joint surfaces with three different lithologies.
Geotechnics 06 00008 g013
Table 1. The joint surface parameters.
CaseCompressive Strength
(/MPa)
Elastic Modulus
(E/Gpa)
Poisson’s RatioShear
Modulus
(G/GPa)
Internal
Friction
Angle (°)
Normal Stiffness (kn)Shear Stiffness
(ks)
Soft rockSR11050.31.922027.474.81
SR220100.33.852054.959.62
SR319.23150.35.772082.4214.42
SR440200.37.6920109.8919.23
SR550250.39.6220137.3624.04
Moderately hard rockMR160300.2512.0040160.0030.00
MR270350.2514.0040186.6735.00
MR380400.2516.0040213.3340.00
MR490450.2518.0040240.0045.00
MR5100500.2520.0040266.6750.00
MR6110550.2522.0040293.3355.00
MR7120600.2524.0040320.0060.00
Hard rockHR1130650.227.0850338.5467.71
HR2140700.229.1750364.5872.92
HR3150750.231.2550390.6378.13
HR4160800.233.3350416.6783.33
HR5170850.235.4250442.7188.54
HR6180900.237.5050468.7593.75
HR7190950.239.5850494.7998.96
HR82001000.241.6750520.83104.17
HR92101050.243.7550546.88109.38
HR102201100.245.8350572.92114.58
HR112301150.247.9250598.96119.79
HR122401200.250.0050625.00125.00
HR132501250.252.0850651.04130.21
HR142601300.254.1750677.08135.42
HR152701350.256.2550703.13140.63
HR162801400.258.3350729.17145.83
HR172901450.260.4250755.21151.04
HR183001500.262.5050781.25156.25
Disclaimer/Publisher’s Note: The statements, opinions and data contained in all publications are solely those of the individual author(s) and contributor(s) and not of MDPI and/or the editor(s). MDPI and/or the editor(s) disclaim responsibility for any injury to people or property resulting from any ideas, methods, instructions or products referred to in the content.