Article

Milling Versus Printing: The Effect of Fabrication Technique on the Trueness and Fitness of Fabricated Crowns (A Comparative In Vitro Study)

by
Mohammed Hassen Ali
and
Manhal A. Majeed
*
Department of Restorative and Esthetic Dentistry, College of Dentistry, University of Baghdad, Baghdad 10071, Iraq
*
Author to whom correspondence should be addressed.
Prosthesis 2025, 7(5), 107; https://doi.org/10.3390/prosthesis7050107 (registering DOI)
Submission received: 15 July 2025 / Revised: 16 August 2025 / Accepted: 20 August 2025 / Published: 25 August 2025
(This article belongs to the Section Prosthodontics)

Abstract

Background/Objectives: Computer-aided manufacturing techniques are divided into subtractive (milling) and additive (3D printing) techniques. The accuracy of both techniques is measured only indirectly by testing the fabricated restorations. However, the role of the fabrication technique is masked by the differences in the materials used. Hence, this study used the same printing resin to print crowns and blocks for milling. Methods: Ten maxillary first premolars were prepared for full crowns and scanned with Primescan Connect IOS, and then crown restorations were designed using Exocad. A CAD/CAM block equal to size C14 was designed in CAD software (Microsoft 3D Builder) (Version 18.0.1931.0). The designed crowns and blocks were printed using three hybrid ceramic materials, namely, Ceramic Crown (SprintRay), Varseosmile Crown plus (Bego), and P-crown (Senertek), using a SprintRay Pro95S 3D-printer. The printed blocks were then used to fabricate the designed crowns using an In-Lab MCXL milling machine. The trueness and marginal and internal gaps of the crowns were then measured using Geomagic Control X metrology software (Version 2022.1). Statistical analysis was performed using the Kruskal–Wallis test, Dunn’s test, one-way ANOVA test, and Tukey’s HSD test. Results: Generally, the milled crowns showed significantly higher trueness but lower fitness than their 3D-printed counterparts (p < 0.05). A significant reverse correlation was found between the trueness and fitness of the fabricated restorations. Conclusions: The fabrication technique significantly influenced the accuracy of the hybrid ceramic crowns. Milling offered superior trueness, whereas 3D printing resulted in better internal and marginal adaptation.

1. Introduction

Assessing the accuracy of indirect restorations is crucial, as it influences their final outcomes [1]. The accuracy is typically evaluated using both trueness and precision. While trueness reflects the degree of closeness between the fabricated crown and its intended digital design, precision describes the degree of consistency among the produced restorations [2]. Trueness is considered more critical for ensuring proper clinical fit than the reproducibility reflected by precision, which depends more on the operator’s handling, as well as on machine calibration and maintenance [3].
On the other hand, internal and marginal fitness are thought to be the most important factors affecting the long-term success of fixed restorations [4,5,6]. A well-fitting margin reduces plaque accumulation, gingivitis, periodontitis, and recurrent caries that can damage the tooth and its supporting periodontium [7,8].
Subtractive manufacturing technology has been extensively studied over the years and is regarded as a well-trusted technique for producing indirect restorations. It allows for the standardized production of more accurate monolithic restorations than conventional methods. However, a significant amount of raw material is wasted, representing an economic and environmental burden. Moreover, milling burs are subjected to significant abrasion and wear [9] with reduced micro-reproducibility in concave areas, owing to the limited thickness of the milling burs [10].
Three-dimensional (3D)-printing technology has also been used for years to fabricate temporary restorations and dental models [11]. However, the recent development of advanced printable hybrid ceramic materials intended for permanent restorations has renewed the significance of 3D printing in restorative dentistry [12,13,14,15,16,17].
Hybrid ceramics have been proposed as a compelling option for the production of permanent indirect restorations, owing to their enhanced mechanical properties, dentine-like elastic modulus, and shock-absorbent properties compared to ceramics [18]. The emergence of printable forms for these materials alongside the existing milled materials highlights the need to compare their outcomes using the two manufacturing methods, additive versus subtractive [5,6].
Although previous studies have compared the trueness and fitness of restorations fabricated by subtractive and additive techniques using hybrid ceramic materials [15,19,20,21,22], the findings of these studies are confounded by the use of chemically different materials in each group. Even when categorized similarly, these materials differ significantly in their filler content, polymer matrix, and degree of polymerization, all of which might have an influence on the final outcomes. Consequently, the true influence of the fabrication method remains unclear, as material-related variables could not be controlled.
Therefore, the present study, which may be the first one, aimed to provide a controlled and more direct comparison of these two manufacturing technologies and evaluate their real effect on the trueness and fitness of crowns fabricated by using the same printable material for both 3D printing of crowns and fabrication of CAM blocks for subsequent milling, ensuring that the material composition remained constant across both workflows.
The proposed null hypothesis was that there would be no statistically significant differences in the trueness, internal and marginal adaptation between the additive and subtractive manufacturing technique.

2. Materials and Methods

2.1. Tooth Selection and Preparation

Ten intact, non-carious, unrestored human maxillary first premolars extracted for orthodontic treatment purposes and gathered from patients aged 18 to 25 years were used in this study. Teeth of comparable shape and size were chosen by measuring mesiodistal and buccolingual dimensions with a digital caliper, to exclude specimens that were excessively large or small, thereby ensuring a degree of uniformity. The teeth were immersed in thymol solution (0.1%) for 7 days at room temperature. All experimental protocols were reviewed and authorized by the Ethics Committee of the College of Dentistry, University of Baghdad, with the approval number (947/2024).
Each tooth was embedded in an acrylic resin (Veracril; New Stetic, Guarne, Colombia) in a custom-made rubber mold up to 2 mm below the cemento-enamel junction (CEJ). For standardization, teeth preparation was performed by the same operator using a high-speed water-cooled handpiece (NSK, Tokyo, Japan) after securing it to the vertical arm of a dental surveyor (Paratherm, Dentaurum, Ispringen, Germany). This arrangement ensured parallelism between the tooth and the bur.
A standardized crown preparation was performed on the mounted teeth using a round-end tapered diamond fissure bur (6856 314 018; Komet Dental, Lemgo, Germany) to provide a chamfer finishing line that was 1 mm in depth and 1 mm above the CEJ. Planar occlusal reduction was performed with the aid of a barrel-shaped trapezoid diamond bur (811 314 037; Komet, Lemgo, Germany) [23]. All samples were prepared to a standardized height of 4 mm and a convergence angle of 6 degrees.

2.2. Digital Workflow

  • Designing of CAD/CAM block
A CAD/CAM block, designed for milling the crowns and equivalent in size to the C14 IPS e-max CAD block (Ivoclar Vivadent, Schaan, Liechtenstein), was 3D-designed using the 3D Builder software program (Microsoft Corporation, Redmond, WA, USA) (Version 18.0.1931.0). The block was designed by creating a virtual base template with dimensions (12.4 mm width, 14.5 mm length, and 18 mm height), as illustrated in Figure 1a.
Boolean operations were used to merge and refine the structure, ensuring proper dimensions and alignment of the 3D mesh for the subsequent milling procedure. After finalizing the design, the file was exported and saved as a standard tessellation language (STL) file, as shown in Figure 1b.
B.
Designing of crowns
The prepared teeth were scanned using Primescan Connect IOS (Dentsply Sirona, Bensheim, Germany) with Connect SW software (version: 5.2.9).
After scanner calibration, the scanning procedure was performed using the Palatal–Occlusal–Buccal (POB) scanning strategy following the manufacturer’s instructions. The 3D scans were exported into CAD software (Exocad 3.0 Galway; GmbH, Darmstadt, Germany), where the restorations were designed. The design parameters were a cement space of 0.1 mm (100 μm) starting 1 mm above the margin, a border of 0 mm, and an anticipated milling diameter of 1.2 mm, as demonstrated in Figure 2a. To maintain standardization in crown design across all samples, a generic smooth shape was chosen for all crowns with a minimum wall thickness set to 1 mm according to the manufacturer’s instructions, while the height of the buccal and palatal cusps was manually adjusted to 1.5 mm for all crowns.
After finishing the design phase (shown in Figure 2b) and applying all the above parameters, the designed block and crowns were saved as an STL file, stored on a USB flash drive, and transferred for 3D printing and milling procedures.
C.
Printing procedure
The STL files of the 3D virtual designs for the block and crown restorations were imported into RayWare software (SprintRay, Cloud version) (Version 2.9.2.5) (shown in Figure 3a). A new print job was created, and the printing parameters were selected: type of fixed restorations “Crown & Bridge”, type of build platform “Standard”, shade “A2”, and layer thickness “50 μm”.
The restorations were manually arranged on the build platform, and the block was duplicated ten times, so that the final platform contained ten crowns with ten blocks for simultaneous printing to ensure standardization (as shown in Figure 3b,c). After automatic generation of the support structures for the crowns, the information was sent via online cloud to a DLP-based 3D-printer (SprintRay, Pro 95S, Los Angeles, CA, USA) and subsequently printed using three different printable hybrid ceramic materials: (1) CC: Ceramic Crown (SprintRay, Los Angeles, CA, USA); (2) VS: Varseosmile Crown plus (Bego, Germany); (3) PC: P-crown V2 ceramic (Senertek, Izmir, Turkey). The chemical compositions, physical and mechanical properties of the three different printing materials used in this study are summarized in Table 1 materials [24,25,26]. Before the hybrid ceramic material was poured from the bottle into the resin tank, it was shaken well for 2 min to ensure its homogeneity. The printing procedure required 51 min to complete for each material.
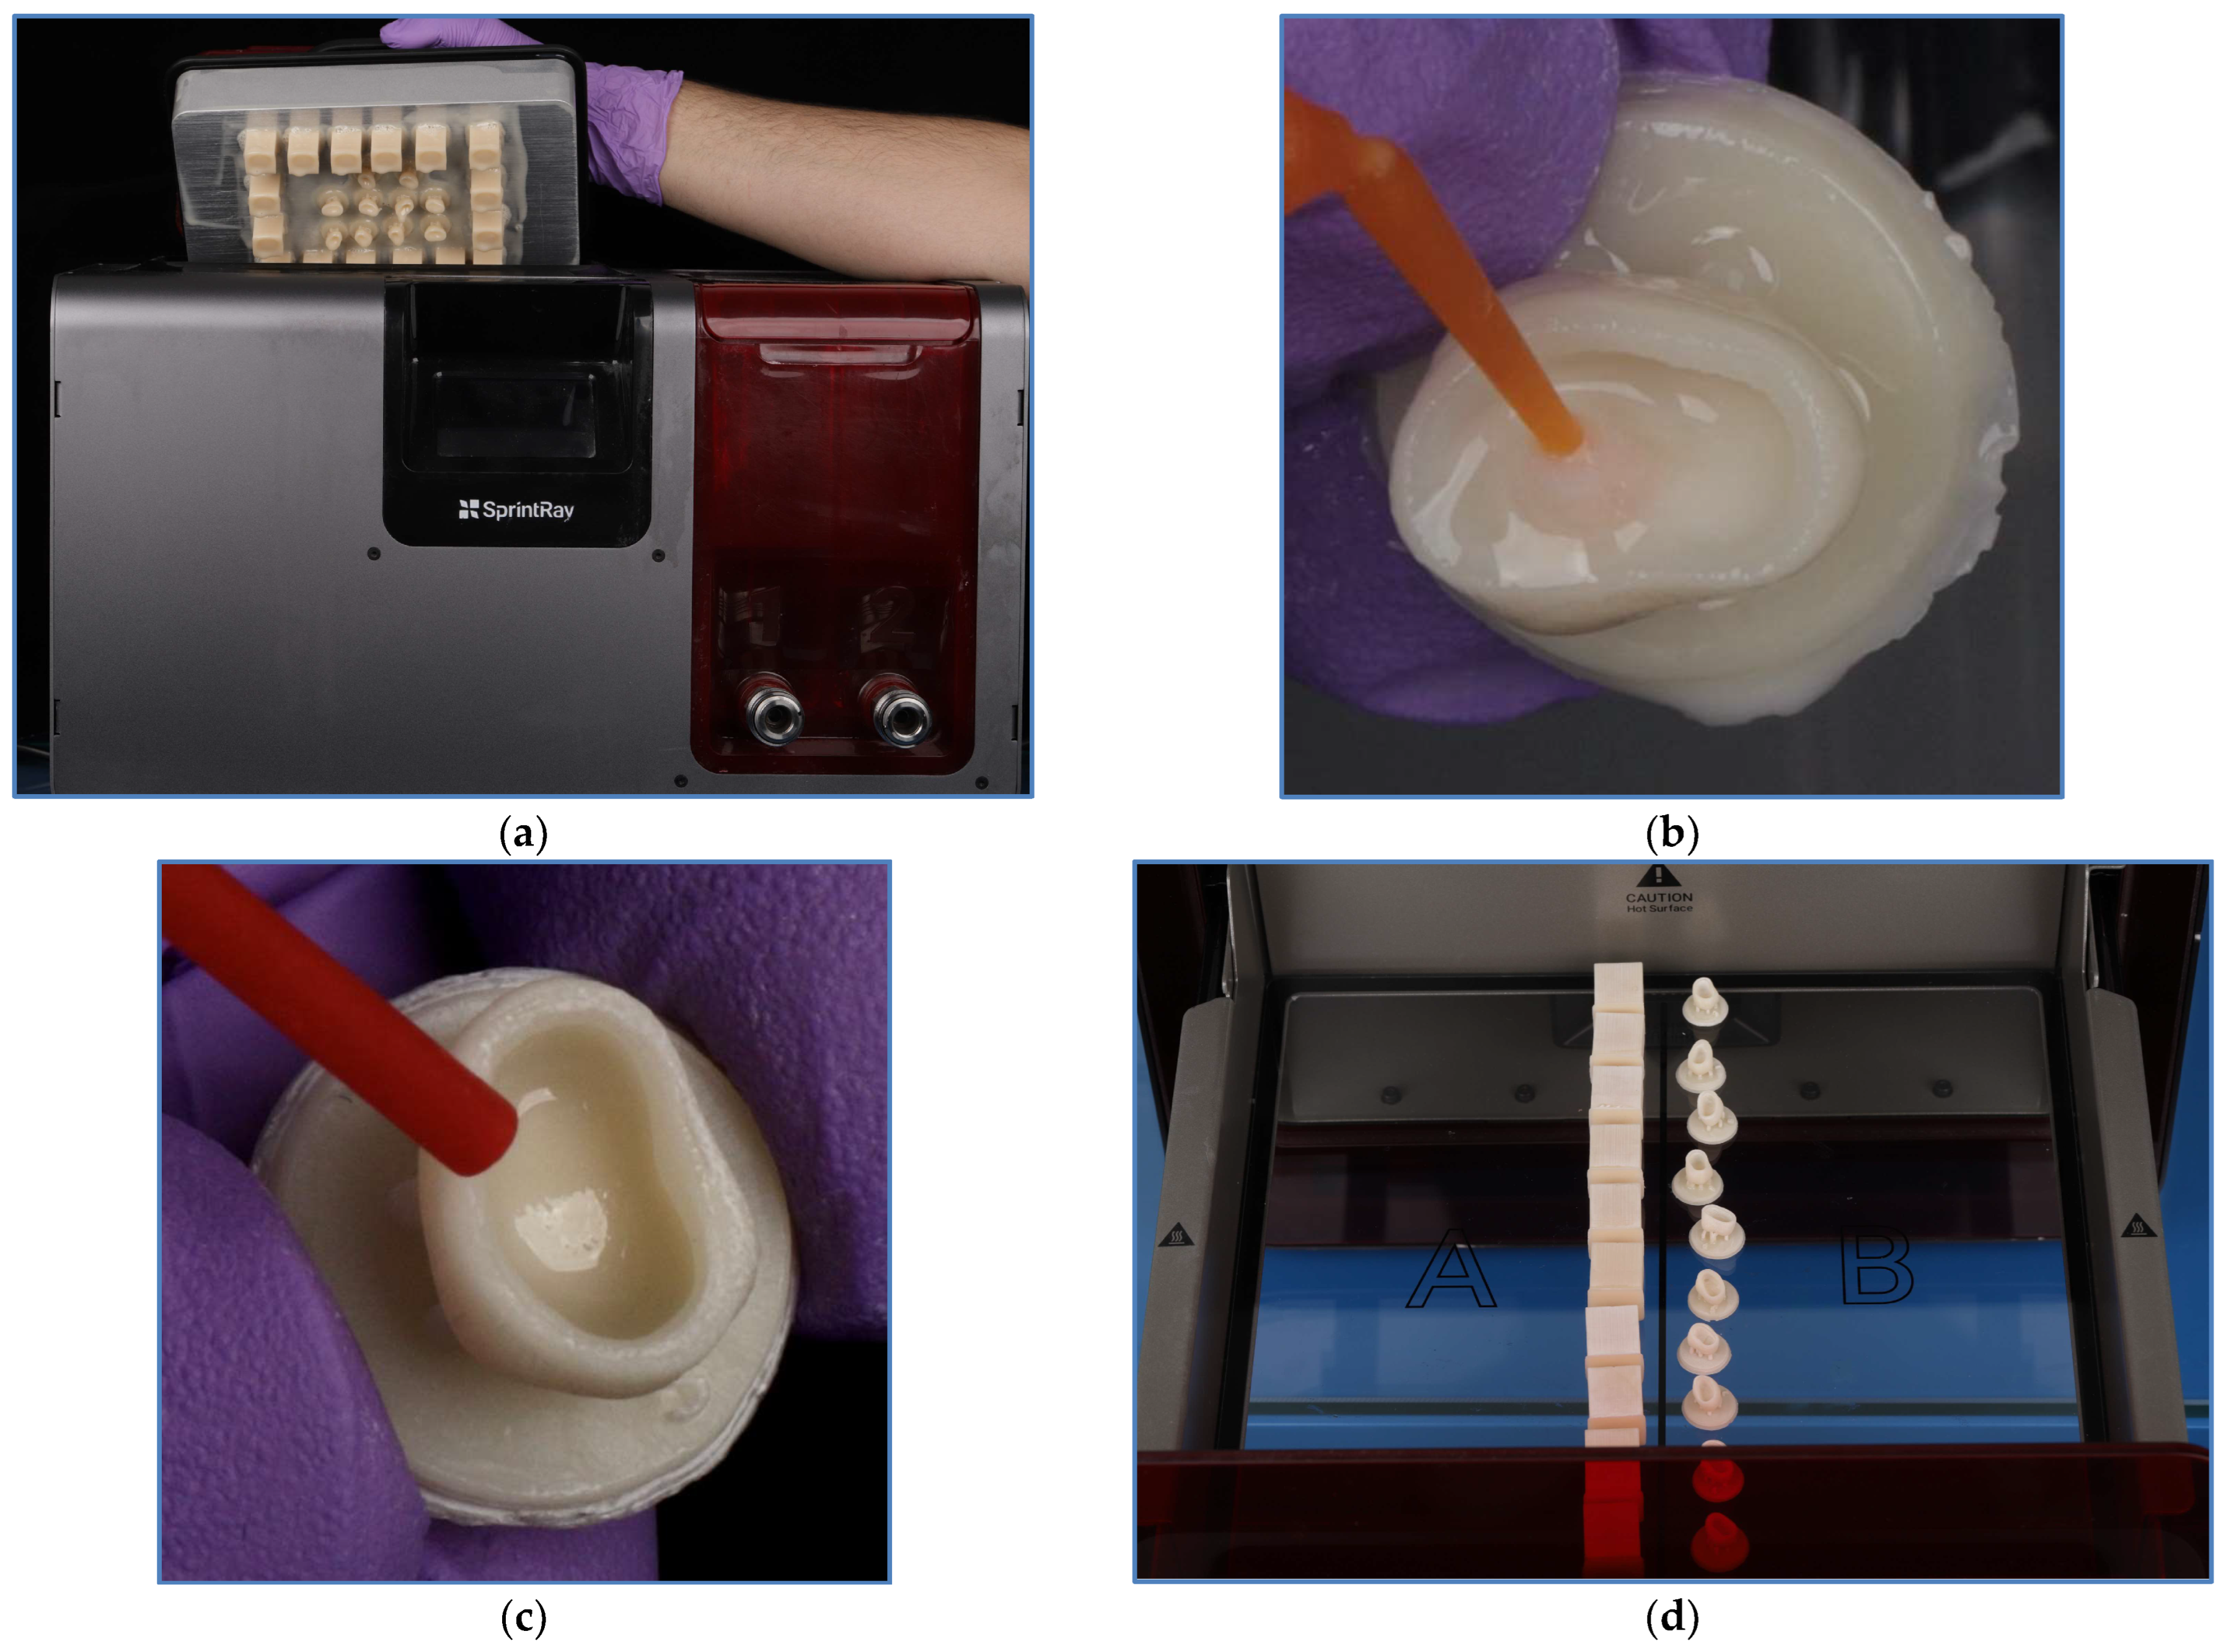
The printed blocks and crowns were subjected to post-processing procedures, including washing and curing, following the manufacturer’s instructions for each material. A proprietary workflow was implemented for VS and PC materials. This process involves simply switching from one machine to another, with no capacity to define or modify the post-processing parameters employed by the operator [27]. It begins with an automatic two-cycle wash using 91% isopropyl alcohol (Pro Wash/Dry, SprintRay, Los Angeles, CA, USA) (shown in Figure 4a). The device took 10 min to finish the two cycles; then, light-curing was performed with a built-in photo-curing device (ProCure 2, SprintRay, Los Angeles, CA, USA) for 1:50 min using the preprogrammed manufacturer settings. However, for the CC materials, controlled manual brushing using 91% isopropyl alcohol was performed until all the surfaces of the crowns were completely free of liquid resin (as shown in Figure 4b); then, the part was dried completely (Figure 4c) before post-curing (for 6:42 min), following the manufacturer’s instructions (Figure 4d).
Upon completion of the curing process for all materials, the support structures for each crown were removed using flush cutters to clip them off. The printing procedure produced 10 printed blocks and 10 printed crowns for each material (30 blocks and 30 printed crowns in total), as shown in Figure 5. The printed crowns were then placed in individually labeled containers to initiate the measurement procedure.
D.
Milling procedure
The printed blocks were glued to a universal metal holder that was obtained from previously milled blocks using an adhesive and activator spray (Soudal Metre Kit, Turnhout, Belgium). The blocks were then milled using a 4-axis milling machine (In-Lab MC XL, Sirona, Bensheim, Germany) [28], following the extra-fine milling mode with the use of cylinder-pointed bur 12 S, step bur 12, cylinder-pointed bur 12 EF, and cylinder bur 12 EF. The milling process took approximately (15–20) min for each block, as shown in Figure 6.
The resulting 30 milled crowns were stored in individually labeled containers. Together with the printed crowns, this resulted in a total of 60 crowns, which were divided into six subgroups (Mill VS, Mill CC, Mill PC, Print VS, Print CC, Print PC), with each subgroup containing ten crowns (n = 10).

2.3. Trueness Evaluation

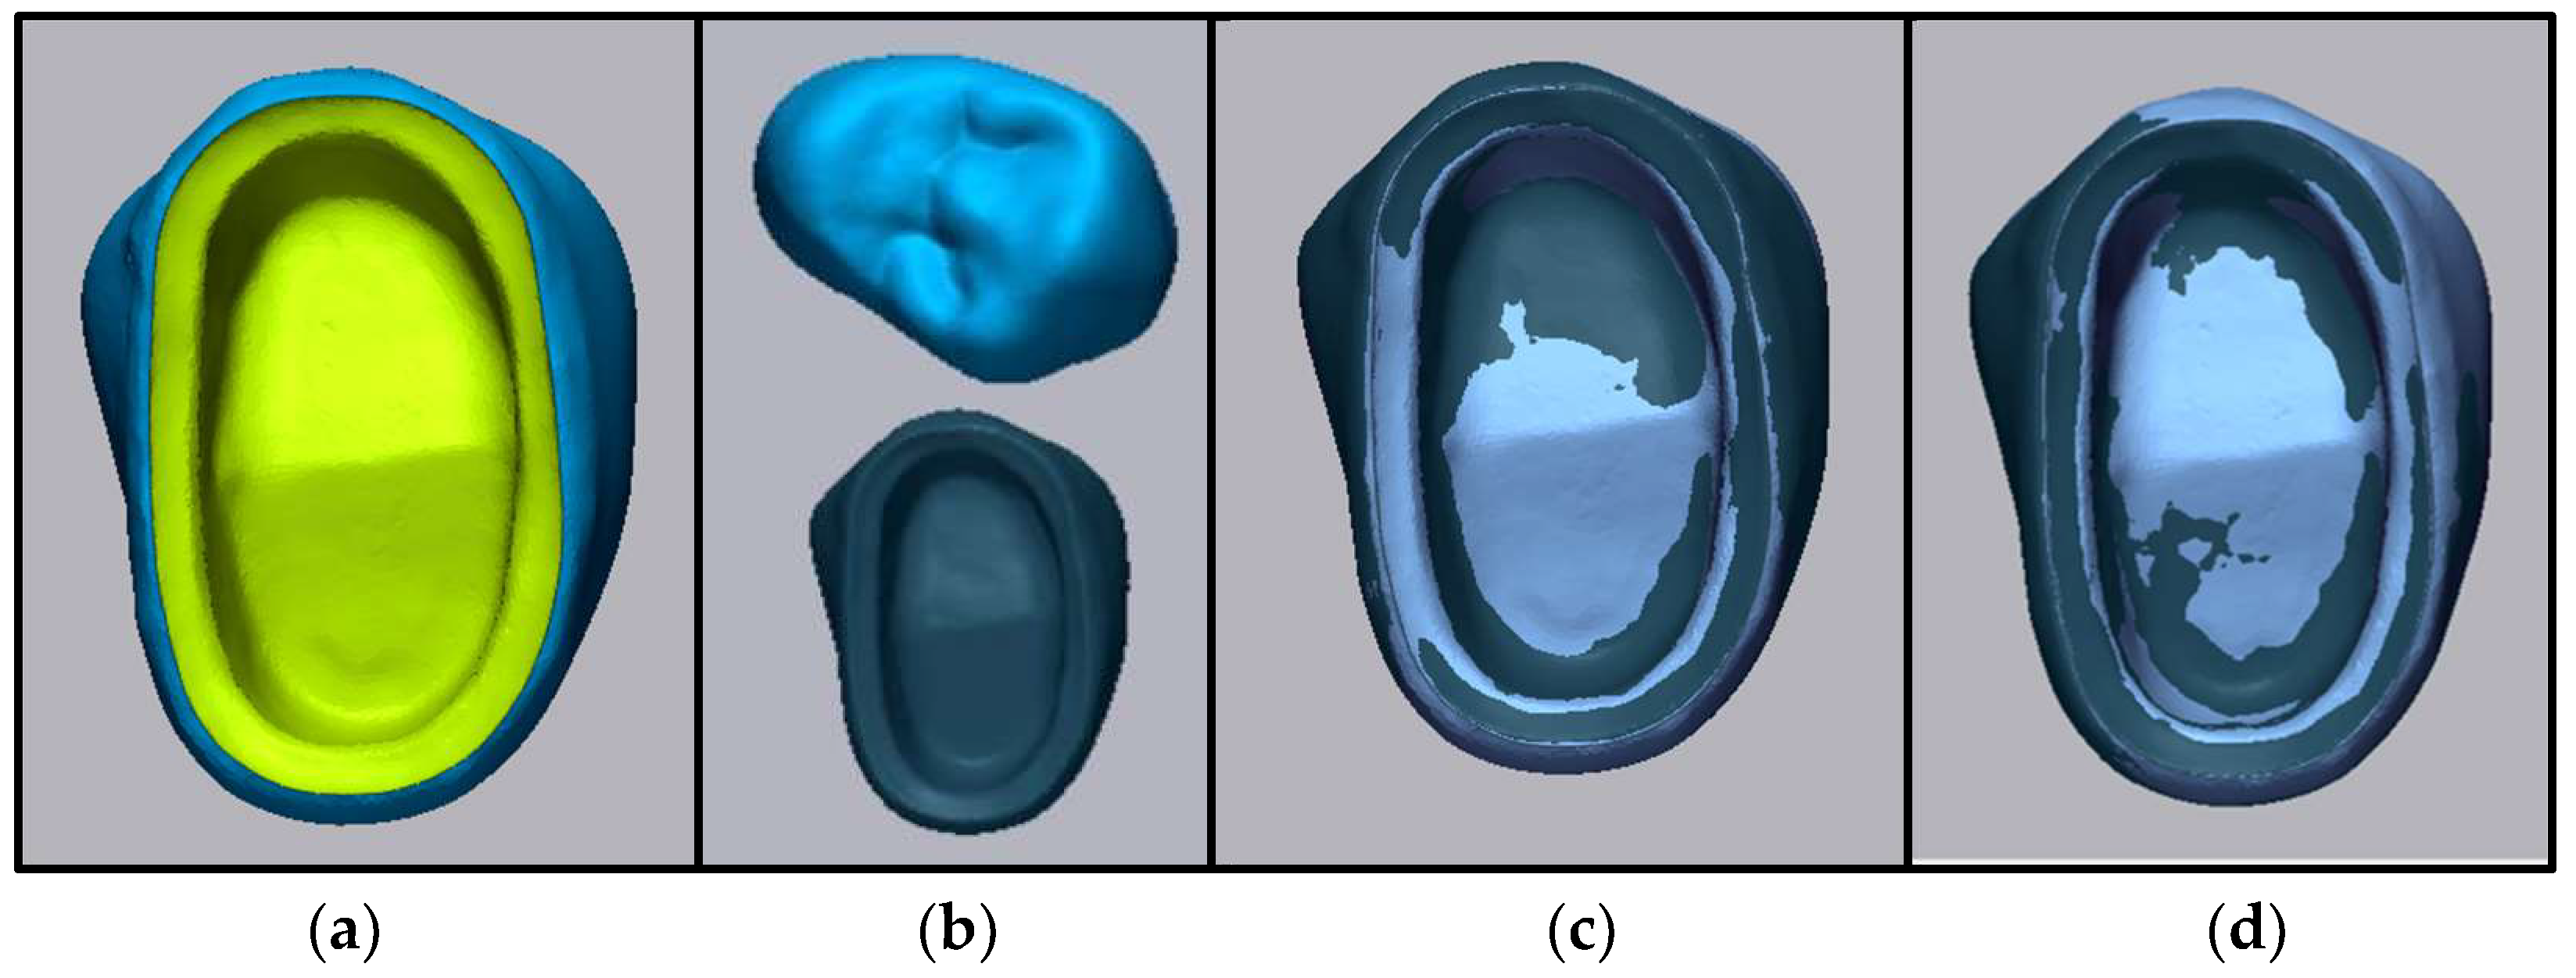
Trueness assessment was started by stabilization of each crown on a base of baseplate wax with its intaglio surface facing upward, then the intaglio surface was scanned using an intraoral scanner (Primescan Connect) and exporting the data as STL files. These files were subsequently superimposed on the corresponding CAD reference design using Geomagic Control X software (3D Systems Inc., Rock Hill, SC, USA) (Version 2022.1). The intaglio surface of the reference design was isolated using the “resegmenting” tool and combined with the “merging” tool to ensure that only the internal surface was included in the measurements. Superimposition using “initial alignment” was performed, followed by “best-fit alignment” based only on the intaglio surface. This process applies the closest point algorithm for alignment of the test and reference files, as exhibited in Figure 7.
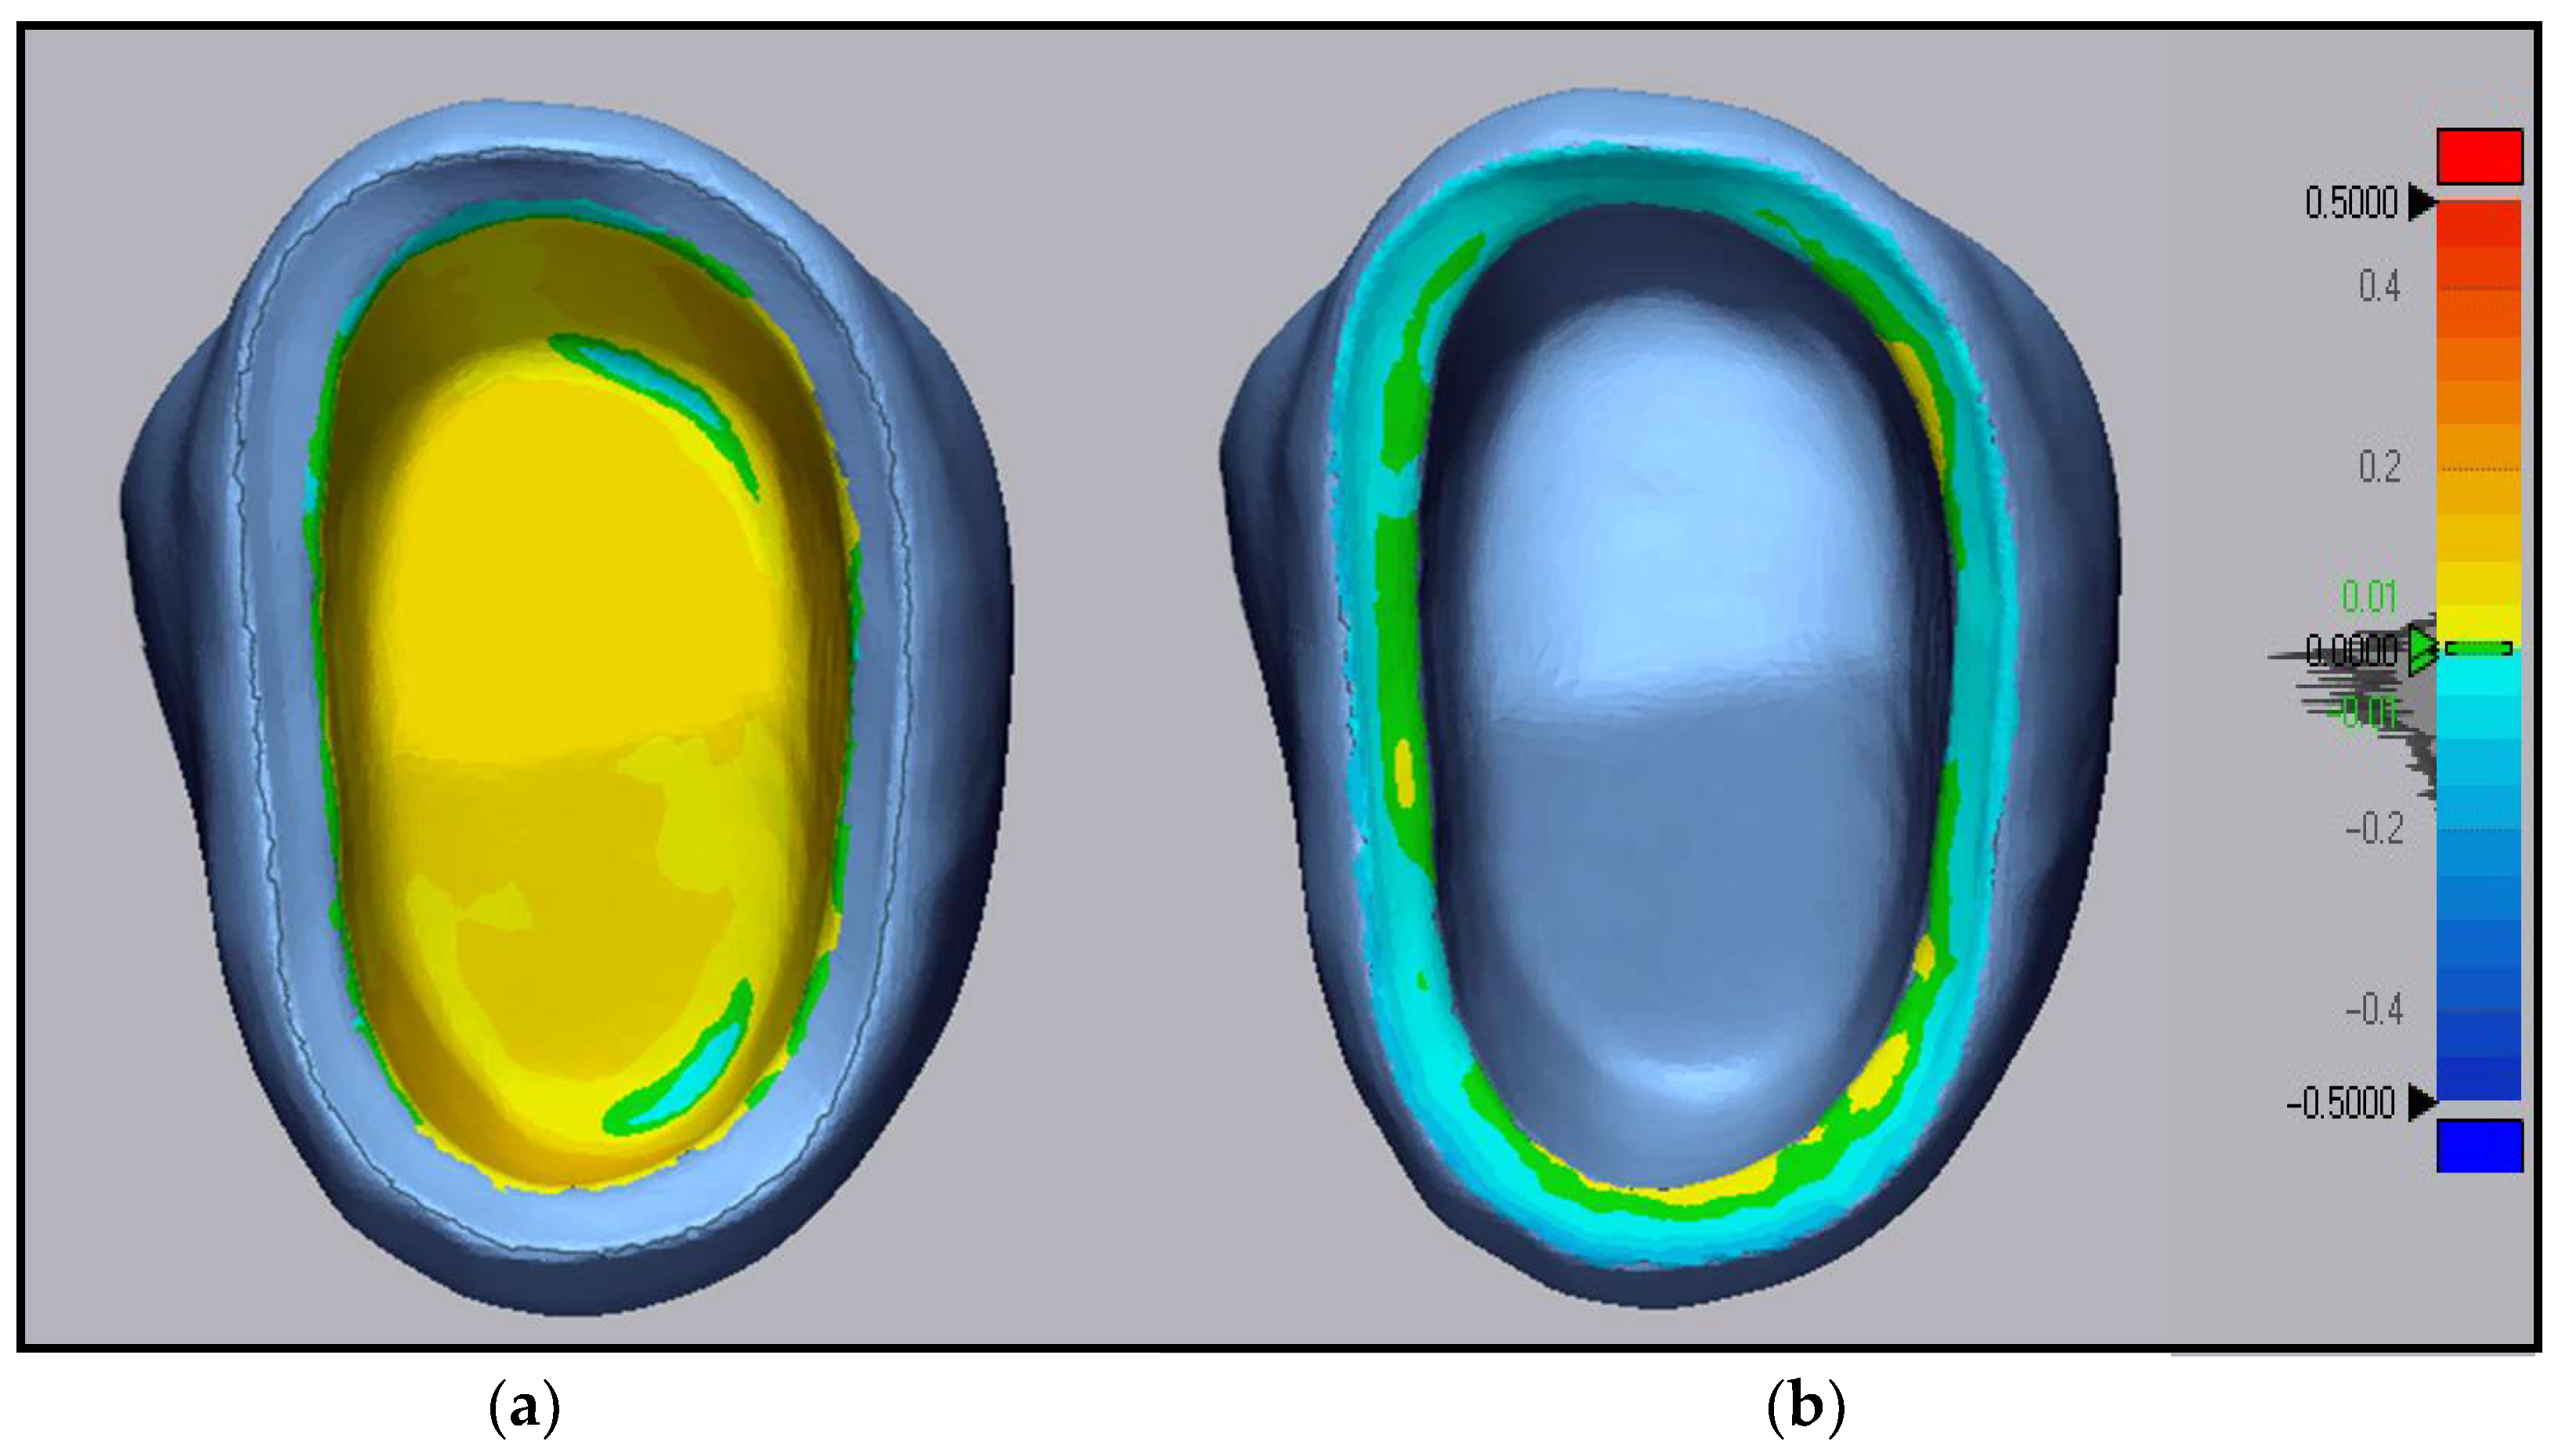
The “3D Compare” tool was utilized to assess deviations between the reference and scanned data by generating a color-coded map of all corresponding points. This map highlighted the deviation across the examined planes [29,30,31]. The tolerance range of the color map was adjusted to ±10 μm. Deviations directed outward were represented by shades toward the red spectrum, while inward deviations appeared in shades of blue. Areas that showed no deviation appeared in the green zone, indicating that the differences between the compared surfaces were within the ±10 μm tolerance range, as illustrated in Figure 8.
Trueness measurements were calculated using the root mean square. Upon superimposition of the two scans, the square of the deviations among the corresponding points in the three-dimensional gap was calculated. The RMS value was obtained by taking the square root of the mean of these squared differences. Lower RMS values indicate closer alignment between datasets, reflecting higher trueness.

2.4. Internal and Marginal Gap Evaluation

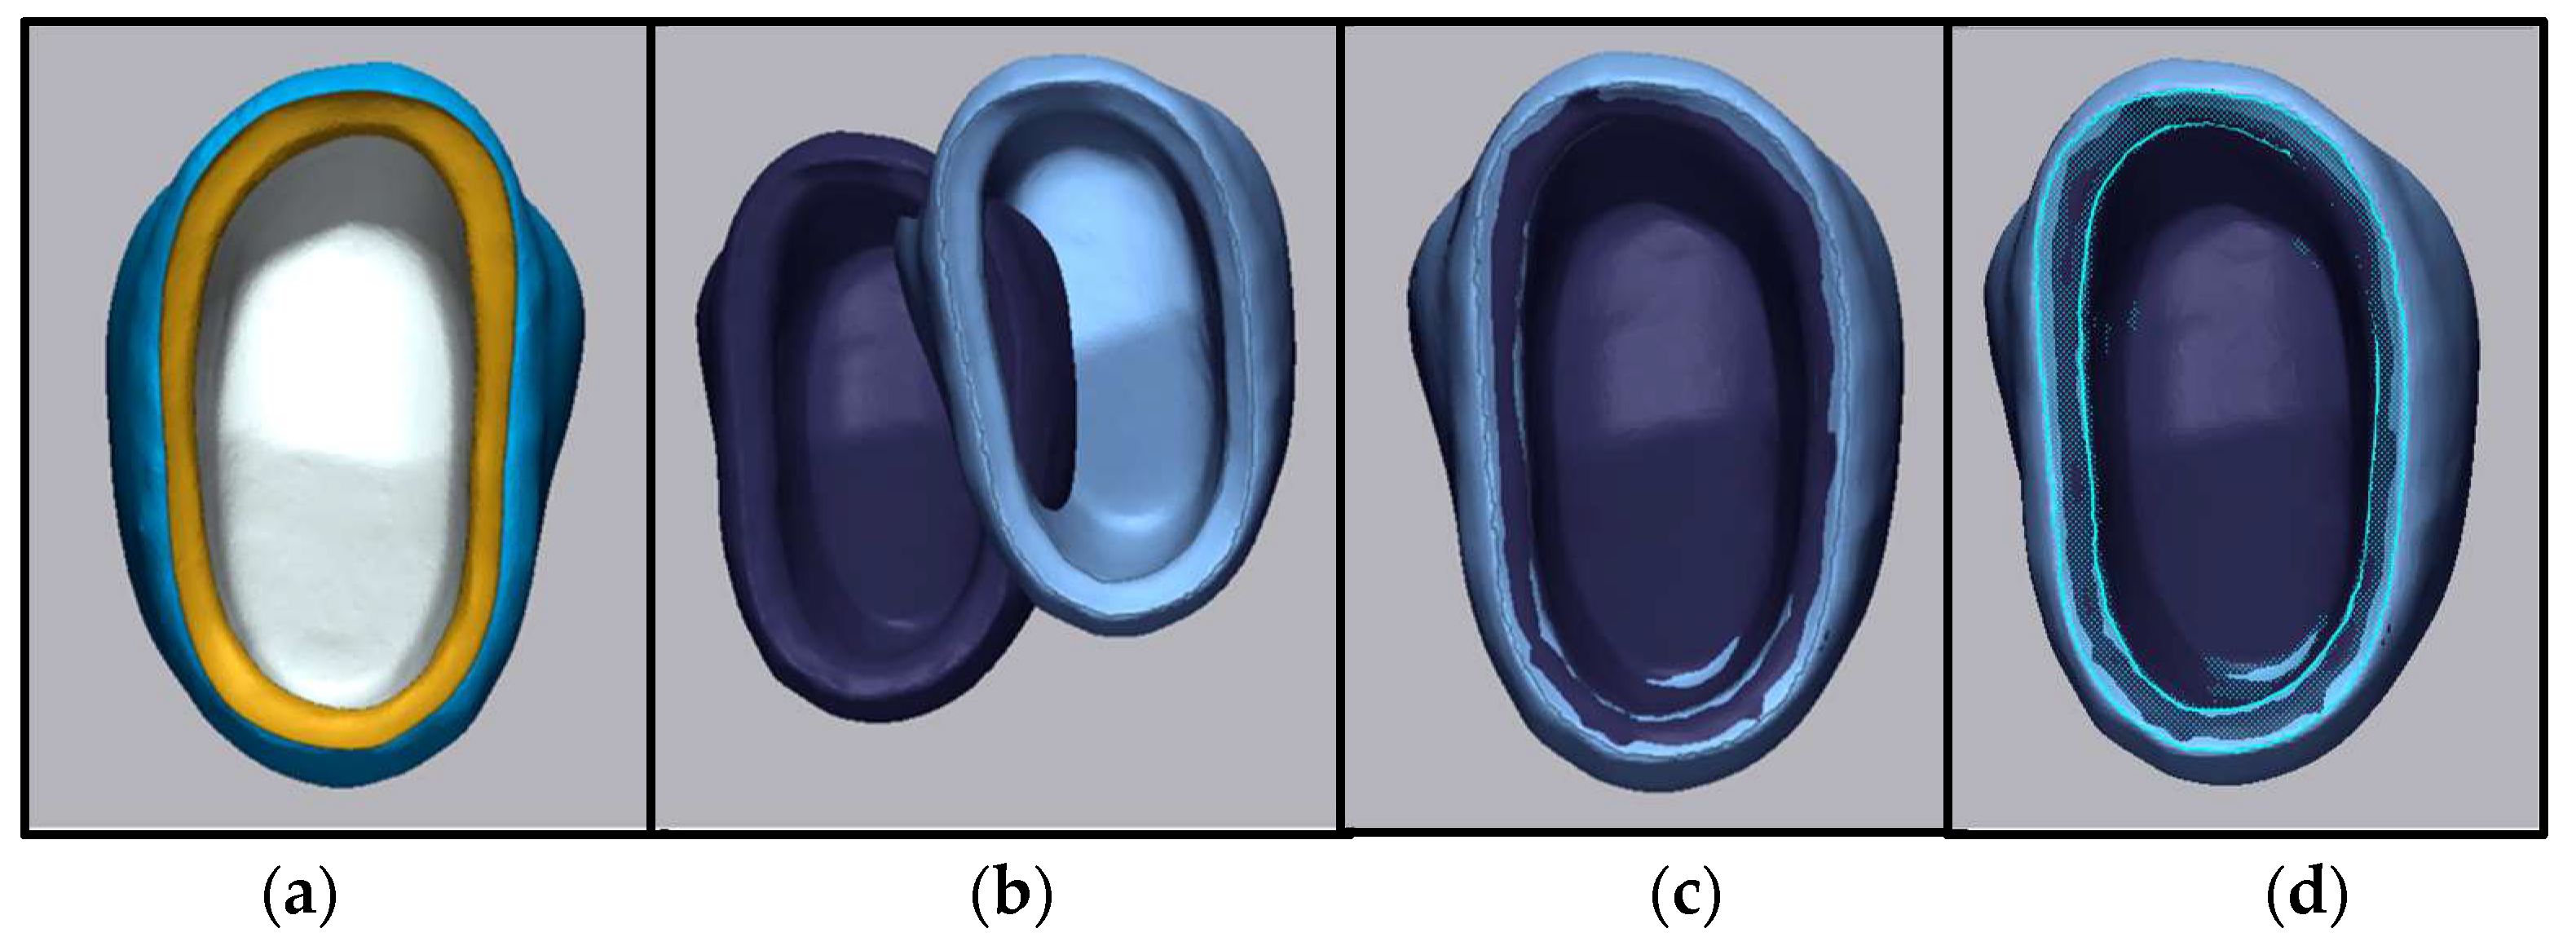
Assessment of internal and marginal adaptation was performed using the digital silicone replica technique [32,33,34]. A very low-viscosity extra-light body silicone material (Panasil initial contact, X-Light body, Kettenbach Dental, Eschenburg, Germany) was applied into each crown, which was then gently seated on its corresponding abutment under a static load of 5 kg using a modified dental surveyor to simulate the average biting forces generated by the jaw or finger pressure during clinical cementation. This step ensures standardization across all samples and minimizes operator variability. Once the light body material had set completely, the crown was carefully detached from the abutment tooth, with the silicone replica remaining in the internal surface. Both the crown alone and the crown with the replica were scanned using the Primescan Connect intraoral scanner. The generated STL files were subsequently imported into Geomagic Control X software (Version 2022.1), where alignment was performed using initial alignment followed by best-fit alignment. The “resegmenting” and “merging” tools were utilized to divide the intaglio surface of the reference file into two distinct regions: marginal area located 1 mm from the crown margin, and the internal area, which includes the remainder of the internal surface, as revealed in Figure 9.
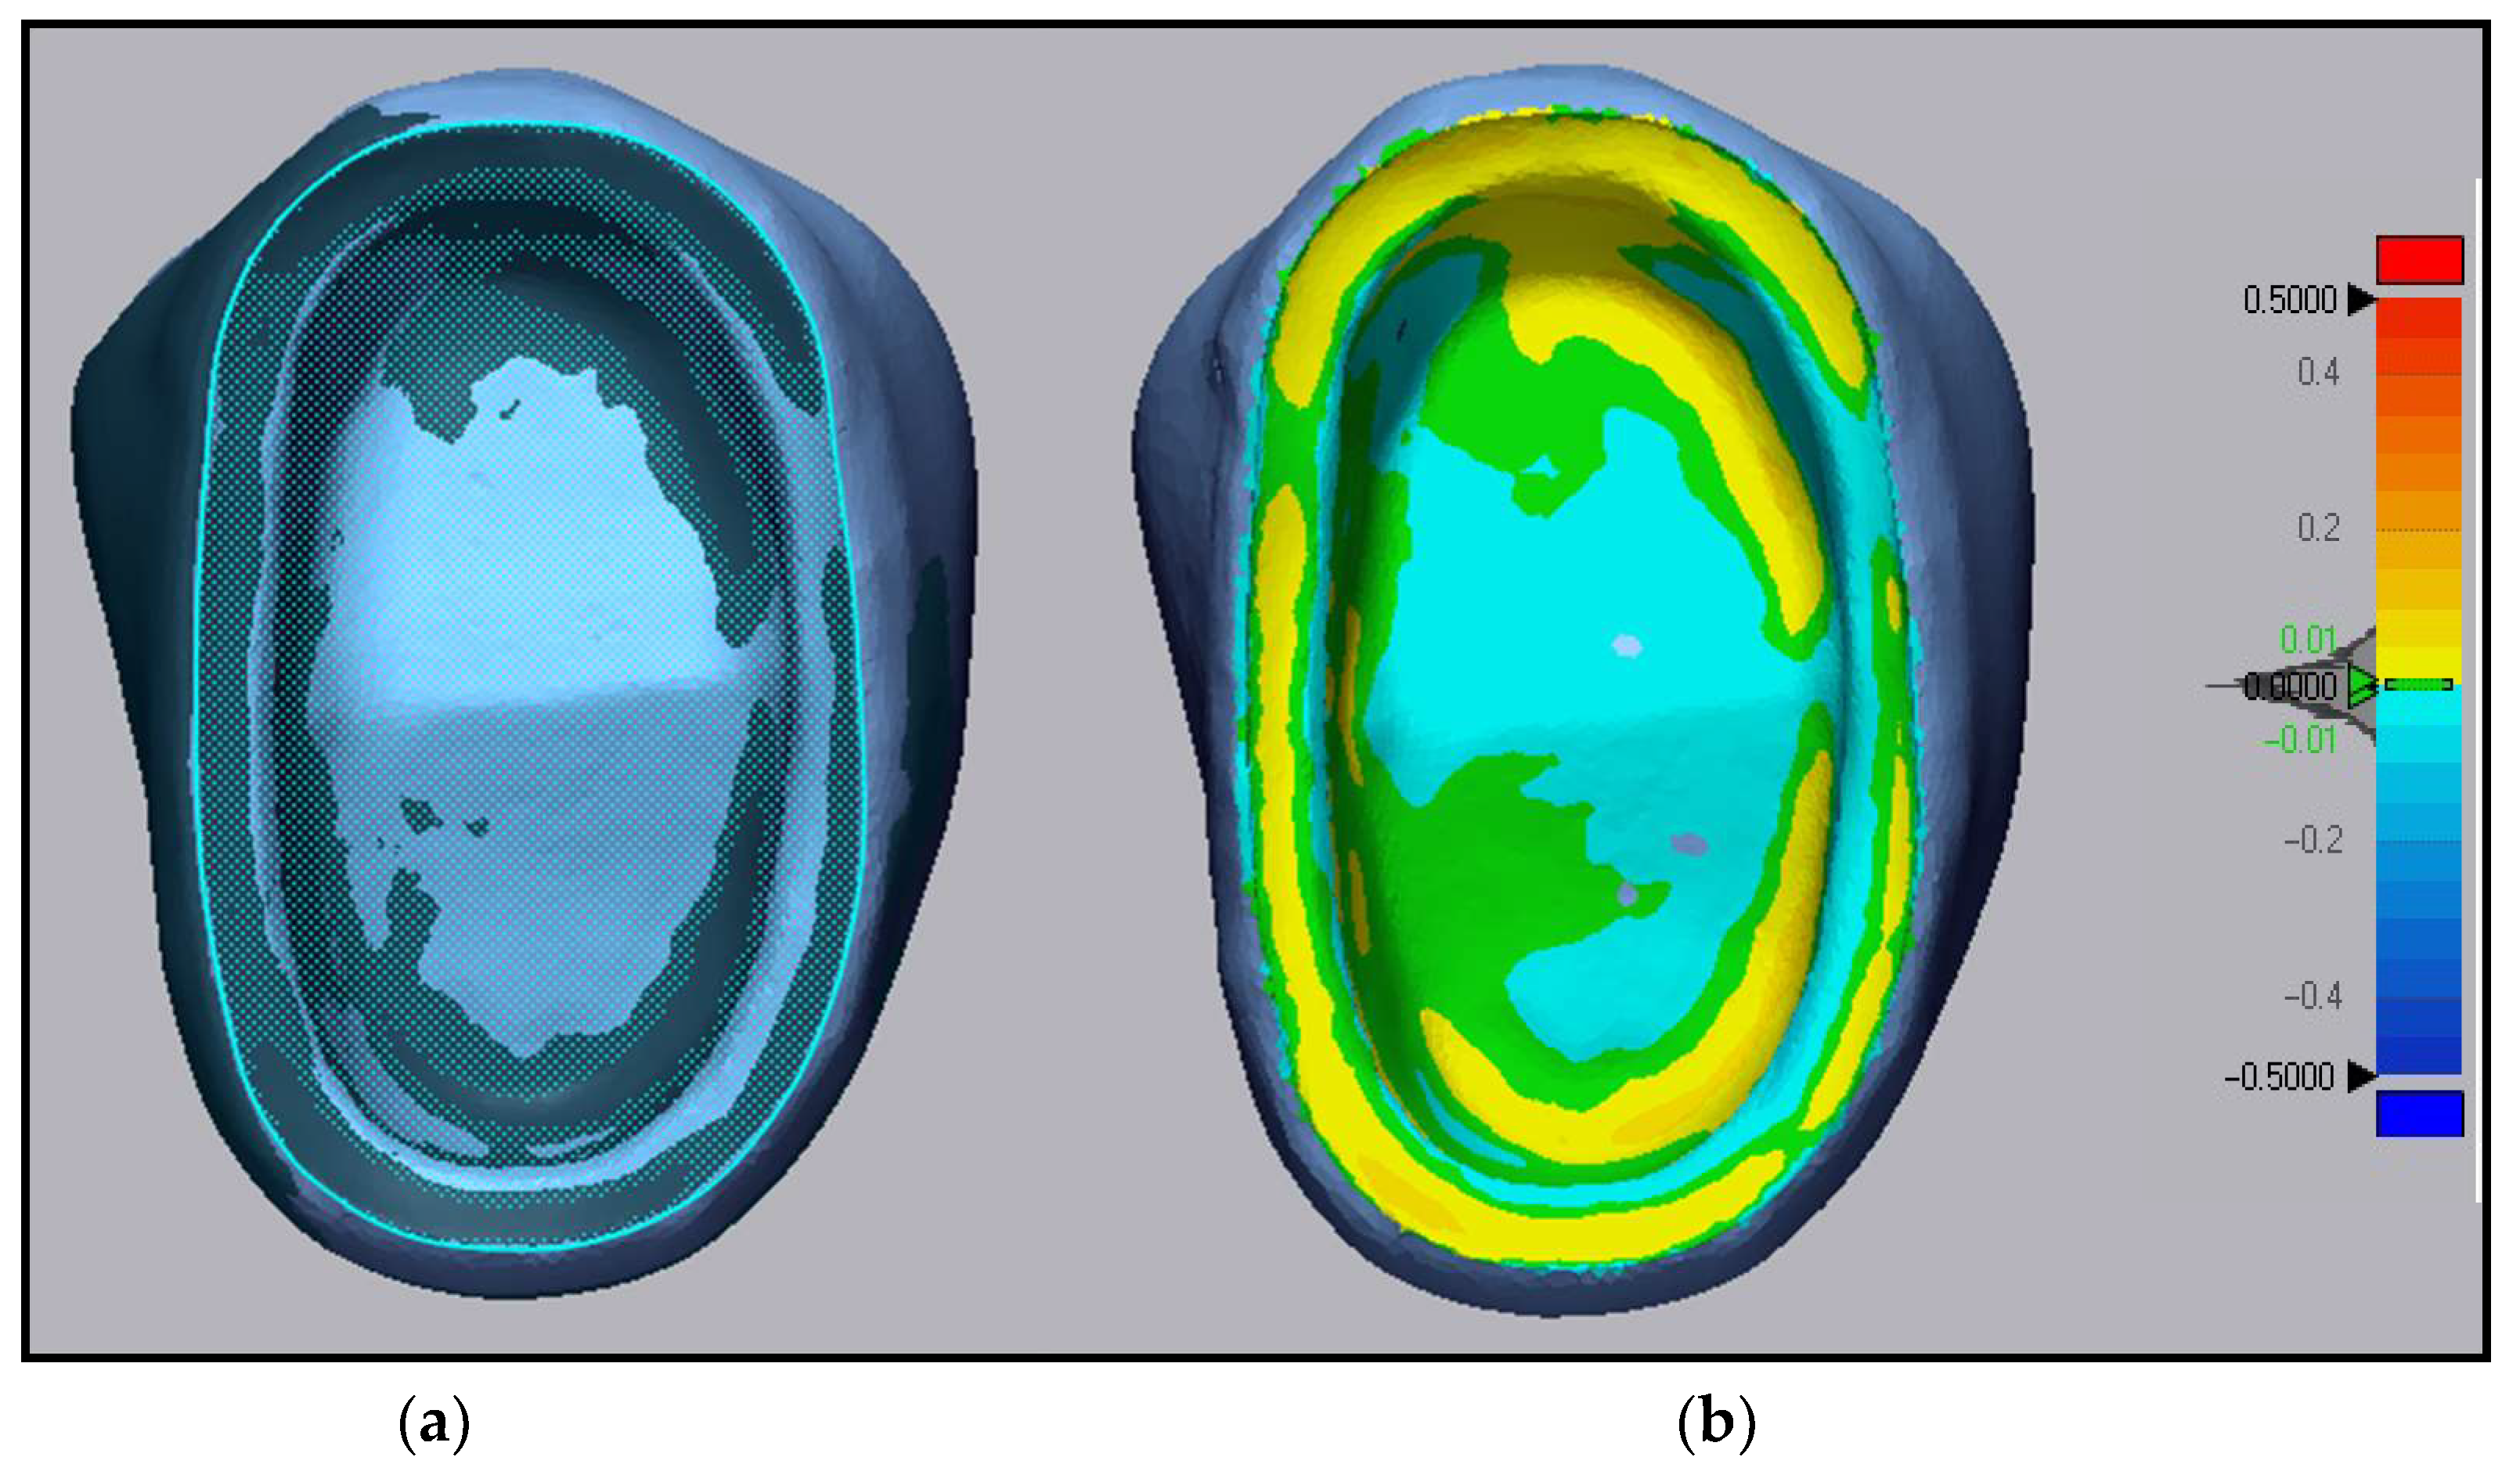
The marginal and internal gaps were calculated in a three-dimensional approach using RMS values generated by the program and visualized through a color-coded map, as illustrated in Figure 10. Higher RMS values indicated larger discrepancies, reflecting lower adaptation of the restoration.

2.5. Statistical Analysis

A prior power analysis was performed using G Power software (version 3.1.9.7) to determine the sample size, assuming a medium effect size (f = 0.4), a significance level of α = 0.05, and a desired power of 80%. Statistical analyses were conducted using SPSS software version 25 (IBM, Armonk, NY, USA), with the level of significance set at 0.05. Normality of data distribution was evaluated using the Shapiro–Wilk test, while Levene’s test was employed to examine the homogeneity of variances across groups [35]. The Kruskal–Wallis test was used to evaluate statistically significant differences in trueness values across the groups, followed by Dunn’s post hoc test for pairwise subgroup comparisons [36]. One-way ANOVA was utilized to assess the influence of fabrication technique on internal and marginal gap measurements [37]. Tukey’s HSD test was subsequently performed for multiple subgroup comparisons [37]. Spearman’s correlation test was employed to evaluate the relationship between the trueness of the fabricated crowns and the marginal and internal fitness [38].

3. Results

3.1. Trueness

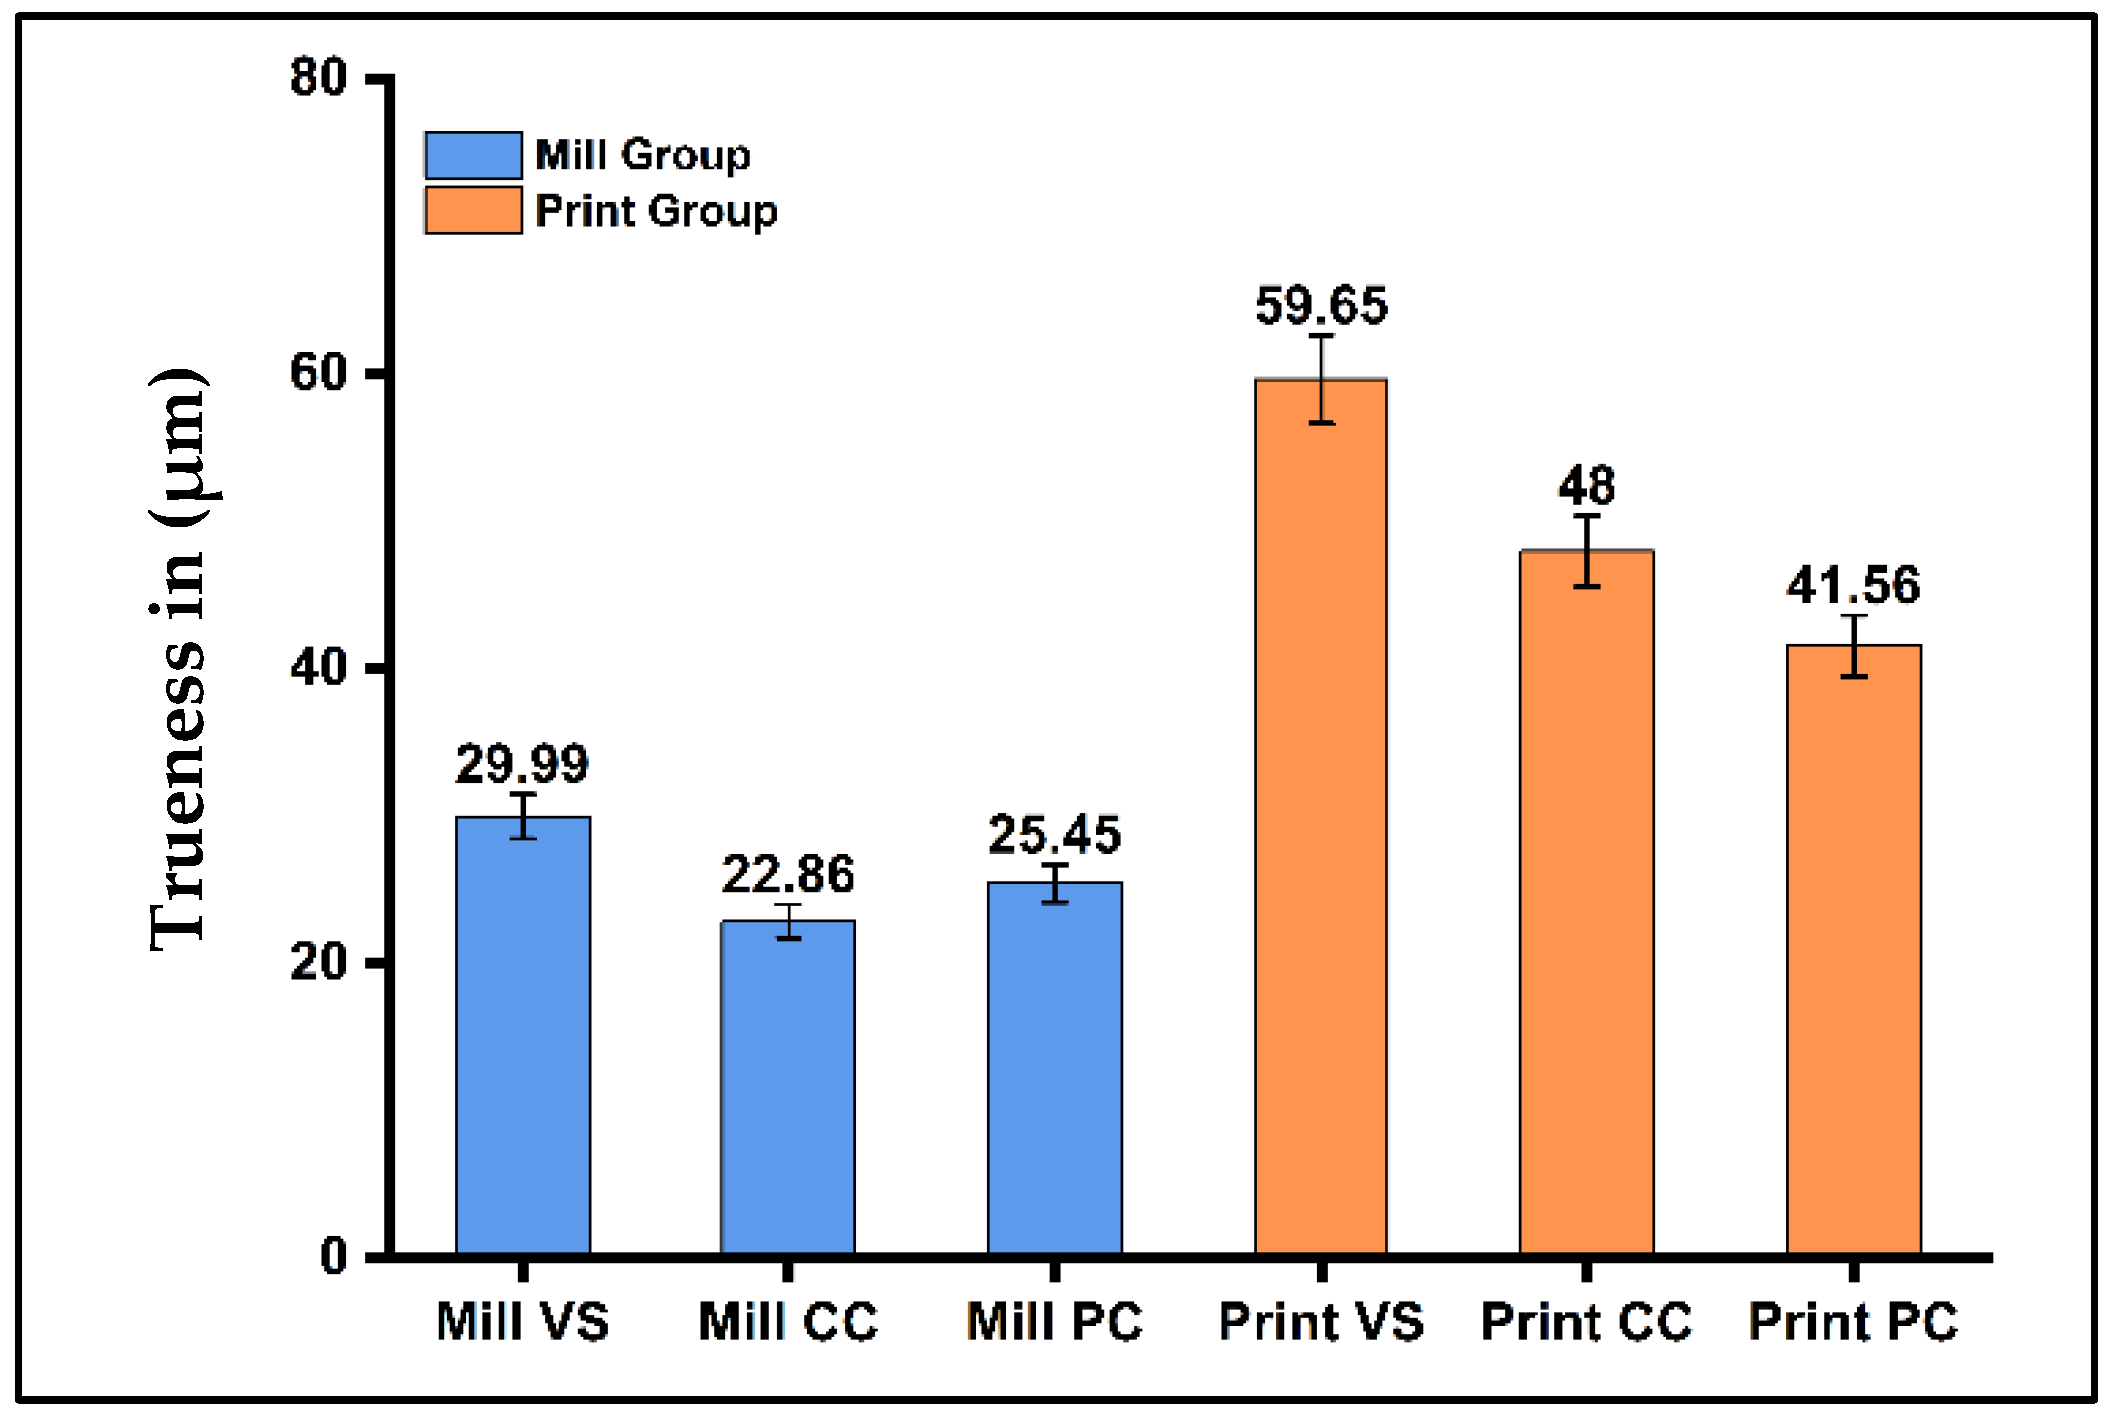
The descriptive statistics, including the means of the mean root square (MRS), the standard deviation (SD) of the trueness measurements in (µm), and the significance comparison among the different groups, are listed in Table 2 and Figure 11. The Mill CC group showed the lowest mean deviation (the highest trueness) (22.86 μm), while the Print VS group recorded the highest mean deviation (the lowest trueness) (59.65 μm). The Kruskal–Wallis test showed significant differences among the subgroups (p < 0.05). Multiple comparisons among the subgroups using Dunn’s test revealed no statistically significant difference among the different materials within the mill and print groups (p > 0.05). On the other hand, statistically significant differences were found between the mill and print groups for the VarseoSmile Crown plus and Ceramic Crown materials (p < 0.05), and a non-significant difference was found between the mill and print P-crown V2 ceramic material (p > 0.05), as shown in Table 2.

3.2. Internal and Marginal Gap

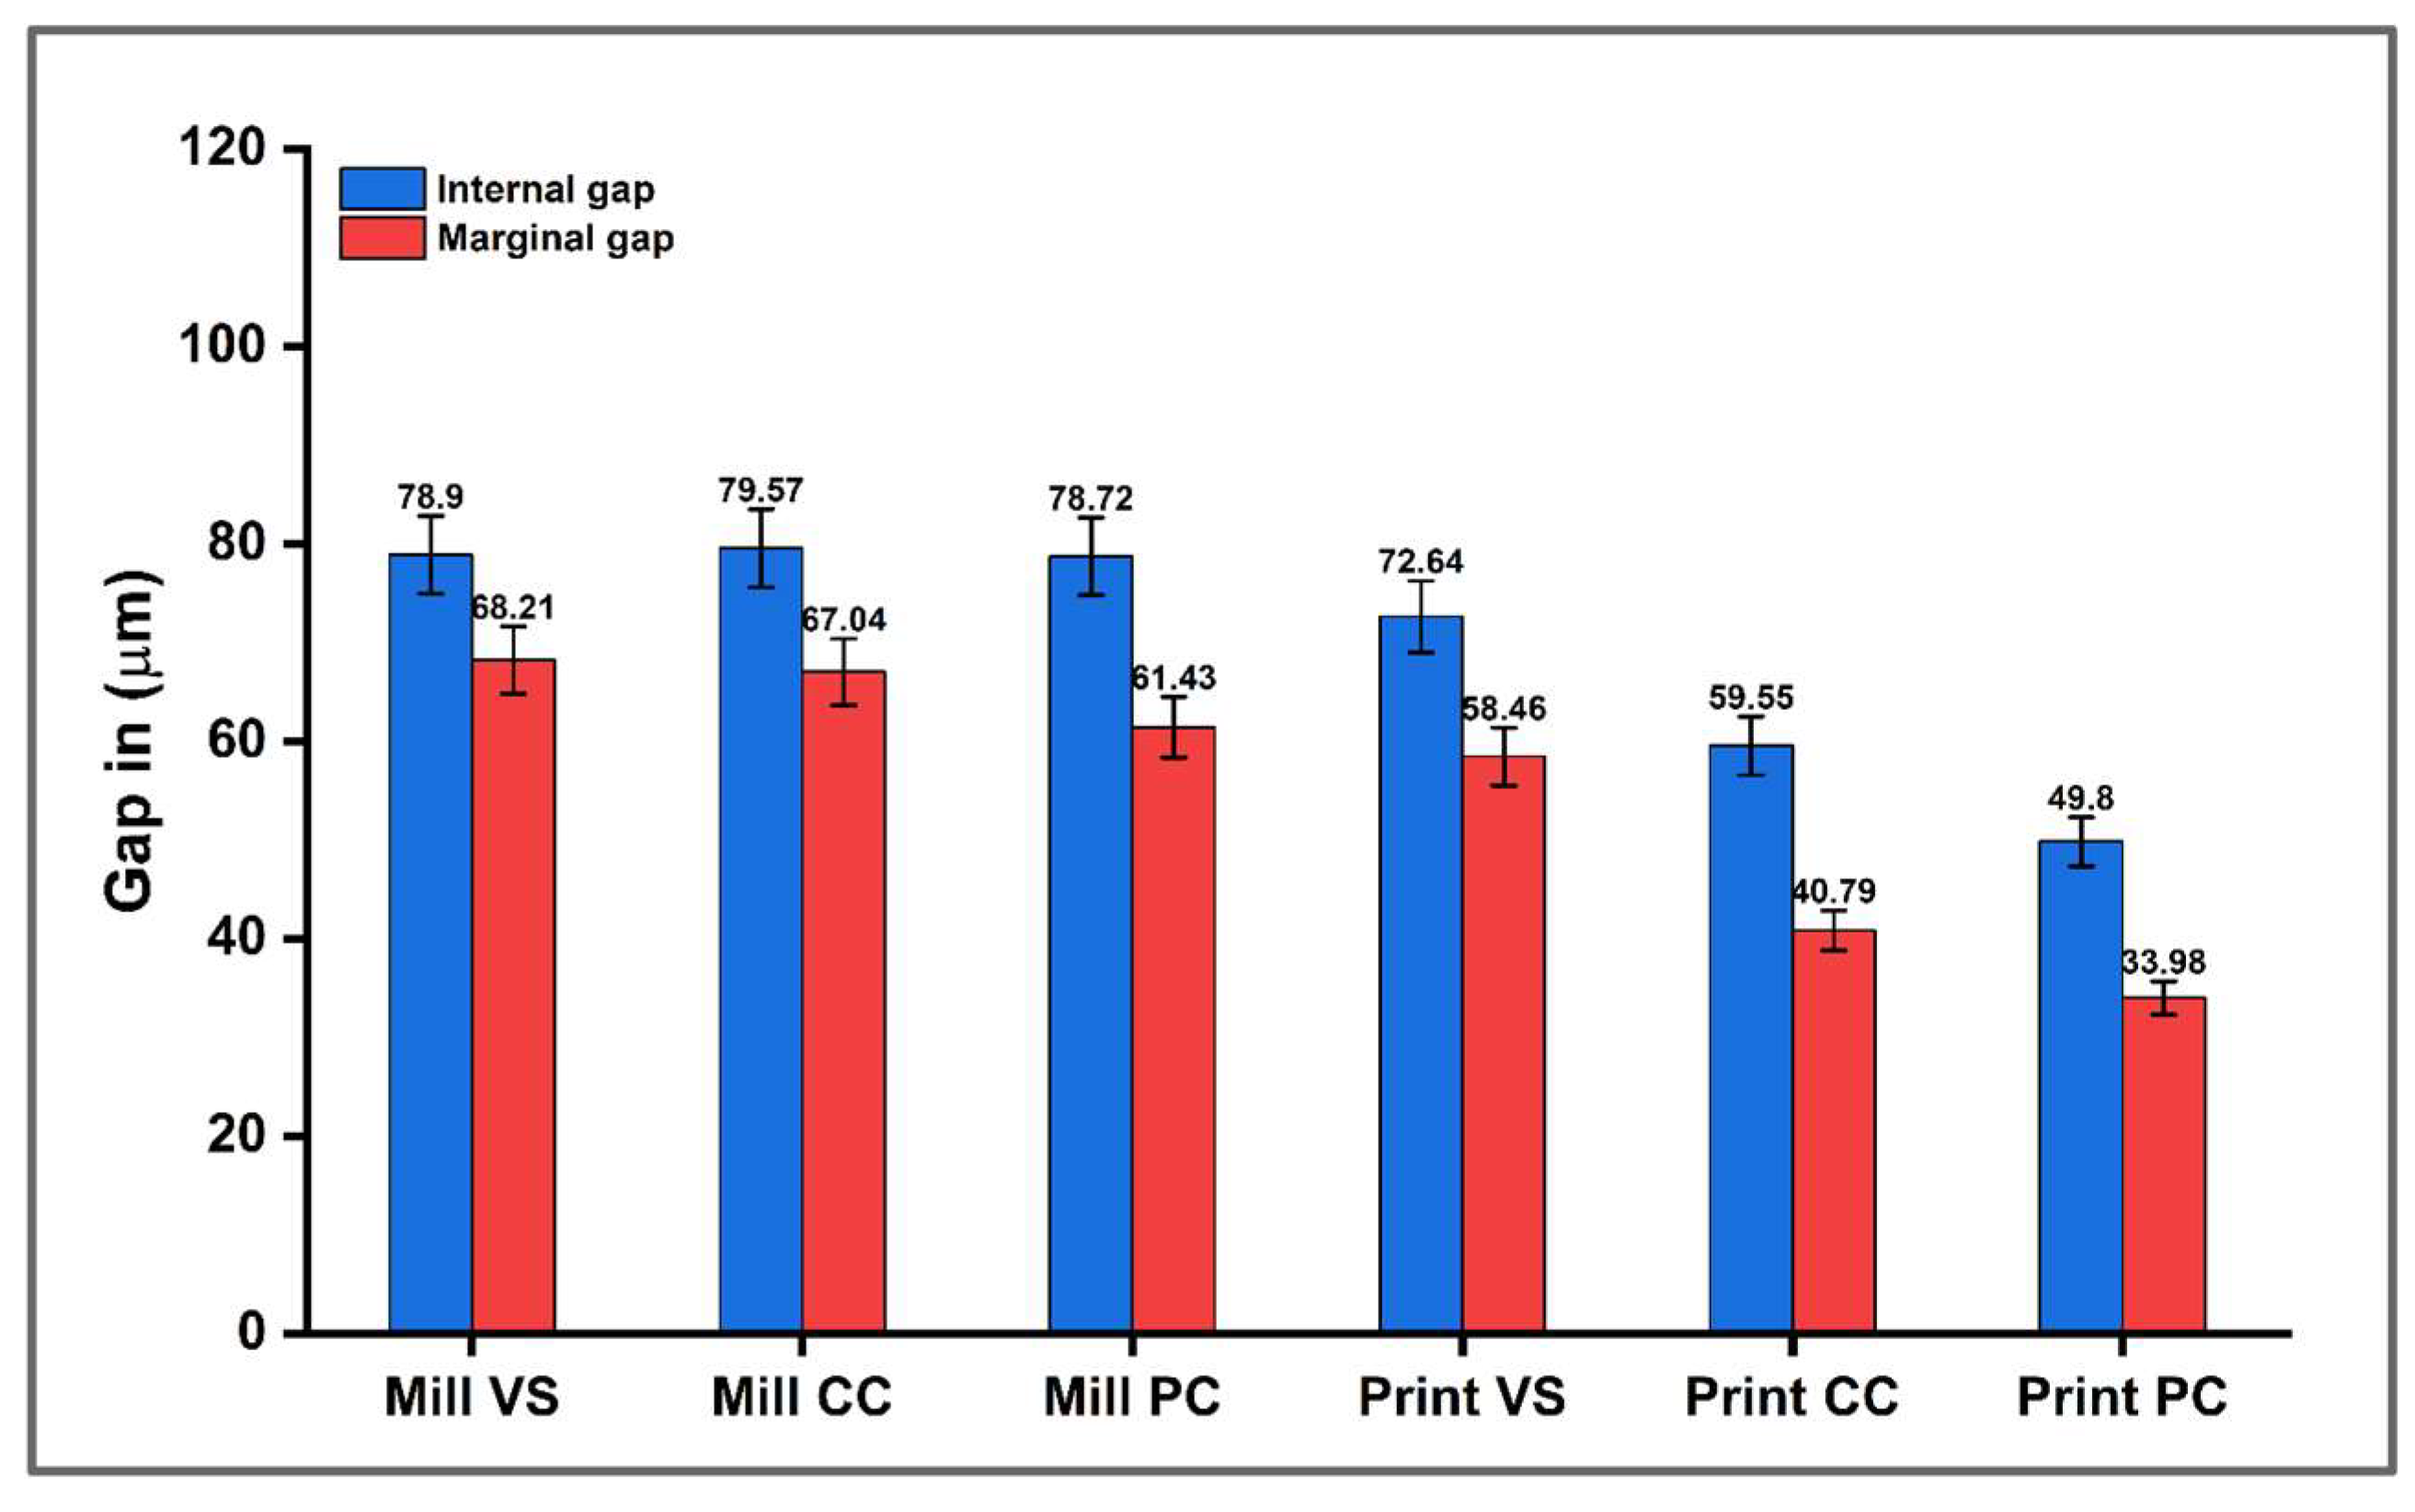
The descriptive statistics, including the means and standard deviation (SD) of the internal and marginal gaps in (μm) and the comparison of significance among the different groups, are listed in Table 3 and Figure 12. In this table and bar chart, all printed groups exhibited smaller internal and marginal gaps than their milled counterparts. The Print PC group demonstrated the lowest internal and marginal gaps (49.8 μm and 33.98 μm, respectively), whereas the highest internal gap was observed in the Mill CC group (79.57 μm), and the highest marginal gap was recorded by the Mill VS group (68.21 μm).
For the internal gap, one-way ANOVA test showed significant differences among groups (p < 0.05). Multiple comparisons among the subgroups using Tukey’s test showed no statistically significant difference among mill groups (p > 0.05), with a statistically significant difference among print groups (p < 0.05). The comparison between both fabrication techniques (mill versus print) revealed a statistically significant difference for both CC and PC materials (p < 0.05), except VS, which showed non-significant difference (p > 0.05), as illustrated in Table 3.
For the marginal gap, Tukey’s test showed no statistically significant difference within mill groups (p > 0.05). Meanwhile, the printed groups showed a statistically significant difference between (VS–CC and VS–PC) (p < 0.05), except (CC-PC), which showed a non-significant difference (p > 0.05). The comparison between both fabrication techniques (mill versus print) showed a statistically significant difference (p < 0.05) for all groups, as shown in Table 3.

3.3. Correlation Between Trueness and Internal and Marginal Fitness

Spearman’s test was utilized to evaluate the association between the trueness of the fabricated crowns and their internal and marginal fitness, as shown in Table 4. The results showed negative correlations for internal fitness (r ≈ −0.77) and marginal fitness (r ≈ −0.78), with a statistically significant inverse association.

4. Discussion

This study compared the trueness, internal, and marginal fitness of crowns fabricated by milling and 3D printing technology. Although different studies addressed that issue [15,19,22,39], the comparisons were made among materials composed of different chemical microstructures, which makes it difficult to isolate the net effect of the manufacturing technique. Therefore, a more direct comparison was conducted to assess the effect of the fabrication methods themselves. Three materials belonging to the same category but from different manufacturers were selected for this comparison to enhance the generalizability of the study findings.
The results demonstrated a statistically significant difference between the two fabrication techniques in terms of trueness, internal gap, and marginal gap. Consequently, the null hypothesis was completely rejected.
The accuracy was assessed by trueness, which is more important than precision, as it reflects how far the scanned data matches the original data [3]. Only the inner surface of the crowns was involved in the measurement to eliminate the distortion effect of the outer surface that may ensue via the manual removal of the supports and sprue, even when the removal performed by the same practitioner, still manual rework always includes a subjective, non-standardizable component [40].
A reference RMS value indicating the clinically acceptable trueness is currently lacking in the literature [41]. However, some studies have proposed a tolerance of 60 µm as a reference value [42,43]. Based on this criterion, the trueness values observed in all groups in the present study fall within the clinically acceptable range.
The lower RMS values recorded in subtractive manufacturing denote higher trueness. This can be attributed to the use of pre-polymerized hybrid ceramic blocks [44]. This technique ensures high-dimensional accuracy due to the stability and homogeneity of the material [45]. Since the blocks are fully polymerized, additional post-processing procedures are not required, thereby minimizing the risk of introducing distortions or structural flaws [46].
In contrast to milling, additive manufacturing showed higher RMS values, denoting lower trueness, which likely results from multiple factors [14,15,16]. Layer-by-layer construction can introduce cumulative errors, leading to deviations from the intended geometry, especially in complex areas [47]. Another important factor is the post-processing and polymerization shrinkage. Printed crowns require post-curing to achieve full polymerization. During this stage, uneven light exposure or excessive heat may lead to shrinkage and warping [46], which cannot be balanced by adding further layers [48]. These thermal and photopolymerization distortions can directly affect the restoration’s trueness [20,21].
The present results are in accordance with those of Anwar et al. [49], who found higher trueness in milled than in 3D-printed crowns. Meanwhile, Yoen et al. [50] showed significantly higher trueness in 3D-printed inlays than inlays milled from lava ultimate hybrid blocks.
It is worth mentioning that limited studies regarding the evaluation of the trueness of 3D-printed permanent hybrid ceramic materials are present in the literature. However, other studies have evaluated the trueness between 3D printing and milling technology using zirconia crowns, with the result showing higher surface trueness for milled compared to 3D-printed crowns [41,44,46,51,52,53,54,55]. Different studies also compared the two manufacturing techniques using interim materials and demonstrated higher trueness in milled restorations than those fabricated by 3D printing [20,40,56].
The comparison of the trueness among the different materials within the same manufacturing technique demonstrated no significant difference. This may be attributed to the highly standardized manufacturing protocols applied for all materials, including milling and 3D printing parameters (e.g., same CAD design, same printer and milling machine, same layer thickness and build orientation), which minimize the potential sources of discrepancy among the fabricated crowns [57].
It is worth mentioning that higher trueness does not always result in better clinical fit. The results of this study revealed an inverse relation between trueness and both internal and marginal fitness of the fabricated crowns.
The silicone replica technique was used in this study to evaluate the internal and marginal fitness of the fabricated crowns. This technique serves as a simulation of the clinical cementation procedure, utilizing an extra-light silicone material applied to the respective tooth, which accurately replicates the final cement layer. In the CAD design software (Exocad, 3.0 Galway), the marginal gap was set to zero to minimize the discrepancies at the crown margin and achieve the best possible marginal adaptation, while the occlusal and axial gaps were adjusted to 100 μm, starting 1 mm beyond the finish line, which is theoretically considered as the essential cement gap to accommodate the luting cement and improve the seating of the crown [58]. Accordingly, a restoration with high trueness relative to the CAD design should theoretically seat properly with no marginal gap. However, this scenario is seldom achieved clinically owing to the frictional resistance and hydraulic pressure generated during the cementation process, which is an unavoidable factor that could potentially affect the seating and adaptation of the restoration [59,60].
Therefore, when a crown restoration with high trueness of the intaglio surface, as seen in the milled crowns in this study, is seated onto its corresponding abutment, excess cement may accumulate on the occlusal surface due to insufficient escape space at the cervical area. This can hinder complete seating of the crown and subsequently increase both marginal and internal discrepancies [41]. In contrast, the lower trueness of the intaglio surface of the printed crowns means higher deviation from the CAD design, which may in turn decrease the friction with the abutment, minimizing the hydraulic pressure and enhancing cement flow, leading to improved overall fitness [56].
This result agrees with that of a study by Keun et al. [56], who reported that high intaglio surface trueness in the axial and occlusal areas may lead to poor fitness, thus adversely affecting both the marginal and internal fit. Other studies suggested that additive manufacturing technologies can produce restorations with improved adaptation compared to the subtractive manufacturing technique [15,19,22].
Meanwhile, Anwar et al. [49] reported that both subtractive and additive specimens exhibited comparable marginal and internal adaptation with slightly higher fitness for the milled group, which is similar to the results of other studies that showed comparable internal fit and marginal adaptation for both 3D-printed and milled restorations [14,44].
Despite the differences in the marginal and internal gap of crown restorations fabricated from both manufacturing techniques observed in this study, it is worth mentioning that these values are all below the clinically acceptable limit [56,57,58,59,60,61,62,63].
No statistically significant differences in marginal and internal gap among the different materials of the milled crowns may be attributed to the high control of the milling procedure and the absence of post-processing steps [64,65].
Unlike the milled group, most of the 3D-printed crowns exhibited statistically significant differences for both internal and marginal adaptation. This variability can be attributed to differences in polymerization behavior, as well as the post-processing procedure, which are further influenced by the effect of the silicone replica technique [52,66]. Differences in internal surface roughness and surface energy among the different printed materials may influence the frictional resistance for the cement (or silicone) during seating, leading to significant differences in the final adaptation [67].
Despite the fact that every attempt was made to provide a high level of standardization during all procedural steps (e.g., the same abutment, same milling and printing devices, same design parameters), this study still demonstrates several limitations. The findings of this study may not fully represent intraoral conditions, such as moisture and functional loading. Secondly, the analysis focused on the intaglio surface only, while the outer surface and occlusal anatomy were not evaluated, which may be important for a more comprehensive evaluation. Finally, only one milling unit and one 3D printer were used, although this approach ensured a high level of standardization, it may limit the generalizability of the results across other systems and brands.

Clinical Implications of the Current Research

The findings of this study underscore the importance of focusing on adaptation as a primary clinical parameter when selecting fabrication techniques. While trueness is a purely geometrical comparison to a digital design, fitness depends more on the actual physical contact between the crown and the tooth or die. This can further be improved by modifying the cement spacer during the design phase. Fitness is considered more critical for ensuring long-term success, as optimal fitness directly impacts the biological and mechanical performance of the restoration, which minimizes the risk of fracture, microleakage, secondary caries, and periodontal complications.
While internal fit provides more uniform stress distribution and retention, marginal fit is prioritized because it has a stronger influence on biological complications. Marginal gaps directly expose the luting cement and tooth structure to the oral environment, making them more prone to caries and periodontal issues.

5. Conclusions

  • Regardless of the fabrication technique or material used, the mean values of trueness, internal gap, and marginal gap of all groups were all below the clinically acceptable limits. This finding supports the suitability of both additive and subtractive techniques for the fabrication of definitive dental restorations using hybrid ceramic materials.
  • The fabrication technique had a significant influence on the trueness of the restorations in comparison to the type of material used.
  • Subtractive technique produced crowns with significantly higher trueness than the crowns produced by additive technique across most materials.
  • Additive technique produced crowns with significantly better internal and marginal fitness compared to the crowns produced by subtractive technique.
  • The novel approach of using custom-milled blocks derived from printable resins followed in this study enabled a standardized comparison between both fabrication techniques. By using the same material in both workflows, the study successfully eliminated material-related variables.
  • These findings may offer new insights for clinical applications of custom-milled blocks by expanding the versatility of printable materials.

Author Contributions

Conceptualization, M.H.A. and M.A.M.; methodology, M.H.A. and M.A.M.; validation, M.H.A. and M.A.M.; formal analysis, M.H.A.; investigation, M.H.A.; resources, M.H.A.; data curation, M.H.A. and M.A.M.; writing—original draft preparation, M.H.A.; writing—review and editing, M.H.A. and M.A.M.; visualization, M.H.A. and M.A.M.; supervision, M.A.M.; project administration, M.H.A.; funding acquisition, M.H.A. All authors have read and agreed to the published version of the manuscript.

Funding

This research received no external funding.

Institutional Review Board Statement

The Research Ethics Committee of the College of Dentistry, University of Baghdad, approved this study (reference number: 947) on 14 October 2024 (protocol No. 947524). All methods were developed according to the Helsinki Declaration.

Informed Consent Statement

The premolars used in this study were extracted for therapeutic purposes not related to this research. All patients provided informed consent for their extracted teeth to be used in this scientific study.

Data Availability Statement

Due to privacy constraints, the data supporting the findings of this study are available from the corresponding author upon reasonable request.

Acknowledgments

The authors would like to thank Abdul Malik and Mustafa for their support and technical assistance.

Conflicts of Interest

No conflicts of interest have been declared by the authors.

References

  1. Lee, B.I.; You, S.G.; Lee, B.I.; You, S.M.; Kang, S.Y.; Kim, J.H. Effect of rinsing time on the accuracy of interim crowns fabricated by digital light processing: An in vitro study. J. Adv. Prosthodont. 2021, 13, 126. [Google Scholar] [CrossRef] [PubMed]
  2. Al Hamad, K.Q.; Al-Rashdan, R.B.; Al-Rashdan, B.A.; Baba, N.Z. Effect of milling protocols on trueness and precision of ceramic crowns. J. Prosthodont. 2021, 30, 171–176. [Google Scholar] [CrossRef]
  3. Falih, M.Y.; Majeed, M.A. Trueness and precision of eight intraoral scanners with different finishing line designs: A comparative in vitro study. Eur. J. Dent. 2023, 17, 1056–1064. [Google Scholar] [CrossRef]
  4. Revilla-León, M.; Methani, M.M.; Morton, D.; Zandinejad, A. Internal and marginal discrepancies associated with stereolithography (SLA) additively manufactured zirconia crowns. J. Prosthet. Dent. 2020, 124, 730–737. [Google Scholar] [CrossRef]
  5. Asady, A.M.; Al azzawi, H.J. A study to compare the internal fitness and marginal gap between single crowns and crowns within three-unite bridge of zirconia substructure fabricated by CAD-CAM system: An In vitro study. J. Baghdad Coll. Dent. 2017, 29, 27–31. [Google Scholar] [CrossRef]
  6. Saadallah, S.; Al-Azzawi, A.K.J. The Influence of Different Fabrication and Impression Techniques on the Marginal Adaptation of Lithium Disilicate Crowns: A Comparative in Vitro Study. J. Baghdad Coll. Dent. 2017, 29, 20–26. [Google Scholar] [CrossRef]
  7. Srimaneepong, V.; Heboyan, A.; Zafar, M.S.; Khurshid, Z.; Marya, A.; Fernandes, G.V.O.; Rokaya, D. Fixed prosthetic restorations and periodontal health: A narrative review. J. Funct. Biomater. 2022, 13, 15. [Google Scholar] [CrossRef]
  8. Hsu, Y.-T.; Huang, N.-C.; Wang, H.-L. Relationship between periodontics and prosthodontics: The two-way street. J. Prosthodont. Implantol. 2015, 4, 4–11. [Google Scholar]
  9. Abduo, J.; Lyons, K.; Bennamoun, M. Trends in computer-aided manufacturing in prosthodontics: A review of the available streams. Int. J. Dent. 2014, 2014, 783948. [Google Scholar] [CrossRef] [PubMed]
  10. Torabi, K.; Farjood, E.; Hamedani, S. Rapid prototyping technologies and their applications in prosthodontics, a review of literature. J. Dent. 2015, 16, 1. [Google Scholar]
  11. Tian, Y.; Chen, C.; Xu, X.; Wang, J.; Hou, X.; Li, K.; Lu, X.; Shi, H.; Lee, E.-S.; Jiang, H.B. A review of 3D printing in dentistry: Technologies, affecting factors, and applications. Scanning 2021, 2021, 9950131. [Google Scholar] [CrossRef]
  12. Corbani, K.; Hardan, L.; Skienhe, H.; Özcan, M.; Alharbi, N.; Salameh, Z. Effect of material thickness on the fracture resistance and failure pattern of 3D-printed composite crowns. Int. J. Comput. Dent. 2020, 23, 225–233. [Google Scholar]
  13. Zimmermann, M.; Ender, A.; Egli, G.; Özcan, M.; Mehl, A. Fracture load of CAD/CAM-fabricated and 3D-printed composite crowns as a function of material thickness. Clin. Oral Investig. 2019, 23, 2777–2784. [Google Scholar] [CrossRef] [PubMed]
  14. Daher, R.; Ardu, S.; di Bella, E.; Krejci, I.; Duc, O. Efficiency of 3D printed composite resin restorations compared with subtractive materials: Evaluation of fatigue behavior, cost, and time of production. J. Prosthet. Dent. 2024, 131, 943–950. [Google Scholar] [CrossRef]
  15. Kakinuma, H.; Izumita, K.; Yoda, N.; Egusa, H.; Sasaki, K. Comparison of the accuracy of resin-composite crowns fabricated by three-dimensional printing and milling methods. Dent. Mater. J. 2022, 41, 808–815. [Google Scholar] [CrossRef]
  16. Frazier, W.E. Metal additive manufacturing: A review. J. Mater. Eng. Perform. 2014, 23, 1917–1928. [Google Scholar] [CrossRef]
  17. AlGhamdi, M.A. Additively Fabricated Permanent Crown Materials: An Overview of Literature and Update. Prosthesis 2025, 7, 35. [Google Scholar] [CrossRef]
  18. Bonfante, E.A.; Calamita, M.; Bergamo, E.T.P. Indirect restorative systems—A narrative review. J. Esthet. Restor. Dent. 2023, 35, 84–104. [Google Scholar] [CrossRef]
  19. Abdulkareem, M.A.; Al-Shamma, A.M.W. Marginal adaptation and fracture resistance of 3D-printed and CAD/CAM-milled definitive resin matrix ceramic crowns. Int. J. Comput. Dent. 2024, 27, 355–363. [Google Scholar] [PubMed]
  20. Çakmak, G.; Donmez, M.B.; Cuellar, A.R.; Kahveci, Ç.; Schimmel, M.; Yilmaz, B. Additive or subtractive manufacturing of crown patterns used for pressing or casting: A trueness analysis. J. Dent. 2022, 124, 104221. [Google Scholar] [CrossRef] [PubMed]
  21. No-Cortes, J.; Ayres, A.P.; Lima, J.; Markarian, R.; Attard, N.; Cortes, A. Trueness, 3D Deviation, Time and Cost Comparisons Between Milled and 3D-Printed Resin Single Crowns. Eur. J. Prosthodont. Restor. Dent. 2021, 29, 107–112. [Google Scholar] [CrossRef]
  22. Suksuphan, P.; Krajangta, N.; Didron, P.P.; Wasanapiarnpong, T.; Rakmanee, T. Marginal adaptation and fracture resistance of milled and 3D-printed CAD/CAM hybrid dental crown materials with various occlusal thicknesses. J. Prosthodont. Res. 2024, 68, 326–335. [Google Scholar] [CrossRef]
  23. Hmedat, S.J.A.; Ibraheem, A.F. An in vitro evaluation of fit of the crowns fabricated by zirconium oxide-based ceramic CAD/CAM systems, before and after porcelain firing cycles and after glaze cycles. J. Baghdad Coll. Dent. 2013, 25, 43–48. Available online: https://jbcd.uobaghdad.edu.iq/index.php/jbcd/article/view/137 (accessed on 8 May 2025).
  24. Bego. Bego Manufactural Instructions; Bego: Bremen, Germany, 2020. [Google Scholar]
  25. SprintRay. SprintRay Manufactural Instructions; SprintRay: Los Angeles, CA, USA, 2023. [Google Scholar]
  26. Senertek. Senertek Manufactural Instructions; Senertek: İzmir, Turkey, 2022. [Google Scholar]
  27. Morón-Conejo, B.; Berrendero, S.; Bai, S.; Martínez-Rus, F.; Pradies, G. Fit comparison of interim crowns manufactured with open and proprietary 3D printing modes versus milling technology: An in vitro study. J. Esthet. Restor. Dent. 2024, 36, 1693–1703. [Google Scholar] [CrossRef] [PubMed]
  28. Ibraheem, A.F.; Abdulkareem, A.M. Comparison of the marginal fitness of the ceramic crowns fabricated with different CAD/CAM systems: An in vitro study. J. Baghdad Coll. Dent. 2016, 28, 28–33. [Google Scholar]
  29. Son, K.; Lee, K.-B. Effect of finish line locations of tooth preparation on the accuracy of intraoral scanners. Int. J. Comput. Dent. 2021, 24, 29–40. [Google Scholar] [PubMed]
  30. Kim, R.J.-Y.; Park, J.-M.; Shim, J.-S. Accuracy of 9 intraoral scanners for complete-arch image acquisition: A qualitative and quantitative evaluation. J. Prosthet. Dent. 2018, 120, 895–903. [Google Scholar] [CrossRef]
  31. Ali, S.; Majeed, M.A. Trueness of intraoral scanners: Its impact on the trueness and marginal and internal discrepancies of fabricated crowns: A comparative in vitro study. J. Int. Dent. Med. Res. 2024, 17, 1048–1055. [Google Scholar] [CrossRef]
  32. Jang, D.; Son, K.; Lee, K. A Comparative study of the fitness and trueness of a three-unit fixed dental prosthesis fabricated using two digital workflows. Appl. Sci. 2019, 9, 2778. [Google Scholar] [CrossRef]
  33. Al-Atyaa, Z.T.; Majeed, M.A. Comparative evaluation of the marginal and internal fitness of monolithic CAD/CAM zirconia crowns fabricated from different conventional impression techniques and digital impression using silicone replica technique: An in vitro study. Biomed. Pharmacol. J. 2018, 11, 477–490. [Google Scholar] [CrossRef]
  34. Abdulrahman, M.; Al-Adel, S. Evaluation of the marginal and internal fitness of full-contour CAD/CAM crowns made from zirconia, lithium disilicate, zirconia-reinforced lithium silicate and hybrid dental ceramic using silicone replica technique: A comparative in vitro study. J. Genet. Environ. Resour. Conserv. 2016, 4, 10–20. [Google Scholar]
  35. Razali, N.M.; Wah, Y.B. Power comparisons of shapiro-wilk, kolmogorov-smirnov, lilliefors and anderson-darling tests. J. Stat. Model. Anal. 2011, 2, 21–33. [Google Scholar]
  36. Dunn, O.J. Multiple comparisons using rank sums. Technometrics 1964, 6, 241–252. [Google Scholar] [CrossRef]
  37. Field, A. Discovering Statistics Using IBM SPSS Statistics; Sage Publications Limited: London, UK, 2024; ISBN 1529668700. [Google Scholar]
  38. Spearman, C. The Proof and Measurement of Association Between Two Things; Appleton-Century-Crofts: New York, NY, USA, 1961. [Google Scholar]
  39. Revilla-León, M.; Supaphakorn, A.; Barmak, A.B.; Rutkunas, V.; Kois, J.C. Influence of print orientation on the intaglio surface accuracy (trueness and precision) of tilting stereolithography definitive resin-ceramic crowns. J. Prosthet. Dent. 2023, 133, 246–251. [Google Scholar] [CrossRef] [PubMed]
  40. Çakmak, G.; Cuellar, A.R.; Donmez, M.B.; Abou-Ayash, S.; Lu, W.E.; Schimmel, M.; Yilmaz, B. Effect of printing layer thickness on the trueness of 3-unit interim fixed partial dentures. J. Prosthet. Dent. 2024, 131, 718–725. [Google Scholar] [CrossRef] [PubMed]
  41. Mosaddad, S.A.; Peláez, J.; Panadero, R.A.; Ghodsi, S.; Akhlaghian, M.; Suárez, M.J. Do 3D-printed and milled tooth-supported complete monolithic zirconia crowns differ in accuracy and fit? A systematic review and meta-analysis of in vitro studies. J. Prosthet. Dent. 2024, 133, 383–393. [Google Scholar] [CrossRef]
  42. Kim, C.-M.; Kim, S.-R.; Kim, J.-H.; Kim, H.-Y.; Kim, W.-C. Trueness of milled prostheses according to number of ball-end mill burs. J. Prosthet. Dent. 2016, 115, 624–629. [Google Scholar] [CrossRef]
  43. Cho, J.H.; Yoon, H.I.; Han, J.S.; Kim, D.J. Trueness of the inner surface of monolithic crowns fabricated by milling of a fully sintered (Y, Nb)-TZP block in chairside CAD-CAM system for single-visit dentistry. Materials 2019, 12, 3253. [Google Scholar] [CrossRef]
  44. Abualsaud, R.; Alalawi, H. Fit, Precision, and Trueness of 3D-Printed Zirconia Crowns Compared to Milled Counterparts. Dent. J. 2022, 10, 215. [Google Scholar] [CrossRef] [PubMed]
  45. Andriyani, M.; Harwasih, S.; Inayati, E. Fabrication Technique of Dental Restoration Using Hybrid Ceramic with CAD CAM Method. J. Vocat. Health Stud. 2017, 1, 32–38. Available online: https://e-journal.unair.ac.id/JVHS/article/view/6584 (accessed on 28 April 2025). [CrossRef]
  46. Refaie, A.; Bourauel, C.; Elshazly, T.; Evers-Dietze, B.; Alhotan, A.; Aldesoki, M. Trueness and precision of digital light processing fabricated 3D printed monolithic zirconia crowns. J. Dent. 2024, 148, 105151. [Google Scholar] [CrossRef]
  47. Wang, W.; Yu, H.; Liu, Y.; Jiang, X.; Gao, B. Trueness analysis of zirconia crowns fabricated with 3-dimensional printing. J. Prosthet. Dent. 2019, 121, 285–291. Available online: https://www.sciencedirect.com/science/article/pii/S0022391318303500 (accessed on 1 May 2025). [CrossRef]
  48. Choi, J.W.; Ahn, J.J.; Son, K.; Huh, J.B. Three-dimensional evaluation on accuracy of conventional and milled gypsum models and 3D printed photopolymer models. Materials 2019, 12, 3499. [Google Scholar] [CrossRef]
  49. Al-Ramadan, A.; Abualsaud, R.; Al-Dulaijan, Y.A.; Al-Thobity, A.M.; Alalawi, H. Accuracy and Fit of Ceramic Filled 3D-Printed Resin for Permanent Crown Fabrication: An In Vitro Comparative Study. Prosthesis 2024, 6, 1029–1041. [Google Scholar] [CrossRef]
  50. Lim, Y.A.; Kim, J.M.; Choi, Y.; Park, S. Evaluation of Fitness and Accuracy of Milled and Three-Dimensionally Printed Inlays. Eur. J. Dent. 2023, 17, 1029–1036. [Google Scholar] [CrossRef]
  51. Lerner, H.; Nagy, K.; Pranno, N.; Zarone, F.; Admakin, O.; Mangano, F. Trueness and precision of 3D-printed versus milled monolithic zirconia crowns: An in vitro study. J. Dent. 2021, 113, 103792. [Google Scholar] [CrossRef] [PubMed]
  52. Noh, M.; Lee, H.; Lee, W.; Kim, J.; Kim, J. Evaluation of Internal and Marginal Accuracy (Trueness and Precision) of Laminates Using DLP Printing and Milling Methods. Biomimetics 2025, 10, 67. [Google Scholar] [CrossRef]
  53. da Silva, S.E.G.; da Silva, N.R.; Santos, J.V.d.N.; Moreira, F.G.d.G.; Özcan, M.; Souza, R.O.d.A.e. Accuracy, adaptation and margin quality of monolithic zirconia crowns fabricated by 3D printing versus subtractive manufacturing technique: A systematic review and meta-analysis of in vitro studies. J. Dent. 2024, 147, 105089. Available online: https://www.sciencedirect.com/science/article/abs/pii/S0300571224002586?via%3Dihub (accessed on 30 April 2025). [CrossRef] [PubMed]
  54. Lee, H.B.; Noh, M.J.; Bae, E.J.; Lee, W.S.; Kim, J.H. Accuracy of zirconia crown manufactured using stereolithography and digital light processing. J. Dent. 2024, 141, 104834. Available online: https://www.sciencedirect.com/science/article/abs/pii/S0300571224000046?via%3Dihub (accessed on 30 April 2025). [CrossRef]
  55. Xiao, P.; Zheng, Z.; Zhang, Y.; Zeng, Y.; Yan, W. Accuracy and adaptation of one-piece endodontic crowns fabricated through 3D printing and milling. J. Prosthet. Dent. 2024, 132, 422–433. Available online: https://www.sciencedirect.com/science/article/abs/pii/S0022391324003639 (accessed on 30 April 2025). [CrossRef] [PubMed]
  56. Son, K.J.-M.L. Marginal and Internal Fit and Intaglio Surface Trueness of Temporary Crowns Fabricated with Stereolithography, Digital Light Processing, and Milling Technology. Int. J. Prosthodont. 2022, 35, 697–701. [Google Scholar] [CrossRef]
  57. Revilla-León, M.; Özcan, M. Additive Manufacturing Technologies Used for Processing Polymers: Current Status and Potential Application in Prosthetic Dentistry. J. Prosthodont. 2019, 28, 146–158. [Google Scholar] [CrossRef]
  58. Baig, M.R.; Akbar, A.A.; Sabti, M.Y.; Behbehani, Z. Evaluation of Marginal and Internal Fit of a CAD/CAM Monolithic Zirconia-Reinforced Lithium Silicate Porcelain Laminate Veneer System. J. Prosthodont. Off. J. Am. Coll. Prosthodont. 2022, 31, 502–511. [Google Scholar] [CrossRef]
  59. Borges, G.A.; Sophr, A.M.; De Goes, M.F.; Sobrinho, L.C.; Chan, D.C.N. Effect of etching and airborne particle abrasion on the microstructure of different dental ceramics. J. Prosthet. Dent. 2003, 89, 479–488. [Google Scholar] [CrossRef] [PubMed]
  60. Hoang, L. Accuracy and Precision of Die Spacer Thickness with Combined Computer-Aided Design and 3-D Printing Technology. Master’s Thesis, Marquette University, Milwaukee, WI, USA, 2014. [Google Scholar]
  61. Baig, M.R.; Tan, K.B.C.; Nicholls, J.I. Evaluation of the marginal fit of a zirconia ceramic computer-aided machined (CAM) crown system. J. Prosthet. Dent. 2010, 104, 216–227. [Google Scholar] [CrossRef] [PubMed]
  62. Santos, M.; Navarro, M.F.; Tam, L.; McComb, D. The effect of dentin adhesive and cure mode on film thickness and microtensile bond strength to dentin in indirect restorations. Oper. Dent. 2005, 30, 50. [Google Scholar]
  63. Mosa, M.O.; Ibraheem, A.F.; Hussein, H.M. Effect of Marginal Cement Space Thickness and Type of Zirconia on the Marginal and Internal Fit of 3-Unit Monolithic Fixed Dental Prosthesis: An In Vitro Study; Springer: Berlin/Heidelberg, Germany, 2024. [Google Scholar]
  64. Bindl, A.; Mörmann, W.H. Marginal and internal fit of all-ceramic CAD/CAM crown-copings on chamfer preparations. J. Oral Rehabil. 2005, 32, 441–447. [Google Scholar] [CrossRef]
  65. Coldea, A.; Swain, M.V.; Thiel, N. Mechanical properties of polymer-infiltrated-ceramic-network materials. Dent. Mater. 2013, 29, 419–426. [Google Scholar] [CrossRef]
  66. Su, S.; Dudley, J. The marginal gaps of lithium disilicate crowns constructed by different scanner and milling unit combinations. Aust. Dent. J. 2022, 67, 125–131. [Google Scholar] [CrossRef]
  67. Rödiger, M.; Schneider, L.; Rinke, S. Influence of material selection on the marginal accuracy of CAD/CAM-fabricated metal- and all-ceramic single crown copings. BioMed Res. Int. 2018, 2018, 2143906. [Google Scholar] [CrossRef]
Figure 1. Designing of the block: (a) initial block design; (b) final STL file of the block.
Prosthesis 07 00107 g001
Figure 2. Designing of the crowns: (a) cement gap parameters; (b) final crown design.
Prosthesis 07 00107 g002
Figure 3. Printing procedure: (a) block and crowns imported to printing platform; (b) block duplication; (c) manual arrangement of blocks and crowns; (d) blocks and crowns after printing.
Prosthesis 07 00107 g003aProsthesis 07 00107 g003b
Figure 4. Post-processing procedure: (a) positioning of printing platform into SprintRay Pro Wash/Dry device for VS and PC material; (b) manual washing for CC material; (c) drying; (d) post-curing for blocks and crowns.
Prosthesis 07 00107 g004
Figure 5. The final blocks and crowns: (a) VS material; (b) CC material; (c) PC material.
Prosthesis 07 00107 g005
Figure 6. Milling procedure: (a) printed block and universal metal holder; (b) block after milling.
Prosthesis 07 00107 g006
Figure 7. Trueness evaluation of crown: (a) segmenting only the intaglio surface; (b) reference and measured crown; (c) initial alignment; (d) best-fit alignment.
Prosthesis 07 00107 g007
Figure 8. Trueness evaluation of crown: (a) determining only the intaglio surface; (b) color map of the intaglio surface of the crown representing deviation in (mm).
Prosthesis 07 00107 g008
Figure 9. Evaluation of internal and marginal gaps: (a) segmenting the intaglio surface into internal and marginal; (b) reference and measured crown; (c) initial alignment; (d) best-fit alignment.
Prosthesis 07 00107 g009
Figure 10. Evaluation of internal and marginal gaps: (a) color map of internal area; (b) color map of marginal area.
Prosthesis 07 00107 g010
Figure 11. Bar chart graph showing the mean values of the trueness (in μm) of the different groups.
Prosthesis 07 00107 g011
Figure 12. Bar chart graph showing the mean values of marginal and internal gaps in (μm) of the different groups.
Prosthesis 07 00107 g012
Table 1. The chemical compositions, physical and mechanical properties of the three printing materials used in this study.
PropertiesVarseosmile Crown Plus
(VS)
Ceramic Crown
(CC)
P-Crown V2 Ceramic
(PC)
Ceramic contentInorganic fillers account for
30–50% of the mass.
More than 50% of the mass.65% nanoceramic rate.
Chemical
composition
Esterification products of 4.4′-isopropylidiphenol, ethoxylated and 2-methylprop-2-enoic acid. Silanized dental glass, methyl benzoylformate, diphenyl (2,4,6-trimethylbenzoyl) phosphine oxide.Oligomers (20–60%), Monomers (20–50%), Photoinitiators (0.1–10%), Additives (10–60%).
The specific chemical identity is withheld because it is trade secret information of SprintRay.
Polymer matrix and Inorganic fillers.
The specific chemical identity is withheld because it is trade secret information of Senertek.
Flexural Strength116–150 MPa150 ± 25 MPa410.00 MPa
Flexural Modulus4090 MPa7800 ± 500 MPa>9500 MPa
Hardness≥90 Shore D≥90 Shore D≥95 Shore D
Water Solubility<1 µg/mm32.16 ± 1.30 µg/mm3<0.09 µg/mm3
Water sorption<12 µg/mm317.35 ± 2.56 µg/mm3<1.2 µg/mm3
Viscosity2500–6000 mPa*s2500–6000 mPa*s ~3500 mPa*s
LOT number600721SRI-0202086SNR202300030
Table 2. Descriptive statistics (mean ± SD) of trueness in (µm) and comparison of significance among the different groups by Kruskal–Wallis test and Dunn’s test.
GroupsSubgroups
Mean ± SD
MillMill VS
29.99 ± 3.98 aA
Mill CC
22.86 ± 2.49 aA
Mill PC
25.45 ± 1.91 aA
PrintPrint VS
59.65 ± 4.7 bA
Print CC
48 ± 4.92 bA
Print PC
41.56 ± 4.83 aA
VS, Varseosmile Crown plus; CC, Ceramic Crown; PC, P-crown V2 ceramic; SD, standard deviation. Different superscript letters denote a significant difference (p < 0.05); lowercase: columns (technique comparison), uppercase: rows (material comparison).
Table 3. Descriptive statistics (mean ± SD) in (µm) and comparison of significance of internal and marginal gap among the different groups by one-way ANOVA test and Tukey’s HSD test.
GroupsSubgroups
Internal Gap Mean ± SD
Subgroups
Marginal Gap Mean ± SD
MillMill VS
78.9 ± 5.02 aA
Mill CC
79.57 ± 4.59 aA
Mill PC
78.72 ± 4.74 aA
Mill VS
68.21 ± 6.38 aA
Mill CC
67.04 ± 6.46 aA
Mill PC
61.43 ± 5.72 aA
PrintPrint VS
72.64 ± 5.74 aA
Print CC
59.55 ± 6.81 bB
Print PC
49.8 ± 6.63 bC
Print VS
58.46 ± 8.44 bA
Print CC
40.79 ± 7.54 bB
Print PC
33.98 ± 7.23 bB
VS, Varseosmile Crown plus; CC, Ceramic Crown; PC, P-crown V2 ceramic; SD, standard deviation. Different superscript letters indicate a significant difference (p < 0.05), lowercase: columns (technique comparison), uppercase: rows (material comparison).
Table 4. Spearman’s test for the correlation between the trueness of the fabricated crowns and the internal and marginal fitness.
VariableSpearman’s Corr.p-ValueInterpretation
Internal−0.770.0004significant
Marginal−0.780.0001significant
Disclaimer/Publisher’s Note: The statements, opinions and data contained in all publications are solely those of the individual author(s) and contributor(s) and not of MDPI and/or the editor(s). MDPI and/or the editor(s) disclaim responsibility for any injury to people or property resulting from any ideas, methods, instructions or products referred to in the content.