2. Experimental Test Bench for Rear Suspension Durability Testing
This section presents the dedicated test bench developed for the durability assessment of a passenger-car rear suspension. The rig has been conceived to reproduce, in a controlled and repeatable manner, the cyclic loading acting on a dependent rear axle and its associated elastic elements, while allowing direct comparison between numerical predictions and experimental measurements of stresses and strains.
2.1. Concept and Kinematic Layout
The test bench is designed to excite the rear suspension through a crank–rocker mechanism that converts the rotary motion of an electric drive into a nearly harmonic vertical motion at the wheel spindle. The kinematic chain consists of a crank mounted on the motor shaft, an adjustable-length connecting rod and a rocker arm pivoted to the bench frame. The distal end of the rocker is connected to the rear axle assembly through a bushing, so that the imposed motion generates a cyclic vertical force on one wheel side of the axle.
The rear axle, complete with helical coil springs and stabiliser bar, is installed on the rig using mounting conditions that reproduce as closely as possible the actual interfaces on the vehicle body. The bench frame provides rigid supports for the axle trailing arms and spring seats, while the crank–rod–rocker mechanism excites the right wheel side. This arrangement enables the investigation of both global bending of the axle beam and local stress concentrations in critical regions, under a loading pattern representative of service conditions.
The stroke of the rocker and the amplitude of the imposed load can be adjusted by modifying the effective length of the connecting rod and the crank radius. In this way, the same bench can be used to test different rear axle geometries and to reproduce various severity levels of service loading.
2.2. CAD Model and Virtual Prototyping
A detailed three-dimensional model of the test bench and rear suspension has been created in SolidWorks 2024. The CAD assembly includes the bench frame, crank–rod–rocker drive mechanism, bushings, rear axle beam, helical coil springs, stabiliser bar and the auxiliary fixtures required for mounting the axle on the rig.
The CAD model serves a dual purpose. First, it provides the geometric basis for manufacturing the bench components and for verifying assembly clearances and ranges of motion. Second, it is used as input for the multibody dynamic model developed in MSC ADAMS, in which the crank–rod–rocker mechanism and the rear axle are represented as a system of rigid and flexible bodies connected by kinematic joints and compliant elements.
Within the ADAMS environment, the stabiliser bar and the rear axle beam are modelled as deformable solids, allowing the computation of displacements, deformations and internal forces in these components under cyclic excitation. The simulation results are subsequently used to define the load cases for the finite element analysis and to support the design of the experimental test programme.
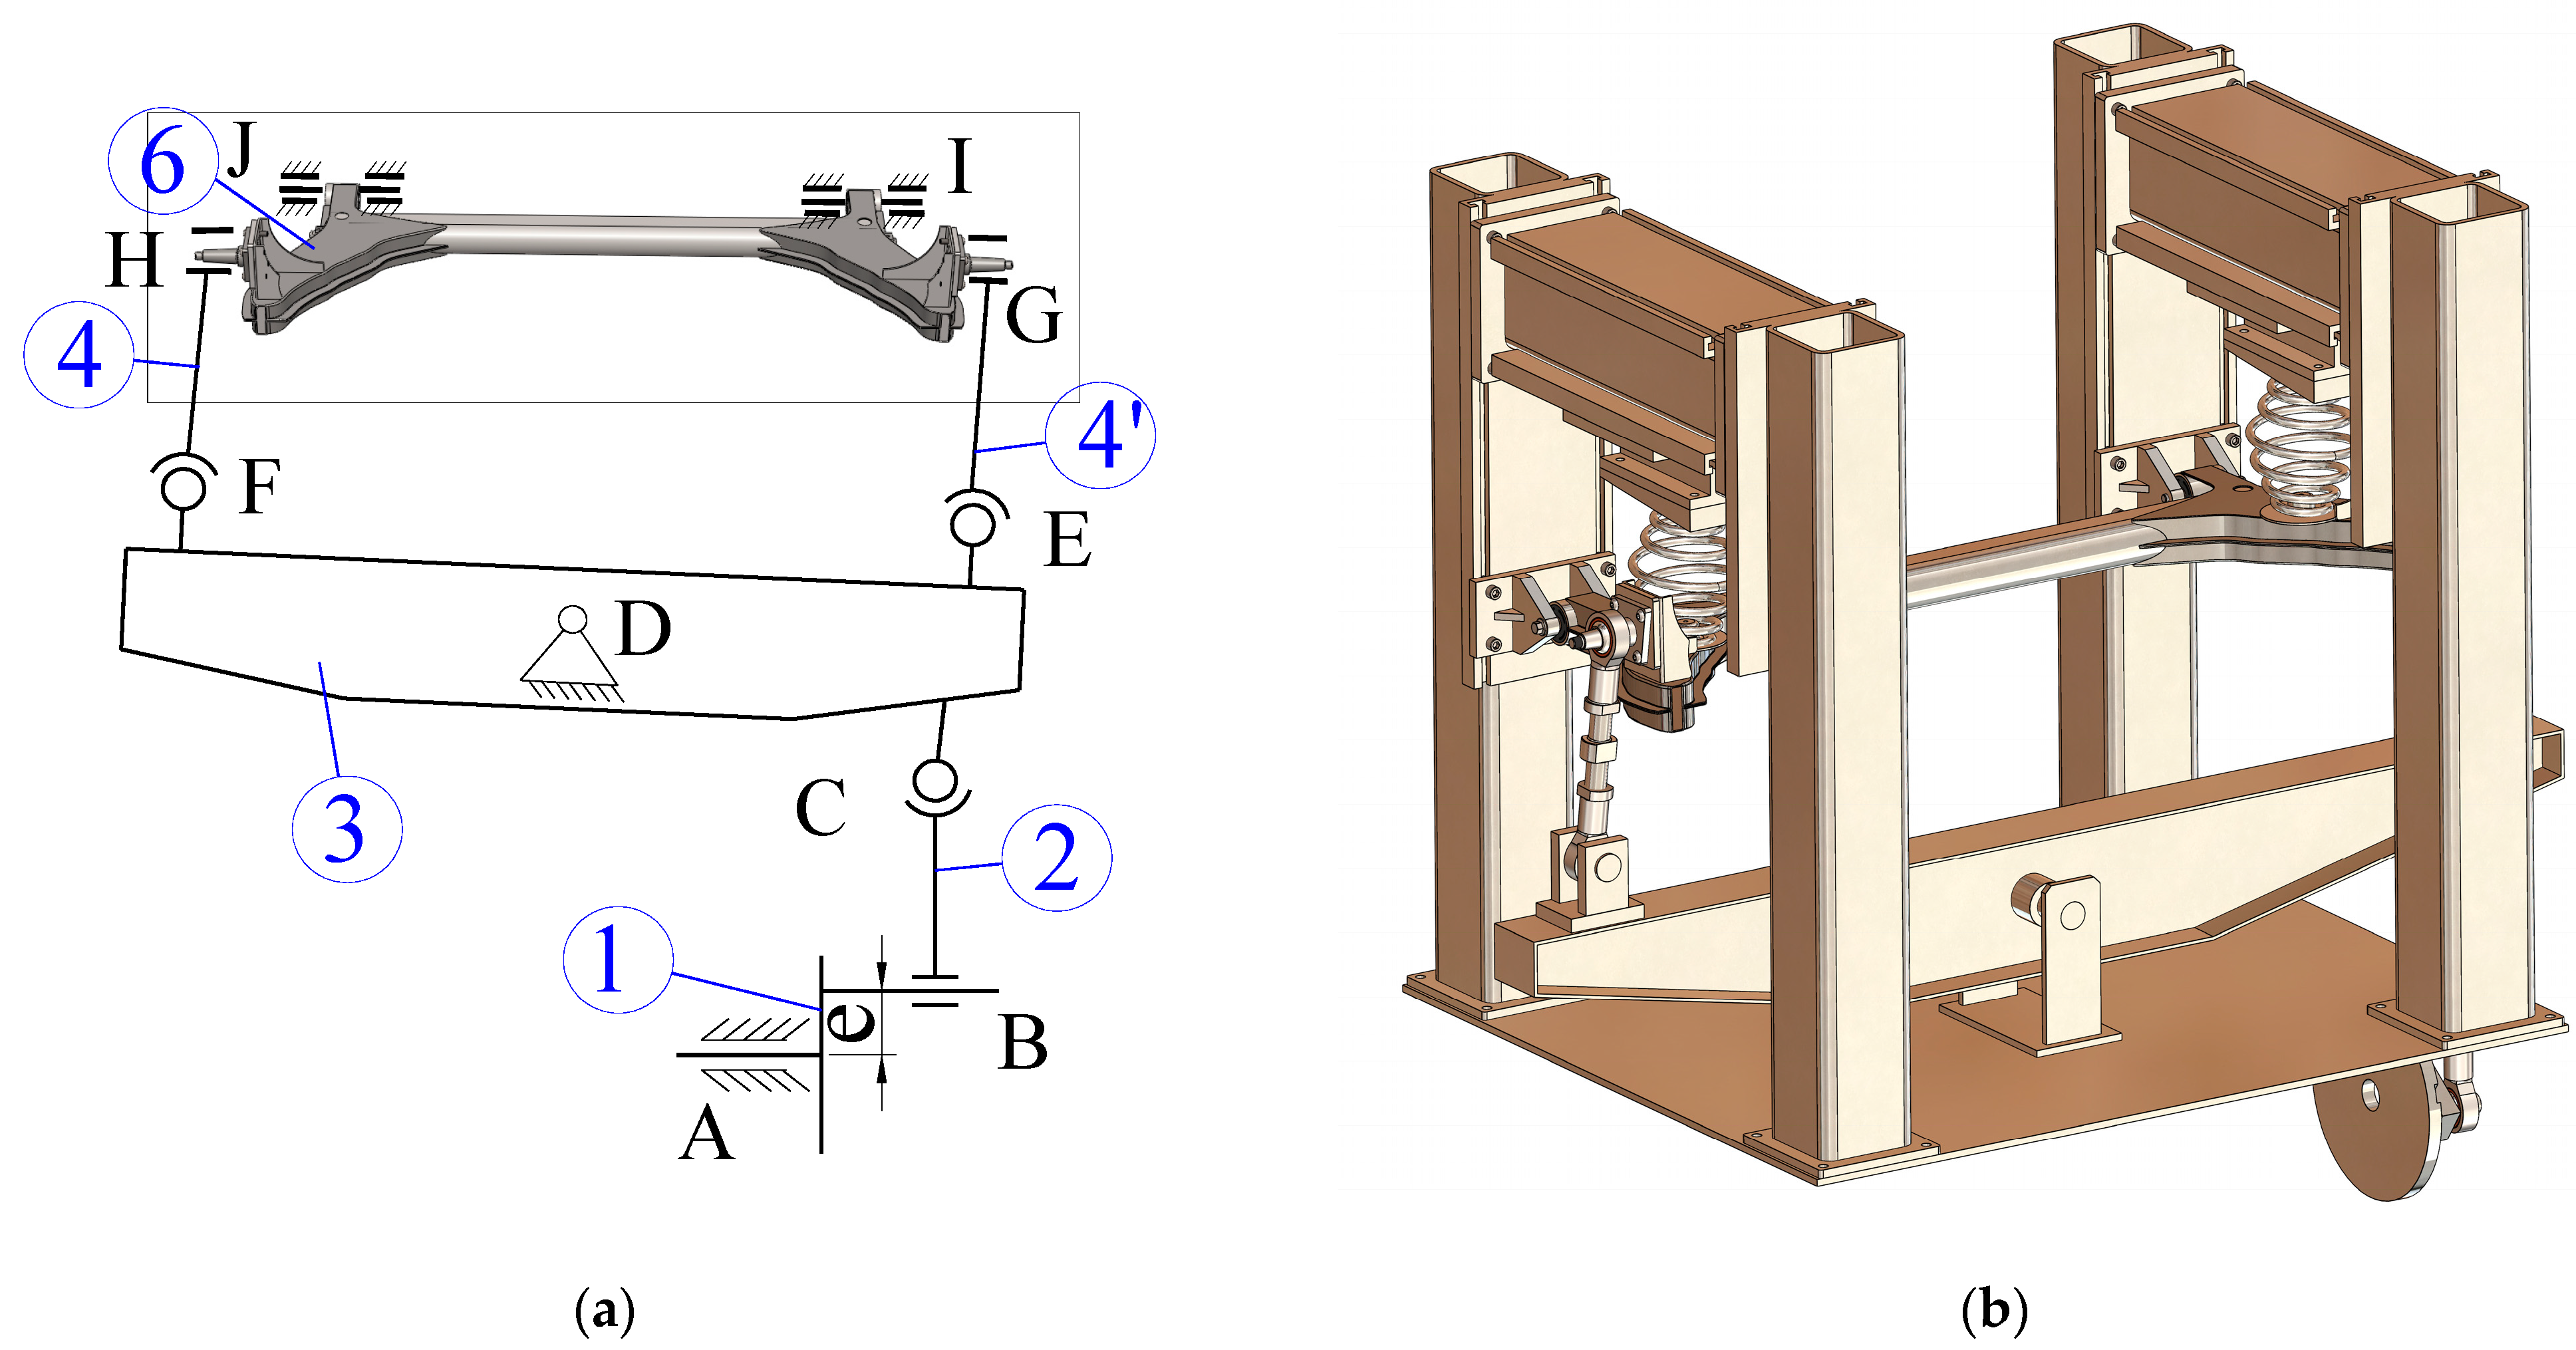
The kinematic scheme of the test bench is shown in
Figure 1a, while the corresponding 3D CAD model developed in SolidWorks is presented in
Figure 1b. In the kinematic sketch, the rear axle assembly is represented in its test position between the vertical uprights of the bench. The lower oscillating beam (3) acts as a rocker that transforms the input motion into a vertical displacement of the right wheel side. The excitation is introduced with a prescribed eccentricity e indicated by item (1), so that the imposed rotation of the rocker generates an alternating vertical motion at its ends.
This motion is transmitted through link 2 (item 2) and the vertical links (4) and (4′) to the axle and to the coil springs (6), reproducing the relative vertical displacement between the axle and the vehicle body. Link 4 provides the mechanical connection between the rocker beam (3) and the right side of the axle, and therefore concentrates the main load path from the drive mechanism to the axle assembly.
The SolidWorks model (
Figure 1b) details the actual geometry of the test bench built according to this kinematic scheme. The structure consists of a base frame and two stiff vertical portals, assembled from rectangular profiles using threaded joints and bolted connections, rather than welded joints. The dependent rear axle is mounted between the portals, with its trailing arms clamped to brackets on the frame and the helical coil springs installed between the axle seats and the adjustable upper supports attached to the uprights. The lower rocker beam is pivoted to the base frame at its centre and connected to the axle on the right-hand side via link 2 and the vertical linkage, in accordance with the schematic in
Figure 1a.
The 3D model includes all functional components of the bench—frame, rocker, links, spring seats, guides and fastening elements—and has been used both to check assembly clearances and to export geometry to the multibody and finite element models employed in the subsequent numerical analysis.
2.3. Mounting of the Rear Axle Assembly on the Bench
The dependent rear axle considered in this study consists of a central beam, two trailing arms made of bent sheet metal, end plates, spring seats and brackets for the stabiliser bar. In the vehicle, the axle is connected to the body through flexible bushings and supported by helical coil springs.
On the test bench, the axle is mounted in a configuration that reproduces the kinematic boundary conditions of the vehicle installation. The trailing arms are clamped to rigid supports that mimic the body brackets, and the coil springs are mounted between the axle seats and fixed upper seats attached to the frame. The stabiliser bar is installed in its operational position, with its ends connected to the axle through links and bushings.
The right wheel spindle location is connected to the rocker arm via a bushing and a short link. The excitation force is thus transmitted directly to the spindle region, generating bending of the axle beam and relative motion in the suspension joints similar to those encountered in service. By acting on both wheel sides, a symmetric loading condition is created, which is particularly demanding for the beam and the welded joints near the wheel spindles.
2.4. Loading System and Test Conditions
The stand is driven by an electric motor operating at a constant speed, which imposes a cyclic motion of the crank and, consequently, of the rocker arm. For the present study, the operating parameters of the rig have been selected such that the maximum dynamic force transmitted to the right wheel spindle is of the order of 1 kN, in line with the values obtained from the flexible multibody simulations for the chosen fatigue loading case.
The resulting operating cycle consists of repeated load reversals over a given number of cycles, corresponding to an accelerated durability test. After a short run-in period, the system reaches a steady-state regime in which the force in the connecting rod and the stresses in the axle structure exhibit nearly periodic behaviour. This regime is used for both numerical–experimental correlation and fatigue-related assessment.
The test bench is designed to allow variation in the excitation frequency, stroke and mean position of the rocker arm, so that different duty cycles can be imposed on the same axle configuration. This flexibility is essential for studying the influence of loading severity and spectrum on the stress distribution and on the anticipated fatigue life of the axle.
It should be noted that, in its current configuration, the test bench applies predominantly vertical cyclic loading; lateral and longitudinal load components associated with braking and cornering are not reproduced and are therefore outside the scope of the present experimental campaign.
The selected load amplitude corresponds to a severe vertical bending case representative of driving over rough, uneven surfaces (e.g., cobblestone or pothole-type irregularities), rather than to the absolute worst-case impact loads.
3. Dynamic Simulation of the Test Bench in ADAMS
The kinematic scheme and CAD model presented in
Section 2 were used as a basis to build a detailed multibody model of the test bench in MSC ADAMS. The objective of this model is twofold: (i) to evaluate the kinematic amplitudes and dynamic loads transmitted to the rear axle and stabiliser bar during fatigue testing, and (ii) to provide design loads for the subsequent finite element analysis of the rear axle assembly.
3.1. Multibody Modelling Strategy
The CAD assembly created in SolidWorks was exported in Parasolid format and imported into ADAMS/View. The rigid parts of the stand (base frame and vertical uprights) were merged into a single body and fixed to ground. The driving mechanism is modelled as a planar four-bar linkage, consistent with the kinematic scheme in
Figure 1a:
In the kinematic scheme of the test bench (
Figure 1a), the kinematic pairs are labelled A–J and are defined as follows:
Joint A—revolute joint between the fixed frame (ground) and the crank (link 1), corresponding to the motor shaft.
Joint B—revolute joint between the crank (link 1) and the adjustable connecting link (link 2).
Joint C—spherical joint between the connecting link (link 2) and the rocker beam (link 3), which accommodates the relative angular misalignment between the two members.
Joint D—revolute joint between the rocker beam (link 3) and the fixed frame.
Joints E and F—spherical joints between the rocker beam (link 3) and the vertical connecting links (links 4′ and 4, respectively), allowing the links to follow the motion of the axle without overconstraining the mechanism.
Joints G and H—cylindrical (revolute) joints between the upper ends of the vertical connecting links (4′ and 4) and the wheel-spindle regions of the rear axle (link 6), transmitting the vertical load from the mechanism to the axle while allowing rotation about the spindle axis.
Joints I and J—cylindrical (revolute) joints between the rear axle (link 6) and the test-bench frame. These joints represent the bushings through which the axle is guided relative to the uprights of the stand and ensure that the axle is constrained to move according to the bench kinematics. The helical coil springs are modelled separately as spring–damper force elements acting between markers on the axle, located in the vicinity of joints I and J, and corresponding markers on the upper supports of the frame.
This explicit definition of the kinematic pairs A–J is used consistently in the ADAMS model, ensuring a one-to-one correspondence between the schematic representation in
Figure 1a and the multibody model.
In the ADAMS model, the mechanism is driven by a single independent degree of freedom, namely the crank rotation at joint A. The motion of the rear axle assembly is then fully determined by the kinematic constraints at joints I and J, which guide the axle in a predominantly vertical translation combined with a small torsional rotation about its longitudinal axis.
The crank is prescribed a periodic rotational motion about its axis. In the simulations reported here a harmonic law is used, with angular position ϕ(t) = ϕ0 + Δϕsin(2πft), where ϕ0 is the mean angle, Δϕ the amplitude and f the test frequency. These parameters are selected such that the vertical displacement at the wheel spindle reproduces the target fatigue loading conditions of the rear axle. Gravity acts along the global negative Z-direction; the global X-axis is aligned with the longitudinal direction of the axle beam.
Contact between the stand and the floor is neglected, because the base frame is bolted to the foundation in the real installation and its motion is negligible. The clearance in revolute joints is also neglected; joints are assumed ideal without friction. This leads to a conservative estimate of the internal forces in the rear axle and stabiliser bar.
3.2. Flexible Representation of the Rear Axle and Stabiliser Bar
To correctly evaluate stress-related quantities and local deformations, the rear axle beam and stabiliser bar cannot be treated as perfectly rigid. Therefore, these components are introduced as flexible bodies using the dedicated functionality available in ADAMS (
Figure 2).
A finite element model of the rear axle–stabiliser-bar assembly is first generated starting from the CAD geometry and the nominal material properties of the steel. The mesh combines shell and solid elements in the regions with complex geometry (such as the bent side plates and welded brackets). This FE model is then reduced to a modal neutral file (MNF), retaining the lowest natural modes that are relevant for the operating frequency range of the stand. The MNF is imported into ADAMS/Flex and replaces the corresponding rigid body. The locations of all joints, bushings and load application points are mapped to interface nodes of the flexible body.
A reference marker is placed at the centre of mass of the stabiliser bar. The translational displacements and elastic deformations of this point along the global X- and Y-axes are later used both for evaluating the dynamic behaviour of the stand and for comparison with experimental measurements.
3.3. Simulation Scenarios and Post-Processing
Dynamic simulations are performed in the time domain for a sequence of crank revolutions, starting from rest. An initial transient interval is discarded so that the analysis focuses on the steady-state response under periodic loading. The integration is carried out with a variable-step algorithm with error control adequate for flexible multibody systems; the maximum step size is limited in order to capture the higher-frequency modes of the axle–stabiliser assembly.
In all simulations, the crank at joint A is driven with a constant angular velocity of ω = 15.5 rad/s (corresponding to an excitation frequency of approximately 2.47 Hz), matching the operating speed used in the experimental tests.
The main output quantities used in the subsequent analysis are:
translational displacements, velocities and accelerations of the marker at the stabiliser bar centre of mass along the global X- and Y-directions;
relative rotations of the stabiliser bar about its longitudinal axis, which correlate with the torsional deformation of the bar;
reaction forces in the vertical connecting links (links 4 and 4′), transmitted through the spherical joint on the rocker beam and the cylindrical joint on the wheel spindle region, which indicate how the excitation is transmitted from the mechanism to the axle;
internal forces at the wheel spindles, obtained by defining force sensors at the connection between the axle and the wheel-hub region.
Figure 2 illustrates the multibody model of the rear suspension durability test bench implemented in MSC ADAMS, highlighting both the overall assembly and, in particular, the vertical connecting link (4) with its spherical joint E to the rocker beam and cylindrical joint G to the wheel-spindle region of the rear axle.
The multibody simulation also provides the reaction forces in joint E, which represents the main load path through which the excitation of the mechanism is transmitted to the right side of the rear axle.
Figure 3 shows the time histories of the force components
FX,
FY and
FZ in this joint (Joint 86 in ADAMS). It can be observed that the dominant component is the vertical force
FZ, whereas the longitudinal and lateral components
FX and
FY remain comparatively small, confirming that the stand primarily excites the axle in vertical bending with only minor parasitic loads in the other directions.
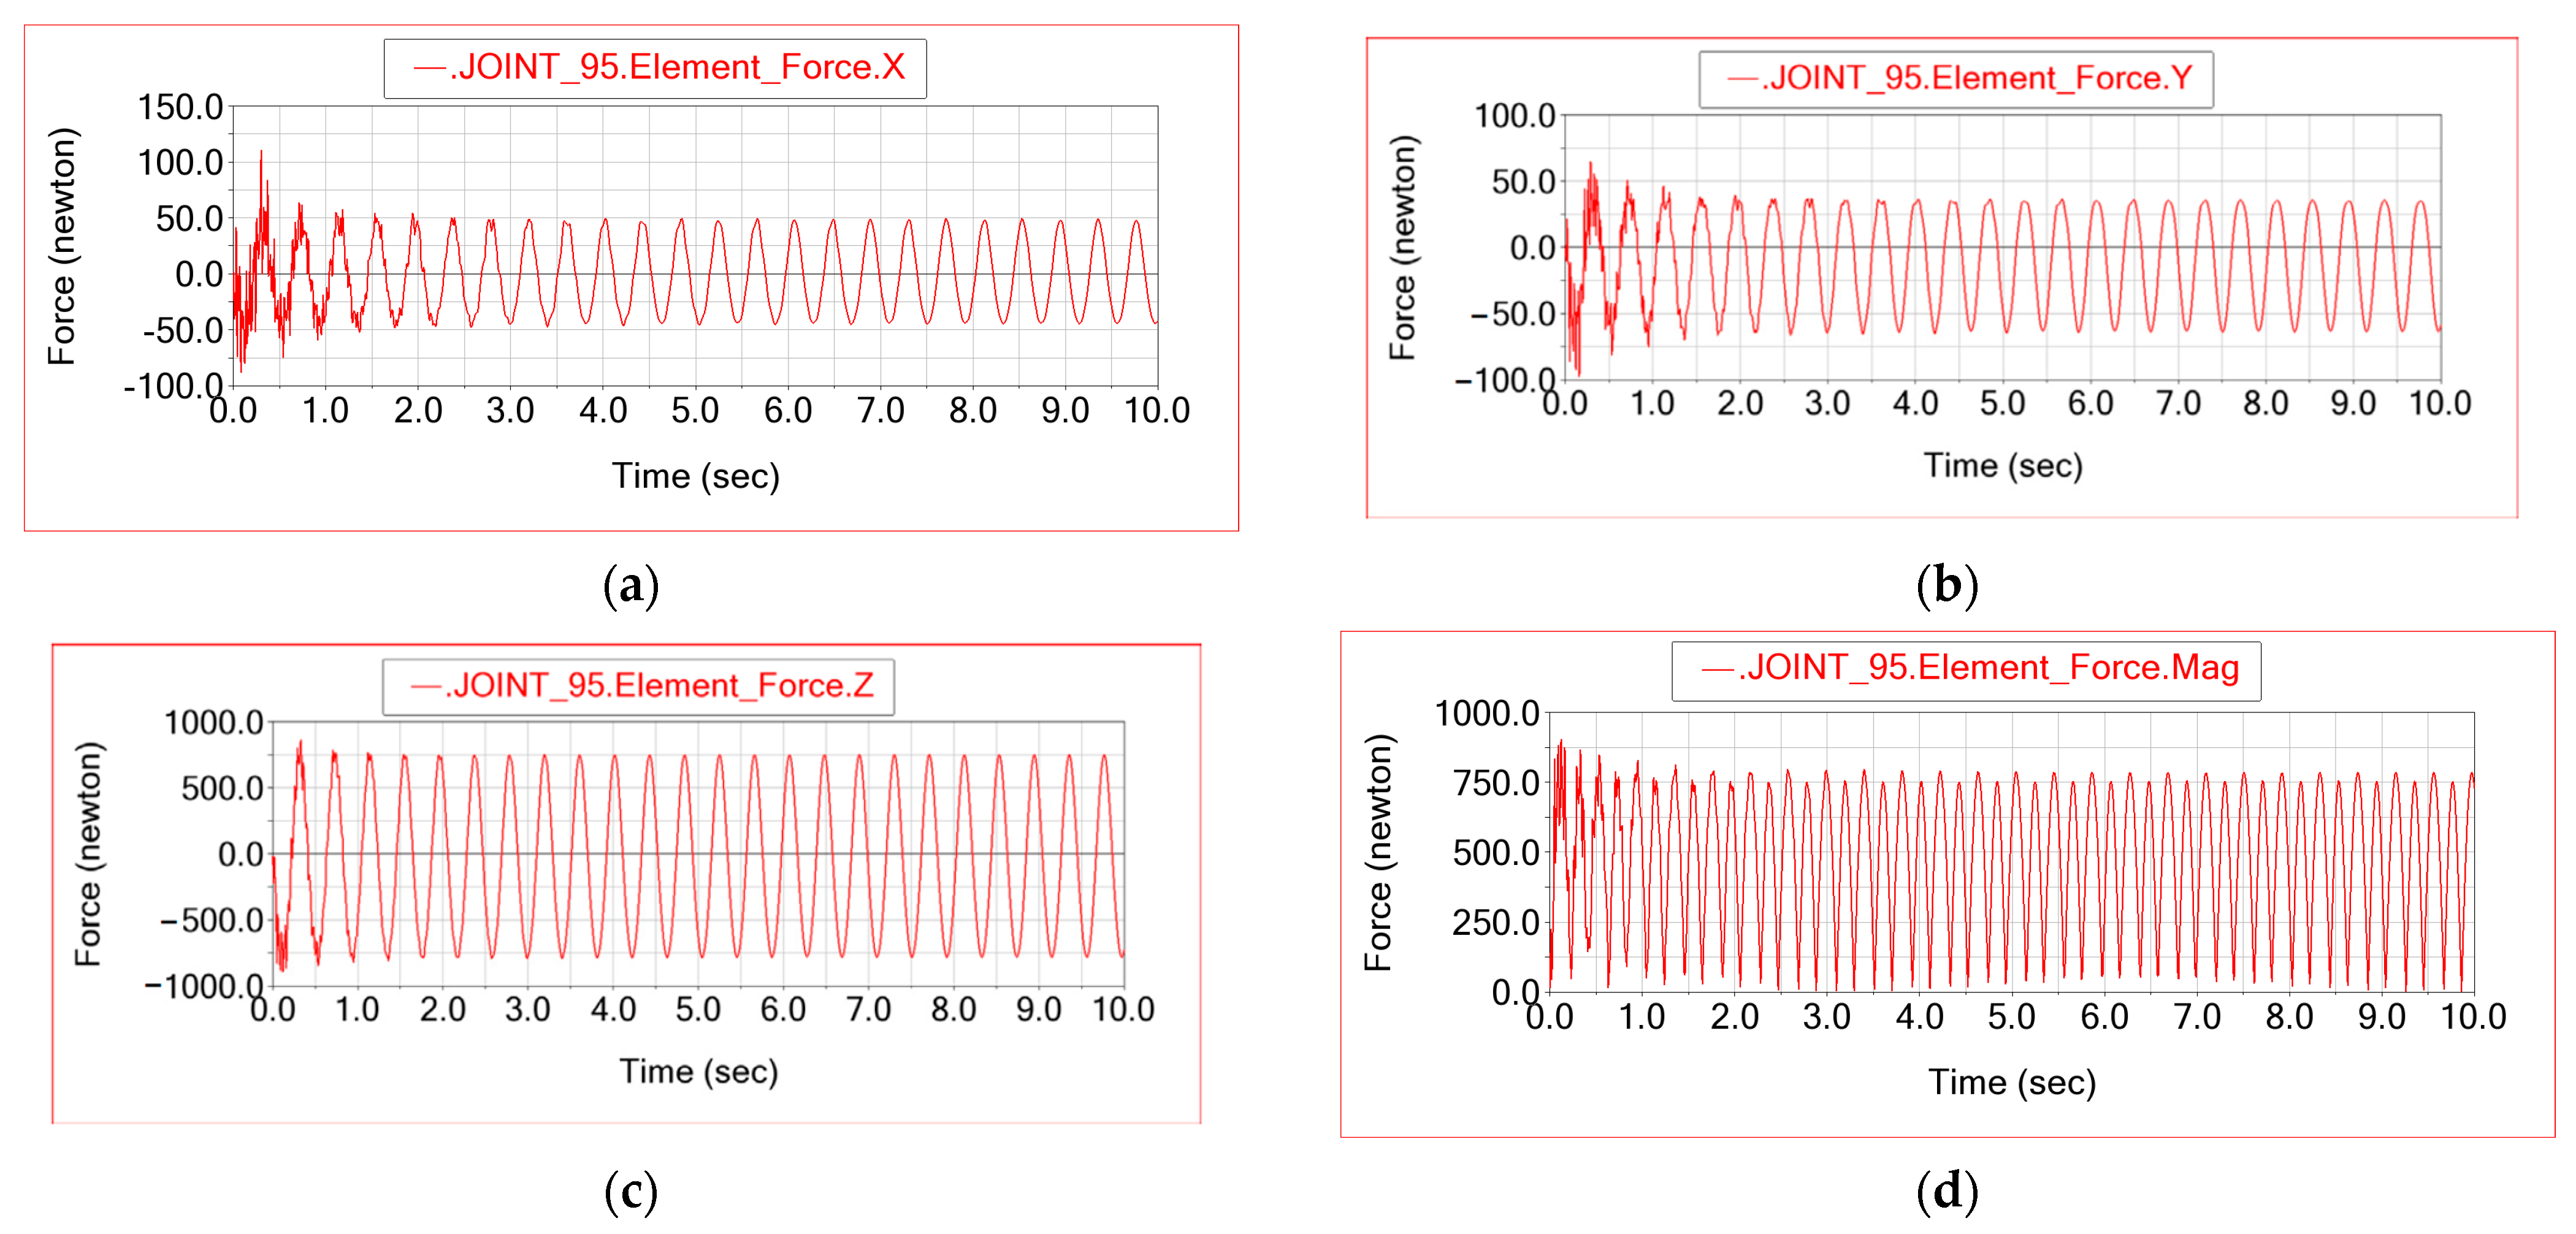
In addition to joint E, the reaction forces were evaluated in joint G, which represents the cylindrical connection between the upper end of the vertical connecting link (4) and the right wheel-spindle region of the rear axle.
Figure 4 shows the time histories of the three force components
FX,
FY and
FZ in this joint (Joint 95 in ADAMS), while panel (d) presents the magnitude of the reaction force ∣
F∣. After a short transient in the first second of simulation, the response becomes strictly periodic. The dominant contribution is given by the
FZ component, which reaches peak values close to ±800–±1000 N, whereas the
FX and
FY components remain below about ±60–±70 N. This confirms that the connection between link 4′ and the wheel spindle is loaded predominantly in the direction that is approximately aligned with the vertical motion imposed by the test bench, while the longitudinal and lateral force components are comparatively small.
Besides the reaction forces in the kinematic joints, the dynamic simulation provides the translational displacements, velocities and accelerations of any marker in the model, as well as the corresponding elastic deformations of the flexible rear stabiliser bar.
In order to characterise the global motion of the rear stabiliser bar during the test cycle, the translational displacements of its centre of mass were monitored in the ADAMS model.
Figure 5 shows the time histories of the three Cartesian components and of the displacement magnitude. After the initial transient, the response becomes clearly periodic, with small-amplitude oscillations of the order of a few millimetres. The longitudinal displacement component remains very small compared with the other two components, indicating that the stabiliser bar is mainly subjected to vertical and lateral motion, consistently with the intended loading mode of the test bench.
To distinguish between rigid-body motion and elastic behaviour, the translational deformations of the centre-of-mass marker of the rear stabiliser bar with respect to its reference node were also monitored.
Figure 6 shows the time histories of the three Cartesian components of this deformation and of its magnitude. After the initial transient, the response becomes purely periodic. The
δX component remains almost negligible, while
δY and
δZ reach amplitudes of the order of 1 mm, indicating that the stabiliser bar mainly deforms in the vertical and lateral directions under the imposed excitation.
In the ADAMS/Flex model, the motion of the marker attached to the centre of mass of the stabiliser bar can be decomposed into a rigid-body contribution and an elastic contribution. The translational displacement outputs (
Figure 5) represent the total motion of the marker in the global reference frame, i.e., the sum of the rigid-body motion of the bar and its local elastic deflection. By contrast, the translational deformation outputs (
Figure 6) represent only the elastic part of the motion, measured with respect to the reference node of the flexible body. Consequently, the deformation amplitudes are much smaller than the corresponding displacements and directly reflect the bending and torsional flexibility of the stabiliser bar under the imposed excitation.
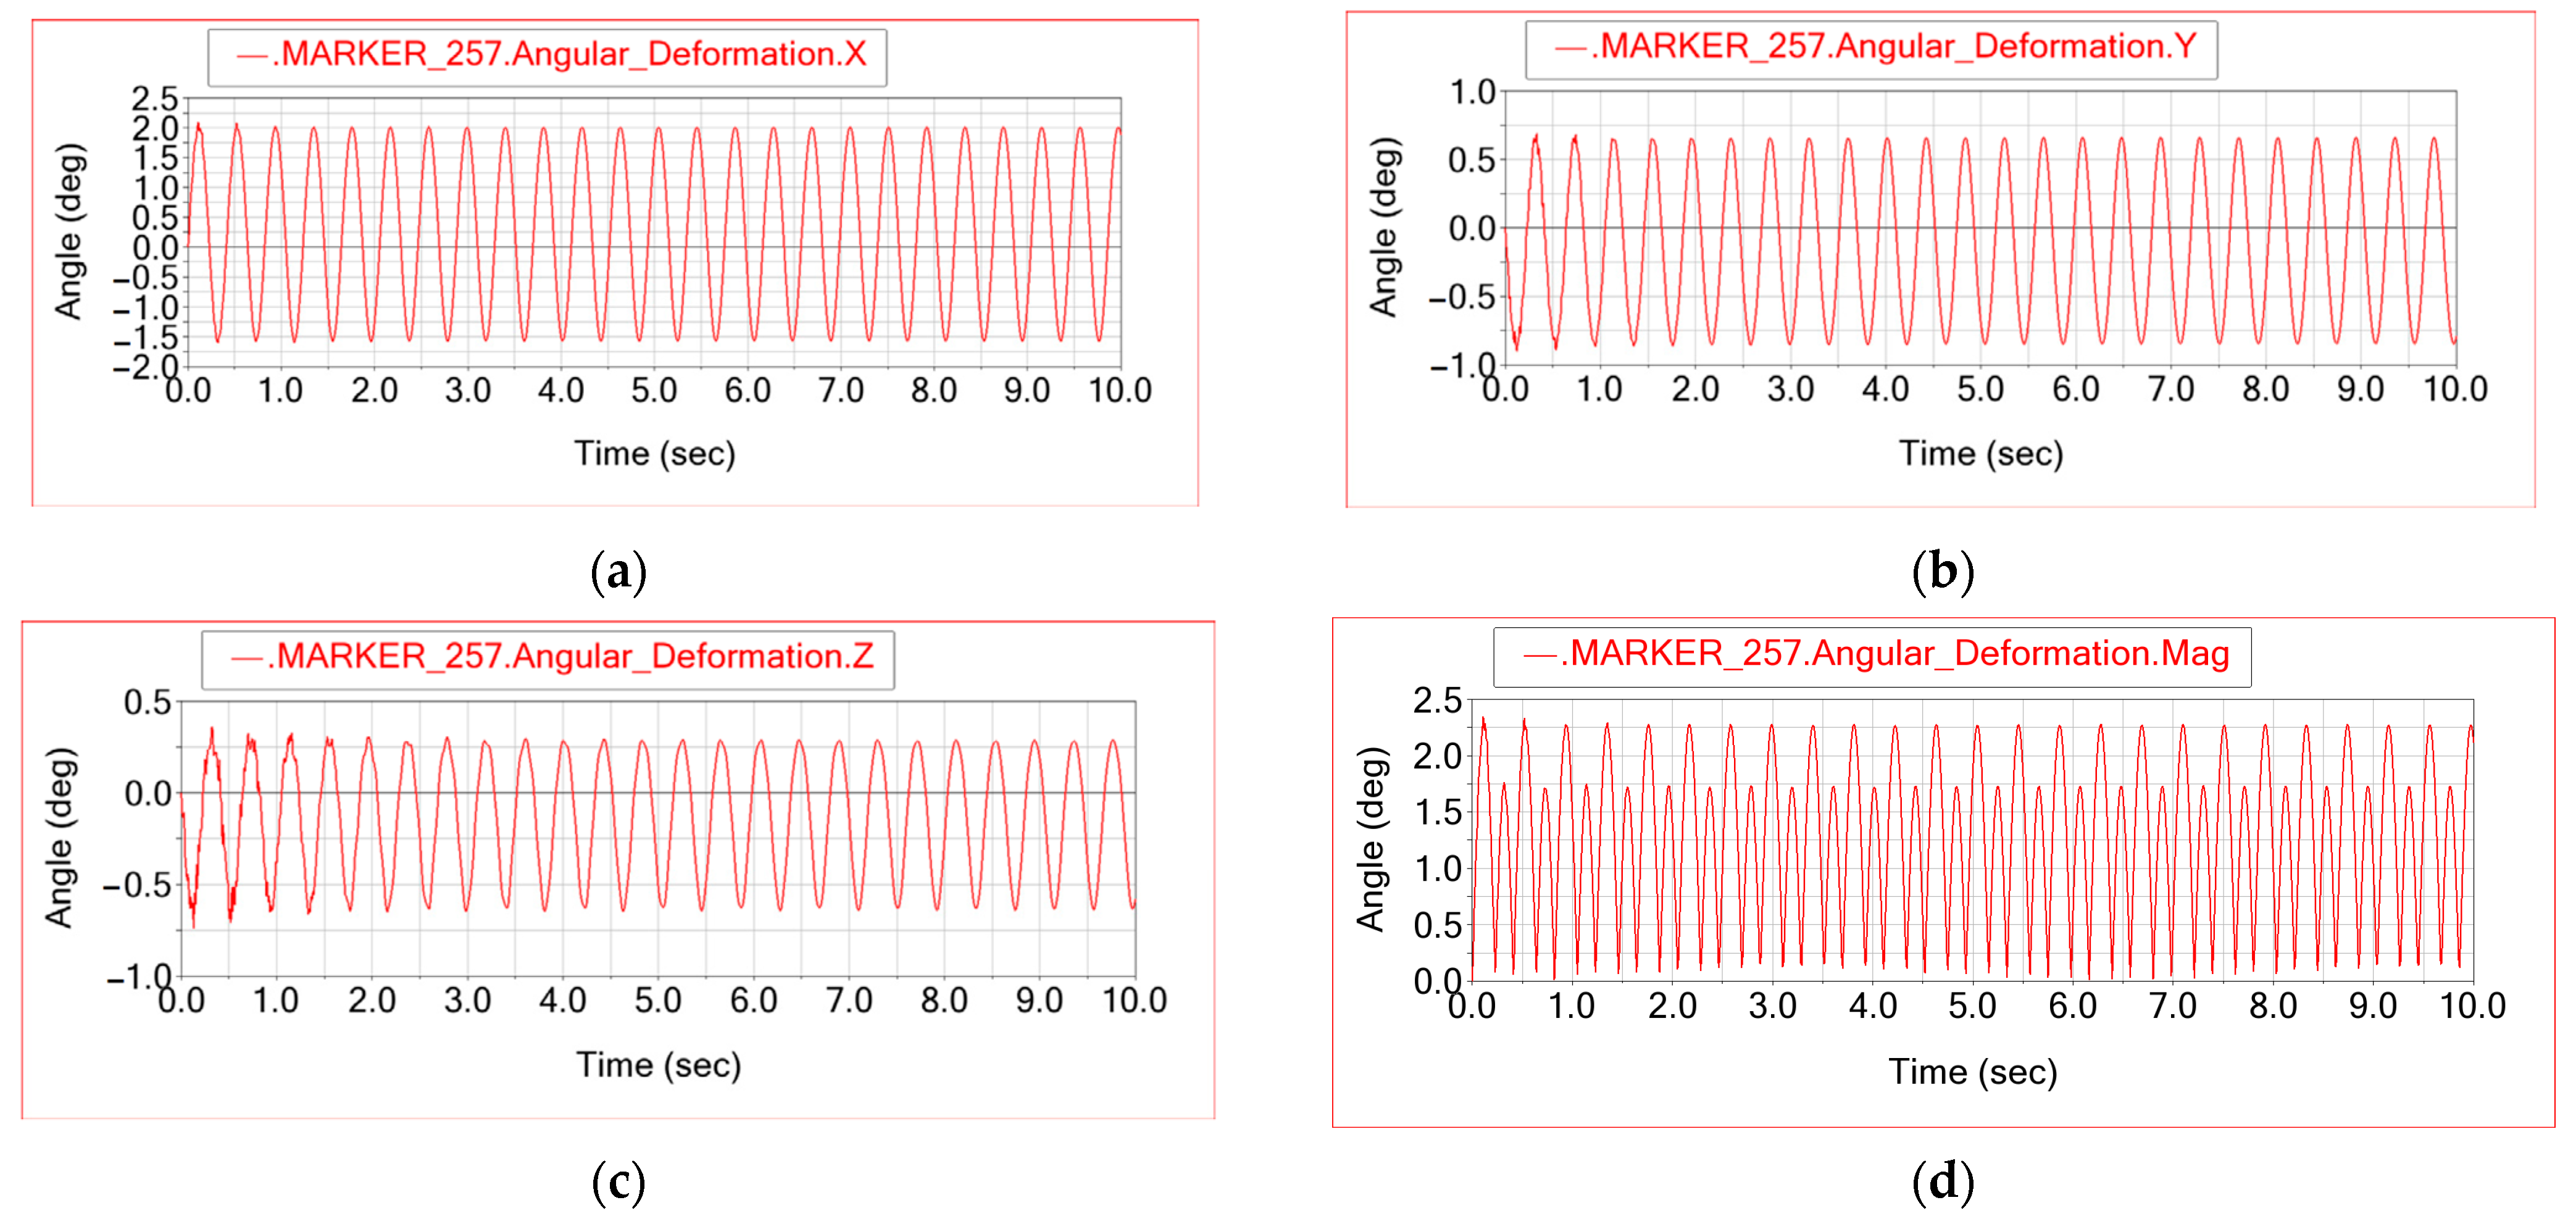
In addition to the translational deformations, the ADAMS/Flex model provides the rotational elastic deformations of markers attached to the flexible stabiliser bar.
Figure 7 shows the time histories of the rotational deformation components
θX,
θY and
θZ for a marker located in the vicinity of the bar’s centre of mass, together with the magnitude of the rotation ∣
θ∣. These quantities describe the local twist and bending rotations of the stabiliser bar relative to its reference configuration. After the initial transient, the response becomes periodic, with the dominant contribution associated with the rotation about the bar’s longitudinal axis (X), confirming that the excitation applied by the test bench produces a significant torsional deformation of the stabiliser bar superimposed on its bending motion.
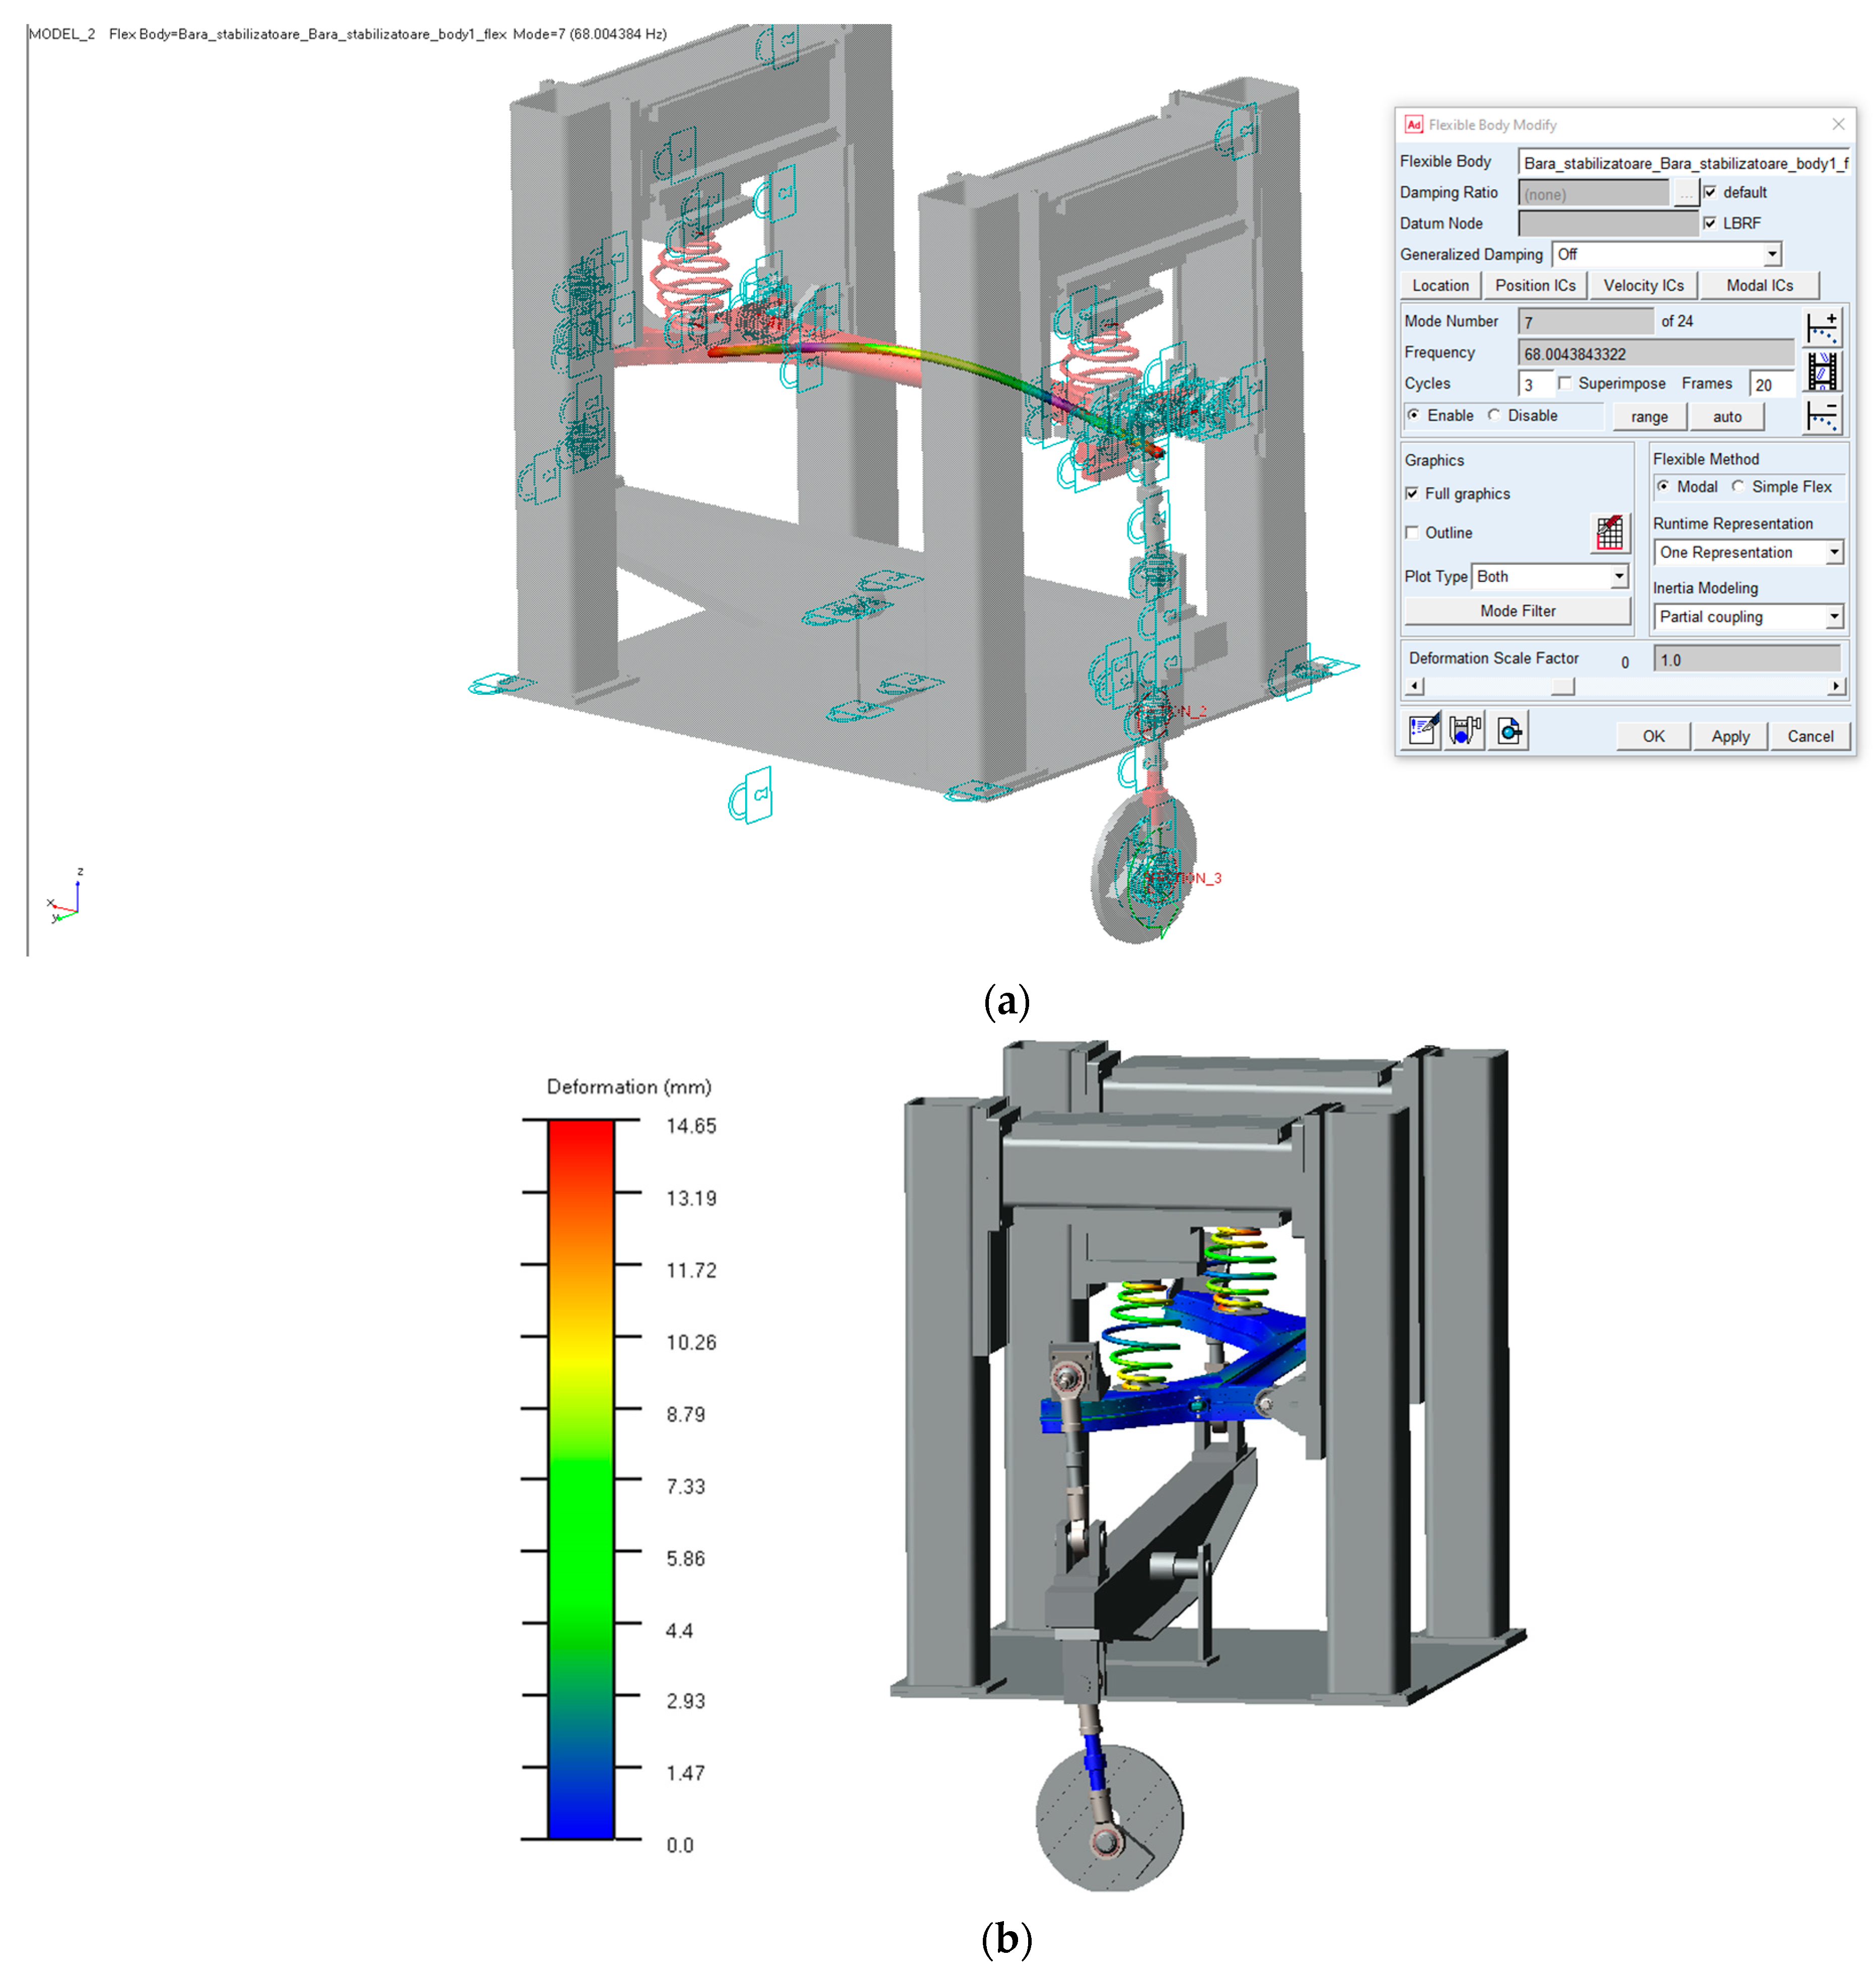
The ADAMS/Flex model also enables a direct three-dimensional visualisation of the deformation of the flexible components. As illustrated in
Figure 8, deformed shapes corresponding to different vibration modes or to selected instants of the transient response can be displayed for the rear stabiliser bar and the rear axle assembly. In addition, coloured contour plots of the deformation field and full 3D animations of the simulated motion have been generated; these are provided as
Supplementary Materials Videos to better illustrate the dynamic behaviour of the test bench and of the rear suspension components.
3.4. Discussion of Dynamic Response
The ADAMS model confirms that the test bench reproduces the intended loading mode of the rear axle. The crank at joint A, driven at a constant angular velocity of ω = 15.5 rad/s, imposes a nearly harmonic motion on the rocker beam (link 3), which in turn drives the vertical connecting links (4 and 4′) through the spherical joints E and F. The loads are then transmitted to the rear axle through the cylindrical joints G and H, exciting the axle beam and the stabiliser bar in a combined bending–torsion mode. After a short transient, all relevant kinematic and kinetic quantities exhibit a purely periodic response. The time histories of displacement and deformation at the stabiliser-bar centre of mass are nearly sinusoidal, as expected from the harmonic drive, while small higher-frequency components are associated with the flexible modes of the axle assembly.
Besides the reaction forces in the joints, the dynamic simulation provides the translational displacements, velocities and accelerations of any marker in the model.
Figure 5 and
Figure 6 illustrate, respectively, the total translational displacements and the translational elastic deformations of the marker located at the centre of mass of the rear stabiliser bar. The displacement histories in
Figure 5 describe the global oscillatory motion imposed by the test bench, whereas the deformation histories in
Figure 6 represent only the elastic part of this motion, relative to the reference node of the flexible body. The deformation amplitudes are significantly smaller than the corresponding displacements and are mainly associated with the lateral and vertical components, indicating that the stabiliser bar undergoes modest but clearly periodic bending and torsional deflection under the imposed excitation. The associated velocity and acceleration histories (displayed in paper) follow the same pattern, with smooth, nearly sinusoidal steady-state behaviour.
The reaction forces transmitted along the load path are quantified in joints E and G.
Figure 3 and
Figure 4 show the time histories of the three Cartesian components and of the magnitude of the reaction force in these joints. After the initial transient, the resultant forces stabilise to nearly constant amplitudes and remain strongly dominated by a single component (here aligned with the global
Z-direction), while the other two components are much smaller. This confirms that the mechanism primarily excites the rear axle in the intended loading direction, with only minor parasitic loads in the orthogonal directions, and that no undesirable kinematic amplification or spurious constraints are introduced by the joint configuration.
In addition, the flexible multibody model allows three-dimensional visualisation of the deformed shapes of the axle and stabiliser bar. As illustrated in
Figure 8, deformed configurations and contour plots of the deformation field can be displayed for selected instants of the response, providing an intuitive picture of the bending and twisting of the flexible components. Animations obtained from these simulations are supplied as
Supplementary Materials Videos, offering further insight into the dynamic behaviour of the test bench and the rear suspension assembly.
Finally, a dedicated force sensor located in the region of the right wheel spindle is used to record the reaction force transmitted by the test bench during the fatigue loading cycle. The resulting periodic signal exhibits a peak value of about 1 kN, which does not represent the maximum service load acting on the wheel, but the reaction corresponding to the prescribed displacement imposed by the bench, given the stiffness of the rear axle and suspension components. This peak value of the simulated reaction force is then adopted as an equivalent design load in the finite element analysis of the rear axle assembly, so that the boundary conditions in the structural model are fully consistent with the kinematic excitation and stiffness distribution represented in the multibody model.
The combination of multibody dynamics with flexible bodies therefore provides a comprehensive picture of the dynamic behaviour of the test bench. It allows the designer to verify that the mechanism operates without excessive kinematic amplification or undesired resonance, and at the same time supplies consistent internal force histories to be used as input for the subsequent explicit-dynamics finite element simulations of the rear axle housing and stabiliser bar.
4. Experimental Strain Analysis of the Rear Axle on the Test Bench
The numerical investigations presented in the previous sections were complemented by an experimental strain analysis carried out on the rear axle mounted on the durability test bench. The main objectives of this analysis were (i) to measure the strain and stress state in critical regions of the rear axle during the imposed fatigue loading cycle, and (ii) to provide reference data for the validation of the finite element model of the axle assembly.
4.1. Strain-Gauge Instrumentation and Measuring Points
The instrumentation layout on the rear axle is shown schematically in
Figure 9. A total of nine measuring points were selected based on the fatigue-sensitive regions identified in previous studies and on the expected bending and torsion modes of the axle beam.
In the central portion of the axle beam, a strain-gauge rosette consisting of three grids was bonded on the tensile side of the beam (points 1, 2 and 3). The grids are oriented at different angles with respect to the longitudinal axis X of the beam so as to enable the reconstruction of the local principal strains and stresses under combined bending and torsion.
Additional single strain gauges were mounted in the following locations:
Left beam head (points 4 and 5), in the vicinity of the left wheel-spindle region, to capture the local bending and torsional effects close to the left support;
Right beam head (points 6 and 7), in a position geometrically symmetric to points 4 and 5 with respect to the mid-span of the axle beam, so that the stress state at both beam ends can be compared under the symmetric loading generated by the test bench;
Left and right trailing arms (points 8 and 9), at the transitions between the bent sheet-metal arms and the axle beam, where geometric discontinuities may induce stress concentration even under globally symmetric excitation.
The
X-axis of the local coordinate system is aligned with the longitudinal axis of the axle beam, while the
Y-axis is oriented transversely, as indicated in
Figure 9a. This convention is consistent with the multibody and finite element models, which simplifies the comparison between measured and simulated stress components.
The layout of the nine strain-gauge measuring points on the rear axle and several details of the instrumentation are shown in
Figure 9a.
A photograph of the rear axle mounted on the test bench, with the strain-gauge positions indicated, is presented in
Figure 9d.
A detailed view of the strain-gauge rosette bonded near the transition between the axle beam and the trailing arm is shown in
Figure 9b. The three grids are oriented at different angles with respect to the beam axis and are protected with adhesive and epoxy coating, while the colour-coded lead wires are routed towards the data acquisition system.
4.2. Data Acquisition System and Measured Channels
The strain gauges were connected to an HBM MGCplus data acquisition system (HBM, Darmstadt, Germany) equipped with CANHEAD modules, providing stable bridge excitation, high-accuracy amplification and simultaneous multi-channel recording. The measurement setup was configured to record both the input force in the driving mechanism and the mechanical stresses derived from the strain-gauge signals.
The experimental setup employed the following instrumentation:
- ○
Force transducer S9M-50 kN (HBM, serial no. 31421930/2016, Darmstadt, Germany), nominal force range ±50 kN, nominal sensitivity 2 mV/V, accuracy class 0.1, linearity ≤0.1%. The sensor was conditioned by strain-gauge input modules SCM5B38-37 (Dataforth, Tucson, AZ, USA) with ±5 V output, nominal sensitivity 2 mV/V, 4 Hz bandwidth, linearity 0.01% and continuous isolation of 240 Vrms.
- ○
Reference force transducer U2B-50 kN (HBM, serial no. 168854/013481), nominal force range ±50 kN, nominal sensitivity 2 mV/V, accuracy class 0.5, coupled with an electronic indicator SCOUT55 (HBM, serial no. 827419902), used for calibration of the main force channel.
- ○
Precision vernier calliper (MIB, New York City, NY, USA), measuring range 0–300 mm, resolution 0.01 mm (serial no. GX 140110211), used for checking geometric dimensions and sensor positioning.
- ○
Portable data acquisition system SoftronicDataAcquisition, Craiova, Romania, based on LAN-XI 3053B120 and LAN-XI 3160A042 modules, providing 16 analogue input channels, 2 analogue output channels (signal generator), one LAN port, one stabilised 5 V DC output and one stabilised 24 V DC output, with battery operation for up to 5 h with all acquisition systems active.
- ○
Strain gauges LY6-10/350 (HBM), resistance 350 Ω, gauge length 10 mm, gauge width 5 mm, polyamide backing, constantan grid, gauge factor k = 2, used in quarter-bridge configurations.
- ○
MGCplus data acquisition system (HBM), 15 measurement channels, maximum sampling frequency 19.2 kHz, accuracy 0.0025, used as the main multi-channel bridge amplifier.
- ○
CANHEAD Data Acquisition System (HBM), strain-gauge measurement system in quarter-bridge configuration, 10 input channels, accuracy class 0.1, maximum sampling frequency 100 Hz.
Data acquisition and online signal processing were performed using Catman 5.6.4 software (HBM), which provides real-time control, visualisation and multi-channel processing for MGCplus and CANHEAD systems.
The following quantities were recorded during the tests:
- ○
Longitudinal force in the connecting link 2: F_link2 (N);
- ○
Normal stress at mid-span of the axle beam, gauge oriented at −90° with respect to the OX axis: Sigma 1 (MPa);
- ○
Normal stress at mid-span of the axle beam, gauge oriented at −135° with respect to the OX axis: Sigma 2 (MPa);
- ○
Normal stress at mid-span of the axle beam, gauge oriented at −45° with respect to the OX axis: Sigma 3 (MPa);
- ○
Normal stress at the left beam head, gauge oriented at 0° with respect to the OX axis: Sigma 4 (MPa);
- ○
Normal stress at the left beam head, gauge oriented at −135° with respect to the OX axis: Sigma 5 (MPa);
- ○
Normal stress at the right beam head, gauge oriented at 0° with respect to the OX axis: Sigma 6 (MPa);
- ○
Normal stress at the right beam head, gauge oriented at −135° with respect to the OX axis: Sigma 7 (MPa);
- ○
Normal stress in the left axle arm, gauge oriented at −45° with respect to the OX axis: Sigma 8 (MPa);
- ○
Normal stress in the right axle arm, gauge oriented at −135° with respect to the OX axis: Sigma 9 (MPa).
The sampling frequency was chosen to ensure a sufficiently dense discretisation of the loading cycle, given the excitation frequency imposed in the ADAMS model and on the test bench (
Section 3). All signals were recorded simultaneously during the start-up and steady-state operation of the bench.
The complete experimental setup, including the rear axle mounted on the test bench and the data-acquisition chain, is shown in
Figure 10.
4.3. Test Procedure and Data Processing
The experimental tests were carried out under the same operating conditions as those used in the multibody simulations, i.e., with the crank rotating at constant angular speed and the rocker beam imposing a periodic displacement on the right wheel-spindle region. After the stand was brought to operating speed, several consecutive cycles were recorded.
For the analysis, three load cycles (cycles 3, 4 and 5) were selected from the stabilised regime, after the decay of the initial transient. For each of these cycles and for each channel (F_Rod and Sigma 1–9), the following quantities were computed:
The statistical processing was then extended across the three cycles:
the average and standard deviation of the mean values and RMS values,
the average and standard deviation of the maxima and minima,
the peak-to-peak amplitude (difference between maximum and minimum) for each measured signal.
These results are summarised in
Table 1, which reports the processed values for the connecting-rod force and for all nine stress channels. The relatively small standard deviations confirm the good repeatability of the measurements in the stabilised regime and indicate that the test bench operates under stable kinematic and loading conditions.
The strain-gauge bridges were configured and calibrated in Catman 5.6.4 using the nominal resistance and gauge factor of the LY6-10/350 sensors (350 Ω, k = 2) and the quarter-bridge wiring. The raw voltage signals were first converted into engineering strain ε(t) for each channel. Assuming linear–elastic, isotropic behaviour of the axle material, the measured strains were then transformed into mechanical stresses by applying Hooke’s law with a Young’s modulus E = 210 GPa (Poisson’s ratio ν = 0.3). For the single gauges, the stress in the gauge direction was obtained as σ(t) = E ε(t), so that each channel Sigma 1–9 directly represents the normal stress in MPa along the orientation of the corresponding strain gauge. In the case of the strain-gauge rosette mounted at mid-span of the beam, the three measured strains were combined to reconstruct the in-plane strain components and the associated normal stresses in the chosen directions, which are likewise reported as Sigma 1–3.
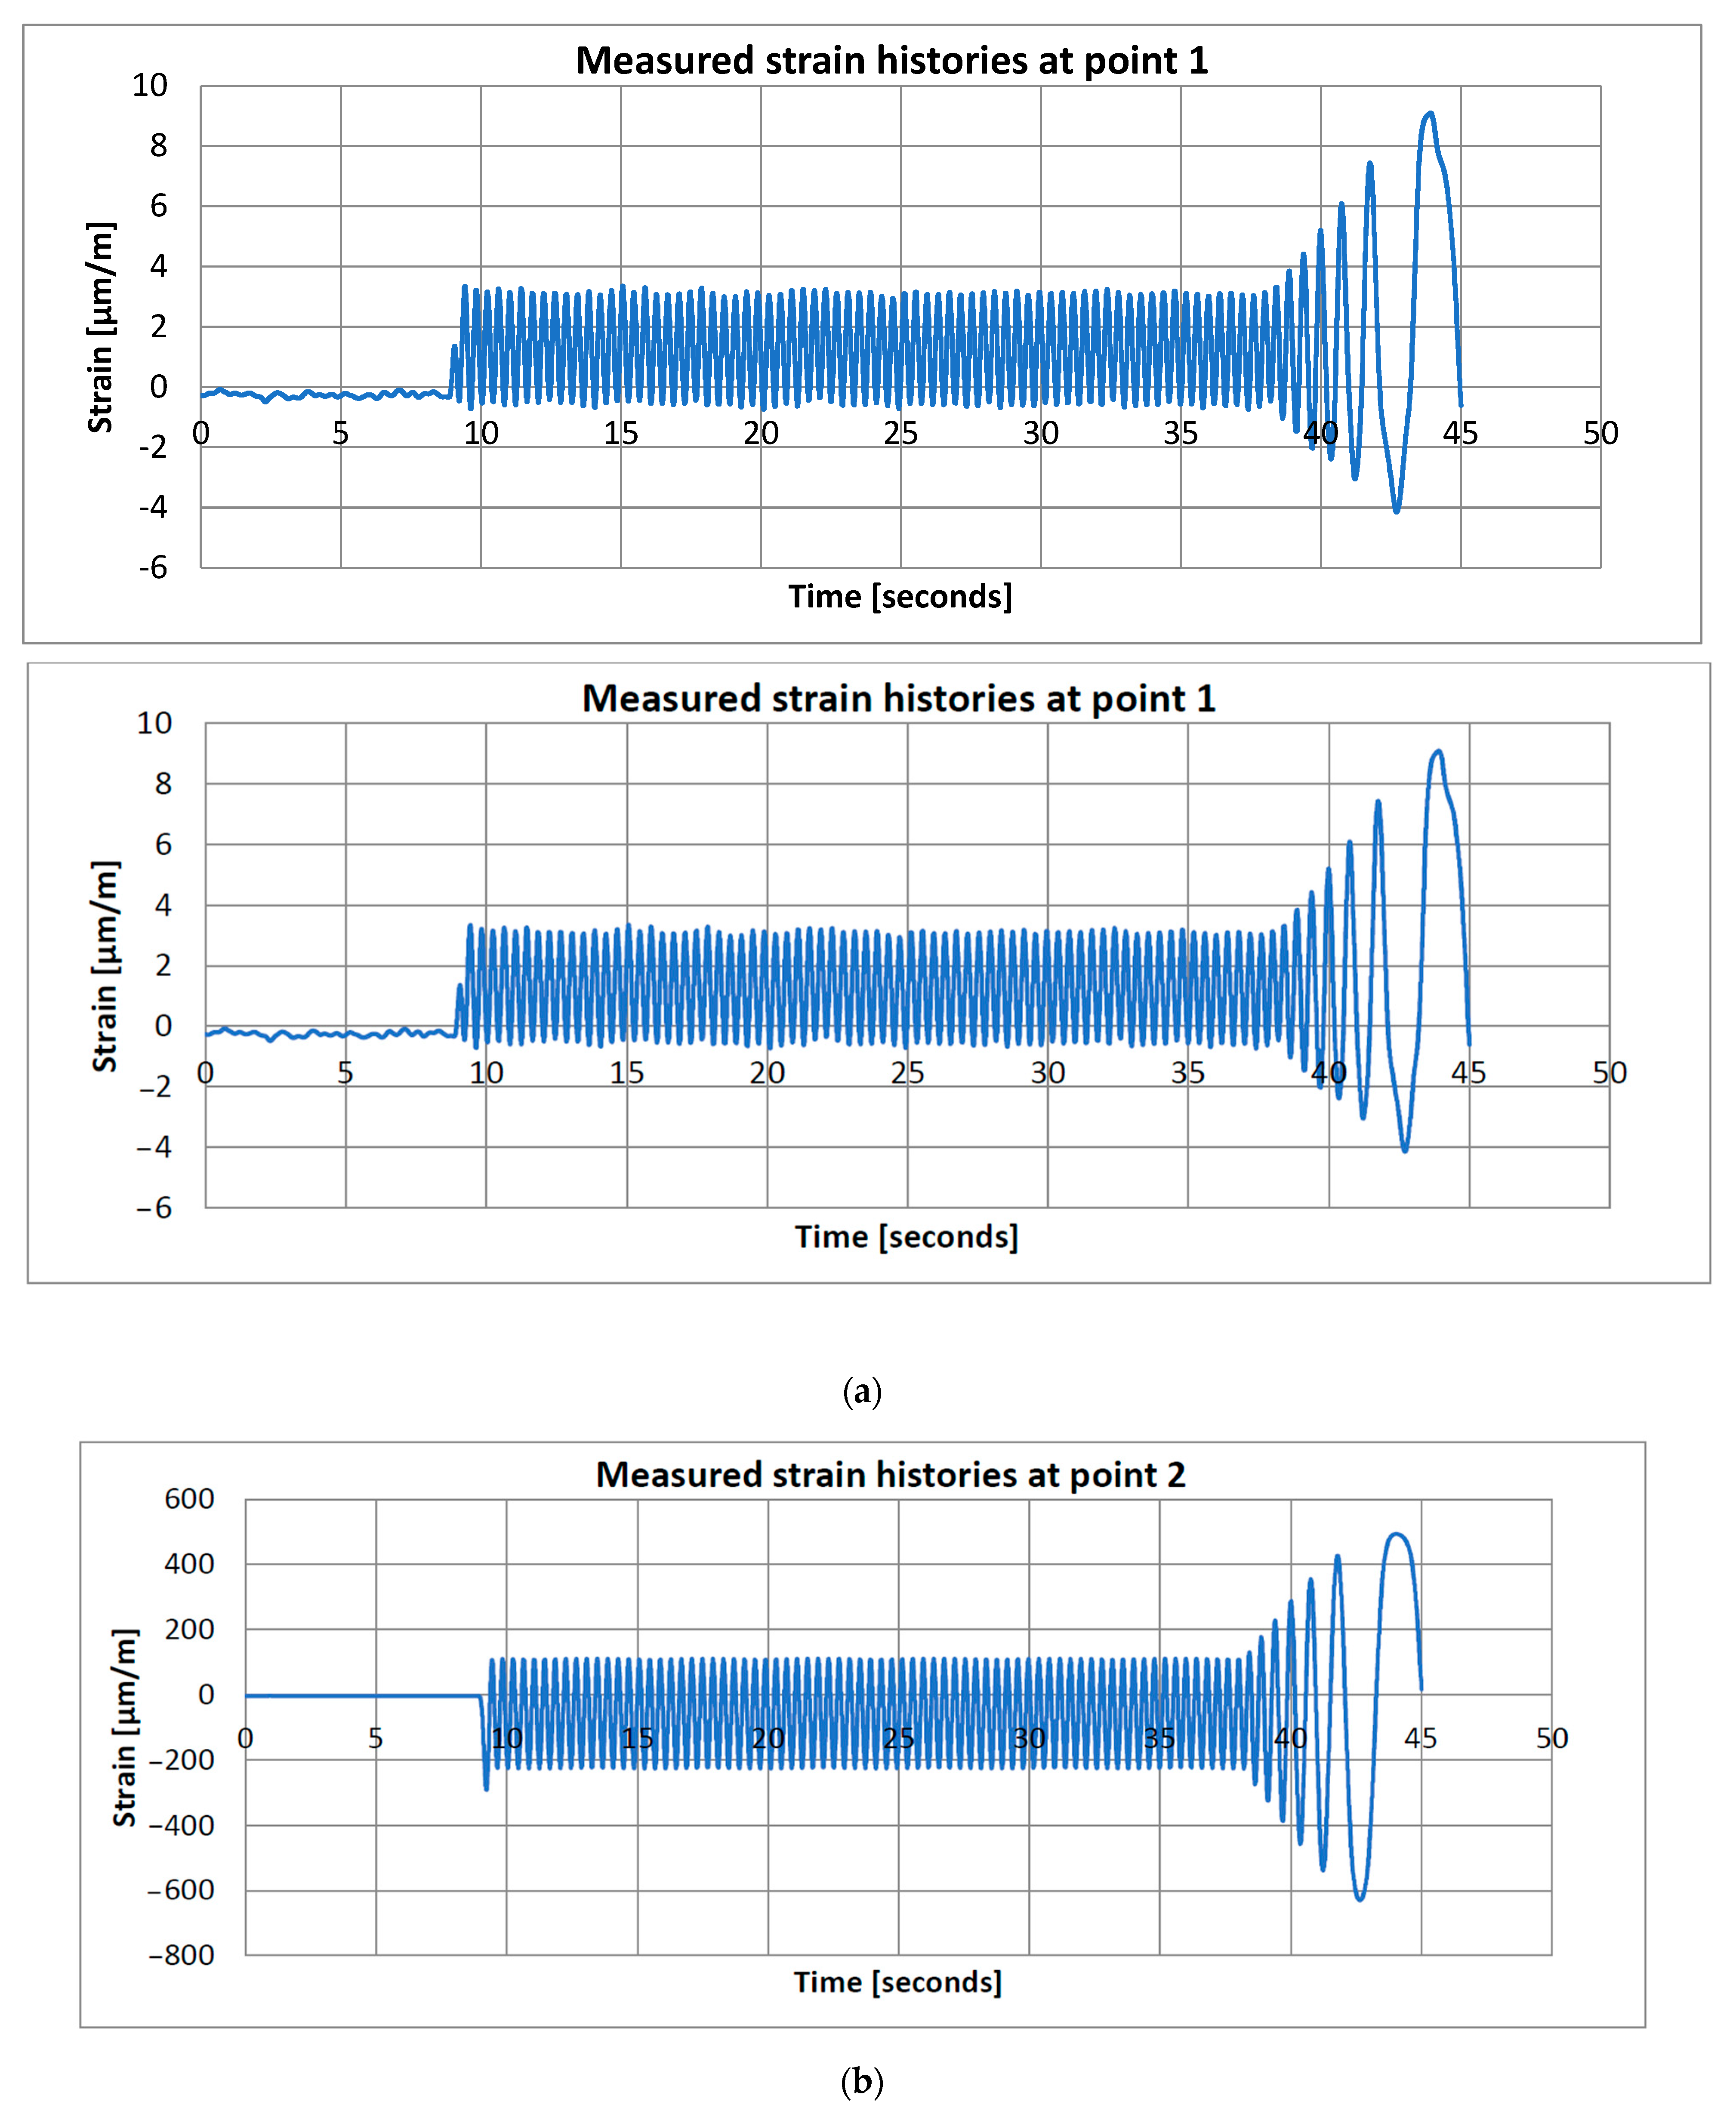
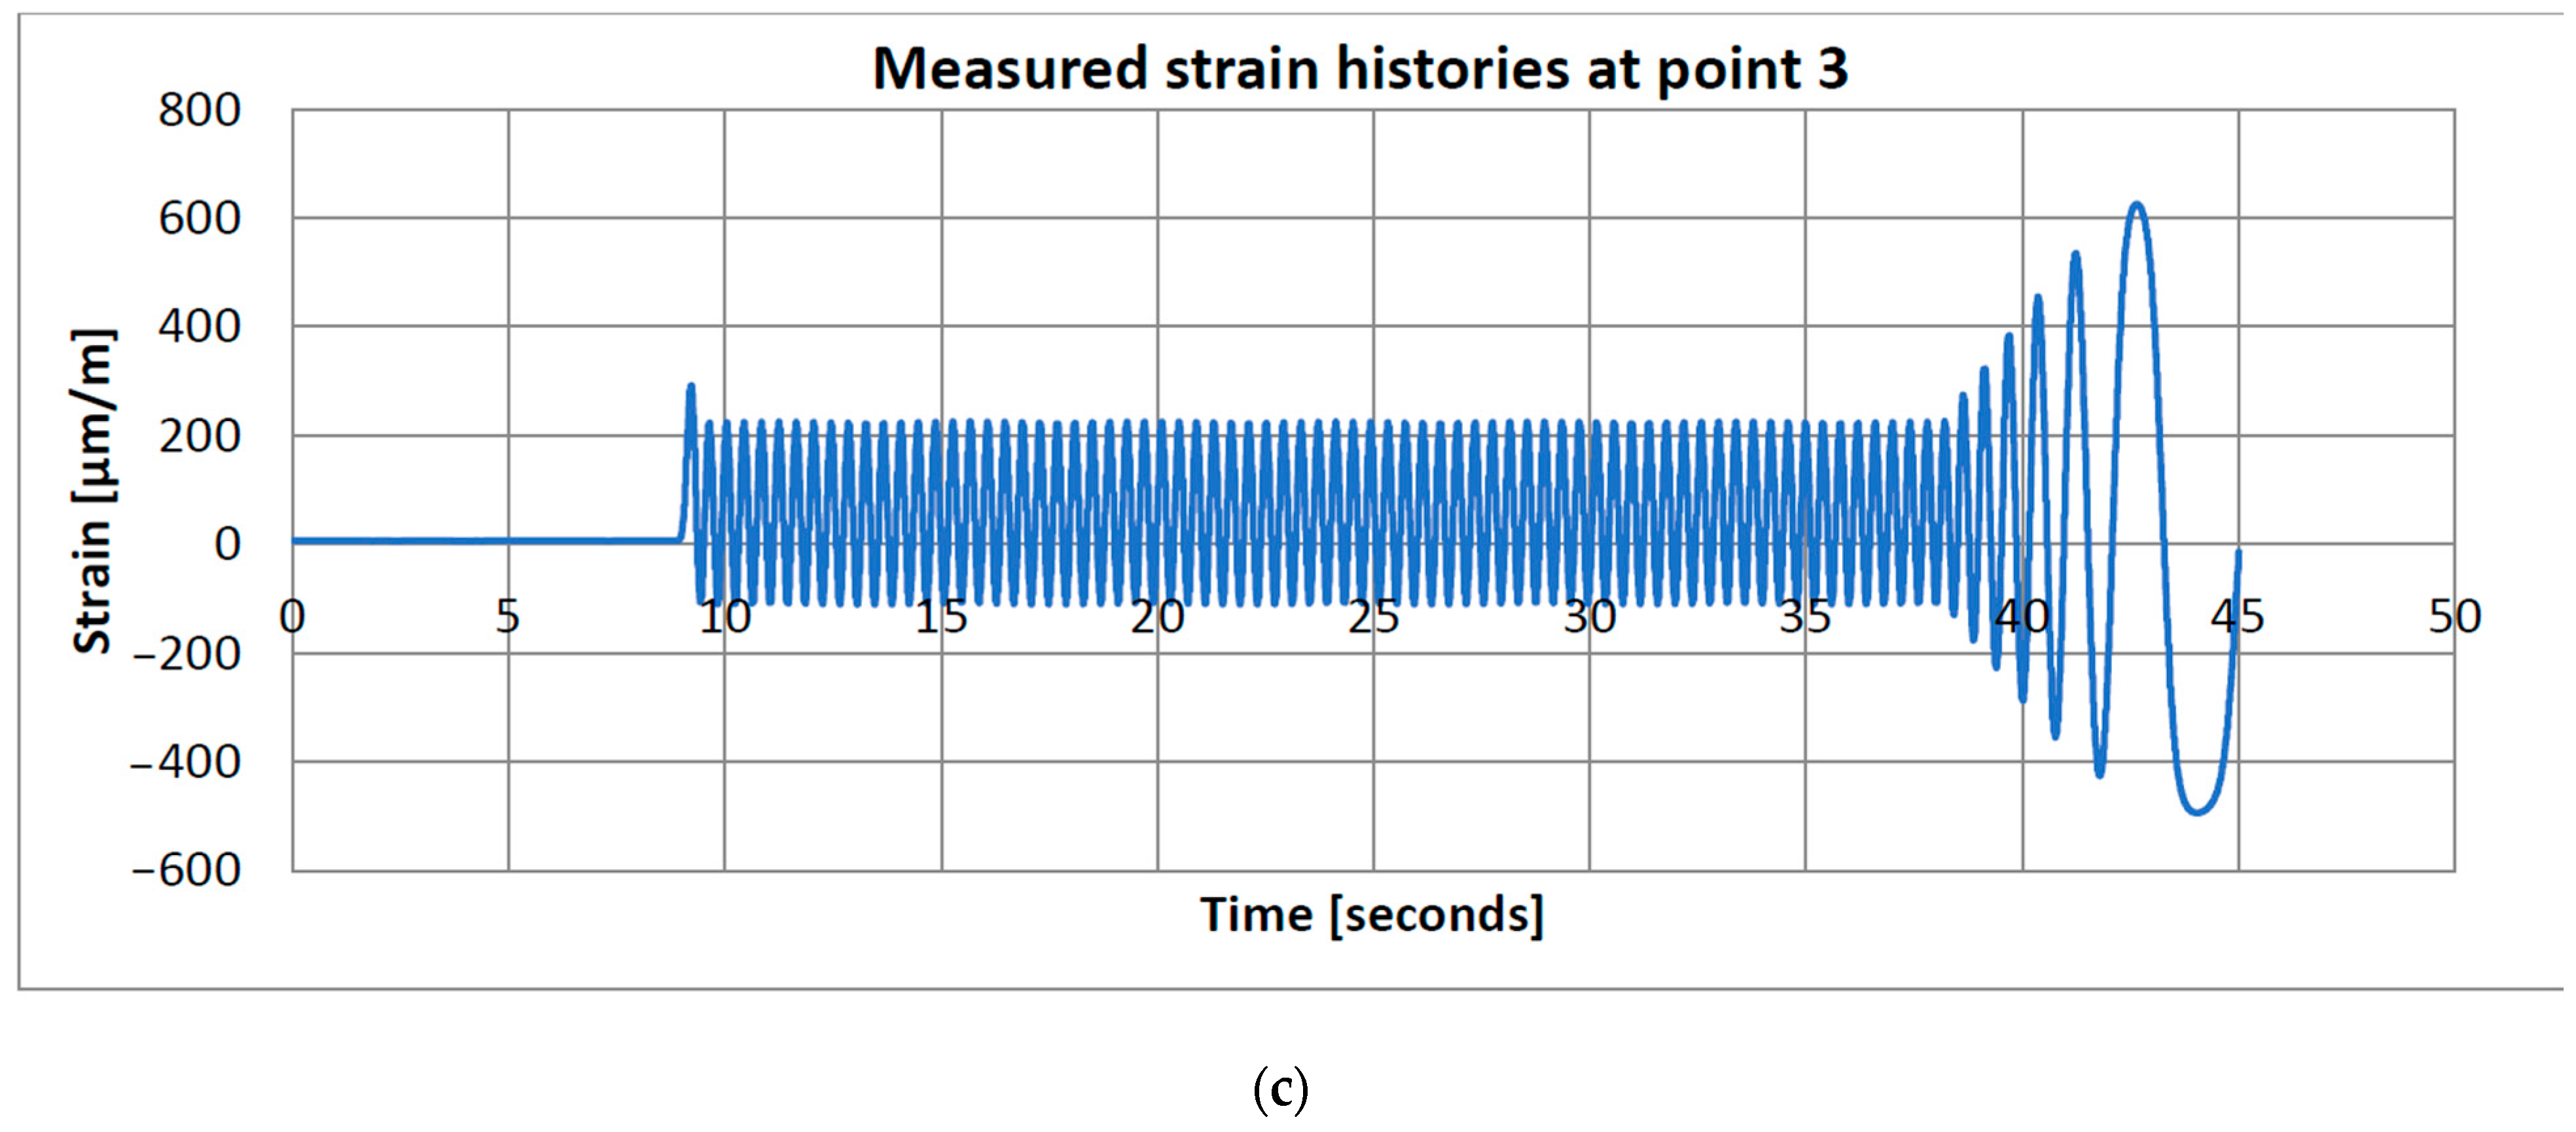
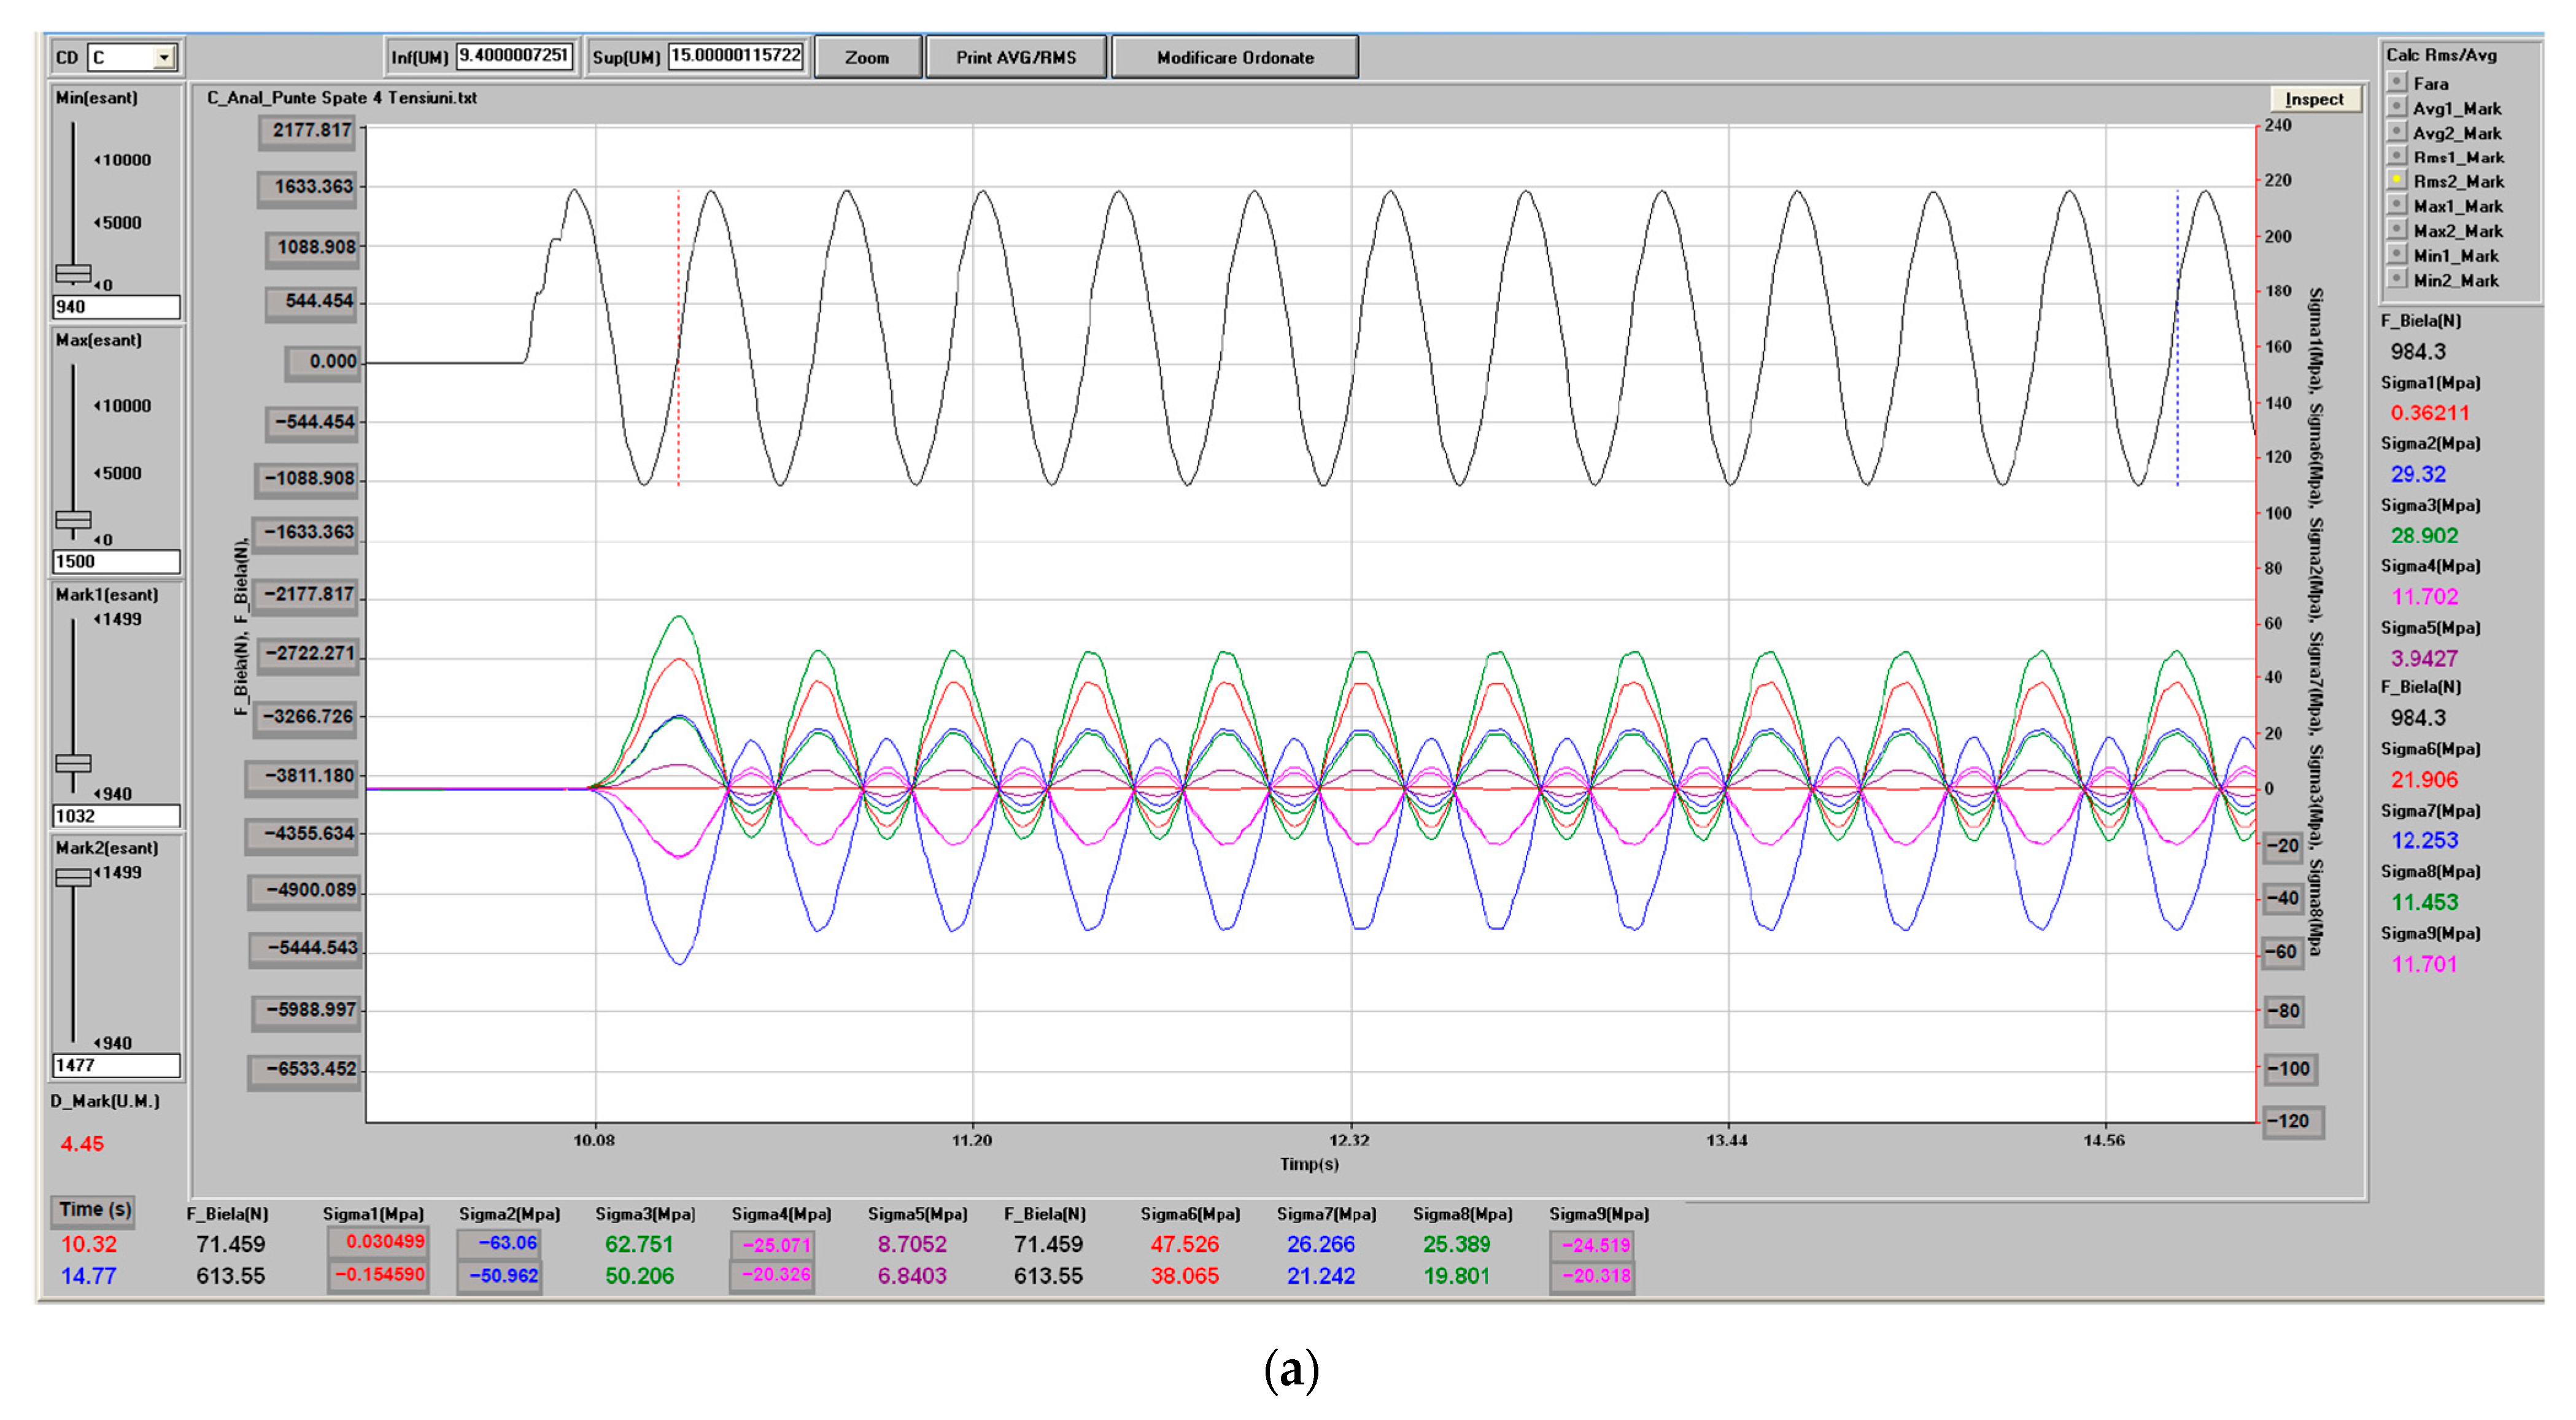
Figure 11 shows the strain histories recorded by the three grids of the rosette mounted at mid-span of the axle beam. After an initial idle phase, the stand is brought to operating speed at about
t ≈ 9 s, where the signals quickly reach a steady-state, nearly sinusoidal regime that is maintained up to approximately
t ≈ 38 s. The subsequent increase and decay of the amplitudes correspond to the controlled run-down of the stand at the end of the test. It can be observed that channel 1 exhibits only small strain amplitudes, whereas channels 2 and 3 reach significantly higher values, indicating that the dominant bending and torsional stresses in the mid-span region are aligned closer to the −135° and −45° directions with respect to the beam axis. The stabilised part of these records (cycles 3–5 in the steady-state window) was used for the statistical processing summarised in
Table 1.
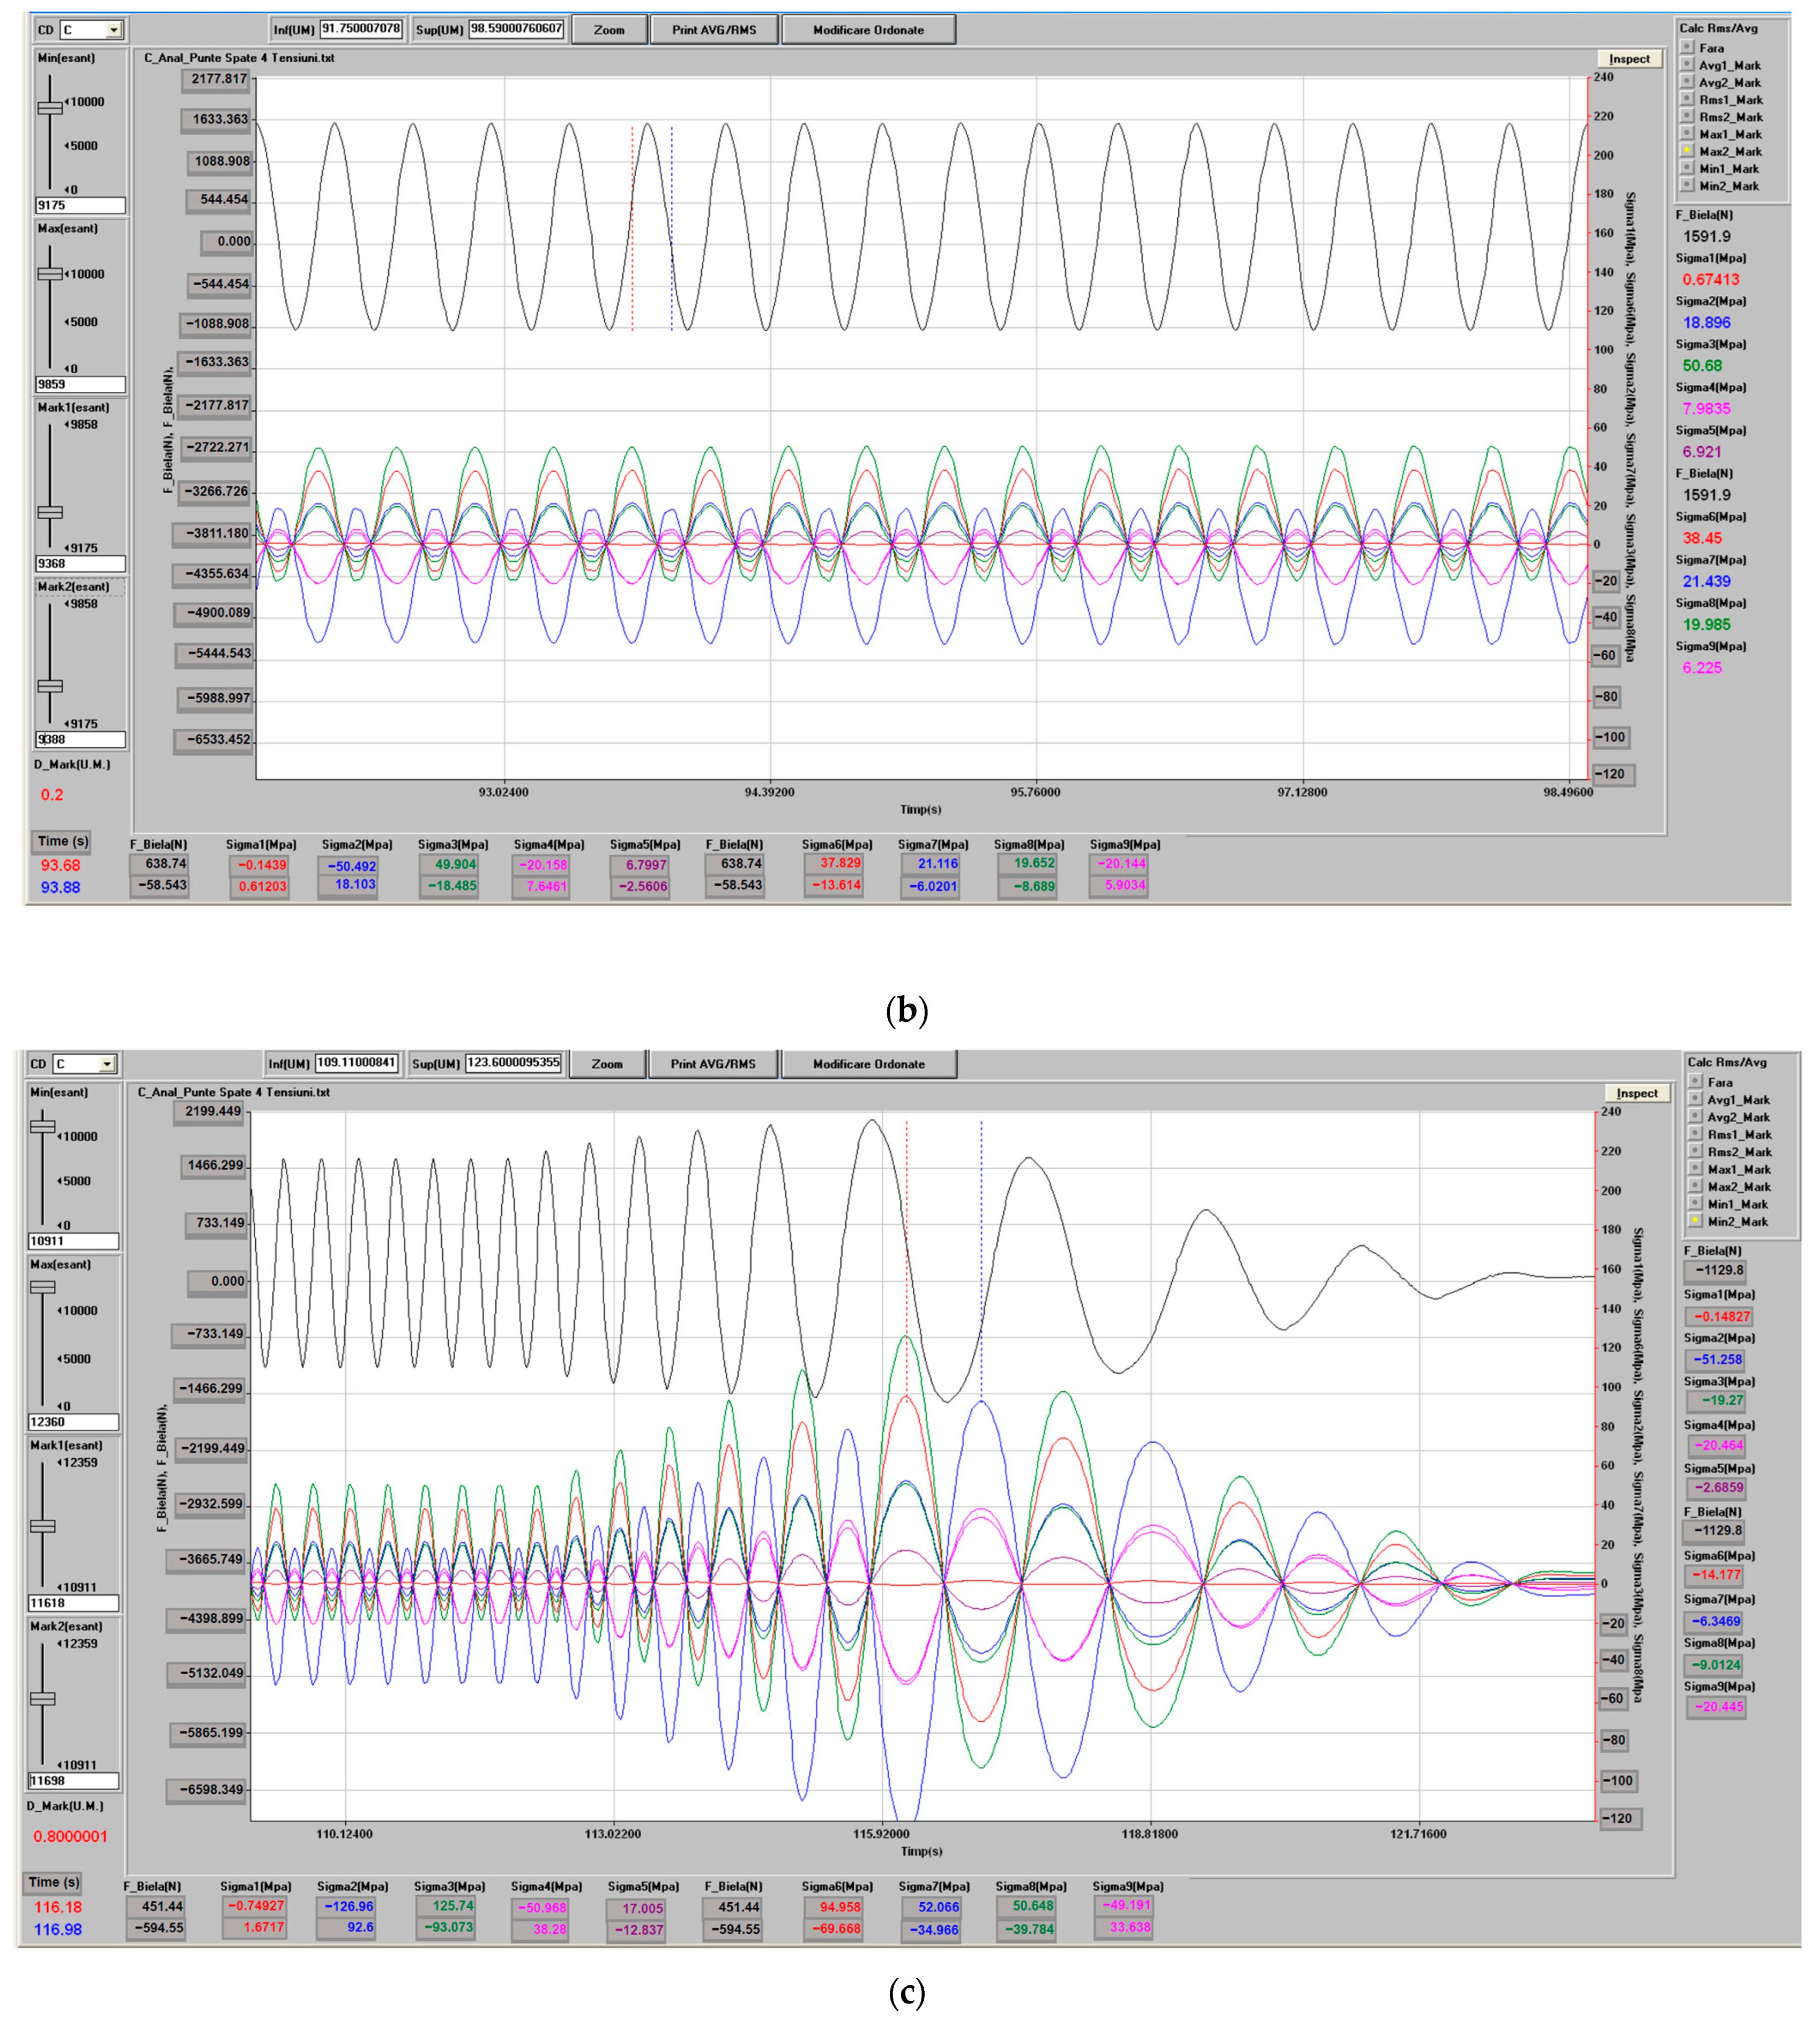
To check the repeatability and stationarity of the loading cycle, the full time histories of the connecting-link force and of the nine stress channels were inspected in TestPoint.
Figure 12 presents representative time windows taken from the beginning, from the middle and from the end of the measurement. In all three cases, the force and stress signals exhibit the same waveform, frequency and amplitude within the steady-state portion of the test, confirming that the stand reproduces an identical motion and load cycle throughout the entire recording and that no significant drift or degradation of the excitation occurs.
4.4. Measured Stress Levels and Identification of Critical Regions
Inspection of the recorded time histories shows that all stress channels exhibit a periodic variation consistent with the imposed cyclic loading. A typical example is provided in
Figure 12b, which illustrates the rod force and selected stress components over a representative cycle in the steady-state regime.
From
Table 1, it can be observed that:
the maximum recorded stresses in the mid-span region (Sigma 3 channel) reach values of approximately 50–51 MPa in the most heavily loaded parts of the cycle;
stresses at the beam heads and arms are somewhat lower in magnitude, with typical maxima in the range of 20–40 MPa, depending on the location and orientation of the gauge;
the peak-to-peak amplitudes of the stress signals (last line of
Table 1) provide a direct indication of the cyclic stress range experienced at each measuring point, which is particularly relevant for fatigue assessment.
Although only nine points on the axle were instrumented, the measured stress distribution already suggests that the most critical regions under the considered loading cycle are located in the central portion of the beam and in the vicinity of the right beam head, where the excitation is applied on the test bench. This observation is consistent with previous numerical studies and will be further quantified by the finite element analysis presented in the next section.
It should be emphasised that in the experimental campaign the stress field is sampled only at discrete locations, limited by the number of strain gauges that can reasonably be installed on the axle. By contrast, finite element analysis provides full-field maps of stresses and strains over the entire structure. The comparison between the measured stresses at the instrumented points and the corresponding values predicted by the FE model therefore constitutes a crucial step in the validation of the numerical model and in the subsequent identification of stress concentration zones and potential fatigue-critical details.
5. Finite Element Analysis of the Rear Axle Assembly
This section presents the finite element analysis of the rear axle assembly, which constitutes the third pillar of the proposed numerical–experimental methodology. Starting from the CAD geometry, a solid finite element model of the axle is built to reproduce the stress and deformation fields under the equivalent design load defined by the flexible multibody simulations. The aim is twofold: first, to obtain full-field maps of von Mises stress and deformation that complement the local strain-gauge measurements; and second, to provide a validated structural model that can be used for design optimisation of safety-critical details, such as the wheel spindle region. The section is organised as follows:
Section 5.1 describes the geometry preparation and FE model;
Section 5.2 details the boundary conditions and loading;
Section 5.3 discusses the resulting stress distribution and critical regions; and
Section 5.4 compares the numerical predictions with the experimental strain measurements.
5.1. Geometry Preparation and FE Model
The finite element analysis was carried out in ANSYS Workbench 19.2, using the CAD assembly of the rear axle previously created in SolidWorks. The geometry was first imported into DesignModeler, where a series of clean-up operations were performed to ensure a robust mesh and physically meaningful connections between parts. In particular, small fillets and chamfers not affecting the global stiffness were removed, artificial overlaps were corrected and several adjacent sheet-metal components (U-shaped cross member, bent side arms and end brackets) were merged by Boolean operations into a single solid representing the rear axle beam.
The final model of the rear axle assembly contains the main torsion beam, the trailing arms, the wheel-spindle regions and the brackets for the springs and stabiliser bar. The components that are welded in the real structure are represented as a single continuous body, whereas components connected by bushings in the real suspension (e.g., body mounts) are modelled by appropriate boundary conditions. The mesh consists of 3D solid elements with local refinement in the vicinity of geometric discontinuities, such as the junction between the bent side plate and the bent arm, and around the locations of the strain gauges (points 1–9), in order to capture accurately the stress gradients in these critical regions.
The axle material is assumed to be structural steel with linear elastic behaviour, characterised by a Young’s modulus E = 210 GPa and Poisson’s ratio ν = 0.3. The rubber bushings that connect the axle to the vehicle body in service and to the stand in the laboratory are represented by equivalent linear springs and dashpots with stiffness and damping values consistent with the experimental stand. The Explicit Dynamics module of ANSYS Workbench was used in order to handle the contact conditions and the nonlinear stiffness of the bushings in a numerically stable way.
5.2. Boundary Conditions and Loading
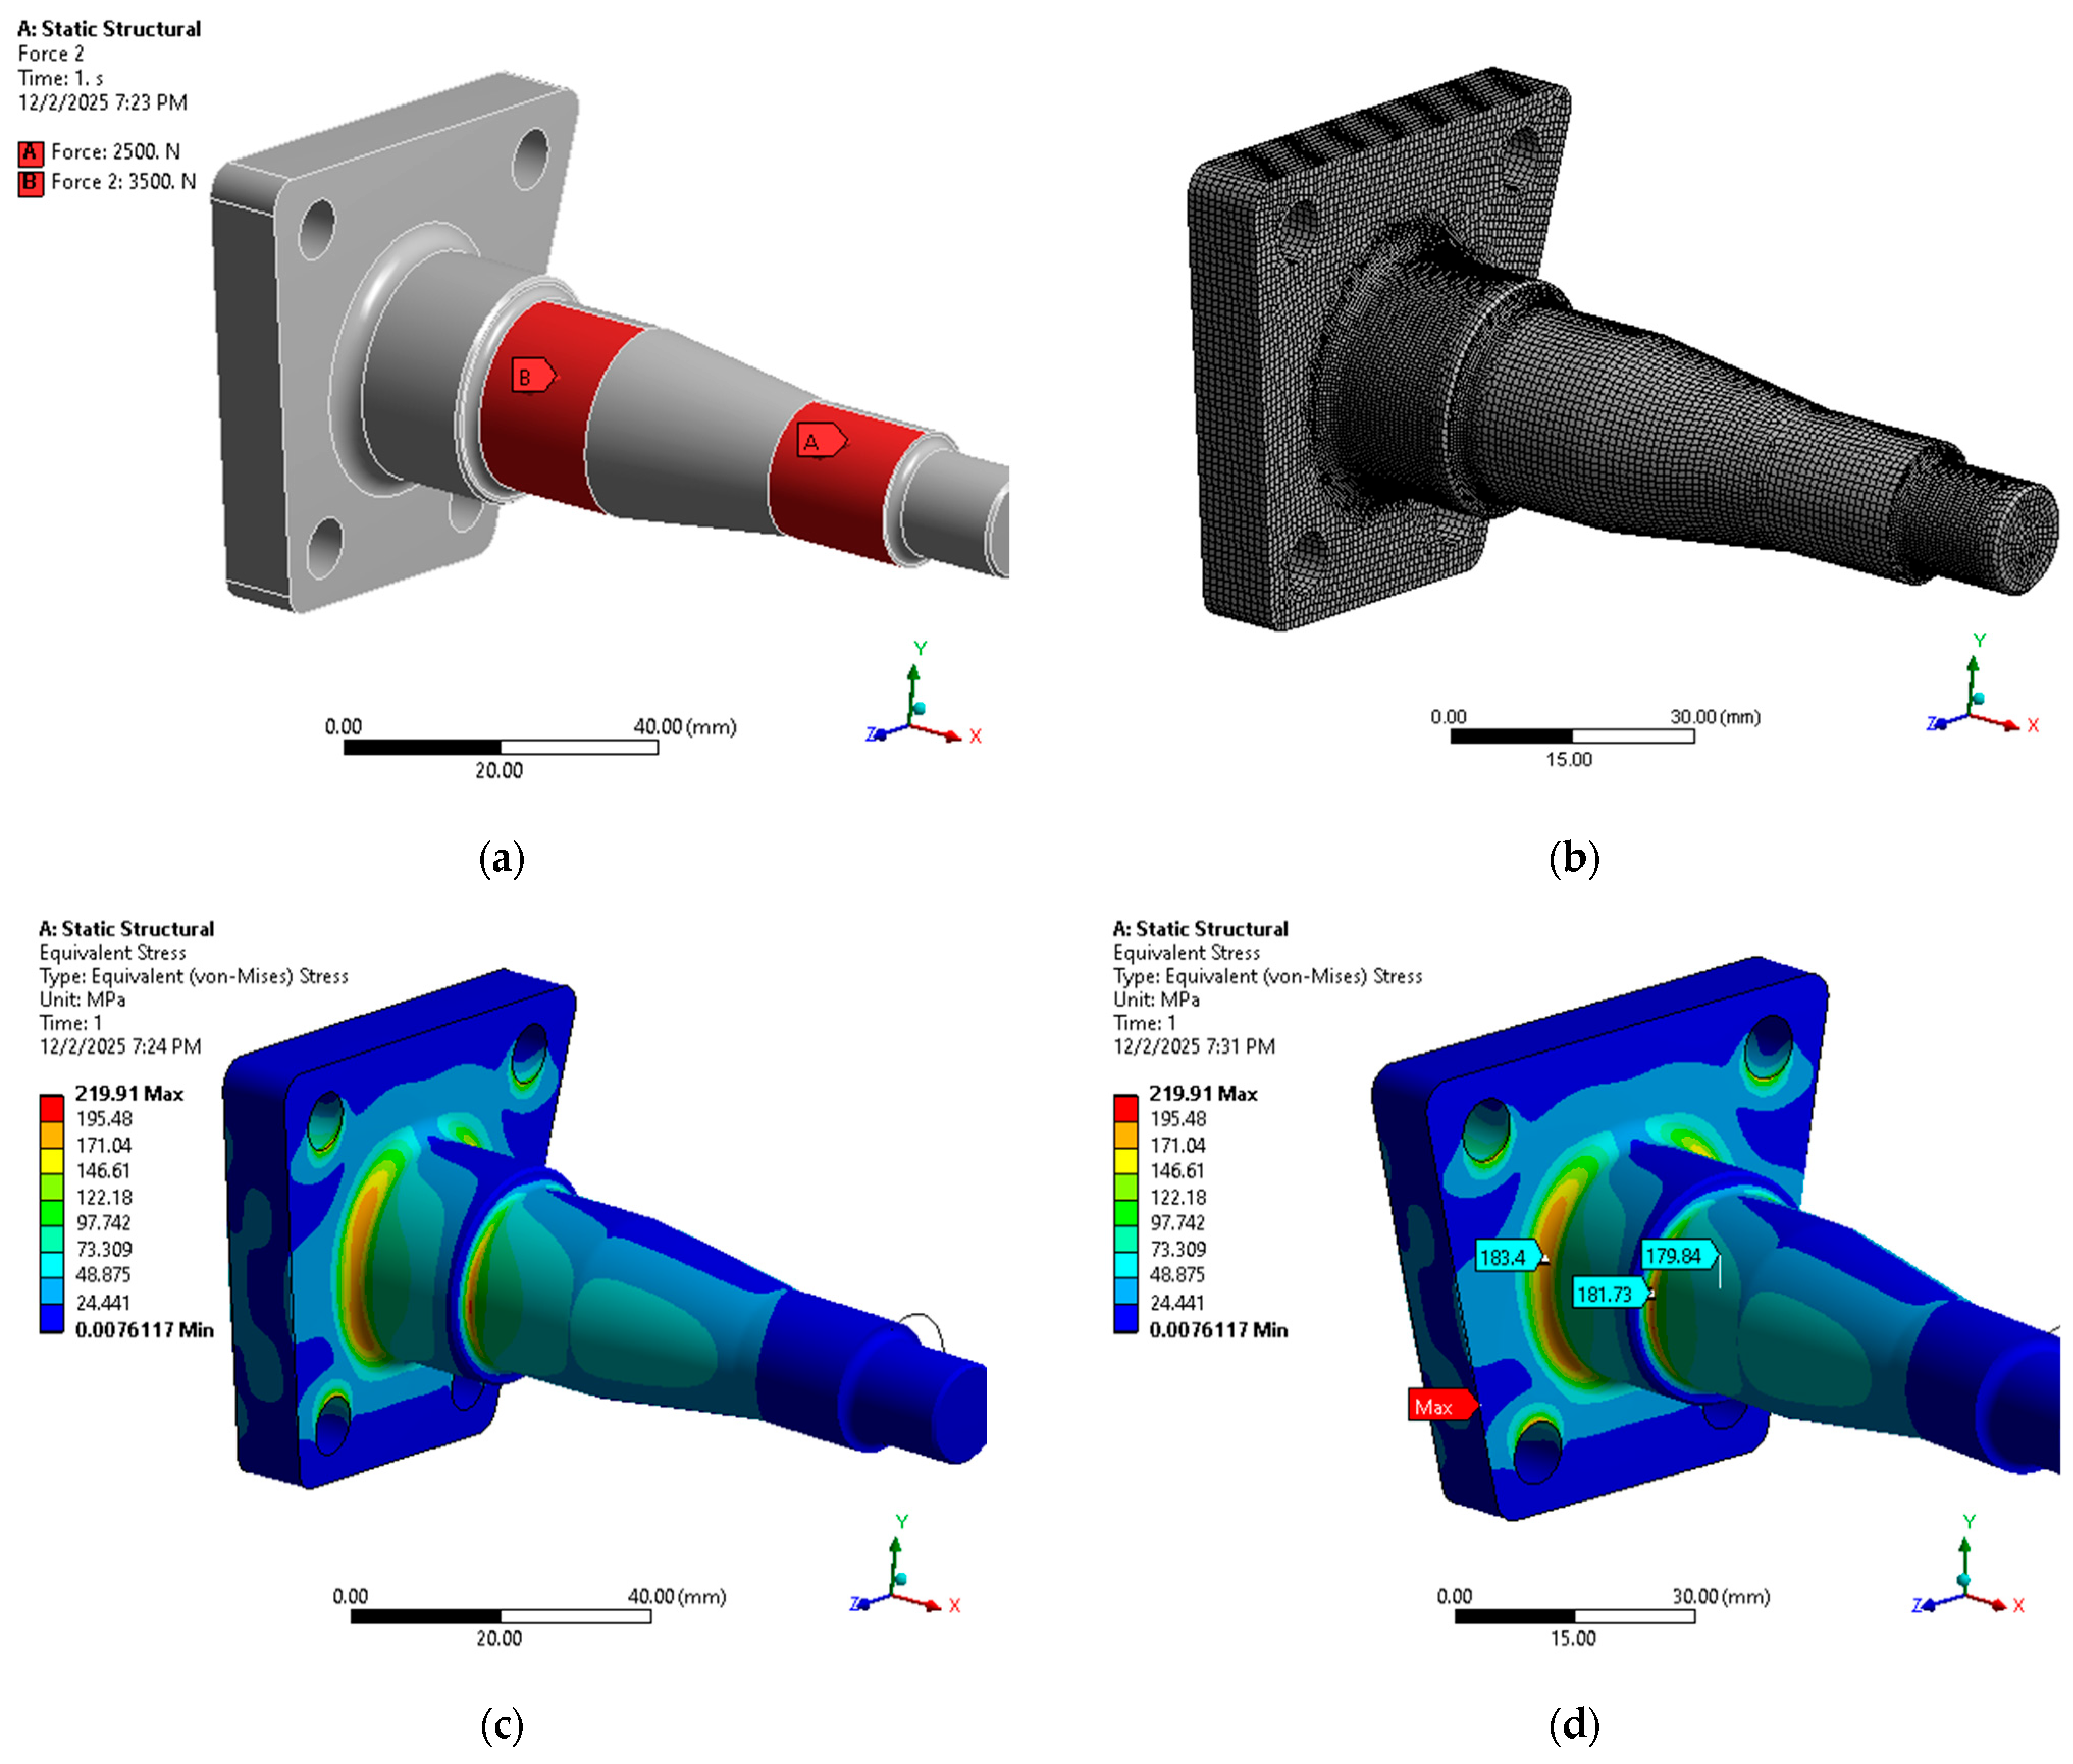
The CAD geometry of the rear axle was imported into ANSYS DesignModeler as an assembly of solid bodies (torsion beam, side arms and spindle brackets). The parts that are welded in the real component were merged into a single continuous body, whereas those connected through bushings or supports were kept as separate entities to allow the definition of realistic boundary conditions. After this preprocessing step, the assembly was discretised with 3D solid elements, with mesh refinement in the vicinity of geometric discontinuities and in the wheel-spindle region (
Figure 13b). The supports corresponding to the axle bushings and spring seats were constrained to reproduce the mounting conditions on the test bench, and a vertical force was applied at the wheel spindle (
Figure 13a), consistent with the equivalent reaction obtained from the multibody simulation.
The explicit dynamic analysis was run over one complete loading cycle, with a time step automatically controlled by the stability criterion of the solver. The resulting time histories of displacements, strains and stresses were post-processed at the nodes corresponding to the experimental measuring points, as well as over the entire axle surface to obtain full-field stress maps.
5.3. Stress Distribution and Critical Regions
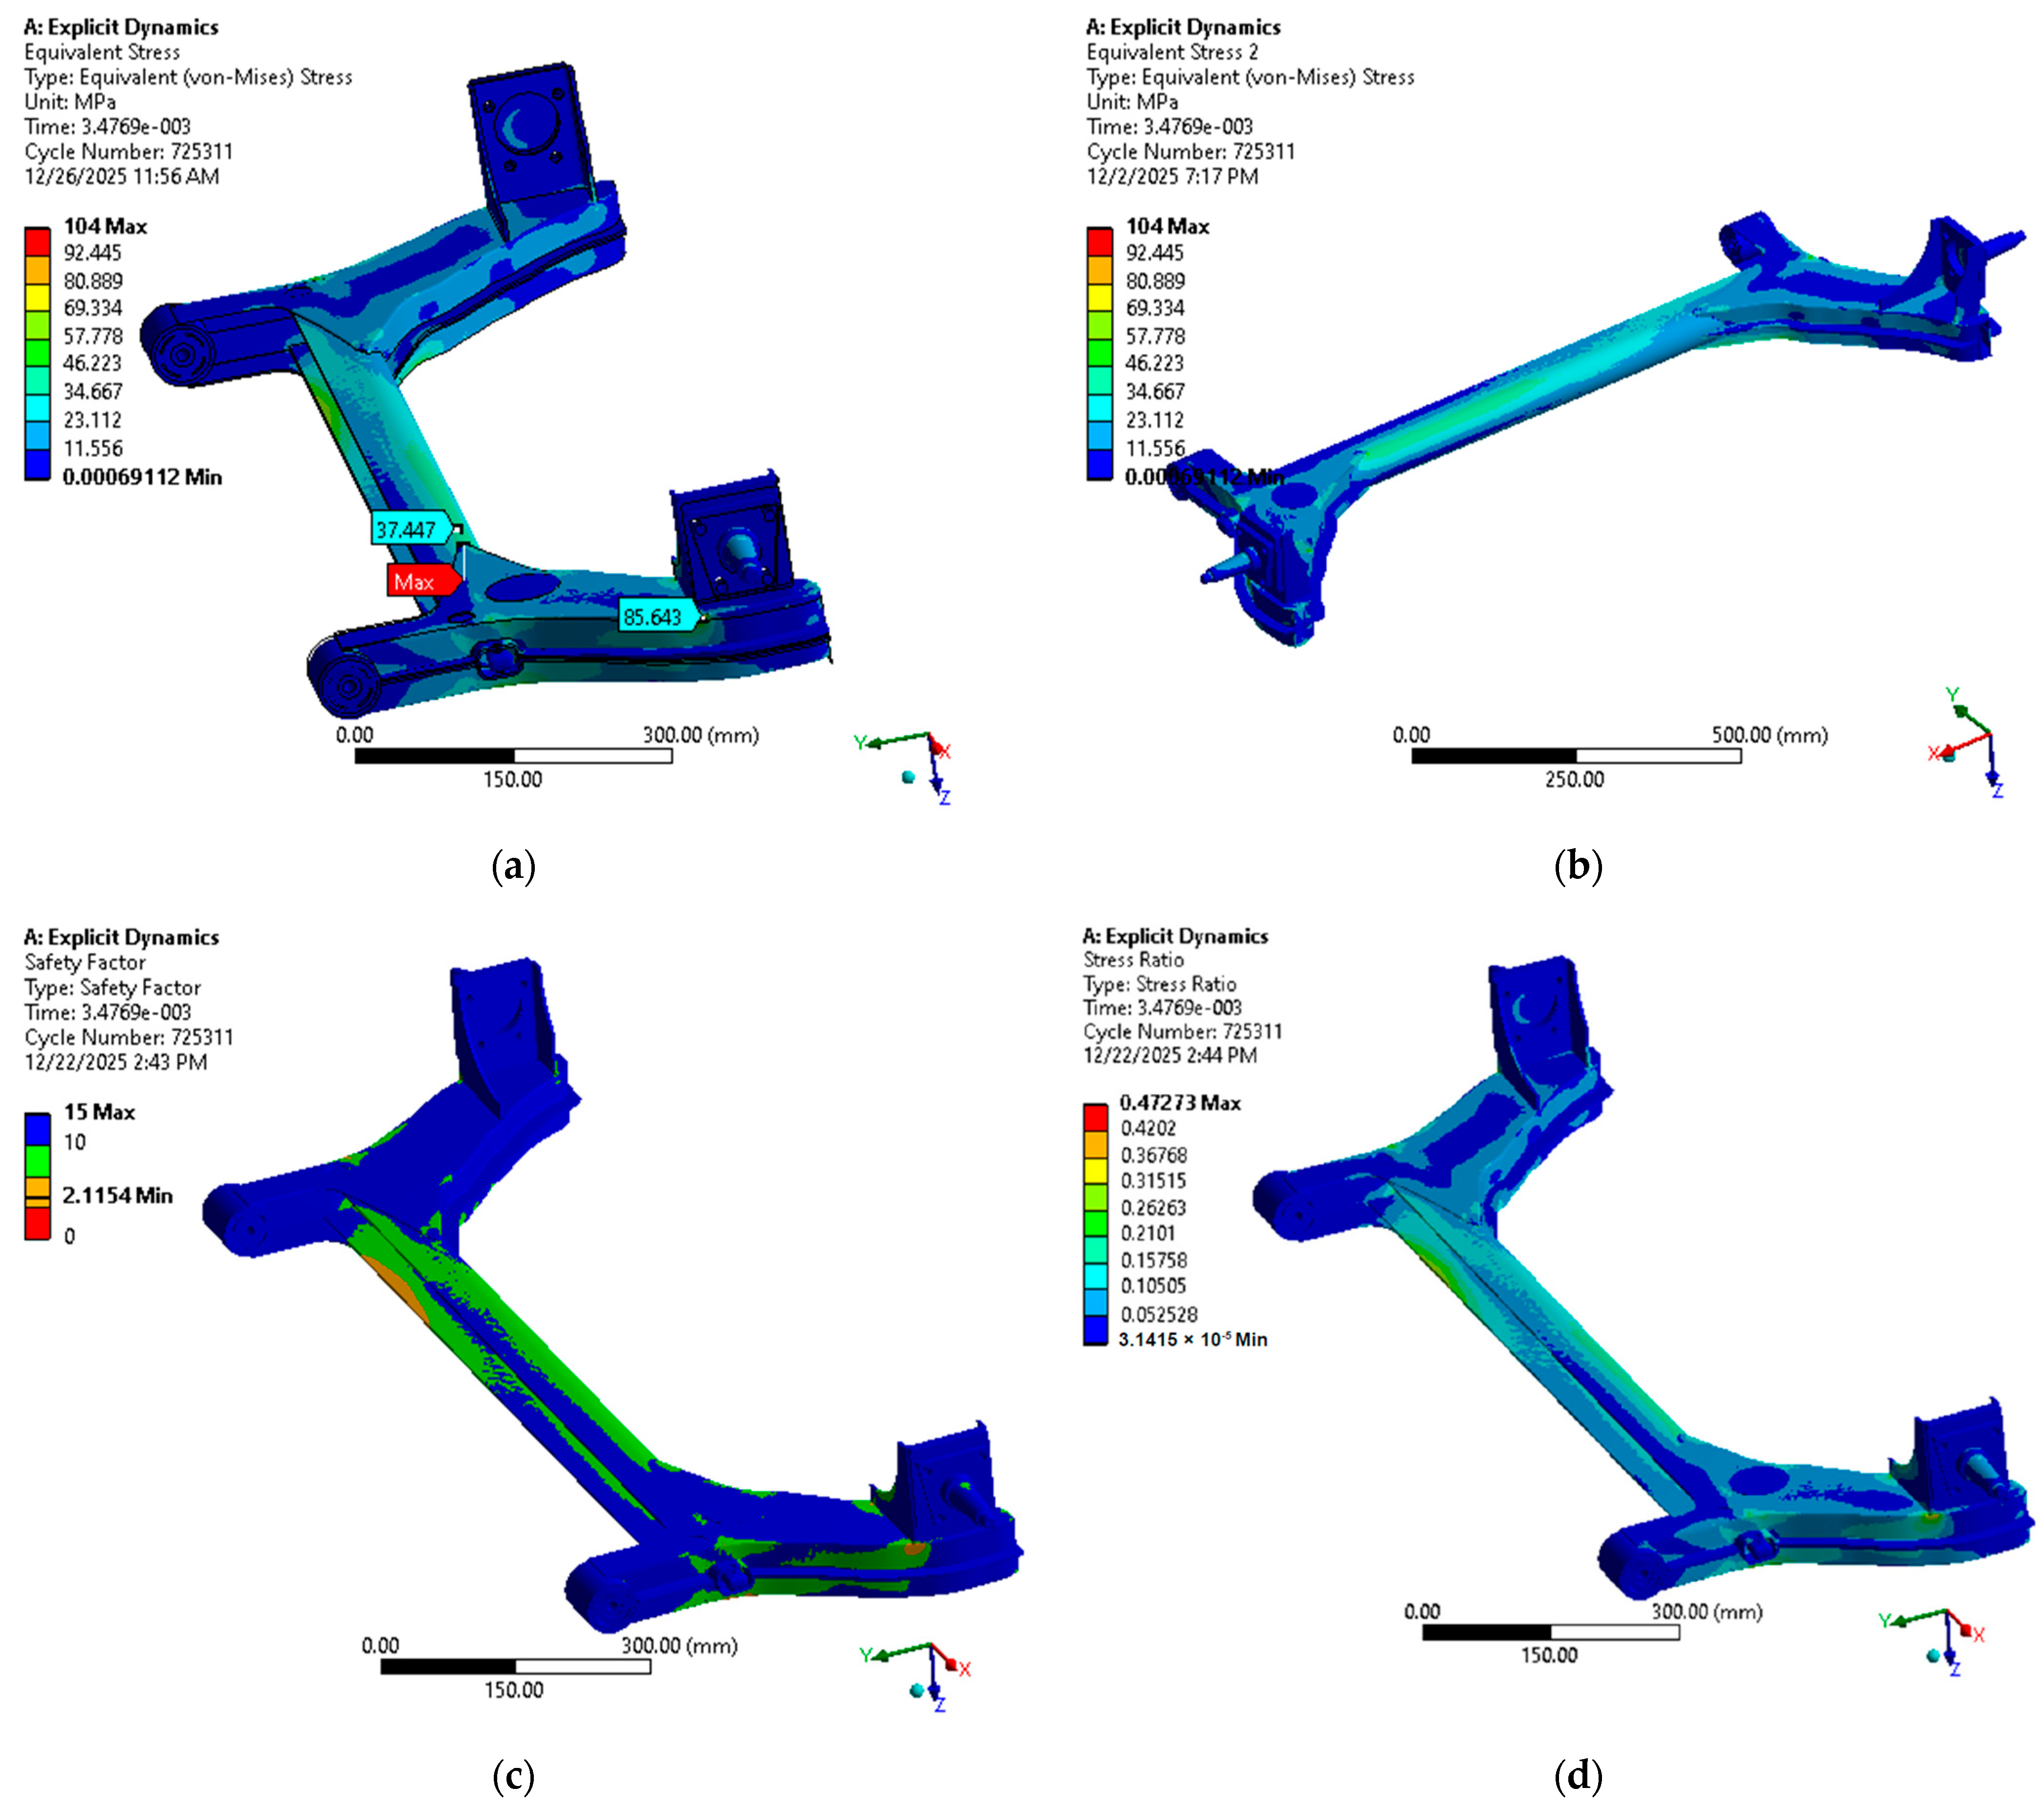
Figure 14 shows the von Mises equivalent stress distribution obtained from the ANSYS Explicit Dynamics analysis at the time instant corresponding to the peak value of the reaction force in the fatigue loading cycle. The model is solved as a fully transient dynamic problem, but for correlation purposes the stress field is sampled at this representative time step, after the initial transient has decayed and the response has reached a stable periodic regime. It should be emphasised that the finite element model of the rear axle is analysed using the Explicit Dynamics solver in ANSYS, i.e., as a transient dynamic problem rather than a quasi-static analysis.
Figure 14 therefore represents one time instant of this dynamic solution.
The von Mises equivalent stress distribution at the instant of maximum load reveals that the most highly stressed region is the corner area where the bent side plate joins the bent side arm, on the side of the axle where the excitation is applied. In this region, the equivalent stress reaches a maximum of approximately 104 MPa, as illustrated in the contour plots of the FE results. This corner therefore represents a potential fatigue-critical detail and a prime candidate for design optimisation (e.g., by introducing larger radii or local stiffening).
In the central portion of the axle beam, the equivalent stresses are significantly lower but still non-negligible. The FE model predicts a maximum equivalent stress of about 54.6 MPa at the mid-span of the U-shaped cross member, decreasing to approximately 41 MPa in the adjacent areas. These values are consistent with the expectation that the central region is mainly subjected to global bending and torsion rather than to strong local stress concentrations.
The stress levels in the regions corresponding to the strain gauges at the beam heads (points 4–7) and in the trailing arms (points 8–9) are lower than in the aforementioned hot spots but still relevant to fatigue. In particular, the FE analysis yields equivalent stresses of about 27 MPa in the vicinity of points 4–5 and about 41 MPa near points 6–7. Although these locations are geometrically symmetric with respect to the beam mid-span, the local stress values differ because of the complex geometry of the brackets and the presence of additional stiffening features, which slightly modify the local stiffness and stress flow. The stresses in the trailing arms (points 8–9) are smaller, in line with the more compliant geometry and with the larger distance from the main load path.
Overall, all predicted stresses remain well below the yield strength of the axle material for the considered equivalent design load, indicating a comfortable static safety margin. However, the local maxima and the stress gradients identified by the FE analysis are highly relevant for assessing fatigue strength and for guiding possible design improvements.
The von Mises stress field at the instant of maximum applied load is shown in
Figure 14. The overall view in
Figure 14a indicates that the stress distribution is far from uniform: most of the axle beam is subjected to moderate equivalent stresses below about 60–70 MPa, while significantly higher values appear in the transition regions between the main beam and the side arms. The detailed view in
Figure 14b reveals a pronounced local maximum in the corner where the right-hand arm joins the beam and spindle bracket, with a peak equivalent stress of approximately 104 MPa. This confirms that the welded junction between the bent side plate and the arm is the most critical area of the axle for the considered loading case and should be regarded as a potential fatigue hot spot in any subsequent design optimisation.
To evaluate the fatigue relevance of these stress levels, the equivalent stress history obtained from the explicit dynamic analysis was further processed to compute a fatigue safety factor for the axle material, using the nominal S–N curve of the structural steel and the stress range in the stabilised regime. The resulting safety-factor and stress-ratio maps are shown in
Figure 14c,d.
Figure 14c confirms that most of the axle beam operates with a comfortable fatigue safety margin, while the lowest safety factor is attained in the same corner region where the peak von Mises stress occurs.
Figure 14d presents the corresponding stress ratio
R =
σmin/
σmax over the axle surface; the most unfavourable (i.e., lowest) values of
R are likewise concentrated in the beam–arm–spindle junction region. This consistency between the von Mises stress field, the fatigue safety factor and the stress-ratio distribution reinforces the identification of this junction as the primary fatigue-critical detail for the considered loading case.
5.4. Correlation with Experimental Strain Measurements
To validate the finite element model, the stress results at the nodes corresponding to the strain-gauge locations were compared with the experimental values derived from the strain measurements presented in
Section 4.
To quantify the agreement between the numerical model and the measurements, the absolute and relative errors of the peak stresses were evaluated for each strain-gauge location. The absolute error is defined as:
The relative error (expressed as a percentage and taken with respect to the FE result) is:
where σ_
exp,max,i is the maximum experimental stress at point i, and σ_
FE,max,i is the corresponding maximum stress predicted by the finite element model.
The quantitative comparison between experimental and numerical peak stresses is summarised in
Table 2, which reports, for each of the nine strain-gauge locations, the maximum experimental stress, the corresponding FE prediction, and the absolute and relative errors. All relative errors remain within a moderate range (typically below about 10–15%), with the smallest discrepancies occurring at the beam mid-span and slightly larger differences in regions where local geometric details (e.g., weld toes, small fillets and local compliance) are necessarily simplified in the FE model. This quantitative agreement supports the earlier qualitative statement that the FE model reproduces both the absolute stress levels and their relative distribution along the axle with sufficient accuracy for design and optimisation purposes.
For the central portion of the beam, the stresses obtained from the rosette gauges (channels Sigma 1–3) reach peak values of approximately 50.7 MPa during the stabilised cycles. This is in very good agreement with the FE prediction of about 54.7 MPa at the same location, the difference being within 7.4%.
At the beam heads, the experimentally derived stresses in points 4–7 are also of the same order of magnitude as those predicted numerically. The FE model tends to slightly overestimate the stresses on the side where stronger geometric discontinuities are present, which is expected for a model that neglects certain local compliance effects (e.g., small gaps, weld toe geometry). In the trailing arms (points 8–9), both experiment and simulation confirm relatively low stress levels, confirming that these regions are not critical for the current loading case.
The FE analysis is therefore used to extend the information obtained from the discrete strain-gauge measurements to the entire axle, identifying stress concentrations and critical regions that cannot be accessed experimentally and providing a reliable basis for fatigue assessment and design optimisation.
6. Design Optimisation of the Rear Axle Wheel Spindle
The results presented in the previous sections show that, for the considered loading case, the highest equivalent stresses are concentrated in the junction regions between the beam, side arms and spindle brackets. Among all components of the rear axle, the wheel spindle, which supports the hub and wheel bearings, is the most safety-critical part: a fracture of the spindle would lead to the loss of the wheel and therefore to a potentially catastrophic failure of the vehicle. For this reason, the spindle is selected as the primary target for design optimisation.
The purpose of this section is to use the validated finite element model as a basis for refining the geometry of the spindle region, with the dual objective of:
reducing the maximum local stresses and stress gradients in the spindle and its immediate vicinity, thus increasing the fatigue strength and safety margin, and
preserving the global stiffness and mass characteristics of the axle assembly, so that the overall kinematic and dynamic behaviour of the suspension is not adversely affected.
To this end, the FE model is restricted to the substructure containing the spindle, the adjacent portion of the arm and the beam–arm junction, while the boundary conditions are inherited from the full-axle model (displacements and reaction forces applied on the cut boundaries). The optimisation problem is formulated in terms of a small number of geometric design variables (for example, fillet radii, local thicknesses and transition angles around the spindle base), with the objective of minimising the peak von Mises stress in the spindle region, subject to constraints on mass, stiffness and manufacturability.
In the following subsections, the design variables, objective function and constraints are specified, and the numerical procedure adopted for the iterative FE-based optimisation of the spindle is described.
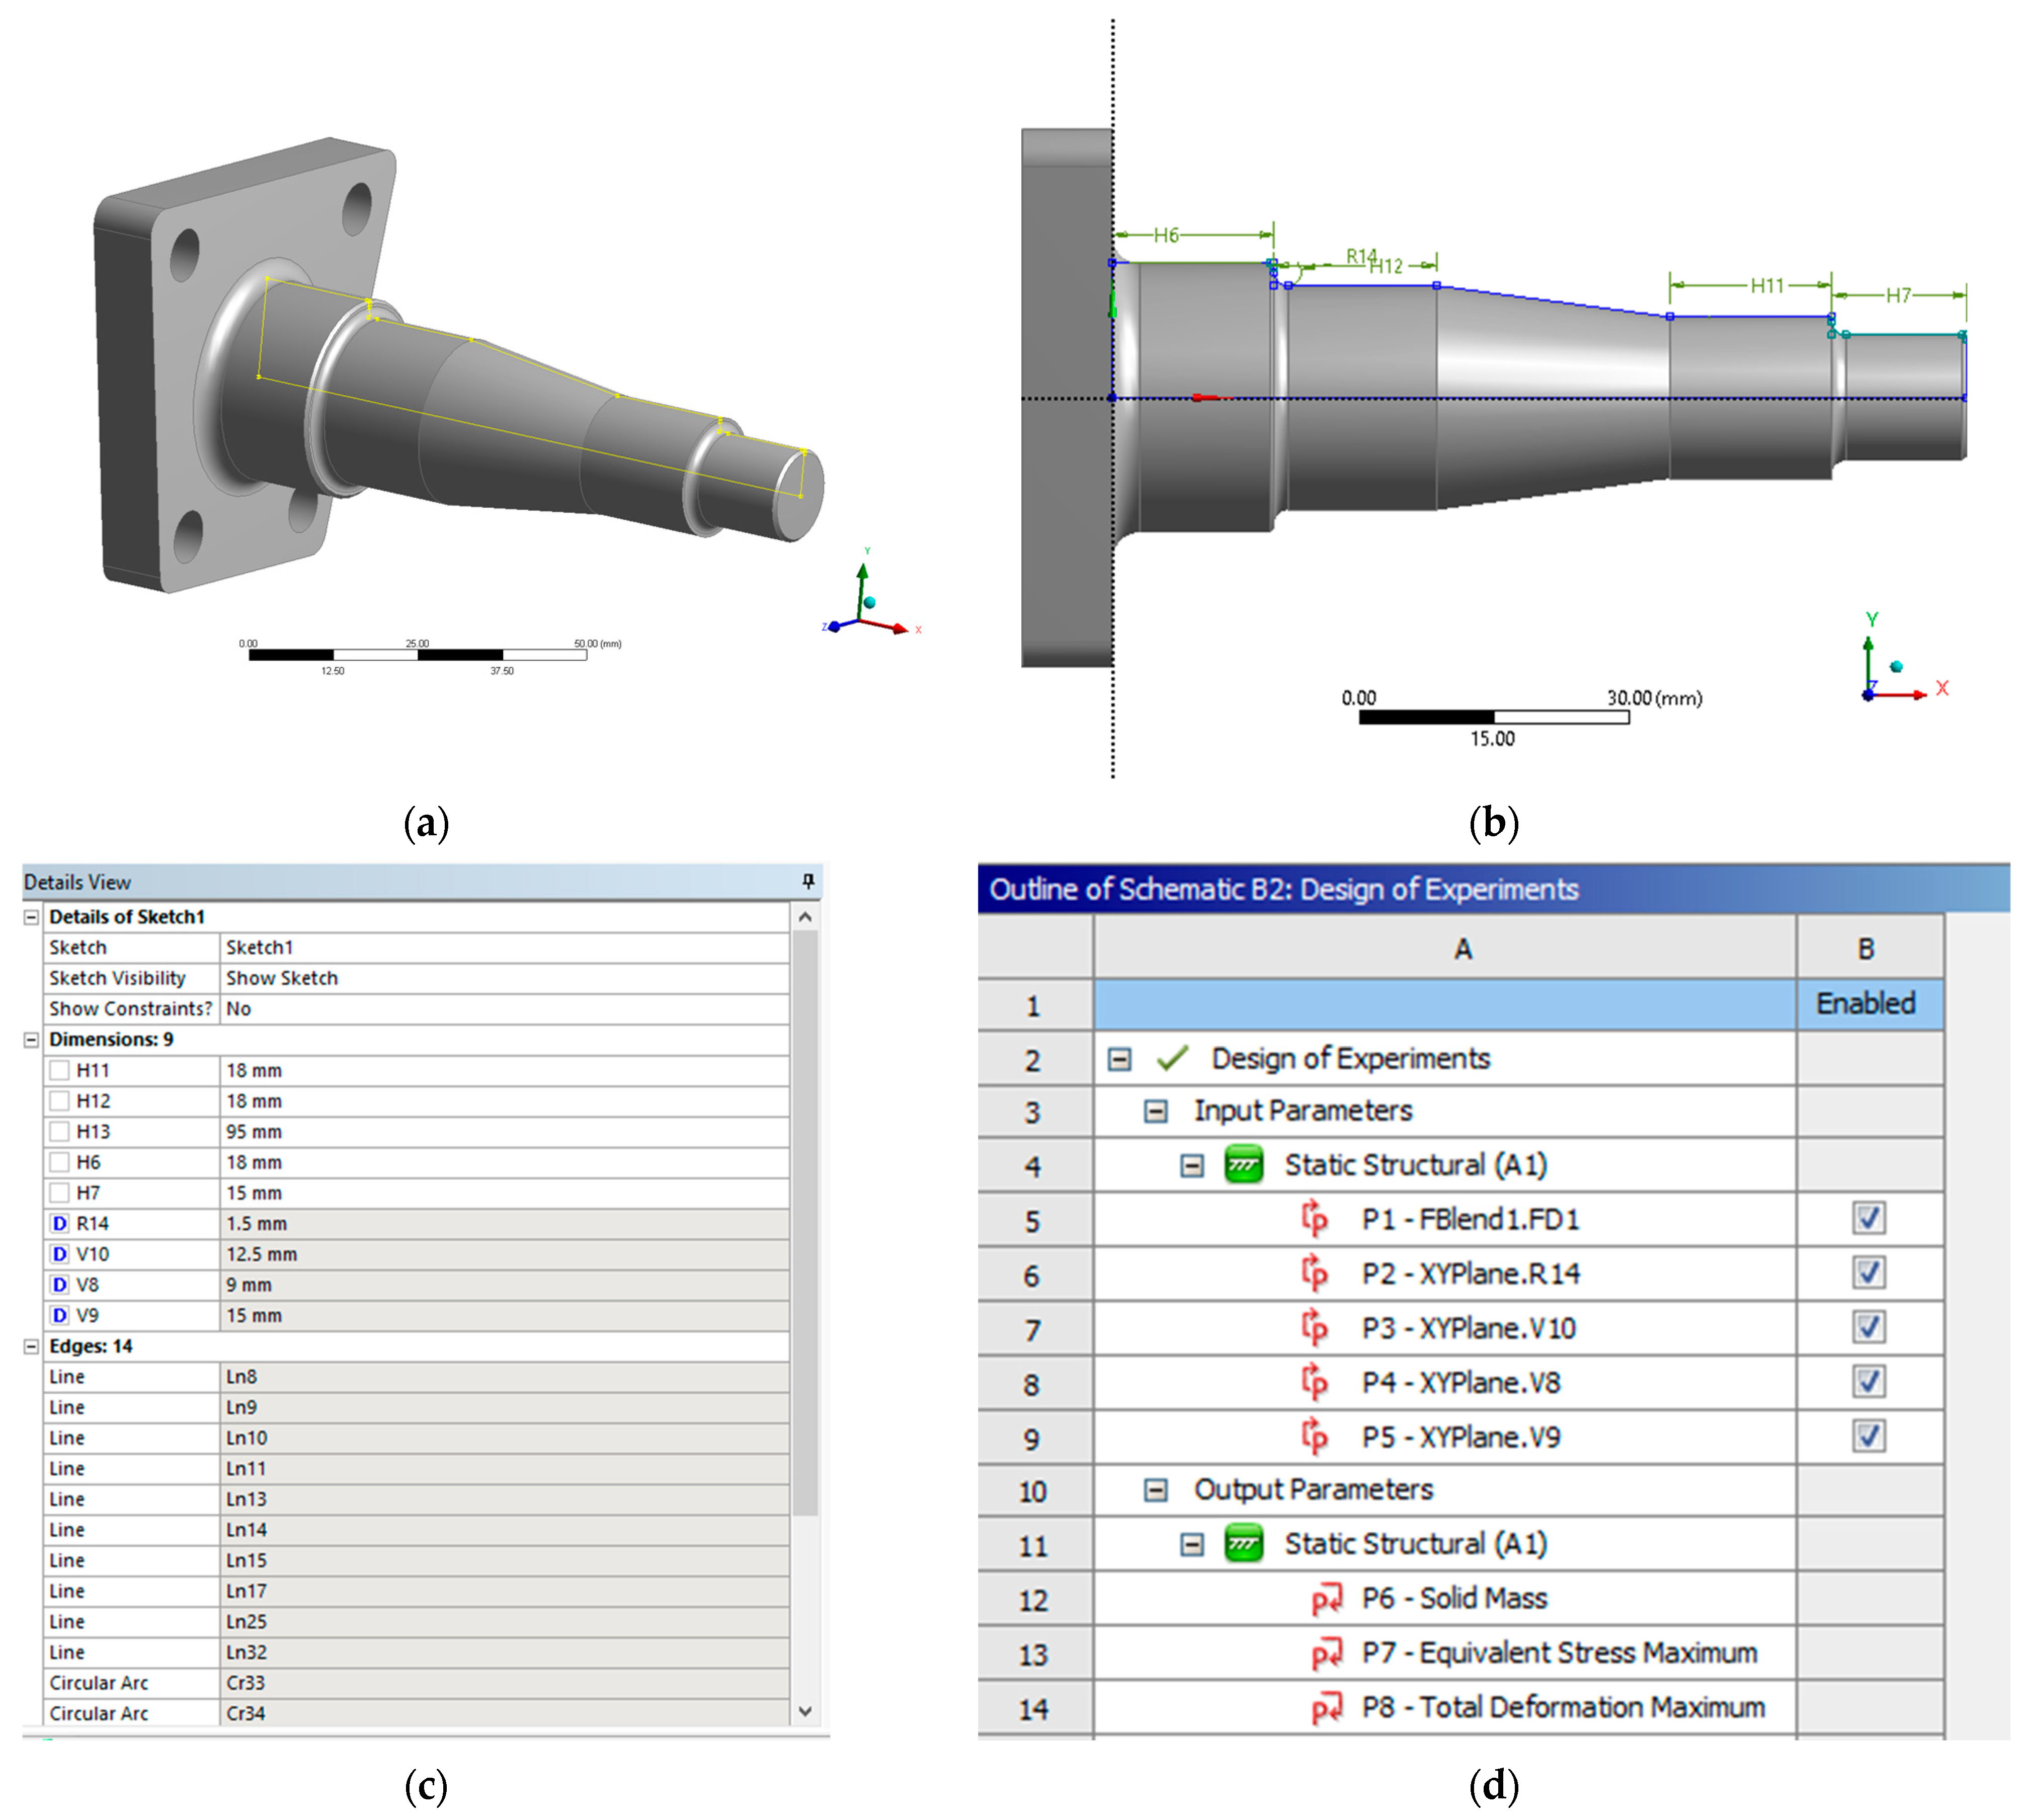
The optimisation is focused on the geometry of the wheel spindle, which was modelled as a separate, fully parametric component in ANSYS DesignModeler (
Figure 15). The sketch defining the spindle profile includes a set of key dimensions—axial lengths
H11–
H13, diameters
V8–
V10 and fillet radius
R14—that control the bearing seats, the transition between different sections and the connection to the mounting flange. These dimensions were exposed as design parameters in Workbench and subsequently used as design variables in the response-surface-based optimisation procedure.
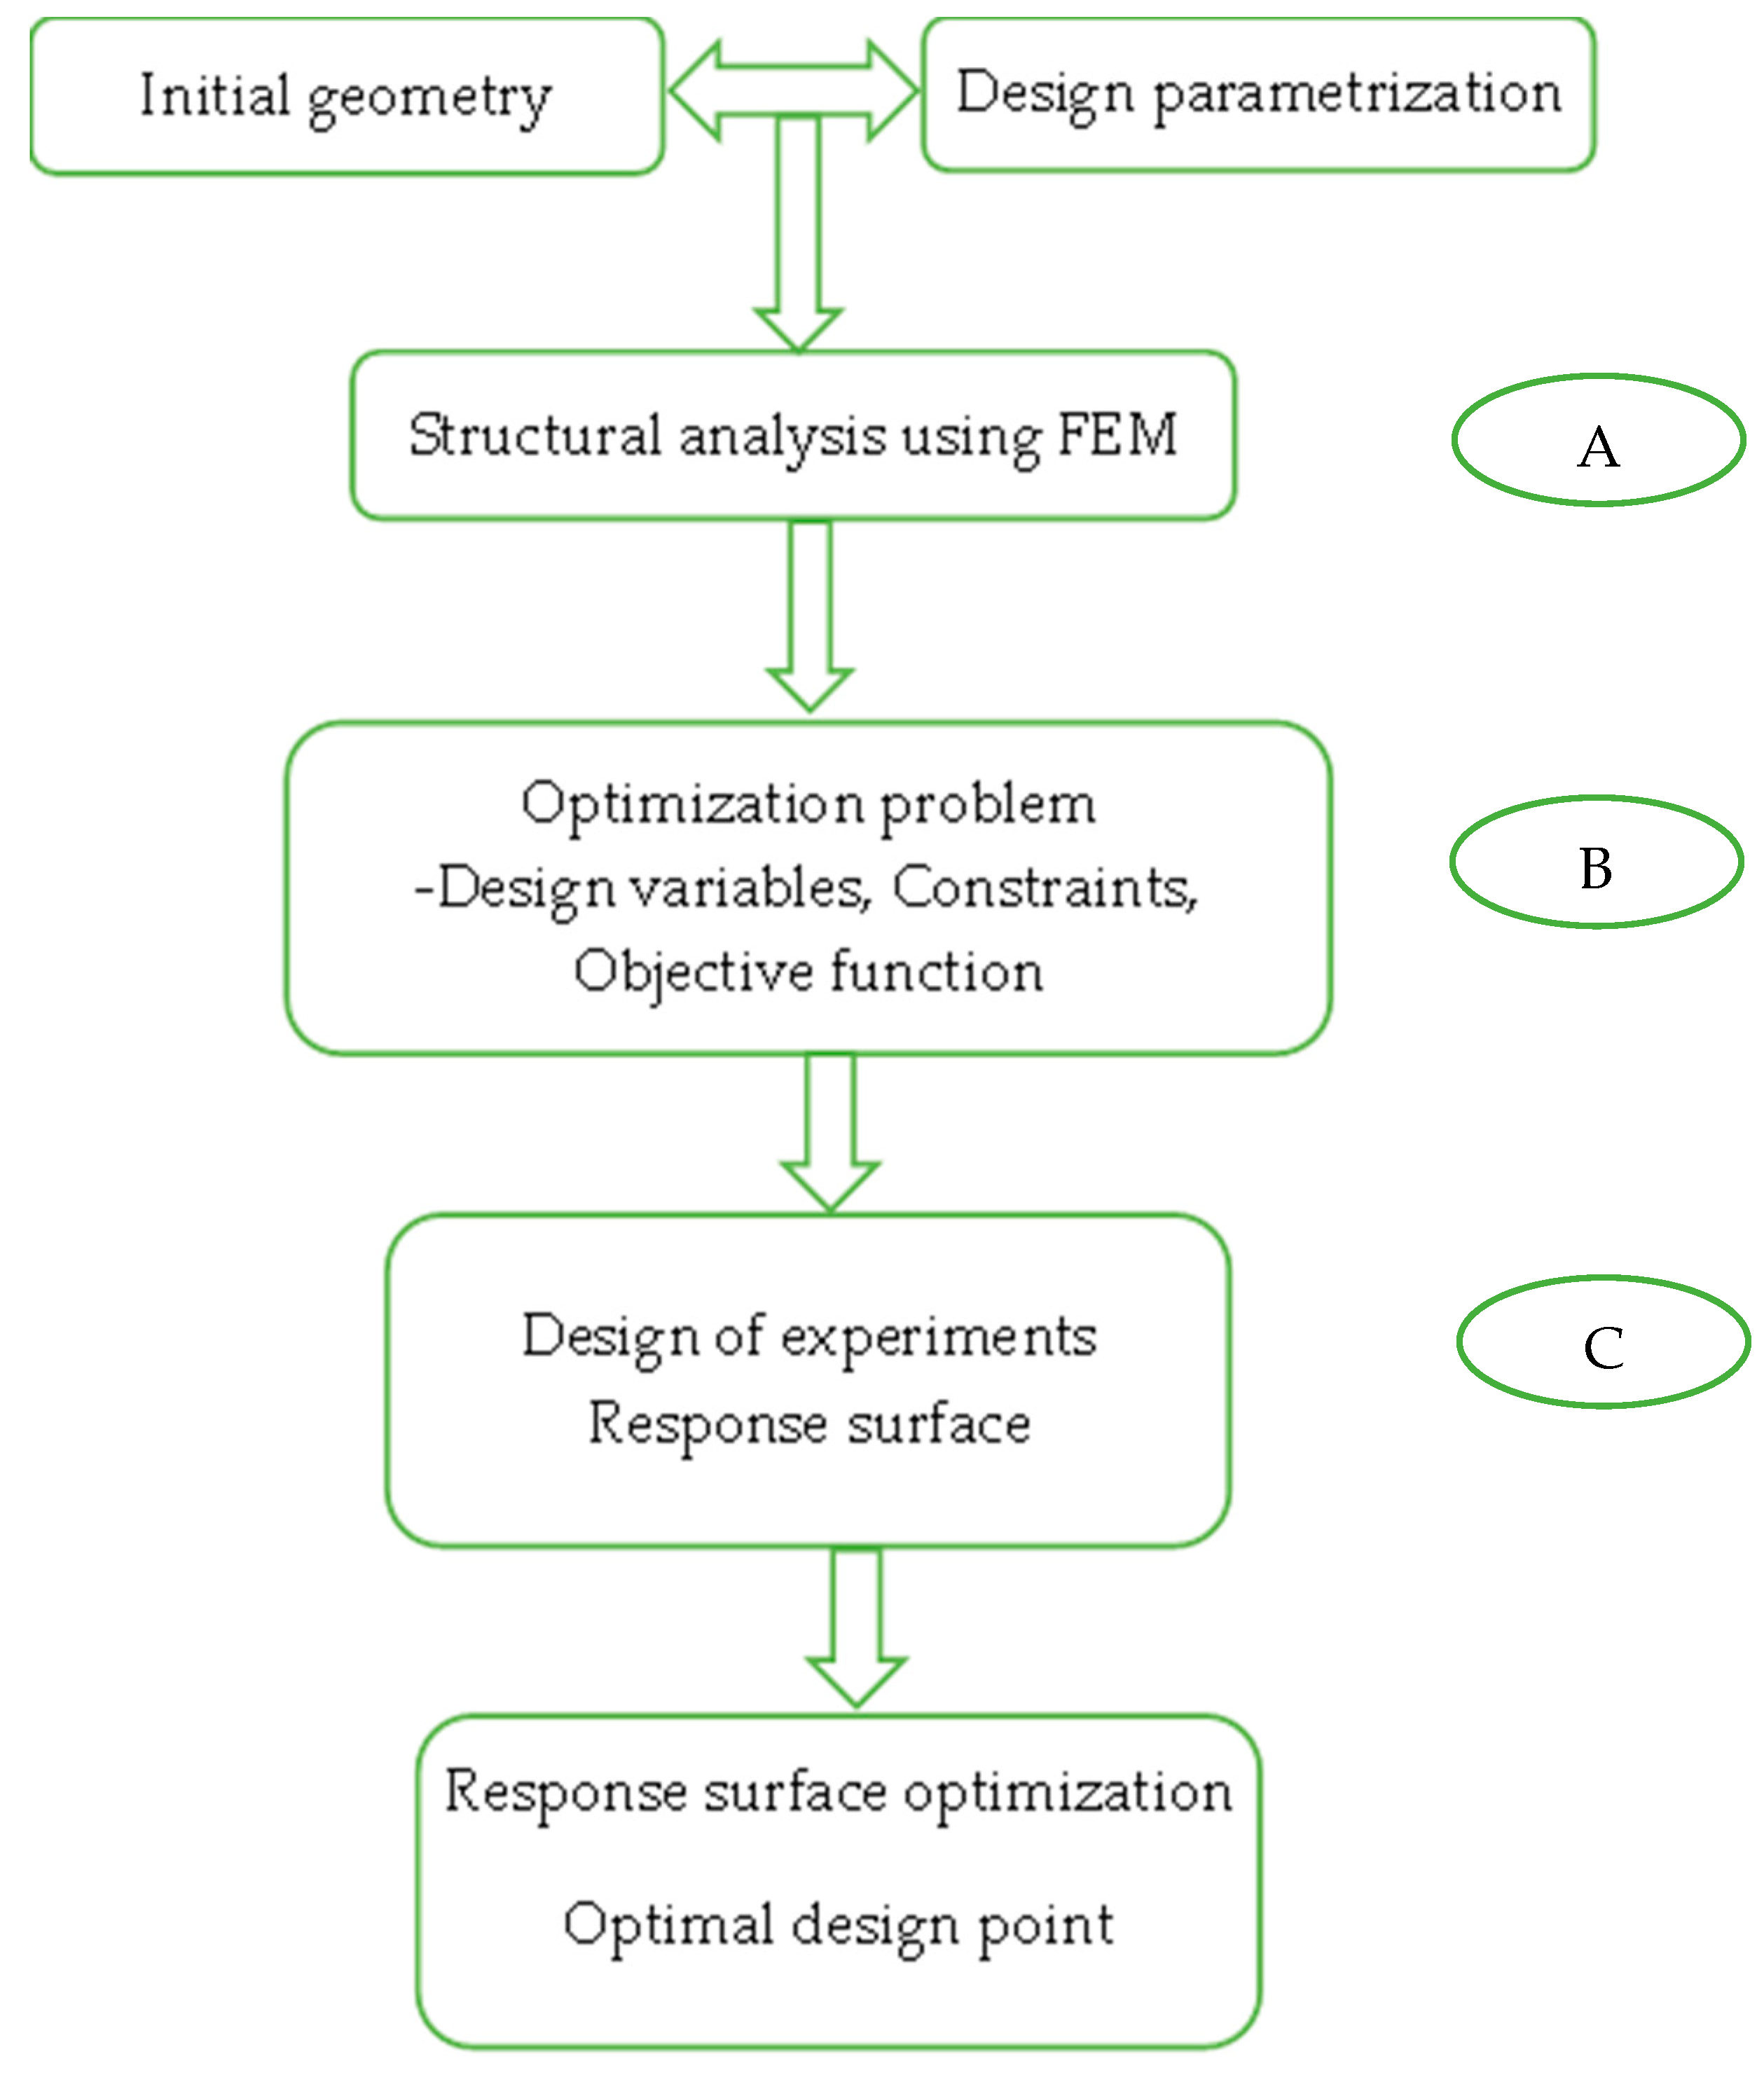
The optimisation of the wheel spindle was performed in ANSYS Workbench using the parametric workflow illustrated in
Figure 16. First, a Static Structural system (A) was setup, in which the spindle geometry, material data, boundary conditions and loads were defined as in the validated FE model, and a set of key geometric dimensions of the spindle region were promoted as design parameters. These parameters were collected in the Parameter Set and linked to a Response Surface system (B). A Design of Experiments (DoE) was then generated to sample the design space; for each design point, the static analysis was solved and the resulting maximum von Mises stress in the spindle and the corresponding mass were stored as responses.
Based on these results, ANSYS built a response surface metamodel, which was subsequently used in the Response Surface Optimisation system (C) to search for the best combination of design parameters. The optimisation objective was to minimise the peak von Mises stress in the spindle region, while imposing constraints on the component mass and on selected stiffness-related quantities, so that the global behaviour of the rear axle remains compatible with the original design.
In the Design of Experiments module, five input parameters were defined, corresponding to the most influential geometric dimensions of the spindle (
Figure 15d). Parameter P1 controls the axial blend length at the transition between the flange and the first bearing seat (Blend1.FD1). Parameters P2 and P3 correspond to the fillet radius
R14 and to the diameter
V10 of the central section of the spindle, respectively, while parameters P4 and P5 define the diameters
V8 and
V9 of the adjacent sections. These parameters were varied within practical bounds dictated by bearing dimensions, assembly requirements and manufacturability.
For each design point in the DoE, the static analysis was solved and three output responses were recorded: P6—the solid mass of the spindle, P7—the maximum equivalent von Mises stress in the spindle region, and P8—the maximum total deformation at the critical nodes. In the subsequent response-surface optimisation, P7 was taken as the objective function to be minimised, while P6 and P8 were used as constraints to ensure that the optimised design does not lead to an unacceptable increase in mass or a reduction in stiffness with respect to the baseline spindle.
The design space explored in the optimisation is defined by the five geometric parameters listed in
Table 3. Parameter
P1 controls the axial length of the blend between the flange and the first bearing seat, while
P2 specifies the fillet radius at the same junction. Parameters
P3,
P4 and
P5 correspond to the diameters of the central, intermediate and outer spindle sections, respectively, and therefore govern both the local stiffness and the mass of the component. The minimum and maximum levels were selected around the nominal (central) values so as to respect bearing and seal fit requirements, available packaging space and manufacturing constraints, while still allowing sufficient variation to reveal the sensitivity of stress, deformation and mass to each parameter.
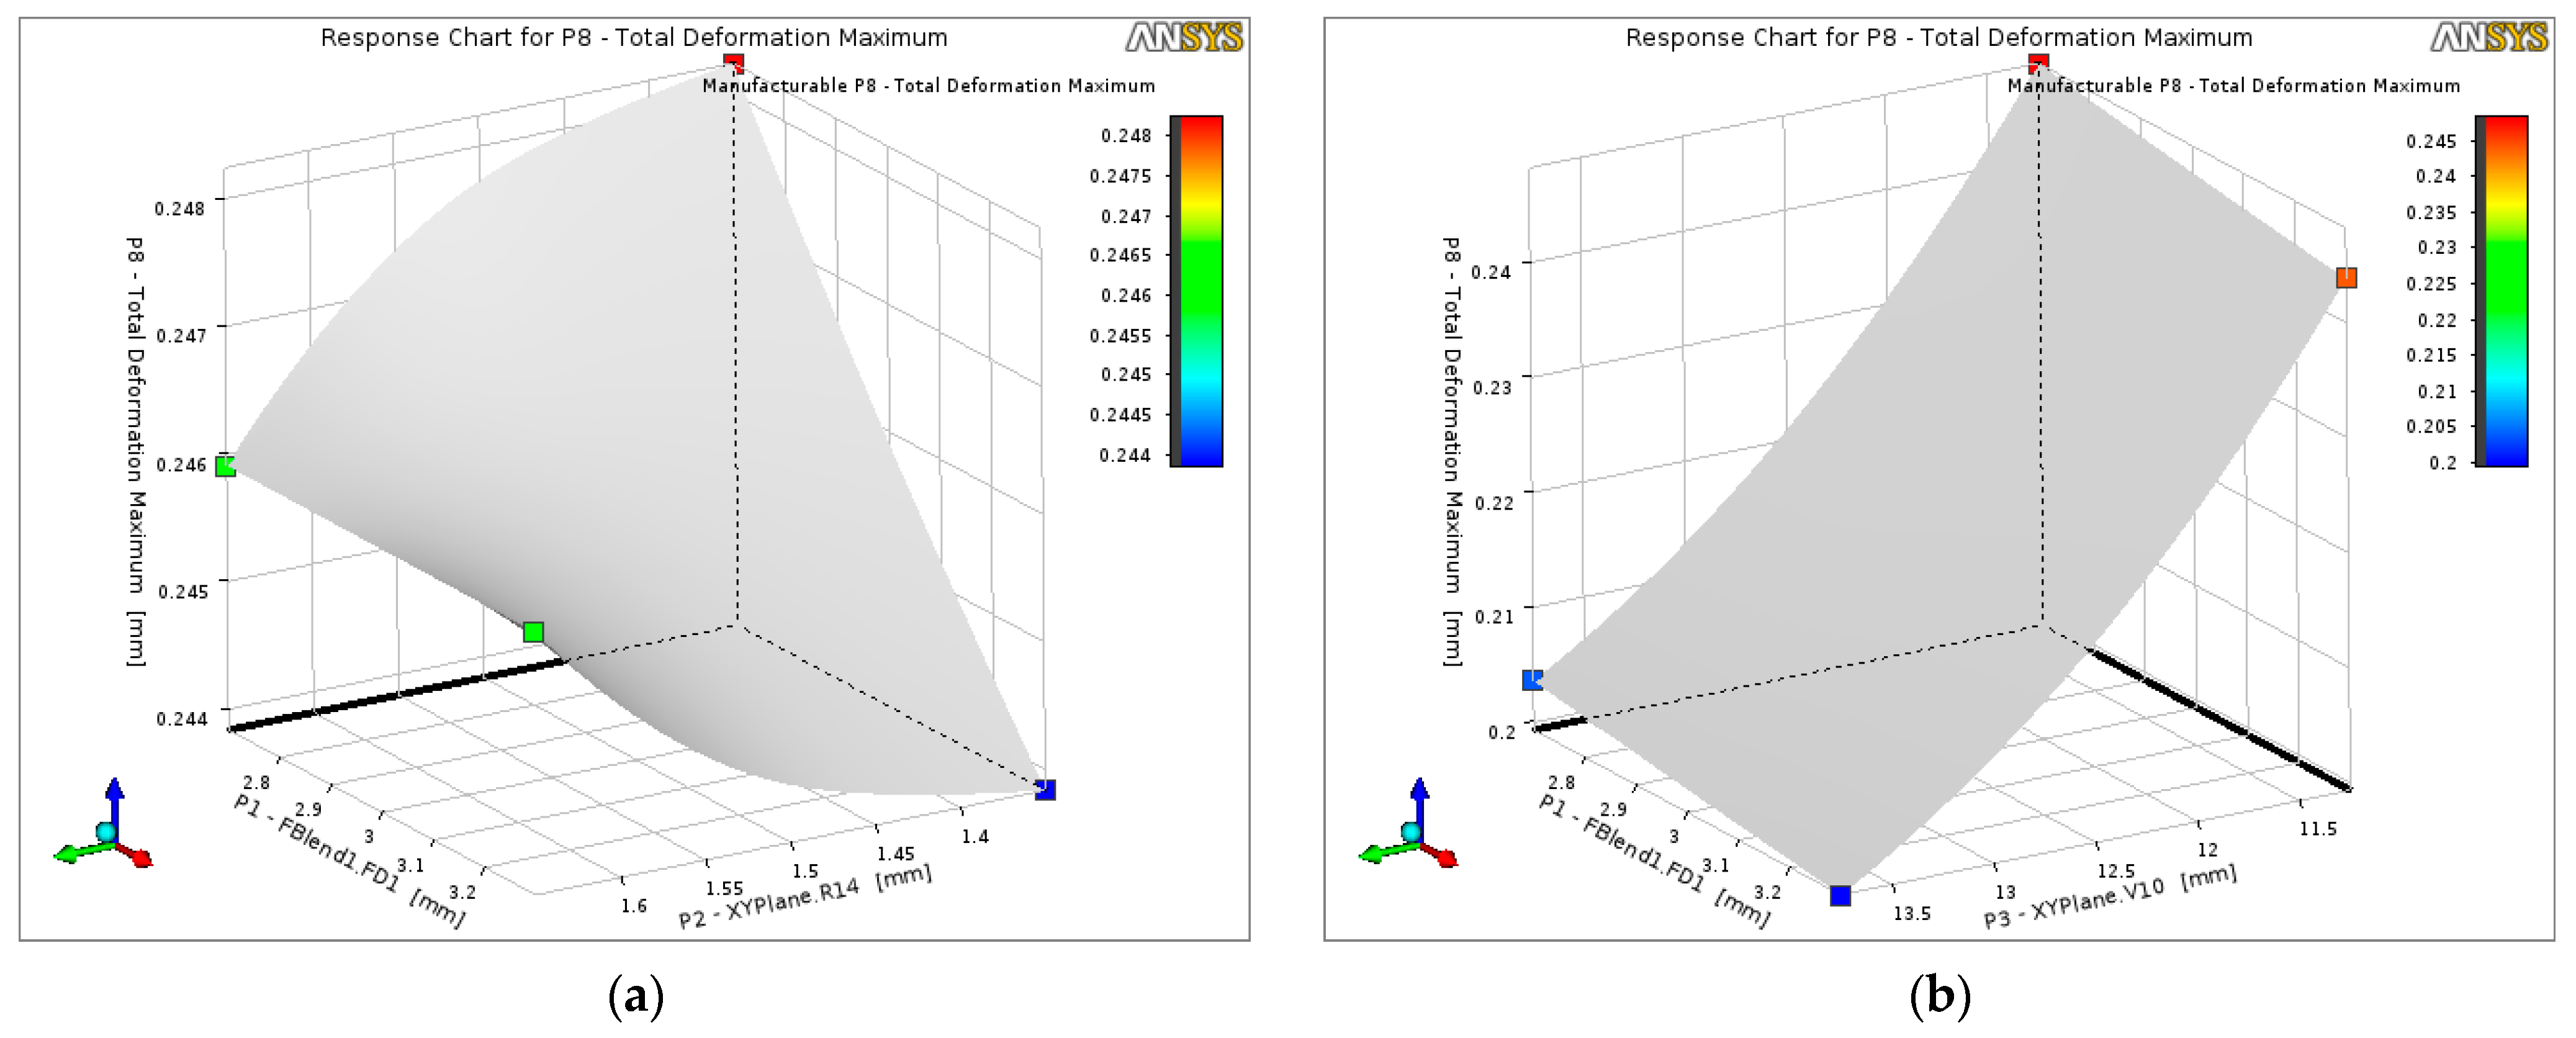
The response surfaces in
Figure 17 show how the maximum total deformation of the spindle varies with the selected geometric parameters. In
Figure 17a, a shallow minimum of
P8 is observed close to the central values of the blend length
P1 and fillet radius
P2; moving towards the lower or upper bounds of these parameters leads to a slight increase in deformation, indicating that excessively small or large transition lengths and fillet radii reduce the local stiffness of the spindle.
Figure 17b highlights a stronger influence of the central diameter
P3: decreasing
P3 and
P1 simultaneously produces the largest deformations, whereas combinations with larger diameters and longer blends yield a stiffer spindle. Overall, the surfaces confirm that the candidate design space contains a region where the deformation remains close to the baseline value, which is used as a constraint in the optimisation to avoid an undesirable loss of stiffness.
The influence of the geometric parameters on the maximum equivalent von Mises stress is illustrated by the response surfaces in
Figure 18. In
Figure 18a, the stress level decreases when both the blend length
P1 and the fillet radius
P2 are increased, indicating that smoother and more gradual transitions between the flange and the spindle significantly reduce the local stress concentration. The lowest stresses are obtained near the upper bounds of
P1 and
P2, whereas the most compact geometry (short blend and small radius) leads to the highest stresses.
Figure 18b shows a pronounced dependence on the central diameter
P3: increasing
P3 results in a marked reduction in the maximum stress, while smaller diameters yield higher stress levels even if
P1 is increased. This confirms that both the cross-sectional area and the transition geometry play an important role in controlling the peak stresses in the spindle region. Consequently, the optimisation process favours combinations with slightly larger diameters and generous transition blends, within the constraints imposed by bearing fit and overall packaging.
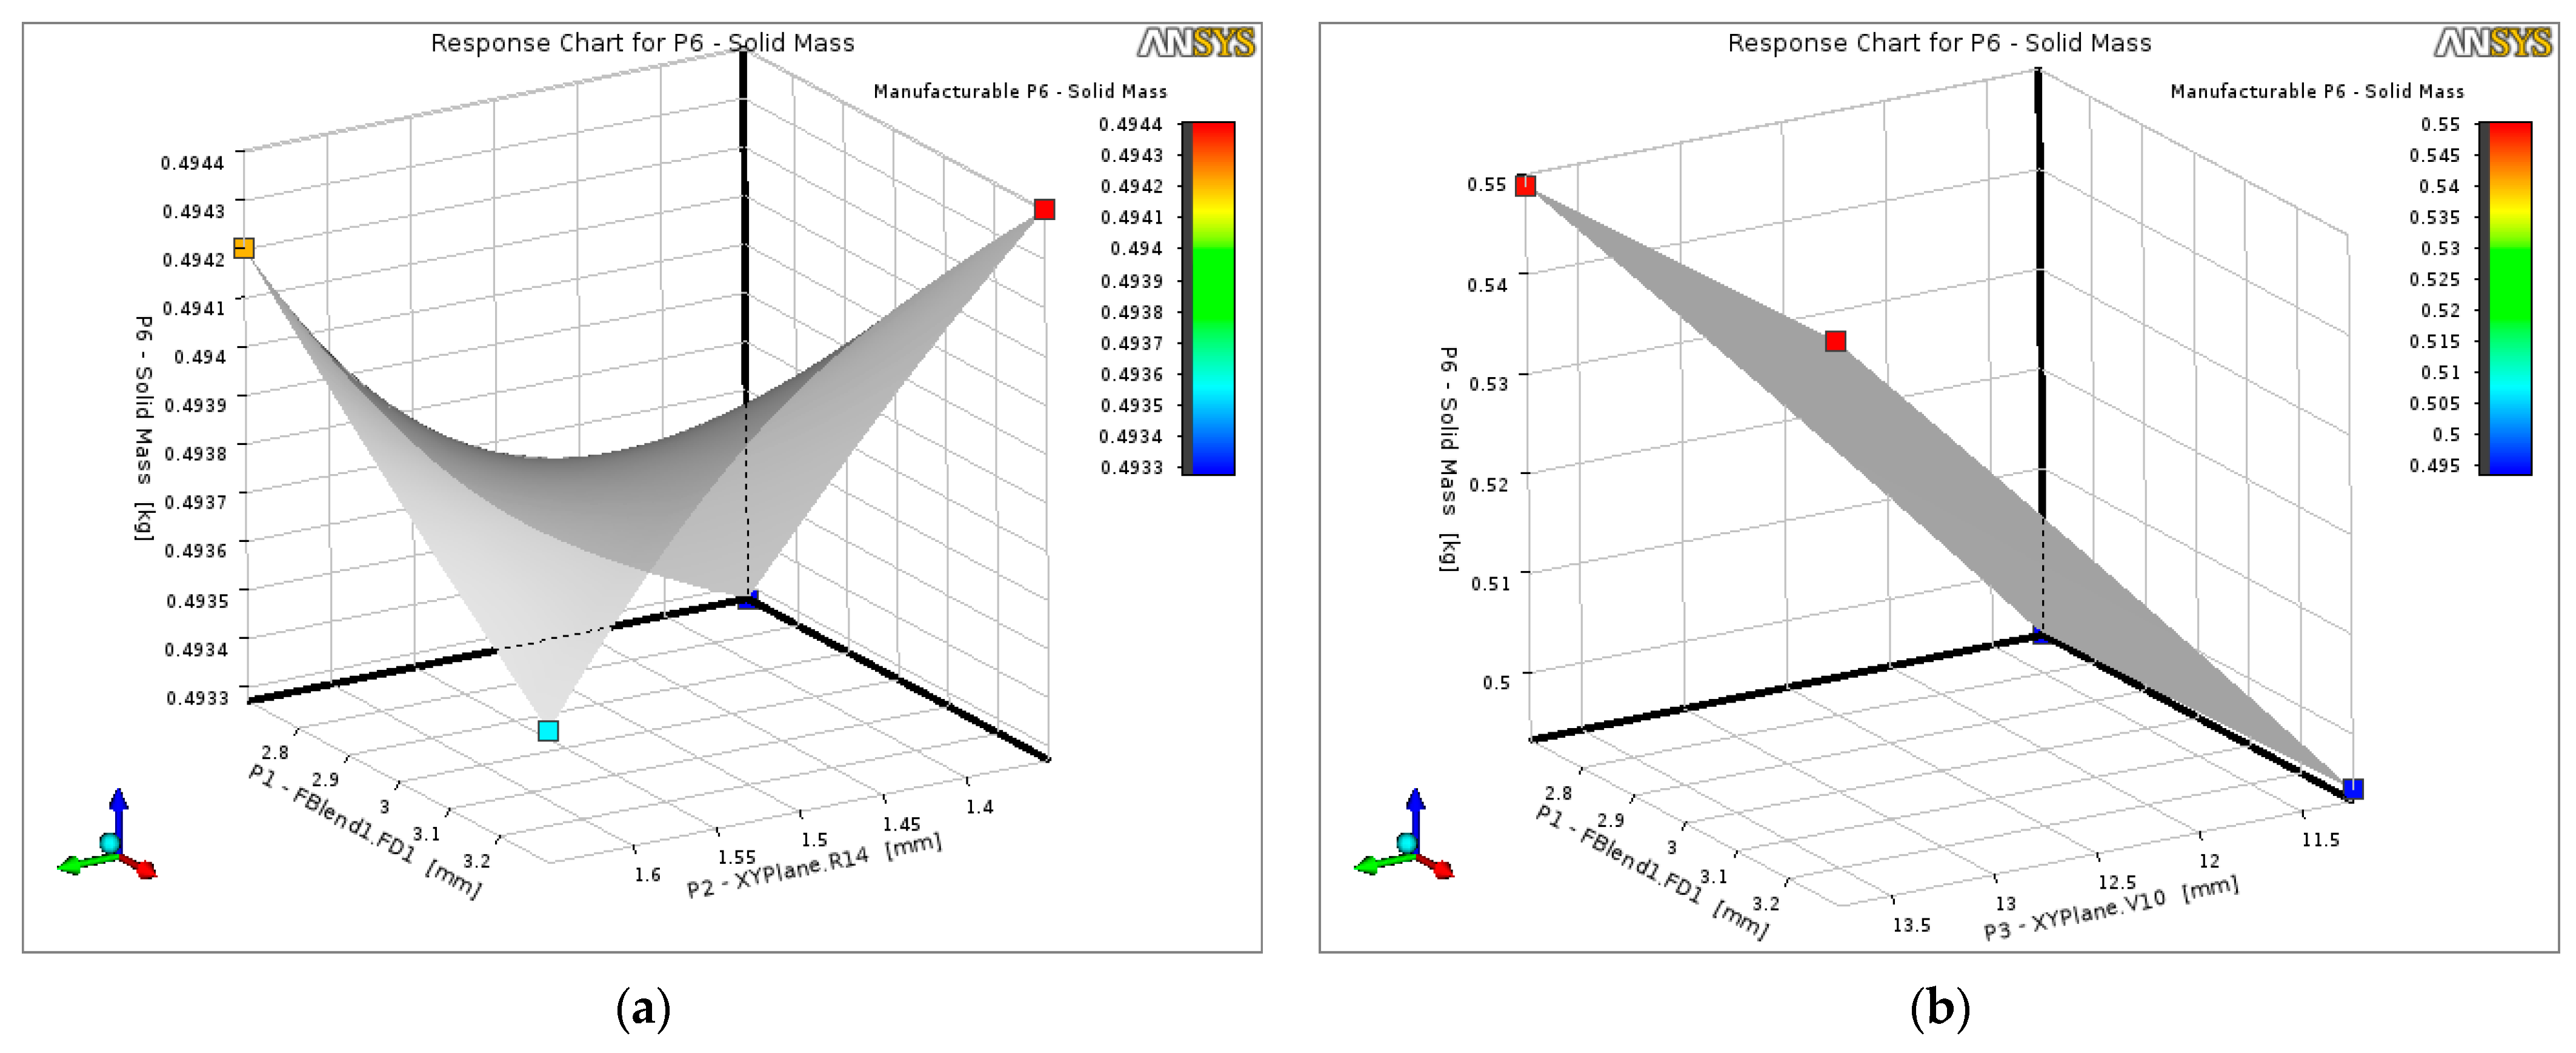
The influence of the design variables on the spindle mass is shown in
Figure 19. In
Figure 19a, the response surface exhibits a shallow bowl-shaped profile, indicating that variations in the blend length
P1 and fillet radius
P2 within the selected bounds have only a modest effect on the solid mass
P6. Increasing
P1 and
P2 simultaneously leads to a slight mass increase, whereas the smallest values yield the lightest but also the most highly stressed designs.
Figure 19b reveals that the mass is much more sensitive to the central diameter
P3: reductions of
P3 produce a noticeable mass saving, while larger diameters increase
P6 almost linearly. These trends confirm that the optimisation must balance the beneficial effect of larger diameters and generous blends on stress reduction against the associated penalty in mass, which is enforced in the optimisation as an upper bound on
P6.
The analysis of the response surfaces confirms that the geometric parameters selected for the spindle have a clear and physically meaningful influence on all three output quantities. Larger blend length P1 and fillet radius P2 systematically reduce the maximum equivalent stress, with only a minor penalty in mass and stiffness, while the central diameter P3 has the strongest effect, simultaneously decreasing stress and deformation but increasing mass. As a result, the optimum region of the design space is found for combinations with relatively generous blends and fillets and a moderately increased central diameter, which provide a significant reduction in peak stress at almost unchanged total deformation and with only a limited increase in mass.
The response-surface optimisation was carried out in ANSYS Workbench using the MOGA (Multi-Objective Genetic Algorithm) method, with the two objectives defined as minimise mass P6 and minimise maximum equivalent stress P7. The algorithm started from 100 initial samples and, with 100 samples per iteration, converged after 32 evaluations, yielding three non-dominated solutions (Candidate Points 1–3). As summarised in the optimisation
Table 4, Candidate Point 1 corresponds to the geometry with P1 = 3.3 mm, P2 = 1.65 mm, P3 = 13.75 mm, P4 = 8.1 mm and P5 = 16.5 mm. This design provides the lowest maximum equivalent stress in the spindle region (P7 = 184.9 MPa), at the cost of a moderate increase in solid mass (P6 = 0.589 kg) compared with the lighter Candidate Point 2. Given the safety-critical nature of the spindle, the reduction in peak stress is prioritised over the small mass penalty, and Candidate Point 1 is therefore selected as the optimal spindle geometry for further assessment.
The von Mises stress field for the optimised spindle geometry (Candidate Point 1) is shown in
Figure 20. The global maximum of about 220 MPa occurs at the edge of a bolt hole in the mounting flange, whereas the stresses in the safety-critical transition between the flange and the spindle shaft are reduced to approximately 180–185 MPa. Compared with the baseline design, this corresponds to a clear reduction in the peak stress in the spindle fillet while keeping the overall stress level in the surrounding flange at a similar magnitude, confirming the effectiveness of the geometric changes identified by the optimisation.
The spindle analysis was carried out under the maximum admissible wheel load transmitted through the two bearing seats, as illustrated in
Figure 20a. The load is applied as two concentrated forces acting on the cylindrical regions corresponding to the inner rings of the bearings (A and B), with magnitudes of 2500 N and 3500 N, respectively, consistent with the bearing manufacturer’s load ratings for the considered axle. All stress results presented for the baseline and optimised spindle therefore refer to this worst-case bearing load combination. The highest stresses in the spindle fillet are around 180–185 MPa, significantly lower than in the baseline design.
7. Discussion
The results obtained from the combined multibody, experimental and FE analyses provide a coherent picture of the structural behaviour of the rear axle under durability loading and highlight several aspects that are directly relevant for design optimisation.
First, the flexible multibody model of the test bench and rear axle proved to be an effective tool for defining realistic boundary conditions for the structural analysis. By tuning the kinematic excitation so that the translational and rotational amplitudes of the axle and stabiliser bar match those observed in service, the reaction forces at the wheel spindles and in the key joints of the mechanism could be determined in a manner consistent with the actual stiffness of the suspension assembly. This is an important difference compared with purely static approaches in which arbitrary loads are applied to the axle, and it explains why the equivalent design load used in the FE model is significantly lower than typical peak service loads: it represents the reaction corresponding to the prescribed displacement imposed by the fatigue test bench, not the absolute worst-case wheel load.
The experimental strain measurements confirm that the stand reproduces a highly repeatable cyclic loading condition, with stable amplitudes and phases over many cycles. The good agreement between measured and simulated stresses—differences of about 10% at the beam mid-span and comparable magnitudes at the other instrumented points—indicates that the FE model successfully captures both the global stiffness of the axle and the local stress distribution in the regions of interest. This level of correlation is satisfactory for design purposes and justifies the use of the FE model to extrapolate the stress field to locations that are not instrumented experimentally and to perform parametric modifications that would be difficult or expensive to test directly.
The FE stress maps show that the most critical areas are not located in the mid-span of the axle beam, where the stresses are moderate and well distributed, but rather in the junction regions between the beam, side arms and spindle brackets. This observation is consistent with classical fatigue design principles, which identify geometric discontinuities and load-path changes as typical origins of crack initiation. In particular, the corner at the base of the spindle stands out as a clear hot spot. The fact that this region is also the most safety-critical from a functional point of view (loss of the wheel in case of fracture) motivates the decision to focus the optimisation effort on the wheel spindle geometry.
The response-surface-based optimisation provides additional insight into the sensitivity of the spindle behaviour to changes in key geometric parameters. The response surfaces for deformation, stress and mass show that the central diameter and the transition geometry (blend length and fillet radius) play distinct roles: increasing these dimensions tends to reduce the maximum equivalent stress and deformation, at the expense of a moderate increase in mass. Within the practical bounds dictated by bearing fits and packaging, the algorithm identifies an optimum region with generous blends and a slightly larger central diameter, where the peak stress is substantially reduced while the increase in mass and the change in stiffness remain limited. Candidate Point 1, selected as the optimal design, embodies this compromise and demonstrates how small, targeted geometric changes can significantly improve fatigue strength without redesigning the entire axle.
In the present study, the rear axle FE model is analysed using the Explicit Dynamics solver in ANSYS, i.e., as a transient dynamic problem rather than a purely static analysis. The excitation frequency of the test bench (about 2.5 Hz) is well below the lowest bending modes of the axle, so that the response in the stabilised regime is dominated by quasi-static behaviour and no significant resonance effects are observed. For fatigue assessment under such low-frequency, non-resonant loading, validation based on stress amplitudes at the strain-gauge locations is therefore adequate and has been performed in
Section 5.4. A full modal and dynamic validation of the FE model (e.g., via experimental modal analysis and comparison of frequency response functions) is planned as future work, once additional instrumentation becomes available, and will further strengthen the dynamic characterisation of the rear axle.
Several limitations of the present study should also be acknowledged. The analysis focuses on a single, predominantly vertical loading case representative of a specific durability test; other loading scenarios (e.g., combined vertical and lateral loads, braking or cornering events) have not yet been considered. Material behaviour has been assumed linear elastic, and the fatigue assessment is currently based on stress levels rather than a full life prediction using S–N or ε–N curves. The models of rubber bushings and joints are simplified, and weld geometries are idealised, which may influence local stress peaks. These aspects point towards natural extensions of the work, including multi-load-case optimisation, more detailed modelling of joints and weld toes, and integration of fatigue-life criteria directly into the optimisation loop.
Moreover, the experimental campaign was carried out on a single representative axle specimen, so that statistical scatter due to material and manufacturing variability could not be quantified; extending the study to a larger sample of axles and incorporating probabilistic fatigue assessment will be an important topic for future work.
Despite these limitations, the study demonstrates that integrating a validated test bench, flexible multibody simulation, FE analysis and response-surface optimisation forms a powerful framework for the design and refinement of safety-critical suspension components. The methodology is generic and can be transferred to other axle types, front-suspension links or even to different vehicle classes, facilitating systematic improvements in durability with a controlled impact on weight and cost.
