Article

Enhancing Geometric Deviation Prediction in Laser Powder Bed Fusion with Varied Process Parameters Using Conditional Generative Adversarial Networks

School of Mechanical, Aerospace, and Materials Engineering, Southern Illinois University, Carbondale, IL 62901, USA
*
Author to whom correspondence should be addressed.
J. Manuf. Mater. Process. 2025, 9(12), 411; https://doi.org/10.3390/jmmp9120411
Submission received: 7 November 2025 / Revised: 11 December 2025 / Accepted: 12 December 2025 / Published: 15 December 2025
(This article belongs to the Special Issue Smart Manufacturing in the Era of Industry 4.0, 2nd Edition)

Abstract

The progress in metal additive manufacturing (AM) technology has enabled the printing of parts with intricate geometries. Predicting and reducing geometrical deviations (i.e., the difference between the printed part and the design) in metal AM parts remains a challenge. This work explores how changes in laser speed, laser power, and hatch spacing affect geometrical deviations in parts made using laser powder bed fusion (L-PBF) and emphasizes predicting geometrical defects in AM parts. Sliced images obtained from CAD designs and printed parts are utilized to capture the effects of various L-PBF process parameters and to generate a comprehensive data set. Conditional Generative Adversarial Networks (cGANs) are trained to predict images that accurately reflect actual geometrical deviations. In this study, the influence of L-PBF process parameters on geometric deviation is quantified, and the prediction results demonstrate the effectiveness of the proposed cGAN-based method in improving the predictability of geometric deviations in parts fabricated via L-PBF. This approach is expected to facilitate early correction of geometrical deviations during the L-PBF process.

1. Introduction

Additive Manufacturing (AM) is known as an advanced manufacturing method that involves the layer-by-layer fabrication of parts from CAD models [1]. The technique enables the manufacturing of highly customized and complex geometrical components while significantly saving geometric accuracy and material resources. The technique only involves the addition of material, which helps minimize material waste [2]. Metal Additive Manufacturing (MAM) has garnered broad research interest in manufacturing due to its ability to rapidly produce lightweight and strong parts with high geometric accuracy [3]. Among the various techniques under the umbrella of MAM, research interest in the Laser Powder Bed Fusion (L-PBF) technique has received notable attention due to its high resolution and compatibility factors [4].
In L-PBF, a thin layer of metallic powder is first uniformly spread over a build plate. Then, a precisely focused laser beam selectively fuses the metallic powder according to the details of the structural component defined by the CAD model. The build plate then lowers to create another layer, gradually forming components with complex geometrical details that were previously difficult or impossible to achieve. Despite these benefits, the L-PBF process is intricate and sensitive to process parameters such as laser power, scanning speed, hatch spacing, and layer thickness [5]. These process parameters determine the local laser energy density. As such, variations in these parameters can result in defects, including porosity, lack of fusion, or distortion. For example, low laser power may result in inadequate melting, while high scanning speed may trigger poor fusion. The value of hatch spacing determines the overlap of adjacent melt pools, and large values of hatch spacing could lead to incompletely melted regions.
Geometric deviations remain another challenge in L-PBF manufacturing. Geometric deviation can be defined as the difference between the designed CAD model and the printed part. For instance, factors such as temperature-related stress patterns, inhomogeneous cooling rates, layer uniformity of the powder on the substrate surface, and L-PBF processing parameters can influence geometric deviations. High temperature gradients that develop during the melting and solidification of material layers create stress patterns that may result in deviations from the intended part geometry. Incomplete fusion of the substrate and layer overlaps may also affect geometric deviation. The summation of these sources of deviation from multiple layers of processing leads to differences between the fabricated part and the original design. The understanding and mitigation of such deviations is crucial since dimensional accuracy has an immediate influence on the functionality and mechanical integrity of critical components. In high-stakes applications such as the design and manufacturing of aircraft-grade fan blades, biomedical implants, or fuel injectors, for instance, any dimensional deviation may trigger a failure to conform to tolerancing principles and therefore increase processing costs [6].
Given the sensitivity of L-PBF to process parameters and the resulting geometric deviations, it is essential to develop methods that can predict and mitigate these deviations efficiently. This study aims to design a Pix2Pix-based conditional generative adversarial network (cGAN) model capable of predicting geometric deviations in L-PBF parts produced under varying laser power, scanning speed, and hatch spacing. The model utilizes pairs of design slice images and in situ layer images as inputs, and evaluates outputs with quantitative image evaluation and geometric deviation metrics. The proposed approach provides a data-driven, non-intrusive, and rapid predictive tool to improve dimensional accuracy and manufacturing efficiency in MAM. This work expands on prior research, incorporating three key methodological improvements: (a) a process-parameter RGB encoding method, in which laser speed, power, and hatch distance are encoded within the spatial input feature tensor, (b) SwinIR-based super-resolution processing of in situ images acquired with the built-in camera of the XM200G 3D printer, which rectifies pixelation artifacts, and (c) a new set of geometry metrics (U, O, T, Udw, Odw) that assess the magnitude of deviation. Although the demonstration in this study is conducted on a specific L-PBF system (XM200G using SS316L powder), the methodological framework, including RGB parameter encoding, adversarial training, and geometry-aware evaluation, remains generalizable to other materials, printer architectures, and process envelopes.

2. Literature Review

The quality of parts produced by L-PBF depends on complex interdependencies among process parameters. Laser power, scan speed, hatch spacing, and layer thickness collectively define the energy density delivered to the material, which governs melt pool formation and thermal history [7,8]. If the energy input is too low, incomplete fusion may occur, leading to internal voids and dimensional undersize [9]. Conversely, excessive energy density may cause keyhole porosity, swelling, or spattering, resulting in positive deviations and surface roughness. Hatch spacing further interacts with energy input, as too large spacing results in insufficient overlap, while too small a spacing increases remelting and heat accumulation [9]. Likewise, thicker layers demand higher laser energy to ensure full melting, while thinner layers allow finer control but increase build time. Scan strategy also influences stress accumulation: alternating scan directions or island scanning can distribute heat more evenly, reducing residual stresses and distortion [10,11]. Preheating the build plate mitigates thermal gradients, thus lowering the risk of cracking and warping [8,12]. These nonlinear interactions highlight the need for precise process optimization to achieve consistent dimensional accuracy.
Geometrical error sources commonly found in L-PBF include warpage, shrinkage, overfilling, and underfilling. Warpage/distortion occurs as a result of high residual stress induced by rapid heating and cooling that exceeds the yield stress of the material, causing bending/lifting of the layer [13,14]. This is particularly true for unsupported overhanging structures or thin-walled components with limited heat dissipation. The shrinkage error comes from the contraction of the material due to solidification, particularly under the constraint of the substrate layer below [7]. Overfill error results from excessive melting and/or excessive powder accumulation within a layer above the design dimension [15,16], while underfill may come from limited melting or powder removal that produces voids and missing material within a layer [9].
The literature has seen extensive efforts by researchers to identify measures to improve geometric accuracy in the L-PBF process. Process parameter optimization remains an area of research that uses design of experiments (DOE) methodologies to determine the set of parameters that can prevent defect formation [15]. However, zero defect formation may still be unachievable even with an optimized set of parameters when dealing with complex shapes. Another area that may improve geometric accuracy includes adaptive scanning patterns like scanning islands or alternating scanning directions to ensure optimized heat-flow homogenization as well as preventing stress build-up [11]. Similarly, adaptive power variation adjusts power output based on the geometric position, avoiding excessive melting or accumulated material formation [17]. Orientation of the build on the plate and designing supports that can withstand upward forces remain important factors that may ensure dimensional accuracy [8,18]. Preheating the build plate to medium temperatures of around 150 °C has been known to reduce warping and residual stress [19]. However, high temperatures may influence microstructures and alter the mechanical properties of the base material and hence require careful control [8].
In situ monitoring and control solutions of high sophistication have been implemented to monitor the stability of the process and identify any defects in real time [13]. High-speed cameras and pyrometers or photodiodes have been used to analyze melt pools, spatter, and surface defects that occur during printing. High-speed cameras and monitoring equipment enable the monitoring of the build process, such that defects can be identified and adjustments can be made within the build process. Some research considers implementing a closed-loop control system that adjusts the laser power or pauses the build based on observed anomalies [20].
Another promising research avenue involves simulation-based distortion prediction and compensation. Finite element (FE) models simulate thermal and mechanical responses during printing to predict part distortion under specific process conditions. For instance, Hu et al. [21] investigated the laser powder bed fusion process of NiTi shape memory alloys and developed a three-dimensional transient multi-physics CFD model. The model focused on studying the influence of laser power and scanning velocity on melt pool characteristics during the process. Meanwhile, for the pre-compensation of CAD geometries prior to fabrication, simplified ‘inherent strain’ methods enable faster computation by approximating layer-wise stresses [22,23]. By offsetting predicted distortions in the opposite direction, final printed parts more closely match intended geometries. Although simulations improve predictability, they are computationally intensive, material-dependent, and may require extensive calibration for different geometries or printers. Thus, while traditional modeling and process optimization approaches mitigate some errors, they fall short of providing universal predictive capability for geometric deviation.
The intricate and multivariate nature of L-PBF processes involving complex coupling of process parameters, geometric information, and material properties makes it very difficult to develop straightforward analytical or empirical correlations. Consequently, research work has gradually shifted towards data-driven solutions involving machine learning algorithms to model such complex couplings. Machine learning algorithms possess the ability to discover complex correlations between process parameters and geometric information from various data sources, such as experimental data. Regression analysis has been used successfully to develop models that predict surface roughness, porosity levels, and dimension error based on process parameters. Recent research efforts have also focused on the development of knowledge-driven and graph-based learning formulations for metal additive manufacturing. Xiao et al. [24] presented a multi-layer graph attention–based knowledge reasoning framework for predicting mechanical performance characteristics in the L-PBF process, using a graph representation that combines simulation and experimental data. Xiong et al. [25] constructed an AM knowledge graph for lattice structures and utilized a relation-mining graph neural network for process parameter recommendation, demonstrating the potential of knowledge-graph-based process reasoning for laser metal AM. In the aspect of information modeling, Xiao et al. [26] presented an information model for process data in 3D printing based on the STEP/STEP-NC standard, which is therefore applicable to the XML-DT format. This model illustrates how process data for AM can be represented for integration into monitoring and control systems. However, the above studies have been conducted at the part- or parameter level and do not provide pixel-wise or layer-wise predictions of geometrical deviations for metal AM parts, which is the specific focus of the present study. Recent research has shifted towards image-driven learning models based on high-quality in situ images to predict local defects as well as geometric inaccuracies [27]. Such emerging research fits well within the layer-wise additive nature of L-PBF processes, which provides ample sources of high-quality images.
From the realm of deep learning models, another model that has shown immense potential for the generation and translation of images is the Generative Adversarial Network (GAN). In a GAN, there is a generator that generates data and a discriminator that distinguishes real data from generated data. The models undergo a process of adversarial training to generate realistic outcomes. In particular, a certain category of the GAN known as the conditional GAN (cGAN) considers data input for the generation of output—for instance, to translate designed images to manufactured images within certain constraints.
Pix2Pix, a successful cGAN implementation, has been used extensively for image-to-image translation tasks [28]. The U-Net architecture of Pix2Pix’s generator maintains high detail of the input image by using skip connections from the encoding layer to the decoding layer. In contrast, the PatchGAN discriminator assesses the realism of the texture of an output image. In an L-PBF implementation using Pix2Pix, training the system enables it to predict geometric deviation based on pairs of input design slices and in situ layer images. The trained system can then be used to predict the deviation distribution of new parts based on process settings and input design. The system’s applicability provides a non-intrusive, rapid predictive solution.
To ensure realistic and structurally faithful predictions, generated outputs are typically evaluated using image quality metrics such as Peak Signal-to-Noise Ratio (PSNR) [29] and Structural Similarity Index Measure (SSIM) [30]. These metrics quantify the fidelity of generated images compared to ground truth, ensuring both visual accuracy and geometric coherence. Furthermore, this research introduces geometry-aware segmentation metrics tailored specifically for additive manufacturing, including Underfill (U), Overfill (O), and Total Error (T), which measure localized missing or excessive material regions relative to the design [31,32]. Distance-weighted variants (Udw and Odw) further evaluate the severity of geometric departures, reflecting not only the presence of errors but their physical depth and distribution. Such metrics provide a more comprehensive understanding of geometric deviation in AM parts compared to conventional pixel-level measures. Previous research has used similar analysis of underfill and overfill for various AM processes. Wang et al. [31] quantified underfill in extrusion-based printing and achieved substantial improvements using adaptive toolpath algorithms. Kuipers et al. [32] studied overfill in thin sections and achieved smaller error values by using variable bead sizes. In MAM, positive and negative deviation measures represent material excess and deficiency, respectively. This has been depicted by X-ray CT deviation mapping for electron beam and laser powder bed fusion processes [33,34]. These types of analysis incorporate both the value and position of deviation and highlight the necessity of including both geometric and deviation measures within ML approaches. Such geometric measures enable validation of model predictions of deviation by observed deviation.
Most existing approaches focus on predicting thermal history, porosity, or global distortion, but not on pixel-wise, localized predictions of layer-wise geometric deviation that incorporate both geometric information and process details. This work addresses this gap through the use of process-aware RGB encoding, SwinIR-enhanced in situ imaging, adversarial training, and metrics that incorporate geometric characteristics specific to additive manufacturing.

3. Methods

3.1. Test Artifact Design and Experimental Setup

The experimental work started with the design of a CAD test object specifically intended to introduce geometric errors during L-PBF processing. This model was created using SolidWorks 2017 and incorporated complex features like downskin angles and unsupported overhanging sections that tend to warp during printing due to a lack of support, rapid solidification, and inhomogeneous residual stress distribution. The CAD model was then saved as an STL file in the AM-compatible format of a tessellated surface represented as a mesh of triangular elements.
Test prints were used to analyze the print outputs that had pixelation and swelling issues, particularly on smaller-scale details. Several design cycles were carried out to obtain an optimum design that balances the resolution of pixels and print size. The design incorporated higher localized detail to ensure compactness. The design was modified to ensure that pixel artifacts were minimized while capturing the required geometric details, as seen in Figure 1a. The STL file was then divided into two-dimensional slices to represent the sections of the object at different layers during the L-PBF process. The sections of the four main components were eventually converted into two-dimensional images shown in Figure 1b.
Eight different combinations of process parameters were considered, with four different parts produced for each combination, leading to the production of 32 parts and a total of 5008 image pairs. Each of the parts includes deviation-sensitive geometric elements, such as downskin angles and overhangs, which were purposefully designed to test different ways of inducing defects.
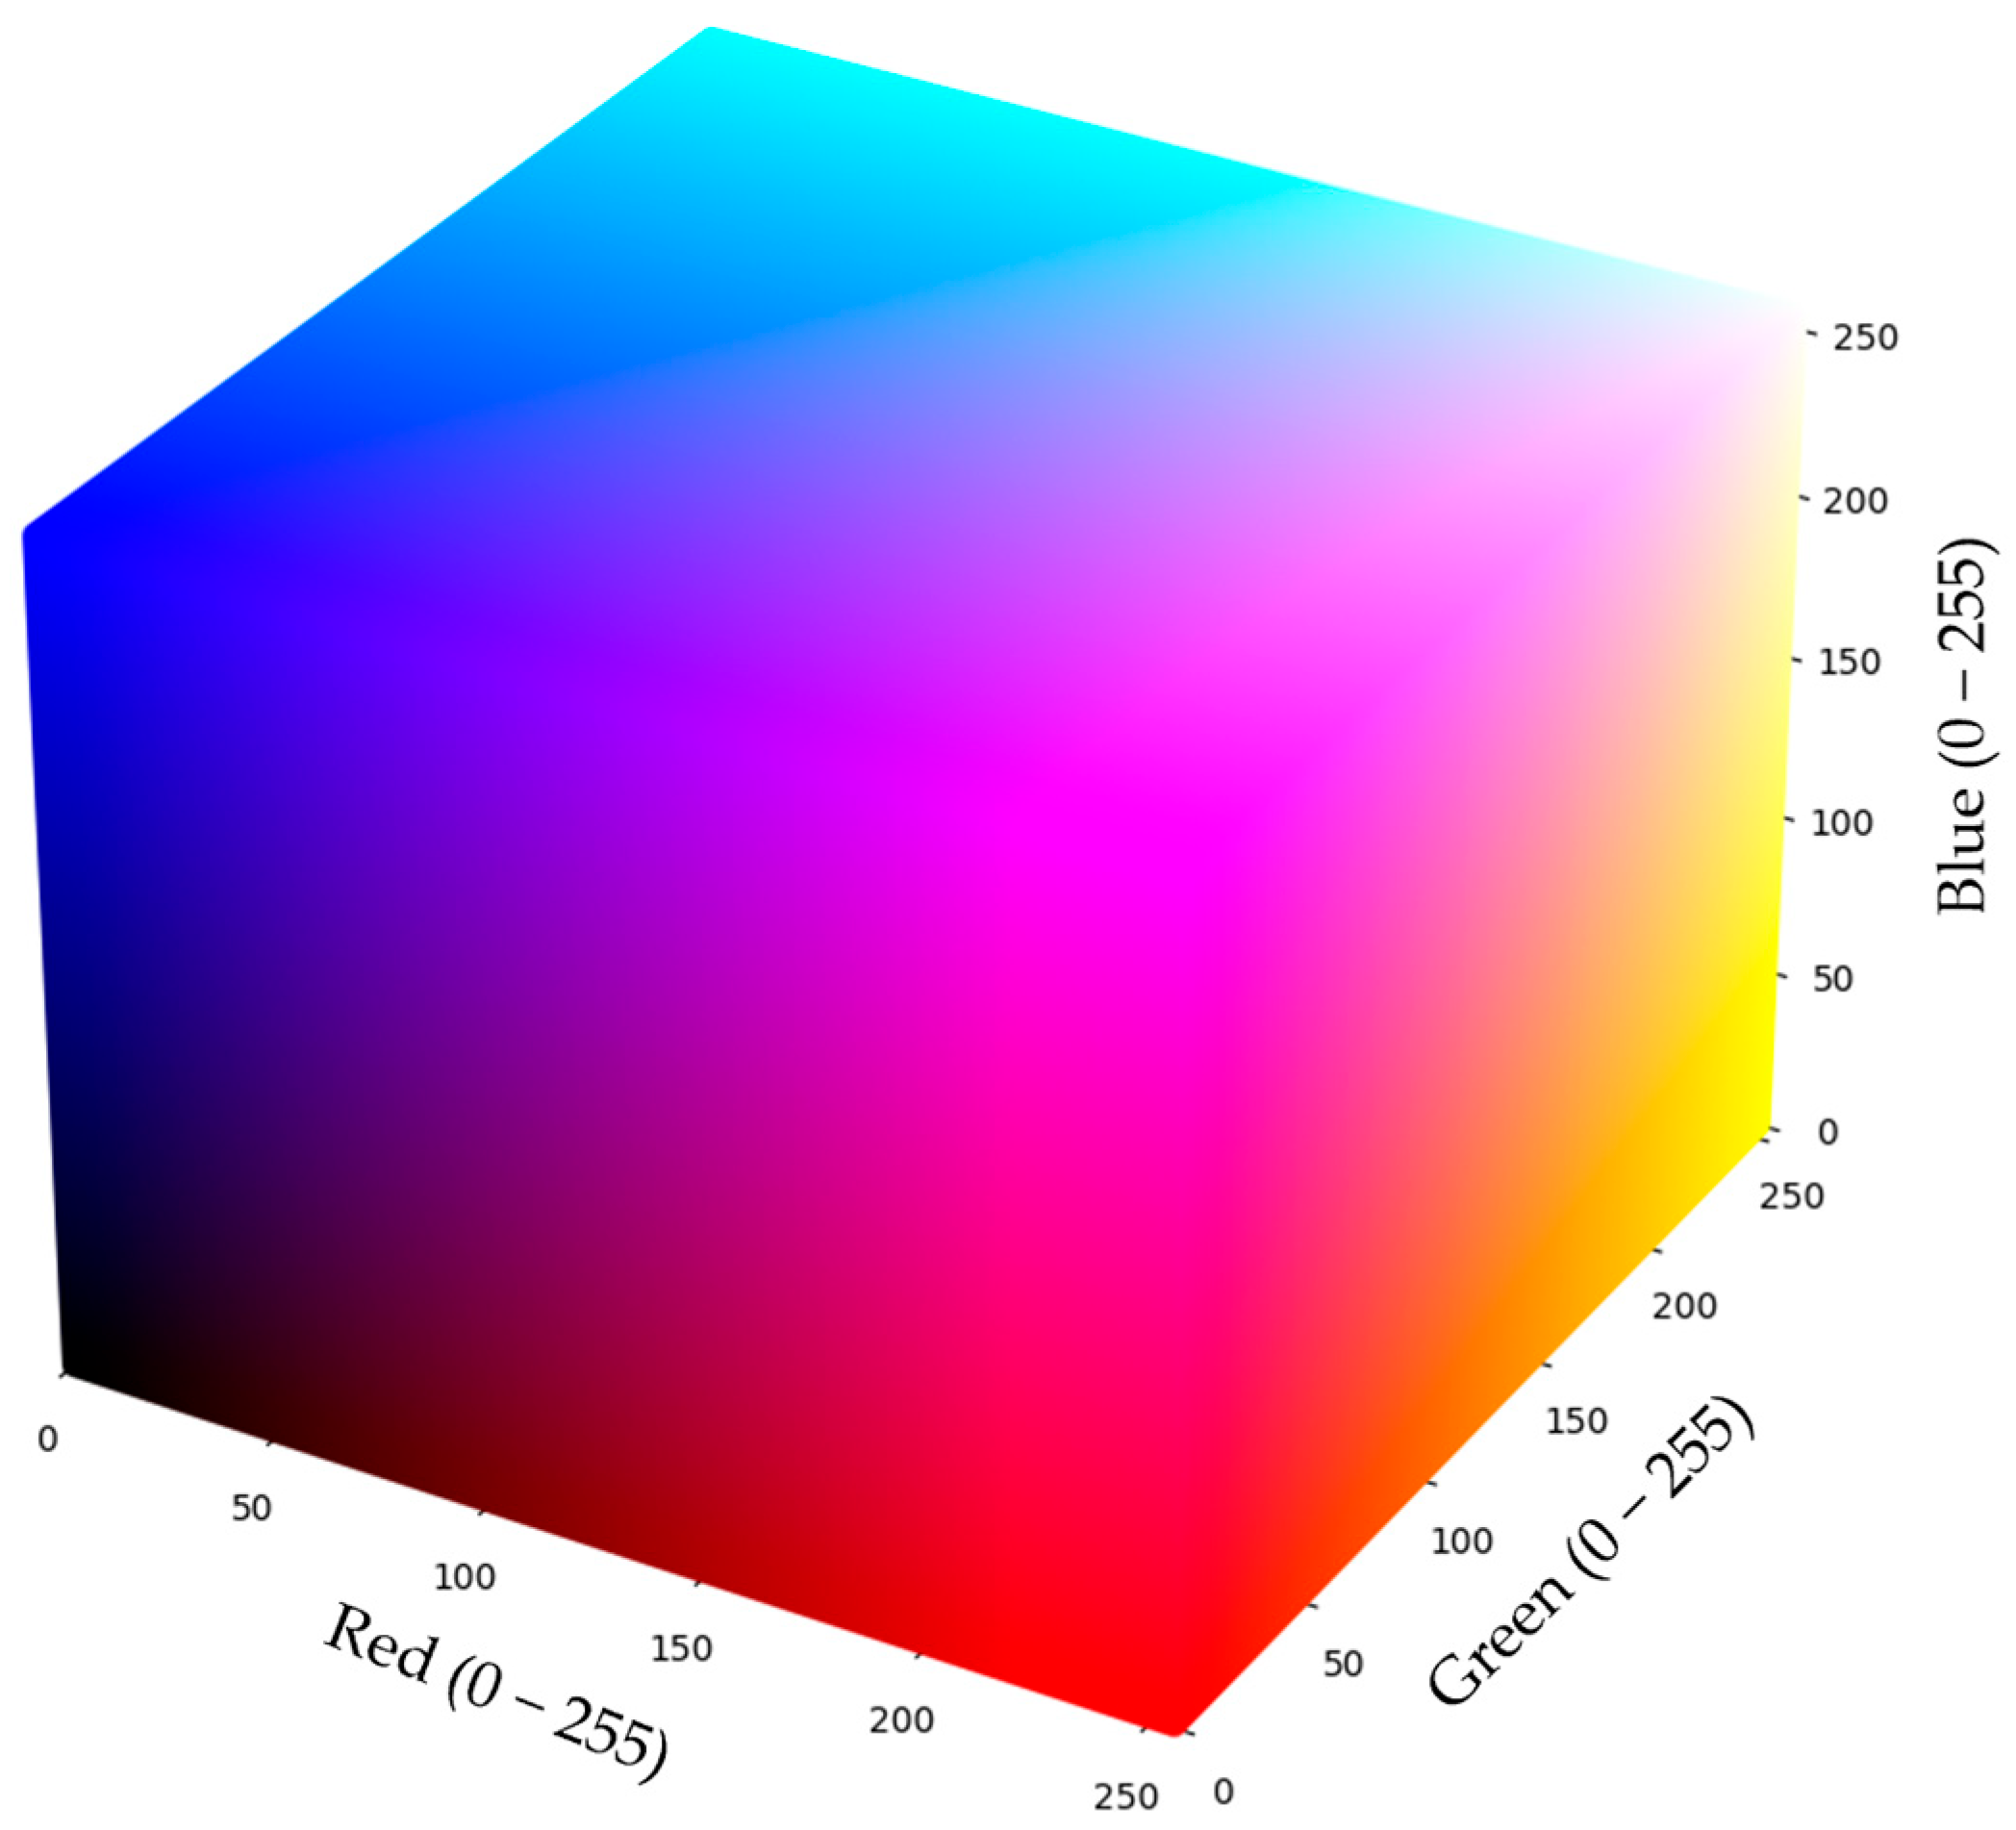
To incorporate the influence of process parameters within the data set itself, an encoding function using MATLAB 2024a was developed to transform laser speed, laser power, and hatch distance into RGB color coordinates. The RGB color cube used for encoding parameters is shown in Figure 2. For encoding parameters within the data set based on laser processing parameters, the red component represented laser speed ranging from 100 mm/s to 1000 mm/s, the green component represented laser power ranging from 20 W to 100 W, and the blue component represented the hatch distance from 30 µm to 100 µm. The integration of the RGB components with process parameters is presented in Table 1. RGB-based encoding was chosen because it embeds process parameters directly and spatially within the input tensor, allowing the generator to learn how local geometric outcomes vary with laser power, speed, and hatch spacing. This spatial embedding is physically meaningful for L-PBF, as the effects of process parameters are manifested locally. Normalized RGB ranges were selected to ensure numerical stability.
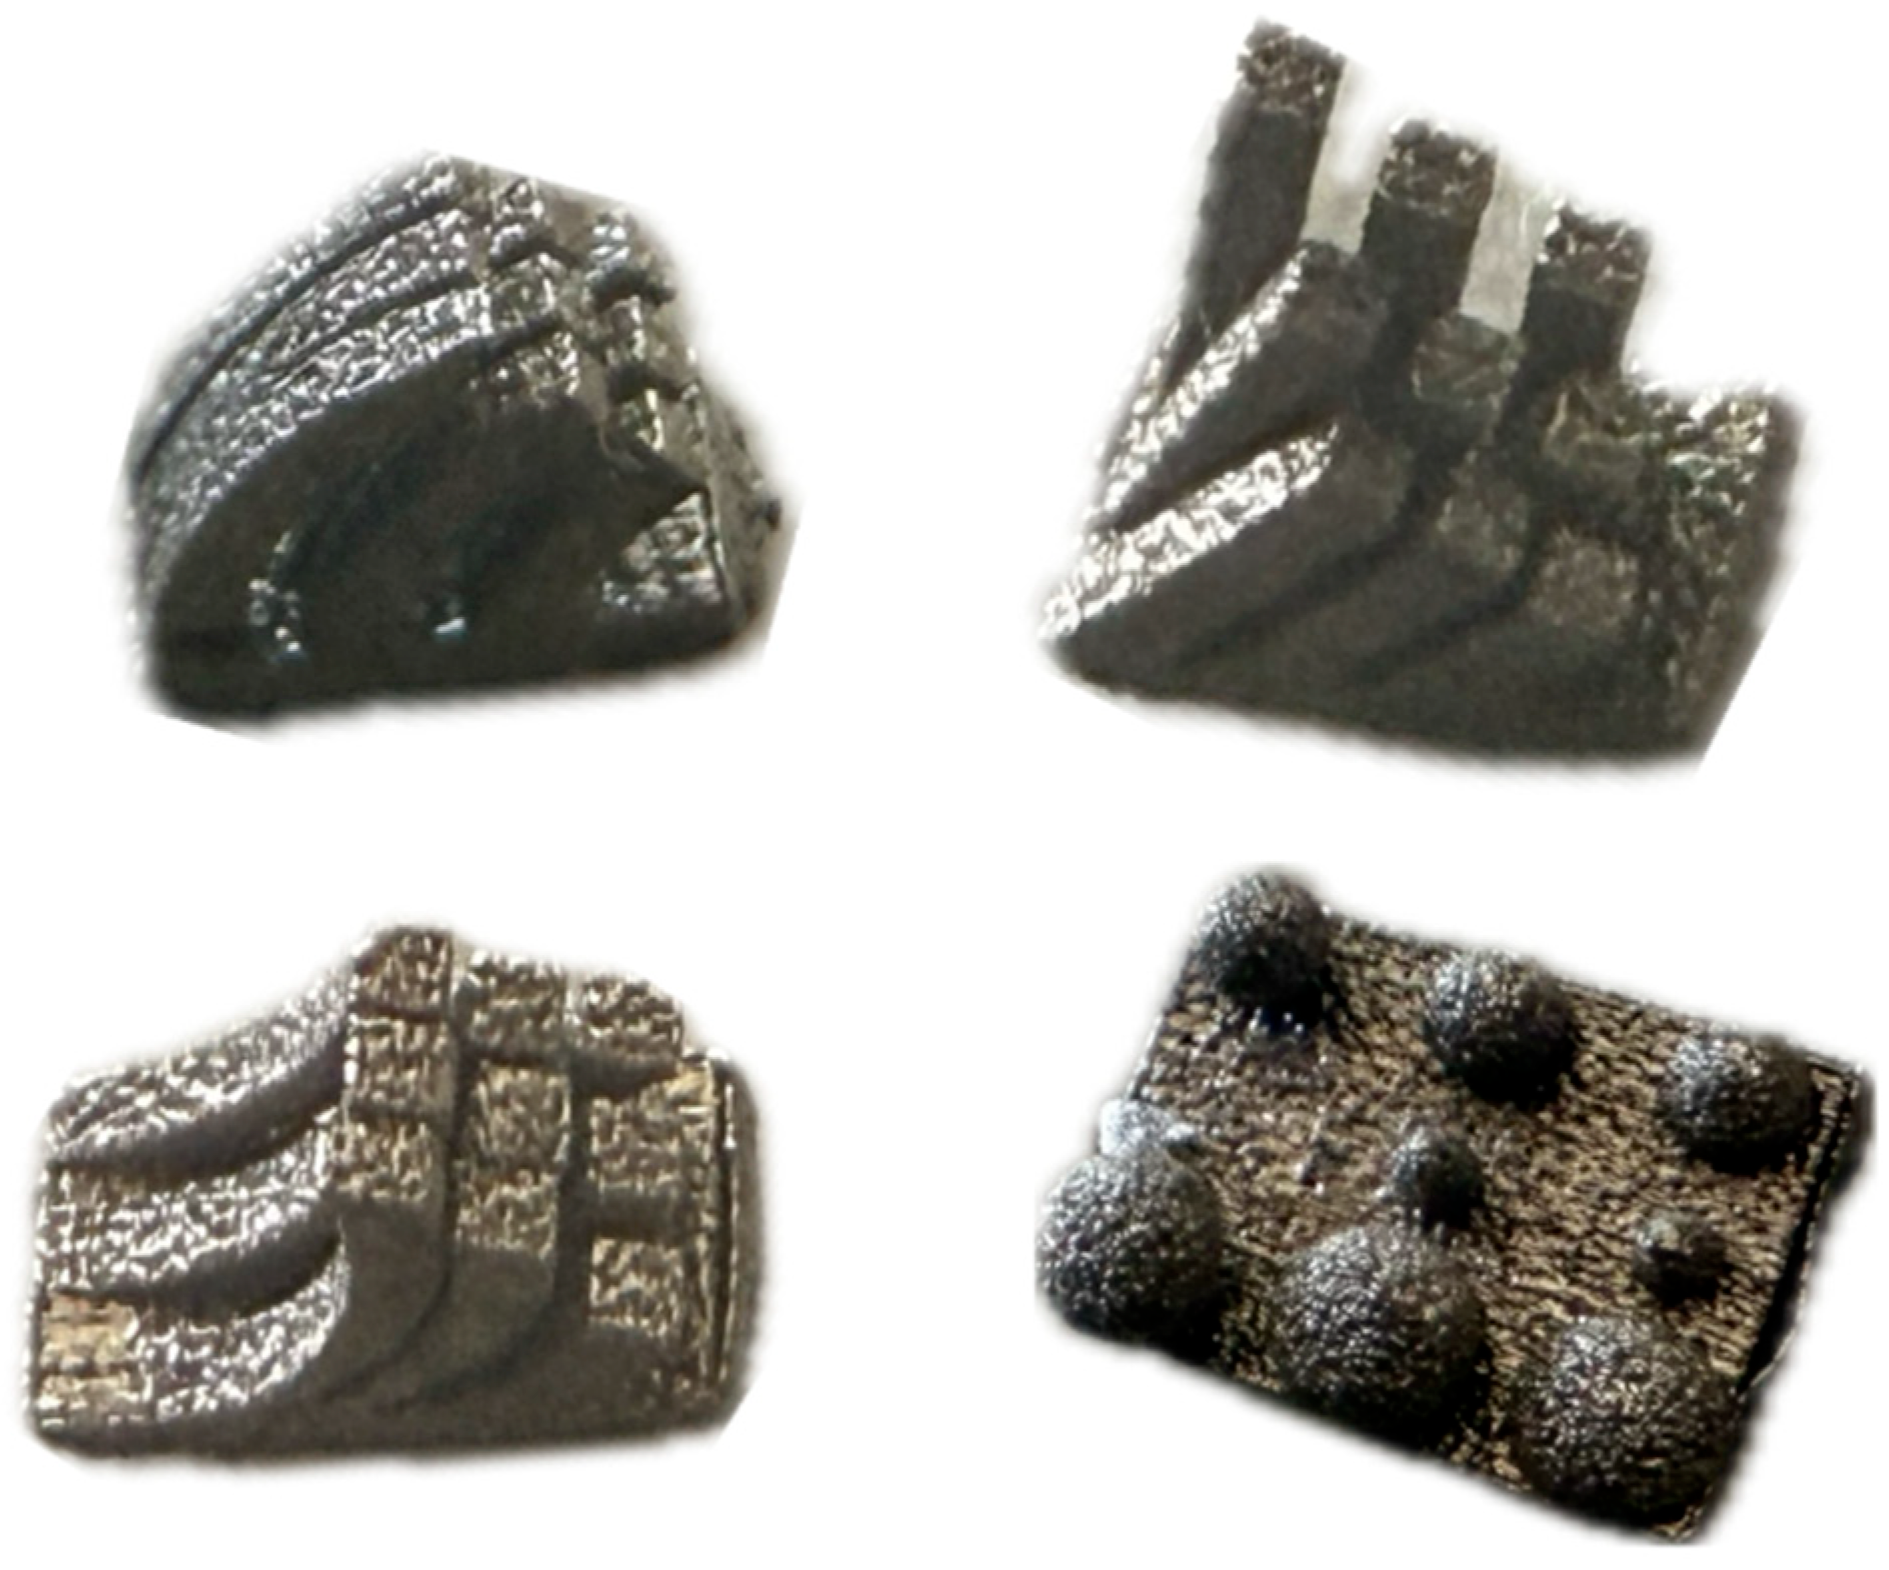
All the samples were printed on the XM200G metal 3D printer built by Xact Metal, Inc., PA, USA that uses a 100 W single-mode fiber laser with a build size of 150 × 150 × 150 mm, and one of the printed samples is shown in Figure 3. The choice of SS316L powder material was based on industrial applicability and the ease of processing with the L-PBF technique. The particle size and flowability were optimized. The interactions among laser power, processing speed, and hatch spacing were studied in a full factorial 23 experimental design. Besides these eight trials at the design points, a center point trial was also conducted. The nine treatment combinations of these factors are given in Table 2. In addition, a visual representation of these parameter sets is shown in Figure 4, where the eight vertices correspond to training conditions and the central point represents the validation condition. In Figure 4, the eight corner points of the cube (i.e., 23 DOE, corresponding to S.N. 1–8 in Table 2) are used exclusively for training the cGAN. During model validation, the cGAN model was evaluated using only the center-point parameter combination (600 mm/s, 90 W, 90 µm, corresponding to S.N. 9 in Table 2). All layers resulting from this combination were kept exclusively for validation, ensuring that none of these layers were used for training.
In Table 2, the energy density can be calculated from the processing parameters using the following formula:
Energy Density =   Laser Power   ( W ) Laser Speed m m s × Hatch Spacing µ m × Layer Thickness   ( µ m ) × 10 6

3.2. Data Set Preparation

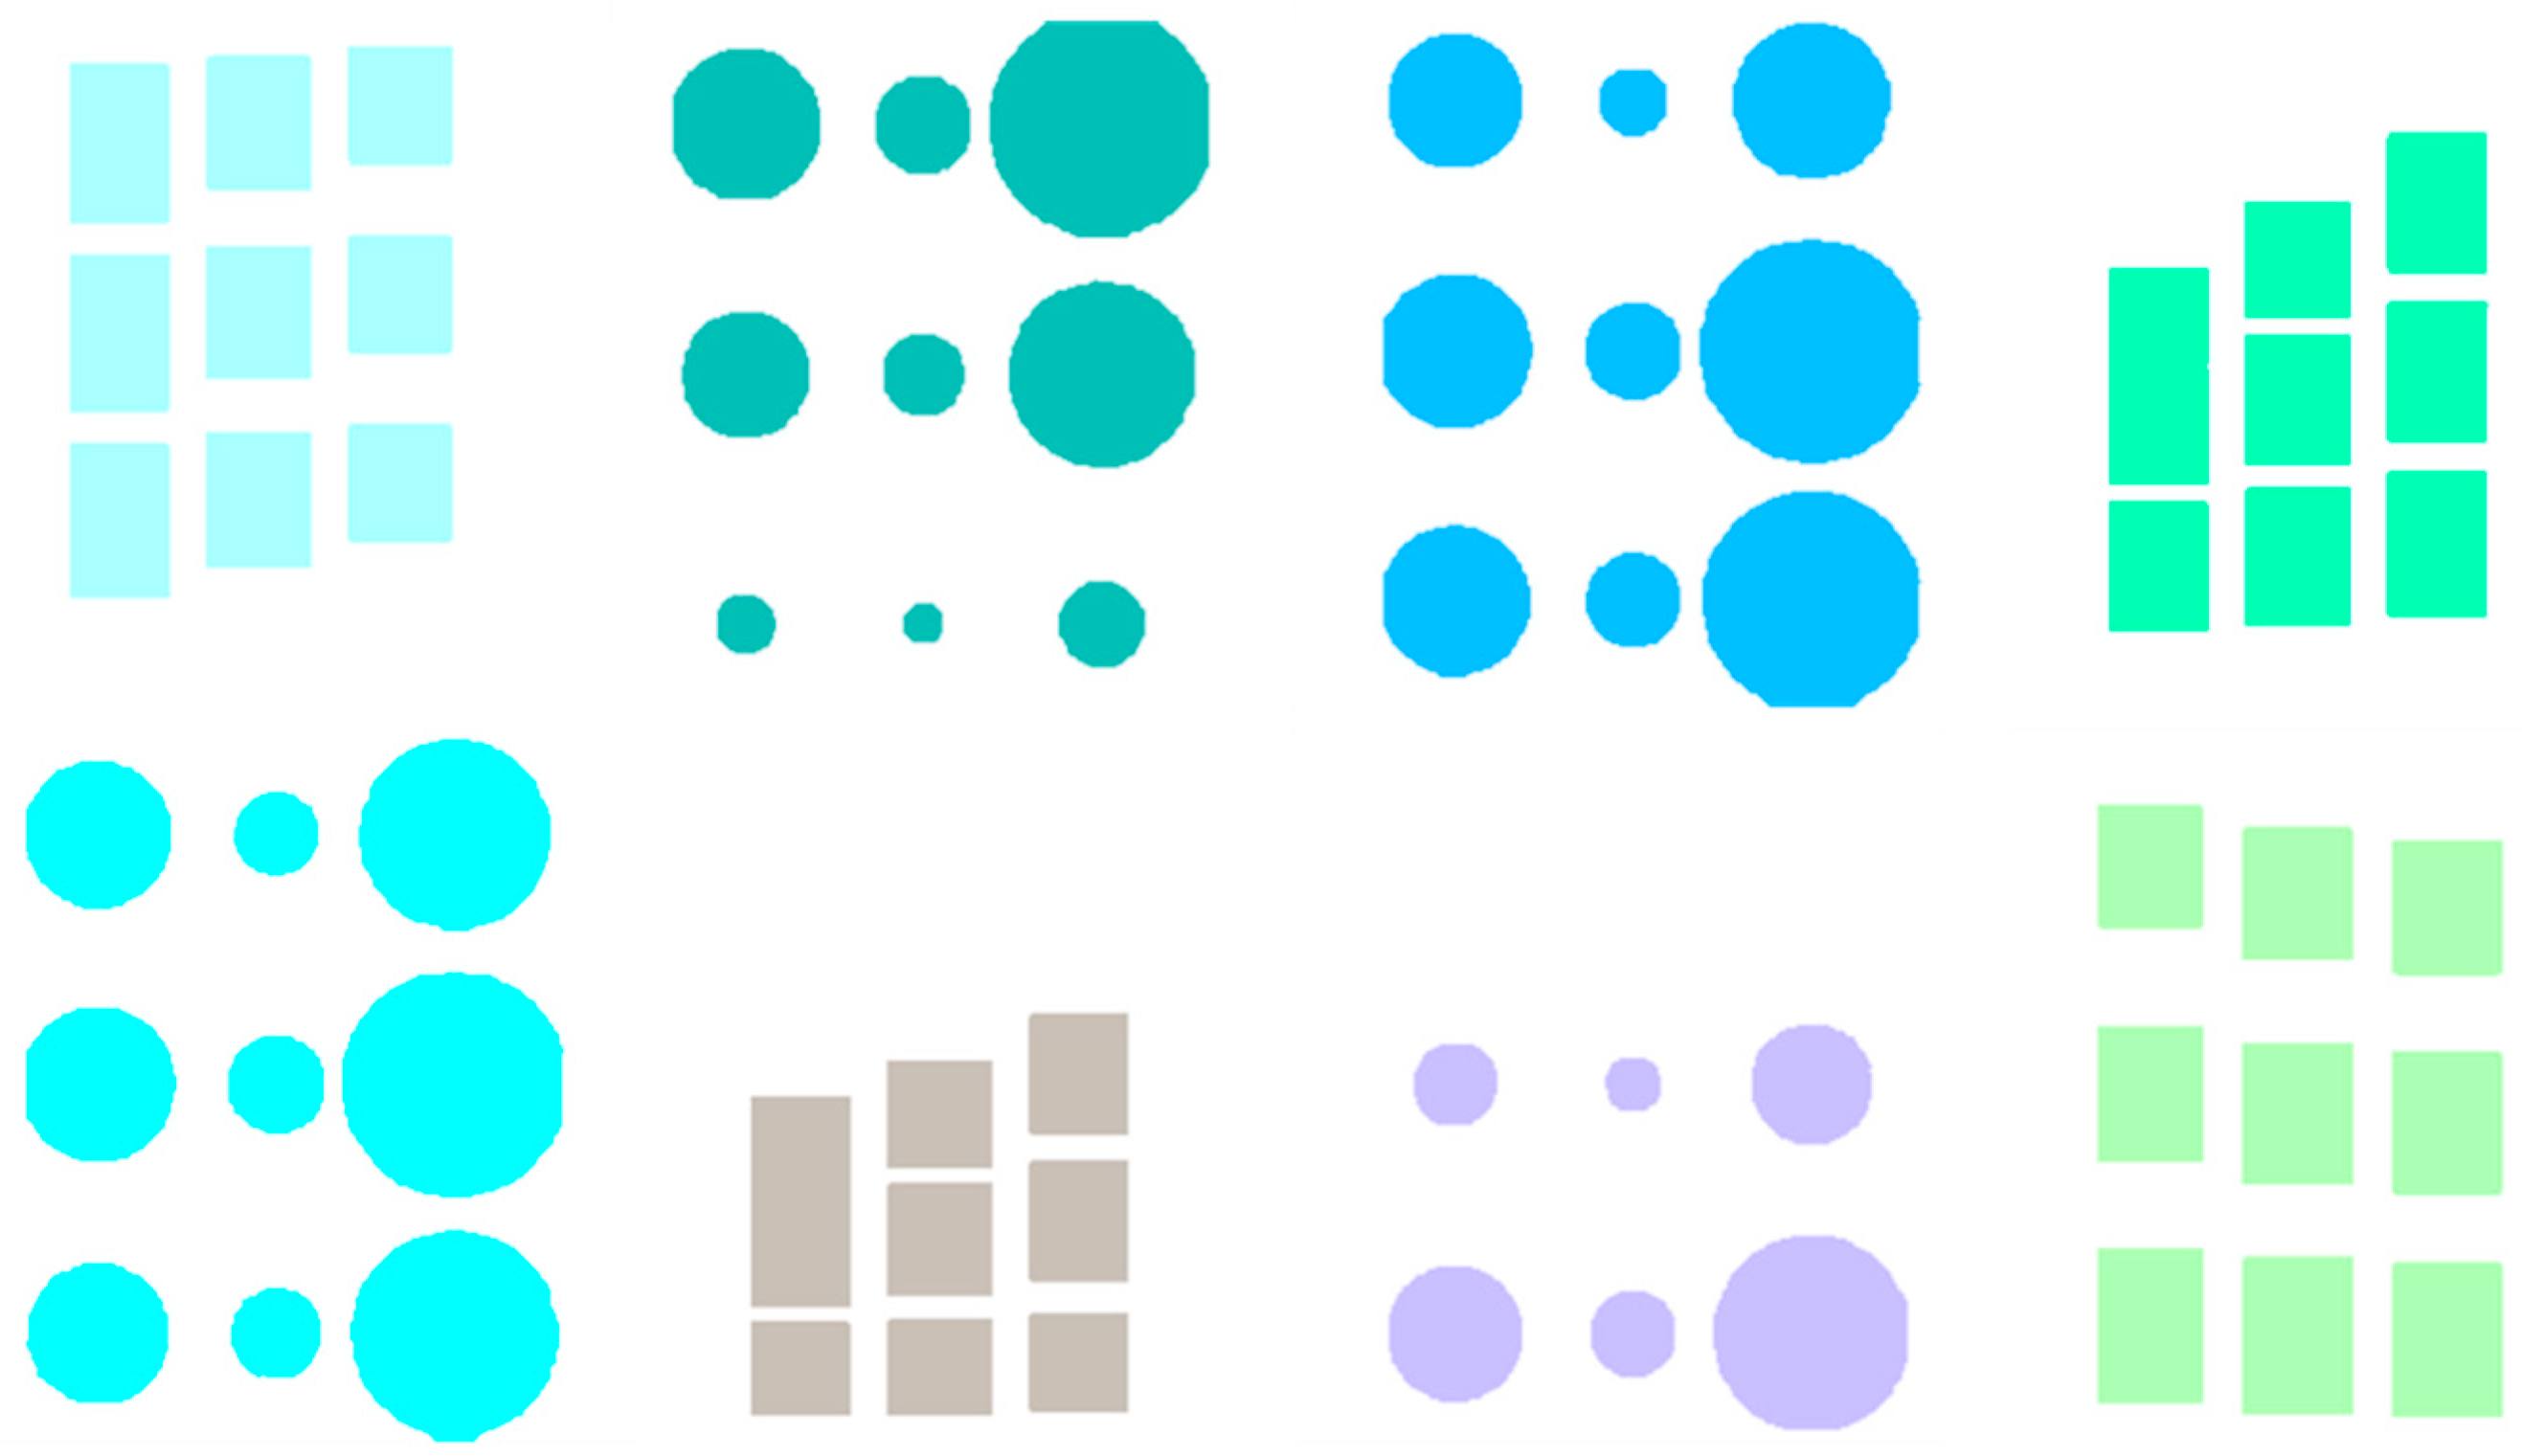
A comprehensive data set of images was created by preparing sliced images of CAD models and in situ images of the printing process. The XM200G-based in situ monitoring system captured high-resolution images layer by layer. These images were processed to create clean ground truth images. The sliced images were created from the STL file with a Python 3.13.2 slicing script. The sliced images were then transformed into two-dimensional binary images with a size of 256 × 256 pixels. The white pixels depicted material addition, and black pixels represented removal. The input images were made multi-channel by encoding them with the already created RGB color scheme. This step ensured that both geometric and parametric data were embedded into the images. Figure 5 illustrates examples of the input images used in the Pix2Pix model.
In situ images were used as the visual record of layer formation. The images included noise and were affected by the background of the powder bed. The images had to undergo cropping and alignment. The two images were made to have a pixel-level correspondence. The images were used to ensure that the intended design geometry had a direct correspondence with the observed outcomes. Figure 6a shows examples of the images used.
As raw in situ images tend to have low contrast and be unevenly illuminated, binarization of these images helped highlight the relevant melt pool areas. In the binarized images, white pixels corresponded to melted powder regions, and black pixels corresponded to unmelted regions. The result of binarization made it easy for the neural network to learn from geometric variations. This process is depicted in Figure 6b.
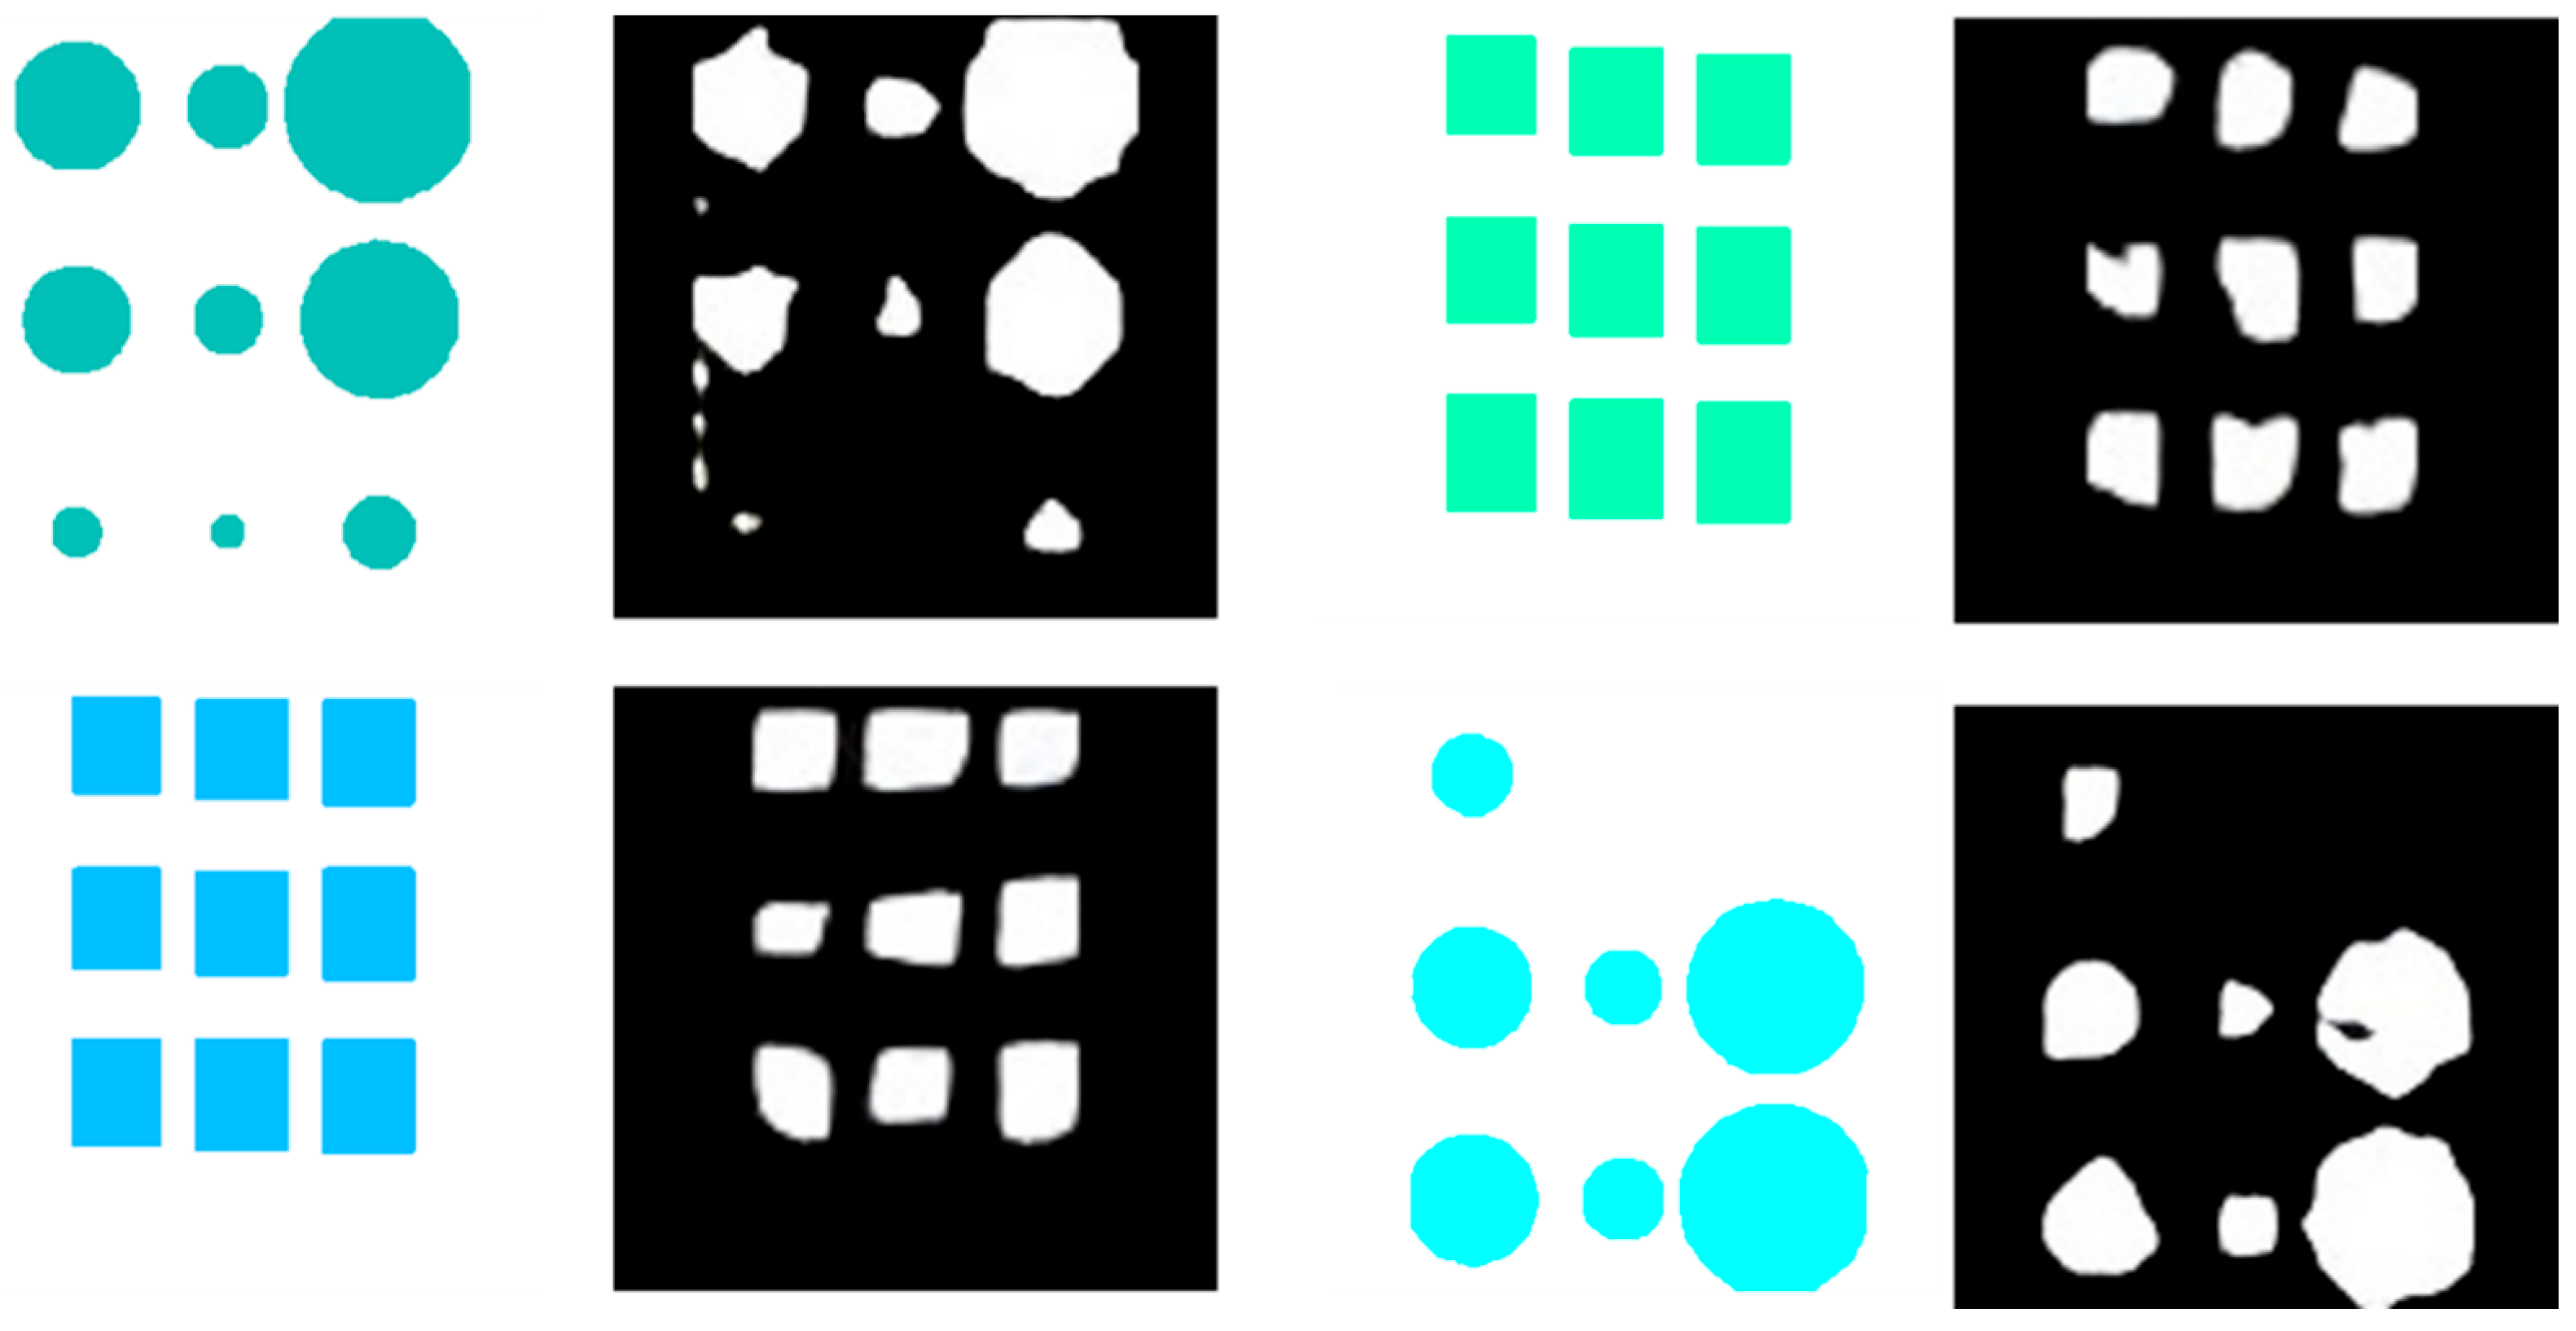
One of the limitations of the in situ camera system was that it had a relatively low resolution. These pixels increased the pixelation effect of the images. To counter such limitations and increase the resolution of these images, an Image Restoration algorithm based on the Swin Transformer model called SwinIR [35] was used. The approach improved the clarity of edges in images, allowing these models to improve the quality of images captured before model training, as seen in Figure 7. The high-resolution binary images obtained from preprocessing operations such as cropping, binarization, resizing, and enhancement were used as the ground truth. These images were then paired with their respective RGB-coded sliced images. The paired images made accurate input-and-output pairs for training. The final set of data included 5008 pairs of images, reflecting 626 layers from each of eight training parameter combinations. The examples of the input data set used in training are shown in Figure 8.

3.3. Pix2Pix Model Architecture and Training

For predicting geometric deviations from design and production layers, a conditional Generative Adversarial Network (cGAN) based on Pix2Pix was implemented. The model applies the concept of image-to-image translation by repeatedly enhancing the parameters to generate images of the printed layers. The Pix2Pix architecture consists of two neural networks trained adversarially: (1) the U-Net generator with skip connections, which captures both global shape and fine local details. Instance Normalization was employed for stability at low batch sizes (batch = 1), and (2) the PatchGAN discriminator, which evaluates the realism of generated images by analyzing local patches rather than full images, encouraging sharp and coherent outputs.
The objective function for training integrates various loss terms to properly weight realism, structural consistency, and boundary accuracy: adversarial binary cross-entropy loss to promote realistic outputs against the discriminator; weighted binary cross-entropy for dealing with class imbalance between printed and non-printed regions; Dice loss to prevent boundary overlap and improve segmentation; and optional L1 loss to suppress large pixel-wise discrepancies. Training employed the Two Time-Scale Update Rule (TTUR) with separate learning rates for the generator and discriminator (i.e., 2 × 10⁻⁴ and 4 × 10⁻⁴, respectively). The Adam optimizer was used with β1 = 0.5 and β2 = 0.999. Gradient clipping was applied to prevent instability, and mixed-precision training was utilized to accelerate computation. The training loop included automatic checkpointing—saving both the most recent model and the best-performing model based on the Intersection-over-Union (IoU) metric.
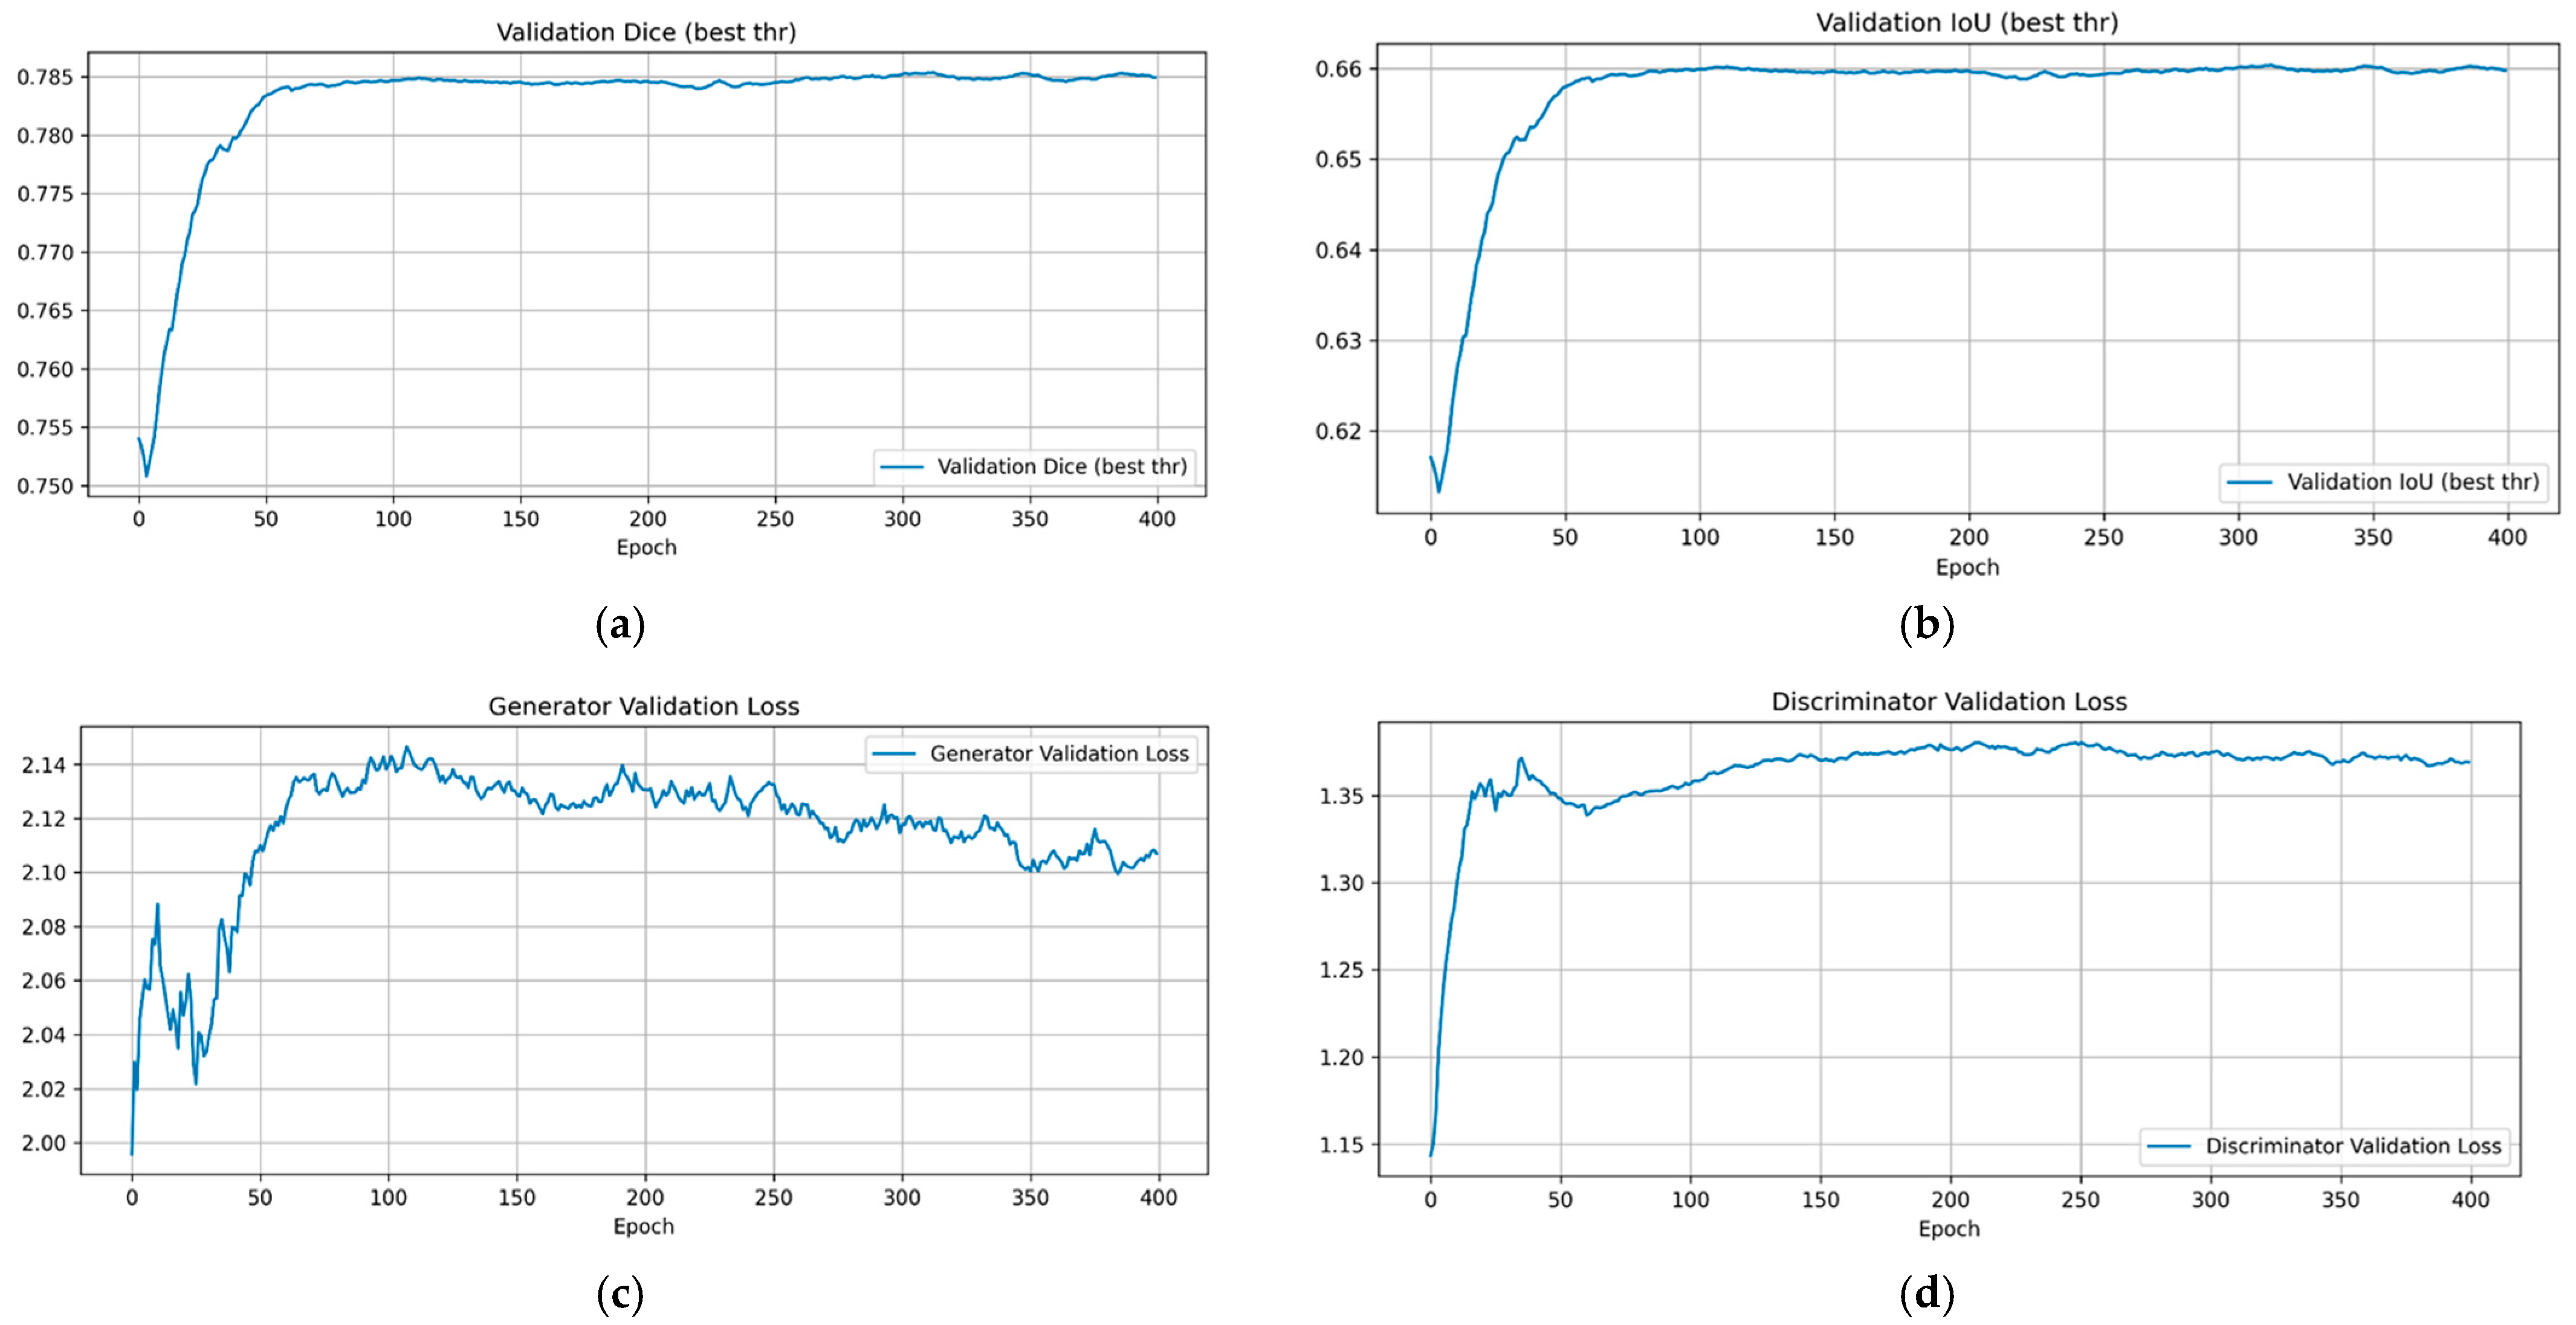
At the end of every epoch, validation sweeps were carried out across sigmoid probability thresholds (0.30–0.70) to calculate IoU and Dice values. The model that produced the maximum validation IoU was considered the best model for that epoch. TensorBoard logs were used to track convergence of generator and discriminator losses, as well as IoU/Dice performance. Learning-rate schedules were applied to ensure steady convergence, and the rates decreased automatically when validation IoU plateaued. The training process was designed to handle highly imbalanced data and single-image batch updates, prioritizing geometrical fidelity over pixel-level similarity.

3.4. Evaluation Metrics

The model assessment was carried out by employing a set of both standard and developed measures that are geometric-aware and suited for additive manufacturing tasks. The Peak Signal-to-Noise Ratio (PSNR) value quantitatively represents the overall image reconstruction quality. The Structural Similarity Index Measure (SSIM) assesses the perceptual and structural similarity of the predicted and ground-truth images. The accuracy of spatial correspondence based on binarization was measured by Intersection over Union (IoU) and the Dice coefficient (F1 overlap). Thresholds were set on a per-epoch basis to ensure consistency.
U   ( Underfill ) = A X A
O   ( Overfill ) = X A A
T   ( Total ) = U + O = A Δ X A
U dw = x A X A x A R
O dw = x X A A x A R
For better representation of the domain-specific performances on object detection tasks involving mask predictions, Geometry-Aware Error Metrics such as Underfill Error (U), Overfill Error (O), and the cumulative error involving both U and O as Total Error (T = U + O) were used. These geometric metrics are computed on 2D binary images with a resolution of 256 × 256 pixels. In these images, white pixels represent the presence of printed material, while black pixels represent the background. ‘A’ denotes the set of foreground pixels in the ground-truth image (i.e., the white pixels indicating printed material), and ‘X’ denotes the set of foreground pixels in the image predicted by the model. Underfill (U) is the fraction of A that is not present in X, where A is the ground truth, and X is the predicted image. Similarly, Overfill (O) is the fraction of extra area that X adds outside A. High U means that the compared mask is small or has holes inside A, and high O means the compared mask extends beyond A. The weightings were later refined based on the average distance of error pixels from the ground truth boundary, denoted as Udw and Odw. Udw is the normalized mean depth of missing regions within A, and Odw is the normalized average protrusion depth of the extra regions outside A. These two sets of metrics together enabled a multidimensional evaluation [31,32].

4. Results

4.1. Model Training and Validation Performance

The Pix2Pix model consisted of a U-Net generator with Instance Normalization and a PatchGAN discriminator. The generator was designed to capture details by using skip connections to retain features of the input images. The discriminator aims to capture realism in local image features by considering image patches. The total loss of the generator contains a weighted sum of adversarial loss, BCE loss, and Dice loss.
The periodic checkpointing approach maintained both the latest and the best models based on the IoU value on the validation set. The validation process included calculating the model’s output at the end of each epoch by sweeping through thresholds from 0.30 to 0.70. The validation outputs were used to plot the loss in TensorBoard. The training process of the model used the Dice coefficient, IoU, and loss values to define the training of generators and discriminators.
Figure 9a shows that the Dice coefficient improved steadily in early epochs. This increase reflects progressive learning of both global geometry and local boundary features, signifying that predicted masks increasingly aligned with the experimental ground truths. The IoU curve in Figure 9b also showed a similar increasing pattern. Although IoU measures always tend to be lower than the Dice similarity coefficient since the overlap criterion is more stringent, the smooth curve without oscillations or drops indicated good generalization.
In the generator’s validation loss curve shown in Figure 9c, the minor fluctuations toward the final epochs reflected healthy competition among the adversarial components. The discriminator’s loss function remained stable with slight variations, as seen in Figure 9d. The stability of the loss function demonstrated that neither of the two models had an advantage over the other. The loss function’s variation reflected a balance between realism and geometric details.

4.2. Visual and Quantitative Evaluation

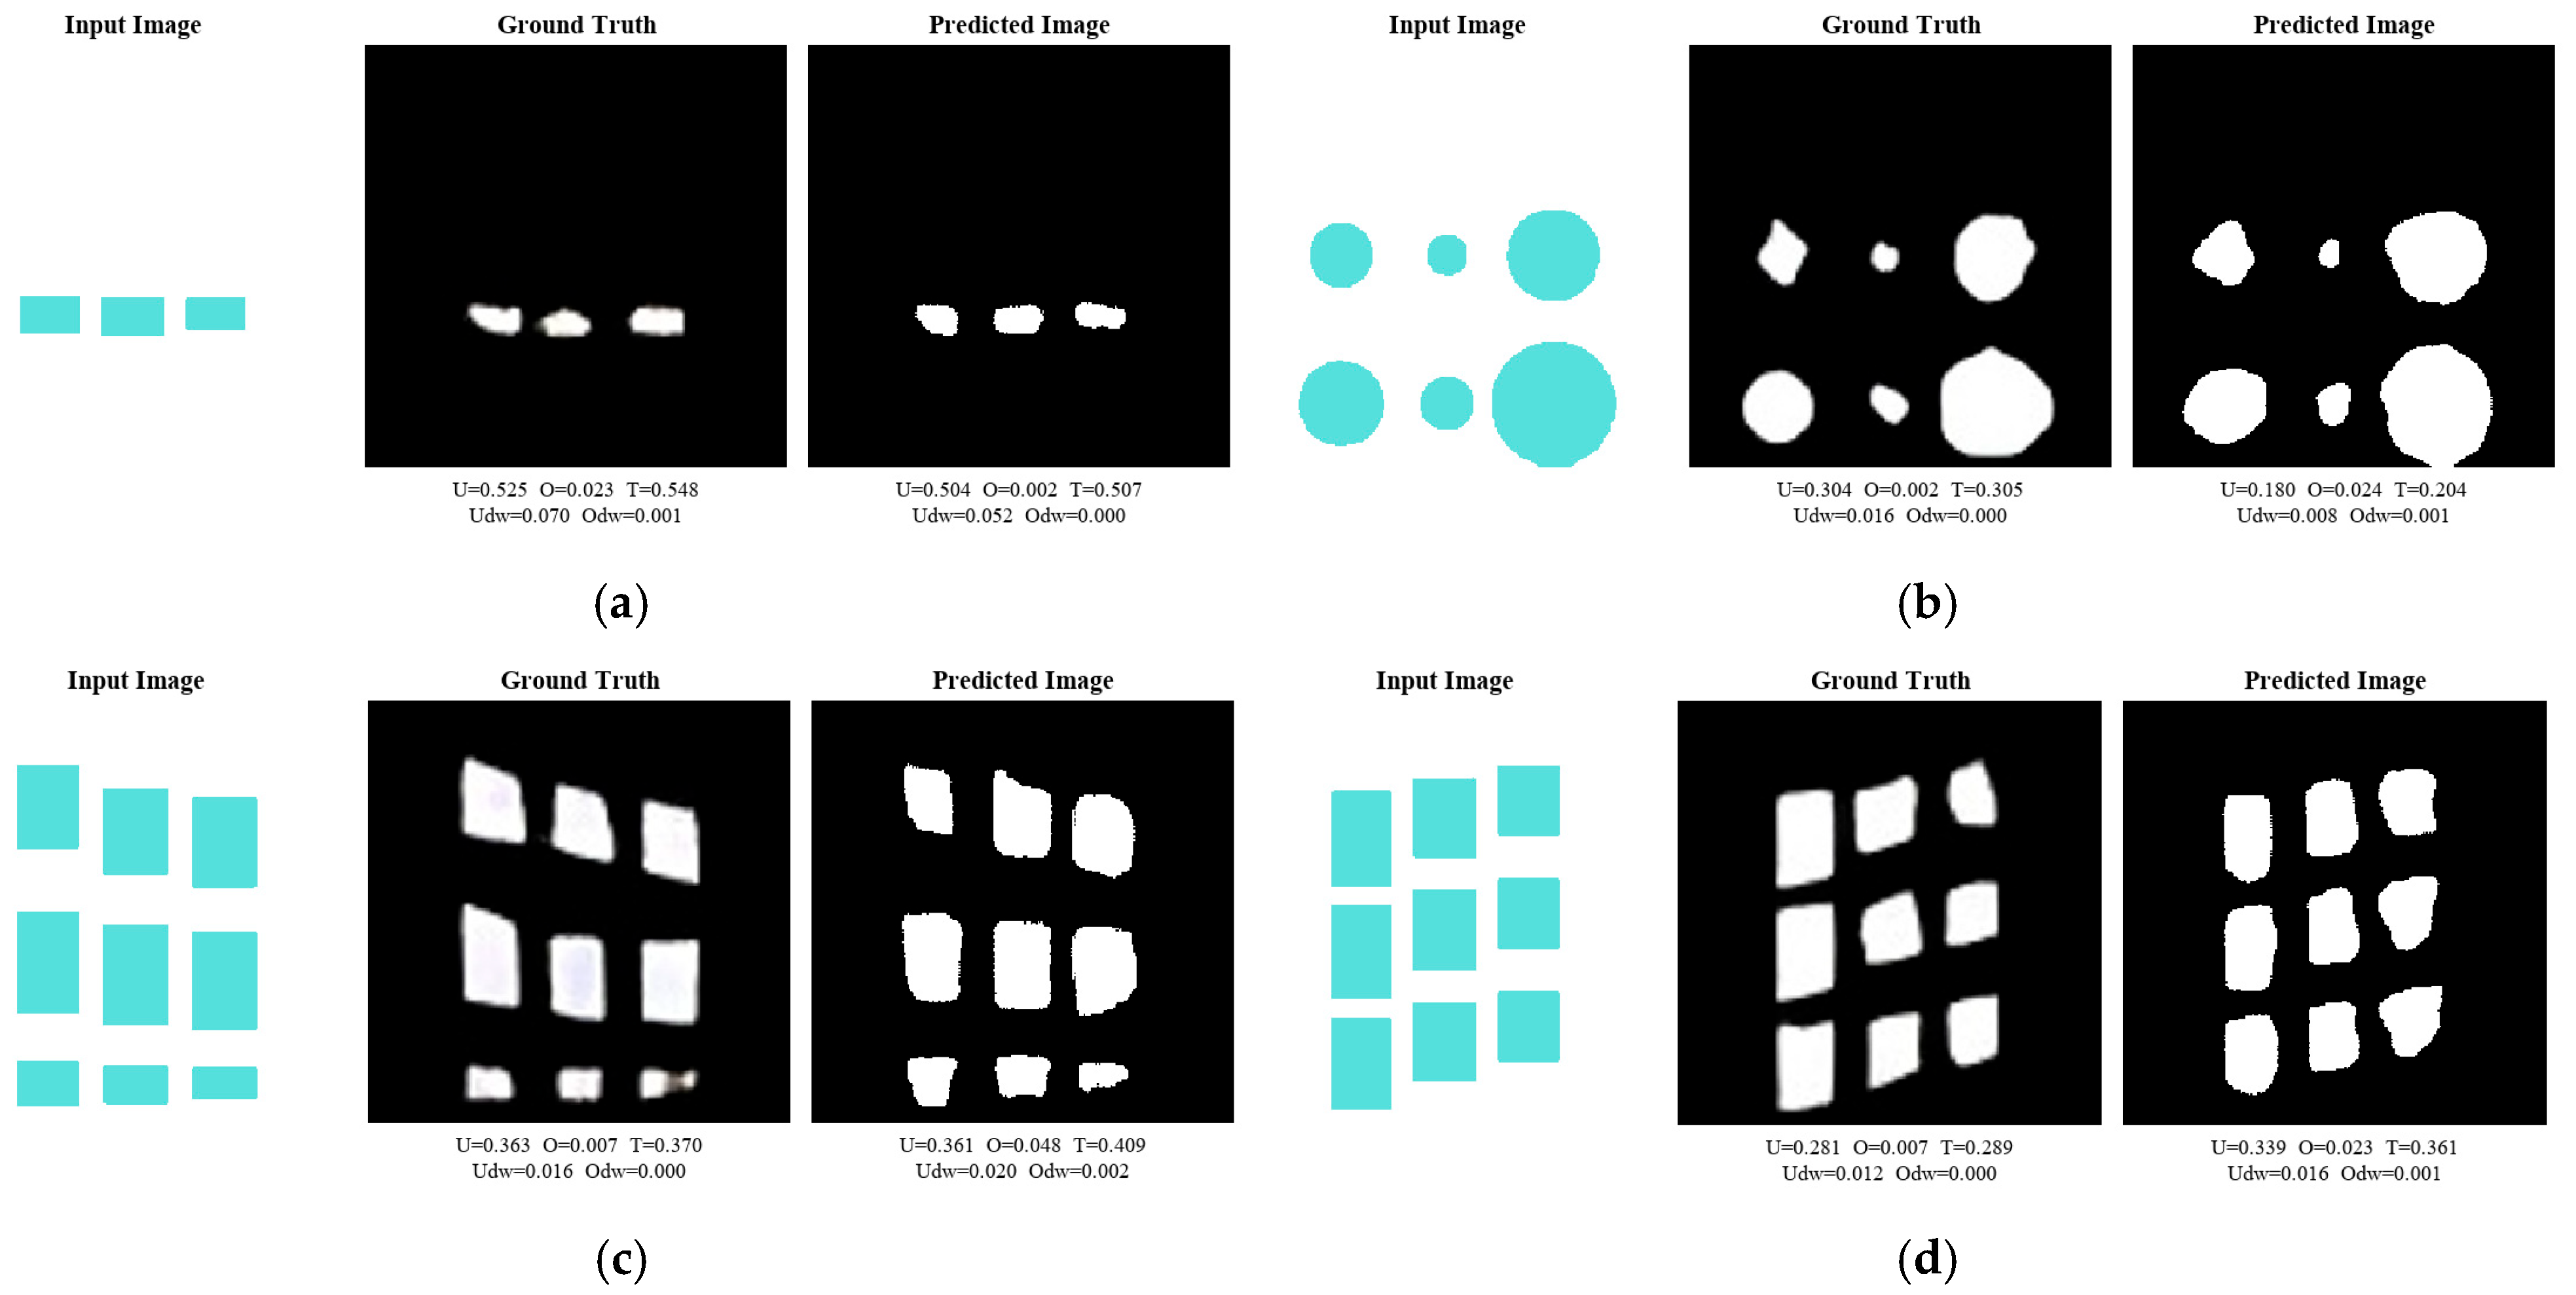
Quantitative measures allow for a numerical assessment of model accuracy, and visual comparison of the ground truth and predicted images can also be highly informative. Figure 10 shows some of these images. The Pix2Pix model, with the proposed color coding, successfully captured the details of the geometric patterns, and the prediction of the layer geometries resembled the ground truths. The error distributions were mainly seen around the boundaries of the features. This shows that the model’s generator successfully captured the geometry of the layer as well as the corresponding details of the melt pools. Visually, the boundaries of the predicted masks were smoother than those of the raw in situ data. This can be attributed to the model’s capacity to eliminate noise as well as illumination inaccuracies that may be found in the experimental images. These qualitative findings serve as a supplement to the quantitative proof that the model made meaningful predictions of geometric deviations.
To evaluate predictive accuracy beyond pixel-level similarity, geometry-aware metrics—Underfill (U), Overfill (O), Total Error (T = U + O), and their distance-weighted counterparts (Udw and Odw)—were calculated for both experimental ground truth and predicted images. The underfill (U) measures the fraction of true printed regions missing from the predicted image, while the overfill (O) quantifies the excess regions erroneously added by the model. Their sum, total error (T), represents the overall deviation between prediction and ground truth. The distance-weighted terms, Udw and Odw, evaluate how deep these errors lie within or outside the true boundaries, respectively, thereby indicating the severity of deviation. Lower values across all these metrics denote higher similarity between the predicted and actual images, even in cases where visual inspection might suggest minor differences due to lighting or edge smoothness. These metrics thus provide a robust numerical framework to assess prediction accuracy beyond visual interpretation.
The in situ imaging system produces layer images composed solely of pixels, without any directly measurable dimensions. Consequently, the U, O, and T metrics quantify relative geometric error rather than absolute error in millimeters. Establishing correlations with dimensional errors in millimeters would require calibrated metrology, such as deviation maps obtained from XCT, which could be explored in future work.
In Figure 10, the differences between the predicted and ground truth images help to demonstrate the performance of the model under various geometric settings. In Figure 10a, both the ground truth and predicted images display a relatively higher total error (T = 0.548 and T = 0.507, respectively) compared to the rest of the demonstrations. This can be attributed to the small portion of the white (feature) region in relation to the black background, as a small error will result in a large total error. Nevertheless, in the predicted image, there is a closer representation of the ground truth with a small total error as well as overfill (O = 0.002 compared to O = 0.023), showing that the model can predict the main boundaries of the feature. This is further evident in the small values of the distance-weighted error (Udw = 0.052, Odw = 0.000).
In Figure 10b, the total error value (T = 0.204) and the underfill value (U = 0.180) of the output are lower than those of the ground truth images (T = 0.305, U = 0.304). The values being slightly less than those of the ground truth images indicate that the output has successfully replicated the circular pattern, but not exactly the same geometry. However, the negligible value of the overfill error (O = 0.024) and the distance-weighted error values (Udw = 0.008, Odw = 0.001) signify that the deviation lies only at the edges and has a negligible impact on the geometry.
Also, in Figure 10c,d, where the layer geometry is rectangular, the predicted total error (T = 0.409 in Figure 10c and T = 0.361 in Figure 10d) is marginally higher than that of the ground truths, with values mostly within a small range around each other, thereby verifying that the model can accurately reconstruct the geometry of the features with a sharp definition of boundaries. However, in all four cases, the values of distance-weighted underfill (Udw ≤ 0.02) and overfill (Odw ≤ 0.002) are small, thereby asserting that most of the error in predictions is restricted to the boundary of the feature rather than the features themselves.
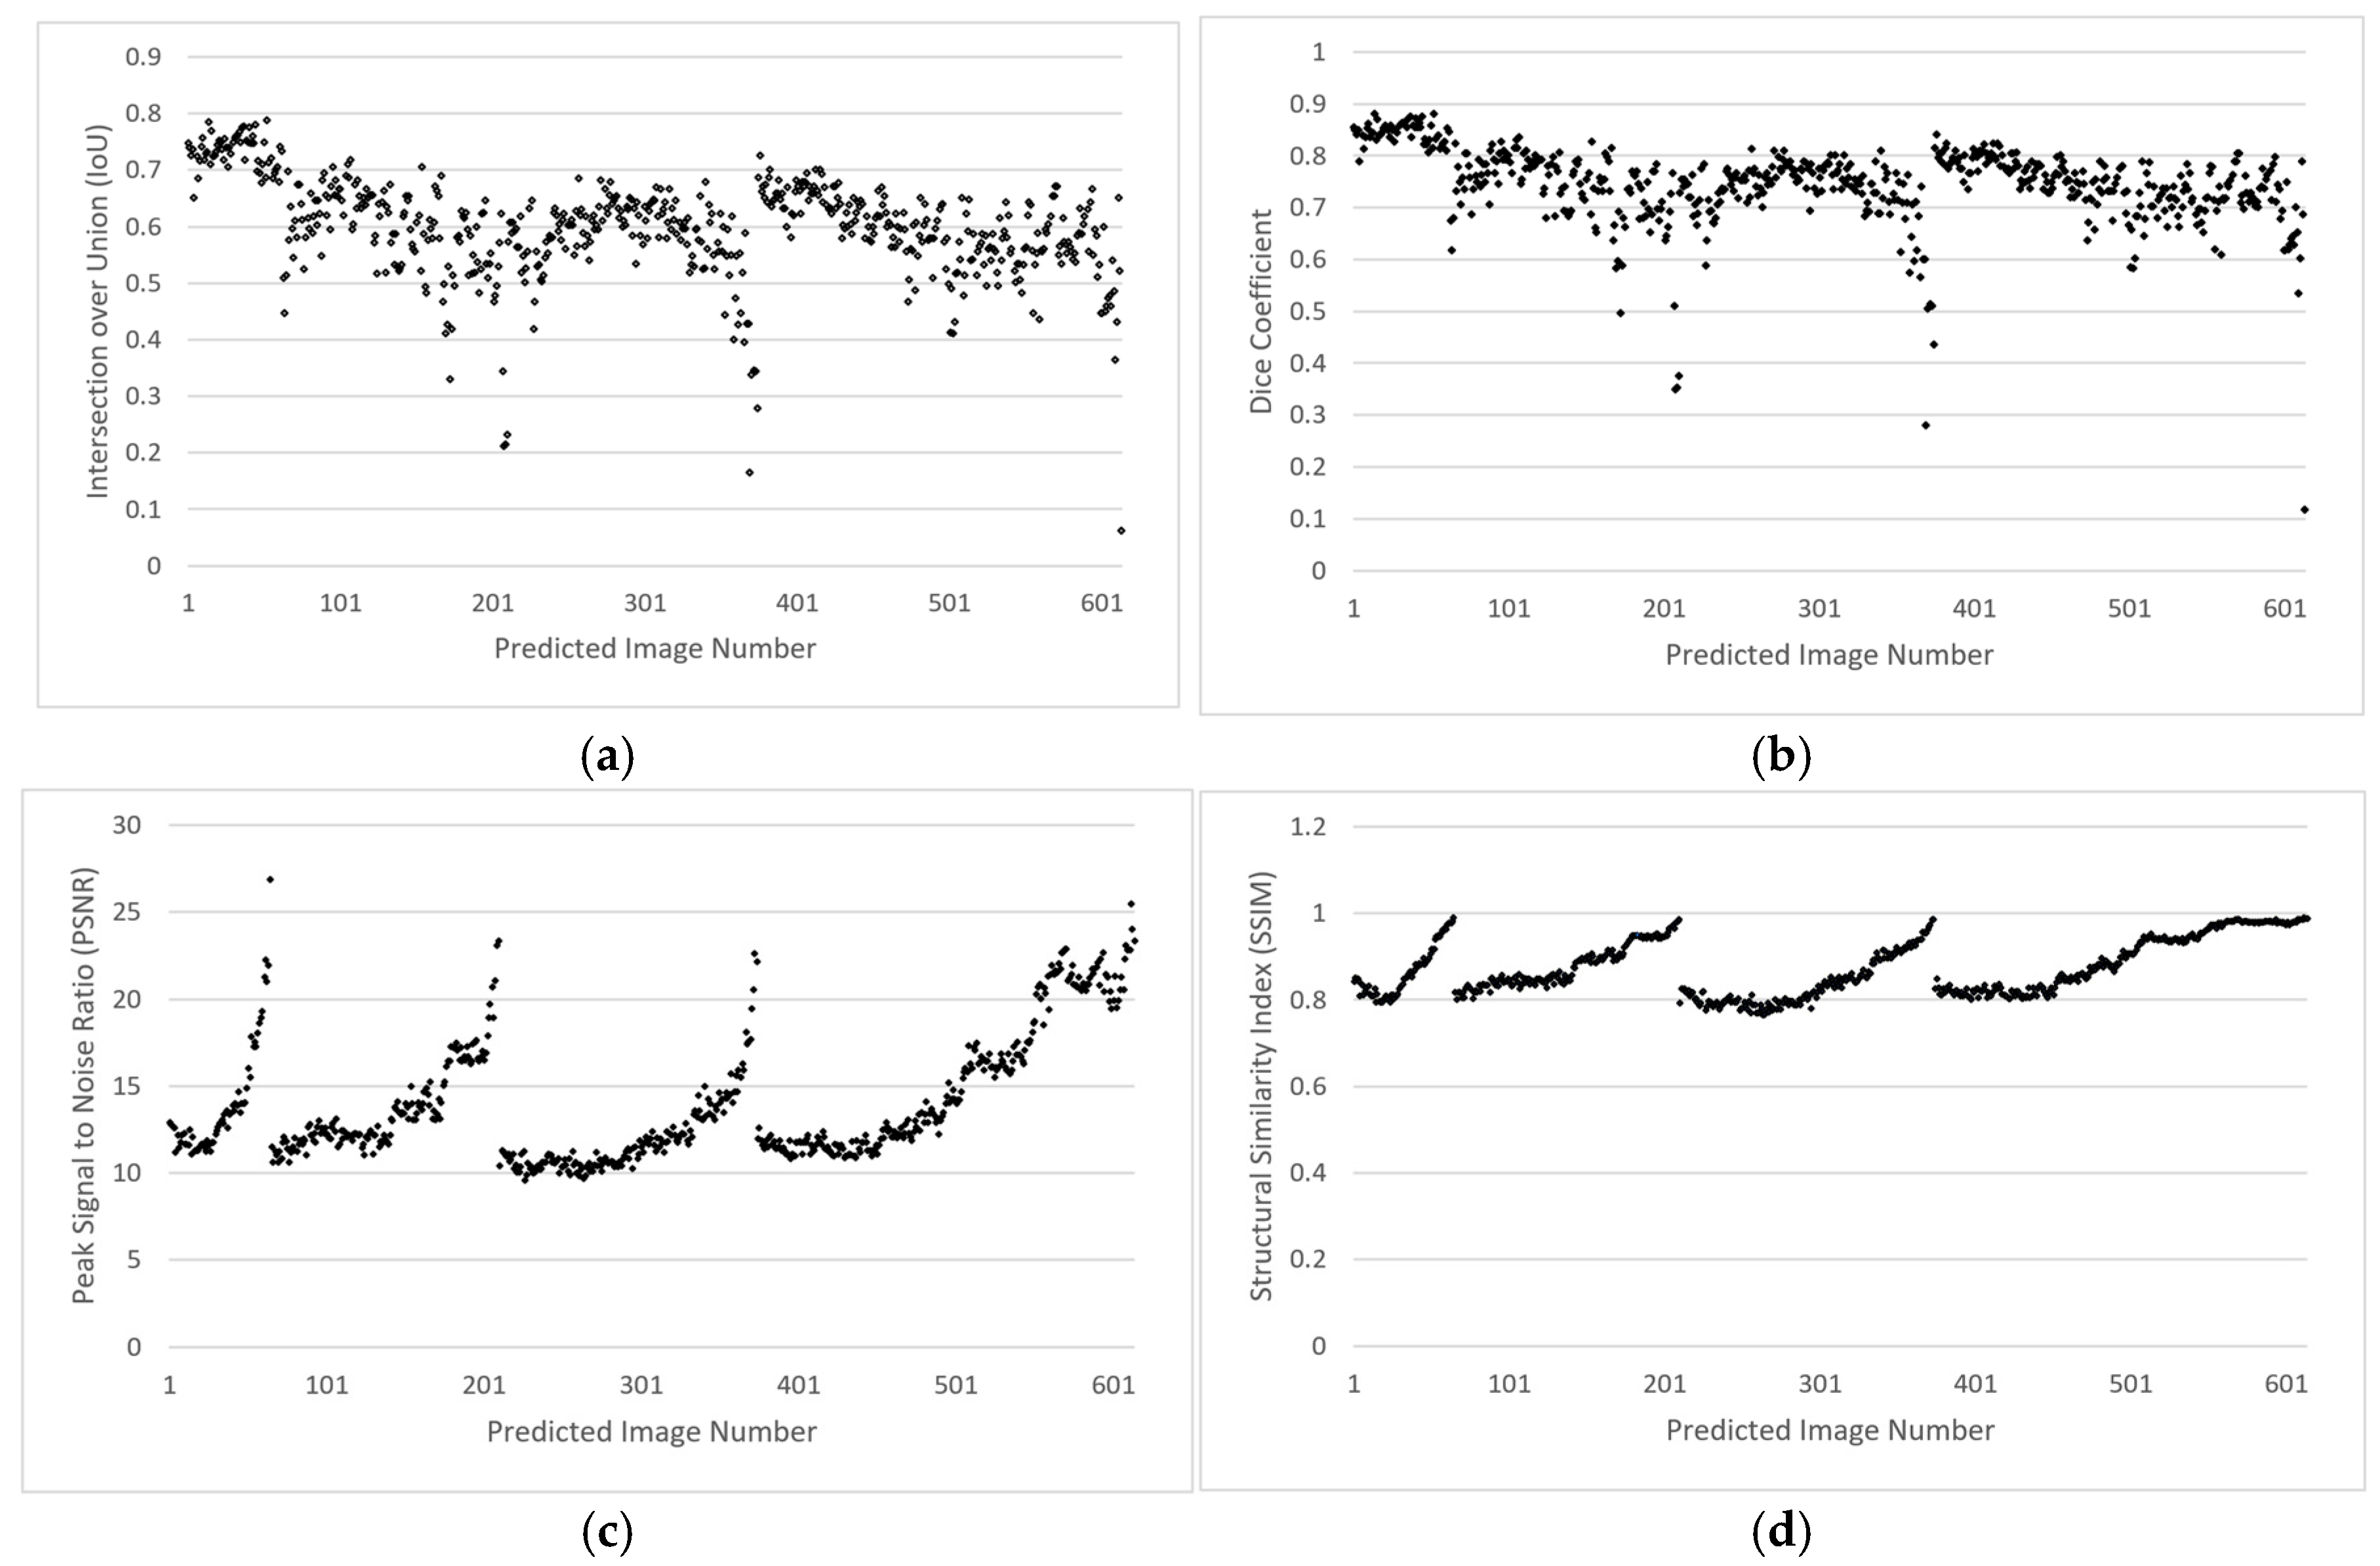
In addition to the above geometry-conscious comparison, various similarity measures of both image fidelity were assessed on the full validation set of images. In Figure 11, each X-axis number corresponds to a specific layer image used during the prediction phase, with all layers indexed sequentially across the four printed parts. The plots of the IoU and Dice coefficient show the accurate spatial overlap of both the predicted and ground truth geometries. The occasional drops in the IoU and Dice scores represent the sparse or almost empty segmentation masks within the ground truth images, as seen in Figure 11a,b, respectively. In such images, it only took very small discrepancies between the ground truth and the output of the neural network to significantly affect the overlap measures. When these sparse slices are ignored, both measures have high values. The PSNR values of the predicted images indicated high pixel-level reconstruction accuracy, as shown in Figure 11c. The SSIM values for the entire data set were very close to 1.0 (Figure 11d), indicating that the structural contrast relationships were well captured.
Overall, these findings demonstrate that the model performed well in both the perceptual and structural similarity of predictions. The combination of high SSIM values and PSNR, along with relatively low error measures of underfill/overfill, suggests that the Pix2Pix model not only captured geometric boundaries successfully but also maintained structural similarity.

5. Conclusions

This research proposes a Pix2Pix cGAN model with color coding to account for different AM process parameters and predict geometric deviations in metallic components fabricated using the L-PBF process. The proposed work has successfully utilized design data as well as in situ images captured during printing. A comprehensive data set was developed by correlating sliced CAD images with in situ monitoring images. Through various preprocessing techniques such as cropping, resampling images to a similar size, binarization, and resolution enhancement using the SwinIR model, the data set was made uniform and refined to retain geometric consistency. This processing enabled the neural network to develop accurate mapping functions between the ideal model layer geometry and the printed output. The performance of the model was assessed using image similarity measures as well as geometric-level metrics. The similarity measures, including IoU, Dice Loss, Peak Signal-to-Noise Ratio (PSNR), and Structural Similarity Index (SSIM), confirmed high agreement between the predictions and experimental results. In addition, new geometry-aware metrics such as Underfill Error (U), Overfill Error (O), Total Error (T), and distance-weighted measures (Udw and Odw) provided meaningful estimates of geometric deviations.
The model provides forward predictions of geometric deviation distributions before printing, allowing users to assess the effects of process variables prior to a print job. This feature may serve as a tool for parameter optimization, scan path optimization, or the redesign of critical regions. Furthermore, future development of the tool could leverage XCT-based 3D deviation maps, enabling the prediction of distortion as well as internal defects prior to printing. This would be a highly valuable addition for advancing automated L-PBF correction systems.

Author Contributions

Conceptualization, S.B. and S.J.; methodology, S.B., H.S. and S.J.; software, S.B. and H.S.; validation, S.B.; formal analysis, S.B.; investigation, S.B. and S.J.; resources, S.B. and H.S.; data curation, S.B. and H.S.; writing—original draft preparation, S.B. and S.J.; writing—review and editing, S.B., H.S. and S.J.; visualization, S.B. and H.S.; supervision, S.J.; project administration, S.B. and S.J.; funding acquisition, S.J. All authors have read and agreed to the published version of the manuscript.

Funding

This research received no external funding.

Data Availability Statement

The original contributions presented in this study are included in the article. Further inquiries can be directed to the corresponding author.

Conflicts of Interest

The authors declare no conflicts of interest.

References

  1. ASTM International. Standard Terminology for Additive Manufacturing Technologies; ASTM International: West Conshohocken, PA, USA, 2013. [Google Scholar]
  2. Mani, M.; Lyons, K.W.; Gupta, S.K. Sustainability Characterization for Additive Manufacturing. J. Res. Natl. Inst. Stand. Technol. 2014, 119, 419–428. [Google Scholar] [CrossRef]
  3. Thompson, S.M.; Bian, L.; Shamsaei, N.; Yadollahi, A. An Overview of Direct Laser Deposition for Additive Manufacturing: Part I—Transport Phenomena, Modeling and Diagnostics. Addit. Manuf. 2015, 8, 36–62. [Google Scholar] [CrossRef]
  4. Pauzon, C. The Process Atmosphere as a Parameter in the Laser-Powder Bed Fusion Process; Chalmers University of Technology: Gothenburg, Sweden, 2019. [Google Scholar]
  5. Brown, C.U.; Jacob, G.; Possolo, A.; Beauchamp, C.; Peltz, M.; Stoudt, M.; Donmez, A. The Effects of Laser Powder Bed Fusion Process Parameters on Material Hardness and Density for Nickel Alloy 625; NIST Advanced Manufacturing Series 100-19; National Institute of Standards and Technology: Gaithersburg, MD, USA, 2018. [Google Scholar]
  6. Fotovvati, B.; Balasubramanian, M.; Asadi, E. Modeling and Optimization Approaches of Laser-Based Powder-Bed Fusion Process for Ti-6Al-4V Alloy. Coatings 2020, 10, 1104. [Google Scholar] [CrossRef]
  7. Guillen, D.; Wahlquist, S.; Ali, A. Critical Review of LPBF Metal Print Defects Detection: Roles of Selective Sensing Technology. Appl. Sci. 2024, 14, 6718. [Google Scholar] [CrossRef]
  8. Malý, M.; Nopová, K.; Klakurková, L.; Adam, O.; Pantělejev, L.; Koutný, D. Effect of Preheating on the Residual Stress and Material Properties of Inconel 939 Processed by Laser Powder Bed Fusion. Materials 2022, 15, 6360. [Google Scholar] [CrossRef]
  9. Poudel, A.; Yasin, M.S.; Ye, J.; Liu, J.; Vinel, A.; Shao, S.; Shamsaei, N. Feature-Based Volumetric Defect Classification in Metal Additive Manufacturing. Nat. Commun. 2022, 13, 6369. [Google Scholar] [CrossRef]
  10. Dar, J.; Ponsot, A.G.; Jolma, C.J.; Lin, D. A Review on Scan Strategies in Laser-Based Metal Additive Manufacturing. J. Mater. Res. Technol. 2025, 36, 5425–5467. [Google Scholar] [CrossRef]
  11. Doğu, M.N.; Ozer, S.; Yalçın, M.A.; Davut, K.; Obeidi, M.A.; Simsir, C.; Gu, H.; Teng, C.; Brabazon, D. A Comprehensive Study of the Effect of Scanning Strategy on IN939 Fabricated by Powder Bed Fusion-Laser Beam. J. Mater. Res. Technol. 2024, 33, 5457–5481. [Google Scholar] [CrossRef]
  12. Monu, M.C.C.; Afkham, Y.; Chekotu, J.C.; Ekoi, E.J.; Gu, H.; Teng, C.; Ginn, J.; Gaughran, J.; Brabazon, D. Bi-Directional Scan Pattern Effects on Residual Stresses and Distortion in As-Built Nitinol Parts: A Trend Analysis Simulation Study. Integr. Mater. Manuf. Innov. 2023, 12, 52–69. [Google Scholar] [CrossRef] [PubMed]
  13. Chen, J.; Zhang, K.; Liu, T.; Zou, Z.; Li, J.; Wei, H.; Liao, W. Monitoring of Warping Deformation of Laser Powder Bed Fusion Formed Parts. Chin. J. Lasers 2024, 51, 219–227. [Google Scholar]
  14. Lin, P.; Wang, M.; Trofimov, V.; Yang, Y.; Song, C. Research on the Warping and Dross Formation of an Overhang Structure Manufactured by Laser Powder Bed Fusion. Appl. Sci. 2023, 13, 3460. [Google Scholar] [CrossRef]
  15. Zhao, X.; Liang, A.; Bellin, M.; Bressloff, N.W. Effects of Process Parameters and Geometry on Dimensional Accuracy and Surface Quality of Thin Strut Heart Valve Frames Manufactured by Laser Powder Bed Fusion. Int. J. Adv. Manuf. Technol. 2024, 133, 543–557. [Google Scholar] [CrossRef]
  16. Li, Z.; Li, H.; Yin, J.; Li, Y.; Nie, Z.; Li, X.; You, D.; Guan, K.; Duan, W.; Cao, L.; et al. A Review of Spatter in Laser Powder Bed Fusion Additive Manufacturing: In Situ Detection, Generation, Effects, and Countermeasures. Micromachines 2022, 13, 1366. [Google Scholar] [CrossRef]
  17. Gadde, D.; Elwany, A.; Du, Y. Deep Learning to Analyze Spatter and Melt Pool Behavior During Additive Manufacturing. Metals 2025, 15, 840. [Google Scholar] [CrossRef]
  18. Dejene, N.D.; Tucho, W.M.; Lemu, H.G. Effects of Scanning Strategies, Part Orientation, and Hatching Distance on the Porosity and Hardness of AlSi10Mg Parts Produced by Laser Powder Bed Fusion. J. Manuf. Mater. Process. 2025, 9, 78. [Google Scholar] [CrossRef]
  19. Buchbinder, D.; Meiners, W.; Pirch, N.; Wissenbach, K.; Schrage, J. Investigation on Reducing Distortion by Preheating During Manufacture of Aluminum Components Using Selective Laser Melting. J. Laser Appl. 2013, 26, 012004. [Google Scholar] [CrossRef]
  20. Klamert, V. Machine Learning Approaches for Process Monitoring in Powder Bed Fusion of Polymers; Technische Universität Wien: Vienna, Austria, 2025. [Google Scholar]
  21. Hu, Y.; Tang, D.; Yang, L.; Lin, Y.; Zhu, C.; Xiao, J.; Yan, C.; Shi, Y. Multi-Physics Modeling for Laser Powder Bed Fusion Process of NiTi Shape Memory Alloy. J. Alloys Compd. 2023, 954, 170207. [Google Scholar] [CrossRef]
  22. Afazov, S.; Rahman, H.; Serjouei, A. Investigation of the Right First-Time Distortion Compensation Approach in Laser Powder Bed Fusion of a Thin Manifold Structure Made of Inconel 718. J. Manuf. Process. 2021, 69, 621–629. [Google Scholar] [CrossRef]
  23. Brenner, S.; Nedeljkovic-Groha, V. Distortion Compensation of Thin-Walled Parts by Pre-Deformation in Powder Bed Fusion with Laser Beam. Addit. Manuf. 2024, 75, 205–219. [Google Scholar]
  24. Xiao, J.; Lan, B.; Jiang, C.; Terzi, S.; Zheng, C.; Eynard, B.; Anwer, N.; Huang, H. Graph Attention-Based Knowledge Reasoning for Mechanical Performance Prediction of L-PBF Printing Parts. Int. J. Adv. Manuf. Technol. 2025, 138, 4175–4195. [Google Scholar] [CrossRef]
  25. Xiong, C.; Xiao, J.; Li, Z.; Zhao, G.; Xiao, W. Knowledge Graph Network-Driven Process Reasoning for Laser Metal Additive Manufacturing Based on Relation Mining. Appl. Intell. 2024, 54, 11472–11483. [Google Scholar] [CrossRef]
  26. Xiao, J.; Eynard, B.; Anwer, N.; Durupt, A.; Le Duigou, J.; Danjou, C. STEP/STEP-NC-Compliant Manufacturing Information of 3D Printing for FDM Technology. Int. J. Adv. Manuf. Technol. 2021, 112, 1713–1728. [Google Scholar] [CrossRef]
  27. Neupane, P.; Sapkota, H.; Jung, S. In-Situ Monitoring and Prediction of Geometric Deviation in Laser Powder Bed Fusion Process Using Conditional Generative Adversarial Networks. In Proceedings of the 2024 ASNT Rearch Symposiu, Pittsburgh, PA, USA, 25–28 June 2024. [Google Scholar]
  28. Isola, P.; Zhu, J.-Y.; Zhou, T.; Efros, A.A. Image-to-Image Translation with Conditional Adversarial Networks. In Proceedings of the IEEE Conference on Computer Vision and Pattern Recognition (CVPR), Honolulu, HI, USA, 21–26 July 2017; pp. 1125–1134. [Google Scholar]
  29. Fardo, F.; Conforto, V.; Oliveira, F.; Rodrigues, P. A Formal Evaluation of PSNR as Quality Measurement Parameter for Image Segmentation Algorithms. arXiv 2016, arXiv:1605.07116. [Google Scholar] [CrossRef]
  30. Zhou, W.; Bovik, A.C.; Sheikh, H.R.; Simoncelli, E.P. Image Quality Assessment: From Error Visibility to Structural Similarity. IEEE Trans. Image Process. 2004, 13, 600–612. [Google Scholar] [CrossRef] [PubMed]
  31. Wang, Y.; Hu, C.; Wang, Z.; Lin, S.; Zhao, Z.; Zhao, W.; Hu, K.; Huang, Z.; Zhu, Y.; Lu, Z. Optimization-Based Non-Equidistant Toolpath Planning for Robotic Additive Manufacturing with Non-Underfill Orientation. Robot Comput.-Integr. Manuf. 2023, 84, 102599. [Google Scholar] [CrossRef]
  32. Kuipers, T.; Doubrovski, E.L.; Wu, J.; Wang, C.C. A Framework for Adaptive Width Control of Dense Contour-Parallel Toolpaths in Fused Deposition Modeling. Comput.-Aided Des. 2020, 128, 102907. [Google Scholar] [CrossRef]
  33. Szabó, V.; Weltsch, Z. Full-Surface Geometric Analysis of DMLS-Manufactured Stainless Steel Parts after Post-Processing Treatments. Results Eng. 2025, 27, 106084. [Google Scholar] [CrossRef]
  34. Arnold, C.; Breuning, C.; Körner, C. Electron-Optical In Situ Imaging for the Assessment of Accuracy in Electron Beam Powder Bed Fusion. Materials 2021, 14, 7240. [Google Scholar] [CrossRef]
  35. Liang, J.; Cao, J.; Sun, G.; Zhang, K.; Van Gool, L.; Timofte, R. SwinIR: Image Restoration Using Swin Transformer. In Proceedings of the IEEE/CVF International Conference on Computer Vision (ICCV) Workshops 2021, Montreal, BC, Canada, 11–17 October 2021; pp. 1833–1844. [Google Scholar]
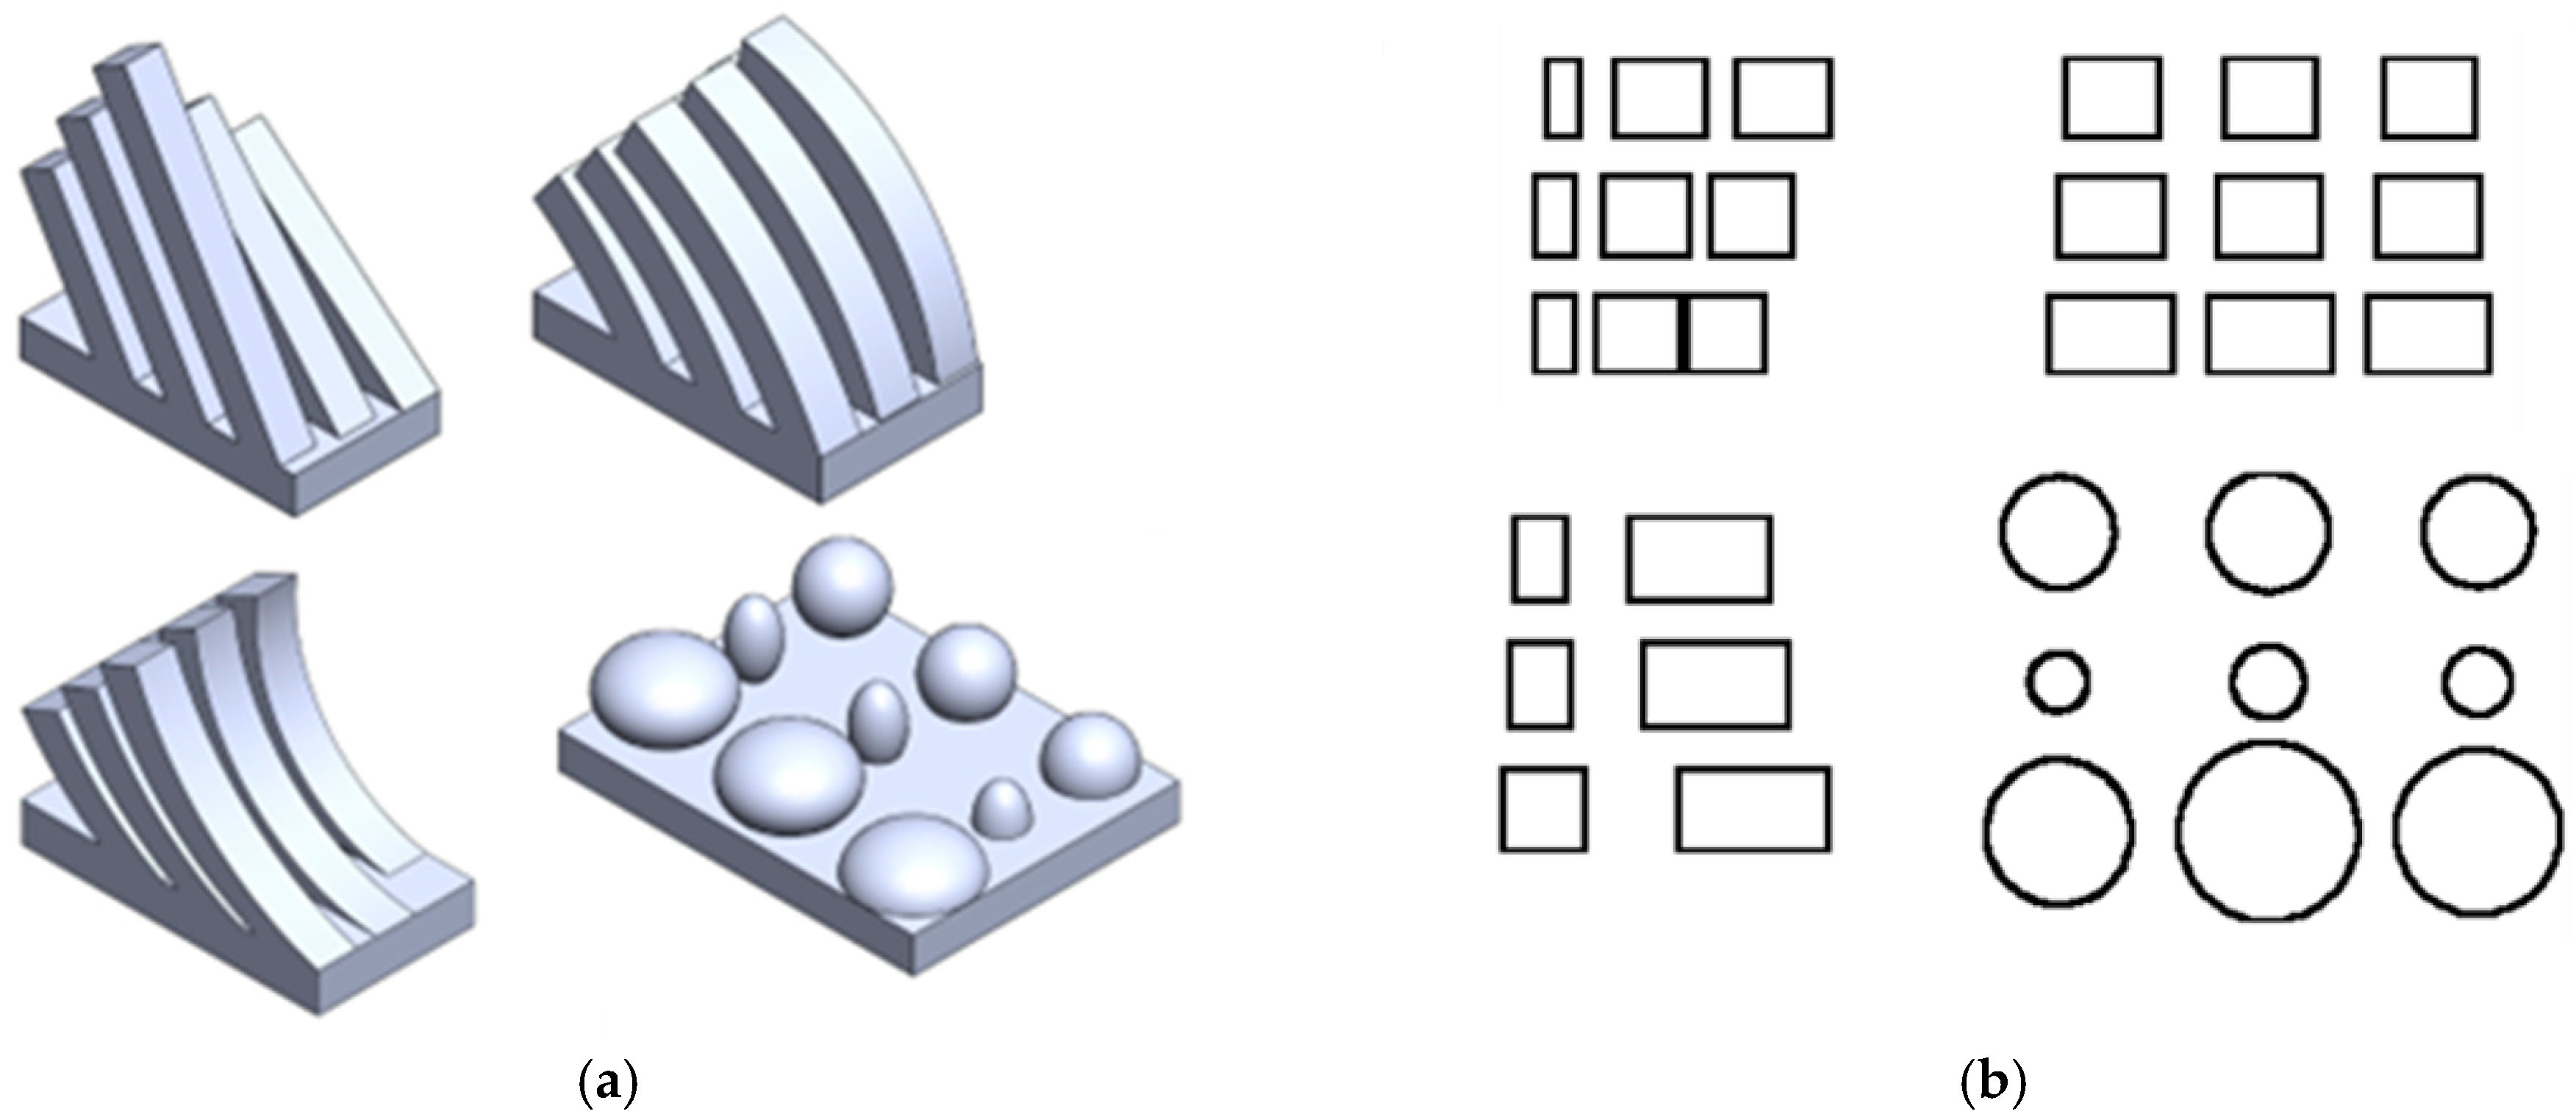
Figure 1. (a) 3D CAD models designed for printing; (b) Sample sliced images of all four parts.
Jmmp 09 00411 g001
Figure 2. Rendered cube illustrating the color standard used to encode input images according to the selected process parameters.
Jmmp 09 00411 g002
Figure 3. 3D-printed parts.
Jmmp 09 00411 g003
Figure 4. Cube illustrating eight combinations of process parameters for training, with a ninth combination (600, 90, 90) used for validation.
Jmmp 09 00411 g004
Figure 5. Sliced images with different colors representing different process parameters based on the rendered cube in Figure 2.
Jmmp 09 00411 g005
Figure 6. In situ images captured by the printer camera: (a) cropped raw image showing the printed part area; (b) binary image where melted powder regions are white and unmelted regions are black.
Jmmp 09 00411 g006
Figure 7. Resolution-enhanced images obtained using the SwinIR model.
Jmmp 09 00411 g007
Figure 8. Input images and their ground-truth images are supplied to the cGAN algorithm.
Jmmp 09 00411 g008
Figure 9. (a) Validation dice curve; (b) validation IoU curve; (c) generator validation loss; (d) discriminator validation loss.
Jmmp 09 00411 g009
Figure 10. Input image, ground truth, and predicted image with area-split and distance-weighted area metrics: (a) total error difference = 0.041, inward distance-weighted error difference = 0.018, outward distance-weighted error difference = 0.001; (b) total error difference = 0.101, inward distance-weighted error difference = 0.008, outward distance-weighted error difference = −0.001; (c) total error difference = −0.039, inward distance-weighted error difference = −0.004, outward distance-weighted error difference = −0.002; (d) total error difference = −0.072, inward distance-weighted error difference = −0.004, outward distance-weighted error difference = −0.001.
Jmmp 09 00411 g010
Figure 11. Validation performance metrics across the entire data set: (a) IoU values; (b) Dice coefficient values; (c) PSNR values; (d) SSIM values, showing the relationships between predicted and ground-truth images for all layers of the sample printed with the ninth set of L-PBF parameters.
Jmmp 09 00411 g011
Table 1. L-PBF Process Parameters and corresponding RGB values.
RGB ValuesProcess Parameters
Red0Laser Speed100 mm/s
2551000 mm/s
Green0Laser Power20 W
255100 W
Blue0Hatch Spacing30 µm
255100 µm
Table 2. Process parameters, energy density, and corresponding RGB values for all printed parts.
S.N.Laser Speed (mm/s)Laser Power (W)Hatch Spacing (µm)Layer Thickness (µm)Energy Density (J/mm3)RedGreenBlue
140080803083.385191.25182.14
2400801003066.785191.25255
3400100803010485255182.14
44001001003083.385255255
580080803041.7198191.25182.14
6800801003033.3198191.25255
7800100803052.1198255182.14
88001001003041.7198255255
960090903055.6142223.125218.57
Disclaimer/Publisher’s Note: The statements, opinions and data contained in all publications are solely those of the individual author(s) and contributor(s) and not of MDPI and/or the editor(s). MDPI and/or the editor(s) disclaim responsibility for any injury to people or property resulting from any ideas, methods, instructions or products referred to in the content.