Abstract
The rapid tooling of mold inserts for injection molding allows for very fast product development, as well as a highly customized design. For this, a combination of rapid prototyping methods with suitable polymer materials, like the high-performance thermoplastic polymer polyetheretherketone (PEEK), should be applied. As a drawback, a huge processing temperature beyond 400 °C is necessary for material extrusion (MEX)-based 3D printing; here, Fused Filament Fabrication (FFF) requires a more sophisticated printing parameter investigation. In this work, suitable MEX printing strategies, covering printing parameters like printing temperature and speed, for the realization of two different mold insert surface geometries were evaluated, and the resulting print quality was inspected. As a proof of concept, ceramic injection molding was used for replication. Under consideration of the two different test structures, the ceramic feedstock could be replicated successfully and to an acceptable quality without significant mold insert deterioration.
1. Introduction
Since the ground-breaking invention of the first additive manufacturing or 3D printing method, namely stereolithography, in 1983 by Charles Hull [1], a tremendous development started, and a huge number of different 3D printing technologies have been produced. Nowadays, and by the further modification of established methods, almost all material classes can be shaped by 3D printing techniques. In addition to material and process development, the usage of computer-based technologies, like digital twins or AI, is gaining more and more relevance [2]. Due to legal- and IP-related issues, different companies denoted similar technologies with different (trade) names. To overcome this proliferation, a method-based systematic classification was established according to DIN/ISOASTM 52900 [3] covering Binder Jetting (BJT), Directed Energy Deposition (DED), Material Extrusion (MEX), Material Jetting (MJT), Powder Bed Fusion (PBF), Sheet Lamination (SHL), and Vat Photopolymerization (VPP). For example, the widely distributed Fused Filament Fabrication (FFF) method is a prominent part of the MEX family, which uses the deposition of polymer melts. Currently, the pristine usable material portfolio has been extended to almost all material classes. As an example, in the case of MEX, the adaption of the material and process development in powder injection molding allows for the MEX printing of small ceramic and metal parts [4,5,6,7,8,9]. Beyond the usage of MEX printers for the printing of standard thermoplastics like PLA, ABS, PMMA, PA, and others, the 3D printing of high-performance polymers like PSU, LCP, and the different variants of PEEK is getting more and more important. Due to the very high glass and melting temperatures of these polymers, melt processing requires more sophisticated printing equipment, especially at the print head with enhanced extruder temperatures up to 500 °C [10].
In contrast to the wide application range of rapid prototyping and, to a minor extent, rapid manufacturing, the usage of additive manufacturing technologies for rapid tooling, i.e., molding tool making for extrusion or injection molding with respect to new product development or small-scale series, is not widely established. Simulation or modeling approaches can hardly be found either [11,12]. Only a few current research papers deal with the fabrication or application of additive-manufactured molds. Kluck et al. described a combination of 2PP (2 photon polymerization), PDMS replication, fused silica generation by thermal treatment, and final liquid metal casting for mold fabrication with very smooth surfaces [13]. Gohn and coworkers used Polyamide 6 (PA6) and carbon fiber-reinforced PA6 mold inserts fabricated via MEX in injection molding [14]. Complex 3D ceramic parts were fabricated in ceramic injection using sacrificial molds prepared by DLP or MEX [15]. The process combination was denoted as freeform injection molding (FIM) [15]. A combination of MEX with melt infiltration enabled a composite consisting of 17-4PH steel and copper suitable for mold making [16]. Krizsma et al. investigated the behavior of PolyJet-fabricated mold inserts during injection molding [17]. The used epoxy-acrylate for mold making possessed a glass transition temperature of around 50 °C, and the applied injected polypropylene had a recommended processing temperature of around 190–235 °C. The authors monitored the deformation that occurred by thermal expansion and cavity pressure [17]. With respect to micro-fabrication, molding tools generated by SLA and its variants, with their higher precision and accessible smaller geometric features, are of particular importance [18]. A US patent from Stratasys Ltd. (Eden Prairie, MN, USA), published in 2018, addresses three main requirements for a suitable mold, namely good thermal conductivity, certain thermomechanical stability, and regions with flexible material for sealing by using a multi-material approach [19]. A small study compared different mold materials fabricated by different 3D printing and CNC milling methods applying polypropylene as replication material [20]. In an early work, Vasco and Pouzada investigated mold inserts, either made from selective laser melting of a stainless-steel powder or by SLA applying an epoxy resin for use in microinjection molding [21]. The moldability of different thermoplastics, like polystyrene (PS), polypropylene (PP), and polyoxymethylene (POM), using additively manufactured molding inserts carrying test structures like small pins or logos, was researched. As expected, the SLA delivered a better mold insert surface quality with no defects compared to the SLM-produced one. The poor mold insert quality caused certain negative polymer demolding issues. With increasing molding trials, the SLA-derived mold insert showed a pronounced deterioration [21]. Surace et al. also investigated SLA-derived mold inserts for micro-injection molding with POM as molding material [22]. In particular, the mold inserts materials with a lower softening temperature than the POM melt temperature during injection (230 °C) showed a pronounced surface deterioration with increasing replication cycles [22]. Quite recently, a MEX-printed ABS-graphene nanocomposite was investigated by targeting wet rapid tooling, exploiting the positive effect of graphene nanoparticles on the ABS tribological properties and enhancing wear resistance [23]. Strano et al. published an overview of MEX-based polymer tools, e.g., for injection molding. They observed the combination of polyetherimide as MEX-printed mold insert and POM as replication polymer difficulties during demolding, which can be attributed to the enhanced mold insert roughness originating from the printing process [24]. Abbas et al. recently published in a very detailed manner the usage of PEEK mold inserts for vulcanization injection molding [25]. On a commercial basis, different mold insert materials are used to apply different 3D printing technologies; a recent overview can be found in [26].
Beyond plastic injection molding, the recognition of ceramic and metal parts for powder injection molding (PIM) is gaining more and more importance in near-net-shape manufacturing on a larger scale, even for parts with very small geometric features [27,28,29]. Due to the more complex feedstock composition consisting of ceramic or metal fillers, additives, and thermoplastic binder mixtures, the requirements for the mold insert properties, like surface quality or abrasion resistance, are significantly higher than in plastic replication.
In continuation of previous work dealing with the impact of the PEEK printing parameters applying MEX on the quality of the final part [30], this work focuses on the usage of MEX-printed PEEK mold inserts in ceramic injection molding (CIM). PEEK possesses a high-performance polymer with outstanding thermal and mechanical stability, but MEX printing is quite challenging. In a very recent paper [31], the following statement can be found: “FDM additive manufacturing of PEEK is a complex process” [31], featuring non-unique cause-and-effect dependencies. Beyond the typical MEX printing parameters like nozzle, chamber and platform temperatures, printing speed, filling ratio, and others, which influence either solely or interactively, the microcristallinity of the semi-crystalline thermoplastic as well as the phase transition suppression have a significant impact on the final part quality and appearance [31]. McNiffe et al. [32], as well as Ritter et al. [33], exploited the adjustment of the microcristallinity degree by different printing, heated bed, and built chamber temperatures enabling the production of functionally graded devices. Following a design of experiments (DOE) approach, Pulipaka et al. investigated the impact of different printing parameters (nozzle and platform temperature, infill, layer height, print, and speed) on surface roughness, elastic modulus, hardness, and others [34]. They observed that when targeting a certain geometric or mechanical property, different printing parameters showed a non-unique impact on the other investigated features.
Nevertheless, PEEK has the potential for use as mold insert material, not only for PIM but also for CIM, by applying highly filled alumina feedstocks with a solid load of 55 Vol.-%. To our best knowledge, this combination—PEEK mold inserts and CIM—has not been investigated systematically up to now. The quality of the printed mold inserts carrying simple test structures was evaluated as a function of different printing parameters by visual inspection, surface roughness, and warpage measurements. The influence of the injection molding parameters on the quality of the replicated parts and the accompanying mold insert surface appearance after replication were also inspected visually and by surface roughness value measurements. Preliminary results were presented during the MicroSystemTechnik Congress 2021 [35].
2. Materials and Methods
2.1. Material Selection
With respect to mold insert printing, commercially available PEEK supplied by the printer’s vendor was selected (Table 1).

Table 1.
Material properties of used commercial PEEK filaments [30].
2.2. Initial Printing Parameter Selection
The printing of all test structures and mold inserts was performed using the Apium P220 printer (Apium Additive Technologies GmbH, Karlsruhe, Germany). The printer was delivered with pre-set printing parameters for PEEK (Table 2). All test trials used either the recommended vendor’s printing parameters (Table 2) or the previously elaborated results [30] as a starting point for further parameter optimization as described and motivated in the related Section 3.2.1, Section 3.2.2 and Section 3.2.3.

Table 2.
Printer vendor recommended standard printing parameters used as starting values.
2.3. Mold Insert Structure Selection
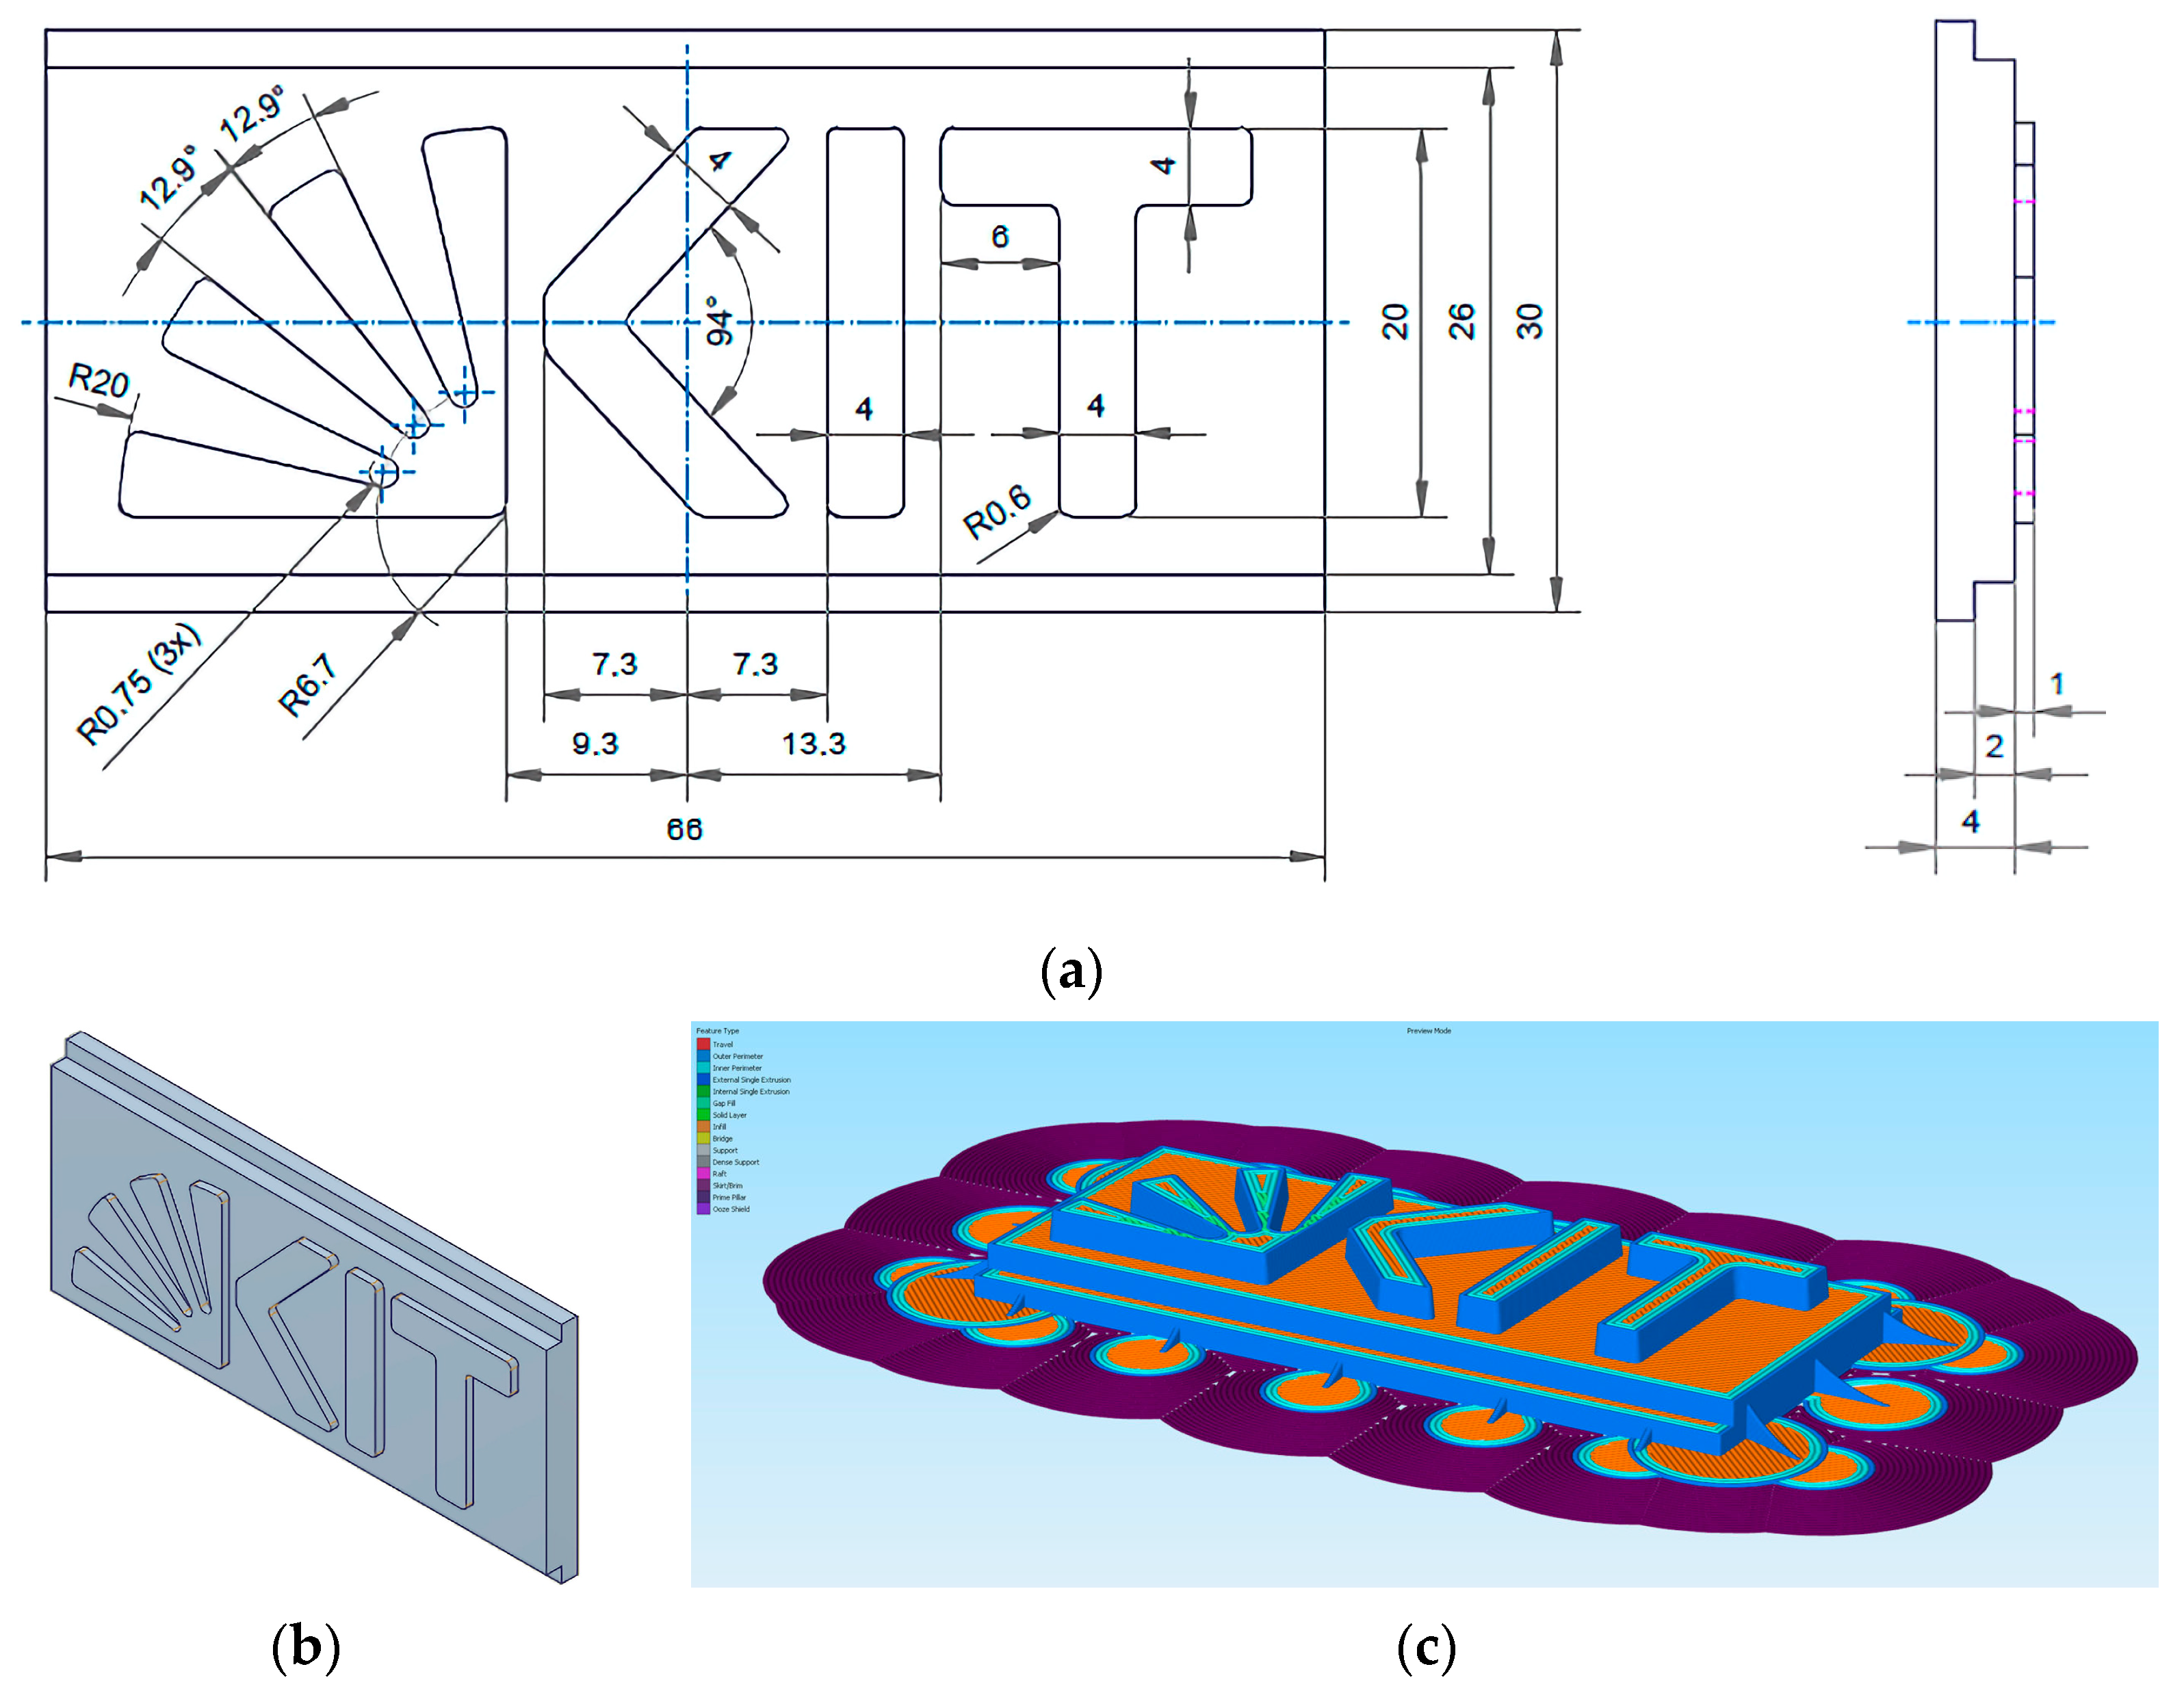
According to preliminary printing trials, the MEX printing of very fine structural details was omitted due to poor printing results. As the first mold insert design, the KIT logo was selected, containing different elements, like a fan-type structure, as well as different letters (Figure 1a). Alle features are elevated on top of the base plate (26 × 66 mm2) with a height of 1 mm. The ground plate of the mold insert has a standard size of 30 × 66 mm2, ruled by the die plate in the molding tool. There are no integrated ejector slopes, and the upper edges do not have a radius. The total height of the mold insert is 5 mm, covering the ground plate (height 2 mm), the base plate (height 2 mm), and the structure for replication (height 1 mm). The step between the ground and base plate is necessary for mold insert clamping in the molding tool die plate. Figure 1b shows a 3D image for better visualization, and Figure 1c shows an STL file with all auxiliary structures, like the brim.
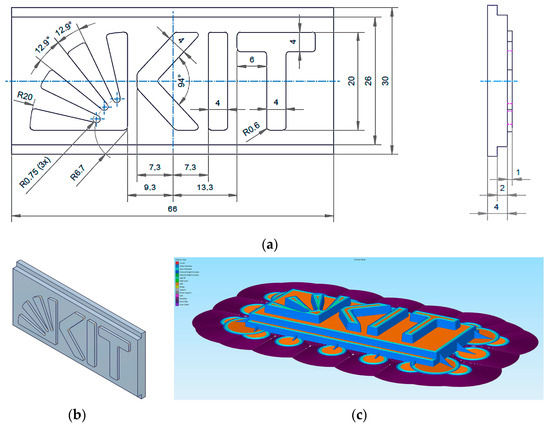
Figure 1.
Mold insert type 1: (a): Engineering drawing with unit mm; (b) 3D view; (c) used STL File.
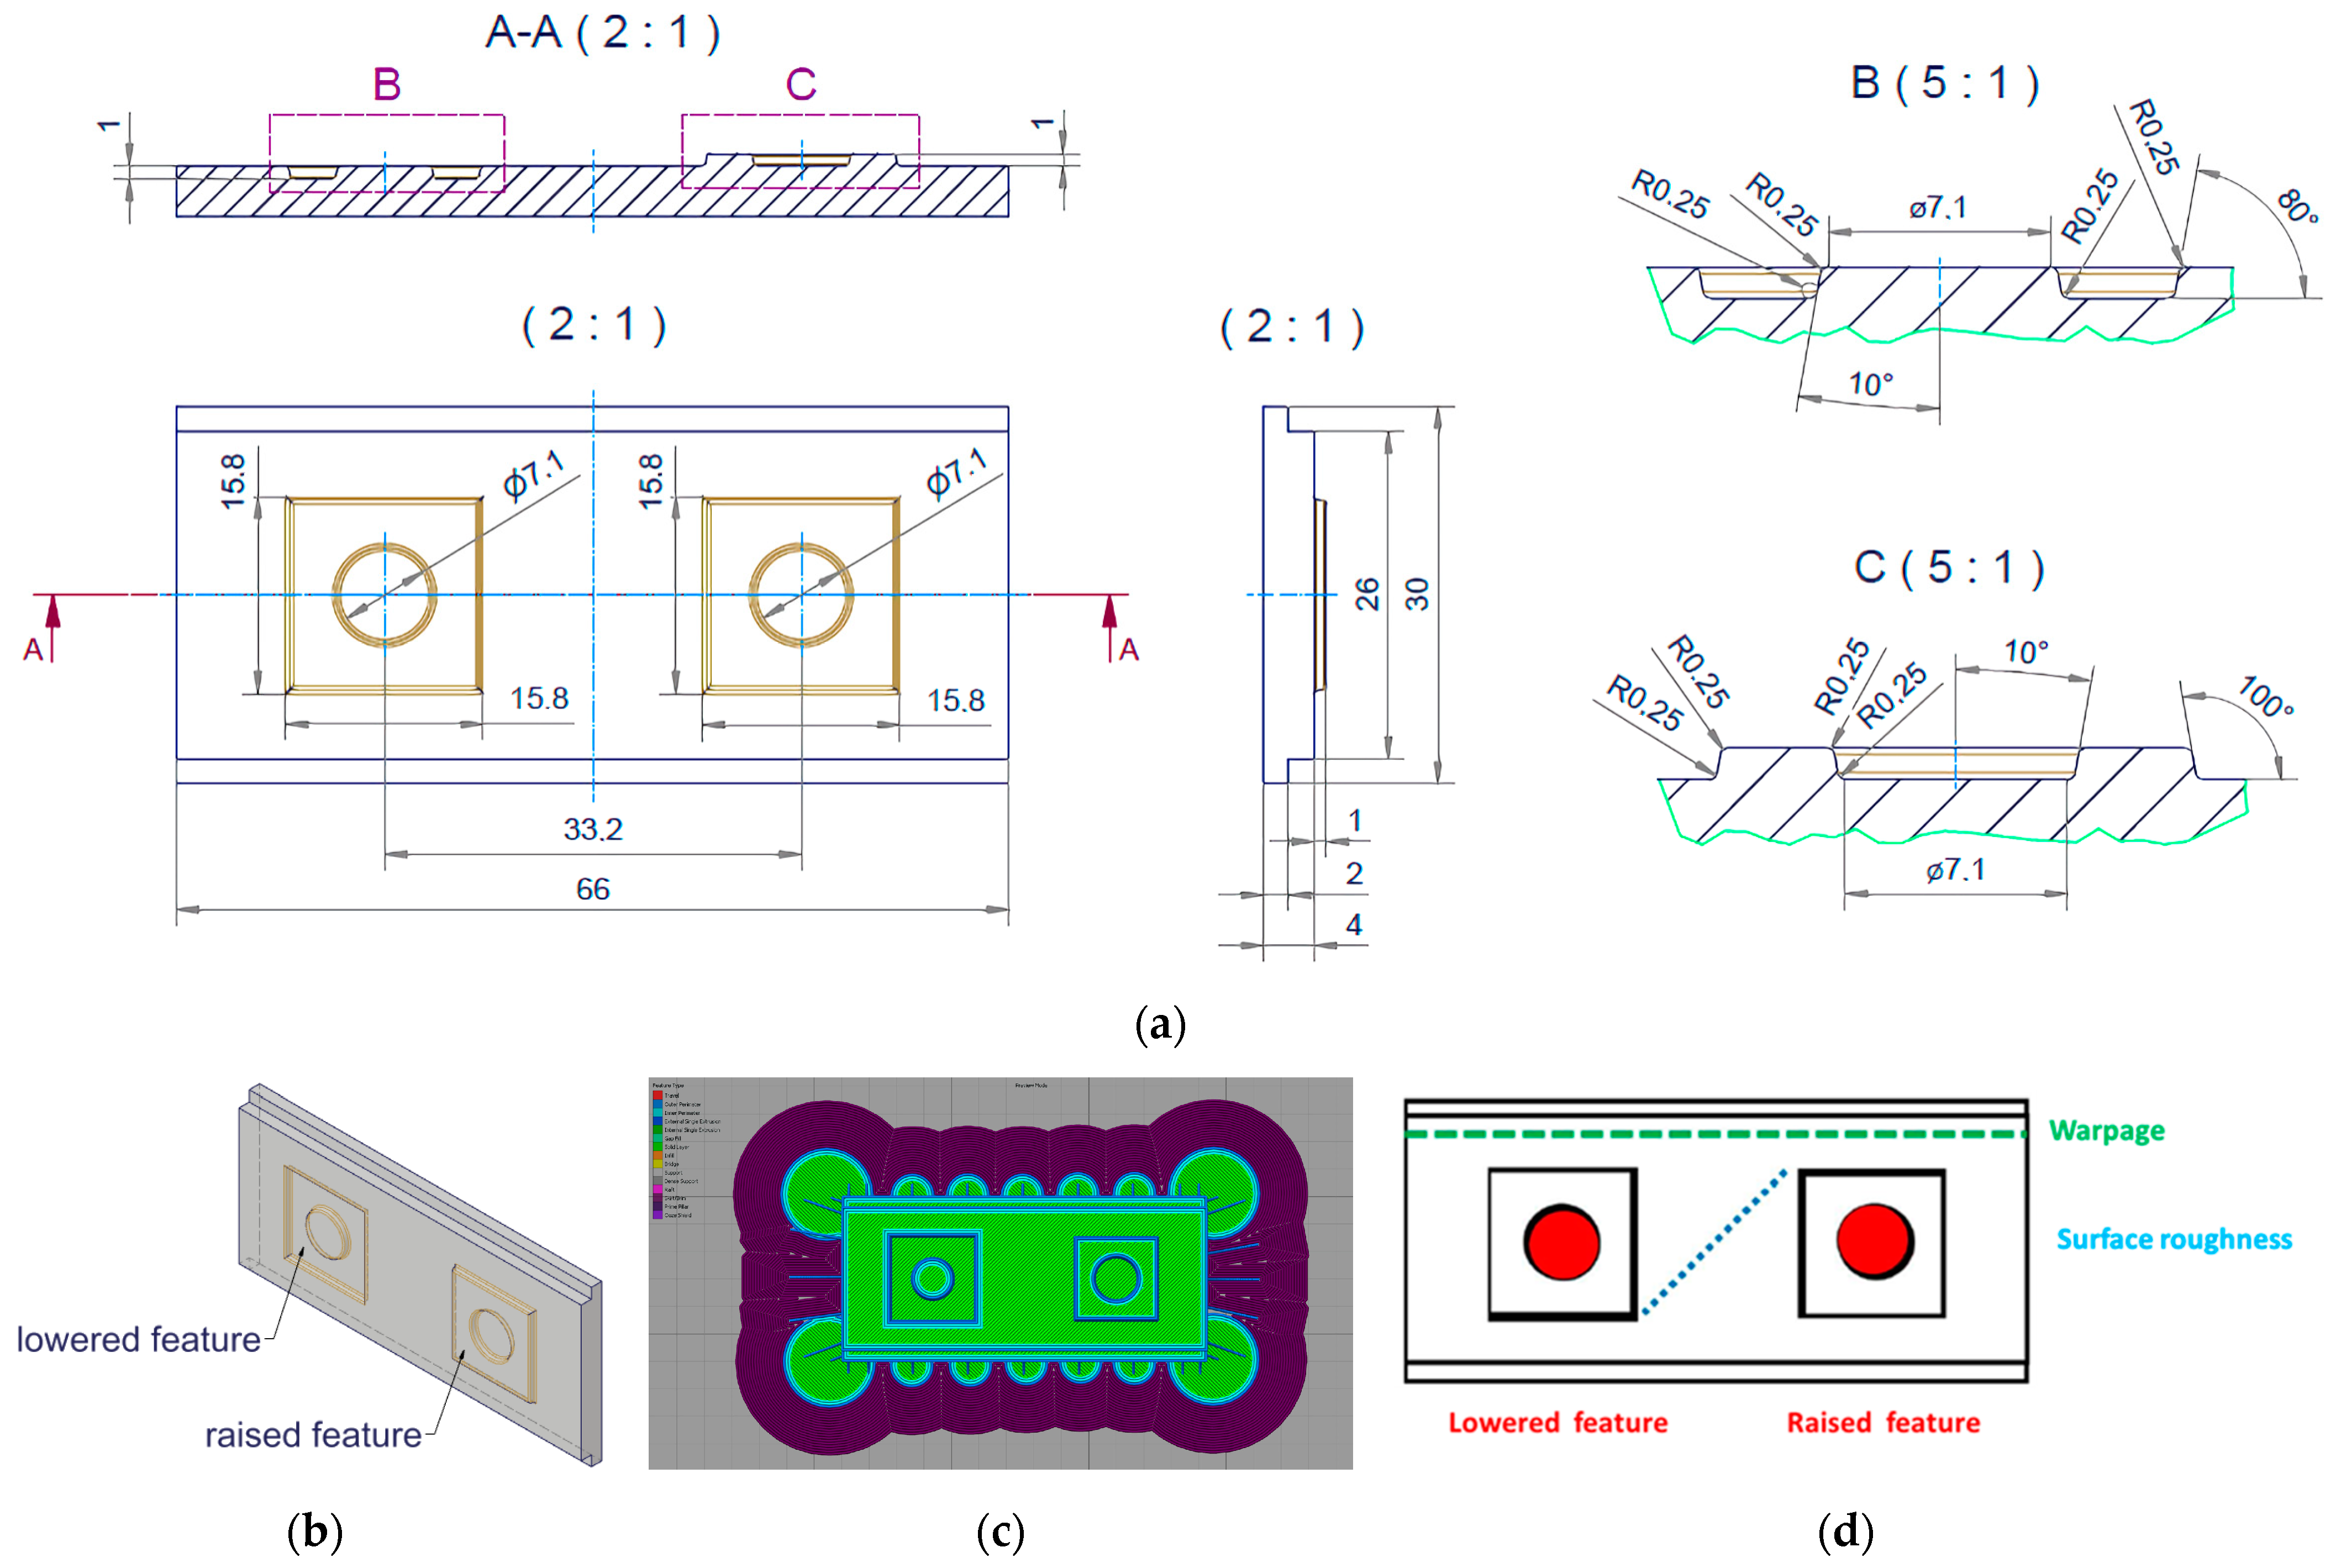
The second mold insert carries elevated and lowered structural elements (Figure 2a). For better demolding, an ejector slope (10°) was integrated, as well as a radius at the upper edges. The maximum total height is again 5 mm with the same ground and base plate dimensions. The rectangular areas with the raised and lowered features have a size of 15.8 × 15.8 mm2, and the inner lowered or raised circle has a diameter of 7.1 mm up to the start of edge rounding and a depth or height of 1 mm. Both mold insert designs were used for the evaluation of the replication by ceramic feedstocks as well as well as mold insert deterioration. Figure 2b shows a 3D image for better visualization, and Figure 2c shows the used STL file with all auxiliary structures, like the brim.
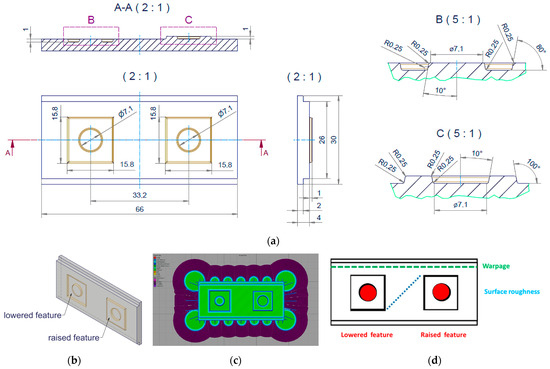
Figure 2.
Mold insert type 2: (a): Engineering drawing with unit mm; (b) 3D view; (c) used STL File; (d): surface roughness and warpage measurement positions.
2.4. Printed Sample Characterization
One of the most important properties of a printed mold insert is the surface roughness facing the feedstock during the molding procedure. The surface roughness of the printed PEEK mold inserts, as well as of the printed samples, was measured using a white light interferometer (MicroProf® CWL F, FRT GmbH, Bergisch-Gladbach, Germany) according to the standard DIN EN ISO 4287 [36]; the used resolution was 1 µm with a sample rate of 32 Hz. Figure 2d shows the selected positions in mold insert type 2 for the different measurements, like roughness between the structural elements (blue line) and at the lowered/raised features (red area), as well as warpage (green line). The mold inserts surface roughness values were measured once prior to and after replication at different positions, and the surface roughness of the replicated parts was measured directly after printing. The warpage was calculated from the largest height difference according to the measured contour line along the long mold insert dimension (green line).
2.5. Injection Molding Experiments
All injection molding experiments were performed using an Arburg 420 C (Arburg GmbH & Co KG, Loßburg, Germany). An established alumina-containing feedstock was selected for ceramic injection molding; the composition is listed in Table 3. More details on the used feedstock composition and properties can be found in [37]. The printed mold inserts were fixed in the die plate, which was placed in the molding tool setup of the injection molding machine. Only a reduced number (<10) of molding trials could be performed due to small mold insert damage and feedstock residues at the mold insert surface. In the latter case, a careful mold insert cleaning after removal from the die plate allowed for further usage. Details can be found in Section 3.3.

Table 3.
Composition of the used feedstock systems.
3. Results and Discussion
In the following, a detailed description of the above printing parameter evaluation targeting different device properties and surface appearance is given. Two different test structures were MEX-printed as mold inserts suitable for ceramic injection molding. Different replication series were undertaken to investigate the impact of the injection molding parameters on the molded part quality with proceeding replication cycle by visual inspection. In addition, the mold insert, as well as green body quality with an ongoing replication cycle, were evaluated by surface roughness and warpage measurements.
3.1. Initial Printing Quality Evaluation
According to previous results [30] and preliminary investigations, the usage of a brim for advanced adhesion on the built plate is mandatory. The vendor of the P220 printer, Apium, claims that the smallest x,y details around 250 µm should be possible. Following our own investigations, all structural features, which are smaller than twice the printing nozzle diameter (0.4 mm), cannot be printed in a reproducible and reliable quality, which shows a realistic feature limit of 0.8 mm only. As a consequence of further printing trials, the x,y details on the PEEK mold insert surface should not be smaller than the specified 0.8 mm, which limits the general usage possibilities, e.g., as mold insert.
3.2. Mold Insert Printing
3.2.1. General MEX Printing Settings
For better comparison, the general printing strategy covering printing direction, brim, number of contour lines, and others are identical, with the exception of certain cases. Figure 1c and Figure 2c show, for both mold insert types, the print preview as defined in the slicer program Simplify 3D (version 4.1.3). In both cases, three contour lines envelop the main structural features, which were filled with a different infill degree (Table 4) at a 45° angle. To avoid any printed parts sliding during printing, auxiliary structures like brim and fixation posts were added. Table 4 lists an excerpt from the generated G-code and exemplarily summarizes important settings for the structure shown in Figure 1c.

Table 4.
Exemplary excerpt of the generated G-code values.
3.2.2. MEX Printing Evaluation of Mold Insert Type 1
The preliminary printing trials demonstrated that small structural features suffered from poor printing quality. Consequently, the mold insert type 1 with course surface features (KIT-Logo) was selected (Figure 1a). In addition to printing parameter adjustment, a variation of the printing strategy was undertaken. In general, a suitable printing strategy includes the variation of relevant printing parameters like temperature and speed, as well as infill factor and raster angle. Targeting the usage of a mold insert in injection molding, the focus was set on reduced surface roughness and good adhesion of the top structures on the base plate for improved demolding accompanied by a certain mold insert stability. In this case, the printing temperature and the printing speed are of major importance. Infill factor and raster angle are more relevant for enhanced mechanical properties but may have a negative impact on warpage. Therefore, the most relevant parameters were printing temperature and speed variation.
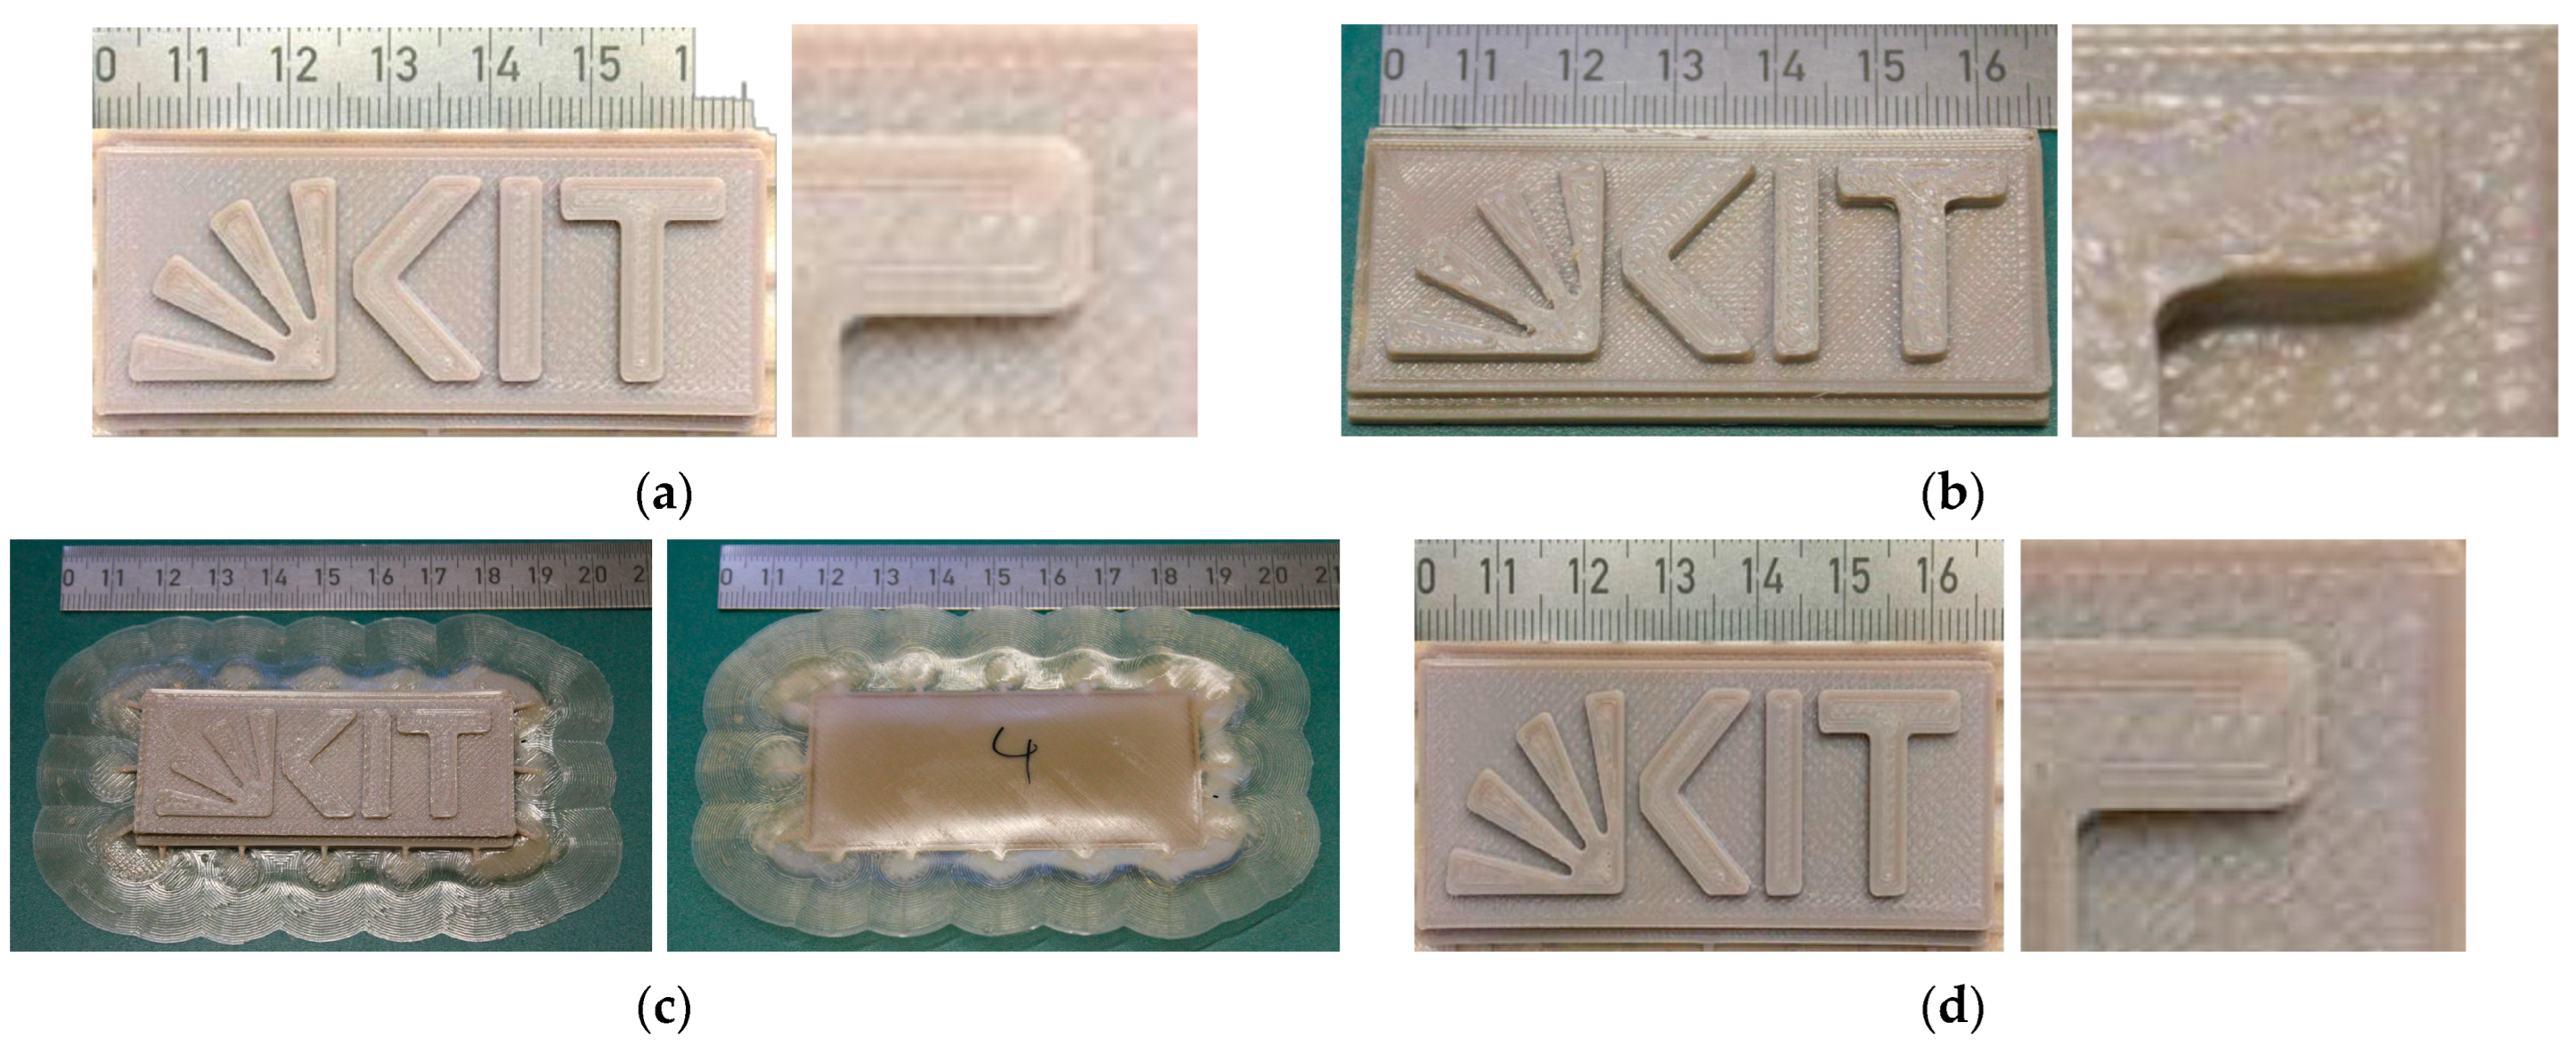
The resulting different printing strategies applying parameter variation are shown in Table 5 and follow, principally, the findings of [34] that different printing parameters have different impacts on device properties. Figure 3 gives an overview of the printed mold inserts according to the different foci described in Table 5. In almost all cases the printing temperature is lower in comparison to the recommended value. At lower temperatures, the viscosity of the filament during printing and after deposition is higher. This is advantageous because it avoids any smearing of the previously printed layer during the printing of the next layer according to the limited surface cooling after printing, which is accompanied by an increased softness and pronounced viscoelastic flow. As a drawback, the resulting surface roughness can be increased.

Table 5.
Printing parameters for mold insert type 1 applying a 0.4 mm nozzle.
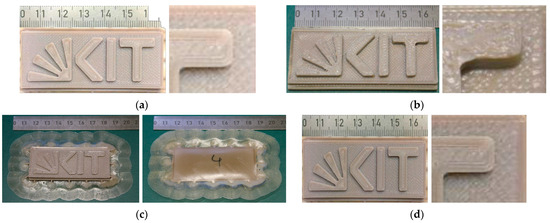
Figure 3.
Printed PEEK mold inserts (type 1) following different printing strategies (Table 5): (a) Strategy, overview and detailed view of upper right part; (b) Strategy, overview and detailed view of upper right corner; (c) Strategy, overview front and back side; (d) Strategy, overview and detailed view of upper right corner.
In the case of strategy (a) in Table 5, the part printing process was split into two steps but applied the same printing parameters. In the first step, the bulk base plate was printed and finalized, allowing for a good surface quality by printing a smooth top layer. After that, in the second step, the structural features were printed on top of the bulk base plate top layer. As a result, a very good surface quality and sharp outer contours could be reached, which are depicted at the zoom-in on the right side of Figure 3a. As a drawback, small undercuts, e.g., in the inner radii of the fan-type feature, can be found, which can be removed easily by slight mechanical postprocessing, like manual grinding using sandpaper (VSM KK114 polishing paper (Hannover, Germany) and Starcke 991A, P1500 (Melle, Germany). In addition, reduced adhesive stability of the structural features on top of the base plate can be expected because of printing on the previously printed smooth bulk surface. Strategy (b) targets just the opposite; hence, a pronounced adhesion of the top structure on the base plate by printing the mold insert in one go. However, this approach caused an increased surface roughness due to enhanced material extrusion (Figure 3b), which can be seen, in a better way, in the zoom-in of Figure 3b on the right side. In strategy (c), the previously selected infill of 70% was raised to 100% for better mechanical stability and improved thermal conductivity (air: 0.0262 W/(m K), PEEK: 0.25 W/(m K)). Due to the larger infill, a pronounced warping occurred due to an enhanced shrinkage during cooling down from the outside towards the center of the printed part.
As a result, the part delaminated despite the large brim from the built platform; a non-constant distance between the nozzle and part surface occurred, generating a poor surface quality (Figure 3c). On the right side of Figure 3c, the mold insert is presented from the backside, and the warpage is obvious; hence, the mold insert could not be used for replication purposes. Finally, in the case of strategy (d), the positive experiences from the previous strategies (a)–(c) were combined, which includes a variable infill from the bottom towards the top for warpage avoidance, improved surface quality like in strategy (a), and a variable printing speed and material extrusion for the ground plate and the raised features (Figure 3d). Higher printing temperatures are recommended for low surface roughness values [34,38,39]. Therefore, the final layers were printed at the highest temperature of 485 °C.
In addition, and to meet the challenging CIM requirements, the mold insert surface was manually ground using sandpaper, reducing the surface roughness. Another mold insert carrying the inverse KIT logo was also printed with identical printing parameters according to strategy (d). Postprocessing is recommended to reduce the filament traces coming from the printing process [34]. A comprehensive correlation between the printing process parameters of a MEX-printed PEEK specimen on the surface and the mechanical properties can be found in [34,38,39] as well.
3.2.3. MEX Printing Evaluation of Mold Insert Type 2
Following the optimized printing parameters found in the previous section, a different test geometry was selected, carrying simple raised and countersank structures to avoid geometrical elements that are too fine. In addition to support demolding, a 10° ejector slope and a radius at the upper edges were implemented. As in the previous case, a variation of the infill from the bottom towards the top surface for warpage avoidance was applied. The used printing conditions with a nozzle diameter of 0.4 mm are listed in Table 6 and are almost identical to strategy (d) described in Table 5. Directly after printing, the traces coming from the filament deposition can be seen by visual inspection (Figure 4a). Therefore, and with respect to better replication, the surfaces facing the feedstock were ground after printing manually as well, which allows for a smoother surface (Figure 4b). The positive effect of the grinding procedure is depicted in the right images (zoom in) of Figure 4a,b. A significant leveling of the surface topology is obvious and should be helpful for successful molding trials.

Table 6.
Printing parameters for PEEK mold insert type 2.

Figure 4.
Photographs of printed PEEK mold inserts and zoom in on the right upper corner with positive/negative structure: (a) as printed; (b) after printing and grinding. For better visualization, the visual contrast of the zoom image was enhanced. For geometric dimensions, see Figure 2.
3.2.4. Mold Insert Warpage
One important criterion for the usage of a mold insert in injection molding is the overall warpage along the longitudinal side (total length of 66 mm; see green line in Figure 2d). The mold inserts carrying the KIT Logo, printed according to printing strategy (d), showed an overall warpage of 301 µm, and the mold insert type 2 possessed a warpage of around 271 µm. Despite the fact that all mold inserts had the same maximum total height and were printed with a brim for better adhesion on the built platform, the observed warpage values were scattered in a certain range. If the warpage is too large, the mold insert cannot be positioned in a proper way in the die plate of the injection molding tool.
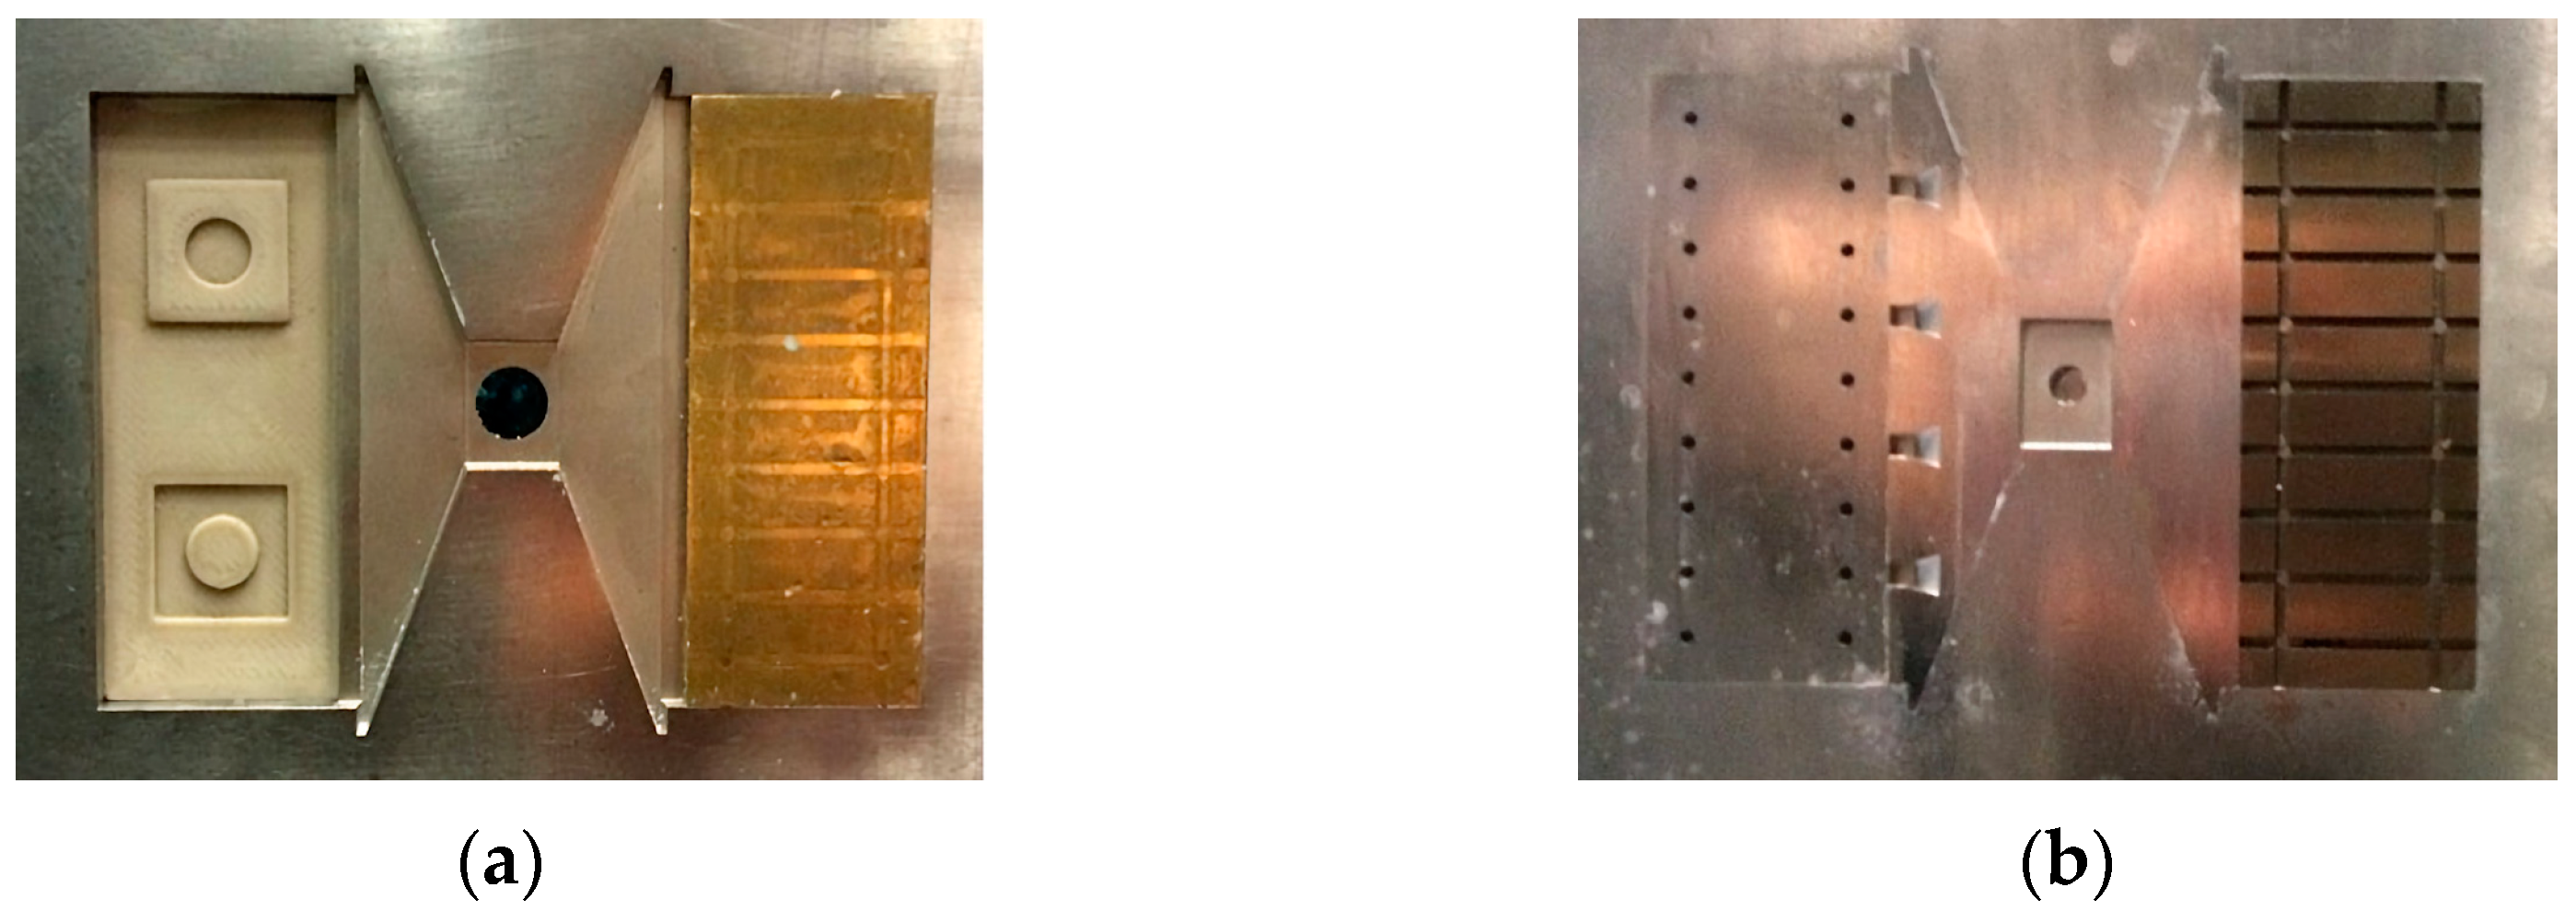
Figure 5 shows, on the left side, a PEEK mold insert clamped in the die plate at the nozzle side of the molding tool. The second molding tool cavity is filled with a dummy brass mold insert. On the right side of Figure 5, the ejection side of the molding tool ejector plates with retracted ejector pins can be seen.
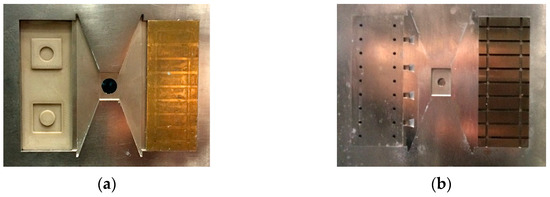
Figure 5.
Molding tool with PEEK mold insert type 2: (a) nozzle side; (b) ejector side.
3.3. Mold Insert Replication by Ceramic Injection Molding
Beyond the impact of the mold insert surface quality on successful demolding, the usage of polymers as mold insert materials in combination with polymer-based feedstocks can cause additional difficulties at elevated temperatures due to thermal welding. Consequently, in general, a polymer mold insert material that is incompatible with the polymers considered in the feedstock systems must be selected. In the literature, only very little data can be found related to suitable polymer pairing for welding or multi-component injection molding; the behavior of modern high-performance polymers like PEEK is unfortunately not listed [40,41]. The selected feedstock injection temperature is, in most cases, below the PEEK’s glass transition temperature (Table 1 and Table 7). In combination with the huge filler amount in the feedstock, this polymer incompatibility issue could be of minor importance but should be kept in mind.

Table 7.
Injection molding parameters using the KIT logo PEEK mold inserts.
3.3.1. Ceramic Injection Molding of Mold Insert Type 1
Test replications using the KIT logo PEEK mold insert to validate the different printing parameter strategies described in Table 5 were undertaken. The initial injection molding parameters were taken from [37], but they were modified empirically towards the best replication results (Table 7) regarding complete mold filling and reliable demolding.
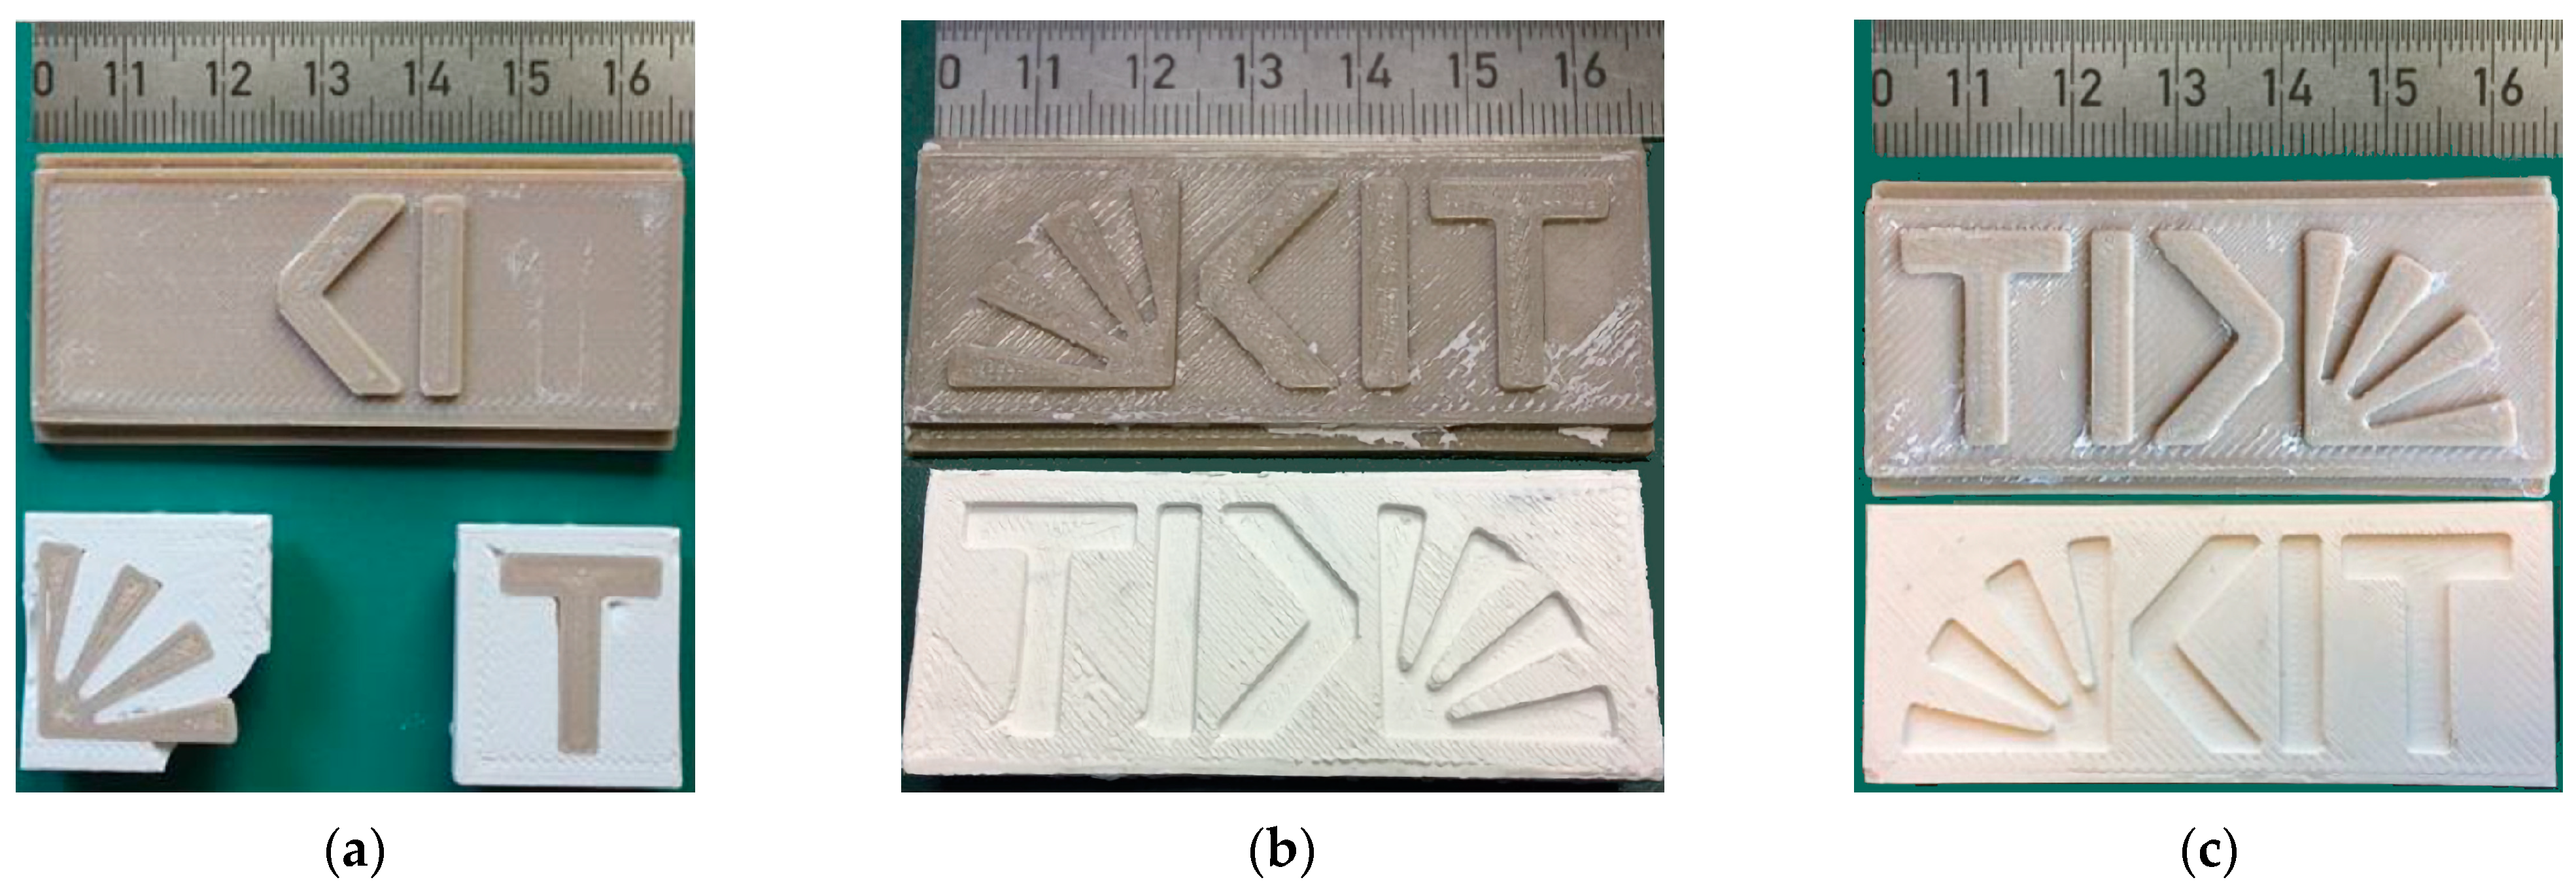
As described earlier, mold insert type one does not possess ejector slopes, which complicates successful demolding. Figure 6 shows the variants (a), (b), and (d) (see Table 5) of the mold inserts after replication with the ceramic feedstock by visual inspection. The replication applying variant (a) was not successful. After the molding tool opened, the ceramic green body was stuck between the mold insert’s top structures (Figure 6a).
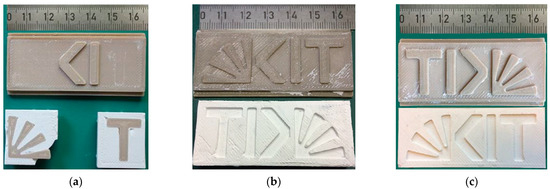
Figure 6.
Visual inspection of the printed PEEK mold inserts (above) and replicated ceramic green body following the different printing strategies: (a) variant; (b) variant; (c) variant.
A manual demolding trial caused delamination of the top surface structures of the mold insert, which could be attributed to the previously described undercuts at the elevated top structures and the poor adhesion on the ground plate originating from the selected printing strategy. The strategy with the focus on enhanced adhesion (b) enabled a successful demolding, but the mold insert’s rough surface was copied to the surface of the molded ceramic green body as well (Figure 6b). Consequently, traces of the feedstock were stuck at the mold insert’s surface following the texture originating from the last printed filament layer, which increased the adhesion of the solidified feedstock in the subsequent molding trials. As a result, the number of successful molding trials (<5) prior to mold insert removal and cleaning is limited. The enhanced parameter variation in variant (d) with the additional surface postprocessing delivered a reduced surface roughness, enabling an improved quality of the resulting green body (Figure 6c), here with the inverse KIT logo structure. A series of five parts could be molded prior to mold insert removal and cleaning.
3.3.2. Ceramic Injection Molding of Mold Insert Type 2
With respect to a systematic investigation of the injection molding parameter influence on the replicated part quality, a variation of the replication parameters was performed (Table 8). Two main parameters were changed. Whilst in series 1 and 2, the feedstock injection temperature was set to 130 °C, which is below the PEEK´s glass transition temperature, the molding temperature was raised to 150 °C, which is higher than the PEEK´s glass transition temperature. A higher injection temperature causes a lower feedstock viscosity, enabling better surface wetting and should allow for a better replication quality.

Table 8.
Injection molding parameters for the different ceramic series (mold insert type 2).
The second varied parameter is the changeover pressure, which represents the change from the injection phase to the dwell or holding phase. In general, a higher changeover pressure causes a higher applied pressure on the feedstock, targeting a better mold filling. A lower changeover pressure reduces the risk that the feedstock is squeezed into the feedstock surface roughness or undercuts, enabling easier demolding. For the molding experiments, a freshly printed mold insert was used and cleaned after each series. In all series, a minimum of five individual parts were molded. Prior to each replication, the PEEK mold inserts were sprayed with a thin film of a mold release agent to simplify demolding. It is worth mentioning that this mold insert possesses ejector slopes (10°) for better demolding.
Ceramic series 1: With an increasing number of replication trials, the number and size of molding defects are increasing. Whilst the first three parts possess only very small damage at some edges (Figure 7a), with part number 4 (Figure 7b), significant chippings at the outer corner occur. In the case of part 7 (Figure 7c), chippings in the frame structure around the lowered feature can be seen. In some areas, some discoloring occurs at the surface, which should be attributed to the usage of the mold release agent.

Figure 7.
Visual inspection of replicated parts (ceramic series 1): (a) part 1; (b) part 4; (c) part 7. Defects are marked by red arrows.
Ceramic series 2: The adjustment of the changeover pressure from 246 bar to 265 bar targeted a better mold filling in the case of ceramic series 2. As in ceramics series 1, almost identical defects could be observed (Figure 8a–c). The observable discoloration originates in the applied mold release agent. The fifth molded part showed some pronounced surface defects at the base plate; as a consequence, the molding trials were stopped. The increase in the changeover pressure caused a slight improvement in the replicated molded part quality.

Figure 8.
Visual inspection of replicated parts (ceramic series 2): (a) part 1; (b) part 4; (c) part 5. Defects are marked by red arrows.
Ceramic series 3: With respect to better demolding, the changeover pressure was reduced. To compensate for the possible molding quality reduction, the injection temperature, accompanied by a lower feedstock viscosity, was increased. Figure 9 shows the first, the fourth, and the fifth molded parts; again, the red arrows highlight some replication defects (Figure 9). In general, the replication quality of the injection molded parts is better; only a few minor defects, especially at corners and edges, could be detected. The elevated injection temperature supports mold filling, but due to a larger temperature interval until demolding by an enhanced bulk shrinkage, demolding is supported as well. The wrong surface coloring, notably in part one, can be attributed again to a surplus of mold-release agents.

Figure 9.
Visual Inspection of replicated parts (ceramic series 3): (a) part 1; (b) part 4; (c) part 5. Defects are marked by red arrows.
As a summary, it can be stated that a few parts can be molded successfully using the PEEK mold inserts with the occurrence of some minor defects. In all cases, the surface defects can be attributed to demolding issues. Previous molding trials applying a PEEK mold insert with more detailed surface structures in combination with a ceramic feedstock failed, unfortunately, due to poor mold insert surface quality [37]. The best replication results were obtained using mold inserts with very low surface roughness produced by the PolyJet process [37], which can be attributed to the PolyJet´s principal process feature of liquid processing and subsequent UV-curing and solidification.
With respect to a complete mold filling and an almost defect-free demolding, a higher feedstock injection temperature and a lower changeover pressure are recommended. In all cases, no welding between the PEEK mold inserts and the polymers in the feedstocks can be observed. Therefore, the PEEK seems to be incompatible with PVB and PEG [42].
3.4. Mold Insert Deterioration
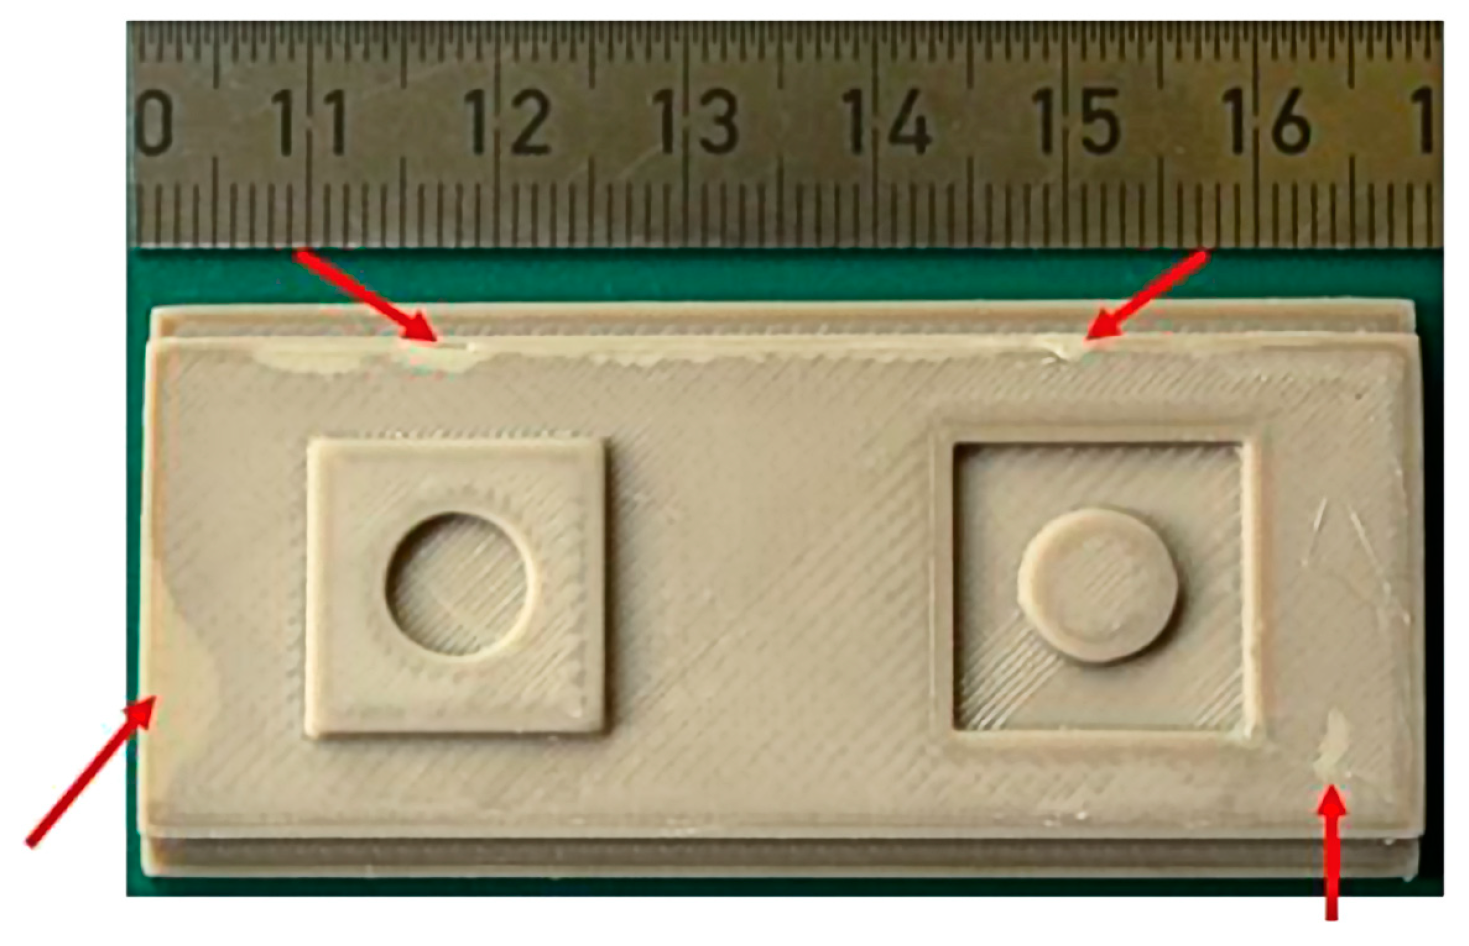
The deterioration of the PEEK mold inserts used for the three ceramic series was inspected visually, and the surface roughness of the elevated and lowered round structures was measured as described in Figure 2d. Figure 10 shows the mold insert type 2 after finishing all ceramic series and subsequent cleaning. The red arrows highlight some small defects; here, there is detachment of the upper printed layers, especially at the corners facing the clamping site of the metal die plate in the injection molding tool. These damages may be attributed to the coefficient of thermal expansion mismatch between the steel die plate and PEEK, causing pronounced mechanical tension generation in the PEEK mold insert during thermal cycling between the molding and demolding temperatures. The sharp corners and edges of the elevated and lowered structures are still intact.
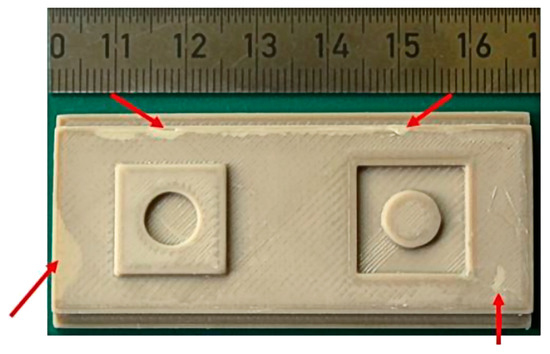
Figure 10.
Visual inspection of PEEK mold inserts with positive/negative structures after finished replication of the ceramic series and subsequent cleaning. Defects are marked by red arrows.
The different measured surface roughness values of the PEEK mold insert, and green bodies of the ceramic series at different positions are listed in Table 9. The surface roughness of the mold insert is slightly reduced after the molding experiments, which can be attributed to the abrasive behavior of the ceramic feedstock. Within the experiment, no significant trend in roughness value change with increasing molding progress could be observed. Therefore, the surface roughness values for the green bodies are averaged considering all molded 17 parts. Whilst the Ra value fits well with the related mold insert value, the obtained Rmax and Rz values differ partially. It is worth mentioning that in the case of the ceramic green bodies, the lowered inner structures correspond with the elevated inner structure of the mold insert. Following the obtained results, with the exception of some chipping, no pronounced mold insert deterioration can be observed. Therefore, further injection molding experiments should be possible.

Table 9.
Ceramic series: Comparison of roughness values prior to and after molding experiments.
3.5. Comparison with State-of-the-Art Usage of Printed Mold Inserts in Injection Molding
Currently, the use of MEX-printed mold inserts for ceramic injection molding is, to our knowledge, not described in the literature. Therefore, the presented results must be compared in a more general way with polymer molding experiments. Abbas and coworkers investigated the usage of the MEX-printed PEEK as a polymer mold insert in vulcanization injection molding [25]. They selected different printing parameters (printing temperature: 410 °C, print speed: 40 mm/s, and infill 30%) and investigated the shape of the infill pattern on the properties of the final part. In addition, the printed parts were thermally post-treated at 250 °C for final post-crystallization of the semi-crystalline polymer. A printed mold was finally used within an aluminum master mold frame for thermoplastic vulcanization at 200 °C [25]. More than 50 parts could be produced, but the soft and rubberlike behavior of the replicated part supported the defect-free molding and demolding, preventing any harm to the mold insert’s surface. With respect to surface appearance, like surface roughness, Pulipaka et al. [34] investigated the impact of different printing parameters on the final device quality in a DOE approach. They found that mostly the nozzle temperature and the layer height had a significant effect on the surface roughness. The investigated nozzle temperatures were 390, 405, and 420 °C, which were significantly lower than the ones applied in this paper. Infill, platform temperature, and print speed showed no significant impact [34] within the given parameter field. Wick-Joliat et al. applied MEX-printed sacrificial molds made from PVA, fitted into a steel adapter, and used in ceramic injection molding [15]. This freeform injection molding denoted approach enabled the production of real 3D-shaped devices by injection molding. After replication, the replicated part with the water-soluble sacrificial PVA mold was immersed in water for 12 to 48 h. Hence, the polymer mold can be treated as a disposable mold insert.
In addition to ceramic injection molding, Altaf et al. reported that ME-printed mold inserts made from ABS or nylon were applied in the metal injection molding of a 316 L-based feedstock replicating simple tensile test specimen [43]. The authors claim that a non-specified small number of molding cycles with these printed mold inserts could be performed.
4. Conclusions and Outlook
In this work, MEX-printed PEEK parts were targeted to be used as mold inserts in ceramic injection molding following a rapid tooling approach. The most important results are as follows:
- Printed structural details should be at least twice the selected nozzle diameter to achieve a reliable printing surface quality;
- A systematic MEX printing parameter variation enables an individual optimization of different device properties and surface appearance;
- The integration of ejector slopes as well as radii is mandatory for successful demolding;
- The molding parameters must be evaluated individually for each mold insert surface structure;
- An almost low-defect and low part number replication of MEX-printed PEEK mold inserts carrying simple surface structures in ceramic injection molding is principally possible;
- Intermediate cleaning after a certain number of replication cycles supports further usage as a mold insert in ceramic injection molding and improves the quality of the replicated green bodies.
Future work should concentrate on further mold insert surface quality improvement by further improving printing parameter variation, avoiding a pronounced feedstock adhesion during injection molding, and reducing the necessity of intermediate mold insert cleaning. One potential approach could be the adaption of the Cura ironing mode for enhanced surface smoothing.
Author Contributions
Conceptualization, T.H. and S.A.; methodology, T.H., S.A. and A.K.; validation, T.H., S.A., A.K. and D.W.; formal analysis, T.H. and S.A.; investigation, H.W. and D.W.; resources, T.H.; data curation, D.W. and T.H.; writing—original draft preparation, T.H.; writing—review and editing, T.H.; visualization, T.H. and D.W.; supervision, T.H. and S.A.; project administration, T.H.; funding acquisition, T.H. All authors have read and agreed to the published version of the manuscript.
Funding
This research received no external funding.
Data Availability Statement
The data presented in this study are available on request from the corresponding author due to legal issues.
Acknowledgments
We acknowledge support by the KIT-Publication Fund of the Karlsruhe Institute of Technology.
Conflicts of Interest
The authors declare no conflicts of interest.
References
- Hull, C.W. Apparatus for Production of Three-Dimensional Objects by Stereolithography. U.S. Patent 4575330, 10 March 1986. [Google Scholar]
- Xiong, Y.; Tang, Y.; Zhou, Q.; Ma, Y.; Rosen, D.W. Intelligent additive manufacturing and design: State of the art and future perspectives. Addit. Manuf. 2022, 59, 103139. [Google Scholar] [CrossRef]
- DIN EN ISO/ASTM 52900:2021; Additive Manufacturing—General Principles—Fundamentals and Vocabulary. Deutsches Institut für Normung: Berlin, Germany, 2011.
- Ranjan, R.; Kumar, D.; Kundu, M.; Chandra Moi, S. A critical review on Classification of materials used in 3D printing process. Mater. Today Proc. 2022, 61, 43–49. [Google Scholar] [CrossRef]
- Lithoz Company. Available online: https://lithoz.com/en (accessed on 1 July 2024).
- Kotz, F.; Arnold, K.; Bauer, W.; Schild, D.; Keller, N.; Sachsenheimer, K.; Nargang, T.M.; Richter, C.; Helmer, D.; Rapp, B.E. Three-dimensional printing of transparent fused silica glass. Nature 2017, 544, 337–339. [Google Scholar] [CrossRef]
- Clemens, F.J.; Kerber, A. FDM/FFF an Alternative to CIM Manufacturing of Prototype and Small Quantities of Ceramic Part? Ceram Appl. 2020, 8, 27–31. [Google Scholar]
- Noetzel, D.; Eickhoff, R.; Hanemann, T. Fused Filament Fabrication of Small Ceramic Components. Materials 2018, 11, 1463. [Google Scholar] [CrossRef] [PubMed]
- Cano, S.; Gonzalez-Gutierrez, J.; Sapkota, J.; Spoerk, M.; Arbeiter, F.; Schuschnigg, S.; Holzer, C.; Kukla, C. Additive manufacturing of zirconia parts by fused filament fabrication and solvent debinding: Selection of binder formulation. Addit. Manuf. 2019, 26, 117–128. [Google Scholar] [CrossRef]
- Apium P220. Available online: https://apiumtec.com/en/industrial-3d-printer (accessed on 2 July 2023).
- Lieber, S.C.; Varghese, A.P.; Tarantino, R.; Tafuni, A. Additive manufacturing for plastic extrusion die tooling: A numerical investigation. CIRP J. Manuf. Sci. Technol. 2023, 41, 401. [Google Scholar] [CrossRef]
- Kanbur, B.B.; Shen, S.; Zhou, Y.; Duan, F. Thermal and mechanical simulations of the lattice structures in the conformal cooling cavities for 3D printed injection molds. Mater. Today Proc. 2020, 28, 379. [Google Scholar] [CrossRef]
- Kluck, S.; Hambitzer, L.; Luitz, M.; Mader, M.; Sanjaya, M.; Balster, A.; Milich, M.; Greiner, C.; Kotz-Helmer, F.; Rapp, B.E. Replicative manufacturing of metal moulds for low surface roughness polymer replication. Nat. Commun. 2022, 13, 5048. [Google Scholar] [CrossRef] [PubMed]
- Gohn, A.M.; Brown, D.; Mendis, G.; Forster, S.; Rudd, N.; Giles, M. Mold inserts for injection molding prototype applications fabricated via material extrusion additive manufacturing. Addit. Manuf. 2022, 51, 102595. [Google Scholar] [CrossRef]
- Wick-Joliat, R.; Tschamper, M.; Kontic, R.; Penner, D. Water-soluble sacrificial 3D printed molds for fast prototyping in ceramic injection molding. Addit. Manuf. 2021, 48, 102408. [Google Scholar] [CrossRef]
- Seleznev, M.; Roy-Mayhew, J.D. Bi-metal composite material for plastic injection molding tooling applications via fused filament fabrication process. Addit. Manuf. 2021, 48, 102375. [Google Scholar] [CrossRef]
- Krizsma, S.; Kovács, N.K.; Kovács, J.G.; Suplicz, A. In-situ monitoring of deformation in rapid prototyped injection molds. Addit. Manuf. 2021, 42, 102001. [Google Scholar] [CrossRef]
- Dempsey, D.; McDonald, S.; Masato, D.; Barry, C. Characterization of Stereolithography Printed Soft Tooling for Micro Injection Molding. Micromachines 2020, 11, 819. [Google Scholar] [CrossRef]
- Matzner, E.; Dikovski, A.; Melamed, O.; Zonder, L. 3-D Printed Mold for Injection Molding. U.S. Patent Application US 2018/0243948A1. Stratasys Ltd: Eden Prairie, MN, USA, 2018. [Google Scholar]
- Kriesi, C.; Bjelland, Ø.; Steinert, M. Fast and iterative prototyping for injection molding—A case study of rapidly prototyping. Procedia Manuf. 2018, 21, 205. [Google Scholar] [CrossRef]
- Vasco, J.C.; Pouzada, A.S. A study on microinjection moulding using moulding blocks by additive micromanufacturing. Int. J. Adv. Manuf. Technol. 2013, 69, 2293–2299. [Google Scholar] [CrossRef]
- Surace, R.; Basile, V.; Bellantone, V.; Modica, F.; Fassi, I. Micro Injection Molding of Thin Cavities Using Stereolithography for Mold Fabrication. Polymers 2021, 13, 1848. [Google Scholar] [CrossRef]
- Tyagi, R.; Tripathi, A.; Kumar, R.; Jain, A.; Pillai, P. On FFF-based 3D printing of wear resistive ABS-Graphene nanocomposites for rapid tooling in wet condition. Diam. Relat. Mater. 2024, 142, 110794. [Google Scholar] [CrossRef]
- Strano, M.; Rane, K.; Farid, M.A.; Mussi, V.; Zaragoza, V.; Monno, M. Extrusion-based additive manufacturing of forming and molding tools. Int. J. Adv. Manuf. Technol. 2021, 117, 2059–2071. [Google Scholar] [CrossRef]
- Abbas, K.; Hedwig, L.; Balc, N.; Bremen, S. Advanced FFF of PEEK: Infill Strategies and Material Characteristics for Rapid Tooling. Polymers 2023, 15, 4293. [Google Scholar] [CrossRef]
- Rapid Tooling for Low Volume Production with Traditional Manufacturing Processes. Available online: https://formlabs.com/uk/applications/rapid-tooling (accessed on 6 May 2024).
- Basir, A.; Sulong, A.B.; Jamadon, N.H.; Muhamad, N.; Emeka, U. Bonaventure Process Parameters Used in Macro/Micro Powder Injection Molding: An Overview. Met. Mater. Int. 2021, 27, 2023. [Google Scholar] [CrossRef]
- Piotter, V. A review of the current status of MicroPIM: Materials, processing, microspecific considerations and applications Part I. Powder Inject. Mould. Int. 2011, 5, 27. [Google Scholar]
- Piotter, V. A review of the current status of MicroPIM: Part 2, Screw injection units, simulation and process variants. Powder Inject. Mould. Int. 2011, 5, 25. [Google Scholar]
- Hanemann, T.; Klein, A.; Baumgaertner, S.; Jung, J.; Wilhelm, D.; Antusch, S. Material extrusion 3D printing of PEEK-based composites. Polymers 2023, 15, 3412. [Google Scholar] [CrossRef]
- Gao, J.; Li, W.; Wang, J.; Wang, X.; Sha, C.; Zhao, K. Comprehensive analysis of fused deposition modeling process conditions for enhancing mechanical properties and surface quality of 3D-Printed poly-ether-ether-ketone. Polym. Test. 2024, 134, 108432. [Google Scholar] [CrossRef]
- McNiffe, E.; Ritter, T.; Higgins, T.; Sam-Daliri, O.; Flanagan, T.; Walls, M.; Ghabezi, P.; Finnegan, W.; Mitchell, S.; Harrison, N.M. Advancements in Functionally Graded Polyether Ether Ketone Components: Design, Manufacturing, and Characterisation Using a Modified 3D Printer. Polymers 2023, 15, 2992. [Google Scholar] [CrossRef]
- Ritter, T.; McNiffe, E.; Higgins, T.; Sam-Daliri, O.; Flanagan, T.; Walls, M.; Ghabezi, P.; Finnegan, W.; Mitchell, S.; Harrison, N.M. Design and Modification of a Material Extrusion 3D Printer to Manufacture Functional Gradient PEEK Components. Polymers 2023, 15, 3825. [Google Scholar] [CrossRef]
- Pulipaka, A.; Gide, K.M.; Beheshti, A.; Bagheri, Z.S. Effect of 3D printing process parameters on surface and mechanical properties of FFF-printed PEEK. J. Manuf. Process. 2023, 85, 368–386. [Google Scholar] [CrossRef]
- Hanemann, T.; Antusch, S.; Baumgaertner, S.; Bonk, S.; Klein, A.; Walter, H.; Wilhelm, D. 3D-gedruckte PEEK Formeinsätze für das Mikropulverspritzgießen. In Proceedings MikroSystemTechnik Congress 2021, 08.–10.11.2021; FRG: Stuttgart-Ludwigsburg, Germany; VDE Verlag GmbH: Berlin, Germany, 2021; pp. 60–63. ISBN 978-3-8007-5656-8. [Google Scholar]
- DIN EN ISO 4287; Geometrical Product Specifications (GPS)—Surface Texture: Profile Method—Terms, Definitions and Surface Texture Parameters. Deutsches Institut für Normung: Berlin, Germany, 2010.
- Medesi, A.J.; Nötzel, D.; Pursche, K.; Hanemann, T.; Franzreb, M.; Wohlgemuth, J. Ceramic Injection Moulding with 3D-printed Mold Inserts. Ceram. Mod. Technol. 2019, 1, 104–110. [Google Scholar] [CrossRef]
- Wang, P.; Zou, B.; Ding, S. Modeling of surface roughness based on heat transfer considering diffusion among deposition filaments for FDM 3D printing heat-resistant resin. Appl. Therm. Eng. 2019, 161, 114064. [Google Scholar] [CrossRef]
- Wang, P.; Zou, B.; Xiao, H.; Ding, S.; Huang, C. Effects of printing parameters of fused deposition modeling on mechanical properties, surface quality, and microstructure of PEEK. J. Mater. Process. Technol. 2019, 271, 62–74. [Google Scholar] [CrossRef]
- Jäger, A. Kombinationen potenzieren das Leistungsvermögen—Trends, Tendenzen und Perspektiven beim Mehrkomponenten-Spritzgießen. Kunststoffe 2001, 91, 91. (In German) [Google Scholar]
- Schuck, M. Kompatibilitätsprinzipien Beim Montagespritzgießen. Ph.D. Thesis, Technische Fakultät Univ., Erlangen, Germany, 2009. (In German). [Google Scholar]
- Stamm, M.; Schubert, D.W. Interfaces between incompatible polymers. Annu. Rev. Mater. Sci. 1995, 25, 325–356. [Google Scholar] [CrossRef]
- Altaf, K.; Qayyum, J.; Rani, A.; Ahmad, F.; Megat-Yusoff, P.; Baharom, M.; Aziz, A.; Jahanzaib, M.; German, R. Performance Analysis of Enhanced 3D Printed Polymer Molds for Metal Injection Molding Process. Metals 2018, 8, 433. [Google Scholar] [CrossRef]
Disclaimer/Publisher’s Note: The statements, opinions and data contained in all publications are solely those of the individual author(s) and contributor(s) and not of MDPI and/or the editor(s). MDPI and/or the editor(s) disclaim responsibility for any injury to people or property resulting from any ideas, methods, instructions or products referred to in the content. |
© 2024 by the authors. Licensee MDPI, Basel, Switzerland. This article is an open access article distributed under the terms and conditions of the Creative Commons Attribution (CC BY) license (https://creativecommons.org/licenses/by/4.0/).

