Article

Investigation of Heat Annealing and Parametric Optimization for Drilling of Monel-400 Alloy

by
Basem M. A. Abdo
1,*,
Redhwan Almuzaiqer
2,
Mohammed A. Noman
3 and
Sanjay Chintakindi
3
1
Innovation Center, Entrepreneurship Institute, King Saud University, Riyadh 11421, Saudi Arabia
2
Sustainable Energy Technologies Center, King Saud University, Riyadh 11421, Saudi Arabia
3
Industrial Engineering Department, College of Engineering, King Saud University, Riyadh 11421, Saudi Arabia
*
Author to whom correspondence should be addressed.
J. Manuf. Mater. Process. 2023, 7(5), 170; https://doi.org/10.3390/jmmp7050170
Submission received: 5 August 2023 / Revised: 9 September 2023 / Accepted: 11 September 2023 / Published: 15 September 2023
(This article belongs to the Special Issue Manufacturing Process Development of Advanced Composite Materials)

Abstract

:
A nickel-based copper alloy known as Monel-400 is extensively applied in many industries including aerospace, marine engineering, and nuclear power generation, owing to its exceptional characteristics such as extreme tensile strength and toughness, excellent corrosion resistance, and the ability to retain shape even at extremely high temperatures. Traditional methods of drilling Monel-400 alloy are difficult due to quick tool wear and poor surface polishing, resulting in expensive machining costs. In this study, a technique called heat annealing was implemented to externally heat-treat the Monel-400 alloy material before the drilling process. Cutting force, surface roughness, and tool wear were used as the responses to investigate the effect of heat annealing and the drilling parameters on the machinability of Monel-400. The results revealed that the cutting force (Fz) and surface roughness (Ra and Rt) could be reduced by 33%, 31%, and 25%, respectively, after annealing at 700 °C compared to the results of the drilled Monel-400 at room temperature. It can be observed that the maximum improvement can reach 42% of Fz, 35% of Ra, and 59% of Rt while annealing Monel-400 at 1000 °C. A significant reduction was observed in the tool wear for machining the annealed material, which minimized the tooling and overall machining cost. Regarding the effects of the drilling process on the considered responses, the results revealed that the spindle speed has a greater effect on the cutting force, whereas the feed rate has the most significant effect on Ra. The significance of the drilling input parameters on the outputs is determined by analysis of the main effect plots and surface plots. Subsequently, the multi-objective genetic algorithm (MOGA) is used to identify the optimal parametric conditions for minimizing the cutting force and surface roughness of the drilled holes. The optimized values achieved via multi-objective optimization are the cutting force, Fz = 388–466 N, and the surface roughness, Ra = 0.17–0.19 μm and Rt = 3–3.5 μm, respectively.

1. Introduction

Nickel-based alloys are crucial in a variety of industries such as marine, nuclear reactors, petrochemical equipment, steam power plants, etc., due to their desirable characteristics [1]. The main strength of nickel-based superalloys is the high melting point, heat corrosion resistance, the ability to retain their chemical and mechanical properties in high temperatures, and high creep resistance. Compared to other materials, nickel-based alloys are the best in terms of high-temperature mechanical properties. Despite their many advantages, they are commonly included in materials that are difficult to machine, owing to their mechanical, chemical, and thermal properties [2]. Monel-400 is a solid combination of nickel and copper alloys that exhibits remarkable toughness and strength across a broad temperature range. Owing to its resistance to seawater corrosion, Monel-400 is used in a variety of marine applications, including hulls, propellers, valves, and pumps. Monel-400 is also used in the aerospace industry and power generation plants for components such as steam turbines, heat exchangers, pumps, and valves. This is due to its high resistance to the corrosive effects of jet fuel, steam, and water, and can withstand high temperatures [3]. Overall, Monel-400 is a versatile material with a wide range of applications including electrical and electronic components, springs, surgical implants, jewelry, and coins. The products constructed using Monel-400 materials have a long lifespan due to their chemical inertness [4]. The performance of a machined part, such as its fatigue life, creep, and corrosion, is greatly influenced by its surface quality. Moreover, tool wear directly affects the total machining cost. Some attempts have been made in the machining of Monel-400 using traditional and advanced machining processes. According to Parida and Maity [4], a hot turning of Monel-400 with a gas flame was studied to see how the heating temperature affected tool wear, chip-to-tool contact lengths, and chip morphologies. When cutting speed and temperature rise, tool life falls; the opposite is true when cutting speed and heat are increased. Dhananchezian [5] studied the dry turning of the Monel-400 alloy to examine the impact of tool materials on the roughness of the machining surface. Surface roughness characteristics were significantly reduced while utilizing a TiAlN carbide-coated tool compared to an untreated tool, according to the results. The hot turning of Monel-400 has been studied using mathematical models of flank wear and surface roughness [6]. The cutting speed was shown to be the most important factor in determining surface roughness, while the temperature was found to be the most important component in determining flank wear. Inconel 718, Inconel 625, and Monel-400 were compared in a hot-turning study by the authors of the study documented in [7]. It was found that the cutting force, tool wear, and chip morphology were all evaluated in both room temperature and hot temperature situations (300 °C and 600 °C). All three nickel-based alloys were shown to have significantly reduced cutting force, tool wear, chatter generation, tool life, surface roughness, and chip tool contact duration while machining at high temperatures. The end milling process of Monel-400 was investigated by Shihan et al. [5]. The results revealed that the minimum tool wear, lower surface roughness, minimum energy consumption, and maximum material removal occur at 1400, 3500, 1400, and 2800 rpm of spindle speed, respectively. The effect of tool coatings and the cutting parameters on the dry drilling performance including tool wear and burr size of aluminum alloys was studied by A. Rivero et al. [6]. Results revealed that high tool wear was found in dry drilling conditions due to workpiece material adhesion on the tool edge. Moreover, the minimum burrs occur when the feed increases, and the cutting power and the tool life can be controlled by controlling the cutting temperature. Aiming to improve the performance of the drilling process, S Rodríguez-Barrero et al. [7] used drag grinding techniques to eliminate droplets and improve the performance of seven coatings of the drilling tools. The results showed that the TiAlSiN, AlTiSiN, and μAlTiN coatings performed better under higher temperatures for drilling applications on 42CrMo4 steel.
Advanced machining processes such as electric discharge machining (EDM) and wire EDM [8,9,10,11,12], Electrochemical machining (ECM) [13,14], and laser and plasma machining [15,16,17,18,19,20] were also used in machining Monel-400. For example, WEDM was used by Kumar et al. [8]. The authors analyzed the impact of WEDM parameters on the machining rate and surface quality of Monel-400. WEDM was also applied to machine square slots on four nickel superalloys [9]. The results obtained found that Monel-400 produced better results in terms of surface quality of the machine feature than other superalloys. EDM was used by Mahalingam and Varahamoorthi [10] for machining Monel-400. The peak current and the pulse off-time have been found to have a significant impact on tool wear. Monel-400 using molybdenum as a tool electrode was also studied in [12] to determine the best WEDM machining parameters. Electrochemical machining (ECM) of the Monel-400 alloy with different electrolytes was studied by Sinha et al. [13] in which the authors found that the electrolyte had a significant impact on the micro ECM process of the Monel-400 alloy. ECM was also used to study the material removal rate (MRR) and the sludge of the Monel-400 alloy by Nagarajan et al. [14]. The authors found that the metaheuristic optimization algorithms were effective at determining the optimum process parameters for fabricating Monel 400 alloys using ECM. Microchannels of different widths have been fabricated on Monel 400 alloys using chemical etching by Patil et al. [11]. The results obtained found that the surface finish of the machine microchannels was better along the rolling direction than across the rolling direction. Rajamani et al. [19] used the plasma arc cutting (PAC) process to fabricate slots in Monel-400. The effect of PAC variables on surface roughness, kerf width, and microhardness was studied. Optimal parameters were obtained by using a multi-objective desirability approach. In another study documented in [20], the authors found that the optimal parameters of PAC while machining Monel-400 are gas pressure of 3 bar, cutting speed of 2400 mm/min, arc current of 45 A, and stand-off distance of 2 mm. Kumar et al. [21] used response surface methodology to investigate and optimize the EDM parameters to find the maximum MRR and minimum tool wear rate while machining Monel-400. Results revealed that, among all the variables, the pulse current is the one shown to be the most important.
Other nickel-based superalloys such as Inconel-718 [22,23,24,25,26], Monel K-500 [27,28], Nimonic [29,30], etc. have been investigated using several techniques. For example, an experiment was carried out to examine the effect of electro-discharge drilling (EDD) parameters on the holes’ accuracy and tool while machining Inconel-718 alloy [23]. The results showed that EDD can be used to drill holes with an aspect ratio greater than 10:1 with accepted accuracy. The turning of Inconel 718 using different ceramic tools was investigated in the paper documented in [22]. The results revealed that the workpiece hardness and cutting speed were the most influencing factors for tool life and cutting force. Face turning of Inconel-700 and Waspaloy alloys was applied by [25] in which the effect of different coolant pressures on the tool wear was investigated. The results showed that high-pressure coolant leads to a reduction in the tool wear on both alloys. WEDM was also applied to machine Nimonic-75 alloy by Sonawane and Kulkarni [29]. The results indicated that the pulse on-time is the major influencing parameter affecting the surface roughness and the MRR of the machined parts.
Although a lot of literature is available on the turning and WEDM of Monel-400, research on drilling of Monel-400 is lacking. However, drilling is one of the primary machining processes used in the fabrication of components made from Monel-400 alloy. For example, gas turbine blades, which are mainly made from Monel alloy materials, possess between 20,000 and 40,000 cooling holes. In addition, most of the previously reported research was limited to studying the effect of some parameters with very few responses studied and the authors could not find any study in optimization of the drilling process parameters of Monel-400 in the literature. Therefore, in this work, an effort was made to evaluate the Monel-400 alloy drilling process experimentally. To reduce shear strength, facilitate machining without affecting the material’s metallurgical behavior, and also make use of the simple, less costly, and easy to control annealing process, the materials were machined at three different conditions, namely at room temperature after annealing up to 700 °C, and after annealing up to 1000 °C. Cutting force, surface roughness, and tool wear were all identified as parameters for measuring machining quality. Finally, the optimization method (MOGA) was applied to identify the optimal drilling parameters for minimizing the selected responses of the Monel alloy. The advantage of the present research work lies in the optimization of drilling process parameters of annealed Monel-400 alloy material, which has several applications in different industries. Therefore, under the optimized parameters, the cost of produced products could be low since the tooling cost is low due to minimizing tool wear. In addition, the quality of the machined product is high, owing to minimizing surface roughness and cutting force under optimal drilling process parameters. Moreover, this research work would be a basis for improving the machinability of other similar nickel-based superalloy materials.

2. Materials and Methods

A 3-axis vertical milling machine (MC 635 V ECO-LINE from DMG MORI, Geretsried, Germany) was used for the tests. In addition to its 8000 RPM, spindle speed, and 24 m/min feed rate, the machine’s positional accuracy was 1 µm. Figure 1 depicts the experimental setup.
The materials used in this study were Monel-400 (Zhengzhou, China) supplied by Zhengzhou Huitong Pipeline Equipment Co., Ltd. of a cylindrical shape with diameters of 80 mm and thickness of 25 mm. Table 1 and Table 2 list the chemical composition and physical properties of the used Monel-400 alloy.
The drill bit used was a 10 mm diameter solid carbide drill bit with a Titanium Aluminum Nitride (TiAlN) finish and a round shank. More specifications of the used drilling tool can be found in Table 3.
The heat annealing process was carried out by using Nabertherm P330 Muffle Furnace (Lilienthal, Germany). It should be mentioned that the annealing temperatures 700 °C and 1000 °C were selected based on the recommended manufacture technical data available in [31]. Figure 2a,b represents the heat annealing process of Monel-400 at 700 °C and 1000 °C, respectively. To analyze the significance of the annealing process on the mechanical properties of the Monel materials before performing the drilling process, the hardness of the Monel-400 alloy was measured using a Vickers hardness tester (Struer Durascan, Ballerup, Denmark).
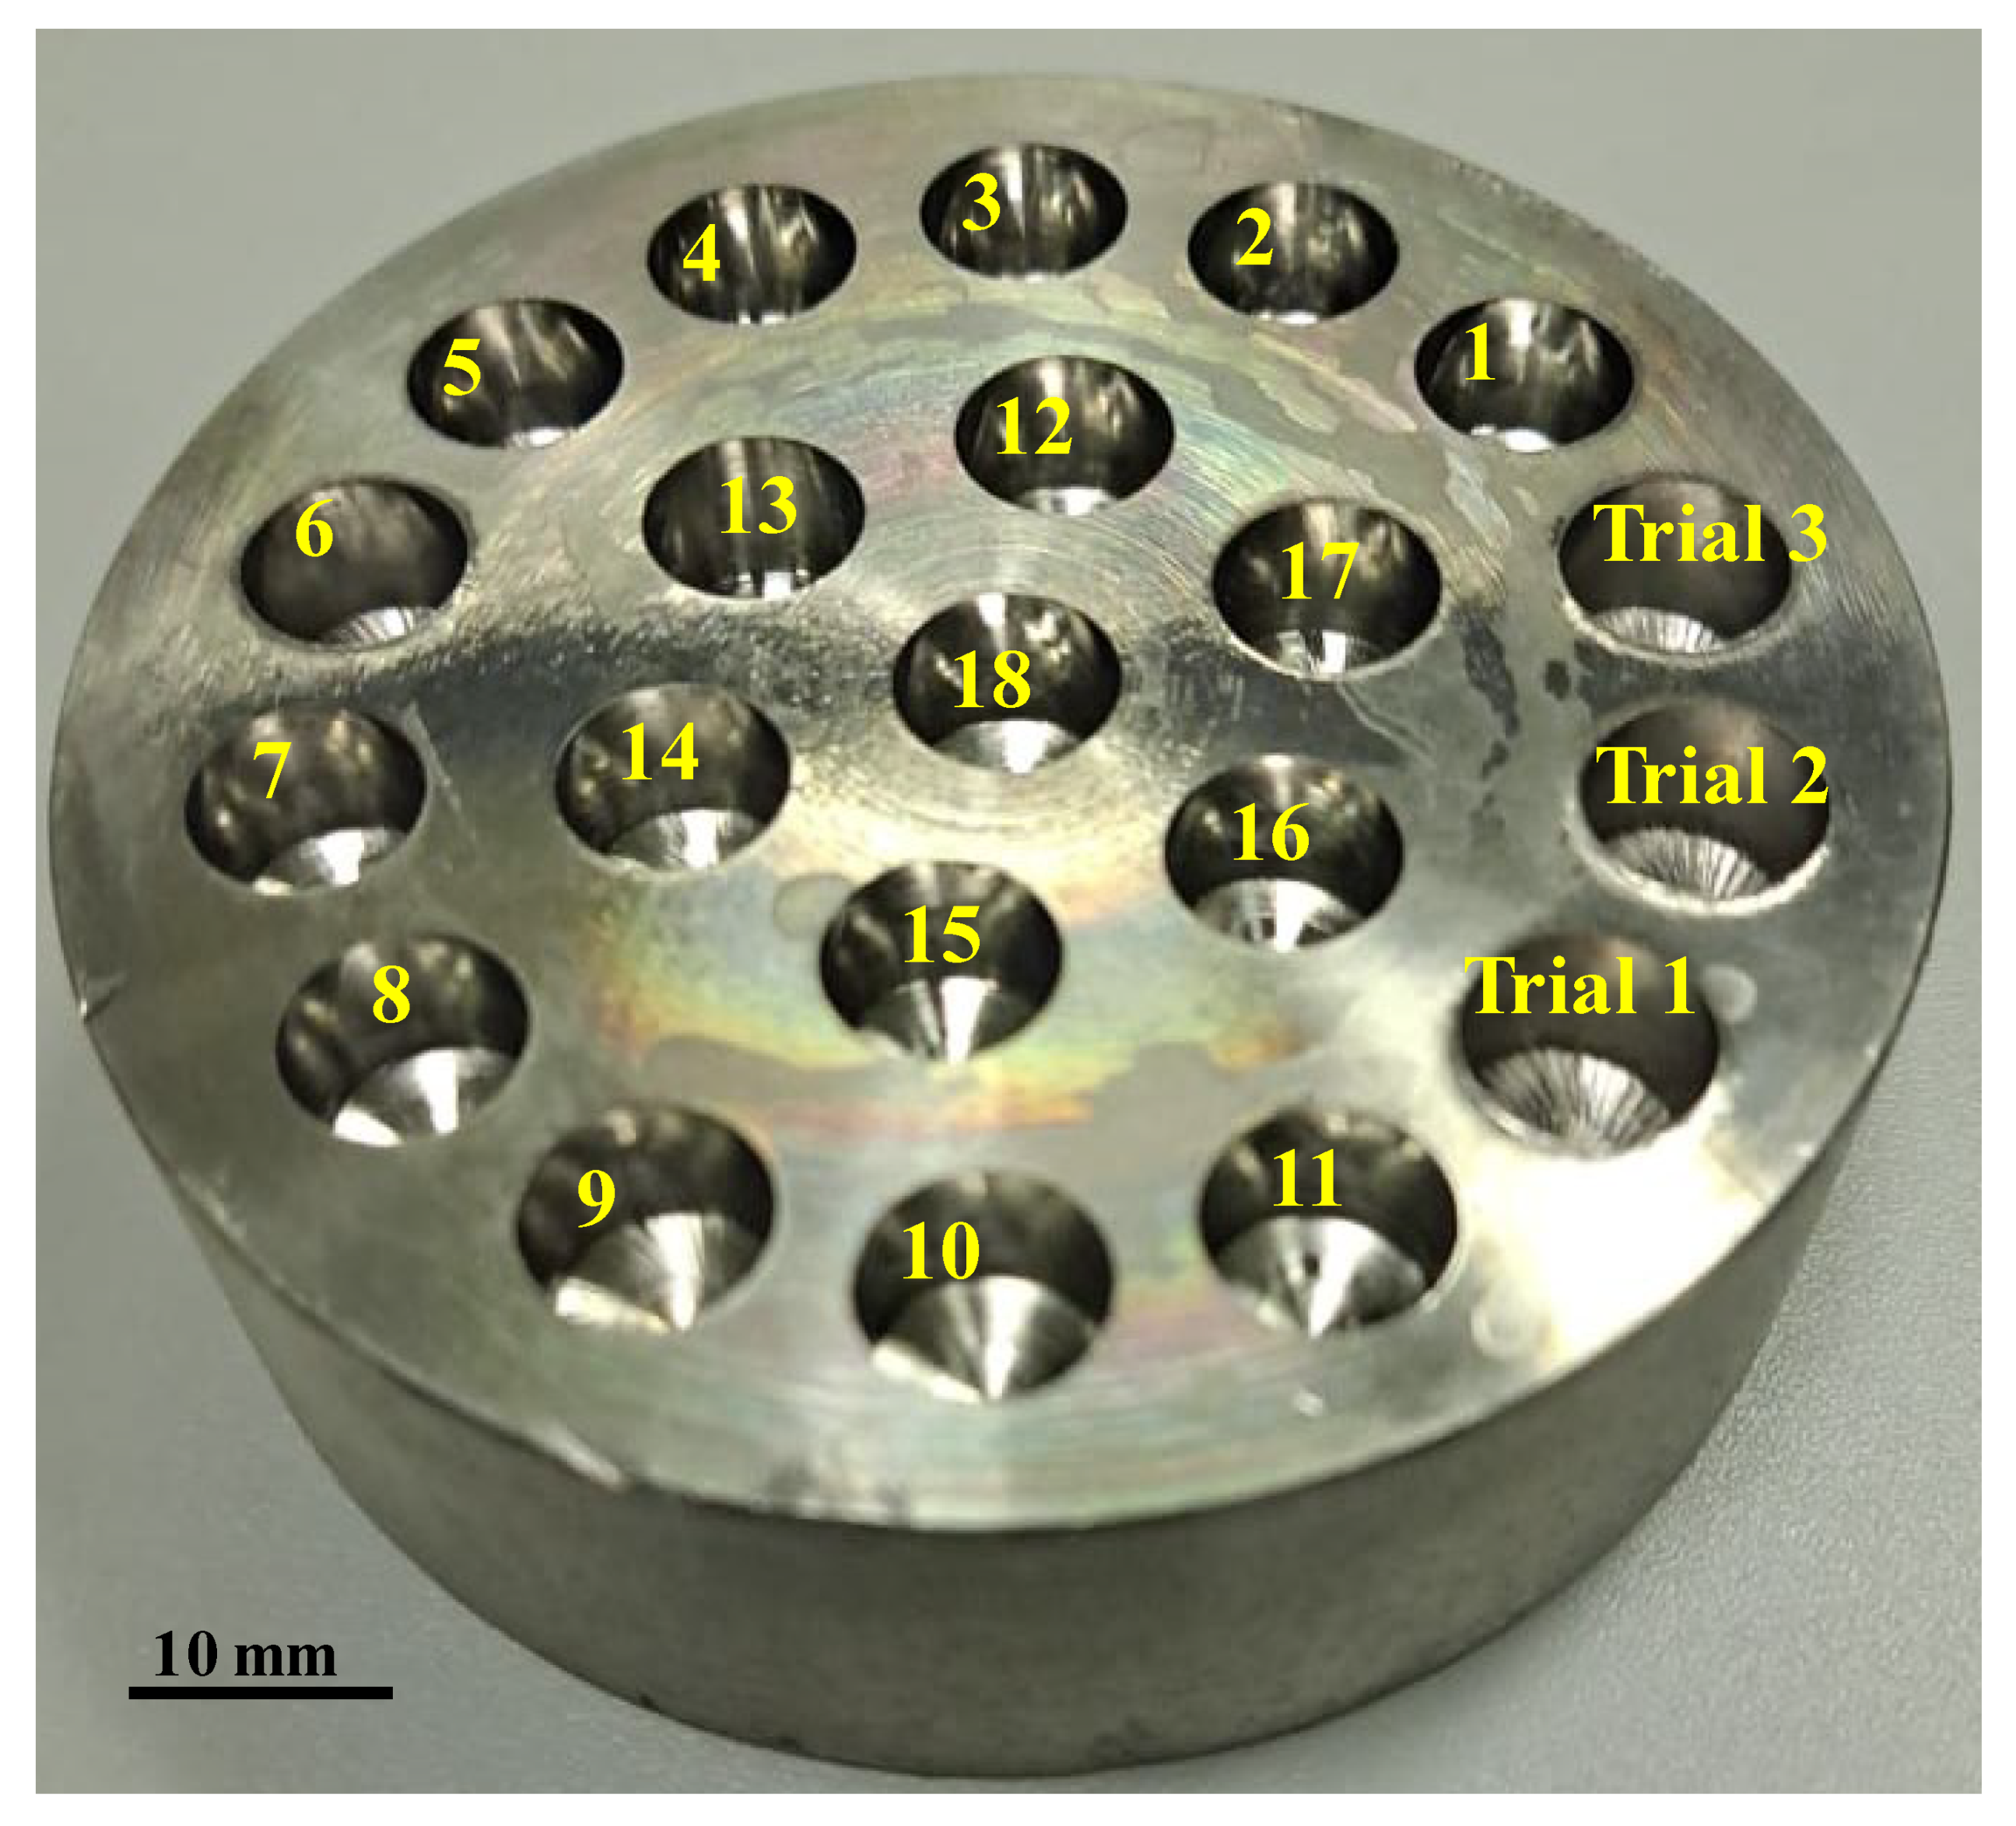
Following the literature, manufacturer recommendations, and screening experiments, the input process parameters for drilling operations were selected. Two key input parameters of the drilling process, namely spindle speed and feed rate were chosen and each of them had three levels. For example, spindle speeds of 1500, 3000, and 4500 rpm and feed rates of 8, 24, and 40 mm/min were selected. Other input parameters such as the tool type, the tool diameter, and the coolant were kept constant in this study. Table 4 displays the input factor and fixed parameter values for various levels of drilling parameters. Table 5 shows that 18 experiments were conducted using a full factorial design with two replications. The trial experiments along with the final experiments were distributed on the cylindrical surface of Monel-400 as shown in Figure 3.
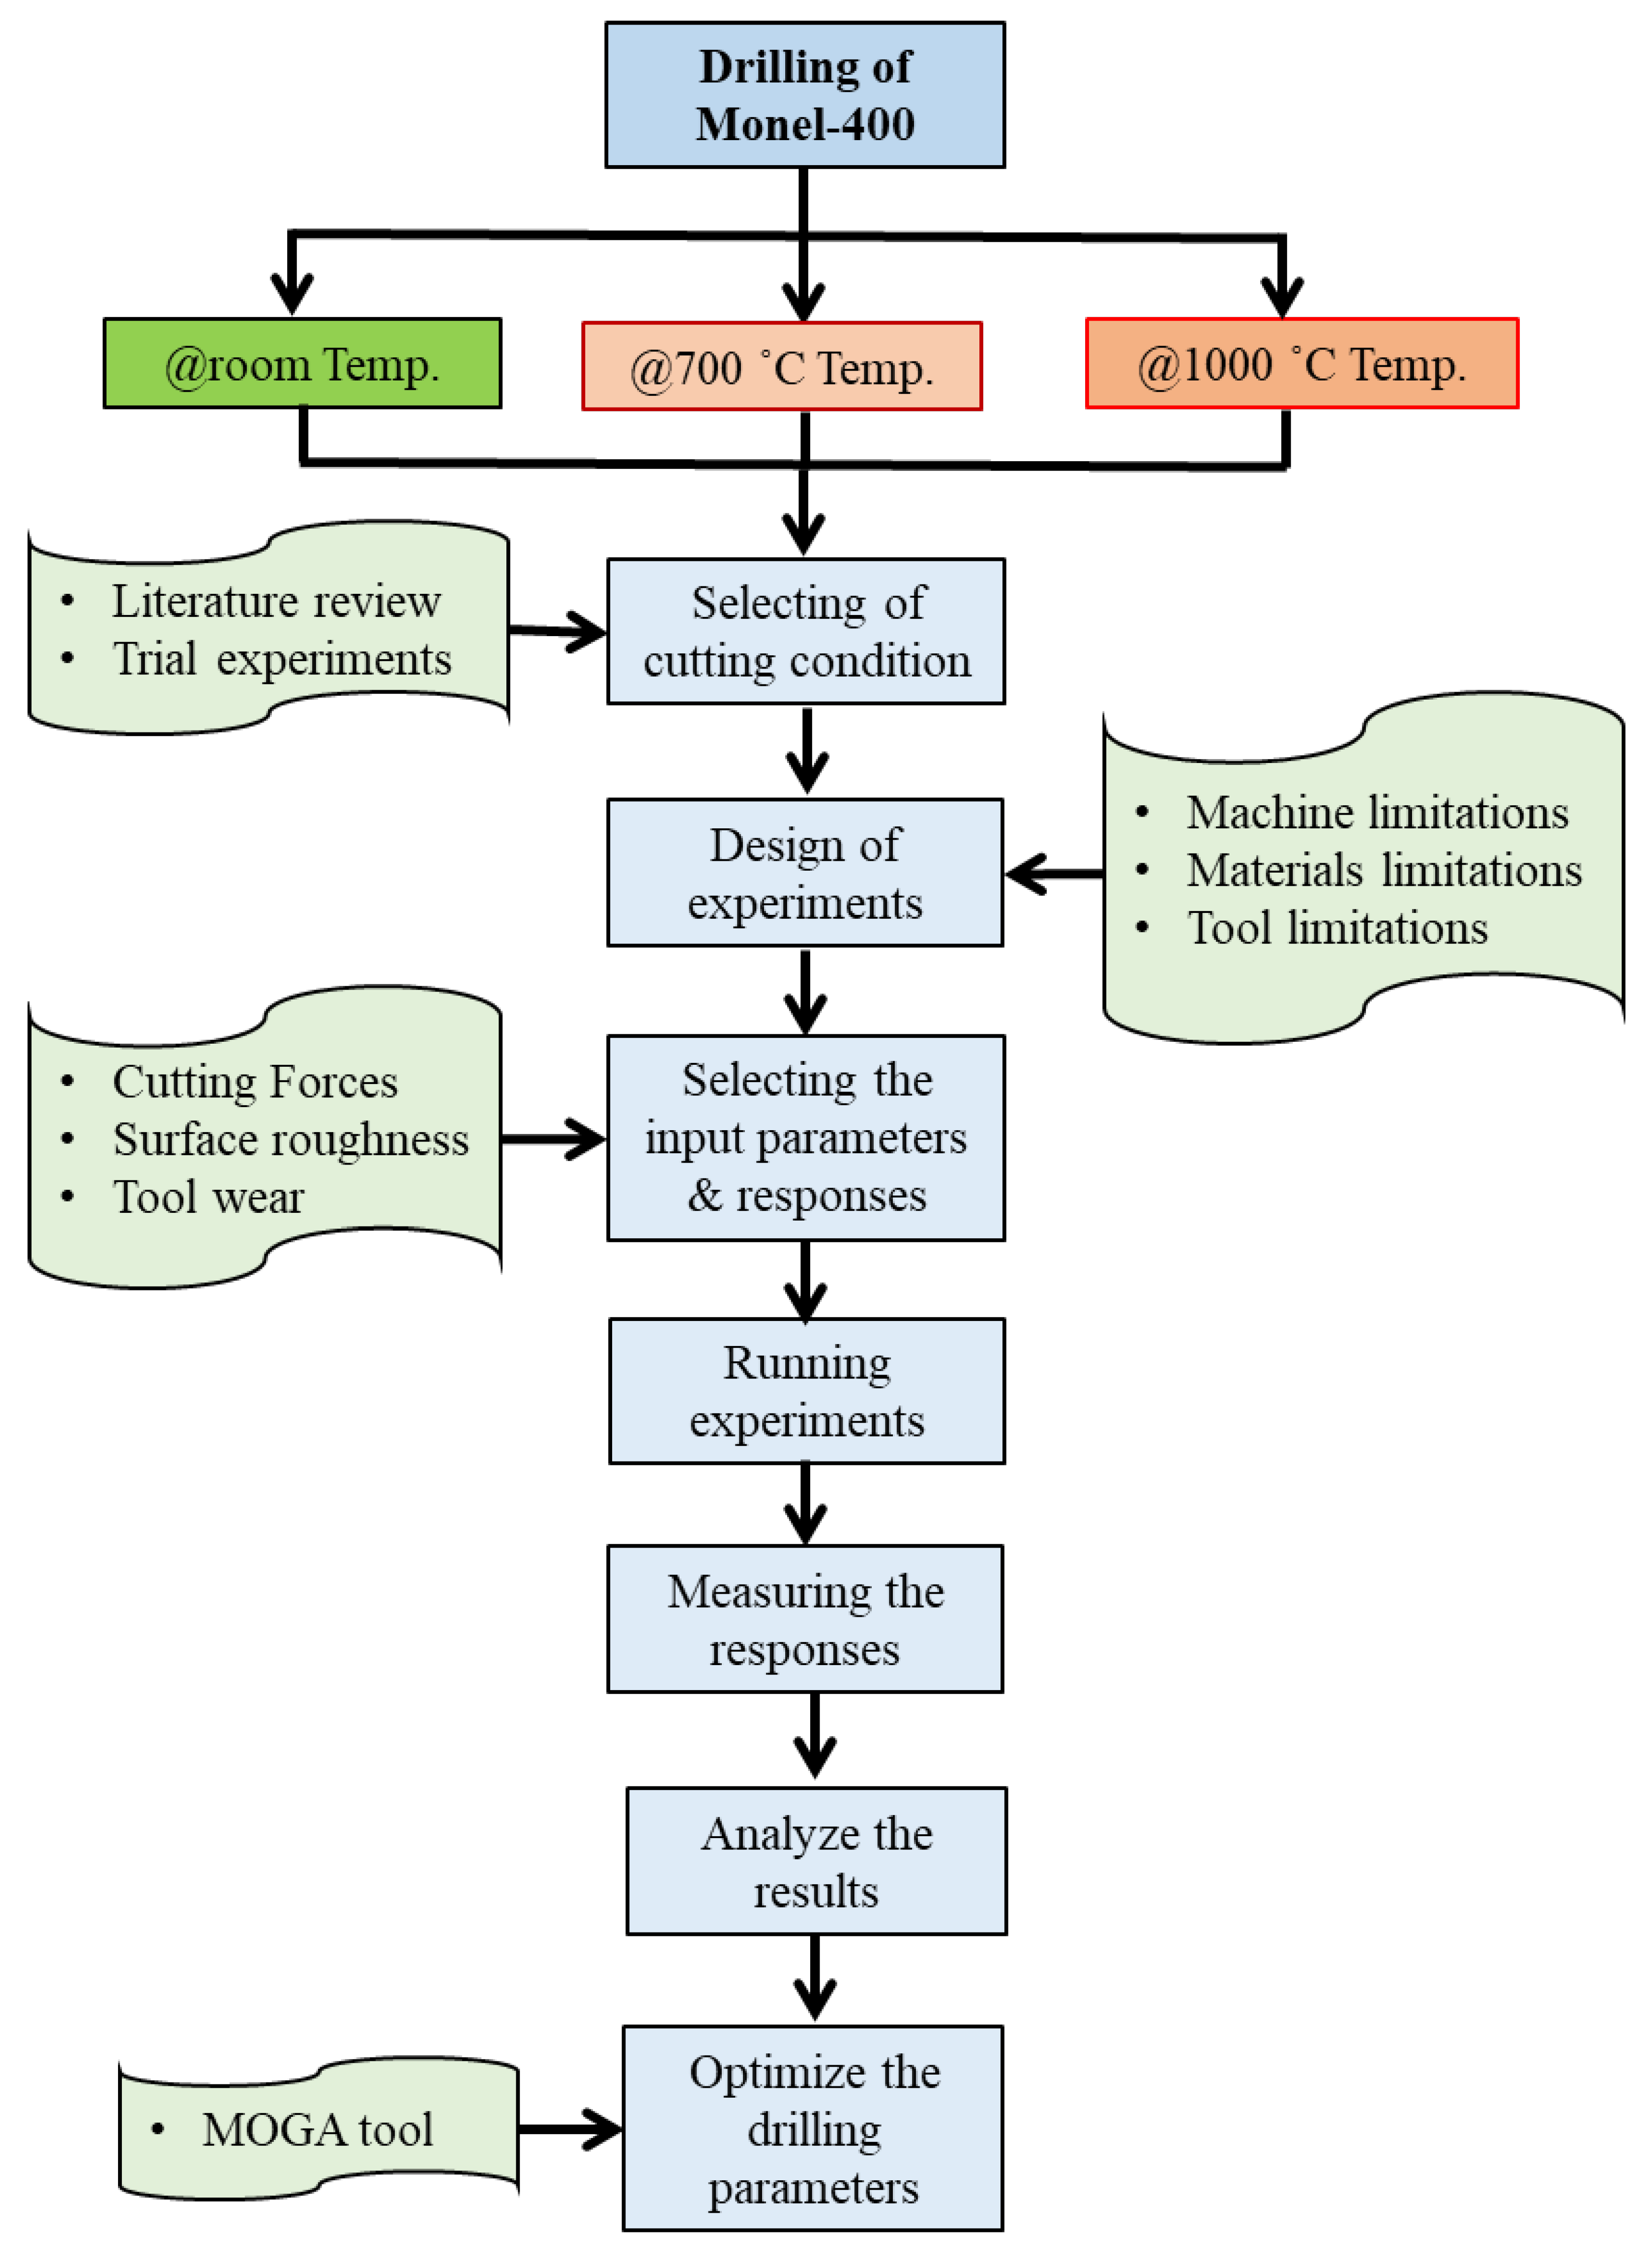
The research is divided into three main phases based on the condition of the Monel-400 materials used for drilling: (i) at room temperature, (ii) after heat-annealed up to 700 °C, and (iii) after heat-annealed up to 1000 °C. The details of the research methodology can be found in the form of a flowchart in Figure 4.
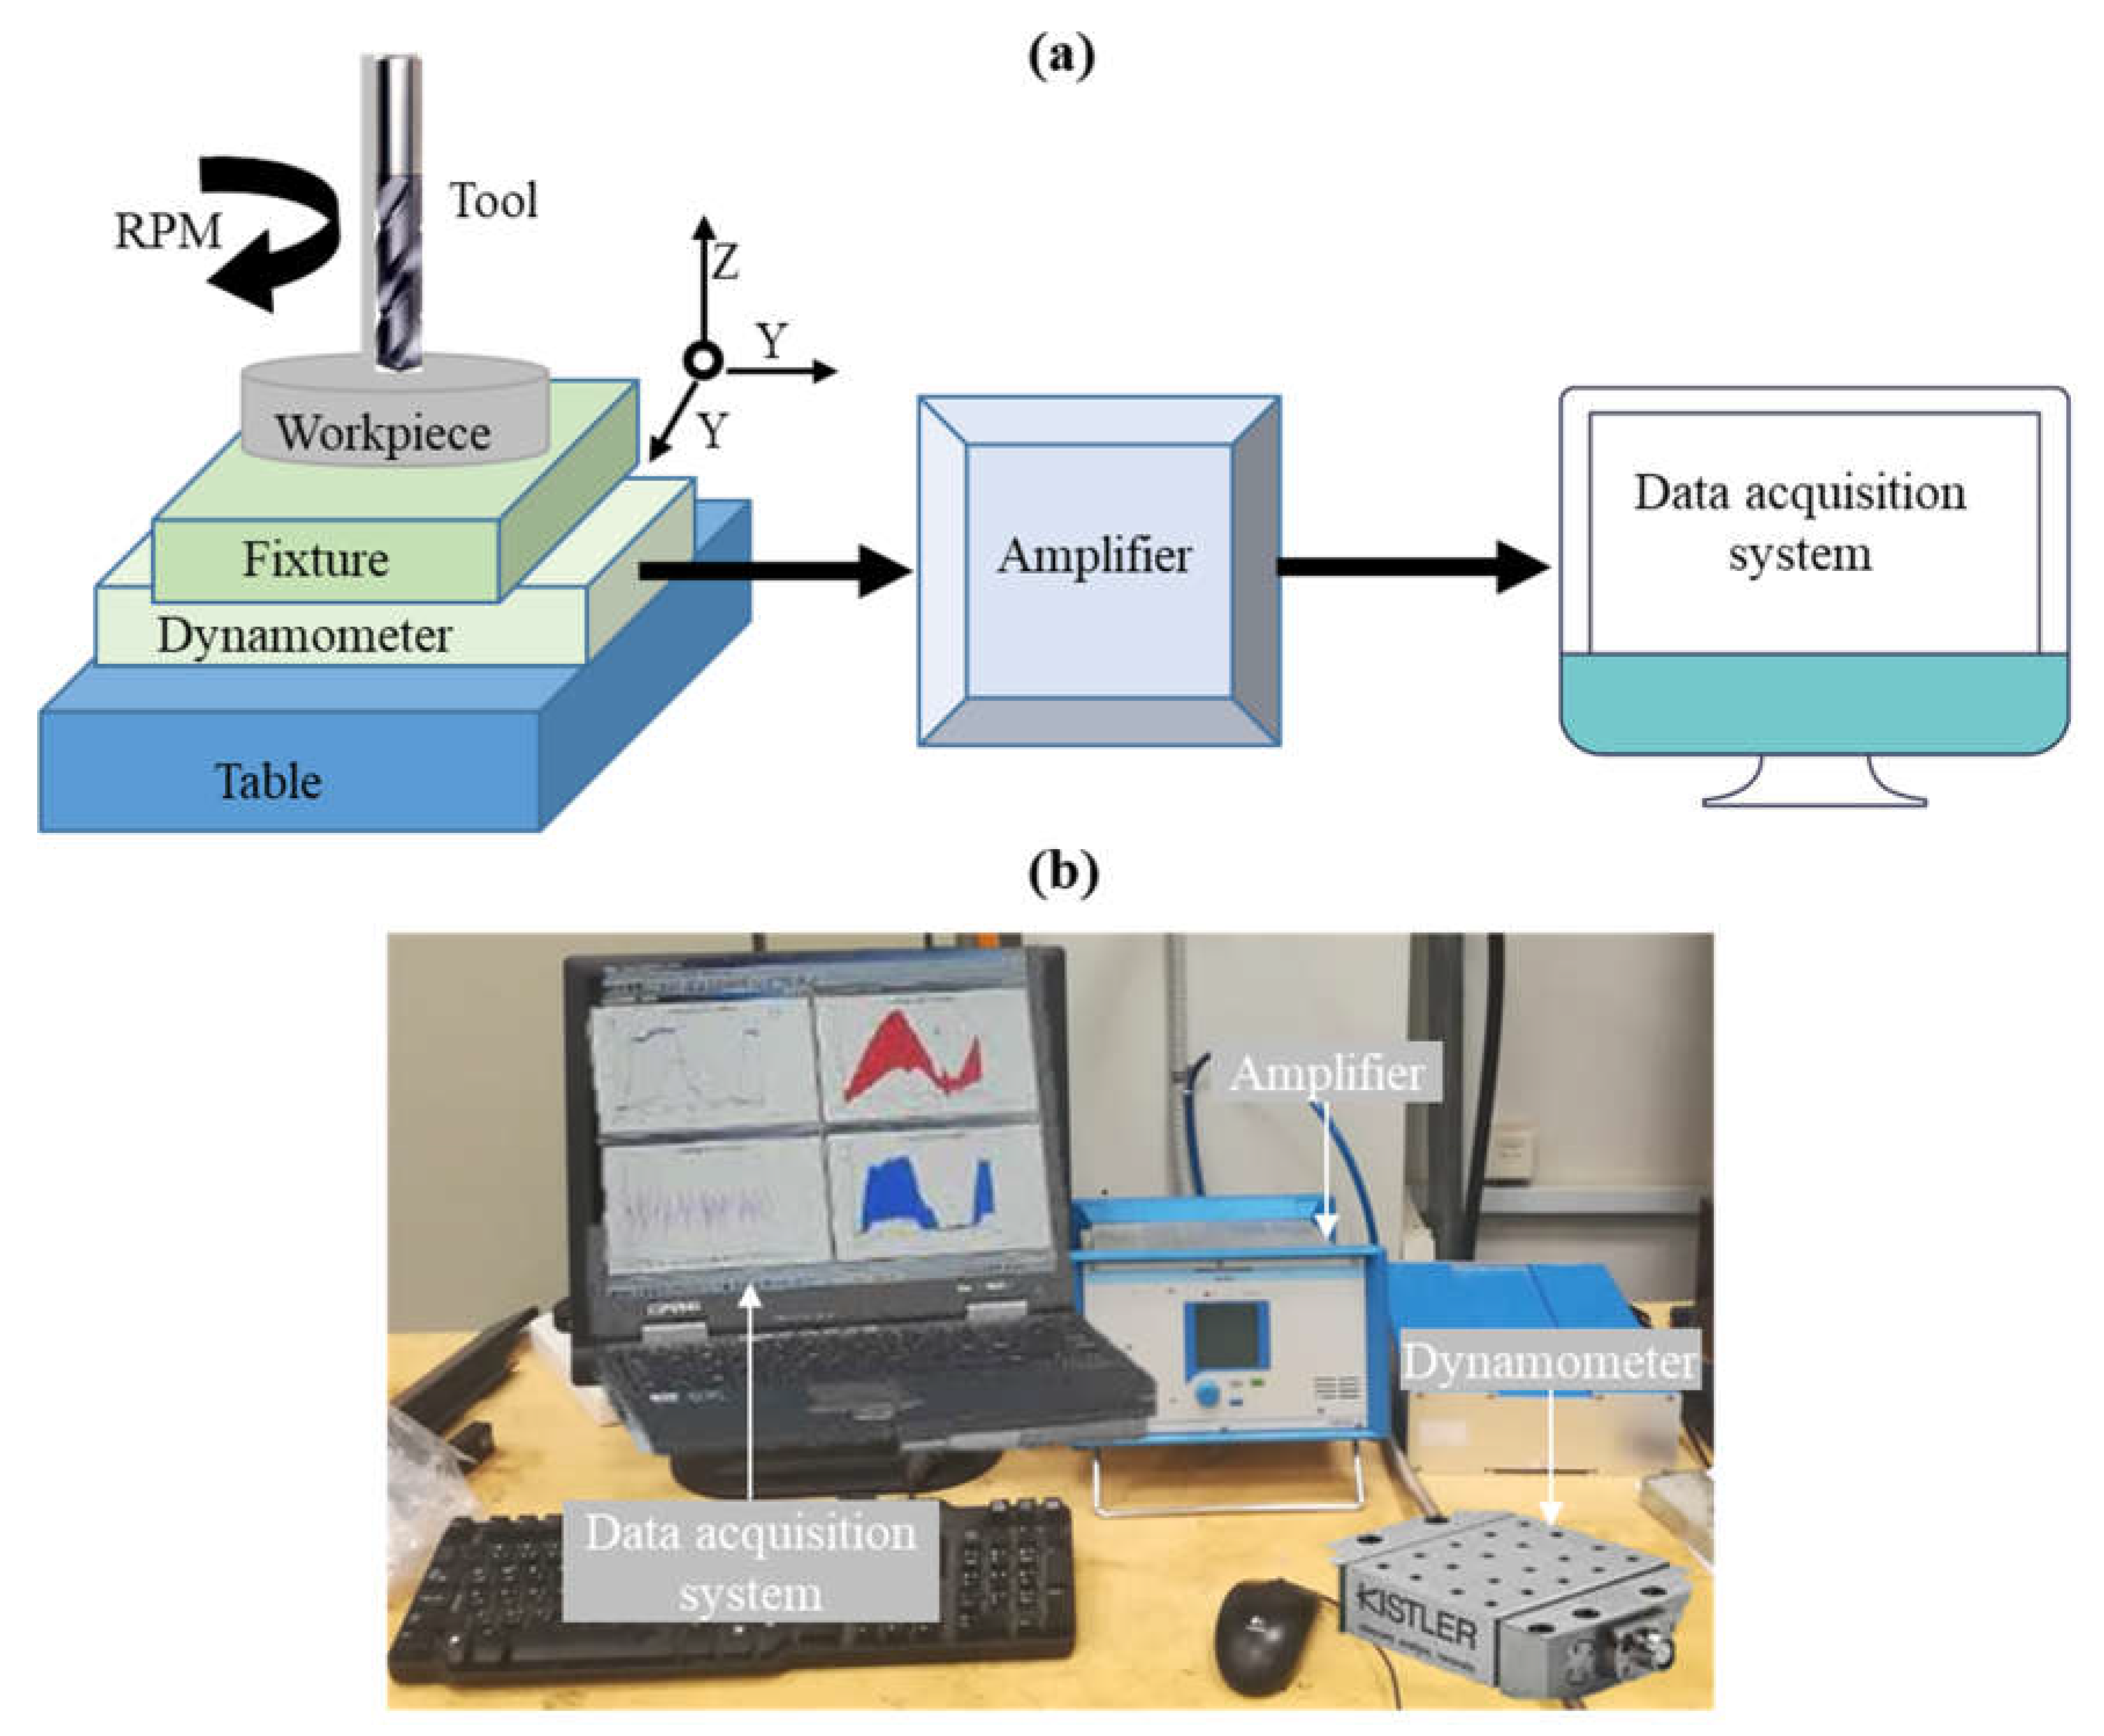
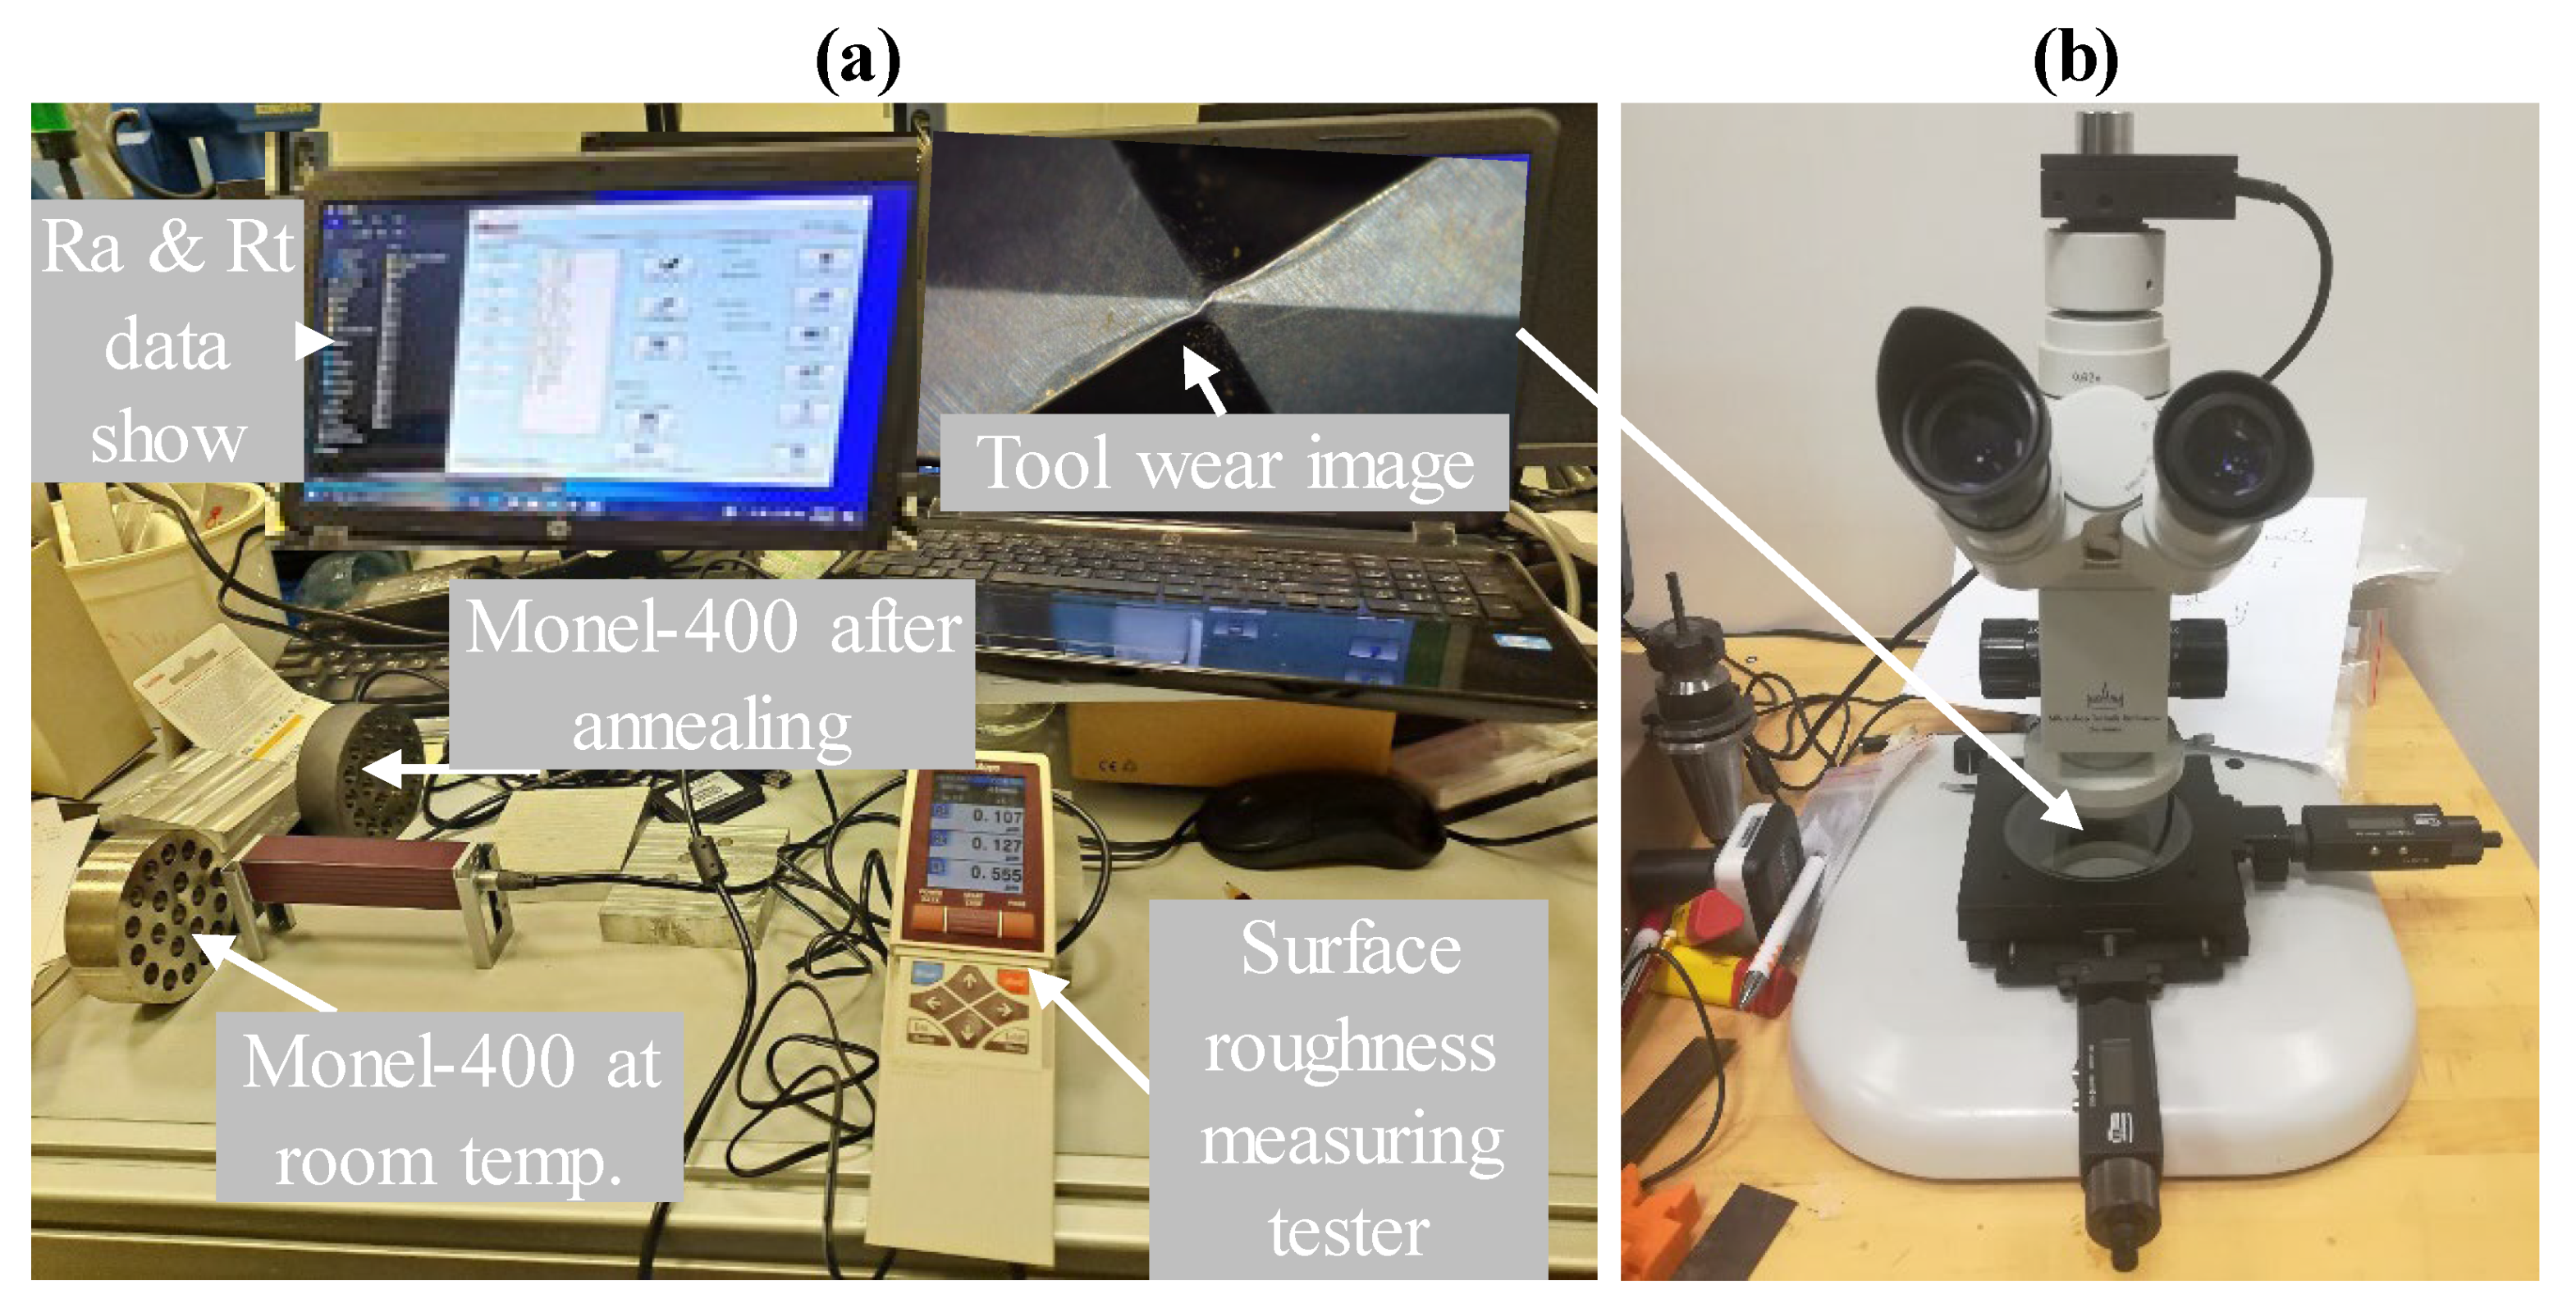
Figure 5a,b illustrates the schematic diagram and the cutting force measurement system. A dynamometer (KISTLER 5697 A, Kistler Group, Eulachstrasse 22, 8408 Winterthur, Switzerland) was applied to calculate the cutting forces in three directions (Fx, Fy, and Fz) during the drilling operation. As it is commonly known in the drilling process, the cutting force in the tool axial direction (Fz) is the main cutting force, and the other component of cutting forces (Fx and Fy) can be neglected so, in this research, the maximum value of Fz was considered for further analysis. A portable surface tester from Mitutoyo, Japan, was used to measure surface roughness in terms of Ra and Rt for each drilled hole. The values of Ra were taken at three different positions inside the drilled holes with a length of 4 mm and the average values were considered in the analysis. Figure 6a illustrates the setup of measuring the surface roughness. Tool wear can also be measured using an optical microscope from Askania Mikroskop, Rathenow, Germany, (see Figure 6b) after drilling 6 holes, 12 holes, and 18 holes for each material. The tool wear was measured in two different regions, as will be discussed in detail in the further section. ImageJ software was used with an appropriate scale for measuring the tool wear in quantitative format (mm).

3. Results and Discussion

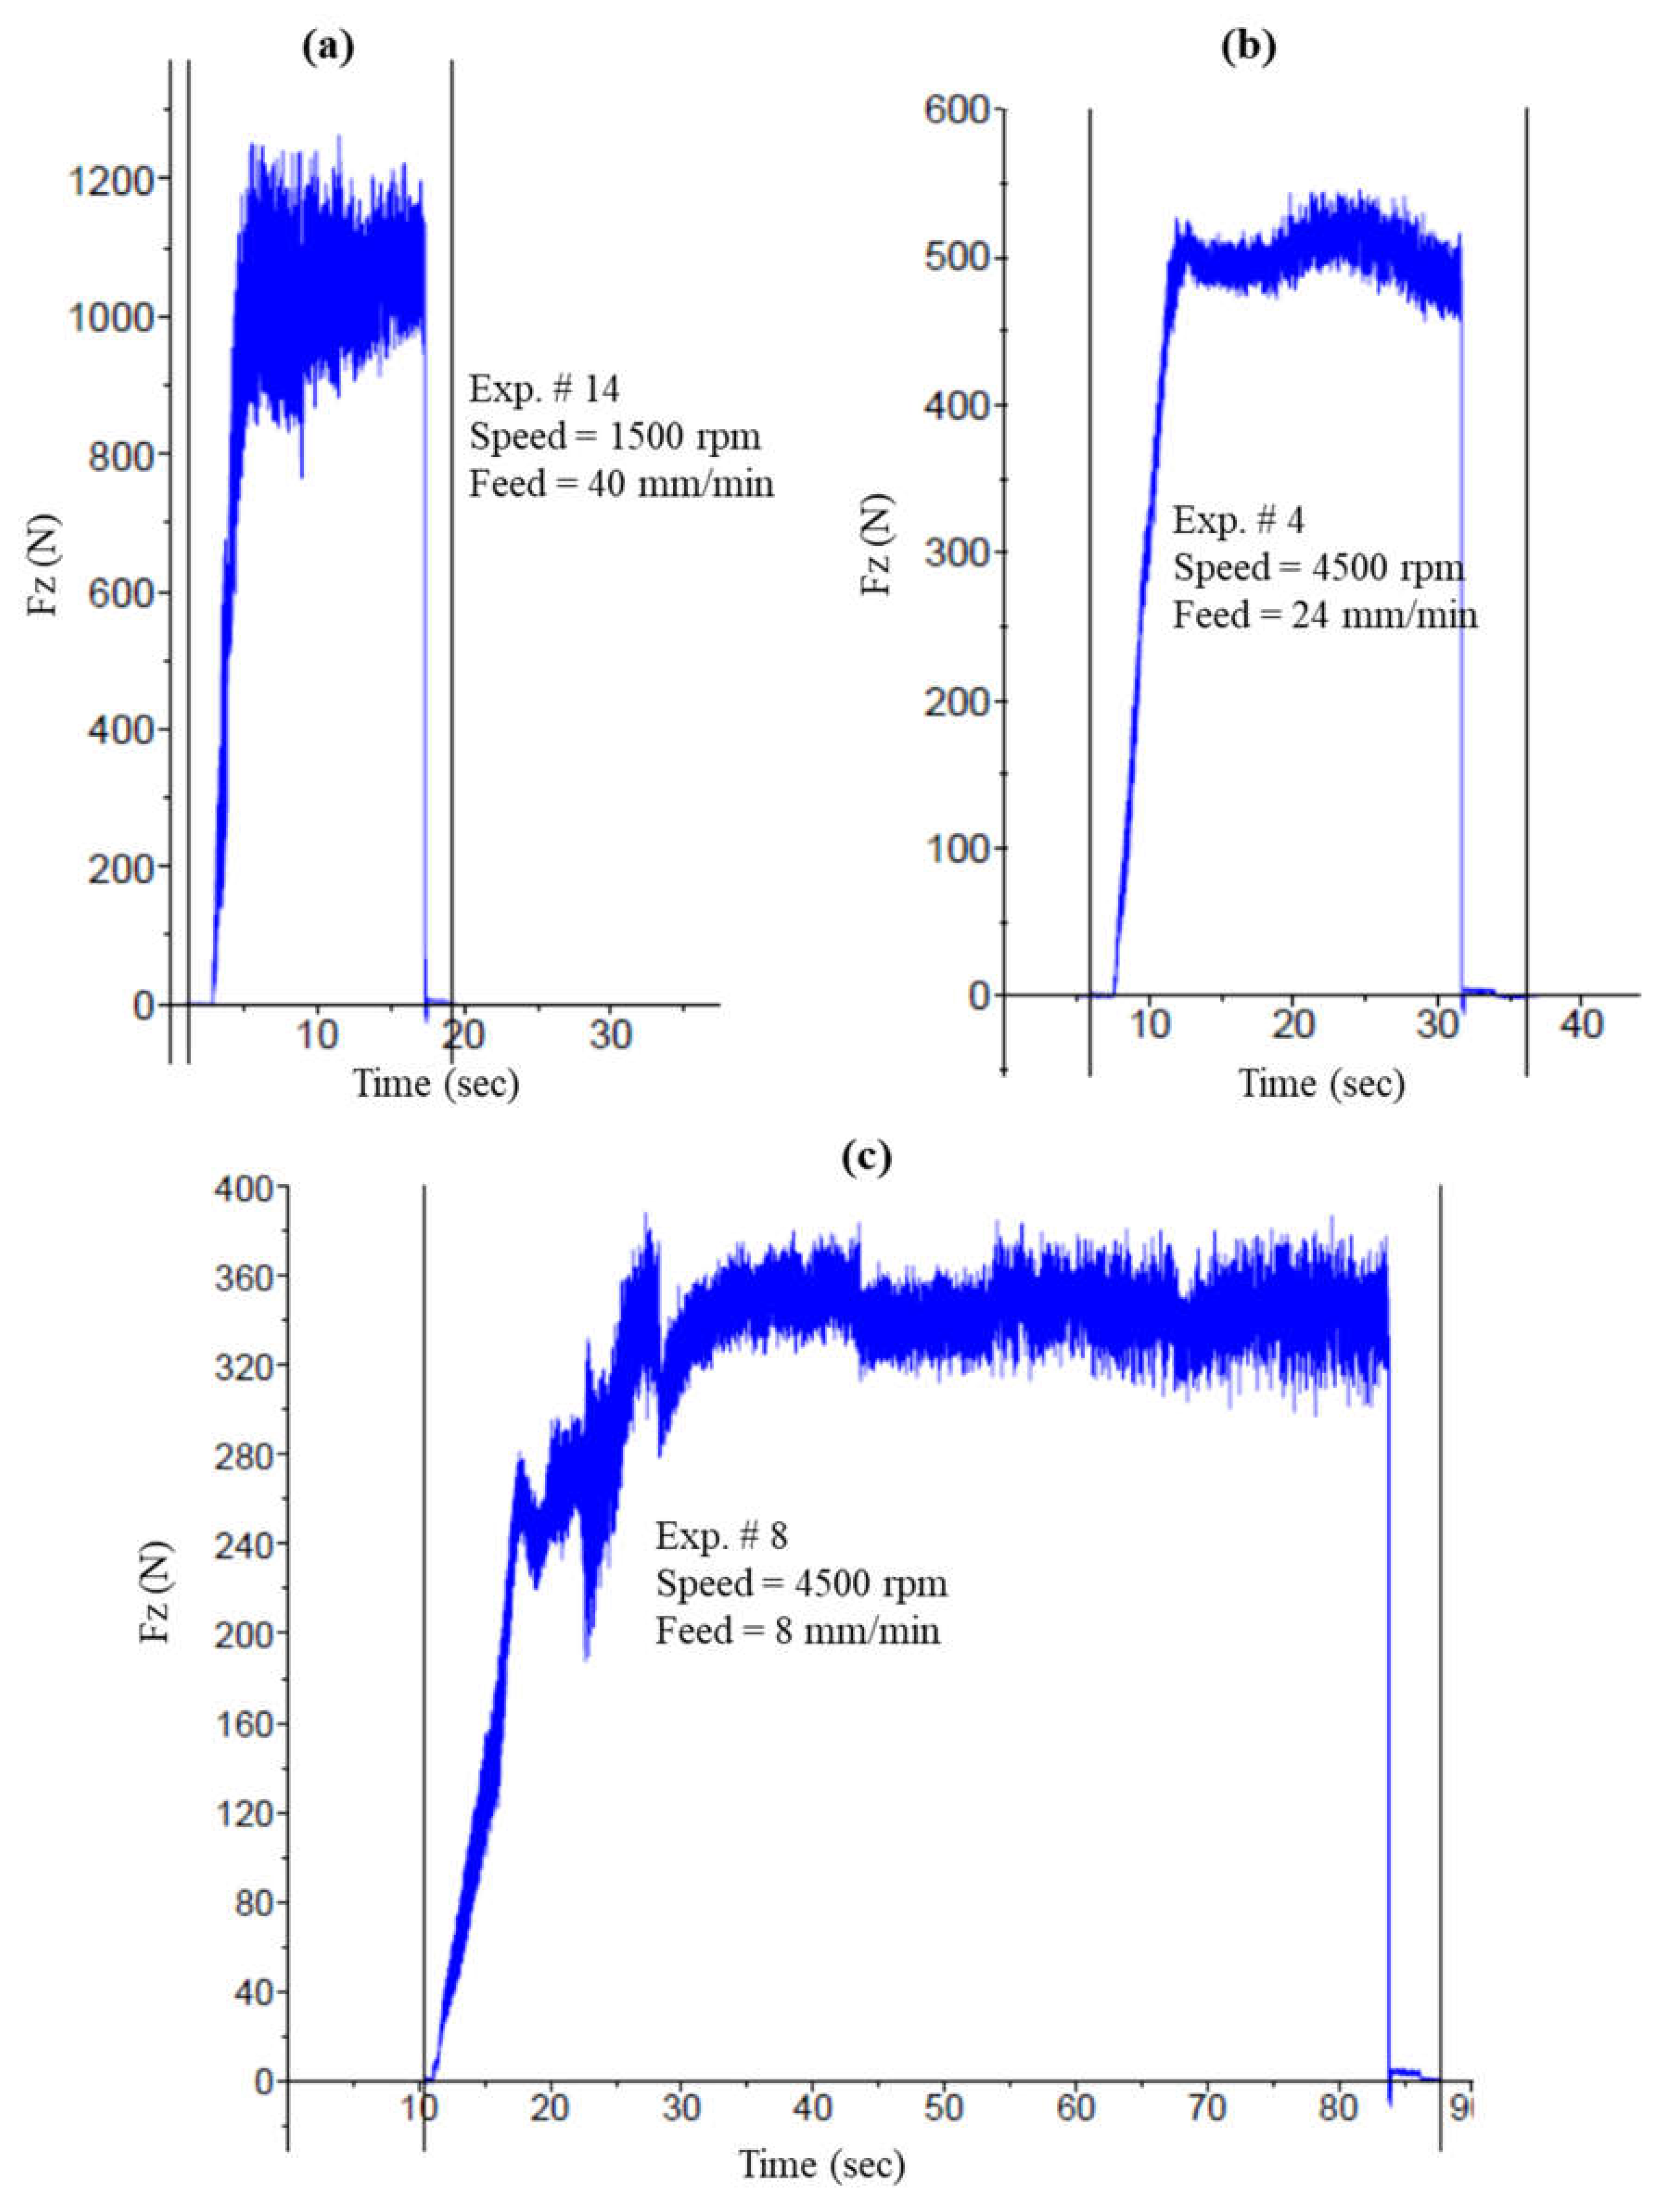
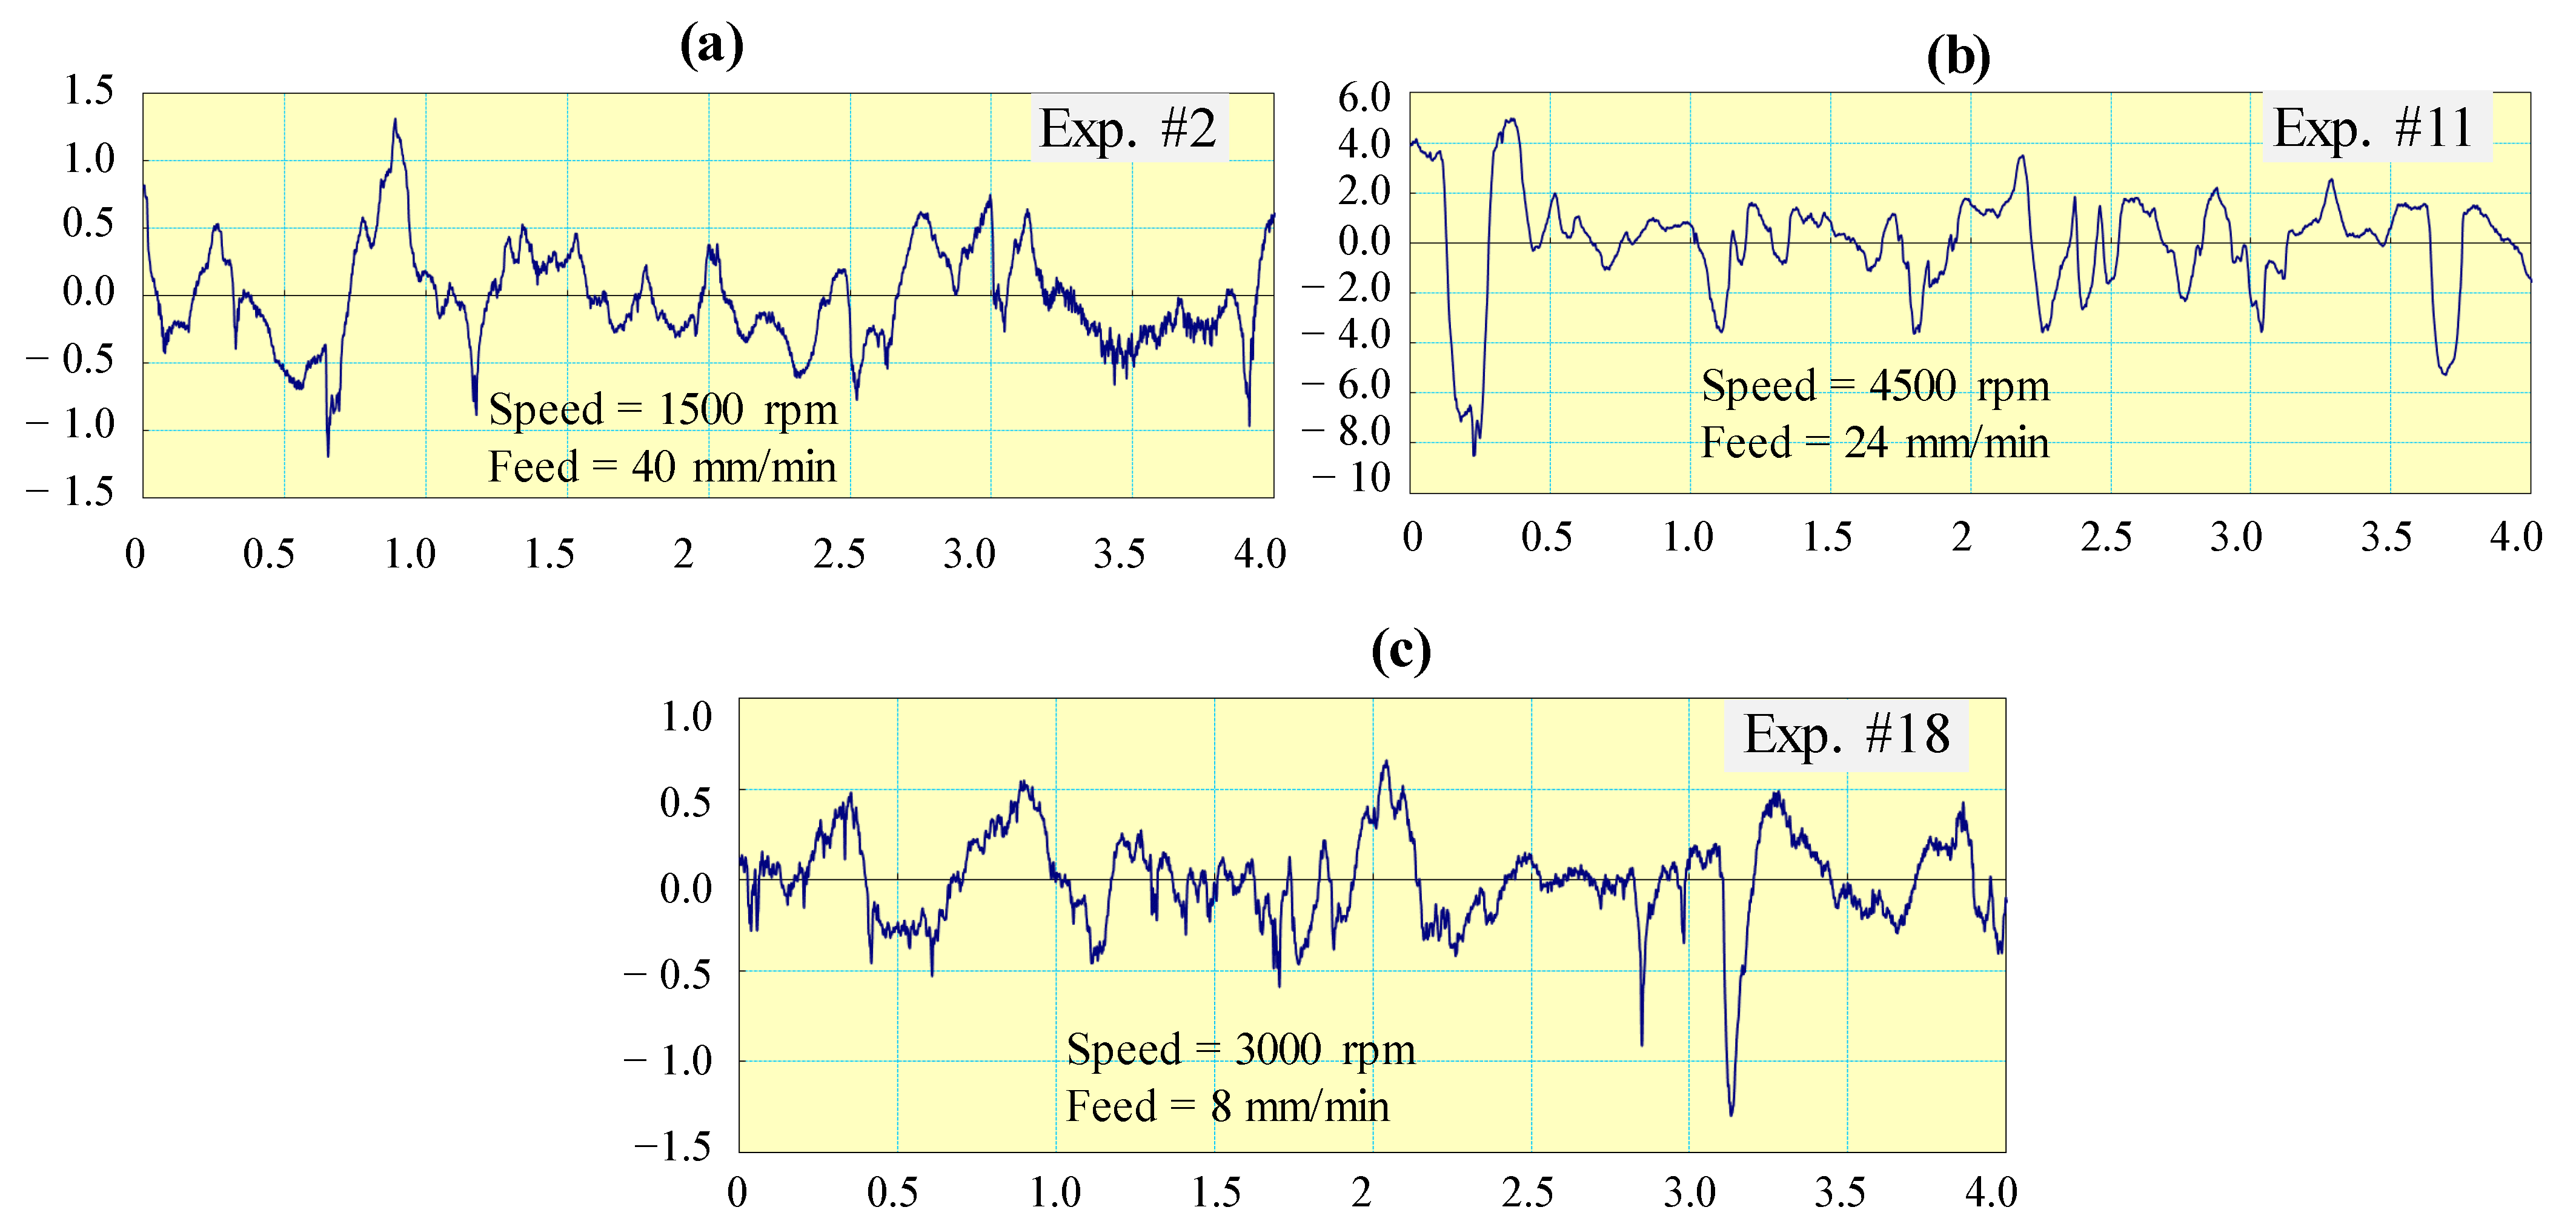
The experiments were accomplished to examin the effects of the heat annealing process and drilling process parameters on the cutting force, surface roughness, and tool wear while drilling Monel-400 alloys. Three different conditions of the Monel-400 materials were tested, namely (i) at room temperature, (ii) after annealing at 700 °C, and (iii) after annealing at 1000 °C. In this research, the effect of maximum cutting force in the tool axial direction (Fz) and the surface roughness profile (Ra and Rt) were considered. The experimental results are tabulated in Table 6. A full factorial design with two replications was employed to plan the experimental design. The experiment results were analyzed using Minitab software (Version 21). In Table 6, it can be seen that minimum cutting forces and surface roughness of Monel-400 can be achieved at 1000 °C compared to the Monel conditions of room temperature and annealing of 700 °C. Table 7 summarizes the percentage improvement of the Fz, Ra, and Rt after annealing compared to the machining of Monel-400 at room temperature. It can be found in Table 7 that the maximum improvement in Fz, Ra, and Rt reaches 33%, 25%, and 31%, respectively. Regarding the results of Monel-400 after annealing up to 1000 °C, it can be observed that the maximum improvement can reach 42%, 35%, and 59% of Fz, Ra, and Rt, respectively. Figure 7 and Figure 8 graphically represent the typical examples of the 2D profiles of the cutting force (Fz) and surface roughness (Ra). These figures show how the drilling input parameters affect Fz and Ra and the right choice of these parameters is essential in the machinability of Monel-400. For example, the maximum cutting force shown in Figure 7a is 1200 N, which corresponds to run #14 (speed = 1500 rpm and feed = 40 mm/min); however, the cutting force is reduced to 500 N for run #4 (speed = 4500 rpm and feed = 24 mm/min). The force becomes slower at 400 N at Exp. #8 (speed = 4500 rpm and feed = 8 mm/min). Again, Figure 8 represents how the selected drilling parameters have significance on the surface roughness. Figure 8a shows the rough surface of the drilled hole on Monel-400 (Ra = 0.6 µm) under the condition of Exp. #2 (speed = 1500 rpm and feed = 40 mm/min) followed by a relatively smooth surface of Ra at Exp. #11 (speed = 4500 rpm and feed = 8 mm/min). The smoother surface can be obtained under the condition of Exp. #18 (speed = 4500 rpm and feed = 8 mm/min). Note that, as mentioned earlier, the surface roughness was measured at three different locations and then the average of the three readings was considered. That is why the numbers of Ra labeled in Figure 8 may differ from those documented in Table 6.
It should be noted that the results of the main effect and surface plot of the other Monel materials, which have been drilled after heat annealing at 700 °C and 1000 °C, followed the same trend, so to avoid repetition, the result of the Monel-400 alloy at only room temperature is considered in the subsequent sections.

3.1. Hardness Analysis

Annealing is a heat treatment process that can significantly impact the mechanical properties and hardness of the Monel-400 alloy. It alters the microstructure of a material and thereby changes its mechanical properties. When the alloy is subjected to high temperatures during annealing, it undergoes recrystallization, which leads to grain growth and improved ductility [32]. Additionally, heat annealing reduces internal stresses within the alloy, resulting in enhanced toughness and resistance to deformation. Moreover, this process can also decrease the hardness of Monel-400, making it more malleable and easier. In this study, heat treatment aims to improve the machinability of the Monel-400 alloys. These improvements were experimentally measured in terms of surface roughness, cutting force, and tool wear. The hardness of the Monel-400 alloy was measured before and after the annealing process. The results showed that, compared with the average hardness of the received materials (185 HV), there was a reduction of 17.5% and 32.7% for the heat-treated materials at 700 °C and 1000 °C, respectively.

3.2. Tool Wear Analysis

Flank wear is a common occurrence when machining super-alloys using various tool types such as carbide tools [33]. The high cutting temperatures can result in thermal softening of the tool material and accelerate the wear process. Moreover, the constant contact between the tool’s flank face and the workpiece can lead to abrasive wear. In this research, the flank wear of the used solid carbide tool was measured after drilling 6 holes, 12 holes, and 18 holes of Monel-400 at every condition (at room temperature and after the annealing process at two temperatures). Figure 9 depicts a comparison of the brand-new tool and the tool after drilling 18 holes. Results showed that the flank wear increases as the number of drilled holes increases [34]. Two regions have been considered for the tool wear measurements as shown in Figure 9b. The comparison of the results of the tool flank wear for machining Monel-400 at room temperature, after annealing up to 700 °C, and after annealing up to 1000 °C is summarized in Table 8. Moreover, the results of tool wear after machining all experiments (18 holes) for all three samples are shown in Figure 10. It can be found from both Table 8 and Figure 10 that the tool wear of the annealed Monel-400 up to 1000 °C is very low and almost negligible compared to the tool wear of the annealed sample up to 700 °C. The drilling of Monel-400 at room temperature results in the highest value of the tool wear and thus higher machining cost. Finally, the heat annealing process changes the chemical and physical properties of the Monel-400 materials, making them more workable, which results in a significant reduction in the flank wear.

3.3. ANOVA Analysis

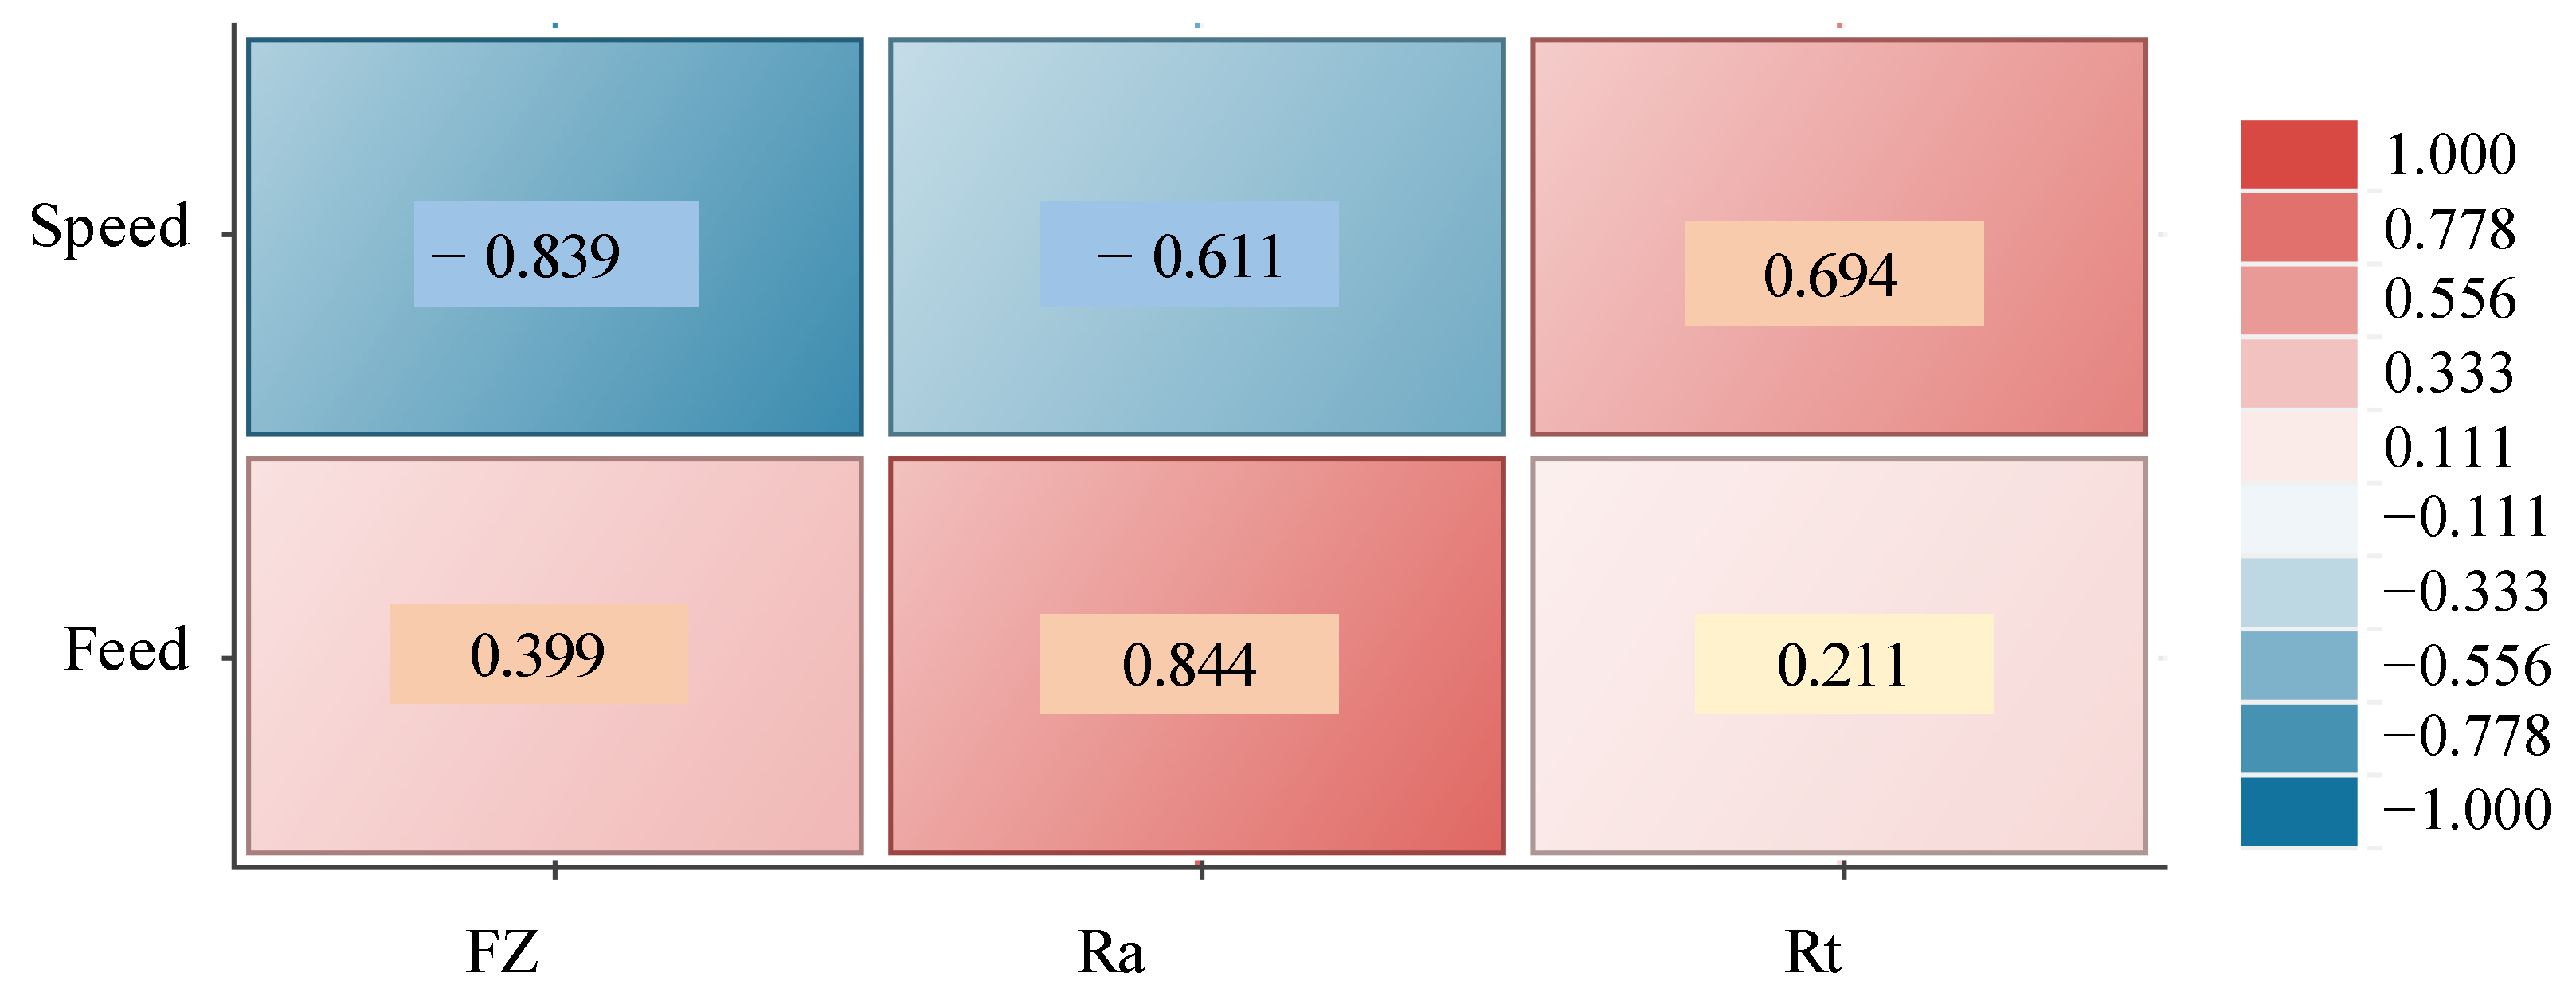
Relative effects and process contribution ratios can only be determined by doing an Analysis of Variance (ANOVA). The significance of drilling parameters on Fz, Ra, and Rt was also evaluated using ANOVA computation. The adjusted sums of squares (Adj. SS), adjusted mean squares (Adj. MS), degrees of freedom (df), variance ratio (F), and the 95 percent confidence interval ANOVA tables (P) results are shown in Table 9, Table 10 and Table 11. It can be seen from the ANOVA tables that all drilling factors tested in this research had a significant effect on the Fz and Ra (p-value < 0.05) in ANOVA tables. Moreover, ANOVA indicates no interaction effect on all responses (as the p-value is greater than 0.05). The relative significance of the drilling parameters on the responses (Fz, Ra, and Rt) is illustrated in Figure 11. Speed had the most significant impact on the cutting force (Fz), and the feed parameters had the most significant on the surface roughness (Ra). The speed contribution ranged from 61% on the Ra to over 84% on Fz. The feed rate had less effect on Fz compared to the spindle speed; its effect on the Fz reached >40%. There was a higher effect of feed rate on Ra, which can reach up to 85%. Regarding Rt, it was found that the spindle speed had more effect on Rt (70%) compared to the effect of feed rate on Rt (21%).

3.4. Main Effect and Surface Plots for Fz and Ra of Monel-400 at Room Temperature

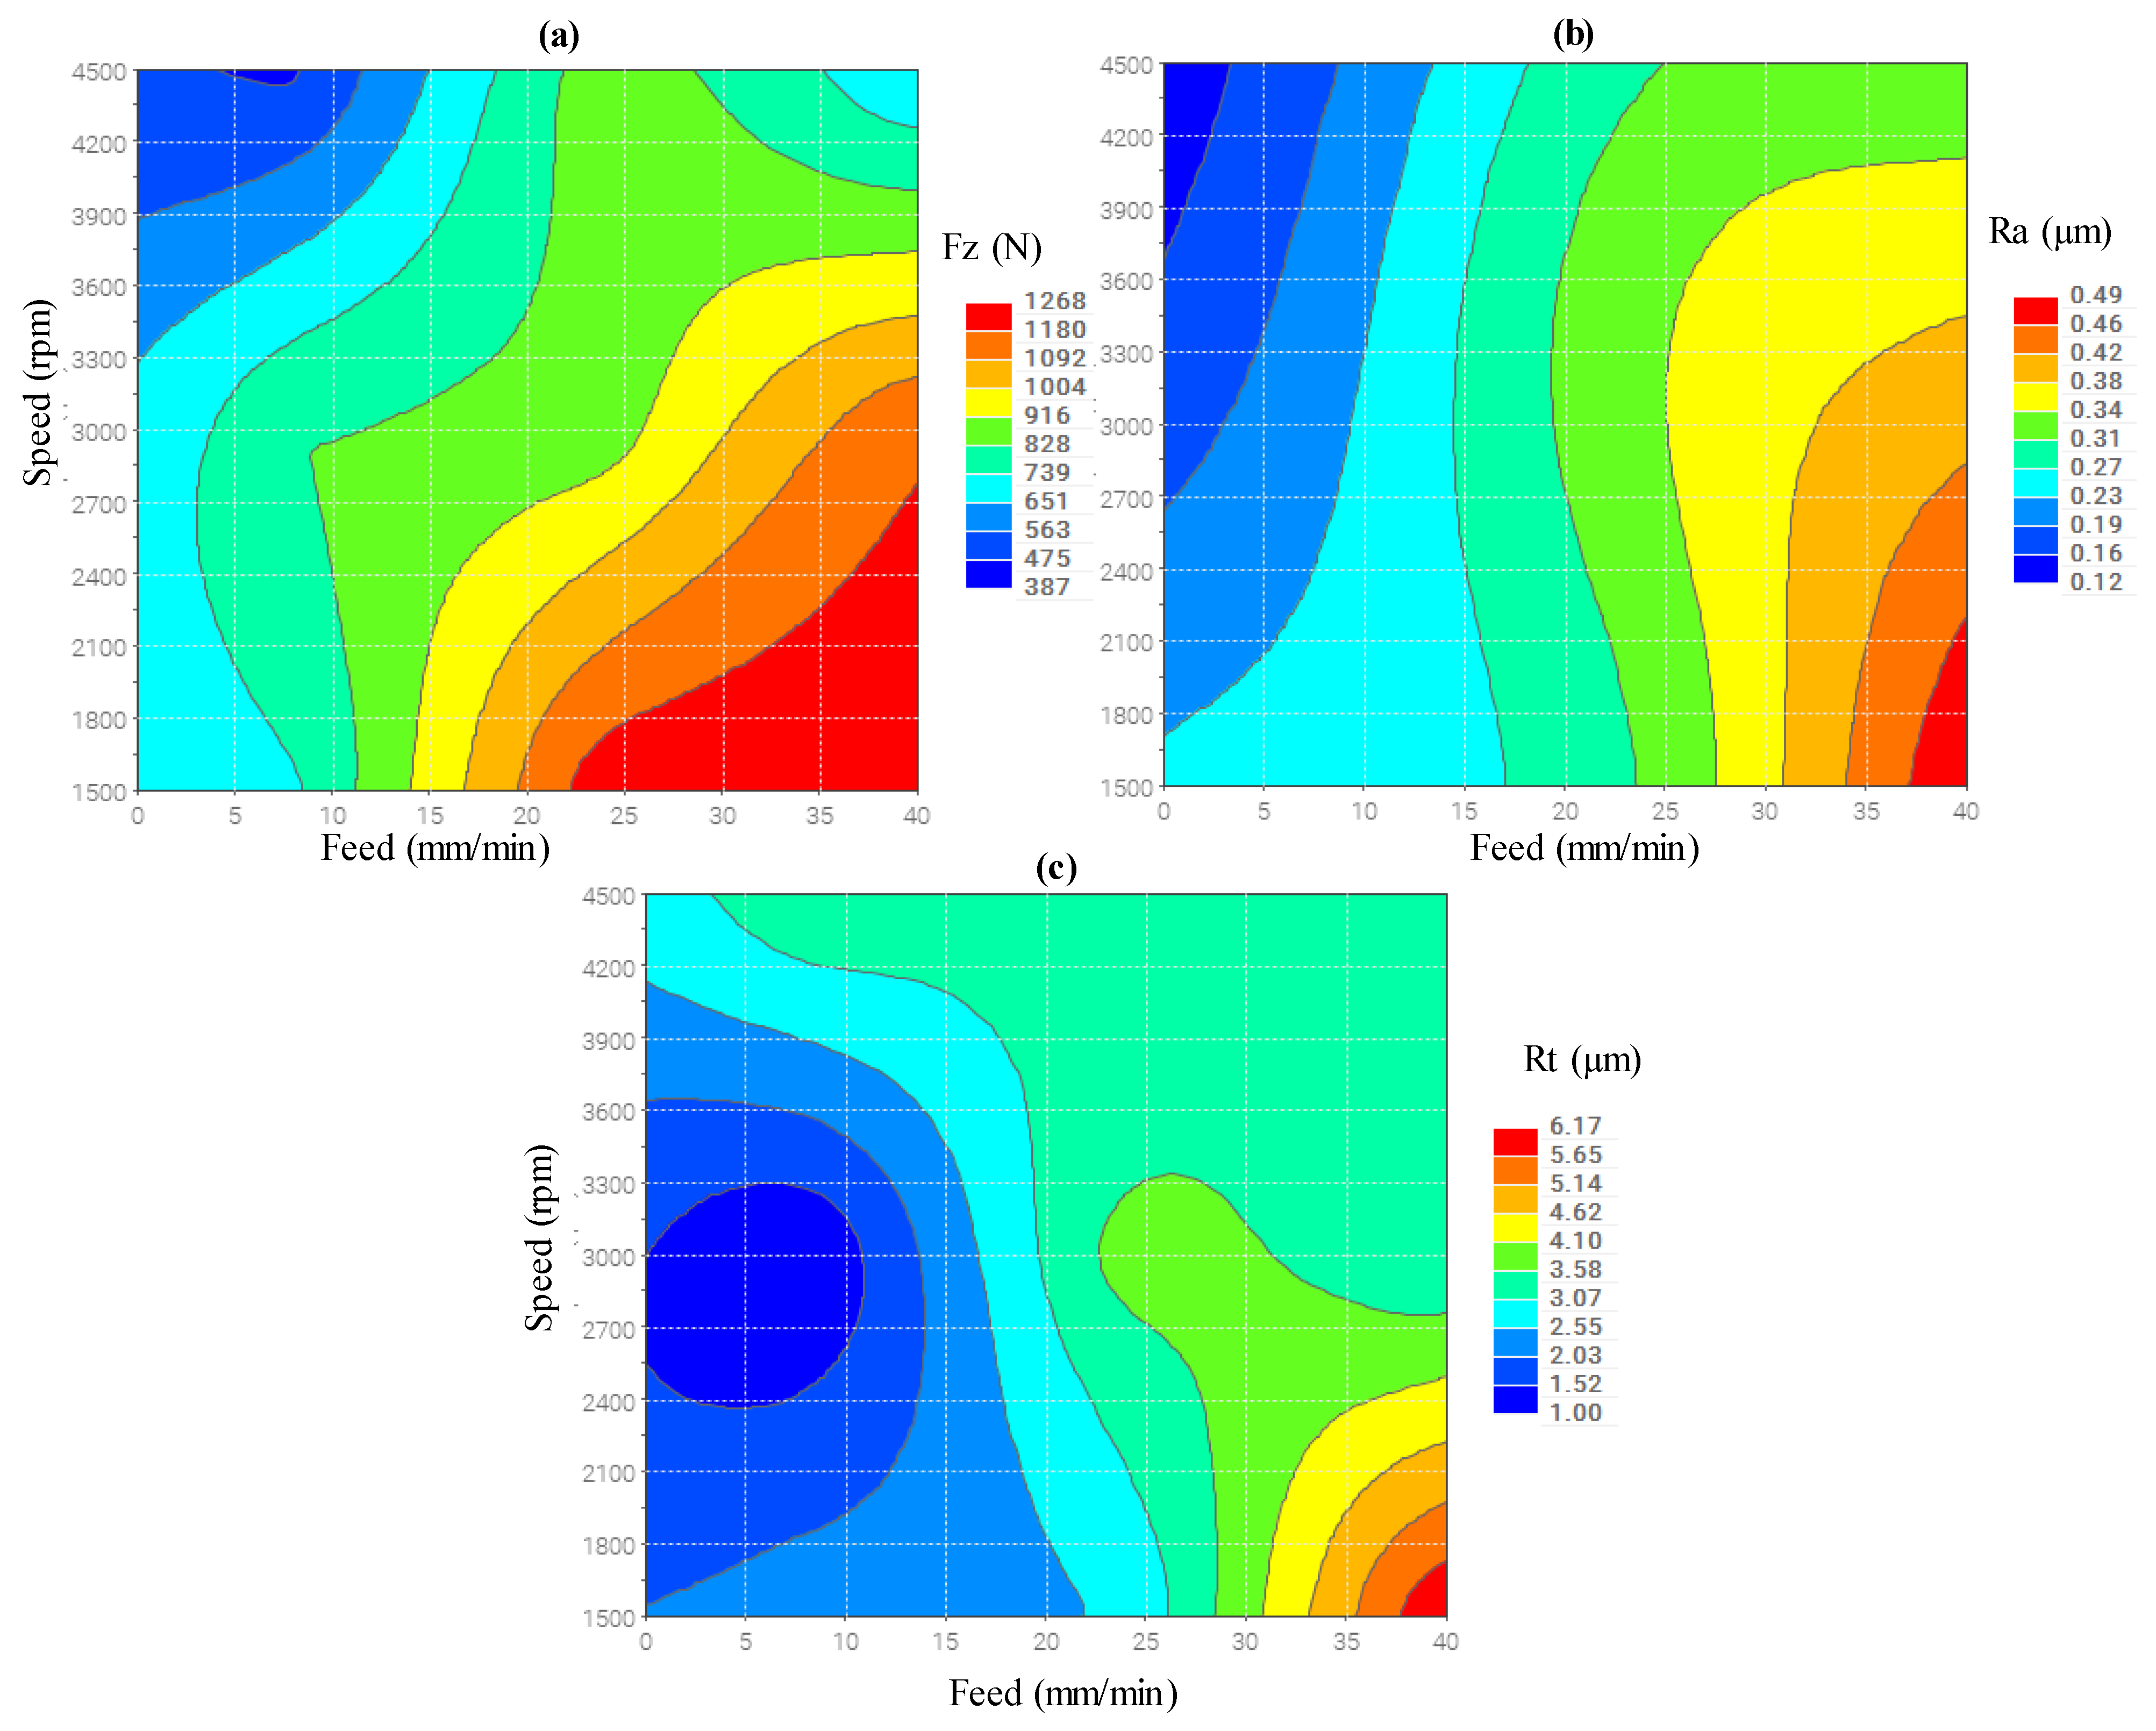
Figure 12 shows the surface plots of the drilling parameters (speed and feed) on Fz, Ra, and Rt, respectively. It can be seen in Figure 12a–c that the minimum cutting force (Fz) and surface roughness (Ra and Rt) can be achieved at a high level of spindle speed (4500 rpm) and a low level of feed (8 mm/min). This is because, at higher spindle speeds, the temperature of the cutting zone increases, and the materials become softer, which reduces the cutting force. Moreover, when the spindle speed increases, the exposure time of the surface being machined increases, which results in the production of a smooth surface [26,27] (see Figure 12b,c). On the other hand, as the feed rate rises, the drill tool must use more energy to cut through the material and remove the growing volume of chips, which results in increasing the cutting force. More details can be found in the surface plots (Figure 12); for example, it can be found in Figure 12a that the feed rate can be increased up to 14 mm/min (higher MRR) and the speed can be decreased down to 3300 rpm (less power consumed) while the cutting force stays at an acceptable range (<900 N). Moreover, it can be seen in Figure 12b that the feed rate can reach up to 20 mm/min at 2700 rpm, which results in better surface roughness (<0.3 µm). Compared to the literature results in the machining of Monel materials using some other processes, it can be found that the minimum surface roughness (Ra) was 0.667 µm in the turning process [35] and 0.98 µm in the Wire-EDM process [8]. Regarding Rt, it is found in Figure 12c that it remains less than 3 µm when the feed rate reaches up to 25 mm/min and the speed is 2700 rpm. To obtain the minimum values of the responses, a compromise between the drilling input parameters should be carried out, so in this study, a multi-objective tool was applied to find the optimal parameters for drilling Monel-400 alloy.

3.5. Optimization Results

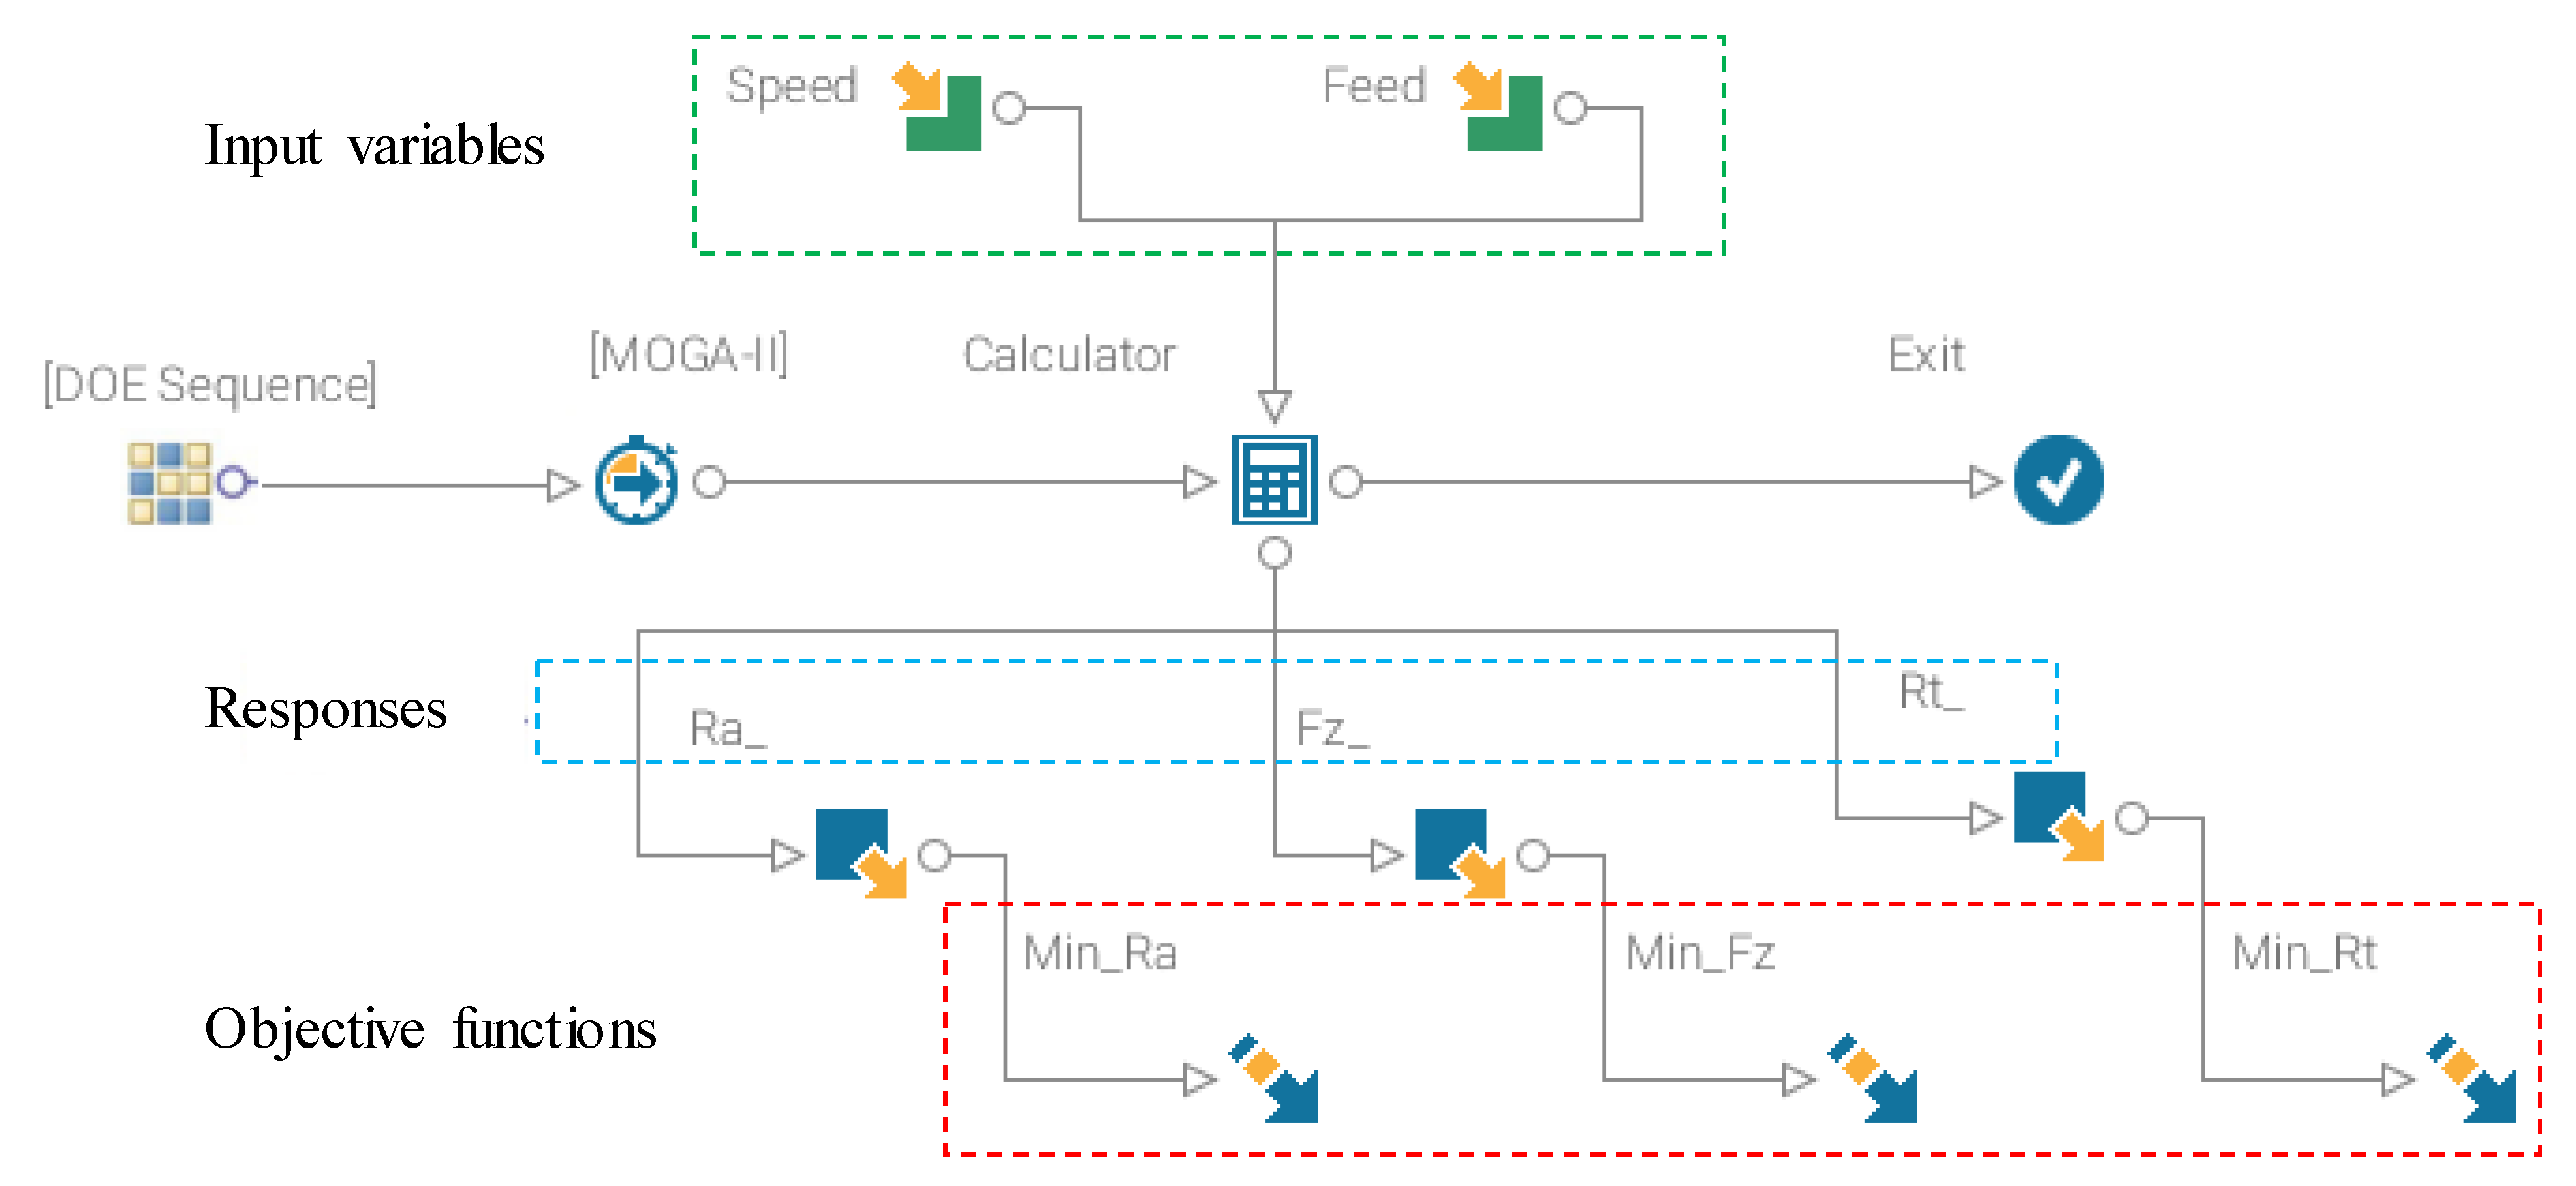
Several optimization methods were found in the literature for optimizing the parameters of different machining techniques. For example, a multi-objective particle swarm method was applied for the optimization of process parameters while turning Monel-400 alloy [36]. Abdo et al. [37] used the MOGA tool to optimize the parameters of rotary ultrasonic machining for the microchannelling of Alumina ceramic. MOGA was also applied to optimize the laser process parameters for the milling of Zirconia dental ceramic [38]. The Taguchi method combined with gray regression analysis was used for the optimization of EDM process parameters while machining insulating zirconia materials [39]. In this research, in addition to studying the effect of the drilling variables on the responses, MOGA was also applied to minimize the cutting force (Fz) and surface roughness (Ra and Rt) of the drilled holes in the Monel-400 alloy. The optimization approach was employed to forecast responses for a particular design point using the response surfaces based on radial basis functions. The values of Fz, Ra, and Rt greater than 0.4 µm, 6 µm, and 1000 N, respectively, were considered unfeasible solutions in the optimization model. Table 12 lists the objective functions and the constraints applied in the optimization model. The process flow for the optimization problem created using the Mode Frontier® software(Version 2019R1) is shown in Figure 13. An approach called MOGA was used to simulate the optimization problem. Table 13 lists the parameters that were used for the MOGA and prediction model. The total number of generations was modeled using MOGA, in which the speed parameter was generated at 50 rpm and the feed was 1 mm/min. The design of the points summary along with a definition of each point type can be found in Figure 14. The specific details regarding MOGA are found in [32].
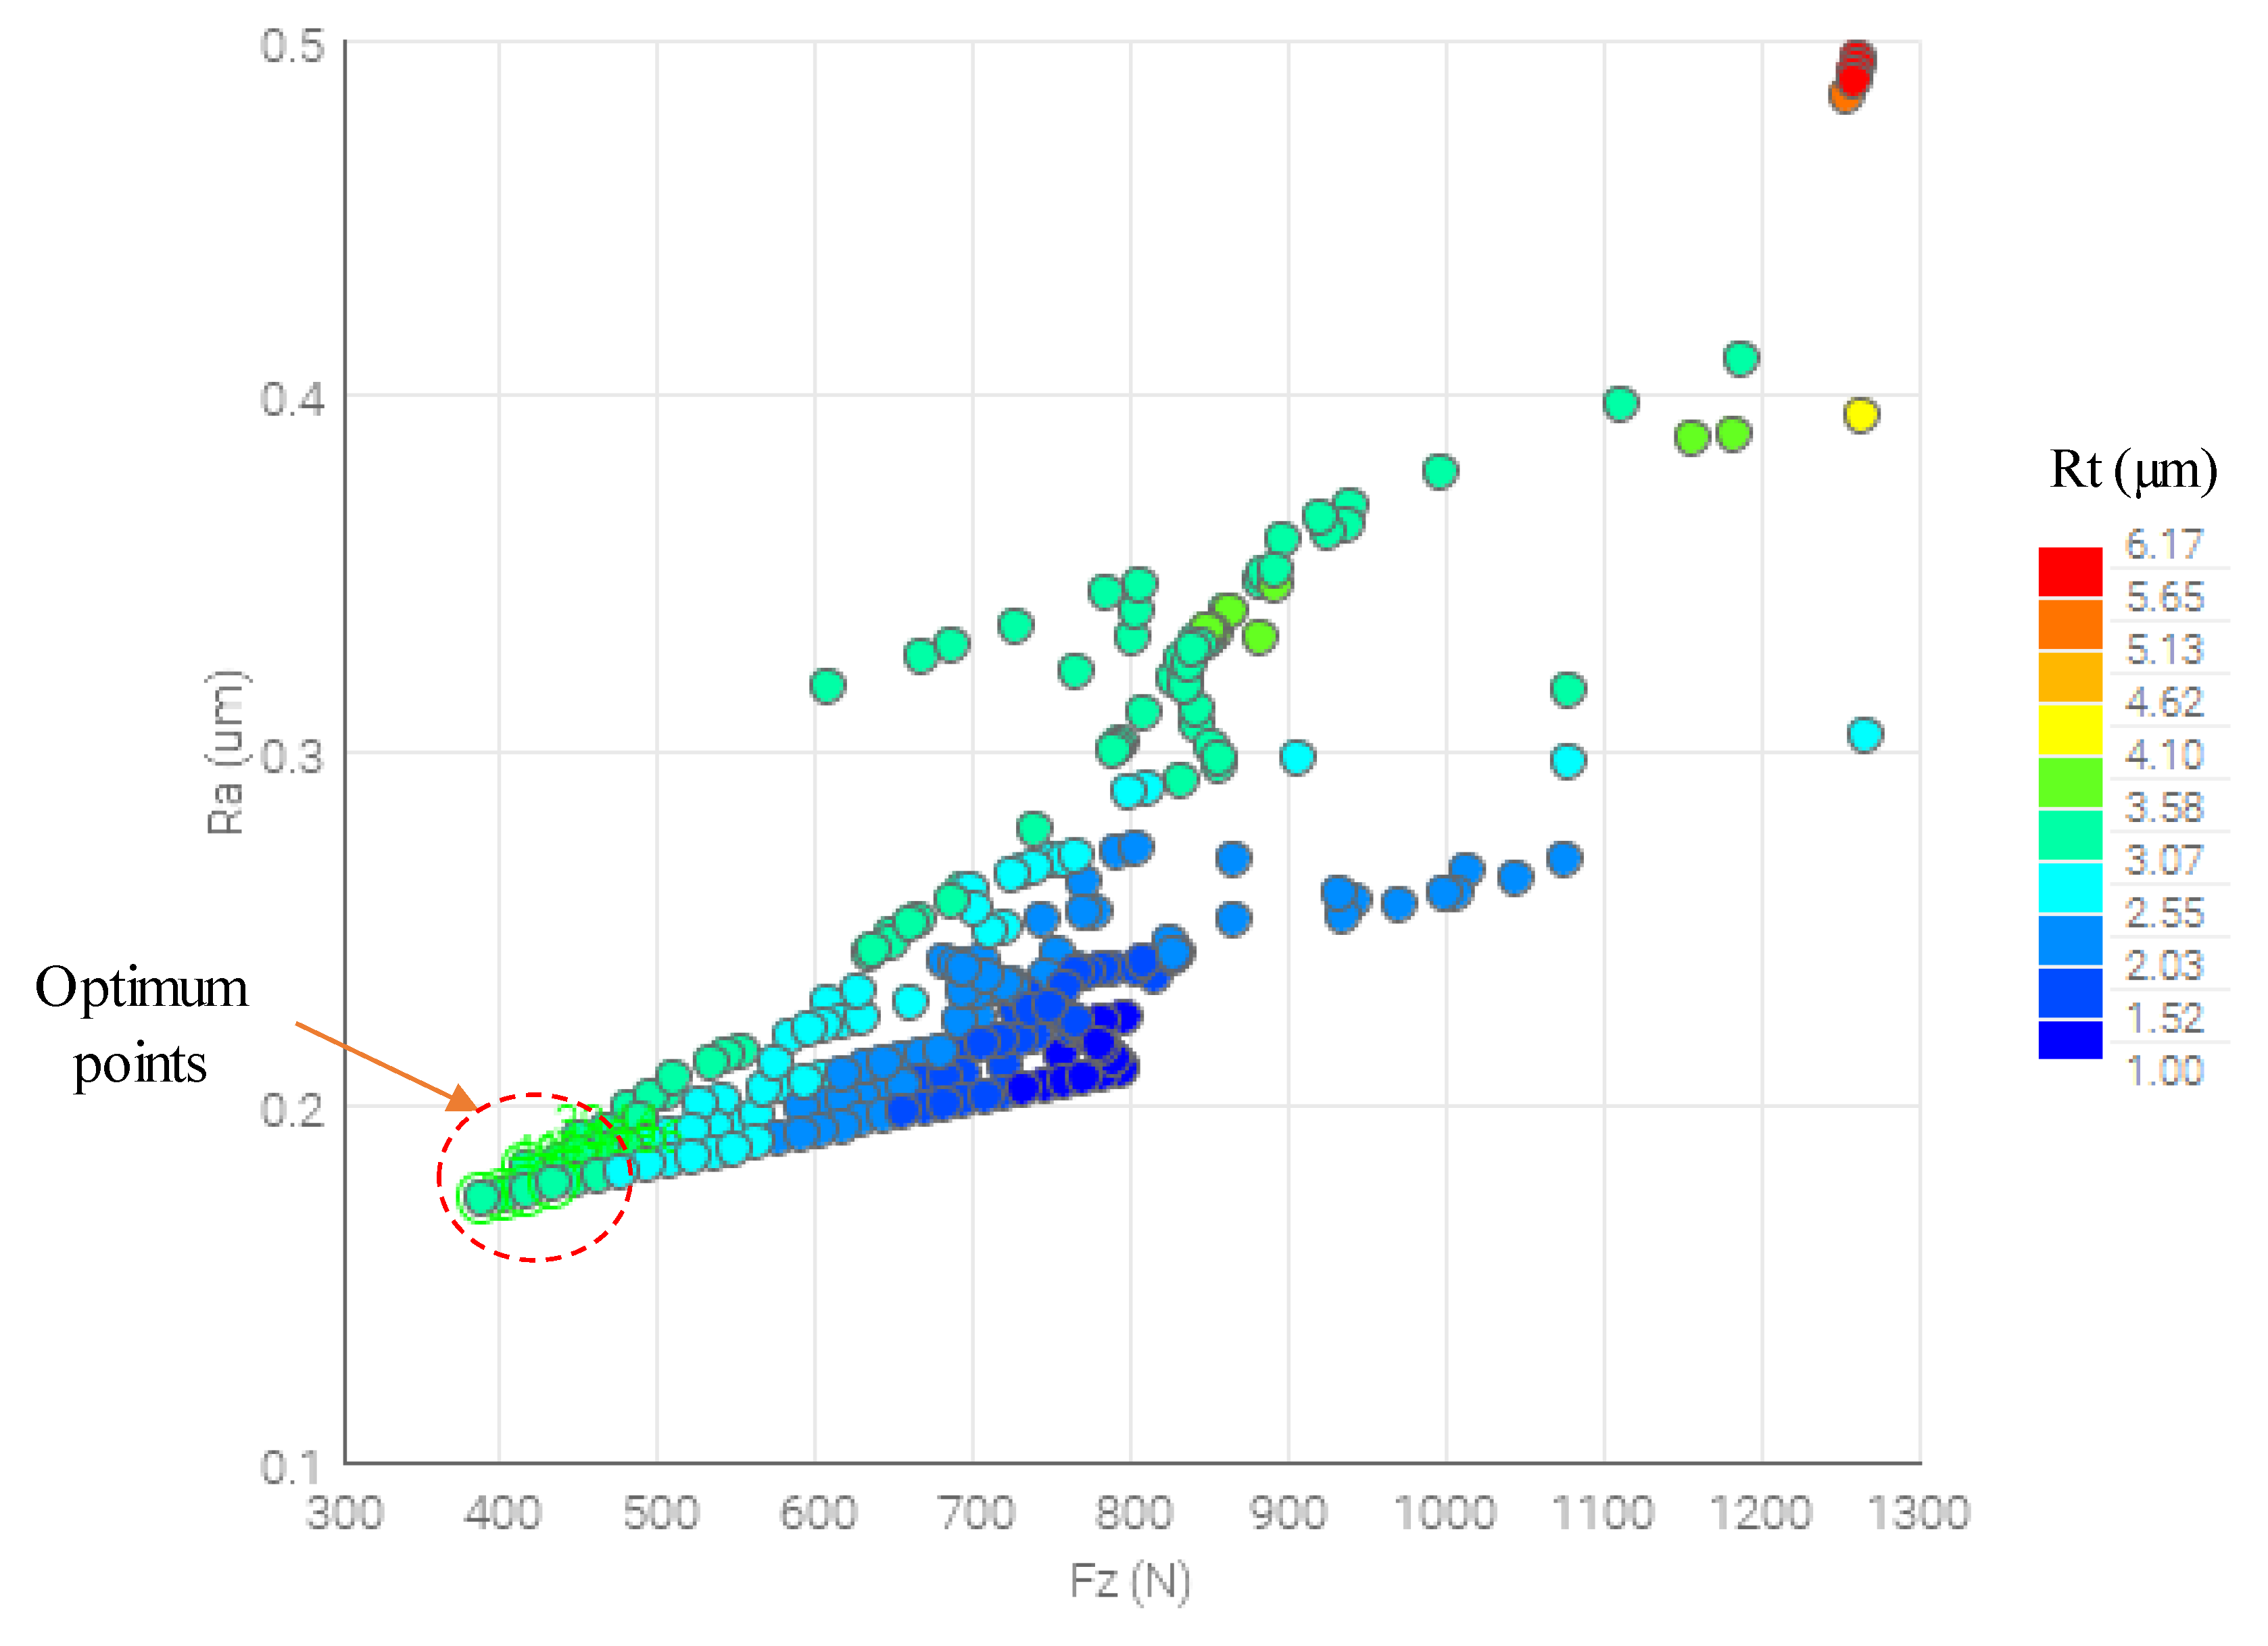
Figure 15 presents the total design points carried relative to the objective functions, i.e., Fz, Ra, and Rt. It is observed that the higher values of Ra and Rt correspond to the higher Rt achieved, and vice versa. The design points with the lowest Fz and Ra are obtained with relatively low to moderate values of Rt, corresponding to higher values of spindle speed and lower values of feed rate. The top right area with high Fz and Ra is characterized by a higher value of Rt. Because the goal of the optimization research is to reduce Fz, Ra, and Rt, the design points that correspond to the lower left corner of the bubble chart in Figure 15 will be chosen as the best options. The optimal design points are marked in Figure 16.
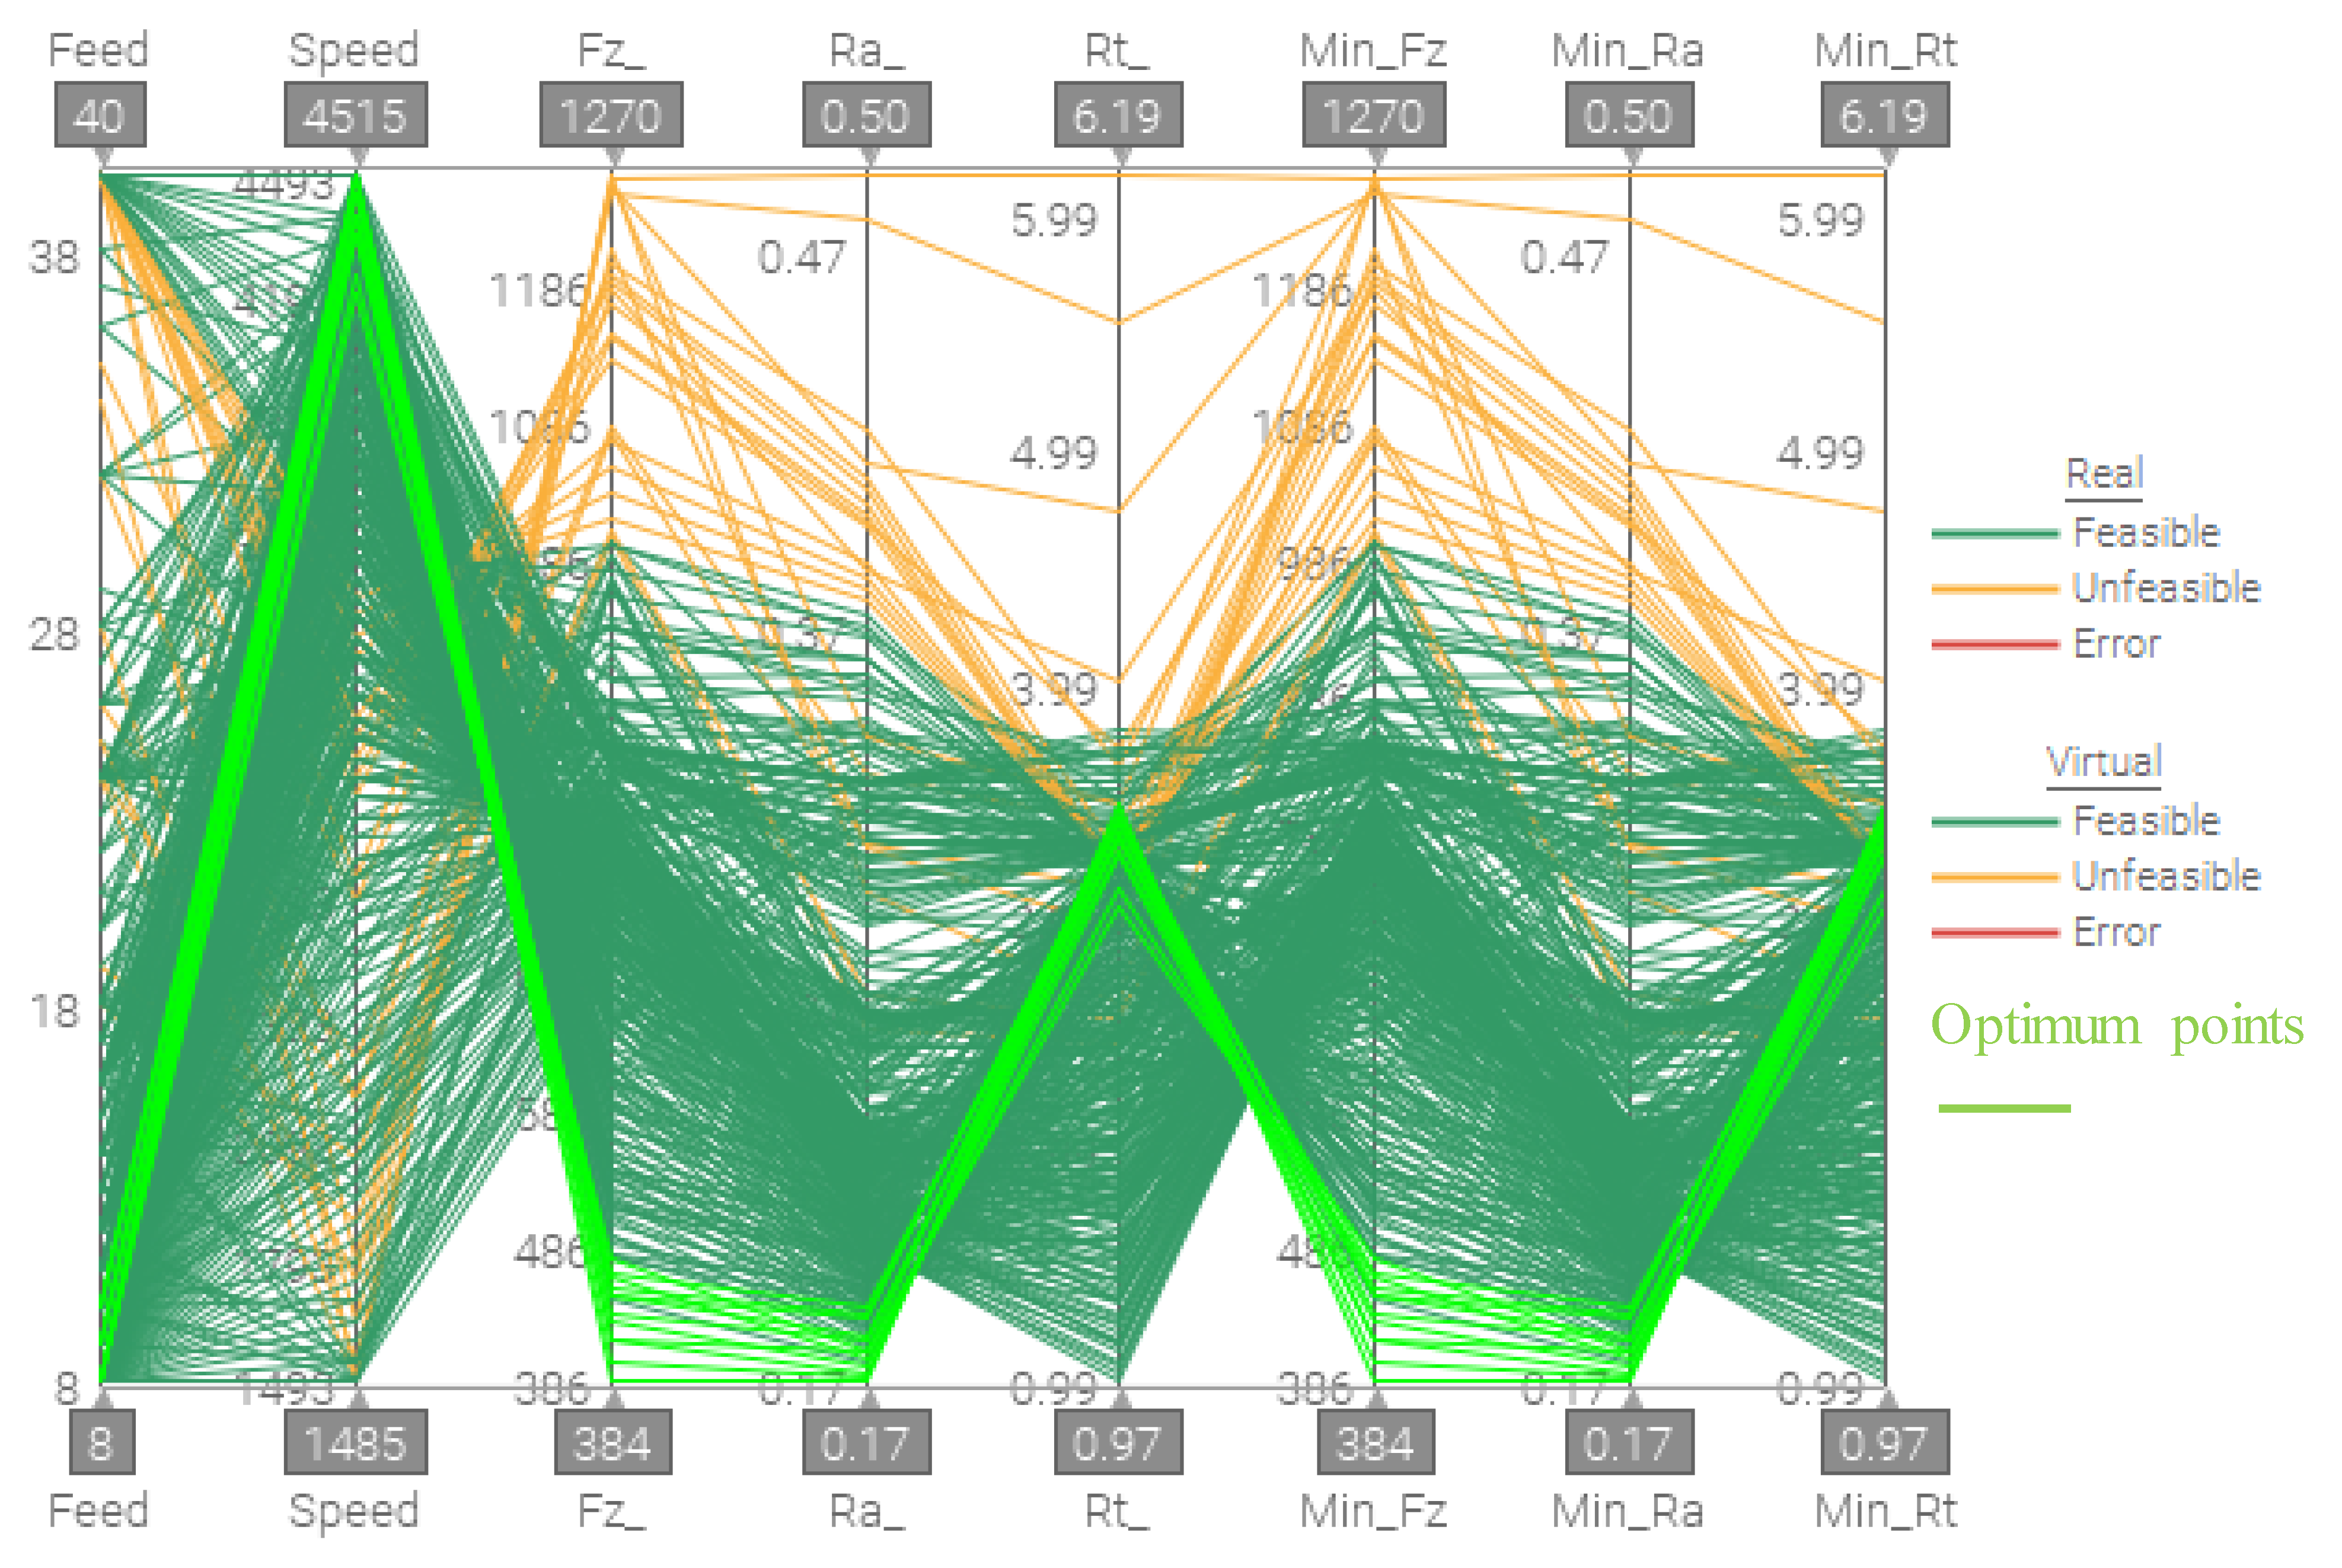
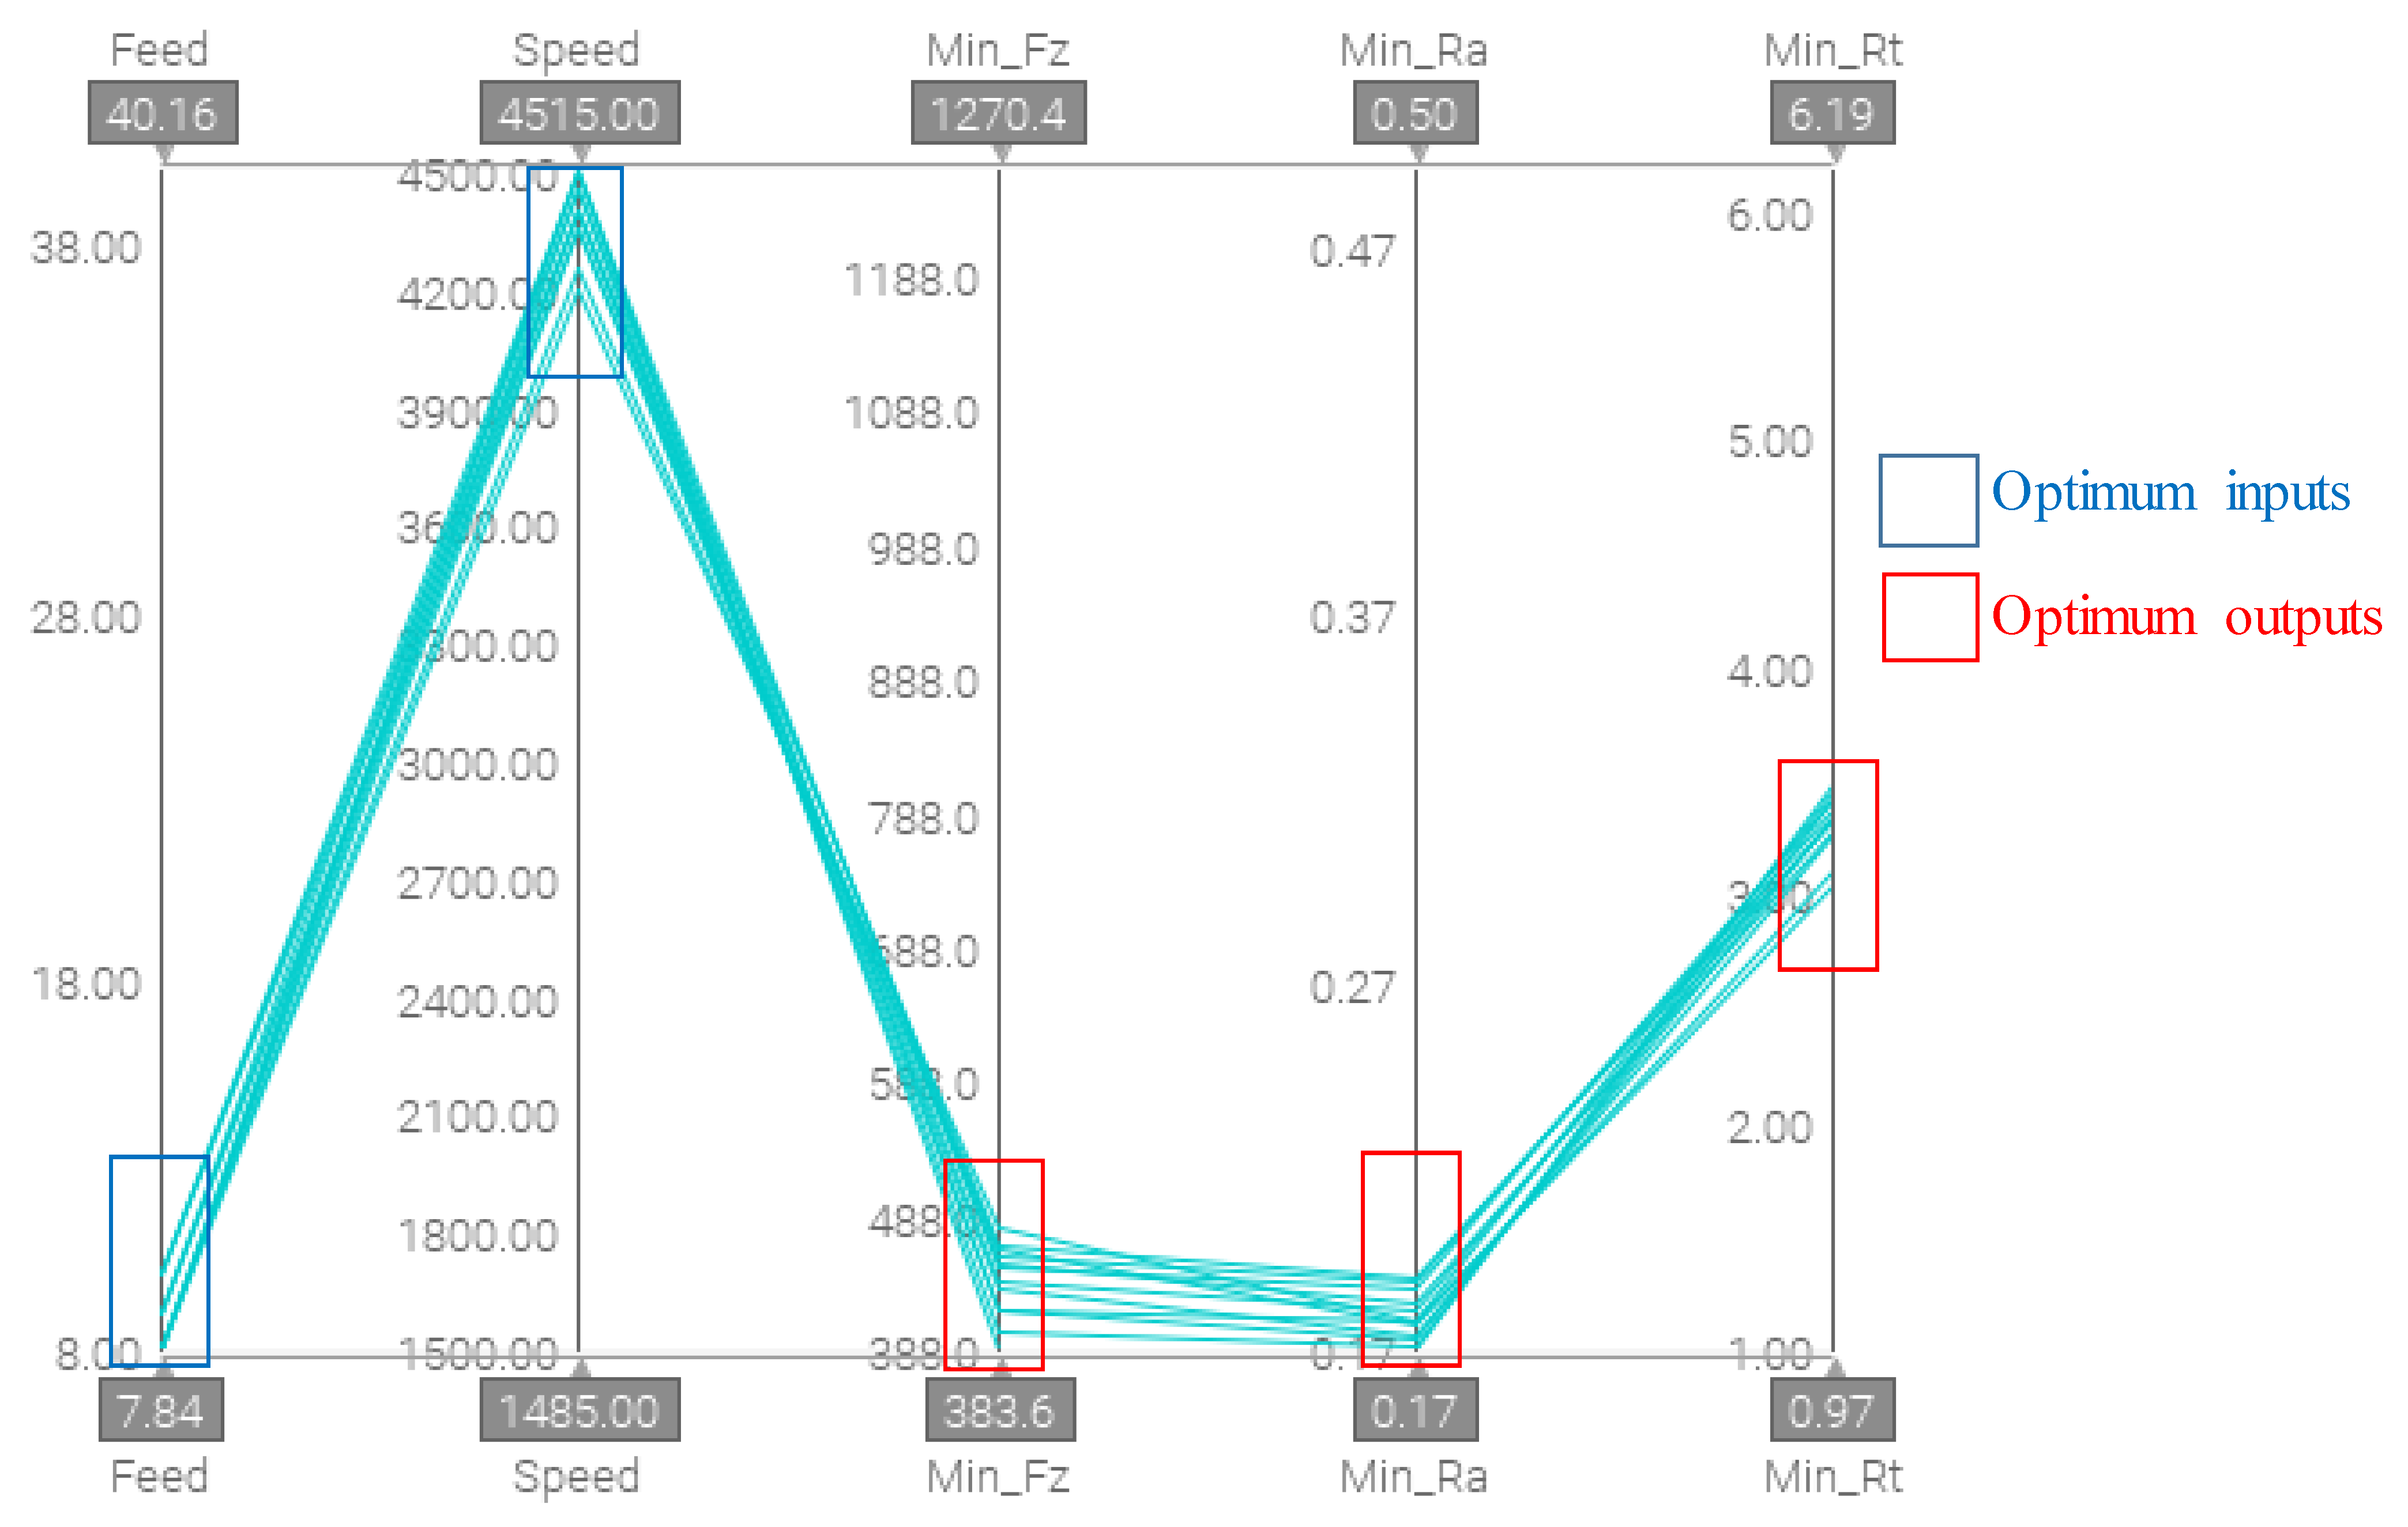
The relations among all input parameters and outputs can be found using a parallel coordinate chart, as shown in Figure 16. Most of the unfeasible design points are related to extreme feed rates and low to mid-level spindle speeds. These unfeasible points lead to maximizing the responses (Fz, Ra, and Rt). Optimum results are found with low levels of feed rate (8–10 mm/min) and high levels of cutting speed (4200–4500 rpm). The corresponding optimal responses were found to be Fz (400–470 N), Ra (0.18–0.19 µm), and Rt (3–3.5 µm). As per the author’s knowledge, there are no studies on the optimization of the drilling process parameters of Monel-400. However, the surface roughness of the machined surface of Monel-400 at optimal parameters of the turning process was found to be Ra = 2.26 µm and 2.17 µm, as documented in [36,40]. The optimal design points are presented in Figure 17 and listed in Table 14. In order to validate the quality of the MOGA result, the verification of the optimal combination of drilling process parameters is established. Six points among the ten optimal points shown in Table 14 were selected to verify the results of the MOGA tool. To obtain more realistic results and to overcome the repetitive accuracy of the machine used, two holes were drilled under each optimal point in the verification test and then the average reading of each response was used for the verification. Table 15 represents the results of the verification runs. The results show that there is great agreement between the MOGA results and the verification results with less than 10% error.

4. Conclusions

This research experimentally studied the use of the drilling process in Monel-400 material. The influence of the heat annealing process on the machinability of Monel-400 materials was analyzed. Additionally, multi-objective optimization was performed using the MOGA tool to optimize the main drilling input parameters, including spindle speed and feed rate. The key responses of cutting force, surface roughness, and tool wear were taken into consideration. The following conclusions can be made:
  • The cutting force (Fz) and surface roughness (Ra and Rt) can be reduced by 33%, 25%, and 31%, respectively after annealing at 700 °C compared to the results of drilled Monel-400 at room temperature.
  • The maximum improvement can reach 42% of Fz, 35% of Ra, and 59% while annealing the Monel-400 at 1000 °C.
  • A significant reduction in the tool wear for machining the annealed material can be obtained, which minimizes the tooling cost and overall machining cost.
  • With an increase in feed rate and a drop in spindle speed, cutting force and surface roughness increase.
  • In terms of cutting force, the spindle speed has the greatest impact, while the feed rate has the most impact on surface roughness.
  • Multi-objective optimization method (MOGA) is accomplished to minimize both the cutting force (Fz) and surface roughness (Ra and Rt).
  • The present research offers the optimal combination of drilling parameters to obtain high-quality and accurate holes in Monel-400 alloy. The optimal drilling parameters are cutting speed of 4250–4500 rpm and feed rate of 8–10 mm/min, yielding the key responses as Fz = 388–466 N, Ra = 0.0.17–0.19 μm, and Rt = 3–3.5 μm.
  • The verification results show great agreement with the MOGA results. This means that the MOGA is a good tool for optimizing the drilling or any machining process parameters.
  • In future work, more input parameters (different tool and coolant types) and more responses (physical properties, edge chipping, heat-affected zone, and dimensional accuracy of the drilled holes) will be included.

Author Contributions

Conceptualization, B.M.A.A. and S.C.; methodology, B.M.A.A.; software, B.M.A.A., R.A. and M.A.N.; validation, B.M.A.A., R.A. and M.A.N. and S.C.; formal analysis, B.M.A.A.; investigation, B.M.A.A.; resources, B.M.A.A., S.C. and R.A.; data curation, B.M.A.A.; writing—original draft preparation, B.M.A.A.; writing—review and editing, B.M.A.A., R.A. and M.A.N.; visualization, B.M.A.A.; supervision, B.M.A.A. and S.C.; funding acquisition, B.M.A.A. All authors have read and agreed to the published version of the manuscript.

Funding

The authors extend their appreciation to the Deputyship for Research and Innovation, “Ministry of Education” in Saudi Arabia for funding this research (IFKSUOR3-334-1).

Data Availability Statement

All relevant data are available in the manuscript.

Acknowledgments

The authors extend their appreciation to the Deputyship for Research and Innovation, “Ministry of Education” in Saudi Arabia for funding this research (IFKSUOR3-334-1).

Conflicts of Interest

The authors declare no conflict of interest.

References

  1. Thellaputta, G.R.; Chandra, P.S.; Rao, C. Machinability of Nickel Based Superalloys: A Review. Mater. Today Proc. 2017, 4, 3712–3721. [Google Scholar] [CrossRef]
  2. Arunachalam, R.; Mannan, M. Machinability of nickel-based high temperature alloys. Mach. Sci. Technol. 2000, 4, 127–168. [Google Scholar] [CrossRef]
  3. Monel Alloy 400. Available online: www.specialmetals.com (accessed on 29 August 2023).
  4. Shoemaker, L.E.; Smith, G.D. Nickel: A Century of Innovation A Century of Monel Metal: 1906–2006. J. Miner. Met. Mater. Soc. 2006, 58, 18–20. [Google Scholar] [CrossRef]
  5. Shihan, M.; Chandradass, J.; Kannan, T.T.M.; Sivagami, S.M. Proceedings Machining Feasibility and Sustainability Study on End Milling Process of Monel Alloy. Mater. Today Proc. 2021, 45, 7162–7165. [Google Scholar] [CrossRef]
  6. Rivero, A.; Aramendi, G.; Herranz, S.; López de Lacalle, L.N. An Experimental Investigation of the Effect of Coatings and Cutting Parameters on the Dry Drilling Performance of Aluminium Alloys. Int. J. Adv. Manuf. Technol. 2006, 28, 1–11. [Google Scholar] [CrossRef]
  7. Rodríguez-Barrero, S.; Fernández-Larrinoa, J.; Azkona, I.; López De Lacalle, L.N.; Polvorosa, R. Enhanced Perfor-mance of Nanostructured Coatings for Drilling by Droplet Elimination. Mater. Manuf. Process. 2016, 31, 593–602. [Google Scholar] [CrossRef]
  8. Kumar, V.; Kumar, V.; Jangra, K.K. An Experimental Analysis and Optimization of Machining Rate and Surface Characteristics in WEDM of Monel-400 Using RSM and Desirability Approach. J. Ind. Eng. Int. 2015, 11, 297–307. [Google Scholar] [CrossRef]
  9. Manikandan, K.; Ranjith, P.; Raj, D.; Palanikumar, K. Machinability Evaluation and Comparison of Incoloy 825, In-conel 603 XL, Monel K400 and Inconel 600 Super Alloys in Wire Electrical. Integr. Med. Res. 2020, 9, 12260–12272. [Google Scholar]
  10. Mahalingam, M.; Varahamoorthi, R. Materials Today: Proceedings Investigation on Tool Wear Rate of Brass Tool during Machining of Monel 400 Alloy Using Electric Discharge Machine. Mater. Today Proc. 2020, 26, 1213–1220. [Google Scholar] [CrossRef]
  11. Patil, D.H.; Mudigonda, S. Investigation on effect of grain orientation in photochemical machining of Monel 400. Mater. Manuf. Process. 2017, 32, 1831–1837. [Google Scholar] [CrossRef]
  12. Parida, A.K.; Maity, K. Comparison the machinability of Inconel 718, Inconel 625 and Monel 400 in hot turning operation. Eng. Sci. Technol. Int. J. 2018, 21, 364–370. [Google Scholar] [CrossRef]
  13. Sinha, A.; Rao, P.S.; Khan, M.Y.; Singh, G. A Comprehensive Study of Electrochemical Machining of Monel-400 Al-loy with Different Electrolytes: Research Challenges. Mater. Today Proc. 2023. [Google Scholar] [CrossRef]
  14. Nagarajan, V.; Solaiyappan, A.; Mahalingam, S.K.; Nagarajan, L.; Salunkhe, S.; Nasr, E.A.; Shanmugam, R.; Hussein, H.M.A.M. Meta-Heuristic Technique-Based Parametric Optimization for Electrochemical Machining of Monel 400 Alloys to Investigate the Material Removal Rate and the Sludge. Appl. Sci. 2022, 12, 2793. [Google Scholar] [CrossRef]
  15. Kukliński, M.; Przestacki, D.; Bartkowska, A.; Kieruj, P.; Radek, N. Conventional and laser-assisted machining of laser-borided Monel 400 alloy. Int. J. Adv. Manuf. Technol. 2023, 126, 5677–5687. [Google Scholar] [CrossRef]
  16. Bartkowska, A.; Bartkowski, D.; Przestacki, D.; Kukliński, M.; Miklaszewski, A.; Kieruj, P. Laser Processing of Diffusion Boronized Layer Produced on Monel® Alloy 400—Microstructure, Microhardness, Corrosion and Wear Re-sistance Tests. Materials 2021, 14, 7529. [Google Scholar] [CrossRef]
  17. Kumar, M.S.; Rajamani, D.; Nasr, E.A.; Balasubramanian, E.; Mohamed, H.; Astarita, A. A Hybrid Approach of Anfis—Artificial Bee Colony Algorithm for Intelligent Modeling and Optimization of Plasma Arc Cutting on MonelTM 400 Alloy. Materials 2021, 14, 6373. [Google Scholar] [CrossRef]
  18. Kukliński, M.; Bartkowska, A.; Przestacki, D. Microstructure and selected properties of Monel 400 alloy after laser heat treatment and laser boriding using diode laser. Int. J. Adv. Manuf. Technol. 2018, 98, 3005–3017. [Google Scholar] [CrossRef]
  19. Rajamani, D.; Ananthakumar, K.; Balasubramanian, E.; Paulo Davim, J. Experimental Investigation and Optimi-zation of PAC Parameters on Monel 400TM Superalloy. Mater. Manuf. Process. 2018, 33, 1864–1873. [Google Scholar] [CrossRef]
  20. Ananthakumar, K.; Rajamani, D.; Balasubramanian, E.; Davim, J.P. Measurement and Optimization of Mul-ti-Response Characteristics in Plasma Arc Cutting of Monel 400 TM Using RSM and TOPSIS. Measurement 2019, 135, 725–737. [Google Scholar] [CrossRef]
  21. Kumar, P.M.; Sivakumar, K.; Jayakumar, N. Multiobjective Optimization and Analysis of Copper–Titanium Diboride Electrode in EDM of Monel 400TM Alloy. Mater. Manuf. Process. 2018, 33, 1429–1437. [Google Scholar] [CrossRef]
  22. Qadri, S.I.A.; Harmain, G.A.; Wani, M.F. The effect of cutting speed and work piece hardness on turning performance of nickel based super Alloy-718 using ceramic cutting inserts. Eng. Res. Express 2019, 2, 025018. [Google Scholar] [CrossRef]
  23. Machno, M. Impact of Process Parameters on the Quality of Deep Holes Drilled in Inconel 718 Using EDD. Materials 2019, 12, 2298. [Google Scholar] [CrossRef] [PubMed]
  24. Baghlani, V.; Mehbudi, P.; Akbari, J.; Sohrabi, M. Ultrasonic Assisted Deep Drilling of Inconel 738LC Superalloy. Procedia CIRP 2013, 6, 571–576. [Google Scholar] [CrossRef]
  25. Polvorosa, R.; Suárez, A.; de Lacalle, L.N.L.; Cerrillo, I.; Wretland, A.; Veiga, F. Tool wear on nickel alloys with different coolant pressures: Comparison of Alloy 718 and Waspaloy. J. Manuf. Process. 2017, 26, 44–56. [Google Scholar] [CrossRef]
  26. Amigo, F.J.; Urbikain, G.; de Lacalle, L.N.L.; Fernández-Lucio, P.; Pereira, O.; Fernández-Valdivielso, A. On the effects of cutting-edge angle on high-feed turning of Inconel 718© superalloy. Int. J. Adv. Manuf. Technol. 2023, 125, 4237–4252. [Google Scholar] [CrossRef]
  27. Jayakumar, K.; Akash Koundinya, K.; Jayakumar, T.; Harshal, M.; Gopinath, G. Experimental Studies on the Ef-fect of Drilling Parameters on Monel Alloy. Mater. Sci. Forum 2020, 979, 137–141. [Google Scholar] [CrossRef]
  28. Tiwari, V.; Mishr, D.R. Multi Response Optimization of EDM Paramerers for Monel K-500. Int. J. Adv. Prod. Mech. Eng. 2016, 2, 53–60. [Google Scholar]
  29. Sonawane, S.A.; Kulkarni, M. Optimization of machining parameters of WEDM for Nimonic-75 alloy using principal component analysis integrated with Taguchi method. J. King Saud Univ. Eng. Sci. 2018, 30, 250–258, Erratum in J. King Saud Univ. Eng. Sci. 2020, 32, 561–562. [Google Scholar] [CrossRef]
  30. Korkmaz, M.E.; Verleysen, P.; Günay, M. Identification of Constitutive Model Parameters for Nimonic 80A Superalloy. Trans. Indian Inst. Met. 2018, 71, 2945–2952. [Google Scholar] [CrossRef]
  31. High Temp Metals. Available online: https://www.hightempmetals.com/techdata/hitempmonel400data.php (accessed on 29 August 2023).
  32. Ruchiyat, A.; Anhar, M.; Yusuf, Y.; Polonia, B.S. The Effect of Heating Temperature on the Hardness, Microstruc-ture and V-Bending Spring Back Results on Commercial Steel Plate. J. Appl. Eng. Technol. Sci. 2019, 1, 1–16. [Google Scholar]
  33. Sousa, V.F.C.; Castanheira, J.; Silva, F.J.G.; Fecheira, J.S.; Pinto, G.; Baptista, A. Wear Behavior of Uncoated and Coated Tools in Milling Operations of AMPCO (Cu-Be) Alloy. Appl. Sci. 2021, 11, 7762. [Google Scholar] [CrossRef]
  34. Khanafer, K.; Eltaggaz, A.; Deiab, I.; Agarwal, H.; Abdul-Latif, A. Toward sustainable micro-drilling of Inconel 718 superalloy using MQL-Nanofluid. Int. J. Adv. Manuf. Technol. 2020, 107, 3459–3469. [Google Scholar] [CrossRef]
  35. Dhananchezian, M. Experimental investigation on dry turned Monel 400 alloy surface parameters with uncoated and coated tool. Mater. Today Proc. 2021, 46, 8303–8306. [Google Scholar] [CrossRef]
  36. Chintakindi, S.; Alsamhan, A.; Abidi, M.H.; Kumar, M.P. Annealing of Monel 400 Alloy Using Principal Component Analysis, Hyper-Parameter Optimization, Machine Learning Techniques, and Multi-Objective Particle Swarm Optimization. Int. J. Comput. Intell. Syst. 2022, 15, 18. [Google Scholar] [CrossRef]
  37. Abdo, B.M.A.; Anwar, S.; El-tamimi, A.M.; Nasr, E.A. Experimental Analysis on the Influence and Optimiza-tion of µ-RUM Parameters in Machining Alumina Bioceramic. Materials 2019, 12, 616. [Google Scholar] [CrossRef]
  38. Abdo, B.M.A.; El-Tamimi, A.M.; Anwar, S.; Umer, U.; Alahmari, A.M.; Ghaleb, M.A. Experimental Investigation and Multi-Objective Optimization of Nd:YAG Laser Micro-Channeling Process of Zirconia Dental Ceramic. Int. J. Adv. Manuf. Technol. 2018, 98, 2213–2230. [Google Scholar] [CrossRef]
  39. Guo, Y.; Wang, L.; Zhang, G.; Hou, P. Multi-response optimization of the electrical discharge machining of insulating zirconia. Mater. Manuf. Process. 2016, 32, 294–301. [Google Scholar] [CrossRef]
  40. Parida, A.K.; Maity, K. Modeling of machining parameters affecting flank wear and surface roughness in hot turning of Monel-400 using response surface methodology (RSM). Measurement 2019, 137, 375–381. [Google Scholar] [CrossRef]
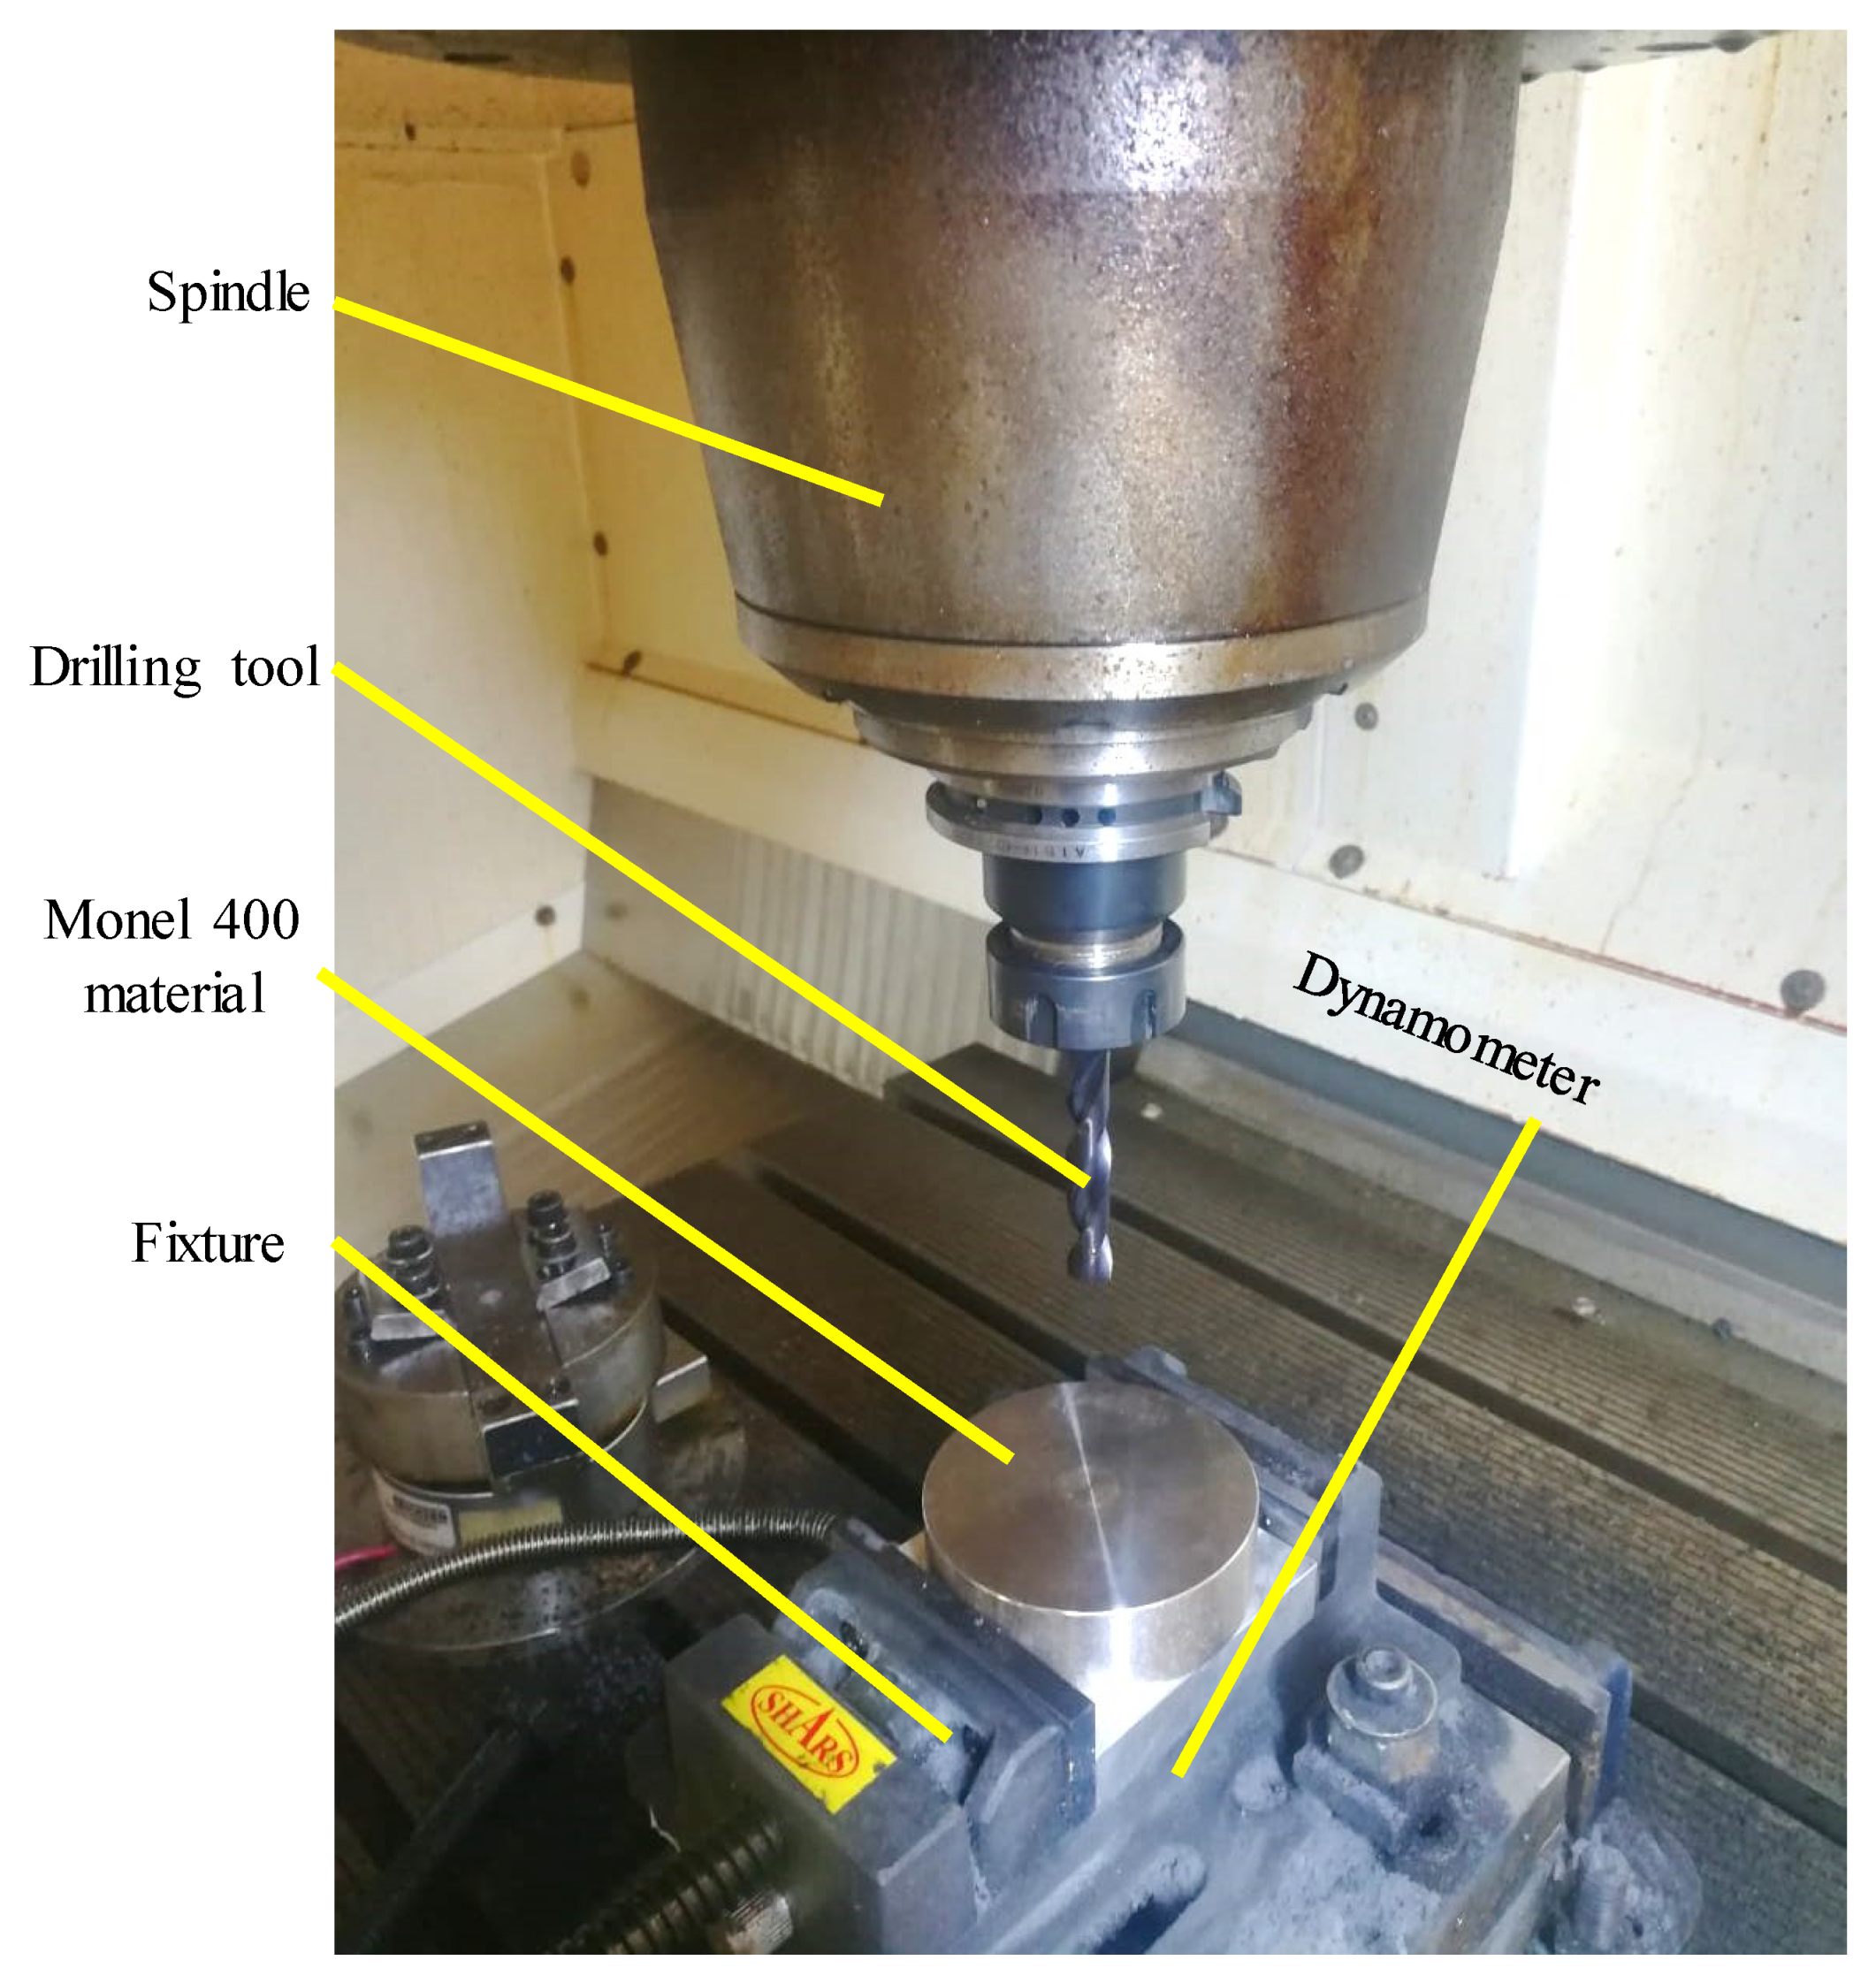
Figure 1. Experimental setup.
Jmmp 07 00170 g001
Figure 2. Heat annealing procedure of Monel-400; (a) at 700 °C, and (b) at 1000 °C.
Jmmp 07 00170 g002
Figure 3. Sample of drilled holes on Monel-400 at room temperature.
Jmmp 07 00170 g003
Figure 4. Research methodology.
Jmmp 07 00170 g004
Figure 5. (a) Schematic illustration of force measurement and (b) cutting force measuring system.
Jmmp 07 00170 g005
Figure 6. (a) Set-up of measuring surface roughness and (b) optical microscope used for measuring the tool wear.
Jmmp 07 00170 g006
Figure 7. Examples of the common 2D profiles of cutting forces (Fz) at various experimental conditions; (a) experiment number 2, (b) experiment number 11, and (c) experiment number 18.
Jmmp 07 00170 g007
Figure 8. Examples of the common 2D profiles of surface roughness (Ra) at various experimental conditions; (a) experiment number 2, (b) experiment number 11, and (c) experiment number 18.
Jmmp 07 00170 g008
Figure 9. (a) A new tool and (b) a sample of tool wear measurement.
Jmmp 07 00170 g009
Figure 10. Comparison of tool wear for the three Monel-400 samples after drilling 18 holes (a) at room temperature, (b) annealed at 700 °C, and (c) annealed at 1000 °C.
Jmmp 07 00170 g010
Figure 11. Relative significance of input drilling parameters on the responses.
Jmmp 07 00170 g011
Figure 12. Response surface plots of (a) Fz, (b) Ra, and (c) Rt.
Jmmp 07 00170 g012
Figure 13. Process flow for the optimization problem.
Jmmp 07 00170 g013
Figure 14. Summary of design points.
Jmmp 07 00170 g014
Figure 15. A 3D bubble chart presenting the design points obtained with all responses (Fz, Ra, and Rt).
Jmmp 07 00170 g015
Figure 16. A chart for all design points.
Jmmp 07 00170 g016
Figure 17. A chart for the optimal points.
Jmmp 07 00170 g017
Table 1. The chemical composition of the Monel-400 alloy.
ElementNickel, NiCopper, CuIron,
Fe
Manganese, MnSilicon,
Si
Carbon,
C
Sulfur,
S
Weight (%)6428–342.520.50.30.024
Table 2. Properties of the Monel-400 alloy [3].
Property (Metric)ValueUnit
Density8.80 × 103kg/m3
Modulus of Elasticity179GPa
Thermal Expansion13.9 × 10−6°C−1
Thermal Conductivity21.8W/(m · K)
Yield Strength240MPa
Elongation48%
Liquids Temperature1350°C
Solidus Temperature1300°C
Table 3. Specifications of the used drilling tool.
Drilling ToolProperty/Value
Cutting edge materialCarbide
Coating/finishTiAlN
Diameter10 mm
Cutting depth30 mm
GradeR458
Point angle140 Degree
Rake angle30 Degree
Relief angle8 Degree
Table 4. Experimental conditions applied in this study.
FactorsLevels
Speed (rpm)150030004500
Feed rate (mm/min)82440
Fixed parameters
CoolantECO COOL S-HL
Tool typeSolid Carbide
Tool Dia.10 mm
Table 5. The full factorial design used in this project.
Exp. #BlockSpeedFeed
1115008
21150040
31150024
41450024
51300040
61300024
71450040
8145008
9130008
10245008
112450024
122450040
132150024
142150040
15215008
162300024
172300040
18230008
Table 6. Experimental results.
Exp. #Input ParametersResponses
At Room Temp.At 700 °CAt 1000 °C
SpeedFeedFz (N)Ra (µm)Rt (µm)Fz (N)Ra (µm)Rt
(µm)
Fz (N)Ra (µm)Rt (µm)
1150088760.2422.34357870.32252.216830.24051.62
215004016110.63856.168513670.5465.1012630.49454.35
315002413550.4552.613512820.421.9012660.3042.01
44500245450.4223.43455290.36954.504740.3383.24
530004012660.533.167512600.5092.3511880.41051.63
63000248630.4063.7868600.34954.618540.3332.94
74500406790.3933.1836500.35323.026080.31853.2
8450083950.2683.46753920.2152.873880.2012.56
9300089570.2010.9988470.2111.027940.21050.95
10450084120.21350.8794050.2010.763560.1850.84
1145002410310.3753.3069260.3252.478570.2961.35
124500408420.4034.01358190.4053.857060.3723.54
1315002414600.3693.2259730.352.988370.3482.45
1415004012030.54053.9939030.5614.507730.5133.51
15150089100.2912.108880.2791.708050.2661.23
163000245910.3763.7686060.3494.955890.2564.21
1730004010020.43052.4819950.4162.249890.33952.54
18300086170.21951.0695420.1661.054820.2111.02
Table 7. Percentage improvement in Fz and Ra of Monel-400 after the annealing process.
Exp. #% Improvement of 700 °C% Improvement of 1000 °C
FzRaRtFzRaRt
110.1524.965.7022.0325.4330.87
215.1414.4917.3221.6022.5529.48
35.387.6927.306.5733.1923.09
42.9312.4431.0213.0319.915.66
50.473.9625.816.1622.5548.54
60.3413.9221.761.0417.9822.35
74.2710.135.1210.4618.960.53
80.7519.7817.231.7735.0726.17
911.494.982.2017.034.734.81
101.695.8513.5413.5913.354.44
1110.1813.3325.2916.8821.0759.17
122.730.504.0716.157.6911.80
1333.355.157.6042.675.6924.03
149.973.7912.7022.935.0912.10
152.414.1219.0511.548.5941.43
162.537.1831.370.3431.9111.73
170.693.379.711.3021.142.38
1812.1524.371.7821.883.874.58
Table 8. Comparison of tool wear for the three Monel-400 samples.
Region# of Drilled HolesTool Flank Wear (mm)
@ Room Temp@ 700 °C@ 1000 °C
A60.1440.1160.000
A120.1850.1720.000
A180.2530.1950.152
B60.00.0000.000
B120.1140.0510.000
B180.2350.1240.113
Table 9. ANOVA results of Fz for machining Monel-400 at room temperature.
SourceDFAdj SSAdj MSF-Valuep-Value
Speed2921,275460,6378.640.001
Feed2451,486225,7434.230.046
Speed × Feed4223,12155,7801.050.441
Table 10. ANOVA results of Ra for machining Monel-400 at room temperature.
SourceDFAdj SSAdj MSF-Valuep-Value
Speed20.0199970.0099986.910.018
Feed20.1928930.09644766.610.000
Speed × Feed40.0205430.0051363.550.060
Table 11. ANOVA results of Rt for machining Monel-400 at room temperature.
SourceDFAdj SSAdj MSF-Valuep-Value
Speed14.31284.312809.460.008
Feed12.16242.162404.740.047
Speed × Feed10.00060.000630.000.971
Table 12. Optimization model used for the study.
ObjectivesMinimize Fz
Minimize Ra
Minimize Rt
ConstraintsFz ≤ 1000 N
Ra ≤ 0.5 µm
Rt ≤ 6.0 µm
Table 13. Prediction model and MOGA parameters.
Evolutionary AlgorithmsMOGA-II
Seed50
Prediction ModelRadial Basis Function
Validation20%
Radial functionHardy’s MultiQuadrics
Max. no. of optimization10
Parameters of MOGA
Parametervalue
Number of evaluation5000
Generations numbers100
Cross-over probability0.5
Selection probability0.05
Mutation ratio0.05
Probability of mutation0.1
Random generator seed1
Table 14. Optimal points of the outputs.
Point
#
InputsOutputs
Feed Rate (mm/min)Speed
(rpm)
Fz
(N)
Ra
(μm)
Rt
(μm)
1104400466.040.193.32
294500417.580.183.44
3104450456.580.193.37
4104500449.220.193.41
594400438.020.183.34
694350451.480.193.27
784450401.510.183.41
884250462.910.183.10
984400417.080.183.33
1084200477.780.183.02
Table 15. Results of the verification tests.
Point
#
InputsOutputs% Error
Feed Rate (mm/min)Speed (rpm)Fz
(N)
Ra
(μm)
Rt
(μm)
FzRaRt
1104400482.600.2113.173.439.954.73
294500450.200.1953.827.257.699.95
3104450420.300.2083.488.638.563.16
694350418.600.2052.997.857.329.36
784450439.510.1843.218.652.176.23
1084200501.200.1722.854.674.655.96
Disclaimer/Publisher’s Note: The statements, opinions and data contained in all publications are solely those of the individual author(s) and contributor(s) and not of MDPI and/or the editor(s). MDPI and/or the editor(s) disclaim responsibility for any injury to people or property resulting from any ideas, methods, instructions or products referred to in the content.