Article

Modelling and Simulation of Mechanical Loads and Residual Stresses in Deep Rolling at Elevated Temperature

1
MAPEX Center for Materials and Processes, University of Bremen, Bibliothekstr. 1, 28359 Bremen, Germany
2
Division Manufacturing Technologies, Leibniz Institute for Materials Engineering IWT, Badgasteiner Str. 3, 28359 Bremen, Germany
*
Author to whom correspondence should be addressed.
J. Manuf. Mater. Process. 2021, 5(3), 76; https://doi.org/10.3390/jmmp5030076
Submission received: 16 June 2021 / Revised: 6 July 2021 / Accepted: 7 July 2021 / Published: 10 July 2021

Abstract

:
Based on the concept of Process Signatures, the deep rolling process is analyzed, aiming at functional relationships between material modifications and internal material loads during the process. The focus of this work is to investigate the influence of the workpiece temperature on the generated residual stress components. For this purpose, extensive finite element simulations of deep rolling were conducted, taking into account the effect of neighboring tool paths on the internal material loads and residual stress. A kinematic strain hardening model was parameterized and utilized and the simulations were validated experimentally. Simulated residual stresses agree qualitatively well with measurements and show a strong influence of the workpiece temperature as expected. Process Signature Components were generated, taking into account the maximal and minimal residual stress as well as their respective positions beneath the workpiece surface.

1. Introduction

The surface integrity, defined as the entirety of inherent and enhanced properties of a surface [1] is essential with respect to a part’s functional properties. This is especially true for highly loaded power transmission parts such as turbine blades or linear guides. Although the relevance of manufacturing processes is well-known, the design of a manufacturing process with respect to certain characteristics of the surface integrity that shall be achieved is still a highly iterative procedure. Starting from an “experience-based guess” about the necessary machining parameters for the desired surface characteristics, time-consuming parameter studies are performed to approach the target values. In contrast, a direct knowledge-based derivation of the required machining parameters from a set of target values of the surface integrity (inverse problem of manufacturing) is not fully possible to this day [2]. However, much research has been conducted in the last years for the solution of this inverse problem in the context of the concept of Process Signatures, which denotes the correlations between the internal material loads in a workpiece during processing and the resulting modifications, i.e., the changes of surface integrity characteristics. The hypothesis is that a suitable choice of variables characterizing the internal material loads leads to a Process Signature that uniquely links material modifications to internal material loads [3]. Consequently, the knowledge of these Process Signatures and further correlations between internal material loads and process quantities (forces, temperatures, …) and between process quantities and machining parameters (feed, cutting speed, depth of cut, …) would facilitate a knowledge-based process design starting from a desired workpiece surface integrity. Process Signatures have already been derived for deep rolling [4]—a process with a mechanical impact—and for laser hardening [5] and induction heating [6] as representatives of processes with a thermal impact. The study of Process Signatures for processes such as these is facilitated by the fact that they are characterized by one impact each, either mechanical or thermal. However, in many processes, especially chip formation processes, such as grinding, turning, milling or drilling, both mechanical and thermal impacts occur and interact with each other at the same time. This interaction complicates the derivation of Process Signatures. To approach this problem, the present publication seeks to consider both impact types by studying deep rolling at different temperatures of the workpiece material. More specifically, it is the aim to investigate how different temperature levels of the workpiece material affect the generation of residual stress by the mechanical impact during deep rolling and, thus, existing Process Signatures.
Deep rolling itself is a finishing process, which is commonly used to positively influence the fatigue life of the workpiece. This is mainly achieved by introducing compressive residual stress [7] and decreasing the surface roughness [8]. As such, it has been widely studied in the scientific literature, mainly regarding the influence of different process conditions on the surface integrity. Regarding to a deeper process understanding, Denkena et al. studied the influence of track overlap on the residual stress depth profiles [9]. They could show that compressive residual stress is introduced only once a certain overlap factor has been reached and that, in general, the residual compressive stress maximum and its depth are influenced by the overlap factor. In their work, they also derived Process Signatures following the approach by Meyer and Kämmler [10] in which the maximum equivalent stress in the workpiece, analytically calculated from an elastic Hertzian contact is correlated with the maximum residual compressive stress in the direction of the tool movement.
Regarding a mechanism-based understanding of deep rolling, Meyer et al. could show that tensile residual stress occurs at the surface after deep rolling of a single track [11]. This is contrary to the expectation of compressive residual stress, which is usually associated with deep rolling. Kinner-Becker et al. could later show by using finite element (FE) simulations that it is indeed the interaction of neighboring tracks which shifts the residual surface stress into the compressive regime [12]. Thus, for studying Process Signatures that are suitable for practical applications, deep rolling of multiple tracks should be taken into account rather than deep rolling of a single track.
There are numerous publications dealing with the modeling and simulation of deep rolling. For the FE models, usually explicit schemes are used [13,14], but the use of implicit schemes can be found as well [12,15,16]. Trauth et al. show that a high mass scaling factor of up to 250 can be used in explicit simulations of deep rolling, which leads to a significant speedup of the simulation time [14]. In [13], a 2D and a 3D model were compared regarding to their predictive power of the residual stresses. It was shown that 2D modeling is not suitable to quantitatively predict residual stresses in deep rolling, and 3D modeling is necessary. This is because the plane strain assumption, which is necessary for the calculation of residual stresses in the axial direction, is not correct for deep rolling. Regarding the importance of considering friction in deep rolling simulations, Lim et al. [16] noted that the residual stresses were not affected in their simulations. However, other publications noted the impact on residual stresses [17] and surface topology [15]. In terms of material modeling, multiple publications noted an improvement in the prediction of residual stress by using a kinematic hardening model [18,19], which accounts for the Bauschinger effect which can be observed in many materials. Demurger et al. [19] showed that using an isotropic hardening model overestimates the residual stresses after deep rolling of 23MnCrMo5. Lyubenova et al. showed that residual stress distributions obtained with isotropic or kinematic hardening differ especially at the surface [18].
Deep rolling at elevated temperatures, or high temperature deep rolling, is a less commonly applied but, nevertheless, known process variation. Common findings are that the fatigue life of a workpiece is considerably improved up to 10% in comparison with deep rolling at room temperature [20]. Cherif was able to demonstrate in his work the positive effect of deep rolling at elevated temperatures on the stability of residual stresses and, thus, the increase in lifetime under alternating loads [21]. In addition, he was able to show that there is an optimal temperature range to increase the fatigue life and setting of stable compressive residual stresses. Studies by Maier used a hybrid process, combining laser heating and deep rolling to show that solely the thermal impact is responsible for microstructural changes during grinding, the mechanical impact is not correlated with these changes [22].
While Zmich and Meyer [23] revealed a dependence of Process Signatures based on thermally induced internal material loads from the deep rolling force, it remains unclear how Process Signatures based on mechanically induced internal material loads are affected by elevated temperatures. Consequently, the present work focusses on studying elevated temperature deep rolling at the level of (thermo-) mechanically induced internal material loads, their dependence on different temperatures, and their correlation with resulting material modifications.

2. Objectives and Procedure

In this work, the influence of workpiece temperatures on the internal material loads and the resulting residual stress components induced by the deep rolling of 42CrMo4 (AISI 4140) were examined. This material is well researched and characteristic values such as thermal and mechanical properties are given in a number of other publications. In addition, a large number of publications aim to generate Process Signatures primarily with this type of steel. Furthermore, this steel is also used for highly stressed components, where high strength and wear resistance with toughness are particularly important.
The material was quenched and tempered with an annealing temperature of 400 °C (47 HRC). It was investigated to understand the impact on components of Process Signatures. Process Signature Components represent specific correlations between a certain internal material load and a chosen material modification. As a complete Process Signature would characterize the overall impact on the surface integrity, Process Signature Components are a piece of the whole picture. In the presented work, residual stresses are discussed as the material modification of interest in the corresponding Process Signature Components.
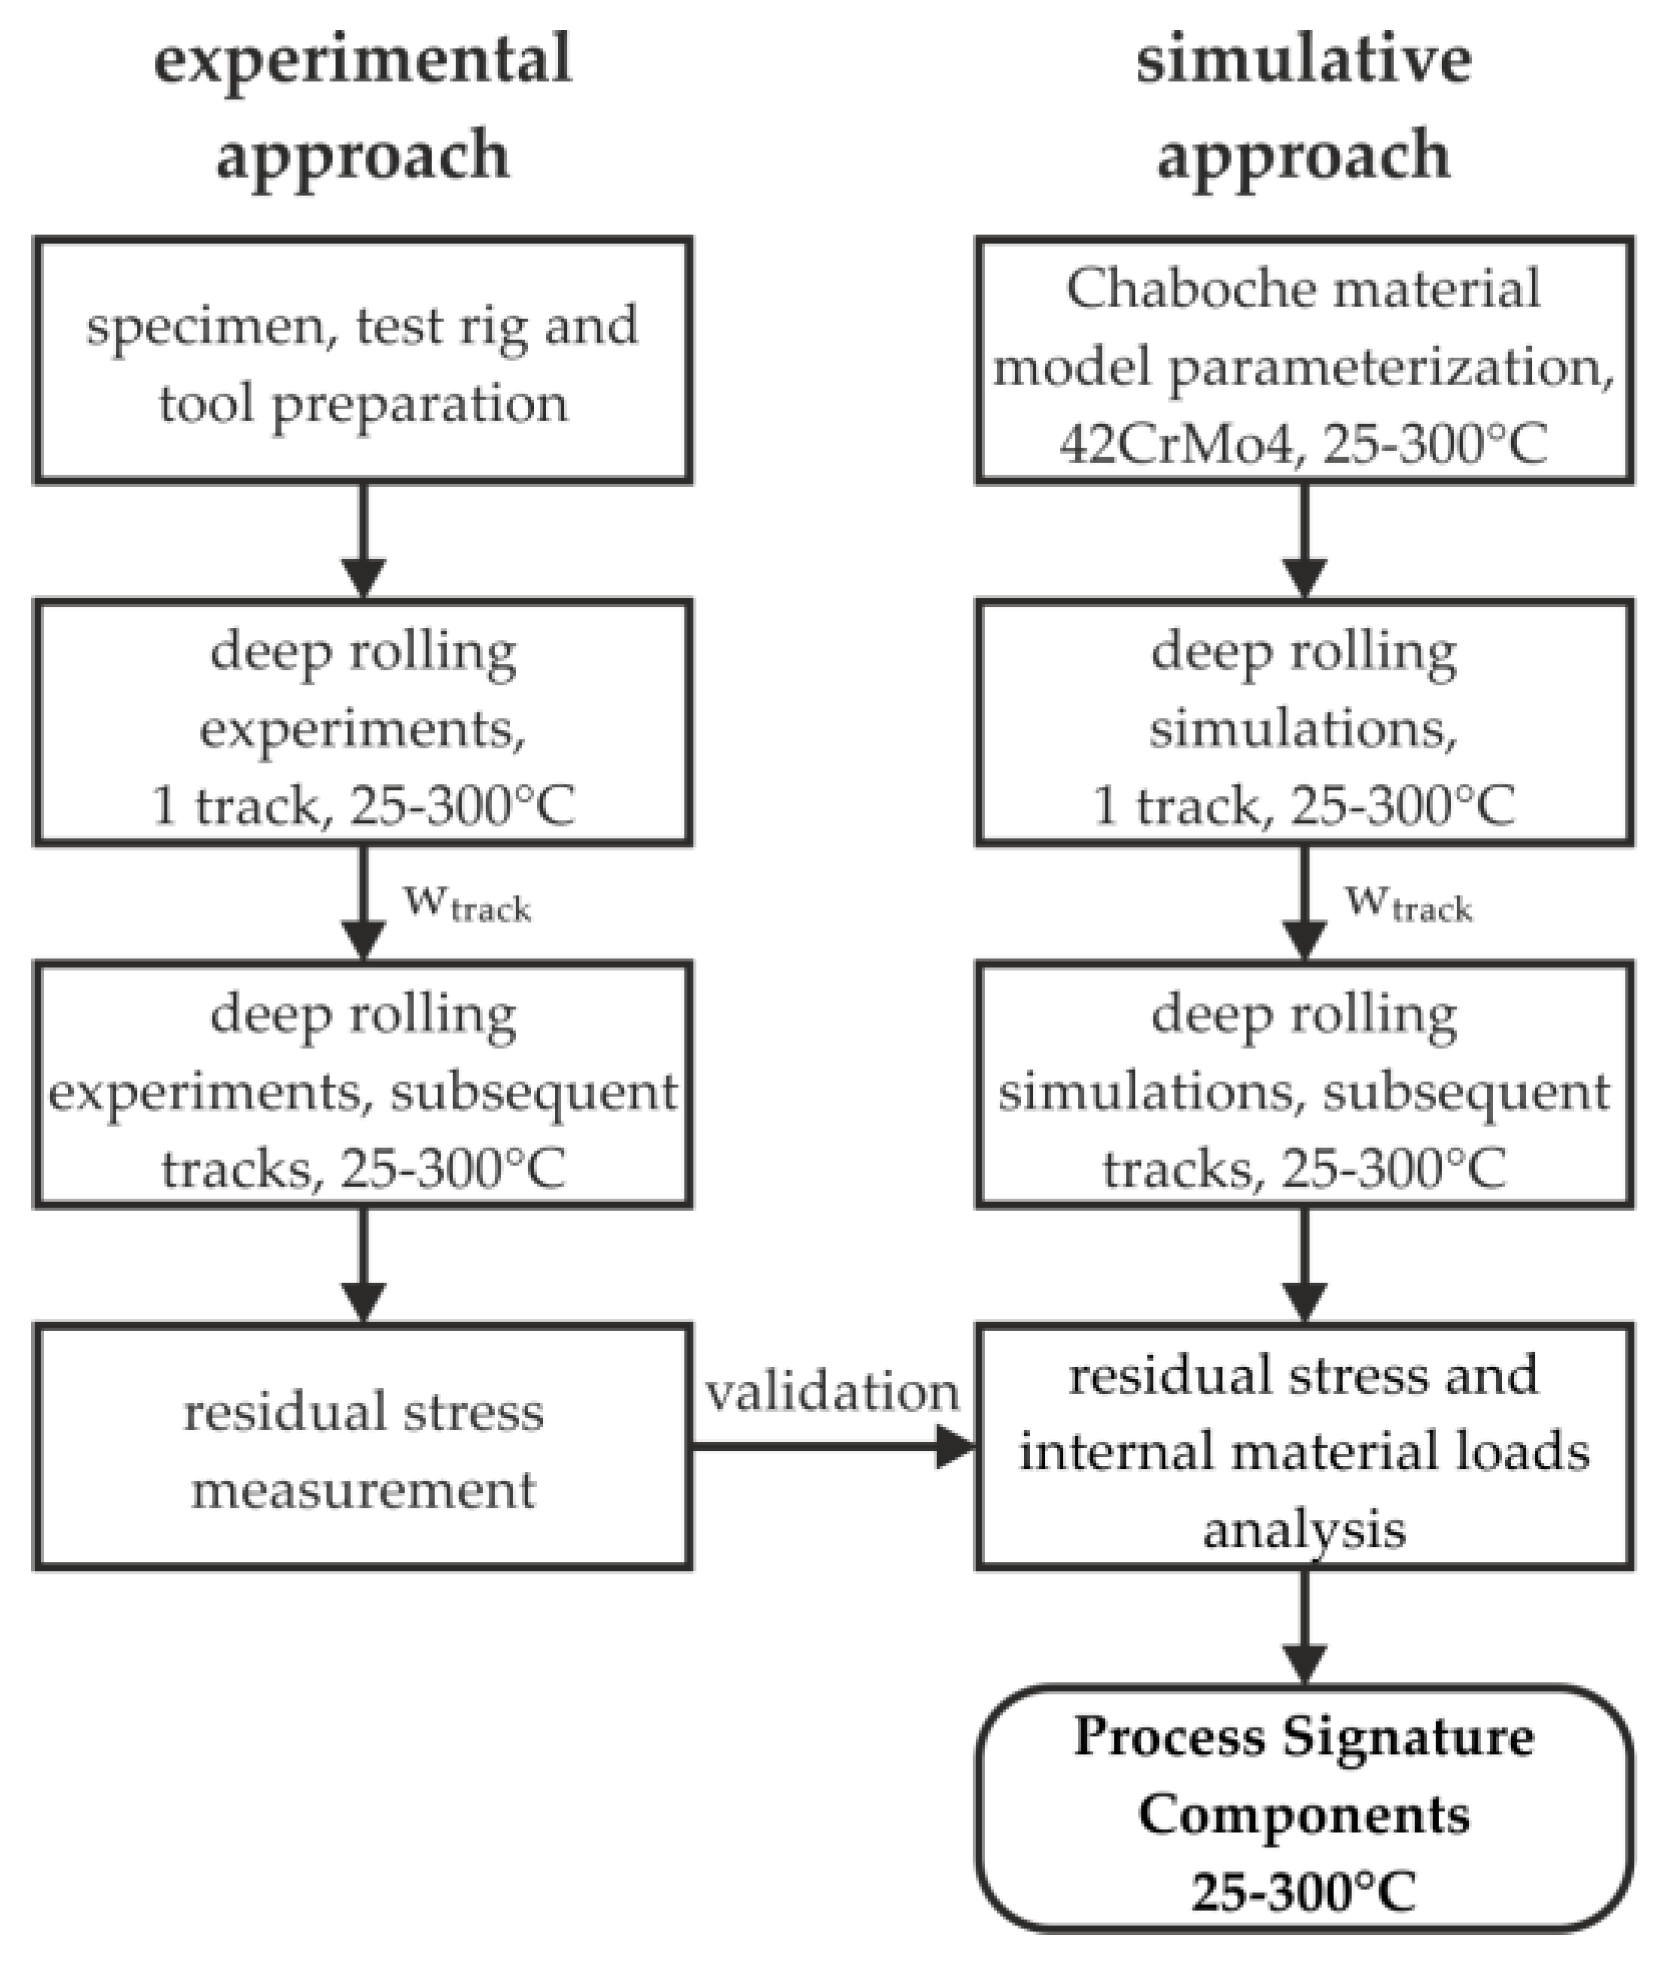
The deep rolling process was analyzed by a simulation-based approach (see Figure 1). In order to account for the alternating internal material loads when simulating deep rolling of multiple tracks, a kinematic work hardening model according to Chaboche was utilized [24]. The model was parameterized based on cyclic tension–compression tests of preheated samples. Simulation results regarding selected residual stress depth profiles and the width of the deep rolled tracks were compared to measurements from deep rolling experiments aiming at a validation of the model. The validated model was then utilized to determine the internal material loads and the residual stress depth profiles for different deep rolling forces. Finally, the temperature dependence of the resulting Process Signature Components are presented and discussed.

3. Deep Rolling Experiments

3.1. Setup

The experiments were carried out on a 4-axis milling machine type U 630 T from HERMLE AG (Gosheim, Germany), see Figure 2. The test setup includes a deep rolling tool, a heater for warming up the test specimens, and a dynamometer for force measurements. Linear tracks were machined into prismatic workpieces.
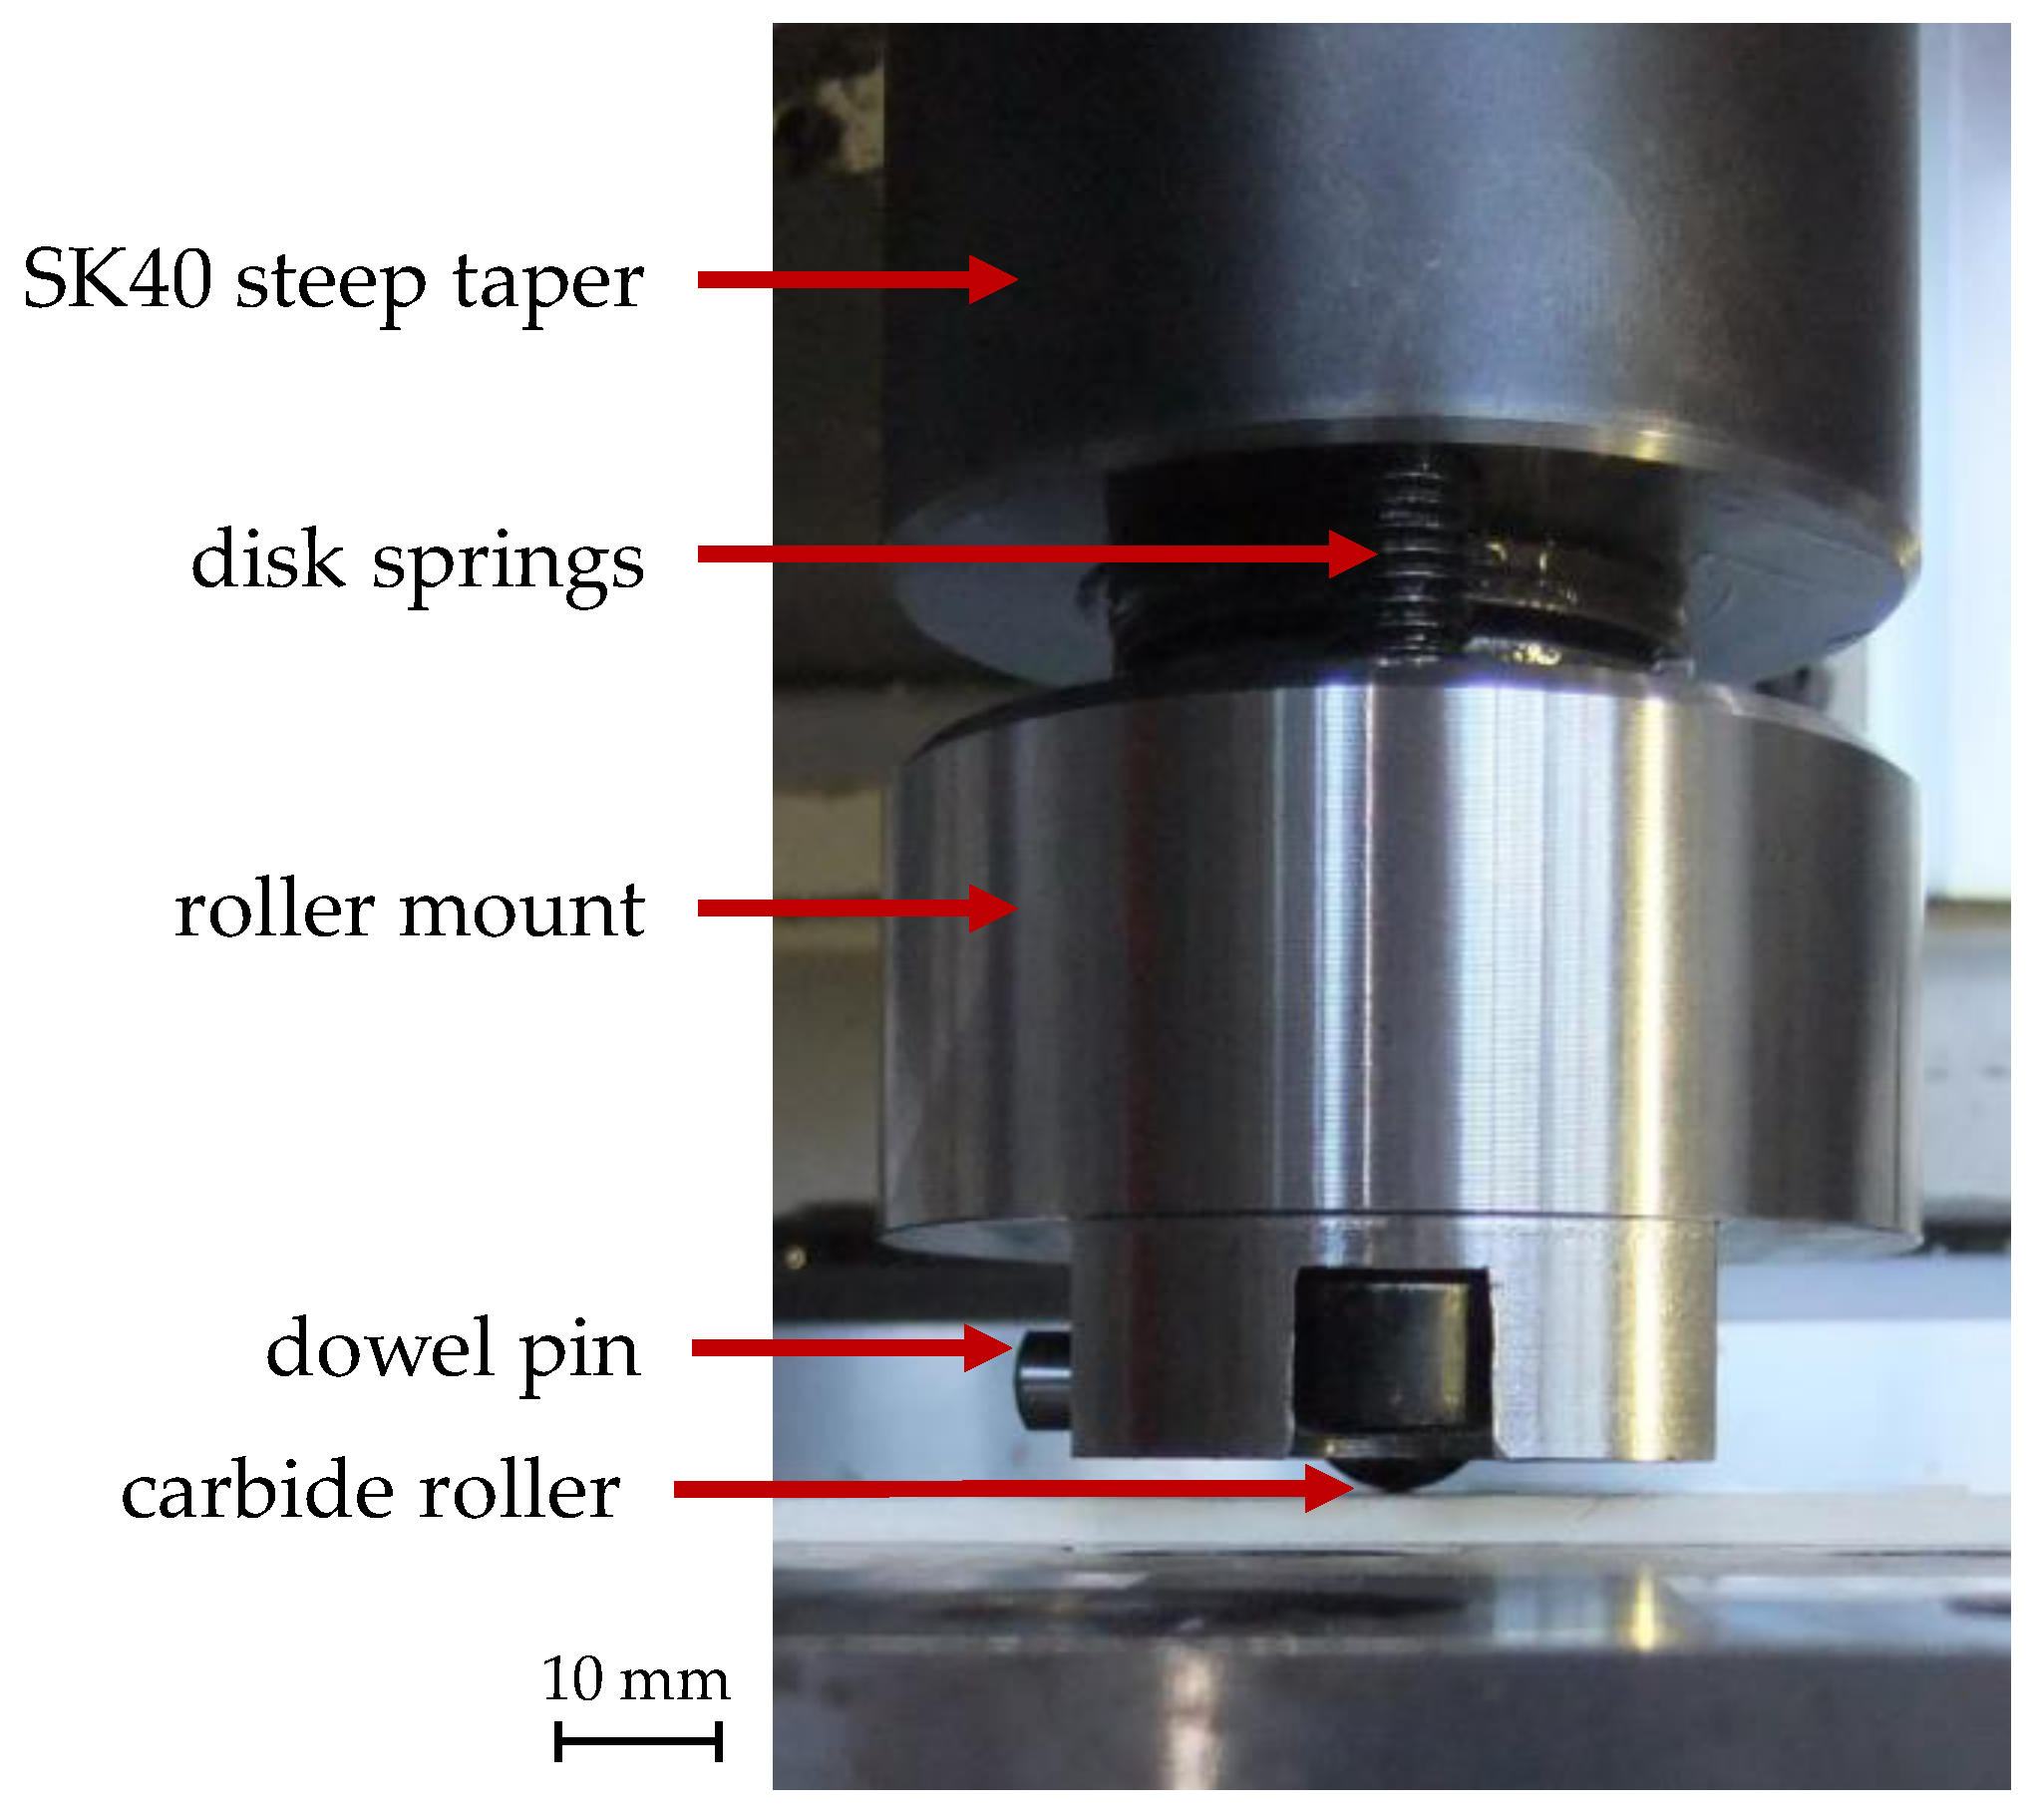
To perform deep rolling tests at elevated temperatures, conventional hydrostatic tools are not suitable. The use of oil or water based metal working fluids to apply the hydrostatic pressure would result in local cooling at the contact between the tool and the workpiece. To minimize cooling effects due to the tool, a deep rolling tool with a spring bearing was designed and manufactured. The roller has a diameter of dr = 13 mm to achieve comparability with conventional hydrostatic deep rolling tools of the same dimensions. To ensure that no plastic deformation occurs on the tool side, the roller is made of tungsten carbide. For the tungsten carbide roller, a holder was manufactured which can be mounted on an SK40 holder and decoupled by using disk springs, see Figure 3.
For uniform heating of the specimens and to keep them at a constant temperature, a heater was designed and manufactured. The main components “heater body”, “heater cartridges”, and “insulation” are illustrated in Figure 4. The maximum possible temperature of the setup while ensuring a proper thermal insulation of the test rig was determined at 750 °C. Calibration of the necessary power for a uniform through-heating of the specimen was carried out by temperature adjustment within the heating element and the sample surface. Using thermocouples, an average heating rate of 0.8 °C/s at a power of 715 W was determined.

3.2. Experimental Programme

For each force at a specific temperature, a single track was generated first. After cooling to room temperature, the width of the track was measured with a tactile roughness measurement device at three different locations. In a second trial, multiple tracks were produced with an overlap of 50% of the initial track width, generating a total width of the deep rolled area of at least 10 mm. This area was later used to measure residual stresses induced by the deep rolling process. The applied parameter combinations are summarized in Table 1. It should be noted that every workpiece was heated only once to exclude additional thermal influences on the residual stress.

4. Deep Rolling Simulation

4.1. Material Model

It is known that the deep rolling tool does not solely compress the material in depth direction, as illustrated in Figure 5 [25]. The material piles up in front of the roller and is deformed to the sides of the track while the tool passes by. This leads to a rather complex material distribution during the process. Since, in deep rolling processes, neighboring tracks typically overlap with each other, the load history of the material includes alternating tensile and compressive loads. Therefore, a non-linear kinematic hardening model based on the approach proposed by Chaboche was used [24]; according to this model, the total back stress tensor (the center of the yield surface in the stress space) was calculated from the single back stress components:
α = i α i
where the evolution of the back stress components is defined as:
α ˙ i = C k 1 σ y ( σ α ) ε ˙ p l , a c c γ k α k ε ˙ p l , a c c
where ε p l , a c c is the accumulated plastic strain, σ y the size of the yield surface and C k and γ k are the model parameters that need to be determined. σ y remained constant throughout the analysis. Three backstresses α i were utilized in the material model.
Strain-controlled cyclic tension–compression tests were performed to parameterize the material model at room temperature (25 °C) and above room temperature (100 °C, 300 °C). For this purpose, a DSI Gleeble 3500 servo-hydraulic deformation dilatometer was used. Figure 6 shows the Gleeble dilatometer and the specimen geometry. For a continuous tracking of the applied strain, a mechanical extensometer was installed at the center area of the specimens. The specimens were heated to the temperature of interest by induction heating and were held for 10 min at the desired temperature prior to the cyclic tests. A thermocouple was soldered in the area of interest, which enables the test setup to automatically maintain the correct temperature level.
During the strain-controlled cyclic tests, engineering strains and stresses were recorded. For usage in the finite element software, the true strain, true stress and plastic strain needed to be calculated. With these data, the Chaboche parameters C1–C3, γ1–γ3 and k were derived as outlined in the literature [26]. The results based on the experimental data are shown in Table 2.
The determined Chaboche parameters were supplied into a material model using Abaqus 2020/Standard and were verified by using a 2D axisymmetric model to simulate the strain-controlled cyclic tests for each temperature level as shown in Figure 7.

4.2. Geometry Model and Boundary Conditions

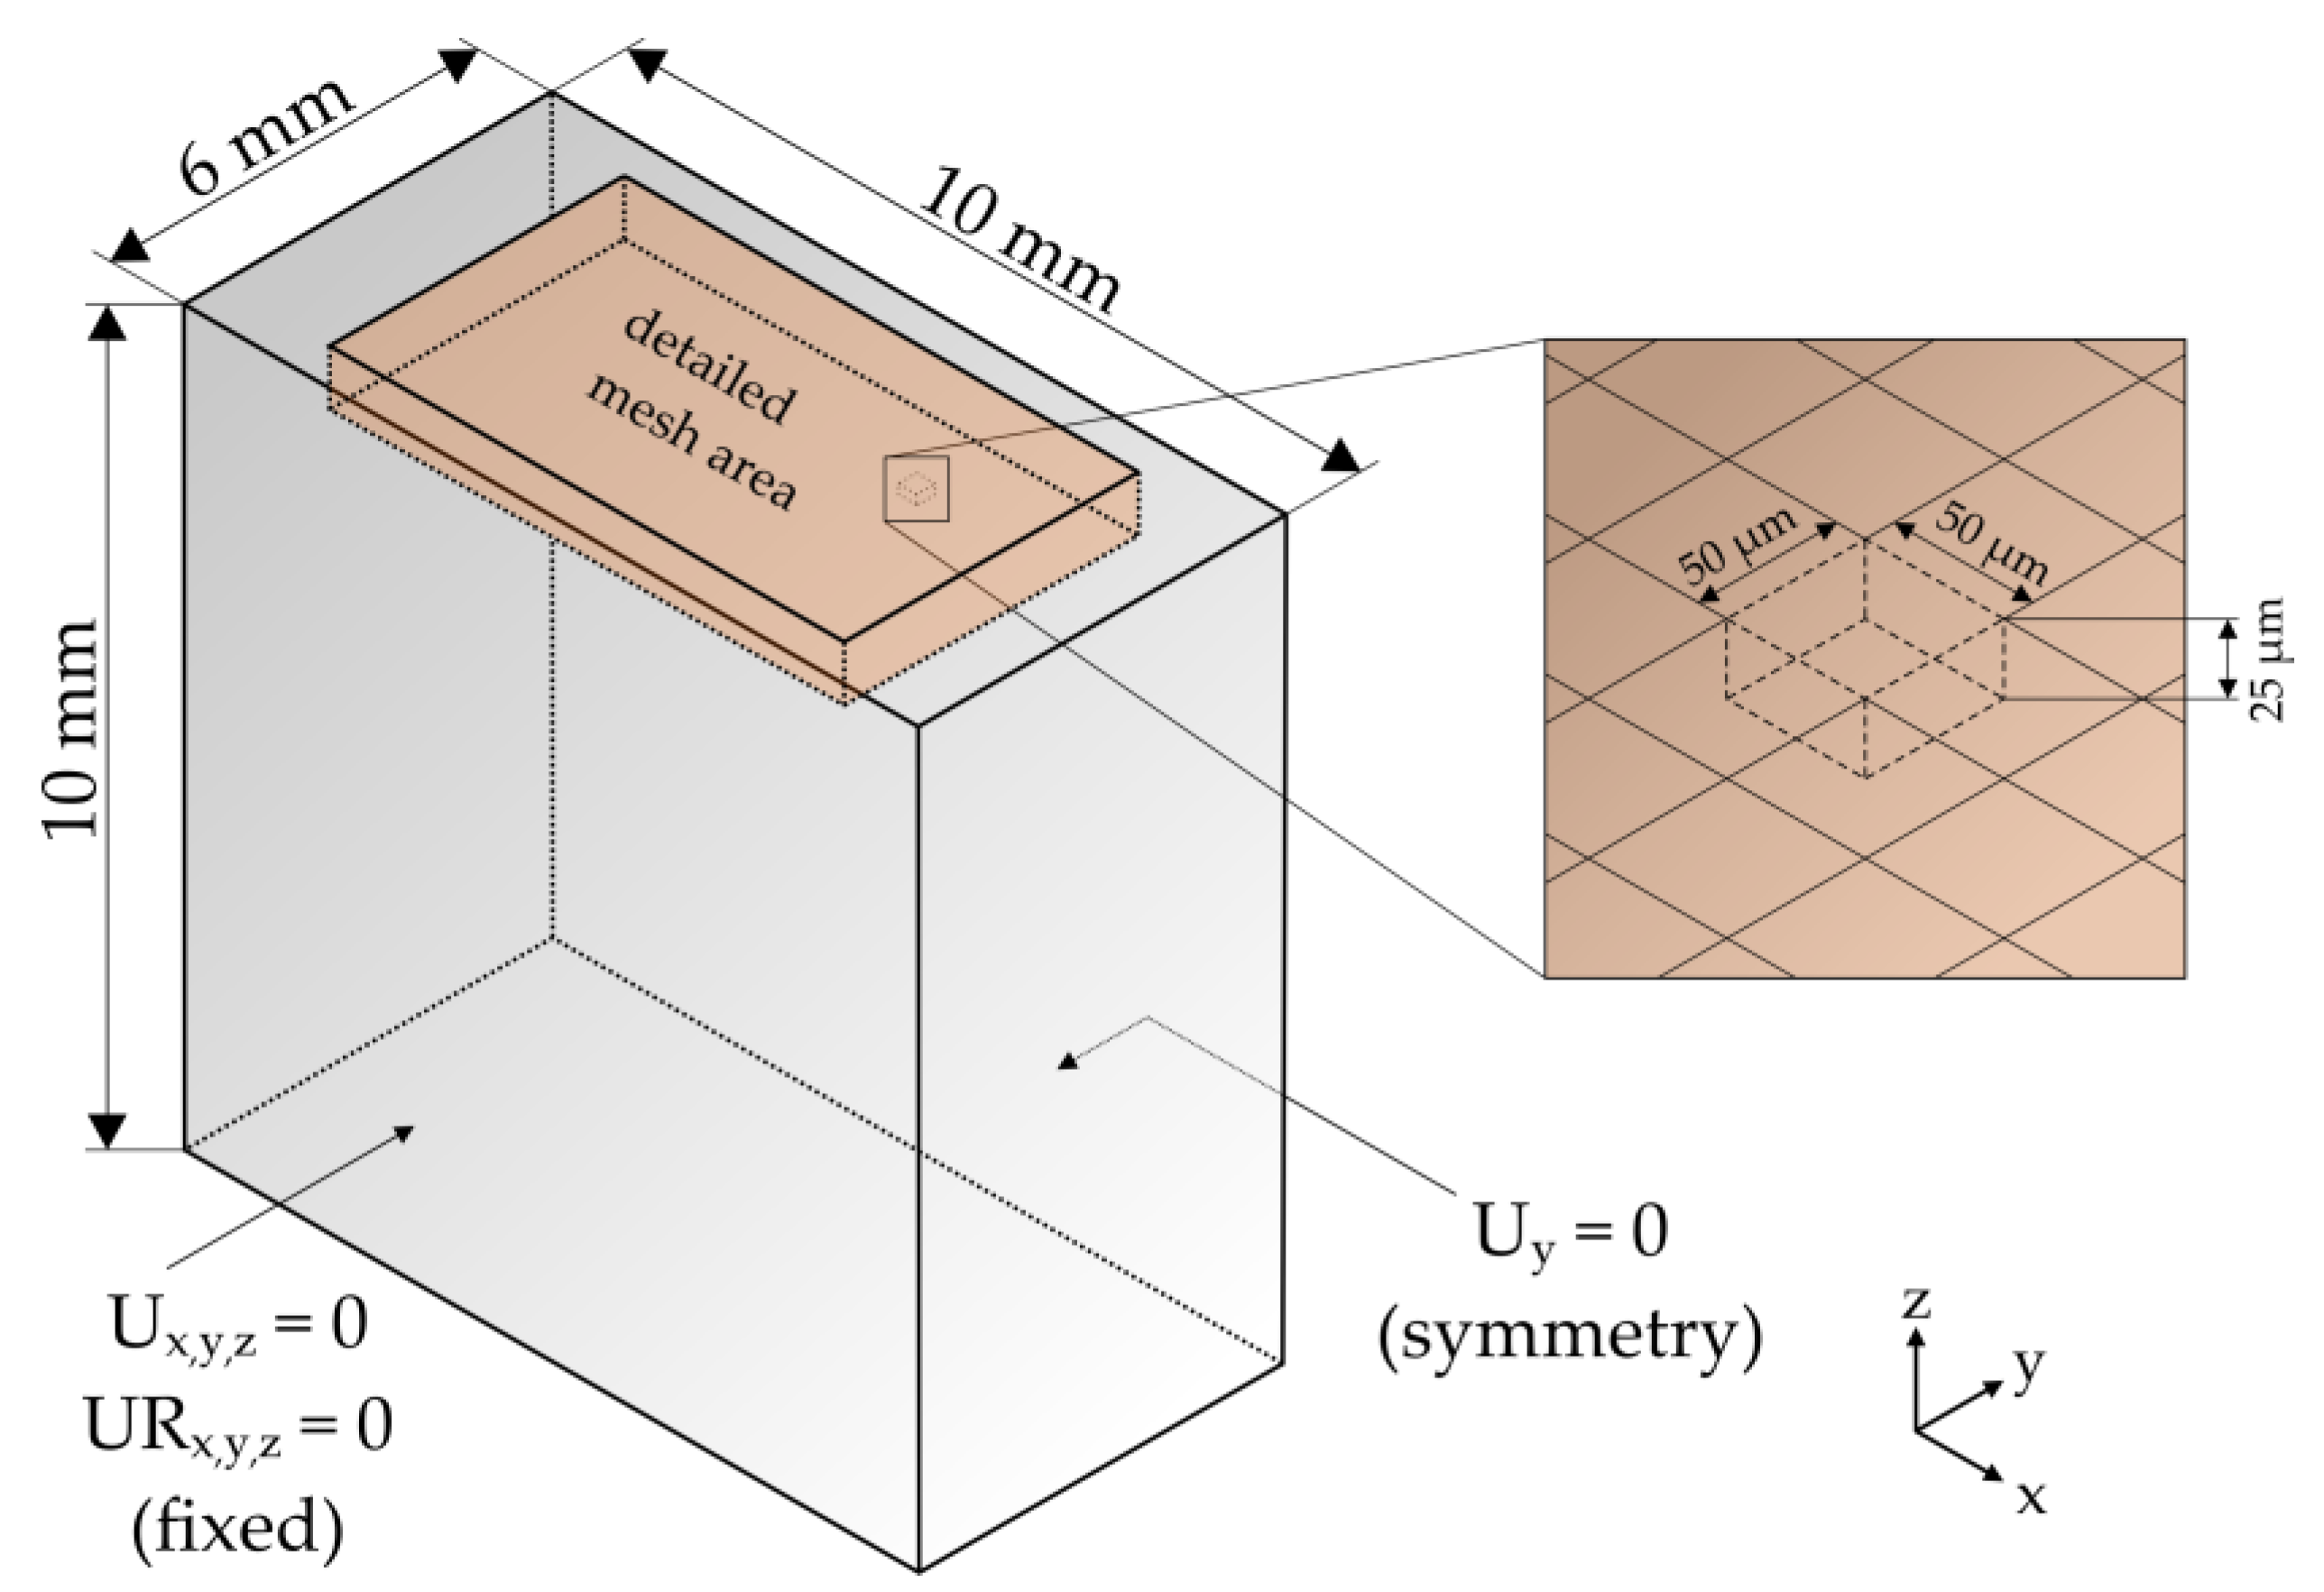
The deep rolling process was simulated with the finite element software Abaqus/Explicit 2016. Since the deep rolling process mainly influences the surface and subsurface region of a workpiece, the aim was to provide a high mesh density of the affected workpiece zone. Compared to the experiment, the lateral size of the geometry model was substantially reduced to increase the computational speed and enable a higher mesh resolution in the subsurface region. The thickness of the modelled workpiece was not reduced to prevent workpiece distortion after the relaxation phase, with an increased element size. The contact region between the tool and workpiece had a resolution of 50 µm between each node in x (tool movement) and y direction and 25 µm in z (depth) direction, resulting in a total number of 484,700 elements and a stable time increment of 3.19 × 10⁻⁹ s (see Figure 8). Since an explicit approach was utilized, linear hexahedral elements of type C3D8TR were used. For a further reduction of computation demands, the Abaqus built-in automatic mass scaling for roller applications was used and set to check the mass scaling each 1000 increments, resulting in a dynamic mass scaling between 1 and 100. The deep rolling tool was modelled as an analytic rigid shell. The contact between tool and workpiece was assumed to be frictionless and used the built-in kinematic contact method. Similar to the experimental setup, the workpiece was constrained mechanically on the sides. For the deep rolling simulations at constant temperature levels, no thermal boundary conditions beside a constant initial temperature of the whole workpiece were defined.

4.3. Process Kinematics

The simulation of linear deep rolling a single track was divided into three steps: firstly, the force build-up on the tool to create contact with the workpiece; secondly, the translation of the tool along the workpiece surface maintaining the initial deep rolling force; finally, the tool lift-off. A single material model was implemented that incorporates all material data presented in Table 2. The general contact algorithm of Abaqus was used which utilizes a finite sliding formulation. This is necessary as the workpiece is fixed, whereas the tool moves along its surface. The rigid tool is defined as a pure master surface in the contact interaction and the workpiece as a pure slave surface. The contact constraints were enforced with a penalty constraint method.
Based on the width measurements of the first deep rolled track, the overlap for the subsequent tracks was determined in the simulations likewise to the experimental approach. As this work focuses on the internal material loads for the generation of components of Process Signatures, the machining parameters were adapted to generate a high grade of deformation and, therefore, high strains during each deep rolling operation. Consequently, the overlap was set to 50% of the width of the first deep rolled track, which results in a high deformation of the piled up area.
As a stop criterion, the maximum number of deep rolling tracks was calculated depending on the track width and the constant track overlap. After tool lift-off, the thermal and mechanical relaxation was calculated with Abaqus/Standard in order to analyze residual stresses in the workpiece. This was modeled in a new simulation model which read in the results from the deep rolling simulation as an initial material state, incorporating all properties from the explicit model such as the deformed mesh, nodes and boundary conditions. For temperatures in between 25, 100 and 300 °C, linear interpolation of the material model values took place. The cooling was simulated with a boundary condition that linearly decreased the workpiece temperature homogenously to 25 °C. The bottom corner nodes were fixed in all their degrees of freedom (see Figure 9). Once room temperature was reached, unclamping the workpiece was simulated in three separate steps. Firstly, at one of the corner nodes, all degrees of freedom except Ux were unconstrained. Secondly, another one of the corner nodes was unconstrained except for Uy. Finally, a third corner node was unconstrained except for Uz.

4.4. Data Processing

4.4.1. Internal Material Loads

In contrast to the experimental investigations, the finite element simulation enables to quantify the internal material load while the manufacturing process is ongoing. Since stress is induced due to elastic and plastic strains, the strain tensors while deep rolling were investigated. However, in order to reduce the complexity of the problem and to facilitate the identification of functional relationships of the resulting material modifications (residual stress tensor) and the internal material loads (strain tensor), an equivalent strain ε eq , similarly calculated as the von Mises yield stress, was introduced. With Equation (3), the equivalent strain ε eq and the equivalent plastic strain ε eq pl were calculated. At this point, it may be noted that strain measures used in this work are always referring to the true (or logarithmic) strain henceforth:
ε eq = ε x 2 + ε y 2 + ε z 2 ε x ε y ε x ε z ε y ε z + 3 ( ε xy 2 + ε xz 2 + ε yz 2 ) .

4.4.2. Workpiece Material Modifications

Workpiece material modifications were analyzed in terms of residual stress depth profiles for the components parallel to the rolling direction ( σ ) and perpendicular to it ( σ ). For the experimental approach, the deep rolled areas were measured with a Seifert 3000 PTS X-ray diffractometer, using the parameters given in Table 3. To enable a comparability with the experiments, the depth profiles were calculated after a thermal and mechanical relaxation phase in the simulations. They were averaged within a circular region around the point of interest (xy plane in Figure 9) with a diameter of 1 mm, which is the same as the aperture size used for the XRD investigations of the experimental specimens.

5. Results Used for Calibration of the Simulation

During the deep rolling process, the effective force was measured for a single and multiple tracks as shown in Figure 10b. The relative error between nominal and effective force was determined as 2% for single tracks and 3% for multiple tracks. Figure 10 shows the force measurements at different workpiece temperatures (a) and during deep rolling several tracks (b). Due to the low deviations, the nominal deep rolling forces were used in the simulations.

5.1. Track Width Measurement

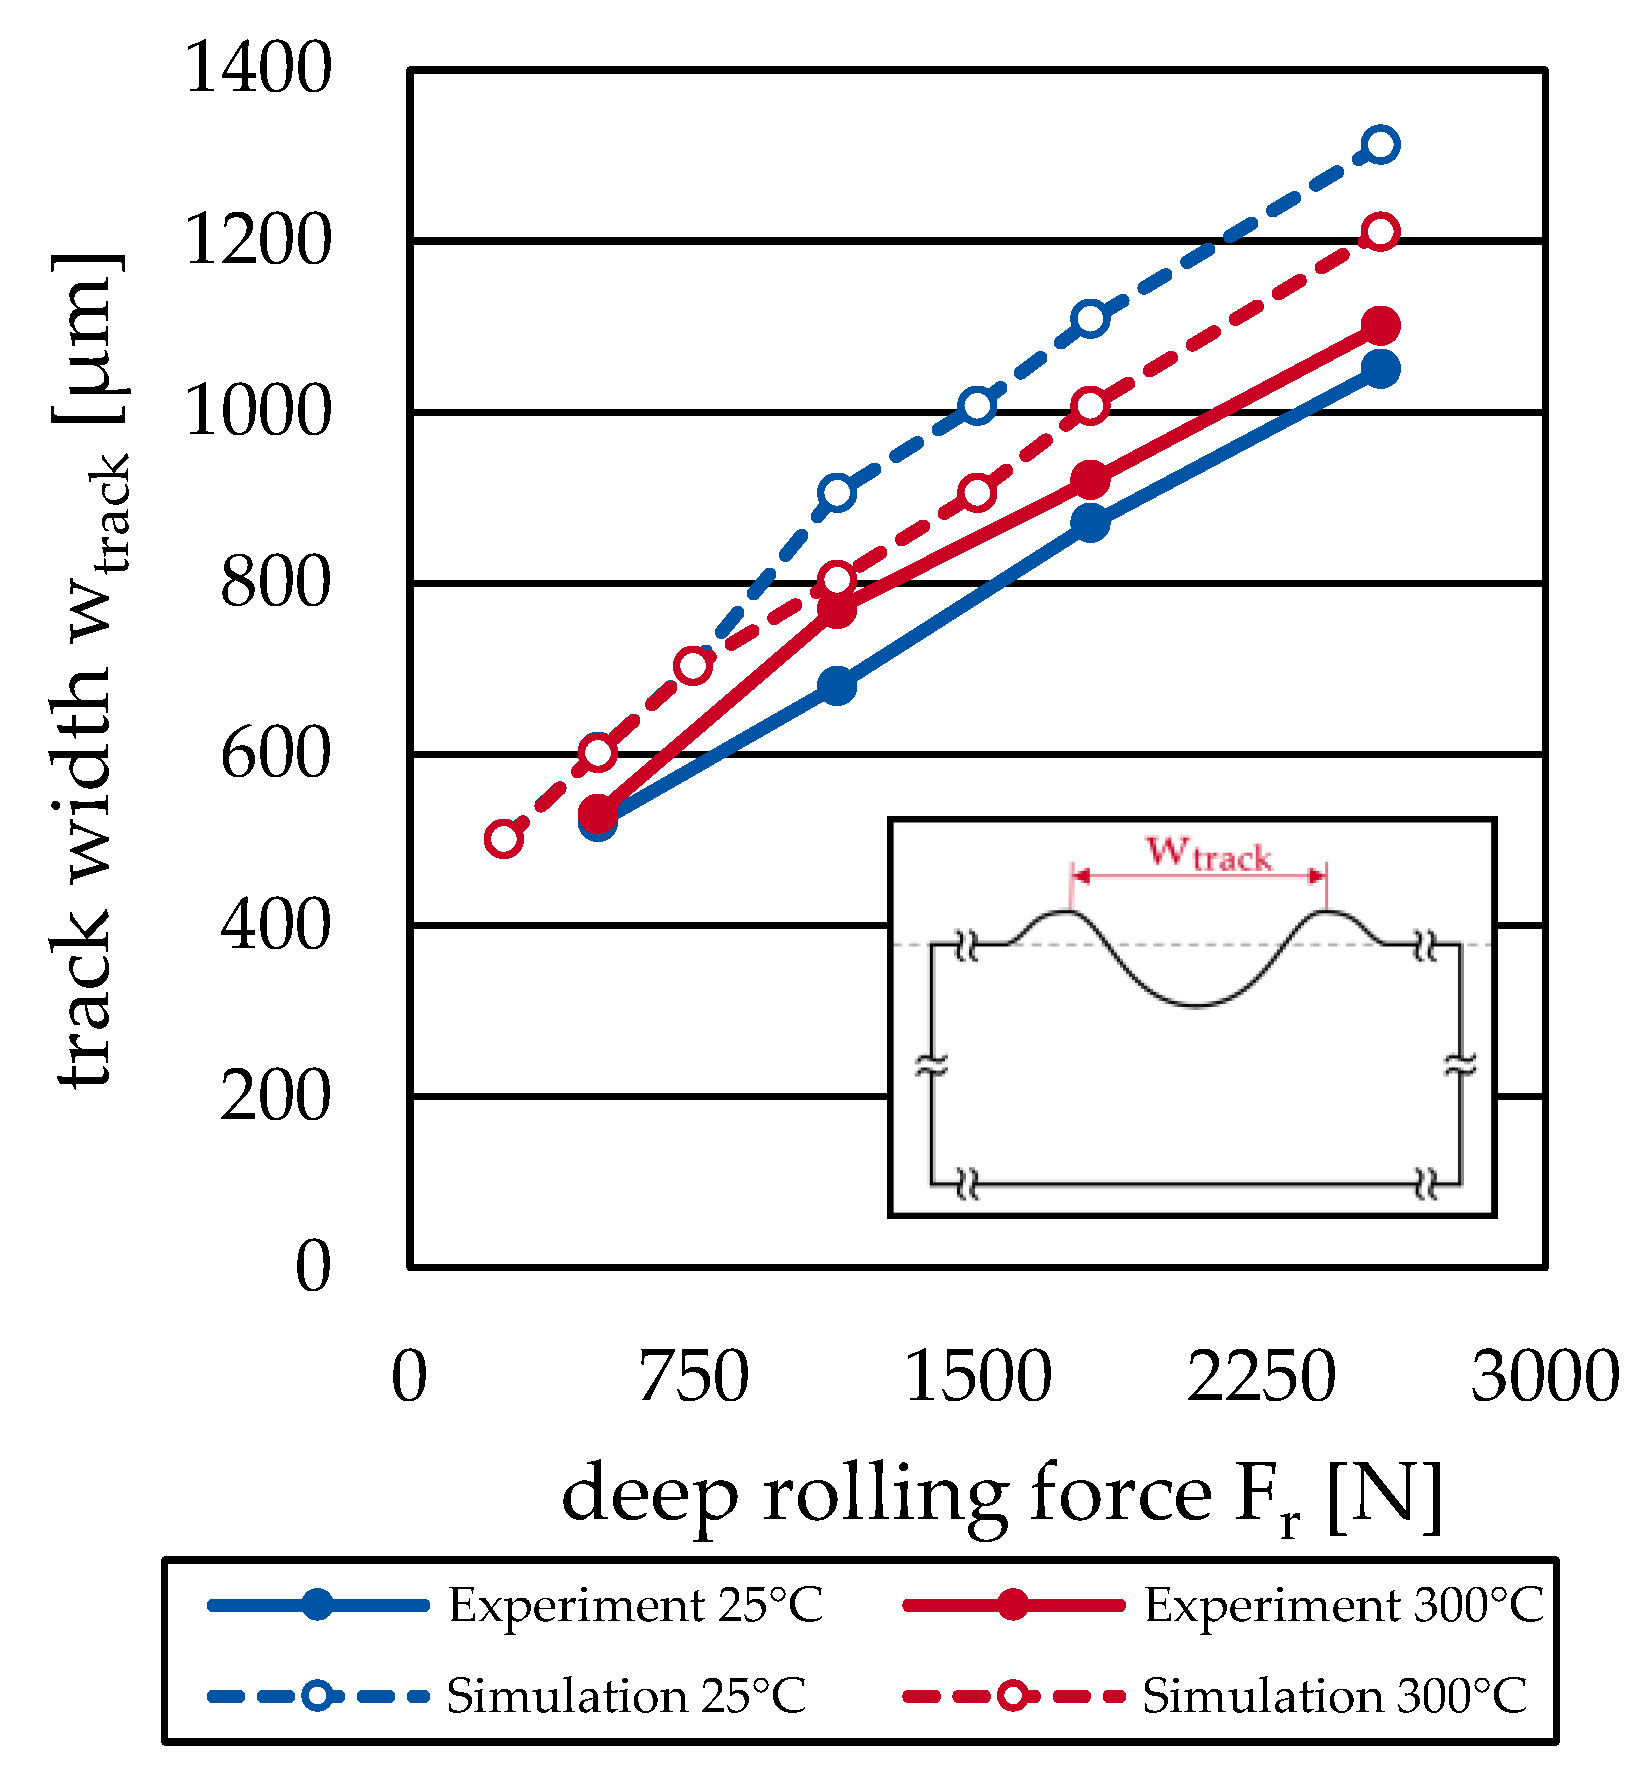
The deep rolled single tracks from the experiment were measured perpendicular to the rolling direction with a tactile surface roughness tester MarSurf XCR 20 to determine the track width wtrack. The track width is defined as the distance between the maxima of the piled-up areas on each side of the track as shown in Figure 11. The relative deviations between simulated and measured track widths for each temperature level are listed in Table 4.

5.2. Residual Stress

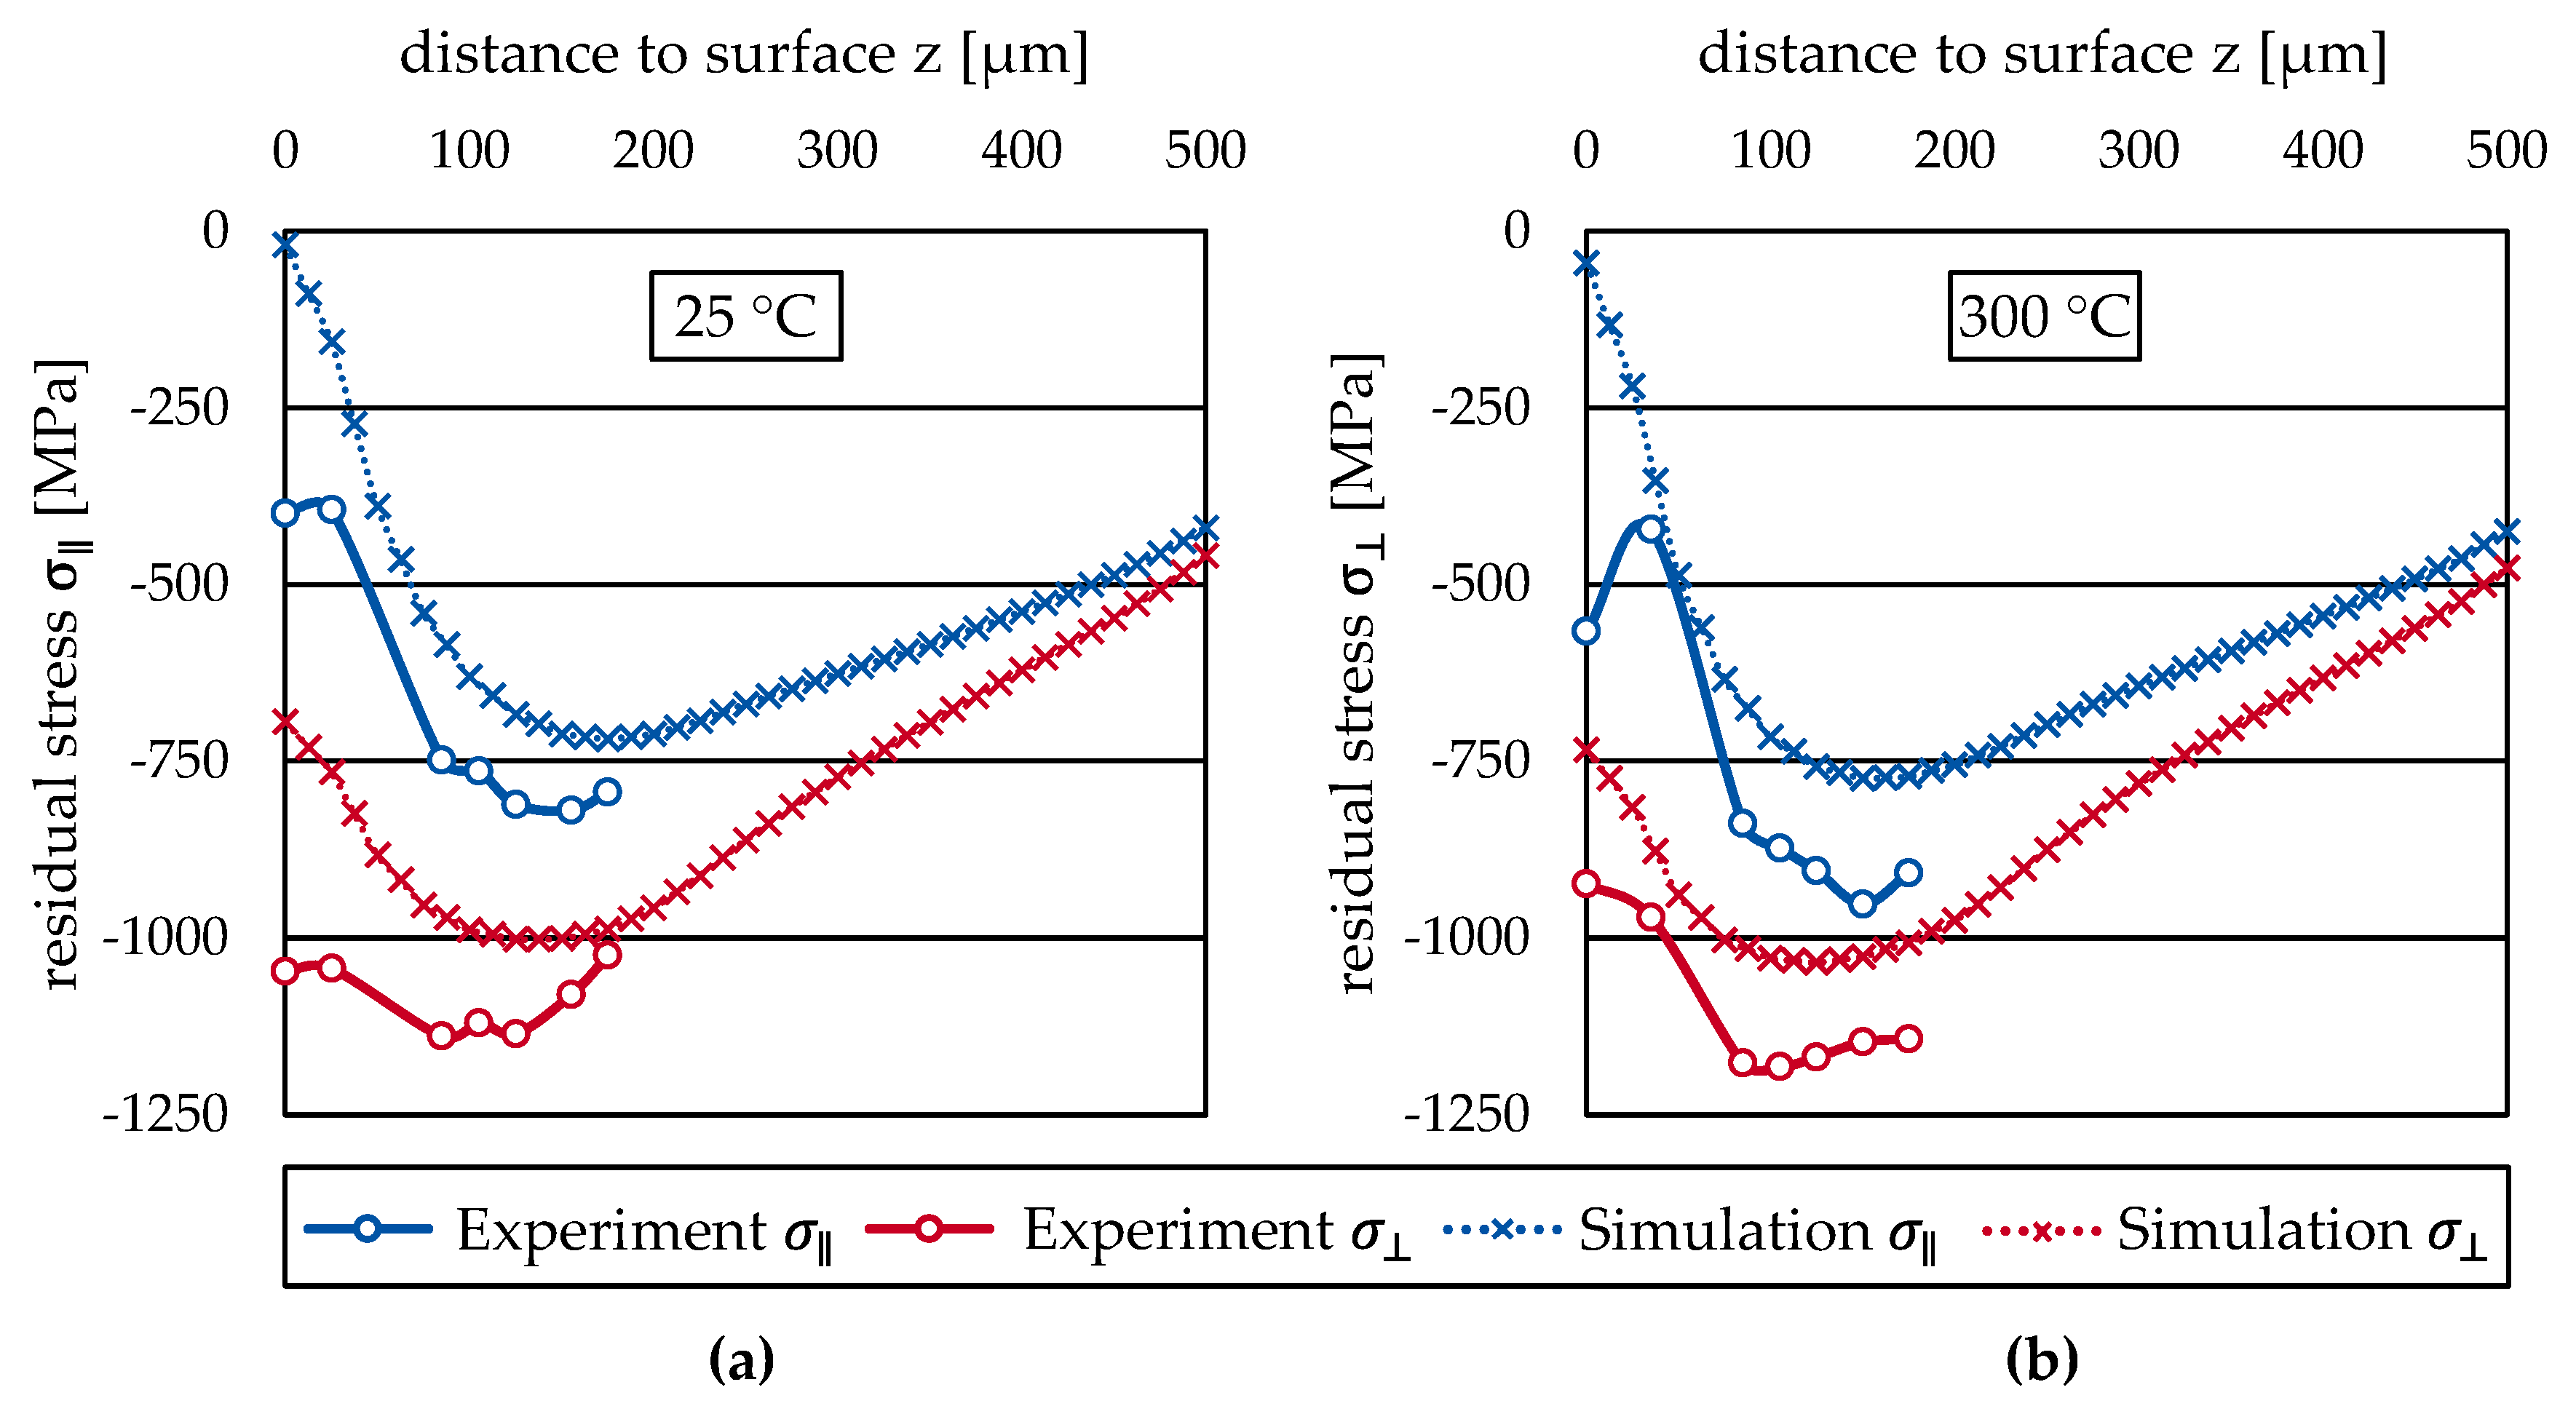
Residual stress was determined experimentally and numerically on deep rolled areas, as indicated in Figure 9. The residual stress components parallel ( σ ) and perpendicular ( σ ) to the deep rolled tracks were analyzed. Figure 12 shows exemplarily the simulated and measured depth profiles of the residual stress components for a constant deep rolling force for T = 25 °C and T = 300 °C. Qualitatively, the simulation results agree reasonably well with the measurements. Higher compressive residual stresses were found at the surface in the experiments, which might have been caused by pre-machining of the specimens. While in the simulations, neither work hardening nor residual stress from previous manufacturing steps were taken into account, experimentally it can be expected that the workpieces were initially not stress-free. Quantitatively, absolute values of σ and σ were underestimated in the simulations.

6. Results Regarding Simulation-Based Process Signatures Components

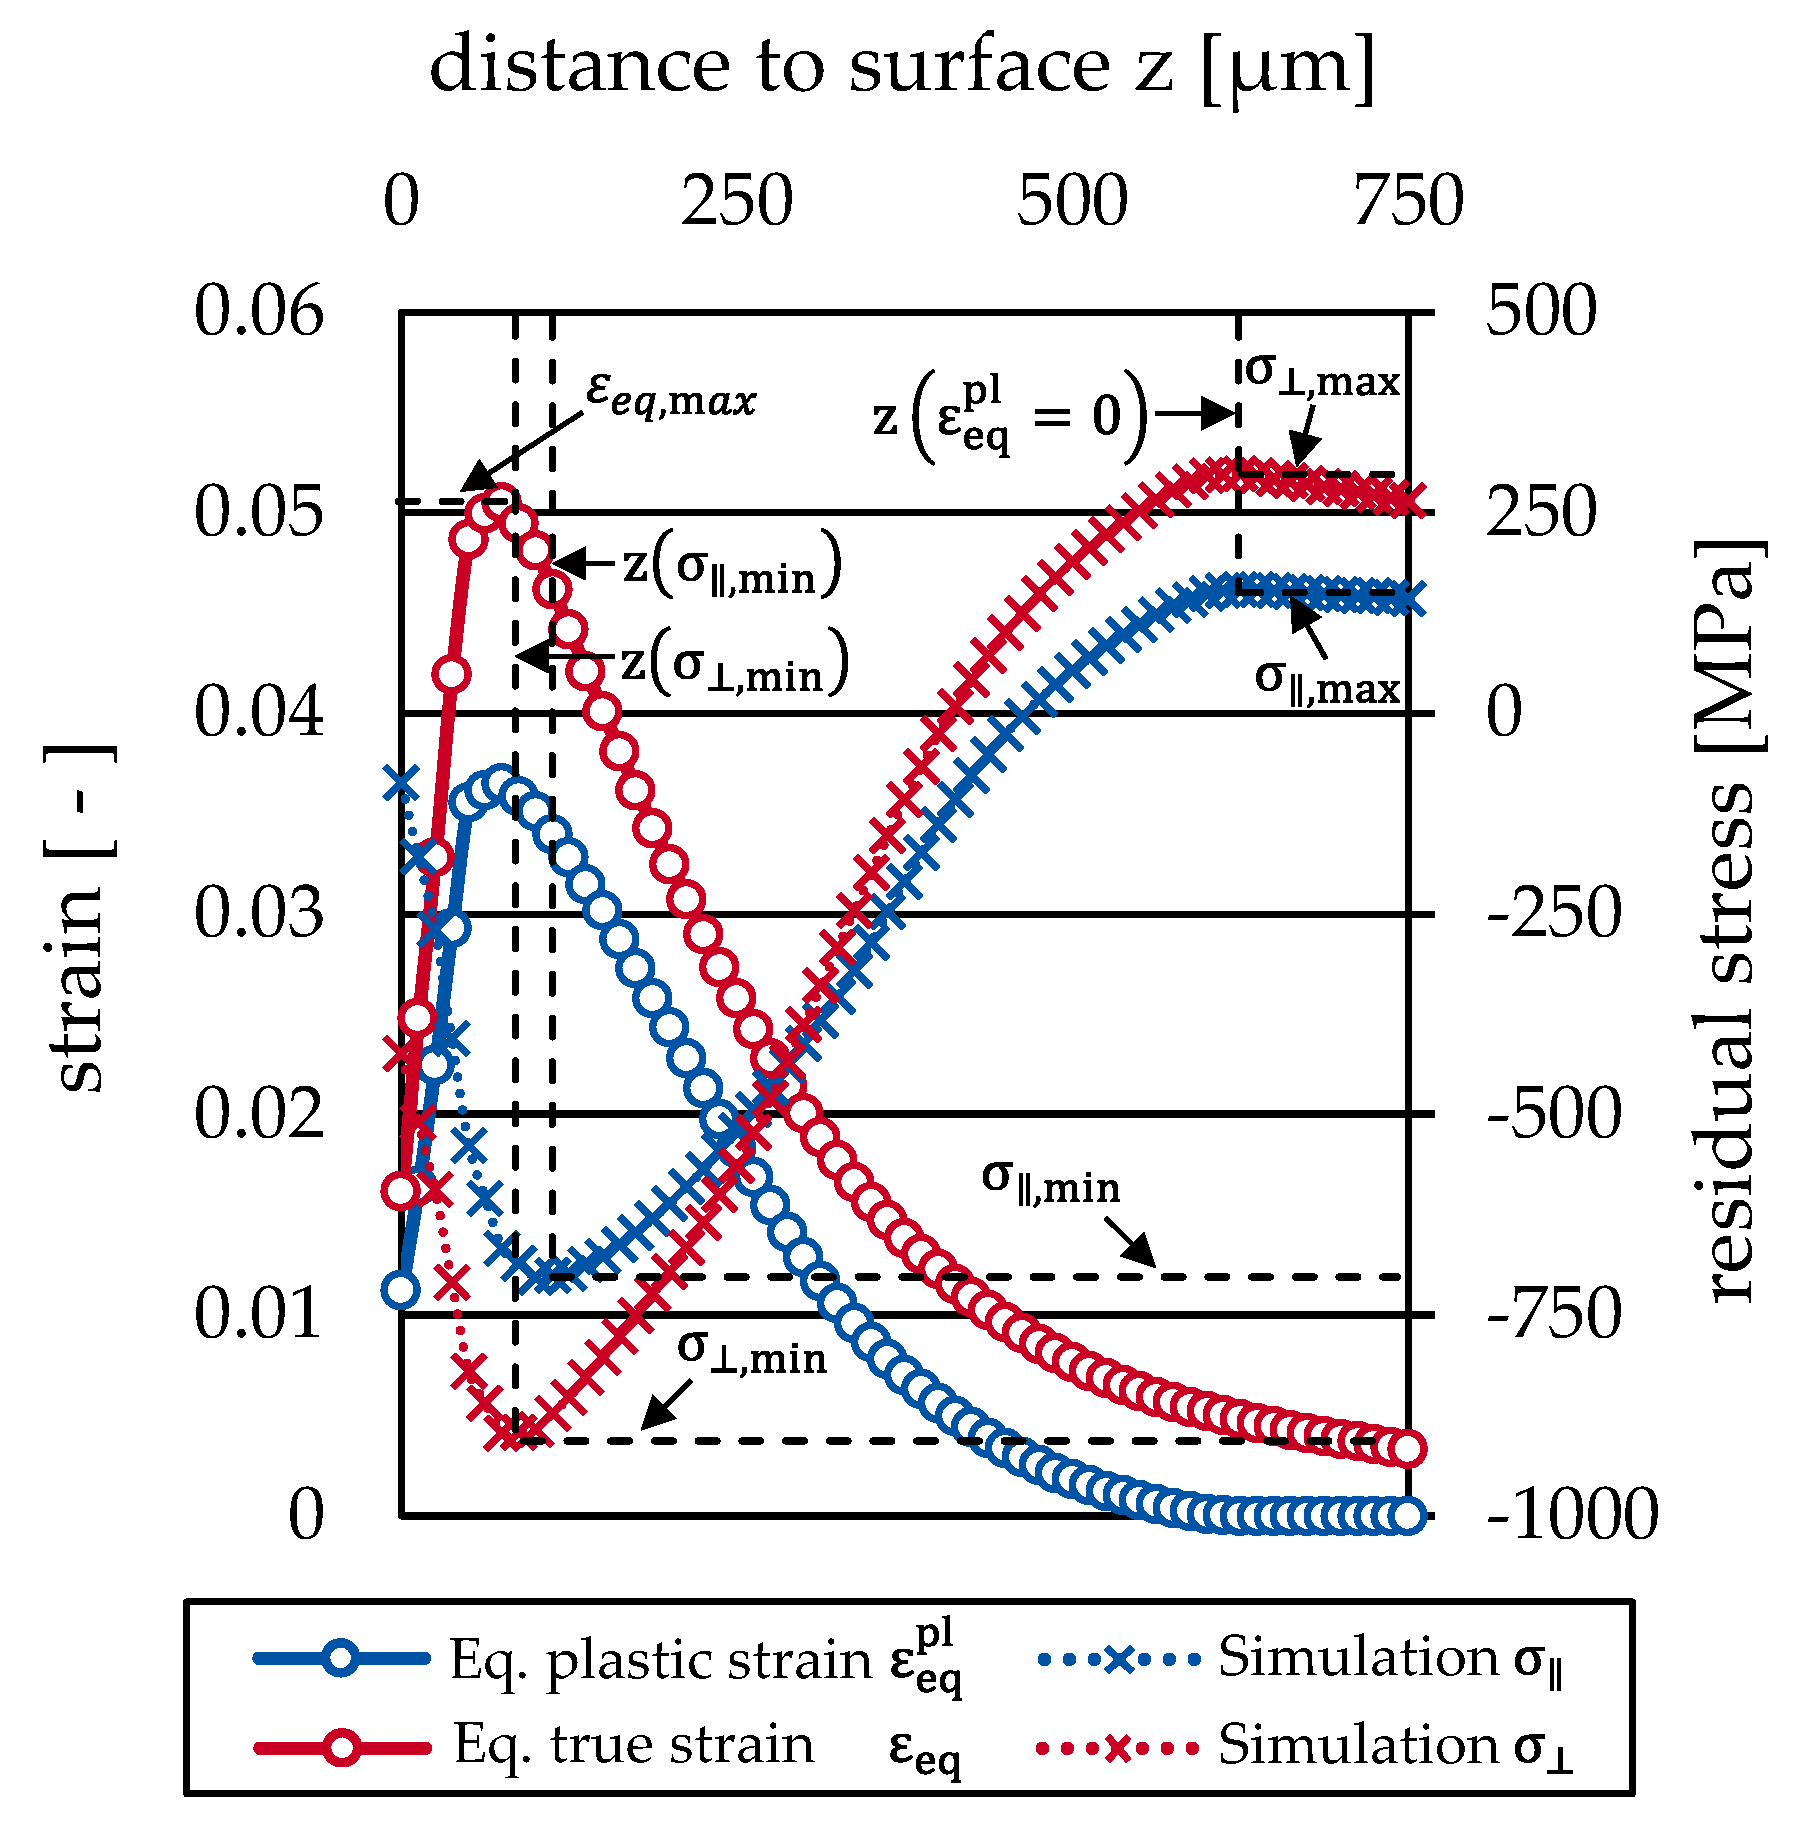
For all simulations, the maximal equivalent strain ε eq , max during the deep rolling process was determined in the vicinity of the tool–workpiece contact as a characteristic value for the internal material load. In addition, the minimum and maximum values of both residual stress components and their depth positions were calculated after relaxation based on the depth profiles shown in Figure 13. The comparison of the profiles shows that the depth where the maximal equivalent strain occurs approximately coincides with the position where the compressive residual stress components are the most pronounced (in this case at a position of z ≈ 100 µm). Moreover, it is observable that the position for which the equivalent plastic strain drops to zero coincides with local maxima of the residual stress components in the tensile region.
Utilizing the maximal equivalent strain as a characteristic value of the internal material load, Process Signature Components according to [3] can be derived for characteristic values of the residual stress components (maximal compressive and tensile residual stress) at different temperatures (Figure 14). Quantitatively, all temperature related differences of the changes of residual stress components at similar strains were below 100 MPa. Moreover, the absolute values of the perpendicular residual stress component (Figure 14b) were significantly higher than those of the parallel component (Figure 14a). In general, the temperature effect was more pronounced for the parallel residual stress component. Due to the parabolic shape of the shown dependencies, optimal conditions for the generation of maximal compressive residual stress exist at a maximal equivalent strain of around ε eq , max = 0.1 .
In particular, an increase from room temperature to a temperature T = 100 °C had the most significant effect on the change of the residual stress components. When increasing the temperature further to T = 300 °C, the parallel component was shifted to lower compressive residual stresses, whereas the perpendicular component differed only for maximal equivalent strains above 0.1. The parabolic shape of the perpendicular residual stress component at T = 300 °C can be explained by the lateral material flow (y direction in Figure 9). Since compressive stress prevails on average, the subsurface region was strained compared to the unaffected bulk material. When deep rolling one track, this strain should be higher at 300 °C than for the lower temperatures, so that a higher compressive residual stress would be expected for higher temperatures and for higher deep rolling forces. However, the strain of one deep rolled track was reduced (compressed) by the strain from neighboring tracks due to the lateral material flow. A lateral material flow should increase for higher temperatures and/or higher deep rolling forces. This would explain the pronounced parabolic shape of the Process Signature Component for the maximum perpendicular residual stress at a temperature T = 300 °C.
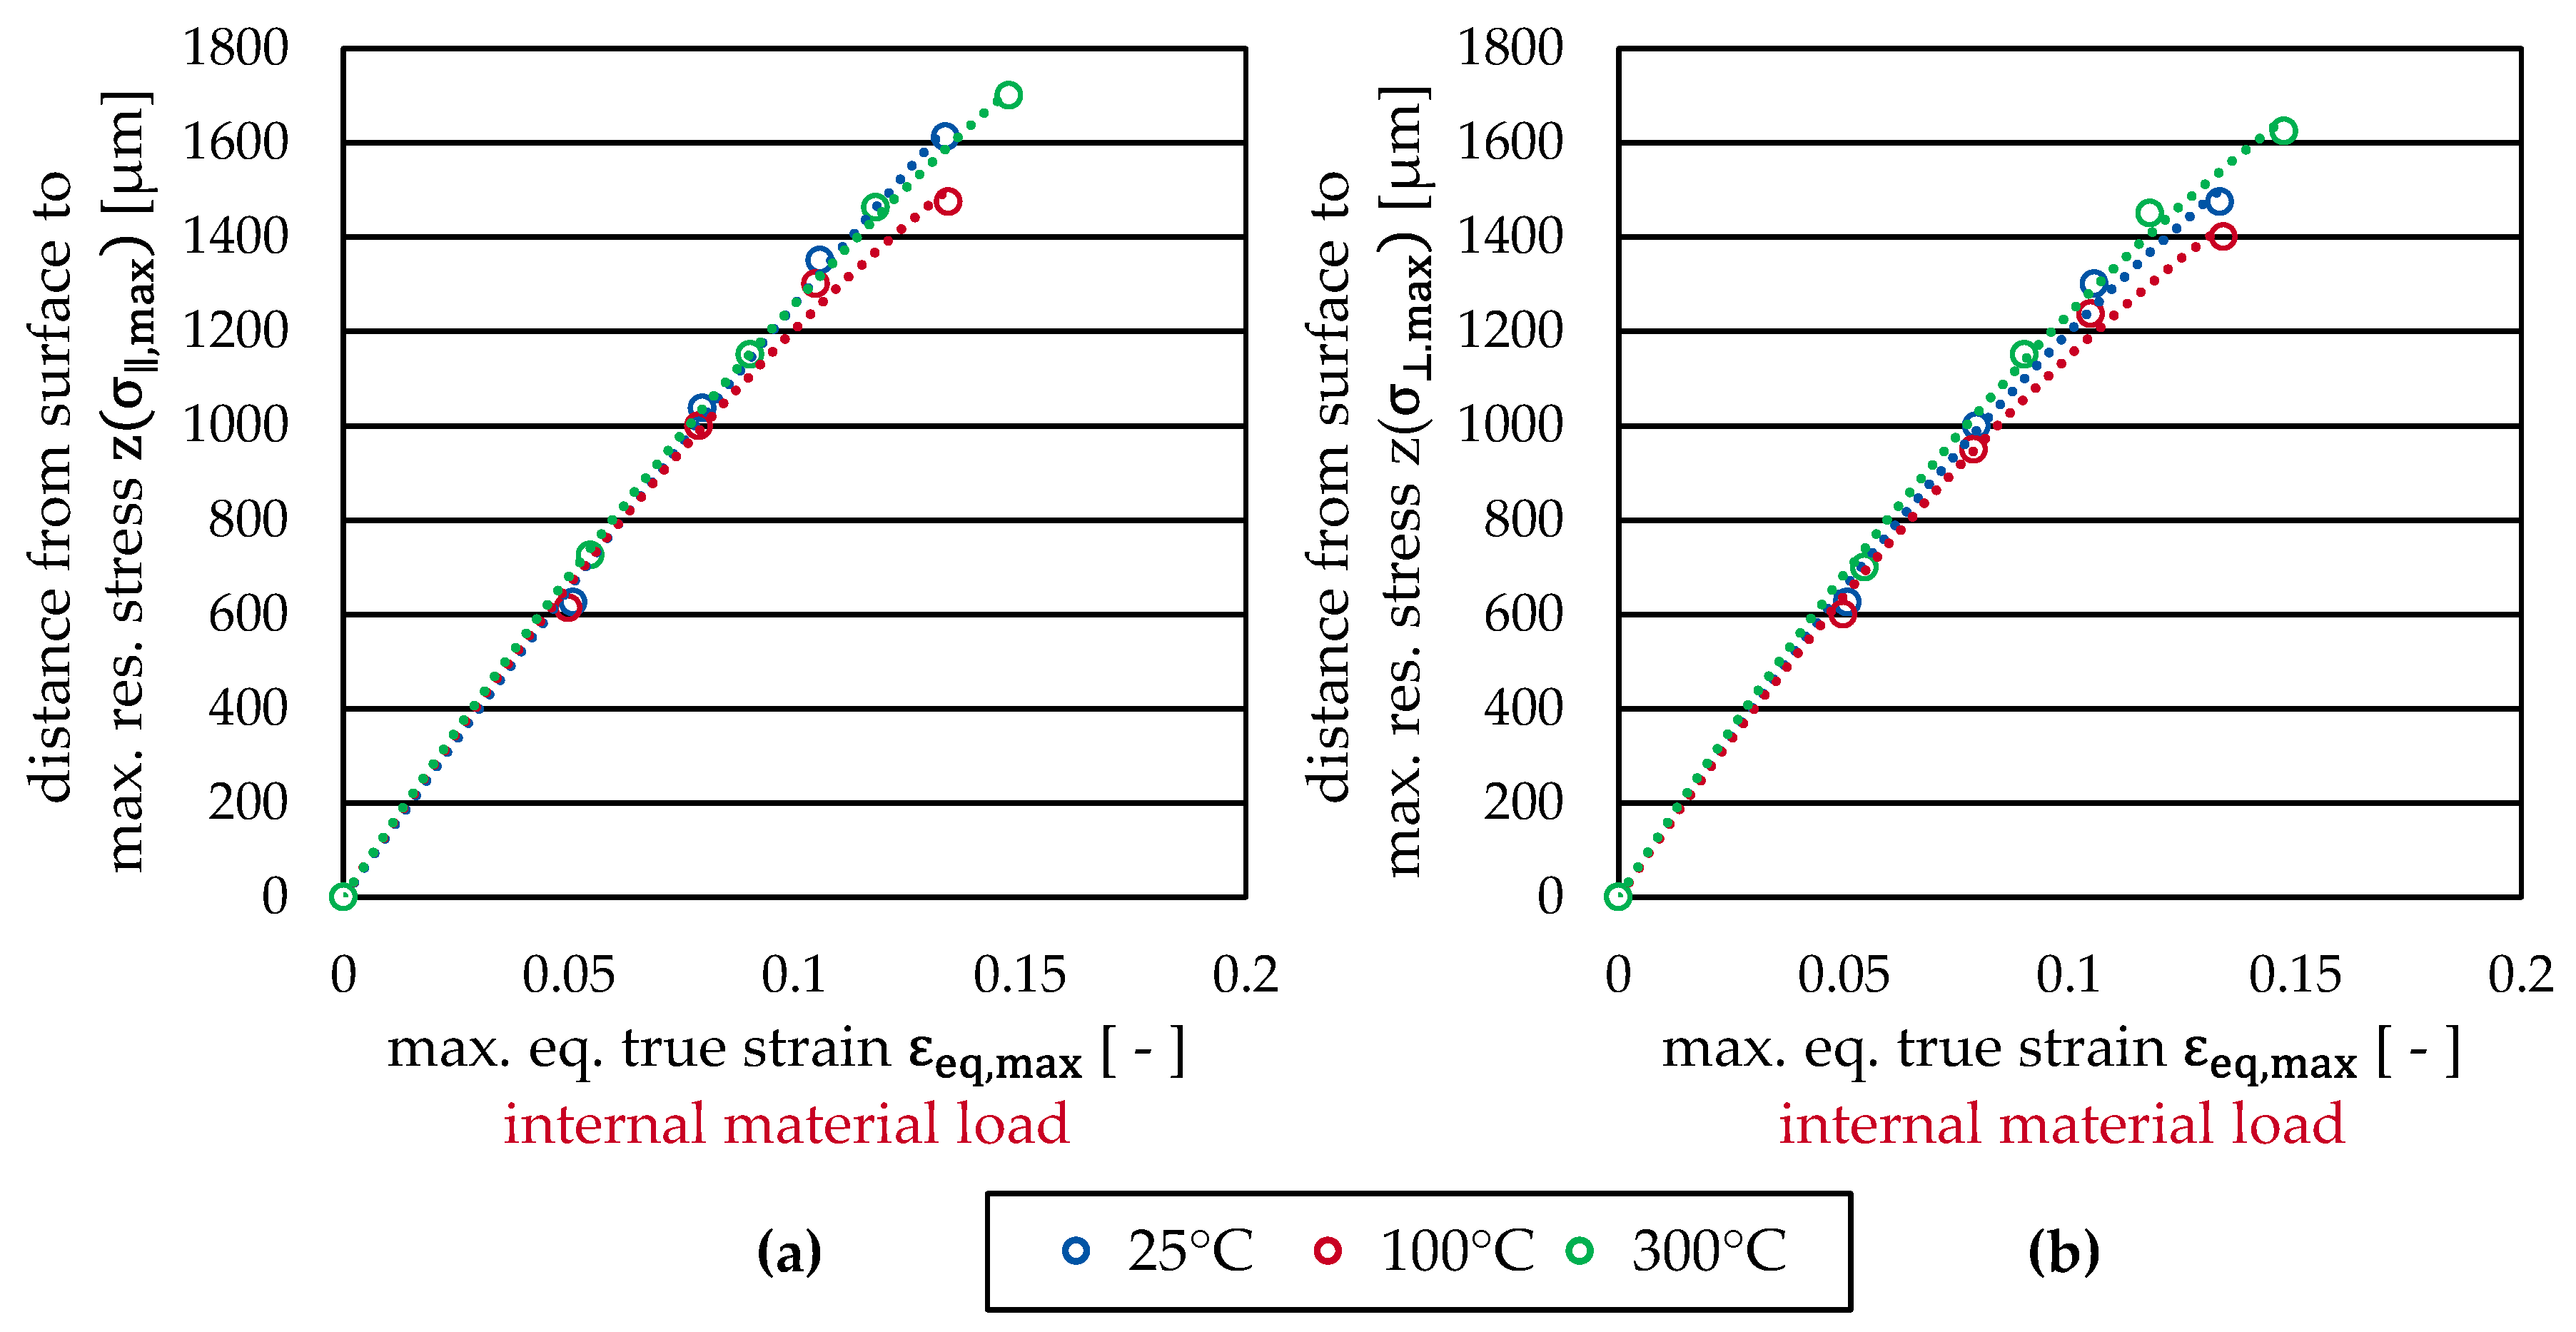
As additional information to the component of Process Signatures, the distance from the surface where the minimum residual stress (maximal residual compressive stress) occurred is plotted in Figure 15. The results show that the location where minimum residual stress was calculated shifted into deeper regions with increasing maximal equivalent strain. However, the effect was more pronounced for the parallel residual stress component. Increasing the specimen temperature to T = 100 °C, in addition, moved the maximal compressive residual stress positions even deeper into the subsurface. Again, the results suggest that effects qualitatively change when temperatures are increased further. At a temperature of T = 300 °C, an even lower distance of the maximal residual compressive stress components from the surface was observed compared to room temperature (T = 25 °C).
For a more comprehensive view on the generated residual stress depth profiles, more characteristic values are needed. This can be accomplished by analyzing the maximal residual stress components (tensile residual stress components) below the workpiece surface. When plotted against the maximal equivalent strain during deep rolling, an almost linear relationship can be observed for both components (Figure 16). As can be expected, the perpendicular maximal residual stress component was higher than the parallel component. This can be explained by the higher compressive residual stress perpendicular to the rolling direction that is generated close to the workpiece surface. A minor influence of the workpiece temperature can only be observed for the perpendicular residual stress component at maximal equivalent strains above 0.1 (Figure 16b).
Keeping in mind the observation determined in Figure 13, which shows that the position where the maximal residual stress components occur and where the equivalent plastic strain drops down to zero coincide, it might be concluded that from this position on all residual stress is compensating stress. Vice versa, the residual stress above this depth is the so called source stress [27] which is directly linked to the plastic strain generated in deep rolling. The simulation results clearly indicate that this depth linearly depends on the maximal equivalent strain (Figure 17). The results show that with increasing maximal equivalent strain, the subsurface region of the workpiece that is affected by plastic strains increases linearly irrespective of the workpiece temperature.

7. Summary

While Process Signature Components for deep rolling at room temperature have been derived and published before, it was of particular interest if and how strongly Process Signatures are affected by the workpiece temperature. Therefore, in the present work, experiments and finite element simulations were employed to study the deep rolling process at elevated temperatures. Cyclic tension-compression tests were performed in order to derive model parameters for a non-linear kinematic hardening model. It could be shown that the used material and process models are capable of reproducing experimental surface and subsurface properties in terms of the track width and the residual stress. For the derivation of Process Signature Components, it was found that the maximal equivalent strain is suitable for describing the internal material loads. Furthermore, comparing the depth profiles of residual stress and equivalent strain shows that the depth of the maximal compressive residual stress coincides with the depth of the maximal equivalent strain. Moreover, the position at which the equivalent plastic strain drops down to zero coincides with the position of the maximal tensile residual stress.
Process Signature Components were then derived correlating the maximum compressive, respectively, maximum tensile residual stress with the maximal equivalent strain during deep rolling at temperature levels of 25, 100 and 300 °C. The results also show that a maximal compressive residual stress was achieved for an internal material load of ε eq , max 0.1 at a temperature T = 100 °C. The depth of the maximum residual stress (either compressive or tensile) increases approximately linear with the maximal equivalent strain. A maximal depth of the compressive residual stress was reached at T = 100 °C.

8. Conclusions

Based on the numerical analyses of the present work, it can be concluded that the internal material loads in deep rolling can be adequately described by the (maximal) equivalent strain. A temperature dependence of the Process Signature Components exists and indicates that the material flow directions generated by the deep rolling process are also temperature dependent. Otherwise the scalar value “equivalent plastic strain” would not be temperature dependent. Moreover, an optimal workpiece temperature and equivalent strain (here: T = 100 °C and ε eq , max 0.1 , respectively) exist for which the mechanical impact is the most pronounced, i.e., highest compressive residual stress reaches furthest into the workpiece subsurface. It is assumed that too high temperatures (here: T = 300 °C) lead to lateral material flows between neighboring deep rolling tracks that counteract the beneficial effective strain of the subsurface workpiece region. This would also explain the decreasing residual stress for high maximal equivalent strains above 0.1 generated by high deep rolling forces.
It was observed that the depth of the maximum tensile residual stress and the depth where the plastic strain drops down to zero coincide. This may be utilized to identify the region where the source stress, which is directly linked to the plastic strain generated during deep rolling, prevails ( z < z ( ε eq pl = 0 ) ), and where compensating stress prevails ( z z ( ε eq pl = 0 ) ) based on measured residual stress depth profiles. In other words: the plastic depth effect of a deep rolling process can be determined experimentally from the maximum tensile residual stress of the residual stress depth profile.
Through the presented Process Signature Components, the maximum residual compressive stress can be mathematically described as a function of the maximal equivalent strain, see Table 5.
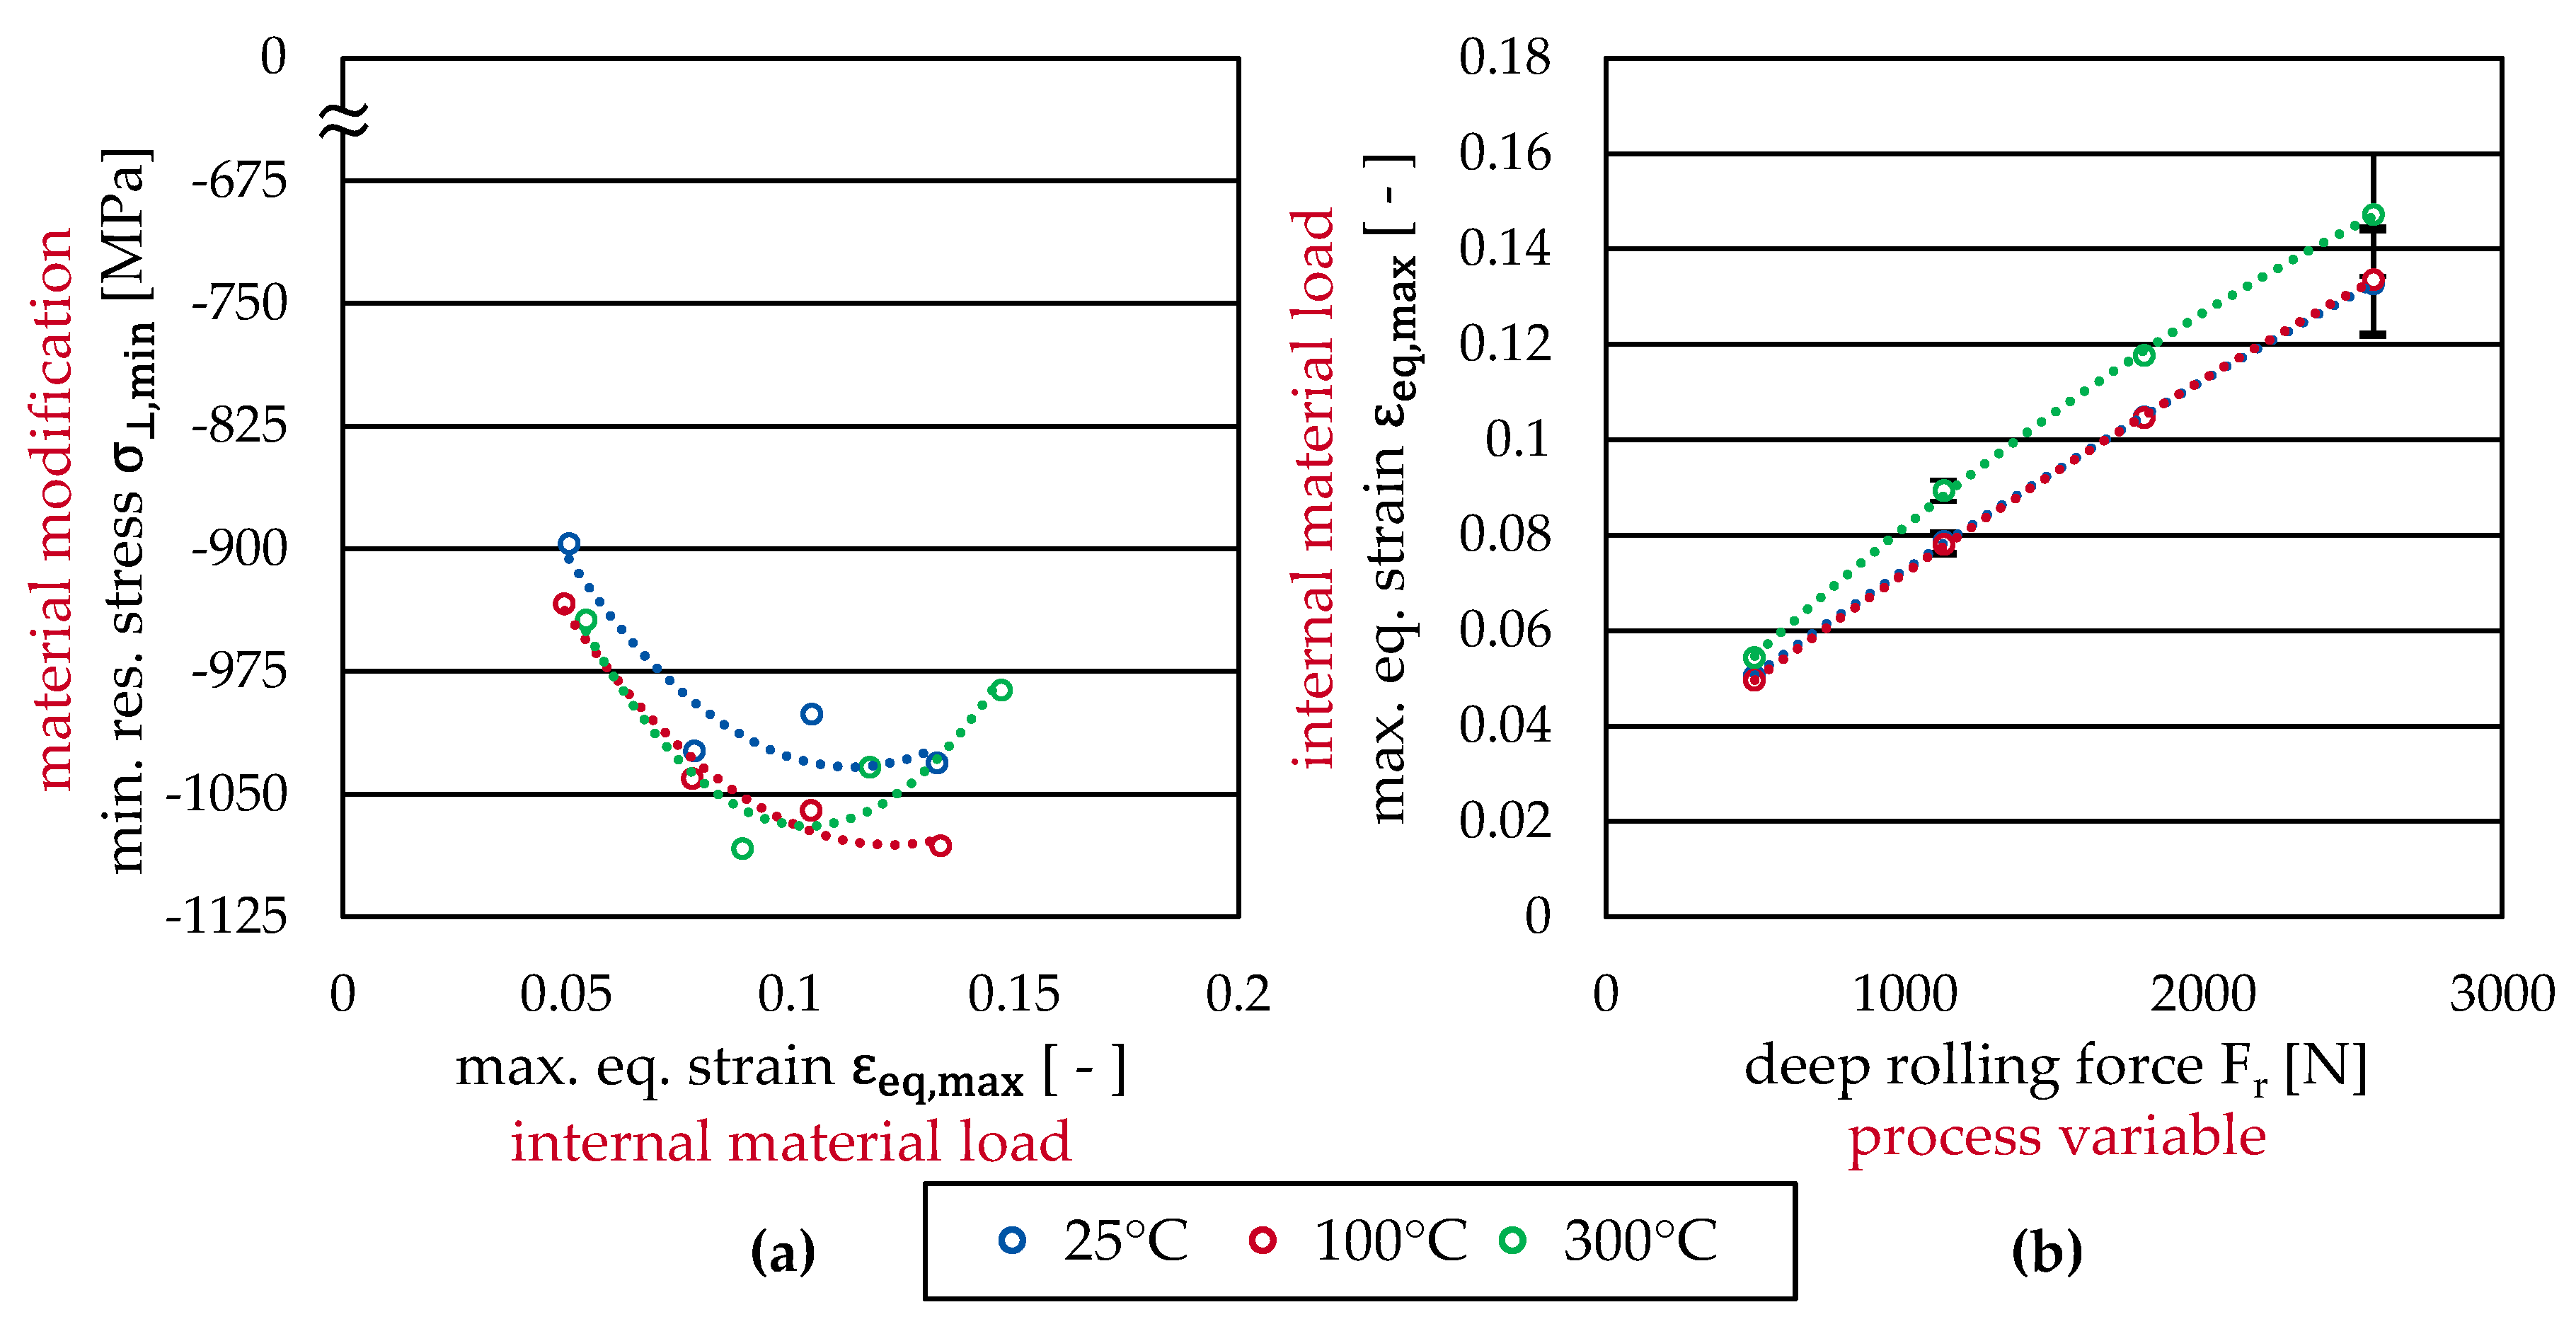
More importantly, the Process Signature Components can be utilized to solve the inverse problem in manufacturing, cf. Figure 18. Starting from a desired maximal residual compressive stress, the necessary temperature and maximal equivalent strain during deep rolling can be calculated from the equations given in Table 5 or can be read out from the Process Signature Component in Figure 18a. The resulting internal material load can then be used in the second correlation shown in Figure 18b to determine the necessary deep rolling force Fr.

Author Contributions

Conceptualization, S.K.; methodology S.K.; software, S.K.; validation, S.K.; formal analysis, S.K.; investigation, S.K.; resources, J.S. and D.M.; data curation, S.K.; writing—original draft preparation, S.K., T.K.-B. and R.Z.; writing—review and editing, S.K., T.K.-B., R.Z., J.S. and D.M.; supervision, J.S. and D.M.; project administration, J.S. and D.M.; funding acquisition, J.S. and D.M. All authors have read and agreed to the published version of the manuscript.

Funding

The authors thank the German Research Foundation (DFG) for funding the transregional Collaborative Research Centre “Process Signatures”—Project number 223500200—SFB/TRR 136, sub-projects M01 and F06. Website: http://www.prozesssignaturen.de/en/home/, accessed on 28 May 2021.

Data Availability Statement

Additional data for this paper can be obtained from the corresponding author upon request.

Conflicts of Interest

The authors declare no conflict of interest.

References

  1. Field, M.; Kahles, J.F. The surface integrity of machined and ground high strength steels. DMIC Rep. 1964, 210, 54–77. [Google Scholar]
  2. Jawahir, I.S.; Brinksmeier, E.; M’Saoubi, R.; Aspinwall, D.K.; Outeiro, J.C.; Meyer, D.; Umbrello, D.; Jayal, A.D. Surface integrity in material removal processes: Recent advances. CIRP Ann. 2011, 60, 603–626. [Google Scholar] [CrossRef]
  3. Brinksmeier, E.; Meyer, D.; Heinzel, C.; Lübben, T.; Sölter, J.; Langenhorst, L.; Frerichs, F.; Kämmler, J.; Kohls, E.; Kuschel, S. Process Signatures—The Missing Link to Predict Surface Integrity in Machining. Procedia CIRP 2018, 71, 3–10. [Google Scholar] [CrossRef]
  4. Brinksmeier, E.; Reese, S.; Klink, A.; Langenhorst, L.; Lübben, T.; Meinke, M.; Meyer, D.; Riemer, O.; So¨lter, J. Underlying Mechanisms for Developing Process Signatures in Manufacturing. Nanomanuf. Metrol. 2018, 1, 193–208. [Google Scholar] [CrossRef] [Green Version]
  5. Frerichs, F.; Lu, Y.; Lübben, T.; Radel, T. Process Signature for Laser Hardening. Metals 2021, 11, 465. [Google Scholar] [CrossRef]
  6. Frerichs, F.; Lübben, T. Development of Process Signatures for Manufacturing Processes with Thermal Loads without and with hardening. Procedia CIRP 2018, 71, 418–423. [Google Scholar] [CrossRef]
  7. Oevermann, T.; Wegener, T.; Niendorf, T. On the Evolution of Residual Stresses, Microstructure and Cyclic Performance of High-Manganese Austenitic TWIP-Steel after Deep Rolling. Metals 2019, 9, 825. [Google Scholar] [CrossRef] [Green Version]
  8. Abrão, A.M.; Denkena, B.; Breidenstein, B.; Mörke, T. Surface and subsurface alterations induced by deep rolling of hardened AISI 1060 steel. Prod. Eng. Res. Dev. 2014, 8, 551–558. [Google Scholar] [CrossRef]
  9. Denkena, B.; Grove, T.; Breidenstein, B.; Abrão, A.; Meyer, K. Correlation between process load and deep rolling induced residual stress profiles. Procedia CIRP 2018, 78, 161–165. [Google Scholar] [CrossRef]
  10. Meyer, D.; Kämmler, J. Surface Integrity of AISI 4140 After Deep Rolling with Varied External and Internal Loads. Procedia CIRP 2016, 45, 363–366. [Google Scholar] [CrossRef] [Green Version]
  11. Meyer, H.; Epp, J.; Zoch, H.W. Residual stress and dislocation density development in single track deep rolled AISI 4140H steel. Procedia CIRP 2018, 71, 192–197. [Google Scholar] [CrossRef]
  12. Kinner-Becker, T.; Sölter, J.; Karpuschewski, B. A simulation-based analysis of internal material loads and material modifications in multi-step deep rolling. Procedia CIRP 2020, 87, 515–520. [Google Scholar] [CrossRef]
  13. Sayahi, M.; Sghaier, S.; Belhadjsalah, H. Finite element analysis of ball burnishing process: Comparisons between numerical results and experiments. Int. J. Adv. Manuf. Technol. 2013, 67, 1665–1673. [Google Scholar] [CrossRef]
  14. Trauth, D.; Klocke, F.; Mattfeld, P.; Klink, A. Time-efficient Prediction of the Surface Layer State after Deep Rolling using Similarity Mechanics Approach. Procedia CIRP 2013, 9, 29–34. [Google Scholar] [CrossRef] [Green Version]
  15. Balland, P.; Tabourot, L.; Degre, F.; Moreau, V. Mechanics of the burnishing process. Precis. Eng. 2013, 37, 129–134. [Google Scholar] [CrossRef]
  16. Lim, A.; Castagne, S.; Wong, C.C. Effect of Friction Coefficient on Finite Element Modeling of the Deep Cold Rolling Process. Shot Peen. Int. Conf. 2014, 12, 376–380. [Google Scholar]
  17. Manouchehrifar, A.; Alasvand, K. Finite element simulation of deep rolling and evaluate the influence of parameters on residual stress. In Proceedings of the 5th WSEAS International Conference, Vienna, Austria, 10–12 November 2012. [Google Scholar]
  18. Lyubenova, N.; Bähre, D. The Impact of the Material Modeling on the Calculated Residual Stresses Induced by Deep Rolling. In: Current trends in the characterization of materials and surface modification. Proc. Int. Mater. Res. Meet. Greater Reg. 2017, 65–66. [Google Scholar]
  19. Demurger, J.; Forestier, R.; Kieber, B.; Lasne, P. Deep rolling process simulation: Impact of kinematic hardening on residual stresses. Proc. ESAFORM 2019, 694, 1–5. [Google Scholar]
  20. Juijerm, P.; Altenberger, I. Effect of high-temperature deep rolling on cyclic deformation behavior of solution-heat-treated Al–Mg–Si–Cu alloy. Scr. Mater. 2007, 56, 85–288. [Google Scholar] [CrossRef]
  21. Cherif, A.; Scholtes, B. Kombinierte thermische und mechanische Festwalzbehandlungen von gehärtetem und vergütetem Stahl Ck 45. HTM J. Heat Treat. Mater. 2008, 63, 155–161. [Google Scholar] [CrossRef]
  22. Maier, B. Beitrag zur thermischen Prozessmodellierung des Schleifens. Ph.D. Thesis, RWTH Aachen University, Aachen, Germany, 2008. [Google Scholar]
  23. Zmich, R.; Meyer, D. Thermal Effects on Surface and Subsurface Modifications in Laser-Combined Deep Rolling. J. Manuf. Mater. Process. 2021, 5, 55. [Google Scholar]
  24. Chaboche, J.L. A review of some plasticity and viscoplasticity theories. Int. J. Plast. 2008, 24, 1642–1693. [Google Scholar] [CrossRef]
  25. Röttger, K.; Wilcke, G.; Mader, S. Festwalzen—eine Technologie für effizienten Leichtbau. Materialwiss. Werkstofftech. 2005, 36, 270–274. [Google Scholar] [CrossRef]
  26. Paygozar, B.; Dizaji, S.; Sadigh, S. Combined hardening parameters of steel CK45 under cyclic strain-controlled loading: Calibration methodology and numerical validation. J. Mech. Eng. Sci. 2020, 14, 6848–6855. [Google Scholar] [CrossRef]
  27. Tönshoff, H.K. Eigenspannungen und Plastische Verformungen im Werkstück Durch Spanende Bearbeitung. Ph.D. Thesis, Fakultät für Maschinenwesen der Technischen Hochschule, Hannover, Germany, 1966. [Google Scholar]
Figure 1. Procedure for the determination of temperature-dependent Process Signature Components.
Jmmp 05 00076 g001
Figure 2. Experimental setup for deep rolling of prismatic workpieces at elevated temperatures.
Jmmp 05 00076 g002
Figure 3. Assembled deep rolling tool.
Jmmp 05 00076 g003
Figure 4. Components of the heating device.
Jmmp 05 00076 g004
Figure 5. Schematic view of residual stress inducing mechanisms due to deep rolling, according to [25].
Jmmp 05 00076 g005
Figure 6. (a) DSI Gleeble 3500 servo-hydraulic deformation dilatometer used for the strain-controlled cyclic tests at different temperature levels. (b) Low cycle fatigue specimen.
Jmmp 05 00076 g006
Figure 7. (a) Exemplary results for the simulation of strain-controlled cyclic tests after one complete cycle, (b) comparison of strain-controlled cyclic tests with the derived material model used in the simulation at a temperature of 25 °C, (c) 100 °C, and (d) 300 °C.
Jmmp 05 00076 g007
Figure 8. Geometry model and mesh resolution of the deep rolled workpiece area.
Jmmp 05 00076 g008
Figure 9. Kinematics sequence in the deep rolling simulation and illustration of the derived parameters for further analyses (red font).
Jmmp 05 00076 g009
Figure 10. (a) Comparison of measured and targeted deep rolling force; (b) force measurement during successive deep rolling of single tracks.
Jmmp 05 00076 g010
Figure 11. Comparison of simulated and measured track widths wtrack for 25 °C and 300 °C.
Jmmp 05 00076 g011
Figure 12. Comparison of simulated and measured residual stress depth profiles in deep rolling with Fr = 1800 N at room temperature (25 °C) and 300 °C (a) for the residual stress parallel to the rolling direction, and (b) for the residual stress perpendicular to the rolling direction.
Jmmp 05 00076 g012
Figure 13. Depth profiles of the equivalent strains during deep rolling and the residual stress components after relaxation for a deep rolling force Fr = 497 N at 25 °C. All values derived from simulations.
Jmmp 05 00076 g013
Figure 14. Simulated Process Signature Components for deep rolling describing the minimal residual stress components in dependence of the maximal equivalent strain at different workpiece temperatures (a) for the minimum residual stress parallel to the rolling direction (b) for the minimum residual stress perpendicular to the rolling direction. All values derived from simulations.
Jmmp 05 00076 g014
Figure 15. Simulated distances from the workpiece surface to the position where changes of the minimal residual stress components occur for different workpiece temperatures (a) for the minimum residual stress parallel to the rolling direction, and (b) for the minimum residual stress perpendicular to the rolling direction. All values derived from simulations.
Jmmp 05 00076 g015
Figure 16. Simulated Process Signature Components for deep rolling describing the changes of maximal residual stress components in dependence of the maximal equivalent strain at different workpiece temperatures (a) for the maximum residual stress parallel to the rolling direction, and (b) for the maximum residual stress perpendicular to the rolling direction. All values derived from simulations.
Jmmp 05 00076 g016
Figure 17. Simulated distances from the workpiece surface to the position where changes of the maximal residual stress components occur for different workpiece temperatures (a) for the maximum residual stress parallel to the rolling direction, and (b) for the maximum residual stress perpendicular to the rolling direction. All values derived from simulations.
Jmmp 05 00076 g017
Figure 18. (a) Correlation of maximal perpendicular residual compressive stress (material modification) and maximal equivalent strain (internal material load) and (b) correlation of maximal equivalent strain with the deep rolling force at different temperature levels during deep rolling.
Jmmp 05 00076 g018
Table 1. Experimental programme.
Temperature (°C)Deep Rolling Force Fr (N)
25497, 1130, 1800, 2567
1001800
300497, 1130, 1800, 2567
Table 2. Determined Chaboche parameters for 42CrMo4 + QT (47 HRC)/AISI 4140.
T (°C)εmax (%)E (GPa)k (MPa)C1 (MPa)γ1 (-)C2 (MPa)γ2 (-)C3 (MPa)γ3 (-)
253.2200750160,00027513,84415.657500
1003.2185750220,00037513,84415.6510000
3003.2175600120,00040075,00020061000
With Temperature T, engineering strain ε, Young’s modulus E, initial yield stress k, Chaboche coefficients C, γ.
Table 3. XRD parameters.
Tilt AngleRadiationU (kV)I (mA)λ (nm)Diffraction PlaneAperture Diameter (mm)
−45° ≤ ψ ≤ 45°Cr-Kα40400.229{211}1
Table 4. Relative deviations between simulated and measured track widths.
Temperature (°C)Min. Relative Track
Width Deviation (%)
Max. Relative Track
Width Deviation (%)
251030
1001327
3001125
Table 5. Functional relationship between maximum residual compressive stresses and maximum equivalent strain.
Temperature T (°C) Maximum   Parallel   Residual   Compressive   Stress   σ   ( MPa ) Maximum   Perpendicular   Residual   Compressive   Stress   σ   ( MPa )
25 16 , 206 ε eq , max 2 2944.5 ε eq , max 598.4 31 , 794 ε eq , max 2 7229.1 ε eq , max 622.33
100 12 , 524 ε eq , max 2 2289.6 ε eq , max 691.92 2701 ε eq , max 2 6607.8 ε eq , max 676.68
300 26 , 786 ε eq , max 2 5229.1 ε eq , max 531.13 48 , 715 ε eq , max 2 10 , 109 ε eq , max 544.94
Publisher’s Note: MDPI stays neutral with regard to jurisdictional claims in published maps and institutional affiliations.