1. Introduction
Hand scraping is a manual metal working process, which is carried out by the use of simple cutting tools or dedicated power tools. The method is based on chip removal with geometrically defined cutting edges as opposed to other finishing processes like grinding, lapping or electromachining. Differently to these methods, the goal is not to achieve an even surface but rather an intended waviness. It has been deployed for surface finishing purposes for many decades, was mentioned in the 19th century [
1] and described in detail in 1917 by Oberg and Jones [
2].
Although the method has been replaced in many of its original applications by machining processes or alternative technical solutions, it is still in use to date in different industries (like machine tool manufacturing or plant construction) due to the properties of its surfaces. Its typical applications are flat tracks (specifically in precision machine tools or large gate valves), plain bearings and machine tables. Moreover, the method is frequently used in reworking operations for machine tools [
3]. The purpose of hand scraping usually is to provide very good planarity as well as improved lubrication. These properties derive from the specific hand scraping procedure and the wavy surface. However, this aspect has only been scarcely investigated by research groups. Tsutsumi et al. showed that scraped surfaces can significantly enhance the behavior of flat tracks during motion by minimizing the wedge effect and improving the pressure distribution and thus enhance the precision of the machine tool [
4]. However, they did not find an improvement of the frictional behavior by hand scraping. Similar results were found by Hou et al. [
5] who compared the tribological behavior of two differently scraped slideways. Although there are different scraping methods and textures (like “flaking”), no scientific investigation seems to have taken place regarding this topic. Furthermore, no comparison to the tribological properties of other textured surfaces (as investigated by Yue et al. [
6] and other research groups) seems to have been implemented yet.
As mentioned before, hand scraping has been replaced by other processes over the last decades, such as milling and grinding machines, which have become more precise and can achieve better planarity values. Moreover, flat tracks have in many applications been replaced by linear rolling element bearings. One other reason is that hand scraping requires experienced and well-trained workers and long working durations per workpiece, which in combination lead to high cost. Ito [
7] describes different aspects of the replacement of hand scraping by alternative technologies. However, no method is able to replace all beneficial properties of hand scraping. Thus, automated scraping could provide added value for the industries mentioned above.
Due to its decreasing industrial importance, hand scraping has received only little attention by research groups. Schmid [
3] gives a broad overview over the topic in the German language describing tools and the different (Western) variants of scraping. Fuji et al. [
8] provide an exhaustive insight into the motion patterns and cutting forces occurring in an Japanese scraping style, named “kisage”. A respective investigation on the Western scraping style was presented by Oßwald et al. [
9] in a so called microanalysis. However, no research has been conducted yet on the processing strategy and procedure that workers use to work a surface. This so-called macroanalysis is the focus of the research presented here.
Many hand scraping operations were facilitated with the introduction of specialized power tools (by companies like Biax or Renz). However, an automated system has not yet been made commercially available although a number of research groups have made efforts in this respect. Publications that deal with the automation of hand scraping mainly cover two areas: the characterization of the workpiece surface and the mechanical execution of the process.
Characterizing the workpiece surface is a key aspect that traditionally has been addressed by rubbing of the workpiece on a flat surface that has been coated with blueing compound. This method unveils areas of high points of the workpiece and thus areas that have to be further worked. This concept was implemented for automation by several research groups and transferred into a task of an automated camera-based system [
10,
11]. An alternative approach was taken by Hsieh et al. [
12] who used a scanning triangulation sensor to obtain a model of the workpiece surface.
Other important components of automated scraping are the positioning and the actuation of the tool. Lin et al. [
11] developed a gantry positioning system that also serves for actuating the tool. Two scraping approaches (“chess board pattern” and “dense pattern”) were imitated by the system and the results were characterized. A similar system has been presented by Tsutsumi et al. [
13] who also developed a software functionality for adaptive machining of the workpiece. Other approaches include the use of CNC milling machine tools that were equipped with an actuator for the scraping strokes by Hsieh et al. [
14]. Using two additional axes for the actuation of the tool they were able to generate different shapes of scraping marks.
The purpose of this research is to develop an in-depth understanding of the scraping process in order to facilitate the development of future automated scraping systems.
2. Materials and Methods
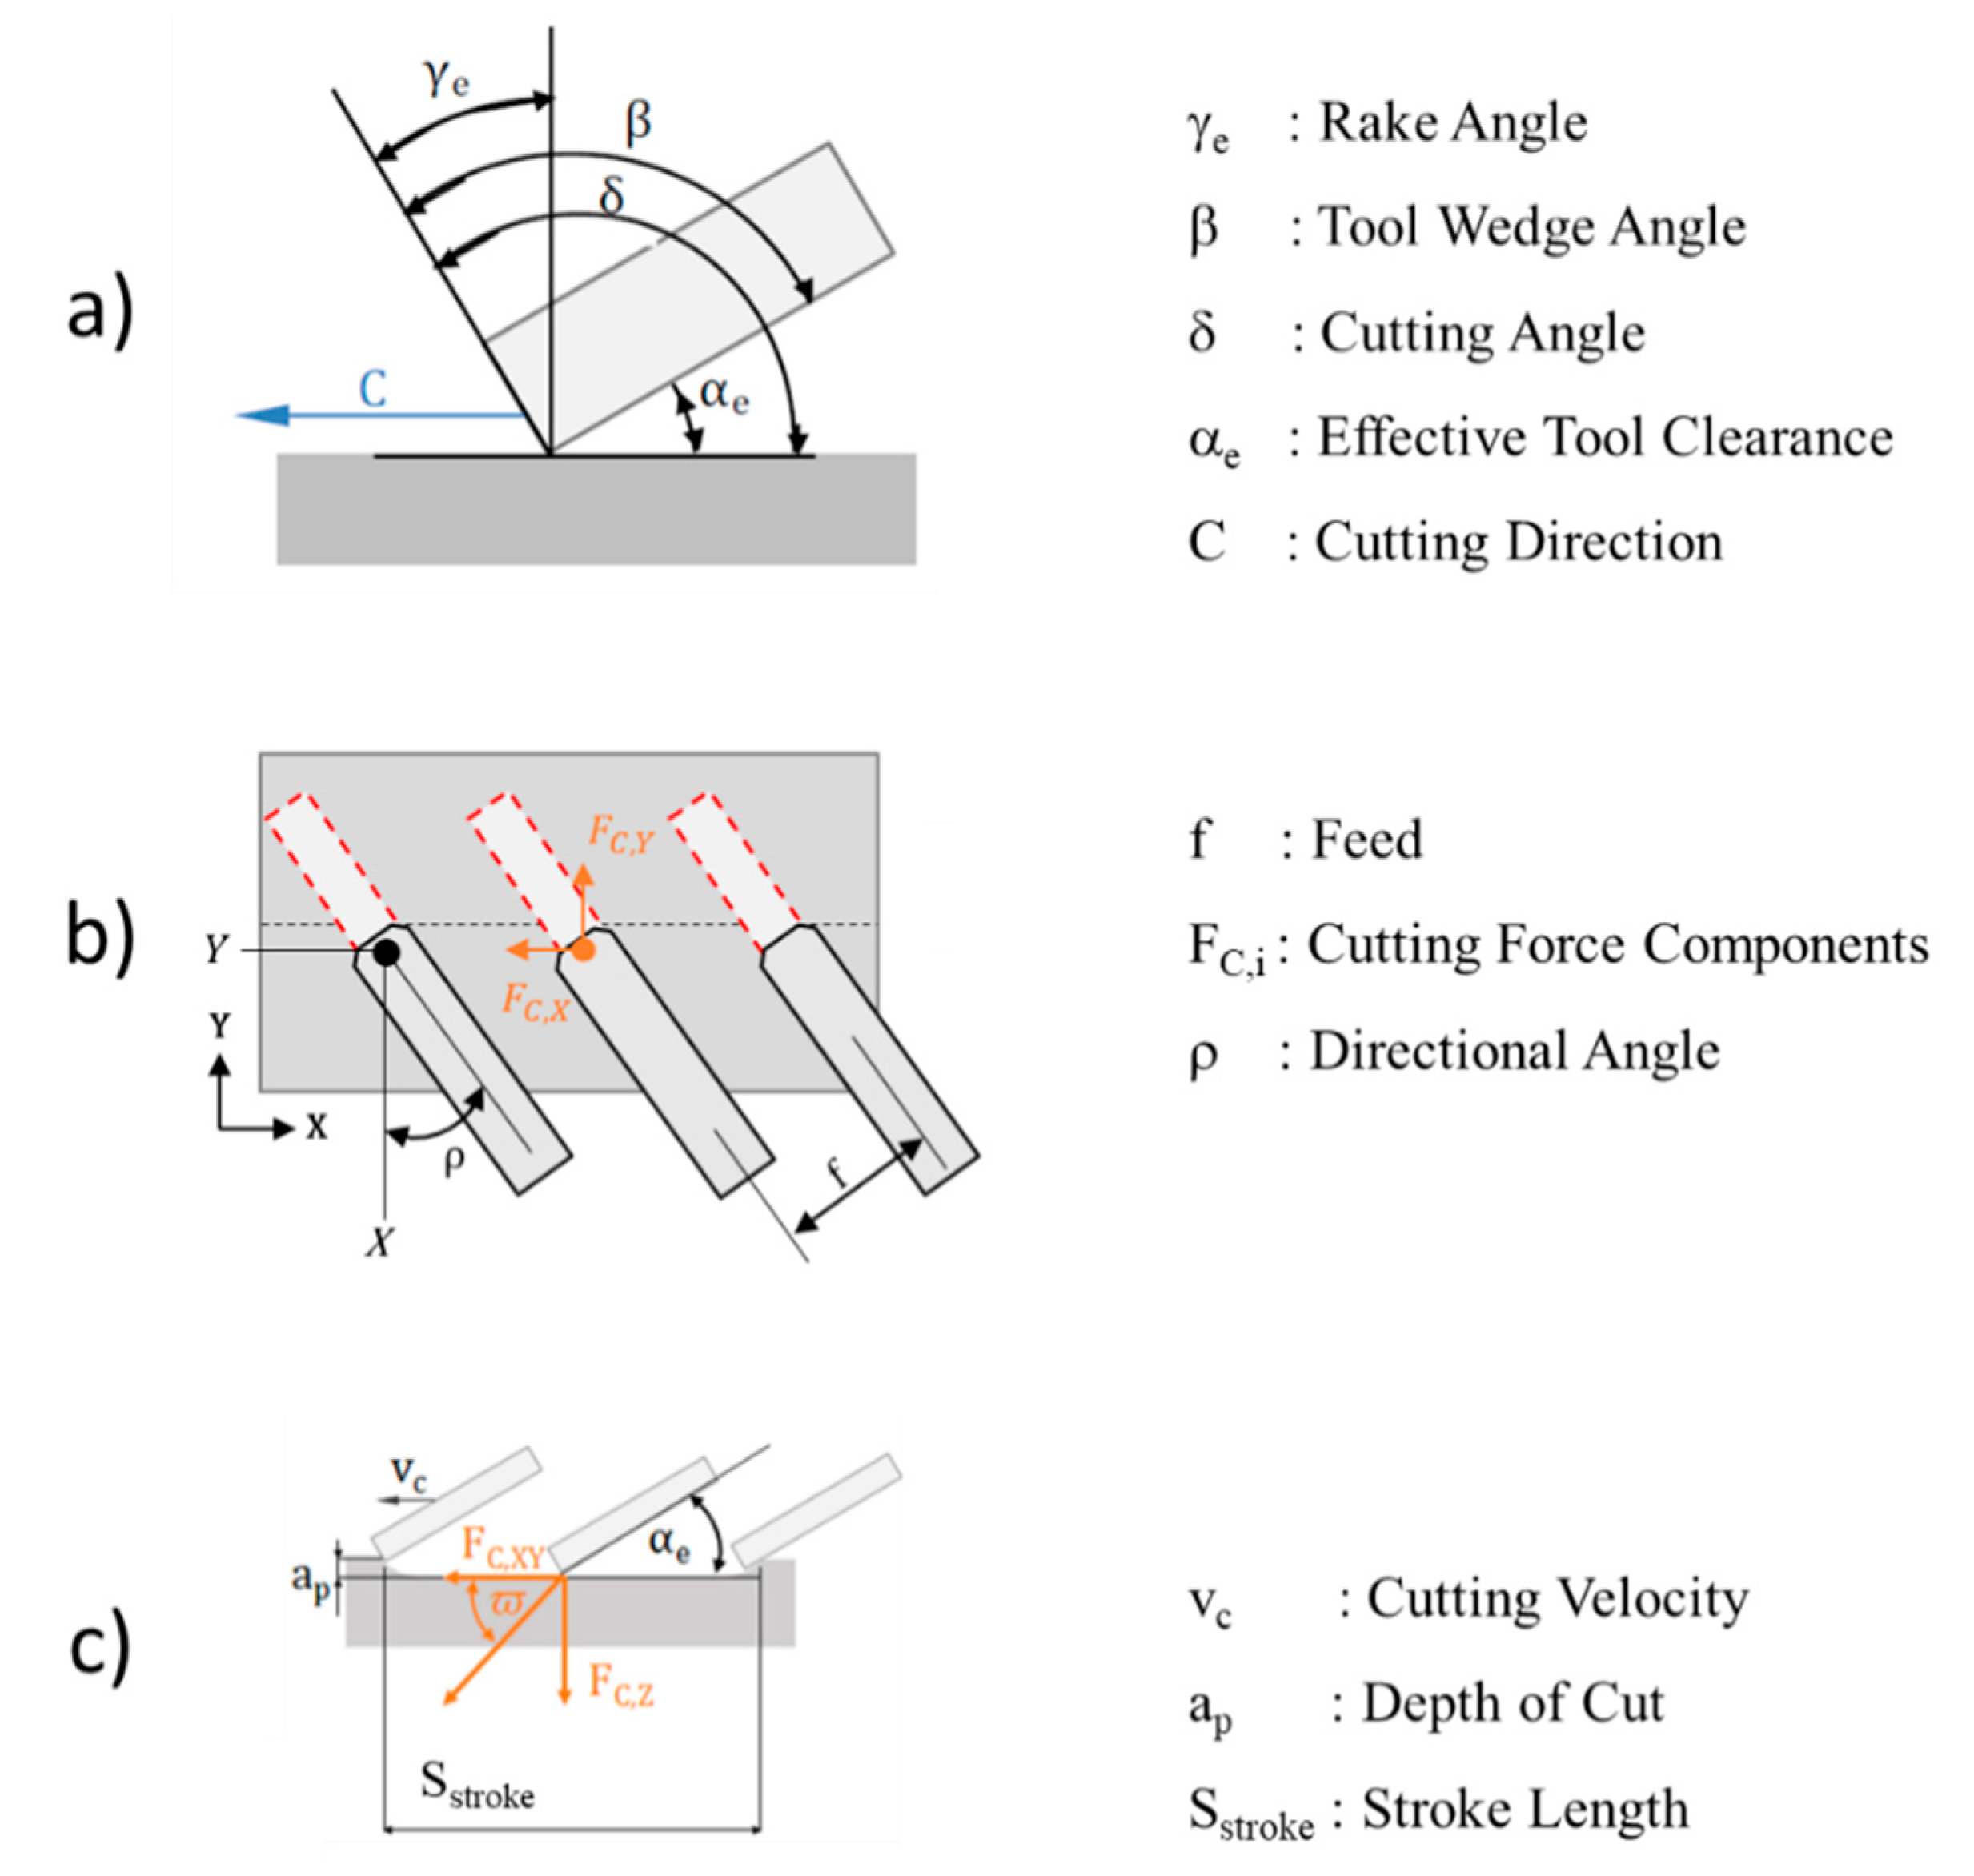
Hand scraping can be characterized as similar to other cutting processes that are based on chip removal with geometrically defined cutting edges. Following ISO 3002 as the relevant standard, the most important directions, angles and forces are depicted in
Figure 1.
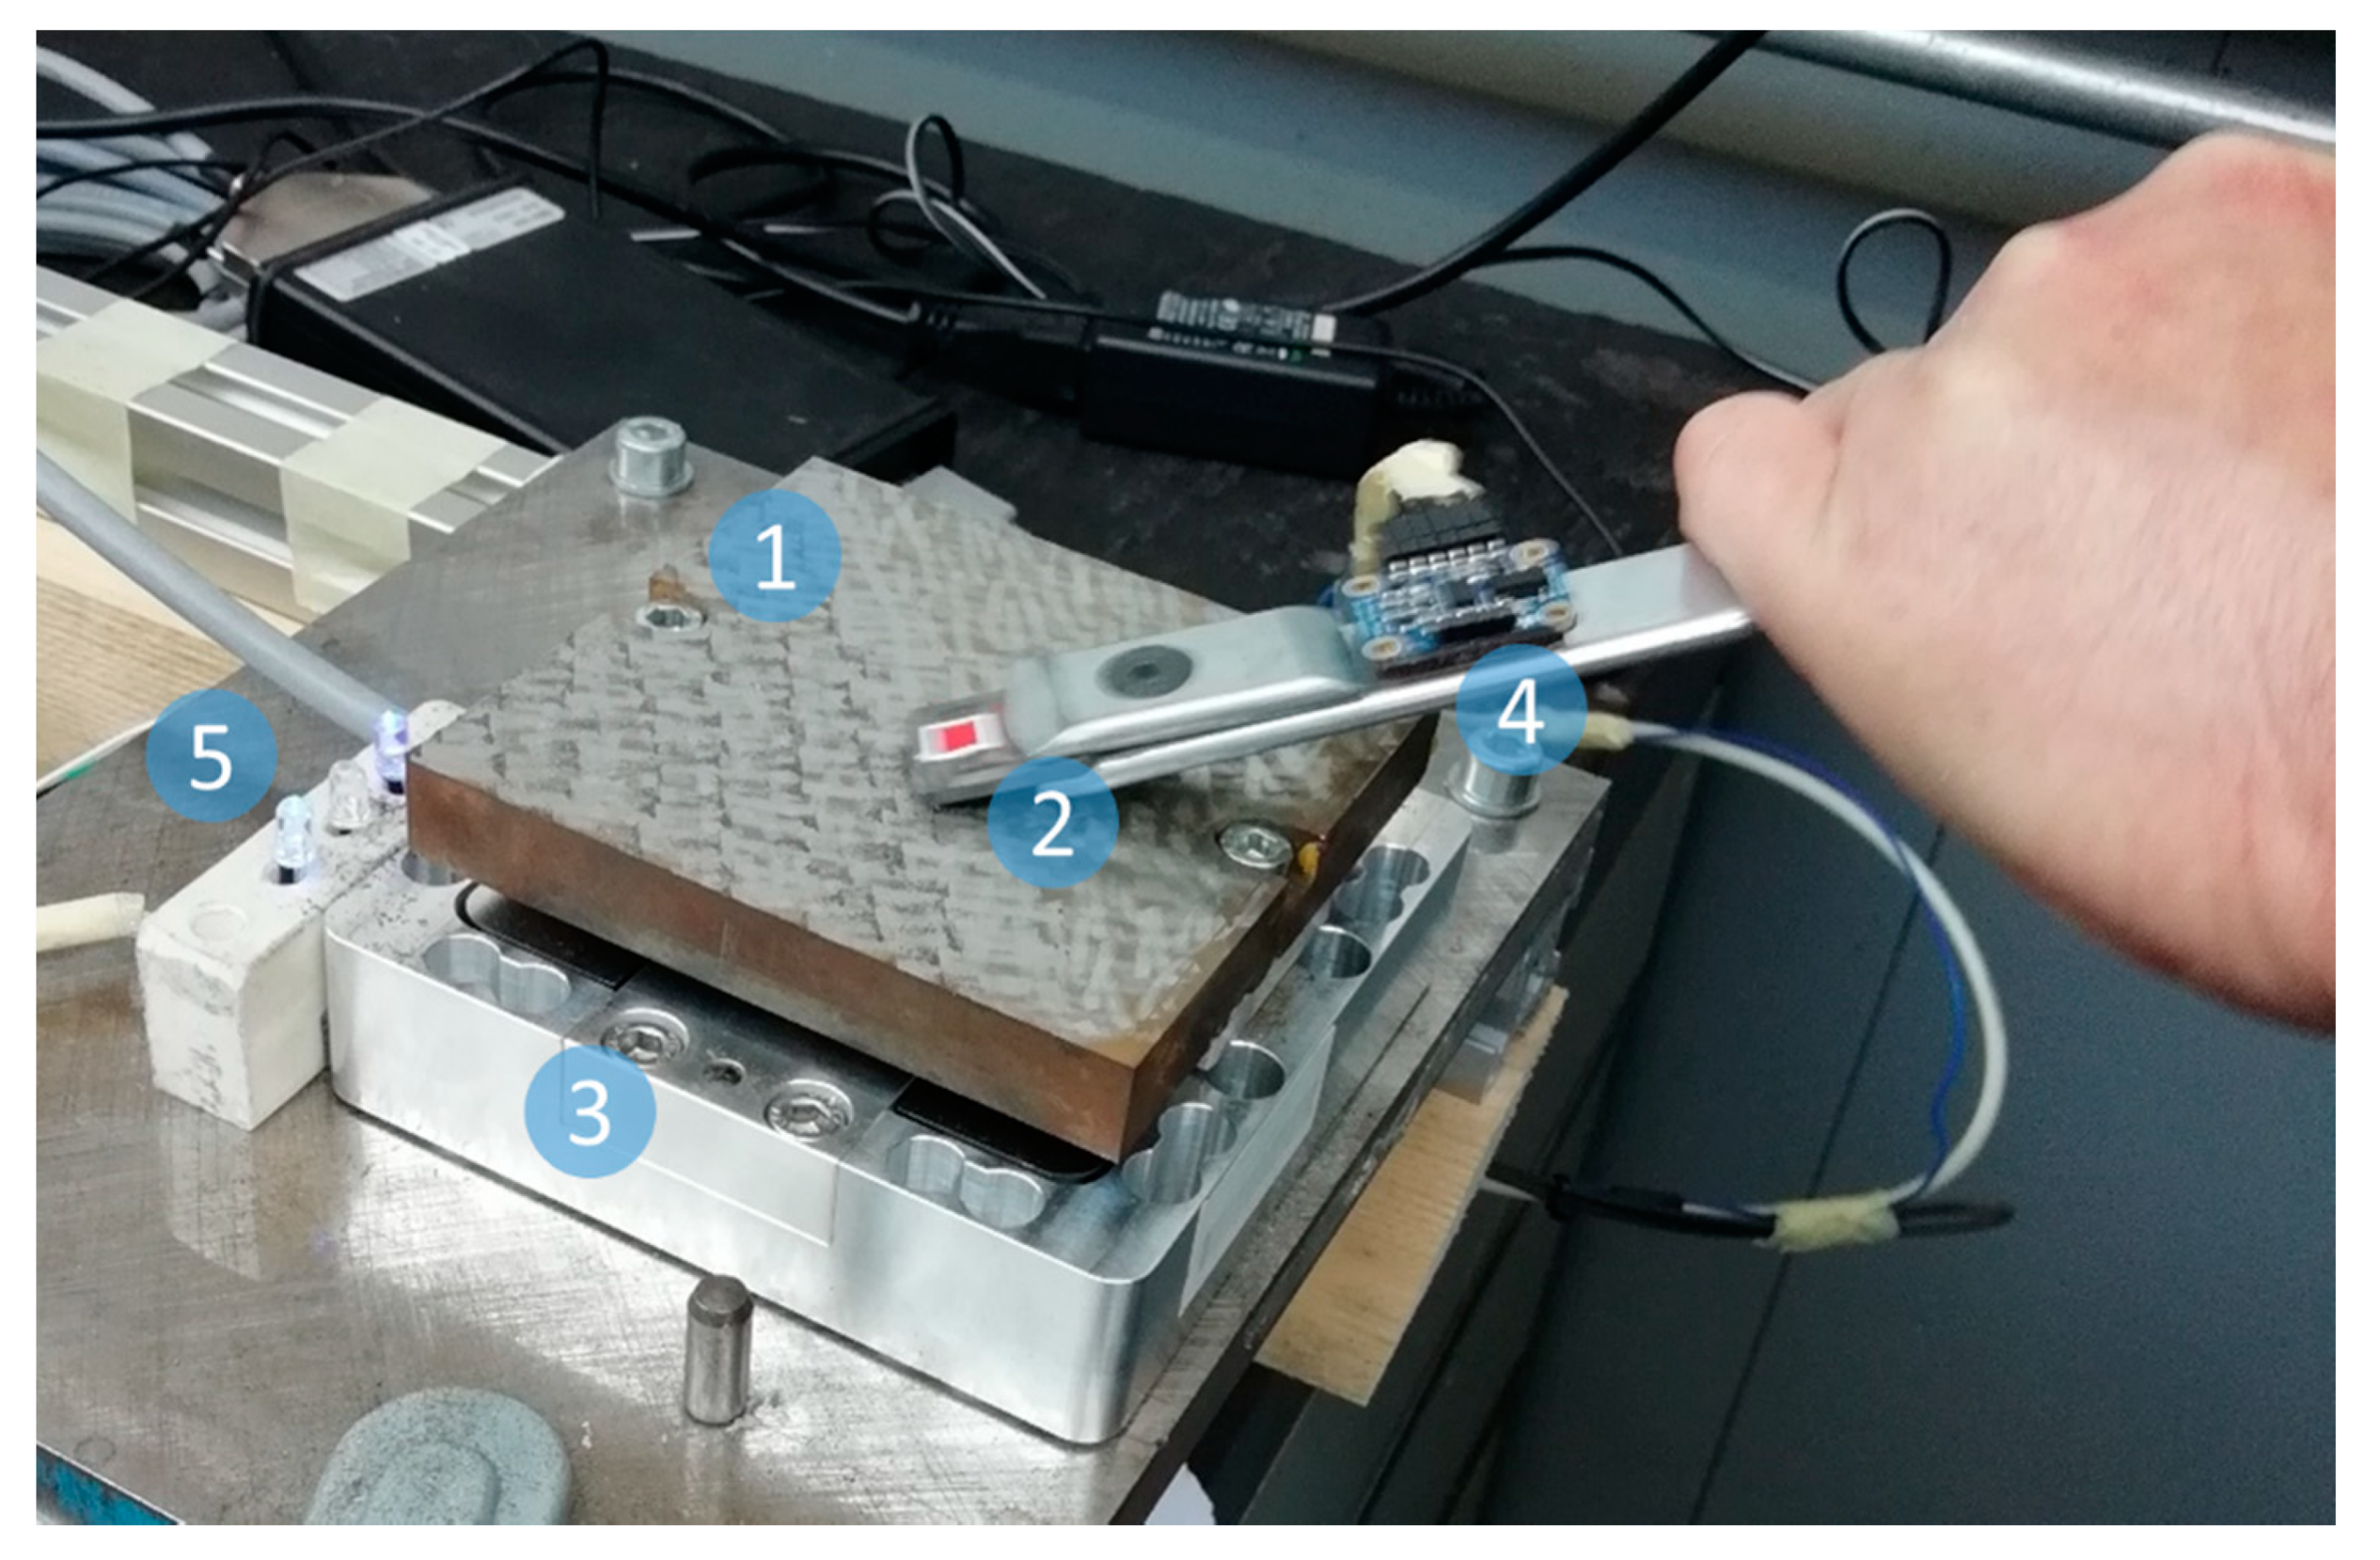
In order to simultaneously acquire forces, positions and angles during scraping a special test stand was used as introduced in [
9]. Apart from the camera, the setup is shown in
Figure 2. The workpiece (1) is directly mounted to the dynamometer (3). The scraping tool is equipped with a specific color pattern (2) that is recognized and followed using images of the camera as well as an inertial measurement unit (IMU) (4) that measures accelerations and angles. To implement synchronization of the camera with the measurement of the other quantities, three light emitting diodes (LEDs) are included into the setup.
Table 1 lists the main components of the test stand and their main specifications.
A 100 × 100 mm block (c.f.
Figure 2) of cast iron (EN-GJL-250/0.6025) served as a workpiece. This material is commonly used for machine beds and is therefore relevant for scraping applications. For the purpose of taking into account the influence of the individual worker on the results of hand scraping, two experienced workers were scraping their individual workpiece and consequently, all measurements were acquired twice. In order to ensure the personal privacy of the workers, they will be named worker “J” and worker “S” in this article. Both workers were asked to scrape a flat surface in the manner and quality they normally work components for flat guides in machine tools.
The density of bearing points (in many cases related to a field of 25 × 25 mm or defined as “points per inch”, PPI) is a common measure for the evaluation of scraped surfaces [
3]. It is usually obtained by counting high points on the surface that previously was rubbed on blueing compound as described above.
For the three-dimensional measurements of the scraped surfaces an optical profilometer (manufacturer: FRT, type: MicroSpy) was utilized. The obtained data was analyzed in the form of images, surface parameters (
Sa and
Sz) as well as material ratio curves. Additionally, characteristic values of the material ratio curves were calculated according to ISO 25178 [
15] as depicted in
Figure 3.
As shown in [
9], hand scraping is usually executed in individual rows as sequences of scraping strokes. Usually, the cutting direction takes place in an angle directional
φ of 30° to 45° to the workpiece edge. Consequently, one pass consists of a number of scraping strokes. It is usually followed by a second pass with a negative directional angle before the workpiece is deburred and rubbed with blueing compound on an even surface to identify the high points and conclude which areas still need to be scraped. In the following, these two passes are counted as pass 1a, pass 1b and so forth.
3. Results and Discussion
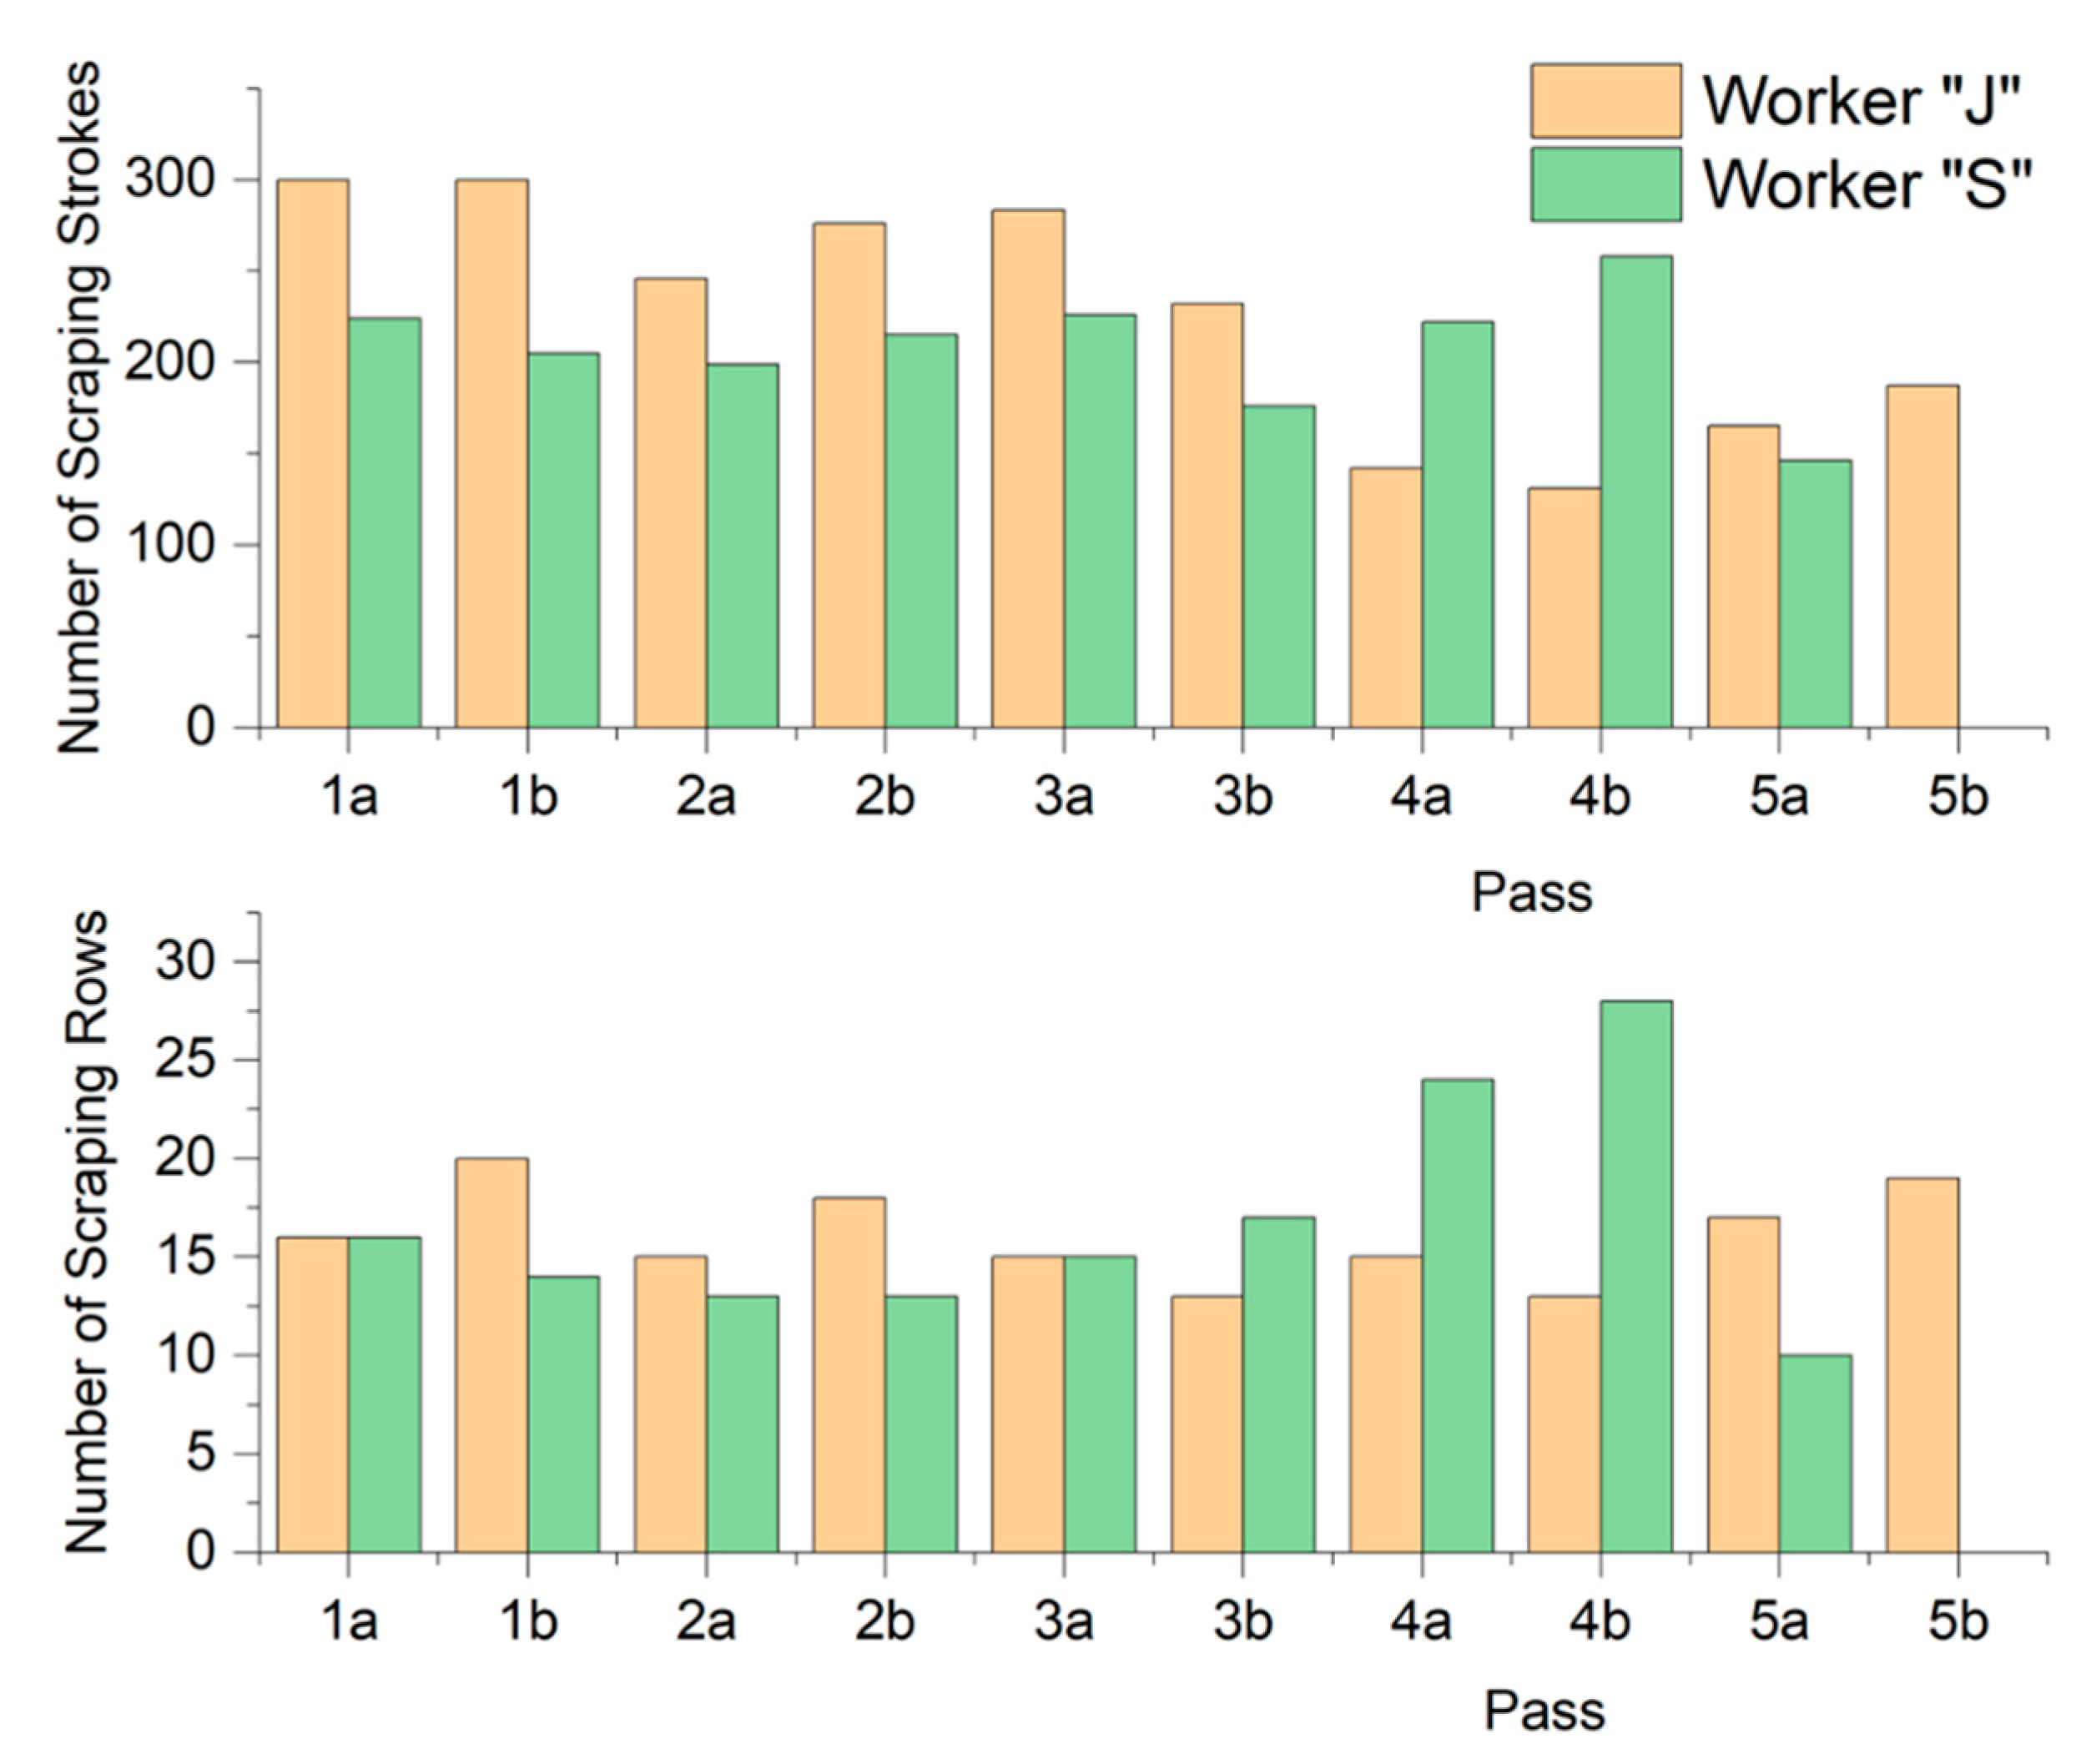
In
Figure 4 the total number of scraping strokes and the number of scraping rows are shown for the two workers. Individual scraping styles can clearly be observed. Worker “J” kept the number of rows nearly constant. A total of 14 to 20 rows corresponded to an offset of approx. 5 to 7 mm. Worker “S” chose to adapt the number of rows between 10 and 28. In addition, he decided that a pass 5b was not necessary for the completion of the workpiece. In contrast, he kept the total number of scraping strokes comparably constant at approx. 200 (with the exception of the final pass 5a) whilst worker “J” chose to work with smaller numbers of strokes for the later passes. Thus, the workers chose different strategies to adapt their work to the requirements of the workpiece.
The corresponding maximum cutting forces are depicted in
Figure 5. Both workers increased the cutting force after pass 1a, probably due to the uneven scraped surface. In general, worker “S” applied higher cutting forces than worker “J” did. However, the forces were lower than those presented in [
9] where the worker exceeded cutting forces of 100 N. Moreover, cutting forces of the “Western” scraping style seem to be lower than those used in the Japanese kisage scraping style presented by [
8] where 300 N were exceeded in “rough cutting”. However, kisage cutting forces are significantly reduced for the finishing passes, which cannot be observed in
Figure 5. Worker “J” varied the applied cutting force to a greater extent compared to worker “S”. This presumably also serves to adapt to the current state of the surface on the workpiece.
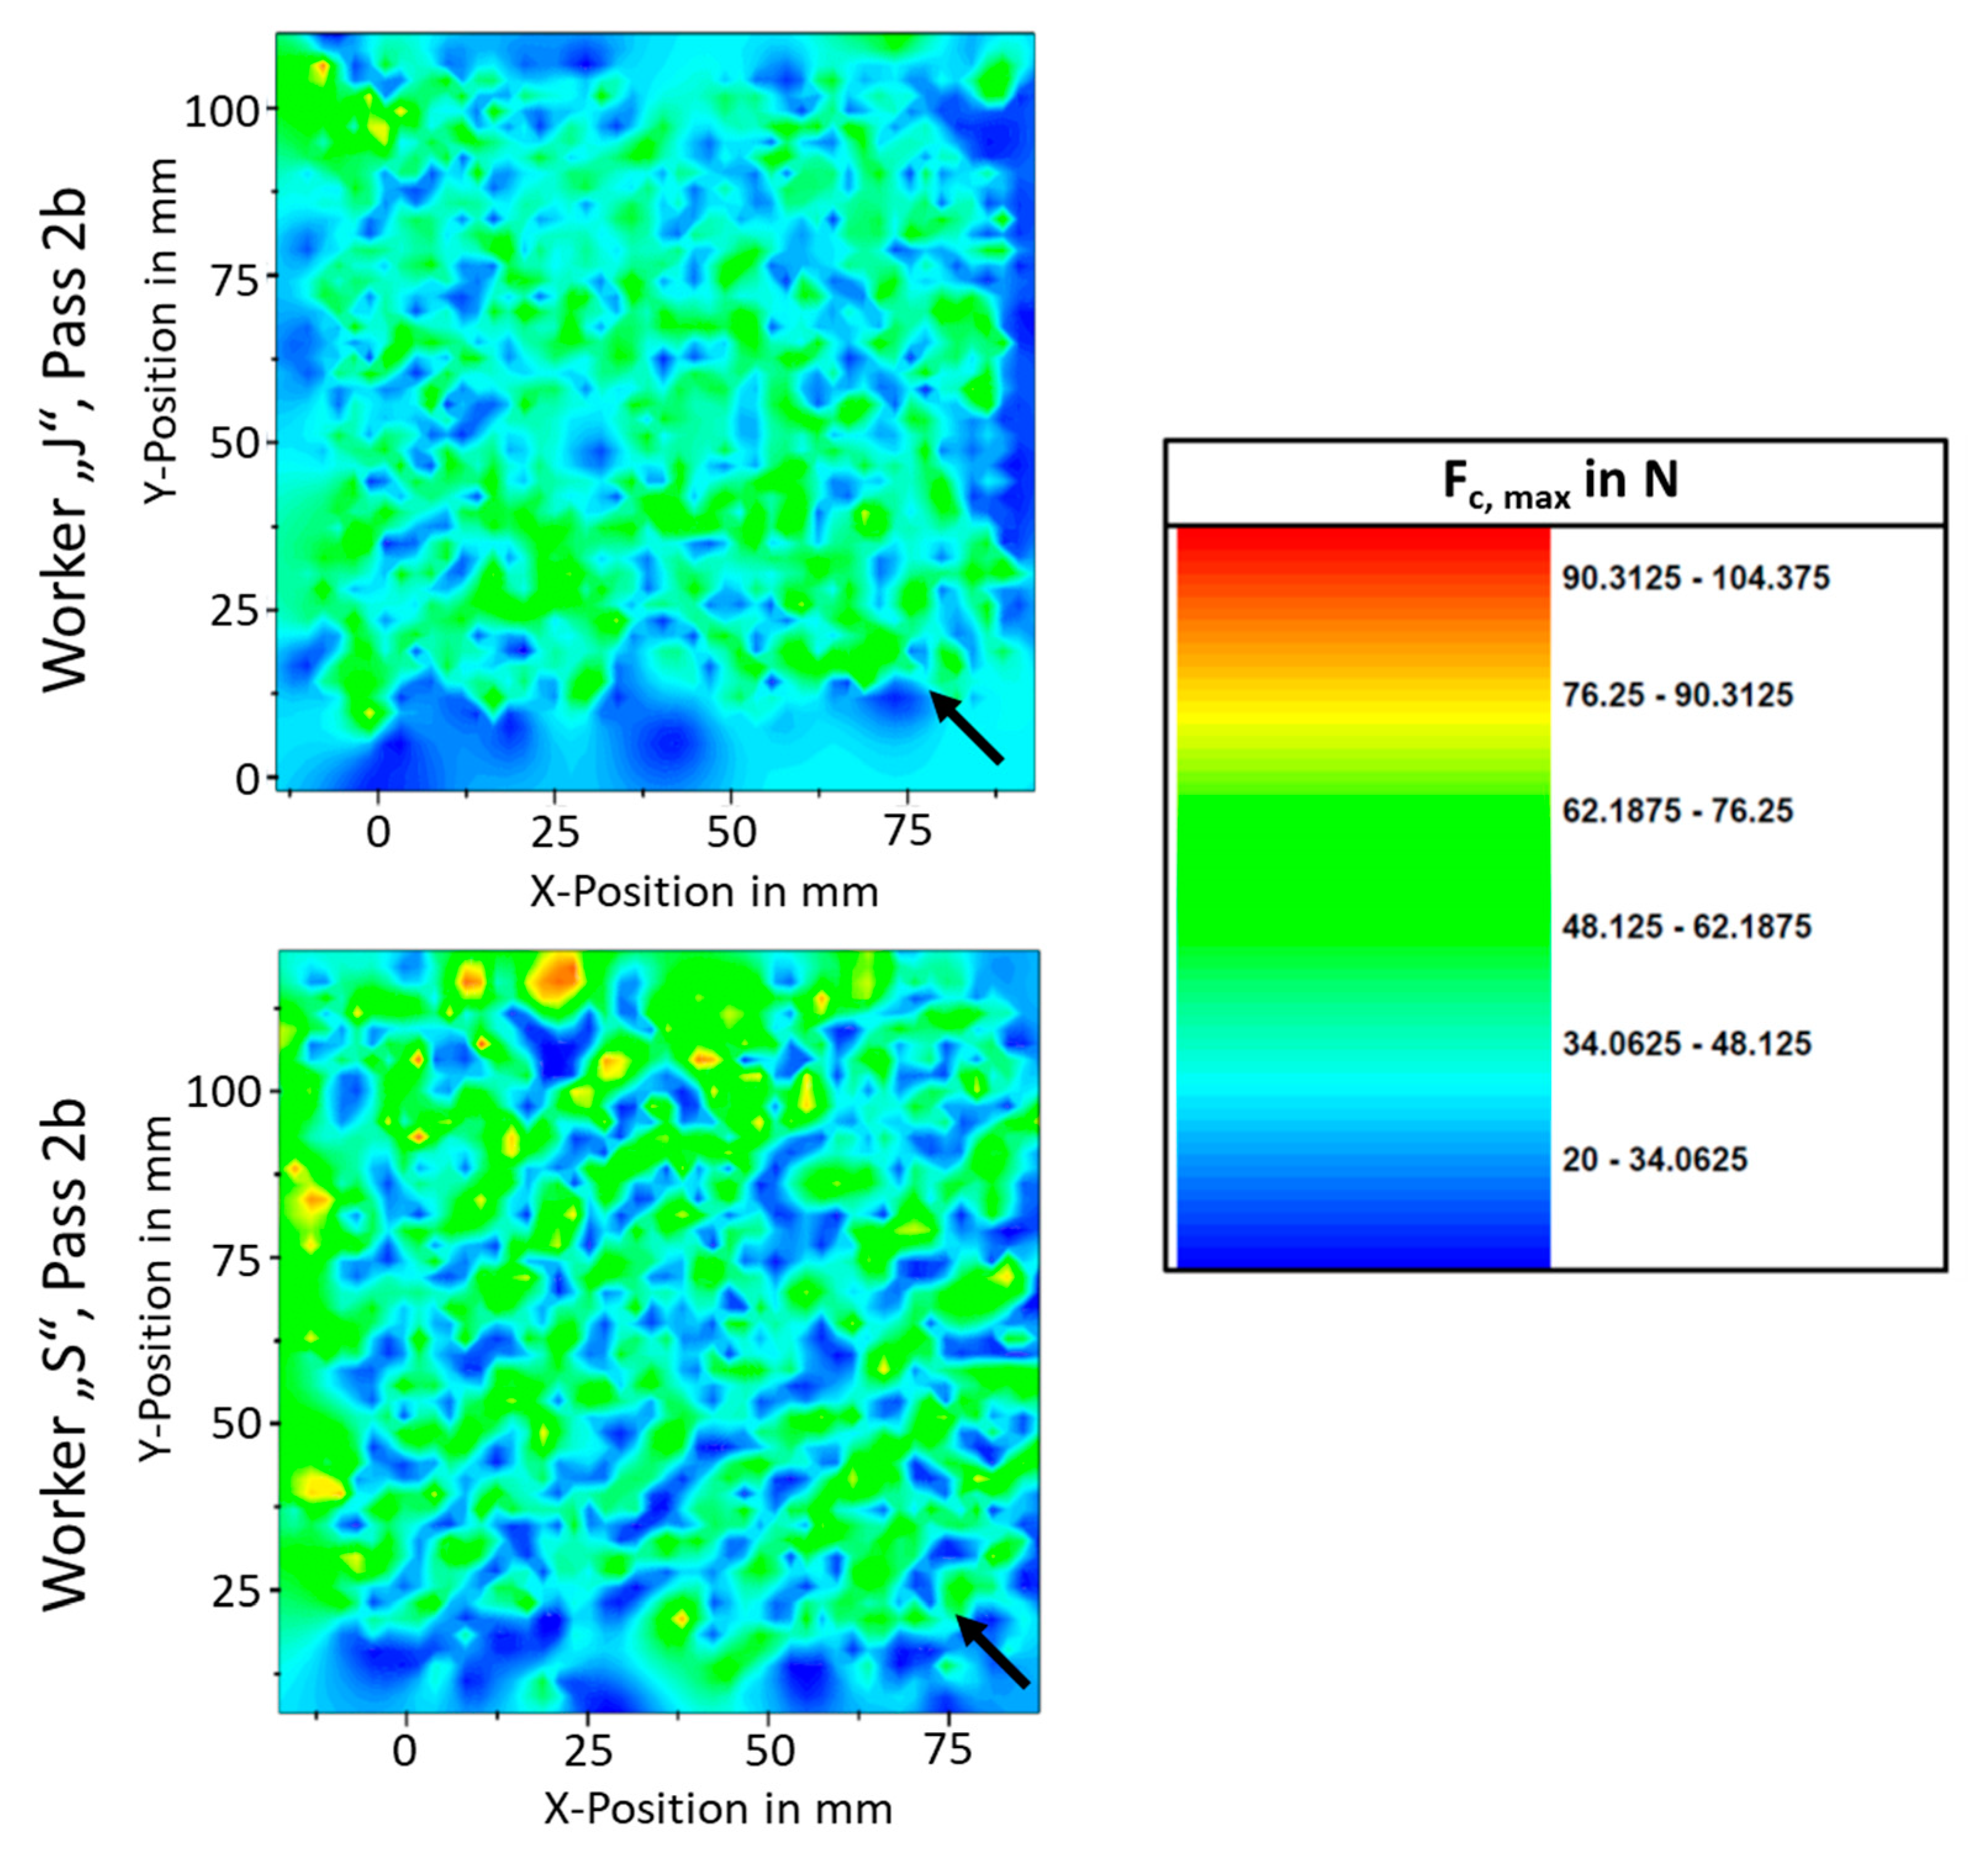
In
Figure 6 the maximum cutting force is presented as a function of the tool position for pass 2b of both workers. In both cases, scraping took place with a positive directional angle
φ (meaning the tool moved in
X- and
Y+ direction) and was started in the lower right corner. Position coordinates were shifted due to the position of the color pattern, which was positioned with a distance of 15 mm to the cutting edge. In order to only show the forces of the scraping strokes; forces below 20 N are not displayed in the diagrams.
In general, worker “S” used higher forces than worker “J” as was already observed in
Figure 5. Both workers tended to use higher forces towards the upper left corner and the end of the pass. Possibly, this is due to the changes in the weight distribution of the workers’ bodies. However, this effect is not observable in all the measured passes.
Furthermore, worker “S” scraped the workpiece in distinct rows whilst worker “J” chose to apply the scraping strokes in another, more even, distribution. Both workers tended to deviate more from straight rows with each pass thus adapting to the pattern of high spots that had been visualized by the rubbing with blueing compound.
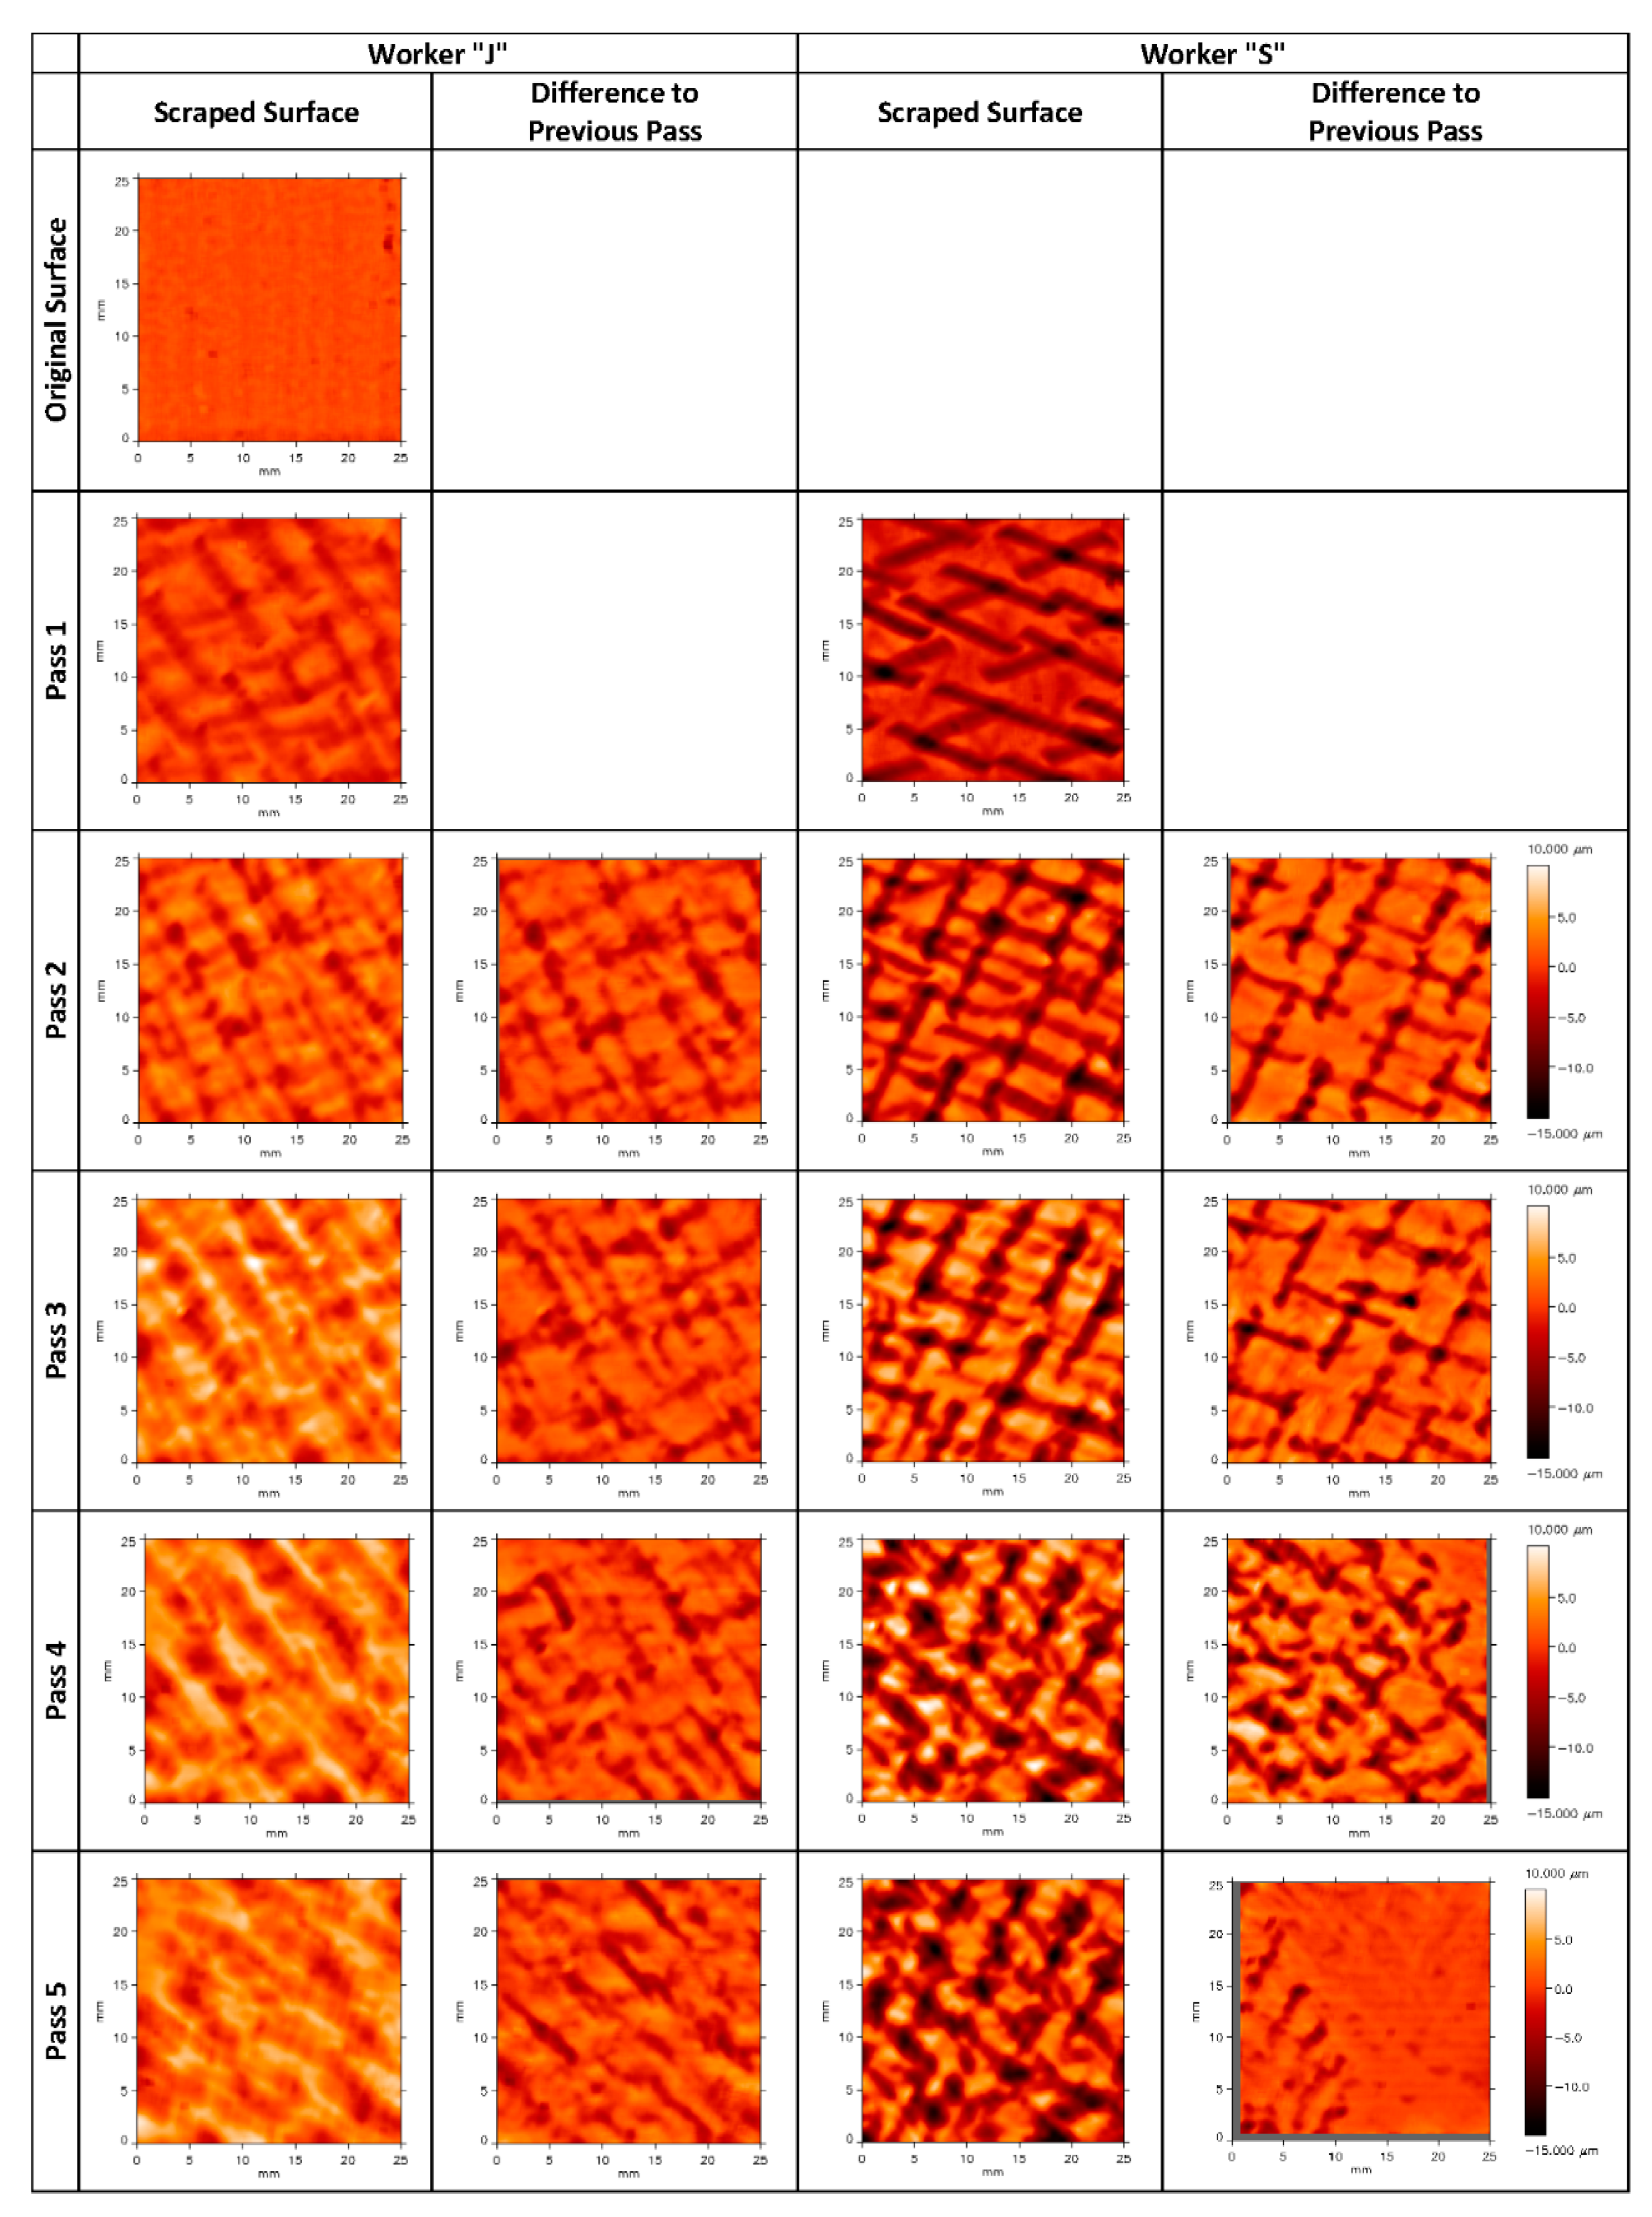
Figure 6 shows an overview of surface scans of both workpieces that were measured using the optical profilometer after each pass. Each scan consists of 5000 points in the x-direction and 1000 points in the y-direction. Additionally, the difference to the previous surface topology was calculated and depicted. Thus, the material removal of each individual pass can be considered separately. All scans were measured at the center of the respective workpiece. The scanned area of 25 × 25 mm is common for the assessment of scraped surfaces [
3]. The color scales represent a range of 25 µm in height for all diagrams.
The comparison of both workpieces after the completion of pass 1 reveals significant differences in the approaches of the two workers. Worker “S” generated considerably deeper cuts in comparison to worker “J”. In accordance with
Figure 4, he also used a lower density of scraping strokes than his colleague. In addition, worker “S” chose directional angles
φ that resulted in obtuse angles on the workpiece whilst worker “J” generated a pattern of nearly right angles. In later passes, worker “S” also scraped right angle patterns.
On both workpieces, deep spots were generated where several scraping strokes passed. Both workers obtained uniformly structured surfaces after five passes. However, the surface structure on the workpiece wrought by worker “J” remained shallower compared to the one of worker “S” for all passes as worker “J” generally worked smaller cutting thicknesses. For pass 5, worker “S” decided to only scrape a part of the workpiece which incidentally is documented in the last differential image (at the very bottom right of
Figure 7).
The scan data represented in
Figure 7 was analyzed to obtain scalar surface parameters according to ISO 25178. A comparison over all passes and for both workers is presented in
Figure 8. Values of the Maximum Height
Sz as well as the Arithmetic Mean Height
Sa show an increase in the first two passes and a more or less constant level for passes 3 to 5 for both workers. However, worker “S” generated significantly deeper structures on the surface than his colleague did. In many cases,
Sa and
Sz values on the workpiece of worker “S” are approximately double the respective values on the workpiece of worker “J”. This observation corresponds well with the higher cutting forces applied by worker “S” which were shown in
Figure 5.
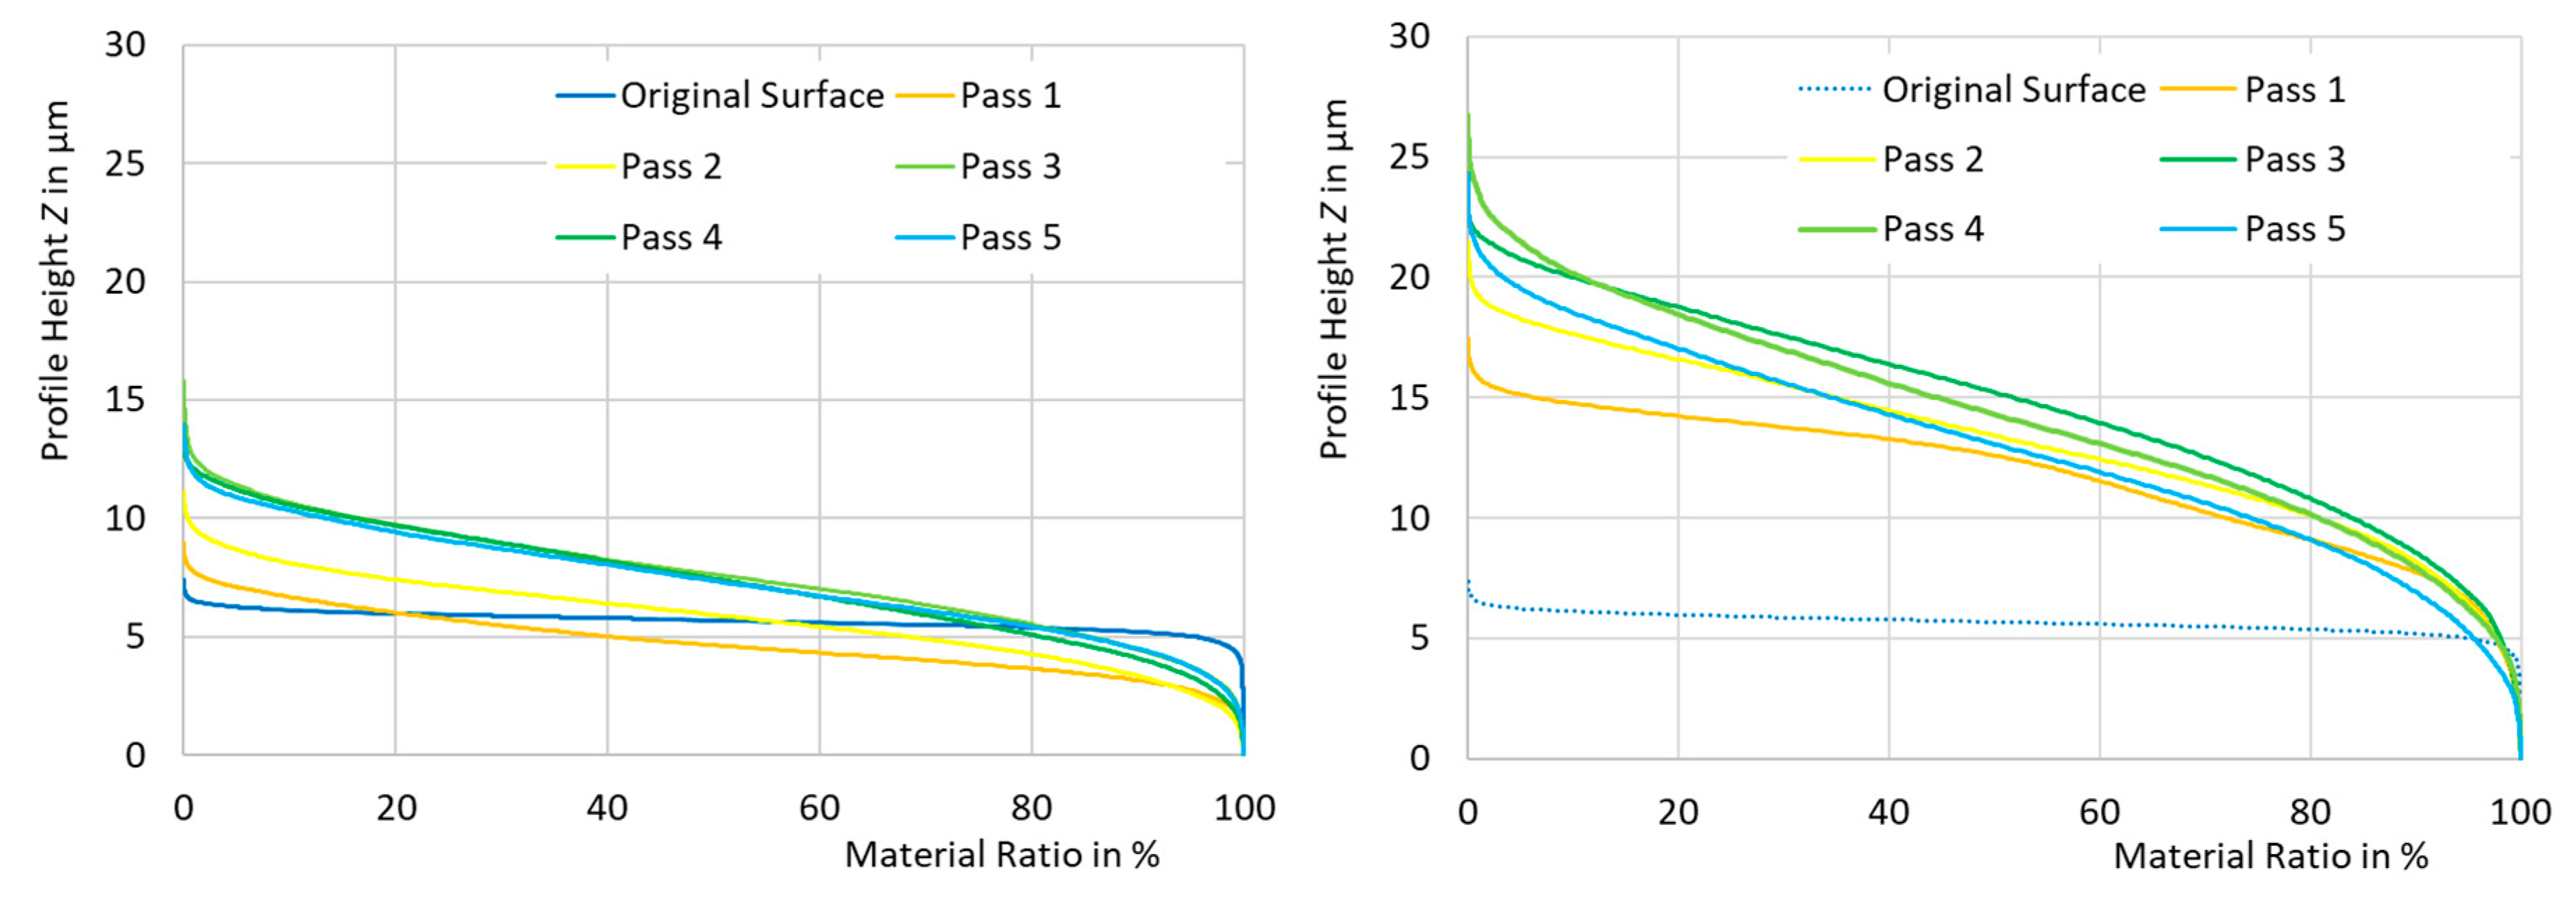
As a further piece of analysis, material ratio curves were calculated from the scanning data. The results are depicted in
Figure 9. The “original surface” presented in the chart of worker “J” is depicted as a dotted line also in the chart of worker “S” as it can be assumed to be equally valid for both workpieces which were cut by Wire Electrical Discharge Machining (WEDM) prior to scraping. The profile heights scraped by worker “S” are significantly deeper compared to those of worker “J” which is consistent with the findings presented above. For both workers, pass 1 and pass 2 lead to deeper profiles whilst later passes only lead to miniscule changes in the material ratio curves. Only pass 5 of worker “S” leads to a flattened course of the curve.
Following Todhunter et al. [
16] all curves can be characterized as “regular” and hill areas (near 0% material ratio) as well as dale areas (near 100% material ratio) are comparably small. Details on these areas can be obtained by the characteristic values calculated according to ISO 25178 [
15] that are shown in
Table 2. The core height
Sk—representing the intended scraped structure—varies within a range of less than one micrometer for all passes of both workers, respectively. However,
Sk values of the workpiece of worker “J” only are approximately half the height of the workpiece wrought by worker “S”. The reduced peak height
Spk can be interpreted as the material ratio of the burrs that remain at the end of a scraping stroke. Consequently, these height values are also smaller on the workpiece of worker “J” compared to the workpiece of worker “S”. Presumably, micro blowholes within the cast iron contribute significantly to the reduced pit depth
Svk as both workpieces show similar values.
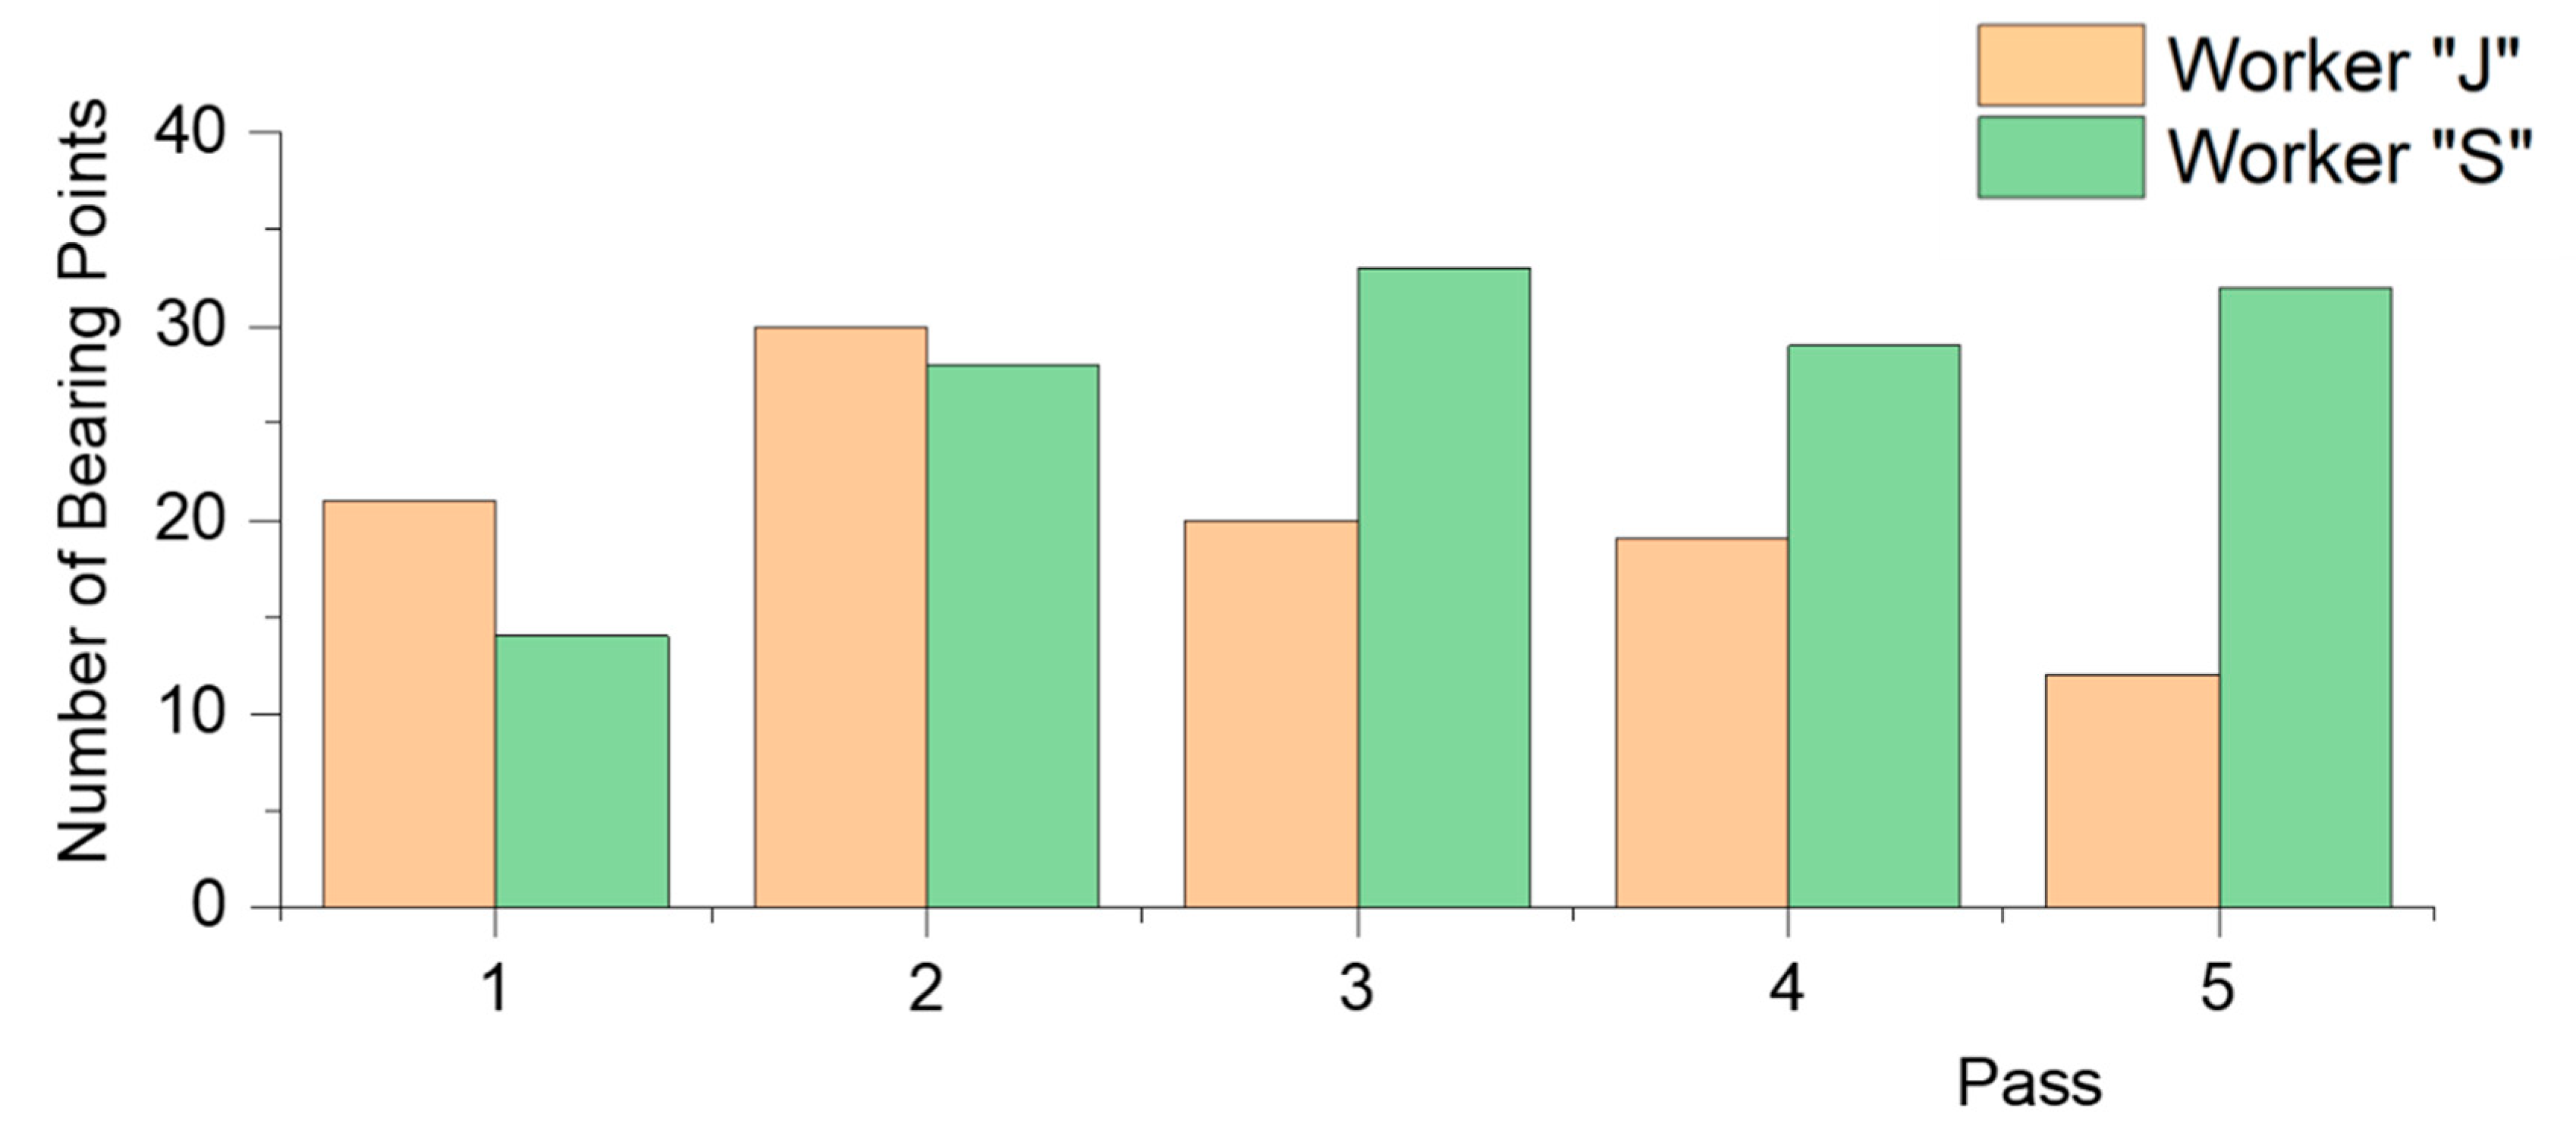
As mentioned above, the number of bearing points is a common measure for the quality of scraped surfaces [
3]. The surfaces generated by the two workers were analyzed accordingly as presented in
Figure 10. Remarkably, both workers only increase the number of bearing points in the first two passes. For passes 3 through 5, worker “S” kept the number steady whilst worker “J” decreased it after pass 2. This corresponds to the results of the surface parameters (
Figure 8) and the material ratio curves (
Figure 9). In all of these analyses the degree of transformation is significantly higher in the first two passes regardless of the worker. Presumably, in the latter passes, the workers were working the surface in order to obtain good planarity and homogeneity even at the expense of constant or lower numbers of bearing points. However, in previous publications, an increasing number of passes was usually related to an increase in bearing points (see for example Schmid [
3]). These aspects should be clarified by the analysis of a larger number of workpieces, wrought by a larger number of workers. This would also help to identify the degree of significance of the number of scraping passes.
4. Conclusions
In conclusion, it appears that in most instances differences between individual workers’ scraping styles are more significant than between consecutive scraping passes. Individual worker scraping styles result in significant differences in cutting forces and surface topologies. Presumably, the depth of the scraped surface is less important to the tribological properties than the contact area ratio or the number of bearing points per area. However, this has not been shown empirically, yet. Thus, future research should cover the dependencies of characteristics of scraped surfaces and their tribological effects.
Future research on hand scraping should also cover the aspect of its effects on the workpiece surface. This topic has recently been discussed as “surface modifications” [
17]. It is well known that the significant plastic deformation caused by cutting processes results in effects like work hardening and residual stresses [
18] that affect the functionality and wear resistance of the workpieces. These effects are presumably different for hand scraping, scraping with power tools and (future) automated scraping and therefore should be investigated for all versions of the process.
The findings concerning the “working strategies” and the resulting surfaces in this macroanalysis, combined with the insights on cutting forces and tool movement patterns obtained by a microanalysis [
9], provide the knowledge base for the design and the parameter windows of future automated scraping systems.
