Article

Effects of Process Parameters, Sheet Thickness and Adhesive on Spot Diameter During Resistance Spot Welding of Aluminum Alloys EN AW-5182 and EN AW-6005 †

Materials Testing Institute (MPA), University of Stuttgart, Pfaffenwaldring 32, D-70569 Stuttgart, Germany
*
Author to whom correspondence should be addressed.
This paper is an extended version of our paper in Fezer, A.; Weihe, S.; Werz, M. Influences of Various Parameters on the Weld Spot Diameter during Resistance Spot Welding of the Aluminum Alloy EN AW-6005. In Proceedings of the Structural Integrity Procedia 2026 of the ICSI 2025, Madeira, Portugal, 1–4 September 2025. The conference version have not been formally published.
J. Manuf. Mater. Process. 2026, 10(2), 50; https://doi.org/10.3390/jmmp10020050 (registering DOI)
Submission received: 19 December 2025 / Revised: 17 January 2026 / Accepted: 26 January 2026 / Published: 31 January 2026

Abstract

Resistance spot welding (RSW) is one of the dominant joining processes in body-in-white manufacturing within the automotive industry, while the use of aluminum alloys continues to increase. This study investigates the influence of key process parameters on the spot diameter in RSW of the aluminum alloys EN AW-5182 (AL5-STD) and EN AW-6005 (AL6-HDI). Experiments were performed using industry-standard robotic welding equipment in a partially automated welding cell. Welding current, electrode force, sheet thickness (1–3 mm), and adhesive application were systematically varied. The welded joints were evaluated by destructive testing to determine spot diameter. The results show that higher welding currents increase the spot diameter for both alloys, while higher electrode forces decrease it. EN AW-5182 exhibited a high tendency toward expulsion, whereas no expulsions occurred for EN AW-6005 under identical conditions. The application of the structural adhesive BETAMATE™ 1640 consistently increased the spot diameter.

1. Introduction

Resistance spot welding (RSW) is one of the most widely used joining processes in body-in-white. Modern car bodies typically contain between 3000 and 6000 spot welds [1,2,3,4], with SUVs reaching up to 8000 [5]. One reason for the frequent use of RSW, in addition to its high efficiency, is its high degree of automatability. Other advantages include short cycle times and usually no need for rework [6].
RSW is primarily used for steel materials, but is currently also increasingly being used for aluminum alloys in body-in-white [7,8,9], particularly the 5xxx and 6xxx series [7,10,11]. In general, aluminum alloys are increasingly employed in the mechanical engineering, aerospace, and automotive industries for sustainable lightweight applications in order to significantly reduce CO2 emissions [12]. Their low density and high strength-to-modulus ratio make them attractive alternatives to steel [10].
In RSW, at least two overlapping workpieces are placed between two electrodes, and a high-intensity, short current pulse partially melts the materials at the faying surface of the two sheets to form a joint, provided the parameters are appropriately set. The dynamic resistance is among the most critical influencing factors here, as it strongly affects both weld quality and the resulting spot diameter [13,14]. In some references, it is also termed total resistance [15,16,17] or transition resistance [18]. Dynamic resistance consists of the contact resistance at all interfaces between the electrodes and workpieces, the bulk resistance of the electrodes and workpieces, and the system resistance of the welding machine. During the welding process, the dynamic resistance evolves and exhibits material-dependent behavior.
A distinctive feature of aluminum welding is the continuous decrease in dynamic resistance throughout welding, in contrast to the behavior observed in steel ([19], Ref. [20] cited from [21]). For steel, extensive studies on resistance behavior exist [22,23,24], whereas comparatively little is known for aluminum alloys. One key difference lies in aluminum’s lower bulk resistance, which requires that a greater portion of the melting heat be generated by contact resistance. However, since contact resistance rapidly collapses during welding [10], the low bulk resistance cannot compensate, necessitating high welding currents and short welding times. The currents required for aluminum welding are approximately twice those for steel, a consequence also of aluminum’s three times higher thermal conductivity [10] and three times higher electrical conductivity [25].
Dynamic resistance is therefore a time-dependent parameter that evolves throughout the welding process. Modern welding control systems frequently monitor dynamic resistance during operation. For steel, this resistance profile can be effectively used for process control; however, this is not the case for aluminum. In steel, bulk resistance accounts for a significantly larger proportion of the dynamic resistance; therefore, the increasing bulk resistance during welding can be used for control. Although aluminum’s bulk resistance also increases during welding, it is not significant enough to cause weld nugget formation. Thus, the contact resistance at the start of welding is crucial for aluminum. The qualitative dynamic resistance behavior of steel and aluminum welding has been described by Andrews et al. (Ref. [20] cited from [21]). Nevertheless, welding control systems cannot distinguish between contact resistance and bulk resistance. This separation into individual resistance components can, however, be achieved numerically using simulation models under certain assumptions [26]. However, the literature does not describe a purely experimental determination of the respective resistance components during welding. Only an approach is described, which uses a combination of experiments and simulation to determine the resistance components of the sheet metal in the initial state [27].
Even though the behavior of the respective resistance components is very difficult to determine, they influence the formation of weld spots during welding. This can vary from alloy to alloy, which is why various fundamental investigations with different focuses have been carried out. These include investigations on the spot diameter or nugget diameter using the alloys EN AW-5754 [28,29], EN AW-6005 [30], EN AW-6016 [31], EN AW-6061 [32,33], EN AW 6082 [34], EN AW-6111 [28], and EN AW-7075 [35]. Very different welding profiles were used in these investigations. In [35], a modified welding profile was tested and compared with the profile according to VDA 238-401 [36]. Ref. [31] varied a short pulse and investigated the effects on the weld spot using optical microscopy images, ultrasound images, and simulations. In [29], the influence of different surface conditions (cleaning, etc.) of the sheets was investigated, while [32] examined the effect of an external magnetic field on weld quality. Ref. [33] also investigated the effect on the fatigue life of a weld. A correlation study between spot diameter and weld strength can be found in [28], which demonstrated a strong relationship between nugget diameter and shear strength.
The main objective of this study is to investigate the effects of various parameters of aluminum alloys typically used in body-in-white on the spot diameter (plug diameter) and to identify any anomalies. A welding profile used in industry, which deviates from VDA recommendations 238-401 [36], will be used. In addition, the investigation will be carried out on industry-standard equipment (cobot for adhesive application and welding robot with C-welding gun) to minimize the human factor and ensure that the welding results can be attributed to the welding process itself. In this study, the fundamental boundary conditions are changed. These include, in addition to the process parameters of welding current and electrode force, the sheet thickness and the use of adhesive.

2. Materials and Methods

This section provides a description of the material used and the welds performed at the MPA (Stuttgart, Germany). The materials selected were EN AW-5182 (AL5-STD), an aluminum alloy commonly used for structural components, and the structural alloy with increased ductility requirements EN AW-6005 (AL6-HDI), which are widely used in body-in-white (refer to Table 1 for chemical composition). All aluminum sheets employed in this study featured an EDT (Electron Discharge Texturing) surface, a TiZr passivation layer, and the dry lubricant “Multidraw Drylube E1” from Zeller+Gmelin (Eislingen/Fils, Germany). Subsequently, the comparability of the measurement results obtained is discussed.
Welding tests were carried out with these aluminum alloys. In industrial practice, welding is carried out both with and without adhesive between the sheets; however, in body-in-white, welding is almost exclusively carried out with adhesive. For this reason, both conditions are examined here. When adhesive was applied, BETAMATE™ 1640 from DuPont (Wilmington, DE, USA) was used, applied in two lines to the lower aluminum sheet (see Figure 1). To ensure the reproducible application of the adhesive, this was done using a collaborative robot (cobot) from KUKA (Augsburg, Germany). The upper sheet was then placed onto the lower sheet and pressed down by hand so that the adhesive was slightly compressed. Figure 2 shows the sample consisting of two aluminum sheets of equal size (500 mm × 88 mm). For subsequent destructive testing, the sheets were placed on top of each other with a 20 mm offset to allow testing with the peeling device. After placing the samples in the welding station, two rows of 15 weld spots each were welded and tested by peel testing in accordance with DVS 2916-1 [39]. This procedure enabled measurement of the weld spots on the lower sheet using a caliper. The weld spots were measured in accordance with DVS 2916-1 [39] and DIN 10447 [40] standard. The representative spot diameter is calculated as the average of the maximum and minimum spot diameter. This measurement process was carried out in the same way for spots with and without expulsion. The procedure is illustrated schematically in Figure 1.
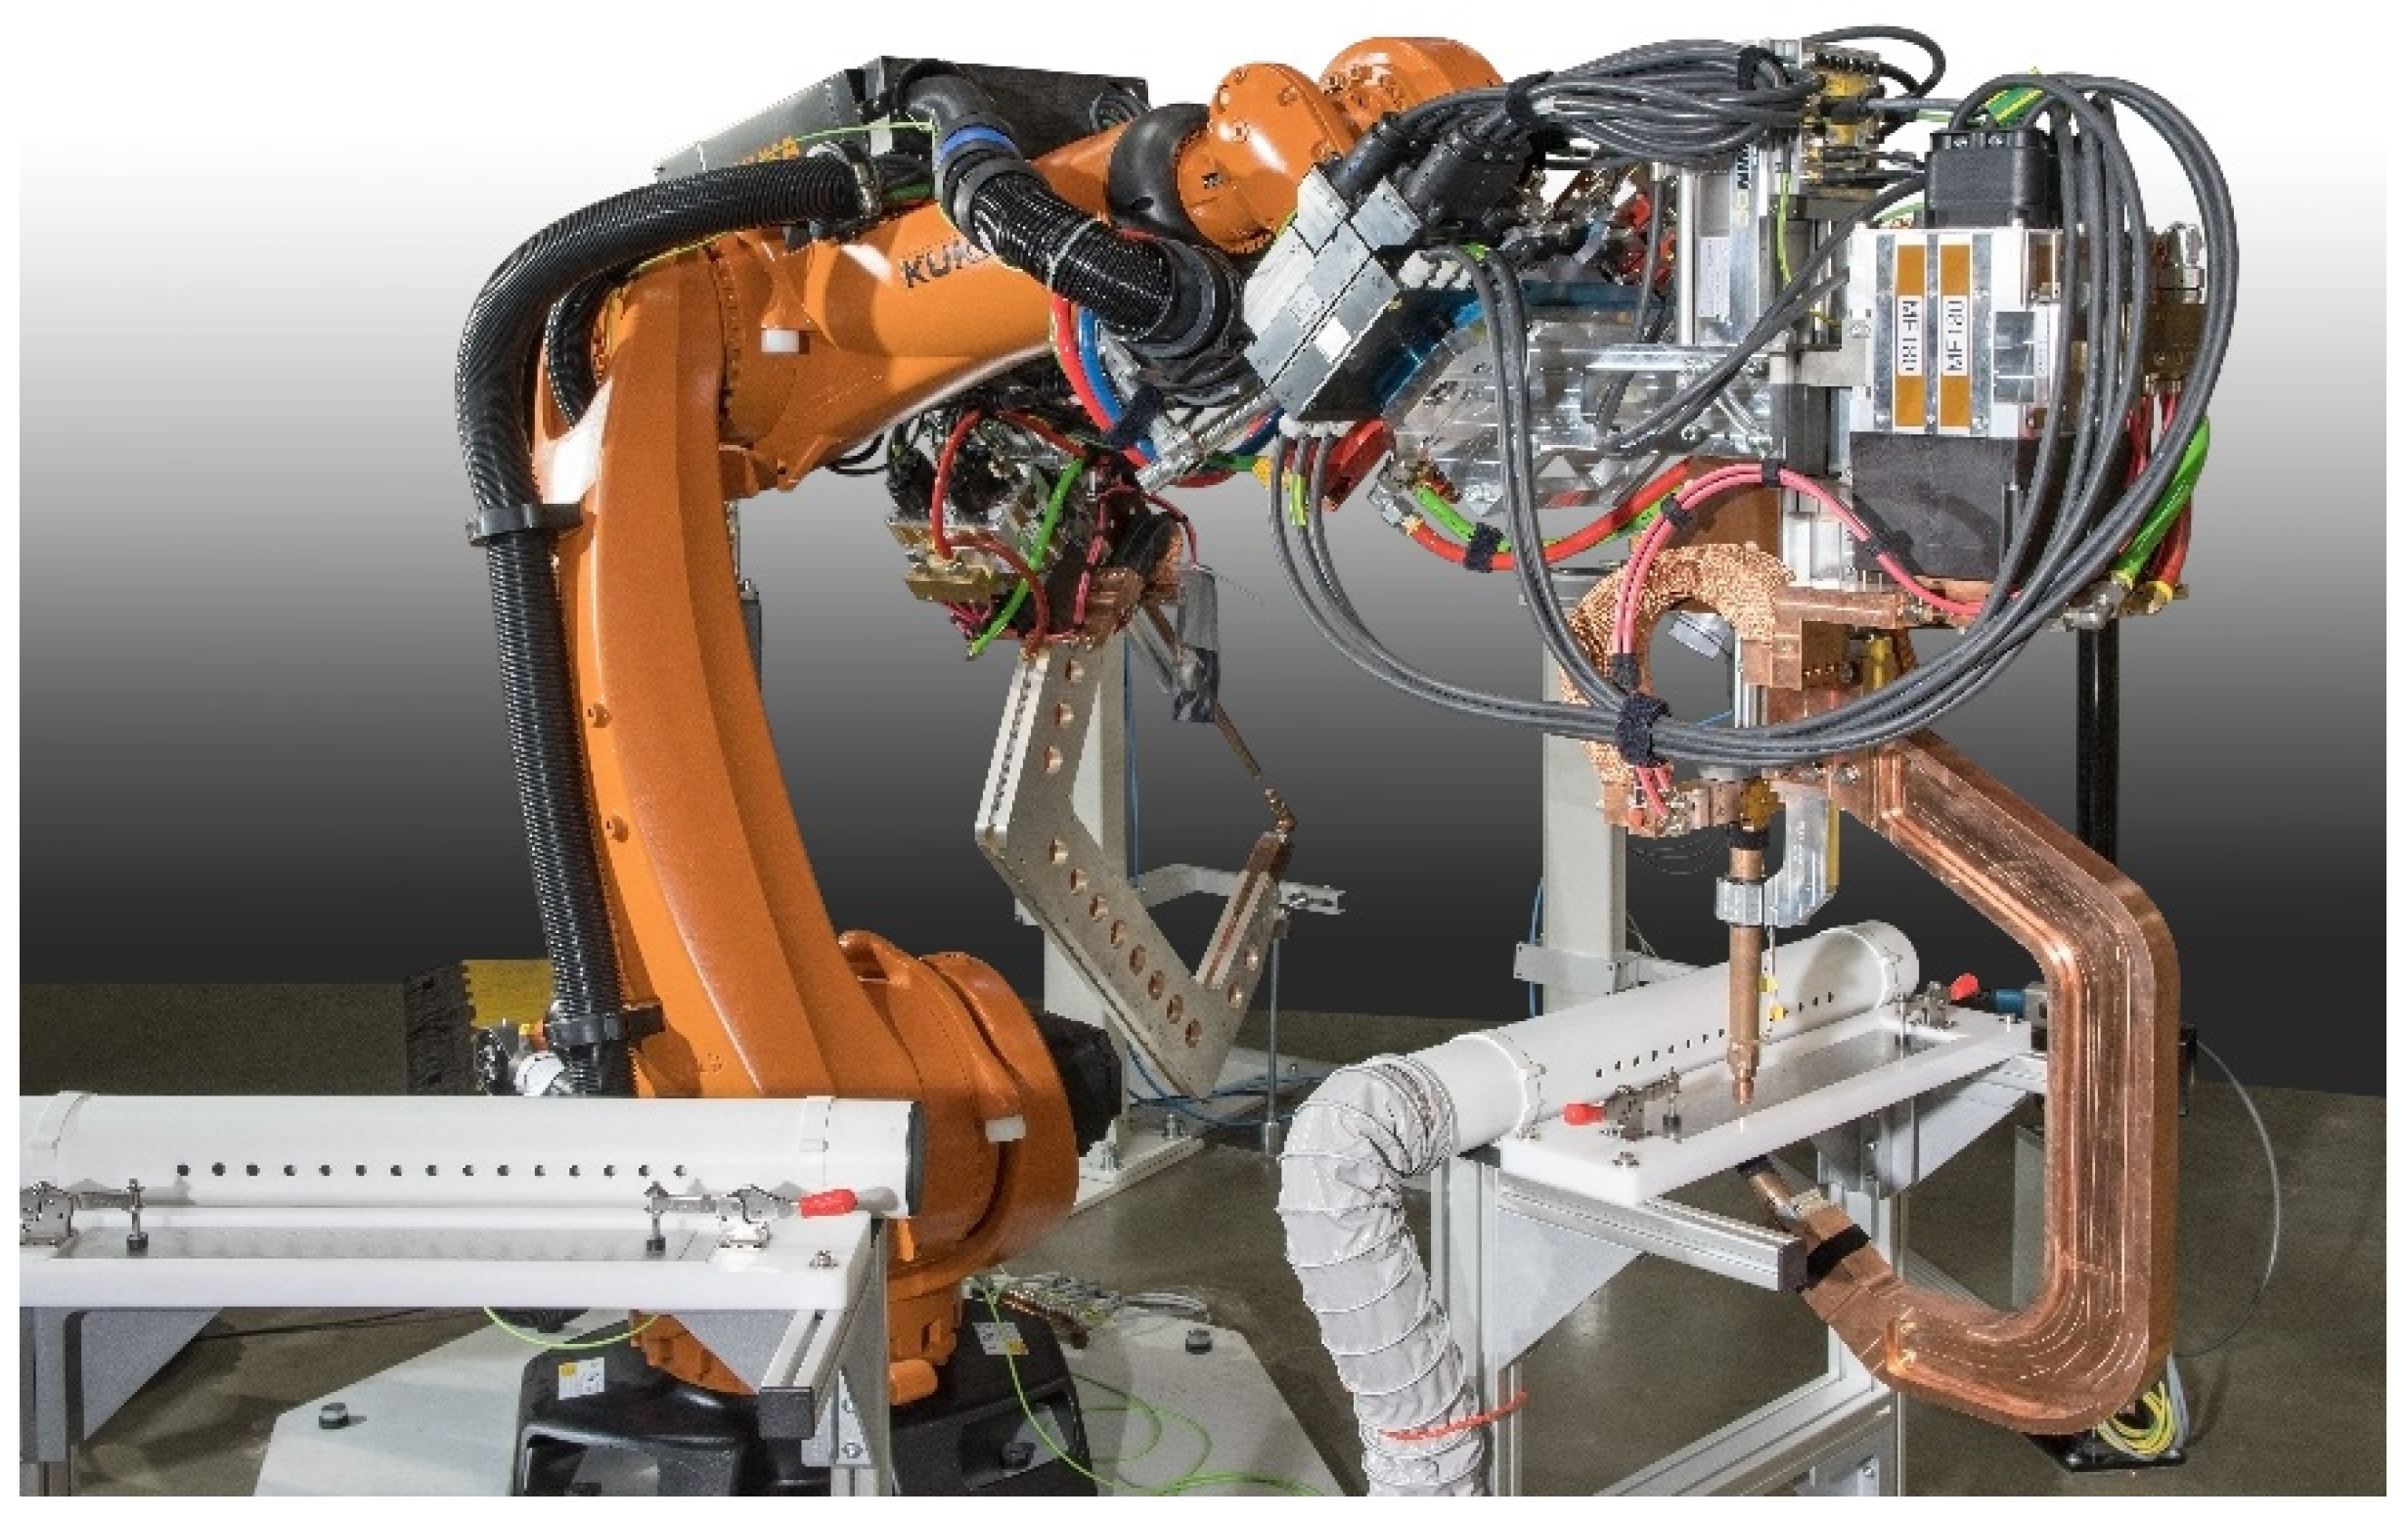
The welds were produced using a BOSCH Rexroth 7000 welding controller (Erbach, Germany) in combination with a NIMAK C-type welding gun (Wissen, Germany). This combination is also used in the automotive industry. The gun was mounted on a KUKA robot, as illustrated in Figure 3.
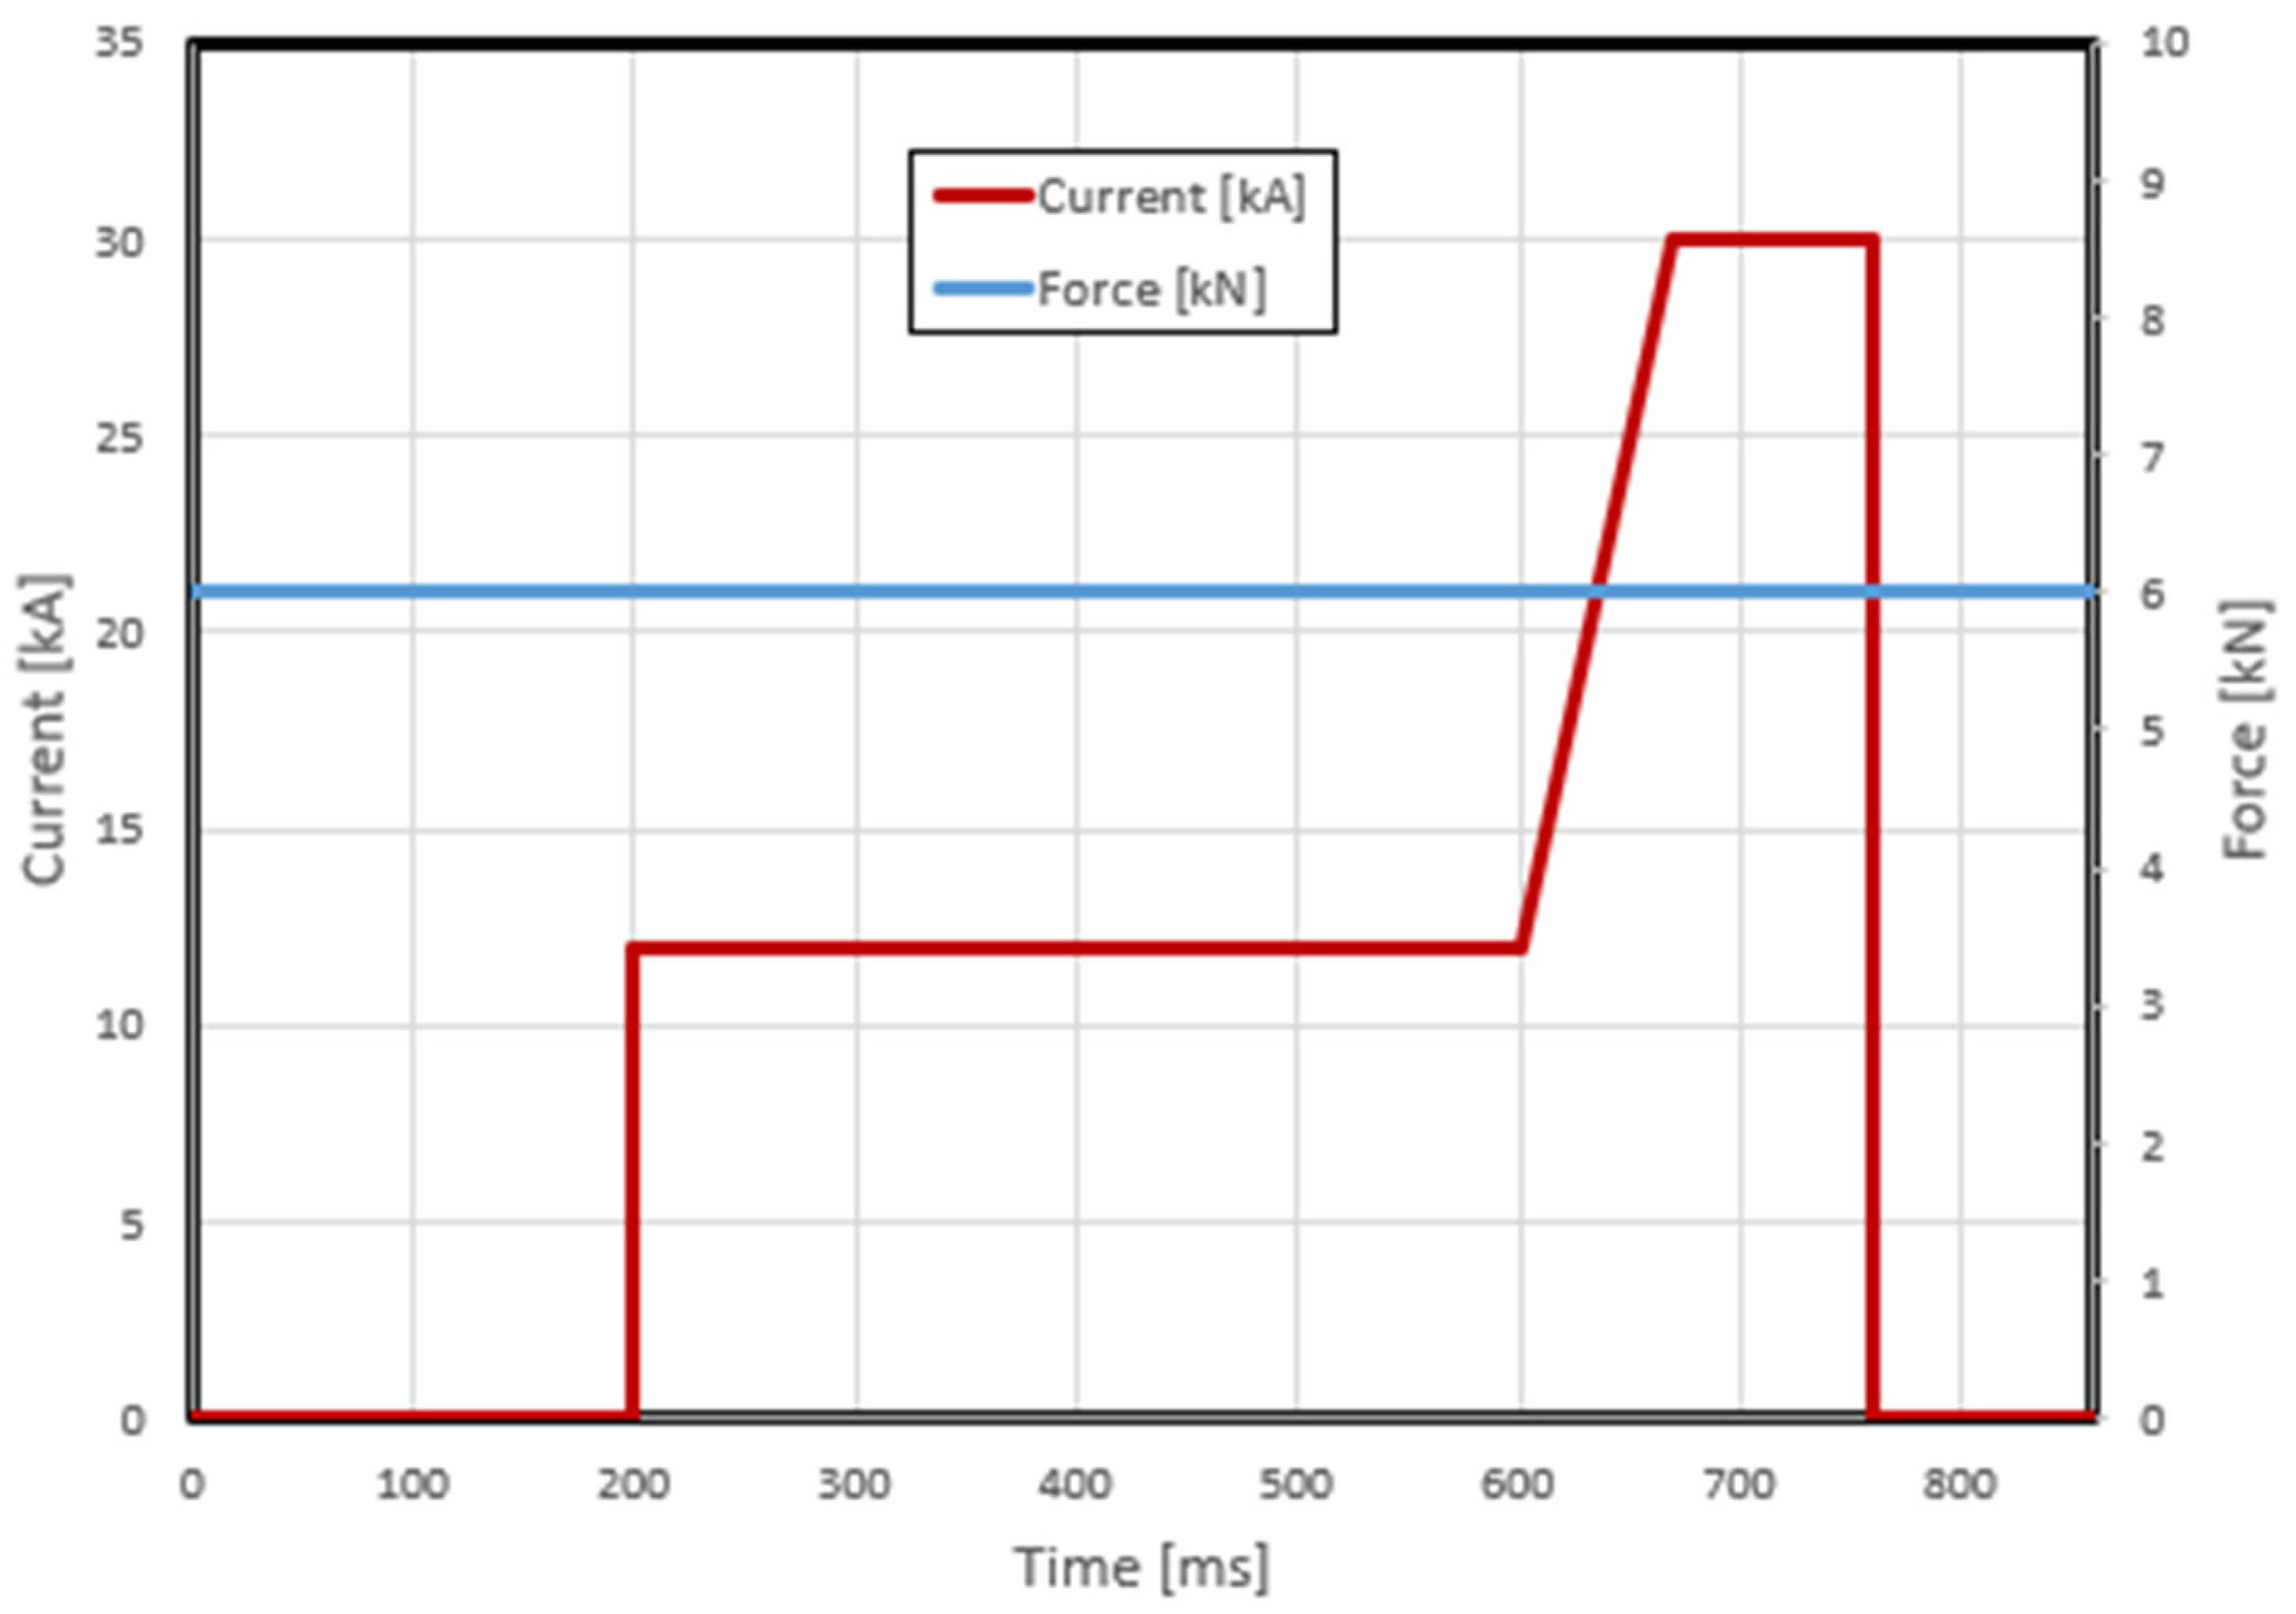
The current and force profiles shown in Figure 4 is one of the welding profiles used in the automotive industry and is always used as the welding profile. To limit the degrees of freedom to a finite, experimentally manageable level, the curves were divided into discrete ranges and parameterized. This also facilitates the subsequent evaluation of the results. The preheating current remained constant throughout all experiments, whereas the welding current amplitude (t = 670–760 ms) was varied. During welding, the electrode force was maintained at a preset level. Across all tests, the applied force ranged from 5 to 8 kN, and the welding current from 30 to 45 kA. These parameters were selected based on industry specifications and empirical data in order to avoid falling significantly below the minimum spot diameter specified in the VDA 238-401 standard [36]. In the context of RSW, only the range above this minimum limit is relevant; thus, this range was the focus of the present study in order to identify the dependencies and trends there.
Several parameters are varied in order to investigate their influence on the diameter of the spot weld. The main parameters that were varied were welding current, electrode force, sheet thickness and the use of adhesive. The following Table 2 lists in detail the parameters that were changed in the respective Section 3.1, Section 3.2 and Section 3.3.

3. Results and Discussion

This section presents the results of the influence studies and discusses the corresponding findings. The effects on spot diameter and expulsion are analyzed in detail. Expulsion refers to molten metal that splashes out of the joining zone during the welding process. The spot welds with the spot diameters listed in the following subsections failed almost exclusively as pullouts. The diameters of the mixed failures were measured in the same way as the pullouts, which is why no distinction is made between the types of failure in the following analysis. The following investigations exclusively present macroscopic measurements of the spot diameter (plug diameter). Therefore, the transfer to welding quality is only limited, as no information about the nugget morphology, internal defects, etc., is provided here. However, in (Ref. [41] cited from [10]), it was shown for the alloys EN AW-5182 and EN AW-6016 that the shear tensile strength increases with increasing spot diameter.

3.1. Influence of Welding Current and Electrode Force on Spot Diameter and Expulsion

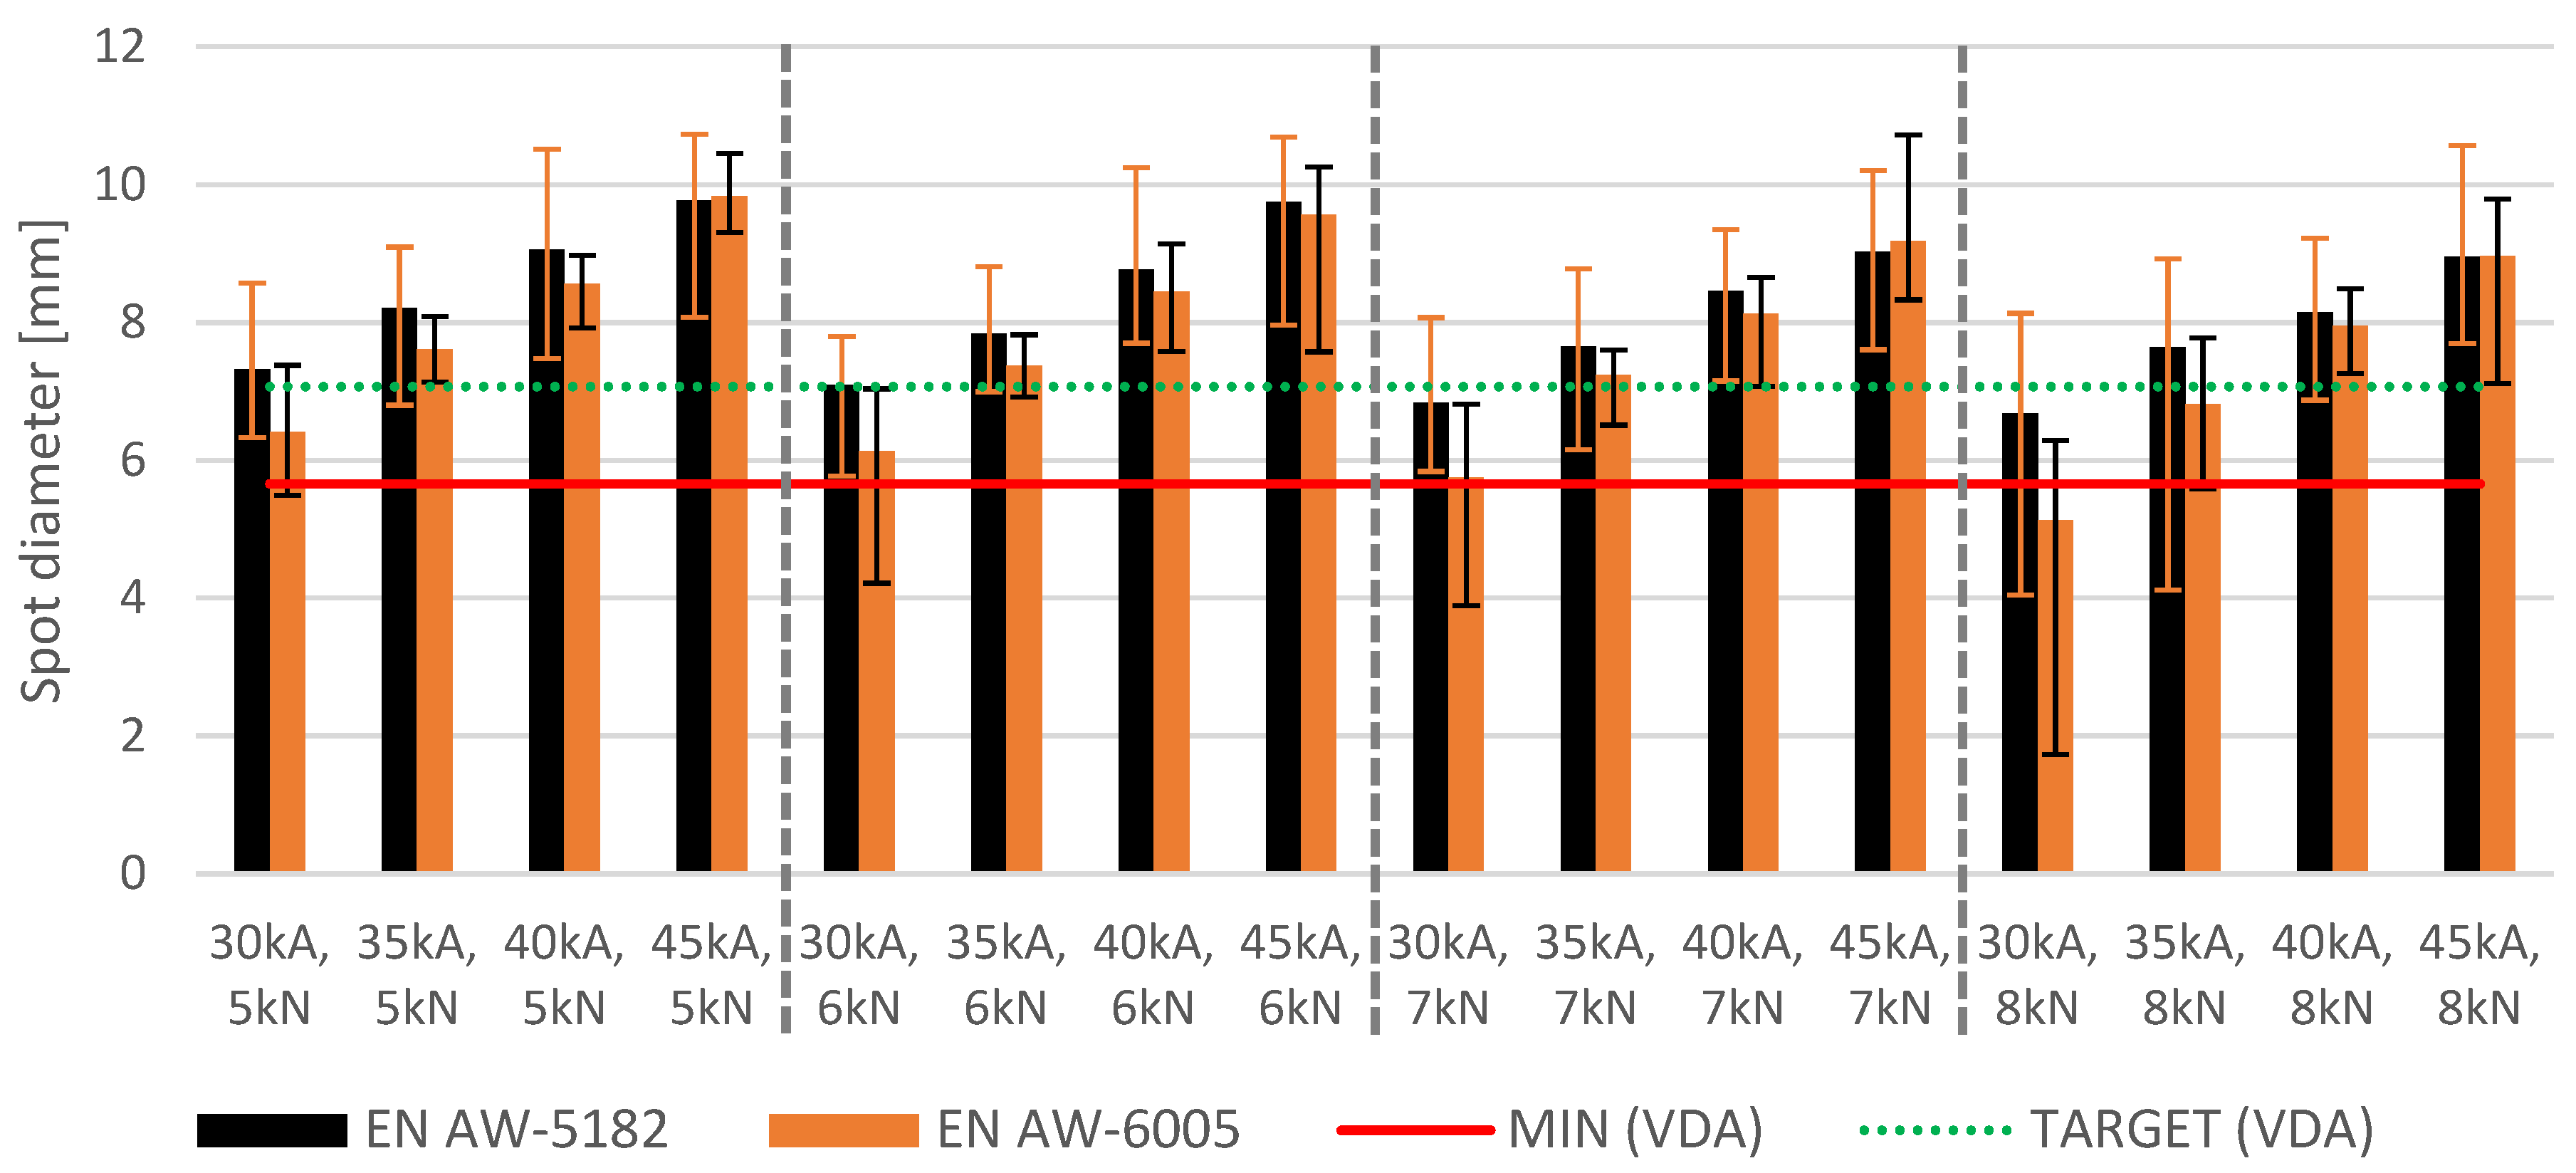
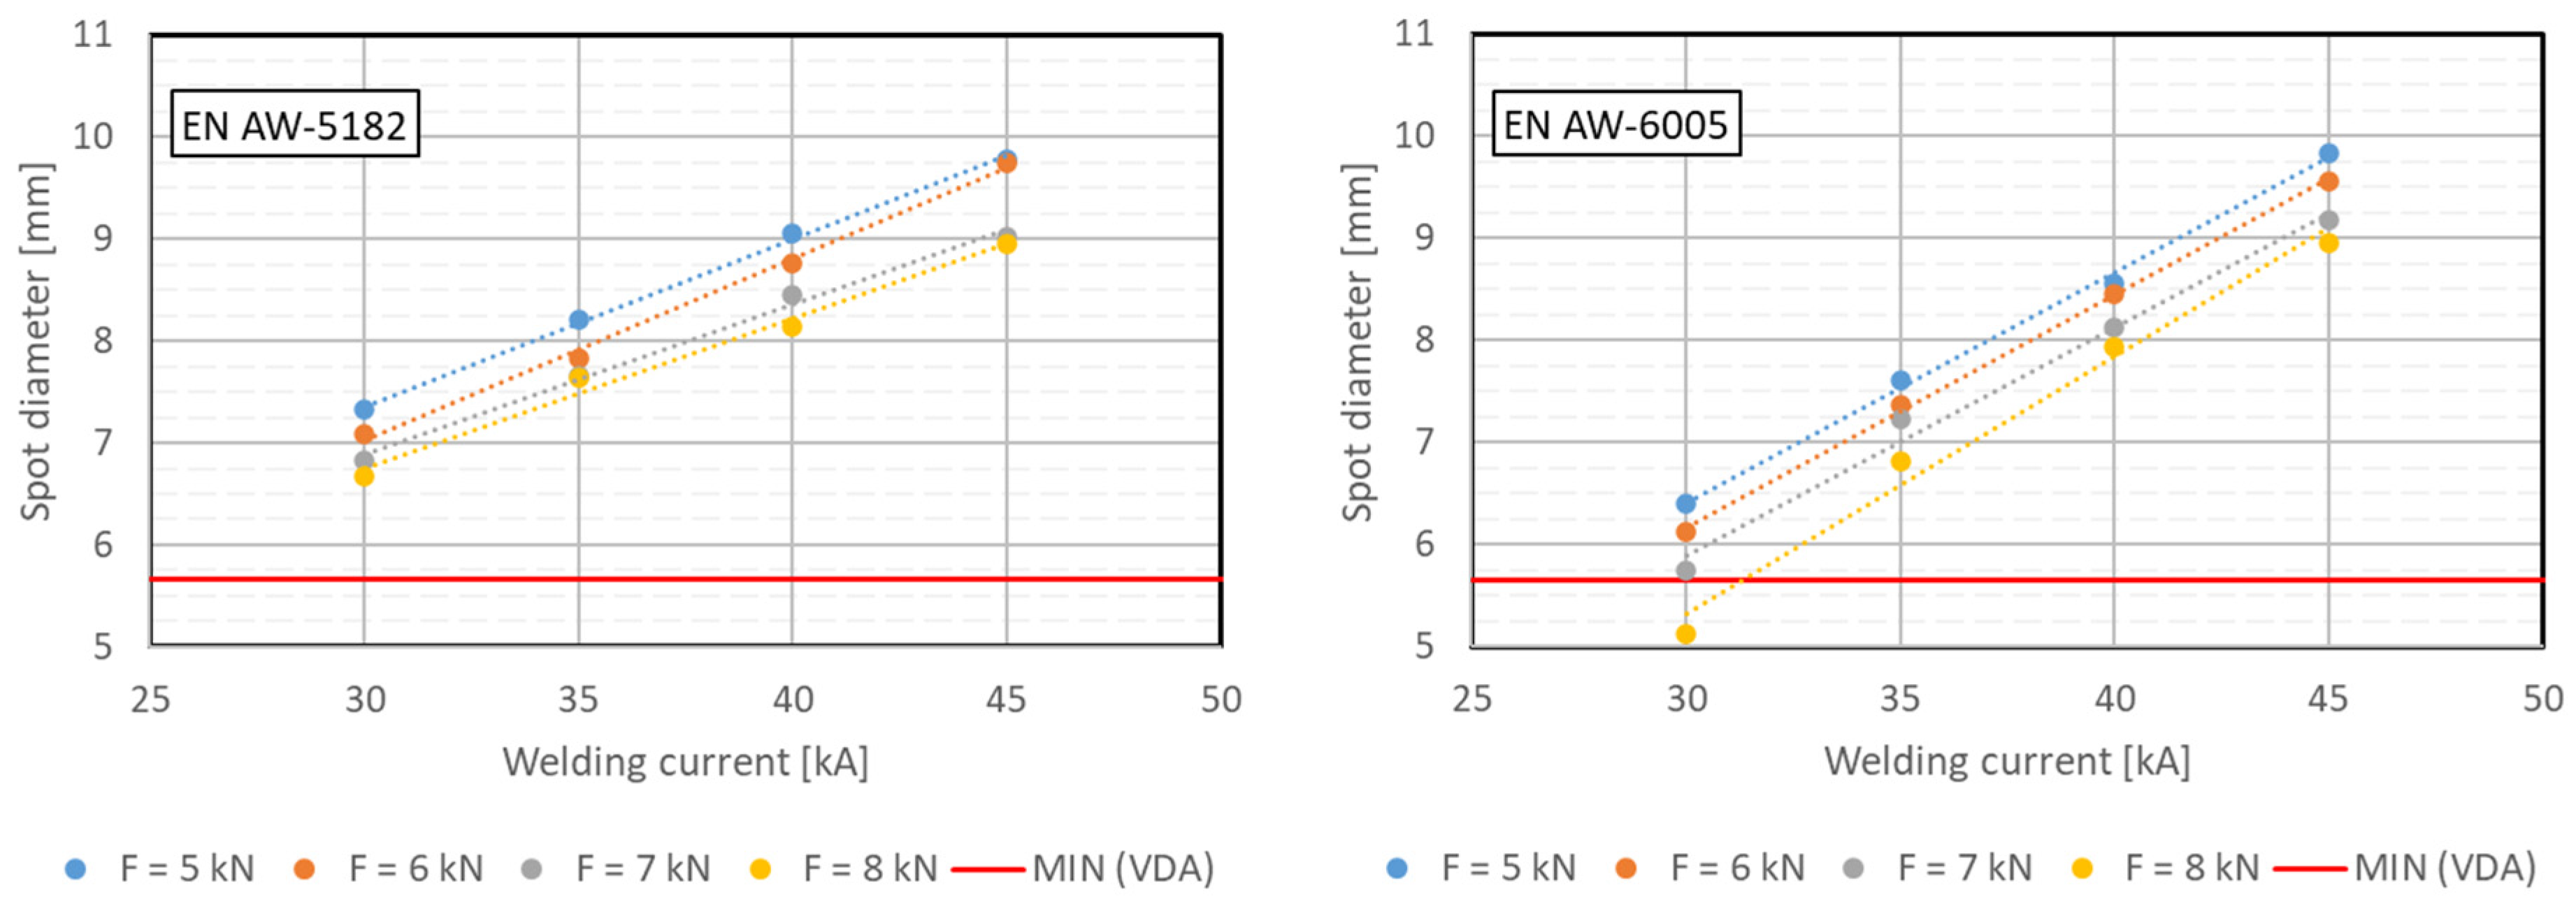
Figure 5 presents the measured spot diameters as a function of the welding current and electrode force. Each bar corresponds to one pair of sheets, comprising a total of 30 weld spots. The red line denotes the minimum spot diameter required for an acceptable weld, as specified in VDA 238-401 [36], whereas the green line indicates the recommended spot diameter [36]. Figure 6 shows another diagram that illustrates the influence of force even more clearly.
It can be observed that the spot diameter increases with increasing welding current at all force levels. Conversely, the spot diameter decreases as the electrode force increases. Based on the trend identified here, the number of tests required to determine the welding range can be reduced, as it is not necessary to examine all possible parameter combinations. However, this trend may not always hold in boundary regions—for example, at high currents or low forces, where excessive heat input can cause expulsion. This effect is also evident in Figure 5, which shows that, under certain parameter combinations (45 kA and 5 kN, 45 kA and 7 kN, 45 kA and 8 kN), the EN AW-5182 alloy produces smaller spot diameters than EN AW-6005, although EN AW-5182 generally exhibits larger spots. In contrast, at low currents or high forces, very small spots with large variability may occur. Nonetheless, this general trend can be assumed to hold within the range of acceptable spot diameters. However, in areas with acceptable spot diameters, it can be assumed that larger weld spots can be achieved with the EN AW-5182 alloy than with EN AW-6005, which is also due to the higher bulk resistance of EN AW-5182. Furthermore, in this range, an approximately linear increase in spot diameter can be assumed with increasing welding current. The scatter bars represent the scatter of the spot diameters on a sheet metal with 30 weld spots. It can be seen that the measured values for EN AW-5182 are slightly larger than those for EN AW-6005. The mean value of all scatter intervals is 2.69 mm for EN AW-5182, compared to 1.98 mm for EN AW-6005. One possible reason for this difference is expulsion, which occurs with EN AW-5182 and results in less reproducible weld spots. It is striking that the scatter for EN AW-6005 is very high with a welding current of 30 kA and an electrode force of 8 kN. This is due to the fact that the spot diameter is below the minimum spot size permitted by the VDA 238-401 standard [36] and is therefore in the process-unstable and undesirable range.
If a linear regression line is drawn through the respective data points in Figure 6 and their slope is determined, the slopes listed in Table 3 are obtained. The slopes of the regression lines are relatively similar within the respective alloy. It is noticeable that, for EN AW-6005, the slope is greater at a force of 8 kN than at the other forces. This is because the spot diameter at a current of 30 kA is below the minimum diameter recommended by the VDA recommendation 238-401 [36], which is why the process is more unstable there and no longer lies within the required stable process window. Therefore, the regression line for the force of 8 kN was not taken into account when determining the average slope of EN AW-6005. When comparing the two alloys, it can be seen that the slope for EN AW-5182 is lower (m = 0.159), meaning that the lines are flatter than for EN AW-6005 (m = 0.225). The reason for this could be that, due to the expulsion in EN AW-5182, the welding spots do not grow as strongly with increasing current than would be the case without expulsion. Expulsion causes heat and molten material to be lost from the weld pool in the joining zone, which limits the growth of the weld spots. In Hu et al. [42], using a modified electrode on the aluminum alloy AA5754 (EN AW-5754), it is shown that this material loss leads to a smaller weld nugget, a thinner weld structure, a large deviation in weld nugget diameter, and a reduced weld nugget penetration.
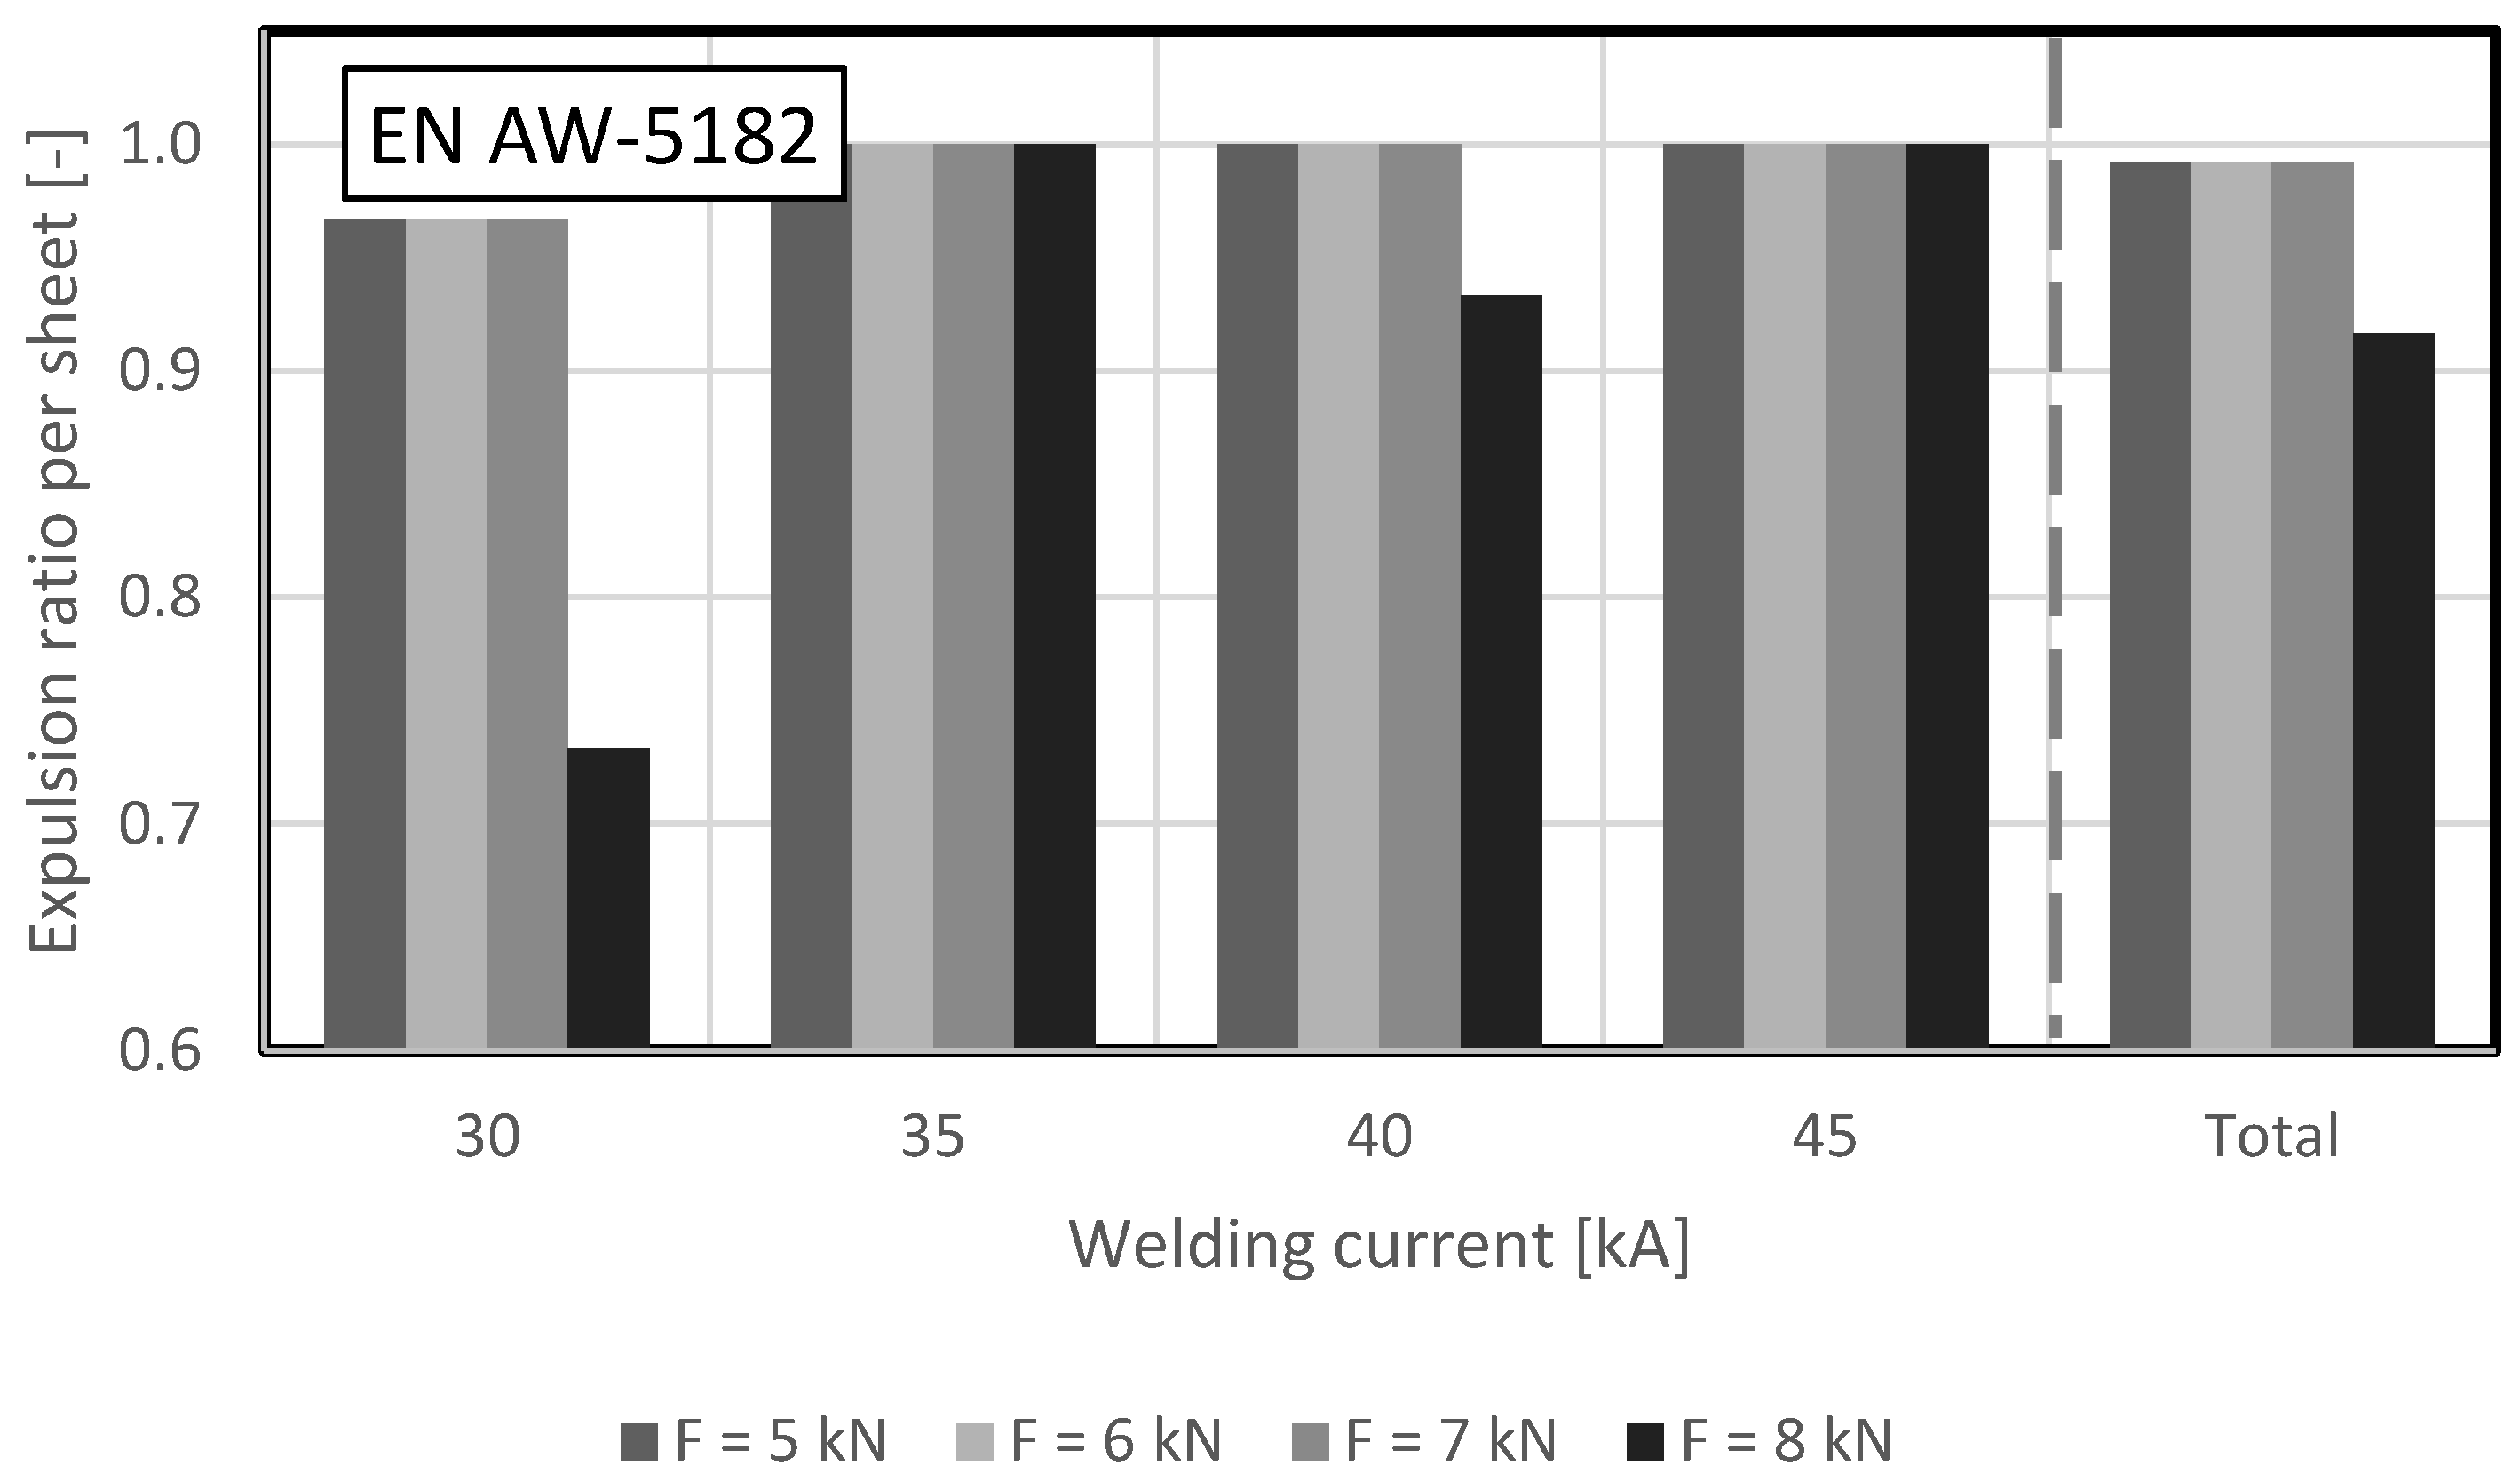
During the welding tests, no expulsion was observed with the EN AW-6005 alloy. In contrast, almost all spots showed expulsion with the EN AW-5182 alloy. Figure 7 shows the expulsion ratio on sheet metal with 30 weld spots. As can be seen, expulsion almost always occurred at high currents above 35 kA and at forces below 8 kN. Only at a force of 8 kN and a current of 30 kA could expulsion be reduced; however, a significant amount of expulsion still occurred. This means that the welding profile used here is very unfavorable for EN AW-5182 and should be adapted to the alloy, even though preheating was carried out, which, according to Luo et al. [43], reduced expulsion occurrence in the EN AW-5052 alloy. In the future, the profile from VDA recommendation 238-401 [36] could be tried here, for example. A total of 0% expulsion occurred with the EN AW-6005 alloy for all welds, while 97% expulsion occurred with EN AW-5182. In [44] it is mentioned that aluminum alloys of the 5000 series tend to have an increased tendency to expulsion.

3.2. Influence of Sheet Thickness on Spot Diameter

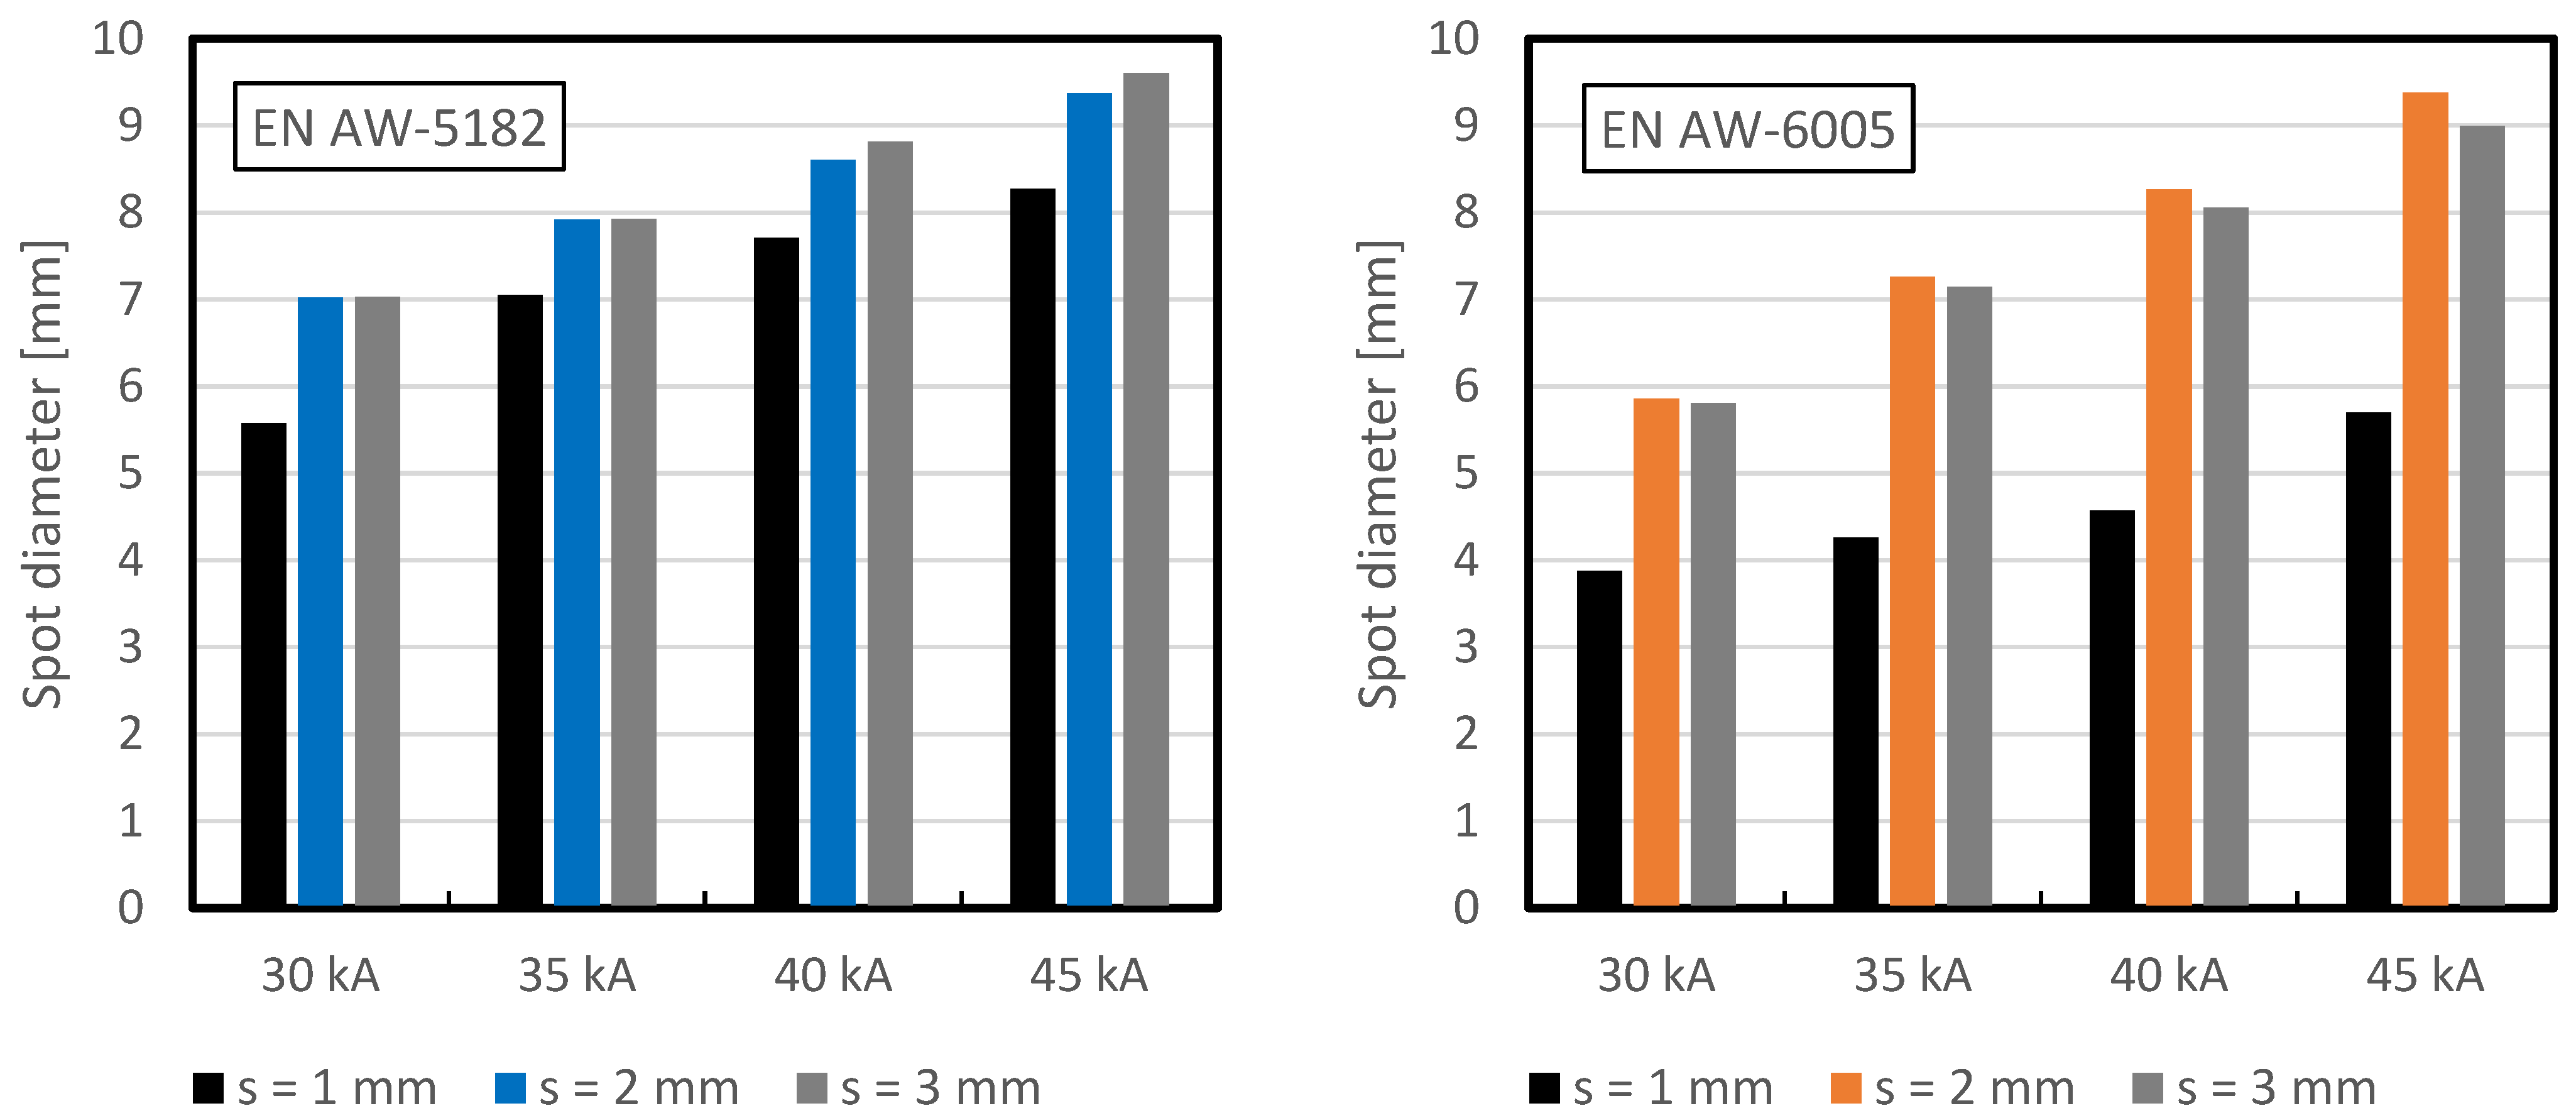
The influence of sheet thickness is illustrated in Figure 8. Each bar represents data from four sheet pairs, corresponding to a total of 120 weld spots, with the values averaged over electrode forces of 5, 6, 7, and 8 kN. It can be observed that the spot diameters of the 2 mm thick sheets are consistently larger than those of the 1 mm thick sheets. This seems obvious, as the 2 mm thick sheets have twice the bulk resistance of the base material. However, bulk resistance is not the only decisive factor, as the values for the 3 mm thick sheets show. With the EN AW-5182 alloy, the spot diameter does not increase further, or only slightly, while the spot diameters for EN AW-6005 are even smaller than those for 2 mm thick sheets. This shows that the spots do not increase continuously with thicker sheets but can be smaller despite the higher bulk resistance. This is because other factors also influence the formation of weld spots, and bulk resistance is not solely responsible for weld spot formation. Contact resistance can be particularly crucial here, as it is affected by surface influences such as roughness, oxide layer, coatings, storage time, contamination, etc. With each new batch, in addition to the chemical composition, which only affects the bulk resistance, the aforementioned surface influences, and thus the contact resistance, can also change. As reported in [27], contact resistance constitutes the dominant resistance at the beginning of the welding process. Nevertheless, the extent to which these initial contact resistances influence the final weld quality and, consequently, the spot diameter, was not investigated there. The probability of expulsion and the current concentration distribution for sheets of different thicknesses could also have a further influence on the spot diameter.

3.3. Influence of Adhesive BETAMATE™ 1640 on Spot Diameter

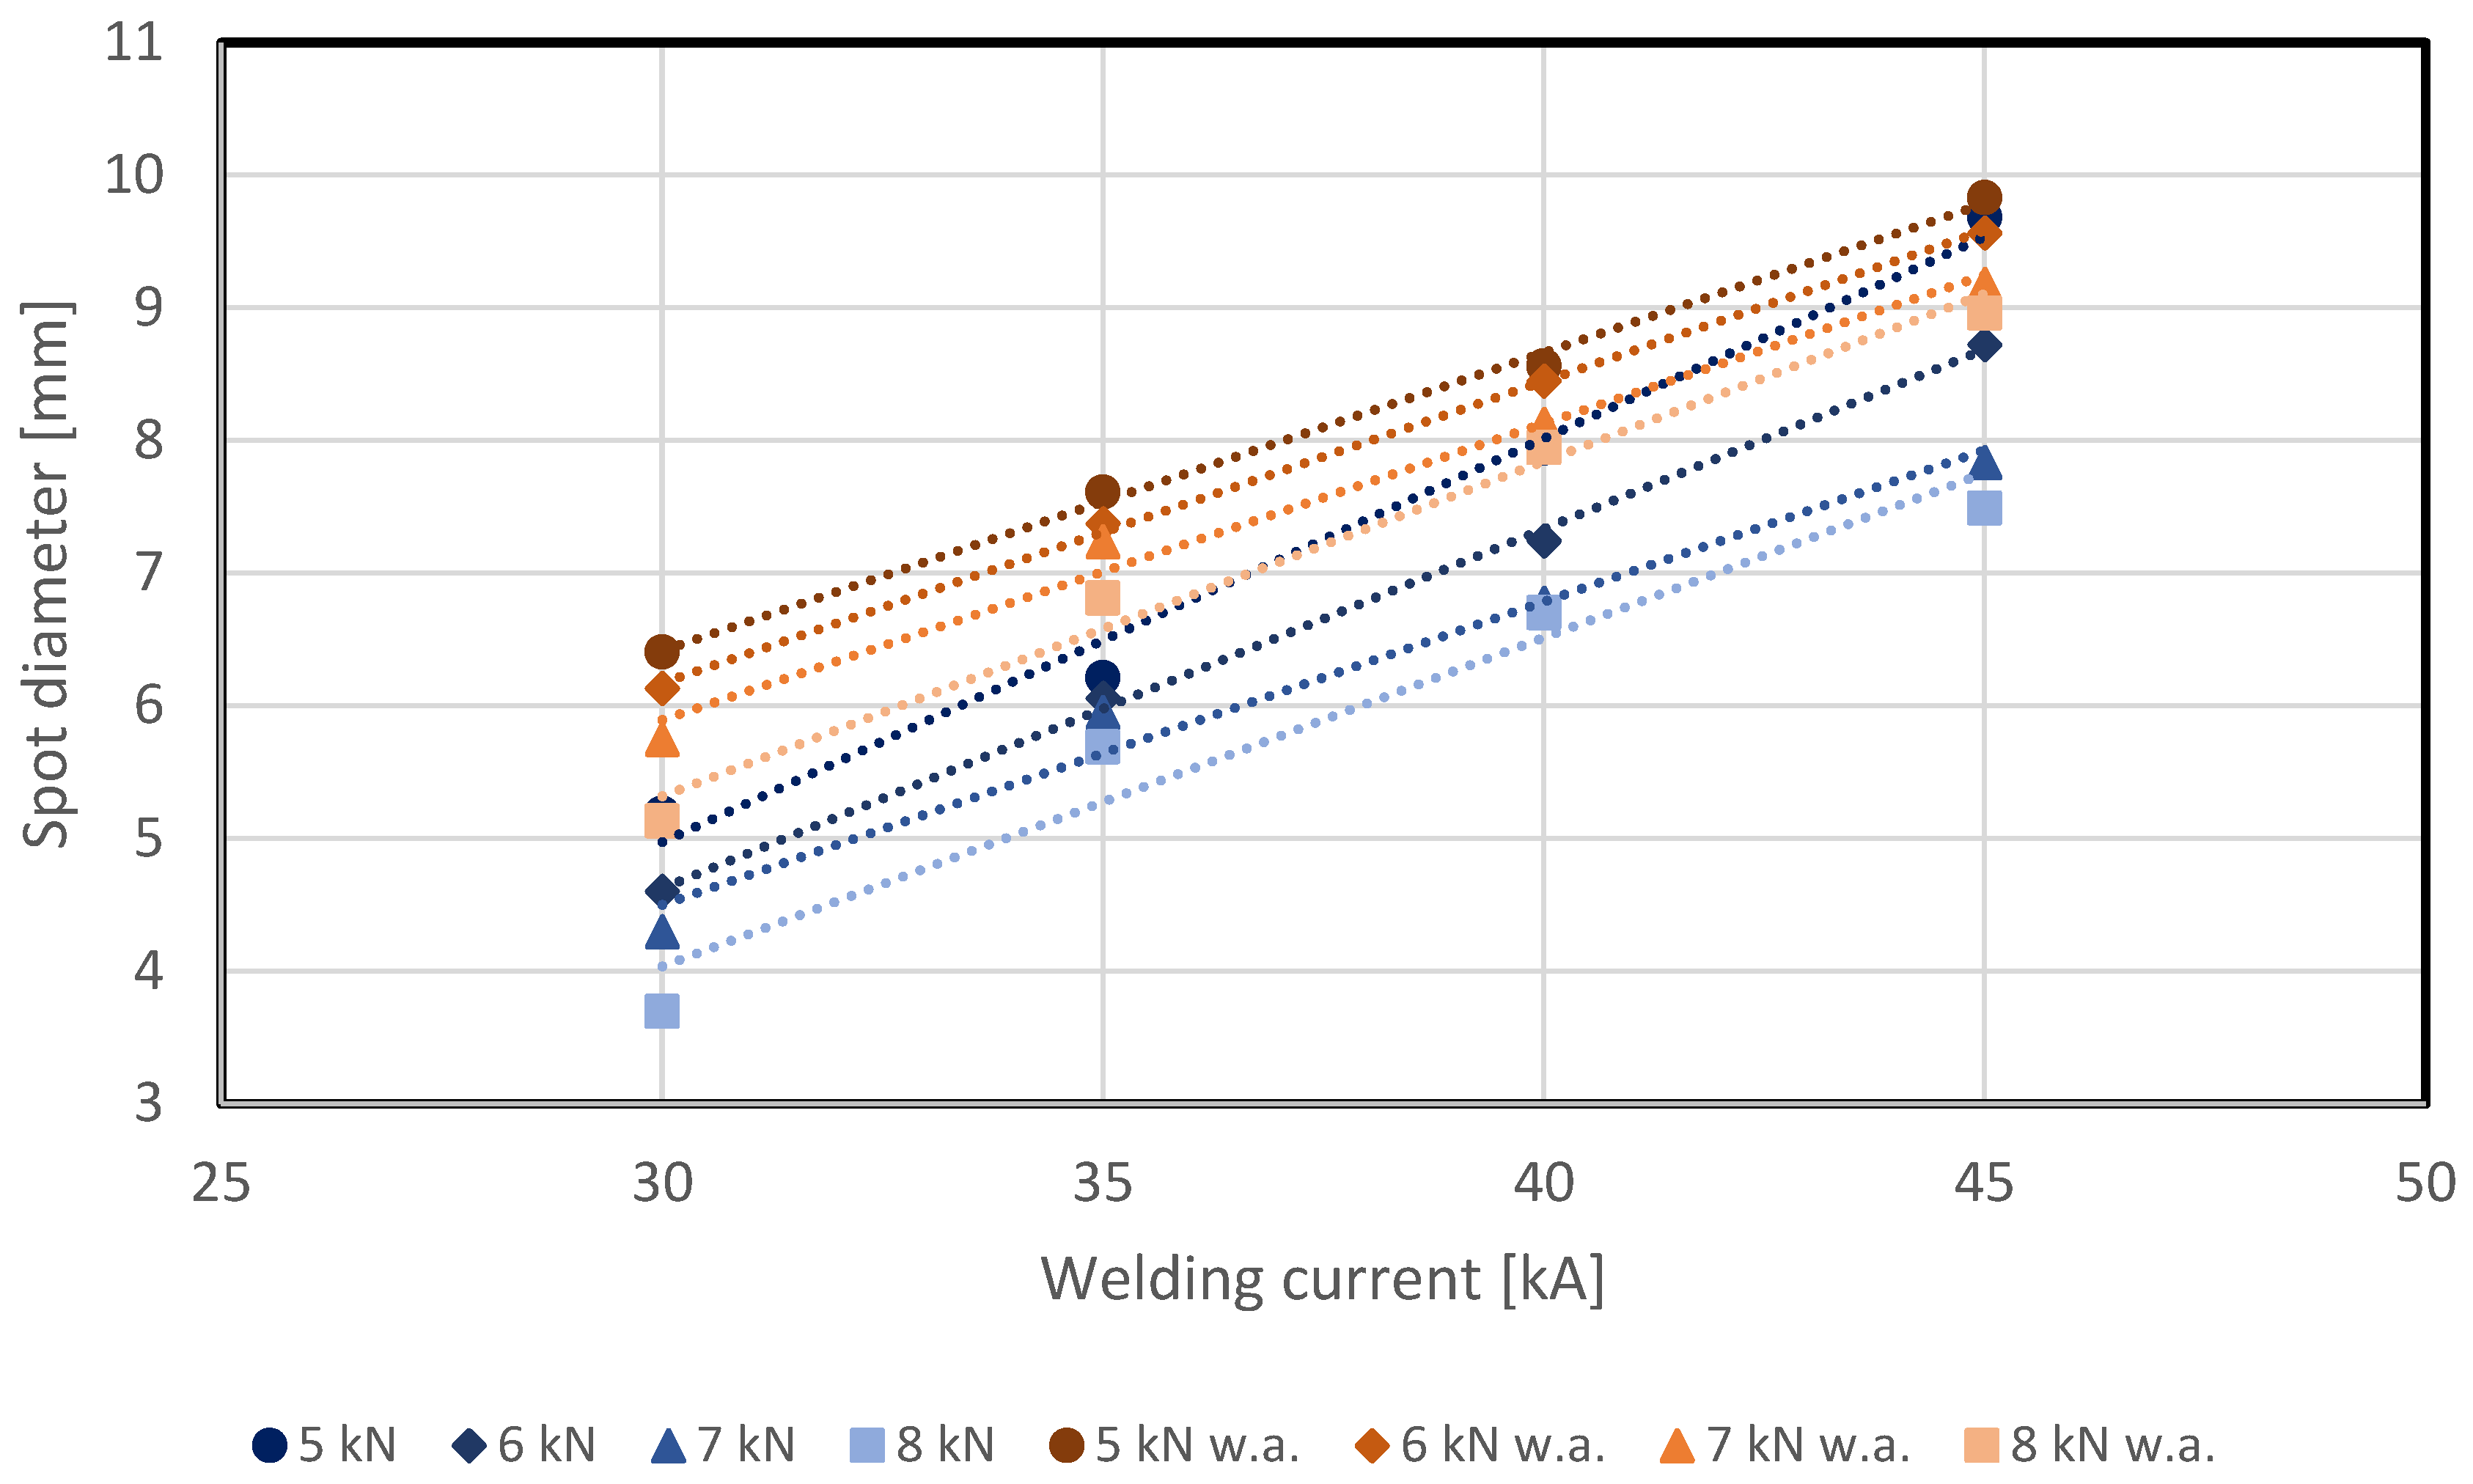
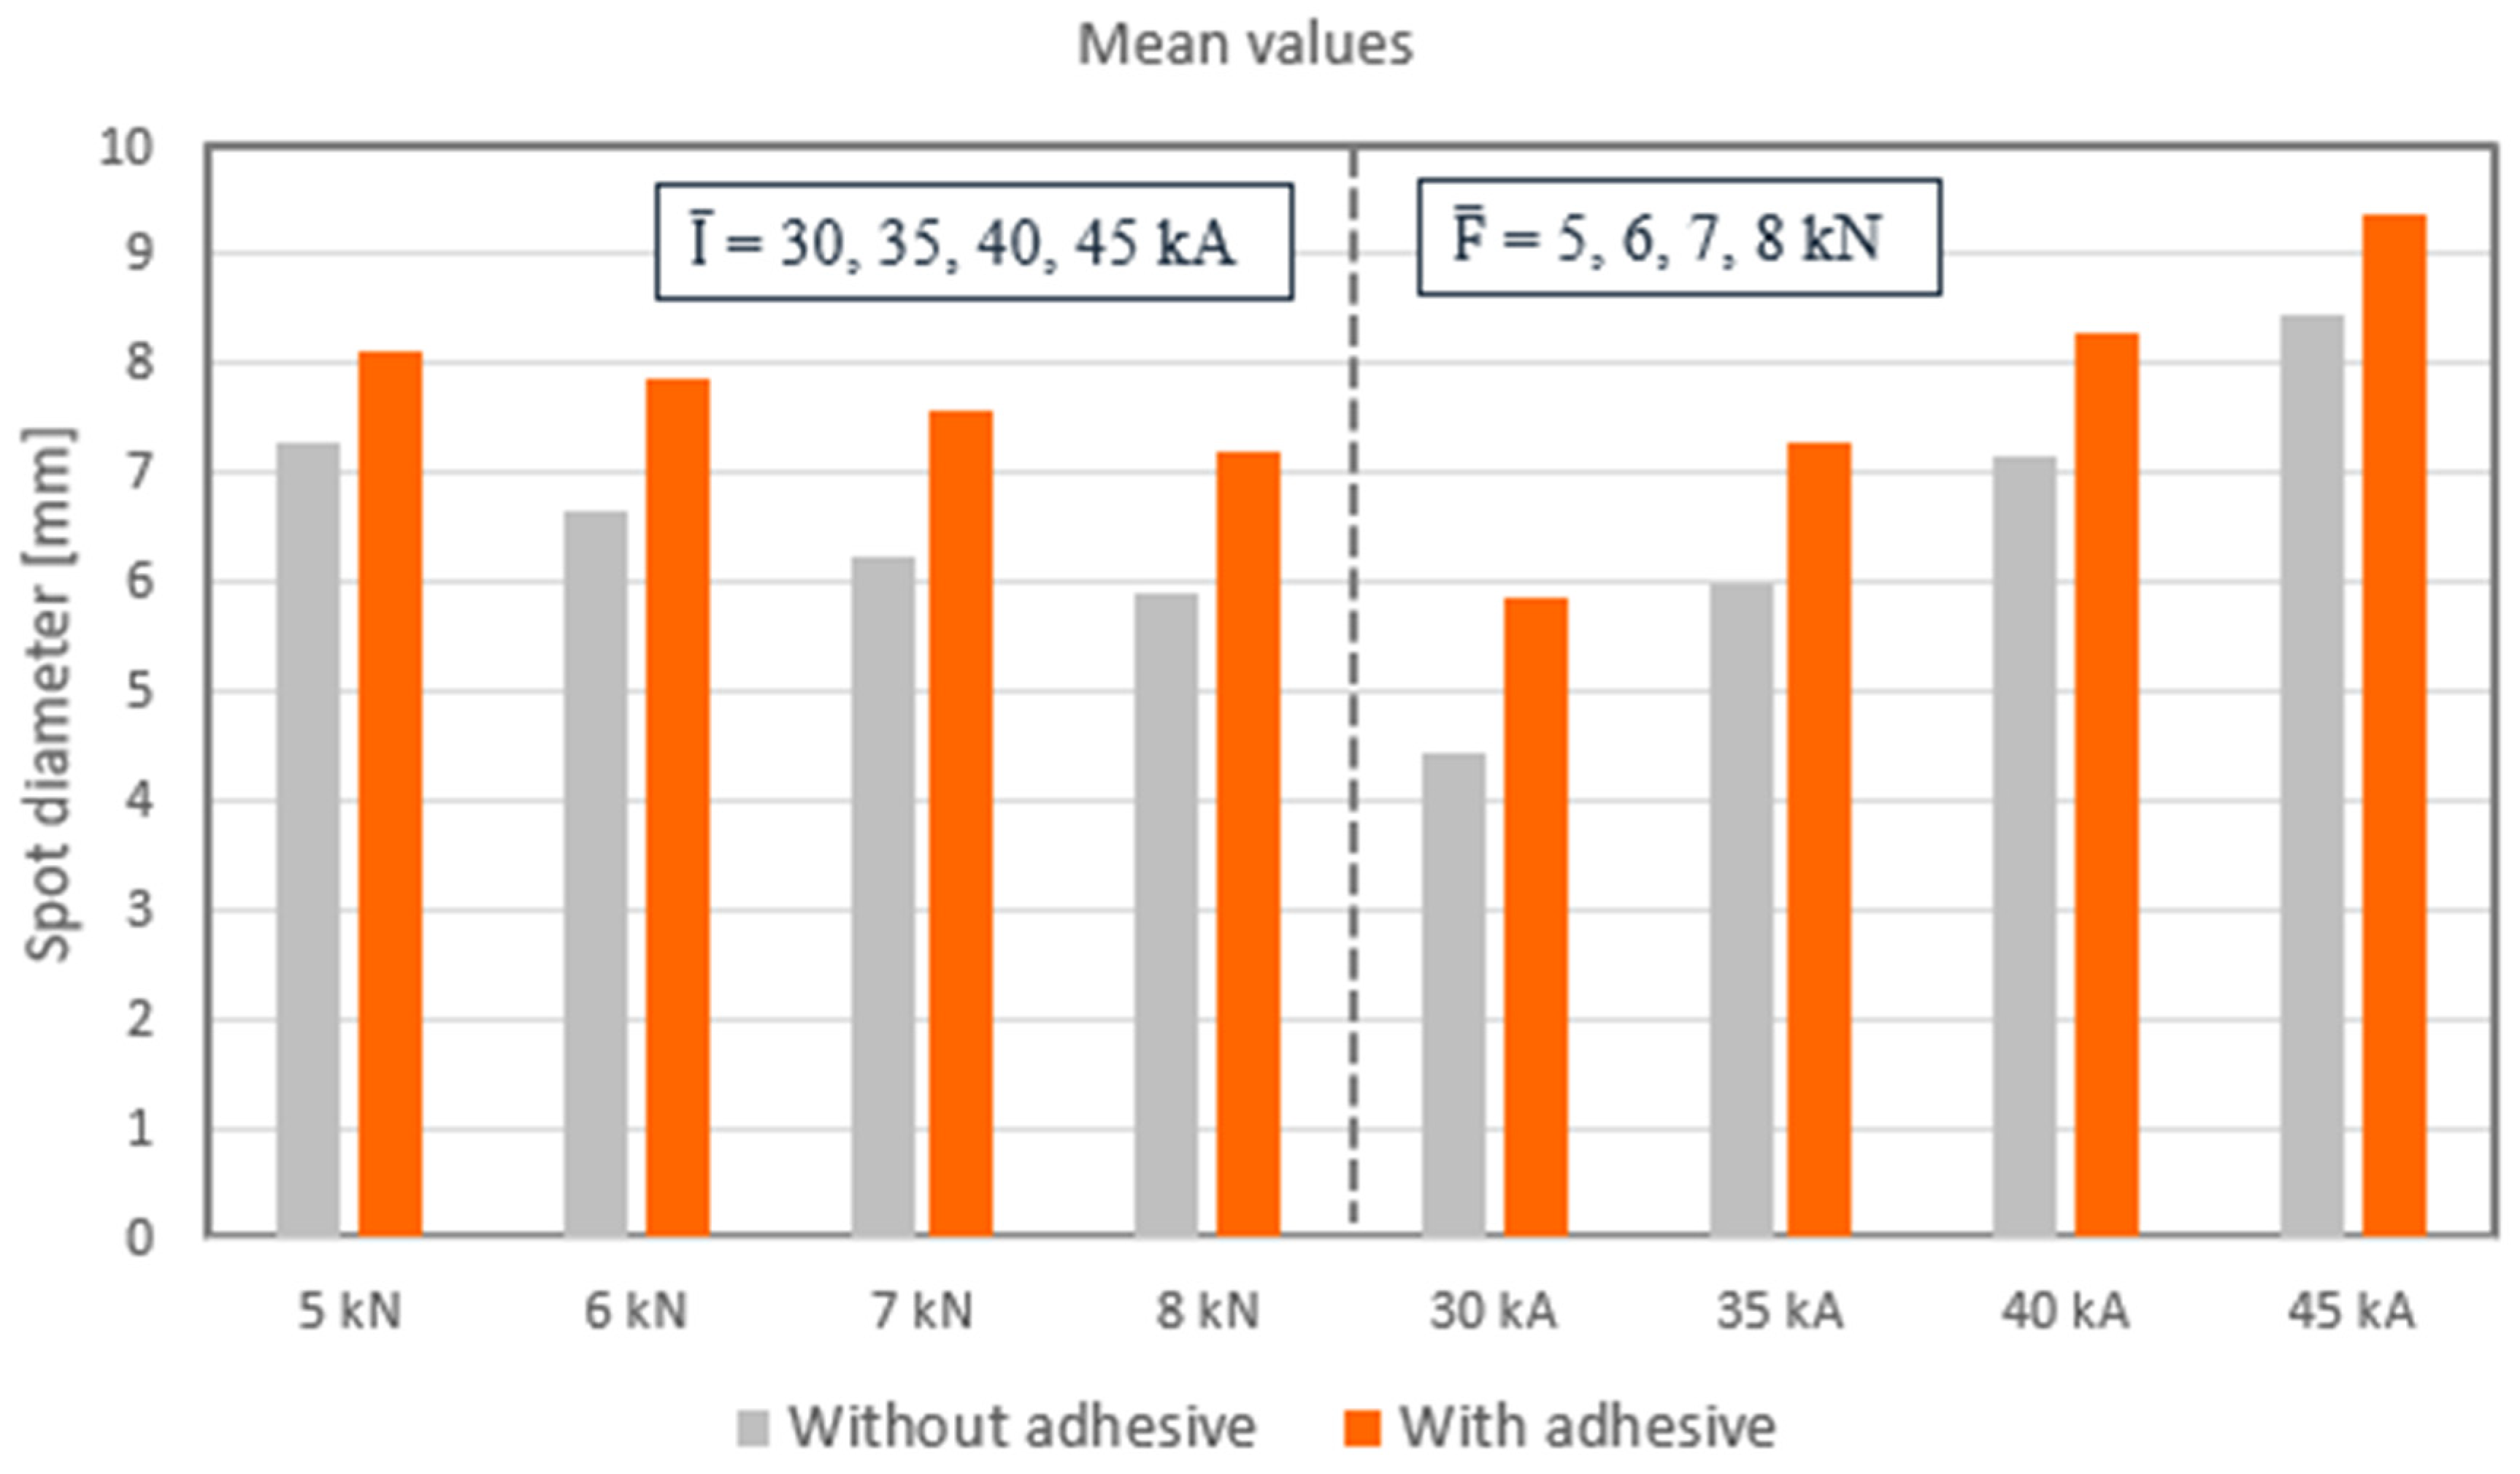
In body-in-white, RSW is predominantly used in combination with adhesive bonding. The applied adhesive also affects the welding process and the resulting joint quality. Figure 9 and Figure 10 illustrate the influence of the BETAMATE™ 1640 adhesive on the spot diameter. Figure 9 presents the effect of the adhesive at different electrode forces and welding currents, while Figure 10 summarizes the mean values in a bar chart. Both figures demonstrate that, under identical welding parameters, the presence of adhesive results in larger spot diameters compared to welds produced without adhesive. This effect can be attributed, among other factors, to the additional electrical resistance introduced by the adhesive layer between the sheets. An analysis of the slopes of the compensation curves depicted in Figure 9 reveals that the curves with adhesive (average slope m ¯ of all 4 curves m ¯ = 0.23) are flatter than those without adhesive ( m ¯ = 0.26). From this, it can be concluded that due to the additional resistance of the adhesive and the resulting larger weld spots, a change in current has a smaller influence on the spot size than without adhesive. Furthermore, Figure 10 clearly confirms the general trend observed previously: increasing electrode force reduces spot diameter, whereas increasing welding current results in larger spots.

4. Conclusions

This study investigated the influence of various parameters on the spot diameter in resistance spot welding (RSW) of the aluminum alloys EN AW-5182 (AL5-STD) and EN AW-6005 (AL6-HDI) with sheet thicknesses of 1 °mm, 2 °mm and 3 °mm. The varied parameters included welding current, electrode force, adhesive application, and sheet thickness. The investigations revealed the following correlations:
  • Spot diameter increases with increasing welding current and decreases with increasing electrode force. The range significantly below the minimum spot diameter specified in the VDA recommendation 238-401 [36] was not considered in this study.
  • EN AW-5182 has a very high probability of expulsion, while EN AW-6005 had no expulsions. The same welding profile was used for both alloys, suggesting that adjusting the welding profile for EN AW-5182 would be beneficial. In addition to adjusting the welding current, adjusting the electrode force profile would also be advantageous.
  • A change in current affects EN AW-6005 more than EN AW-5182. It should be noted that EN AW-5182 had a spatter rate of 97%, while EN AW-6005 exhibited no spatter, which also affects the spot diameter.
  • Welding with adhesive BETAMATE™ 1640 results in larger spot diameters. This was observed with both alloys.
  • With a sheet thickness of 1 mm, smaller spot diameters were achieved than with 2 mm, regardless of the alloy. With a sheet thickness of 3 mm, the spot diameters were similar to those achieved with 2 mm thick sheets, and in some cases, even slightly smaller.
The fundamental trends that a higher welding current and lower electrode force lead to larger spot diameters can also be applied to other aluminum alloys within the permissible welding range specified in the VDA recommendation 238-401. However, it should be noted that the welding parameters to be set may differ for other aluminum alloys from those used here. Therefore, further validation is absolutely necessary when using other alloys. Future work will include extending this investigation to alternative welding profiles, particularly with the aim of significantly reducing expulsion occurrence in the EN AW-5182 configuration. In addition, artificial intelligence (AI) methods will be employed with larger datasets to facilitate the transfer of the identified patterns to other aluminum alloys.

Author Contributions

Conceptualization, A.F. and M.W.; methodology, A.F.; validation, A.F.; formal analysis, A.F.; investigation, A.F.; data curation, A.F.; writing—original draft preparation, A.F.; writing—review and editing, M.W. and A.F.; visualization, A.F.; supervision, M.W. and S.W.; project administration, A.F. and M.W.; funding acquisition, S.W., A.F. and M.W. All authors have read and agreed to the published version of the manuscript.

Funding

This research was partly funded by the German Federal Ministry for Economic Affairs and Energy (BMWE) on the basis of a decision by the German Bundestag within the scope of the “Technologietransfer-Programm Leichtbau”, (FKZ: 03LB1009A).

Institutional Review Board Statement

Not applicable.

Informed Consent Statement

Not applicable.

Data Availability Statement

The data presented in this study are available on request from the corresponding author.

Conflicts of Interest

The authors declare no conflicts of interest.

References

  1. Nadimi, N.; Yadegari, R.; Pouranvari, M. Resistance Spot Welding of Quenching and Partitioning (Q&P) Third-Generation Advanced High-Strength Steel: Process–Microstructure–Performance. Met. Mater. Trans. A 2023, 54, 577–589. [Google Scholar] [CrossRef]
  2. Lv, T.-L.; Rao, Y.-Z.; Zhang, Q.-X.; Xia, Y.-J.; Lin, Y.; Wu, F.; Li, Y.-B.; Yan, D.-J. Effect of storage time on the surface status and resistance spot weldability of TiZr pretreated 5182 aluminum alloy. J. Manuf. Process. 2022, 81, 166–176. [Google Scholar] [CrossRef]
  3. Söderberg, R.; Wärmefjord, K.; Lindkvist, L.; Berlin, R. The influence of spot weld position variation on geometrical quality. CIRP Ann. 2012, 61, 13–16. [Google Scholar] [CrossRef]
  4. Li, Y.; Yan, F.; Luo, Z.; Chao, Y.J.; Ao, S.; Cui, X. Weld Growth Mechanisms and Failure Behavior of Three-Sheet Resistance Spot Welds Made of 5052 Aluminum Alloy. J. Mater. Eng. Perform. 2015, 24, 2546–2555. [Google Scholar] [CrossRef]
  5. Qi, L.; Li, F.; Chen, R.; Zhang, Q.; Li, Y. Improve resistance spot weld quality of advanced high strength steels using bilateral external magnetic field. J. Manuf. Process. 2020, 52, 270–280. [Google Scholar] [CrossRef]
  6. Dilthey, U. Schweißtechnische Fertigungsverfahren 1 [Welding Manufacturing Processes 1]: Schweiß- und Schneidtechnologien [Welding and Cutting Technologies], 3rd ed.; Springer: Berlin/Heidelberg, Germany, 2006. [Google Scholar]
  7. Friedrich, H.E. Leichtbau in der Fahrzeugtechnik [Lightweight Construction in Automotive Engineering], 2nd ed.; Springer Vieweg: Wiesbaden, Germany, 2017. [Google Scholar]
  8. Hirsch, J. Aluminium in Innovative Light-Weight Car Design. Jap. Inst. Met. Mat.—Mat. Trans. 2011, 52, 818–824. [Google Scholar] [CrossRef]
  9. Tisza, M.; Czinege, I. Comparative study of the application of steels and aluminium in lightweight production of automotive parts. Int. J. Light. Mat. 2018, 1, 229–238. [Google Scholar] [CrossRef]
  10. Ostermann, F. Anwendungstechnologie Aluminium [Application Technology Aluminum], 3rd ed.; Springer Vieweg: Berlin/Heidelberg, Germany, 2014. [Google Scholar]
  11. Gould, J.E. Joining Aluminum Sheet in the Automotive Industry—A 30 Year History. Weld. Res. 2012, 91, 23–34. [Google Scholar]
  12. Emadi, P.; Andilab, B.; Ravindran, C. Engineering Lightweight Aluminum and Magnesium Alloys for a Sustainable Future. J. Indian Inst. Sci. 2022, 102, 405–420. [Google Scholar] [CrossRef]
  13. Thornton, P.H.; Krause, A.R.; Davies, R.G. Contact Resistances in Spot Welding. Weld. Res. Suppl. 1996, 75, 402–412. [Google Scholar]
  14. Hamm, K.J. Beitrag zur Qualitätssicherung Durch Analyse des Widerstandspunktschweißprozesses beim Fügen von Aluminiumwerkstoffen [Contribution to Quality Assurance by Analyzing the Resistance Spot Welding Process When Joining Aluminum Materials]. Ph.D. Dissertation, RWTH Aachen University, Aachen, Germany, 1989. [Google Scholar]
  15. Biele, L.; Schaaf, P.; Schmid, F. Method for contact resistance determination of copper during fast temperature changes. J. Mat. Sci. Mat. Electron. 2021, 56, 3827–3845. [Google Scholar] [CrossRef]
  16. Aslanlar, S.; Ogur, A.; Ozsarac, U.; Ilhan, E. Welding time effect on mechanical properties of automotive sheets in electrical resistance spot welding. Mat. Des. 2008, 29, 1427–1431. [Google Scholar] [CrossRef]
  17. Han, Z.; Orozco, J.; Indacochea, J.E.; Chen, C.H. Resistance Spot Welding: A Heat Transfer Study: Real and simulated welds were used to develop a model for predicting temperature distribution. Weld. J. 1989, 68, 363–371. [Google Scholar]
  18. DVS 2929-1; Messung des Übergangswiderstands—Grundlagen, Messmethoden und -Einrichtungen [Method for Determining the Transition Resistance—Basics, Measurement Methods and Set-Up]. DVS—Deutscher Verband für Schweißen und Verwandte Verfahren e.V.; DVS Media GmbH: Düsseldorf, Germany, 2014.
  19. Leuschen, B. Beitrag zum Tragverhalten von Aluminum- und Aluminium/Stahl-Widerstandspunktschweissverbindungen bei Verschiedenartiger Beanspruchung [Contribution to the Load-Bearing Behavior of Aluminum and Aluminum/Steel Resistance Spot Welded Joints Under Different Types of Stress]. Ph.D. Dissertation, RWTH Aachen University, Aachen, Germany, 1984. [Google Scholar]
  20. Andrews, D.R.; Bhattacharya, S. Dynamic Resistance and Its Application to In-Process Control of Spot Welding. In Proceedings of the International Conference on Exploiting Welding in Production Technology, London, UK, 22–24 April 1975; pp. 221–227. [Google Scholar]
  21. Ma, Y.; Wu, P.; Xuan, C.; Zhang, Y.; Su, H. Review on Techniques for On-Line Monitoring of Resistance Spot Welding Process. Adv. Mat. Sc. Eng. 2013, 2013, 630984. [Google Scholar] [CrossRef]
  22. Dickinson, D.W.; Franklin, J.E.; Stanya, A. Characterization of Spot Welding Behavior by Dynamic Electrical Parameter Monitoring. Weld. Res. Suppl. 1980, 59, 170–176. [Google Scholar]
  23. Gedeon, S.A.; Eagar, T.W. Resistance Spot Welding of Galvanized Steel: Part II. Mechanisms of Spot Weld Nugget Formation. Met. Trans. B 1986, 17B, 887–901. [Google Scholar] [CrossRef]
  24. Savage, W.F.; Nippes, E.F.; Wassell, F.A. Dynamic contact resistance of series spot welds. Weld. J. 1978, 43–50. [Google Scholar]
  25. Patrick, E.P.; Auhl, J.R.; Sun, T.S. Understanding the Process Mechanisms Is Key to Reliable Resistance Spot Welding Aluminum Auto Body Components; SAE Technical Paper Series; 400 Commonwealth Drive; SAE International: Warrendale, PA, USA, 1984. [Google Scholar]
  26. Piott, M.; Werber, A.; Schleuss, L.; Doynov, N.; Ossenbrink, R.; Michailov, V.G. Numerical and experimental analysis of heat transfer in resistance spot welding process of aluminum alloy AA5182. Int. J. Adv. Manuf. Technol. 2020, 111, 1671–1682. [Google Scholar] [CrossRef]
  27. Fezer, A.; Weihe, S.; Werz, M. Method for Determining the Contact and Bulk Resistance of Aluminum Alloys in the Initial State for Resistance Spot Welding. J. Manuf. Mater. Process. 2025, 9, 266. [Google Scholar] [CrossRef]
  28. Han, L.; Thornton, M.; Boomer, D.; Shergold, M. A correlation study of mechanical strength of resistance spot welding of AA5754 aluminium alloy. J. Mater. Process. Technol. 2011, 211, 513–521. [Google Scholar] [CrossRef]
  29. Han, L.; Thornton, M.; Boomer, D.; Shergold, M. Effect of aluminium sheet surface conditions on feasibility and quality of resistance spot welding. J. Mater. Process. Technol. 2010, 210, 1076–1082. [Google Scholar] [CrossRef]
  30. Fezer, A.; Weihe, S.; Werz, M. Influences of Various Parameters on the Weld Spot Diameter during Resistance Spot Welding of the Aluminum Alloy EN AW-6005. Struct. Integr. Proc. 2026; submitted. [Google Scholar]
  31. Schulz, E.; Wagner, H.; Schubert, H.; Zhang, W.; Balasubramanian, B.; Brewer, L.N. Short-Pulse Resistance Spot Welding of Aluminum Alloy 6016–T4—Part. Weld. J. 2021, 100, 41–51. [Google Scholar] [CrossRef]
  32. Huang, M.; Zhang, Q.; Qi, L.; Deng, L.; Li, Y. Effect of external magnetic field on resistance spot welding of aluminum alloy AA6061-T6. J. Manuf. Process. 2020, 50, 456–466. [Google Scholar] [CrossRef]
  33. Florea, R.S.; Bammann, D.J.; Yeldell, A.; Solanki, K.N.; Hammi, Y. Welding parameters influence on fatigue life and microstructure in resistance spot welding of 6061-T6 aluminum alloy. Mater. Des. (1980–2015) 2013, 45, 456–465. [Google Scholar] [CrossRef]
  34. Pereira, A.M.; Ferreira, J.M.; Loureiro, A.; Costa, J.; Bártolo, P.J. Effect of process parameters on the strength of resistance spot welds in 6082-T6 aluminium alloy. Mater. Des. (1980–2015) 2010, 31, 2454–2463. [Google Scholar] [CrossRef]
  35. Bamberg, P.; Gintrowski, G.; Liang, Z.; Schiebahn, A.; Reisgen, U.; Precoma, N.; Geffers, C. Development of a new approach to resistance spot weld AW-7075 aluminum alloys for structural applications: An experimental study—Part 1. J. Mater. Res. Technol. 2021, 15, 5569–5581. [Google Scholar] [CrossRef]
  36. VDA 238-401; Vorgabe zur Prüfung der Schweißeignung von Aluminiumblechwerkstoffen Durch Widerstandspunktschweißen (WPS) [Requirements for Testing the Weldability of Aluminium Sheet Alloys Using Resistance Spot Welding (RSW)]. Verband der Automobilindustrie e.V.: Berlin, Germany, 2020.
  37. VDA 239-200; Flacherzeugnisse aus Aluminium [Aluminium Sheet Material]. Verband der Automobilindustrie e.V.: Berlin, Germany, 2017.
  38. DIN EN 573-3; Aluminium und Aluminiumlegierungen—Chemische Zusammensetzung und Form von Halbzeug—Teil 3: Chemische Zusammensetzung und Erzeugnisformen [Aluminium and Aluminium Alloys—Chemical Composition and Form of Wrought Products—Part 3: Chemical Composition and Form of Products]. DIN—Deutsches Institut für Normung e.V.; Beuth Verlag GmbH: Berlin, Germany, 2024.
  39. DVS 2916-1; Prüfen von Widerstandspressschweißverbindungen—Zerstörende Prüfung, Quasistatisch [Testing of Resistance Welded Joints—Destructive Testing, Quasi Static]. DVS—Deutscher Verband für Schweißen und Verwandte Verfahren e.V.; DVS Media GmbH: Düsseldorf, Germany, 2014.
  40. DIN EN ISO 10447; Widerstandsschweißen—Prüfung von Schweißverbindungen—Schäl- und Meißelprüfung von Widerstandspunkt- und Buckelschweißverbindungen [Resistance Welding—Testing of Welds—Peel and Chisel Testing of Resistance Spot and Projection Welds]. DIN—Deutsches Institut für Normung e.V.; Beuth Verlag GmbH: Berlin, Germany, 2015.
  41. Leuschen, B. Fügen von Aluminium-Karosseriewerkstoffen [Joining Aluminum Body Materials], Aluminium-Werkstofftechnik für den Automobilbau [Aluminum Materials Technology for Automotive Construction]; Ostermann, F., Ed.; Expert-Verlag: Ehningen, Germany, 1992. [Google Scholar]
  42. Hu, S.; Haselhuhn, A.S.; Ma, Y.; Li, Y.; Carlson, B.E.; Lin, Z. Comparison of the Resistance Spot Weldability of AA5754 and AA6022 Aluminum to Steels. Weld. J. 2020, 2020, 224–238. [Google Scholar] [CrossRef]
  43. Luo, Z.; Ao, S.; Chao, Y.J.; Cui, X.; Li, Y.; Lin, Y. Application of Pre-heating to Improve the Consistency and Quality in AA5052 Resistance Spot Welding. J. Mater. Eng. Perform. 2015, 24, 3881–3891. [Google Scholar] [CrossRef]
  44. Mallick, P.K. Materials, Design, and Manufacturing for Lightweight Vehicles; Woodhead Publishing: Duxford, UK; Cambridge, MA, USA; Kidlington, UK; Oxford, UK, 2021. [Google Scholar]
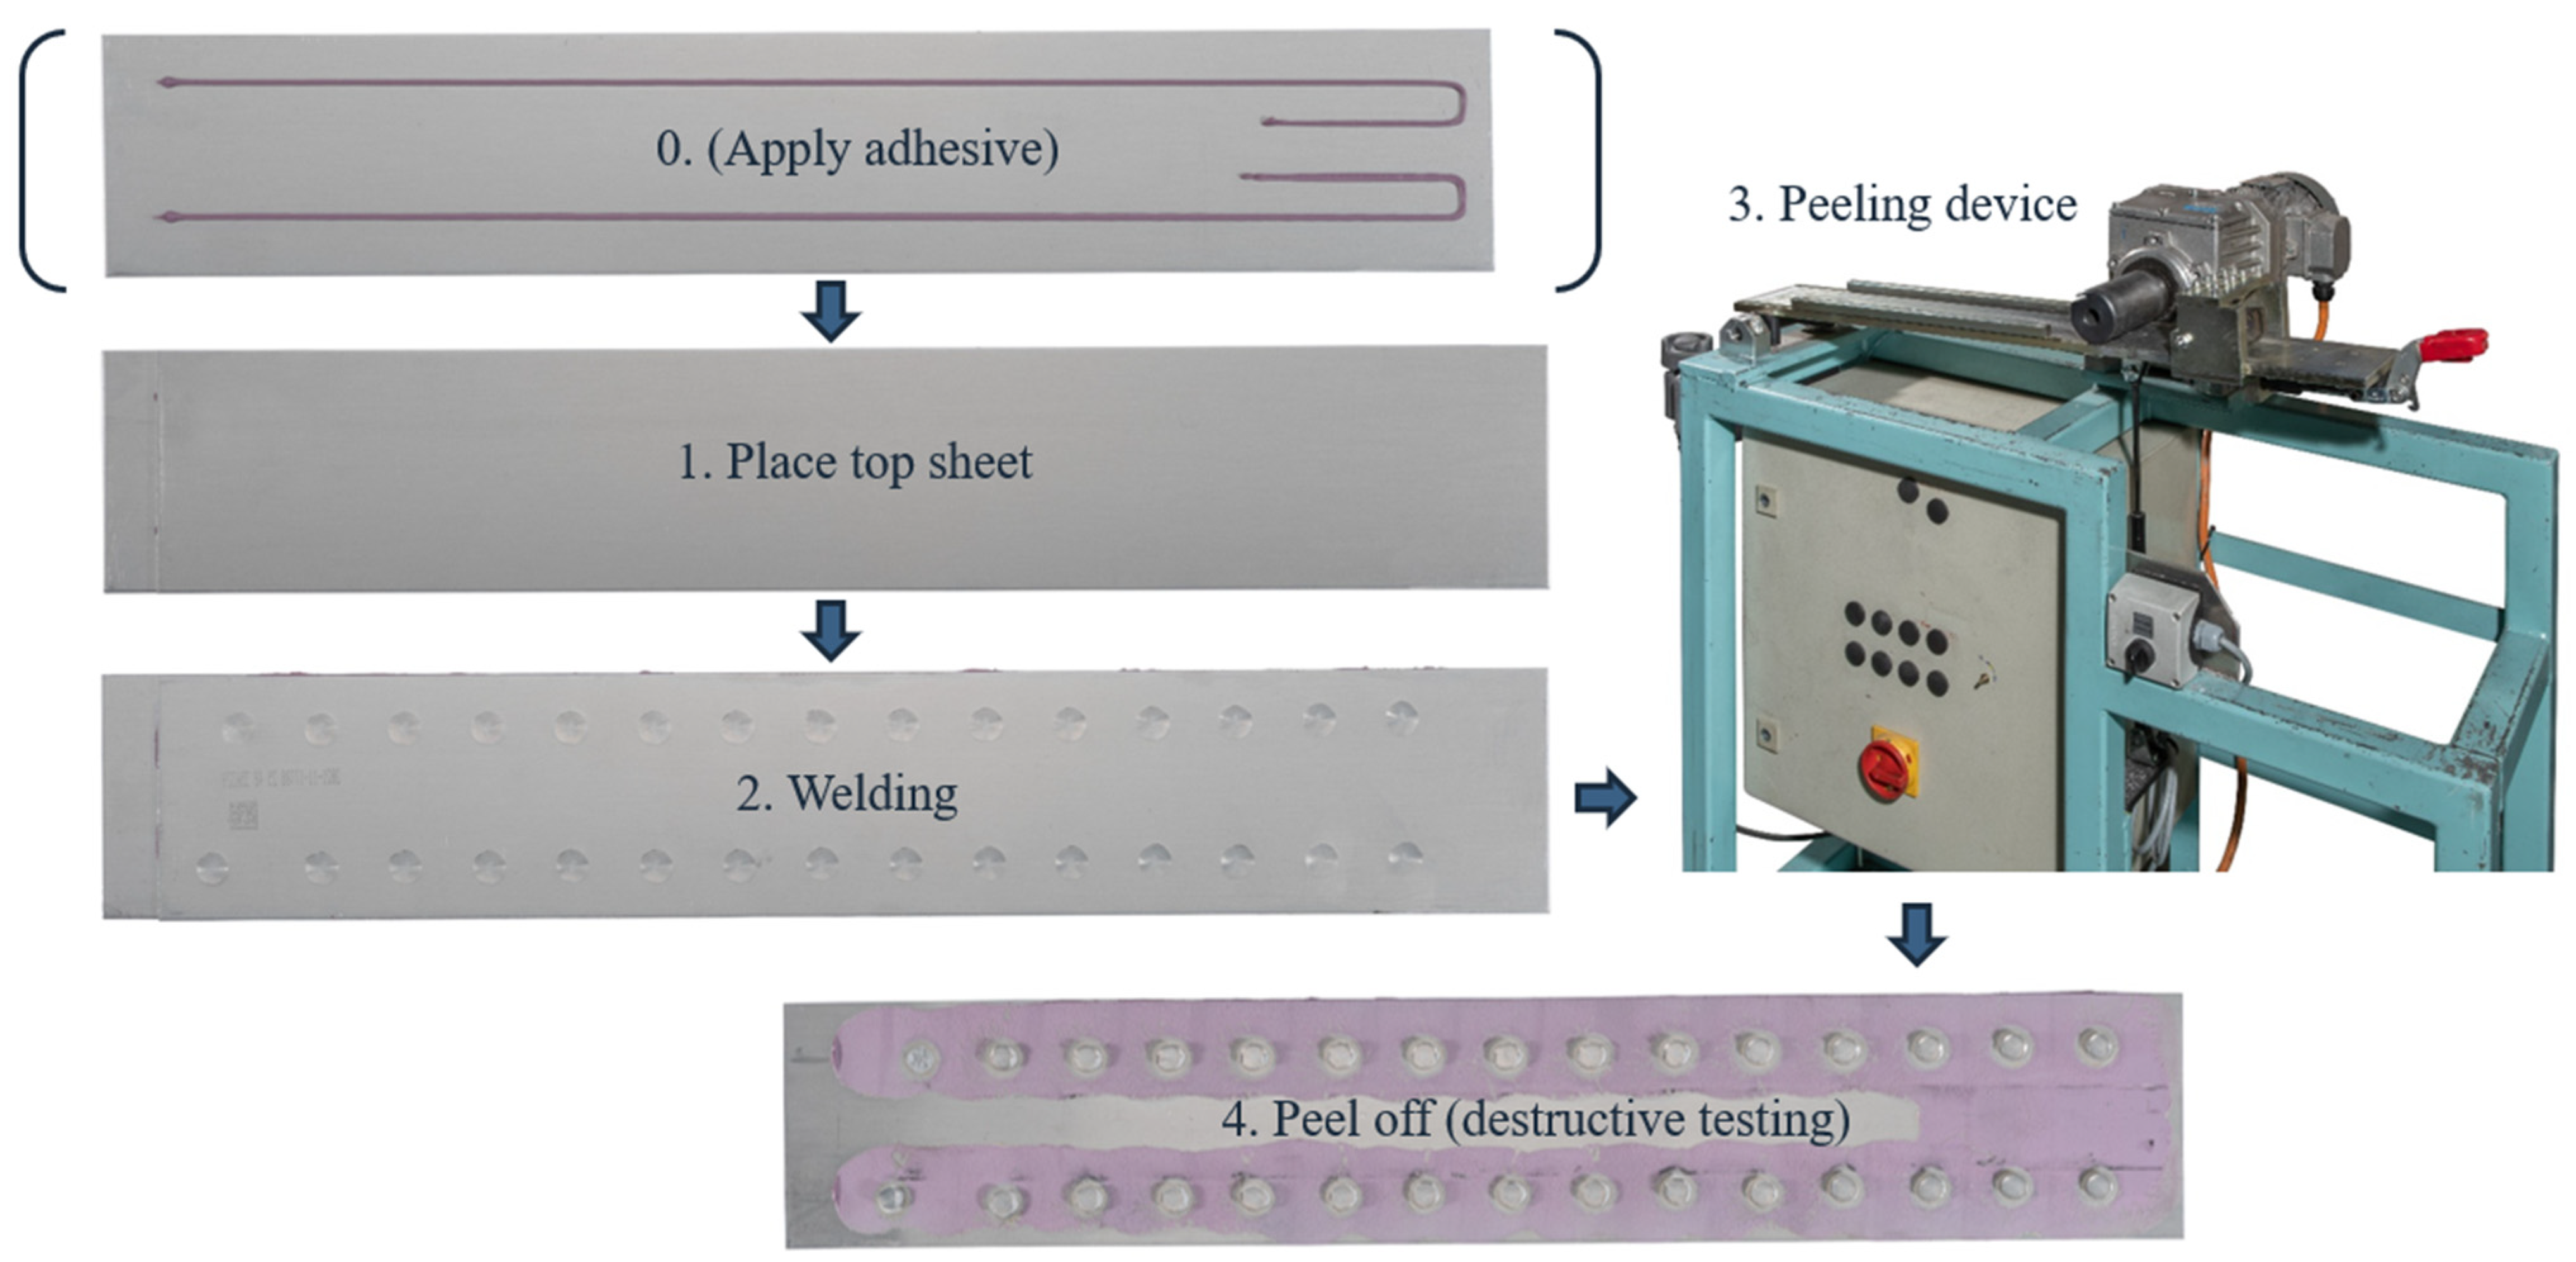
Figure 1. Procedure of the sheets before and after welding.
Jmmp 10 00050 g001
Figure 2. Sample geometry with dimensions.
Jmmp 10 00050 g002
Figure 3. KUKA-robot with C-type welding gun from NIMAK.
Jmmp 10 00050 g003
Figure 4. Welding current and electrode force profile.
Jmmp 10 00050 g004
Figure 5. Spot diameter of EN AW-5182 and EN AW-6005 at different welding currents and electrode forces as a bar chart.
Jmmp 10 00050 g005
Figure 6. Spot diameter of EN AW-5182 and EN AW-6005 at different welding currents and electrode forces.
Jmmp 10 00050 g006
Figure 7. Expulsion from EN AW-5182 at different welding currents and electrode forces as a bar chart.
Jmmp 10 00050 g007
Figure 8. Influence of the sheet thickness on spot diameter as a bar chart (mean values).
Jmmp 10 00050 g008
Figure 9. Influence of the adhesive BETAMATE™ 1640 on the spot diameter of the alloy EN AW-6005 (w.a. = with adhesive).
Jmmp 10 00050 g009
Figure 10. Influence of the adhesive BETAMATE™ 1640 on the spot diameter of the alloy EN AW-6005 as a bar chart (mean values).
Jmmp 10 00050 g010
Table 1. Chemical composition (wt.%) of EN AW-5182 and EN AW-6005 according to VDA 239-300 [37] and DIN EN 573-3 [38] with different sheet thicknesses (s = 1, 2, 3 mm).
EN AW-5182
(AlMg4.5Mn0.4)
(AL5-STD)
SiFeCuMnMgCrZnTiV
Chemical Composition [37,38]≤0.20≤0.35≤0.150.20–0.504.00–5.00≤0.10≤0.25≤0.10-
s = 1 mm0.080.260.030.314.310.0220.0100.0120.012
s = 2 mm0.090.240.020.304.800.0140.0100.0130.010
s = 3 mm0.070.250.020.324.350.0200.0040.0140.010
* EN AW-6005
* (AlMg0.6Si0.6V)
** (AL6-HDI)
SiFeCuMnMgCrZnTiV
* Chemical Composition [38]0.60–0.90≤0.35≤0.10≤0.100.40–0.60≤0.10≤0.10≤0.10-
** Chemical Composition [37]≤1.50≤0.35≤0.25≤0.30≤0.90≤0.15≤0.25≤0.15≤0.10
s = 1 mm0.730.200.090.070.590.0110.0040.0240.01
s = 2 mm0.730.210.100.080.590.0020.0040.0240.01
s = 3 mm0.730.200.090.070.600.0110.0040.0240.01
Table 2. Overview of tests performed and their parameters per aluminum alloy.
ParameterSubsectionParameter VariationsBoundariesNumber of Sheet PairsNumber of Weld Spots
Welding currentSection 3.130/35/40/45 kASheet thickness: 2 mm
Adhesive: yes
16480
Electrode forceSection 3.15/6/7/8 kNSheet thickness: 2 mm
Adhesive: yes
16480
Sheet thicknessSection 3.21/2/3 mmAdhesive: yes3 × 16 = 483 × 480 = 1440
AdhesiveSection 3.3With/Without adhesive BETAMATE™ 1640Sheet thickness: 2 mm2 × 16 = 322 × 480 = 960
Table 3. Slope m of the linear regression line for predicting the spot diameter d.
F [kN]m (EN AW-5182) [-]m (EN AW-6005) [-]
50.1640.225
60.1780.227
70.1480.224
80.147(0.252)
Mean Value0.1590.225
Disclaimer/Publisher’s Note: The statements, opinions and data contained in all publications are solely those of the individual author(s) and contributor(s) and not of MDPI and/or the editor(s). MDPI and/or the editor(s) disclaim responsibility for any injury to people or property resulting from any ideas, methods, instructions or products referred to in the content.