Abstract
Rotary ultrasonic machining (RUM) is a nontraditional and cost-effective machining method for hard and brittle materials, such as ceramics, optical glass, composite materials, and so on. RUM is a hybrid process that combines the material removal mechanisms of diamond abrasive grinding and ultrasonic machining. In RUM, a rotating cutting tool with metal-bonded diamond abrasive particles is ultrasonically vibrated in the axial direction while the tool spindle is fed toward the workpiece at a constant feedrate to remove material. It has been reported that continuous rotary ultrasonic machining has been successfully used to drill holes in K9 glass. Intermittent rotary ultrasonic machining is a newly introduced ultrasonic machining process, which uses a slotted cutting tool instead of a common metal bonded diamond cutting tool as used in continuous rotary ultrasonic machining. There has been no reported study to compare the effects of intermittent RUM and continuous RUM when machining K9 glass. This paper, for the first time, presents an experimental investigation to compare intermittent RUM and continuous RUM when machining K9 glass from the perspectives of cutting force, surface roughness, and chipping size.
1. Introduction
1.1. K9 Glass
K9 glass, also known as BK7 or borosilicate crown glass, has excellent optical performance due to its bubble-free structure and low inclusions [1]. K9 glass has been used as a representative functional material in many applications, such as optics, electronics, thermodynamics, fluidics, and so on [2]. K9 glass is regarded as a difficult-to-machine material due to its mechanical properties, such as high hardness, high strength, and low fracture toughness [3]. Other material properties that give K9 glass a broad application include its low density, high thermal resistance, and good resistance to corrosion and wear.
Some material processing techniques have been reported on machining of K9 glass. Gu et al. used a diamond grinding wheel to study four grinding modes: brittle mode, semi-brittle mode, semi-ductile mode and ductile mode in horizontal surface grinding of K9 glass [4]. Park et al. investigated micro machining of K9 glass by using micro-abrasives, which were accelerated by compressed air to form linear grooves and holes with width and diameter of 80 μm [5]. Matsumura et al. reported the use of abrasive water jet to make grooves of 20–100 μm wide on glass [6]. Rotary ultrasonic machining (RUM) has also been applied to K9 glass machining [3,7,8,9]. Paragraphs that follow will give more details to introduce the RUM process and the state-of-the-art of its application to K9 glass machining.
1.2. Rotary Ultrasonic Machining and Its Application to K9 Glass Machining
Rotary ultrasonic machining (RUM) is a hybrid machining process of diamond grinding and ultrasonic machining. Figure 1 shows an illustration of this process and microscopic pictures of machined surface, cutting interface, and cutting chips of K9 glass. In RUM, a rotating cutting tool with metal-bonded diamond abrasive particles is ultrasonically vibrated in the axial direction; while the tool spindle is fed toward the workpiece at a constant feedrate to remove material. Coolant is injected to the cutting interface between the tool and the workpiece to flush the swarf away and to prevent overheating at the cutting interface.
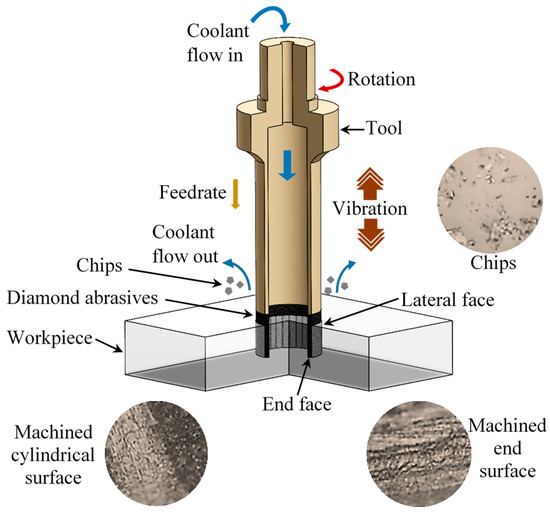
Figure 1.
Illustrations of Rotary ultrasonic machining (RUM) and microscopic pictures of machined surface, cutting interface, and cutting chips of K9 glass.
Several experimental investigations revealed that RUM is a cost-effective machining method for difficult-to-machine materials [9,10]. RUM also provides 6–10 times higher material removal rate (MRR) than conventional grinding with a relatively low cutting force, which helps to achieve high tool life, high machining accuracy, low machining temperature, and low surface roughness [7,11,12].
Zhang et al. did a feasibility study on RUM of K9 glass [3]. They revealed that RUM can drill holes on K9 glass with compressed air as coolant [3]. Zhang et al. also investigated rotary ultrasonic face milling of K9 glass and studied its material removal mechanism [13]. It is reported that, comparing to diamond milling, rotary ultrasonic face milling reduced surface damage depth, chipping size, and lateral cracks [3].
Lv et al. investigated RUM of K9 glass and reported a study of scratch test to obtain damage patterns in the stage of high strain rate [7]. In their study, they discussed kinematic principles of the abrasives. Material strain rate effects based on the indentation mechanics theory were also studied in Lv et al.’s study [7]. Lv et al. also studied the surface formation mechanisms and conducted experimental investigations on subsurface damage, including the relationship between subsurface damage and surface roughness, subsurface damage depth and its distribution in RUM and conventional grinding of K9 glass [8,9,14,15]. They did another study to attain influences of high-frequency vibration on tool wear in RUM of K9 glass [16].
RUM is merited for providing good surface finish. In order to reduce the hole surface roughness, it is important to have an efficient way to flush the swarf away. RUM employs liquid coolant or compressed air to flush the swarf in between the tool and workpiece away [17]. Intermittent rotary ultrasonic machining (intermittent RUM) is a newly introduced machining process. The main difference between these two RUM processes is that intermittent RUM uses a slotted cutting tool (metal bonded diamond core drill) instead of a common metal bonded diamond core cutting tool (without slots) in continuous RUM. Regarding swarf flushing, intermittent RUM provides a higher coolant flow rate [18]. Zeng et al. did an experimental investigation on intermittent rotary ultrasonic machining of alumina (92% hot-pressed) [18]. They compared output coolant flowrate and surface quality between continuous RUM and intermittent RUM. They found that coolant flowrate was increased and surface quality was improved significantly by using intermittent RUM [18]. But there was no significant difference in cutting force by using intermittent RUM compared to continuous RUM [18].
In RUM studies, results were also obtained and analyzed through mathematical modeling. Chowdhury et al. conducted an experiment by drilling high precision holes in Ti6Al4V using RUM and constructed a set of possibility distributions in order to represent the uncertainty in the output variables to determine the effects of the input variables on output variables quantitatively [19].
This study, for the first time, conducts intermittent RUM on K9 glass, and compares its performance against continuous RUM from the perspectives of cutting force, surface roughness, and chipping size. The remainder of this paper presents as follows. Section 2 provides experimental conditions and measurement procedures. Experimental results including effects on cutting force, surface roughness, and edge chipping are described in Section 3. Section 4 presents conclusions drawn from this study.
2. Material, Experimental Set-Up and Measurement Procedures
2.1. Material
The workpiece was K9 glass with the size of 40 mm × 30 mm × 5 mm. The properties of workpiece are listed in Table 1.

Table 1.
Properties of K9 glass [20].
2.2. Experimental Set-Up
The experiments were conducted on a rotary ultrasonic machine (Series 10, Sonic-Mill, Albuquerque, NM, USA). As illustrated in Figure 2, rotary ultrasonic machining set-up mainly consisted of an ultrasonic spindle system, a coolant system, and a data acquisition system. The ultrasonic spindle, a power supply, an electric motor, a control panel, and a hydraulic feeding device (not shown in the figure) comprised the ultrasonic spindle system. The power supply converted electrical input of 110 V and 50–60 Hz signal in to 20,000 Hz electrical signal which fed to a piezoelectric device that located at inside of the ultrasonic spindle. Then piezoelectric device converted 20,000 Hz signal into high frequency mechanical vibration, namely ultrasonic vibration. That low amplitude ultrasonic vibration was amplified by the acoustic horn located in the ultrasonic spindle and delivered to the cutting tool. Amplitude of the vibration is mainly depending on the output level of the power supply. Rotation of the spindle was provided by the electric motor located on top of the spindle. The coolant system included a coolant tank, a pump, valves, flowrate and pressure gauges, and pressure regulators. The data acquisition system contained a dynamometer (Model 9272, Kistler Inc., Winterthur, Switzerland), a charge amplifier (Model 5070, Kistler Inc., Winterthur, Switzerland), an analog to digital converter, a data acquisition card (PC-CARD-DAS16/16), and a computer with software (Type 2815A, Kistler Inc., Winterthur, Switzerland).
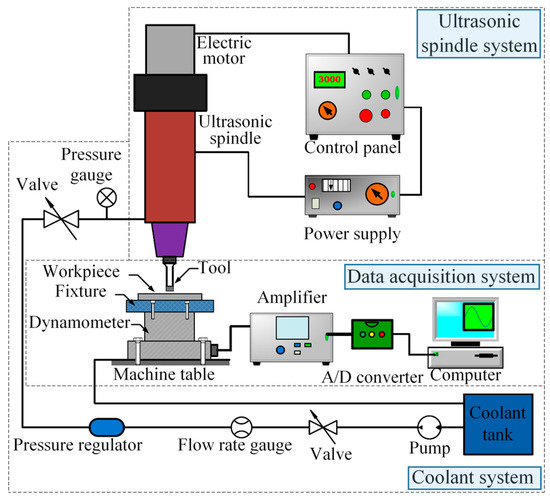
Figure 2.
RUM system set-up.
Experiments were conducted using metal-bonded diamond core drills as illustrated in Figure 3. Figure 3a shows a metal-bonded diamond cutting tool without slots for continuous RUM, and Figure 3b shows a slotted metal-bonded diamond cutting tool for intermittent RUM. Their outer and inner diameters (OD and ID) were 9 mm and 7 mm, respectively. Four input variables (cutting tool: intermittent and continuous, ultrasonic power, tool rotation speed, and feedrate) were studied during the experiment and the experimental design is shown in Table 2. Ultrasonic power was presented as the percentage at ultrasonic power supply.
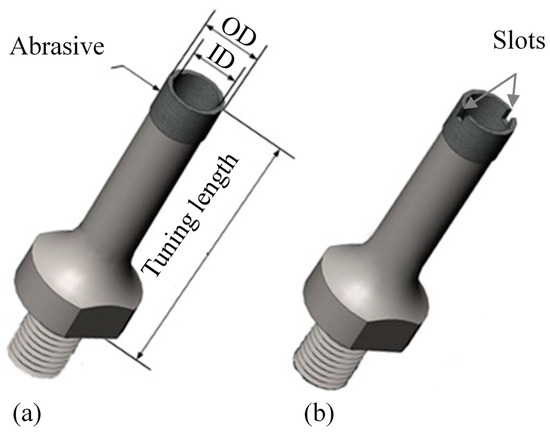
Figure 3.
Illustration of cutting tools. (a) Tool in continuous RUM; (b) Tool in intermittent RUM.

Table 2.
Experimental conditions.
2.3. Measurement Procedures
Cutting force in the axial direction was measured by using a dynamometer. A charge amplifier was used to amplify the signal of cutting force from the dynamometer, and an analog to digital converter was used to convert the signal. Cutting force data was collected by the Dynoware software (Type 2815A, Kisler Inc., Winterthur, Switzerland).
A surface profilometer (Surftest-402, Mitutoyo Corporation, Kanagawa, Japan) was used to measure the surface roughness of the holes. Test range and cut-off length were set at 4 mm and 0.8 mm, respectively. Surface roughness of a hole was measured at the entrance and the exit locations along the axial direction of the hole and characterized by average surface roughness (Ra). Four measurements were taken at each quadrant. The reported Ra value was the average of eight collected data.
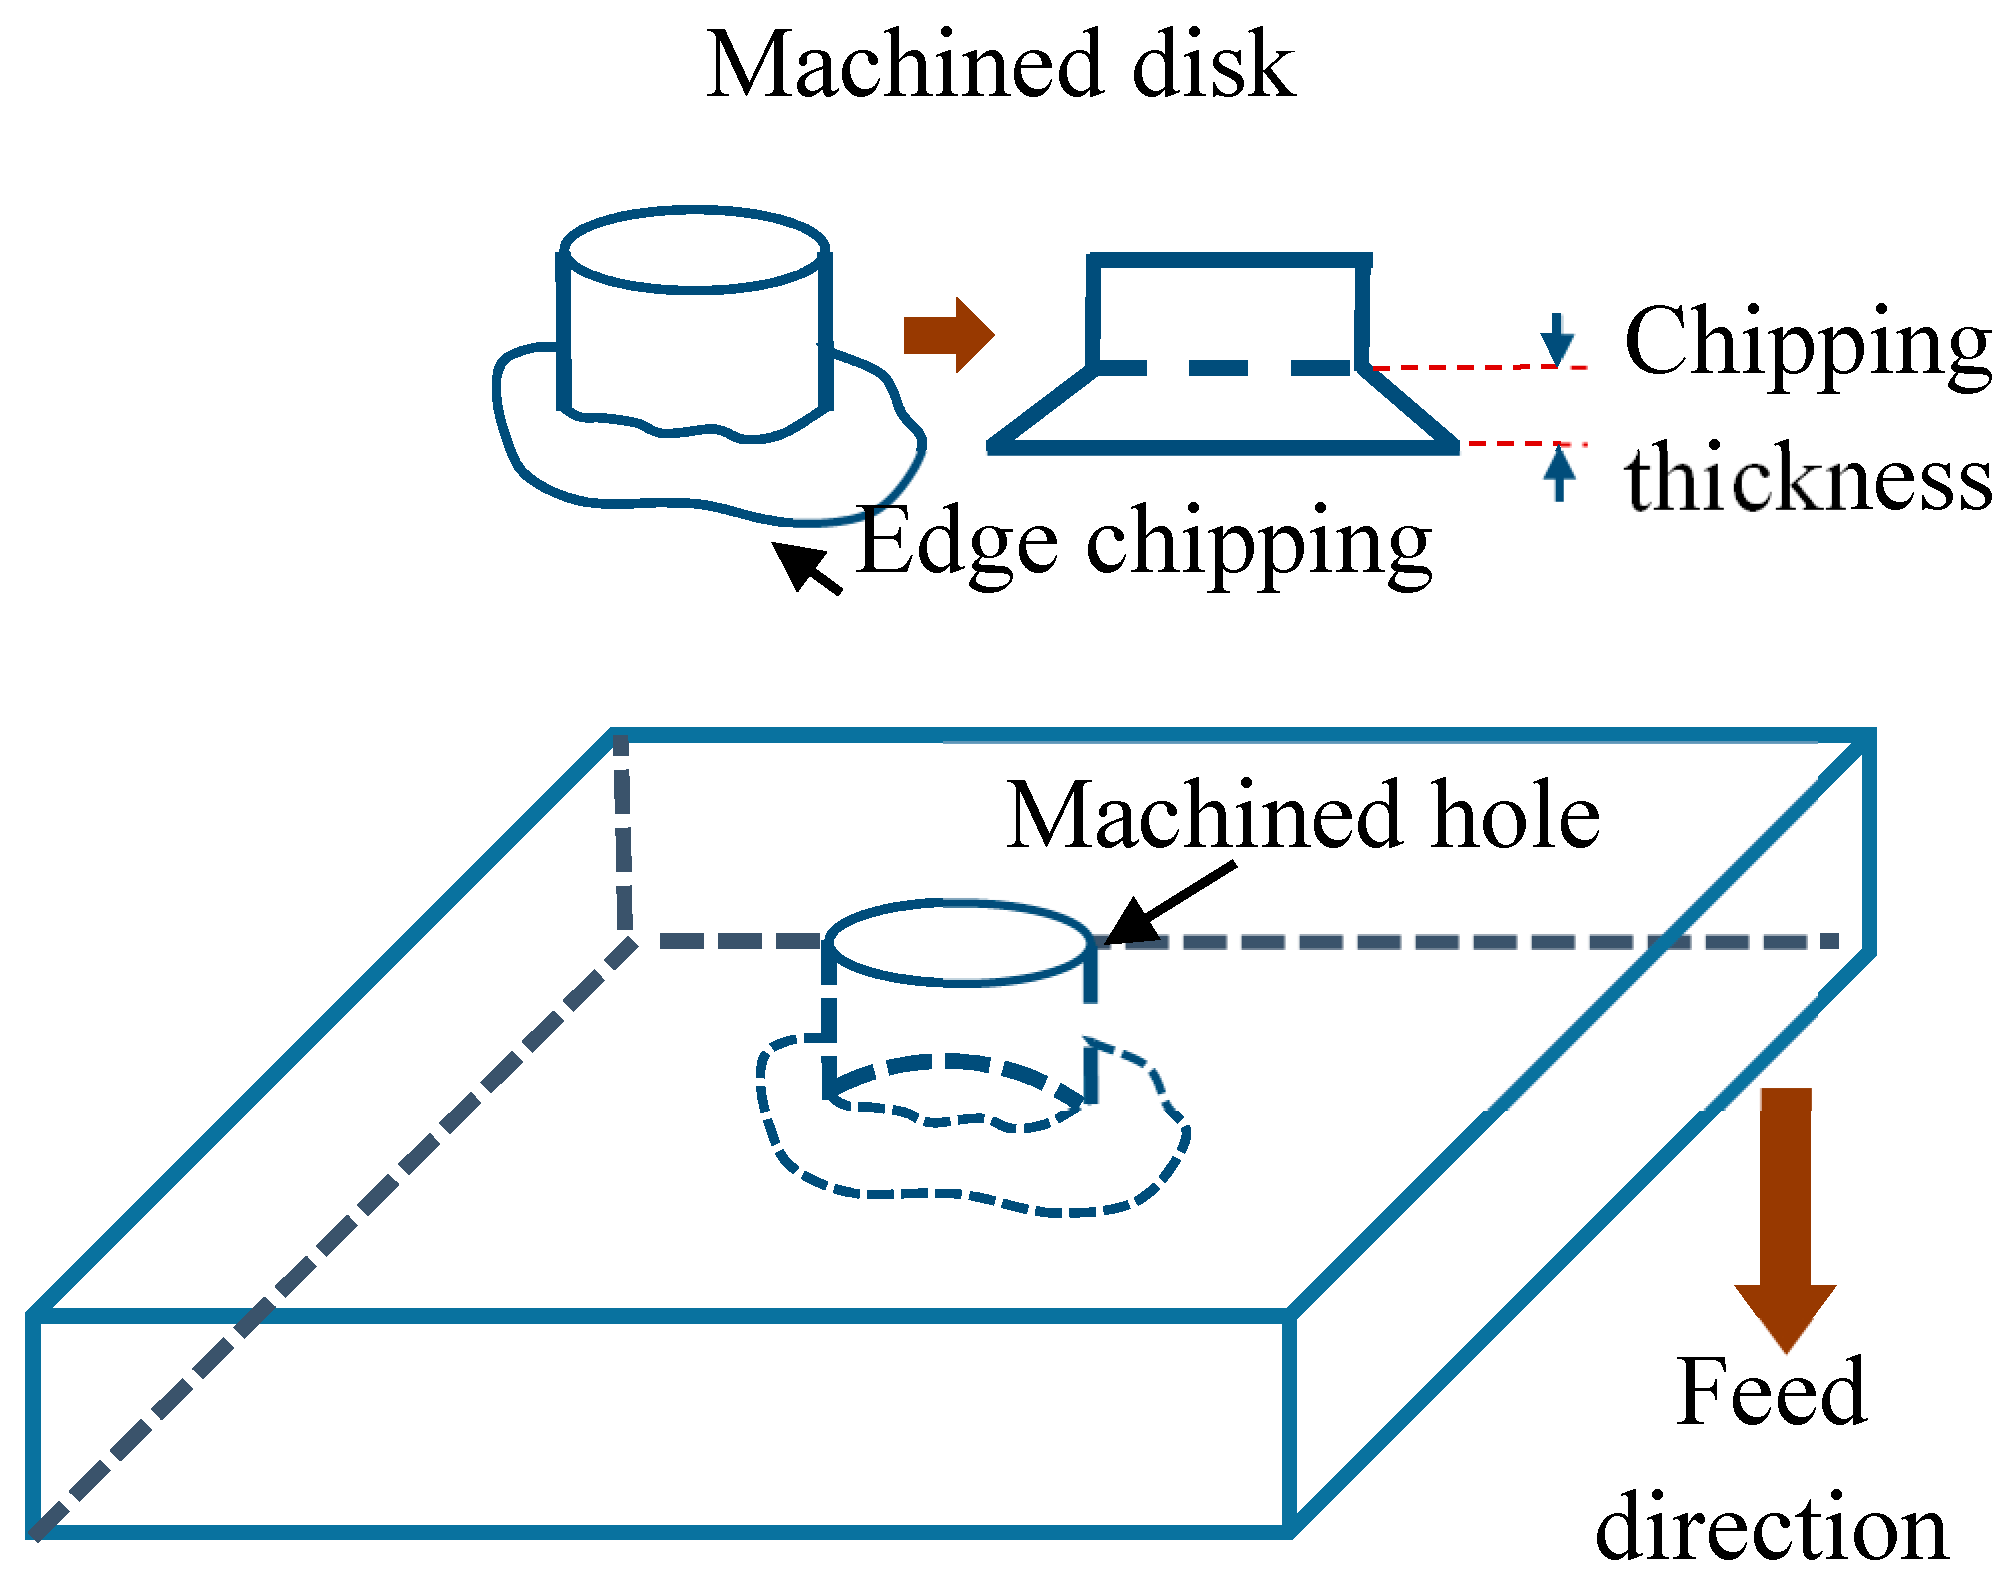
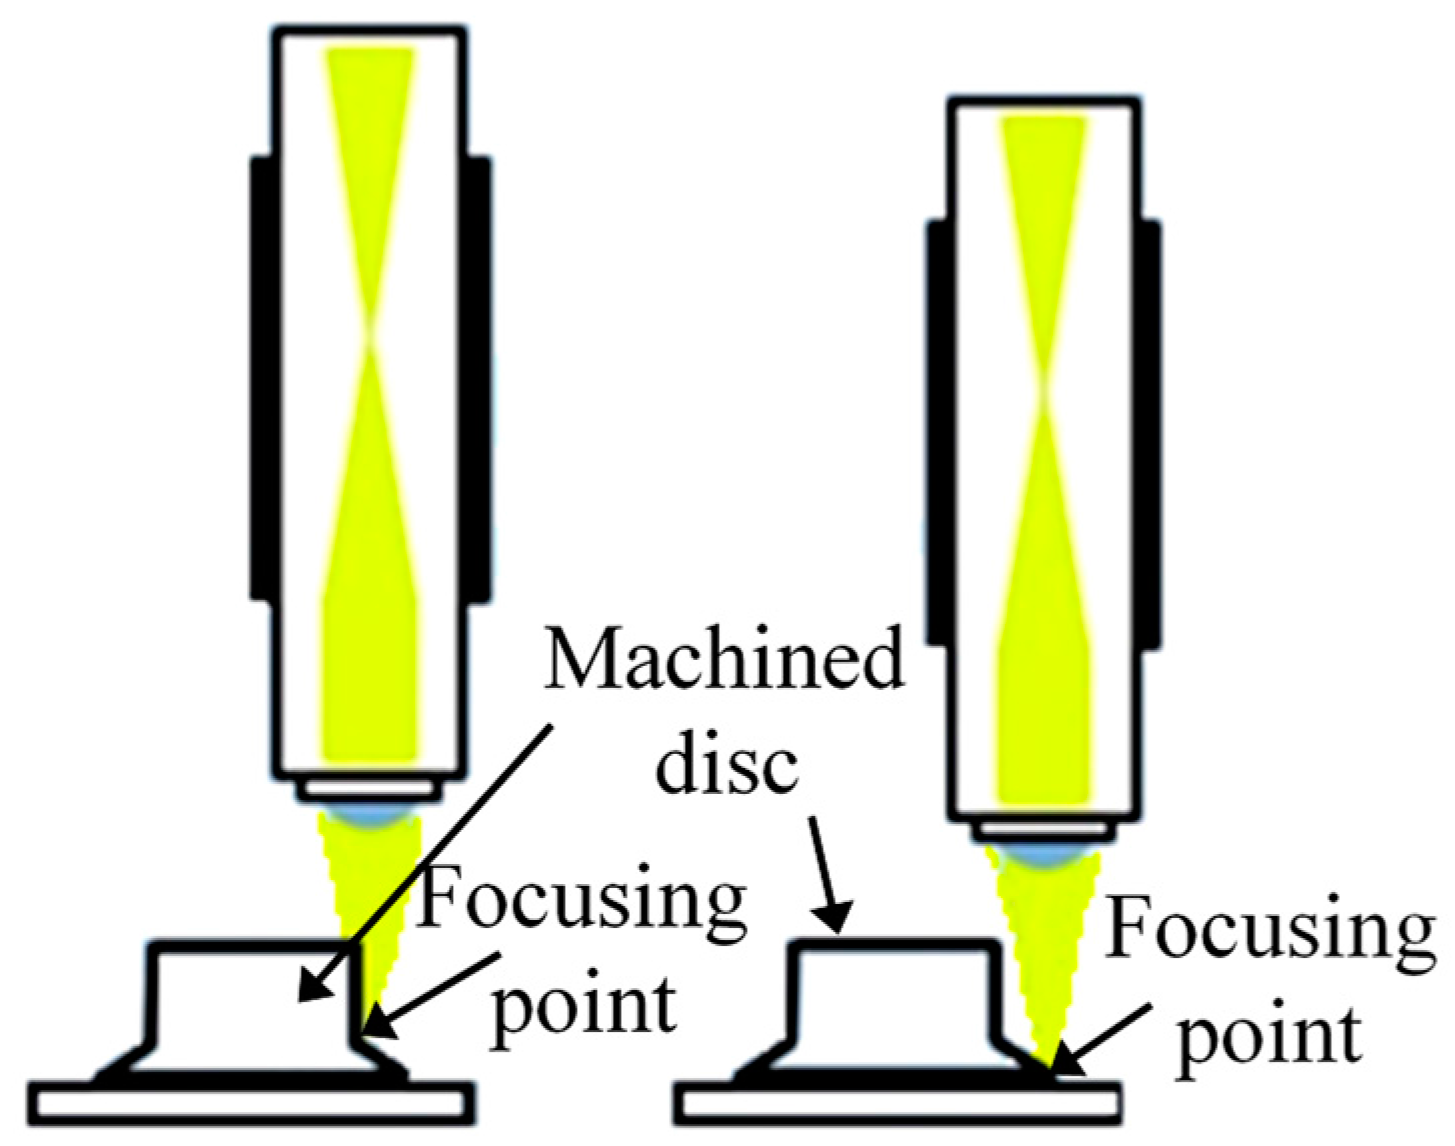
Figure 4 illustrates the edge chipping in RUM of K9 glass. RUM uses core drill as the tool, so drilling a hole also produces a cylindrical disk-shape core at the same time and the core is addressed as the machined disk. Edge chipping thickness was measured on the machined disk by using a microscope (Model BX51M Olympus Inc., Tokyo, Japan) as illustrated in Figure 5. The microscope has high resolving power along its longitudinal axis, referred as depth of focus (DOF). Based on DOF, edge chipping thickness was measured with the assistance of fine-adjustment of the microscope. The K9 machined disc was placed flat on the adjustable table of the microscope, then the fluorescent lamp was turned on. The corresponding reading of the fine adjustment was noted down after focused on the edge of the exit surface. According to the same procedure, the reading of the fine adjustment was taken after focus on the uppermost surface of the chipping area. Edge chip thickness was calculated by the difference of the two readings on the fine adjustment.
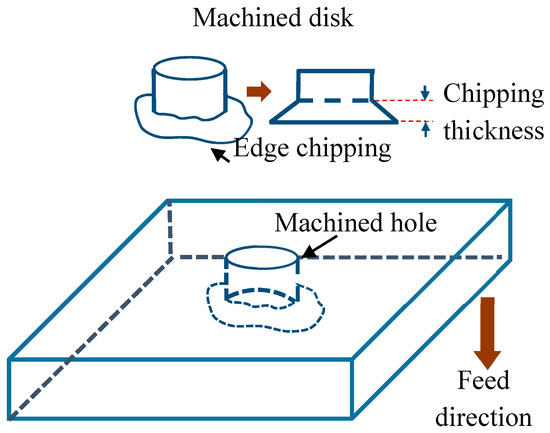
Figure 4.
Illustration of edge chipping.

Figure 5.
Illustration of the measurement of chipping size (thickness) on a microscope.
3. Experimental Results
3.1. Effects on Cutting Force
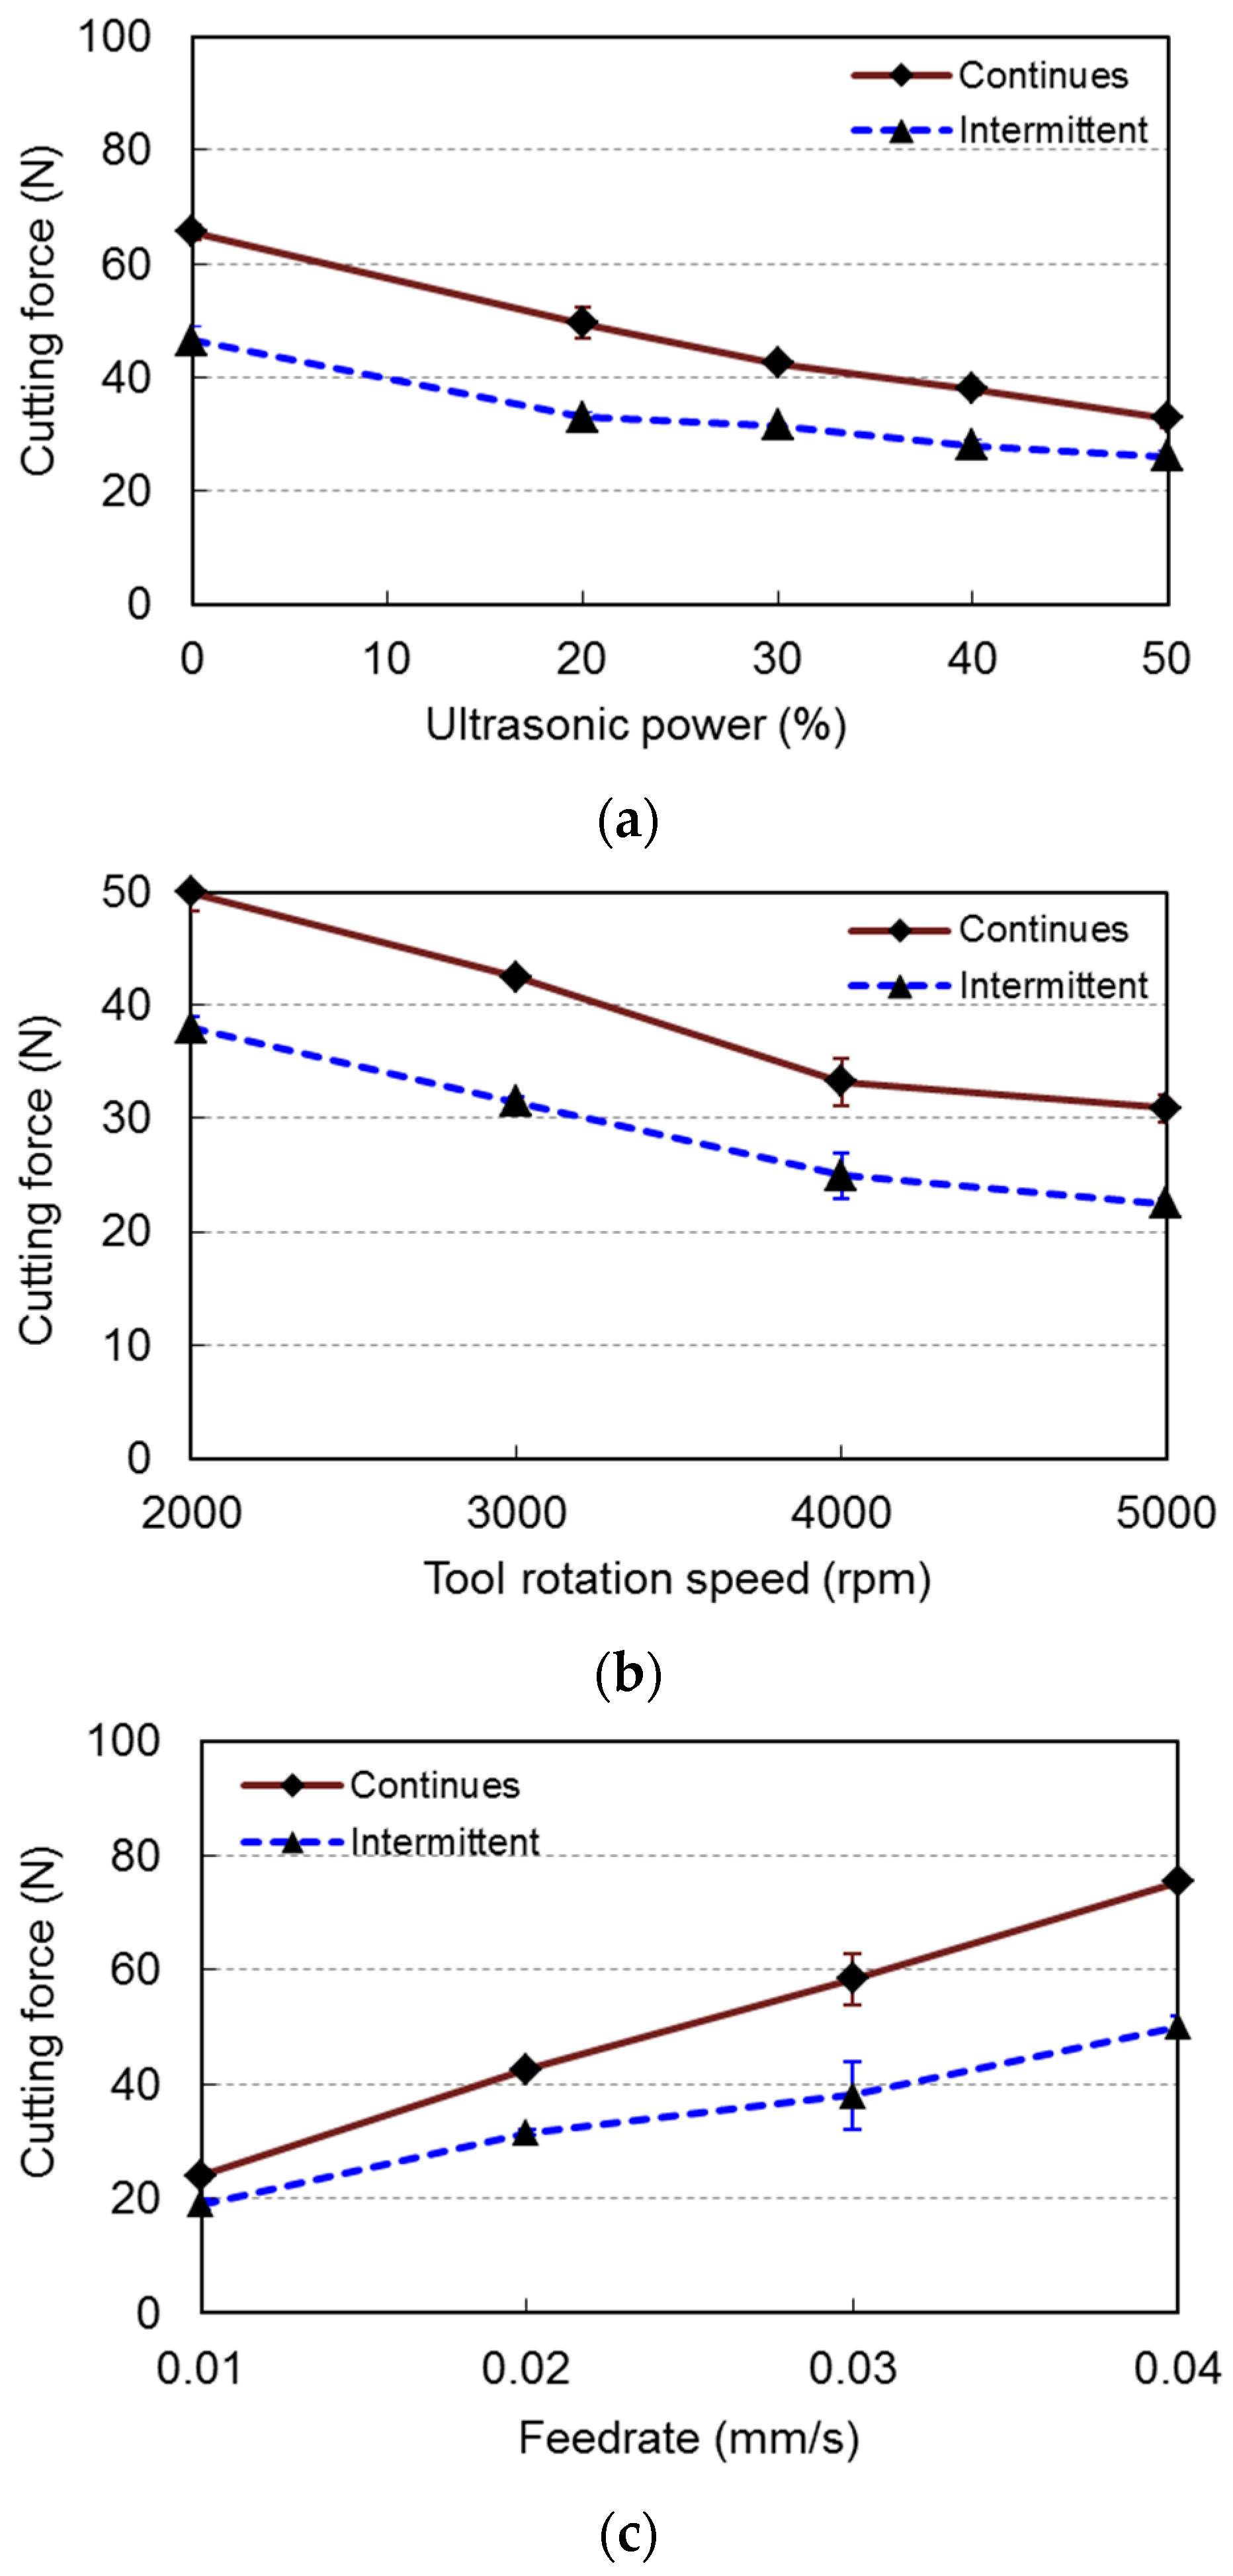
Cutting force is one of the main output variables, since it is associated with tool wear, cutting temperature, surface roughness, and torque [21,22]. Figure 6a shows a comparison of cutting force between intermittent and continuous RUM. Figure 6 presents the average value of the cutting force of three holes drilled on K9 glass under the same condition. It can be seen that cutting force of intermittent RUM was always lower than that of continuous RUM. However, previous intermittent RUM study of alumina reported that cutting force has no significant difference compared with cutting force of continuous RUM [18].
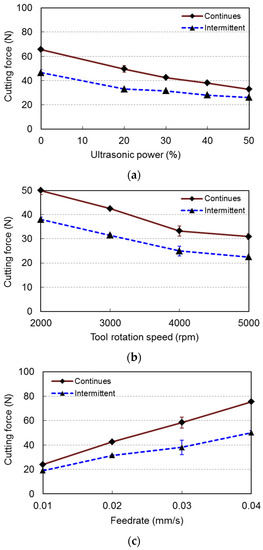
Figure 6.
Effects of input variables on cutting force. (a) Effects of ultrasonic amplitude; (b) Effects of tool rotation speed; (c) Effects of federate.
Cutting force decreased with the increase of ultrasonic power for both intermittent and continuous RUM. The difference in cutting force between intermittent and continuous RUM was larger at lower ultrasonic power levels.
According to the Figure 6b, cutting force of intermittent RUM is lower than that of continuous RUM at the same tool rotation speed. Cutting force of both intermittent RUM and continuous RUM decreased as tool rotation speed increased. As shown in Figure 6c, cutting force of both intermittent and continuous RUM increased with the increase of feedrate. The difference in cutting force between intermittent and continuous RUM became larger as feedrate increased.
3.2. Effects on Surface Roughness
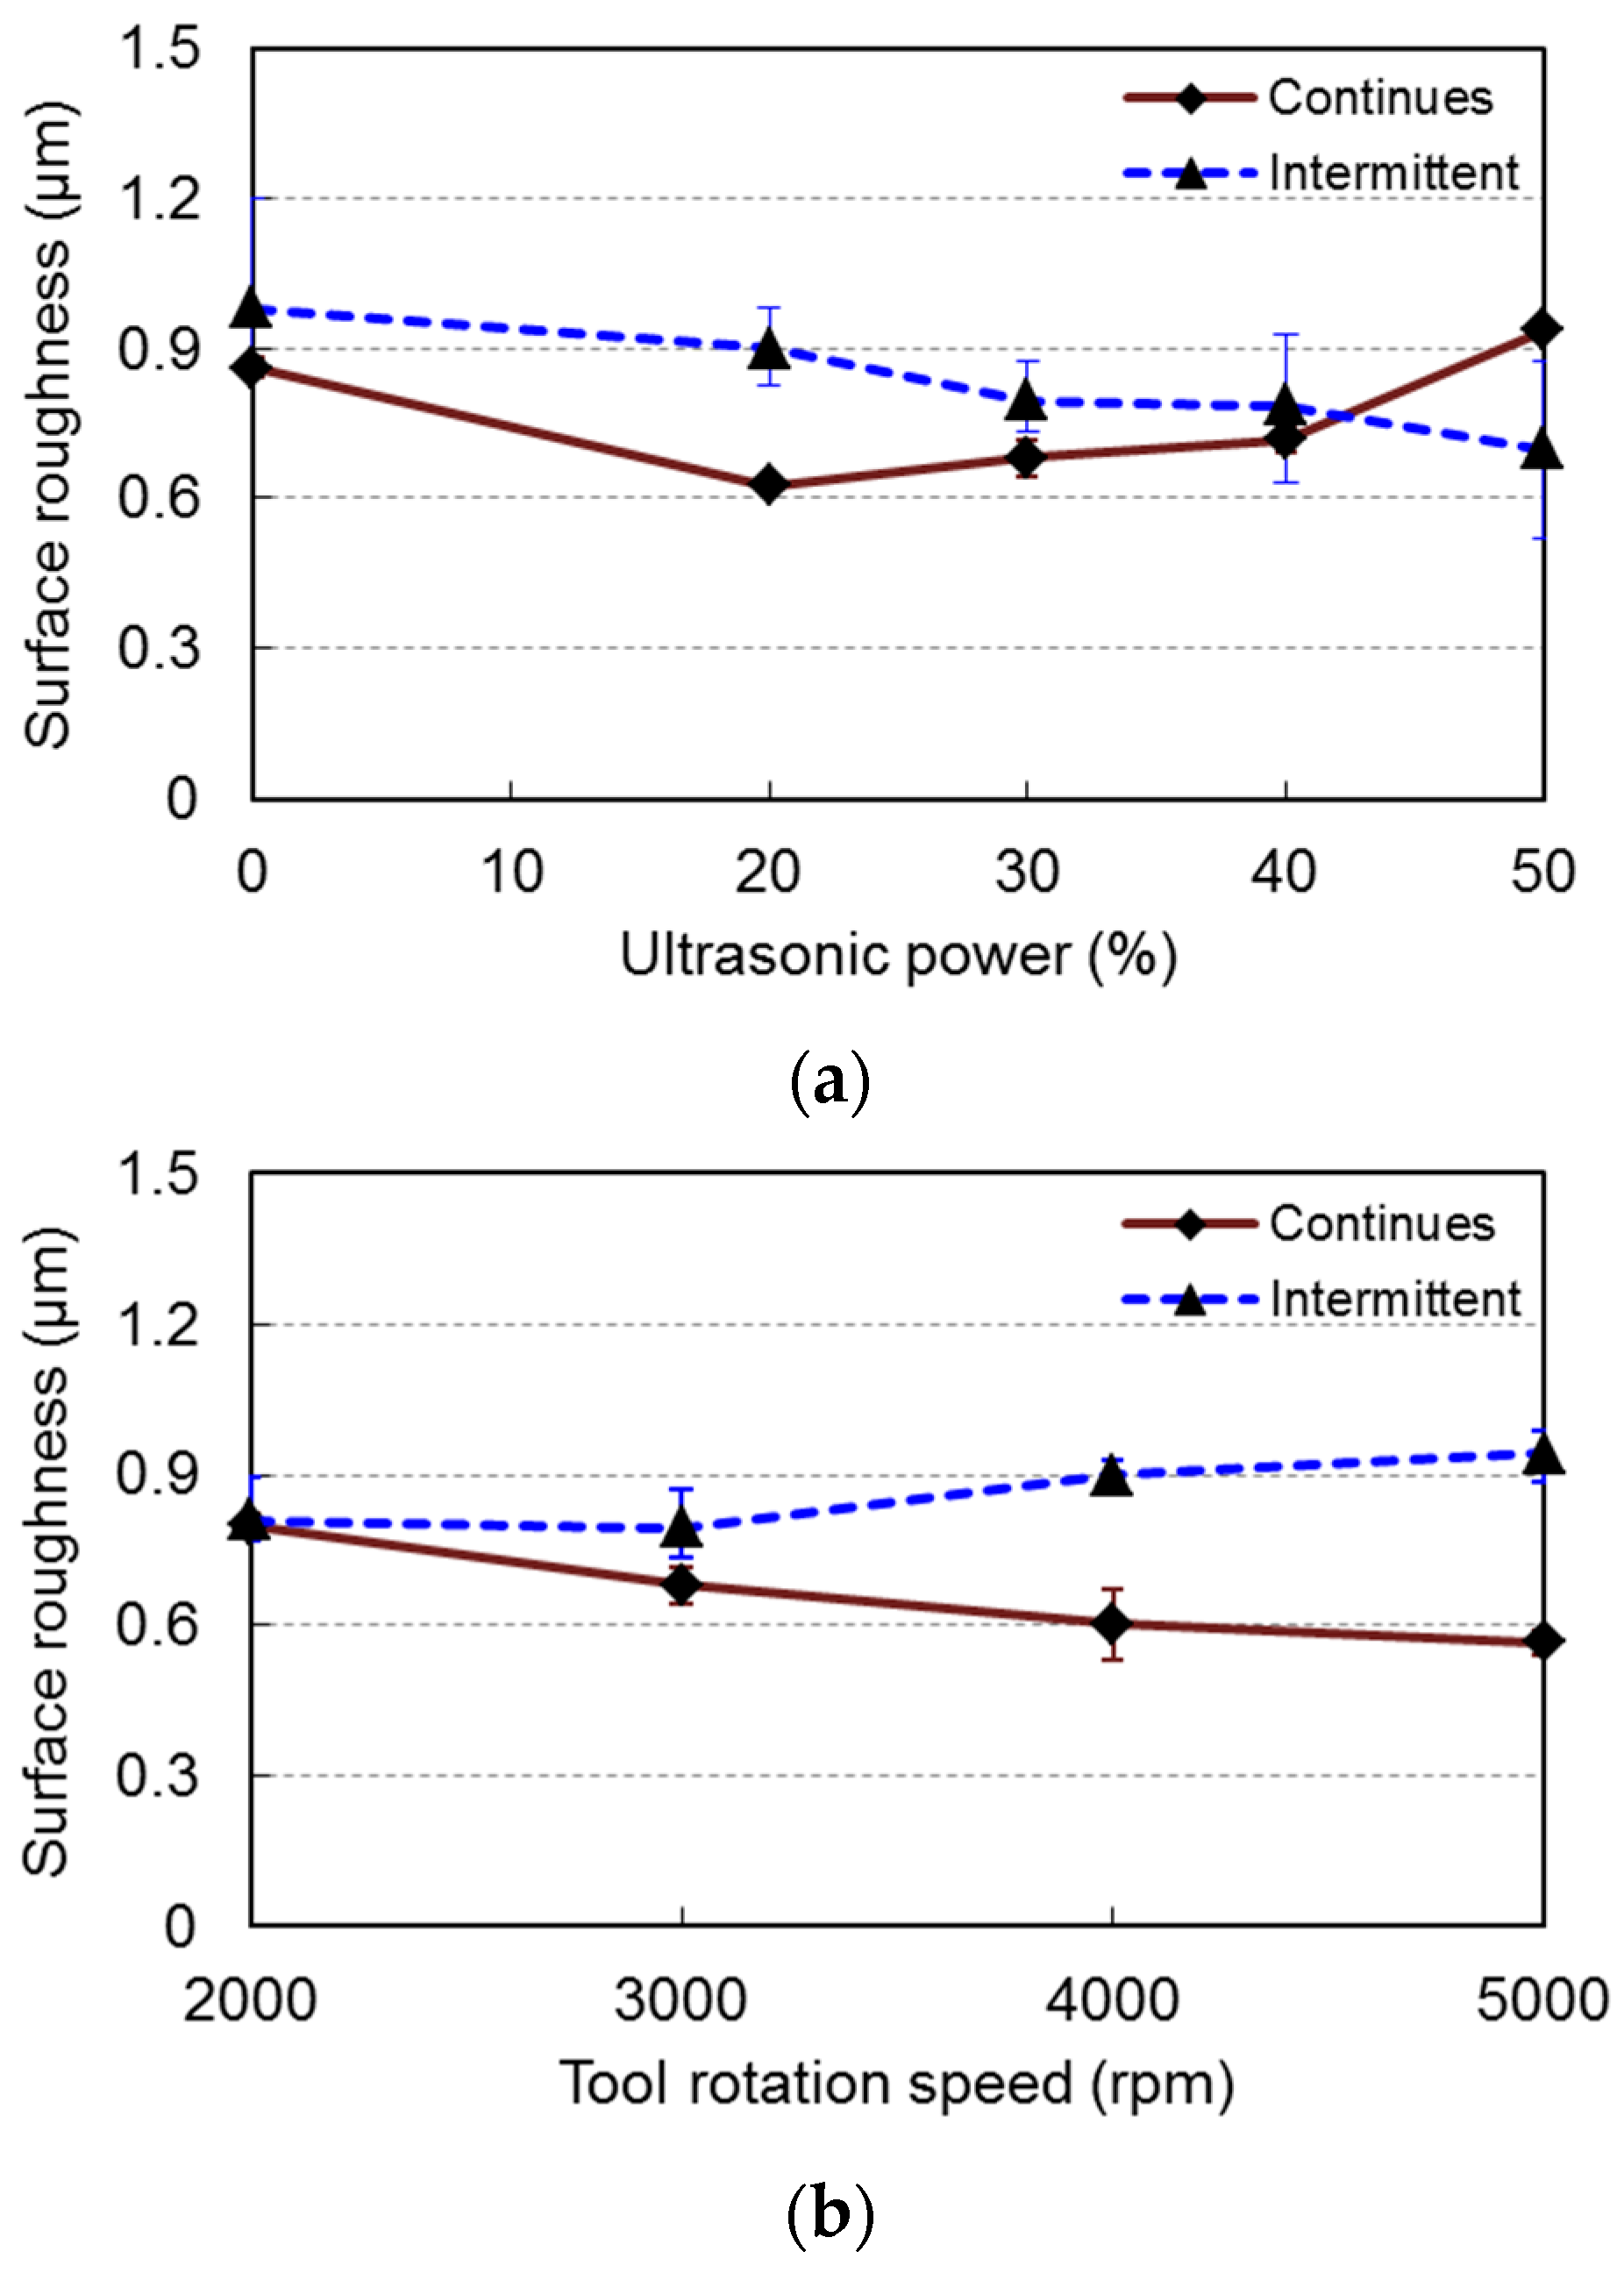
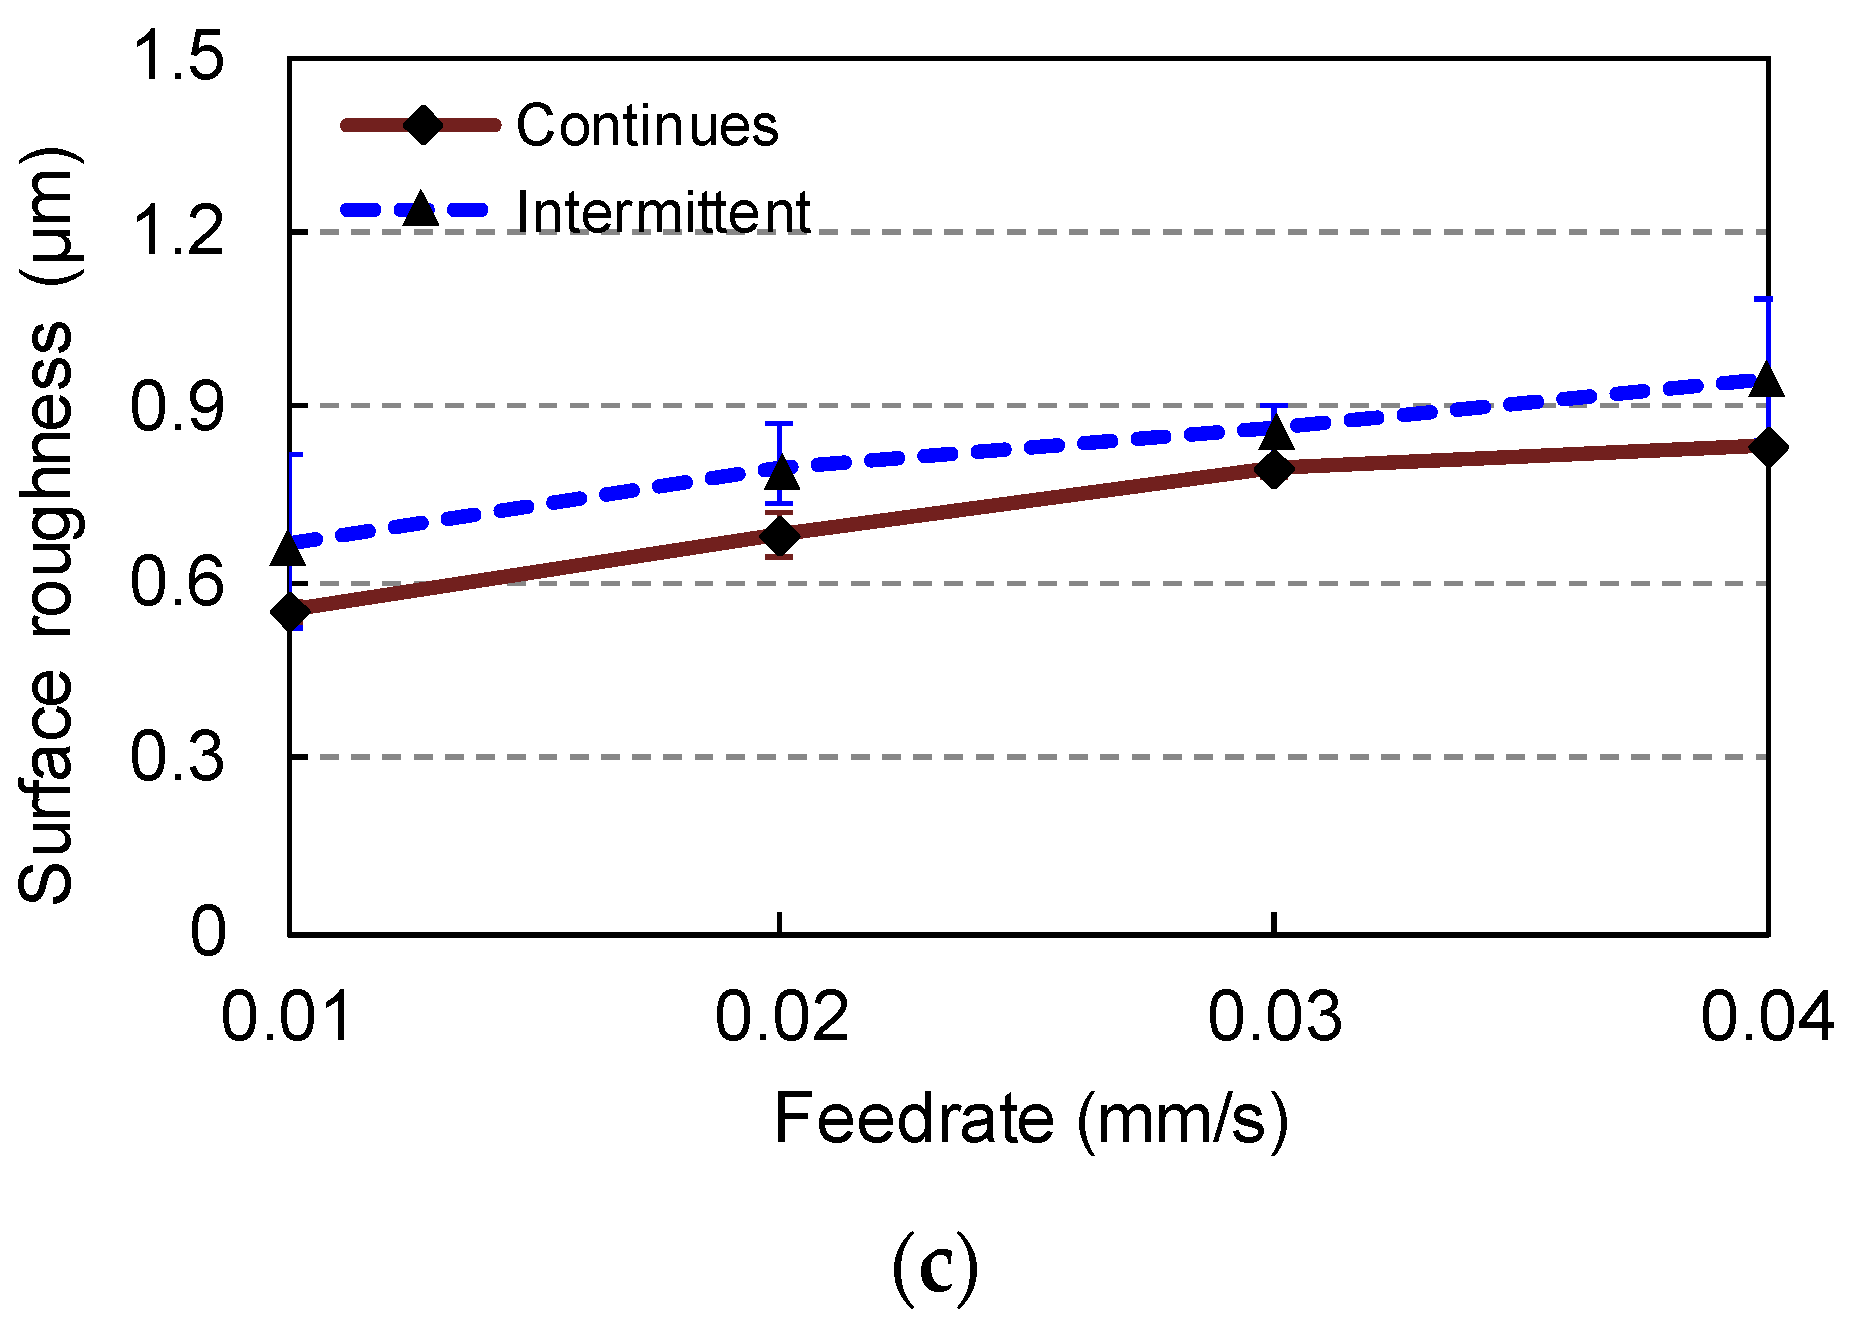
Figure 7 shows the effects of ultrasonic power, tool rotation speed, and feedrate on surface roughness. Surface roughness of intermittent RUM was higher than the surface roughness of continuous RUM except for that at 50% ultrasonic power. This is not consistent with the outcome of the study of intermittent RUM by Zeng et al., which reported that surface roughness of machined hole decreased significantly by using intermittent RUM compared to continuous RUM [3].
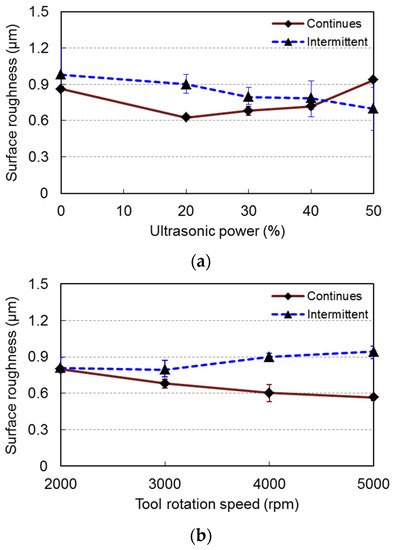

Figure 7.
Effects on surface roughness. (a) Effects of ultrasonic amplitude; (b) Effects of tool rotation speed; (c) Effects of federate.
As shown in Figure 7a, in continuous RUM, the lowest and the highest surface roughness were obtained at 20% and 50% ultrasonic power, respectively. According to Figure 7b, surface roughness of continuous RUM decreased as tool rotation speed increased. However, surface roughness of intermittent RUM increased with the increase of tool rotation speed beyond 3000 rpm. The difference in surface roughness between intermittent RUM and continuous RUM was enlarged as tool rotation speed increased. It can be seen from Figure 7c, for both intermittent and continuous RUM, surface roughness increased with the increase of feedrate. The difference in surface roughness between intermittent RUM and continuous RUM did not change much as feedrate increased.
3.3. Effects on Edge Chipping
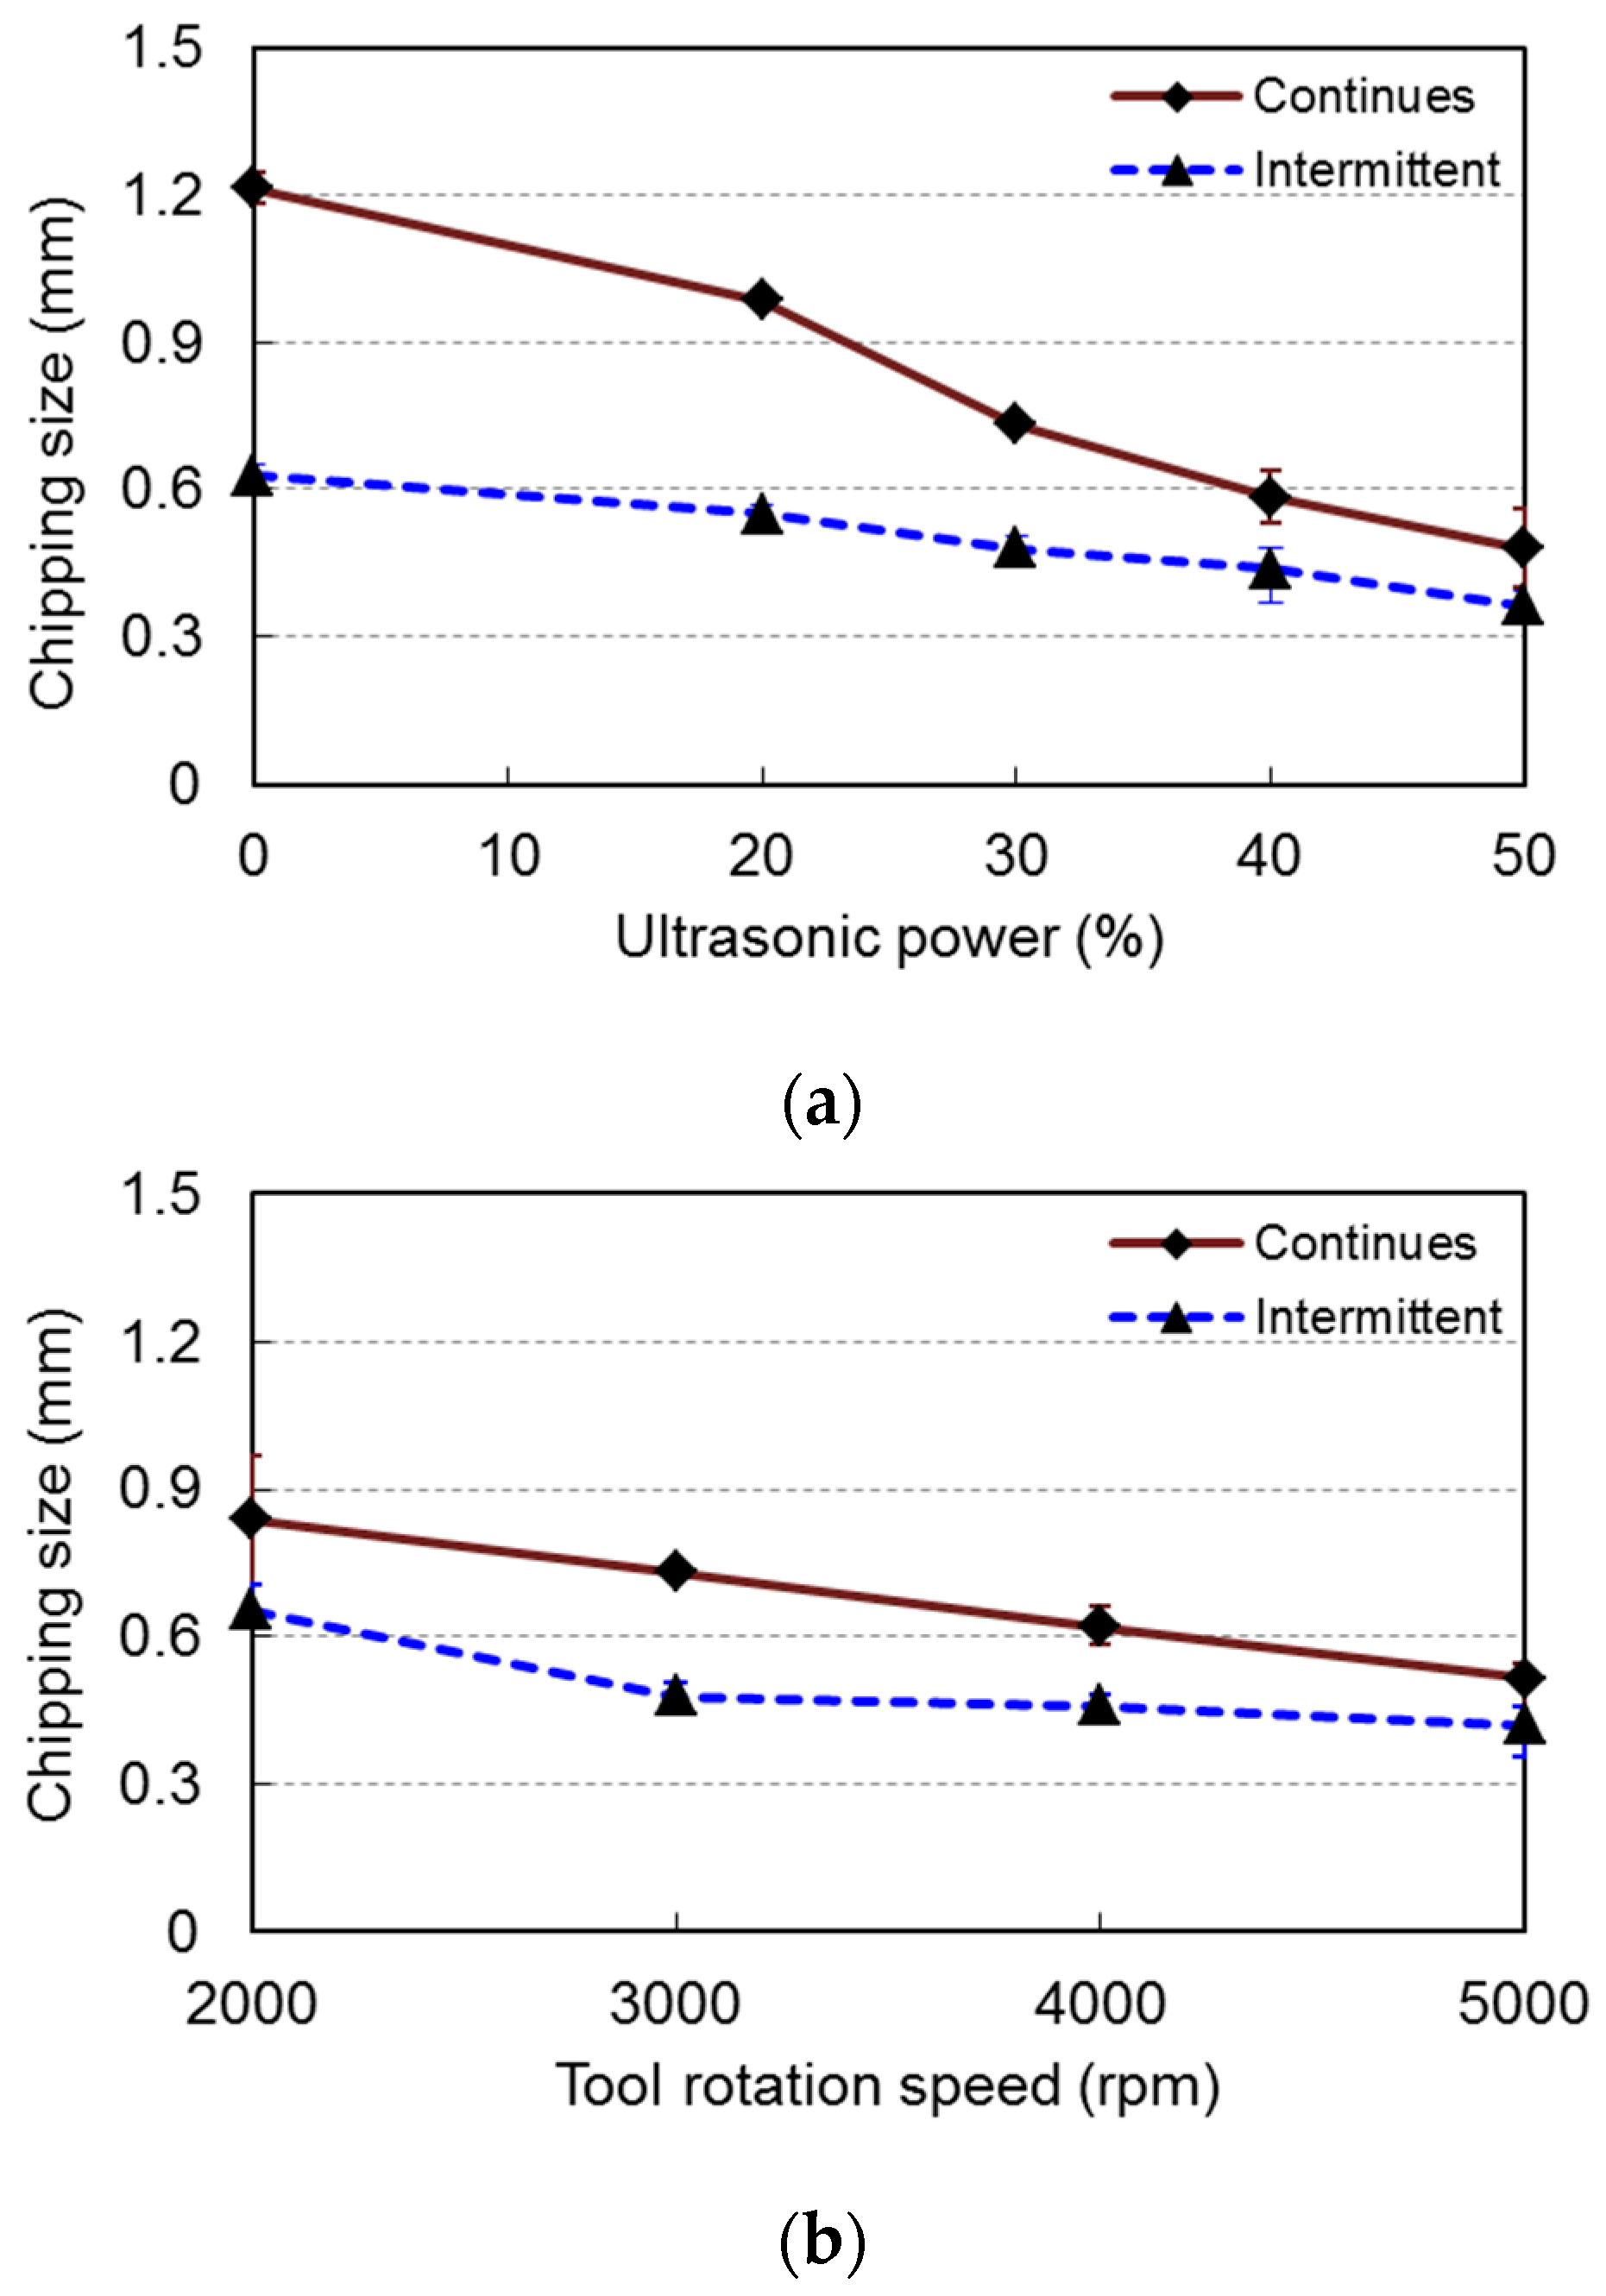
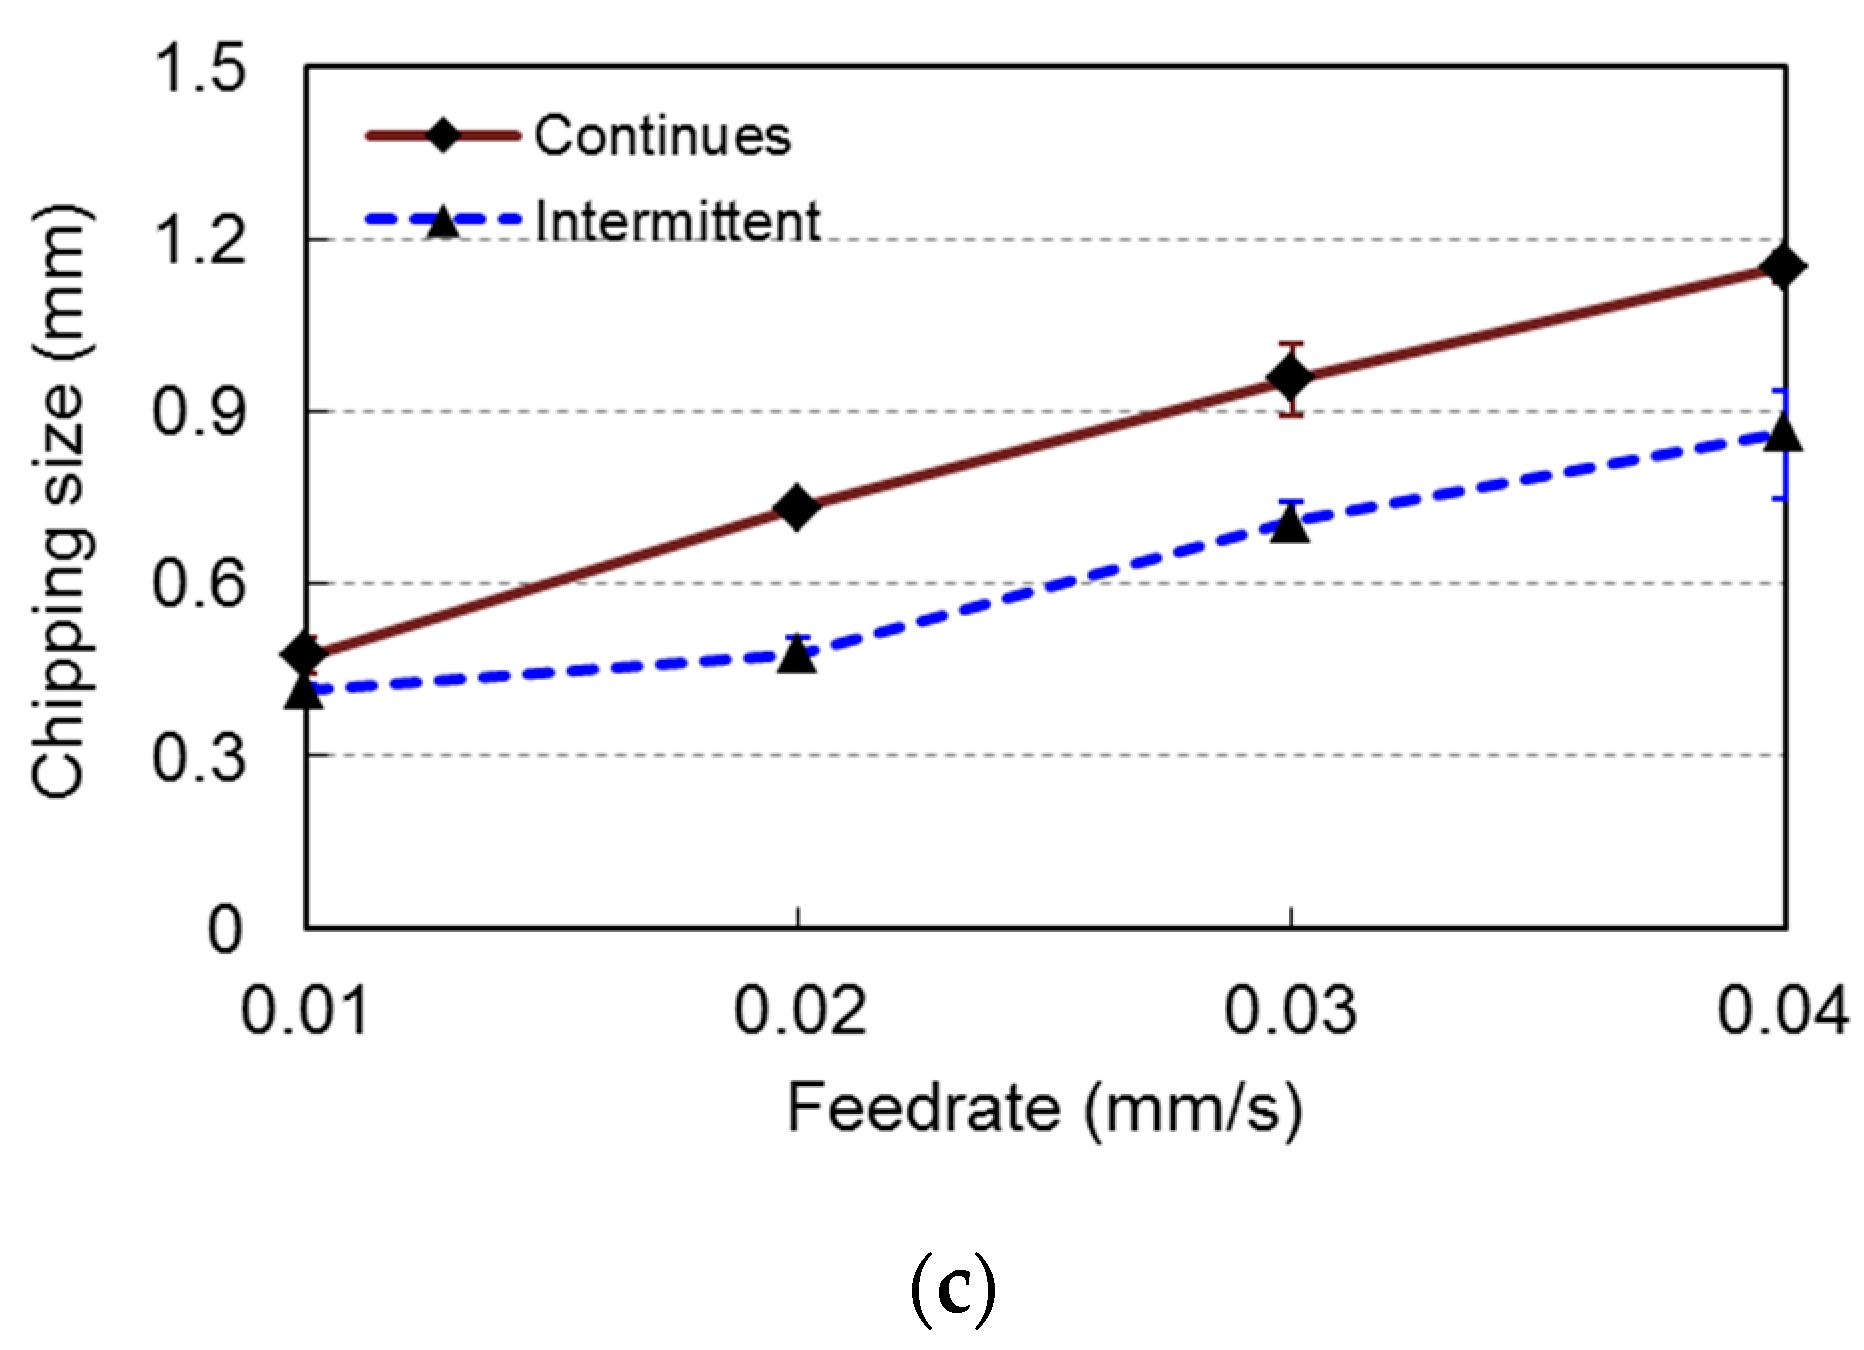
A comparison of edge chipping size between the two types of RUM is shown in Figure 8. According to Figure 8, the chipping size of intermittent RUM was smaller than that of continuous RUM. The chipping size decreased as ultrasonic power increased for both continuous and intermittent RUM. The difference in chipping size was larger at lower ultrasonic power levels. According to Figure 8b, chipping size decreased with the increase of tool rotation speed for both RUM. The lowest chipping size was obtained for intermittent RUM at the tool rotation speed of 3000 rpm. As shown in Figure 8c, chipping size increased as feedrate increased. The difference in chipping size between intermittent RUM and continuous RUM did not change much as feedrate increased beyond 0.02 mm/s.

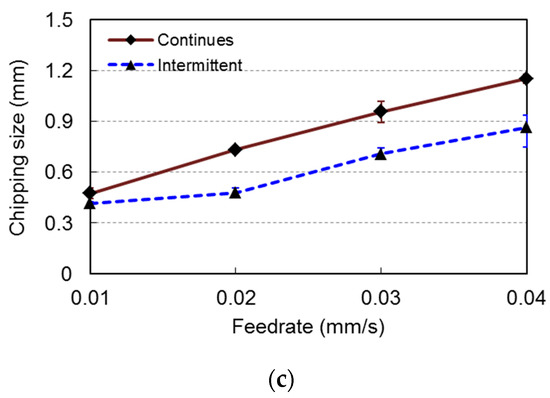
Figure 8.
Effects on edge chipping. (a) Effects of ultrasonic amplitude; (b) Effects of tool rotation speed; (c) Effects of federate.
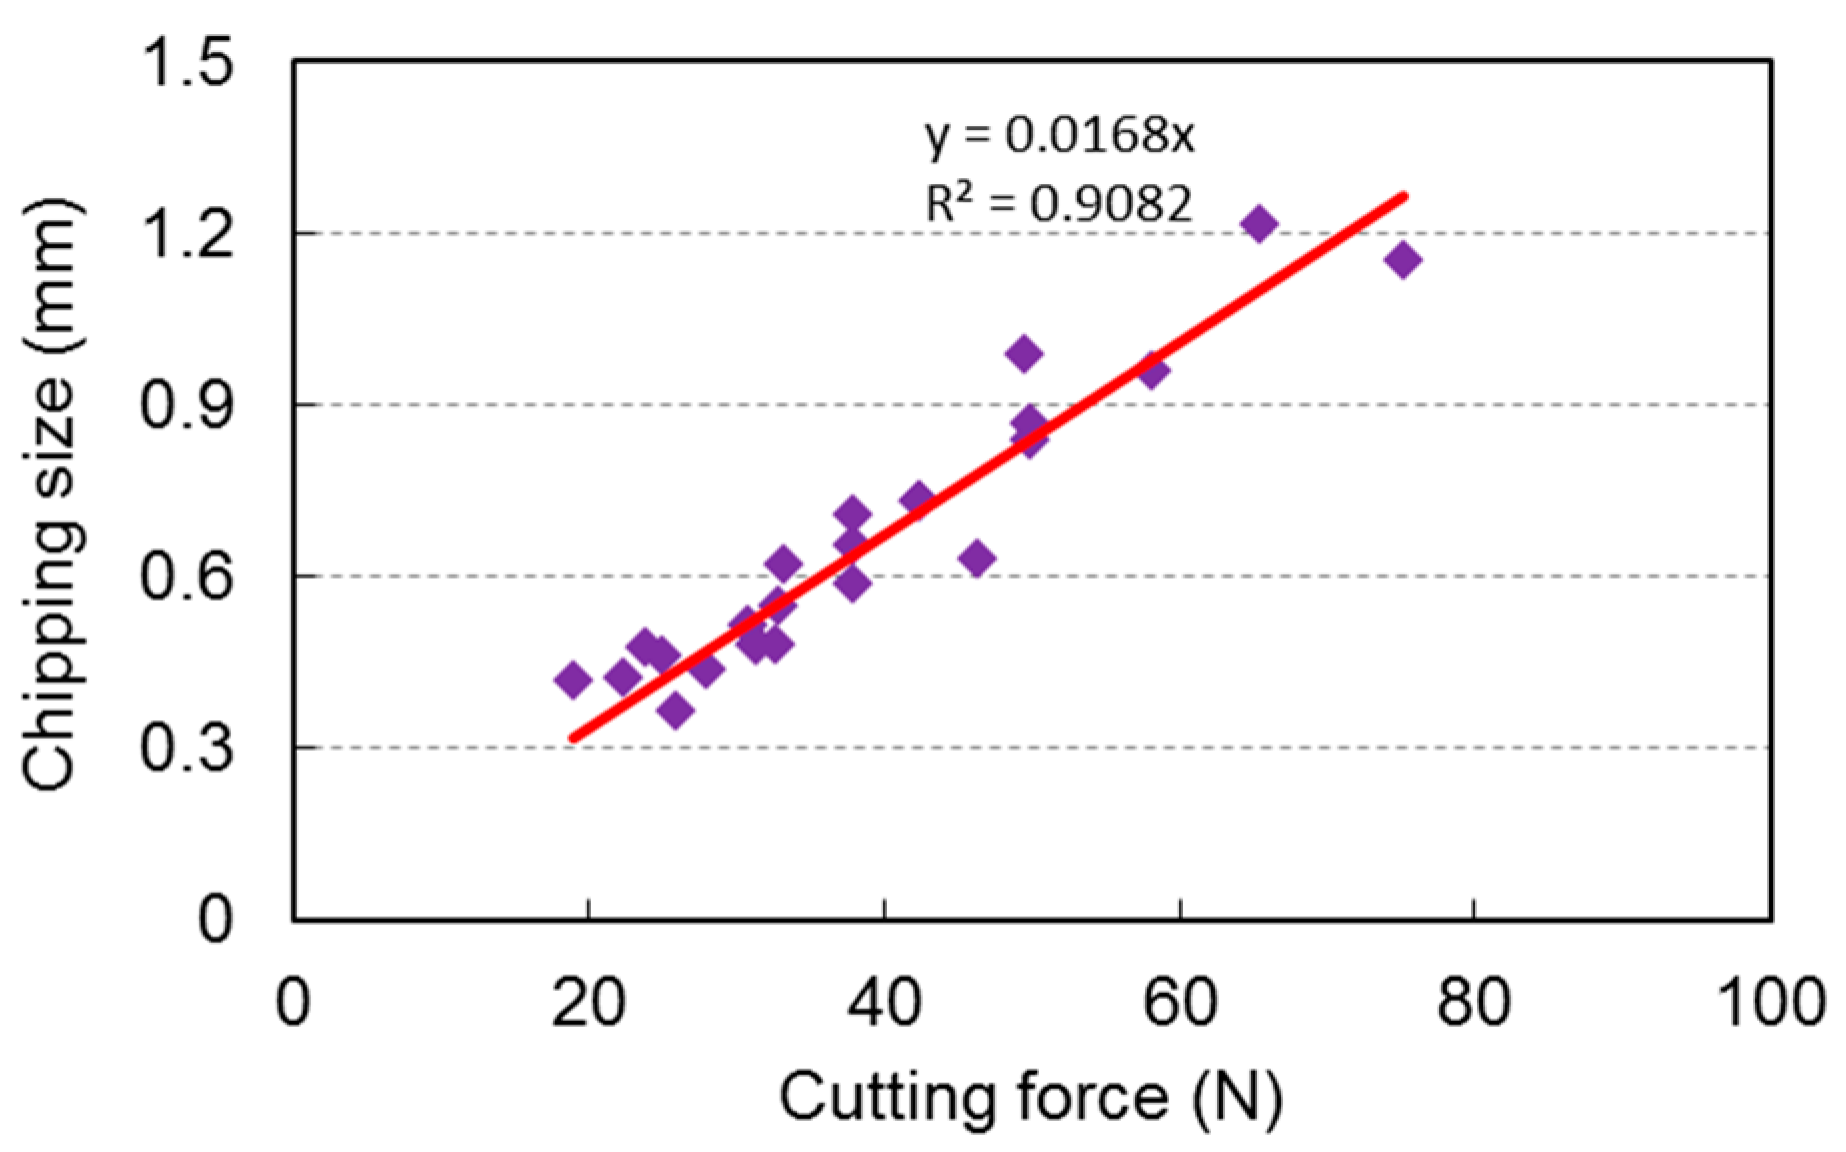
Figure 9 shows the relationship between cutting force and chipping size. The fitted regression line () graphically shows the expecting chipping size to cutting force. The coefficient of “” indicates that the expecting chipping size increases by average of 0.0168 mm for the increment per cutting force. The coefficient of determination obtained for this model fitting is R2 = 0.9082.

Figure 9.
Relationship between cutting force and chipping size.
4. Conclusions
This paper, for the first time, reported an experimental investigation of rotary ultrasonic machining of K9 glass using both intermittent and continuous RUM. Effects of ultrasonic power, tool rotation speed, and feedrate on cutting force, surface roughness, and chipping size were compared. The following conclusions are drawn:
- (a)
- Using intermittent RUM led to a lower cutting force than using continuous RUM in K9 glass machining.
- (b)
- Compared to the continuous RUM, intermittent RUM didn’t improve the surface roughness of drilled holes.
- (c)
- Chipping size in intermittent RUM was smaller than that in continuous RUM when other input variables stayed constant.
- (d)
- It was observed that higher cutting force resulted in a larger chipping size, and this relationship was close to linear.
Acknowledgments
This work was partially supported by the National Science Foundation through the award CMMI 1538381.
Author Contributions
Palamandadige Fernando and Weilong Cong conducted the experiments, collected data, analyzed the data and wrote the manuscript. The conception and the design of experiments were discussed by all authors. Zhijian Pei and Meng Zhang provided critical revision. Weilong Cong and Meng Zhang supervised the project.
Conflicts of Interest
The authors declare no conflicts of interest.
References
- Gu, W.; Yao, Z. Evaluation of surface cracking in micron and sub-micron scale scratch tests for optical glass BK7. J. Mech. Sci. Technol. 2011, 25, 1167–1174. [Google Scholar] [CrossRef]
- Choi, J.; Jeon, B.; Kim, B. Chemical-assisted ultrasonic machining of glass. J. Mater. Process. Technol. 2007, 191, 153–156. [Google Scholar] [CrossRef]
- Zhang, C.; Cong, W.; Feng, P.; Pei, Z. Rotary ultrasonic machining of optical K9 glass using compressed air as coolant: A feasibility study. Proc. Inst. Mech. Eng. Part B J. Eng. Manuf. 2014, 228, 504–514. [Google Scholar] [CrossRef]
- Gu, W.; Yao, Z.; Li, H. Investigation of grinding modes in horizontal surface grinding of optical glass BK7. J. Mater. Process. Technol. 2011, 211, 1629–1636. [Google Scholar] [CrossRef]
- Park, D.; Cho, M.; Lee, H.; Cho, W. Micro-grooving of glass using micro-abrasive jet machining. J. Mater. Process. Technol. 2004, 146, 234–240. [Google Scholar] [CrossRef]
- Matsumura, T.; Muramatsu, T.; Fueki, S. Abrasive water jet machining of glass with stagnation effect. CIRP Ann. 2011, 60, 355–358. [Google Scholar] [CrossRef]
- Lv, D.; Huang, Y.; Wang, H.; Tang, Y.; Wu, X. Improvement effects of vibration on cutting force in rotary ultrasonic machining of BK7 glass. J. Mater. Process. Technol. 2013, 213, 1548–1557. [Google Scholar] [CrossRef]
- Lv, D.; Huang, Y.; Tang, Y.; Wang, H. Relationship between subsurface damage and surface roughness of glass BK7 in rotary ultrasonic machining and conventional grinding processes. Int. J. Adv. Manuf. Technol. 2012, 67, 613–622. [Google Scholar] [CrossRef]
- Lv, D.; Wang, H.; Tang, Y.; Huang, Y.; Li, Z. Influences of vibration on surface formation in rotary ultrasonic machining of glass BK7. Precis. Eng. 2013, 37, 839–848. [Google Scholar] [CrossRef]
- Zeng, W.; Li, Z.; Pei, Z.; Treadwell, C. Experimental observation of tool wear in rotary ultrasonic machining of advanced ceramics. Int. J. Mach. Tools Manuf. 2005, 45, 1468–1473. [Google Scholar] [CrossRef]
- Prabhakar, D. Machining Advanced Ceramic Materials Using Rotary Ultrasonic Machining Process. Master’s Thesis, University of Illinois at Urbana-Champaign, Champaign, IL, USA, 1992. [Google Scholar]
- Hu, P.; Zhang, J.; Pei, Z.; Treadwell, C. Modeling of material removal rate in rotary ultrasonic machining: Designed experiments. J. Mater. Process. Technol. 2002, 129, 339–344. [Google Scholar] [CrossRef]
- Zhang, C.; Feng, P.; Zhang, J.; Wu, Z.; Yu, D. Investigation into the rotary ultrasonic face milling of K9 glass with mechanism study of material removal. Int. J. Manuf. Technol. Manag. 2012, 25, 248–266. [Google Scholar] [CrossRef]
- Lv, D.; Tang, Y.; Wang, H.; Huang, Y. Experimental investigations on subsurface damage in rotary ultrasonic machining of glass BK7. Mach. Sci. Technol. 2013, 17, 443–463. [Google Scholar] [CrossRef]
- Lv, D.; Wang, H.; Zhang, W.; Yin, Z. Subsurface damage depth and distribution in rotary ultrasonic machining and conventional grinding of glass BK7. Int. J. Adv. Manuf. Technol. 2016, 86, 2361–2371. [Google Scholar] [CrossRef]
- Lv, D. Influences of high-frequency vibration on tool wear in rotary ultrasonic machining of glass BK7. Int. J. Adv. Manuf. Technol. 2015. [Google Scholar] [CrossRef]
- Cong, W.; Pei, Z.; Deines, T.; Treadwell, C. Rotary ultrasonic machining of CFRP using cold air as coolant: Feasible regions. J. Reinf. Plast. Compos. 2011, 30, 899–906. [Google Scholar] [CrossRef]
- Zeng, W.; Li, Z.; Xu, X.; Pei, Z.; Liu, J.; Pi, J. Experimental Investigation of Intermittent Rotary Ultrasonic Machining. Key Eng. Mater. 2008, 359–360, 425–430. [Google Scholar] [CrossRef]
- Chowdhury, M.; Ullah, A.; Anwar, S. Drilling High Precision Holes in Ti6Al4V Using Rotary Ultrasonic Machining and Uncertainties Underlying Cutting Force, Tool Wear, and Production Inaccuracies. Materials 2017, 10, 1069. [Google Scholar] [CrossRef] [PubMed]
- Wang, J.; Zhang, C.; Feng, P.; Zhang, J. A model for prediction of subsurface damage in rotary ultrasonic face milling of optical K9 glass. Int. J. Adv. Manuf. Technol. 2015, 83, 347–355. [Google Scholar] [CrossRef]
- Cong, W.; Feng, Q.; Pei, Z.; Deines, T.; Treadwell, C. Rotary ultrasonic machining of carbon fiber-reinforced plastic composites: Using cutting fluid vs. cold air as coolant. J. Compos. Mater. 2011, 46, 1745–1753. [Google Scholar] [CrossRef]
- Cong, W.; Pei, Z.; Sun, X.; Zhang, C. Rotary ultrasonic machining of CFRP: A mechanistic predictive model for cutting force. Ultrasonics 2014, 54, 663–675. [Google Scholar] [CrossRef] [PubMed]
© 2017 by the authors. Licensee MDPI, Basel, Switzerland. This article is an open access article distributed under the terms and conditions of the Creative Commons Attribution (CC BY) license (http://creativecommons.org/licenses/by/4.0/).


