Proceeding Paper

Emitter-Receiver Piezoelectric Transducers Applied in Monitoring Material Removal of Workpiece during Grinding Process †

by
Felipe Alexandre
1,*,
Paulo de Aguiar
1,
Reinaldo Götz
1,
Martin Aulestia Viera
1,
Thiago Lopes
1,
Doriana D’addona
2,
Eduardo Bianchi
3 and
Rosemar Batista da Silva
4
1
Department of Electrical Engineering, São Paulo State University, Av. Eng. Luiz Edmundo Carrijo Coube, 14-01, Bauru 17033-360, Brazil
2
Fraunhofer Joint Laboratory of Excellence on Advanced Production Technology (Fh-J_LEAPT Naples) Department of Chemical, Material and Industrial Production Engineering, University of Naples Federico II, Piazzale Tecchio 80, 80125 Naples, Italy
3
Department of Mechanical Engineering, São Paulo State University, Av. Eng. Luiz Edmundo Carrijo Coube, 14-01, Bauru 17033-360, Brazil
4
School of Mechanical Engineering, Federal University of Uberlandia, Av. João de Ávila 2121, Uberlandia 38408-100, Brazil
*
Author to whom correspondence should be addressed.
Presented at the 5th International Electronic Conference on Sensors and Applications, 15–30 November 2018; Available online: https://ecsa-5.sciforum.net.
Proceedings 2019, 4(1), 9; https://doi.org/10.3390/ecsa-5-05732
Published: 14 November 2018
(This article belongs to the Proceedings of 5th International Electronic Conference on Sensors and Applications)

Abstract

:
Grinding is one of the most commonly used finishing processes in the manufacture of precision components that also needs to be monitored. Monitoring of the workpiece surface quality is considered highly complex due to particularities of the cutting tool and material removal mechanism. In this context, the monitoring of the grinding process is very important for the metalworking industry and a topic of great interest for machining researchers. Many studies on grinding process monitoring have been developed and most of them focus on process automation. The objective of this work is to monitor the workpiece material removal during grinding by using piezoelectric transducers in the emitter and receiver modes along with digital signal-processing techniques. Tests were performed on a peripheral surface grinding machine equipped with an aluminum oxide grinding wheel. The SAE 4340 steel grade was used as workpiece material. The transducer signals were sampled at a sampling frequency of 2 MHz. The digital signal processing was performed through spectrum analysis and the application of techniques such as root mean square. The mass of the workpieces was measured by means of a digital scale prior to and after grinding tests. The number of grinding passes was varied in order to increase the material removal. The results show that the monitoring technique proposed in this work is sensitive to the material removal in the grinding process. The appropriate selection of frequency bands allows for the best diagnosis in relation to the events that occur during the grinding process.

1. Introduction

In the grinding process, the material removal mechanism is performed by thousands of abrasive grits with undefined cutting geometry that are randomly distributed in the grinding wheel [1], which makes grinding a highly stochastic process. The monitoring of the grinding process allows a better comprehension of the interaction between the abrasive grits and workpiece surface. Also, the understanding of the material removal mechanism can help to control the abrasive grinding wheel wear and workpiece surface quality.
The monitoring methods used in manufacturing processes are usually divided into two major categories: direct and indirect [2]. Direct methods are usually employed in a laboratory environment because of their intrinsic handling limitations, and are less used in industrial environments. On the other hand, indirect methods are more employed in industrial applications because of their easy handling characteristics [3]. In the indirect methods, sensors are employed to measure a certain variable of interest, such as acoustic emission, power, vibration (with use of accelerometer), and force (with use of dynamometer device).
The low-cost piezoelectric diaphragm poses as an alternative for the monitoring of the grinding process. Evidence of some successful studies has already been carried out with the application of this method in the monitoring of the grinding process. Ribeiro et al. [4] applied the piezoelectric diaphragm as an alternative for the acoustic emission (AE) sensor to detect burns on steel workpieces. Marchi et al. [5] employed the piezoelectric diaphragm along with the electromechanical impedance (EMI) method in the evaluation of the workpiece surface quality in the grinding process with a cubic boron nitride (CBN) grinding wheel.
This work proposes a new method for monitoring the material removal mechanism in the grinding process by means of the application of piezoelectric transducers in the ultrasonic emission and receiver modes and digital signal-processing techniques. Thus, this work focuses on opening new possibilities for monitoring the material removal mechanism in the grinding process as well as for its automation.

2. Grinding Process

The grinding process, when compared to other manufacturing processes, stands out for its complexity, especially because of the high number of variables. In this process, the material removal mechanism is based on friction generated by the contact between the workpiece surface and the abrasive grits of the cutting grinding wheel surface. In the grinding process, material removal generates reactions like the release of energy by heat irradiation as well as by acoustic and vibration waves that propagate through the workpiece structure. Such reactions can be detected as workpiece damage indicators during the grinding process. Ding et al. [6] evaluated grinding wheel wear and workpiece material removal during the grinding of nickel-based alloy by measuring the force and temperature of the grinding process. Agarwal and Rao [7] also studied the material removal mechanisms during the grinding of ceramic workpieces when using a resin-bond diamond grinding wheel. Burning detection on the workpiece surface was proposed in the work of Aguiar et al. [8], in which the acoustic emission (AE) signal and several statistical parameters were used, such as correlation, ratio of power (ROP), root mean square (RMS), and others. The RMS parameter for AE signals is defined in Equation (1):
A E r m s = 1 N i = 1 N A E ² ( i )
where N is the block data size, A E is the raw acoustic emission signal, and i is the vector index of the raw AE signal.

3. Material and Methods

3.1. Experimental Setup

Grinding tests were carried out in a surface grinding machine from Sulmêcanica manufacturer, model RAPH 1055, equipped with an aluminum oxide grinding wheel, from the NORTON manufacturer, with specification mark 38A150LVH. The workpieces of SAE 4340 with square prism geometry and dimensions of 150 mm × 7 mm × 43 mm (length, width and height, respectively) were used. The grinding tests consisted of three passes of 30 μm each along the workpiece length. Prior to the test, a dressing operation was performed in order to increase the grinding wheel cutting capacity. The following cutting parameters were used: cutting speed (vs) of 29 m/s and worktable speed (vw) of 0.08 m/s, with the use of coolant based on water-oil emulsion of 4%. Two piezoelectric diaphragms were used. They were attached to the opposite sides of the workpiece holder width. The piezoelectric diaphragms used in the tests consist of a disc-shaped lead zirconate titanate (PZT) ceramic (active element) with a diameter of 10 mm adhered concentrically onto a brass disc with a diameter of 20 mm.
An oscillograph, model DL850, from the Yokogawa company, was employed to collect the raw signals at a sampling rate of 5 MS/s. A data acquisition system (DAQ), USB–6221 model, from National Instruments, was used to generate the excitation signal to the PZT emitter. This excitation signal consists of a chirp with 500 ms of time window and frequencies from 1 Hz to 250 kHz. In addition, five equally-spaced excitation packages were sent to the PZT emitter in order to verify the repeatability of the measurements.

3.2. Workpiece Material Assessment

The evaluation of the workpiece material was carried out prior to each grinding test, i.e., the workpiece mass was measured before the damages were caused by the grinding process. Thus, the data obtained represent the characteristics of the workpiece without material removal. The mass of the workpiece was also measured after the grinding process. A precision scale with a scale of 500 g was used for this purpose. The workpiece was placed in position on the precision scale in order to avoid any change that does not belong to the grinding process.

3.3. Signal Processing and Selection of Frequency Bands

The data set from the tests was digitally processed in MATLAB. First, the selection of three data packages out of five available was carried out, i.e., the data packages # 1, 2 and 3 were selected. The data packages # 4 and 5 were discarded, in order to ensure the integrity of the selected signal packages. The selected packages were composed of the excitation (emission signal) and the received signals, both sampled from the piezoelectric diaphragms attached to the workpiece holder. The selection of received signals, #1, 2 and 3, was performed for the three grinding passes.
A study of the received signal spectra was performed in order to find the frequency bands that are most strongly related to the workpiece conditions (without material removal and with material removal). The fast Fourier transform (FFT) algorithm was used for this analysis. The FFT magnitudes were computed for each selected received package and then the mean values were obtained. The criterion for the selection of frequency bands was presented by Ribeiro et al. [4]. According to these authors, the best frequency bands are not necessarily those with the higher peaks in the spectrum, but those with the greatest magnitude differences, related to the condition of the process.
After the selection of bands, Butterworth digital filters were applied to the raw received signals packages, and thus new vectors were obtained. Then, the RMS values were calculated for both vectors (raw received signal and filtered received signal) for 4096-point blocks, which correspond to about 1 ms. Finally, the mean and the standard deviation values for each package and workpiece condition (without material removal and with material removal) were computed.

4. Results and Discussion

4.1. Workpiece Assessment

The workpiece mass values, measured through the precision scale, before and after the grinding passes, are shown in Table 1. After the grinding passes, there was a mass workpiece decrease of about 0.33% due to the removal of material during the process.
The material removal volume is show in Figure 1. There is an increase in this parameter as the number of grinding passes increases, as expected. The material removed volume is obtained by Equation (2).
Qw(p) = p·ap·lw·bw,
where Qw is the material removed volume in mm3, p is the number of the grinding pass, ap is the depth of cut in mm, lw is the workpiece length in mm, and bw is the workpiece width in mm, as shown in Figure 1a. Figure 1b shows the material removal volume as a function of the number of grinding passes.

4.2. Signal Processing and Selection of Frequency Bands

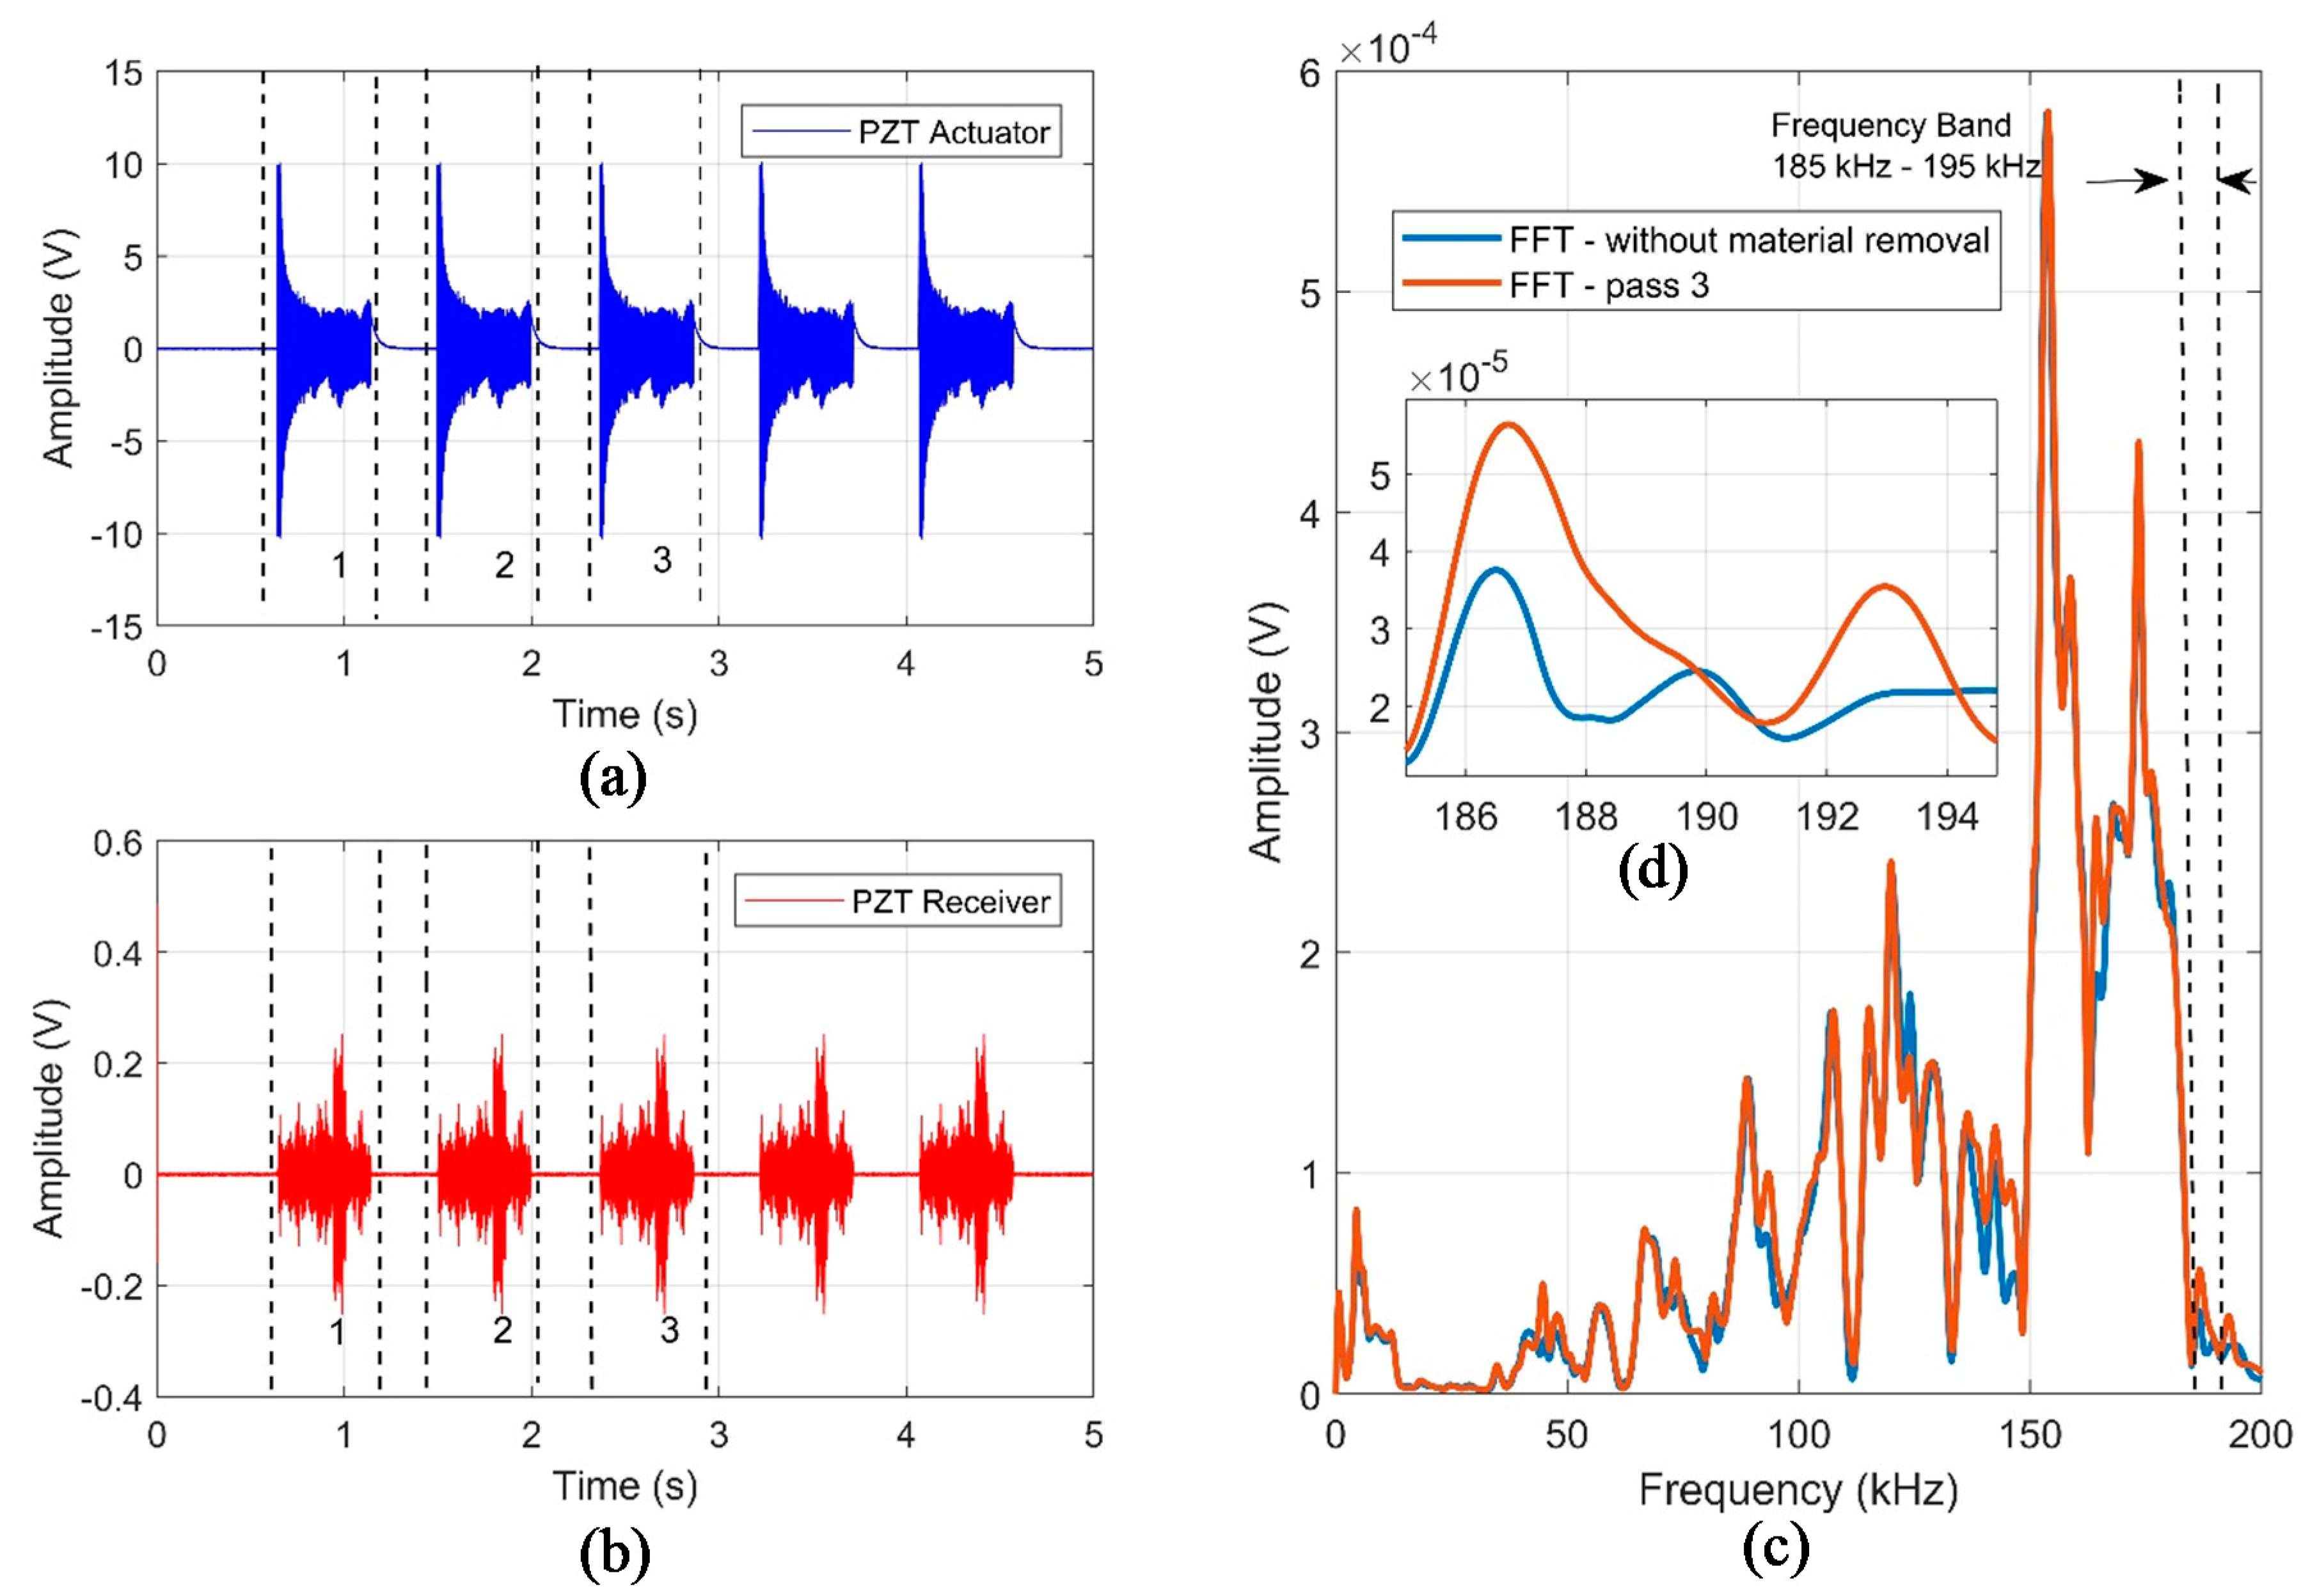
The emitted and received signals before and after the grinding pass, as well as the frequency spectrum of the received signals before and after grinding pass 3, are shown in Figure 2. It is observed that the excitation signal (Figure 2a) decreases as the frequency increases. This behavior may be explained by the arrangement of impedance between the DAQ board and the PZT emitter; the capacitive elements of the PZT emitter caused a voltage decrease at higher frequencies. Regarding the received signals in Figure 2b, it is observed that some frequencies propagated with greater effectiveness; such behavior is justified by the properties of the material, which play an important role in the propagation of waves. The signal emission and reception procedure was performed for all the grinding passes, as well as the selection of packages #1, 2 and 3.
The average spectrum of the received selected packages for two workpiece conditions, before and after the 3rd grinding pass, is shown in Figure 2c. The spectrum activity for the two conditions is greater at higher frequencies (Figure 2c), from 150 kHz to 180 kHz. In addition, the spectrum amplitude is higher for the workpiece after machining when compared to the workpiece prior to grinding (without loss of material). The magnification of the selected frequency band according to the criteria presented in Section 3.3 is show in Figure 2d.
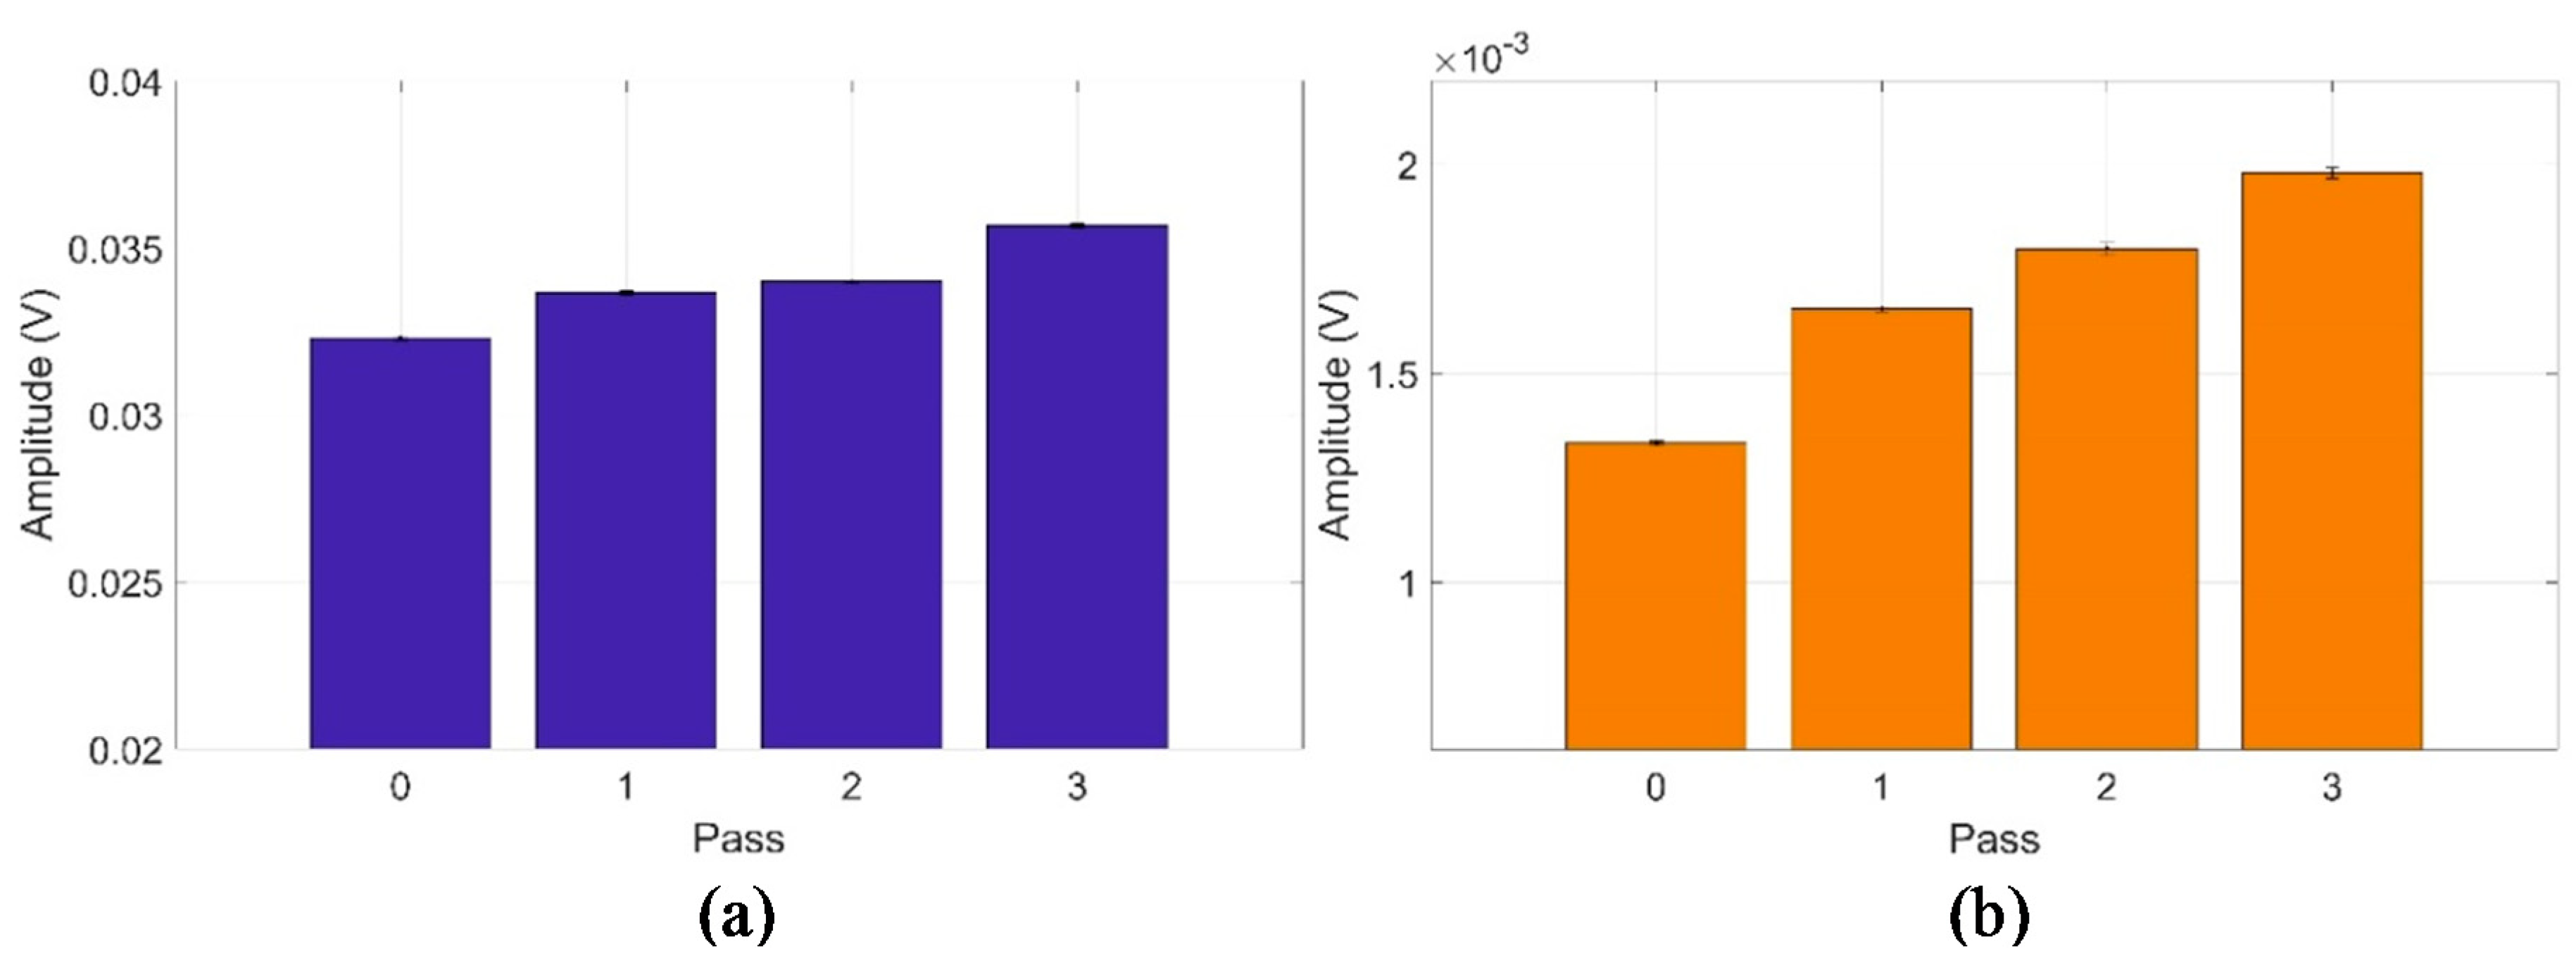
The RMS mean and standard deviation values of the raw and filtered signals packages for each grinding pass are shown in Figure 3. It can be seen in Figure 3a that the mean RMS values of the unfiltered signals for each grinding pass show slight growth; however, this has rather a low sensitivity to establish the material removal level since the RMS mean values for pass # 1 and 2 are very similar. Thus, the mean RMS values of the raw signals have not been shown to be a good tool for detecting the material removal, being unattractive to a monitoring system of the grinding process. However, in Figure 3b, where the RMS mean values of the filtered signals in the chosen frequency band are presented, a mean value increase is well identified relative to the amount of material removed during the grinding process. Thus, the selection of frequency bands that best characterize the process is of great importance for the performance of the technique proposed in this work.
The increase of the filtered RMS mean values is due to the behavior of the received signals’ amplitude in the selected frequency band. Thus, events that indicate changes in the workpiece structure, such as the loss of material or damages resulting from the grinding process, such as burning and an increase of surface roughness, are evidenced in the selected frequency band, allowing a better diagnosis of the process. Finally, it is worth mentioning that the standard deviation values were very small, which show the consistency and repeatability of the technique.

5. Conclusions

This work proposed the monitoring of material removal in SAE 4340 steel in a grinding process. The study of signals was performed through time and frequency domain analysis showing important characteristics related to the workpiece conditions. Thus, it can be concluded that the mean RMS values computed from the unfiltered signal have low sensitivity to the variations of material removal during the grinding process, which is unattractive for practical purposes. On the other hand, the mean RMS values of the filtered signals in the selected band presented a good response regarding material removal during the grinding process, and an increase and consistent trend was obtained as the grinding passes were performed. Nevertheless, the results presented in this work are preliminary and, therefore, new investigations need to be conducted for improvements and verification of the proposed method.

Author Contributions

The authors contributed equally to this work.

Funding

This research was funded by São Paulo Research Foundation (FAPESP), grant number #2017/18148-5.

Acknowledgments

This work was supported in part by the São Paulo Research Foundation (FAPESP) (grants #2017/18148-5) and Capes Foundation, Ministry of Education of Brazil. The authors also thank the Norton company for donating the grinding wheel used in this work.

Conflicts of Interest

The authors declare no conflict of interest.

References

  1. Winter, M.; Li, W.; Kara, S.; Herrmann, C. Determining optimal process parameters to increase the eco-efficiency of grinding processes. J. Clean. Prod. 2014, 66, 644–654. [Google Scholar] [CrossRef]
  2. Teti, R.; Jemielniak, K.; O’Donnell, G.; Dornfeld, D. Advanced monitoring of machining operations. CIRP Ann. Manuf. Technol. 2010, 59, 717–739. [Google Scholar] [CrossRef]
  3. Stavropoulos, P.; Chantzis, D.; Doukas, C.; Papacharalampopoulos, A.; Chryssolouris, G. Monitoring and Control of Manufacturing Processes: A Review. Procedia CIRP 2013, 8, 421–425. [Google Scholar] [CrossRef]
  4. Ribeiro, D.M.S.; Aguiar, P.R.; Fabiano, L.F.G.; D’Addona, D.M.; Baptista, F.G.; Bianchi, E.C. Spectra Measurements Using Piezoelectric Diaphragms to Detect Burn in Grinding Process. IEEE Trans. Instrum. Meas. 2017, 66, 3052–3063. [Google Scholar] [CrossRef]
  5. Marchi, M.; Baptista, F.G.; de Aguiar, P.R.; Bianchi, E.C. Grinding process monitoring based on electromechanical impedance measurements. Meas. Sci. Technol. 2015, 26, 45601. [Google Scholar] [CrossRef]
  6. Ding, W.-F.; Xu, J.-H.; Chen, Z.-Z.; Su, H.-H.; Fu, Y.-C. Wear behavior and mechanism of single-layer brazed CBN abrasive wheels during creep-feed grinding cast nickel-based superalloy. Int. J. Adv. Manuf. Technol. 2010, 51, 541–550. [Google Scholar] [CrossRef]
  7. Agarwal, S.; Rao, P.V. Experimental investigation of surface/subsurface damage formation and material removal mechanisms in SiC grinding. Int. J. Mach. Tools Manuf. 2008, 48, 698–710. [Google Scholar] [CrossRef]
  8. Aguiar, P.R.; Serni, P.J.A.; Bianchi, E.C.; Dotto, F.R.L. In-process grinding monitoring by acoustic emission. In Proceedings of the 2004 IEEE International Conference on Acoustics, Speech, and Signal Processing, Montreal, QC, Canada, 17–21 May 2006; Volume 5, p. V-405-8. [Google Scholar]
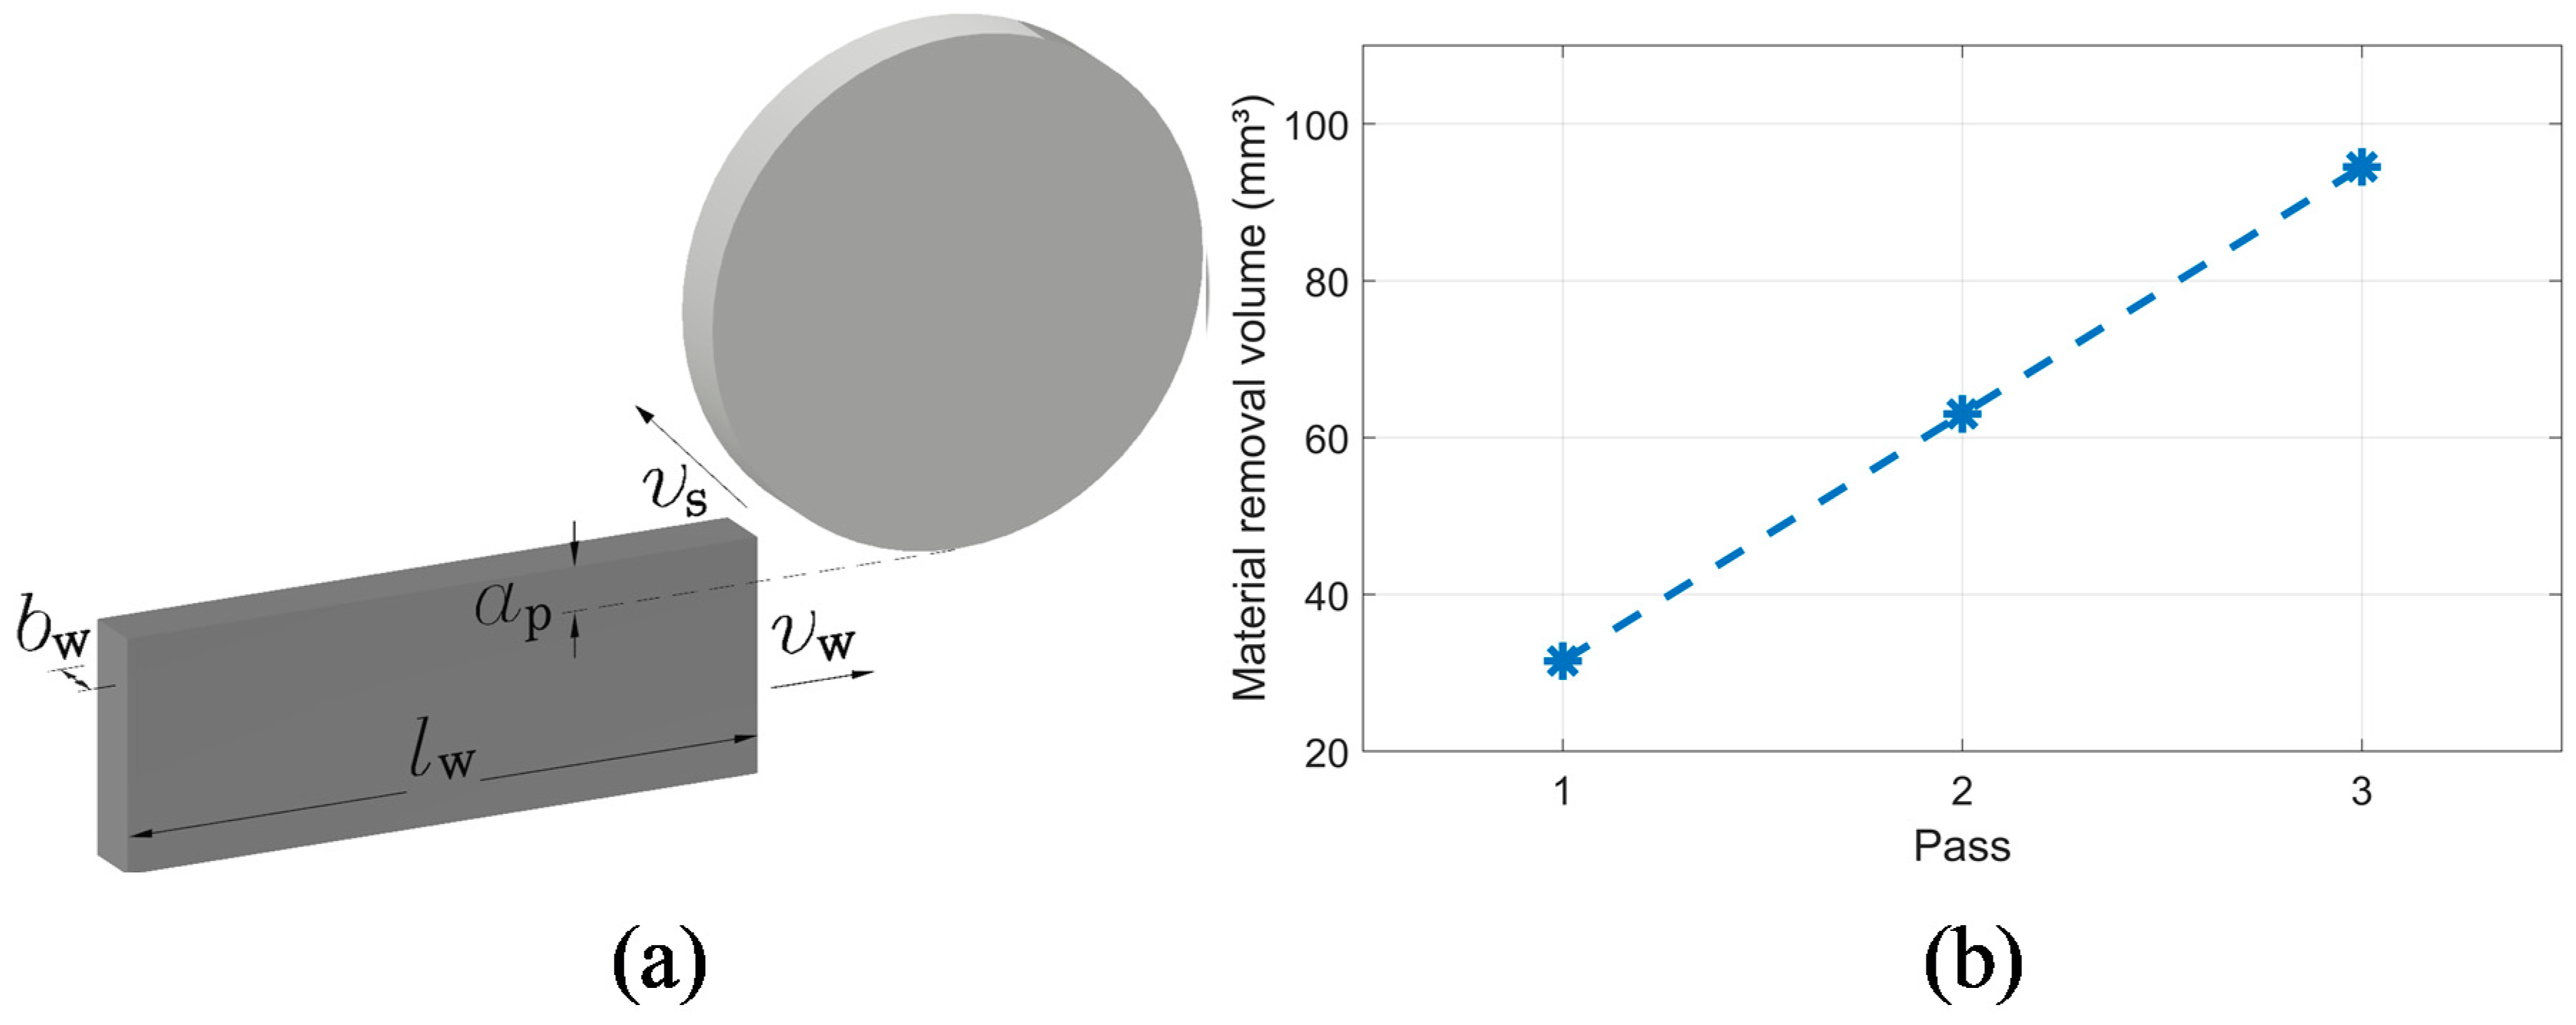
Figure 1. (a) Schematic for grinding process with cutting parameters; (b) material removal volume as a function of grinding pass.
Proceedings 04 00009 g001
Figure 2. Emitted signal (a) and received signals (b); spectrum for two workpiece conditions, (c) spectrum magnification 18–194 kHz (d).
Proceedings 04 00009 g002
Figure 3. Mean root mean square (RMS) and standard deviation—raw signals (a) and filtered signals (b).
Proceedings 04 00009 g003
Table 1. Workpiece weight.
ConditionWeight (g)
Without material removal workpiece331.24
Pass 3330.15
Publisher’s Note: MDPI stays neutral with regard to jurisdictional claims in published maps and institutional affiliations.