1. Introduction
According to market forecasts, the use of composite materials, like glass- and carbon-fiber reinforced polymers (GFRP and CFRP), will be exponentially increasing in the coming years. In the wind energy sector, for instance, the number and size of GFRP wind blades produced per year are in constant grow. As a consequence, the demand of sensor systems for the structural health monitoring of such massive composite structures is also increasing. For this purpose, optical fiber (OF) sensors, such as fiber Bragg gratings (FBG) [
1], have recently started to be used as a valid alternative to electrical sensors. OF sensors offer several advantages compared to electrical sensors. For instance, they are small in size and they can be embedded in the composite components during their manufacturing [
2] with negligible effects on the material strength. Up to now, most of the FBG sensor networks exploited for this monitoring activity have been based on silica fibers, mainly because these fibers allow low signal attenuation and reduced losses on very long distances. However, polymer optical fiber (POF) sensors [
3], like polymer FBG sensors, have also been proposed and tested. POF are in general more competitive than silica OF in terms of costs (the fiber and associated optical links and connectors are generally less expensive); they can be used in applications where large elongations are expected and they have higher thermal sensitivity. Similarly to silica OF, conventional POF sensors are mainly sensitive along the fiber direction, and therefore they require an accurate placement and a precise alignment along the desired measurement direction. In order to decrease the error measurements associated with OF misplacement and misalignment, optical sensors with planar configuration could be employed. Recently, our research groups have developed new ultra-thin polymeric photonic films which exploit the same sensing principle of conventional FBG being at the same time planar [
4]. These foils consist of polymer waveguides (PWGs) realized in flat substrates and inscribed with one or more Bragg gratings. When light is driven inside a PWG, only one wavelength is reflected back, in agreement with the Bragg equation [
5]. When a strain acts on the PWG, the reflected Bragg wavelength shifts in the wavelength domain, allowing therefore to measure the applied strain.
Thanks to a smart manufacturing process, the proposed PWG sensors can have a final thickness of 100 µm or lower. Therefore, besides being used as surface glued sensors, they can be embedded in composite laminates in a very low intrusive manner. Apart from the easiness of placement, the developed polymer sensor foils offer the additional advantage of having multiple wavelength-multiplexed gratings inscribed in a single non straight-waveguide, which can be read out using commercial FBG interrogators. This means that, by using a single waveguide, it is possible to achieve multiaxial sensing capabilities and construct a sort of optical equivalent of strain rosette [
6].
This article shows how the PWG sensor foils can be used to measure and monitor the dynamic strains occurring in vibrating composite components. This is achieved by performing the estimation of the modal parameters of several composite components. In particular, the following cases are investigated:
GFRP beam-like coupon with surface mounted PWG
CFRP reinforced composite plate with surface mounted PWG
CFRP plate with surface mounted PWG rosette
The article is structured as follows. Section “Materials and Methods” presents the manufacturing of the polymer waveguide sensors, the production of the composite components, the setup and procedure for the experimental campaigns. Section “Results and Discussion” reports and discusses the experimental results for each of the cases under investigation. Section “Conclusions” collect the conclusive remarks.
2. Materials and Methods
The PWG sensors used for this work were manufactured by imprinting Bragg gratings in waveguides obtained in flat polymeric supports. For the unaxial PWG sensors, the support was made of epoxy, while Ormocer® was adopted for the PWG rosette.
The uniaxial PWGs were manufactured by spin-coating a glass substrate (previously treated with a release layer) with a 50 µm thick layer of EpoClad. The EpoClad was softened via heat treatment and imprinted with a stamp to create the desired grating lines. Then, it was cover by a 5 µm thick layer of EpoCore in which 5 µm × 5 µm waveguides were created via selective UV exposure. Successively, a second layer of EpoClad (50 µm in thickness) was spin-coated on top of the waveguides. Finally, the created PWG sensor foil was released from the glass support and cut in several uniaxial PWG sensors using a laser.
The multiaxial PWGs were manufactured by spin-coating on a PET substrate an 18 µm thick layer of OrmoClad in which waveguide channels were created using a stamp. The shape of the stamp was such that non-straight waveguides were created. The stamp was kept in place and the OrmoClad was cured with UV light. The stamp was then removed and the OrmoClad was covered with a 5 µm thick layer of OrmoCore (filling the channels and forming the core) in which three gratings were imprinted by means of a second polymeric stamp. The three gratings were oriented in a 0°, 45°, 90° configuration. The nominal pitches Λ of the three gratings were slightly different (502 nm, 506 nm, 510 nm) for wavelength multiplexing purposes and chosen to be compatible with commercial interrogators.
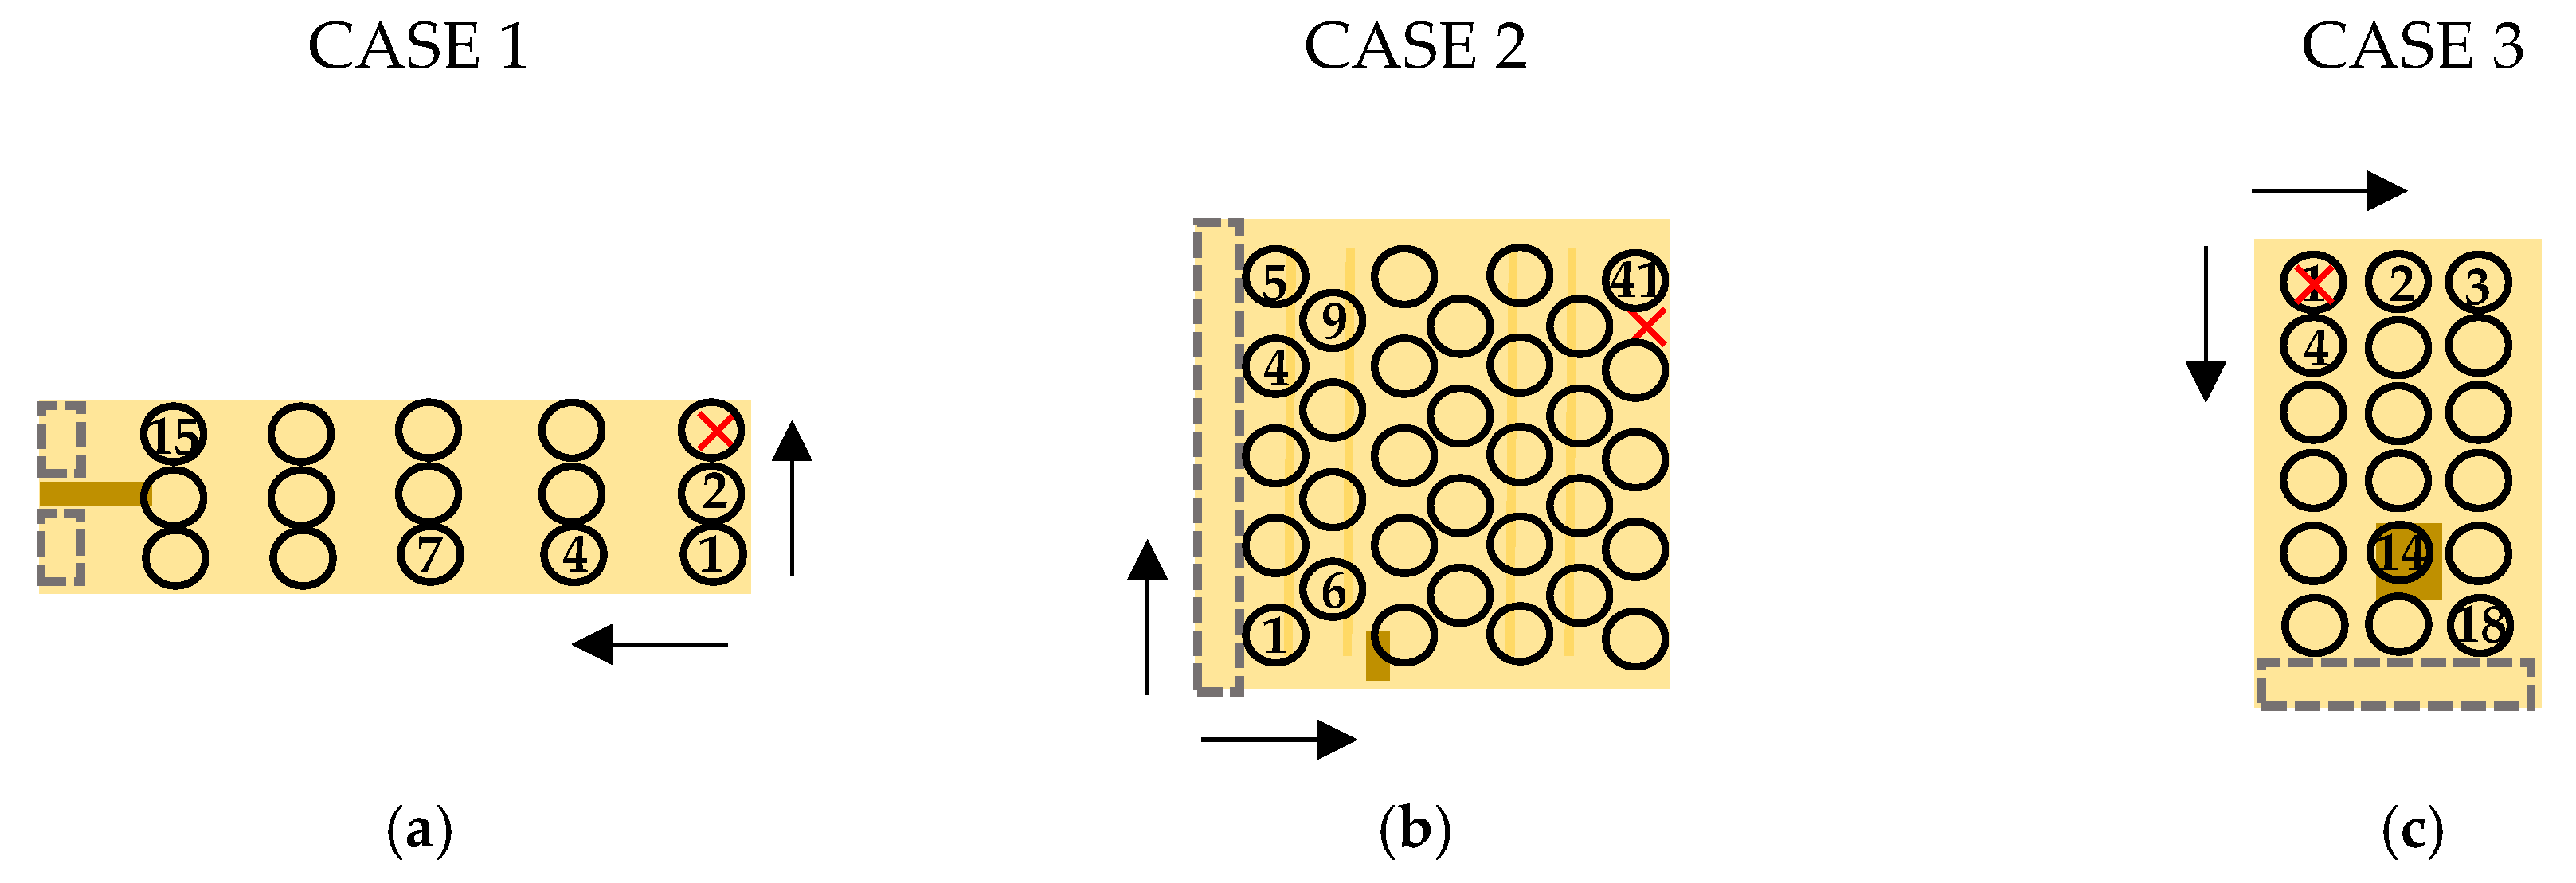
One of the uniaxial PWG sensors (planar dimensions 10 mm × 30 mm) was embedded inside a GFRP beam-like coupon (CASE 1,
Figure 1a). The coupon was made of 4 layers of UD glass fiber infused with a mix of epikote MGS RIM135 and epicure MGS RIMH137. The PWG sensor was embedded in the midplane. The coupon was cured at room temperature for 24 h and successively postcured at 80 °C for 15 h. Finally, the coupon was trimmed to the desired planar dimensions (40 mm × 110 mm) and the PWG sensor was connected to a single mode fiber (SMF 28) through an in-house developed connector.
A second uniaxial PWG sensor (planar dimensions 5 mm × 30 mm) was glued on top of a CFRP stiffened panel (CASE 2,
Figure 1b) made of a flat plate (470 mm × 470 mm) with two omega-shaped stiffeners both made of M10/T300 pre-impregnated material. The plate and the stiffeners were manufactured separately, cured for 8 h at 120 °C and then assembled with an aerospace adhesive. Finally, the uniaxial PWG was connected to a standard single mode fiber with an in-house developed connector.
The multi-axial PWG sensor was glued on top of a 300 mm × 150 mm CFRP plate (CASE3,
Figure 1c) with a stacking sequence of (0
8). The plate was manufactured using M10/T300 pre-impregnated material. The PWG rosette was connected to an SMF 28 optical fiber by means of the same type of in-house developed connector mentioned above.
The manufactured composite components instrumented with the PWG sensors were then mounted on rigid supports before proceeding with the modal testing. All three components were clamped (C) along one edge, while the other edges were left free (F), meaning that CFFF type of boundary conditions were selected. In
Figure 1, the clamping regions are indicated by the area enclosed by the dashed rectangles in gray. For CASE 1, given the proximity of the PWG sensor to the clamped side and considering the space taken by the optical connector, two metallic spacers were placed between the GFRP coupon and the rigid support. For sake of comparison, an accelerometer was mounted on each of the component (red cross in
Figure 1). Then, the components were tested with a roving impact hammer procedure [
7].
Figure 2 shows the schematic of the grid points used for each case while
Table 1 reports the number of impact locations and averages (per impact location) used in the different cases.
During the impact, the dynamic strains occurring in the composite components were measured by acquiring the PWGs reflected spectra (acquisition frequency of 1 kHz) by means of an FBGS804 [
8] interrogator and by processing these spectra with the fast phase correlation algorithm [
9]. At the same time, the accelerations were acquired (acquisition frequency of 1 kHz) using a NI USB 9234 DAQ and the data acquisition toolbox of Matlab
®. Both strain and acceleration data were transformed to the frequency domain and processed via a least-square poly-reference modal parameter estimator (PolyMAX) [
10]. The results of the modal analysis are reported in the following section.
3. Results and Discussion
For the estimation of the modal parameters, the frequency bands 0–120 Hz, 0–100 Hz and 0–100 Hz were considered respectively for CASE 1, CASE 2 and CASE 3.
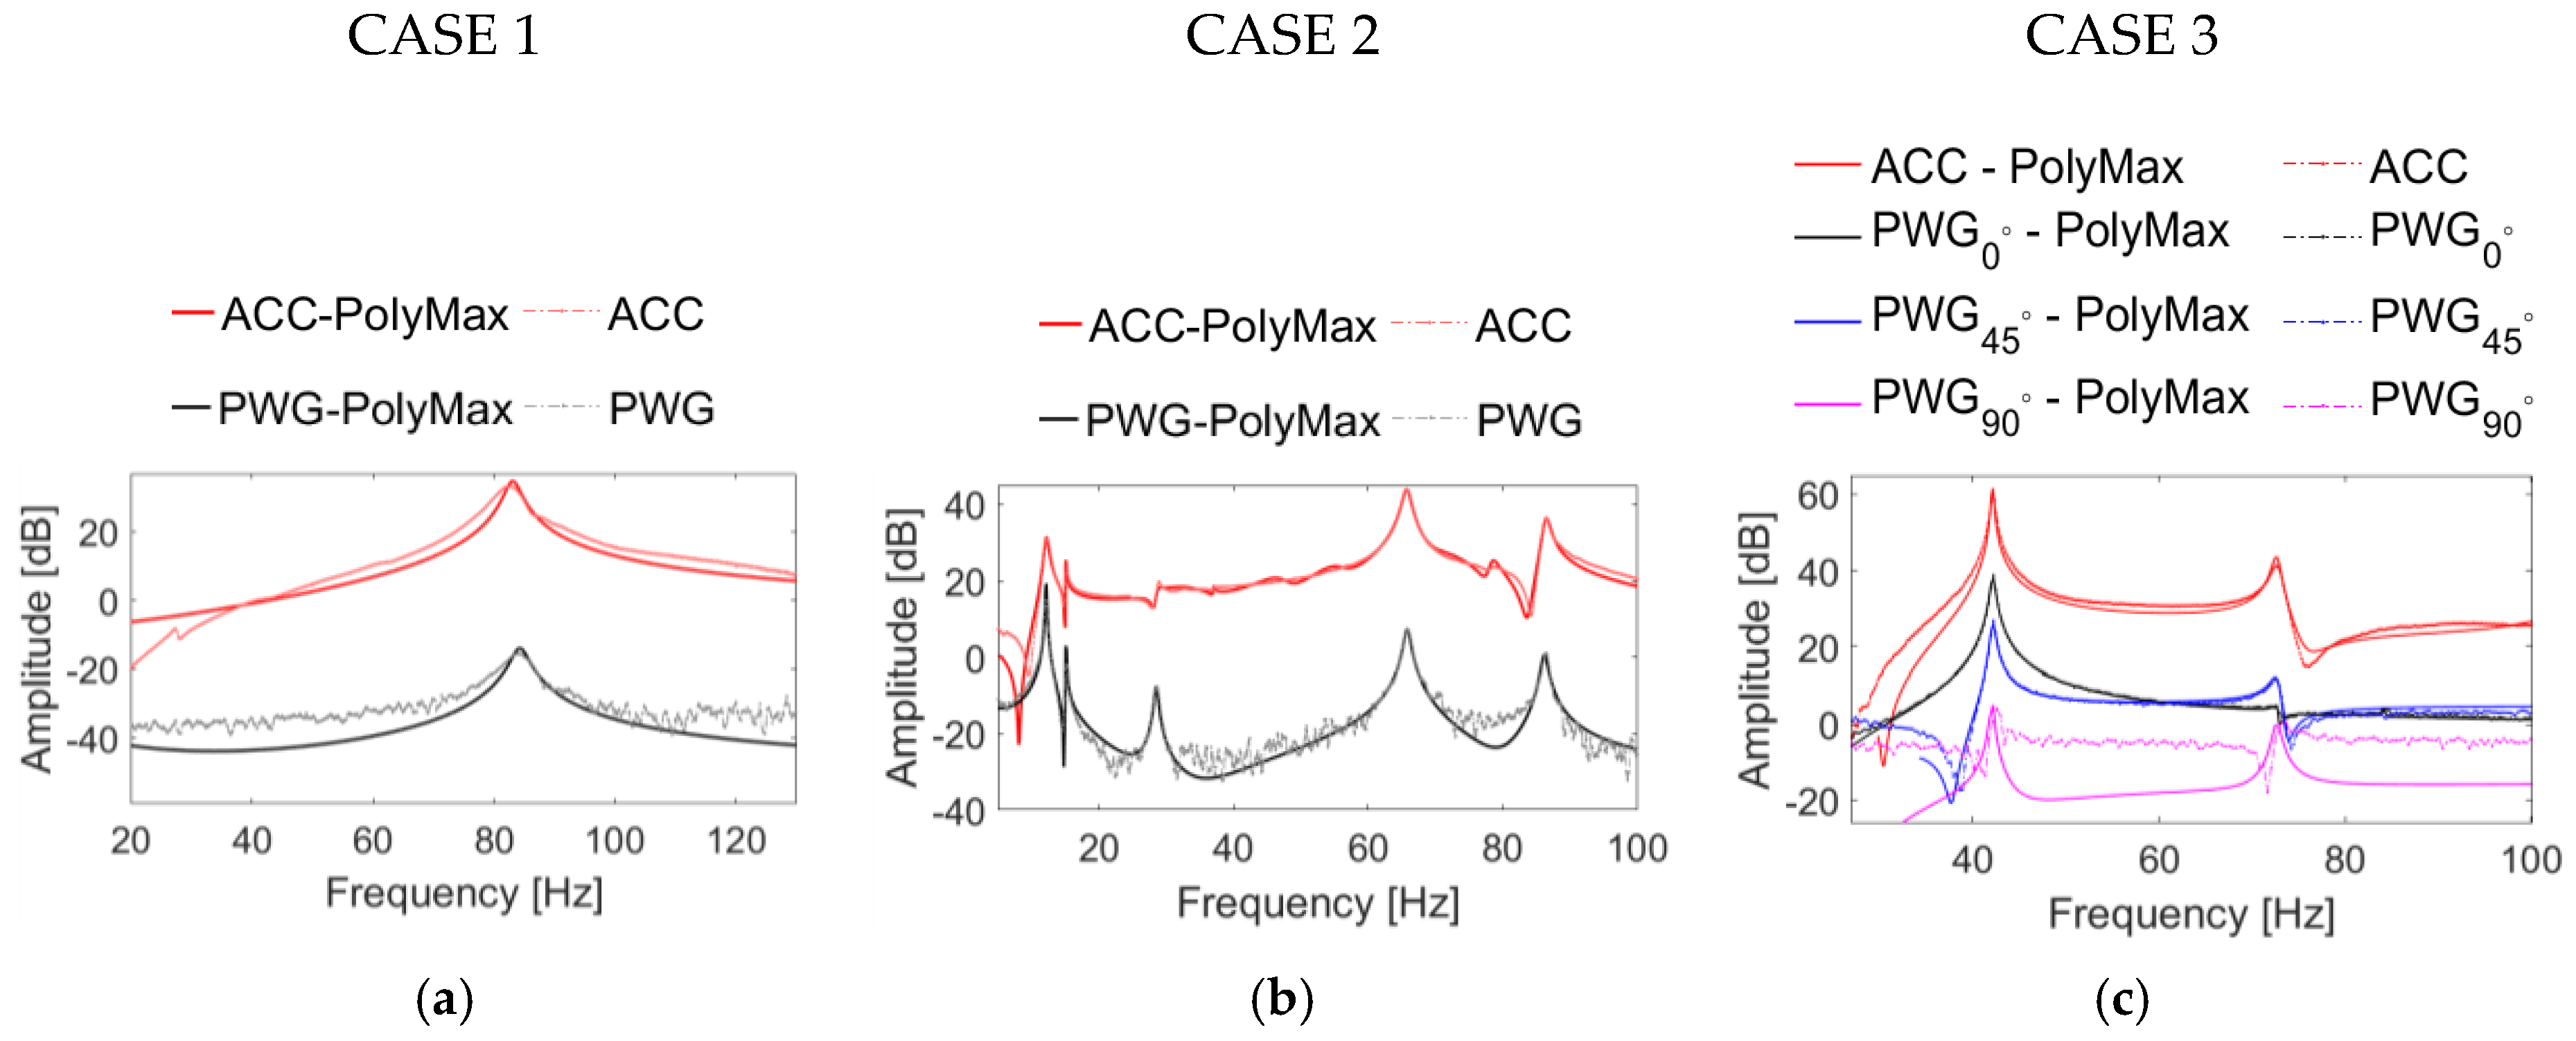
Figure 3 shows representative frequency response function (FRF) amplitudes obtained for each of the test cases.
Table 2 and
Table 3 report the first three estimated resonance frequencies and damping ratios for both ACC and PWG measurements for all three cases.
A first comparison between the ACC and PWG data shows that, in general, the strain data shows a slightly higher noise content (see dotted-dashed lines in
Figure 3). However, the model fitting (PolyMAX lines) was accurate both for ACC and for PWG. In fact, comparing the resonance frequencies estimated from the PWG data to those obtained from the ACC measurements, the maximum relative difference was limited to: (i) 0.237 Hz for the first resonance frequency of CASE 1; (ii) 0.241 Hz for the third resonance frequency of CASE 2; (iii) 0.32 Hz for the second resonance frequency of CASE 3. Looking at the estimated damping ratios (ζ), the discrepancy was slightly higher due to the fact that the damping estimations are generally more affected by uncertainties. The maximum relative difference on the estimated damping ratios was: (i) 0.15% for CASE 1; (ii) 1.88% for the first resonance of CASE 2; (iii) 0.3% for the first resonance of CASE 3.
The multi-axial sensor shows great sensing capabilities. Looking at
Figure 3c, it is clear that, for the first resonance, corresponding to a bending mode in the longitudinal direction of the CFRP plate, the grating oriented at 0° is more sensitive than the grating at 45° which, in turn, is more sensitive than the one in the 90° direction. On the other hand, for the second resonance frequency, the gratings at 45° and 90° are more sensitive than that at 0°, meaning that the second resonance mode is a torsion around the longitudinal axis of the plate.


