Metrological-Characteristics-Based Calibration of Optical Areal Surface Measuring Instruments and Evaluation of Measurement Uncertainty for Surface Texture Measurements
Abstract
1. Introduction
2. Metrological Characteristics for Optical Areal Surface Measuring Instruments
- (1)
- The instrument setup (configuration) and environmental conditions should be similar to those during the actual measurement activity for that instrument.
- (2)
- Calibration should be performed within the same measurement volume defined for the intended application.
- (3)
- In applications where filters or operators are used, the flatness determination should proceed under the same filter conditions as those used for measurements.
3. Determination of the MCs and the Corresponding Measurement Uncertainty Contributions for Surface Texture Measurements
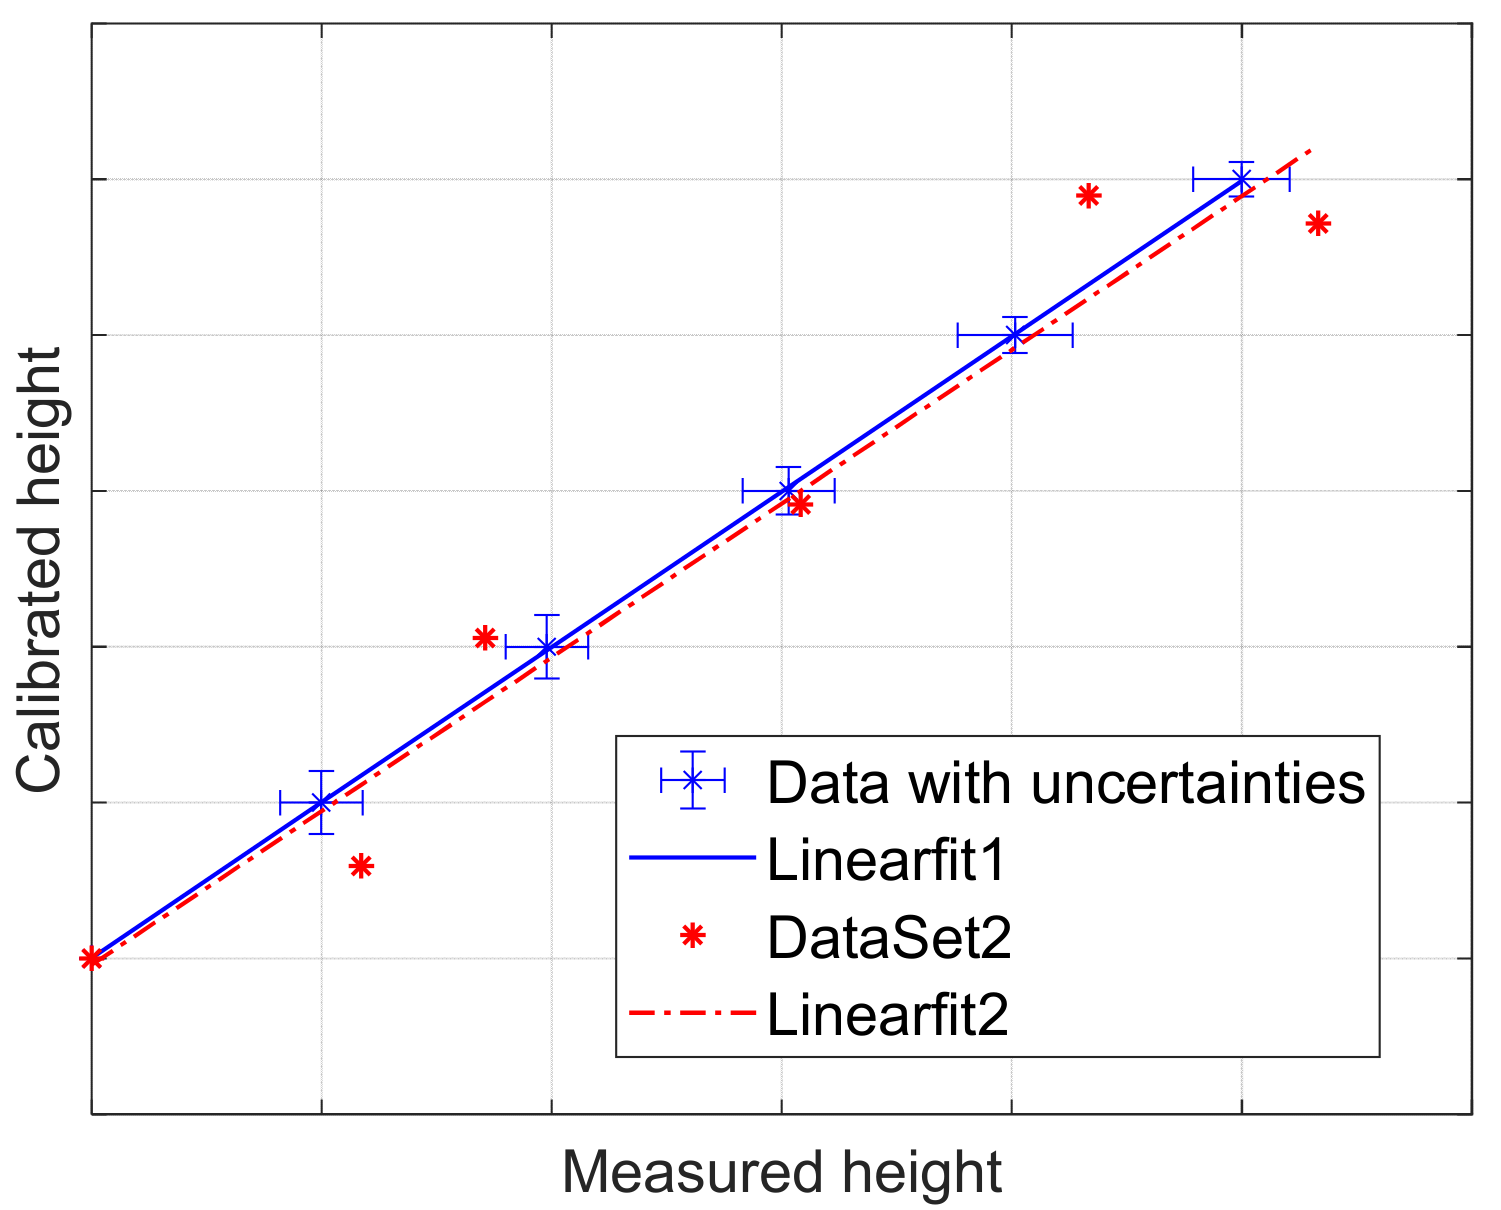
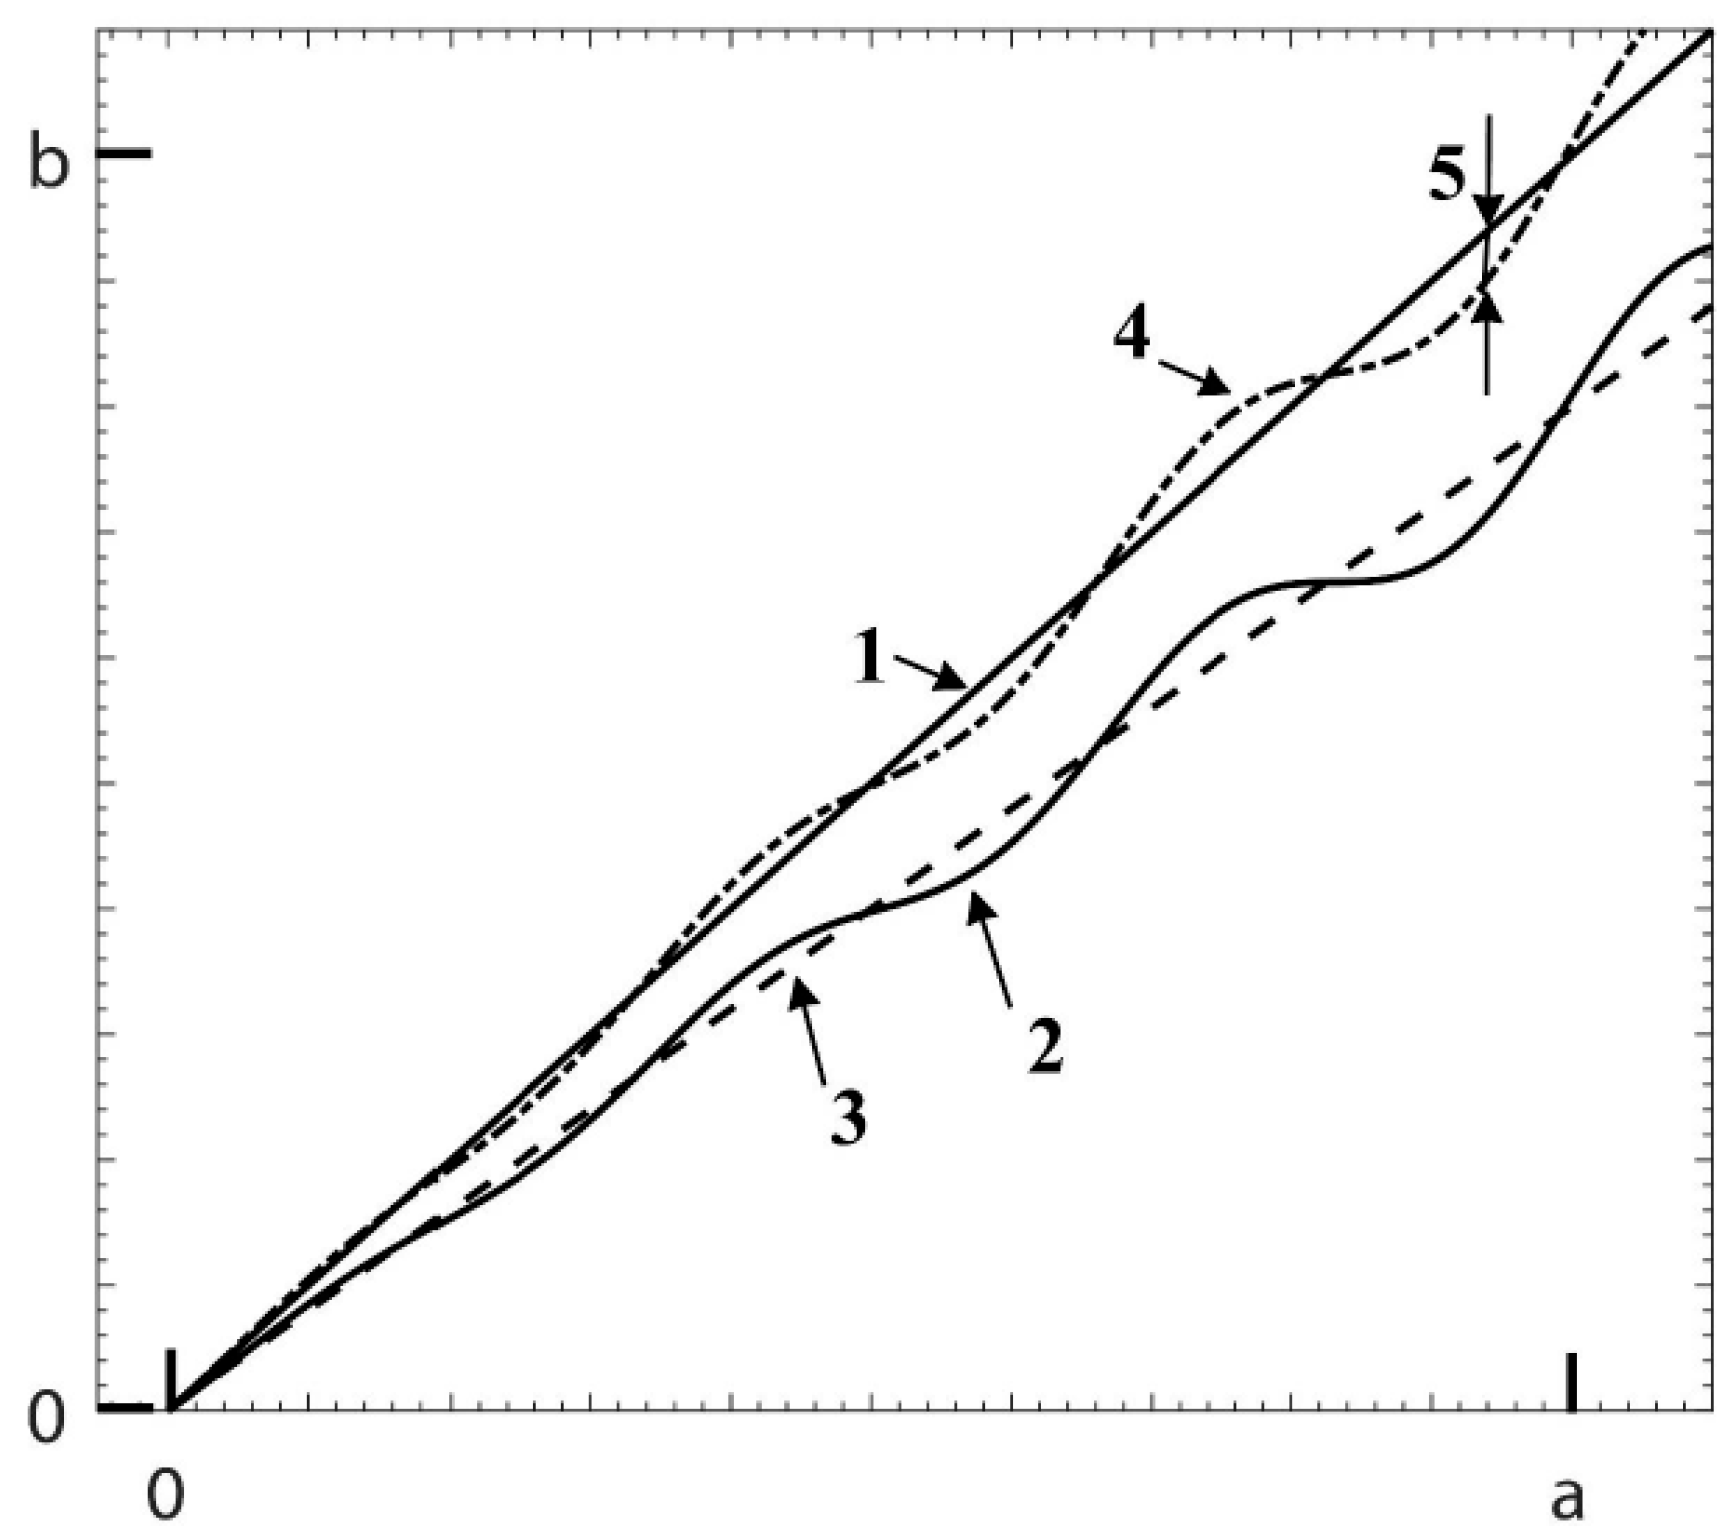
3.1. Amplification Coefficient
3.2. Linearity Deviation
3.3. Flatness Deviation
3.4. Measurement Noise
3.5. x, y-Mapping Deviations
3.6. Topographic Spatial Resolution
3.7. Topography Fidelity
4. Measurement Uncertainty Models for Height Parameters of Surface Texture
4.1. Measurement Uncertainty Evaluation for Sa and Sq
4.2. An Example of Measurement Uncertainty Evaluation for Sa and Sq Values
5. Conclusions
Author Contributions
Funding
Data Availability Statement
Conflicts of Interest
References
- Chen, K.; Tang, Y. Research Progress on the Design of Surface Texture in Tribological Applications: A Mini-Review. Symmetry 2024, 16, 1523. [Google Scholar] [CrossRef]
- Costa, H.L.; Schille, J.; Rosenkranz, A. Tailored surface textures to increase friction—A Review. Friction 2022, 10, 1285–1304. [Google Scholar] [CrossRef]
- Tang, W.; Zhou, Y.; Zhua, H.; Yang, H. The effect of surface texturing on reducing the friction and wear of steel under lubricated sliding contact. Appl. Surf. Sci. 2013, 273, 199–204. [Google Scholar] [CrossRef]
- Zhan, X.; Liu, Y.; Yi, P.; Feng, W.; Feng, Z.; Jin, Y. Effect of Substrate Surface Texture Shapes on the Adhesion of Plasma-Sprayed Ni-Based Coatings. J. Therm. Spray Technol. 2021, 30, 270–284. [Google Scholar] [CrossRef]
- Kim, C.-S.; Yoo, H. Three-dimensional confocal reflectance microscopy for surface metrology. Meas. Sci. Technol. 2021, 32, 102002. [Google Scholar] [CrossRef]
- De Groot, P. Principles of interference microscopy for the measurement of surface topography. Adv. Opt. Photonics 2015, 7, 1–65. [Google Scholar] [CrossRef]
- Reitbauer, J.; Harrer, F.; Eckhart, R.; Bauer, W. Focus variation technology as a tool for tissue surface Characterization. Cellulose 2021, 28, 6813–6827. [Google Scholar] [CrossRef]
- ISO 25178-600:2019; Geometrical Product Specification (GPS)—Surface Texture: Areal—Metrological Characteristics for Areal Topography Measuring Methods. ISO: Geneva, Switzerland, 2019. Available online: https://www.iso.org/standard/67651.html (accessed on 20 February 2025).
- ISO 25178-700:2022; Geometrical Product Specification (GPS)—Surface Texture: Areal—Calibration, Adjustment and Verification of Topography Measuring Instruments. ISO: Geneva, Switzerland, 2022. Available online: https://www.iso.org/standard/78204.html (accessed on 20 February 2025).
- Giusca, C.L.; Leach, R.K. Good Practice Guide No. 128: Calibration of the Metrological Characteristics of Imaging Confocal Microscopes (ICMs). 2012. Available online: https://eprintspublications.npl.co.uk/5821/ (accessed on 20 February 2025).
- Giusca, C.L.; Leach, R.K. Good Practice Guide No. 127: Calibration of the Metrological Characteristics of Coherence Scanning Interferometers (CSI) and Phase Shifting Interferometers (PSI). 2013. Available online: https://eprintspublications.npl.co.uk/5820/ (accessed on 20 February 2025).
- Giusca, C.L.; Leach, R.K.; Helary, F.; Gutauskas, T.; Nimishakavi, L. Calibration of the scales of areal surface topography-measuring instruments: Part 1. Measurement noise and residual flatness. Meas. Sci. Technol. 2012, 23, 035008. [Google Scholar] [CrossRef]
- Giusca, C.L.; Leach, R.K.; Helery, F. Calibration of the scales of areal surface topography measuring instruments: Part 2. Amplification, linearity and squareness. Meas. Sci. Technol. 2012, 23, 065005. [Google Scholar] [CrossRef]
- Haitjema, H. Uncertainty in measurement of surface topography. Surf. Topogr. Metrol. Prop. 2015, 3, 035004. [Google Scholar] [CrossRef]
- Giusca, C.L.; Claverley, J.D.; Sun, W.; Leach, R.K.; Helmli, F.; Chavigner, M.P. Practical estimation of measurement noise and flatness deviation on focus variation microscopes. Ann. CIRP 2014, 63, 545–548. [Google Scholar] [CrossRef]
- Thomsen-Schmidt, P. Characterization of a traceable profiler instrument for areal roughness measurement. Meas. Sci. Technol. 2011, 22, 094019. [Google Scholar] [CrossRef]
- Leach, R.; Haitjema, H.; Su, R.; Thompson, A. Metrological characteristics for the calibration of surface topography measuring instruments: A review. Meas. Sci. Technol. 2021, 32, 032001. [Google Scholar] [CrossRef]
- Pappas, A.; Newton, L.; Thompson, A.; Hooshmand, H.; Leach, R. Uncertainty propagation of field areal surface texture parameters using the metrological characteristics approach. In Proceedings of the Euspen’s 23 rd International Conference & Exhibition, Copenhagen, Denmark, 12–16 June 2023. [Google Scholar]
- Evaluation of Measurement Data—Guide to the Expression of Uncertainty in Measurement. JCGM 100:2008. Available online: https://www.bipm.org/documents/20126/2071204/JCGM_100_2008_E.pdf (accessed on 20 February 2025).
- Evaluation of Measurement Data—Supplement “Guide to the Expression of Uncertainty in Measurement”—Propagation of Distributions Using a Monte Carlo Method. JCGM 101:2008. Available online: https://www.bipm.org/documents/20126/2071204/JCGM_101_2008_E.pdf/325dcaad-c15a-407c-1105-8b7f322d651c (accessed on 20 February 2025).
- Krystek, M.; Anton, M. A weighted total least-squares algorithm for fitting a straight line. Meas. Sci. Technol. 2007, 18, 3438. [Google Scholar] [CrossRef]
- Bauer, W.; Hueser, D.; Gerbert, D. Simple method to determine linearity deviations of topography measuring instruments with a large range axial scanning system. Precis. Eng. 2020, 64, 243–248. [Google Scholar] [CrossRef]
- ISO 25178-2:2021; Geometrical Product Specification (GPS)—Surface Texture: Areal—Part 2: Terms, Definitions and Surface Texture Parameters. ISO: Geneva, Switzerland, 2021. Available online: https://www.iso.org/standard/74591.html (accessed on 20 February 2025).
- Leach, R.K.; Giusca, C.L.; Haitjema, H.; Evans, C.; Jiang, X. Calibration and verification of areal surface texture measuring instruments. Ann. CIRP 2015, 64, 797–813. [Google Scholar] [CrossRef]
- Creath, K.; Wyant, J.C. Absolute measurement of surface roughness. Appl. Opt. 1990, 29, 3816–3822. [Google Scholar] [CrossRef]
- de Groot, P. The instrument transfer function for optical measurement of surface topography. J. Phys. Photonics 2021, 3, 024004. [Google Scholar] [CrossRef]
- Jiao, Z.; Deng, T.; Thiesler, J.; Bergmann, D.; Tutsch, R.; Dai, G. Hybrid method combining SEM and AFM in reference metrology for characterization of the instrument transfer function using CCS material measure. Meas. Sens. 2025, 101666. [Google Scholar] [CrossRef]
- Giusca, C.L.; Leach, R.K. Calibration of the scales of areal surface topography measuring instruments: Part 3. Resolution. Meas. Sci. Technol. 2013, 24, 105010. [Google Scholar] [CrossRef]
- Final Report. 2024. Available online: https://www.euramet.org/smart-electricity-grids/projects/details/project/traceable-industrial-3d-roughness-and-dimensional-measurement-using-optical-3d-microscopy-and-optica (accessed on 20 February 2025).
- Hüser, D.; Kirchhoff, J.; Felgner, A. Algorithm to robustly determine pitch and height of 1D grating measurement standards, Measurement: Sensors. In Proceedings of the XXIV IMEKO World Congress “Think Metrology”, Hamburg, Germany, 26–29 August 2024. [Google Scholar] [CrossRef]
- Gao, S.; Felgner, A.; Hüser, D.; Koenders, L. Characterization of the topography fidelity of 3D optical microscopy. Proc. SPIE 2019, 11057, 110570G. [Google Scholar]
- Eifler, M.; Hering, J.; von Freymann, G.; Seewig, J. Calibration sample for arbitrary metrological characteristics of optical topography measuring instruments. Opt. Express 2018, 26, 16609–16623. [Google Scholar] [CrossRef] [PubMed]
- Available online: https://www.ptb.de/empir2021/tracoptic/home/ (accessed on 20 February 2025).
- Available online: http://www.simetrics.de/pdf/RS-N.pdf (accessed on 20 February 2025).
- Su, R.; Leach, R. Physics-based virtual coherence scanning interferometer for surface measurement. Light Adv. Manuf. 2021, 2, 2–16. [Google Scholar] [CrossRef]
- Haitjema, H.; van Dorp, B.; Morel, M.; Schellekens, P.H.J. Uncertainty estimation by the concept of virtual instruments. Proc. SPIE 2001, 4401, 147–157. [Google Scholar]
- Eifler, M.; Hering, J.; Seewig, J.; Leach, R.K.; von Freymann, G.; Hu, X.; Dai, G. Comparison of material measures for areal surface topography measuring instrument calibration. Surf. Topogr. Metrol. Prop. 2020, 8, 025019. [Google Scholar] [CrossRef]
- Pappas, A.; Newton, L.; Thompson, A.; Leach, R. Review of material measures for surface topography instrument calibration and performance verification. Meas. Sci. Technol. 2024, 35, 012001. [Google Scholar] [CrossRef]
- Dai, G.; Seeger, B.; Weimann, T.; Xie, W.; Hüser, D.; Tutsch, R. Development of a novel material measure for characterising instrument transfer function (ITF) considering angular-dependent asymmetries of areal surface topography measuring instruments. Proc. Euspen 2019, 516–519. Available online: https://www.euspen.eu/product/book-19th-ice-proceedings-bilbao-2019/ (accessed on 20 February 2025).
- Krueger-Sehm, R.; Bakucz, P.; Jung, L.; Wilhelms, H. Chirp Calibration Standards for Surface Measuring Instruments. Tech. Mess. 2007, 74, 572–576. [Google Scholar] [CrossRef]
- Felgner, A.; Gao, S.; Hüser, D.; Brand, U. Development of a sinusoidal pseudochirp material measure for the characterization of optical surface topography measuring instruments. Proc. SPIE 2022, 12137, 121370S. [Google Scholar]
- Eifler, M.; Hering, J.; von Freymann, G.; Seewig, J. Manufacturing of the ISO 25178-70 material measures with direct laser writing: A feasibility study. Surf. Topogr. Metrol. Prop. 2018, 6, 024010. [Google Scholar] [CrossRef]
- Hüser, D.; Rudolf, M.; Dai, G.; Felgner, A.; Hahm, K.; Verhülsdonk, S.; Feist, C.; Gao, S. Precision of diamond turning sinusoidal structures as measurement standards used to assess topography fidelity. Surf. Topogr. Metrol. Prop. 2024, 12, 015014. [Google Scholar] [CrossRef]
- Su, R.; Wang, Y.; Coupland, J.; Leach, R. On tilt and curvature dependent errors and the calibration of coherence scanning interferometry. Opt. Express 2017, 25, 3297. [Google Scholar] [CrossRef] [PubMed]
- Lehmann, P.; Xie, W.; Niehues, J. Transfer characteristics of rectangular phase gratings in interference microscopy. Opt. Lett. 2012, 37, 758–760. [Google Scholar] [CrossRef]
- Xie, W.; Hagemeier, S.; Bischoff, J.; Mastylo, R.; Manske, E.; Lehmann, P. Transfer characteristics of optical profilers with respect to rectangular edge and step height measurement. Proc. SPIE 2017, 10329, 1032916. [Google Scholar]
- Mauch, F.; Osten, W. Model-based approach for planning and evaluation of confocal measurements of rough surfaces. Meas. Sci. Technol. 2014, 25, 105002. [Google Scholar] [CrossRef]
- Liu, M.; Cheung, C.; Ren, M.; Cheng, C.-H. Estimation of measurement uncertainty caused by surface gradient for a white light interferometer. Appl. Opt. 2015, 54, 8670. [Google Scholar] [CrossRef]
- Fu, L.; Birk, A.; Frenner, K.; Gao, S.; Reichelt, S. Simulation of light scattering from complex 3D structures for confocal microscope using accelerated boundary element method. Proc. SPIE 2023, 12619, 1261908. [Google Scholar]
- Available online: https://www.ptb.de/empir2021/fileadmin/documents/empir-2021/tracoptic/documents/GPG1_Instrumentation_for_Optical_Roughness_Measurements.pdf (accessed on 20 February 2025).
- Gao, S.; Felgner, A.; Hüser, D.; Wyss, S.; Brand, U. Characterization of the maximum measurable slope of optical topography measuring instruments. Proc. SPIE 2023, 12618, 126182L. [Google Scholar]
- Gao, S.; Felgner, A.; Brand, U.; Koops, R. Influence of the inhomogeneity of the field of view on the measurement of surface texture in optical surface topography measuring instruments. In Proceedings of the Euspen 2025, Zaragoza, Spain, 9–13 June 2025. accepted, oral presentation. [Google Scholar]
- Klapetek, P.; Necas, D.; Campbellova, A.; Yacoot, A.; Koenders, L. Methods for determining and processing 3D errors and uncertainties for AFM data analysis. Meas. Sci. Technol. 2011, 22, 025501. [Google Scholar] [CrossRef]
- ARS f2 Areal Surface Texture Sample from the SiMetrics GmbH in Limbach-Oberfrohna (Germany). Available online: http://www.simetrics.de/pdf/ARS.pdf (accessed on 20 February 2025).


| Metrological Characteristic | Symbol | Main Potential Error Along |
|---|---|---|
| Amplification coefficient | , , | x, y, z |
| Linearity deviation | , , | x, y, z |
| Flatness deviation | zFLT | z |
| Measurement noise | NM | z |
| Topographic spatial resolution | WR | z |
| x-y mapping deviations | , | x, y |
| Topography fidelity | TFI | x, y, z |
Disclaimer/Publisher’s Note: The statements, opinions and data contained in all publications are solely those of the individual author(s) and contributor(s) and not of MDPI and/or the editor(s). MDPI and/or the editor(s) disclaim responsibility for any injury to people or property resulting from any ideas, methods, instructions or products referred to in the content. |
© 2025 by the authors. Licensee MDPI, Basel, Switzerland. This article is an open access article distributed under the terms and conditions of the Creative Commons Attribution (CC BY) license (https://creativecommons.org/licenses/by/4.0/).
Share and Cite
Gao, S.; Felgner, A.; Brand, U. Metrological-Characteristics-Based Calibration of Optical Areal Surface Measuring Instruments and Evaluation of Measurement Uncertainty for Surface Texture Measurements. Instruments 2025, 9, 11. https://doi.org/10.3390/instruments9020011
Gao S, Felgner A, Brand U. Metrological-Characteristics-Based Calibration of Optical Areal Surface Measuring Instruments and Evaluation of Measurement Uncertainty for Surface Texture Measurements. Instruments. 2025; 9(2):11. https://doi.org/10.3390/instruments9020011
Chicago/Turabian StyleGao, Sai, André Felgner, and Uwe Brand. 2025. "Metrological-Characteristics-Based Calibration of Optical Areal Surface Measuring Instruments and Evaluation of Measurement Uncertainty for Surface Texture Measurements" Instruments 9, no. 2: 11. https://doi.org/10.3390/instruments9020011
APA StyleGao, S., Felgner, A., & Brand, U. (2025). Metrological-Characteristics-Based Calibration of Optical Areal Surface Measuring Instruments and Evaluation of Measurement Uncertainty for Surface Texture Measurements. Instruments, 9(2), 11. https://doi.org/10.3390/instruments9020011


