Abstract
Retinal diseases such as Age-Related Macular Degeneration (ARMD) affect nearly one in three elderly patients. ARMD damages the central vision photoreceptors in the fovea. The Photostress Test is a simple technique for testing for the early effects of ARMD. Here, the illumination sources in a novel self-administered Photostress Testing device were modeled for safety and distribution in illumination software. After satisfying the design constraints in the model, a prototype of the illumination system was fabricated and tested to confirm the modeling results. The resultant prototype can be used to aid in the diagnosis of retinal disease and is well within retinal safety levels.
1. Introduction
Age-Related Macular Degeneration (ARMD) is a progressive disease where the photoreceptors of the retina are damaged, creating a localized blind spot in the field of vision. The disease typically affects the photoreceptors in the fovea, while leaving peripheral vision unaffected. Consequently people with ARMD tend to be able to navigate just fine, but have difficulty with tasks such as reading, watching television and identifying faces due to a central blind spot. Early diagnosis and treatment may help slow the progression of the disease. The Photostress Test is a simple means for screening for ARMD [1,2]. In the test, a bright spot of light is shone on the fovea to bleach the photoreceptors, effectively creating the spots people “see” following flash photography. In healthy retinas, the after image spots resolve fairly quickly, while in patients with early stage ARMD, the spots take much longer to disappear. We are developing a Photostress Testing device that can be self-administered. The Photostress Testing device was modeled and analyzed in FRED Optical Engineering Software (Photon Engineering, Tucson, AZ, USA). The purpose of the Photostress Testing device is to test the recovery time of a person’s eye from being bleached by a central light source. The design calls for the patient to hold the device up to their eye and look through the center of a ring. This aligns the optical axis of the device with the visual axis of their eye. The person then presses a button that introduces a bright flash of light onto a small part of the retina called the fovea. This temporarily bleaches their retina so that their vision is impaired. The button, once pushed, triggers the light source to begin blinking at a much lower illuminance. Once the viewer sees this light, they re-push the button to stop the timer. The time elapsed from the initial bleach of their eye to the recovery of vision is called their recovery time. This time is compared to a standard value of recovery times that will be determined by test trials of many subjects using the device. If the viewer’s recovery time is within a standard deviation of the accepted value, their fovea (the center of the retina) is healthy. However, if the recovery time is outside a standard deviation of the typical recovery time, the patient is diagnosed with diseases of the macula such as genetic disease affecting the macula, e.g., Retinitis Pigmentosa, Best disease, etc., Stargaurdt’s disease, Diabetic Macular Edema (DME), Central Serous chorioretinopathy (CSCR) and Age-Related Macular Degeneration (ARMD): a degradation of the macula that causes a person to lose their central vision. The test also distinguishes optic neuropathy form macular diseases. Components of the Photostress Testing device are detailed in Section 2.1, a model of the in optical illumination software is shown in Section 2.2, analysis from that software shown in Section 3.1, a comparison between the software analysis and experimental results is made in Section 3.2, and a conclusion is made in Section 4.
2. Experimental Section
2.1. Components of the Photostress Testing Device
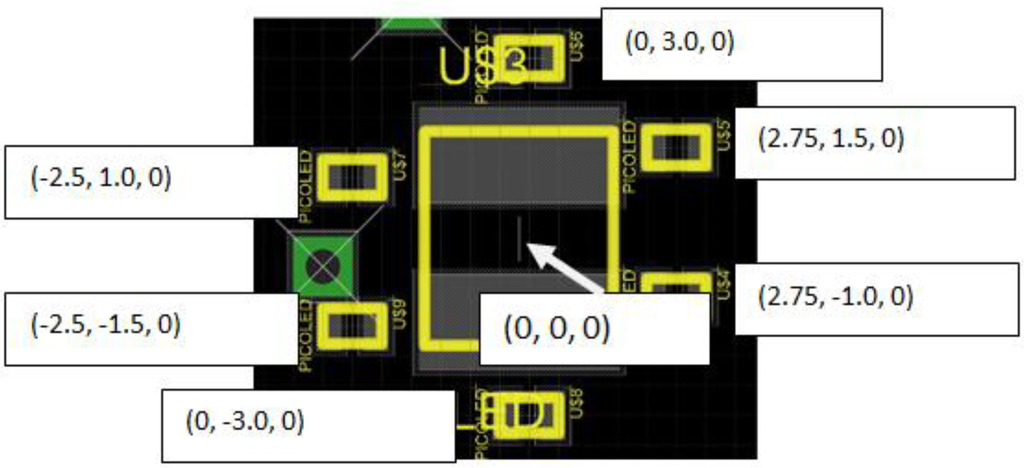
The Photostress Testing device consists of a target, a Badal Lens, and the eye. The target is the source of the system. It is composed of a center LED surrounded by six picoLEDsTM. The center LED (NSSW064, Nichia) is a 2.8 mm × 3.2 mm LED with a circular emission region that is 2.4 mm × 2.4 mm. The target is placed at the front focal point of a Badal Lens, while the pupil of the eye sits at the rear focal point of the Badal Lens. In this configuration, the target can be axially shifted to compensate for refractive error in the eye, but the target size will remain constant on the retina. The purpose of the center LED is to “bleach,” or temporarily blind the viewer by emitting 2000 Lx to 4000 Lx onto their retina [3,4]. The six picoLEDsTM, (SMLP12WBC7W1, Nichia), are 0.6 mm × 0.6 mm LEDs that emit 11.5 μW of light into the system [5]. Their function is for alignment; the viewer looks at the center of the ring of six picoLEDsTM, and by doing this, aligns the optical axis of the device to their visual axis. All seven sources emit white light. Figure 1 shows the layout of the LEDs. The Badal Lens, (NT49-664, Edmund Optics) is an aspherized achromatic lens with a 25 mm diameter and 40 mm focal length. Its purpose is to collimate the light from the source so that a clear image can form on the retina. For nearsighted and farsighted individuals, the target is moved towards or away from the Badal Lens by plus or minus 8.0 mm. This provides the eye with negative or positive corrective power within a range of plus or minus five diopters.

Figure 1.
This is the source layout. Each grid line is 0.5 mm. The yellow rectangles represent where the LED and picoLEDsTM will be placed into. The rectangles are a little larger than the actual LED and picoLEDsTM. The gray represents the solder pads for the sources. The picoLED’sTM center coordinates are labeled.
2.2. Model of Photostress Testing Device in Optical Engineering Software
2.2.1. General Model
The center LED and picoLEDsTM were shown in separate ray traces for each model in order to more clearly show how each was traced through the system. Note that the central LED at the bleaching setting is referred to the bleaching LED; at the blinking setting it is referred to as the blinking LED. Note also that the sources are kept at one position and not translated in the software for the illumination analysis.
2.2.2. Source Model
The sources in Figure 2A,B are modeled in optical engineering software as detailed optical sources. For the model of the picoLEDsTM (Figure 2a), rays are shown sitting on a 0.6 mm × 0.6 mm random grid plane that is rectangular. For the model of the bleaching LED (Figure 2b), rays are sitting on a 2.4 mm × 2.4 mm random grid plane that is circular. Once traced, the rays are set to emit into an angular range of 10 degrees in the X and Y directions from Z, the axis orthogonal to the source grids. This angle was chosen as to view only light that passes through the system. The source powers were set to 7.5 × 10⁻³ Lm, 0.8 lm and 5.8 × 10⁻³ Lm for the picoLEDsTM, bleaching LED, and blinking LED respectively, i.e., the bleaching LED emits 144 times more power than the blinking LED and 112 times more power than the picoLEDsTM. Their spectrums were digitized into the optical engineering software from the data sheets. Ten million rays were traced from the center LED at each setting and 200,000 rays were traced from each of the six picoLEDsTM. This is more than is required by the Rose model to ensure an accurate ray trace; the Rose model required a minimum of 148,852 rays to be traced from the bleaching LED and 9716 rays to be traced from each of the six picoLEDsTM [6].

Figure 2.
(a) Source Model for the picoLEDsTM; (b) Source Model for the leaching LED.
2.2.3. Lens Model
The lens model is number NT49-664 and was imported from Zemax (Radiant Zemax, Redmond, WA, USA). It is an aspherized achromat oriented for minimum spherical aberration (Figure 2). Its function is to collimate light from the source for viewers with perfect visual acuity (20–20 vision).
2.2.4. Arizona Eye Model
The Arizona Eye Model was opened as a sample file in the software. It is composed of a cornea, lens, pupil, and eye ball. The light refracts at the cornea and a little at the gradient index lens. The pupil is the aperture stop of the system and limits how much light enters the eye. It is set to a diameter of 6 mm. At the back of the eye ball is the fovea, which is about the size of the image from the central LED source. The magnification m of the system changed the size of the source after it passed through the Badal Lens and through the eye by
where feye is the focal length of the eye (23 mm) and fBadal Lens is the focal length of the Badal Lens. In order to determine which focal length lens to use, the bleaching LED had to be chosen. Once an LED with the correct illuminance was found, the magnification was found to be
where Dfovea is the diameter of the fovea (1.5 mm) and DLED width (2.8 mm) with the diameter of the shortest side of the LED. The magnification turned out to be m = 0.54. Using this magnification and the focal length of the eye, the desired focal length of the Badal Lens was calculated to be fBadal Lens = 42.9 mm. The closest lens to that had a focal length of 40 mm and covered an image diameter of 1.6 mm, which is a little larger than the fovea.
2.2.5. Analysis Surface
The analysis surface was placed at the back of the retina, as shown as a green box in Figure 3. It is a 4 mm × 4 mm grid that collects all of the rays. It has 51 × 51 divisions.

Figure 3.
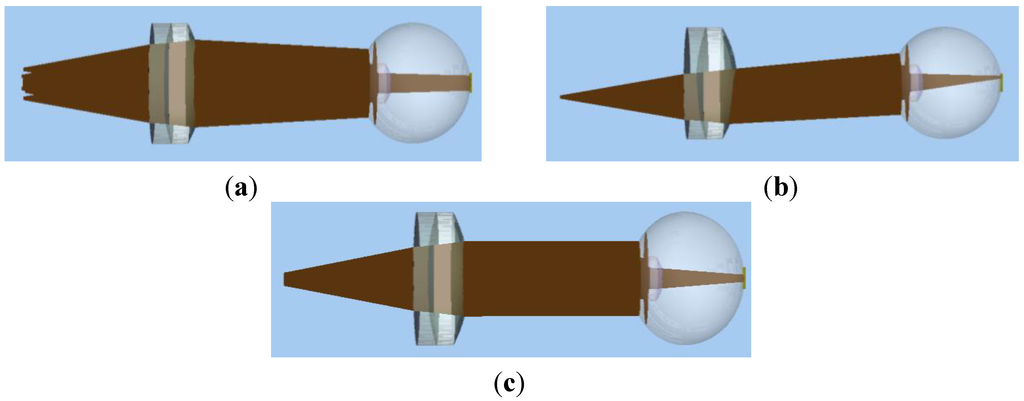
Badal Lens. The Badal Lens reduces spherical aberration and collimates the light in its direction of propagation. (a) Note that for the whole system it is difficult to tell how the light is directed by the lens; (b) A bottom picoLEDTM gets refracted by the lens and focuses at the top of the retina. The light is well collimated at the angle it is propagating in; (c) The light is visibly collimated on the Z axis after the lens and before it enters the eye.
The analysis surface shows the source distribution on the retina in Figure 4.

Figure 4.
Images formed by Photostress Tester. (a) The image of the source is a smaller image of the six picoLEDsTM; (b) The image of the source is a circle with the same shape, but with a smaller size.
3. Results and Discussion
3.1. Analysis of Photostress Tester in Illumination Software
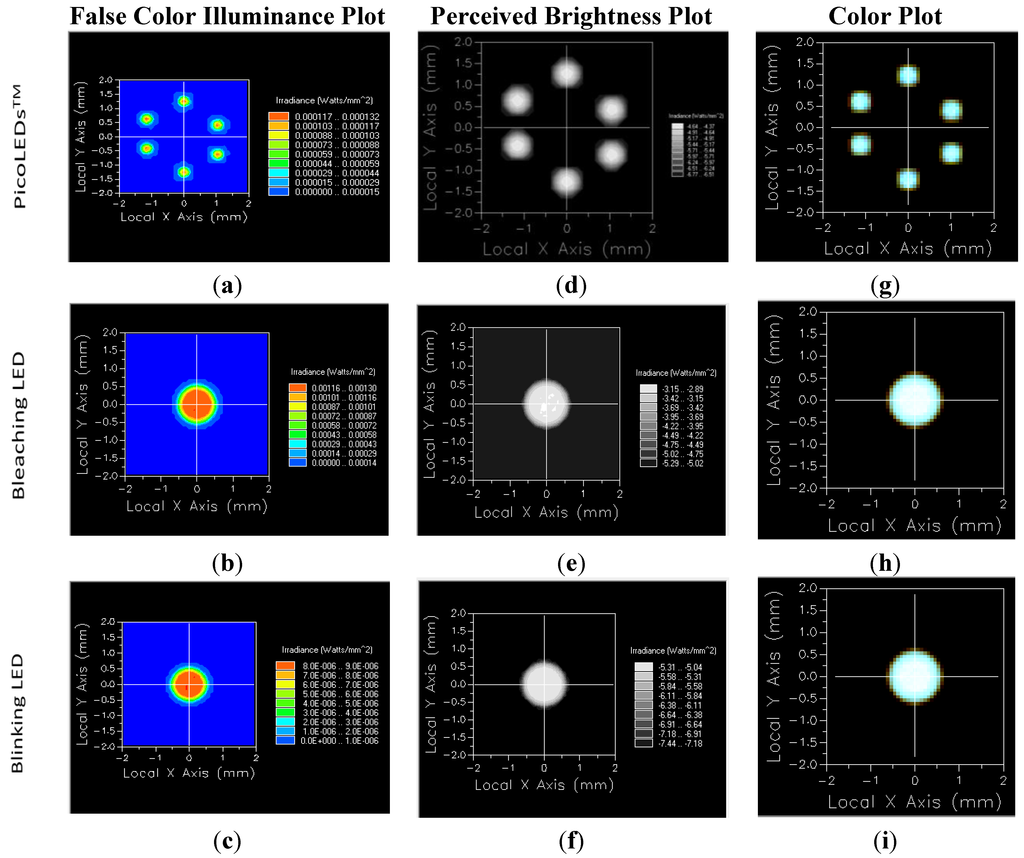
Figure 5a shows a false color illuminance plot for the six picoLEDsTM. The maximum power detected was 1.20 × 10⁻⁵ lumens (Lm): 617 times less power than was emitted. The maximum illuminance detected was 4.1 × 10⁻⁵ Lm/mmz. Figure 5b shows the illuminance data scaled by log (base 10) with the floor set to −2.4; the chart color levels were set to gray. The purpose of this was to model the image brightness perceived by the human eye, which is the log of the source’s actual brightness [7]. Figure 5c shows the color image of the picoLEDsTM with a brightness setting of 2.2. This simulates what color the viewer will see when they look at the picoLEDsTM.

Figure 5.
Illumination Analysis. (a,b,c) The illumination analysis windows show a false color illuminance plot; (d,e,f) perceived brightness plot; and (g,h,i) color plot for the picoLEDsTM, bleaching LED, and blinking LED.
Figure 5d shows a false color illuminance plot for the bleaching LED. There were 2.3 × 10⁻³ lumens covering the 1.76 mm2 bleach area compared to the 0.8 Lm?lumens emitted from the LED. The maximum illuminance detected was 1.3 × 10⁻³ Lm/mm2 or 1300 Lx. The diameter of the image is a 1.53 mm, showing that the fovea (with a diameter of 1.5 mm) will successfully be bleached. Figure 5e shows the illuminance data scaled by log(base 10) with a floor of −2.4. This models the illuminance perceived by the eye when the LED is at the bleach setting. Figure 5f shows the color plot of the bleaching LED with the brightness set to 2.2.
Figure 5g shows a false color illuminance plot for the blinking LED. There were 1.6 × 10⁻⁵ lumens covering the 1.76 mm2 blinking area compared to the 5.8 × 10⁻³ lumens emitted from the LED. The maximum illuminance detected was 9.0 × 10⁻⁶ Lm/mm2 or 9 Lx. This is two orders of magnitude lower than what was detected by the bleaching LED. The diameter of the image is 1.53 mm. Figure 5h shows the illuminance data scaled by log(base 10) with a floor of −2.4. This models the illuminance that the eye perceives when the LED is at blinking setting. Figure 5i shows the color plot of the blinking LED with the brightness set to 2.2.
3.2. Comparison of Software Analysis to Experimental Results
Data taken from the illumination analysis was compared with data taken in an experimental set up to test the safety of the device. Specifically, the illuminance of the bleaching LED was tested, as it was the primary safety concern for the device. The spot size was taken as well.
3.2.1. Setup
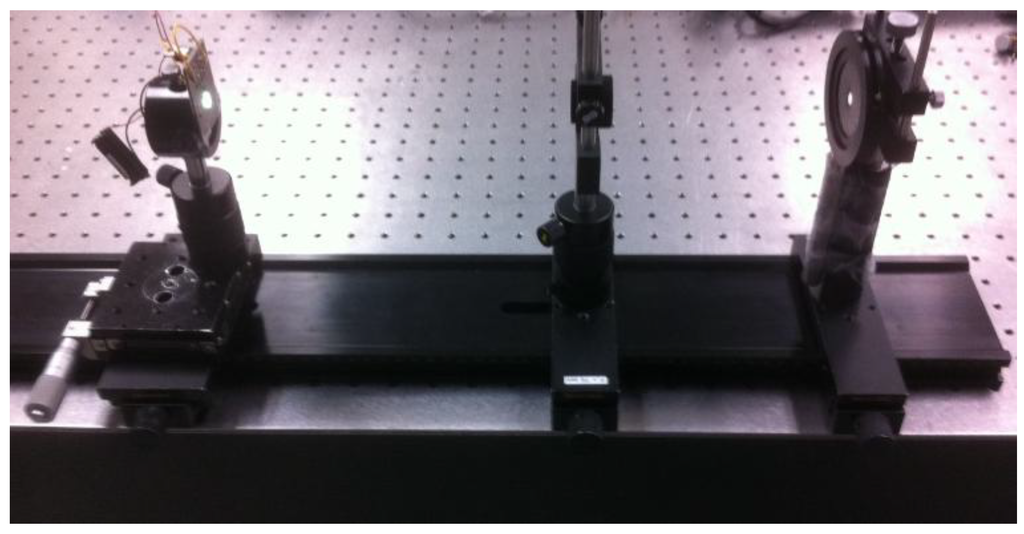
The experimental set up consisted of the source, Badal Lens, adjustable iris, and eye lens mounted with posts, post holders, translation stages, rail carriers, an optical rail, and an optical bread board (See Figure 6). The sources were fabricated after the model shown in Figure 1. The Badal Lens was the same lens modeled in the software (NT49-664, Edmund Optics). The adjustable iris had a diameter of 6 mm. The eye lens was a 12.5 mm diameter × 17.5 mm focal length achromat (NT49-928, Edmund Optics). The focal length of the lens was a close match the eye’s effective focal length in air: 17 mm [8]. This accounts for the lens being in air rather than surrounded by two disparate mediums, as it is in the eye.

Figure 6.
Experimental setup of the Photostress Tester.
3.2.2. Experiment
The bleaching LED was turned on to emit 0.8 lumens of power. A handheld power meter from Edmund Scientific was held up to the focal point at the back of the eye lens and used to test to power there. The size of the image at the focal point was taken with calipers held up to a white imaging screen that captured the image. The area of the image was calculated and used to determine the illuminance at the image plane. The experiment was repeated at the two extremes of the source translation: −8 mm and +8 mm from the front focal length of the lens.
3.2.3. Results
Main Table 1 shows the illuminance values on the retina as 3106 Lx, 2622 Lx, and 2003 Lx. These values are all within the desired safe range of 2000 Lx to 4000 Lx. The illuminance from the software was 1300 Lx, which is lower than the targeted range. The variation is likely due to stray light entering the power meter from the room. The measured spot size at each location matches expected value of 1.5 mm.

Table 1.
Illuminance on the retina.
| Translation (mm) | Illuminance Ev (lux) | Spot Size (mm) |
|---|---|---|
| −8 | 3106.7 | 1.5 |
| 0 | 2622.9 | 1.5 |
| 8 | 2003.2 | 1.5 |
4. Conclusions
A Photostress Testing device was modeled and analyzed in optical engineering software. The illumination analysis showed that the image of the bleaching LED successfully covered the entire 1.5 mm diameter fovea with a diameter of 1.53 mm. It also showed that 1300 Lx from the bleaching LED hit the retina, which is a safe value since it is under the initial target range of 2000 Lx to 5000 Lx. Experimental data confirmed that the Photostress Testing device produced an image 1.5 mm in diameter from the bleaching LED with illuminance values of 3106.7 Lx, 2622.9 Lx, and 2003.2 Lx at the −8 mm, 0 mm, and +8 mm translation distances of the source from the front focal length of the Badal lens. This showed that the bleaching LED produces illuminance on the retina within the safe illuminance range even when the target is translated. Discrepancies between data from the software and from the experiment are due to experimental error. In the experiment, light from the source did not fill the entire detector, thereby rendering higher values than expected. The apparent discrepancy between the experimental and theoretical prediction appears to be associated with the size limitations of the available detector. One possible improvement of the experimental design could include placing the detector closer to the source, so that its active area is overfilled. This will bring the measured illuminance values closer to those obtained via simulation.
Acknowledgments
The work done in the paper was performed to enhance a senior design project consisting of an optical engineer (Elizabeth Swan), two mechanical engineers (Abraham Timler and Layne Castro) and an electrical engineer (Oscar Galvan) as part of the ATLANTIS student mobility grant at the University of Arizona. Oscar Galvan provided Figure 1 and the illuminance values required to bleach the retina. John Koshel provided FRED modeling and analysis insight. The project was sponsored by the US Department of Education (P116J080016) and the National Science Foundation (Grant #: 0856761, 1311851).
Author Contributions
Elizabeth Swan wrote the majority of the manuscript with edits done by Jim Schwiegerling. Jim Schwiegerling also suggested the use of a Badal Lens in the device. Eniko Enkov and Gholam Peyman were responsible for the funding of the project and main design and end objectives.
Conflicts of Interest
The authors declare no conflict of interest.
References
- Messenio, D.; Marano, G.; Gerosa, S.; Iannelli, F.; Biganzoli, E.M. The influence of age on the recovery of the ERG photostress test. Doc. Ophthalmol. 2013, 126, 87–97. [Google Scholar]
- Margrain, T.H.; Thomson, D. Sources of variability in the clinical photostress test. Ophthalmic Physiol. 2002, 22, 61–67. [Google Scholar]
- Jacobs, R.J.; Lacey, A. The macular photostress test. Aust. J. Optom. 1983, 66, 147–150. [Google Scholar]
- Sykes, S.M.; Robinson, W.G.; Waxler, M.; Kuwabara, T. Damage to the monkey retina by broad-spectrum fluorescenet light. Investig. Ophthalmol. Vis. Sci. 1981, 20, 425–434. [Google Scholar]
- Taub, M.B. The photostress test as a guide to etiology. J. Am. Optom. Assoc. 2007, 78, 570–571. [Google Scholar]
- Koshel, J. Lecture 2-Sampling & Lit-Appearance Modeling. OPTICS X85 Illumination Engineering; University of Arizona College of Optical Sciences: Tucson, AZ, USA, 2012. [Google Scholar]
- 13.8. Eye Intensity Response, Contrast Sensitivity. Eye Intensity Response, Contrast Sensitivity. Available online: http://www.telescope-optics.net/eye_intensity_response.htm (accessed on 22 April 2012).
- Schwiegerling, J. Field Guide to Visual and Ophthalmic Optics; SPIE: Bellingham, WA, USA, 2004. [Google Scholar]
© 2014 by the authors; licensee MDPI, Basel, Switzerland. This article is an open access article distributed under the terms and conditions of the Creative Commons Attribution license (http://creativecommons.org/licenses/by/3.0/).