Article

Analysis of Sealing Characteristics of Hydraulic Clamping Flange Connection Mechanism

1
Northeast Branch of National Petroleum and Natural Gas Pipe Network Group Co., Ltd., Shenyang 110167, China
2
National Oil & Gas Pipeline Group Northeast Branch, Jinzhou Oil & Gas Transmission Subcompany, Jinzhou 121000, China
3
School of Mechanical Engineering and Automation, Northeastern University, Shenyang 110819, China
*
Author to whom correspondence should be addressed.
Processes 2026, 14(1), 72; https://doi.org/10.3390/pr14010072
Submission received: 20 November 2025 / Revised: 14 December 2025 / Accepted: 19 December 2025 / Published: 24 December 2025
(This article belongs to the Topic Clean and Low Carbon Energy, 2nd Edition)

Abstract

A novel hydraulically actuated uniform clamping flange connection mechanism is proposed to address the long-standing challenges in high-pressure natural gas flowmeter calibration, including cumbersome bolt-by-bolt assembly/disassembly, high leakage risk, and severe non-uniform gasket contact pressure associated with conventional multi-bolt flanges. Unlike traditional discrete bolt loading, the proposed mechanism generates a continuous and actively adjustable circumferential clamping force via an integrated hydraulic annular piston, ensuring excellent sealing uniformity and rapid installation within minutes. A high-fidelity transient finite element model of the hydraulic clamping flange assembly is established, incorporating the nonlinear compression/rebound behavior of flexible graphite–stainless steel spiral-wound gaskets and one-way fluid–structure interaction under water hammer loading. Parametric studies reveal that reducing the effective clamping area to below 80% of the original design significantly intensifies stress concentration and compromises sealing integrity, while clamping force below 80% or above 120% of the nominal value leads to leakage or component overstress, respectively. Under steady 10 MPa pressurization, the flange exhibits a maximum stress of 150.57 MPa, a minimum gasket contact stress exceeding 30 MPa, and a rotation angle below 1°, demonstrating robust sealing performance. During a severe water hammer event induced by rapid valve closure, the peak flange stress remains acceptable at 140.41 MPa, while the minimum gasket contact stress stays above the critical sealing threshold (38.051 MPa). However, repeated water hammer cycles increase the risk of long-term gasket fatigue. This study introduces, for the first time, a hydraulic uniform-clamping flange solution that dramatically improves sealing reliability, installation efficiency, and operational safety in high-pressure flowmeter calibration and similar temporary high-integrity piping connections, providing crucial technical guidance for field applications.

1. Introduction

Currently, both domestically and internationally, the installation of flowmeters in natural gas flowmeter calibration facilities is predominantly performed manually, using bolt-fixed clamping connections [1,2,3]. This procedure represents a critical foundational step in the calibration process, directly influencing subsequent sealing performance and overall calibration accuracy. The manual approach heavily depends on the expertise of calibration personnel and is susceptible to human errors, such as misalignment or uneven bolt pretension. Consequently, these issues elevate the risk of sealing failure in flange connections, thereby substantially constraining the efficiency and throughput of calibration stations [4]. There is, therefore, an urgent need for optimization and improvement.
Bolted flange connections are widely employed in industrial, mechanical, and chemical engineering fields. Sealing is primarily achieved through the interaction between the compressed gasket and the flange sealing surfaces. Durbaca et al. [5] investigated the sealing performance and structural strength of bolted flange connections. They developed an analytical method for flange structures, performed corresponding calculations, and compared the results with those obtained from standard methods. Their findings indicated that rubber gaskets exhibited the best sealing performance and that a larger contact area between the flange sealing surface and the gasket led to improved sealing effectiveness. Wang et al. [6] numerically simulated the deformation and stress distribution in pipeline flanges under four different operating conditions. The results revealed that, under both bolt pretightening and operating conditions, radial displacement of the flange increased from the inner to the outer diameter, whereas circumferential displacement remained nearly constant. Jiao [7] noted that the gasket experiences uniform compressive stress under bolt pretightening loads; however, external torque induces uneven compressive stress on the gasket. Consequently, the influence of external torque on flange sealing performance was found to exceed that of bolt stress alone. Bouzid and Nechache [8,9] conducted simulations to evaluate the effects of temperature on the sealing performance of bolted flange connections under both steady-state and transient conditions. The results demonstrated that, in high-temperature environments, creep phenomena in the flange connection components altered the stress distribution within the joint.
Liu [10] developed a finite element model of bolted flange connections using ANSYS 2023 software, with particular emphasis on the average compressive stress and edge stress in the gasket under sealing conditions. By integrating theoretical calculations with experimental validation, the study revealed that variations in edge stress exert a more pronounced influence on the sealing performance of flange connections. Larson et al. [11] adopted an approach that combined finite element simulation with experimental measurements. Strain gauges were placed on the inner and outer rings of a metal spiral-wound gasket to monitor strain variations during bolt pretightening. These data were then used to establish a finite element model of bolted flange connections, enabling analysis of the nonlinear structural response under external loads. Nash and Abid [12] highlighted that factors such as internal fluid pressure, axial flange stress, and external bending moments significantly affect the sealing performance of bolted flange connections, with external bending moments—induced by applied loads—having a particularly pronounced effect. Wu [13] investigated the influence of seismic loads on the sealing performance of flange connections through modal and spectral analyses. Experimental validation of the structural dynamic response characteristics provided essential data to support research on flange sealing behavior under vibrational conditions. Bortz and Wink [14] examined the factors influencing the leakage rate in bolted flange connections, specifically addressing the effects of internal fluid pressure within the pipeline and external bending moments on sealing performance. Zhang [15] developed a model for the bolted flange connection system incorporating bolts, gaskets, and flanges under operating conditions. The theoretical derivation was refined to account for creep and wear in bolts and gaskets, as well as gasket stress under external loads, and a tightness evaluation procedure was proposed. Li et al. [16] examined the bolted flange connection system subjected to varying pressure fluctuations, employing a finite element model that incorporated operating conditions and temperature-structure coupling analysis. Krishna et al. [17] experimentally determined the compression-rebound characteristics of the gasket and subsequently conducted three-dimensional finite element analysis of the bolted flange connection. Their results demonstrated that the distribution of compressive stress in the gasket exerts a more significant influence on sealing performance than flange rotation or deflection angle. Wang et al. [18] utilized finite element simulation to assess the structural components of flanges, verifying whether the strength of the flange disk, bolt-nut assembly, and gasket reinforcement satisfied operational requirements under both pretightening and in-service conditions. Zhang [19] investigated a PN16/DN150 pipeline flange paired with a compatible graphite composite spiral-wound gasket. Through theoretical calculations, sealing performance experiments, and finite element simulations, the effects of bolt tightening sequence, nonuniform bolt preload distribution, and gasket contact pressure variation on the sealing performance of the pipeline flange assembly were evaluated. Cavalheiro et al. [20] examined the mechanical behavior of steel clamp connections under diverse loading conditions using experimental tests and finite element modeling. The research assessed the viability, structural efficiency, and potential for sustainable and reusable applications of clamp-based connections, analyzing deformation distribution, load-carrying capacity, and cost optimization across various configurations while ensuring structural integrity remained within the elastic range.
The majority of existing studies on the sealing performance of high-pressure flange connections have focused on conventional multi-bolt manually preloaded structures, in which the clamping force is applied discretely through individual bolts. These structures commonly suffer from uneven distribution of sealing contact pressure and poor installation consistency. Although extensive research has thoroughly investigated the strength, sealing mechanisms, and optimization design of traditional bolted flanges, there is still a lack of systematic research on the sealing behavior, dynamic response, and water hammer impact response of novel automated clamping flange connections that employ hydraulically actuated circumferential uniform loading. In particular, quantitative analysis is notably absent regarding installation deviations caused by manual operations and the associated sealing risks.
Against this background, this paper proposes and validates—for the first time—a hydraulic automated clamping flange connection solution. The study focuses on revealing the inherent advantages of this new design over conventional manual bolting schemes in terms of sealing uniformity, installation efficiency, and adaptability to extreme operating conditions.
To address the above shortcomings, this paper focuses on the sealing characteristics of hydraulic clamping flange connections. A combination of numerical simulation and experimental methods is used to systematically study the influence of clamping area and clamping force on sealing performance. The study emphasizes the sealing performance of flange connections under pressurization and water hammer impact conditions. At the same time, the experiment verifies the impact of installation deviations on sealing performance, providing theoretical support for optimizing the installation process or proposing automation solutions.

2. Establishment of the Finite Element Analysis Model

2.1. Geometric Model of Hydraulically Clamped Flange Connecting Mechanism

In accordance with the Chinese national standards GB/T 4622.1–2-2022 (“Spiral Wound Gaskets for Pipe Flanges”) [21] and GB 150.1–150.4-2011 (“Pressure Vessels”) [22], a standard butt-welding neck flange with nominal diameter DN300 and pressure rating PN100 was selected [23]. The flange features a raised-face (RF) sealing surface, paired with a flexible graphite–stainless steel spiral-wound gasket.
Bolted flange connections exhibit structural integrity, and the accuracy of their numerical simulations is influenced by the attached pipe length. According to Saint-Venant’s principle, when the pipe length L > 2.5 R t (R is the pipe radius, t is the pipe thickness), the edge stress of the pipe can be eliminated, thus eliminating the interference with the flange stress distribution. Calculations indicate that the minimum pipe length required to satisfy Saint-Venant’s principle is 108 mm. Accordingly, a conservative pipe length of 300 mm was adopted for the finite element simulations in this study. The complete flange system model is illustrated in Figure 1.

2.2. Material Properties

The material properties of the flange connection components are shown in Table 1. Among them, the flexible graphite metal spiral wound gasket is the core sealing element. Its key sealing performance parameters are determined based on the manufacturer’s actual test data and the recommended values provided in Appendix F of the API 6A/ISO 10423 [24] as follows: gasket factor m = 3 and minimum design seating stress y = 69 MPa. The nonlinear mechanical behavior of the gasket is the primary source of the nonlinear characteristics of the flange connection. Based on previous studies [25,26,27], for the gasket’s nonlinearity and non-conservativeness, an experimentally calibrated multilinear elastic–plastic material model is used for simulation. Specifically, the compression–strain stress curve of the gasket is simulated by customizing the input of compression amount and gasket compressive stress in the Engineering Data material library, and the rebound curve is simulated by customizing the input of rebound amount and gasket compressive stress.

2.3. Finite Element Mesh Model

In this paper, the gas pipeline and associated components were modeled using SOLID185 solid elements, while the gasket was simulated using INTER195 gasket elements. During mesh generation, the flexible graphite–stainless steel spiral-wound gasket was meshed employing the sweep method, whereas the flowmeter and gas pipeline were discretized using the patch-conforming algorithm. The resulting mesh predominantly consists of tetrahedral elements. To ensure computational accuracy, refined mesh densities were applied in critical regions, with element sizes varied according to geometric features and model dimensions. The detailed mesh size assignments are presented in Table 2. The final finite element model comprised 548,168 elements and 908,838 nodes.

2.4. Assembly Constraint Settings

In the actual assembly of the bolted flange connection, two primary contact pairs exist: the interface between the flowmeter and the flexible graphite–stainless steel spiral-wound gasket and the interface between the gas pipeline and the same gasket. To prevent spurious contact between components that should remain separated, a contact tolerance of 0.5 mm was specified, and the surface-to-surface contact pairs were redefined accordingly. Additionally, to mitigate erroneous penetration detections arising from inadequate mesh refinement, the contact detection method was adjusted to “adjust to touch.”
To reflect actual operating conditions, the detailed contact settings employed for the bolted flange connection in this study are summarized in Table 3.

2.5. Constraints and Loads

In this study, the boundary constraints and loading conditions were established in accordance with the actual operating conditions of the bolted flange connection, as detailed below:
(1)
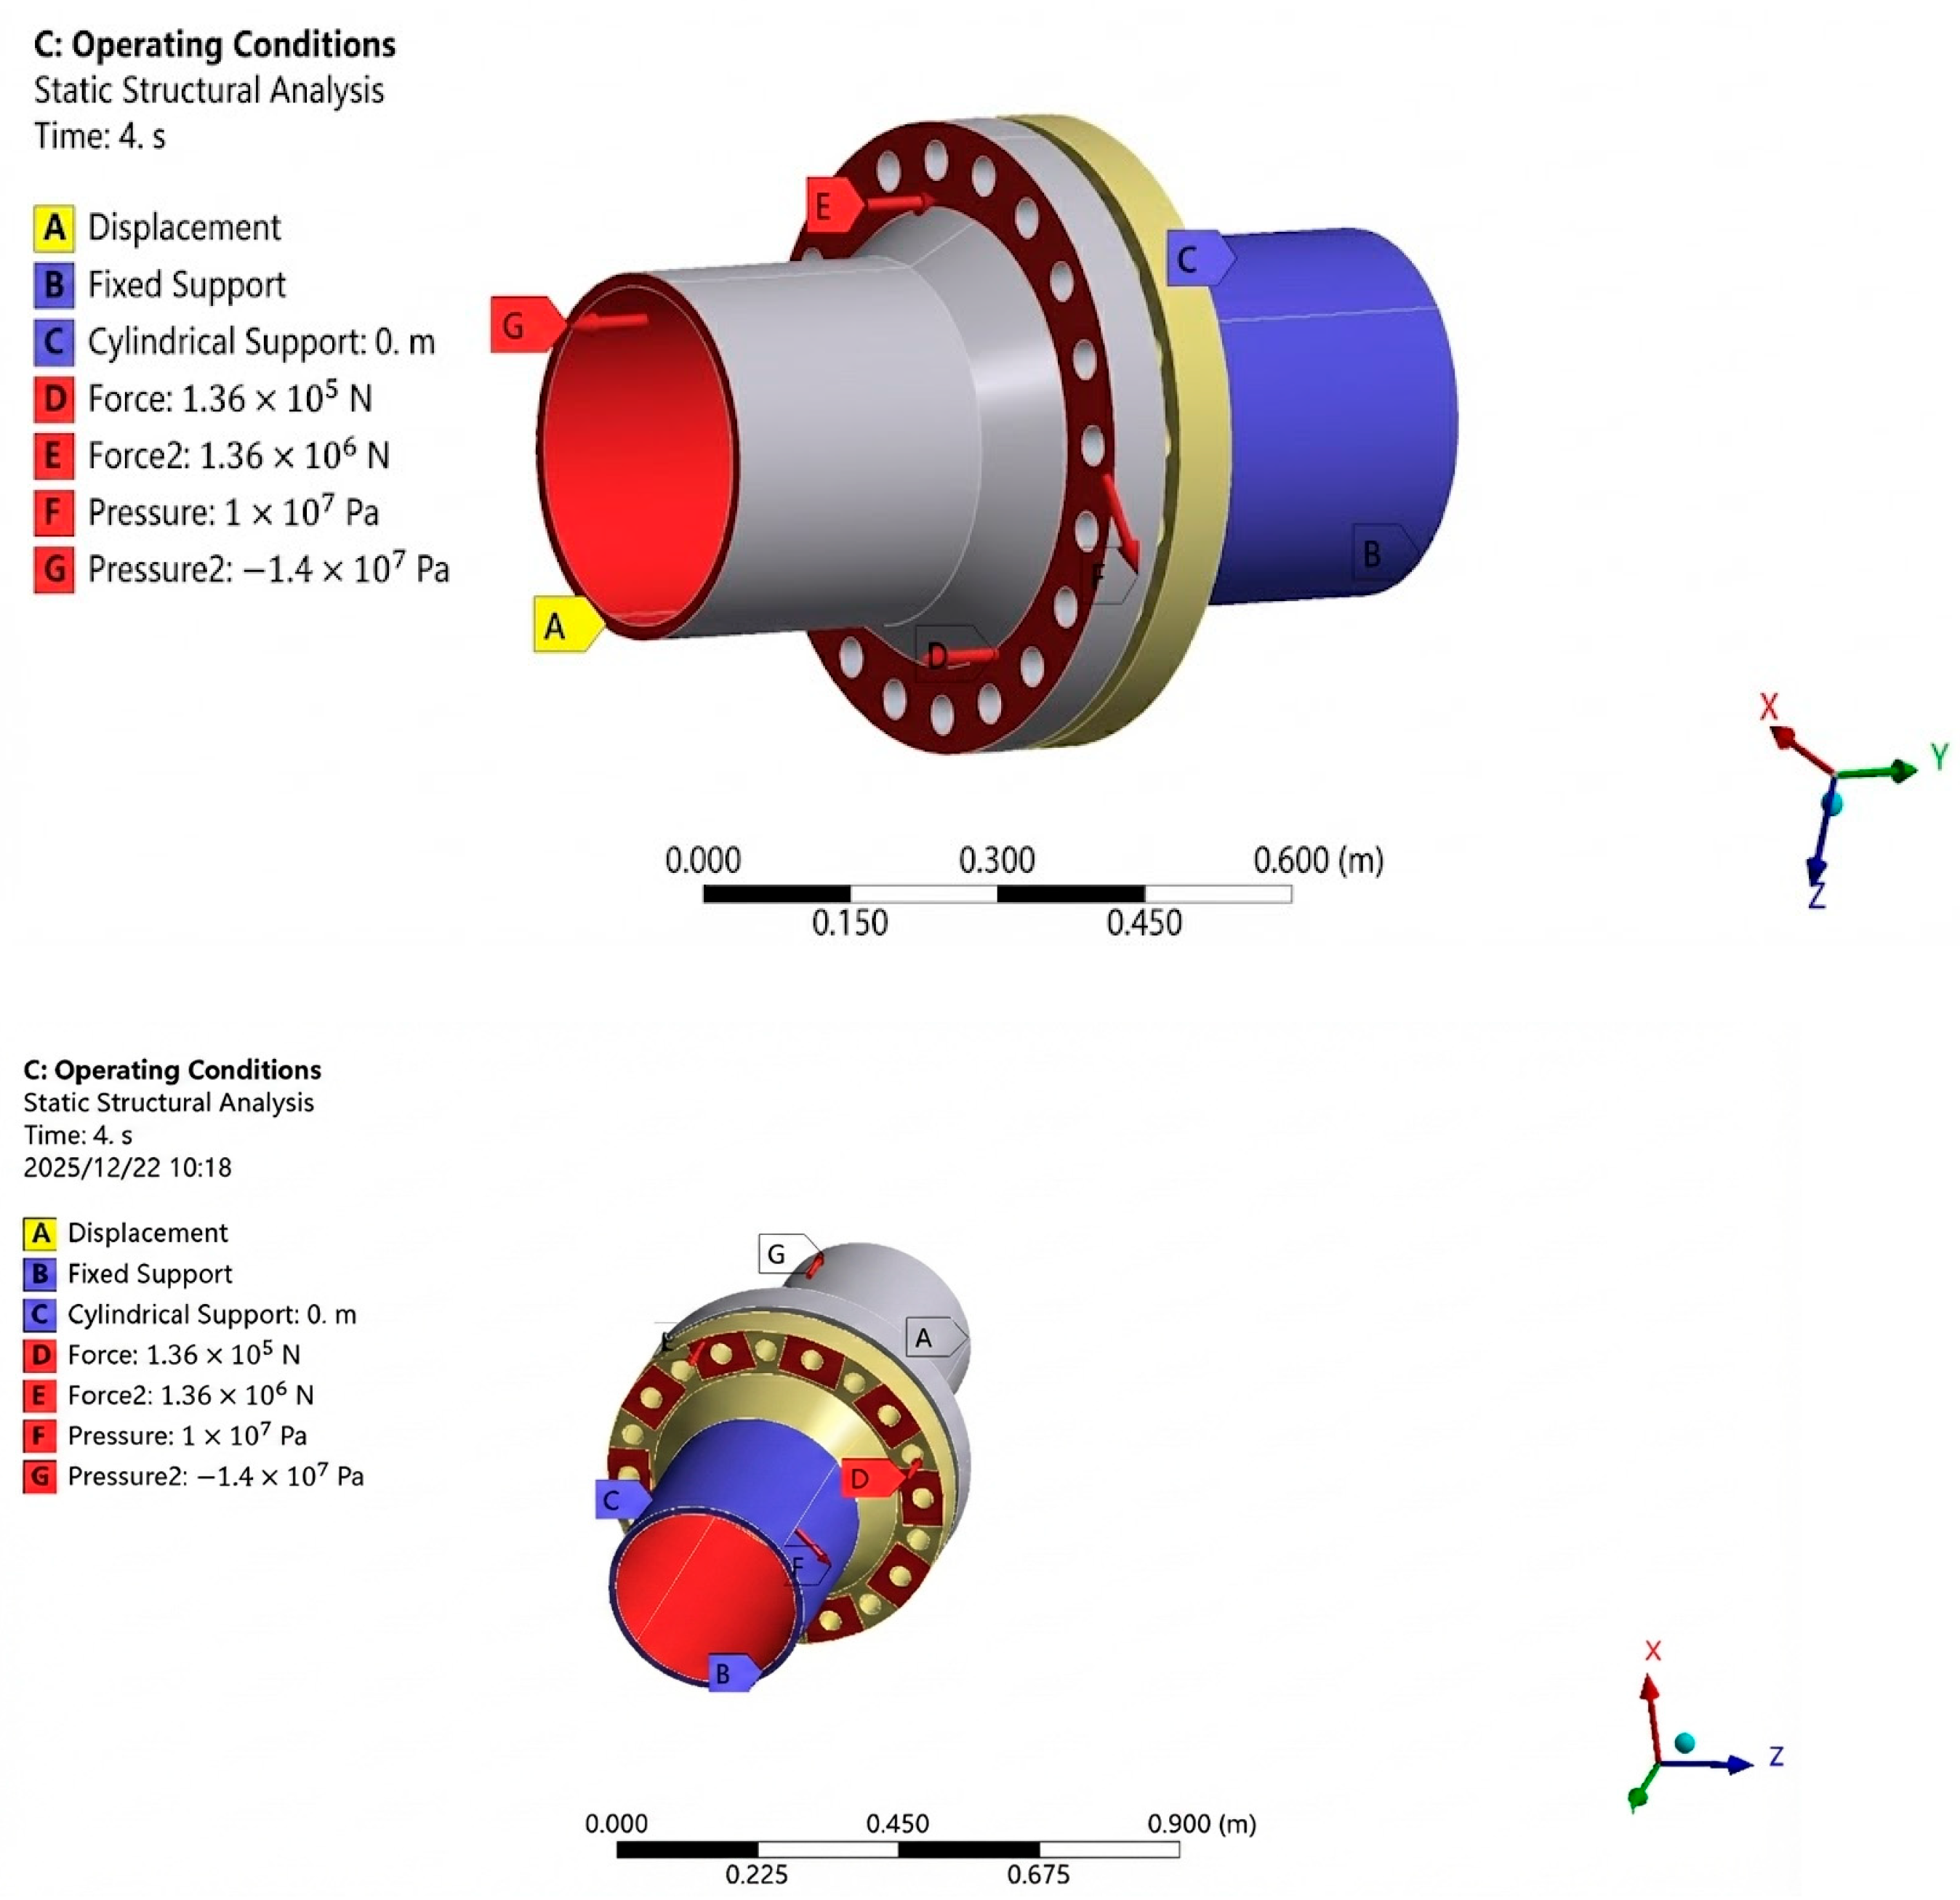
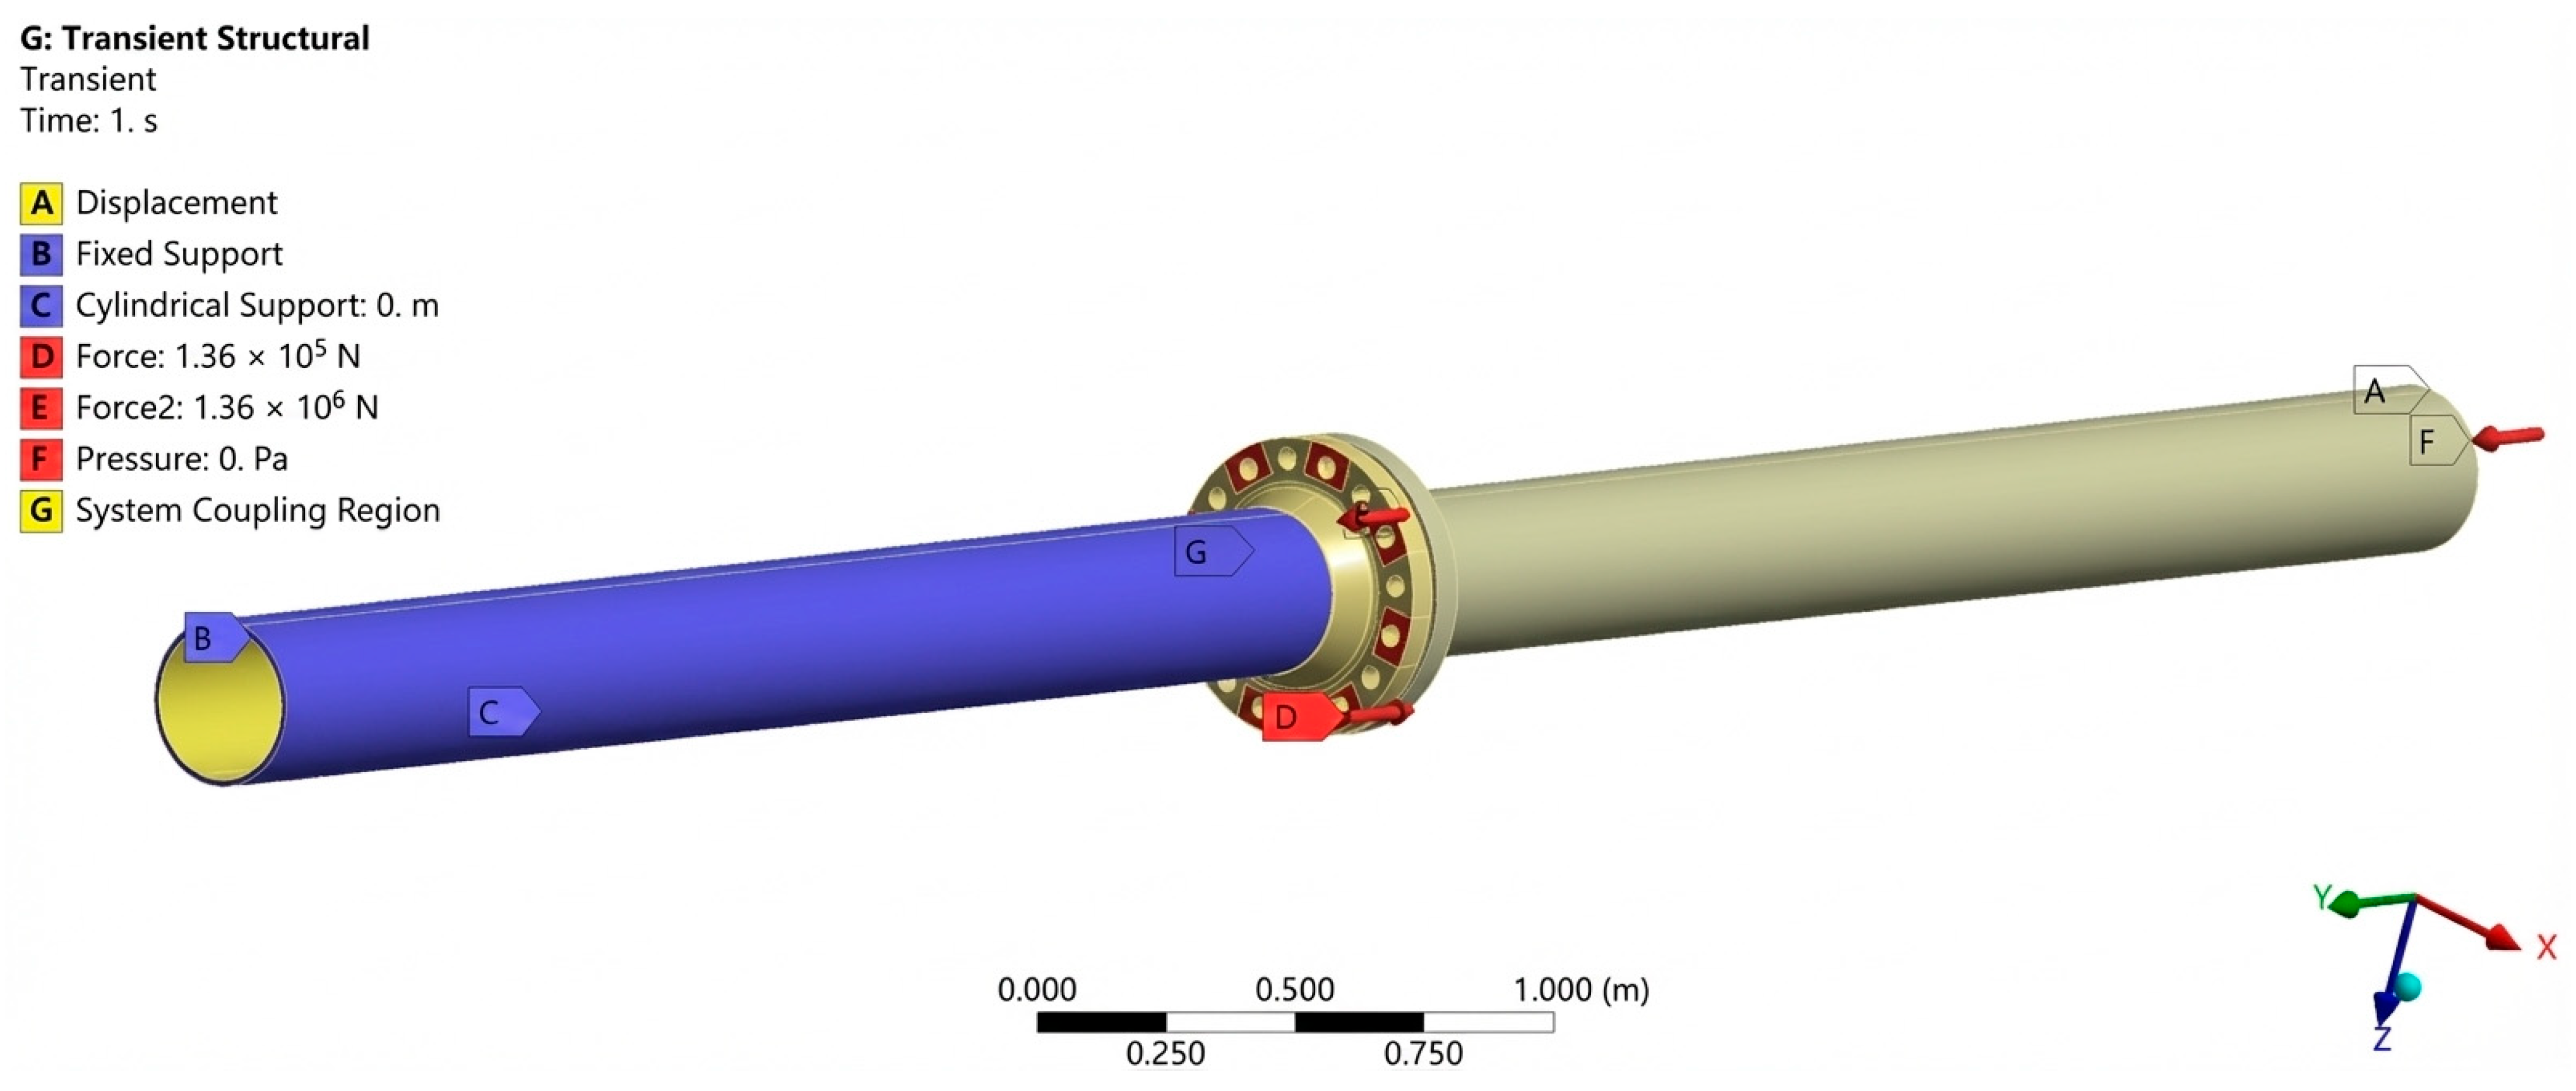
Boundary Conditions: (1) Apply a displacement constraint on the end face of the gas pipeline tail: fixed in the axial direction (X-axis), while free in the circumferential and radial directions (Y-axis and Z-axis directions). (2) Apply a fixed constraint on the end face of the flowmeter tail. (3) Simulate the constraint provided by the self-centering support frame on the flowmeter and gas pipeline by applying cylindrical supports to the outer surfaces of the flowmeter and gas pipeline, with freedom in the axial direction and fixed constraints in both the radial and tangential directions.
(2)
Loading Conditions: Taking the DN300, PN100 flange as the research object, the required bolt preload force for sealing is consistent with the hydraulic clamping force. Two operating conditions, preload and pressurization, are simulated and applied in two steps (total duration of 2 s): Step 1 (0–1 s) involves loading the clamping force to 1,360,000 N; Step 2 (1–2 s) involves increasing the internal pressure to 10 MPa, while simultaneously applying an equivalent axial force to the pipeline end face. The internal pressure acts on all the inner surfaces in contact with the medium [28].
An equivalent axial force load induced by the head effect is applied to the annular face at the end of the slender pipeline [29]. The calculation formula is as follows:
P e = P c R 2 t = 10 × 150 2 × 12.5 = 60   MPa
where Pe represents the equivalent membrane stress (MPa), Pc represents the internal pressure (MPa), and R represents the average radius of the pipeline (mm).
In summary, the boundary conditions and load application methods implemented in the finite element model of the bolted flange connection under operating conditions are illustrated in Figure 2.

3. Analysis of the Impact of Different Factors on the Sealing Performance of Flanged Connections

Calibration of natural gas flowmeters requires operation under high-pressure conditions of 10 MPa for prolonged durations. The bolted flange connection must endure sustained high internal pressure while potentially experiencing pressure fluctuations and shock waves from the flowing medium, which can alter the stress distribution at the sealing interface. Consequently, particular attention must be paid to investigating the sealing stability and failure thresholds of the joint. Furthermore, extended calibration periods may induce fatigue in the hydraulic clamping mechanism and degradation of sealing components, resulting in a loss of clamping force or nonuniform force distribution, thereby compromising the sealing integrity.
In accordance with the guidelines on bolt preload variation outlined in ASME PCC-1 and EN 1591-1 [30], this study systematically investigates the influences of effective gasket contact area ratio and clamping force on the sealing performance of bolted flange connections. These findings provide theoretical guidance for evaluating and ensuring sealing reliability in flowmeter calibration applications.

3.1. Sealing Performance Evaluation Criteria for Flanged Connections

The determination of the sealing performance of flanged connections must consider both structural sealing and component strength to meet the requirements of integrity and sealing. The main evaluation criteria are as follows:
(1)
Allowable Stress of Components: The flanges, gaskets, and other metal components must be subjected to forces less than the material’s allowable stress under conditions such as pressurization and water hammer impact, in order to avoid insufficient strength that could lead to sealing failure.
(2)
Gasket Compressive Stress: According to GB150 [22] and ASME VIII-1 [31] standards, the gasket compressive stress should satisfy σ m p (where m is the gasket factor and p is the internal pressure) to meet the sealing requirements. Moreover, the larger the effective sealing area and the more uniform the stress distribution, the better the sealing performance [32].
(3)
Flange Angular Deformation: The combined effect of medium pressure and external bending moments can cause the flange to undergo circumferential deflection. According to the ASME VIII-1 standard, the flange angular deformation should be ≤1°. Studies show that the larger the angular deformation, the more uneven the distribution of the gasket compressive stress, so the deflection angle must be assessed. The calculation method is as follows: Measure the axial displacement of corresponding points on the inner and outer diameters of the flange plate, calculate the displacement difference, and divide by the flange plate width. If the resulting angular deformation is ≤1°, the flange connection stiffness meets the standards, and the sealing performance is good.
The calculation formula for the deflection angle is
θ = Δ S V × 180 ° π
where Δ S represents the difference in axial displacement between the outer and inner sides of the flange (mm), and V represents the radial width of the flange (mm).

3.2. The Effect of Clamping Area Size on Sealing Performance

Under pressurized conditions, clamping forces were applied to the flowmeter flange faces with effective clamping areas reduced to 90%, 80%, and 70% of the original area. This setup enabled analysis of the sealing performance of the hydraulically clamped flange connection. Models of the flowmeter configurations corresponding to these different clamping areas are illustrated in Figure 3.
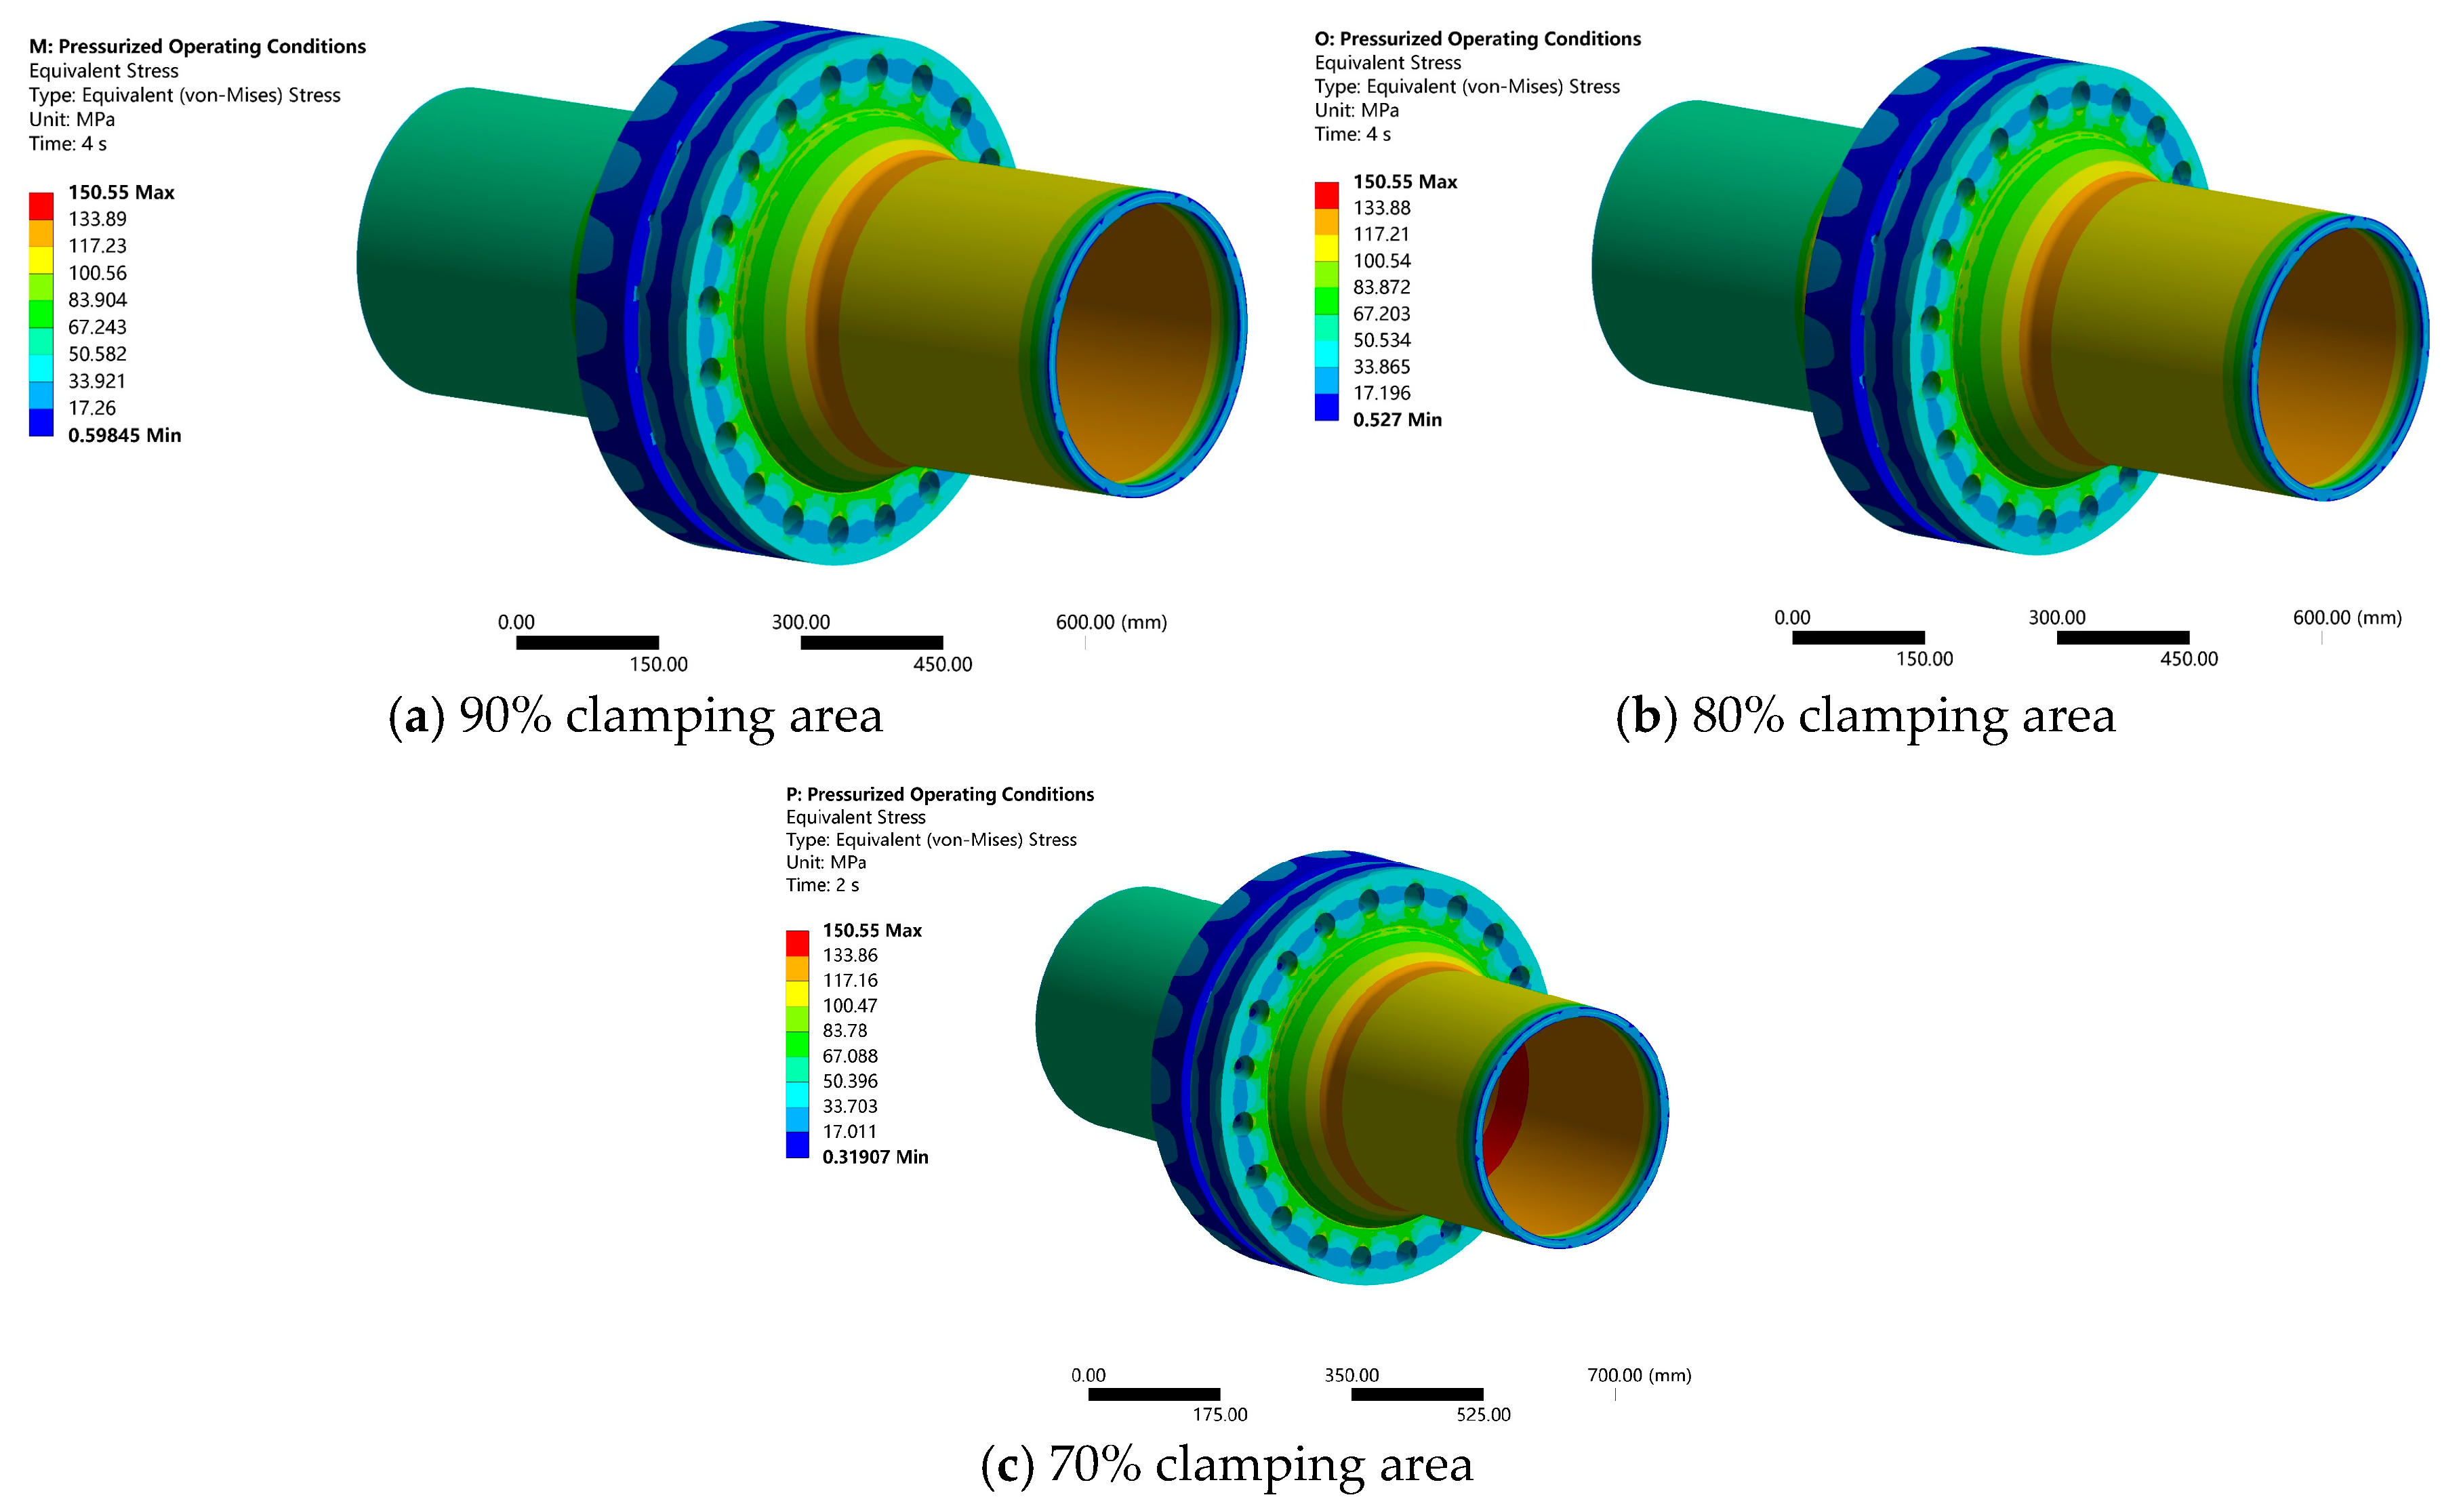
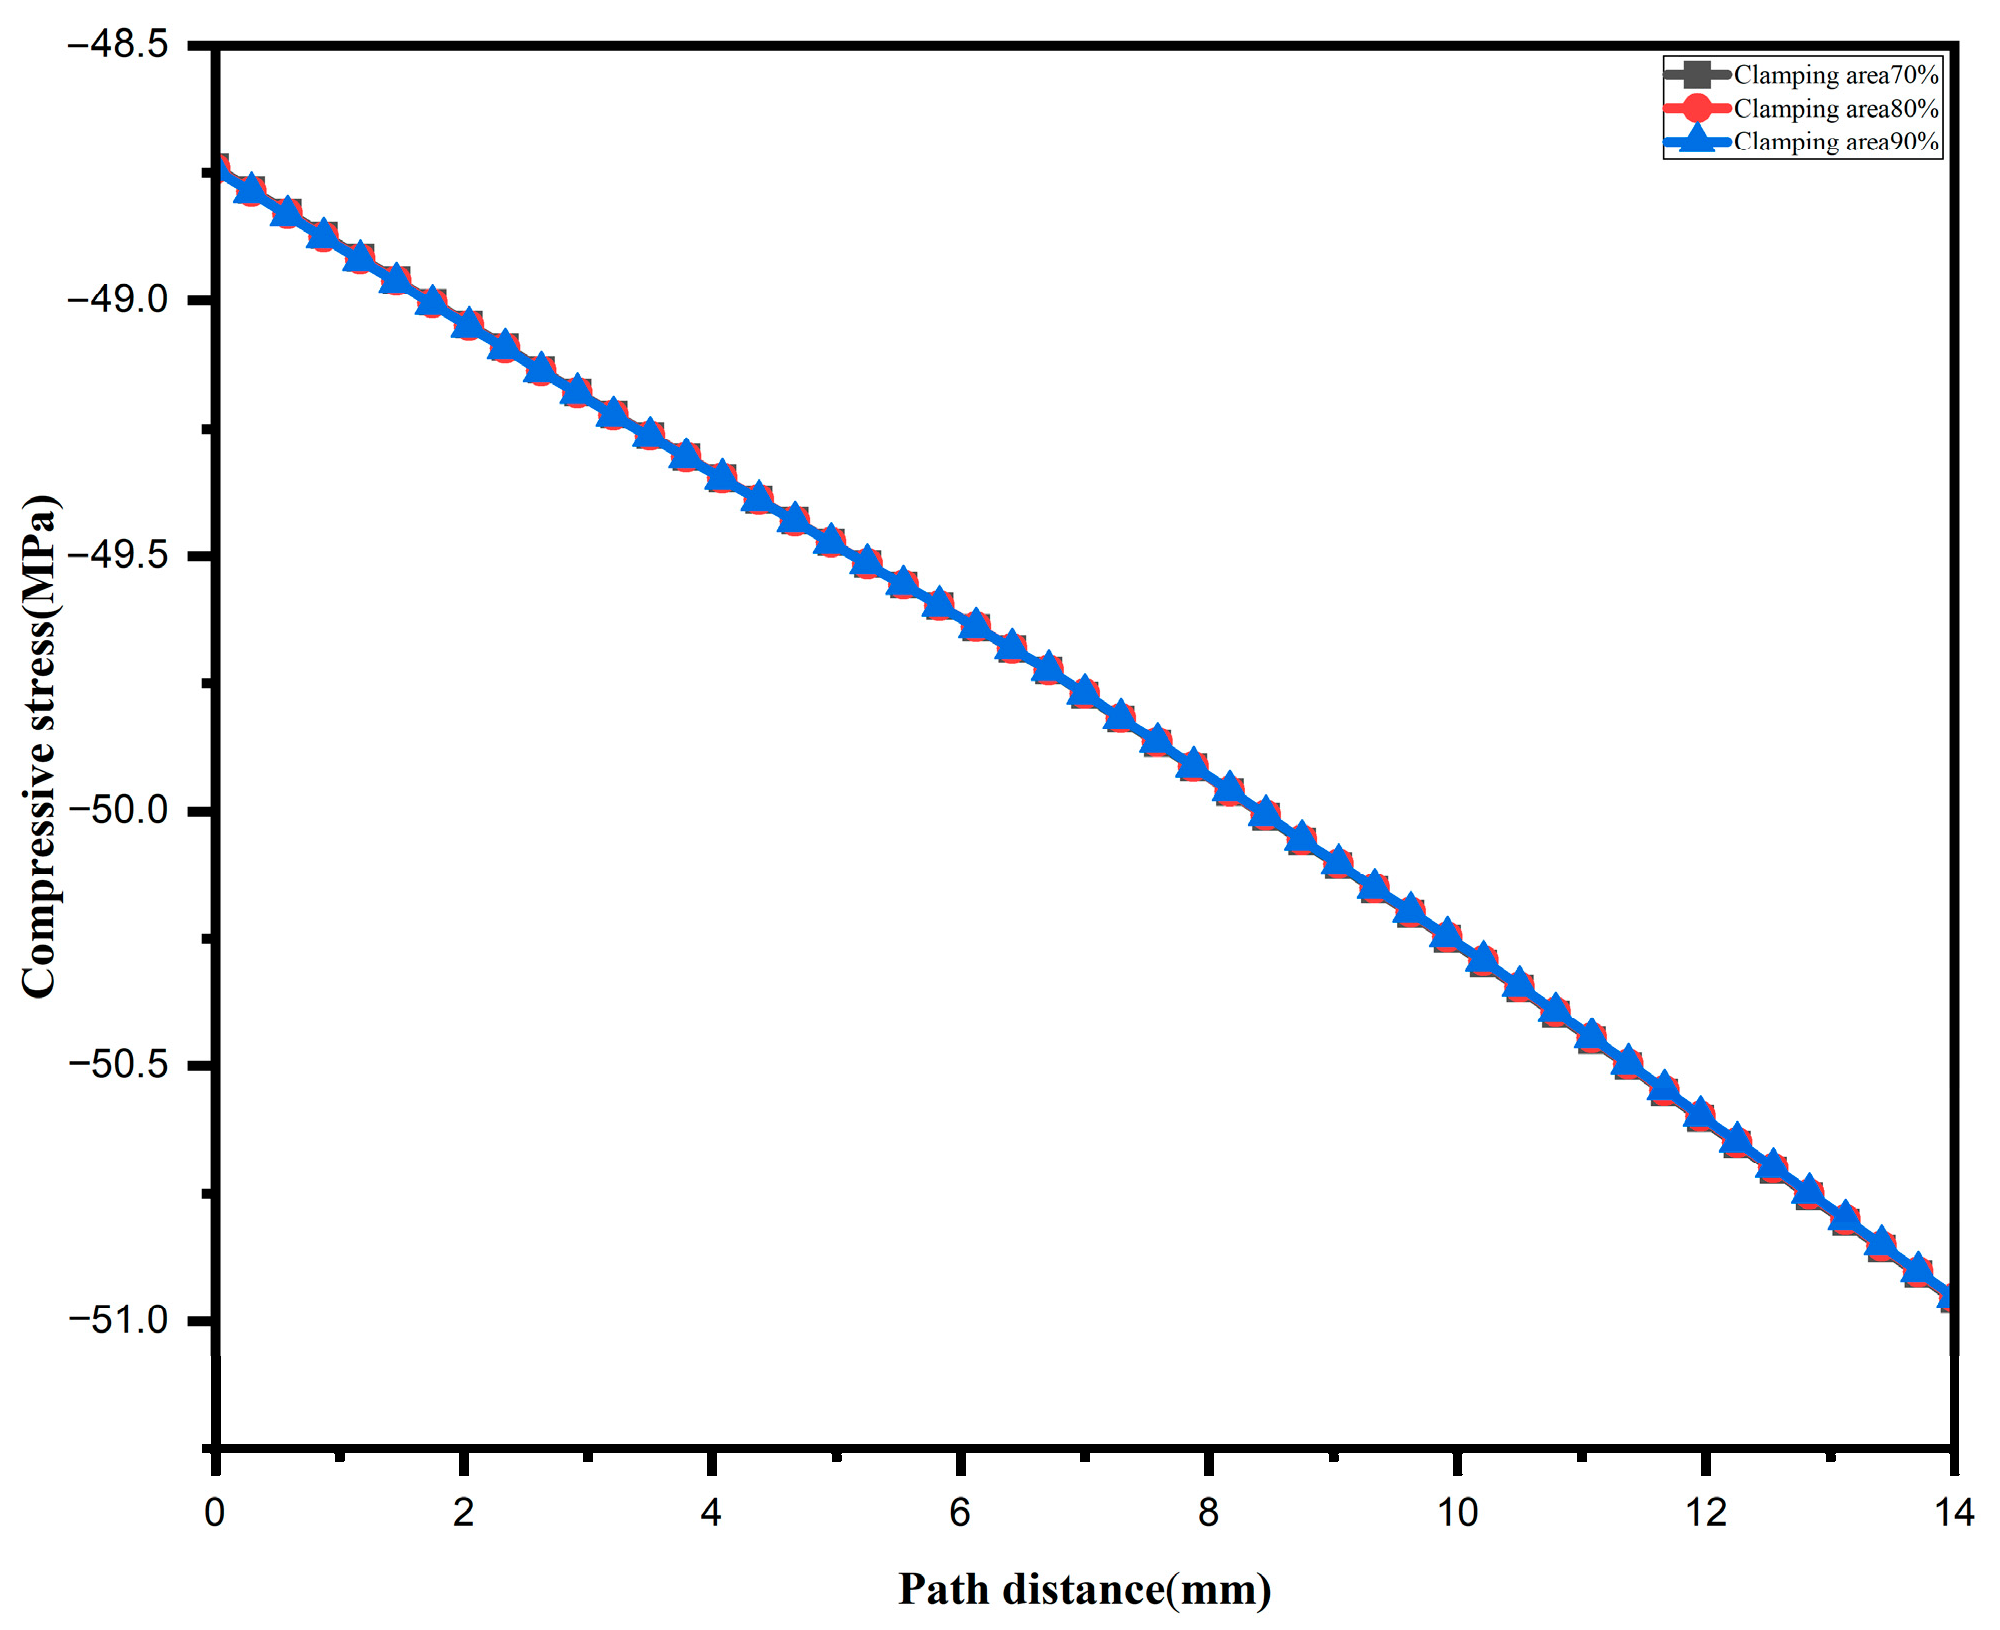
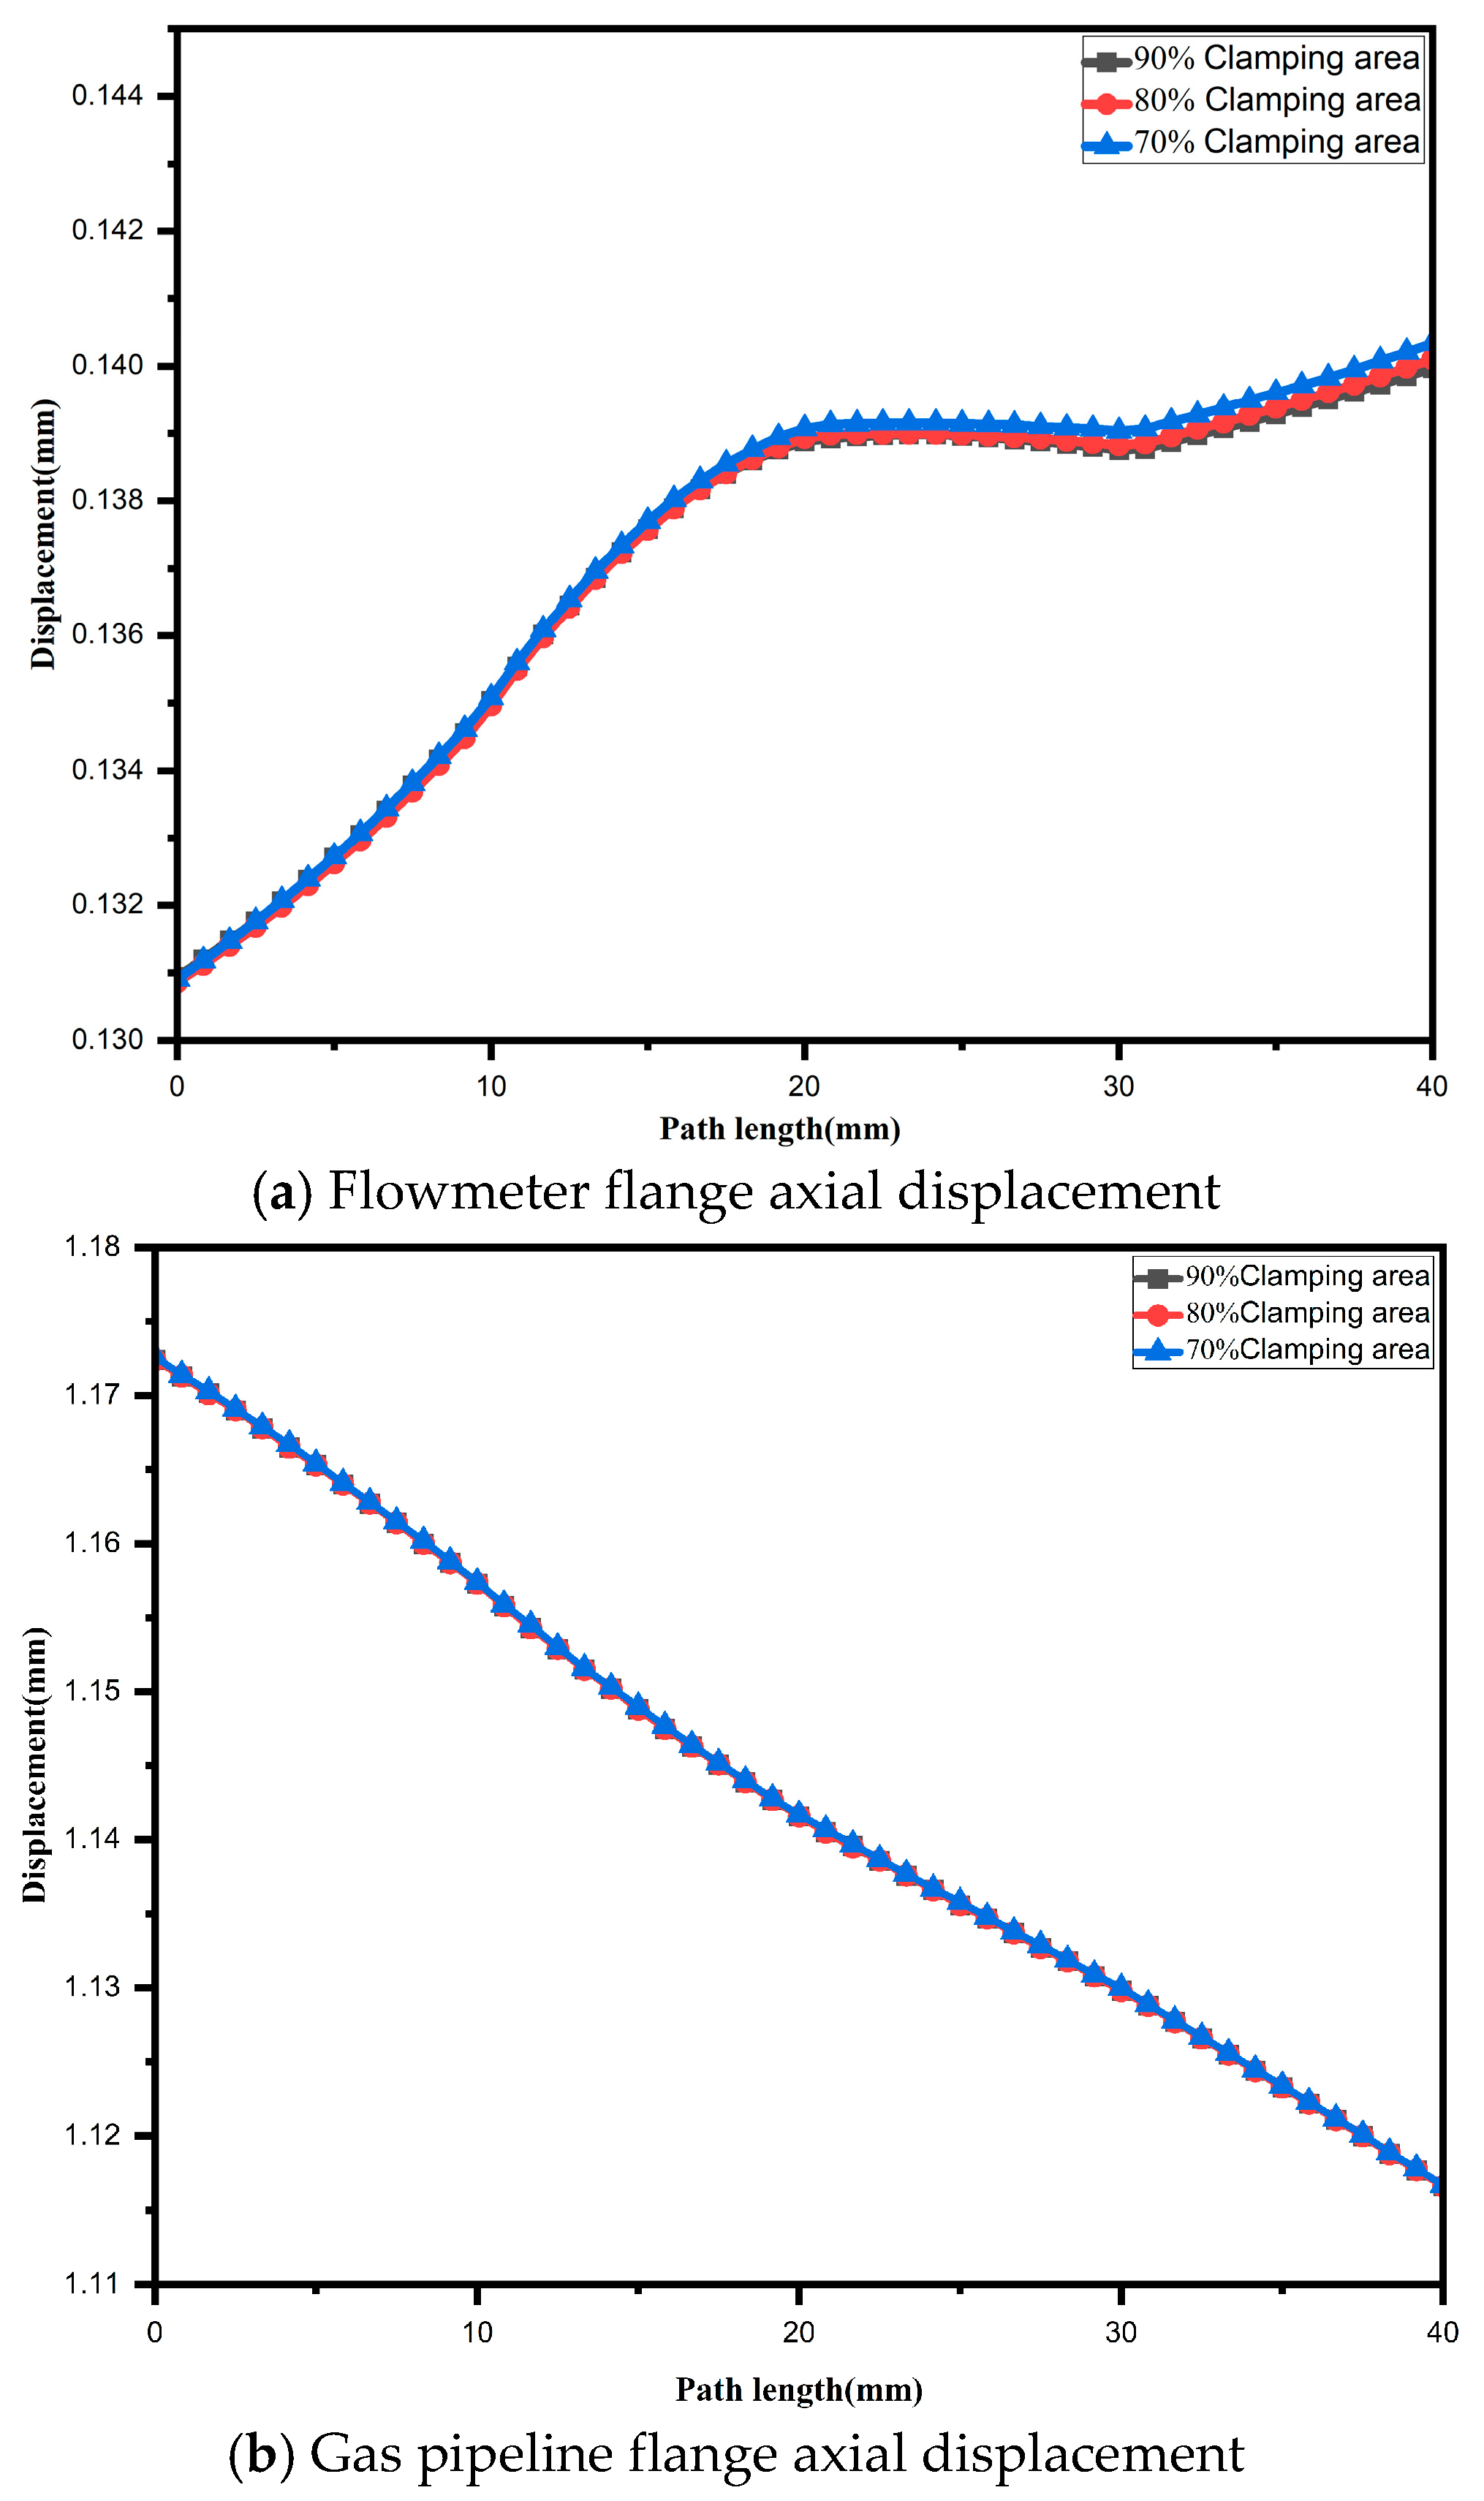
Finite element simulations were conducted to obtain the Tresca stress distributions in the bolted flange connection under operating conditions with varying clamping areas, as illustrated in Figure 4a–c. The radial compressive stress distributions on the gasket are presented in Figure 5, while the flange displacements for the corresponding conditions are shown in Figure 6a,b.
The results presented in Figure 4 indicate that variations in clamping area have a negligible influence on the overall stress distribution pattern and magnitude in the bolted flange connection. The maximum Tresca stress consistently occurs at the transition region between the flange disk and the connecting pipe, remaining at approximately 150.55 MPa—well below the material’s allowable stress limit of 400 MPa. However, as the clamping area decreases, the stress concentration becomes more pronounced. Additionally, the stresses in the flowmeter exhibit an upward trend, with the maximum value rising to 136.73 MPa, which remains safely below the material’s allowable stress.
Figure 5 reveals that variations in clamping area exert minimal influence on the distribution pattern and magnitude of compressive stress in the gasket. Even under the 70% clamping area condition, both the minimum and maximum gasket compressive stresses exceed 30 MPa. Consequently, from the standpoint of gasket stress alone, the bolted flange connection maintains sealing integrity without failure when the clamping area is reduced to 70%.
Figure 6 demonstrates that variations in clamping area do not alter the overall distribution pattern of flange displacement. However, as the clamping area decreases, flange deflection increases noticeably. Specifically, the rotation angle of the flowmeter flange rises to 0.0799°, whereas the rotation angle of the gas pipeline flange remains constant at 0.0646°. In all cases, the rotation angles remain well below the permissible limit of 1°, confirming that the structural rigidity of the bolted flange connection satisfies the requirements for maintaining sealing integrity.

3.3. The Impact of Clamping Force on Sealing Performance

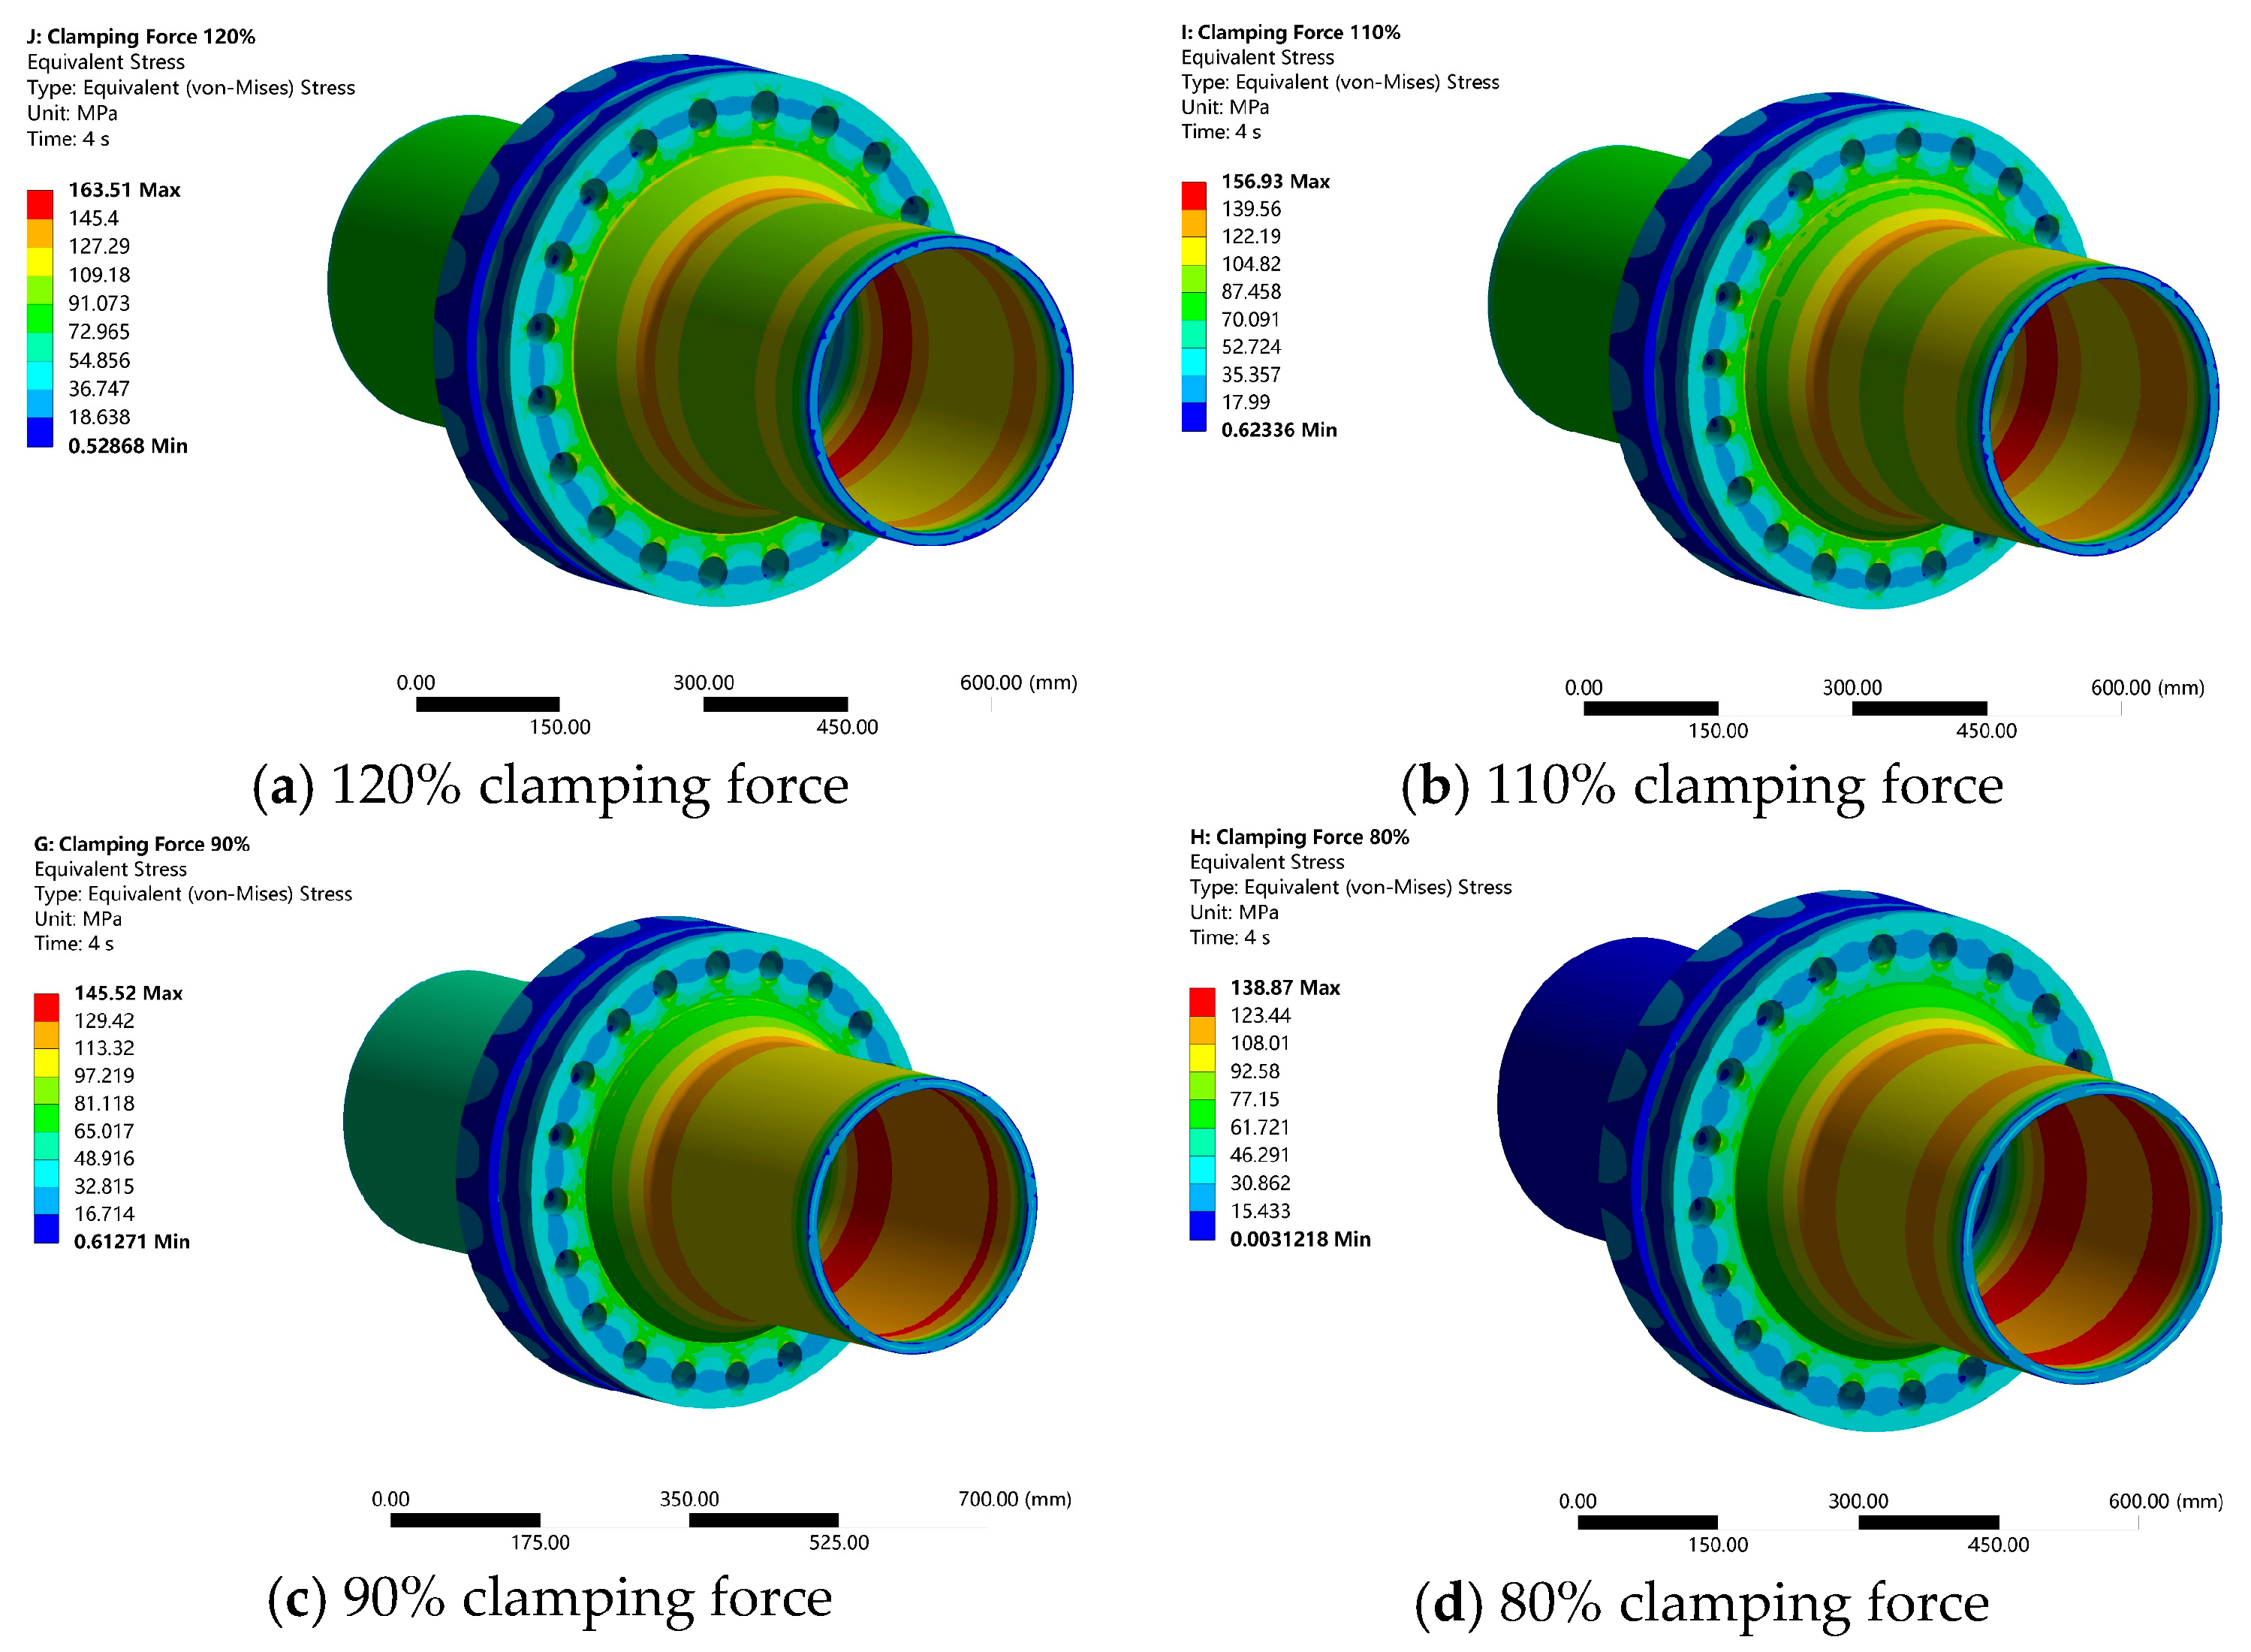
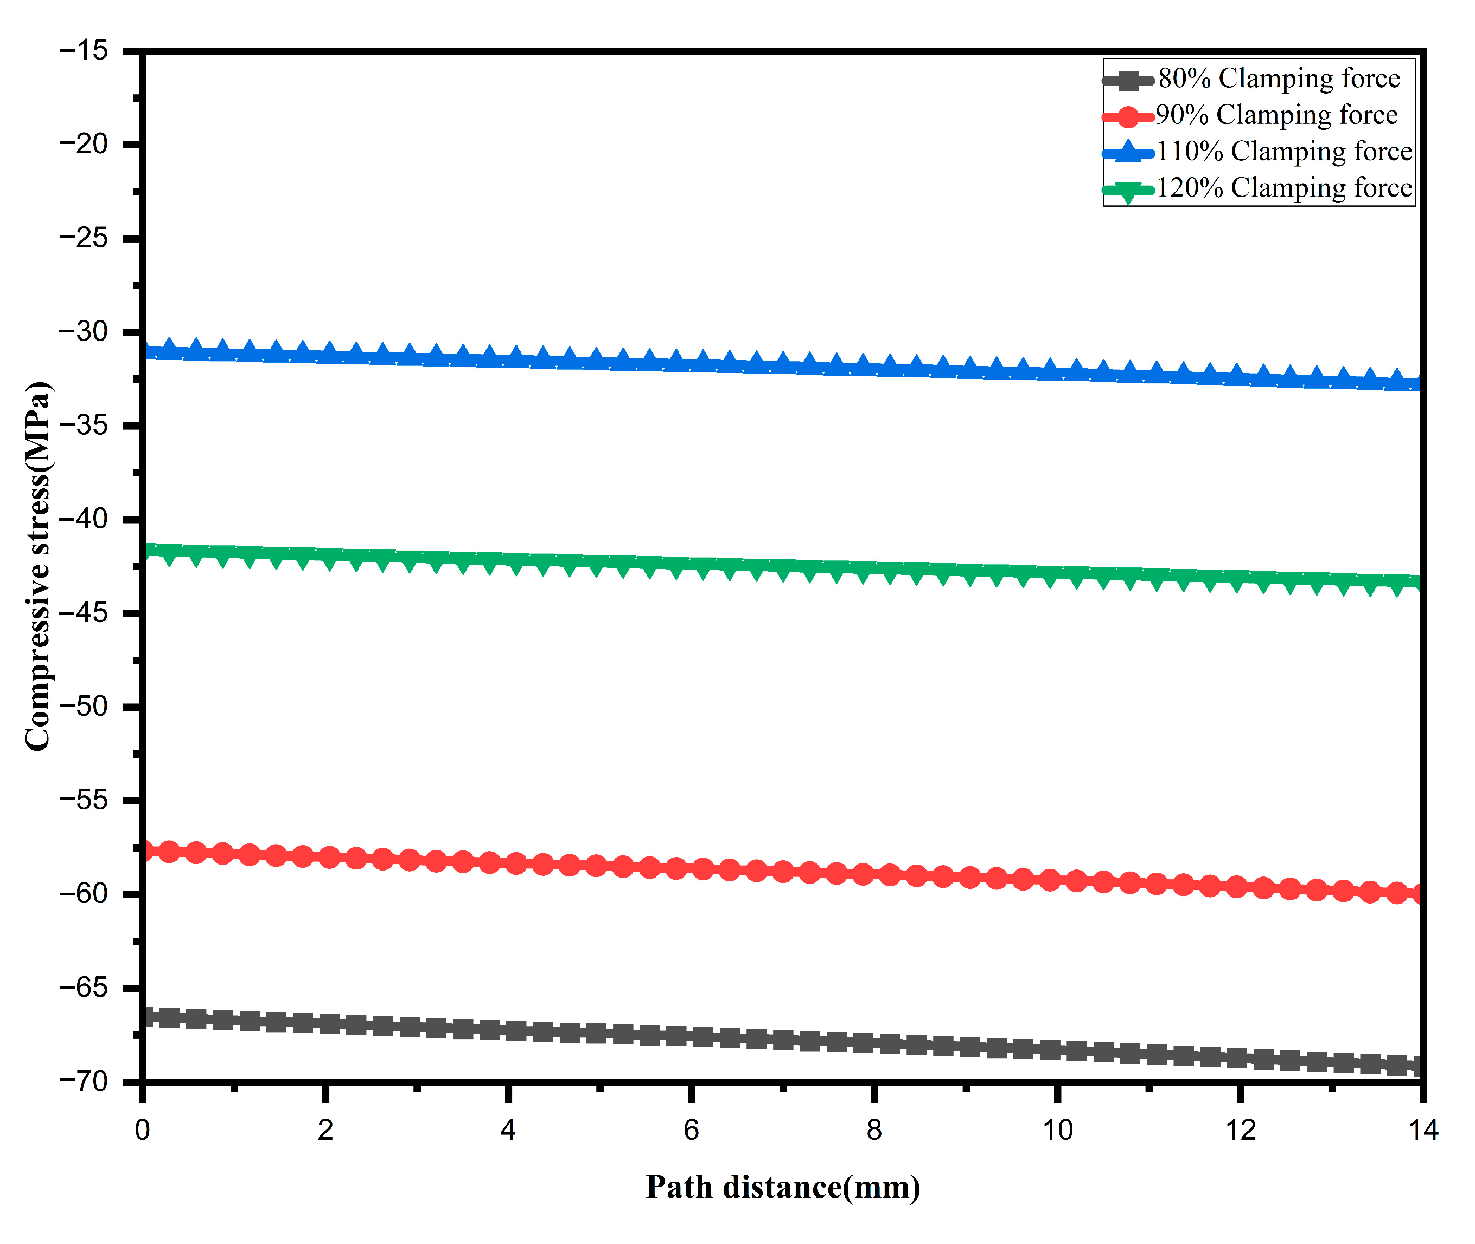
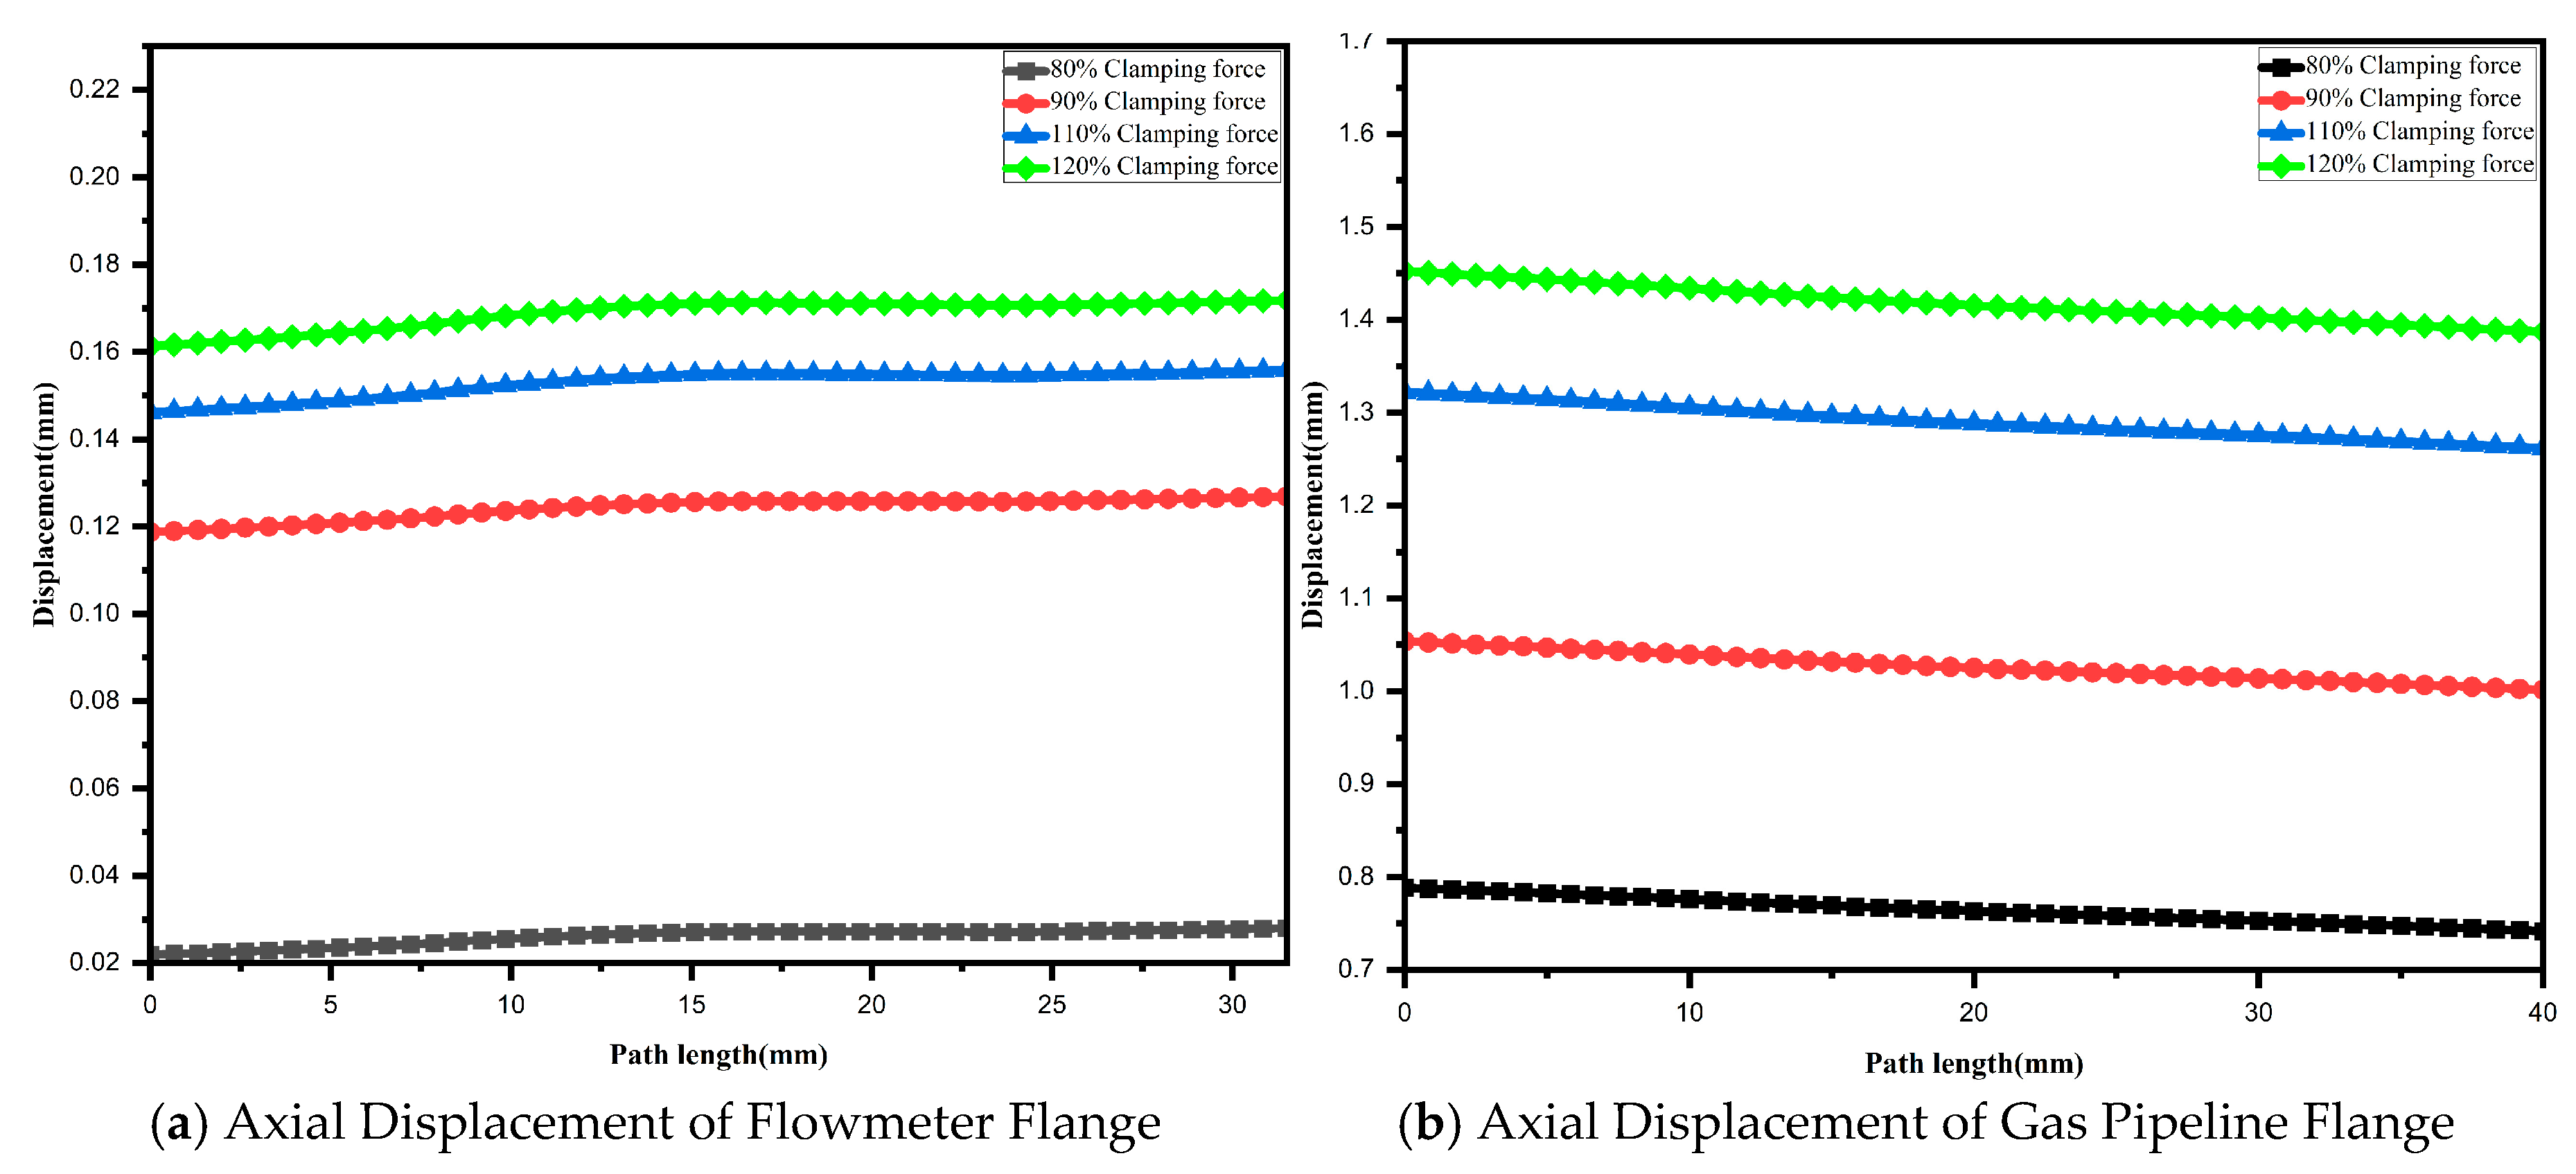
Theoretical analysis determines that the ideal clamping force is 1,360,000 N. To investigate the sealing performance of the hydraulically clamped flange connection, clamping forces corresponding to 120%, 110%, 90%, and 80% of this ideal value were applied. The finite element simulation results for these cases are presented in Figure 7, Figure 8 and Figure 9, respectively.
The results depicted in Figure 7 reveal that variations in clamping force do not alter the overall stress distribution pattern in the bolted flange connection. However, as the clamping force increases, the loads on the components rise accordingly, with the maximum Tresca stress reaching 163.51 MPa—still well below the material’s allowable stress limit of 400 MPa. Although this stress elevation increases the risk of potential strength failure in the flange, the structural integrity remains intact, with no failure observed under the investigated conditions.
Figure 8 illustrates that the compressive stress in the gasket increases with higher clamping forces, while the overall distribution pattern remains largely unchanged. Under the 120% clamping force condition, the minimum and maximum gasket compressive stresses reach 66.45 MPa and 69.17 MPa, respectively. In contrast, under the 80% clamping force condition, these values drop to 30.97 MPa and 32.75 MPa, respectively. Given that the minimum compressive stress approaches 30 MPa in this latter case—considered the critical threshold for the gasket material—the sealing performance of the bolted flange connection is at a critical state, on the verge of failure.
Figure 9 shows that the displacement distribution pattern remains consistent across varying clamping forces. As the clamping force increases, the rotation angles of both the flowmeter flange and the gas pipeline flange increase accordingly. The maximum rotation angle reaches 0.0824° for the flowmeter flange and 0.0768° for the gas pipeline flange, both of which remain well below the permissible limit of 1°. These results confirm that the stiffness of the bolted flange connection is sufficient to satisfy sealing requirements.

4. Sealing Analysis of Flange Connections Under Multiple Operating Conditions

The sealing reliability of bolted flange connections directly impacts equipment operational safety and is intimately linked to prevailing operating conditions. During natural gas flowmeter calibration, the water hammer effect induced by valve switching generates instantaneous pressure fluctuations in the pipeline, which can transiently alter the hydraulic clamping force on the gasket. This, in turn, may result in component damage, gas leakage, or sealing failure. Accordingly, a targeted analysis of sealing performance was performed for two representative scenarios—steady-state operating conditions and water hammer impact conditions—using the optimized ranges of clamping area and clamping force as benchmarks.

4.1. Analysis of Operating Conditions

(1)
Flange Stress Analysis and Strength Evaluation
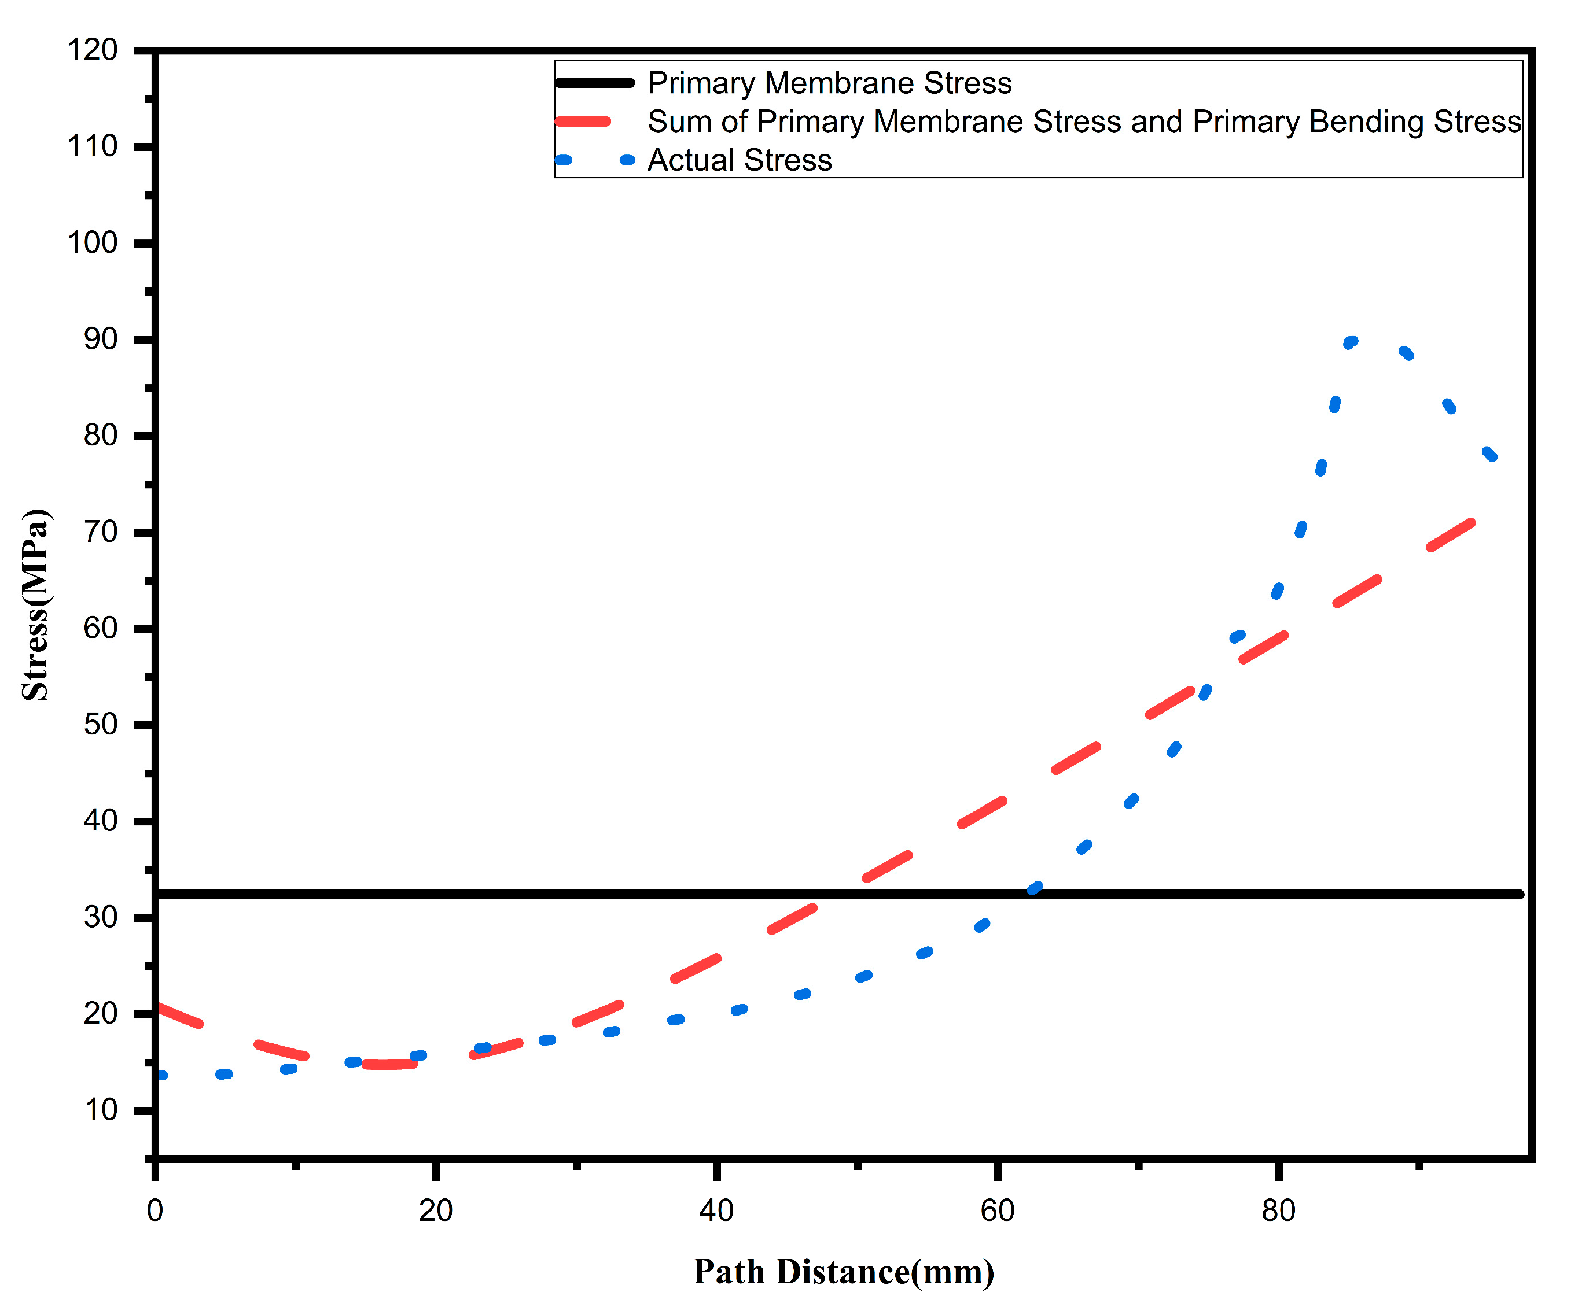
Figure 10 and Figure 11 present the linear stress variation curves along defined paths for the flowmeter flange and gas pipeline flange under steady-state operating conditions, respectively. The figures reveal that the stress distribution in the gas pipeline flange remains essentially unchanged. In contrast, the maximum stress in the flowmeter flange reaches 150.57 MPa, concentrated at the transition region between the flange and the connected pipeline. This value remains below the material’s allowable stress at room temperature, resulting in only a minor increase in overall flange stress. These findings indicate that, under steady-state operating conditions, the bolted flange connection exhibits no strength failure and maintains excellent sealing performance.
(2)
Gasket Stress Analysis
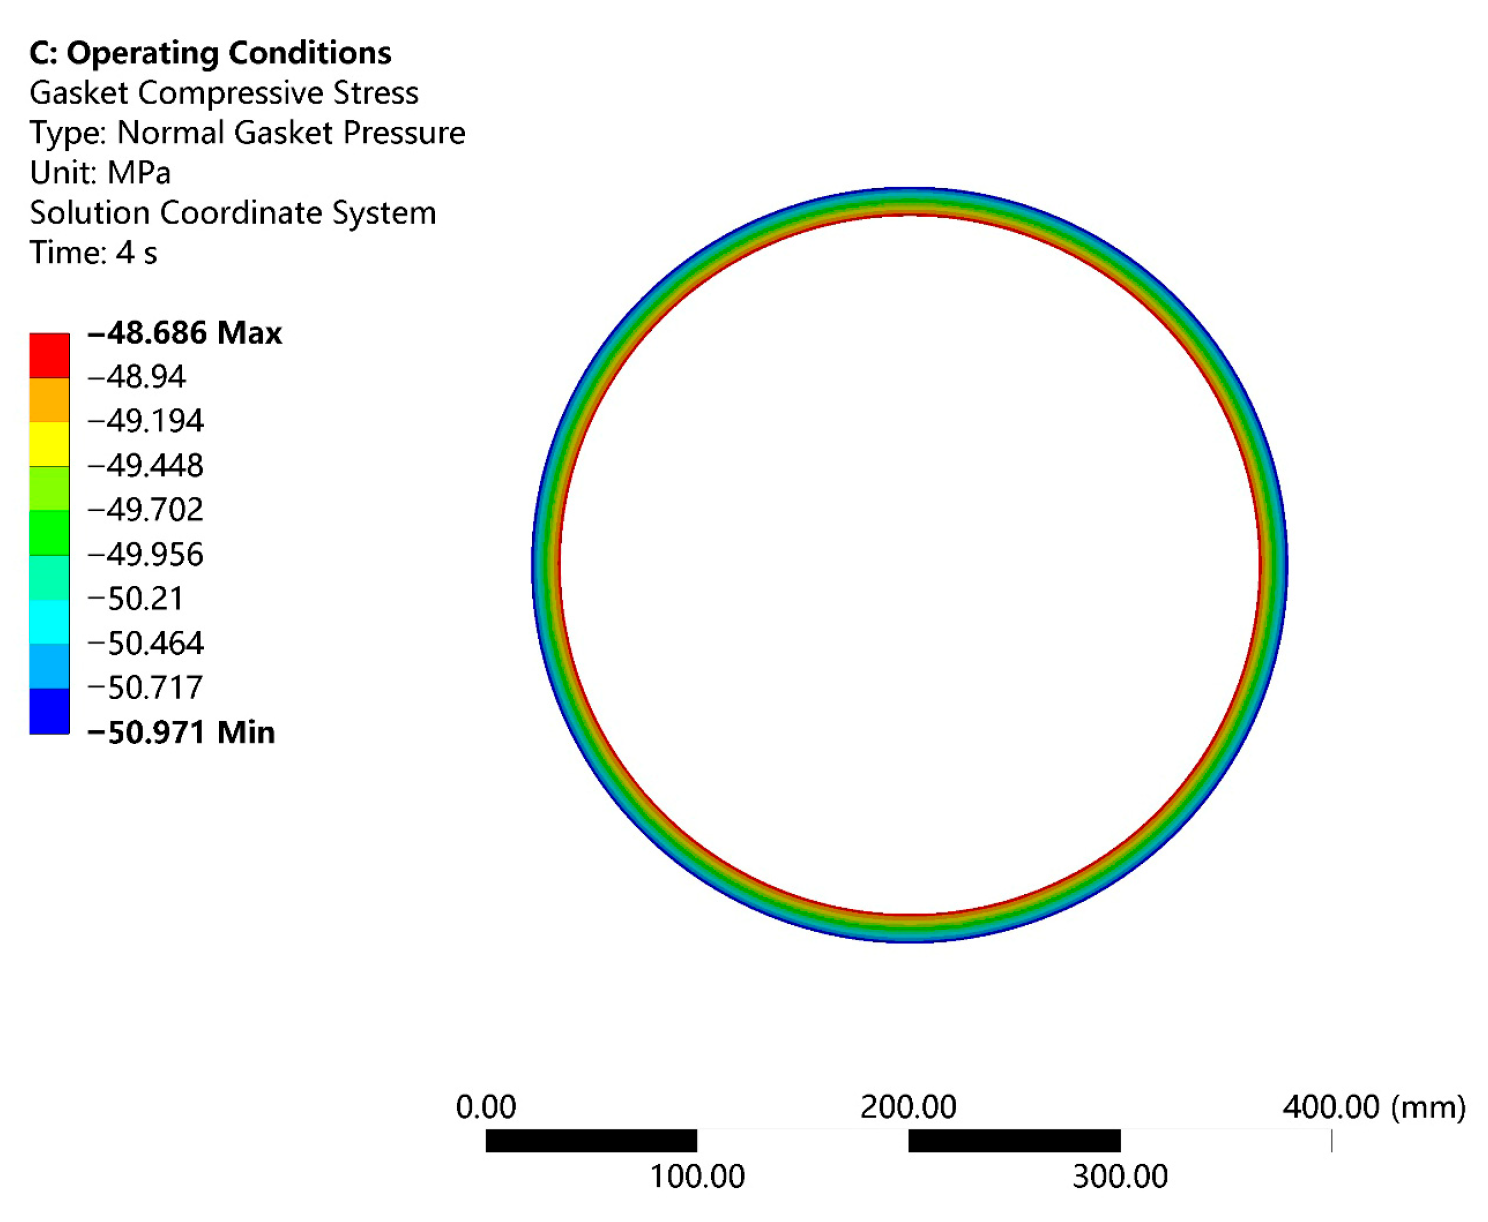
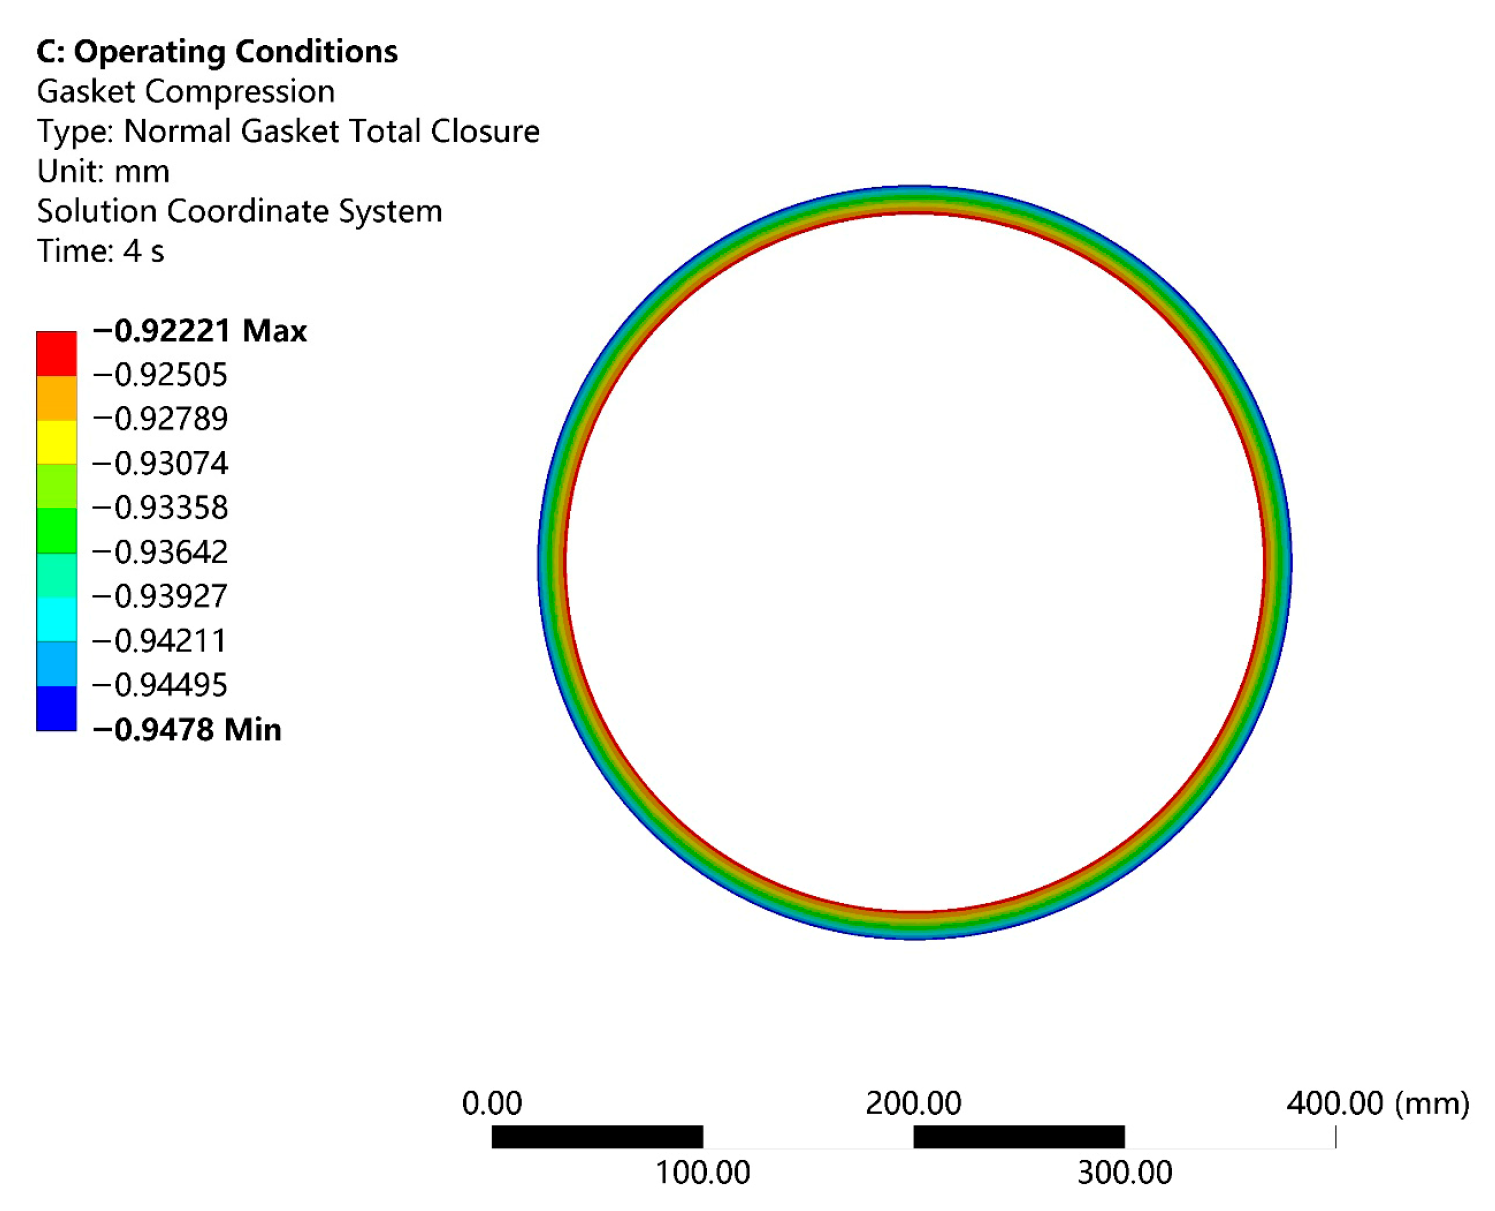
Figure 12 and Figure 13 illustrate the distributions of gasket compressive stress and compression amount under steady-state operating conditions. The simulation results demonstrate that the internal medium pressure does not significantly alter the distribution patterns of these parameters. However, the internal pressure exerts an axial separation force on the flange, leading to a reduction in gasket compressive stress to a range of 48.686–50.971 MPa and in compression amount to 0.922–0.948 mm. Nevertheless, since the minimum gasket compressive stress remains above 30 MPa—the critical threshold for maintaining seal integrity—it can be concluded that, from the perspective of gasket stress, the bolted flange connection exhibits robust sealing performance under steady-state operating conditions.
(3)
Flange Displacement and Deflection Angle
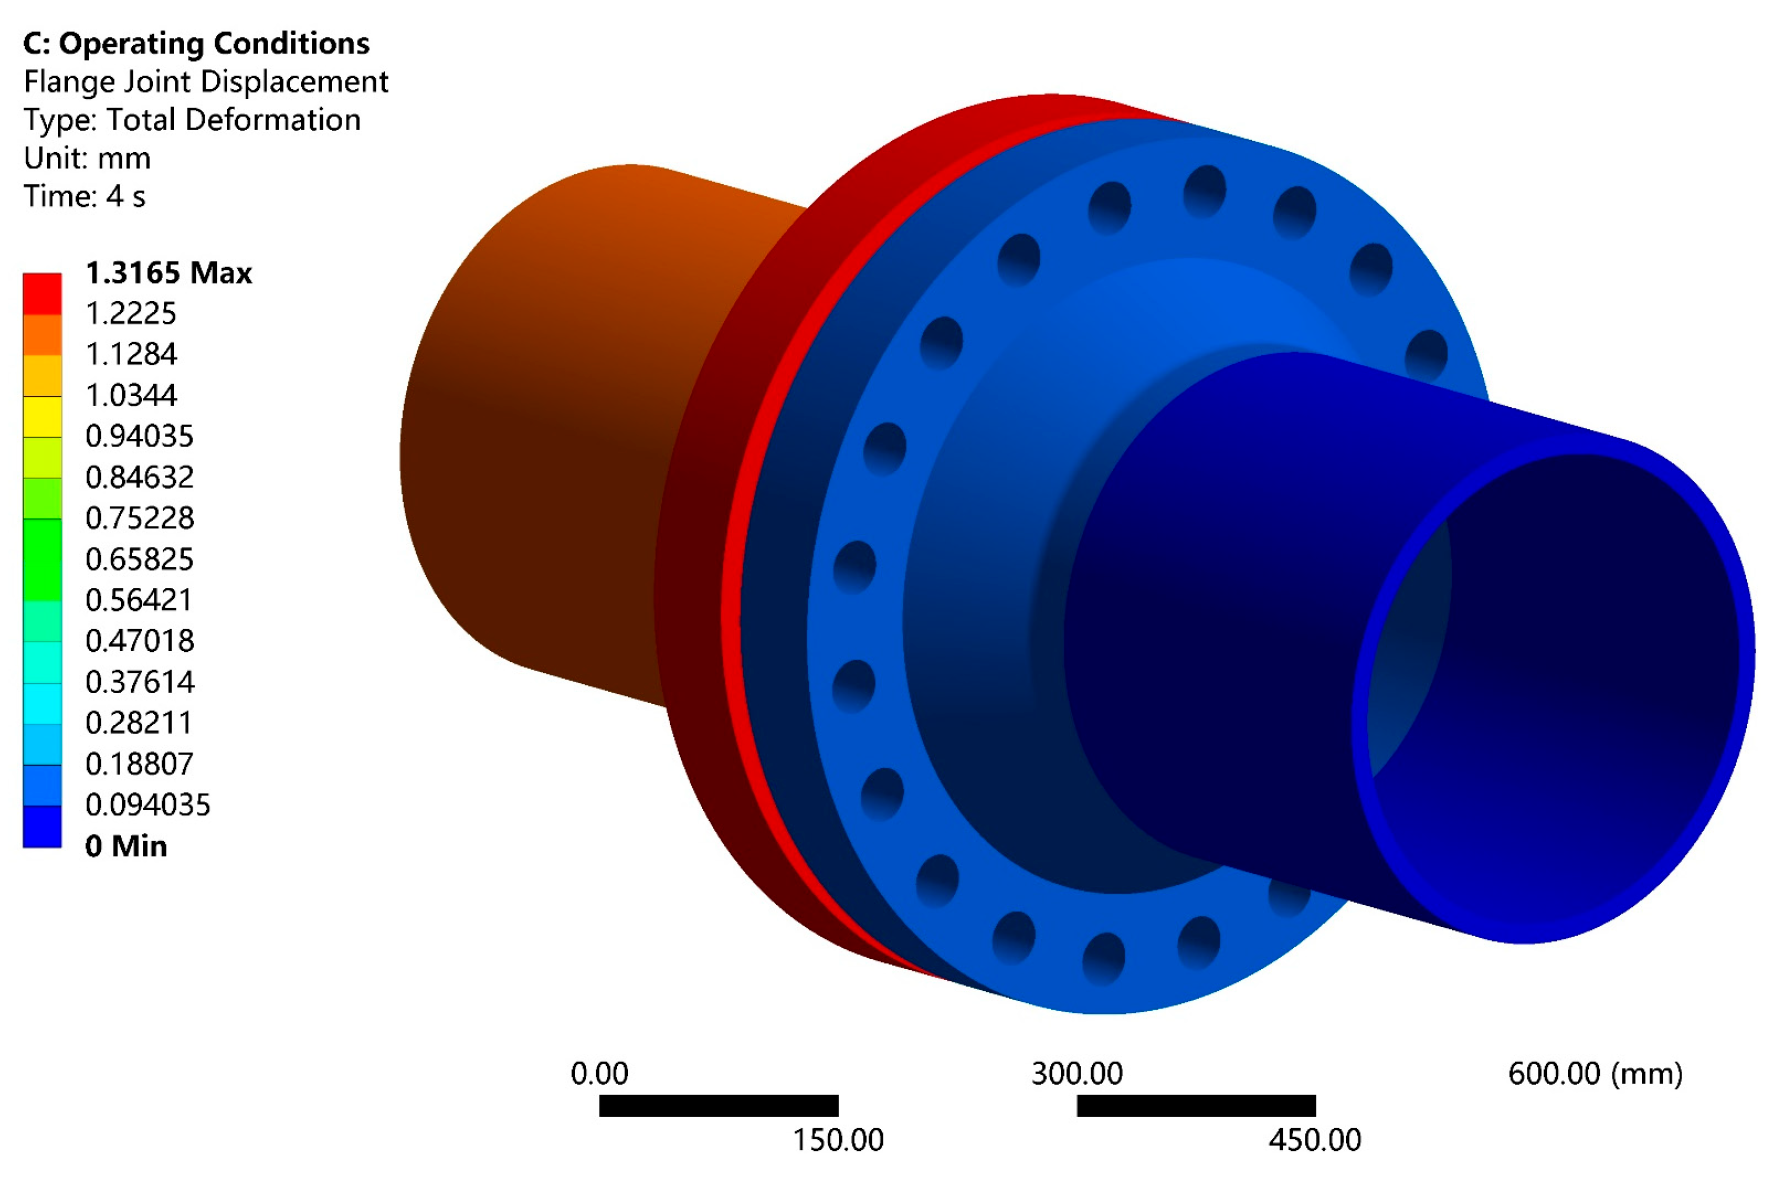
The flange displacement contour plot in Figure 14 reveals that, under steady-state operating conditions, the displacement distribution pattern in the bolted flange connection remains unchanged, while the maximum displacement decreases to 1.316 mm. The computed flange rotation angles are listed in Table 4. Notably, all rotation angles are below the maximum permissible value of 1°, as stipulated by the relevant standard. Consequently, from the standpoint of flange rotation, the bolted flange connection maintains robust sealing performance under steady-state operating conditions.

4.2. Water Hammer Impact Condition Analysis

4.2.1. Numerical Model and Simulation Conditions

(1)
Governing Equations
The flow of natural gas within the pipeline adheres to the principles of mass and momentum conservation, with thermodynamic effects neglected for simplicity. The continuity equation, which represents mass conservation, is expressed as follows [33]:
ρ t + ( ρ u i ) x i = 0
where ui (i = 1, 2, 3) represents the velocity components along the coordinate axes xi (m/s), ρ represents the fluid density (kg/m3), and t represents the time (s).
The momentum conservation equation is based on the Navier–Stokes equation:
( ρ u i ) t + ( ρ u i u j ) x j = p x j + x j ( μ μ i x j ) + τ i j x j + S m i
where ρ represents the pressure acting on the fluid element, τ i j represents the stress tensor, and Smi represents the generalized source term.
Owing to the compressibility of natural gas, transient dynamic simulations are necessary to accurately capture the flow behavior. The water hammer phenomenon represents a transient turbulent flow problem. Accordingly, the standard k-ε turbulence model was employed, in which the turbulent viscosity is computed from the turbulent kinetic energy k and the dissipation rate ε, as expressed in Equation (5). The corresponding transport equations for k and ε are provided in Equations (6) and (7).
μ t = C μ ρ k 2 ε
In this equation, Cμ = 0.09.
Turbulent Kinetic Energy k Equation:
( ρ k ) t + ( ρ k u i ) x i = x j μ + μ t σ k k x j + G k + G b ρ ε + S k
Turbulent Dissipation Rate ε Equation:
ρ ε t + ρ ε u i x i = x j μ + μ t σ ε ε x j + C 1 ε ε k G k + C 3 ε G b C 2 ε ρ ε 2 k + S ε
where Gk represents the production term of turbulent kinetic energy k due to the mean velocity gradient; Gb represents the production term of turbulent kinetic energy k due to buoyancy; C1ε, C2ε, and C3ε are empirical constants; σk represents the Prandtl number of turbulent kinetic energy k; σε represents the Prandtl number of the dissipation rate k; and Sk, Sε represent the user-defined source terms.
(2)
Model Setup and Preprocessing
The water hammer phenomenon is inherently transient, necessitating the use of the standard k-ε turbulence model in computational fluid dynamics (CFD) simulations. For model verification under conditions of constant natural gas pressure, the valve structure was omitted from the fluid domain, as illustrated in Figure 15. Instead, a time-dependent outlet velocity profile, defined by the function f(x), was implemented to equivalently replicate the valve closure process. This simplification significantly reduces mesh density, thereby decreasing computational resource requirements and simulation time [34]. The simplified fluid domain model, including the monitoring surfaces S1 and S2 at the flange connection and near the valve location, is depicted in Figure 16. Hexahedral meshes were generated using ANSYS Fluent Meshing, with local refinement in the near-wall boundary layer regions to accurately resolve pressure wave propagation and impingement. Following grid independence checks, a base mesh size of 25 mm was selected, resulting in a total of approximately 255,000 cells. In accordance with GB 50028-2006 [35], the inlet pressure was set to 10 MPa, and the initial outlet velocity was specified as 15 m/s.
To conservatively assess the most adverse impact of water hammer on flange sealing performance, this study employs an idealized instantaneous valve closure model (closure time Δt = 0.01 s) to simulate rapid valve shutdown, without modeling the complex internal flow path geometry of an actual ball valve. This simplification may yield a slightly higher peak pressure compared to a realistic gradual closure process; nevertheless, it establishes the most unfavorable bounding envelope for evaluating the minimum gasket contact pressure, thereby ensuring that the conclusions are conservatively safe. In future investigations, incorporating the actual valve geometry could further enhance the accuracy of predicted water hammer waveforms [36].
(3)
Validation of Turbulence Models
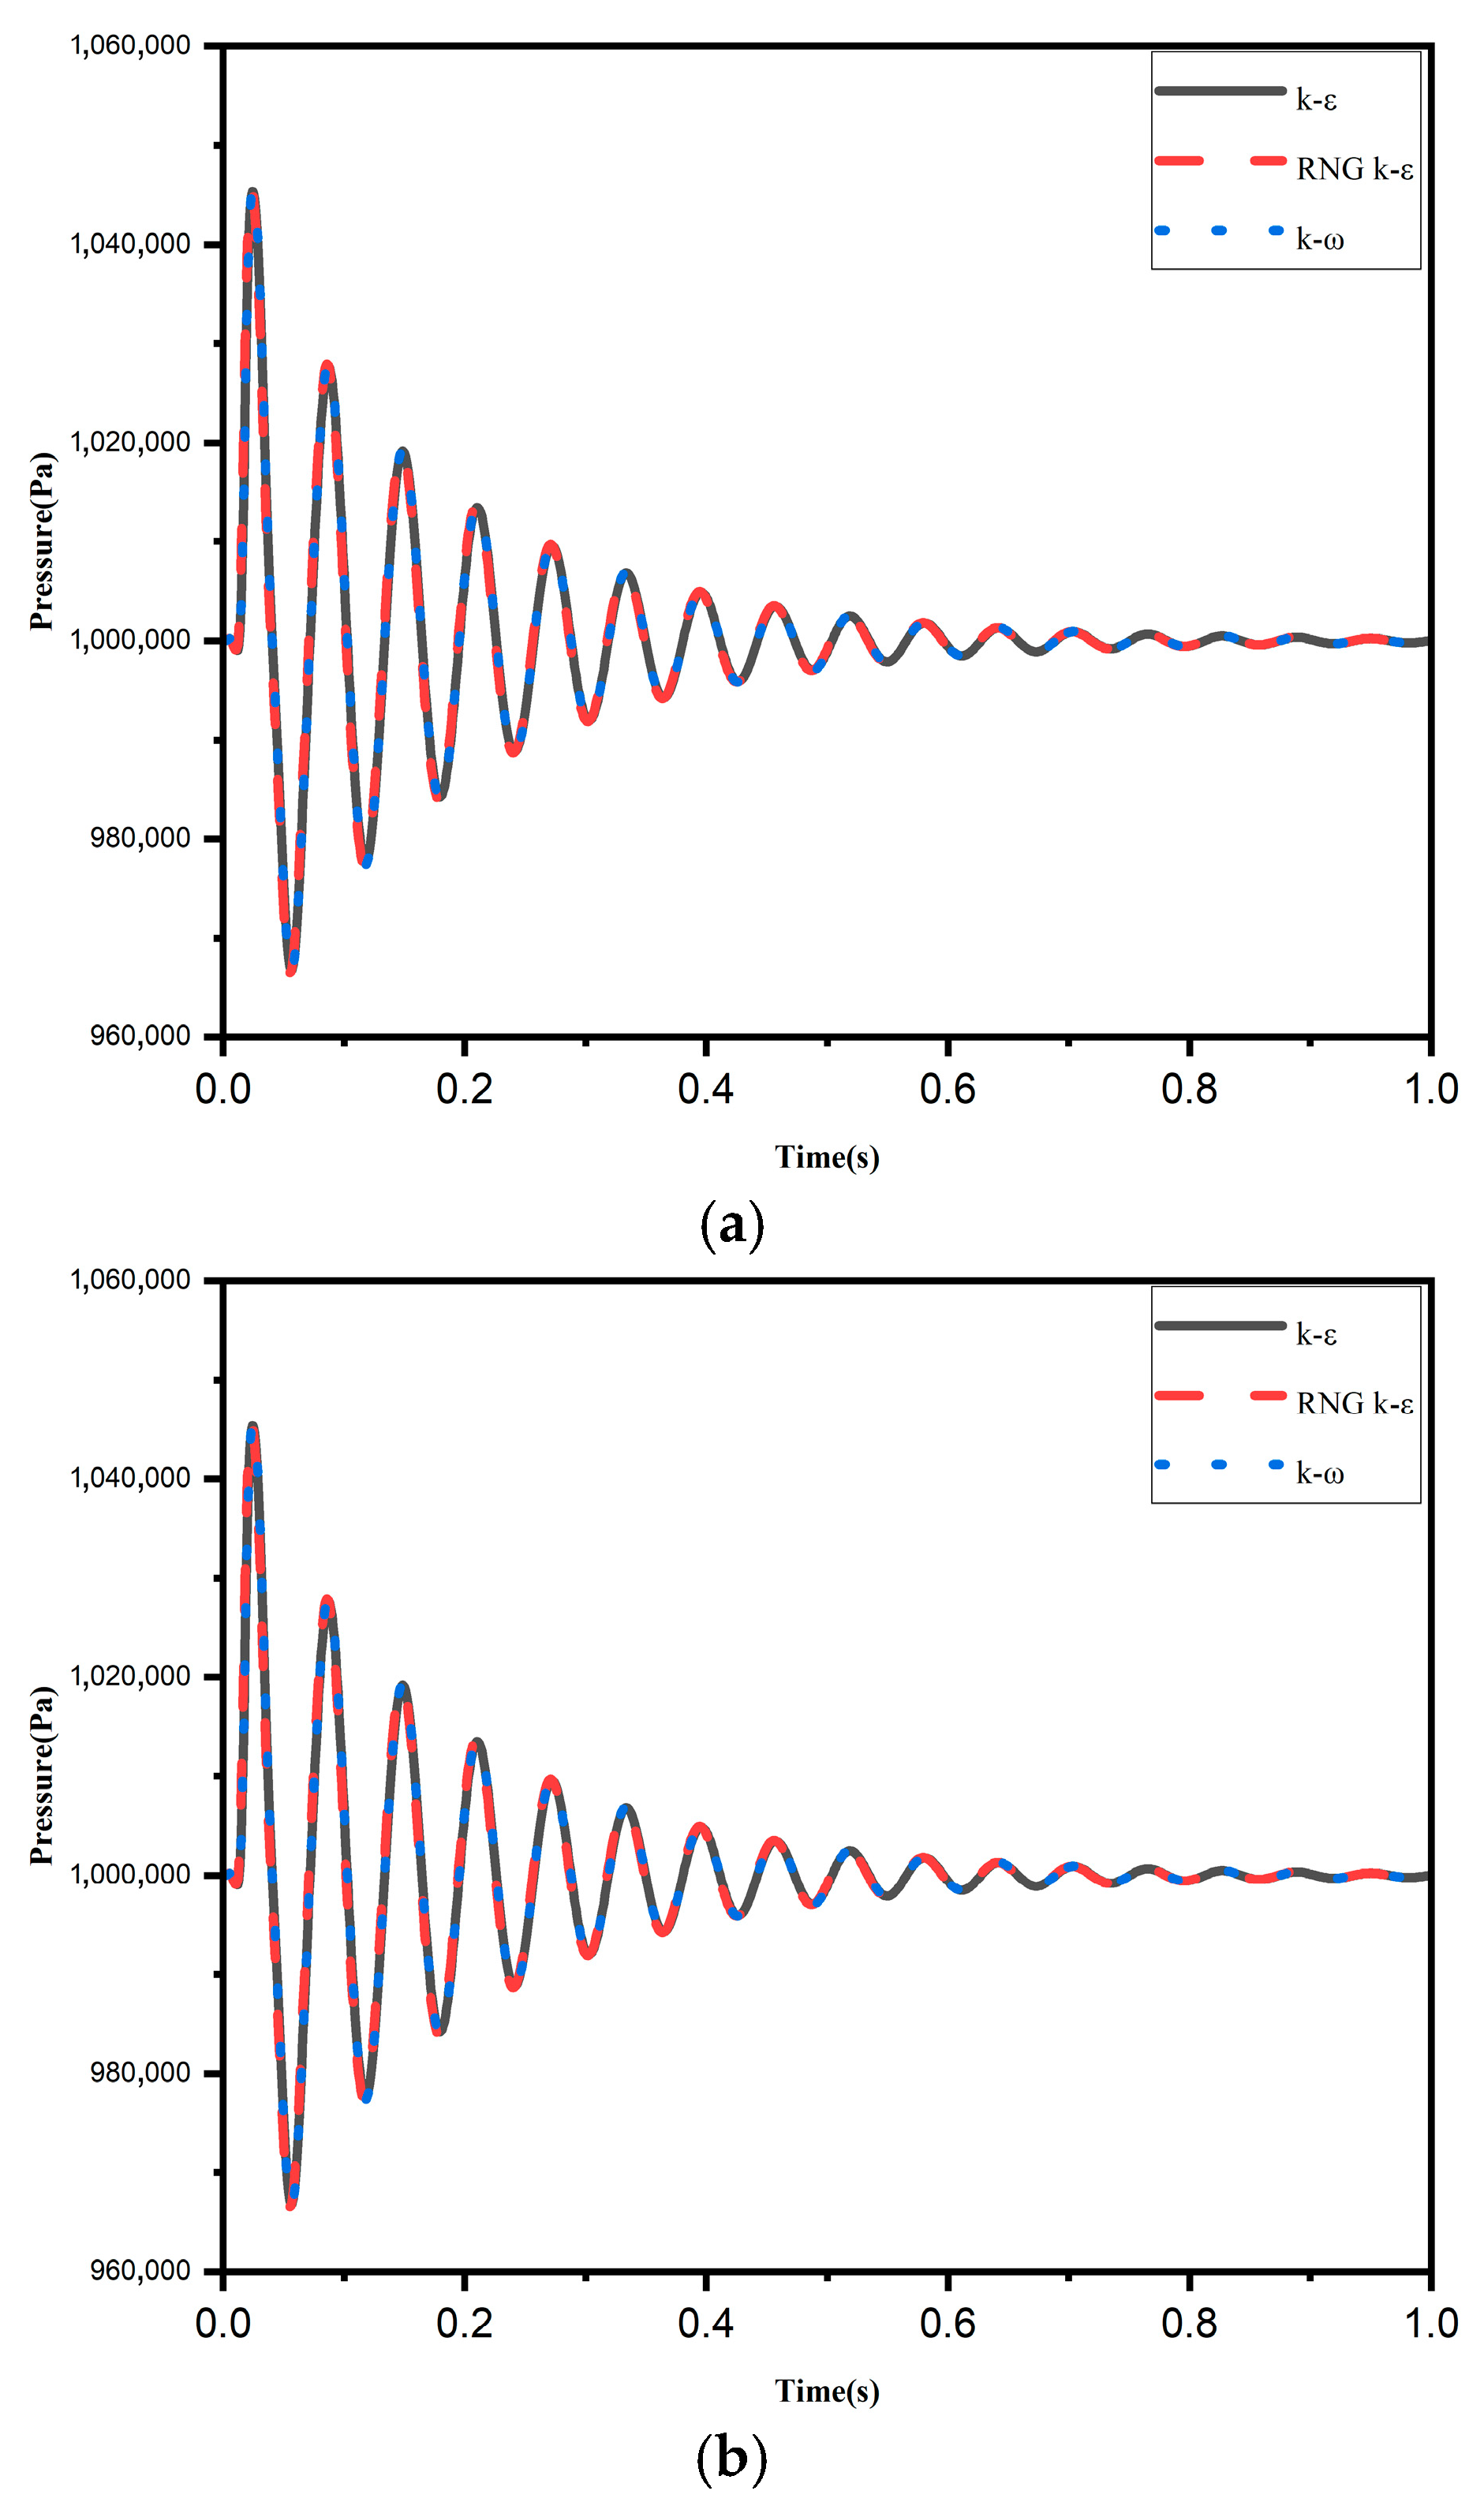
For the transient simulations, a mesh comprising 255,000 cells and a time step of 0.001 s was employed. Three turbulence models—the standard k-ε, RNG k-ε, and k-ω models—were utilized to compare their performance. An analysis of the differences among these models yielded pressure variation curves for the fluid at the flange connection and near the valve inlet, as illustrated in Figure 17. Specifically, Figure 17a depicts the temporal pressure variation at the flange connection, while Figure 17b shows the corresponding variation near the valve inlet [37,38].
As shown in Figure 17, the pressure fluctuation curves at the flange connection and near the valve location, obtained using different turbulence models, exhibit near-perfect overlap with identical oscillation periods. This demonstrates the low sensitivity of water hammer pressure predictions to the choice of turbulence model. The primary reason likely lies in the axisymmetric nature of the straight pipe geometry, which suppresses anisotropic turbulence effects. Accordingly, the standard k-ε model employed in this study adequately captures the turbulent characteristics of the fluid and was therefore selected as the turbulence model for simulating flow under water hammer conditions.
In summary, the schematic illustration of the boundary conditions and load application under water hammer impact conditions is presented in Figure 18.

4.2.2. Simulation Results and Sealing Performance Analysis

(1)
Flange Stress and Strength Evaluation
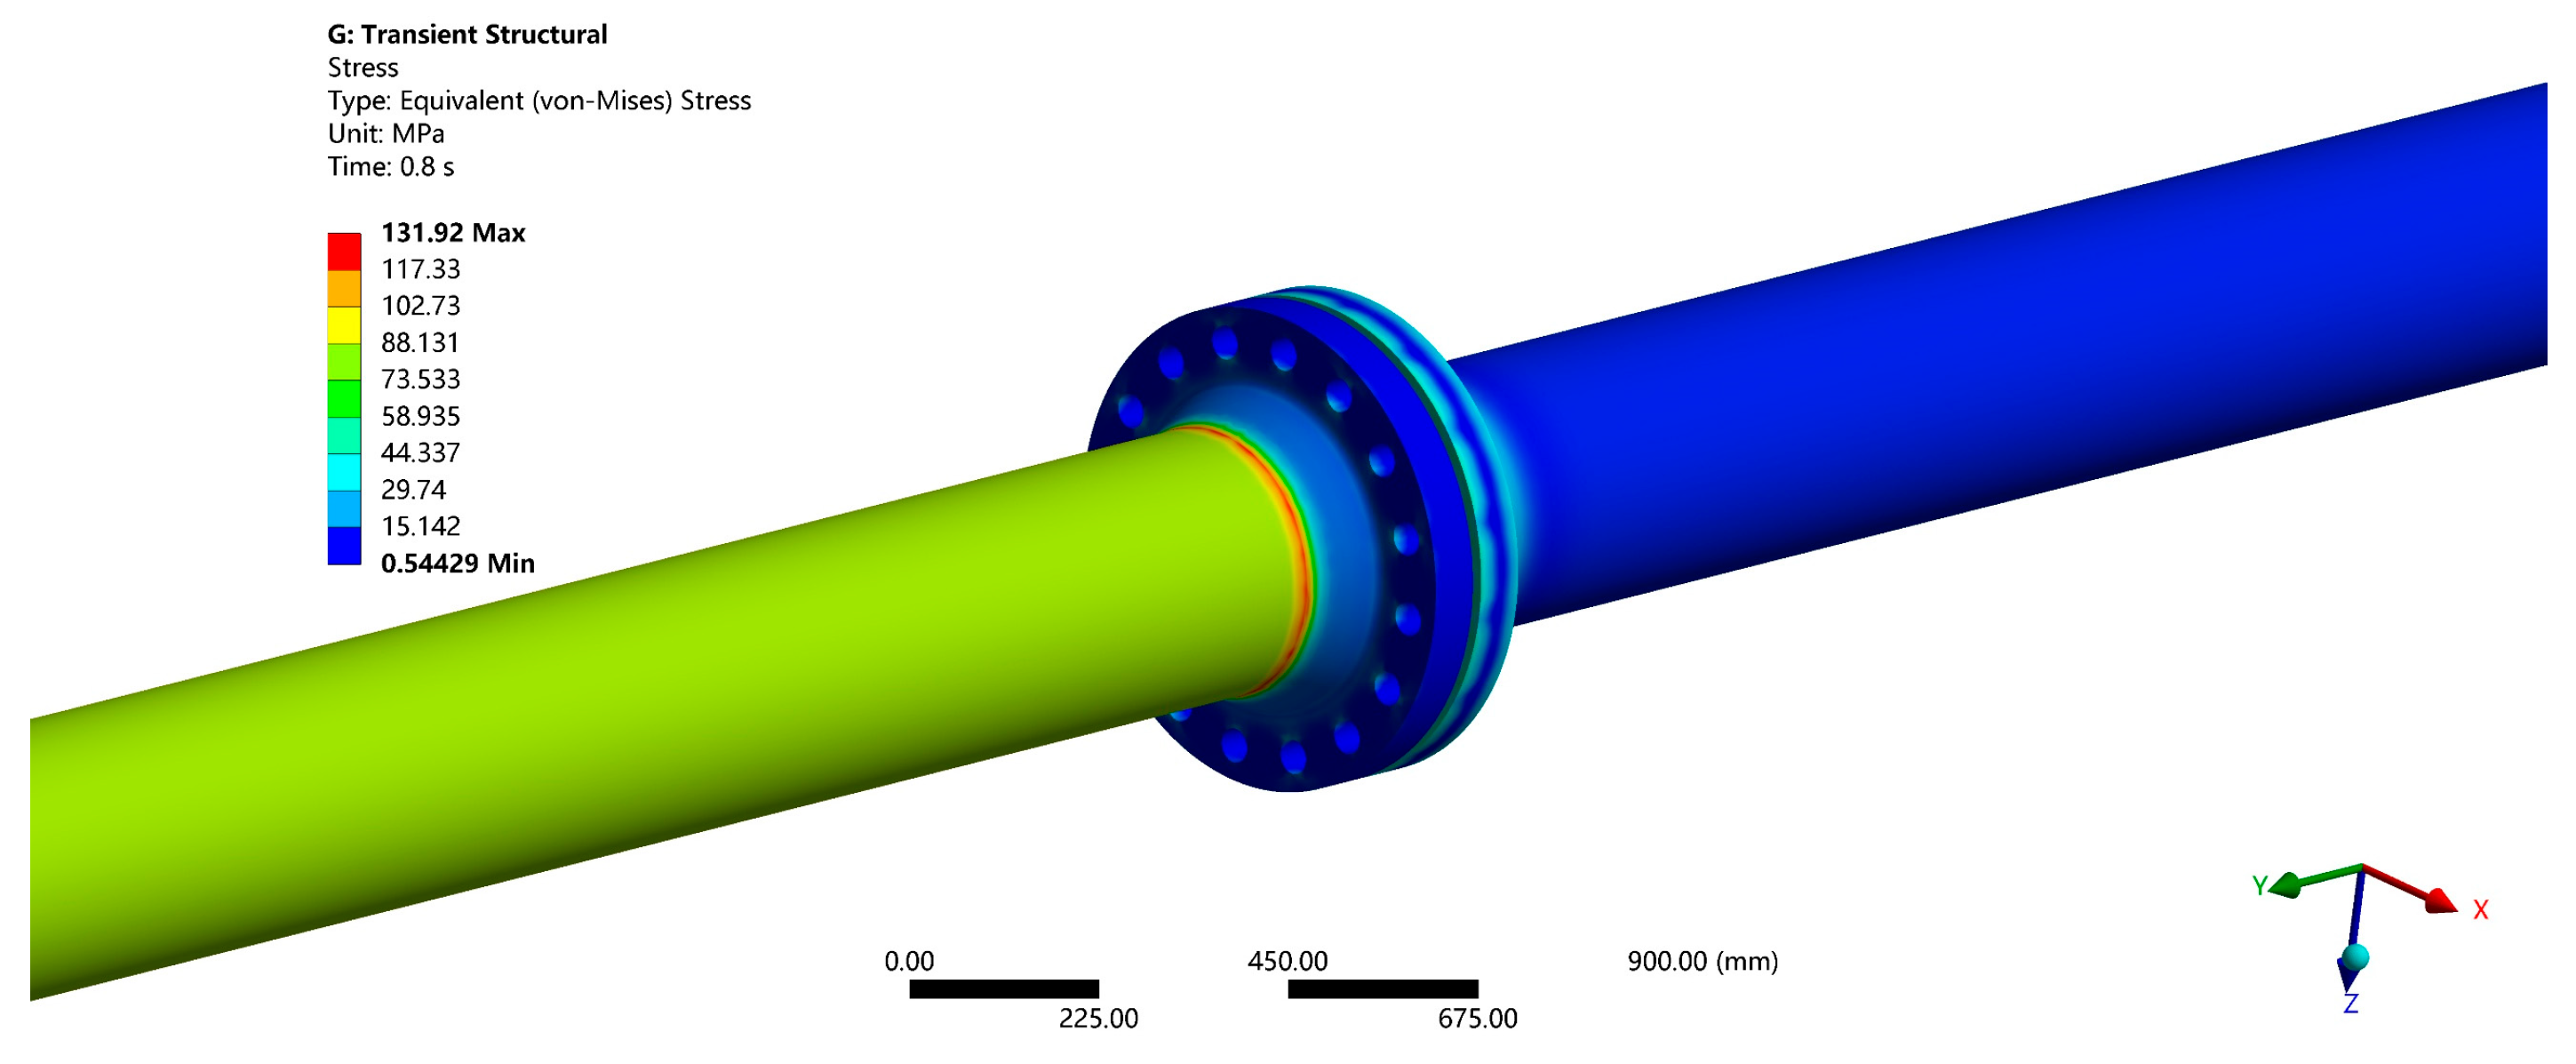
Figure 19 illustrates the overall stress distribution in the bolted flange connection under water hammer impact conditions. The maximum Tresca stress is 140.41 MPa, which is substantially below the material’s allowable stress limit of 400 MPa at room temperature. These results confirm that the strength of the flange connection satisfies the design requirements, with no evidence of strength failure.
(2)
Gasket Stress Analysis
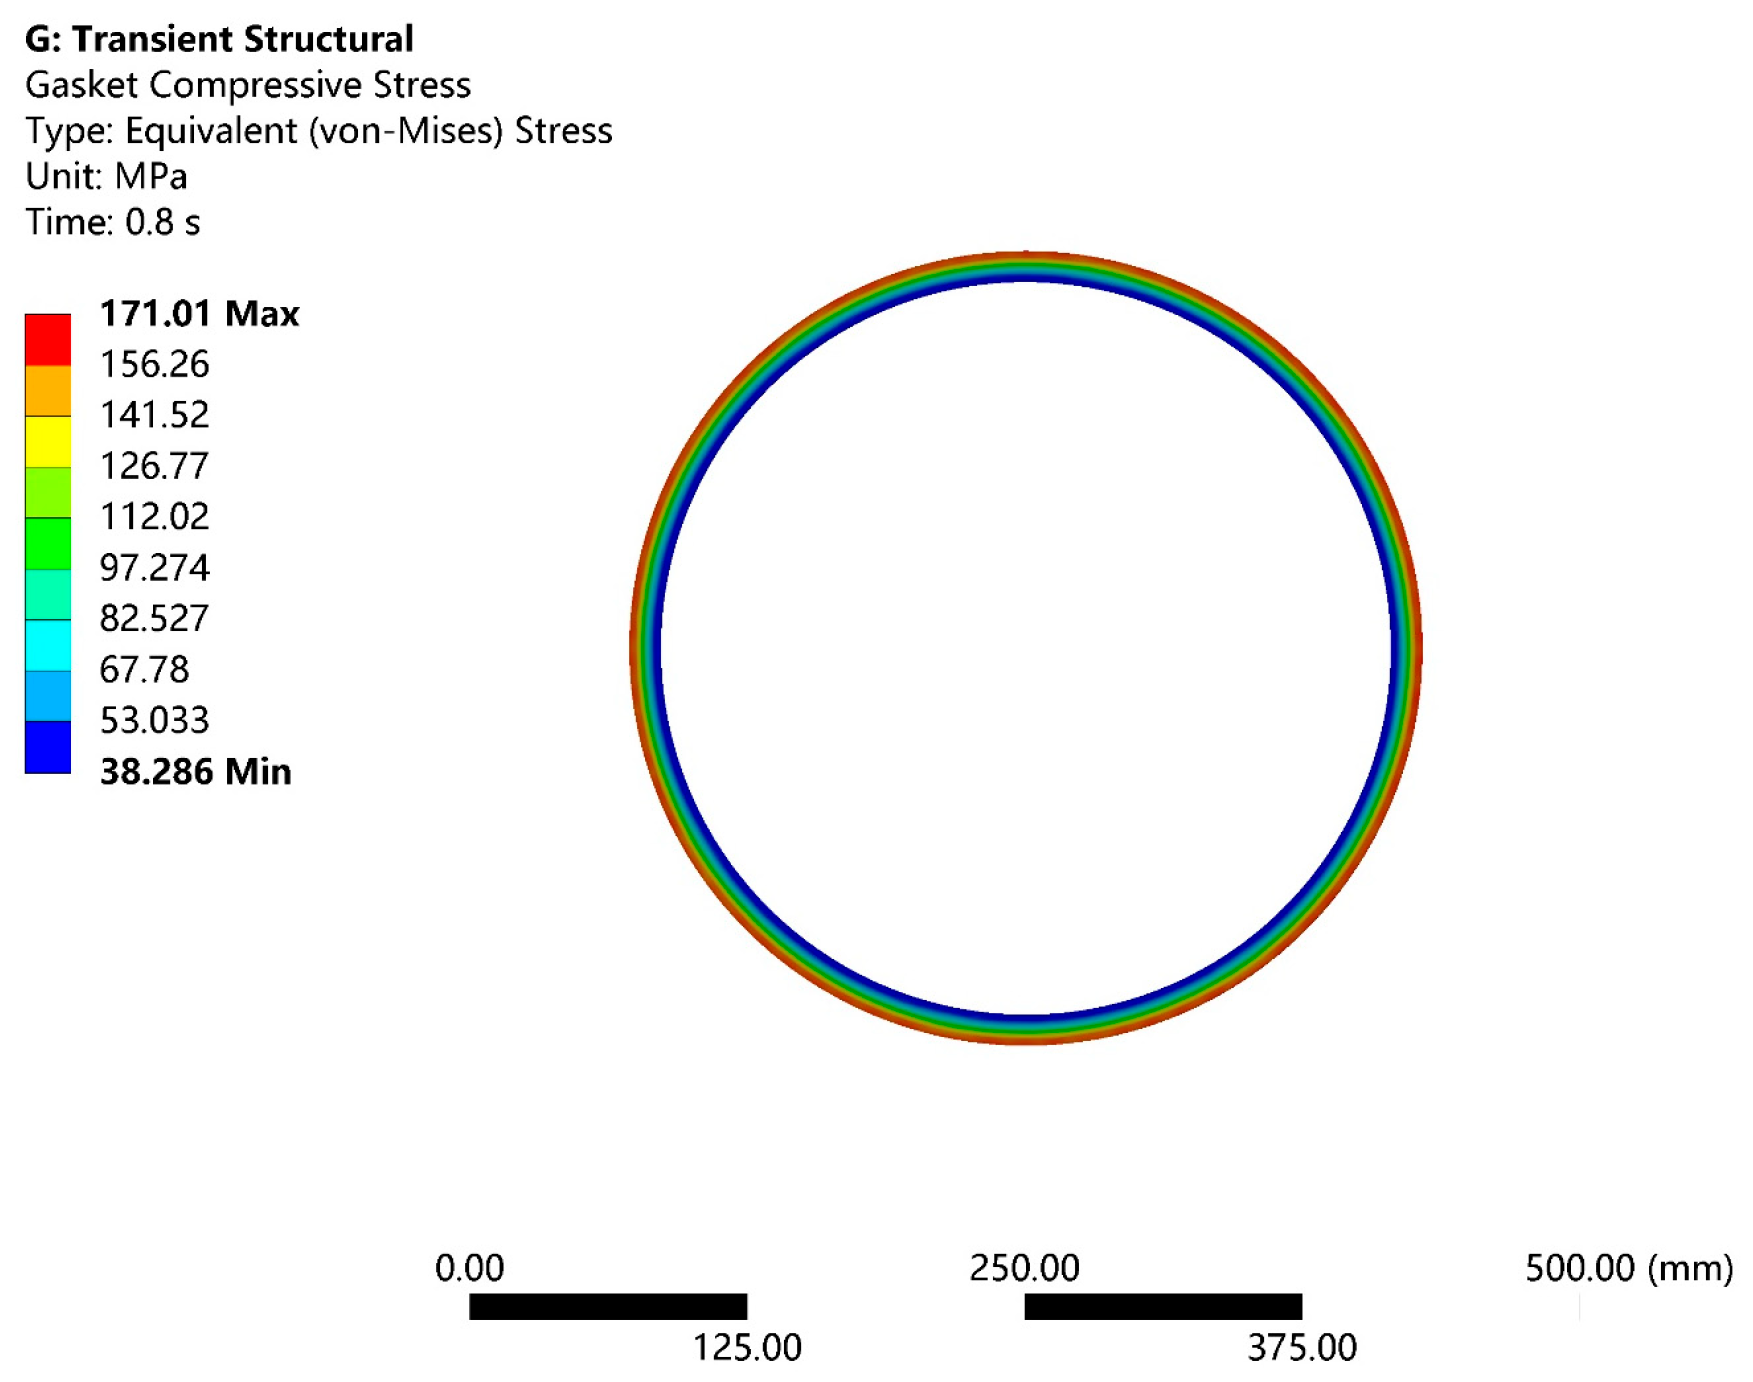
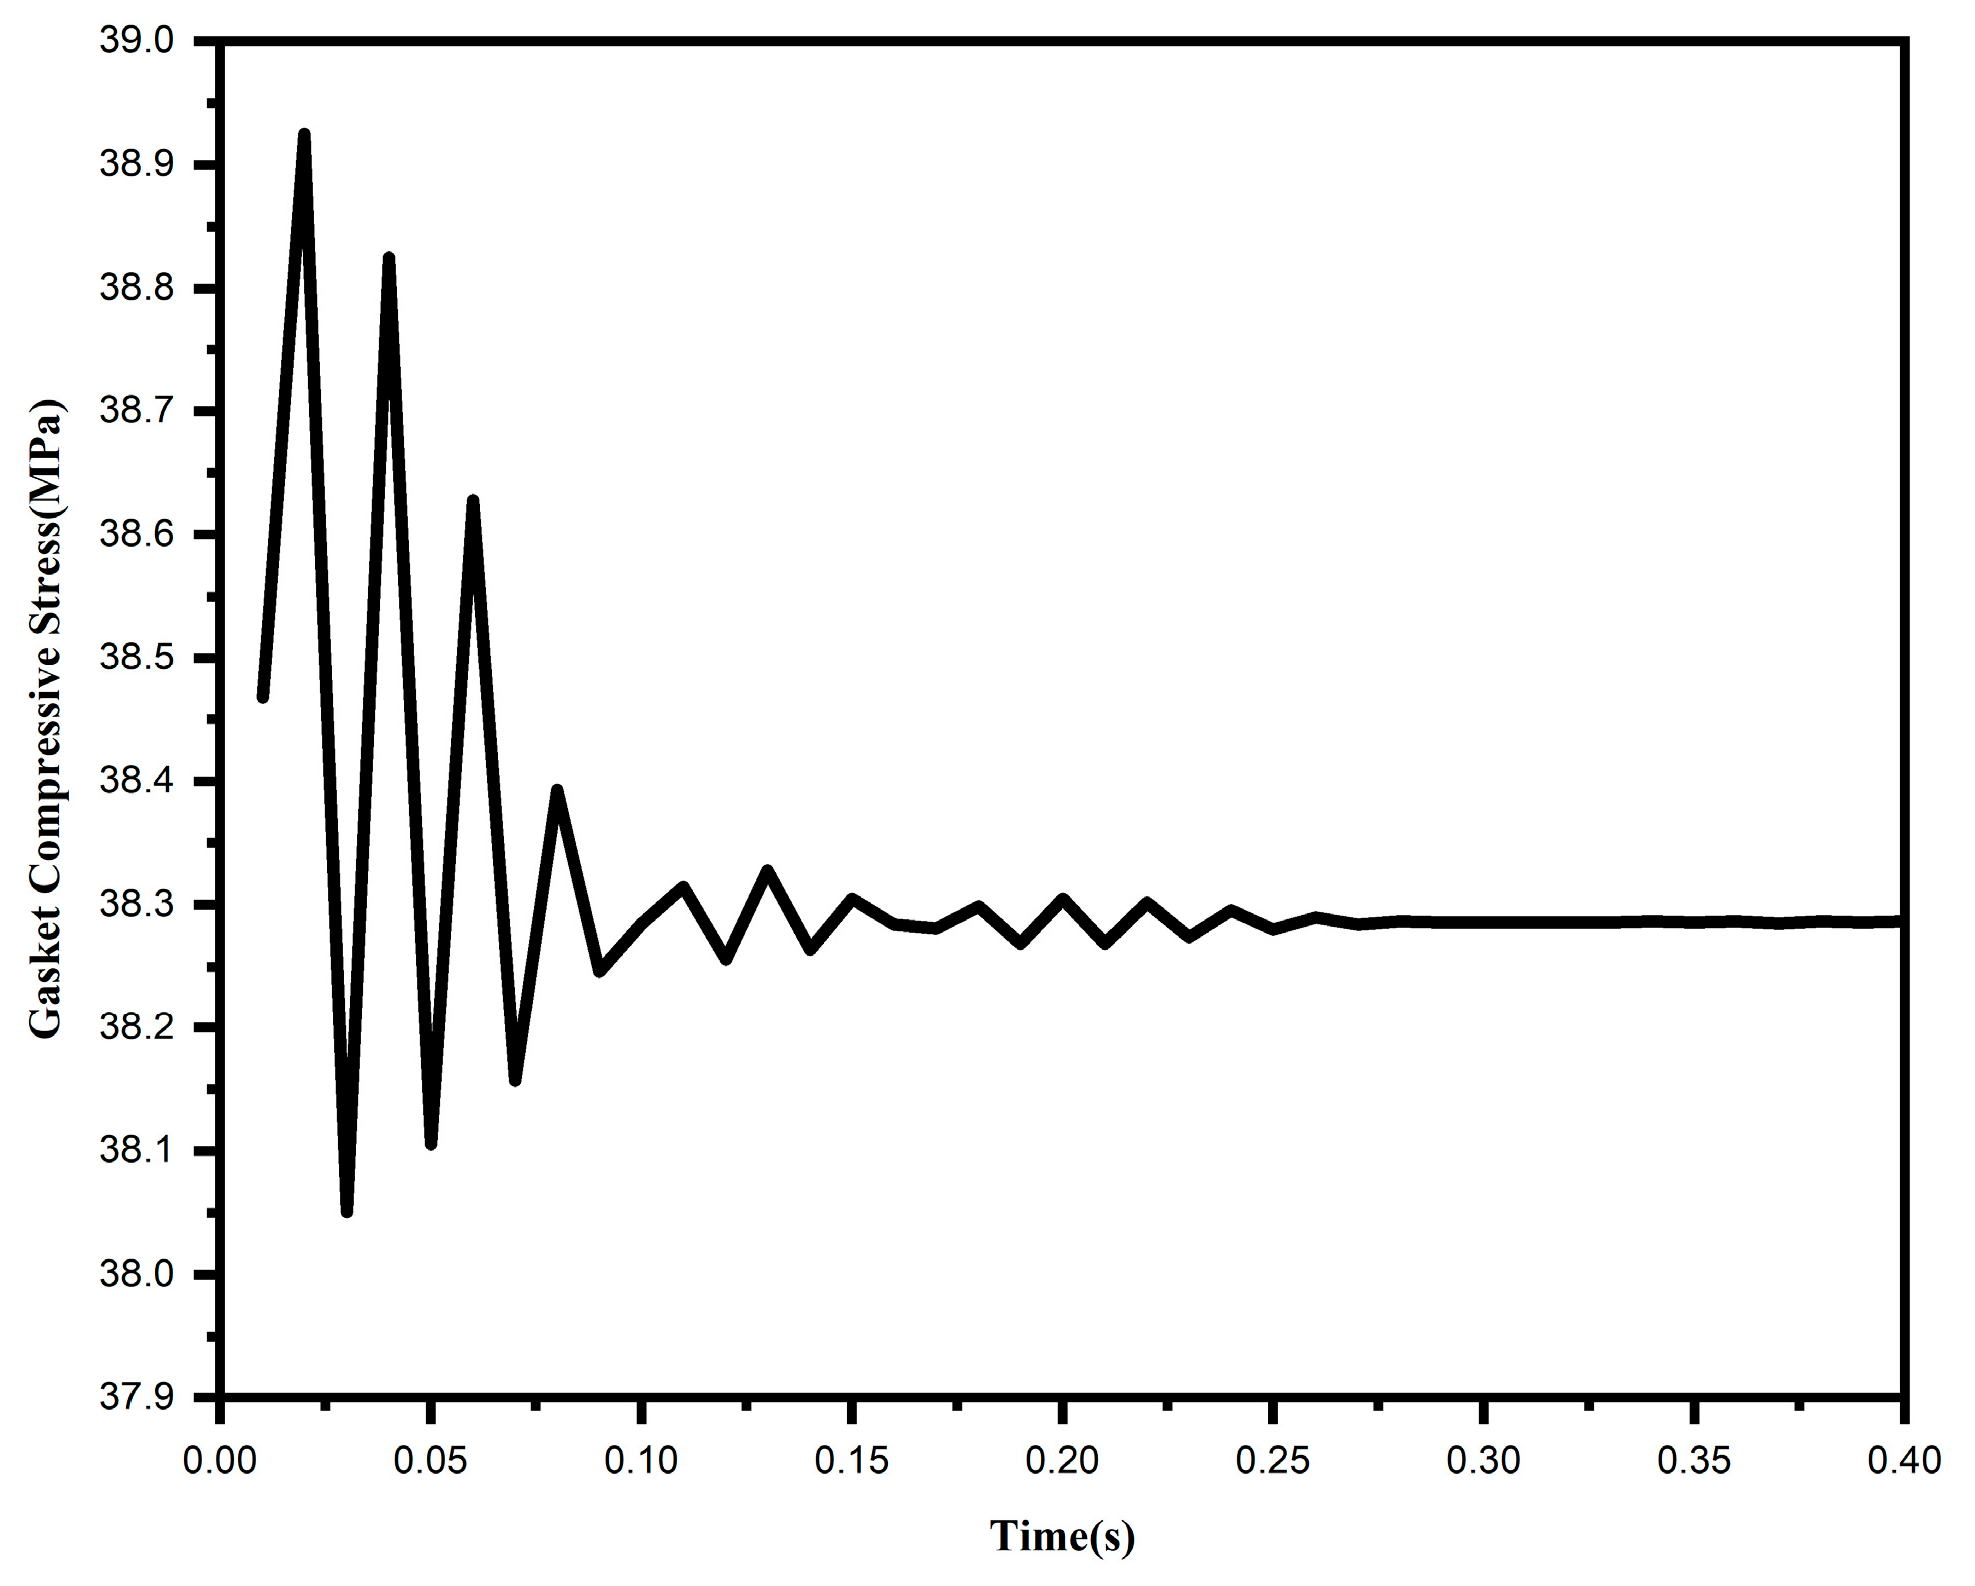
Figure 20 reveals an “inner loose, outer tight” distribution pattern for the compressive stress in the gasket under water hammer impact conditions. The maximum compressive stress reaches 171 MPa on the outer side, while the minimum value is 38.286 MPa on the inner side. The time-history curve presented in Figure 21 further shows that the minimum gasket compressive stress transiently decreases to 38.051 MPa, which remains above the critical sealing threshold of 30 MPa. Consequently, sealing failure does not occur. Nevertheless, the substantial reduction in minimum stress significantly elevates the risks of gasket fatigue damage and potential long-term sealing degradation.

5. Hydraulic Clamping Flange Connection Sealing Test

5.1. Introduction to the Test Bench

Figure 22 illustrates the test rig developed for the hydraulic clamping mechanism in this study. The rig facilitates automatic centering and clamping of the DN300 flowmeter under a gas pressure of 10 MPa. During testing, a straight pipe section of identical diameter was used as a substitute for the flowmeter. The rig primarily consists of a base, a center frame support, a self-centering center frame, a clamping mechanism, and associated auxiliary components.

5.2. Test and Analysis

In accordance with the leakage test protocol specified in GB 50235 [39], a sealing performance evaluation was conducted on the hydraulically clamped flange connection. All tests were performed at room temperature (10 °C) using nitrogen gas at a pressure of 10 MPa. The test is deemed successful if the pressure drop in the pipeline remains below 133 × 10 - 6 MPa. The corrected pressure drop should be determined according to Formula (8):
Δ P = ( H 1 + B 1 ) ( H 2 + B 2 ) 273 + t 1 273 + t 2
where ΔP represents the corrected pressure drop (MPa); H1, H2 represent the pressure gauge readings at the beginning and end of the test (MPa); B1, B2 represent the barometer readings at the beginning and end of the test (MPa); and t1, t2 represent the medium temperatures inside the pipeline at the beginning and end of the test (°C).
Figure 23 presents the recorded internal pipeline gas pressure as a function of time. The graph reveals that the pressure remained stable during both pressure-holding phases, with no observable decrease. The stepwise pressure increase observed during the gas pressurization phase can be attributed to the sequential charging from the gas cylinders. Substituting the data from the two pressure-holding processes into Equation (8) yields a corrected pressure drop of ΔP1 = 0 MPa at 50% test pressure and ΔP2 = 0 MPa at 100% test pressure. Given that the corrected pressure drop is less than 133 × 10 6 MPa, it can be concluded that the hydraulically clamped flange connection achieves reliable sealing performance under a gas pressure of 10 MPa.

6. Conclusions

This study develops a finite element model for the hydraulically clamped flange connection, systematically addressing the complete modeling workflow, including material property definition, contact pair configuration, boundary constraint application, and element type selection. Building on this model, the effects of variations in clamping area and clamping force on sealing performance under pressurized conditions are systematically investigated. Furthermore, the sealing behavior of the flange connection under both steady-state pressurized and water hammer impact conditions is analyzed in detail. Simulations are performed to evaluate sealing performance in these scenarios, providing a theoretical foundation for the optimal sealing design and operational adaptability of such connection structures. In addition, a dedicated test rig for the hydraulic clamping mechanism was constructed, enabling experimental validation of the sealing performance of the flange connection.
(1)
Simulation results demonstrate that both the clamping area and clamping force significantly influence sealing performance. When the clamping area is reduced below 80% of the design value, stress concentration causes the maximum stress in the flowmeter flange to rise to 136.73 MPa, leading to a marked degradation in sealing performance. Similarly, reducing the clamping force to 80% of the design value lowers the minimum compressive stress in the gasket to approximately 31 MPa, bringing the seal to the brink of failure. Although increasing the clamping force to 120% enhances sealing redundancy, it diminishes the strength margin of components such as the flange. Therefore, during operation and maintenance, it is recommended to maintain the clamping force within 90–110% of the design value while ensuring an effective clamping area of at least 80%. This approach optimally balances sealing reliability with structural strength and safety.
(2)
The instantaneous pressure fluctuations induced by water hammer result in periodic oscillations in both flange stress and gasket compressive stress, with the minimum gasket compressive stress decreasing to approximately 38 MPa. Although this does not cause immediate sealing failure, it exacerbates the “inner loose, outer tight” stress distribution pattern, substantially elevating the risk of gasket fatigue damage. To mitigate these effects, energy-dissipating devices can be installed at the pipeline terminus, or slow-closing valves can be employed to attenuate water hammer pressure peaks. Furthermore, regular monitoring of variations in gasket compressive stress is advised; if significant fluctuations are detected, the maintenance interval should be shortened to preempt potential fatigue-induced failure.
(3)
Experimental sealing tests confirm that the hydraulic clamping mechanism delivers stable and reliable sealing performance under a gas pressure of 10 MPa. These results validate that the hydraulic clamping force can effectively substitute for traditional bolt preload.

Author Contributions

Conceptualization, X.L. and S.L.; Methodology, X.L. and Q.B.; Software, Y.S.; Validation, C.M. and Y.S.; Formal analysis, X.C.; Investigation, Q.B. and Y.Z.; Resources, J.L.; Data curation, Q.B. and Y.Z.; Writing—original draft, X.L.; Writing—review and editing, S.L. and J.L.; Visualization, X.L. and C.M.; Supervision, X.C.; Funding acquisition, S.L. All authors have read and agreed to the published version of the manuscript.

Funding

This research was funded by the Northeast Branch of National Petroleum and Natural Gas Pipe Network Group Co., Ltd., Grant number (No. DBGS-SZZN202401).

Data Availability Statement

The original contributions presented in this study are included in the article. Further inquiries can be directed to the corresponding author.

Conflicts of Interest

Authors Xiaofeng Liu, Qingchao Bu, Sitong Luan, Yu Zhang and Chaoyi Mu were employed by the Northeast Branch of National Petroleum and Natural Gas Pipe Network Group Co., Ltd. Author Xuelian Cao was employed by the National Oil & Gas Pipeline Group Northeast Branch, Jinzhou Oil & Gas Transmission Subcompany. The remaining authors declare no conflicts of interest. The authors declare that this study received funding from the Northeast Branch of National Petroleum and Natural Gas Pipe Network Group Co., Ltd. The funder was not involved in the study design, collection, analysis, interpretation of data, the writing of this article or the decision to submit it for publication.

References

  1. Wu, Y.; Song, C.; Liu, Z.; Gu, J.; Liu, Y.; Jin, Z. Intelligent Quality Control Technology Practice in the Calibration Process of Natural Gas Flow Meters. Oil Gas Storage Transp. 2021, 40, 637–642. [Google Scholar] [CrossRef]
  2. Yang, H.; Xu, Y.; Liu, T.; Liu, T.; Huang, Z.; Xie, D. Research on ultra-clean micro gas flow calibration technology of passive piston type with sealing. Flow Meas. Instrum. 2024, 100, 102735. [Google Scholar] [CrossRef]
  3. Zhang, L.; Ding, X.; Wang, S.; Zhang, S.; Ding, J. Research Progress on the Dynamic Stability of Dry Gas Seals. Processes 2024, 12, 575. [Google Scholar] [CrossRef]
  4. Han, W.; Chen, X.; Zheng, C.; Han, J.; Hou, J. Preliminary Exploration of the Application of Intelligent Flow Meter Calibration System. Ind. Metrol. 2018, 28, 80–83. [Google Scholar] [CrossRef]
  5. Urse, G.; Olaru, N.; Urse, L. Some research results on the tightness and strength of flange joints. J. Eng. Sci. Innov. 2018, 3, 149–158. [Google Scholar] [CrossRef]
  6. Wang, H.; Lu, J.; Guan, K.; Wang, Z.W. Finite Element Analysis of Strength and Sealing for Flanges with Pipe Coupling. Press. Vessel. 2012, 29, 22–29. [Google Scholar] [CrossRef]
  7. Lei, J. A Brief Analysis of Sealing and Leakage in Pressure Pipeline Flanges. Petrochem. Technol. Econ. 2012, 28, 26–30. [Google Scholar] [CrossRef]
  8. Bouzid, A.-H.; Nechache, A. An Analytical Solution for Evaluating Gasket Stress Change in Bolted Flange Connections Subjected to High Temperature Loading. Asme J. Press. Vessel Technol. 2005, 127, 414–422. [Google Scholar] [CrossRef]
  9. Bouzid, A.-H.; Nechache, A. Thermally Induced Deflections in Bolted FlangedConnections. J. Press. Vessel Technol. 2005, 127, 394–401. [Google Scholar] [CrossRef]
  10. Liu, L.; Gu, B.; Li, C. The Influence of Maximum Stress at the Outer Edge of Gasket on the Leakage Rate of Bolt-Flange Connection Structure. Mech. Des. Manuf. 2012, 5, 196–198. [Google Scholar] [CrossRef]
  11. Larson, R.A.; Bibel, G. Experimental and analytical evaluation of buckling forces of a spiral wound flexible gasket. In Proceedings of the ASME 2005 Pressure Vessels and Piping Conference, Denver, CO, USA, 17–21 July 2005; Computer Technology; Volume 2, pp. 97–104. [Google Scholar]
  12. Nash, D.H.; Abid, M. Combined external load tests forstandard and compact flanges. Int. J. Press. Vessel. Pip. 2000, 77, 799–806. [Google Scholar] [CrossRef]
  13. Wu, P. Study on the Sealing Performance of Bolt-Flange Joints Under Dynamic Loading; East China University of Science and Technology: Shanghai, China, 2016. [Google Scholar] [CrossRef]
  14. Bortz, M.; Wink, R. Leakage Analysis of a High Pressure Flange Connection Under Bending Moments: An Analytic Procedure. In Proceedings of the Asme Pressure Vessels & Piping Conference, Anaheim, CA, USA, 20–24 July 2014. [Google Scholar] [CrossRef]
  15. Zhang, Z. Study on the Micromotion Wear Characteristics and Tightness Evaluation of Flange Sealing Connections in Gas Stations; China University of Petroleum: Beijing, China, 2022. [Google Scholar]
  16. Li, Y.; Zhong, X.; Chen, Y.; Chen, H.; Liu, J.; Qiu, T.; Yang, Y.; Cheng, L. The Effect of Pressure Fluctuations in Gas Stations on the Sealing Performance of Bolt-Flange Connection Systems. Lubr. Eng. 2023, 48, 118–124. [Google Scholar]
  17. Krishna, M.M.; Shunmugam, M.; Prasad, S.N. A study on the sealing performance of bolted flange joints with gaskets using finite element analysis. Int. J. Press. Vessel. Pip. 2007, 84, 349–357. [Google Scholar] [CrossRef]
  18. Wang, W.; Li, C.; Zhao, W. Analysis of the Tightness of Flange Joints Based on Workbench. New Technol. New Process. 2023, 7, 52–55. [Google Scholar] [CrossRef]
  19. Zhang, Q. Numerical Simulation and Experimental Study on the Sealing Performance of Flanged Connections in Pressure Pipelines; Wuhan University of Engineering: Wuhan, China, 2024. [Google Scholar]
  20. Cavalheiro, F.N.; Cabaleiro, M.; Conde, B.; Bouzas, Ó. Clamp-based steel connections for structural reusability: Experimental and finite element analysis in the elastic range. Structures 2025, 75, 108767. [Google Scholar] [CrossRef]
  21. GB/T 4622.1~2-2022; Spiral Wound Gaskets for Pipe Flanges. Standards Press of China: Beijing, China, 2022.
  22. GB 150.1~150.4-2011; Pressure Vessels. Standards Press of China: Beijing, China, 2011.
  23. GB/T 150.3-2011; Pressure Vessels—Part 3: Design. AQSIQ: Beijing, China; SAC: Beijing, China, 2011.
  24. API Specification 6A; Specification for Wellhead and Tree Equipment. American Petroleum Institute: Washington, DC, USA, 2018.
  25. Wang, L.; Xue, J. Numerical Simulation Analysis of the Gasket Stress Field in the Flange Joint Pre-tightening Process. Pipeline Technol. Equip. 2018, 6, 52–56. [Google Scholar] [CrossRef]
  26. Li, F.; Zhang, L.B.; Dong, S.H.; Wu, W. Numerical Analysis and Research on Sealing Performance of Flange Connection System in Gas Station. In Proceedings of the ASME 2023 Pressure Vessels and Piping Conference (PVP2023), Atlanta, Georgia, 16–21 July 2023; ASME: New York, NY, USA, 2023; Volume 2. [Google Scholar]
  27. Li, Y. Study on the Compression and Resilience Performance of Metal Wound Gaskets in Bolt-Flange Connection Systems; Lanzhou University of Technology: Lanzhou, China, 2018. [Google Scholar] [CrossRef]
  28. Zhang, Y.; Zhan, J.; Liao, Y.; Ding, W.; Tan, S.; Liu, Y. Experimental and numerical studies on hybrid bolted connection of steel box girders: Bending mechanism. Eng. Struct. 2024, 321, 118986. [Google Scholar] [CrossRef]
  29. Lu, L. Study on the Performance of Metal Wound Gaskets Based on Leakage Rate; Zhejiang University of Technology: Zhejiang, China, 2016. [Google Scholar]
  30. Han, J. Study on the Seal Failure and Protection of Bolt-Flange Joints in Mobile Tanker Trucks; China University of Mining and Technology: Xuzhou, China, 2017. [Google Scholar]
  31. ASME Boiler and Pressure Vessel Code Section VIII, Division 1: Rules for Construction of Pressure Vessels; American Society of Mechanical Engineers: New York, NY, USA, 2023.
  32. Li, Y. Finite Element Simulation of the Influence of Complex Variable Operating Conditions on Flanged Connection Strength and Sealing; East China University of Science and Technology: Shanghai, China, 2020. [Google Scholar] [CrossRef]
  33. Ahmadi, N. Revolutionizing heat exchanger design: Helical groove turbulators for superior thermal-hydraulic and exergy performance. Results Eng. 2025, 28, 107207. [Google Scholar] [CrossRef]
  34. Lin, J. Study on the Nonlinear Vibration Characteristics of Hydraulic Pipe-Clamp Systems in Aircraft Engines; Northeastern University: Boston, MA, USA, 2018. [Google Scholar] [CrossRef]
  35. GB 50028-2006; Code for Design of City Gas Engineering. China Architecture & Building Press: Beijing, China, 2006.
  36. Wang, G.; Huo, Y.; Zhang, B.; Li, X.; Yu, Z. Application and Evaluation of Turbulence Models in the Performance Prediction of Axial Flow Pumps. J. Beijing Inst. Technol. 2009, 29, 309–313. [Google Scholar] [CrossRef]
  37. Zhang, D.; Wu, S.; Shi, W.; Pan, D.; Yao, J.; Zhang, J. Application and Experiment of Different Turbulence Models for Simulating Tip Leakage Vortex in Axial Flow Pump. Trans. Chin. Soc. Agric. Eng. 2013, 29, 46–53. [Google Scholar] [CrossRef]
  38. Wang, Z. Study on the Influence of Turbulence Models on the Simulation Results of Internal Flow Performance in Impeller Machinery; Tianjin University: Tianjin, China, 2009. [Google Scholar]
  39. He, B.; Jiao, B.; Wan, Q.; Nie, R.; Yang, J. Strength and tightness evaluation method for pipe flange connections considering thermal effects. J. Loss Prev. Process Ind. 2023, 83, 105053. [Google Scholar] [CrossRef]
Figure 1. Flange connection finite element geometric model.
Processes 14 00072 g001
Figure 2. Boundary conditions and load application methods under operating conditions.
Processes 14 00072 g002
Figure 3. Flowmeter model diagrams with different clamping areas.
Processes 14 00072 g003
Figure 4. Force cloud diagrams of flange connections with different clamping areas.
Processes 14 00072 g004
Figure 5. Radial compressive stress curves of gaskets with different clamping areas.
Processes 14 00072 g005
Figure 6. Flange connection displacement with different clamping areas (mm).
Processes 14 00072 g006
Figure 7. Force cloud diagram of flange connection under different clamping forces.
Processes 14 00072 g007
Figure 8. Distribution curve of radial compression stress of the gasket under different clamping forces.
Processes 14 00072 g008
Figure 9. Flange connection flange displacement under different clamping forces (mm).
Processes 14 00072 g009
Figure 10. Linearization curve of the flowmeter flange along the path under pressurized conditions section.
Processes 14 00072 g010
Figure 11. Linearization curve of the gas pipeline flange along the path under pressurized conditions.
Processes 14 00072 g011
Figure 12. Gasket compressive stress under pressurized conditions.
Processes 14 00072 g012
Figure 13. Gasket compression amount under pressurized conditions.
Processes 14 00072 g013
Figure 14. Displacement of flange connection under pressurized conditions.
Processes 14 00072 g014
Figure 15. Three-dimensional pipeline model.
Processes 14 00072 g015
Figure 16. Water hammer calculation model.
Processes 14 00072 g016
Figure 17. Pressure variation curves over time for different turbulence models: (a) pressure variation curves of different turbulence models at the flange connection; (b) pressure variation curves of different turbulence models at the valve.
Processes 14 00072 g017
Figure 18. Boundary conditions and load application under water hammer impact conditions.
Processes 14 00072 g018
Figure 19. Overall stress of the flange connection under water hammer conditions.
Processes 14 00072 g019
Figure 20. Gasket compressive stress under water hammer impact conditions.
Processes 14 00072 g020
Figure 21. The minimum compressive stress of the gasket varies with time.
Processes 14 00072 g021
Figure 22. Hydraulic clamping mechanism Test bench: 1—base; 2—central frame support; 3—straight pipe segment (simulating flowmeter); 4—self-aligning central frame; 5—V-block 1; 6—clamping mechanism; 7—straight pipe segment; 8—V-block 2.
Processes 14 00072 g022
Figure 23. Curve of gas pressure variation in the pipeline.
Processes 14 00072 g023
Table 1. Material properties table for each component of the flange connection.
Component NameMaterialElastic Modulus (GPA)Poisson’s Ratio ( μ )Density (kg/m3)Yield Strength (MPA)Tangential Modulus (MPA)Allowable Stress (MPA)
Gas Pipeline16MnR2110.37.87 × 103450150170
Flowmeter16MnR2110.37.87 × 103450150170
Graphite Metal Spiral Wound GasketFlexible Graphite1860.31.20 × 103
Table 2. Mesh size table.
PartMesh Generation MethodMesh Size (mm)Mesh Type
Flowmeter, Gas PipelinePatch Conforming Method10 mmTetrahedral
Graphite Wound GasketSweeping Method1.5 mmHexahedral
Table 3. Contact settings.
Contact Body 1Contact Body 2Contact TypeFriction Coefficient
GasketFlowmeterFrictional0.2
GasketGas PipelineFrictional0.2
Table 4. Flange rotation angles under pressurized conditions.
Evaluation MetricGas Pipeline Flange (°)Flowmeter Flange (°)Allowable Value (°)Evaluation Result
Flange Rotation Angle0.082°0.0104°Satisfied
Disclaimer/Publisher’s Note: The statements, opinions and data contained in all publications are solely those of the individual author(s) and contributor(s) and not of MDPI and/or the editor(s). MDPI and/or the editor(s) disclaim responsibility for any injury to people or property resulting from any ideas, methods, instructions or products referred to in the content.