Article

Fatigue Life and Crack Initiation in Monopile Foundation by Fatigue FE Analysis

1
Department of Civil, Environmental & Plant Engineering, Chung-Ang University, 84, Hekseouk-ro, Dongjak-gu, Seoul 06974, Republic of Korea
2
Department of Civil Engineering, Osaka University, Osaka 565-0871, Japan
*
Author to whom correspondence should be addressed.
Processes 2023, 11(5), 1317; https://doi.org/10.3390/pr11051317
Submission received: 15 March 2023 / Revised: 12 April 2023 / Accepted: 21 April 2023 / Published: 24 April 2023
(This article belongs to the Special Issue Reliability and Engineering Applications)

Abstract

:
The construction of new renewable energy infrastructures and the development of new ocean resources continues to proceed apace. In this regard, the increasing size and capacity of offshore wind turbines demands that the size of their accompanying supporting marine structures likewise increase. The types of marine structures utilized for these offshore applications include gravity base, monopile, jacket, and tripod structures. Of these four types, monopile structures are widely used, given that they are comparatively easy to construct and more economical than other structures. However, constant exposure to harsh cyclic environmental loads can cause material deterioration or the initiation of fatigue cracks, which can then lead to catastrophic failures. In this paper, a 3D fatigue finite element analysis was performed to predict both the fatigue life and the crack initiation of a welded monopile substructure. The whole analysis was undertaken in three steps. First, a 3D non-steady heat conduction analysis was used to calculate the thermal history. Second, a thermal load was induced, as an input in 3D elastoplastic analysis, in order to determine welding residual stresses and welding deformation. Finally, the plastic strain and residual stress were used as inputs in a 3D fatigue FE analysis in order to calculate fatigue crack initiation and fatigue life. The 3D fatigue finite element analysis was based on continuum damage mechanics (CDM) and elastoplastic constitutive equations. The results obtained from the 3D fatigue finite element analysis were compared with hot spot stresses and Det Norske Veritas (DNV-GL) standards.

1. Introduction

The world’s focus is on reducing oil or coal-fired electricity generation as much as possible while at the same time developing new and renewable energy generation to replace both, since this will reduce carbon dioxide emissions. One of these new renewable energy sources that is being increasingly deployed is offshore wind. Indeed, many countries are making great efforts to develop offshore wind farms. It is thus very important to ensure that structures used for offshore wind power are safe. To ensure this, many studies have been undertaken [1,2,3,4,5,6,7,8,9,10]. Lee et al. used a centrifugal model to analyze and study the P-Y curve of a large-diameter monopile subjected to horizontal forces and moments under offshore wind [1]. Bang et al. studied the development of a mechanical load data analysis program and its application, in which a 5 MW level monopile structure wind turbine generation system was simulated. The equivalent load was calculated using data analysis according to the IEC 61400-13 standard and the slope of S-N curves corresponding to different materials [4]. Jang et al. analyzed and compared four different verticality errors selected from ISO standards for a 5 MW monopile. These errors were due to misjudgments in the marine environment and construction [5]. Yoon et al. used the response surface method to analyze the reliability of offshore wind monopile structures, while KIOST (The Korea Institute of Ocean Science and Technology) developed the reliability design program, which allowed the impact of marine loads, such as wind load and wave load on the monopile structures, to be analyzed [6,7]. Kim et al. used the damage estimation method to infer damage, both by location and severity, to a monopile structure [8]. Jang et al. used 2D and 3D finite element methods to analyze and compare the lateral behavior of the monopile structure [9]. Kim et al. used the 3D finite element analysis method and field test to study the cycle P-Y curve of the pile. Ali Mehmanparast et al. used fracture mechanics analysis to predict the fatigue life of the monopile structure. In addition, the fatigue crack growth rate of monopile structures welded offshore in both air and seawater was confirmed [11,12,13,14,15,16,17]. Joey Velarde et al. discussed the possibility of extending the use of 10 MW monopile structures to large wind turbines and deep-sea areas and introduced the fatigue design factors method for calculating fatigue damage [18,19]. Ko used Rayleigh’s method to establish a rigid base single-degree-of-freedom structure model of the conical tower wind turbine. Then, to simulate the flexibility of the monopile foundation (the transition plate), a concentrated spring model was introduced and the inertia and bending effects of the substructure were considered [20]. Wang et al. studied the structure, employing centrifuge tests and FE analyses [21]. Chen et al. carried out a fatigue bending test and axial compression test on the specimen. Given all this work, it is clear that many different studies are currently in progress [22,23].
Marine structures are divided into gravity base, monopile, tripod, and jacket structures [2,3]. Of these structures, the monopile structure is relatively easy to construct and more economically feasible than the other structures; given this, it is widely used. Monopile structures must be designed for a decades-long life in the ocean if they are to be economically viable. Monopile structures are subject to heavy vertical dead loads and repeat horizontal live loads in the marine environment. These monopile structures are subjected to repeated wind loads, wave loads, and tidal current loads in the horizontal direction. Therefore, the effects of dead load and repeated live load on the fatigue life of monopile structures were considered in this study. A structure’s heavy large-diameter steel pipes are connected by means of welding. Thus, the residual stress on the welds of the monopile structure as well as the influence of welding deformation on the fatigue of the monopile structure were both considered in this research. The goal of this paper was to allow the accurate prediction of the fatigue life and crack initiation of a monopile structure. This was attempted by incorporating the effects caused by weld-induced residual stresses, deformations, and cyclic loading. To this end, 3D thermo- mechanical analysis was carried out to calculate the welding residual stresses and welding deformation. Finally, 3D fatigue finite element analysis was used. This analysis method combined continuum damage mechanics and cyclic hysteresis constitutive theory as a means to calculate the fatigue life and crack initiation position. The cyclic hysteresis constitutive equation was obtained by conducting an experimental test to ascertain material properties and the different parameters used in the equation. Additionally, in this study, we predicted the effect of thickness on the fatigue life of monopile structures. Comparing the FE analysis results with the hot spot stress method and DNV GL, it was found that our results were quite reliable.

2. Material Constant Determination by Experiment

Cyclic deformation, e.g., cyclic hardening or cyclic softening feature and ratcheting behavior plays an important role in the safety assessment and fatigue-life estimations of structural components. To capture these features, constitutive equations were used and, to predict the crack initiation, continuum damage mechanics was considered. One of the aims of this section was to elucidate, by means of experimentation, the role of cyclic hardening/softening and ratcheting features on the material strength of the material. From these experiments (as shown in Figure 1), the material constants were obtained. These material constants were then used in FE analysis to obtain the hysteresis loop. Following this, the experimental hysteresis loops (as shown in Figure 2) were compared to a hysteresis loop obtained from FE analysis data.
The test specimen for fatigue determination was manufactured according to ASTM standards. ASTM E606/E606M-2021 “Standard Test Method for Strain-Controlled Fatigue Testing” provides the size of the fatigue test specimens for any form of metallic material at room temperature [24]. Figure 1a shows a realistic specimen for fatigue testing. Figure 1b shows a 3D model showing the size of the specimen; a total length of 200 mm, a gauge length of 23.5 mm, and a diameter (in the middle part) of 6.35 mm with the diameter at the end part being 12.7 mm. Figure 1c shows the mesh model of the specimen for the FEM analysis. Figure 1d shows the displacement conditions used for fatigue testing with MTS810-250 KN machines and displacement control systems being used to perform the fatigue test. In Figure 2a, the specimens were fatigue tested using the 810 MTS machine with multiple iterations at ±0.188 mm displacement conditions. The same displacement condition was used in the FE analysis method in order to obtain numerical analysis results. The experimental data and the analysis data were compared, as shown in Figure 2b. The experimental results coincided with the FE analysis results, indicating that the FE analysis results were quite reliable. Previously, we conducted experiments for different materials with different specimens and verified the validity of our FE analysis method.
The physical properties of SM355 steel are shown in Table 1 and were obtained from tensile tests (Young’s Modulus being 204 GPa, Poisson’s Ratio being 0.3, the yield stress being 344.3 MPa, ultimate stress being 580 MPa, elongation being 30%). While performing the fatigue test, the effect of hardening on the material was considered, which included kinematic hardening and isotropic hardening; the following equations were then used to obtain the parameters of the material.
In the small deformation case, the total strain increment tensor was divided into the elastic increment tensor and plastic strain increment tensor, as shown:
ε ˙ ij t = ε ˙ ij e + ε ˙ ij p
The elastic strain rate can be obtained from the Cauchy stress tensor. The plastic strain rate can be captured from the plastic potential function q(σ). With a von Mises yield criterion used for most stable materials, a common approach in plasticity theory is to assume that the plastic potential function coincides with the yield function f(σ), i.e., q(σ) = f(σ), and that the plastic flow follows the direction normal to the yield surface. In this case, the plastic flow rule was expressed as:
ε ˙ ij p = λ ˙ f σ = 1 H     σ ˙ '   : n     n ,               n = 2 3 f σ
where λ ˙ is a positive scaling factor that is zero in the elastic domain and H is the plastic modulus.
When the stress state exceeds the elastic limit and loading continues, two types of hardening may occur in the material: kinematic hardening, which accounts for the translation of the yield surface in the deviatoric stress space, and isotropic hardening, which is the expansion of the yield surface without translation. With reference to the kinematic hardening law, this study decomposed the nonlinear kinematic hardening using the Chaboche model, which represented the evolution of the bias back stress.
α ˙ ij ¨ ' = k = 1 m ( α ˙ ij ¨ ' ) k = k = 1 m ( 2 3 c k ε ˙ ij p γ k ( α ij ¨ ' ) k p ) ˙
where m is the back stress coefficient and c and γ are the constant values of each back stress evolution defined by cyclic loading tests, respectively. In this study, the kinematic hardening of the three back stresses was considered. In Equation (3), p ˙ is the evolution of the accumulated plastic strain, which can be expressed as
p ˙ = ε ˙ ij p = 2 3 ε ˙ ij p ε ˙ ij p 1 / 2
The isotropic hardening rule is:
R ˙ = Q b   e bp   p ˙
where Q is the isotropic hardening variable obtained from experimental data and b is the material parameter describing the isotropic hardening rate. When p = 0 at R = 0, the Equation (5) can be transformed into
R   =   Q   ( 1 e bp )
Isotropic and nonlinear kinematic hardening models take into account various phenomena such as ratcheting effects, mean stress relaxation, and cyclic hardening, all of which are typical of materials exposed to cyclic loading.
The material parameters required in the cyclic forming model, i.e., the material constants Q, b, c1, c2, c3, γ1, γ2, and γ3, can all be obtained from the above equations. The material parameters for kinematic and isotropic hardening are shown in Table 2.

3. FE Welding Analysis Procedure

Fatigue performance investigation has become an essential undertaking with regard to the usage of large offshore structures. However, due to the huge size and complexity of these offshore structures, it is difficult to carry out experiments on the structure itself as such experiments would be of long duration and high cost. Additionally, the many adverse conditions experienced on site make it difficult to carry out experiments. In light of this, 3D finite element analysis has become a hot topic of late due to the fact that 3D finite element analysis can deal with these adverse conditions. Three-dimensional finite element analysis has been widely used to predict various effects, such as welding residual stresses, welding deformations, and fatigue loads on structures [25,26,27,28,29,30,31,32,33,34]. These analyses can be employed to predict the safety and economy of a structure prior to its construction. Three-dimensional non-steady heat FEM conduction analysis was used to simulate the welding process applied to the structure. In 3D heat transfer analysis, a thermal analysis was first carried out. The transient heat conduction equation was then used to calculate temperature history. The temperature history of each sequence weld pass was then calculated as the thermal load, which was then utilized as input data to calculate the residual stress and welding deformation in the 3D thermal elasto-plastic FEM analysis. The weld residual stress and weld deformation caused by welding must be considered in the fatigue analysis. This is because welding deformation and welding residual stress have been found to affect fatigue life [29].

3.1. Model for FE Welding Analysis

In this study, a finite element analysis of the 5 m diameter monopipe structure was carried out. According to the American Petroleum Institute (API) design standard, t o is the wall thickness (mm), with D o being the diameter (mm)as denoted in Equation (7). The thickness of the monopile structure was then calculated from Equation (7) [35].
t o = 6.35 + D o 100
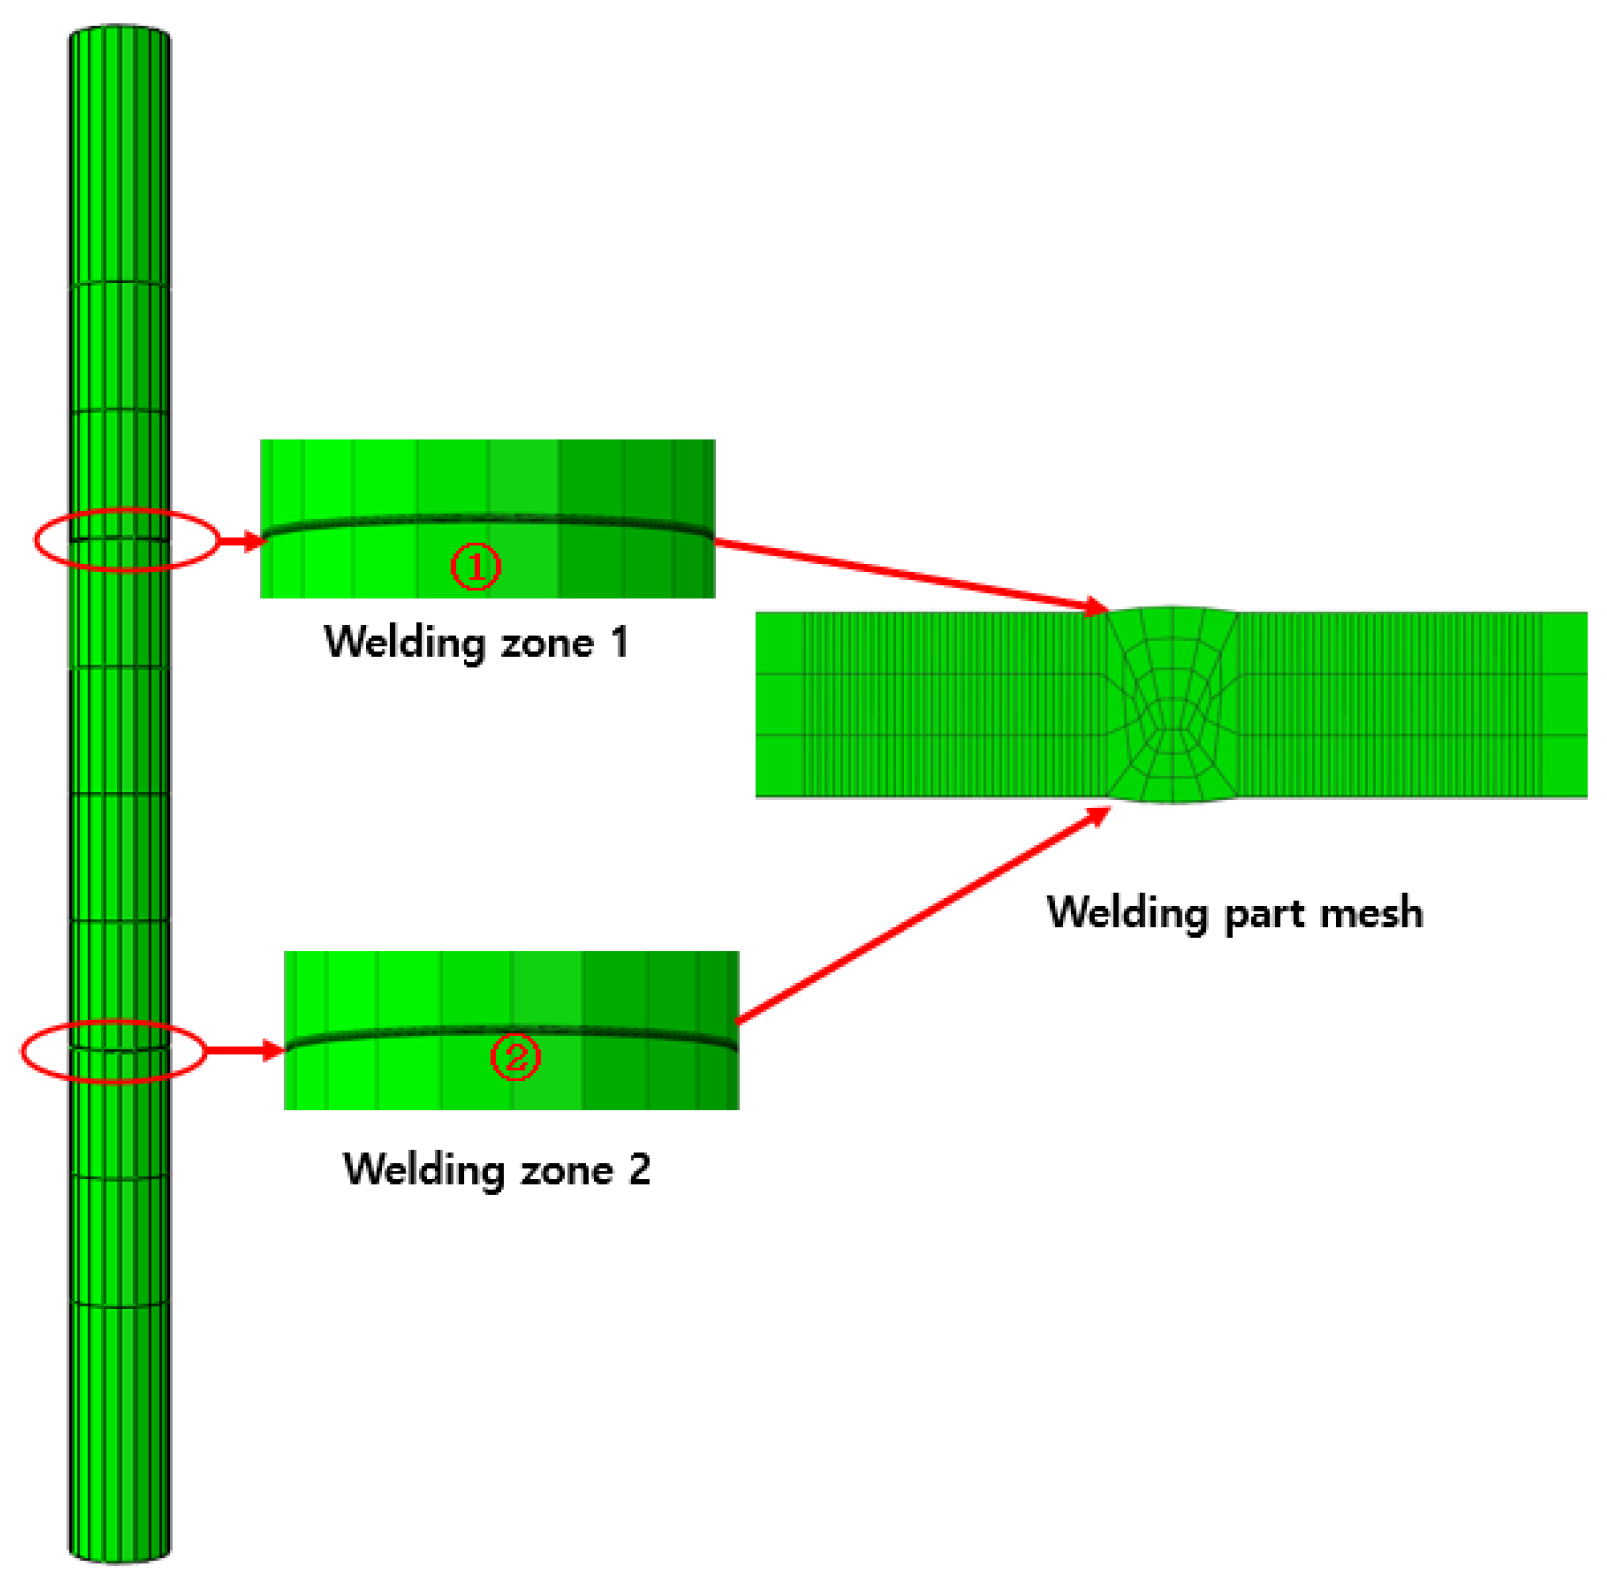
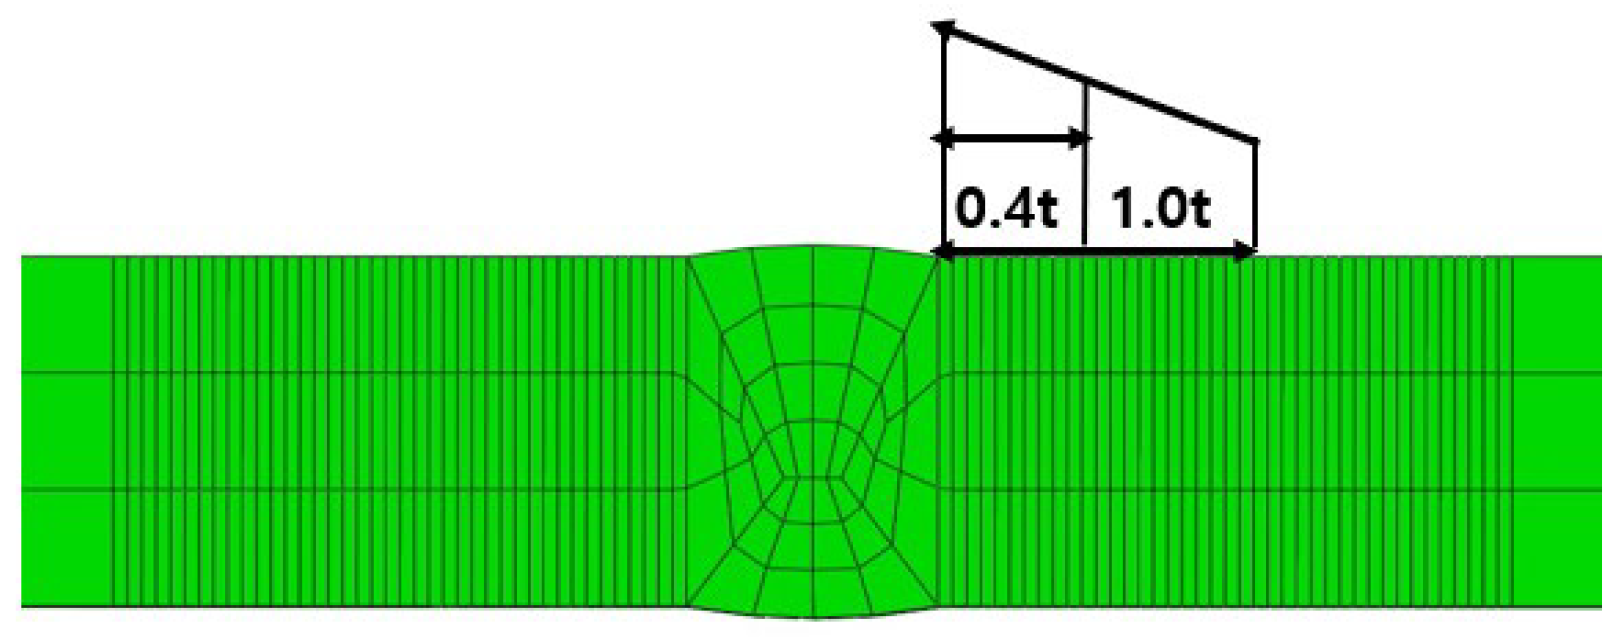
The welding of a super-long single pile is extremely complex. Multi-pass welding was required to finalize the required single pile. Figure 3 shows the welding sequence and its geometric characteristics. Figure 3a represents the whole image of the wind power system. The length of the monopipe, which was welded and assembled using 25 m steel pipes, was 75 m. The pipe was welded, at two places, by using the girth-welding method of welding. Figure 3b shows the size of the monopipe structure with different thicknesses of 60 mm and 80 mm. Figure 3b displays the dimensions of the welding joint. The 8-noded iso-parametric solid element was used in the finite element analysis. To accurately calculate the welding deformations and residual stresses, a fine mesh was used in the welding section, with the size of the element increasing gradually with the distance from the weld area. This fine mesh was used in the vicinity of the weld as it allowed the gradual changes in temperature and stress to be accurately captured. The mesh view of the component is shown in Figure 4.

3.2. 3D Non-Steady Heat Conduction FE Analysis

The non-steady heat finite element method was used to analyze the three-dimensional temperature distribution of the welded material. The non-steady heat FEM method, which relies on the Galerkin method, was employed. The three-dimensional heat conduction method for the thermal model was calculated by using the following basic differential equations [36].
ρ c T t = λ 2 T + Q
where T is the temperature (°C), c is the specific heat (cal/g/°C), λ is x, y, z direction of the heat conveying rate (cal/cm/sec/°C), t is time (sec), Q is the rate of moving heat generation per unit volume (cal/sec), and ρ is the density (g/ cm 3 ) . Using the Galerkin method and substituting boundary conditions, the above equation was expressed in the form of a three-dimensional heat conduction equation matrix as follows [36]:
k θ + c θ t = F
where [F] is the heat flow rate matrix, [c] is the heat capacity matrix, and [k] is the heat conduction matrix.
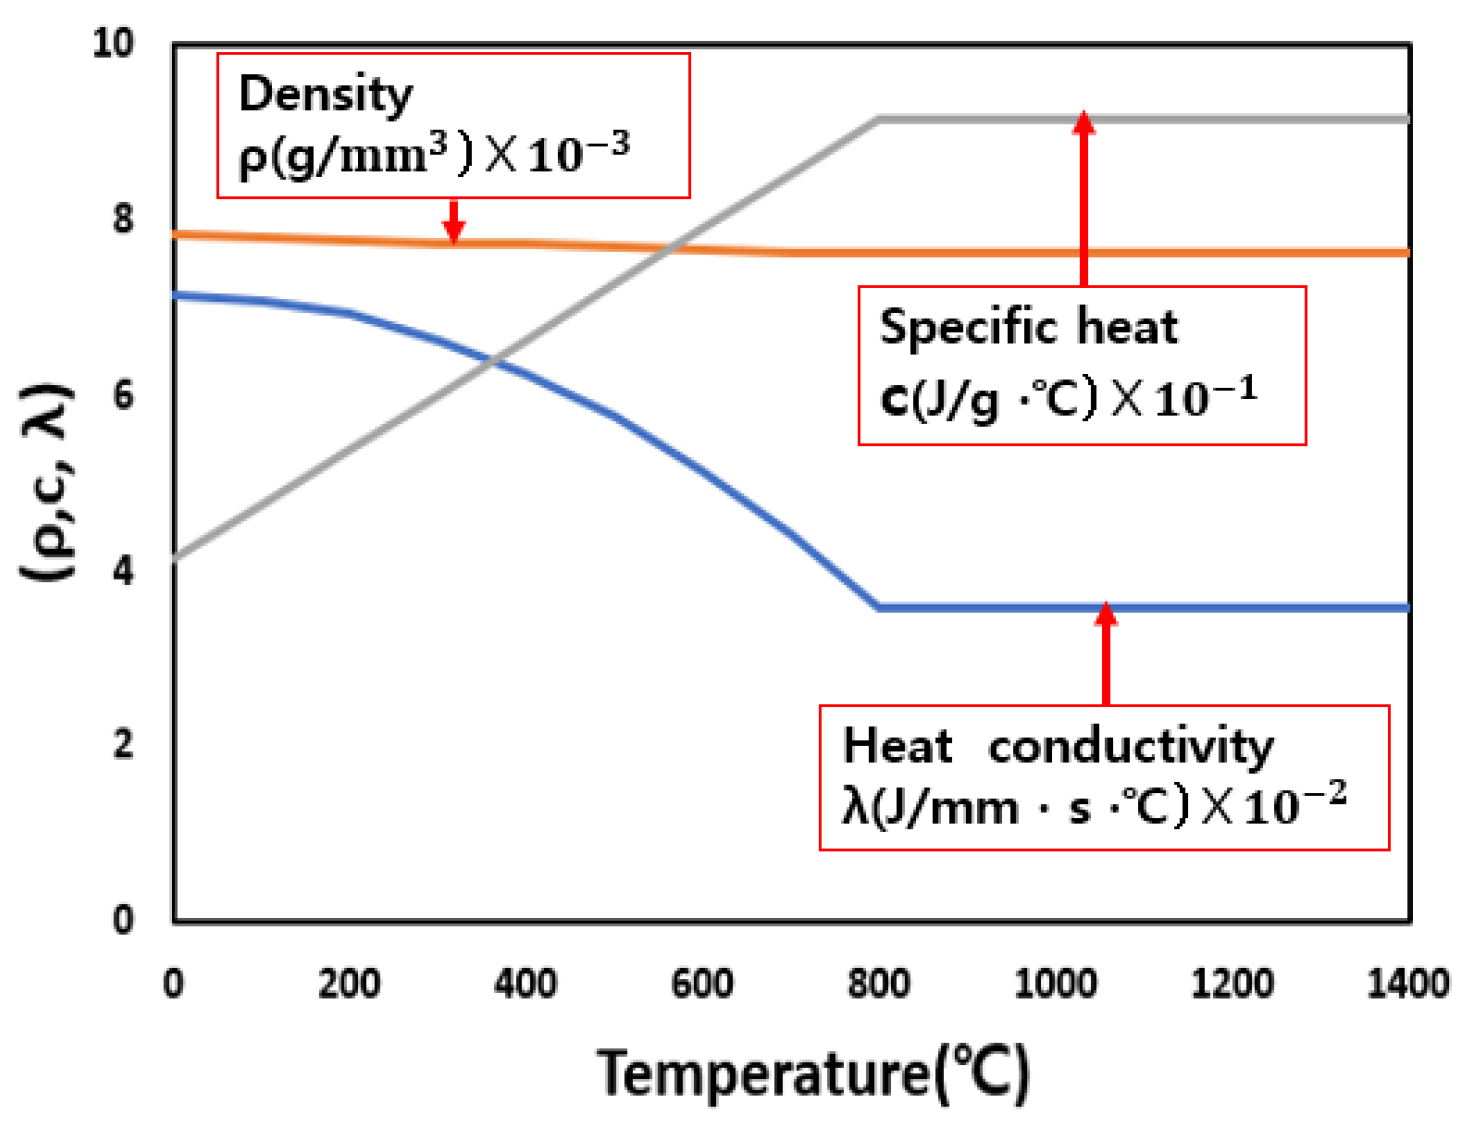
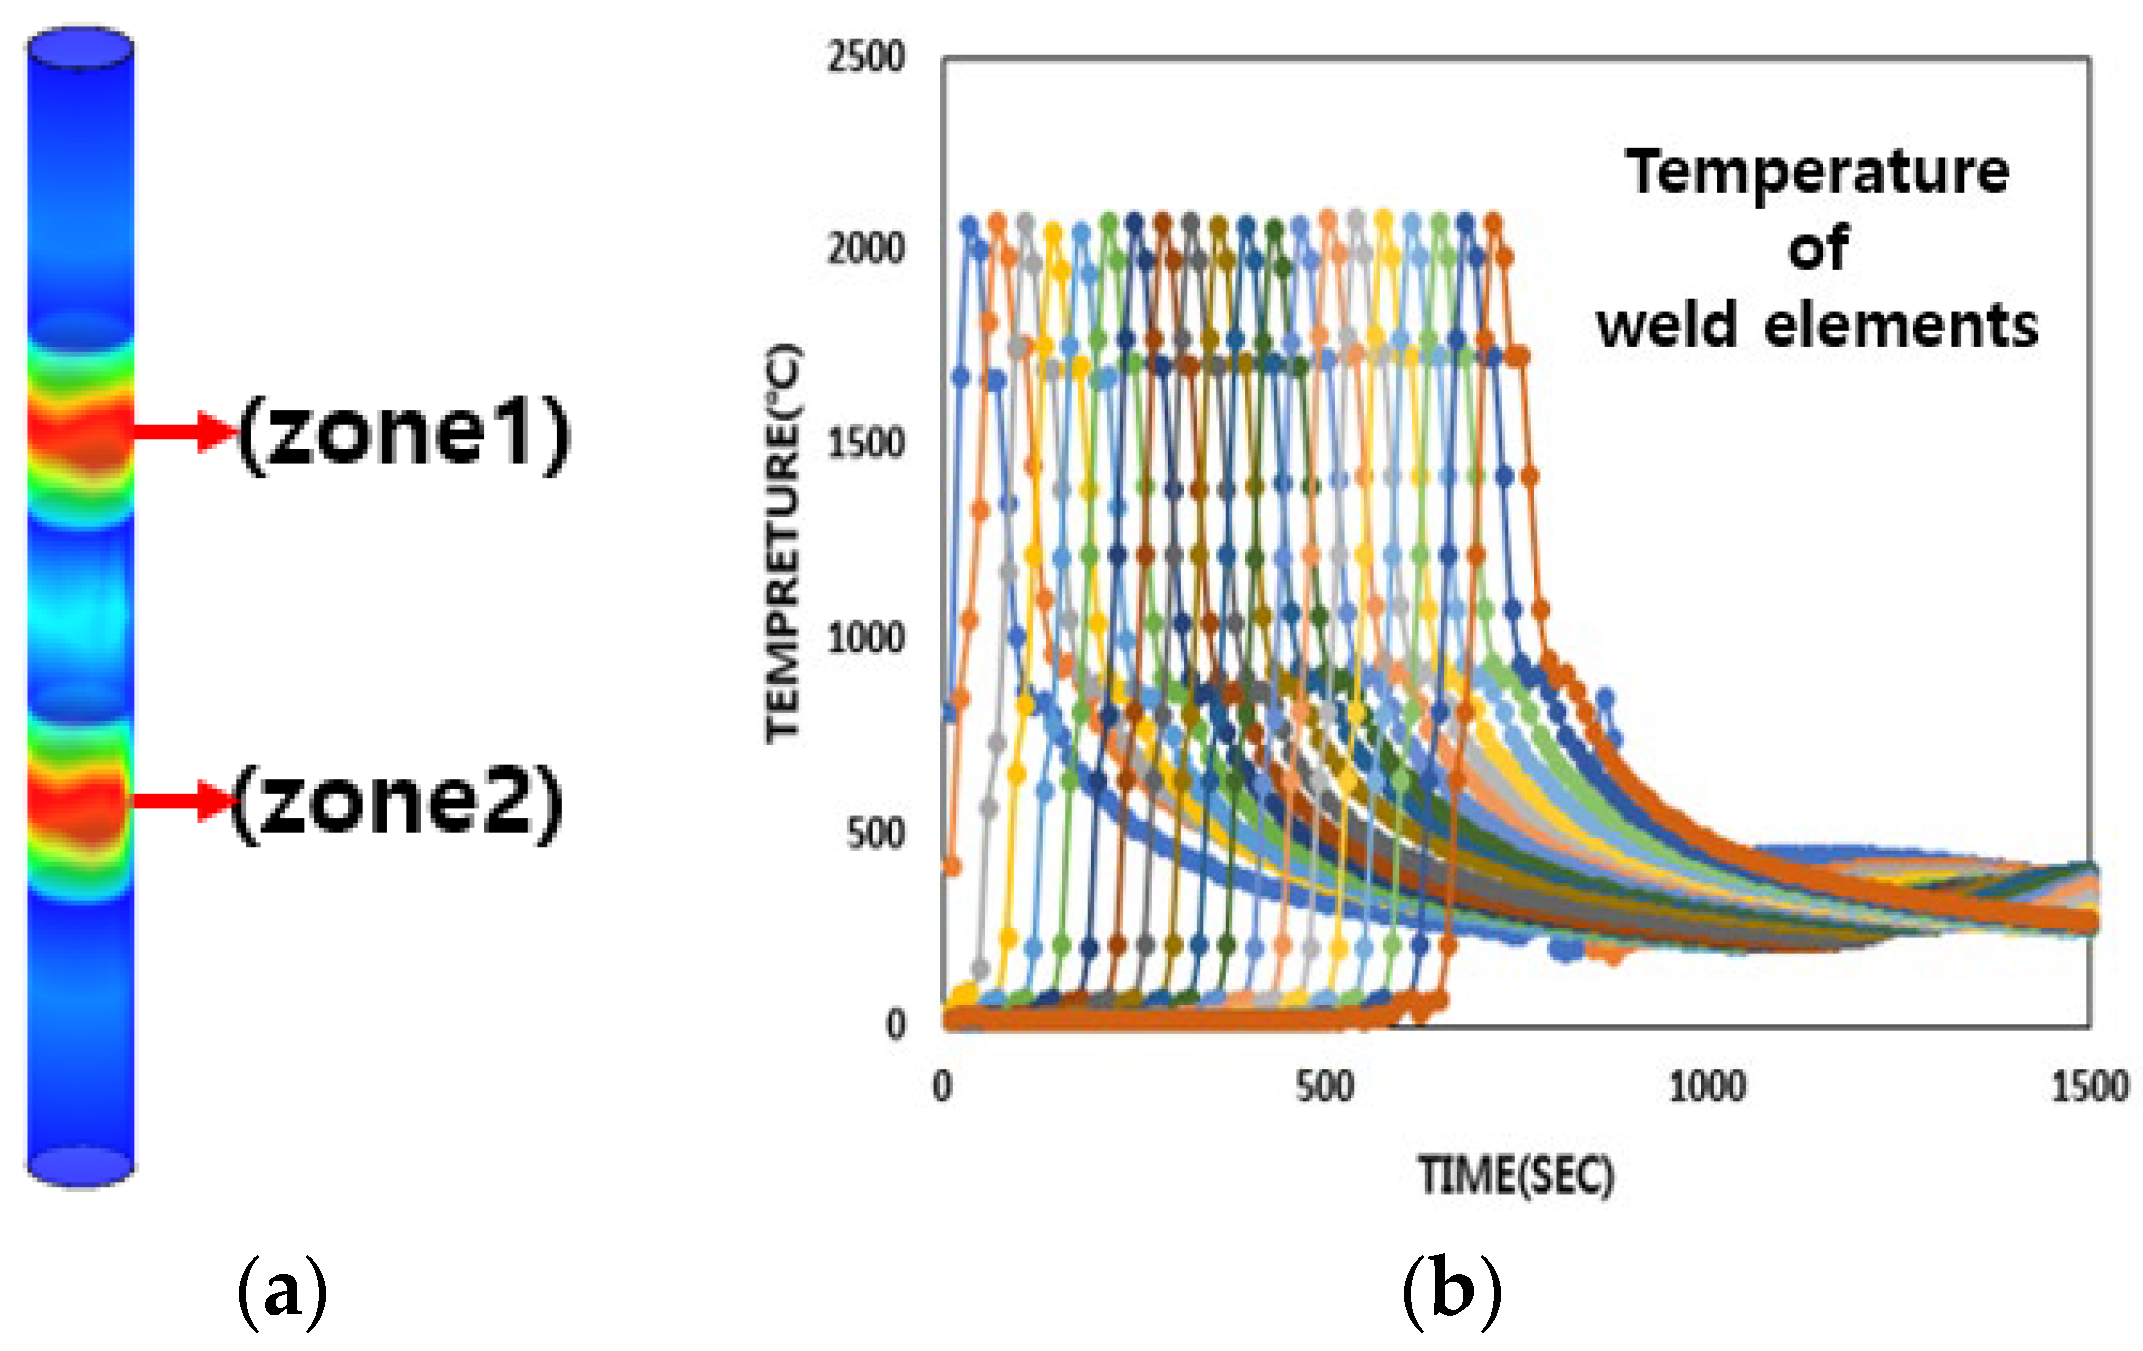
Temperature-dependent thermo-physical constants (density, heat conductivity, and specific heat) can be obtained from experiments and these physical constants change with temperature, as shown in Figure 5. Using the in-house built code, the welding of the structure could be simulated by using a moving welding arc, whereby the welding history heat for each time increment was obtained. Figure 6 is a visualization of the welding temperature and the temperature history graph. The curves in the temperature graph represent the thermal history of welding elements in zone 1 or zone 2 by FEM. The temperature history graph for both positions zone 1 and zone 2 are the same; the welding time is different for both zones.

3.3. 3D Thermal Elasto-Plastic FE Analysis

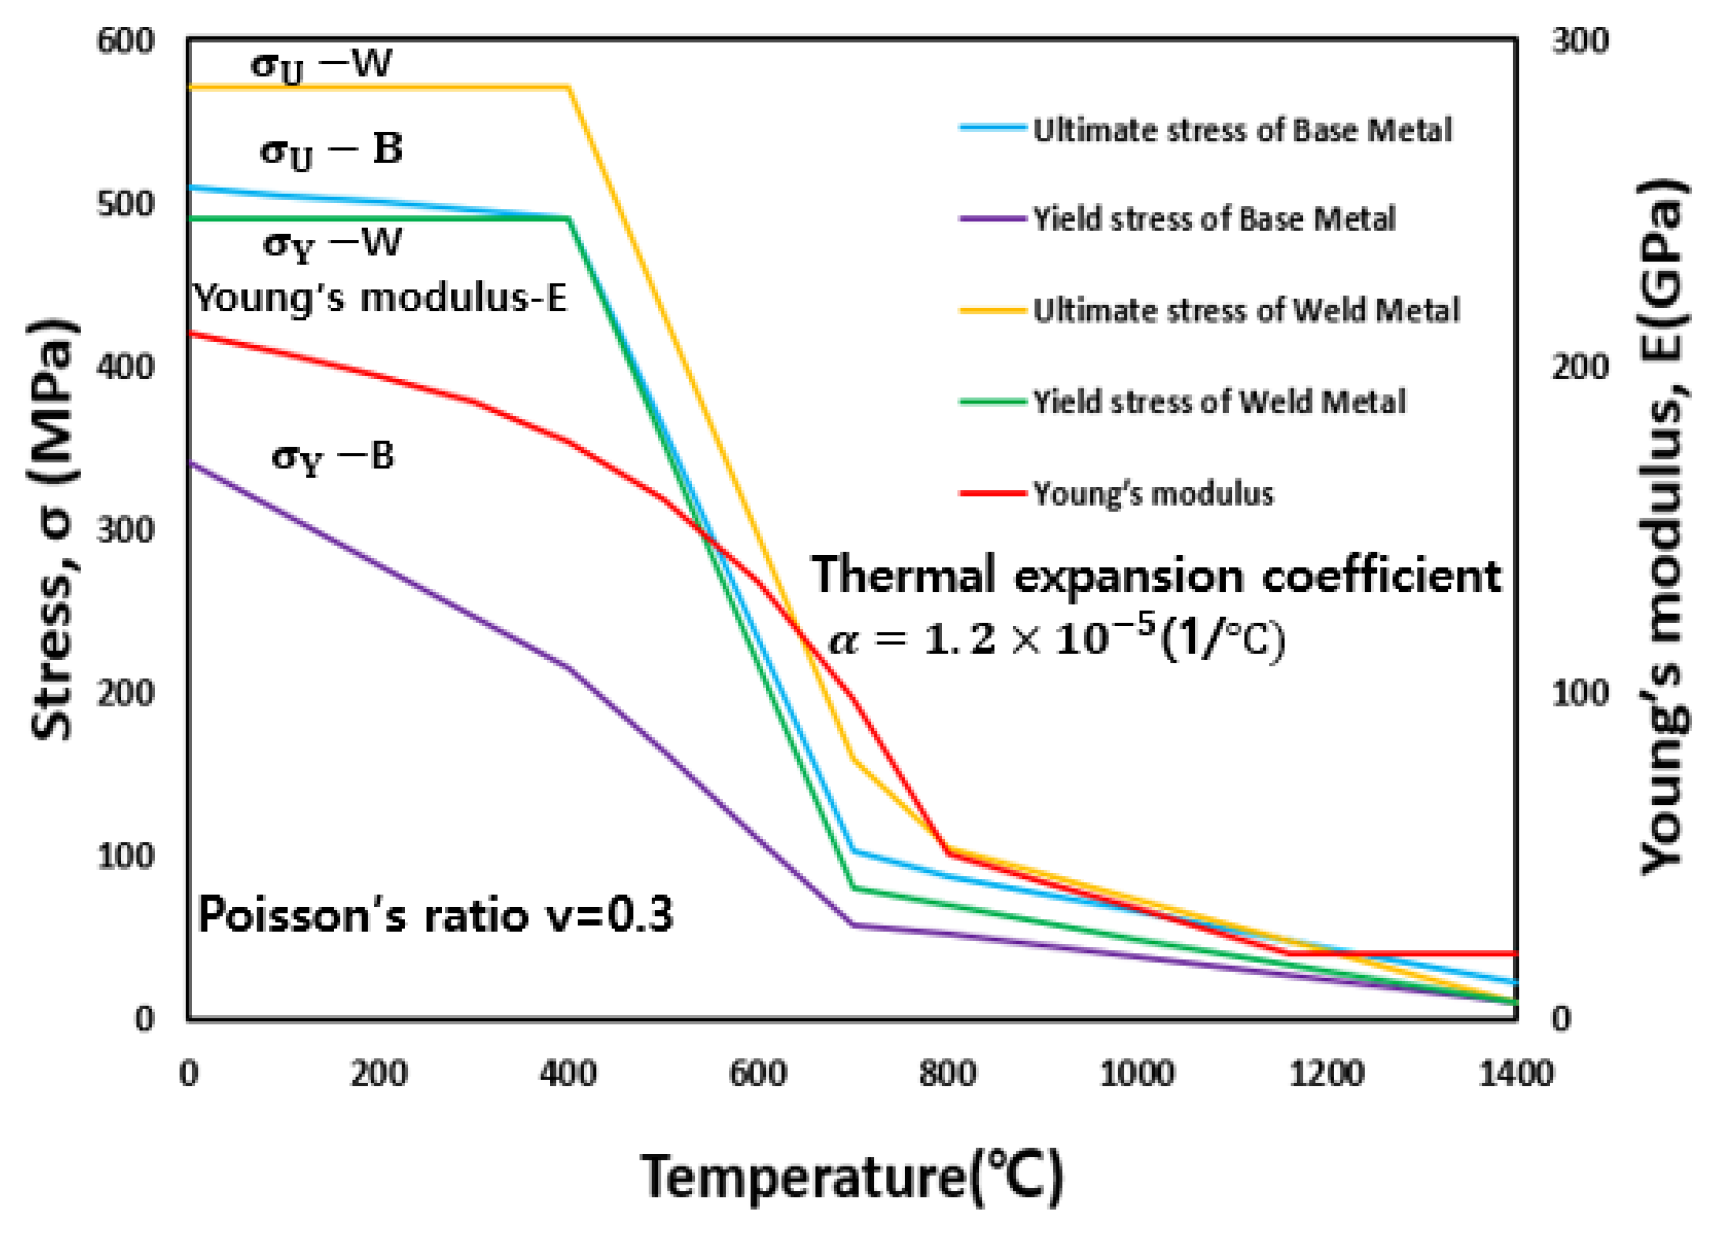
In 3D thermal elasto-plastic FEM analysis, the nonlinear theory of geometry and the nonlinear theory of material science are applied. The relations of the displacement–strain rate and the stress–strain rate is used in the nonlinear theory of geometry. In the nonlinear theory of materials science, the stress and deformation rates change when the temperature changes in the elastic and plastic domains [36,37,38,39]. Mechanical material properties can be obtained by using high-temperature tensile tests with temperature variations. Figure 7 shows variations of mechanical material properties (Young’s modulus, Poisson’s ratio thermal expansion coefficient, yield stress, ultimate stress) with temperature change [40]. Using the thermal history obtained in Section 3.2 and mechanical material characteristics in Figure 7, the residual stress and welding deformation of the welded structure could be calculated using the 3D thermal elasto-plastic FEM analysis method. Further reliability of the determination method was derived by experimental comparison [31,32,33,34].
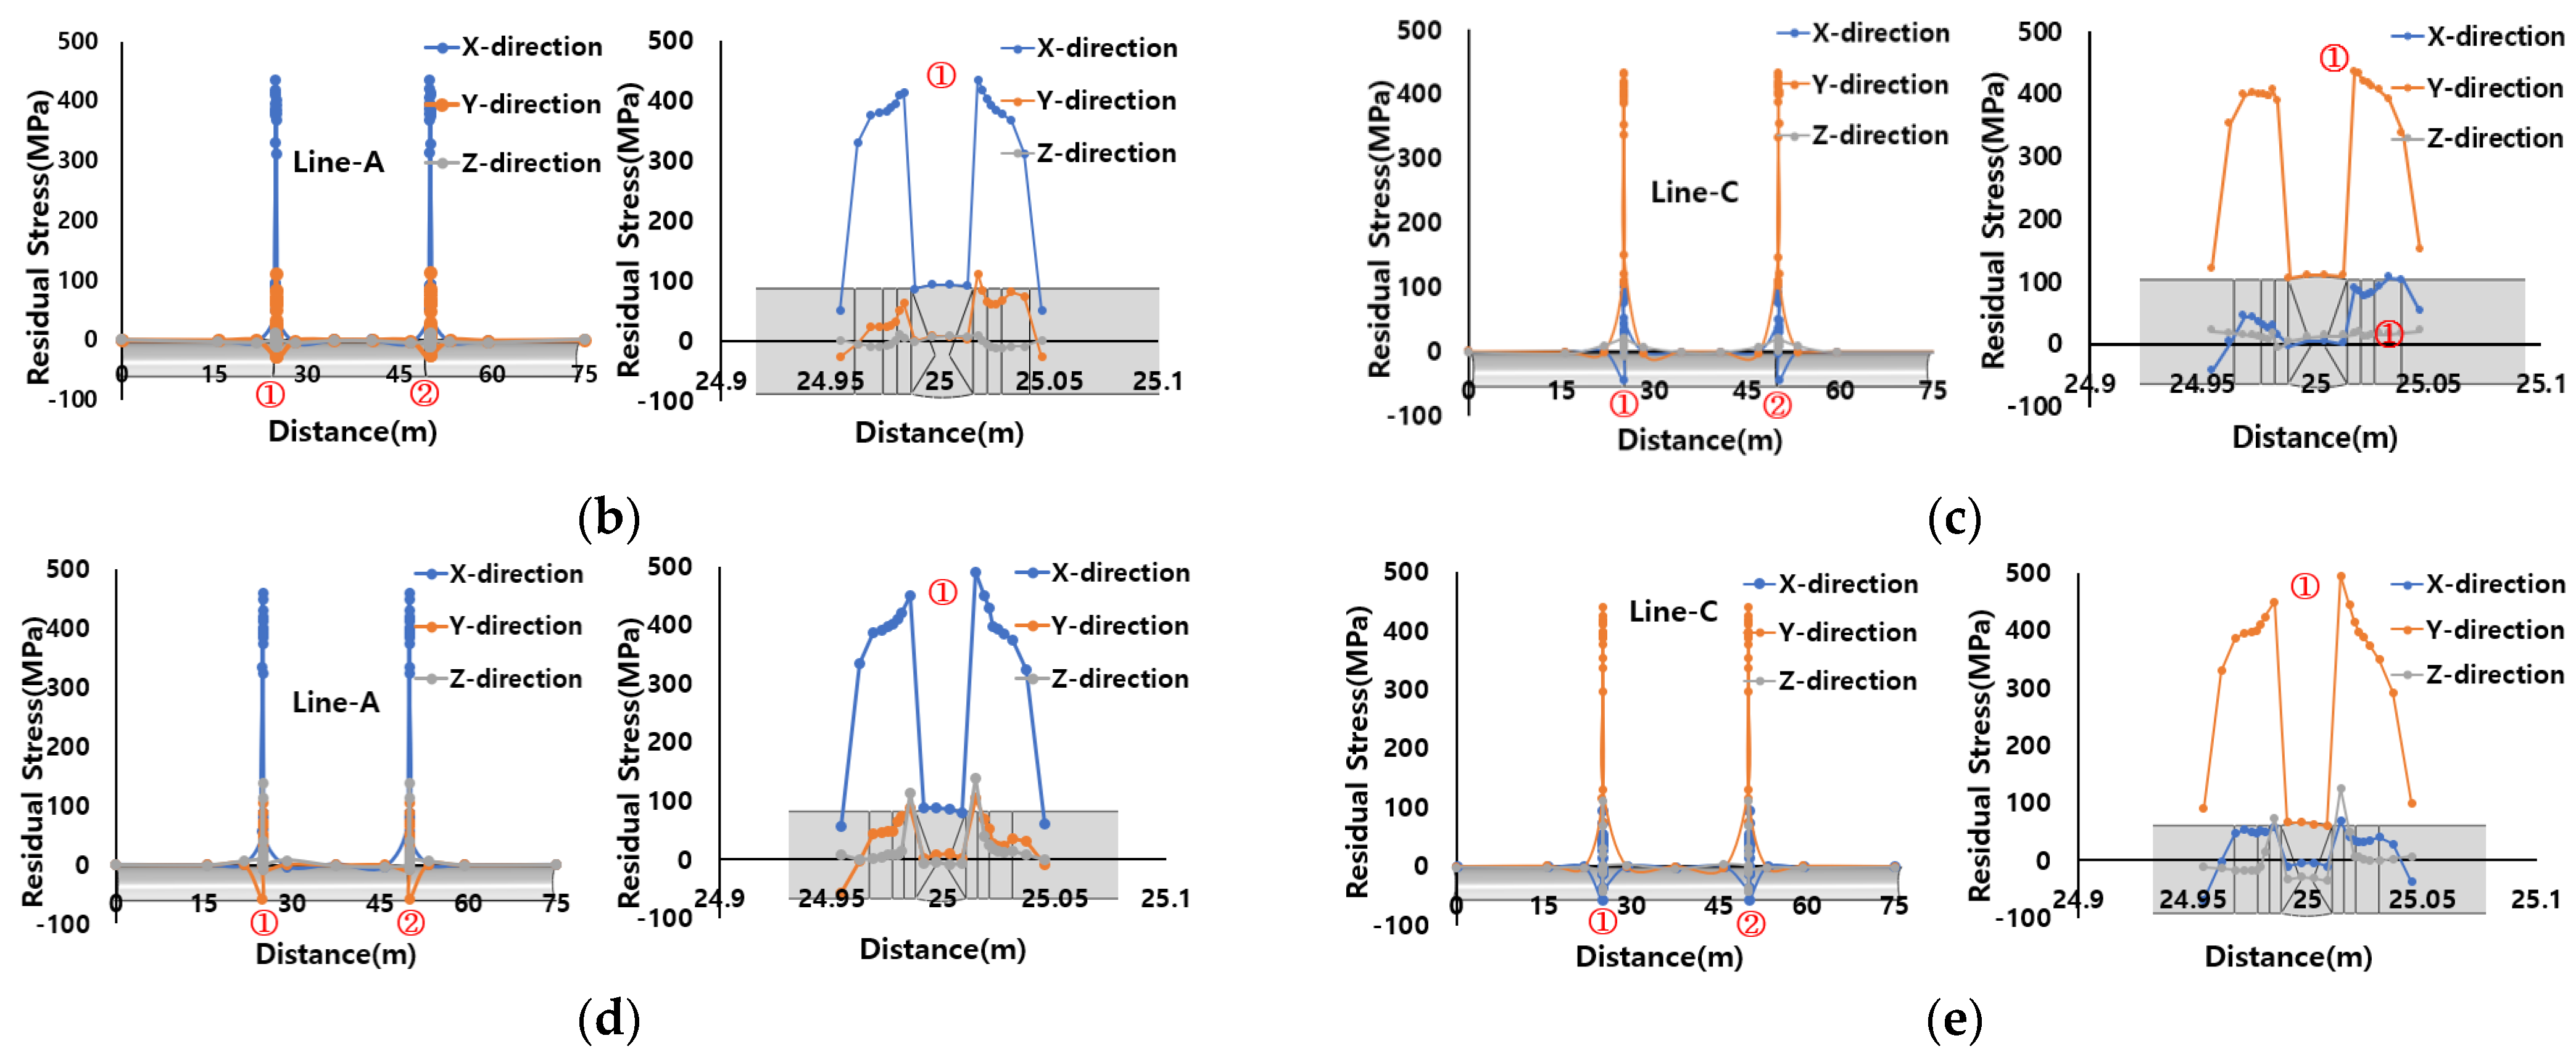
In Figure 8a, the residual stress distribution was analyzed by taking data at four lines denoted in red (A, B, C, D) in the monopile model after welding. Since Line A and Line B, Line C, and Line D are 180 degrees symmetrical, the results are basically the same; thus, the figure below shows the residual stresses of the monopile in circumferential, longitudinal, and transverse directions at lines A and C. In Figure 8b,d, we can see the residual stress distribution at Line A. The figure shows the overall stress distribution, whereas ① and ② show the residual stress at the different heat-affected parts, respectively. At Line A, the X-direction has the maximum value of residual stress of 435 MPa in a monopile with 60 mm thickness and 495 MPA in a monopile with 80 mm thickness. Meanwhile, in Figure 8c,e, we can see the residual stress distribution at Line C, where ① and ② in Figure 8c,e denote the position of welding zone 1 and zone 2. At Line C, the Y-direction has the maximum value of residual stress of 433 MPa in a monopile with 60 mm thickness and 490 MPA in a monopile with 80 mm thickness.

4. Fatigue Life Calculation Procedure

4.1. Hot Spot Stress Method

The (HSS) hot spot stress method is a method that is applied to many types of welded structures. The hot spot stress method is analyzed by linear extrapolation as shown in Figure 9. The (HSS) hot spot stress method was used to analyze monopile structures with reference to the International Institute of Welding (IIW) design recommendations. The IIW design recommendations employ fine mesh or coarse mesh types, depending on which structure is to be analyzed, by using linear or quadratic extrapolation. In the finite element analysis, the size of the mesh has an impact on the structure analysis. Therefore, it is advantageous to use a very fine mesh for the heat-affected zone in the analysis of the model since, according to the IIW design recommendation, the calculation method of hot spot stress can be obtained by selecting the type and mesh state.
According to the IIW design recommendation, Equations (10) and (11) could be obtained for calculating the S-N curve. Before the N 10 7 cycle, m is the negative inverse slope equal to 3 in Equation (11), N is the number of cycles, C is a constant, and Δ σ is the stress range. From Figure 3, we could know the type of welding, while the corresponding S-N curve (FAT90) could be found in the IIW design recommendation. Simultaneously, the corresponding S-N curve (D) could also be found in the DNV-GL design standard. It can be compared with the S-N data of fatigue calculation below [41,42].
σ h s = 1.67 σ 0.4 t 0.67 σ 1.0 t
N = C Δ σ m

4.2. 3D Fatigue FE Analysis

The effects of residual stress and welding deformation on fatigue life and crack initiation positions of welded structures could be determined. Therefore, the residual stress and welding deformation were considered in the fatigue analysis.
Continuum damage mechanics (CDM) was used to simulate fatigue damage. CDM combines damage evolution with large deformation theory. The initiation and propagation of microcracks were described under the condition of material damage. A fully coupled method was used to solve the initiation and propagation of weld fatigue cracks. Meanwhile, the fatigue damage method allowed the fatigue life of the structure to be predicted [28,29,30].
Kaminski proved the development of a 1D fatigue damage model under cyclic loading. The following equation details the relationship between 1D fatigue damage and mean stress ( σ m ) , maximum stress ( σ Max ) , fatigue limit for full reversed loading ( σ 1 ) , and number of cycle N.
δ D = 1 1 D β + 1 α σ M , σ ¯ σ Max σ m M σ m 1 D   β δ N
with
M σ m = M 0 1 b 2 σ m σ u , m 0 = q 2 C 1 1 / 2 q
α σ Max , σ m = 1 a σ Max σ l σ m σ u σ Max ;   σ l σ m = σ 1   1 b 1 σ m σ u  
where σ u is ultimate stress at static rupture and M σ m and α σ Max , σ m denote the stress limit of fatigue. M 0 ,   β ,   a ,   b 1 ,   b 2 are material coefficients obtained from the S-N curve.
Equation (15) was obtained under constant amplitude loading by integrating Equation (14), until crack initiation (D = 1).
δ D = 1 1 D β + 1 α σ M , σ m A II M 1 D β δ N  
The whole procedure for calculating fatigue life and crack initiation is shown in this flow chart, Figure 10.

4.3. Boundary Condition of the Monopile Structure

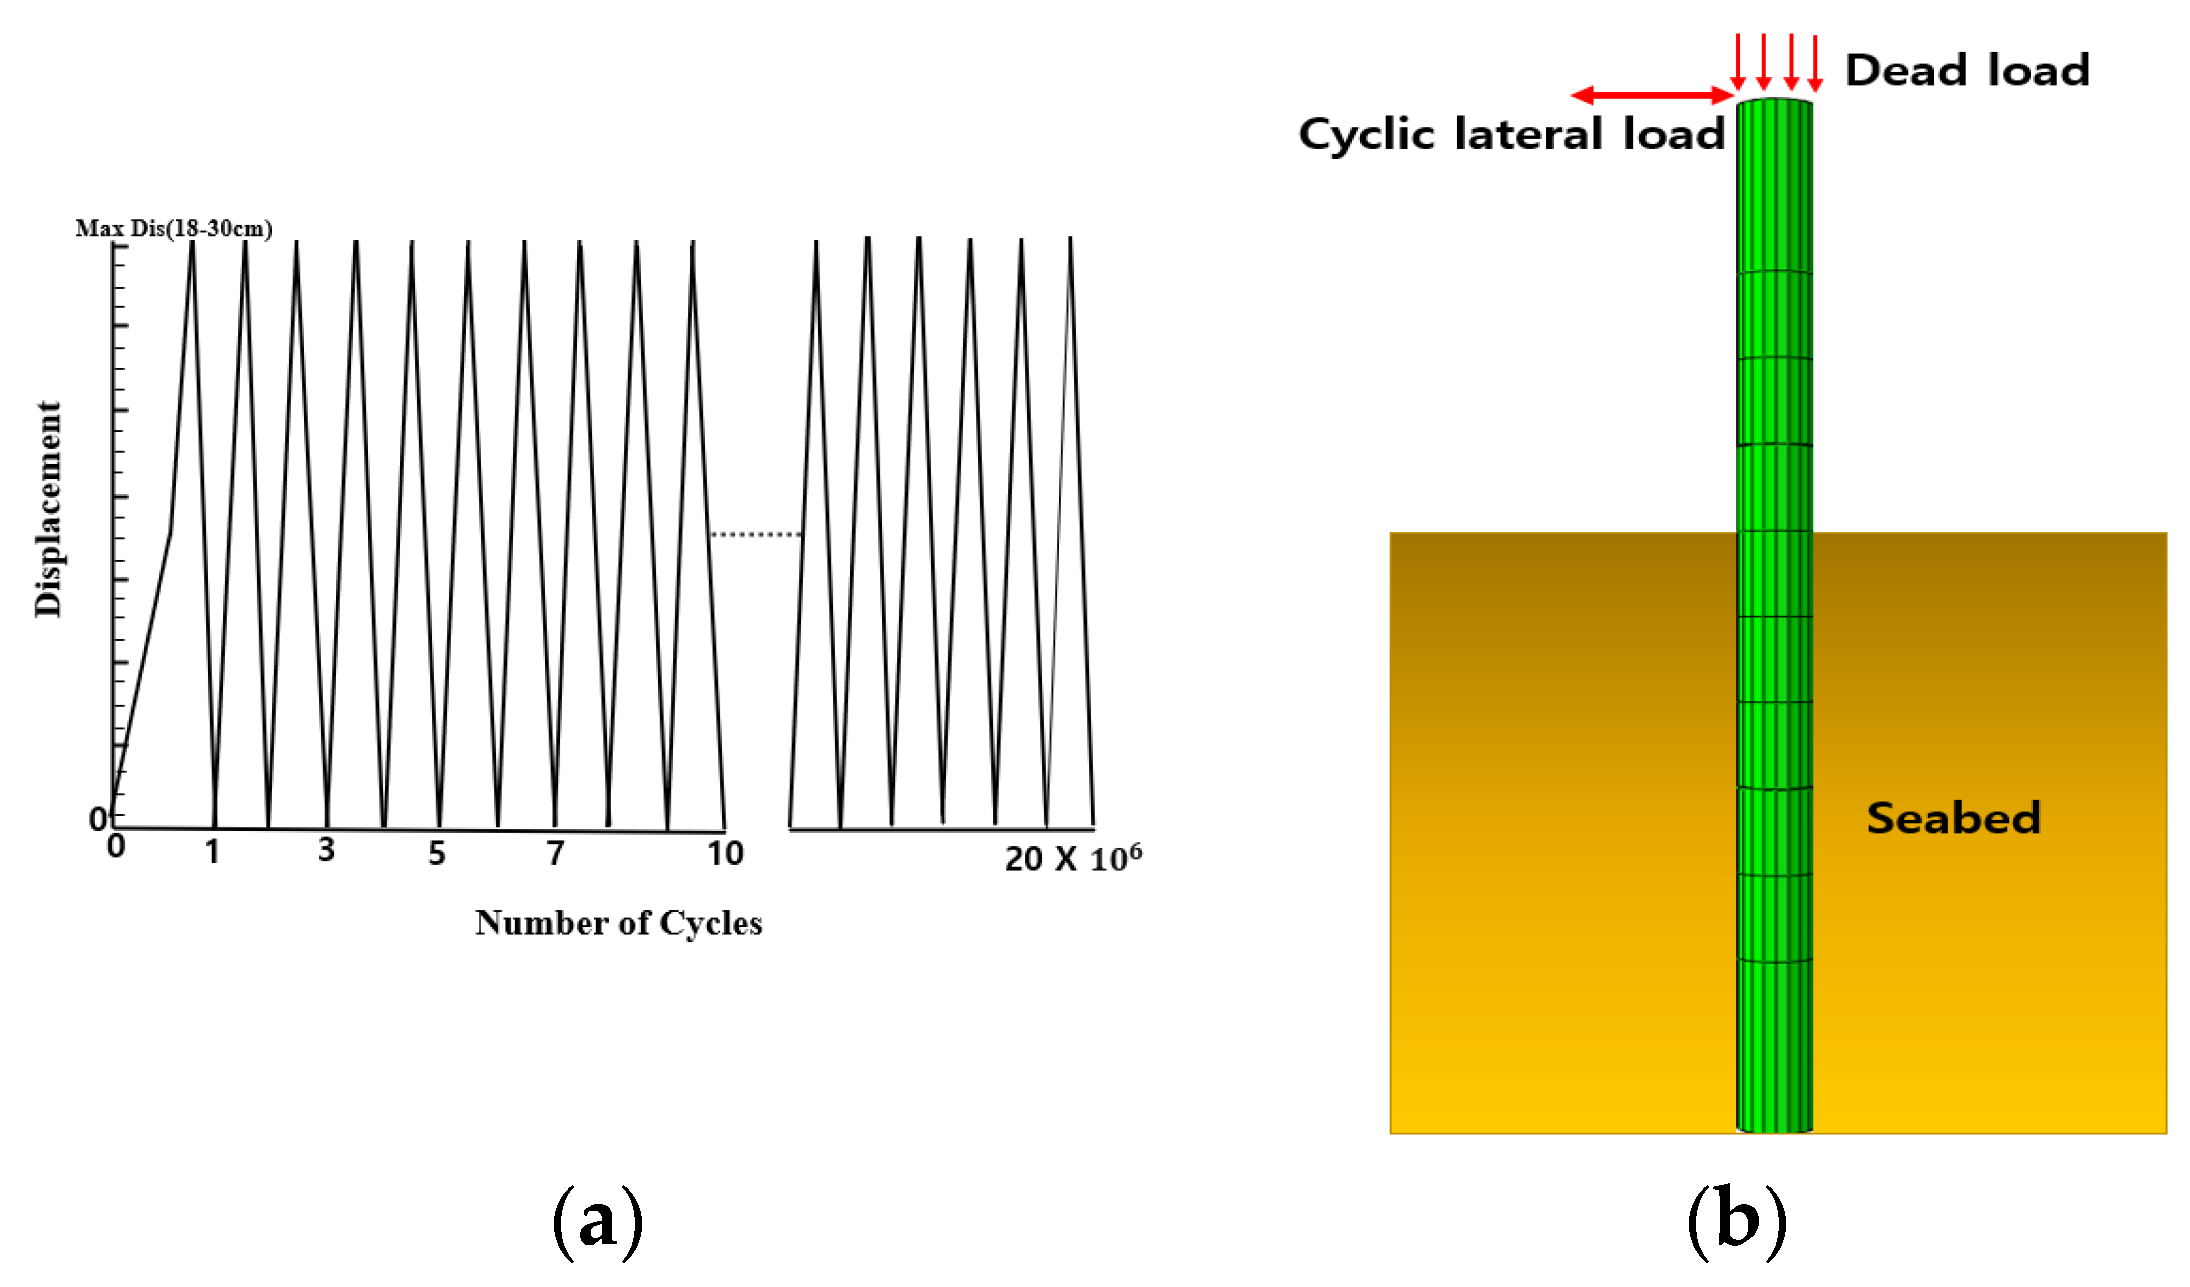
In the fatigue finite element analysis calculations, a high fatigue analysis was performed for the monopile structure. Figure 11a shows the FEA fatigue analysis under continuous cyclic loading. In Figure 11b, the stress analysis of the structure was performed by applying a horizontal and vertical load. This was in addition to boundary conditions, which were also applied when the lower part of the monopile was fixed in all directions. The monopile experienced a certain amount of constant dead load in the vertical direction. The monopile in the horizontal direction differed in that it was subjected to periodic repeated live loads. Wind turbine sizes of 3.6 MW and 5 MW in Ref. [43] were utilized for calculating fatigue life. According to Table 3, wind turbines with a turbine size of 3.6 MW and 5 MW offshore wind turbines could sustain vertical loads of 4.79 MN and 7.64 MN, respectively.

5. Results and Discussion

5.1. Crack Initiation

Fatigue is the most dominant type of failure in offshore structures. The fatigue crack has two parts, namely crack initiation and crack propagation [44,45,46]. In the 3D fatigue analysis, the crack was defined as a region of completely damaged material. The relation between the damage variables and the number of cycles to failure was defined in the equation as follows:
D = 1 1 N N f 1 / 1 α 1 / 1 + β  
N f = 1 1 + β 1 α A I I M β  
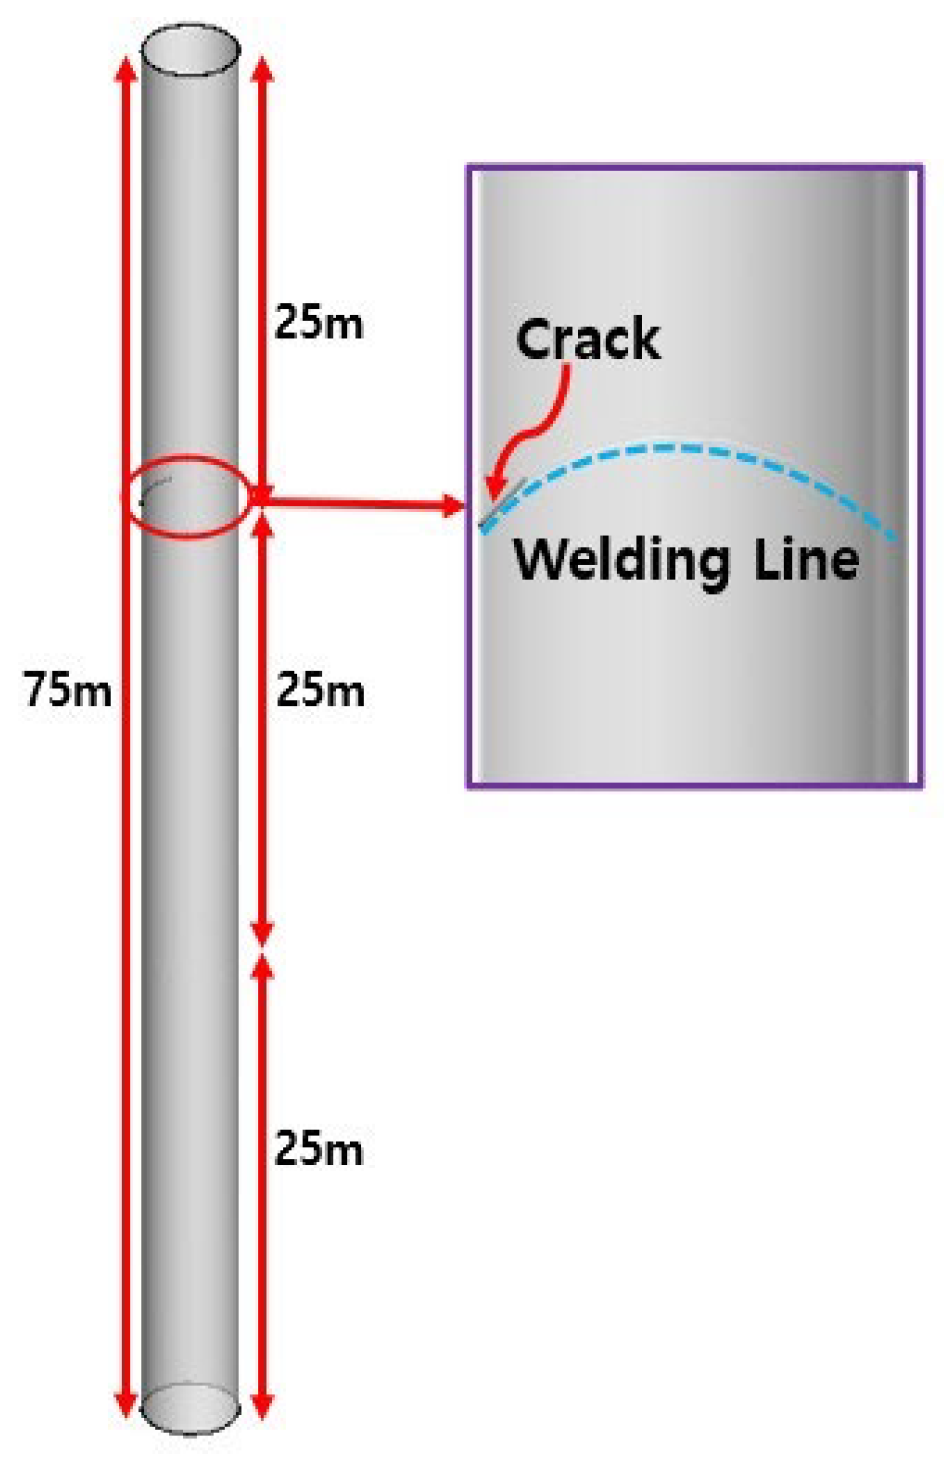
where N f is the number of cycles to failure. The residual stresses and welding deformation were used as initial data, along with cyclic loading, to calculate the fatigue life and crack initiation. Figure 12 shows the initial crack position of the monopile structure. The initial crack was at the welded part of the weld line ①. The plastic stress kept accumulating until a specific element crack occurred.

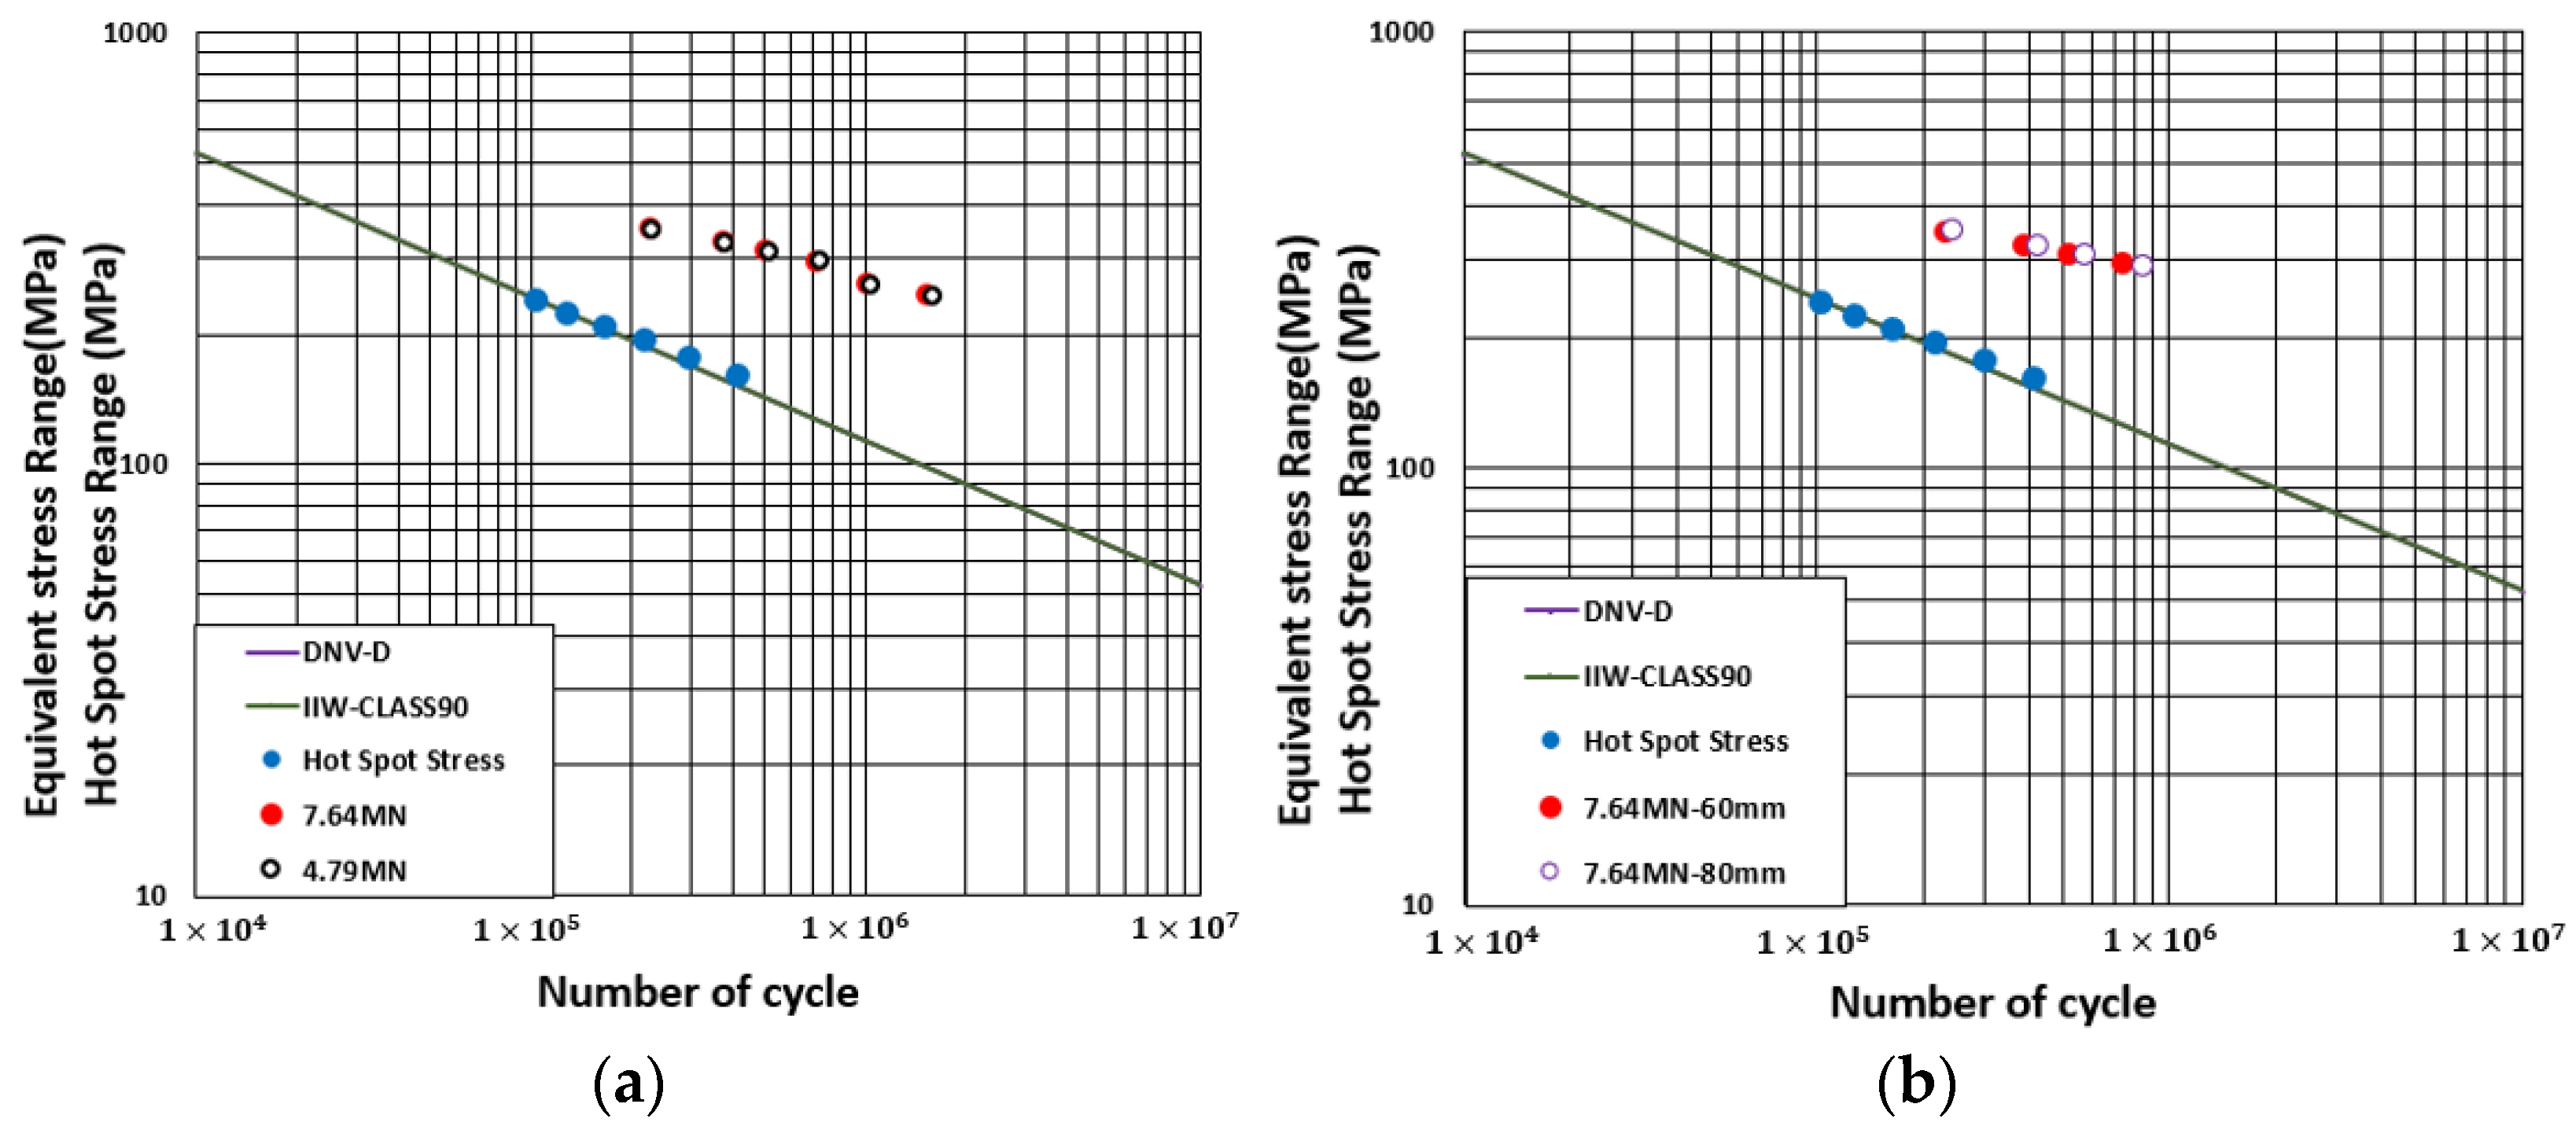
5.2. Comparison of Fatigue FEA Result and IIW DNV Standard

To verify the validity of the 3D fatigue FEA, we performed a comparison between the experiments and the analysis. A comparison of the fatigue life of a simple girth-welding model and the results of the analysis further confirmed the reliability of the 3D fatigue FEA. Thus, it was confirmed that 3D fatigue FEA can be used to analyze large and complex structures, i.e., those that are difficult to experiment on, which can in turn assist in analyzing the safety of these structures prior to installation [30]. Welding design standards and recommendations are generally used for comparing the analysis, as well as experimental results. The IIW design recommendation S-N curve (FAT90) and the DNV-GL design standard S-N curve (D) in Figure 13a,b have the same values. In the IIW recommendation and the DNV standard, the S-N curve is found according to the type of weld; however, the location of the crack initiation is not studied. In [25,31], fatigue FE results were compared with the HSS method, the DNV GL, and the IIW recommendation, which confirmed that the fatigue FE method was a more reliable method to calculate fatigue life and crack initiation than HSS. Furthermore, the 3D fatigue FE analysis results and the experimental results were the same, which confirmed that our method was quite a reliable method to calculate fatigue life. In Figure 13a, the effect of loads on fatigue life at a higher equivalent stress range was found to be about 1.8%, whereas the fatigue life at a lower equivalent stress range increased by about 4.6% for both 7.64 MN and 4.79 MN load types. From the S-N curve in Figure 13b, we found the fatigue life of monopile structures with thicknesses of 60 mm and 80 mm with the same equivalent stress range was not the same. The higher equivalent stress range fatigue life increasing ratio was 6.4%, while the lower equivalent stress range fatigue life increasing ratio was 15%. As the equivalent stress range decreased, taking into consideration the effect of load and thickness, the fatigue life increased.

6. Conclusions

In this study, the weld joints of the monopile structure were simulated by FEM welding analysis. Additionally, the welding residual stresses and deformations produced by the welding heat on the structure were considered in the 3D fatigue FEM analysis. The fatigue calculations, which took into consideration continuum damage mechanics (CDM) theory, were also carried out, such that the fatigue life and crack initiation of the structure were obtained.
The following conclusions can be drawn from this study.
  • The fatigue life of the monopile structure was analyzed considering the initial state of the weld (residual stress and welding deformation).
  • Fatigue FE results were compared with the HSS method and the DNV GL and IIW recommendations, all of which confirmed that the fatigue FE method was a more reliable method of calculating fatigue life and crack initiation than HSS.
  • The effect of vertical loads on fatigue life at a higher stress range was about 1.8%, whereas the effect of vertical loads on the fatigue life at a lower stress range increased by about 4.6% for both 7.64 MN and 4.79 MN vertical load types.
  • The effect of the thickness of the monopile on fatigue life at a higher stress range was about 6.4%, whereas the effect of vertical loads on the fatigue life at a lower stress range significantly increased by about 15%. Therefore, the effect of thickness was more dominant in the fatigue life of monopile structures than the vertical loading.
  • Fatigue FE analysis method is an effective method for calculating the fatigue life.

Author Contributions

Conceptualization, Z.-M.W., K.-H.C., S.M. and M.H.; software, Z.-M.W., K.-H.C. and S.M.; formal analysis, Z.-M.W. and S.M.; investigation, K.-H.C.; writing—original draft preparation, Z.-M.W., K.-H.C. and S.M.; writing—review and editing, Z.-M.W., K.-H.C., S.M. and M.H.; visualization, K.-H.C.; supervision, K.-H.C.; project administration, K.-H.C.; funding acquisition, K.-H.C. All authors have read and agreed to the published version of the manuscript.

Funding

This research was supported by the Basic Science Research Program through the National Research Foundation of Korea (NRF) funded by the Ministry of Education (NRF-2021R111A204584511). This research was also supported by Chung Ang University research grants in 2018.

Data Availability Statement

Not applicable.

Acknowledgments

The authors would like to acknowledge the support of the Ministry of Education and Chung Ang University.

Conflicts of Interest

The authors declare no conflict of interest.

References

  1. Lee, M.J.; Yun, J.S.; Choo, Y.W. Effect of Lateral Load-Moment Combination on p-y Curves of Large Diameter Monopile for Offshore Wind Turbine: Centrifuge Model Tests. J. Korean Geotech. Soc. 2020, 2, 29–42. [Google Scholar]
  2. Nah, D.B.; Shin, H.S.; Na, D.J. Offshore Wind Power, Review. J. Energy Eng. 2011, 2, 143–153. [Google Scholar] [CrossRef]
  3. Lee, D.Y.; Im, S.W. Technical Aspects for Development of Offshore Wind Power Substructure. Korean Soc. Steel Constr. 2011, 10, 12–16. [Google Scholar]
  4. Bang, J.-S.; Han, J.-W.; Gil, K. Development of Programs to Analyze Mechanical Load Data of Wind Turbine Generator Systems and Case Studies on Simulation Data. Trans. Korean Soc. Mech. Eng. B 2013, 37, 789–798. [Google Scholar] [CrossRef]
  5. Jang, H.S.; Kim, H.S.; Eum, H.J.; Kim, M.E. Behavior Analysis by Verticality Error of Monopile Foundation for 5 MW Offshore Wind Turbine. J. Korean Soc. Civ. Eng. 2012, 3, 61–68. [Google Scholar]
  6. Yoon, G.L.; Kim, K.J.; Kim, H.Y. Reliability Analysis of Monopile for a Offshore Wind Turbine Using Response Surface Method. J. Korean Soc. Civ. Eng. 2013, 33, 2401–2409. [Google Scholar]
  7. Yoon, G.L.; Kim, H.Y. Case Study on Reliability Analysis of Offshore Wind Turbine Foundation. J. Korean Geo-Environ. Soc. 2012, 13, 91–98. [Google Scholar]
  8. Kim, S.R.; Lee, J.W.; Kim, B.K.; Lee, J.S. Damage Estimation Method for Monopile Support Structure of Offshore Wind Turbine. Korean Soc. Noise Vib. Eng. 2012, 22, 667–675. [Google Scholar] [CrossRef]
  9. Jang, H.S.; Kim, H.S.; Kwak, Y.M.; Park, J.H. Analysis of Lateral Behavior of Offshore Wind Turbine Monopile Foundation in Sandy Soil. J. Korean Soc. Steel Constr. 2013, 25, 421–430. [Google Scholar]
  10. Kim, B.-C.; Jeong, S.-S.; Ko, J.-Y. Proposed Reduction Factor of Cyclic p-y Curves for Drilled Shafts in Weathered Soil. J. Korean Geotech. Soc. 2015, 31, 47–63. [Google Scholar] [CrossRef]
  11. Romali, B.; Ali, M. Fatigue damage analysis of offshore wind turbine monopile weldments. Procedia Struct. Integr. 2019, 17, 643–650. [Google Scholar]
  12. Anais, J.; Jeferson, O.; Ali, M.; Foroogh, H.; Joe, K.; Filippo, B. Residual stress measurements in offshore wind monopile weldments using neutron diffraction technique and contour method. Theor. Appl. Fract. Mech. 2018, 96, 418–427. [Google Scholar]
  13. Khajeian, A.; Mahmoudi, A.; Mehmanparast, A. Shot peening effects on residual stresses redistribution of offshore wind monopile multi-pass weldments. Mar. Struct. 2019, 66, 106–120. [Google Scholar] [CrossRef]
  14. Ali, M.; Feargal, B.; Isaac, T. Fatigue crack growth rates for offshore wind monopile weldments in air and seawater: SLIC inter-laboratory test results. Mater. Des. 2017, 114, 494–504. [Google Scholar]
  15. Anais, J.; Ali, M. Crack growth direction effects on corrosion-fatigue behaviour of offshore wind turbine steel weldments. Mar. Struct. 2021, 75, 10288. [Google Scholar]
  16. Mathieu, B.; Ali, M.; Jarryd, B.; Mahmood, S. New shape function solutions for fracture mechanics analysis of offshore wind turbine monopile foundations. Ocean Eng. 2018, 160, 264–275. [Google Scholar]
  17. Abdulhakim, A.S.; Ali, M.; Phil, H.; Athanasios, K. Comparative study between S-N and fracture mechanics approach on reliability assessment of offshore wind turbine jacket foundations. Reliab. Eng. Syst. Saf. 2021, 215, 107383. [Google Scholar]
  18. Joey, V.; Claus, K.; John, D.S.; Gianluca, Z. Fatigue reliability of large monopiles for offshore wind turbines. Int. J. Fatigue 2020, 134, 10548. [Google Scholar]
  19. Joey, V.; Erin, E.B. Design and fatigue analysis of monopile foundations to support the DTU 10 MW offshore wind turbine. Energy Procedia 2017, 137, 3–13. [Google Scholar]
  20. Ko, Y.-Y. A simplified structural model for monopile-supported offshore wind turbines with tapered towers. Renew. Energy 2020, 156, 777–790. [Google Scholar] [CrossRef]
  21. Wang, J.Y.; Sun, G.D.; Chen, G.S.; Yang, X. Finite element analyses of improved lateral performance of monopile when com-bined with bucket foundation for offshore wind turbines. Appl. Ocean Res. 2021, 111, 102647. [Google Scholar] [CrossRef]
  22. Chen, T.; Wang, X.; Gu, X.; Zhao, Q.; Yuan, G.; Liu, J. Axial compression tests of grouted connections in jacket and monopile offshore wind turbine structures. Eng. Struct. 2019, 196, 109330. [Google Scholar] [CrossRef]
  23. Chen, T.; Wang, X.; Yuan, G.; Liu, J. Fatigue bending test on grouted connections for monopile offshore wind turbines. Mar. Struct. 2018, 60, 52–71. [Google Scholar] [CrossRef]
  24. ASTM E606/E606M; Standard Test Method for Strain-Controlled Fatigue Testing. ASTM: West Conshohocken, PA, USA, 2021.
  25. Shin, W.; Chang, K.-H.; Muzaffer, S. Fatigue analysis of cruciform welded joint with weld penetration defects. Eng. Fail. Anal. 2021, 120, 105111. [Google Scholar] [CrossRef]
  26. Chang, K.-H.; Kang, S.-U.; Wang, Z.-M.; Muzaffer, S.; Hirohata, M. Fatigue finite element analysis on the effect of welding joint type on fatigue life and crack location of a tubular member. Arch. Appl. Mech. 2019, 89, 927–937. [Google Scholar] [CrossRef]
  27. Muzaffer, S.; Chang, K.-H.; Wang, Z.-M.; Kang, S.-U. Comparison of stiffener effect on fatigue crack in KT-type pipe joint by FEA. Weld. World 2022, 66, 783–797. [Google Scholar] [CrossRef]
  28. Van Do, V.N.; Lee, C.-H.; Chang, K.-H. A nonlinear CDM model for ductile failure analysis of steel bridge columns under cyclic loading. Comput. Mech. 2014, 53, 1209–1222. [Google Scholar] [CrossRef]
  29. Van Do, V.N.; Lee, C.-H.; Chang, K.-H. High cycle fatigue analysis in presence of residual stresses by using a continuum damage mechanics model. Int. J. Fatigue 2015, 70, 51–62. [Google Scholar] [CrossRef]
  30. Van Do, V.N.; Lee, C.-H.; Chang, K.-H. A constitutive model for uniaxial/multiaxial ratcheting behavior of a duplex stainless steel. Mater. Des. 2015, 65, 1161–1171. [Google Scholar] [CrossRef]
  31. Wang, Z.-M.; Chang, K.-H.; Muzaffer, S. Fatigue Analysis of the Effects of Incomplete Penetration Defects on Fatigue Crack Initiation Points in Butt-Welded Members. J. Weld. Join. 2020, 38, 543–550. [Google Scholar] [CrossRef]
  32. Lee, C.H.; Chang, K.H. Prediction of residual stresses in welds of similar and dis-similar steel weldment. J. Mater. Sci. 2007, 42, 6607–6613. [Google Scholar] [CrossRef]
  33. Chang, K.-H.; Lee, C.-H.; Park, K.-T.; Um, T.-H. Experimental and numerical investigations on residual stresses in a multi-pass butt-welded high strength SM570-TMCP steel plate. Int. J. Steel Struct. 2011, 11, 315–324. [Google Scholar] [CrossRef]
  34. Chang, K.-H.; Lee, C.-H. Characteristics of High Temperature Tensile Properties and Residual Stresses in Weldments of High Strength Steels. Mater. Trans. 2006, 47, 348–354. [Google Scholar] [CrossRef]
  35. American Petroleum Institute. API Recommended Practice 2A-WSD (RP 2A-WSD). In Planning, Designing and Constructing Fixed Offshore Platforms—Working Stress Design; API Publishing Services: Sydney, NSW, Australia, 2000. [Google Scholar]
  36. Lee, S.H. A Study on the Mechanism of the Stress Generated by Replacement Repair Welding and Repair Method of Steel Bridge. Ph.D. Thesis, Chung-Ang University, Seoul, Republic of Korea, 2003. [Google Scholar]
  37. Park, T.-U.; Jung, D.-H.; Park, J.-H.; Kim, J.-H.; Han, I.-W. Changes in the Mechanical Properties and Microstructure of High Manganese Steel by High Heat Input Welding and General Welding Processes. J. Weld. Join. 2022, 40, 33–39. [Google Scholar] [CrossRef]
  38. Yi, M.-S.; Seo, J.-K. Residual Stress Study of High Manganese Steel Riser Pipe Manufactured by Longitudinal Butt Welding (1): Residual Stress Measurement and FE Analysis. J. Weld. Join. 2021, 39, 135–143. [Google Scholar] [CrossRef]
  39. Wu, C.; Wang, C.; Kim, J.-W. Welding Distortion Prediction for Multi-Seam Welded Pipe Structures using Equivalent Thermal Strain Method. J. Weld. Join. 2021, 39, 435–444. [Google Scholar] [CrossRef]
  40. Kwon, I.K. Derivation of the Mechanical Properties of Structural Steels at High Temperatures. Korean Inst. Fire Sci. Eng. 2007, 21, 47–55. [Google Scholar]
  41. Hobbacher, A. Recommendations for Fatigue Design of Welded Joints and Components; Doc. XIII-1539-96/XV-845-96; IIW (International Institute of Welding): Paris, France, 2008. [Google Scholar]
  42. DNVGL-RP-C203; Fatigue Design of Offshore of Steel Structures. Recommended Practice. Det Norske Veritas: Oslo, Norway, 2016.
  43. Ljjj, L.B.J.; Gravesen, H. Kriegers Flak Offshore Wind Farm—Design Basis Foundations; Version B1 29-01-2008; Vattenfall Vindkraft AB: Solna, Sweden.
  44. Lee, M.S.; Kim, M.H. Fatigue Crack Growth Evaluation of IMO Type B Spherical LNG Cargo Tank Considering the Effect of Stress Ratio and Load History. J. Weld. Join. 2022, 40, 40–47. [Google Scholar] [CrossRef]
  45. Kang, S.-K. Crack Propagation Characterization Applying High Manganese Austenitic Steel to Independent Type B Tank. J. Weld. Join. 2022, 40, 9–15. [Google Scholar] [CrossRef]
  46. Park, S.-Y.; Kang, Y.; Oh, D.; Song, S.; Hong, H.-U. Solidification Cracking Susceptibility of the Weld Metal of Additively Manufactured 316L Stainless Steel. J. Weld. Join. 2021, 39, 45–50. [Google Scholar] [CrossRef]
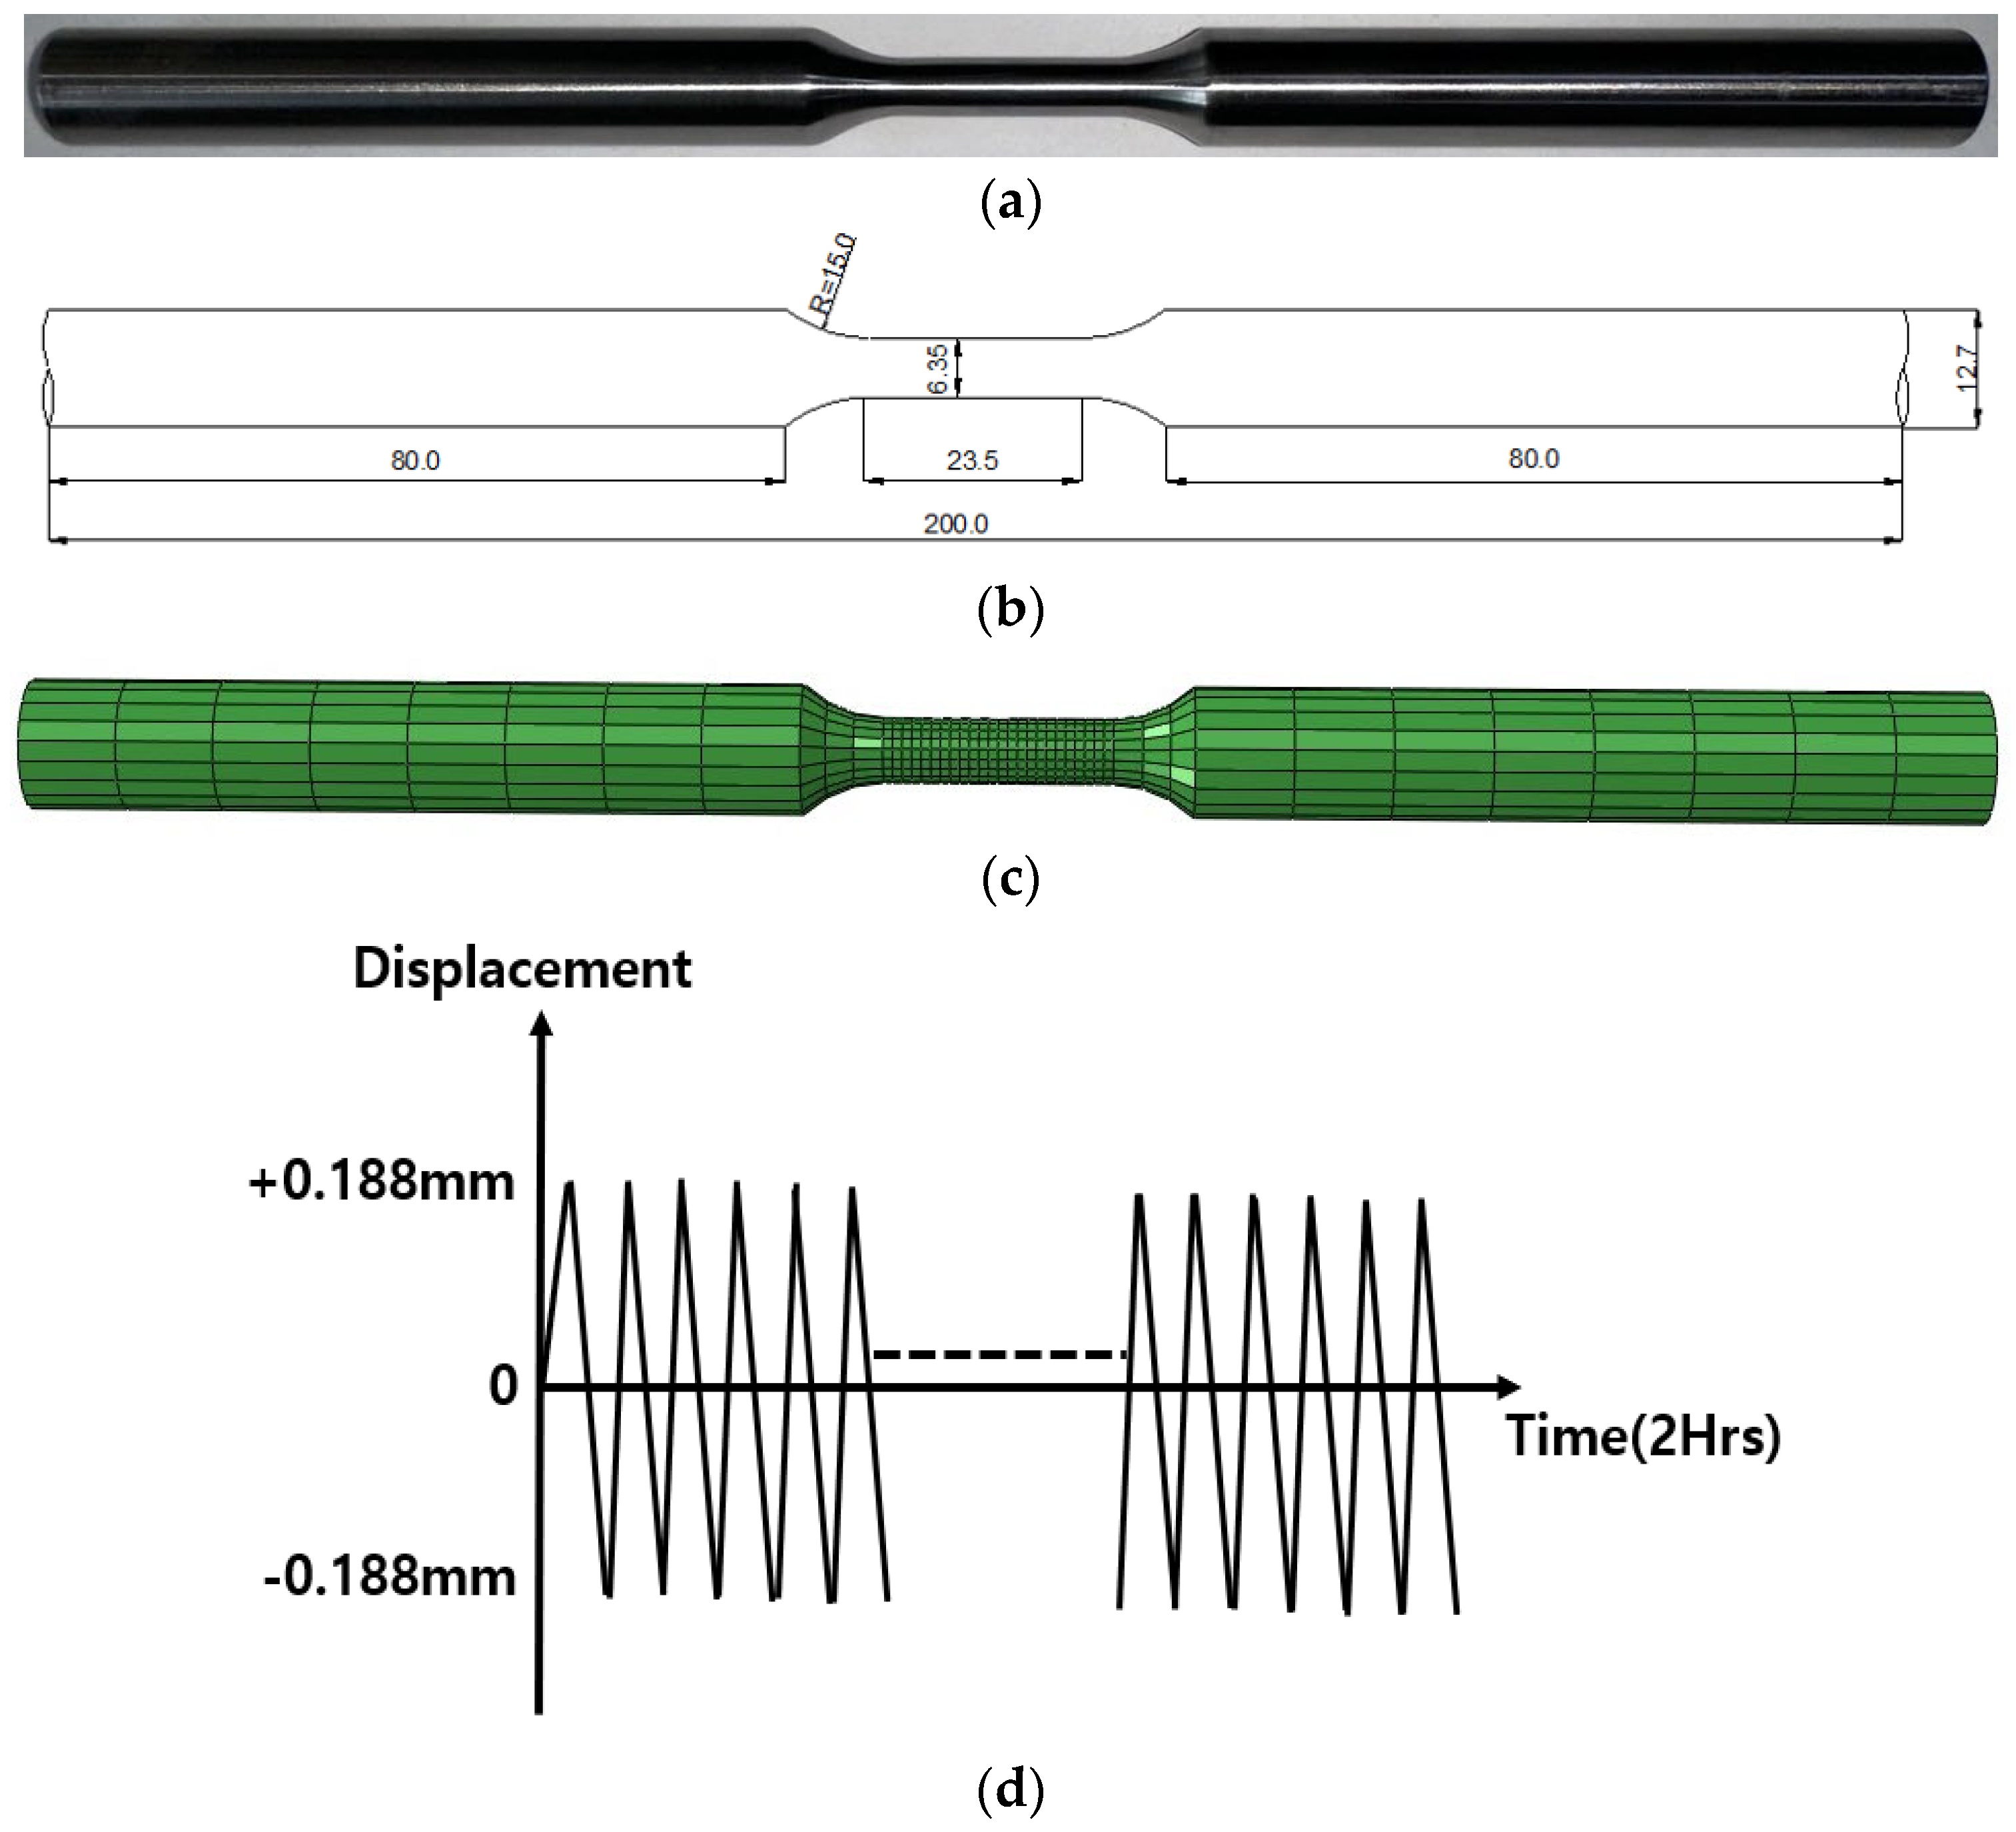
Figure 1. Specimen size and axial strain control condition. (a) Specimen for ASTM E606/E606M-21; (b) specimen size; (c) specimen mesh; (d) axial displacement control from ±0.188 mm.
Processes 11 01317 g001
Figure 2. Comparison of hysteresis loops of the fatigue test result and FEM. (a) Fatigue test; (b) comparison test result and FEM.
Processes 11 01317 g002
Figure 3. Monopipe model geometry. (a) Monopile structure; (b) monopile model size with different thickness (60 mm, 80 mm) and welding joint size.
Processes 11 01317 g003
Figure 4. Mesh view of model.
Processes 11 01317 g004
Figure 5. Temperature-dependent physical constants.
Processes 11 01317 g005
Figure 6. Welding position and temperature. (a) Welding position; (b) welding temperature.
Processes 11 01317 g006
Figure 7. Temperature-dependent mechanical material properties.
Processes 11 01317 g007
Figure 8. Residual stresses distribution. (a) Cross section (Line A, B, C, D); (b) residual stress in Line A (60 mm); (c) residual stress in Line C (60 mm); (d) Residual stress in Line A (80 mm); (e) residual stress in Line C (80 mm).
Processes 11 01317 g008aProcesses 11 01317 g008b
Figure 9. Linear extrapolation of hot spot stress.
Processes 11 01317 g009
Figure 10. Flow chart of fatigue FE analysis.
Processes 11 01317 g010
Figure 11. Load and boundary condition. (a) Cyclic load type; (b) load direction and boundary condition.
Processes 11 01317 g011
Figure 12. Crack initiation.
Processes 11 01317 g012
Figure 13. S-N curves. (a) Comparison of IIW recommendation and DNV-GL standard with 3D fatigue results; (b) comparison of different thickness 60 mm and 80 mm monopile with 3D fatigue results.
Processes 11 01317 g013
Table 1. Material of mechanical properties.
MaterialYoung’s
Modulus (GPa)
Poisson’s Ratio σ Y M P a σ u ( MPa ) Elongation (%)
SM4902040.3344.358030
Table 2. Parameters for the isotropic hardening and kinematic hardening rates.
Material C 1   ( MPa ) C 2   ( MPa ) C 3   ( MPa ) γ 1 γ 2 γ 3 Q (MPa)b
SM490130851.27130056.6716518.27
Table 3. Upper structure load of wind generator.
Turbine Size3.6 MW5 MW
Nacelle mass incl. rotor220 ton410 ton
Tower mass220 ton300 ton
Blade mass39 ton54 ton
Total mass479 ton764 ton
Disclaimer/Publisher’s Note: The statements, opinions and data contained in all publications are solely those of the individual author(s) and contributor(s) and not of MDPI and/or the editor(s). MDPI and/or the editor(s) disclaim responsibility for any injury to people or property resulting from any ideas, methods, instructions or products referred to in the content.