Abstract
This article intends to define a new methodology that allows the processing of complex surfaces in space through processing cycles, in parallel superposed planes—the variant known as generic processing in 2 ½ D—but with predictable control over the deviation from the geometric form of the surface to be processed. The novel methodology consists of identifying the optimal distances between the working planes and the corresponding successive positions so that the deviations from the resulting geometric form fall within the prescribed limits. It is also envisaged that the method will provide facilities in terms of the possibilities for evaluation of deviations from the given form of the surface, and keeping them under control by the stage of elaboration of the numerical control programs. The new optimization is designed to determine the maximum distances between successive processing planes and their position in space, depending on the spatial shape of the surface to be processed. Thus, the aim is to obtain a small number of processing planes with a favorable effect on productivity, but under conditions that respect the tolerances of the surface or the profile, a restriction that otherwise has a negative effect on the same process.
1. Introduction
1.1. The Importance of Processing Methods with Numerical Control
The study presented in this paper is about surface processing in 2 ½ D with preliminary control of the deviation of the form of a new mathematical concept, with the mention that the experimental research made in the Technological Department of the Technical University of Civil Engineering of Bucharest confirmed the mathematically model presented here [1]. Until now, complex machining in space using the generic 2 ½ D method resulted in uneven and uncontrollable machining errors [2]. Modelling of complex bodies widely uses a mathematical model of curves and surfaces. Now, by applying this method, we keep under control the deviation from the shape obtained by machining and besides we can find the optimal position of the overlapping machining planes so that the deviation is included within the maximum imposed limits. This article combines the mathematical model with:
- The new mathematical concept of optimal surface generation in 2 ½ D with control over the accuracy of the geometric shape resulting from the processing.
- A new algorithm for the mathematical concept for the optimal generation of the surface in 2 ½ D with a new program that was made for the optimal generation with preliminary control of the deviation of the geometric form when processing the complex surfaces in space.
This article is completed at the end with some of the experimental research already carried out, research that confirmed the correctness of the mathematical model and the initial optimization algorithm presented here, with the following content:
- Applied experimental research on optimal modelling of surface generation in 2 ½ D on production technology systems equipped with numerical control;
- Determination based on the 2D modelling of the characteristic points of the profile piece and of the equidistant curve with an original soft;
- Determination based on optimal modelling in 2 ½ D of the characteristic coordinates of the level planes used and the points corresponding to the spatial contours of the equidistant curve so that the deviations from the resulting geometric shape should fall within the required limits;
- Experimental results.
1.2. General Context
In the concept of optimal surface generation in 2 ½ D [3], the ability to process complex surfaces in space on numerically controlled manufacturing systems is one of their essential qualities, making them in many situations irreplaceable in manufacturing certain parts with complex configurations in terms of plan or space. The proposed concept, designed for the transition from in-plane processing to space processing, is based on the realization of the third dimension, by processing profiles arranged in several overlapping planes, positioned one at the other at certain calculated distances (Δi). Numerous 2 ½ D or 2.5 D generation schemes and several optimization systems have been known for many years. In some articles, it is described as the processing mode in 2.5D [1]. Many scientific research works dealt with the optimization process, for example in the machining of aircraft structural parts with complex structures [4], optimization of high-speed machining [5], optimizing the feed rate in milling to improve machining efficiency [6], and optimization of machining of rigid parts with complex configurations [7]. The common goal of these researchers is to optimize a machining performance [8,9,10,11]. Some other efforts at developing machining models for optimization of the machining process include artificial intelligence [12]. New models were developed for a comprehensive evaluation of machining process sustainability for optimizing machining performance [13,14,15]. Recent advances in the application of plasticity in metal machining are discussed in detail in [16,17,18]. The optimization of milling operations for selection of cutting conditions using genetic algorithms is described in [19]. Although the process is well known and analysed from many points of view, one aspect remained insufficiently explored, namely that of geometrical shape errors resulting from the processing in overlapping planes. Moreover, this is the objective of the present article, which also offers an algorithm, an original procedure by which these errors can be kept under control [20,21,22,23], since the design phase of the technology on 2.5D processing systems, the procedure that was otherwise and experimentally confirmed. The first phase of the above-mentioned study presented a mathematical definition of the dependency law regarding the dimensions of the deviation [24], resulting from processing the influencing variables (factors): the top radius of the tool, the spatial shape of the surface to be processed, the distance between successive level planes, etc. Some of these variables are fixed (imposed by the drawing or the existing SDVs) and they cannot be changed. However, some others (i.e., the distance between plane surfaces) can be changed in order to control the deviation of form resulting after processing. Based on this observation, an algorithm was created in the above-mentioned mathematical model, which allows the prediction of form deviations as early as in the manufacturing programming phase, while control is ensured by the adequate choice of distances between the level planes used in processing. The algorithm was extended for all types of technological surfaces and, during the experiment, the following model was used, as a result of the research and analyses made [25,26,27]. 2.5D machining is a case of machining carried out on the X–Y plane, and the movements along Z-axis are made for positioning the tool in accordance with the cutting depth. In that case, a part which is cut has numerous flat features at different depths. The key point in 2.5D modelling is to follow the changing rules in Z-axis, what means that a set of discrete grid points are used to create a continuous surface Z = F (x, y). These changing rules are associated with three situations:
- 2 ½ D information (height) is in the form of a constant,
- 2 ½ D information (height) is in the form of a function,
- 2 ½ D information ((height) is in the form of a combination of a constant and a function [28,29].
2. The Mathematical Concept of Optimal Surface Generation in 2 ½ D
2.1. The Concept of Optimal Surface Generation in 2 ½ D with Predictive Control of the Geometric Shape Deviations Resulting from the Processing
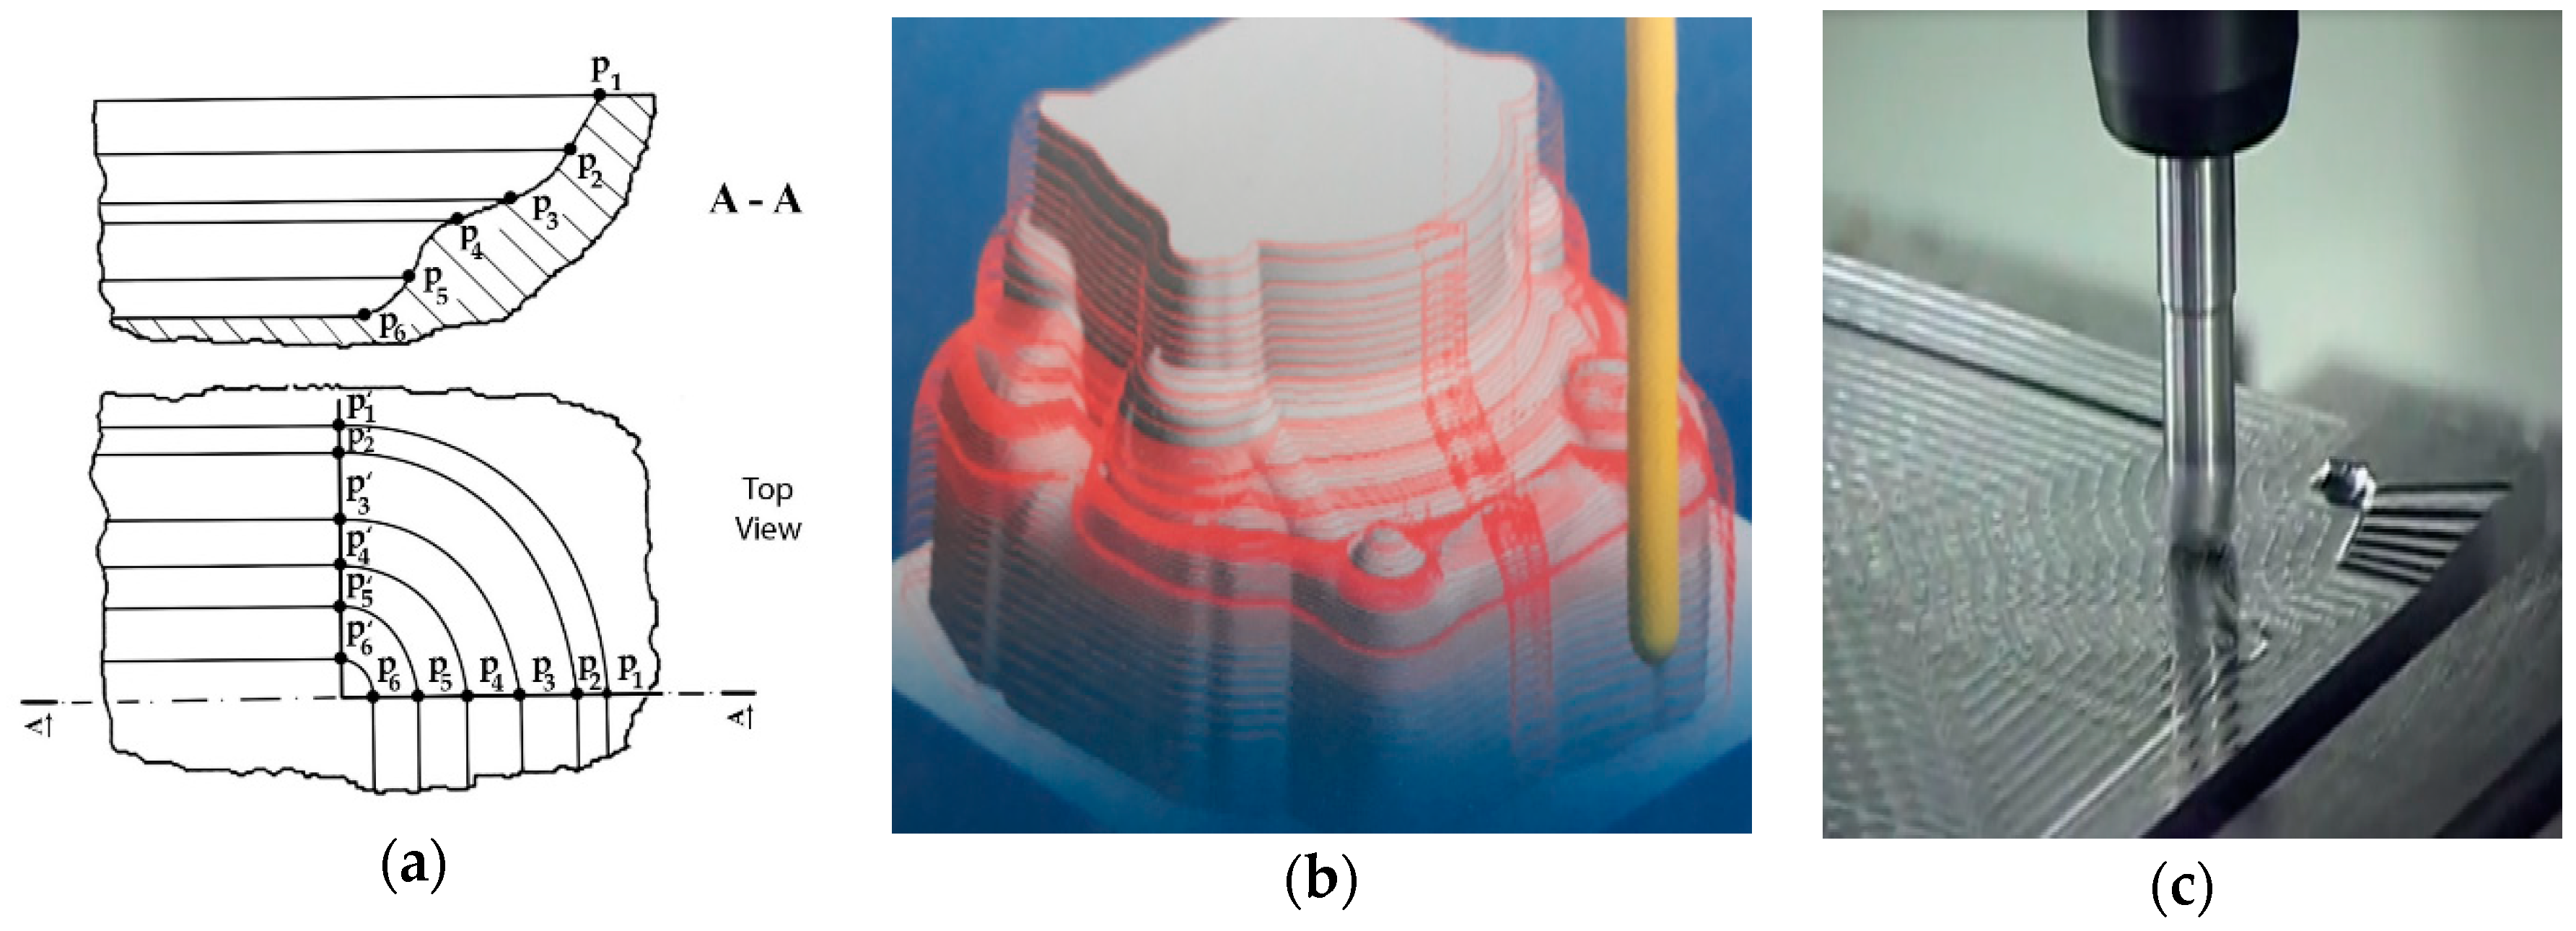
The ability to process complex surfaces in space on numerically controlled manufacturing systems is one of their essential qualities, making them in many situations irreplaceable in manufacturing certain parts with complex configurations in plan or space. The proposed concept, designed for the transition from in-plane processing to space processing, is based on the realization of the third dimension, by processing profiles arranged in several overlapping planes, positioned one at the other at certain calculated distances (ΔI). In other words, the transition from 2D processing to 2 ½ D processing is done but in a new manner described in the optimal sense. The concept of complex surface processing (Figure 1) in space by the multipurpose overlapping method is as follows:
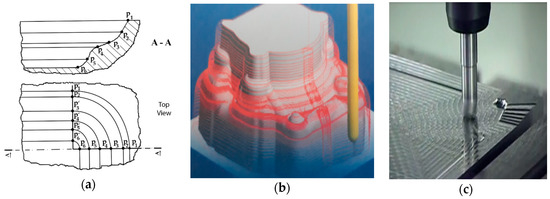
Figure 1.
The concept of complex surface processing in space in 2 ½ D with the geometric shape deviations. (a) Section and top view of the complex surface in space pocket type; (b) The concept of complex surface processing in 2 ½ D; (c) The geometric shape deviations of the part.
A section of the piece is considered to be characteristic if there is a change over the surface shape of the piece. In practice, the characteristic section of any surface is homologous to the characteristic point of a plane curve. In fact, it is also found that the characteristic sections A-A, A′-A, A″-A″, etc., pass through the points characteristic of planar contours Pi, P′i, P″i, etc. We chose a general case for a particular profile P1 ... P6, obtained from the combination of usual curves, namely:
- = straight segment (forms the angle α1 with the OX axis)
- = arc of a circle, of radius R2 (may be tangent or not to neighboring segments)
- = straight segment (forms the angle α3 with the OX axis)
- P4P5 = arc of a circle, of radius R4 (may be tangent or not to neighboring segments)
- P5P6 = arc of a circle, of radius R5, (may be tangent or not to P4P5 arc), with the observation that in the case of tangent P5 will be the inflexion point. The arc is tangent for technological reasons at the bottom surface of the piece.
2.2. Optimal Modelling of Concave Surface Generation
We analyze the concept for a single section A-A, specifying that in the other sections necessary for the complete description of the piece, the concept is similar.
To better illustrate how the distance (Δ) between processing planes influences the processing precision, the general profile breaks down into segments as follows:
(a) The straight segment (Figure 2)
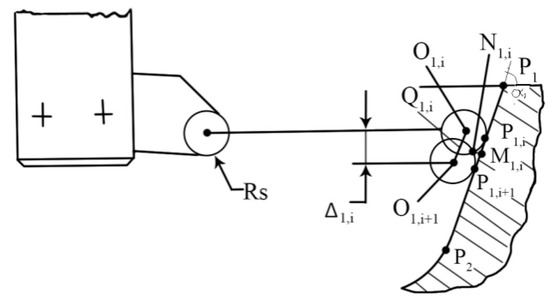
Figure 2.
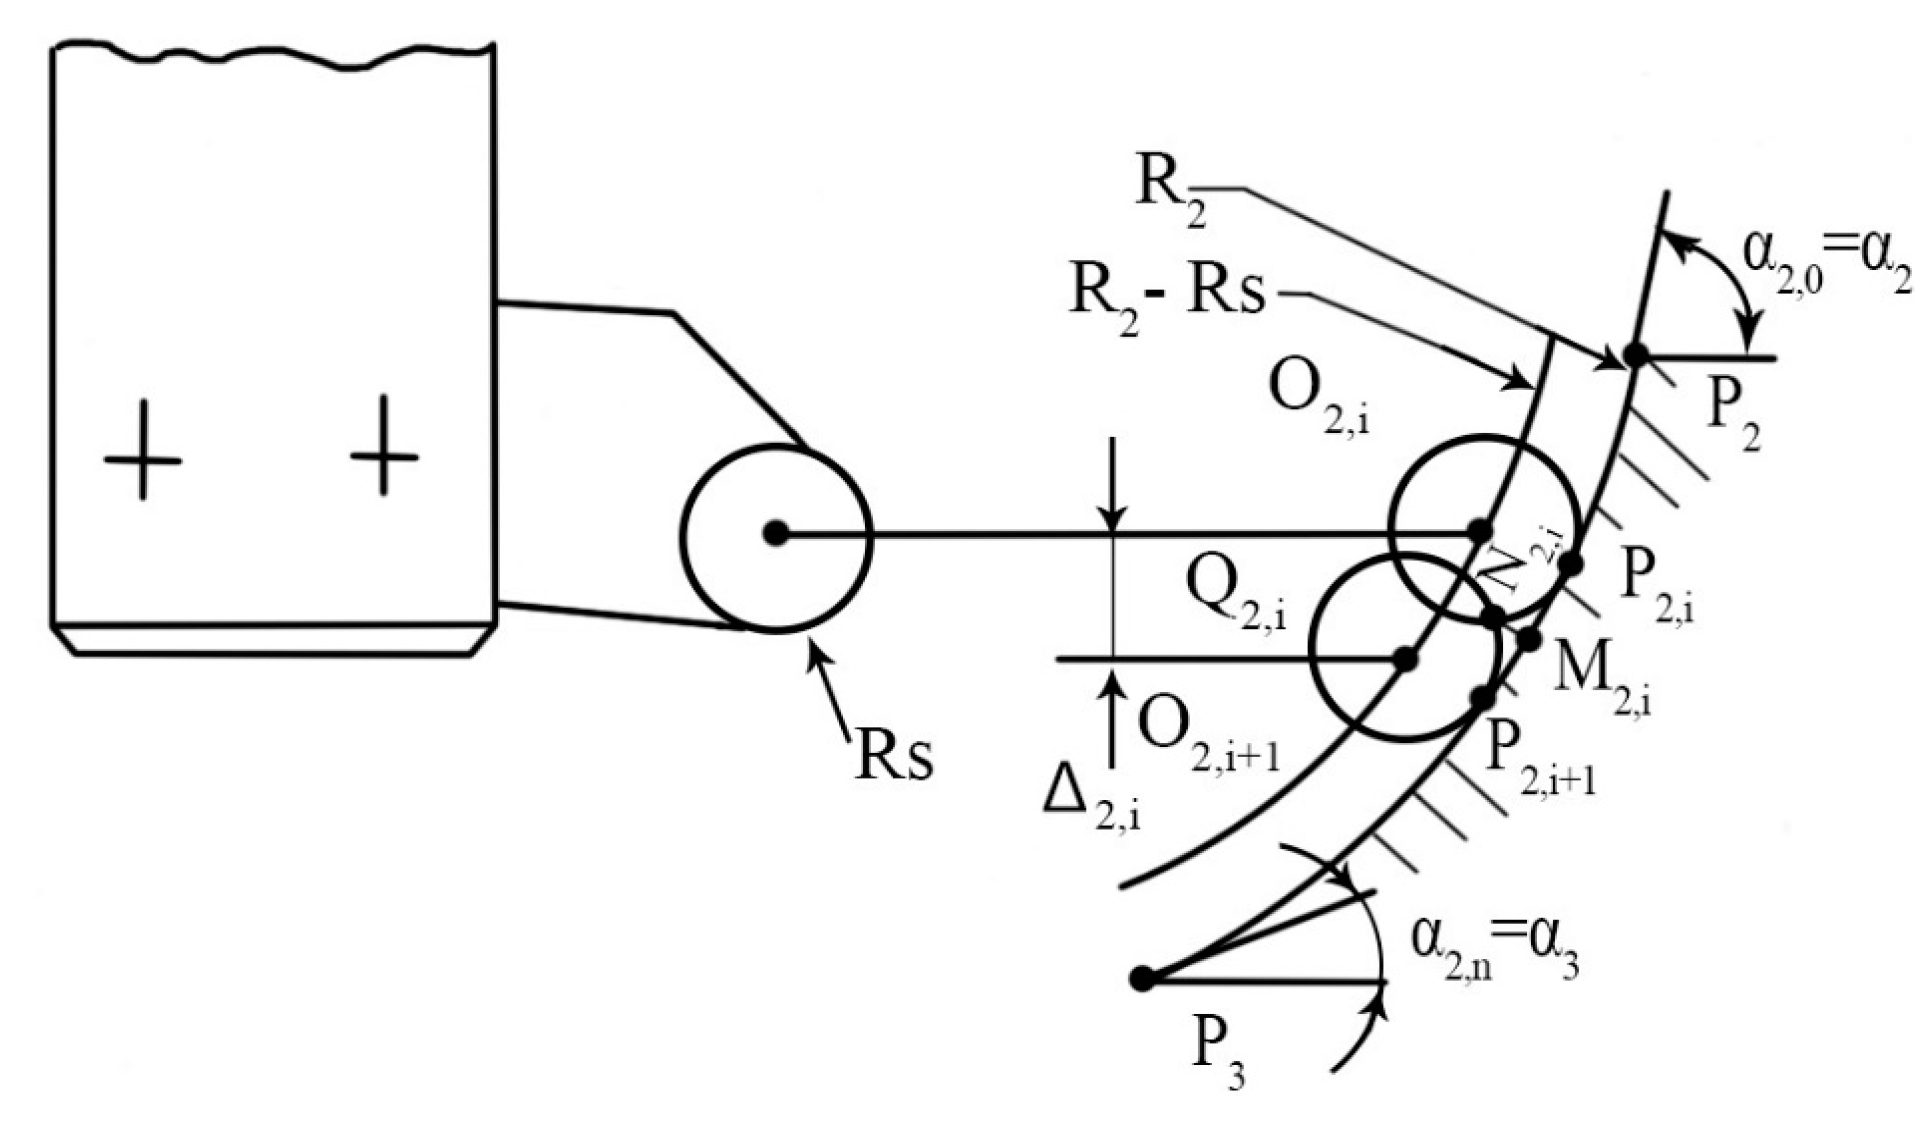
The occurrence of the geometric deviation—rectilinear generator curve.
We initially consider that the cutting tool—the boring tool, the fly knife, or the cylindrical front cutter—has a peak radius Rs known (for example, corner radius of metal carbide plates).
To process the inside profile (pocket) on the corresponding portion of the P1P2 generating curve, the instrument will execute several processing operations in the successive planes π1,i and π1,i+1, the distance between the two planes by noting it with Δ1,I, for this first portion.
It is found that on the piece, due to the generation scheme used, the P1P2 segment is actually obtained by joining several cycloids.
M1, iN1, i = Deviation from profile shape.
AFf1, i = the deviation from straight-sidedness, in this case, obtained by the generation scheme
This value—although it has similar expressions—must not be confused with the theoretical roughness that is obtained from processing and which is otherwise measured in another plane.
In the analyzed concept, must be treated as a deviation from the straight-sidedness of the generating curve, which occurs due to the 2 ½ D generation scheme and which, in the analysis, is constituted as a deviation from the shape resulting from the processing in the treated area.
From elementary calculations, the following is obtained:
Thus, we notice that the deviation from the given shape of the profile on the P1P2 portion can be considered to be a function of several variables:
However, α1 = constant (from the execution drawing), Rs = constant (as the tool radius at the top), therefore:
As an interpretation, the deviation from the given shape of the surface resulting from the processing according to the analyzed scheme is based on the distance between the successive planes.
It follows that in practice, it is advisable to choose the limit Δ1,i < Rs; otherwise, an inappropriate generation pattern may occur with deviations higher than those previously calculated and which should be avoided.
In the particular case of the right segments (example P1P2), the position of the points P1,i on the segment () does not influence the magnitude of the deviation from the prescribed shape, the influence is given only by the distance between the planes Δ1,i, and i since the angle α1 = constant for any i.
In contrast to other curves (e.g., P2P3 circular arc), apart from the distance Δ2,i, the position of the points P2 along the curve is also affected by the fact that the index “I” influences the angle α2,i and thereby also influences the magnitude of the deviations of form resulting from processing. The problem that comes to meet the deviations of form is that:
= tolerance of the profile shape required for the P1P2 portion. By mathematically analysing the generation scheme, we obtain after transformations:
Because of the previous observations, the value Δ1,i will be optimal when, following the inequality/restriction presented, it will lead to a minimum number of processing planes. In these conditions, we finally get the optimal distance between planes on the first portion:
The value obtained corresponds to the general case when the cutting tool has a correctly executed shape, with a peak radius Rs and positive attack angles.
This case corresponds to the majority of processing situations in which metal-carbide-reinforced metal plates are used, with the known peak radius Rs.
For special tools with other configurations, the same procedure is followed, but in the approximation concept, the shape, and the way of obtaining the generating curve as a loader of the tool positions in the scrubbing processing planes must be taken into account.

Figure 3.
The occurrence of the deviation of the geometric shape-generator of the curve.
The segment represents a characteristic portion of the concave surfaces, the usual orientation being in the tangent extension of the previous segment. Level planes are selected at any position, and the generation pattern is analyzed at 2 ½ D. As in (a), it is calculated the deviation from the given shape of the profile obtained by processing in the two planes of level π2,i and π2,i+1 situated at the distance Δ2,I:
In the approximation, it was taken into account that the three circles in the figure are tangent inside. In the expression , we took into account the approximation, the term:
This is the best approximation of the string through the median angle. The tangent angle in P2,i is α2,i, and the angle of tangent in P2,i+1 is α2,i+1, thus the angle of the tangent to the midpoint M2,i is even with the median angle used in the relationship. It is also observed that the angle of the tangent is decreasing, with the values: in point P2, in point P2,I and in point P3.
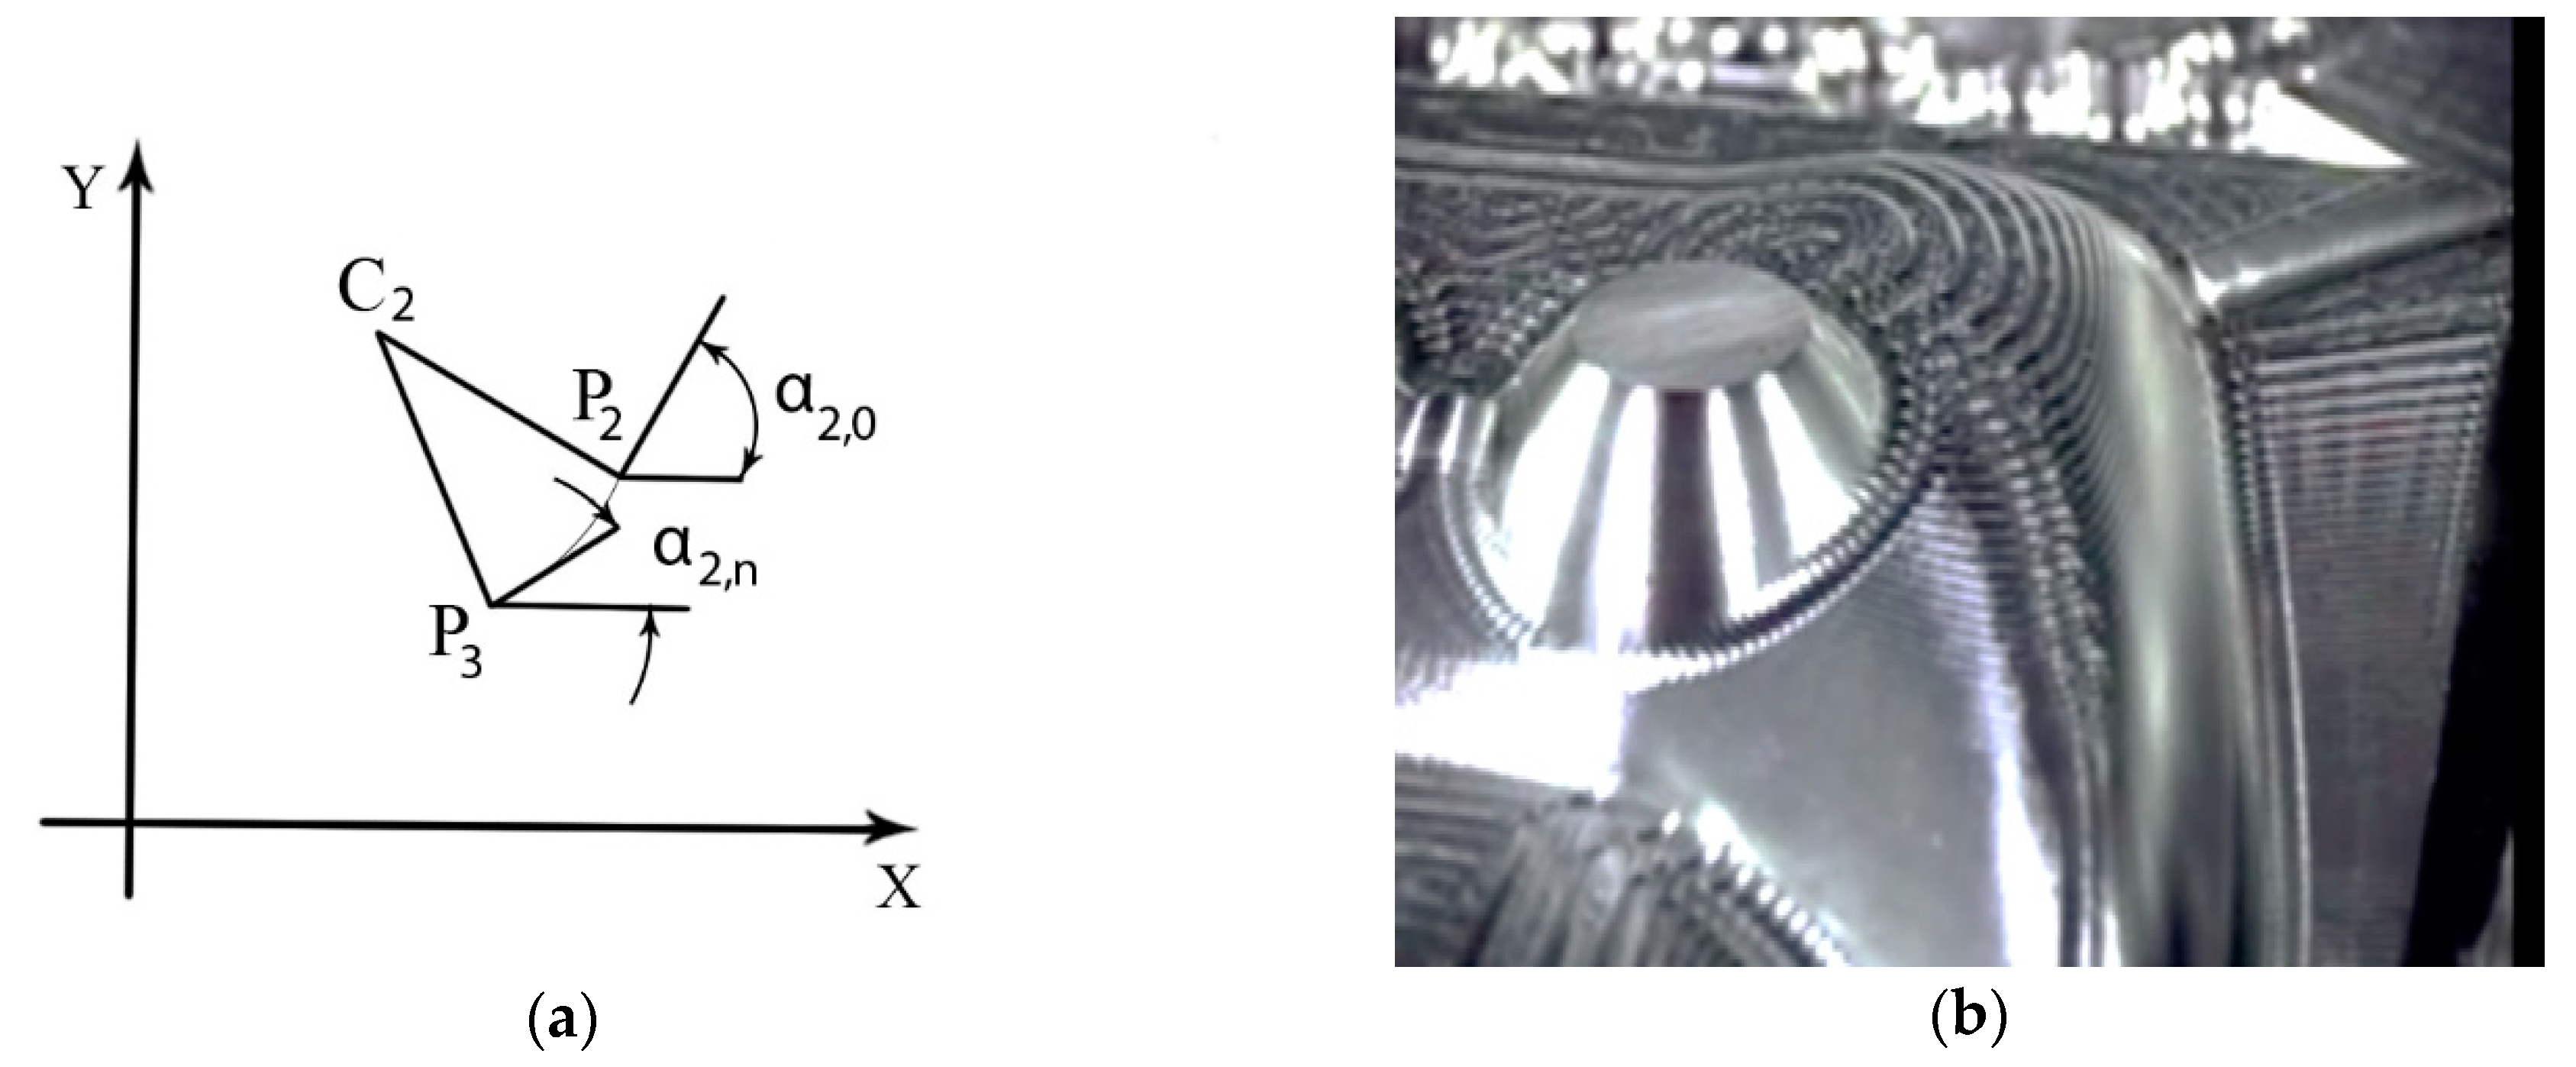
In this context, the size of the segment O2O2′ has values that vary depending on the position on the arc between the limit positions corresponding to α2,0→ α2 and α2,n→ α3; this modifies the deviation (Figure 4a).
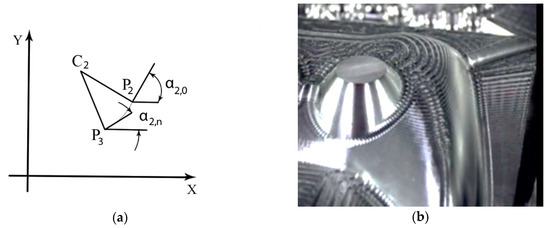
Figure 4.
The arc between the limit positions and variable geometric shape deviations without 2 ½ D control. (a) The arc between the limit positions; (b) Variable geometric shape deviations.
Mathematically, it is demonstrated that for the same value of Δ2, the arc O2, iO2, i+1 by the decrease of the angle α. According to Figure 3, this means that the maximum value is reached to point P3, because at this point α2,n→ α2,0. At point P3, a local maximum is reached. The absolute maximum value for the arc and implicit for the profile error would be reached if . The arc ranges between the following absolute limits:
The absolute maximum value would correspond to , and the absolute minimum value for . For the general case when extremes have any limit values, a local maximum is obtained for the arc :
For these reasons, we obtain that the maximum deflection value along the P2P3 arc of a circle is:
As with the straight segment P1P2, and for the P2P3 arc of a circle, the spacing between successive planes must be correlated with the required profile tolerance. The restriction will be:
However, the following observation should be taken into account. If in the straight segment the profile error has the same value regardless of the position of the points P1,i, P1,i+1, in the case of the arc of a circle, the deviation of the profile is influenced by the position of the points P2,i, P2,i+1 on the arc (P2P3), thus it is influenced by the angle formed by the tangent to the circle at the median point M2,i and the axis OX. This median angle has the value:
There are the following choices for Δ2,i:
No. 1. Choosing a constant value for the distance between planes, Δ2, the same regardless of the position of the planes superimposed on the P2P3 arc.
No. 2. Choosing a variable value for Δ2,i, depending on the position of the planes relative to the P2P3 arc.
Case no. 1 is solved by the relation with known notations:
This case has the advantage that requires a smaller computing volume, requiring the identification of a single size Δ2,opt (the distance between the successive planes that verifies the above-mentioned in the equation, in order to respect the imposed restriction).
After transformations and approximations of square differences, we obtain:
where the smallest angle in the range .
The way of obtaining this constant value checks the imposed restrictions in the most disadvantaged situation when: α2,i→ α2min = α2,n. For the other areas, when α2,i → α2max = α2,n, it can be assumed that the magnitude Δ2max is chosen under conditions that are closer than necessary, so it can be said that the method leads to an optimal, but only in the local sense. Also, the process will lead to a large number of processing planes, with repercussions in terms of productivity, cost of processing, and may favor the occurrence of profile deviations.
As follows from the expression of the deviation of the profile AFf2,i, if Δ2,i = Δ2 = constant, then AFf2 = AFf2 (α2,i), the error increasing by the decrease of the angle α2,i, in the case of Figure 3, when α2,i → α2,n. When Δ2 has higher values, some irregular traces may appear on the piece, indicating the contours of the level planes π2,i, traces being more pronounced to the area with α2,i→ α2min.
For these reasons, case no. 1 for local optimization—even if it is simple and less laborious—is only recommended for those processes that by their degree of concentration do not lead to the appearance of “narrow points” on the manufacturing line. It is also useful for parts that are not specifically intended to obtain uniform profile deviations on spatially processed surfaces.
Case no. 2 gives the possibility of choosing absolute optimal values for Δ2,i = Δ2,i(α2,i) that the initial optimization criterion and the imposed restrictions are respected (minimum number of processing planes subject to adherence to a permissible deviation).
This case is solved with the inequality of
where:
with .
For less precise calculations, the expression can be simplified by approximation functions, but in this form, it describes exactly the deviation of the profile in the analyzed case. It is known that through the linear programming methods, the optimum belongs to the border of the interval, which in this case represents one of the extremes.
Solving the equation:
Restriction: AFf2,i < Tff2 and imposing the optimal condition, is found
with the expression:
This distance, which is a function of the angle α2,i, has the following interpretation: for each P2,i point, located on the P2P3 arc, (the tangent P2,i making the angle α1,i with the axis OX), corresponds to a certain optimal distance Δ2,i opt so that the deviation from the given shape of the profile in that AFf2,i, point does not exceed the TFf2 imposed tolerance. This distance Δ2,i opt is considered to be optimal because it is determined in the maximum permissible sense and it will ensure a minimum number of processing planes (this means the maximum productivity implicitly), in the conditions of obtaining a uniform profile deviation, and within the required tolerance limit. In this sense, proceed as follows:
- Determine the law of dependence of the optimum distance between the planes of the profile geometry (function Δ2,i opt);
- Calculate the successive positions of the planes.
To determine the “steps” required for the successive planes, the values corresponding to the starting point α2,0 or α2,n (generally α2,0) are replaced in relation, and are determined successively, from nearly almost the coordinates O2,1, O2,2, O2,i, and so forth, as well as their respective angles, elements that will constitute input data to determine the coordinates of the next plan. The process continues until α2,i takes its value to the destination point (α2,i = α2,n) [3].
Intermediate angular steps can be established by a recurrence relationship of the form:
with the angular division between α1 and α2 in terms:
= known (from the execution drawing);
=
= known (from the execution drawing);
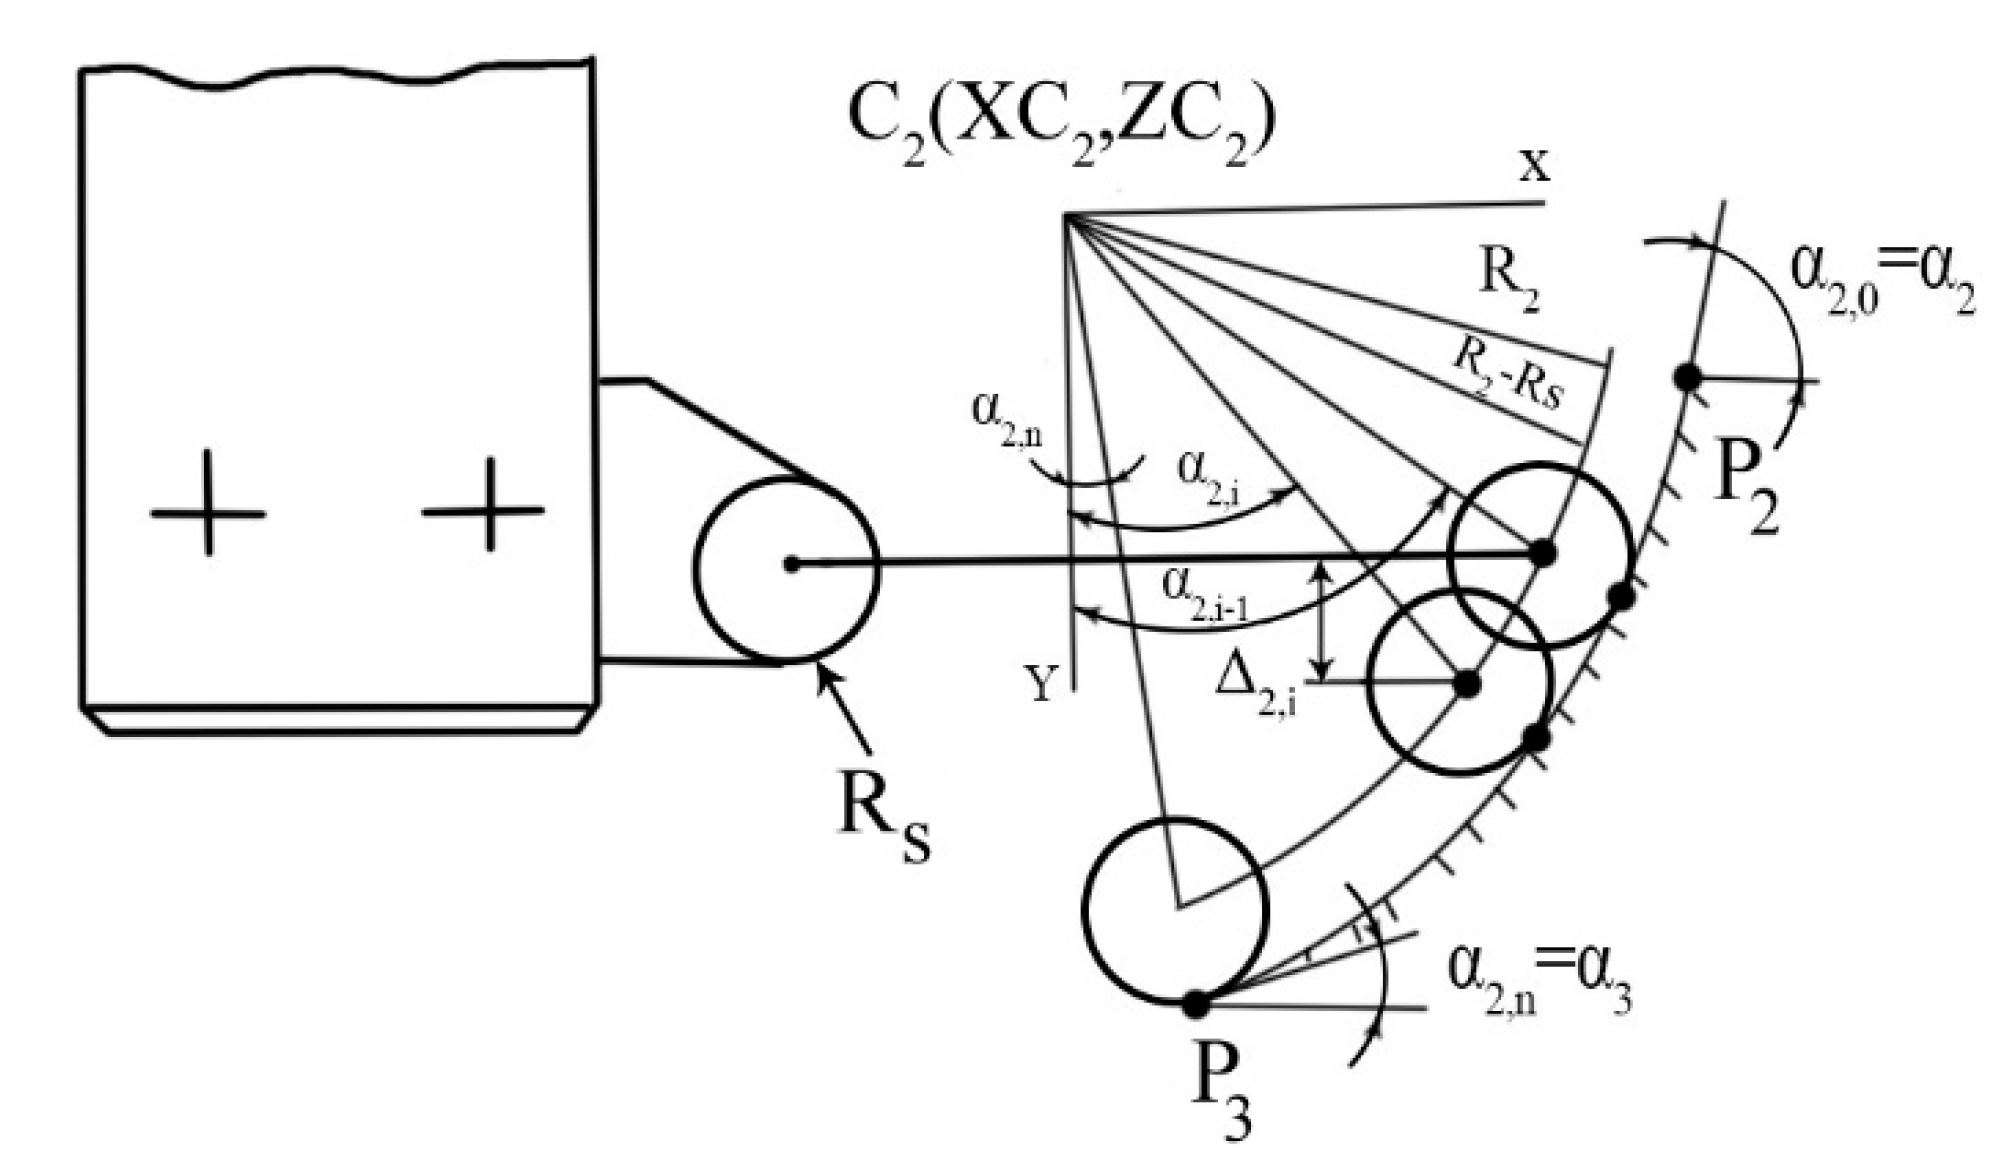
The auxiliary notation was also used Δ2 (α2,i) Δ2,i. The points outlined in Figure 5 represent the O2 centers corresponding to the connection point at the tip of the tool.

Figure 5.
The points outlined, the centers corresponding to the connection point at the tip of the tool.
In a global assessment, the method can be considered laborious, but using the basic calculus program, the optimal distances between successive planes can be found after the expression Δ2,i opt, defined above, as well as the corresponding angles α2,i. Identifying these angles is very useful for carrying out the numerical control program because through them, there are all the necessary geometric coordinates [30]. However, such a calculation should be done because ECN cannot identify the successive co-ordinates on the arc since, as mentioned, it is not a standard plan interpolation, but a space interpolation, more precisely in 2 ½ D, and the coordinates of the intermediate points must be specified by the programmer.
These coordinates will be:
where = the point corresponding to the interpolation centre, and the angles α2,i result from the recurrence relationship. The sign (±) is denoted in the expression as the center position C2 is left (+) or right (−) in relation to the points O2,i. As compared to other methods currently used for spatial interpolation, this variant offers the advantage to obtaining a controlled profile deviation (within the boundary of TFf2), and moreover, this deviation will be uniform over the entire arc segment, a condition that other methods do not satisfy.
Also, as it results from the optimization goal, the number of successive processing planes will be minimal, with a favorable influence on the productivity and cost of processing.
(c) The segment (P3P4)—A straight segment
A separate analysis of the deviation from the given shape of the AFf3 profile is not required, which in this case is like a (P1P2) deviation from straight-sidedness. The segment is positioned by the angle α3, and if in drawing α3 = α2,n, then the segment is tangent to the circular arc (P2P3). Considering similarly several πι, πι+1 planes located at distances Δ3,i, we obtain:
As for the segment (P1P2), the position of the intermediate points along the segment does not influence the deviation, so imposing as an objective function, the finding of the maximum distance between the successive processing planes, under the conditions of respecting the shape tolerance of the profile, we obtain:
with the observation that it is usual (for functional reasons) that the tolerances have a common value = for all segments .
2.3. Optimal Modelling of Convex Surfaces and Marginal Surfaces
Convex surfaces and marginal surfaces are analyzed from the same premises and will lead to specific relationships appropriate to the proposed form and concept of generation [19]. If we continue in the description of the shape of the complex surface in the space defined in Figure 3, the convex part is given by:
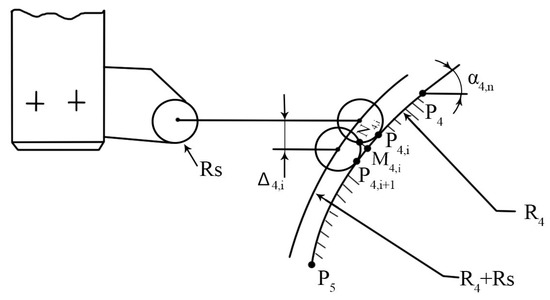
Figure 6.
The occurrence of the deviation of the geometric shape-convex generator curve.
The conceptualization and optimization in generating these surfaces are performed in compliance with the segment within the arc of the circle (P2P3), leading to similar dependencies specific to the two solutions (1 and 2). The arch (P4P5) is defined by the angle of the tangent at point P4 with the axis OX (angle α4,0) and the similar angle at point P5, the angle α4,n.
If α4,0 = α3, the arc P4P5 is tangent in the extension of the right segment (P3P4), and if α4,n = α5,0, it will also be tangent to the next arc of a circle, the point P5 becoming the inflexion point. This is, in fact, the most commonly used situation in combinations of such surfaces.
By analyzing cases no. 1 and no. 2 of the arc of a circle solved for (P2P3), it should be found that the radius Rs corresponding to the tool positions in the successive processing planes are, for the arc (P4P5), tangential to the exterior part of the profile. This causes deviations to be slightly smaller than in the case of straight segments and much smaller than in the case of concave tangent circle segments, such as for the previously analyzed P2P3 arc. The relationship used in the calculation determined accordingly is:
Taking into account the observations made in solving the arch (P2P3), we obtain for the two cases corresponding to the arc (P4P5), the following values:
Case no. 1 = use of unique value (local optimum) for the entire arc.
where: α4min = the minimum angle in the range [α4,0, …, α4,n].
Case no. 2 = use of optimal values correlated with the position of the planes π4,i,…, π4,i+1 regarding P4P5 arc (better performance).
It can be noticed that compared to the concept of the concave surfaces, the optimal distances between planes, in this case, will result higher due to the denominator (R4–Rs) with R4 >> Rs.
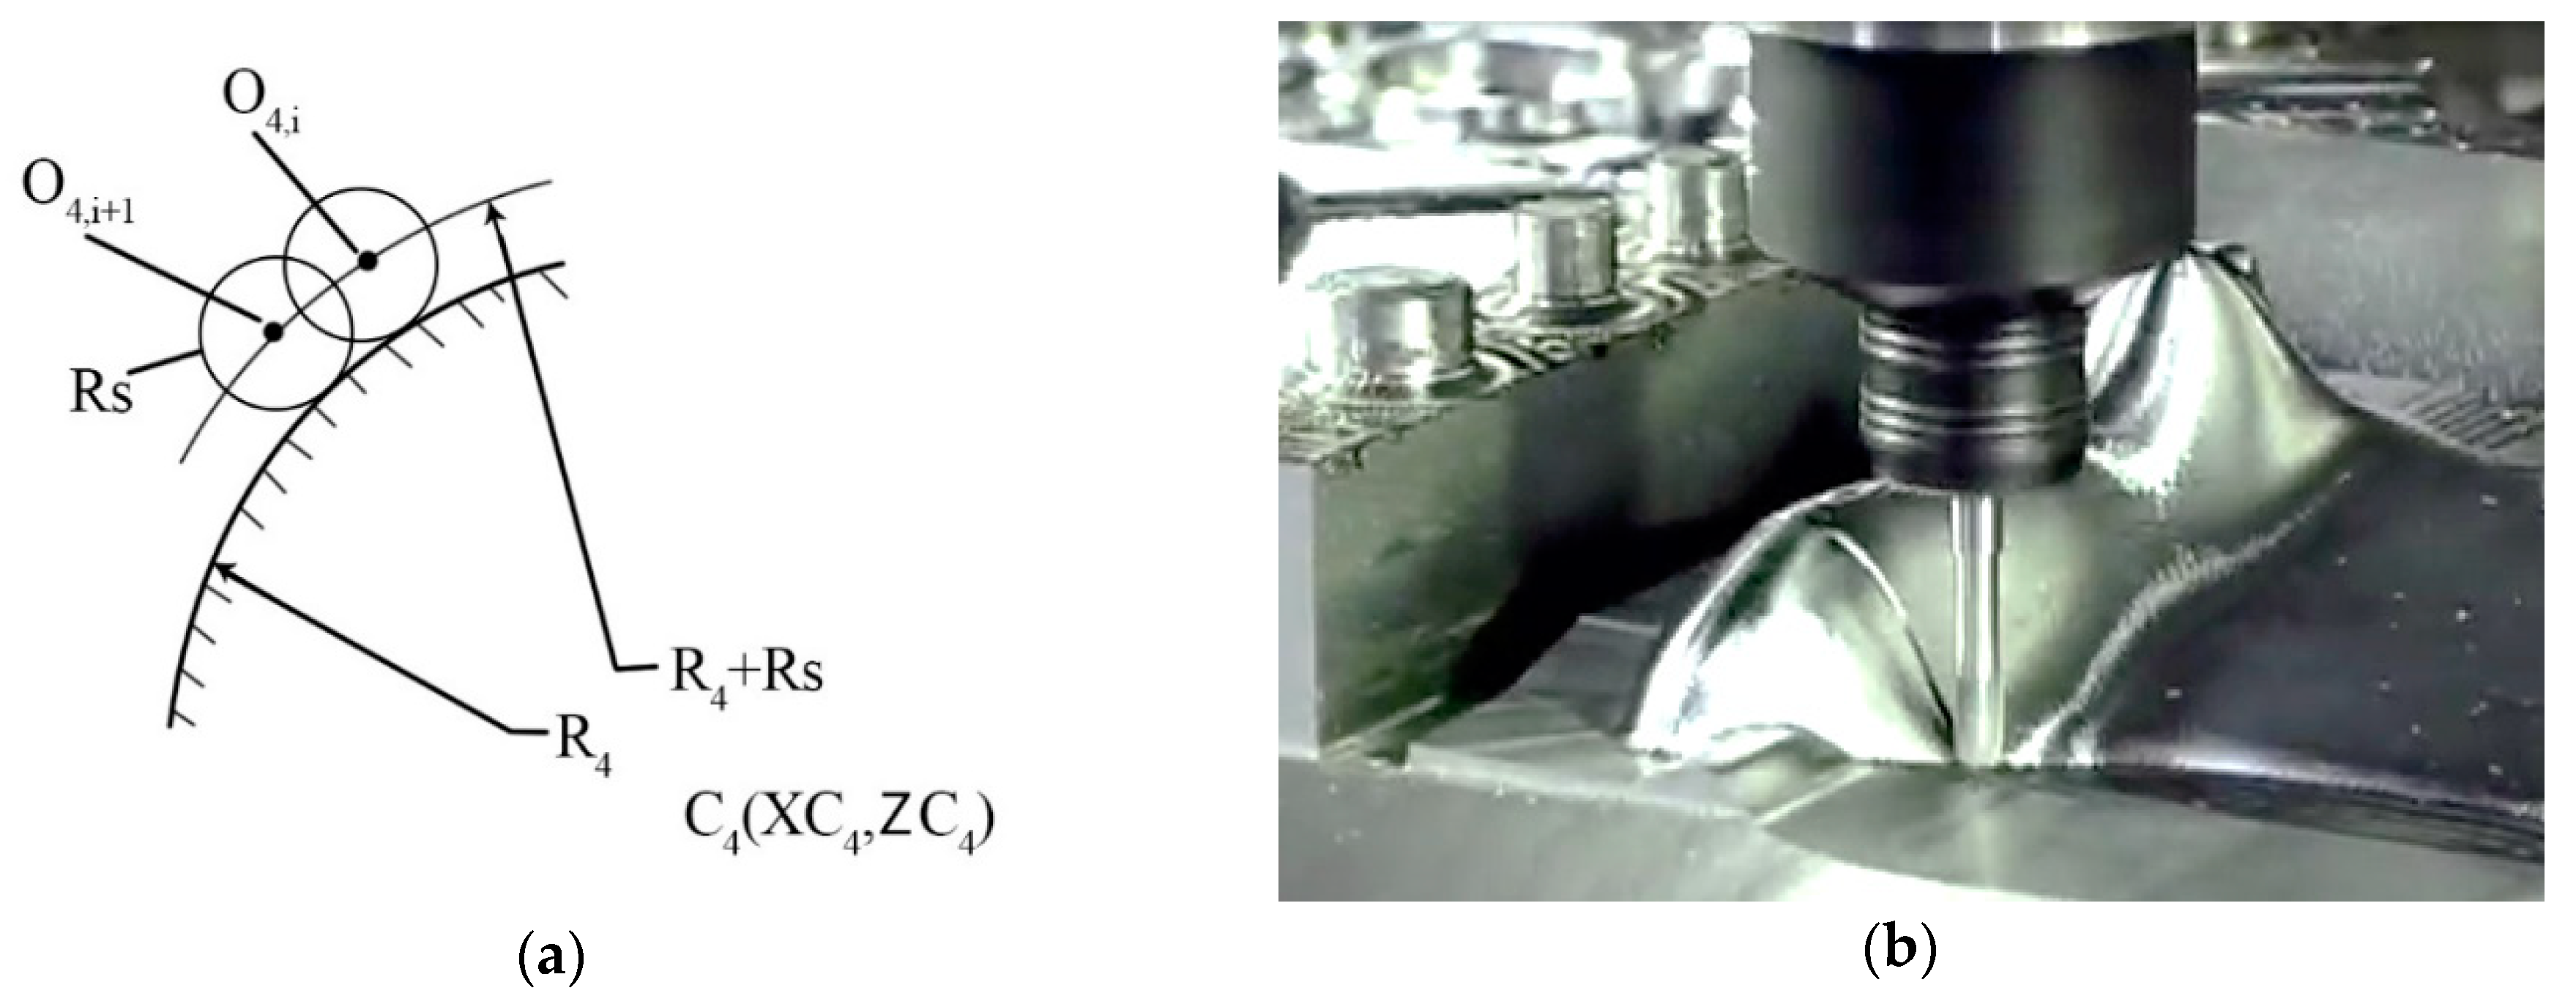
As for the P2P3 arc of a circle, the angular steps must be found for determining the set of values Δ4,i and successive positions O4,i (Figure 7), which for this case of the external tangent will have the recurrence relation:
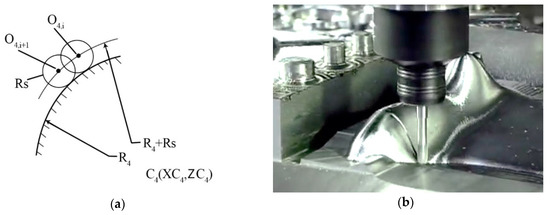
Figure 7.
Successive positions of the reference point O4,i corresponding to the overlapping planes, and the result of optimal control: (a) Successive positions of the tool reference point O4,i; (b) Constant geometric shape deviations with 2 ½ D control.
For their actual determination, start from the known values, and the steps will be calculated as follows:
α4,0 = known (from the drawing)
α4,n = known (from the drawing)
Once the angular steps corresponding to the successive positions of the planes are known according to the formulated criterion of optimization, the coordinates of the O4,i points, which are required for the subsequent elaboration of the numerical control programs, are determined.
These coordinates will be:
The (−) sign corresponds to the situation when the center C4 is to the right of the point and the sign (+) when it is located to the left of the point. The points will belong to the level curve, which determines the trajectory of the equidistant, which represents the database for the numerical control program. The relationship between the level curve, the contour of the piece and the trajectory of the equidistance achieved by the tool reference point on the AAP at the 2 ½ D processing can be exemplified in Figure 8. One can notice that in order to describe the contour of the piece in a plane passing through a specific reference point P4,i, located on the arc (P4P5), it is necessary that the center of the connecting spring at the tooltip (point ) describe cinematically, as an envelope of successive positions, the level curve marked with N4,i.
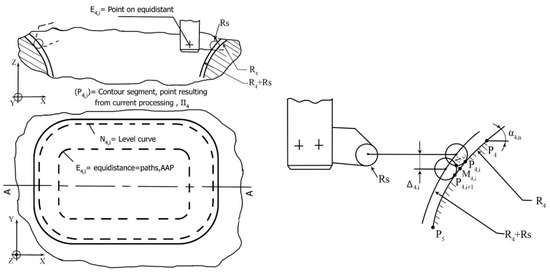
Figure 8.
Level curve, the contour of the piece and the trajectory of the equidistance achieved by the tool.
The planar coordinates of point = () were previously determined by the coordinates of the spatial interpolation center in the drawing and by the angular step α4,I obtained from the recurrence relationship.
The third coordinate (in space) is obtained directly with the relationship:
It represents the distance between the processing plane (the contour curve plane including the point P4,i) on the plane and the level plane π4,i, which comprises the level curve N4,i, equidistant E4,i and the reference points of the tool (the center of the radius connection, etc.).
The output element—to be described in the numerical control program—will refer only to the equilibrium curve E4,i.
Practically, it is observed that each point P4,i, which is an intermediate point, finally corresponds to a single point E4,i, so a function:
For example, considering in space, the point:
we will have a corresponding point on equidistant:
All elements are given or obtained through previous calculation relationships, and the Rref parameter is a parameter of the cutting tool, known from the tool setting step.
The relationship of dependence given:
has different expressions depending on the position of the point along the contour of the piece, the complete solution being made by the above-described methods of identifying the equidistant plane curves. Not all possible E4,i points (their set being infinite) should be determined, but only those points that are considered trajectory points as customary processing.
Thus, for the final stage of drawing the numerical control subroutine “4,i” of the contour processing given by (belonging to the P4P5 spring), it is sufficient to identify the characteristic points of the contour by moving the point along the contour of the piece in that section and then calculate the coordinates of the corresponding E4,i points, possibly by an elementary program.
Each characteristic point on the contour will correspond to a characteristic point on equidistance, whose coordinates will be found by calculation, identifying the ϕ4,i function according to the example above. After the contour of was closed in a plane parallel to π4,i, the following contour +1, located at the optimum distance calculated Δ4,i, ensures that the TFf4 tolerance corresponding to the P4P5 portion is achieved, under the conditions of a minimum number of circuits. Then the cycle is repeated until it reaches P5.
(b) P5P6-segment—An arc of a circle tangent to the end surface
The segment P5P6 (without figure, is similar to the P2P3 arc), which in principle allows for a similar solution, but with a peculiarity related to the angle α5,n = 0, unlike the other arcs with αi,5 > 0, which makes it unnecessary to use case no. 1 of choice of the size Δ5, opt. The potential use of this case would require the identification of a more accurate method of approximating the value of Δ5, opt but the value obtained would be low, it would lead to an oversized number of processing planes with an unfavorable effect on productivity.
Considering these observations, for the P5P6 end spring, it is, therefore, best to use the second solution which although it is more laborious than the first one, presents the stated advantages regarding productivity and the uniformity of the geometric deviations. Thus, the steps specific to the concave arcs will be followed, with the observation that the starting spring α5,0 must be given, and if α5,0 = α4,n, then the point P5 is the inflexion point, the P4P5 and the P5P6 arcs being external tangents.
Also, the arc α5,n is given, (α5,n = 0), which is a particular case but is frequently used in the configuration of complex parts.
Following the optimization of the P5 distances under the same conditions, subject to the restriction:
we obtain:
where α5,i is identifiable from the recurrence relation:
α5,0 = known (from the drawing)
Please note that using the definition mode, the angle used in the calculation will tend to zero, without touching it, the angle representing, according to previous interpretations, the angle of the median line with the OX axis.
This will allow the last step (Δ3,n), to be made, step by which the transition from the P5P6 circular arc to the horizontal segment will be determined, which will determine the flat surface of the piece’s alveolus, meaning the final processing.
3. Application—The Result of Optimization for a Real Piece–Extract for New Surfaces
3.1. Case Study
Figure 9 presents a section of a piece that presents a “pocket” type processing. The programmers of Numerical Control know that in the first stage, the piece is redesigned and the characteristic points on the profile of the piece (Pi) are identified, which in our case, have: i = 1 … 7. This stage is actually the most complex but will allow for the controlled conditions to be achieved, and it is done on the basis of the optimal modelling from above. Analysing the shape of the section through the piece, we note that we can fragment the complex generator curve into several elementary curves, namely:
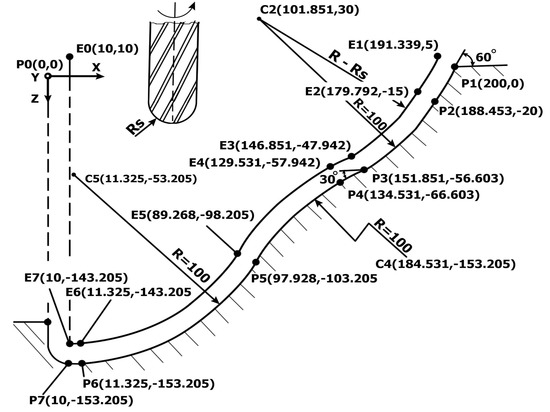
Figure 9.
Characteristic points of the part (Pi), respectively those of the equidistant curve, (Ei).
- = 60-degree straight segment
- P2 P3 = 100 mm concave circle tangent to segment P1 P2 and P3 P4
- = 30-degree straight segment tangent to P2 P3
- P4 P5 = arc of 100 mm radius convex circle tangent to segment P3 P4 and
- P5 P6 = 100 mm radius concave arc tangent to the P4 P5 arc
- = horizontal straight line tangent to the P5 P6.
The numerical results are passed here directly into drawing to reduce the editorial space.
In the most general case (mandatory if the car does not have the radius correction function), the next step is to determine the characteristic points (Ei), from the equidistant curve, using in this sense the known calculation relations: (bisector or a circle arc). These calculated points are also found directly in the drawing (Figure 9) for the economy of editorial space.
Analyzing the execution drawing, we can see that we have a minimum number of known or apparent points, namely:
P0 = P0 (0,0)-the origin point resulting from the intersection of standard V–H directions.
P1 = P1 (200.0)-instant result from the quota.
Assuming that we choose a cylindrical-frontal milling machine with R = 10 mm, the coordinates of the corresponding points on the equidistant:
E0 = E0 (10,10) and E1 = E1 (191,339.5) are immediately displayed.
The following points can be obtained by applying the bisector or arc of circles:
P2 = P2 (188.453, −20), E2 = E2 (179.792, −15) and centre C2 (101.851, 30).
For the other points, Pi and Ei since coordinates no longer occur immediately, a geometric “processing” of the work profile data to be achieved using the utility point determination tool.
From the available modules of the utility will be selected those that correspond to the case definitions of Pi and Ei, compatible with application data, as follows:
- P3, E3 = points defined by a circle and an angle (module 1 option 4, original algorithm and soft ([6] Rece)
- P4, E4 = points defined on the structure of a given straight line (Module 5 Option 3)
- P5, E5 = points defined by a circle and an angle (module 1 option 4)
- P5, E5 = points defined by a circle and an angle (module 1 option 4)
- P6, E6 = points defined by the right/circle intersection (module 1 option 3, all calculated with ([6])
How to obtain the coordinates of these characteristic points using the utility program, is detailed for the first points, and then abbreviated for the following, including the interpolation centers, in Table 1.

Table 1.
The characteristic points obtained with the help of the utility program.
3.2. Results of Optimisation Based on the Optimal Modelling in 2 ½ D of the Characteristic Coordinates of the Level Planes and the Points Corresponding to the Spatial Contours of the Equidistant–Extract
For each type of elementary curve of the part, we will select optimal distance computation relationships between superimposed processing planes as follows:
● = straight segment
For this case, as shown in the introduction, there is a unique value of the optimal distance, which is calculated with the relation (7).
Taking into account the required angles −60 degrees-for form tolerance −0.10 mm—as well as the value for the tool radius, −10mm—we obtain the relation: .
Knowing the calculation of the value and drawing from the drawing the difference of level between the points P1 and P2 which is 20 mm, we can calculate the optimal number of planes superimposed with the following relation, where the meaning of the square brackets is the whole part as we can see in the relation:
The justification for this relationship stems from the fact that the number of passes must be closer to the one resulting from the calculation, greater than or equal to it to ensure the accuracy required and at the same time, it must be a whole number.
The problem now is to determine the coordinates of the intermediate points between points P1 and P2 and E1 and E2, respectively.
For this, it is possible to use the utility (original, made for that). More specifically, we will select from module no. 5 for defining structures submodule no. 3, which defines a structure of equidistant points on a given date [6]. The mode of use and the results obtained are presented in the run-in listing, as shown in Table 2.

Table 2.
The results of automatic calculation of characteristics points P1P2 and E1E2.
- P2P3 = concave arc of a circle
For this portion, the calculations are complicated, and the two approaches appear (see Case nos. 1 and 2 in the program [6]. We will choose “Case no. 2 “which although more laborious, leads to the best results both in terms of productivity-by minimizing the number of processing planes and operational time—as well as the quality of the surface processed—by uniformizing the processing traces on the entire length of the profile-which the methods used so far cannot fulfill it. The optimal distance between successive planes becomes variable in this case, and it is dependent on the position along the contour, controlled by the angle α2,i, according to the relations (16) and (19).
Based on these relations shown above in mathematical model, the utility program was completed with subroutines to facilitate the determination of the successive optimal distances, the corresponding angles and the intermediate points corresponding to the positions of the successive planes within the concave P2P3 arc and respectively inside the E2E3 equidistant spring,
The input data taken from the drawing are: Tff2 = 0.10 mm, R = 100 mm, Rs = 10 mm, = 60° = 1.046 rad., = 30° = 0.526 rad., XC2 = 101.851 mm, ZC2 = 30 mm.
The output data mean the run results are listed in the table in Table 3, where we excluded the intermediate coordinates of the planes. They are not used to implement the Numerical Control Program, and we retained the other data that they use later. The angles are expressed in radians, and the coordinates in millimeters in the reference system are shown in Table 3.

Table 3.
The results of the optimization: the optimal position of the processing planes in space for a segment of arc P2P3 corresponding intermediate points on the equidistant segment E2E3.
- P3P4 = straight segment
In this case, the solution method is similar to the segment P1P2. The optimal distance between planes is calculated analogously Δ3opt = 1.410 mm, which will lead to a whole number of seven processing planes. Calling up the utility program again, we obtain in Table 4 the coordinates of the intermediate and endpoints on E3E4.

Table 4.
The results of automatic calculation of characteristics points—direct E3E4.
- P4P5 = convex arc of a circle
The solution method is similar to the P2P3 arc but with the changes resulting from the different calculus relations generated by the convex shape, v. relations (26) and (28).
By using the “Case no. 2” solution in a similar way, we will have to calculate the optimal distance between planes based on a specific subroutine made and attached to the utility program. Usage and results are shown in Table 5. The input data extracted from Figure 9 are:

Table 5.
The results of the optimization: the optimal position of the processing planes in space and the corresponding intermediate points on the equidistant segment E4E5.
Tff4 = 0.10 mm, R = 100 mm, Rs = 10 mm, α0 = 30° = 0.526 rad., αn = 60° = 1.046 rad.
XC4 = 1184.531 mm, ZC4 = −153.205 mm.
In the same manner, all processing surfaces proceed, and the obtained results confirm the validity of the original mathematical model presented, as well as of the dedicated utility software, made on its basis.
Through the novelty of the model introduced, the paper ensures a leap in technology, in the sense that by applying the mathematical model and the calculation program derived from it, a new quality in technology could be obtained (confirmed in practice). This consists of the fact that it is possible to process complex surfaces in space with predictive control of the geometric shape deviation. The deviation resulting from the processing (by the proposed method) is kept within the limits imposed by identifying the optimal distance between the processing planes (the distance that is influenced by the prescribed geometric form of the part and other factors) and which is provided step by step to a plan from processing to the next, until the total completion of the piece. Until the implementation of this method, either a medium distance is adopted, which leads to unevenly distributed deviations and could leave the tolerance field, or a very small distance between planes is adopted as a safety measure leading to small deviations and probably located within the tolerance field. However, this leads to low productivity far from the optimum values which are provided only by the proposed method that is novelty in the world and constitutes a technological leap in the field of processing complex parts on machine tools with numerical control and in industrial engineering. This was confirmed by experts in industrial engineering, authors of the article as well as other neutral specialists in the field.
The paper presents an original mathematical model with an algorithm and a suitable calculation program (an industrial software derived from it). The purpose was to find a way to process complex surfaces in space in an optimal and predictive sense.
The concept of optimization results from the fact that the model allows obtaining a minimum (optimal) number of planes/machining circuits, resulting in a total path of the minimum possible tool (therefore optimal in terms of productivity).
The concept that the model is predictive refers to the fact that regardless of the size of the deviation from the geometric form (imposed in the execution drawing) and the shape of the piece (given by the combination of elementary curves P1 P2 ... Pn−1 Pn), the method allows finding the position of the superposed planes, step by step, so that the deviation of the shape that will inevitably result from the processing is smaller than the one imposed in the drawing.
The paper describes in the first part the theoretical model, on different combinations of curves (with which in fact, through their alternation the profile of any complex piece can be realized).
In the second part, the article presents the results of applying the model (together with the industrial software made on its basis) for a specific part. The obtained results confirmed the validity and the correctness of the method, which allows on the one hand a considerable reduction of the processing time, and on the other hand keeping within the imposed limits of the deviation of form, obtaining a uniform quality of the surface, etc. There are several advantages of technology presented in the paper. As mentioned above, the purpose is not necessarily to reduce the form error, i.e., to obtain a very small error, as this would lead to an increase in the number of processing planes with negative effect on the productivity and cost of the part (which is great anyway). The purpose is to keep under control the deviation from the geometric form, within the limits imposed with the increase of productivity. Thus, we obtain the lowest price for the part and in accordance with the conditions imposed in the drawing, including a predictive optimization of the manufacture, and this including the elimination of waste or test pieces (which are still used in today’s technologies).
It is not the purpose of this technological model to obtain beautiful or more aesthetically pleasing parts, without traces of processing, etc. (these being realized by other processes), but parts that must have a certain prescribed form in space, with deviations of strict form, which do not exceed certain limits. These are usually molded parts for injection of plastics or for precise casting or plastic deformation, etc., which are important landmarks through which thousands or hundreds of thousands of identical parts are made in mass production. Or, this is for parts with a certain imposed geometric shape, (from different mechanisms), which enter into relative motion with other parts with their congruent shapes, dependent on each other for proper functioning, etc.
4. Conclusions
In this article, a methodology was developed in which the processing of complex surfaces in space is optimally done in a minimum number of processing planes, but regarding the precision of form imposed by the design, process called ‘processing in 2 ½ D’.
The main advantages of the method are related to the use of facilities from the processing of flat contours to the processing of complex surfaces in space and the possibility of controlling deviations (errors) from the given shape of the surfaces or profiles.
In fact, the novelty of the method results from the fact that by its execution, a possible overcoming of the shape tolerance imposed on the surface of the piece is prevented by identifying the optimal distances between the successive processing planes, depending on the shape of the plane section of the surface and the form of tolerance imposed on it.
The optimization is designed to determine the maximum distances between the successive processing planes, depending on the shape of the work surface, so as to obtain as small several processing planes as possible, but in the conditions of the tolerance of the surface or profile. The optimization criterion is therefore to minimize the number of processing planes, and the set of restrictions is obtained from the conditions that deviations from the given shape of the surface or profile are less than the corresponding tolerances imposed.
The concept involves the following steps:
- Identifying the characteristic sections of the complex surface, A-A, A′-A′, A″-A″, and so on and for each other the set of the corresponding characteristic points {Pi}, {Pi′} etc., as well as the types of segments corresponding to Pi, Pi+1.
- Identify the defining dimensions for each segment (Pi, Pi+1) using the execution drawing (angles, rays, interpolation centers, lengths, etc.).
- The calculation for each segment of optimal processing distances Δi,opt using the specific relationships determined for each type, taking into account the following observations:
- (a)
- In the case of straight segments, the optimum distance between the planes is unique (depending on the required form tolerance, the radius at the tip of the tool and the segment angle with the OX axis). This value is used for positioning all processing planes in space, resulting in uniform formulas.
- (b)
- In the case of some concave or convex circle segments, two solutions with specific relations can be used, namely Case no. 1, and Case no.2:
- Case no. 1 involves the determination of a single value Δi,opt, for the entire segment, a value that results in the accuracy of the required form. This case is simpler in terms of solution. Case no. 1 leads to accuracy by using several processing planes greater than the strictly necessary.
- Case no. 2 takes into account the spatial position of the processing plane versus the generating curve, and leads to superior results by obtaining absolute values for the distances between the processing planes, according to their position regarding the analyzed segment. It ultimately presents the advantage of obtaining under the conditions of minimizing the number of processing planes, deviations from the given shape of the surface, uniforms and within the accepted limits.
- (c)
- In the case of particular circle segments and end segments tangent to frontal plane surfaces or other types of special surfaces, it is recommended to resort to case no. 2, the first case leading to an oversized plane number, which ensures the shape of the imposed surface, but with low productivity. This situation is also avoided in terms of the final stage of compiling numerical control programs, a stage which in this case would implicitly lead to the development of more complex programs of long duration.
- The calculus of the coordinates of the intermediate characteristic points Pi,j of the profile, on each segment Pi, Pi+1, obtained by processing in successive Pi,j+1 at the optimal distances determined previously. These coordinates are determined from almost using the recurrent relationships presented and the definition data of each segment.
- Determination of the coordinates of the intermediate characteristic points (Ei,j) of equidistance. At each characteristic intermediate point on the profile (Pi,j), generally corresponds to a single intermediate point characteristic on the equidistant (Ei,j) which is determined by the position of the characteristic section relative to the complex surface area of the piece, the level curve and tool parameters with specific mathematical relationships.
- Finally, the execution of N.C. l programs for each processing plan based on the sets {Ei,j} and {E′i,j}.
This optimization method will ultimately have beneficial effects on the productivity of complex surface processing in space by reducing the number of circuits and the total path of the tool, respecting the required form precision and even, in the second solution of the problem, obtaining the facility that generates errors resulted from processing are uniform and controlled, with the possibility of optional intervention on them at the stage of drawing up the numerical control program.
Author Contributions
Conceptualization, L.R. and V.F.; methodology, A.M.; software, V.J.; validation, M.H. and J.V.; investigation, M.B.; writing—original draft preparation, L.R.; writing—review and editing, V.F., A.M. and J.V.; supervision, V.J. and M.B.; funding acquisition, M.H. All authors have read and agreed to the published version of the manuscript.
Funding
This project was done within the project VEGA no. 1/0720/18 Research of Alternative Navigation Algorithms for the Control of Autonomous Robots in Plant Production.
Conflicts of Interest
The authors declare no conflict of interest.
References
- Szeptycki, P. Processing and Analysis of 2.5 D Face Models for Non-Rigid Mapping Based Face Recognition Using Differential Geometry Tools. Ph.D. Thesis, Ecully, Ecole centrale de Lyon, Lyon, France, 2011. [Google Scholar]
- Jayal, A.D.; Badurdeen, F.; Dillon, O.W., Jr.; Jawahir, I.S. Sustainable manufacturing: Modeling and optimization challenges at the product, process and system levels. CIRP J. Manuf. Sci. Technol. 2010, 2, 144–152. [Google Scholar] [CrossRef]
- Yi, Q.; Li, C.; Tang, Y.; Chen, X. Multi-objective parameter optimization of CNC machining for low carbon manufacturing. J. Clean. Prod. 2015, 95, 256–264. [Google Scholar] [CrossRef]
- Liu, C.; Li, Y.; Zhou, X.; Shen, W. Interim feature-based cutting parameter optimization for aircraft structural parts. Int. J. Adv. Manuf. Technol. 2015, 77, 663–676. [Google Scholar] [CrossRef]
- Wang, H.; Jang, P.; Stori, J.A. A metric-based approach to two-dimensional (2D) tool-path optimization for high-speed machining. J. Manuf. Sci. Eng. 2005, 127, 33–48. [Google Scholar] [CrossRef]
- Karunakaran, K.P.; Shringi, R.; Ramamurthi, D.; Hariharan, C. Octree-based NC simulation system for optimization of feed rate in milling using instantaneous force model. Int. J. Adv. Manuf. Technol. 2010, 46, 465–490. [Google Scholar] [CrossRef]
- Soare, G.; Rece, L. Des nouvelles methodes d’interpolation ameliorées grace à des equations de corrections, avec application dans l’usinage des pieces rigides avec configurations complexes (New improved interpolation methods due to correction equations, with application in the machining of rigid parts with complex configurations). In SISOM 2000; Romanian Academy—Institute of Solid Mechanics: Bucharest, Romania, 2010; pp. 221–227. [Google Scholar]
- Escamilla-Salazar, I.G.; Torres-Treviño, L.; González-Ortiz, B.; Praga-Alejo, R.; González-González, D. Intelligent tools selection for roughing and finishing in machining of Inconel 718. Int. J. Adv. Manuf. Technol. 2017, 88, 3031–3039. [Google Scholar] [CrossRef]
- Yemane, A.; Colledani, M. Performance analysis of unreliable manufacturing systems with uncertain reliability parameters estimated from production data. Int. J. Comput. Integr. Manuf. 2019, 32, 875–889. [Google Scholar] [CrossRef]
- Zhang, Y.; Liu, Q.; Zhou, Y.; Ying, B. Integrated optimization of cutting parameters and scheduling for reducing carbon emissions. J. Clean. Prod. 2017, 149, 886–895. [Google Scholar] [CrossRef]
- Ji, W.; Wang, L.; Haghighi, A.; Givehchi, M.; Liu, X. An enriched machining feature-based approach to cutting tool selection. Int. J. Comput. Integr. Manuf. 2018, 31, 1–10. [Google Scholar] [CrossRef]
- Saranya, K.; Jegaraj, J.J.R.; Kumar, K.R.; Rao, G.V. Artificial intelligence-based selection of optimal cutting tool and process parameters for effective turning and milling operations. J. Inst. Eng. India Ser. C 2018, 99, 381–392. [Google Scholar] [CrossRef]
- Jawahir, I.S.; Dillon, O.W. Sustainable manufacturing processes: New challenges for developing predictive models and optimization techniques. In Proceedings of the First International Conference on Sustainable Manufacturing, Montreal, QC, Canada, 18–19 October 2007; pp. 1–19. [Google Scholar]
- Granados, S.; Jawahir, I.S.; Fernandez, J.A. Comprehensive Criterion for Sustainability Evaluation of Machining Processes. In Proceedings of the 7th Global Conference on Sustainable Manufacturing, Chennai, India, 2–4 December 2009; pp. 385–391. [Google Scholar]
- Wanigarathne, P.C.; Liew, J.; Wang, X.; Dillon, O.W., Jr.; Jawahir, I.S. Assessment of process sustainability for product manufacture in machining operations. In Proceedings of the Global Conference on Sustainable Product Development and Life Cycle Engineering, Berlin, Germany, 29 September–1 October 2004; pp. 305–312. [Google Scholar]
- Wang, X.; Jawahir, I.S. Recent advances in plasticity applications in metal machining: Slip-line models for machining with rounded cutting edge restricted contact grooved tools. Int. J. Mach. Mach. Mater. 2007, 2, 347. [Google Scholar] [CrossRef]
- Wang, X.; Jawahir, I.S. Web-based optimization of milling operations for the selection of cutting conditions using genetic algorithms. Proc. Inst. Mech. Eng. B J. Eng. Manuf. 2004, 218, 647–655. [Google Scholar] [CrossRef]
- Valíček, J.; Harničárová, M.; Kopal, I.; Palková, Z.; Kušnerová, M.; Panda, A.; Šepelák, V. Identification of Upper and Lower Level Yield Strength in Materials. Materials 2017, 10, 982. [Google Scholar] [CrossRef] [PubMed]
- Rece, L. Maşini-Unelte şi Prelucrări Mecanice cu Comandă Numerică; Machine-Tools with Numerical Control; Editura Conspress: Bucharest, Romania, 2003; pp. 120–224. ISBN 973-8165-81-4. [Google Scholar]
- Rece, L. Application des Méthodologie et Logiciel de Détermination des Coordonnées Caractéristiques du Profil de Pièce et Trajectoire D’outil Pour L’usinage a Machines-Outils avec Commande Numérique (Application of the Methodology and Software for Determining the Characteristic Coordinates of the Part Profile and Tool Path for Machine Tool with Numerical Control). In SISOM; Romanian Academy—Institute of Solid Mechanics: Bucharest, Romania, 2009; pp. 363–368. [Google Scholar]
- Rece, L.; Soare, G. Maşini-Unelte şi Prelucrări Mecanice; Machine-Tools and Mechanical Processing; Matrix-Rom: Bucharest, Romania, 2003; pp. 160–192. ISBN 973-685-580-5. [Google Scholar]
- Rece, L.; Soare, G.; Ionescu, T. Modele d’adaptation des systemes cao de projection en 3d des pieces complexes, pour systemes fao de fabrication en 3D (Adaptation model CAD system for 3D projection of complex parts, for 3D manufacturing systems). In SISOM; Romanian Academy—Institute of Solid Mechanics: Bucharest, Romania, 2011; pp. 131–136. [Google Scholar]
- Göleç, A. A relationship framework and application in between strategy and operational planes for manufacturing industry. Comput. Ind. Eng. 2015, 86, 83–94. [Google Scholar] [CrossRef]
- Liu, J.; Liu, X.; Cheng, Y.; Ni, Z. A systematic method for the automatic update and propagation of the machining process models in the process modification. Int. J. Adv. Manuf. Technol. 2016, 82, 473–487. [Google Scholar] [CrossRef]
- Nguyen, H.; Ko, S.L. A mathematical model for simulating and manufacturing ball end mill. Comput. Aided Des. 2014, 50, 16–26. [Google Scholar] [CrossRef]
- Bosetti, P.; Bertolazzi, E. Feed-rate and trajectory optimization for CNC machine tools. Robot. Comput. Int. Manuf. 2014, 30, 667–677. [Google Scholar] [CrossRef]
- Dumitrache, A.; Borangiu, T.; Dogar, A. Automatic generation of milling toolpaths with tool engagement control for complex part geometry. IFAC Proc. Vol. 2010, 43, 252–257. [Google Scholar] [CrossRef]
- Yang, F.; Yu, S.; Li, T.N. The 2.5 D Modeling Method Based on Expanding Half-Dimensional Information. Appl. Mech. Mater. 2013, 303, 2321–2324. [Google Scholar] [CrossRef]
- Kim, D.S.; Kim, Y.H.; Jung, Y.T. Area Properties of Strictly Convex Curves. Mathematics 2019, 7, 391. [Google Scholar] [CrossRef]
- CNC Plus Milling; HAAS Automation Inc.: Oxnard, CA, USA; R&S Keller GmbH: Wuppertal, Germany, 2006.
© 2020 by the authors. Licensee MDPI, Basel, Switzerland. This article is an open access article distributed under the terms and conditions of the Creative Commons Attribution (CC BY) license (http://creativecommons.org/licenses/by/4.0/).

