1. Introduction
Components manufactured by using additive technologies, such as Laser Powder Bed Fusion (LPBF), exhibit remarkable mechanical properties, thanks mainly to the rapid solidification rates achieved during the process. However, this rapid and repeated cooling means that the parts are subject to high levels of residual stresses at the end of the printing phase, which could lead to distortions and surface defects once the parts are cut from the building platform. Owing to this, and also with the aim of homogenizing and optimizing the microstructure and mechanical properties of the materials, almost all parts obtained via additive manufacturing are subjected to post-process heat treatments before their removal from the building platform.
Post-process heat treatments on Ti-6AI-4V components obtained using additive technology, such as LPBF, have been extensively studied in the literature with the aim of identifying optimal cycles with which to achieve effective elimination of residual stresses combined with proper microstructural balance. As a matter of fact, the large thermal gradients inherently present in the process where a laser spot scans a surface, inducing localized melting, are responsible for the generation of residual stresses. Such stresses appear as the process proceeds because of the expansion/contraction interactions between the layers [
1]. This occurs not necessarily in the whole thickness of the built part, and it is dependent also on its shape and scanning strategy, but in any case, it contributes to the reduction in parts ductility. Literature results, summarized in a recent review [
2], show that yield and tensile strengths are significantly higher compared to the ASTM specifications for the biomedical or aerospace sector, but when it comes to tensile strain, most of the studies reported values lower than the minimum required.
The typical microstructure of Ti-6Al-4V alloy obtained by LPBF consists of an extremely fine acicular martensitic structure known as the alpha prime phase. Such microstructure is a result of the extremely fast heating (10
5–10
7 K/s) and cooling (10
3–10
8 K/s) rates typical of LPBF [
3]. Moreover, the LPBF as-built microstructure usually consists of an acicular martensitic phase within columnar β grains, presenting a pronounced orientation along the building direction [
4]. The martensitic needles are generally observed to be inclined about 45° with respect to the manufacturing direction [
5]. This results in typical mechanical properties such as high yield strength (>1000 MPa), high ultimate tensile strength, and elongations in the range of 7–10% [
6].
The most relevant microstructural parameter influencing the strength of LPBF fabricated lamellar structures is the α or α prime width due to the fact that the effective slip length for dislocation is limited to the individual martensite width rather than the α colony size [
7]. For this reason, post-processing heat treatments must also be designed to control the dimension of the alpha phases, as a Hall–Petch relationship with the strength exists.
Hence, post-process treatments have been explored to promote the controlled metastable martensite decomposition to equilibrium α + β phases and to minimize residual stress.
Starting from these initial conditions, there are many different heat treatment strategies that can be used in order to achieve the following key targets:
- -
Minimize residual stresses generated during the printing process;
- -
Homogenize the mechanical response even in parts showing thickness variations;
- -
Increase material ductility without compromising the high yield strength and UTS.
Previous studies have revealed that annealing in the range of 750–900 °C can effectively facilitate the α′ martensite decomposition and improve ductility [
8]. Nevertheless, the mechanical properties of LPBF fabricated materials have been reported as anisotropic due to the columnar prior-β grains inclined close to the build direction. For this reason, β solution treatments can also effectively mitigate the anisotropy in mechanical property due to the fact that β grains tend to lose the columnar morphology after such treatment [
9], but at the cost of strength and ductility, due to grain coarsening.
Over the past decade, many authors have studied the effect of different post-process heat treatment strategies on titanium Ti6Al4V alloy components obtained by LPBF technology in terms of mechanical properties and the evolution of the material’s microstructure. For example, Cao et al. [
10] investigated several sub-transus post-process heat treatments in the range of temperature 700–950 °C for various holding times in order to study the coarsening behavior in the α + β phase field. Additionally, Yan et al. [
11] studied the effect of post-processing vacuum heat treatments above 900 °C, also comparing the results with HIP samples and determining the impact of densification on fatigue properties. Moreover, Korasani et al. [
12] investigated how traditional treatments typically applied to the wrought components, such as solution and aging, β annealing, and duplex annealing, would not lead to the usual or expected results in the case of parts manufactured with LPBF technology.
However, despite the large number of scientific papers published regarding the optimization of post-process heat treatment on LPBF titanium parts, the decomposition kinetics of α prime martensite remains a subject that requires further insights. Even the process parameters, such as temperature, holding time, cooling rate, etc., require optimizations and trials in order to identify the correct operating conditions, which will allow the achievement of excellent mechanical properties and good ductility.
When it comes to the industrial manufacturing of LPBF TI6Al4V components, a further objective for post-heat treatments is raised, and it involves the robustness of the process, i.e., its capability of providing results not dependent on parameters considered as “noise factors”. In LPBF, many process-related factors influence the mechanical properties of the as-built materials, but even within the same build, differences exist. As a matter of fact, for PBF techniques, there is a known dependence of mechanical properties on part location and powder reuse, which in different studies has been reported as non-linear with height and linear with radial distance from the center of the build plate [
13] or dependent on the direction of gas flow in the build chamber [
14].
Hence, the mechanical properties of the as-built materials are affected by the occurrence of large deviations, and a properly designed heat treatment can help reduce such variability by inducing microstructural modifications. HIP is considered one of the most reliable processes to improve tensile performance, close defects, and modify the microstructure at elevated temperatures, and the recent use of machine learning helped optimize the process parameters based on literature results collected from 2010 to 2019 [
15]. However, HIP severely alters the microstructure of the alloy, inducing a coarse lamellar α and β formation [
16]. Hence, despite the possibility of reducing porosity to less than 0.1% and elongation being increased to 10−15%, strength is negatively affected [
17].
Based on such premises, the aim of this work is to identify a post-heat treatment of LPBF Ti6Al4V parts able to retain the outstanding mechanical properties derived by the extremely fine microstructure typical of LPBF while minimizing the variability of the mechanical properties within the same build.
2. Materials and Methods
2.1. Samples
For the present study, sets of 30 cylindrical samples of 10 mm diameter and 120 mm height, showing vertical growth direction, were manufactured using Ti-6Al-4V ELI EOS GmbH Electro Optical Systems commercial powder, produced on an EOS M290 LPBF unit.
Six different part locations on the building platform have been selected, namely in the corners, at a 10 mm distance from the platform edges, and in the central position, in two symmetrical positions spaced 100 mm along the y direction.
The typical process parameters used for this specific job were:
- -
Average powder grain size: D90 (48–51 μm);
- -
Source power: 340 W (single laser source);
- -
Printing speed: 1250 mm/s;
- -
Spot size: 80 μm;
- -
Layer thickness 50 μm.
2.2. Heat Treatment Strategies
In the present study, three different post-process vacuum heat treatment strategies were considered and investigated (
Table 1).
In detail:
- (a)
Simple stress relief thermal cycle (S1): heat treatment performed at 750 °C with a holding time of 2 h and followed by a cooling in Ar flux at 3 bar pressure and 60% fan speed. At the chosen temperature of 750 °C, which is lower than 780 °C, no α prime transformation is expected to occur; the target of the present thermal cycle is simply to erase residual stresses. Expected advantages, according to literature results, are very high peak mechanical properties (UTS and Rp0.2) but with possible scattering and inhomogeneity of mechanical response due to part location;
- (b)
Single annealing (S2) thermal cycle: in this case, different thermal cycles at T > 780 °C are performed but always remain below β transus transition temperature. In detail:
- -
S2.a: heat treatment performed at 800 °C with a holding time of 2 h and followed by a constant cooling rate of 11 °C/min in Ar flux;
- -
S2.b: heat treatment performed at 835 °C with a holding time of 2 h and followed by a constant cooling rate of 11 °C/min in Ar flux;
- -
S2.c: heat treatment performed at 870 °C with a holding time of 2 h and followed by a constant cooling rate of 11 °C/min in Ar flux;
Operating at these temperatures, an α prime transformation is expected and will theoretically be more relevant as temperature increases. The expected advantages are an increased homogeneity of mechanical response and increased elongation at break and ductility, while the higher temperature could have a detrimental effect on the peak mechanical properties (UTS and Rp0.2);
- (c)
Solution annealing + aging (S3) thermal cycle: this is the typical heat treatment strategy used on Ti-6Al-4V alloy in the shape of bars. The thermal cycle, which consists of two stages, is performed as follows:
- -
Solution annealing at 955 °C with a holding time of 1.5 h in an inert atmosphere vacuum, followed by rapid water cooling;
- -
Aging at 500 °C with a holding time of 8 h in a vacuum oven followed by slow cooling in Ar flux;
The purpose of this heat treatment is to completely transform the acicular microstructure α prime and generate the biphasic equiaxial microstructure typical of Ti-6Al-4V alloy. Expected advantages are the achievement of mechanical properties comparable to those obtained by traditional plastic deformation processes, supported by extensive data in the literature. However, this requires a double thermal cycle, and the high mechanical properties typical of the martensitic microstructure are expected to be lost.
In order to have a better understanding of the impact of different heat treatment strategies on Ti-6Al-4V alloy, some samples in an “as built” condition have also been tested as a reference of initial basic properties that can be obtained directly via the LPBF process. In addition, a few samples obtained from a forged bar have also been heat treated using the S3 thermal cycle, which is the one typically used on parts in Ti-6Al-4V machined from solid. These additional samples are used in order to better understand the different properties that can be achieved on the same alloy produced with different technologies and using a thermal strategy that is supposed to deeply homogenize the microstructure [
18].
All heat treatments have been conducted on a TAV vacuum unit H6 S, having chamber dimensions of 600 × 600 × 900 mm and maximum Ar pressure during cooling of 11.5 bar. Heat treatment has been performed using a charge thermocouple, i.e., a thermocouple positioned in contact with one of the samples, where a 1 mm diameter hole, 20 mm deep, had been drilled to fix the K-type thermocouple in place.
2.3. Types of Analyses
The samples heat treated with the different strategies discussed in
Section 2.2 were submitted to a complete characterization by way of tensile tests, microstructural examination with optic and scanning electron microscope, and microstructural phase determination with X-ray Diffraction (XRD).
Tensile tests were performed in accordance with standard EN ISO 6892-1:2016 and using fully machined cylindrical specimens with L0 = 20 mm and D0 = 4 mm. The tests were performed using the constant strain rate method (A1 mode with closed-loop control). Five tests at room temperature were performed for each set of samples subjected to the heat treatment strategy shown in
Table 1, using a hydraulic universal press Instron 5982 with 100 kN maximum load;
For optical micrographic analysis, samples were mechanically grounded using SiC grinding paper and then polished with colloidal silica (0.04 μm) and hydrogen peroxide (30%). Kroll reagent (5 mL HNO3; 10 mL HF; 85 mL H2O) was used as an etchant. Samples were then analyzed using a Nikon Eclipse LV150-NL optical microscope and fluoride lenses. Higher magnification observations have been performed using scanning electron microscopy (ESEM Quanta-200 Fei, Hillsboro, OR, USA, and SEM Nova NanoSEM 450–FEI).
X-ray Diffraction (XRD) data were collected in Bragg–Brentano configuration using an X′Pert PRO multi-purpose diffractometer (PANalytical, Almelo, The Netherlands) equipped with a Real-Time Multiple Strip (RTMS) detector. The Cu-K radiation emitted from the X-ray tube at 40 kV and 40 mA passed through fixed divergence and anti-scatter slits (both 0.5°) as well as a soller slit (0.04 rad) before interacting with the sample. The beam width was adjusted using a mask of 10 mm. The diffracted beam pathway included a Ni filter, a soller slit (0.04 rad), and an anti-scatter blade (5 mm). Data were collected in the angular range 10–120° 2θ using a step size of 0.0167° and 40 s/step. Phase identification was accomplished with the aid of the X′Pert Highscore plus software (2.0, PANalytical B.V., Almelo, The Netherlands) implemented with the PDF2 database.
3. Results and Discussion
In this section, a concise description of the experimental results and their interpretation will be provided.
3.1. Tensile Test Results
The results of tensile tests performed on samples along the growth direction (Z direction) are summarized in
Table 2.
The experimental results confirmed the initial theoretical assumptions: as the stress relief temperature increases, the mechanical characteristics of the specimens are generally reduced compared to the as-built conditions, while elongation, and therefore ductility, are rising. This result is not verified in the case of water-quenched samples (S3) obtained by LPBF. In fact, this thermal cycle undoubtedly results in very high mechanical properties, but it reveals a tendency to significantly reduce the material elongation, which is, in fact, halved with respect to that obtained on a bar of Ti-6Al-4V titanium alloy subjected to the same heat treatment.
Concerning the robustness and limited to the heat treatments below beta transus temperature, both treatments, S2.b or S2.c, provide excellent peak mechanical properties with minimum variance in the case of the S2.b one, while elongation at break has a minimum variance for the S2.1 treatment, but with an average value lower than the one achievable by the two aforementioned treatments. Based on such results, the best trade-off solution is represented by the S2.b treatment, which dramatically reduces the variance with respect to the as-built conditions.
3.2. Micrographic Examinations
With the rapid solidification and cooling rates of the LPBF process, the bcc β phase of Ti-6Al-4V alloy transforms completely into metastable hcp α prime phase, which is typically fine acicular martensite needles with the presence of elongated and oriented grains [
19]. A sample obtained by cutting the section of a specimen in the “as built” condition parallel to the build direction was extracted [
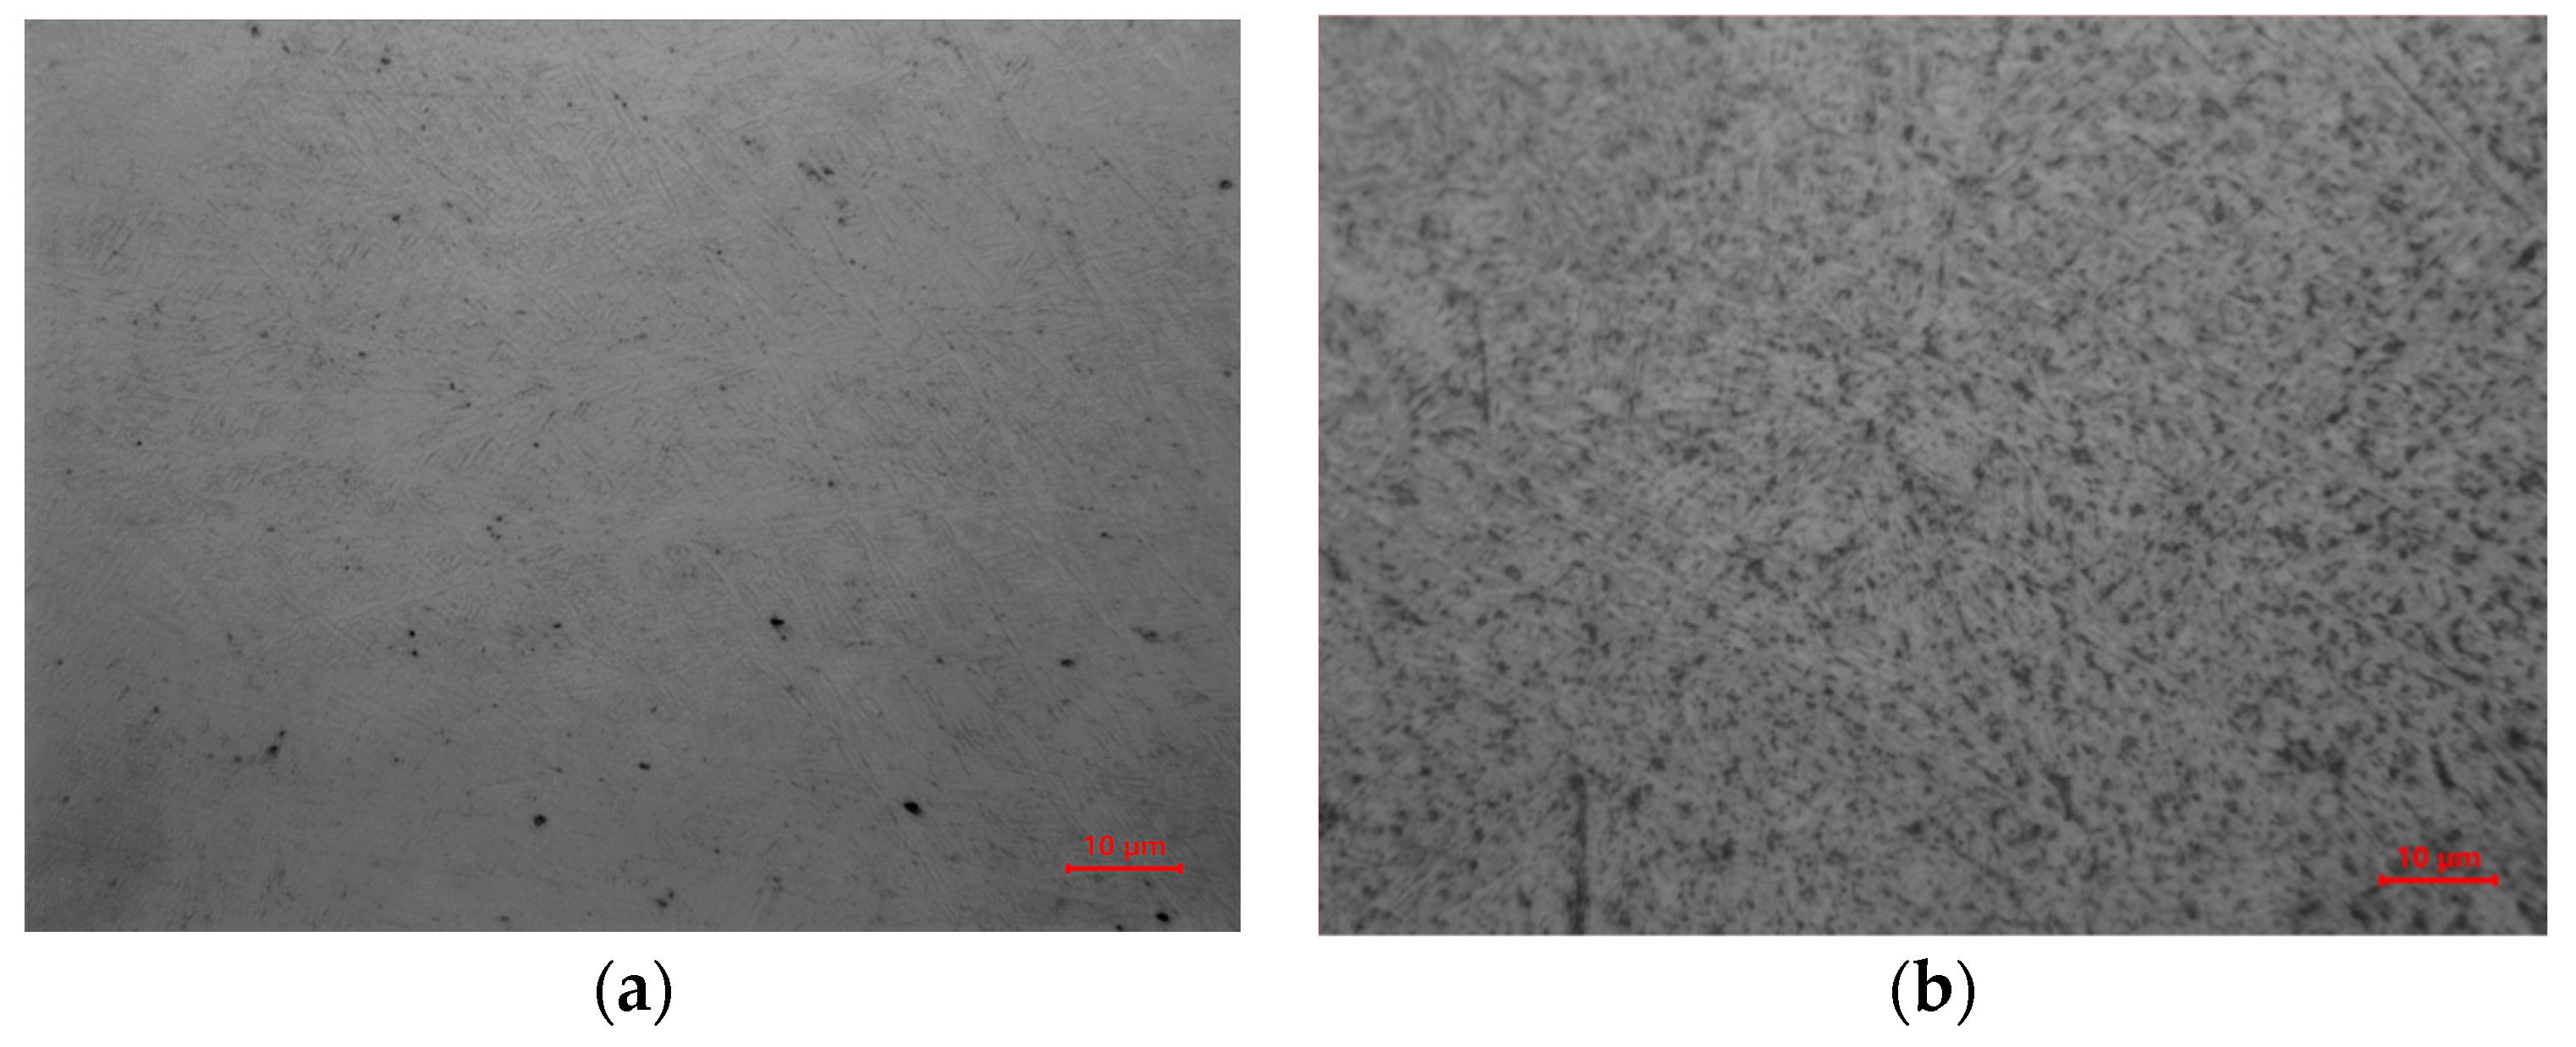
20]. Its typical microstructure is shown in
Figure 1a.
In this microstructure, the fine α prime needles, generated due to a sequence of rapid heating and cooling cycles typical of the LPBF process, are clearly visible, and at lower magnification, the printing pattern can be easily identified (
Figure 1a,b). This phenomenon of martensitic structure creation occurs because the high cooling rates used in LPBF processing deplete the vanadium content present in the material matrix; this element is a strong β stabilizer for the titanium alloys, and its absence allows for the formation of α prime.
The sample submitted to stress relieving treatment S1 (T = 750 °C) analyzed by OM (
Figure 1b) did not present significant changes in the morphology and microstructure of the material if compared to the sample in the as-built condition (
Figure 1a), in agreement with literature results [
21].
Figure 2 shows OM micrographs of samples subjected to single annealing treatments at higher temperatures but still below the beta transus one. As can be observed from the figures, the resulting microstructure in all heat-treated samples is composed of α acicular phase.
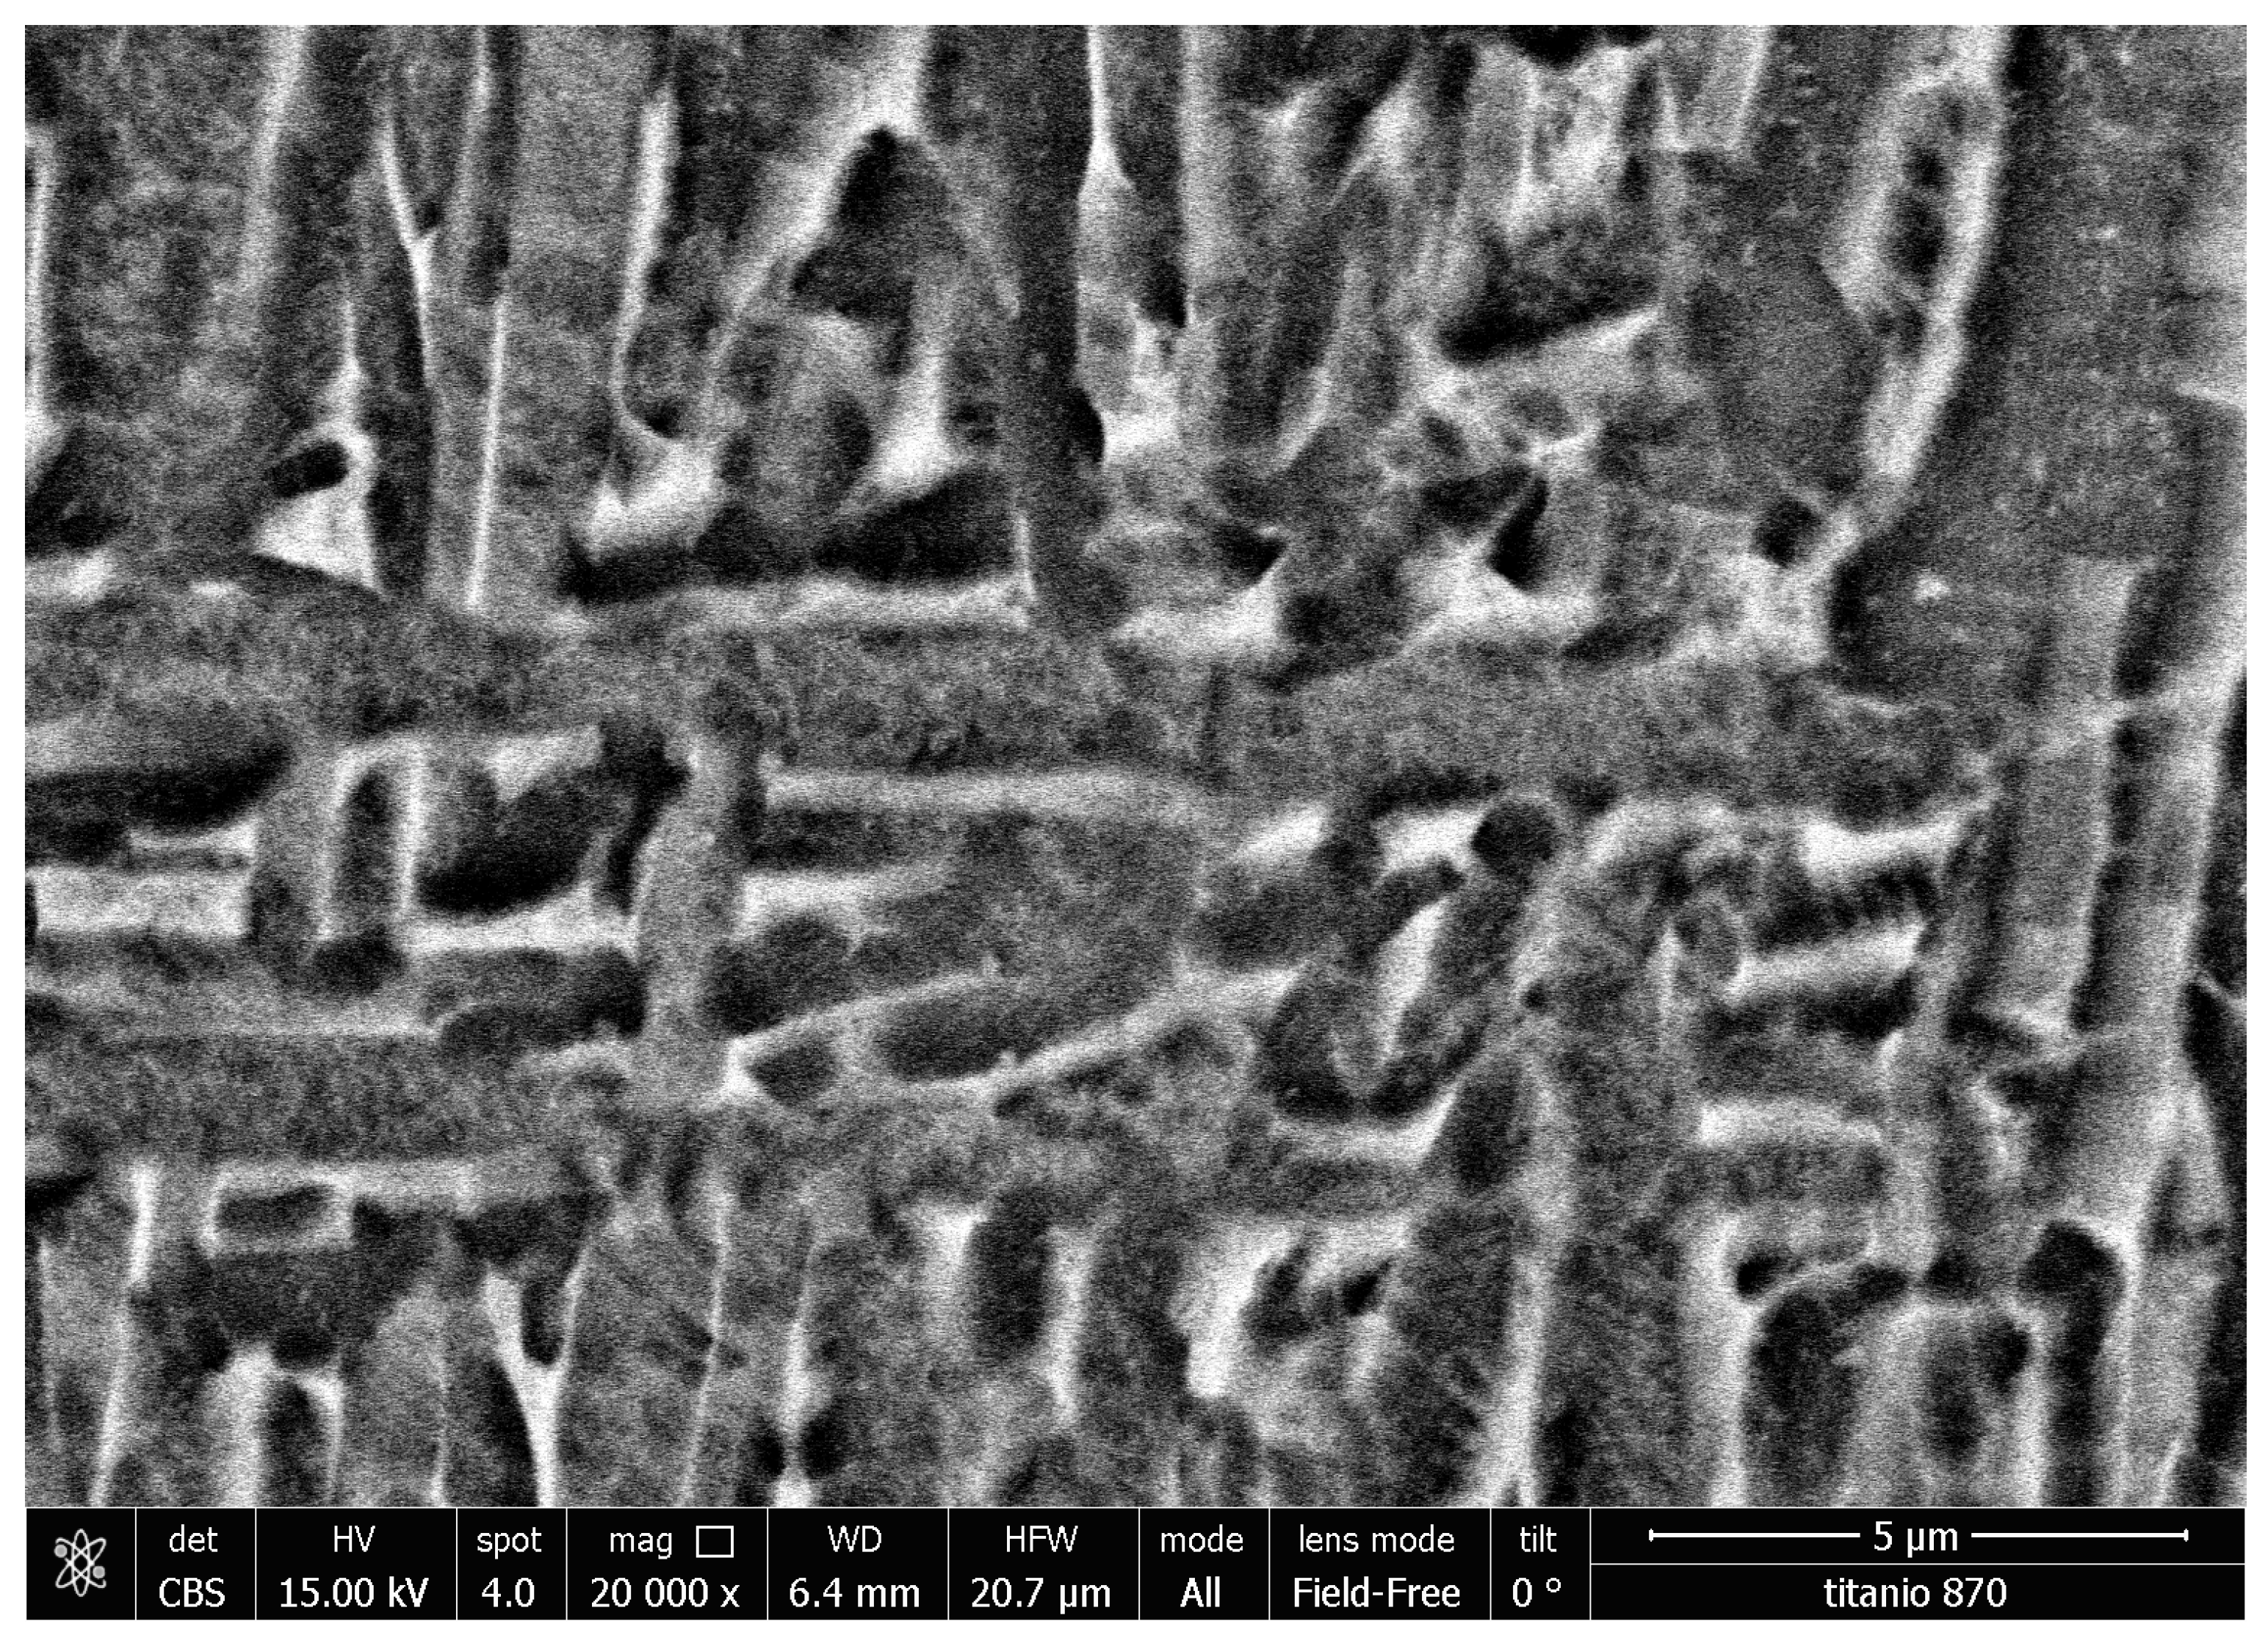
For stress relief conditions S2.a, S2.b, and S2.c, since the heat treatment temperature is still far below the beta transus temperature (Tβ), the initial grain morphology is unchanged, as can be observed in
Figure 3. However, nucleation of a small portion of β phase (areas between α needles) can be noted in all three microstructures in increasing amounts as the treatment temperature rises. This result, further confirmed by the analysis of lamellae dimensions, shows that the final spacing of the microstructural features in the LPBF material is primarily dependent on the maximum temperature reached, and not on the cooling rate, for heat treatments in the intermediate α + β range, in agreement with literature results [
6].
The morphology of the three samples is very similar, and the size of the most prominent lamellae was measured using higher magnification, as shown in
Figure 3 in the case of the sample heat-treated at 870 °C (S2.c).
For all the treatment temperatures below the beta transus and not involving water quenching, the lamellae size, determined by the intercept method on high magnification micrographs, is summarized in
Table 3.
Results indicate the expected growth of lamellae size with temperature, having temperature a greater impact on lamellae coarsening than resident time or cooling rate for treatments performed below beta-transus [
22]. Within the investigated temperature range, there is a linear dependence of the lamellae size on maximum temperature (correlation coefficient R
2 = 0.99), with minimum standard deviation for the S2.a and S2.b strategies.
All the sub-beta transus processed samples except for S2.a follow the Hall–Patch relationship σ
y = σ
0 + k × d
0.5 equation, correlating the inverse of lamellae size (d) with the yield strength (σ
y), with σ
0 = 891.53 MPa and a strengthening coefficient k = 0.133 MPa√m. Results are almost in agreement with similar results from the literature but with a lower strengthening coefficient [
23].
At higher temperatures, the resulting microstructure is more influenced by the cooling rate. The previous results show that heat treatment below the β-transus temperature transforms an α prime martensitic structure into a lamellar α + β structure.
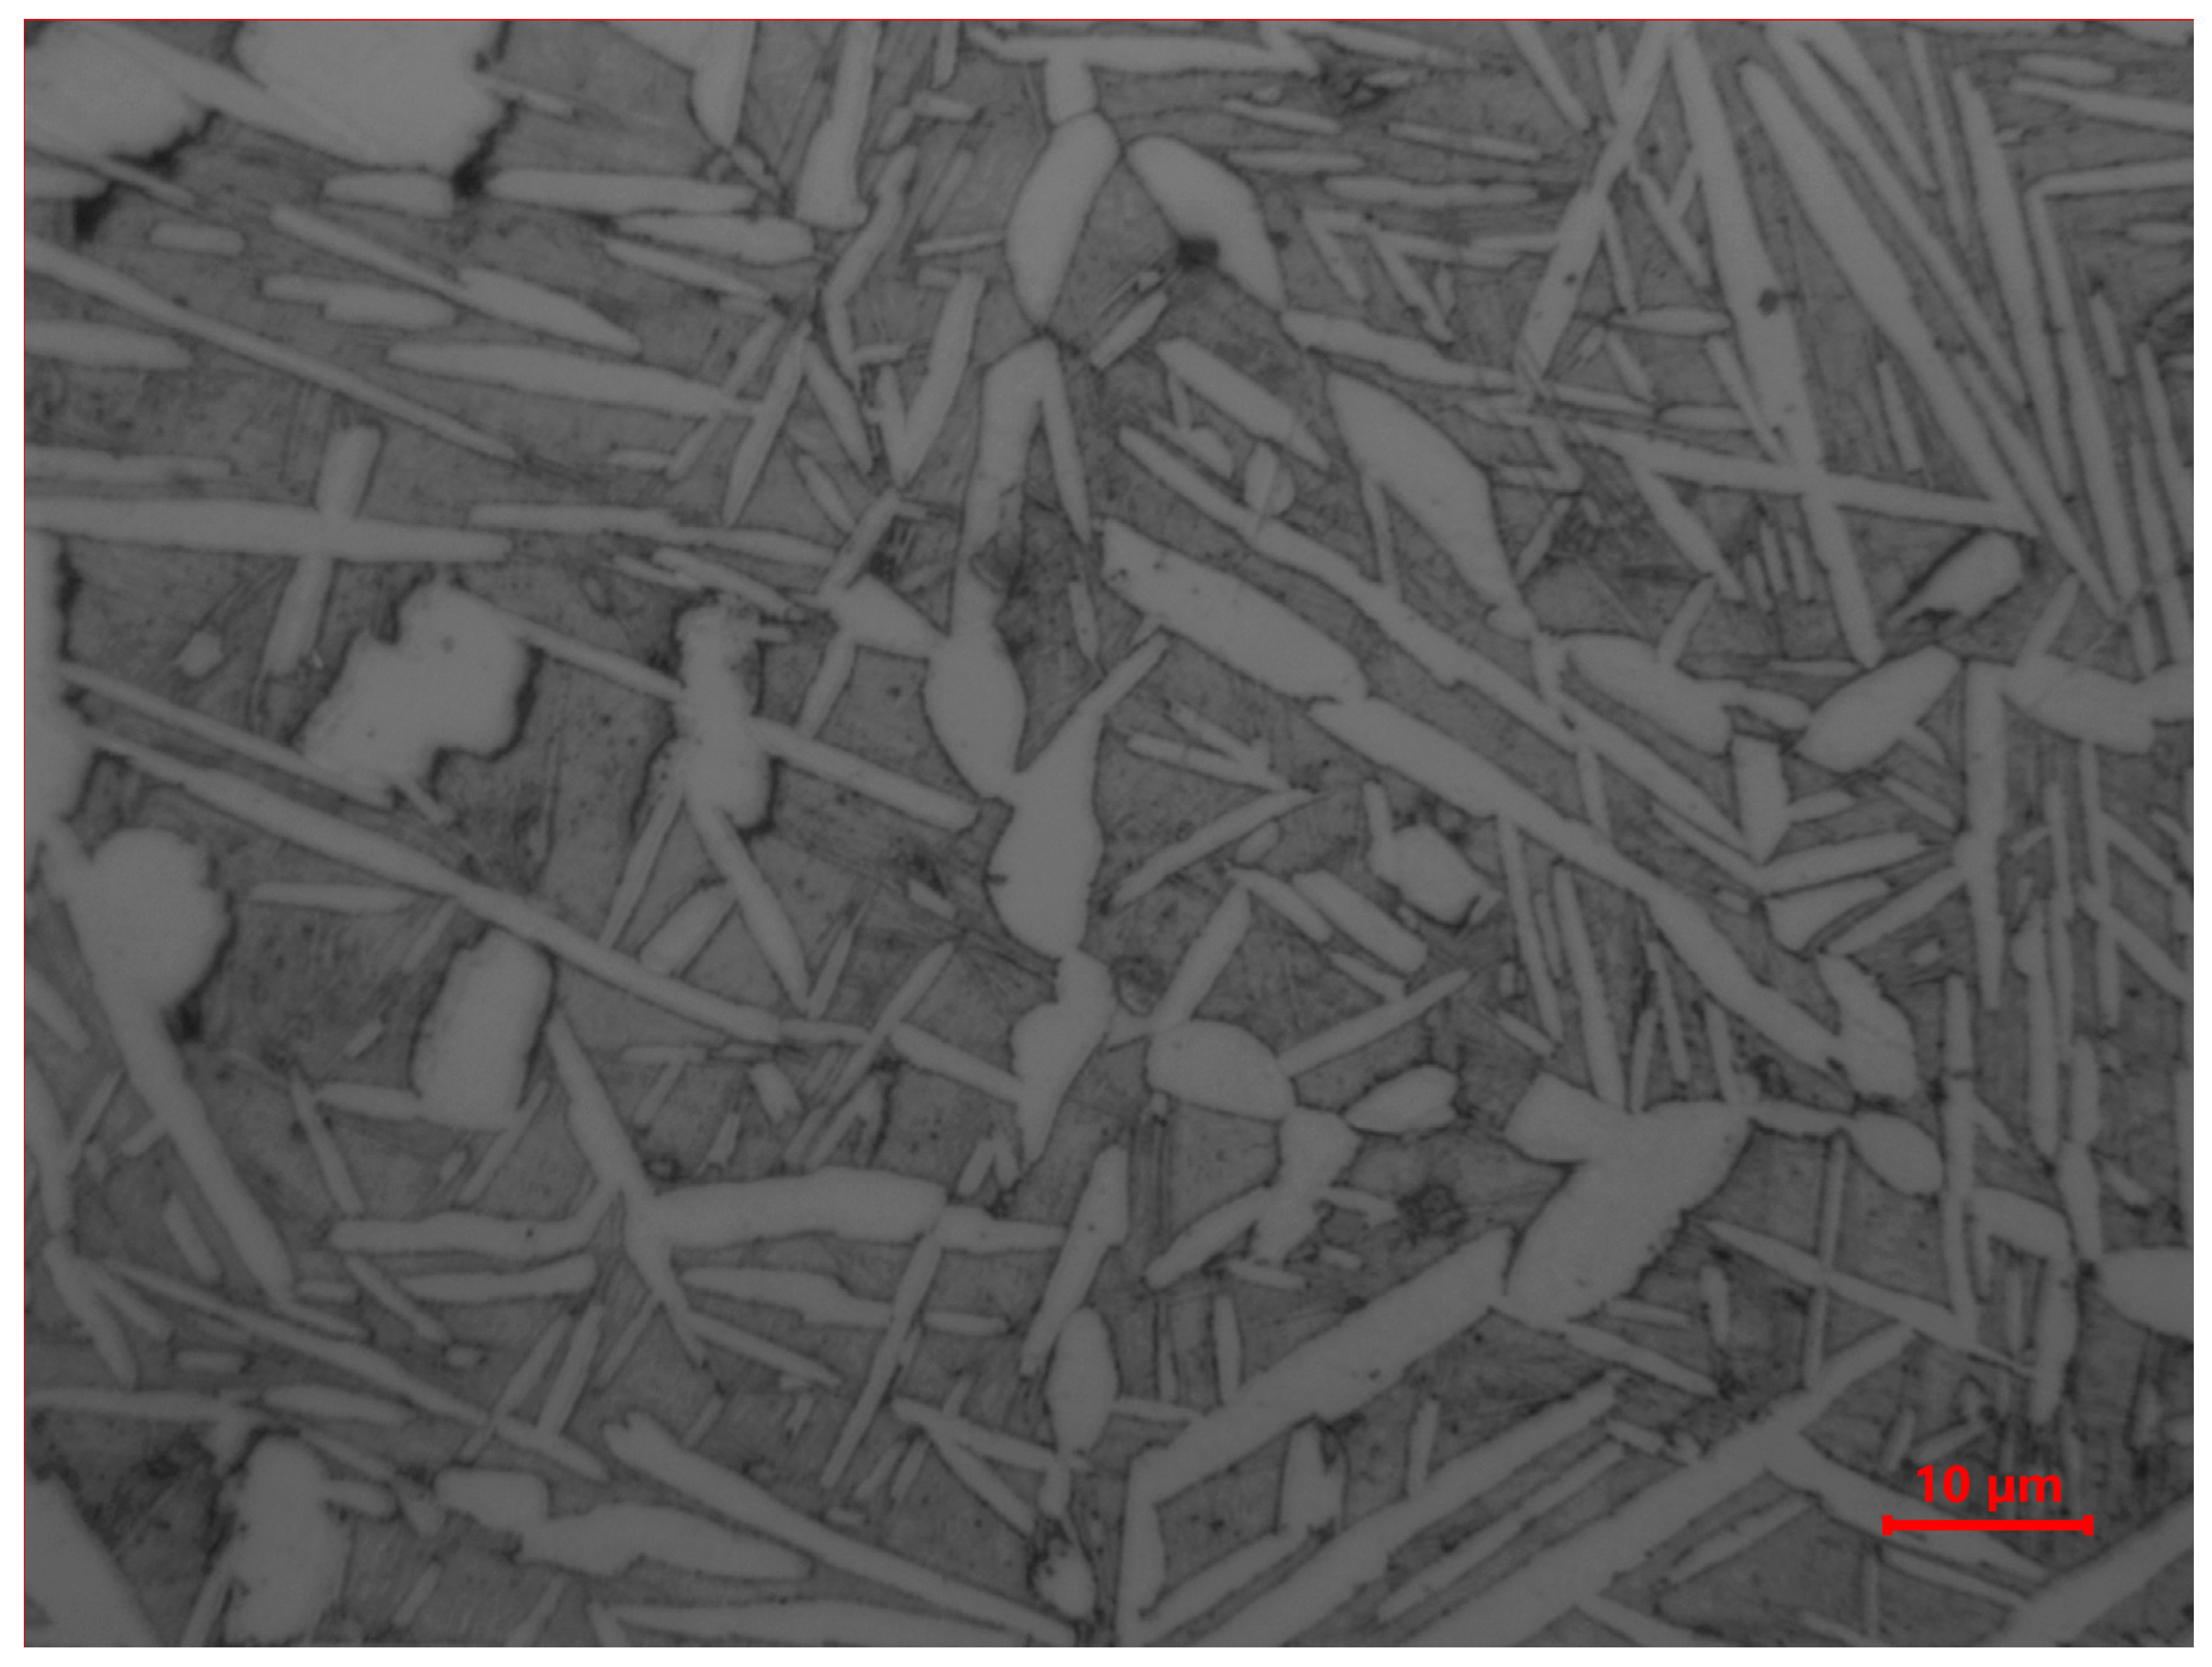
In the case of heat treatment strategy S3 (solution treatment + aging), the temperature was brought to 955 °C, close to Tβ, but not enough for the total transformation of the initial microstructure. The resulting microstructure is shown in
Figure 4.
The microstructure obtained with the LPBF samples consists mainly of α and β, showing, in this case, a coarser structure. The coarsened structure occurs due to the more severe heat treatment conditions of S3 samples, which present a higher Larson–Miller parameter. Such parameter is defined as P = (T + 273) × (20 + log10t)/1000, where T is the temperature n °C and t the duration of the heat treatment in hours. Such P parameter can be used to describe the effect induced by the heat treatment on the Ti6Al4V samples [
24], and in our study, ranges from the value of 20.76 for the S1 strategy to the range of 21.78–23.20 for the S2 strategy and reaches values higher than 24, even considering only the initial stage of S3 treatment.
3.3. XRD Analysis
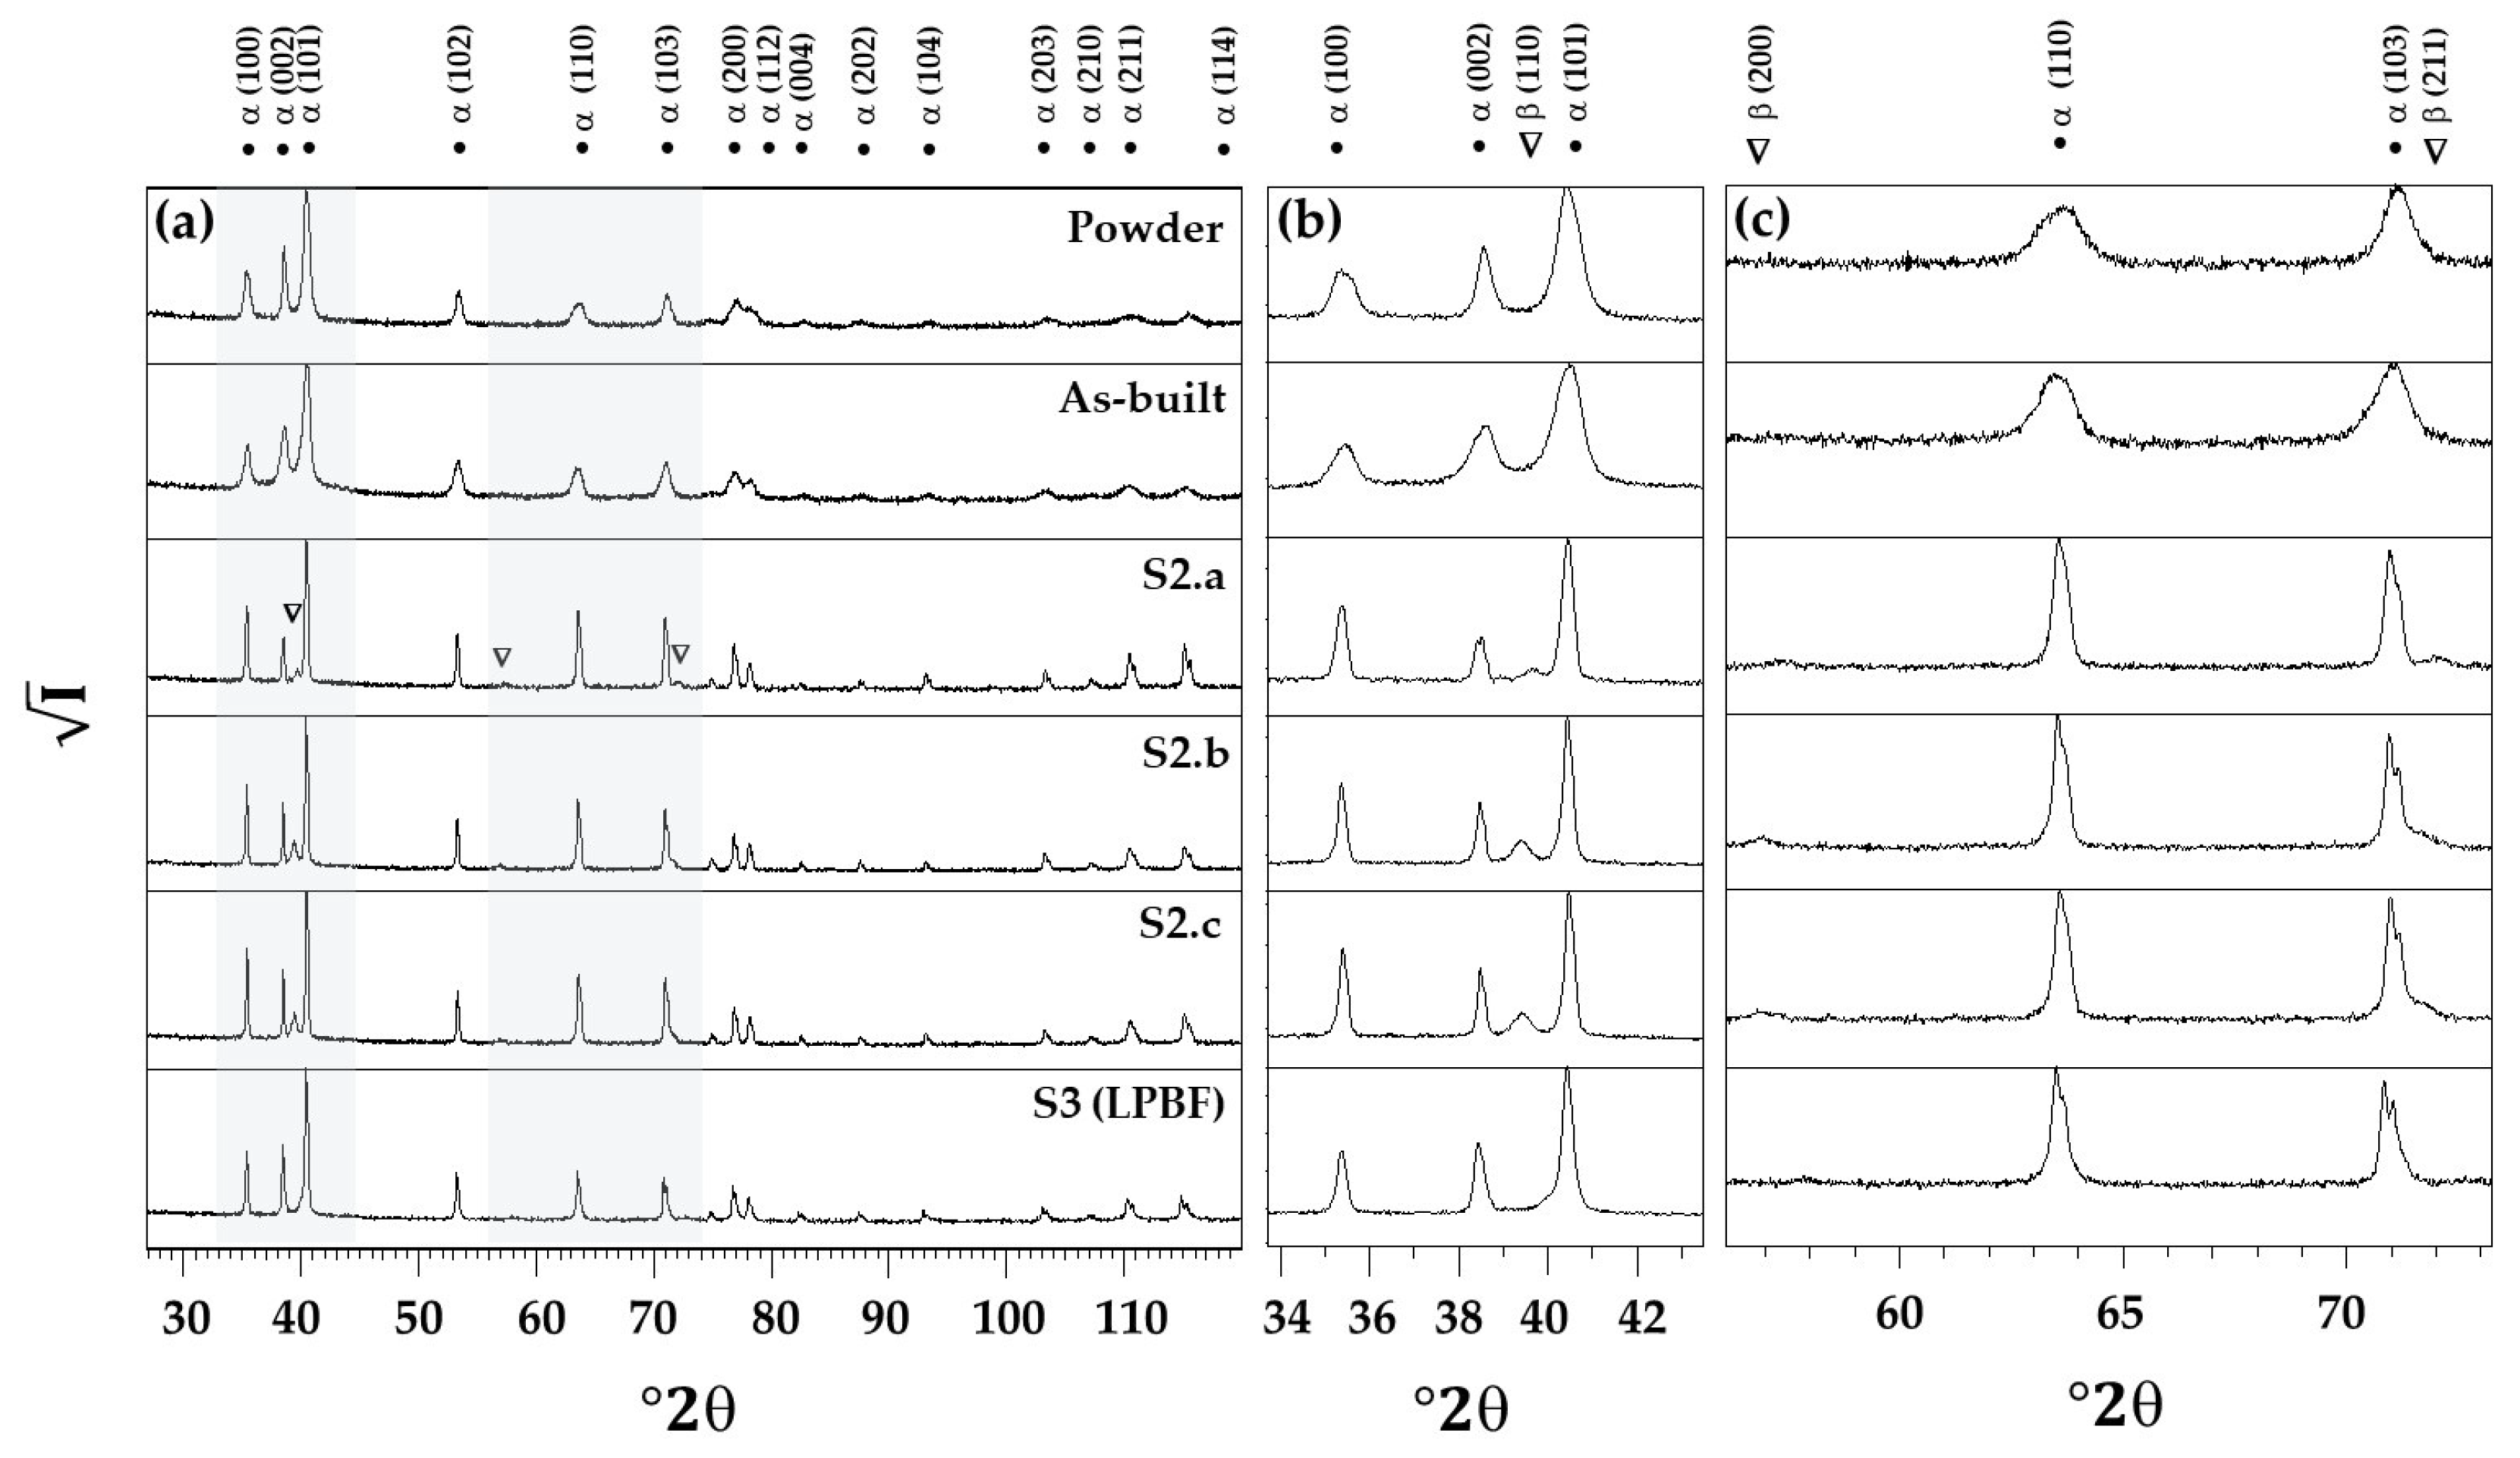
Figure 5 shows XRD data collected from the powder, the as-built sample, and the samples exposed to heat treatments at various temperatures. The full angular range is shown in (
Figure 5a), whereas limited ranges, better visualizing the reflections assigned to the β-phases, are shown in (
Figure 5b,c). First of all, the powder and as-built sample are both composed of a single hcp phase which is in line with the metallographic analyses showing an α prime martensite phase. For gas-atomized particles, this is usual, and it can be ascribed to the high cooling rates applied during production [
25]. The relative intensities of the peaks correspond to the reference pattern (JCPDS file 44-1294, space group P63/mmc), indicating the random orientation of the crystallites. Following single annealing at 800 °C (S2.a), reflections assigned to the β-phase appear (body-centered cubic structure, space group Im-3m [
26]). Increasing the annealing temperature to 835 °C (S2.b) results in higher intensity of these reflections, whereas no further increase in intensity is observed for the sample annealed at 870 °C (S2.c). In fact, the XRD patterns collected from the sample annealed at 835 °C and 870 °C are practically identical. The relative intensities of the hcp reflections are changed in the annealed samples, most probably due to texture development. It is interesting to observe that annealing results in decreased width of the hcp reflections. This is indicative of increased crystallite size and/or decreased microstrain and, thus, in accordance with the heat-induced transformation of the fine α-martensite structure into a coarser lamellar α + β structure.
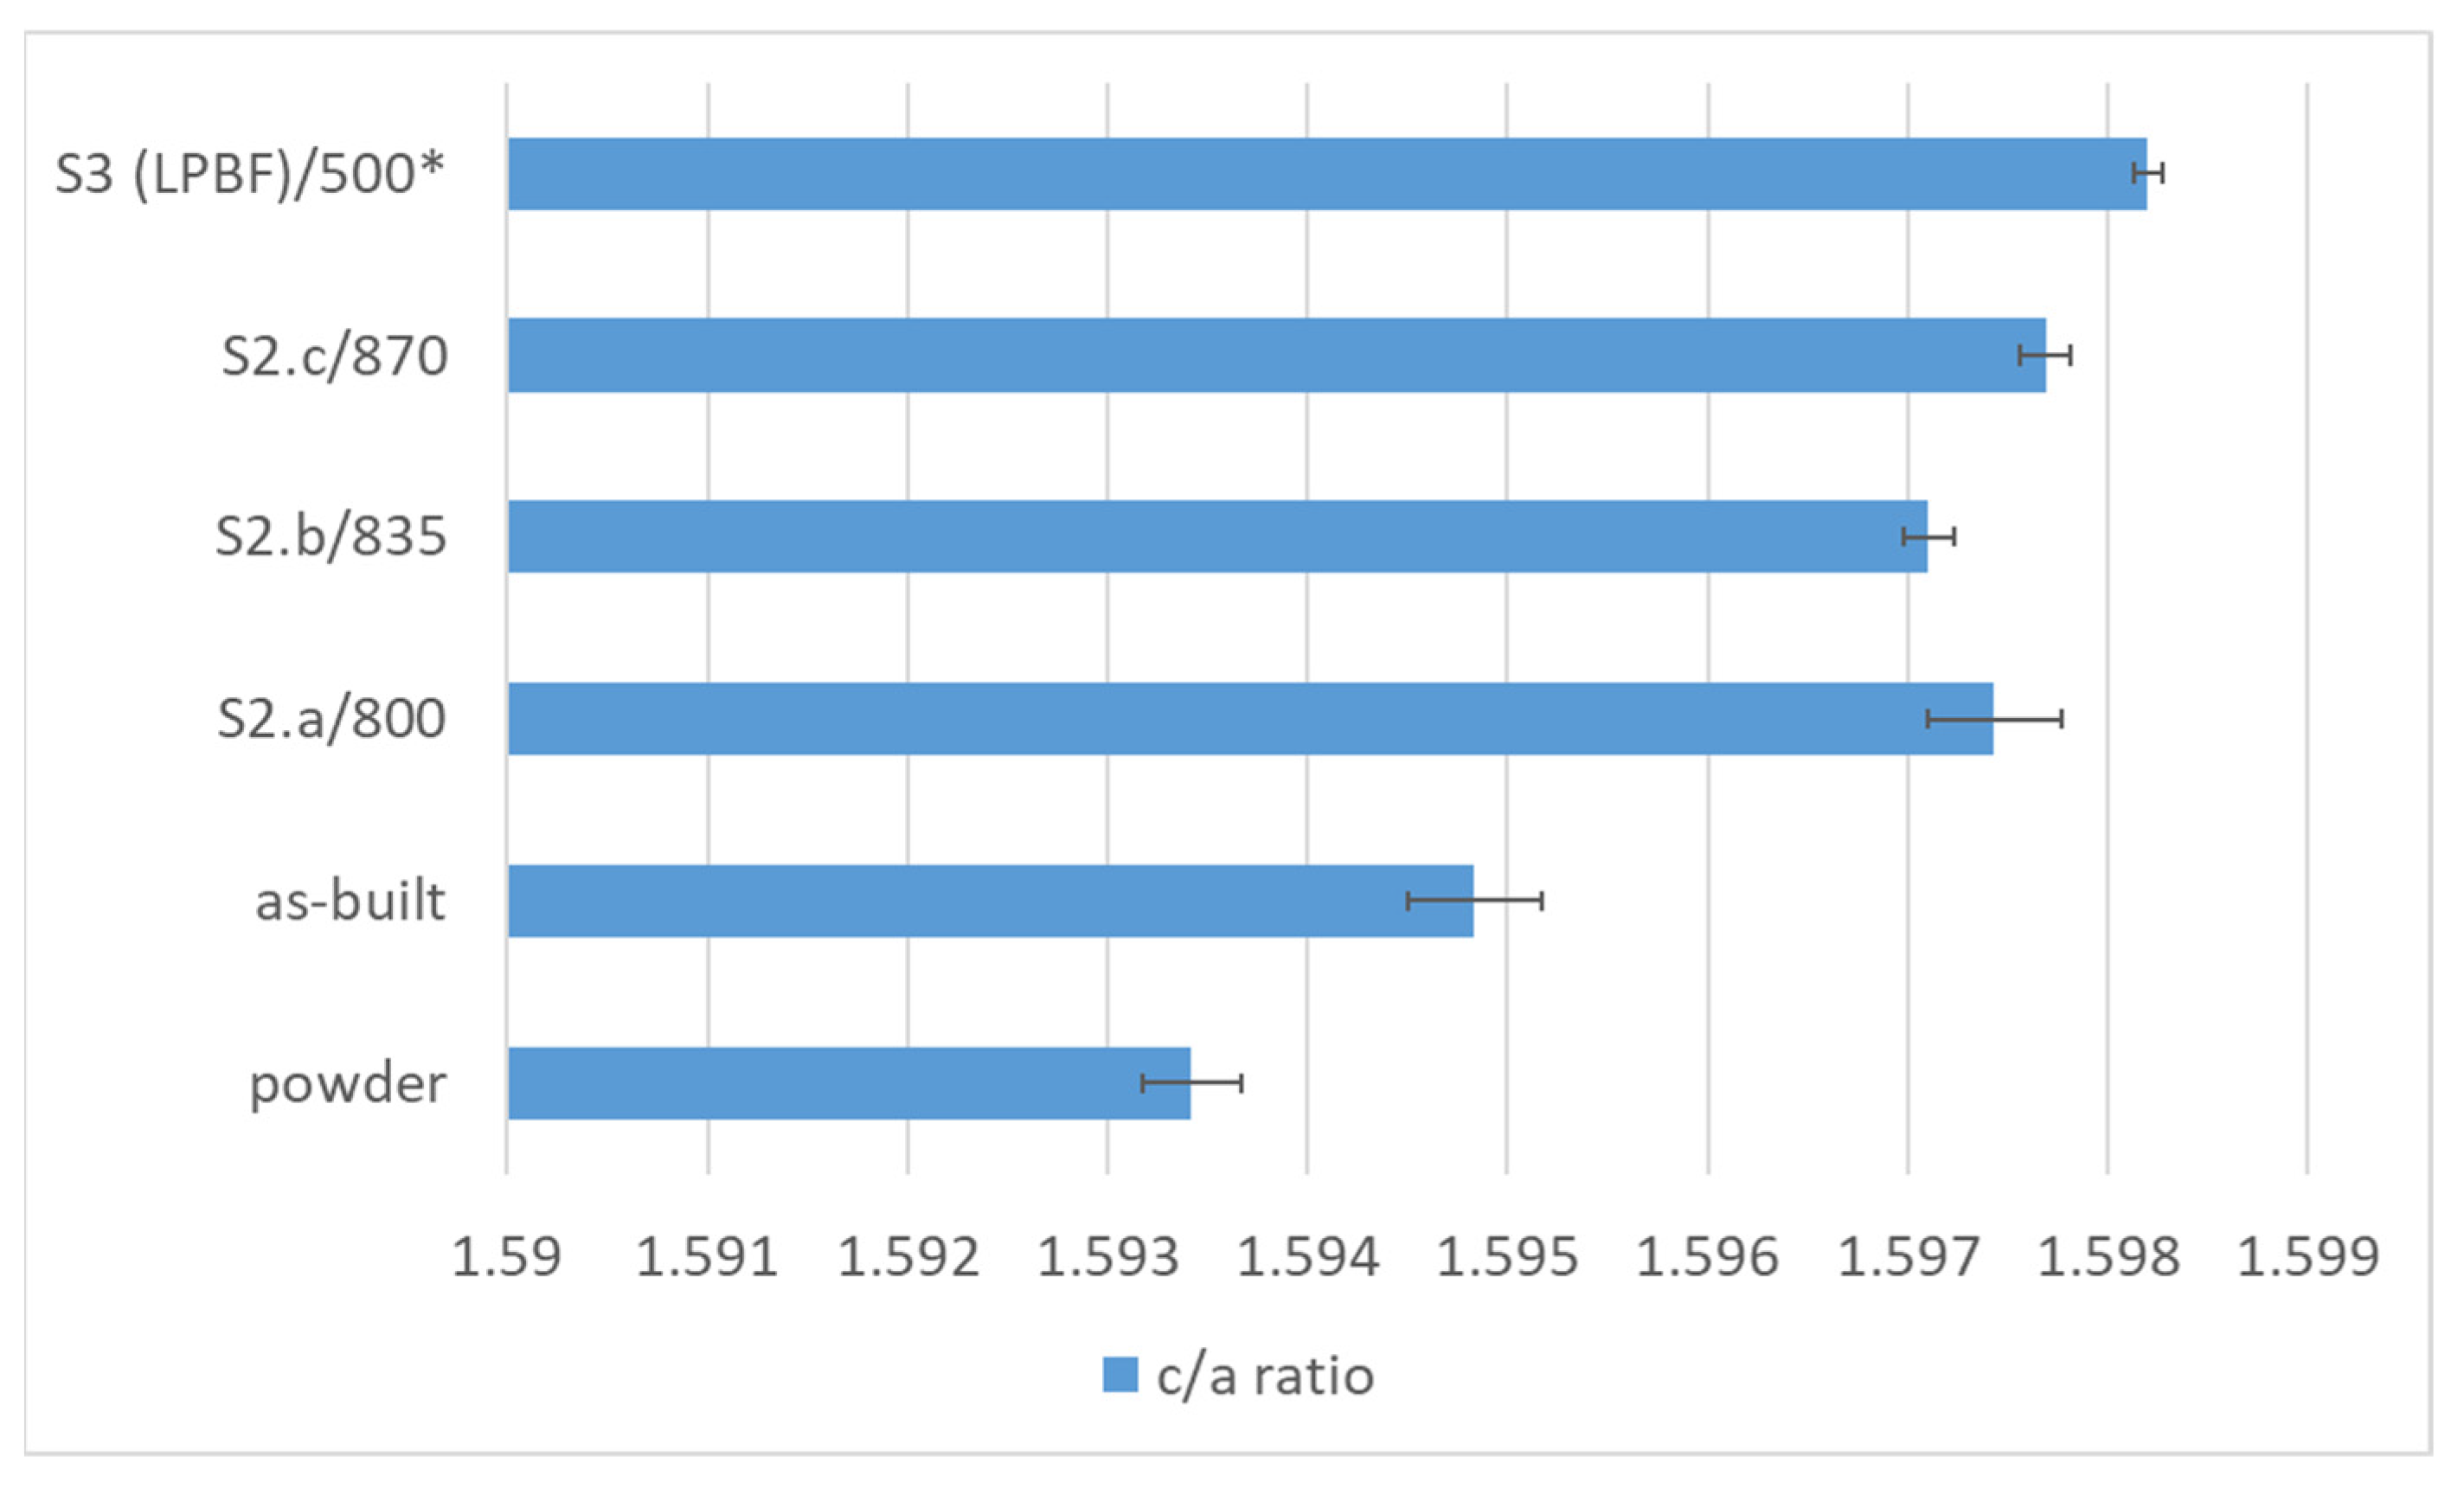
The XRD patterns allowed to evaluate the c/a ratio of the alpha or alpha prime phases (distinguishing between these two phases by XRD patterns collected in the experimental conditions used in this study is challenging, as both are characterized by the same hexagonal structure [
27]), as shown in
Figure 6.
Results are consistent with the typical values of Ti6Al4V alloys from the literature [
28]. The smaller values of the c/a ratio are found in the case of powders or as-built samples, indicating the presence of martensite, possibly supersaturated with β stabilizing elements, distorting the lattice [
29]. Residual stresses in the samples deriving from the fabrication process are also evidenced by the XRD patterns, which present a shift towards higher 2θ angles.
On the contrary, heat-treated samples of the S2 series present an increase of the c/a ratio and no peak shift, indicating on one side that the elements are progressively re-distributed, and the original alpha prime phase is progressively transformed into equilibrium alpha and beta phases and on the other side, that annealing successfully reduced or erased the residual stresses. Within the experimental error, for the S2 series, there is a positive trend towards the increase of the c/a ratio as a function of the annealing temperature, as expected.
In the case of the sample subjected to water quenching and subsequent aging at 500 °C (S3), it presents the maximum c/a ratio and negligible peak shift, indicating the full removal of residual stresses and the decomposition of the alpha prime phase formed during quenching into the equilibrium alpha and beta phases.
4. Conclusions
An analysis that combines mechanical response, microstructural observation, and the study of diffraction patterns allows a better understanding of post-heat treatments on LPBF Ti6Al4. In particular, by means of the analyses performed, it has been possible identifying a sub-beta-transus heat treatment able to retain the excellent mechanical properties of the as-built samples but with higher elongation and, more importantly, presenting lower variance within samples belonging to the same build but with a different part location. This allowed us to fulfill the objective of this study, i.e., selecting an 830 °C annealing for 2 h to obtain parts that combine high strength, good ductility, and uniform distribution of characteristics in the whole printing area. Moreover, as temperature increases, the mechanical properties decrease with respect to as-built conditions, and there is a gain in ductility. In particular, comparing the mechanical response of the analyzed specimens, it is observed that samples treated at 750 °C and 800 °C exhibit comparable mechanical properties. However, as evidenced by XRD analysis, at 800 °C there is an onset of phase transformation α′ → α + β resulting in an increase in ductility (approximately 2%). At 835 °C, the best compromise between mechanical properties and ductility is achieved, while further increasing temperature has detrimental effects: mechanical properties are already decreasing, as well as the elongation, which is 4% lower than at 835 °C to S2.b sample. XRD results have shown that the intensity of the β-phase reflections increases with increasing annealing temperature. The narrowing of the reflections of the hcp phase following annealing should, at least in part, be explained by the change from finer needles of the α′ phase to larger lamellae of the α phase.
