Abstract
A vectorized analytical model for the cutting dynamics in the spiral bevel gear face hobbing process has been developed, which is based on machine tool kinematics and vibration vectorization. The structural modal parameters of the cutter head spindle system are obtained through experimental modal analysis with hammer impact testing. The analytical model is utilized to simulate the generation of simulated vibration acceleration signals during spiral bevel gear hobbing. A wavelet threshold denoising method is applied to process the simulated vibration signals of the spiral bevel gear face hobbing with added white noise. Signal processing methods, including short-time Fourier transform are employed for time-domain analysis, frequency-domain analysis, and time–frequency-domain analysis of measured signals and simulated signals, thereby extracting the corresponding statistical features. In addition to the results of the experimental modal analysis, the causes of chatter in spiral bevel gear hobbing are discussed in detail, revealing that the main factor is cutter head vibration in the Y direction of the Hunan ZDCY CNC EQUIPMENT YKA2260 machine tool used in this research. The error in the time-domain characteristic parameters between simulated signals and measured vibration acceleration signals is within 15%, with a difference of 3.5% in spectral peak values. The predicted tooth surface morphology from simulation matches the actual morphology on the workpiece, comprehensively validating the reliability of the cutting dynamics model for the spiral bevel gear face hobbing process. Another conclusion drawn from numerical simulation experiments is that the amount of tooth surface waviness of the spiral bevel gears is the ratio of tool chatter frequency to cutting fundamental frequency.
1. Introduction
Spiral bevel gears are one of the most complex types of hypoid gears in gear transmissions. They offer advantages, such as high meshing accuracy, strong load-bearing capacity, high transmission efficiency, low noise, and high reduction ratio. As the most crucial transmission components, they find widespread applications in industrial systems including aircraft, helicopters, transportation vehicles and machine tools. In helicopter drive systems, spiral bevel gears play a vital role. The spiral bevel gear transmission device and the two-stage planetary gear reduction system constitute the main gearbox of the helicopter, which reduces the output shaft speed of the engine to drive the main rotor. Spiral bevel gears can be classified into two types based on their tooth profiles: involute and cycloidal. These gears are typically manufactured by two distinct methods: face milling for involute teeth and face hobbing for cycloidal teeth [1,2]. Due to the low transmission noise, high efficiency of continuous tooth generation, and excellent smoothness during the meshing process, cycloidal gears have been widely promoted and utilized across various industries. In the meantime, the theoretical aspects of the face hobbing process for spiral bevel gears have garnered significant attention from researchers. Fan [3,4] and Litvin et al. [5] conducted detailed analyses of the machine tool motion during the face hobbing process for spiral bevel gears and investigated the tooth surface formation principles based on machine tool motion models. Wu et al. [6] studied the formation principles and geometric structures of cycloidal bevel gears. Zhang et al. [7] derived equations for the root fillet and discussed the geometric characteristics of the tooth surface in the face hobbing process for spiral bevel gears. Suzuki et al. [8] proposed a direct method for designing the working surfaces of quasi-hyperbolic gears, accurately obtaining conjugate gear surfaces through coordinate transformations. Wang et al. [9] proposed a method for machining line-contact spiral bevel gears using a tapered cylindrical milling cutter. This approach offers a novel perspective for the design and manufacturing of spiral bevel gears. Habibi et al. [10] developed a semi-analytical representation of the projection of undeformed chips on the rake face of the cutting tool. They applied the theory of oblique cutting using the derived geometric shape of the chip to transform hobbing into oblique cutting, thereby predicting the cutting forces during the hobbing process. Efstathiou et al. [11] developed the Ithaca Bevel Gear Suite platform, which not only enables the calculation of gear tooth and undeformed chip solid geometries but also calculates the global cutting forces. Additionally, it utilizes charts of localized forces generated at the tool tip to predict tool wear. Due to the complexity in both the design theories and face hobbing technology for spiral bevel gears, only a few companies worldwide, namely Oerlikon in Switzerland, Klingelnberg in Germany, and Gleason in the United States, are capable of providing complete solutions. Consequently, there is very limited information publicly available on systematic research regarding the face hobbing process for spiral bevel gears.
Chatter is a self-excited and detrimental vibration phenomenon in mechanical machining, which results from the interaction between the tool and the workpiece and is to be avoided. It can lead to unstable machining processes, thereby negatively impacting machining accuracy, workpiece surface quality, machining efficiency, and tool life. Chatter can be categorized into friction-induced chatter, modal coupling chatter, and regenerative chatter based on its causes [12]. The first two types of chatter can be addressed, respectively, by improving lubrication conditions and optimizing system structural design. However, as for the regenerative chatter, which arises from the interaction between the metal cutting process and machine tool structure, its behavior is unstable and this results in significant relative displacements between the tool and workpiece, leaving dense chatter marks on the machined tooth surfaces. This makes it challenging to achieve surface finish quality requirements and difficult to suppress [13]. Therefore, numerous scholars have conducted research on modeling the cutting dynamics and regenerative chatter mechanism during metal cutting processes [14,15,16,17]. In identifying the dynamic parameters of chatter models, two main approaches are typically employed to describe the analytical expressions of cutting dynamics [18]. One method involves obtaining coefficients of specified forms of incremental cutting equations through steady-state cutting experiments [19]. The other method relies on Meritt’s proposed cutting process model to derive the mathematical model of chatter dynamics [20]. Totisa et al. [21] analyzed the influence of forced vibration on the contact state between the tool and workpiece, discovering that the contact state between the tool and workpiece leads to nonlinear vibrations of the machine tool, thereby further refining the theoretical modeling of metal cutting dynamics. Kilic et al. [22,23] established analytical models for predicting chatter stability in milling processes and proposed a general mechanical model for metal cutting based on oblique cutting theory. Moradi et al. [24,25] investigated bifurcation characteristics in metal machining processes considering the effects of process damping and tool wear and developed an analytical dynamic model incorporating nonlinear regenerative chatter. Feng et al. [26] proposed a normalized process damping model based on the variable stiffness of movable components in the machining process system to study the suppression of chatter in metal machining processes. Similar to traditional metal cutting, the face hobbing process for spiral bevel gears is prone to chatter, which involves excessive vibrations between the cutting tool and workpiece. This phenomenon leads to poor surface finish, high-frequency noise, and accelerated tool wear [27,28,29]. Due to the synchronous motion of the cutter head and workpiece during the face hobbing process for spiral bevel gears, the kinematic model for face hobbing with vibration is more complex compared to conventional models. This complexity poses significant challenges for investigating the cutting dynamics and the chatter mechanisms in the face-hobbing process of spiral bevel gears. However, currently published research primarily focuses on the cutting force modeling and chatter stability prediction in traditional metal machining processes, such as milling and grinding. Up to now, there is scant systematic research on the cutting dynamics and chatter mechanism in the spiral bevel gear face hobbing process.
This research applies the method of vibration vectorization modeling to vectorize the machined tooth surface under cutter head vibration, thereby establishing an analytical model for dynamic cutting forces in spiral bevel gear face hobbing. Modal parameters of the cutter head spindle process system of the research equipment, namely the YKA2260 gear hobbing machine, are obtained through hammer impact testing and experimental modal analysis. Subsequently, simulated vibration acceleration signals are generated using the cutting dynamics model. Vibration acceleration signals during spiral bevel gear face hobbing are collected in machining experiments. A comparative analysis in the time domain, frequency domain, and time-frequency domain is carried out using the simulated signals and the measured signals. Corresponding characteristic statistical quantities have been extracted to verify the reliability of the theoretical model and simultaneously explore the influence of cutter head vibration on the quality of machined sample spiral bevel gears. This research intends to provide significant reference value for optimizing the spiral bevel gear face hobbing process.
2. The Cutting Dynamics in the Spiral Bevel Gear End-Face Hobbing Process
2.1. Kinematics of Machine Tool and Machined Tooth Surface of Gearwheel
Based on the existing research achievements of the research group [30,31], the machine tool motion relationship for the spiral bevel gear face hobbing process can be established as depicted in Figure 1. There are three crucial reference coordinate systems: the machine origin coordinate system Om-xmymzm, the cutter head coordinate system OH-xHyHzH, and the workpiece coordinate system Ow-xwywzw. O1-x1y1z1 and O4-x4y4z4 denote the theoretical initial cutting positions of the cutter head and workpiece, respectively. Due to vibration effects, both the cutter head and workpiece experience displacement to their actual starting cutting positions O’1 and O’4, with corresponding vibration displacements vH and vw. vH and vw are decomposed along the coordinates Om-xmymzm and O4-x4y4z4, yielding components (xH, yH, zH)T and (xw, yw, zw)T, respectively. φw represents the rotational angle of the workpiece, φH denotes the rotational angle of the cutter head, βw is the angular position of the workpiece, OW is the length of the workpiece fixture, X denotes the theoretical horizontal position of the tool head on the machine’s x-axis, Z represents the theoretical initial vertical position of the cutter head on the machine’s z-axis, and Y denotes the theoretical horizontal position of the cutter head on the machine’s y-axis.
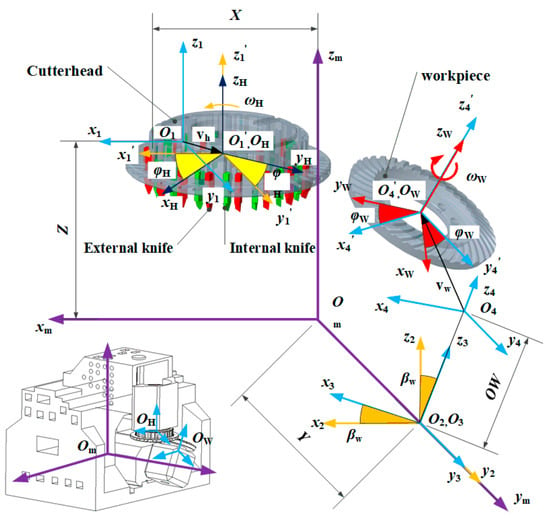
Figure 1.
Kinematic relationship in face-hobbing with machine tool vibration.
The installation relationship between the tool and the cutter head is illustrated in Figure 2. rt represents the analytical formula for the cutting edge in the tool-fixed coordinate system (OT-xTyTzT), and s denotes the arc length parameter of a specific point on the cutting edge. The angles α, αt and αb correspond to the rake angle, the top edge tooth angle, and the main cutting-edge tooth angle of the tool, respectively.
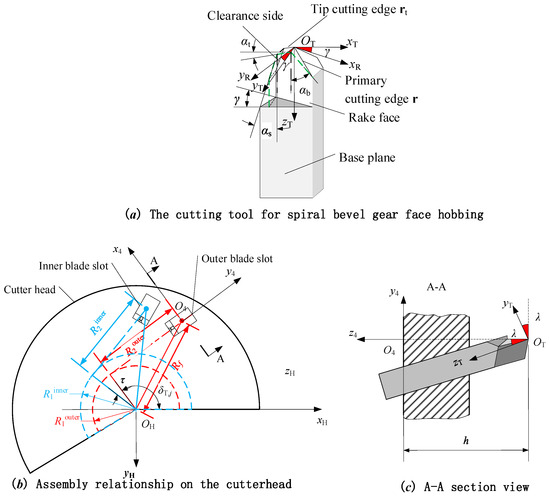
Figure 2.
Layout of tool structure and its installation.
The tooth profile of the generated spiral bevel gears with the influence of cutting vibration can be expressed as follows:
In the equation, Φ represents the tooth profile of the gearwheel, φ represents the angular displacement of the cutting edge of the tool, and s represents the arc length parameter of a point on the cutting edge. M’wh is the homogeneous transformation matrix from the workpiece-fixed coordinate system Ow-xwywzw to the cutter head-fixed coordinate system Oh-xhyhzh. MhT is the homogeneous transformation matrix from the cutter head-fixed coordinate system Oh-xhyhzh to the tool-fixed coordinate system Ot-xtytzt. r(s) represents the expression of the cutting edge of the tool in the tool-fixed coordinate system Ot-xtytzt.
2.2. Undeformed Chip Geometry and End Cutting Forces
The workpiece material is continuously removed by the cutting edges of the tools, which forms concave and convex surfaces on both sides of the tooth slot. The cutting cycle in the pre-expansion stage of the face hobbing process of quasi-hyperbolic gears is determined by the rotational speed of the cutter head and the gear ratio between the cutter head and the workpiece:
In this formula, zw represents the number of teeth on the gear being processed, z0 denotes the number of teeth on the cutter head, and ω0 represents the angular velocity of the cutter head rotation.
As shown in Figure 3, the undeformed chip geometry during the tooth surface forming stage can be represented by the cutting region between the tooth surfaces Σ1 and Σ2 formed during the machining of two consecutive cutting cycles. Due to the periodicity of face hobbing and the consistency of the geometric characteristics of each tool mounted on the cutter head, it can be assumed that tooth surface families formed in different cycles of the machining process possess identical geometric features. Therefore, the tooth surface of the gearwheel of spiral bevel gears formed during the previous and current cutting cycles is given by:
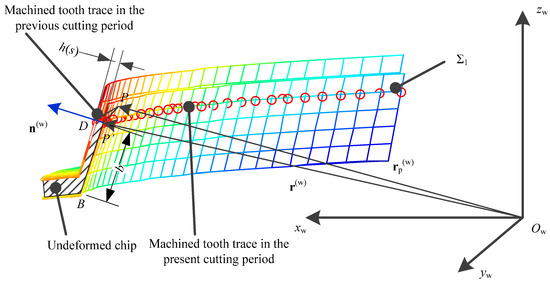
Figure 3.
The geometric characteristics of undeformed chip in spiral bevel gear face hobbing.
Here, zp represents the feed position in the previous cutting cycle, which under uniform feed conditions can be obtained from the following equation:
In the equation, f represents the feed rate during the face-hobbing process. Therefore, the undeformed chip thickness during the tooth surface forming stage can be expressed as the projection of the difference vector from the tooth surface source point on the tooth surface formed in the current machining cycle to the tooth surface formed in the adjacent previous machining cycle onto the normal vector of the tooth surface.
The relationship between the thickness h of the un-deformed chip (in the primary cutting-edge region) formed by the primary cutting edge, the tool angle φ on the cutter head, and the corresponding set of cutting-edge arc length parameters s can be expressed as in the following equation:
where n(w) represents the normal vector of the machined tooth surface in the current cycle, and can be further determined by the following:
After establishing the tooth blank coordinate system as shown in Figure 4, and substituting the cutting width b of the undeformed chip into the simultaneous equations of the tooth blank surface cone equation and the tooth surface equation, the following relationship exists:
where h1 represents the distance from the apex of the large bevel gear face cone to the bottom of the gear blank, Γ stands for the cone angle of the spiral bevel gear blank, d3 is the small end diameter of the gear blank, and d4 is the large end diameter of the gear blank. By simultaneously solving the first and second constraints in Equation (7), the cutting width b of the undeformed chip at a certain instant is obtained. The cutter rotation angle φst and φex can also be calculated by the combination of the second and the third equations in Equation (7).
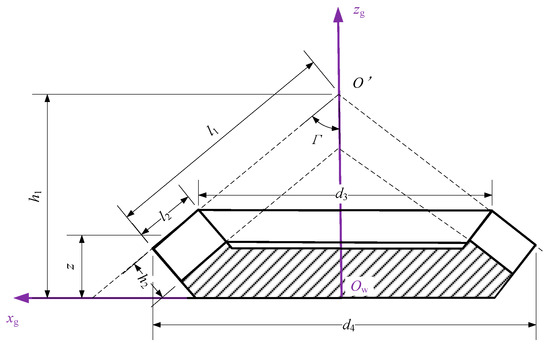
Figure 4.
Spiral bevel gear blank coordinate system.
Based on the classic oblique cutting theory, discretizing the undeformed chip along the direction of the cutting tool edge, the resultant cutting force element dF produced on each discrete chip element, as illustrated in Figure 5, can be expressed by the following equation:
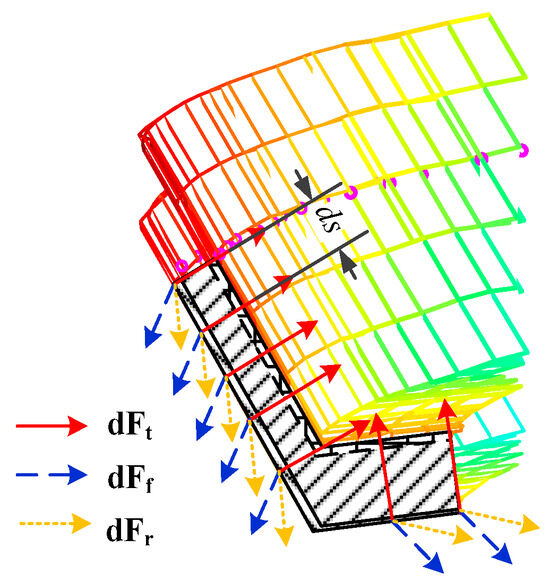
Figure 5.
Dynamic cutting force microelement component.
In this equation, Ktc, Krc, and Krc are the cutting force coefficients, while Kte, Kre, and Kre are the edge coefficients for cutting forces, with different values along the directions of the cutting edge. The aforementioned coefficients and the direction of cutting forces can be determined using the following formulas:
In the equation, αr represents the normal rake angle of the tool, ϕc denotes the material shear angle during oblique cutting, βa stands for the average friction angle of the material, τs represents the shear yield strength of the workpiece material, αr is the tool’s rake angle, and i is the chip flow angle during end milling. It is worth noting that cutting forces are only generated when the tool is engaged with the workpiece, and can be introduced using the following window function:
Integrating the obtained elemental cutting forces along the primary cutting edge and the secondary cutting edge, respectively, the analytical expression for the cutting forces on the entire cutting edge of the tool can be expressed as follows:
The cutting force model in Equation (12) encompasses both the magnitude and direction of cutting forces. The dynamic cutting force on a single tool can be represented using the homogeneous transformation matrix Mmw from the workpiece-fixed coordinate system Ow-xwywzw to the machine tool origin coordinate system Om-xmymzm as follows:
By summing up the individual cutting forces on each tool and considering the window function, the dynamic cutting force model acting on the cutter can finally be obtained as:
Synthesizing Equations (1)–(14), the following closed-form vectorized analytical model for predicting dynamic cutting forces in the spiral bevel gears face-hobbing process can be obtained:
In these equations, vH = [xH, yH, zH]T represents the cutter’s vibration displacement, vw = [xw, yw, zw]T denotes the workpiece’s vibration displacement. r(w) and rp(w) can be calculated from Equation (3), n(w) is derived from Equation (6). Ktc, Krc, and Kre are obtained from Equation (9). dFt, dFf, and dFr represent the three components of the cutting force element in the workpiece coordinate system, and their directions are determined by Equation (10).
2.3. Cutting Dynamics Analytical Model of Face Hobbing Process
Built further on the research outputs in the research group [30,31] and the derivation as explained above, the cutting dynamics model for spiral bevel gear face hobbing can be obtained as depicted in Figure 6. It can be observed that the cutting force F induces vibrations in the xm, ym, and zm directions of the cutter head, while the reactive force Fw acting on the workpiece will similarly induce vibrations in the x4, y4, and z4 directions of the workpiece. The cutting force Fw acting on the workpiece and the cutting force F acting on the cutter head form a pair of reactive forces. Their component forms in the reference coordinate system O4-x4y4z4 are:
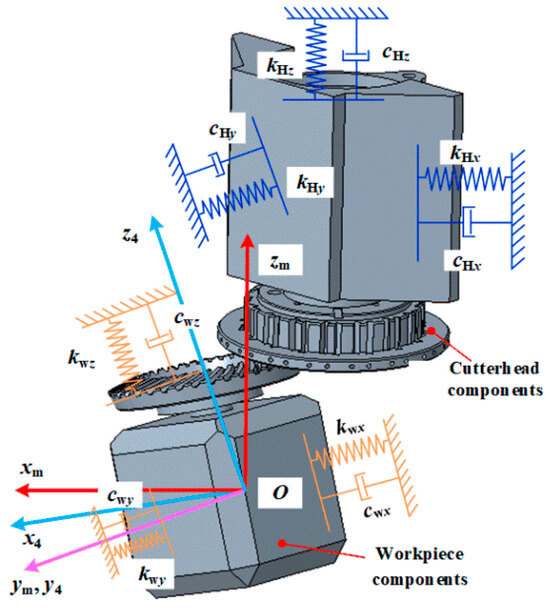
Figure 6.
Dynamic model of spiral bevel gear end face hobbing process system.
Considering the chip regeneration effect during end milling and its vectorized expression, the cutting dynamic model of the end milling process for hypoid gears can be represented in the following analytical form:
In the equation, T represents the gear cutting cycle, MH is the mass matrix for the vibrations of the cutter head in the xm, ym, and zm directions, Mw is the mass matrix for the vibrations of the workpiece in the x4, y4, and z4 directions. CH is the damping matrix for the vibrations of the cutter head in the xm, ym, and zm directions, Cw is the damping matrix for the vibrations of the workpiece in the x4, y4, and z4 directions. KH is the stiffness matrix for the vibrations of the cutter head in the xm, ym, and zm directions, and Kw is the stiffness matrix for the vibrations of the workpiece in the x4, y4, and z4 directions. The specific parameters can be obtained from experimental modal analysis or structural finite element analysis. Based on the analytical dynamic model, dynamic simulations can be conducted for the spiral bevel gear face hobbing.
3. Experimental Tests and Verification
3.1. Hammer Impact Testing
To simulate the face hobbing process of spiral bevel gears with the cutting dynamics model, it is necessary to obtain the dynamic characteristic parameters of the machining system, including damping, stiffness, and natural frequency. On an industrial production system, the dynamic response and modal characteristics of structures are often studied by hammer impact testing to determine its modal parameters, such as natural frequency, mode shape, and damping ratio of the system. As shown in Figure 7, hammer impact testing experiments have been conducted on a YKA2260 gear cutting machine. Since the cutter head vibration is much more significant compared to that of the workpiece during the face hobbing process of spiral bevel gears, the influence of cutter head vibration is emphasized in this experiment and the vibration of the workpiece is neglected. So only the modal parameters of the cutter head components are identified in this research. The material of the hammer affects the excitation frequency range of the structure; a hard hammerhead has more energy in the high-frequency range, which may excite the dynamic characteristics of the filter. If a harder hammerhead is used in the lower frequency range, significant filter ringing may occur. Since this experiment involves low-speed cutting of spiral bevel gears, a relatively soft rubber material hammerhead, as shown in Figure 7, was chosen, and the impact force and duration of each hammer blow were kept the same through computer control.

Figure 7.
Modal test of YKA2260 machine tool.
As illustrated in Figure 7, the cutter head is first moved to a stationary position at the starting point of cutting to eliminate variations in the dynamic characteristics caused by the cutter head at different positions on the machine tool guideway. Accelerometers are attached near the cutter head area to prevent movement during the impact testing process. The force signal of the impact excitation is monitored by a PCB© force sensor above the hammer, while the vibration of the cutter head is monitored by a PCB© uniaxial accelerometer attached near the cutter head area. By adjusting the hammering position and the position of the accelerometer, modal parameters in various directions are identified. The hammering positions are set near the cutting tool on the cutter head, with 41 output response points measured for each axial direction in the hammering experiment. The sampling frequency of the vibration signal is set to 10,240 Hz, and the data is monitored and analyzed using LMS TEST LAB 14.A developed by Simcenter.
3.2. Experiment on Face-Hobbing of Spiral Bevel Gear
To verify the reliability of the cutting dynamic model for machining spiral bevel gears, it is necessary to compare and validate the actual vibration signals with the simulated vibration ones. Therefore, in this study experiments have been designed on an industrial gear hobbing machine, YKA2260, to perform the face hobbing of a large left-handed 37-tooth spiral bevel gear (Figure 8). Some of the machining parameters are listed in Table 1. Three uniaxial vibration acceleration sensors were installed on stationary components near the cutter head position to monitor the vibration of the cutter head, in order to collect vibration acceleration signals in real time in X, Y, and Z directions during the face milling process.
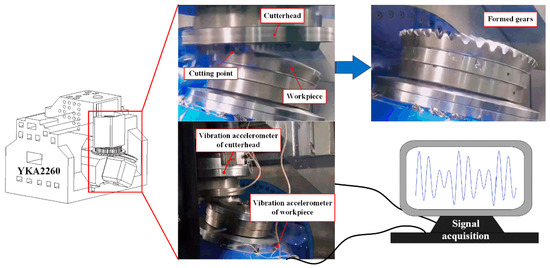
Figure 8.
Vibration signal acquisition in the process of face hobbing.

Table 1.
Parts of machining parameters for spiral bevel gear face hobbing.
4. Results and Discussion
4.1. Experimental Modal Analysis
Prior to the dynamic simulation of the face-hobbing process of spiral bevel gears, modal analysis of the hammer impact testing data is necessary to obtain the dynamic characteristic parameters of the cutter head, such as damping, stiffness, and natural frequency. The essence of modal analysis is the transformation of coordinates, which involves describing response vectors in the natural physical coordinate system, i.e., the linear steady-state system vibration differential equation set, transforming them into modal coordinate systems, and performing decoupling calculations. The coordinate transformation matrix in the transformation process is the modal matrix. The transfer function provides a description of the relationship between the input signal of different frequencies and amplitudes and the response of the continuous-time system, as shown in Equation (18).
In the equation, H(ω) represents the frequency response function matrix, where Hij(ω) denotes the ratio of the response at point i when the system is excited only at point j. mr stands for the modal mass of the system at the r-th order, cr represents the modal damping of the system at the r-th order, Kr is the modal stiffness of the system at the r-th order, φri stands for the mode shape of the system at the r-th order, is the natural frequency of the r-th order, and is the damping ratio of the r-th order.
According to Formula (21), the transfer function is the sum of all single-degree-of-freedom systems corresponding to each mode of the system, which provides a description of the relationship between the input signal and the response of a continuous-time system at different frequencies and amplitudes, including the frequency response, phase response and order of the system, which can effectively understand the amplification or attenuation effect of the system for different frequency signals. The spectral testing module of the LMS TEST LAB 14.A software was utilized to process the output response data of each axis in the hammering experiment. By applying Laplace transformation, the transfer function was converted into the frequency response function in the complex domain. The Bode plot depicted the amplitude and phase information of the frequency response functions at 41 points on the cutter head’s three axes, as shown in Figure 9. Under the same hammer excitation and observation scale, it can be observed that the gain curves of the Bode plots on the X-axis and Z-axis do not exhibit significant peaks, and the overall values of the gain curves are relatively small. In contrast, the gain curve of the Bode plot on the Y-axis shows a significant peak at around 159.8 Hz, with significantly larger overall values. This indicates that the dynamic stiffness of the cutter head system is better in the X-axis direction, followed by the Z-axis direction, while the dynamic stiffness is weakest in the Y-axis direction. Due to the system’s maximum amplification of input signals near the resonant frequency, the gain curve at the resonance frequency in the Bode plot typically reaches a peak. Additionally, at the resonant frequency, the system exhibits a phase lag of 90 degrees with respect to the input signal, corresponding to a phase of −90°. It is evident from Figure 9 that the cutter head system exhibits resonance phenomenon near 159.8 Hz on the Y-axis, with a resonance bandwidth of approximately 30 Hz.
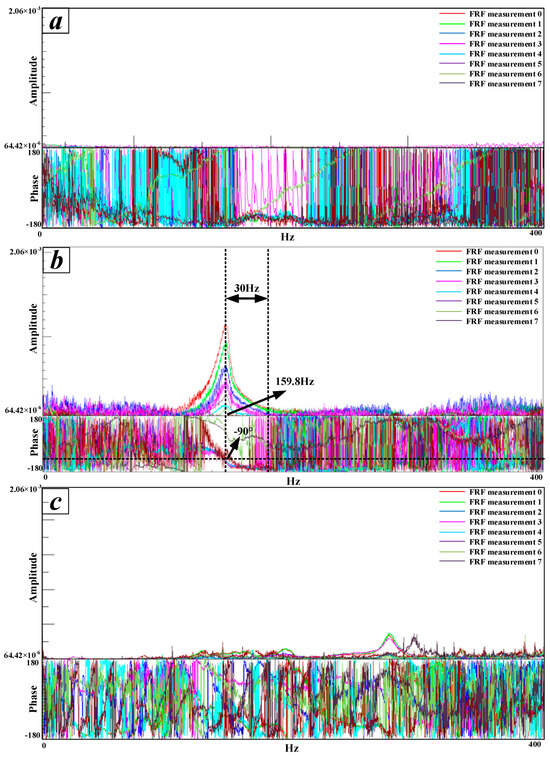
Figure 9.
Bode diagram of frequency response functions for various test points in the process system of machine tool cutter head spindle: (a) X-axis, (b) Y-axis, (c) Z-axis.
After obtaining the frequency response function data for the three axes of the cutter head, modal parameter estimation needs to be performed to extract the system’s poles and residues. The modal analysis module of the TestLab® software is utilized to compute the frequency response functions for the three axes (3 sets). Poles are extracted from the frequency response equations, representing the system’s natural frequencies, which are independent of specific input–output measurement locations. In the process of extracting poles from the three sets of frequency response data, this study adopts the PolyMAX technique, which is currently a mainstream method for modal parameter estimation. The PolyMAX technique utilizes commonly used functions, such as the SUM function and Imaginary Sum, to fit the modal steady-state diagram of the tool, as shown in Figure 10. The steady-state diagram utilized in this study employs high-order models to fit modal data. As poles converge to “stable roots”, the diagram includes markers that determine various pieces of information related to the continuity of poles. During the computation process, if poles are identified, they are marked with “o”, and the order of the fitting model is increased to recalculate the poles. If the same pole is identified, it is marked as “f” if the frequency error compared to the previously calculated modal frequency is within 1%, “v” if the mode shape vector error compared to the previous mode shape vector is within 2%, and “d” if the damping error compared to the previous modal damping is within 5%. If all three conditions are met, it is marked as “s”, indicating that a stable value has been reached within the specified error range.
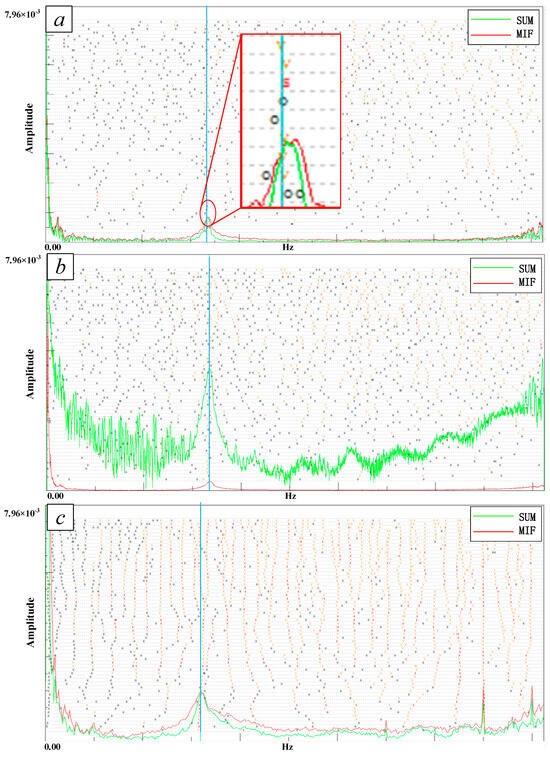
Figure 10.
Modal steady-state fitting diagram of machine tool cutter head spindle process system: (a) X-axis, (b) Y-axis, (c) Z-axis.
In the diagram, stable points labeled as “s” are selected, with a blue vertical line marking the location of the “s” point. This enables the extraction of modal parameters for the cutter head spindle system, as shown in Table 2.

Table 2.
Modal parameters of machine tool process system.
The modal parameters of the manufacturing system are incorporated into the dynamic cutting force model for face hobbing of spiral bevel gears (Equation (17)) to generate simulated vibration acceleration signals during face hobbing (Figure 11).
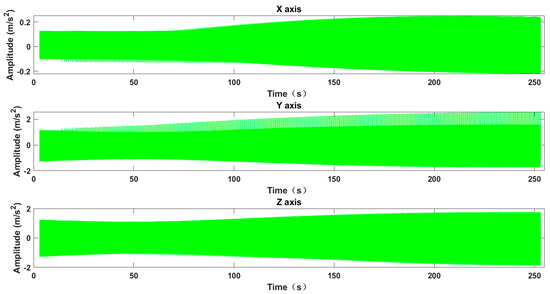
Figure 11.
Signal in Wavelet Threshold Denoising Process.
In this research, the cutter disk rotated at 141 rpm, which is close to the first-order modal frequency of the machine tool and makes it difficult to excite higher-order modal vibrations of the machine tool. Therefore, higher-order modes can be neglected. Only the first-order modal parameters of the cutter head spindle process system are incorporated into the established cutting dynamic model for dynamic simulation. From Figure 10, it is observed that the first-order natural frequencies of the tool spindle process system in all three axial directions are around 160 Hz. Additionally, the dynamic stiffness in the X direction is the highest, while it is the lowest in the Y direction. It is reasonable to assume that the vibration in the Y direction is the main source of chatter vibration during machining for this machine tool.
4.2. Analysis in Time Domain
4.2.1. Wavelet Denoising
In this case, there are inevitable external disturbances in the experimental environment of spiral bevel gear machining and this leads to the presence of environmental noise in the collected vibration signals. Therefore, it is necessary to preprocess the measured signals to reduce noise and improve the signal-to-noise ratio. Given the advantages of wavelet transform in multi-resolution analysis and time-frequency localization, it exhibits good time-domain and frequency-domain resolution, especially in low-frequency machining processes. Therefore, the wavelet thresholding denoising method is chosen to process the measured signals. The wavelet denoising formula can be expressed as in the following formula:
in which f(t) denotes the reconstructed signal, i.e., the signal post-denoising. The term dj,k refers to the wavelet coefficients, which represent the signal’s decomposition coefficients at scale j and position k. Furthermore, φj,k is the wavelet basis function, indicating the wavelet basis utilized for the signal’s decomposition. Here, J signifies the number of decomposition layers, and N denotes the number of positions at each decomposition layer.
After obtaining the denoised signal, it is necessary to quantitatively evaluate the noise reduction effect. This can be realized by quantifying the signal-to-noise ratio (SNR), which evaluates the relative energy intensity between the original signal and the removed noise signal, as shown in Equation (20). Additionally, the difference between the denoised signal and the original signal is quantitatively evaluated using the root mean square error, as represented in Equation (21).
in which Psignal represents the simulated noise-free signal, and Pnoise denotes the difference between the filtered signal and Psignal.
where n denotes the number of data points in the signal, yi represents the numerical value of the original signal, and y′i signifies the numerical value of the signal after filtering.
The denoising effect is case dependent and influenced by the applied wavelet basis functions and decomposition levels. There is no single wavelet function or fixed number of decomposition levels that yield optimal results for all signals. It is necessary to select wavelet functions based on their specific characteristics. In the denoising process of gear machining vibration signals, wavelet basis functions with orthogonal symmetry, high regularity, and scale functions allowing for fast algorithms are typically preferred. The wavelet basis functions that meet these criteria include the Haar wavelet (db1 wavelet), Daubechies wavelet (dbN wavelet), Symlets wavelet, and Coiflet wavelet. Both the Daubechies and Symlets wavelet families contain 45 wavelets, but as the order increases, the computational cost also sharply rises. Therefore, usually only the first 10 orders of wavelets are employed. The Haar wavelet corresponds to the db1 wavelet in the Daubechies wavelet series, and the Coiflet wavelet series comprises 5 wavelets. Denoising of simulated vibration signals from face hobbing of spiral bevel gears with added white noise is performed using four wavelets meeting the requirements and varying decomposition levels. The comparative effects are illustrated in Figure 12, Figure 13 and Figure 14. It can be observed that different combinations of wavelet functions and decomposition levels yield different denoising effects. The denoising effects of all wavelet functions generally increase first and then decrease with the increase in decomposition levels. For the same decomposition level, higher-order wavelet functions yield better denoising effects.
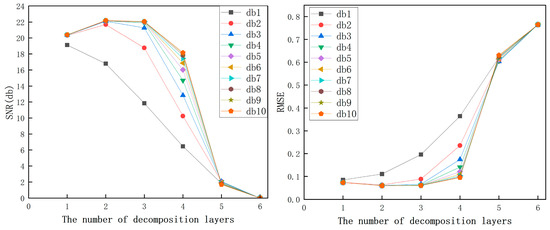
Figure 12.
The denoising effectiveness of the Daubechies wavelet series at different decomposition levels.
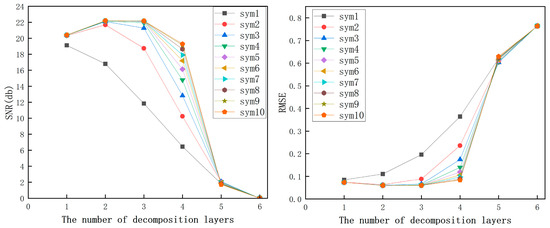
Figure 13.
The denoising effectiveness of the Symles wavelet series at different decomposition levels.
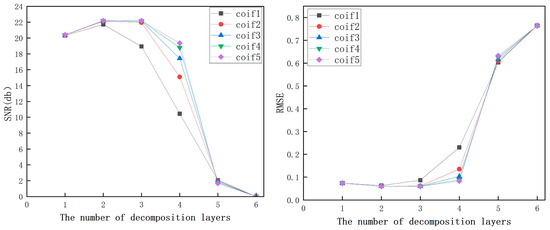
Figure 14.
The denoising effectiveness of the Coiflet wavelet series at different decomposition levels.
Among the combinations tested, the denoising effects of the combinations with db10 decomposition level 2, sym9 decomposition level 2, and coif5 decomposition level 2 are relatively prominent within their respective wavelet families. Specifically, the combination of sym9 with decomposition level 2 exhibits the optimal performance in this case study. It results in a signal-to-noise ratio of 22.1989 dB and a root mean square error (RMSE) of 0.059448. Therefore, this combination is selected for further analysis.
The key issue in wavelet threshold denoising lies in determining the threshold selection rule and choosing the threshold function, which directly affects the quality of denoising. Setting the threshold too high can cause removal of useful information and this leads to signal distortion during reconstruction. On the other hand, a low setting of the threshold may result in ineffective removal of noise components. Four widely used threshold selection rules and two threshold functions are combined. As shown in Table 3, the denoising effects of various combinations on simulated vibration signals from face hobbing of spiral bevel gears are compared, using the sym9 wavelet with a decomposition level of 2.

Table 3.
The denoising effect when combining different threshold functions and threshold selection rules.
It can be observed that using the sym9 wavelet with a decomposition level of 2, along with the Rigrsure threshold selection rule and the soft thresholding function, yields the most significant denoising effect for the signals in this case study. Therefore, this combination is employed for denoising the vibration acceleration signals from face hobbing of spiral bevel gears, as depicted in Figure 15.
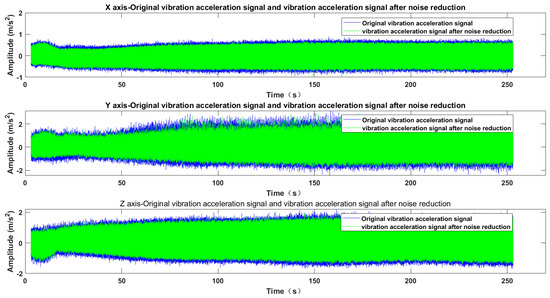
Figure 15.
Original vibration acceleration signal and denoised vibration acceleration signal.
4.2.2. Feature Extraction in Time Domain
To verify the reliability of the cutting dynamics model for spiral bevel gear machining, a comparison was made between the vibration signals generated by dynamic simulation and the denoised actual vibration signals. In Figure 16, the actual and simulated acceleration signals are denoted in blue and green, respectively. It was observed that both signals exhibit good consistency in terms of amplitude size and vibration trend in the Y and Z axis, while there is a noticeable discrepancy in the vibration amplitude along the X axis. To further quantify and evaluate the consistency of the two types of signals in the time domain, this study intended to use the correlation coefficient test as a statistical method. However, as shown in Figure 17, when conducting normality tests on both the measured acceleration signals and the simulated acceleration signals, it is evident that neither of the vibration data sets conforms to a normal distribution. Consequently, they fail to meet the prerequisites for correlation coefficient testing, rendering statistical methods unsuitable for assessing the similarity between the two signals.
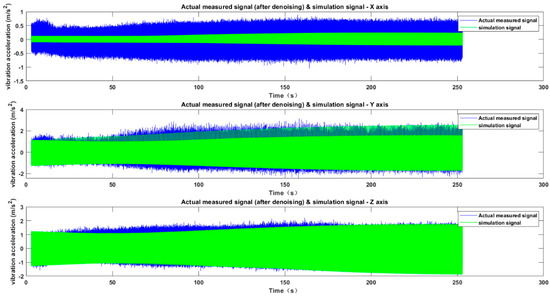
Figure 16.
After noise reduction, the measured vibration acceleration signal and simulation acceleration signal.
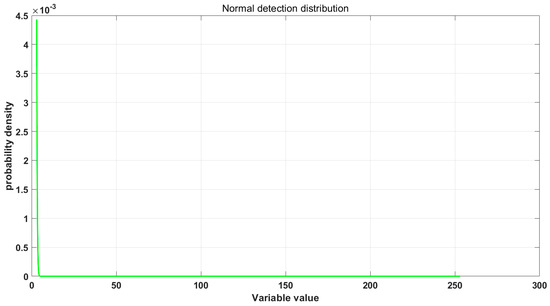
Figure 17.
Normal distribution test chart.
Therefore, it was necessary to extract and quantitatively compare the time-domain features of the three axial directions of the two sets of vibration signals to determine the reliability of the cutting dynamics model. In this case, the mean is used to describe the overall amplitude level and central position of the signal; variance is used to describe the dispersion of signal amplitudes; skewness and kurtosis are used to describe the shape of the signal waveform; and Shannon entropy is employed to describe the average information content and complexity of the signal. The numerical values of the time-domain statistical feature indicators for the two sets of vibration data across three axes are presented in Table 4. It is observed that the errors in the time-domain statistical indicators for the Y and Z axes of the two signals are both less than 15%, indicating a high degree of data agreement. However, the errors in the mean, variance, and kurtosis along the X axis exceed 15%, suggesting significant discrepancies in the X-axis data. An analysis, considering the conditions of the machining experiment, conjectures that this is primarily due to the presence of many joint surfaces along the X axis of the YKA2660 spiral bevel gear machining tool. This causes the force hammer excitation signal in the impact test to decay rapidly before being detected by the sensor, leading to the modal data fitting results of the cutter head in the X direction being significantly higher than the actual situation. Consequently, this results in the dynamic simulation-generated X-axis vibration signal of the cutting dynamics model being noticeably lower than the measured value. However, due to the complexity of the machine tool’s structural design, the exact cause of this issue is difficult to ascertain, which also provides directions for future research. By integrating the comparative results of the various characteristic quantities in the time domain of the two sets of vibration data, it can be concluded that the time-domain characteristics of the measured and simulated signals are relatively consistent. This consistency at the time-domain level proves the reliability of the cutting dynamics model for spiral bevel gears face hobbing.

Table 4.
Time-domain statistical indices of the measured vibration signal and simulated signal along the three axes.
Furthermore, from Figure 16, it can be observed that, among the three axial directions of the measured vibration acceleration signals, the Y-axis data has the largest amplitude, while the X-axis has the smallest. This observation aligns with the modal analysis conclusion that the dynamic stiffness is the poorest in the Y-axis direction and the best in the X-axis direction. This validates the hypothesis that Y-axis vibration is the primary cause of machining chatter during the face gear rolling process of spiral bevel gears.
4.3. Frequency Domain Analysis
Given that axial vibration along the Y-axis is the principal cause of machining chatter, this case primarily investigates the relationship between axial vibrations along the Y-axis and the surface waviness on spiral bevel gears. Fourier transforms were applied to both the measured and simulated vibration signals along the Y-axis to calculate their spectra and energy spectra, as illustrated in Figure 18. It was found that the spectral peak and energy spectral peak of the measured vibration signal were at 159.7799 Hz, whereas the peak frequency of the simulated signal was at 165.4639 Hz, with an error of 3.558%. The frequency composition and main vibration frequencies of both the measured and simulated signals were essentially consistent, which, on a frequency domain level, validates the reliability of the cutting dynamics model established for the face milling process of spiral bevel gears in this study.
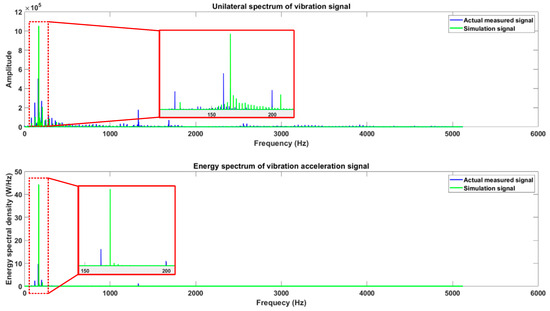
Figure 18.
The unilateral spectrum and energy spectrum of the Y-axis vibration signal.
The measured vibration signal is a non-stationary signal. To analyze the time-frequency domain characteristics of the measured vibration signal along the Y-axis, a Short-Time Fourier Transform (STFT) was employed. The time-frequency plot effectively describes the transient nature of the vibration signals during the machining of spiral bevel gears, as depicted in Figure 19. It can be observed that the main frequency of the vibration signal during the machining of spiral bevel gears, 159.7799 Hz, remains prominently present throughout the entire gear machining cycle. According to modal analysis results, the first natural frequency of the Y-axis direction of the machine tool spindle is 167.16 Hz, with a resonance bandwidth of approximately 30 Hz. The main frequency of the vibration signal during the machining of spiral bevel gears is located near the first natural frequency of the Y-axis direction of the machine tool spindle. Based on vibration analysis theory, it can be inferred that the vibration along the Y-axis is the primary cause of machining chatter and the generation of surface waviness during the machining of spiral bevel gears.
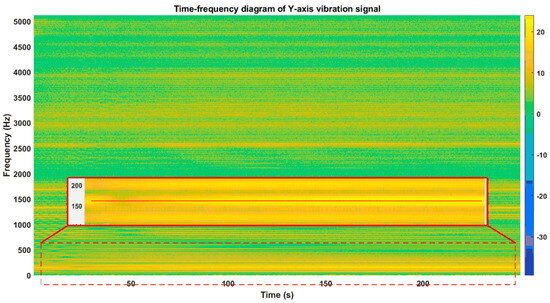
Figure 19.
Time-frequency spectrum of vibration signal measured in y-axis.
4.4. The Impact of Tool Vibration on the Machining Quality of Spiral Bevel Gear Tooth Surface
To delve deep into the influence of tool vibrations on the machining quality of spiral bevel gear profiles, this research utilizes the mathematical concept of normal machining errors on the gear tooth profile. As depicted in Figure 20, the surface morphology of the machined spiral bevel gears is simulated and predicted by employing a cutting dynamics model. The color bands on the tooth surface represent the machining error values at their specific locations, with four distinct yellow regions observable on the surface of a single tooth. In this scenario, ten sampling areas were selected at equal intervals along the height direction on both the concave and convex surfaces of a single tooth of the spiral bevel gear. Machining error data were then collected from the starting machining face of the gear along the tooth width direction (direction of machining), as illustrated in Figure 21. Each sampling area was established with 252 equidistant sampling points, and the machining errors in these areas, as shown in Figure 22, demonstrate a consistent trend for machining error data on both the concave and convex surfaces of a single tooth of the spiral bevel gear. Within one machining cycle, four periodic peaks are present. Waviness, a term frequently used in the machining field, describes the undulation changes in the workpiece surface shape. Thus, on the tooth surface of the spiral bevel gear, there are four equidistant areas where the waviness is significantly greater. From a macro perspective, this phenomenon manifests as four distinct ripple patterns on the tooth surface of the spiral bevel gear.
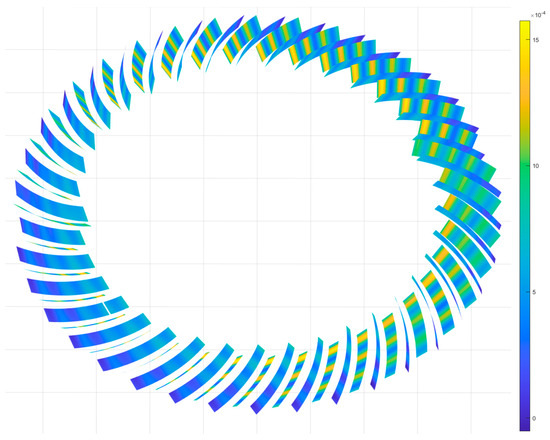
Figure 20.
Simulated prediction of surface morphology of machined gears.
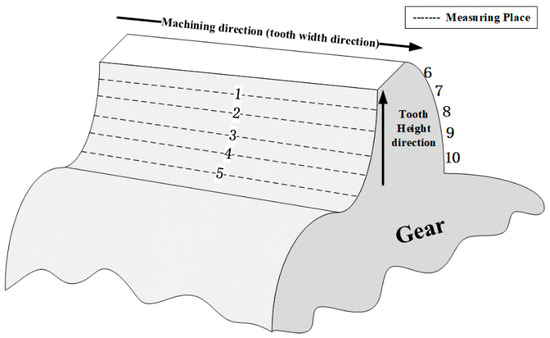
Figure 21.
Sampling diagram of single tooth surface machining error in the simulation model.
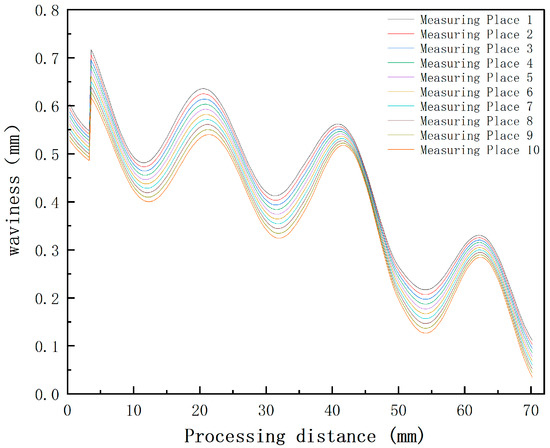
Figure 22.
The waviness of single tooth surface from spiral bevel gear machining simulation.
According to cutting principles, it is known that the cutting cycle in face gear hobbing is related to the angular velocity of the cutter head, the number of tool groups on the cutter head, and the number of teeth on the gear being machined [2]. By inserting relevant machining parameters from Table 1 into the gear cutting cycle expression in Equation (2), the time required to machine a single tooth within one cycle of spiral bevel gear face hobbing is 0.02503 s. From the results of frequency domain analysis, the frequency at which the machine tool’s Y-axis and the technological system experience chatter is found to be 159.7799 Hz, corresponding to a chatter cycle of 0.00625 s. This indicates that during one cycle of machining a single tooth of the spiral bevel gear, chatter occurs approximately 4.005 times, aligning with the results of tooth surface morphology predictions from simulation. As shown in Figure 23, the simulated tooth surface morphology matches closely the actual tooth surface morphology of the machined spiral bevel gear. This validates the reliability of the spiral bevel gear cutting dynamics model.

Figure 23.
The vibration marks on the gear surface after face hobbing.
In this case study, the fundamental cutting frequency of the end milling experiment on the spiral bevel gear is 42 Hz. The frequency of chatter occurring in the cutter head process system is 159.7799 Hz, which is approximately four times the fundamental cutting frequency. This value matches the number of vibration marks on the tooth surface, allowing for a preliminary hypothesis that the number of vibration marks on the spiral bevel gear tooth surface corresponds to the ratio of the tool chatter frequency to the fundamental cutting frequency. To verify this hypothesis, numerical simulation of the face hobbing process on spiral bevel gear section has been conducted, and the data on tooth surface waviness was collected, as shown in Figure 24. In this simulation, the system’s natural frequency within the spiral bevel gear cutting dynamics model was adjusted to three and five times the fundamental cutting frequency, i.e., 126 Hz and 210 Hz, respectively. The results show that, when the tool chatter frequency is adjusted to three and five times the fundamental cutting frequency, the number of vibration marks correspondingly becomes three and five.
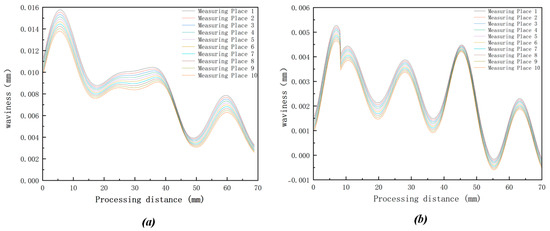
Figure 24.
The corrugation degree of single tooth surface in hobbing simulation of spiral bevel gear cross section under (a) 3 times (b) 5 times natural frequency of cutting base frequency.
5. Conclusions
In this investigation, spiral bevel gears, an important component in the aerospace field, were taken as the research object. Detailed research was conducted on chatter phenomena in the spiral bevel gear face hobbing process using methods such as analytical modeling of cutting dynamics, modal analysis, wavelet denoising, and time–frequency analysis. The main causes of machining chatter were explored, and the impact of chatter on machining quality was analyzed. Additionally, a reliable predictive model for tooth surface morphology in the spiral bevel gear face hobbing process was proposed. This study aims to provide experimental support for the relatively understudied area of chatter in the spiral bevel gear face hobbing process and to offer theoretical support for improving machining accuracy and optimizing machining processes. The conclusions of this study are summarized as follows:
- (1)
- By comparing the denoising effects of different combinations of wavelet basis functions, decomposition levels, threshold selection rules, and threshold functions, and selecting based on SNR and RMSE, the best denoising effect can be obtained by the combination of using the sym9 wavelet with 2 decomposition levels, applying the Rigrsure rule, and employing a soft thresholding function. This results in a SNR of 22.5046 db, and a RMSE of 0.057393.
- (2)
- Through time-domain analysis of both measured vibration signals and simulated signals, a high degree of conformity in the time-domain statistical indicators between the two signal sets was observed, providing evidence at the time-domain level for the accuracy of the cutting dynamics model. For the equipment YKA2260 used in this investigation, the main frequency of cutter head vibration was identified as 159.7799 Hz. The Y-axis vibration was found to be the main cause of machining chatter and the formation of tooth surface chatter marks. The accuracy of the cutting dynamics model at the frequency domain level is confirmed.
- (3)
- With respect to the influence of tool vibration on the machining quality of spiral bevel gears, the comparison between the predicted and actual machined gear surface morphology has validated the reliability of the cutting dynamics model for spiral bevel gear machining. This model can effectively predict the gear surface morphology of spiral bevel gears. The prediction and experimental analysis indicate that the number of tooth surface chatter marks is proportional to the ratio of tool chatter frequency to cutting base frequency. This finding provides promising significance for optimizing the face hobbing process for spiral bevel gears.
- (4)
- This study provides a theoretical foundation and guidance for the design of new non-traditional dynamic vibration absorbers suitable for spiral bevel gear machining machines, aiming to address vibration issues specific to different models of such machines. Additionally, this research is significant for optimizing the face hobbing process of spiral bevel gears. To prevent machining defects caused by vibrations, machining parameter design should be optimized based on the modal parameters of the process system, avoiding multiples of the cutting frequency.
Author Contributions
Conceptualization, J.W. and J.Y.; methodology, J.W.; software, J.W. and K.H.; validation, J.W.; investigation, J.W. and K.H.; data curation, J.W.; writing—original draft preparation, J.W.; writing—review and editing, J.Y., J.Q. and J.W.; supervision, J.Y., Z.S. and J.Q. All authors have read and agreed to the published version of the manuscript.
Funding
This research was funded by Natural Science Foundation of Hunan Province, grant number 2023JJ30147 and MOST of China, grant number G2023160007L. This work was supported by Hunan University.
Data Availability Statement
The raw data supporting the conclusions of this article will be made available by the authors on request.
Conflicts of Interest
The authors declare no conflicts of interest.
References
- Stadtfeld, H.J. Handbook of Bevel and Hypoid Gears: Calculation-Manufacturing-Optimization; Rochester Institute of Technology: Rochester, NY, USA, 1993. [Google Scholar]
- Stadtfeld, H.J.; Works, G. Gleason Bevel Gear Technology: Basics of Gear Engineering and Modern Manufacturing Methods for Angular Transmissions; Gleason Works: Rochester, NY, USA, 2014. [Google Scholar]
- Fan, Q. Computerized Modeling and Simulation of Spiral Bevel and Hypoid Gears Manufactured by Gleason Face Hobbing Process. In Proceedings of the ASME International Design Engineering Technical Conferences & Computers & Information in Engineering Conference, Philadelphia, PA, USA, 10–13 September 2006. [Google Scholar]
- Fan, Q. Kinematical simulation of face hobbing indexing and tooth surface generation of spiral bevel and hypoid gears. Gear Technol. 2006, 23, 30–38. [Google Scholar]
- Litvin, F.L.; Chaing, W.S.; Kuan, C.; Lundy, M.; Tsung, W.J. Generation and geometry of hypoid gear-member with face-hobbed teeth of uniform depth. Int. J. Mach. Tools Manuf. 1991, 31, 167–181. [Google Scholar] [CrossRef]
- Wu, L.Y.; Wei, H.Q.; Wang, X.C. Analysis on the forming principle and the differential structure of extended epicycloid bevel gear tooth surface. J. Xi’an Jiaotong Univ. 2001, 35, 43–46. [Google Scholar]
- Zhang, Y.; Wu, Z. Geometry of Tooth Profile and Fillet of Face-Hobbed Spiral Bevel Gears. In Proceedings of the ASME 2007 International Design Engineering Technical Conferences and Computers and Information in Engineering Conference, Las Vegas, NV, USA, 4–7 September 2007; pp. 181–192. [Google Scholar]
- Suzuki, A.; Tarutani, I.; Aoyama, T. Design of high-reduction hypoid gears meshing in plane of action. J. Adv. Mech. Des. Syst. Manuf. 2017, 11, JAMDSM0068. [Google Scholar] [CrossRef][Green Version]
- Wang, M.Y.; Li, L.; Sun, Y.H. Tooth flank machining and modelling of line contact spiral bevel gears with the conical finger-type milling cutter. Int. J. Adv. Manuf. Technol. 2023, 125, 3277–3291. [Google Scholar] [CrossRef]
- Habibi, M.; Chen, Z.C. A semi-analytical approach to un-deformed chip boundary theory and cutting force prediction in face-hobbing of bevel gears. Comput.-Aided Des. 2016, 73, 53–65. [Google Scholar] [CrossRef]
- Efstathiou, C.; Tapoglou, N. Simulation of spiral bevel gear manufacturing by face hobbing and prediction of the cutting forces using a novel CAD-based model. Int. J. Adv. Manuf. Technol. 2022, 122, 3789–3813. [Google Scholar] [CrossRef]
- Yan, Y.; Xu, J.; Wiercigroch, M. Modelling of regenerative and frictional cutting dynamics. Int. J. Mech. Sci. 2019, 156, 86–93. [Google Scholar] [CrossRef]
- Kayhan, M.; Budak, E. An experimental investigation of chatter effects on tool life. Proc. Inst. Mech. Eng. Part B J. Eng. Manuf. 2009, 223, 1455–1463. [Google Scholar] [CrossRef]
- Huang, D.; Wang, Z.; Kubo, A. Hypoid gear integrated wear model and experimental verification design and test. Int. J. Mech. Sci. 2020, 166, 105228. [Google Scholar] [CrossRef]
- Park, D.; Kolivand, M.; Kahraman, A. Prediction of surface wear of hypoid gears using a semi-analytical contact model. Mech. Mach. Theory 2012, 52, 180–194. [Google Scholar] [CrossRef]
- Park, D.; Kolivand, M.; Kahraman, A. An approximate method to predict surface wear of hypoid gears using surface interpolation. Mech. Mach. Theory 2014, 71, 64–78. [Google Scholar] [CrossRef]
- Park, D.; Kahraman, A. A Surface Wear Model for Hypoid Gear Pairs; Elsevier: Amsterdam, The Netherlands, 2009. [Google Scholar]
- Das, M.; Knight, W. Critical Assessment of Cutting Force Models in the Analysis of Machine Tool Instability. In Advances in Machine Tool Design and Research, Proceedings of the International Machine Tool Design and Research Conference, Manchester, UK, 15–17 September 1971; Red Globe Press: London, UK, 1971; Volume A, pp. 87–104. [Google Scholar]
- Kaymakci, M.; Kilic, Z.; Altintas, Y. Unified cutting force model for turning, boring, drilling and milling operations. Int. J. Mach. Tools Manuf. 2012, 54, 34–45. [Google Scholar] [CrossRef]
- Merritt, H. Theory of self-excited machine-tool chatter: Contribution to machine-tool chatter research—1. J. Eng. Ind. 1965, 87, 447–454. [Google Scholar] [CrossRef]
- Mohammadi, Y.; Ahmadi, K. Chatter in milling with robots with structural nonlinearity. Mech. Syst. Signal Process. 2022, 167, 108523. [Google Scholar] [CrossRef]
- Kilic, Z.; Altintas, Y. Generalized modelling of cutting tool geometries for unified process simulation. Int. J. Mach. Tools Manuf. 2016, 104, 14–25. [Google Scholar] [CrossRef]
- Kilic, Z.; Altintas, Y. Generalized mechanics and dynamics of metal cutting operations for unified simulations. Int. J. Mach. Tools Manuf. 2016, 104, 1–13. [Google Scholar] [CrossRef]
- Moradi, H.; Movahhedy, M.R.; Vossoughi, G. Bifurcation analysis of milling process with tool wear and process damping: Regenerative chatter with primary resonance. Nonlinear Dyn. 2012, 70, 481–509. [Google Scholar] [CrossRef]
- Moradi, H.; Vossoughi, G.; Movahhedy, M.R.; Ahmadian, M.T. Forced vibration analysis of the milling process with structural nonlinearity, internal resonance, tool wear and process damping effects. Int. J. Non-Linear Mech. 2013, 54, 22–34. [Google Scholar] [CrossRef]
- Feng, J.; Wan, M.; Dong, Z.-Y.; Zhang, W.-H. A unified process damping model considering the varying stiffness of the milling system. Int. J. Mach. Tools Manuf. 2019, 147, 103470. [Google Scholar] [CrossRef]
- Schmitz, T.L.; Couey, J.; Marsh, E.; Mauntler, N.; Hughes, D. Runout effects in milling: Surface finish, surface location error, and stability. Int. J. Mach. Tools Manuf. 2007, 47, 841–851. [Google Scholar] [CrossRef]
- Siddhpura, M.; Paurobally, R. A review of chatter vibration research in turning. Int. J. Mach. Tools Manuf. 2012, 61, 27–47. [Google Scholar] [CrossRef]
- Uhlmann, E.; Mahr, F. A time domain simulation approach for micro milling processes. Procedia CIRP 2012, 4, 22–28. [Google Scholar] [CrossRef]
- Huang, K.; Yu, J.; Wang, J.; Zhang, C.; Wan, L. A vectorization model to closed-form solution for cutting forces prediction during face-hobbing of hypoid gears. Mech. Mach. Theory 2022, 173, 104824. [Google Scholar] [CrossRef]
- Huang, K.; Yu, J.; Luo, H.; Shang, Z.; Huang, S.; Fu, L. An efficient vectorization solution to cutting dynamics modeling for face-hobbing of hypoid gears. Mech. Mach. Theory 2024, 191, 105504. [Google Scholar] [CrossRef]
Disclaimer/Publisher’s Note: The statements, opinions and data contained in all publications are solely those of the individual author(s) and contributor(s) and not of MDPI and/or the editor(s). MDPI and/or the editor(s) disclaim responsibility for any injury to people or property resulting from any ideas, methods, instructions or products referred to in the content. |
© 2024 by the authors. Licensee MDPI, Basel, Switzerland. This article is an open access article distributed under the terms and conditions of the Creative Commons Attribution (CC BY) license (https://creativecommons.org/licenses/by/4.0/).