1. Introduction
The Raspberry Pi computer has been immensely successful for countless electronics projects: Its low cost and accessibility have made it a favourite for do-it-yourself tinkering experiments and special purpose projects, from home control to data gathering on balloons to being shot into the upper atmosphere, and everything in-between. Despite being a general purpose computer, its low cost has also made it feasible to be used as a component in single-purpose devices.
These projects—impressive as many of them are—were not, however, the original main purpose of the creation of the Raspberry Pi. In this article, we come back to the original goal that led to the development of this low cost computer: Getting an easily programmable machine into the hands of kids to get them to learn to program and get them engaged with computer science.
The opening statement of the “About Us” page on the Raspberry Pi website, titled “The Making of the Pi” starts:
“The idea behind a tiny and affordable computer for kids came in 2006, when Eben Upton, Rob Mullins, Jack Lang and Alan Mycroft, based at the University of Cambridge’s Computer Laboratory, became concerned about the year-on-year decline in the numbers and skills levels of the A Level students applying to read Computer Science. From a situation in the 1990s where most of the kids applying were coming to interview as experienced hobbyist programmers, the landscape in the 2000s was very different; a typical applicant might only have done a little web design.”
The main goal was to turn kids back into programmers again.
Part of the problem was that the typical home computer, in contrast to earlier generations such as the BBC Micro, Commodore 64 or Spectrum ZX, was not a toy to program and experiment with anymore, but was used by the family for a range of important purposes, and that “programming experimentation on them had to be forbidden by parents” [
1] for fear of breaking the family machine. To get kids back into the position where they could play and learn with programming, they needed a computer that they were in control of, that they could experiment with and break if necessary, and—most importantly—that provided a “platform that, like those old home computers, could boot into a programming environment” [
1].
The goal was summarised in the following statement:
“We want owning a truly personal computer to be normal for children.”
Thus, the original purpose of the Raspberry Pi was not as a special purpose device employed to gather sensor data, or as the control element in electronics projects; it was to serve as a replacement for a general purpose personal computer to tinker with and program on. Programming environments on the Pi were crucial.
At the same time as taking inspiration from early personal computers’ successes, such as the BBC Micro’s lasting impact on early programming in the UK, the Raspberry Pi team set their sights higher. Instead of just appealing to the “geeky” kids who might already have an interest in programing, the goal was to bring this computer to a wide spectrum of the population. One means to achieve this was the goal to “provide excellent multimedia, a feature we felt would make the board desirable to kids who wouldn’t initially be interested in a purely programming-oriented device” [
1].
These goals translate into several direct requirements for the Raspberry Pi’s software:
The computer must come with an easily accessible programming environment. Programming as an activity should not only be possible, but encouraged.
To create engagement, the programming environment should be flexible and extendable. It should also prepare learners for further engagement with computer science. This suggests using existing, general purpose programming systems as a good option.
To serve the goal of using multimedia to create engagement, the programming environment should provide easy creation and manipulation of graphics, animation and sound.
When the Raspberry Pi was released, two general purpose programming environments were included in its software: Scratch [
2] and IDLE for Python [
3]. (In fact, the “Pi” in the Raspberry’s name derives from “Python” as the envisaged main language offered to users.)
This was a reasonable choice: The two environments represent the two main modes of manipulation used in programming education—block-based editing for Scratch and text-based editing for Python—and address distinctly different age groups and possible projects. While Scratch is usable by children as young as primary school age, Python scales to large projects and professional quality code. The two systems offer options to a wide range of users.
In addition, a Java runtime and development kit was included. Java was (and still is) one of the most popular languages in use both in education and industry [
4], and considering its inclusion is a natural step.
Before the initial release of the Raspberry Pi standard image (the software recommended for initial installation), BlueJ [
5] and Greenfoot [
6], two of our own environments which we developed specifically for the learning and teaching of programming, were considered for inclusion as Java development tools. Both are attractive in this context in aligning perfectly with the goals of the Raspberry Pi foundation: They are educational development environments aimed at attracting young learners to programming, they teach concepts of computer science, and we have more than ten years of experience with developing and maintaining these systems for other platforms. However, in early testing it transpired that performance was a problem: The Java runtime did not perform well enough to run any program with a significant graphical user interface at sufficient speed to be acceptably usable. As a result, a decision was taken not to include BlueJ or Greenfoot (or any other Java-based applications), and not to release any educational resources or documents built around programming in Java. Promotion of text-based programming activities on the Raspberry Pi was exclusively structured around Python.
The Java runtime and SDK were present, however, even though no integrated development environment was included in the image. This made development in Java on the Raspberry Pi theoretically possible by using a plain text editor and command line compiler. This was unattractive to most users. Crucially, though, it made execution of Java programs possible.
In the following years, a large number of Java projects on the Raspberry Pi were published. A representative set of examples is Simon Ritter’s collection of Raspberry Pi/Java projects [
7]. Java could run on the Raspberry Pi. The development on the Java side did not, however, meet the original goals of the Raspberry Pi project: While being a successful platform for knowledgeable enthusiasts, it did not serve to attract kids to programming. Most importantly, the setup allowed Java development
for the Raspberry Pi, but not Java development
on the Raspberry Pi.
To develop these applications, programmers typically worked in standard integrated development environments (IDEs) on separate computers and then transferred the executable Java program to the Raspberry Pi for execution. Thus, the Raspberry Pi did not function as a replacement for the existing computer, as the mission statement envisaged, but in addition to the existing computer. This works well for enthusiasts working on hobby projects, but is ineffective in providing kids with a new programming learning platform.
Over the last few years, three separate developments have changed this situation:
The Java runtime consistently improved in performance. Oracle, the developers of the main Java platform, dedicated explicit effort to optimising the Java runtime for the ARM architecture of the Raspberry Pi.
More recently, we optimised BlueJ and Greenfoot for the Raspberry Pi. We created dedicated Raspberry Pi versions for both systems (separate from the Linux version used before) which included modifications specifically to improve performance on this platform.
The Raspberry Pi hardware improved significantly. With the release of the Raspberry Pi 2 in early 2015, and then the Raspberry Pi 3 in 2016, hardware performance increased greatly compared to the initial version.
As a result, running BlueJ and Greenfoot—integrated educational Java development environments—directly on the Raspberry Pi became possible. From September 2015, both these systems were included on the standard Raspberry Pi disk image and are now available to every Raspberry Pi user.
In this paper, we discuss what these environments have to offer, how they compare, and what they can achieve. We present their differences (to each other, and to the Python environments available on the Raspberry Pi), and outline how they allow users to interact directly with the Raspberry Pi hardware.
2. Why a Java IDE?
The Raspberry Pi already includes two easily accessible programming environments: Scratch and Python. This leads to the obvious question: What do additional Java development environments offer that is qualitatively different to what is already possible?
The difference to Scratch is more easily obvious. Java offers the same difference to Scratch that Python presented and that justified the coexistence of these two systems in the first place. Java, like Python, is a traditional, industry strength, text-based language. Scratch, on the other hand, with its block-based, drag-and-drop language of limited scope, is mainly aimed at young learners under 14 years of age. The systems serve a different market, both in targeted user group and application domain.
The more interesting comparison is between Java and Python, since these languages share many similar characteristics and serve the same market. There are, however, several reasons why including both the Greenfoot and BlueJ environments leads to qualitatively new possibilities:
Many teachers of programming prefer the statically typed nature of Java to the dynamic typing of Python, as it helps clarify some programming concepts and acts as an aid to learners.
Some learners have the goal of not only learning programming in general, but learning Java in particular. Java is attractive, as it is the basis for many popular systems, from many well known web-based programs to most Android applications. More teaching material exists for Java than for Python, as it has been used in schools and universities for a much longer time (although there is also plenty of Python material available).
The most important reason is the lack of a good
educational development environment for Python. An educational environment should create
engagement (the Raspberry Pi mission statement itself suggested multimedia support to facilitate this engagement), it should be
easy to use, and it should
teach programming concepts through its interactions. Greenfoot and BlueJ make it easy to program interactive animated graphical applications (such as games and simulations), thereby creating the engagement aimed for. They also have interfaces designed specifically for learners with specific educational functionality. This includes a high degree of interaction to facilitate experimentation and visualisation to illustrate important underlying programming concepts. IDLE, the Python environment included and recommended by the Raspberry Pi foundation [
8], does not fit the requirements nearly as well. In IDLE, it is difficult to create even simple graphical games, support for graphical interaction in the environment is poor and pedagogical visualisations are missing in the system. Whereas Greenfoot and BlueJ are developed based on many years of computing education research [
9,
10,
11,
12,
13], IDLE incorporates few of the lessons learned. It incorporates none of the pedagogical interaction and visualisation functionality that constructivist learning requires, and its main interface abstractions remain on the low syntactic level, offering little support for developing mental models at higher abstraction levels.
Thus, fundamentally, the attraction of including Greenfoot and BlueJ in the Raspberry Pi image is not based mainly on a difference between the programming languages—Python and Java—but a difference between the programming environments: Greenfoot and BlueJ versus IDLE.
3. Greenfoot—A Playful Step to Programming
In this section, we discuss the educational aspects of the Greenfoot environment, as they present the most significant advantage in using Greenfoot over IDLE and Python.
3.1. Aims of the Greenfoot Environment
Greenfoot was created in 2006 at the University of Kent to facilitate learning and teaching of programming for learners aged about 14 upwards. It was designed for use in both classic teaching situations (with a teacher present) as well as for self-directed learning without a human instructor.
The main design goals of Greenfoot were four-fold:
Engaging examples. Greenfoot should make it easy to create engaging programming examples. Creation of interactive animated graphics and sound should be quick and easy, so that the first examples—such as simple graphical games or simulations—can be achieved in the first programming session.
Visualisation. The Greenfoot environment should employ visualisation techniques to illustrate fundamental programming concepts. The interface should not primarily concentrate on the presentation of source code, but should add presentations of underlying concepts.
Interaction. The environment should allow small scale and quick-turnaround interaction to facilitate experimentation and exploration.
Simplicity. The interface of the software must be simple and become familiar quickly. It should be easy to learn how to use the environment, so that mental effort can be concentrated on learning to program.
These main goals are discussed in more detail below, together with a description of the Greenfoot functionality presenting implementations to meet these goals. They are also described at a more detailed level in previous publications [
6].
3.2. Engaging Examples
The Greenfoot framework was designed to make the creation of interactive, animated graphics and production of sound easy for programming novices. This enables the creation of two-dimensional video games and simulations.
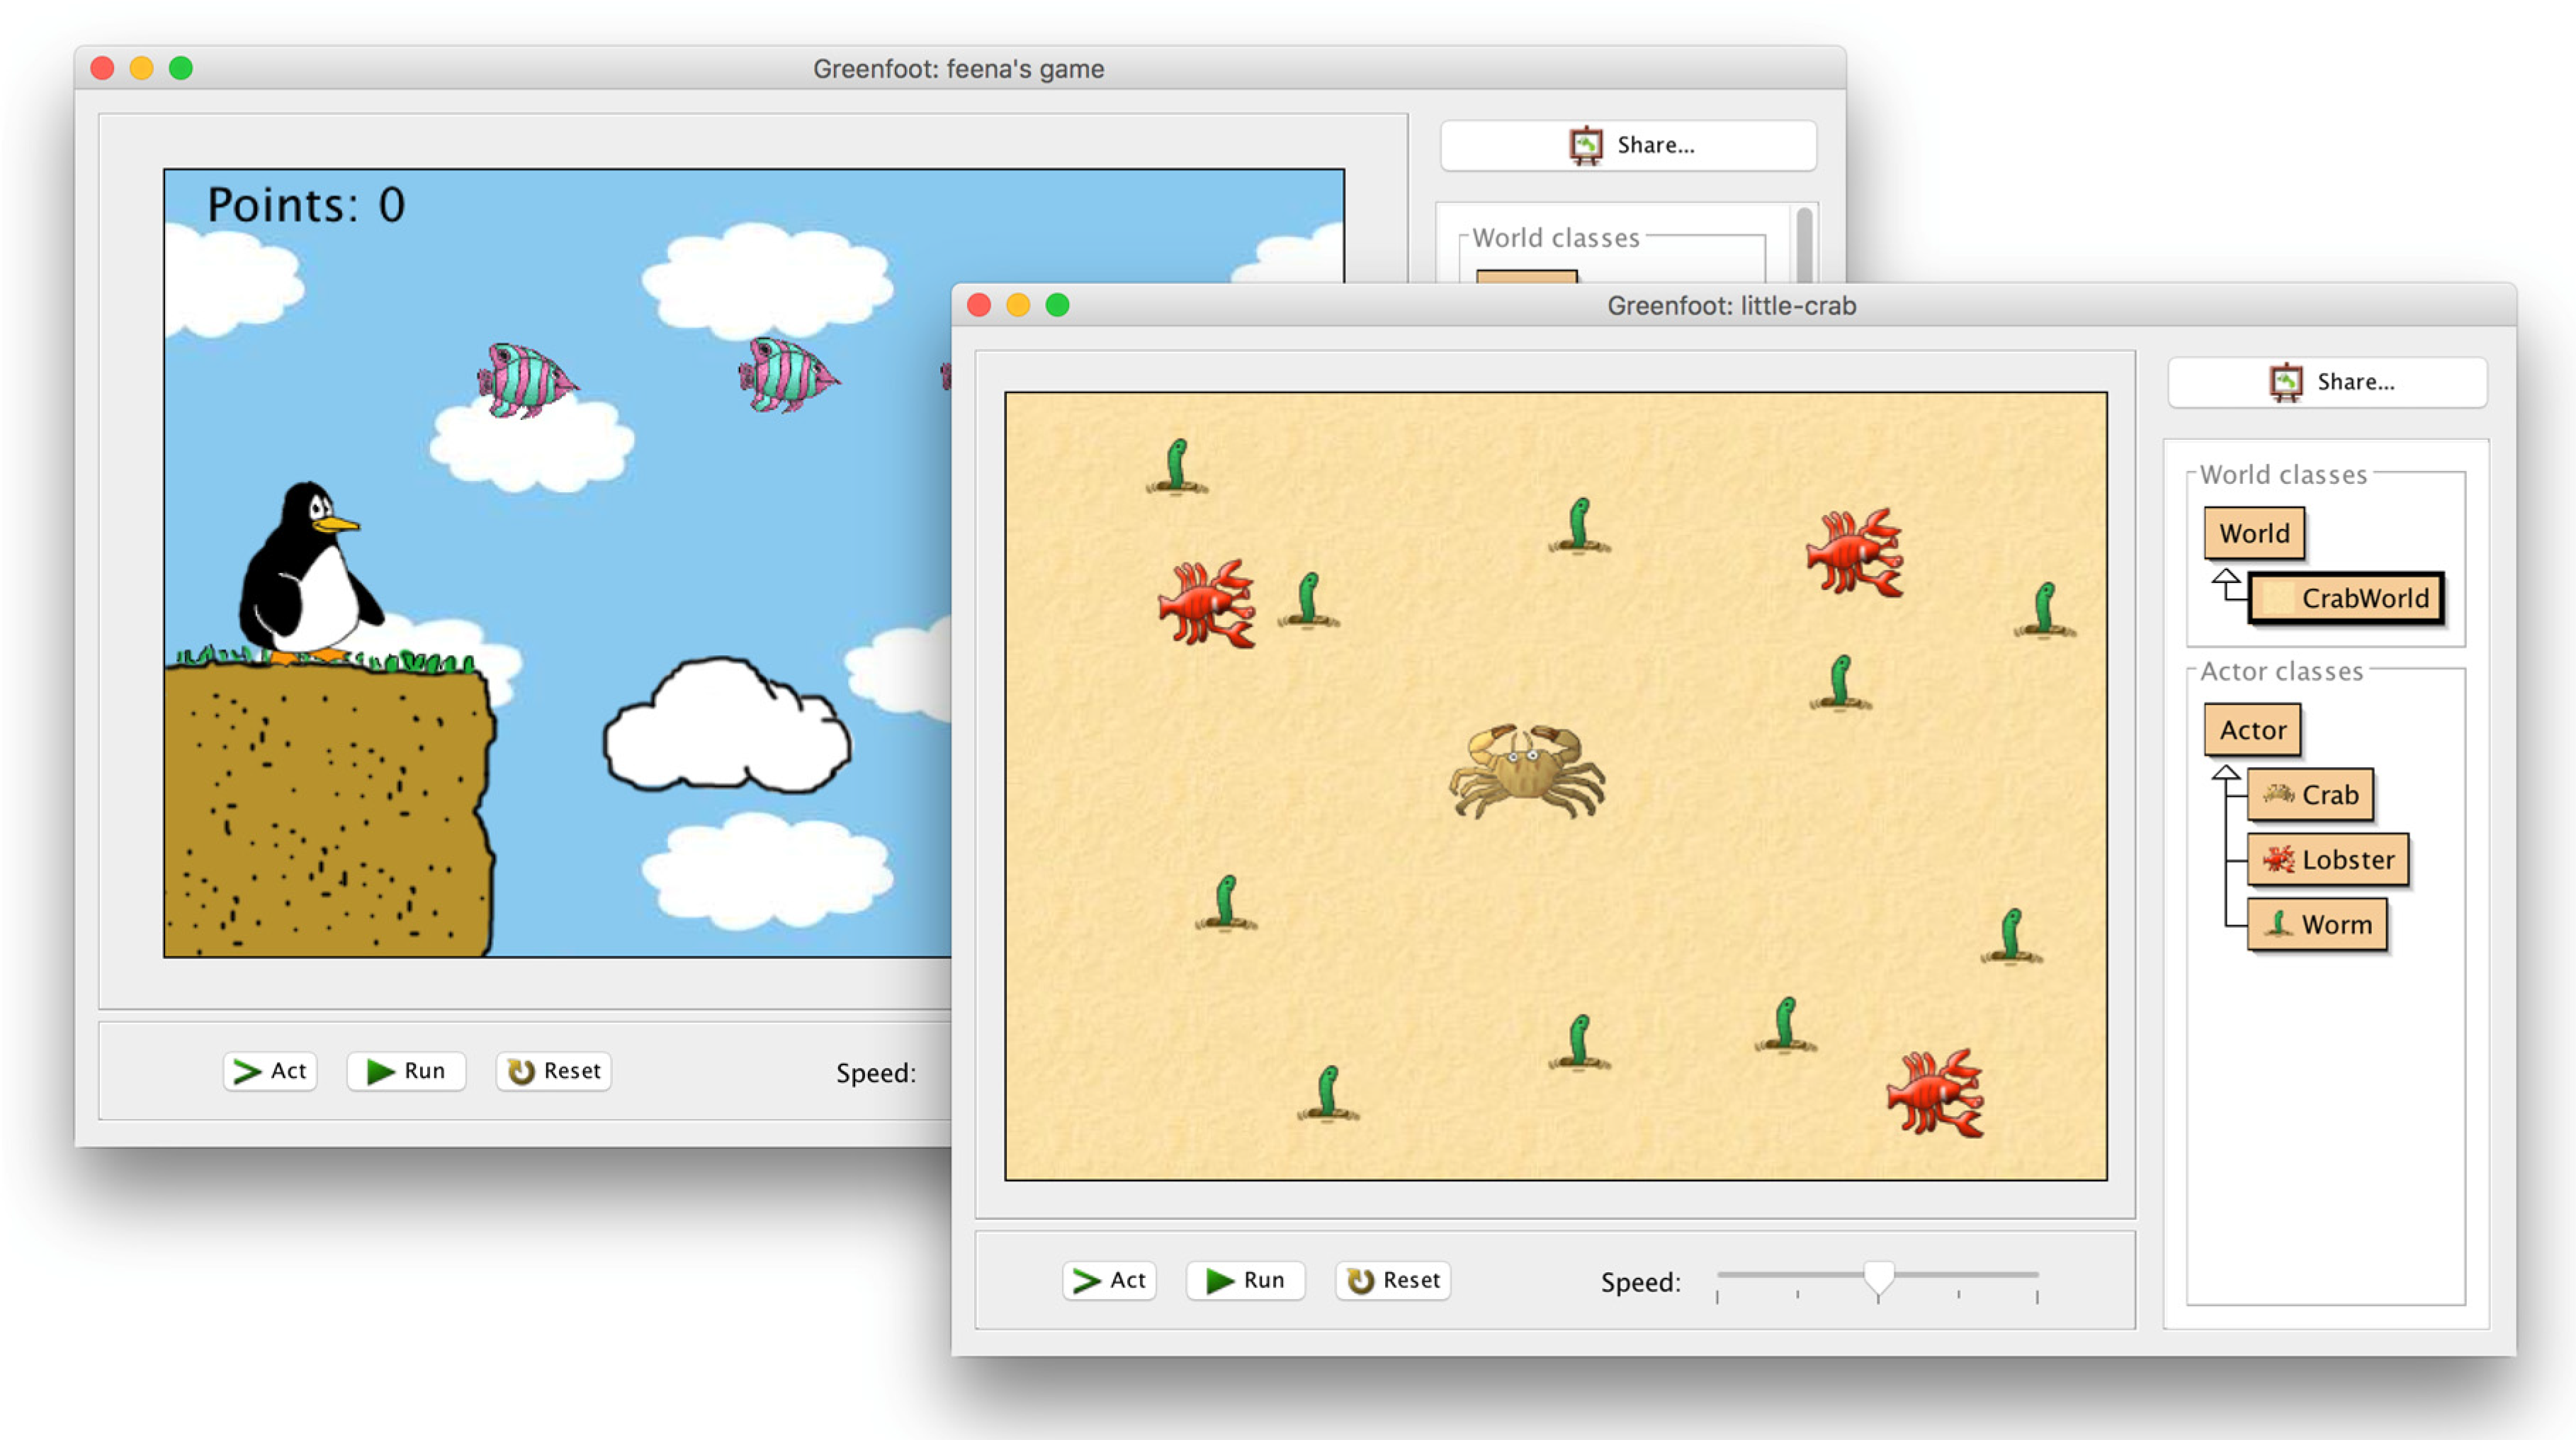
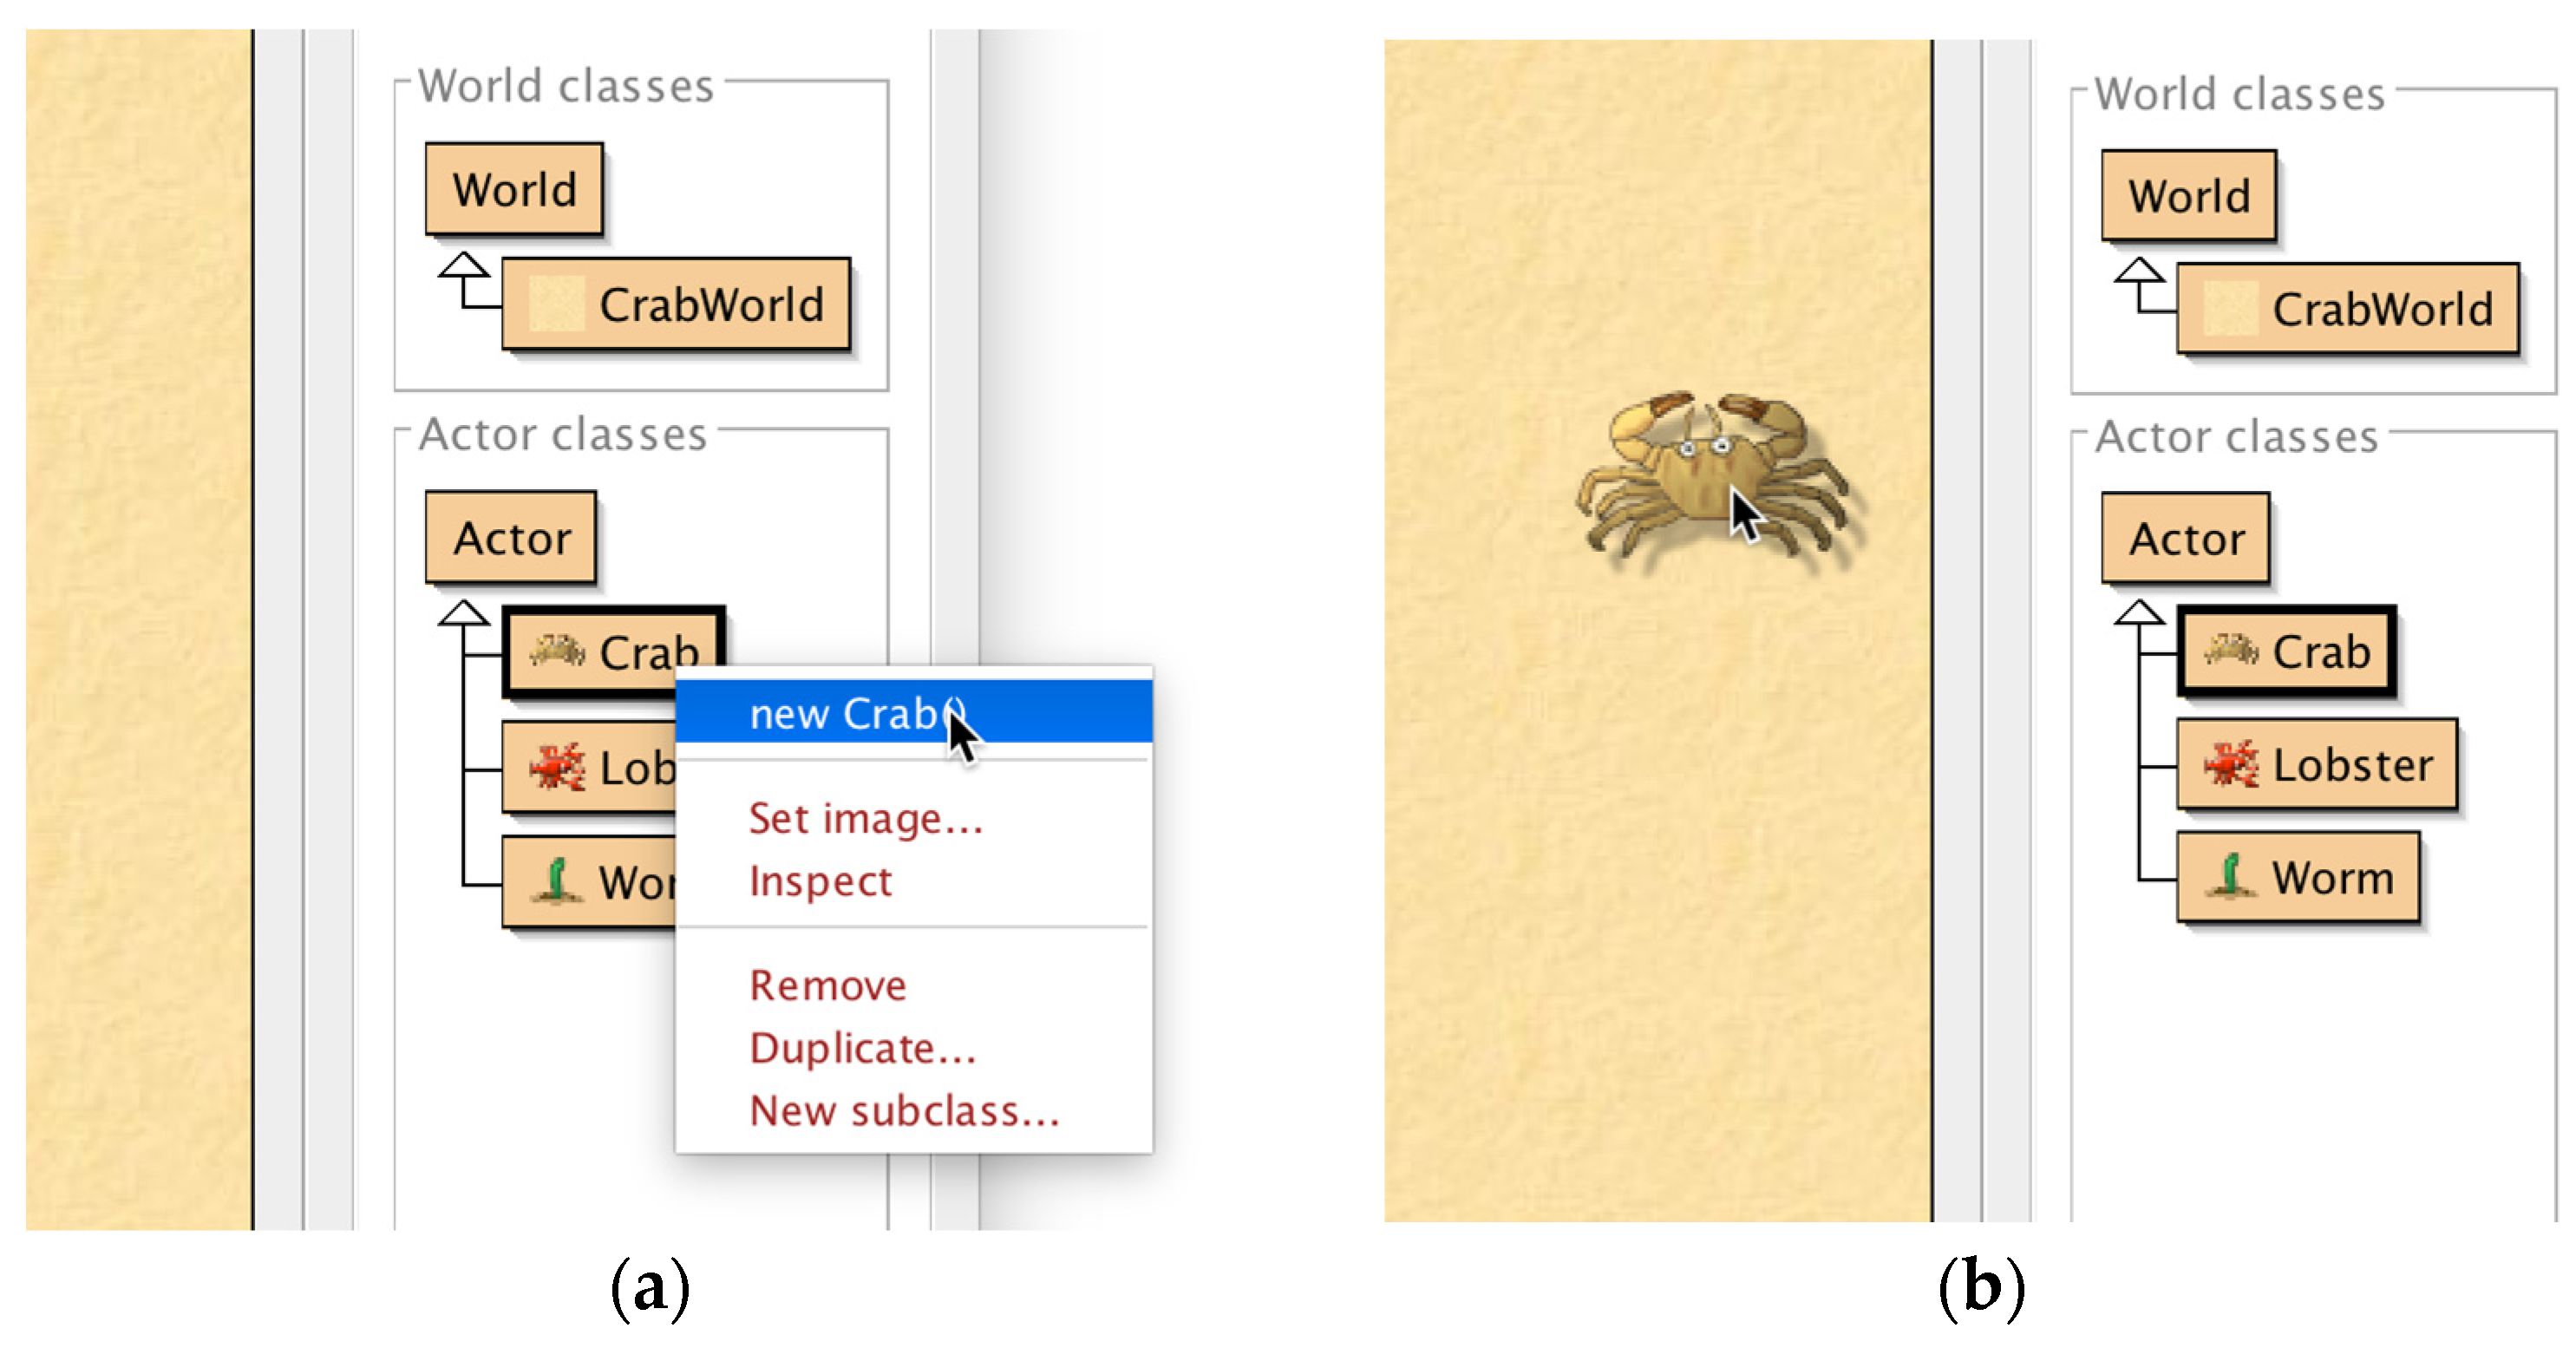
Figure 1 shows two simple examples that can be used for early introduction of programming concepts, each with a keyboard controlled game character. The examples illustrate two classes of typical games, a birds-eye view game and a platform jumper game. Game characters (classes and their objects) can be created interactively, and character behaviour is programmed in Java. Greenfoot provides simple movement, control and collision detection methods to enable novice programmers to create the first interactively controlled graphical characters within a few minutes.
Greenfoot also includes a built-in sound recorder and easy functionality for sound playback, enabling audio support.
Greenfoot scenarios do not have to be games: other often used examples include simulations (such as an ant simulation or a simulation of solar systems) and musical examples (such as an on-screen piano). Since the implementation language is Java, and Greenfoot provides the full standard Java Development Kit (JDK), the system scales easily to more complex and elaborate examples. For example, networking libraries can be used to include data from the internet in Greenfoot scenarios (such as live weather reports), and Greenfoot can easily be connected to a number of external devices, such as the Microsoft Kinect (a sensor board for human motion tracking). Actors in Greenfoot scenarios can also be controlled with arbitrarily complex artificial intelligence algorithms; this is in contrast to possible programs in Scratch, which provides a similar World/Actor model, but fails to scale to the same size and sophistication of example programs (see further discussion below). A wide range of different example programs with pedagogical explanations is presented in a Greenfoot specific programming textbook [
14].
3.3. Visualisation
To learn programming, especially to learn the concepts of object orientation, it is not sufficient to learn about lines of code; instead, sophisticated models of object interaction have to be understood by novices. It is crucial that learners develop mental models of these underlying concepts to master the foundations of programming. The difficulty in developing these mental models, and understanding the concepts of programming, has often been identified as the main hurdle to the learning of programming [
15]. Therefore, the Greenfoot environment provides a number of conceptual visualisations to aid in this understanding.
3.3.1. Classes and Objects
The main window of the Greenfoot environment does not present lines of code in its main panel, as so many other environments (including IDLE, the default Python environment on the Raspberry Pi) do. Instead, it shows classes and objects.
The classes are represented in a simple diagram along the right side of the main window (see
Figure 1) which shows their inheritance relationships. Instances of these classes are shown as
actors (with custom images specified by their class) in the main part of the interface, the
world.
Objects (actors) can be dragged and dropped in the world, and actors of the same class exhibit similar appearance and behaviour. This design illustrates important object-oriented concepts before learners start to interact with lines of source code.
Of course, to modify the behaviour of actors, learners will soon enough see lines of code and edit them, but when this happens it does so in the context of changing the behaviour of an object. The context is established first, before small scale syntax is addressed.
3.3.2. State
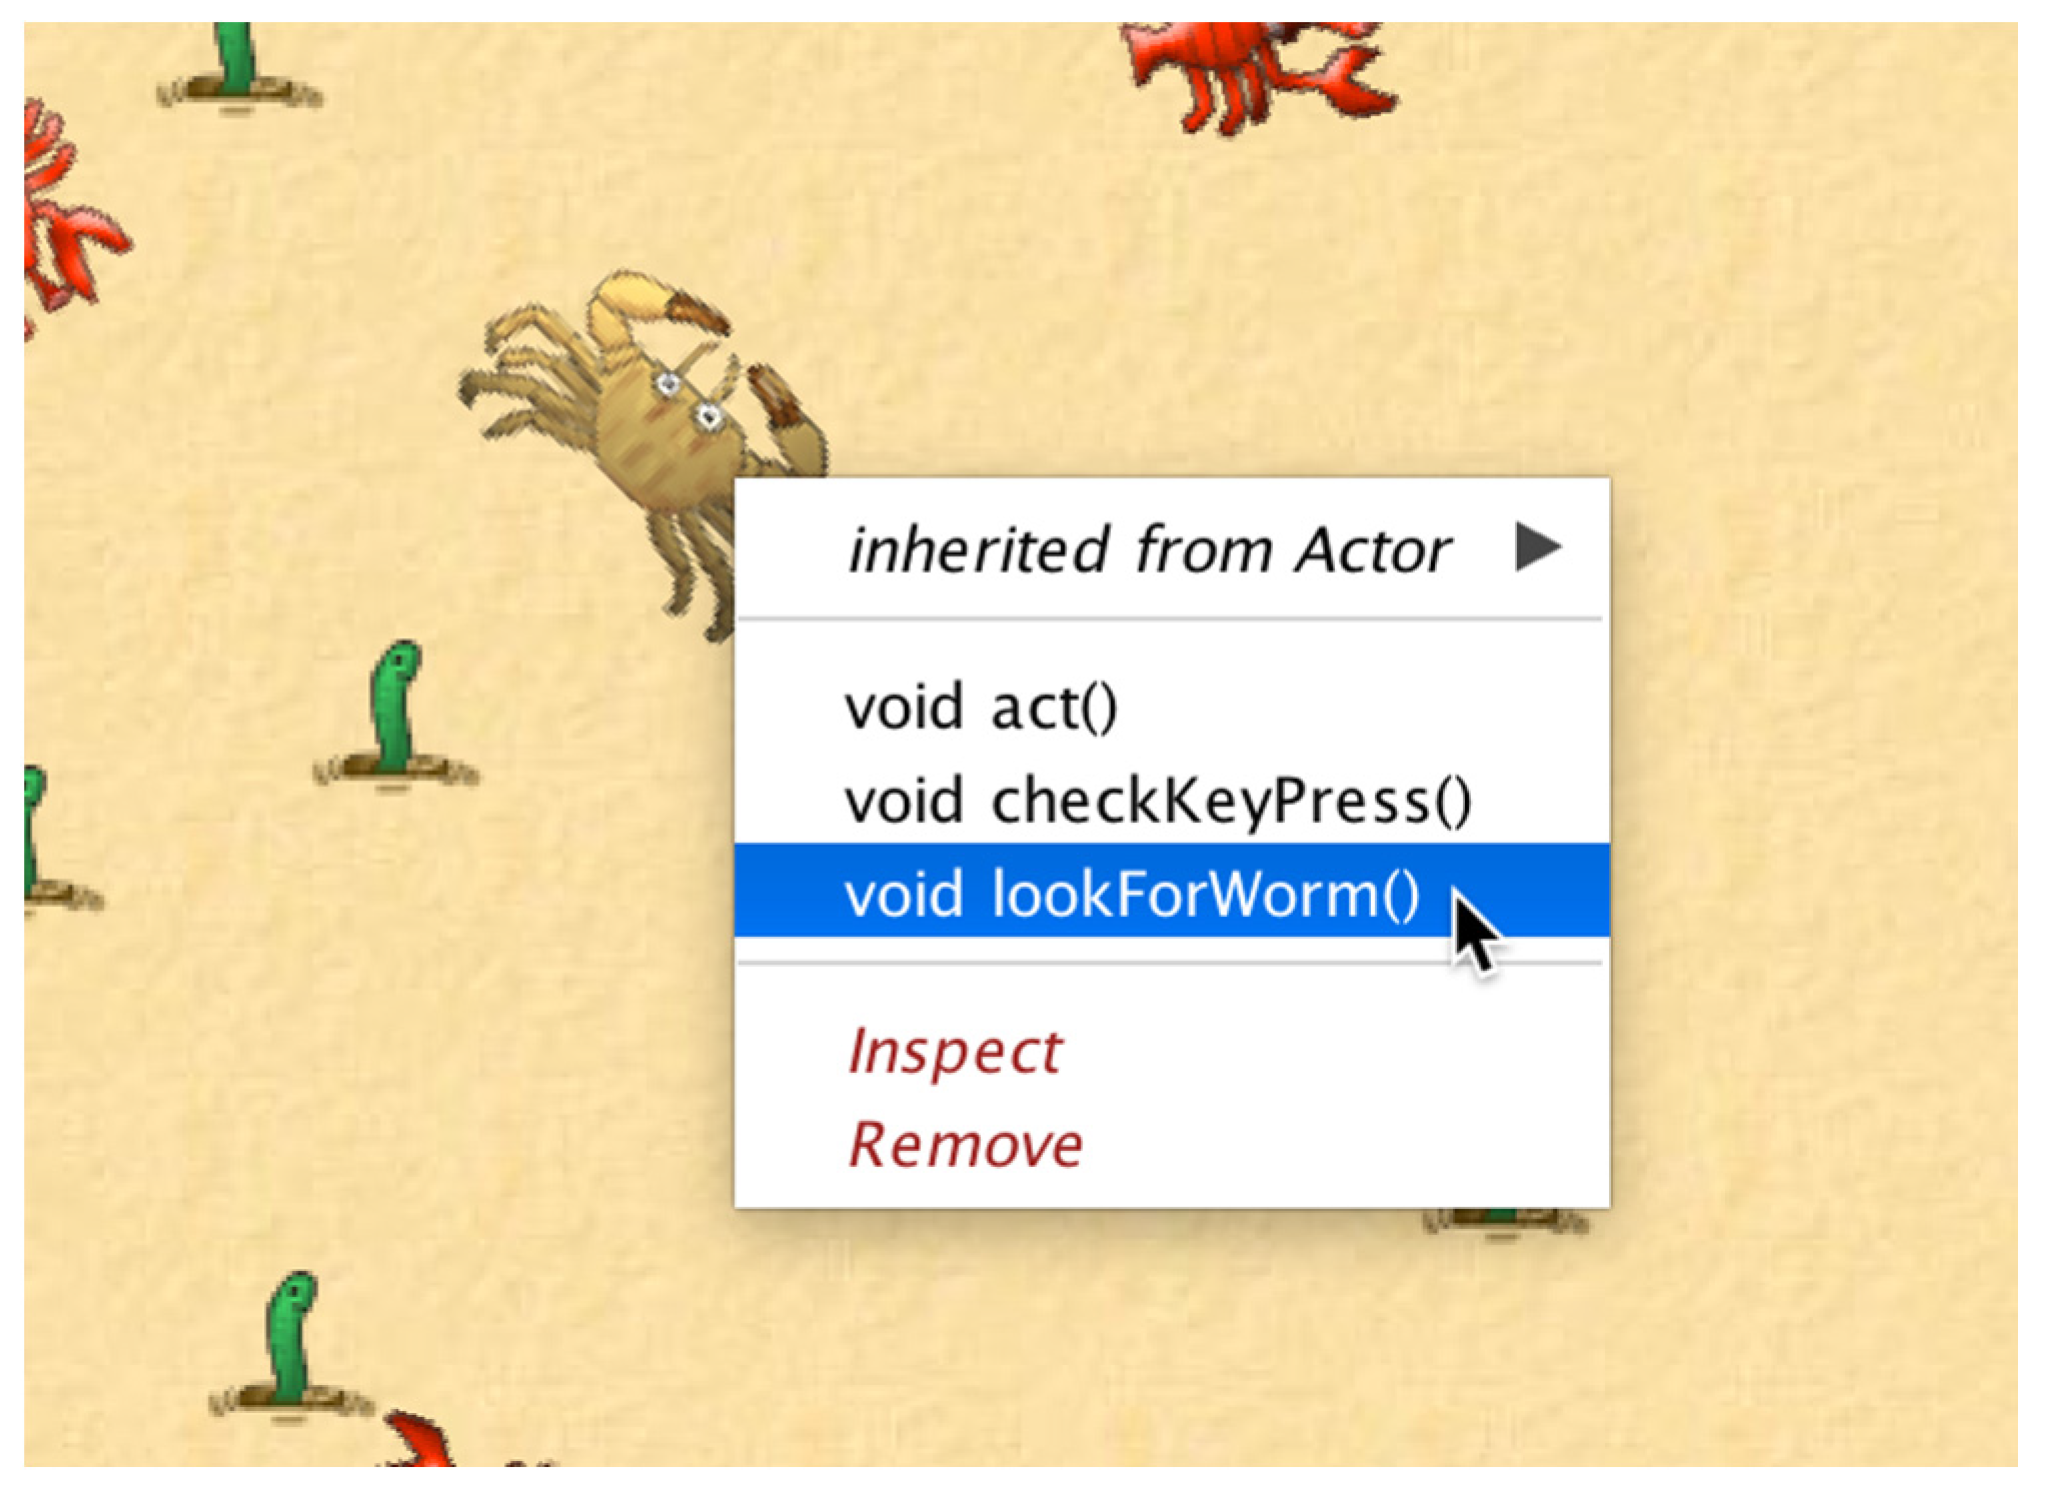
Objects in the world can be inspected (using an
Inspect function in a right-click menu). This displays an
object inspector showing the state of the object (
Figure 2). Object inspectors serve to visualise the concept that objects have state, and the names of the fields can be associated with the variable names defined in the source code. Comparison of inspectors can be used to illustrate the class-based nature of field definitions (objects of the same class have the same fields; objects of different classes have different fields) and the object-based nature of values (each object holds its own values).
Object inspectors may be left open when the program executes, and field values will be dynamically updated as they change. This visualises dynamic state changes in a running program.
3.3.3. Behaviour
Another important concept in object orientation is that of behaviour of objects. Two important mechanisms are present in Greenfoot to visualise behaviour.
The first aspect comes from the nature of Greenfoot as a micro-world, and was first popularised with the introduction of turtle graphics in Logo [
16]: The visualisation of the program as it runs. It is in the nature of graphical micro-worlds that the execution of the program has visible visual effects in real time during runtime. This often provides an automatic implicit debugging aid: bugs in the program often surface as unexpected behaviour of an actor in the world. A learner might observe this behaviour and immediately ask herself “
Why did it do that now?”. This is a valuable implicit and effortless start to program testing and debugging.
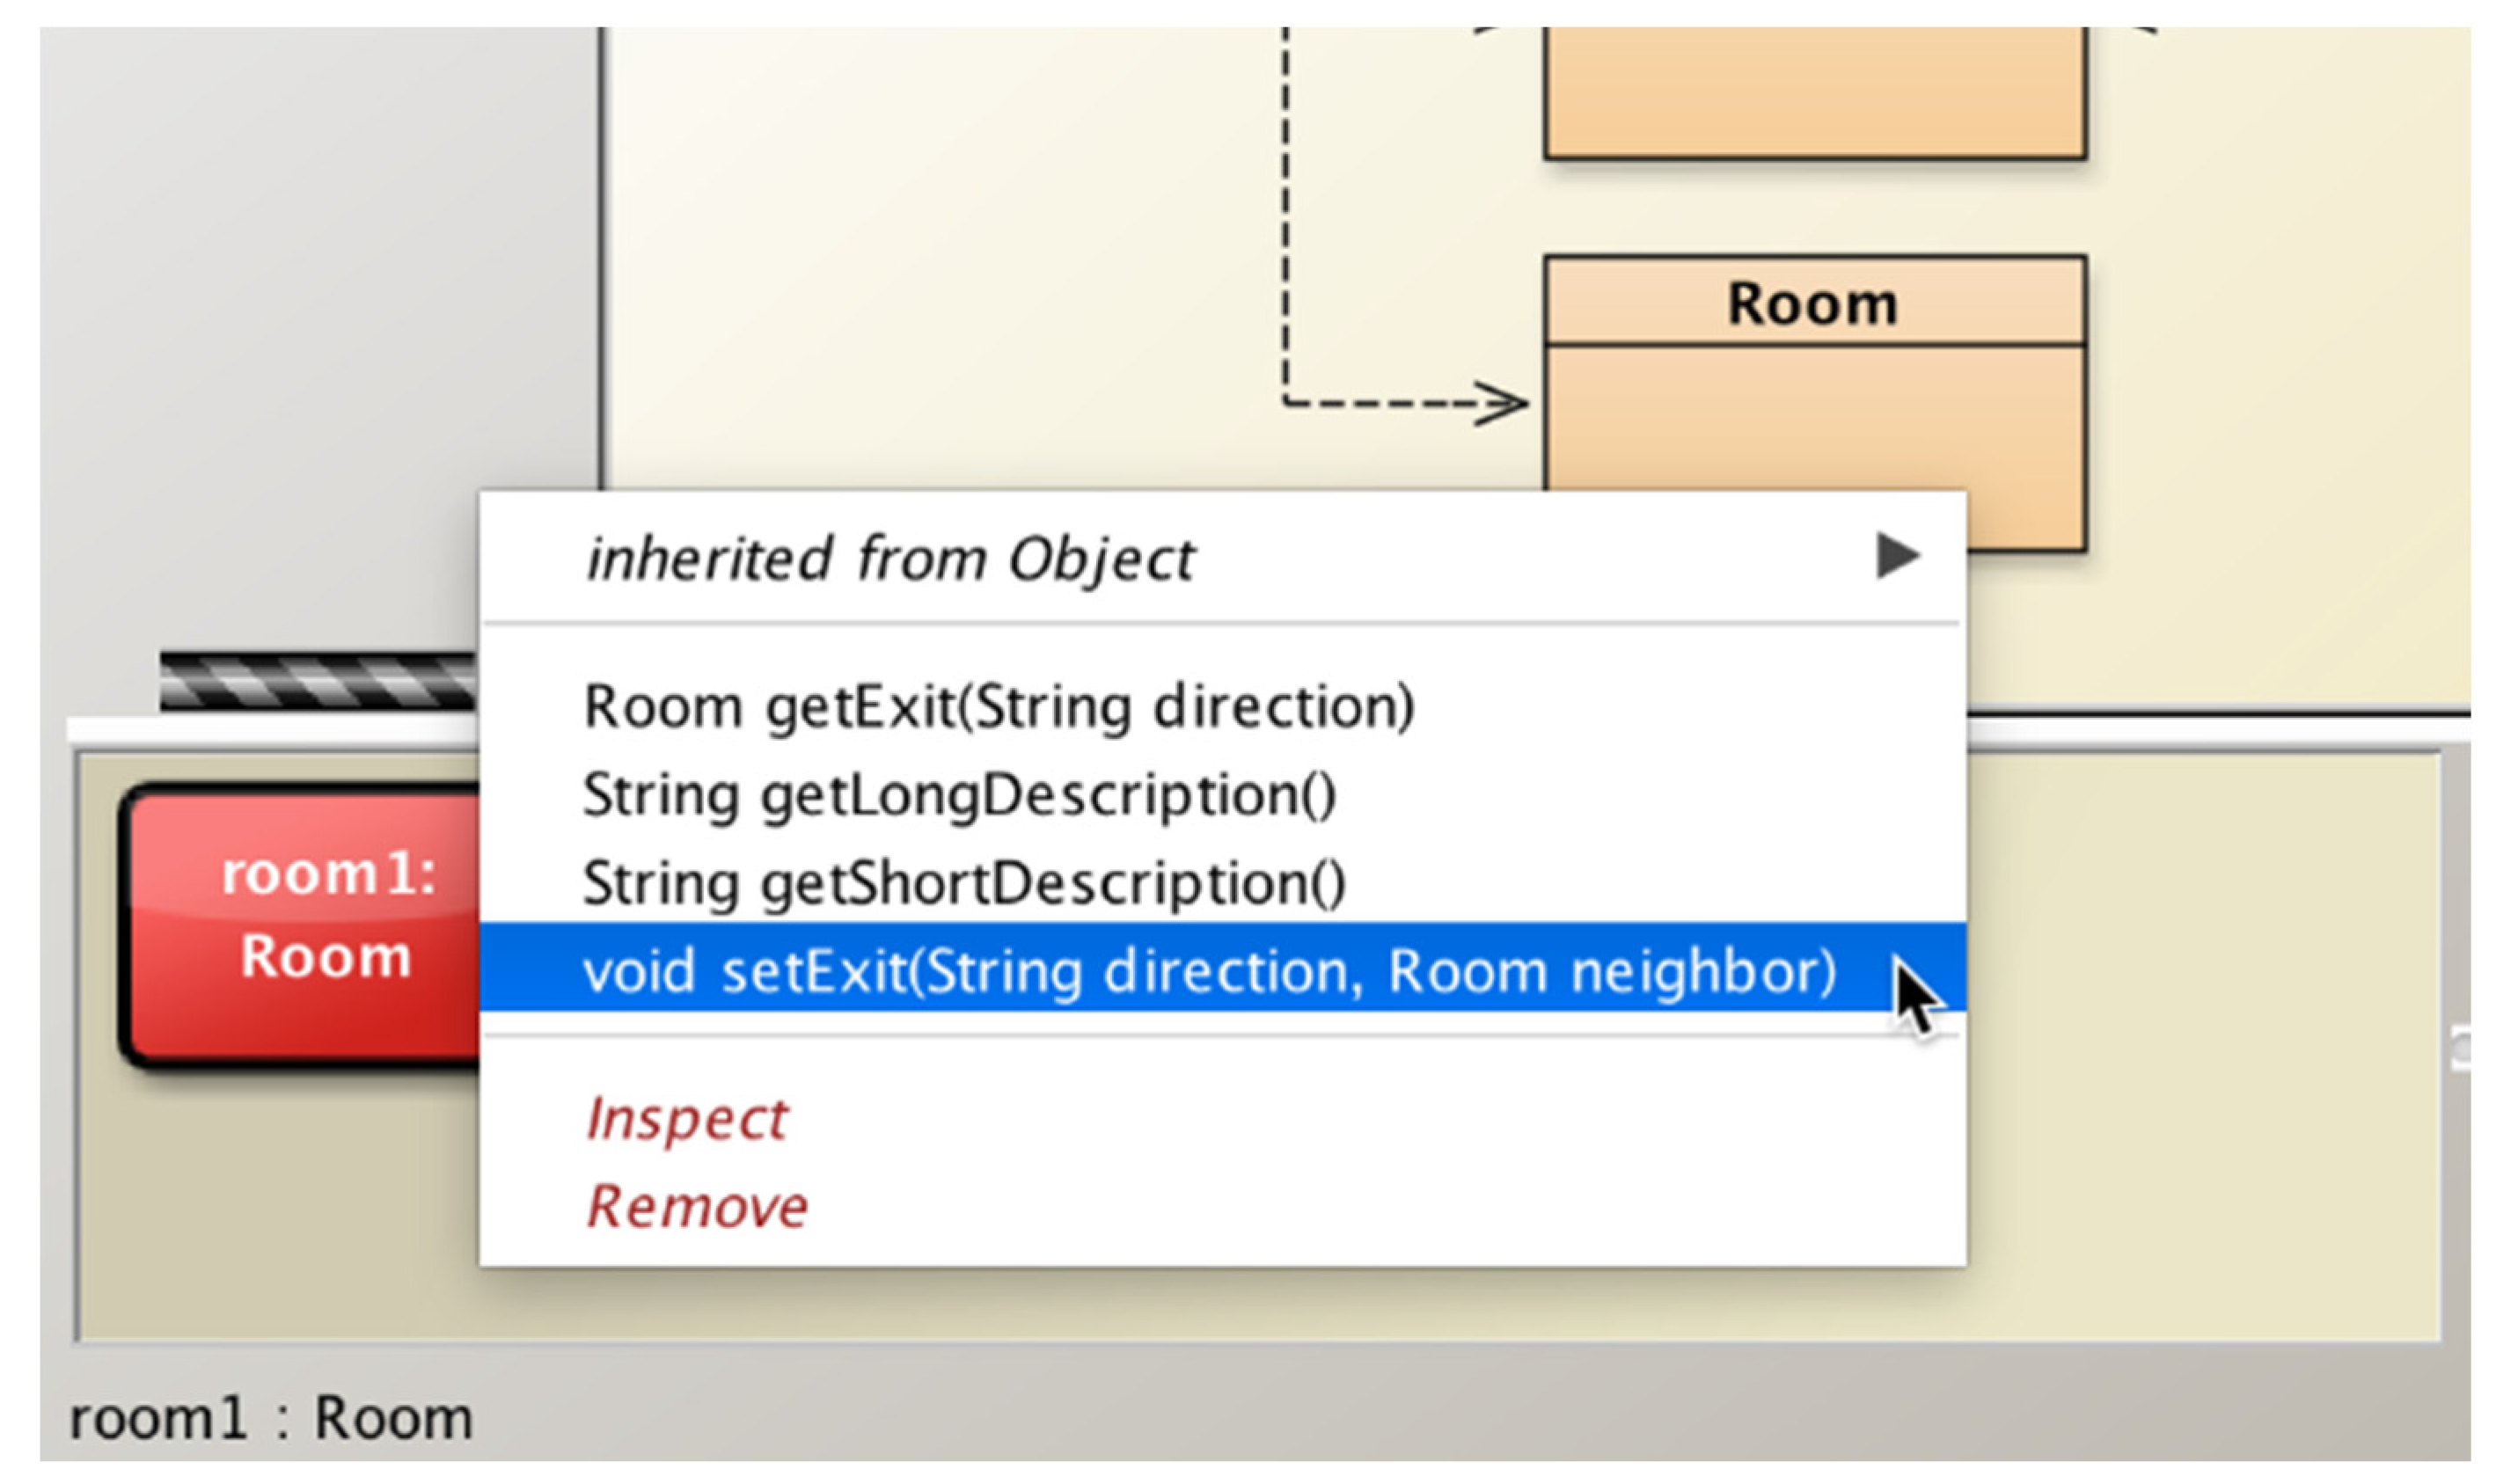
The second visualisation option of object behaviour is offered via the provision of interactive method calls (
Figure 3). Instead of running the program as a whole, individual methods of individual objects can be invoked interactively via the mouse. Parameters may be passed in if necessary, and return values may be displayed.
This mechanism serves two distinct purposes: It illustrates the concept that objects have a fixed set of methods and that one can communicate with an object by invoking those methods, and it allows experimentation with and exploration of the classes and objects to investigate and understand a program’s behaviour.
3.4. Interaction
3.4.1. Method Invocation
The first example of interactive behaviour—interactive method invocation—has already been discussed (
Section 3.3.3), as visualisation and interaction are closely integrated. This can be extended by combination with other interaction mechanisms. Objects can, for example, be freely dragged to different locations in the world. By combining this with interactive method invocation, many concepts and behaviours can be illustrated. For example, the
getX() method (which provides an objects current x-coordinate) may be called repeatedly after moving the object to different locations to illustrate the world coordinate system, or a check for touching the edge of the world may be called with the object being or not being at the edge. Many behaviours can be experienced in exploration without the need to write test drivers.
3.4.2. Object Creation
Another opportunity for interaction lies in the interactive creation of objects (
Figure 4). By right-clicking a class, access can be gained to a class’s constructors; invoking these interactively creates instances that then may be placed into the world. Flexible scenarios may be created this way to experiment with different object configurations.
3.5. Source Level Support
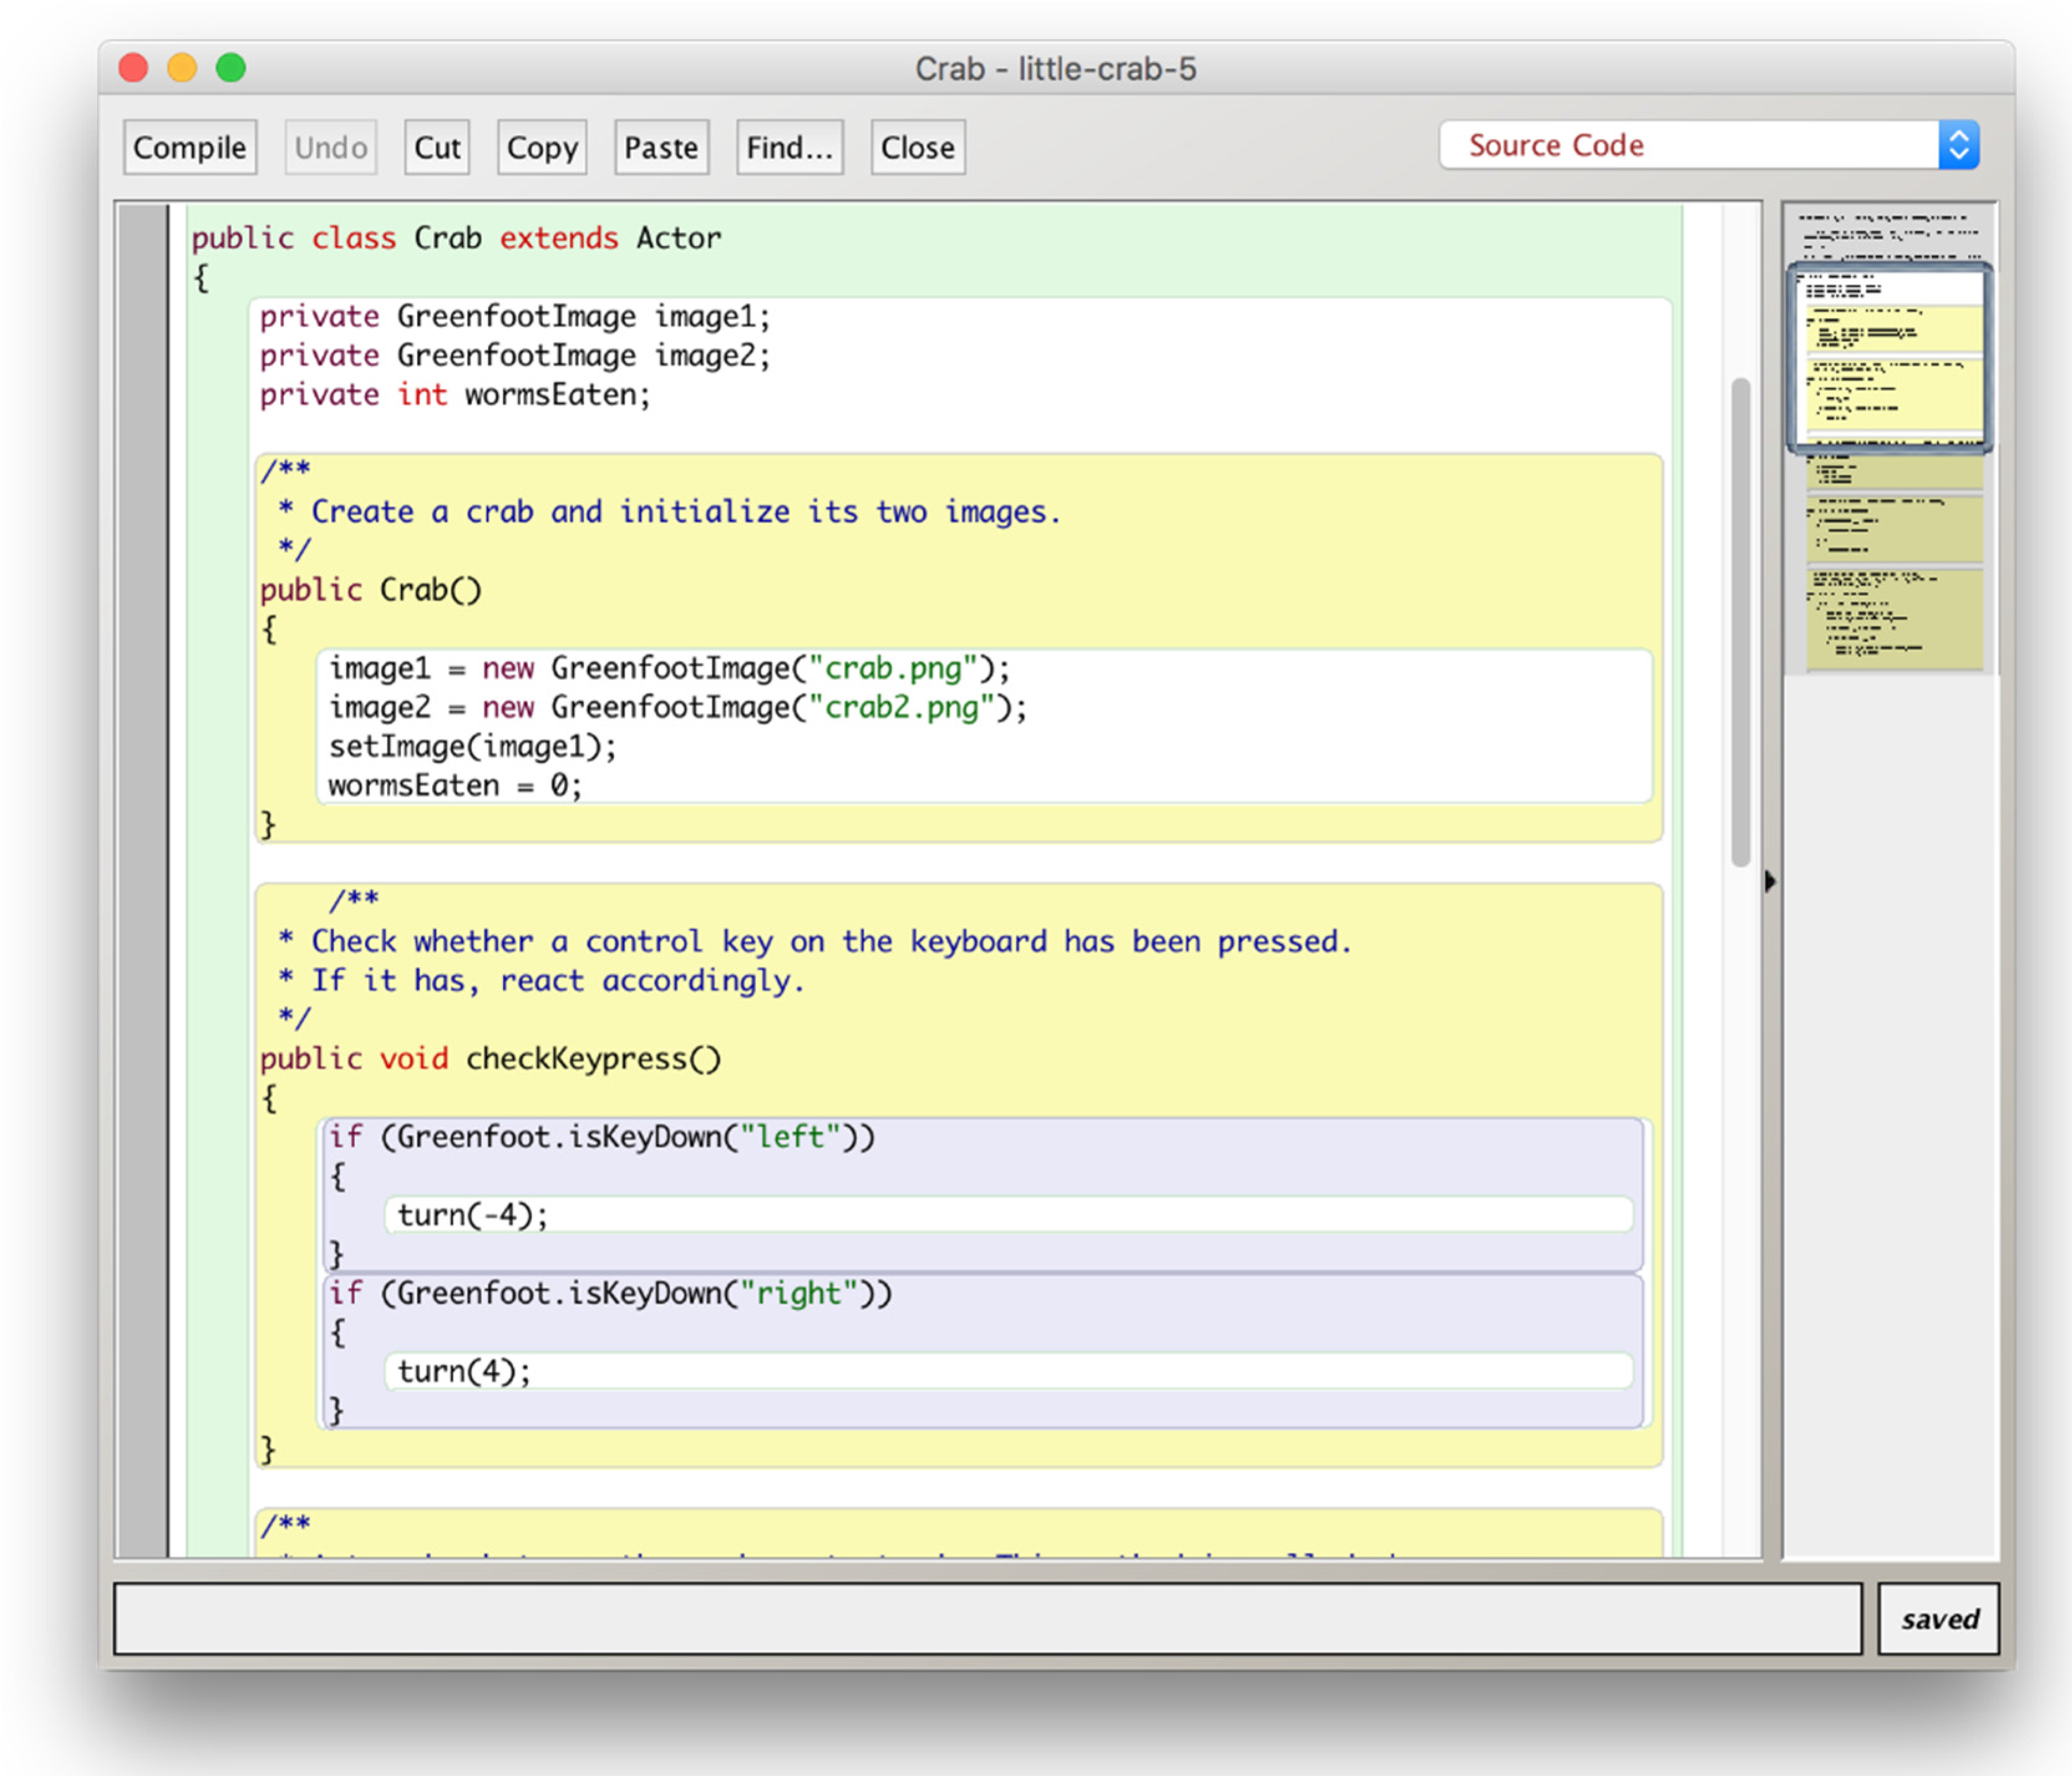
While the first interactions with Greenfoot are often with existing, at least partially implemented scenarios, and the first activities are often at the conceptual level—running programs, creating objects, invoking methods interactively, etc.—learners very quickly get to the point where they are ready to modify or write source code. Programming is, after all, the goal.
Source code is displayed in Greenfoot by opening the editor for a class (
Figure 5). The source is standard Java code.
One of the arguments often presented in favour of Python over Java is the larger amount of boilerplate code needed in Java to get started. This code is a hurdle for beginners, and Python’s ability to let users get started with individual lines of code is very attractive.
Greenfoot ameliorates this affect by partly avoiding, partly auto-generating the boilerplate code. Java’s usual public static void main method—a major stumbling block for beginners—does not appear in Greenfoot. Learners simply implement individual behaviour of objects, and the Greenfoot framework arranges execution. The object model therefore is cleaner than in other Java environments.
Each class has the standard Java class structure, requiring the class header and method signatures. These are, however, auto-generated when a new Greenfoot class is created, so that learners can indeed create the first executable program (with a visual effect) by adding a single line of code. Once users become more familiar with the environment and more adventurous, standard techniques such as code-completion and links to documentation facilitate further exploration of the API.
One other educational tool that should be highlighted is Greenfoot’s scope colouring (
Figure 5). Correctly maintaining nested lexical scopes is one of the difficult challenges for beginners, and the Greenfoot editor helps with this by automatically colouring the extent of the defined blocks. If an opening or closing bracket is missing or misplaced, this colouring helps greatly in recognising and localising the error.
3.6. Greenfoot and Scratch
Scratch has been available on the Raspberry Pi for introductory programming education longer than Greenfoot, so it is interesting to evaluate how they relate.
Greenfoot does not replace Scratch: Scratch is aimed at younger learners and uses a different programming model (block-based programming). However, the two systems have a number of similarities: Both are graphical, two-dimensional frameworks that let users program the behaviour of actors in a world, and they display this world and its execution on screen. Because of these similarities, they present an ideal sequence of instruction for younger learners: concepts learned in Scratch transfer well into Greenfoot, with Greenfoot providing more complex and powerful abstractions and interactions. Therefore, Greenfoot is an ideal successor system once young learners outgrow Scratch.
The characteristics of Scratch and Greenfoot, their similarities and possible educational path, have been discussed elsewhere [
17].
3.7. Greenfoot and IDLE/Python
As this discussion shows, Greenfoot may be used as an alternative to IDLE on the Raspberry Pi. Both systems aim at similar styles and level of programming (full featured, text-based programming languages), and both share similar models (modern object-oriented abstractions).
While Python in IDLE has the attraction that typing in individual lines of code can have a visible execution result, Greenfoot has many other advantages from a pedagogical point of view: It is more interactive, allows easy creation of more engaging and more sophisticated examples, and illustrates important programming concepts better. The output of programs is more graphical, and the functionality it provides delivers on the goal of the initial Raspberry Pi mission statement to “provide excellent multimedia” to “make the board desirable to kids who wouldn’t initially be interested in a purely programming-oriented device” [
1]. It delivers this multimedia capability not only in the form of a media player for passive media consumption, but tied in to active programming activities.
4. BlueJ
BlueJ is the second educational Java development environment included in the Raspberry Pi image, and therefore available to all Raspberry Pi users. It differs from Greenfoot in a number of important aspects (which we discuss in detail below). Greenfoot is aimed at programmers from 14 years old upwards, and it specialises in the development of a specific class of application—two-dimensional graphical games. BlueJ was initially developed for introductory university courses (although it, too, is now often used at school age) and is more generic: It provides no special support for any particular type of application, and in return lets users develop programs of any kind. What is especially interesting in the context of the Raspberry Pi is that it can also interact directly with the Raspberry Pi hardware and provides easily accessible software abstractions for its components.
4.1. Aims of the BlueJ Environment
The purpose of BlueJ is to provide a thorough introduction to the foundations and principles of object-oriented programming. The environment is designed with pedagogical goals in mind, to support the understanding and mastery of object-oriented principles. Where Greenfoot’s foremost aim was to create engagement and motivation by providing special support for one particular class of application, BlueJ aims to facilitate a full understanding of principles and details of object-oriented programming. No framework code is automatically provided (as it is in Greenfoot), so there is no “magic”, and no restriction as to what kinds of programs can be created. BlueJ is a general purpose IDE. While Greenfoot was aimed at drawing people in to programming who previously may not have thought they would like it, BlueJ’s target user group are novices who have decided they want to learn more, and achieve a deeper understanding.
The overall design goals of BlueJ are similar to Greenfoot: visualisation, interaction and simplicity. We will first give a short overview of the BlueJ environment (a more detailed description is provided elsewhere [
18]), and then concentrate on possible projects specific to the Raspberry Pi.
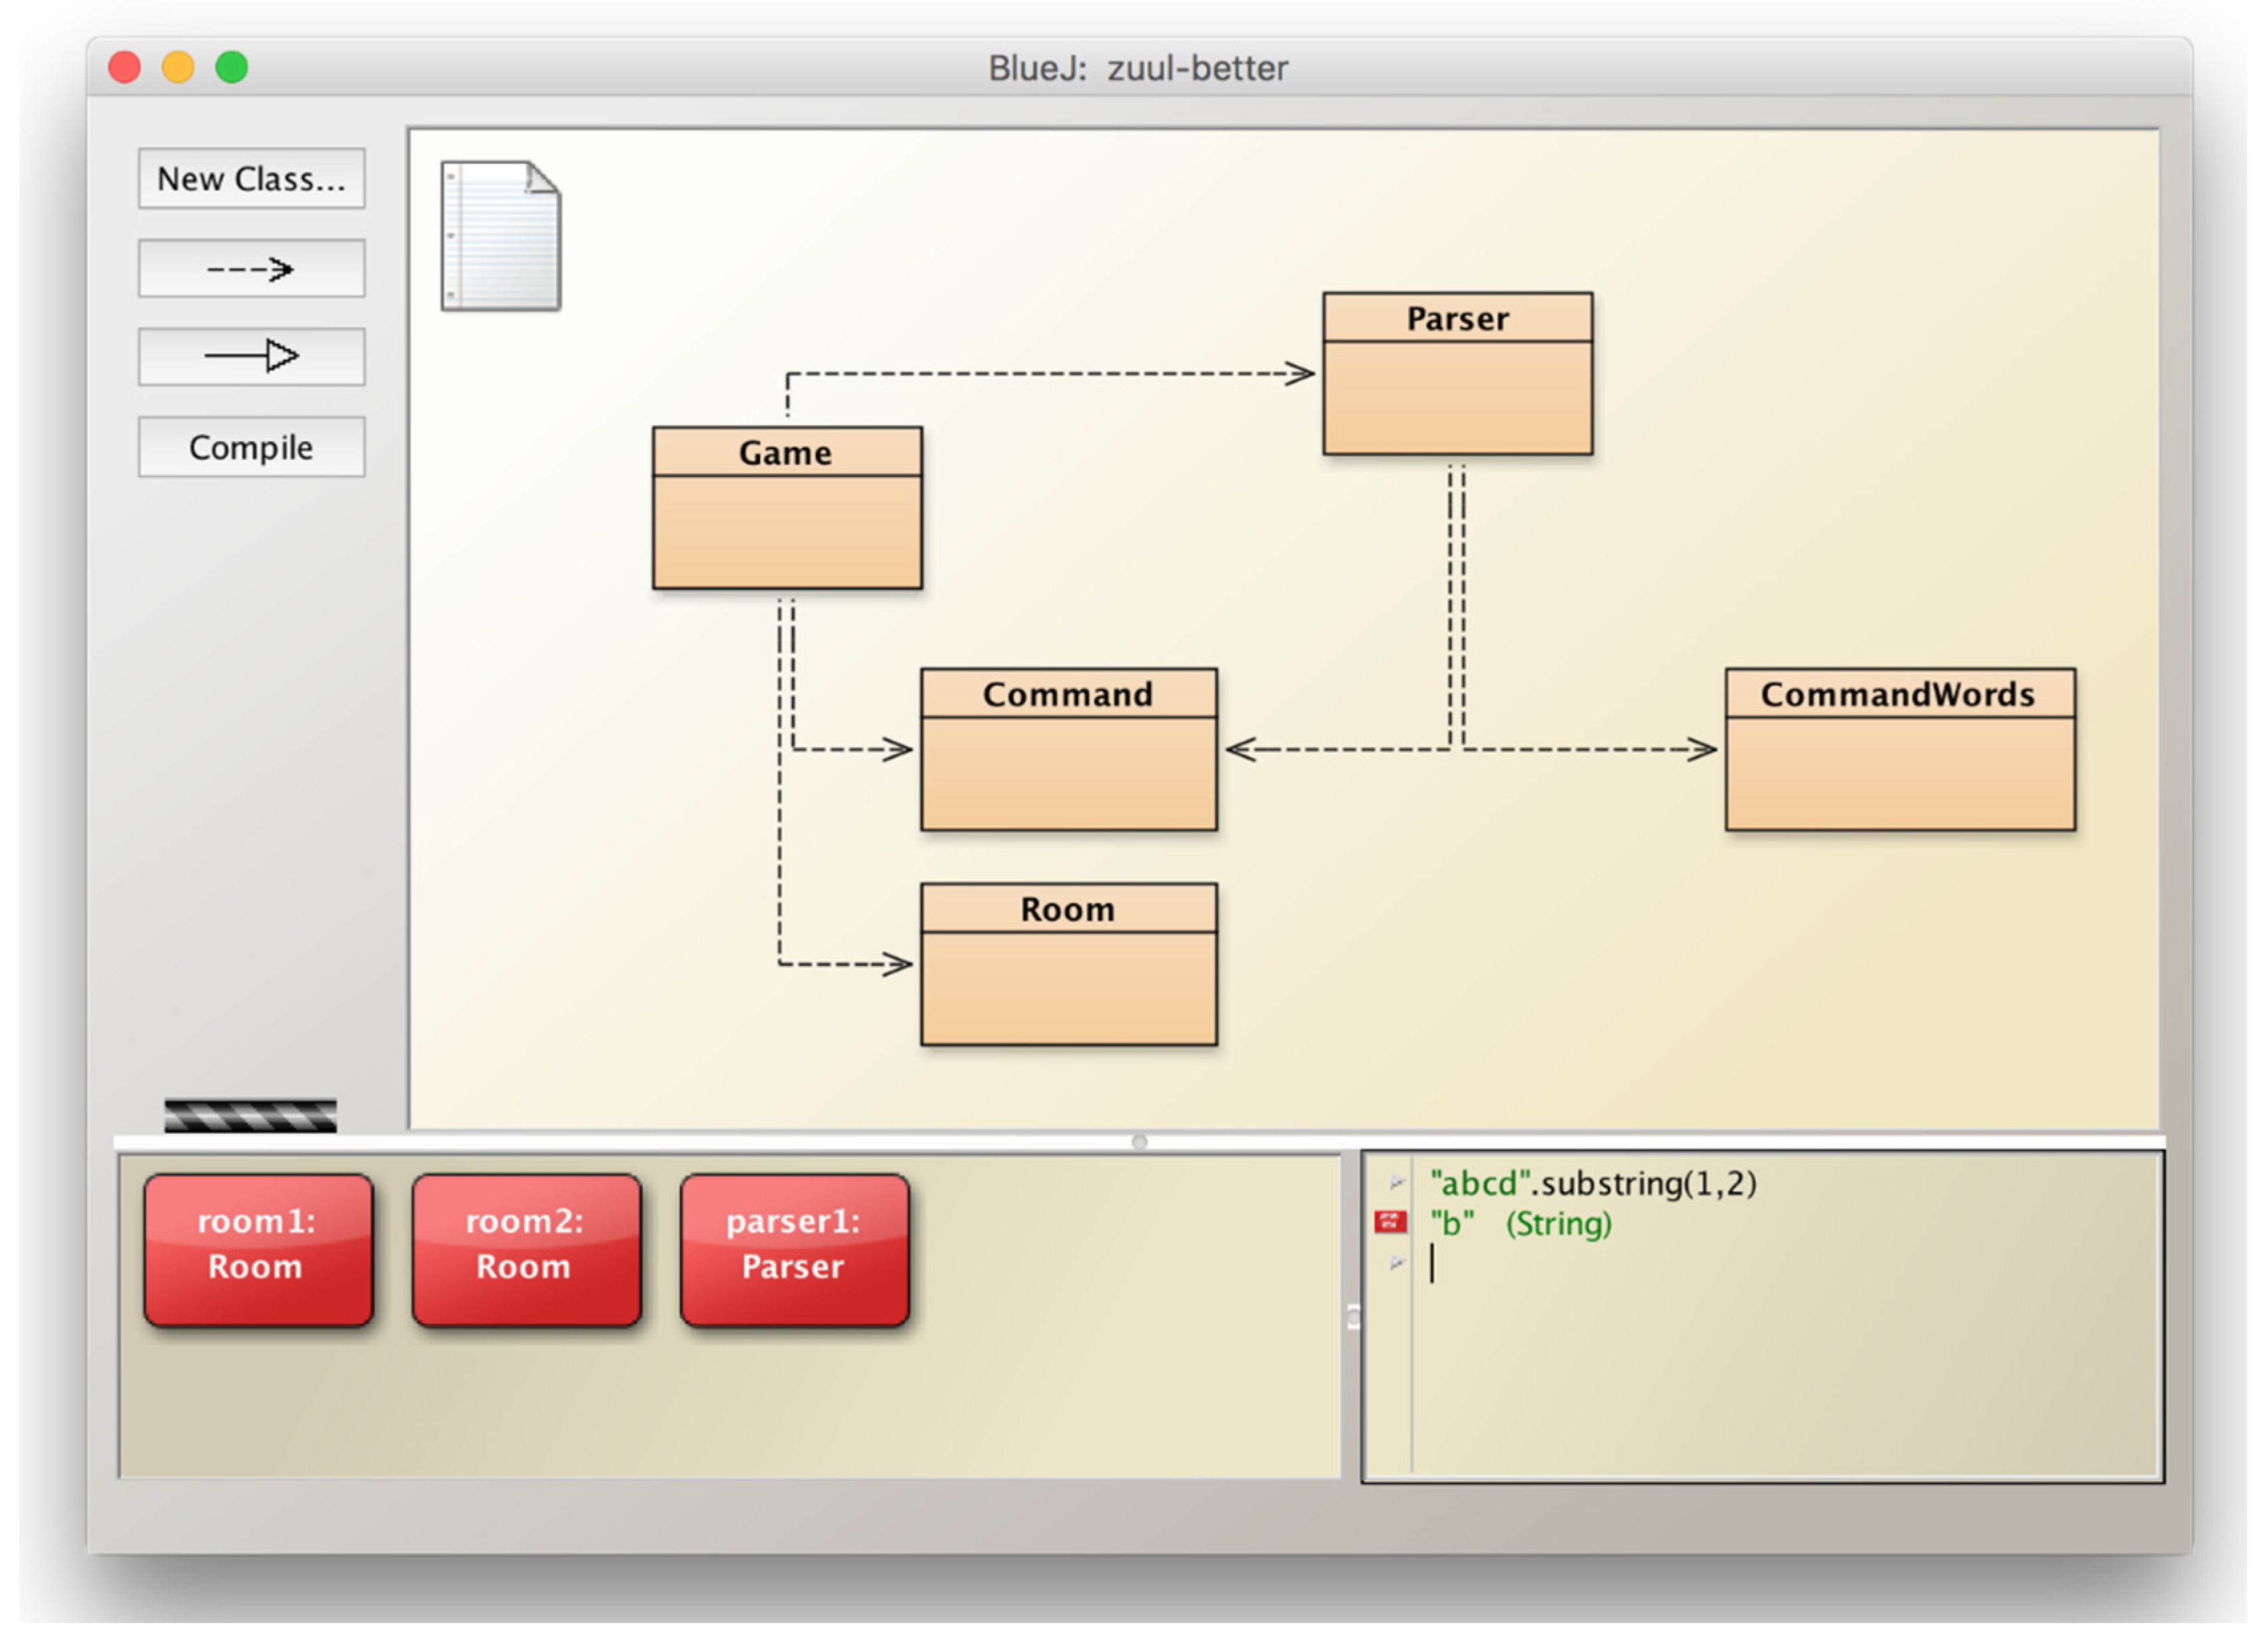
4.2. The Main Window
BlueJ differs from most IDEs for text-based languages in that its main window (
Figure 6) does not focus on the display of source code, but program structure. That main part of the window shows a diagram of classes (in a notation that is a subset of UML) and their relationships. These classes are interactive: A right-click on a class allows interactive invocation of a class’s constructors, and the resulting objects are displayed on the object bench (
Figure 6, bottom left). The bottom right area in the main window is a
read-eval-print loop, which allows typing in and evaluation of single expressions or statements.
4.3. Execution
Methods may be directly and interactively invoked by selecting them from an object’s pop-up menu (
Figure 7). As in Greenfoot, methods may have parameters (which are then supplied in a dialogue) and return values, which are displayed after execution.
Not all classes have to be complete, or even be able to compile, before execution, and there is no need for a public static void main method. As soon as a single class successfully compiles, objects of this class may be created and methods executed. This allows much earlier experimentation and testing than possible in other systems, without the need for written test drivers, and it aids the learning process.
If a traditional main method is present, it can be invoked (as can all static methods) from the class’s pop-up menu. BlueJ projects are standard Java, and all Java programs can be manipulated in BlueJ.
4.4. Editing
BlueJ uses the same editor that is also integrated in the Greenfoot environment (
Figure 5). This allows easy transition from Greenfoot to BlueJ (and back), and also provides the useful educational support, such as scope colouring.
4.5. Other Tools
Several other tools are integrated in BlueJ and can be enabled in the application’s preferences. Some are hidden by default to initially provide a simple interface that can be mastered quickly by beginners, and enabled when they are needed. Tools available include a debugger, support for unit testing with JUnit [
19] and support for standard source code repositories [
20].
4.6. Accessing the Raspberry Pi hardware
BlueJ is a general purpose IDE, and many teaching projects making use of it have been created and discussed in detail [
21]. In the context of this paper, however, one new aspect is especially interesting: accessing the Raspberry Pi hardware components. With the port of BlueJ to the Raspberry Pi, we have added support for accessing the Pi’s hardware, and we provide some BlueJ projects that offer higher level abstractions of the hardware components for pedagogical purposes. These abstractions allow interaction with the hardware (as GUI interactions or programmatically), and they offer an easier start into programming that addresses the hardware. We discuss this here in a little more detail.
BlueJ interfaces with the Raspberry Pi via a (slightly modified version of) the Pi4J library [
22], which is included by default with the Raspberry Pi BlueJ version and does not need to be installed separately. In addition to the resulting ability to access the Pi4J interface directly (documentation for this is available online [
23]), we provide a set of classes that represent physical components. Once the BlueJ project has been opened that provides these abstractions, users can interact with these components by interactively creating objects and invoking their methods. They can also write code to perform more complex actions.
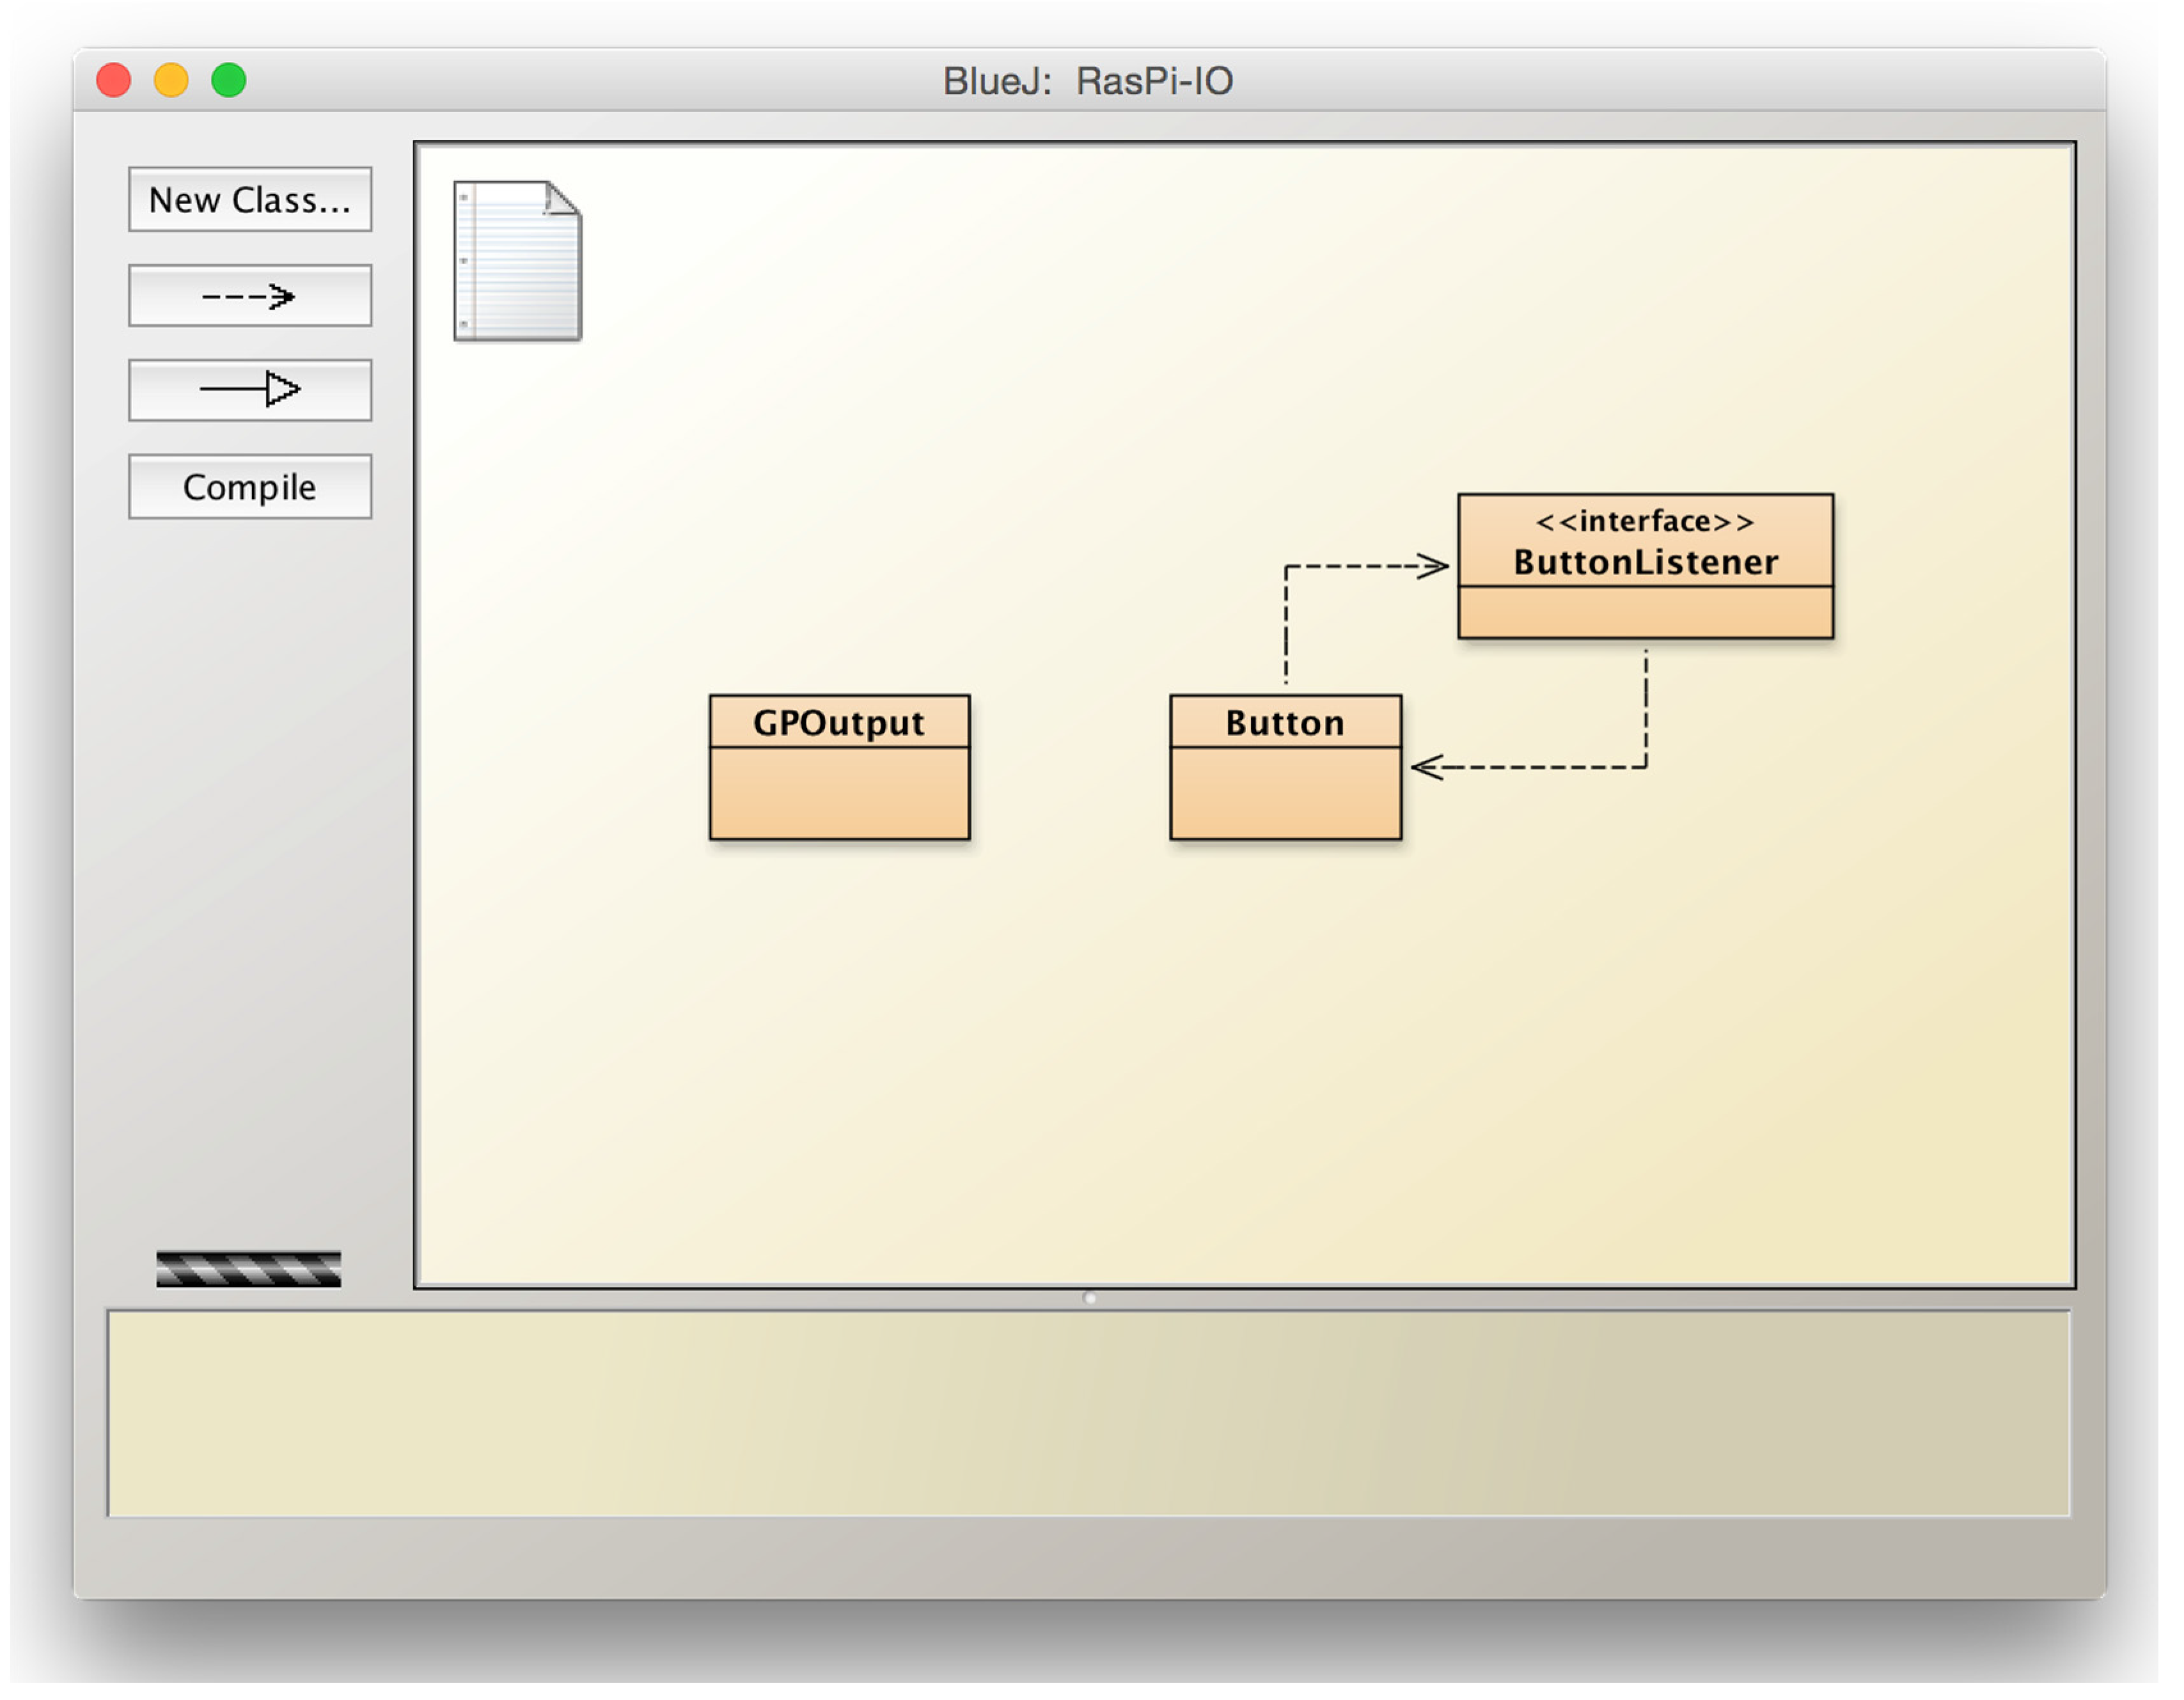
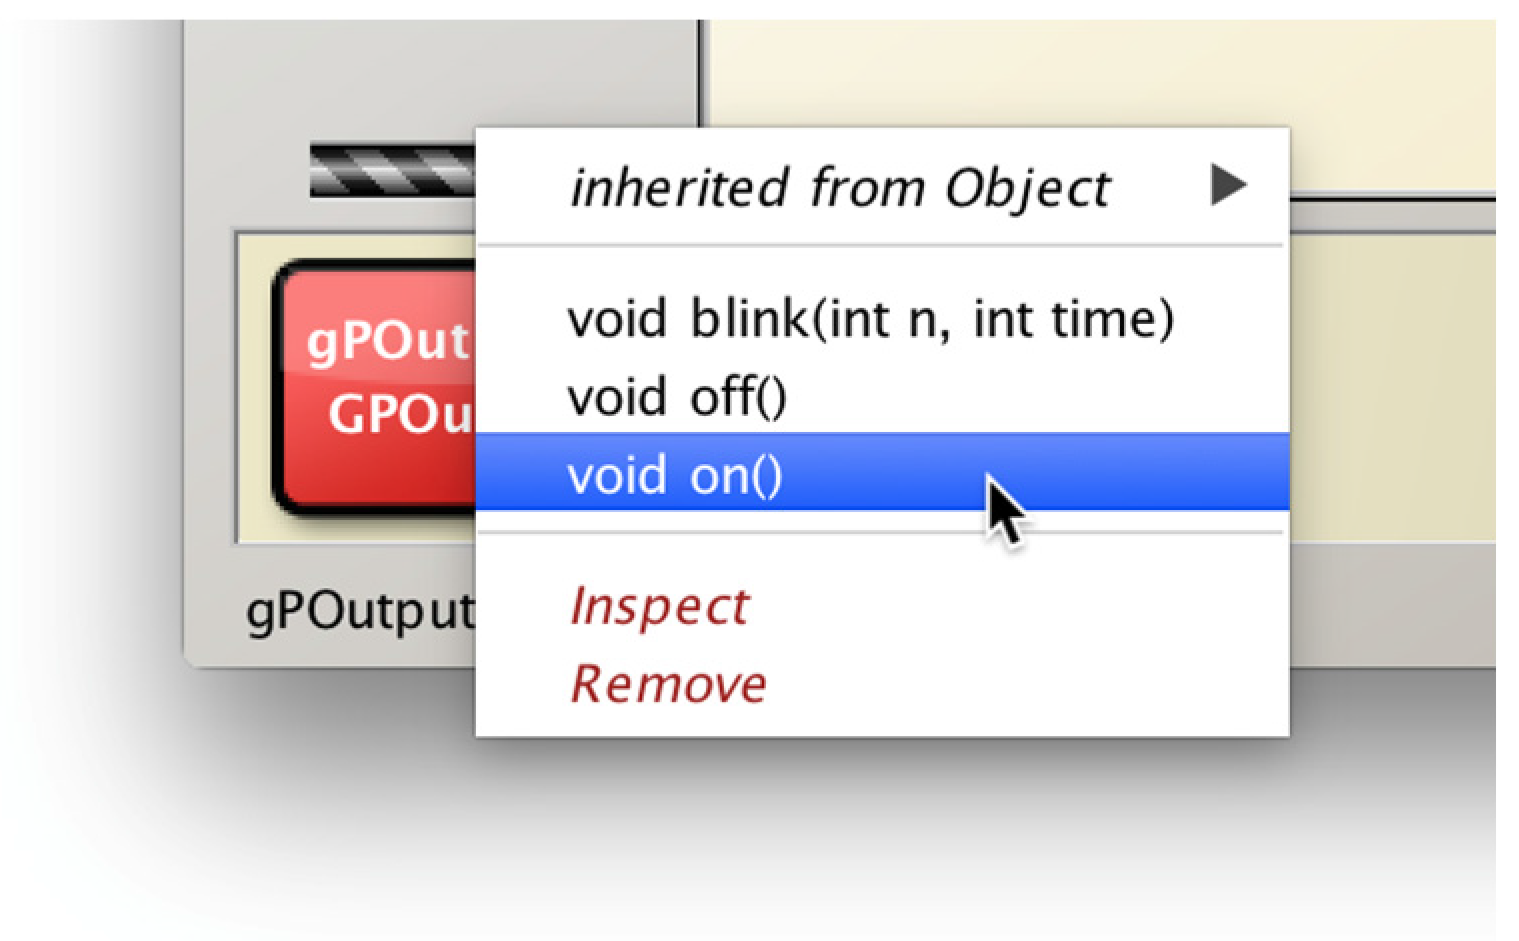
Figure 8, for example, shows classes representing output devices connected to the general purpose I/O (GPIO) pins and buttons (which may also be connected to the GPIO pins). If we now, for instance, connect a LED to a pin on the Raspberry Pi, we can create an object of class
GPOutput, specifying the pin number in its constructor, to represent the LED. This LED will now be represented in BlueJ as an object on the object bench, and methods can be called interactively on this object to communicate with the LED (
Figure 9).
This abstraction allows easy interaction and exploration of the functionality of various components, and also makes it easy to start writing code with these. Making use of the classes shown in
Figure 8, for example, it is now easy to add a class called
LightSwitch and write code to switch the LED in reaction to the button state (Code 1).
            if (button.isDown()) {
                led.on();
            }
            else {
                led.off();
            }
Code 1. A sample code snippet showing use of the Button and GPOutput abstractions being used for simple program control. Variable button is of type Button, and variable led is of type GPOutput.
Thus, the classes provided by BlueJ provide a more interactive interface to the hardware that provides an easier entry to starting to code on the Raspberry Pi. The initial interactive method invocation, which requires no typing of code or memorisation of syntax, allows easy familiarisation with the available functionality that is not available when accessing similar components from the Python/IDLE environment.
The BlueJ projects providing the Raspberry Pi hardware abstractions are available on the BlueJ website [
24]. In addition to the
GPOutput and
Button abstractions shown here, classes are also available for other components, including servo motors and analogue inputs and outputs.
The convenience and ease of use of these pre-fabricated classes comes at the price of flexibility: While some actions are made easy by having specific methods provided to support them, some other possible functionality is not directly supported. When users reach the point that they want to implement behaviour not supported by these classes, they can fall back to using the Pi4J interface directly. In that case, the implementation of the classes provided serves as a code example of how to access and use the Pi4J library.
5. Discussion
Programming in Java is now available on the Raspberry Pi via the Greenfoot and BlueJ environments. These systems provide a direct alternative for text-based programming to the IDLE environment and Python as the language. Learners now have a choice of language and IDE.
All three approaches, IDLE, Greenfoot and BlueJ, have their strengths and weaknesses which make them a good choice in different situations.
5.1. IDLE/Python
Starting with Python in IDLE has the advantage that single lines of code can be typed in and evaluated, without any overhead. No boilerplate code is necessary, little “magic” is present. Most behaviour that is observed is explainable by the lines of code immediately typed in. First experiences of success—typing a code snippet and seeing it evaluated—are possible very quickly [
8].
Many teachers and learners also like the syntax of Python: It appears somewhat simpler than Java (although not by much), and some teachers argue that dynamic typing increases flexibility. Python is an easy language to get started very quickly with small segments of code.
On the negative side, IDLE focuses on lines of code in its presentation of a project, offering little support to model, understand or investigate higher order abstractions. Once programs become larger than a few lines, and classes and objects are the natural abstractions for structuring the project, IDLE offers little help.
Python’s characteristic of allowing, but not enforcing, object-oriented structures can be seen as an advantage or disadvantage, depending on a user’s goals and point of view. Allowing to break out of strict object-oriented structures allows quicker and more flexible creation of ad-hoc and experimental small code segments. For short, spontaneous experimentation, this can be an advantage.
Users who aim at learning good, systematic programming construction, though, may be better served with a language enforcing a stricter object-oriented style, such as Java. The ad-hoc flexibility which is beneficial for small programs often breaks code style guidelines and violates good object-oriented practice. If the learning of software engineering concepts is a goal, the stricter framework may provide more help.
One of the most obvious limitations of IDLE is the lack of a good and easy to use framework for the creation of interactive graphical programs. This misses an opportunity for creating engagement, and fails to bring the goal of engaging multi-media from the consumption model into the creative space.
5.2. Greenfoot/Java
Greenfoot’s main advantage is the easy creation of animated, interactive, graphical applications. Early examples typically programmed with Greenfoot are much more engaging than those used with most other environments for text-based languages. Greenfoot also allows direct, GUI-based interaction with objects and classes, supporting experimentation with underlying concepts (such as classes, objects, constructors, methods, parameters, etc.) before having to get bogged down in source code and syntax. Visible effects can be achieved by adding single lines of code.
A disadvantage of Greenfoot is that a much larger framework is at play behind the scenes. The lines of code typed in Greenfoot—even if it is initially just a single line—is typed into an editor also containing some boilerplate that may at first not be fully understood. The execution and effect of the user-authored lines cannot be understood without also understanding some aspects of the embedding framework. More functionality “just happens” automatically, presenting some “magic” to novices that may cloud full understanding of the system.
Even though most users work without problems in Greenfoot, having to develop a mental model of the Greenfoot execution framework in order to understand even small segments of code makes initial understanding harder.
On the positive side, once the programs become a little larger—consisting of multiple classes and objects, both the structure and the execution of projects can be understood more easily, since both—structure and execution—are supported by visualisations in the environment.
Learning of good object-oriented practices is well supported, since the main abstractions—classes, objects, methods, state—are represented explicitly in the environment, and all programming takes place within these structures.
Greenfoot also offers an ideal sequence for learners coming from Scratch, the other programming environment available on the Raspberry Pi. Scratch focuses on programmed micro-worlds, with actors (named Sprites in Scratch) executing on a Stage. This model transfers directly into Greenfoot’s very similar execution framework. Where Scratch is object-based (users program individual instances), Greenfoot’s class-based model represents a logical next step when a programmer outgrows Scratch’s capabilities.
5.3. BlueJ/Java
As with Greenfoot, early BlueJ examples are often larger than learning examples used with Python. While BlueJ also offers a read-eval-print loop that makes starting by typing single statements or expressions possible, this is not the typical entry point in pedagogical BlueJ literature. First steps in Python typically use smaller snippets of code and fewer concepts, making the initial exercises potentially easier to understand.
BlueJ, on the other hand, offers a conceptual overview—in the form of a class diagram and functionality that allows interaction with existing classes and objects—that illustrates the underlying main programming concepts more clearly. While typing and experimenting with single lines of code is easier in IDLE, BlueJ provides better support for understanding program structures and more fundamental abstraction concepts of object orientation.
Both BlueJ and IDLE enable users to programmatically access the hardware components of the Raspberry Pi. BlueJ may have an advantage initially, since the available classes for the component abstractions offer methods than can be discovered experimentally (while they have to be known and memorised in IDLE). When programming more complex interactions with the Raspberry Pi hardware, the complexity in both languages is comparable.
All three systems—IDLE, Greenfoot and BlueJ—enable learning of a mainstream, general purpose, object-oriented language, and all are freely available. Both languages—Java and Python—have large amounts of easily accessible teaching material available. More pedagogically targeted material exists for the Greenfoot and BlueJ environments than for IDLE, and dedicated online teacher communities are available for the two Java systems [
25,
26]. All three systems are currently popular in programming education contexts (schools and universities).

