Article

Effect of High-Temperature-Assisted Ultrasonic Deep Rolling on Microstructure and Tribological Properties of Ni-WC Coatings

School of Mechanical and Electrical Engineering, Jiangxi University of Science and Technology, Ganzhou 341000, China
*
Author to whom correspondence should be addressed.
Coatings 2023, 13(3), 499; https://doi.org/10.3390/coatings13030499
Submission received: 29 December 2022 / Revised: 12 February 2023 / Accepted: 22 February 2023 / Published: 24 February 2023
(This article belongs to the Special Issue Laser-Assisted Coating Techniques and Surface Modifications)

Abstract

:
Cermet coatings are post-treated by a new surface microcrystallization technology, namely high-temperature-assisted ultrasonic deep rolling (HT + UDR). The process parameters of ultrasonic deep rolling significantly affect the microstructure and tribological properties of the Ni-WC coatings. In this paper, the samples were treated with different preloading depths (0.20 mm, 0.25 mm, and 0.30 mm), and the microstructure and properties of the coatings were characterized by SEM, EDS, X-ray stress analysis, and micro-Vickers hardness testing. An MMW-1A-type friction and wear tester was used for the dry friction and wear test at room temperature, respectively. Compared with the untreated sample, plastic rheology occurred on the surface of the coatings after HT + UDR, showing a phenomenon of “cutting peaks and filling valleys”. In the treated coatings, visible cracks were eliminated, and the inside of the coating was denser. The surface hard phase was increased as a “skeleton” and embedded with the soft phase, which played a role in strong and tough bonding. After HT + UDR + 0.25 mm treatment, the surface roughness increased by 68%, the microhardness of the surface layer reached a maximum of 726.3 HV0.1, and the residual tensile stress changed from 165.5 MPa to −337.9 MPa, which inhibited the germination and propagation of cracks. HT + UDR improved the wear resistance of the coating in many aspects. The coating after the 0.25 mm preloading depth treatment possessed the smallest friction coefficient and the lowest wear amount, which is 0.04 and 4.5 mg, respectively. The wear form was abrasive wear, and the comprehensive tribological performance is the best.

1. Introduction

The cermet coatings are deposited on the surface of the metal materials by plasma spraying technology. Ceramic materials (such as WC, Cr3C2, TiC, and TiB2) serve as hard phases, and metal materials (such as Ni, Fe, and Co) work as soft phases, thus generating strong and cohesive coatings [1,2,3,4]. Currently, traditional plasma-sprayed cermet coatings have insurmountable shortcomings, such as poor quality of the coating surface, internal defects, and the uneven distribution of ceramic grains in the coatings [5]. The grain distribution in the coating cannot be improved by optimizing spray process parameters alone [6]. On the one hand, the cermet coating has high porosity, multiple cracks, and a coarse layered structure in the presence of large ceramic particles, and the interface bonding strength of each layer is weak [7]. On the other hand, the thermal expansion coefficient and elastic modulus of the ceramic particles are quite different from those of the alloy powders, resulting in high amplitude and residual gradient stress in the coating interior and at the substrate-coating interface. These two aspects seriously affect the overall performance and wear resistance of the coatings [8]. Xiaoqin Zhao et al. deposited conventional and nanoscale WC-12%Co coatings on a 1Cr18Ni9Ti stainless steel substrate by plasma spraying technology, wherein the nanoscale WC-12%Co coating exhibited higher hardness and finer microstructure [9]. However, the preparation of nanocoatings cannot solve the large residual tensile stress. Residual stress further promotes interface delamination and cohesive delamination, which requires appropriate post-treatment [10].
Numerous studies have shown that strong plastic deformation (SPD) causes grain refinement [11,12] and work hardening [13,14] on the surface of the materials and introduces large residual compressive stress, which plays an important role in reducing the growth rate and germination of crack [15,16]. SPD technologies include surface mechanical grinding (SMAT) [17], shot peening (SP) [18], deep drawing (DR) [19], low plastic polishing (LSP) [20], etc. Different surface states of treated materials may generate surface defects and affect fatigue strength. Ultrasonic deep rolling (UDR) utilized both ultrasonic frequency and static pressure to reduce surface damage, showing excellent results [21]. For materials with high hardness and poor toughness, UDR treatment leads to excessive work hardening of the material and is not easy to produce a large plastic deformation layer. Metal materials have good ductility at high temperatures and are more prone to plastic deformation [22]. Xuehui Shen et al. [23] conducted ultrasonic roller burnishing (URB) and ultrasonic roller burnishing combined with heat treatment (URB/HT) on Inconel 718 alloy. After URB/HT treatment, the sample surface roughness was lower, the microhardness was further improved, and the residual compressive stress distribution was more uniform. Auezhan et al. [24] performed ultrasonic nanocrystalline surface modification (UNSM) on the basis of local high-temperature heating (LHT) for Ti-6Al-4V, in which the surface hardness was increased by a maximum of 34.3%, forming a high work hardening layer on the surface. The surface roughness and friction coefficient decreased, and LHT (800 °C) and UNSM exhibited the highest residual compressive stress and the best wear resistance. S G MacLeod et al. [25] also treated Ti-6Al-4V at high temperatures and high pressures, and Ti-6Al-4V existed stably in a hexagonal structure at 30 GPa and 886 K. Numerous studies have confirmed that the comprehensive properties of the materials were improved under high-temperature and high-pressure treatment.
Many researchers have mainly applied this technology to metal materials with low hardness and good toughness, greatly improving fatigue life and wear resistance. There are few studies on HT + UDR (high temperature and ultrasonic deep rolling) Ni-WC coatings because WC particles have high hardness and high brittleness. In this paper, the surface morphology, microstructure, mechanical properties, and wear resistance of Ni-WC coatings treated with different process parameters under HT + UDR were investigated. It provides a reference for high-temperature ultrasonic deep rolling metal-ceramic coating and is of great significance to the development of coating post-treatment technology.

2. Experimental Materials and Methods

2.1. Experimental Materials and Equipment

First, the base body was pretreated. 45 steel served as the base body material, which was processed into a ring shape with an outer diameter of 54 mm, an inner diameter of 38 mm, and a ring thickness of 8 mm. The chemical composition and mechanical properties of 45 steel are shown in Table 1 and Table 2. The samples were polished with metallographic sandpaper, cleaned with acetone to remove impurities, and sandblasted for roughening. Ni60 and 15 WC cermet powder produced by China Chengdu Zhenxing Metal Powder Co., Ltd. was used as the plasma spraying material, with a powder particle size and particle size of 53 µm. The chemical composition is shown in Table 3. Ni60 and 15 WC cermet powder was sprayed on the surface of 45 steel with a thickness of 0.45 mm through a JP-8000 automatic spraying system (TAFA Corporation, Concord, NH, USA). The parameters were set as a barrel size of 10/cm, oxygen flow rate of 837/L∙min−1, powder feeding gas flow rate of 11.8/L∙min−1, powder feeding pressure of 0.34/MPa, powder feeding rate of 100/g∙min−1, spraying distance of 350/mm, and natural cooling in air.
The coatings were softened by absorbing high heat provided with induction heating equipment, an Al-518 artificial intelligence temperature controller, auxiliary induction heating, and other modular system devices at 800 °C. The coatings exhibited a large surface roughness after heating treatment, and direct ultrasonic rolling caused the peeling of the coating due to the high friction between the ball and the coating contact surface. Therefore, ultrasonic deep rolling surface strengthening treatment on the coating was carried out using an ultrasonic rolling strengthening horizontal lathe (Shandong Huayun Haukeng equipment C616-10 series, Jinan, China) after grinding. The ultrasonic deep rolling process is shown in Figure 1. The deep rolling force was 0.3 MPa, the feed rate was 0.15 r/min, the spindle speed was 248 r/min, the ultrasonic frequency was 20 kHz, the amplitude was 10 µm, and the preloading depths were 0.20 mm, 0.25 mm, and 0.30 mm. Samples were labeled as follows: Untreated, HT + UDR + 0.20 mm, HT + UDR + 0.25 mm, and HT + UDR + 0.30 mm.

2.2. Analysis and Characterization

A wire cutting machine was used to process the large sample of the ring into a small sample of 10 mm × 9 mm × 6 mm, and 500, 800, 1000, 1500, and 2000 grit sandpaper was used on the YM-2A metallographic sample pre-grinder in turn. The samples were polished to the mirror effect by the PG-2D metallographic polishing machine with 0.5 W and 0.25 W diamond abrasive paste. After washing with absolute ethanol, the section of the small sample was etched with 4% nitric acid alcohol for 10 s, quickly cleaned, and dried for further observation.
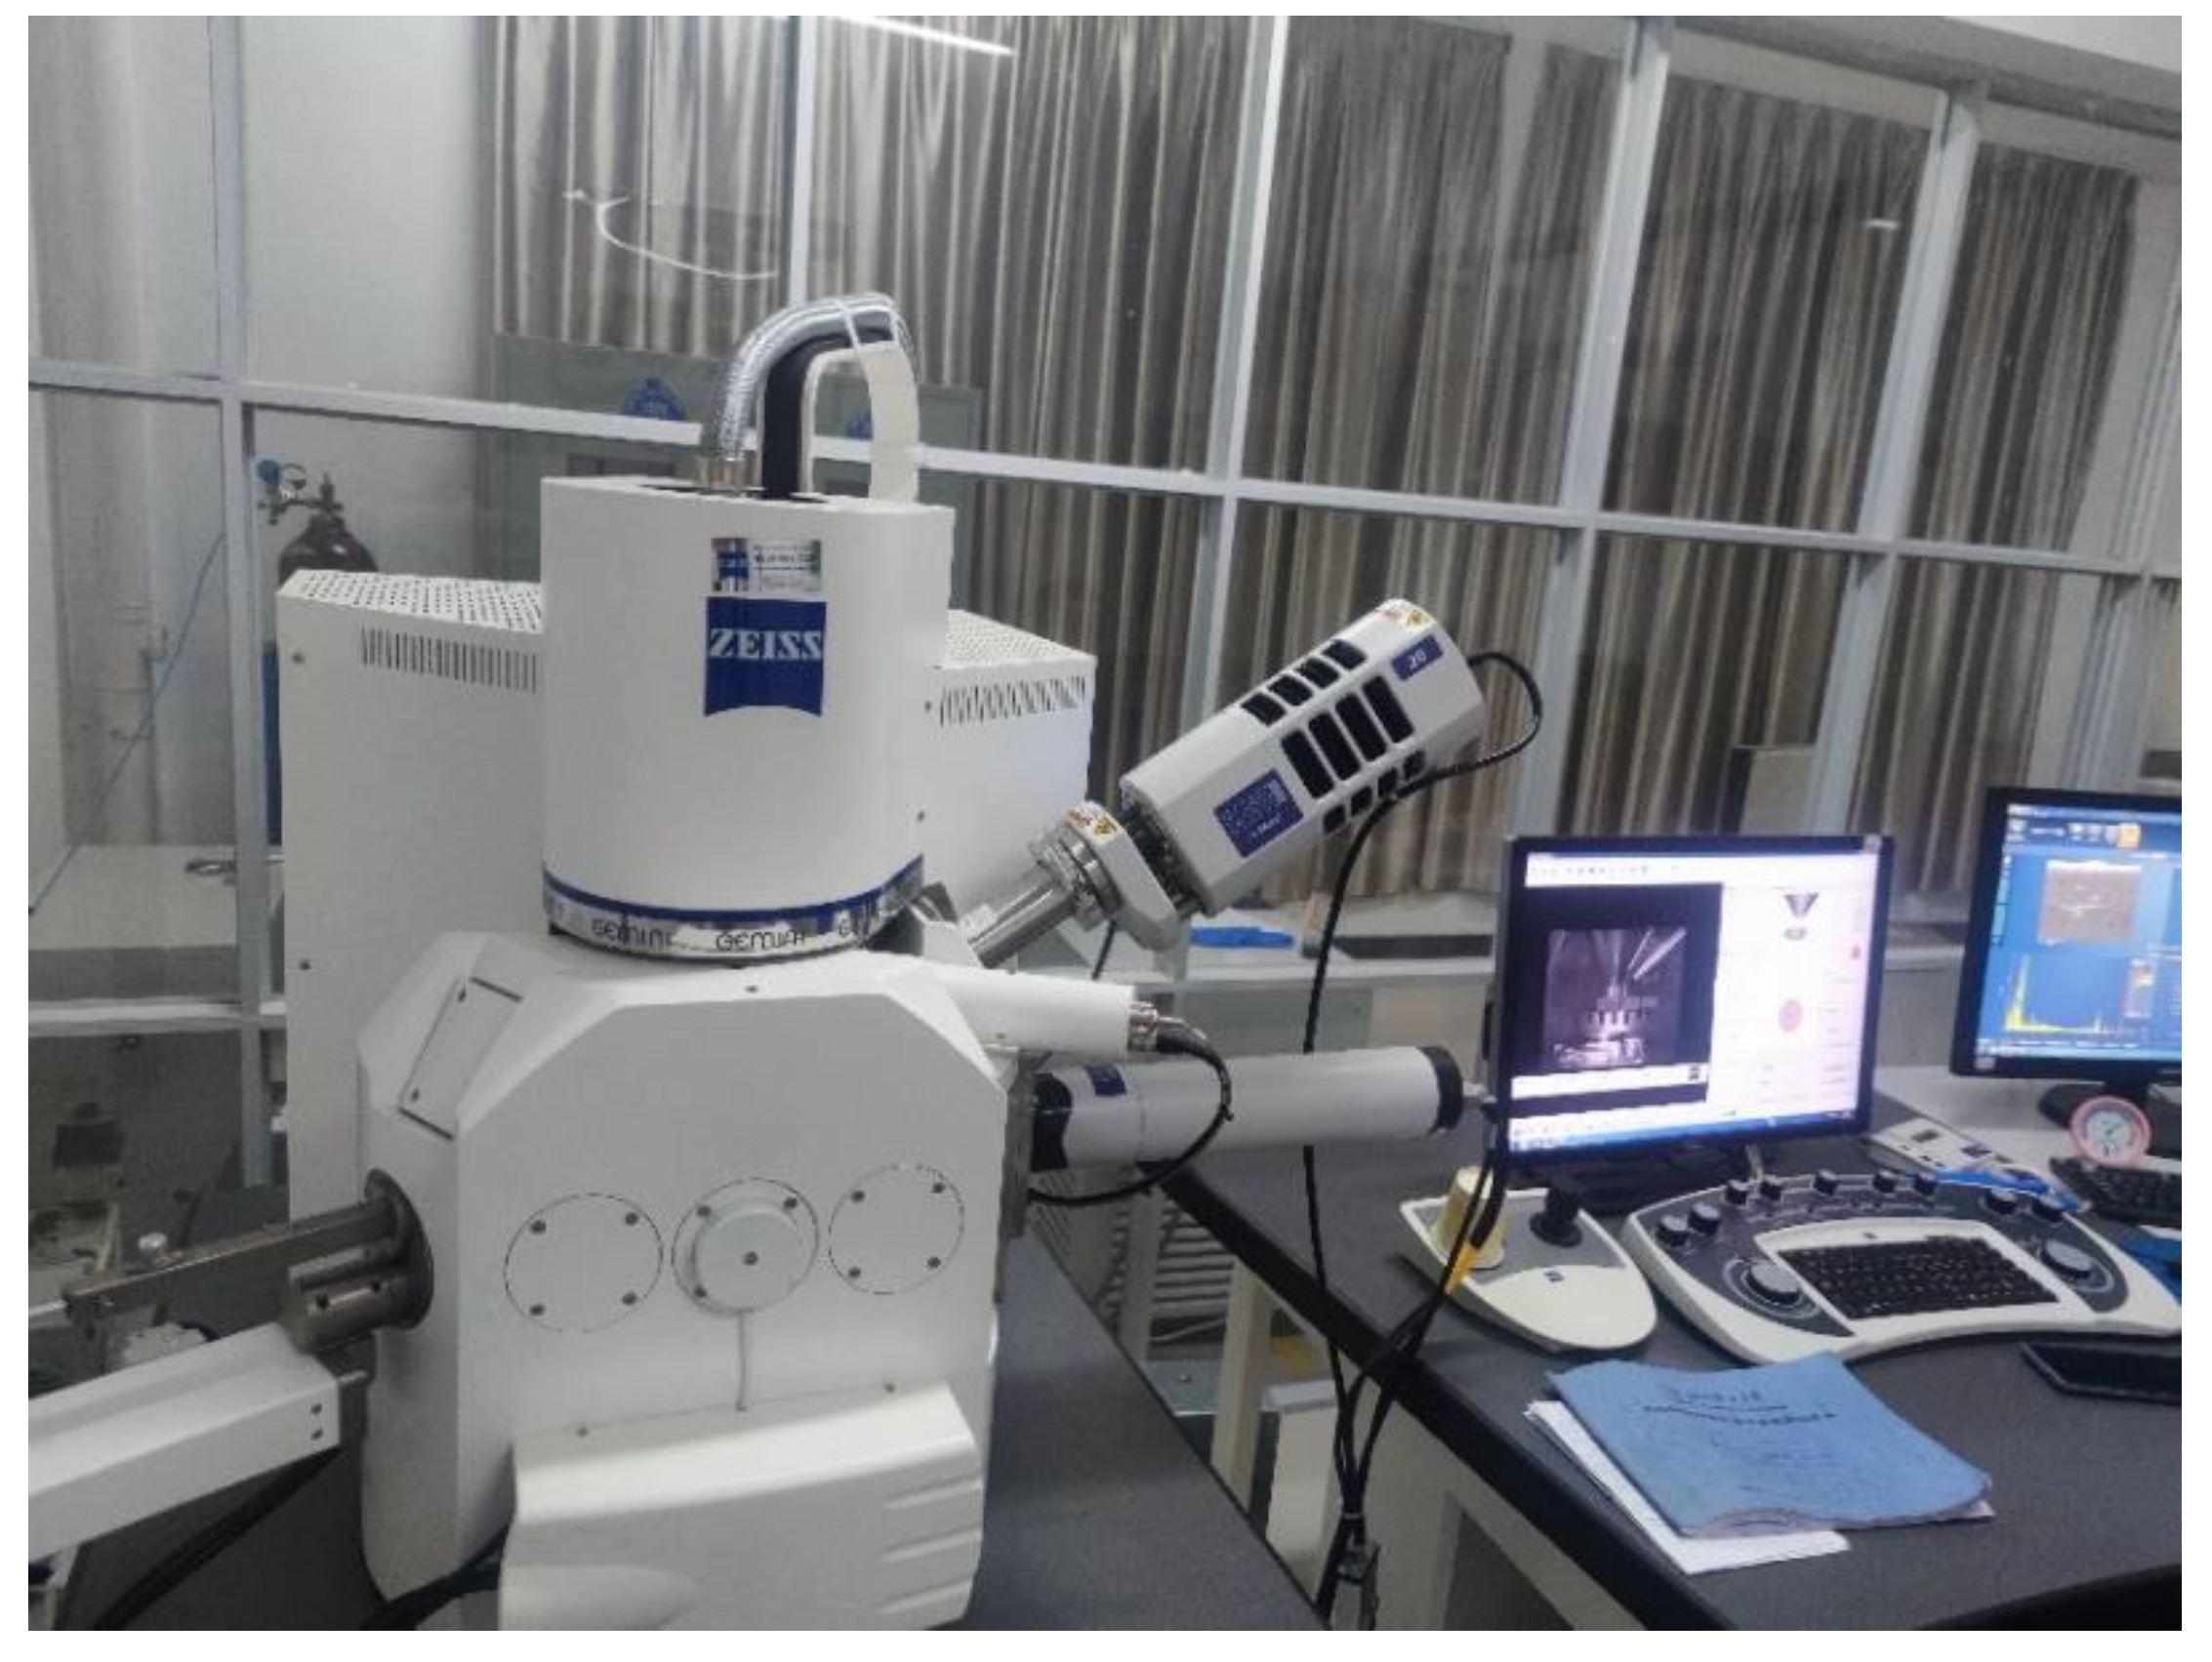
The microstructure of the cermet coating was observed by electron microscopy (ZEISS Sigma, Jena, Germany), and the surface elements of the coating were analyzed by energy dispersive spectrometry (EDS), as shown in Figure 2. The JB-6C inductive surface roughness tester was used to randomly measure the surface roughness of the coating in three regions of the sample, and the average value was taken to reduce the error. The gradient microhardness of the cermet coating was tested by a CHV-1000A microhardness tester with an experimental load of 100 g and an application time of 15 s. Ten regions were selected for each position, and the average value was taken. The residual stress test of the coating surface was carried out by an X-350A X-ray stress analyzer, and the Cu target Kα line was selected and measured by the roll fixed ψ method. The principle is that the residual stress changes the crystal structure of the material, the diffraction peak is displaced, the diffraction line displacement is used as the original data, and the measured result is the residual strain. Then, the residual stress was calculated by Hooke’s law, as shown in Formula (1):
σ = E 2 1 + μ cot θ 0 π 180 2 θ ψ   sin 2 ψ  
In Formula (1), σ is the residual stress, E is the elastic modulus of the material, μ   Poisson’s ratio for the material, θ 0 is the Bragg angle without stress, θ ψ   is the Bragg angle when stressed, and ψ is the normal angle with the surface of the specimen. Each specimen surface was randomly tested for 5 points, and the average value was taken.
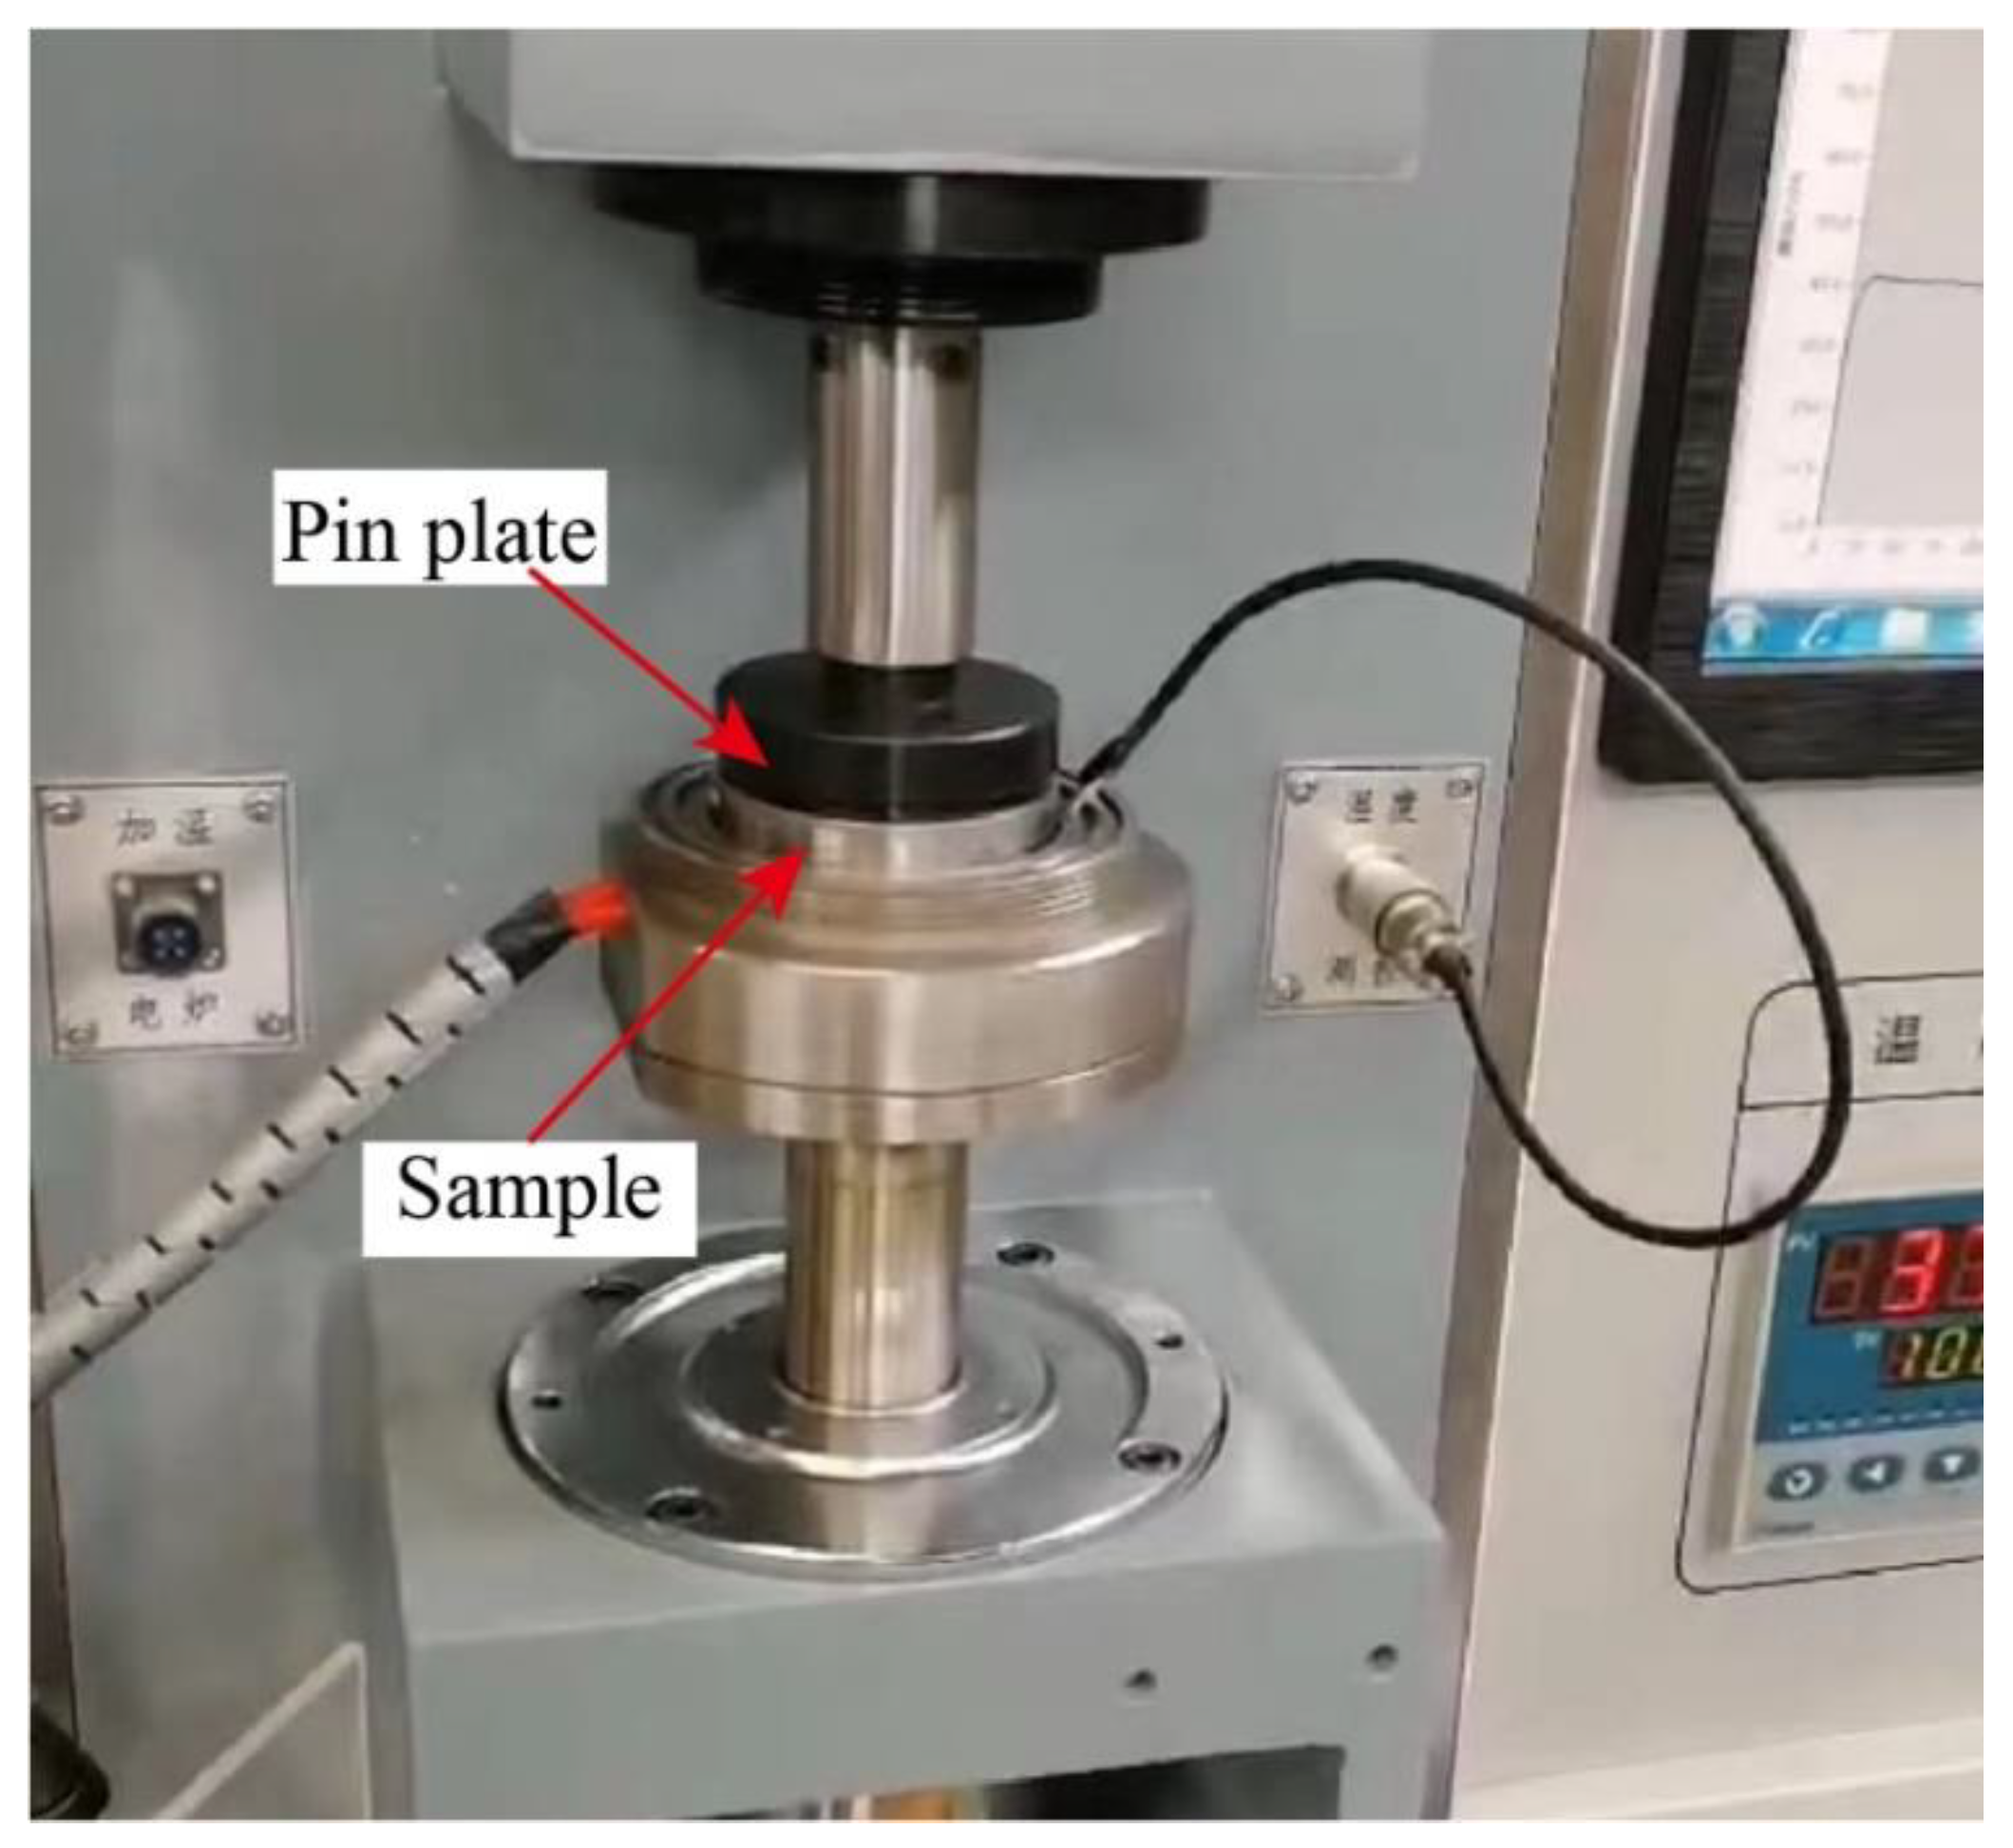
A large pin plate wear test on the surface of the sample was performed at room temperature using an MMW-1A friction and wear testing machine (Jinan Chenda Testing Machine Manufacturing Co., Ltd., Jinan, China). As shown in Figure 3. The friction pair material was 45 steel with φ 4 mm × 12 mm, and the hardness was HRC40-HRC45. The friction and wear test parameters are listed in Table 4.

3. Results and Discussion

3.1. Analysis of Organizational Structure and Surface Topography

3.1.1. Organizational Structure Analysis

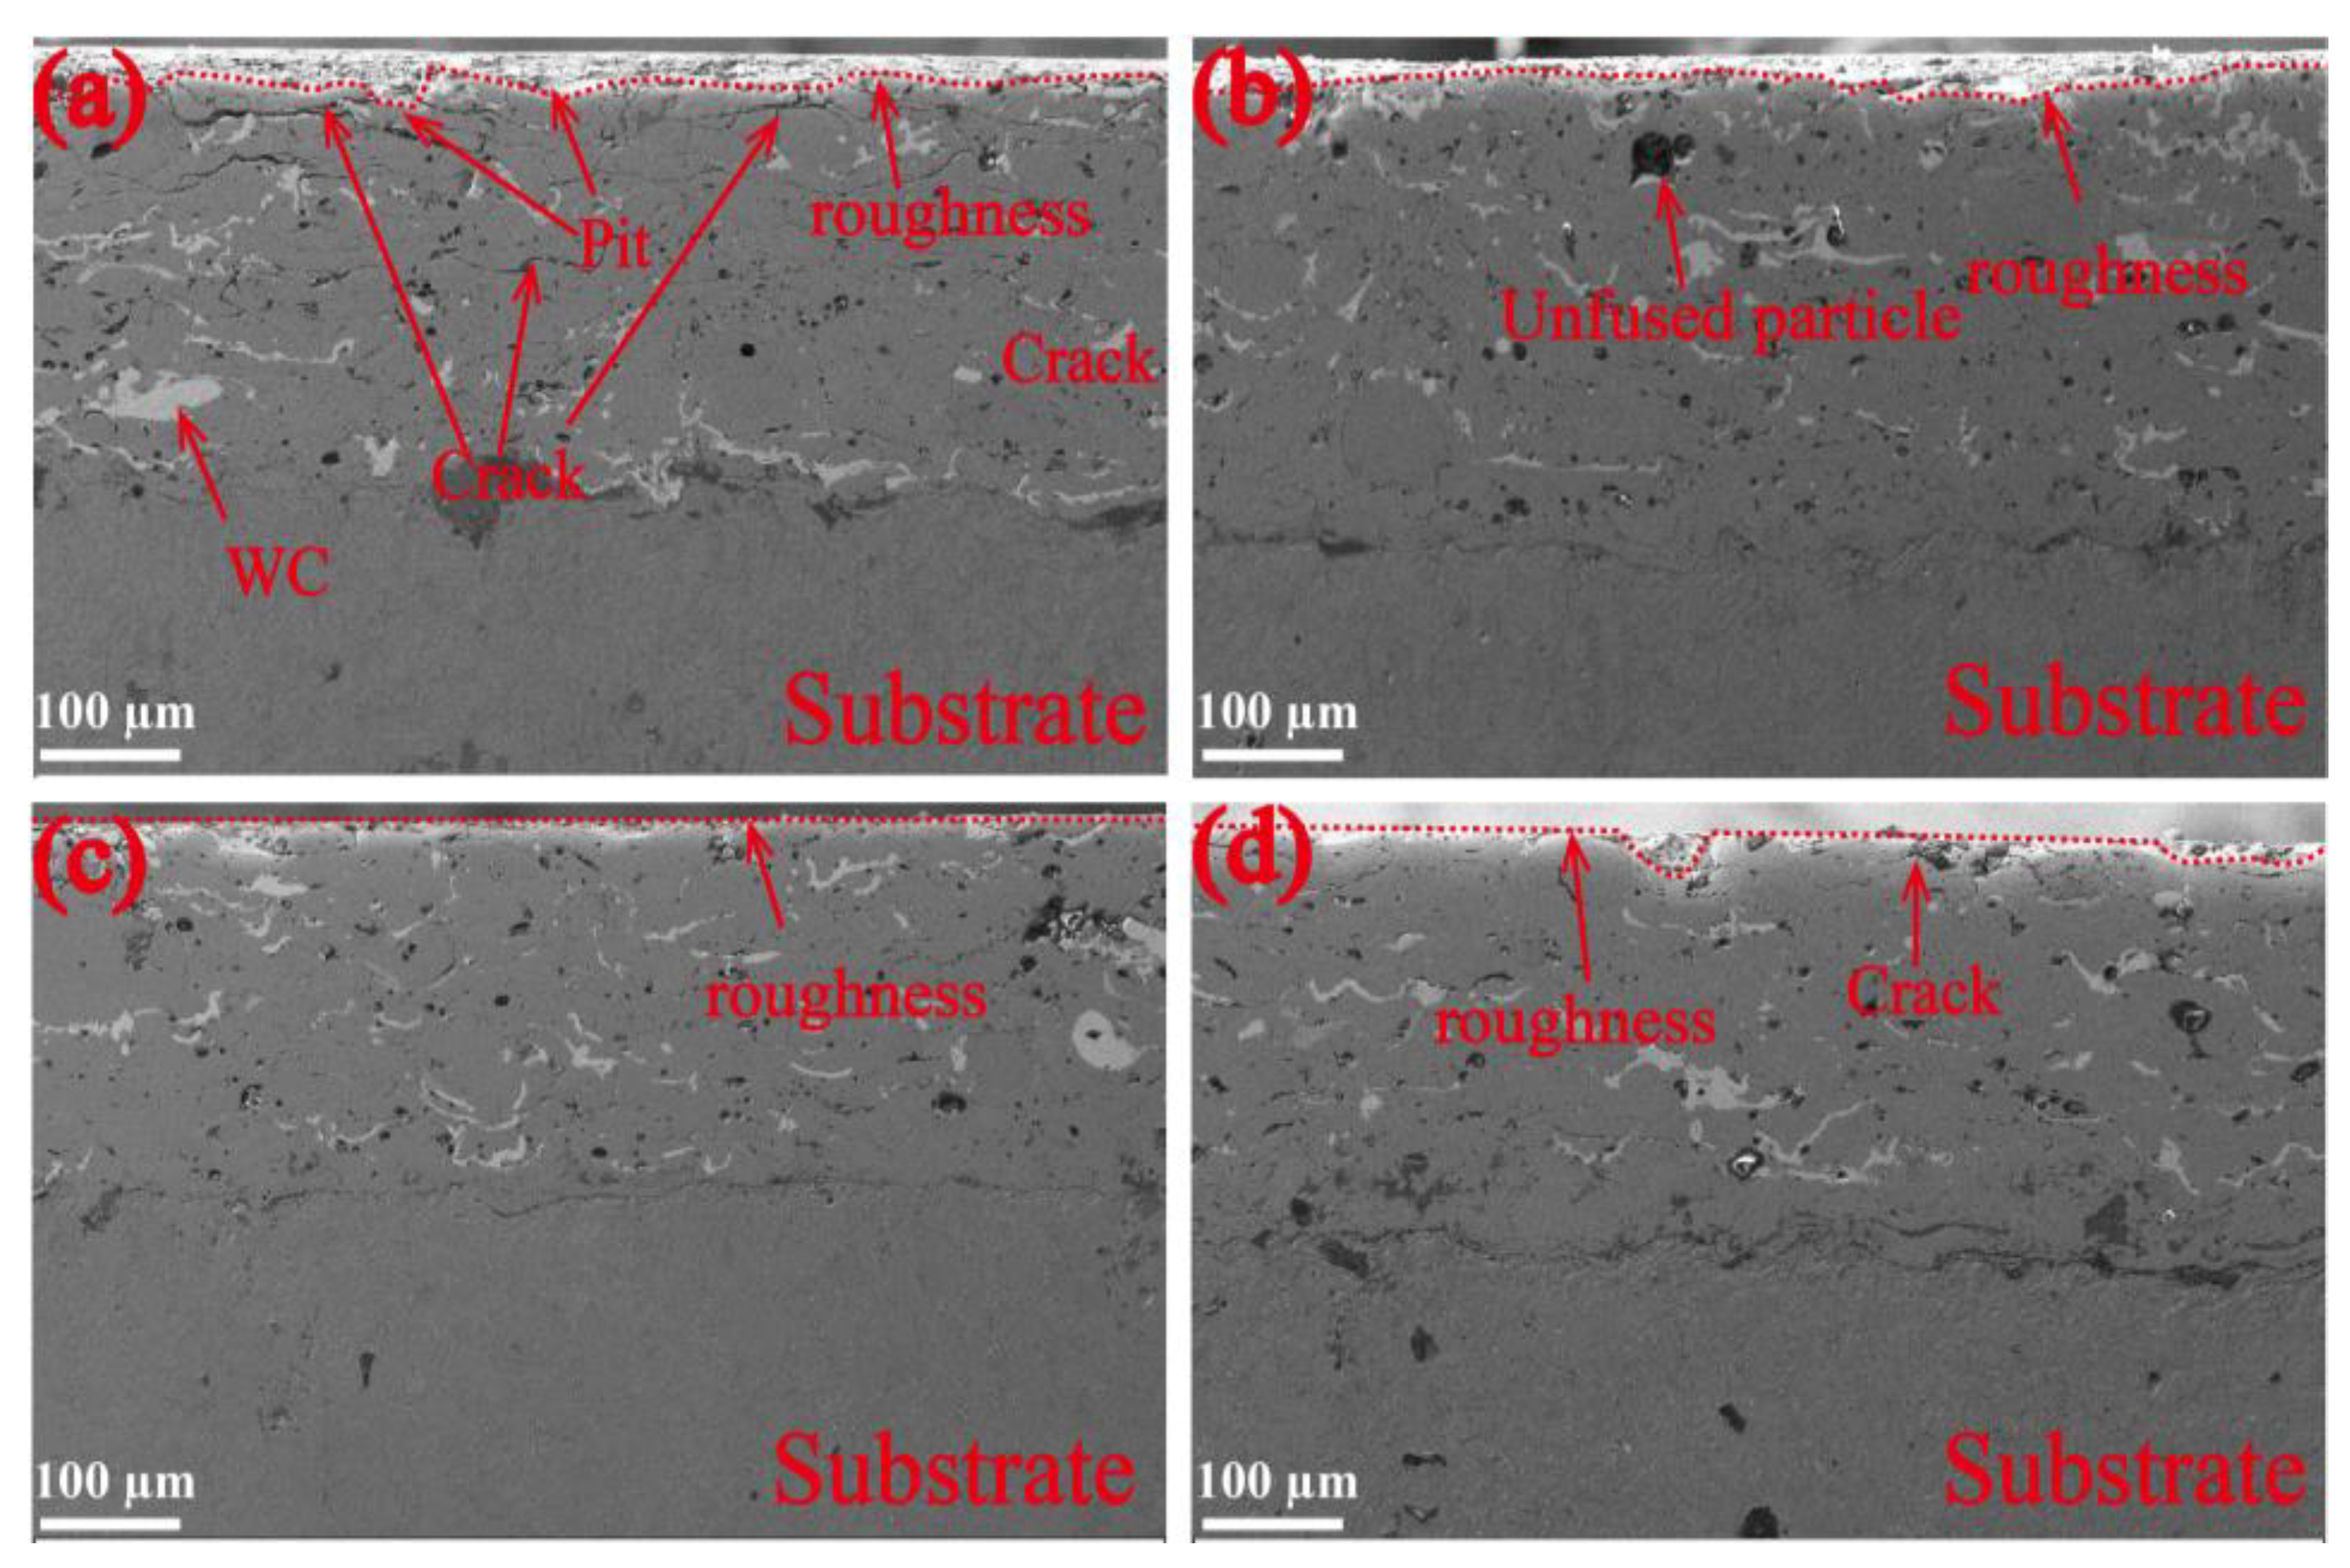
Figure 4 shows the SEM (scanning electron microscope) images of the cross-section of the cermet coatings. Figure 4a indicates that Untreated coating possessed a low density and high surface roughness. A large number of cracks and holes were mainly distributed in the middle and upper parts of the coating, and a mass of unmelted silver–white WC particles were aggregated and unevenly distributed [26]. Plasma spraying heated the metal and ceramic material particles to a high temperature in a very short time, making the materials in a molten and semi-molten state. After spraying to the surface of the substrate, they were solidified by rapid cooling in air. The thermal expansion coefficient and elastic modulus of the metal powder and ceramic particles in the coating were quite different, and the residual stress distribution in the coating and the bonding area between the coating and the substrate exhibited a high amplitude and a large gradient [9], which resulted in cracks and pores in the coating, mainly occurring around the WC ceramic particles with a small thermal expansion coefficient. In Figure 4b, HT + UDR + 0.20 mm coating comprised a higher density, obvious cracks were eliminated, the surface roughness was reduced, the upper pores were eliminated by the flowing material, and the unmelted WC particles were embedded in the coating. The layer was evenly distributed and stretched in a wavy shape along the deep rolling direction. The surface roughness of untreated and HT + UDR treated samples were 1.36, 0.466, 0.335, and 0.387 μm, respectively, as shown in Table 5. Under HT + UDR processing, the coating absorbed enough heat to soften, the atomic spacing increased, the metal bonds became weaker and broken, and plastic deformation was more likely to occur. In addition, the micro peaks were squeezed to flow, and the pits were filled with the material flowing in the micro peaks. The surface cracks were also eliminated, and the internal cracks of the coating were bridged under the action of plastic rheology, which inhibited the large-area expansion of the cracks and the surface cracking. The hardness and brittleness of WC particles decreased, and the tensile deformation in the deep rolling direction exhibited a wavy shape.
In Figure 4c,d, the surface pits of the HT + UDR + 0.25 mm and HT + UDR + 0.30 mm coatings were eliminated, and the porosity was gradually reduced. HT + UDR + 0.25 mm coating possessed the highest surface flatness, in which coating cracks and pores were basically eliminated. With the increase in the preloading depth, the slip [27,28] and dislocation of the grains became large under the action of high-temperature heating and ultrasonic deep rolling. The deformation degree of the coating was also increased, the effect was deepened, and the dislocation slip rate of the unit cell gradually changed. The large dislocation density led to the entanglement phenomenon, and annihilation and recombination were generated near the dislocation wall, forming a new grain boundary layer and refining the grains [29]. However, the bottom layer cracked when the preloading depth was 0.3 mm. When the grains were refined to the limit of the material, the more grains per unit volume increased, the grain boundary area became larger, which prevented dislocation and intergranular slip. The ability to resist plastic deformation became stronger, and excessive preloading depth destroyed the internal stress balance, causing the coating grains to break and fall off.
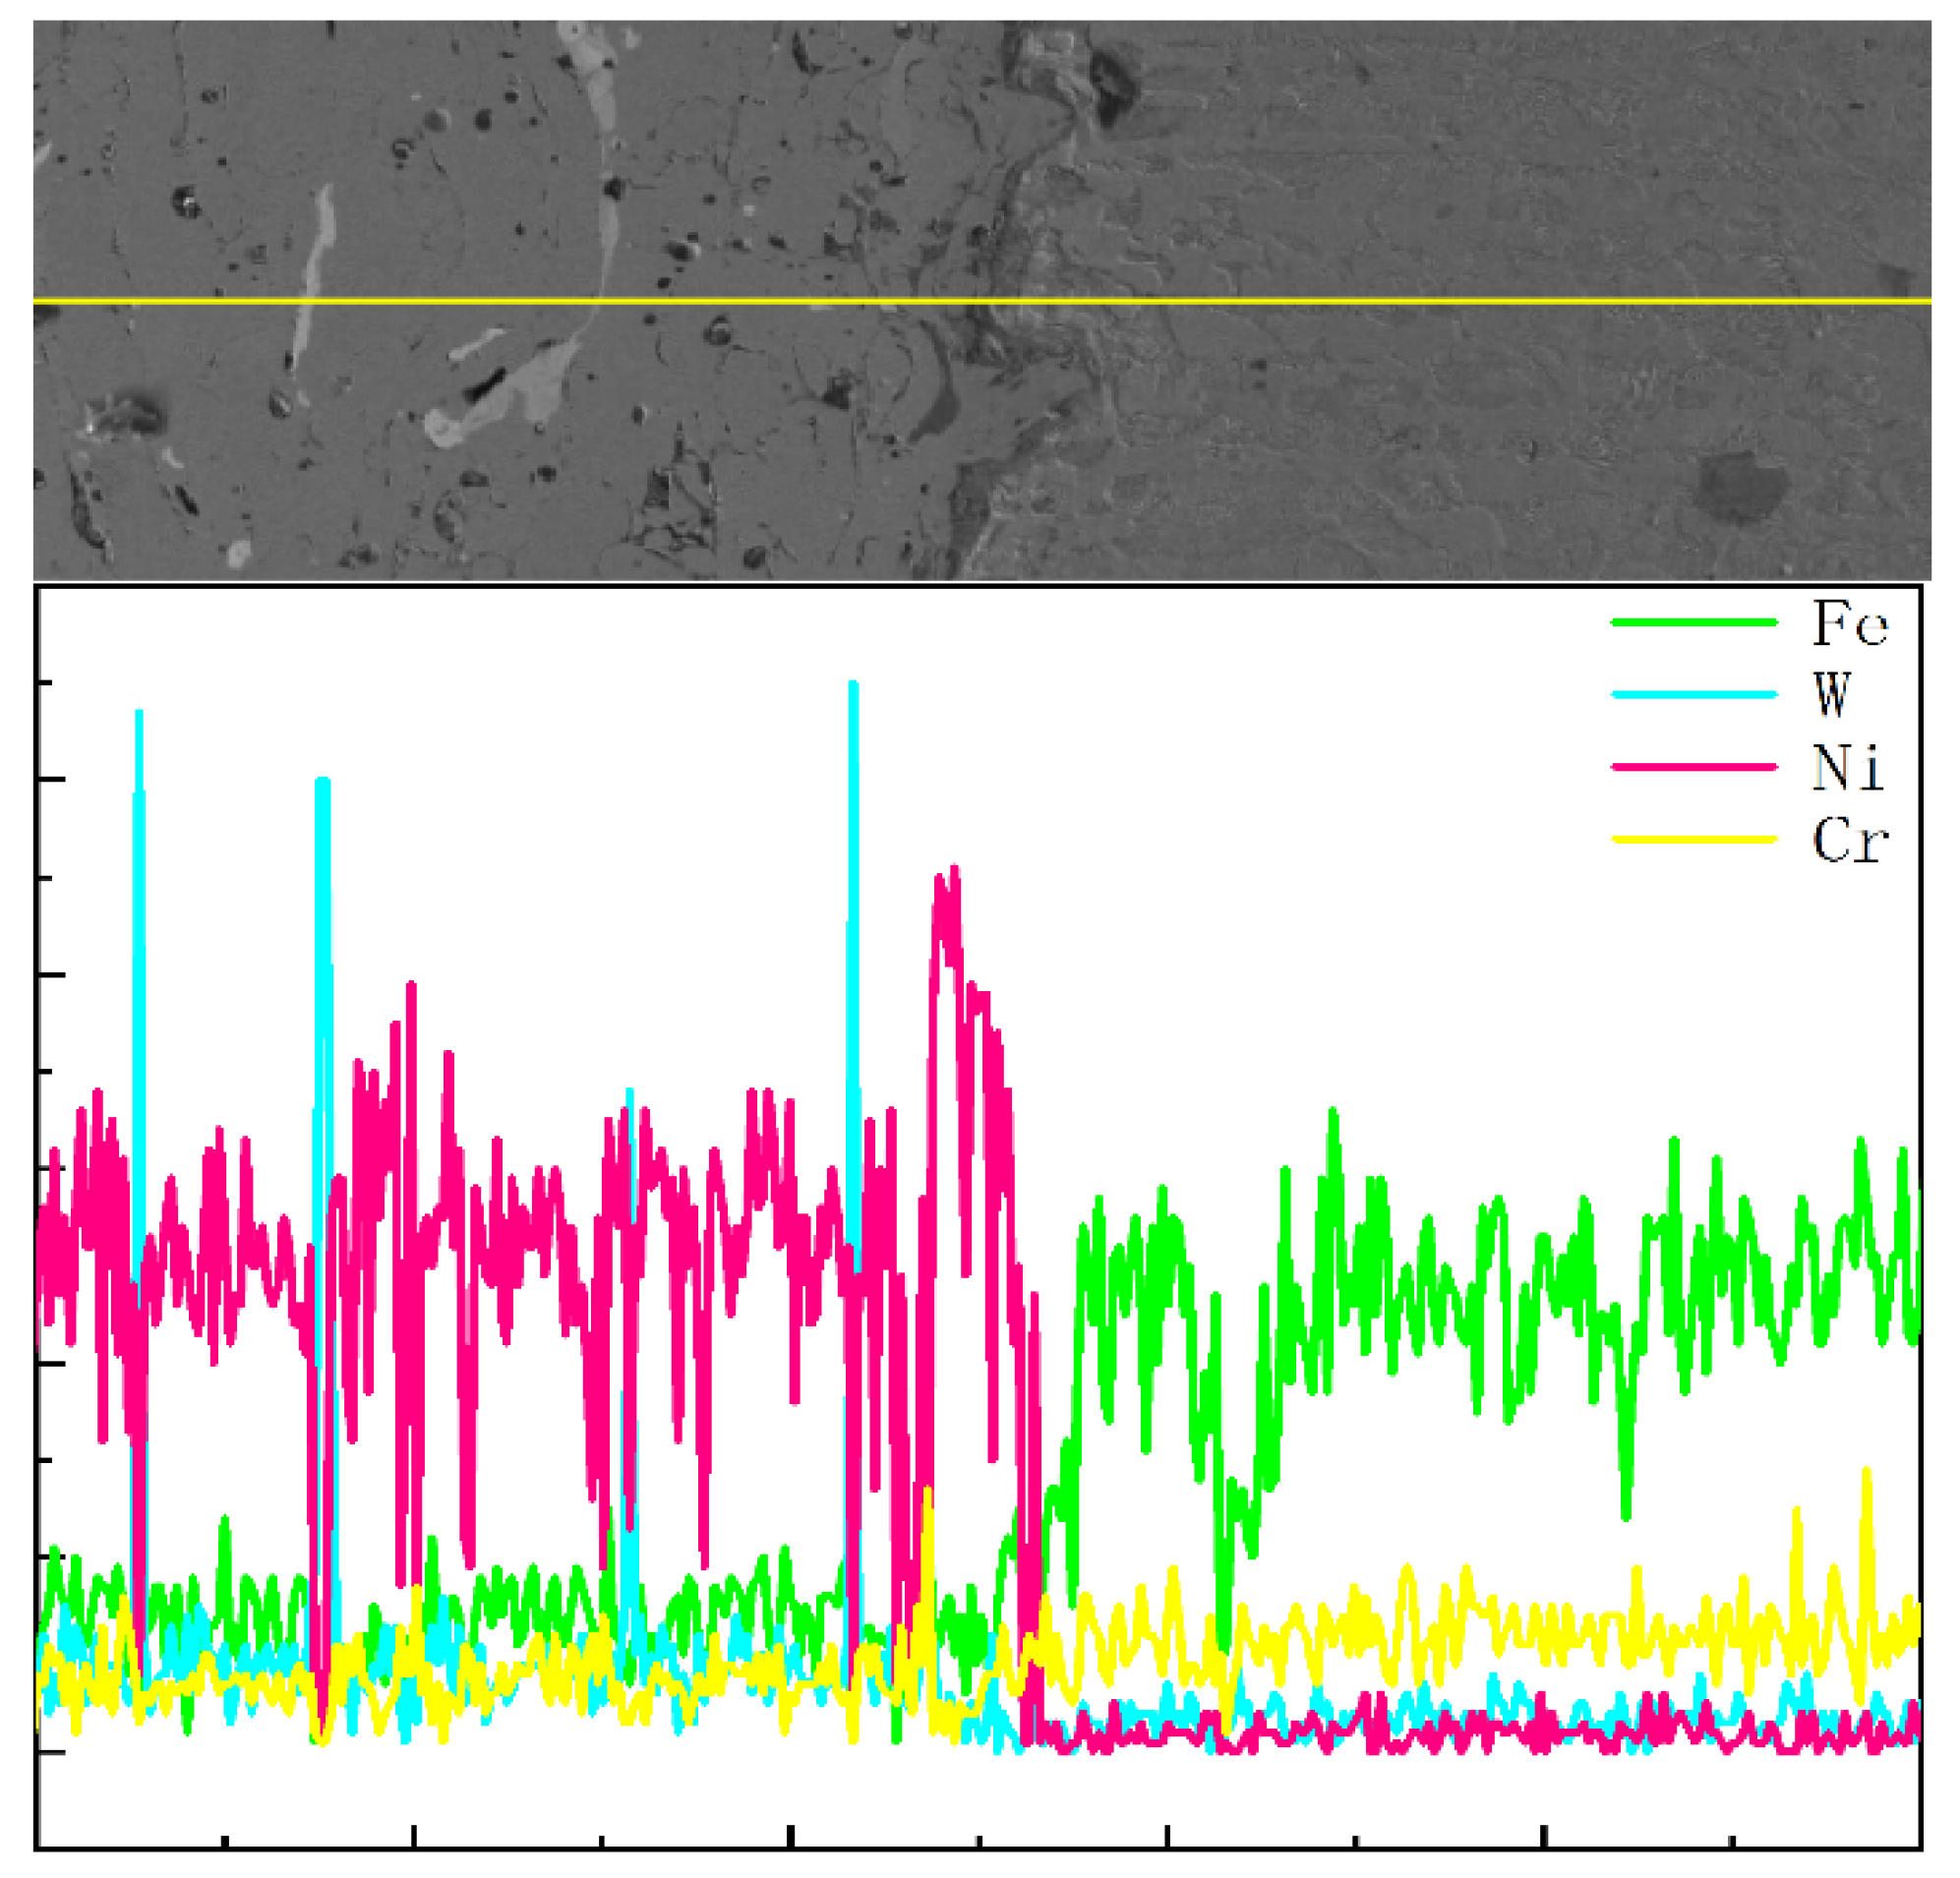
Figure 5 shows the energy spectrum line scanning diagram of the interface of the coating treated by high-temperature ultrasonic deep rolling. The scanning direction was from the coating to the substrate, and the different color curves indicate the changes of the main elements Fe, W, Ni and Cr at the interface. The content of Fe and Cr elements in the transition interface from the coating to the substrate gradually increased, and the content of Ni and W elements gradually decreased at the interface junction. It can be concluded that the element diffusion phenomenon occurred at the interface between the coating and the substrate after the coupling treatment, mainly Fe and Cr diffused from the substrate to the deep rolling coating, and Ni and W diffused from the coating to the substrate. The interface between the coating and the substrate was clear and in the form of occlusion, and the main bonding mode was mechanical bonding [29,30]. After HT + UDR, the lower part of the coating was embedded with the substrate under the action of temperature field and ultrasonic extrusion pressure, which improves its bonding strength.

3.1.2. Surface Topography Analysis

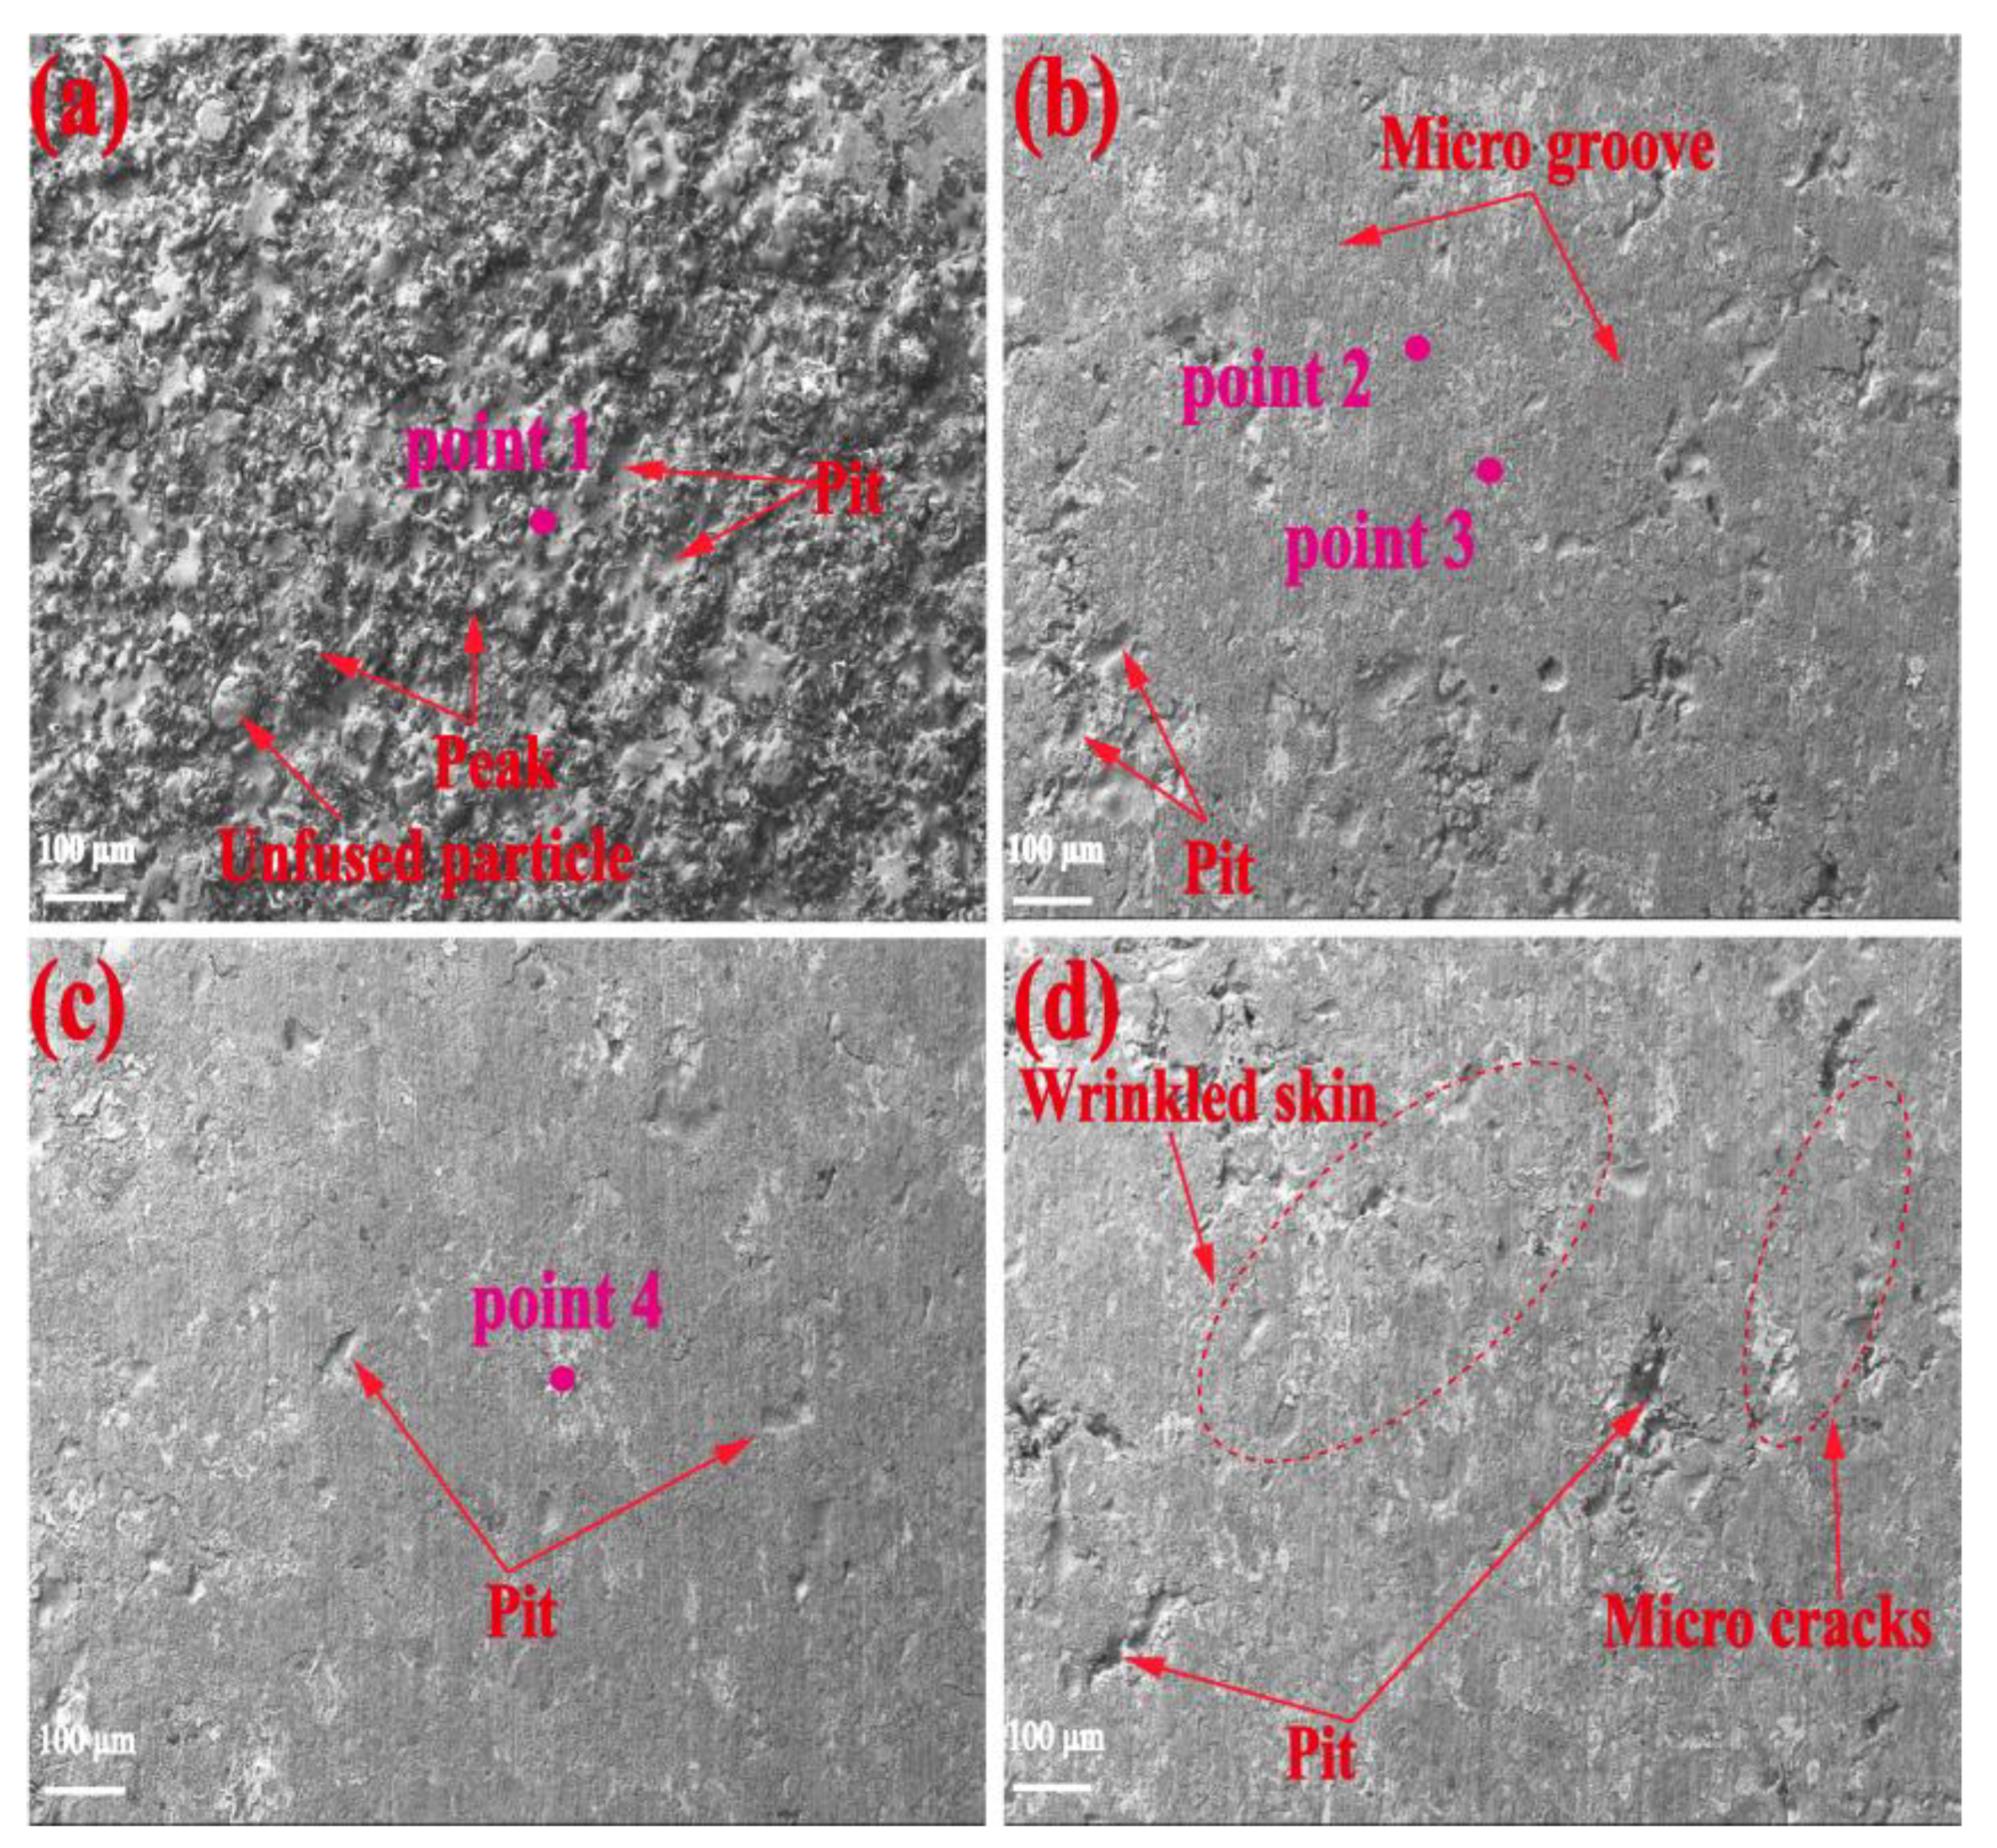
Figure 6 shows the surface morphologies of all coatings. The surface of the Untreated coating (Figure 6a) was continuous and uneven, similar to a hill. The melting point of WC powder particles is much higher than that of Ni-based powder particles, and the incompletely melted WC particles accumulated on the surface of the coating, resulting in the diffusion, accumulation, and solidification of droplets after high-speed impact. After the HT + UDR + 0.20 mm processing (Figure 6b), the distance between the surface microgrooves and pits of the coating was equal. Surface grinding was performed before HT + UDR to leave grooves. To avoid cracks, shedding and cracking of the coating occurred under the action of ultrasonic deep rolling, which was due to the large contact friction between the ball and the coating surface. Subsequently, the material underwent plastic flow to fill the grooves, forming microgrooves and pits. Figure 6c shows that both grooves and pits on the surface of the HT + UDR + 0.25 mm coating basically disappeared. With better plastic rheology, enough materials were available to fill pits to obtain better surface quality. In Figure 6d, the grooves on the surface of the HT + UDR + 0.30 mm coating disappeared completely, leaving a large area of potholes. The larger preloading depth generated a more intense deep rolling force impact on the coating surface, exceeding the strength limit of the material itself. The excessive slip of local metal particles produced more significant compressive stress, severe lattice and grain damage distortion, and the falling-off material and fine lines on the coating surface.
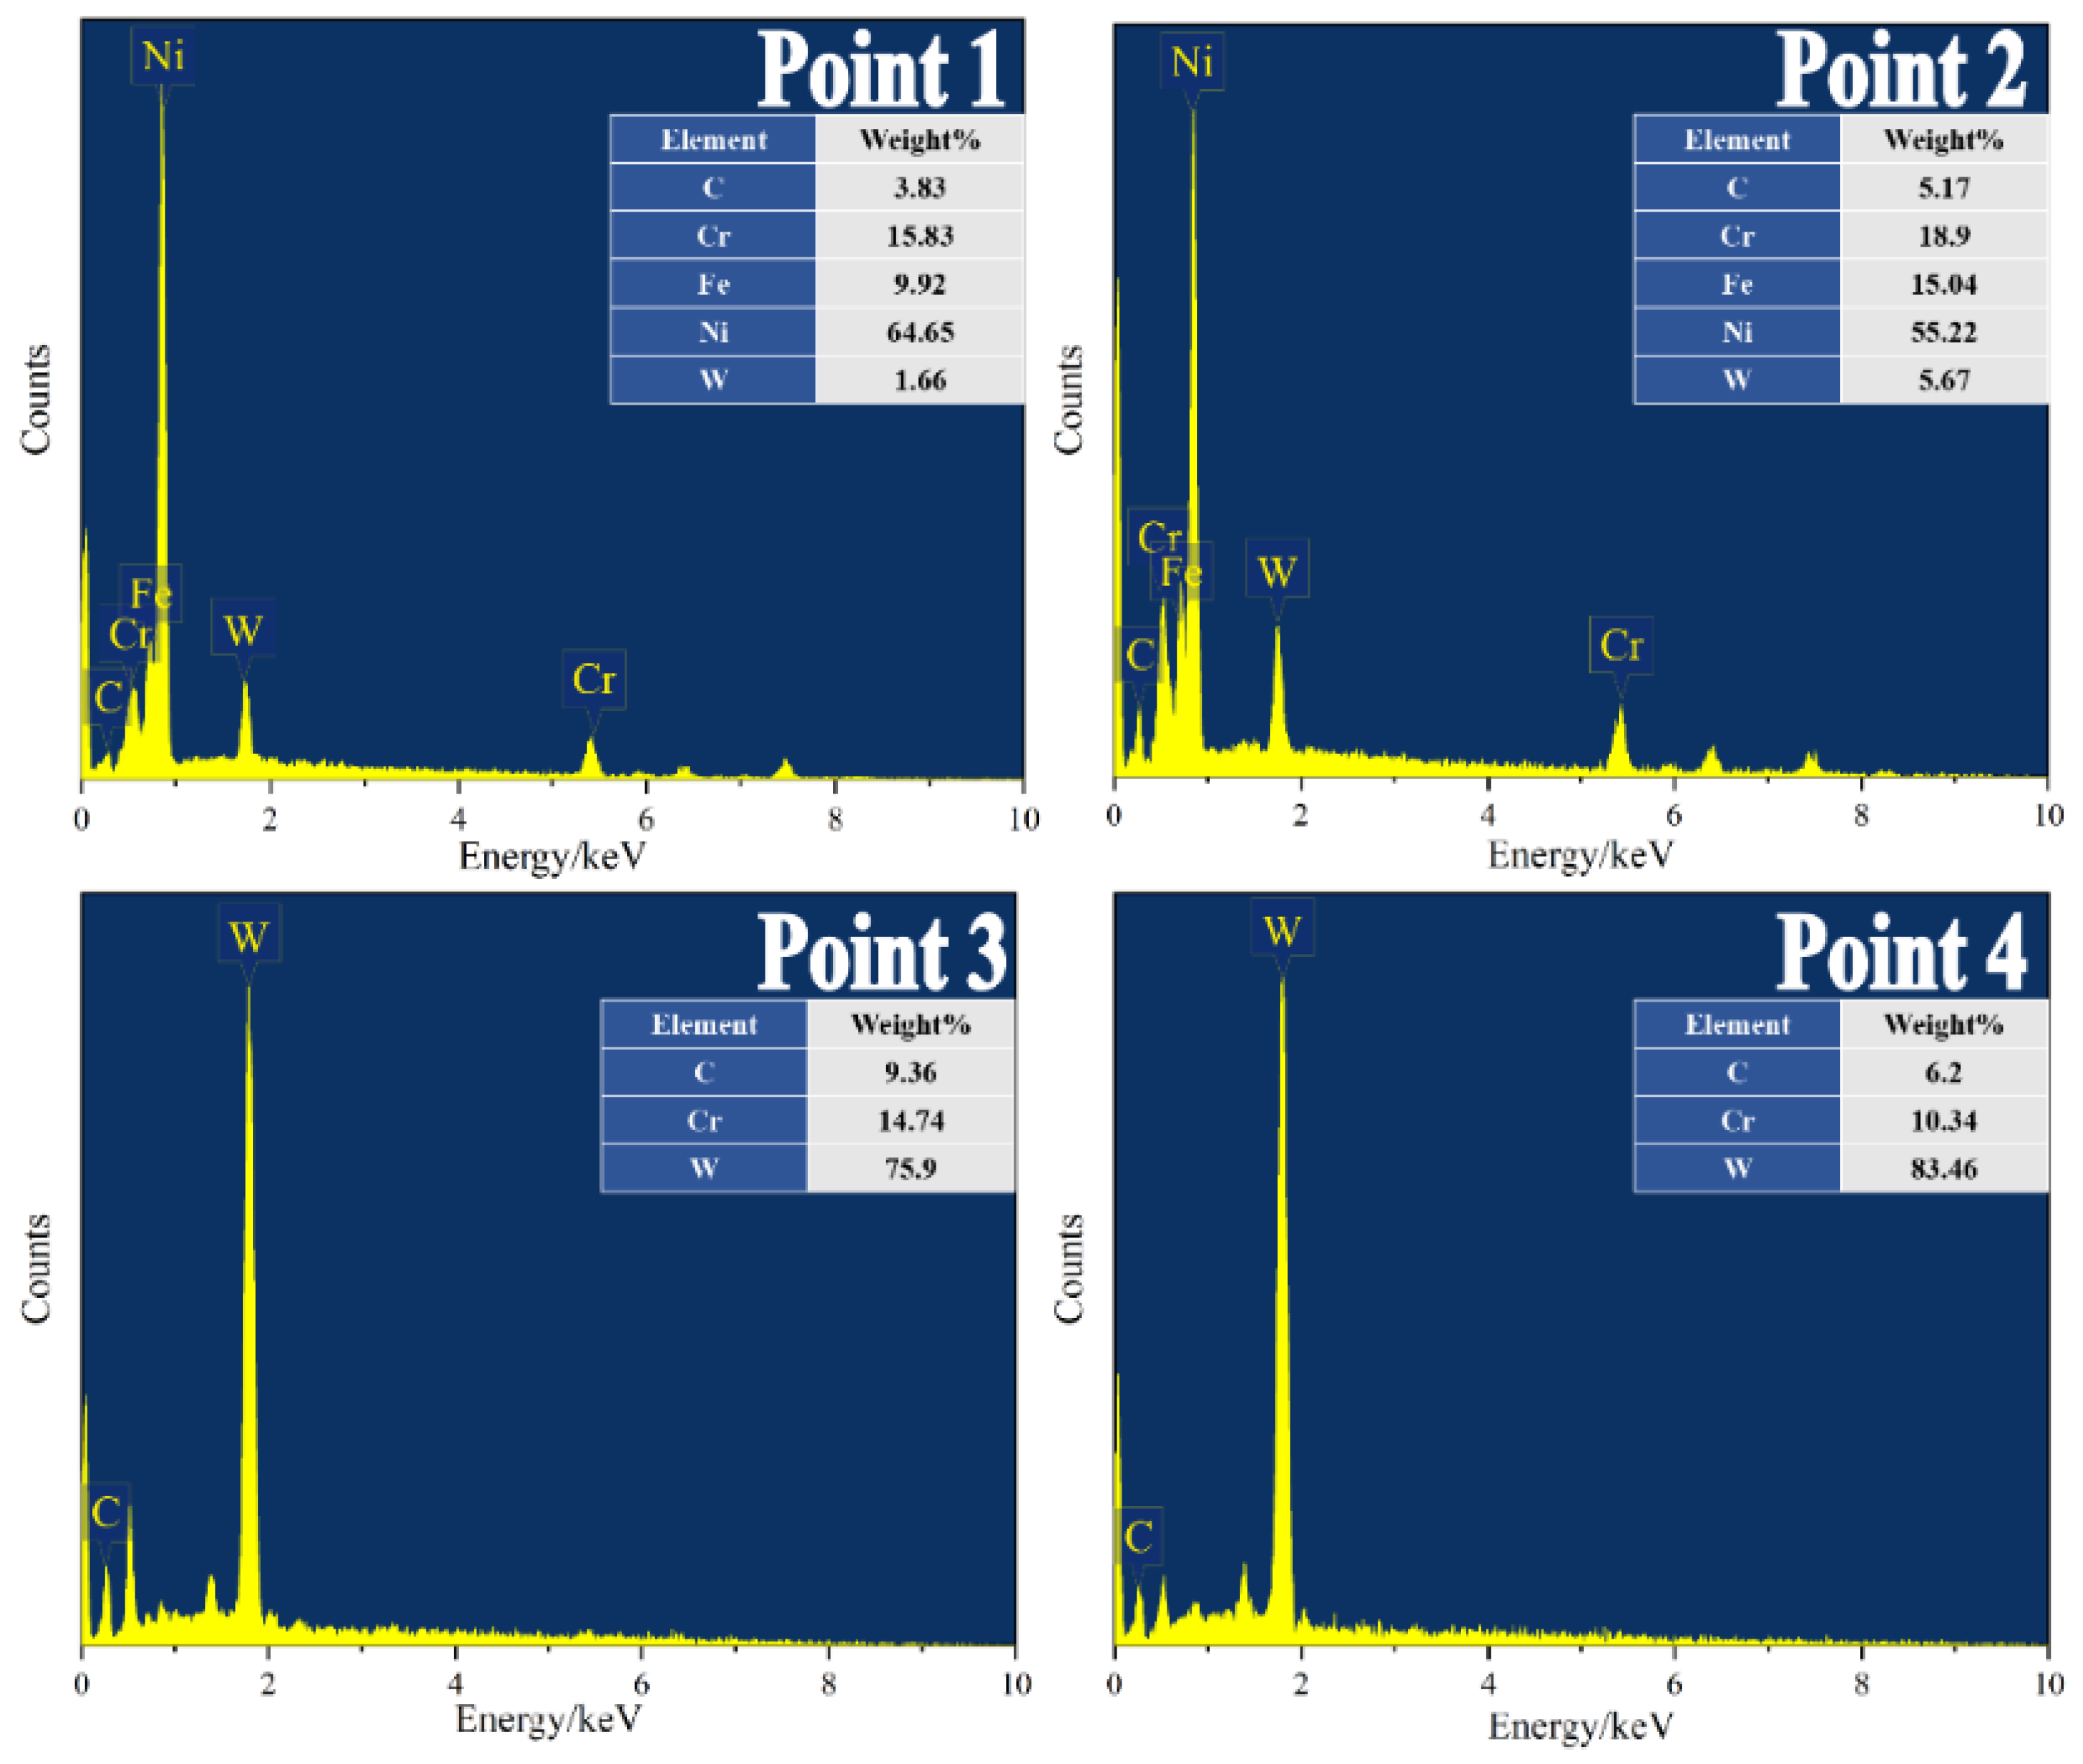
There were a large number of “silvery white” areas on the surface of the HT + UDR coatings, which points 1–4 were analyzed by EDS, as shown in Figure 7. The gray position points 1 and 2 showed that the enrichment of Ni was the most significant, and the peak intensity of Cr and W on the surface of HT + UDR was improved. Cr and C easily formed hard phases at high temperatures, such as Cr7C3 and Cr23C7 compounds [30], which played an important role in improving the strength and hardness of the coatings. The W element was enriched in Point 3 and Point 4 with a silver–white color, which was composed of WC and W2C. WC particles were crushed under the action of the UDR surface. The brittle fracture occurred, which was attributed to the softening of the coating at high temperatures and the embedding of particles on the coating surface under ultrasonic impact. Therefore, the surface quality of the coating was improved under HT + UDR, and more hard phases were generated on the surface, which comprehensively improved its wear resistance.

3.2. Coating Performance Analysis

3.2.1. Microhardness Analysis

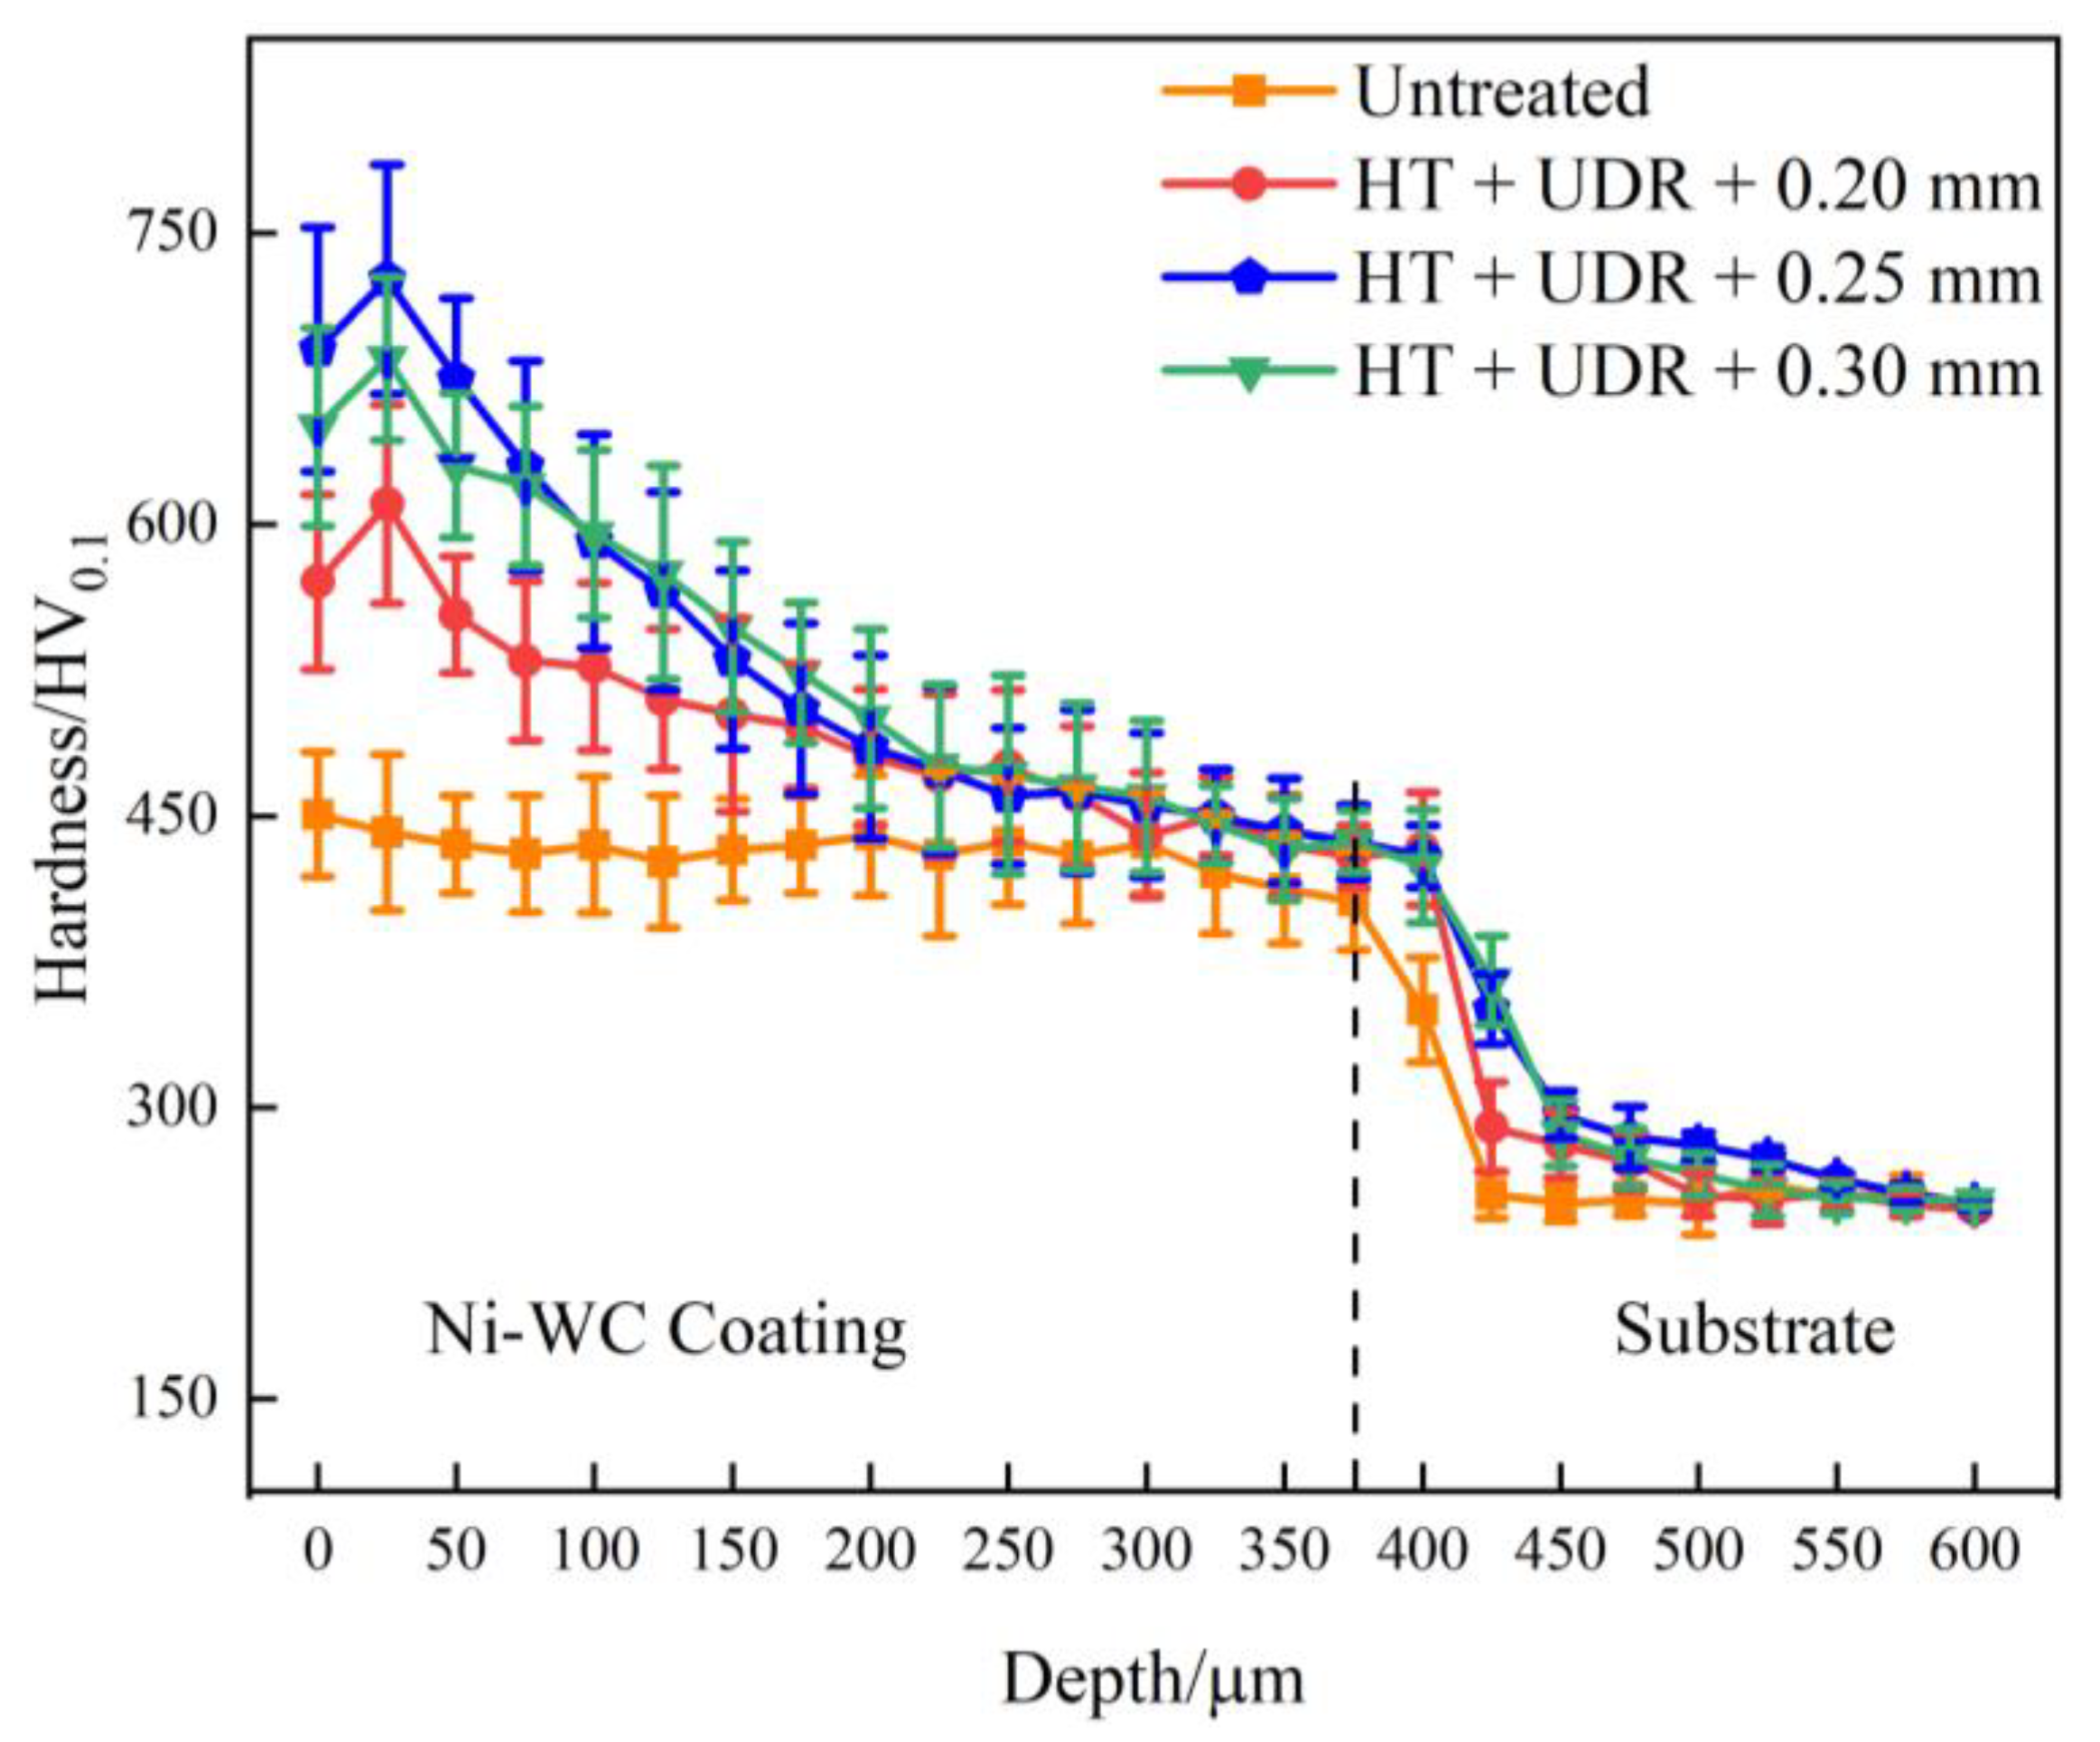
In this study, the hardness of the coating was significantly improved after HT + UDR treatment. Under the action of the high-frequency deep rolling impact coating surface, the coating was extruded and deformed, the cracks and pores were compressed, and the bonding was closer. The surface grains were extruded and deformed gradually with the depth, resulted in changes in the microstructure. As shown in Figure 8, the maximum microhardness was not on the surface, which occurred at 25 µm from the surface. The maximum surface microhardness of the Untreated, HT + UDR + 0.20 mm, HT + UDR + 0.25 mm, and HT + UDR + 0.30 mm groups was 450.9 HV0.1, 610.5 HV0.1, 726.3 HV0.1, and 685.3 HV0.1, respectively. In the process of HT + UDR, the surface grains were refined under the action of deep rolling force [11,31,32], and the surface grains underwent elastic recovery after deep rolling. Meanwhile, the heat generated by the contact between the deep ball and the coating surface and the residual heat generated by high-temperature heating promoted grain growth. The grains in the subsurface layer were prevented from elastic recovery by the coating surface, and the heat transmitted to this area was also small, so the grains occurred permanent plastic deformation. The microhardness decreased with increasing grain size, which was ascribed to the refinement of grains under the ultrasonic deep rolling impact, and the strength (or hardness) was calculated by the Formula (2) [33]:
σ f = σ 0 + k d f p 1 / 2 + α G b ρ 1 / 2
In Formula (2), σ f is the strength, σ 0 is the frictional stress, k is the Hall–Petch constant, d f p is the mean free path of dislocation, α is the constant, G is the shear modulus, b is the Burgess vector, and ρ is the dislocation density.
According to the formula, with the decrease in the mean free path of dislocations and the increase in dislocation density, the grain size decreased, and the microhardness increased. The hardness of the Untreated coating varied with different preloading depths, which was less than that of HT + UDR. However, the hardness did not increase with increasing preloading depth, it increased between 0.20 mm and 0.25 mm and then decreased from 0.25 mm to 0.30 mm. Combined with the analysis of the microstructure of the coating, the impact stress on the surface of the cermet coating was more significant when the preloading depth was too high, resulting in wrinkling and micro-cracks on the surface of the coating, and the surface roughness will increase, which had a particular influence on the uniformity of the microhardness. With the increase in the preloading depth, the plastic change layer and work hardening layer of the coating were improved. When the depth was more than 0.25 mm, the maximum microhardness no longer increased, the depth of strengthening also gradually became slow, and the hardness tended to be consistent after reaching the substrate.

3.2.2. Residual Stress Analysis

The residual stress in the thermal spraying coating is mostly tensile stress, which has an adverse effect on the comprehensive performance of the coating. The main sources are quenching stress, thermal stress, and structural stress [10]. Figure 9 shows the residual stress of the Untreated, HT + UDR + 0.20 mm, HT + UDR + 0.25 mm, and HT + UDR + 0.30 mm coatings were 165.5 MPa, −290.9 MPa, −337.9 MPa, and −308.6 MPa, respectively. Considering the large error bar, the residual stress after treatment was relatively close. Uneven plastic deformation occurred on the surface layer under UDR, resulting in lattice distortion and residual compressive stress on the surface layer. The maximum value reached −337.9 MPa with a preloading depth of 0.25 mm. The residual compressive stress on the surface of the HT + UDR + 0.30 mm treated coating was reduced. However, the plastic deformation of the coating became more severe with increasing preloading depth, resulting in a change in residual stress. With the continuous increase in preloading depth, the dynamic recrystallization behavior of the surface was intensified, and the dislocation density decreased and released residual stress. The transformation of residual tensile stress into residual compressive stress on the surface increased the fatigue resistance and plastic deformation resistance of the coating, thus effectively improving the wear resistance of the material [31,34].

3.3. Tribological Performance Analysis

3.3.1. Analysis of the Friction Coefficient and Wear Loss

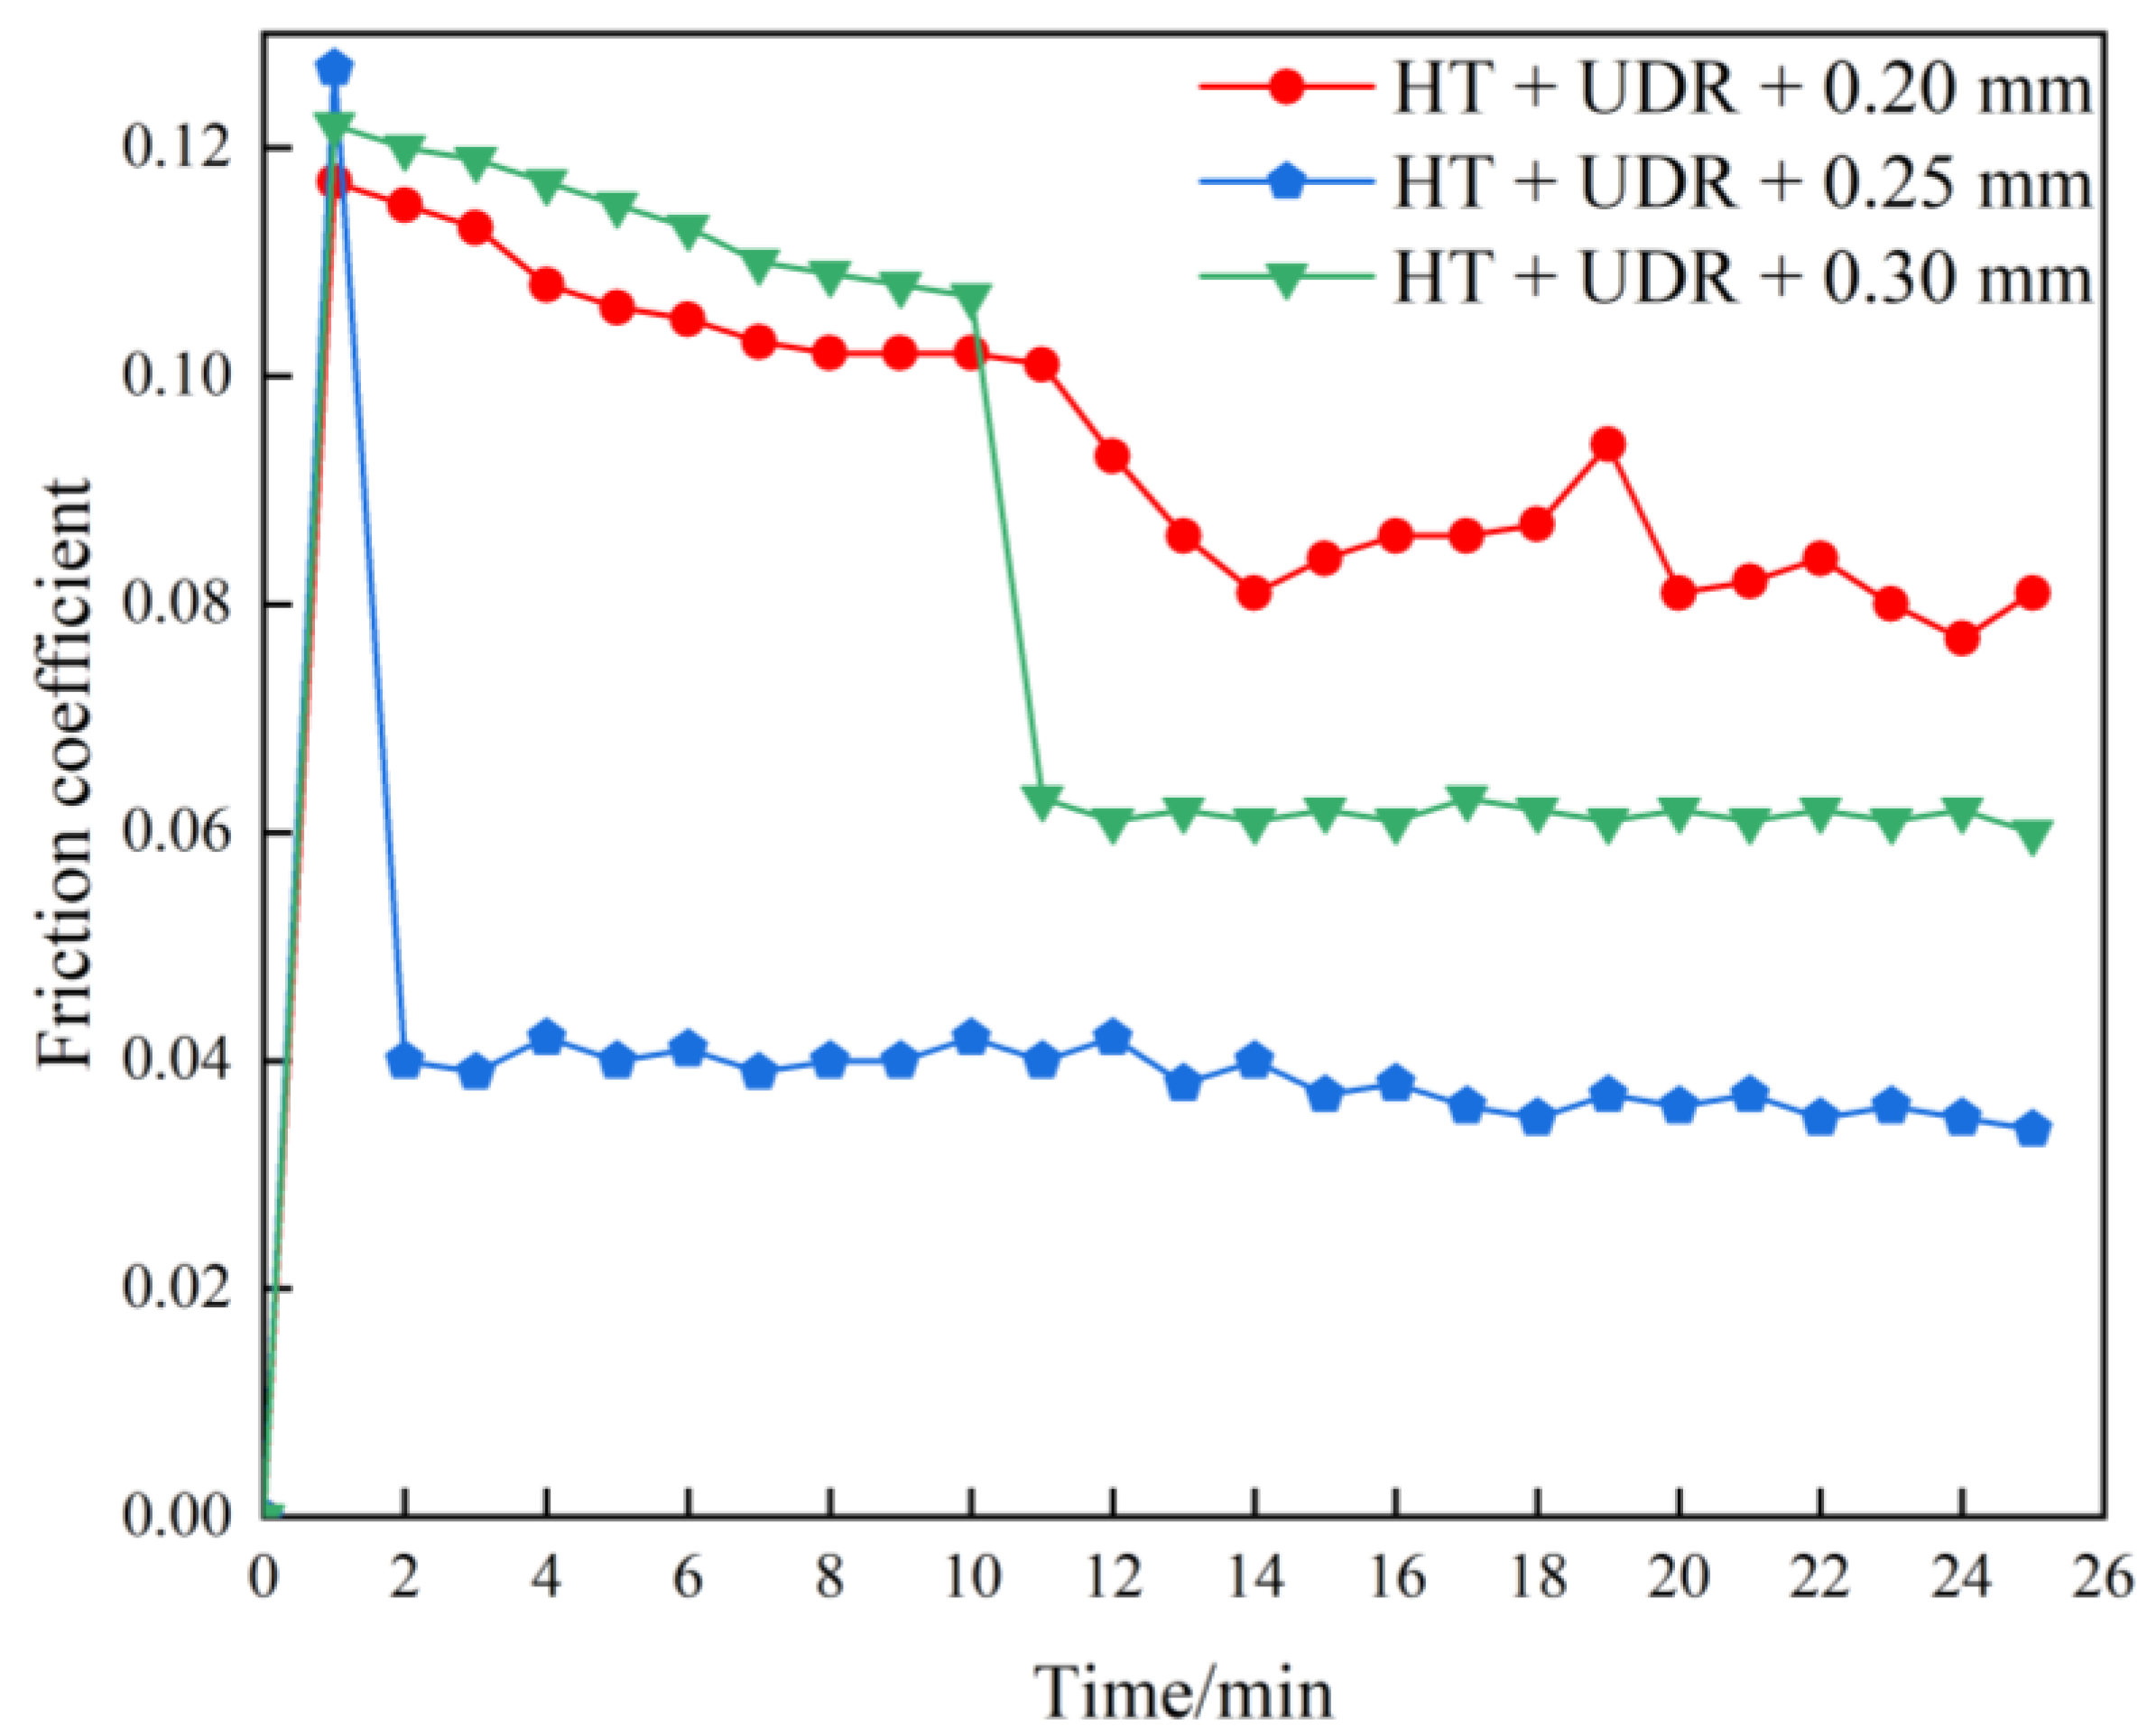
Figure 10 shows the friction coefficient curves of the samples after different preloading depth treatments. In the initial stage of friction and wear, the friction coefficients showed a sharp rise trend and then gradually decreased to a stable stage. In the initial stage, the soft base was first worn off by the surface of the friction pair to produce scratches, furrows, or fragments, and the remaining hard points formed a prominent surface to rub against the surface of the friction pair, leading to a large friction coefficient. As the friction and wear entered the second stage, the wear contact part of the coating began to peel off, and oxidation continued to increase. At this time, the wear contact interface was micro peak and chip layer, and the friction coefficient decreased. When the wear entered the third stage, the friction coefficient gradually stabilized. Mechanical meshing and molecular attraction were involved in the coating wear process. According to the tribology principle, the calculation formula of the friction coefficient is as follows:
μ = F W = S A W
In Formula (3), μ is the friction coefficient, F is the friction test force, W is the normal load, A is the actual contact area, and S is the shear stress.
The initial friction coefficient of HT + UDR + 0.20 mm was the smallest, and it fluctuated more. The initial friction coefficient of HT + UDR + 0.25 mm was the largest, but it quickly reached the stable stage. The initial friction coefficient of HT + UDR + 0.30 mm was in the middle, then gradually decreased, then dropped sharply at 10 min, and gradually fluctuated steadily. The surface quality under the 0.20 mm preloading depth was relatively poor with pits and grooves, which resulted in contact stress concentration, local friction heat, high adhesion, and oxide, promoting the friction coefficient to fluctuate in an unstable way. Tribology mentioned in molecular mechanical theory that there were many tiny bumps on the smooth surface from the atomic scale. When the normal pressure was more than the elastic limit of the material, the bump at the top of the plastic deformation happened, crushed into a flat, and then touched each other. The distance between two objects decreased, with small molecular attraction to the scope of work, and atomic bonding occurred between two compressed surfaces. Therefore, the initial friction coefficient was the largest under 0.25 mm. After the preloading depth HT + UDR + 0.30 mm treatment, microcracks and pits appeared on the surface of the coating, which needed a long period of wear in the first and second stages before entering the stable wear stage.
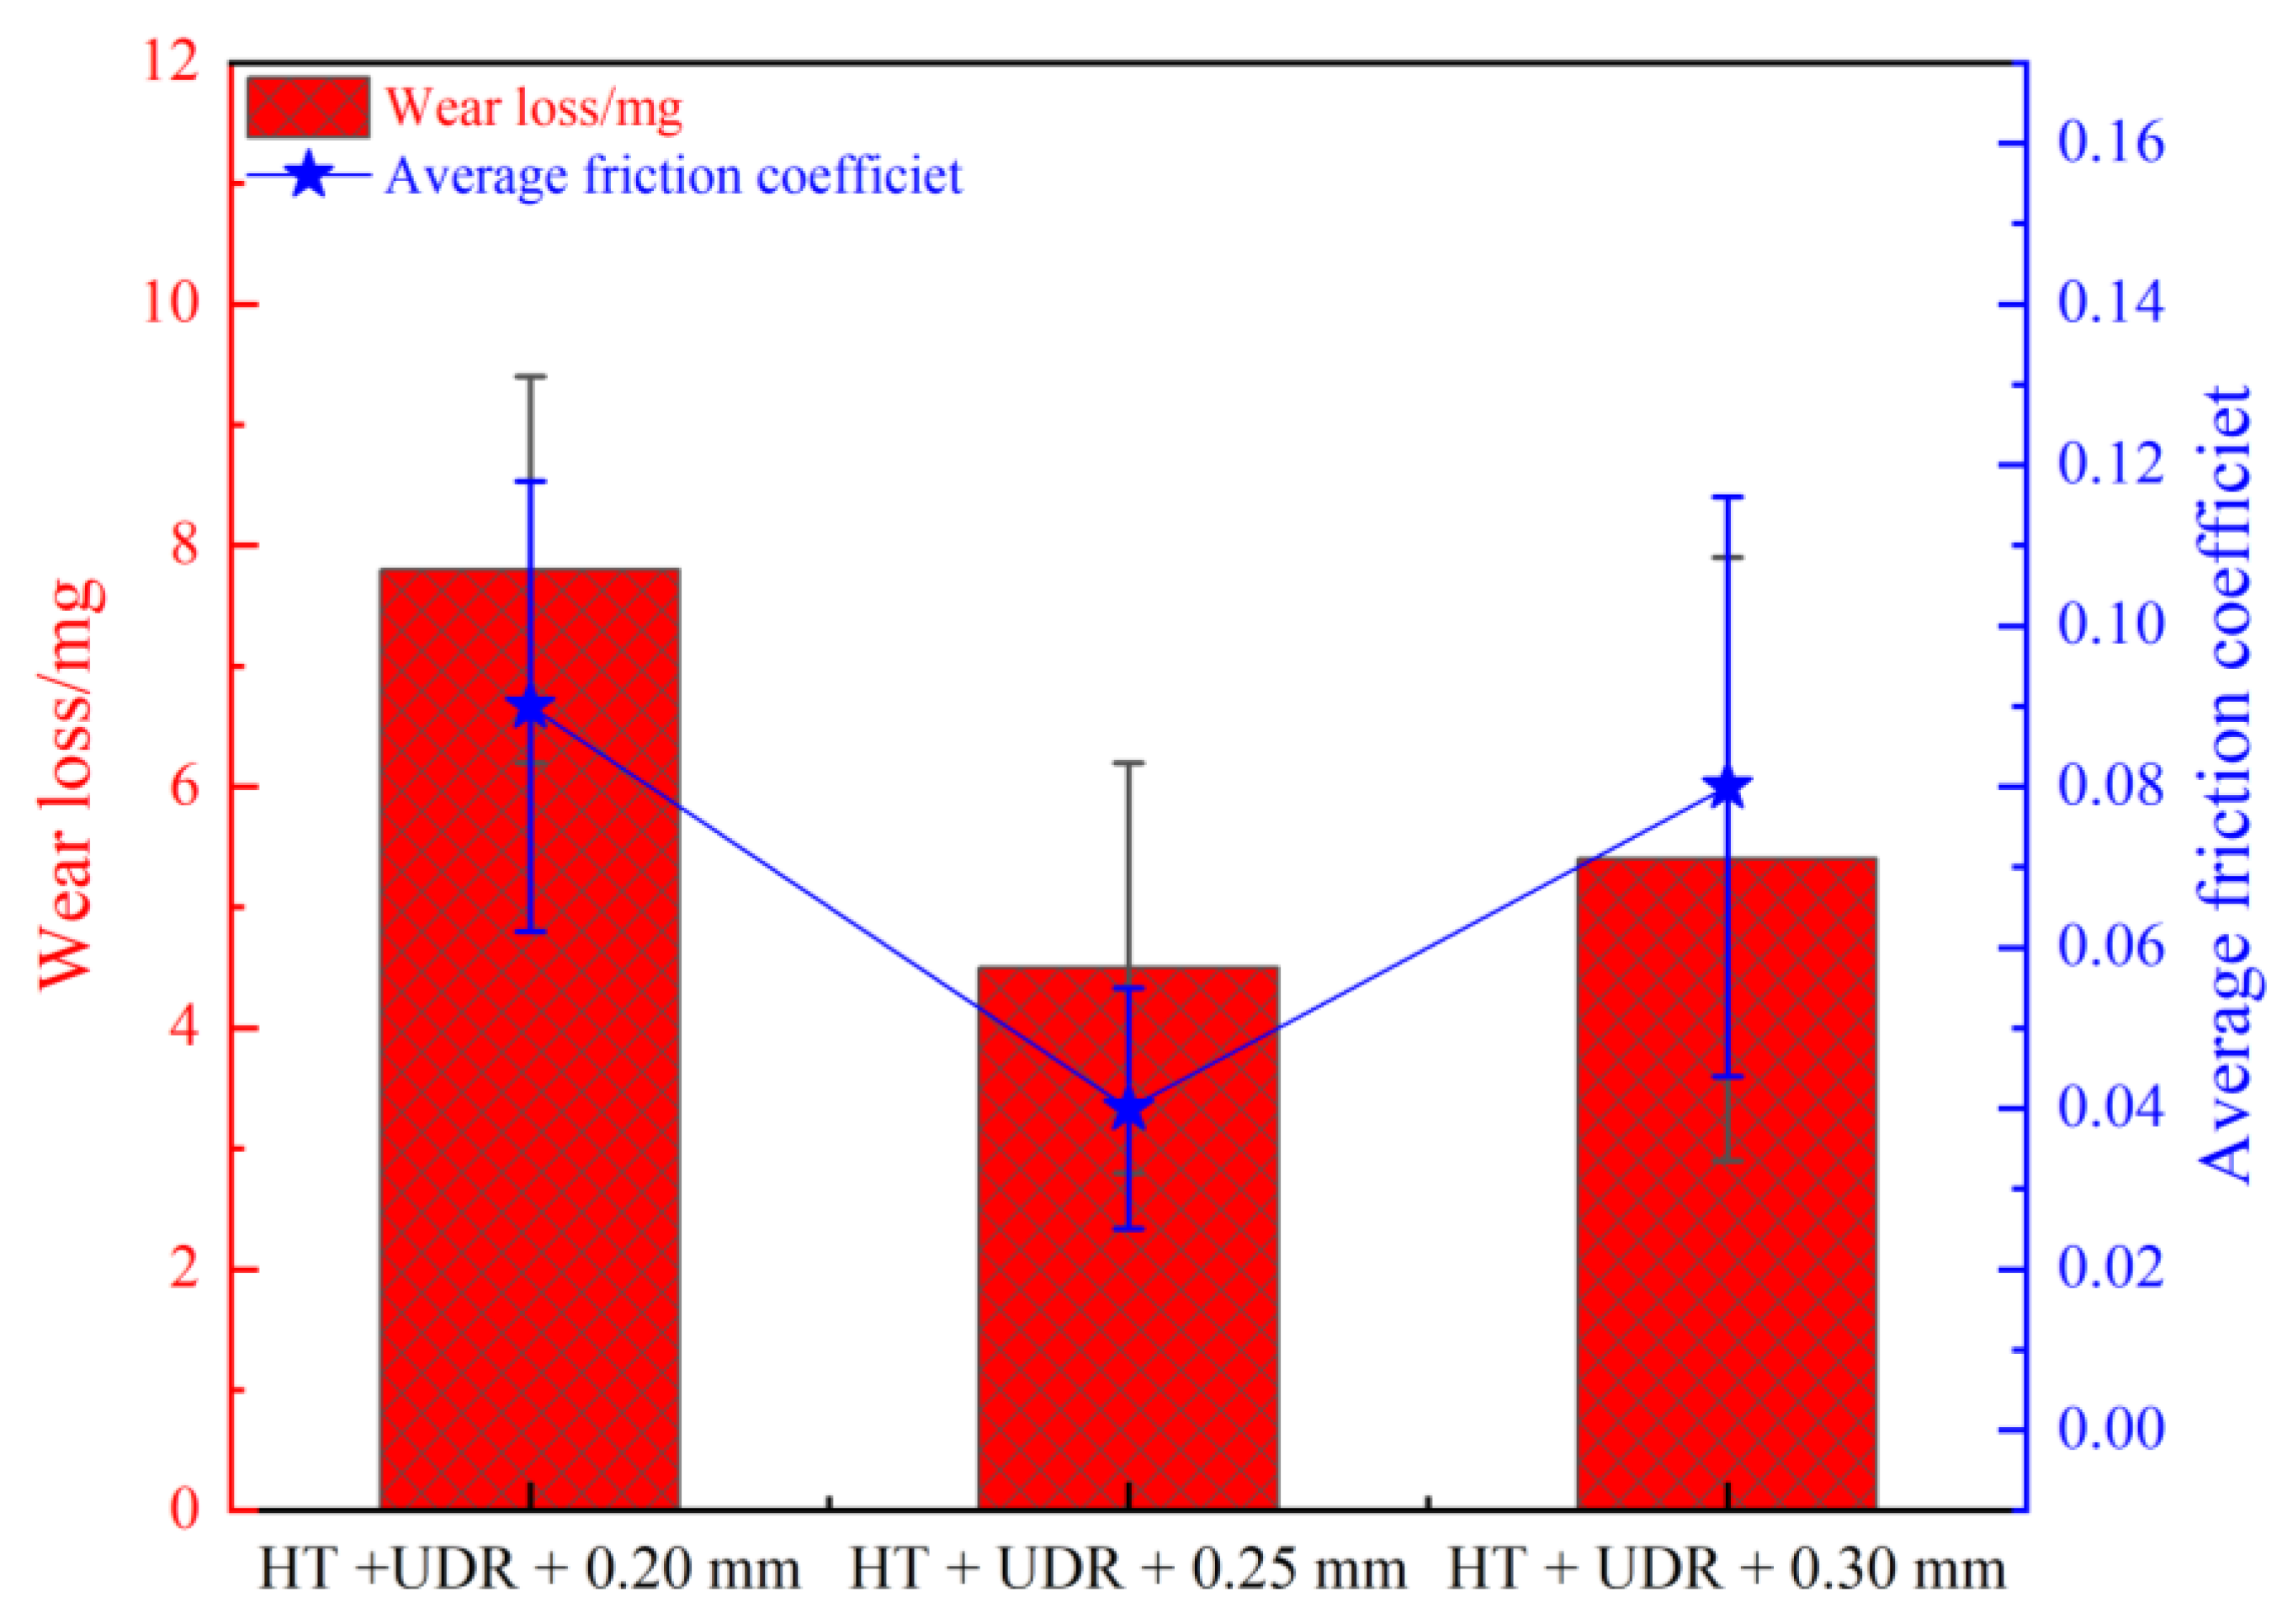
As shown in Figure 11, the average friction coefficients of the coatings under different preloading depths of 0.20 mm, 0.25 mm, and 0.30 mm were 0.09, 0.04, and 0.08, respectively, with the wear amounts of 7.8 mg, 4.5 mg, and 5.4 mg, respectively. In addition, the friction coefficient is related to the hardness and residual stress of the material. The residual compressive stress generated on the surface can offset the contact stress suffered by some samples. The microhardness and residual compressive stress of the coatings increased with increasing preloading depth. When the preloading depth reached 0.30 mm, microcracks appeared on the coating surface and the residual compressive stress was reduced.

3.3.2. Wear Type and Mechanism Analysis

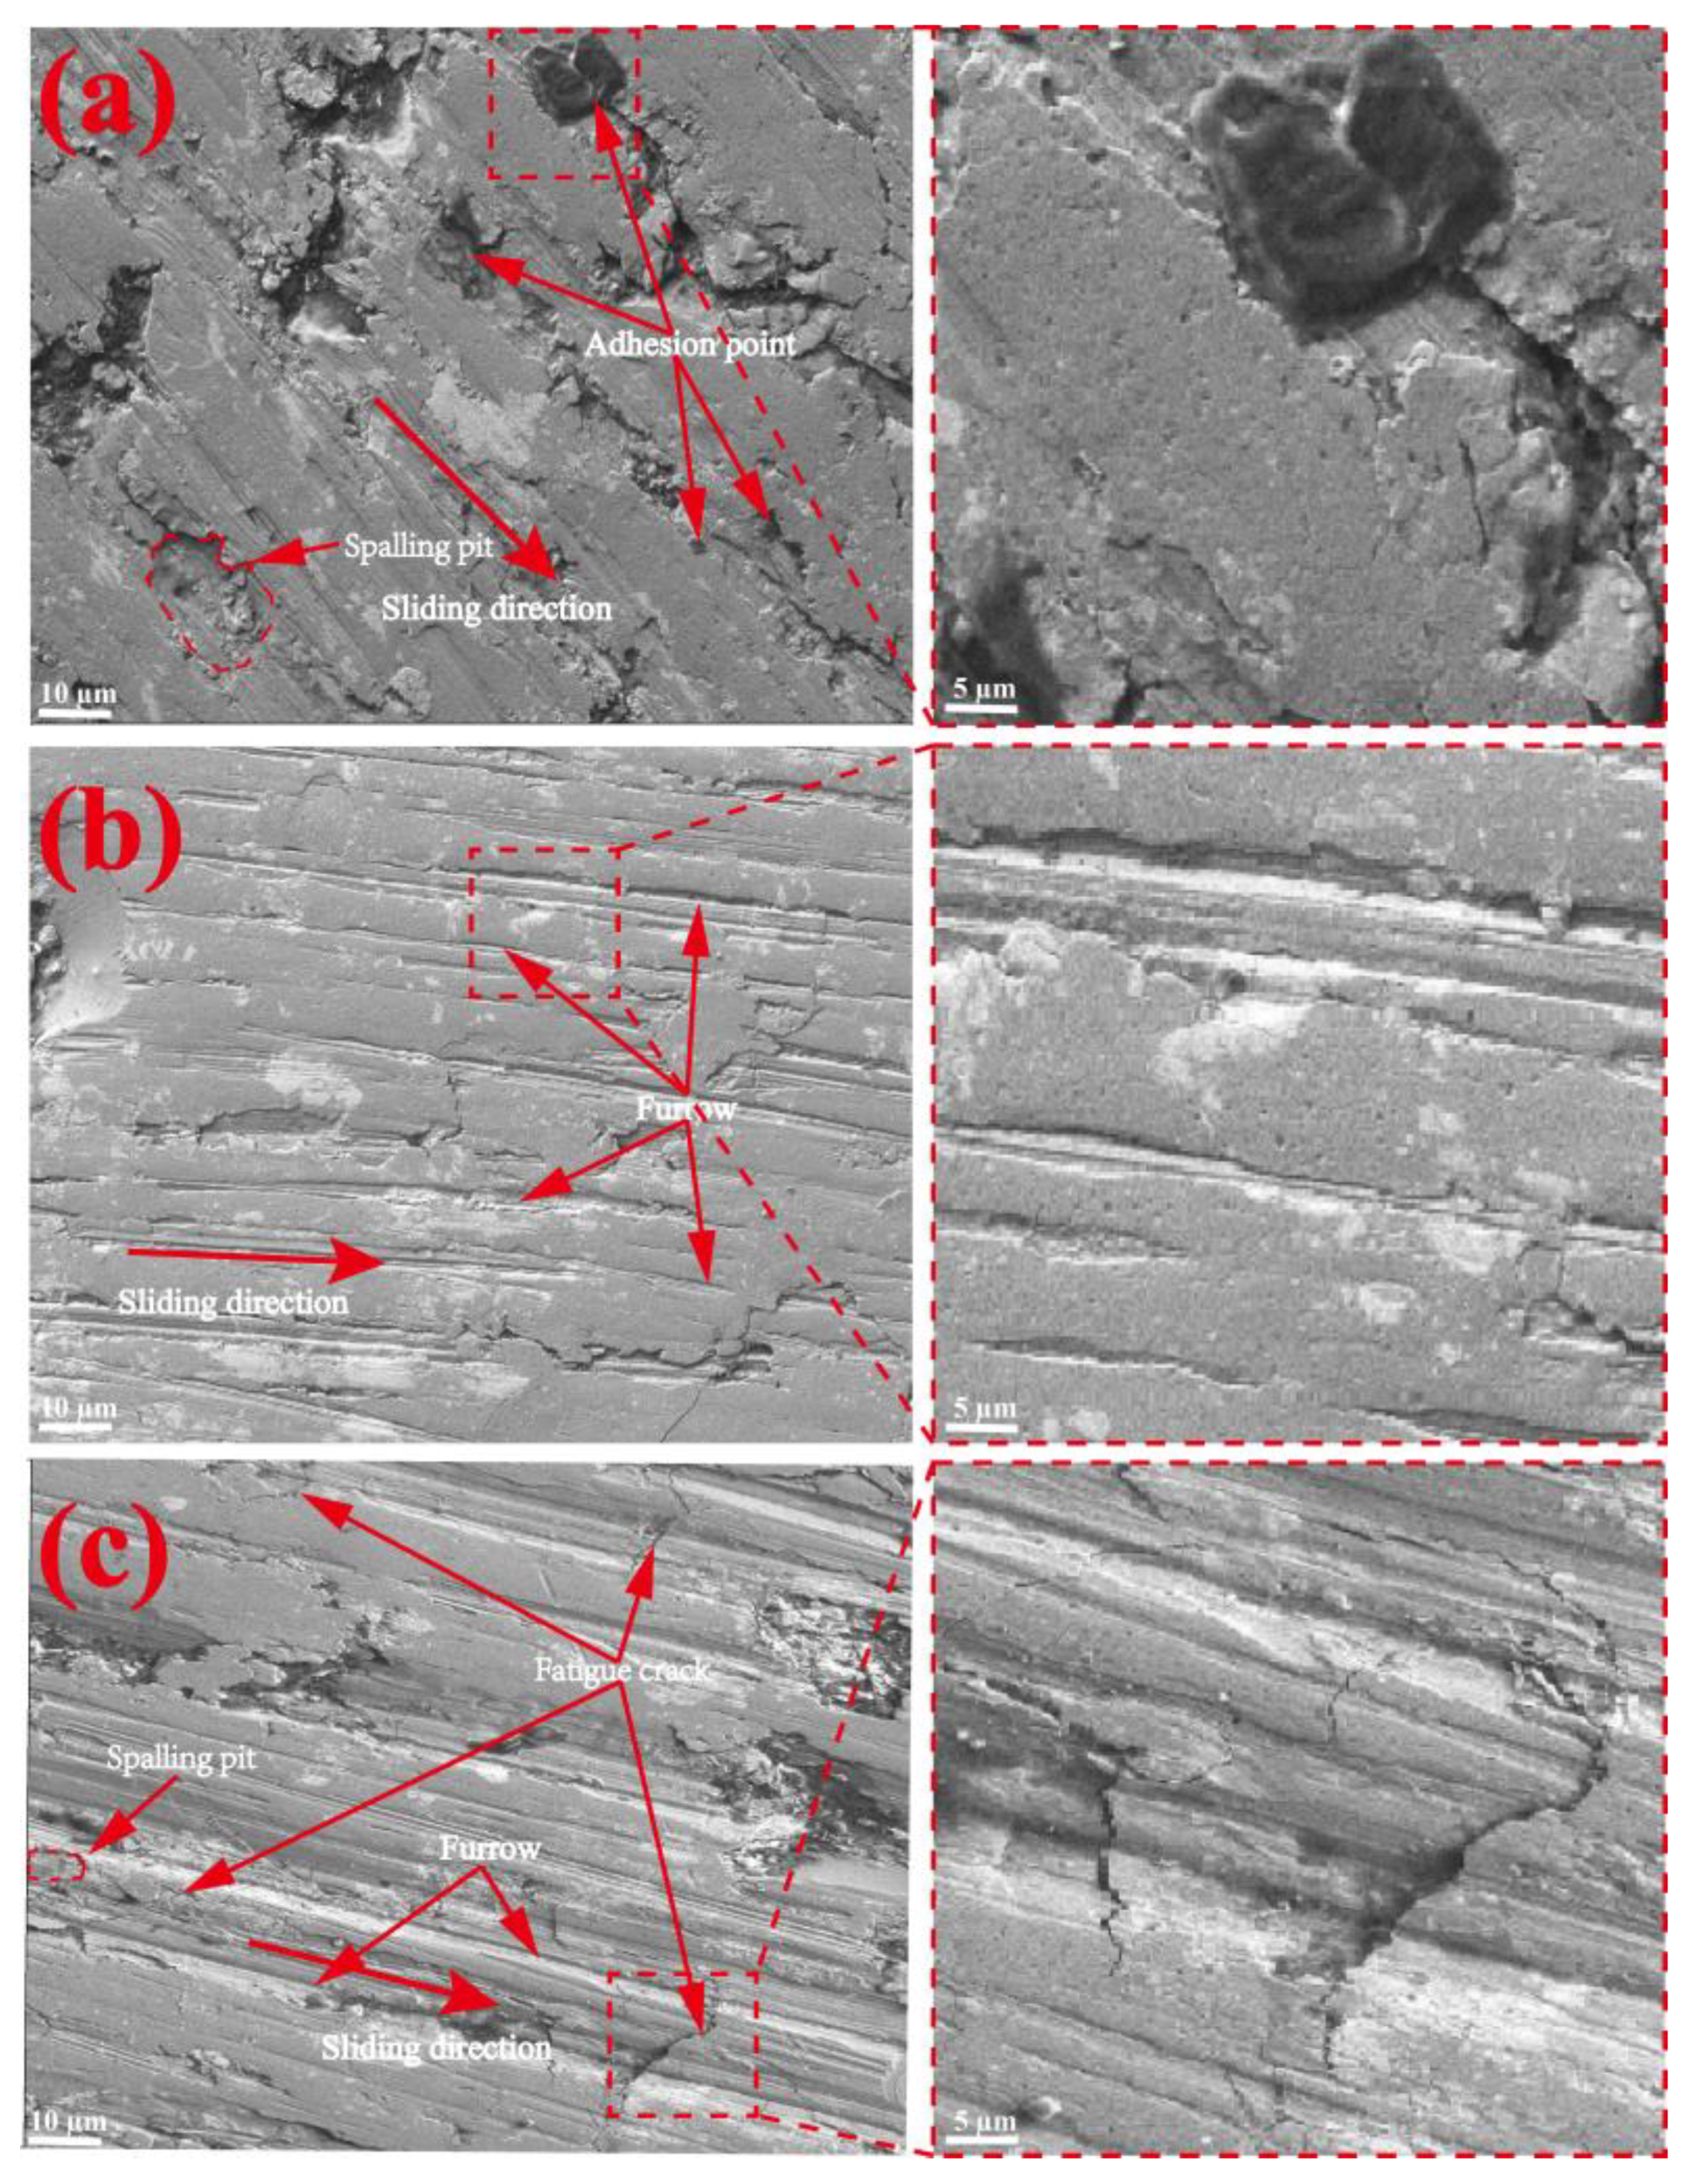
Figure 12 shows the surface wear morphologies of the dry sliding friction under different preloading depths. The wear surface of HT + UDR + 0.20 mm showed flake peeling, with spalling pits and adhesion points. The furrows were wide and deep, accompanied by the accumulation of debris. There were many pits and rough peaks on the surface, and the rough peaks were cut during dry sliding wear, resulting in adhesion on the worn surface. Further wear generated more friction heat and aggravated adhesion, eventually forming larger adhesion points. The main forms of friction wear were adhesive wear and fatigue wear. There were many furrows on the wear surface under the 0.25 mm preloading depth in Figure 12b, and the furrows were narrow and shallow. The furrows were parallel to each other and moved in the same direction as the friction pair, without obvious cracks and spalling pits. There were no obvious defects on the surface of the coating before wear, and the friction curve showed that the sample entered the stable wear stage from the point contact transition surface. The width and depth of scratches and furrows in the silver–white area were smaller than those in the black area, which was attributed to the higher hardness and strength of hard phases (such as WC), as well as strong wear resistance and deformation. The friction and wear of the hard phase in the coating was a “skeleton” effect, and the soft phase exhibited good capability of plastic deformation. The embedded WC hard phases in Ni and Fe underwent plastic deformation, absorbed energy, and prevented the hard phase from peeling, thus achieving the effect of the “strong and tough bonding”. The main wear form was abrasive wear. In Figure 12c, there were deep furrows and fatigue cracks, as well as spalling pits at the crack edges. On the surface of high hardness, the pin plate with the sample in the process of wear and tear led to the extrusion edge grinding crack area of the bulge and increased some parts that were prone to large stress concentration. The area of the bulge was separated from the surface under the repeated friction of the pin plate to form a high hardness abrasive grain and then fell into the furrow area to form three-body abrasive wear of the pin plate, high hardness abrasive grain, and coating, thus generating deeper furrows during the wear process. As the yield stress of the material is certain, cyclic stress was formed in the contact area with continuous wear. When the cyclic stress was greater than the yield stress of the material, the coating surface underwent irreparable plastic deformation, and microcracks occurred and expanded to a certain extent on the surface, resulting in material fracture and spalling. The main wear forms were fatigue wear and abrasive wear.
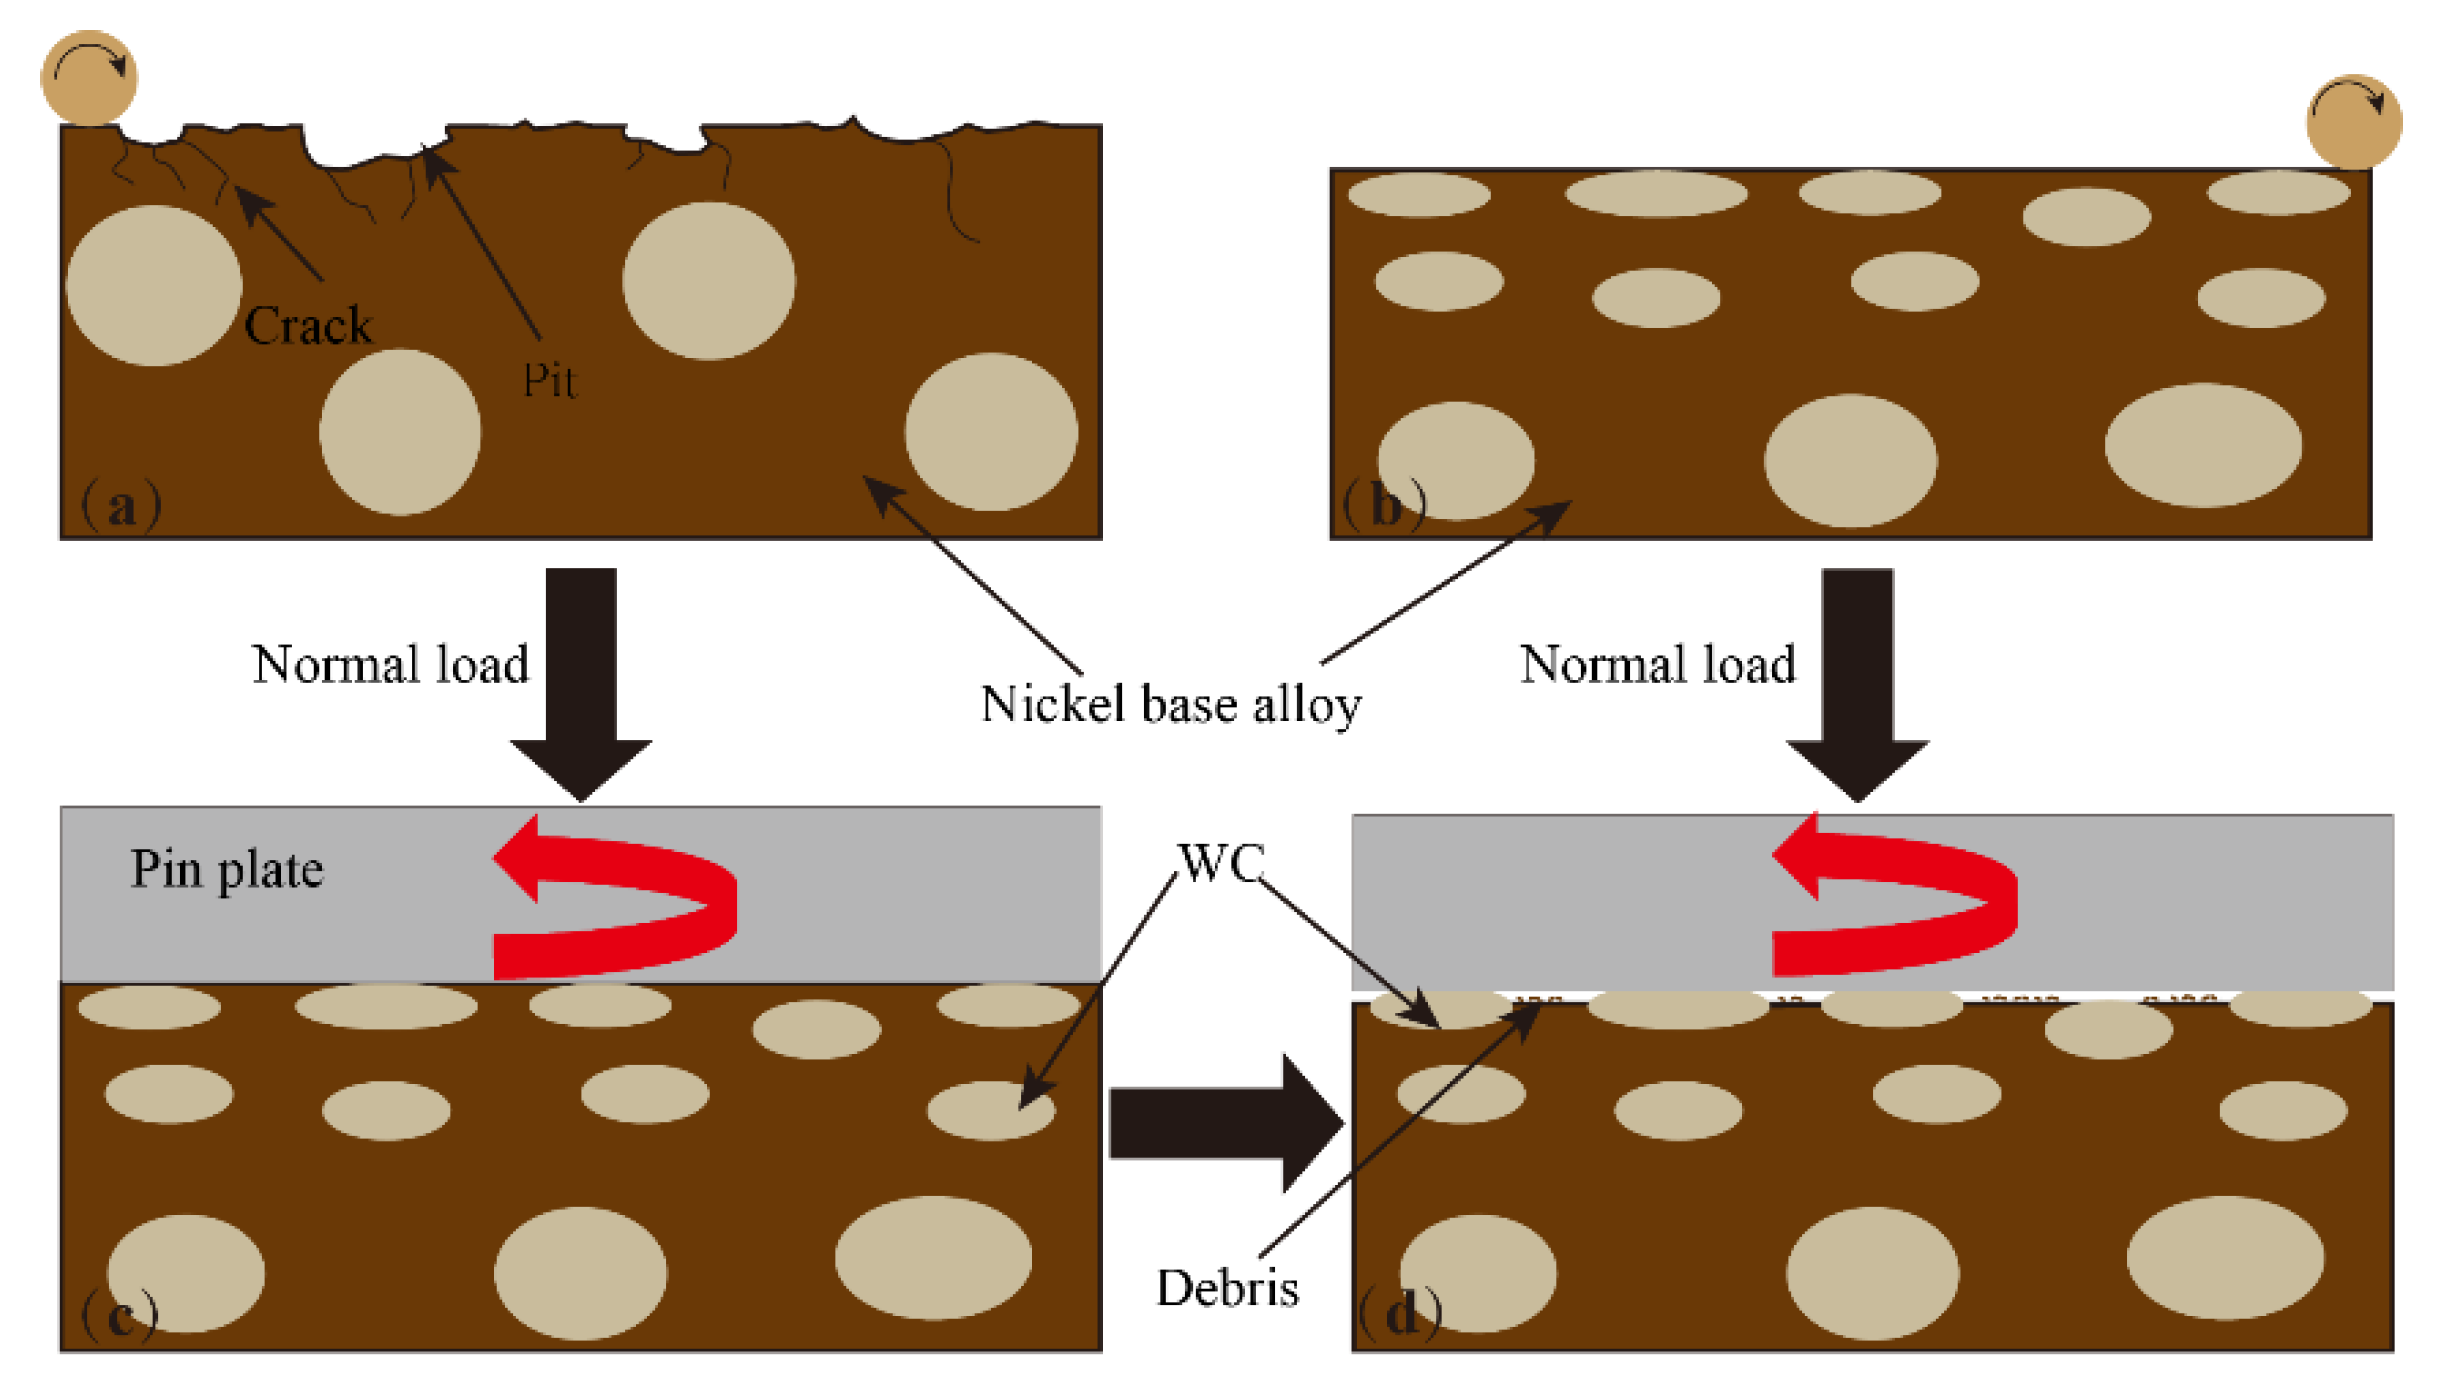
The mechanism analysis pre and post wear resistance strengthening is shown in Figure 13. The surface defects of the coating were eliminated by high-temperature ultrasonic deep rolling, and WC particles were dispersed in the coating structure. At the same time, the surface hardness of the coating was improved and the residual compressive stress was introduced to further improve the wear resistance of the coating [32]. In the early stage of wear, the pin plate was continuously squeezed and rotated along the surface of the Ni-WC coating to cause friction and wear. The hardness of the nickel-based alloy is smaller than that of the WC particles, and it is quickly removed by the asperities on the surface of the pin plate, exposing the skeleton of the WC particles, which can effectively block the ploughing of the abrasive particles on the nickel-based alloy area. The convex WC particles and the concave nickel-based alloy structure continuously flow into the concave nickel-based alloy area during the wear process, avoiding the sliding of the wear debris between the pin plate and the coating and reducing the probability of plastic deformation and spalling on the coating surface. With the increase of wear time, the height of WC particles reaches the concave area, and the next cycle is carried out until the wear fails. The preloading depth mainly affects the degree of plastic deformation of the coating. With the increase in preloading depth, the surface roughness and microhardness of the coating increased first and then decreased, and the tribological properties increased first and then decreased.

4. Conclusions

The Ni-WC coatings were posttreated by HT + UDR to investigate the effect of preloading depth on the microstructure and tribological properties of the coatings. The main conclusions of this study are as follows:
(1) After HT + UDR treatment, plastic rheology occurred on the surface of the coating, achieving the effect of “peak cutting and valley filling”. The surface defects were eliminated and the coating becomes denser. The large WC particles were elongated and fractured along the deep rolling direction, and then flowed and dispersed between the coatings with the coating structure.
(2) After HT + UDR treatment, the coating underwent grain refinement and work hardening to improve the hardness of the coating. The microhardness of HT + UDR + 0.25 mm was the highest. The residual tensile stress was transformed into residual compressive stress.
(3) After Ni-WC coating HT + UDR, more hard phases, such as WC, were exposed on the surface, which played the role of “skeleton” in the wear process. When the preloading depth was 0.25 mm, the tribological properties of the coating after HT + UDR treatment were the best.

Author Contributions

Conceptualization, Y.Z. and J.Z.; methodology, Y.H.; software, C.M., X.Z. and S.Z.; validation, Y.Z., J.Z. and Y.H.; formal analysis, C.M., X.Z. and S.Z.; investigation, Y.Z.; resources, J.Z.; data curation, J.Z.; writing—original draft preparation, C.M., X.Z. and S.Z.; writing—review and editing, Y.Z.; visualization, J.Z.; supervision, Y.H.; project administration, C.M. and X.Z.; funding acquisition, Y.Z. All authors have read and agreed to the published version of the manuscript.

Funding

This research was funded by National Natural Science Foundation of China (No. 51965023).

Institutional Review Board Statement

Not applicable.

Informed Consent Statement

Not applicable.

Data Availability Statement

The authors confirm that the data supporting the findings of this study are available within the article.

Acknowledgments

Thanks to Engineering Research Institute of Jianxi University of Science and Technology for supporting the experiment.

Conflicts of Interest

The authors declare no conflict of interest.

References

  1. Wang, J.; Wang, H.; Wang, H.; Zeng, Z. Preparation of Ni60-WC coating by plasma spraying, plasma re-melting and plasma spray welding on surface of hot forging die. J. Wuhan Univ. Technol. Mater. Sci. Ed. 2012, 27, 640–643. [Google Scholar] [CrossRef]
  2. Yang, S.; Meng, Q.; Geng, L.; Guo, L.; Wu, L. Ni–TiC coating deposited on Ti–6Al–4V substrate by thermal spraying and laser remelting of Ni-clad graphite powder. Mater. Lett. 2007, 61, 2356–2358. [Google Scholar] [CrossRef]
  3. Liu, Y.; Xu, T.; Liu, Y.; Gao, Y.; Di, C. Wear and heat shock resistance of Ni-WC coating on mould copper plate fabricated by laser. J. Mater. Res. Technol. 2020, 9, 8283–8288. [Google Scholar] [CrossRef]
  4. Thi, H.P.; Van, T.N.; Nguyen, T.A.; Le Thu, Q.; Thi, L.P.; Bich, T.D.; Van, T.T.; Quoc, C.L. Cr3C2-25NiCr cermet coating: Preparation, PTFE sealant, wear and corrosion resistances. J. Therm. Spray Technol. 2021, 30, 716–724. [Google Scholar] [CrossRef]
  5. Thakare, J.G.; Pandey, C.; Mahapatra, M.M.; Mulik, R.S. Thermal barrier coatings—A state of the art review. Met. Mater. Int. 2021, 27, 1947–1968. [Google Scholar] [CrossRef]
  6. Hu, Y.; Ning, F.; Cong, W.; Li, Y.; Wang, X.; Wang, H. Ultrasonic vibration-assisted laser engineering net shaping of ZrO2-Al2O3 bulk parts: Effects on crack suppression, microstructure, and mechanical properties. Ceram. Int. 2018, 44, 2752–2760. [Google Scholar] [CrossRef]
  7. Zhao, Y.; Wu, X.; Du, H.; Shangguan, X.; He, W. Influence of different laser re-melting paths on the microstructure of a spray coating: Defect prevention and tribological properties. Surf. Coat. Technol. 2019, 367, 11–18. [Google Scholar] [CrossRef]
  8. Konyashin, I.Y. Wear-resistant coatings for cermet cutting tools. Surf. Coat. Technol. 1995, 71, 284–291. [Google Scholar] [CrossRef]
  9. Zhao, X.Q.; Zhou, H.D.; Chen, J.M. Comparative study of the friction and wear behavior of plasma sprayed conventional and nanostructured WC–12% Co coatings on stainless steel. Mater. Sci. Eng. 2006, 431, 290–297. [Google Scholar] [CrossRef]
  10. Ojha, S.; Thakare, J.G.; Giri, A.; Pandey, C.; Mahapatra, M.M.; Mulik, R.S. Experimental and numerical investigation of residual stress in coatings on steel. J. Test. Eval. 2020, 48, 4370–4386. [Google Scholar] [CrossRef]
  11. Xu, G.; Wang, C.; Li, Q.; Zhang, X.; Zhu, Z.; Liang, T.; Yang, B. Effects of ultrasonic rolling on surface performance of 7B85-T6 alloy. Mater. Manuf. Process. 2020, 35, 250–257. [Google Scholar] [CrossRef]
  12. Luo, X.; Ren, X.; Jin, Q.; Qu, H.; Hou, H. Microstructural evolution and surface integrity of ultrasonic surface rolling in Ti6Al4V alloy. J. Mater. Res. Technol. 2021, 13, 1586–1598. [Google Scholar] [CrossRef]
  13. Liu, C.; Liu, D.; Zhang, X.; He, G.; Xu, X.; Ao, N.; Ma, A.; Liu, D. On the influence of ultrasonic surface rolling process on surface integrity and fatigue performance of Ti-6Al-4V alloy. Surf. Coat. Technol. 2019, 370, 24–34. [Google Scholar] [CrossRef]
  14. Sweeney, C.A.; O’Brien, B.; Dunne, F.P.E.; McHugh, P.E.; Leen, S.B. Strain-gradient modelling of grain size effects on fatigue of CoCr alloy. Acta Mater. 2014, 78, 341–353. [Google Scholar] [CrossRef]
  15. Valiev, R. Nanostructuring of metals by severe plastic deformation for advanced properties. Nat. Mater. 2004, 3, 511–516. [Google Scholar] [CrossRef] [PubMed]
  16. Lu, L.X.; Sun, J.; Li, L.; Xiong, Q.C. Study on surface characteristics of 7050-T7451 aluminum alloy by ultrasonic surface rolling process. Int. J. Adv. Manuf. Technol. 2016, 87, 2533–2539. [Google Scholar] [CrossRef]
  17. Lu, K.; Lu, J. Nanostructured surface layer on metallic materials induced by surface mechanical attrition treatment. Mater. Sci. Eng. 2004, 375, 38–45. [Google Scholar] [CrossRef] [Green Version]
  18. Bagheri, S.; Guagliano, M. Review of shot peening processes to obtain nanocrystalline surfaces in metal alloys. Surf. Eng. 2009, 25, 3–14. [Google Scholar] [CrossRef]
  19. Meyer, D.; Brinksmeier, E.; Hoffmann, F. Surface hardening by cryogenic deep rolling. Procedia Eng. 2011, 19, 258–263. [Google Scholar] [CrossRef]
  20. Prevéy, P.S.; Cammett, J.T. The influence of surface enhancement by low plasticity burnishing on the corrosion fatigue performance of AA7075-T6. Int. J. Fatigue 2004, 26, 975–982. [Google Scholar] [CrossRef]
  21. Yang, J.; Liu, D.; Zhang, X.; Liu, M.; Zhao, W.; Liu, C. The effect of ultrasonic surface rolling process on the fretting fatigue property of GH4169 superalloy. Int. J. Fatigue 2020, 133, 105373. [Google Scholar] [CrossRef]
  22. Li, G.; Qu, S.; Xie, M.; Li, X. Effect of ultrasonic surface rolling at low temperatures on surface layer microstructure and properties of HIP Ti-6Al-4V alloy. Surf. Coat. Technol. 2017, 316, 75–84. [Google Scholar] [CrossRef]
  23. Shen, X.; Gong, X.; Wang, B.; He, J.; Xu, C.; Su, G. Surface properties enhancement of Inconel 718 alloy by ultrasonic roller burnishing coupled with heat treatment. Arch. Civ. Mech. Eng. 2021, 21, 122. [Google Scholar] [CrossRef]
  24. Amanov, A.; Pyun, Y.S. Local heat treatment with and without ultrasonic nanocrystal surface modification of Ti-6Al-4V alloy: Mechanical and tribological properties. Surf. Coat. Technol. 2017, 326, 343–354. [Google Scholar] [CrossRef]
  25. MacLeod, S.G.; Errandonea, D.; Cox, G.A.; Cynn, H.; Daisenberger, D.; Finnegan, S.E.; McMahon, M.I.; Munro, K.A.; Popescu, C.; Storm, C.V. The phase diagram of Ti-6Al-4V at high-pressures and high-temperatures. J. Phys. Condens. Matter 2021, 33, 154001. [Google Scholar] [CrossRef] [PubMed]
  26. Wang, X.; Zhu, L.; Zhou, Z.; Liu, G.; Liu, E.; Zeng, Z.; Wu, X. Tribological properties of WC-reinforced Ni-based coatings under different lubricating conditions. J. Therm. Spray Technol. 2015, 24, 1323–1332. [Google Scholar] [CrossRef]
  27. Ren, Z.; Lai, F.; Qu, S.; Zhang, Y.; Li, X.; Yang, C. Effect of ultrasonic surface rolling on surface layer properties and fretting wear properties of titanium alloy Ti5Al4Mo6V2Nb1Fe. Surf. Coat. Technol. 2020, 389, 125612. [Google Scholar] [CrossRef]
  28. Angkurarach, L.; Juijerm, P. Effects of high-temperature deep rolling on fatigue, work hardening, and residual stress relaxation of martensitic stainless steel AISI 420. J. Mater. Eng. Perform. 2020, 29, 1416–1423. [Google Scholar] [CrossRef]
  29. Amanov, A.; Umarov, R. The effects of ultrasonic nanocrystal surface modification temperature on the mechanical properties and fretting wear resistance of Inconel 690 alloy. Appl. Surf. Sci. 2018, 441, 515–529. [Google Scholar] [CrossRef]
  30. Zhao, Y.; He, W.; Du, H.; Luo, P. The effect of laser power on the interface microstructure of a laser remelting nano-SiC modified Fe-based Ni/WC composite coating. Coatings 2018, 8, 297. [Google Scholar] [CrossRef] [Green Version]
  31. Dang, J.; Zhang, H.; An, Q.; Lian, G.; Li, Y.; Wang, H.; Chen, M. Surface integrity and wear behavior of 300M steel subjected to ultrasonic surface rolling process. Surf. Coat. Technol. 2021, 421, 127380. [Google Scholar] [CrossRef]
  32. Zhang, Y.; Li, L.; Wang, X.; Zhao, Y.; Chang, Q.; Wang, W.; Xu, A. Experimental study on aluminum bronze coating fabricated by electro-spark deposition with subsequent ultrasonic surface rolling. Surf. Coat. Technol. 2021, 426, 127772. [Google Scholar] [CrossRef]
  33. Ye, C.; Telang, A.; Gill, A.S.; Suslov, S.; Idell, Y.; Zweiacker, K.; Wiezorek, J.M.; Zhou, Z.; Qian, D.; Mannava, S.R. Gradient nanostructure and residual stresses induced by Ultrasonic Nano-crystal Surface Modification in 304 austenitic stainless steel for high strength and high ductility. Mater. Sci. Eng. 2014, 613, 274–288. [Google Scholar] [CrossRef] [Green Version]
  34. Suh, C.M.; Song, G.H.; Suh, M.S.; Pyoun, Y.S. Fatigue and mechanical characteristics of nano-structured tool steel by ultrasonic cold forging technology. Mater. Sci. Eng. 2007, 443, 101–106. [Google Scholar] [CrossRef]
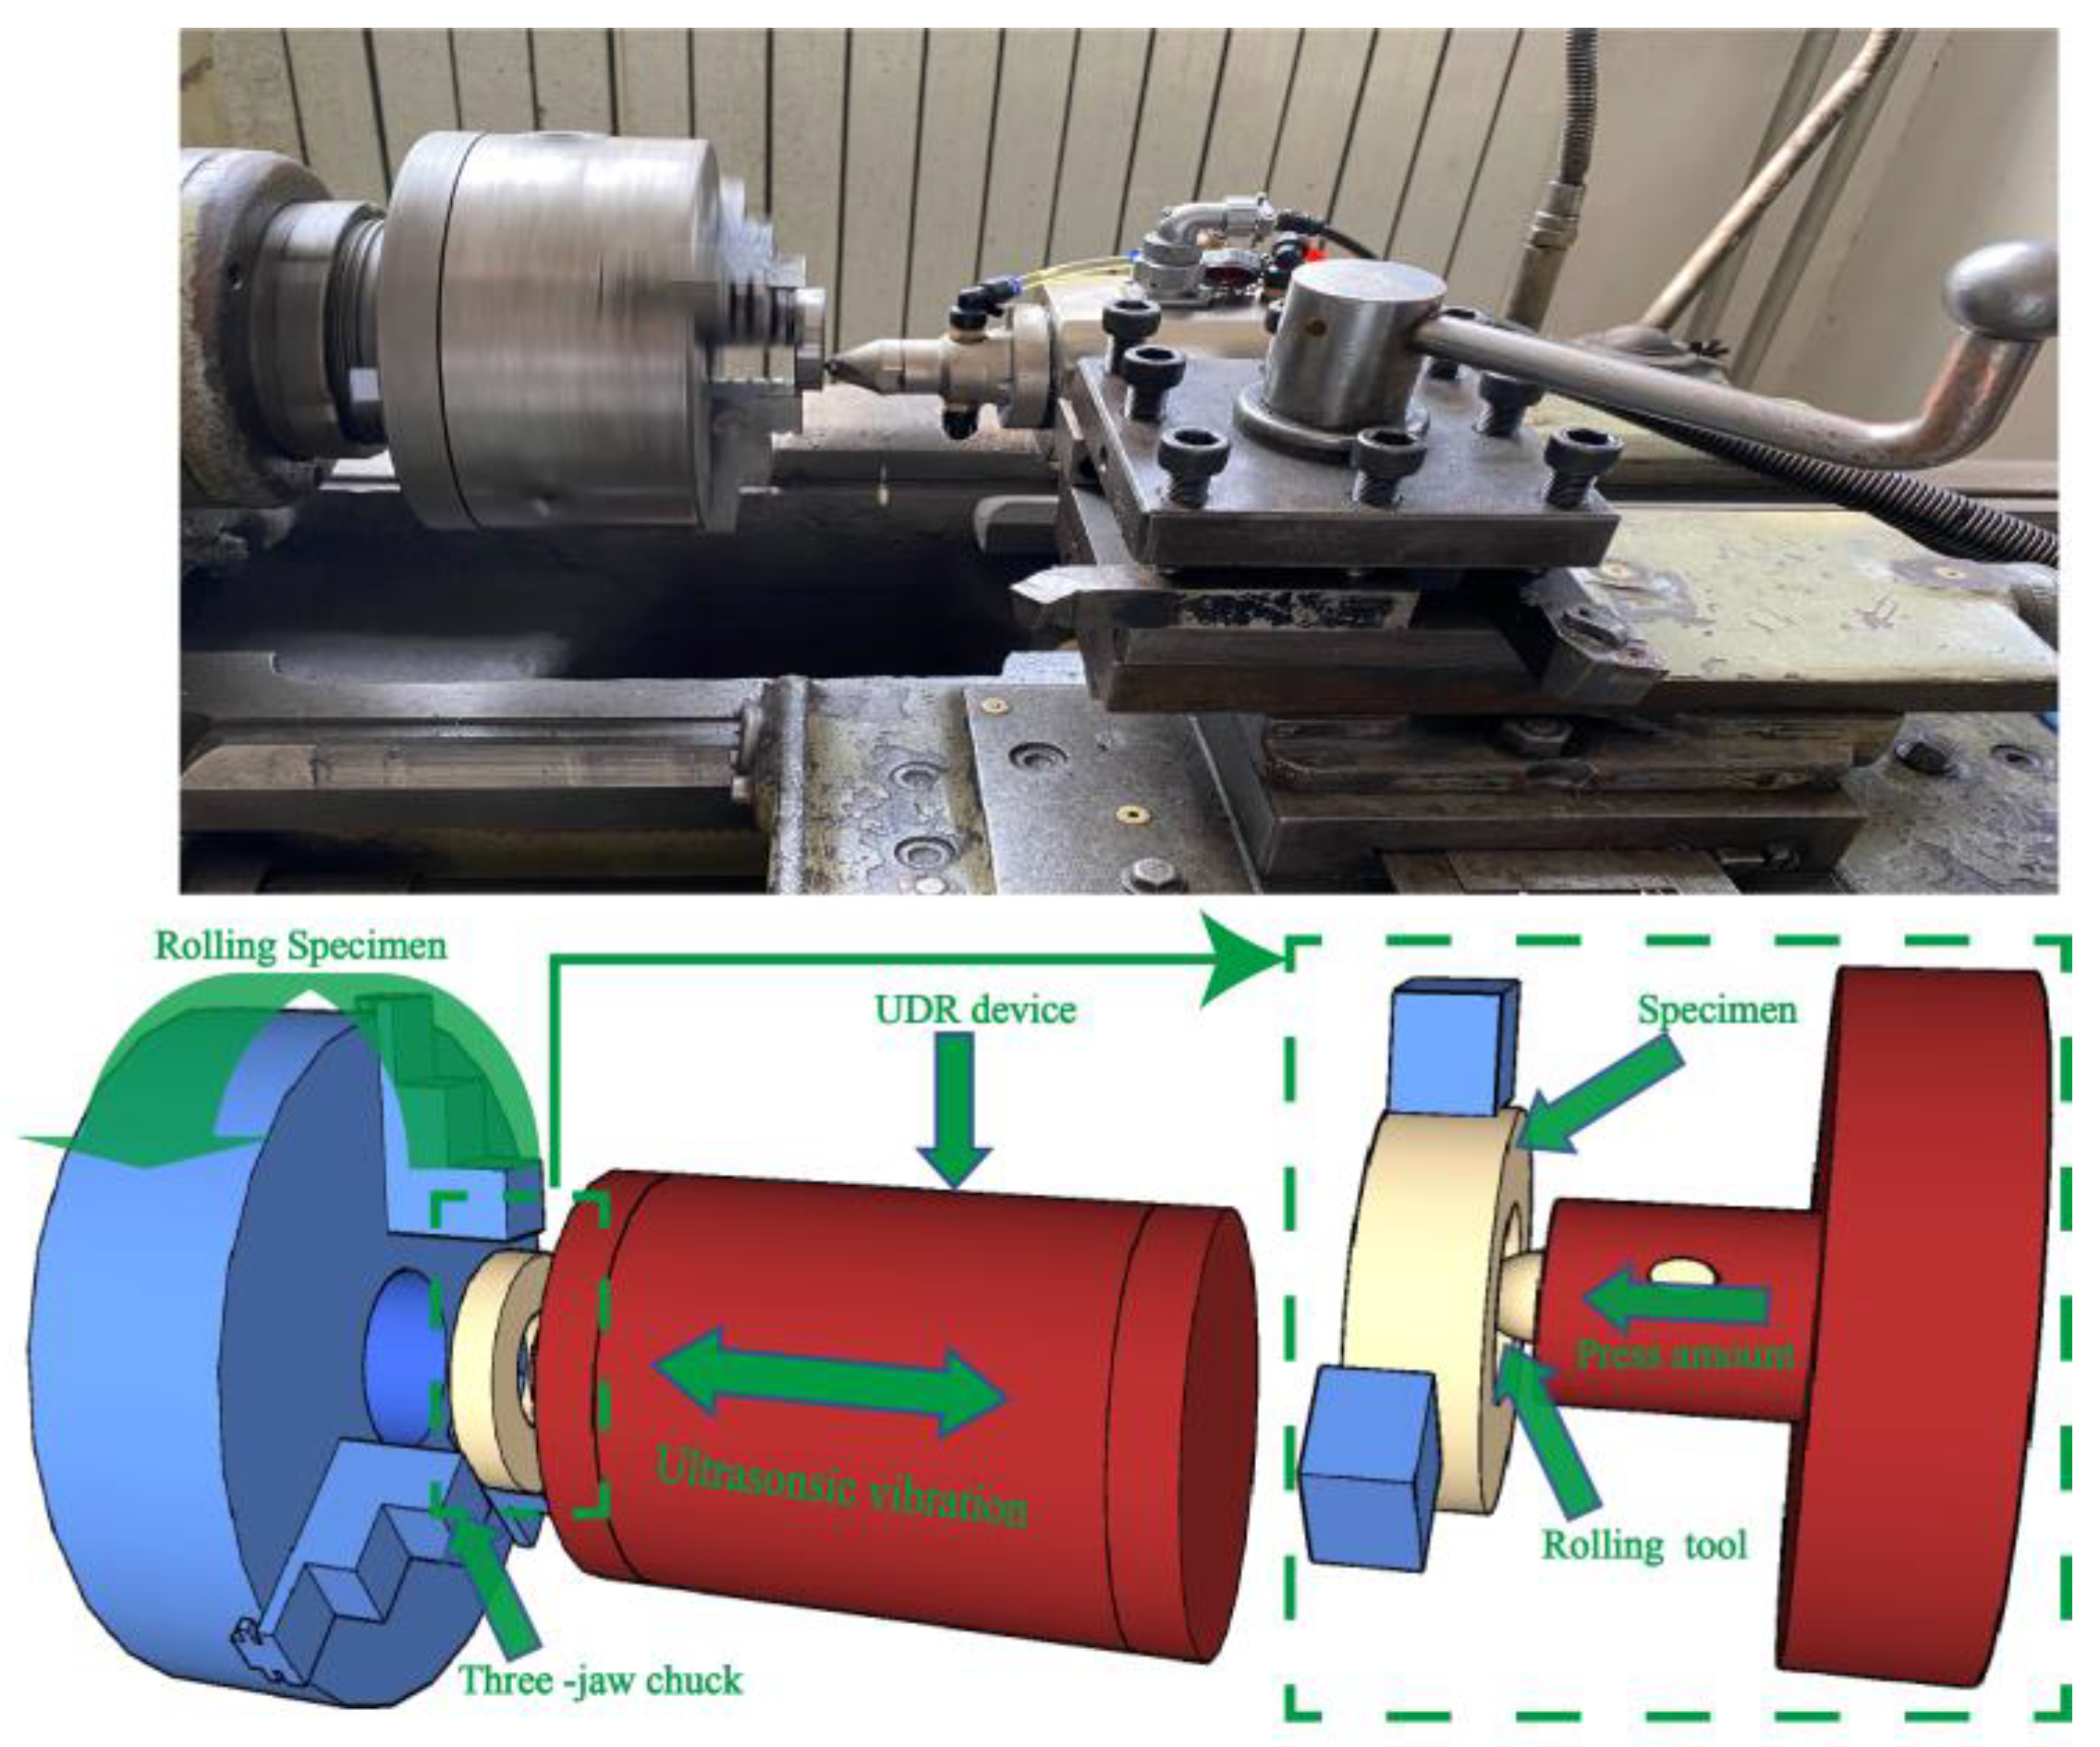
Figure 1. Diagram of the ultrasonic deep rolling process.
Coatings 13 00499 g001
Figure 2. Electron microscope (ZEISS Sigma) with spectrometer.
Coatings 13 00499 g002
Figure 3. MMW-1A friction and wear testing machine.
Coatings 13 00499 g003
Figure 4. The structure of different preloading depths: (a) Untreated; (b) HT + UDR + 0.20 mm; (c) HT + UDR + 0.25 mm; (d) HT + UDR + 0.30 mm.
Coatings 13 00499 g004
Figure 5. Line scanning results of HT + UDR + 0.25 mm coating interface.
Coatings 13 00499 g005
Figure 6. Surface morphology of preloading depth: (a) Untreated; (b) HT + UDR + 0.20 mm; (c) HT + UDR + 0.25 mm; (d) HT + UDR + 0.30 mm.
Coatings 13 00499 g006
Figure 7. EDS results of the corresponding points of Points 1–4 in Figure 6.
Coatings 13 00499 g007
Figure 8. Distribution of hardness along with depth under different preloading depths.
Coatings 13 00499 g008
Figure 9. Residual stress of the coating under different preloading depths.
Coatings 13 00499 g009
Figure 10. Friction coefficient of the coating under different preloading depths.
Coatings 13 00499 g010
Figure 11. Average friction coefficient and wear of the coating under different preloading depths.
Coatings 13 00499 g011
Figure 12. Wear morphology of coatings with different preloading depths: (a) HT + UDR + 0.20 mm; (b) HT + UDR + 0.25 mm; (c) HT + UDR + 0.30 mm.
Coatings 13 00499 g012
Figure 13. Wear resistance mechanism diagram pre and post coating strengthening: (a,b) pre and post HT + UDR; (c,d) pre and post coating wear.
Coatings 13 00499 g013
Table 1. Chemical composition of 45 steel (mass fraction, %).
ElementCSiMnCrNiCuFe
45 steel0.42 ~ 0.500.18 ~ 0.30.50 ~ 0.80≤0.25≤0.30≤0.25Bal.
Table 2. Mechanical properties of 45 steel.
Yield Strength/MPaTensile Strength/MPaSection Shrinkage/%Elongation after Fracture/%Hardness/HRC
≥355≥600≥40≥2545
Table 3. Chemical composition of nickel tungsten carbide powder Ni60 + 15 WC (mass fraction, %).
ElementCrBSiCFeNiWC
Ni60 + 15 WC15 ~ 203.0 ~ 4.53.5 ~ 5.50.5 ~ 1.1≤10Bal.15
Table 4. Parameters of the friction-wear test.
Normal Load/NRotating Speed of Pair/(r·min−1)Wear Time/sTest Temperature/°C
300200150025
Table 5. Surface roughness of untreated and HT + UDR processed samples.
SampleUntreated0.20 mm0.25 mm0.30 mm
Surface roughness/µm1.360.4660.3350.387
Disclaimer/Publisher’s Note: The statements, opinions and data contained in all publications are solely those of the individual author(s) and contributor(s) and not of MDPI and/or the editor(s). MDPI and/or the editor(s) disclaim responsibility for any injury to people or property resulting from any ideas, methods, instructions or products referred to in the content.