Abstract
G20Mn5QT steel has excellent mechanical properties and is widely used in key components of rail vehicles. However, during the operation of high-speed vehicles, wear and tear will inevitably occur. In this paper, laser cladding technology was selected to successfully prepare 316L stainless steel coating. The optimum processing parameters were obtained with a laser power of 2300 W, a scanning speed of 500 mm/min, and a powder feeding speed of 14 g/min. The microstructure of 316L coating is mainly composed of planar crystals, cellular crystals, columnar crystals, and equiaxed crystals. Through range analysis, it is found that the microhardness, wear resistance, and micro-shear strength of the cladding layers increase with the increase of laser power, while the tensile strength and yield strength increase first and then decrease with the increase of laser power. Under the optimized process parameters, the low-temperature impact toughness, elongation, tensile strength, and yield strength of the cladding layer were 97.6%, 24%, 10.9%, and 32.5% higher than that of the G20Mn5QT substrate, respectively. An excellent combination of strength and toughness was achieved by cladding 316L alloy on the surface of the G20Mn5QT substrate, which can meet the requirements of remanufacturing fractional key vehicle parts.
1. Introduction
G20Mn5QT steel has excellent strength and toughness [1,2,3], so it is widely used in key components of rail vehicles [4]. When the rail vehicle is running at high speed, due to the high-frequency impact between the wheel and rail for a long time, the key components are worn out, which poses a huge hidden danger to the operation of high-speed trains. So far, the replacement of high-speed train parts requires huge costs. In order to save costs, laser cladding (LC) repair technology is used to repair them. Previously, many surface modification techniques [5,6,7,8] have also been used to repair other materials and thus improve their service life. Examples include surface remanufacturing [9], thermal spraying [10], electroplating [11], and vapor deposition [12]. These techniques enhance the surface properties of the substrate without changing the overall properties of the substrate material. Among these surface modification techniques, laser cladding technology stands out. Laser cladding repair technology [8,13] has the characteristics of high energy density, low dilution rate, good metallurgical bonding with the substrate, high automation, enhanced mechanical properties, and fine quality uniformity, which is suitable for surface repair and modification of hole parts, shaft parts, and flat parts. In this investigation [14], the mechanical properties, degree of anisotropy, and microstructure of the LC sheets produced by using commercial 316L stainless steel powder were studied. The test results revealed the elastic isotropy for the elastic modulus and Poisson’s ratio, and the plastic anisotropy for the proof stresses, ultimate stress, and elongation, but the degree of anisotropy for most of the plastic mechanical properties was less than 20%. Some scholars [15] have used laser cladding technology to study the friction characteristics of copper-based powder metallurgy materials. The results show that the friction layer prepared by laser cladding technology has a compact structure, without obvious crack defects, and has good wear resistance. Some researchers [16] synthesized that TiB2 and TiC particles reinforced dr40-based composite coatings in situ on shaft parts via laser cladding. This composite coating was found to have a clean wear surface with shallower and more uniform scratches. In the past, many authors [17,18,19,20,21] have repaired different materials using LC technology and studied their wear resistance. It was found that the wear resistance of the coating repaired by LC technology has been improved. The sensitivity of the LC process parameters to the effect of cladding quality has been investigated [22]. It was found that the laser power was more sensitive to the effect of the melting temperature, while the powder feeding rate was more sensitive to the effect of the melt pool flow rate.
In the past [4,23,24], scholars have mainly focused on the study of butt welds of G20Mn5QT cast steel and other materials. However, little research has been reported on the laser cladding repair of G20Mn5QT steel. According to the performance requirements of G20Mn5QT steel, the properties after LC require better toughness, plasticity, wear resistance, and fatigue properties than the substrate. This paper requires that the mechanical properties of the selected cladding material are similar to and better than those of the substrate, but the hardness should not be so high as to cause wear to the shaft. After the study of various powder materials, it was found that the 316L stainless steel powder is more suitable for the repair of the substrate selected in this paper. Due to its low cost [25], good corrosion resistance, high toughness and plasticity, good formability [26], and good weldability [25,27], 316L stainless steel is an austenitic stainless steel commonly used for various industries [28,29,30,31,32] and structures in corrosive environments [33,34,35]. Some scholars [36] have studied the effect of heat treatment on the wear behavior of additively manufactured 316L stainless steel and found that the heat treatment process leads to a decrease in hardness and wear resistance. Some researchers [37] have investigated the wear anisotropy of SLM-formed 316L stainless steel by scratch tests. The crystal structure and grain orientation were found to be critical for wear resistance. The effect of cryogenic treatment on the wear behavior of additively manufactured 316L stainless steel has also been studied [38], and the treatment was found to have a significant effect on reducing the friction coefficient. This work takes the volumetric energy density as an energy input variable to explore the synergy mechanism of the high energy efficiency and excellent mechanical properties of 316L parts [35]. The results showed that a lower energy density helped to improve 316L parts while ensuring fewer defects. This study provides a direction to improve the performance of the parts by optimizing the energy input parameters. Some scholars [39] also used laser cladding repair technology to repair 304 stainless steel by powdering 316L stainless steel. The results showed that the wear performance was significantly higher than that of the substrate. An experimental study of 316L stainless steel by Zhan [40], who chose the laser cladding repair technique, showed that thermal cycling had a significant effect on the microstructure and hardness of the cladding layer. Several researchers [41] investigated the effect of powder composition on the organization and mechanical properties of the repaired 316L layer by the laser cladding repair technique. The results showed that there was a good metallurgical bond between the repair layer and the substrate, the organization consisted of ferrite and austenite, and the overall properties were good after repair. In past studies [38,39,42], scholars mainly focused on the study of laser cladding repair of 316L stainless steel powder on materials such as 304 stainless steel, but the repair of indentation and rust of G20Mn5QT steel was rarely studied.
In this context, the repair capability of 316L stainless steel powder on G20Mn5QT cast steel was investigated in this paper using laser cladding repair technology. The microstructure and properties of G20Mn5QT cast steel and 316L coating were studied, and the sensitivity of the laser cladding process parameters to the effect of the properties was analyzed. Finally, the laser cladding repair process parameters were optimized by extreme difference analysis. The mechanical properties of the substrate and 316L coating were compared, and it was found that 316L coating could improve the service life of key vehicle components, thus improving the use of the parts and reducing the maintenance cost repair cost. Therefore, laser cladding repair technology is of great significance to the service performance and service life of repaired G20Mn5QT cast steel.
2. Methods and Materials
2.1. Materials
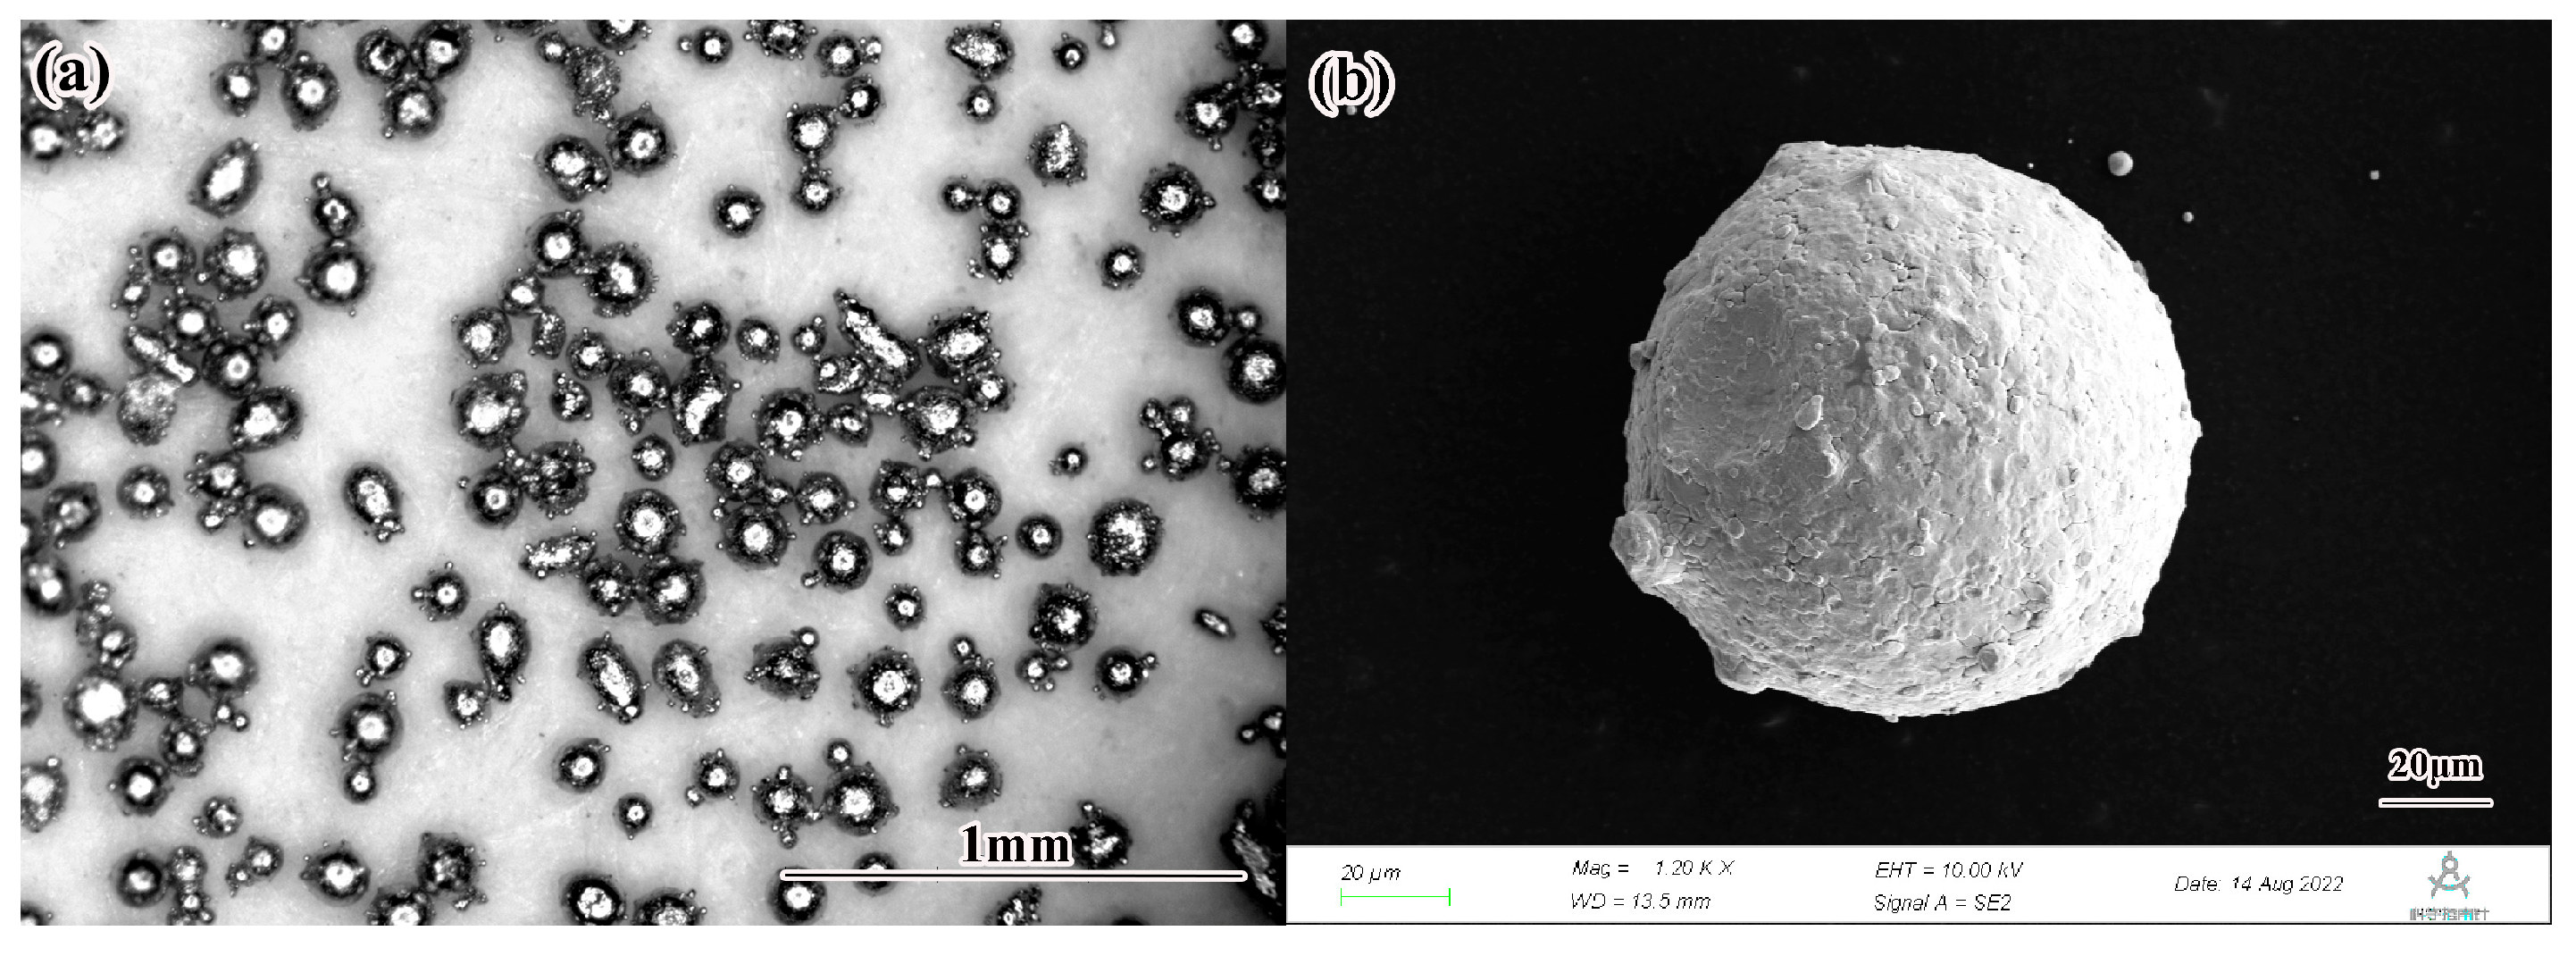
The powder material used in this paper is 316L stainless steel which is prepared by the gas atomization method. The morphology of the powder is shown in Figure 1. The particle size is 53~150 µm. The particle size distribution is shown in Table 1. The substrate material is G20Mn5QT cast steel with dimensions of 175 × 150 × 30 mm3, and the chemical composition of G20Mn5QT cast steel and 316L stainless steel powder is shown in Table 2. The substrate material was cleaned using anhydrous ethanol before the test, and the stainless steel powder was placed in a vacuum drying oven at 100 °C for 2 h.
Figure 1.
Scanning electron microscope image of 316L steel powder: (a) 20× (b) 1200×.
Table 1.
Particle size distribution of 316L stainless steel powder.
Table 2.
Chemical composition of 316L stainless steel powder and G20Mn5QT steel (wt. %).
2.2. Methods
2.2.1. Sample Preparation Methods and Equipment
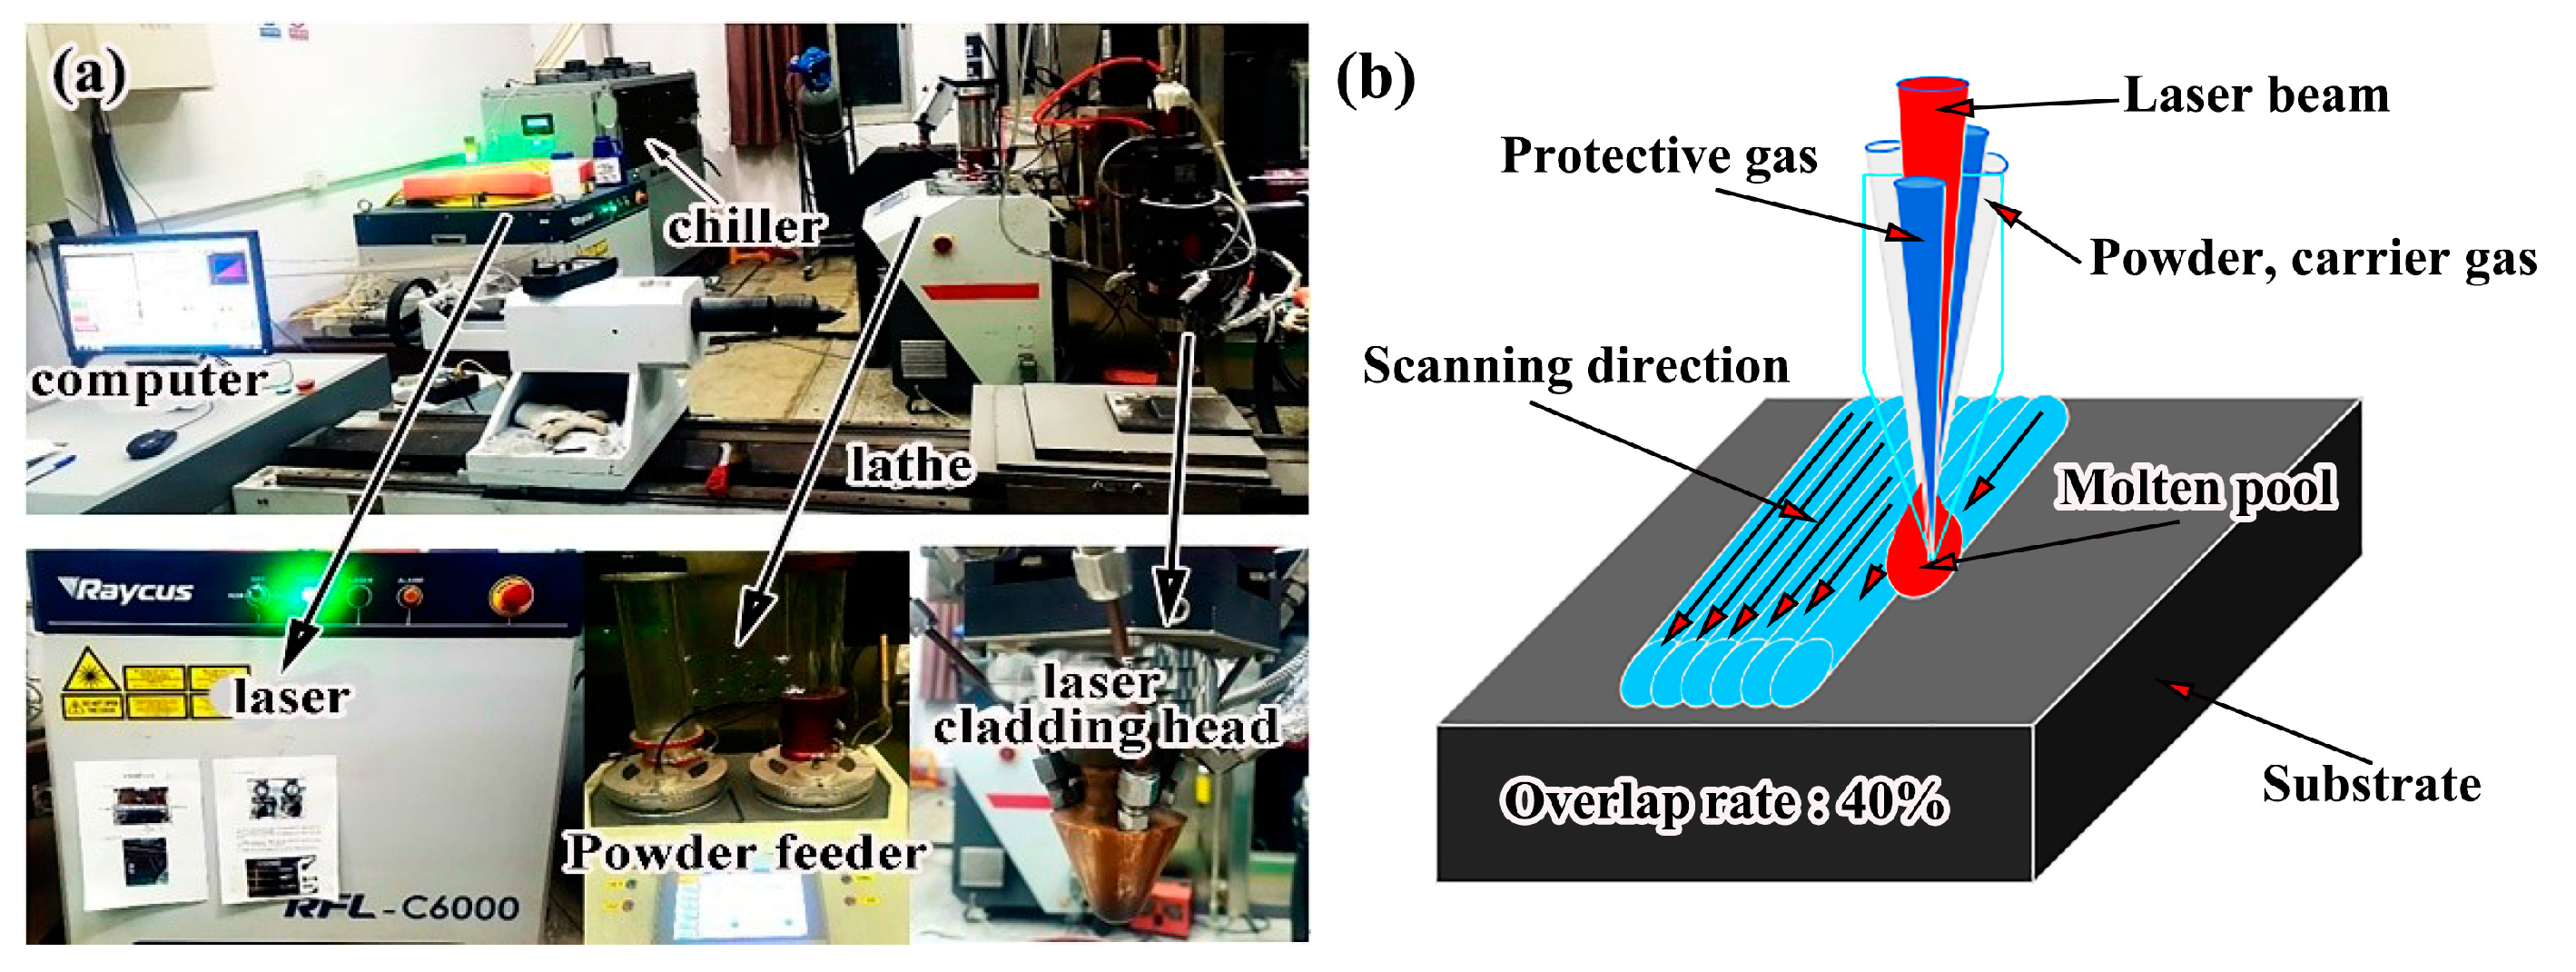
The laser melting equipment includes an RFL-C6000 (Wuhan Ruike Fiber Laser Technology Co., Ltd., Wuhan, China) high power fiber laser and three coaxial nozzles of a laser melting head, powder feeder, control cabinet, etc. The protective gas and carrier gas are argon. The laser beam wavelength is 1070 nm, the focal length is 11.6 mm, the scanning mode is linear scanning, and the overlap rate is 40%. The laser melting equipment and scanning diagram are shown in Figure 2.
Figure 2.
Laser cladding systems: (a) components of the experimental setup; (b) schematic of laser cladding process showing scanning direction.
Table 3 lists the factor levels selected for the experiments in this paper, and orthogonal tests were designed to analyze the variation pattern of mechanical properties of the deposited specimens with the laser process parameters. Based on the preliminary experiments, the orthogonal process parameters were designed according to the engineering requirement of a dilution rate of less than 5%. According to the test factor levels in Table 3, the L9 (33) orthogonal test scheme was used, which has nine sets of process parameters, as shown in Table 4. According to the test requirements, the constant process parameters are a carrier gas flow rate of 7 L/min, a protective gas flow rate of 40 L/min, a laser spot diameter of 4 mm, and the number of deposited layers is two.
Table 3.
Test factor level.
Table 4.
Orthogonal process parameters.
2.2.2. Microstructure and Performance Test Methods
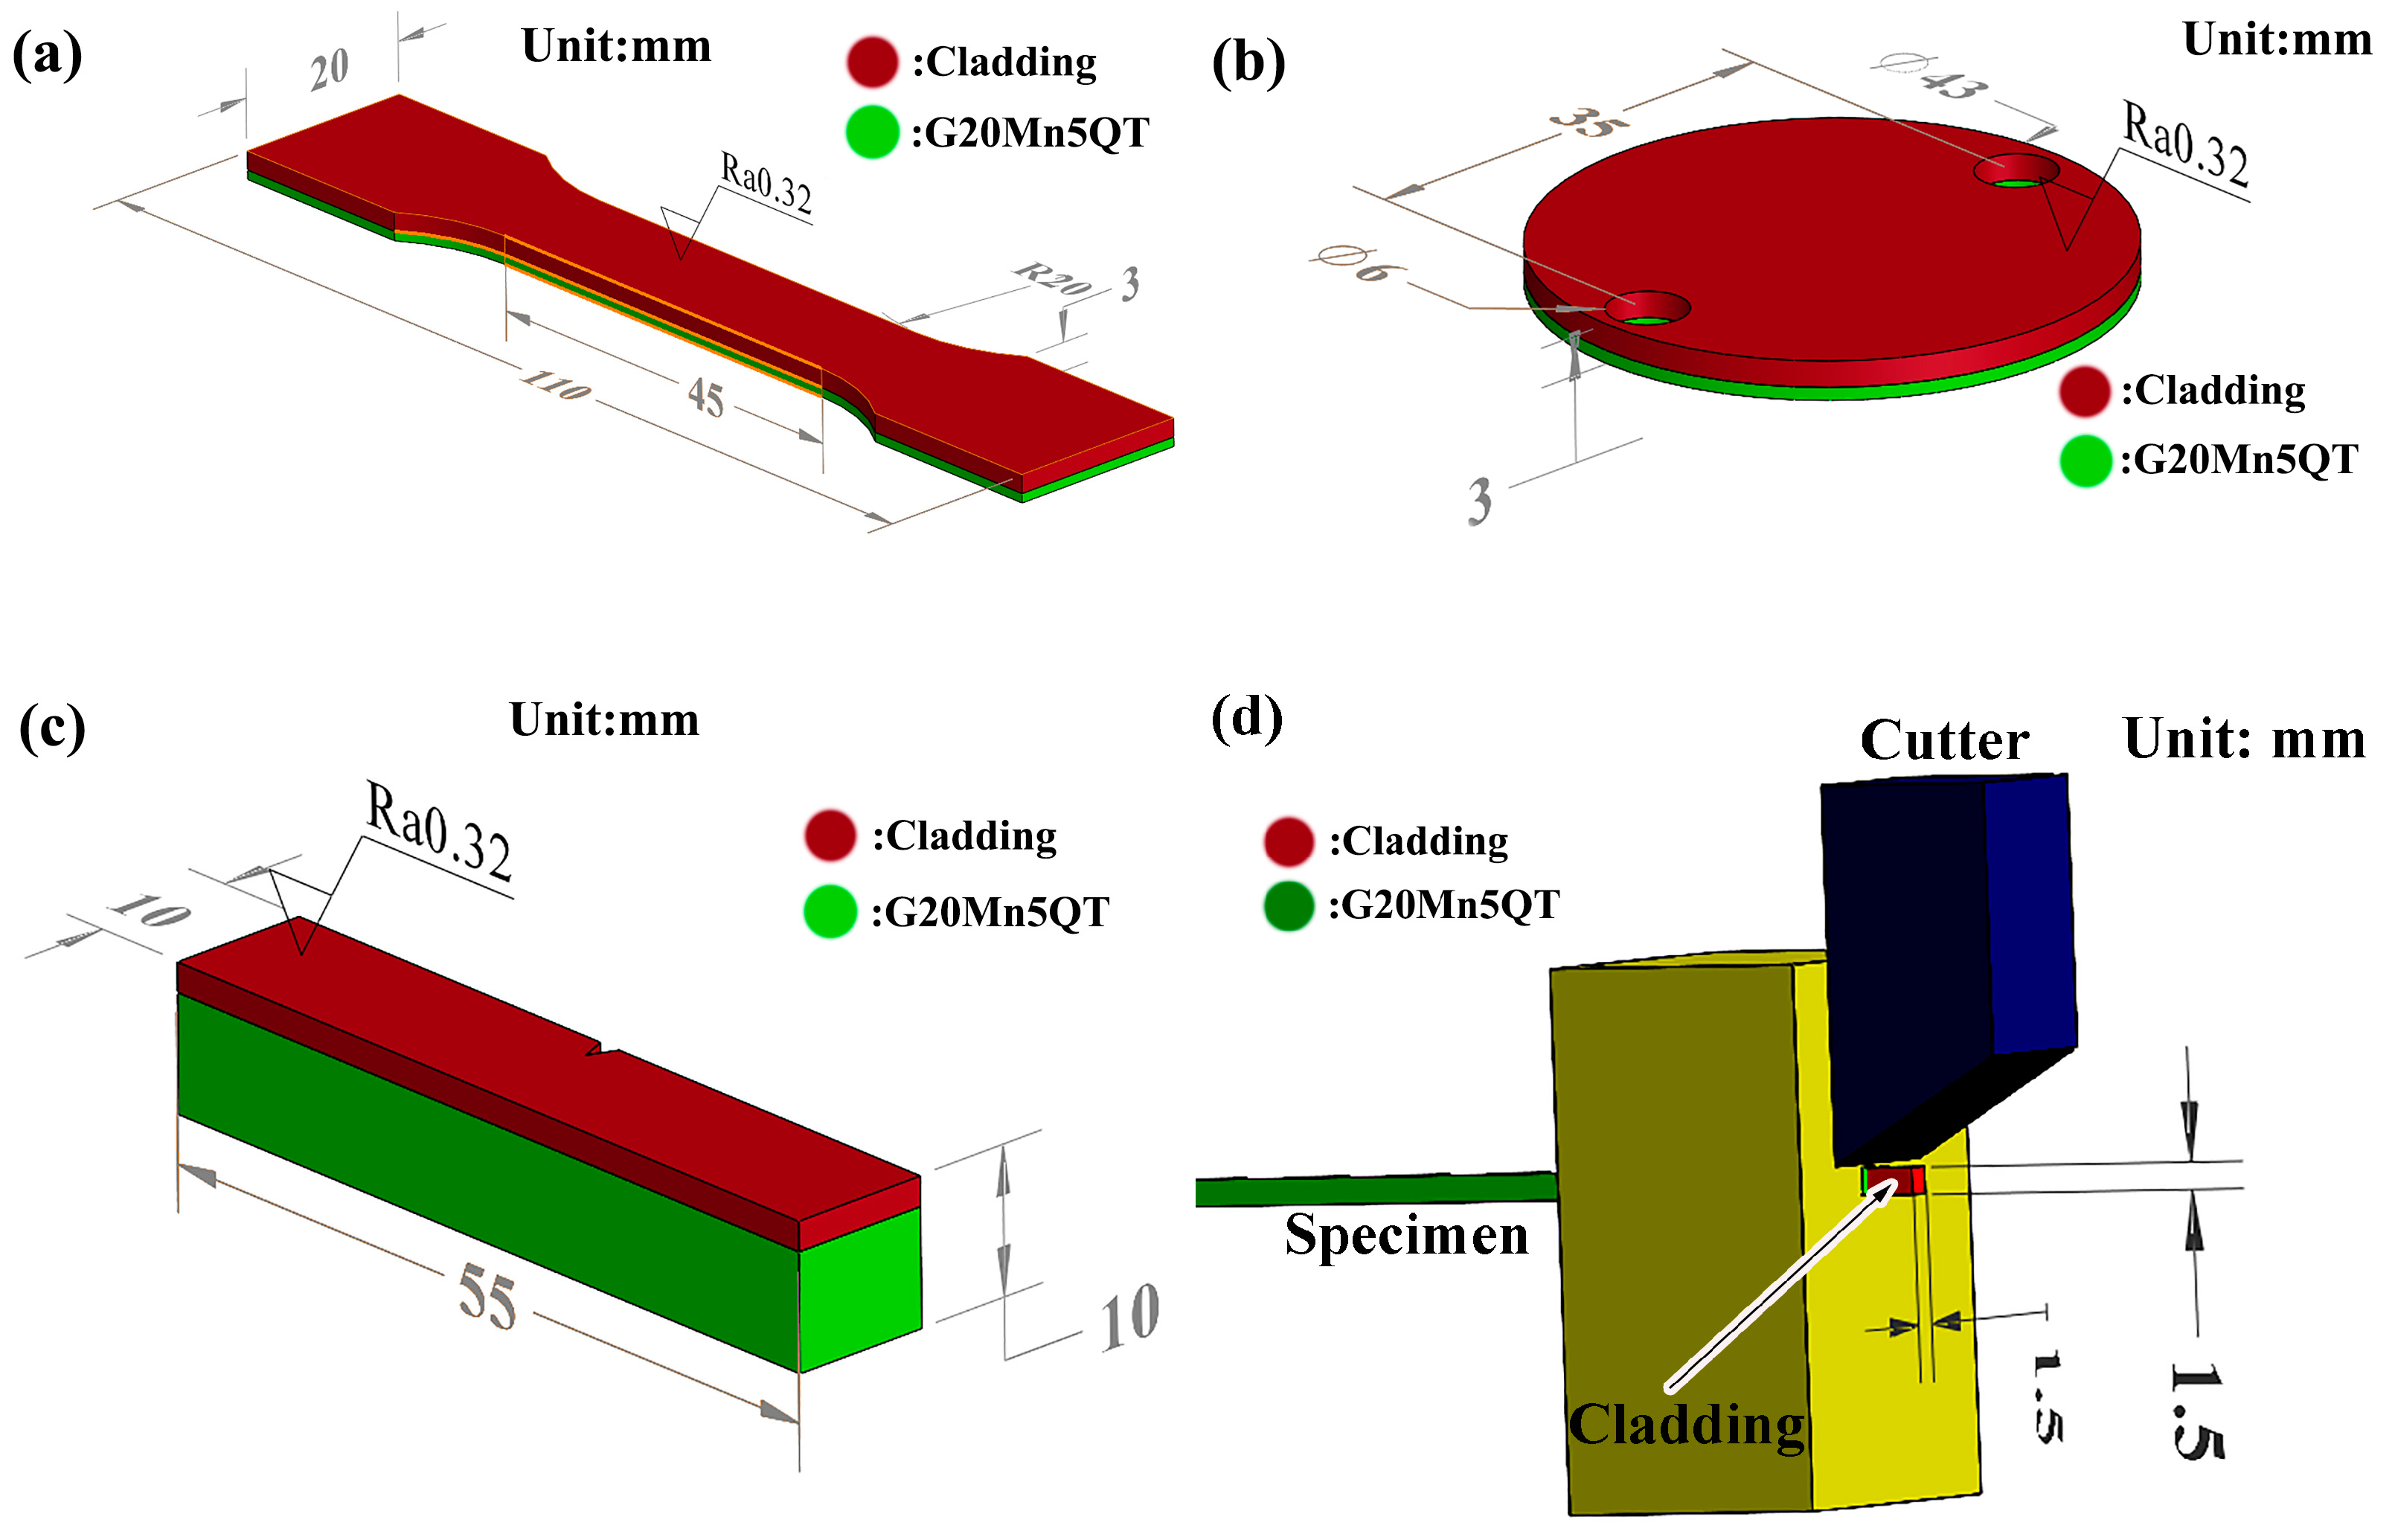
The microstructure characterization and hardness test specimens were 15 × 15 × 8 mm3 and the micro-shear test specimen size was 1.5 × 1.5 × 20 mm3. The hardness of the coating and the substrate was measured with an FM-700 (Future, Tokyo, Japan) Vickers hardness tester with a load of 1.98 N and a loading time of 15 s. The microstructure was observed using a Leica DMi8A (Leica microsystems Ltd., Wetzlar, Germany) light microscope and a German ZEISS Sigma 300 scanning electron microscope. Since G20Mn5QT requires high plasticity and toughness in service, it is necessary to test the impact and tensile properties of the melt-clad specimens. A JBN-300 (Wuzhong Tongli Material Testing Machine Co., Ningxia, China) testing machine was used for the impact test. The DNS300 (China Machinery Test equipment Co., Ltd., Jilin, China) electronic universal testing machine was selected to test the tensile properties of the 316L cladding and substrate. The wear performance of 316L and G20Mn5QT cast steel was tested on MMU-5G (Jide Machinery and Equipment Co., Ltd., Jinan, China) using pin-disk reciprocating friction. The friction and wear test parameters are shown in Table 5. The test specimen sizes for tensile properties, impact properties, and frictional wear properties are shown in Figure 3a–c. The micro-shear test method was used to test the shear strength of the coating zone and the substrate. The schematic diagram of the microscopic shear is shown in Figure 3d, with a shear speed of 1 mm/min. The displacement and force sensors and data acquisition computer control equipment were developed by the Southwest Jiaotong University welding laboratory. In this method, the coating is cut off from the substrate at a certain speed by the cutter of the shearing device, and the shearing strength is calculated by a computer. The cladding layer thickness of the test specimens for tensile properties, impact toughness, and wear properties was taken as 2 mm. In order to avoid accidents, three samples were taken from each group of samples for performance testing.
Table 5.
Friction and wear test parameters.
Figure 3.
Schematic diagram of test sample for mechanical properties: (a) tensile; (b) frictional and wear (c) impact; (d) micro-shear.
3. Results and Discussion
3.1. Macroscopic Appearance
Figure 4 is the cross-sectional shape of the sample under different parameters taken under low magnification by an optical microscope. It can be observed that no cracks appear in the cross-section, and small pores are present in the deposited specimens except for specimens No. 5 and No. 8. From Figure 4a–d,f,g,i, it can be seen that the pores mainly appear in the lap region. This is because the fast scanning of the laser and the fast solidification of the melt pool result in insufficient time for the protective gas to escape from the top of the melt pool after dissolving in the melt pool. As the morphology in Figure 4c shows, when the laser power is 2000 W and the scanning speed is 550 mm/min, the surface of this specimen is formed uniformly compared with other specimens. From Figure 4h,i, it can be seen that when the laser power is 2600 W, the dilution rate is larger and the wave shape of the substrate/clad layer interface is formed, which is caused by the higher input energy.

Figure 4.
Cross-sectional morphology of the specimens under the optical microscope: (a) No. 1; (b) No. 2; (c) No. 3; (d) No. 4; (e) No. 5; (f) No. 6; (g) No. 7; (h) No. 8; (i) No. 9.
3.2. Microstructure Characteristic
Figure 5 shows the microstructure of specimen No. 5 under an optical microscope. Among them, Figure 5a shows the cross-sectional microstructure, where the cladding, heat-affected zone, and substrate are clearly visible. Figure 5b shows the microstructure of the cladding, which is organized as austenite with various types of crystals (SEM images were obtained by taking cross-sections of the specimens.) in the cladding, including planar crystals, cellular crystals (Figure 6b), columnar crystals (Figure 6a) and equiaxed crystals (Figure 6c). The microstructure of the deposited specimens did not vary much under the orthogonal process parameters. Since the protective gas does not have enough time to escape to the top of the melt pool after dissolving in the melt pool, the melt pool solidifies quickly, resulting in the formation of pores in the clad layer. As shown in Figure 5c, the microstructure of the heat-affected zone is mainly composed of pearlite, massive ferrite, and low-carbon martensite. The substrate maintains the original crystal type and size as seen in Figure 5d, and its microstructure consists of white massive ferrite and black lamellar pearlite with uniform grain size.
Figure 5.
Microstructure of specimens under the optical microscope: (a) cross-sectional; (b) cladding; (c) HAZ; (d) G20Mn5QT.
Figure 6.
SEM image of specimen cross-section: (a) columnar grain; (b) cellular grain; (c) equiaxed grain.
3.3. Mechanical Properties
3.3.1. Microhardness
Microhardness is an important indicator of the uniformity of the mechanical properties of the 316L coating, as shown in Figure 7 for the hardness distribution of the cross-section of the orthogonal specimen. As can be seen in the figure, the hardness value of the substrate is about 200 HV0.2, where the hardness value of the formed specimen at 2000 W power is comparable to that of the substrate. The laser cladding process has a very fast solidification speed, and the formed crystal tissue is fine and dense, which produces an obvious fine crystal strengthening effect and can significantly improve the hardness of the clad layer. It can be seen from the results of various authors that the improvement in the mechanical properties such as microhardness occurred by obtaining the refined grain size and equiaxed grain structure [43]. Compared with the traditional 316L material processing method, the hardness of the 316L stainless steel clad layer obtained by laser cladding is greatly improved. The heat-affected zone is harder than the substrate and the coating, with a hardness value of about 260 HV0.2. The reason for this is that the heat-affected zone is very thermally affected and martensite is generated in the microstructure, resulting in a heat-affected zone that is harder than the coating and the substrate.
Figure 7.
Microhardness of specimens.
3.3.2. Micro-Shear Properties
The results of the micro-shear strength test in the fusion zone of the molten coating and the substrate are represented in Figure 8. It can be seen from Figure 8 that the micro-shear strength of specimen No. 2 is lower than that of the substrate, but the micro-shear strength of all other specimens is higher than that of the substrate, indicating that the 316L coating bonds well with the substrate after laser cladding repair. With the increase in laser power, the shear strength of the coating and substrate increases. When the laser power is higher, more energy is absorbed by the substrate, and the melt pool size increases, resulting in a higher dilution rate [44], so the coating and substrate bonding strength increases. By comparing the shear strength of the substrate, it can be shown that the shear strength of the 316L stainless steel coating obtained by laser melting of G20Mn5QT carbon steel is higher, which fully proves the fact that the 316L coating prepared by laser melting process has a high strength metallurgical bond with the substrate G20Mn5QT cast steel.
Figure 8.
Micro-shear strength of specimens.
3.3.3. Tensile Properties
The results of the tensile properties of the specimens under different parameters are shown in Figure 9. It can be seen from the figure that the tensile strength of all the specimens except specimen No. 1 is higher than that of the substrate. The tensile strength increases at higher laser power, which may be due to the important effect of grain size and morphology on the tensile strength [42,45]. Additionally, the yield strength was lower than the matrix only for specimen No. 8. The fracture surface of the tensile specimen No. 8 (Figure 10c) was observed by SEM, and it was found that the fracture mode of specimen No. 8 was mainly brittle fracture. This is related to the lower yield strength and elongation of specimen No. 8. And it may be related to defect traps inside the repair area, which may lead to stress concentration and weaken the yield strength. As for the tensile fracture pattern of the matrix, uniform craters on the fracture surface can be observed, showing the characteristics of plastic fracture, as shown in Figure 10a. As shown in Figure 10b, the tensile fracture morphology of specimen No. 5 has craters of various shapes and sizes on the fracture surface, and the presence of deep equiaxed craters indicates plastic fracture. Moreover, the strength of specimen No. 5 is higher, with tensile and yield strengths of 28% and 17% of the matrix, respectively. When plastic deformation occurs, grain boundary segregation associated with dislocations will hinder plastic deformation, resulting in yield enhancement of the coated portion [46], indicating that the repaired material possesses good strength and plasticity. Figure 10d shows the tensile fracture morphology of specimen No. 9. It can be seen from the figure that there is a tough nest at the fracture surface and there is a plastic fracture mechanism, which may be the reason why the yield strength of specimen No. 9 is higher than that of specimen No. 8.
Figure 9.
Tensile test results: (a) tensile properties; (b) elongation after fracture; (c) stress-strain curve.

Figure 10.
Tensile fracture morphology: (a) G20Mn5QT; (b) No. 5; (c) No. 8; (d) No. 9.
3.3.4. Impact Properties
The impact test results of the fused specimens at a low temperature of −45 °C for different laser process parameters are represented in Figure 11. According to the engineering requirements, the low temperature impact absorbed work of the repair is not less than 27 J. It can be seen from the figure that the toughness of the low-temperature impact under different parameters is in accordance with the actual application standards of engineering. The impact absorbed energy value of the substrate at −45 °C is about 63 J. The low-temperature impact toughness of the orthogonal specimens is higher than that of the substrate. Since the laser melting process is a continuous thermal cycling process, the optimization and selection of the process can also have a huge impact on the performance of the repaired part. In addition, specimen No. 5 not only has higher tensile strength, yield strength, and elongation after fracture than the base material but also has almost twice the impact absorbed energy (123 J) and 48.78% higher impact toughness than the base material, which may mean that the plasticity of the specimen plays an important role in the low-temperature toughness of the specimen. As Figure 12a shows the impact fracture morphology of the base material, it can be seen from the figure that the substrate exhibits significant plastic deformation. Figure 12b shows the impact fracture morphology of specimen No. 5, and the obvious large equiaxed craters can be seen. The equiaxial craters indicate that the specimens have a ductile fracture surface, good toughness, and a good metallurgical bond between the coating and the substrate. Figure 12c,d is the impact fracture morphologies of the No. 8 and No. 9 samples. The fracture morphology is mainly a cleavage with poor impact performance, which may be mainly due to the presence of unfused alloy powder. It has been reported that the microstructure of the brittle zone and the sprouting and extension of the relative unraveling microcracks have a great influence, and the unraveling extension behavior plays an important role in the microscopic mechanism of the unraveling fracture [47,48]. According to the above results, it can be seen that the deposited specimen No. 5 has good low-temperature impact energy.
Figure 11.
Low-temperature impact energy.
Figure 12.
Fracture morphology of low-temperature impact: (a) G20Mn5QT; (b) No. 5; (c) No. 8; (d) No. 9.
3.3.5. Friction and Wear Properties
Figure 13 shows the results of the friction and wear properties of the specimens for different process parameters. As shown in Figure 13a, it is observed that the friction coefficient curves of the specimens are different, but all have a short “Running-In” period. The coefficient of friction of the substrate first increases, then decreases, then increases and finally, stabilizes at 0.45–0.55. The coefficient of friction of specimens No. 2 and No. 3 is larger at the early stage and starts to decrease after a stable friction time and finally, does not differ much from the value of the coefficient of friction of the substrate. The coefficient of friction of specimen No. 6 fluctuated more, which could be a result of adhesion during the wear process, leading to a more unstable wear curve [49]. The friction coefficient of specimen No. 7 did not fluctuate much, and the friction coefficient value was stable at 0.30–0.35. The coefficient of friction curves of specimens No. 1, No. 4, No. 5, No. 8, and No. 9 are similar, and the coefficient of friction gradually decreases after the “Running-In” period. The coefficient of friction of specimens No. 1 and No. 4 finally stabilizes at 0.25–0.30, while the coefficient of friction of specimens No. 5, No. 8, and No. 9 stabilizes at 0.35–0.40. Figure 13b shows the results of the wear loss test of the specimens. It can be seen that the wear loss of the matrix is 102.6 mg, which is lower than the wear loss of specimen No. 3. By comparing the microhardness of the substrate with that of specimen No. 3, it is found that the microhardness of the substrate is slightly higher than that of specimen No. 3, which may be a match between the wear performance and the hardness of the specimen [50,51]. Except for specimen No. 3, the wear weight loss of all specimens was lower than that of the substrate. As shown in Figure 14, the wear morphology of the specimens with different process parameters is shown. The surface of the coating is sheared and adhered, gradually forming spalling layers and deeper furrows [52], which are evidence of adhesive wear [53]. As shown in Figure 14b, the coating surface becomes smooth, which helps to improve the wear resistance [50]. In addition, from the coating in Figure 14c, it can be seen that there are also abrasive chips and some debris composition indicating that there are two forms of wear: abrasive wear and adhesive wear. However, the morphology of Figure 14a shows that the wear is mainly in the form of furrows arranged in the sliding direction, which can be attributed to the fact that the wear mechanism of 316L is mainly adhesive wear.
Figure 13.
Frictional wear test results: (a) friction coefficient; (b) loss of weight by wear.
Figure 14.
Friction and wear morphology: (a) wear morphology; (b) adhesive wear; (c) abrasive wear.
3.4. Parameter Optimization
The mechanical properties such as microhardness, micro-shear strength and impact toughness, tensile strength, yield strength, elongation after fracture, and loss of weight of the deposited specimens under orthogonal parameters are shown in Table 6.
Table 6.
Orthogonal tests and results.
The range analysis method was used to calculate the arithmetic mean of the mechanical performance test results of each factor at different levels and was recorded as the k value. Then, the range in R value of this factor was calculated. The larger the range, the greater the influence of this factor on the mechanical properties, and vice versa. The evaluation indexes of the specimens were analyzed by the polar difference method, where Kn is the arithmetic mean of the response values of the nth level of each factor and R is the range. The results of the range analysis of each response value are shown in Table 7. It can be seen from the table that the laser power, scanning speed, and powder feeding rate have different degrees of influence on the mechanical properties of the deposited specimens. The effect on microhardness is laser power > scanning speed > powder delivery rate, and the effect on wear resistance is mainly laser power > scanning speed > powder delivery rate. The effect on tensile strength is laser power > scanning speed > powder delivery rate, the effect on yield strength is laser power > powder delivery rate > scanning speed, and the effect on elongation is mainly scanning speed > powder delivery rate > laser power. The effect on micro-shear strength is laser power > powder feeding rate > scanning speed, the effect on wear resistance is mainly laser power > scanning speed > powder feeding rate, and the effect on impact toughness is mainly scanning speed > laser power > powder feeding rate. As the repair of G20Mn5QT steel pays more attention to mechanical properties such as hardness, tensile strength, yield strength, impact toughness, and wear resistance, the influence of laser power on these mechanical properties can be found to be dominant throughout the range. Therefore, the optimal process can be explored mainly by adjusting the laser power and fine-tuning the scanning speed and powder feeding rate.
Table 7.
Analysis of range.
Figure 15 is a range analysis diagram showing the variation of the tensile strength (TS), yield strength (YS), and elongation with process parameters. As can be seen from Figure 15a, TS, YS, and elongation first increase and then decrease with the increase in laser power. As shown in Figure 15b, TS and YS have little effect on the scanning speed, but the elongation decreases with the increase in the scanning speed. It can be seen from Figure 15c that TS and YS increase at first and then decrease with the increase in the powder feeding rate, but the elongation increases with the increase in the powder feeding rate.
Figure 15.
Range analysis: (a) variation of tensile properties with laser power; (b) variation of tensile properties with scanning speed; (c) variation of tensile properties with powder feeding rate.
As shown in Figure 16, it is the micro-shear strength, micro-hardness, low-temperature impact, and friction and wear range analysis. From Figure 16a, it can be found that the micro-shear strength increases with the increase in laser power, while the impact toughness decreases with the increase in laser power. As shown in Figure 16b, the micro-shear strength first increases and then decreases with the increase in scanning speed, while the impact toughness first decreases and then increases with the increase in scanning speed. As shown in Figure 16c, the micro-shear strength and impact toughness increase with the increase in the powder feeding rate. From Figure 16d, it can be found that the microhardness and wear properties increase with the increase in laser power, while the microhardness and wear properties decrease with the increase in scanning speed and powder feeding rate, as shown in Figure 16e,f.
Figure 16.
Range analysis: (a) variation of micro-shear and impact with laser power; (b) variation of micro-shear and impact with scanning speed; (c) variation of micro-shear and impact with powder feeding rate; (d) variation of microhardness and friction and wear with laser power; (e) variation of microhardness and friction and wear with scanning speed; (f) variation of microhardness and friction and wear with powder feeding rate.
Through the analysis of the range results, it can be seen that the laser power has a great influence on the properties of the cladding layer, while the scanning speed and powder feeding rate have little influence on the properties of the cladding layer. Because the dilution rate can not be met when the laser power is 2600W, the optimal laser power is 2300W. Considering the influence of scanning speed and powder feeding rate on the cladding layer, the scanning speed is 500 mm/min and the powder feeding rate is 14 g/min. When the laser power is 2300 W, the scanning speed is 500 mm/min and the powder feeding speed is 14 g/min, the deposited samples have higher tensile strength, yield strength, plasticity, and toughness, which shows that 316L has strong laser cladding ability on the surface of G20Mn5QT cast steel.
4. Conclusions
The 316L cladding was successfully prepared on G20Mn5QT steel substrate by different process parameters. In this paper, the microstructure, microhardness, impact properties, tensile properties, and frictional wear properties of the deposited specimens were investigated and the following conclusions were drawn.
The microstructure of G20Mn5QT steel is mainly composed of ferrite and pearlite. The microstructure of the 316L melt layer is austenite, which is mainly composed of planar crystal, cellular crystal, columnar crystal, and equiaxed crystal. Through the range analysis of the mechanical properties of the cladding samples, it is found that the microhardness, wear resistance, and micro-shear strength of the cladding samples increase with the increase in laser power, while the tensile strength and yield strength first increase and then decrease with the increase in laser power. When the laser power is low, due to insufficient energy, the metallurgical bond between the 316L stainless steel cladding layer and G20Mn5QT steel is weak, resulting in a lower shear strength. When the laser power is higher, although the shear strength is higher, the dilution rate does not meet the repair requirements. The optimal process parameters obtained by range analysis are as follows: laser power of 2300 W, scanning speed of 500 mm/min, and powder feeding rate of 14 g/min. Under the optimal process parameters, there are few defects such as pores and cracks in the cladding sample structure. Compared with G20Mn5QT cast steel, the mechanical properties of the cladding sample under the optimal parameters are better than those of the substrate. Among them, the micro-shear strength, tensile strength, and yield strength of the cladding specimens were increased by 17.8%, 10.91%, and 32.5%, respectively, and the elongation after tensile fracture and low-temperature impact properties reached 1.3 and 2 times that of G20Mn5QT cast steel, respectively. The comprehensive study shows that, under the optimal process parameters, the cladding specimens have high strength, plasticity, and toughness, which can meet the repair requirements of G20Mn5QT steel.
At present, there are few studies on the laser cladding of 316L on G20Mn5QT cast steel, especially about the relationship between microstructure and properties. In the future, a large number of studies can be conducted using laser cladding technology on G20Mn5QT cast steel, which is of great significance for the future maintenance cost and operation cost of high-speed trains.
Author Contributions
Methodology, Y.L. and Y.F.; software, Y.Z.; validation, X.H. and H.C.; formal analysis, Y.Z.; investigation, S.X. and C.G.; resources, Y.L., H.C., X.H., and Y.F.; data curation, Y.Z.; writing—original draft preparation, Y.Z.; writing—review and editing, Y.L.; supervision, X.H.; project administration, Y.L., H.C., and X.H.; funding acquisition, Y.L., and X.H. All authors have read and agreed to the published version of the manuscript.
Funding
This research was funded by Sichuan Provincial Science and Technology Plan Project (Project No. 2021YFG0095).
Institutional Review Board Statement
Not applicable.
Informed Consent Statement
Not applicable.
Data Availability Statement
Not applicable.
Conflicts of Interest
The authors declare no conflict of interest.
References
- Yin, Y.; Ma, T.; Han, Q.H.; Lu, Y.; Zhang, Y.J. Material Parameters in the GTN Model for Ductile Fracture Simulation of G20Mn5QT Cast Steels. J. Mater. Civ. Eng. 2022, 34, 04021412. [Google Scholar] [CrossRef]
- Yin, Y.; Li, S.; Han, Q.H.; Li, M.F. Material parameters in void growth model for G20Mn5QT cast steel at low temperatures. Constr. Build. Mater. 2020, 243, 118123. [Google Scholar] [CrossRef]
- Xu, J.; Sun, T.; Xu, Y.T.; Han, Q.H. Fracture toughness research of G20Mn5QT cast steel based on the acoustic emission technique. Constr. Build. Mater. 2020, 230, 116904. [Google Scholar] [CrossRef]
- Zhang, Z.X.; Li, Z.W.; Wu, H.; Sun, C.Q. Size and Shape Effects on Fatigue Behavior of G20Mn5QT Steel from Axle Box Bodies in High-Speed Trains. Metals 2022, 12, 652. [Google Scholar] [CrossRef]
- Zhang, L.J.; Yu, P.F.; Cheng, H.; Zhang, H.; Diao, H.Y.; Shi, Y.Z.; Chen, B.L.; Chen, P.Y.; Feng, R.; Bai, J.; et al. Nanoindentation Creep Behavior of an Al0.3CoCrFeNi High-Entropy Alloy. Metall. Mater. Trans. A-Phys. Metall. Mater. Sci. 2016, 47, 5871–5875. [Google Scholar] [CrossRef]
- Hsu, M.C.; Wang, C.L.; Xu, F.; Herrema, A.J.; Krishnamurthy, A. Direct immersogeometric fluid flow analysis using B-rep CAD models. Comput. Aided Geom. Des. 2016, 43, 143–158. [Google Scholar] [CrossRef]
- Zhao, X.; Yang, H.; Cui, Z.; Li, R.; Feng, W. Enhanced photocatalytic performance of Ag-Bi4Ti3O12 nanocomposites prepared by a photocatalytic reduction method. Mater. Technol. 2017, 32, 870–880. [Google Scholar] [CrossRef]
- Kanyane, L.R.; Malepe, T.J.; Malatji, N.; Popoola, A.P.I. Synthesis and Characterization of Al-SiC Composite Coatings on 316L Stainless Steel Fabricated via Laser Cladding Technique. Metallogr. Microstruct. Anal. 2021, 10, 601–609. [Google Scholar] [CrossRef]
- Zhang, M.Y.; He, S.H.; Jiang, B.Y.; Yao, X.M.; Zhang, K. The Study on Feasibility and Welding Characteristics of GMAW Surfacing Remanufacturing of H13 Steel Cutter Ring of TBM Hob. Coatings 2021, 11, 1559. [Google Scholar] [CrossRef]
- Kutschmann, P.; Grimm, M.; Lindner, T.; Ernst, K.R.; Schwabe, O.; Pluta, C.; Lampke, T. Comparison of Aqueous and Gelled 3.5% NaCl Electrolytes for Assessing the Corrosion Resistance of Thermal Spray Stainless-Steel Coatings in Electrochemical Corrosion Tests. Coatings 2022, 12, 344. [Google Scholar] [CrossRef]
- Ahn, J.; Hong, S.; Shim, Y.S.; Park, J. Electroplated Functional Materials with 3D Nanostructures Defined by Advanced Optical Lithography and Their Emerging Applications. Appl. Sci. 2020, 10, 8780. [Google Scholar] [CrossRef]
- Luo, J.; Chen, H.; Wang, J.; Xia, F.; Huang, X. Direct growth of 2D MoO 2 single crystal on SiO 2/Si substrate by atmospheric pressure chemical vapor deposition. Mater. Chem. Phys. 2020, 251, 123166. [Google Scholar] [CrossRef]
- Cai, J.; Shi, J.M.; Wang, K.S.; Li, F.G.; Wang, W.; Wang, Q.J.; Liu, Y.Y. A modified parallel constitutive model for elevated temperature flow behavior of Ti-6Al-4V alloy based on multiple regression. Int. J. Mater. Res. 2017, 108, 527–541. [Google Scholar] [CrossRef]
- Lan, K.; Chen, F.; Wu, B.; Liu, X.; Ge, H. Mechanical properties and microstructure of laser-cladding additively manufactured 316L stainless steel sheets. J. Constr. Steel Res. 2022, 199, 107603. [Google Scholar]
- Li, J.; Gu, J.; Zhang, Y.; Wang, Z.; Zhang, G. Study on laser cladding process and friction characteristics of friction pairs of copper-based powder metallurgy materials. Tribol. Int. 2023, 177, 107953. [Google Scholar] [CrossRef]
- Yu, J.; Chen, J.; Ho, H. Effect of laser cladding Ti/B4C/dr40-based composite coatings for the surface strengthening of shaft part. Opt. Laser Technol. 2023, 157, 108721. [Google Scholar] [CrossRef]
- John, M.; Kuruveri, U.B.; Menezes, P.L. Laser Cladding-Based Surface Modification of Carbon Steel and High-Alloy Steel for Extreme Condition Applications. Coatings 2022, 12, 1444. [Google Scholar] [CrossRef]
- Saxena, M.; Sharma, A.K.; Srivastava, A.K.; Singh, R.K.; Dixit, A.R.; Nag, A.; Hloch, S. Microwave-Assisted Synthesis, Characterization and Tribological Properties of a g-C3N4/MoS2 Nanocomposite for Low Friction Coatings. Coatings 2022, 12, 1840. [Google Scholar] [CrossRef]
- Wu, T.; Shi, W.; Xie, L.; Gong, M.; Huang, J.; Xie, Y.; He, K. Effects of re-melting process parameters on the forming quality of the Stellite 6/WC laser cladding layer. Optik 2022, 269, 169887. [Google Scholar] [CrossRef]
- Zhang, H.; Pan, Y.; Zhang, Y.; Lian, G.; Cao, Q.; Que, L. Microstructure, toughness, and tribological properties of laser cladded Mo2FeB2-based composite coating with in situ synthesized WC and La2O3 addition. Surf. Coat. Technol. 2022, 449, 128947. [Google Scholar] [CrossRef]
- Liu, J.; Li, X.; Bai, J.; Zhang, T.; Xu, Y.; Yu, Y. Effects of Thermal Treatment on Microstructure and Wear Properties of Ni60/CeO2 Composite Coating 35CrMoV Steel by Laser Cladding. Coatings 2022, 12, 1575. [Google Scholar] [CrossRef]
- Jia, T.; Li, C.; Deng, S.; Zhang, M.; Han, X. Parameter sensitivity evaluation of the laser cladding for Fe60 powder with different sulfur contents. Appl. Phys. A 2022, 128, 1039. [Google Scholar] [CrossRef]
- Han, Q.H.; Wang, X.; Lu, Y. Effect of corrosion on the fatigue behaviour of butt welds of G20Mn5QT cast steel and Q345D hot rolled steel in 3.5-wt% NaCl solution. Fatigue Fract. Eng. Mater. Struct. 2020, 43, 2703–2714. [Google Scholar] [CrossRef]
- Lu, Y.; Wang, R.Q.; Han, Q.H.; Yu, X.L.; Yu, Z.C. Experimental investigation on the corrosion and corrosion fatigue behavior of butt weld with G20Mn5QT cast steel and Q355D steel under dry-wet cycle. Eng. Fail. Anal. 2021, 134, 105977. [Google Scholar] [CrossRef]
- Li, J.S.; Cao, Y.; Gao, B.; Li, Y.S.; Zhu, Y.T. Superior strength and ductility of 316L stainless steel with heterogeneous lamella structure. J. Mater. Sci. 2018, 53, 10442–10456. [Google Scholar] [CrossRef]
- Gökhan, Ö.; Alptekin, K. The role of heat treatments on wear behaviour of 316L stainless steel produced by additive manufacturing. Mater. Lett. 2022, 327, 133014. [Google Scholar]
- Yang, Y.; Zhu, Y.; Khonsari, M.; Yang, H. Wear anisotropy of selective laser melted 316L stainless steel. Wear 2019, 428–429, 376–386. [Google Scholar] [CrossRef]
- Ye, F.; Zhu, T.; Mori, K.; Xu, Q.; Song, Y.; Wang, Q.; Yu, R.; Wang, B.; Cao, X. Effects of dislocations and hydrogen concentration on hydrogen embrittlement of austenitic 316 stainless steels. J. Alloy. Compd. 2021, 876, 160134. [Google Scholar] [CrossRef]
- Wang, X.; Muñiz-Lerma, J.A.; Shandiz, M.A.; Sanchez-Mata, O.; Brochu, M. Crystallographic-orientation-dependent tensile behaviours of stainless steel 316L fabricated by laser powder bed fusion. Mater. Sci. Eng. A 2019, 766, 138395. [Google Scholar] [CrossRef]
- Lodhi, M.K.; Deen, K.M.; Greenlee-Wacker, M.C.; Haider, W.M.J.K. Additively manufactured 316L stainless steel with improved corrosion resistance and biological response for biomedical applications. Addit. Manuf. 2019, 27, 8–19. [Google Scholar] [CrossRef]
- Krakhmalev, P.; Fredriksson, G.; Svensson, K.; Yadroitsev, I.; Yadroitsava, I.; Thuvander, M.; Peng, R. Microstructure, Solidification Texture, and Thermal Stability of 316L Stainless Steel Manufactured by Laser Powder Bed Fusion. Metals 2018, 8, 643. [Google Scholar] [CrossRef]
- Zhang, M.; Li, M.; Wang, S.; Chi, J.; Ren, L.; Fang, M.; Zhou, C. Enhanced wear resistance and new insight into microstructure evolution of in-situ (Ti,Nb)C reinforced 316L stainless steel matrix prepared via laser cladding. Opt. Lasers Eng. 2020, 128, 106043. [Google Scholar] [CrossRef]
- Hou, R.; Lu, S.; Chen, S.; Dou, W.; Liu, G. The corrosion of 316L stainless steel induced by methanocossus mariplaudis through indirect electron transfer in seawater. Bioelectrochemistry 2023, 149, 108310. [Google Scholar] [CrossRef] [PubMed]
- Hongyi, Z.; Zhao, T.; Liao, C. Corrosion behaviour characterisation of 316L stainless steel and Inconel 625 in supercritical water containing hydrochloric acid and high oxygen. Corros. Eng. Sci. Technol. 2022, 57, 640–647. [Google Scholar]
- Zhao, Y.; Xiong, H.; Li, X.; Qi, W.; Wang, J.; Hua, Y.; Zhang, T.; Wang, F. Improved corrosion performance of selective laser melted stainless steel 316L in the deep-sea environment. Corros. Commun. 2021, 2, 55–62. [Google Scholar] [CrossRef]
- Wang, H.; Liu, P.; Chen, X.H.; Lu, Q.Q.; Zhou, H.L. Mechanical properties and corrosion resistance characterization of a novel Co36Fe36Cr18Ni10 high-entropy alloy for bioimplants compared to 316L alloy. J. Alloy. Compd. 2022, 906, 163947. [Google Scholar] [CrossRef]
- Sugavaneswaran, M.; Kulkarni, A. Effect of Cryogenic Treatment on the Wear Behavior of Additive Manufactured 316L Stainless Steel. Tribol. Ind. 2019, 41, 33–42. [Google Scholar] [CrossRef]
- Liu, W.; Wei, H.Y.; Liu, A.L.; Zhang, Y. Multi-index co-evaluation of metal laser direct deposition: An investigation of energy input effect on energy efficiency and mechanical properties of 316l parts. J. Manuf. Process. 2022, 76, 277–290. [Google Scholar] [CrossRef]
- Song, L.J.; Zeng, G.C.; Xiao, H.; Xiao, X.F.; Li, S.M. Repair of 304 stainless steel by laser cladding with 316L stainless steel powders followed by laser surface alloying with WC powders. J. Manuf. Process. 2016, 24, 116–124. [Google Scholar] [CrossRef]
- Zhan, M.J.; Sun, G.F.; Wang, Z.D.; Shen, X.T.; Yan, Y.; Ni, Z.H. Numerical and experimental investigation on laser metal deposition as repair technology for 316L stainless steel. Opt. Laser Technol. 2019, 118, 84–92. [Google Scholar] [CrossRef]
- Sun, G.F.; Shen, X.T.; Wang, Z.D.; Zhan, M.J.; Yao, S.; Zhou, R.; Ni, Z.H. Laser metal deposition as repair technology for 316L stainless steel: Influence of feeding powder compositions on microstructure and mechanical properties. Opt. Laser Technol. 2019, 109, 71–83. [Google Scholar] [CrossRef]
- Xu, G.; Wu, L.J.; Su, Y.Y.; Wang, Z.F.; Luo, K.Y.; Lu, J.Z. Microstructure and mechanical properties of directed energy deposited 316L/Ti6Al4V functionally graded materials via constant/gradient power. Mater. Sci. Eng. A-Struct. Mater. Prop. Microstruct. Proc. 2022, 839, 142870. [Google Scholar] [CrossRef]
- Srivastava, A.K.; Kumar, N.; Saxena, A.; Tiwari, S. Effect of friction stir processing on microstructural and mechanical properties of lightweight composites and cast metal alloys–A review. Int. J. Cast Met. Res. 2021, 34, 169–195. [Google Scholar] [CrossRef]
- Li, Y.; Wang, K.; Fu, H.; Zhi, X.; Guo, X.; Lin, J. Prediction for Dilution Rate of AlCoCrFeNi Coatings by Laser Cladding Based on a BP Neural Network. Coatings 2021, 11, 1402. [Google Scholar] [CrossRef]
- Peng, P.; Wang, K.S.; Wang, W.; Han, P.; Zhang, T.; Liu, Q.; Zhang, S.Y.; Wang, H.D.; Qiao, K.; Liu, J. Relationship between microstructure and mechanical properties of friction stir processed AISI 316L steel produced by selective laser melting. Mater. Charact. 2020, 163, 110283. [Google Scholar] [CrossRef]
- Wang, X.L.; Muniz-Lerma, J.A.; Sanchez-Mata, O.; Shandiz, M.A.; Brochu, M. Microstructure and mechanical properties of stainless steel 316L vertical struts manufactured by laser powder bed fusion process. Mater. Sci. Eng. A-Struct. Mater. Prop. Microstruct. Proc. 2018, 736, 27–40. [Google Scholar] [CrossRef]
- Sexton, L.; Lavin, S.; Byrne, G.; Kennedy, A. Laser cladding of aerospace materials. J. Mater. Proc. Technol. 2002, 122, 63–68. [Google Scholar] [CrossRef]
- Sun, G.F.; Wang, Z.D.; Lu, Y.; Zhou, R.; Ni, Z.H. Investigation on microstructure and mechanical properties of NV E690 steel joint by laser-MIG hybrid welding. Mater. Des. 2017, 127, 297–310. [Google Scholar] [CrossRef]
- Gu, Z.; Mao, P.; Gou, Y.; Chao, Y.; Xi, S. Microstructure and properties of MgMoNbFeTi 2 Y x high entropy alloy coatings by laser cladding. Surf. Coat. Technol. 2020, 402, 126303. [Google Scholar] [CrossRef]
- Bu, F.; Li, C.; Shen, C.; Zhang, X.; Sun, X.; Feng, X. Microstructures and Wear Resistance of Diamond-Reinforced FeCoCrNiAl0.5Ti0.5Si0.2-Carbonized High-Entropy Alloy Coatings by Laser Cladding. Trans. Indian Inst. Met. 2022, 75, 1967–1978. [Google Scholar] [CrossRef]
- Sun, X.; Zhu, H.; Li, J.; Huang, J.; Xie, Z. Influence of aluminum content on the microstructure and properties of the in-situ TiC reinforced Al x FeCoNiCu high entropy alloy matrix composites. Mater. Sci. Eng. A 2019, 743, 540–545. [Google Scholar] [CrossRef]
- Wang, J.; Li, C.; Zeng, M.; Guo, Y.; Feng, X.; Tang, L.; Wang, Y. Microstructural evolution and wear behaviors of NbC-reinforced Ti-based composite coating. Int. J. Adv. Manuf. Technol. 2020, 107, 1–11. [Google Scholar] [CrossRef]
- Guo, Y.; Li, C.; Zeng, M.; Wang, J.; Deng, P.; Wang, Y. In-situ TiC reinforced CoCrCuFeNiSi 0.2 high-entropy alloy coatings designed for enhanced wear performance by laser cladding. Mater. Chem. Phys. 2020, 242, 122522. [Google Scholar] [CrossRef]
Disclaimer/Publisher’s Note: The statements, opinions and data contained in all publications are solely those of the individual author(s) and contributor(s) and not of MDPI and/or the editor(s). MDPI and/or the editor(s) disclaim responsibility for any injury to people or property resulting from any ideas, methods, instructions or products referred to in the content. |
© 2023 by the authors. Licensee MDPI, Basel, Switzerland. This article is an open access article distributed under the terms and conditions of the Creative Commons Attribution (CC BY) license (https://creativecommons.org/licenses/by/4.0/).