Article

A Two-Dimensional Non-Destructive Beam Monitoring Detector for Ion Beams

1
Albert Einstein Center for Fundamental Physics (AEC), Laboratory for High Energy Physics (LHEP), University of Bern, Sidlerstrasse 5, 3012 Bern, Switzerland
2
Department of Physics “Ettore Pancini”, University of Napoli Federico II, Complesso Universitario di Monte S. Angelo, 80126 Napoli, Italy
*
Author to whom correspondence should be addressed.
Current address: SWAN Isotopen AG, 3010 Bern, Switzerland.
Current address: Deutsches Elektronen-Synchrotron DESY, 22607 Hamburg, Germany.
Appl. Sci. 2023, 13(6), 3657; https://doi.org/10.3390/app13063657
Submission received: 21 February 2023 / Revised: 7 March 2023 / Accepted: 10 March 2023 / Published: 13 March 2023
(This article belongs to the Section Applied Physics General)

Abstract

:
A two-dimensional beam monitoring detector named π 2 has been developed and tested at the Bern University Hospital, using an 18 MeV proton beam provided by a medical cyclotron. This non-destructive device utilises a scintillating compound (P47 phosphor) coated onto a thin aluminium foil that is angled at 45 with respect to the beam axis. The scintillating light produced when the beam passes through the foil is captured by a CMOS camera, resulting in a two-dimensional image of the beam profile. Custom software is then used to analyse the image and extract valuable information about the beam’s position, shape, and intensity. The focus of the experimental work was on characterising the performance of the π 2 with the 18 MeV proton beam. The linearity of the detector’s output signal was evaluated for proton fluxes ranging from 2 · 10 10 cm 2 · s 1 to 5 · 10 11 cm 2 · s 1 . Furthermore, the beam profiles measured with the π 2 were found to be consistent with reference measurements obtained using alternative beam monitors. Additionally, the experiments also involved studying the beam scattering caused by the foil and scintillating layer. Finally, in a long-term radiation test, the detector demonstrated a stable response up to an integrated proton flux of 3 · 10 15 cm 2 . The π 2 is currently being used at the Bern cyclotron for monitoring beams in the development of new methods for medical radioisotope production and for radiation hardness studies. The π 2 has potential applications in several fields that involve the use of accelerated ions, such as cancer particle therapy, medical radioisotope production and radiation hardness studies.

1. Introduction

In the field of ion beam accelerators and their applications, the precise monitoring of the beam intensity, position, and shape is of utmost importance during both the commissioning and operational phases. This is particularly significant in research activities, where a comprehensive understanding of the beam distribution and intensity on the sample being irradiated is often a fundamental requirement to accurately quantify the radiation effects being studied.
In the medical field, beam monitoring detectors play a crucial role in controlling the delivery of ion beams in various scenarios. For example, low-energy, high-intensity proton beams with energies around 20 MeV and intensities ranging from 10–100 μA are utilised for the production of radioisotopes in nuclear medicine [1,2,3]. On the other hand, high-energy, low-intensity beams, such as protons with energies around 250 MeV and intensities around 1 nA, and carbon ions with energies around 4800 MeV and intensities around 0.1 nA, are utilised in cancer particle therapy. Along this line, a research program focused on developing advanced beam monitoring detectors for ion beams is underway at the Bern cyclotron laboratory [4].
A variety of options exist for beam monitoring in particle accelerators [5,6]. One simple approach to measuring the beam intensity involves the use of Faraday cups [7]. In this kind of device, a metal body is placed in the path of the particle beam to absorb it. The electrical charge carried by the particles is transferred to the metal and can be measured using an ammeter in electrical contact with the cup. If the metal block is segmented into multiple electrodes with independent readout, additional spatial information can be gathered, and beam distribution measurements, typically called beam profile measurements, can be obtained [8]. Another method for beam monitoring involves the use of movable phosphor screens in combination with CCD cameras [9]. This solution is typically employed to monitor the beam along transfer lines. Since they are based on destructive measurements, Faraday cups and conventional phosphor screens do not allow, however, for real-time observation of the beam during irradiation. To achieve this, non-destructive detectors need to be used. These are solutions that aim to measure the beam properties with minimal disturbance, ensuring that monitoring can take place without disrupting the beam. Examples of non-destructive detectors include inductive pick-ups, which use coils located around the beam pipe to measure magnetic field variations and determine the beam’s position and intensity [10], and Secondary-Emission Monitors (SEM’s) [11]. SEM’s rely on the emission of low-energy electrons that is produced when charged particles strike a metal surface. This so-called Secondary Electron Emission (SEE) is a surface effect, so very thin metal layers or even thin wires can be used [12]. Some examples of SEM’s include the SLIM [13], developed by the TERA Foundation at CERN for particle therapy, and the BISE [14,15], developed jointly by TERA and AEC-LHEP for low-energy cyclotrons used in the production of radioisotopes.
One of the challenges in using SEM’s for beam monitoring in accelerator environments is their sensitivity to magnetic fields, which makes it difficult to accurately reconstruct the beam profile. To overcome this limitation, our research group has focused on the development of 2D and 3D beam monitor detectors using scintillators [16,17]. One of the detectors developed by our group is the UniBEaM, which uses moving scintillating fibers to measure the vertical and horizontal projections of the beam profile [18]. This device has been commercialised by the Canadian company D-Pace [19]. In this paper, we present the design, implementation, and characterisation of a two-dimensional non-destructive beam monitoring detector called π 2 . This detector is based on a very thin aluminium foil coated with a phosphor scintillating compound. The π 2 is a versatile device that is currently being used at the Bern medical cyclotron for research programs related to novel medical radioisotopes and radiation hardness studies.

2. Materials and Methods

The π 2 detector was developed to enhance the beam monitoring capabilities of the medical cyclotron laboratory at the Bern University Hospital (Inselspital) [4]. The cyclotron, a Cyclone 18/18 model from the Belgian company IBA (Louvain-La-Neuve, Belgium), provides proton beams with a nominal energy of 18 MeV and a maximum beam current of 150 μ A . The facility is used for both radioisotope production and a range of multidisciplinary research studies, and has been specifically designed to accommodate both types of use. To enable the research activities, a Beam Transfer Line (BTL) has been installed, which transports the proton beam to a separate bunker located adjacent to the main cyclotron bunker [20], with independent access. The BTL is 6.5 m in length and features two steering dipole magnets and two quadrupole magnets to allow for displacing and focusing of the beam on both horizontal and vertical planes. The BTL is also equipped with two destructive beam viewers located at the beginning and end of the transfer line, which are used to visually monitor the beam and to measure its current. The cyclotron can be operated using a specialised method that allows for stable beams down to the picoampere range, making it possible to support a wide range of research activities that require very low beam currents. This method was developed by our research group and has been documented in a separate publication [21].
The π 2 consists of a cerium- and terbium-doped yttrium orthosilicate ( Y 2 SiO 5 : Ce,Tb ) phosphor scintillating material (P47) deposited on an aluminium foil. When traversed by the beam, it emits light in the blue region ( λ 400 nm), so the beam footprint can be observed on the scintillating screen. The light emission is characterised by a fast luminescence decay, reaching 10% of its initial intensity within just 100 ns. The thickness of the deposition and of the foil can be chosen according to the specific use, taking into account, however, that while a very thin foil is less intercepting, it is also more fragile and could brake, especially when the primary vacuum pump of the beam line is switched on. We used ∼15 μ m -thick aluminium foils coated with a layer of P47. The thickness of the P47 coating was measured to be less than 1 μ m using an Ortec Alpha Duo Spectrometer, based on the measurement of energy loss of alpha particles emitted by a 241Am source.
The working principle of the device and its technical drawing are depicted in Figure 1. The aluminium foil is securely attached to an elliptical support using SikaPower 1548 adhesive for optimal heat dissipation. The scintillating screen is positioned in a vacuum environment at the center of a DN-40 ISO-KF 4-way cross and tilted at a 45 angle relative to the beam path. The scintillating foil covers an elliptical area, which corresponds to a 20-mm diameter circle when projected in the transverse plane of the beam and covers the full beam pipe cross-section. One of the two cross ports perpendicular to the beam path is used to mount the scintillating screen on a pneumatic actuator, which enables it to be easily inserted and removed from the beam path. The opposite port, on the coated side of the scintillating screen, is fitted with a transparent glass flange to allow for the scintillating light to escape and be captured by a CMOS camera, which is located inside a Poly-Oxy-Methylene (POM) cylinder for neutron shielding.
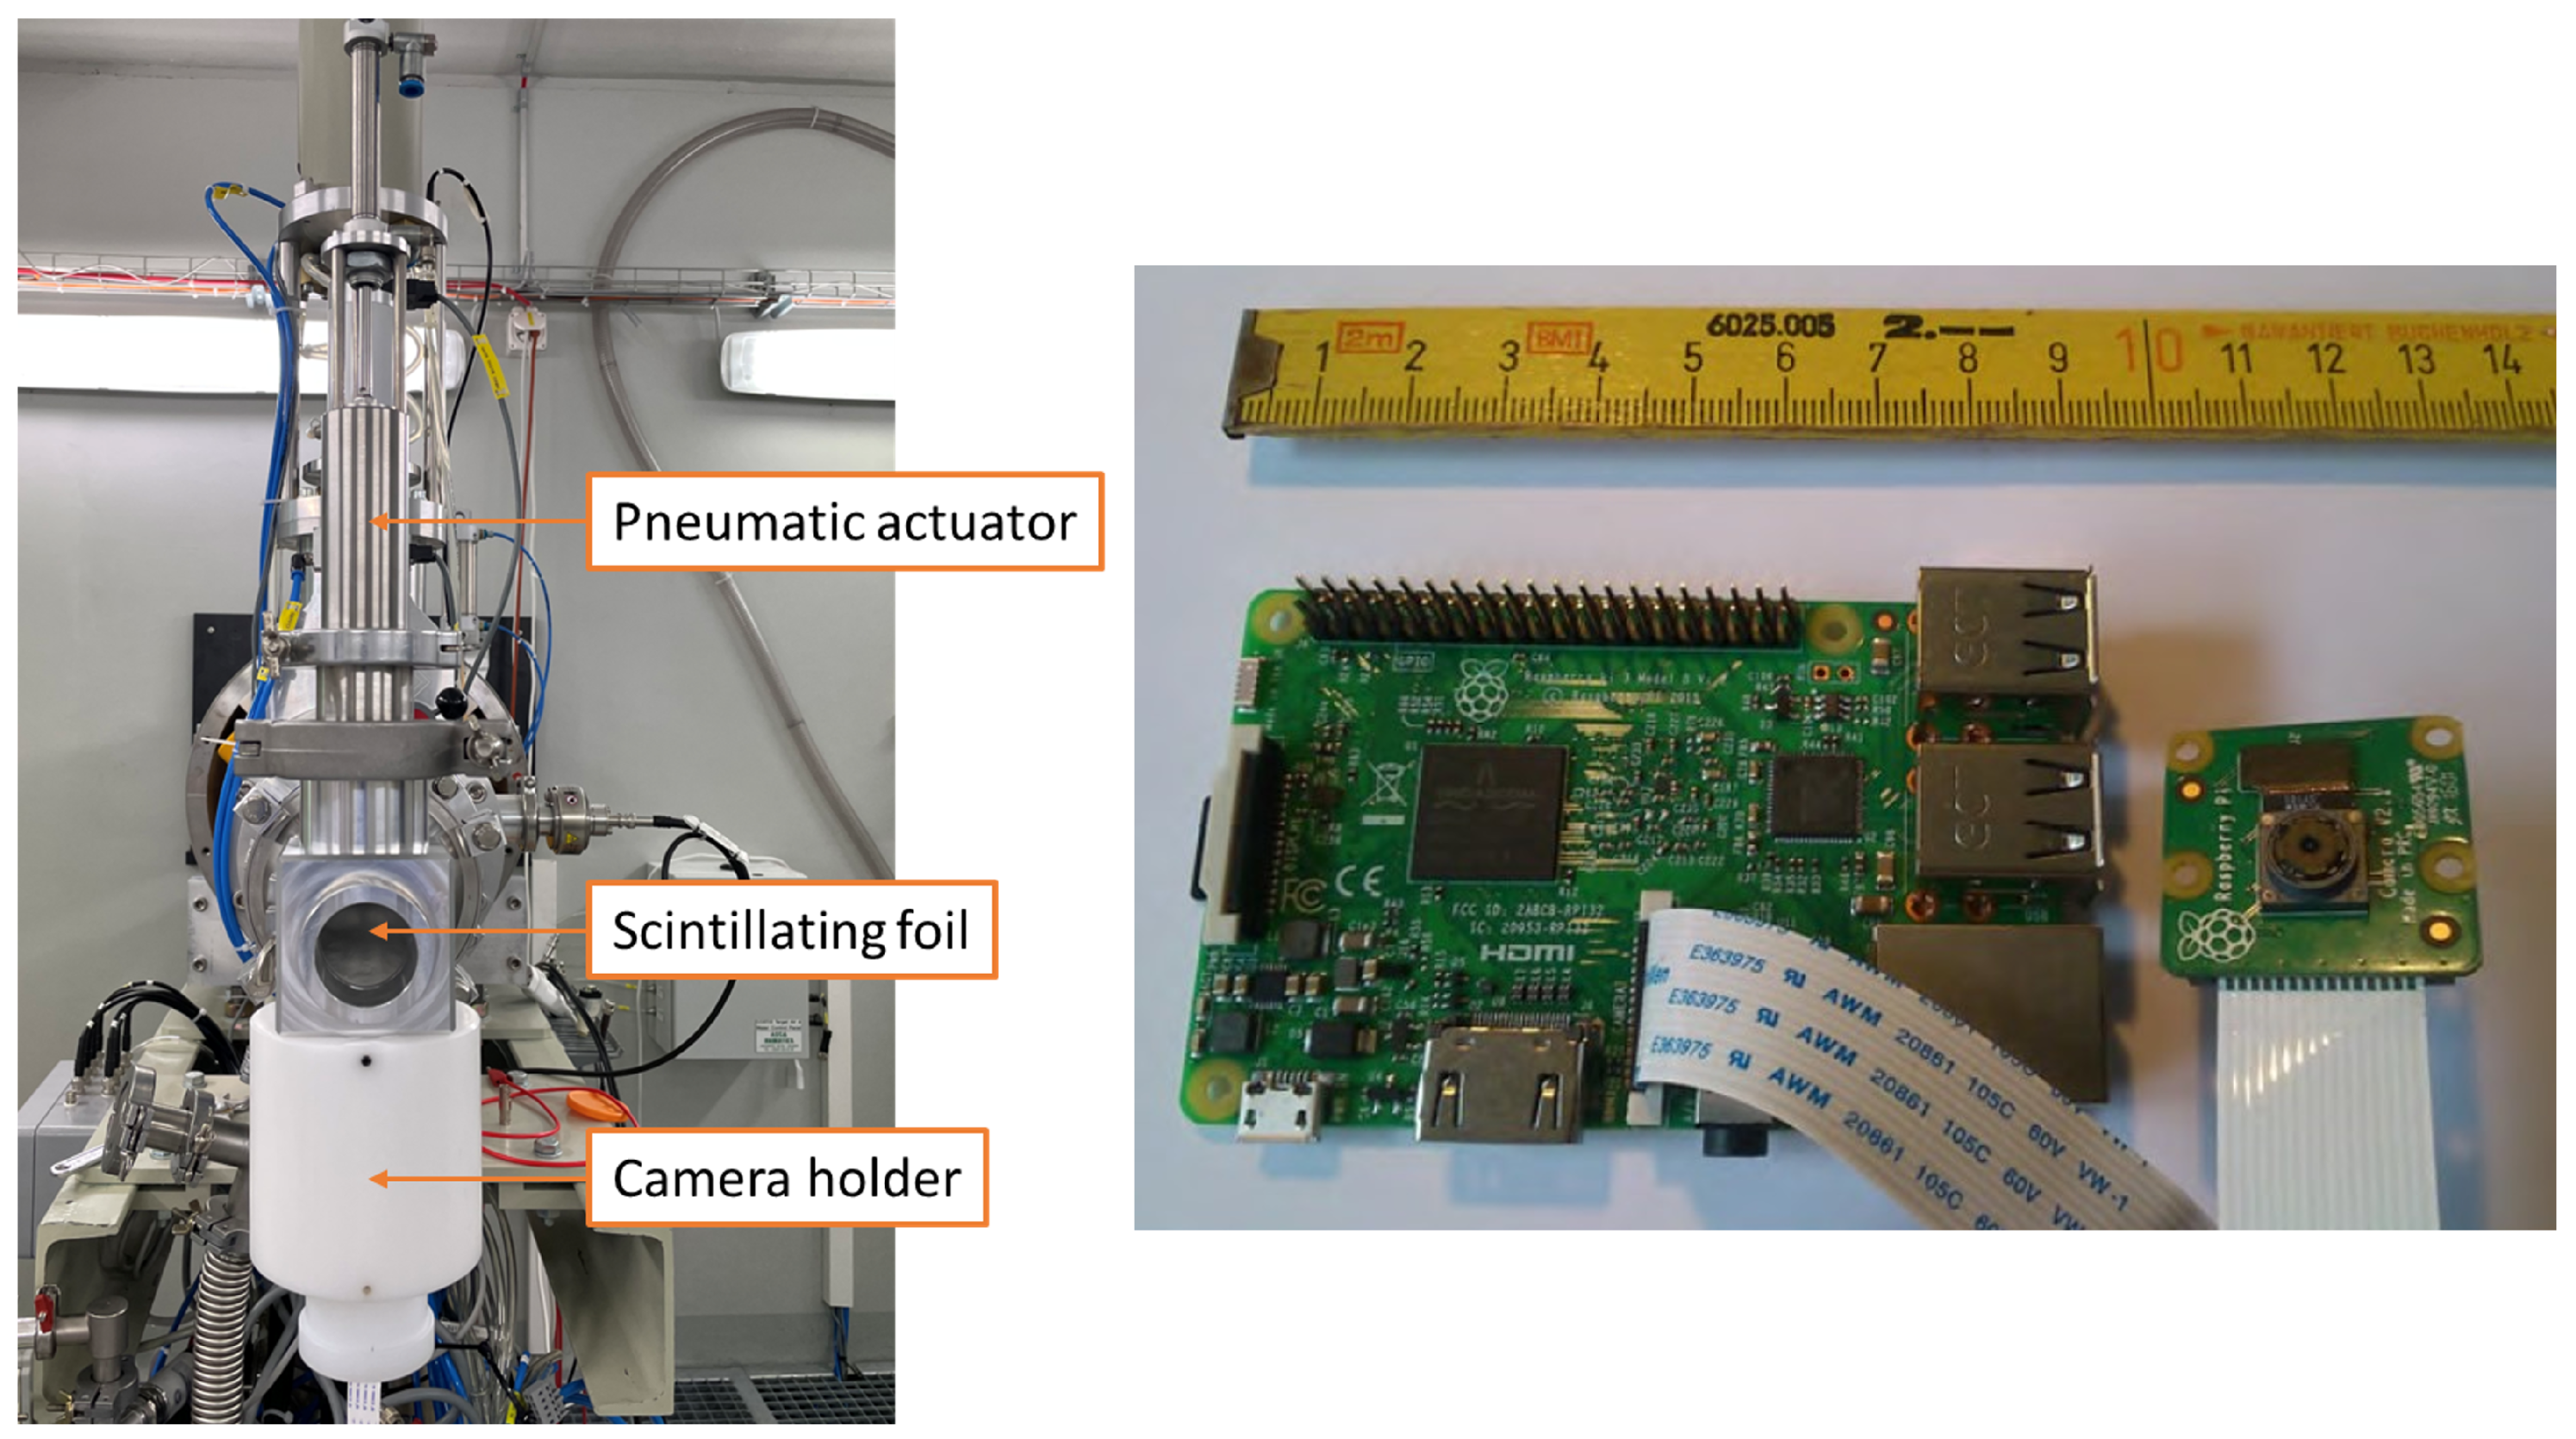
The device we realised is depicted in Figure 2, as installed in the BTL (left). In an effort to make the device cost-effective, we chose to use a Raspberry Pi micro-controller in conjunction with a Raspberry Camera Module V2 to record the beam profile on the scintillating screen. This combination of components offers a solution that is both affordable and reliable. Both the camera and the micro-controller can be easily replaced in case of degradation or failure due to radiation. The camera features an 8 megapixel CMOS sensor. It can capture images with a resolution of 3280 × 2464 pixels and record videos with a resolution of 1920 × 1080 pixels, with a maximum frame rate of 90 FPS. It is connected to the Raspberry Pi’s Camera Serial Interface (CSI) port via ribbon cable, as shown in Figure 2 (right).
A Python code was developed to optimise the detector operation and to provide an on-line analysis tool. To allow for fast processing, images can be taken and evaluated at a resolution of 640 × 480 pixels. The analysis software includes a Graphical User Interface (GUI), for the on-line monitoring of the beam shape, position and intensity. The GUI provides a real-time display of the beam footprint on the scintillator screen, together with its horizontal and vertical projections. Both the horizontal and vertical profiles are automatically fitted to a Gaussian distribution from which the beam position and Full Width Half Maximum (FWHM) are extracted. The images can also be stored for off-line analysis.
In order to accurately measure the position and size of the beam, it is important to establish a relationship between distances in the image, which are represented in pixels, and distances in the plane perpendicular to the beam motion, which are measured in millimetres. The challenge in doing so lies in the fact that the foil is inclined at an angle of 45 with respect to both the beam axis and the camera, causing the beam image to appear distorted as a result of perspective. Features that are located on parts of the foil furthest from the camera appear smaller in comparison to those that are located on closer parts of the foil. To correct this perspective distortion and restore the proper beam profile shape, a linear transformation is applied to the image using the OpenCV Python library for image processing. This transformation is accomplished by using a reference image of a beam that has been collimated into a square shape, as shown in Figure 3. The OpenCV library contains a dedicated routine that calculates the coefficients of the transformation matrix using the coordinates of the four vertices of the collimated beam on the raw image and their corresponding coordinates on the corrected image. After the transformation has been applied, the average resolution on the corrected image can be determined by dividing the length covered by the foil by the number of pixels in the image. The average resolution is 0.086 mm/pixel on the horizontal axis and 0.14 mm/pixel on the vertical axis.
To benchmark the π 2 measurements, experiments were carried out in which both radiochromic films and the UniBEaM detector were used as reference beam profile monitors. The chosen film was the FWT-60 from Far West Technology, Inc. (Goleta, CA, USA) [22]. After irradiation, the films were scanned with an EPSON V800 flatbed scanner in transmission mode using the red, green and blue (RGB) channels. To evaluate the beam profile, the relative luminance, Y, defined in [23], is calculated from the RGB components, scaled from 0 to 1, as follows:
Y = 0.2126 R + 0.7152 G + 0.0722 B .
A calibration was performed to examine the relationship between the change in luminance and the integrated proton flux. The results showed that the relationship was linear for values below 8 · 10 12 cm 2 . This means that if the film is irradiated below this level, a heatmap of the change in luminance will directly visualise the beam profile shape.
The UniBEaM detector measures the horizontal and vertical beam profiles separately by means of two scintillating fibres. The fibre measuring the horizontal profile is oriented vertically and performs a continuous horizontal sweep of the sensitive area. Analogously, the fibre measuring the vertical profile is oriented horizontally and performs a vertical sweep. The scintillating fibres are coupled to optical fibre cables to transmit the scintillating light to a dedicated readout unit.
The next section provides a comprehensive overview of the experiments conducted to evaluate the performance of the π 2 detector. The following tests were performed with the aim of characterising its capabilities and assessing its suitability for proton beam profiling applications:
  • The first experiment aimed at examining the response function of the apparatus with varying proton flux, and at establishing a calibration for displaying the beam footprint in terms of proton flux.
  • The second experiment aimed at validating the beam profile measurements by the π 2 and involved a comparison between the measured beam profile and those obtained from radiochromic films and the UniBEaM detector. The comparison was carried out for parallel beams and focused beams, respectively.
  • Beam Scattering Analysis: The third experiment focused on characterising the amount of beam scattering introduced by the π 2 foil. The goal was to evaluate the impact of the foil on the beam profile downstream of the detector.
  • Radiation Tolerance Study: The final experiment aimed at investigating the radiation tolerance of the scintillator material used in the π 2 detector. The goal was to determine if the light yield of the scintillator is affected by exposure to radiation and to assess the long-term stability of the detector.
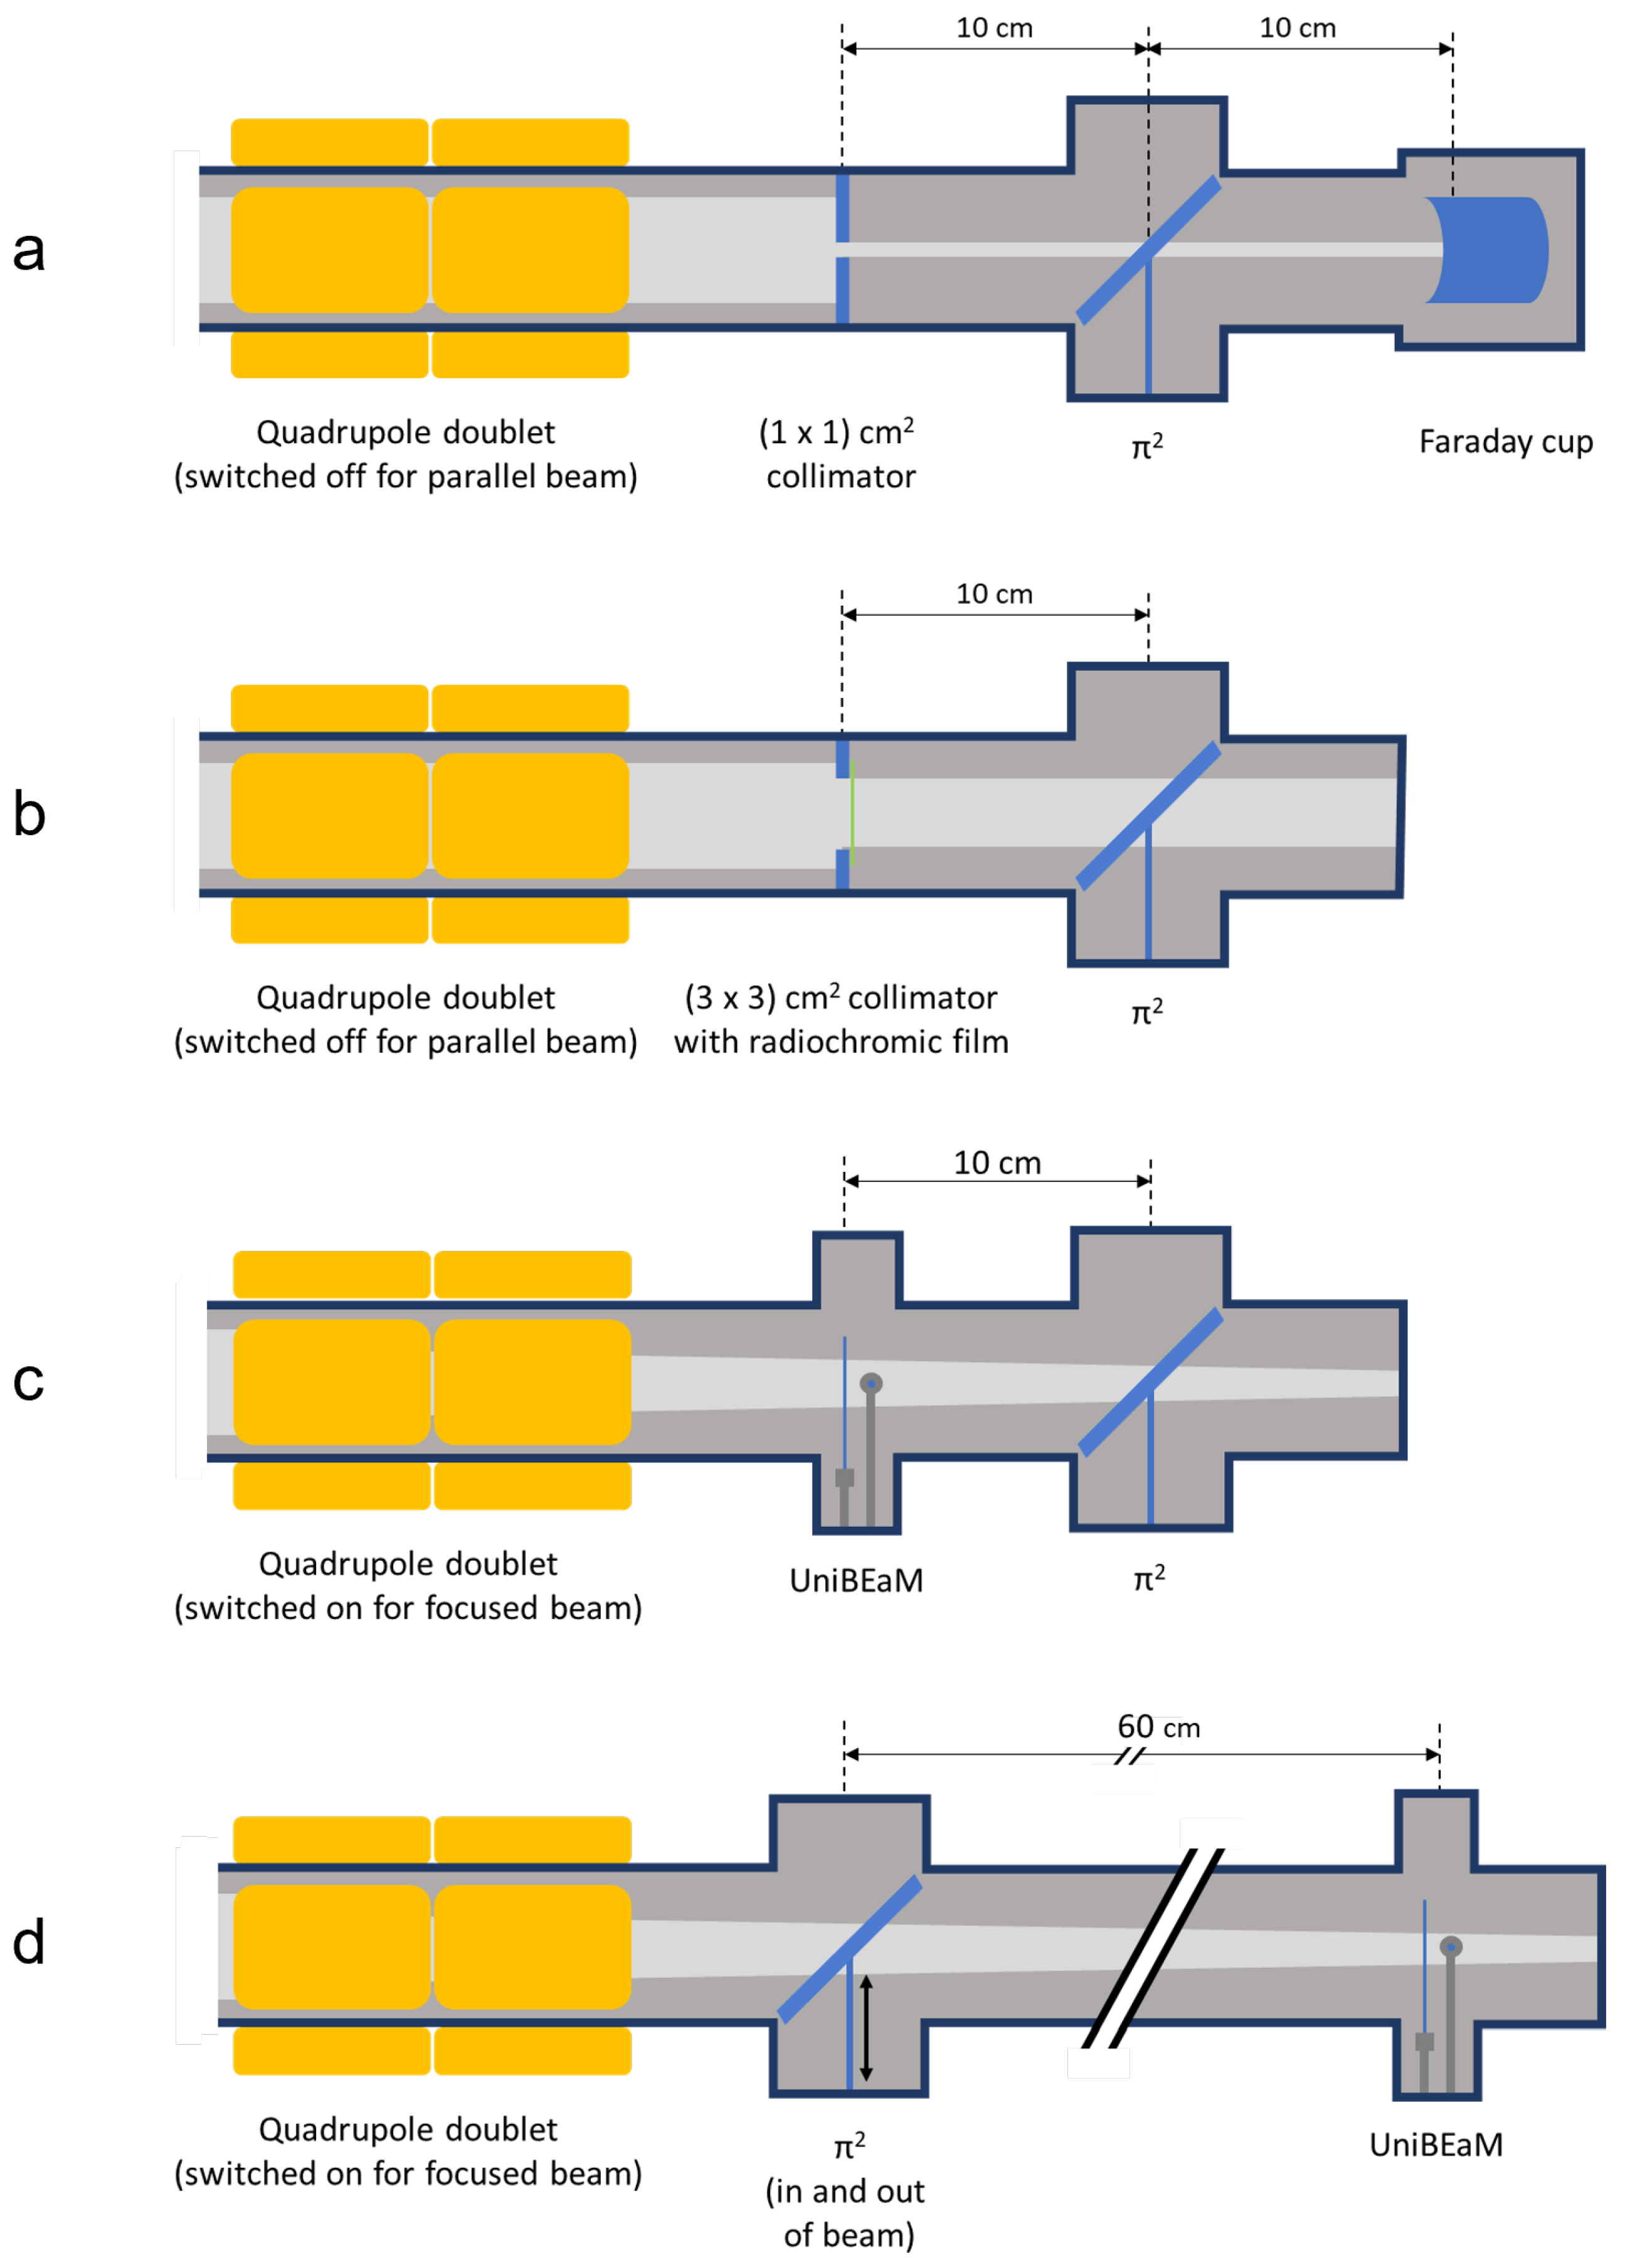
The experimental setups for each of these tests are depicted in Figure 4.

3. Experimental Results

3.1. Linearity with Respect to Beam Current

The π 2 can be calibrated to track the integrated proton flux during irradiations. To this end, an experiment to probe the change of the output signal as a function of the proton flux was carried out. The beam line was set up as shown in Figure 4a: a high-sensitivity Faraday Cup was installed 10 cm downstream of the π 2 , providing an accurate measurement of the beam current, and the second quadrupole magnet on the BTL was switched off to obtain an almost-parallel beam. It is therefore assumed that the proton flux remains constant between the π 2 and Faraday cup positions. A ( 1 × 1 ) cm 2 square collimator, installed upstream of both instruments, was used to define the area over which the beam current was measured.
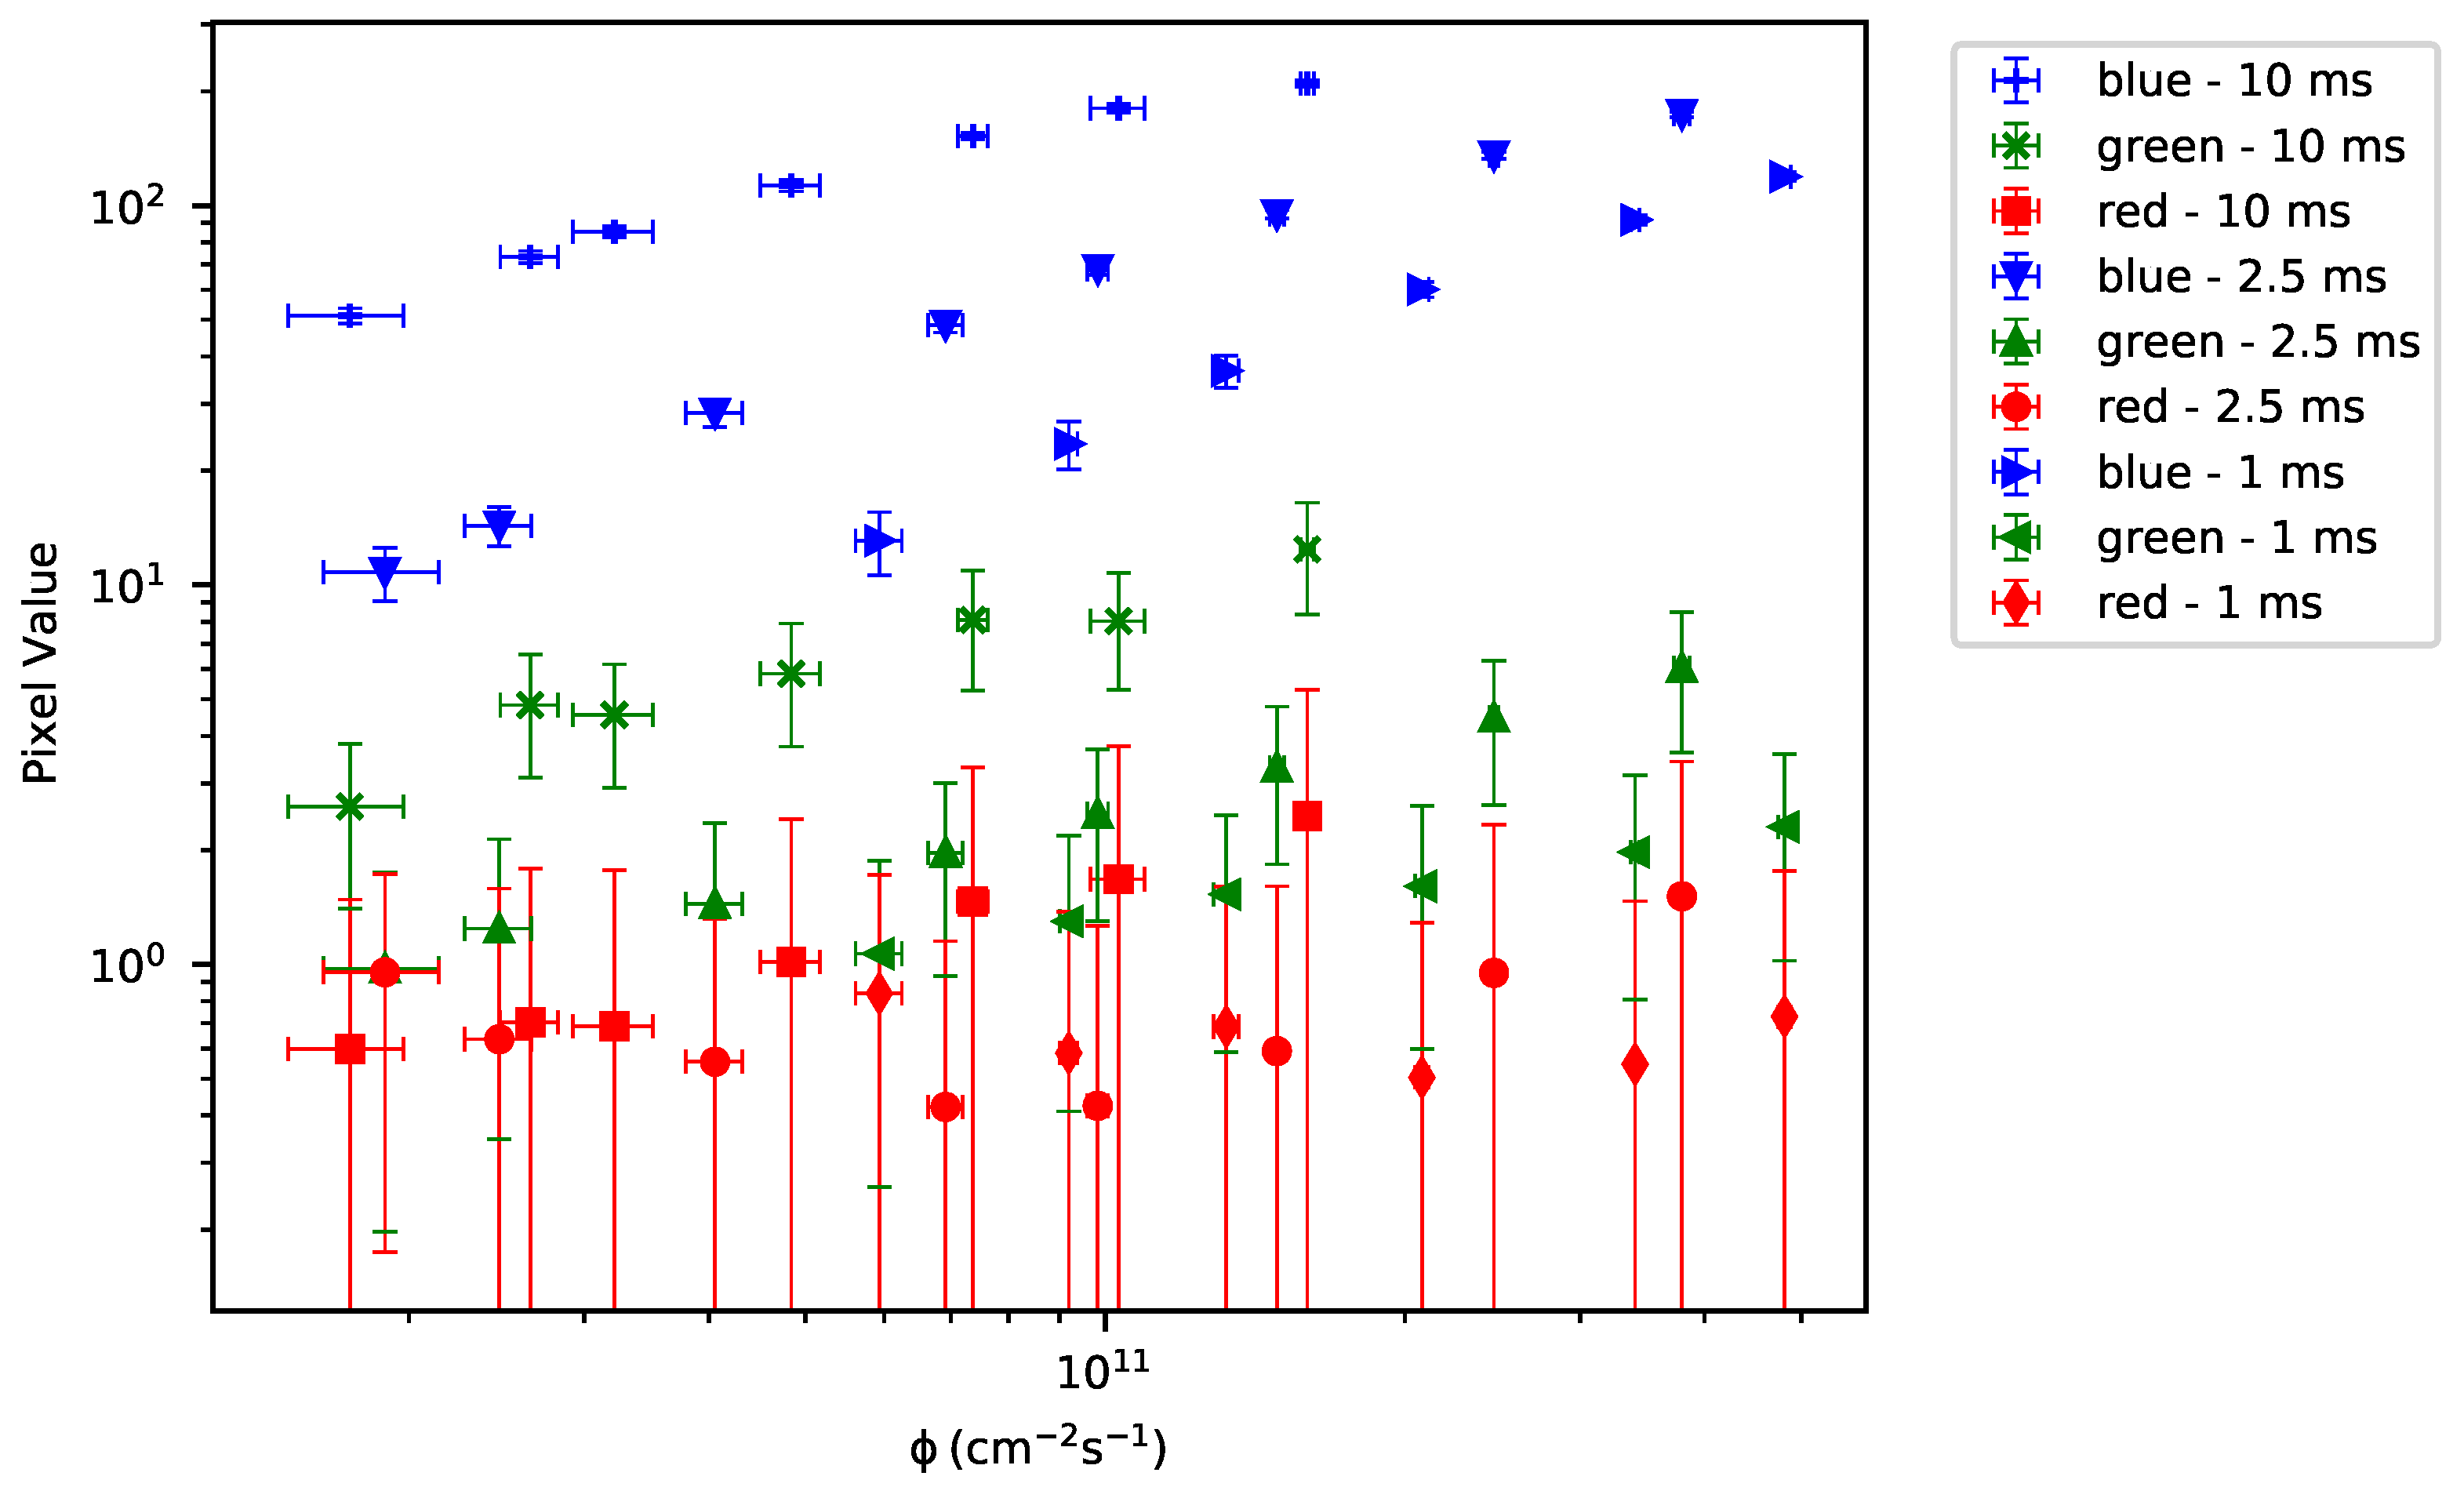
Figure 5 shows the red, green and blue pixel values measured by the camera against the proton flux for three different exposure time settings. The pixel value is the average of the pixel values over the region of the image corresponding to the collimated beam, while the proton flux is calculated from the current measured by the Faraday Cup divided by the collimator aperture area times the elementary charge. For each data point, 10 individual pictures and current measurements were taken and averaged. Changing the exposure time of the camera allows extension of the particle flux range that can be observed by avoiding the saturation of the image at high flux, and increasing the sensitivity at low flux. Given that the P47 compound emits blue light, the signal is mostly contained in the blue channel. Its sub-linear behaviour, apparent in the plot, may be due to three different causes:
  • A saturation of the scintillator light yield at high incident proton flux.
  • A saturation of the camera sensor or front-end electronics at high photon count rates.
  • A non-linear encoding of the photon count into pixel value.
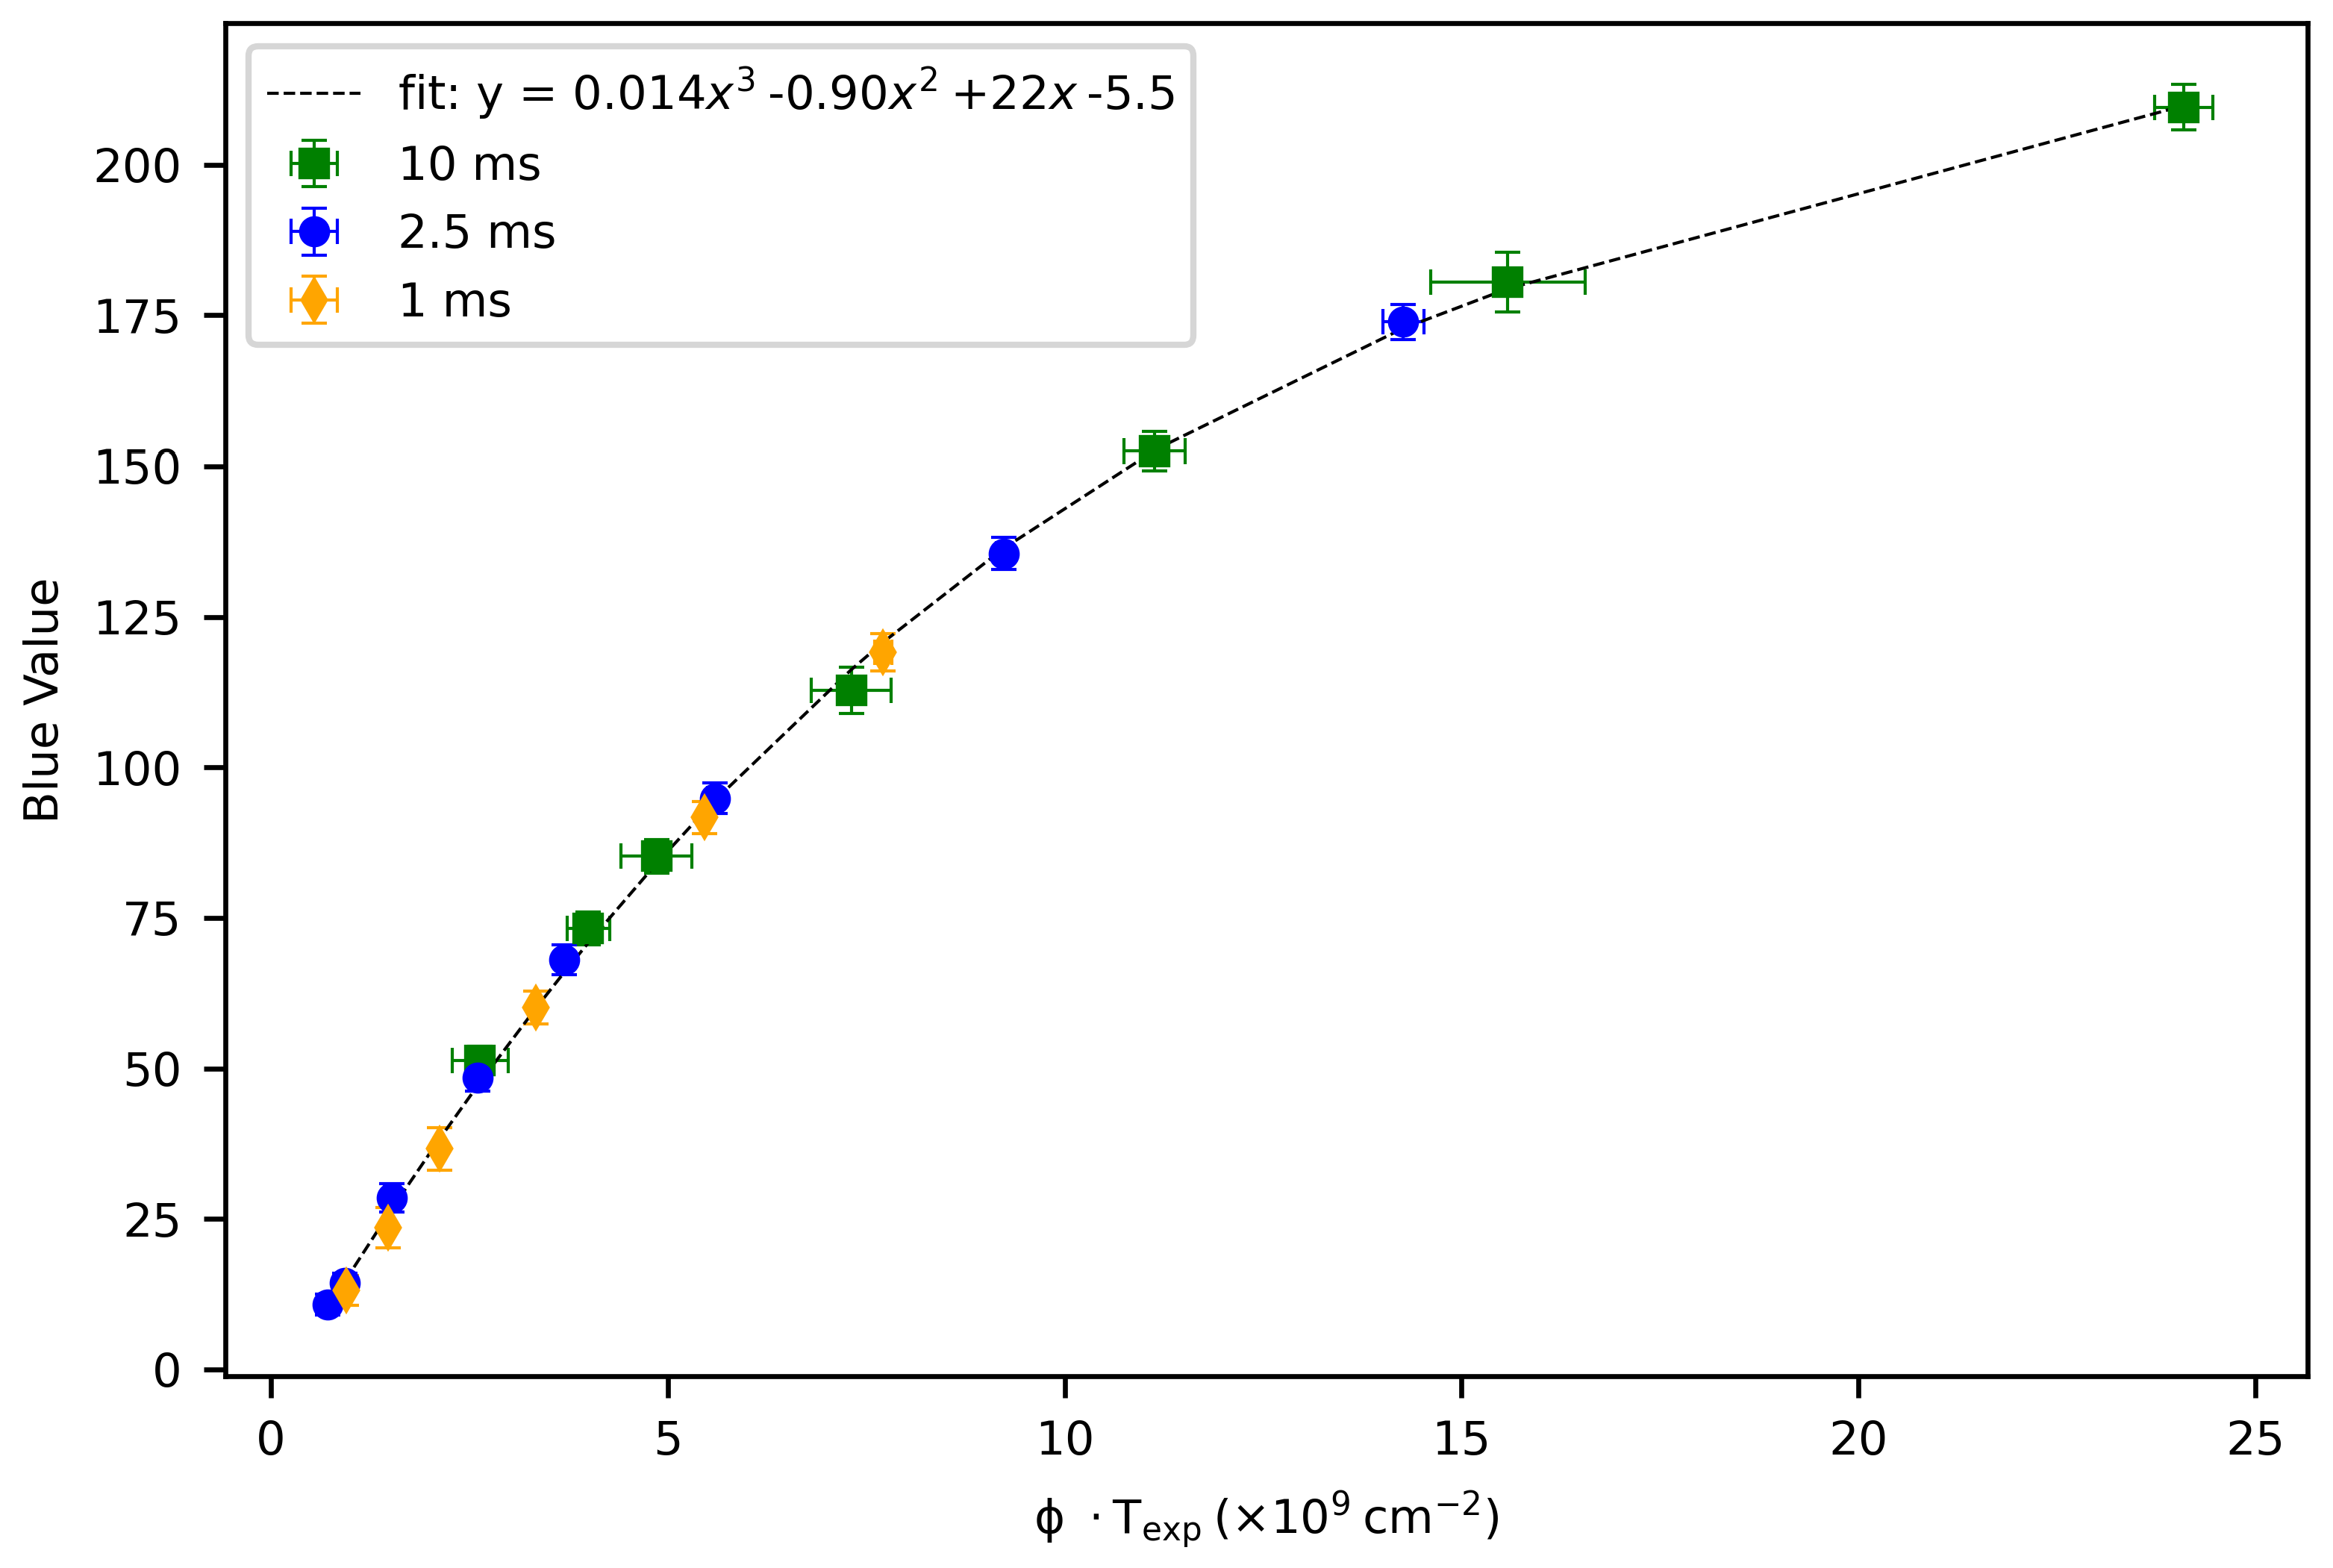
To exclude hypotheses 1 and 2, in Figure 6, the pixel value (only the blue channel in this case) is plotted against the product of proton flux and exposure time: ϕ · T e x p . Assuming a linear response of the scintillator and the camera sensor, this quantity should then be proportional to the sensor photon count and a unique function reflecting the encoding from photon count to pixel value should be obtained. The very good overlap of the three curves for different exposure times confirms indeed the hypothesis that the scintillator and sensor response are linear for a proton flux ranging from 2 · 10 10 cm 2 · s 1 to 5 · 10 11 cm 2 · s 1 . A third order polynomial is found to well describe the transfer function and can be used to calibrate the beam profile image directly in terms of proton flux.
It is worth noting that the minimum proton flux of 2 · 10 10 cm 2 · s 1 used in this calibration was given by the minimum setting of the cyclotron’s ion source current. At this intensity level the beam could easily be observed with an exposure time of 2.5 ms. However, the Raspberry Pi camera accepts an exposure time as long as 1 s, i.e., 400 times longer; so, with the current hardware, the π 2 is expected to be sensitive to proton fluxes lower than the ones used in this characterisation.

3.2. Comparison with Reference Beam Profile Measurements

The correct functioning of the π 2 detector was validated by means of two independent experiments: in the first one, the measurement of a parallel beam was compared with the measurement of the same beam provided by a FWT-60 radiochromic film; in the second one, the measurement of a focused beam was compared with the measurement provided by the UniBEaM detector.
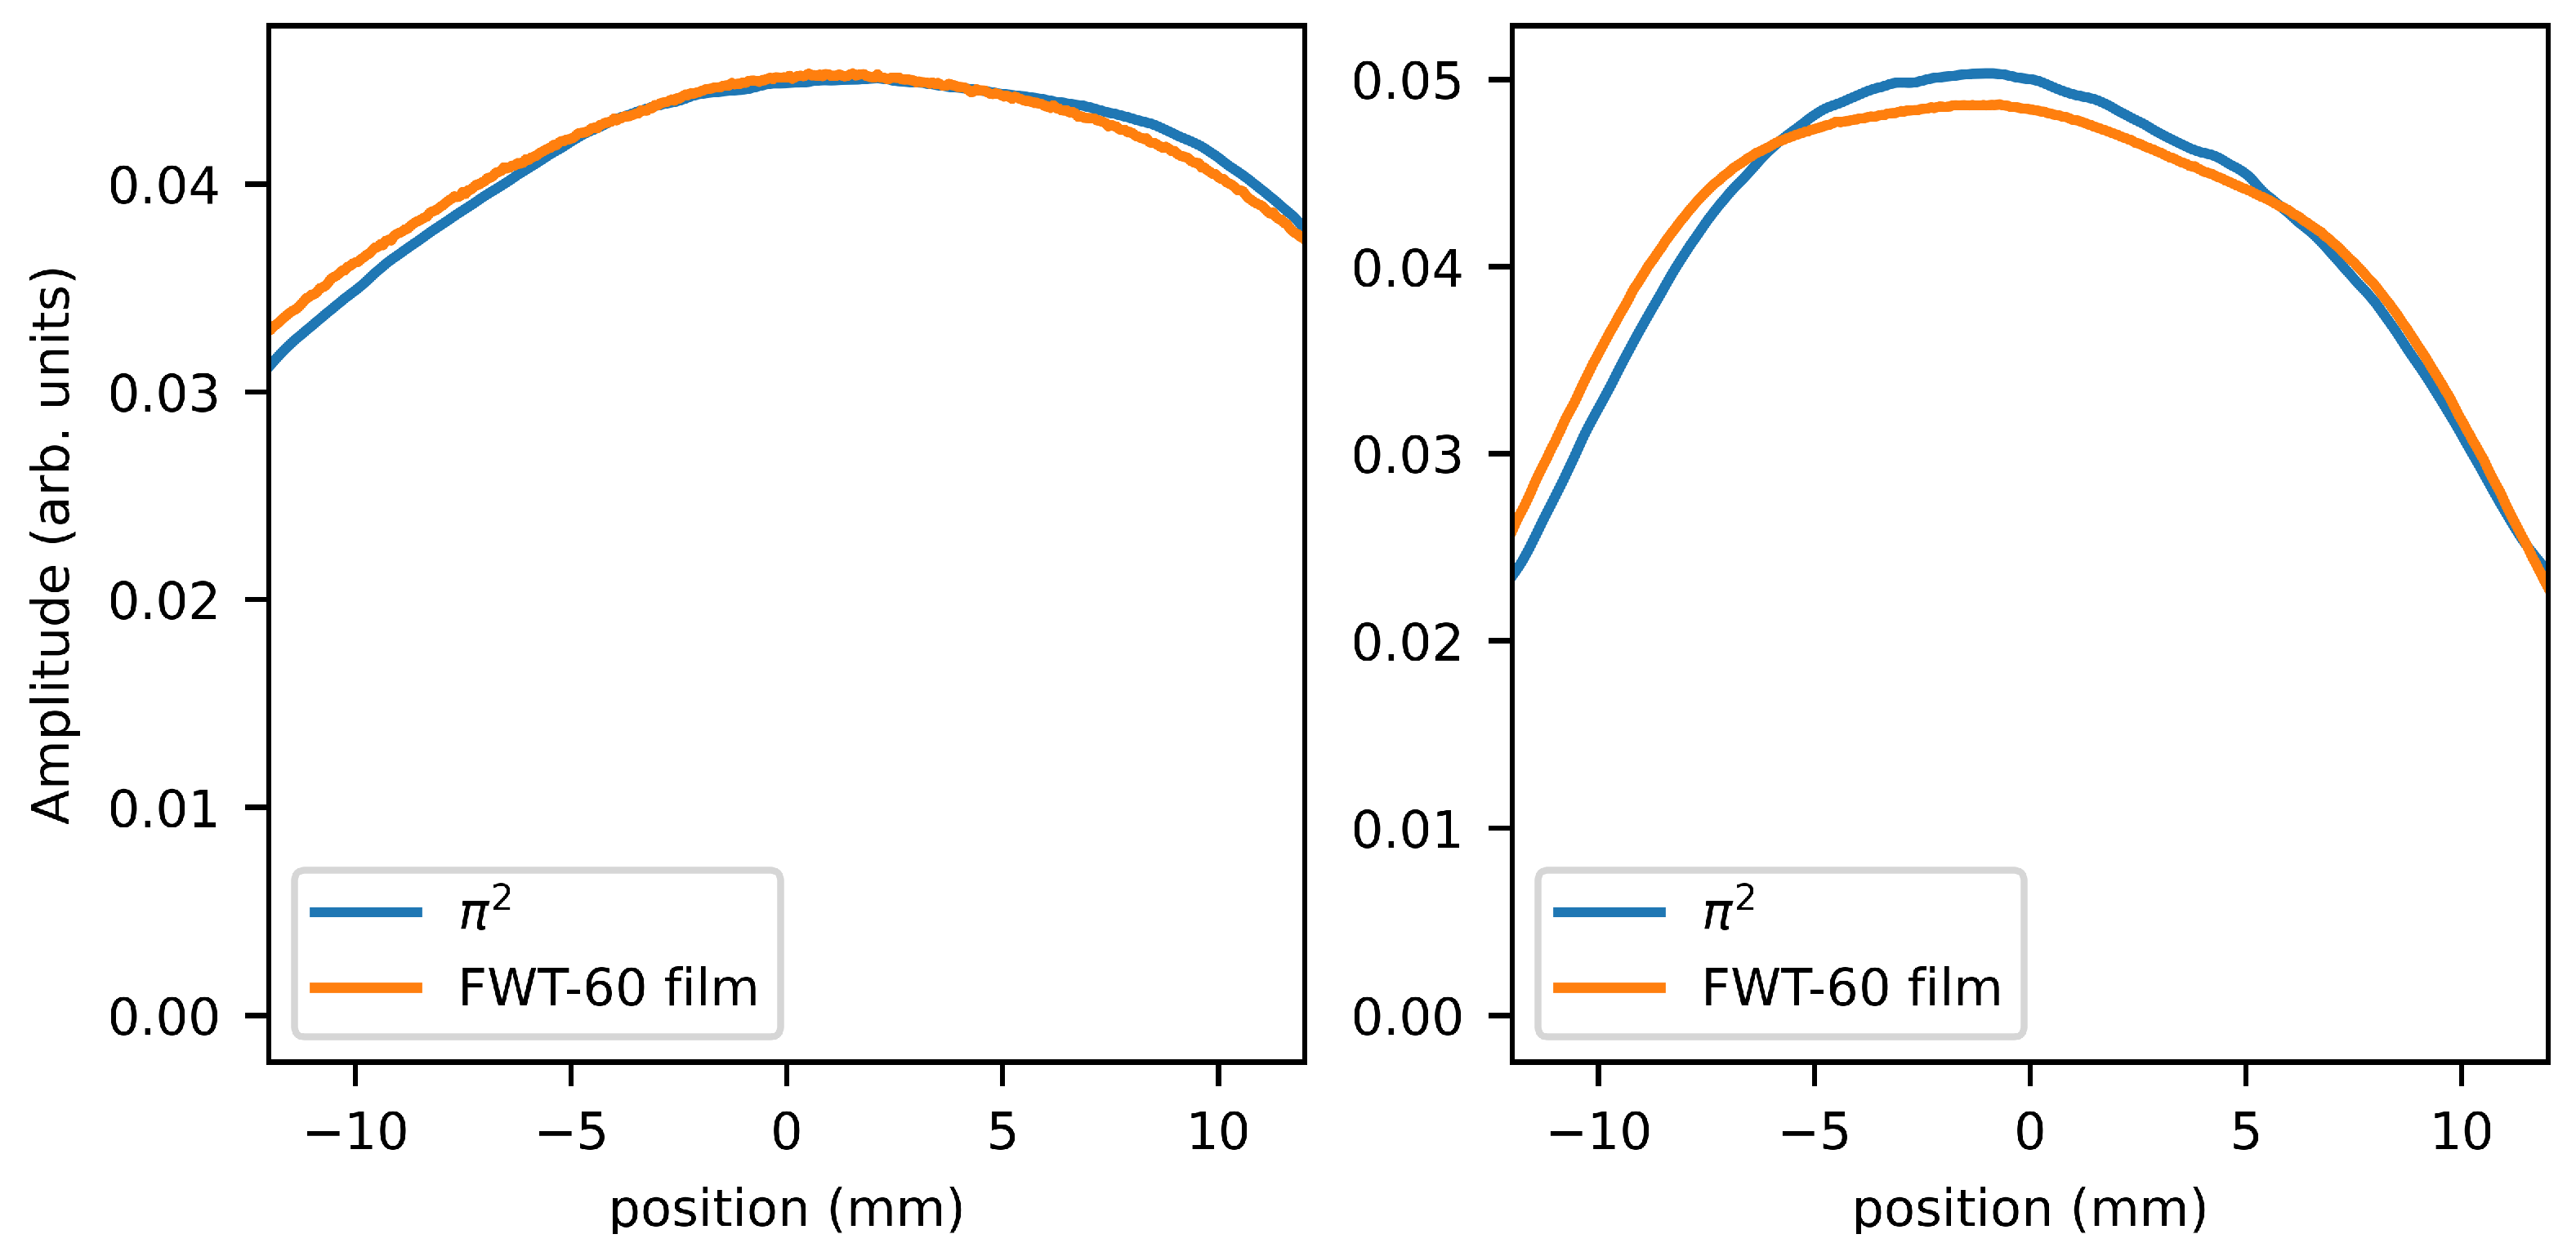
In the first experiment (Figure 4b), the film was attached with adhesive tape to the back of a ( 3 × 3 ) cm 2 collimator, 10 cm upstream of the π 2 . The second quadrupole magnet of the BTL was switched off to obtain a parallel beam, i.e., with identical profile at the position of the film and detector. The film was irradiated up to an integrated proton flux of 3 · 10 12 cm 2 , thus, well within its linear response range. During that time, 10 images were acquired by the π 2 and averaged in the post-processing for the comparison with the film. Figure 7 shows the two measurements, where the two-dimensional beam images have been projected onto the horizontal and vertical axes, for comparison. Both measurements agree within 5%.
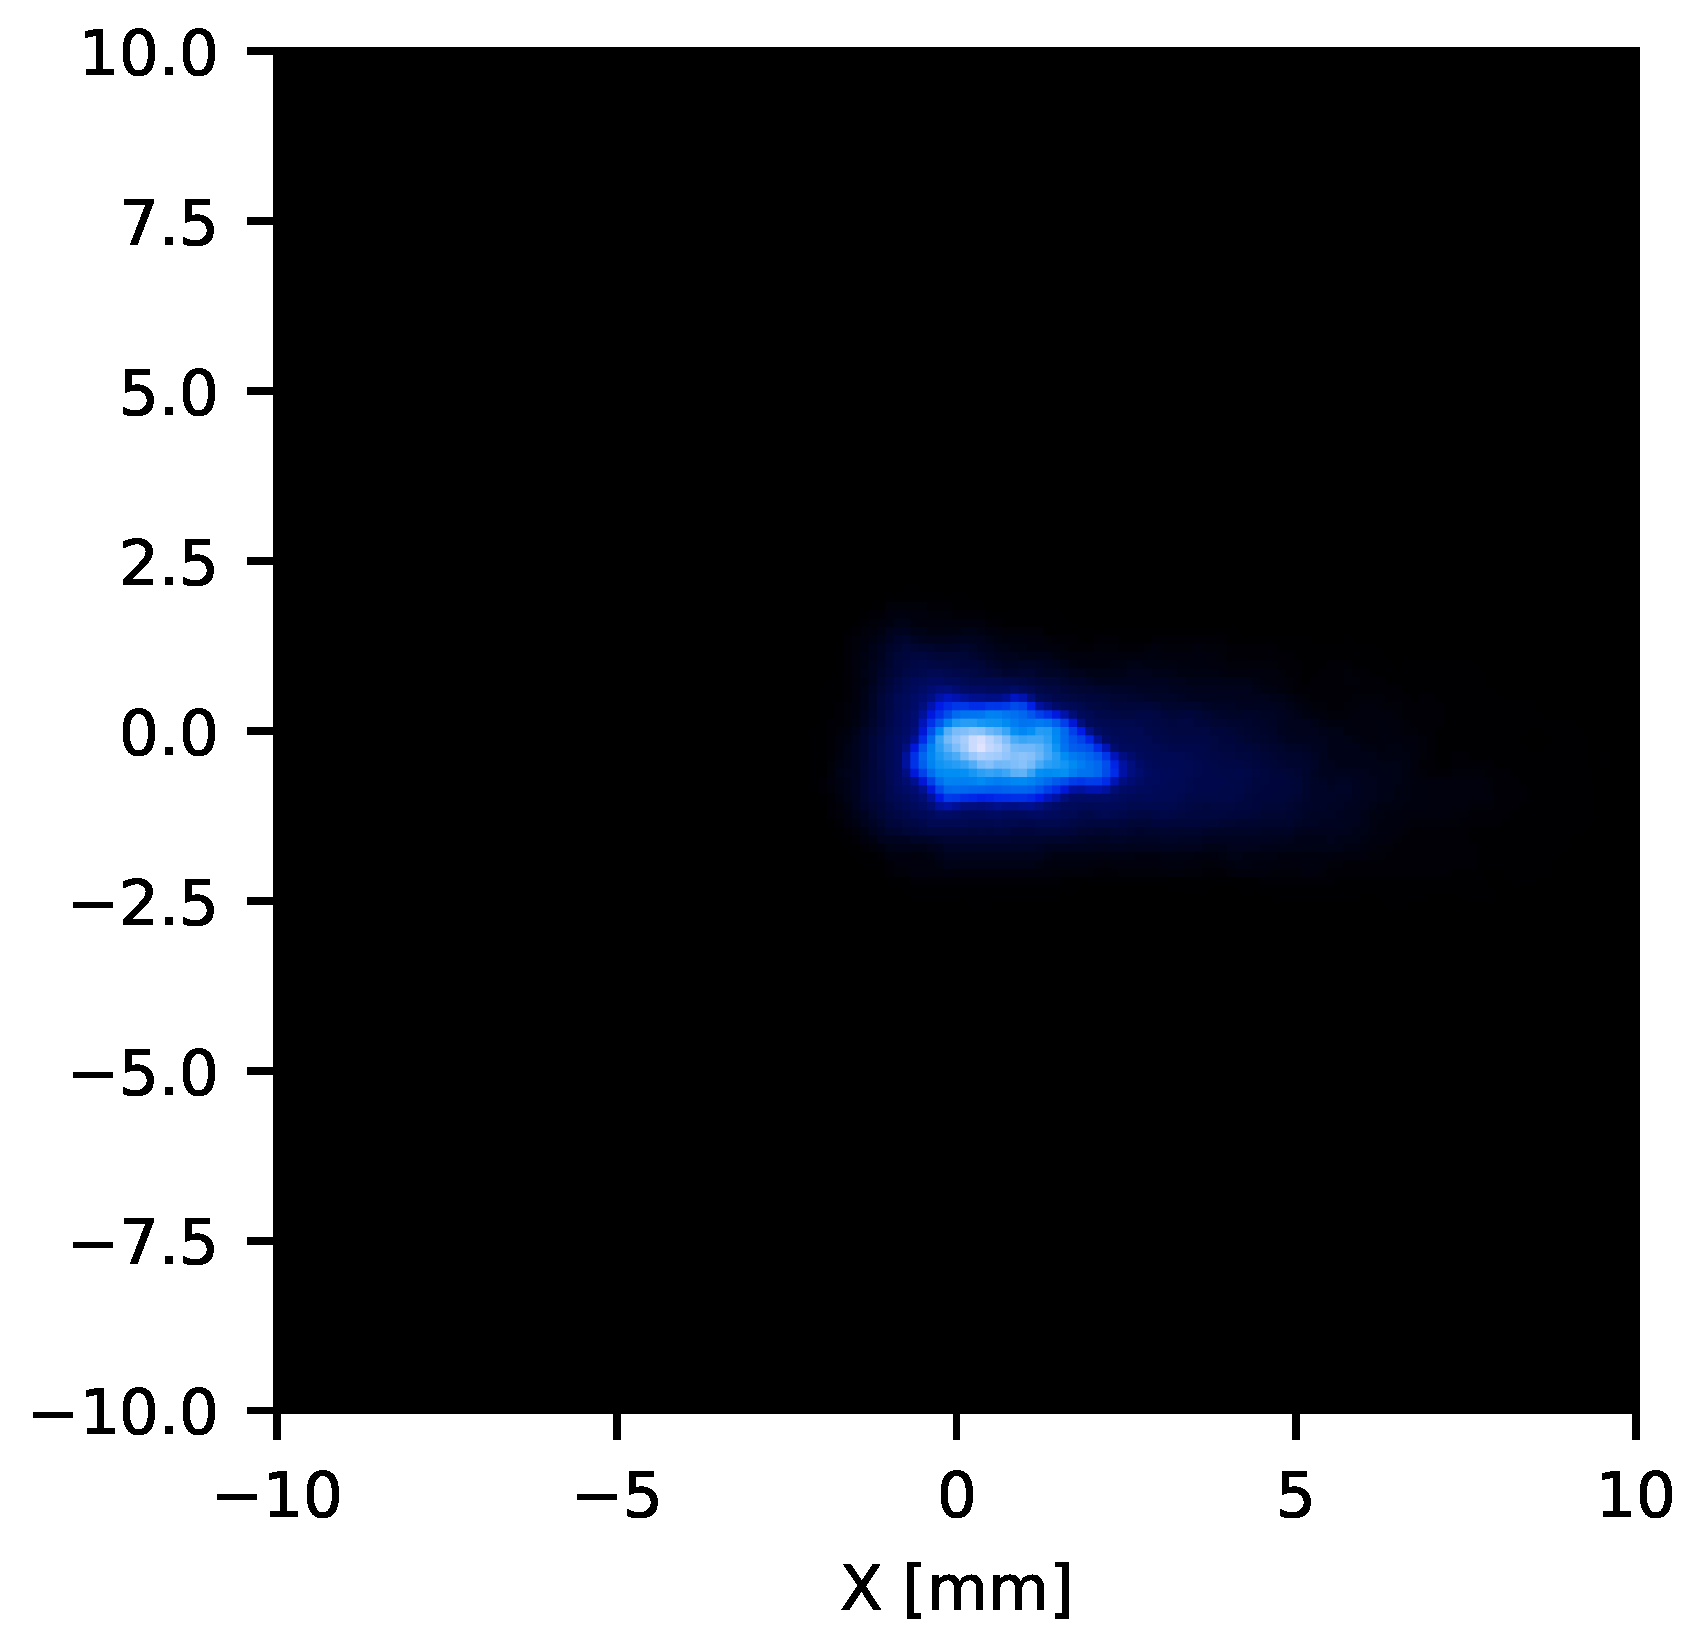
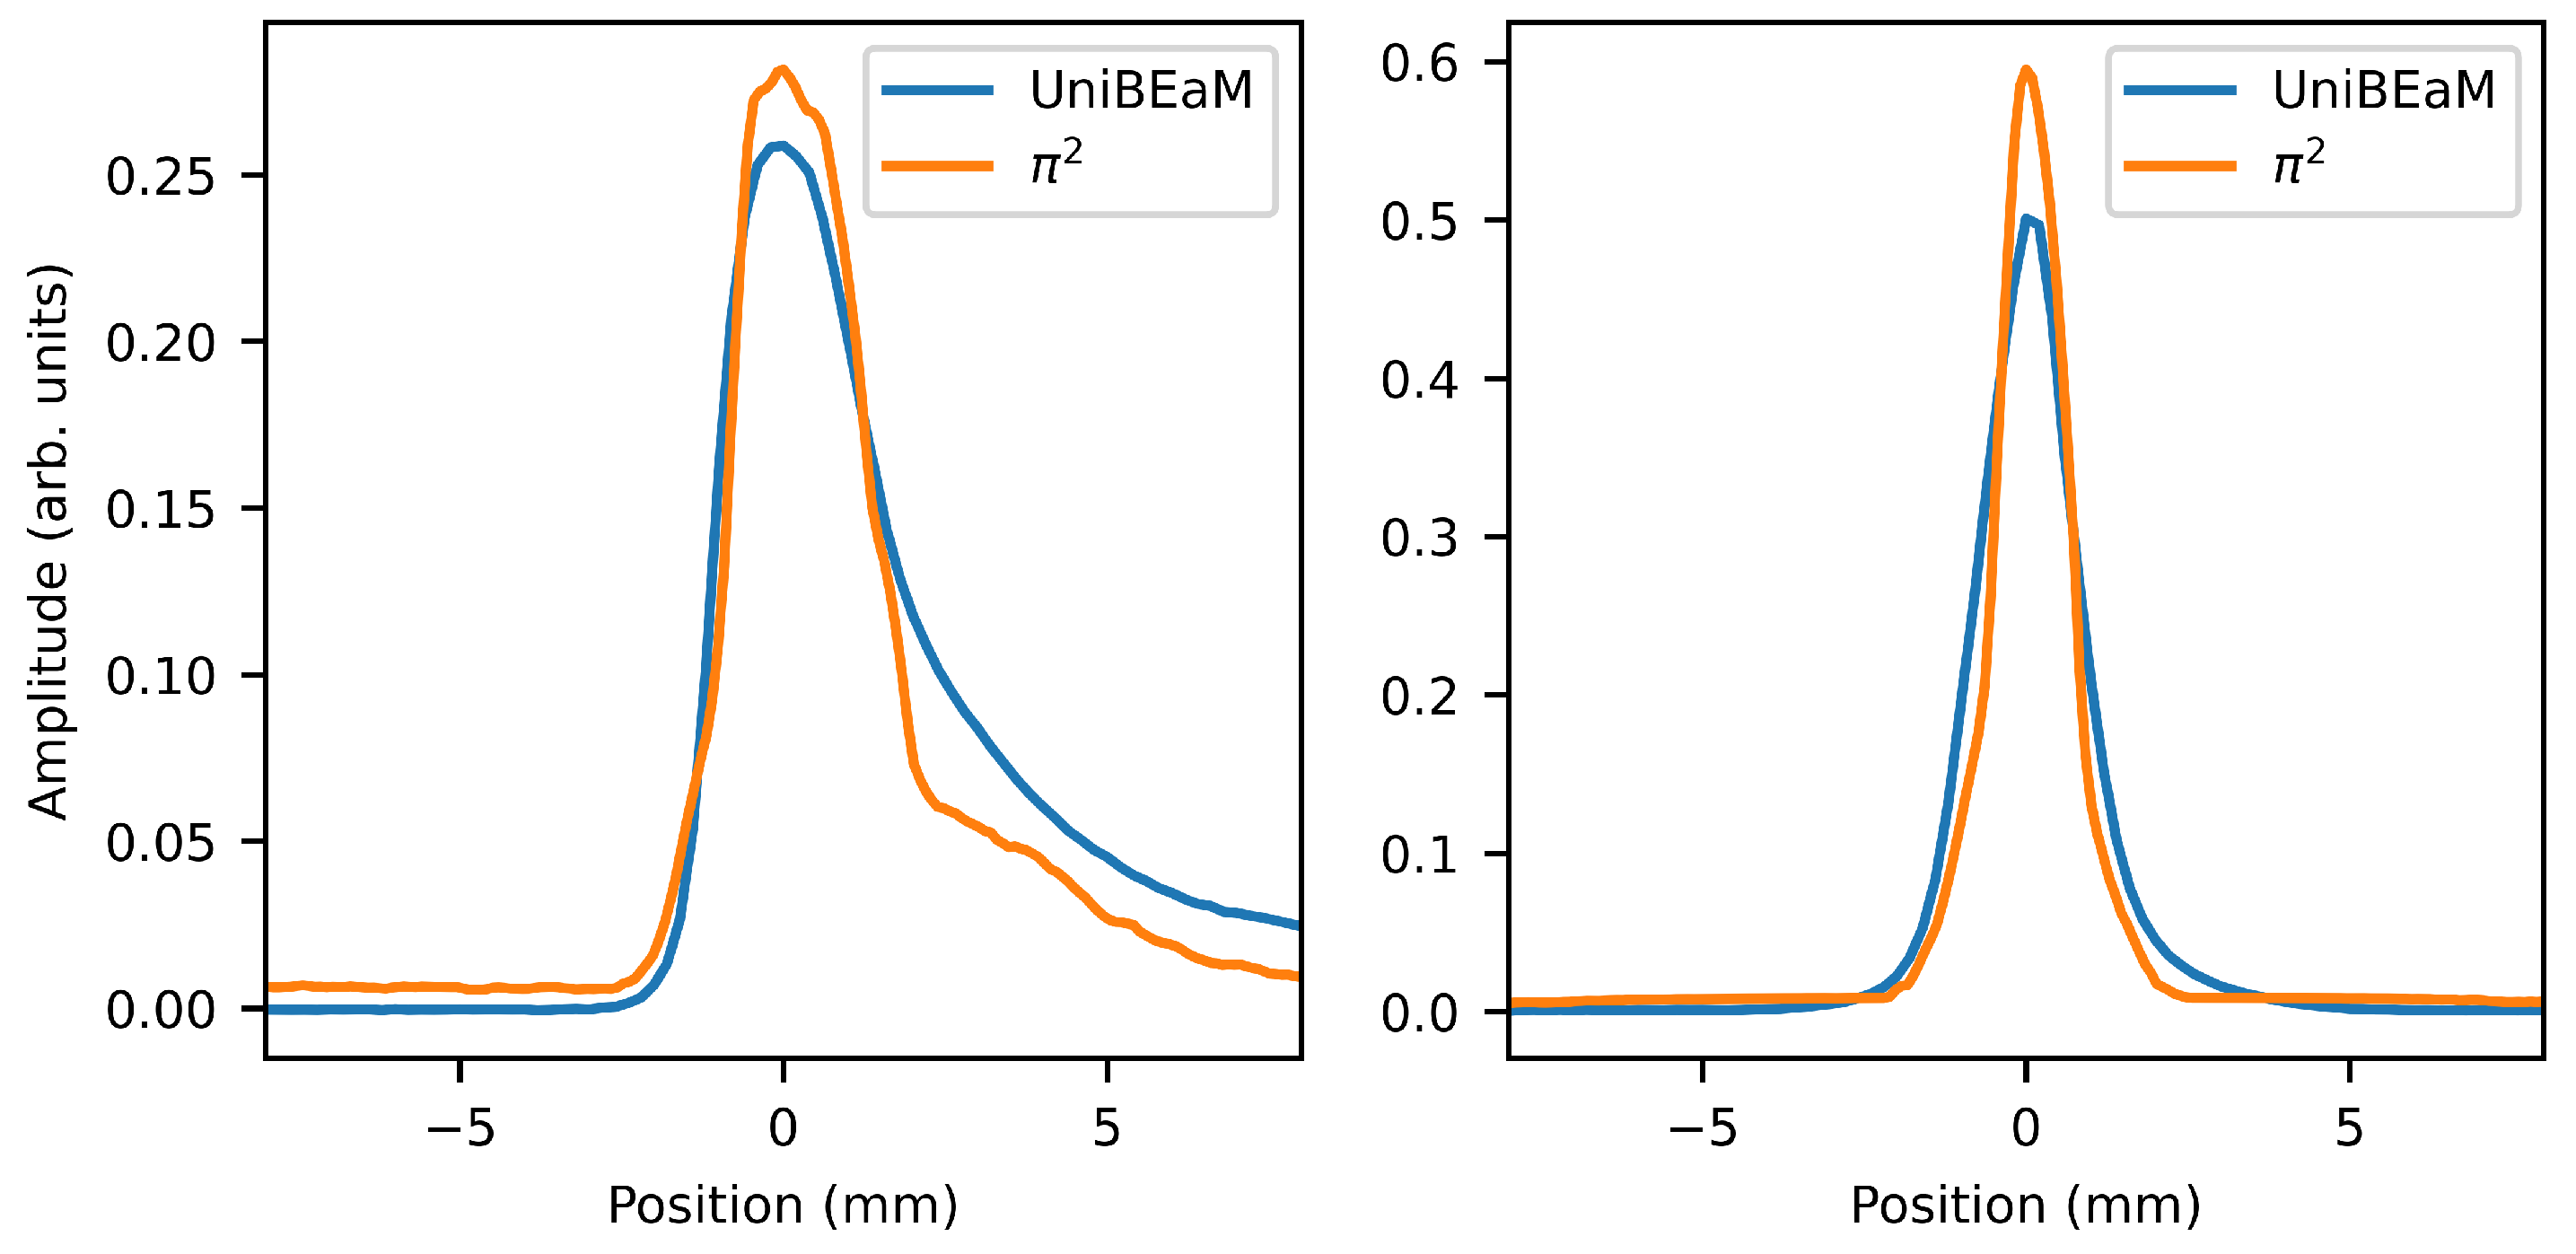
For the comparison with the UniBEaM (Figure 4c), both devices were simultaneously installed on the beam line, with the UniBEaM about 10 cm upstream of the π 2 ; the current on the quadrupole magnets was set to obtain a focused beam, fully contained in the sensitive area of both devices. The beam profile measured by the π 2 is shown in Figure 8. The image projections onto the horizontal and vertical axes are compared to the UniBEaM profiles in Figure 9, with good agreement. For a better visualisation, the profiles have been normalised and re-centred. Since the beam is focused, and the π 2 monitor is placed after the UniBEaM, the narrowing of the profile from one detector to the other is to be expected. It should be noted that the comparison in this case is only qualitative, since neither of the two instruments was calibrated for the intensity levels obtained with focused beams.

3.3. Scattering Effects

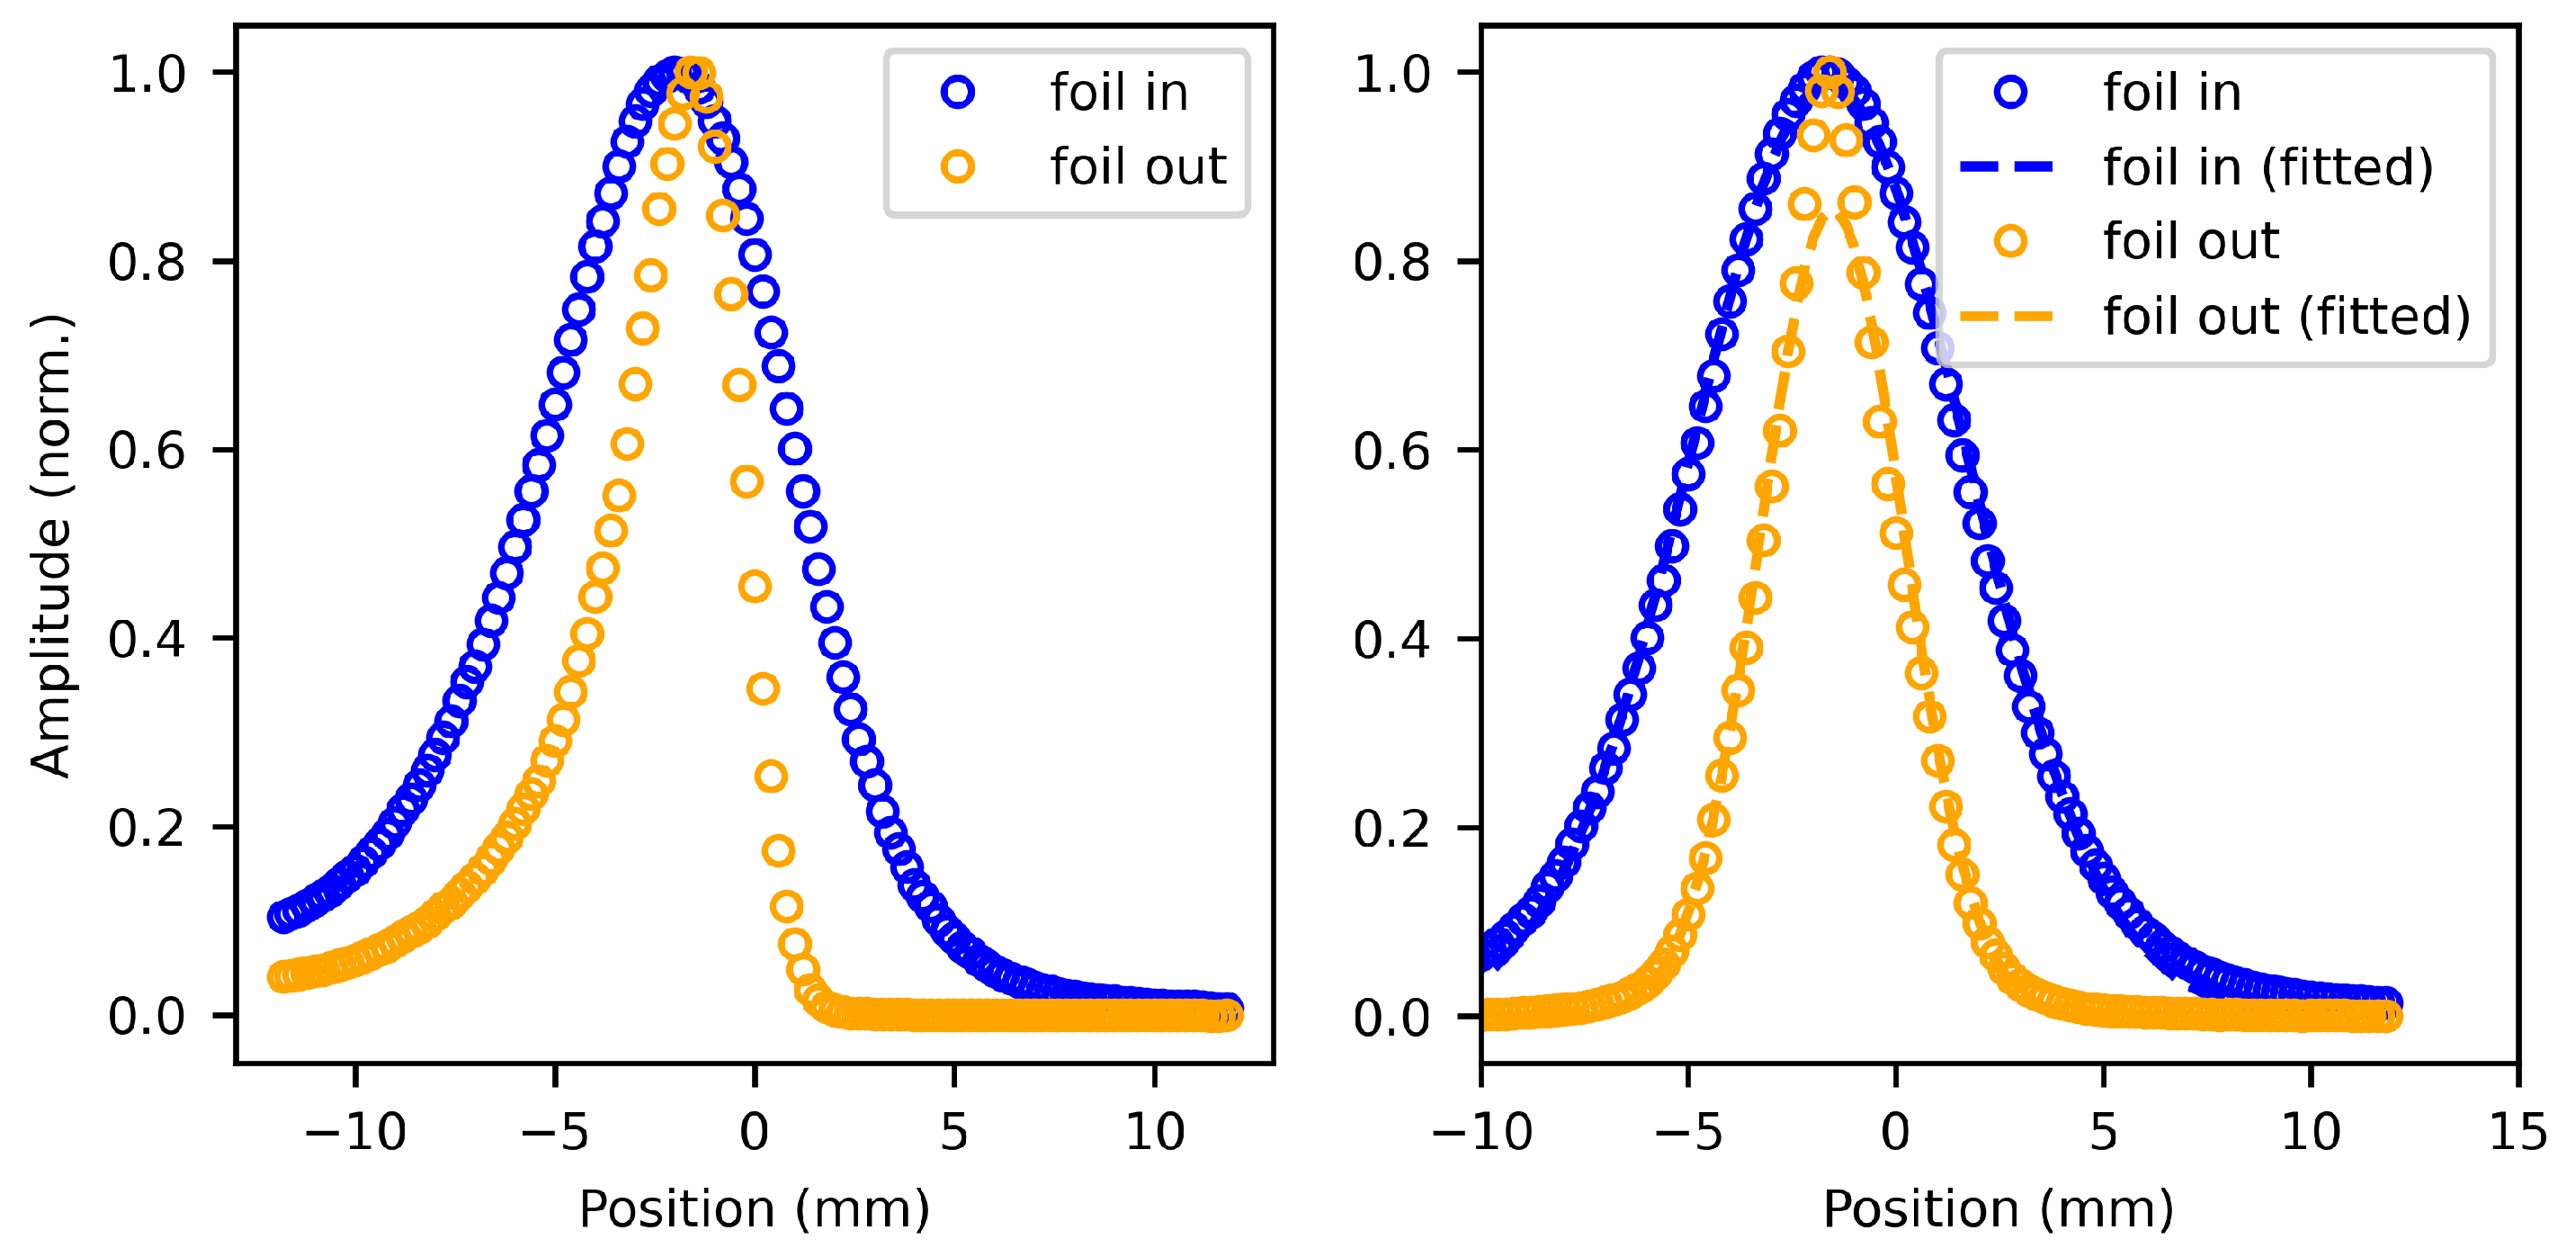
A dedicated experiment was conducted to determine the amount of beam scattering introduced by the π 2 foil. The method, shown in Figure 4d, consisted in installing the UniBEaM detector 60 cm downstream of the π 2 , in order to assess the effect of the foil on the beam profile measured by the UniBEaM. To this end, beam profile measurements were taken with the UniBEaM, with the foil in and out of beam. The results are reported in Figure 10. The vertical profile, which closely resembles a Gaussian distribution, was fitted obtaining standard deviations σ I N = ( 3.3 ± 0.1 ) mm and σ O U T = ( 1.7 ± 0.1 ) mm, for the situations with the π 2 foil inserted and removed, respectively. The beam profile with the foil in beam can be thought of as the convolution of the beam profile with the foil out of beam and the probability distribution of the scattering introduced by the foil on a point-like beam. Assuming that this probability distribution is also Gaussian with standard deviation σ s p r e a d , the following relationship holds:
σ I N = σ O U T 2 + σ s p r e a d 2
For our experiment we obtain σ s p r e a d = ( 2.8 ± 0.2 ) mm. Considering the 60 cm drift space between the π 2 scintillating foil and the UniBEaM detector, this is equivalent to 47 μ m per cm of drift space.
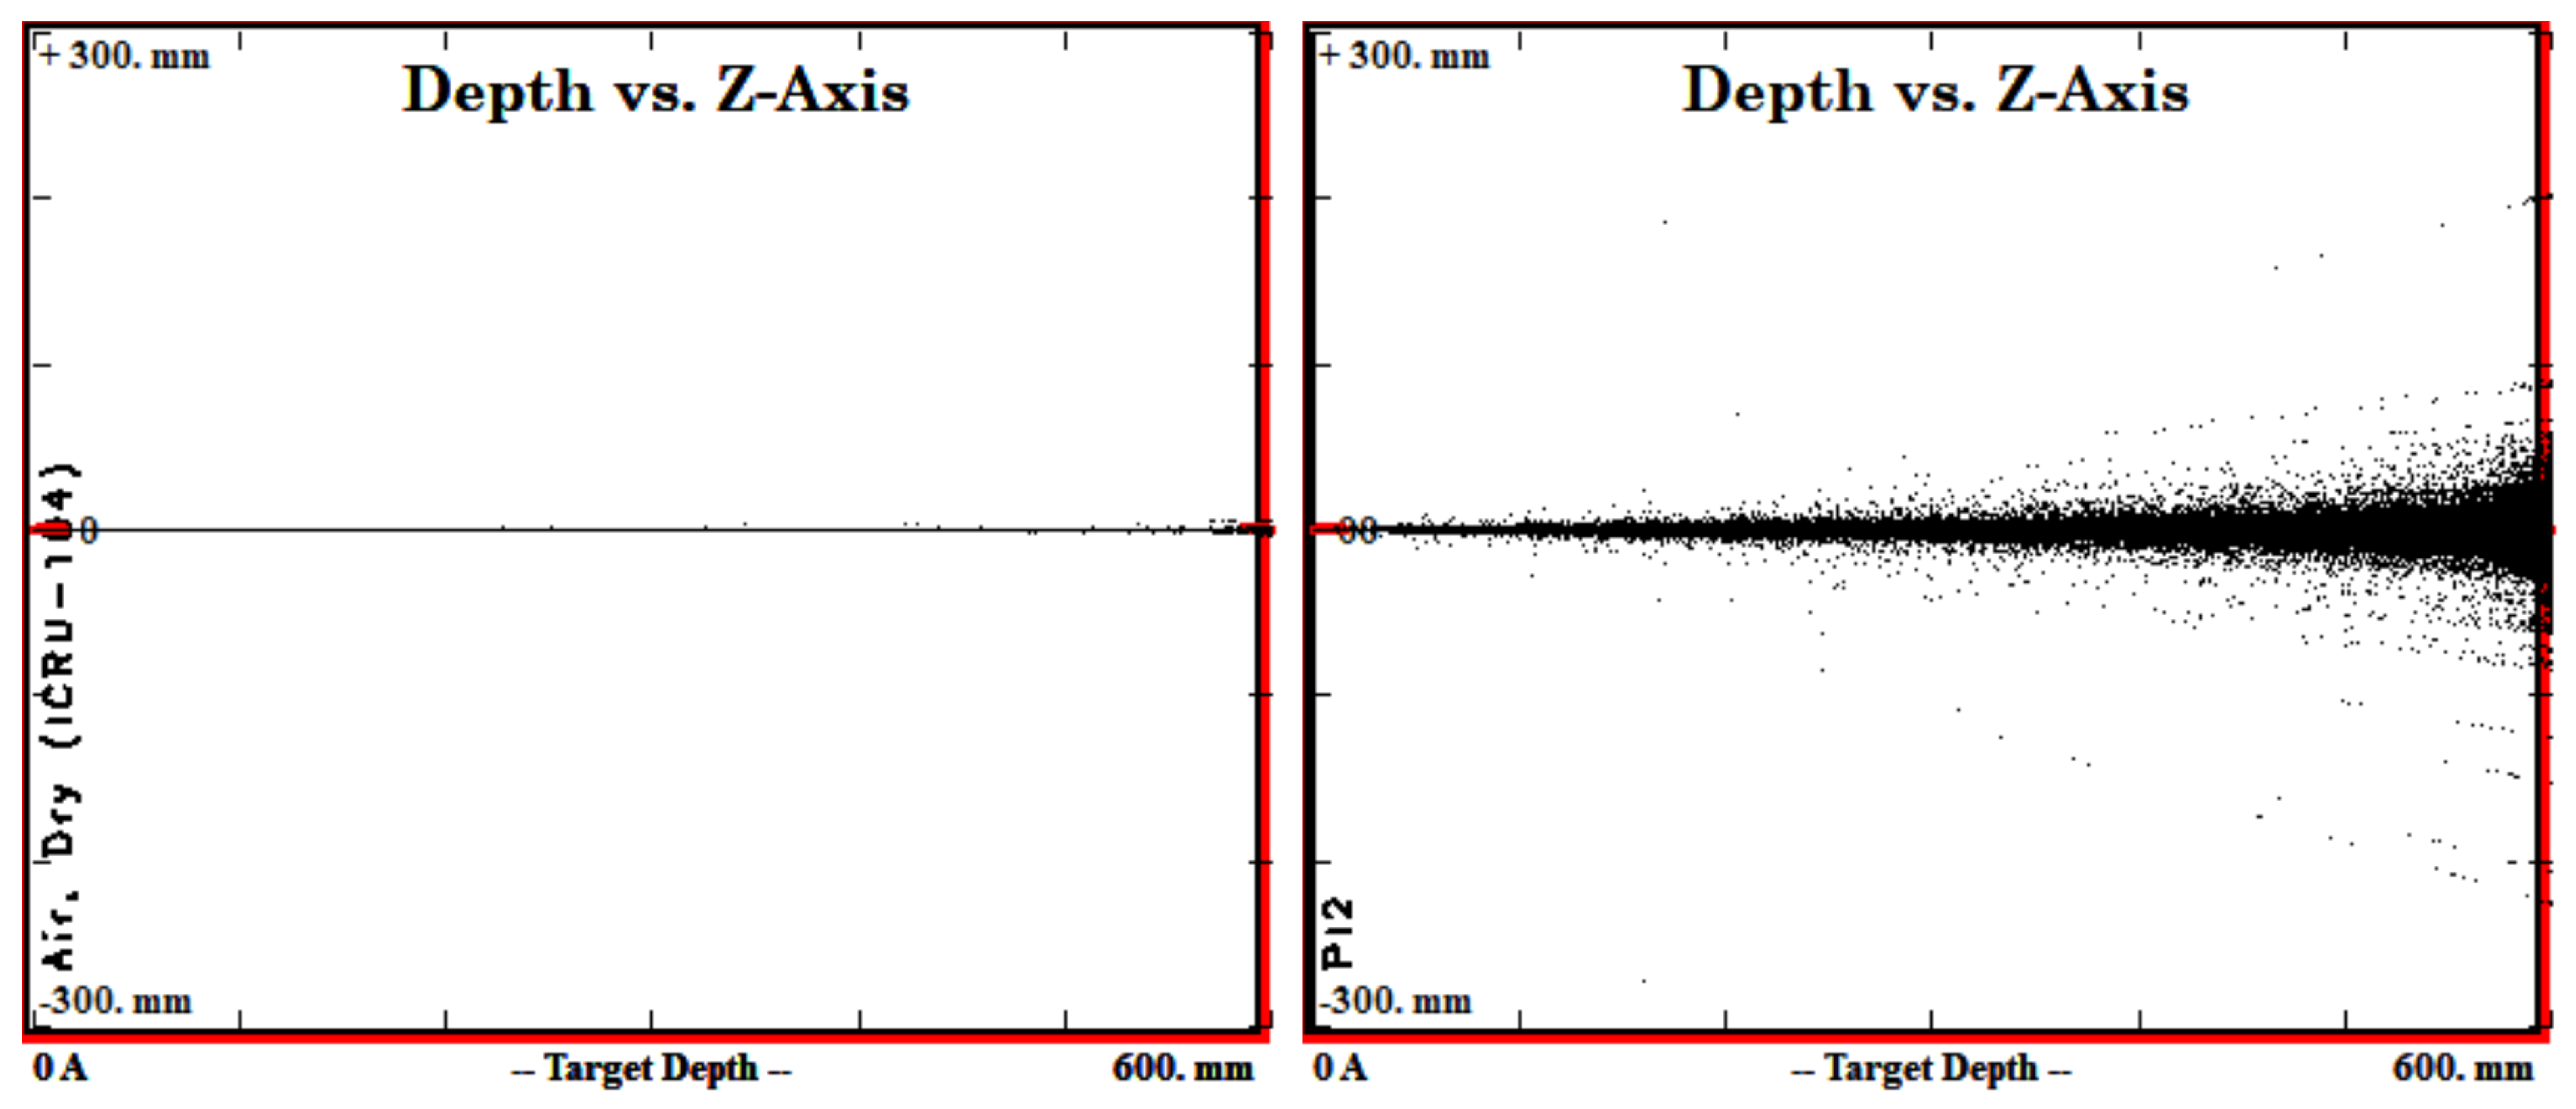
This result was cross-checked against a simulation using the TRIM (Transport of Ions in Matter) software [24]. In the simulation, an 18 MeV point-like proton was set to impact a 15 μ m aluminium foil at an angle of 45 . Since the thickness of the P47 coating is less than 1 μ m , it is considered negligible. The mean energy lost by the protons in the foil, as determined by the simulation, is of only 89.0 keV. After the foil, 60 cm of drift space in vacuum was simulated as air at a pressure of 1.2 · 10 7 g / cm 3 . The proton beam at the end of the drift space presented a Gaussian distribution with a spread of ( 2.60 ± 0.05 ) mm in both the horizontal and vertical planes (Figure 11). This result deviates less than 10% from the measurement, well within the 25% tolerance on the thickness foil guaranteed by the manufacturer of the aluminium foil.

3.4. Radiation Tolerance Study

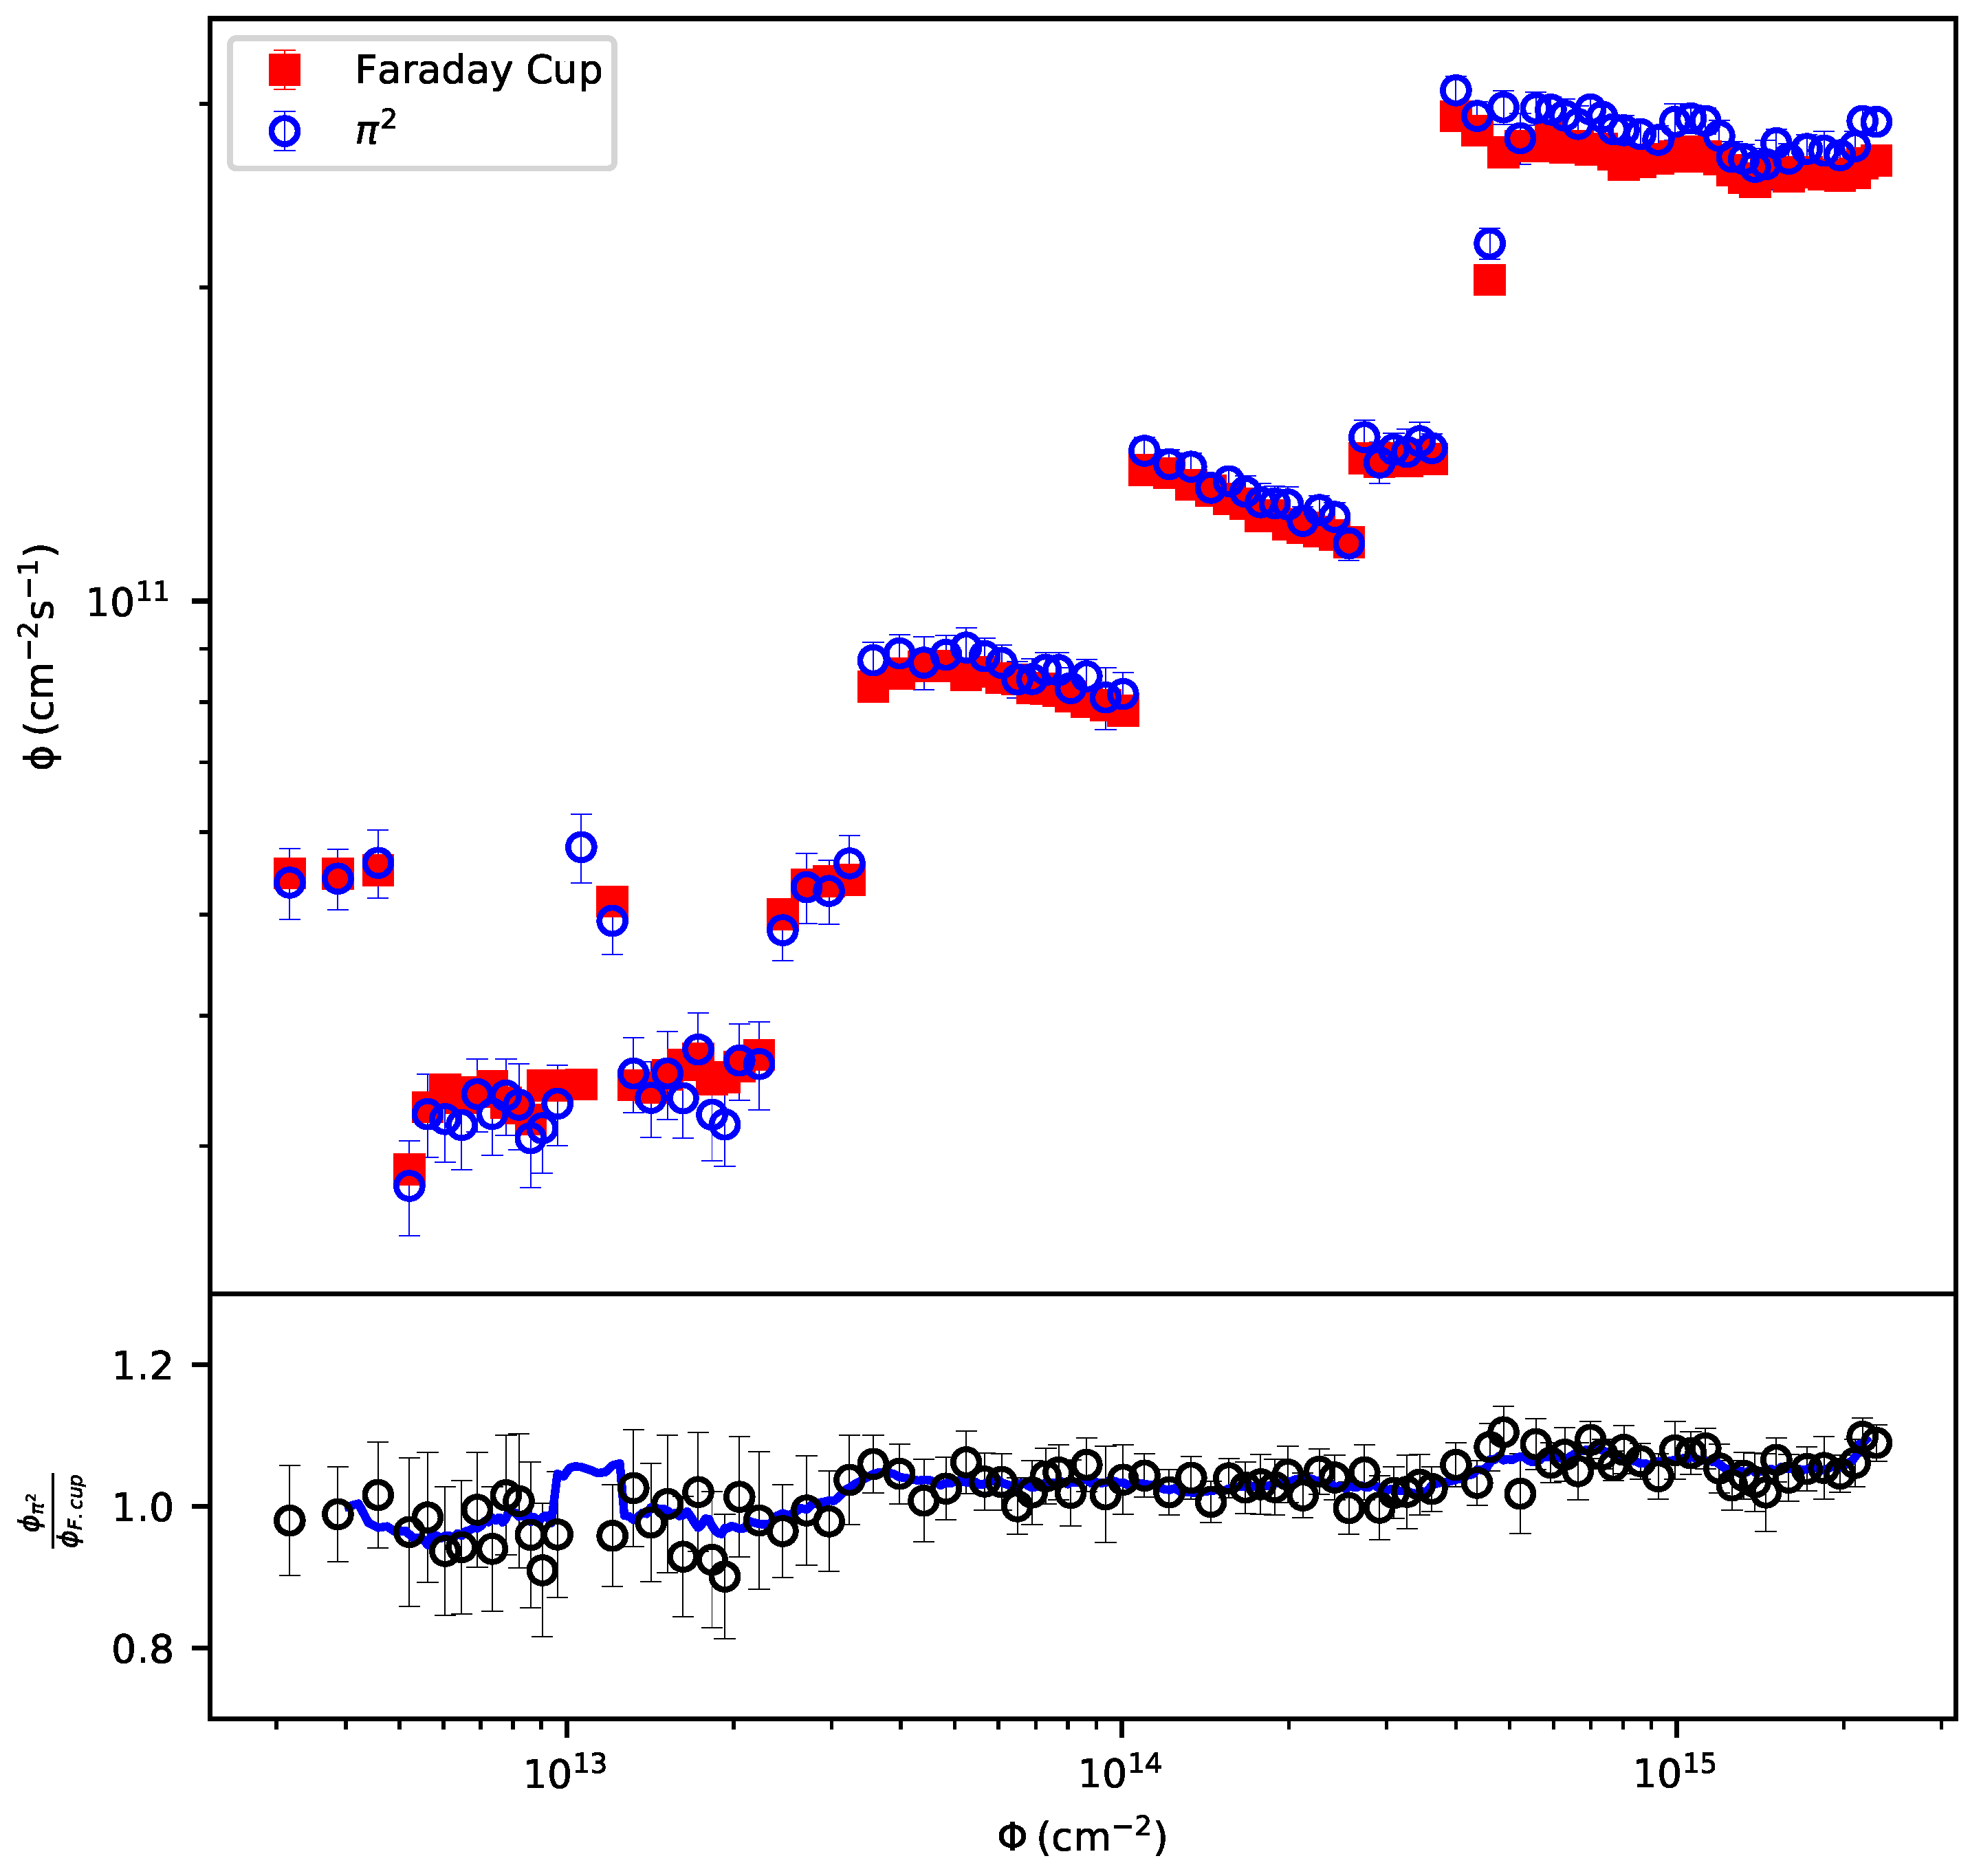
A long-term irradiation was performed to study any radiation-induced degradation of the π 2 response. The beam line setup was identical to the one used to study the linearity of the output signal (Figure 4a), i.e., the π 2 was installed after the ( 1 × 1 ) cm 2 square collimator, and upstream of the Faraday Cup. Images and current measurements were taken simultaneously at regular time intervals for the whole irradiation time. Figure 12, top, shows the instantaneous proton flux ϕ (in units of cm 2 · s 1 ) measured by both the Faraday Cup and the π 2 as a function of the integrated proton flux Φ (in units of cm 2 ). The instantaneous proton flux from the Faraday Cup was calculated as the measured current (converted to number of charges per second) divided by the collimator aperture area. The proton flux from the π 2 was obtained by converting the blue pixel value using the fit to the transfer function in Figure 6. The integrated proton flux Φ was calculated from the proton flux measured by the Faraday Cup, as Φ [ n ] = i = 0 n 1 ϕ [ i ] · t [ i ] , where t [ i ] is the vector of time intervals between consecutive measurements. Figure 12, bottom, shows the ratio between the two flux measurements. At the start of the test, the proton flux was set as low as possible to observe changes in the response for low Φ values. The proton flux was later increased in subsequent steps to reach as high a value of Φ as possible. As seen in the bottom plot, the ratio between both measurements remained stable within the experimental uncertainty for the whole duration of the test, up to Φ = 3 · 10 15 cm 2 , equivalent to 10.6 MGy Total Ionising Dose on silicon, thus showing no sign of any radiation-induced degradation in light yield.

4. Conclusions and Outlook

The π 2 detector is a user-friendly, cost-effective solution for monitoring the profile of ion beams with minimum disturbance and precision better than 0.1 mm. It is easy to install and remove, and can be adapted to any beam line. Dedicated software allows for the real-time visualisation of the beam footprint on the scintillator screen and extraction of beam parameters such as FWHM in both the horizontal and vertical axis. The detector is currently used regularly to monitor an 18 MeV proton beam for research activities at the Bern medical cyclotron laboratory. The instrument’s performance was evaluated in several tests carried out using the beam transfer line available in the facility. In the first experiment, we performed beam intensity scans from 2 · 10 10 cm 2 · s 1 to 5 · 10 11 cm 2 · s 1 , and observed a linear response of the scintillator in the whole range. From this test, a calibration curve to scale the π 2 image to proton flux units was obtained. A second experiment showed that the beam profile measurements given by the π 2 are consistent with the ones obtained using both radiochromic films and the UniBEaM detector. In a third experiment, the amount of beam scattering introduced by the scintillating foil was assessed. The effect on the transversal beam profile downstream the π 2 is the convolution with a Gaussian distribution with standard deviation equal to 47 μ m per cm of drift space. Finally, an irradiation study up to a total integrated proton flux of 3 · 10 15 cm 2 , in which the flux measured by the π 2 was continuously compared with the measurement given by a Faraday Cup installed downstream the detector ruled out any radiation-induced degradation of the π 2 response.
The results presented in this paper show that the π 2 detector has potential to be industrialised, since it can be used to monitor accelerated ion beams in a wide range of applications encompassing medical radioisotope production, proton therapy and radiation hardness studies.

Author Contributions

S.B. conceived the π 2 detector; S.B., T.S.C., I.M. and M.S. contributed to the construction of the detector; P.C., G.D., I.M. and M.S. performed the beam tests and analysed the data; S.B., L.F., I.M. and P.S. wrote the paper; S.B., P.C., T.S.C., L.F., G.D., I.M., P.S., and M.S. revised the paper; S.B. coordinated the project. All authors have read and agreed to the published version of the manuscript.

Funding

This research was partially funded by the Swiss National Science Foundation (SNSF). Grants: 200021_175749, CRSII5_180352, CR23I2_156852.

Institutional Review Board Statement

Not applicable.

Informed Consent Statement

Not applicable.

Data Availability Statement

Not applicable.

Acknowledgments

We acknowledge contributions from the LHEP engineering and technical staff who helped us with the mechanical and electronics challenges during the prototype development and installation. We thank the SWAN team for the support in the operation of the cyclotron, Gianni Molinari from the TERA Foundation at CERN as well as our colleagues and students Martin Auger, Carolina Belver-Aguilar, Philipp Daniel Häffner, Konrad Nesteruk, Alexander Gottstein, Meinrad Schefer and Michael Wenger.

Conflicts of Interest

The authors declare no conflict of interest.

References

  1. Jacobson, O.; Chen, X. PET designated flouride-18 production and chemistry. Curr. Top. Med. Chem. 2010, 10, 1048–1059. [Google Scholar] [CrossRef] [PubMed] [Green Version]
  2. Hoehr, C.; Bénard, F.; Buckley, K.; Crawford, J.; Gottberg, A.; Hanemaayer, V.; Kunz, P.; Ladouceur, K.; Radchenko, V.; Ramogida, C.; et al. Medical Isotope Production at TRIUMF—From Imaging to Treatment. Phys. Procedia 2017, 90, 200–208. [Google Scholar] [CrossRef]
  3. Synowiecki, M.A.; Perk, L.R.; Nijsen, J.F.W. Production of novel diagnostic radionuclides in small medical cyclotrons. EJNMMI Radiopharm. Chem. 2018, 3, 3. [Google Scholar] [CrossRef] [PubMed] [Green Version]
  4. Braccini, S.; Ereditato, A.; Scampoli, P.; Bremen, K.V. The new Bern cyclotron laboratory for radioisotope production and research. In Proceedings of the IPAC2011, San Sebastian, Spain, 4–9 September 2011; p. 3618, THPS080. Available online: www.jacow.org (accessed on 20 February 2023).
  5. Raich, U. Beam Diagnostics; CER-2006-012; CERN Accelerator School (CAS): Geneva, Switzerland, 2006; p. 297. [Google Scholar]
  6. Gasior, M.; Jones, R.; Lefevre, T.; Schmickler, H.; Wittenburg, K. Introduction to Beam Instrumentation and Diagnostics; CERN-2014-009; CERN Accelerator School (CAS): Geneva, Switzerland, 2016; p. 23. [Google Scholar]
  7. Brown, K.L.; Tautfest, G.W. Faraday-Cup Monitors for High-Energy Electron Beams. Rev. Sci. Instruments 1956, 27, 696–702. [Google Scholar] [CrossRef]
  8. Peyser, T.A.; Antoniades, J.A.; Myers, M.C.; Lampe, M.; Pechacek, R.E.; Murphy, D.P.; Meger, R.A. A segmented concentric Faraday cup for measurement of time-dependent relativistic electron beam profiles. Rev. Sci. Instruments 1991, 62, 2895–2903. [Google Scholar] [CrossRef]
  9. Noh, S.Y.; Chang, S.D.; Yang, T.-K.; Hahn, G.R.; Hwang, J.-G. The development of scintillating screen detector for beam monitoring at the Khima project. In Proceedings of the International Particle Accelerator Conference (IPAC), Busan, Republic of Korea, 8–13 May 2016. MOPMR010. [Google Scholar]
  10. Gasior, M. An inductive pick-up for beam position and current measurements. In Proceedings of the European Workshop on Beam Diagnostics and Instrumentation for Particle Accelerators (DIPAC), Mainz, Germany, 5–7 May 2003. [Google Scholar]
  11. Bernier, K.; de Rijk, G.; Ferioli, G.; Hatziangeli, E.; Marchionni, A.; Palladino, V.; Stevenson, G.R.; Fatis, T.T.d.; Tsesmelis, E. Calibration of Secondary Electron Emission Monitors of Absolute Proton Beam Intensity in the CERN SPS North Area; CERN Yellow Report 97-07 1997; European Organization for Nuclear Research: Geneva, Switzerland, 1997. [Google Scholar]
  12. Bosser, J.; Camas, J.; Evans, L.; Ferioli, G.; Hopkins, R.; Mann, J.; Olsen, O. Transverse emittance measurement with a rapid wire scanner at the CERN SPS. Nucl. Instrum. Methods Phys. Res. A: Accel. Spectrom. Detect. Assoc. Equip. 1985, 235, 475–480. [Google Scholar] [CrossRef]
  13. Badano, L.; Ferrando, O.; Klatka, T.; Koziel, M.; Molinari, G.; Abbas, K.; Braccini, S.; Bulgheroni, A.; Caccia, M.; Gibson, P.N.; et al. Laboratory and in-beam tests of a novel real-time beam monitor for hadrontherapy. IEEE Trans. Nucl. Sci. 2005, 52, 4. [Google Scholar] [CrossRef]
  14. Kirillova, E. Study and Test of a Beam Monitor Detector for the Bern Medical Cyclotron. Master’s Thesis, University of Bern, Bern, Switzerland, 2014. [Google Scholar]
  15. Braccini, S.; Bergesio, D.; Ereditato, A.; Kirillova, E.; Molinari, G.; Nesteruk, K.P.; Scampoli, P.; Amaldi, U. An innovative on-line beam-monitoring detector based on the emission of secondary electrons. Radiother. Oncol. 2014, 110, S14. [Google Scholar] [CrossRef]
  16. Belver-Aguilar, C.; Carzaniga, T.S.; Gsponer, A.; Häffner, P.; Molinari, G.; Scampoli, P.; Schmid, M.; Braccini, S. Development of novel non-destructive 2D and 3D beam monitoring detectors at the Bern medical Cyclotron. In Proceedings of the IBIC 2020—9th International Beam Instrumentation Conference, TUPP32, JACoW, Santos, Brazil, 14–18 September 2020; Available online: https://indico.jacow.org/event/34/ (accessed on 20 February 2023).
  17. Belver-Aguilar, C.; Braccini, S.; Carzaniga, T.S.; Gsponer, A.; Häffner, P.D.; Scampoli, P.; Schmid, M. A novel three-dimensional non-destructive beam-monitoring detector. Appl. Sci. 2020, 10, 8217. [Google Scholar] [CrossRef]
  18. Auger, M.; Braccini, S.; Carzaniga, T.S.; Ereditato, A.; Nesteruk, K.P.; Scampoli, P. A detector based on silica fibers for ion beam monitoring in a wide current range. J. Instrum. 2016, 11, P03027. [Google Scholar] [CrossRef]
  19. Potkins, D.E.; Braccini, S.; Nesteruk, K.P.; Carzaniga, T.S.; Vedda, A.; Chiodini, N.; Timmermans, J.; Melanson, S.; Dehnel, M.P. A low-cost beam profiler based On cerium-doped silica fibres. Phys. Procedia 2017, 90, 215–222. [Google Scholar] [CrossRef]
  20. Braccini, S. The new Bern PET cyclotron, its research beam line, and the development of an innovative beam monitor detector. AIP Conf. Proc. 2013, 1525, 144–150. [Google Scholar] [CrossRef]
  21. Auger, M.; Braccini, S.; Ereditato, A.; Nesteruk, K.P.; Scampoli, P. Low current performance of the Bern medical cyclotron down to the pA range. Meas. Sci. Technol. 2015, 26, 094006. [Google Scholar] [CrossRef]
  22. FWT-60 Radiochromic Film. Available online: https://www.fwt.com/racm/fwt60ds.htm (accessed on 20 February 2023).
  23. ITU Recommendation, BT. 709-6 (06/2015). Available online: https://www.itu.int/rec/R-REC-BT.709-6-201506-I/en (accessed on 20 February 2023).
  24. SRIM and TRIM Software. Available online: http://www.srim.org/ (accessed on 20 February 2023).
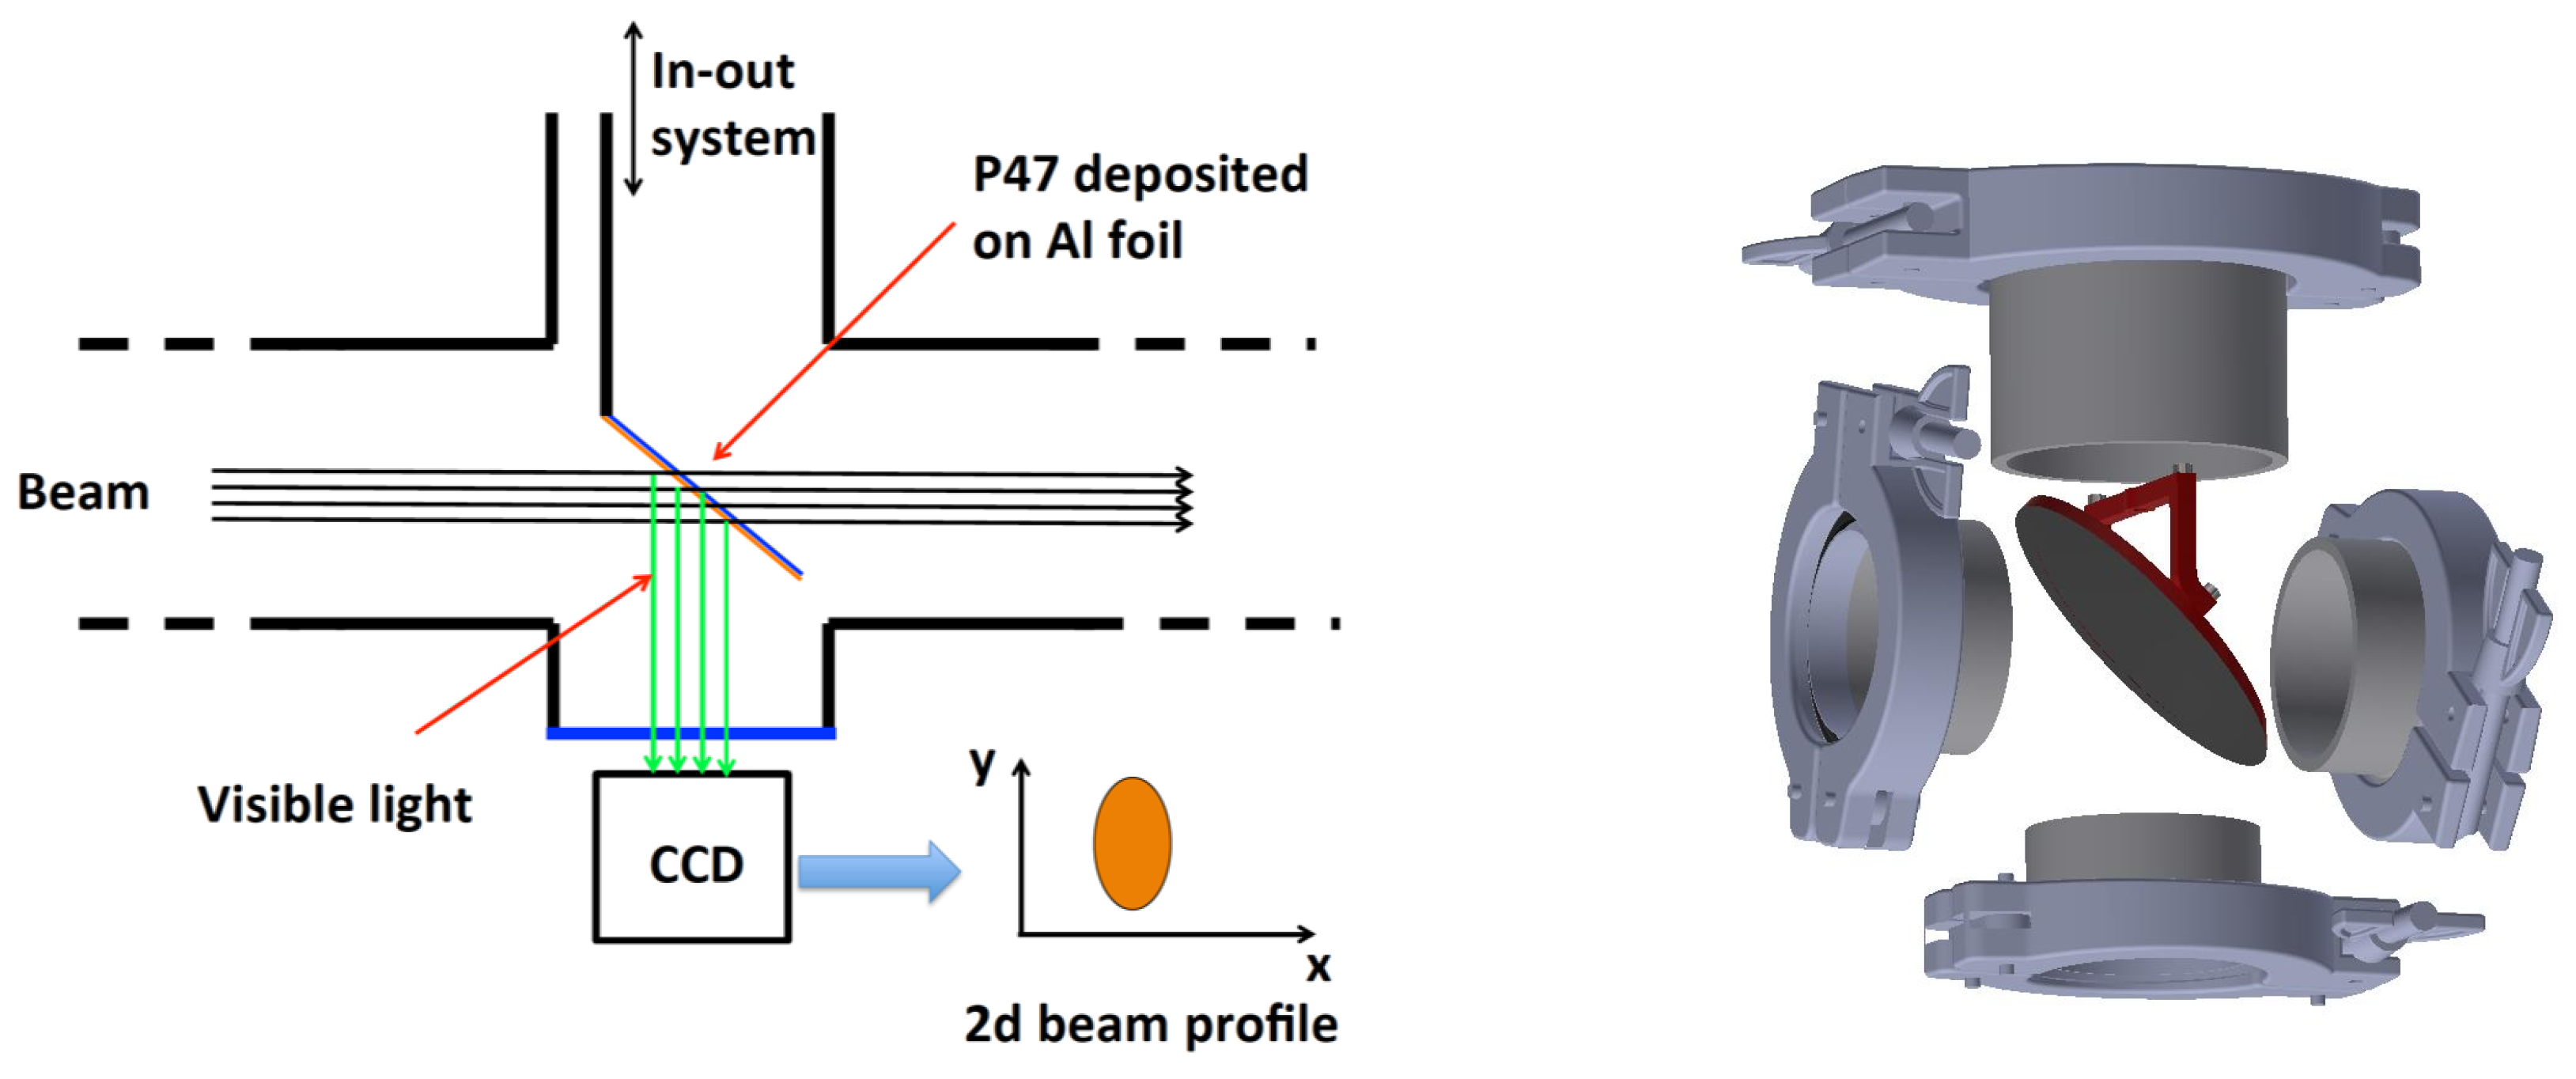
Figure 1. Left: scheme of the π 2 working principle. The scintillating screen, oriented 45 with respect to the beam axis, can be moved in and out of the beam path by means of a mechanical actuator. The beam footprint on the scintillating screen is captured by the camera. Right: technical drawing of the device adapted to the DN 40 ISO-KF vacuum standard. The 4-way beam cross enclosure is not shown to allow for the visualisation of the scintillating screen.
Applsci 13 03657 g001
Figure 2. Left: π 2 prototype installed on the BTL. Right: π 2 read-out system based on a Raspberry Pi micro-controller and V2 camera.
Applsci 13 03657 g002
Figure 3. Raw (left) and corrected image (right) of a beam collimated to a ( 2.5 × 2.5 ) cm 2 square. The raw image is used to determine a transformation matrix to correct for the perspective distortion.
Applsci 13 03657 g003
Figure 4. Beam line arrangements for the different experiments presented in Section 3: (a) Output signal versus proton flux and radiation tolerance studies; (b) Parallel beam profile comparison with radiochromic film measurement; (c) Focused beam profile comparison with UniBEaM measurement; (d) Measurement of the beam scattering introduced by the π 2 foil.
Applsci 13 03657 g004
Figure 5. Average red, green and blue pixel values in the collimated region, as a function of the incident proton flux, for three different exposure time settings. As expected for the P47 scintillator, most of the signal is contained in the blue channel. A sublinear characteristic is observed for all three exposure times.
Applsci 13 03657 g005
Figure 6. Average blue pixel value in the collimated region, as a function of ϕ · T e x p , for three different exposure time settings. The dashed black line represents a 3rd order polynomial fit to the data.
Applsci 13 03657 g006
Figure 7. Comparison of the horizontal (left) and vertical (right) beam profiles measured by the π 2 detector, with an FWT-60 radiochromic film placed 10 cm upstream of the detector.
Applsci 13 03657 g007
Figure 8. π 2 image of the focused beam used for the comparison with the UniBEaM reference detector.
Applsci 13 03657 g008
Figure 9. Comparison of the horizontal (left) and vertical (right) beam profiles measured by the π 2 and the UniBEaM detectors. The profiles have been normalised and re-centred for better visualisation.
Applsci 13 03657 g009
Figure 10. Horizontal (left) and vertical (right) beam profiles measured by the UniBEaM, with and without the π 2 foil inserted along the beam path. A Gaussian fit to the vertical profile is used to determine the amount of scattering introduced by the foil.
Applsci 13 03657 g010
Figure 11. TRIM simulation of the beam scattering due to the π 2 foil on a target placed 60 cm downstream the instrument. On the left, the trajectory of the point-like beam when the foil is not in beam. On the right, the scattering when the foil is in beam can be observed.
Applsci 13 03657 g011
Figure 12. π 2 response as a function of the integrated proton flux. The top plot compares the flux calculated from the Faraday Cup’s current measurement to that obtained from the calibrated π 2 image, as a function of the integrated proton flux. The bottom plot shows the ratio between both measurements (black markers), and a 10-sample moving average (blue line) to guide the eye.
Applsci 13 03657 g012
Disclaimer/Publisher’s Note: The statements, opinions and data contained in all publications are solely those of the individual author(s) and contributor(s) and not of MDPI and/or the editor(s). MDPI and/or the editor(s) disclaim responsibility for any injury to people or property resulting from any ideas, methods, instructions or products referred to in the content.