1. Introduction
Turbine guide vanes, alongside with turbine blades, are crucial components in the gas turbine system. Due to the complexity of such parts the most reliable process of production is still to cast and machine them in subsequent manufacturing steps. 3D printing of such elements is still under development, especially for parts working in high temperature in the hottest area of the turbine and, therefore, this method is of negligible industrial impact.
Proper inspection is of critical importance in the industrial part acceptance process. There are several tests, usually applied simultaneously, like grain etching, non-destructive and destructive tests, and overall part shape inspection. For the purpose of the last of these, the form and profile can be easily inspected by a coordinate measuring machine (CMM). Another method gaining increasing popularity is optical scanning. It has lower accuracy and is still relatively slower, but it is able to deconstruct the overall 3D part shape, which then can be compared with the original CAD (Computer-aided design) model [
1,
2]. The trend in modern approaches is to focus on fast-developing 3D scanning techniques, but there is still scope for improvement in existing and commonly used coordinate measurement machines, with strictly-defined rules and standards [
3].
Inspection time can vary from a couple of minutes up to several dozens for complex vanes [
4]. While CMM is still the most reliable method for part inspection, many researchers point out that is relatively slow and a significant time reduction is needed in order to provide cost effective solutions [
5]. Well-written CMM inspection programs can provide reliable and repeatable measure processes for a large set of components and CAD based sampling and point reduction is a very good start for CMM path programming. Abdullah [
6] investigated blade geometry discontinuity, such as small diameter holes or inconsistent depths, demonstrating that a CMM test may not reveal any problems or provide inconsistent results. A possible solution might be non-destructive testing that can identify the occurrence of these flaws before CMM inspection and properly set tolerance boundaries can result in disregard for small, identified flaws.
The path for the CMM probe needs to be written in such a way as to avoid collisions between the inspected parts and to include all the shape variations. Good examples of case studies can be found in the work of Chang [
7,
8] or Ristic [
9]. Interferences can often occur between the probe and inspected parts. The CMM path should include not only higher shape variations than the desired tolerances, but also rapid curvature changes, and supporting features like handles and stabilizers. Ainsworth [
10] discusses path improvement and verification, measurement, and probe radius compensation of shape variations and undesired collisions with components above the desired tolerances. An important conclusion is that the calculated manufacturing tolerances are the desired ideal, but real parts can exhibit high divergences, so the measurement process should adapt to part shape changes greater than the ones that were assumed at the beginning. Parts manufactured outside the desired tolerances can cause CMM probe damage, especially when the set measurement speed is too high. A good prevention strategy is to define safety conditions in the CMM program and operator supervision during the first trials.
Path simplification and the required number of inspection points to collect are broadly discussed in literature. Researchers also try to develop their own algorithms e.g., Mansour [
11] for overall time reduction of the measurement, or Rui-Song [
4] for determination of the reduced number of points and sections to be measured. CAD-based sampling is a good starting strategy, as the nominal shape can be used to determine and improve the measuring path [
12]. While designing a simplification process, part variations and possible imperfections should always be considered. Shape errors may significantly impact calculations, which is why CAD-based inputs should be recalculated as simpler mathematical representations. When tolerance boundaries are added, complex curvature changes can be collapsed and simplified within these boundaries and the overall inspection becomes easier.
Researchers’ interests focus on the whole surface as well, not only on the profile. Interesting examples can be found in the works of Poniatkowska [
13], Li [
14], and Yu [
15]. Profile fluctuations can be referenced to manufacturing processes. It is possible to determine areas with the greatest deviations and re-write inspection processes to focus on them. Reverse engineering tools like Geomagic [
16] are very helpful for managing data clouds and obtaining results in a short period of time.
Complex shapes can be described by well-understood mathematics. Weishi Li [
17] initiated a method of building simplified splines based on knots, whereas Hyungjun [
18,
19] followed a similar approach, extending it to surfaces. Even with noisy datasets it is always possible to simplify the overall shape and identify crucial knots to determine the shape curvature as simplified shape errors have a marginal impact on the original shape.
Aero-related components with complex curvatures are still a valuable subject to develop more reliable and efficient approaches. Yun Zhang [
20] developed a sampling method for twisted blades to improve measurement efficiency. A very similar method was developed by Feiyan Guo [
21] for a turbine guide vane. Xuezhe Li [
22] focused his attention on the twist itself, to solve high-precision measurement problems with this phenomenon.
Shape preserving knot removal from B-spline sections is a good starting point for defining a CMM path. Researchers have already developed some algorithms based on C1 and more sophisticated C2 connections, which are vital in modern car and aero industries. Yet, further algorithms are needed to simplify the overall math and shape efficiency. Simplification can decrease the number of defining points by up to 99%, still preserving good overall quality whilst helping to obtain the desired tolerance [
23]. A good example of curve fitting for noisy data can be found in the work of Binder [
24] or Cusimano [
25].
There are two important handbooks for CAD based researchers: the Computer Aided Design handbook [
26] and the NURBS Book [
27]. Eck [
28] made fundamental contribution to practical aspects of knot removal that is still used in modern CAD software.
Many researchers use automation and AI (artificial intelligence) in their studies [
1,
7,
8,
15]. This approach is not a new trend in industry, and it is gaining more popularity every year. It really helps to improve both the time and quality of inspection, allowing fast CMM path creation, usually based on a CAD model. Automated tools also allow inspection of a given part based on the best fit position for each part in reference to the CAD ideal position, unlike conventional measurements, referring to one standardized position. Almost everything can be automated: path planning, probe adjustments and interchange, or the measuring protocol itself [
29]. A smart CMM inspection lies under automation and simplification, which will be highlighted in this paper.
Part development is very expensive, therefore modern engineers always provide a 3D stack-up for worst case scenario—the part calculated for all material conditions, and similarly for operating conditions. Modern tools can simulate thousands of possible scenarios according to part shape variations and help to address them all without impacting the desired part life and strength. Engineering simulation analysis should contain all adverse working environment (excessive pressure, unexpected temperature increases, unexpected shutdowns etc.).
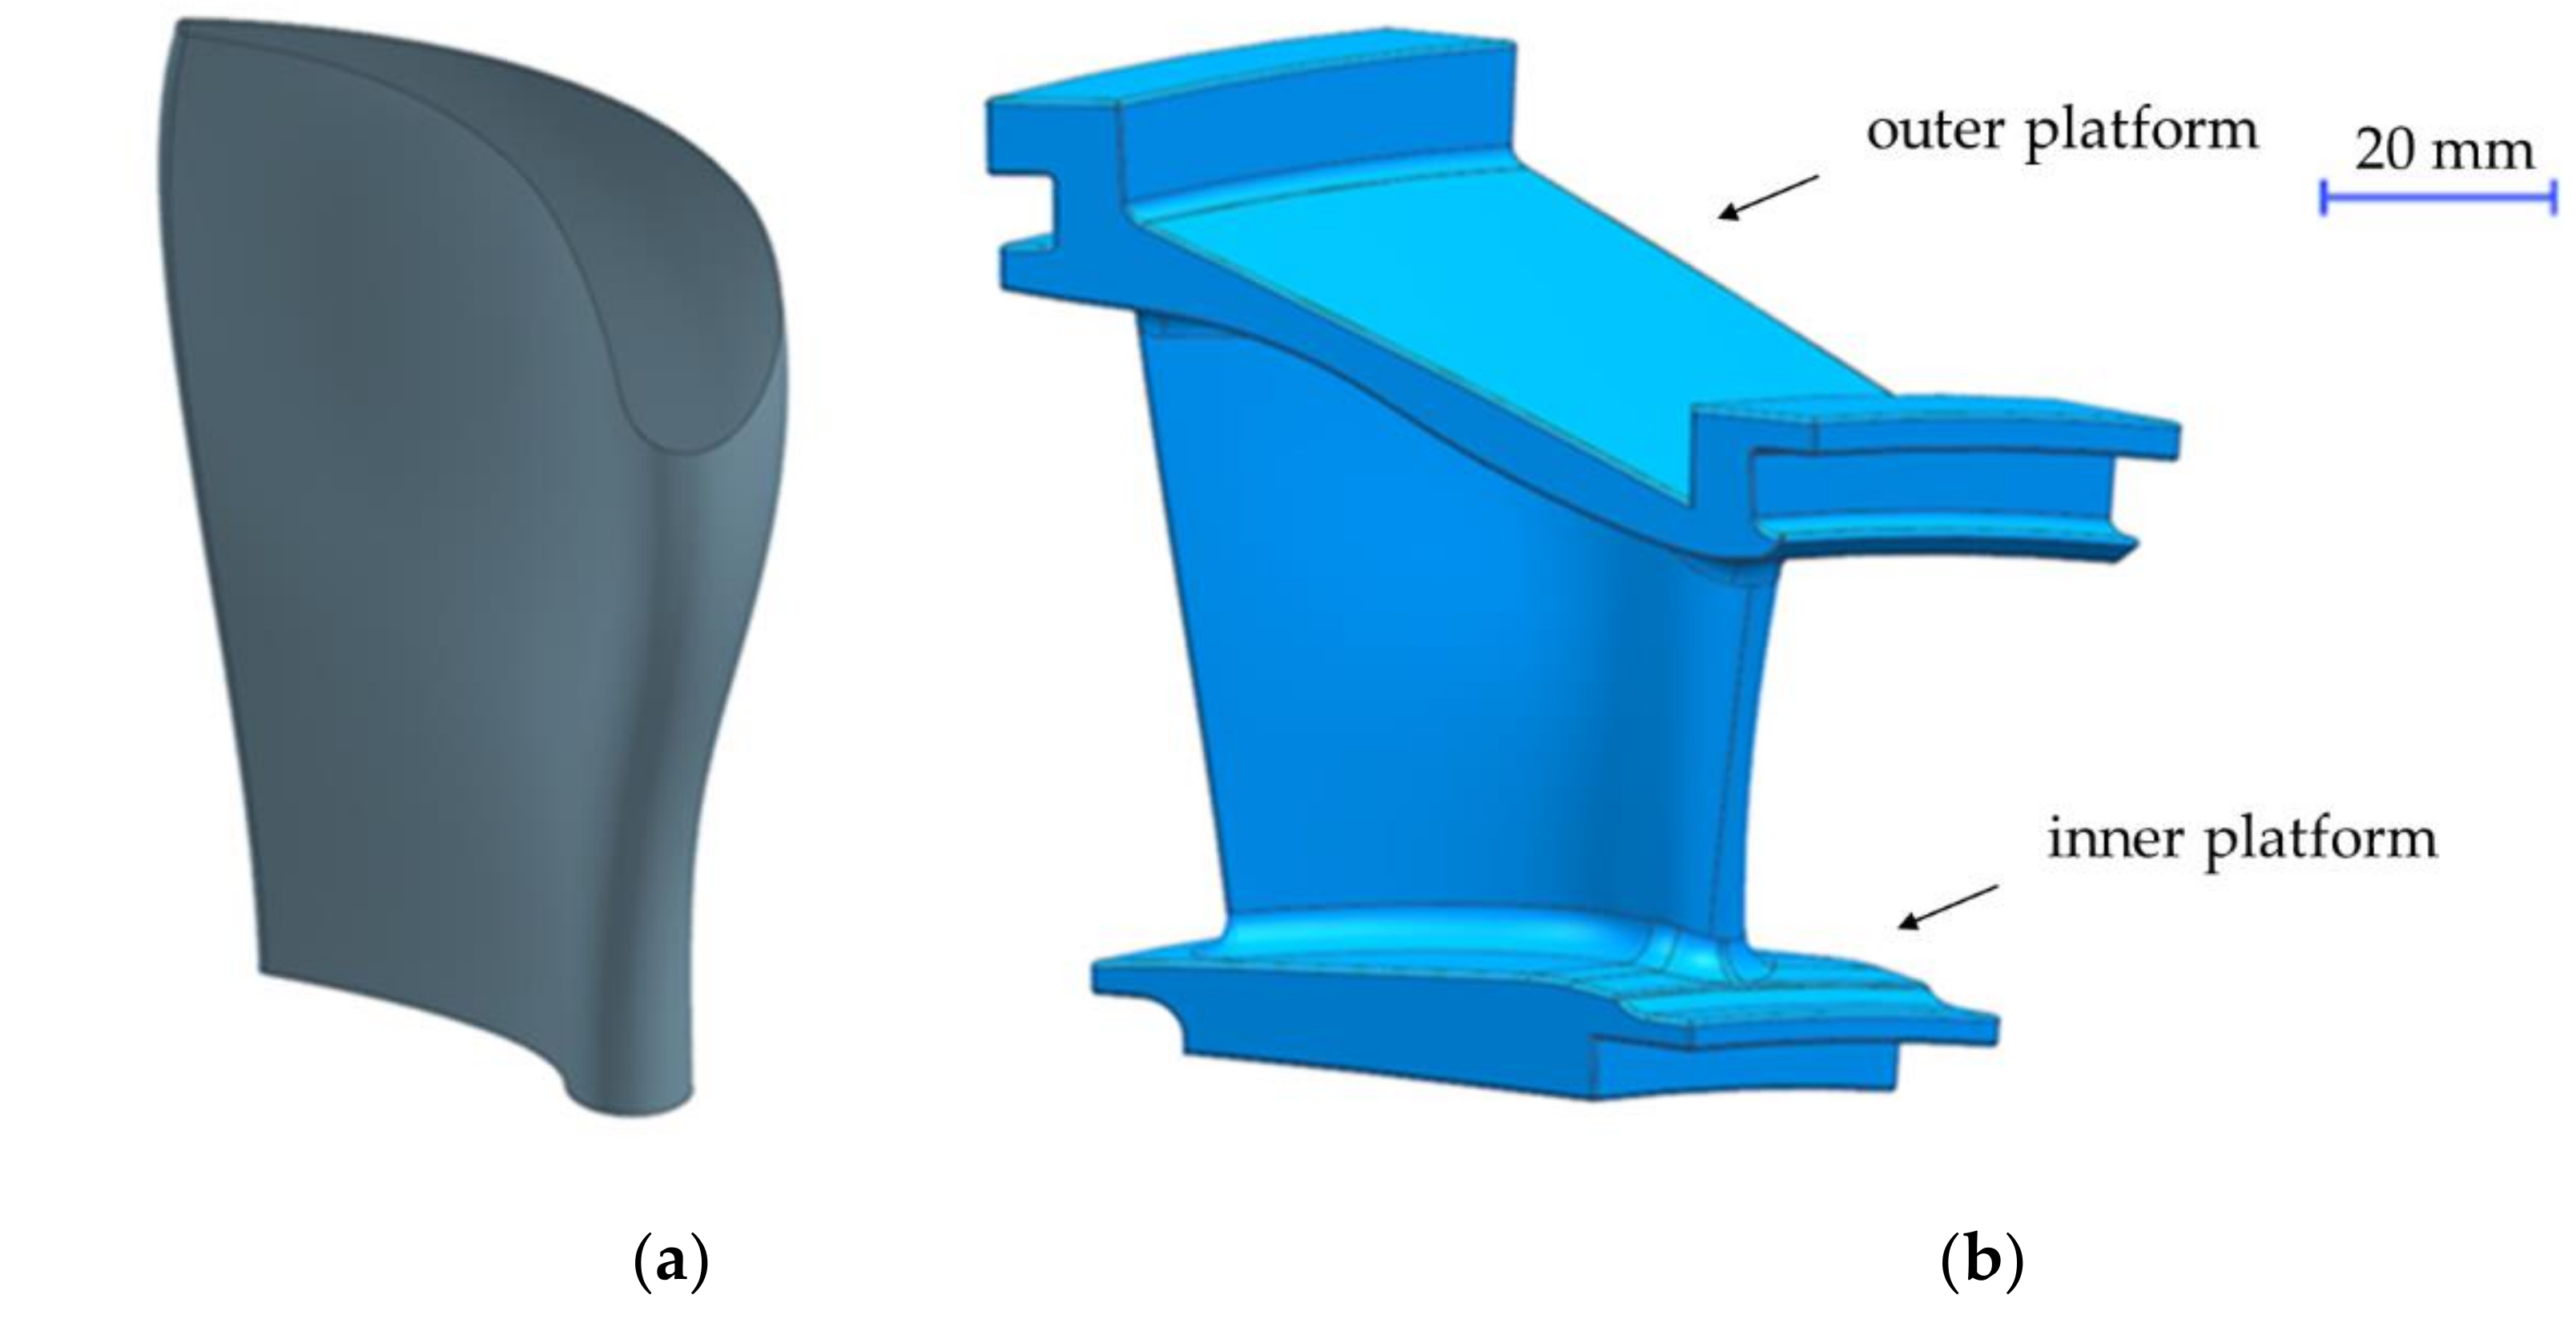
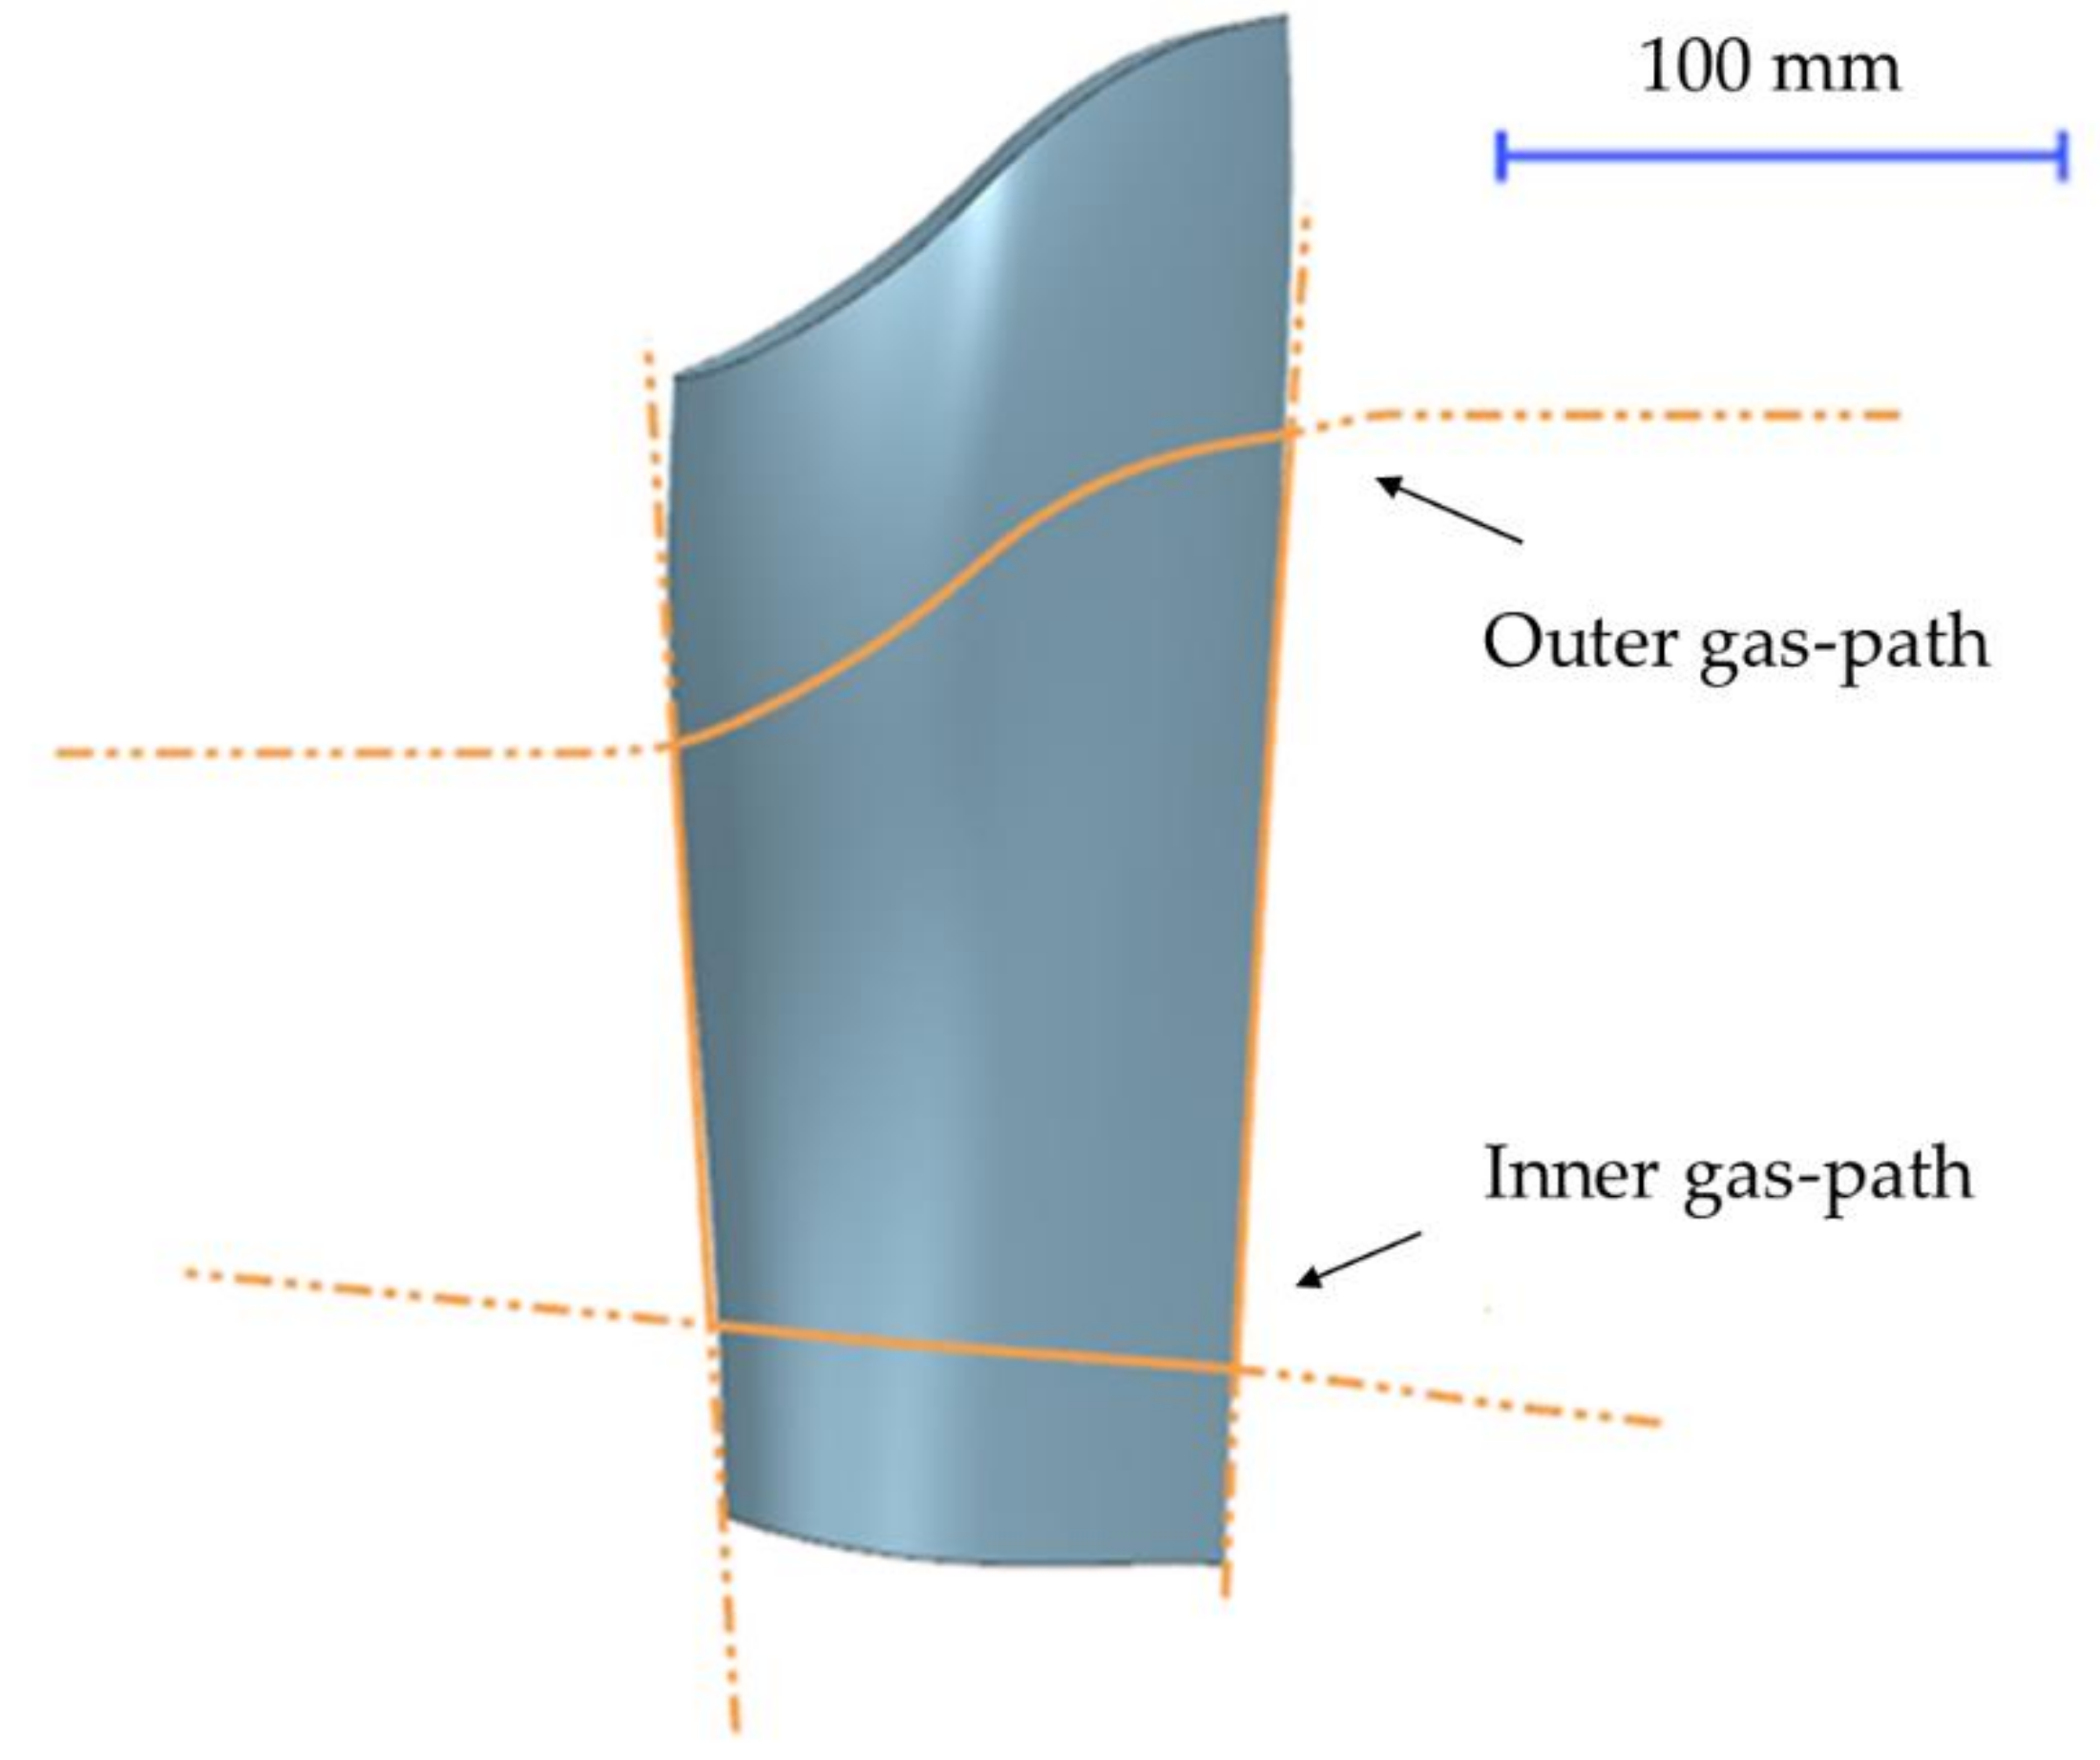
This paper describes a measurement algorithm for turbine guide vane airfoils with reference to manufacturing processes and tolerances. Furthermore, it assesses the deviations from basic shapes that can be considered in the development plan to achieve accurate results without impacting the full engine efficiency and reliability. Some shape deviations come from CMM inspection path improvement and should have a negligible impact on the results. An example of an airfoil and turbine guide vane shape is shown in
Figure 1. There are three major features: the outer platform, the inner platform, and the airfoil itself. This article will cover only airfoil inspection.
If the manufacturing process is still under development, then the specifications can also be adjusted. First of all, the process should be certified by a hardware engineer in order to acknowledge that it is repeatable, stable, and accurate. A better understanding of the manufacturing process can help to predict how the measurement can be simplified and in the long run it can decrease the overall planned cost. To sum up, the modification to the overall process tree can be shown as below:
Design → First Trials → Hard inspection → Manufacturing Optimization →Design Optimizations → Measurement Simplification →Mass Production.
The new approach used in this work is to use critical physical properties of the part, such as throat value, or intersection of horizontal and vertical path measuring processes on the key surface areas of the part.
1.1. Prototyping
The process of developing tools for vane casting is very expensive and time consuming. Even experienced casting houses need to develop a perfect castability process after real part tests with a few adjustments after every attempt. It can be very helpful to create casting shells based on high-quality 3D printing with use of the stereolithography (SLA) method, and to improve solutions in order to achieve a repeatable process. This is a substantial cooperative effort between a hardware engineer and manufacturing casting plant. It is obvious that the hardware engineer wants to have a perfect repeatable shape, especially on the airfoil surface, whilst the casting engineer needs to provide cast-ability with repeatable methods, providing good gating for the liquid metal.
Many iterations are needed in order to identify a satisfactory configuration which is feasible and functional. Some of the facets, like the airfoil and critical platform surfaces (areas above and below the airfoil shape, used to connect with the surrounding components), cannot be machined by downstream processes. That is why if a flaw appears there, the whole part must be rejected. Proper gating for liquid metal is also very important in order to achieve a repeatable and reliable process.
After all iterations, the final form for casting is complete and is ready for wax injection. The final form is the most expensive part of the development process and remains unchanged throughout future processing. Only a few suppliers are specialized in developing final forms, and the delivery time is usually long.
A great deal of work is done to start casting the first part which will be used in the turbine. It is worth mentioning that every step is very precise, which significantly improves the quality of the final part. Overall production controls are so strict that they can be said to guarantee an almost perfect final part. On the other hand, there is a need to simplify inspection processes and reduce all checks as much as possible to improve the speed of measurements and finally to decrease the overall manufacturing cost.
1.2. Qualification to Mass Production
The main difference between processes during the development stage and regular qualified production is the number of corresponding tests that are required. The first parts should be tested extensively for correct grain size in order to achieve the desired part life, then tested for cracks and other unwanted deviations with use of chemical penetrants, and finally verified with blue light scans to assess whether every small portion of the surface is within the desired tolerance.
Non-destructive tests are not enough at the prototyping stage. During the next step, the part needs to be cut into slices to check wall thickness and deviations. The number of checked sections and pairs of points is high and cannot be reduced without lowering the overall standards. The overall cost of tools and corresponding fixtures is incredibly high but it can be adjusted using vendor guarantees before mass manufacturing starts.
After the process has been approved, qualified, and verified for repeatability, simpler (relying on simple math and statistics) methods to check the produced vanes can be employed.
3. Calculations
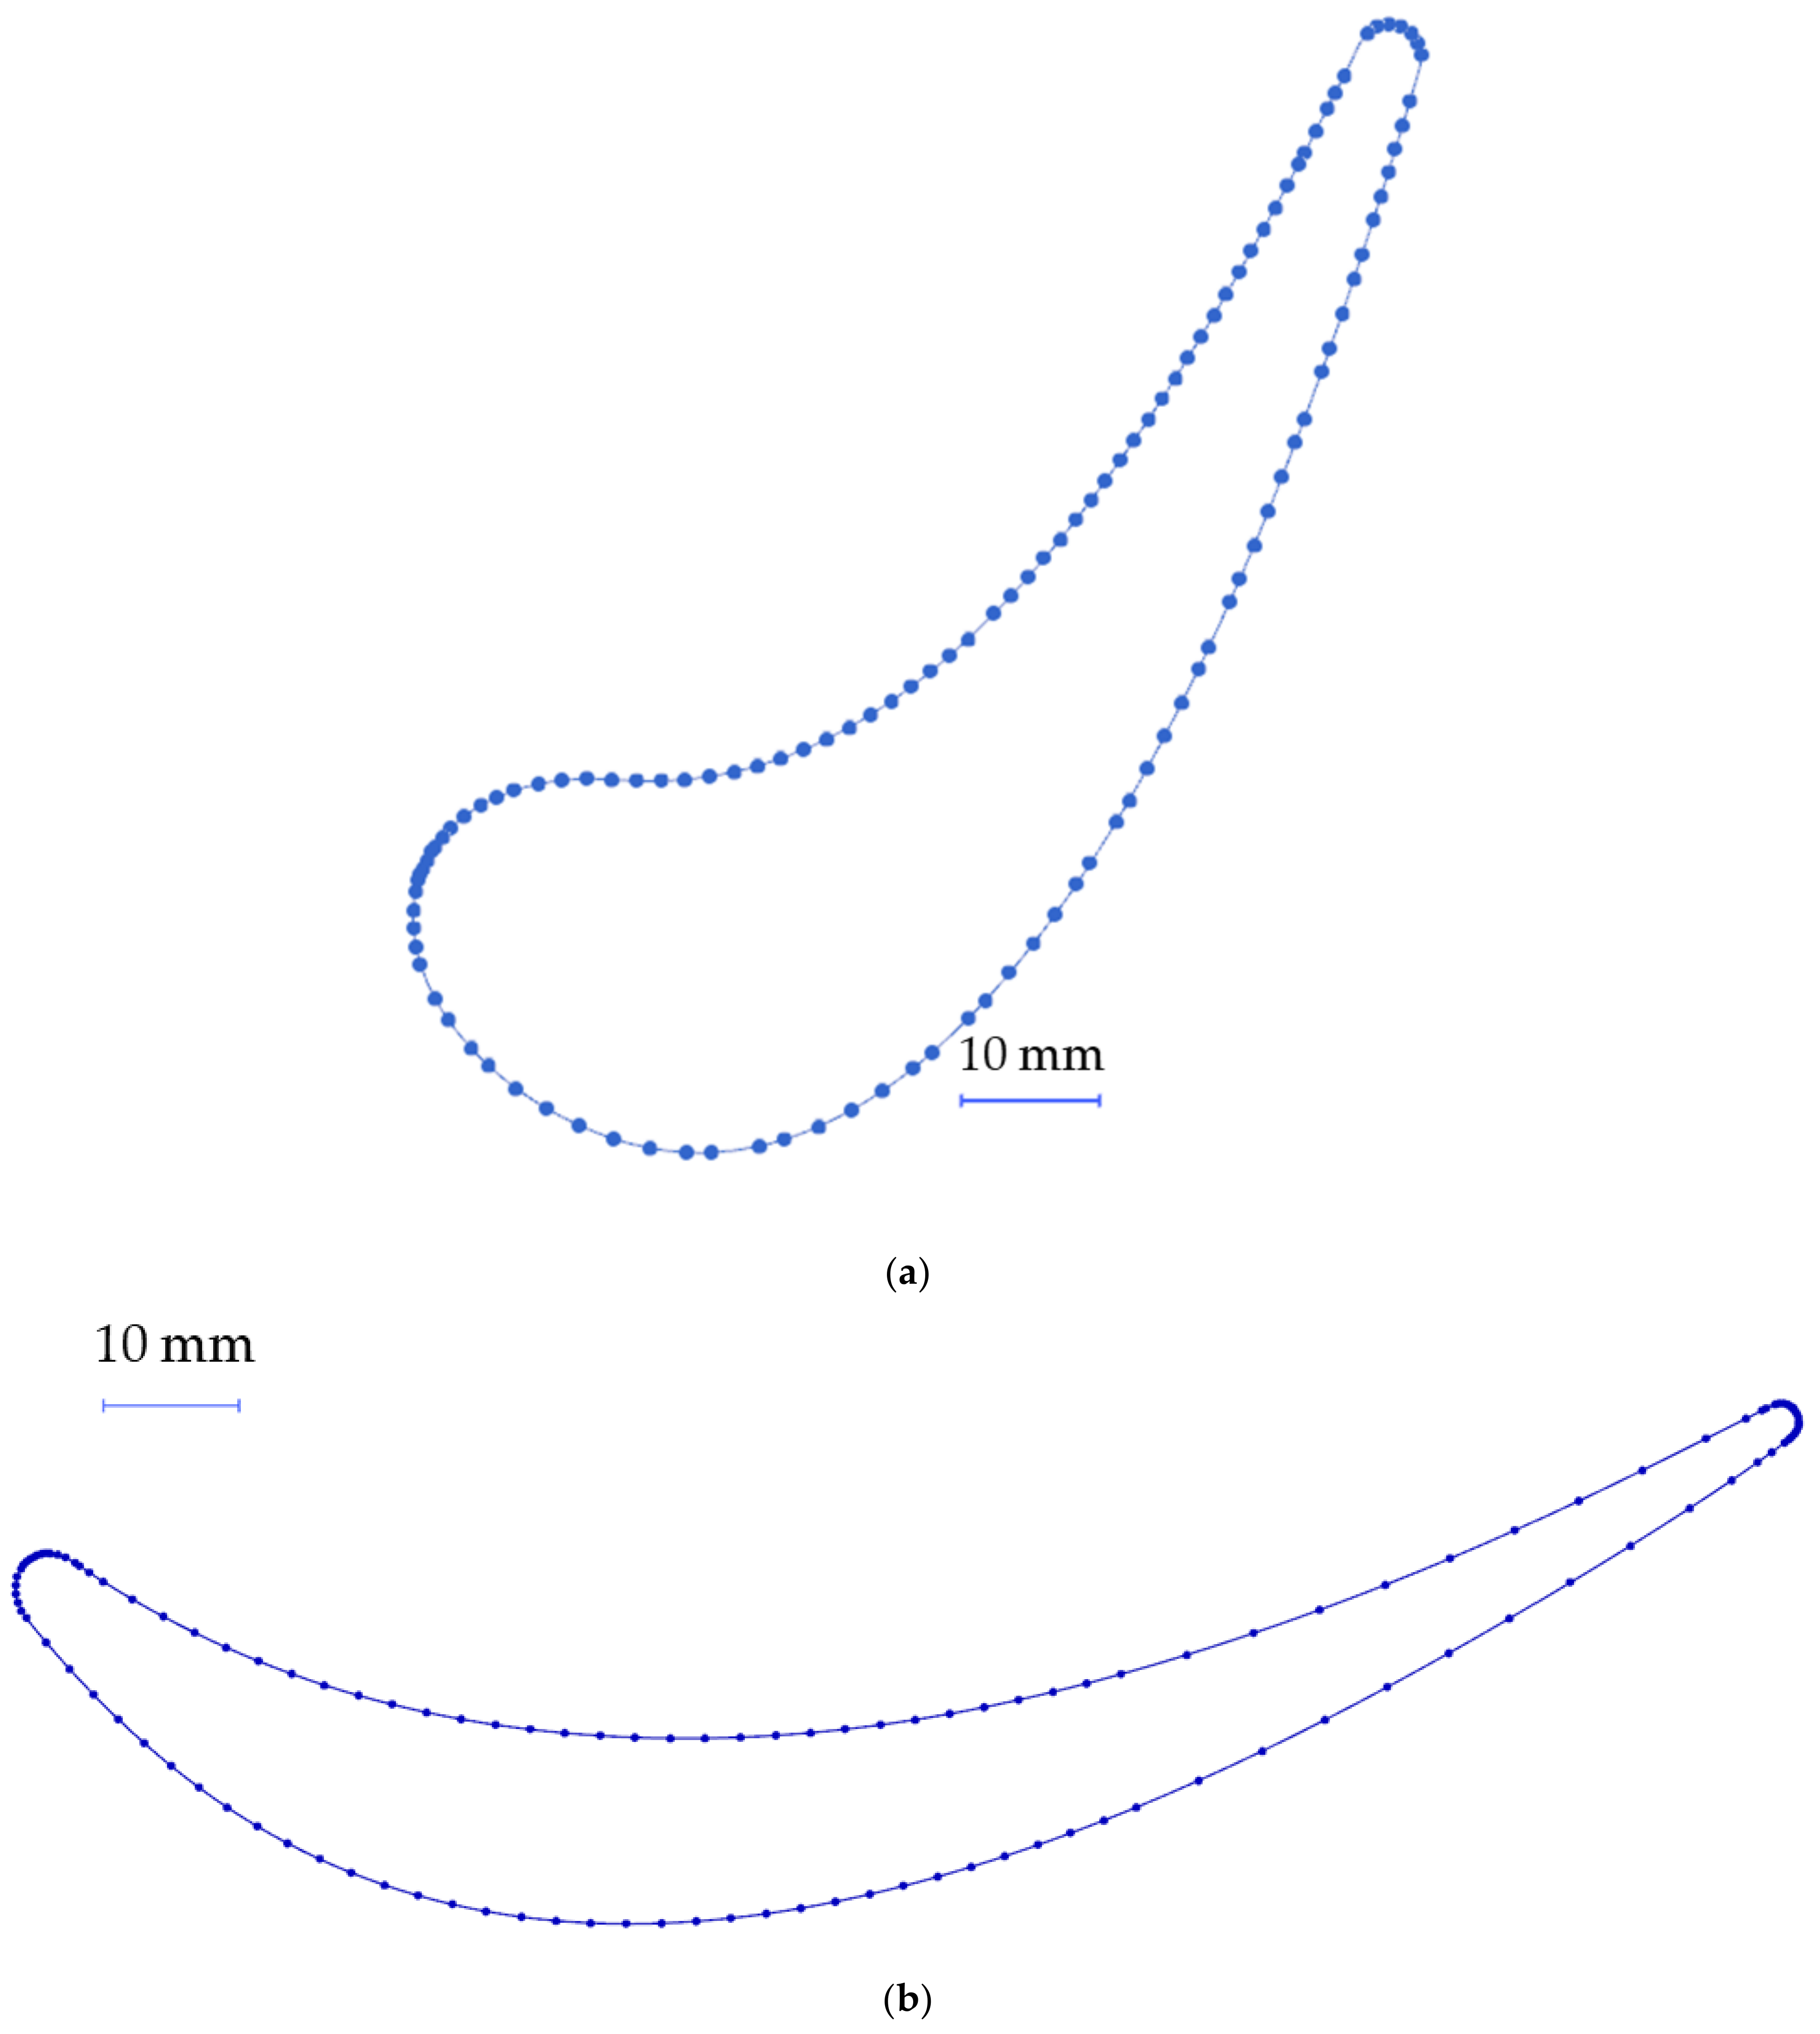
To calculate a significant number of points for a CMM inspection, fundamental CAD math operations with spline interpretation need to be performed. Each section has been described as an extension of B-spline NURBS (non-uniform rational basis spline) in shape, shown in
Figure 7. A B-spline can be understood as a collection of smaller Bezier three-degree curves beneath to achieve C2 continuity. The CMM base spline based on knot reduction was calculated following the method described in the work of [
26,
27,
28]. Knot points are the most important and informative points and after simplification they indicate crucial shape changes.
The original CAD section contains 104 smaller Bezier curves (
Figure 7a), which is more than needed, as proved by other authors [
15,
17,
18,
19,
20,
21,
22,
23,
24,
25,
26]. It was rebuilt using knot removal methods and it was concluded that for CMM measurement the number of control points can be slightly decreased, reducing it to 20–30. This recalculation will produce a simplified B-spline with looser tolerance. Examples of point reduction and errors in shape are collated in
Table 1. Different scenarios were tested, decreasing the number of points from 1000 into 5. It can be noticed that with around 25 points the spline is still of good quality, having only a few control points to inspect. The following spline simplification parameters were used: three-degree Bezier curves with C2 continuity and knot limitations with the maximum error less than 0.1 mm. Here, the widely known “One to Ten Rule” can be referred to. If the deviation and method accuracy in total is less than 10% of the desired tolerance, then the inspection method is safe and acceptable to use. The exercise was repeated with a different design for the airfoil shape—a turbine blade. The results are similar, and even for quite a different shape the observations regarding curve rebuild and point reduction are also similar (
Figure 7b). The turbine blade section was used for contrast in the theoretical section of this article and will not be mentioned in further practical investigations. The average error chart based on
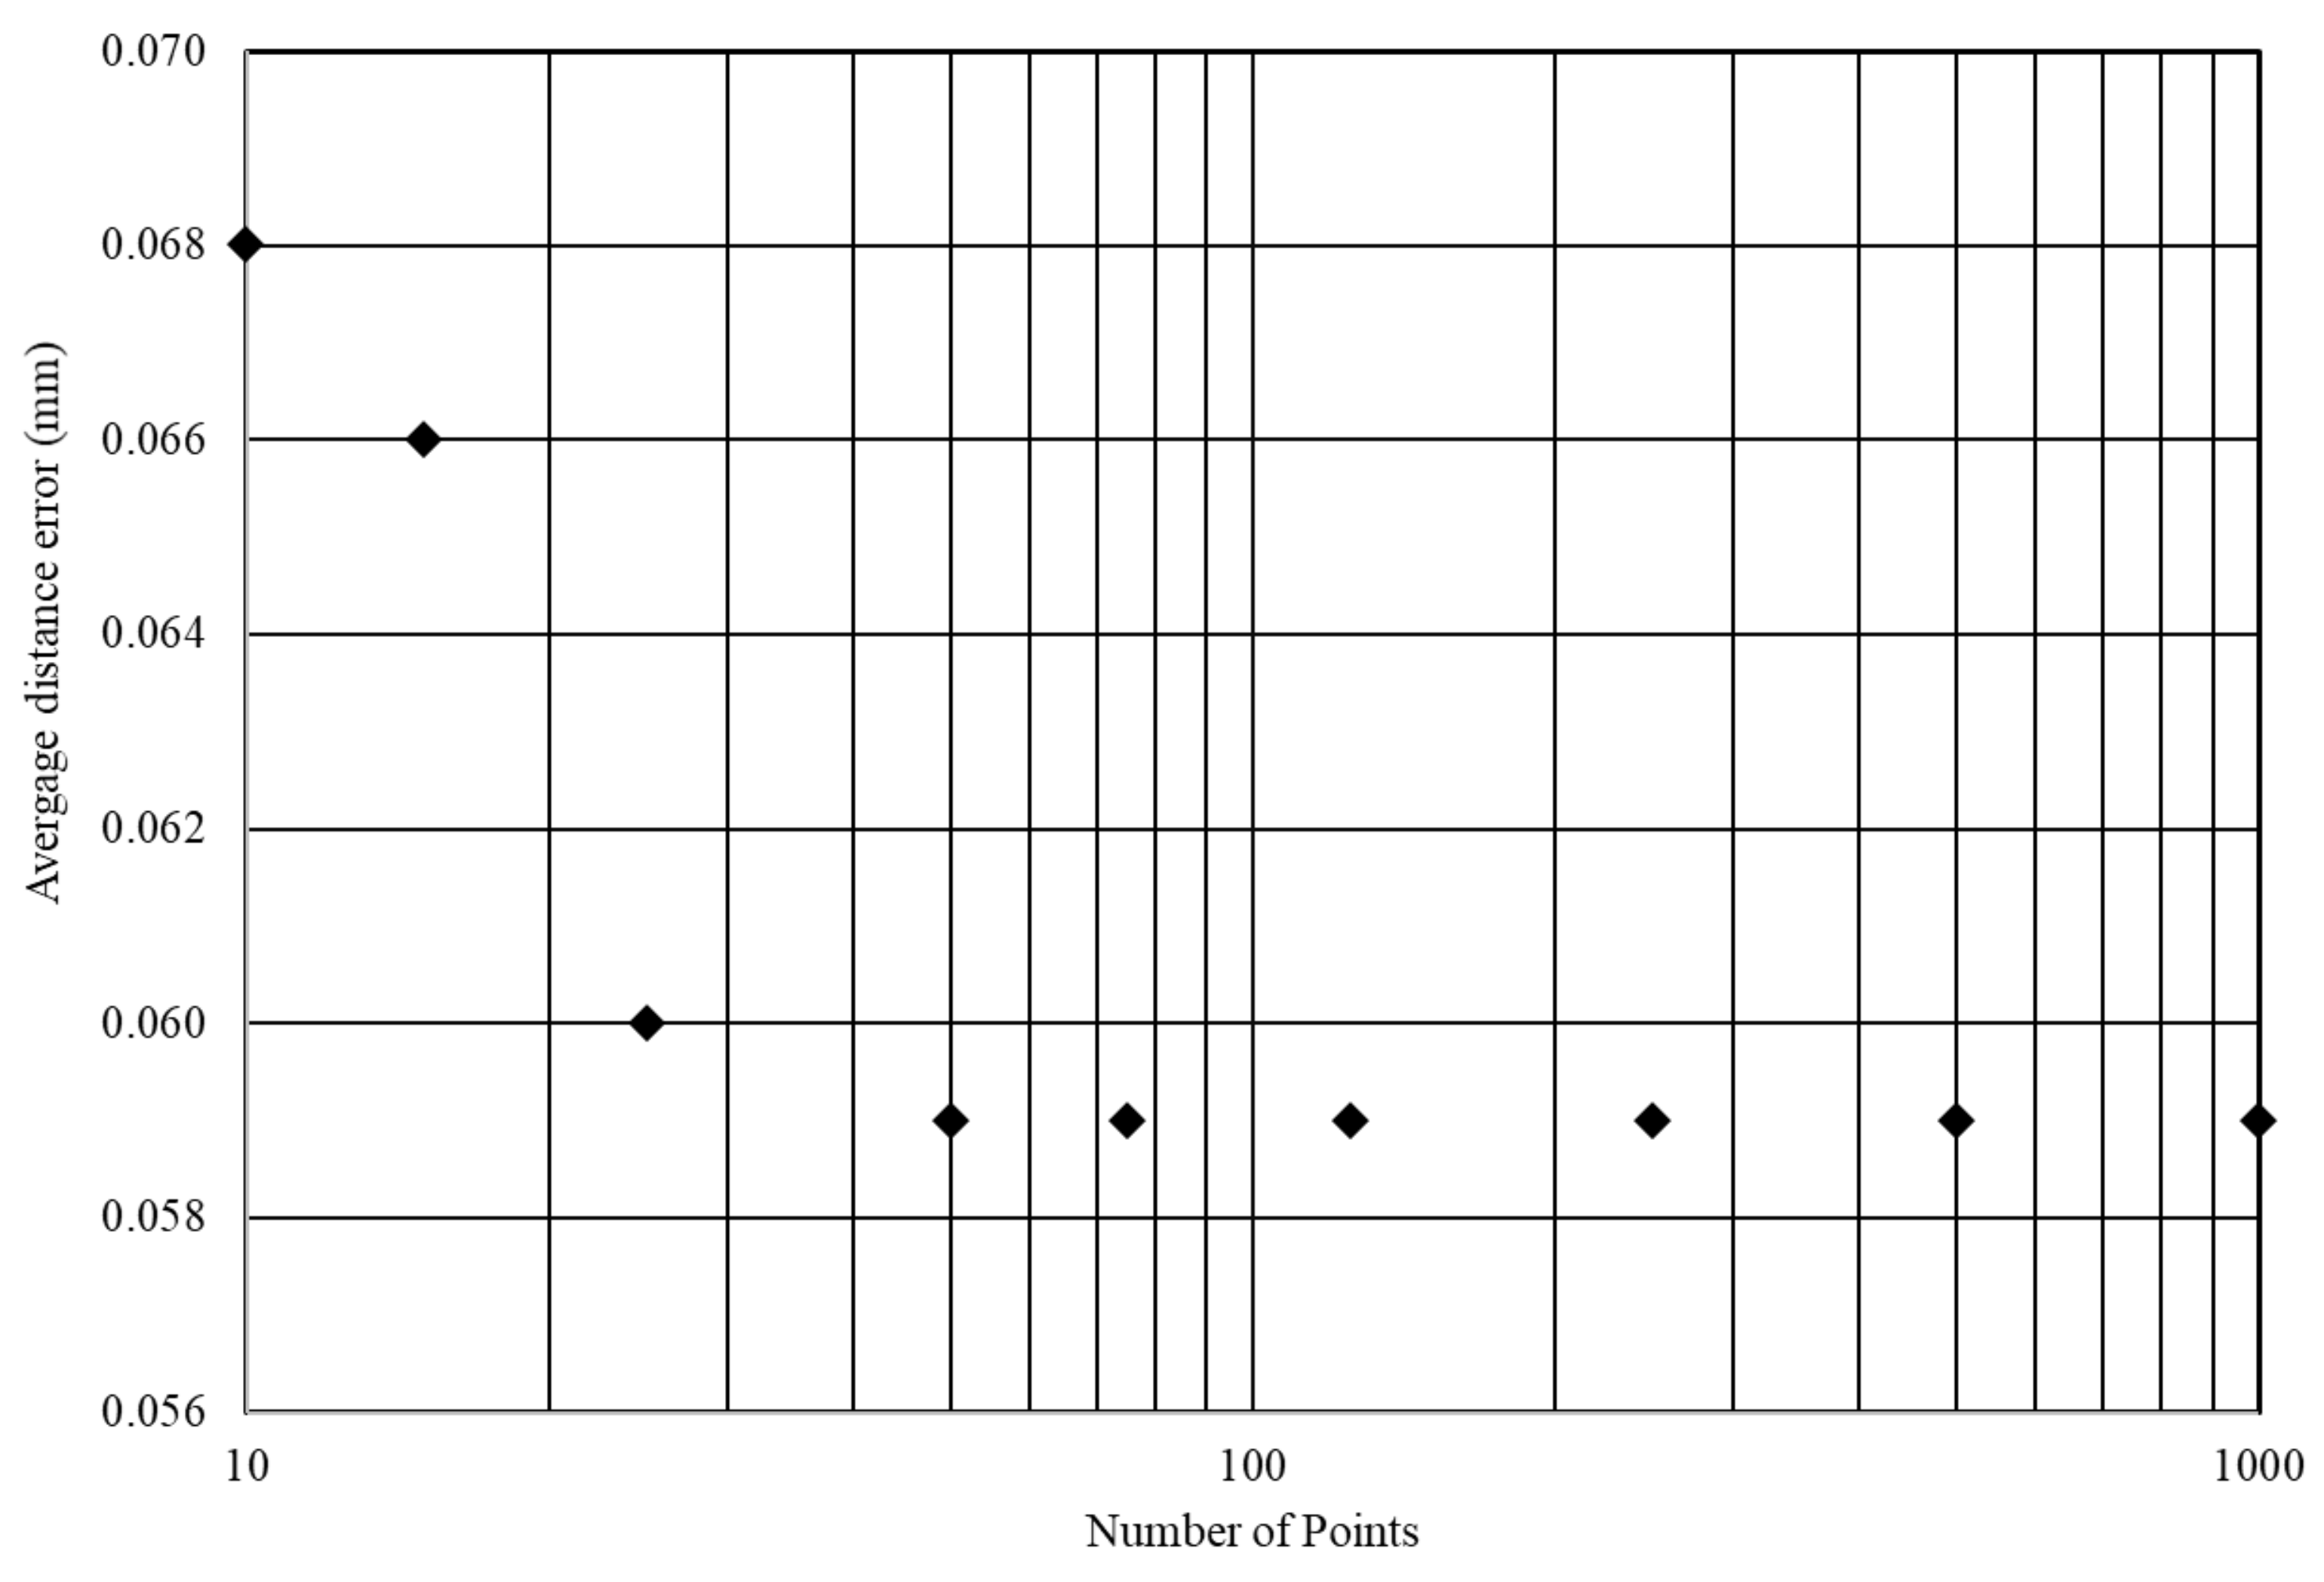
Table 1 for both examples presented in
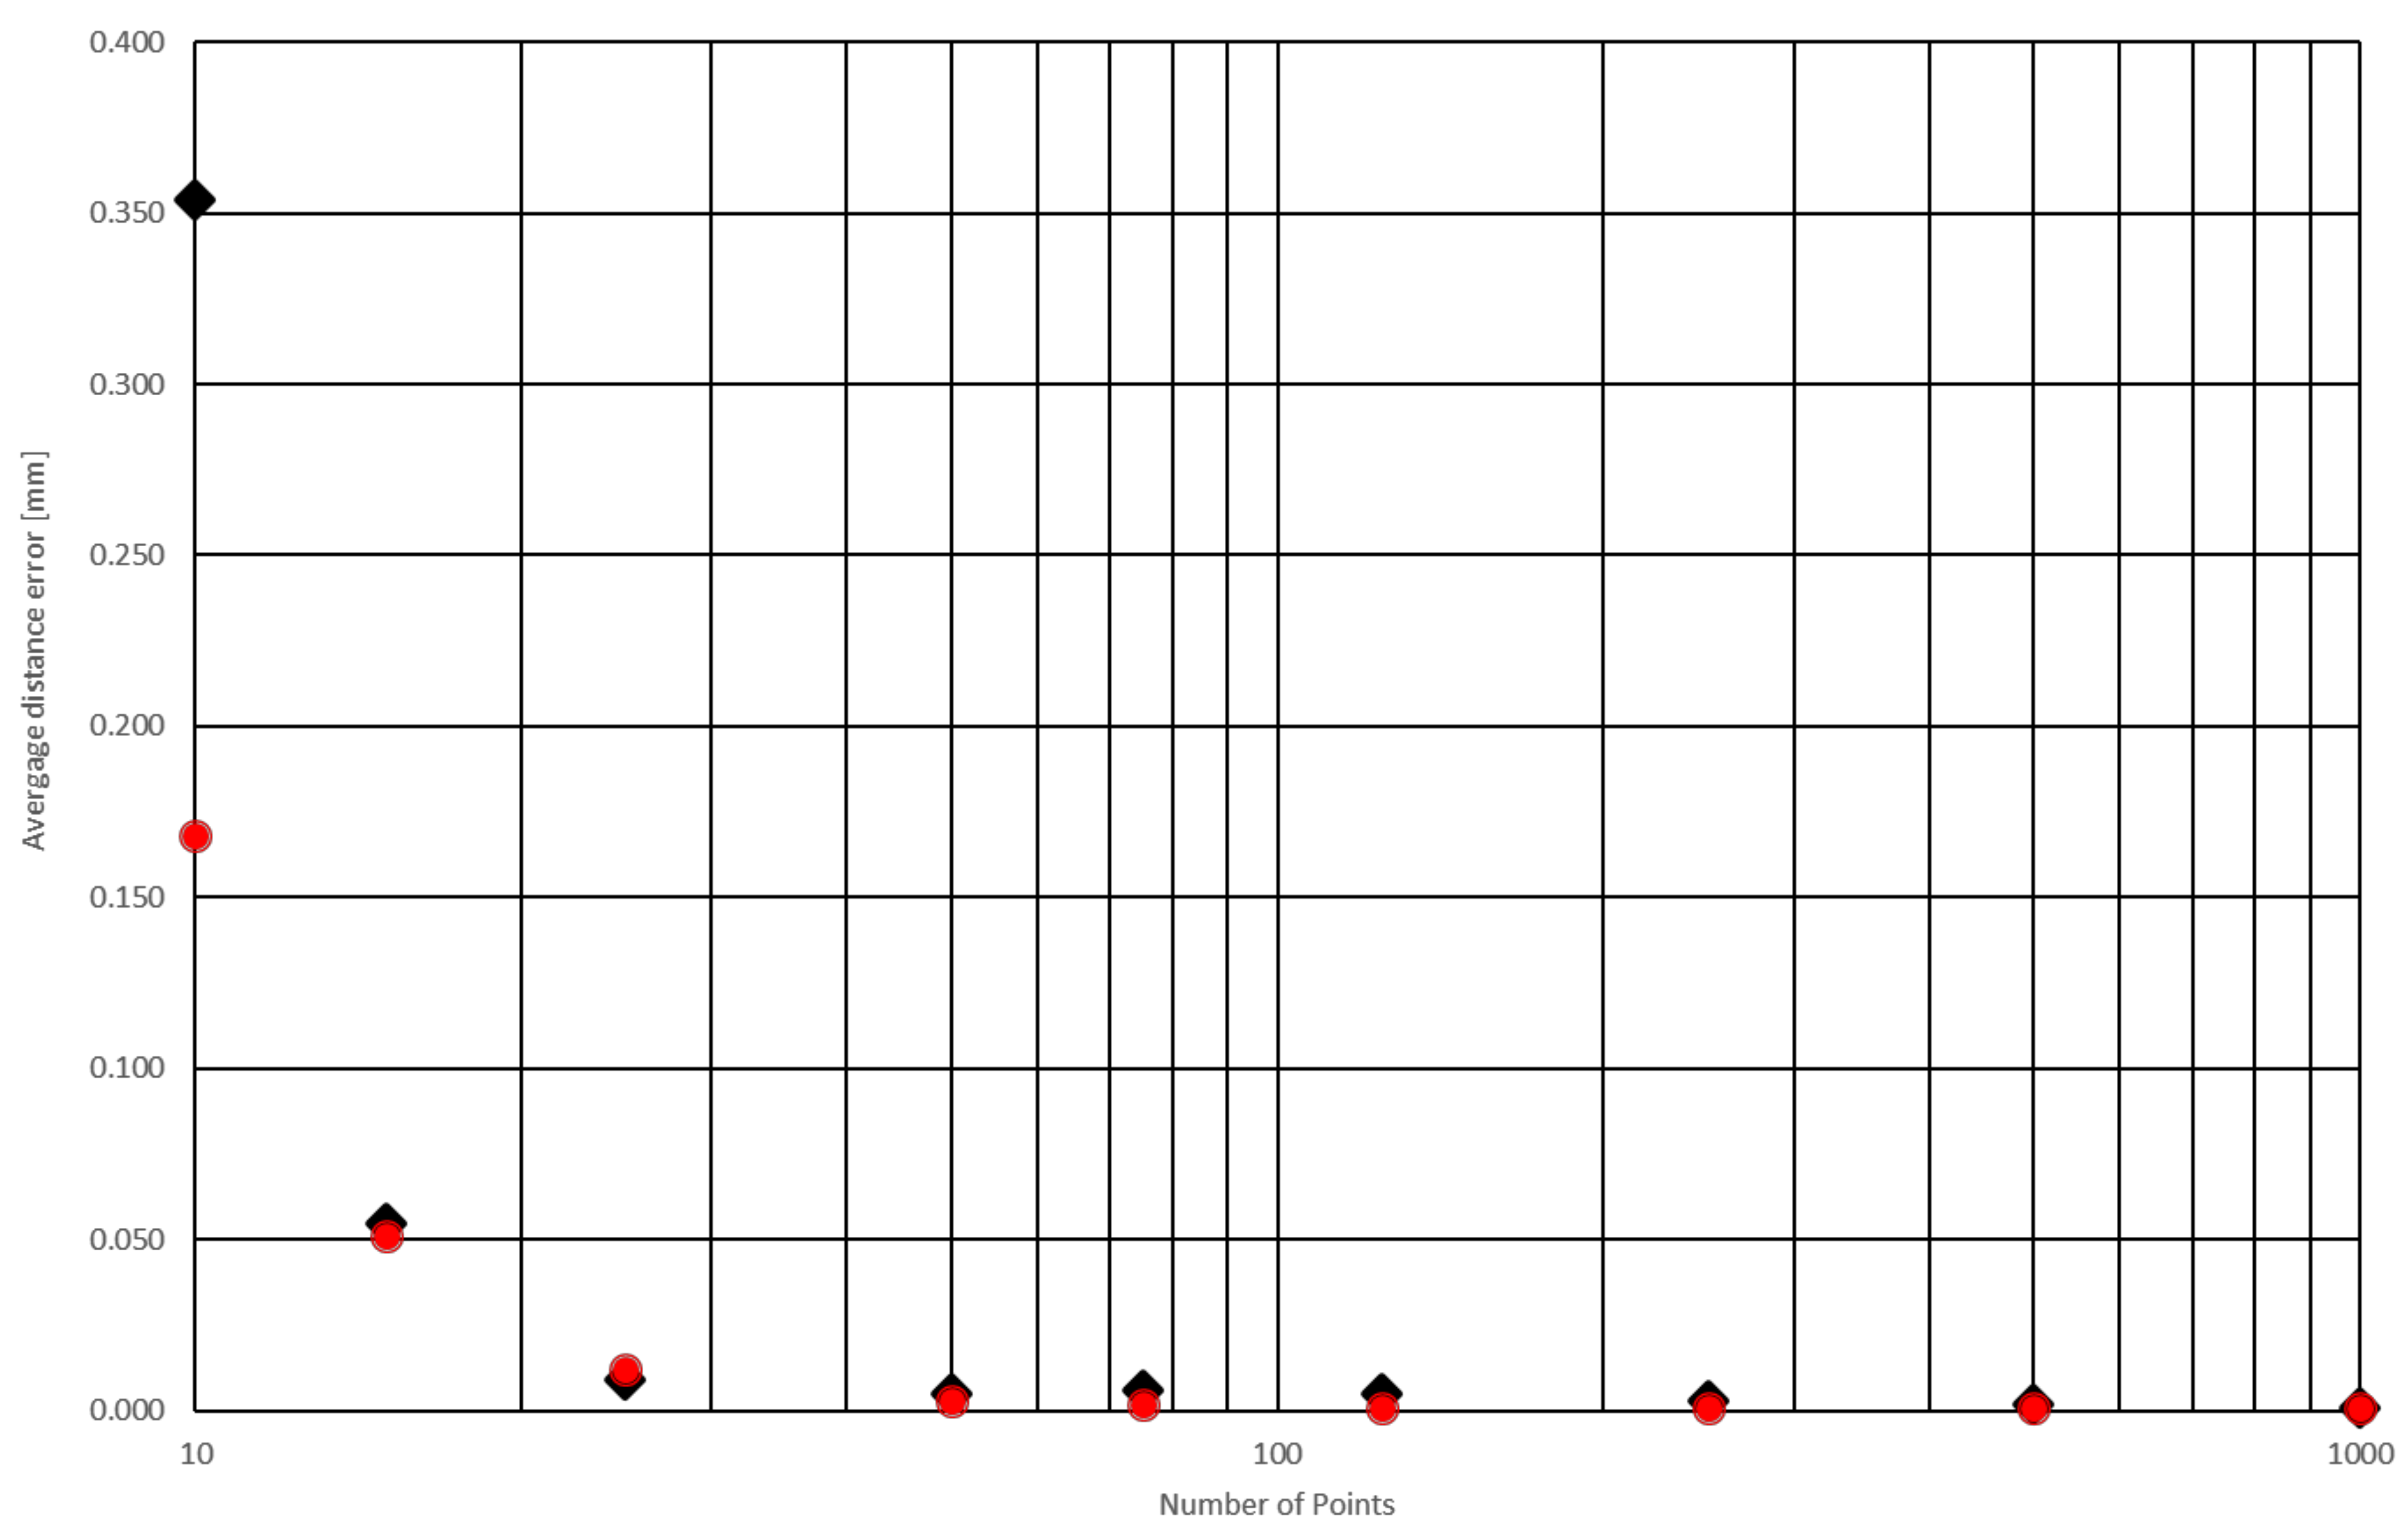
Figure 8 proves that the distance error (distance between theoretical spline and the measured point) is on the same level for all points from 25 to 1000. To calculate the parameters, absolute values for error (inside/outside part material) and sample standard deviation were used. If we start from 100 points, 1000 will still be within the range, without any distortion—that is why standard deviation is 0. For 250 and 125 points, the rebuilt spline can be slightly different, with a small deviation. Using more than 50 points is not justified as this increases both costs and inspection time.
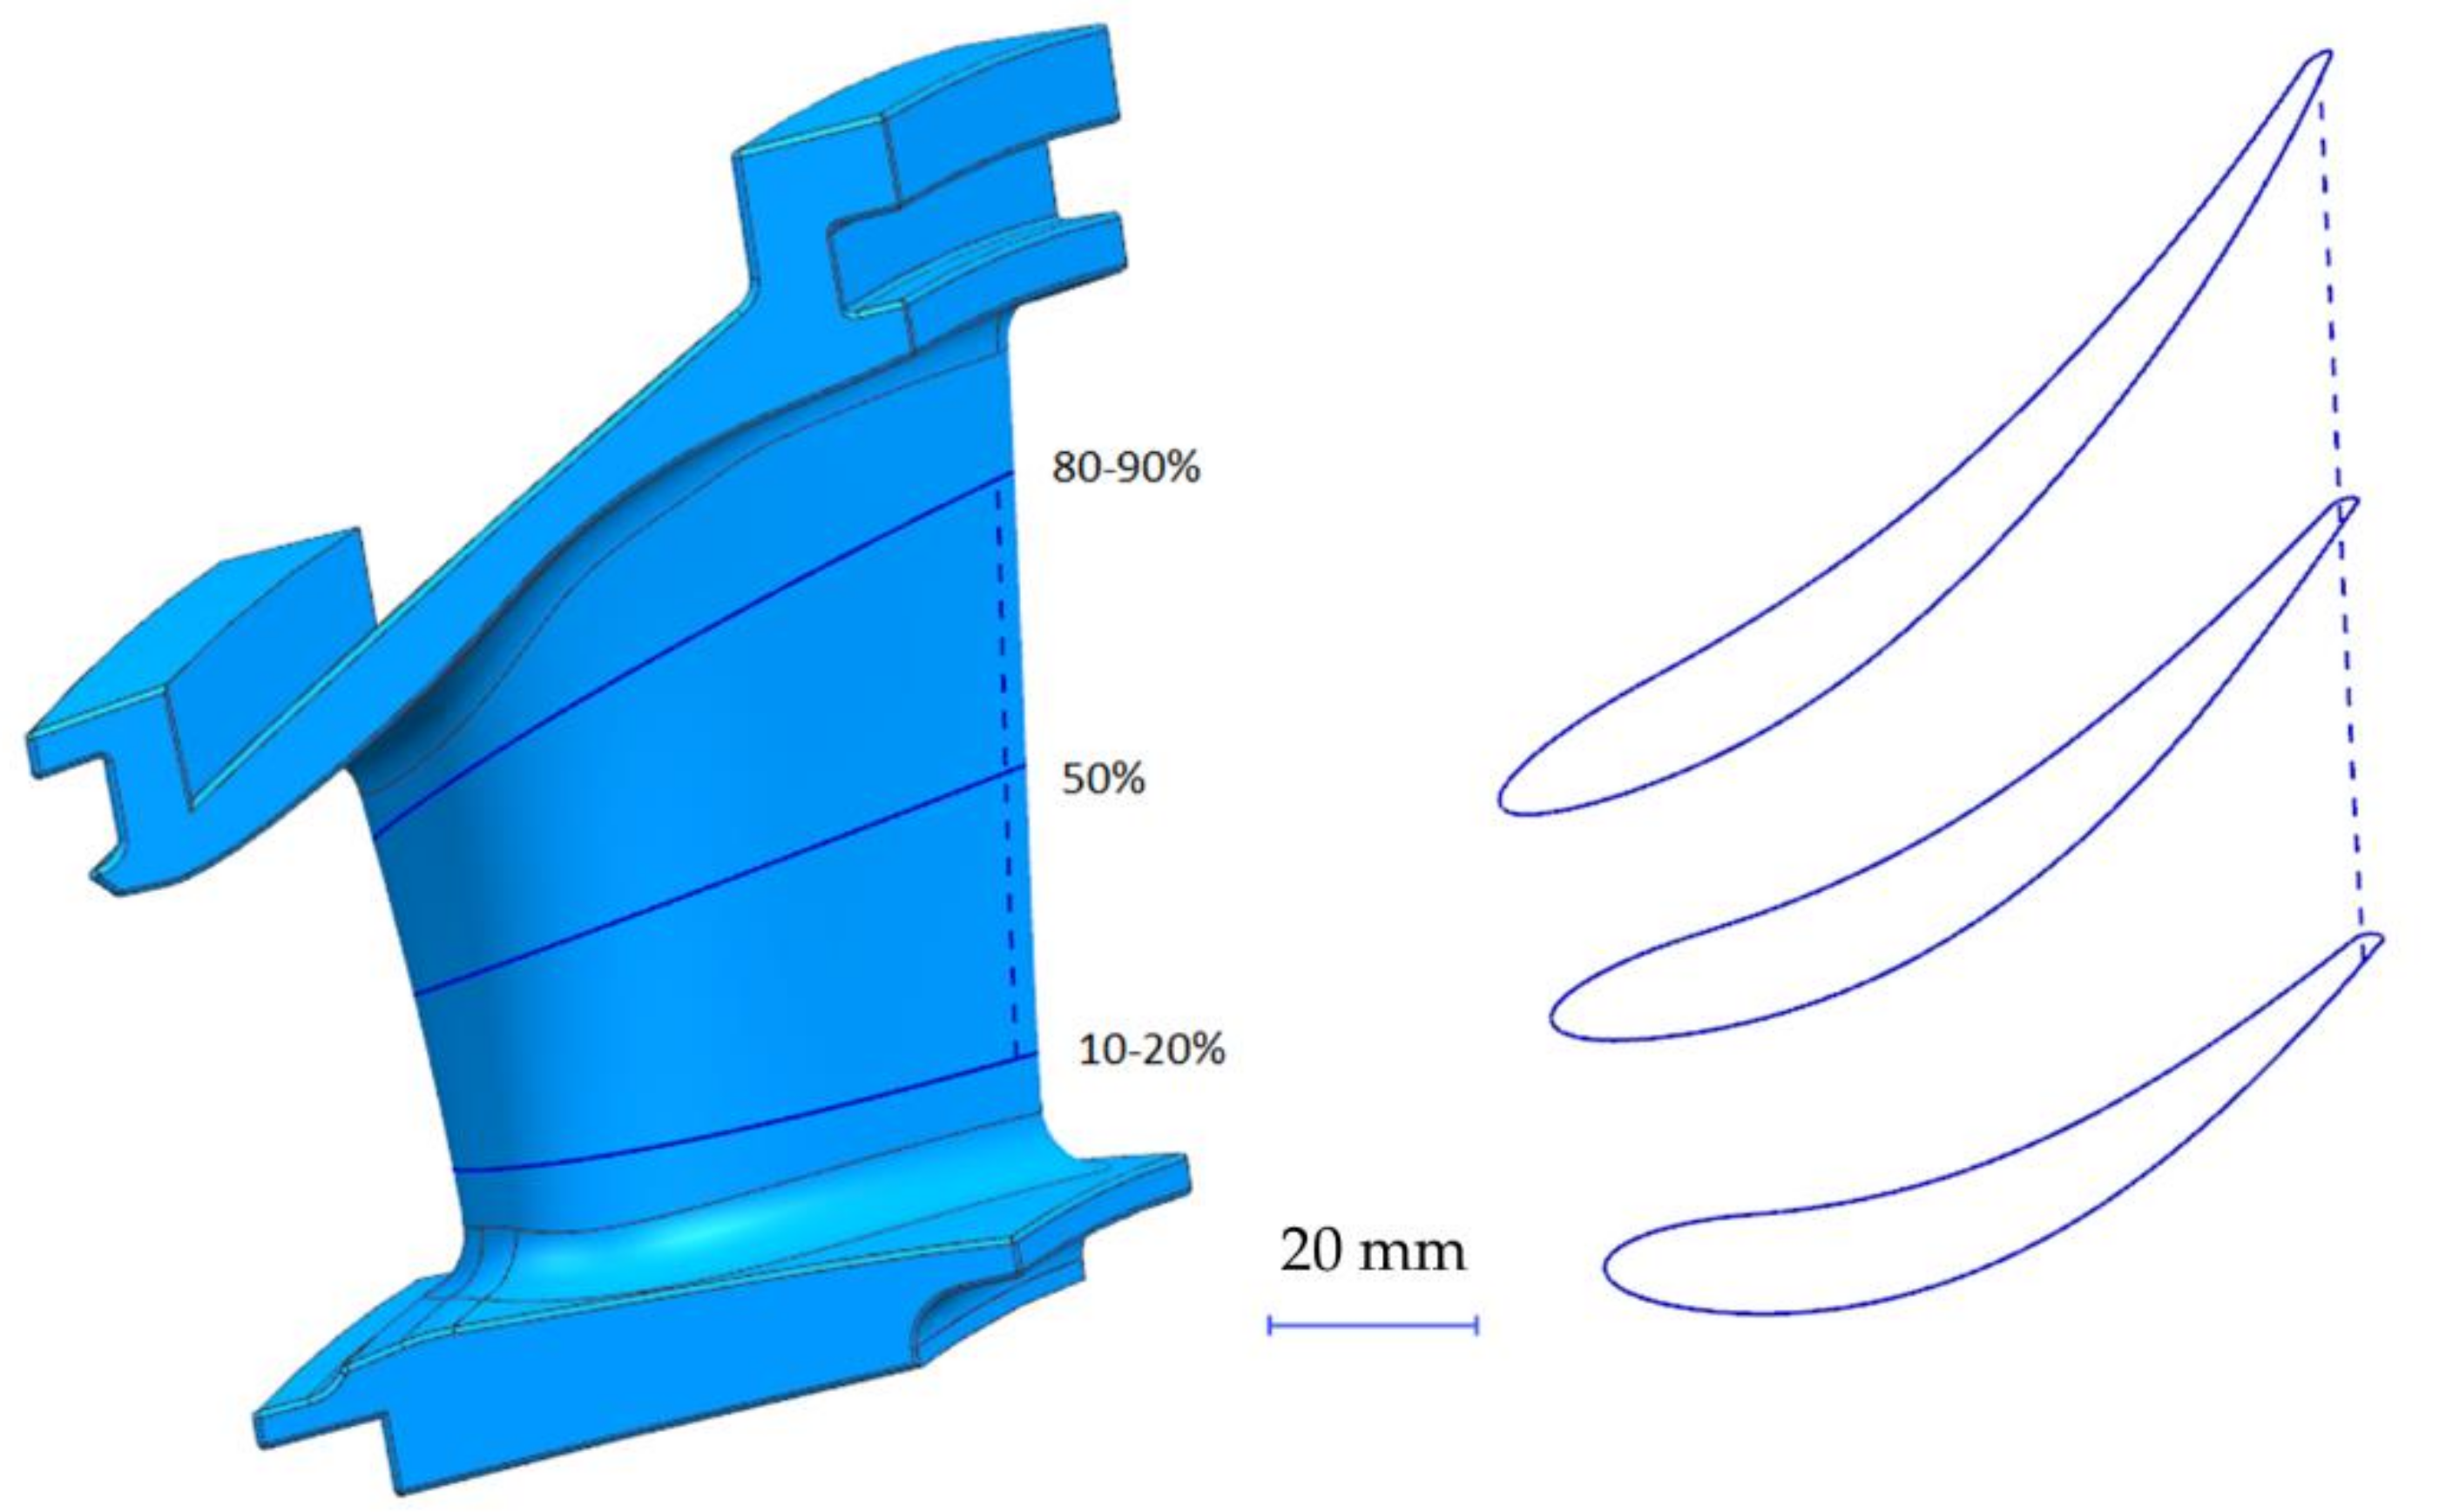
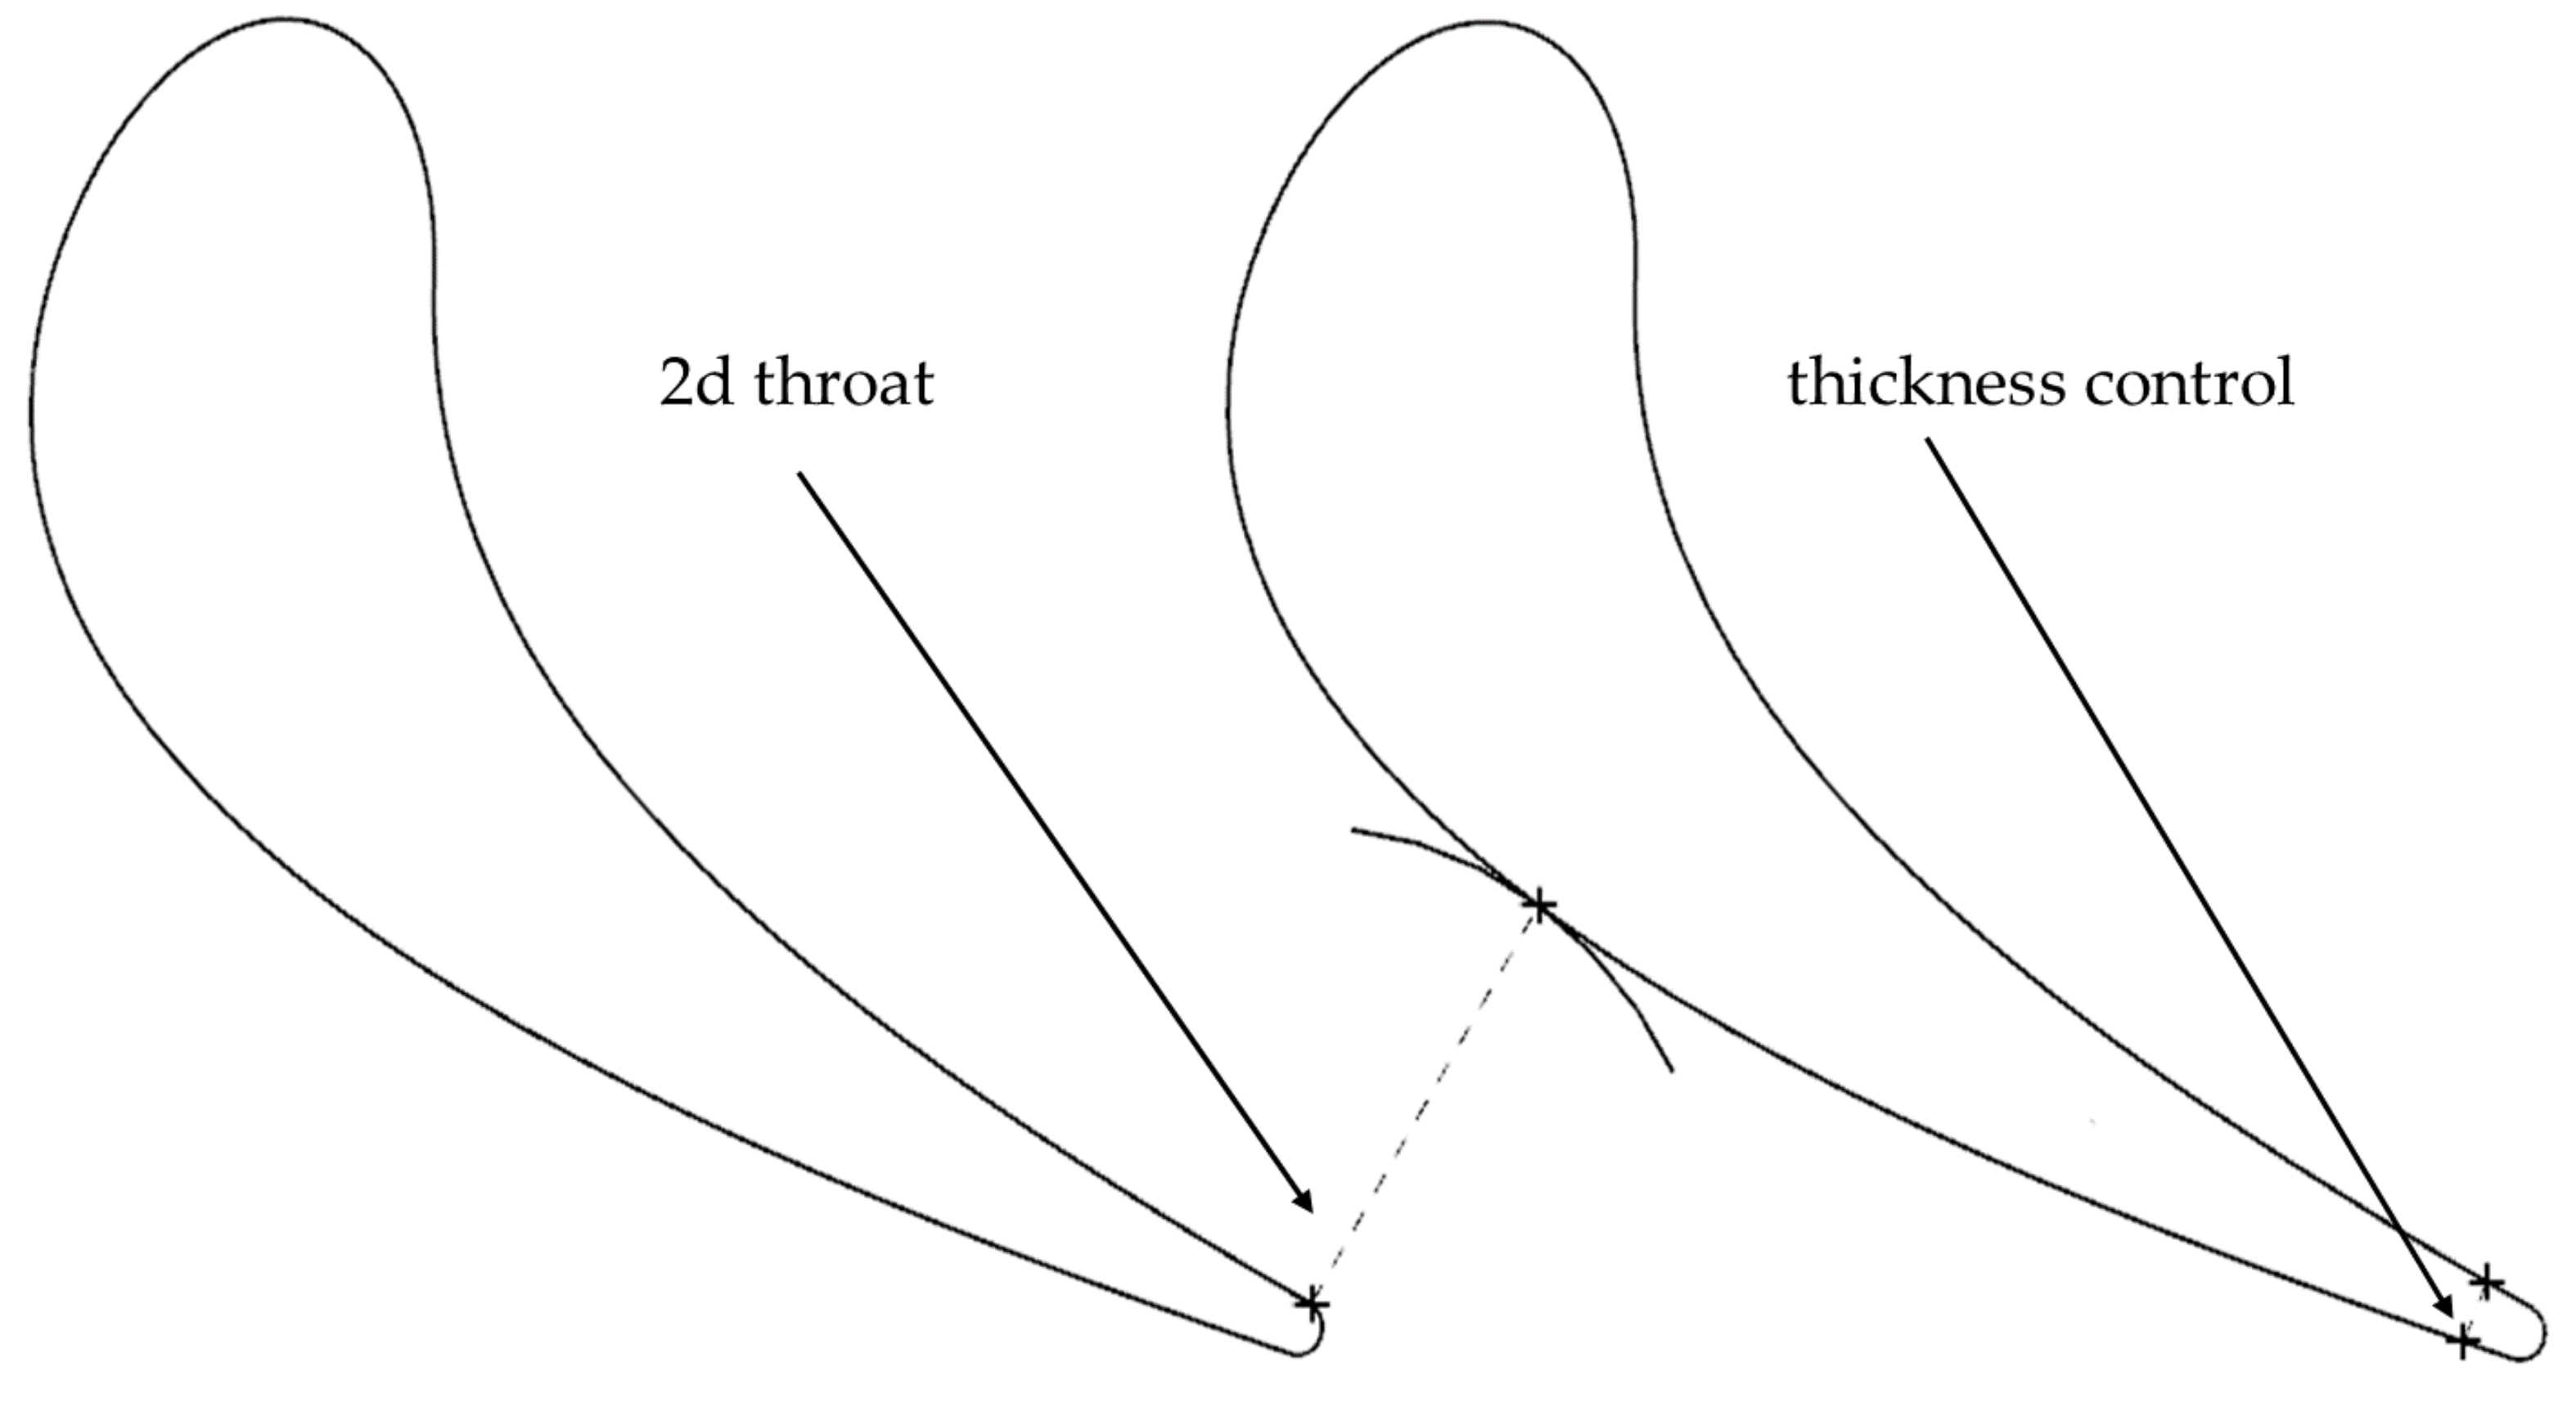
Due to a rapid curvature change and being a very thin wall itself, the trailing edge can be removed from the enhancement and omitted during mass production. The horizontal trailing edge curvature is not so important from a mechanical perspective—it is slightly more valuable just to measure its thickness (
Figure 6). A very critical part of the cast structure, which should be carefully verified to confirm overall surface smoothness, is a vertical curvature near the trailing edge—a trend line which lies on a throat area (
Figure 6). It is critical for the part’s performance and it has to be done simultaneously with the overall profile definition.
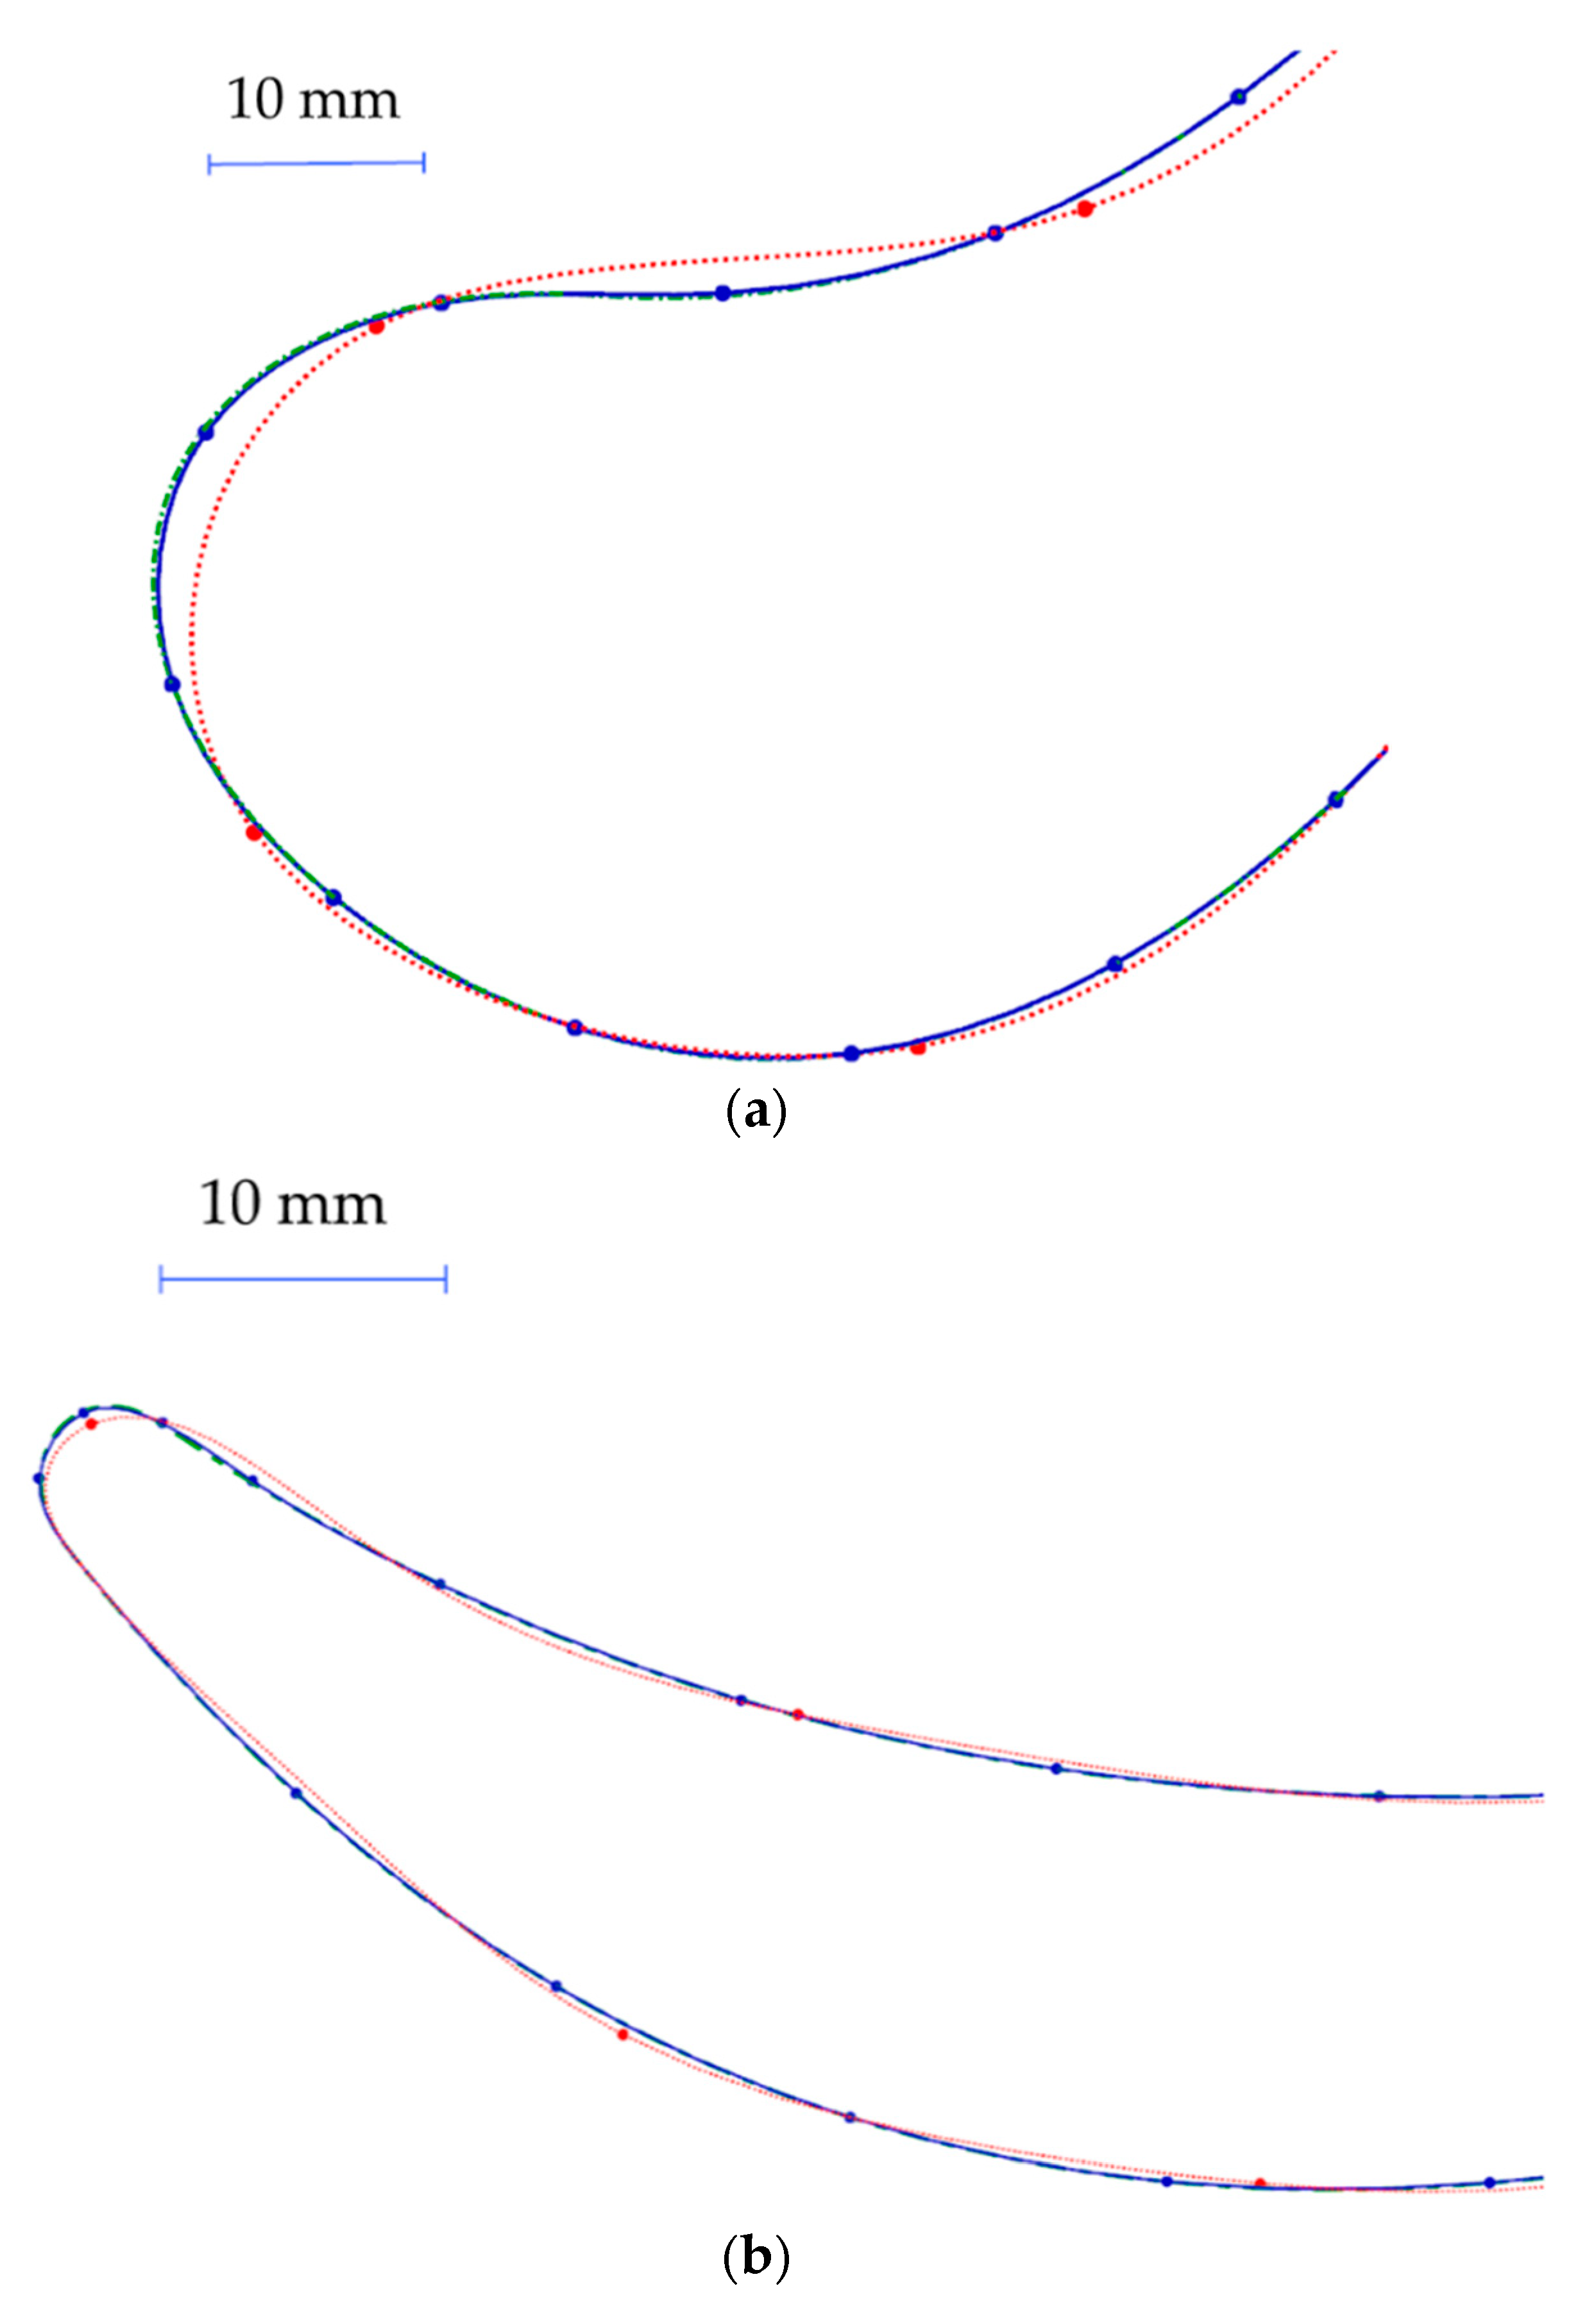
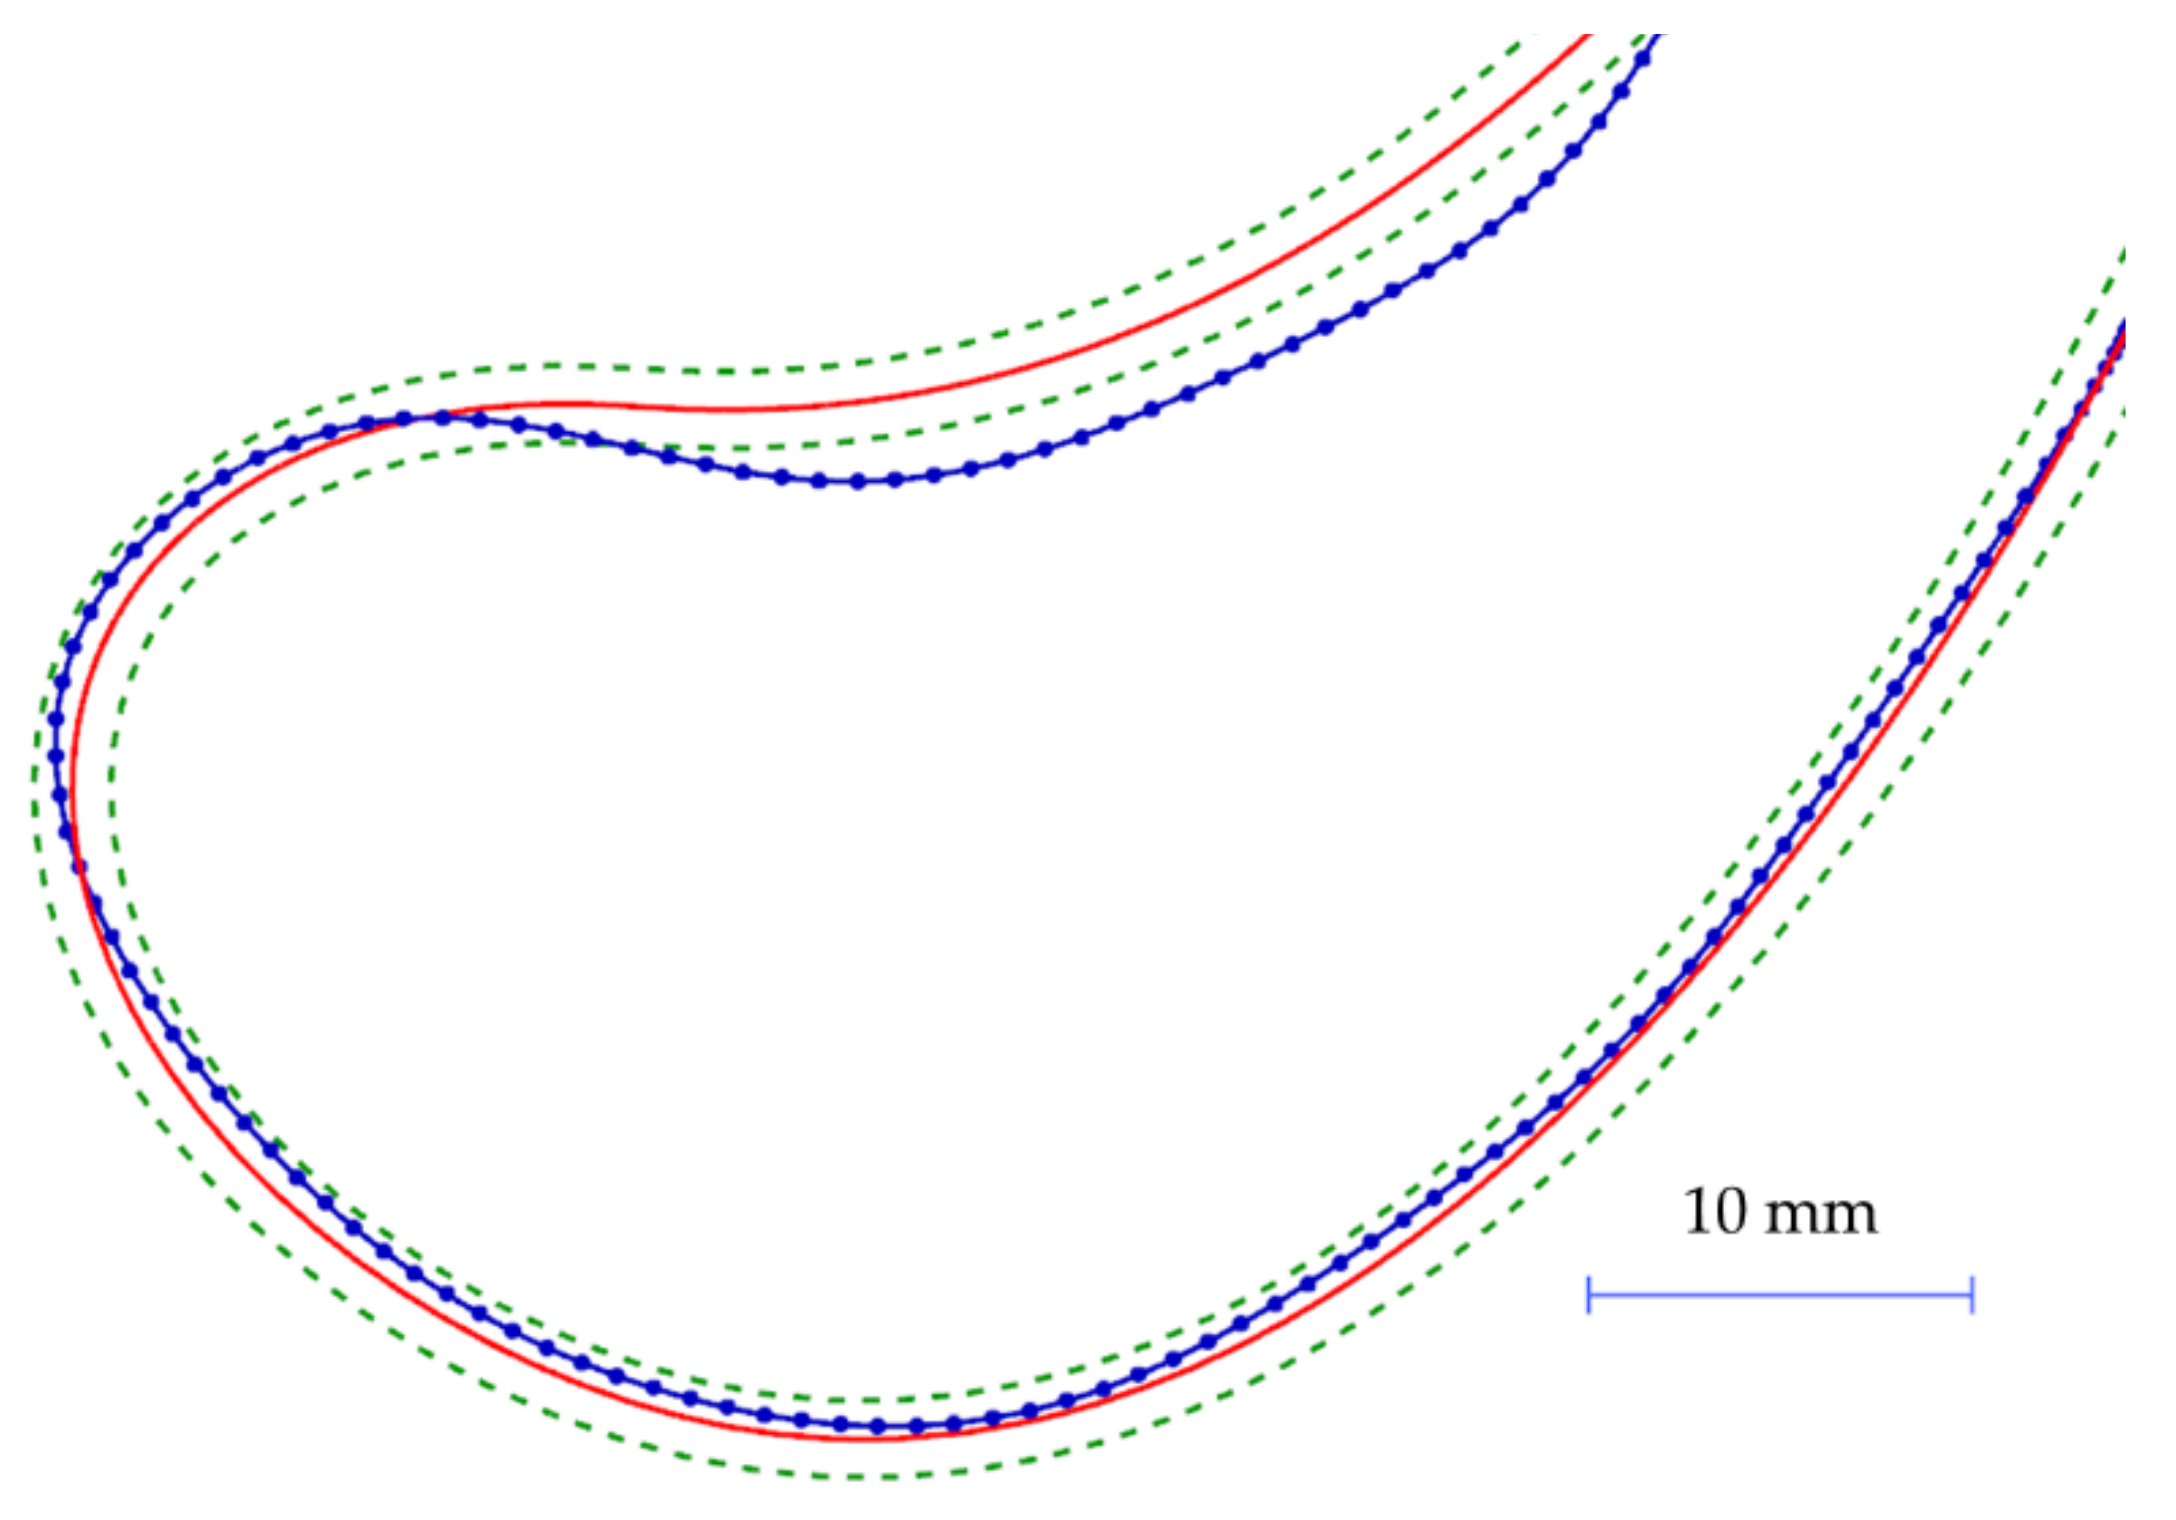
Comparing with the original shape (the green dotted-dashed line) in
Figure 9 and calculating deviations based on 25 points (the blue straight line), any deviation impact can be omitted as the spline average error will not affect the part shape at all (
Table 1). Understanding the error resulting from an adjusted spline defined by 25 control points should be considered during engineering. In
Figure 9 the red dashed line show that too small a number of points can also dramatically perturb the shape of the measuring sections. The same behavior can be seen for both the turbine guide vane and turbine blade airfoils. Following the same method, the number of points needed to verify the trend line can be introduced. This can vary between 10 and 30 points, depending on the trailing edge curvature.
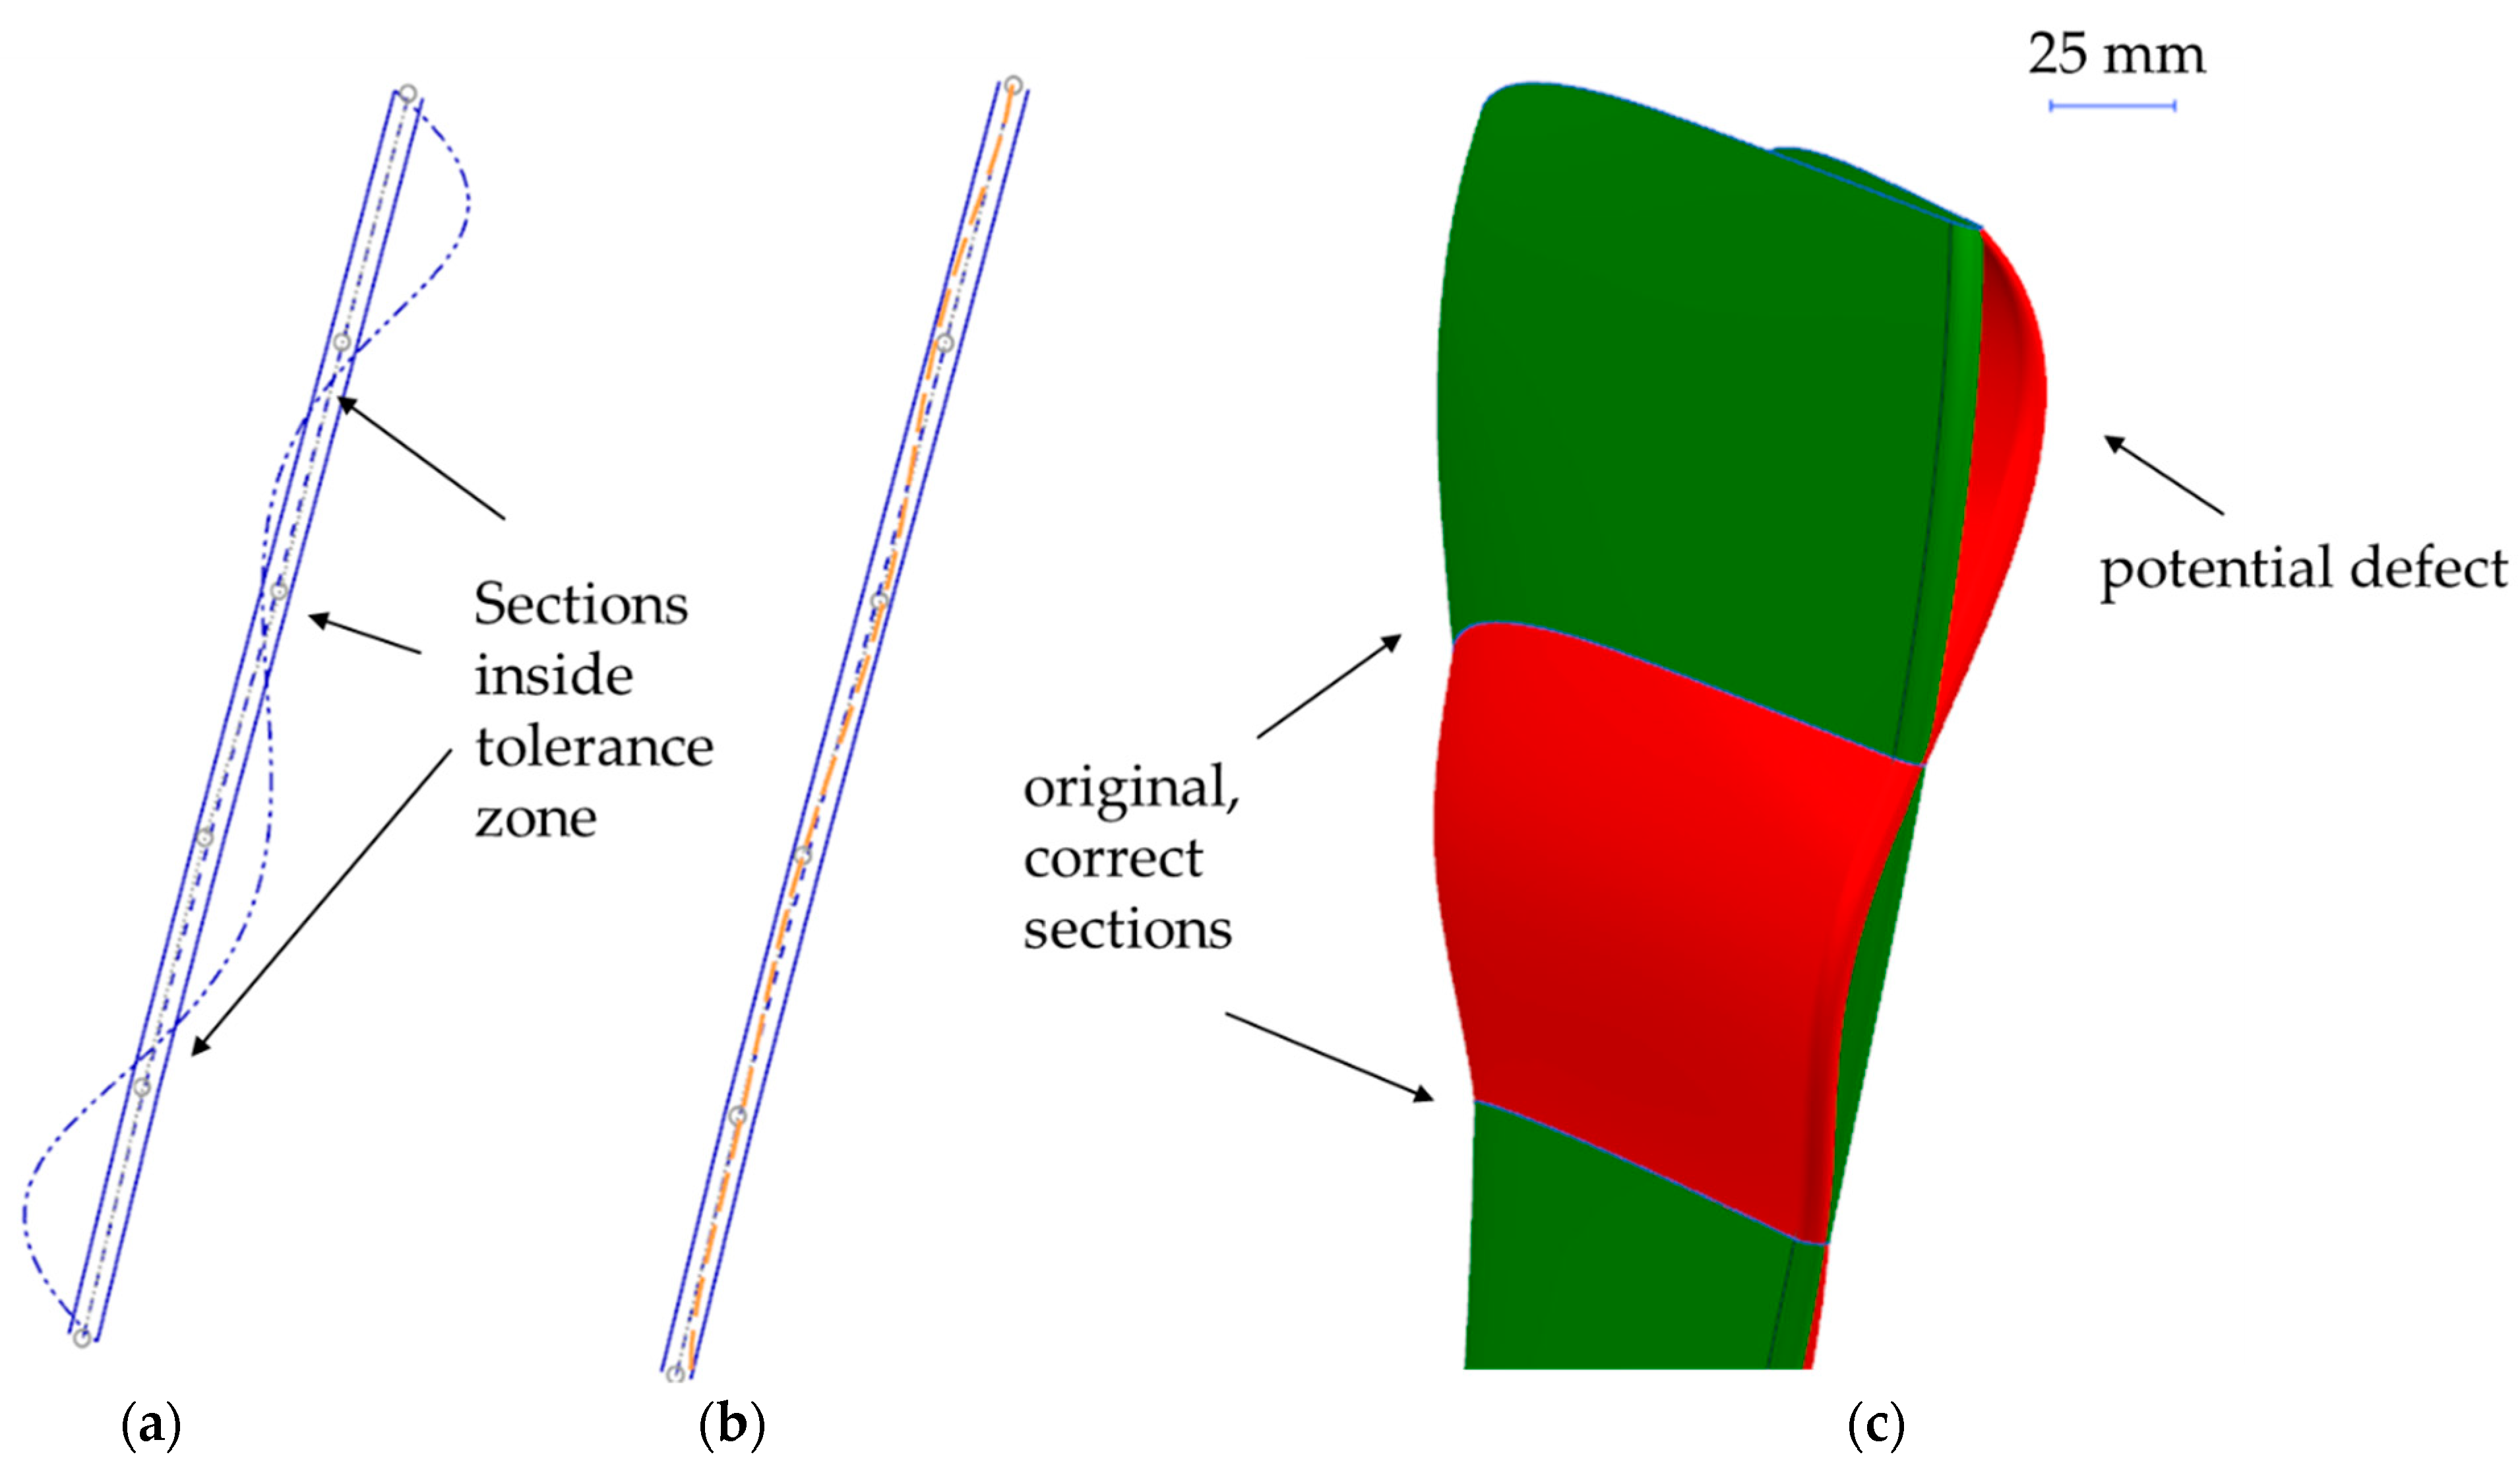
Non-destructive tests can reveal small flaws like holes or cracks, which has already been mentioned in the previous chapters. Larger discontinuities will not require a large number of points to be checked. A rough CMM path can reveal flaws on the part without a need for densifying the measurement points (
Figure 10). Serious flaws may be identified by measuring at a large number of points while mere awareness of its existence (a measurement taken at one point) is needed in order to reject or approve the part. Rejected parts are usually very rare, so they can be fully inspected in a separate process.
4. Results and Discussion
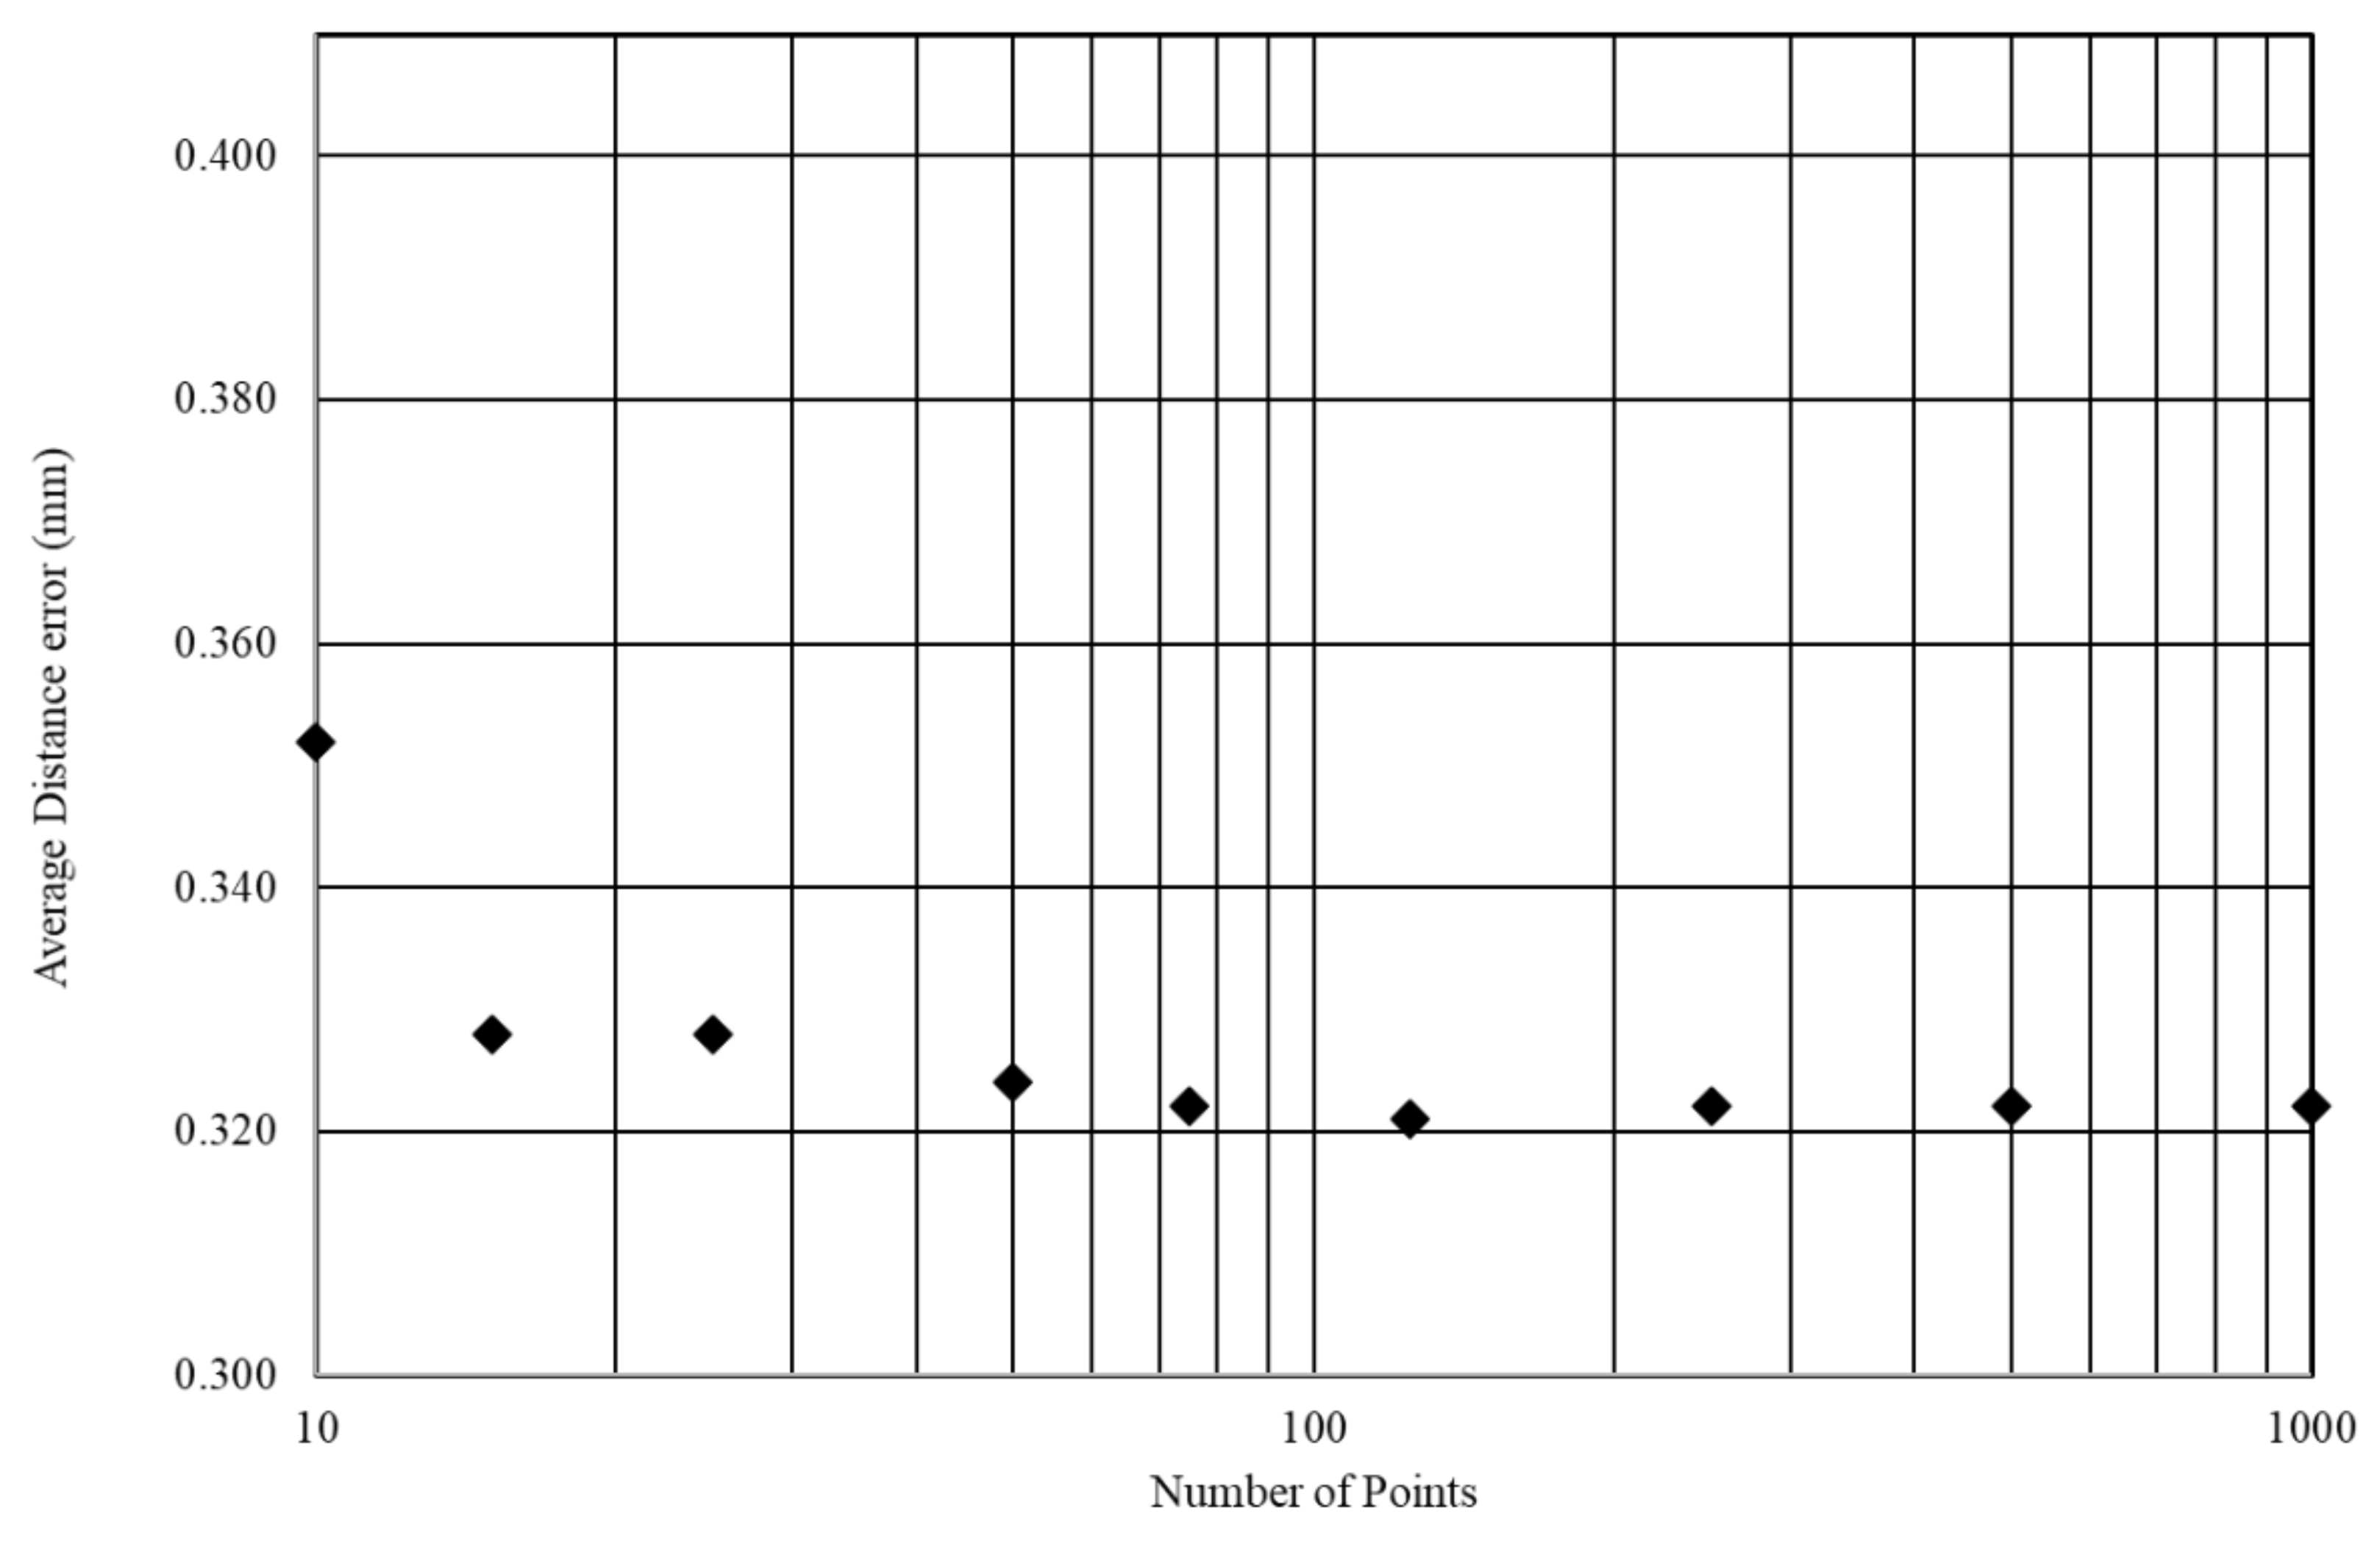
To prove the thesis of approximately 25 points being enough for a section measurement, this theory was verified in practice on a Zeiss (Oberkochen, Germany) Accura II, Calypso 2019 (Zeiss, Oberkochen, Germany) software with curve and freeform modules, and Vast XT and Vast XXT probe heads. Different scenarios from 10 to 1000 measuring points are presented in
Table 2 and drawn in the chart in
Figure 11. The chart shows the same level of error for all the measurements, which proves the theoretical assumptions. Thus, it transpires that within the boundaries of the specified part tolerances it has been proved that smaller point groups can drastically reduce the overall measuring time for part inspection.
Based on theoretical speculations, a production part was measured by CMM using three sections and one trend line. Data was collected on all the measured points and deviations calculated from the original 2D spline. Sample results are presented in
Table 3. The result including two almost perfect sections and one which varies greatly from the desired specification but is still within tolerance. This is part-specific, based on curvature changes in the configuration, but also shows an interesting fact about part castability. Twenty-five points per section and 16 for the trend line gave us satisfactory results with an average error similar to the theoretical one. The total number of measured points can slightly fluctuate around this number; there is no difference whether we use 23 or 28 for a curve. Twenty-five was chosen as it seems to be a good compromise between the maximum and average distance error, giving a reliable result. This proves the thesis about shape inspection simplification. The sample standard deviation is acceptable, as its value is at the same level as for 1000 points. All tests were repeated on about 50 guide vanes as a first attempt at a prototype set and then released to production for other sets. All results are very similar and confirm the method for the real parts.
An additional check was performed using a 3D scan aligned with the best fit related to the data. The results were computed using Geomagic Control X [
16]. The calculated error is within the desired overall tolerance, which confirms that the simplified CMM inspection is enough to accelerate the verification process.
Previously, for a qualified process, all parts met the intent of the checking process, so additional checks were introduced on the parts rejected before qualification. Some defective parts were produced on purpose at the tooling development phase in order to stabilize manufacturing processes. Those parts were used to verify the smallest number of points necessary to find an error of the shape, similarly to the previous verification.
Table 4 is an evidence of the premise that the number of CMM points needed to verify the part can oscillate around approximately 25 per section on aero-shaped components. In
Figure 12 the presented average error tends to be stable for a high number of data points, still aiming to ensure enough accuracy even for a small amount of data. Only one point is needed to find the flaw, but it must be ensured that that specific point can be found during the inspection. A high number of measured points can register the same flaw many times and based on important knots we can limit these significantly. A set of 1000 points contains 256 points outside the tolerance, whilst a set of 50 contains only 11, and a set of 15 contains five. At approximately 25 points, based on knot reduction, it is certain that shapes outside the tolerance can be found. Using just a few points can result in identification of a flaw, but it is by no means certain that all flaw locations will be identified this way or that these will be all the significant flaws for our configuration.
The reason why larger groups of points have larger values for error measurement lies simply within the type of measurement. Single points are measured in intervals; a quick sensor movement needs a short time period (about one second) to damp the vibrations. A high number of points (up from 125 in the presented case) is measured by scanning. The speed of the sensor is decreased so as not to induce vibrations, but the speed per single point overall is higher, as the machine is collecting the data continuously, without stopping the probe movement. The scanning method can be less precise, but there is a need for a compromise between the speed and accuracy for this type of inspection and everything rests upon the inspector’s experience. Mass inspection can accept small errors, which do not affect the overall inspection quality. Additionally, there is a full overview of the part shape with all the maximum and minimum peaks on the part surface.
Table 3 and
Table 4 results use absolute values for the maximum, average error, and sample standard deviations calculations.
Many automation methods were also used for the final path planning, probe adjustments, box of safety (a 3D place where we can use the full speed for CMM without a risk of probe damage), and report generation. These modern software tools are already available on the market; it is strongly recommended to use the latest available software in all the path-measuring optimizations. Full maintenance for software can be expensive, but it will certainly be compensated within a reasonable time period. In brief, this is what we can call an intelligent CMM.
CMM inspection shall be performed even 3–6 times on a part during the manufacturing processes. The first inspection is on the casting, the second one on the coated surfaces, and the third inspection after any heat treatment, to check for thermal deformations. The fourth inspection should be during or after all the machining operations. At this point, there is still a possibility to implement a repair method and perform a re-staggering action to rotate the airfoil in relation to the machined facets which interface with other components. A fifth inspection can be performed after any extra operations involving any kind of heating, like welding or brazing of plates and tubes, where the whole product is put into a furnace. The last inspection is performed at the arrangement level to provide an average flow rate through the complete ring assembly. It is recommended to use at least three CMM inspections: for the cast part, after the heat treatment, and before the final assembly on the final product. Simplifying measurements, which are performed during each inspection, significantly reduces the time required for each inspection, therefore optimizing the overall manufacturing process.
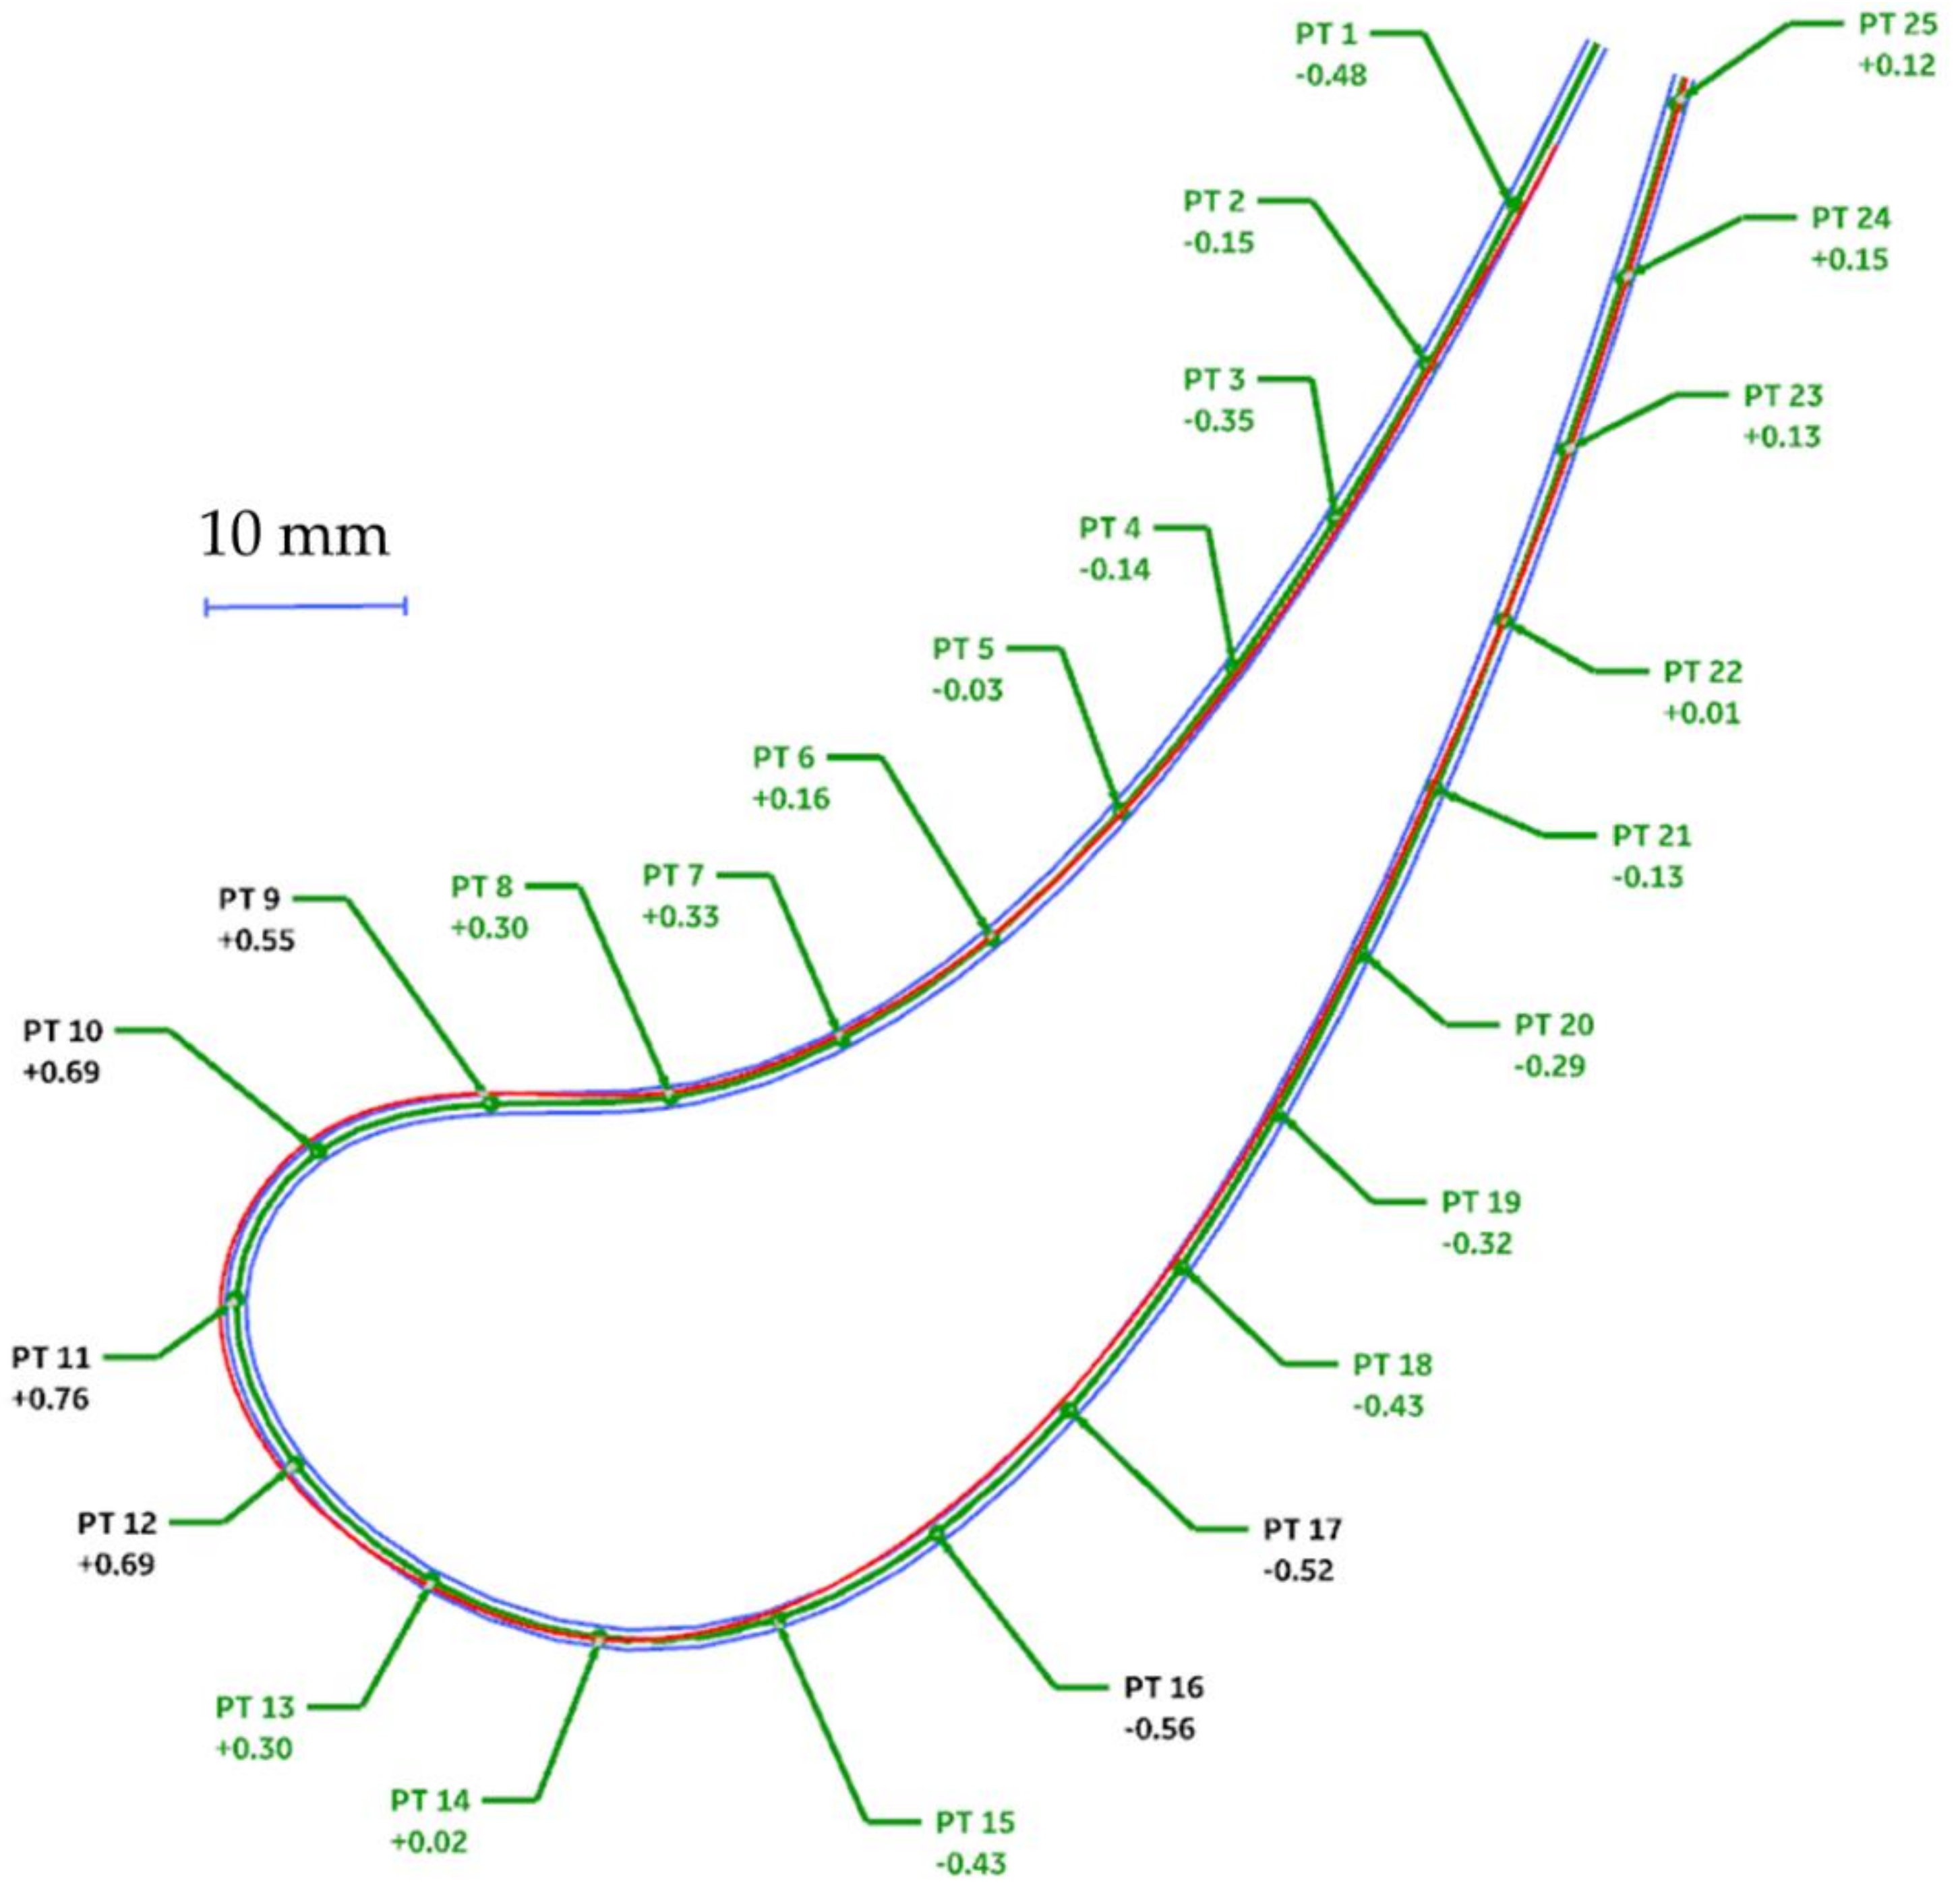
The time saved due to simplified measurements is easily transferable to the overall part cost, which is highly sought after in view of current world industry competitiveness. In
Figure 13 a report example is presented. From an engineering perspective, short and well-presented information about deviations is preferable in order to approve the developed parts. When all measurements meet our expectations (the values in the figure are in green) and the measured spline is within the tolerance zone, the part can be approved automatically. Red or yellow (black in this article — to improve contrast and readability) colors are used to indicate errors and then the part can be approved if these errors do not occur in critical places. These reports are very easy to review, as they usually contain hundreds of sections for all parts in an ordered set. Twenty-five points, as used in this case, is a good compromise between speed and accuracy. The part can still be accepted based on an engineering analysis with a simplified inspection. There is no reason to scrap parts with small flaws, but those parts should be carefully verified and accepted separately piece by piece. There are many possible scenarios for fixing the shape, such as additional machining, welding, and grinding if the identified flaw is too serious.
5. Conclusions
The purpose of this paper is to present a novel methodology of geometry inspection of complex-shaped elements. The proposed method has been used in the real world, implemented for turbine guide vane components, and can be incorporated into all aero-shaped components, such as turbine and compressor blades and other similar components in all engines, especially in the aero, steam, and gas families.
It has been proved that in order to verify the geometry of such complex shapes as blades, it is sufficient to make measurements of the coordinates of 25 points along three appropriately-selected cross-sections with one additional crossing trend line, which significantly reduces the measurement time.
Every complex machine mentioned in the article contains derived parts counted in the hundreds. Fast and reliable measurement helps to deliver complicated engines on time, reducing the impact for customers. Turbine guide vanes are also key components which are frequently replaced during outages and engine inspections. This makes manufacturing houses busy places with the need to inspect the produced parts almost constantly one by one with reduced breaks in between.
Researchers need to understand the math used in CAD development, as it might be simplified while introduced into modern software. Bezier curves are the most popular solutions both for managing data and for building the geometry and their CAD limitations should be taken into account.
Moreover, proper understanding of the manufacturing process and other corresponding tests is the key to developing the correct method of measuring, also for other researchers in the future.
