Article

Application of Advanced Measuring Methods for Identification of Stresses and Deformations of Automotive Structures

1
Department of Applied Mechanics and Mechanical Engineering, Faculty of Mechanical Engineering, Technical University of Košice, Letná 9, 042 00 Košice, Slovakia
2
Department of Biomedical Engineering and Measurement, Faculty of Mechanical Engineering, Technical University of Košice, Letná 9, 042 00 Košice, Slovakia
3
Department of Construction and Transport Engineering, Faculty of Mechanical Engineering, Technical University of Košice, Letná 9, 042 00 Košice, Slovakia
4
Department of Automation and Production Systems, Faculty of Mechanical Engineering, University of Žilina, Univerzitná 8215/1, 010 26 Žilina, Slovakia
*
Author to whom correspondence should be addressed.
Appl. Sci. 2020, 10(21), 7510; https://doi.org/10.3390/app10217510
Submission received: 23 September 2020 / Revised: 19 October 2020 / Accepted: 22 October 2020 / Published: 26 October 2020
(This article belongs to the Special Issue Advanced Engine Technologies and Innovative Vehicle Driving Systems)

Abstract

:
In the automotive industry, 3D laser scanning is the most frequently used method to check the geometry of the shape and dimensions of a body in individual stages of production, where the scanned model is compared in a computer model. This procedure identifies excessive deformations around the roof antenna of an SUV. The manufacturer assumed that these deformations occurred during the antenna assembly process. An analysis of possible causes of deformation occurrence was performed based on the comparison of results obtained by numerical and experimental modelling. Experimental measurements using tensometry performed on a painted and unpainted roof structure showed the effect of paint reinforcement on deformations around the antenna. Based on the analysis of results obtained directly under operational load, it was found that the installation of the antenna was carried out on the already deformed roof plate and the installation process itself was not the primary cause of the identified excessive deformations. The presented results of deformation and stress analysis document deeper connections between the measured displacements of 3D scanning and the technological process of component production itself. The use of the achieved results should especially help designers, calculators, technologists as well as production quality controllers.

1. Introduction

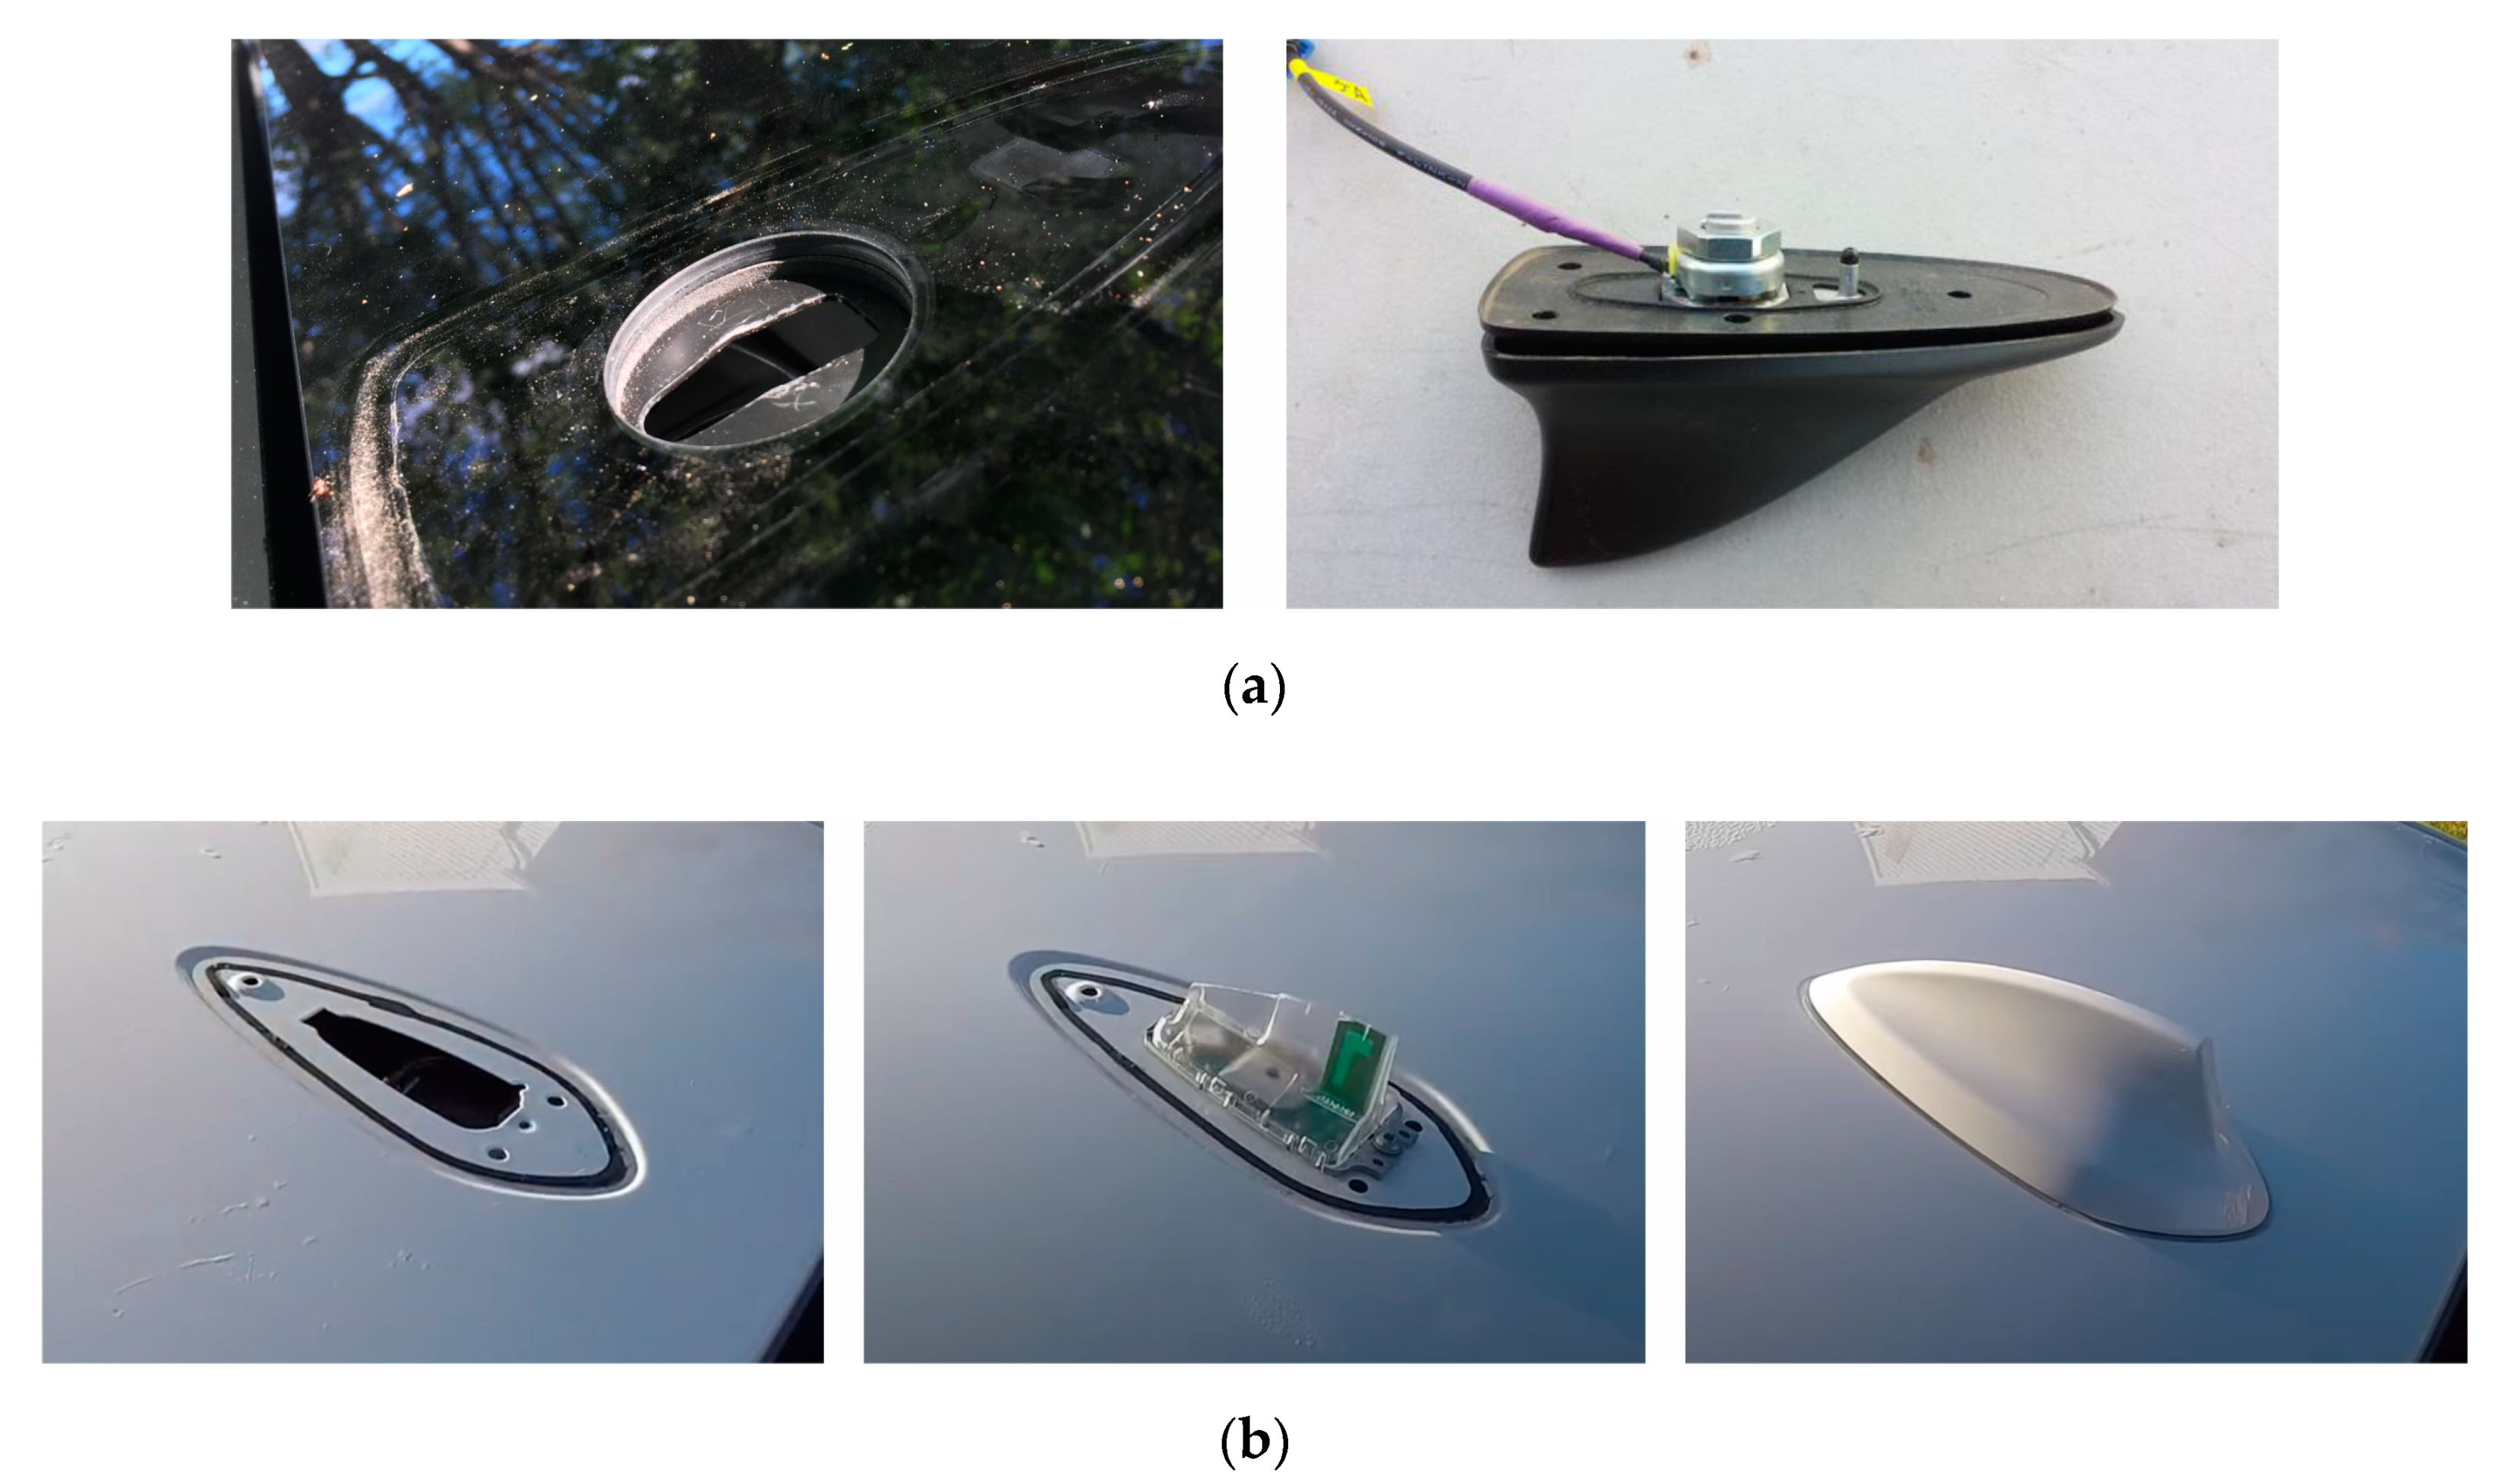
Technological processes of processing especially thin sheets in the automotive industry are often associated with excessive deformations of components, which on the one hand may not be dangerous in terms of safe and reliable operation, but their presence is undesirable from a visual (esthetic) point of view. Undesirable deformations are related not only to technological operations of cutting and processing but also to residual stresses in materials [1,2,3]. With the introduction of automation to technological processes, car manufacturers are trying to introduce new elements to control the geometry and shape of components in order to ensure trouble-free assembly or minimization of errors during handling [4,5,6]. The achieved accuracy affects, for instance, the quality of component joints in terms of required strength and functionality, etc. The paper describes the analysis of the occurrence of excessive deformations, which were identified during the installation of the roof antenna. Figure 1 provides examples of various locations and methods of antenna mounting. When studying Figure 1, it is clear that the attachment points of antennas are different in terms of size and shape of the plate.
Each manufacturer tries to implement their own “Know How” in their products and thus create products which are unique not only at first glance, but also in production and assembly technology. As different antenna shapes are created depending on the design or functionality, different types of mounting for the respective antenna are also created. The size of the antenna shape depends on the possibility of its use, whether it has a built-in GPS receiver or a basic AM/FM receiver [7]. The two antenna-mounting procedures are shown in Figure 2. The first is the attachment of the upper part of the antenna inserted into a predefined hole by locking the screw mechanism from the underside of the roof (Figure 2a). The second possible alternative is to attach the antenna, which consists of two parts—the core and the cover—with screws from the underside of the body (Figure 2b).
At first glance, the installation of a roof antenna is a simple operation, but during its realization, visible deformations may occur, which will ultimately significantly affect the customer’s first impression when buying a car. On the other hand, it should be mentioned that the price to achieve a perfect shape and surface is often too high and therefore it is necessary to find a compromise (boundary) between perfection and acceptability.
Constant demands on the innovation of the body shape from the customers’ side brings several problems for the designers; it is possible to include the design of technical solutions that can be used for several car models without significant changes. Adjusting the shape and dimensions of the roof is one of these components, because it is made of thin sheet metal, which needs to be reinforced in selected places. The places, shape and method of attachment of reinforcing elements must be consulted not only with the production technologist, whether the proposed solution is technically possible to produce, but also with the economist to assess the economic side of production, etc.
To reduce excessive deformations, reinforcement elements are most often used, the shape and method of attachment of which are currently designed primarily using the means of numerical modelling. A car body, however, is a complex construction, where every small change can cause considerable complications in the assembly process. Therefore, where possible, experimental measurement tools based on different physical principles are used to verify the results of numerical modelling [8]. As for the dimensions or shape of inspected components, laser methods are most often used. With the development of modern measuring devices, we can observe a significant advent of powerful measuring devices enabling 3D analysis of components in real time [9], including outputs in a format that can be relatively quickly and easily compared with numerical modelling results.
It should be noted that, in the case of numerical modelling, it is often an investigation of an ideal model, where the results depend on the input parameters defined by the designer. In the best case, information obtained from experimental measurements on real products is needed, otherwise tabular values are used. In some cases, the problem of defining the required parameters is mainly for modern (developed) composite materials, which mechanical properties are not known for all stress (loading) states or types of stress [10,11]. The designer must always keep in mind that any small change (modification) of one component may adversely affect the functionality of another and thus endanger the safe and reliable operation of the entire mechanism.
The presented paper describes the methodology of experimental verification of the occurrence of excessive deformations on the roof of a car, which were identified around the roof antenna. The assumption was that the main cause was the process of tightening the screw to fix the antenna. The proposed methodology was based on a deformation-stress analysis determined by numerical modelling. Subsequently, displacements around the antenna before and after its assembly were experimentally determined with a Leica 3D measuring scanning device. To validate the achieved results, a strain gauge method was used, which allowed us to measure strain in selected locations under operational loading. Based on the comparison of the obtained data, the influence of antenna assembly on the occurrence of excessive deformations was assessed.

2. Checking the Geometry and Shape of the Assessed Car Roof

2.1. Light Reflection Method

For the immediate identification of undesirable inequalities on equal or relatively curved surfaces, a relatively simple method is used, based on observing the reflection of parallel black and white stripes. If the reflected bands are parallel, the area to be assessed does not show the presence of undesirable defects.
Process for inspecting the shape of the roof surface in the vicinity of the antenna under consideration after installation is shown in Figure 3. From Figure 3 it is clear that the areas with the most visible deformations around the opening have been covered by the upper part of the antenna, but the curves of the black and white stripes are still visible to the naked eye on the sides.
Although the undeniable advantage of this method is the speed of measurement, it does not provide accurate quantitative data on the shifts needed for a deeper analysis of the problem. However, the patterns obtained may help to validate the results obtained by other methods, whether using numerical or experimental modelling.

2.2. Laser Tracker Systems

The optical laser method called laser tracker systems is currently a standard part component of automated lines, especially in automotive plants. It is one of the most accurate and fastest methods for analyzing the unevenness of complex components. Scanning 3D objects is used, for example, to check tolerances of individual dimensions in real time. The measuring set used consists of a static part of the Leica Absolute Tracker AT960 and a portable Leica T-Scan 5 [12].
The apparatus enables data collection at a speed of up to 160 lines per second, or up to 210,000 points per second. The identification of the position in space is realized on the basis of reflection of the laser beam from the optical system of mirrors, which are distributed around the entire circumference. The greatest advantage is the possibility to measure various types of surfaces—from matt to reflective. The computer software then evaluates measured data and, by comparing them with model values, deviations are determined at analyzed points. The accuracy of the equipment specified by the manufacturer is ± 60 μm to a distance of 8.5 m.
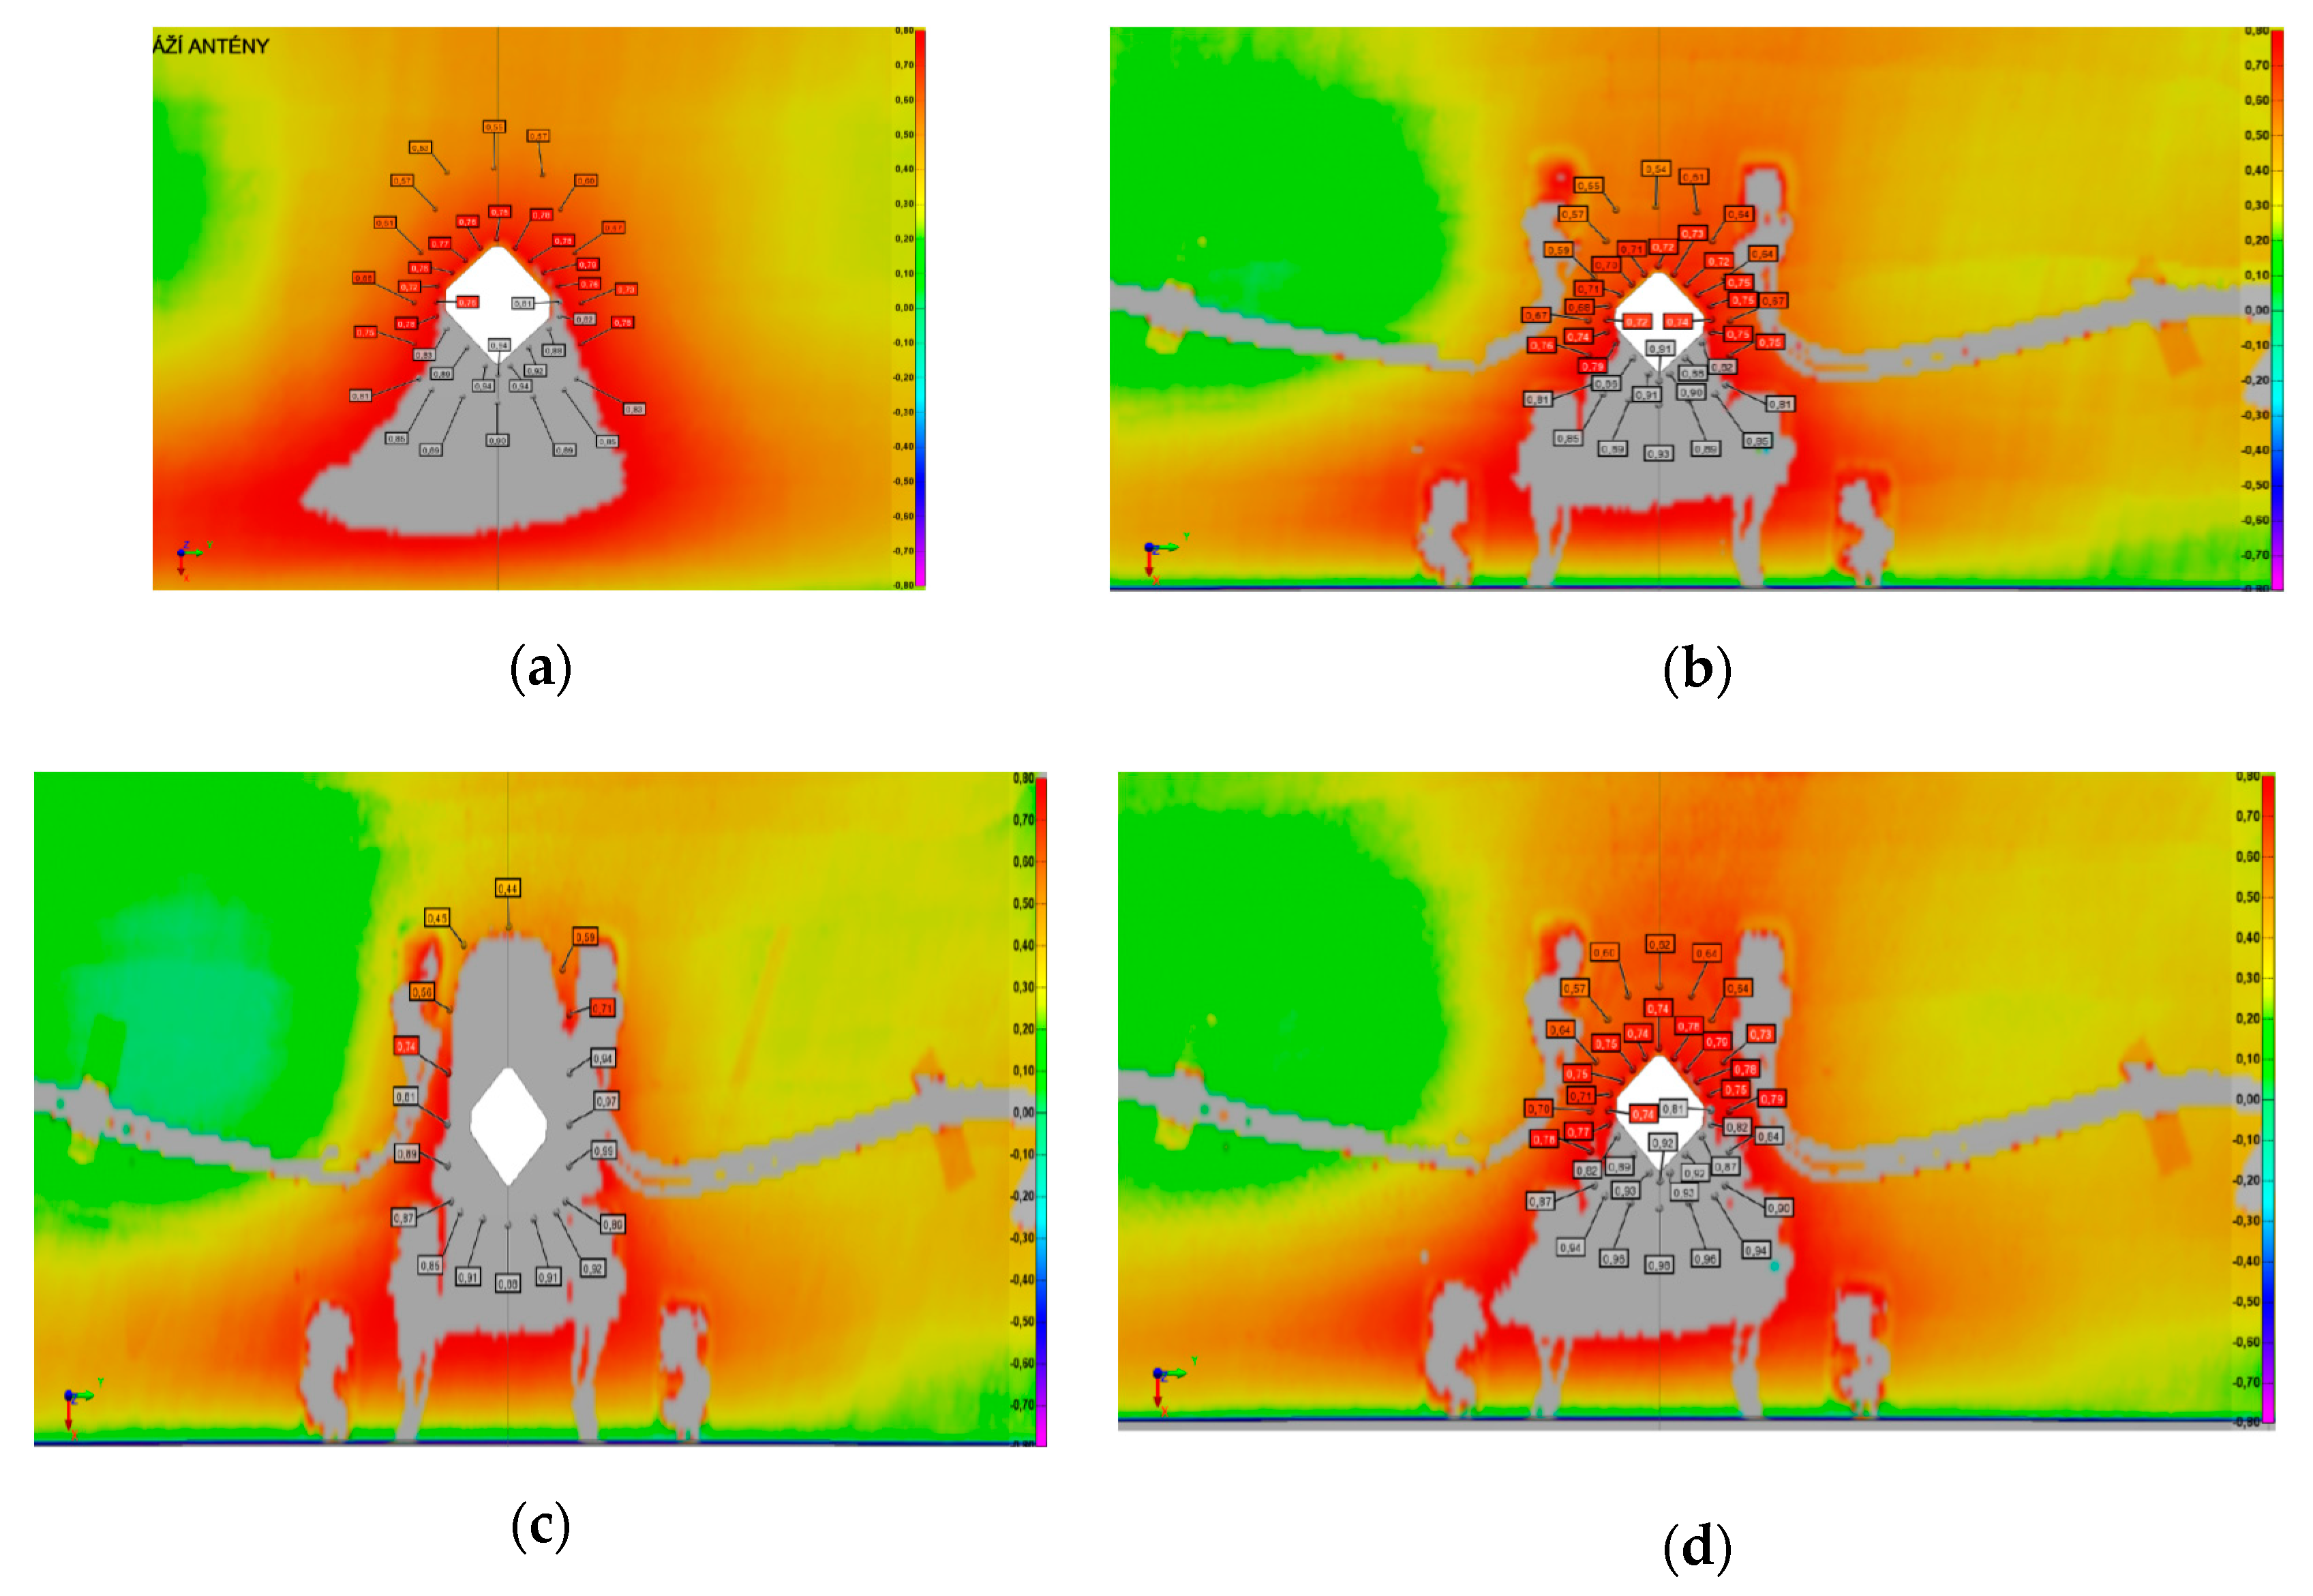
The main advantage of the device is not only the compact character and easy operation, but the possibility to validate measured dimensions of the real product with a software 3D model at predetermined points. Figure 4 shows a process of measuring displacement of the analyzed roof before mounting the antenna. Figure 5 shows the measured fields of roof displacement before and after mounting the antenna. The displacement measurement points were selected so that it was possible to compare the change near the hole (points 1 to 20) but also in the vicinity of the antenna cover (points 21 to 38).
Table 1 compares displacement values at selected locations according to Figure 5. In the case of measurement after installation, the area under the antenna cover was not evaluated (stage 3). Places where displacements have not been evaluated (measured) are marked in gray.
Deviations of values between individual stages are given in Table 2. Three stages were analyzed. The first stage was represented by deviations of displacements after the application of strain gauges to the unloaded roof (2/1). The second stage was the comparison of the displacement after the antenna mounting with the state after application of strain gauges (3/2). At this stage, it was not possible to evaluate deviations at locations 1 to 20. The last step was to compare values of displacements after disassembly of the antenna against the state after application of sensors—i.e., with the conditions before antenna mounting (4/2). An interesting fact was the finding of deviations in the same operation in both directions. The most important fact is that significant deviations occurred after the installation of the antenna in places 34 to 36, where the difference in values reached almost 47% (in absolute terms, the difference equals 0.3 mm). Nevertheless, this condition is not critical for the assessment of car operation safety, but these deviations may already be visible to the eye.
For easier interpretation of numerical values given in Table 1, a displacement filed can be used (Figure 5). From the asymmetrical distribution of the displacement fields, it is clear that the deformation of the sheet metal registered before the actual assembly of the antenna is different on the right and left side. The cause of the detected phenomenon is most probably due to some of the previous technological operations, whether cutting the hole, fixing the reinforcing elements by welding, connecting the roof to the supporting structure of the car, etc. Although the manufacturer tried to achieve the required accuracy during the production of its products, it still varies within certain tolerances. The basis on which the criteria for the specific intervals is determined and whether they are sufficient are still questionable. The answers to these questions make it possible to obtain experimental measurements based on other physical principles carried out on real components. On the one hand, their implementation provides the possibility of validating theoretical values, but it must be borne in mind that experimental measurements have their limitations. A great advantage of experimental measurements is the acquisition of data in the so-called operational loading, which is often time-consuming and costly. In this case, a strain gauge method was chosen to validate the measured data.

3. Experimental Measurement

3.1. Design of Methodology for Experimental Measurement of Deformations in Selected Places

The advantage of experimental measurement is that it allows the consideration of real boundary conditions including constrains, dynamics loading and other operational influences [13,14,15,16]. The strain gauge method was proposed for experimental measurements. At selected locations, values of reduced stresses were recalculated from relative values and were compared.
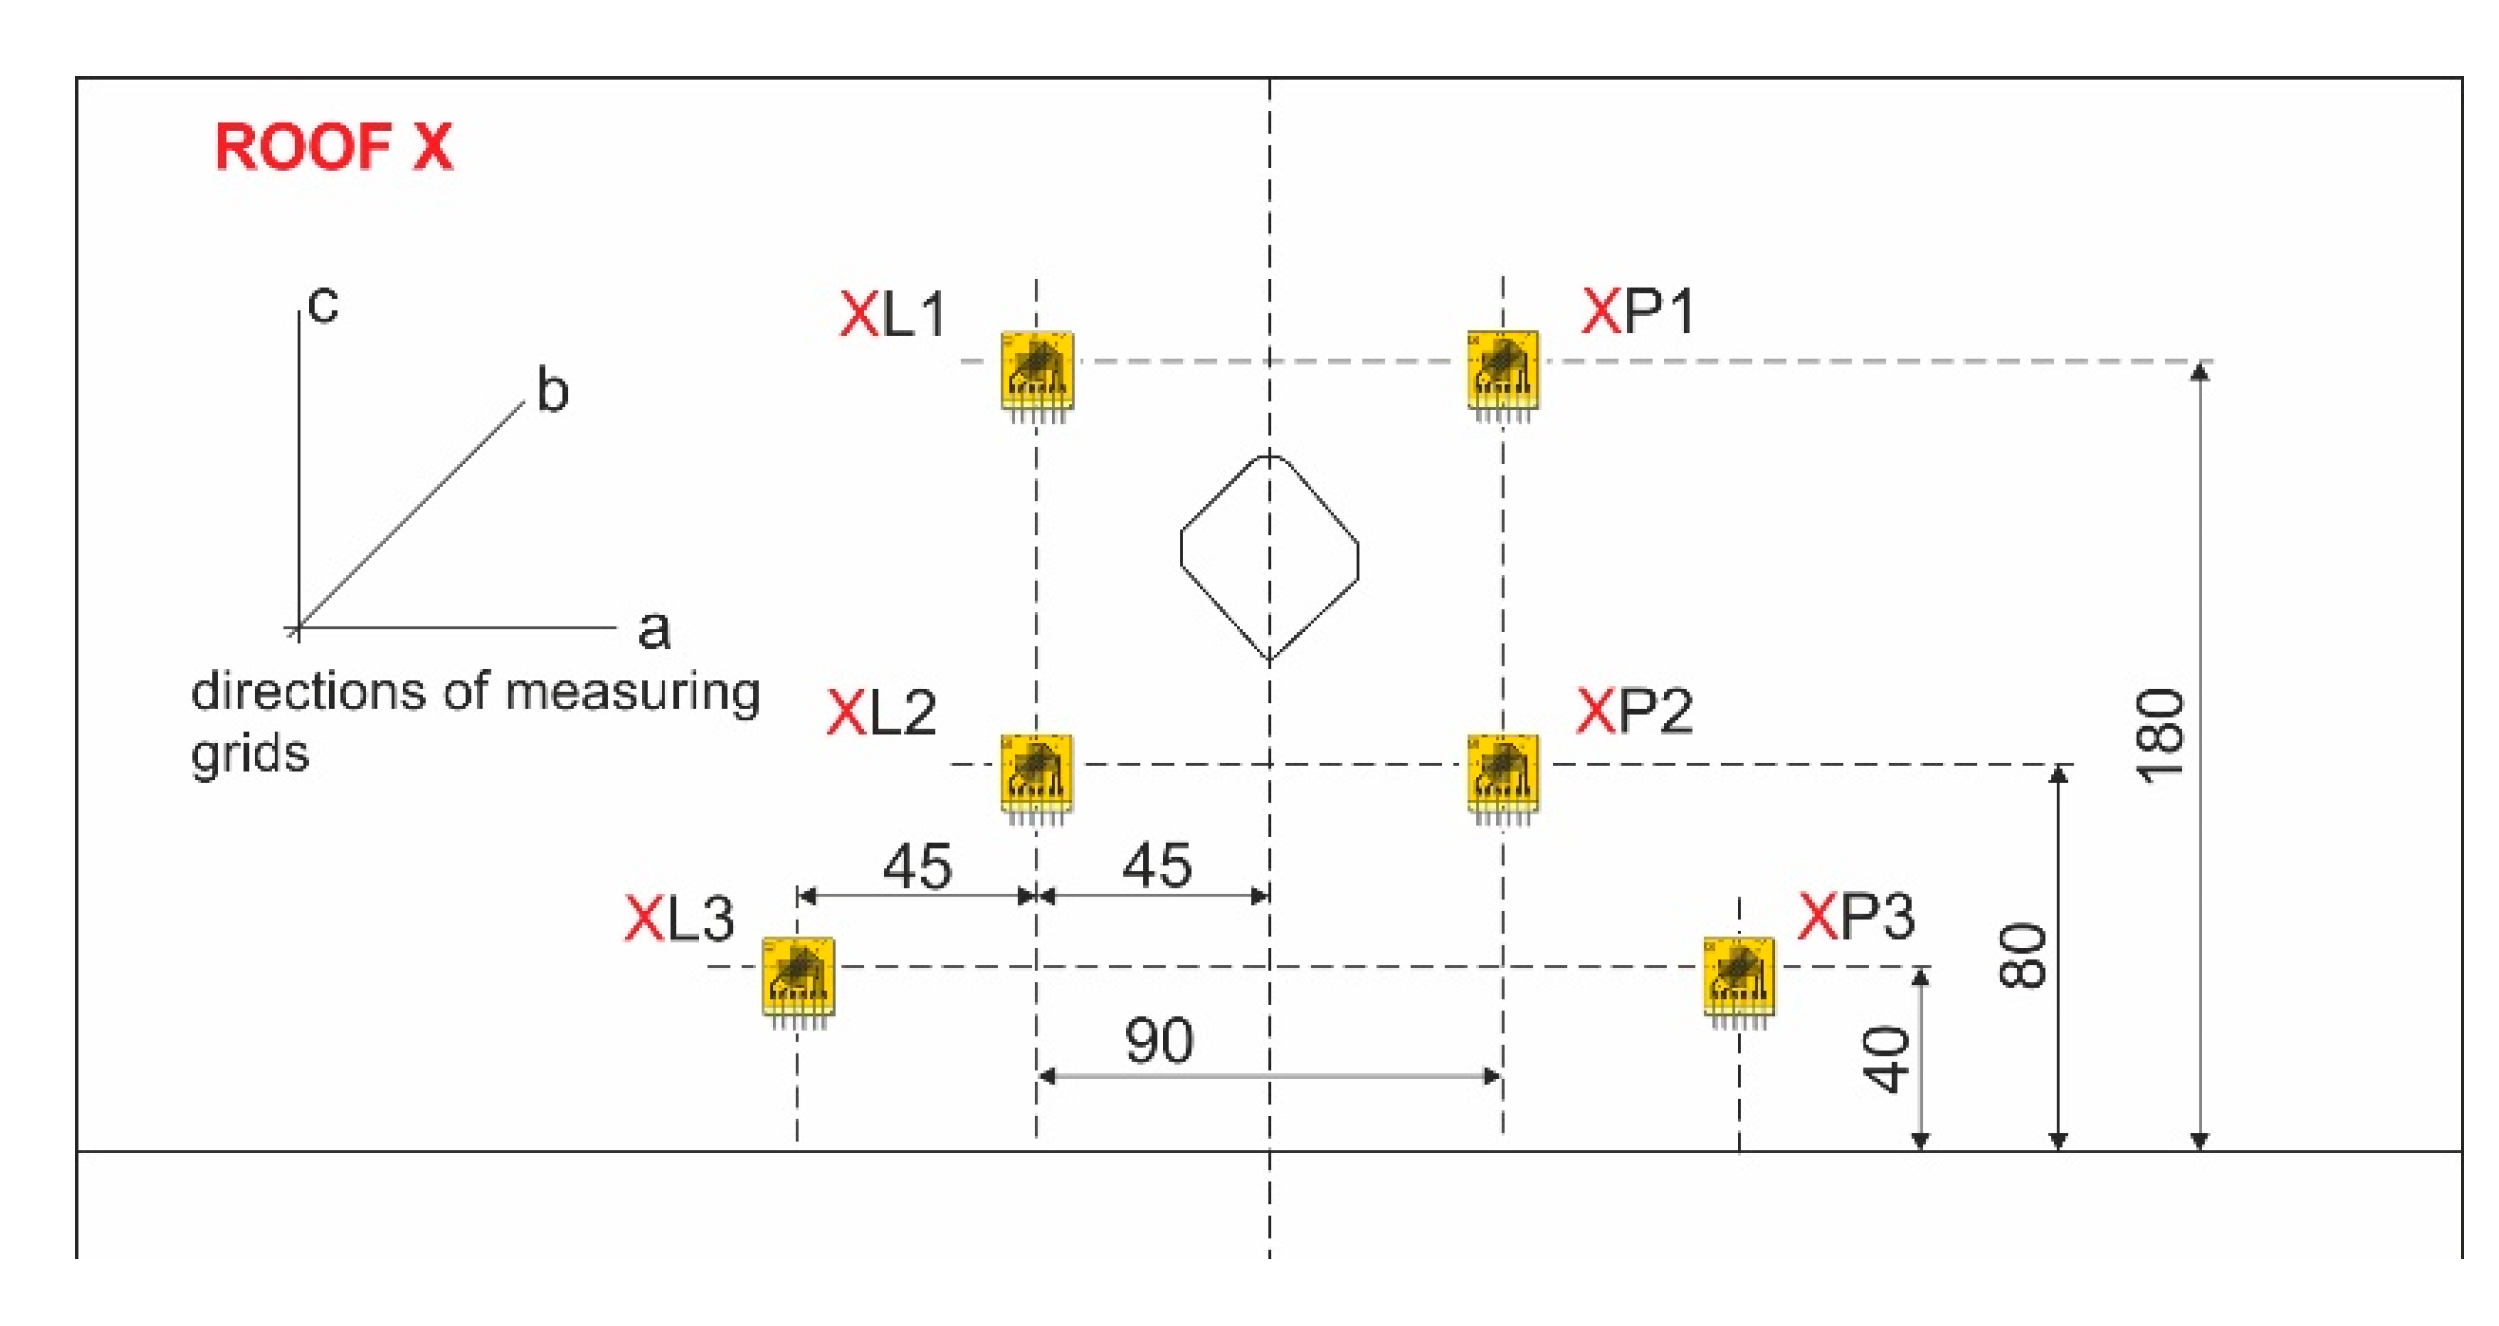
A strain gauge method was proposed for experimental measurements. The aim was to compare values of measured strain in selected places with values determined by numerical modelling. The application points of strain gauges were placed symmetrically along the axis parallel to the longer side of the roof (Figure 6). Since the stress in question was not known in advance, strain gauges RY91-10/120 were used. The deformation sensitivity constant was ka = 1.98 ± 1%, kb = 2.04 ± 1% and kc = 2.05 ± 1%. Each grid was connected in a quarter-bridge. A Quantum MX840 strain gauge (manufactured by HBM) with Catman software evaluation was used for operational measurements. Since a quasi-static load was considered, a sampling frequency of 50 Hz was set. The aim was to compare values of measured reduced stresses in selected places with values determined by numerical modelling.

3.2. Realization of Experimental Measurement

3.2.1. Test Measurement at Unit Load

Experimental measurements were performed on three different roofs of the same car model. Two roofs were painted and one was unpainted (Figure 7). It should be noted that these roofs are not the same. Marking A—painted roof, in selected places material was taken for other mechanical tests. Marking B—unpainted roof. For this reason, roofs A and B were used for preparatory experimental measurements; therefore, only four strain gauges were applied. The measured results were not compared with numerical modelling, as the model with the collected material was not used in the FEM (Finite Element Analysis) analysis. The third roof marked C corresponds in shape to the numerical model, so that the measured values were compared with FEM analysis. In this case, strain gauges were applied at six locations. In order to ensure the same operating conditions, one person used the same type of antenna and the same tightening procedure in all cases. Figure 8 shows a view of the applied strain gauges on the analyzed roofs.
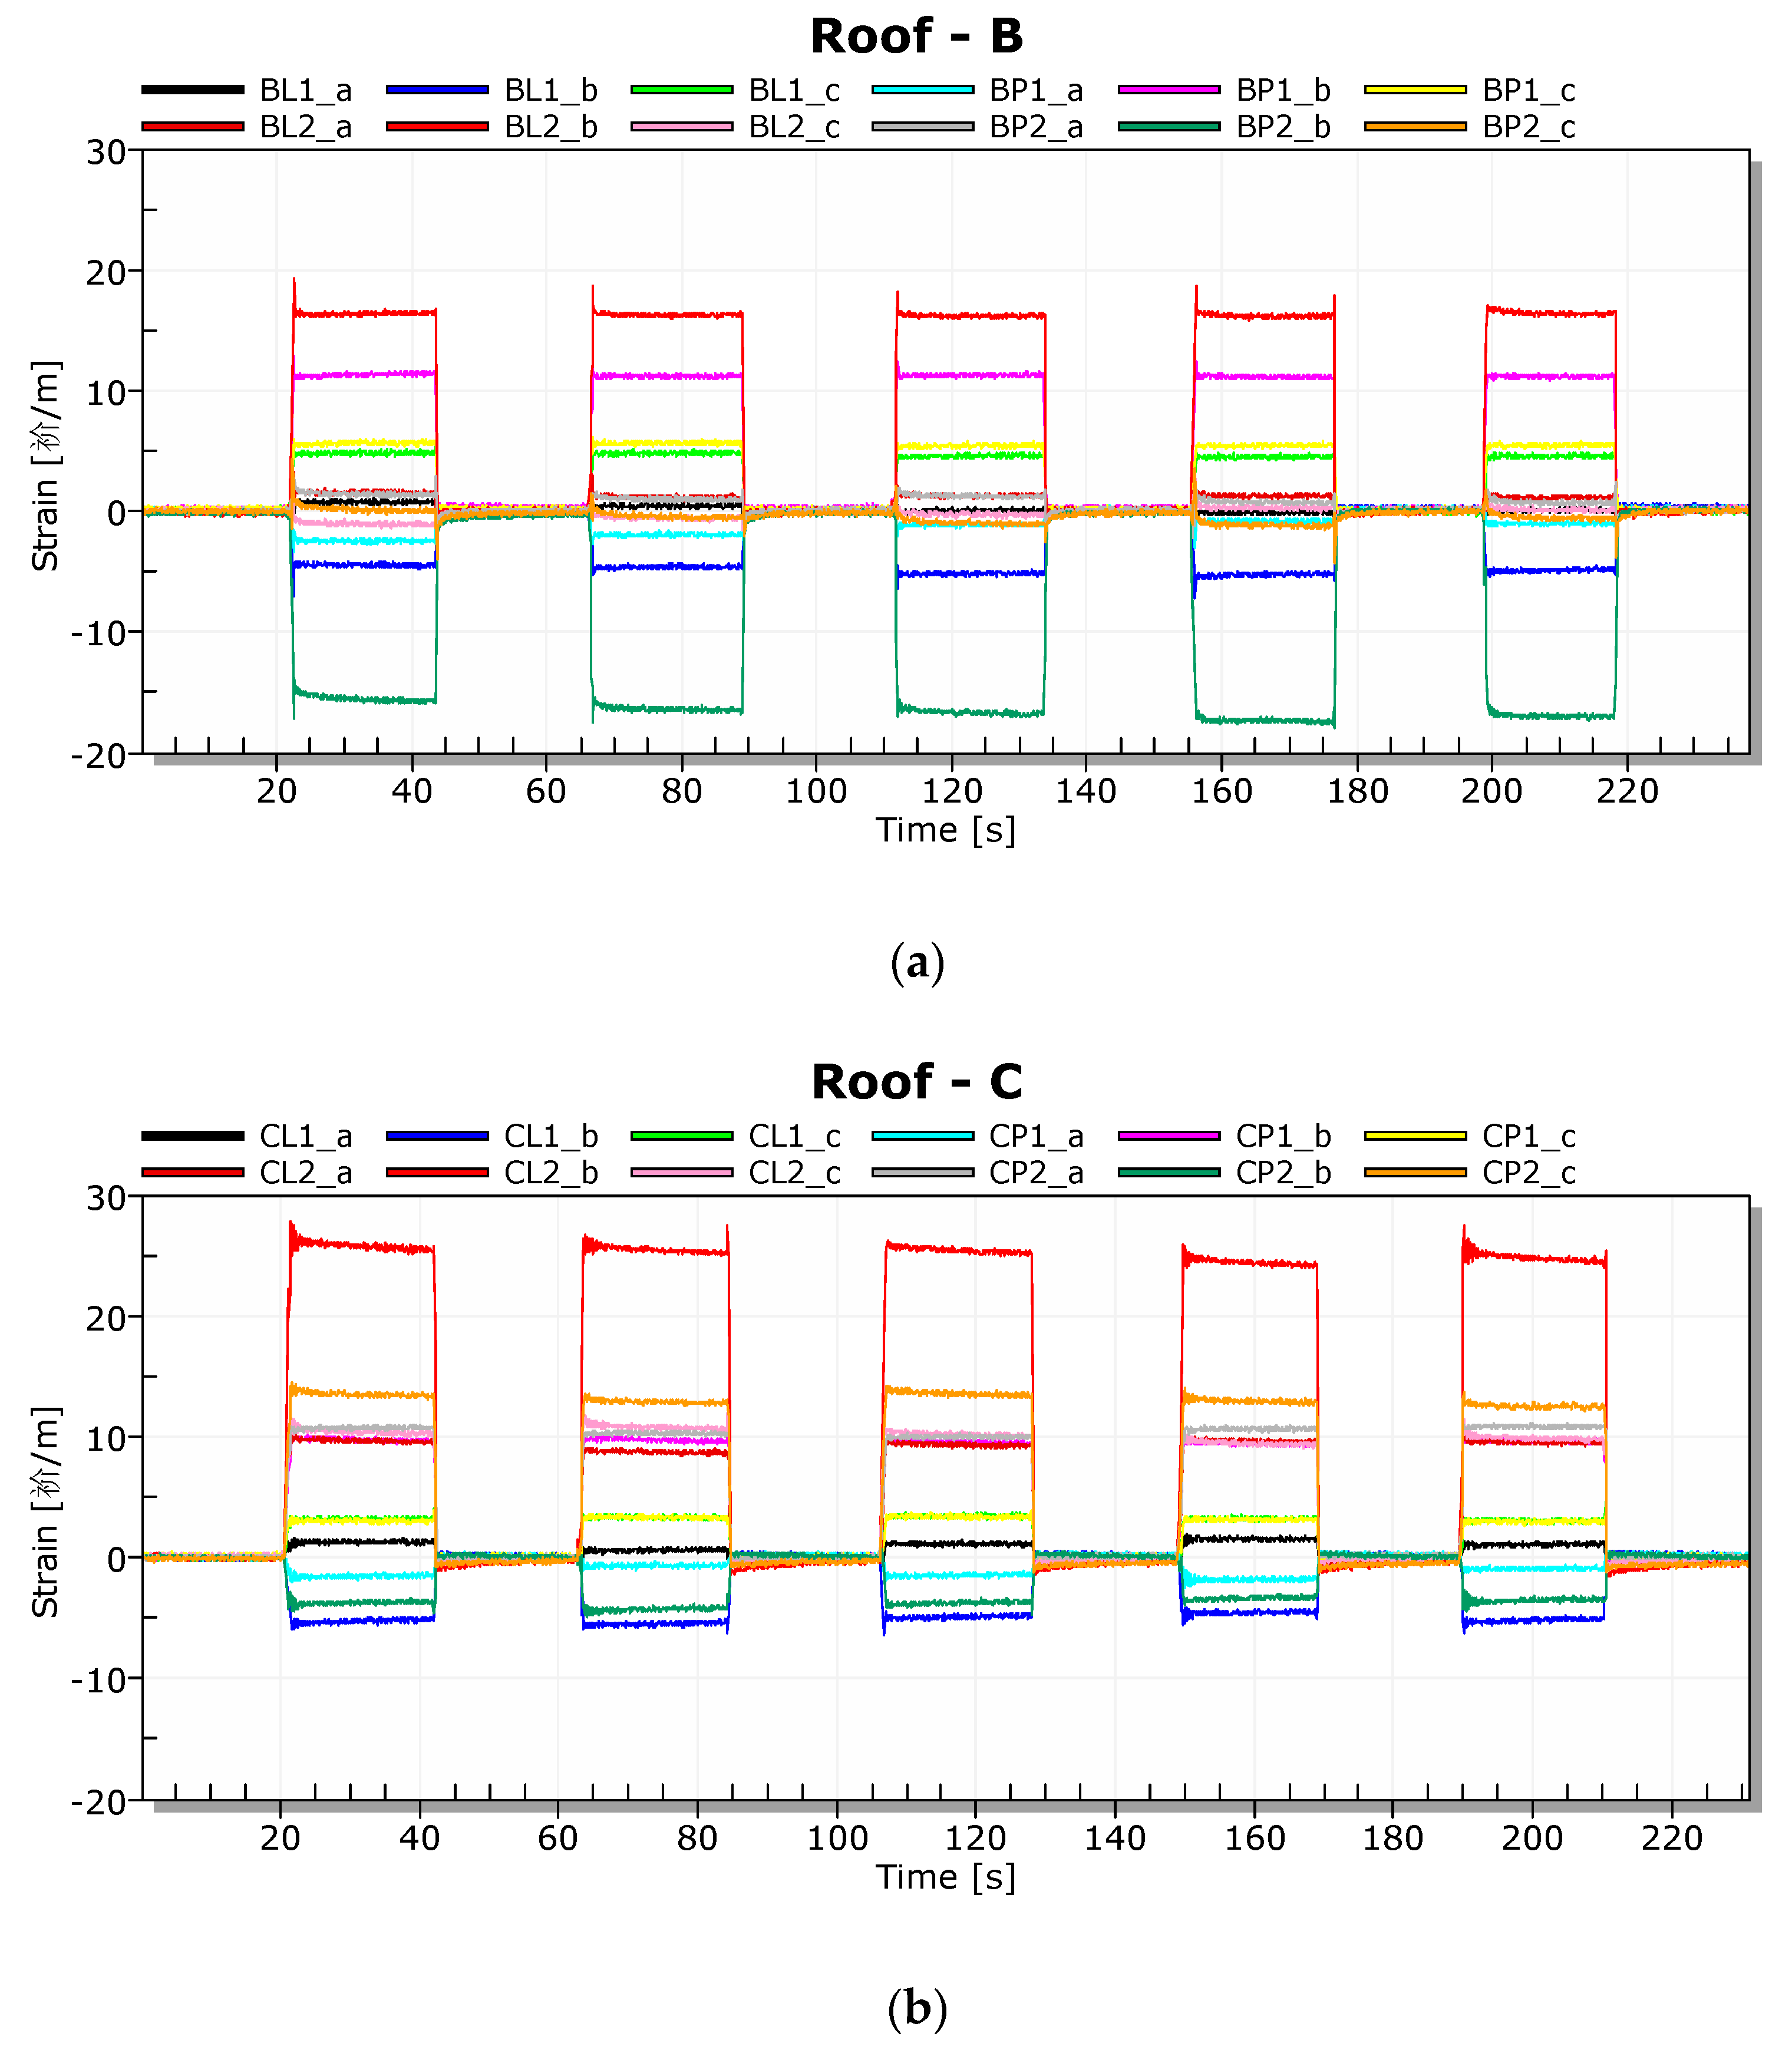
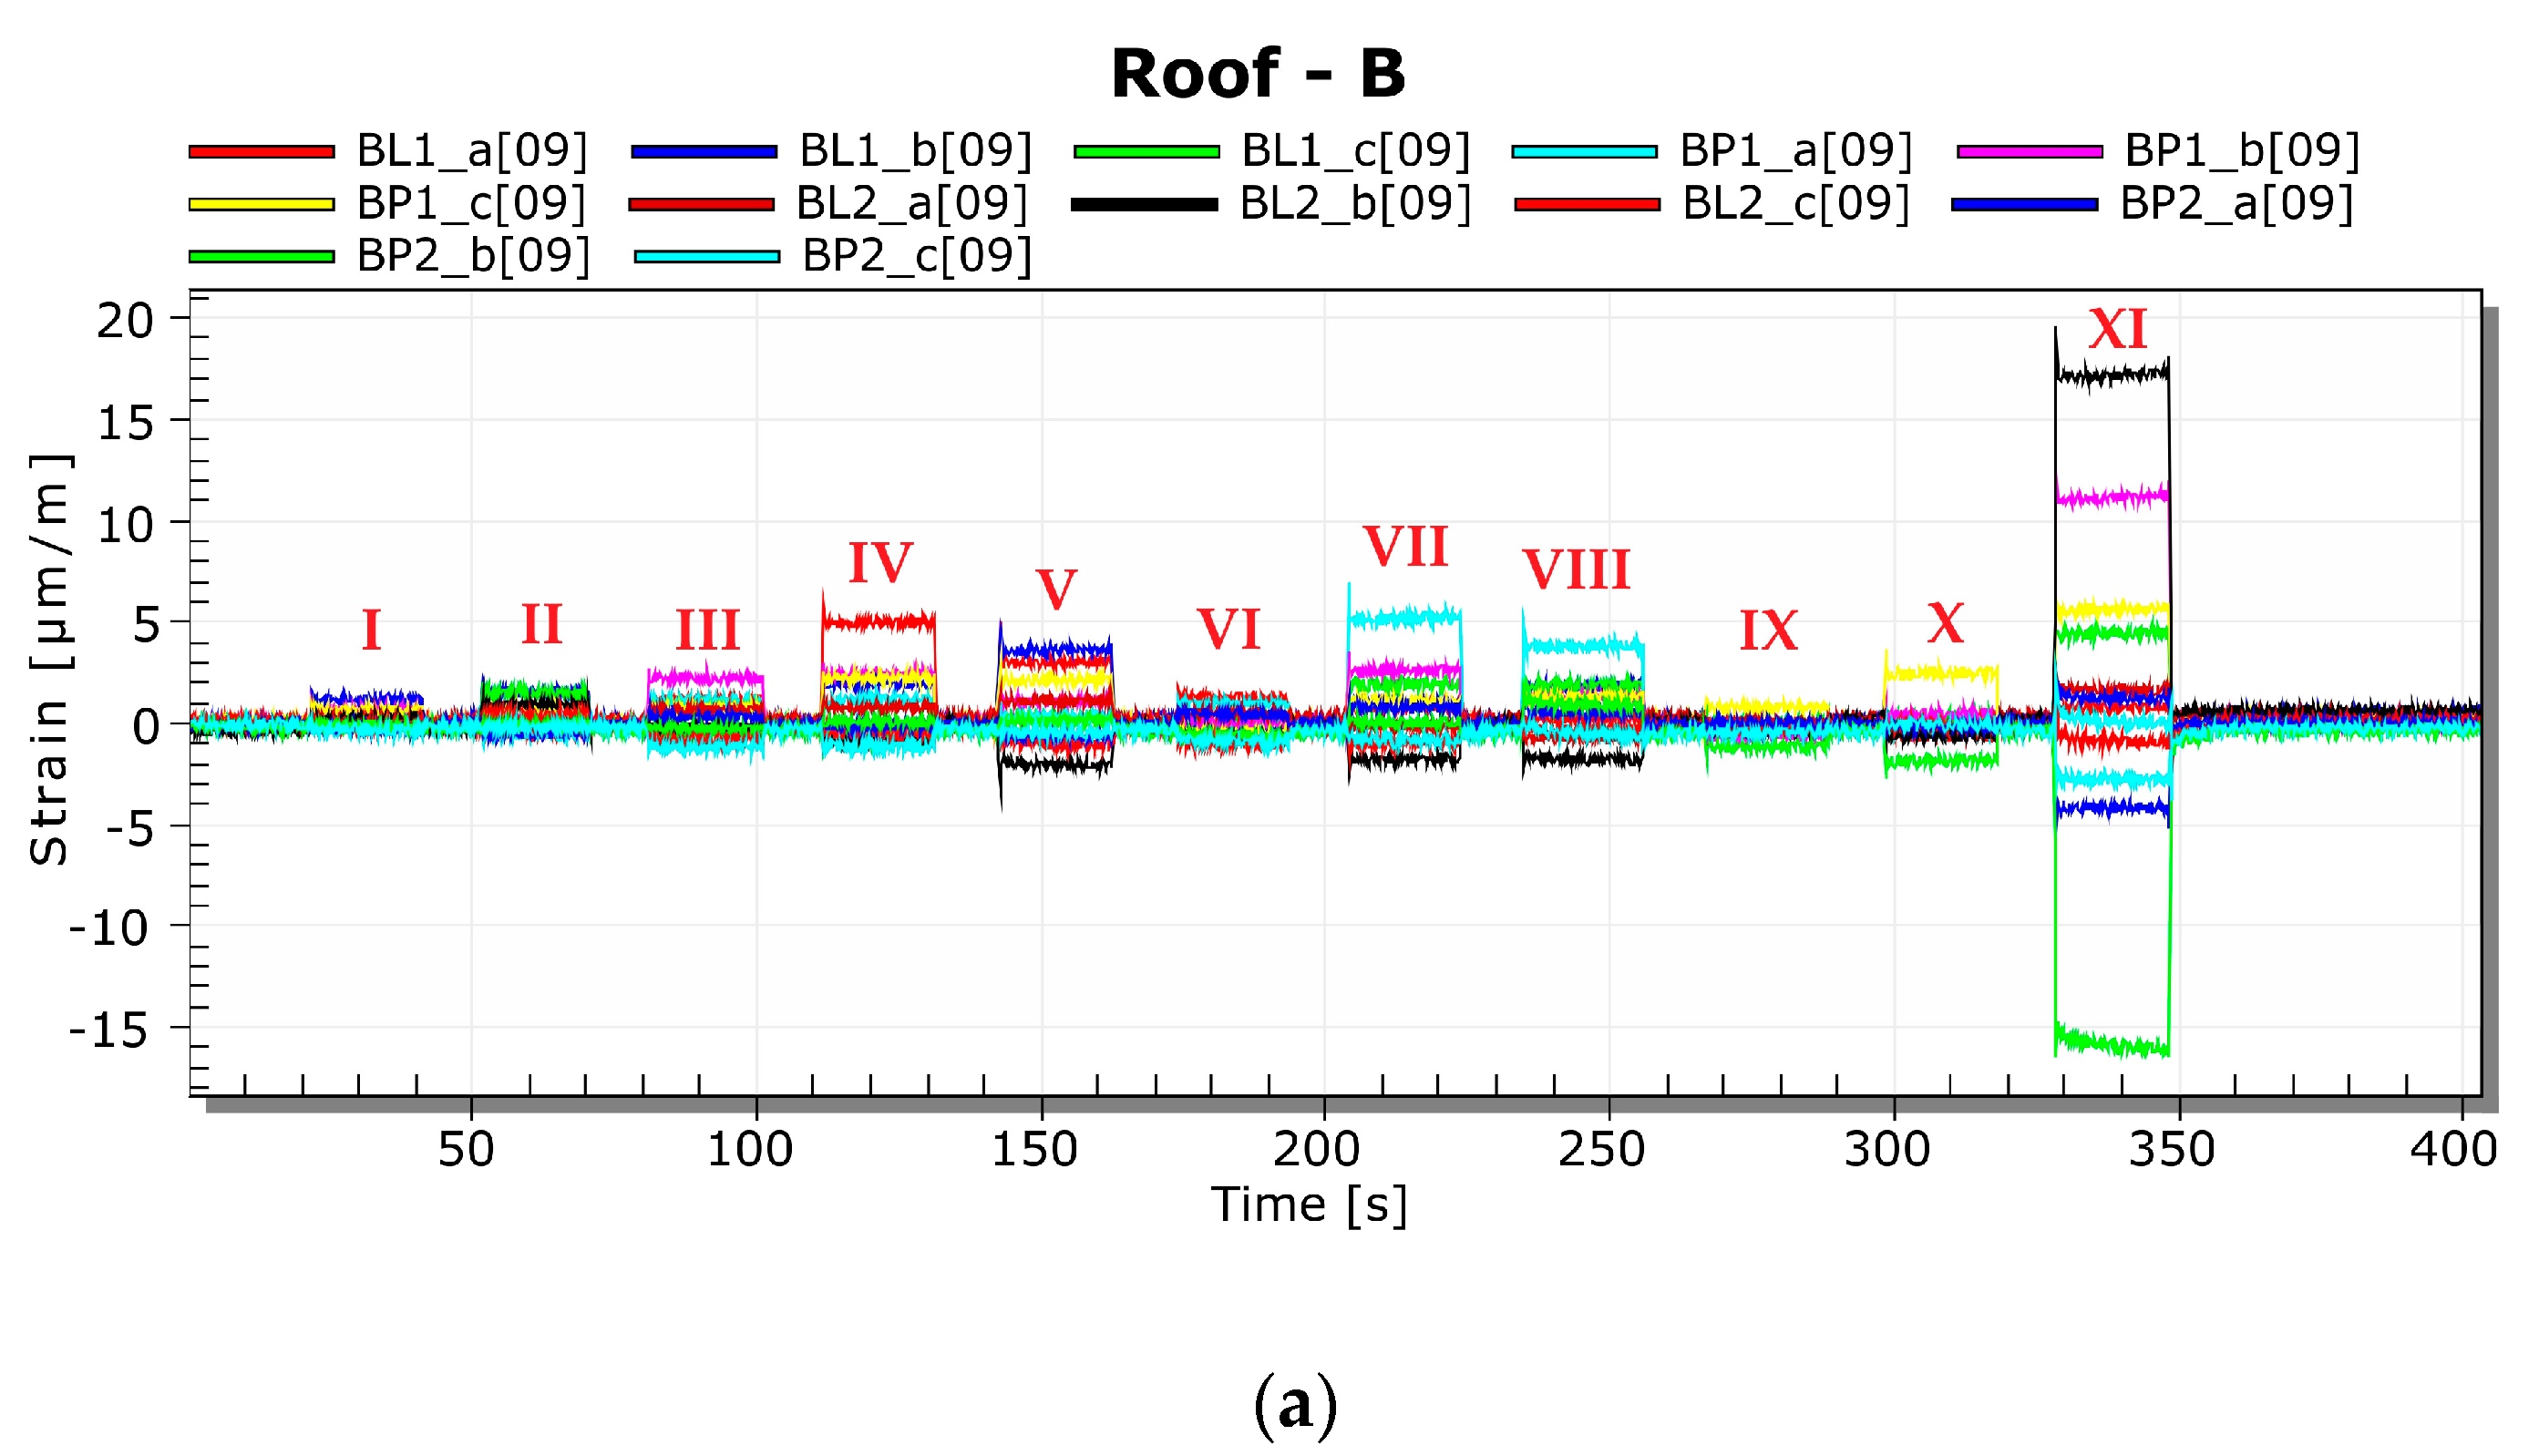
The following presents the results of tensometric measurements performed on roofs B and C. The aim was to compare the values of relative deformations εa, εb, and εc in locations BL1, BL2, BP1, BP2, CL1, CL2, CP1, and CP2 at unit load caused at the location of the antenna mounting hole (Figure 8). Five repeated measurements were performed. The time courses of the measured relative deformations are shown in Figure 9.
From the measured strain εa, εb, and εc, the values of the principal stresses were calculated according to Equation (1)
σ 1 / 2 = E ( 1 μ ) ε a + ε c 2 ± E 2 ( 1 + μ ) ( ε c ε b ) 2 + ( ε a ε b ) 2 ,
where E is Young’s modulus and μ is Poisson’s ratio, and subsequently, using Equation (2), the values of equivalent stresses according to von Mises theory were determined
σ r e d H M H = σ 1 2 + σ 2 2 + σ 3 2 ( σ 1 σ 1 + σ 2 σ 3 + σ 1 σ 3 ) .
where σ1, σ2, and σ3 are principal stresses.
The values of the main normal stresses and reduced stresses according to the von Mises theory are given in Table 3 to compare the stress states on roofs B and C under the same load.
From the above values it follows that:
In place 1, in both cases (roofs B and C), the values are significantly lower compared to values in place 2, while on the painted roof (roof C) there are larger percentage differences; in the places on the left side, the measured values are lower than on the right side in the case of both painted and unpainted roofs, which is most likely closely related to the shape of the roof (see Figure 6—displacements determined by 3D scanning).
In the next step, a strain gauge measurement was performed under load at 11 locations, see Figure 8. Figure 10 shows time records of relative deformations under unit load at locations I to XI.
The mentioned measurement was performed in order to document the influence of the operating load on the stress in various places of the roof structure. The disadvantage of the measurement is that the values can be evaluated only in places of applied strain gauges (it is not a full-area analysis as in the case of optical methods). On the other hand, as can be seen from the above curves (Figure 10), strain gauges are extremely sensitive and even very low stress levels can be evaluated. In this case, the stress values for individual modes were not compared. The aim of the measurement was to verify the functionality of the applied strain gauges before the actual measurement at the operational load, which was the installation of the antenna.

3.2.2. Operational Measurement—Antenna Mounting

After performing tensometric measurements at the so-called unit load, the measurement was performed during the actual assembly of the antenna. As part of this measurement, displacement measurements were also performed by the Leica device, which required surface preparation (spray application) in the measurement area (Figure 11). The connection of the strain gauges and the setting of the sampling frequency were identical to the test measurement.
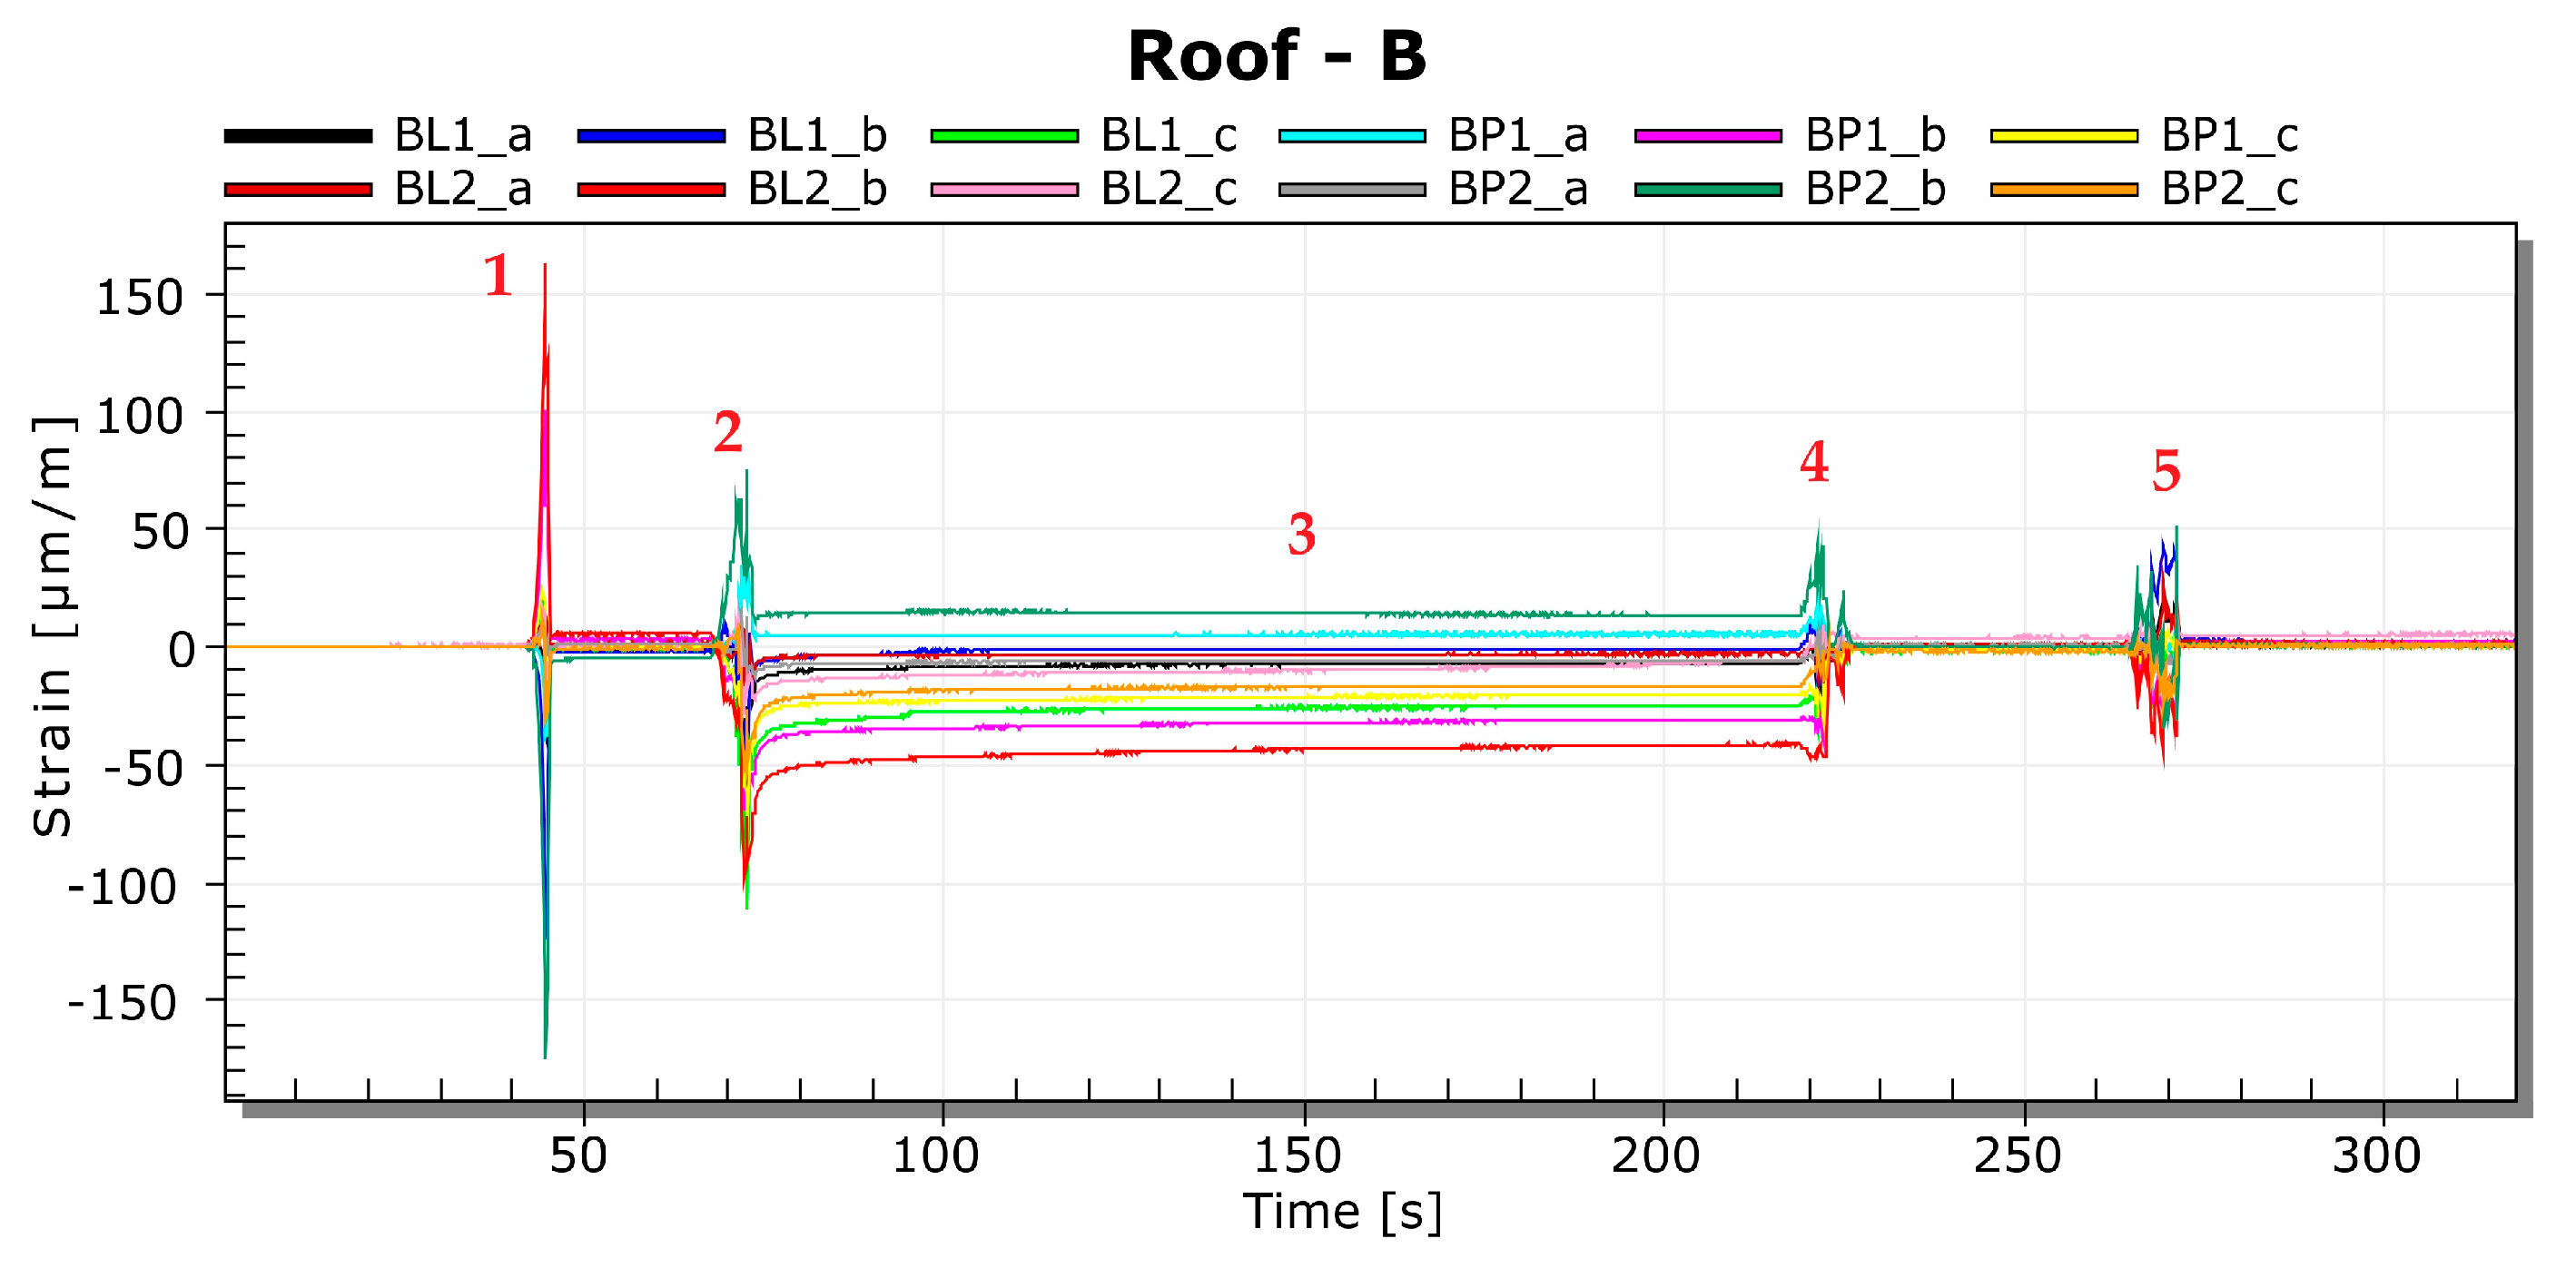
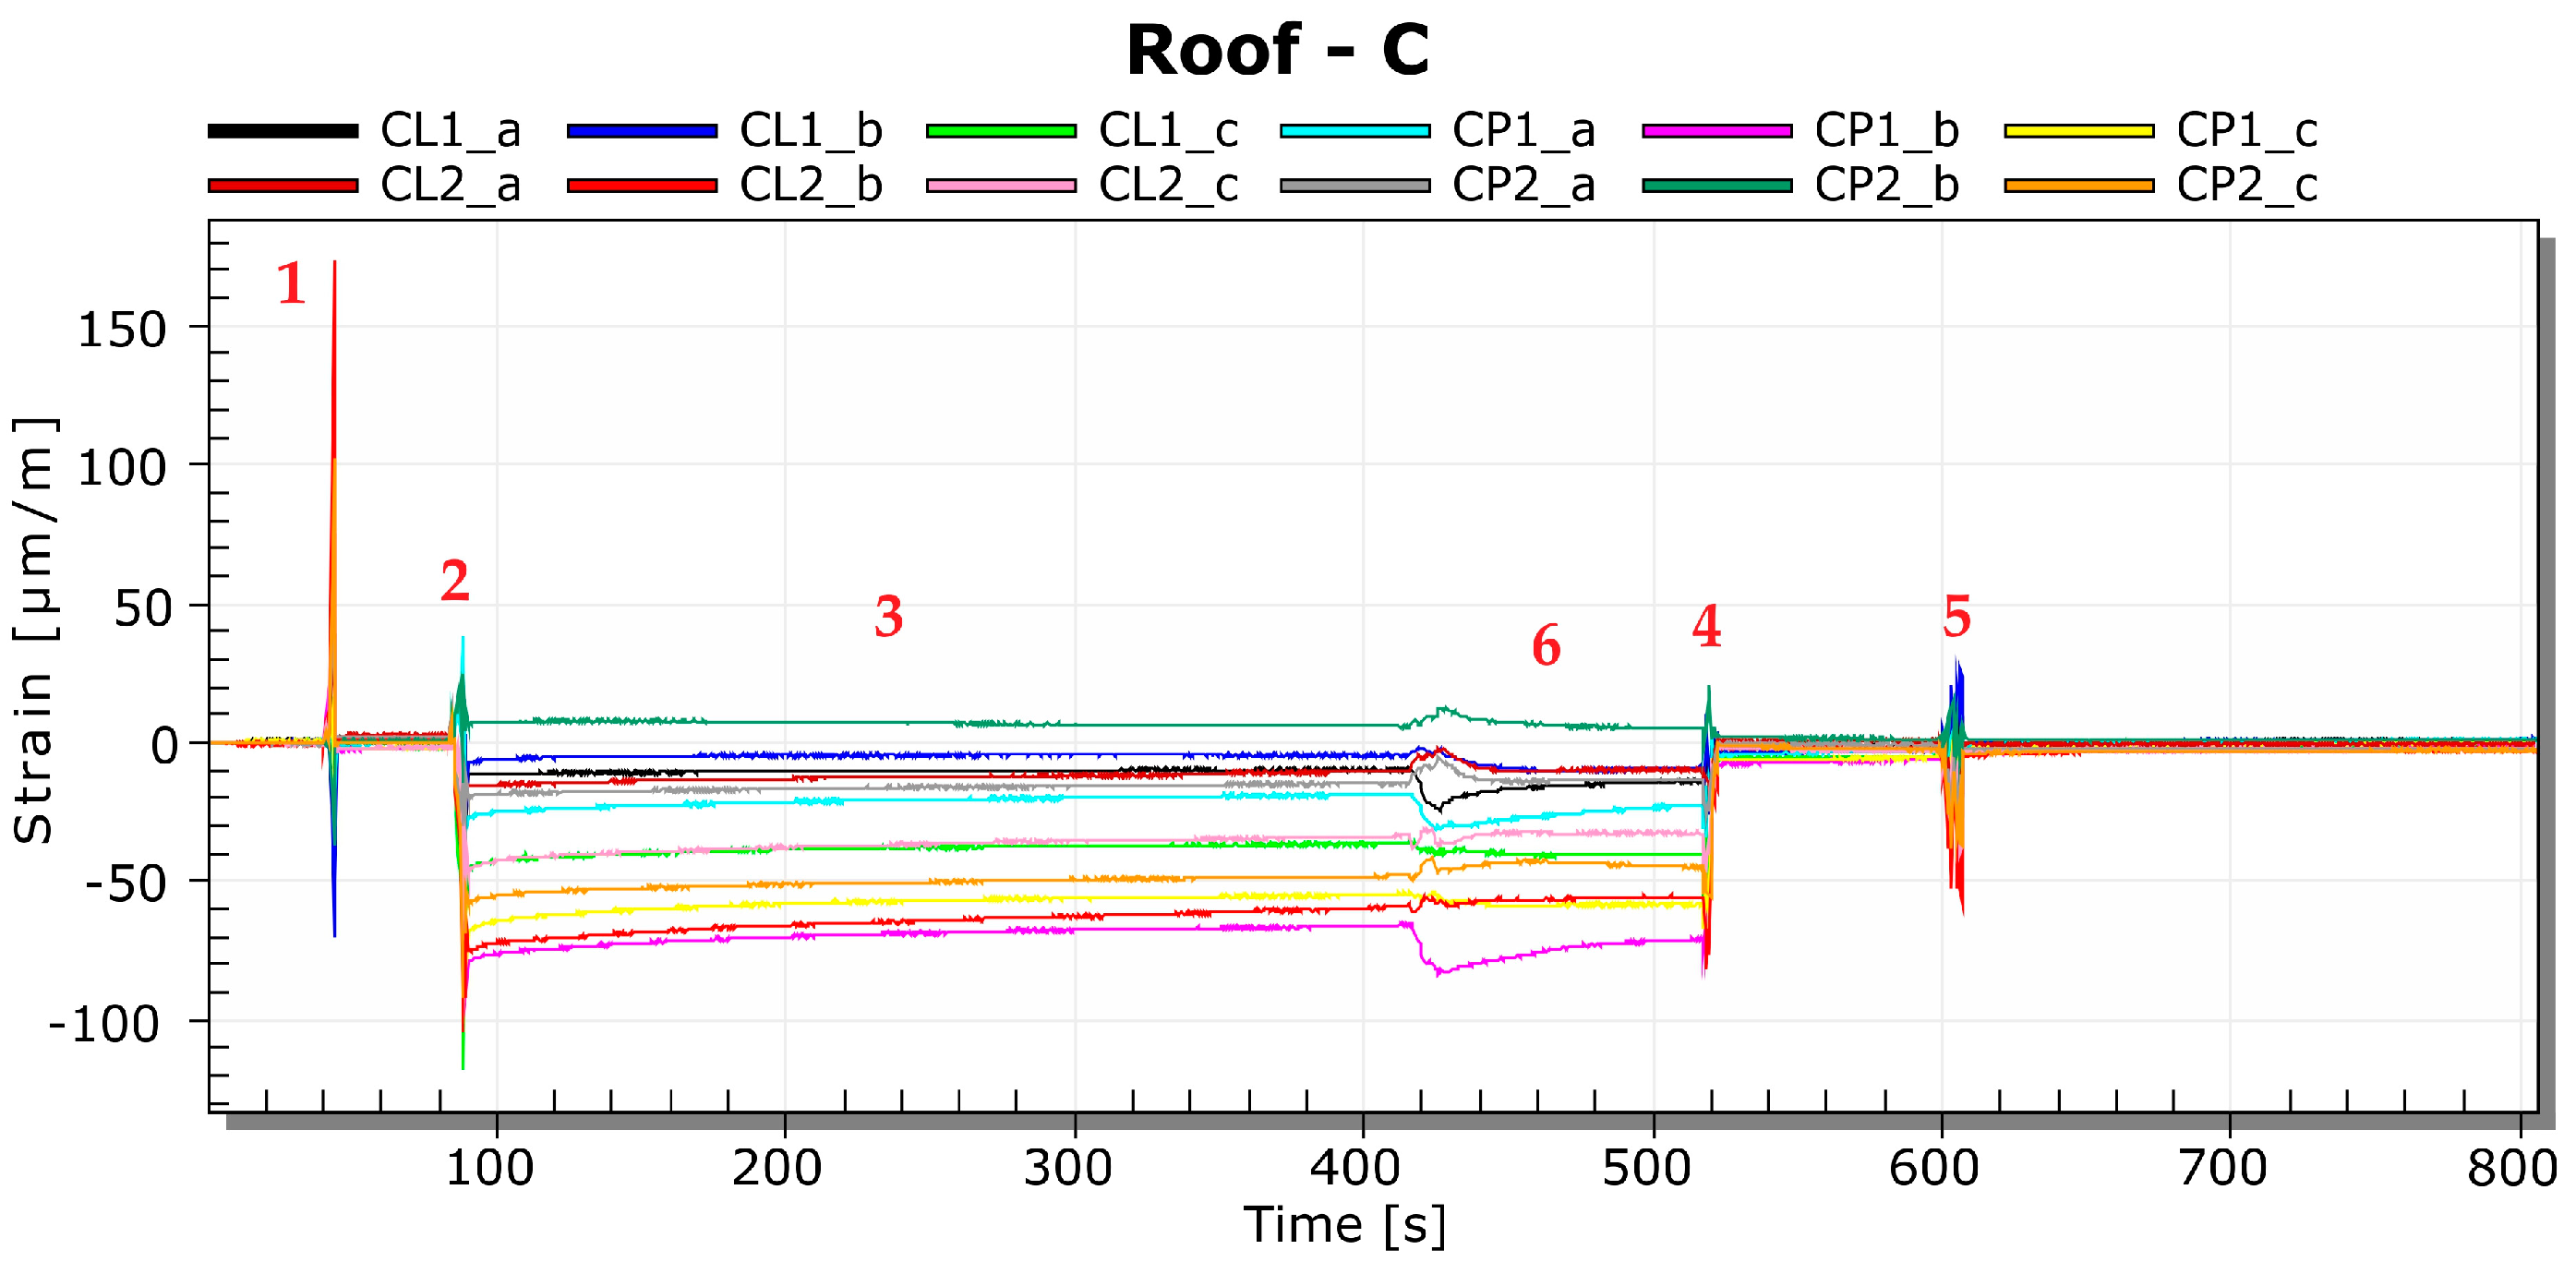
The time record of the strains during antenna mounting on the unpainted roof B is shown in Figure 12 and on the painted roof C in Figure 13. Since the assembly tightening process can be considered a quasi-static loading phenomenon, the sampling frequency was set to 50 Hz. Significant peaks corresponding to sudden changes (e.g., at 43 s), such as object impact, etc., do not affect the value after tightening (in 195 s). The description of the individual stages of measurements is as follows:
1—setting the antenna to the mounting position,
2—tightening the nut,
3—stabilization of measured values,
4—loosen the nut,
5—antenna removal,
6—spray application for surface scanning (this phase was carried out only on the painted roof C).
The procedure for evaluating the measured strains was identical to that of the test measurement. The values of the normal stresses and reduced stresses for the state after antenna assembly (stage 3) calculated according to Equations (1) and (2) are given in Table 4.
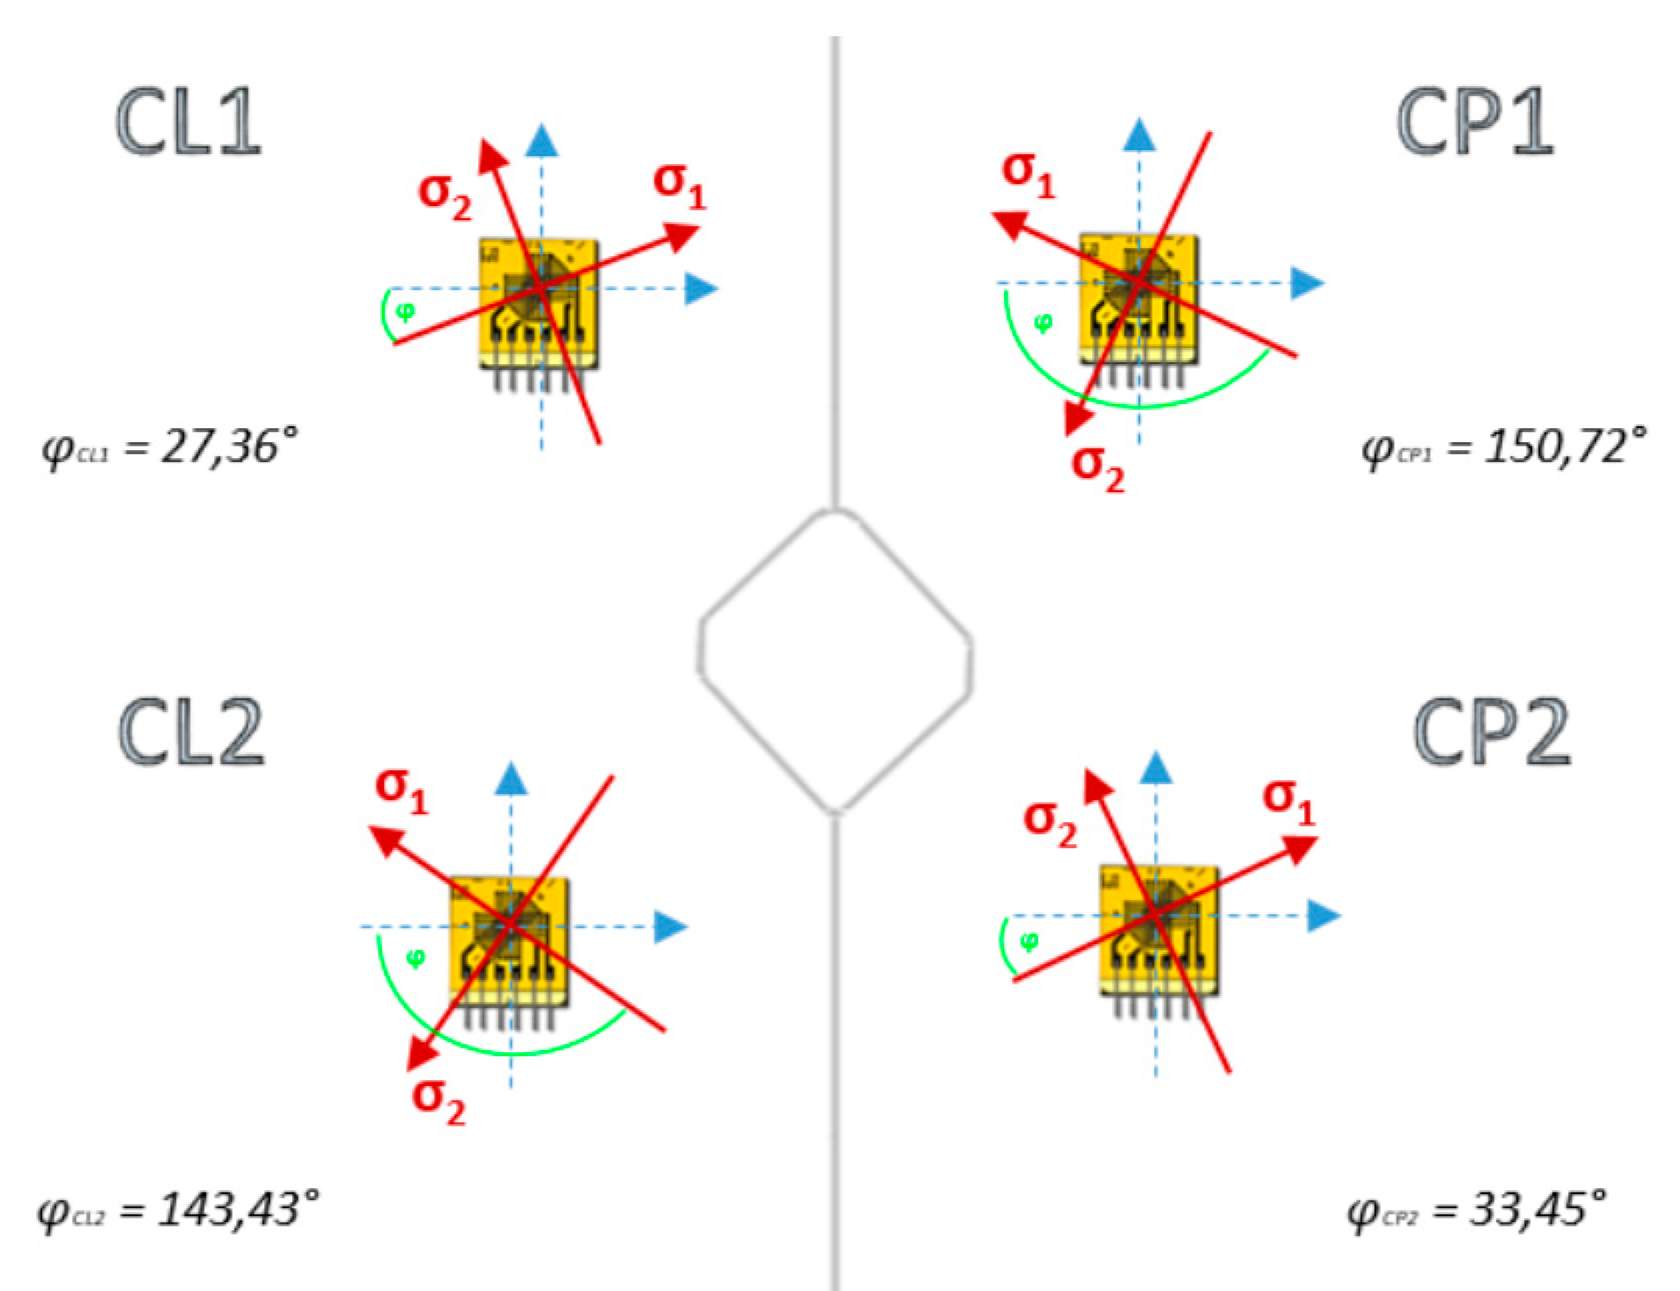
Figure 14 shows a graphic interpretation of direction of normal stresses in measuring places after antenna installation (Figure 13—stage 3), calculated according to Equation (3)
tan φ = 2 ε b ε a ε c ε a ε c .
The advantage of strain gauge measurements under operational load is the possibility of validation of the results with numerical modelling. The difference is mainly in boundary conditions. Experimental measurements are performed on a real model with real bonds, while numerical modelling depends on the definition of bonds, contacts, etc. The disadvantage of the strain gauge measurement is the evaluation of deformations and stresses only in places of applied gauges, while numerical modelling allows examination in any place. At present, numerical modelling methods are most often used in the selection of experimental evaluation sites. When it is not possible to obtain necessary information by the above procedure, the experimenter’s own experience plays an important role. There are certain dependences between deformations and stresses, which was also confirmed by the results of tensometric measurements. However, it should not be forgotten that stress levels in the material of real structures and equipment, in addition to the load from operation, also consider residual stresses from production. In the case of thin sheets, these can result in higher levels of deformation.

4. Deformation and Stress Analysis Using Numerical Modelling

Experimental measurements showed that stresses on the right and left sides of both painted and unpainted roofs showed significant deviations. The aim of numerical modelling was to show that with symmetrical geometry of the roof structure and the attachment of the antenna on the axis of symmetry, uniform loads are assumed on the right and left side of the roof. For the numerical simulation by the finite element method, a real roof model was used. As already mentioned in Section 2, the control of a real model with a computer model is currently realized in the real part by 3D scanning of shape and dimensions. However, it is necessary to consider what the device is measuring and what are the measured values compared to, or how it should be proceeded in case of optimization of the production process, etc. We do not address this part in this paper. Numerical modelling can, e.g., analyze not only the overall displacements but also their components. Numerical modelling is highly used in the automotive industry. It is a modern and fast method for the implementation of design changes. It is used for different parts of vehicles or different areas of interest—e.g., in [17] the noise and vibration of a roof is investigated using the finite element method and is compared by an experimental modal analysis.
Due to the fact that it was not necessary to address the safety of the structure itself—the results were to be used to illustrate a possible comparison of the results—the boundary conditions were simplified. Only the part of the roof around the mounting hole attached around the perimeter was analyzed. The static analysis of the roof has been realized by ANSYS software. The created mesh consists of approximately 31,092 volume finite elements with quadratic approximation and approximately 58,405 nodes. A unit load was applied at the antenna site.

Results of Numerical Modelling

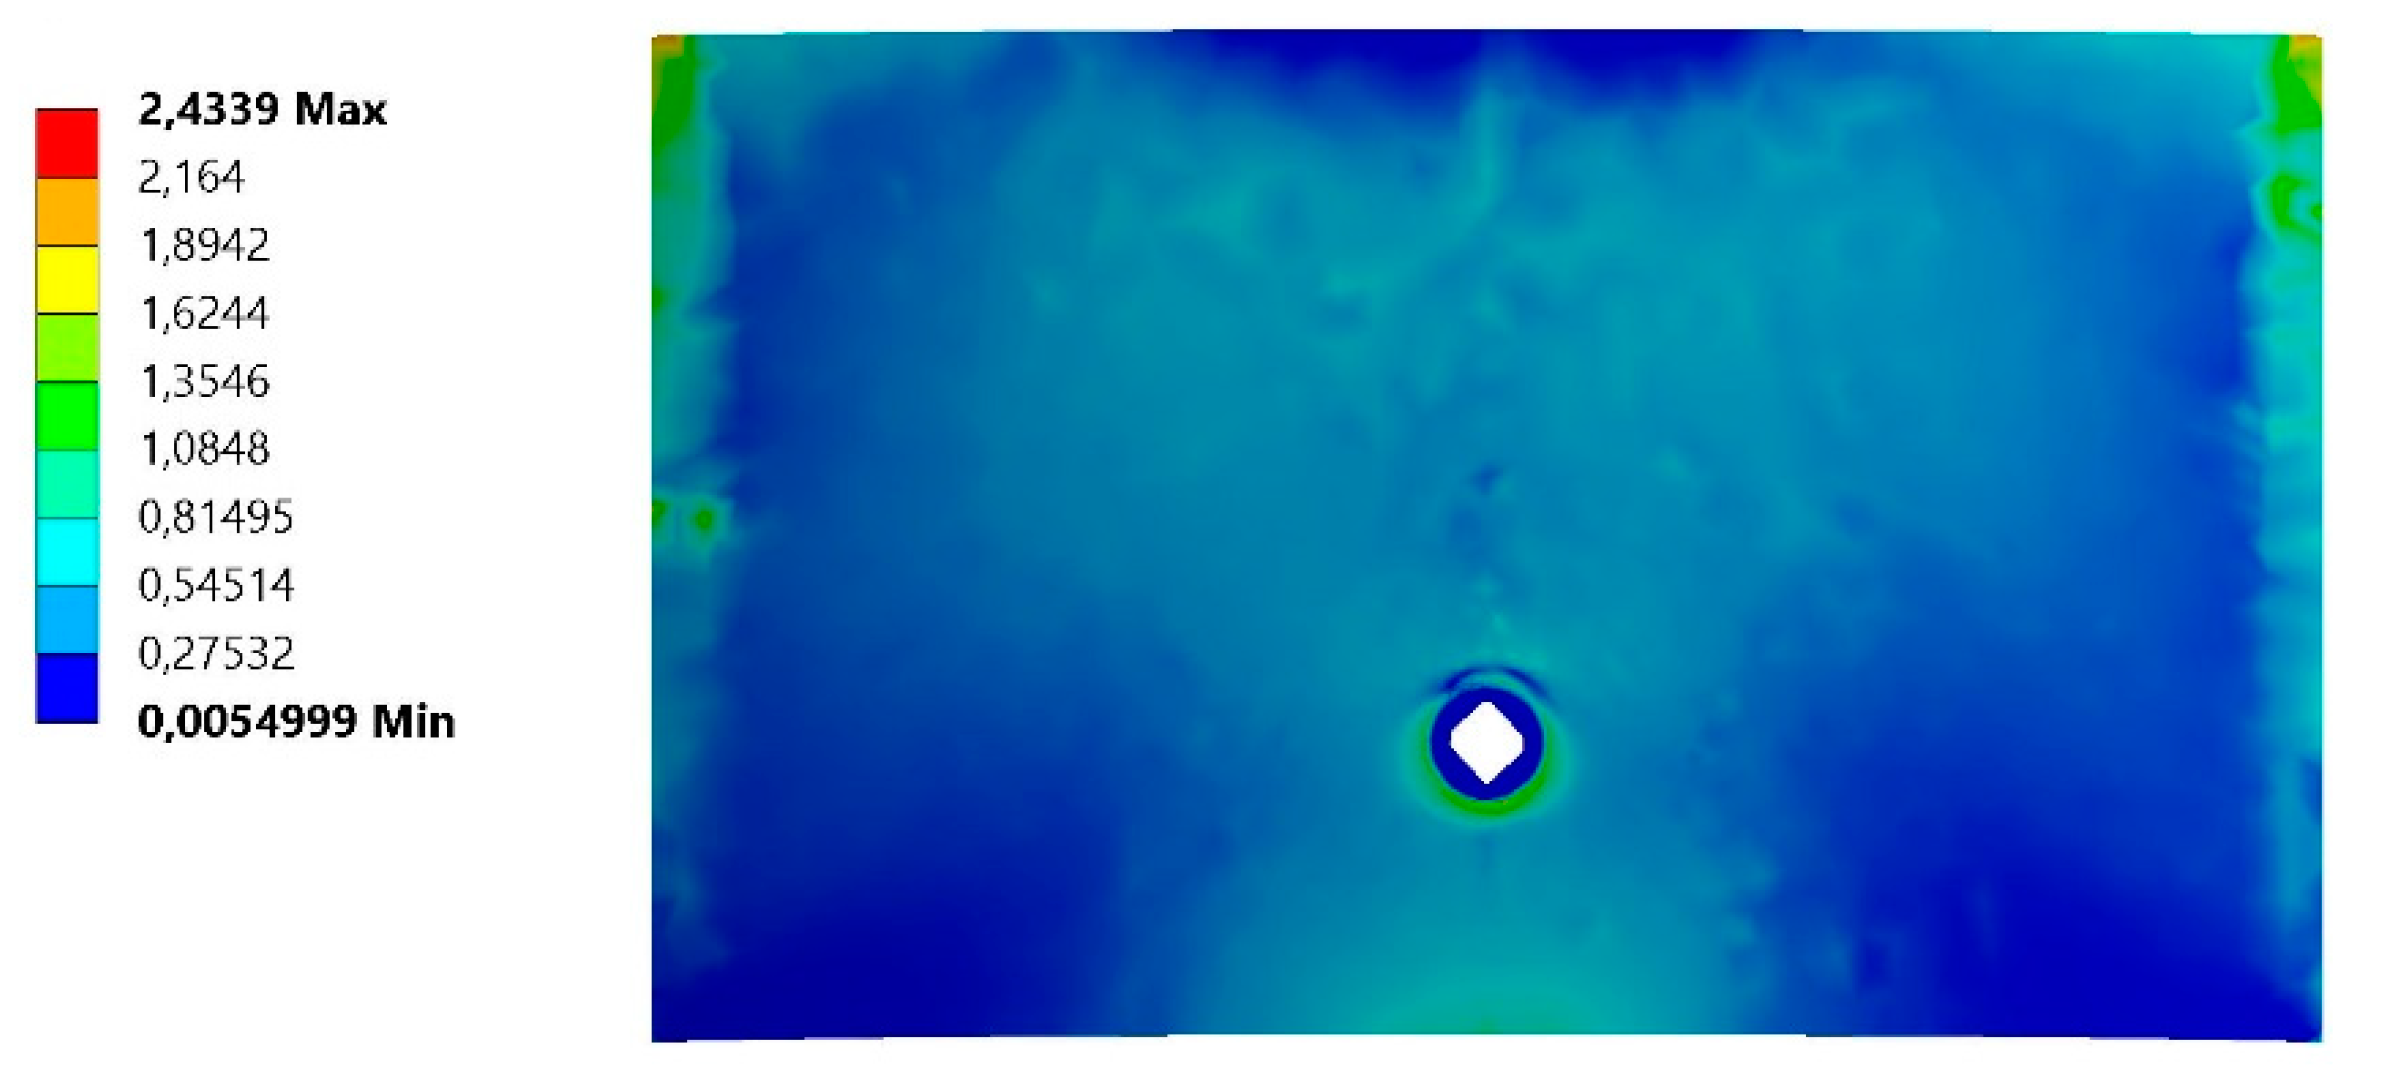
Figure 15 shows a field of resulting displacements, and Figure 16 shows a fields of reduced stresses according to the von Mises theory.
In both cases, the figures show an even distribution of the examined parameters on the right and left side of the roof. This fact corresponds to a theoretical consideration. In our case, however, the displacement field determined by FEM (Figure 15) does not correspond to Figure 5, where the displacements were measured with a Leica high-precision 3D scanning device on a real roof. The values of reduced stresses in places of applied strain gauges determined by numerical modelling do not correspond to values determined for antenna mounting (see Table 3). It should be noted here that due to the defined boundary conditions, the specific values of reduced stresses were not evaluated, but their percentage on the right and left side of the roof and in places 1 and 2 were. In the case of numerical modelling, the differences did not exceed 2%. This deviation is related to the setting of the finite element mesh parameters. For the stress analysis of the antenna assembly process, it is necessary to use a real model of the antenna consisting of several moving parts. From a technical point of view, this is not a problem, but the differences between experimental measurements and numerical modelling may also be related to the accuracy of the shape and dimensions of the antenna used.

5. Conclusions

The aim of this study was to assess the effect of antenna mounting on the occurrence of excessive deformations of a car roof. The methodology was designed based on data from the manufacturer, who used a Leica 3D scanning device to measure shape and geometry. A real roof model was used for numerical modelling. To validate the results of numerical modelling as well as the manufacturer’s data, a tensometric measurement was performed on a painted and unpainted roof under operational load—antenna installation. Based on the analysis of the achieved results of numerical modelling and experimental measurements (3D scanning, tensometry), it was found that:
  • numerical modelling confirmed theoretical assumptions of the distribution of stress and strain fields,
  • total displacements determined by 3D scanning after unmounting the antenna on the painted roof were higher in most of the examined places and the differences almost reached 18%,
  • different values of deformations/stresses on the right and the left side of the roof determined by strain gauge measurements are directly related to the already deformed shape of the sheet,
  • excessive deformation did not occur due to the antenna mounting as originally assumed,
  • the antenna was mounted on a 0.8-mm thick roof plate, most likely already deformed due to previous technological operations (pressing, cutting out the mounting hole, painting).
The mentioned methodology is also applicable for deformation-stress analysis in other stages of component production (in this case sheet metal roofs), but it is a question of finance and time. The identification of suitable measuring points and the application of strain gauges can be realized in the order of days. The largest item is not only the assessed part itself, but also the implementation of the experiment under operational load. It should be not forgotten that a series of measurements must be performed to obtain relevant results. In this case, there were two painted roofs and one unpainted.
The presented paper describes the procedure of comparing relative deformations and stresses (FEM—tensometry) and displacements (FEM—Leica). From the above-mentioned it is clear that although FEM analysis provides a great deal of information, numerical modelling is performed on an ideal model under boundary conditions, which may not correspond exactly to real bonds. The advantage of experimental methods is the determination of physical quantities under operating load, taking into account real bonds, material defects, residual stresses; however, they often only provide information about a certain quantity depending on the method used. The presented results can be used for a better understanding or interpretation of the displacement fields measured by Leica, or for adjusting the range of permissible deviations from the computer model in order to improve final products or minimize the error rate in production.

Author Contributions

Conceptualization, M.P. (Miroslav Pástor) and J.Ž.; Methodology, M.P. (Miroslav Pástor) and P.L.; Software, P.L.; Validation, M.P. (Miroslav Pástor), M.P. (Michal Puškár), J.Ž. and P.L.; Formal analysis, M.P. (Miroslav Pástor) and P.L.; Investigation, M.P. (Miroslav Pástor), M.P. (Michal Puškár), J.Ž. and P.L.; Resources, M.P. (Miroslav Pástor); Writing—original draft preparation, M.P. (Miroslav Pástor) and P.L.; Visualization, M.P. (Miroslav Pástor), P.L., M.P. (Michal Puškár) and I.K.; Project administration, M.P. (Miroslav Pástor), J.Ž., M.P. (Michal Puškár) and I.K. All authors have read and agreed to the published version of the manuscript.

Funding

This paper was developed within the projects implementation: VEGA Nr. 1/500/20 “Investigation of mechanical properties of materials with complex internal structure by numerical and experimental methods of mechanics”, University Science Park TECHNICOM for Innovation Application Supported by Knowledge Technology—Phase 1, ITMS: 26220220182, supported by the Research and Development Operational Program funded by the ERDF and by the Slovak Research and Development Agency under the contract No. APVV-15-0435. This work was supported by the Slovak Research and Development Agency under the Contract no. APVV-19-0328.

Conflicts of Interest

The authors declare no conflict of interest.

References

  1. Bing, G.J.A.; Wallbank, J. The effect of using a sprung stripper in sheet metal cutting. J. Mater. Proces. Tech. 2008, 300, 176–184. [Google Scholar] [CrossRef]
  2. Rodrigues, G.C.; Vorkov, V.; Duflou, J.R. Optimal laser beam configurations for laser cutting of metal sheets. Procedia CIRP 2018, 74, 714–718. [Google Scholar] [CrossRef]
  3. Salvati, E.; Korsunsky, A.M. An analysis of macro- and micro-scale residual stresses of Type I, II and III using FIB-DIC micro-ring-core milling and crystal plasticity FE modelling. Int. J. Plast. 2017, 98, 123–138. [Google Scholar] [CrossRef]
  4. Arnal, L.; Solanes, J.E.; Molina, J.; Tornero, J. Detecting dings and dents on specular car body surfaces based on optical flow. J. Manuf. Syst. 2017, 45, 306–321. [Google Scholar] [CrossRef] [Green Version]
  5. Teodor, V.G.; Păunoiu, V.; Susac, F.; Baroiu, N. Optimization of the measurement path for the car body parts inspection. Measurement 2019, 146, 15–23. [Google Scholar] [CrossRef]
  6. Muñoz, A.; Mahiques, X.; Solanes, J.E.; Martí, A.; Gracia, L.; Tornero, J. Mixed reality-based user interface for quality control inspection of car body surfaces. J. Manuf. Syst. 2019, 53, 75–92. [Google Scholar] [CrossRef]
  7. Agrawal, N.; Gautam, A.K.; Rambabu, K. Design and packaging of multi-polarized triple-band antenna for automotive applications. AEU Int. J. Electron. Commun. 2020, 113, 152943. [Google Scholar] [CrossRef]
  8. Hambli, R.; Potiron, A. Finite element modeling of sheet-metal blanking operations with experimental verification. J. Mater. Process. Tech. 2000, 102, 257–265. [Google Scholar] [CrossRef]
  9. Metrologic Group. Available online: https://www.metrologicgroup.com (accessed on 22 September 2020).
  10. Li, C.; Wang, Y.; Xu, L.; Liu, Y.; Lu, N.; Mi, G. Microstructure and Mechanical Property of Compact Graphite/6061Al Composite Prepared by Ultra-High Pressure Sintering. Appl. Sci. 2020, 10, 5107. [Google Scholar] [CrossRef]
  11. Borazjani, S.; Belingardi, G. Development of an innovative design of a composite-sandwich based vehicle roof structure. Compos. Struct. 2017, 168, 522–534. [Google Scholar] [CrossRef]
  12. Hexagon. Available online: https://www.hexagonmi.com/en-GB/ (accessed on 22 September 2020).
  13. Pástor, M.; Lengvarský, P.; Trebuňa, F.; Čarák, P. Prediction of failures in steam boiler using quantification of residual stresses. Eng. Fail. Anal. 2020, 118, 104808. [Google Scholar] [CrossRef]
  14. Trebuňa, F.; Šimčák, F.; Bocko, J.; Trebuňa, P.; Pástor, M.; Šarga, P. Analysis of crack initiation in the press frame and innovation of the frame to ensure its further operation. Eng. Fail. Anal. 2011, 18, 244–255. [Google Scholar]
  15. Trebuňa, F.; Šimčák, F.; Buršák, M.; Bocko, J.; Šarga, P.; Pástor, M.; Trebuňa, P. The strain gage method for determination of input working life parameters of pipes in compressor stations. Metalurgija 2007, 46, 201–204. [Google Scholar]
  16. Trebuňa, F.; Šimčák, F.; Trebuňa, P.; Bobovský, Z.; Pástor, M.; Šarga, P.; Frankovský, P.; Hagara, M. Methodology for experimental verification of safety of packages for transport of spent nuclear fuel. Acta Mech. Slovaca 2012, 16, 34–43. [Google Scholar]
  17. Chandru, B.T.; Suresh, P.M. Finite Element and Experimental Modal Analysis of Car Roof with and without damper. Mater. Today Proc. 2017, 4, 11237–11244. [Google Scholar] [CrossRef]
Figure 1. Examples of roof antennas—different sizes, shapes and locations.
Applsci 10 07510 g001
Figure 2. Examples of different variants of antenna mounting: (a) first variant; (b) second variant.
Applsci 10 07510 g002
Figure 3. Light reflection test after mounting the antenna.
Applsci 10 07510 g003
Figure 4. Displacement measurement with the Leica T-Scan 5 around the hole before mounting the antenna.
Applsci 10 07510 g004
Figure 5. The displacement fields measured by Leica T-Scan 5: (a) before mounting antenna—stage 1; (b) after application the strain gauges—stage 2; (c) after mounting antenna—stage 3; (d) after unmounting antenna—stage 4.
Applsci 10 07510 g005
Figure 6. Strain gauges’ locations.
Applsci 10 07510 g006
Figure 7. View of applied strain gauges: (a) painted roof A; (b) unpainted roof B; (b) painted roof C.
Applsci 10 07510 g007
Figure 8. Roof loading at the mounting hole.
Applsci 10 07510 g008
Figure 9. Time records of strains for repeated loading at the hole: (a) roof B; (b) roof C.
Applsci 10 07510 g009
Figure 10. Time record of strains at unit load in places 1–11: (a) roof B; (b) roof C.
Applsci 10 07510 g010aApplsci 10 07510 g010b
Figure 11. Scanning of the analyzed area when mounting the antenna on the roof C.
Applsci 10 07510 g011
Figure 12. Time record of strains during antenna mounting—roof B.
Applsci 10 07510 g012
Figure 13. Time record of strains during antenna mounting—roof C.
Applsci 10 07510 g013
Figure 14. Directions of normal stresses rotated by angle φ (roof C).
Applsci 10 07510 g014
Figure 15. The field of resulting displacements in a selected roof part at unit loading (mm).
Applsci 10 07510 g015
Figure 16. The field of reduced stresses according to von Mises method in a selected roof part at unit loading (MPa).
Applsci 10 07510 g016
Table 1. Displacement values in selected places in individual stages of mounting.
Measuring PlaceDisplacement (mm)Measuring PlaceDisplacement (mm)
Stage 1Stage 2Stage 3Stage 4Stage 1Stage 2Stage 3Stage 4
10.750.72-0.74210.550.540.440.62
20.760.71-0.74220.530.550.450.60
30.770.70-0.75230.570.570.560.57
40.760.71-0.75240.610.590.740.64
50.720.68-0.71250.680.670.810.70
60.760.72-0.74260.750.760.890.78
70.760.74-0.77270.810.810.870.87
80.830.79-0.82280.850.850.850.94
90.890.86-0.89290.890.890.910.96
100.940.91-0.93300.900.930.880.98
110.940.91-0.92310.890.890.910.96
120.940.90-0.93320.850.850.920.94
130.920.88-0.92330.830.810.890.90
140.880.82-0.87340.780.750.990.84
150.820.75-0.82350.730.670.970.79
160.810.74-0.81360.670.640.940.73
170.760.75-0.75370.600.640.710.64
180.790.75-0.78380.570.610.590.64
190.760.72-0.79
200.780.73-0.78
Table 2. Displacement deviations between individual stages of antenna mounting.
Measuring PlaceDeviation Interval of Measured Values (%)
2/13/24/2
1–20<1.32; 9.09>Not evaluated<−9.72; 0.0>
21–38<−7.0,2; 8.22><−46.88; 18.52><−17.91; 0.00>
Table 3. The values of normal stresses and reduced stresses at unit load according to Figure 10.
Measuring Placeσmax (MPa)σmin (MPa)σred (MPa)
BL11.83−0.512.13
BL22.55−2.214.12
BP12.12−0.912.69
BP22.65−2.504.46
CL11.72−0.552.05
CL25.220.265.09
CP11.61−1.162.41
CP25.770.925.36
Table 4. Values of normal stresses and reduced stresses after antenna mounting.
Measuring Placeσmax (MPa)σmin (MPa)σred (MPa)
BL1−1.94−7.506.74
BL23.93−7.339.90
BP11.88−6.377.48
BP20.68−7.187.54
CL1−3.14−10.229.07
CL2−0.39−12.5812.39
CP1−5.31−15.9714.09
CP2−2.69−15.5314.38
Publisher’s Note: MDPI stays neutral with regard to jurisdictional claims in published maps and institutional affiliations.