1. Introduction
This work presents a study on the multiparameter optimization of the weight of a double-acting hydraulic cylinder installed on an excavator. In particular, starting from the loading conditions of the machine and the geometry of the cylinder, graphs are provided showing how the variable weight varies according to the working pressure, since it is the most significant variable for the choice of the components under examination. Furthermore, the problem of the radial displacement of the barrel as a function of the working pressure is also examined.
The working conditions set the constraint conditions, from which an initial sizing—via an analytical method—of the various components of the cylinder was done. Once this part was completed, some constructive considerations were made, paying particular attention to the presence of the ports on the barrel for the oil passage. Finally, in order to verify the results obtained, a model for the calculation of stresses through finite element analysis (FEM) was realized.
The study was approached using two different types of materials, as it aimed to highlight how the mass of the component varies according to the material chosen. The two materials were: structural steel S355JR, since it is the most commonly used material for these applications, and aluminum alloy 7075-T6 (Ergal).
The main objective of this study was to identify, given the working conditions and the geometry of the cylinder, the minimum weight that the component can reach.
This research started from the observation that the weight of such a component is important when compared with the weight of the structure, and therefore, the lightening of hydraulic actuators, also telescopic, is possible and necessary and can be performed using composite materials [
1,
2].
Combining the approach used in this work with a subsequent study that includes the realization of mechanical components in composite materials, it will be possible to obtain a further reduction in weight compared to what would already be obtained only with their use.
The minimization of the weight of mechanical and non-mechanical components has been studied in many sectors, as it involves an increase in performance in terms of eco-sustainability and environmental compatibility [
3].
Furthermore, the main advantage of reducing the weight of a component such as a hydraulic cylinder is that it can increase the load that can be carried by the earthmoving machine. In particular, the power required for handling will be lower because the component has a lower weight. In addition, thanks to a low inertia, it will be possible to move the system faster in order to increase the hourly productivity [
3,
4].
2. Component Description and Loading Conditions
The excavator, as described above, is used for all those operations which require the movement of soil. This function consists of removing portions of the land that are not particularly consistent and are easy to grind. It is the most versatile and important earth-moving machine in our day, also it has a greater employment share by 50% than other machines. The excavator power is 110 kW and its mass is 21,550 kg. The component under study is a double-acting hydraulic cylinder [
5], installed on an excavator like the one shown in
Figure 1. In particular, the cylinder that will be examined is the one that in
Figure 1 is called the “arm cylinder.” It is a double-acting actuator which therefore needs oil pressure for both the output and input strokes and is composed of the following components (
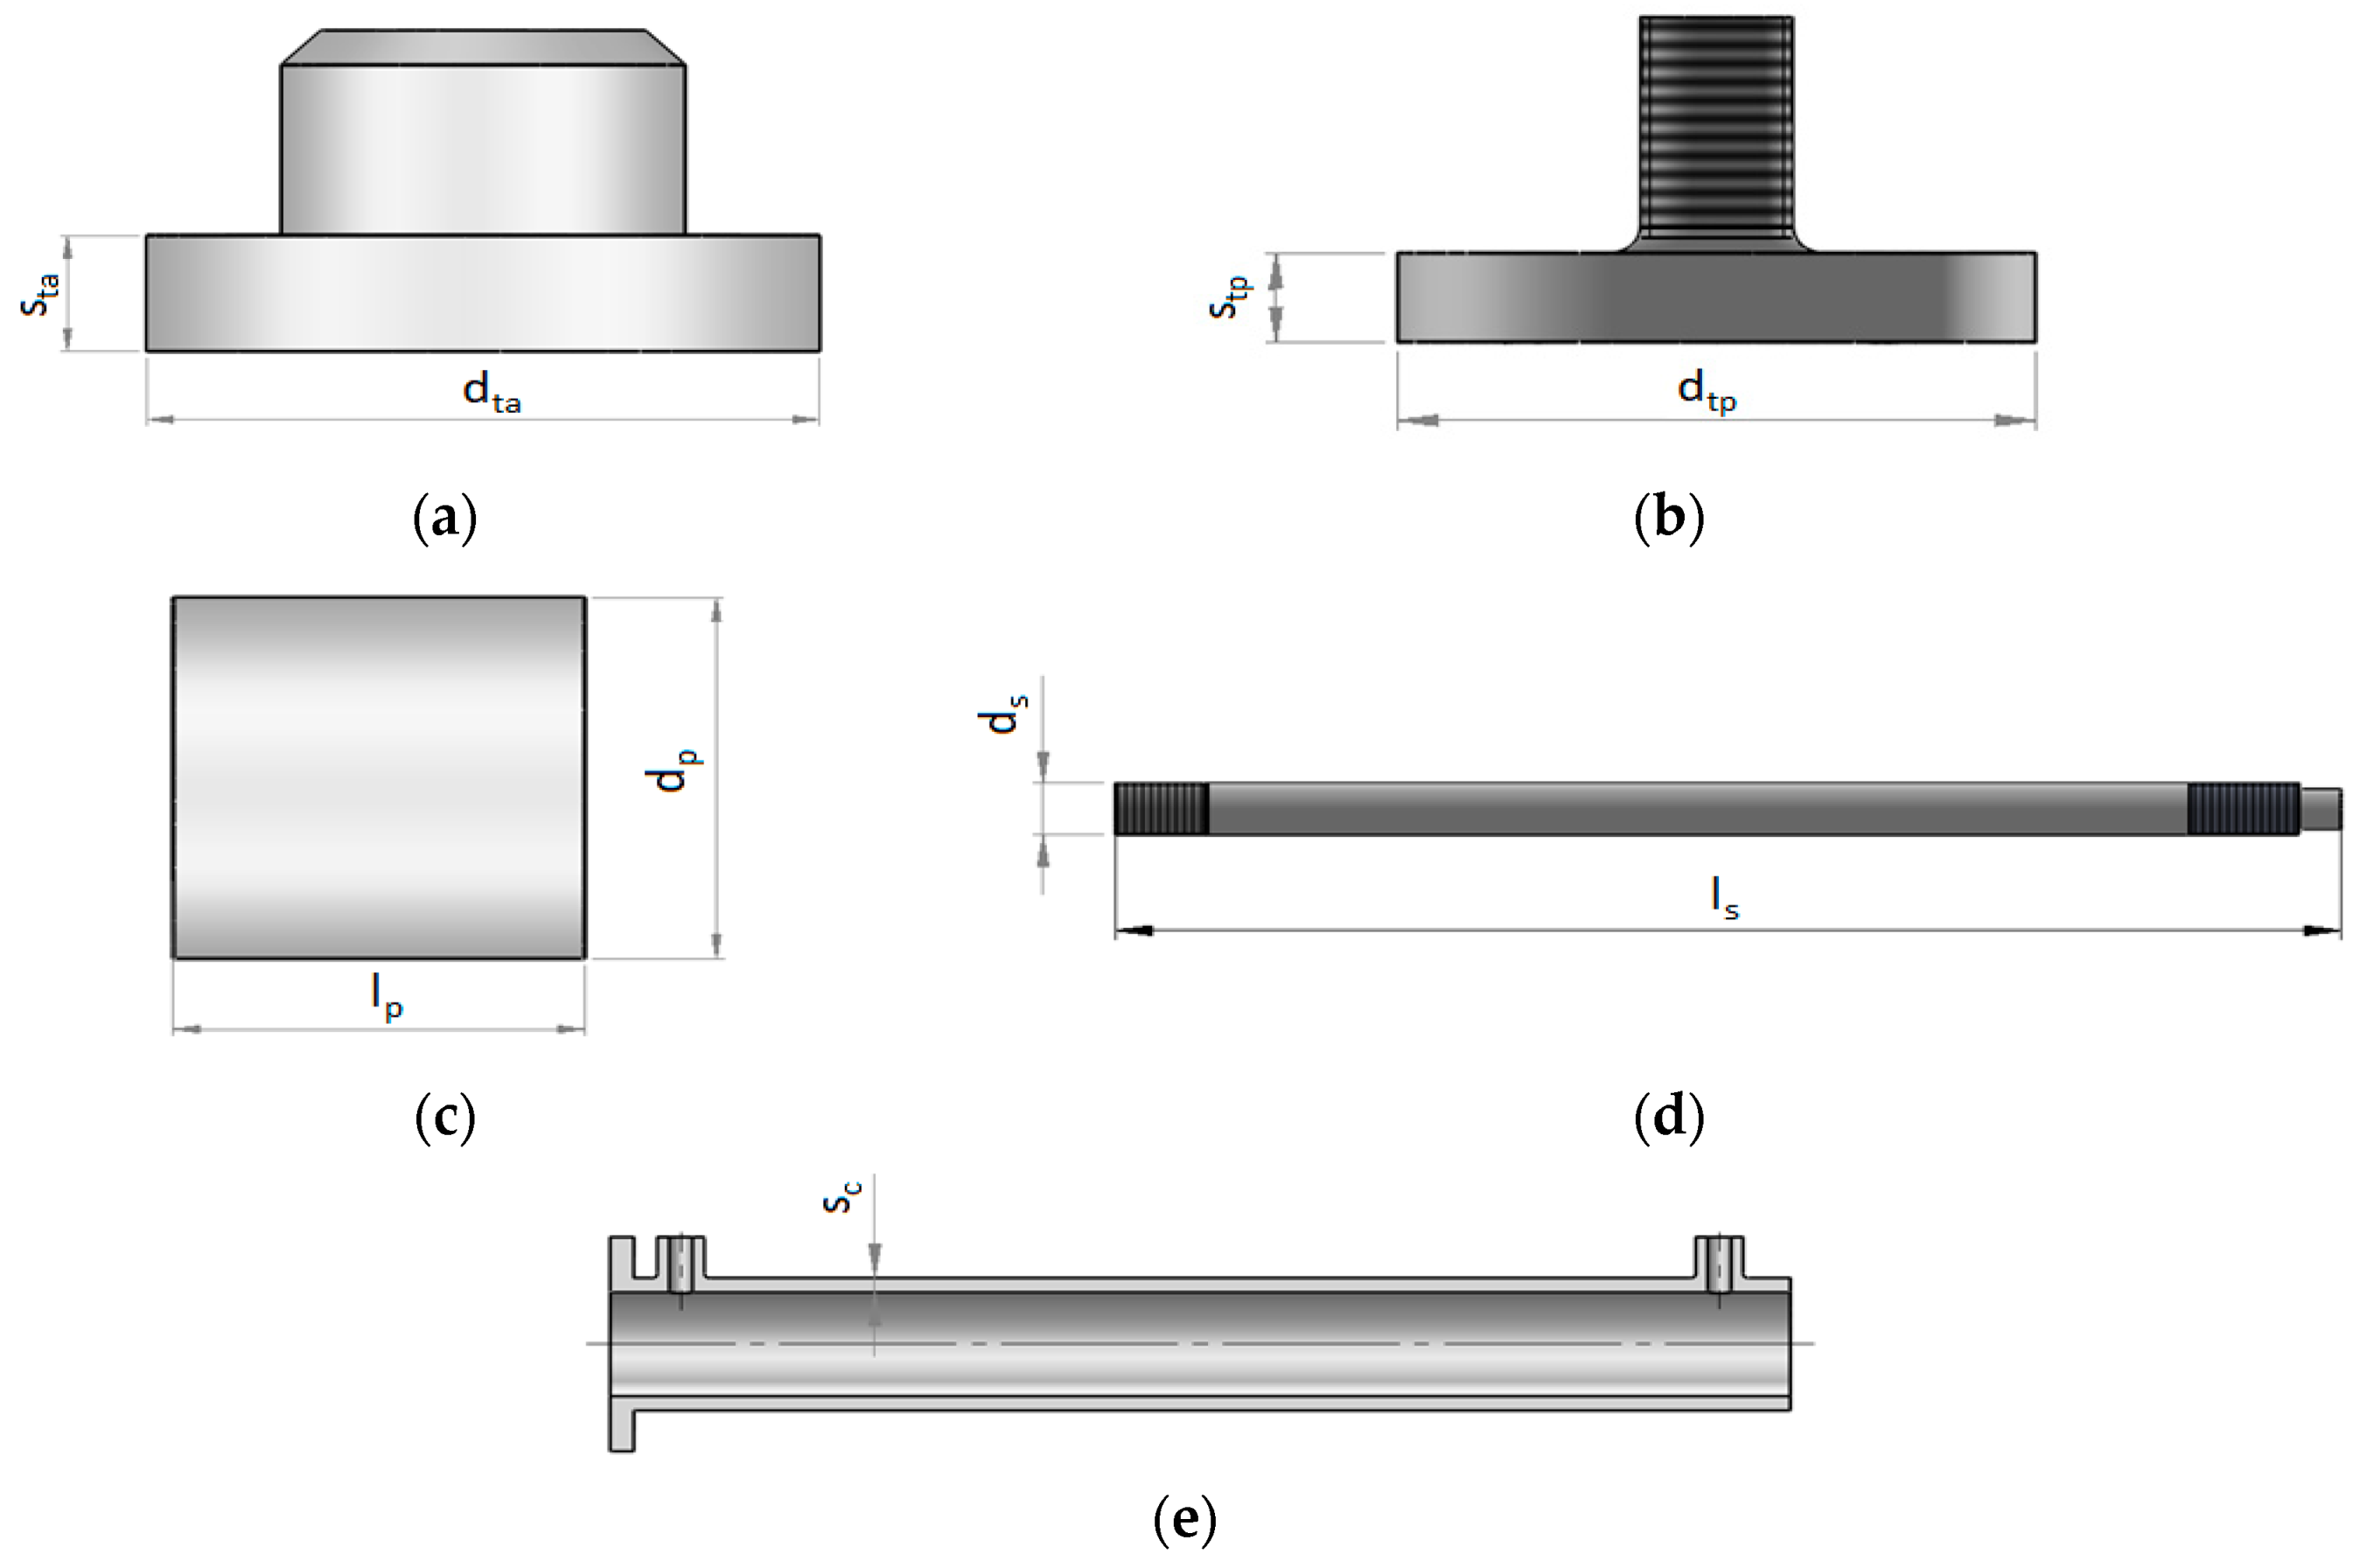
Figure 2): piston, piston rod, barrel, rod cap head, end cap head and the two joints or fixings. These details can be seen in
Figure 3, while
Figure 4 shows the details that will be analyzed during the construction considerations.
The geometrical characteristics to be satisfied are as follows:
- -
Barrel length L: 500 mm.
- -
Stroke length: 385 mm.
- -
Open cylinder length: 1109 mm.
- -
Closed cylinder length: 724 mm.
Instead, the variables to be determined, represented in
Figure 3, are indicated below:
- -
dp: external diameter of the piston that coincides with the internal diameter of the barrel;
- -
lp: length of the piston;
- -
ds: external diameter of the piston rod, coinciding with the internal diameter of the rod end head and piston;
- -
ls: piston rod length;
- -
sc: barrel thickness;
- -
dta: outer diameter of the rod end head;
- -
sta: thickness of the rod end head;
- -
dtp: external diameter of the cap end head;
- -
stp: thickness of the cap end head.
The loading conditions to which the cylinder is subjected are the following:
- -
Working pressure p: 350 MPa;
- -
Maximum Force Fmax: 70 kN.
These values are the maximum admissible ones for the type of component studied and have been obtained directly from the manufacturer of the earthmoving machine [
6]. The value of 70 kN is the maximum load capacity of the excavator when its bucket is closed and fully loaded.
From these data it is possible to size all the variables required for the construction of the cylinder. In addition, safety coefficients are imposed on the yield stress σsn and critical load Pcr equal to:
These coefficients are due to the fact that the component is subject to high stresses, and no fatigue analysis was performed due to the lack of knowledge of the trend of the stress cycles with respect to time, and in general the number of cycles is about a few thousand.
3. Loading Conditions and Selected Materials
The materials chosen for this application are given in
Table 1 [
7]. It should be noted that for ease of implementation, aluminum alloy only was chosen to be used for the barrel.
In particular, two values can be observed for the barrel in
Table 1. In fact, two case studies can be distinguished: the case study with a steel barrel and the case study with an aluminum barrel.
The choice of these materials was caused by the fact that they are the most used for the components of the cylinder under study. In particular, a high strength steel with a particular attitude to cold forming was selected for the barrel. This material, in addition to good fatigue strength, has excellent toughness and very good weldability.
4. Sizing of Cylinder Components
The techniques chosen for sizing are those used for isotropic materials [
7], as all the materials used fall into this category. In particular, starting from the loading conditions described in
Section 3, the external diameter of the piston was calculated first and then the thickness of the barrel. Again, using analytical methods, the piston rod diameter, the thicknesses of the rod and cap end cap head and the relative external diameters were dimensioned. Moreover, due to the fact that the cap end head is assembled with the rest of the cylinder by bolting, it is also recommended to size the bolts themselves; and the welding that binds the rod and cap end head. It should be noted that there will be holes on the shirt that will act as passageways for the working oil; it is therefore advisable to check the resistance of the shirt also in these points of particular gravity. As far as the joints are concerned, on the other hand, it was decided to select them directly from the manufacturer, as they are commercial elements. The fatigue phenomenon was taken into consideration, assuming a high safety factor for the yield strength. This value makes it possible to considering the phenomenon of fatigue when sizing and checking the component [
8,
9,
10].
4.1. Sizing the External Diameter of the Piston and of the Piston Rod
The minimum external diameter of the piston
dp was derived from the working pressure value
p and the maximum required force value Fmax as follows:
Regarding the sizing of the external diameter of the piston rod
ds [
11], on the other hand, it is necessary to calculate the maximum axial stress that manifests because of the operating pressure.
The relation that allows one to calculate the minimum piston rod diameter is the following:
A buckling analysis should also be carried out for the piston rod [
5,
12,
13]. This verification is accomplished by comparing the force acting on the piston rod
Ppiston rod, calculated by Equation (3) and the critical load
Pcr, obtained according to the simple Equation (4)
where the term
l0 indicates the free length of inflection which in turn depends on the type of constraint conditions and
Jmin represents the smallest area moment of inertia of the cross section of the piston rod. For this problem, considering the structure of the cylinder and the possible movements of the piston rod, one could opt for a carriage hinge solution with torsional spring [
14]. However, even if this configuration is very close to reality, it is very difficult to implement in the calculations because the spring constant is not generally known. We therefore chose to bind the piston rod with a carriage-cantilever configuration, and to be further in favor of safety, we chose to increase the safety coefficient by
ηPcr = 2 to
ηPcr = 3 [
5,
12,
14].
Given the constraint condition, the literature shows that the free inflection light l
0 is 0.7 times the length of the piston rod l s. At this point, once the values of ds and
ls were obtained, it was verified that the force acting on the piston rod
Ppiston rod was less than its permissible critical load
Pcr [
15,
16].
4.2. Sizing of Barrel Thickness
In this phase the minimum thickness of the barrel is dimensioned in order to guarantee the necessary resistance to the working pressure; this parameter is important for the resistance and the stiffness of the component and it was numerically verified in the
Section 5. The theory used in this case is that of small thickness pressure vessels, since the condition that the ratio between internal diameter and thickness is less than 1/10 is true [
17]. The relation that allows one to calculate the thickness is Equation (5).
As mentioned above, there are two holes in the barrel, which act as a passage for the oil. At these points the barrel is subjected to a significant increase in stress; it is therefore appropriate to verify its resistance. The theory used in this case is that of the infinite plate with a double axial load and the contribution of pressure [
12,
18]. Since the stresses acting with those holes coincide with those of the case of the infinite plate with a double axial load with the addition of the pressure acting inside the hole, the relation that allows one to calculate the maximum stress in these points is the following [
8,
17].
4.3. Analytical Sizing of Cap End Head Thickness
To determine the thickness of the cap end head, the theory of small thickness circular plates is applied [
10,
11]. In this case the diameter of the plate is considered as the diameter of the piston
dp to which the thickness of the barrel will be added; that is:
The static configuration representing this case is schematically shown in the
Figure 5. It is noted that the head can be considered as hinged because the shell is so thick that it cannot simulate an interlocking constraint on the edge.
According to the above theory, the contributions of circumferential and radial moments were calculated, and then the minimum thickness was obtained by applying the Guest–Tresca criterion [
5,
17,
19].
4.4. Analytical Sizing of the Rod End Head Thickness
Additionally, in this case the theory of small thickness plates is adopted [
12,
20]. In addition to the external diameter, however, the internal diameter must also be considered, since the front plate has a hole for the passage of the piston rod [
5]. This diameter, in a first phase of study, was assumed to be equal to the external piston rod diameter. By schematizing the rod end head as in
Figure 6 and applying the von Mises criterion, the value of the thickness was obtained.
4.5. Sizing of Bolts and Welding
For the sizing of the bolts, as a first step it is necessary to calculate the maximum axial force
Pmax acting on each of them using Equation (8).
where
nb is the number of bolts assumed to be four and strength class 12.9 [
21,
22].
From these data, by applying the bolted joint theory [
22] it is possible to calculate the minimum core diameter by means of Equation (9) [
21,
22]:
As far as welding is concerned, is necessary to calculate is its minimum thickness, which will be indicated with the letter a.
Since the τ
⊥ are null and assuming that we can neglect the
τ// [
23], only the contribution of
σ⊥ [
23] that is obtained from (10) remains to be calculated:
where
and the terms des and dis are respectively the internal and external diameters of the weld which are described by the following relationships (Equations (12) and (13)):
The stress obtained σ
⊥ is compared with the admissible stress by means of Equation (14):
At this point, the lateral thickness h is obtained according to Equation (15) [
23]
Table 2 shows the minimum dimensions resulting from the analytical method for the various parts of the cylinder. Subsequently, the effective dimensions that must be taken into account during the construction phase of the component will be shown. These measures will be increased compared to those calculated to take into account the constructive, functional and normative requirements of each single part [
8,
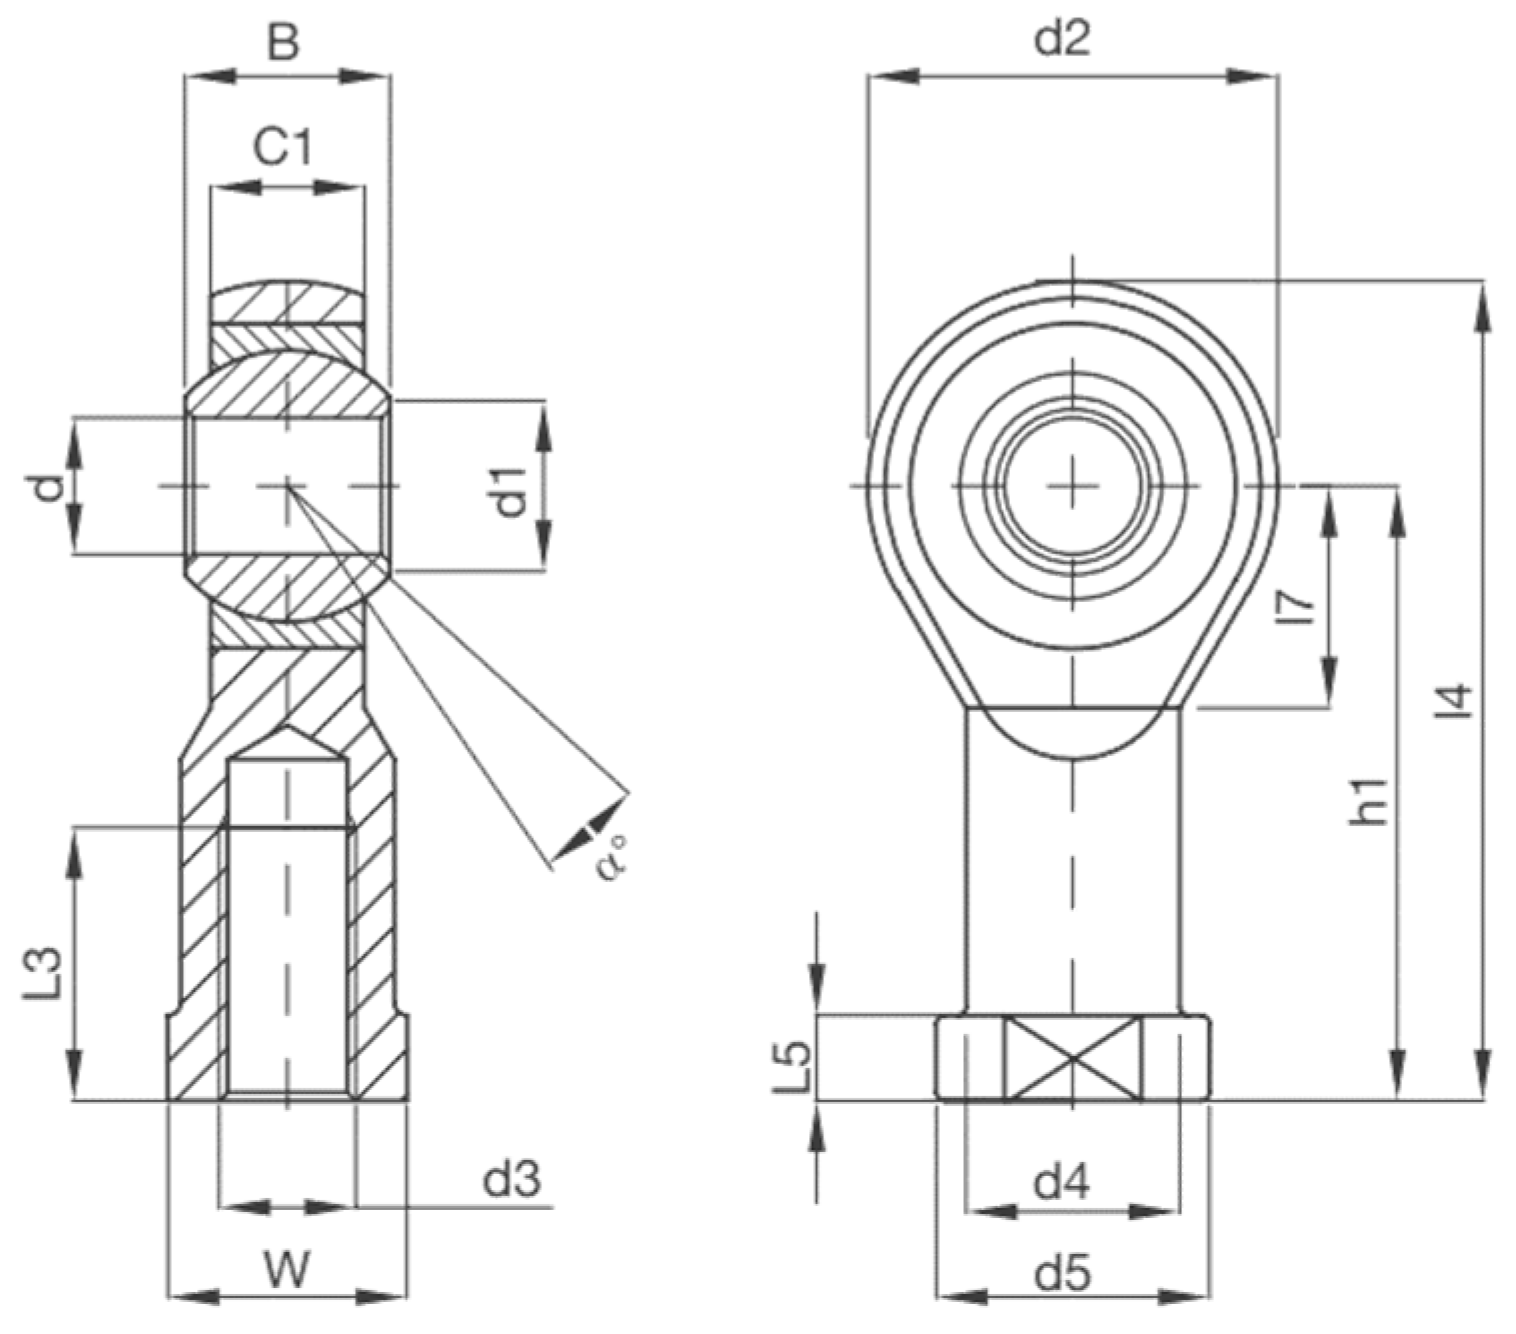
17]. As far as the joints are concerned, the geometrical parameters that depend on the value of the piston rod diameter are reported. In the table the value l
3 is called l
snodes, a value found in the supplier’s catalogue [
24], as shown in
Figure 8. Moreover, the piston rod length l
s has been obtained as the sum of the barrel length L, the thickness of the rod end head s
ta and the length of the joints l
snodes.
In addition to the dimensions of the main components of the cylinder, the size of the bolts and the minimum thickness of the weld for the connection between the rod end head and the barrel have also been calculated. The results of the sizing processes previously reported are summarized below:
- -
Bolts: M12.
- -
Minimum welding thickness: 6 mm.
It should also be noted that the effective dimensions of the external diameters of the funds have been obtained by increasing the measurements calculated in the previous paragraph by the following quantities:
- -
dtp = +40 mm to take account of the presence of the bolts;
- -
dta = +20 mm to guarantee the weldability.
5. Numerical Analysis
Numerical analyses are necessary to verify the results obtained with the analytical theory, to obtain results closer to reality (as in the case of the heads, which using the plate theory would be excessively oversized); those were subsequently used in the cylinder weight optimization phase.
Furthermore, FEM analysis was carried out in order to verify that the results obtained effectively guaranteed the resistance of the component. In order to perform these analyses, it was necessary to create a model using the SOLIDWORKS
® design program, using the dimensional values obtained from the calculation using the analytical method. Static and buckling analyses were carried out using the same software. The simulation used in this case is of linear elastic type and adopts brick elements with a quadratic function. It should be noted that with regard to the dimensions obtained for the both heads, it is necessary to re-size their thickness, since the result obtained analytically does not allow one to treat the bottom with the theory of thin plates [
12,
18].
The following paragraphs will show the results obtained for both case studies, paying particular attention to the analysis carried out on the barrel.
5.1. Buckling Analysis of the Piston Rod
In order to verify the result obtained for the piston rod by means of the analytical procedure using finite element analysis, it is necessary to treat it as a beam, place two joints at the ends and bind and load them in order to simulate the carriage-cantilever conditions (
Figure 9). When applying the proposed procedure, the verification is more valid because the FEM (beam type mesh with 86 total elements for a total of 89 nodes) gives a critical load that compared to the one obtained analytically presents a percentage variation %v that is positive and is around 3% (16).
5.2. Sizing of the Thickness Heads
By applying the theory of thin plates for both heads, the respective values were obtained:
- -
sta = 23 mm.
- -
stp = 20 mm.
However, these results are not compatible with the hypotheses of the thin plate theory. It was therefore necessary, starting from the analytically obtained result, to further reduce the thickness using finite element analysis. We decided to decrease the size with a pitch of 1 mm until the minimum value that guaranteed the resistance would be obtained.
The minimum values that guarantee the resistance are:
- -
sta = 17 mm.
- -
stp = 17 mm.
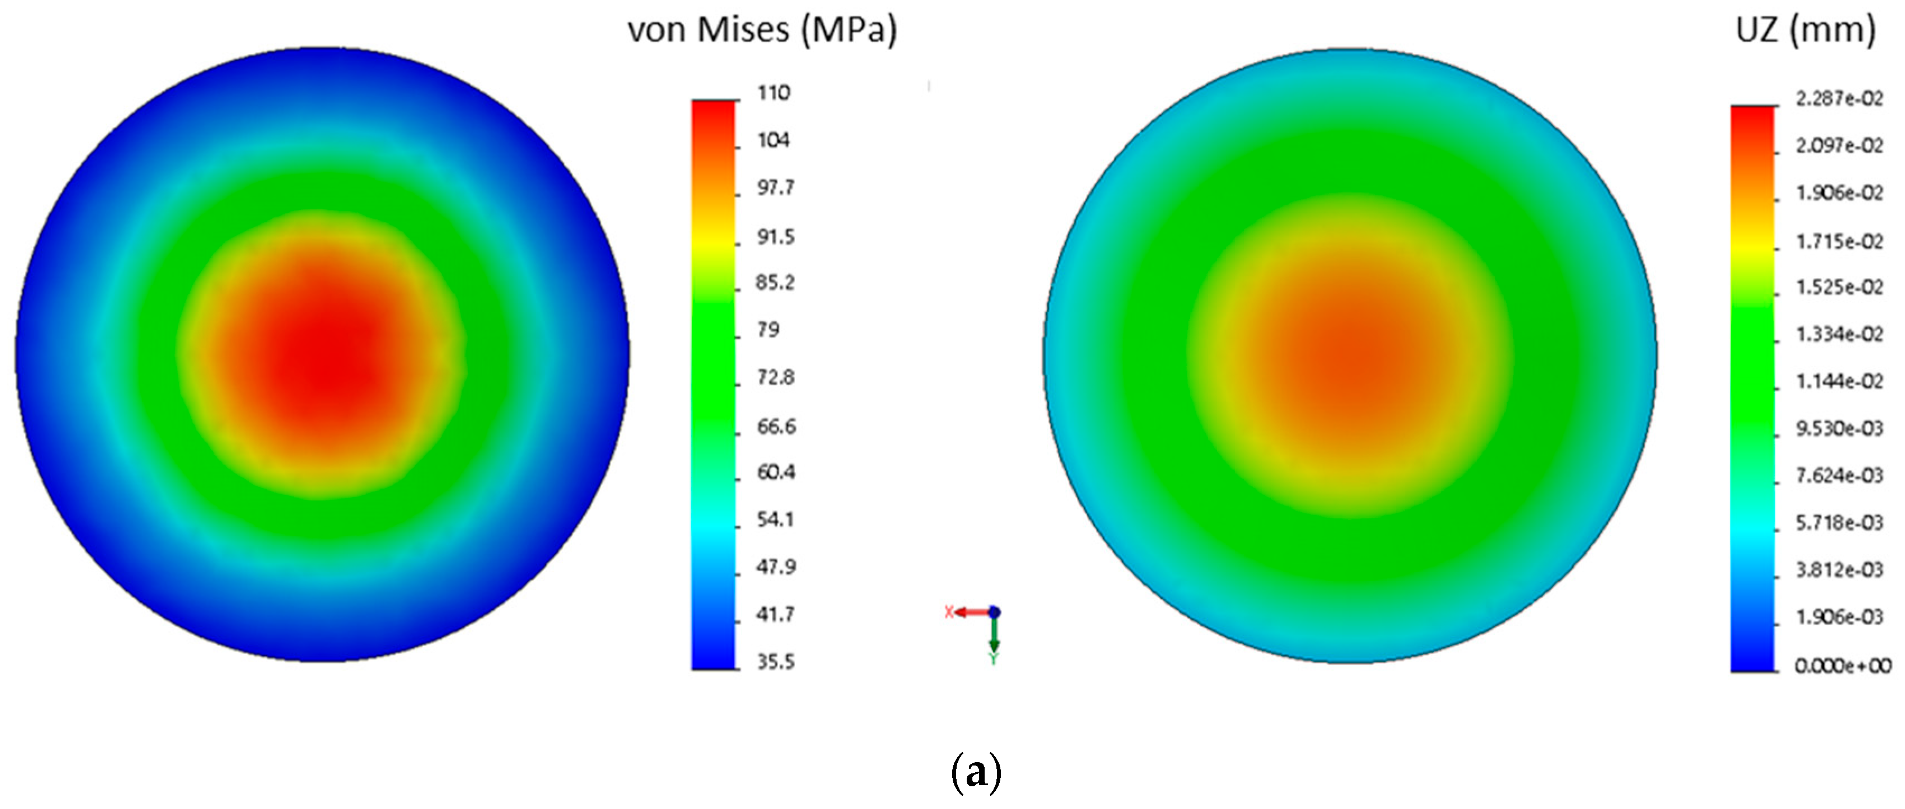
The
Figure 10 shows the FEM results of the components just described, remembering that these parts are made only of steel. In particular, the mesh used are in both cases was solid mesh (brick elements) respectively with:
- (a)
total nodes: 9638; total elements: 6232;
- (b)
total nodes: 8548; total elements: 5365.
5.3. FEM Analysis of the Barrel
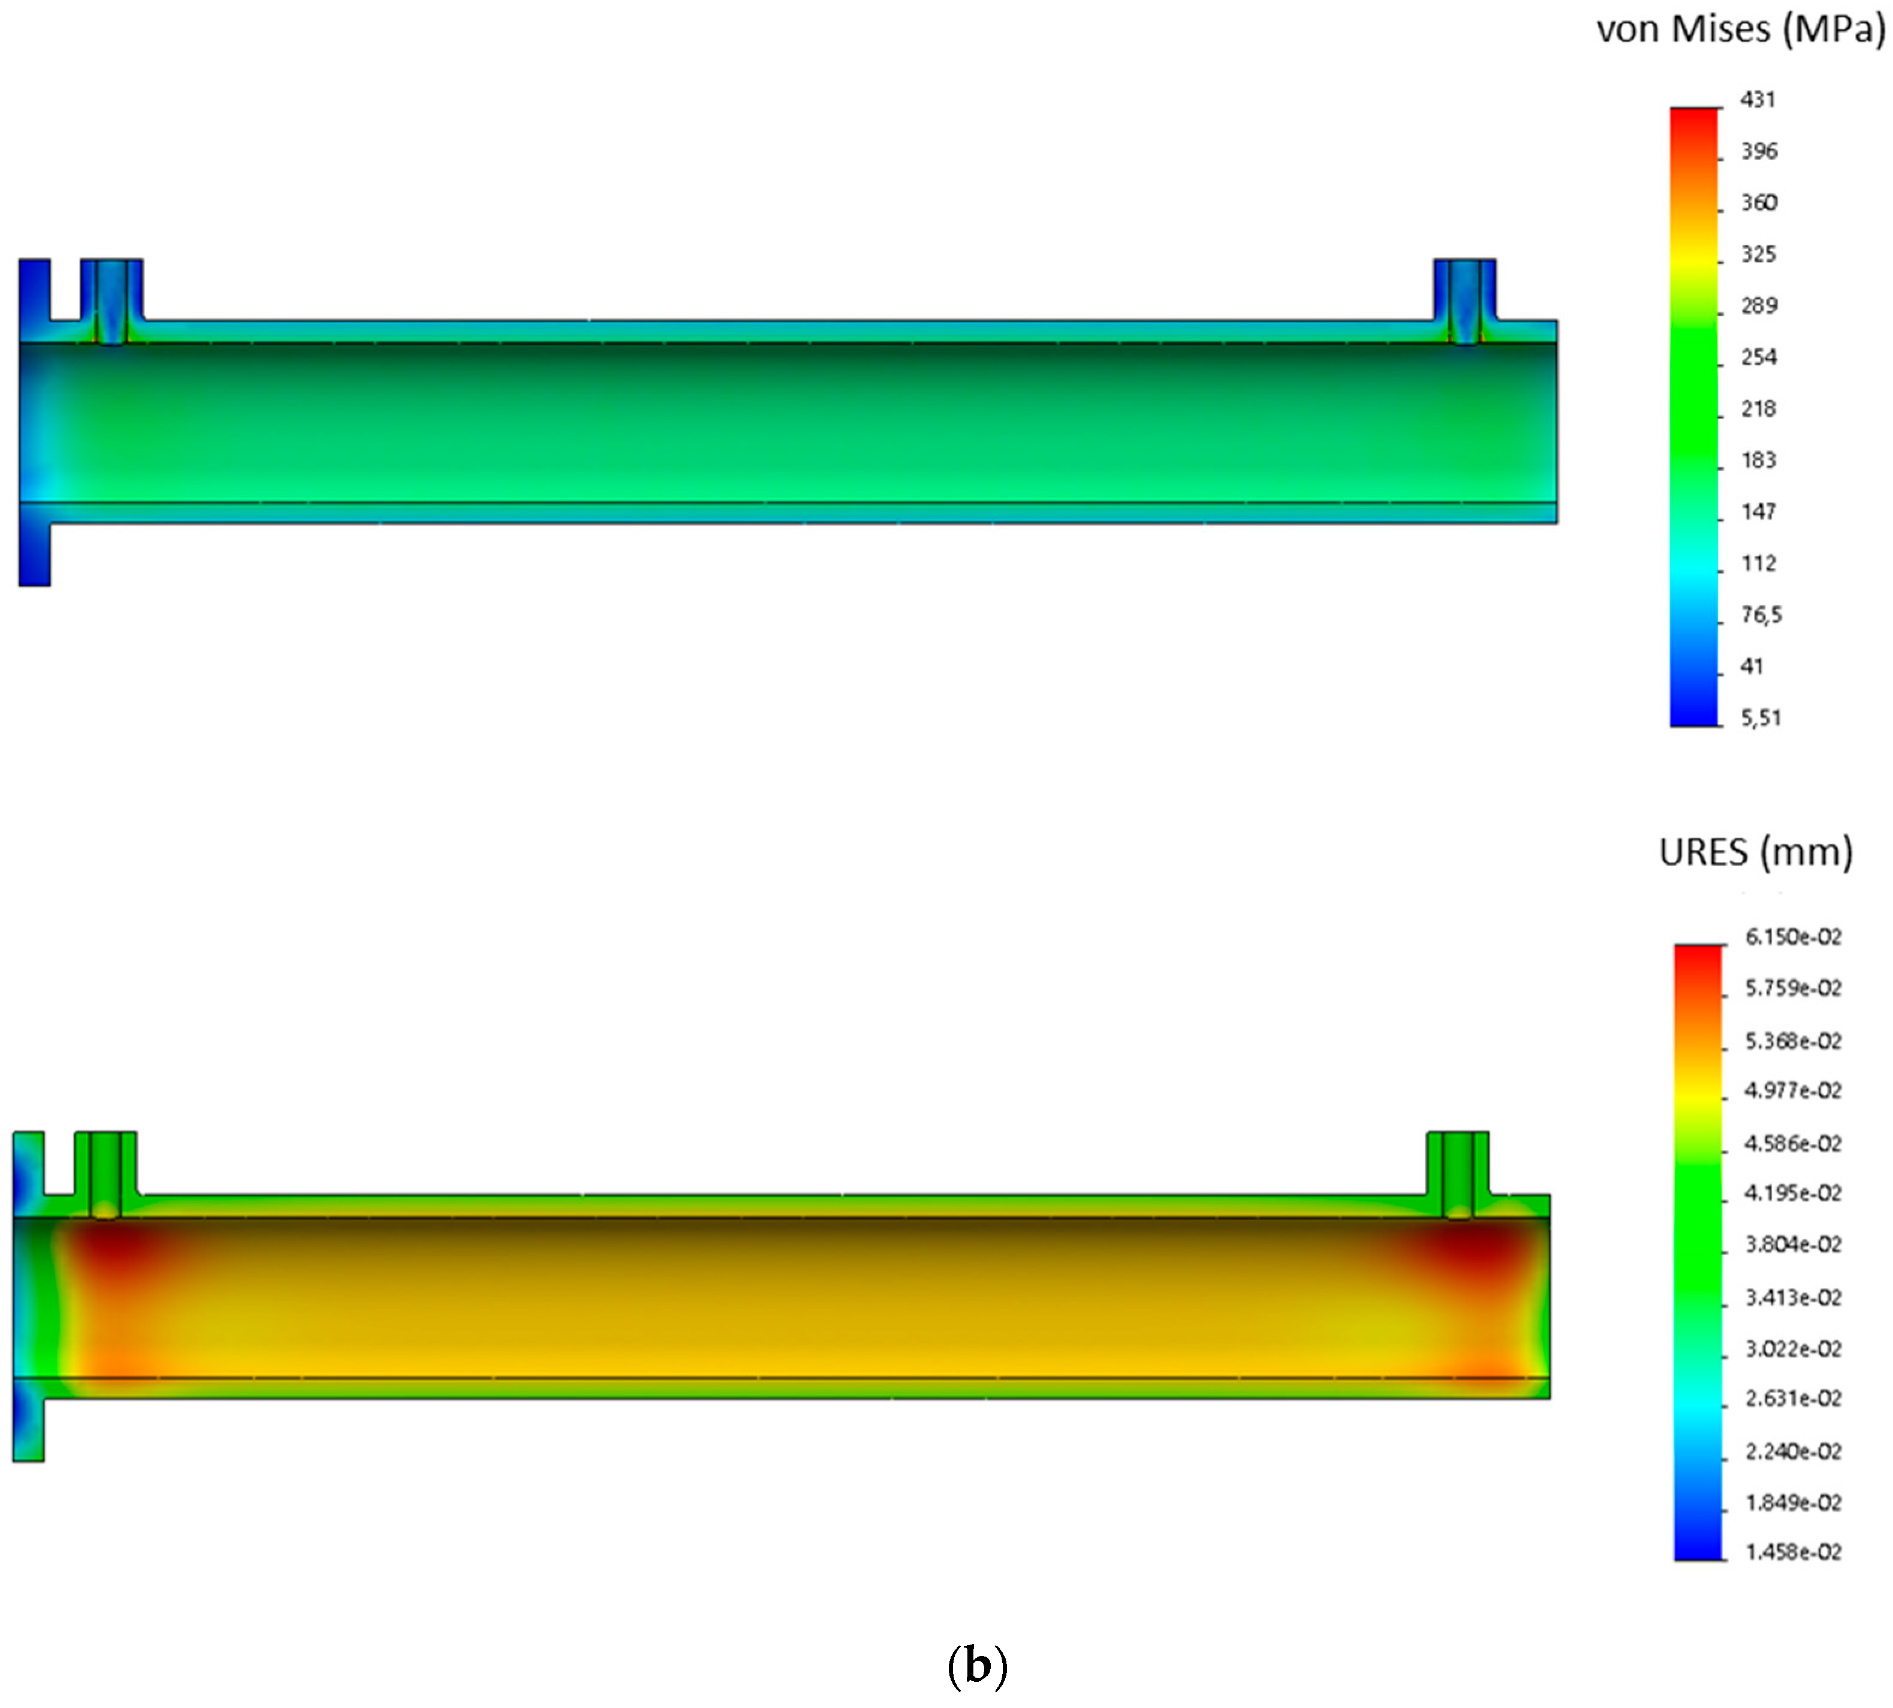
Finally, FEM analysis was also chosen for the barrel for both case studies. The results obtained numerically, represented in the
Figure 11, are in line with those obtained analytically.
6. Optimization of the Weight as a Function of Geometric Variables
In the following sections the optimization of the cylinder weight according to geometric variables and input variables is discussed.
In this way it will be possible to understand what the most influential variable is regarding affecting the final mass of the component.
The first step to be faced is the determination of the weight as a function of the geometrical parameters that define the cylinder. The second step consists of determining the weight as a function of work pressure.
The graphs that were obtained show which of all the variables considered have the most influence on the weight of the component. Acting on this parameter, during the sizing and verification phase, it was possible to obtain a cylinder that, with the same material chosen, was able to guarantee the same performance but with a lower weight.
In particular, graphs are shown that compare the trend of the weight with the two materials used.
Finally, the radial displacement of the barrel as a function of the working pressure was analyzed.
6.1. Constructive Considerations
Before proceeding with the study of the dependence of the weight on the different parameters that characterize the cylinder, it is necessary to make some constructive considerations. In fact, in addition to the sizes that were dimensioned, the cylinder was also characterized by further construction details that had to be considered during the construction phase and therefore also during the parameterization study.
First of all, it should be noted that where the holes for the oil passage were positioned, reinforcement cylinders were added. In addition, it was necessary to make a flange on the barrel to connect it with the bolts to end cap head (
Figure 4). The dimensions of these elements are shown in
Table 3.
As far as the length of the piston is concerned, it was necessary to choose it from the manufacturers’ catalogues [
5] since its value was to be determined considering the sizes of other elements such as seals. For those reasons the length of the piston was l
p = 50 mm.
In order to guarantee the complete oil inlet from the hole in the barrel, a distance of 35 mm was required between the piston and the end cap head. Because of this consideration, it was necessary to make a spacer on the rod cap head (
Figure 4), whose dimensions are shown in the
Table 4.
Finally, it was necessary to make a screwed shank on the end cap head to ensure the connection with the joint. Assuming to use the same joint installed on the piston rod, it was necessary to realize a screwed section M24x2 with a length equal to l
snodes [
24]. This element would have to be properly fitted, r
fillet = 5 mm, in order to avoid the phenomenon of stress concentration [
25,
26].
6.2. Determination of the Weight Function
To determine the weight function
wf, Equation (17) must be applied:
where
V indicates the volumes of the various components (
c: barrel,
s: piston rod,
p: piston,
ta: rod end head,
tp: cap end head),
ρ the relative density and
g the gravitational acceleration.
The following assumption was adopted for the calculation of the weight: in order to simulate the change in the length of the threaded section on the cylinder for the connection of the joints, a trend equal to lsnodes = 1.4∙ds was considered.
Explicitly expressing the various terms of volume in the Equation (17) gives:
- -
Vs:
- -
Vp:
- -
Vta:
- -
Vtp:
By comparing the results obtained by applying Equation (17) with those extracted from the CAD model, the following deviations/differences emerge: 0.73% in the case study of the steel barrel; 1.23% in the case study of the aluminum barrel. The results achieved demonstrate the validity of the analytical model summarized in Equation (17).
6.3. Influence of Dimensioned Variables on the Weight Function
In order to determine the relationships that correlate the weight function to the variation of geometric parameters, it is necessary to perform an analytical analysis using partial derivatives. Working in that way the following results were obtained:
- -
Case study of steel barrel:
Thickness of end cap head:
Perforated bottom thickness:
- -
Case study of aluminum barrel:
Subsequently, by implementing these relationships with the Excel© calculation software and making the sizing parameters vary individually, it was possible to verify the validity of the results obtained. By plotting the graphs related to these variations, setting a polynomial trend line and requesting to visualize the equations of the graphs we got the same results.
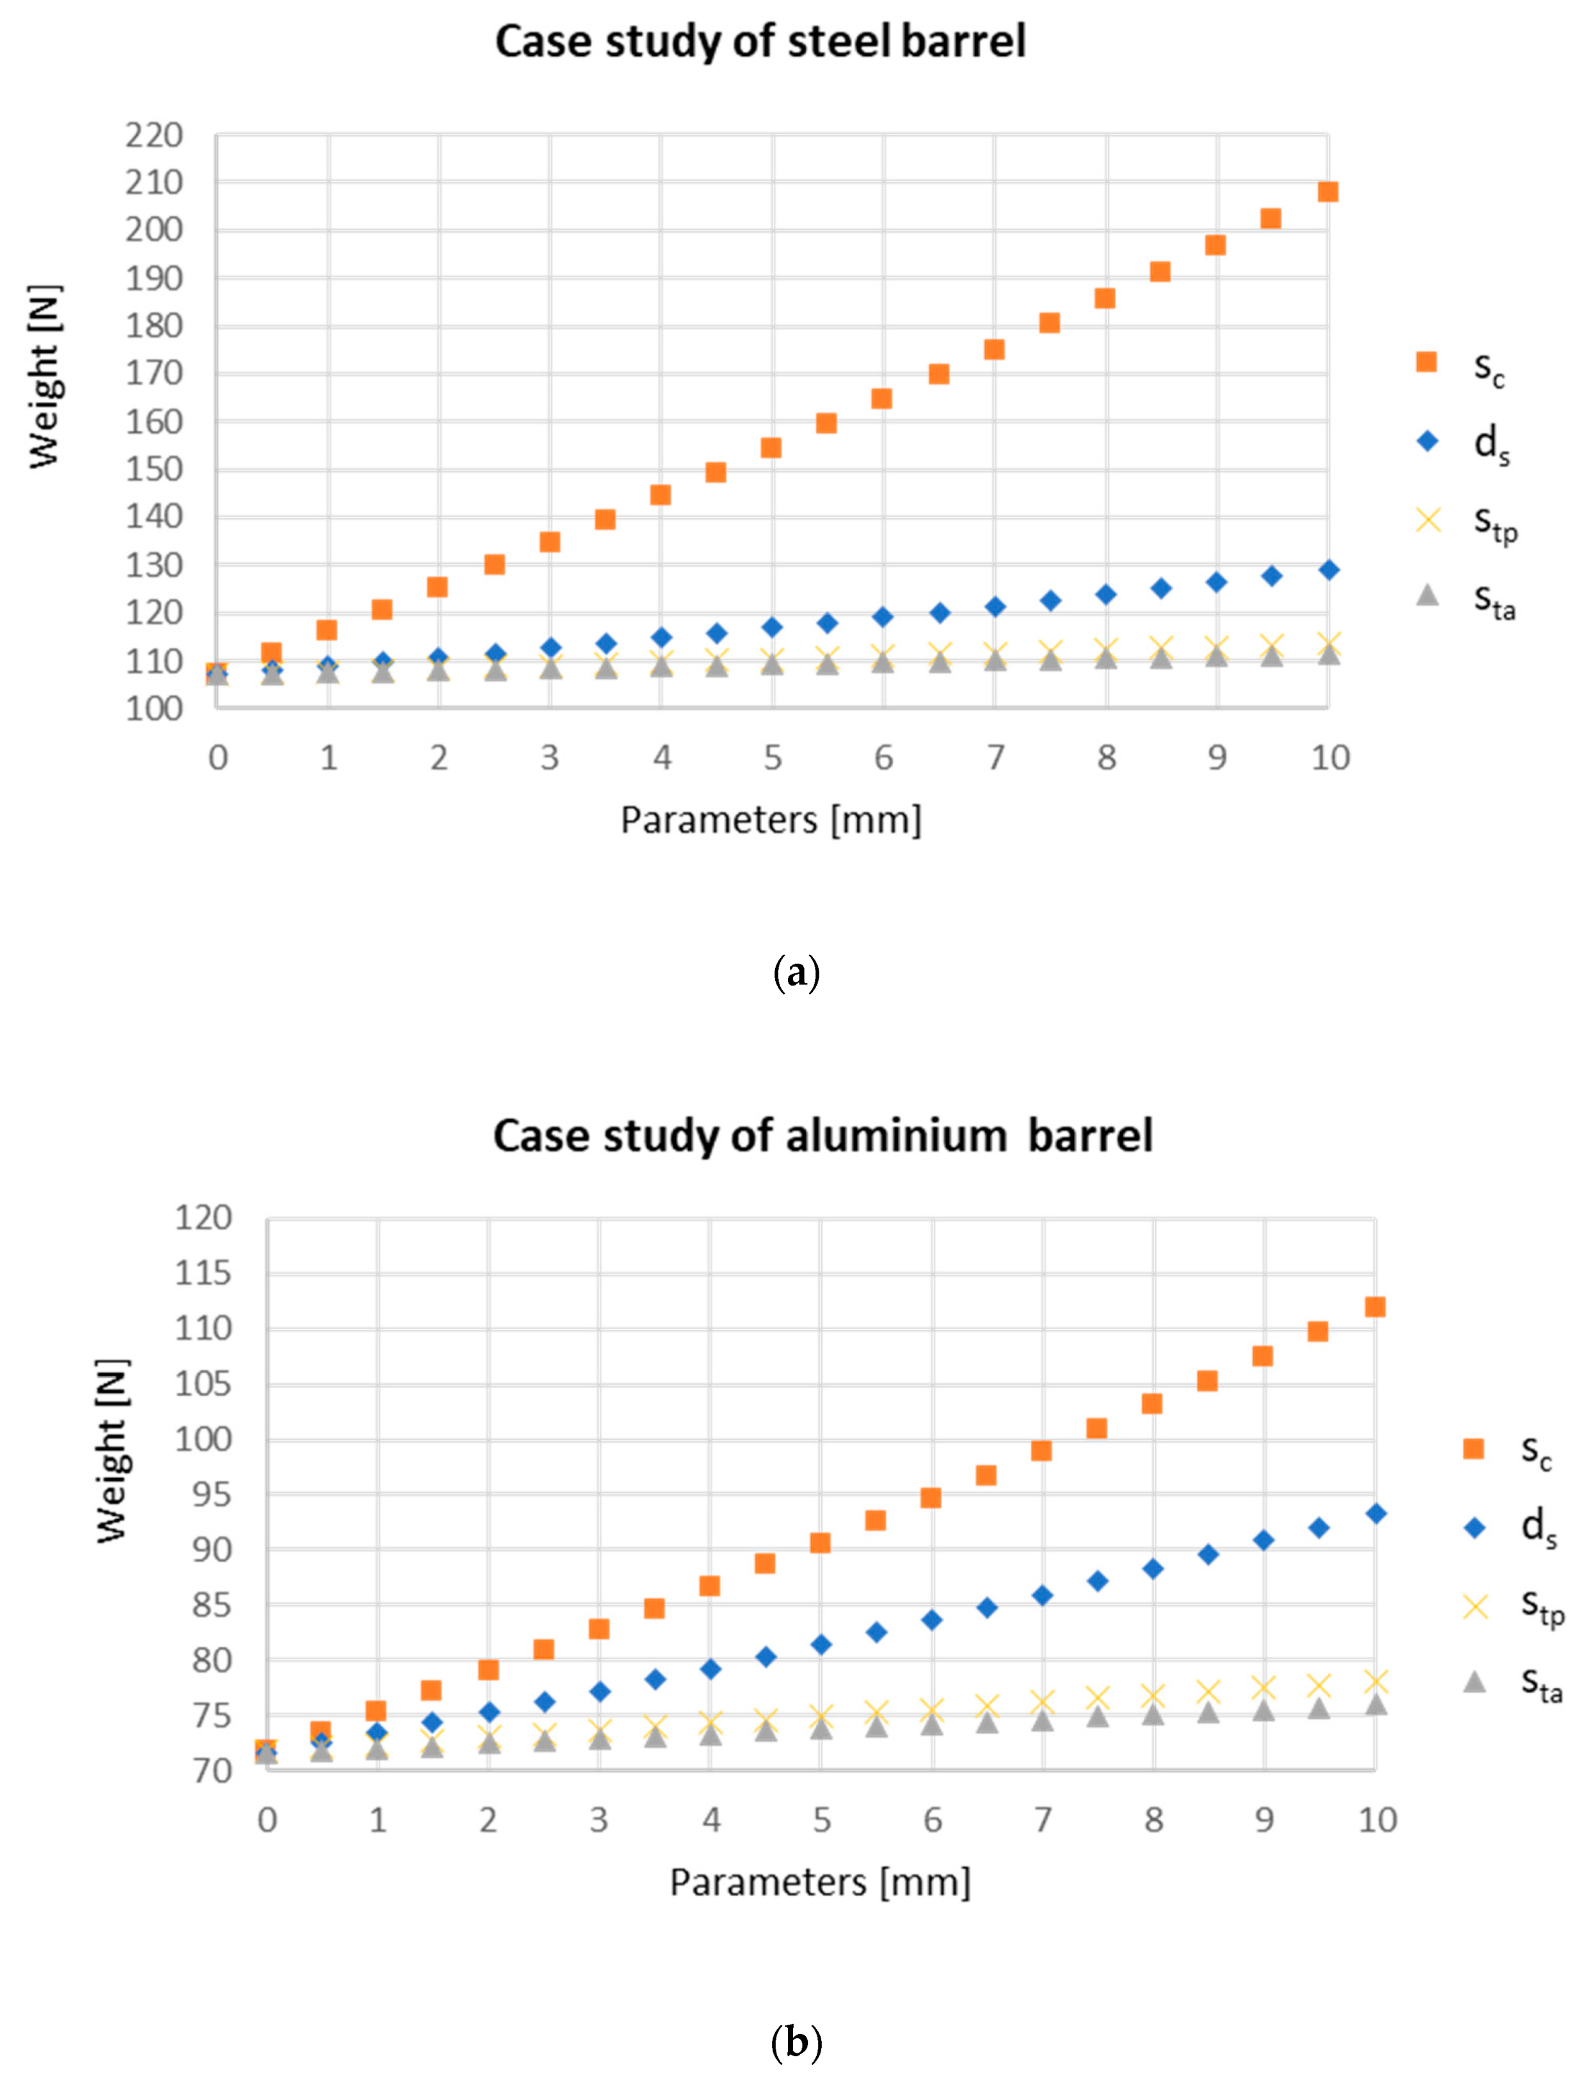
The following graphs (
Figure 12) show the dependence of the geometric variables, considered individually, on the weight function for both case studies. The graphs reveal that the most influential parameter for the weight is the thickness of the barrel.
6.4. Influence of Dimensioning Variables on the Weight Function
In this section, the dependence of the weight is analyzed, no more on the geometric characteristics of the cylinder, but on the working variables. In particular, the trend of the weight as a function of pressure is studied, since at a practical level it is the variable that most affects the choice of the operating conditions of the cylinder.
Weight as a Function of Working Pressure
When sizing and selecting a hydraulic cylinder for a given application, it is necessary to know how much pressure is required to work the component. In particular, the working pressure is achieved by using a pump. It is therefore useful to be able to understand the dependence of the weight in relation to the required pressure so that the size of the pump itself can also be chosen in an optimal way. As a first step, it is necessary to explain all the geometrical parameters of Equation (17) as a function of the working pressure, which makes it possible to obtain the weight as a function of the working pressure.
It is important to underline, however, that the expressions characterizing the thicknesses of the heads have been obtained with the use of Excel© software, by starting from the analytical theory, and then correcting them with two corrective factors obtained through FEM analysis.
The relations derived from the analytical theory are:
- -
Case study of steel barrel:
- -
Case study of aluminum barrel:
The corrective factors obtained through FEM analysis in both cases are:
Excluding the parameters that do not depend on working pressure and expressing all the terms of Equation (17) as a function of the working pressure, the results are as follows:
- -
Case study of steel barrel:
- -
Case study of aluminum barrel:
Figure 13 shows the trend searched for both case studies.
In the case under examination, the weight has a minimum at a pressure of 32 MPa for the steel barrel and 34 MPa for the aluminum one.
The trend obtained can be explained considering all the parameters that, as a function of the working pressure, involve a variation of the weight. By observing that the piston rod diameter remains constant and that the heads do not affect the weight much, it was concluded that the most influential variables are the piston diameter dp and the barrel thickness sc. It can be seen that by increasing the working pressure, the diameter of the piston necessary to apply the same force decreases, and therefore so does its weight. On the other hand, however, the barrel is much more stressed, and therefore there is an increase in its thickness to ensure its structural resistance: this means an increase in the weight.
6.5. Radial Displacement of the Barrel as a Function of Working Pressure
During pressurization, the barrel undergoes a deformation that leads to an increase in diameter and therefore in circumference. Thus it is useful, through the theory of small thickness pressure vessels [
17,
19], to be able to study how the radial displacement varies as a function of the working pressure.
The theory indicates that the radial displacement
u is a function of geometry (
dp,
sc, material (
E,
ν) and pressure
p):
With the available data, the results are:
- -
Case study of steel barrel:
- -
Case study of aluminum barrel:
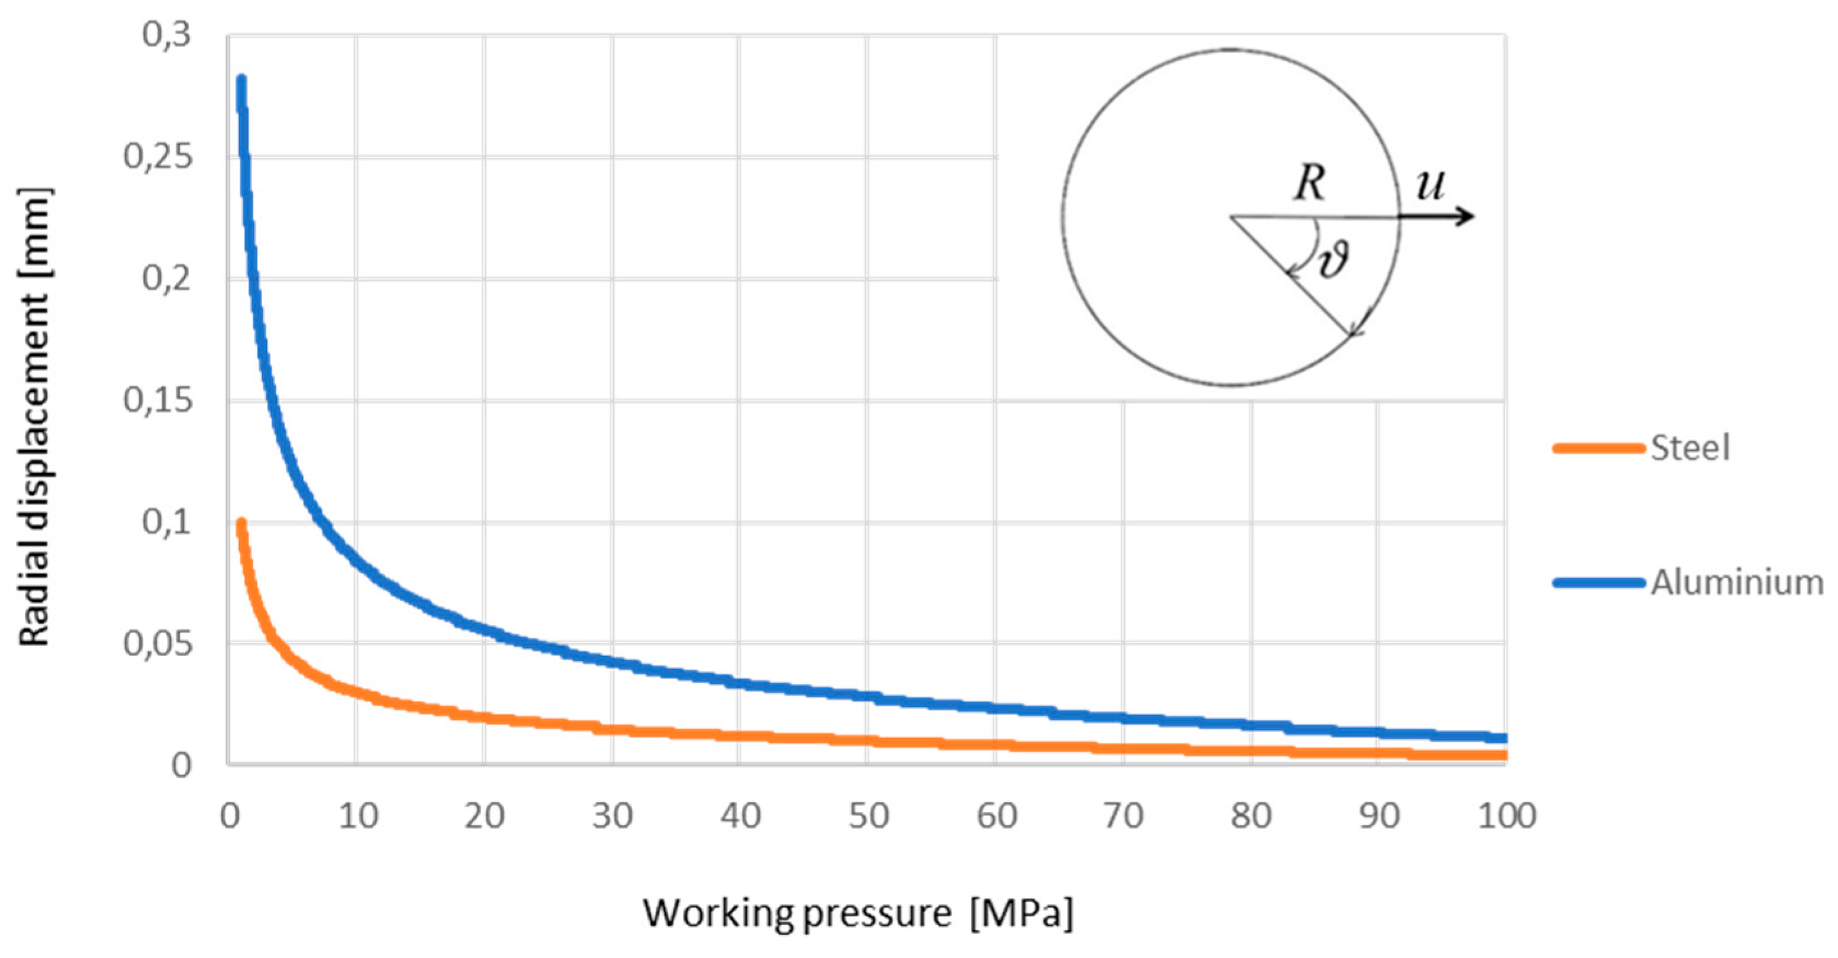
By varying the working pressure from 1 MPa to 100 MPa, the graphs shown in
Figure 14 for the two case studies were obtained.
The maximum displacement is obtained with the minimum pressure (1 MPa); this is because with the increase in pressure the thickness of the barrel increases and therefore the deformation decreases. The maximum radial displacement assumes a value of 0.1 mm for the steel case study and 0.28 mm for the aluminum. These values are tolerable for the applications commonly required by these components; the difference in values is due to a considerable difference between the elastic moduli of the two materials.
7. Conclusions and Future Developments
The research presented shows how the weight trend of a mechanical component can depend on several factors.
The main result of this study is that it has been possible to identify which variable has the greatest influence on the weight of a mechanical component. In this way, the study of the minimization of the weight can be focused on this variable, bringing enormous advantages in terms of weight reduction.
Starting, therefore, from certain working data, it is possible to obtain the minimum value of the weight by minimizing the geometric variables of all the components of the cylinder. This minimization has several advantages; first of all, energy savings related to the system that allows the movement of the hydraulic cylinder. This brings a further advantage related to CO
2 emissions in the environment, without affecting the productivity of the machinery [
27,
28].
This work aims to be a starting point for other studies related to minimizing the weights of mechanical components. It is enough to think, in fact, of the great advantage that such a study can bring if combined with the dimensioning of parts using innovative materials such as composite materials.
In this sense, research is in continuous development, as the treatment just adopted will have to be properly related to composite materials. In fact, the latter, not being isotropic in nature, will have to be subjected to a special study based on specific theories. Finally, this research will be extended to study the phenomenon of fatigue at which these components can be exposed.


