Article

Aspects of Bending High-Borated Austenitic Stainless Steel Sheets for Interim Storage of Spent Nuclear Fuel

1
Department of Material Science and Technology, Faculty of Mechanical Engineering, University of West Bohemia, UWB Plzeň, Univerzitní 22, 306 14 Pilsen, Czech Republic
2
COMTES FHT a.s., Průmyslová 995, 334 41 Dobřany, Czech Republic
3
Department of Physics and Chemistry of Materials, IMT-Institute of Metals and Technology, Lepi Pot 11, 1000 Ljubljana, Slovenia
*
Author to whom correspondence should be addressed.
Metals 2023, 13(2), 348; https://doi.org/10.3390/met13020348
Submission received: 20 November 2022 / Revised: 13 January 2023 / Accepted: 2 February 2023 / Published: 9 February 2023

Abstract

:
The presented work is aimed at the evaluation of the cold bending capacity of high-borated austenitic stainless steel sheets. Due to their excellent neutron-absorbing capability, borated stainless steels belong to the group of tailor-made structural materials widely used for vertical storage baskets for holding spent nuclear fuel assemblies in cooling pools at dry or wet storage facilities. The basket consists of individual fuel assembly cells. Each polygonal cell is usually welded from several steel strips. It would be advantageous to use bent steel semi-product to avoid welded seams as much as possible. Welded seams are difficult to make, and moreover, they are susceptible to corrosion. However, high-borated stainless steels, because of their boron content, show limited hot and cold workability. Thus, their cold bending capacity would be the primary issue. Their austenitic matrix with embedded hard and brittle boride particles is prone to the evolution and fast propagation of dimple transgranular fracture. This work is focused on the bending aspects of borated steel sheets with respect to the most commonly used hexagonal cell geometry. Experimental results provide practical recommendations for the rack design. The damage criterion has also been proposed using FEM simulations in DEFORM®.

1. Introduction

After being discharged from a nuclear reactor, spent fuel has to be stored in water pools at the reactor site to allow for radioactive decay and cooling [1]. The inside of the pool contains vertical storage racks for holding the spent-fuel assemblies and may contain a gated compartment to hold a spent-fuel cask while it is being loaded and sealed [2]. High-borated stainless steel racks are installed in both boric acid and deionized water pools to help with cooling and criticality control [3,4]. Recently, new methods for criticality and burnup calculations have been developed, especially a trajectory period folding method for burnup calculations [5] and a linear chain method for numerical modeling of burnup systems [6].
The absorption capability of high-borated stainless steels stems from boron’s high neutron cross-section. Boron has two naturally stable isotopes, 10B and 11B, with an average abundance of approximately 19.9% and 80.1%, respectively. The 10B(n,α) reaction cross-section is about 3840 barns for thermal neutrons. Most 10B(n,α) reactions of thermal neutrons are 10B(n,α)7Li reactions accompanied by gamma-ray emission [7]. Both reaction products, helium and lithium, are stable isotopes. Thanks to its excellent fast neutron moderating properties, thermal neutron absorption properties, and gamma-ray shielding performance, combined with excellent mechanical properties, corrosion resistance, weldability, and availability, borated stainless steel with boron content ranging from 1% to 2% is one of the largest consumables for radiation protection and structural elements in the nuclear power industry [8,9,10]. This paper aims to assess the bending capacity as the key material property for the design of vertical storage baskets for holding spent nuclear fuel assemblies in cooling pools at wet storage facilities.
The basket consists of individual fuel assembly cells. Each polygonal cell is usually welded from several steel strips. It would be advantageous to use bent steel semi-product to avoid welded seams as much as possible. Welded seams are difficult to make, and moreover, they are susceptible to corrosion [11]. However, high-borated stainless steels, because of their boron content, show limited hot and cold workability [12]. Thus, their cold bending capacity would be the primary issue.
Won et al. [13] proposed high-temperature annealing running a long period of time (up to 8 days) at 1180 °C to improve both the strength and ductility. Indeed, at such annealing conditions, brittle plate-like M2B particles [11] transform into spherical shape particles with increased size. As the size of the particles grows, the density decreases. The microstructure is also more homogeneous with respect to the nickel and chromium distribution in the austenite matrix. The mechanical properties improve accordingly. Utilizing such an annealing procedure in practical production technology seems to be not cost-effective.
It has been shown that the initial large and brittle M2B particles can break into more spheroidal and refined particles with increasing strain [14]. However, applying a total rolling compression ratio higher than ten no longer enhances the ductility and toughness. The fracture mode of the wrought borated stainless steel seems to be mainly ductile dimples rather than a brittle fracture [15].
It appears to be very difficult to achieve sheet-forming technology without the risk of cracking assuming the use of conventional metallurgy. This paper assesses the influence of the degree of bend (D.O.B.), thickness, and microstructure on the crack evolution of hot-rolled borated stainless steel sheets. The damage criterion is also proposed using FEM simulations in DEFORM®. Assuming the hexagonal design of the spent-fuel cell, the target D.O.B. is 60° (Figure 1).

2. Materials and Methods

The test samples for the bending experiments were extracted from the hot-rolled sheets. Initially, the experimental material was acquired in the form of a machined wrought slab for a hot rolling sheet. The octagonal 1 t cast ingot was produced and converted to wrought steel in ŽĎAS a.s. The molten metal was treated by melting the raw materials in an electric arc furnace (EAF) and subsequent refining processes of secondary metallurgy. After the alloying of necessary constituents in a ladle furnace (LF), vacuum ladle degassing (FD) and vacuum oxygen decarburization (VOD) were used for the final steel refinement [17]. The chemical composition is shown in Table 1.
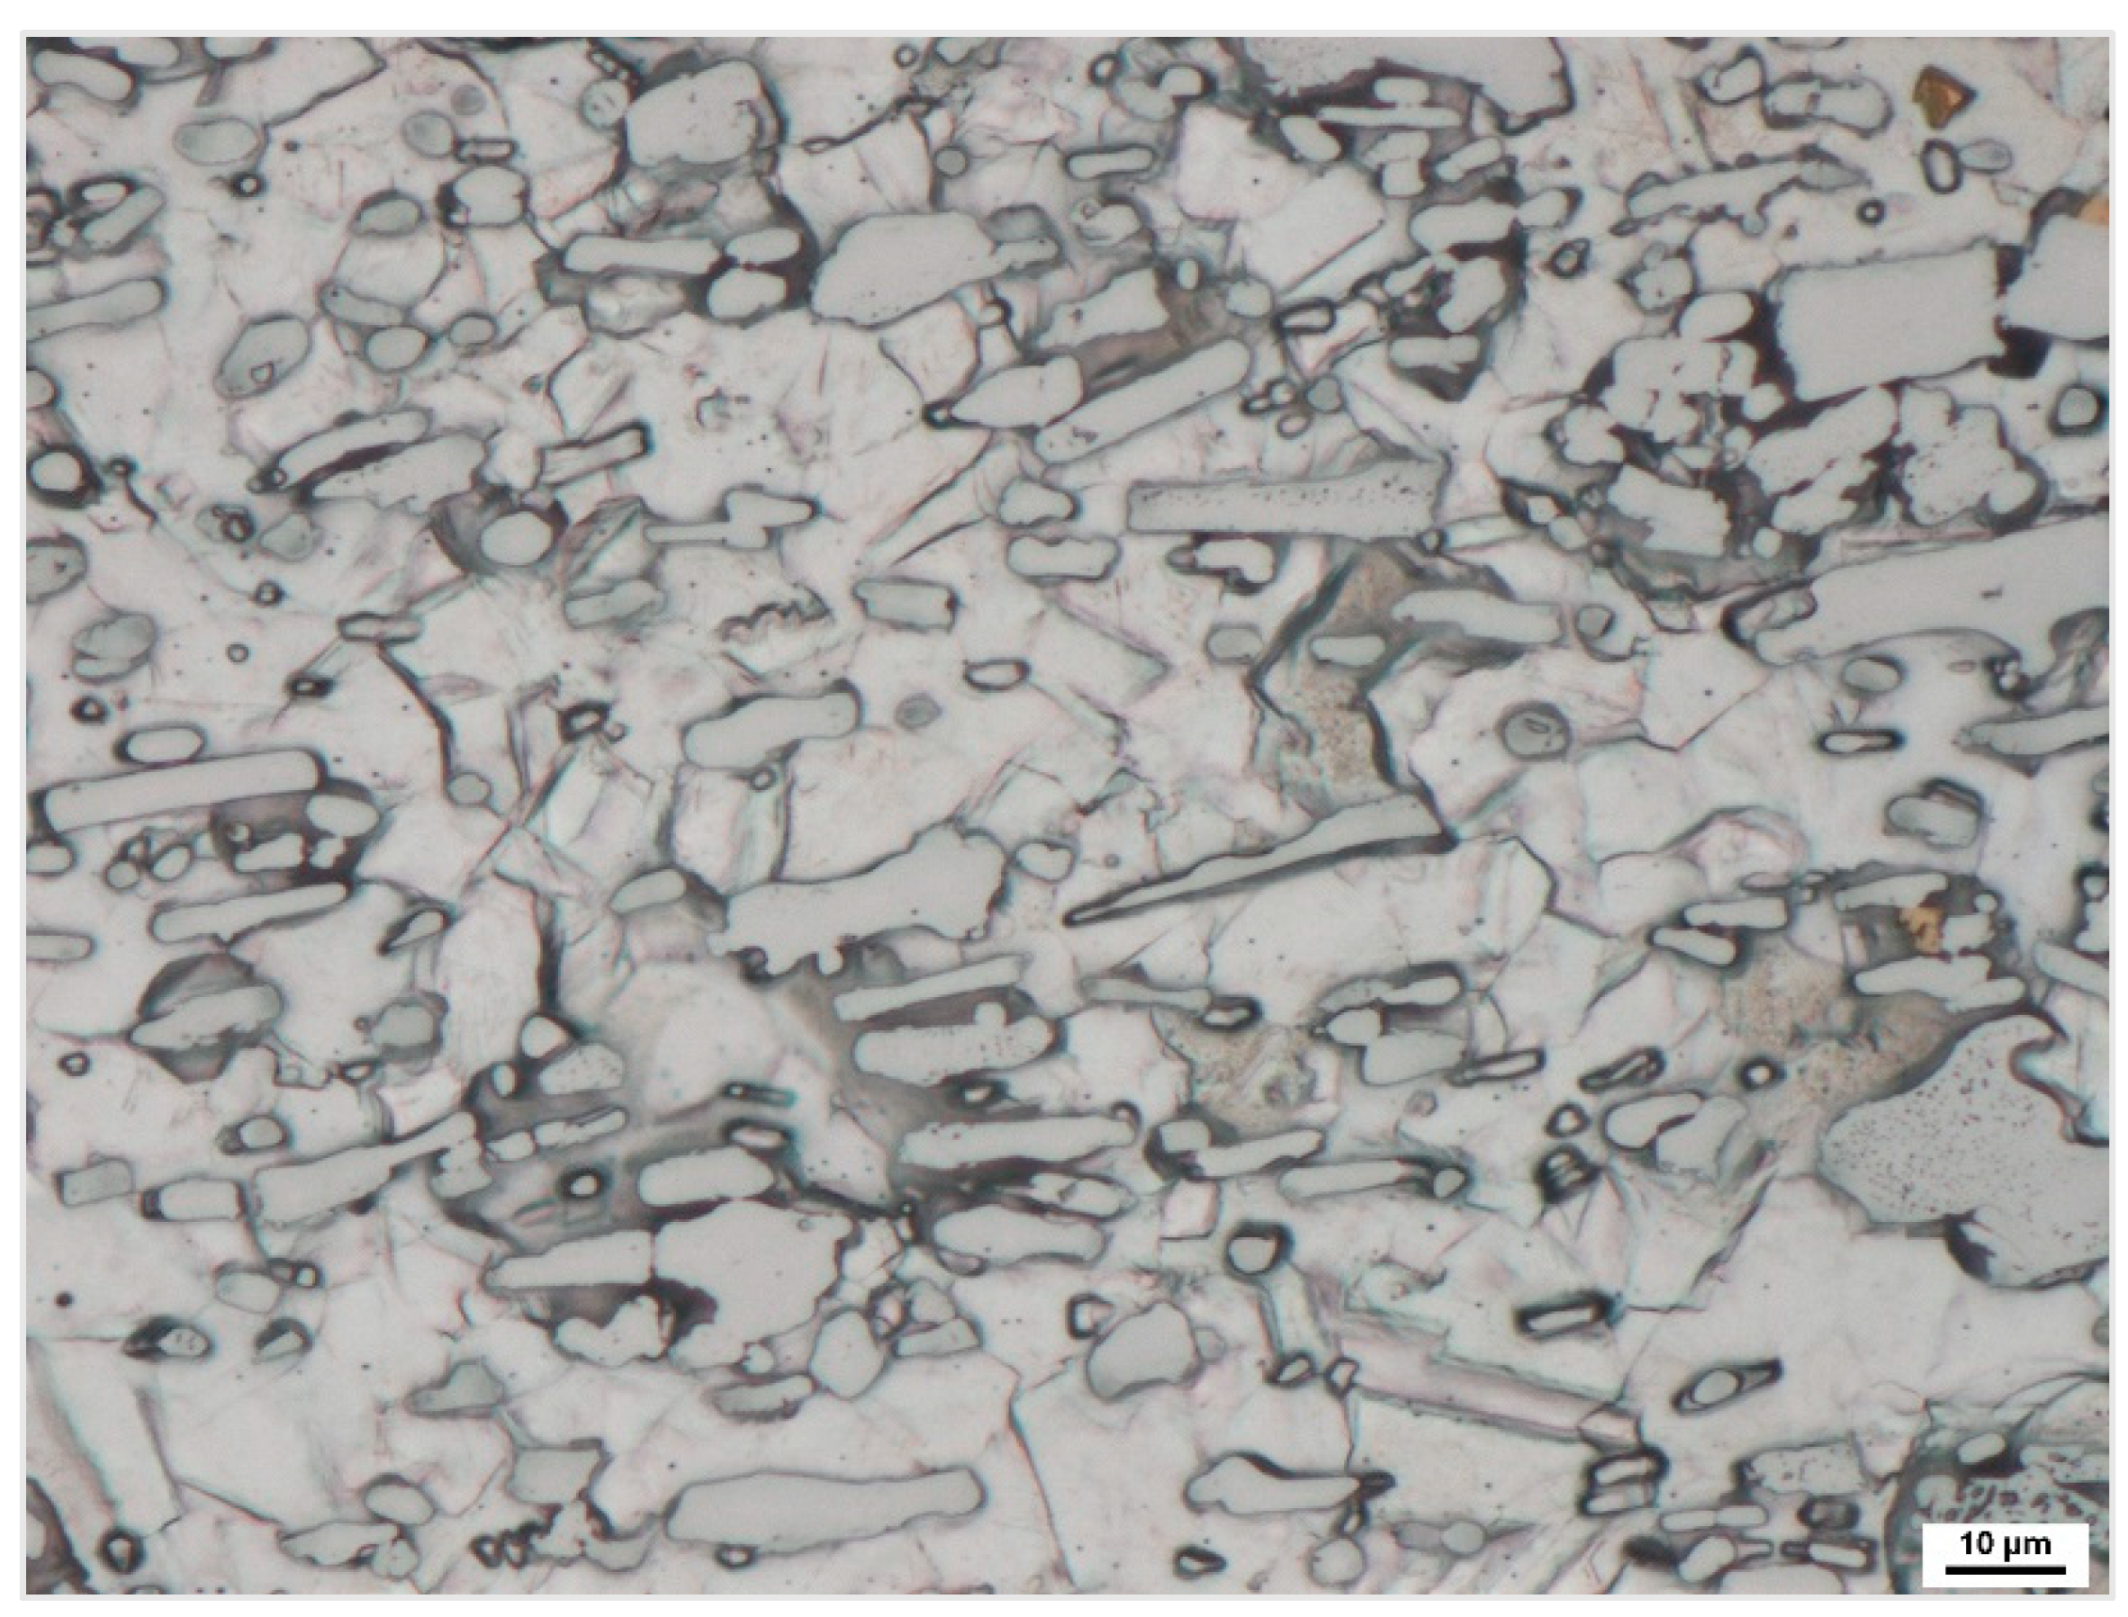
The cast ingot was first hot upset forged using a hydraulic forging press to destroy the as-cast structure by breaking up segregation, healing porosity, and promoting homogenization [18]. Afterward, the cross-section was reduced, and the forging stock was lengthened to obtain suitable slabs for the hot rolling process. Approximately 100 kg machined slabs were then hot rolled to 3.5–5 mm sheets using a reversible two-high rolling mill at COMTES FHT. Hot-rolled sheets were finally solution treated in a roller hearth furnace and cooled down in still air. The microstructure is shown in Figure 2.
Both longitudinal and perpendicular samples were extracted for three-point bending tests (3PB). All tests were performed on a ZWICK ROELL servo-electric testing machine with a load cell capacity of 250 kN. To track the deformation of the specimen, each test was accompanied by digital image correlation (DIC) system ARAMIS SRX in 3D configuration. The resolution of the cameras was 4096 × 3068 px calibrated for the volume 190 × 150 × 60 mm. Frames were recorded with a constant frame rate of 4 fps. The outer surface of the specimens, which were subjected to tension, was covered by a stochastic black/white pattern, which allows the DIC system to calculate the strain map (mesh) over the area of the specimens. The mesh consists of ‘facets’, which have dimensions of 20 × 20 px with 18 px overlapping.
Failure in bulk metal forming usually occurs as ductile fracture, rarely as brittle fracture. Therefore, the ductile fracture criterion is very important for designing an optimum plastic forming process without failure [19]. Besides physical testing, computer modeling of failure during the processing of a sheet was carried out. As a result, the fracture criterion has been proposed. To predict failure, ductile fracture criteria must be incorporated into the modeling. The most widely used fracture criterion is the Cockcroft–Latham criterion (CL), which states that fracture occurs when the integration of the maximum principal stress over equivalent strain exceeds a constant. In most cases, ductile cracking is predominantly associated with tensile stress states that are involved in a CL ductile fracture criterion mathematically described through the normalized formula [20]:
nCL = 0   ε ¯ fract σ 1   σ ¯   d   ε ¯   ,
where nCL is the normalized Cockcroft-Latham damage value representing the workability of the workpiece material, ε ¯ fract is the equivalent strain at fracture, σ 1 is the maximum principal tensile stress,   σ   is the effective stress, and   ε ¯   is the equivalent strain. If σ 1 < 0 , there are only compressive stresses. The moment of fracture initiation was predicted using the nCL and the softening method. Damage softening is a method by which the flow stress above this critical value will be reduced to a specified percentage [21,22].
DEFORM® engineering software exploiting the finite element method (FEM) was used to simulate 3PB. The selected mesh consisted of a total of 3000 elements (Figure 3). Good accuracy was provided by 10 elements assigned to the sheet thickness. Due to the springback effect after the load release, the deformation analysis used an elastoplastic model of the workpiece. The 2D plane strain problem was solved assuming the same deformation throughout all the longitudinal cross-sections. The 3D strain effects on the sheet edges were omitted. Both the loading ram and the saddle supports were assumed to be rigid bodies. Since the increase in temperature due to deformation heat release is negligible, the temperature of all tools and the workpiece was set to the ambient temperature of 20 °C. The velocity of the loading ram was constant (10 mm/min) without any acceleration or deceleration. As the cross-head displacement increased, both the stress and the strain increased. In each step, the force exerted by the machine was predicted based on the current stress-strain state. The calculated values of the force were then compared to the measured values. In the case of the 2D model, the resulting force was acquired by multiplying the sheet width (20 mm).
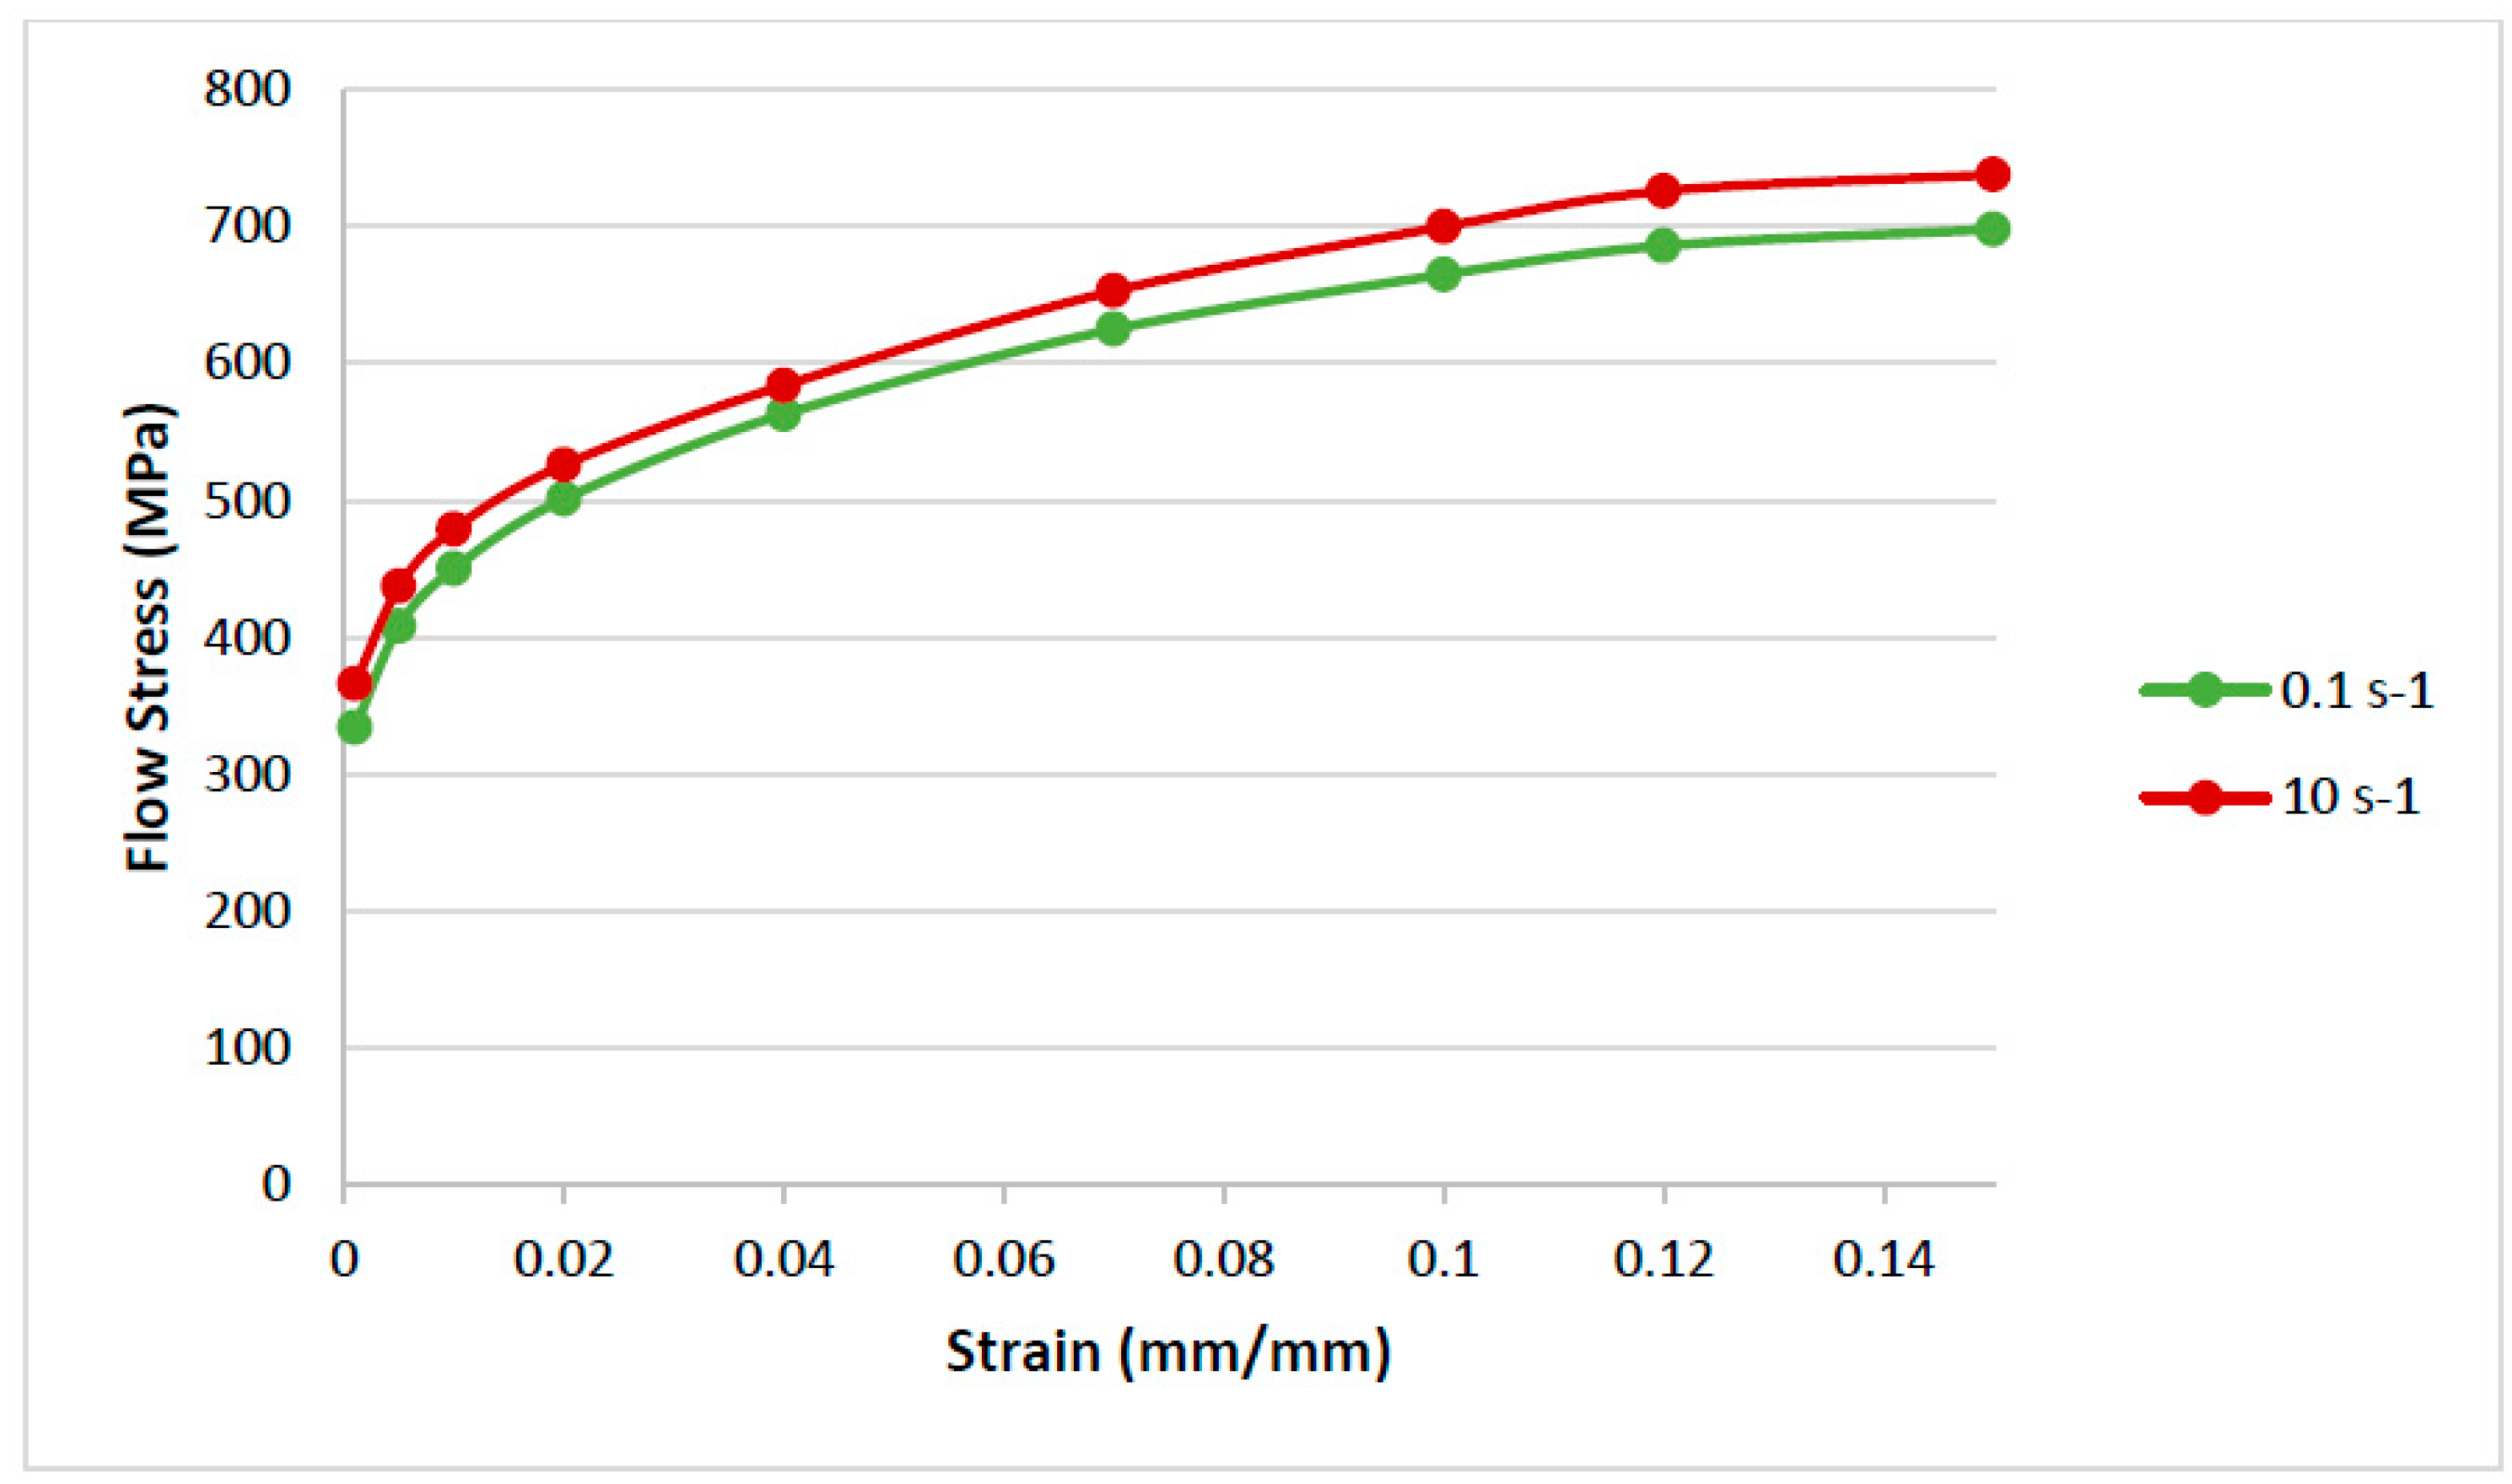
Recalculated engineering data acquired from quasi-static tensile tests (Table 2) provided true stress–strain curves describing the work-hardening of material. True stress–true strain curves without elastic contribution describe a work-hardening of the material, and they are utilized as so-called flow stress data in DEFORM (Figure 4).
The test specimens were extracted from an annealed hot-rolled sheet in a direction perpendicular to the rolling direction. The perpendicular direction was chosen due to the longitudinal orientation of the sheet on the bending bench. The velocity of the cross-head displacement was 10 mm/min. A 3PB test bench equipped with the DIC system helped to determine the moment of crack initiation and propagation. The force against the cross-head displacement was recorded as well. Based on the comparison of all experimental 3PB data and the simulation results the simulation was calibrated to approximate a real deformation behavior as closely as possible. The critical value for the NCL fracture model was determined in the moment of a drop of the experimental force curve. The critical NCL value calculated in the same moment was used for the prediction of fracture in subsequent simulations varying different conditions. Various thickness and radius combinations were included in the bending simulation to predict 120° bending without crack initiation. The presented results are further discussed with respect to the processing technology. Relevant factors contributing to the deterioration of the mechanical values are assessed.

3. Results

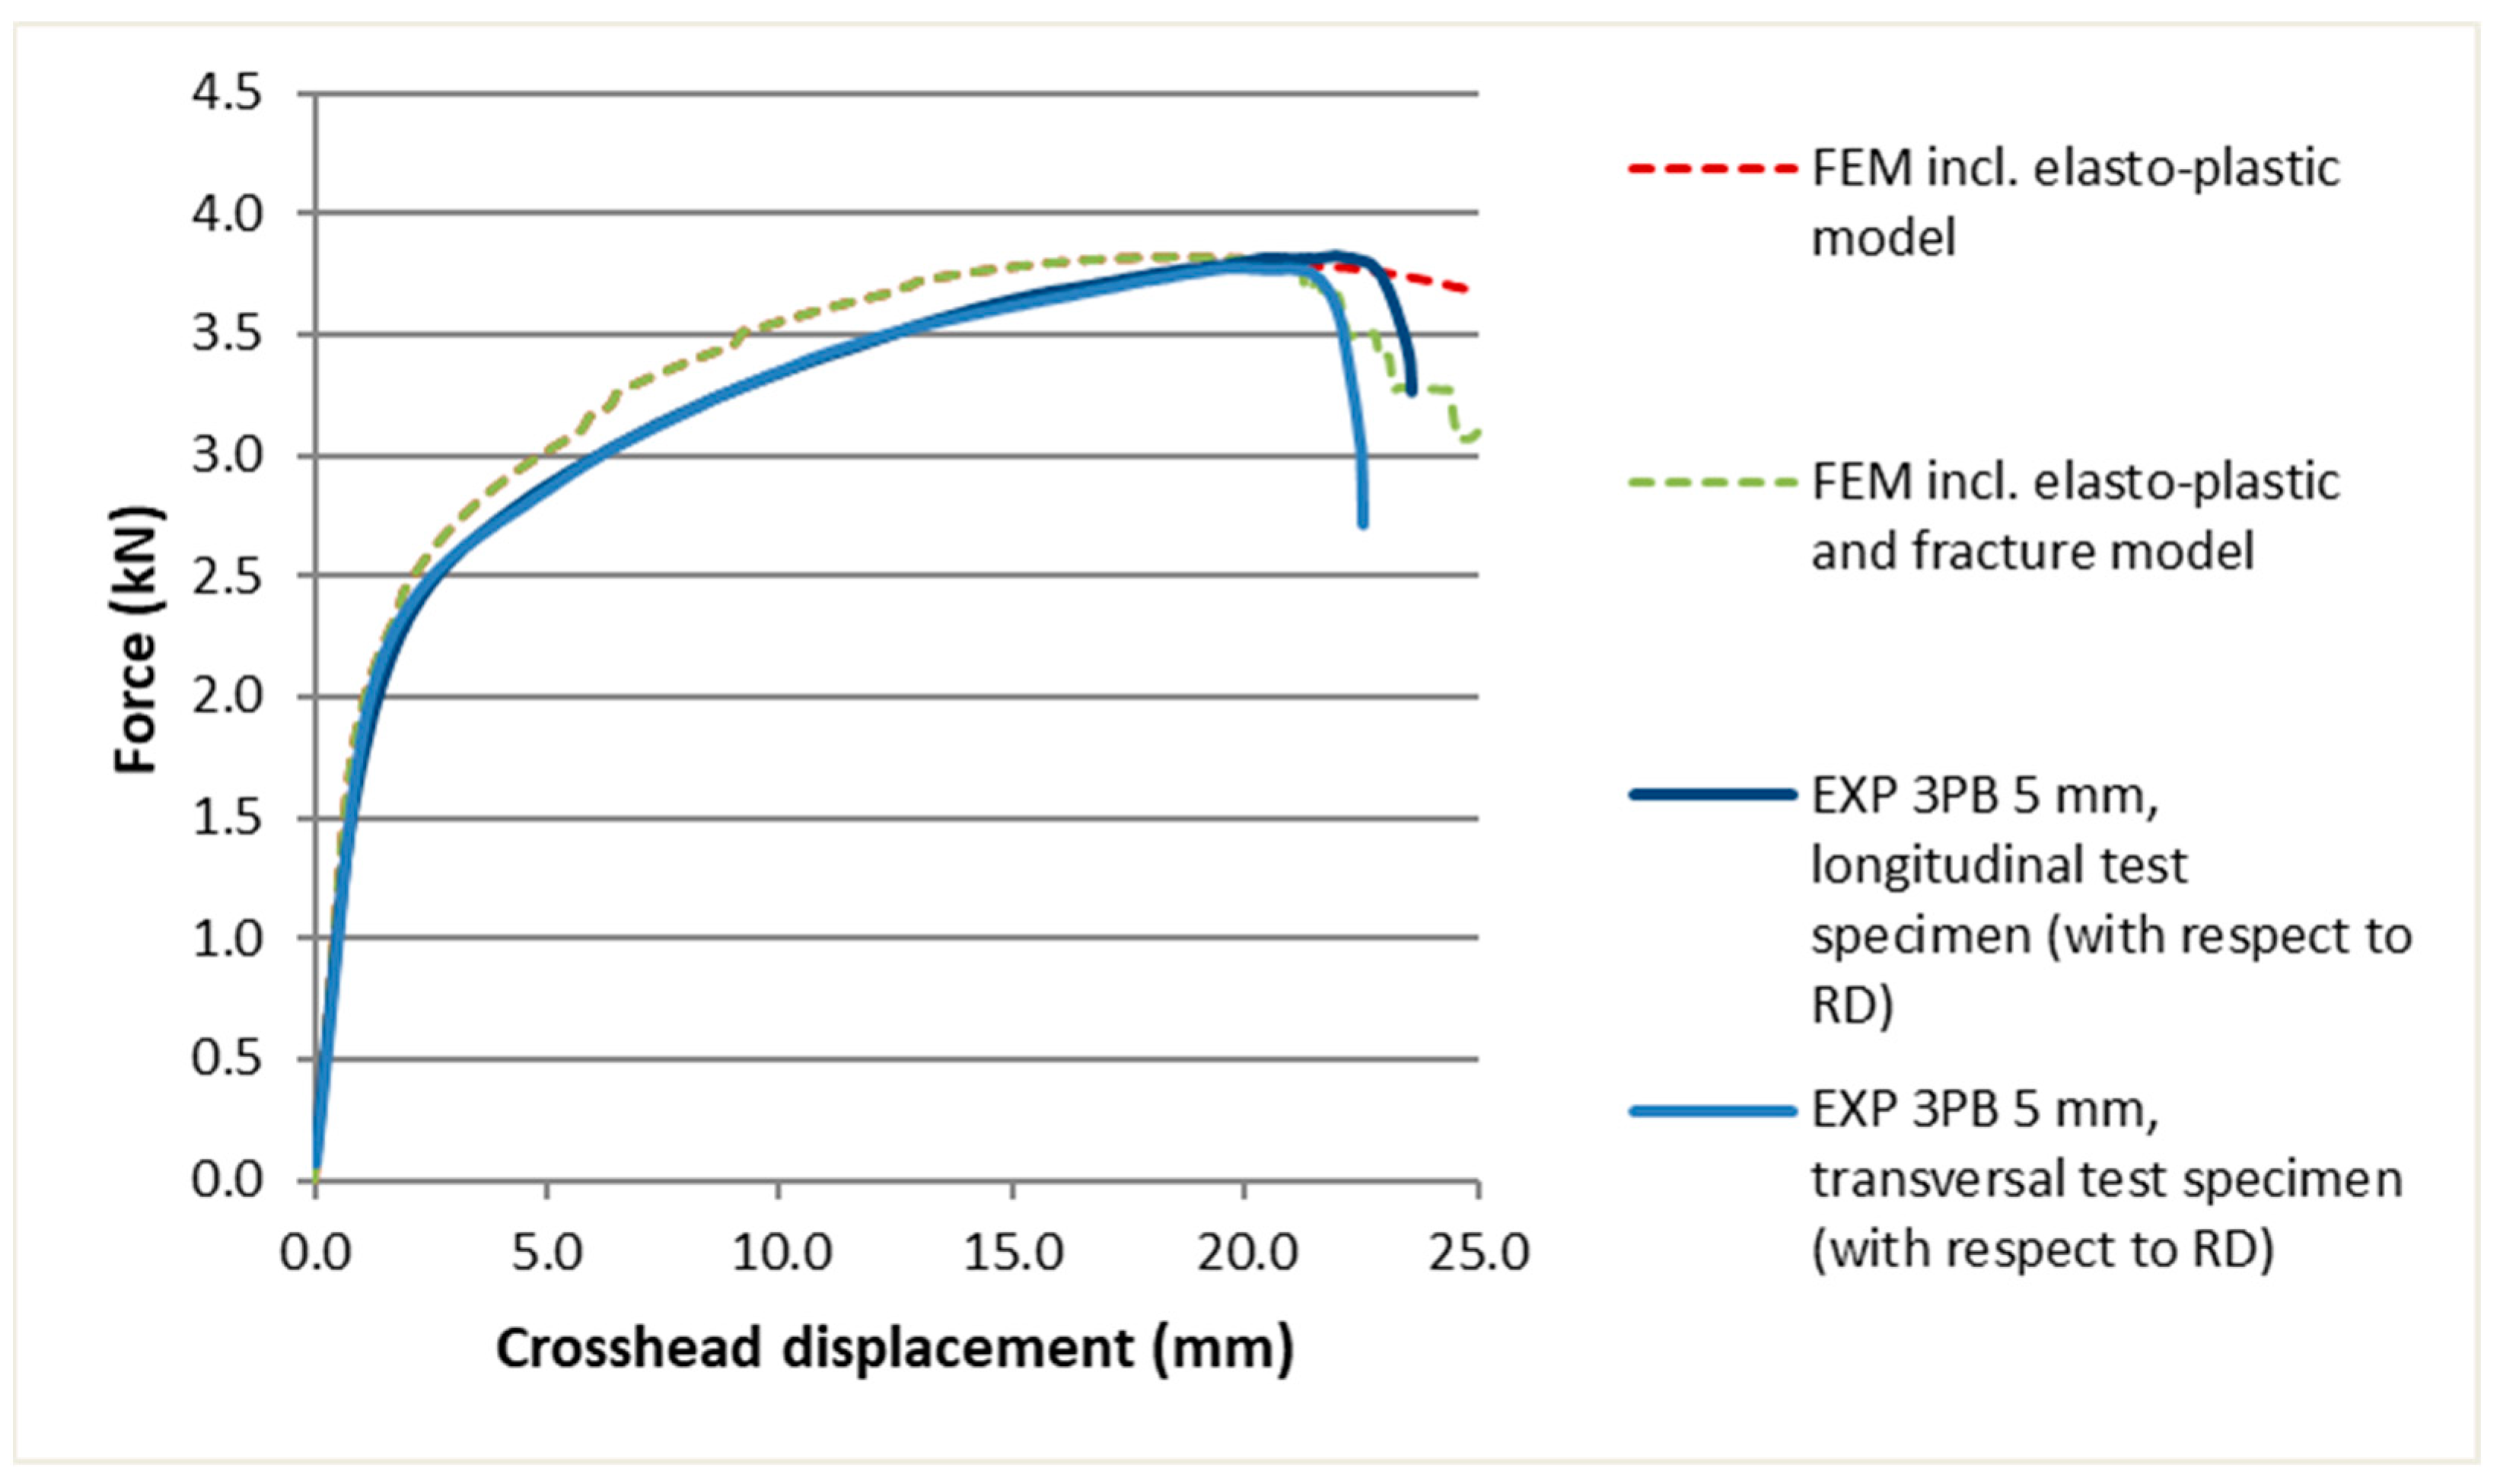
The observed values from the first 5 mm sheet 3PB test were in good agreement with the predicted values (Figure 5). For the estimation of the fracture initiation, the damage coefficient of 0.16 and the parameter of the softening method of 55% were determined. For pure curiosity, all 3PB experiments were carried out using both the longitudinal and the transversal test specimens with respect to the rolling direction. However, the difference was almost negligible, and no logical pattern was observed. It should be pointed out that all the presented results applied to the transversal test specimens. In practice, the sheet is always bent along the axis collinear with the rolling direction since the polygonal cell can reach a length of up to 5 meters.

3.1. FEM Simulation and 3PB Experimental Results

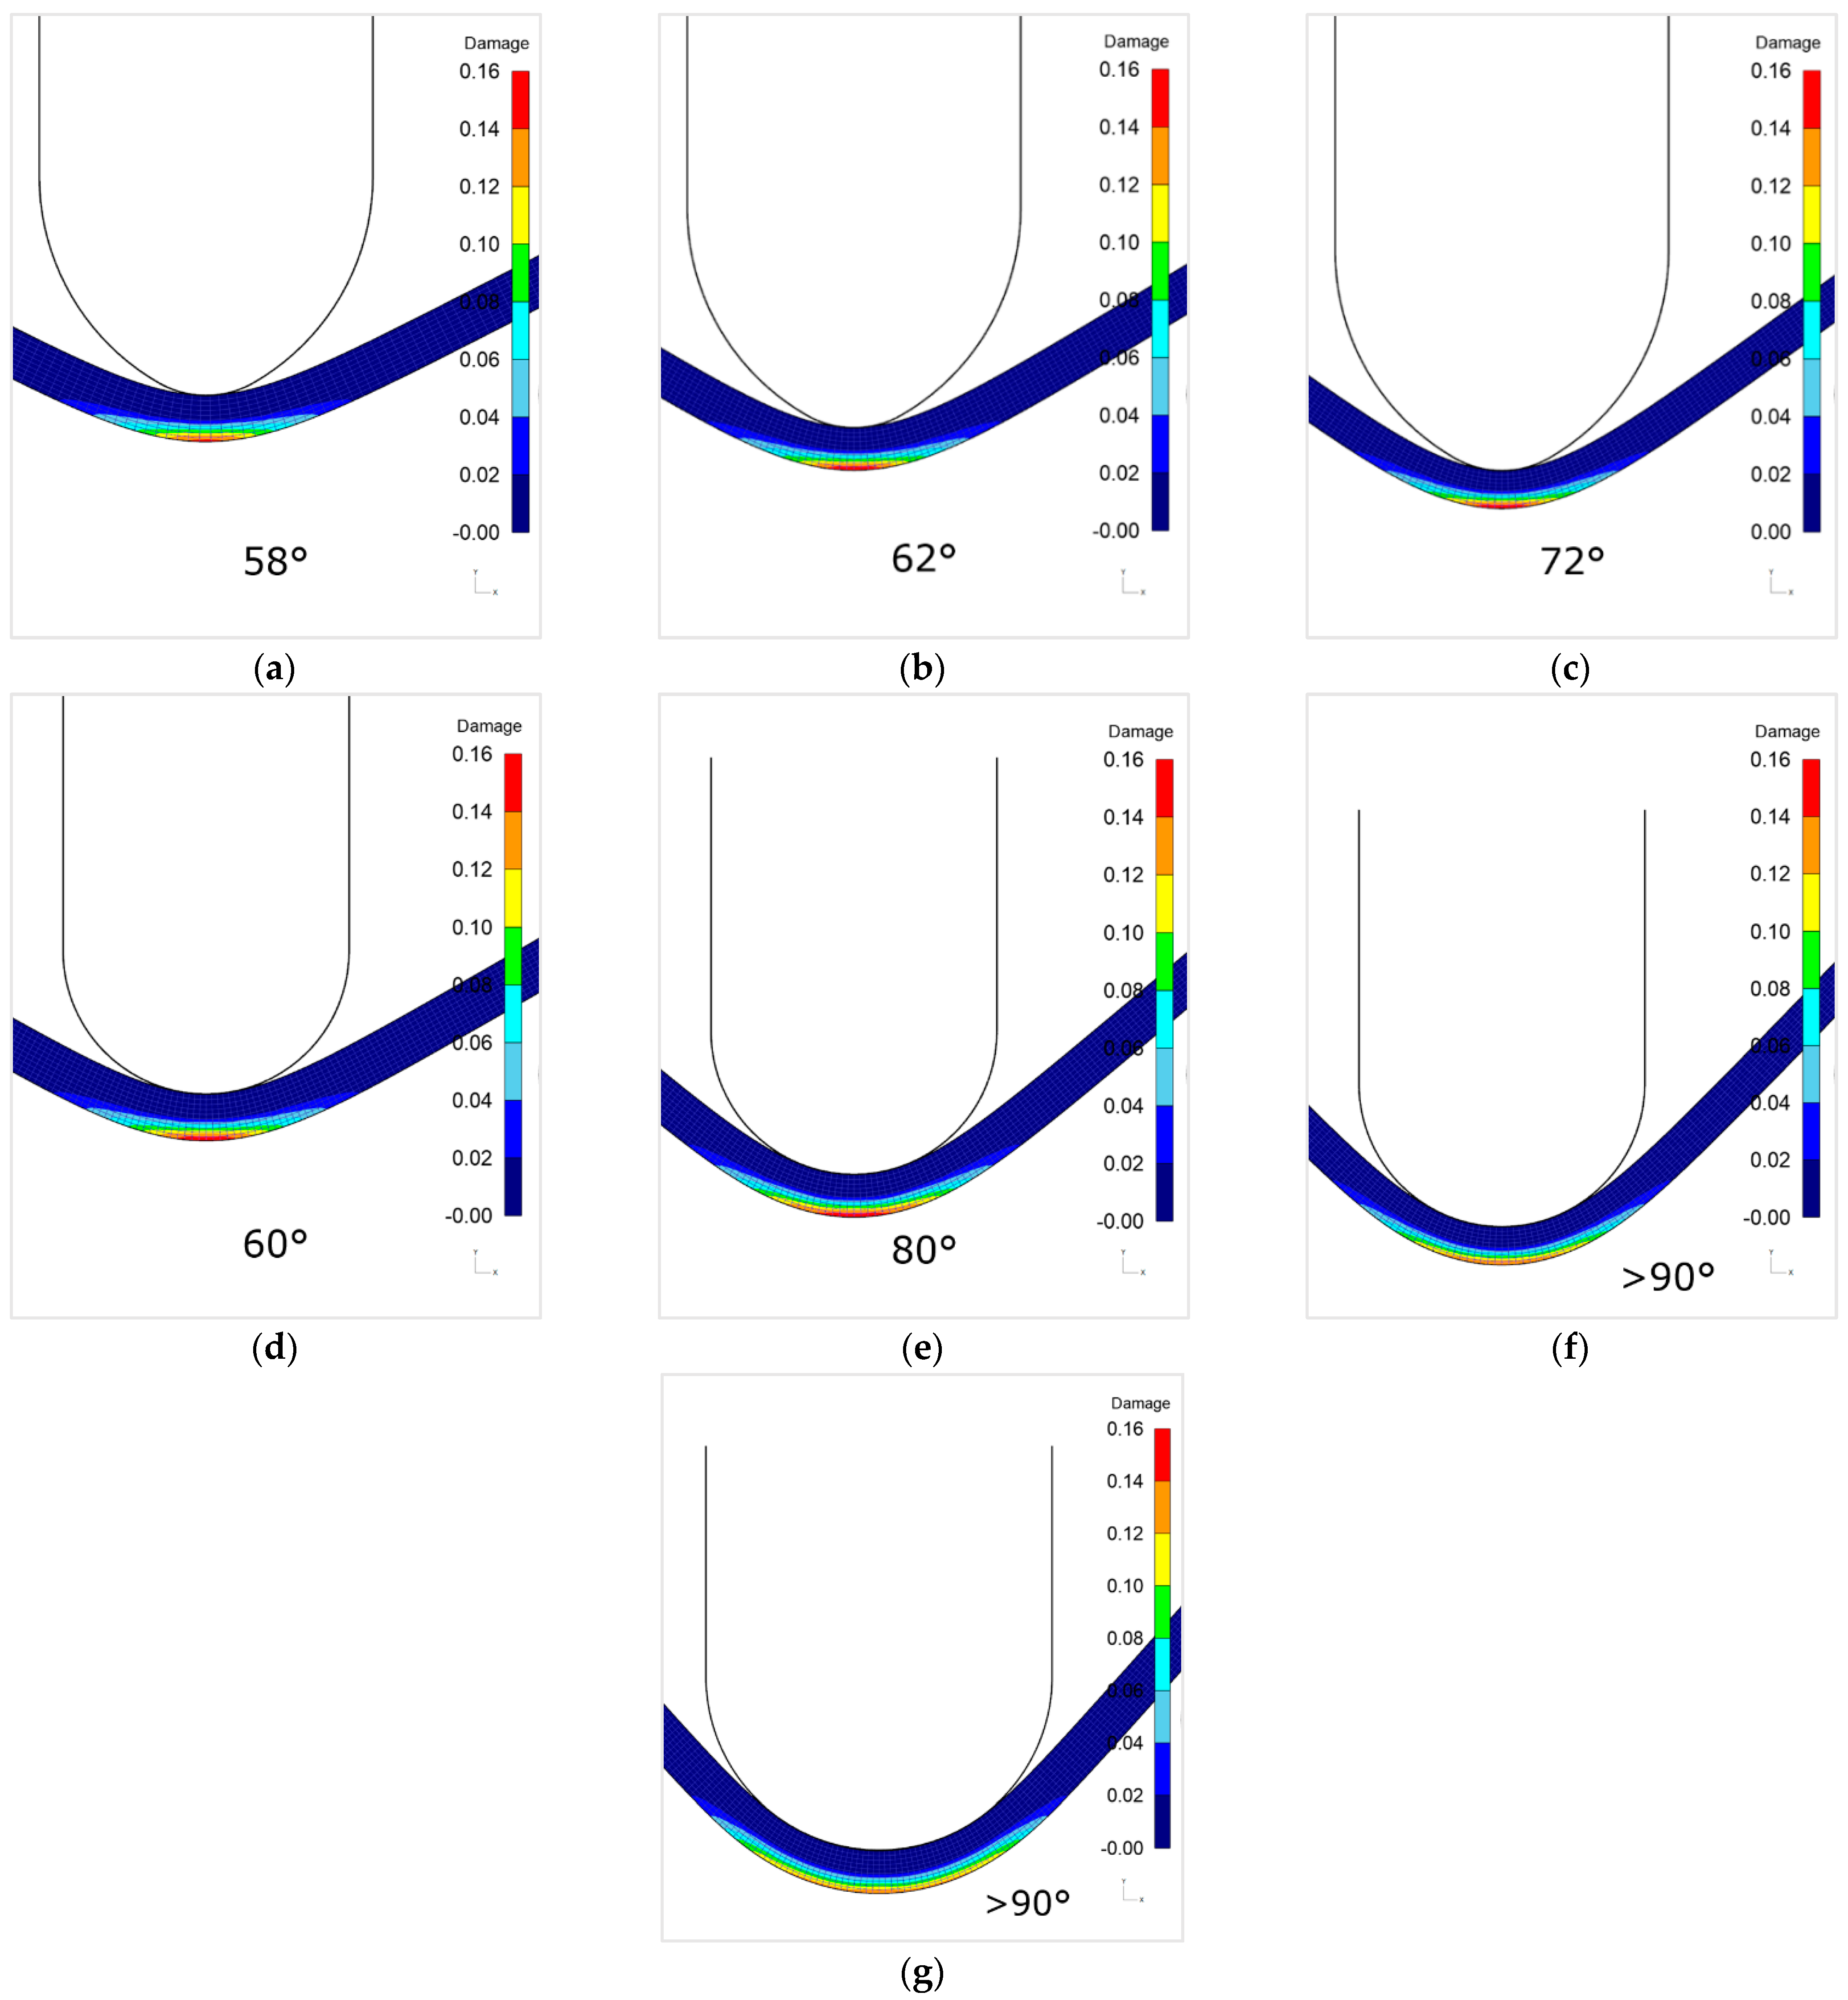
According to the simulation results (Table 3), the requirement for D.O.B. of 60° without the fracture is readily met for radius R10 and the sheet thickness of 4 mm and below. The simulation results also show the D.O.B. of 60° can be reached using R15 and for thicknesses of 4.5 mm and below. For radius R20 the fracture never occurs, even with a thickness of 5 mm. Table 3 also shows the springback after the load is released. The springback was predicted on the basis of elastic modulus for isotropic work-hardening [23]. In the cases of either a high probability of fracture occurrence, or, a high probability of 3PB without fracture initiation, the springback was not solved. Figure 6 shows the graphic representation of the damage criterion prediction.
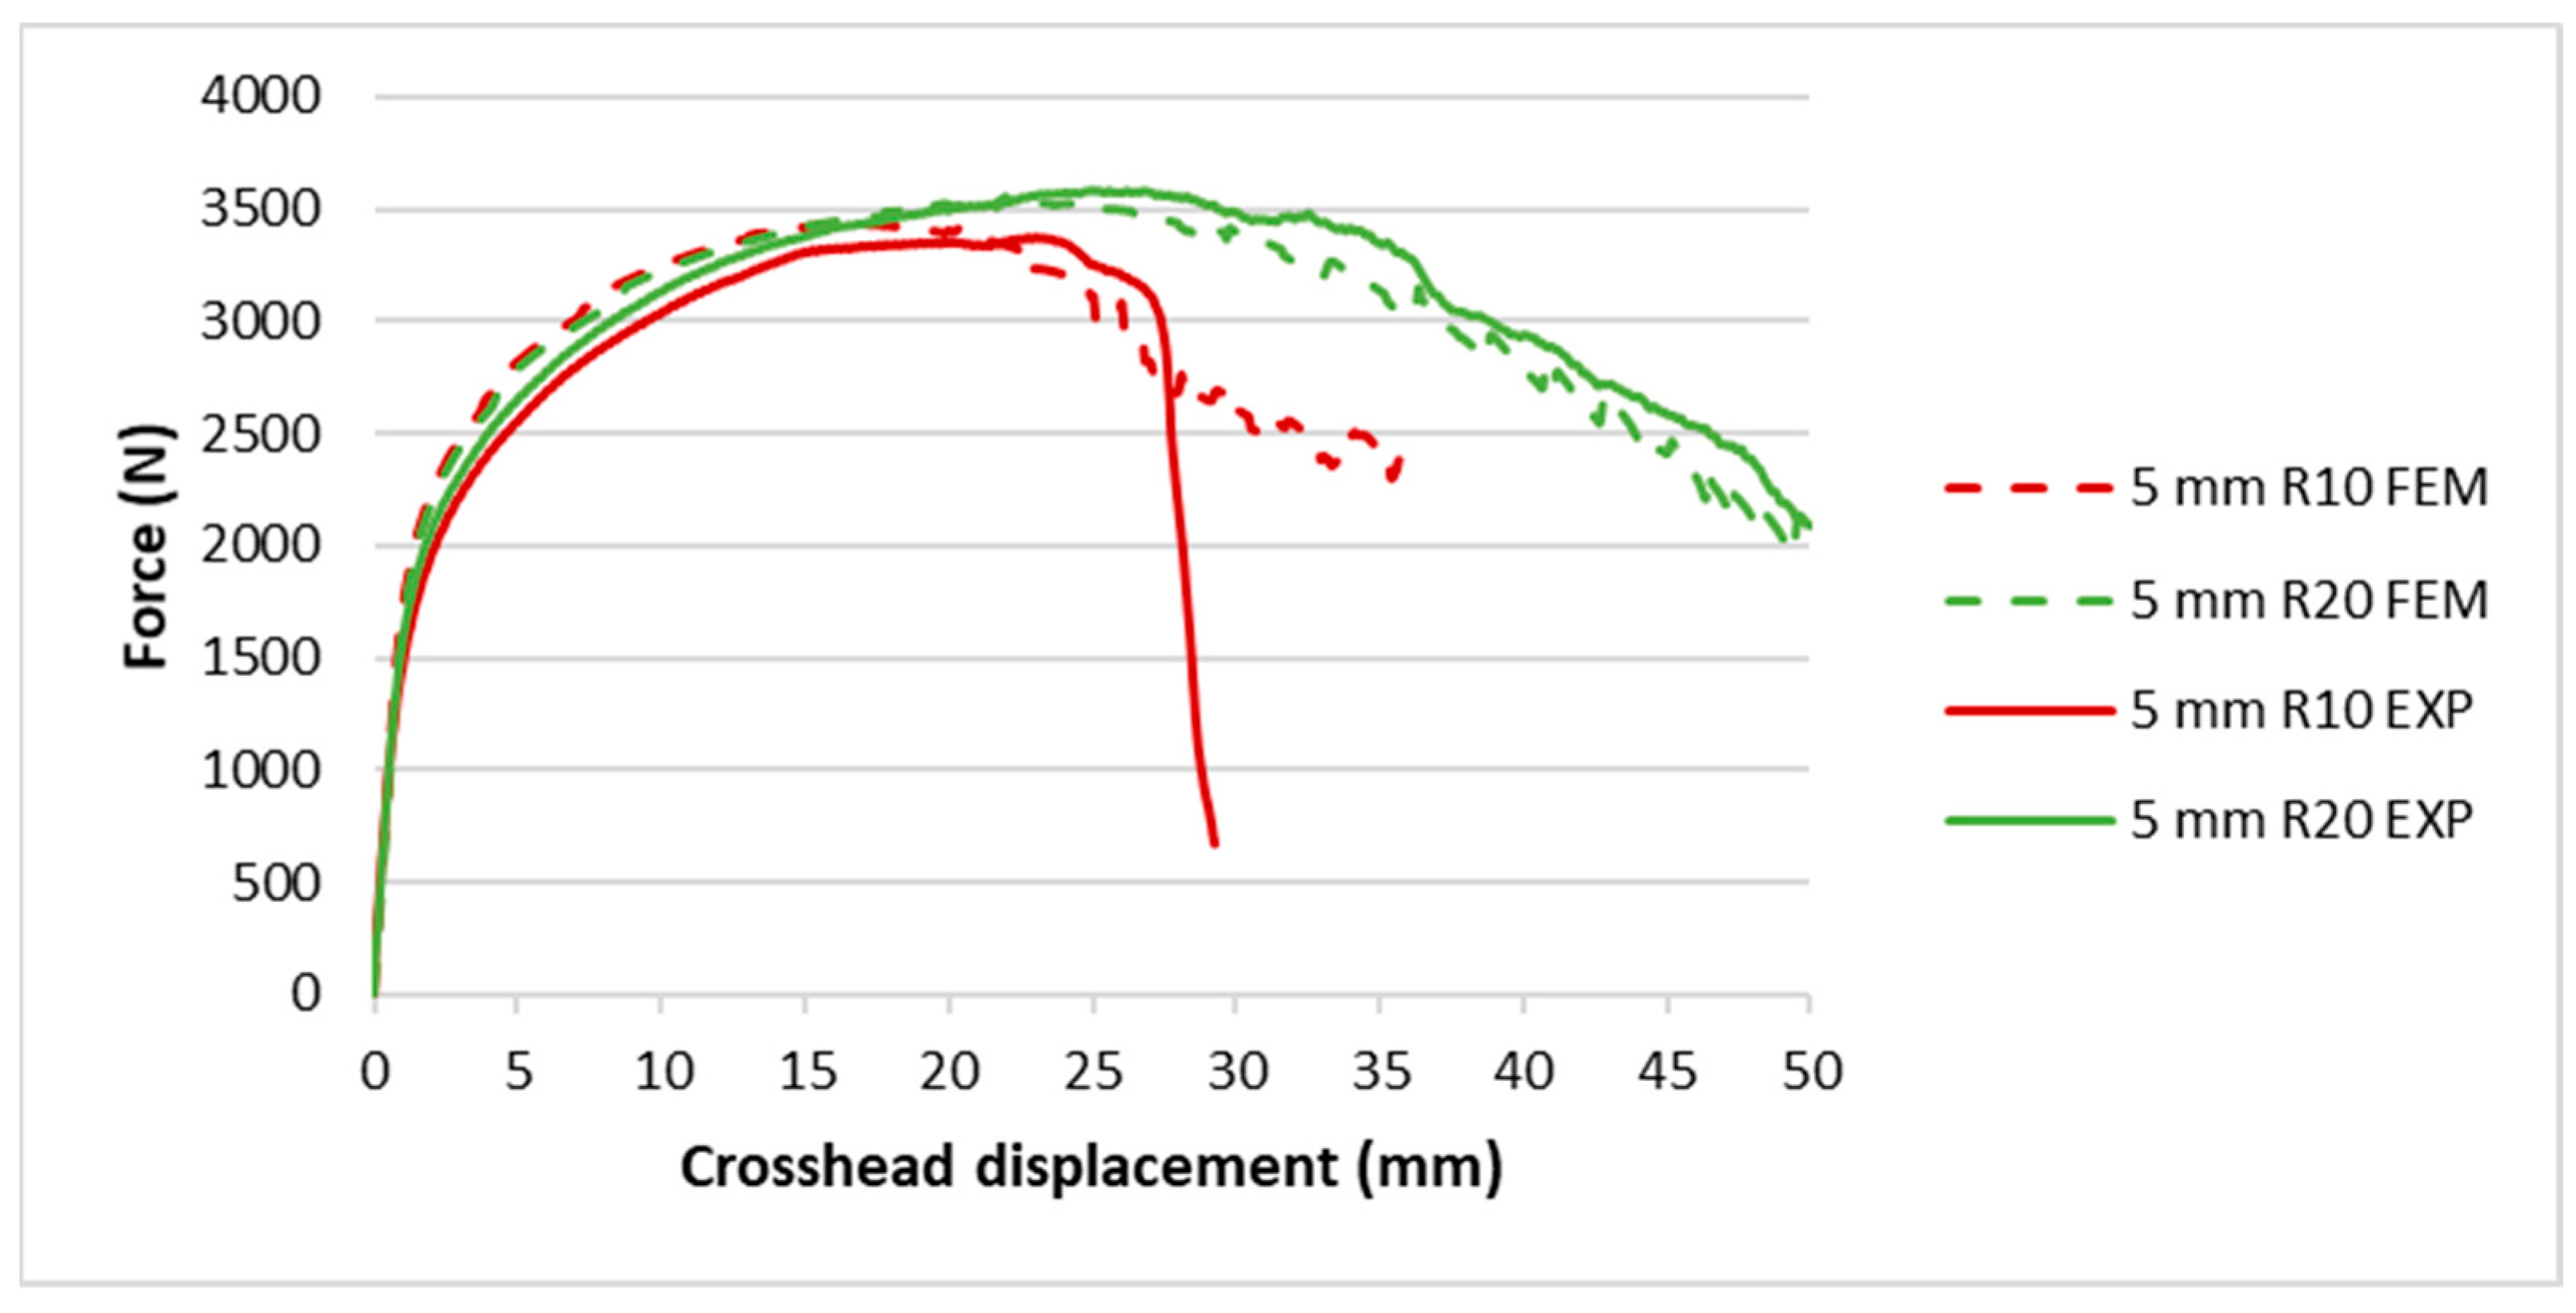
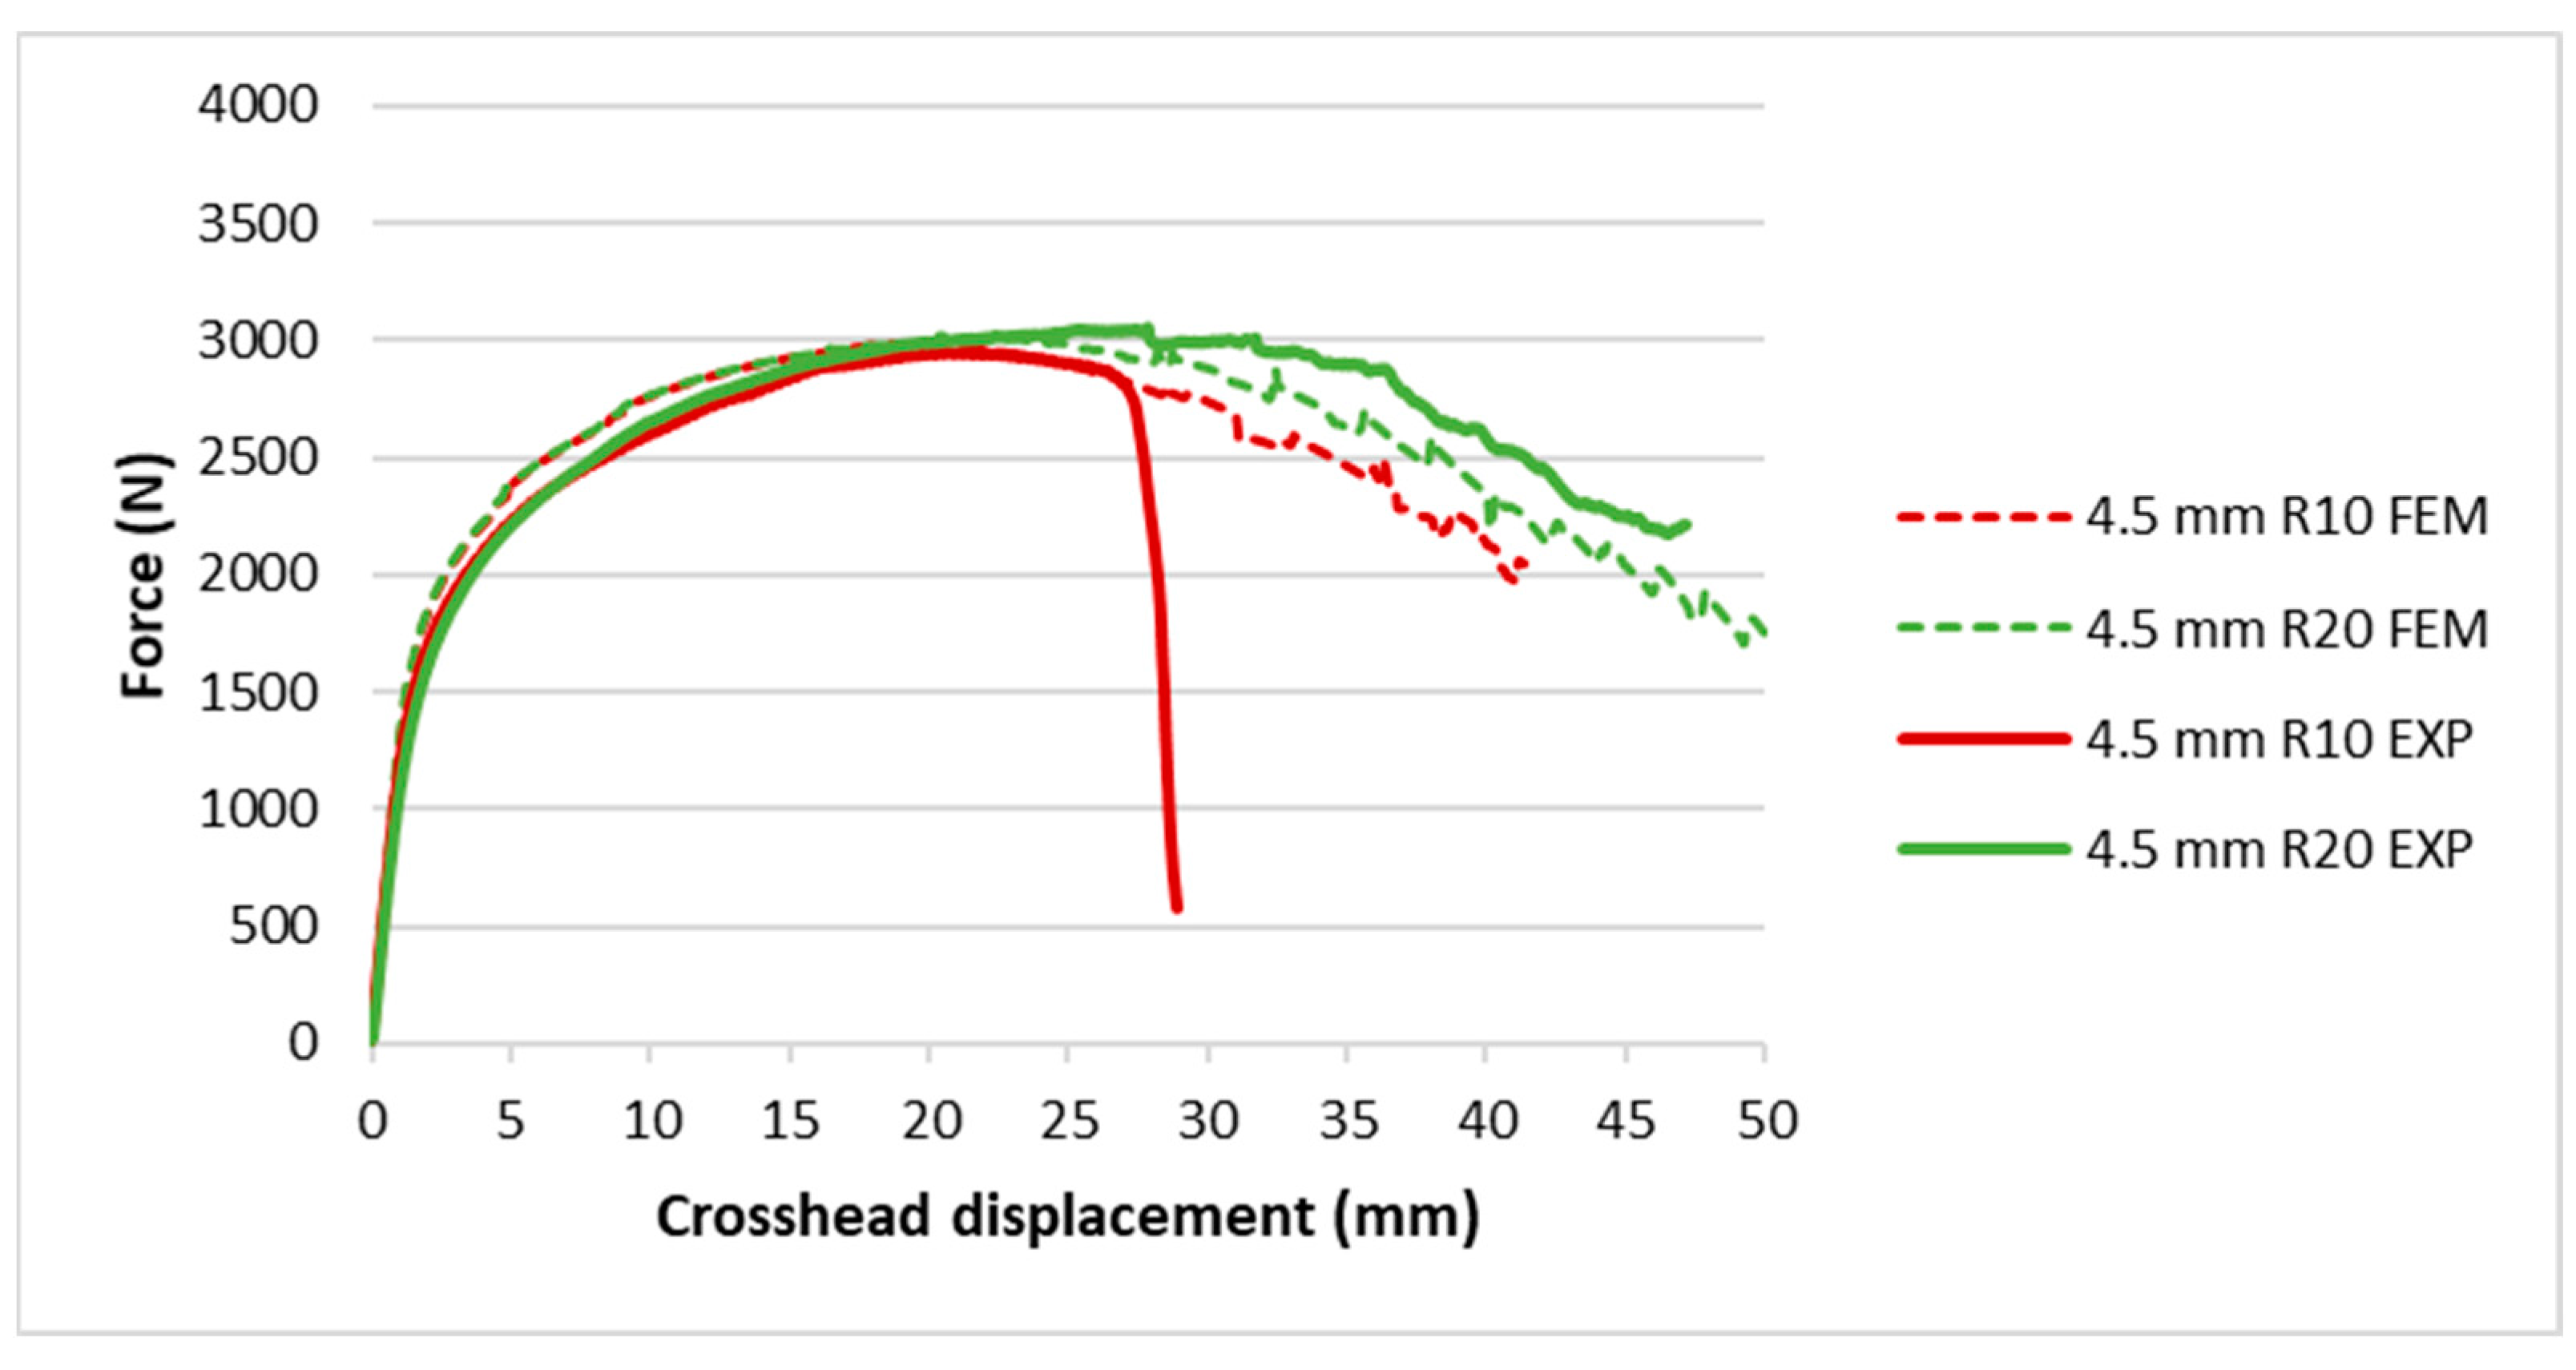
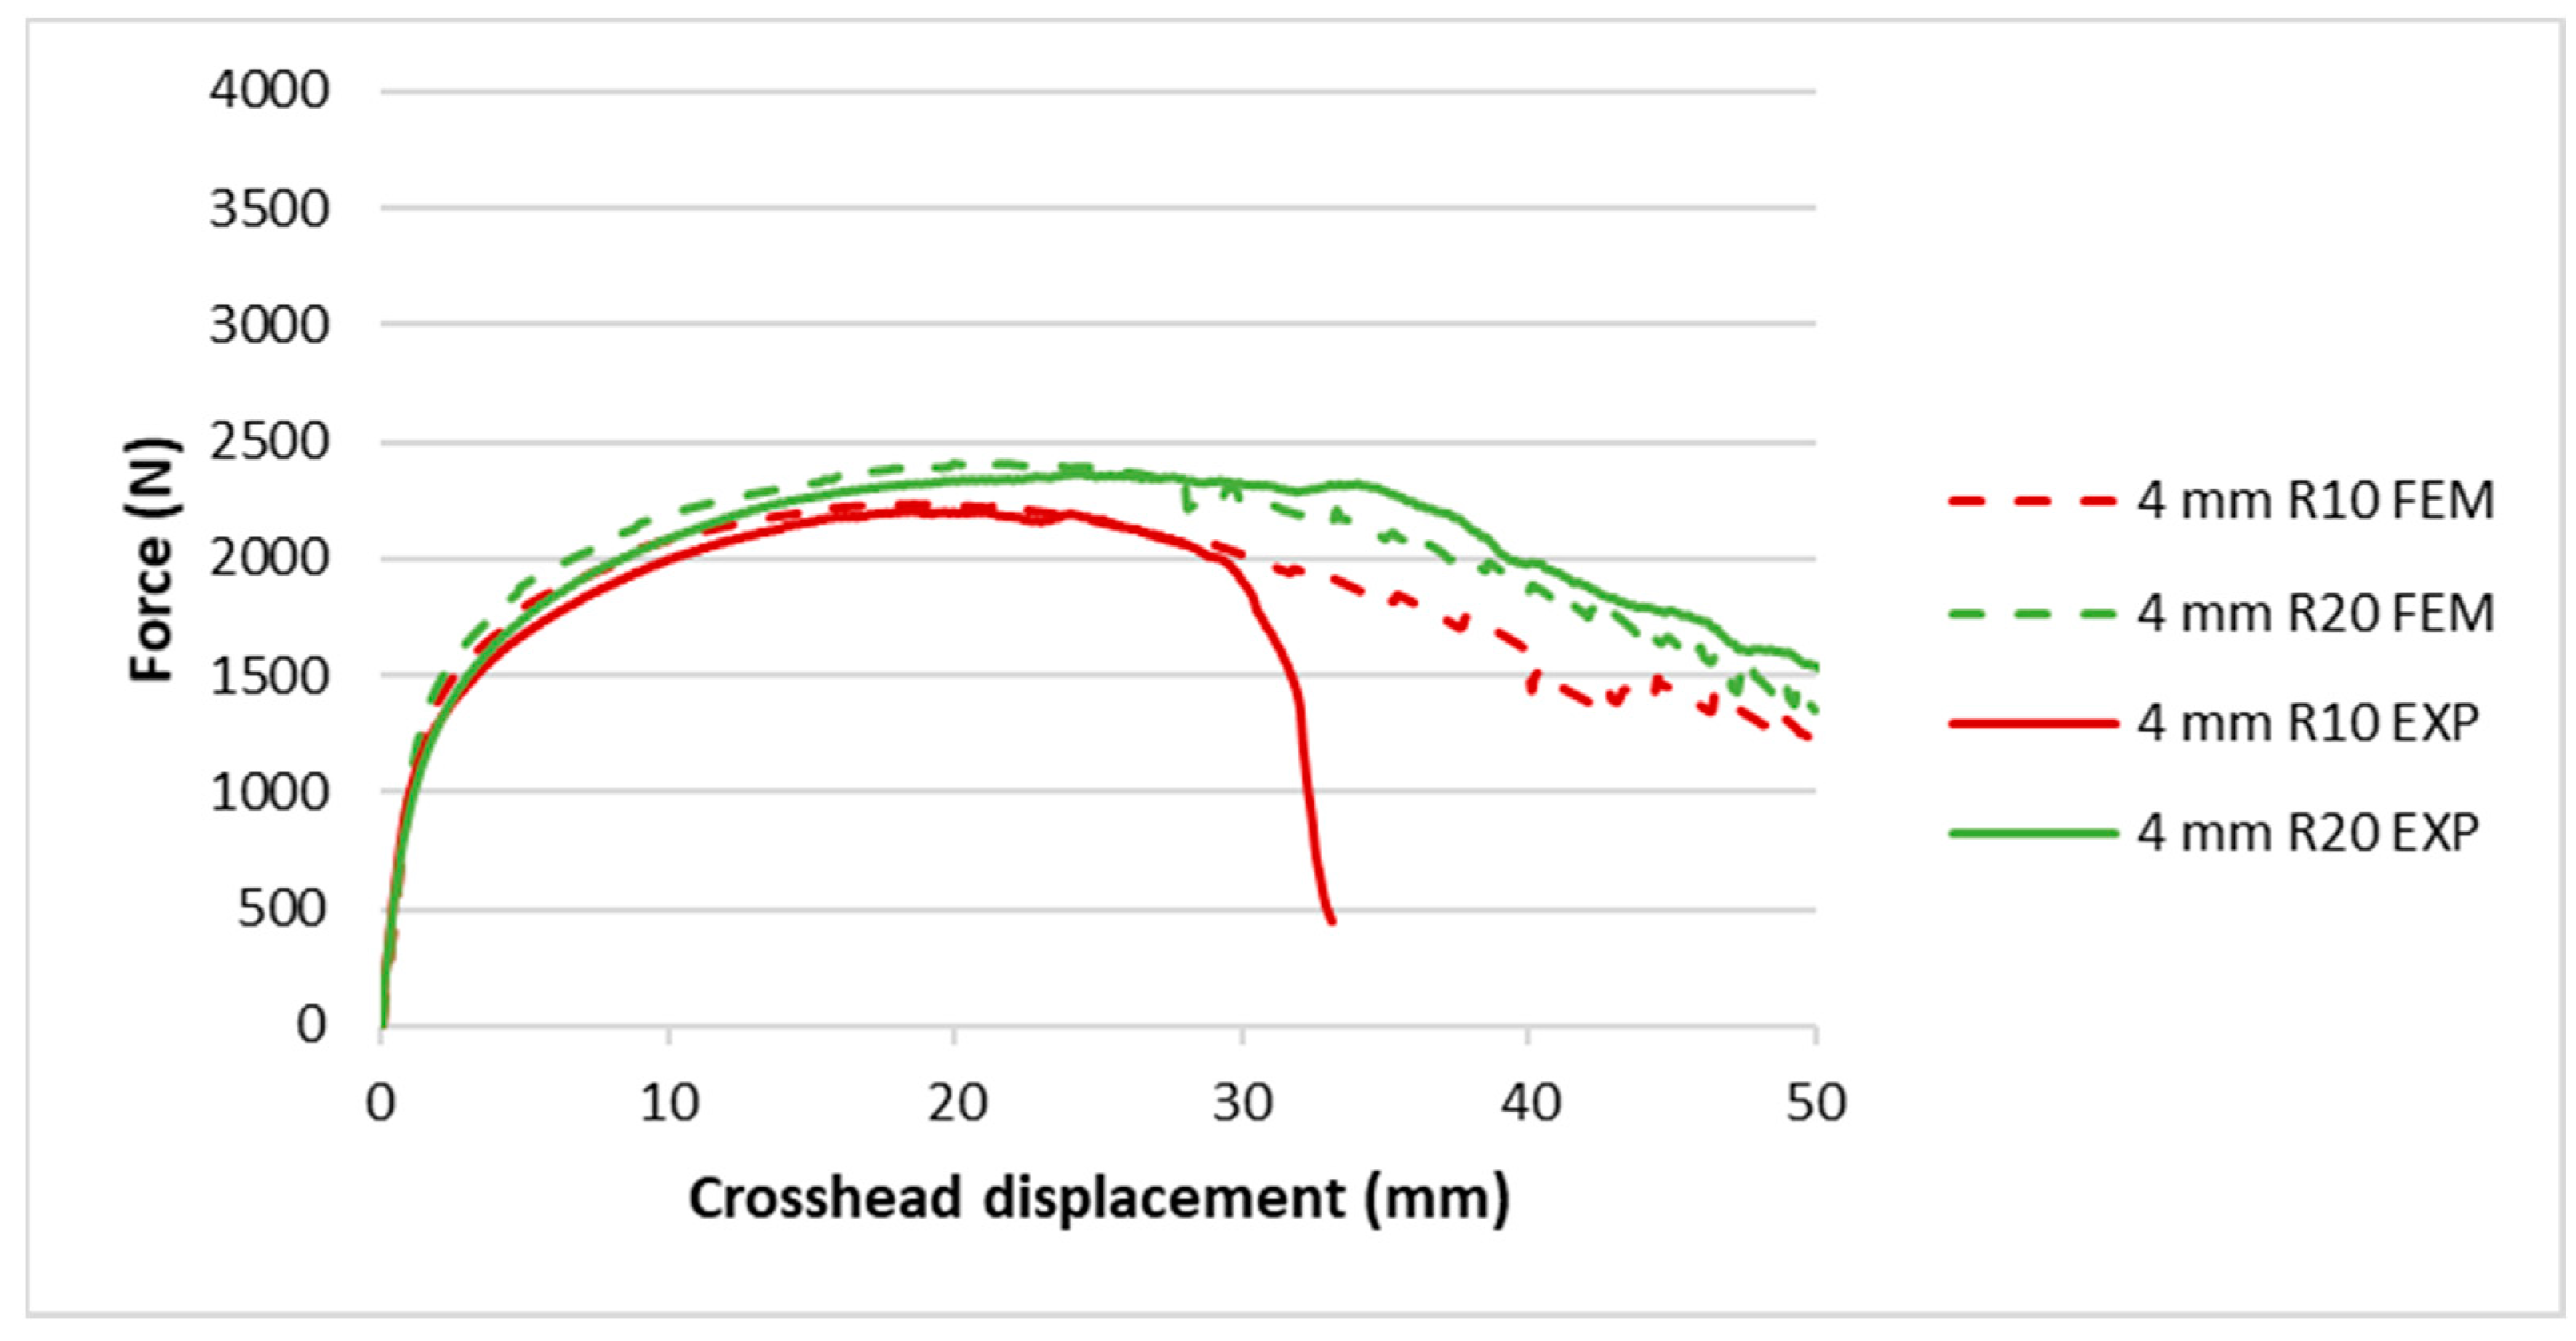
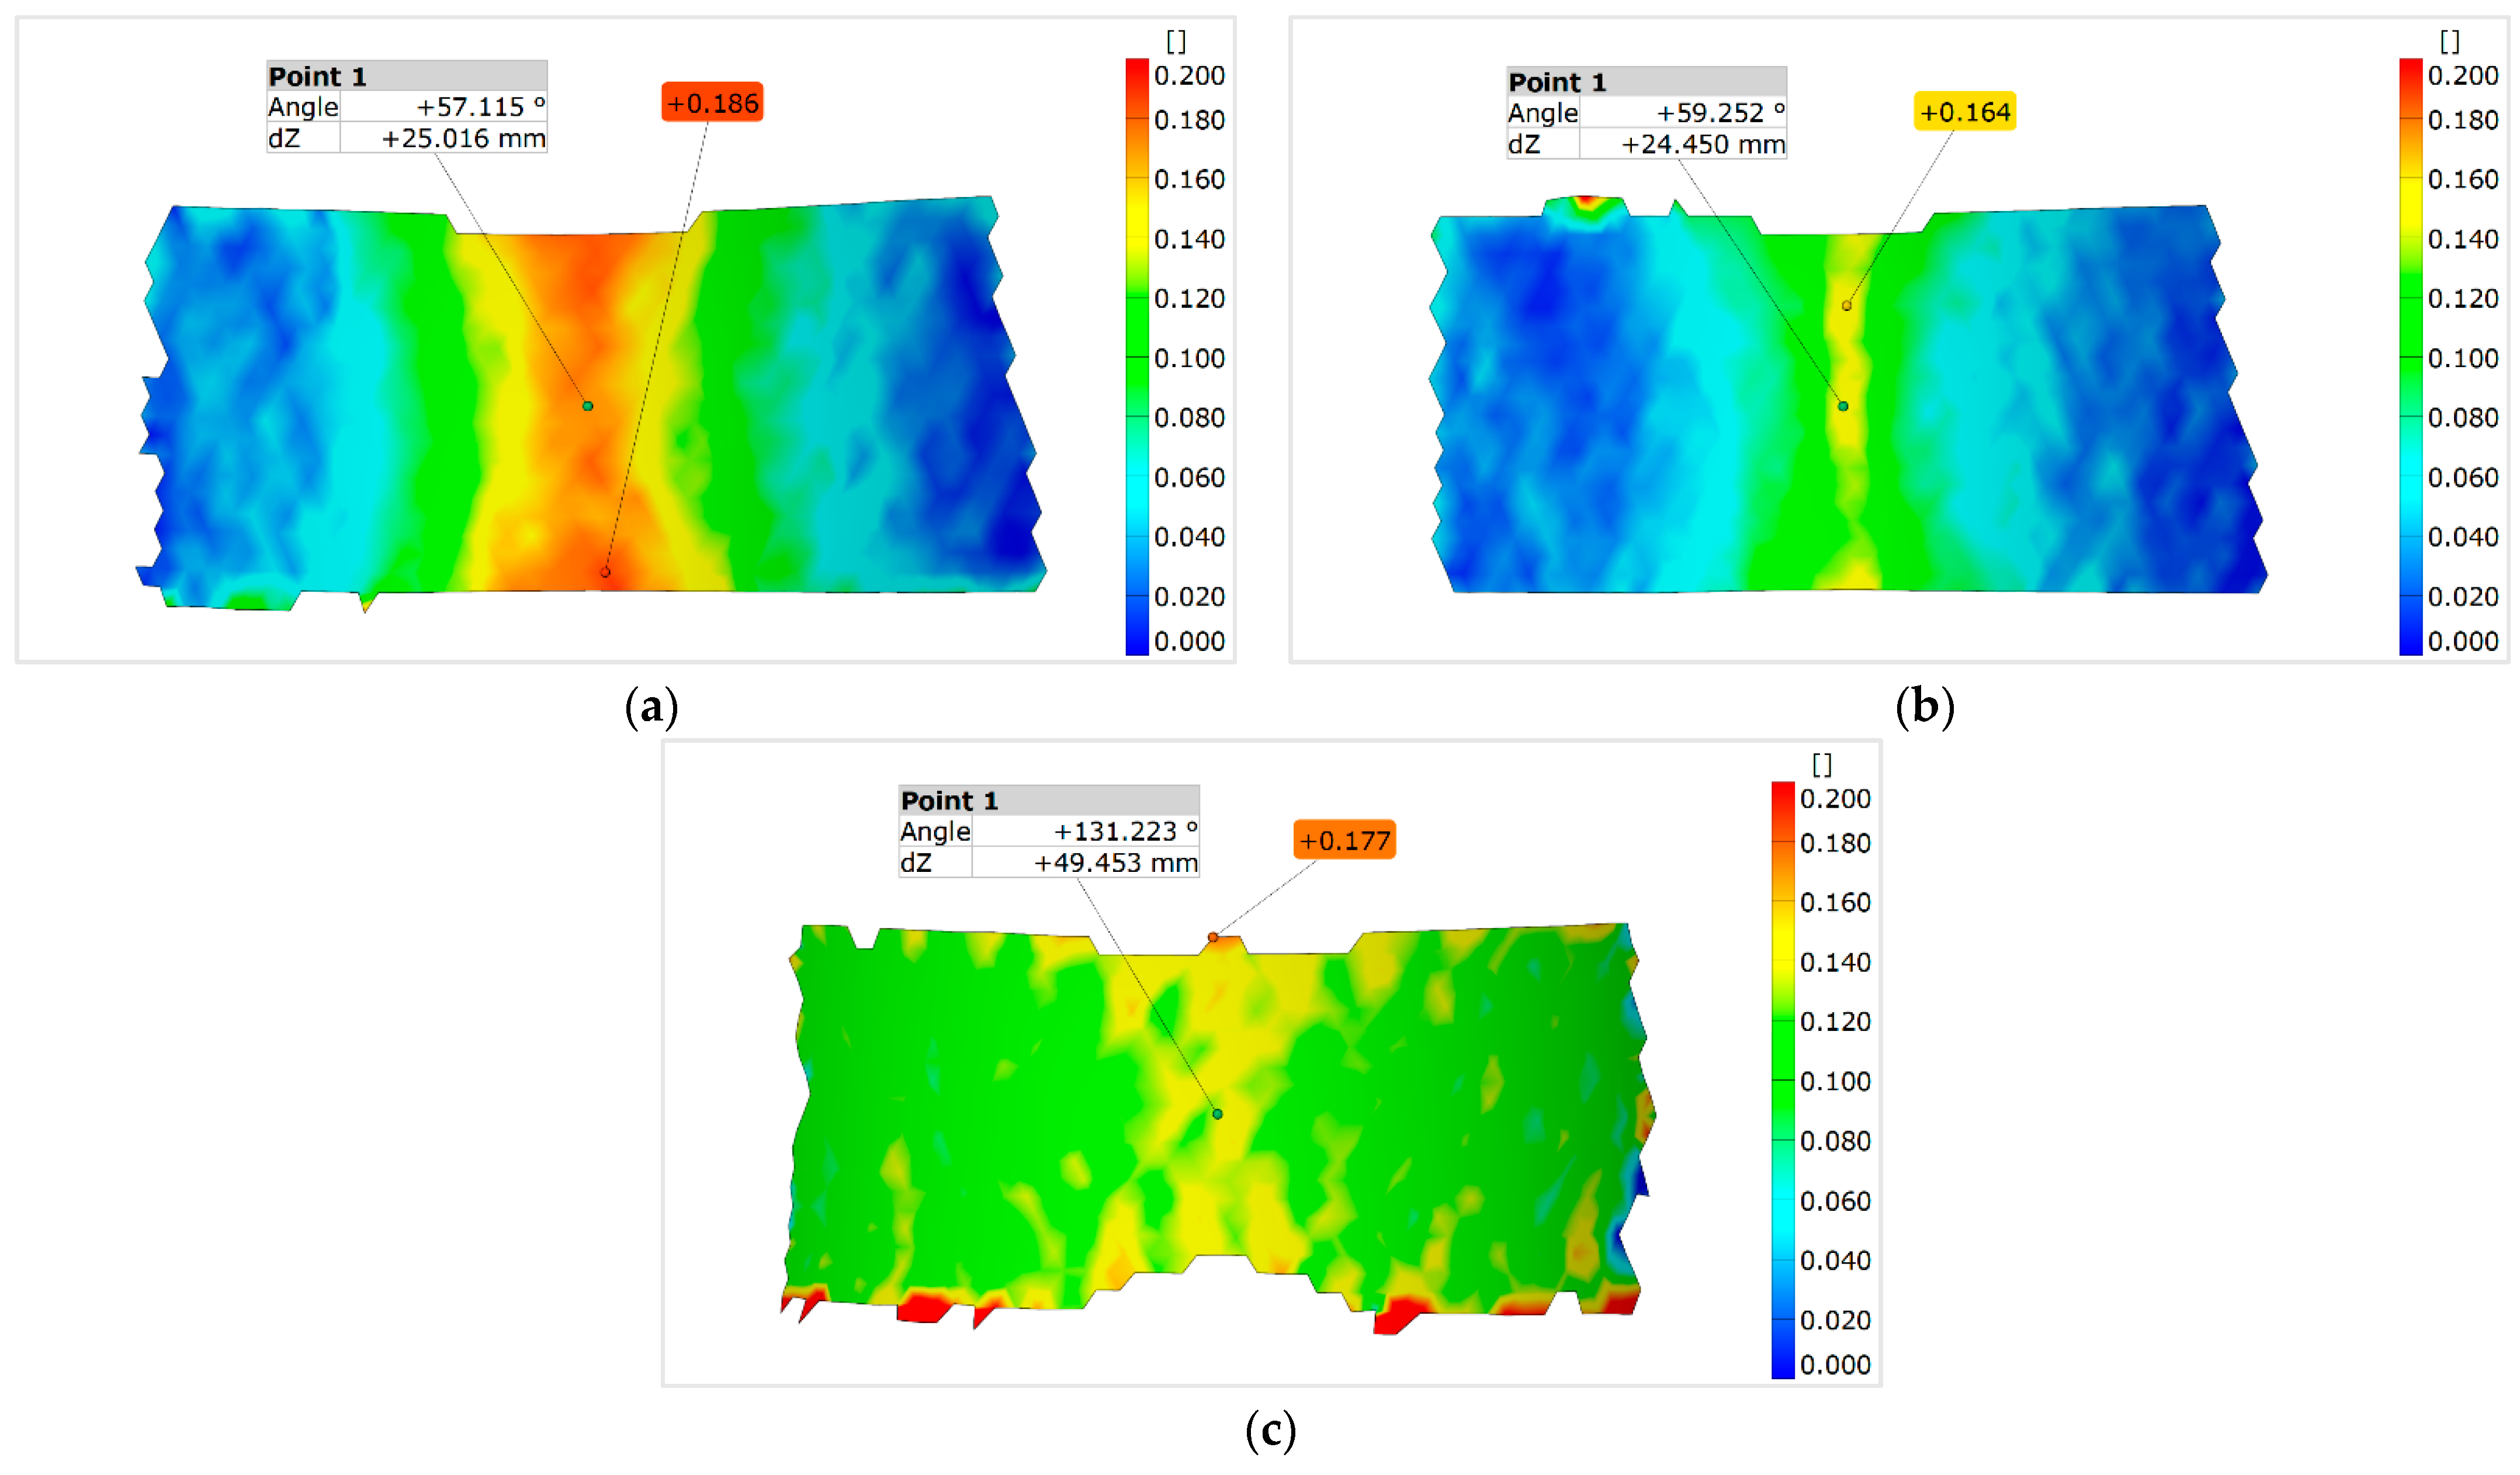
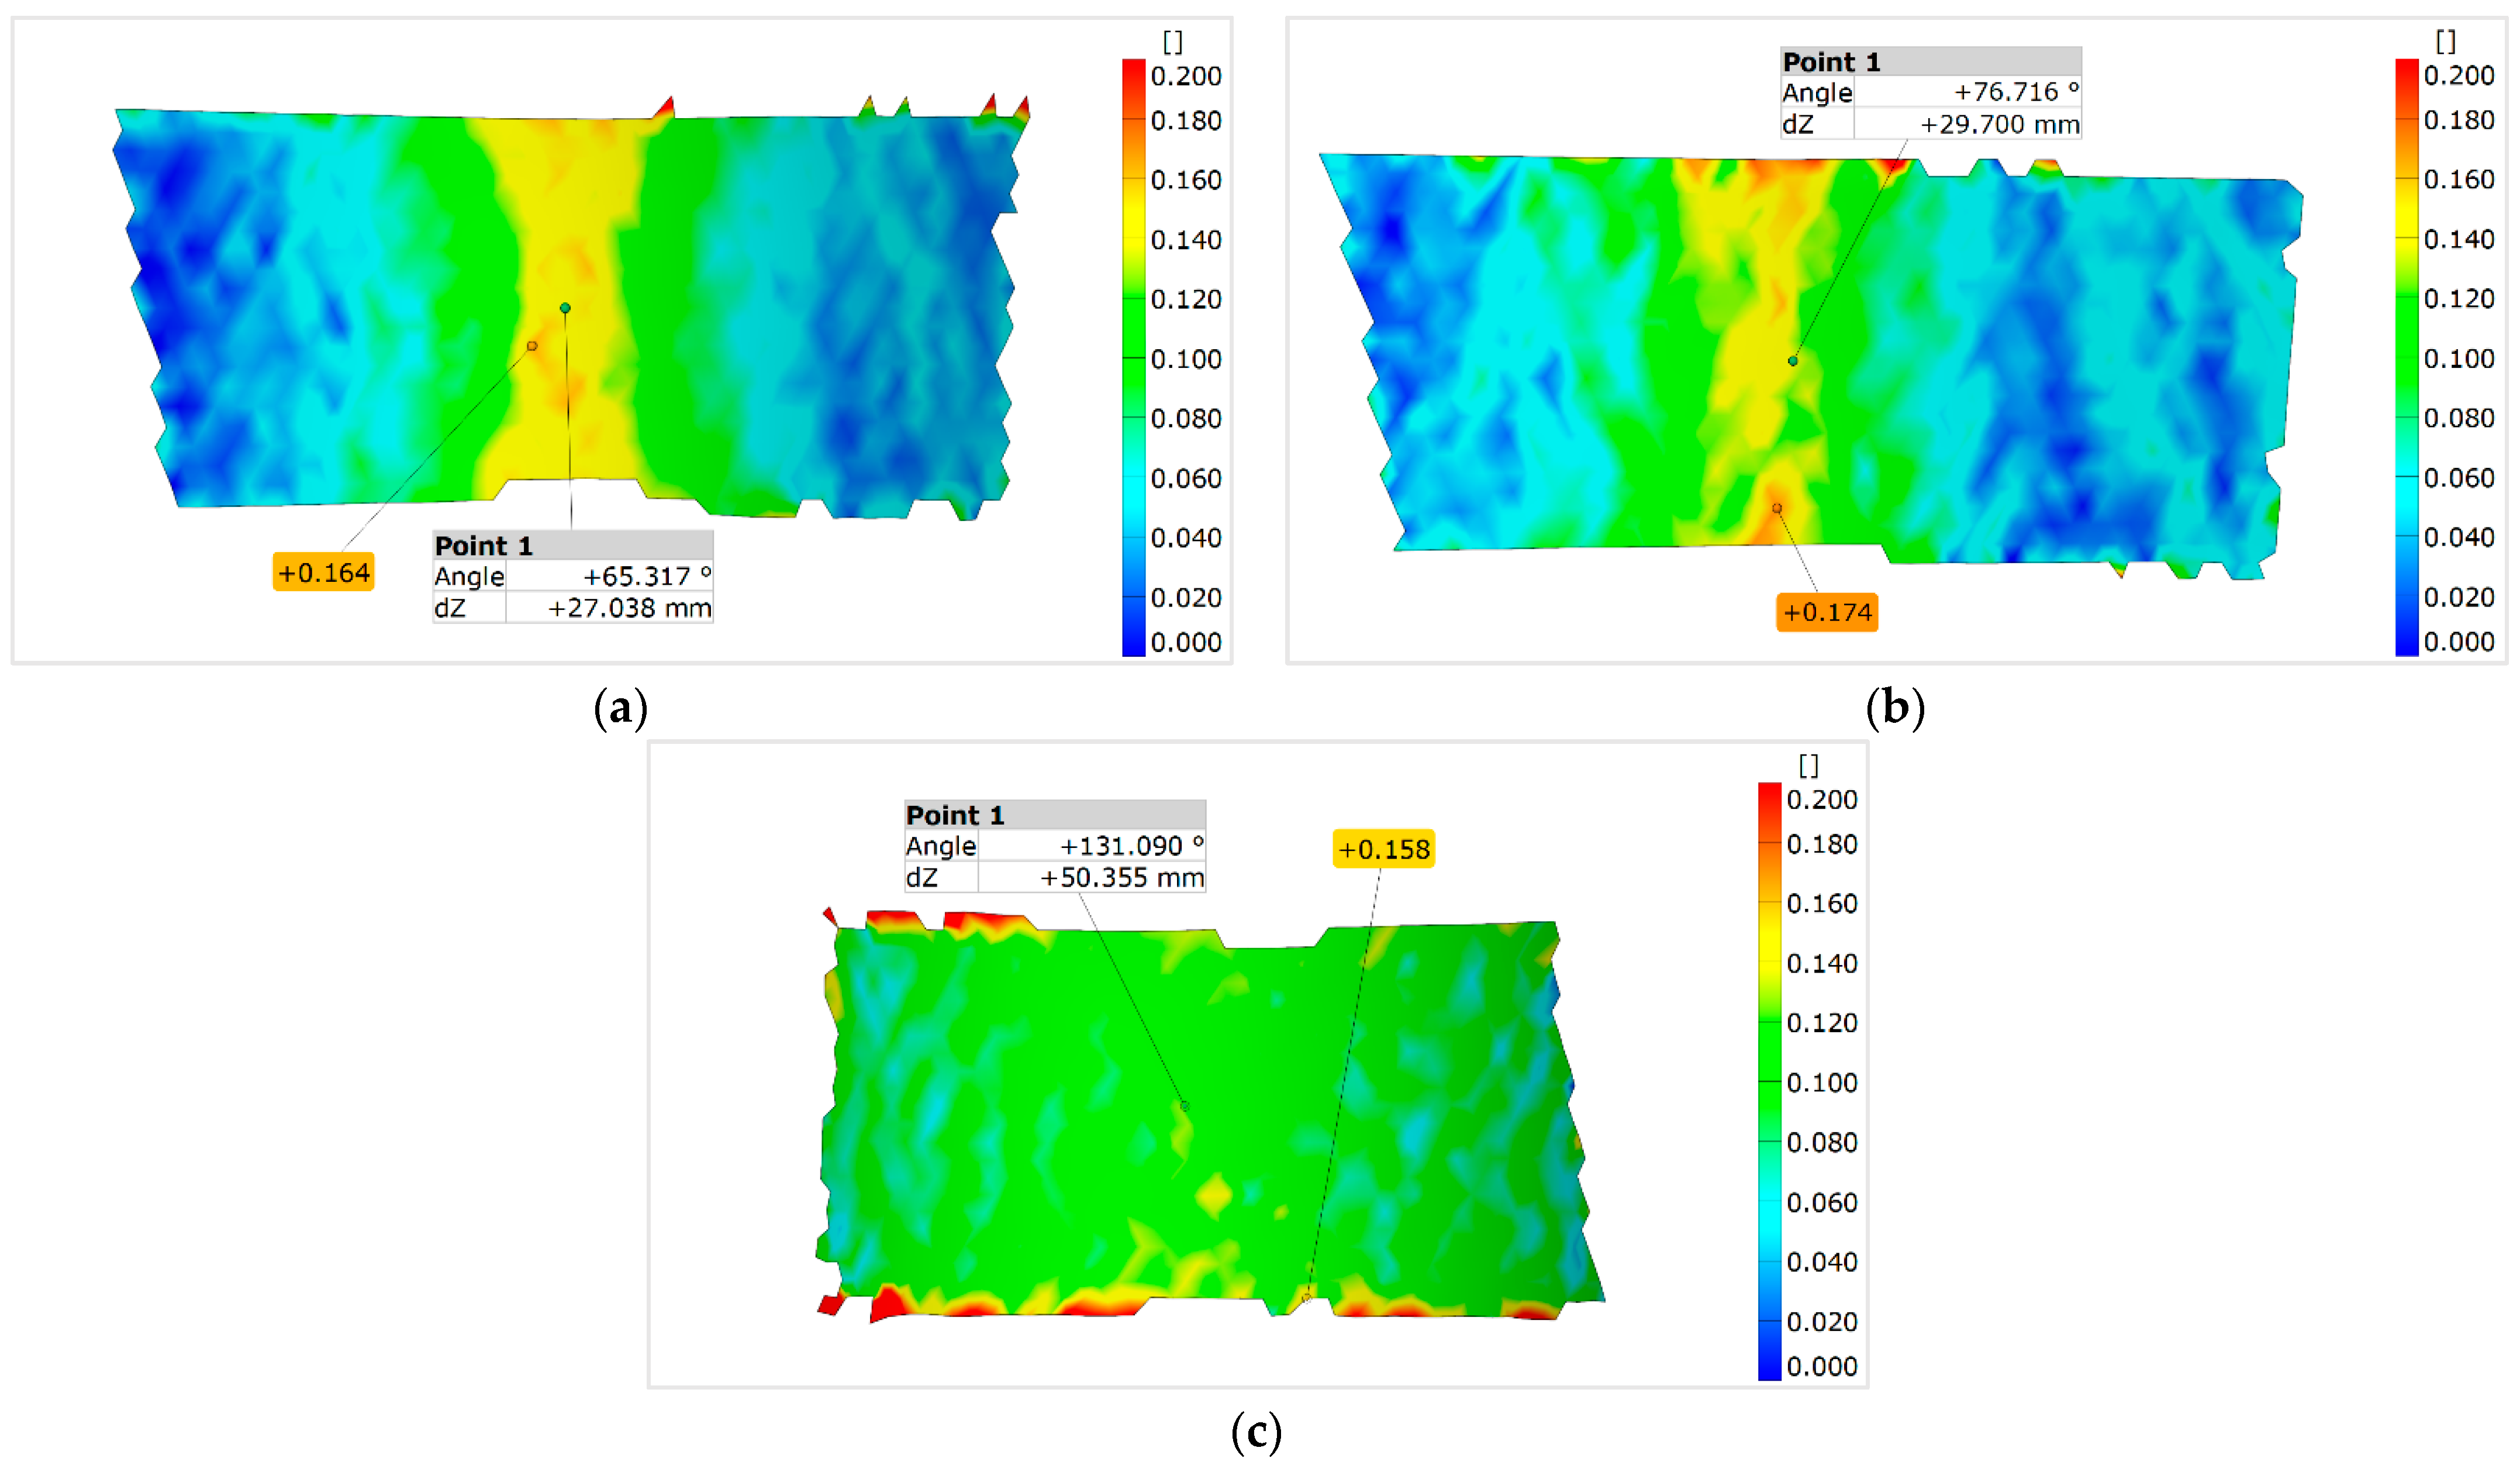
Table 4 shows the 3PB results of D.O.B. without the fracture initiation, and without the springback. So, the D.O.B. values are not the final values of the bent sheets. However, very good agreement with the FEM predictions can be seen. The correlation between FEM predicted and the experimentally measured relation between the force and the cross-head displacement is shown in Figure 7, Figure 8 and Figure 9. Besides the stress and force curves, the ARAMIS system provided time-dependent strain fields of the test specimens (Figure 10, Figure 11 and Figure 12). There Thecombinations exceeding the D.O.B value of 70 should provide the sheet bending without the fracture initiation.

3.2. 3PB Test Variations

The previous tensile tests (Table 5) proved there is a small difference (approximately 50 MPa) between the yield strength of both solution-treated and as-rolled sheets. The ductility of the solution-treated sheet is approximately 30% higher than its as-rolled analog. This observation allows the utilization of a considerable deal of the remaining plastic capacity of the as-rolled sheet to pre-bend the sheet before the solution treatment and subsequent bending to the final D.O.B. of 60°. It was experimentally verified that a pre-bending D.O.B of 30° and higher is sufficient to achieve the requested 60° after the solution treatment without the fracture initiation even with the sheet thickness of 5 mm.

3.3. Fractography

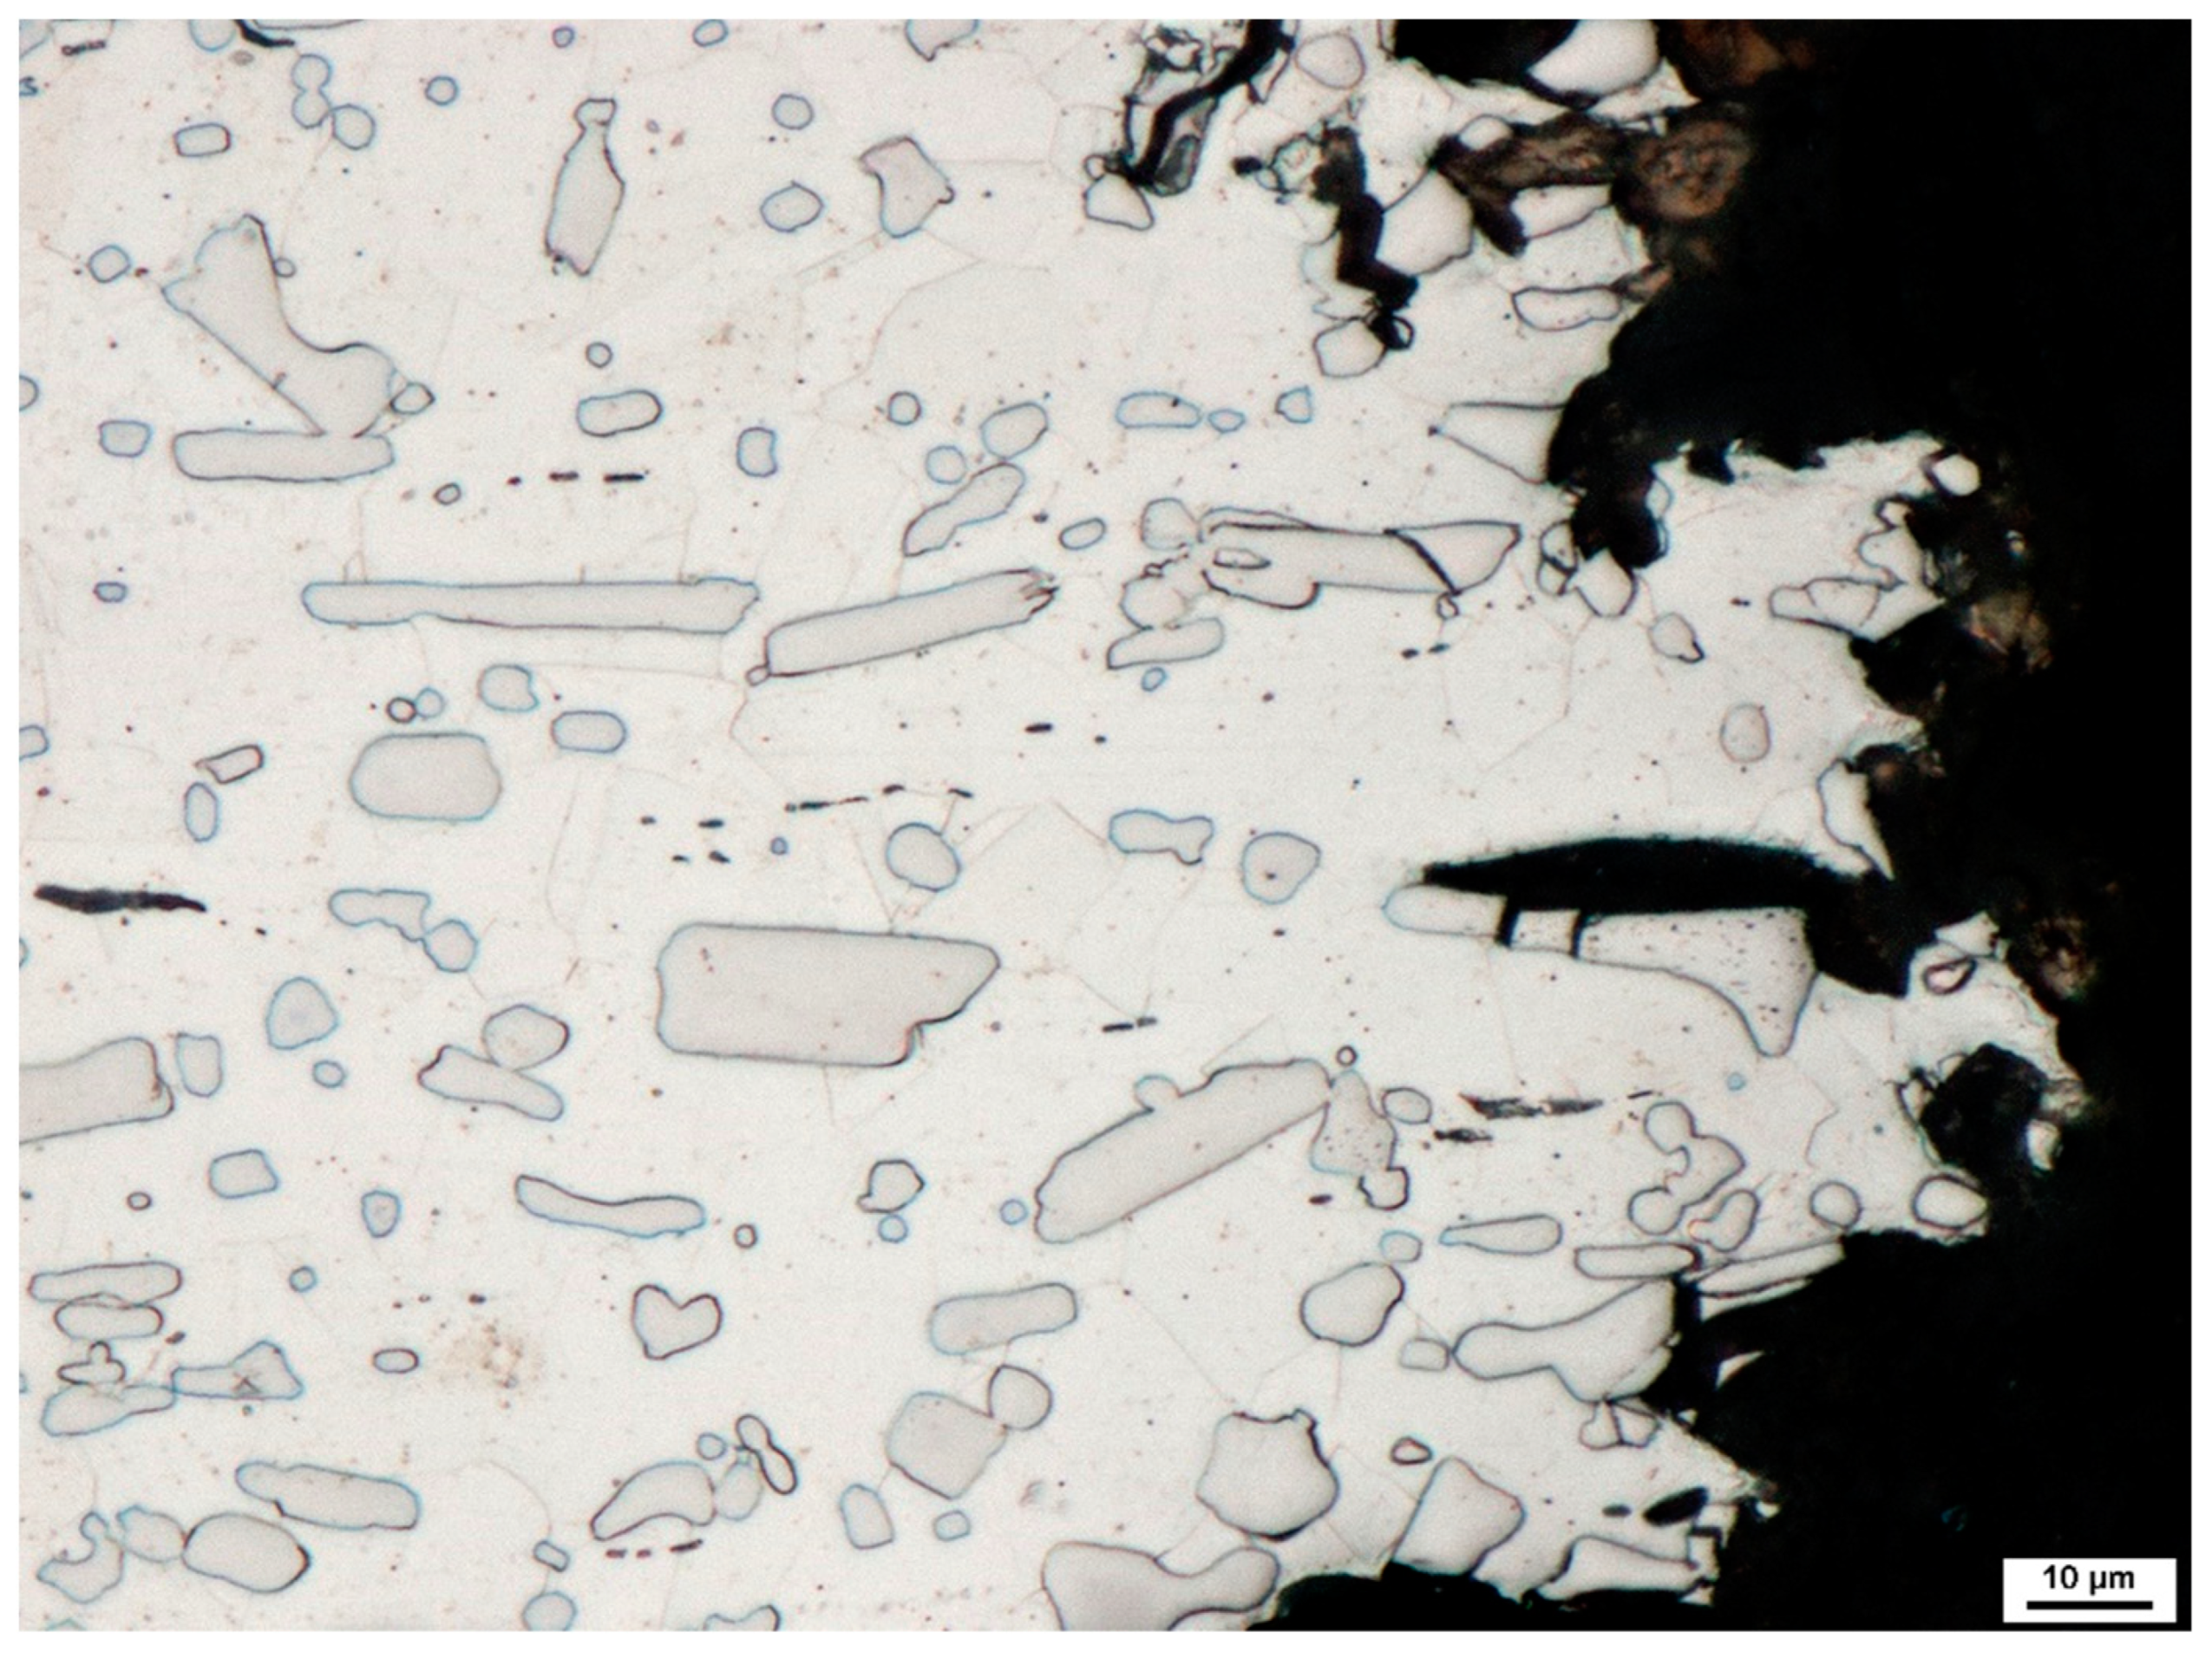
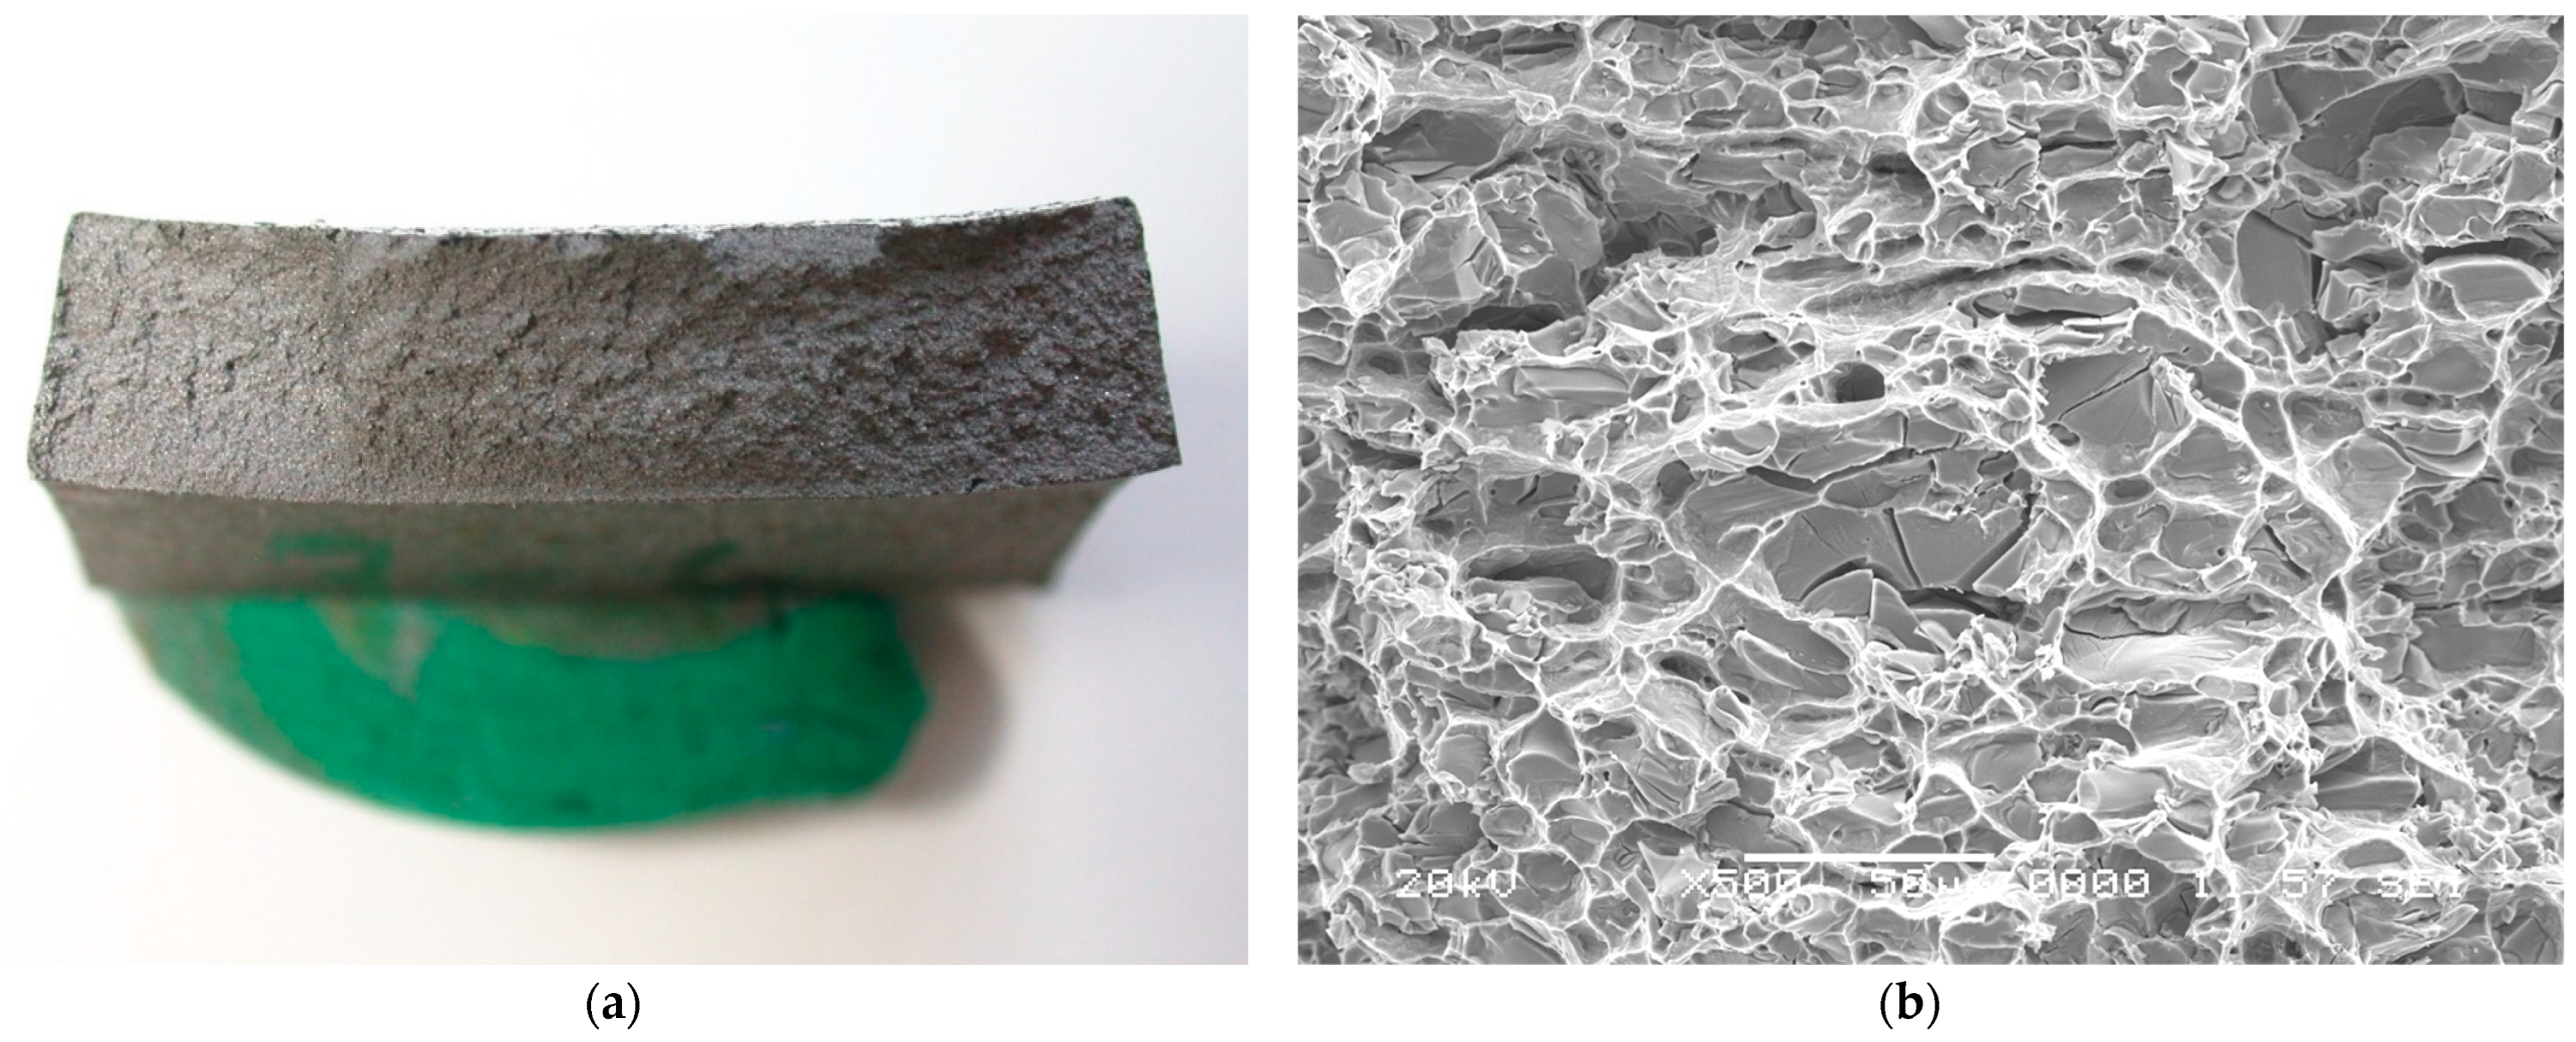
An optical micrograph of the fracture is shown in Figure 13. When overload is the principal cause of fracture, most common structural alloys fail by a process known as microvoid coalescence. The microvoids nucleate at regions of localized strain discontinuity, such as that associated with second-phase particles, inclusions, grain boundaries, and dislocation pile-ups. As the strain in the material increases, the microvoids grow, coalesce, and eventually form a continuous fracture surface. This type of fracture exhibits numerous cuplike depressions that directly result from the microvoid coalescence. The cuplike depressions are referred to as ‘dimples’ (Figure 14), and the fracture mode is known as ‘dimple rupture’ [24].
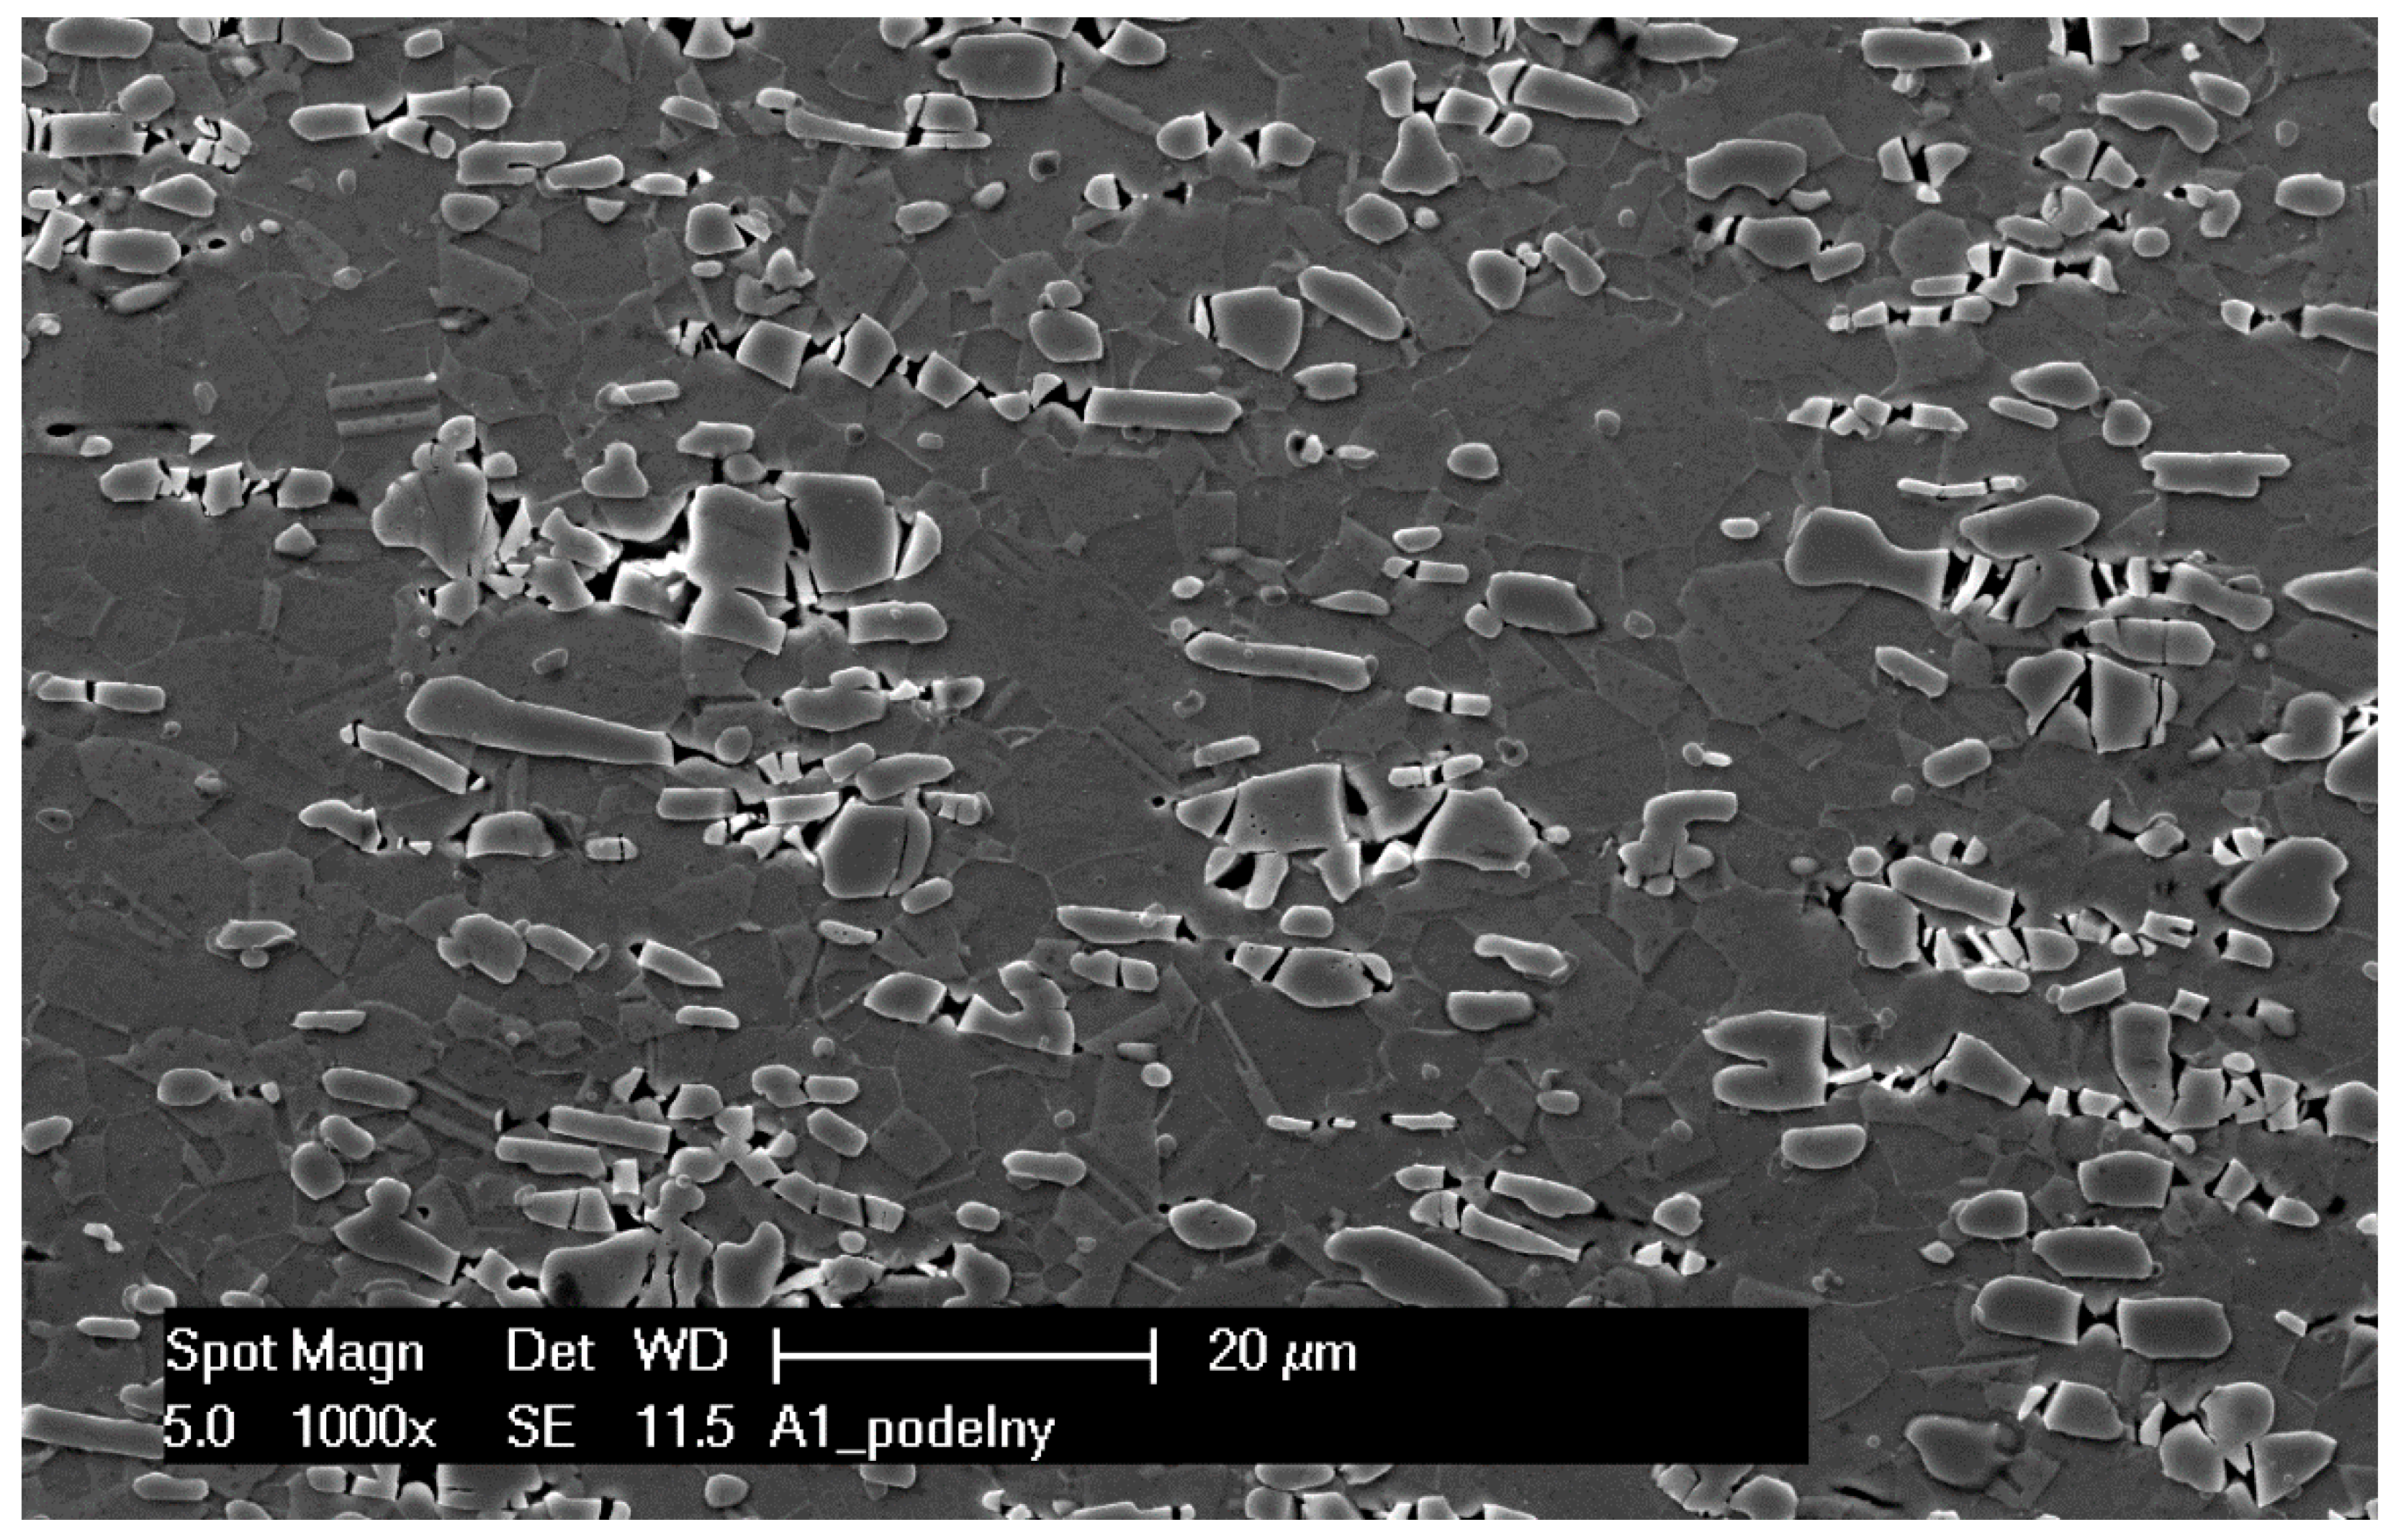
The voids, or cavities, are initiated by the brittle fracture of boride during the hot working of material (Figure 15). At high temperatures, the plastic flow can reduce the number of cavities. At lower temperatures, the plastic flow is not sufficient to fully heal the structure. When further deformation is applied, the austenitic matrix is severely deformed around hard boride particles. Increasing dislocation density accumulates the stress that is ultimately relieved through the fracture of borides. Cavities are then located between the boride fragments or around sharp particle edges. These cavities then serve as a nucleation site for the fracture.

4. Discussion

Various factors deteriorate the room temperature ductility, which is essential for cold bending capacity. The influence of other relevant factors will be discussed in this section.

4.1. Delta Ferrite and Sigma Phase Embrittlement

One of the factors contributing to room temperature cracking susceptibility could be the formation of hard and brittle intermetallic phases during the solution treatment. In practice, it is not convenient to water-cool annealed thin steel sheets because of severe distortion (fast cooling). However, air cooling might be slow enough to promote the sigma phase formation [25] in the range of 580 °C to 780 °C. The sigma phase formation accompanies the loss of ductility and the defect formation in the microstructure. The presence of delta ferrite in austenitic alloys accelerates sigma phase precipitation. All ferrite-forming elements encourage the sigma phase formation because of two orders of magnitude slower chromium diffusion rate of chromium in BCC lattice in comparison to austenite FCC lattice [26]. According to Wang et al., borated stainless steels are less prone to delta ferrite formation than their non-borated counterparts. Increasing boron content gradually inhibits the formation of delta ferrite until no delta ferrite appears. Depending on the alloying concept of austenitic stainless steel, the critical boron content is around 1 wt. %B [27]. Nonetheless, differential scanning calorimetry (DSC) was conducted to get a closer look at liquid–solid phase transformation during solidification. Relatively low solidus temperature limits the temperature range for potential homogenization annealing. The cooling curve (Figure 16) shows only two exothermic peaks. Austenite crystallizes first from the liquid (center of mass at 1314.1 °C), followed by the eutectic boride structure (center of mass at 1219.7 °C). DSC provided enthalpy values for respective phase transformations as well.
The experimental results proved that the temperatures of the solution treatment ranging from 1050 °C to 1150 °C and holds ranging from 15 min to 6 h do not significantly affect the susceptibility to fracture initiation and propagation. This result further supports that no delta ferrite nor sigma phase is present either in the as-cast structure or solution-treated wrought material. This result applies to both air cooling and water cooling.

4.2. Grain Size Effect

It is well known that increased average grain size can positively affect the work-hardening behavior of austenitic stainless steel exploiting the TRIP effect. Besides the contribution of meta-stable austenite, grain size also affects the fracture behavior. Fractography of the test specimens confirmed a dimple rupture typical for austenitic steels. It has been reported that the size and depth of dimples are closely connected with tensile toughness [27,28]. As the grain size increases, the size and the depth of dimples increase as well. This implies that fewer microvoids become operative, and the microvoids’ coalescence is hindered to a certain level. This phenomenon thus might enhance the tensile toughness and cold bending capacity. According to the authors of the study, the highest tensile toughness of AISI 304 stainless steel was achieved with ASTM grain size G6.
Micrographic determination of austenitic grain size according to EN ISO 643 proved there is a negligible change in the grain size for temperatures up to 1150 °C and holds up to 6 h. Depending on the deformation degree, the ASTM grain size number of the test specimens varied from G10 to G13. High-borated stainless steels show very slow austenite grain growth kinetics. A longer annealing process at even higher temperatures (slightly below the solidus temperature) can provide a coarser grain structure with rounded coarser boride particles. However, a little beneficial contribution to mechanical properties can hardly compensate for the costs.

5. Conclusions

The ultimate challenge here is to design a suitable spent-fuel basket that could hold even more spent nuclear fuel in a safe and controlled way. There has to be enough space for both the fuel and the cooling system, while the material has to possess safe enough structural strength and shielding capacity that will last for decades. Besides the thermal neutron and gamma-ray shielding capacity, good heat exchange properties, and high mechanical strength, the basket has to be 100% corrosion-resistant throughout its years of service. The risk of corrosion is greatly decreased if the structural elements include the least possible number of weld joints. This can be achieved by bending the semi-products. This paper proposes conditions at which the requirement of D.O.B. of 60° is met.
It is clearly shown that, by using a rather simplistic model and 2D plane strain, FEM calculation provides valid results, assuming the bending of the steel sheet semi-product within the range of most used material, geometry, and dimensions.
Obviously, the thinner the sheet and the bigger the radius, the better results upon exerting the bending load with respect to localized strain and susceptibility to fracture occurrence. The most constrained variable for the design would probably be the thickness, since the structural strength and the shielding capacity are needed. If higher radii are also not permissible, a divorced bending process, as described in Section 3.2, remains.
From the solution treatment experiments follows the important observation that there is no solution treatment regime allowing the full 60° bending of a 5 mm sheet without fracture initiation. One has to keep in mind that in practice, the steel sheet semi-product will be manufactured within a certain tolerance field. It seems a good compromise between the sheet thickness and radius would be a thickness of 4.5 mm and a radius of 15 mm. If that is the case, there might be a need for a slightly higher boron content to acquire a certain level of shielding capacity.
In this study, only one particular high-borated steel was used. However, for a given application, slightly modified material and structural design might be even better with respect to the level of radiation protection and the cost-effective production. Future research will cover various steels with different boron content and their effect on material features discussed in this paper.

Author Contributions

Methodology, J.O., T.S. and P.Č.; experimental investigation, J.O., P.Č., M.R., V.B. and P.M.; numerical simulation, I.P.; writing—original draft preparation, J.O., T.S. and M.R.; review and editing, P.Č., P.F. and Č.D. All authors have read and agreed to the published version of the manuscript.

Funding

The result was supported by ERDF research of advanced steels with unique properties, No. CZ02.1.01/0.0/0.0/16_019/0000836. The result was further supported by project No. CZ.1.05/2.1.00/19.0387 “Development of research and development basis of RMSTC” within the framework of the operation program Research and Development for Innovations financed by the Structural Funds and from the state budget of the Czech Republic.

Institutional Review Board Statement

Not applicable.

Informed Consent Statement

Not applicable.

Data Availability Statement

Not applicable.

Conflicts of Interest

The authors declare no conflict of interest. The funders had no role in the design of the study; in the collection, analyses, or interpretation of data; in the writing of the manuscript; or in the decision to publish the results.

References

  1. IAEA. IAEA Technical Report No. 218—Storage of Water Reactor Spent Fuel in Water Pools; IAEA: Vienna, Austria, 1982; No. 218. [Google Scholar]
  2. Committee on the Safety and Security of Commercial Spent Nuclear Fuel Storage, Board on Radioactive Waste Management. Safety and Security of Commercial Spent Nuclear, Illustrate; National Academies Press: Washington, DC, USA, 2006. [Google Scholar]
  3. Soliman, S.E.; Youchison, D.L.; Baratta, A.J.; Balliett, T.A. Neutron Effects on Borated Stainless Steel. Nucl. Technol. 1991, 96, 346–352. [Google Scholar] [CrossRef]
  4. Sadawy, M.; El Shazly, R. Nuclear radiation shielding effectiveness and corrosion behavior of some steel alloys for nuclear reactor systems. Def. Technol. 2019, 15, 621–628. [Google Scholar] [CrossRef]
  5. Stanisz, P.; Oettingen, M.; Cetnar, J. Development of a Trajectory Period Folding Method for Burnup Calculations. Energies 2022, 15, 2245. [Google Scholar] [CrossRef]
  6. Cetnar, J.; Stanisz, P.; Oettingen, M. Linear Chain Method for Numerical Modelling of Burnup Systems. Energies 2021, 14, 1520. [Google Scholar] [CrossRef]
  7. Chapter 3—Boron; de Groot, P.A. (Ed.) Elsevier: Amsterdam, The Netherlands, 2009; pp. 227–228. [Google Scholar] [CrossRef]
  8. Fu, X.; Ji, Z.; Lin, W.; Yu, Y.; Wu, T. The Advancement of Neutron Shielding Materials for the Storage of Spent Nuclear Fuel. Sci. Technol. Nucl. Install. 2021, 2021, 5541047. [Google Scholar] [CrossRef]
  9. Bastürk, M.; Arztmann, J.; Jerlich, W.; Kardjilov, N.; Lehmann, E.; Zawisky, M. Analysis of neutron attenuation in boron-alloyed stainless steel with neutron radiography and JEN-3 gauge. J. Nucl. Mater. 2005, 341, 189–200. [Google Scholar] [CrossRef]
  10. Stone, M.; Crow, L.; Fanelli, V.; Niedziela, J. Characterization of shielding materials used in neutron scattering instrumentation. Nucl. Instrum. Methods Phys. Res. Sect. A Accel. Spectrometers Detect. Assoc. Equip. 2019, 946, 162708. [Google Scholar] [CrossRef]
  11. He, X.; Ahn, T.; Sippel, T. Corrosion of Borated Stainless Steel in Water and Humid Air. NACE Int. Corros. Conf. Ser. 2012, 1, 761–783. [Google Scholar]
  12. Zhou, X.; Wang, M.; Chen, C.; Zhao, H. Borides Effect on the Workability and Microstructure Evolution of As-Cast Borated Stainless Steel under Hot Compression. Steel Res. Int. 2016, 87, 1648–1656. [Google Scholar] [CrossRef]
  13. Won, C.-H.; Jang, J.H.; Kim, S.-D.; Moon, J.; Ha, H.-Y.; Kang, J.-Y.; Lee, C.-H.; Lee, T.-H.; Kang, N. Effect of annealing on mechanical properties and microstructure evolution of borated stainless steels. J. Nucl. Mater. 2019, 515, 206––214. [Google Scholar] [CrossRef]
  14. Li, Y.-W.; Wang, Z.-J.; Fu, D.-G.; Li, G.; Liu, H.-T.; Zhang, X.-M. Fabrication of high borated austenitic stainless steel thick plates with enhanced ductility and toughness using a hot-roll-bonding method. Mater. Sci. Eng. A 2021, 799, 140212. [Google Scholar] [CrossRef]
  15. He, J.Y.; Soliman, S.E.; Baratta, A.J.; Balliett, T.A. Fracture Mechanism of Borated Stainless Steel. Nucl. Technol. 2000, 130, 218–225. [Google Scholar] [CrossRef]
  16. Funke, T.; Henig, C. CASTOR® 1000/19: Development and Design of a New Transport and Storage Cask. In Proceedings of the International Youth Nuclear Congress, Interlaken, Switzerland, 20–26 September 2008; pp. 20–26. [Google Scholar]
  17. Herfurth, K.; Scharf, S. Casting; Viswanathan, S., Apelian, D., Donahue, R.J., Das Gupta, B., Gywn, M., Jorstad, J.L., Monroe, R.W., Sahoo, M., Prucha, T.E., Twarog, D., Eds.; ASM International: Almere, The Netherlands, 2008. [Google Scholar] [CrossRef]
  18. Kestens, L.; Jonas, J.J. Metalworking: Bulk Forming; Semiatin, S.L., Ed.; ASM International: Almere, The Netherlands, 2005; Volume 14A. [Google Scholar] [CrossRef]
  19. Xia, Y.-F.; Luo, G.-C.; Wu, D.-S.; Quan, G.-Z.; Zhou, J. The Evaluation of Varying Ductile Fracture Criteria for 3Cr20Ni10W2 Austenitic Heat-Resistant Alloy. Adv. Mech. Eng. 2013, 5, 520127. [Google Scholar] [CrossRef]
  20. ASM Handbook Committee; Kerlins, V. Modes of Fracture. In Fractography; ASM International: Almere, The Netherlands, 1987; Volume 2, pp. 12–71. [Google Scholar] [CrossRef]
  21. Kvačkaj, T.; Tiža, J.; Bacsó, J.; Kováčová, A.; Kočiško, R.; Pernis, R.; Fedorčáková, M.; Purcz, P. Cockcroft-Latham Ductile Fracture Criteria for Non Ferrous Materials. Mater. Sci. Forum 2014, 782, 373–378. [Google Scholar] [CrossRef]
  22. Poláková, I.; Urbánek, M.; Kubina, T.; Dzugan, J. Prediction of fracture in the shearing process using DEFORM and MARC software. IOP Conf. Ser. Mater. Sci. Eng. 2017, 179, 012058. [Google Scholar] [CrossRef]
  23. Poláková, I.; Zemko, M.; Rund, M.; Džugan, J. Using DEFORM Software for Determination of Parameters for Two Fracture Criteria on DIN 34CRNIMO6. Metals 2020, 10, 445. [Google Scholar] [CrossRef]
  24. Oliveira, M.; Alves, J.; Chaparro, B.; Menezes, L. Study on the influence of work-hardening modeling in springback prediction. Int. J. Plast. 2007, 23, 516–543. [Google Scholar] [CrossRef]
  25. Jordan, P.; Maharaj, C. Asset management strategy for HAZ cracking caused by sigma-phase and creep embrittlement in 304H stainless steel piping. Eng. Fail. Anal. 2020, 110, 104452. [Google Scholar] [CrossRef]
  26. Kuboň, Z.; Stejskalová, Š.; Kander, L. Effect of Sigma Phase on Fracture Behavior of Steels and Weld Joints of Components in Power Industry Working at Supercritical Conditions. In Austenitic Stainless Steels: New Aspects; IntechOpen: Rijeka, Croatia, 2017; pp. 63–92. [Google Scholar] [CrossRef]
  27. Wang, M.J.; Bao, E.; Wang, Z.X.; Zhang, S.Y.; Chen, C.; Li, Y.M.; Wei, H.Y. Solidification and Boride Characteristics of Boron-Containing Austenitic Stainless Steel. Mater. Sci. Forum 2011, 704–705, 563–568. [Google Scholar] [CrossRef]
  28. Naghizadeh, M.; Mirzadeh, H. Effects of Grain Size on Mechanical Properties and Work-Hardening Behavior of AISI 304 Austenitic Stainless Steel. Steel Res. Int. 2019, 90, 1900153. [Google Scholar] [CrossRef]
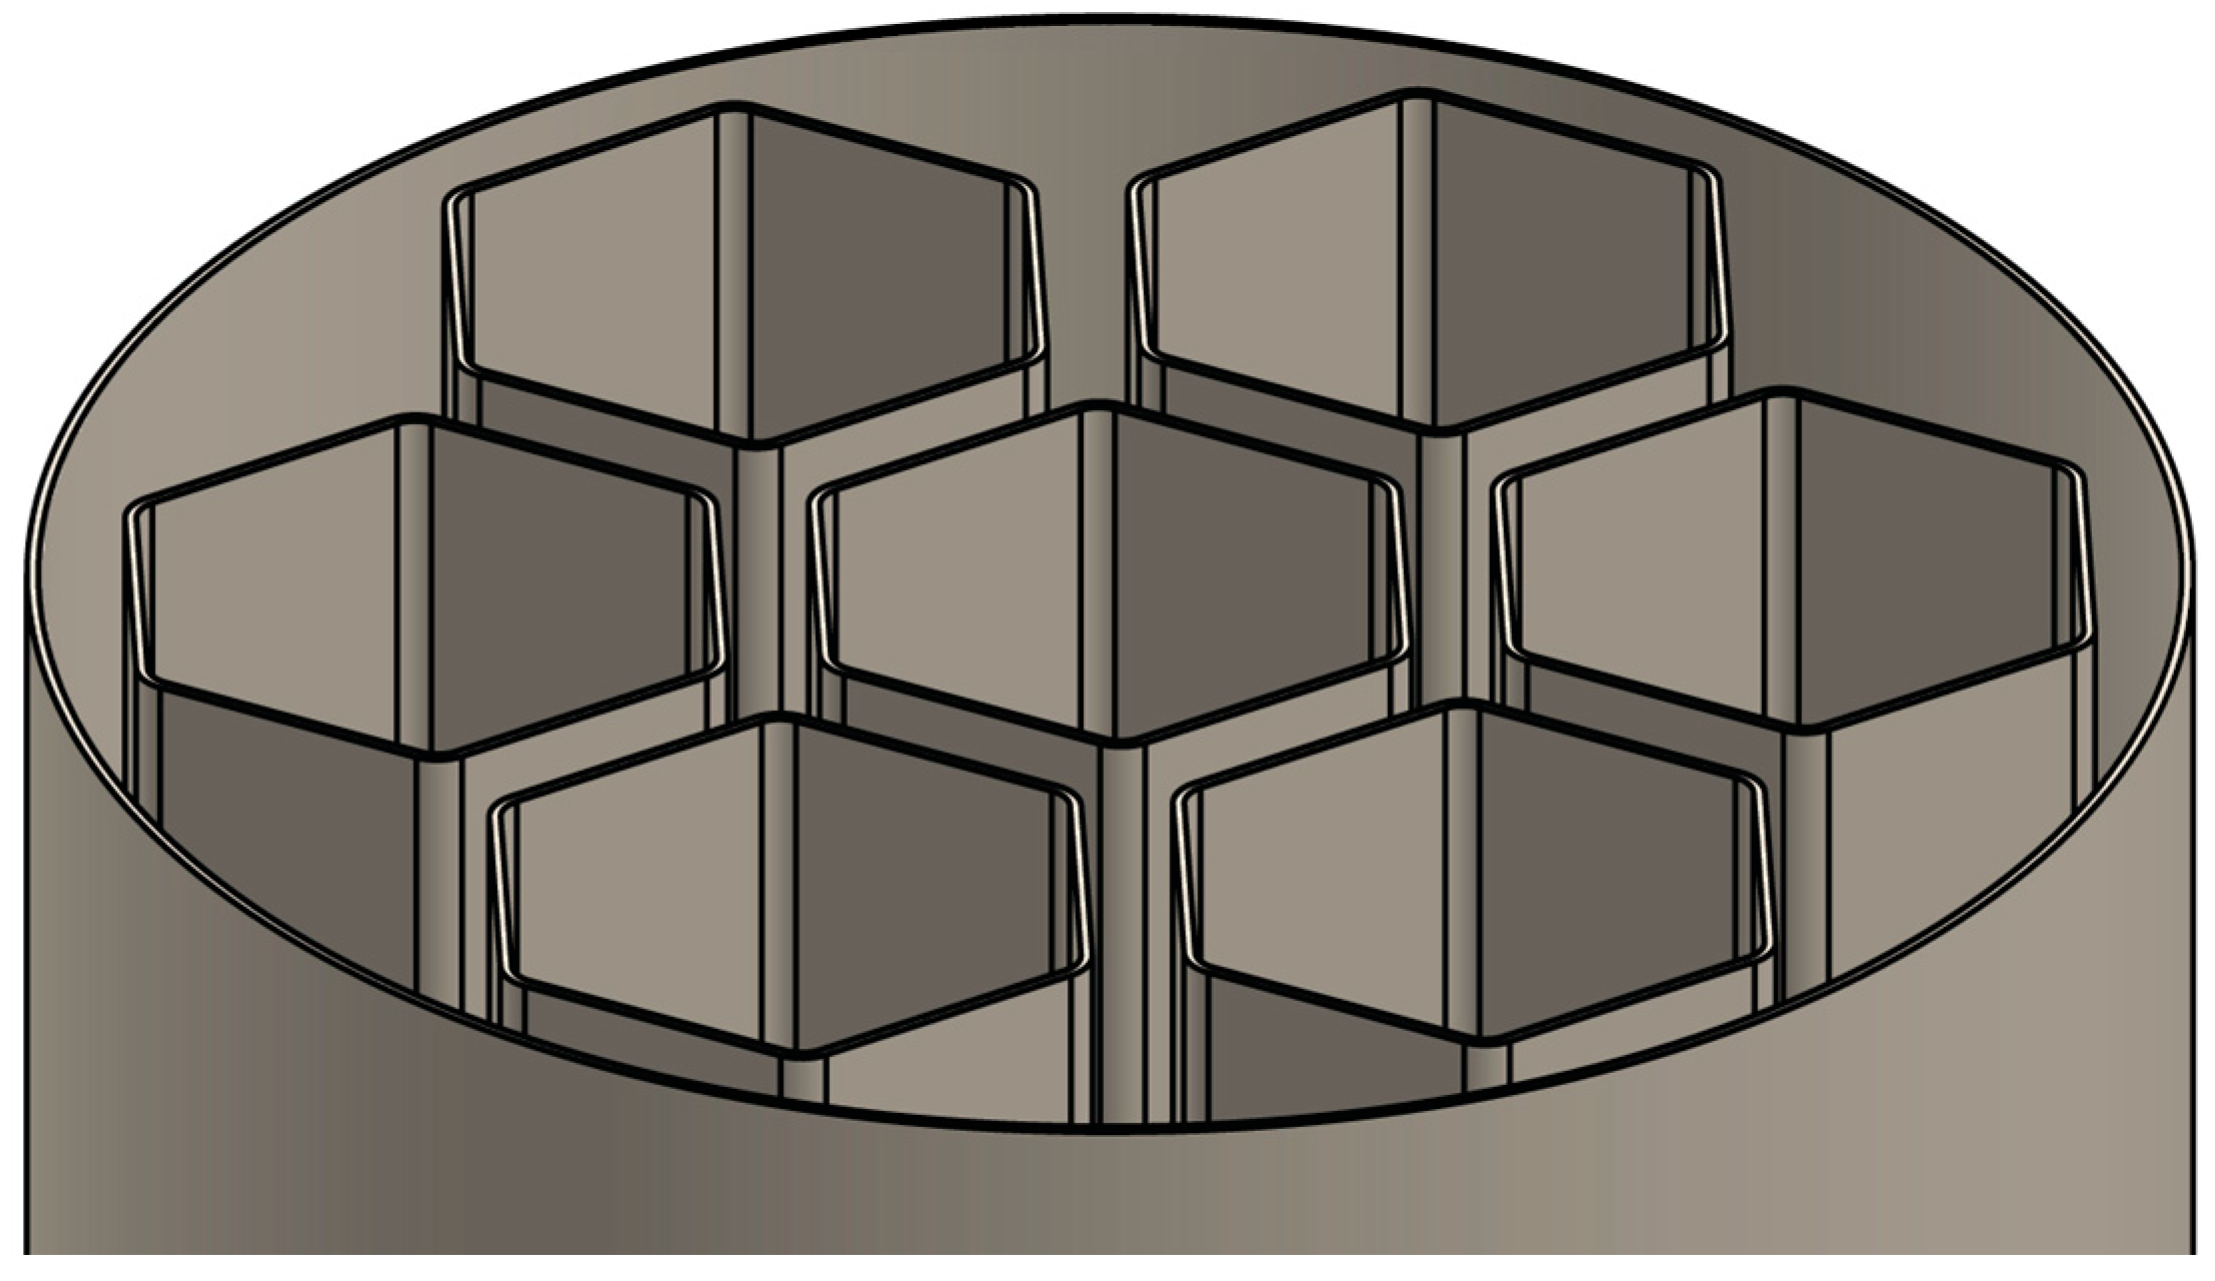
Figure 1. Sketch of the basket with hexagonal fuel assembly cells holding spent nuclear fuel. The basket of CASTOR®1000/19-type cask consists of 19 hexagonal cells [16], with the length of the hexagon side of 150 mm and the total length of 4630 mm.
Metals 13 00348 g001
Figure 2. Microstructure of the input material (after solution treatment) revealed in Hamil etchant. ASTM grain size G 10.2. The microstructure is fully recrystallized, polyhedral, and shows uniformly distributed borides with exclusive orientation in the rolling direction.
Metals 13 00348 g002
Figure 3. (a) The geometry and the mesh of the 2D FEM 3PB tests; (b) FEM simulation of effective strain distribution.
Metals 13 00348 g003
Figure 4. Flow stress data of borated austenitic stainless steel sheet in solution annealed state for two different strain rates, 0.1 s−1, and 10 s−1.
Metals 13 00348 g004
Figure 5. Good correlation between the force from the measurement and the simulation of the 3PB.
Metals 13 00348 g005
Figure 6. FEM simulated D.O.B. in the moment before fracture initiation: (a) 5 mm, R10; (b) 4.5 mm, R10; (c) 4 mm, R10; (d) 5 mm, R15; (e) 45 mm, R15; (f) 4 mm, R15; (g) 5 mm, R20.
Metals 13 00348 g006
Figure 7. The correlation between FEM predicted and the experimentally measured relation between the force and the cross-head displacement for 5 mm sheet.
Metals 13 00348 g007
Figure 8. The correlation between FEM predicted and the experimentally measured relation between the force and the cross-head displacement for 4.5 mm sheet.
Metals 13 00348 g008
Figure 9. The correlation between FEM predicted and the experimentally measured relation between the force and the cross-head displacement for 4 mm sheet.
Metals 13 00348 g009
Figure 10. True strain field before fracture initiation of 5 mm test specimens; (a) R10; (b) R15; (c) R20.
Metals 13 00348 g010
Figure 11. True strain field before fracture initiation of 4.5 mm test specimens; (a) R10; (b) R15; (c) R20.
Metals 13 00348 g011
Figure 12. True strain field before fracture initiation of 4 mm test specimens; (a) R10; (b) R15; (c) R20.
Metals 13 00348 g012
Figure 13. Fracture. Optical microscopy 500×. Etched in HNO3.
Metals 13 00348 g013
Figure 14. (a) Photography of the fracture; (b) SEM micrograph of a dimple rupture (the length of the bar in micrograph is 50 µm).
Metals 13 00348 g014
Figure 15. Brittle fracture of borides and cavities generation.
Metals 13 00348 g015
Figure 16. Differential scanning calorimetry cooling curve; phase transformations during solidification from 1400 °C.
Metals 13 00348 g016
Table 1. Chemical composition of the experimental material (wt. %).
CMnSiCrNiB
0.0091.050.2519.5012.301.62
Table 2. Tensile tests results at room temperature. Hot-rolled sheets after solution treatment (1100 °C/30 min./cooling in still air.).
ɛRp0.2RmAgAZ
s−1MPaMPa%%%
1039364914.015.014
0.136460312.215.314
Table 3. FEM simulation results.
Thickness Fracture
Initiation D.O.B. (R10)
D.O.B. Springback (R10)Fracture
Initiation D.O.B. (R15)
D.O.B. Springback (R15)Fracture
Initiation D.O.B. (R20)
D.O.B. Springback (R20)
mm°°°°°
5.058N.A.6054>135N.A.
4.562548075>135N.A.
4.07262>90N.A.>135N.A.
Table 4. Three-point bending (3PB) experiment results.
ThicknessD.O.B. without Fracture Initiation (R10)Max. Value of Effective Strain (R10)D.O.B. without Fracture Initiation (R15)Max. Value of Effective Strain (R15)D.O.B. without Fracture Initiation (R20)Max. Value of Effective Strain (R20)
mm°mm/mm°mm/mm°mm/mm
5.0570.186590.164>1300.177
4.5650.164760.174>1300.157
4.0690.170930.175>1300.136
Table 5. Tensile test results at room temperature for different states of material.
StateRp0.2RmAgAZ
MPaMPa%%%
As-rolled33560511.912.014
Solution-treated38865814.216.314
Disclaimer/Publisher’s Note: The statements, opinions and data contained in all publications are solely those of the individual author(s) and contributor(s) and not of MDPI and/or the editor(s). MDPI and/or the editor(s) disclaim responsibility for any injury to people or property resulting from any ideas, methods, instructions or products referred to in the content.