Abstract
The issues of durability and fatigue life of various structural materials occupy an important place in the operation of equipment and elements subjected to high stresses. To correctly predict its operation time, knowledge of the unique internal structure of a particular piece of operating equipment is required. To obtain such data, a multilevel model of acoustic emission signal flow is proposed in the article, which is based on the kinetic concept of strength and the selection of various stages of destruction in the kinetics of damage accumulation. The selected information, which accounts for the hypothesis of the linear summation of damage, is used in modern models for calculating fatigue life based on kinetic parameters, e.g., the activation energy of destruction and activation volume. The fracture activation energies, activation volume, destructive load, and fatigue life of various structural alloys and steels were calculated using the proposed acoustic emission model based on static test data from various scientific literature sources. For comparison, several methods of calculating kinetic parameters based on the thermal fluctuation concept of strength were used. In addition, numerical modeling was performed to select the structural lethargy coefficient from the elastic deformation zone. The results of the proposed model are in good agreement with the experimental data and allow—within the framework of more thorough tests and with a more accurate consideration of temperature—for the application of an engineering-based approach with which to evaluate the durability and residual service life of objects.
1. Introduction
The current state of industry imposes increased requirements on the assessment of the condition of the structural elements comprising technological equipment, which in many cases has already fulfilled its assigned service life. The proposed theories, hypotheses, and methods for assessing the residual life of equipment should be physically justified and have a methodological connection with an extensive database of accumulated experimental data. This physical connection with various destruction processes should be employed without the loss of practical accessibility for existing engineers and be applicable to as many types of working technological equipment as possible [1,2,3,4].
This article proposes a model that can be used to estimate the main parameters included in the durability formula (activation energy and activation volume) based on acoustic emission parameters, unlike traditional AE approaches to strength assessment based on the laws of fracture mechanics and signature analysis. Since acoustic emission is actively used to assess the structural integrity of real technological equipment, with the help of the proposed model and by means of the model’s criteria, it is possible to obtain information about structural changes during operation and the individual strength states of more than solely laboratory samples. Other methods used to evaluate these parameters, such as differential scanning calorimetry, thermal and thermomechanical analysis, etc., have some difficulties regarding application in industry. This paper provides an overview of the theoretical positions and views on durability parameters and their physical nature and shows the complexity of their determination and strong dependence on operating conditions, which are difficult to account for in the existing methods. This explains the scientific and innovative significance of the presented approach. Herein, the wide sample of experimental samples used indicates the good applicability and possible adaptability of the technique in industry. In addition, other methods for evaluating the parameters included in the durability formula, as well as a method for calculating fatigue life, are given for comparison.
1.1. Temperature–Time Dependence of Strength
The dependence of durability on temperature and stress is called the time dependence of strength or the temperature–time dependence of strength. The exponential law of the dependence of the time to destruction on the temperature at constant stress is described by the following equation:
where is the preexponential factor; is the activation energy of the destruction process; is Boltzmann constant; is the temperature.
On the basis of a large number of empirical data on the study of the durability of a several solids (including polymer ones), the Soviet scientist Zhurkov proposed a general formula of durability, which bears his name [5]:
where is the period of atomic vibrations; is the activation energy of destruction corresponding to the sublimation energy (the separation of an atom and the transition of a body to a gaseous state); is the parameter of the structural state, which corresponds to the value of the activation volume and reflects the structural heterogeneity of the sample material; and is the rate of stress change on one structural element.
The formula can be described as follows. During thermal motion, the atoms of the crystal lattice oscillate near their equilibrium positions with a frequency of . Bonds between atoms can be broken by thermal fluctuations. The probability of breaking such a connection is expressed in the multiplier , whose value depends on both the temperature and the stress on the bond. The tensile effective stress that occurs during fracture reduces the initial energy barrier (the energy of interatomic bonds [5]) by the value ; resultantly, the probability of breaking the bonds responsible for strength increases. In other words, the member is the work performed by an external force. Moreover, the determining factors are not medium but large, local overvstresses that occur in inhomogeneities of the structure, which may be clusters of dislocations at the boundaries of blocks [6].
The value of was experimentally obtained by determining the dependence of the time to failure on the applied stress in the coordinates at different temperatures. At the same time, each material corresponds to a “vane” of straight lines with a pole obtained by distant extrapolation at the point . Thus, is the durability of solids at the moment when the value of reaches the value ; that is, destruction will occur during the nearest thermal fluctuation, which for all solids lasts seconds on average.
The rest of the barrier is overcome by the fluctuations themselves. When the stress decreases, the rupture rate will drop (at the same temperature), and at it will become equal to the rate of thermal destruction. Thus, destruction does not occur because the bodies are under a load exceeding any critical value, but because the external stress reduces the activation energy of the rupture of bonds by thermal fluctuations. As the probability of exiting the “potential pit” increases, the rate of fluctuation breaks of bonds also increases, which leads to a decrease in the durability of the sample. The position of the temperature value in the denominator means that under conditions of absolute zero temperature, destruction is impossible without the thermal motion of atoms in the absence of a certain critical value [7].
However, some researchers indicate that the coefficients fully describing the strength properties of metals and alloys in the region of moderate temperatures (both for deformation and destruction) are insufficient with respect to describing these properties [8,9].
1.2. Energy Activation of Destruction
The value obtained by extrapolating the direct dependence on the stress axis for various materials is close to the energy of breaking interatomic bonds. For polymers, it corresponds to the activation energy of the thermal degradation process; for metals and alloys, it denotes the energy of the sublimation of atoms (breaking lattice bonds). This parameter is considered stable with respect to the structure for a group of materials if there are no significant changes in the chemical composition and structure of the crystal lattice during the tests.
The parameter is stable with respect to the structure within a wide range of operating conditions [10,11,12]. I. G. Grabar in his work [13], using the Einstein and Debye approximations, gave two dependencies for finding , which allows us to explain the well-known, experimentally tested stability of the initial activation energy in relation to heat treatment, impurity content, irradiation, the orientation coefficient (for single crystals), and so on. Within the limits of the Zhurkov formula, according to the author, the only independent parameter is .
Often, the deviation of dependence (2) (the so-called “pole shift”) is associated with the presence of temperature dependencies of the thermal activation parameters. In [14], a modified formula was proposed wherein the effective activation energy was used while considering the dependence on temperature:
Therefore, in order to estimate the activation energy under complicated conditions (for example, during a “pole shift”), it is necessary to ensure the constancy of the structure in the studied range of temperatures and stresses [10,15]. The test results of the 08X18N9M2 and 12X18N12T steel samples showed this dependence [16]. The temperature–force coefficient for the activation energy was also proposed in [17].
To identify and assess the degree of the risk of defects in elements that are potentially subject to plastic deformation, physical models are needed that would be based on a number of assumptions [18,19]: (1) The strength characteristics and parameters of the fracture and deformation processes depend on the competition and interaction of these two processes occurring simultaneously. (2) The influence of plastic consists in the restructuring of the structure of the object, which is characterized by the rupture and restoration of broken bonds in a new position. The process of destruction is only associated with the breaking of bonds. (3) In case of plastic deformation before the onset of macroscopic destruction, such as the occurrence of a main crack or the formation of a neck, two periods can be distinguished: light sliding (flow area) and the period of deformation hardening.
Of great interest is the dependence of the activation energy on the mechanism of destruction, the relationship between fracture and deformation [20,21,22], the process of crack growth [23], deformation hardening, and so on. In [24], it is indicated that during the transition to a brittle state, the activation energy of destruction does not change. The temperature and force dependence of the activation energy was noted by the authors of the thermodynamic strength model [25]. In some works, the dependence of the activation energy on the type of stress state was noted [10,26]. The activation energy of destruction may have a connection with the characteristics of destruction, such as the stress intensity factor [27,28,29].
1.3. Structurally Sensitive Parameter
Usually, is represented as being responsible for the unique structure of a particular body or samples, which characterizes the most dangerous forms of local damage: defects in the structure of solid body–stress microconcentrators [10]. The value of corresponding to the volume is explained as the multiplying of the defect volume (of the atomic order) by the stress concentration coefficient , where is the maximum stress at the defect boundary. It is often assumed that the parameter depends on the stress of nonactivation failure . The smaller the value of , the greater the real strength. In other words, the smaller the value of , the more uniform the distribution of microscopic stresses across the crystal lattice.
Some studies have shown that the magnitude of is determined by the dislocation structure of the alloy [30,31]. According to the dislocation interpretation of , it consists of the expansion of the crystal lattice during the formation of dislocations and expansion during their movement. Thus, this parameter is sensitive to changes in operating conditions and is unstable.
In the general case of the kinetic concept, it is assumed that does not depend on the loading conditions [21,32]; however, various structural rearrangements are possible in the real material of the object. It was noted in [33] that depends on the type of stress state. So, for example, for torsion conditions, this parameter is less than it would be for tension.
In [34], a factor was proposed to estimate the effective activation volume of the relaxation process for brittle materials and polymers. In [23], Regel demonstrated the correspondence of the activation volume of crack growth and durability. The presence of differences between the activation volumes of deformation and fracture was shown by Petrov in [21]. A correspondence relation was established between the activation volumes of surface deformation (in particular, micro-indentation) [35,36] as well as electrical destruction [37] and the destruction process. In [38], dependence for the determination of is proposed, which accounts for the deformation of nanotubes. Several studies indicate the dependence of on welding processes and post-welding structural adjustments in the thermal zone [39,40]. The activation volume increases with an increasing test temperature, as shown in tests with increasing load in [41]. This observation was confirmed in [42] by the example of the X20CrMoV121 alloy.
The parameter naturally changes with possible significant deformations preceding destruction, which can occur both under static and dynamic loading conditions. If it is necessary to evaluate the durability parameters, then it is necessary to ensure the constancy of the structural coefficient [43].
2. Materials and Methods
2.1. The Evaluation of Durability Parameters
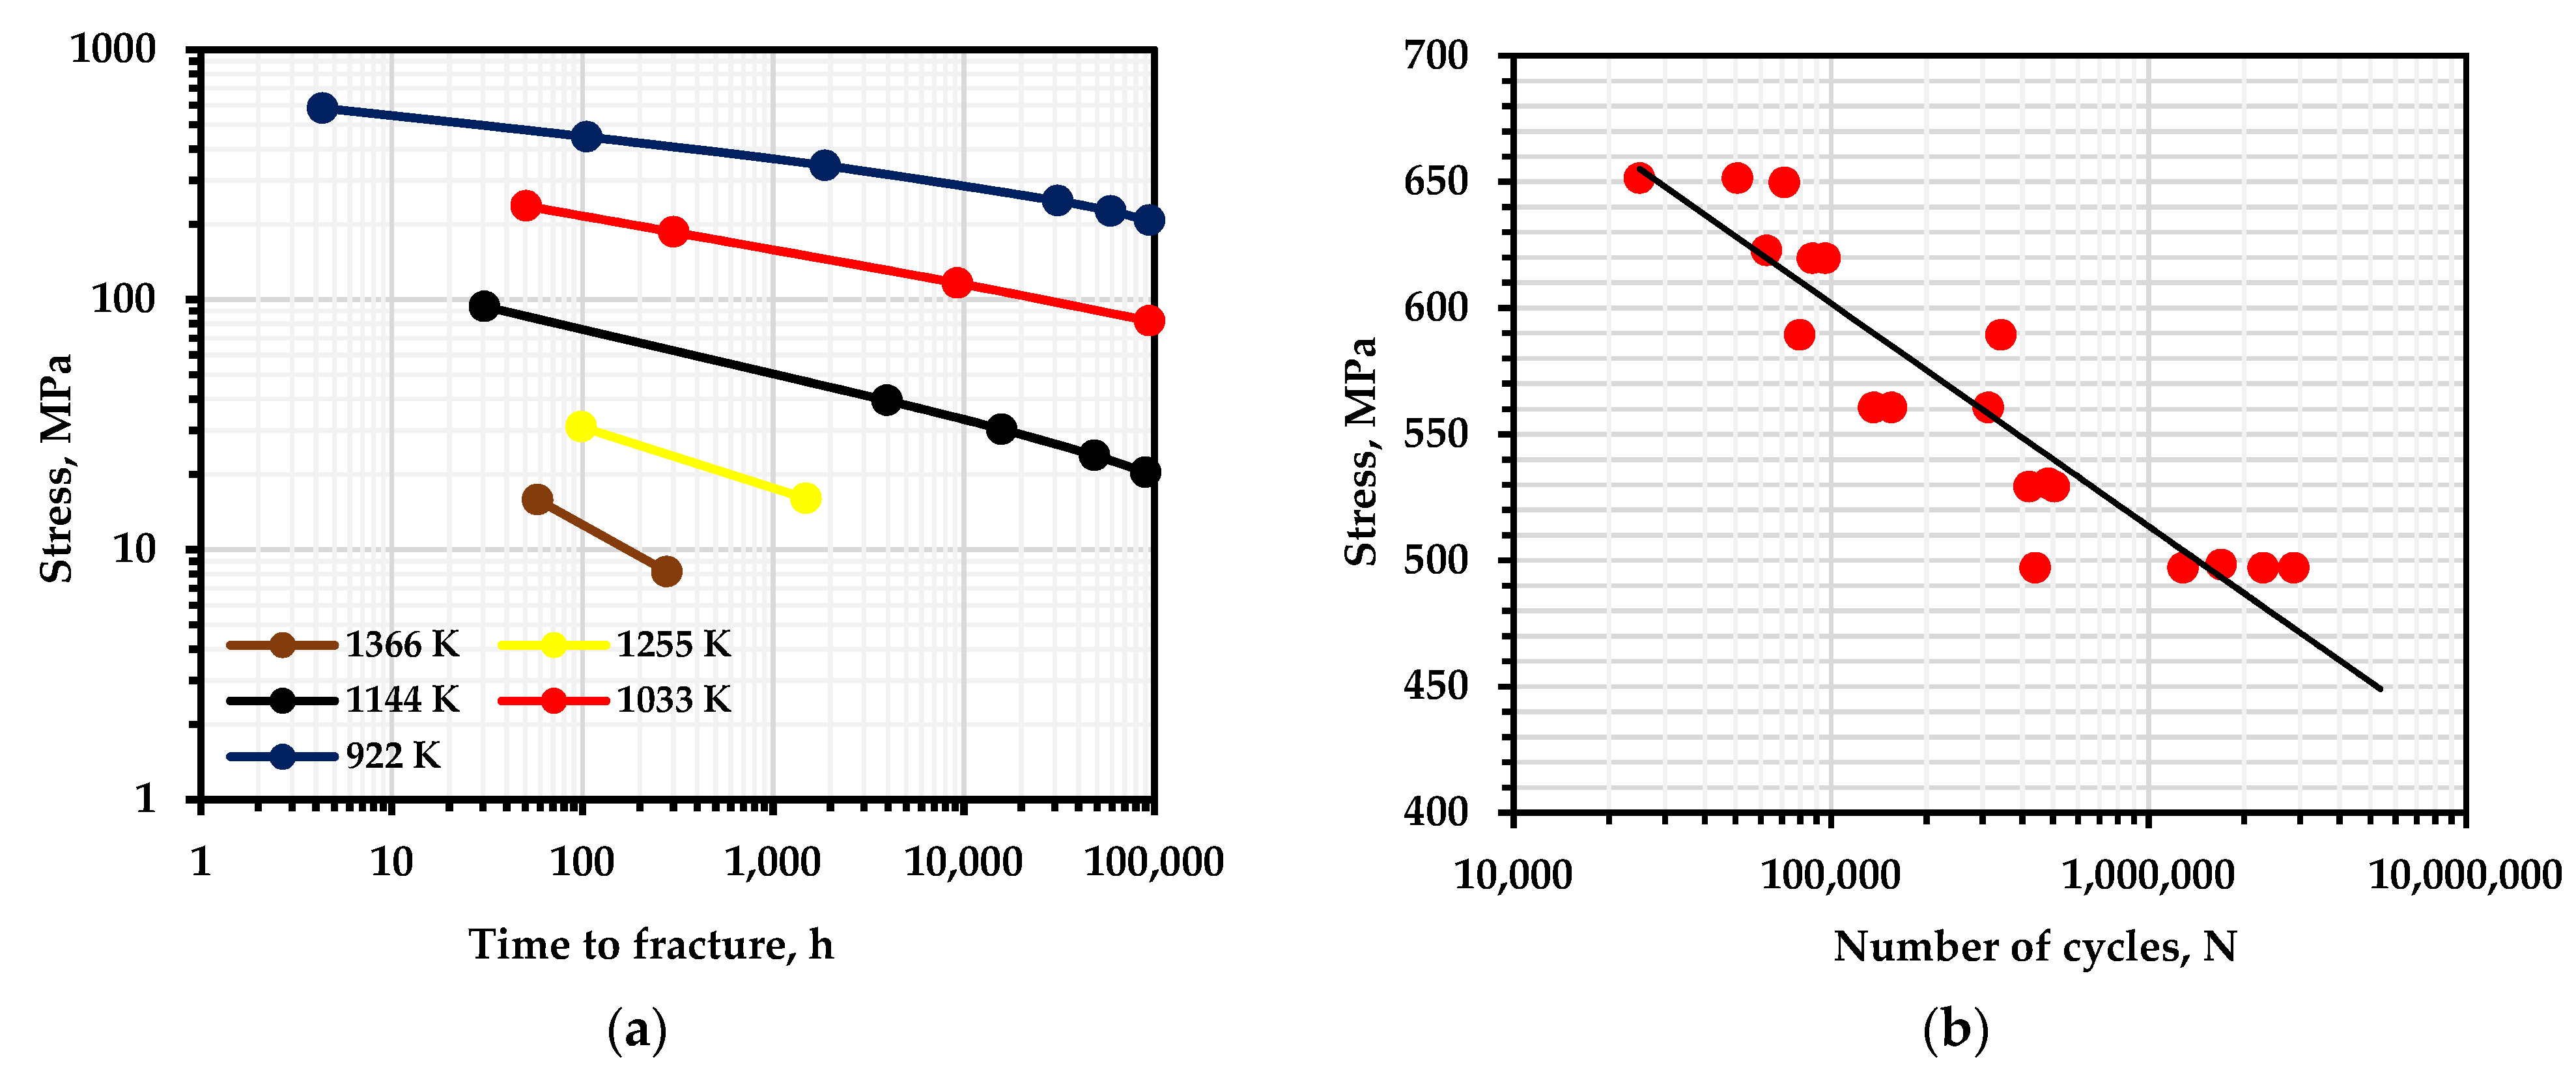
For the benefit of engineering practice, methods for estimating the parameters included in the durability formula should be accessible, non-cumbersome, and consider as many processes as possible that occur during the destruction of bodies with a minimum of empirical coefficients. The traditional assessment of activation energy is based on the data concerning static strength with help creep curves to failure, for example, for nickel alloy 625+ (Figure 1a). Based on Equation (2):
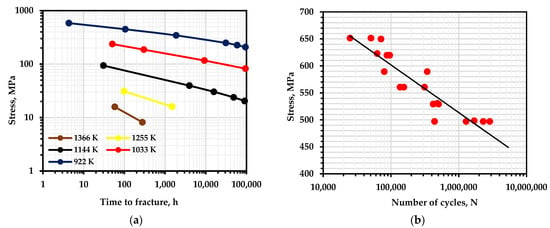
Figure 1.
Durability curves: (a)—creep [44]; (b)—fatigue at 300 K [45] for nickel alloy 625+.
Extrapolating the axis at the point , we obtain the value of the stable parameter , which is stable with respect to the structure (Figure 2a).
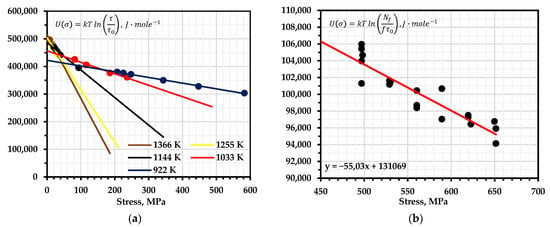
Figure 2.
Graphical interpretation of the determination of the activation energy of the destruction of nickel alloy 625: (a)—for creep processes; (b)—for fatigue failure processes.
Fatigue curves of the corresponding alloys are used to estimate under cyclic loading (Figure 1b). Such a method of estimating (Figure 2b) can be simplified without analyzing the contribution of such phenomena as relaxation during loading cycles, temperature overheating, cycle shape, sinusoidal loading shape, and structural adjustments during prolonged loading, which were mentioned earlier, as follows:
where is the number of cycles to failure; is the loading frequency.
I. G. Grabar used the data on the fatigue curves of BCC and HCC metals to estimate the thermal fluctuation parameters and proposed an equation for calculating based solely on the data of the fatigue curves:
where and are the values of the number of failure cycles and the stress of two points on the fatigue curve, respectively; is the loading frequency.
The author notes that the process of destruction in the multi-cycle zone is controlled by a single mechanism of atomic bond breaks, as well as by the fact that the values of determined by fatigue curves are much smaller than those determined by the curves of long-term strength (creep), as can be seen from our calculations (Figure 2). In addition, the activation energy is dependent on the frequency of cyclic loading for fatigue failure. With a decrease in frequency and its approach to zero (static destruction), an increase in activation energy was observed almost twice, but with a value of and more, the activation energy remained stable for a large number of samples.
To express the process of damage accumulation as an irreversible process during loading, interpreting the degree of destruction from the standpoint of the kinetic concept of strength, the Bailey criterion is most often used [46]:
where is the time dependence of the stress under loading.
To evaluate the parameters of the temperature–time dependence, it is necessary to ensure the constancy of the structure (the structure-sensitive parameter ) over the entire temperature range. This requirement coincides with the need for the constancy of the structure in experiments to measure durability at . In the loading cases under consideration, this condition is fulfilled when the discontinuous deformations at different temperatures are approximately the same, as long as there is no restructuring of the structure under the influence of temperature. The simplest case is the destruction of a sample with small elastic deformations, when, under the conditions of measuring the deformation curve, the stress changes in time according to a linear law.
Then, in order to express the initial activation energy from the uniform loading condition, we perform the transformation of expression (7) by substituting , where is the loading rate:
To calculate a structurally sensitive coefficient based on the results of static destructive tests (“lethargy coefficient”), Song [47] proposed a general expression that confirmed its applicability in a number of works on the evaluation of fatigue life from the standpoint of the kinetic concept [48,49]:
where
where is the time until failure during static tests and is the destructive load.
Another expression for estimating and for the case of fatigue loading was presented in the framework of the Moghanlou model [48], which will be discussed in more detail later. The parameter is determined using the Lambert function, :
where
as well as are stresses and the corresponding number of cycles to failure under two temperature ( and ) and frequency ( and ) modes. The obtained value of the structural coefficient is used to calculate the activation energy:
where is the number of cycles to failure at the stress level .
The models and calculation methods mentioned above will be used further for a comparative assessment of the temperature–time dependence parameters determined using a multilevel AE model.
2.2. Acoustic Emission
Acoustic emission is a phenomenon and a non-destructive testing method that has become popular among researchers and engineers over the past few decades. This method is most often used to track the processes of the destruction of materials and is based on the release of energy “inside” the material during loading, followed by the registration of signals on converters. Acoustic signals propagating through the material in the form of an elastic wave have a number of parameters related to the characteristics of the signal. Many techniques and signal models have been proposed for the identification of destruction using AE [50], along with approaches to evaluating the service life of technological equipment [51]. AE is a passive control method that has earned recognition due to its excellent ability to detect and localize dynamic defects. The main sources of acoustic emission from the standpoint of traditional strength concepts are plastic deformation, the origin and propagation of cracks, and the rupture of bundles between micro-voids [52]. In addition, as indicated in [53], acoustic emission makes it possible to track the development of an ensemble of defects of different scale levels over time; this distinguishes it from other control methods.
However, there are many questions about which criterion should be selected as an indicator of destruction and a means of monitoring the accumulation of damage. One of the most frequently used AE parameters is the total AE count [54]. Based on the total AE count, several diagnostic parameters have been proposed. In [55], the brittle and ductile natures of the destruction of four structural steels were determined by the time dependence of the total count in tests to assess the fracture toughness. L.R. Botvina focused on the feasibility of using the total count to identify the degree of accumulated damage in pipe steel and the stages of destruction after preliminary cyclic loading [56,57]. She also proposed the parameter , [54] denoting the slope modulus of the straight line of the AE signal amplitude distribution, and in [58] this parameter is used to characterize damage modes in AlSi10 Mg samples. In his study [59], Williams used the angle of inclination of the logarithm of the total acoustic emission count relative to the displacement of the crack tip and stress in COD tests to determine the zone of its stable propagation. In [60], it was noted that the change in the slope of the curve of the total energy of acoustic emission accurately reflects the change in the nature of deformation and corresponds to the deformation curve at quasi-static fracture for A572 steel of the grade 50. To estimate the crack point based on AE energy, Sajad Mostafavi et al. proposed the sentry function parameter [61] as a characteristic of the balance between the released energy during destruction and the accumulated energy of plastic deformation.
AE activity was used to differentiate the stages for a pre-cycled aluminum alloy 6061-T6 reinforced with SiCp, wherein this activity was associated with the separation of particles and matrix and the binding of voids [62]. Several acoustic emission models have been proposed based on both the dislocation theory [63] and the kinetic concept of strength and use the Zhurkov equation to characterize the fractures [50].
2.3. Multilevel Model of Acoustic Emission Pulse Flow
This approach is based on the kinetic concept of strength, which is founded on the Zhurkov formula, the rule of linear summation of damage, separation of destruction at the stage of fine accumulation of microcracks in the stressed zone in front of the developing concentrator, and subsequent unstable crack growth. The method is also based on the consideration of structural (inherent in a real object) and metrological (associated with AE equipment) heterogeneity. The approach does not require complex calculations, allows us to distinguish the stages of destruction using cumulative characteristics of AE, and can be used in engineering practice [64].
As mentioned above, during the loading of an object under heavy loads, competition is assumed between the processes of the breaking of atomic bonds leading to the formation of microcracks and the phenomena of restructuring the structure during plastic deformation (Figure 3). This process relates with the following reasons:
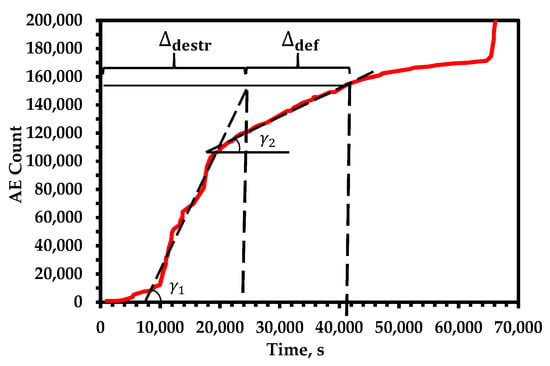
Figure 3.
The destructive and deformational components of the tensile strength of nickel alloy 625.
- The process of breaking bonds, from the point of view of the authors, is decisive in destruction and retains its kinetics during structural rearrangements under uniform loading, which compete with acts of destruction in the field of AE signals [9];
- The activity of acoustic emission for structural steels during plastic deformation is characterized by low values, and the process itself is relatively “quiet” [65];
- From the point of view of the kinetic concept of strength, the accumulation of damage through the formation, accretion, and further growth of microcracks is a continuous process throughout most of the life and at multiple levels simultaneously—it starts to occur at low stresses due to the nature of the thermal fluctuation of the rupture of bonds at the tops of cracks [23];
- From the point of view of applying the approach to real objects, plastic deformation at diagnostic loading is unacceptable—the elastic deformation stage is taken as the determining stage for AE diagnostics.
According to several studies, a large surge of AE signals occurs at the end of elastic deformation—during the transition to macroplastic deformation, when crack development becomes uncontrolled [66,67]. This is associated with the resulting avalanche of dislocations during the generation and multiplication of dislocations due to the operation of Frank–Reed sources and grain boundaries, as well as with the movement of dislocations during flow. The decrease in AE activity beyond the yield point is due to the reduced rate of avalanche formation of dislocations and the reduced sliding distance of dislocations [65]. Moreover, as reported in [65], the occurrence and movement of dislocations at an early stage of deformation to the yield point increases the amount of signals with a low peak amplitude. D. Fang explains the nature of signals below the yield point as a “saturation” process, in which the movement of dislocations begins in the elastic deformation region, reaches a maximum just beyond the yield point, and, finally, tends to saturation. At the same time, in addition to dislocation movements, the source is the destruction of inclusions and twinning, which are still difficult to separate from each other from the point of view of processing AE signals.
In [68], for prestressed A533B steel samples, the need for diagnostic indicators that would be associated with the kinetics of damage accumulation for brittle materials or prestressed steel structures was shown, since the total count curve did not show significant differences between different levels of prestressing. Shun kai Li compared the activity of AE at the stage of elastic and elastic–plastic deformation for aluminum alloy, cast iron, and steel [69]. All three materials showed a significant increase in the number of AE signals before the transition to plastic deformation, however, cast iron had less activity.
The multilevel model is based on recording reference structural elements’ (grains, fibers, etc.) times of destruction during loading. For this purpose, a stage of homogeneous destruction is allocated, at which the probability of destruction of such elements is equally likely and there is a kinetic feature common to such elements, namely, the angle of inclination of the logarithm curve of the total AE count.
The time to destruction in this case will be determined by the time corresponding to the moment of accumulation of the critical concentration of microcracks . The stage of homogeneous destruction is defined by the following expression:
where is the initial concentration of structural elements in the sample.
Converting expression (16) yields:
where is the time of thermal fluctuation destruction of a structural element in accordance with the Zhurkov formula.
Then, the concentration of microcracks during quasi-static loading with a constant velocity is described by the following formula:
AE control is influenced by a number of factors that interfere with the identification of AE sources and the separation of the parameters of the fracture process, which need a metrological parameter linking the number of AE pulses and the number of destroyed structural elements formed during the rupture of atomic bonds at the tops of microcracks. To achieve this, an acoustic emission coefficient is introduced, which is characterized as an acoustically active volume:
where is the volume of material subject to control (macro level), while is a function of the density of the distribution of AE signals over the duration of pauses between signals , frequency , and amplitude . The meaning of the integral of this formula entails the probability of the registered signals entering the range of the corresponding AE parameters. The parameter that contains information about the number of destroyed structural elements in the model can be one of the cumulative parameters of the AE (total count, total energy, amplitude, etc.):
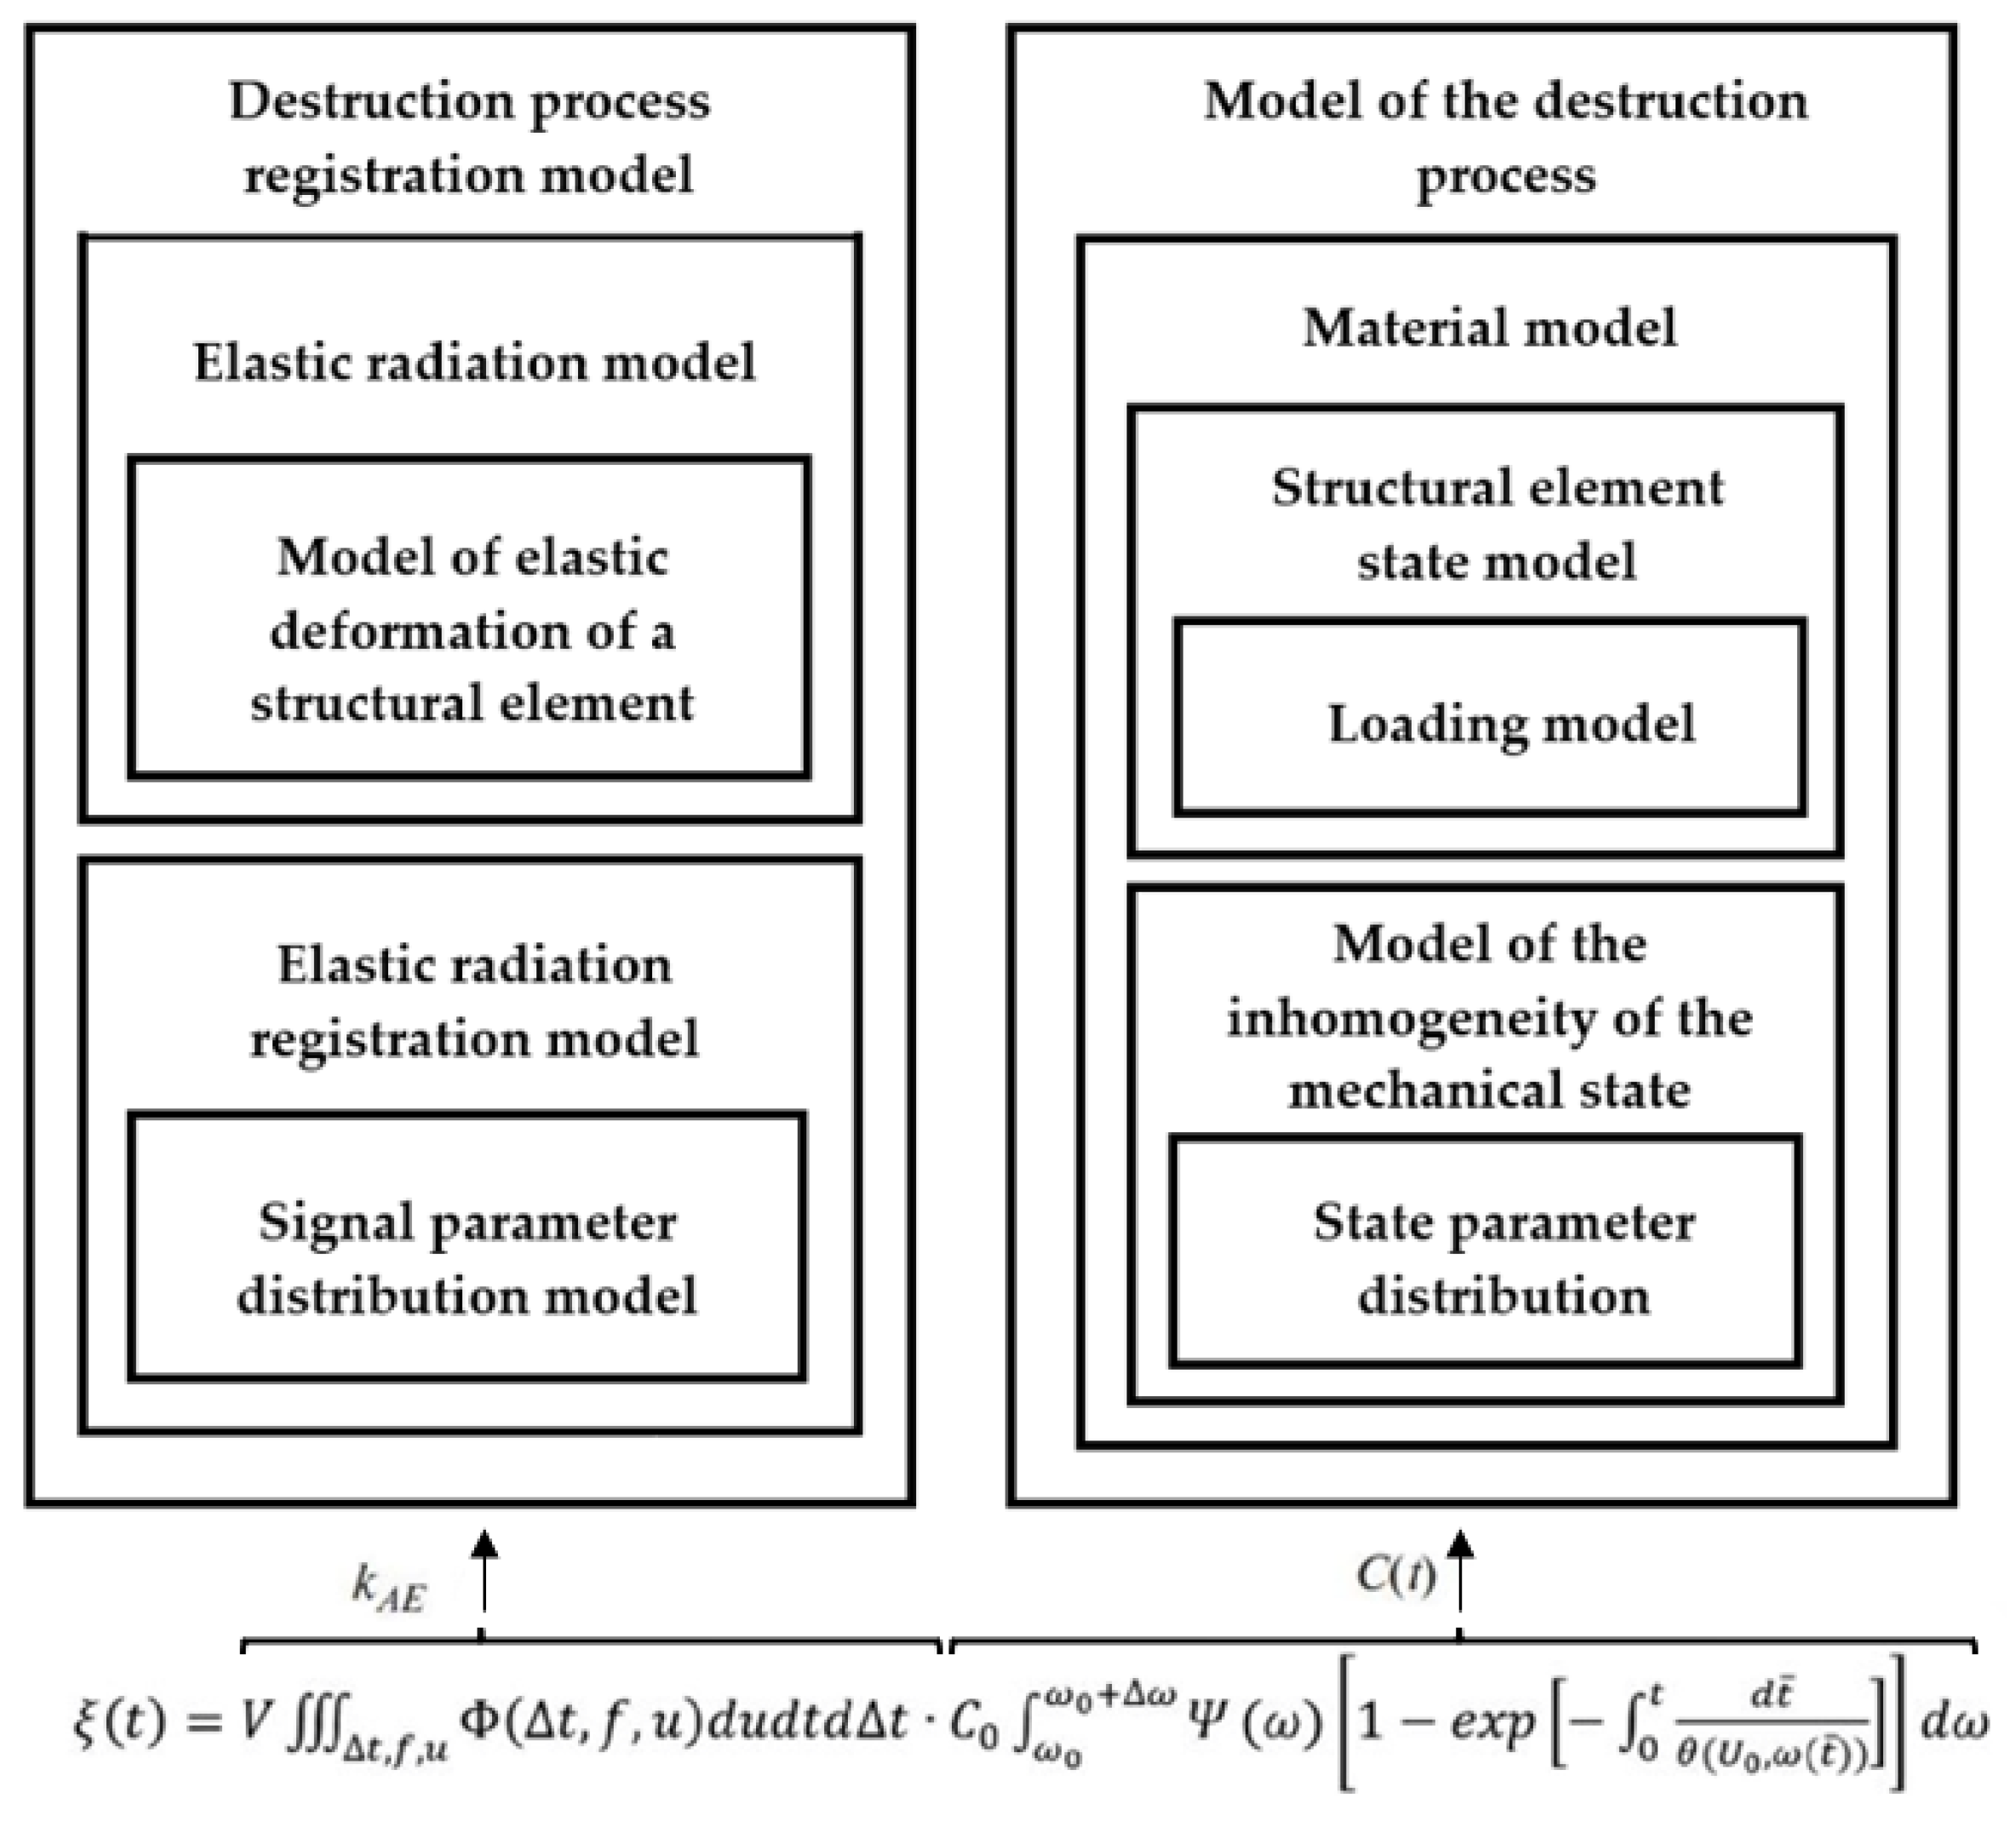
Equation (20) is a multilevel AE model (Figure 4) [9]. According to the kinetic feature (linear sections of time dependence), two stages of the finely dispersed destruction stage are separated: heterogeneous, which is characterized by instability of AE, and homogeneous, which is more informative in relation to strength and having a stable indicator of the rate of “failure” of structural elements.
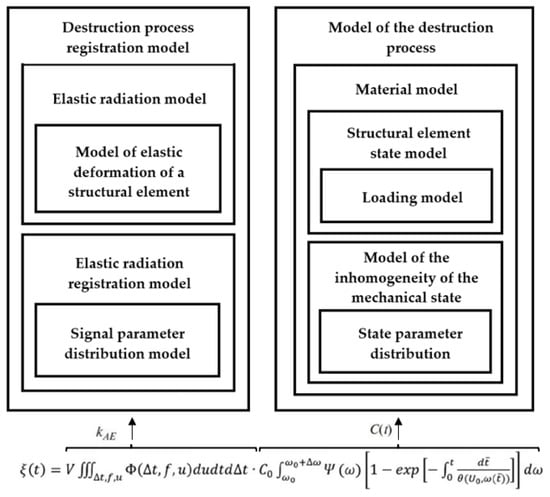
Figure 4.
Block diagram of a multilevel model of acoustic emission pulse flow.
According to the model, the basis for strength and durability control is the intensity of the current stage of homogeneous elastic destruction of the structural elements of the material, which can be traced at different scale levels. The nanoscale, which is of the order of atomic bonds, is described by the kinetic nature of destruction during thermal fluctuations under stress. Tracking at the micro level takes place using the kinetics of AE parameters and microcracking processes. The macro level is expressed in the number of worked loading cycles or the time sustained under the load of the entire object before destruction.
The destruction process is divided into stages of finely dispersed (scattered over the volume of the object or locally grouped in the defect area) microcracking, which includes the stages of heterogeneous and homogeneous destruction and localized macroscopic discontinuity. At the second stage, an enlarged, localized discontinuity occurs (the formation or growth of a crack), flowing elastically or plastically. The homogeneous stage is a period of stable “failure” of structural elements of approximately the same strength, which proceeds until the accumulation of a critical concentration of microcracks.
The stage of homogeneous fracture is associated with the accumulation of microcracks in the area in front of the top of the crack. If the sample does not have a distinct concentrator, then the stage of homogeneous destruction comprises about 60% of the first stage of destruction. Otherwise, when a concentrator has already formed during the fusion of pores and germination of microcracks, the stage of homogeneous destruction lasts for a shorter period of time. To separate the stage of homogeneous destruction with the help of AE diagnostics, three signs are used:
- Kinetic—approximation of the time dependence of cumulative AE parameters by homogeneous destruction (determination of the linear section of the AE dependence in semi-logarithmic coordinates) (Table 1);
 Table 1. Diagnostic features of destruction phases and service life appraisal formulas.
 - Statistical—taking into account the stabilization of the values of amplitude, frequency, and pause distributions of AE in a temporary area of homogeneous fracture;
- A sign of elastic deformation—the accumulation of micro-damage corresponding to homogeneous destruction which occurs before the beginning of structural rearrangements during plastic deformation in the upper region of direct elastic deformation.
The time dependence of the number of AE pulses, as a special case of the parameter , is expressed at this stage as:
After simple transformations of Equation (21), we obtain a number of diagnostic parameter-concentration-kinetic AE strength indicators:
The obtained parameters are resistant to the problems of AE equipment and control, consider the heterogeneity of the structure, allow one to track changes in the mechanism of destruction, and can be used in various models for assessing the resources based on the kinetic concept of strength. Considering the form of expressions (21), (22), and (23), in order to separate time period of homogeneous destruction in the time dependence of the logarithm of the AE parameter, it is necessary to select such a linear section, which corresponds to the exponential nature of the curve of the AE parameter itself.
The distribution of the structural inhomogeneity parameter over the structural elements of the material is bell-shaped, as will be shown below. At the beginning of loading, the most fragile elements with a high value of “fail” from the region of the “tail of the distribution”. Due to the large variation in the coefficient , the AE parameters at the initial stage are unstable; as a result, at this stage of destruction (inhomogeneous), the angle of inclination of the time dependence of the logarithm of the cumulative AE parameter has high values, representing an initial spike in dependence. After this stage, elements from the “distribution bell” with smaller but relatively equal values of begin to collapse. In the absence of data on the statistical characteristics of the AE parameters, a linear section of the logarithm of the AE parameter with a smaller angle of inclination is used to isolate the homogeneous fracture stage, which is usually in the upper part of the elastic deformation dependence. The rupture of structural bonds, which proceeds until the point of destruction, is determined by the kinetics of the selected stage with the most stable values of the parameter .
To calculate the activation energy of destruction in accordance with the proposed model, we use the expression (21). Provided that is the time before destruction, is the critical concentration of microcracks, and is the destructive stress or tensile strength, then we obtain:
We use the proposed concentration-kinetic parameters and . We also consider that less than 10% of all bonds in the material during thermal fluctuation destruction are overstressed and responsible for strength [6]. This corresponds to the critical value ; then, the formula for calculating the activation energy is expressed as:
The structurally sensitive parameter can easily be estimated from Equation (23).
2.4. Experimental Data
For the purposes of the paper, a literary review was carried out with respect to scientific publications regarding the results of AE registration during static destructive tests with increasing load. All data sets were obtained during tests of various structural steels and alloys under varying temperature and force conditions of the experiment.
Most of the data sets comprise fracture toughness tests in which AE signals were recorded. These are traditional tests that are very common in engineering practice. Due to the representativeness and accessibility of the data, they can be used to develop approaches based on kinetic equations.
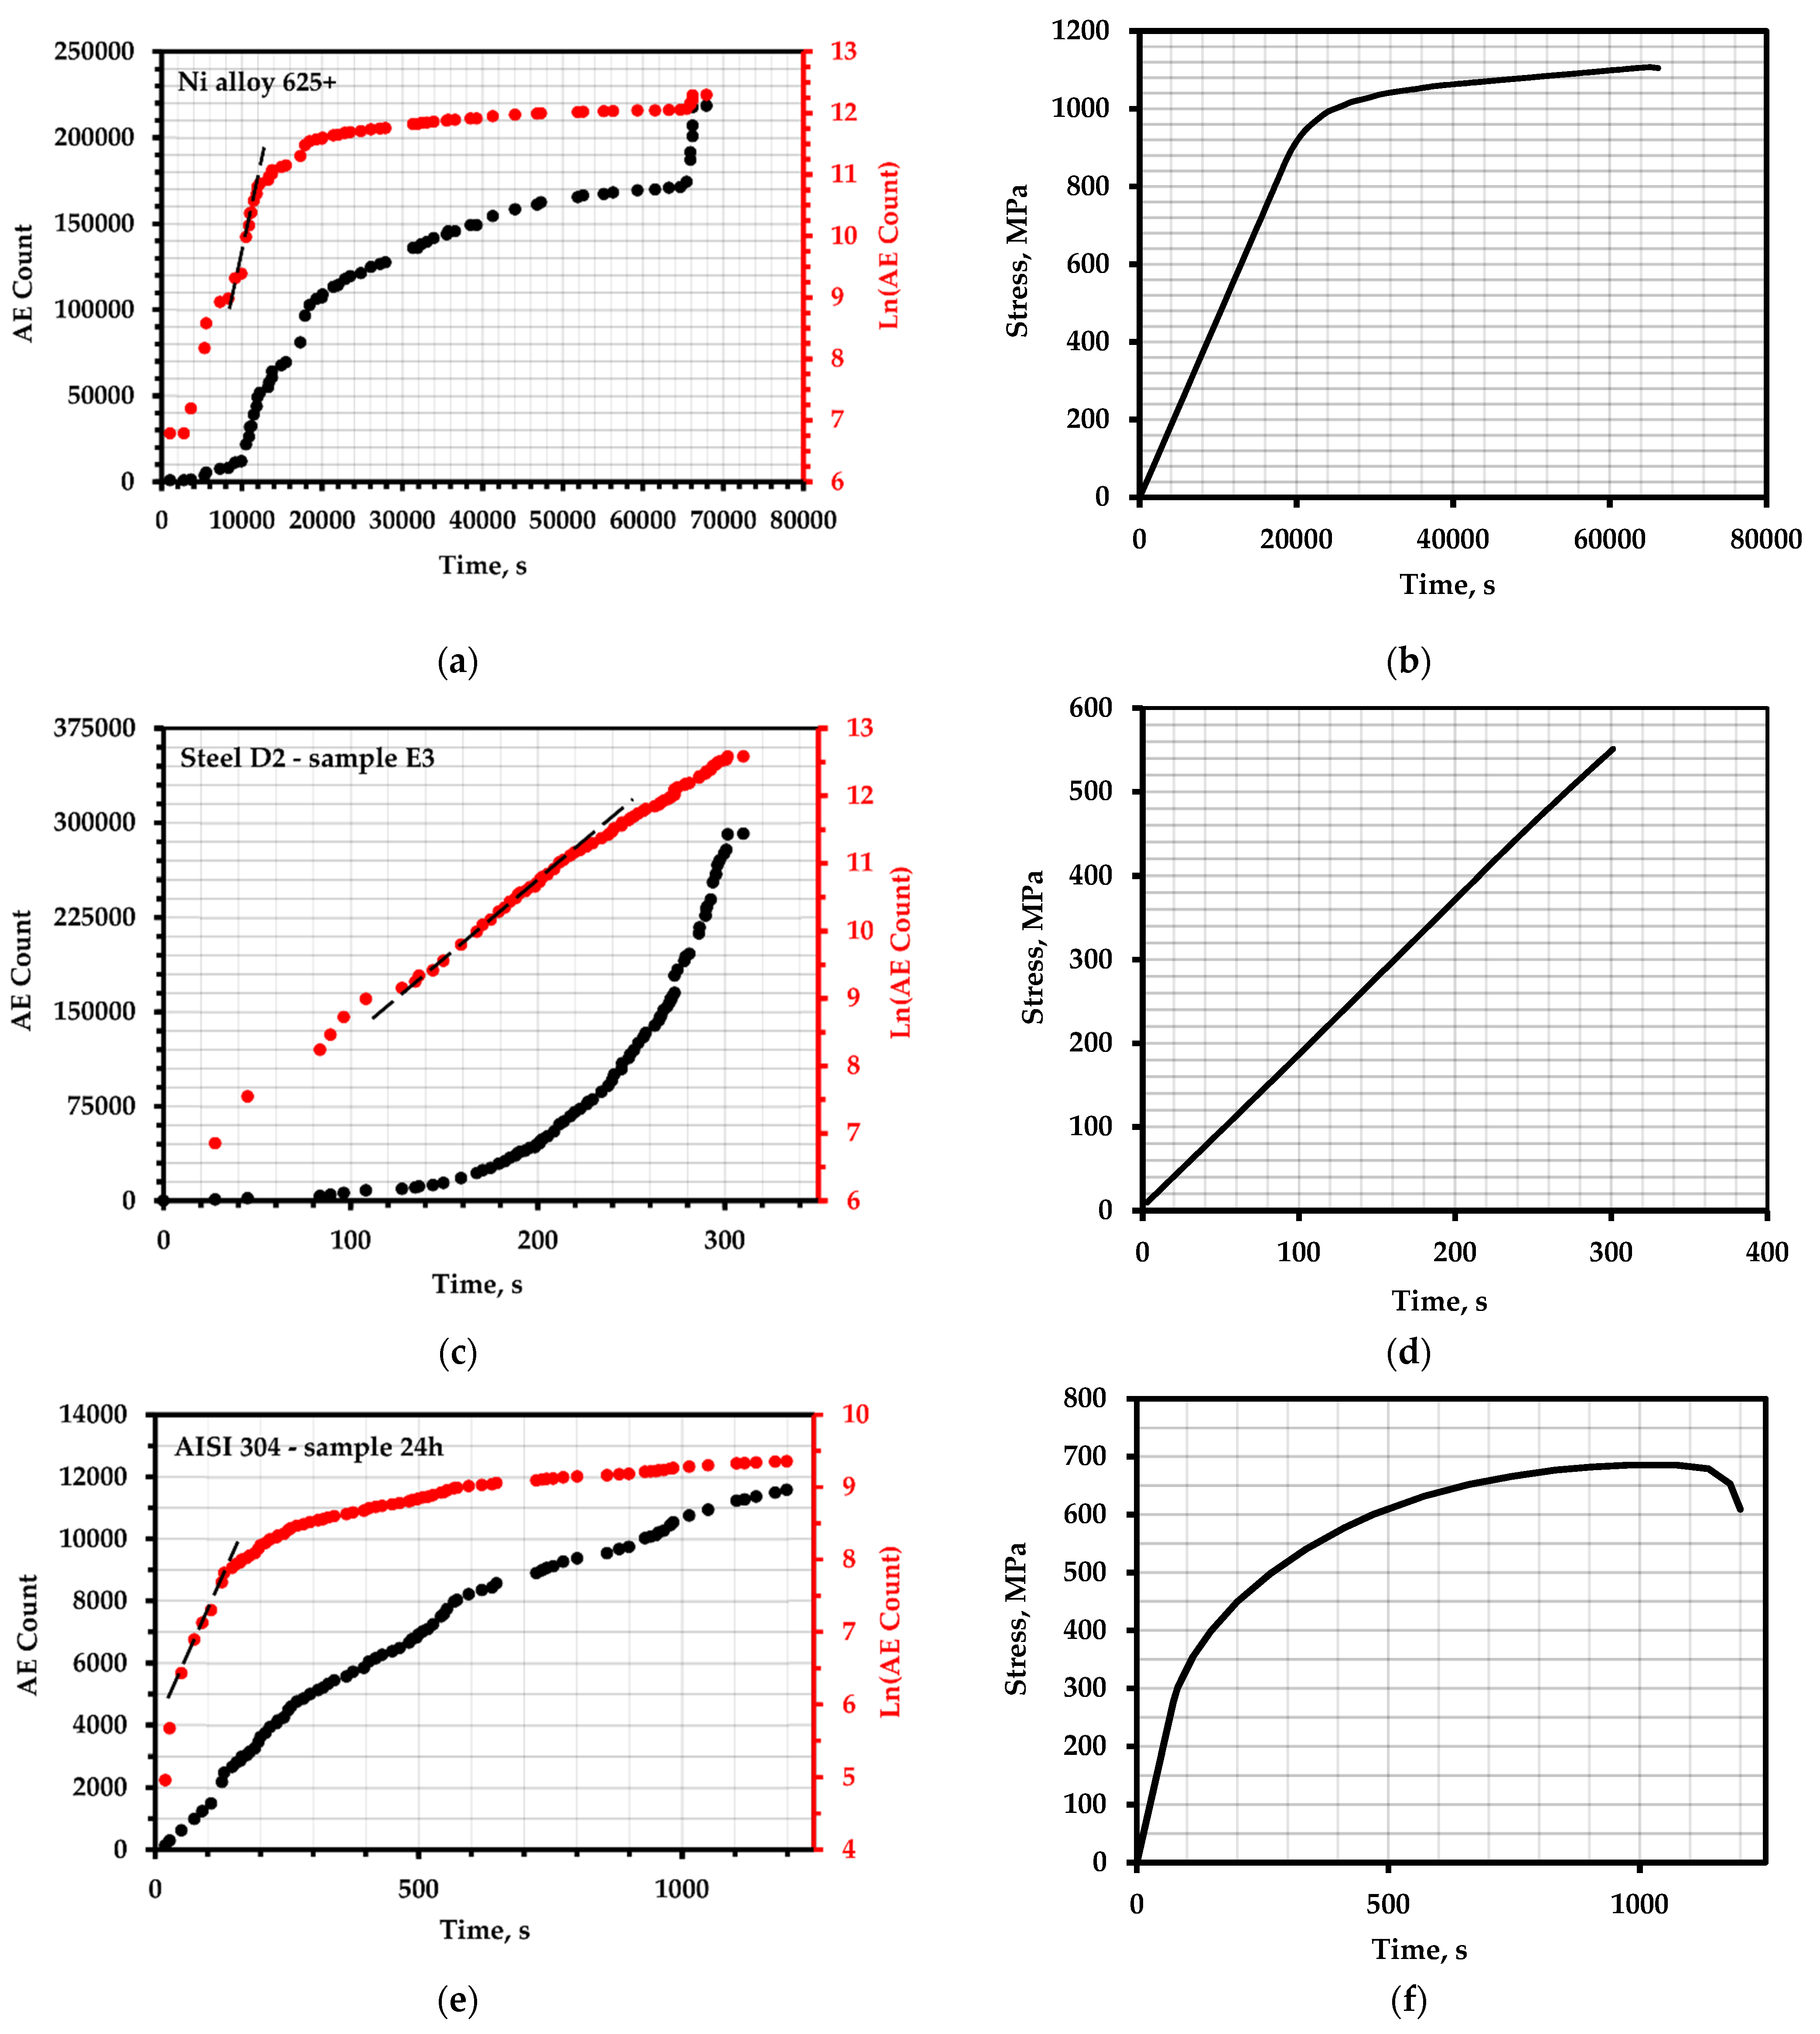
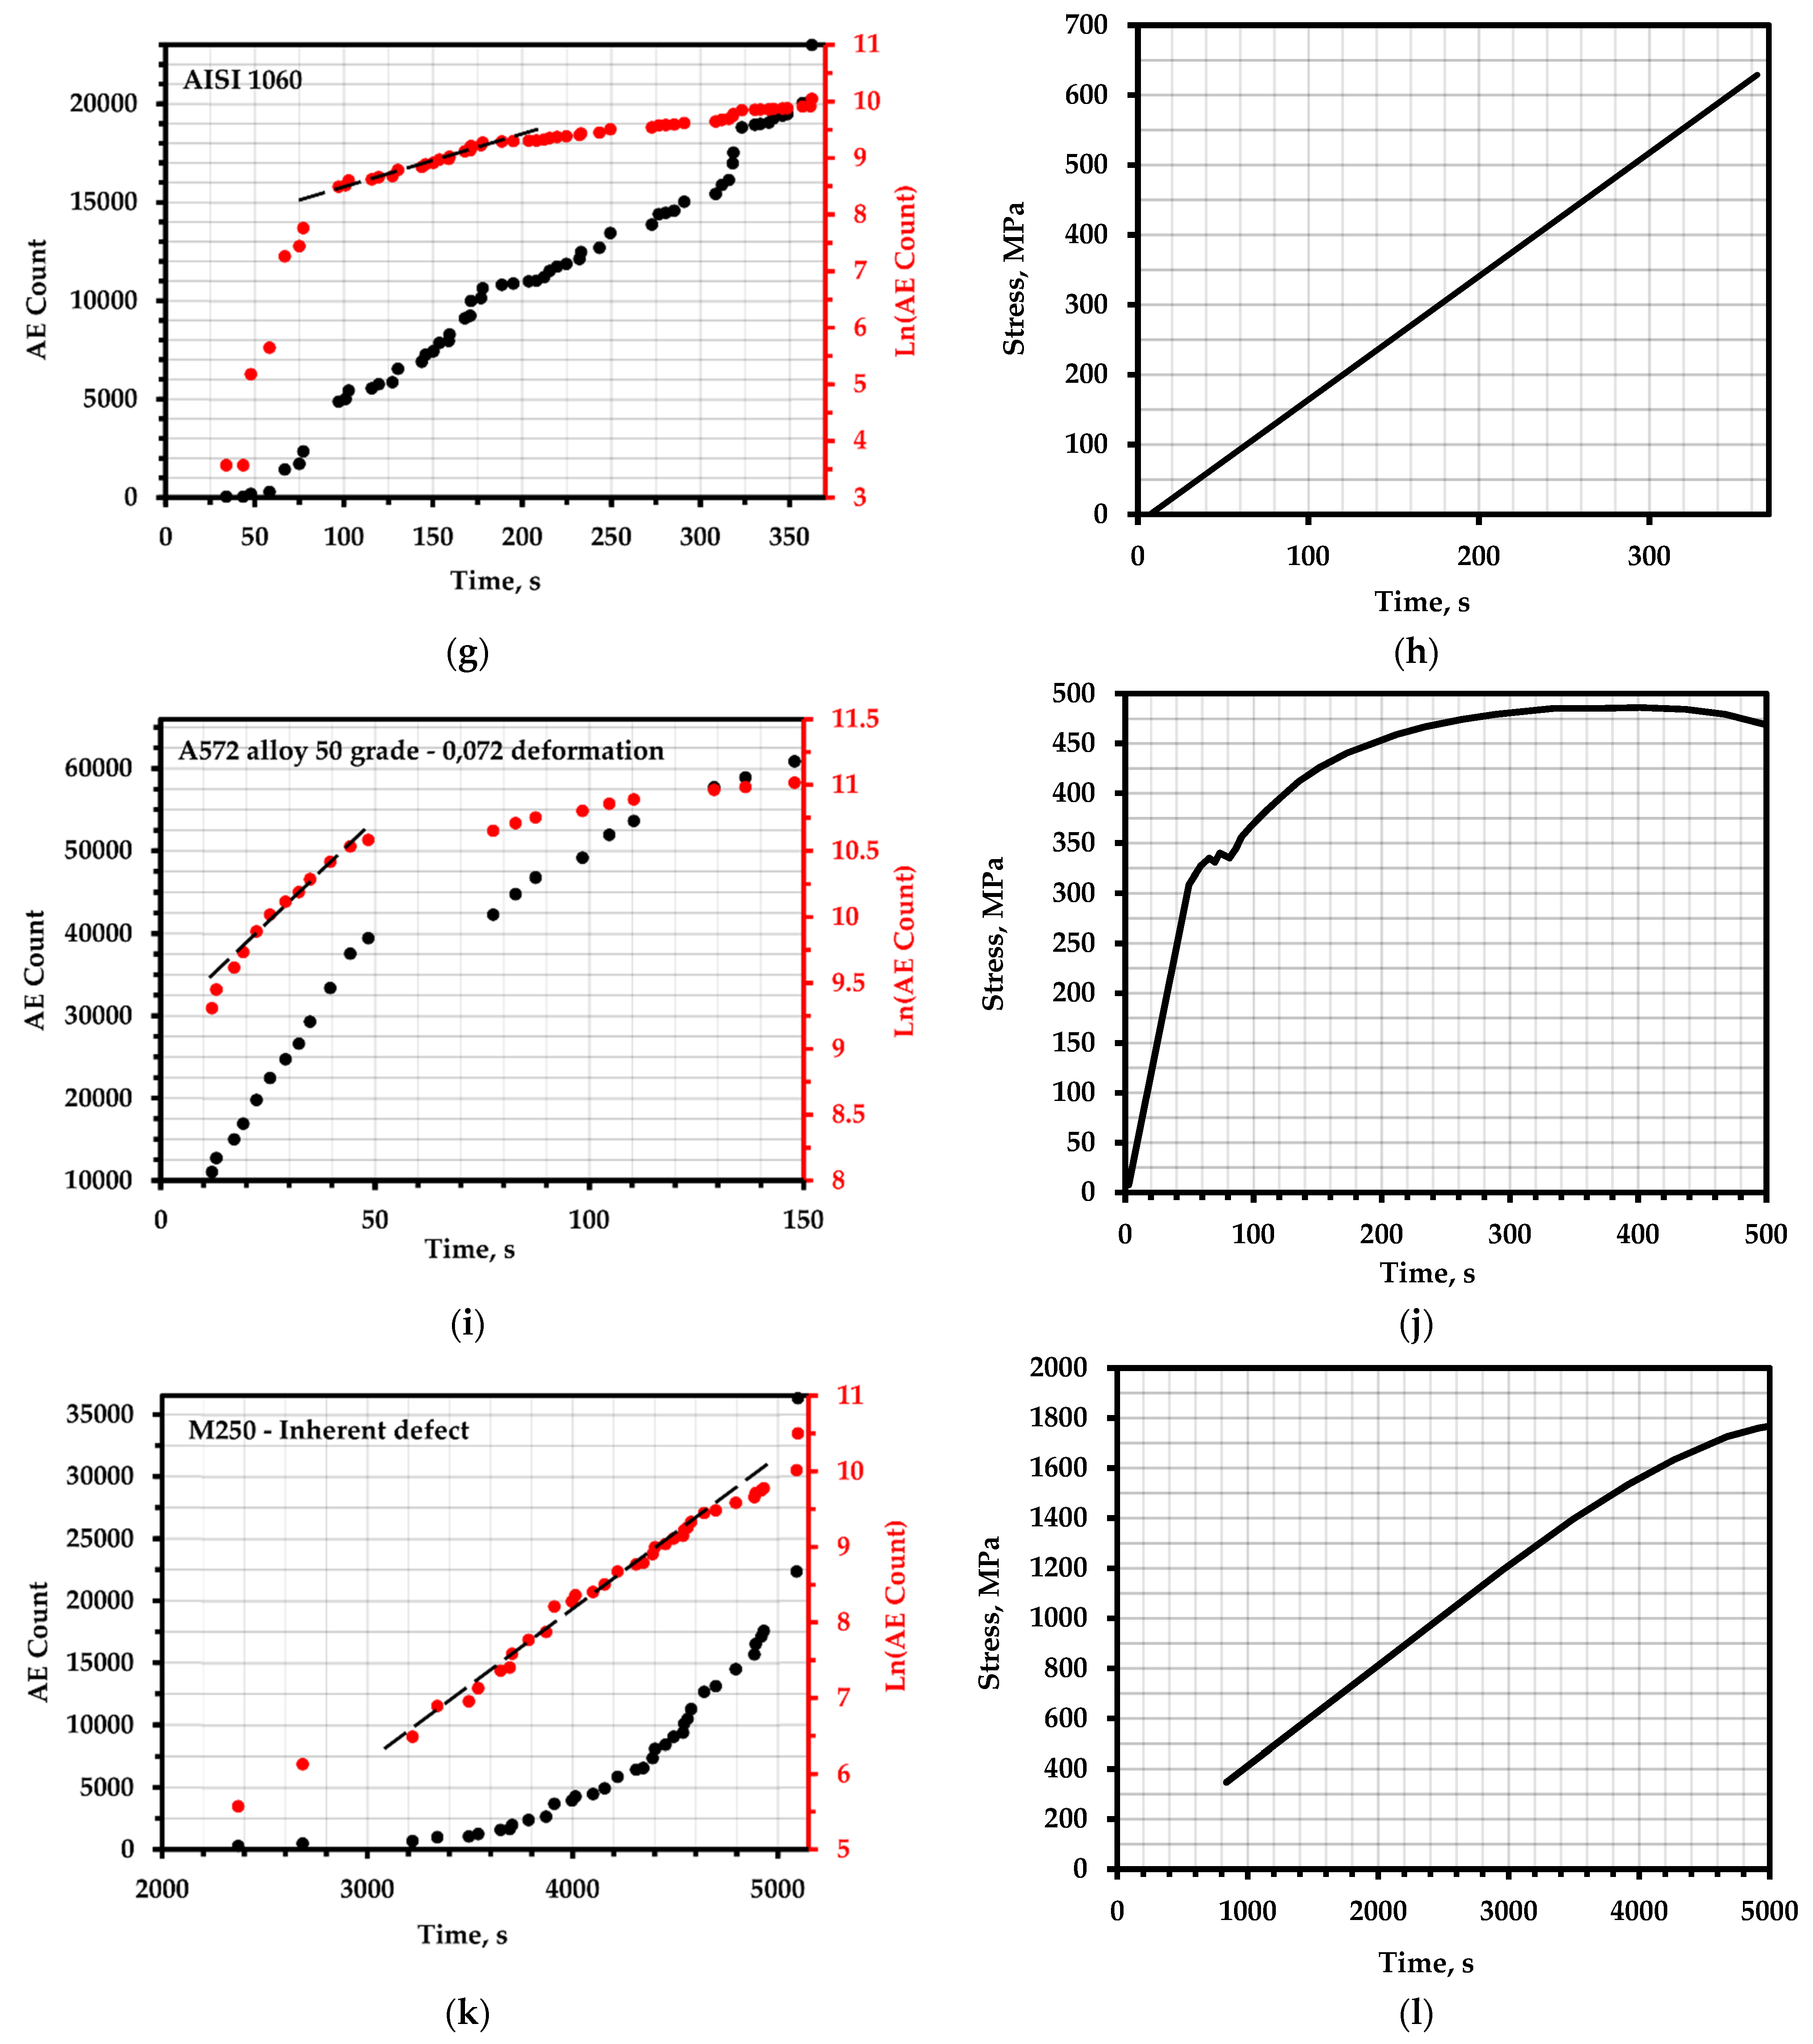
With the help of cumulative acoustic emission characteristics, the durability parameters and the destructive load were calculated for subsequent comparison with real values. We will briefly describe the conditions of each experiment. Loading charts of some samples and test results in the form of a time dependence of the total AE count and the logarithm of the AE count are shown in Figure 5.
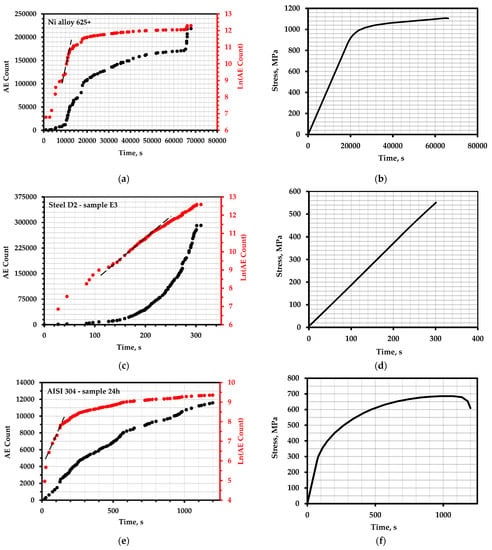
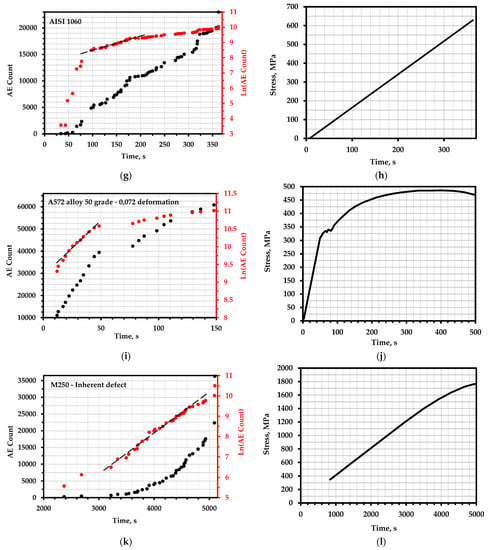

Figure 5.
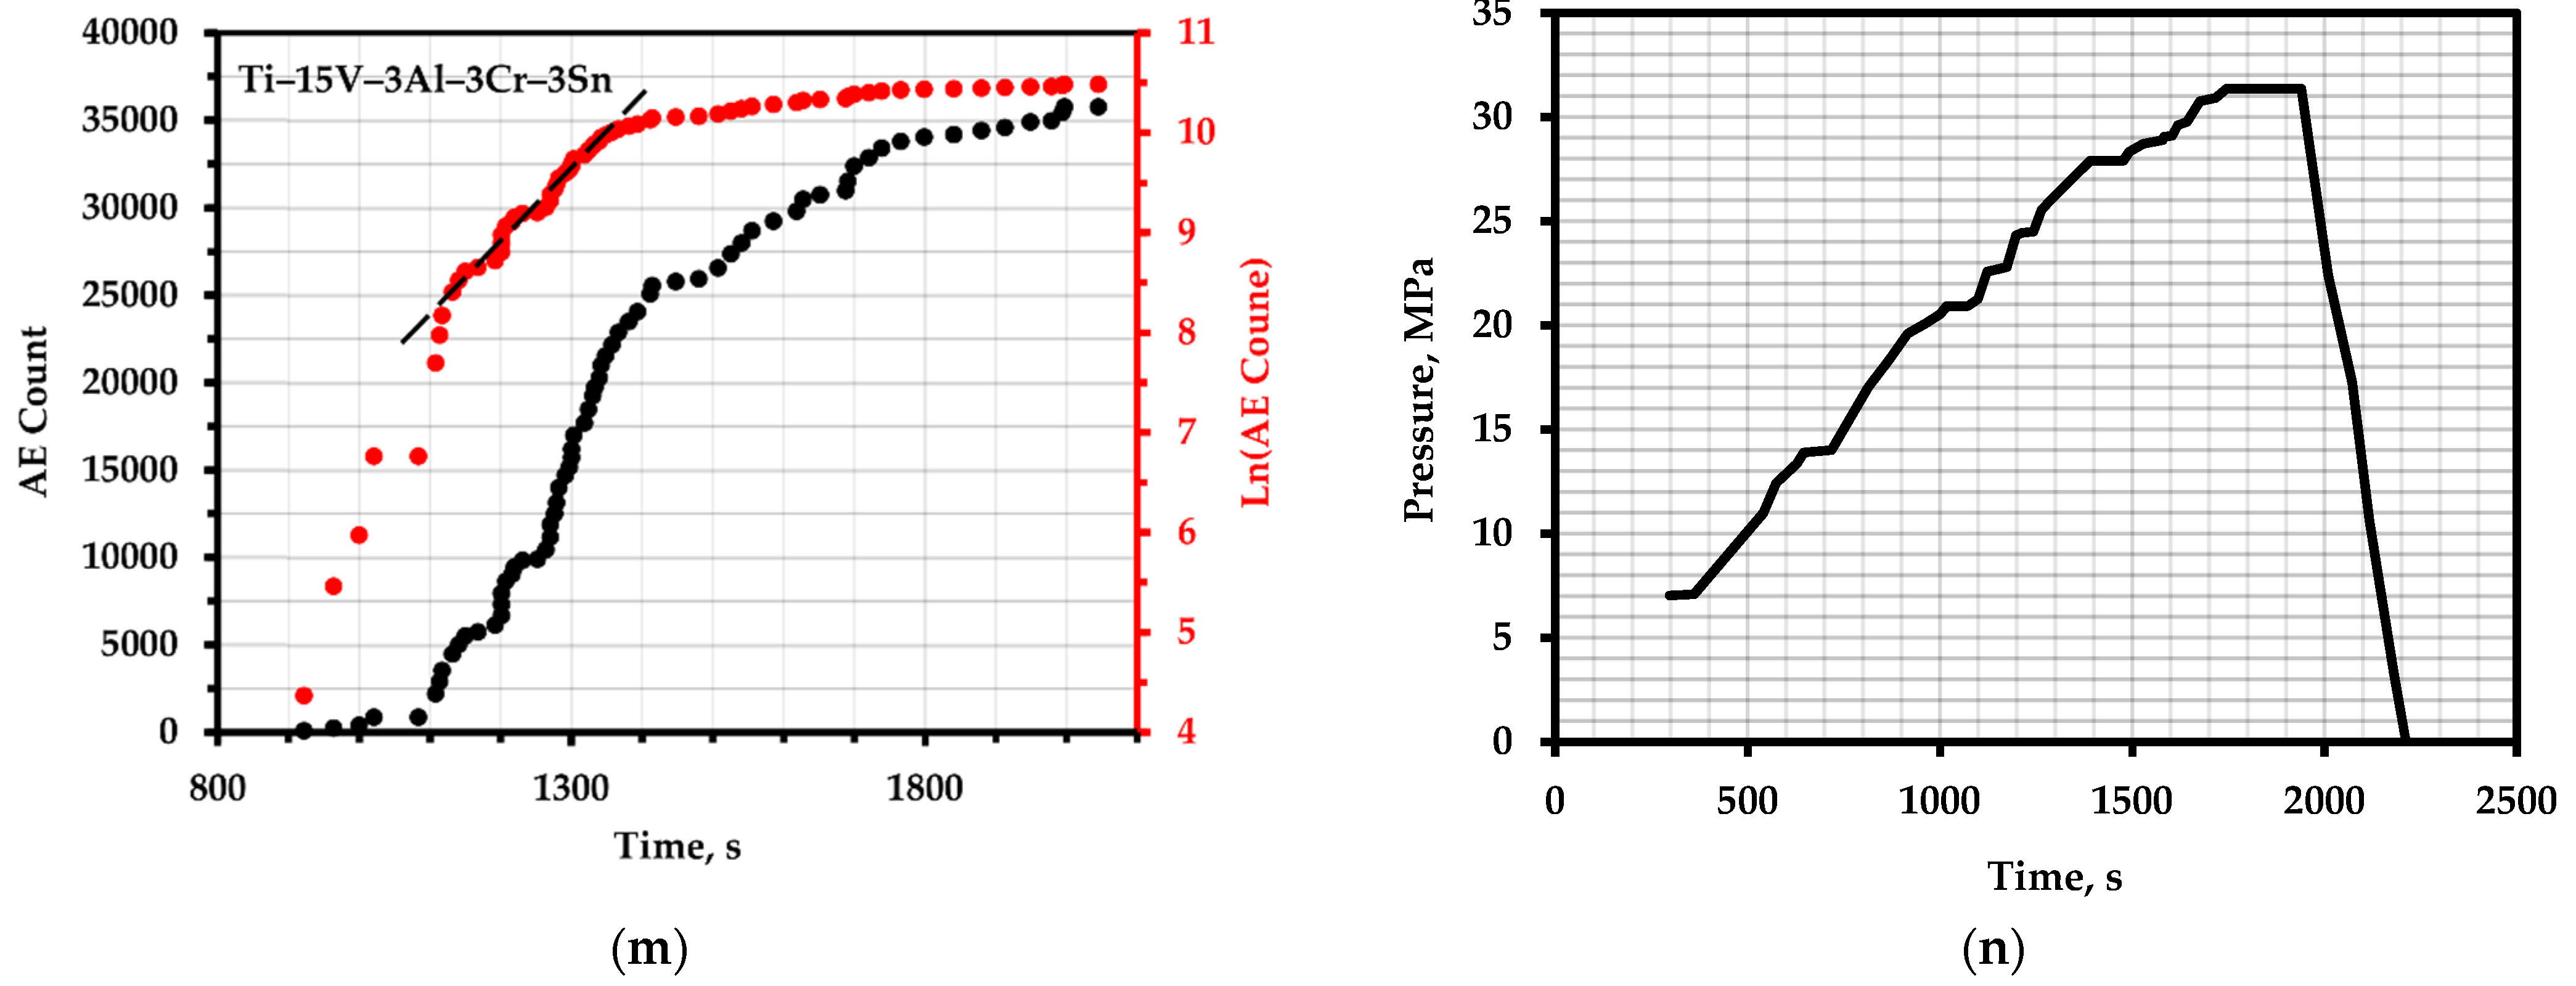
The total AE count and the logarithm of the total AE count over time: (a) nickel alloy 625+; (c) tool steel D2 (sample E3); (e) AISI 304 steel with 24 h exposure; (g) AISI 1060 steel; (i) A572 steel of grade 50 with a deformation value of 0.072; (k) M250 steel with hidden defects; (m) vessels made of Ti–15V–3Al–3Cr–3Sn alloy; (b,d,f,h,j,l,n)—corresponding loading schedules.
The authors of [70] investigated the effect of the slow deformation rate of the Ni 625+ alloy under conditions of electrochemical hydrogen charging. The experimental samples were obtained from a pre-hardened material with a formation of particles having a dense morphology and a cylindrical shape with a diameter of 3.81 mm and a length of 25.4 mm. During deformation at a temperature of 313 K, and at a deformation rate of 10−6 s−1 in a solution of 0.5 M H2SO4 with galvanostatic polarization applied with a cathodic current density of 5 mA/cm2, AE was monitored together with the registration of the total acoustic emission count. The moment of crack initiation corresponded to a stress of 1079 MPa. The data are shown in Figure 5a,b.
In their articles, Cevat Teymuri SINDI [71] and Sajad Mostafavi [61] conducted experiments to determine the crack resistance of AISI D2 tool steel using cumulative AE parameters, such as cumulative acoustic emission count (AECC), acoustic emission energy rate (AEER), and a combination of mechanical characteristics collectively referred to as the sentry function. Samples measuring 36 × 34 × 8 mm were obtained at different annealing times during processing. The paper presents the data of two samples annealed at 450 and 575 degrees Celsius for 1 h followed by air cooling. The notch for the subsequent formation of cracks was made according to the ASTM E399 standard and deformed on an Instron machine at a speed of 0.2 mm/min (Figure 5c,d).
The cited report presents the results of hydraulic tests of three spherical pressure vessels used in the aerospace industry [72]. The vessels were made in two different ways. One of the methods comprised spin molding and the tungsten inert gas (TIG)-welding process, and the other consisted of blow molding and solid-phase diffusion-bonding process. The first vessel, which was made of Ti–15V–3Al–3Cr–3Sn alloy with a diameter of 304 mm and a wall thickness of 4 mm, was designed for the storage of high-pressure nitrogen gas in the orientation system of the apparatus. The second vessel was a helium injection tank used to operate a valve actuator for the storage of high-pressure gaseous helium with a diameter of 180 mm and a wall thickness of 3 mm, which was made of Ti–6Al–4V titanium alloy. The tanks were loaded to a pre-destructive load (Figure 5m,n). The first of the nitrogen storage vessels was never completely disabled; it was loaded up to 31 MPa of internal pressure. The degree of deformation was measured using strain gauges. The testing temperature was room temperature.
The deformational behavior during a standard tensile test of AISI 304 stainless steel using acoustic emission parameters was studied by S. Sahoo [73]. A total of 4 flat (25 × 6 × 5 mm) samples were prepared with different holding times during processing after austenization at 1050 °C for 30 min. The deformation rate was 8.33 × 10⁻⁴ s−1 at room temperature. During the tensile test, the AE was converted by the AE sensors into an electrical signal; then, the signal was amplified by a constant rate of 40 dB and passed through a bandpass filter from 10 kHz to 2 MHz. For the analysis, in addition to cumulative counting (Figure 5e,f) of the AE, the RMS voltage, peak amplitude, and incrementation time of the AE signals were also selected.
The authors of [55] present data on acoustic emission tests conducted to determine the fracture toughness of four structural steels: AISI 1080, AISI 1060, SA333, and AISI 304LN. The experiment was carried out using the samples SE(B) and C(T), and preliminary fatigue loading was performed to form an initial crack in accordance with the ASTM E647-03 standard. The thickness of the samples was from 20 to 30 mm, the loading mode is shown in Figure 5h, and the test temperature was room temperature. Based on the total AE count (Figure 5g), it was determined that the nature of changes in cumulative AE parameters over time is different for linear and nonlinear load displacement charts, and the point of origin of a crack in the material can be estimated by the total energy, count, and intensity of AE.
To study a problem as important as the influence of a waveguide on the registration of AE signals, F. Dahmene [74] conducted tensile tests on CT samples at elevated temperatures. The data of the total AE count were used for a sample with dimensions of 48 × 40 × 20 mm made of AISI 304L steel at a temperature of 723 K. The deformation rate was 10−5 s−1.
A.G. Penkin and colleagues in [75] studied the mechanisms of destruction under static tension of flat samples of structural steels of the Russian brands 09G2 and K3, which are widely used in the oil and gas industry, in a defect-free state and after the development of an artificial defect in the form of a fatigue crack, where they used an SDS1008 acoustic emission diagnostic system to record the total AE and employed a fractographic analysis of the crack’s surface. The tests were carried out at room temperature on samples measuring 200 × 20 × 6 mm; accordingly, deformation rates of 5 mm/min for the defect-free and 0.5 mm/min for the defective samples were recorded AE signals.
The crack nucleation point and fracture toughness during the three-point bending test of the weld metal and the base metal of AISI 316LN stainless steel were evaluated using acoustic emission parameters in [52]. The rate of deformation by unilateral bending at room temperature was 0.5 mm/min. The samples were subjected to pre-fatigue treatment to achieve a/W ≈ 0.5 in accordance with the ASTM E647-03.15 standard.
Static bending tests at three points at a deformation rate of 0.2 mm/min on samples of martensitic–austenitic steel 5KHN3MA with dimensions of 12 × 6 × 110 mm at room temperature were carried out by L.R. Botvina and colleagues in [76]. Flat samples were made with a central notch, cut out by a spark with a depth of 4 mm, and the radius of the tip was 0.5 mm. The total AE count was used to estimate the crack generation and propagation energies, the dynamic fracture viscosity, the critical temperature of the transition from plasticity to brittleness, and the parameters of the fracture microrelief. Three types of samples were prepared: after initial heat treatment, after shock wave exposure, and in an annealed state.
The authors of [77] studied the use of acoustic emission to quantify the evolution of microstructural damage during tension from the point of view of the micro-cracking of aluminum alloy 7075. The samples were machined in the rolling direction. A rectangular sample with dimensions of 50 × 12.7 × 6.35 mm in accordance with the ASTM E8 standard was intermittently deformed at a rate of 0.001 s−1. The test temperature was room temperature.
J. Vetrone investigated the effect of various degrees of plastic deformation on the reproducibility of the kinetics of cumulative AE parameters [60]. A new characteristic of acoustic emission was introduced to determine the stage of deformation of metals under quasi-static loading. A new characteristic of the AE was extracted from the derivative of the cumulative energy of the AE in time. For verification, quasi-static deformation was performed at a speed of 0.04 mm/s on high-strength, low-alloy A572 grade 50 steel at room temperature. A total of 9 experiments were performed concerning tension at degrees of deformation from 0.012 to 0.085. The results for a sample with a strain value of 0.072 are shown in Figure 5i,j.
To study the acoustic emission response of various zones associated with the weld of aging martensitic M250 steel, an attempt was made in [78] to compare the AE data obtained by the tension values for 16 welded samples with known defects. Cumulative AE activity, hit frequency, energy velocity, count rate, total AE energy, and hit amplitude distribution were investigated. Four types of samples with dimensions of 200 × 20 × 5 mm were prepared in accordance with the ASTM E8 standard: base metal with an inherent defect (Figure 5k,l), weld metal without defects, weld metal with defects, and damaged metal from the thermal impact zone [79]. Tension was applied at a loading speed of 2.5 kN/min at room temperature.
The paper also presents data from quasi-static tensile tests with flat samples that were carried out at ambient temperature (20 °C) and at a lower temperature −40 °C on GJS-400-15 cast iron samples [80]. Three-point bending tests were performed on curved bars with notches and preliminary cracks with dimensions of 120 × 20 × 10 mm (in accordance with ISO 12135 standard) and a deformation rate of 10−3 s−1. Acoustic emission correlated well with the volume of plastically deformed material in steel, and the size of the plastic zone was estimated during the fracture toughness test. In addition, the acoustic signal was used to determine the beginning of the formation of a stable crack.
In a study conducted by V. Kietov [81] and colleagues, the effect of the additive Al–5Ti–1B on the microstructure, mechanical properties, and acoustic emission characteristics of the aluminum alloy Al 5052 was studied. Cylindrical specimens for tensile testing with a diameter of 20 mm and a length of 40 mm were prepared. These tests were carried out at a deformation rate of 10−2 s−1. The AE results showed that the intensity of the signals increased with an increase in the content of the Al–5Ti–1B ligature, which was associated with the combined effect of dislocation movement and grain grinding.
3. Results
According to the obtained time dependences of the logarithm of the total count and the selected area of homogeneous destruction at the elastic stage, the indicators and were calculated (columns 2 and 3 in Table 2). Further, with the help of these indicators, the activation energy of destruction was calculated according to Formula (25) (column 8 of Table 2). Table 2 also shows the results of the calculation of the activation energy of destruction according to the quasi-static uniform loading to failure (column 11), according to the fatigue curves (curves and related information in Appendix A) in column 9, according to the formula proposed by Grabar for fatigue curves (column 10), and according to the Moghanlou model (column 12). Next, the parameter was calculated from the concentration-kinetic index, , according to Formula (23) (column 4) and according to the Moghanlou model (10) using the Lambert function. Columns 5, 6, and 7 show the destructive stress, the rate of stress growth, and the test temperature, respectively.

Table 2.
Results of calculation of concentration-kinetic AE strength indicators, kinetic parameters, and activation energy of destruction.
For a sample of nickel alloy 625+, the activation energy calculated according to the AE results was 139291 , for which the deviations from the calculation results according to the fatigue curves were less than 6%; however, the Moghanlou model gave underestimated results of 123.3 . Figure 2 shows that the activation energy obtained from the results regarding the long-term strength (creep) at a positive temperature is several times greater than at room temperature and in the dynamic loading mode; the same results were shown by tests of the AISI 304LN samples at a temperature of 723 K (Table 2). So, the was 251.9 at the same temperature, for cyclic loading at 700 K it was 264.6 , and for high-temperature creep it was 388.5 . This discrepancy was also noted by other authors [13] and was associated with diffusion processes that manifested at high temperatures.
For the spherical tanks of an aircraft (Ti–15V–3Al–3Cr–3Sn and Ti–6Al–4V), the activation energy values showed similar values for all the calculation methods, although the formula for quasi-static loading yielded lower values. This trend was observed in all samples (Table 2). Apparently, this is due to the presence of microplastic deformation at high stress values and the corresponding internal restructuring. This seems reasonable, since the activation energies of elastic and plastic deformation have significant differences. For the AISI 1060 and 1080 samples, the values calculated by Formula (8) were 94 and 92 ; the values calculated by the multilevel model (107.9 and 106.7 ) also had a slight difference.
The effect of processing on the parameter was considered for the AISI 304 samples (Figure 5e,f), which had different exposure times during annealing. Although there was a slight decrease in the activation energy as the annealing time increased, the deviation from the initial value was no more than 4%. For the tool steel D2, the annealing temperature produced a slight change in at 450 °C, and at 575 °C, this value amounted to 115 . A different treatment was applied to the 5KHN3MA samples, namely, a traditional heat treatment and shock wave action followed by annealing, which showed close values of activation energy of 120 and 119 , respectively; however, the deformation of the sample, which occurred only after shock wave action (SWA), gave a value of = 131 . This might have been due to the peculiarities of structural adjustment. For the aging steel M250, the presence of a defect in the weld produced higher activation energy values than for the micro-deformed and defect-free zones. At the same time, similar values corresponded to a defect-free welded joint and a base metal with microdefects. The presence of a defect formed before quasi-static destruction increased the value of the activation energy by about 4% for the steel samples 09G2 and K3; in both cases, was greater for the samples with initial defects. In addition, the destruction of the weld led to an increase in , as was seen for the samples of 316LN steel.
Good correspondence was shown by a data set from the A572 samples with varying degrees of plastic deformation. All the samples yielded a value of = 100 . The deviation for the samples of aluminum alloy 7075 (rectangular sample) was no more than 3%; however, for alloy 5052 (cylindrical sample), the compliance was worse.
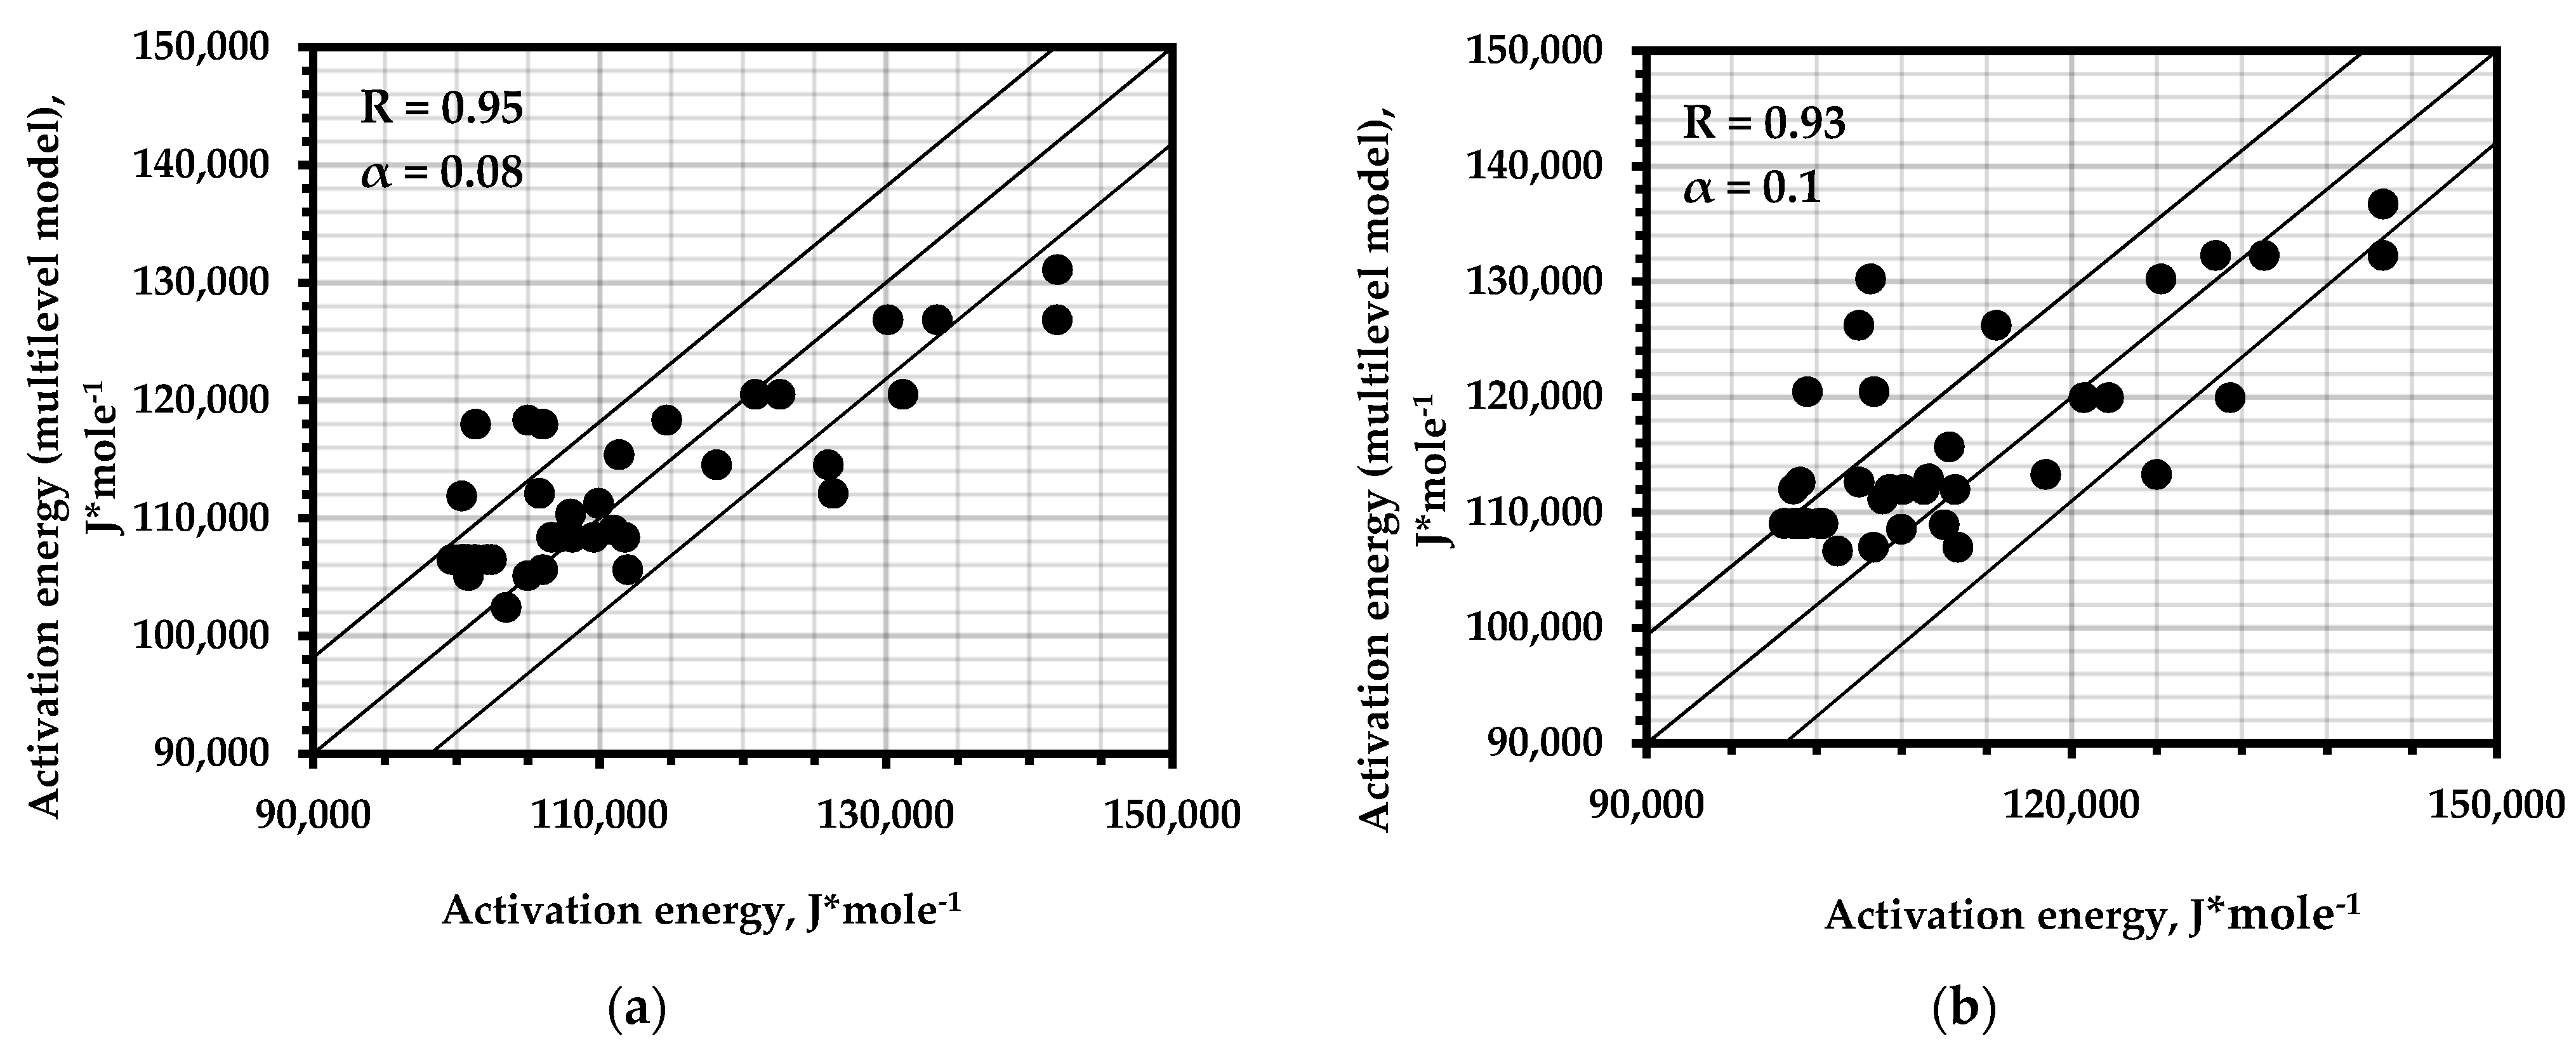
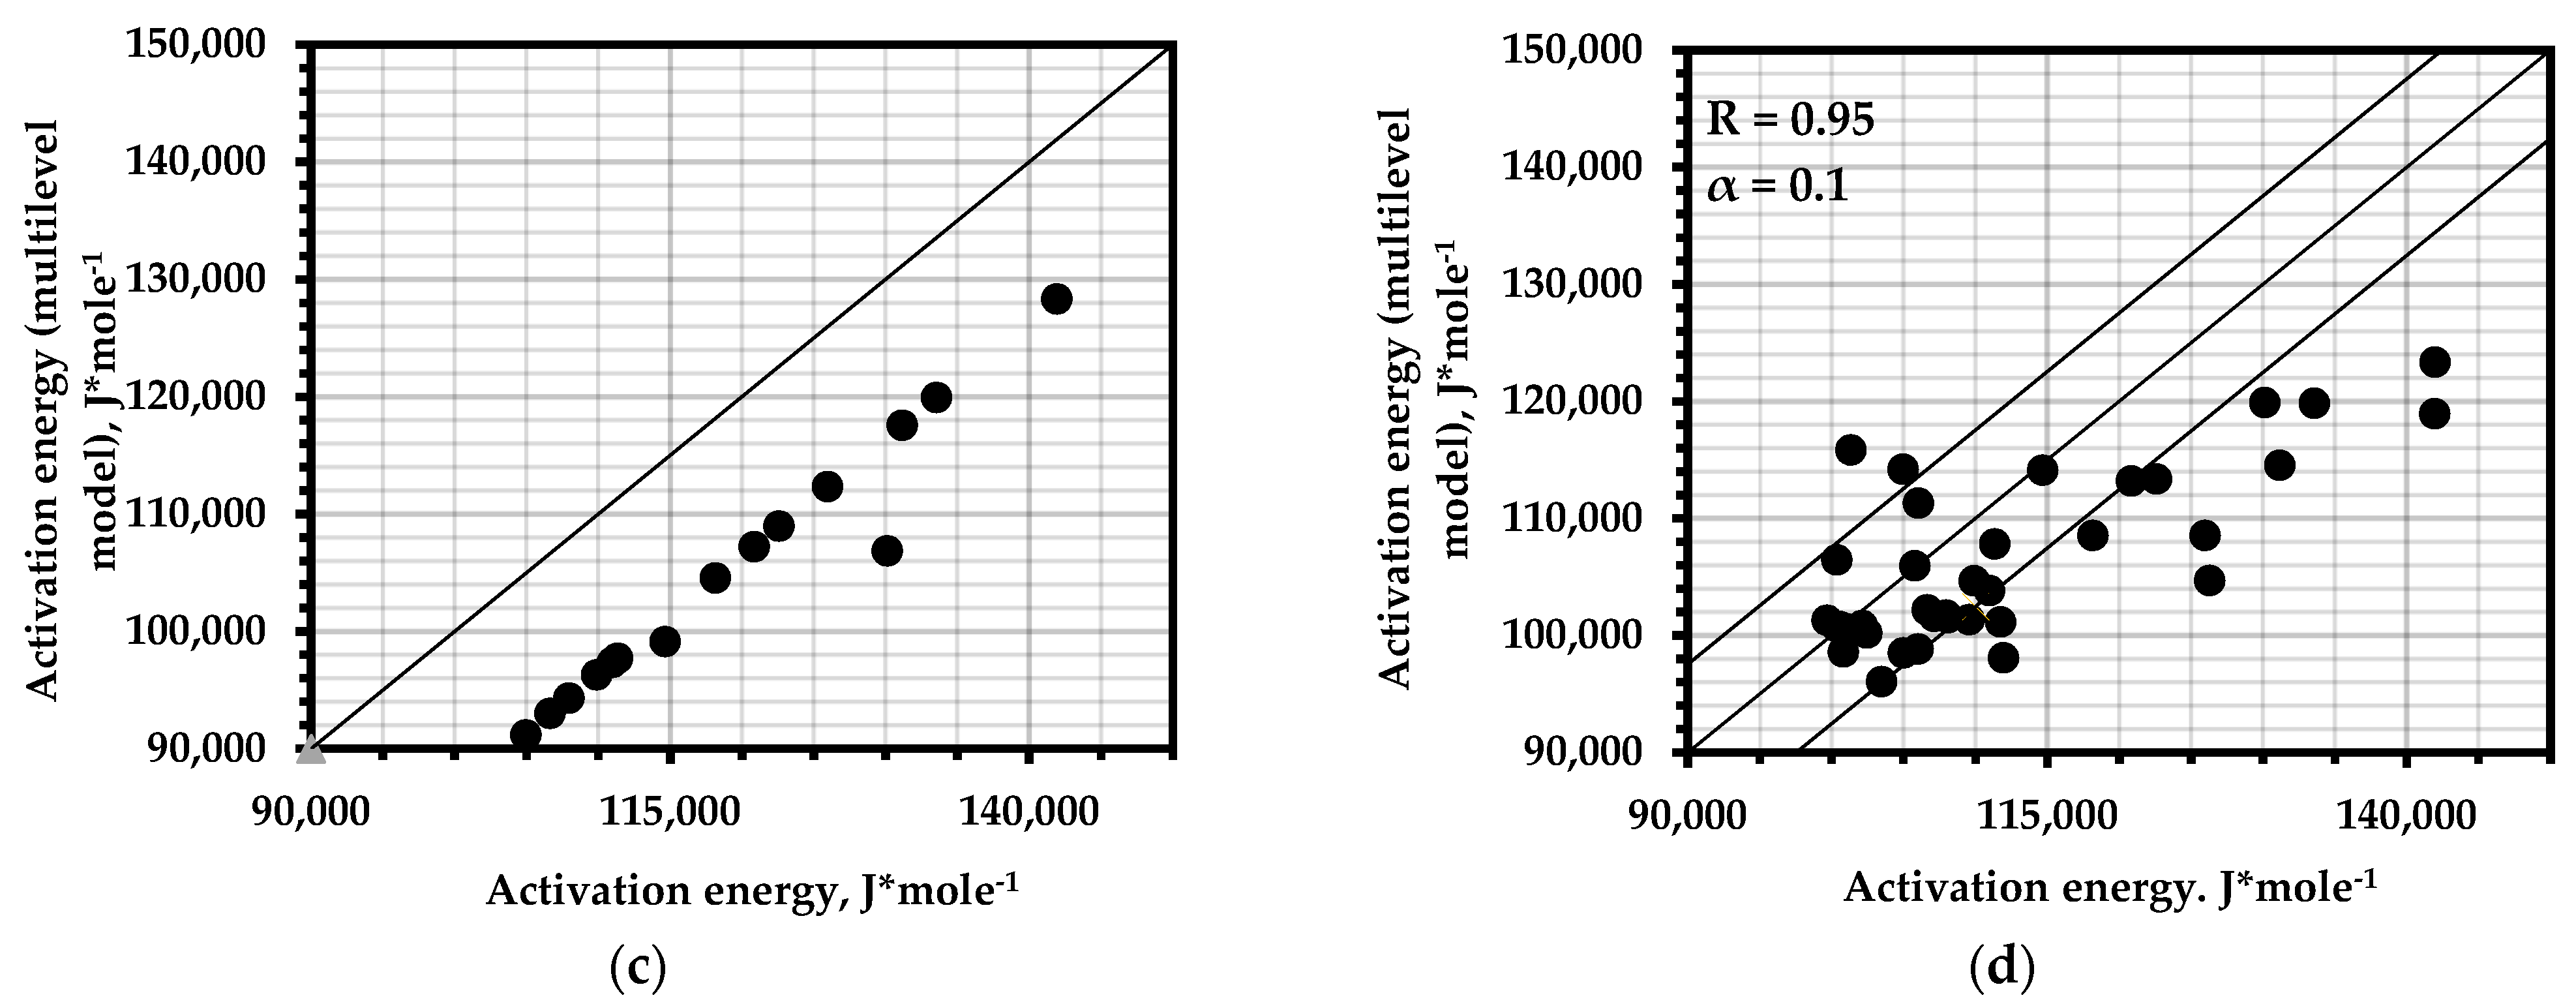
The best correspondence in calculating the durability parameters of the structural alloys was given by the models based on fatigue curves (Figure 6a,b). This allows for the use of a large experimental base of fatigue tests accumulated to date to assess the durability parameters without destructive loads, which, in turn, allows for the use of this methodology for calculating the resource of real objects.
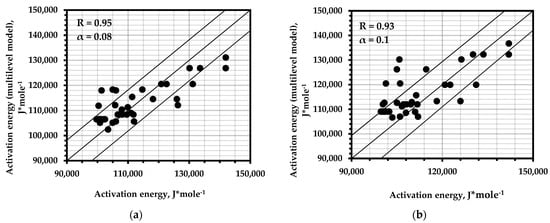

Figure 6.
Correlation of the results of the calculation of the activation energy of fracture using a multilevel model of the AE pulse flow compared with: (a)—data of fatigue curves of alloys; (b)—Grabar’s formula for fatigue curves; (c)—results of static tests of samples; (d)—Moghanlou’s formula for fatigue tests.
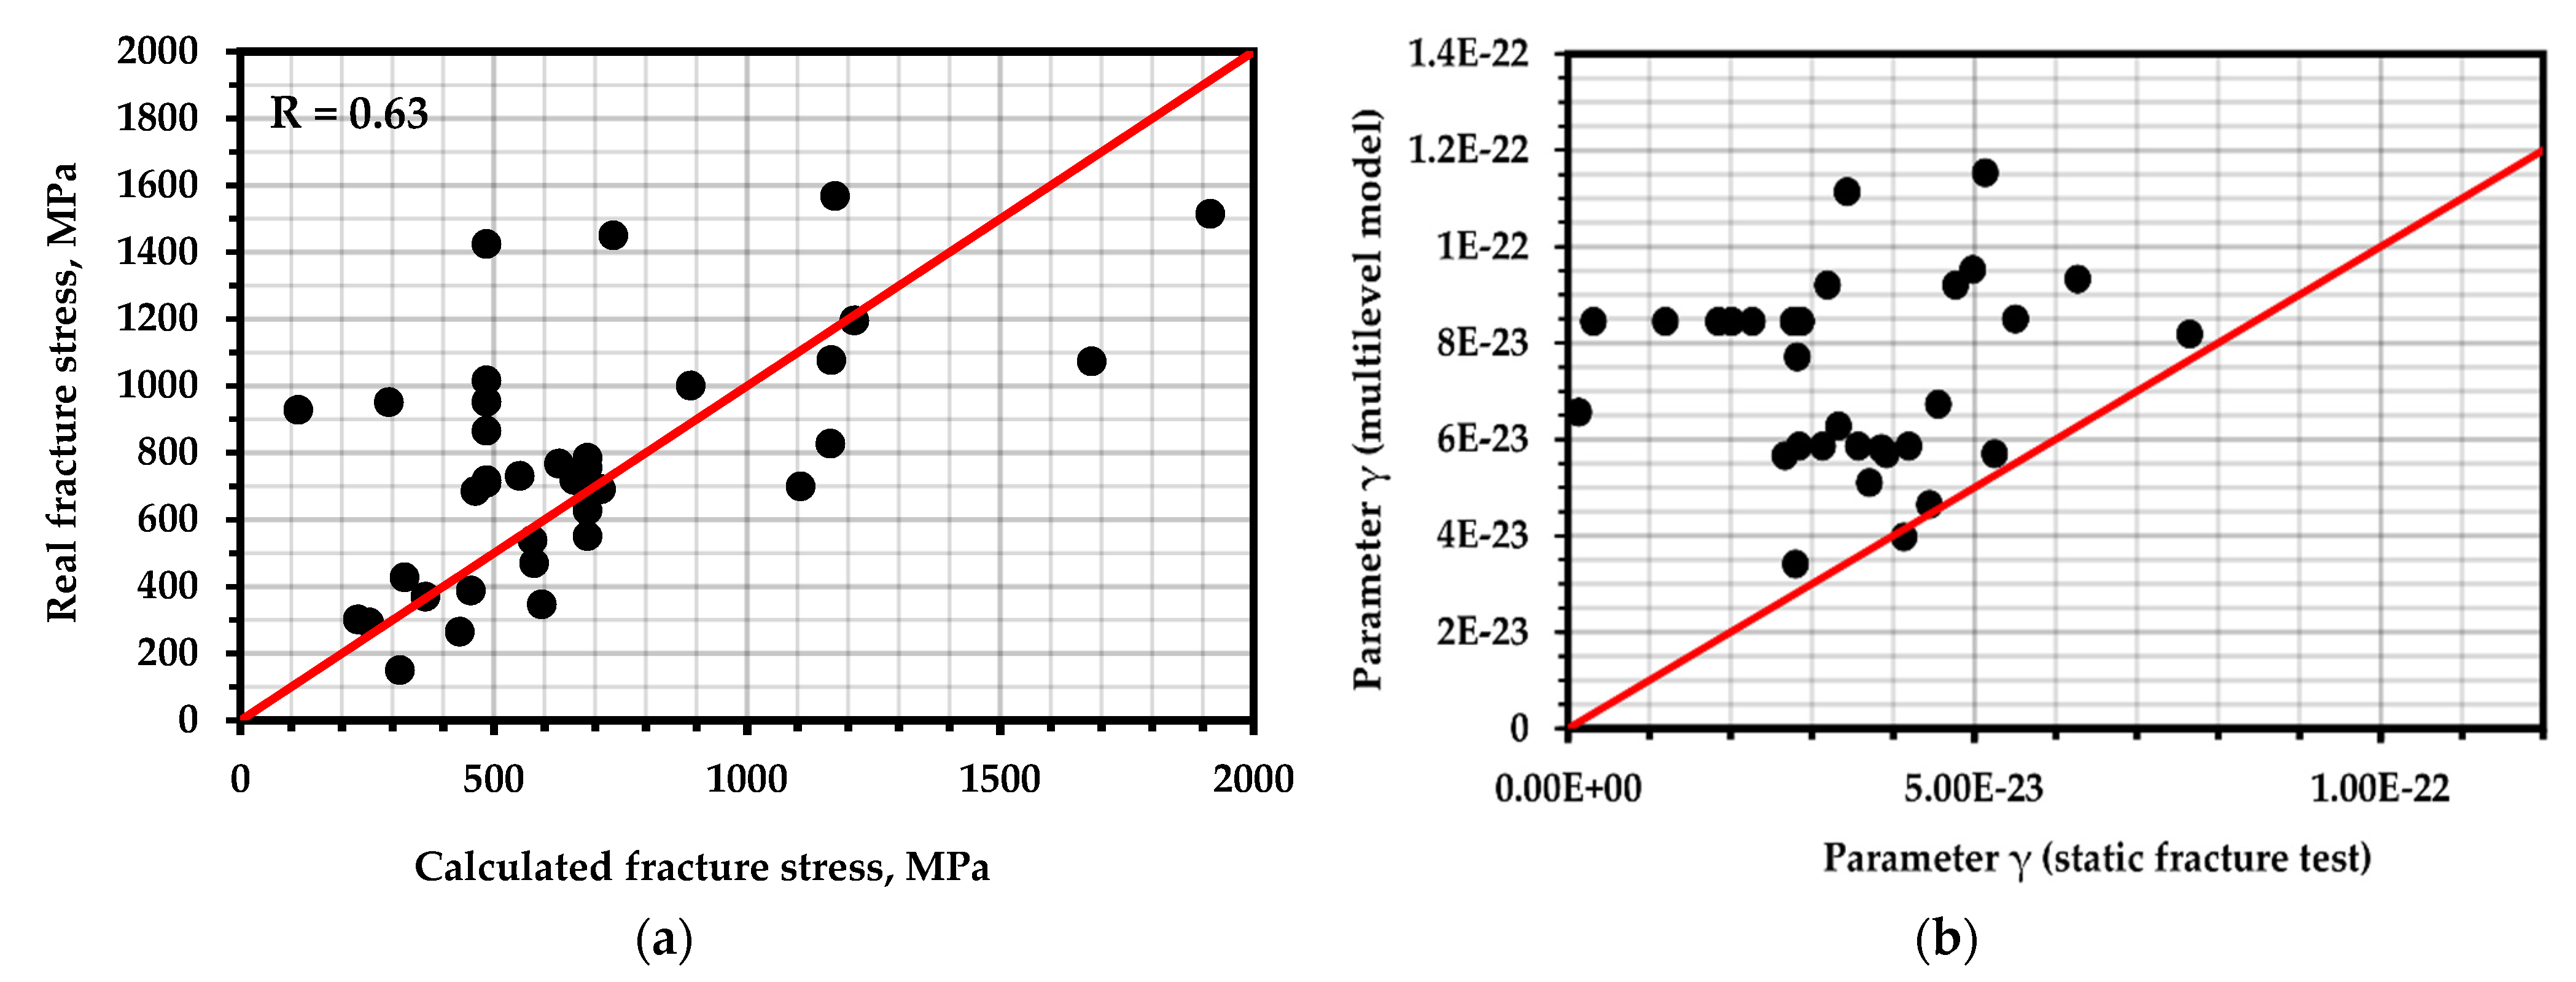
The parameter , as the most variable parameter, changed during structural rearrangements, thermal influences, and changes in the deformation conditions. The task of calculating the coefficient is still extremely time-consuming due to the uniqueness of this parameter for each real object. Figure 7b shows the results of calculating using a multilevel model and using Formula (9). A large deviation can be seen in the values.
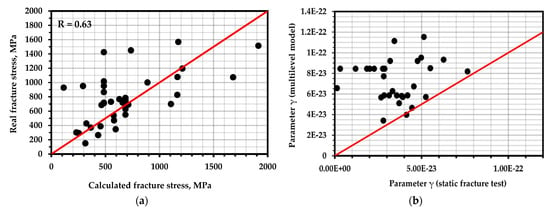
Figure 7.
(a) Correlation between the actual destructive stress and that calculated by the multilevel AE model; (b) correlation between the structural parameter calculated from the multilevel AE model and the results of static tests.
Using the data from fatigue curves to calculate the activation energy of a material as an available reference material, the destructive stress for a sample or element of equipment can be calculated using the following formula:
To calculate the destructive load, it is unnecessary—as it can be seen—to precipitate the object’s destruction. The homogeneous fracture site corresponds to the elastic deformation zone. However, there are also differences between the calculated values (Figure 7a), which indicates the need for the strict compliance of fatigue curves according to the type of loading, composition, and the orientation of the sample with respect to the element on which the AE diagnosis was performed.
3.1. Numerical Simulation
To describe the accumulation of damage during homogeneous, finely dispersed destruction at the stage of elastic deformation, a multilevel AE model in the form of Equation (17) is used. The program compiled to estimate the time to destruction according to AE data uses the homogeneous destruction stage for approximation [19].
The structural heterogeneity and unevenness of the stress state in terms of the volume of the material affects the average value of the time of destruction of the structural elements of the body. The durability parameter is not the same for different elements. In order to account for such heterogeneity, a distribution function of the parameter over structural elements was introduced. The function has different distributions depending on the degree of heterogeneity. In this article, a limited Weibull and logarithmic-normal distribution was used in the destruction of samples of various structural materials.
In this paper, the bounded Weibull distribution is written as
where the distribution parameters are denoted as is the coefficient linking the load in and the stress in MPa, which is the inverse of the working cross–sectional area of the sample.
The logarithmically normal distribution with the parameters is as follows:
The time dependence of microcracking for a structurally inhomogeneous body in accordance with the multilevel model is as follows:
and are the minimum and maximum values of the structural parameter in the distribution.
As indicated, the transition to spontaneous destruction and a macroscopic cracking state occurs when the number of destroyed structural bonds reaches , that is, the approximate number of overstressed bonds in the loaded body. Then, expression (29) assumes the form:
To calculate the time to destruction, it is necessary to know the value of the activation energy of destruction of a given material, the time dependence of stresses and temperature, and the distribution parameters of the structural parameter. To obtain these parameters, acoustic emission tests are carried out when the sample is loaded. Having obtained the time dependence of the total AE count, the stage of homogeneous destruction along the linear section of the slope angle of the logarithm of the total count AE over time is selected. Further, the time dependence of the number of acoustic emission pulses is approximated, which is assumed to be proportional to the number of microscopic cracks formed—the main sources of AE. The number of AE pulses is expressed as:
—the acoustic emission coefficient is assumed to be constant for loading at a constant speed.
As an example, we used the loading data of samples of the tool steel D2 after two different annealing times and the martensitic aging steel M250 with different types of defects. The description of the experiments, the AE equipment used, and the characteristics of the samples were presented earlier. As a stage of homogeneous destruction, various time intervals were taken, whose beginning and end are indicated by and in Table 3. The approximation of the theoretical and experimental curves of the total AE count was carried out.

Table 3.
Distribution parameters of the structural coefficient.
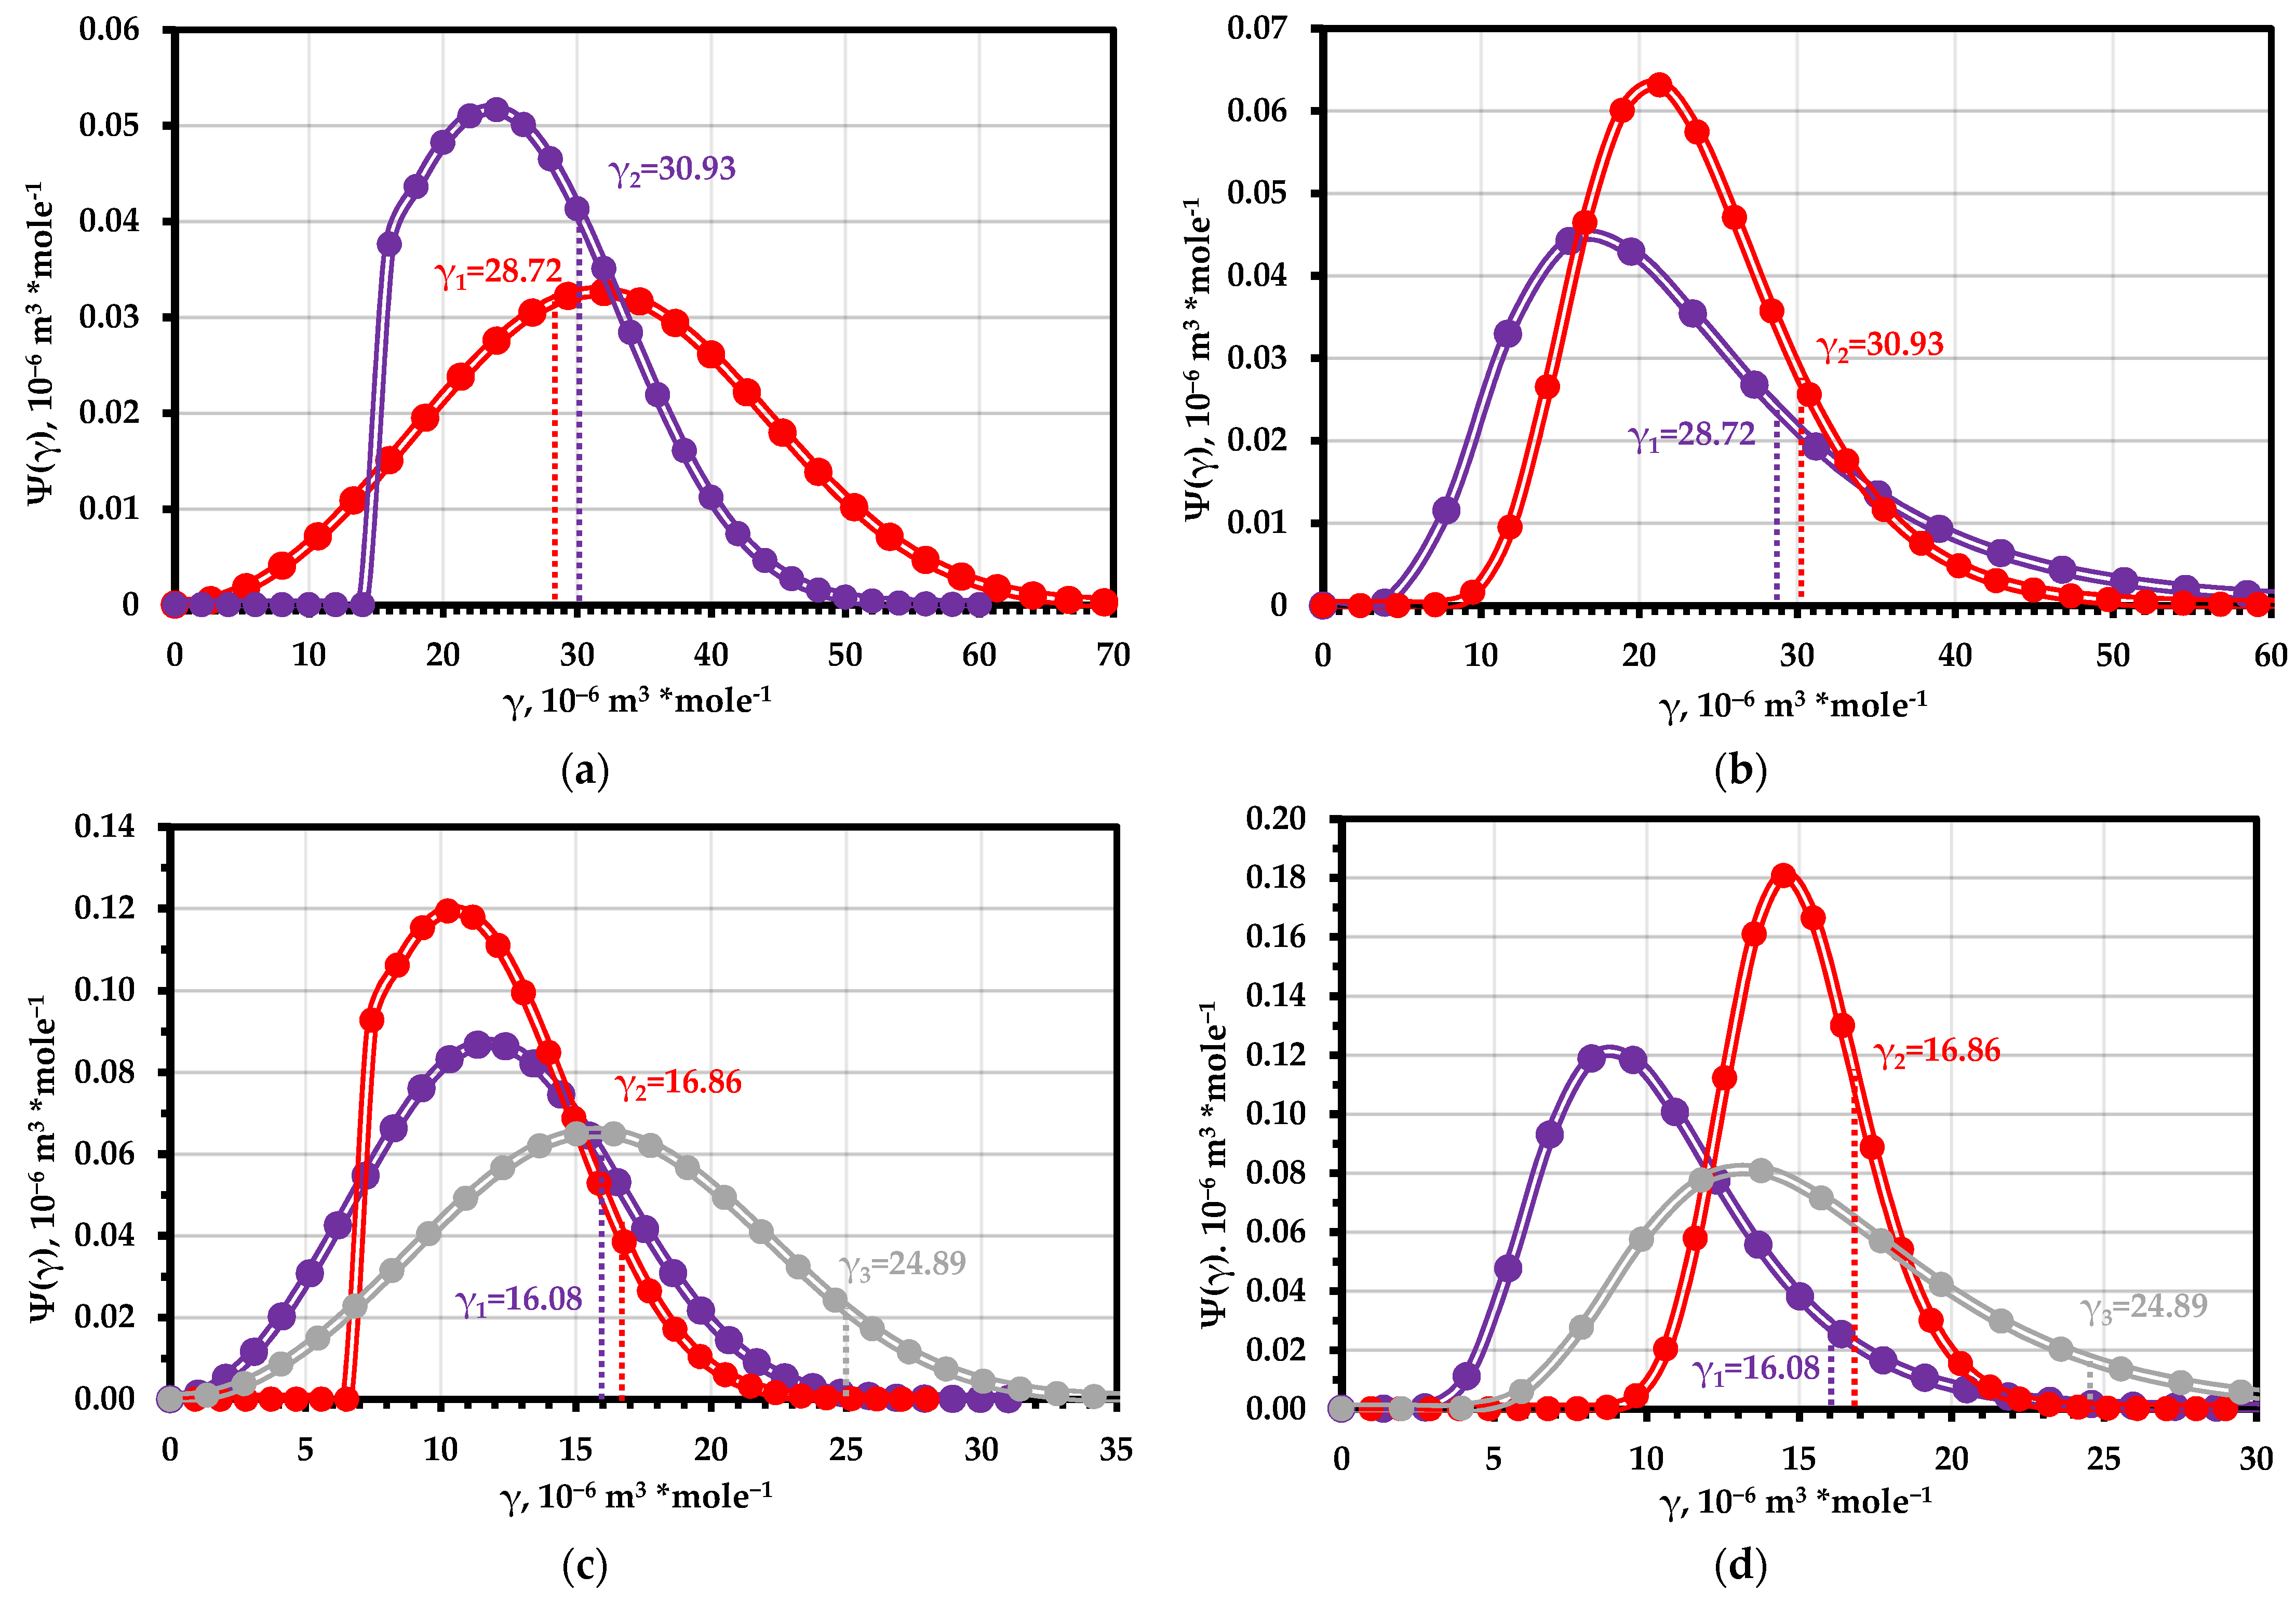
During the approximation, the distribution parameters were selected (Figure 8 and Table 3) so that the average error of approximation and the error of determining the time to destruction are minimal. For the Weibull distribution, the parameter is the most commonly used and is suitable for the distribution of defects in welded steel samples.
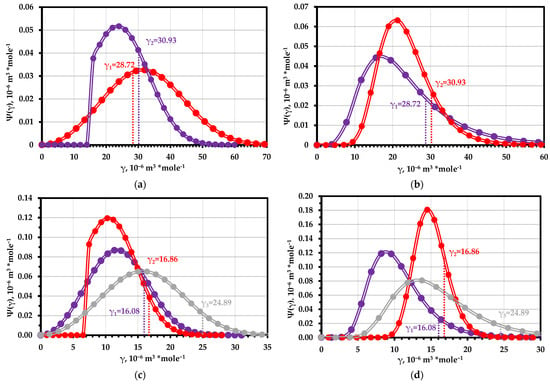
Figure 8.
The distribution of the structural parameter γ during homogeneous fracture: (a)—Weibull distribution for D2 steel samples (red—C2 sample; blue—E3 sample); (b)—logarithmically normal distribution for D2 steel samples (red—E3 sample; blue—C2 sample); (c)—Weibull distribution for M520 steel samples; (d)—logarithmically normal distribution for M520 steel samples (blue–inherent defect, red—weld seam without defect, and gray—weld seam with defect).
It can be noted that despite a significant error in determining the time to destruction, the parameter and the structural parameter found only by the logarithm curve of the total AE count are in the “bell” region of the distribution (Figure 8). This indicates the correctness of the expression describing the experimental curve and the correspondence of the structural elements destroyed in the elastic region to the main array of elements. For the samples of M250 steel of a defective weld, the resulting for both types of distribution corresponded to the “tail” of the distribution, i.e., an array of the weakest structural elements. It is assumed that this was due to structural changing during welding, due to which relatively less durable structural elements were fractured at the elastic fracture stage. For the samples of M250 steel with inherent microdefects, a shift of the value to the right side of the bell was observed for all types of distribution.
Despite the engineering and practical significance of such a determination of a homogeneous fracture site, it is better to use methods based on the analysis of the AE signature for a more accurate identification of the time interval. The end of the interval is determined by the lesser of the two values, that is, the moments of the beginning of an abrupt increase in the duration of signals (the beginning of plastic deformation) and the beginning of the growth of the overlap coefficient corresponding to the beginning of an avalanche-like restructuring of the structure. The beginning of the plot will be located at the beginning of the linear section to the left of one of these points. Another way to determine the beginning of the section is to determine the point corresponding to the maximum of the amplitude variation coefficient. The increase in this coefficient is explained by the destruction of structural elements with a large variation in size and operating stresses, which occurs with heterogeneous destruction. A decrease in this coefficient indicates the beginning of a homogeneous stage.
Thus, to estimate the spread of the structural parameter of thermal fluctuation destruction, an automated program can be used to approximate the theoretical and experimental curves of the total acoustic emission count, which confirms its applicability to a number of steel samples based on the idea of the kinetic nature of the destruction of structural materials.
3.2. Fatigue Life Calculation
Most real industrial facilities are operated under fatigue conditions with different cycle forms. Fatigue life assessment is one of the most important safety tasks in the modern mechanical engineering of equipment [82,83,84,85]. There are a number of models for the nonlinear summation of fatigue damage [86], some of which require only fatigue curve data [87], as well as methods for determining the characteristics of fatigue failure [88]. To assess the structural changes occurring during fatigue failure, methodological approaches are needed that provide objective information about the kinetics of damage accumulation. A method that is devoid of greater labor intensity and is available for engineering tasks in production conditions is the acoustic emission method, which is also the most widely used non-passive control method.
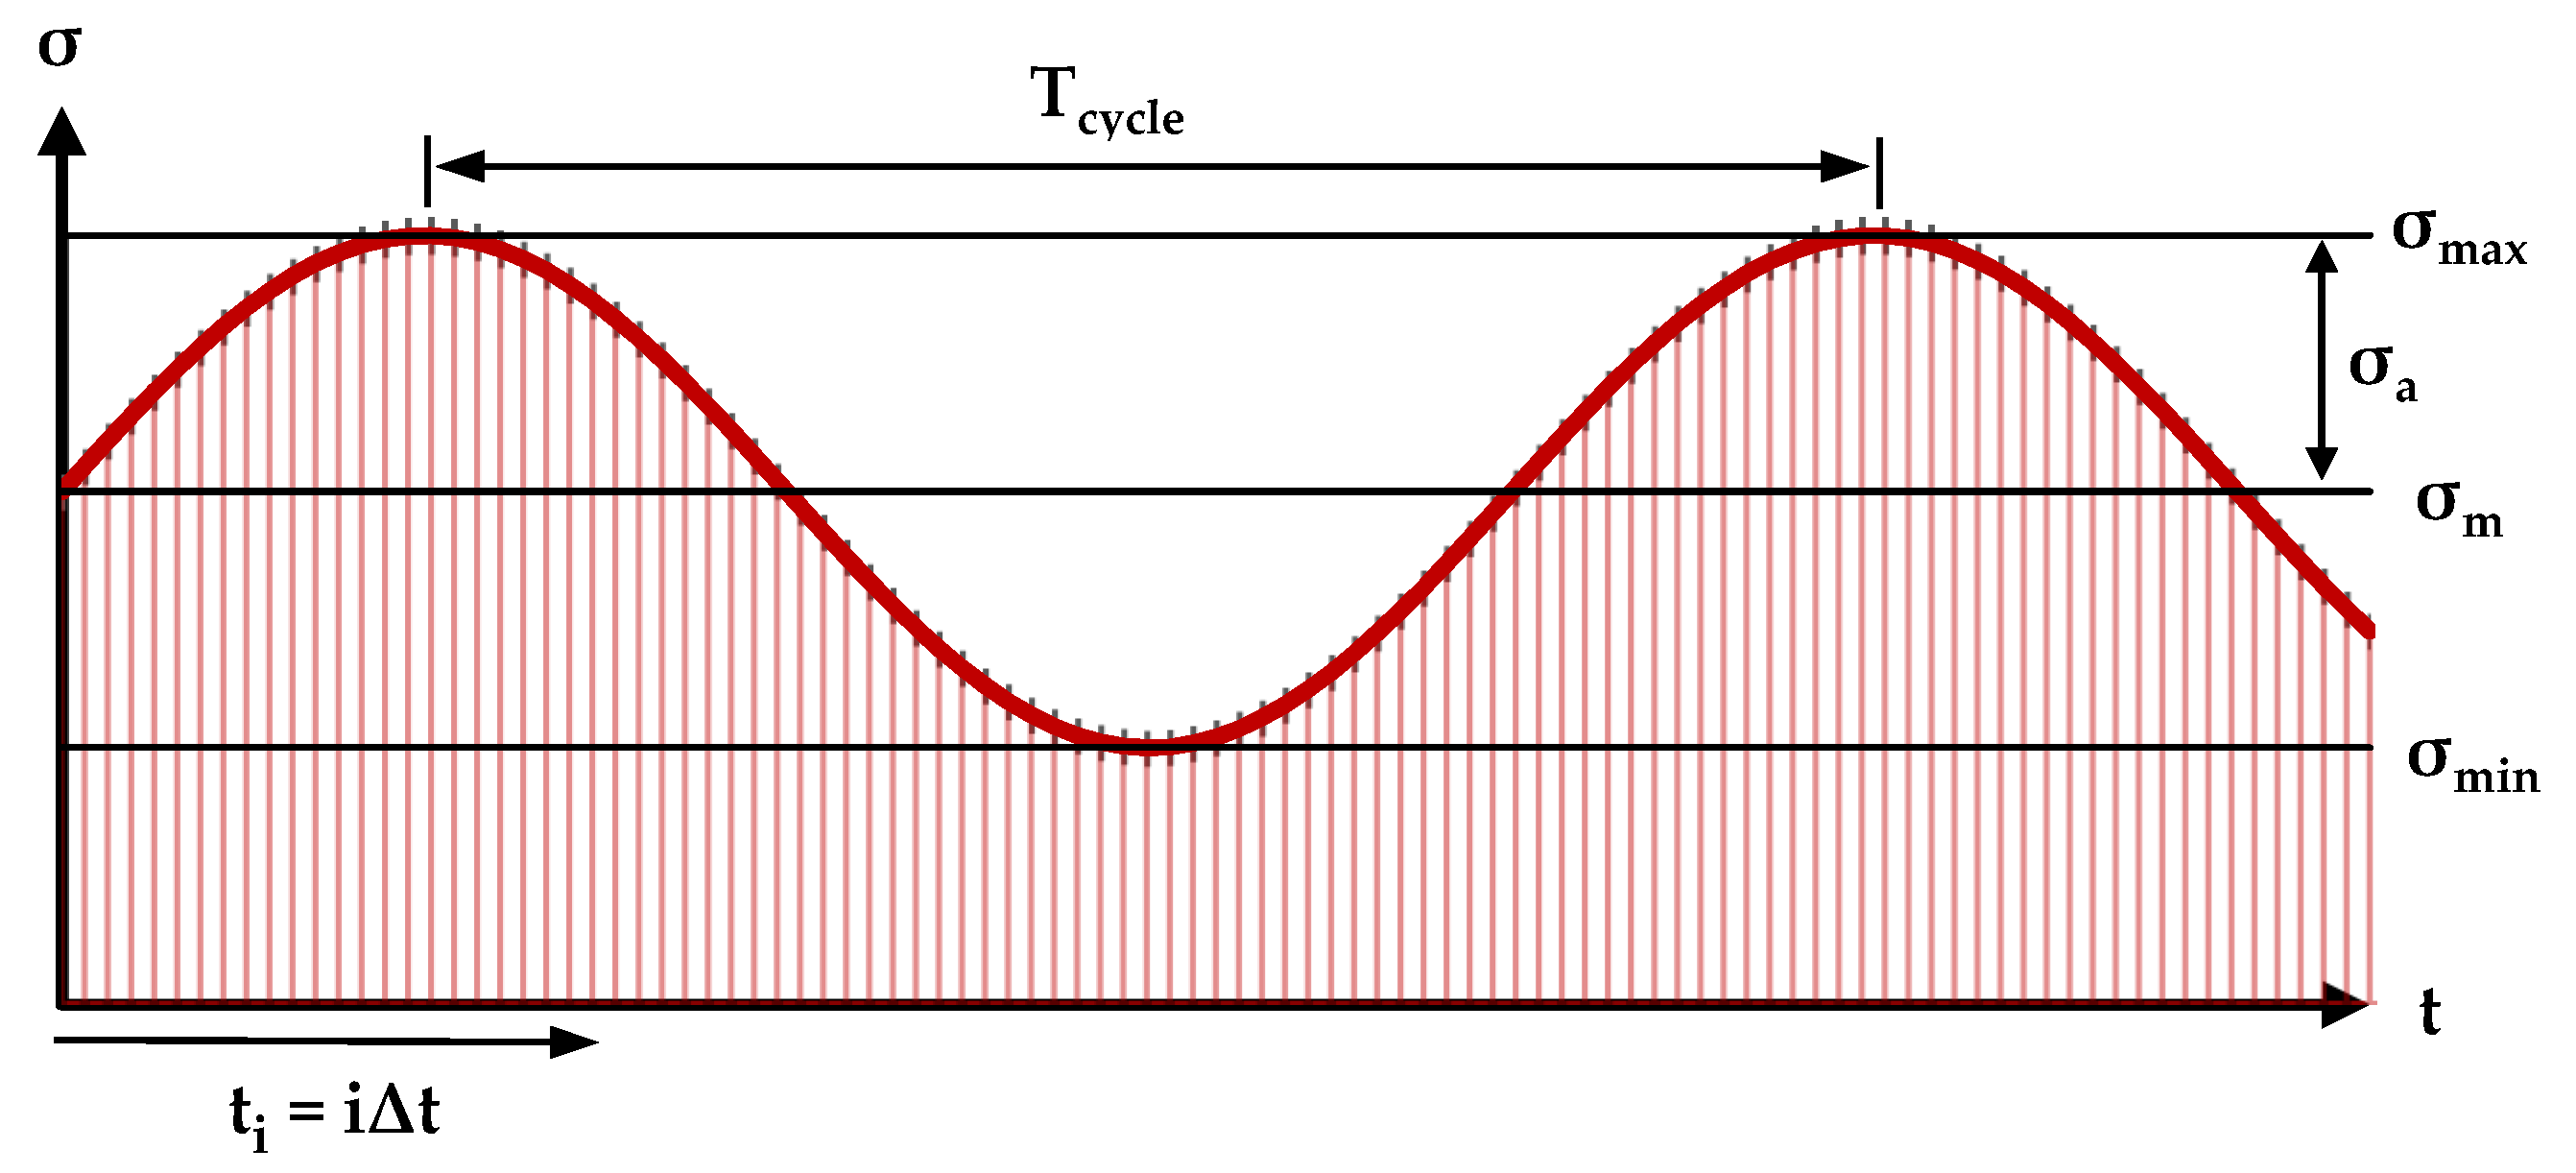
The traditional Zhurkov equation is used to estimate durability under conditions of constant stress and temperature, which correspond to creep processes. However, there are various modes of loading objects, in which it is necessary to determine their times to destruction. To estimate fatigue life, it is necessary to transform the Zhurkov equation, while accounting for the sinusoidal mode of stress change (Figure 9). Similar transformations are presented in a number of papers [48,89,90,91,92]. Considering the Bailey criterion (Equation (7)) and the ratios of stress changes and temperature , we obtain:
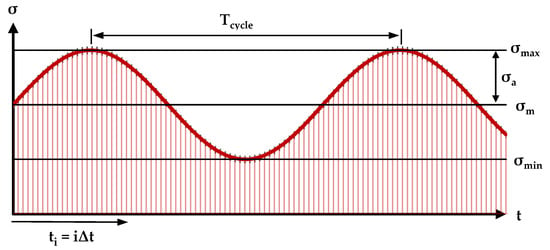
Figure 9.
The scheme of division of the fatigue cycle into elementary time sections.
Using the Cauchy–Schwartz inequality (32), we obtain:
Then, we apply the modified zero-order Bessel function [93]:
and are obtained by Hankel expansions based on asymptotic forms for a large value of the argument x [93]. Then,
Using expressions (34) and (35), we transform the right part of equation (33):
Solving the equation with respect to the time before destruction and neglecting the temperature change, after substituting expression (34), we obtain:
or
The equations for determining the number of cycles before destruction are obtained, bearing in mind the relationship between the durability of the sample and the frequency of cyclic loading as follows:
Then, Equation (37) takes the form [89]:
For an example of the implementation of a method for finding the parameters of the durability equation using acoustic emission and calculating fatigue life, we will use the data of L.R. Botvina and colleagues [94,95,96], wherein experiments were conducted concerning the tensile loading of samples after various levels of fatigue life. This study will provide data on testing samples of the steel grades 20 and 15X2GMF used for oil sucker rods.
Tensile tests were carried out after three levels of fatigue life—0.3, 0.5, and 0.7—as well as in the initial state. The time dependences of the total AE count and its logarithm are shown in Figure 5 (reference [96]), in Figure 3 (reference [95]), and in Figure 14 (reference [94]). The frequency of pre-cyclic loading was 30 Hz with the coefficient R = 0.1 at 390, 330, and 800 MPa, respectively.
Fatigue tests were carried out in accordance with GOST 25.502 in all three experiments. Before the tensile tests, fatigue curves were created for this material, according to which the approximate fatigue life was determined. According to the results of the AE diagnostics, sections of homogeneous fracturing corresponding to the upper region of the elastic deformation zone were identified as linear sections of the logarithm of the total AE count. For the samples made of 15X2GMF steel, the data are given with an initial (without fatigue life) condition, after a service life of 0.7, and also the tensile standard sample with other dimensions.
The results of calculating the parameters and , as well as the structural parameter and the number of cycles to failure at an amplitude equal to that at which preloading was performed, are summarized in Table 4. Since various structural changes are observed at different levels of the cyclic loading amplitude, fatigue life was estimated only at the amplitude at which static tensile loading was performed and AE data were available. Attempts to construct a fatigue curve based on the results of only one level of pre-cycling stresses lead to a large deviation from the real curve due to the high variability of the structural parameter . As mentioned earlier, this parameter is affected by the loading mode.

Table 4.
Results of fatigue life calculation using concentration-kinetic AE strength indicators.
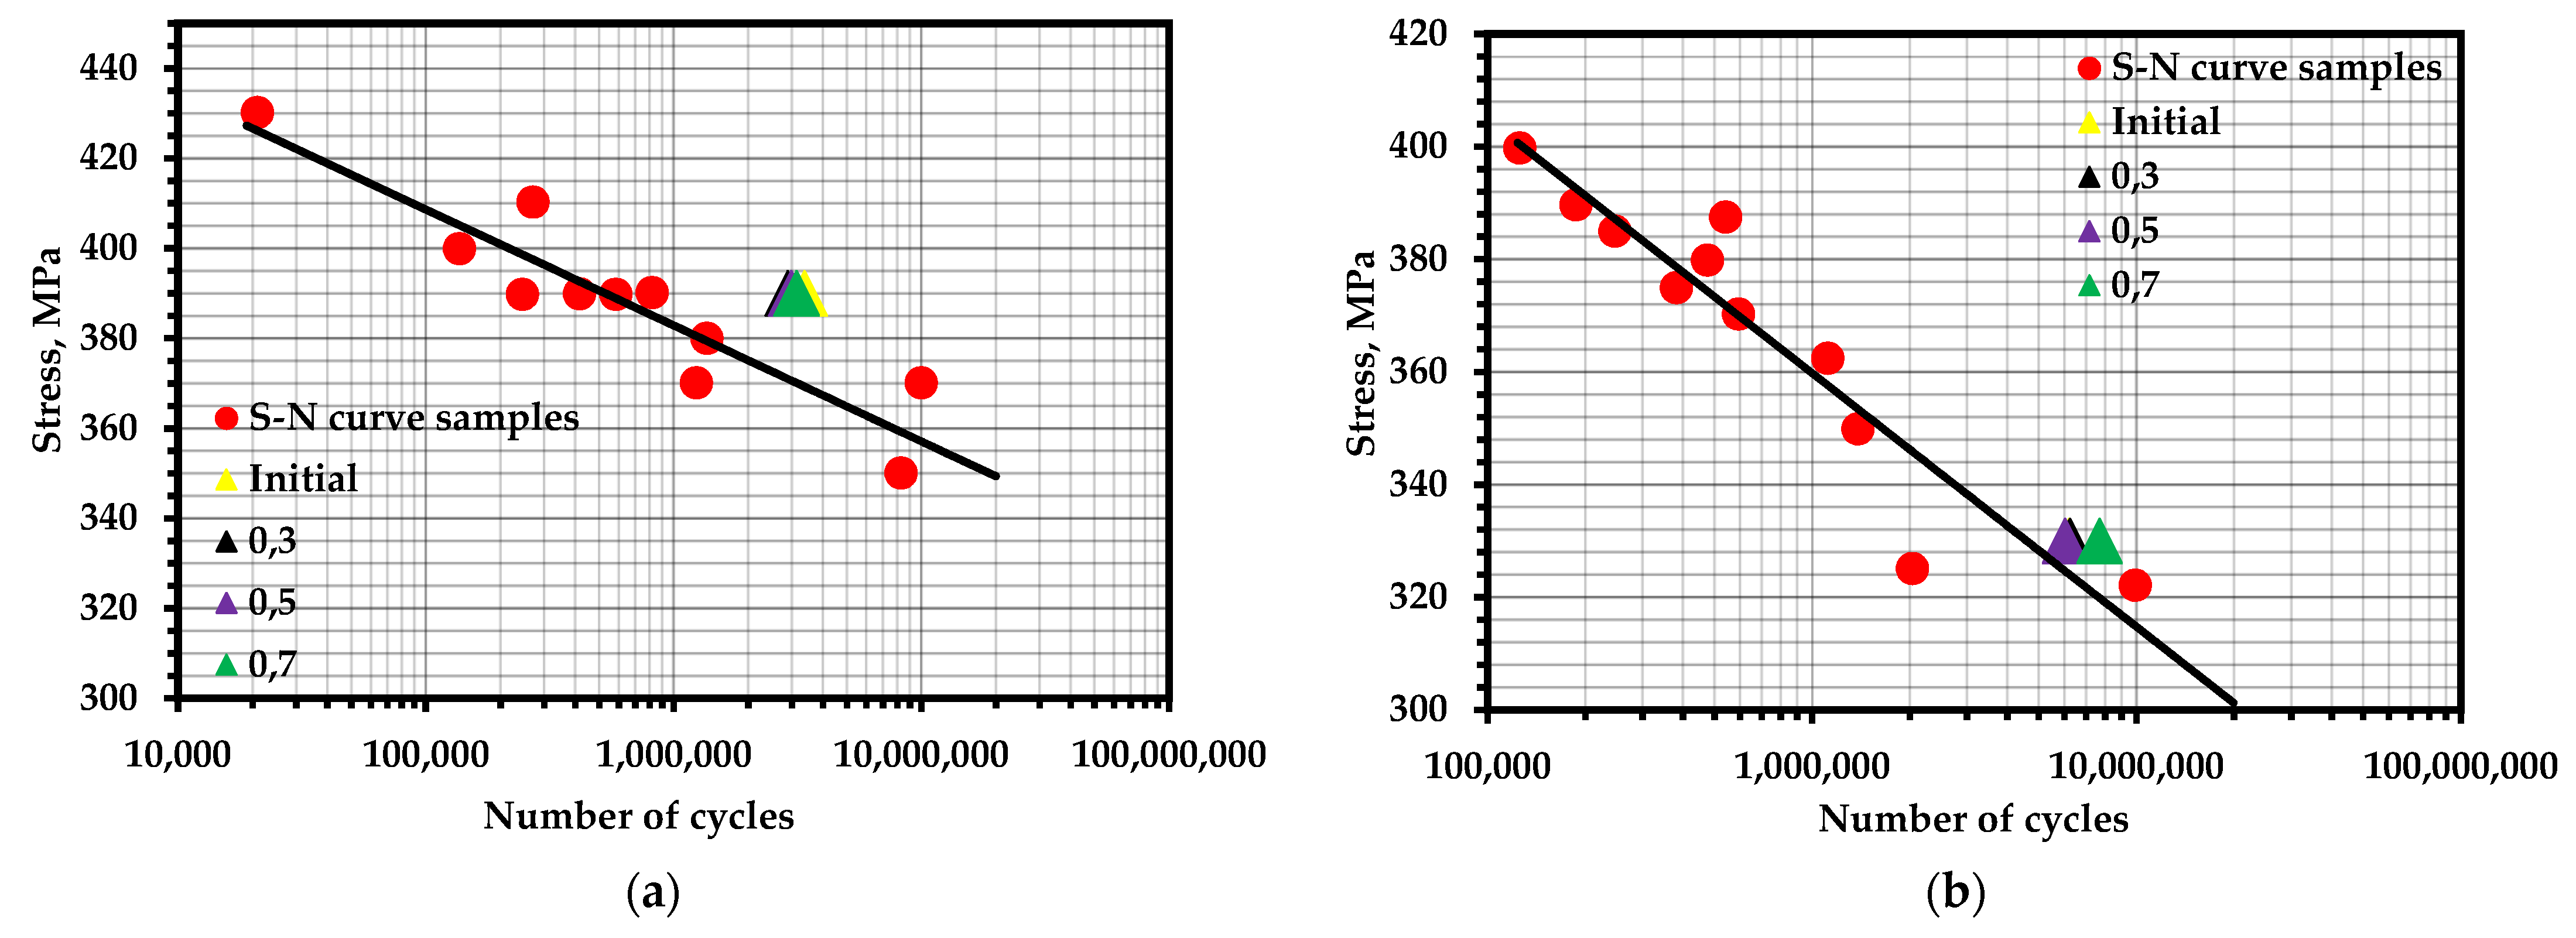
The points corresponding to the fatigue life of the samples are marked on the fatigue curves for these samples (Figure 10). It can be noted that the concentration-kinetic AE strength indicators and showed stable values regardless of the operation time and loading speed. This means that it is possible to apply these parameters to assess the resource at any time of operation of a real object and, knowing the loading history, predict the remaining number of cycles before destruction.
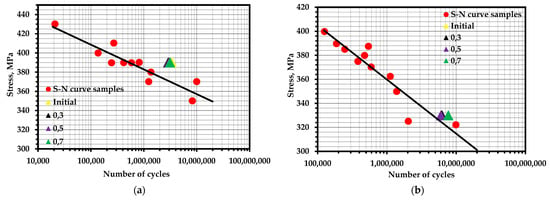
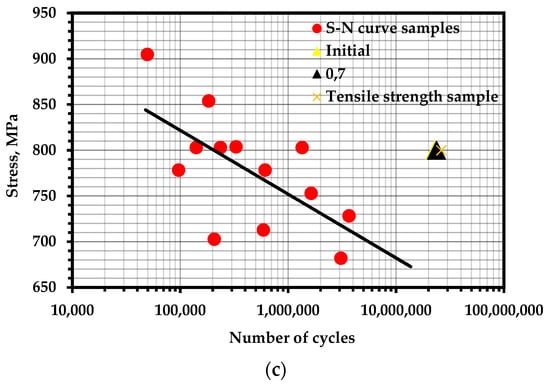
Figure 10.
S–N curves for experimental materials with marked points of calculated fatigue life: (a) steel 20 with pre-cycling at 390 MPa; (b) steel 20 with pre-cycling at 330 MPa; (c) 15X2GMF steel with pre-cycling at 800 MPa.
In both cases, the obtained durability parameters yielded results slightly exceeding the average values of the fatigue curve. Obviously, this is due to the unaccounted influence of temperature and the temperature dependence of the durability parameters themselves. It has been repeatedly pointed out [97,98] that temperature differences during cyclic loading can reach values exceeding the initial temperature by tens of degrees. The removal of heat from the samples during the experiments allowed for a more accurate assessment of the resource.
Research of this phenomenon will be the goal of further research.
4. Conclusions
In this study, an analysis of the physical nature of the parameters included in the durability equation based on the kinetic concept of strength was carried out. The calculations show that the acoustic emission method can track changes in the kinetics of damage accumulation from the perspective of thermal fluctuations in the crystal lattice of the material with the subsequent formation of microcracks. The concentration-kinetic parameters of AE obtained from the site of homogeneous, finely dispersed fracturing corresponding to the elastic and elastoplastic deformation zones made it possible to calculate the durability parameters and, above all, the structure parameter and the activation energy of the fracture.
The parameters calculated using the proposed model showed a good correlation with other methods and models. However, the calculation of the structural coefficient of gamma and the destructive load requires further development and consideration of the temperature and deformation component, as well as the more effective use of frequency and amplitude characteristics to determine the site of homogeneous destruction.
Numerical modeling was also performed in the work using the D2 and M250 steels as examples, which generally confirmed that the obtained values of the structural parameter correspond to the main array of structural elements that are responsible for strength and destruction. The use of modern models for calculating fatigue life based on the kinetic Zhurkov equation applied to three experiments conducted on the 15X2GMF and 20 steel as examples and with various fatigue operating times has been shown in the last part of this work. Some overestimation of the fatigue life was associated with an insufficient consideration of temperature changes and the thermoelastic effect during cyclic loading, which we plan to investigate in future works.
Author Contributions
Conceptualization, V.V.N., A.I.B. and O.G.P.; methodology, V.V.N.; software, A.I.B. and O.G.P.; validation, O.G.P. and V.V.N.; formal analysis, O.G.P. and N.V.C.; investigation, O.G.P. and N.V.C.; resources, O.G.P.; data curation, N.V.C. and K.M.K.; writing—original draft preparation, O.G.P. and V.V.N.; writing—review and editing, O.G.P.; visualization, O.G.P.; supervision, V.V.N., A.I.B. and K.M.K.; project administration, O.G.P. All authors have read and agreed to the published version of the manuscript.
Funding
This research was partially funded by the Ministry of Science and Higher Education of the Russian Federation as part of the World-Class Research Center program: Advanced Digital Technologies (contract No. 075-15-2022-311 dated 20 April 2022).
Data Availability Statement
Not applicable.
Acknowledgments
Information about the experiments conducted on fatigue life was provided by L.R. Botvina and colleagues from the Baikov Institute of Metallurgy and Materials Science, the Russian Academy of Sciences, Moscow, Russia.
Conflicts of Interest
The authors declare no conflict of interest.
Appendix A
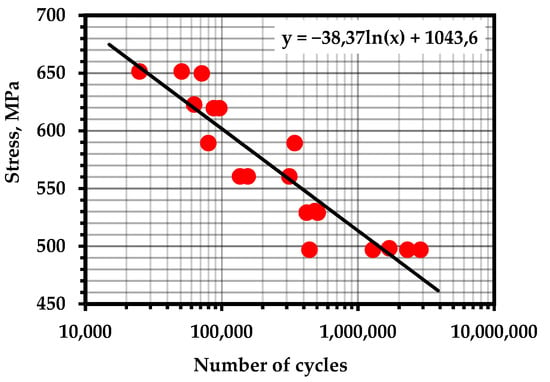
Figure A1.
S–N Curve—Inconel 625 (Temperature—300 K; frequency—10 Hz; R = 0.1) [45].
Figure A1.
S–N Curve—Inconel 625 (Temperature—300 K; frequency—10 Hz; R = 0.1) [45].
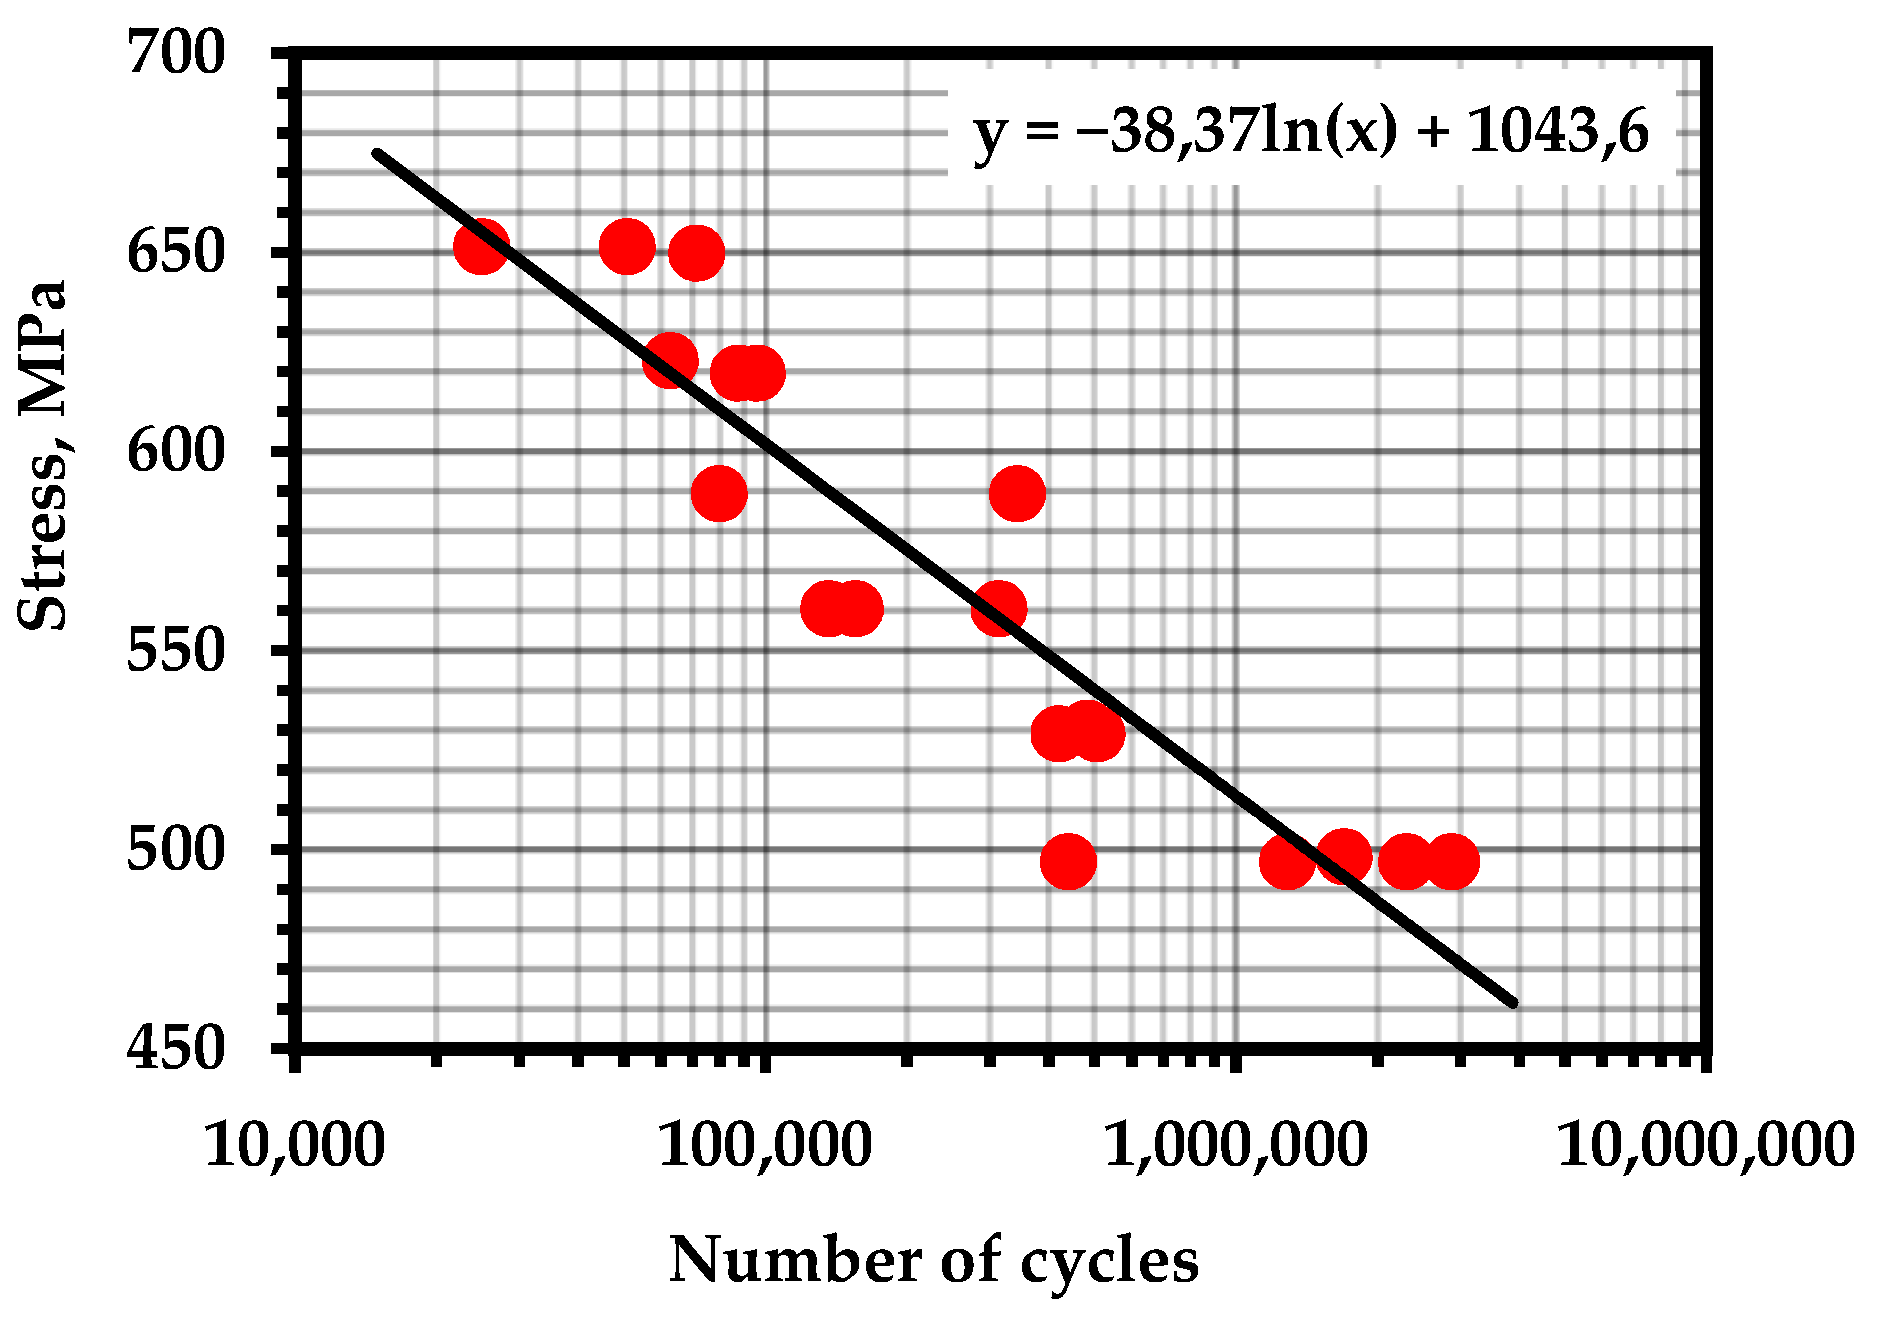
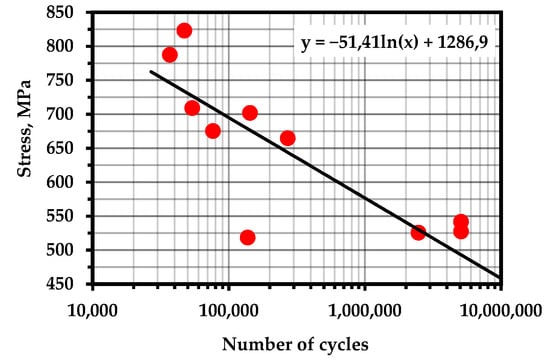
Figure A2.
S–N Curve—Steel D2 (Temperature—293 K; frequency—23 Hz; R = 0.75) [99].
Figure A2.
S–N Curve—Steel D2 (Temperature—293 K; frequency—23 Hz; R = 0.75) [99].

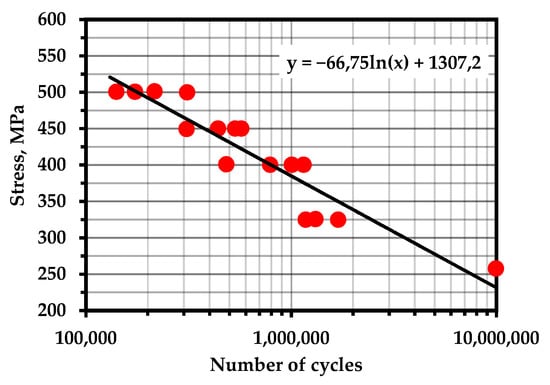
Figure A3.
S–N Curve—Ti–6Al–4V (Temperature—298 K; frequency—110 Hz). Source—Base Total Material.
Figure A3.
S–N Curve—Ti–6Al–4V (Temperature—298 K; frequency—110 Hz). Source—Base Total Material.
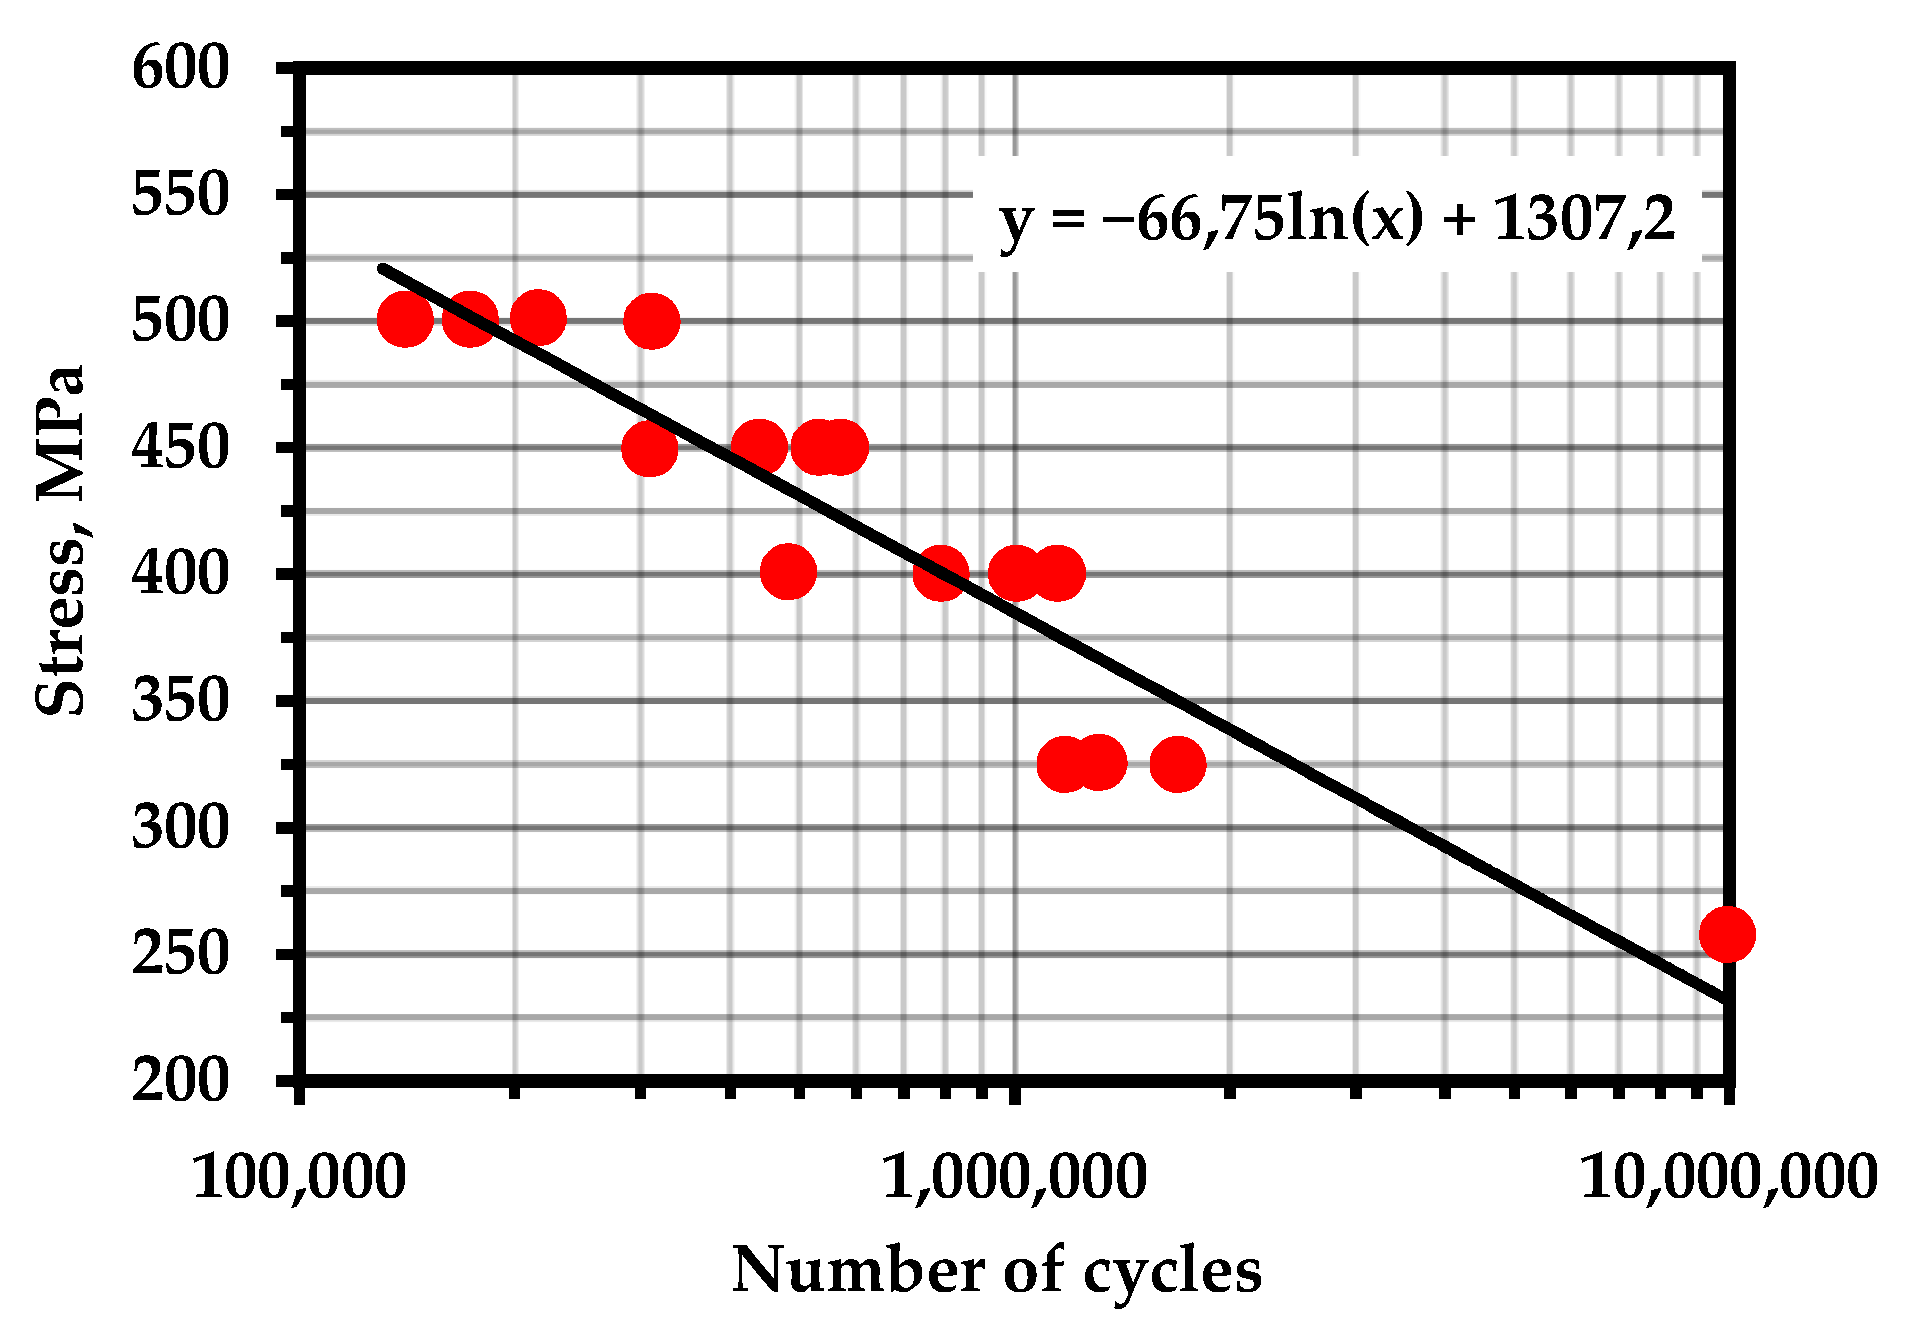
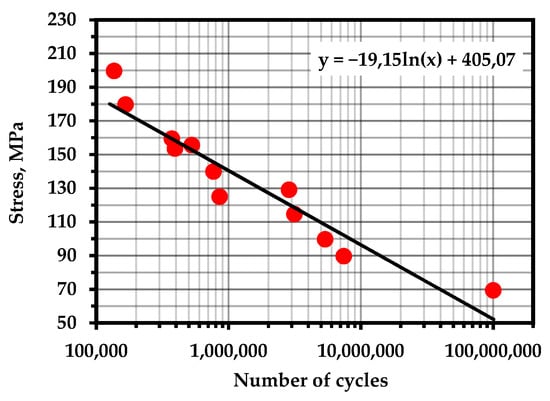
Figure A4.
S–N Curve—Ti-15V-3.0Cr-3.0Al-3.0Sn (Temperature—298 K; frequency—20 Hz). Source—Base Total material.
Figure A4.
S–N Curve—Ti-15V-3.0Cr-3.0Al-3.0Sn (Temperature—298 K; frequency—20 Hz). Source—Base Total material.

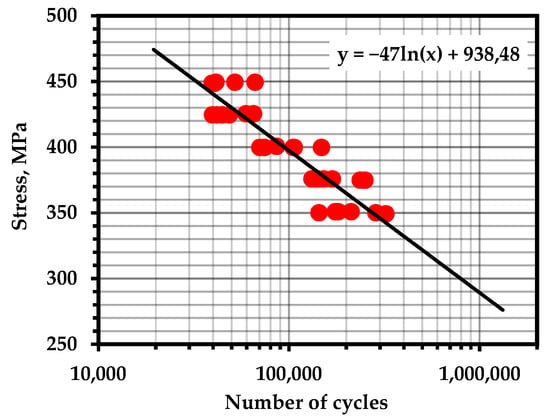
Figure A5.
S–N Curve—Steel AISI 304SS (Temperature—293; frequency—50 Hz; R = 1.5) [100].
Figure A5.
S–N Curve—Steel AISI 304SS (Temperature—293; frequency—50 Hz; R = 1.5) [100].

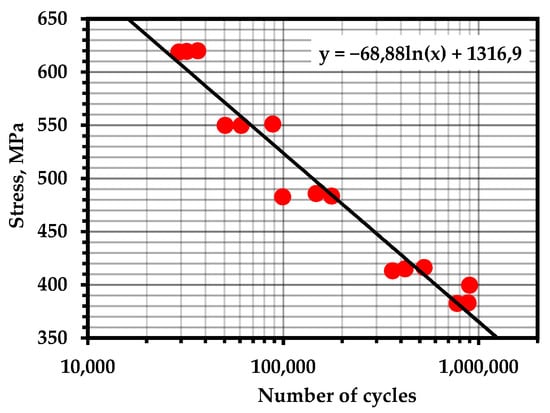
Figure A6.
S–N Curve—Steel AISI 1080 (Temperature—293 K; frequency—30 Hz; R = −1) [101].
Figure A6.
S–N Curve—Steel AISI 1080 (Temperature—293 K; frequency—30 Hz; R = −1) [101].

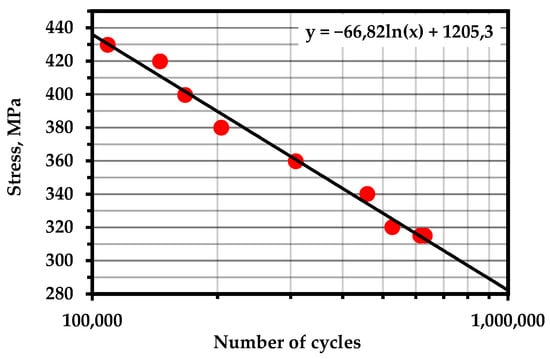
Figure A7.
S–N Curve—Steel AISI 1060 (Temperature—293 K; frequency—30 Hz; R = −1) [102].
Figure A7.
S–N Curve—Steel AISI 1060 (Temperature—293 K; frequency—30 Hz; R = −1) [102].
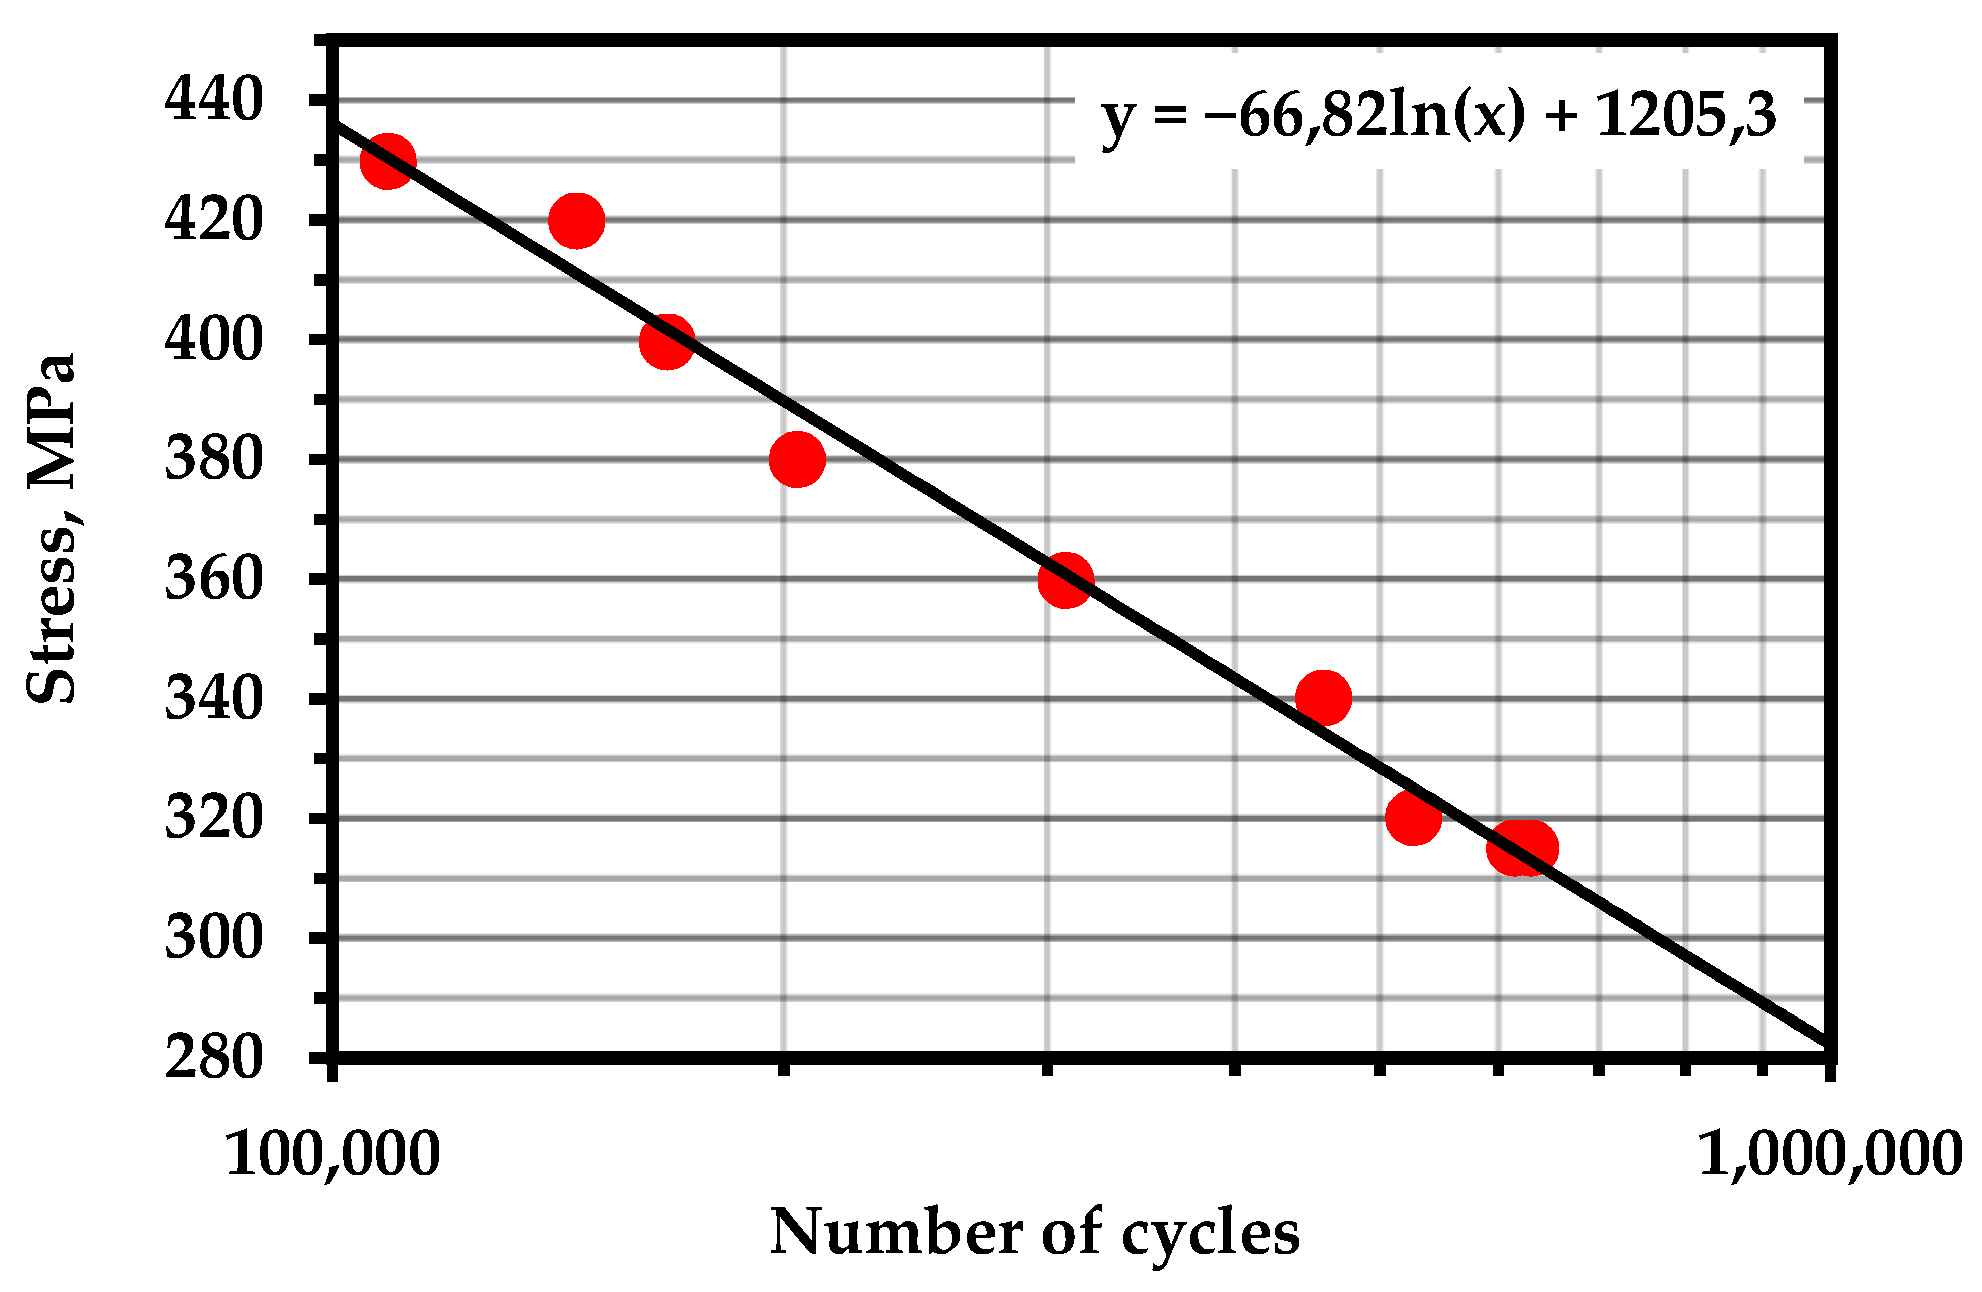

Figure A8.
S–N Curve—A516 Grade 70 Steel (Accepted as an analogue of SA333) (Temperature—293 K; frequency—30 Hz). Source—Base Total Material.
Figure A8.
S–N Curve—A516 Grade 70 Steel (Accepted as an analogue of SA333) (Temperature—293 K; frequency—30 Hz). Source—Base Total Material.
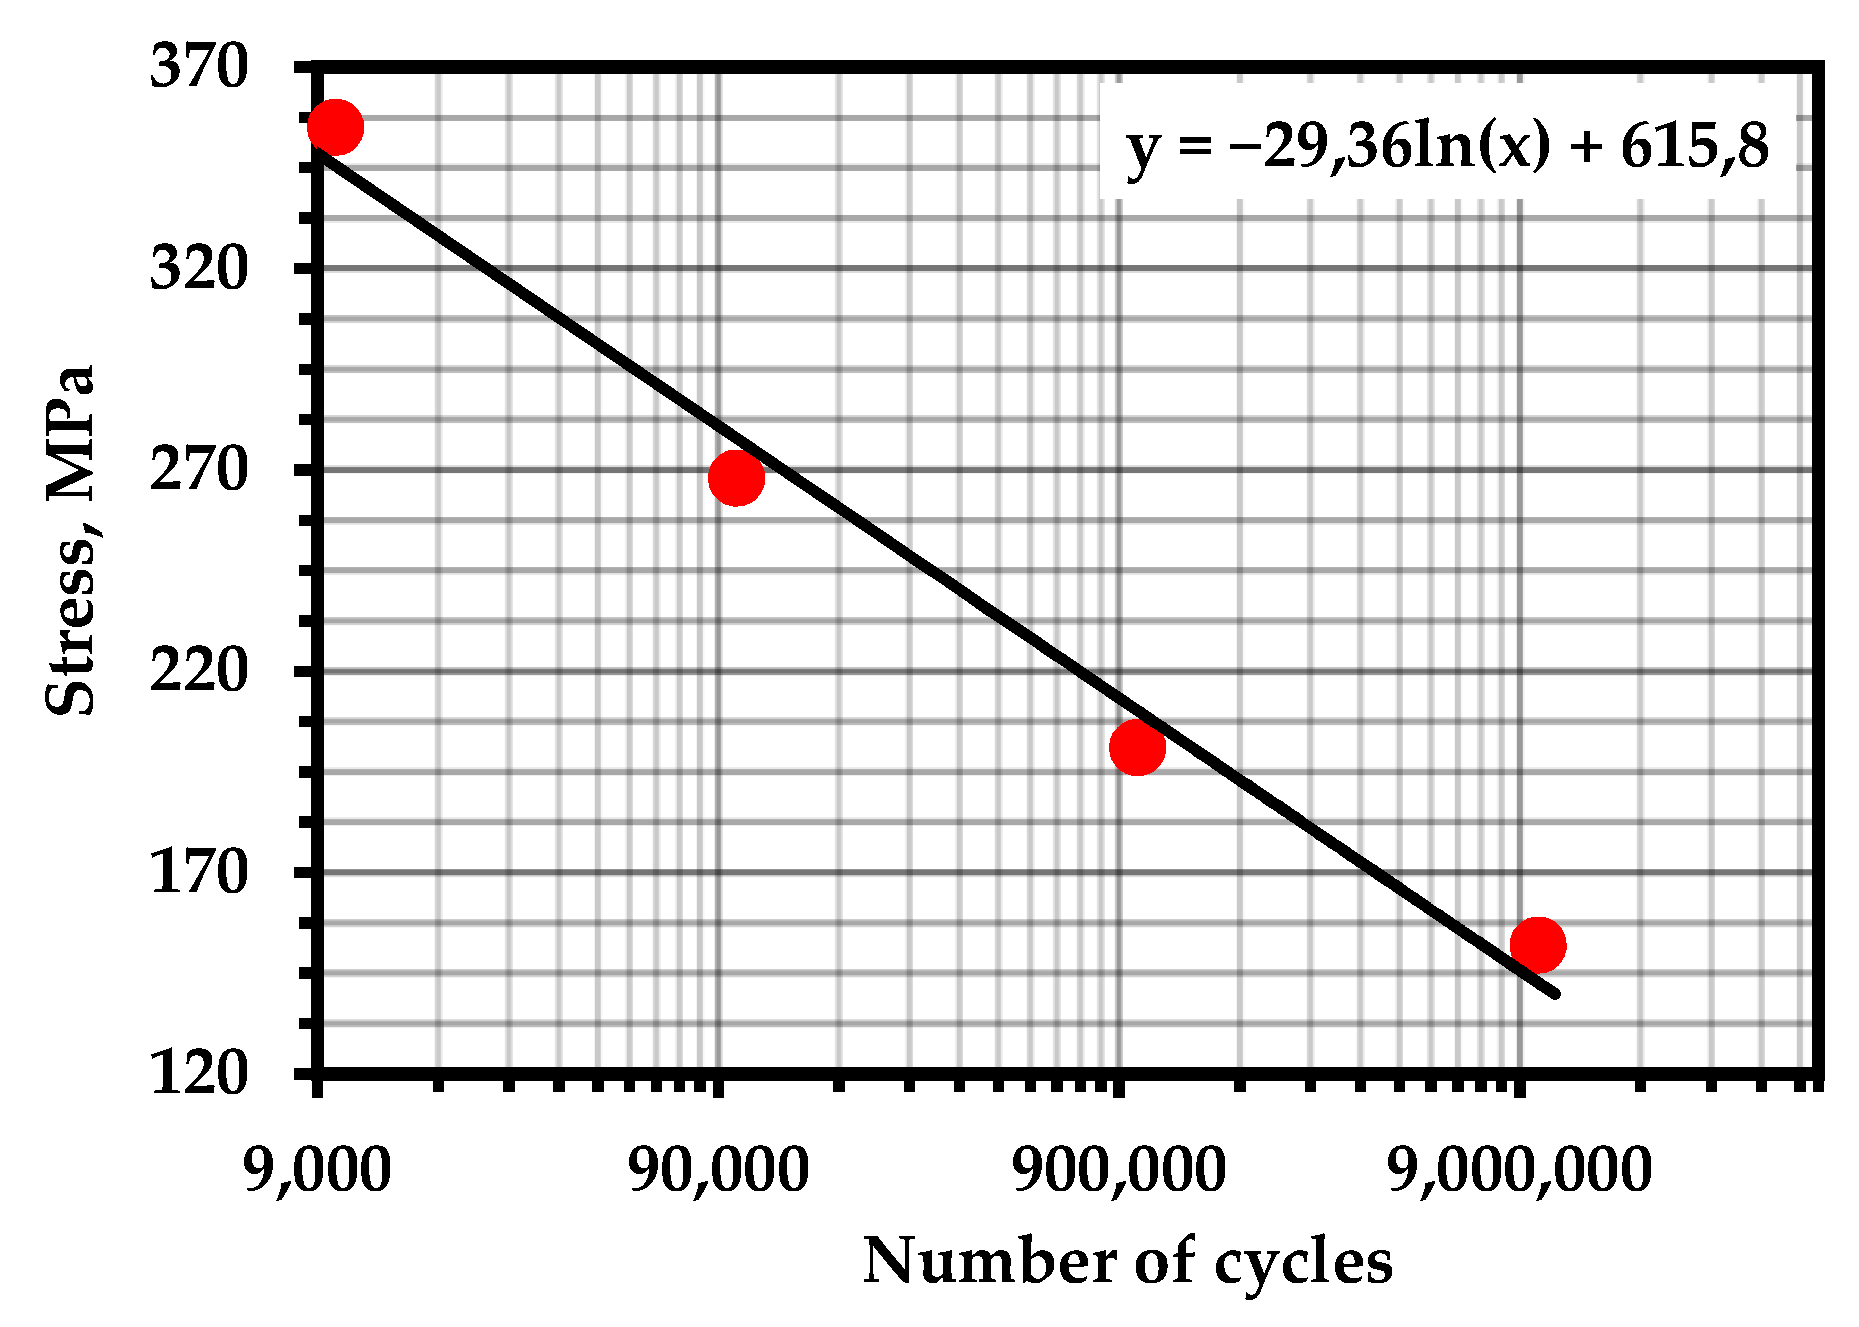
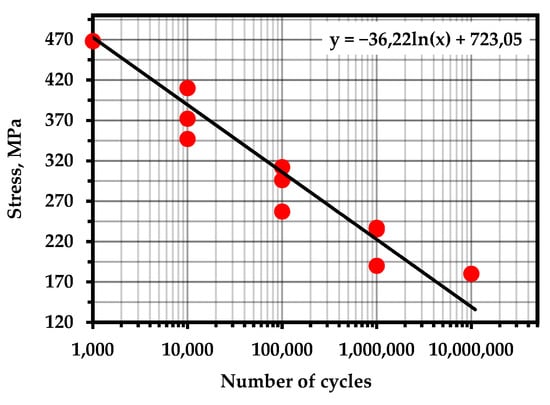
Figure A9.
S–N Curve—Steel AISI 304LN (Temperature—293 K; frequency—30 Hz). Source—Base Total Material.
Figure A9.
S–N Curve—Steel AISI 304LN (Temperature—293 K; frequency—30 Hz). Source—Base Total Material.
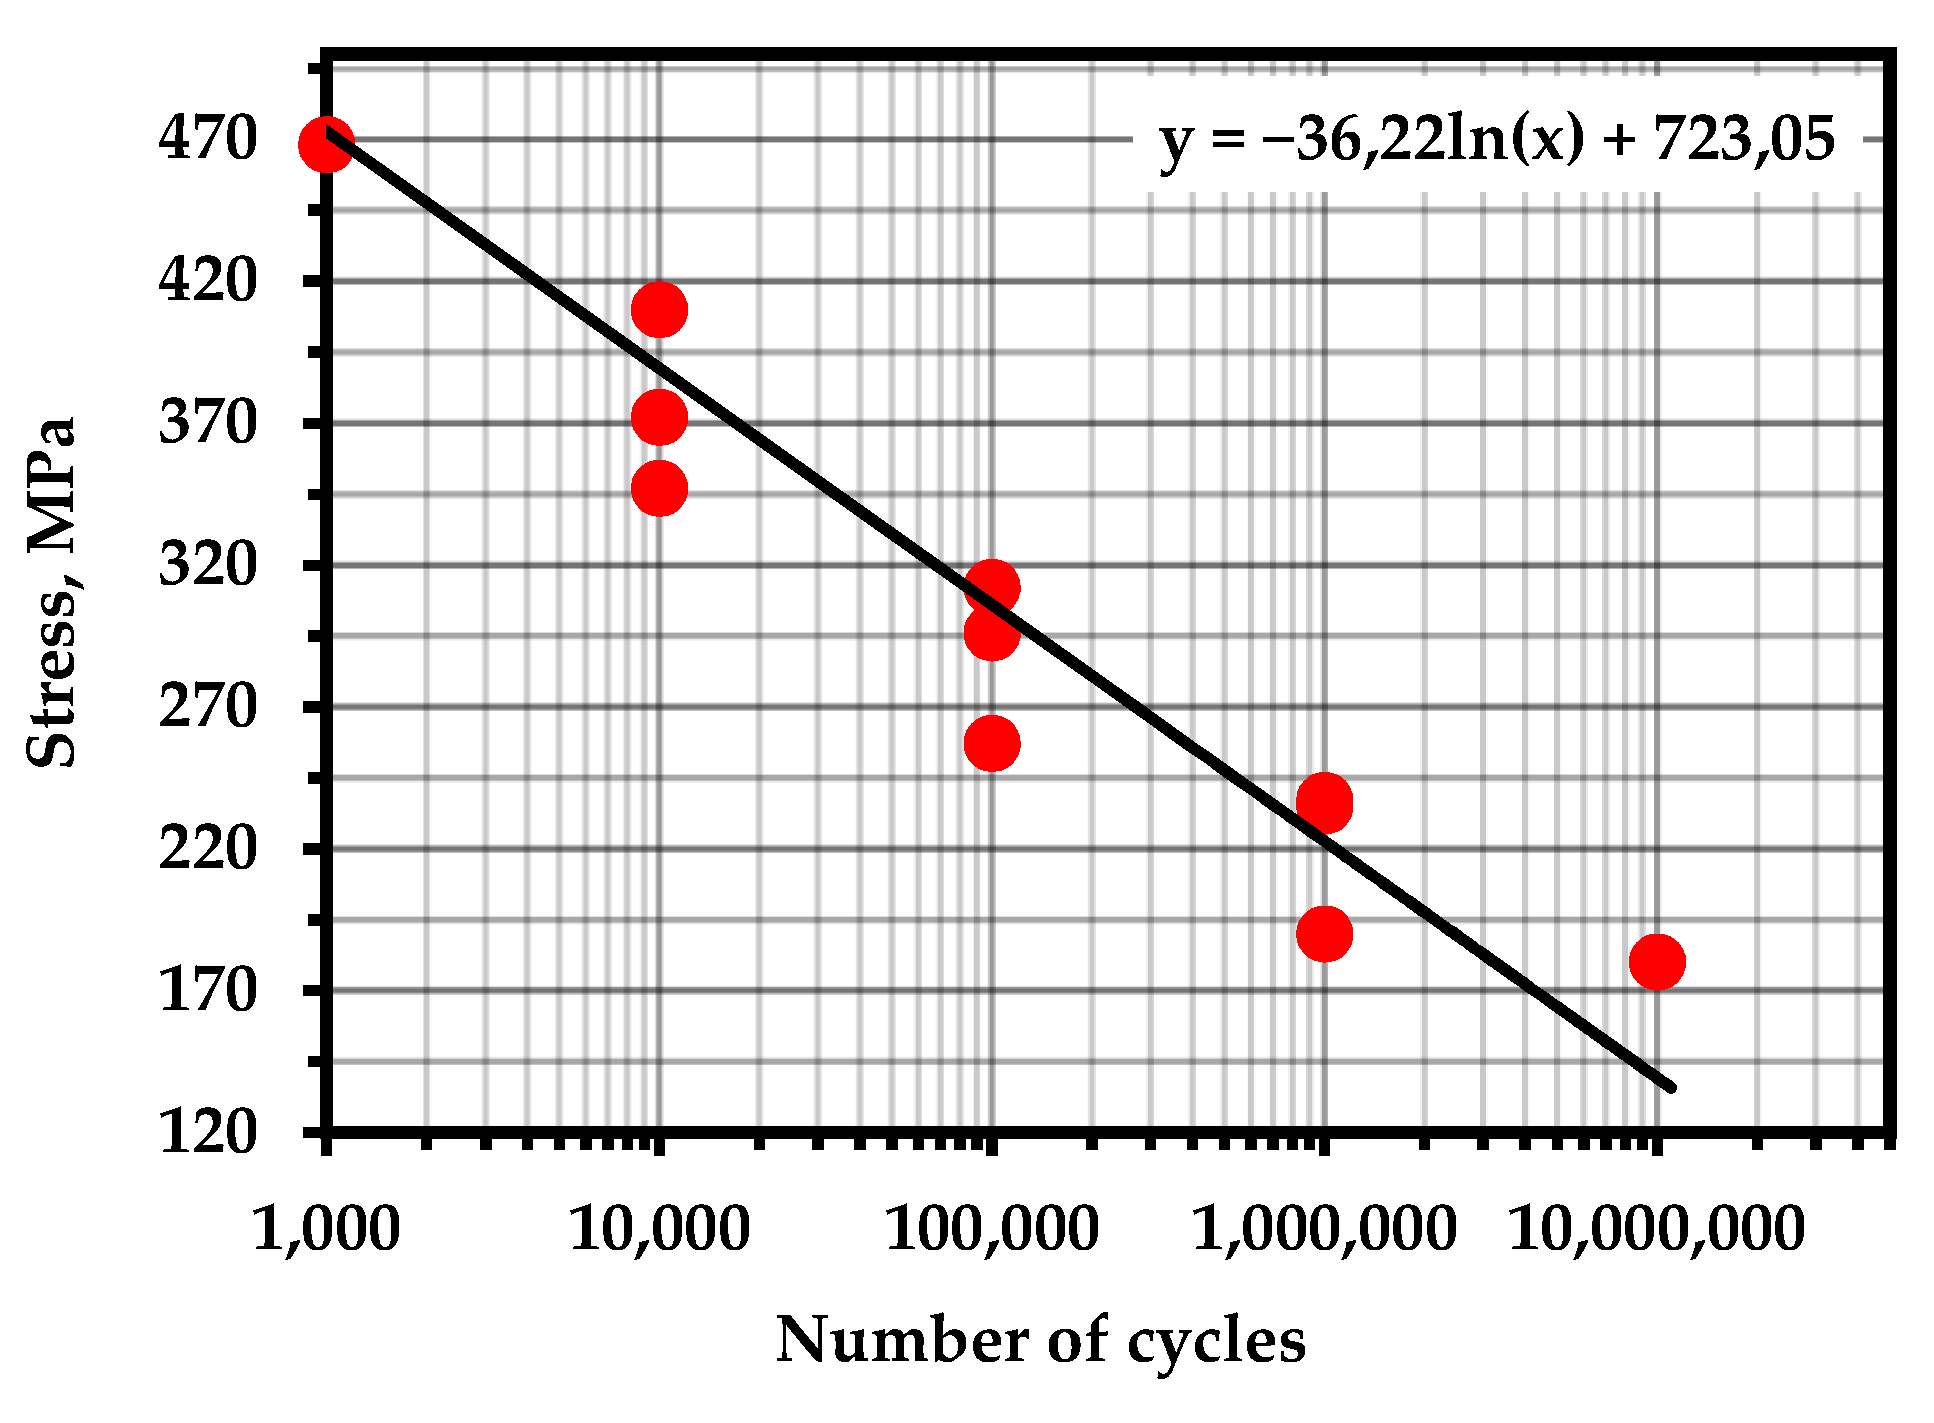

Figure A10.
S–N Curve—Steel AISI 304L (Temperature—700 K; frequency—40 Hz; R = −1) [103].
Figure A10.
S–N Curve—Steel AISI 304L (Temperature—700 K; frequency—40 Hz; R = −1) [103].
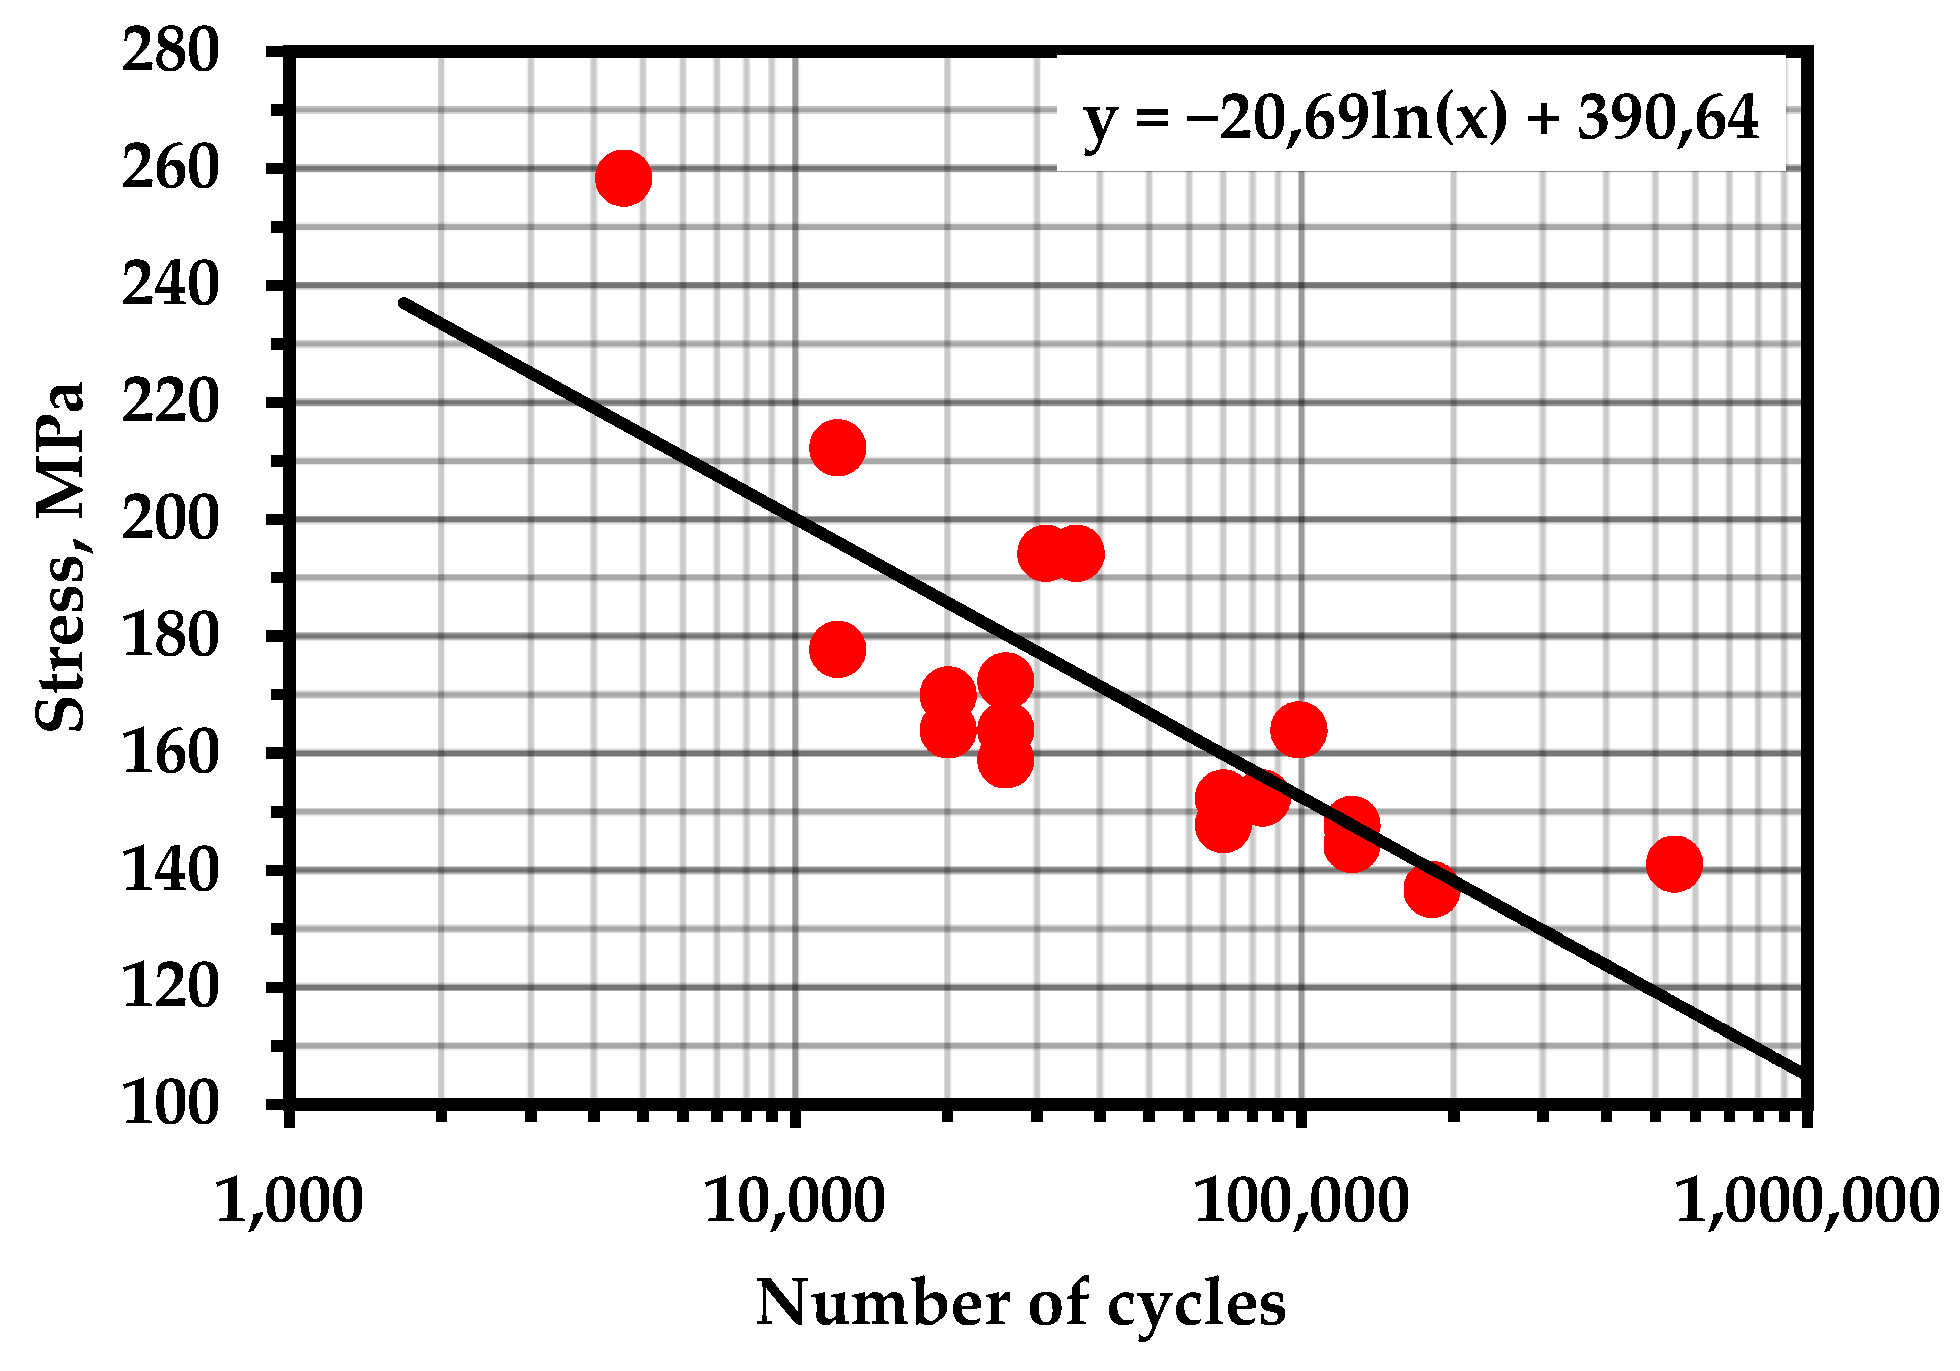
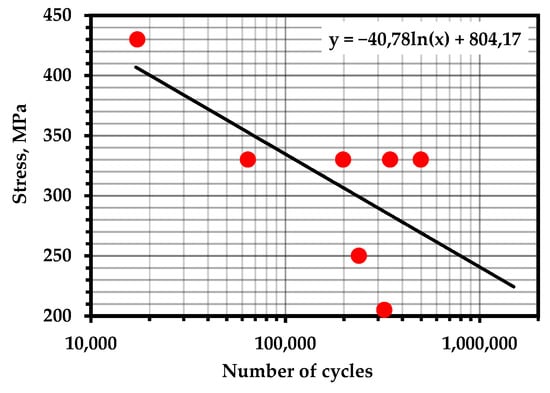
Figure A11.
S–N Curve—Steel 09G2S (Temperature—293 K; frequency—0.6 Hz) [104].
Figure A11.
S–N Curve—Steel 09G2S (Temperature—293 K; frequency—0.6 Hz) [104].

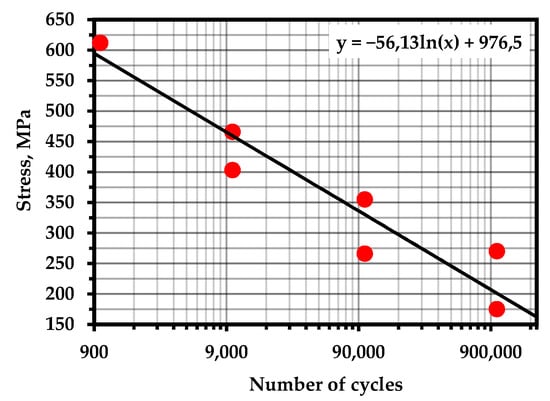
Figure A12.
S–N Curve—Steel C55 (accepted as an analogue) (Temperature—293 K; frequency—30 Hz) [105].
Figure A12.
S–N Curve—Steel C55 (accepted as an analogue) (Temperature—293 K; frequency—30 Hz) [105].
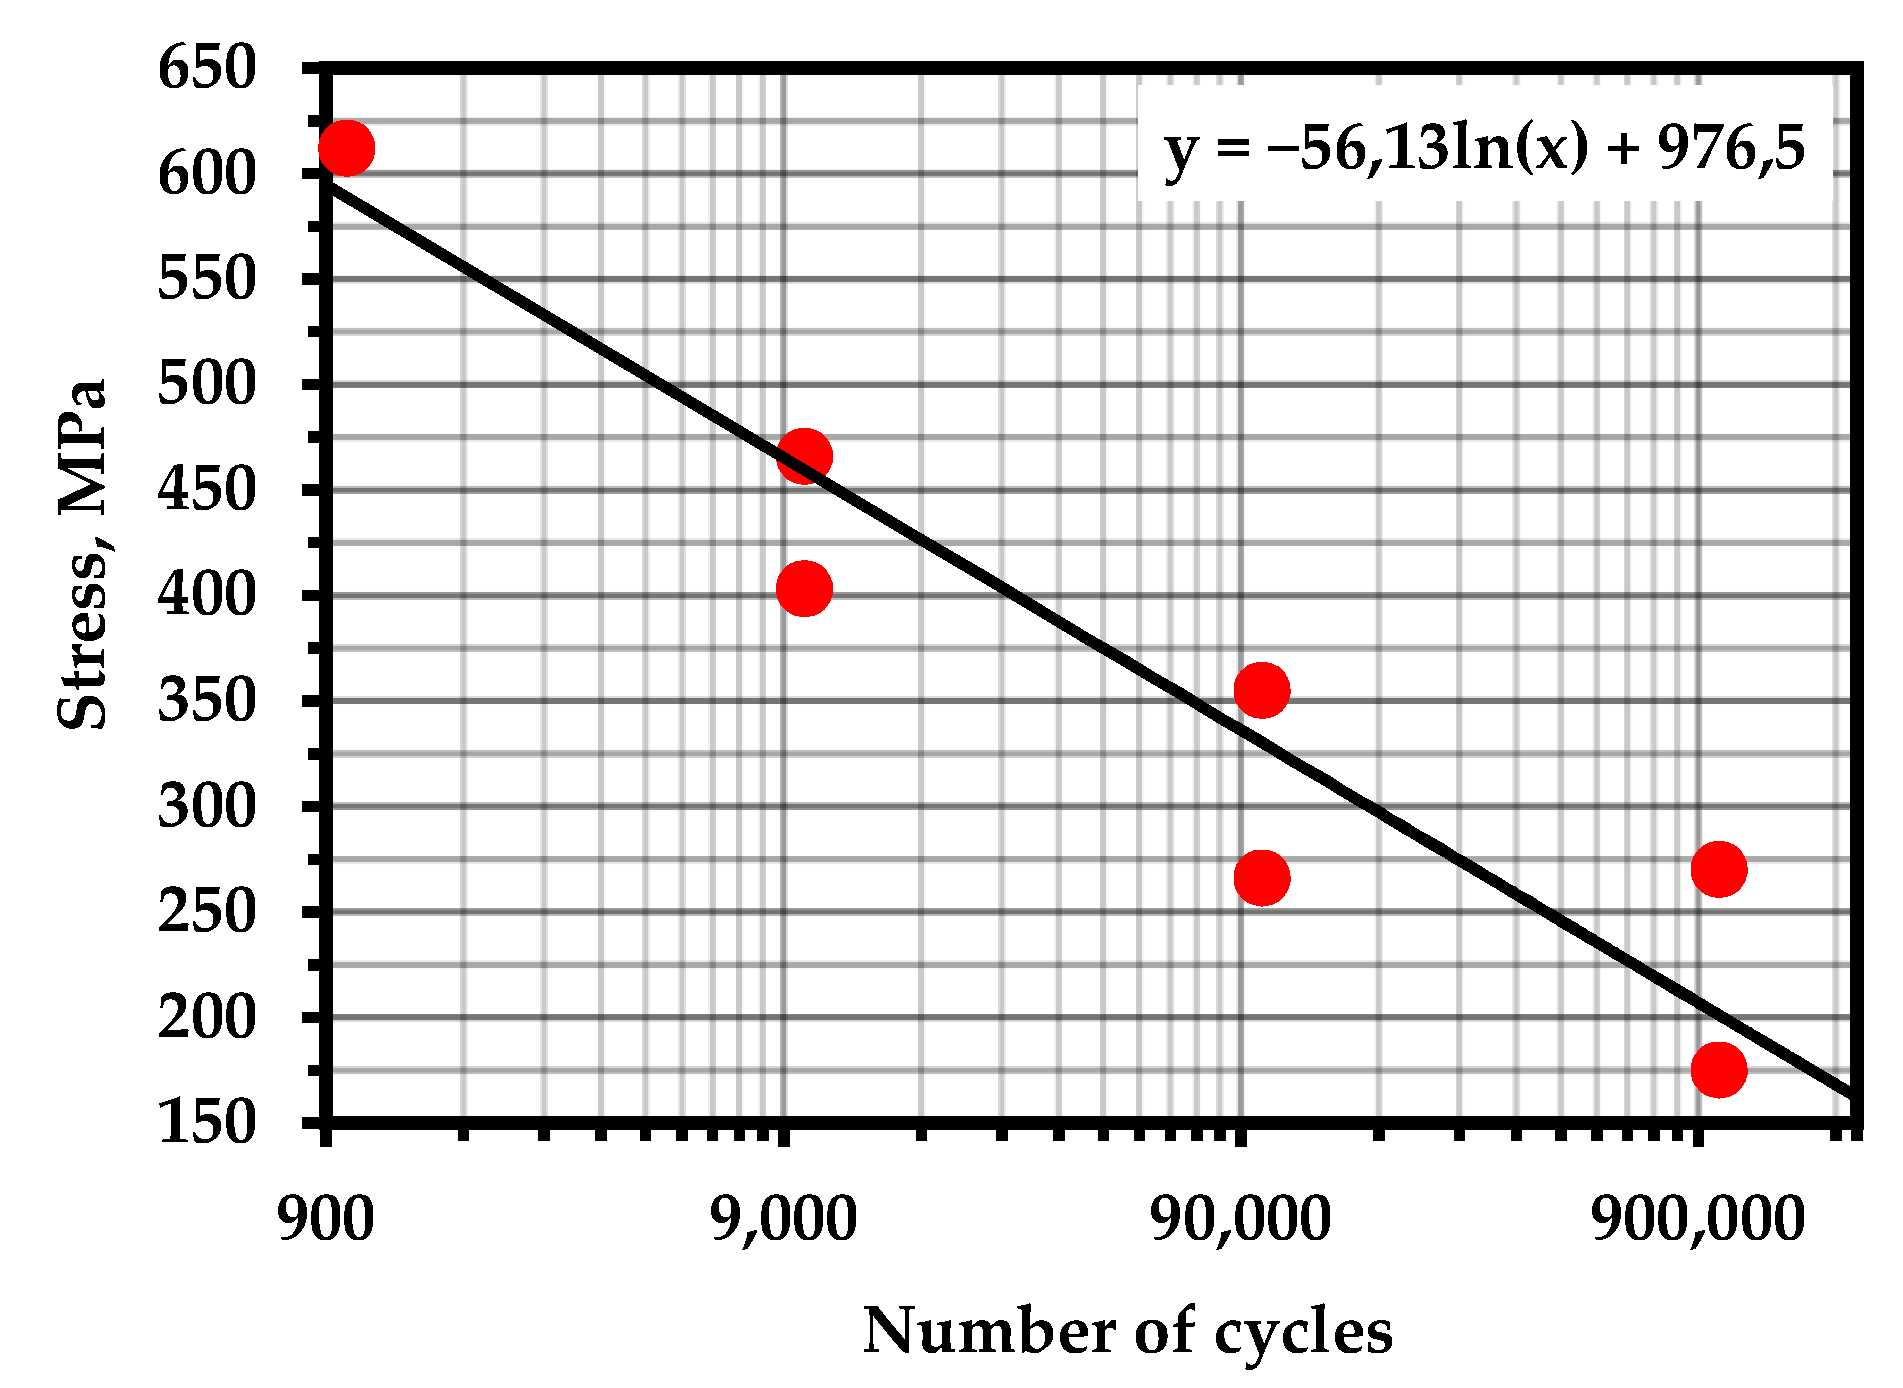
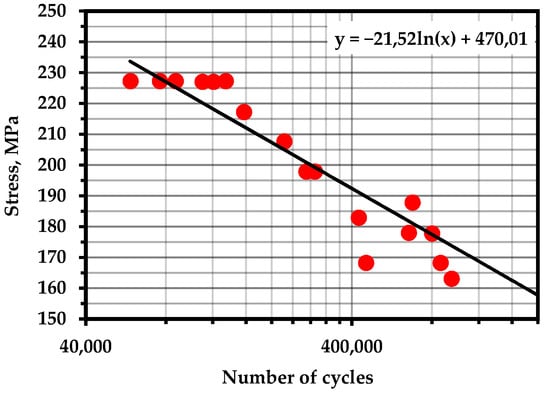
Figure A13.
S–N Curve—Steel AISI 316LN (Temperature—293 K; frequency—10 Hz; R = 0.1) [106].
Figure A13.
S–N Curve—Steel AISI 316LN (Temperature—293 K; frequency—10 Hz; R = 0.1) [106].

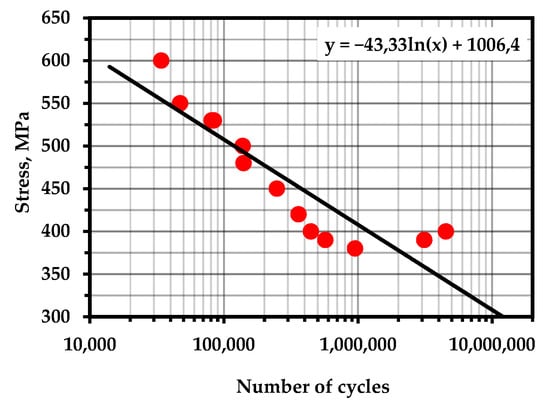
Figure A14.
S–N Curve—4330V (accepted as an analogue) (Temperature—293 K; frequency—50 Hz) [107].
Figure A14.
S–N Curve—4330V (accepted as an analogue) (Temperature—293 K; frequency—50 Hz) [107].

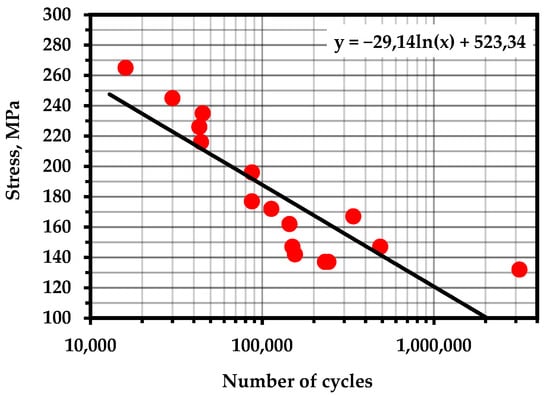
Figure A15.
S–N Curve—Al 7075 alloy (Temperature—293 K; frequency—60 Hz) [107].
Figure A15.
S–N Curve—Al 7075 alloy (Temperature—293 K; frequency—60 Hz) [107].
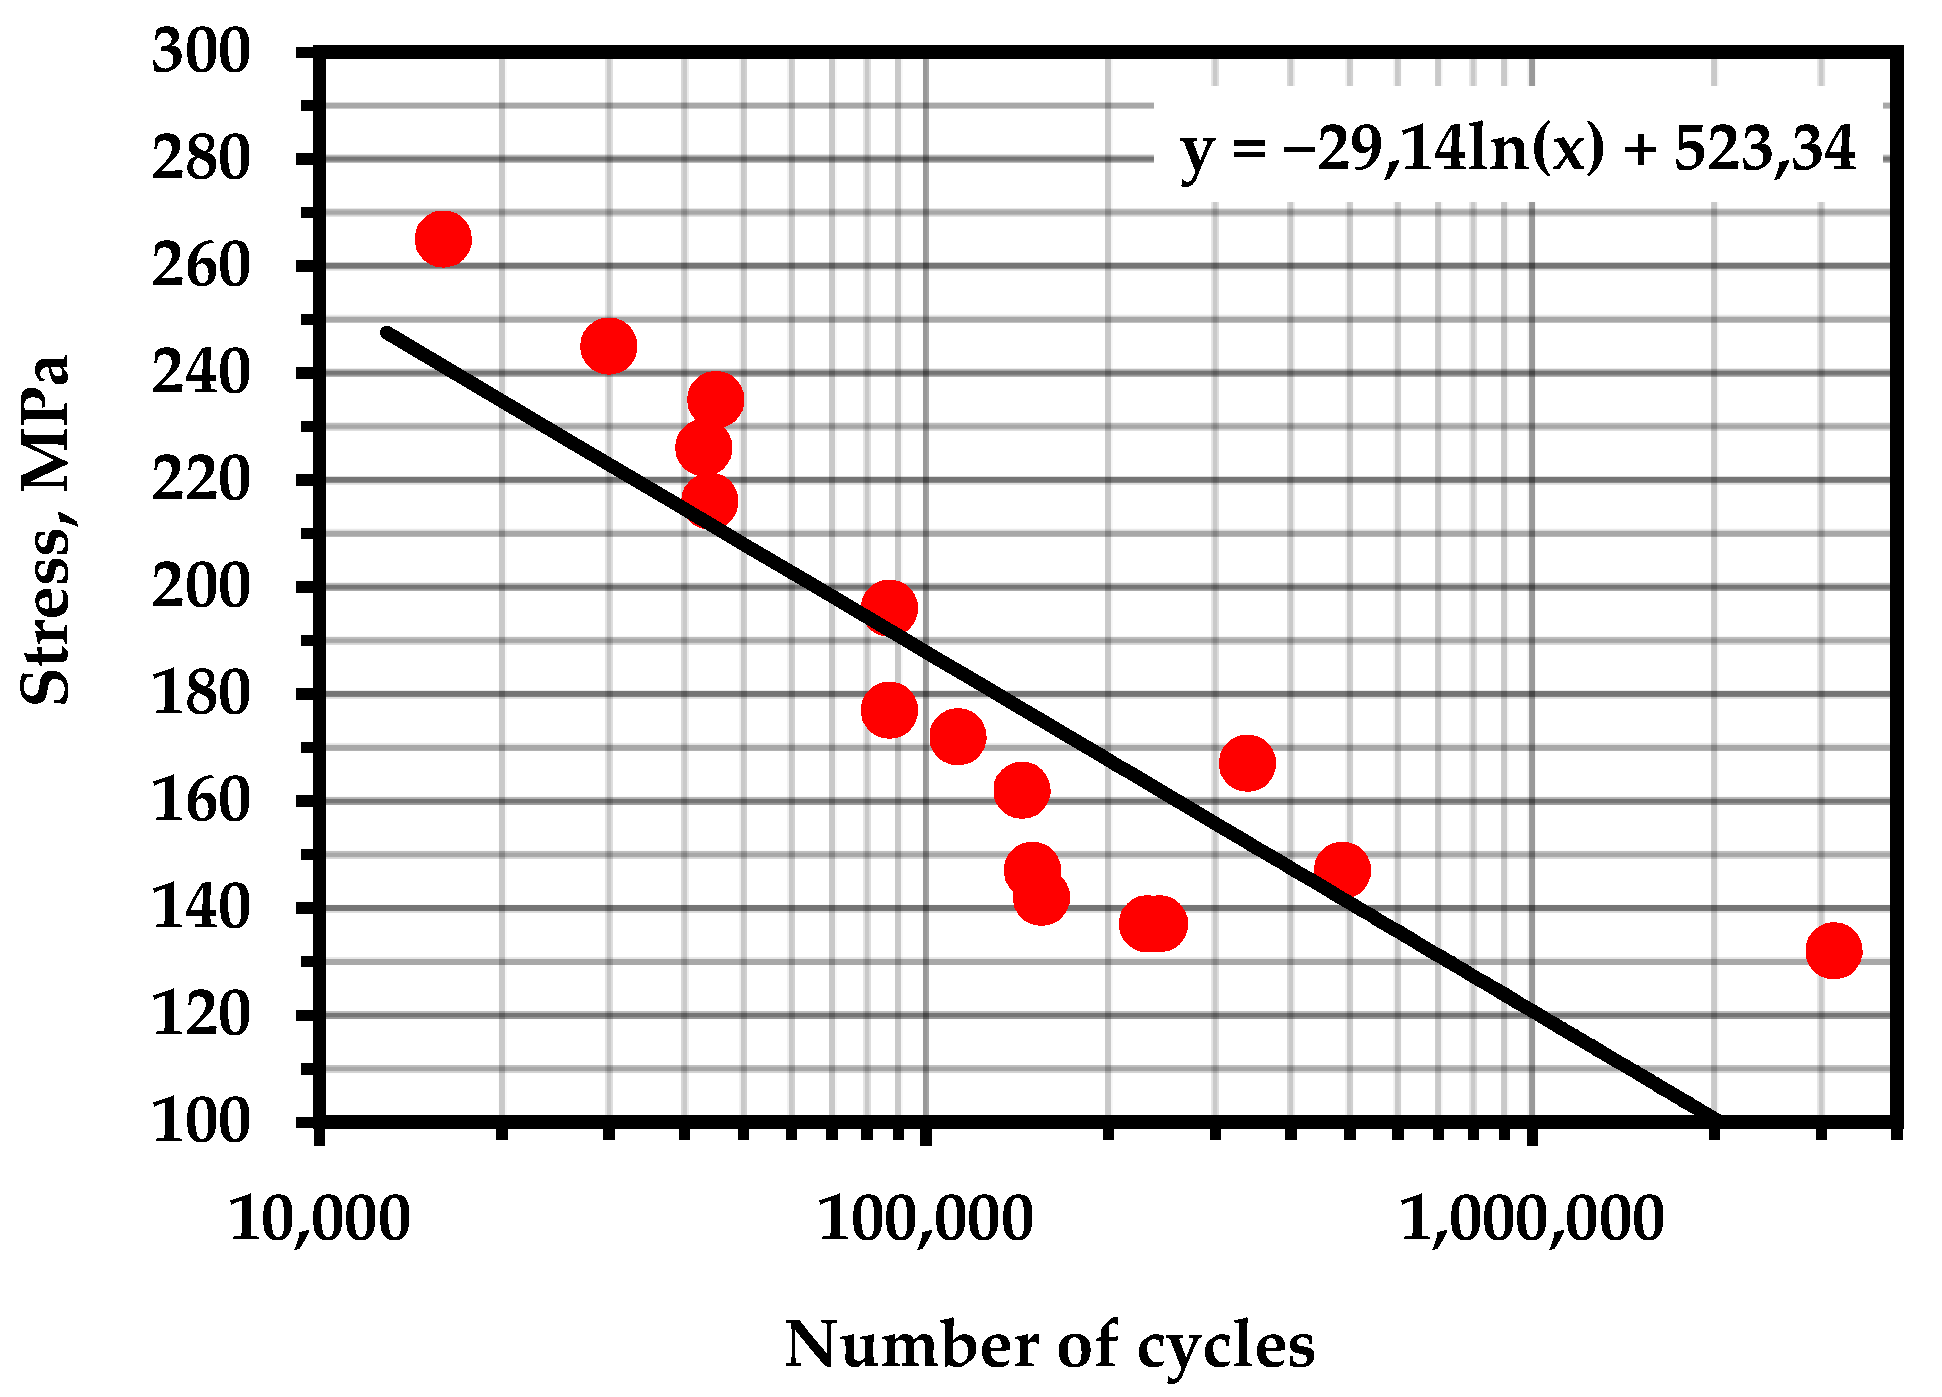
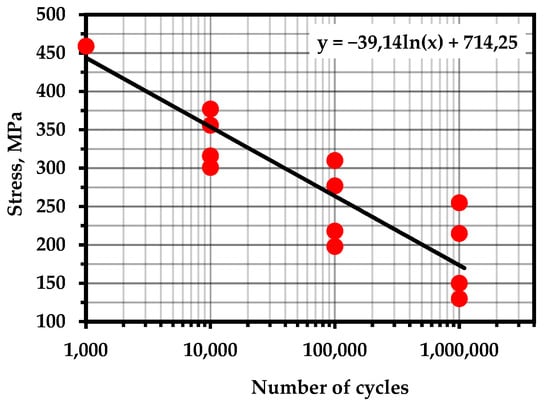
Figure A16.
S–N Curve—Steel S355JR (accepted as an analogue) (Temperature—293 K; frequency—30 Hz) [105].
Figure A16.
S–N Curve—Steel S355JR (accepted as an analogue) (Temperature—293 K; frequency—30 Hz) [105].
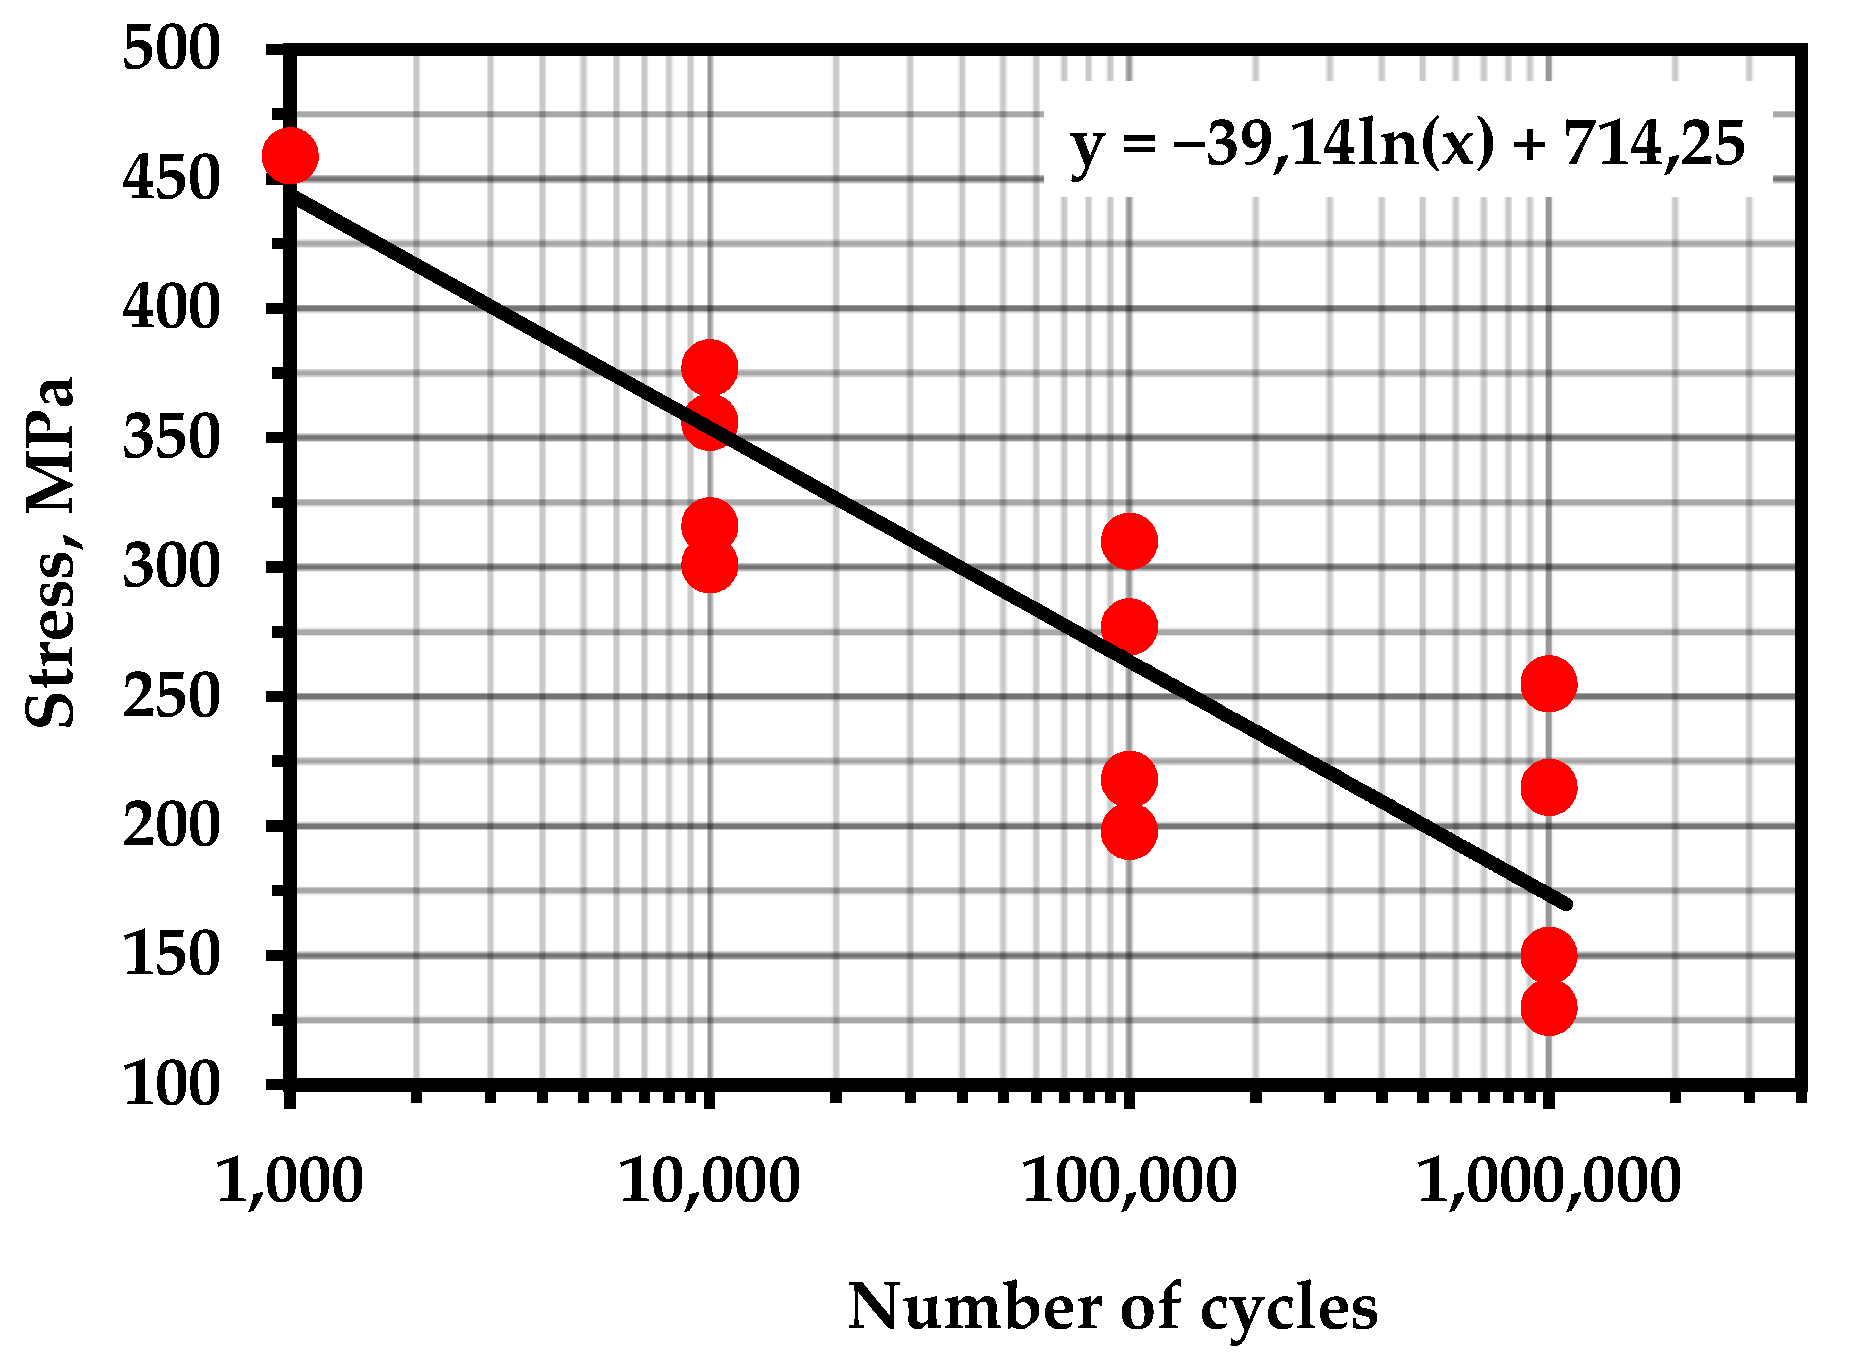
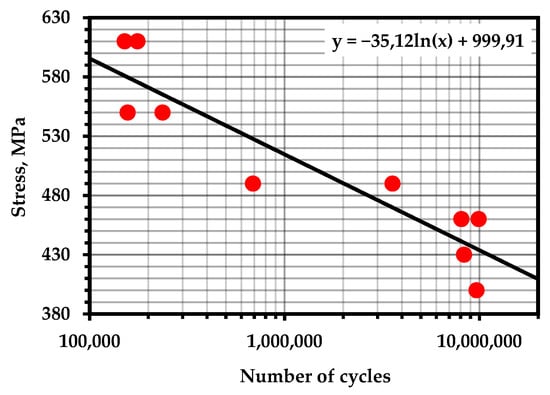
Figure A17.
S–N Curve—Steel M250 (Temperature—293 K; frequency—60 Hz) [108].
Figure A17.
S–N Curve—Steel M250 (Temperature—293 K; frequency—60 Hz) [108].


Figure A18.
S–N Curve—GJS-400-15 (Temperature—293 K; frequency—20 Hz) [109].
Figure A18.
S–N Curve—GJS-400-15 (Temperature—293 K; frequency—20 Hz) [109].
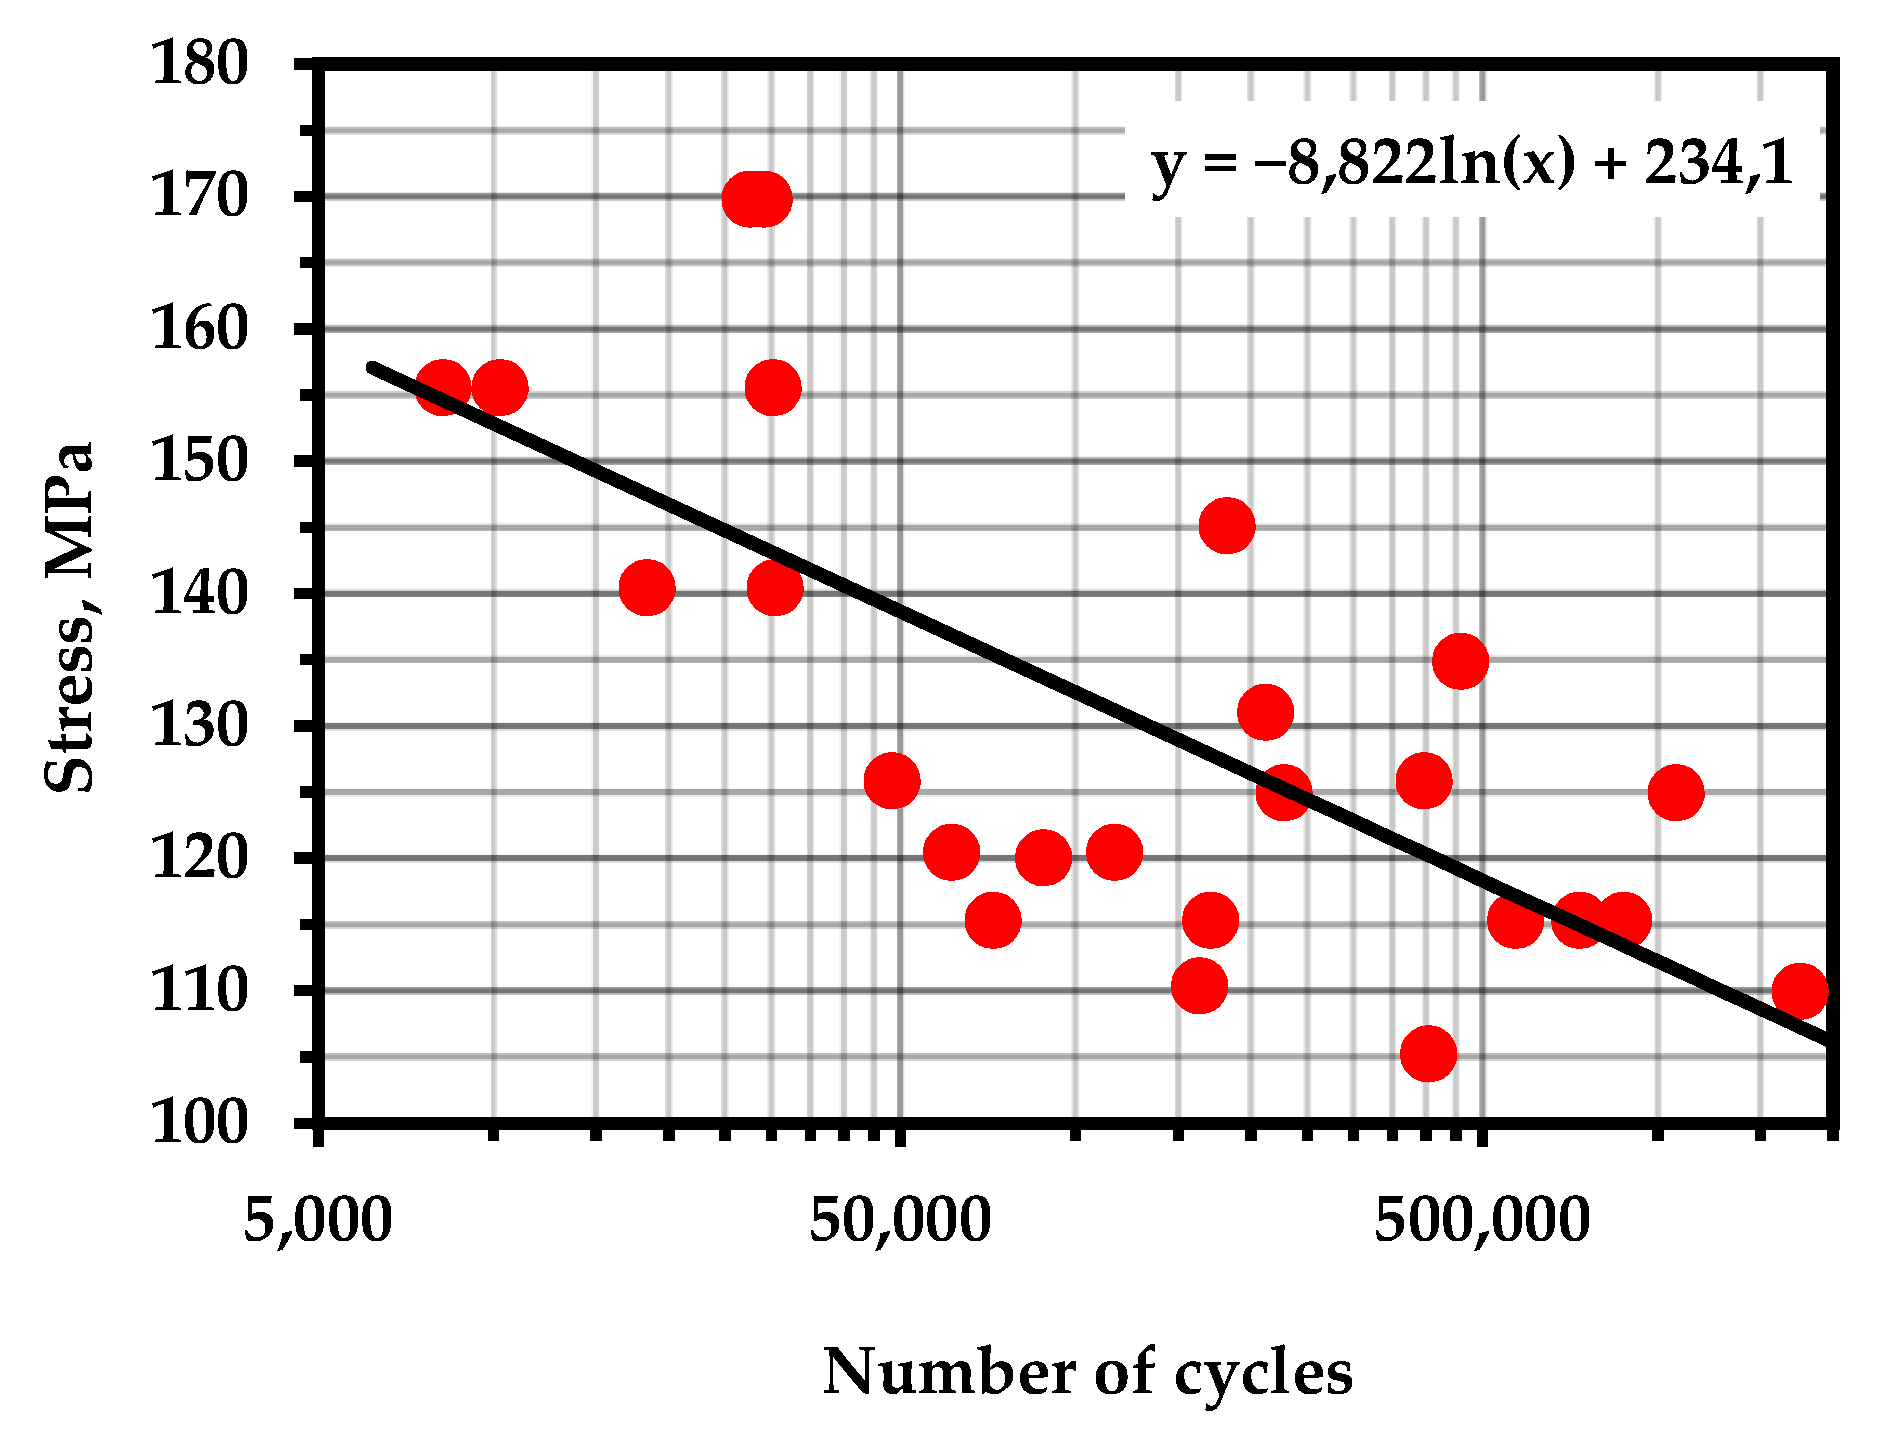
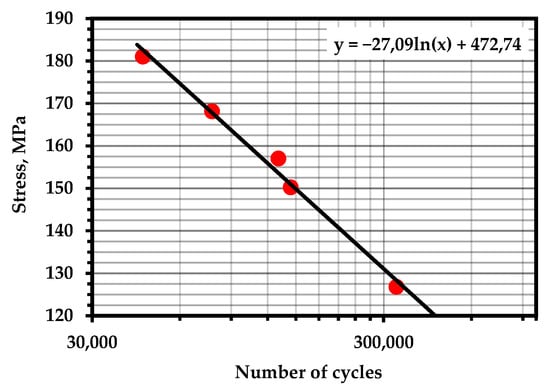
Figure A19.
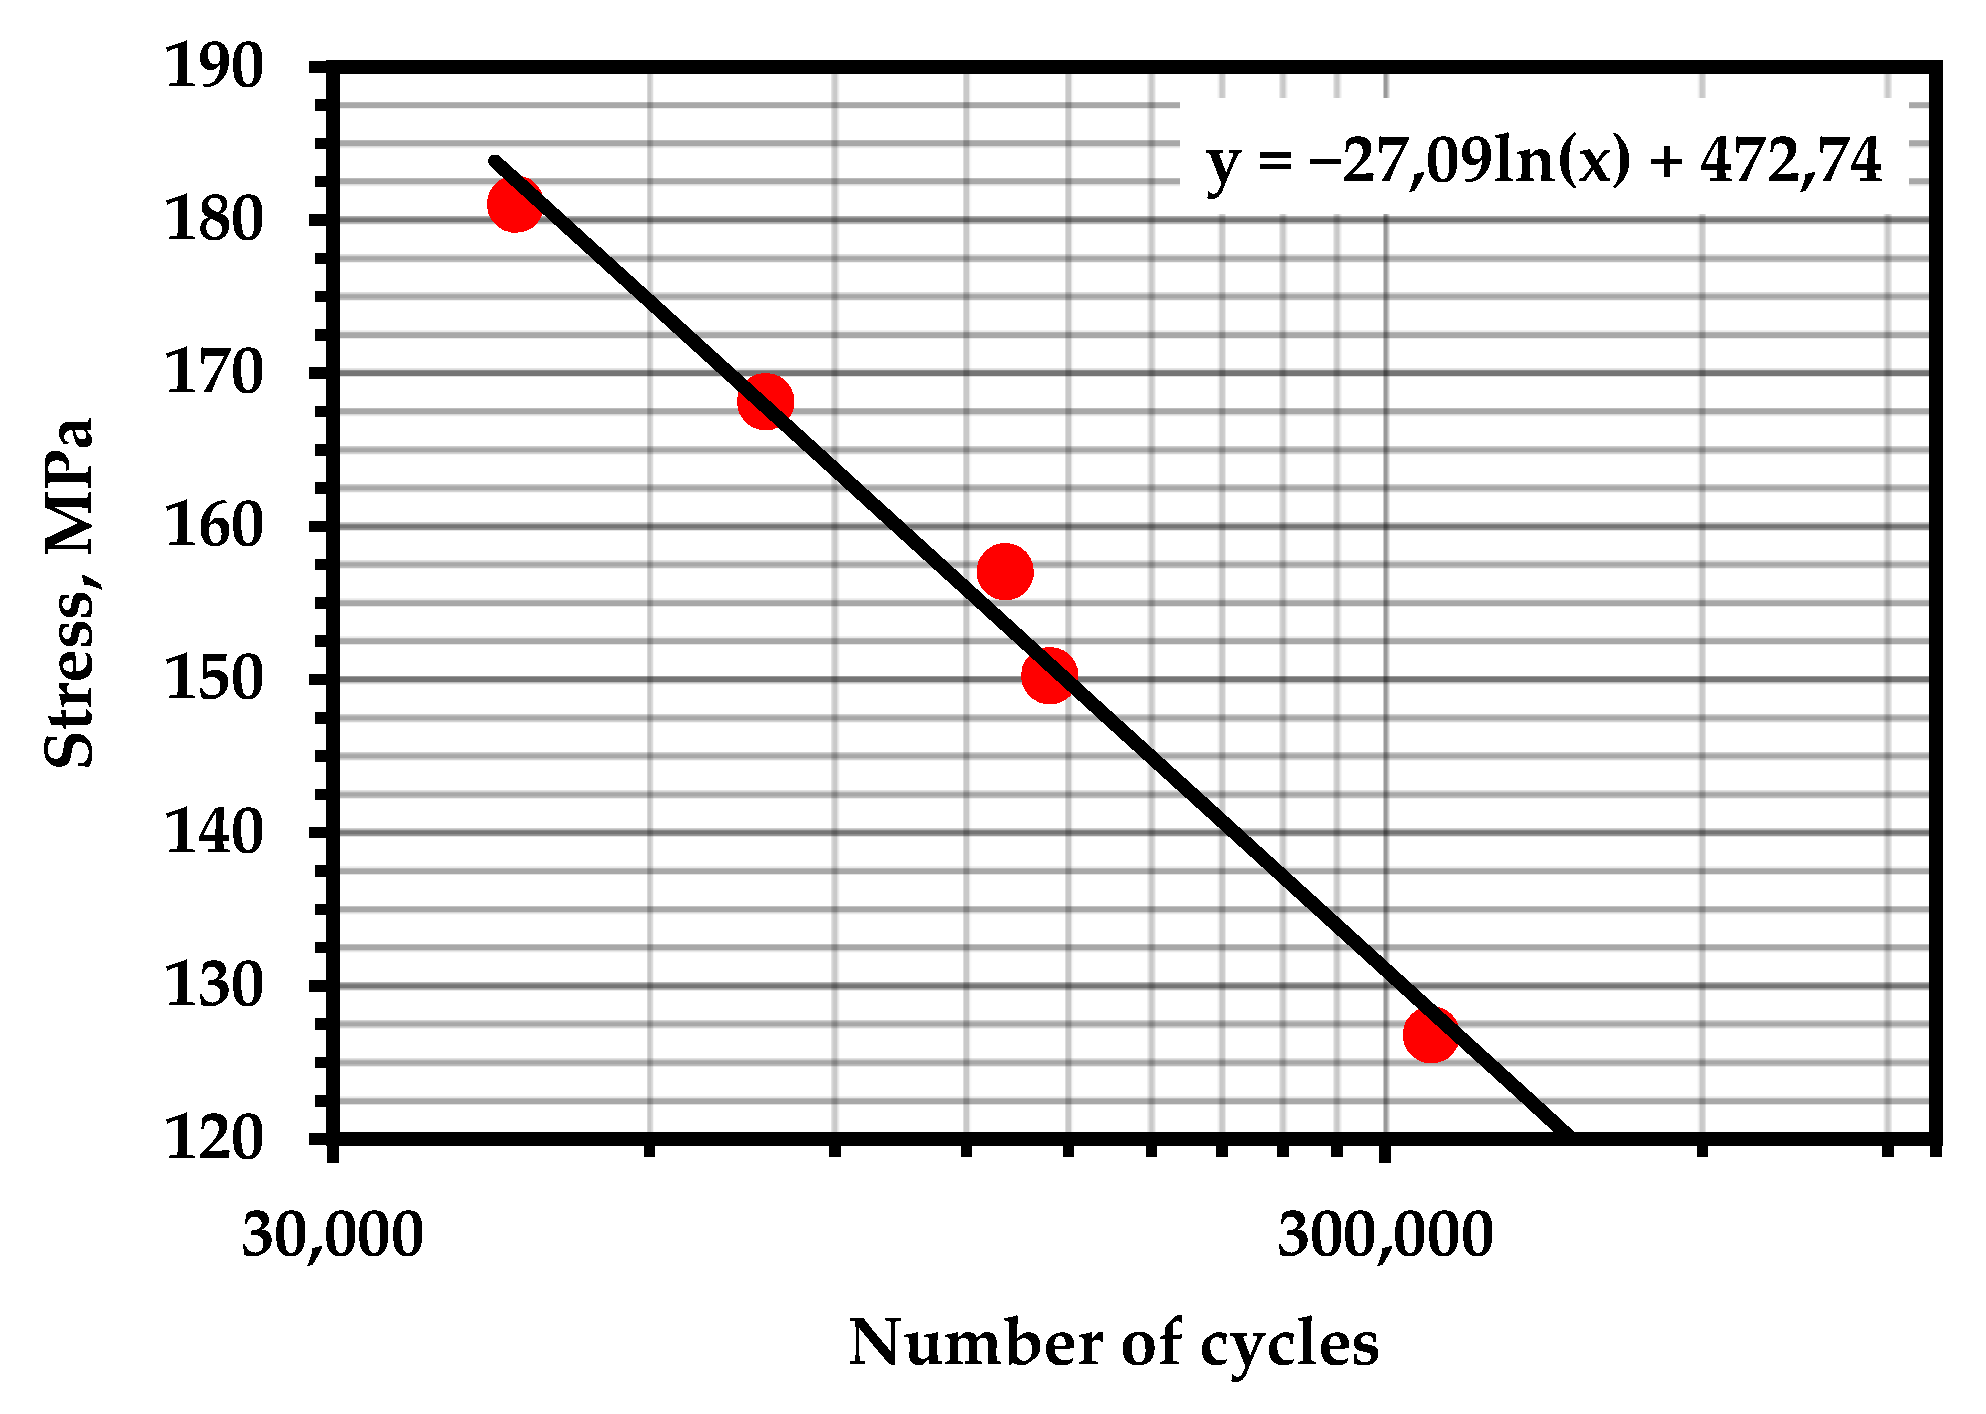
S–N Curve—Al 5052 alloy (Temperature—293 K; frequency—4 Hz). Source—Base Total Material.
Figure A19.
S–N Curve—Al 5052 alloy (Temperature—293 K; frequency—4 Hz). Source—Base Total Material.
References
- Dzhemilev, E.R.; Shammazov, I.A.; Sidorkin, D.I.; Mastobaev, B.N.; Gumerov, A.K. Developing technology and device for the main pipelines repair with cutting out their defective sections. Neft. Khozyaystvo Oil Ind. 2022, 10, 78–82. [Google Scholar] [CrossRef]
- Bolobov, V.; Martynenko, Y.V.; Voronov, V.; Latipov, I.; Popov, G. Improvement of the Liquefied Natural Gas Vapor Utilization System Using a Gas Ejector. Inventions 2022, 7, 14. [Google Scholar] [CrossRef]
- Samigullin, G.; Lyagova, A. Determination of the limiting sizes of crack-like defects in a wall of steel vertical tanks. Neft. khozyaystvo Oil Ind. 2017, 104–107. [Google Scholar] [CrossRef]
- Lyubchik, A.N. Way remote magnitometrichesky control of the technical condition of the main pipelines. J. Min. Inst. 2012, 195, 268. [Google Scholar]
- Zhurkov, S.N. Kinetic concept of the strength of solids. Int. J. Fract. 1984, 26, 295–307. [Google Scholar] [CrossRef]
- Krul, L.P.; Matusevich, Y.I.; Prokopchuk, N.R. Mechanical properties of graft copolymers of polyethylene and acrylonitrile obtained by the inhibited graft polymerization method. J. Polym. Sci. Part C Polym. Lett. 1984, 22, 611–615. [Google Scholar] [CrossRef]
- Halimov, A.G.; Zainullin, R.S.; Halimov, A.A. Technical Diagnostics and Resource Assessment of Devices; USPTU: Ufa, Russia, 2001. [Google Scholar]
- Elizavetin, M.A. Improving the Reliability of Machines. Technological Foundations for Improving the Reliability of Machines, 2nd ed.; Mechanical Engineering: Moscow, Russia, 1973; p. 431. [Google Scholar]
- Grigorev, E.; Nosov, V. Improving Quality Control Methods to Test Strengthening Technologies: A Multilevel Model of Acoustic Pulse Flow. Appl. Sci. 2022, 12, 4549. [Google Scholar] [CrossRef]
- Korshunov, A.I.; Novikov, S.A. Influence of the scale effect on endurance parameters. Strength Mater. 1990, 22, 1003–1006. [Google Scholar] [CrossRef]
- Morris, D.G. Strengthening Mechanisms in Nanocrystalline Metals. Nanostructured Metals and Alloys; Elsevier: Amsterdam, The Netherlands, 2011; pp. 299–328. ISBN 9781845696702. [Google Scholar]
- Regel’, V.R. Kinetic theory of strength as a scientific basis for predicting the lifetime of polymers under load. Polym. Mech. 1973, 7, 82–93. [Google Scholar] [CrossRef]
- Grabar, I.G. Thermoactivation analysis of the failure of bcc- and fcc-metals and the concept of interrelation of fatigue curve parameters. Strength Mater. 1989, 21, 1511–1515. [Google Scholar] [CrossRef]
- Zhurkov, S.; Regel, V.; Sanfirova, T. Effect of active additives on the time-temperature dependence of polymer strength. Polym. Sci. USSR 1965, 7, 1486–1491. [Google Scholar] [CrossRef]
- Petrov, M.G. Investigation of the longevity of materials on the basis of the kinetic concept of fracture. J. Appl. Mech. Tech. Phys. 2021, 62, 145–156. [Google Scholar] [CrossRef]
- Troyansky, E.A. Increasing the Durability of Elements of Boiler Equipment; Energoatomizdat: Moscow, Russia, 1986. [Google Scholar]
- Valishin, A.A.; Kartashov, E.M. On the temperature factor of activation energy of fracture. Vysokomolekularnye Soedineniya. Ser. A Ser. B Ser. C Kratkie Soobshcheniya 1993, 35, 45–51. [Google Scholar]
- Stepanov, V.A. Deformation and fracture of polymers. Polym. Mech. 1976, 11, 83–93. [Google Scholar] [CrossRef]
- Nosov, V.V. Acoustic-emission quality control of plastically deformed blanks. Russ. J. Nondestruct. Test. 2017, 53, 368–377. [Google Scholar] [CrossRef]
- Stepanov, V.A.; Bershtein, V.A.; Peschanskaya, N.N. Kinetics of the deformation of polymers. Polym. Mech. 1981, 16, 395–399. [Google Scholar] [CrossRef]
- Petrov, M.G.; Ravikovich, A.I. Deformation and Failure of Aluminum Alloys from the Standpoint of the Kinetic Concept of Strength. J. Appl. Mech. Tech. Phys. 2004, 45, 124–132. [Google Scholar] [CrossRef]
- Nassif, N.S.; Ibatullin, I.D.; Kremlev, V.I.; Barynkin, V.E. Kinetics of fatigue failure of hard alloys. Aerosp. Mech. Eng. 2006, 5, 240–244. [Google Scholar]
- Regel, V.R.; Leksovskii, A.M.; Sakiev, S.N. The kinetics of the thermofluctuation-Induced micro- and macrocrack growth in plastic metals. Int. J. Fract. 1975, 11, 841–850. [Google Scholar] [CrossRef]
- Stepanov, V.A.; Shpeizman, V.V.; Zhoga, L.V. The kinetics of brittle failure in solids and the possibility of predicting failure for static and cyclic loading. Mater. Sci. 1979, 15, 110–115. [Google Scholar] [CrossRef]
- Fedorov, V.V.; Romashov, R.V. Investigation of damage kinetics and patterns of fatigue destruction of metals. Mech. Fatigue Met. Mater. VI Int. Colloq. Kiev. 1983, 87–97. [Google Scholar]
- Stepanov, W.A.; Peschanskaya, N.N.; Shpeizman, V.V.; Nikonov, G.A. Longevity of solids at complex loading. Int. J. Fract. 1975, 11, 851–867. [Google Scholar] [CrossRef]
- Ivanov, V.S. Quantitative Fractography: Fatigue Failure; Metallurgy: Chelyabinsk, Russia, 1988. [Google Scholar]
- Iost, A. Temperature dependence of stage II fatigue crack growth rate. Eng. Fract. Mech. 1993, 45, 741–750. [Google Scholar] [CrossRef]
- Botvina, L. On Correlation of Various Approaches for Description of Kinetic Processes. Int. J. Fract. 1999, 99, 131–141. [Google Scholar] [CrossRef]
- Betekhtin, V.I. Temperature-Time Dependence of the Strength of Metals. In Strength and Reliability of Metals and Alloys; Leningrad House of Scientific and Technical Propaganda: Saint-Petersburg, Russia, 1965; pp. 74–79. [Google Scholar]
- Yang, S.M.; Kang, H.Y.; Kim, H.S.; Song, J.H.; Park, J.M. Influence of Loading Speed on Tensile Strength Characteristics of High Tensile Steel; Chonbuk National University: Chonju, Republic of Korea, 1999. [Google Scholar]
- Kartashov, M. Decrease in durability of brittle solids in cyclic tests. Sov. Phys. J. 1981, 24, 479–483. [Google Scholar] [CrossRef]
- Bugai, N.V.; Berezina, T.V.; Trunin, I.I. Efficiency and Durability of the Metal of Power Equipment; Energoatomizdat: Moscow, Russia, 1994; 272p. [Google Scholar]
- Bershtein, V.A.; Emel’Yanov, Y.A.; Stepanov, V.A. Effect of a static load on the processes of mechanical relaxation in brittle materials and polymers. Polym. Mech. 1981, 17, 6–12. [Google Scholar] [CrossRef]
- Kats, M.S.; Regel, V.R. Estimation of activation parameters for materials in sclerometric tests. J. Mater. Sci. 1980, 15, 997–1000. [Google Scholar] [CrossRef]
- Kats, M.S.; Regel, V.R.; Boyarskaya, Y.S.; Boyarskaya, S. Kinetic Nature of the Process of Microindentation into Alkali Halide Crystals. Cryst. Res. Technol. 1974, 9, 1389–1398. [Google Scholar] [CrossRef]
- Shkolnik, I.E.; Hiziroglu, H.R. An Analogy for Estimation of Dielectric and Mechanical Strength of Insulators at Elevated Temperature. In Proceedings of the 2011 Annual Report Conference on Electrical Insulation and Dielectric Phenomena, Cancun, Mexico, 16–19 October 2011; IEEE: Piscataway, NJ, USA, 2011. ISBN 9781457709852. [Google Scholar]
- Xiao, T.; Ren, Y.; Liao, K. A Kinetic Model for Time-Dependent Fracture of Carbon Nanotubes. Nano Lett. 2004, 4, 1139–1142. [Google Scholar] [CrossRef]
- Shin, S.C.; Yang, S.M.; Yu, H.S.; Kang, H.Y.; Kim, C.W. Fatigue Life of Multi-Lap Welding of Automotives Steel Sheet by QSTS. Adv. Mater. Res. 2008, 33-37, 151–156. [Google Scholar] [CrossRef]
- Sin, S.R.; Yang, S.M.; Yu, H.S.; Kim, C.W.; Kang, H.Y. Fatigue Analysis of Multi-Lap Spot Welding of High Strength Steel by Quasi Static Tensile-Shear Test. Key Eng. Mater. 2007, 345-346, 251–254. [Google Scholar] [CrossRef]
- Campbell, J.D.; Ferguson, W.G. The temperature and strain-rate dependence of the shear strength of mild steel. Philos. Mag. 1970, 21, 63–82. [Google Scholar] [CrossRef]
- Park, J.-E.; Yang, S.-M.; Han, J.-H.; Yu, H.-S. Creep-Fatigue Life Design with Various Stress and Temperature Conditions on the Basis of Lethargy Coefficient. Trans. Korean Soc. Mech. Eng. A 2011, 35, 157–162. [Google Scholar] [CrossRef][Green Version]
- Malkin, A.Y. Methods for Measuring the Mechanical Properties of Polymers; Chemistry: Moscow, Russia, 1978; 330p. [Google Scholar]
- Special Metals. Inconel Alloy 625. Creep and Rupture Strength. 2006. Available online: http://specialmetals.ir/images/technical_info/nickel-base-alloy/inconel-alloy_622_625.pdf (accessed on 4 November 2022).
- Lee, S.; Kim, H.; Park, S.; Choi, Y. Fatigue Variability of Alloy 625 Thin-Tube Brazed Specimens. Metals 2021, 11, 1162. [Google Scholar] [CrossRef]
- Freeds, A.D.; Leonov, A.I. The Bailey criterion: Statistical derivation and applications to interpretations of durability tests and chemical kinetics. Math. Phys. 2002, 53, 160–166. [Google Scholar]
- Song, J.H.; Noh, H.G.; Yu, H.S.; Kang, H.Y.; Yang, S.M. Estimation of fatigue life by lethargy coefficient using molecular dynamic simulation. Int. J. Automot. Technol. 2004, 5, 215–219. [Google Scholar]
- Hur, S.H.; Doh, J.; Yoo, Y.; Kim, S.; Lee, J. Stress-life prediction of 25 °C polypropylene materials based on calibration of Zhurkov fatigue life model. Fatigue Fract. Eng. Mater. Struct. 2020, 43, 1784–1799. [Google Scholar] [CrossRef]
- Moghanlou, M.R.; Khonsari, M.M. On the kinetic formulation of fracture fatigue entropy of metals. Fatigue Fract. Eng. Mater. Struct. 2021, 45, 565–577. [Google Scholar] [CrossRef]
- Babak, V.P.; Filonenko, S.F. Models of acoustic emission signals. Proc. Natl. Aviat. Univ. 1998, 1, 54–65. [Google Scholar] [CrossRef]
- Ivanov, S.L.; Fokin, A.S.; Potapenko, V.S.; Podkhalyuzin, S.P. Monitoring of condition, forecastingand increasing of residual resource of transmission and supported bearings of tubular furnaces. J. Min. Inst. 2011, 192, 111. [Google Scholar]
- Chai, M.; Duan, Q.; Hou, X.; Zhang, Z.; Li, L. Fracture Toughness Evaluation of 316LN Stainless Steel and Weld Using Acoustic Emission Technique. ISIJ Int. 2016, 56, 875–882. [Google Scholar] [CrossRef]
- Leksovskii, A.M.; Baskin, B.L.; Yakushev, P.N. Some aspects of the damage kinetics at static loading of a heterogeneous solid under the conditions of constrained deformation. Tech. Phys. 2015, 60, 1887–1889. [Google Scholar] [CrossRef]
- Botvina, L.R.; Tyutin, M.R.; Bolotnikov, A.I.; Petersen, T.B. Effect of Preliminary Cycling on the Acoustic Emission Characteristics of Structural 15Kh2GMF Steel. Russ. Met. (Metally) 2021, 2021, 32–41. [Google Scholar] [CrossRef]
- Roy, H.; Parida, N.; Sivaprasad, S.; Tarafder, S.; Ray, K. Acoustic emissions during fracture toughness tests of steels exhibiting varying ductility. Mater. Sci. Eng. A 2008, 486, 562–571. [Google Scholar] [CrossRef]
- Botvina, L.; Tyutin, M.; Sinev, I.; Bolotnikov, A. The effect of preliminary cyclic loading on acoustic emission parameters and damage of structural steels. Procedia Struct. Integr. 2020, 28, 2118–2125. [Google Scholar] [CrossRef]
- Botvina, L.R.; Tyutin, M.R. New acoustic parameter characterizing loading history effects. Eng. Fract. Mech. 2019, 210, 358–366. [Google Scholar] [CrossRef]
- Barile, C.; Casavola, C.; Pappalettera, G.; Kannan, V.P. Novel method of utilizing Acoustic Emission Parameters for Damage Characterization in Innovative Materials. Procedia Struct. Integr. 2019, 24, 636–650. [Google Scholar] [CrossRef]
- Williams, R.S. Modeling of Elastoplastic Fracture Behavior Using Acoustic Emission Methods. J. Met. 1979, 31, 21–25. [Google Scholar] [CrossRef]
- Vetrone, J.; Obregon, J.E.; Indacochea, E.J.; Ozevin, D. The characterization of deformation stage of metals using acoustic emission combined with nonlinear ultrasonics. Measurement 2021, 178, 109407. [Google Scholar] [CrossRef]
- Mostafavi, S.; Fotouhi, M.; Motasemi, A.; Ahmadi, M.; Sindi, C.T. Acoustic Emission Methodology to Evaluate the Fracture Toughness in Heat Treated AISI D2 Tool Steel. J. Mater. Eng. Perform. 2012, 21, 2106–2116. [Google Scholar] [CrossRef]
- Shan, D.; Nayeb-Hashemi, H. Fatigue-life prediction of SiC particulate reinforced aluminum alloy 6061 matrix composite using AE stress delay concept. J. Mater. Sci. 1999, 34, 3263–3273. [Google Scholar] [CrossRef]
- Fang, D.; Bercovits, A. Acoustic emission during the tensile deformation of Incoloy 901 superalloy. J. Mater. Sci. 1995, 30, 3552–3560. [Google Scholar] [CrossRef]
- Tyutin, M.R.; Botvina, L.R.; Petersen, T.B. Tensile damage evolution of structural steels with different structure. Procedia Struct. Integr. 2020, 28, 2148–2156. [Google Scholar] [CrossRef]
- Venkataraman, B.; Mukhopadhyay, C.; Raj, B. Effect of variation of strain rate on thermal and acoustic emission during tensile deformation of nuclear grade AISI type 316 stainless steel. Mater. Sci. Technol. 2004, 20, 1310–1316. [Google Scholar] [CrossRef]
- Han, K.S.; Oh, K.H. Acoustic Emission as a Tool of Fatigue Assessment. Key Eng. Mater. 2006, 306-308, 271–278. [Google Scholar] [CrossRef]
- Kotoul, M.; Bílek, Z. Acoustic emission during deformation and crack loading in structural steels. Int. J. Press. Vessel. Pip. 1990, 44, 291–307. [Google Scholar] [CrossRef]
- Clark, G.; Corderoy, D.J.H.; Ringshall, N.W.; Knott, J.F. Acoustic emissions associated with fracture processes in structural steels. Met. Sci. 1981, 15, 481–491. [Google Scholar] [CrossRef]
- Li, S.; Yu, Q.; Pu, J.; Chen, F. Study on mechanical properties and acoustic emission characteristics of metallic materials under the action of combined tension and torsion. Eng. Fract. Mech. 2018, 200, 451–464. [Google Scholar] [CrossRef]
- Martelo, D.; Sampath, D.; Monici, A.; Morana, R.; Akid, R. Correlative analysis of digital imaging, acoustic emission, and fracture surface topography on hydrogen assisted cracking in Ni-alloy 625+. Eng. Fract. Mech. 2019, 221, 106678. [Google Scholar] [CrossRef]
- Sindi, C.T.; Najafabadi, M.A.; Ebrahimian, S.A. Fracture Toughness Determination of Heat Treated AISI D2 Tool Steel Using AE Technique. ISIJ Int. 2011, 51, 305–3122. [Google Scholar] [CrossRef]
- Lee, H.-S.; Yoon, J.-H.; Park, J.-S.; Yi, Y.-M. A study on failure characteristic of spherical pressure vessel. J. Mater. Process. Technol. 2005, 164–165, 882–888. [Google Scholar] [CrossRef]
- Sahoo, S.; Jha, B.B.; Sahoo, T.K. Acoustic emission study of deformation behaviour of sensitised 304 stainless steel. Mater. Sci. Technol. 2014, 30, 1336–1342. [Google Scholar] [CrossRef]
- Dahmene, F.; Laksimi, A.; Hariri, S.; Hervé, C.; Jaubert, L.; Cherfaoui, M.; Mouftiez, A. Acoustic wave propagation in austenitic stainless steel AISI 304L: Application examples. Int. J. Press. Vessel. Pip. 2012, 92, 77–83. [Google Scholar] [CrossRef]
- Penkin, A.G.; Terentyev, V.F.; Roshchupkin, V.V.; Pokrasin, M.A. Diagnostics of fracture mechanisms of structural steels by acoustic emission. Inorg. Mater. Appl. Res. 2016, 7, 525–530. [Google Scholar] [CrossRef]
- Botvina, L.R.; Tyutin, M.R.; Perminova, Y.S.; Utkin, A.V. Dynamic Fracture Toughness of High-Strength 5KhN3MA Steel. Russ. Met. (Metally) 2021, 2021, 1051–1059. [Google Scholar] [CrossRef]
- Lugo, M.; Jordon, J.B.; Horstemeyer, M.F.; Tschopp, M.A.; Harris, J.; Gokhale, A.M. Quantification of damage evolution in a 7075 aluminum alloy using an acoustic emission technique. Mater. Sci. Eng. A 2011, 528, 6708–6714. [Google Scholar] [CrossRef]
- Wuriti, G.S.; Chattopadhyaya, S.; Krolczyk, G. Comparison of Acoustic Emission Data Acquired During Tensile Deformation of Maraging Steel M250 Welded Specimens. Arch. Acoust. 2020, 45, 221–231. [Google Scholar]
- Palaev, A.G.; Nosov, V.V.; Krasnikov, A.A. Simulating distribution of temperature fields and stresses in welded joint using ANSYS. Sci. Technol. Oil Oil Prod. Pipeline Transp. 2022, 12, 461–470. [Google Scholar] [CrossRef]
- Kietov, V.; Henschel, S.; Krüger, L. AE analysis of damage processes in cast iron and high-strength steel at different temperatures and loading rates. Eng. Fract. Mech. 2019, 210, 320–341. [Google Scholar] [CrossRef]
- Pattnaik, A.B.; Das, S.; Jha, B.B.; Prasanth, N. Effect of Al–5Ti–1B grain refiner on the microstructure, mechanical properties and acoustic emission characteristics of Al5052 aluminium alloy. J. Mater. Res. Technol. 2015, 4, 171–179. [Google Scholar] [CrossRef]
- Nasonov, M.Y.; Lykov, Y.V.; Trong, D.D. The study of the resource and durability of metal structures of excavators after the expiration of the service life. Ugol 2020, 1127, 13–17. [Google Scholar] [CrossRef]
- Bańdo, D.; Matachowski, F. Strength analysis of the reason of initiation of fatigue defects in winding drums. J. Min. Inst. 2006, 167, 204. [Google Scholar]
- Gerasimenko, A.A.; Samigullin, G.K. Evaluation of Steel Vertical Tank Residual Life by a Metal Low-Cycle Fatigue Criterion Under Biaxial Loading Conditions. Chem. Pet. Eng. 2016, 52, 53–58. [Google Scholar] [CrossRef]
- Lyagova, A. Simulation crack growth in the wall of cylindrical steel storage tank under complex stress state. Int. J. Appl. Eng. Res. 2016, 11, 6760–6766. [Google Scholar]
- Hectors, K.; De Waele, W. Cumulative Damage and Life Prediction Models for High-Cycle Fatigue of Metals: A Review. Metals 2021, 11, 204. [Google Scholar] [CrossRef]
- Rege, K.; Pavlou, D.G. A one-parameter nonlinear fatigue damage accumulation model. Int. J. Fatigue 2017, 98, 234–246. [Google Scholar] [CrossRef]
- Shchipachev, A.M. Method for Determining Fatigue Limit Taking Into Account the Effect of a Surface Layer. Chem. Pet. Eng. 2017, 53, 340–346. [Google Scholar] [CrossRef]
- Doh, J.; Lee, J. Bayesian estimation of the lethargy coefficient for probabilistic fatigue life model. J. Comput. Des. Eng. 2017, 5, 191–197. [Google Scholar] [CrossRef]
- Regel’, V.R.; Leksovsky, A.M. A study of fatigue within the framework of the kinetic concept of fracture. Int. J. Fract. Mech. 1967, 3, 99–109. [Google Scholar] [CrossRef]
- Mahmoudi, A.; Khonsari, M.M. Evaluation of fatigue in unidirectional and cross-ply laminated composites using a coupled entropy-kinetic concept. J. Compos. Mater. 2022, 56, 2443–2454. [Google Scholar] [CrossRef]
- Mishnaevsky, L.; Brøndsted, P. Modeling of fatigue damage evolution on the basis of the kinetic concept of strength. Int. J. Fract. 2007, 144, 149–158. [Google Scholar] [CrossRef]
- Geelen, B.B. Accurate solution for the modified Bessel faction of the first kind. Adv. Eng. Softw. 1995, 23, 105–109. [Google Scholar] [CrossRef]
- Botvina, L.R.; Tyutin, M.R.; Levin, V.P.; Ioffe, A.V.; Perminova, Y.S.; Prosvirnin, D.V. Mechanical and Physical Properties, Fracture Mechanisms, and Residual Strength of 15Kh2GMF Steel for Oil Sucker Rods. Russ. Met. (Metally) 2021, 2021, 546–558. [Google Scholar] [CrossRef]
- Botvina, L.R.; Tyutin, M.R.; Petersen, T.B.; Levin, V.P.; Soldatenkov, A.P.; Prosvirnin, D.V. Residual Strength, Microhardness, and Acoustic Properties of Low-Carbon Steel after Cyclic Loading. J. Mach. Manuf. Reliab. 2018, 47, 516–524. [Google Scholar] [CrossRef]
- Botvina, L.R.; Kushnarenko, V.M.; Tyutin, M.R.; Levin, V.P.; Morozov, A.E.; Bolotnikov, A.I. Fracture Stages and Residual Strength of Pipe Steel after Long-Term Operation. Phys. Mesomech. 2021, 24, 475–485. [Google Scholar] [CrossRef]
- Kireenko, O.F.; Leksovskii, A.M.; Regel, V.R. Role of heating in connection with the reduced life of cyclically stressed polymers. Polym. Mech. 1972, 4, 386–388. [Google Scholar] [CrossRef]
- Stepanov, V.A.; Nikonov, Y.A.; Timoshenko, I.I. Influence of cyclic loading conditions on the life of materials. Strength Mater. 1979, 11, 575–577. [Google Scholar] [CrossRef]
- de Jesus, A.M.; Ramos, G.F.; Gomes, V.M.; Marques, M.J.; de Figueiredo, M.A.; Marafona, J.D. Comparison between EDM and grinding machining on fatigue behaviour of AISI D2 tool steel. Int. J. Fatigue 2020, 139, 105742. [Google Scholar] [CrossRef]
- Strzelecki, P.; Mazurkiewicz, A.; Musiał, J.; Tomaszewski, T.; Słomion, M. Fatigue Life for Different Stress Concentration Factors for Stainless Steel 1.4301. Materials 2019, 12, 3677. [Google Scholar] [CrossRef]
- Querales, A.; Byrne, J.G. Improvement of fatigue life of 1080 steel by thermomechanical processing. Fatigue Fract. Eng. Mater. Struct. 1979, 1, 371–382. [Google Scholar] [CrossRef]
- Maleki, E.; Farrahi, G.H.; Kashyzadeh, K.R.; Unal, O.; Gugaliano, M.; Bagherifard, S. Effects of Conventional and Severe Shot Peening on Residual Stress and Fatigue Strength of Steel AISI 1060 and Residual Stress Relaxation Due to Fatigue Loading: Experimental and Numerical Simulation. Met. Mater. Int. 2020, 27, 2575–2591. [Google Scholar] [CrossRef]
- Boller, C.; Seeger, T. Materials Data for Cyclic Loading: Part C: High-Alloy Steels; Elsevier: Oxford, UK; New York, NY, USA; Tokyo, Japan, 1987. [Google Scholar]
- Lukin, E.S.; Ivanov, A.M. low-cycle fatigue of 09g2s steel strengthened by severe plastic deformation method. Fundam. Res. 2015, 11, 92–95. [Google Scholar]
- Maschinenbau, F.K. (Ed.) Rechnerischer Festigkeitsnachweis Für Maschinenbauteile: Analytical Strength Assessment, 5th ed.; FKM-Guideline; VDMA: Frankfurt, Germany, 2003. [Google Scholar]
- Strizak, J.; Tian, H.; Liaw, P.; Mansur, L. Fatigue properties of type 316LN stainless steel in air and mercury. J. Nucl. Mater. 2005, 343, 134–144. [Google Scholar] [CrossRef]
- Kazuaki, S. Databook on Fatigue Strength of Metallic Materials; JSMS, The Society of Materials Science: Kyoto, Japan; Elsevier: Amsterdam, The Netherlands, 1996. [Google Scholar]
- Croccolo, D.; De Agostinis, M.; Fini, S.; Olmi, G.; Robusto, F.; Kostić, S.; Vranić, A.; Bogojević, N. Fatigue Response of As-Built DMLS Maraging Steel and Effects of Aging, Machining, and Peening Treatments. Metals 2018, 8, 505. [Google Scholar] [CrossRef]
- Bergner, K.; Hesseler, J.; Bleicher, C. Fatigue analysis of cast iron components considering the influence of casting skin. Procedia Struct. Integr. 2019, 19, 140–149. [Google Scholar] [CrossRef]
Disclaimer/Publisher’s Note: The statements, opinions and data contained in all publications are solely those of the individual author(s) and contributor(s) and not of MDPI and/or the editor(s). MDPI and/or the editor(s) disclaim responsibility for any injury to people or property resulting from any ideas, methods, instructions or products referred to in the content. |
© 2022 by the authors. Licensee MDPI, Basel, Switzerland. This article is an open access article distributed under the terms and conditions of the Creative Commons Attribution (CC BY) license (https://creativecommons.org/licenses/by/4.0/).

