A Machine Vision-Based Method for Detecting Surface Hollow Defect of Hot-State Shaft in Cross Wedge Rolling
Abstract
1. Introduction
2. Construction of the Machine Vision-Based System
- (1)
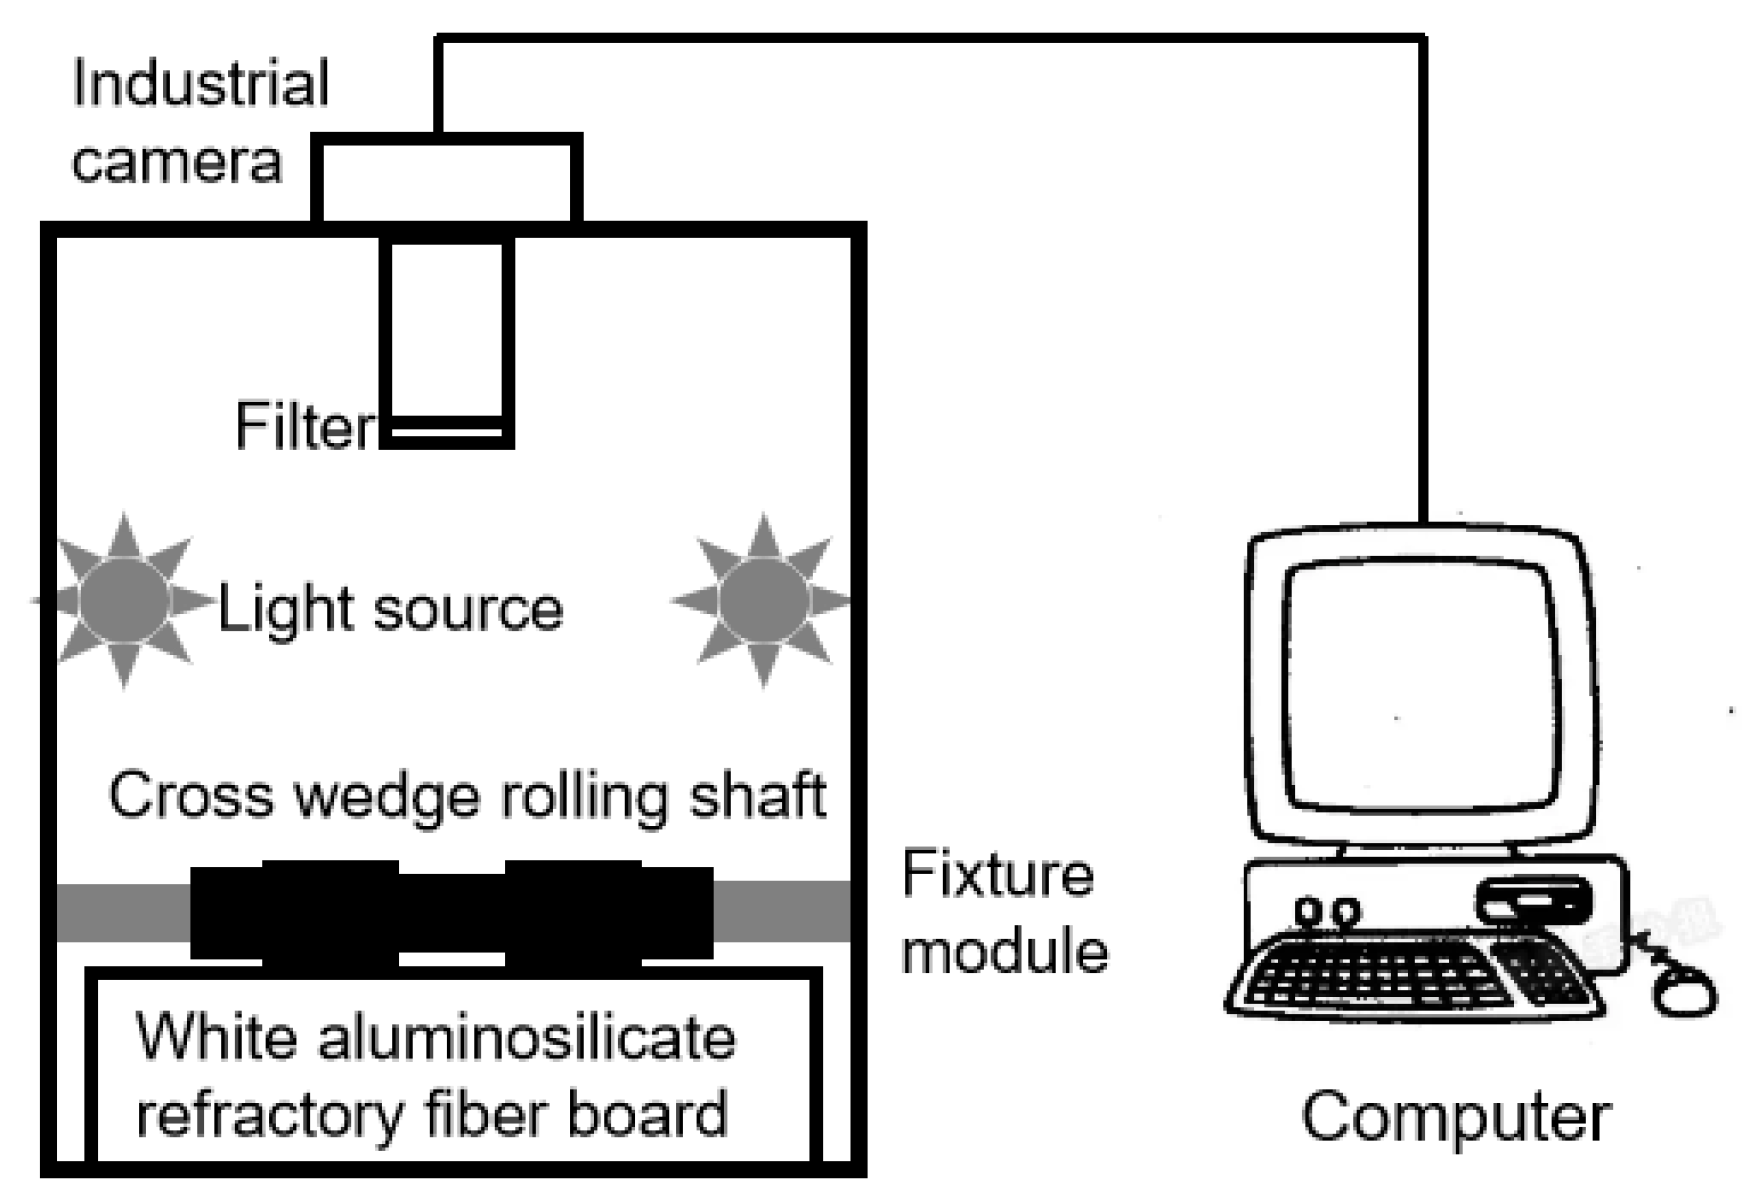
- The schematic diagram of the surface hollow defect detection system for hot-state shaft in cross wedge rolling is shown in Figure 2, and it mainly consists of the following three modules:Image acquisition module. The image acquisition module includes industrial camera and camera lens. The industrial camera is manufactured by Daheng Image Company in Shanghai, China, with the product model is ME2P-2612-4GC-P CMOS. The resolution of the camera is 5120 × 5120 pixels and its rectangular chip size (L × H) is 12.8 mm × 12.8 mm. The product model of the camera lens is DaHeng Image’s HN-P-1624-25M-C1.2/1 with focal length f of 16 mm. According to Equation (1), the field of view of the camera module can be calculated as 43.6°. Therefore, the shafts will not overflow the image boundary during imaging.
- (2)
- Lighting module. The lighting module includes two identical LED light bars and background plate. LED light bars are used to provide lighting for the shafts in cross wedge rolling in the image acquisition area, and their lengths are 30 cm. The background plate is made of white aluminosilicate refractory fiber board, which can isolate the high temperature of 1260 °C, and it is mainly used to reduce the noise of images.
- (3)
- Fixture module. The fixture is a slotted wheel mechanism with telescopic end. The shaft is clamped by controlling the movement of the telescopic end, and the shaft intermittent rotation is driven by controlling the rotation of the groove wheel mechanism. Thus, the overall surface of the shaft image acquisition is achieved.
2.1. Lighting Method
2.2. Light Filtering Method
2.2.1. Image Contrast
2.2.2. Selection of the Optical Filters
3. Process and Analysis of Surface Hollow Defect Detection
3.1. Elimination and Analysis of Rolled Shaft Surface Noise
3.1.1. Fourier Transform
3.1.2. Low-Pass Filter
3.2. Extraction and Analysis of Surface Hollow Defect
4. Conclusions
- (1)
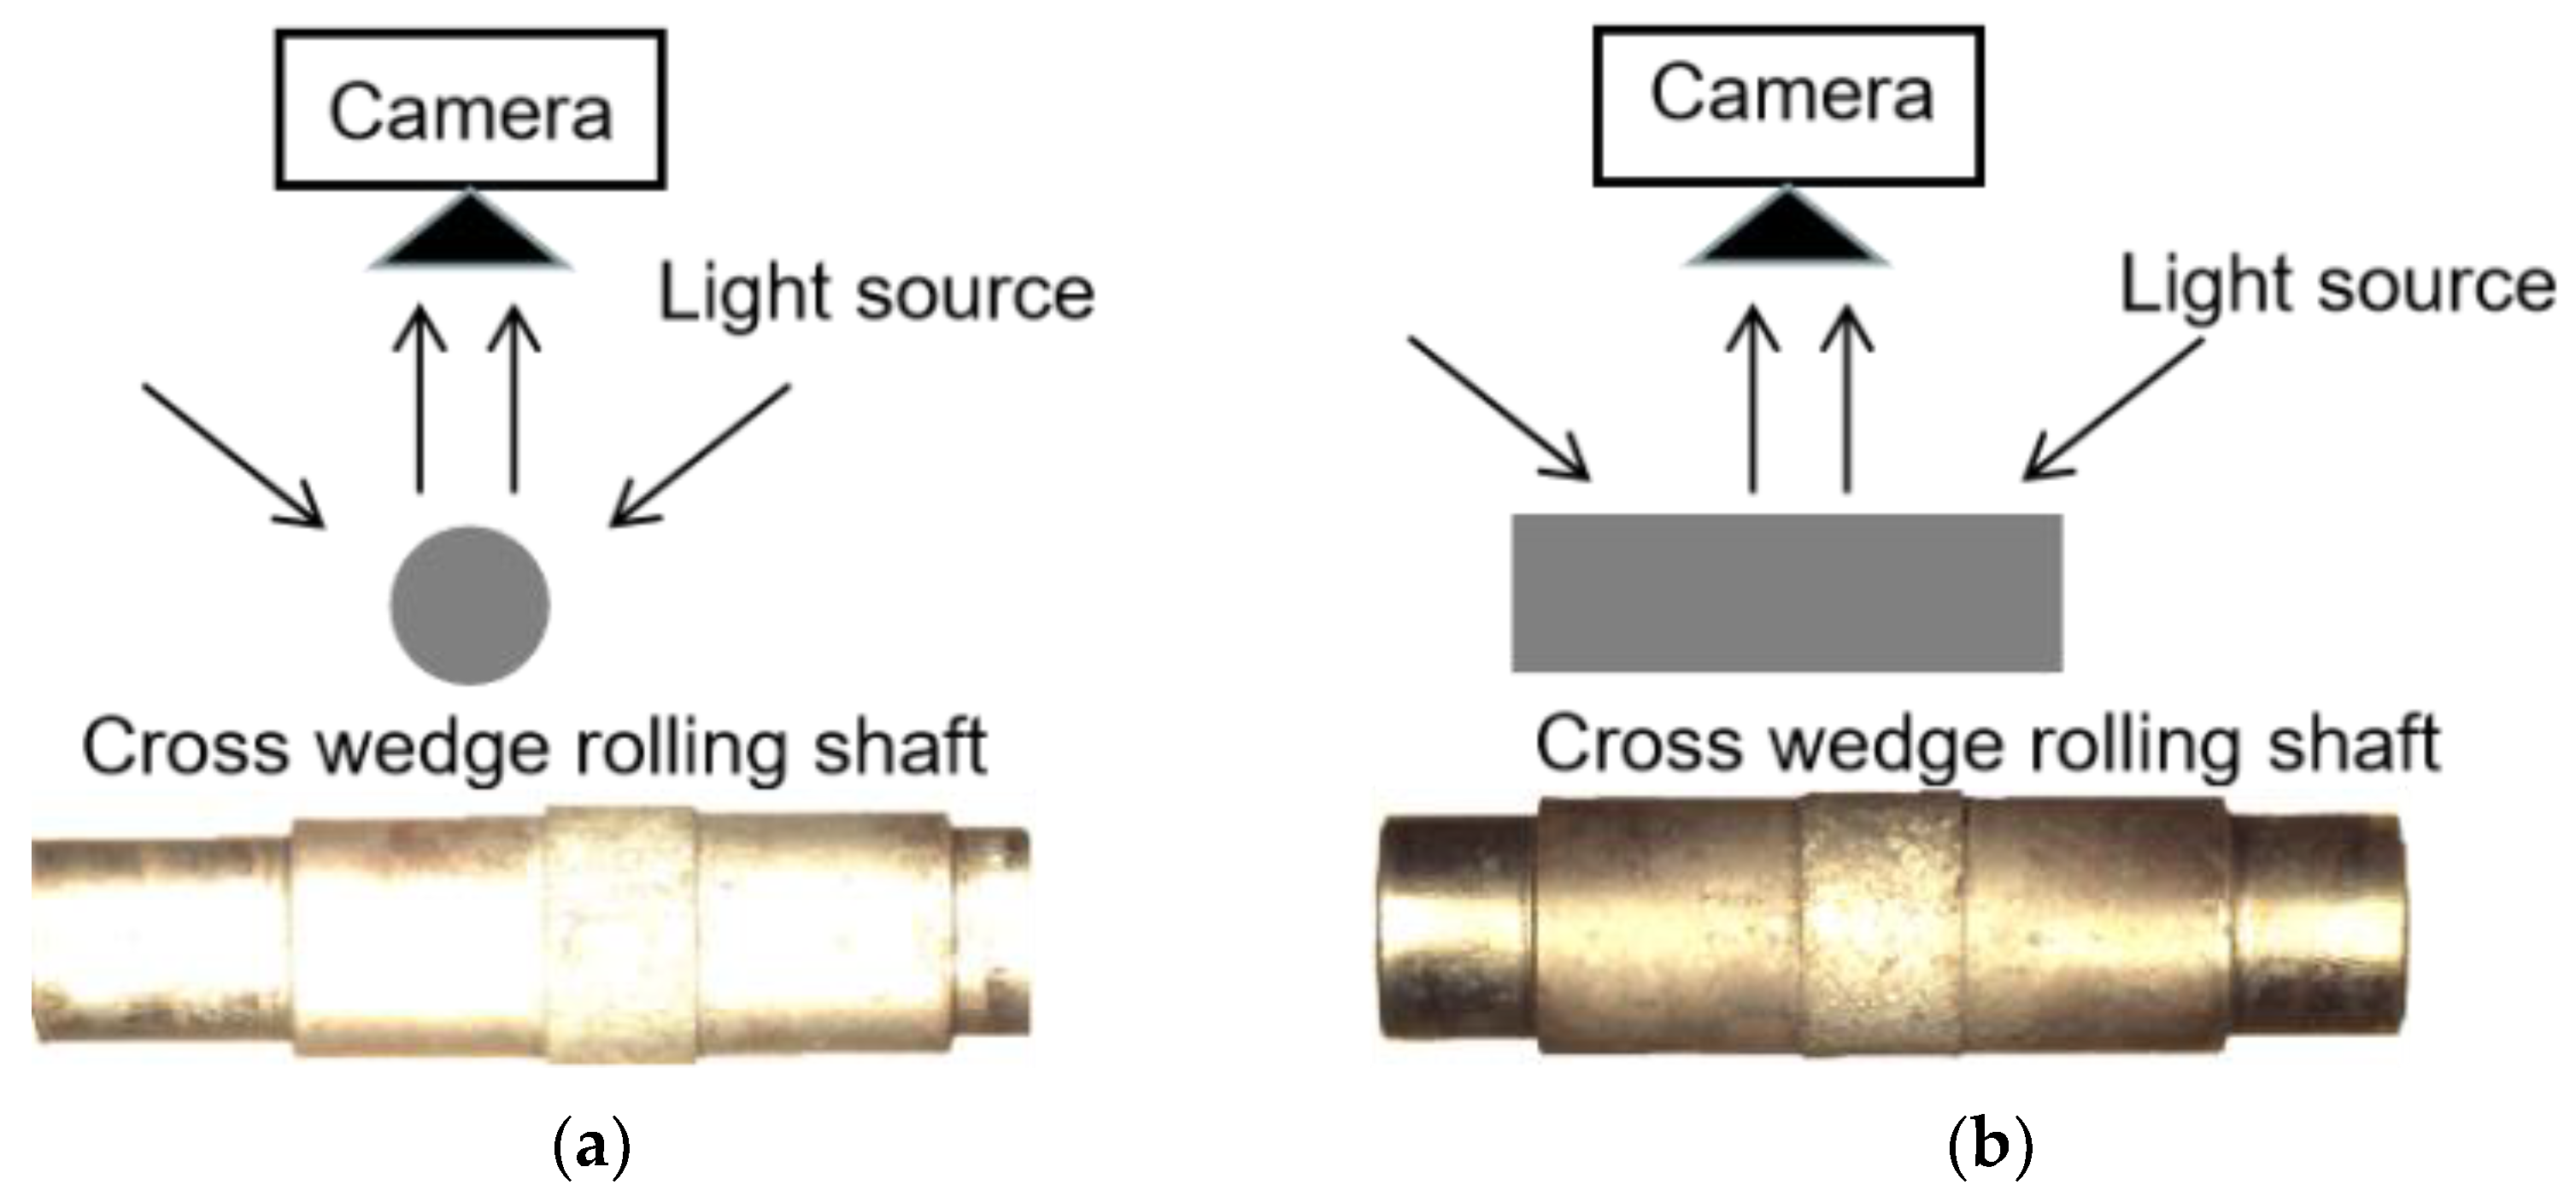
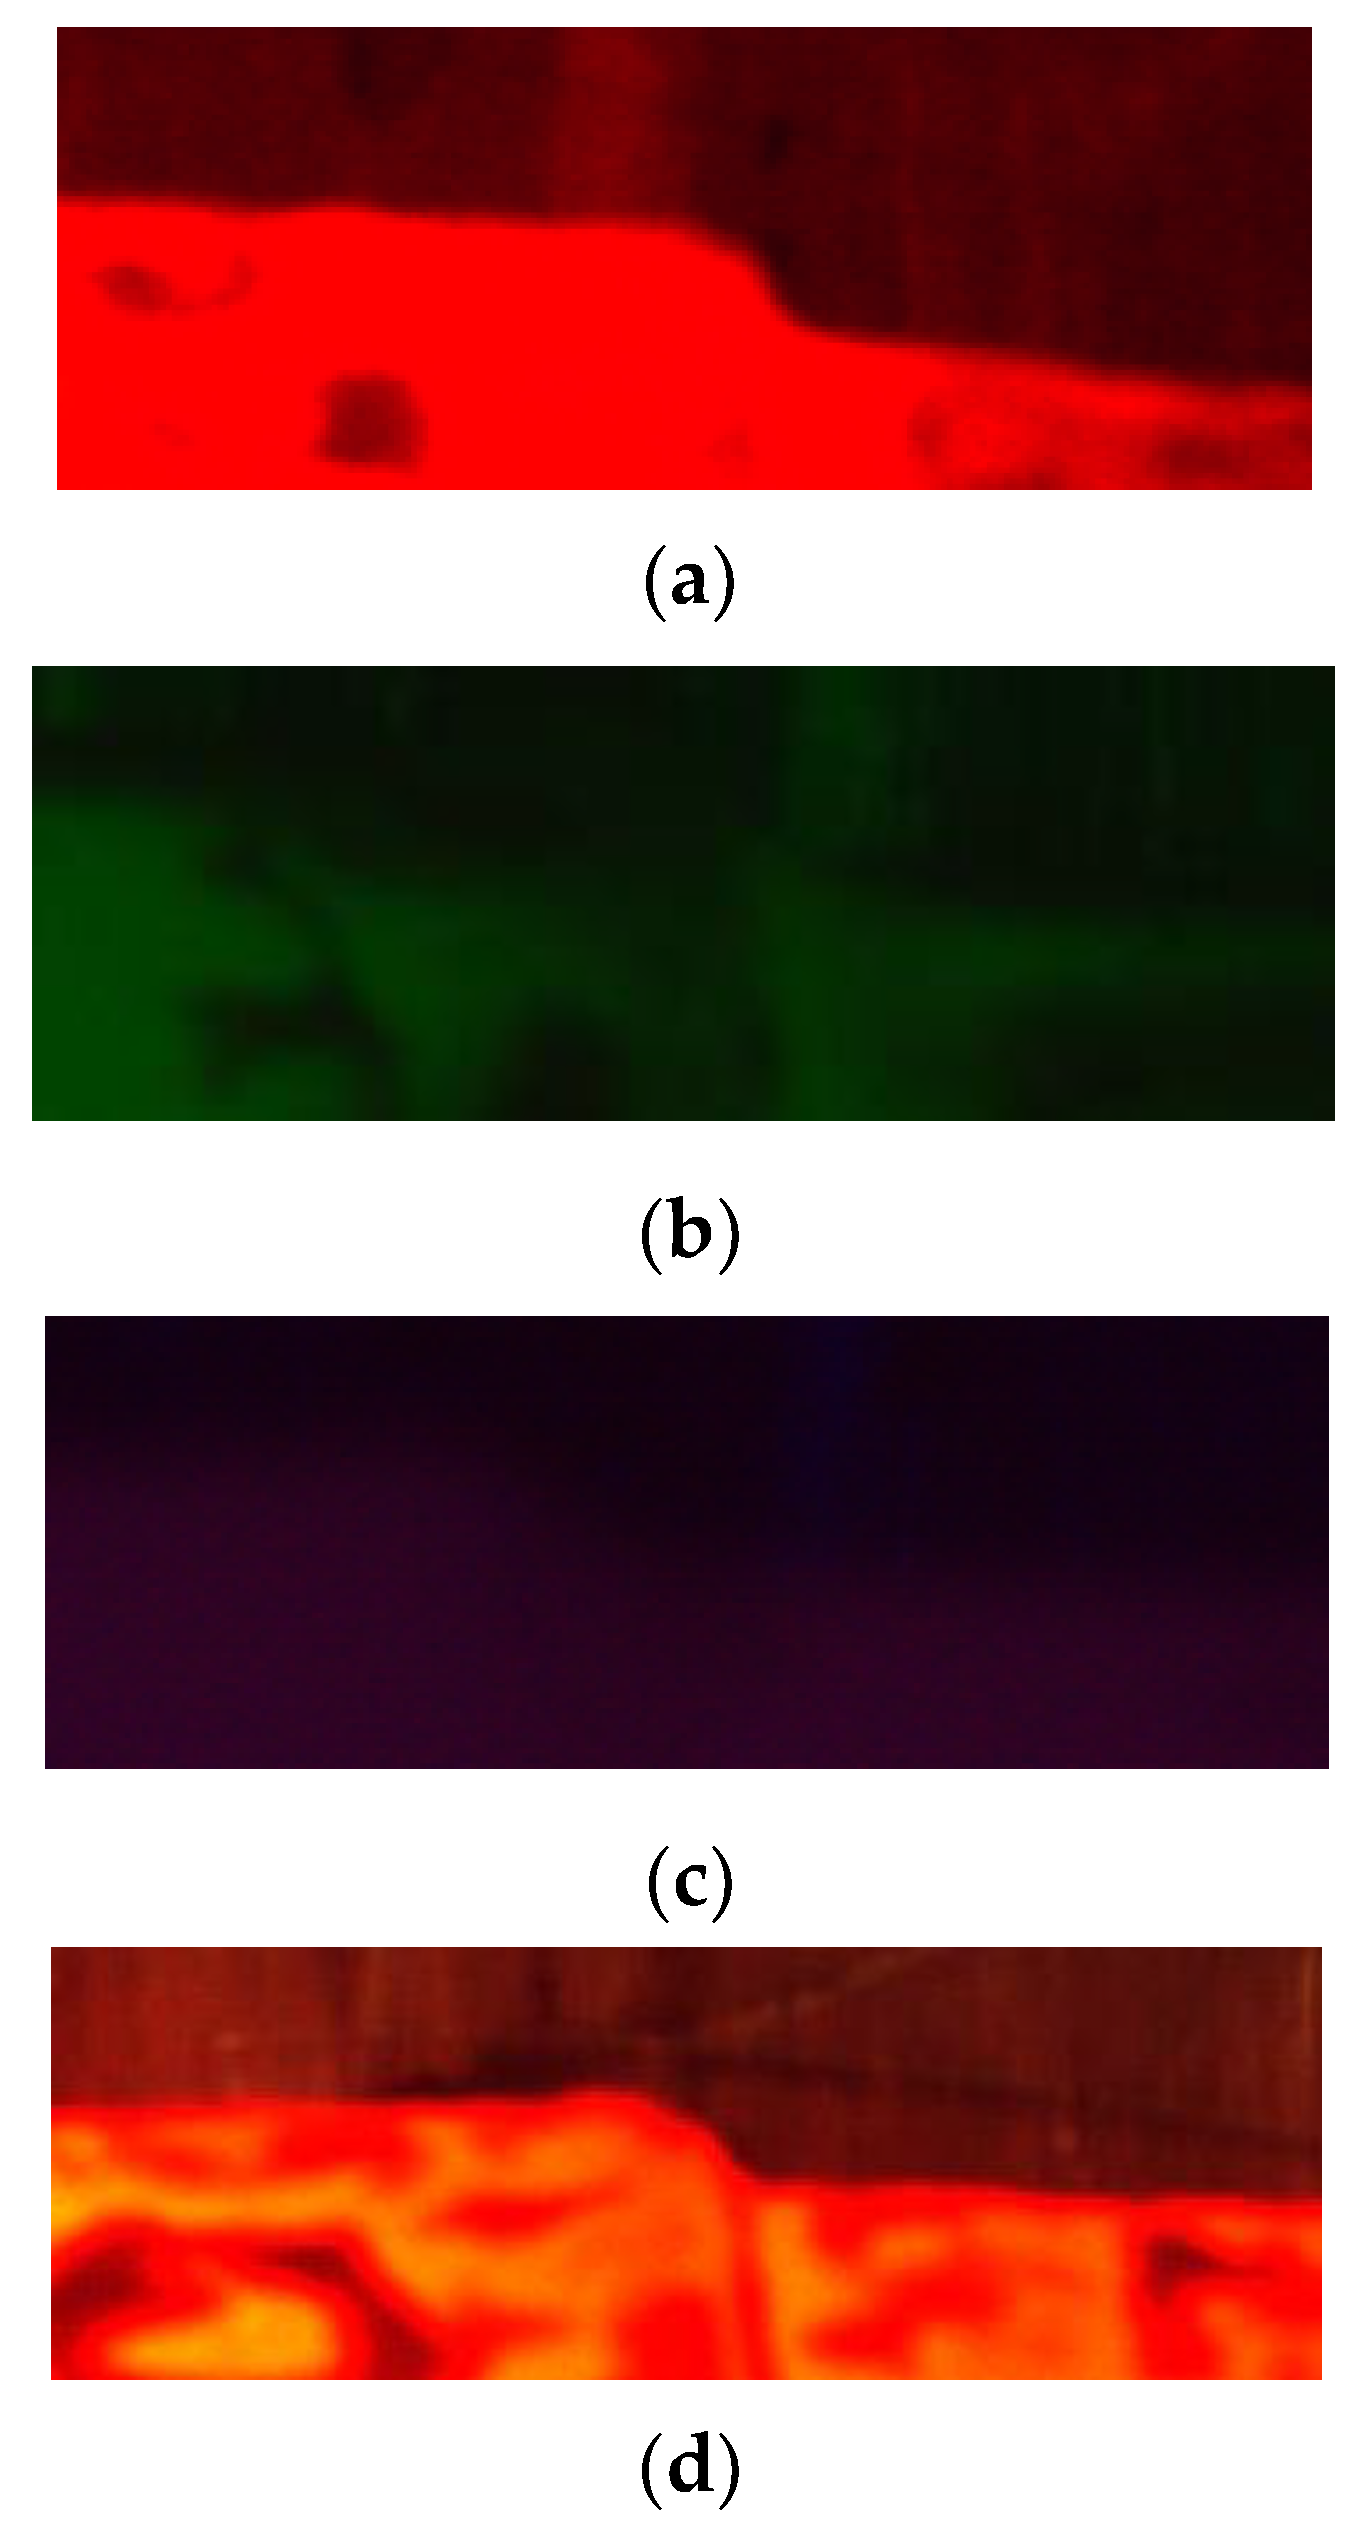
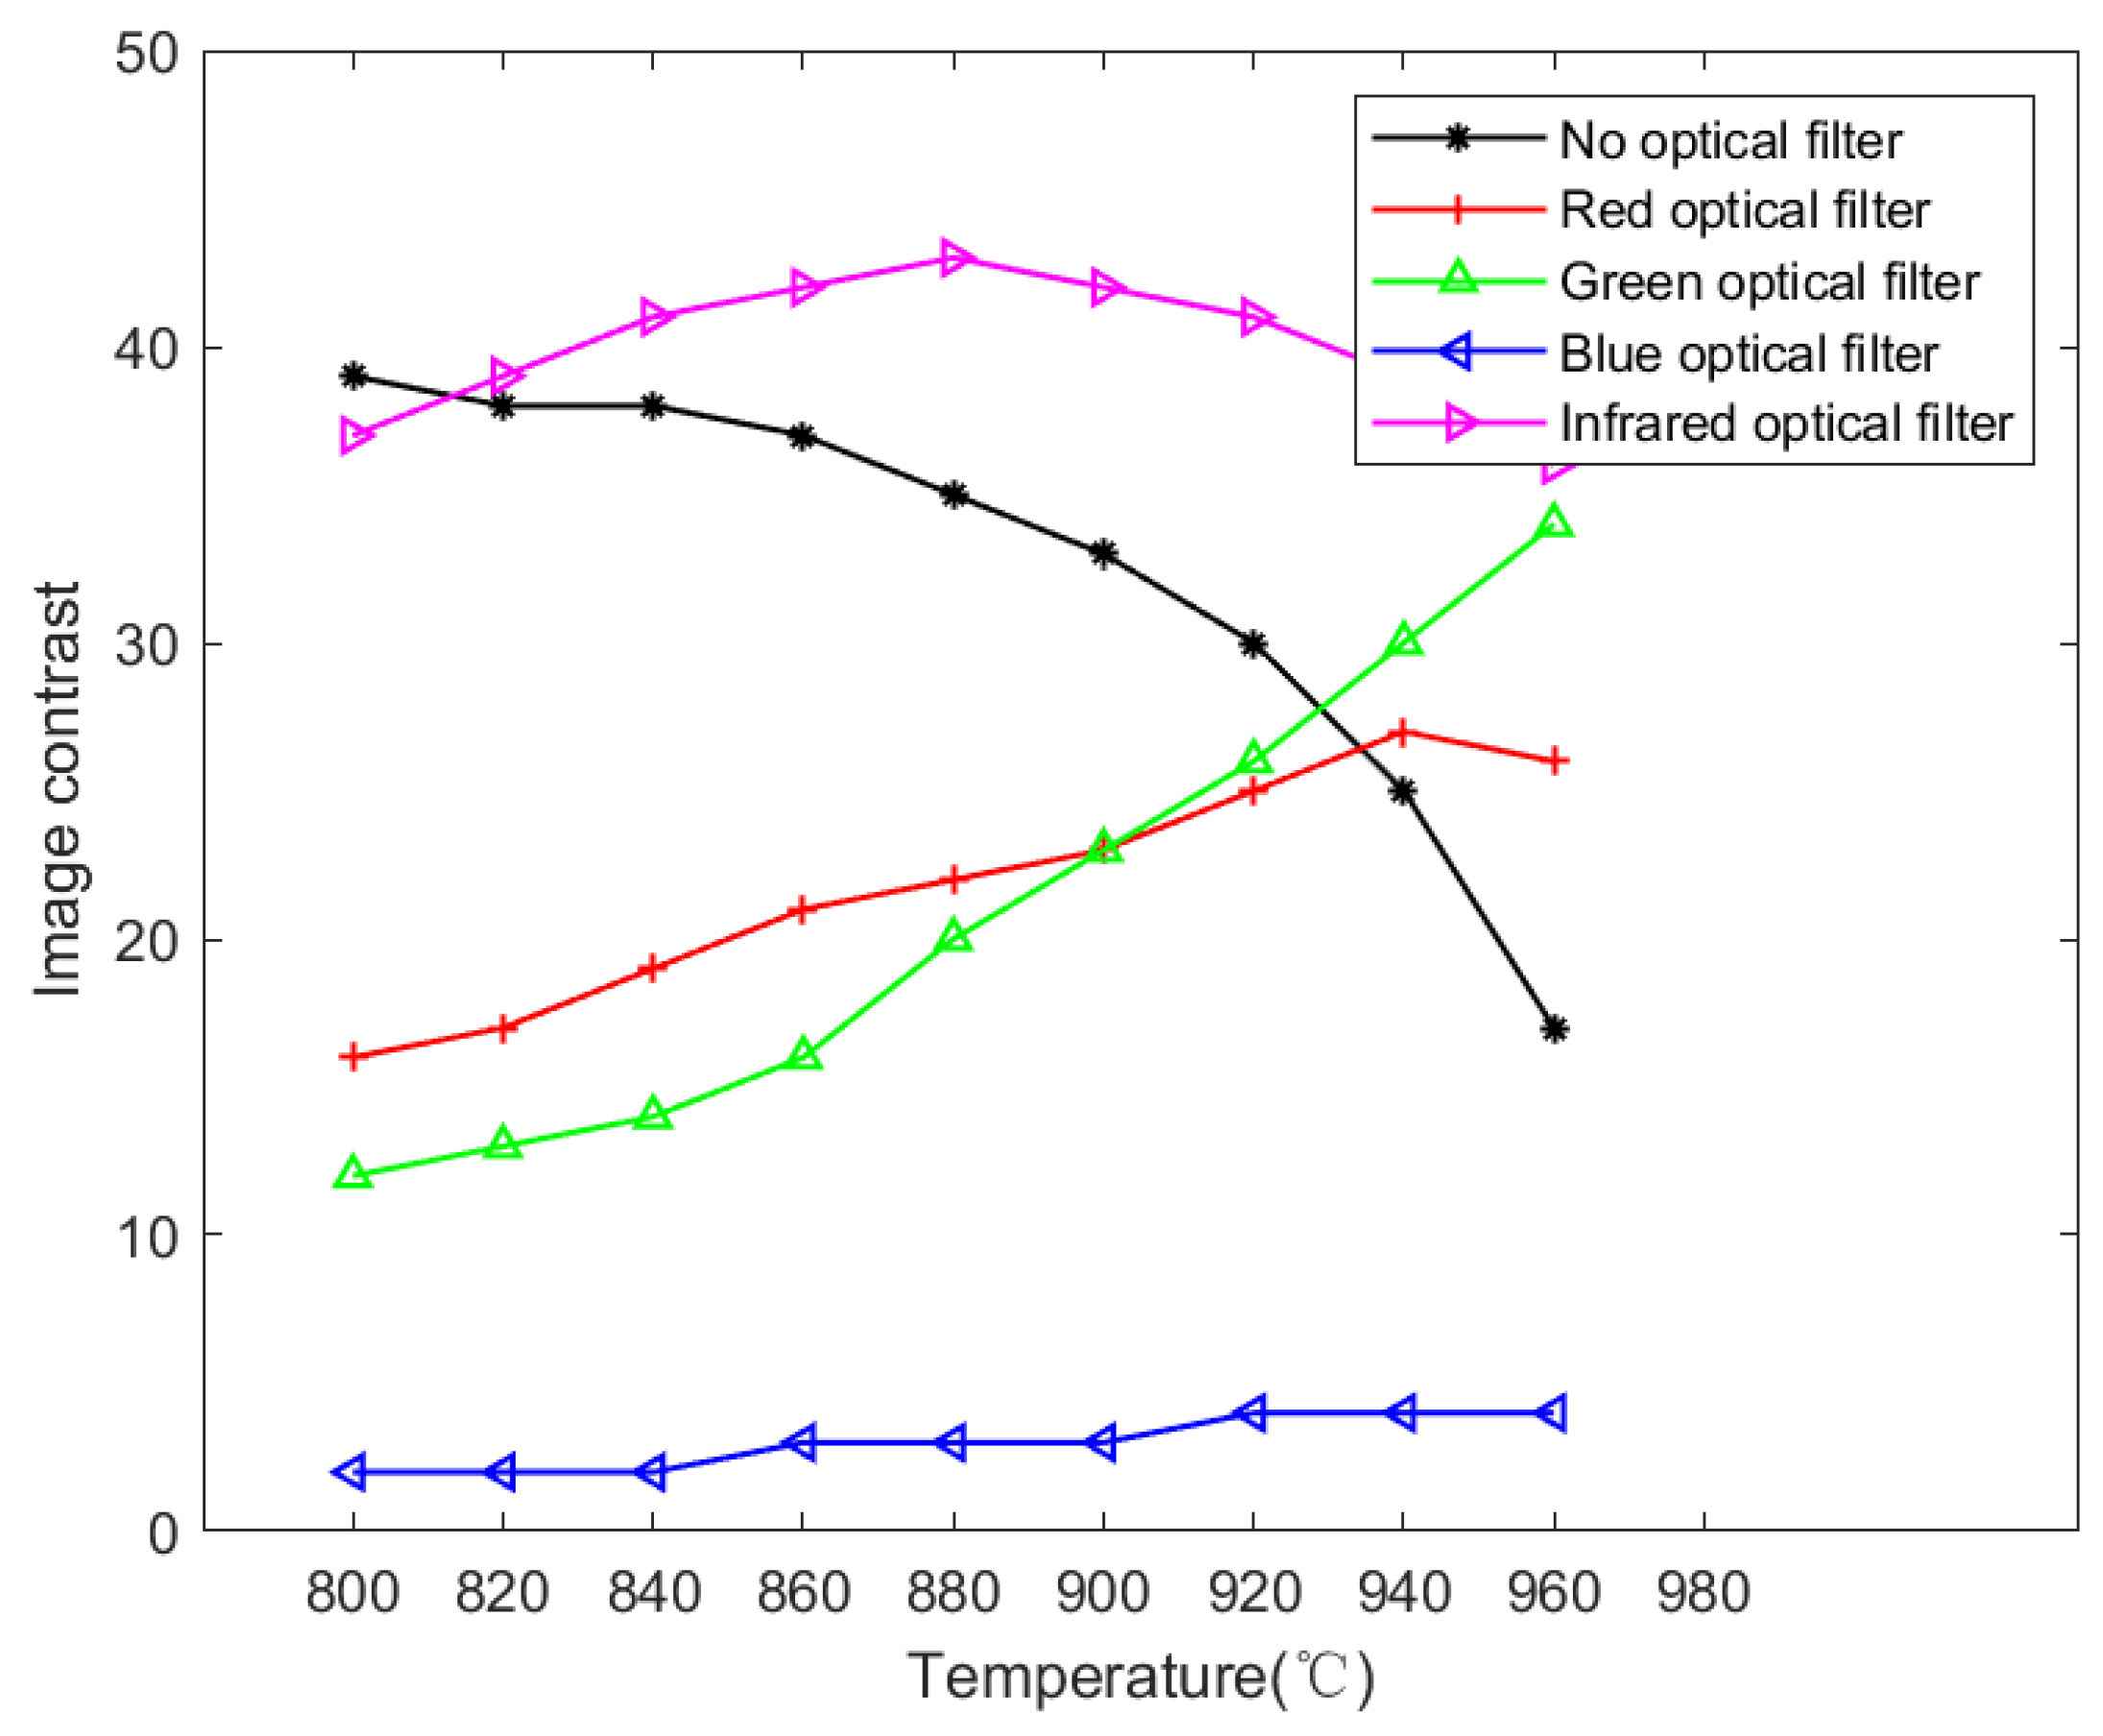
- Under the strong lighting, the axial lighting source can greatly reduce the high-light noise of the shaft surface; When collecting the shaft image, the infrared optical filter IR-cut can be installed on the capturing camera to make the image foreground and image background have greater contrast, so as to improve the imaging quality of the shaft.
- (2)
- Based on Gaussian low-pass filter to remove the medium and high frequency components in frequency domain, so as to eliminate the interference of surface noises effectively.
- (3)
- The surface hollow defect extraction method based on Otsu threshold method and adaptive threshold method can effectively identify the surface hollow defect of hot-state shaft in cross wedge rolling. After many trials, the average defect recognition rate is up to 95.7%, which proves the effectiveness of this method.
Author Contributions
Funding
Data Availability Statement
Conflicts of Interest
References
- Li, Q.; Lovell, M. Cross wedge rolling failure mechanisms and industrial application. Int. J. Adv. Manuf. Technol. 2008, 37, 265–278. [Google Scholar] [CrossRef]
- Li, J.L.; Wang, B.Y.; Qin, Y.; Fang, S.; Huang, X.; Chen, P. Investigating the effects of process parameters on the cross wedge rolling of TC6 alloy based on temperature and strain rate sensitivities. Int. J. Adv. Manuf. Technol. 2019, 103, 2563–2577. [Google Scholar] [CrossRef]
- Wang, M.T.; Li, X.T.; Du, F.S. Current trends in cross wedge rolling for part forming. ISIJ Int. 2005, 45, 1521–1525. [Google Scholar] [CrossRef]
- Zhou, X.Y.; Shao, Z.T.; Pruncu, C.I.; Hua, L.; Balint, D.; Lin, J.G.; Jiang, J. A study on central crack formation in cross wedge rolling. J. Mater. Process. Technol. 2020, 279, 116549. [Google Scholar] [CrossRef]
- Liu, Y.; Xu, K.; Wang, D.D. Online surface defect identification of cold rolled strips based on local binary pattern and extreme learning machine. Metals 2018, 8, 197. [Google Scholar] [CrossRef]
- Konovalenko, I.; Maruschak, P.; Brevus, V.; Prentkovskis, O. Recognition of scratches and abrasions on metal surfaces using a classifier based on a convolutional neural network. Metals 2021, 11, 549. [Google Scholar] [CrossRef]
- Neven, R.; Goedeme, T. A multi-branch u-net for steel surface defect type and severity segmentation. Metals 2021, 11, 870. [Google Scholar] [CrossRef]
- Martinez, S.S.; Ortega, J.G.; Garcia, J.G.; Garcia, A.S. A machine vision system for defect characterization on transparent parts with non-plane surfaces. Mach. Vis. Appl. 2012, 23, 1–13. [Google Scholar] [CrossRef]
- Lu, M.H.; Chen, C.L. Detection and classification of bearing surface defects based on machine vision. Appl. Sci. 2021, 11, 1825. [Google Scholar] [CrossRef]
- Zhou, Q.B.; Chen, R.W.; Huang, B.; Liu, C.; Yu, J.; Yu, X.Q. An automatic surface defect inspection system for automobiles using machine vision methods. Sensors 2019, 19, 644. [Google Scholar] [CrossRef]
- Shen, H.; Li, S.X.; Gu, D.Y.; Chang, H.X. Bearing defect inspection based on machine vision. Measurement 2012, 45, 719–733. [Google Scholar] [CrossRef]
- Rosati, G.; Boschetti, G.; Biondi, A.; Rossi, A. Real-time defect detection on highly reflective curved surfaces. Opt. Lasers Eng. 2009, 47, 379–384. [Google Scholar] [CrossRef]
- Pastor-Lopez, I.; de-la-Pena-Sordo, J.; Rojas, S.; Santos, I.; Bringas, P.G. Machine vision for surface defects categorisation in foundries based on machine learning. Dyna 2015, 89, 325–332. [Google Scholar]
- Chiou, Y.C.; Li, W.C. Flaw detection of cylindrical surfaces in PU-packing by using machine vision technique. Measurement 2009, 42, 989–1000. [Google Scholar] [CrossRef]
- Bai, J.; Yao, L.; Yao, T.T.; Zhang, Y. Removing of metal highlight spots based on total variation inpainting with multi-sources-flashing. In International Conference on Computational and Information Science; Springer: Berlin/Heidelberg, Germany, 2005; Volume 3802, pp. 826–831. [Google Scholar]
- Bassiou, N.; Kotropoulos, C. Color image histogram equalization by absolute discounting back-off. Comput. Vis. Image Underst. 2007, 107, 108–122. [Google Scholar] [CrossRef]
- Shin, Y.J.; Lee, J.B. Machine vision for digital microfluidics. Rev. Sci. Instrum. 2010, 81, 014302. [Google Scholar] [CrossRef]
- Ortiz-Jaramillo, B.; Kumcu, A.; Platisa, L.; Philips, W. Content-aware contrast ratio measure for images. Signal Process.-Image Commun. 2018, 62, 51–63. [Google Scholar] [CrossRef]
- Li, P.C.; Xiao, H. An improved filtering method for quantum color image in frequency domain. Int. J. Theor. Phys. 2018, 57, 258–278. [Google Scholar] [CrossRef]
- Danailov, M.B.; Narayanamurthy, C.S. Ultra high-pass Fourier filtering. Am. J. Phys. 2001, 69, 582–585. [Google Scholar] [CrossRef]
- Tukey, C.J.W. An algorithm for the machine calculation of complex Fourier series. Math. Comput. 1965, 19, 297–301. [Google Scholar]
- Chen, C.H.; Chi, C.Y.; Chen, C.Y. Two-dimensional Fourier series-based model for nonminimum-phase linear shift-invariant systems and texture image classification. IEEE Trans. Signal Process. 2002, 50, 945–955. [Google Scholar] [CrossRef]
- Saito, N.; Remy, J.F. The polyharmonic local sine transform: A new tool for local image analysis and synthesis without edge effect. Appl. Comput. Harmon. Anal. 2006, 20, 41–73. [Google Scholar] [CrossRef][Green Version]
- Belda, J.; Vergara, L.; Safont, G.; Salazar, A.; Parcheta, Z. A new surrogating algorithm by the complex graph Fourier transform (CGFT). Entropy 2019, 21, 759. [Google Scholar] [CrossRef] [PubMed]
- Xiao, Y.; Zhou, L.N.; Chen, W. Fourier spectrum retrieval in single-pixel imaging. IEEE Photonics J. 2019, 11, 7800411. [Google Scholar] [CrossRef]



| Type | Number | Accuracy | |||
|---|---|---|---|---|---|
| Circumferential Illumination + Spatial Filtering Method | Axial Illumination + Spatial Filtering Method | Circumferential Illumination + Low-Pass Filter | Axial Illumination + Low-Pass Filter | ||
| defective shaft | 70 | 57.1% | 82.9% | 61.4% | 95.7% |
| qualified shaft | 30 | 73.3% | 86.7% | 76.7% | 100% |
Publisher’s Note: MDPI stays neutral with regard to jurisdictional claims in published maps and institutional affiliations. |
© 2022 by the authors. Licensee MDPI, Basel, Switzerland. This article is an open access article distributed under the terms and conditions of the Creative Commons Attribution (CC BY) license (https://creativecommons.org/licenses/by/4.0/).
Share and Cite
Fu, H.; Wang, Y.; Shu, X.; Chen, X.; Lin, K. A Machine Vision-Based Method for Detecting Surface Hollow Defect of Hot-State Shaft in Cross Wedge Rolling. Metals 2022, 12, 1938. https://doi.org/10.3390/met12111938
Fu H, Wang Y, Shu X, Chen X, Lin K. A Machine Vision-Based Method for Detecting Surface Hollow Defect of Hot-State Shaft in Cross Wedge Rolling. Metals. 2022; 12(11):1938. https://doi.org/10.3390/met12111938
Chicago/Turabian StyleFu, Huajie, Ying Wang, Xuedao Shu, Xiaojie Chen, and Kai Lin. 2022. "A Machine Vision-Based Method for Detecting Surface Hollow Defect of Hot-State Shaft in Cross Wedge Rolling" Metals 12, no. 11: 1938. https://doi.org/10.3390/met12111938
APA StyleFu, H., Wang, Y., Shu, X., Chen, X., & Lin, K. (2022). A Machine Vision-Based Method for Detecting Surface Hollow Defect of Hot-State Shaft in Cross Wedge Rolling. Metals, 12(11), 1938. https://doi.org/10.3390/met12111938


