Article

Combination of Finite Element Spindle Model with Drive-Based Cutting Force Estimation for Assessing Spindle Bearing Load of Machine Tools

by
Chris Schöberlein
1,*,
Daniel Klíč
2,*,
Michal Holub
2,
Holger Schlegel
1 and
Martin Dix
1,3
1
Professorship Production Systems and Processes (PSP), Chemnitz University of Technology, Reichenhainer Str. 70, 09126 Chemnitz, Germany
2
Institute of Production Machines, Systems and Robotics, Faculty of Mechanical Engineering, Brno University of Technology, Technicka 2896/2, 616 69 Brno, Czech Republic
3
Fraunhofer Institute for Machine Tools and Forming Technology IWU, 09126 Chemnitz, Germany
*
Authors to whom correspondence should be addressed.
Machines 2025, 13(12), 1138; https://doi.org/10.3390/machines13121138
Submission received: 13 November 2025 / Revised: 4 December 2025 / Accepted: 9 December 2025 / Published: 12 December 2025
(This article belongs to the Special Issue Machines and Applications—New Results from a Worldwide Perspective)

Abstract

Monitoring spindle bearing load is essential for ensuring machining accuracy, reliability, and predictive maintenance in machine tools. This paper presents an approach that combines drive-based cutting force estimation with a finite element method (FEM) spindle model. The drive-based method reconstructs process forces from the motor torque signal of the feed axes by modeling and compensating motion-related torque components, including static friction, acceleration, gravitation, standstill, and periodic disturbances. The inverse mechanical and control transfer behavior is also considered. Input signals include the actual motor torque, axis position, and position setpoint, recorded by the control system’s internal measurement function at the interpolator clock rate. Cutting forces are then calculated in MATLAB/Simulink and used as inputs for the FEM spindle model. Rolling elements are replaced by bushing joints with stiffness derived from datasheets and adjusted through experiments. Force estimation was validated on a DMC 850 V machining center using a standardized test workpiece, with results compared against a dynamometer. The spindle model was validated separately on a MCV 754 Quick machine under static loading. The combined approach produced consistent results and identified the front bearing as the most critically loaded. The method enables practical spindle bearing load estimation without external sensors, lowering system complexity and cost.

1. Introduction

The paper deals with the estimation of the bearing forces on the main spindle of a machine tool that arise during the machining procedure. Hence, this chapter briefly introduces the state of the art in related topics, such as drive-based cutting force estimation and the basic structure of spindle bearings, as well as the influence of process forces on the spindle bearings. Eventually, the structure and main goals of the paper are introduced.

1.1. Cutting Force Estimation

To determine the load on the spindle bearings during machining, process forces in three cartesian directions must be known. One approach is to predict these forces using theoretical process models, which take into account tool and process parameters as well as the material properties of the workpiece. For machining processes, a common approach is the Kienzle machining model [1]. Drawbacks of these theoretical methods are idealized assumptions for tool wear state or workpiece material. As a result, fluctuations in the workpiece and process parameters as well as the condition of the tools are not taken into account. Alternative approaches measure the cutting forces directly with force sensors, which can be mounted either directly under the workpiece or on the tool side. These sensors provide high accuracy due to their proximity to the Tool Center Point (TCP). However, their installation increases costs, adds complexity, and raises the probability of machine tool failure. Hence, estimating the process forces based on data from the installed electromechanical drive systems offers great potential for force monitoring without structural intervention. In addition to motion-related effects, process forces affect the measured motor torque values according to Equation (1).
τ m = τ a + τ f + τ g + τ l , d + τ p ,
To calculate the process forces acting on the TCP ( τ p ) all superimposed influences of the motor torque signal, such as friction ( τ f ), acceleration ( τ a ), gravity ( τ g ) and other effects ( τ l , d ) must be subtracted. Furthermore, the transmission behavior of the mechanical subsystem as well as the drive control loops must be taken into account. In the literature, various approaches for the identification and correction of the superimposed torques exist. However, these either rely on external excitation sources such as impulse hammers and shakers [2,3,4,5], use specially designed processes [6,7] or apply reduced-order models, which are limited in accuracy and frequency range [8,9,10,11,12,13]. As a consequence, a new methodology for drive-based process force estimation is proposed in Section 2, which allows the identification of the required models without additional external sensors or actuators.

1.2. Spindle Bearings

Spindle bearings are classified as super-precision, single-row angular contact ball bearings. They consist of solid inner and outer rings together with a ball-and-cage assembly, typically employing solid window cages [14]. Their widespread application is justified by the broad design flexibility in terms of dimensional ranges, contact angles, preload levels, and arrangement methods. Hence, these properties enable an optimal balance between maximum stiffness and limiting rotational speed [15]. Spindle bearings can be arranged in various configurations and numbers, typically ranging from two up to several bearings, most commonly in X, O, or tandem arrangements. During machining, the front bearing is generally subjected to the highest loads. The loads acting on the bearings are influenced by their radial and axial stiffness. Manufacturers usually specify only the axial stiffness, while radial stiffness is commonly determined by calculations or obtained through measurement or numerical simulation. Bearing stiffness is also a function of the applied preload, which may be achieved by mechanical means such as mounting or clamping with a nut, or maintained by springs or hydraulic systems [16]. Preloading the spindle bearings within the spindle assembly increases the working accuracy and overall stiffness of the seating. However, higher preload levels also promote heat generation within the bearings, which can adversely affect performance and service life [15].
To determine the residual service life of a bearing, the forces acting on each individual bearing must be known. These forces arise from the combined effects of gravity, belt preload, and cutting loads. However, because spindle manufacturers typically do not disclose preload values as part of their proprietary know-how, this parameter is omitted from service life calculations. Recently, with the rapid development of artificial intelligence, bearing fault diagnostics has increasingly been addressed using deep learning techniques. A comprehensive overview of this field has been presented by Bao et al. [17]. The common method for calculating bearing life is defined in ISO 281:2007, which determines the equivalent dynamic load from the combined radial and axial forces according to the bearing type and their proportional distribution [18]. This approach provides satisfactory results for a wide range of operating conditions. The standard also accounts for different lubrication methods as well as the influence of contamination [18]. The current version of this standard, issued in 2007, neglects the influence of external dynamic loads. As a result, service life predictions may be inaccurate, leading either to the application of overly conservative safety factors during design or to unexpected failures during operation [19]. One way to determine the forces acting on the individual bearings is to integrate sensors such as piezoelectric crystals. However, this requires direct access to the bearing and therefore dismantling of the spindle. While some modern machine tools may have already integrated sensors, older machines typically do not provide this option. Alternatively, the bearing forces can be estimated analytically using simplified calculations. This approach enables approximate force values for each bearing pair. On the other hand, it is time-consuming, less accurate, and does not account for bearing stiffness.

1.3. Force Influence on Spindle Bearings

Cutting forces generated during machining operations, such as milling, directly affect the TCP. To fully understand the consequences of these cutting forces, it is necessary to trace their transmission path through the machine tool structure. The forces are transferred through the worktable and other machine components to the bed, and subsequently from the tool through the spindle and spindle head to the machine stand. Each structural element along this load path is susceptible to bending stresses. Typically, the main spindle, which generates the cutting movement, is the weakest element in the machine tool’s force transmission line. This applies to both static and dynamic compliance [20].
The spindle assembly must have high static stiffness, determined by the combined stiffness of the spindle structure and its bearings. Machining precision is influenced by bending, axial, and torsional stiffness. In serial configurations of machine tool components, the headstock often represents the most compliant structural node, thereby limiting the overall stiffness of the machine and constraining the achievable no-load accuracy [15]. Since the spindle is a critical link in this force-transmission chain, attention must also be given to the rolling element bearings that support it. These bearings are subjected to multiple loads that critically influence operational performance and service life. Such loads may be either static or dynamic, and their effects are particularly pronounced in high-speed applications. The principal forces include externally applied loads, internal forces arising from rotational motion, such as centrifugal forces, and gyroscopic moments [19,21]. The combined influence of these bearing loads and the transmitted cutting forces governs the overall dynamic behavior of the spindle–tool system. This interplay determines machining accuracy, productivity, and component longevity, making a comprehensive understanding of force transmission essential for optimizing high-performance machining operations.
The aim of this paper is to determine the process-induced loads on the bearings of the main spindle in machine tools. However, the resulting forces and their directions of action cannot be measured directly at the bearings. Therefore, they must be predicted from the cutting forces. To ensure a high level of industrial applicability, the approach avoids the use of external sensors. Section 2 presents the overall methodology, including the modular methodology for cutting force estimation as well as the FEM model for main spindle dynamics. Section 3 describes the experimental setup, while Section 4 evaluates the functionality of the individual approaches for cutting force estimation and modeling of spindle dynamics as well as their combination. Using an exemplary machining contour, the estimated forces are compared to direct measurements obtained by a force sensor. Subsequently, these estimated process forces serve as inputs to the spindle model in order to calculate the corresponding bearing loads. Eventually, the paper concludes with a discussion of the findings and provides an outlook on future research.

2. Materials and Methods

2.1. Cutting Force Estimation

Drive-based estimation of the cutting forces is achieved by a modular procedure (Figure 1). The basic principle is to model all motion-related components of the motor torque signal in advance and to automatically identify the model parameters depending on the axis configuration. During online operation, the process-related torque value is calculated by subtracting the modeled torque values from the measured motor torque.
The required input signals include the motor torque as well as the setpoint and actual values of the motor angle. If a module requires angular velocities or accelerations, the time-discrete derivatives are calculated within the corresponding sub-function. In contrast to the position values, torque signals are typically processed in subordinate drive control modules and must be transmitted to the control system via proprietary fieldbus systems (e.g., [22]).
The first module provides models for correcting friction-related torque values. For this purpose, a speed-dependent friction model is estimated based on preliminary motion experiments and, in the case of linear axes, may be extended by a position-dependent term. From these experiments, the torque value related to the axis weight in the case of vertical feed axes is determined. Details of the identification routines and measurements at a machining center are provided in [23]. The second module corrects the setpoint-induced acceleration torques. For this purpose, a scalable reduced-order model of the drive control is identified, which takes into account the total moment of inertia of the axis as well as the limits of acceleration and motor torque. A detailed description of the functionality and comparative results for a rotary axis are presented in [24].
The subsequent module addresses the problem that the motor torque remains at values below the static friction limit when the axis is at standstill. This effect results from the slow decline of the integral part in the current control loop. In addition, the magnitude of the residual torque depends on the preceding axis motion and direction of previous process loads. To avoid complex modeling of these effects, the developed function subtracts the moving average of the measured motor torque signal. The decision whether an axis is at standstill is made by evaluating the speed setpoint signal in combination with a first-order delay element representing the time behavior of the speed control loop. In contrast to the commonly used actual speed value, this approach does not require a definition of thresholds for noise and periodic process loads.
In addition, the motor torque signal is superimposed by periodic torque fluctuations during movement phases, e.g., as a result of pole and slot effects, errors in position measurement systems, or mechanical influences. Knowledge of these torque fluctuations is mandatory for distinguishing them from periodic cutting forces. A detailed description of the functionality, including experimental tests on a single axis test rig can be found in [25]. Another obstacle arises due to the acting of process forces at the end of the mechanical transmission chain. To reconstruct external loads, it is essential to take into account the transfer function of the mechanical system as well as the disturbance behavior of the drive control. Unlike established methods, the module identifies the mechanical transfer function by exciting the installed servomotor. The controller cascade is modeled using control parameters in combination with order-reduced models. Details on the procedure, including its experimental verification, are provided in [26].

2.2. Bearing Force Estimation

To determine the forces acting on the bearings more quickly and accurately than by analytical calculations, a Computer-Aided Design (CAD)-based spindle model is required. In addition, the tool geometry (primarily its diameter and length) must be specified, along with the individual components of the resultant cutting force vector acting on the tool. These inputs are then used to calculate the distribution and progression of the force vectors acting on each bearing, which subsequently enables estimation of the residual service life. Although the explicit residual life calculation is not presented here, the model allows predictions in accordance with ISO 281:2007 and provides the potential for greater accuracy models through knowledge of the time-dependent waveform and force curves for each bearing [18].
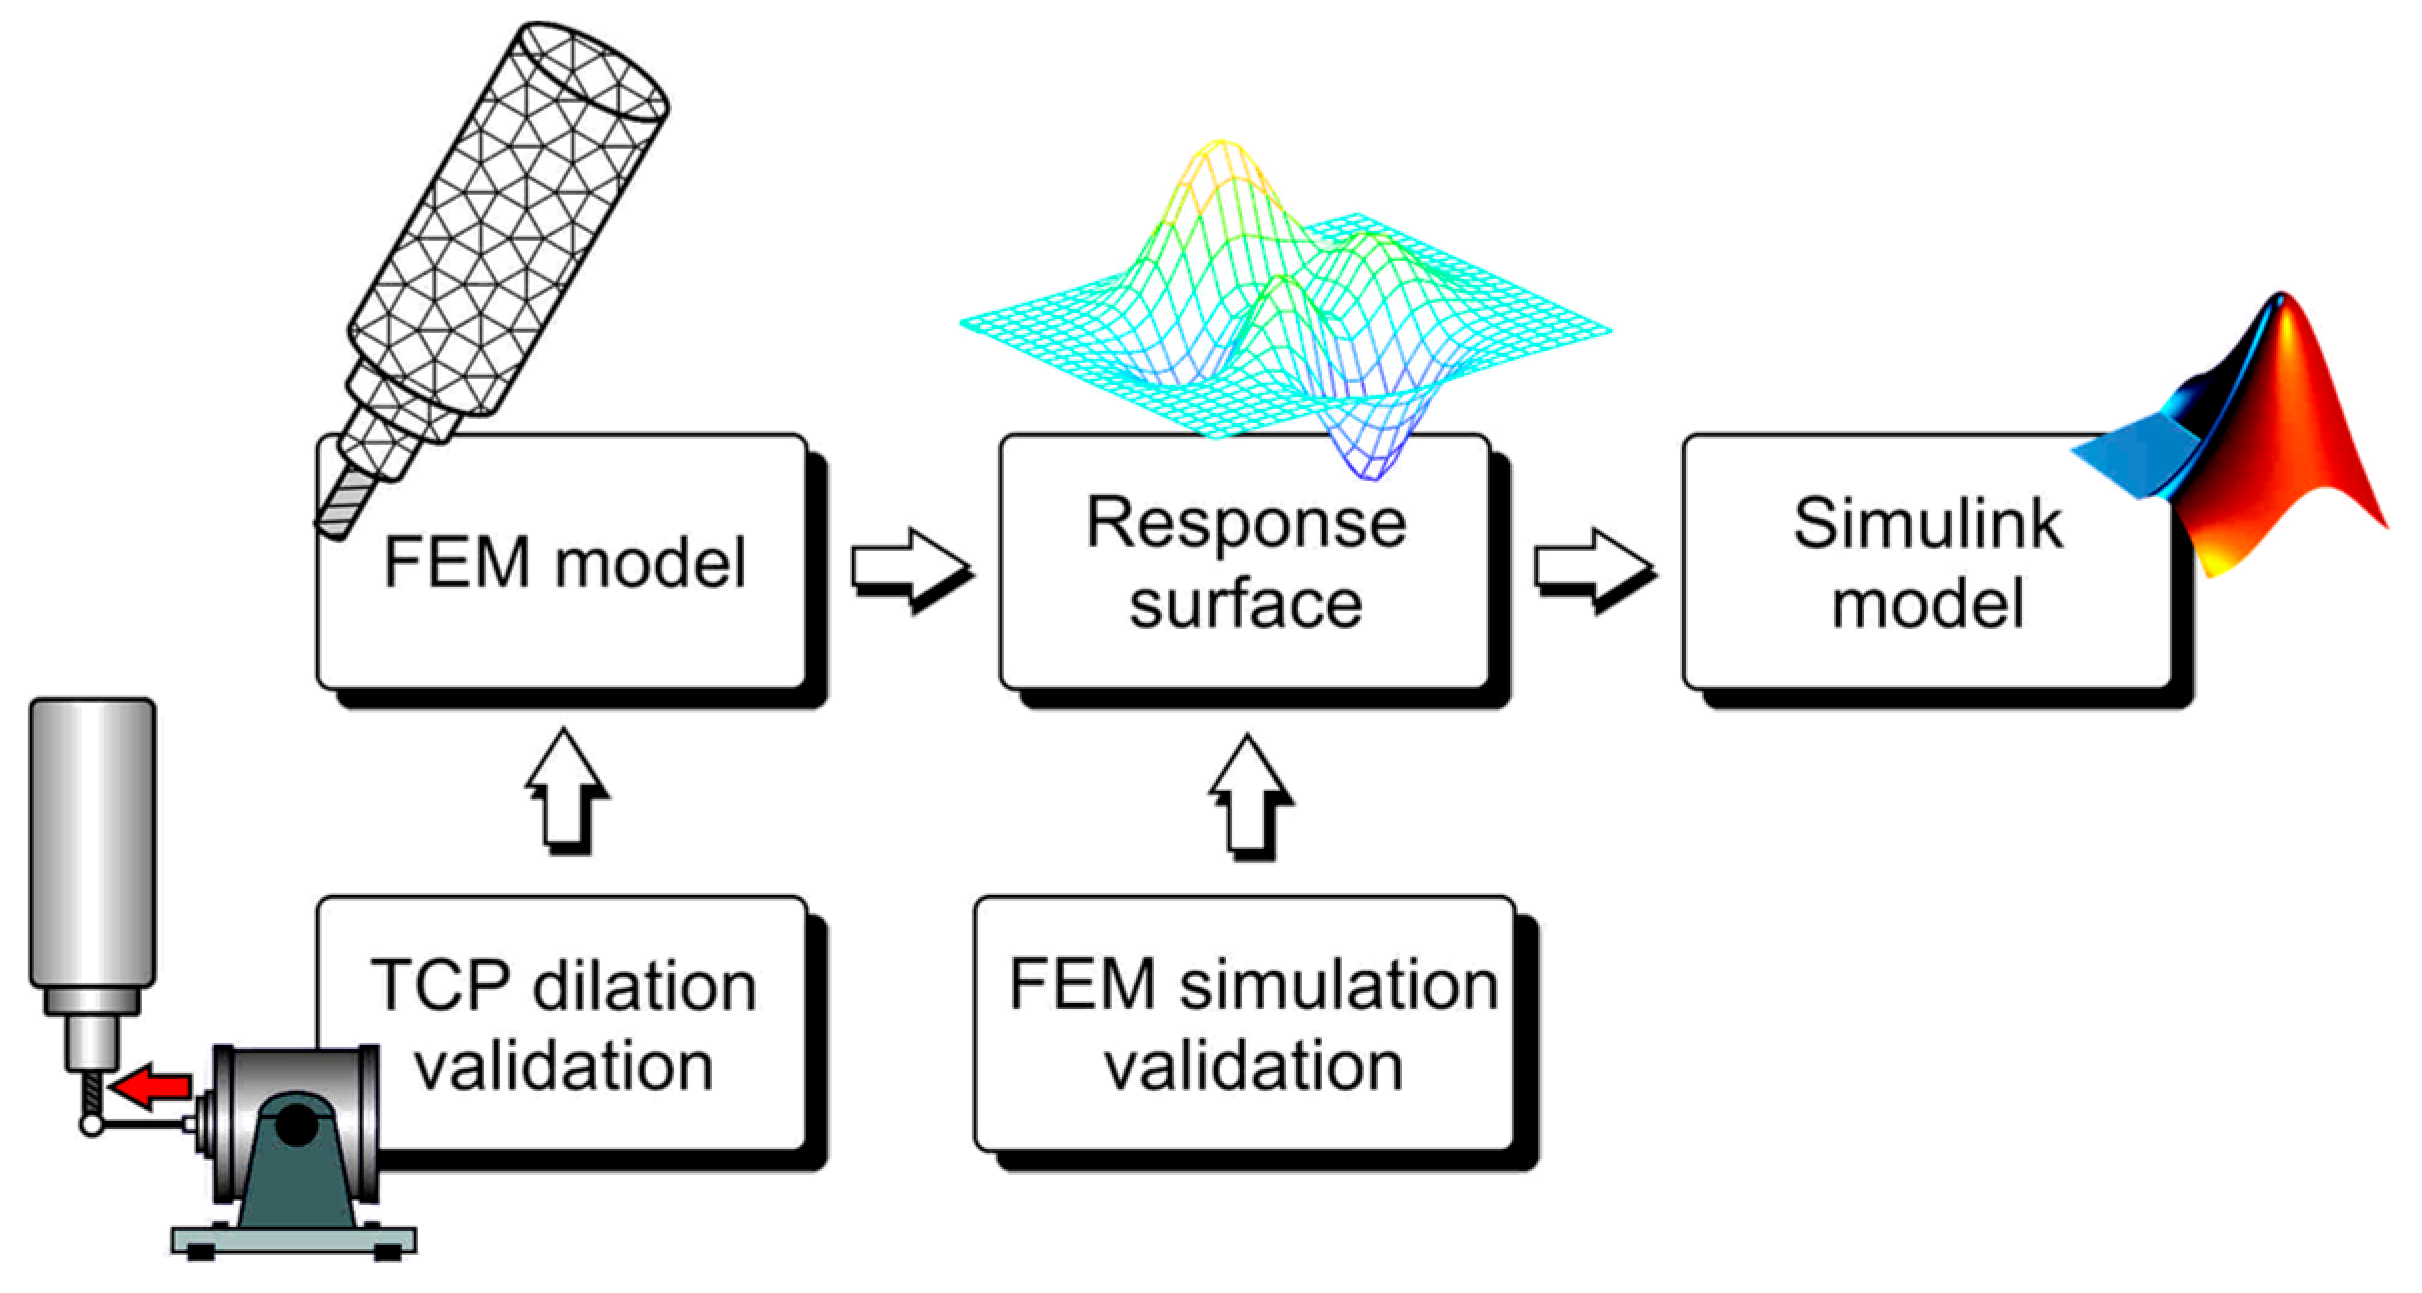
The modeling procedure was carried out as depicted in Figure 2. First, a model for FEM was created from the CAD model of the spindle, with emphasis placed on computational efficiency. Therefore, the model was formulated in a simplified linear form. This FEM model was verified by measuring the TCP deformation using testing equipment without spindle rotation. From the FEM model, a response surface was created which can estimate one step in approximately 220 ms, within a small margin of error, which is explained further in the text. The response surface was further validated with the FEM model through simulations on a representative sample of 45 experiments. Design of experiments was Central Composite Design type. Finally, the reduced-order model was implemented in MATLAB Simulink R2023b, enabling force estimation based on input signals with a sampling frequency of 250 Hz.
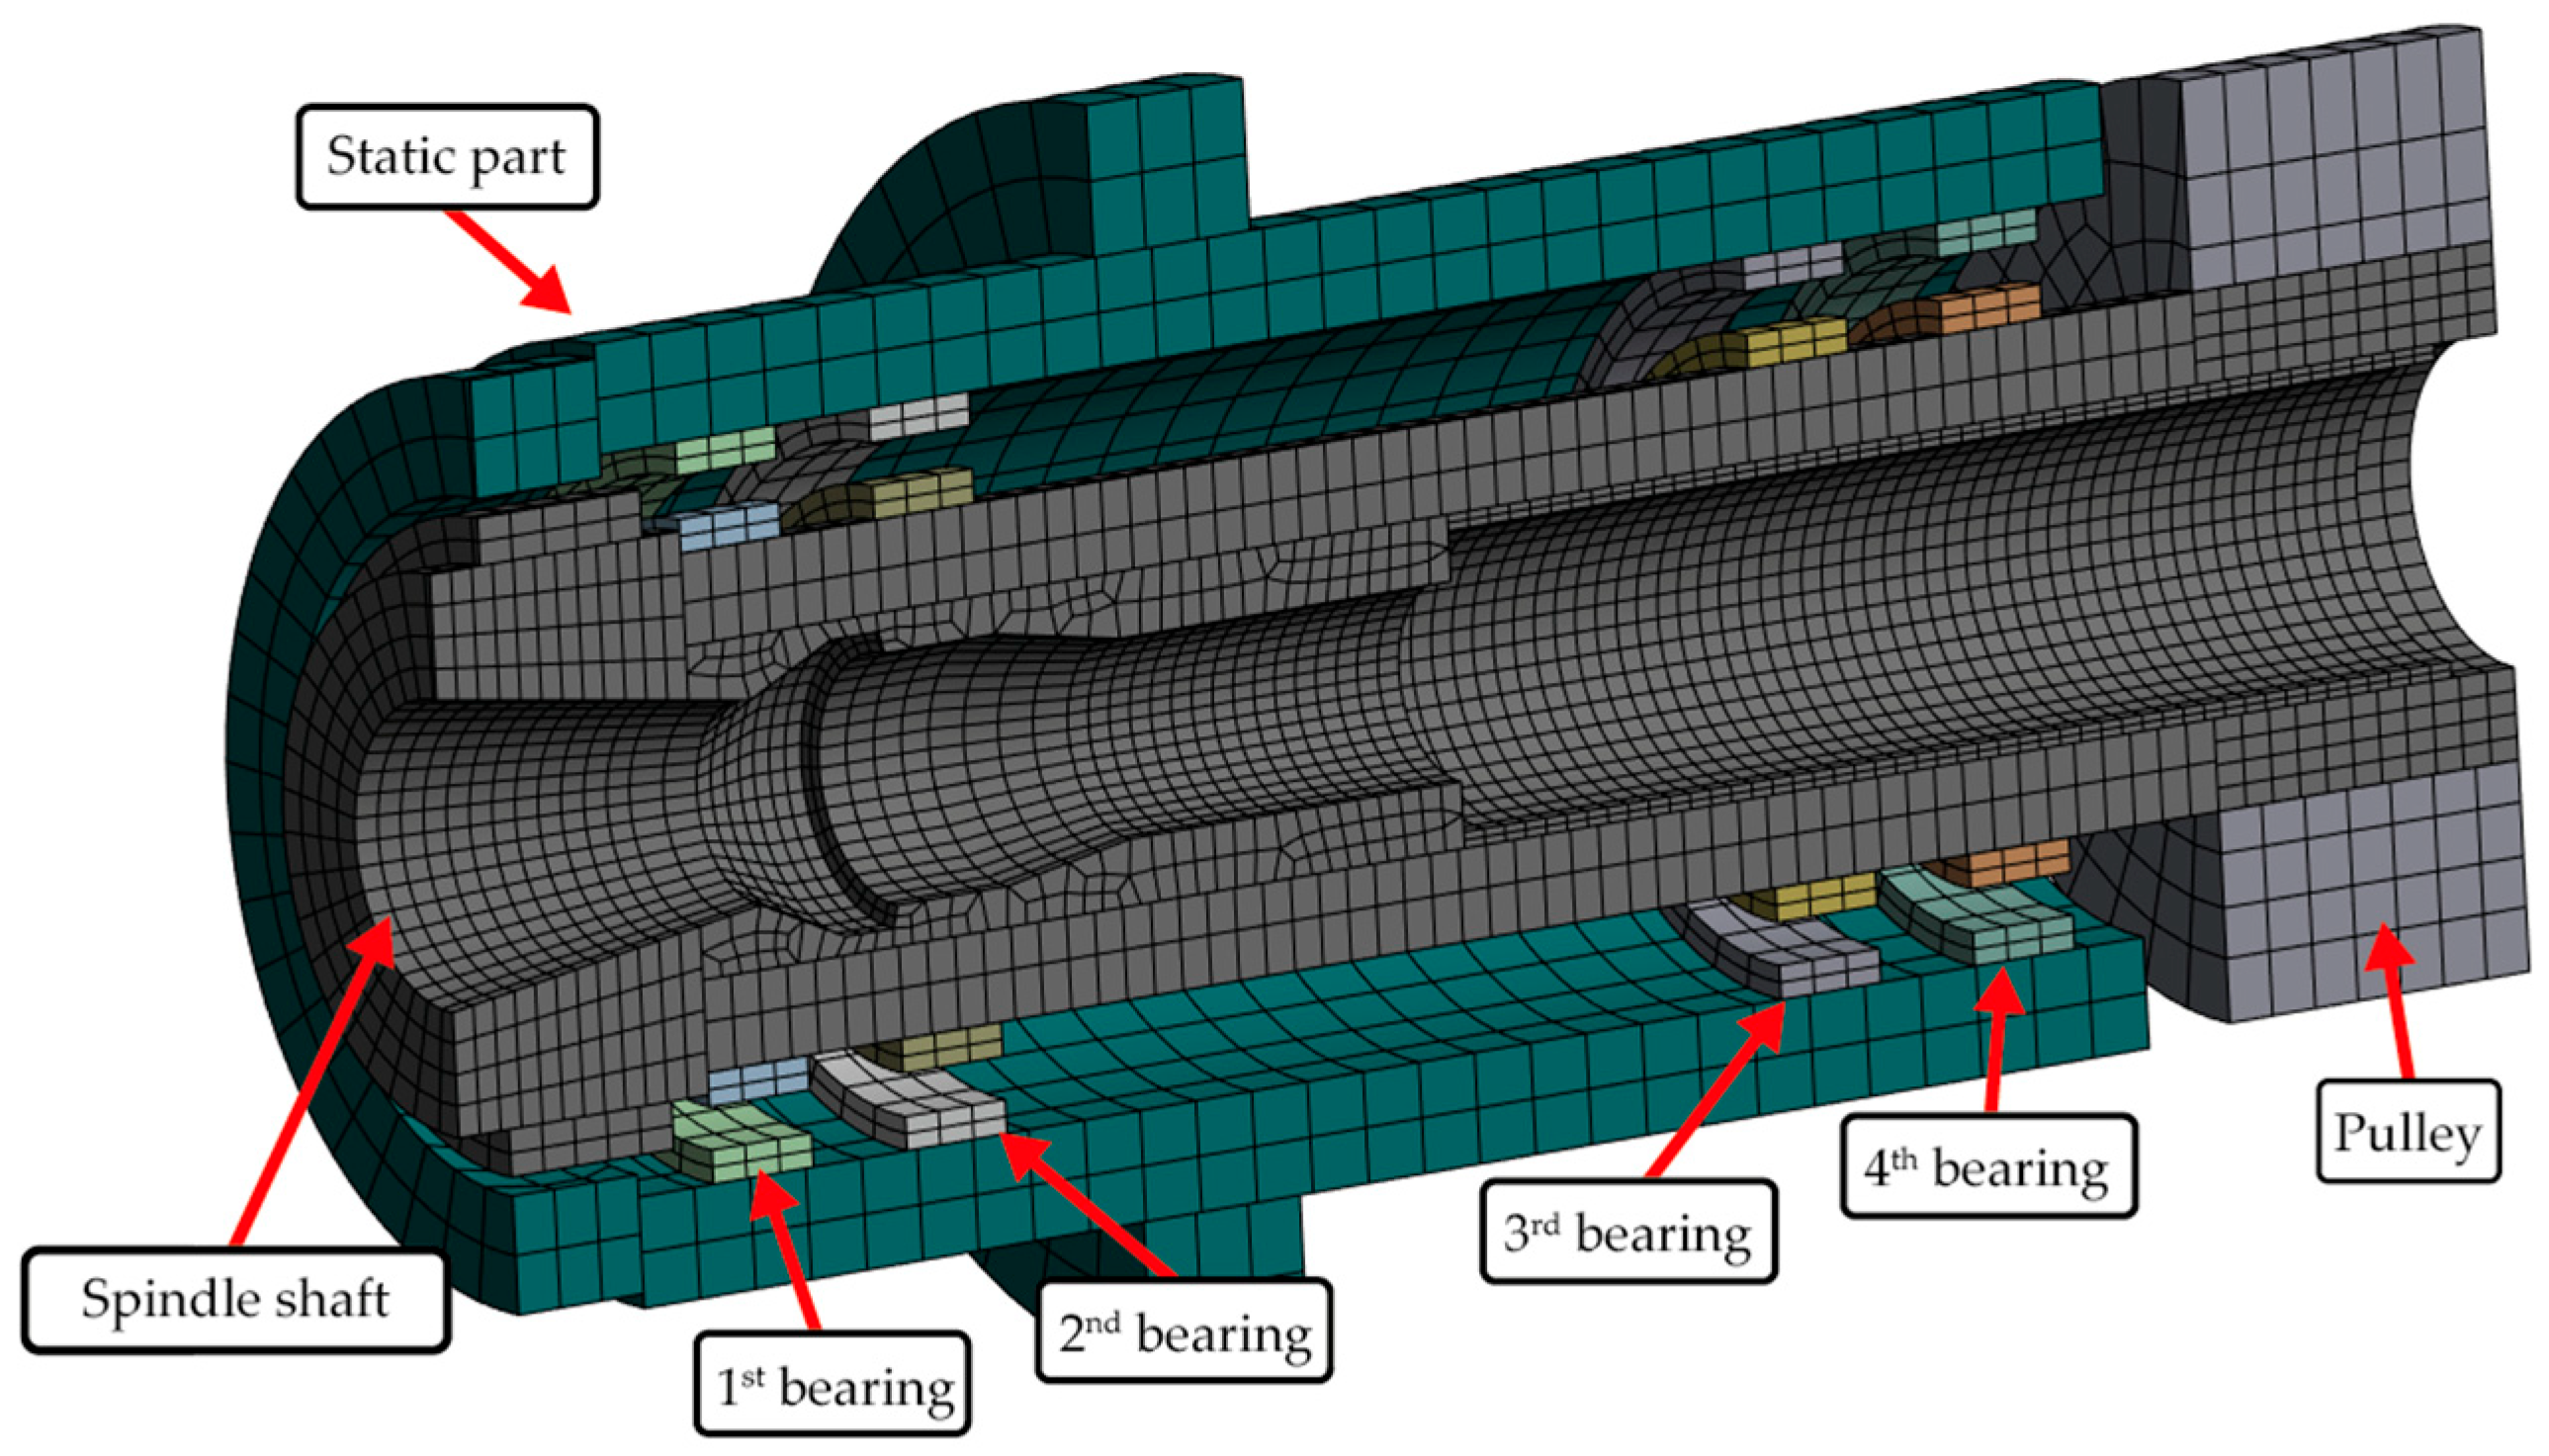
The model is created in ANSYS Static Structural 2024 R2, which means that it is quasi-dynamic and the components with negligible influence on the rigidity of the spindle have been removed. The individual components are flexible. To simplify the model and achieve its linearity, the individual contacts are bonded using the Multi-Point Constraint (MPC) formulation. The model is created for static structural analysis, and therefore the spindle shaft must not rotate in the Z-axis. The other degrees of freedom must not be unrestrained. Therefore, a combination of universal and general joints is used on the shaft at the pulley and from the pulley to the ground to achieve the desired connection. The model itself can be seen in Figure 3.
The rolling elements of the bearings were replaced by bushing joints. Their rigidity is defined according to the stiffness of the actual bearings. The stiffness values were obtained from the datasheet for bearing type 71914 ACD/P4A [27]. Since the manufacturer specifies only axial stiffness, the radial stiffness was calculated from the bearing contact angle according to [16]. Because the exact bearing mounting configuration is considered proprietary know-how of the spindle manufacturer, the average preload specified in the datasheet was adopted as a starting point for calculating both axial and radial stiffness. The resulting stiffness matrix was then assigned to the bushing joints. After the stiffness testing, the bushing parameters were further corrected, and the model was finalized for use.
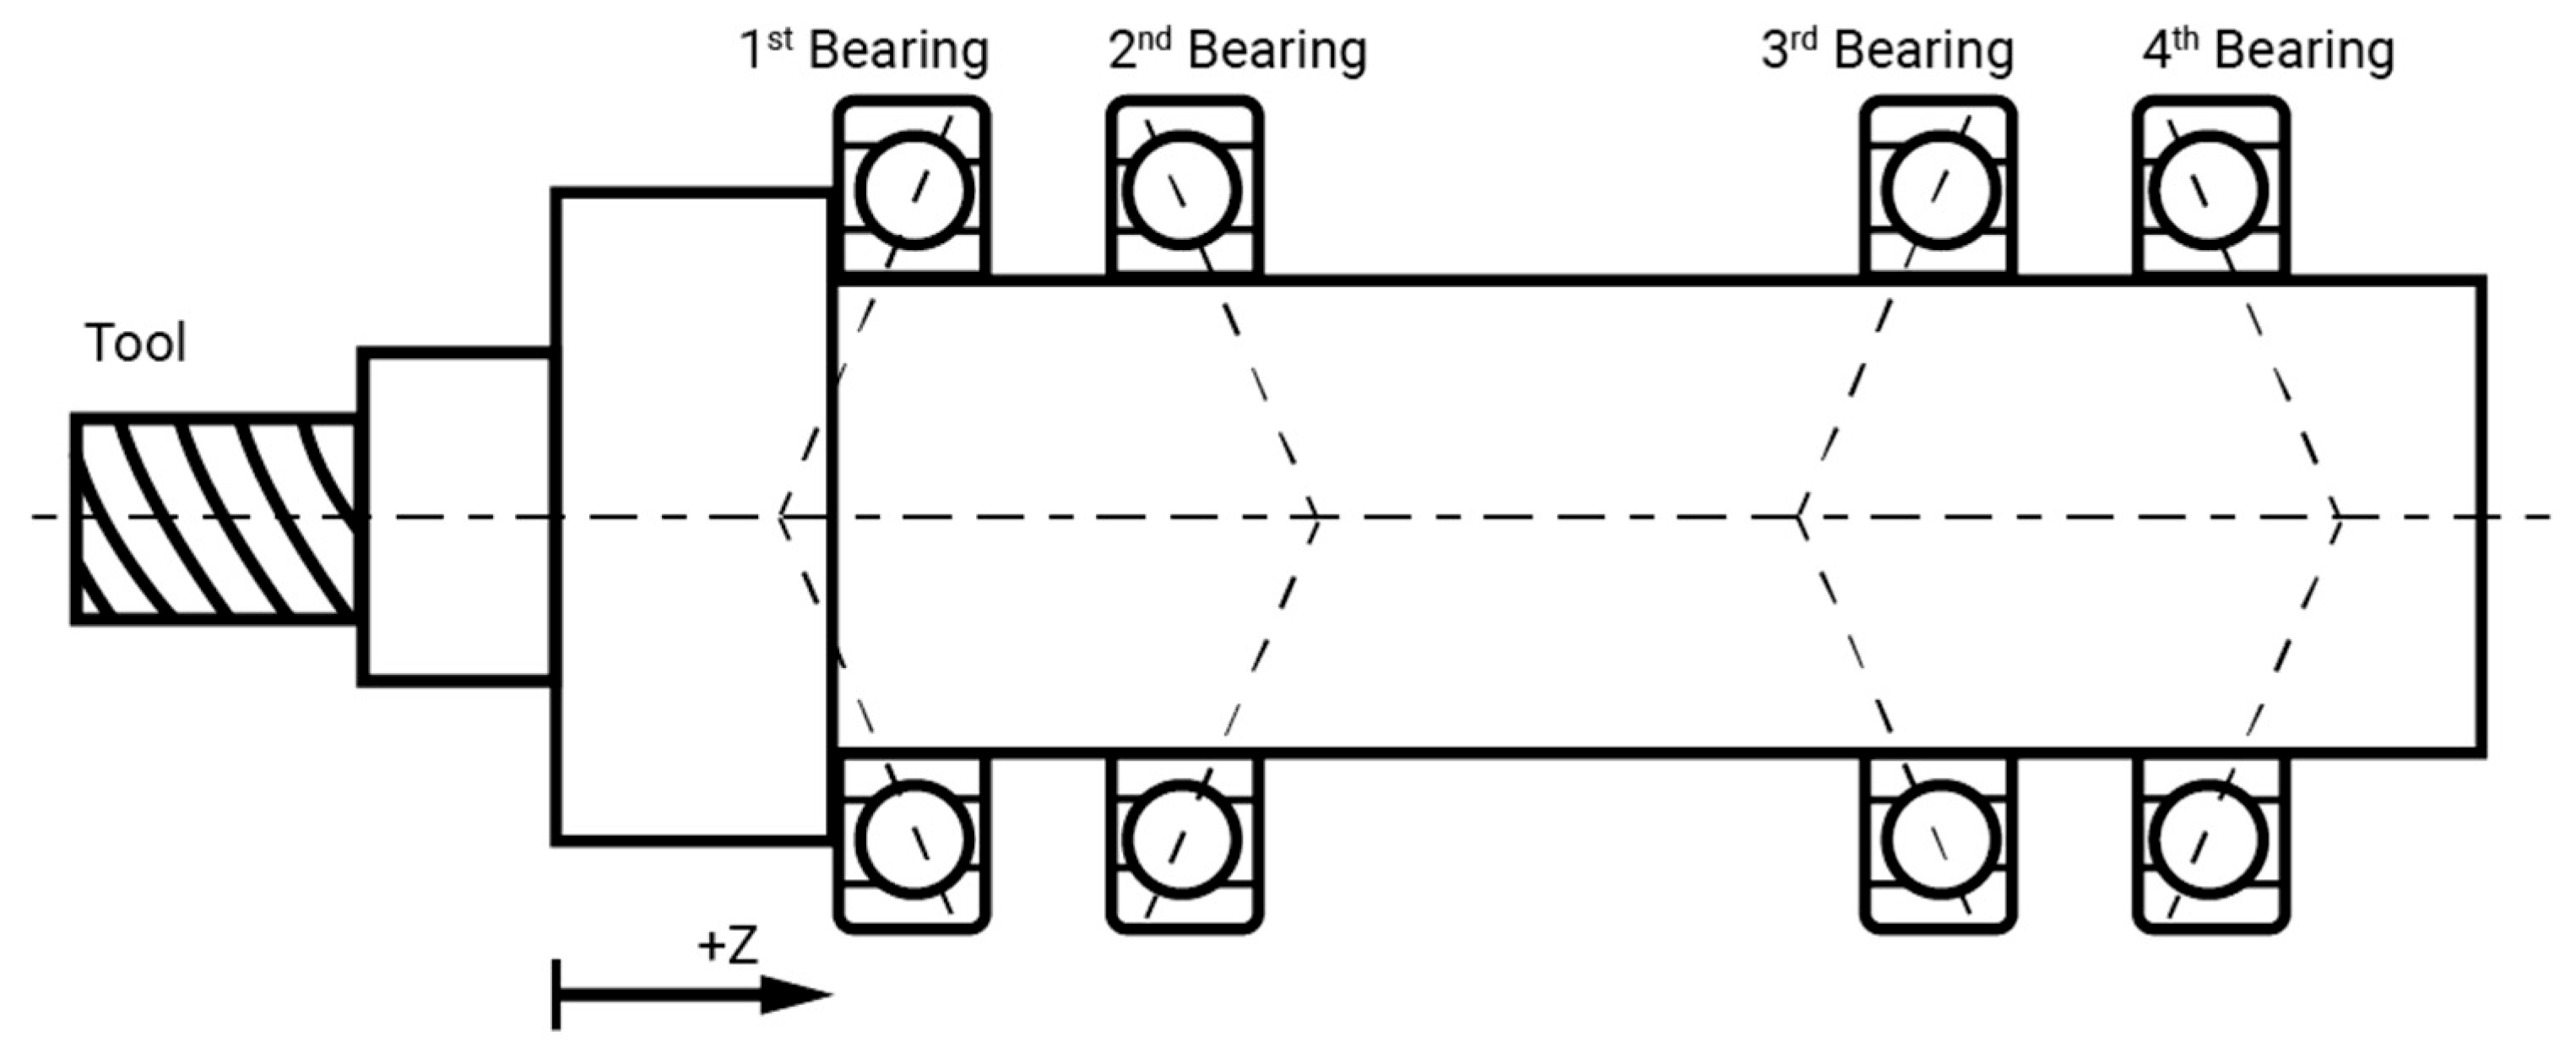
The bearing substitutions with bushing do not consider the alignment of axial bearings on the spindle. The bearings are aligned in two back-to-back arrangements. Therefore, only the first and third bearings provide load support in the negative Z-direction while second and fourth provide support in the positive Z-direction. This must be considered after the model estimates loads in the Z-direction on each bearing. In the negative direction, the first bearing carries the combined load from the first and second bearings, and vice versa. The same applies to the second pair. As already noted, the input parameters of this model are the individual components of the resultant cutting force vector and its point of application (defined by the tool dimensions), while the output parameters obtained from the response surface are the deformations of the TCP in the individual axes and the force vectors acting on each bearing. Bearing numbers and positions for a typical main spindle of a machine tool are illustrated in Figure 4. Overall, the response surface demonstrated a low error rate in comparison with the significant computational time savings.
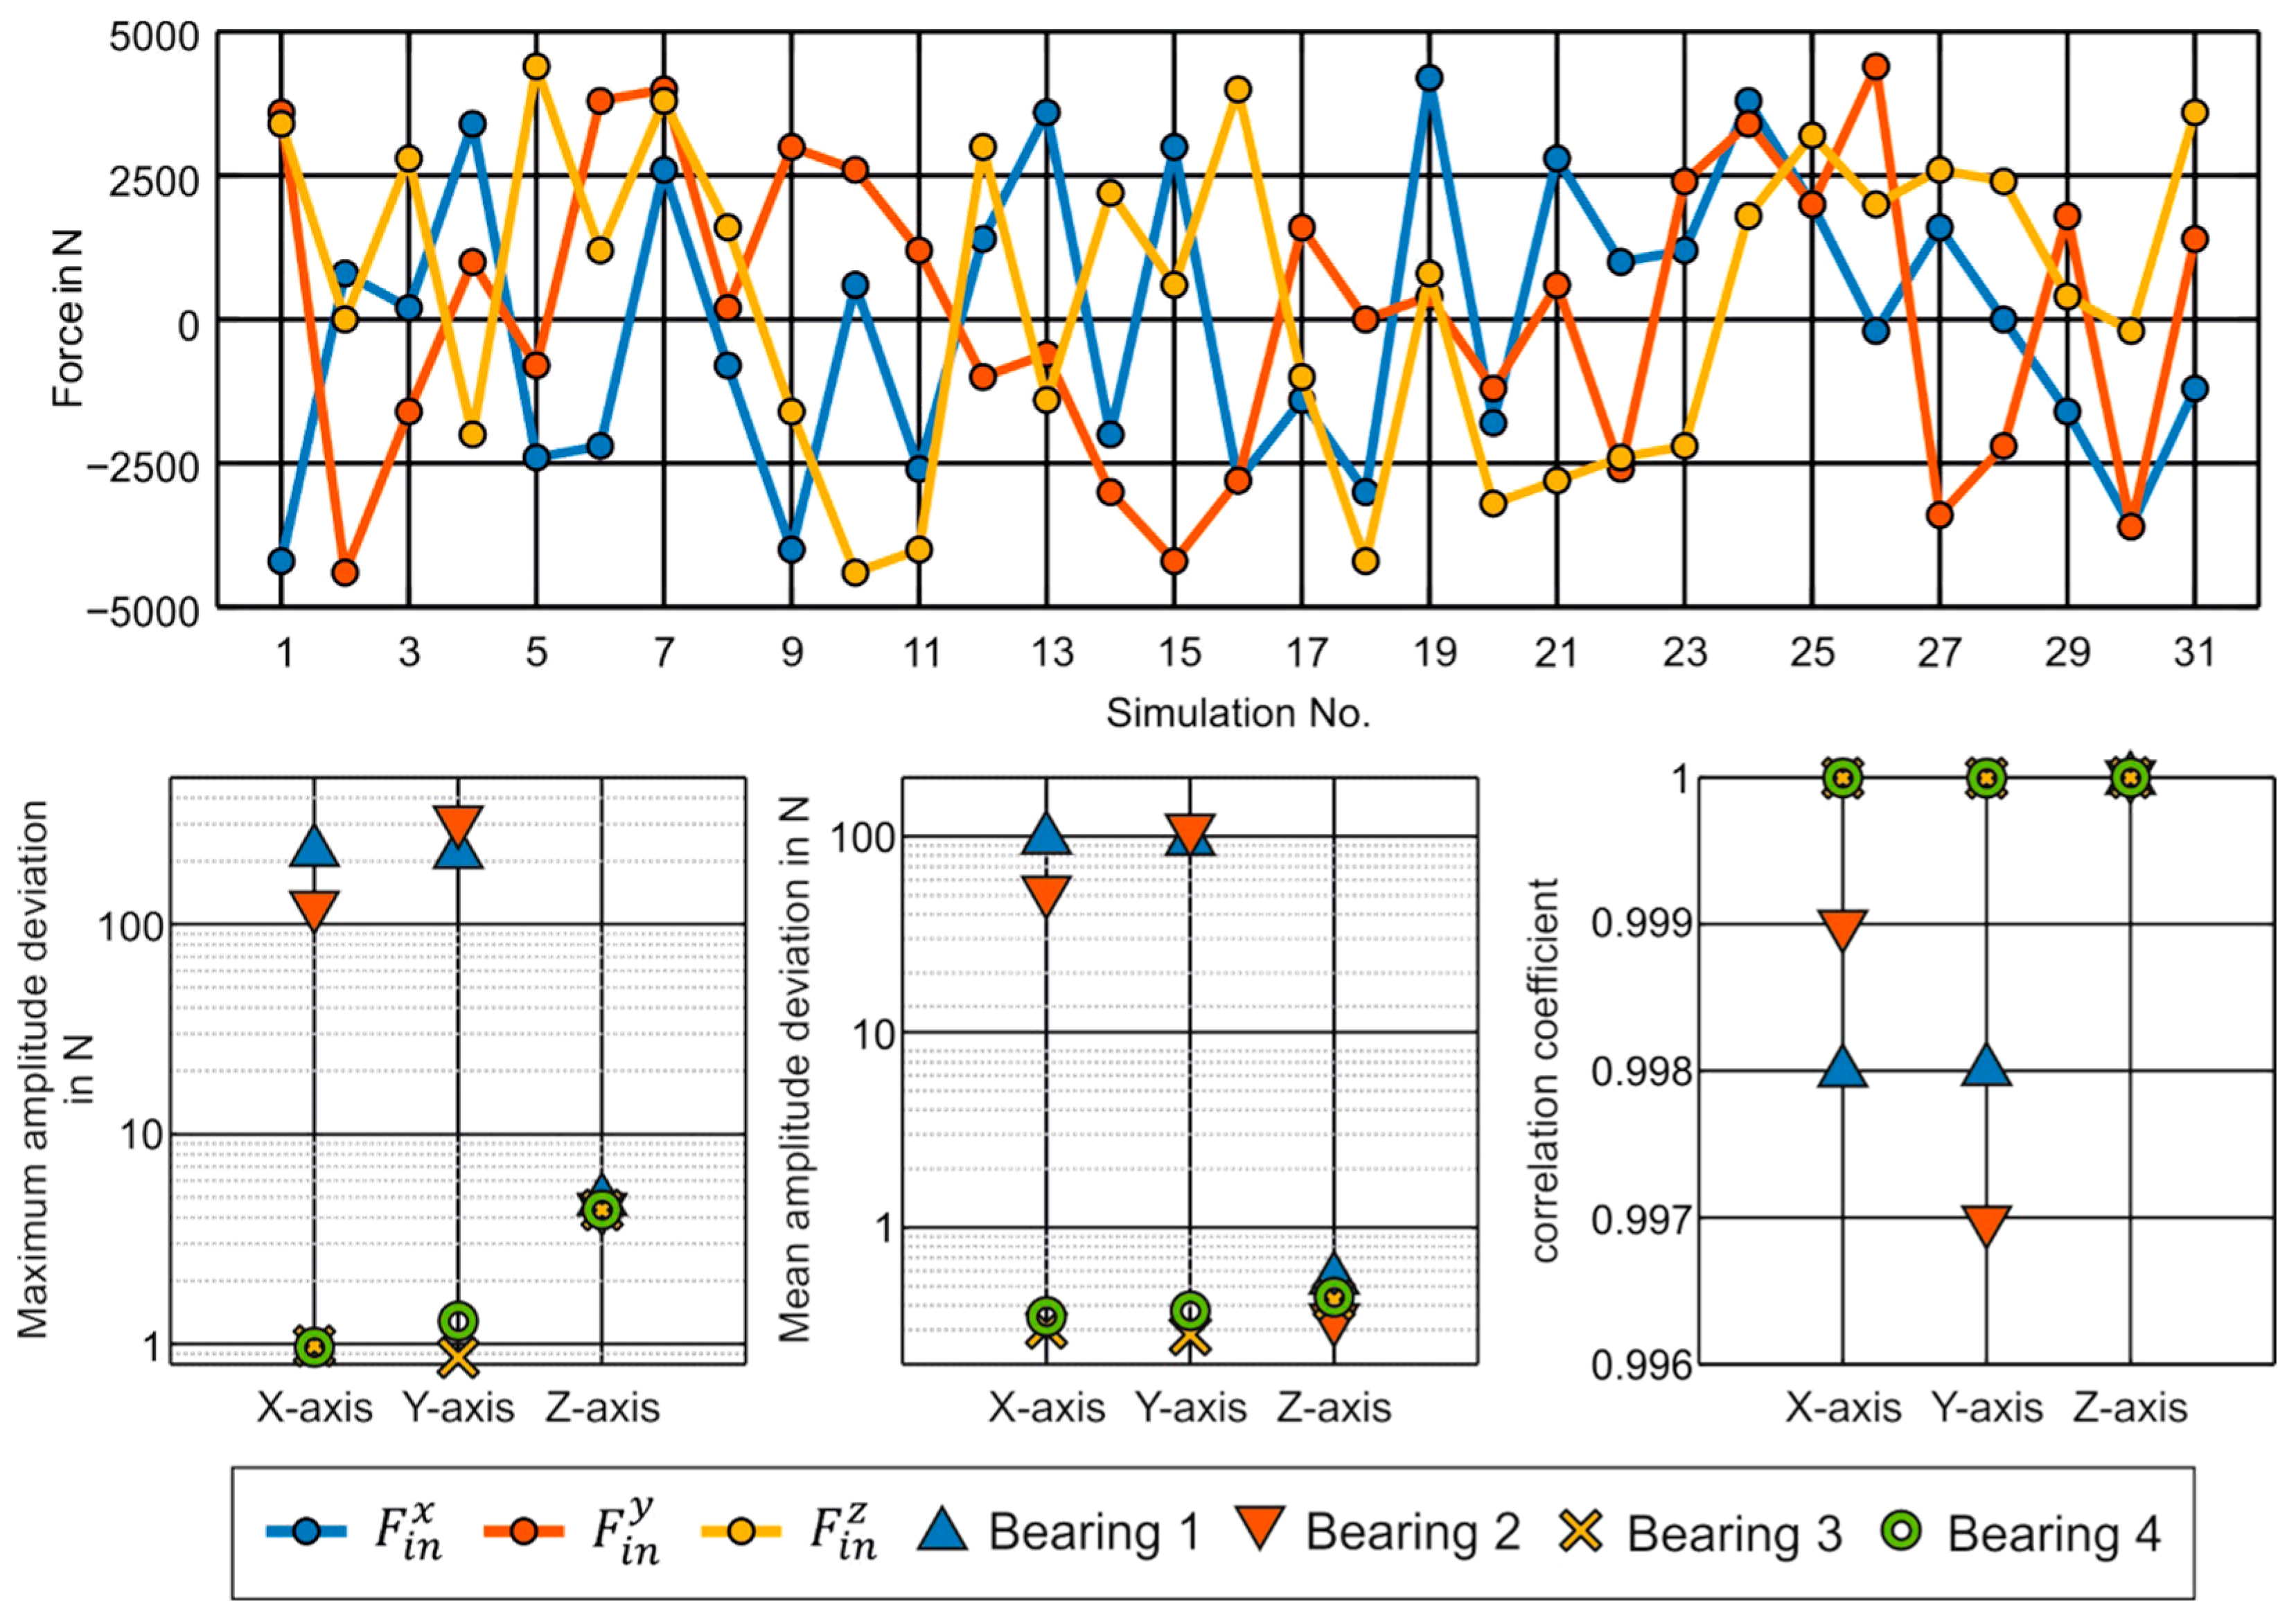
Although the response surface provides results comparably fast, it is restricted to variations in the predefined input parameters. Therefore, no additional information beyond the specified output parameters can be obtained. The model was created on the basis of 100 simulations, with input parameters distributed using an Advanced Latin Hypercube method and an Adaptive Metamodel of Optimal Prognosis (AMOP). The response surface itself was constructed by combining polynomial, linear as well as kriging regression methods, and implemented in the OptiSLang software environment [28]. OptiSLang is embedded software in the Ansys Workbench 2024 R2, and its specialization is for creating response surfaces and finding correlations between parameters and outputs. The response surface was subsequently verified against the FEM model. For this purpose, a design of experiments was generated, consisting of 31 simulations distributed using the central composite design method. These cases were simulated on a full ANSYS model and then evaluated by Functional Mockup Unit (FMU). The results of the simulations are illustrated in Figure 5 including the simulated input Forces ( F i n x , y , z ) in three cartesian directions. To evaluate all 31 simulation runs, maximum and mean amplitude deviations as well as a correlation coefficient according to Equation (2) were calculated. The correlation coefficient Δ n c o r r compares two mean-free signals x and y and indicates their similarity with values between −1 (opposite signs) and 1 (identical signals) [29]
Δ n c o r r = i = 1 n x i x ¯ y i y ¯ i = 1 n x i x ¯ 2 y i y ¯ 2 ,
The simulations showed that the model exhibits an absolute mean error of 0.55% in TCP deformation and 0.80% in the bearing loads.

3. Experimental Setup

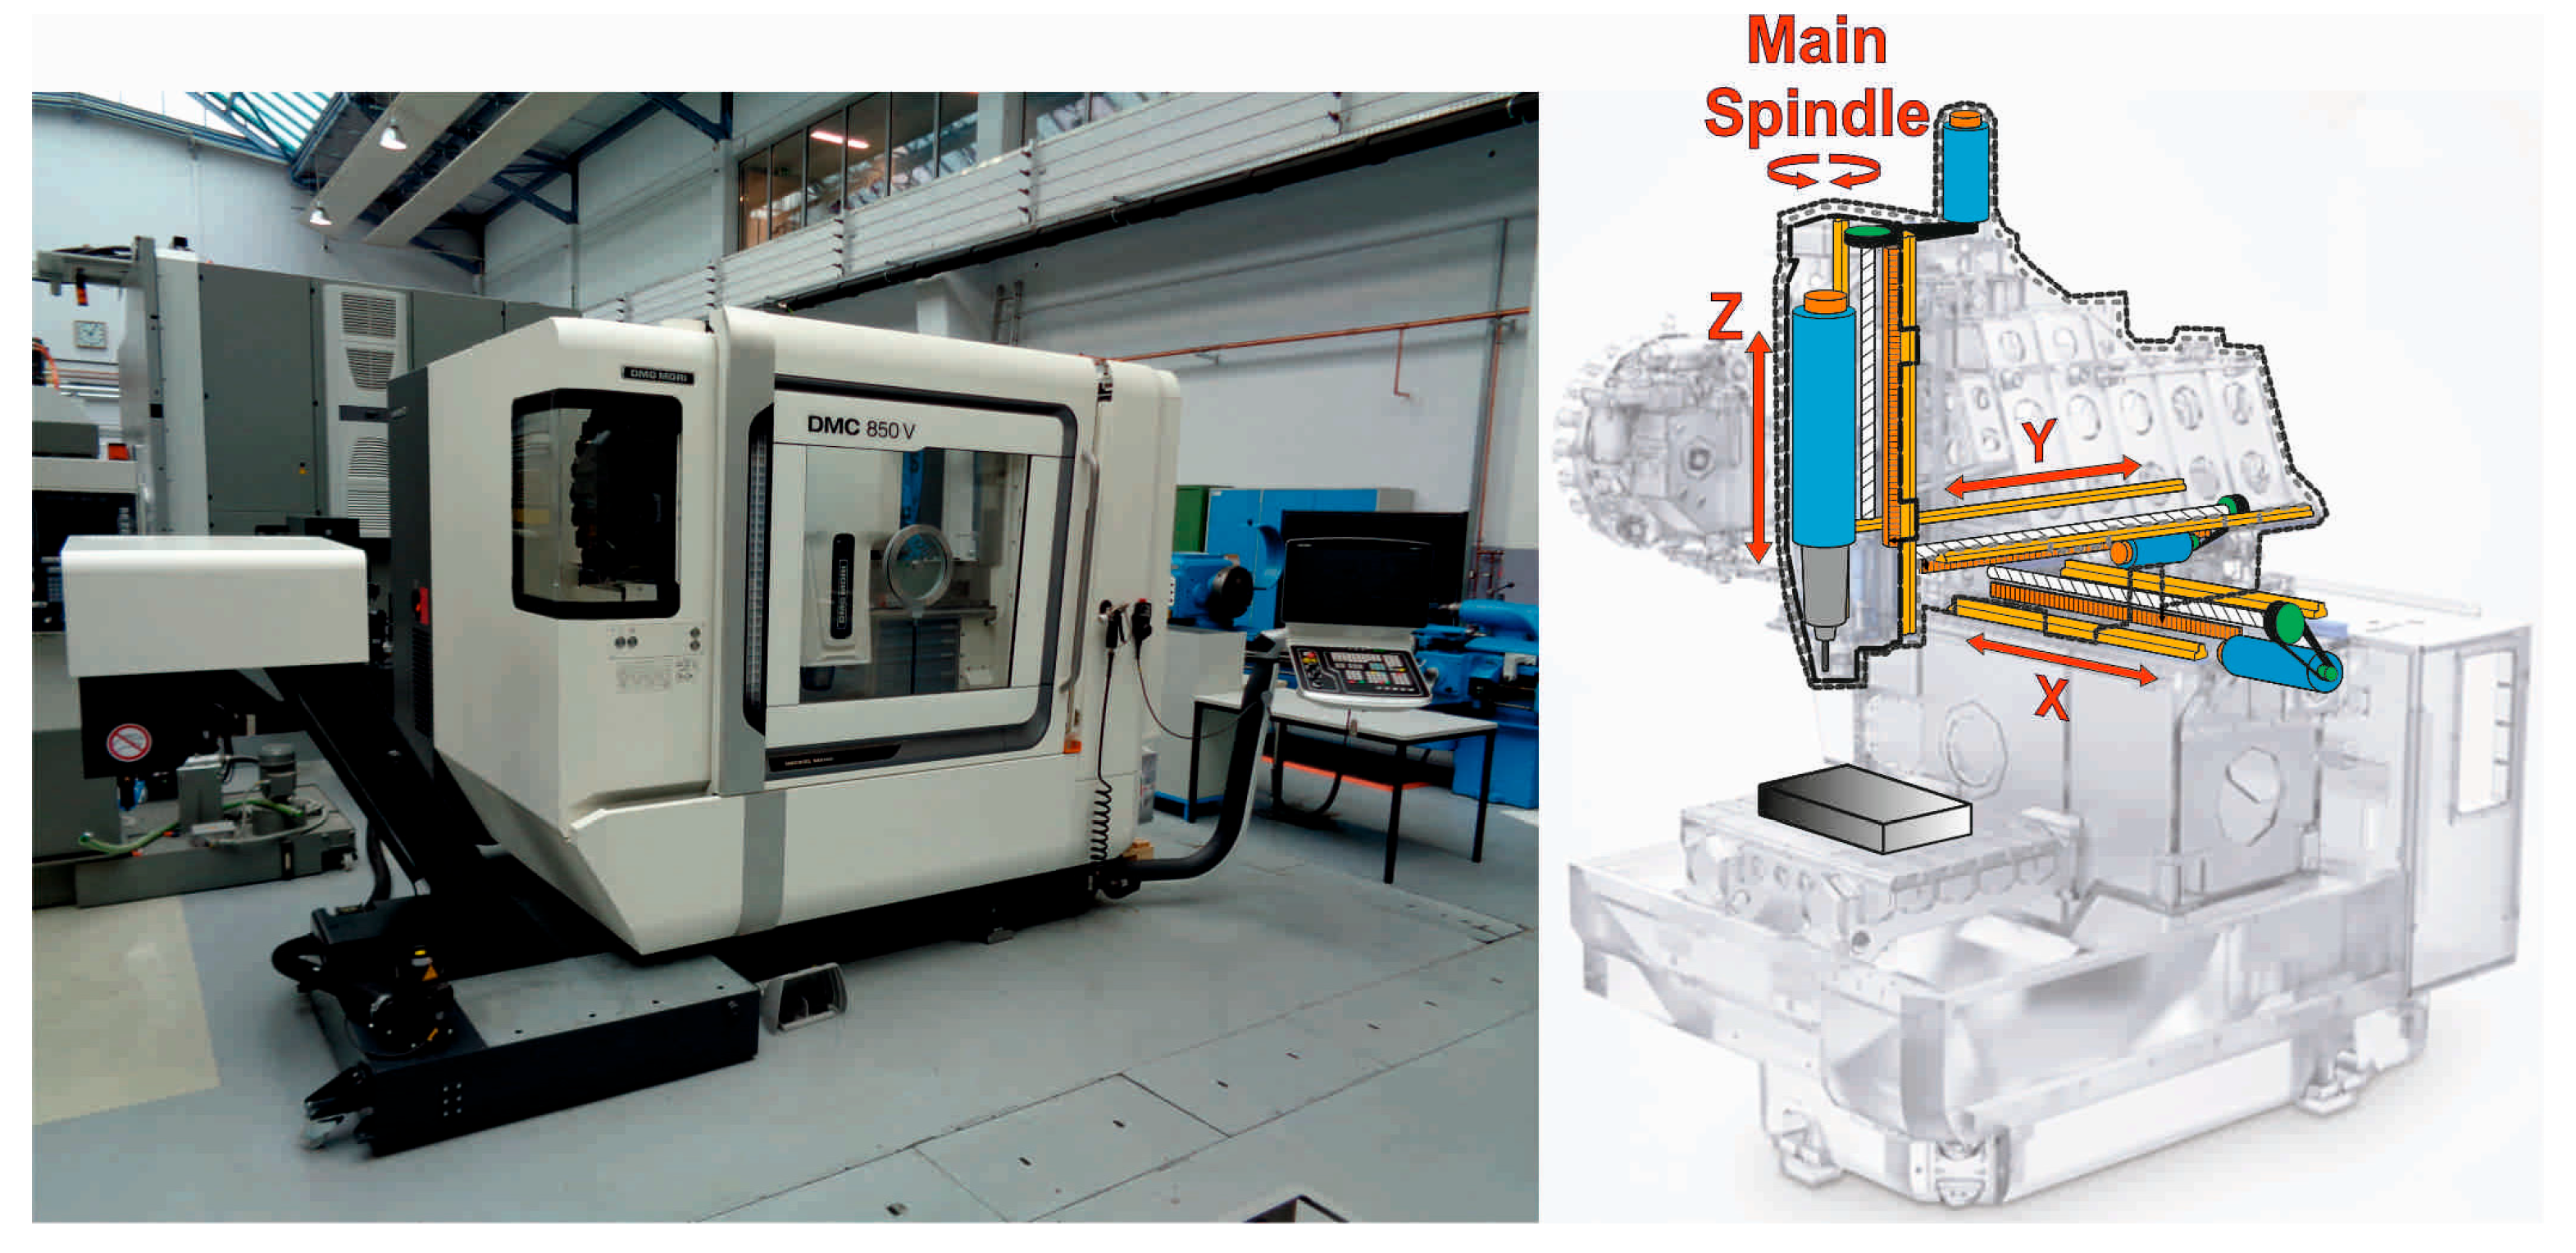
The proposed method was verified on a DMC 850 V three-axis milling center from DMG Mori (DMG MORI Seebach GmbH, Seebach, Germany). As illustrated in Figure 6, the machine incorporates three cartesian feed axes in addition to the main spindle. The rotational motion of the servomotors is converted into translational movement by a toothed belt drive in combination with a ball screw spindle. The Sinumerik 840d sl machine (Siemens AG, München, Germany) control records the required drive signals in the interpolation cycle (250 Hz).
Since the CAD data for the main spindle is not available, a spindle model of a milling machine MCV 754 Quick, three axis milling tool from Kovosvit MAS Machine Tools (Sezimovo Ústí, Czech Republic). The machine is located in the laboratories of the Brno University of Technology was used instead. Note that the MCV 754 Quick differs in its axis configuration. It has a movable cross table which moves in the X- and Y-axes, while the Z-axis is integrated into the spindle head column, which contains the spindle, spindle motor, and parts of the automatic tool changer. Although this work was implemented on two different machines for logistical and legal reasons, the overall validity of the bearing force estimation methodology remains unaffected. Furthermore, cutting forces can be estimated using servo data of the MCV 754 Quick and vice versa, which implies that a force calculation model could likewise be developed for the geometry of the DMG spindle.

3.1. Cutting Force Estimation

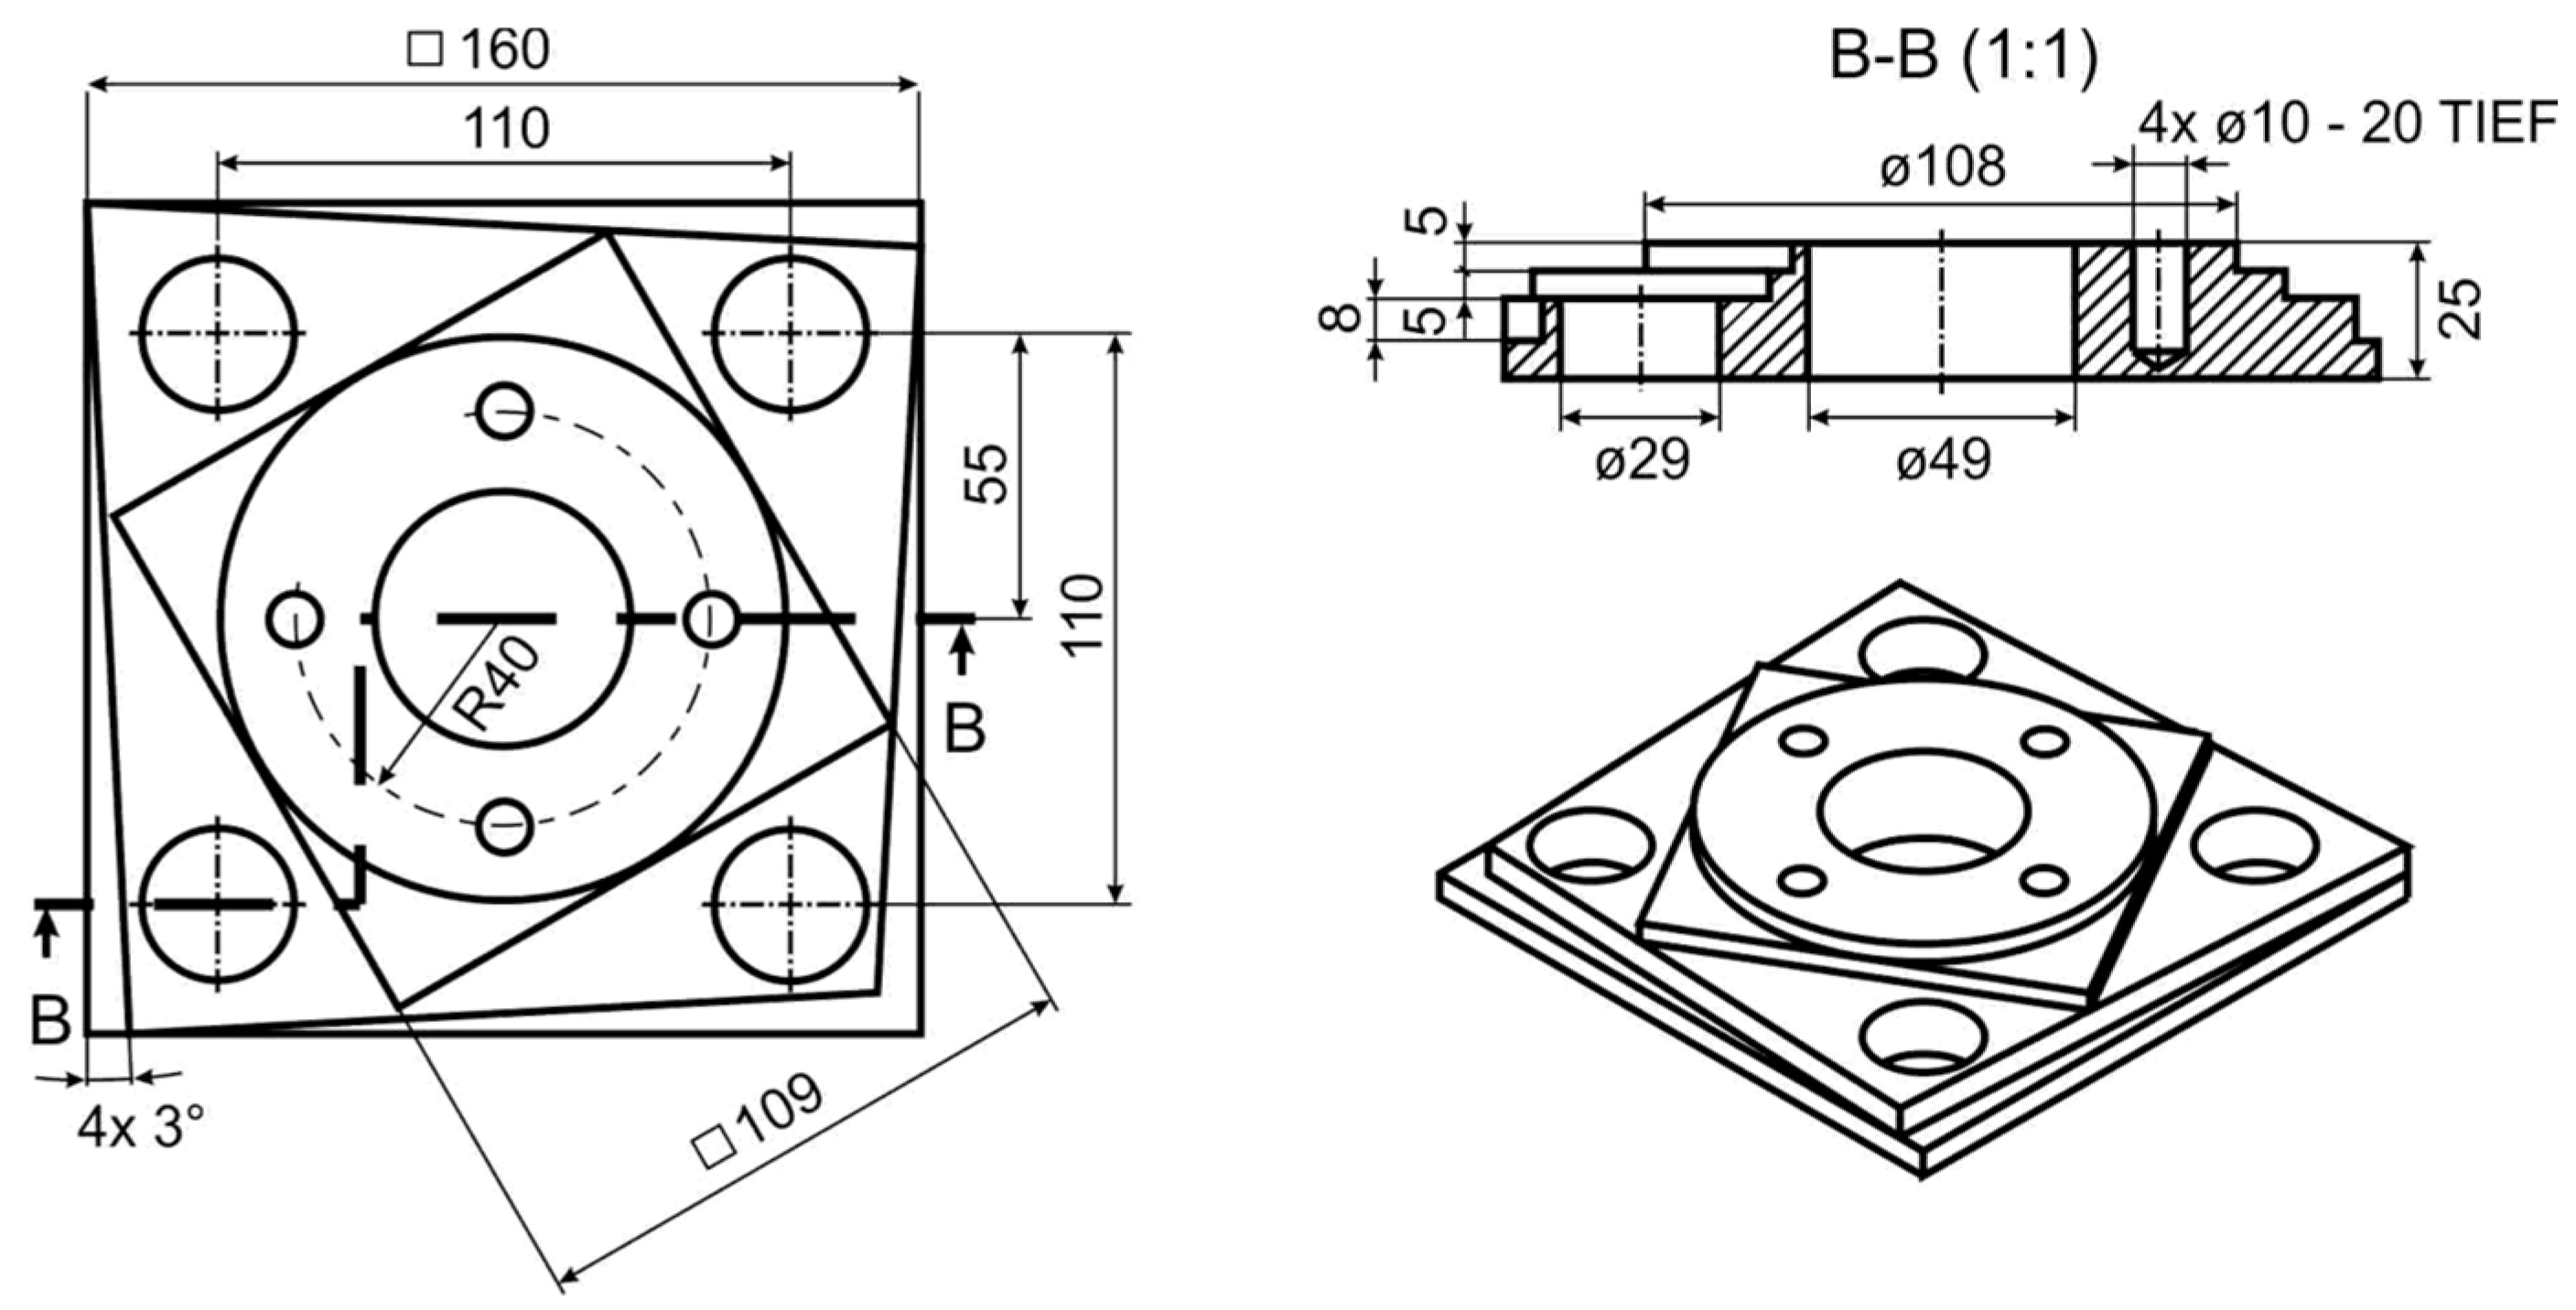
The validation of the drive-based cutting force estimation was carried out using a standardized test workpiece illustrated in Figure 7 [31]. The workpiece consists of unalloyed structural steel and is placed in the center of the working space. During machining, the feed axes execute typical motion scenarios, including linear single-axis movements as well as linear and circular interpolating multi-axis trajectories. In addition, different manufacturing strategies (milling and drilling) were applied using various tools in different states of wear. Direct measurement of cutting forces using a dynamometer served as reference. The contour is produced in seven process steps. Table 1 shows essential parameters as well as noteworthy parameter variations for each step.

3.2. Bearing Rigidity Verification

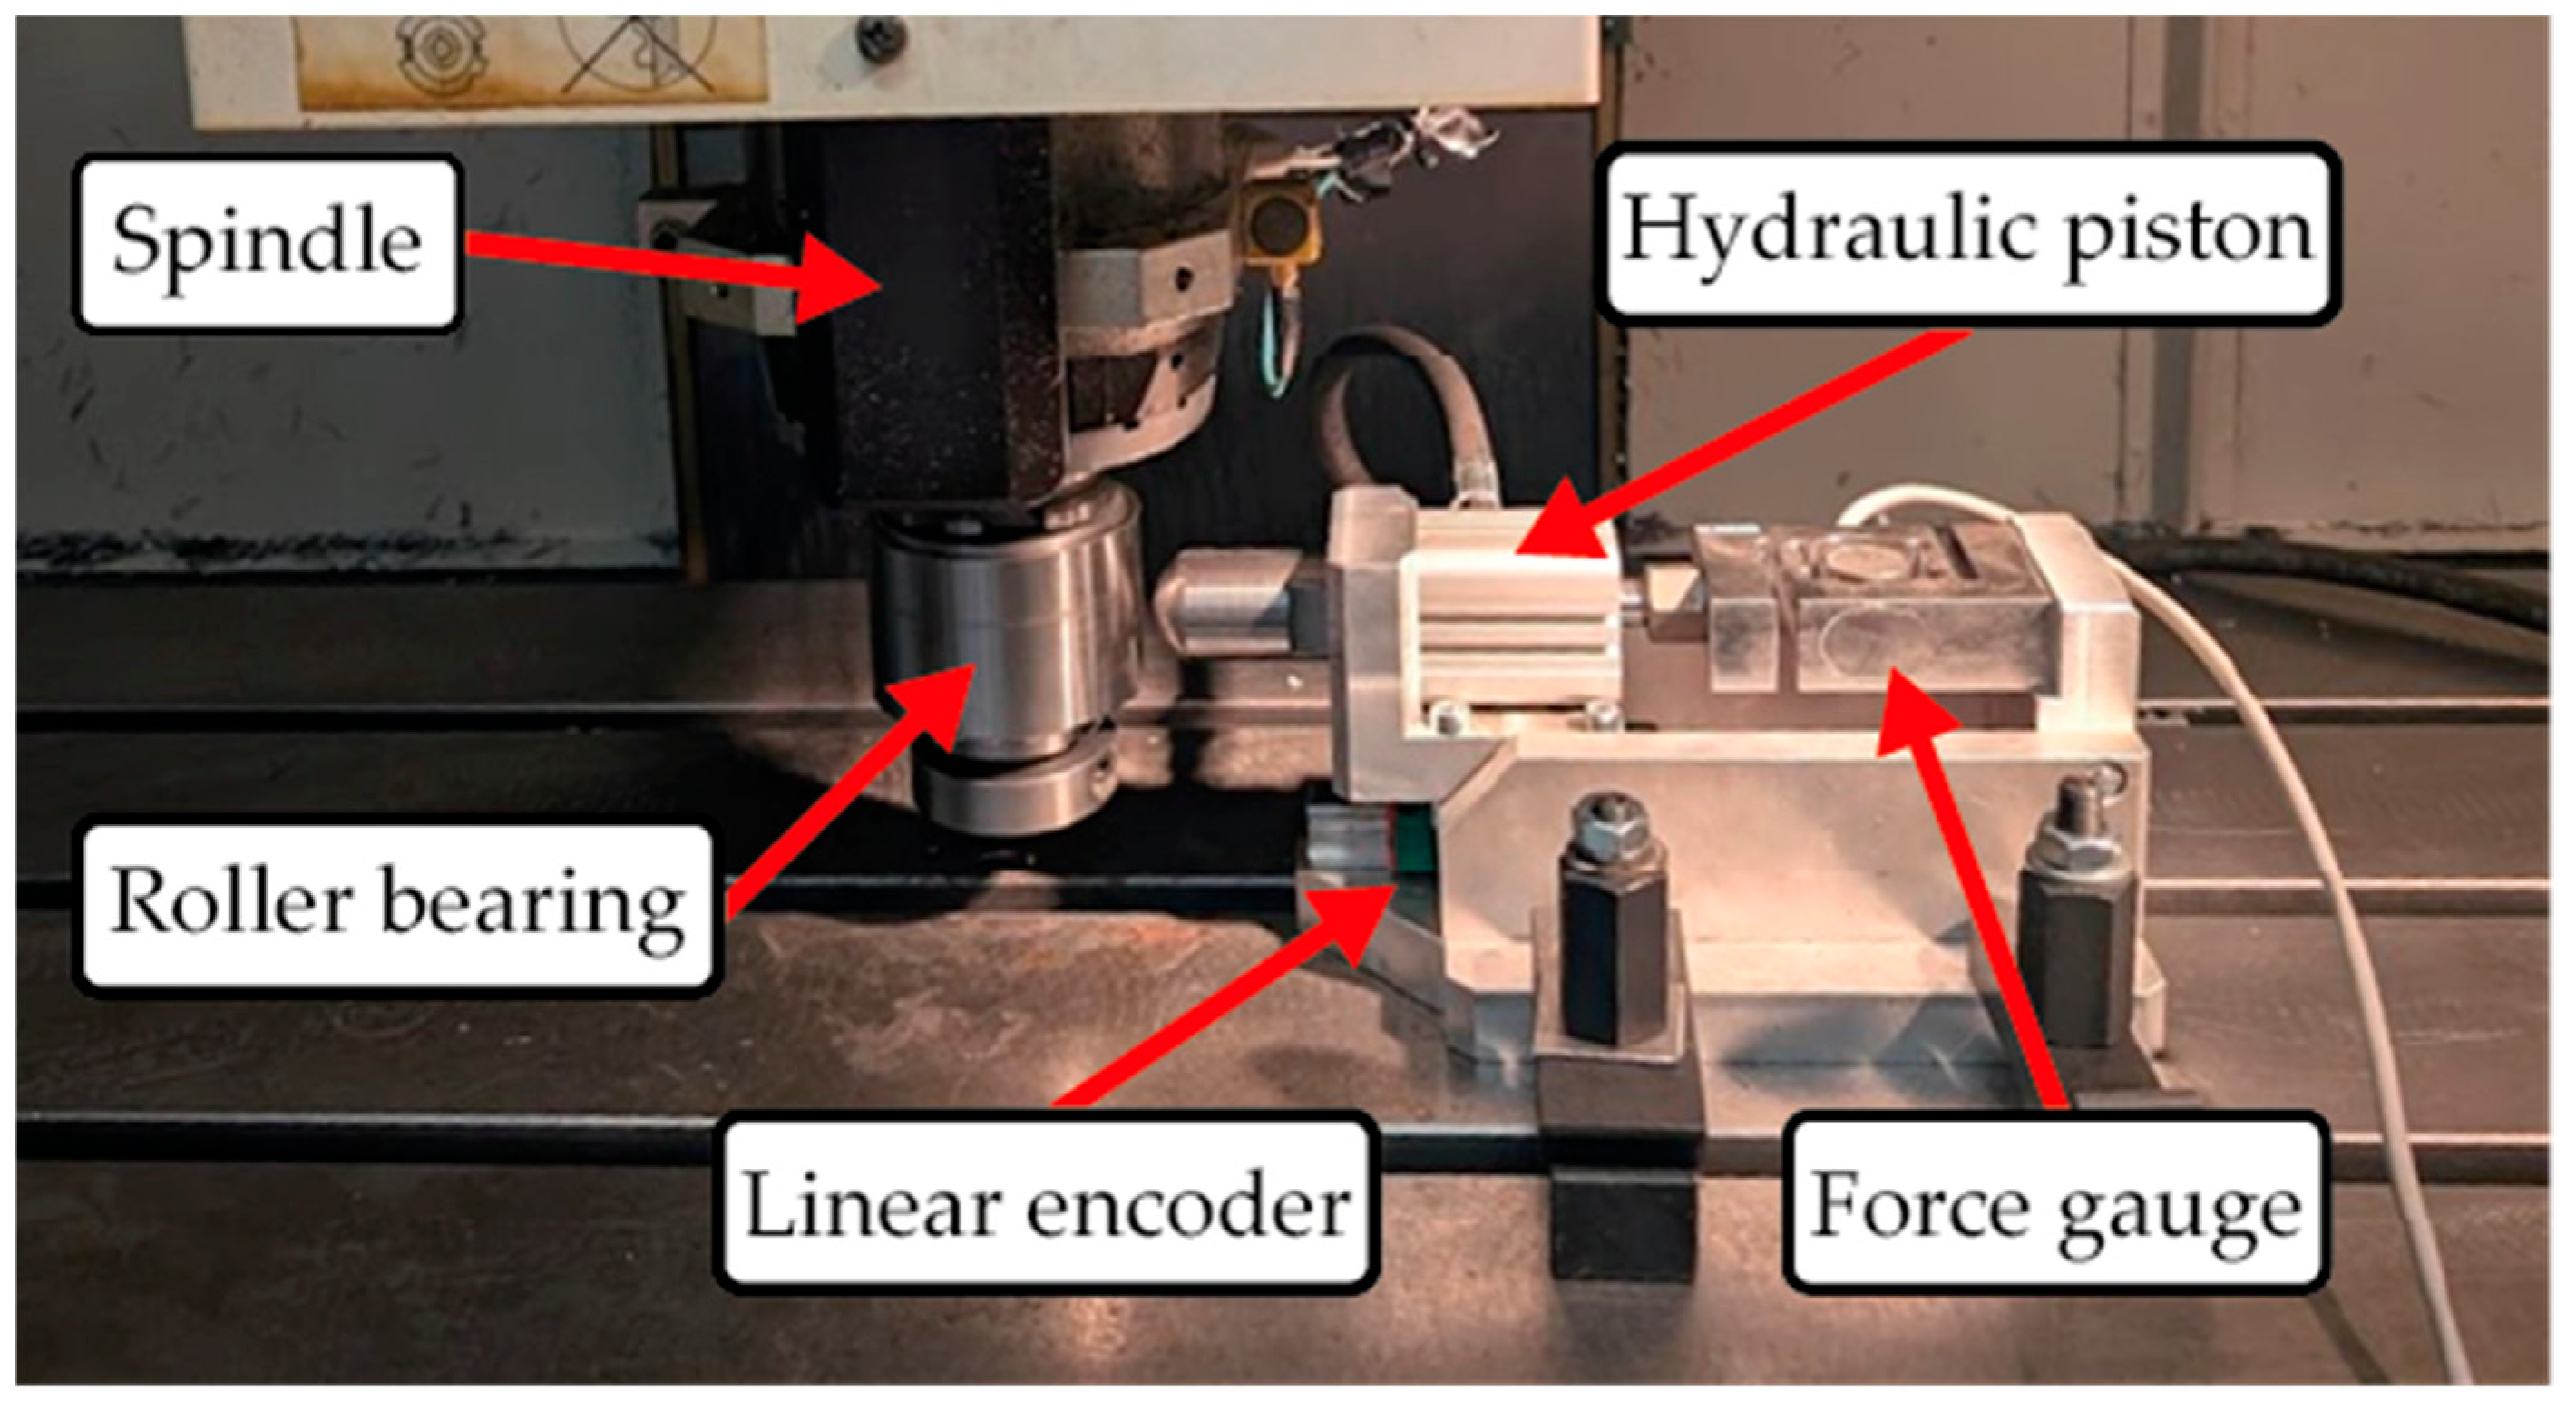
The assembly used for this measurement consists of a dynamometer (force gauge), a hydraulic piston, and a ruler for deformation readings. A detailed description is provided in [32]. The entire setup was mounted on the milling machine table, where, instead of a tool, a device with a roller bearing clamped in a tool holder was installed (Figure 8).
Hydraulic pressure was generated manually by tightening a screw, and the resulting force was recorded on a computer along with the corresponding deformation of the bearing. Measurements were carried out in the X- and Y-axes as well as at their common angle of 45°. This allows the determination of the spindle assembly stiffness, which was subsequently used to verify the bearing model. Unfortunately, the calculated force values cannot be directly verified without intervention in the machine and must therefore be regarded only as estimates. TCP deformation values are subsequently compared with the model. Eventually, the stiffness matrix of the bushing joints (representing the bearings) is adjusted accordingly, which serves to further refine the model.

4. Results

In this section, the methods for drive-based process force estimation and the FEM model of the main spindle are individually validated. Eventually, the spindle model is combined with drive-based cutting force estimation for all process stages of the test workpiece. In addition to the estimated values, the influence of directly measured cutting forces on the spindle model is investigated. Hence, possible limitations of using the estimated forces can be quantified.

4.1. Cutting Force Estimation

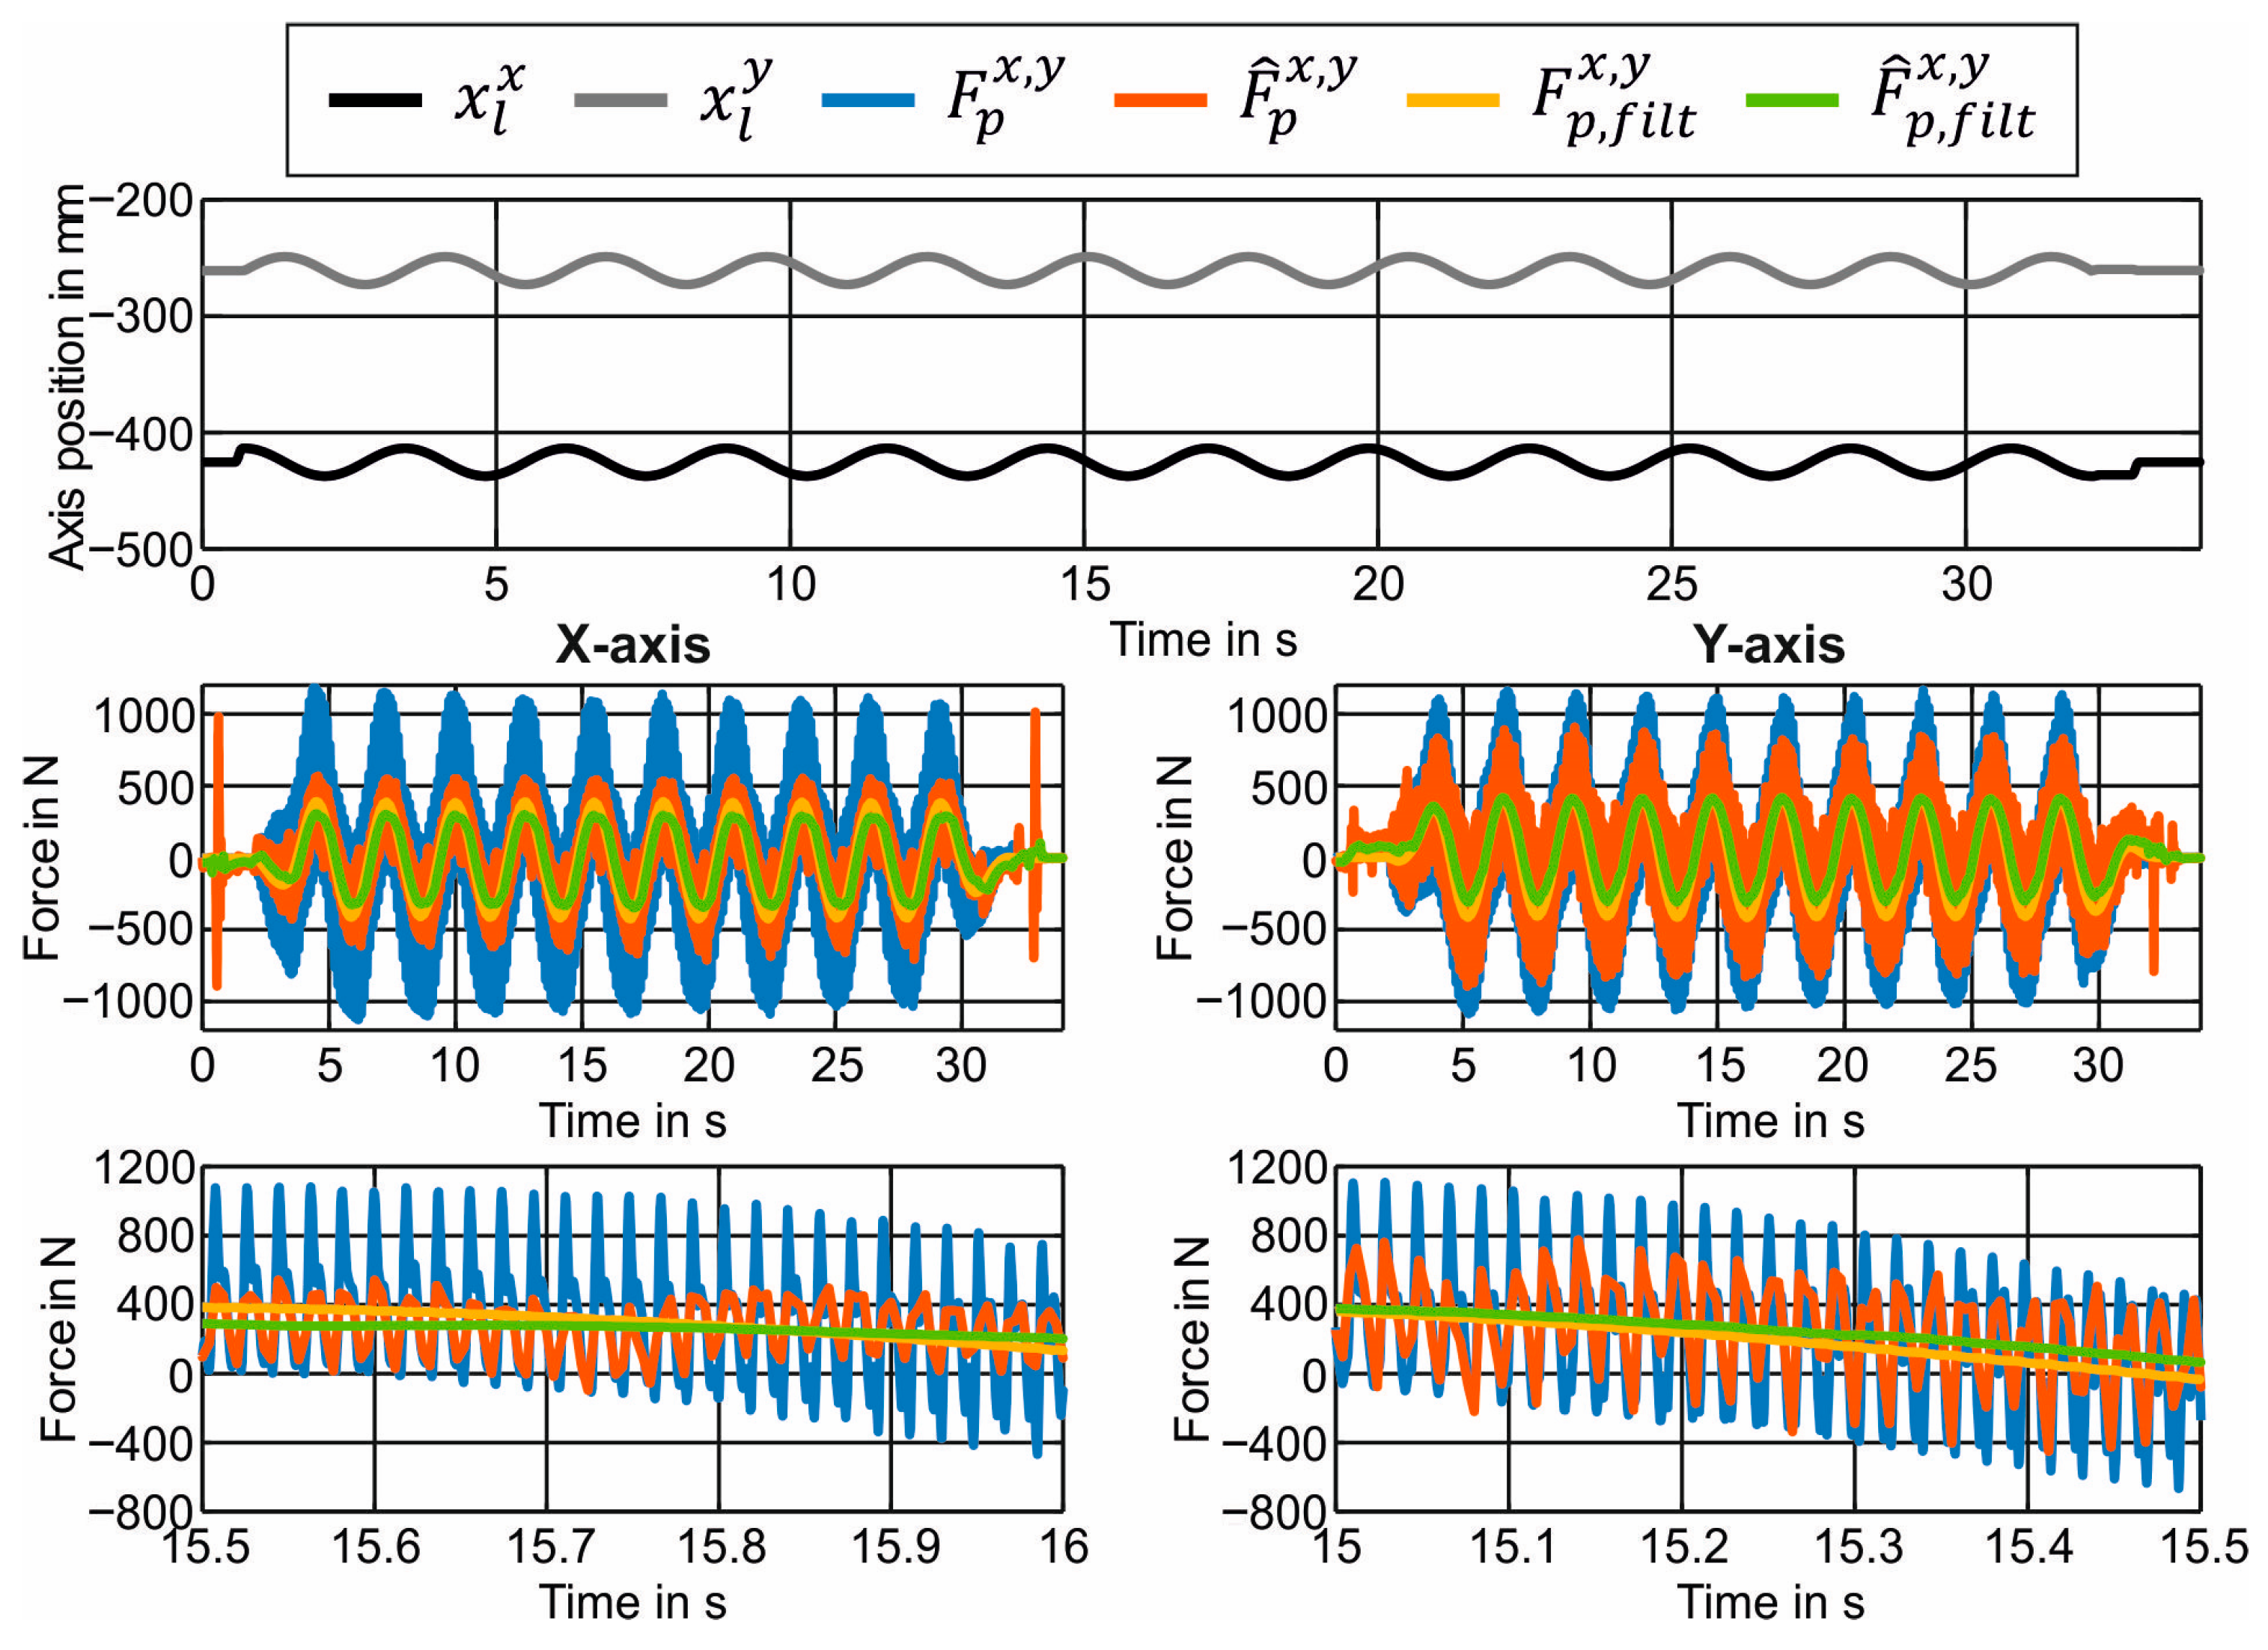
The quality of the drive-based cutting force estimation is verified using the dynamometer. A trigger signal from the part program ensures simultaneous start of force measurement in the machine control and the external measurement computer. Figure 9 shows time curves of the TCP position ( x l x , black and x l y , gray) as well as the measured ( F p x , y , blue) and reconstructed process force curves ( F ^ p x , y , orange) in the X- and Y-directions for circular milling in process step seven with new tool cutting edges. In addition, the lowpass-filtered signals with a cutoff frequency of one hertz ( F p , f i l t x , y , green, and F ^ p , f i l t x , y , yellow) are illustrated.
It is noticeable that process forces are better reproduced in the Y-direction than in the X-direction. This is a consequence of the mechanical transfer functions, which are significantly more complex for the X-axis due to the kinematic design. Hence, model identification is more difficult when the system is excited by the servomotor. In addition, both axes accelerate and decelerate throughout the entire process step, which also leads to errors in the axis-specific correction of periodic disturbances. Furthermore, significant deviations are apparent on the X-axis before and immediately after the process step. These result from acceleration or braking movements in case of rapid speed during non-productive times and also affect the torque values of the Y-axis. However, these errors could be almost completely eliminated by adjusting the acceleration correction as described in [23]. Nonetheless, the quasi-static process forces are very well reproduced for both feed axes.
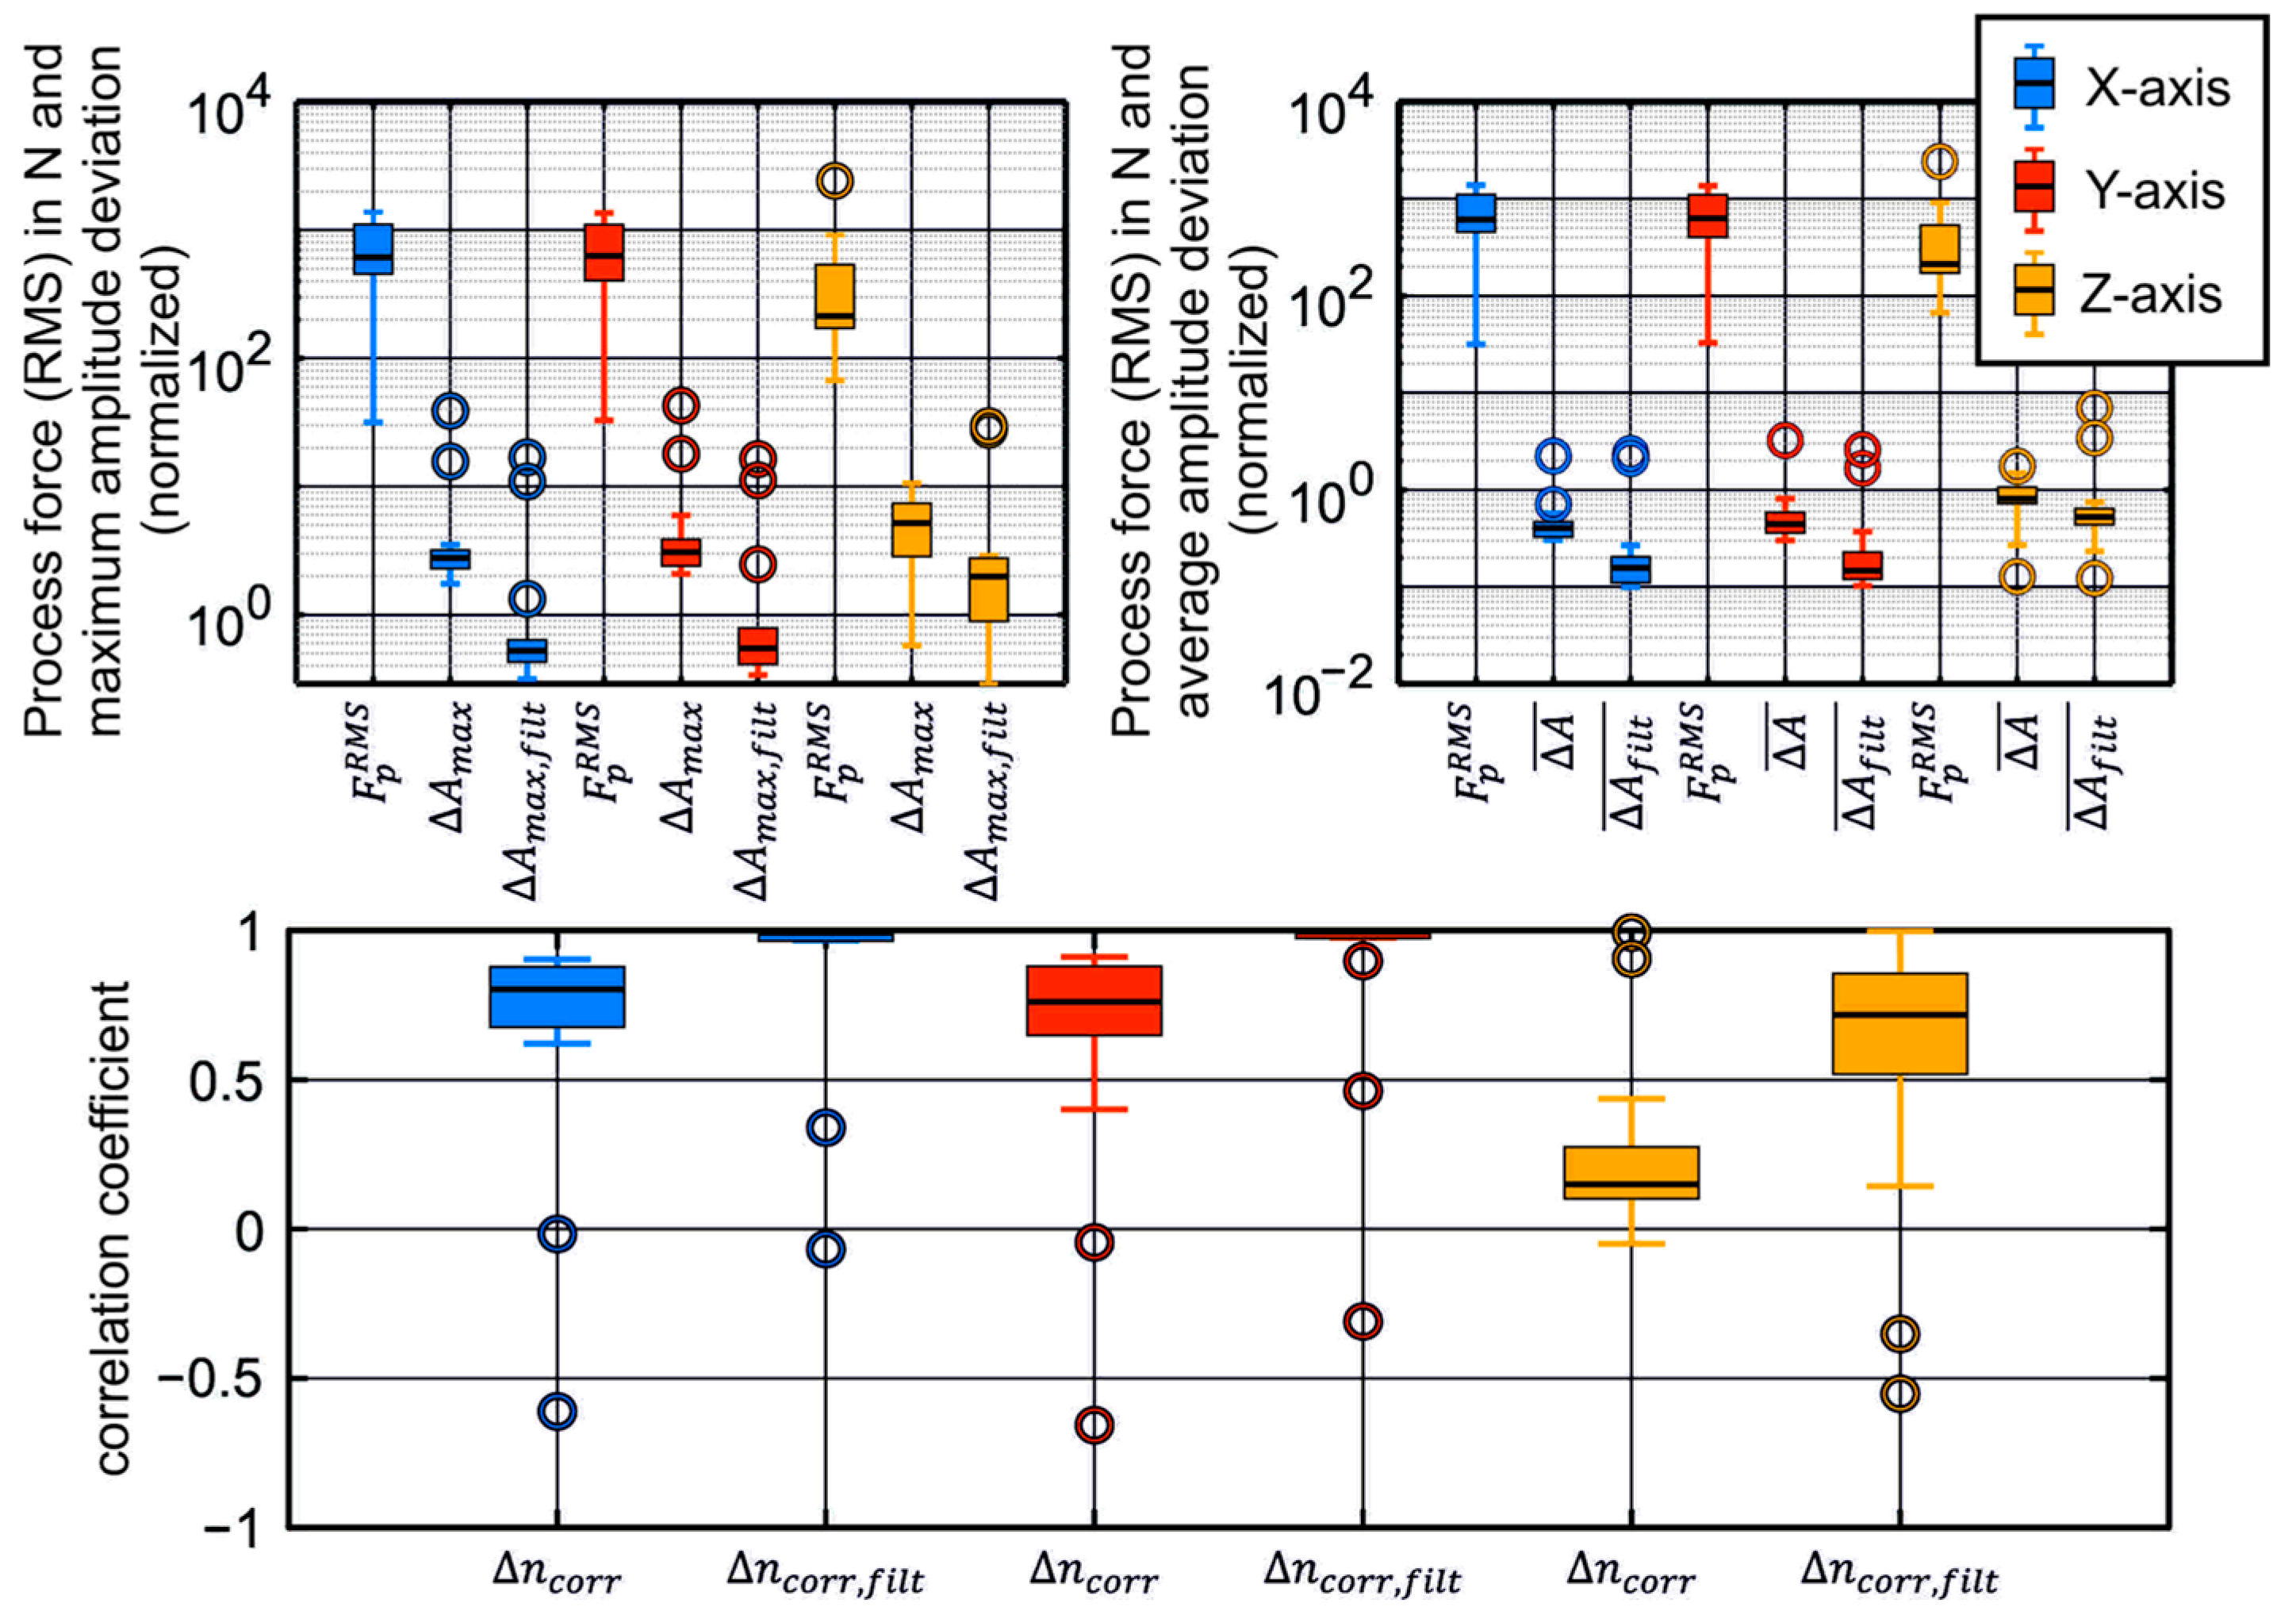
To evaluate all seven process steps, maximum and mean amplitude deviations as well as the correlation coefficient according to Equation (2) were calculated. Comparability across all process steps is ensured by normalizing the amplitude deviations to the root mean square (RMS) value of the measured force. The results are illustrated in Figure 10. The upper two whisker graphs show the RMS values of the measured process forces F p R M S and the normalized maximum and mean amplitude deviations ( Δ A m a x and Δ A ¯ ) between the modeled and measured force signals separated by feed axis and for all process steps. Additionally, the values for the filtered signals ( Δ A m a x ,   f i l t and Δ A f i l t ¯ ) are depicted. The correlation coefficients Δ n c o r r are shown in the lower part.
Particularly in the quasi-static case, a good approximation of the measured process forces is achieved. The outliers for the X- and Y-axes occur during drilling, where only low forces orthogonal to the feed direction occur. In contrast, with the exception of the two drilling processes, only low process forces are present in the vertical direction. Hence, force estimation in this axis leads to a reduced approximation quality. In particular, only low passive forces can be measured for the circular and rectangular shapes of process steps No. 2 and No. 3. Especially when the axis is at standstill, only minor process-related forces are measurable. Since the bearing load of the main spindle in the X- and Y-directions is considered to be most critical, process forces in the vertical direction are less relevant.

4.2. Bearing Force Estimation

According to general knowledge of spindle bearing behavior, the first bearing pair carries the majority of the bending loads (forces in the X- and Y-directions), while the second pair carry only a partial share of these loads. In the axial (Z) direction, the forces are nearly identical for both pairs. As mentioned earlier, within each pair, only one bearing carries the combined axial load in a given direction. Therefore, when the calculated force in the Z-direction acts downward, the corresponding forces must be summed and applied to the bearing on the loaded side.
The model calculates the distribution of radial forces as follows: the first bearing carries the largest portion of the load, followed by the second, third, and fourth, which carry progressively smaller shares in the X-direction. The load in the Y-direction is influenced by the belt preload, which acts on the opposite side of the spindle shaft. When low radial forces are applied, the first bearing pair carries the majority of the load, while the second pair supports only a residual portion. In such cases, the fourth bearing carries slightly higher loads than the third. The residual force transmitted to the second pair is very small, beyond the effective resolution of the model. These forces, ranging between approximately 4 N and 20 N, are too small to have any noticeable influence on the bearing service life. Although the force acting on the fourth bearing in the X-direction is comparatively higher, it remains negligible to the entire force range from −6500 N to 6500 N.

4.3. Combining Cutting Estimation and Spindle Model

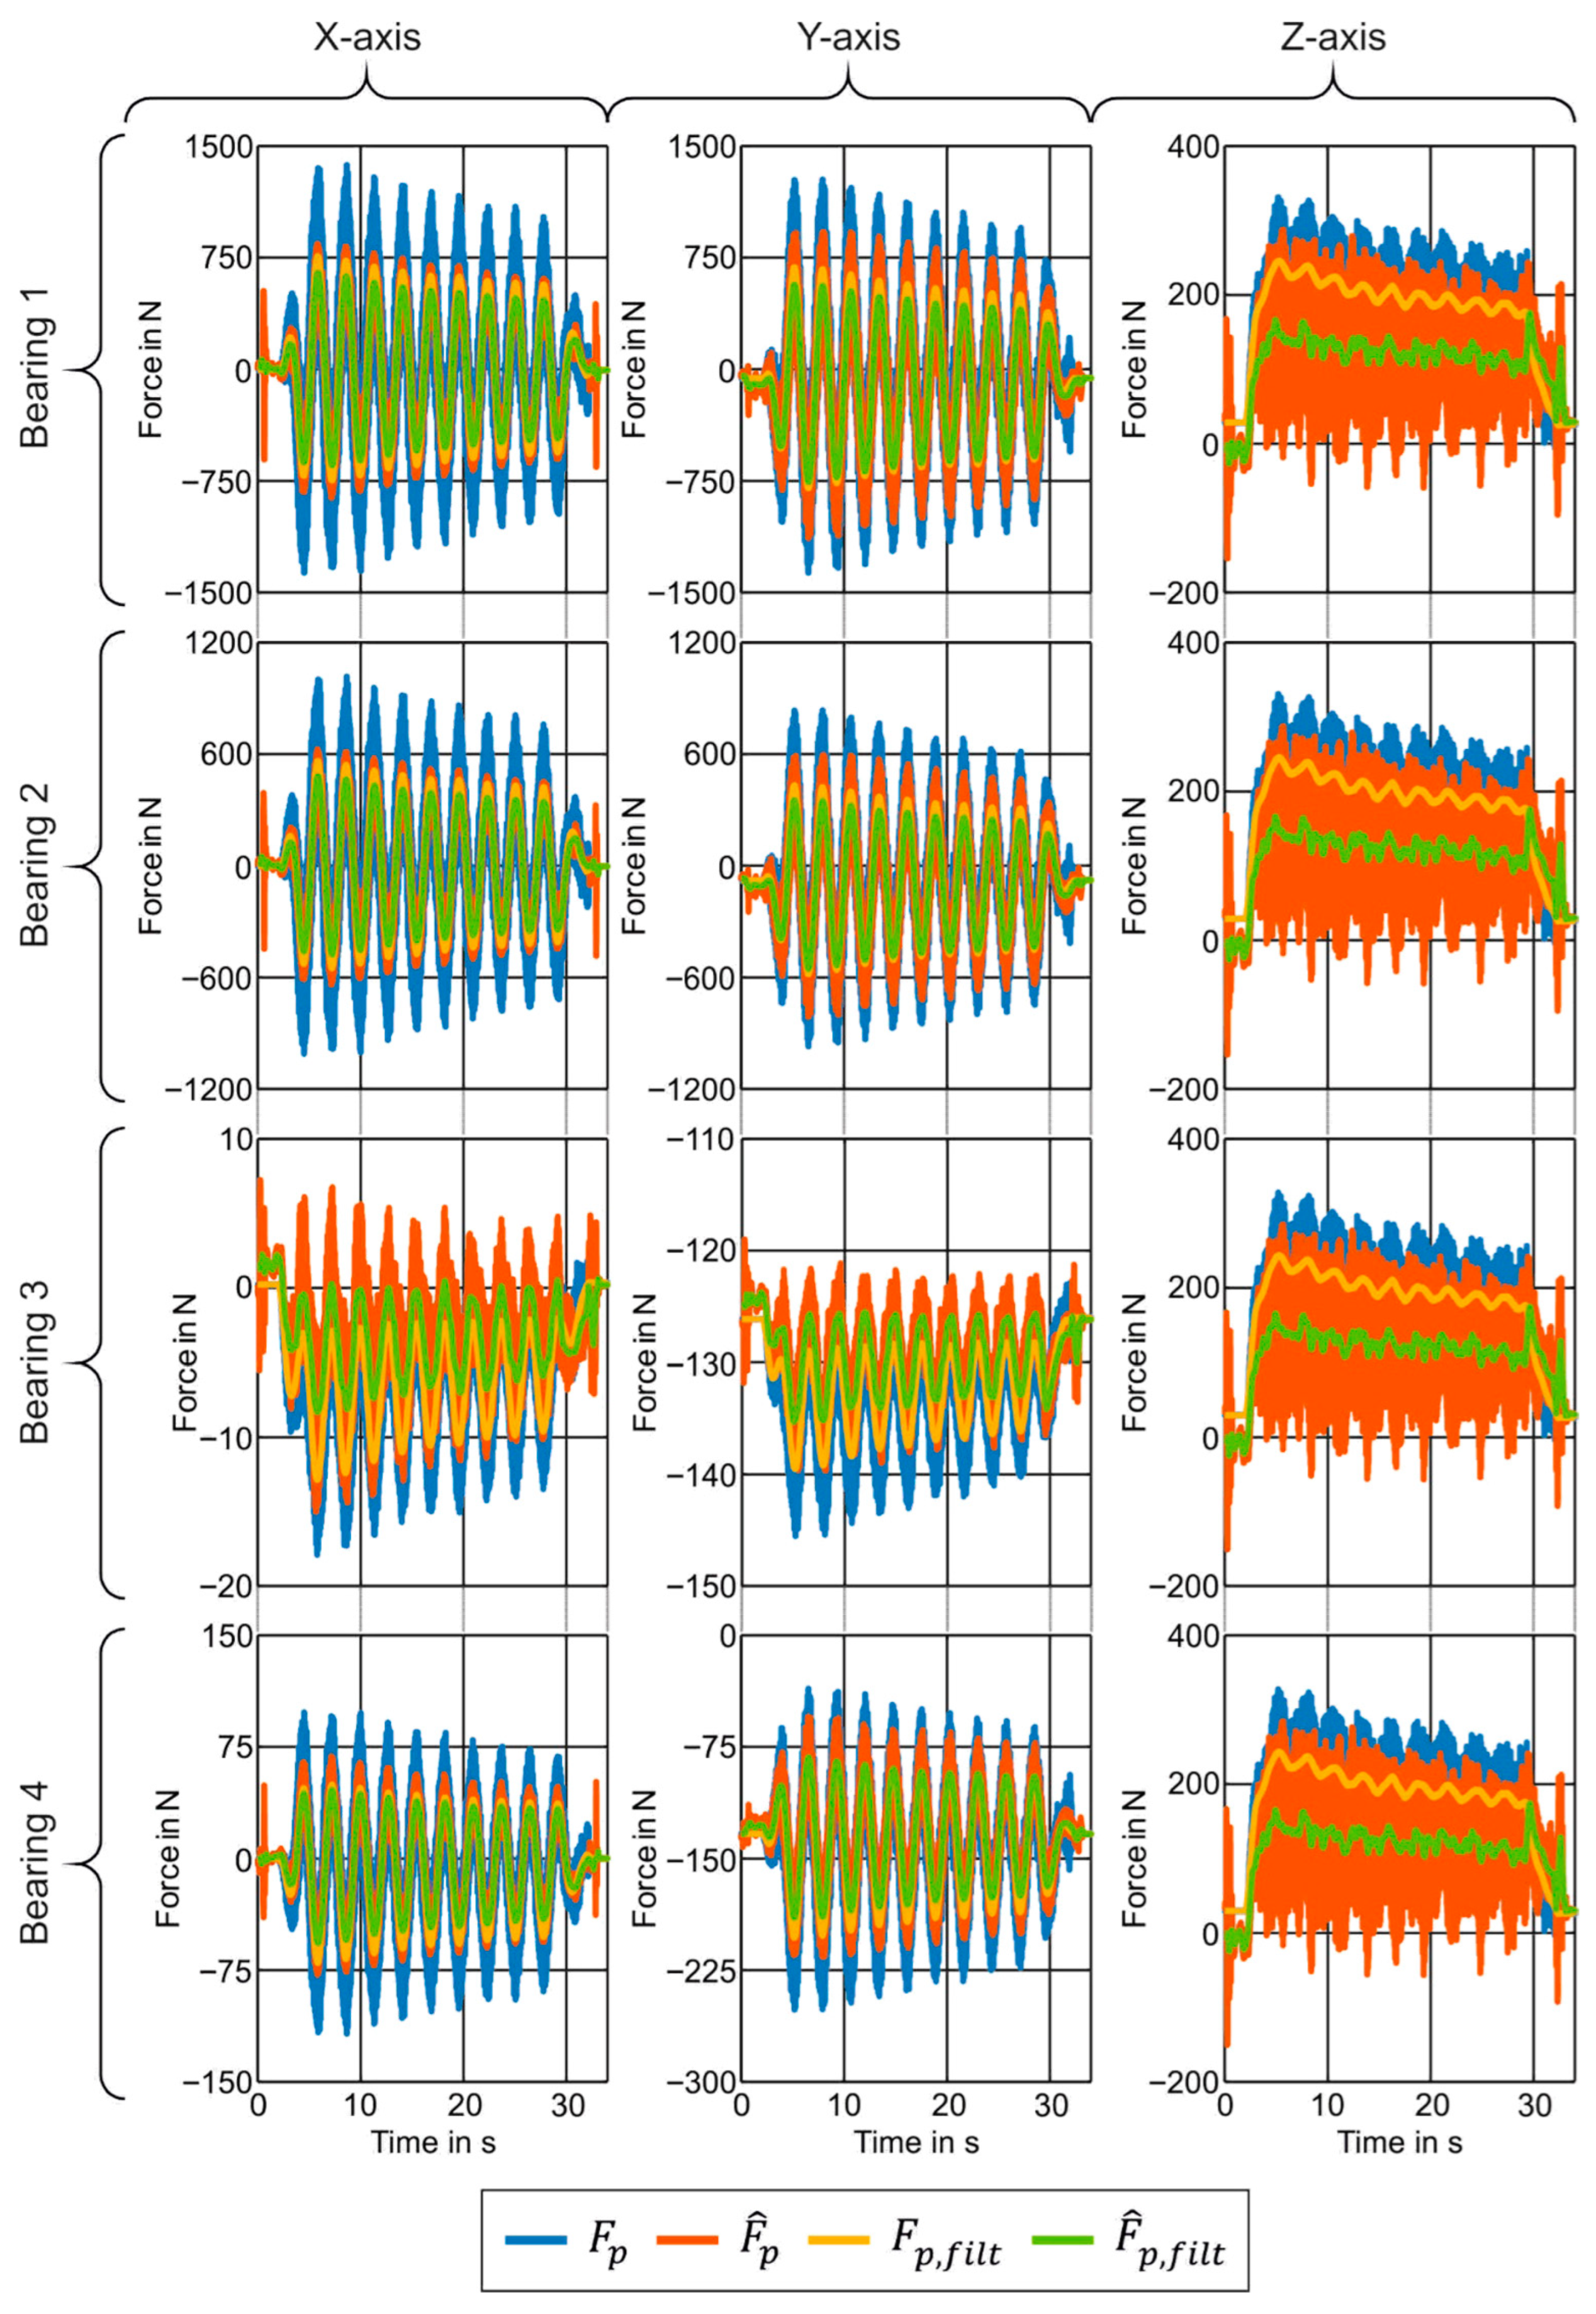
After considering the two aspects separately, both approaches are combined to estimate the forces on the main spindle bearings. In Figure 11, the resulting forces on the four bearings of the main spindle are illustrated individually and in all three cartesian directions for process step No. 7.
For reasons of comparability, the forces at the bearings are marked in orange when using the drive-based process force estimation ( F ^ P ), while the results obtained by the dynamometer are shown in blue ( F P ). The green ( F ^ P , f i l t ) and yellow ( F P ,   f i l t ) signal curves represent the results using the filtered process forces as input for the FEM model.
Overall, it can be stated that the force magnitudes at bearings one and two are significantly greater than those at bearings three and four in case of the horizontal axes. This can be explained by their location at the lower end of the headstock, where the bending moments have higher values as a result of the feed force direction. Consequently, only very low force reactions occur at bearings three and four for the investigated process step. Furthermore, a slight deviation between the filtered forces can be observed in case of the third bearing. This deviation appears more significant due to the enlarged scale in the graphs. In fact, the differences are approximately 2 N in the X-axis and 4 N in the Y-axis. Hence, their magnitude is negligible and has practically no effect on the bearing life estimation. In the vertical direction, process forces are distributed approximately equally across all four spindle bearings and are subject to only minor fluctuations. The main reason for the equal force distribution is that the bearings are aligned along the rotational axis, resulting in no bending. The minor force differences are caused by imperfections in the models, particularly in the friction model in case of downward movement at low feed rates. Comparing the input signals of the FEM model, only minor deviations in bearing loads occur between directly measured and estimated cutting forces.
Analogous to Figure 7, errors in the approximated transfer functions between TCP and servomotor are decisive for the horizontal axes. In addition, the already mentioned errors of the acceleration correction in case of rapid feed motions lead to non-existent force peaks at the beginning and end of the process step. This could be counteracted by adapting the acceleration correction by setting the acceleration torque to zero for rapid motion sequences as described in [23].
On the other hand, additional signal filtering leads to an almost ideal approximation of the bearing load, regardless of the input signals. Only in the Z-direction do static deviations remain, which were observed to the same extent when considering the process forces alone. This effect can be explained by disproportionately high torque values of the servomotor during downward movements with feed rates of less than 500 mm/min. One possible explanation is the insufficient lubricant distribution in the guideways of the Z-axis. In addition, damage to the guideways as a result of the continuous use of the machine in university testing operations, some of which involve high loads, cannot be ruled out. However, the deviations in vertical axis are generally tolerable. This can be explained by the kinematic design of the machine and its primary use for milling operations. Hence, the main process-related loads usually occur in the XY plane. In addition, the bending load is considered to be the most critical factor for the service life of the spindle bearings.
In the equation for bearing rating life, the force appears in the denominator, with the entire fraction raised to the power of three. Although this introduces variation in the calculated values, the magnitudes are comparable, and the overall outcome stays within the same order of magnitude. This method can be improved by introducing a coefficient to the drive-based force, as it is consistently smaller than the force measured by the dynamometer. The value of this coefficient should be determined through experimental validation. To evaluate the consequences of deviations in the force signals, a simplified bearing life was calculated. Equations (3) and (4) from ISO 281 [18] were used. The calculation details and coefficients are provided in [27].
P r = X F r + Y F a ,
L 10 = C r P r 3
where P r denotes the equivalent radial load, F r and F a represent radial and axial forces, respectively. X and Y are coefficients determined by the bearing type and the load ratio. For this case X = 1 and Y   =   0 . L 10 represents the basic rating life, and C r basic dynamic radial load rating.
Exemplary for the helix machining process, the force values of the dynamometer and the drive-based approach in both the X- and Y-directions were measured at T = 10   s . By inserting these values in Equations (3) and (4), the bearing life estimated from the dynamometer forces was 6.47 × 10 11 revolutions, while the value derived from the servo-based forces was 7.64 × 10 11   revolutions. Note that the results were calculated for a single time instance and represent the total theoretical service life. To determine the residual service life, the forces and the number of revolutions that have already occurred over time must be recorded and subtracted from the remaining lifetime. For this calculation, the low-pass filtered signals were used in order to deliberately exclude the influence of harmonic process force components. On the other hand, usage of filtered values prevents the inclusion of vibration effects in the current calculations. However, these effects are not addressed in existing bearing life calculation standards. Recent research on the influence of vibration on bearing performance is increasingly focusing on this issue, and both methods of cutting force measurements can also provide useful information about vibration, making them suitable for future implementation in more advanced evaluation approaches.
When calculating the basic bearing life, the difference between the forces obtained from both methods was approximately 4.6%, and the difference between the resulting lifetimes was 13.3%. Although the deviation is relatively large, the results remain within a reasonable range of agreement.
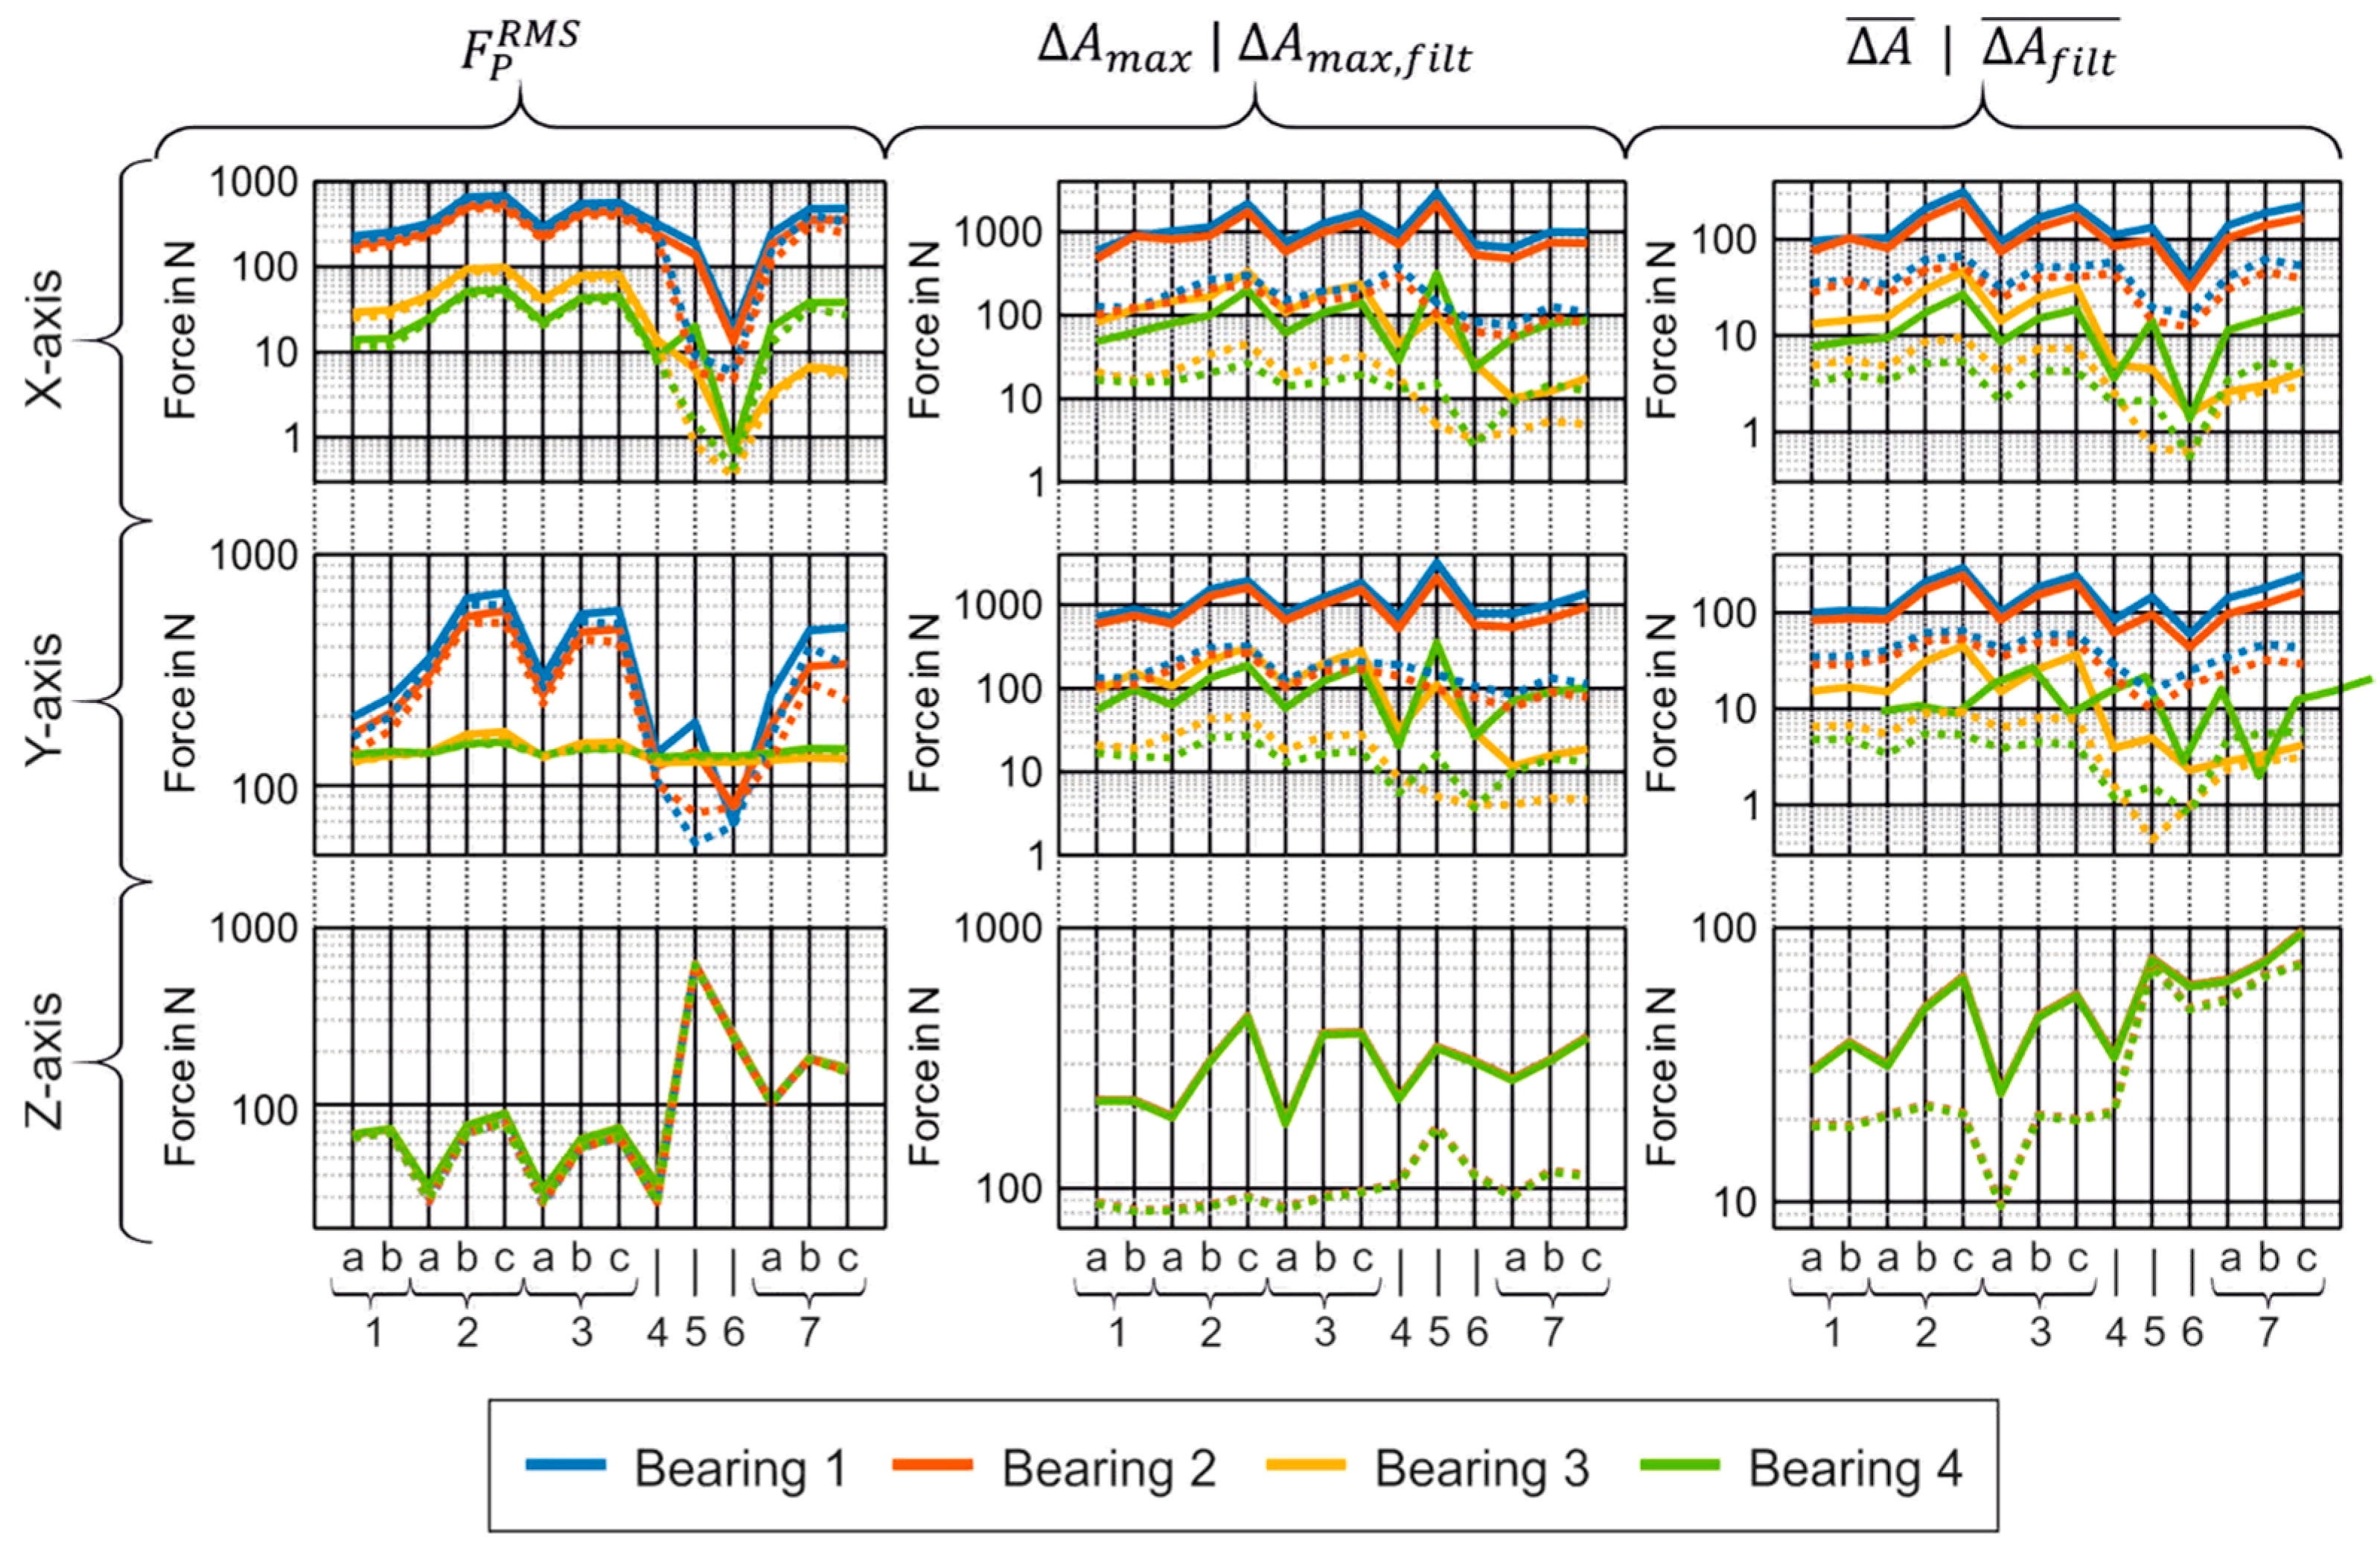
Figure 12 shows a classification of the deviations between the bearing forces measured directly and those estimated from the drive torques for all process steps. Again, the maximum and average deviations as well as the RMS value of the bearing force for all three directions are shown. Note that solid lines represent the non-filtered and dashed lines the filtered cutting forces at the input of the FEM model.
Looking at the effective force values of the individual main spindle bearings, the results of step No. 7 are also confirmed for all process steps. Regardless of the process design, the resulting forces in the X- and Y-directions are highest for the two lower spindle bearings. The two drilling processes (No. 5 and No. 6) are exceptions, as they only generate low forces in the XY plane. On the other hand, due to the changed main machining direction, these processes result in very high forces in the vertical direction. However, as these forces are subject to only minor fluctuations, the influence of signal filtering is more present in the other two axes.
The values of the maximum amplitude deviations, which are comparatively high for all axes, especially in the case of unfiltered input signals, should be evaluated with caution. In addition to the aforementioned deviations in acceleration phases, another cause is the phase shift in relation to the measured forces as a result of the transfer function between TCP and servomotor. The latter in particular are irrelevant for a pure evaluation of the bearing load. This statement is also supported by the maximum deviations when using the filtered force signals. With the exception of the drilling processes, the values for all process steps of the X- and Y-axes are significantly lower than the RMS force values. The average amplitude deviations can also be explained by the effects described above. If the filtered input signals are used, only deviations in the lower double-digit or single-digit percentage range remain. This statement applies equally to the Z-axis. However, with the exception of drilling processes, significant forces in the vertical direction only occur in the case of worn or broken tool cutting edges. Consequently, the resulting deviations must also be evaluated in the context of the machining process.

5. Discussion

In the presented work, two individual approaches for the monitoring of the process loads on the main spindle bearings were combined. A novel approach for estimating the process forces based on the servo drives of the electromechanical feed axes was proposed. The advantage of this approach is that the required measurement data is already available in the machine control system. Using individual correction modules, the measured motor torque is subtracted by all operating and movement-related values and thus only load-independent components remain. The modules are selected and parameterized automatically depending on the mechanical characteristics of the axis. The suitability of the approach is investigated on a three-axis milling machining center by producing a standardized workpiece contour and comparing the resulting forces with a dynamometer. The results show that the quasi-static process loads in particular are in good agreement with the drive torques. In contrast to a direct evaluation of the motor force, the average and maximum amplitude deviations are reduced by 63% to 92% and 70% to 85%, respectively, depending on the machine axis and overall process steps. In the case of filtered force signals, these deviations are further reduced by 5% to 15%. The high effectiveness is also confirmed by the calculated correlation coefficients, which improve by 0.5 to 1.2 in the unfiltered case and 1 to 1.6 in the filtered case. However, due to modeling inaccuracies, the application of the correction modules also leads to minor deviations, which vary depending on the process and its parameters. For example, the module for correcting acceleration torques is based on an evaluation of the position setpoint in order to avoid unintended correction of load torques during axis acceleration. However, especially in the case of rapid movements, a residual error remains, which could be further reduced by adapting the module. In addition, the approach for determining the transfer function between TCP and servomotor and system excitation on the motor side leads to further inaccuracies in terms of phase and magnitude. Nevertheless, the experiments show that a high quality of process force estimation is achievable even without additional sensors.
The second part of the publication focuses on a FEM model of the main spindle. The developed FEM-based spindle model provides a practical approach for estimating the forces acting on individual bearings more efficiently than analytical methods or full FEM simulations. This was confirmed by a simulation comparison in which the average deviations between the two approaches were only 0.55% for the estimated bearing forces and 0.8% for the TCP deformation. By simplifying the CAD geometry and replacing the bearing rolling elements with stiffness-defined bushing joints, the model achieves sufficient accuracy for engineering analysis while maintaining low computational cost. These simplifications limit the model’s ability to fully capture dynamic behavior, especially under high-speed or transient load conditions. Nevertheless, the reduced-order model implemented in MATLAB Simulink enables almost real-time estimation of bearing loads and deformation trends, which is valuable for monitoring applications and could be used for preliminary design studies as mentioned in [33]. Further refinement of the stiffness model and inclusion of dynamic effects could improve prediction accuracy in future work.
Eventually, both approaches are combined and evaluated by comparison to direct cutting force measurement of the dynamometer. For an exemplary machining step, the forces determined at the four bearings of the main spindle show that it is possible to estimate the bearing load solely on the basis of control-internal signals. Comparing the remaining deviations for all process steps and individually for all three machine axes, the findings from the validation of the process force estimation are confirmed. Although minor deviations remain in contrast to sensor-based force measurements, their magnitude is negligible. The forces acting on the bearings in both the FEM and reduced order model show agreement between values obtained from dynamometer measurements and those calculated from the motor torque of the drive units. For estimating the residual bearing lifetime, an approximate force value (accurate within the correct order of magnitude) is sufficient. Integrating a dynamometer into the machine workspace would degrade the system’s dynamic behavior, restrict the available working area, and significantly increase machine costs, making this approach economically impractical. The proposed methodology estimates bearing loads from the actual motor torque of individual servo drives, providing sufficiently accurate results for practical applications. Since it does not rely on dedicated sensors, the method can be implemented on most conventional three-axis CNC milling machines, offering a cost-effective alternative for process force monitoring and bearing load evaluation.

6. Conclusions

This paper presents a new system for drive-based estimation of external loads using a reduced-order FEM model to estimate the process-related load on the main spindle bearings. The starting point is the novel method for estimating process forces based on control and drive-internal signals. The main innovation lies in the fact that all submodels are parameterized automatically and without the necessity of additional sensors or actuators. Furthermore, the modules were designed in such a way that they can be transferred to other machines or feed axes as well as load cases without additional effort.
Future work should focus on improving the individual components of the process. For example, a relatively simple linear model was used to calculate the forces acting on the spindle assembly, allowing the methodology to be tested and the response surface to be generated efficiently. For more accurate results, it would be appropriate to employ FEM models that incorporate nonlinear interactions between components (such as friction, bearing stiffness depending on spindle speed, etc.). Ideally, a model containing bearings with explicitly modeled rolling elements and preload could be simulated. Performing high-fidelity simulations and comparing them with the simplified model would be advisable to evaluate the associated error margin.
In addition, the drive-based estimation of process forces could be further improved. For example, the acceleration correction could be extended to distinguish between motions with rapid and interpolation feed or set the motor torque to zero during acceleration phases. Furthermore, the transfer function of the mechanics and drive control should be compared with a measurement using external excitation, e.g., by impulse hammers or shakers. Alternatively, system excitation by a specially designed reference process may lead to better approximation of the transfer behavior. Furthermore, the findings on bearing stress should be investigated in more detail. Extending the experiments in combination with a sensitivity analysis could quantify the influence of various process parameters such as tool wear, feed rate, spindle speed, etc. In addition to a case-specific adjustment of the models based on this, this also opens up potential for the full utilization of the process. The information obtained on bearing forces can serve not only for predictive bearing maintenance but also for evaluating what-if scenarios, where identical force conditions are applied to new components to assess their behavior. Moreover, the proposed methodology can be extended to other critical machine components, including linear motion systems, screw connections, and TCP corrections.

Author Contributions

Conceptualization, C.S. and D.K.; methodology, C.S. and D.K.; formal analysis, C.S. and D.K.; writing—original draft preparation, C.S. and D.K.; writing—review and editing, M.H., H.S. and M.D.; project administration, M.H., H.S. and M.D. All authors have read and agreed to the published version of the manuscript.

Funding

This research was funded by the Federal Ministry for Economic Affairs and Energy (grant number 16PS307501) and with the financial support of the Faculty of Mechanical Engineering, Brno University of Technology (grant number FSI-S-23-8260).

Data Availability Statement

Dataset available on request from the authors.

Conflicts of Interest

The authors declare no conflicts of interest.

Abbreviations

The following abbreviations are used in this manuscript:
AMOPAdaptive Metamodel of Optimal Prognosis
CADComputer Aided Design
CNCComputer Numerical Control
FEMFinite Element Method
FMUFunctional Mockup Unit
MPCMulti-Point Constraint
PCPersonal computer
RMSRoot Mean Square
TCPTool Center Point

References

  1. Kienzle, O. Die Bestimmung von Kräften Und Leistungen an Spanenden Werkzeugen Und Werkzeugmaschinen. Z. Des. Ver. Deutscher Ingenieure 1952, 94, 299–305. [Google Scholar]
  2. Aslan, D. Integration of Virtual and On-Line Machining Process Control and Monitoring Using CNC Drive Measurements. Doctoral Dissertation, University of British Columbia, Vancouver, BC, Canada, 2019. [Google Scholar] [CrossRef]
  3. Yamamoto, K.; Kamba, A.; Takeuchi, K.; Fujita, J.; Fujimagari, Y.; Kakinuma, Y. Enhancing the Multi-Encoder-Based Cutting Force Estimation along the Stationary Axis of a Machine Tool with Multiple Inertia Dynamics. Int. J. Adv. Manuf. Technol. 2022, 123, 1215–1229. [Google Scholar] [CrossRef]
  4. Doerrer, F.; Otto, A.; Kolouch, M.; Ihlenfeldt, S. Virtual Sensor for Accuracy Monitoring in CNC Machines. J. Manuf. Mater. Process. 2022, 6, 137. [Google Scholar] [CrossRef]
  5. Löser, M.; Otto, A.; Ihlenfeldt, S.; Radons, G. Chatter Prediction for Uncertain Parameters. Adv. Manuf. 2018, 6, 319–333. [Google Scholar] [CrossRef]
  6. Berthold, J.; Kolouch, M.; Wittstock, V.; Putz, M. Identification of Modal Parameters of Machine Tools during Cutting by Operational Modal Analysis. Procedia CIRP 2018, 77, 473–476. [Google Scholar] [CrossRef]
  7. Yamato, S.; Kakinuma, Y. Precompensation of Machine Dynamics for Cutting Force Estimation Based on Disturbance Observer. CIRP Ann. 2020, 69, 333–336. [Google Scholar] [CrossRef]
  8. Yamada, Y.; Yamato, S.; Kakinuma, Y. Mode Decoupled and Sensorless Cutting Force Monitoring Based on Multi-Encoder. Int. J. Adv. Manuf. Technol. 2017, 92, 4081–4093. [Google Scholar] [CrossRef]
  9. Yamato, S.; Sugiyama, A.; Suzuki, N.; Irino, N.; Imabeppu, Y.; Kakinuma, Y. Enhancement of Cutting Force Observer by Identification of Position and Force-Amplitude Dependent Model Parameters. Int. J. Adv. Manuf. Technol. 2019, 104, 3589–3605. [Google Scholar] [CrossRef]
  10. Sakata, S.; Kadota, T.; Yamada, Y.; Nakanishi, K.; Yoshioka, H.; Suzuki, N.; Kakinuma, Y. Chatter Avoidance in Parallel Turning with Unequal Pitch Angle Using Observer-Based Cutting Force Estimation. J. Manuf. Sci. Eng. Trans. ASME 2018, 140, 044501. [Google Scholar] [CrossRef]
  11. Denkena, B.; Bergmann, B.; Stoppel, D. Tool Deflection Compensation by Drive Signal-Based Force Reconstruction and Process Control. Procedia CIRP 2021, 104, 571–575. [Google Scholar] [CrossRef]
  12. Yamato, S.; Nakanishi, K.; Suzuki, N.; Kakinuma, Y. Development of Automatic Chatter Suppression System in Parallel Milling by Real-Time Spindle Speed Control with Observer-Based Chatter Monitoring. Int. J. Precis. Eng. Manuf. 2021, 22, 227–240. [Google Scholar] [CrossRef]
  13. Isshiki, K.; Sato, T.; Imabeppu, Y.; Irino, N.; Kakinuma, Y. Enhancement of Accuracy in Sensorless Cutting-Force Estimation by Mutual Compensation of Multi-Integrated Cutting-Force Observers. MIC Procedia 2021, 33–40. [Google Scholar] [CrossRef]
  14. Schaeffler Technologies AG & Co. KG Super Precision Bearings. Available online: www.schaeffler.com/remotemedien/media/_shared_media/08_media_library/01_publications/schaeffler_2/catalogue_1/downloads_6/sp1_de_en.pdf (accessed on 8 December 2025).
  15. Šooš, Ľ. Headstock for High Speed Machining—From Machining Analysis to Structural Design. In Machine Tools—Design, Research, Application; Šooš, Ľ., Marek, J., Eds.; IntechOpen: Rijeka, Croatia, 2020; ISBN 978-1-83962-351-6. [Google Scholar]
  16. AB SKF Super-Precision Bearings. 2016. Available online: https://cdn.skfmediahub.skf.com/api/public/0901d19680495562/pdf_preview_medium/0901d19680495562_pdf_preview_medium.pdf (accessed on 8 December 2025).
  17. Bao, Z.; Liu, C.; Yang, H.; Zhang, J.; Li, Y. From Theory to Industry: A Survey of Deep Learning-Enabled Bearing Fault Diagnosis in Complex Environments. Eng. Appl. Artif. Intell. 2026, 163, 113068. [Google Scholar] [CrossRef]
  18. ISO 281:2007; Rolling Bearings—Dynamic Load Ratings and Rating Life. ISO: Geneva, Switzerland, 2007.
  19. Jacobs, W.; Brandolisio, D.; Boonen, R.; Sas, P.; Moens, D. Investigating the Effect of External Dynamic Loads on the Lifetime of Rolling Element Bearings. In Proceedings of the 9th National Congress on Theoretical and Applied Mechanics, Brussels, Belgium, 9–11 May 2012. [Google Scholar]
  20. Weck, M.; Hennes, N.; Krell, M. Spindle and Toolsystems with High Damping. CIRP Ann. 1999, 48, 297–302. [Google Scholar] [CrossRef]
  21. Rantatalo, M.; Aidanpää, J.O.; Göransson, B.; Norman, P. Milling Machine Spindle Analysis Using FEM and Non-Contact Spindle Excitation and Response Measurement. Int. J. Mach. Tools Manuf. 2007, 47, 1034–1045. [Google Scholar] [CrossRef]
  22. Profibus Nutzerorganisation PROFIdrive Technology and Application—System Description. Available online: https://www.profibus.de/downloads/profidrive-technology-and-application-system-description (accessed on 31 August 2025).
  23. Schöberlein, C.; Sewohl, A.; Schlegel, H.; Dix, M. Modeling and Identification of Friction and Weight Forces on Linear Feed Axes as Part of a Disturbance Observer. Int. J. Mech. Eng. Robot. Res. 2022, 11, 198–206. [Google Scholar] [CrossRef]
  24. Schöberlein, C.; Sewohl, A.; Schlegel, H.; Dix, M. Experimental Investigation and Comparison of Approaches for Correcting Acceleration Phases in Motor Torque Signal of Electromechanical Axes. In Proceedings of the 20th International Conference on Informatics in Control, Automation and Robotics (ICINCO 2023), Rome, Italy, 13–15 November 2023. [Google Scholar] [CrossRef]
  25. Schöberlein, C.; Schleinitz, A.; Schlegel, H.; Dix, M. Identification and Correction of Periodic Fluctuations in the Motor Torque Signal of Electromechanical Axes. In Proceedings of the 5th Winter IFSA Conference on Automation, Robotics & Communications for Industry 4.0/5.0 (ARCI’ 2025), Granada, Spain, 19–21 February 2025. [Google Scholar]
  26. Schöberlein, C.; Schlegel, H.; Dix, M. Drive-Based Identification of Transfer Function Between External Load and Motor Torque on Electromechanical Axes. In Production at the Leading Edge of Technology; WGP 2024. Lecture Notes in Production Engineering; Springer: Cham, Switzerland, 2025. [Google Scholar] [CrossRef]
  27. 71914 ACD/P4A—Schrägkugellager der Reihe “Super-Precision Bearings” SKF. Available online: https://www.skf.com/de/products/super-precision-bearings/angular-contact-ball-bearings/productid-71914%20ACD%2FP4A (accessed on 31 August 2025).
  28. Getting Started with OptiSLang. Available online: https://ansyshelp.ansys.com/account/secured?returnurl=/Views/Secured/corp/v252/en/opti_ug/opti_ug_intro.html (accessed on 29 October 2025).
  29. Darvishi, A. Translation Invariant Approach for Measuring Similarity of Signals. J. Adv. Comput. Res. 2009, 1, 19–27. [Google Scholar]
  30. DMC V Series. Available online: https://tecnoinsrl.it/wp-content/uploads/2022/05/catalogo_dmc-850-v.pdf (accessed on 28 November 2025).
  31. ISO 10791-7:2020; Test Conditions for Machining Centres—Part 7: Accuracy of Finished Test Pieces. ISO: Geneva, Switzerland, 2020.
  32. Holub, M.; Vetiska, J.; Knobloch, J.; Minar, P. Analysis of Machine Tool Spindles under Load. Appl. Mech. Mater. 2016, 821, 608–613. [Google Scholar] [CrossRef]
  33. Klic, D.; Minarcik, M.; Polzer, A.; Tuma, J.; Marek, J.; Holub, M. Digital Twin for CNC Machine Tools Design. In Proceedings of the 2024 21st International Conference on Mechatronics—Mechatronika (ME), Brno, Czech Republic, 4–6 December 2024. [Google Scholar] [CrossRef]
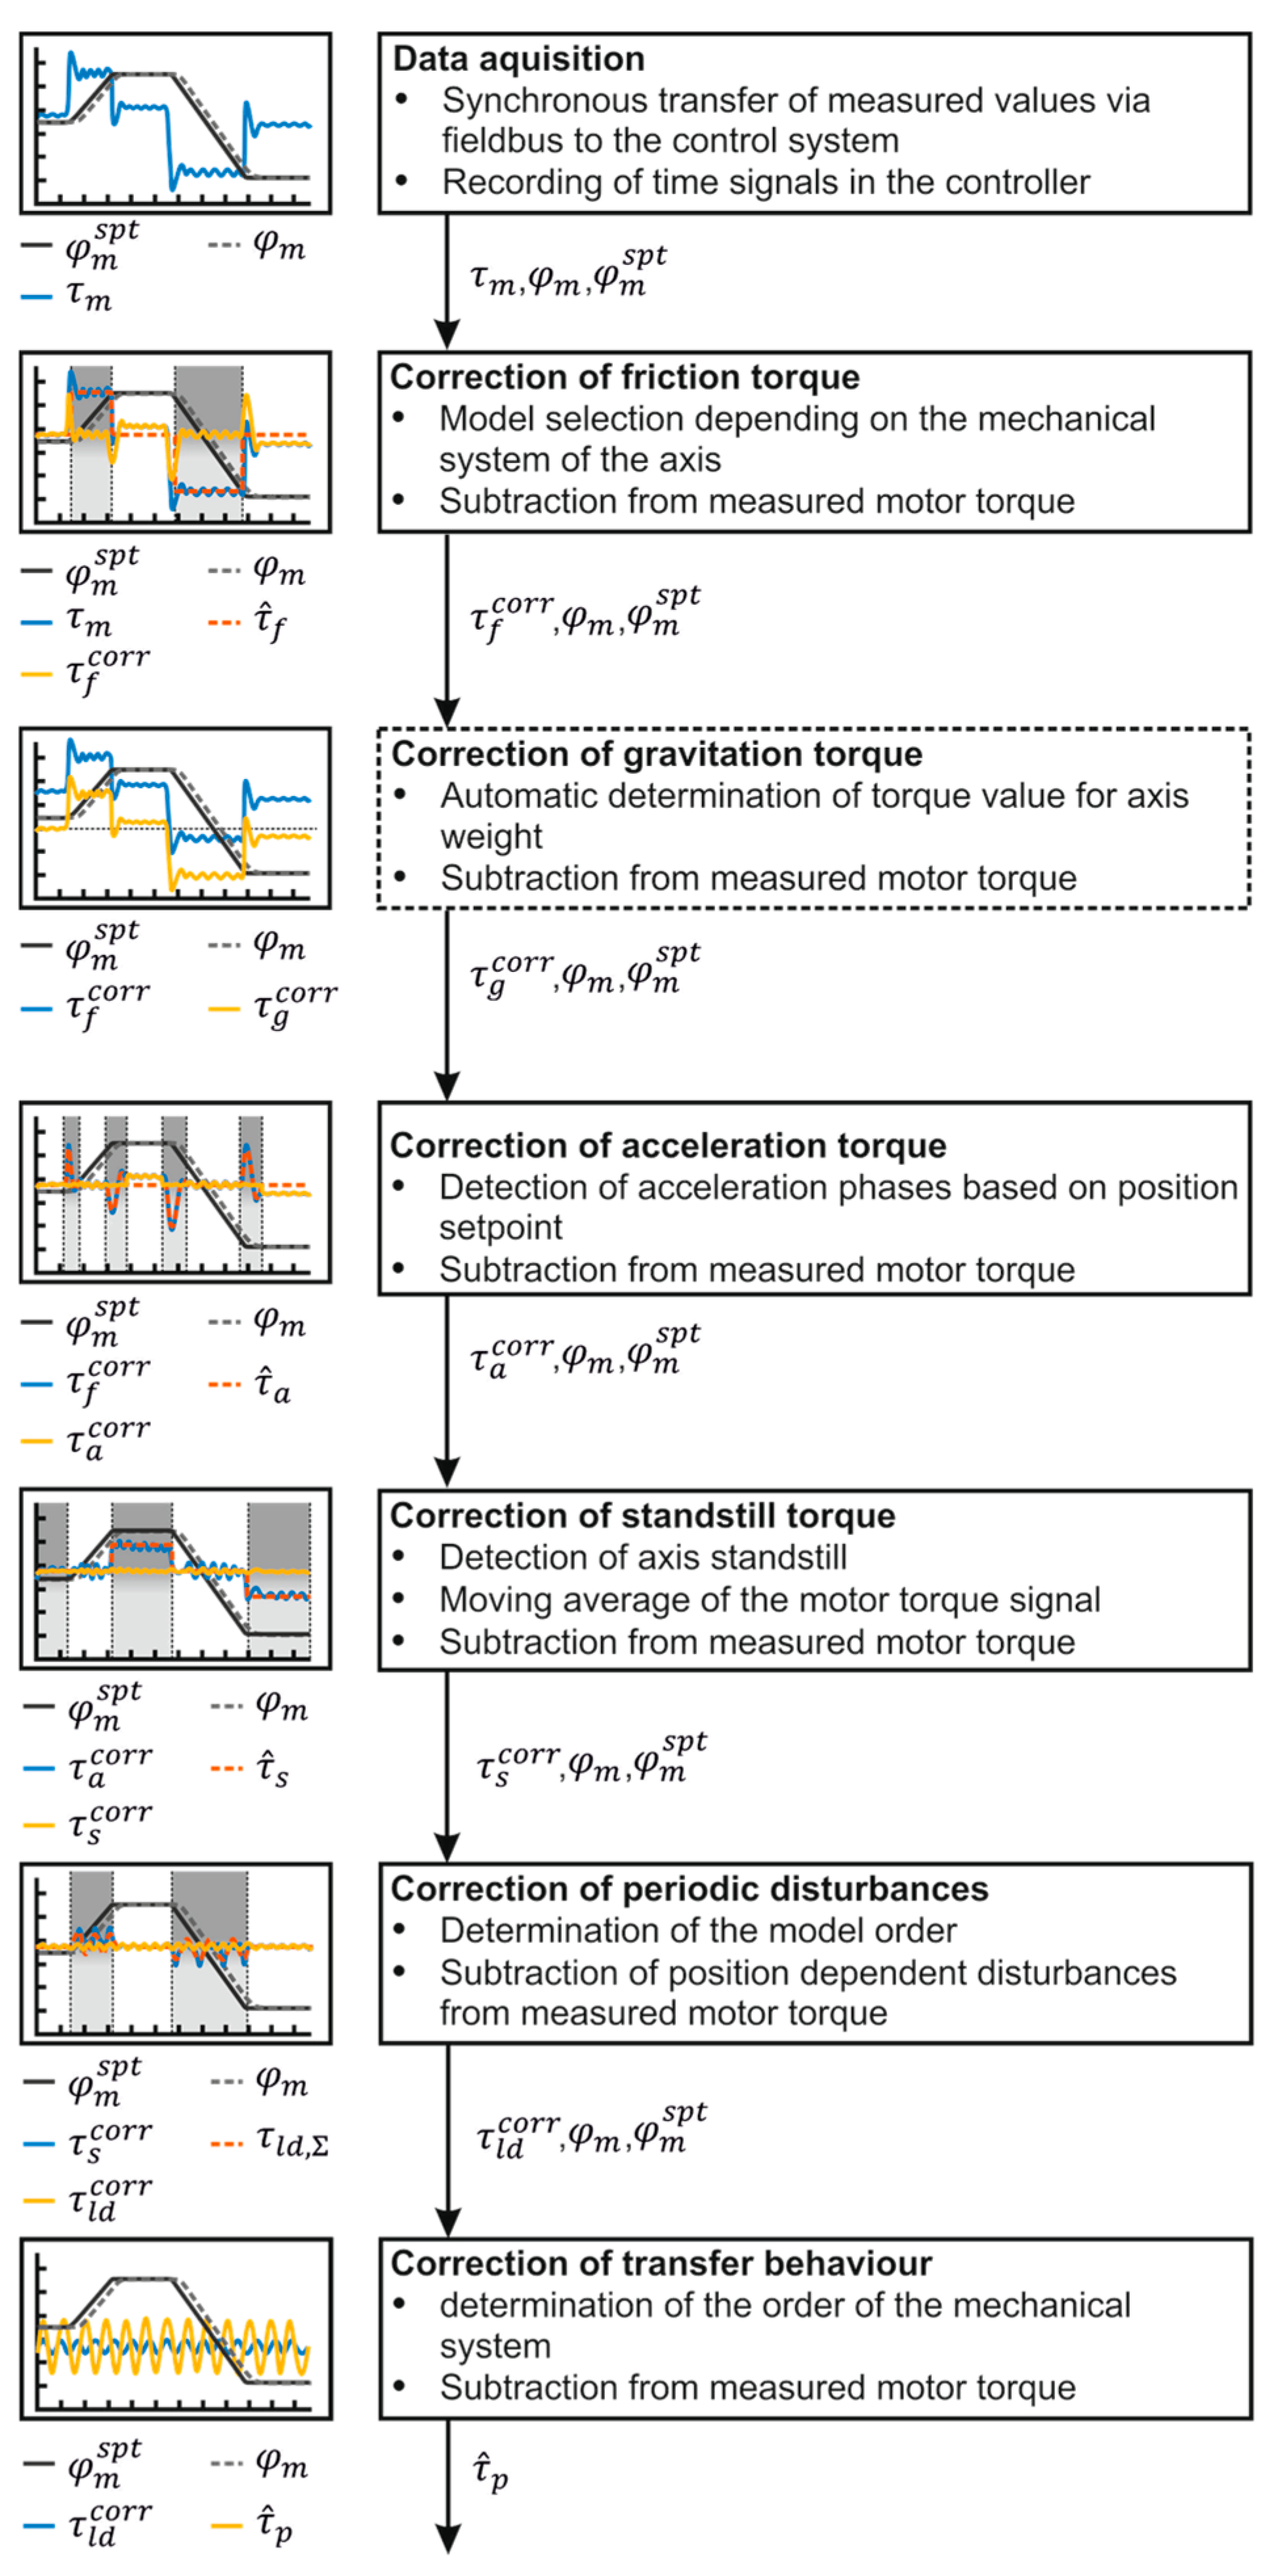
Figure 1. Overall procedure for drive-based cutting force estimation.
Machines 13 01138 g001
Figure 2. Procedure for determining the forces acting on bearings.
Machines 13 01138 g002
Figure 3. Spindle model in Ansys Mechanical.
Machines 13 01138 g003
Figure 4. Bearing positions and direction of Z-axis in the spindle model.
Machines 13 01138 g004
Figure 5. Input forces (top) as well as average maximum deviations (bottom left), mean deviations (bottom center) and correlation coefficients (bottom right) between the ANSYS static structural model and FMU for all 31 simulations.
Machines 13 01138 g005
Figure 6. DMC 850 V three-axis milling machining center (left) and schematic layout of the installed electromechanical axes (right, based on [30]).
Machines 13 01138 g006
Figure 7. Test workpiece based on [31] for functional verification of the cutting force estimation.
Machines 13 01138 g007
Figure 8. Tool center point dilatation measuring setup.
Machines 13 01138 g008
Figure 9. Axis position as well as measured and reconstructed process forces in the X- (left) and Y-directions (right) for circular milling in process step No. 7.
Machines 13 01138 g009
Figure 10. Whisker plot of the normalized maximum and average deviations as well as correlation coefficients for all process steps of the test work piece.
Machines 13 01138 g010
Figure 11. Resulting forces of the four main spindle bearings for drive-based and directly measured process forces in all three cartesian directions.
Machines 13 01138 g011
Figure 12. Bearing force (RMS) as well as maximum and average deviations for filtered (dashed) and non-filtered (solid) input signals for all process steps and parameter variations of the test work piece.
Machines 13 01138 g012
Table 1. Overview of the investigated process steps and their parameters for the machining of the test workpiece.
No.ToolCutting DepthFeed
Rate
Spindle
Speed
Variation
1 Machines 13 01138 i001Face
milling cutter
(6-edged)
2.5 mm 2600 mm min 974 1 min a: cutting depth 2.5 mm
b: cutting depth 4 mm (x) and 1 mm (y)
2 Machines 13 01138 i002Corner milling cutter
(7-edged)
5 mm 696 mm min 995 1 min a: new cutting edges
b: worn out cutting edges
c: emulated tool edge breakage
3 Machines 13 01138 i003Corner milling cutter
(7-edged)
5 mm 696 mm min 995 1 min a: new cutting edges
b: worn out cutting edges
c: emulated tool edge breakage
4 Machines 13 01138 i004Solid carbide milling cutter8 mm 955 mm min 2387 1 min -
5 Machines 13 01138 i005Indexable insert drill bit-313 mm min 1646 1 min -
6 Machines 13 01138 i006Solid carbide drill bit-1190 mm min 5411 1 min -
7 Machines 13 01138 i007Corner milling cutter
(3-edged)
2 mm 1660 mm min 3247 1 min a: new cutting edges
b: worn out cutting edges
c: emulated tool edge breakage
Disclaimer/Publisher’s Note: The statements, opinions and data contained in all publications are solely those of the individual author(s) and contributor(s) and not of MDPI and/or the editor(s). MDPI and/or the editor(s) disclaim responsibility for any injury to people or property resulting from any ideas, methods, instructions or products referred to in the content.