1. Introduction
Hydrogen has the advantages of elevated heat value and environmentally friendly combustion products, making it widely used in various fields such as aerospace and energy [
1]. During the process of hydrogen production, hydrogen atoms permeate into the material of the hydrogen production reactor through adsorption and diffusion, and the mechanical properties of hydrogen reactor materials are reduced by the effect of the enrichment and hydrogen-containing compound formation at the material surface defects [
2,
3]. The 06Cr18Ni11Ti steel exhibits excellent resistance to hydrogen permeation and is widely used in the manufacture of hydrogen production reactors. However, the hydrogen production reactor weld region often contains surface defects such as micro-cracks, large surface roughness, and large surface residual tensile stress due to the influence of the manufacturing process [
4]. The aforementioned surface defects exacerbate the hydrogen diffusion process, which makes the weld region the weakest hydrogen permeation resistance region of the hydrogen production reactor, and reduce the reliability of the hydrogen production reactor.
Therefore, it is necessary to use surface strengthening or surface finishing processes to improve the hydrogen permeation resistance in the weld region by changing the distribution of surface residual stresses, refining the micro-organization of the material, reducing surface roughness, and other methods. Although the mentioned processing techniques are widely used in the machining process, the machining effects are heavily influenced by material properties. To obtain a better machining effect and the optimal process parameters, plenty of experiments should be carried out. Meanwhile, the process of exploring the optimal process parameters prolongs the device manufacturing time and increases the device manufacturing cost. The optimal machining schedule could be determined in a short period of time by using finite element simulation methods, effectively reducing experimental costs and providing a scientific basis for process optimization. However, the simulation results are severely affected by material property parameters and modeling methods. Therefore, to obtain a better simulation result, numerous scholars have carried out research from the aspects of material parameter measurement and simulation modeling.
The Johnson–Cook (J–C) constitutive model is commonly employed in the analysis of complex loading conditions involving high temperatures, large strains, and high strain rates, due to its ability to characterize the plastic flow and nonlinear behavior of metal materials under these conditions [
5]. In addition, due to the simple forms of the equations and the fact that the parameters are relatively easy to determine, the versatility of the J–C constitutive model increases [
6]. Consequently, numerous scholars have conducted experiments to test or modify the J–C constitutive model for various materials to refine material parameters for better accuracy. Shen et al. [
7] carried out uniaxial tensile tests on 6061 aluminum alloy plates under different working conditions and constructed a modified J–C constitutive model; by comparison, they found that the mean absolute error of the modified J–C constitutive model is smaller, and the plastic stress–strain relationship of 6061 aluminum alloy under different deformations can be more accurately described. Zhu et al. [
8] investigated the temperature rise effect due to adiabatic strain in separated Hopkinson compression rod tests, built the temperature–strain relationship, and corrected the strain rate coefficients of the J–C constitutive model to obtain the strain rate strengthening coefficients of Ti6Al4V alloy. Xi et al. [
9] modified the J–C constitutive model by considering the coupling effects of temperature and strain rate, which improved the accuracy in describing the flow stress of WAAM IN718 alloy under various deformation temperatures, strain rates, and heat treatment conditions. Wang et al. [
10] modified the J–C constitutive model based on the experimentally measured stress–strain curves and modified J–C constitutive model considering the coupling relationship between deformation temperature and deformation rate. The plastic deformation of 18CrNi4A steel at high temperatures was investigated using a modified model; as can be seen from the comparison, the modified J–C constitutive model has a high prediction accuracy. Shen et al. [
11] used the Separate Hopkinson Pressure Bar (SHPB) and parameter identification method to establish various J–C constitutive models for TC17 titanium alloy and analyzed the influence of different constitutive models on the flow stresses, finding that the J–C constitutive model built with the determined parameters was more suitable for simulating the cutting process under high temperature and large strain rate conditions. Qian et al. [
12] carried out SHPB experiments to study the compression behavior of CuCrZr alloy in a range of strain rates and temperatures. Based on the experimental results, a J–C constitutive model has been constructed for the CuCrZr alloy, incorporating modifications to account for the coupling effects of strain, strain rate, and temperature, which shows excellent agreement with the experimental data. Khare et al. [
13] determined the material parameters for the J–C flow stress and J–C failure model of armor steel through a combination of tensile testing and finite element simulation. They analyzed the material properties of armor steel under large deformations and high strain conditions by constructing two models. Yin [
14] and Zhang et al. [
15] obtained stress–strain curves and developed a J–C constitutive model for 7075-T6 aluminum alloy under various strain rates, analyzing the material’s processing performance based on the acquired J–C constitutive models. Shen et al. [
16] calculated the stress distribution of the diffusion weld of 06Cr18Ni10Ti at different temperatures using the finite element method and studied the effects of heating temperature and pressure on the stress distribution.
It can be seen that the J–C constitutive model has been widely used in simulating the impact and failures of various materials. Currently, the study on the J–C constitutive model parameters primarily focuses on alloy materials, with fewer studies focusing on welds. Moreover, the J–C constitutive model parameters for the welds of 06Cr18Ni11Ti are not easily found in the literature.
To ensure the accuracy of research results, the inverse analysis methods were used by many scholars. Tao et al. [
17] proposed a Dual Fidelity Ensemble Random Maximum Likelihood (BF-EnRML) method. The results indicate that the proposed method could provide wall deflection predictions close to those obtained from 3D Finite Element Method (FEM) calculations while maintaining a computational cost similar to that of 2D FEM. Takayuki et al. [
18] proposed a forward model to calculate the tensile properties of dual-phase steel and explored the optimal microstructure through inverse analysis methods. The verification results are consistent with traditional materials engineering findings, demonstrating the effectiveness of this method in understanding the structure–property relationship. Ryan et al. [
19] proposed an inverse method to obtain the mechanical properties of wear-resistant coatings by simulating Rockwell hardness tests. This approach was used to simulate the interactions between blades and casing, thereby optimizing compressor performance and extending blade life. Buljak et al. [
20] proposed a new method for identifying the anisotropic parameters of structural materials, which utilizes experimental data from indentation curves. This method combines an optimized elliptical cross-section indenter, repeated indentation tests, and deterministic inverse analysis based on function minimization, achieving a computationally efficient model simplification. Fedele et al. [
21] proposed an experimental–numerical method centered around the flat-topped wedge test, which combines novel flat-topped wedge experiments, conventional finite element simulation, and inverse analysis to monitor local stress components and elastic modulus at specific locations on the dam surface.
Furthermore, numerous scholars have built different grinding simulation models and conducted simulation studies to optimize grinding process parameters and improve the grinding surface accuracy. Jun et al. [
22] conducted profile grinding experiments on the turbine disc’s electroplated CBN grinding wheel and investigated the influence of grinding parameters on grinding forces. Mao et al. [
23] built a simulation model of the coolant flow field for grinding wheels with randomly distributed grains and simulated grinding processes of micro-grooved and non-grooved grinding wheels to study the influence of different processing techniques on the performance of the wheels. Ding et al. [
24] built a grinding wheel model based on the real surface morphology of the grinding wheel to simulate the grinding process of steel rail by Deform-3D simulation software and analyzed the influence of process parameters on grinding forces. Wu et al. [
25] built a new model that considered the randomness of grain size and distribution in grinding wheels to accurately predict grinding force. The accuracy of the built simulation model was verified by conducting grinding experiments. Gao et al. [
26] investigated the relation between the geometric shape of the grinding wheel and specimen contact, focusing on localized material removal patterns in the grinding zone and grinding temperature distribution. Based on the findings, a 3D thermal model of the heat source was constructed to explore the influence of the geometry of the grinding wheel and the contact of the specimen on the distribution of grinding heat. Li et al. [
27] built a simulation model considering the material’s brittle fracture, grinding conditions, and the random distribution of grinding wheel morphology, which could analyze the grinding force on silicon carbide ceramics. Zhang et al. [
28] built a truncated polyhedral grain model to simulate the grinding process of Si3N4 ceramics and analyzed the influence of variation in the radial line speed on the grinding force during the grinding process. Mao et al. [
29] considered the actual morphology of the grinding wheel to build a theoretical grinding force model for the machining hardening process of AISI 52100 material and validated the effectiveness of the built model through experiments. Ren et al. [
30] built a thermal-force coupled finite element model to investigate the subsurface residual stresses and heat-affected layers of bearing steel during the grinding process and verified the correctness of the built model through experiments.
The aforementioned scholars have built various grinding simulation models based on practical considerations and have improved the simulation accuracy to various degrees. However, the simulations mentioned above primarily focus on common metal materials, and there is a lack of comprehensive studies of grinding simulations specifically for weld materials.
In this paper, the mechanical properties of 06Cr18Ni11Ti welds were investigated through experiments, and the parameters of the J–C constitutive model were determined by conducting quasi-static tensile tests at different temperatures and tensile tests at different strain rates. The damage parameters of the J–C failure model were determined by conducting quasi-static tensile tests on notch specimens at different temperatures and in simulations. Based on the determined parameters of the J–C constitutive model and incorporating the W-M fractal dimension, a multi-grain grinding wheel model was built to simulate the grinding process of the weld surface. The influence of grinding speed and grinding depth on the grinding force was investigated. Finally, the grinding experiments were conducted to analyze the influence of the various process parameters on the grinding heat and the grinding force. The accuracy and validity of the constructed simulation model and the determined material parameters were verified by comparing the simulation and experimental results. The determination of the weld material parameters and the built simulation model in this paper would provide new research ideas for grinding studies.
3. Determination of J–C Failure Model Parameters
The fracture criterion generally considers the effect of stress triaxiality, strain rate, and temperature on the failure of the material [
35,
36]. Therefore, to facilitate the theoretical derivation and determination of the failure parameters, the coupling effects of the above three factors are neglected. The simplified J–C failure model is formulated as follows:
where
D1 is the fracture failure strain at tensile rupture for the notched tensile test;
D2 and
D3 are the relationships introducing equivalent force-equivalent strain;
D4 is the strain rate sensitive parameter; and
D5 is the temperature sensitive parameter.
The schematic of the notched tensile specimen shown in
Figure 11, and the stress triaxiality parameters of the plate notched tensile specimen could be calculated from Equation (13).
where
t is half of the notch width of the plate tensile specimen;
R is the notch radius of the plate tensile specimen; and
is the stress triaxiality of the plate specimen.
Different fracture strains for various notch radii could be obtained by notched tensile test, and the stress triaxiality of specimens with different notch radii could be calculated by using Equation (13). Meanwhile, based on Equation (14), the corresponding material strain could be obtained.
Finally, by ignoring the influence of temperature term on the strain, Equation (15) could be obtained, according to the determination of the relationship between the stress triaxiality and fracture strain, the parameters of fracture strain terms
D1–
D3 could be determined.
Combining dynamic experiments and fitting the strain rate term according to Equation (16), the strain rate sensitive parameter
D4 could be determined.
By substituting the obtained parameters
D1–
D3 into Equation (17), the temperature sensitivity parameter
D5 could be determined.
3.1. The Tensile Test of Notch Specimen and Finite Element Simulation
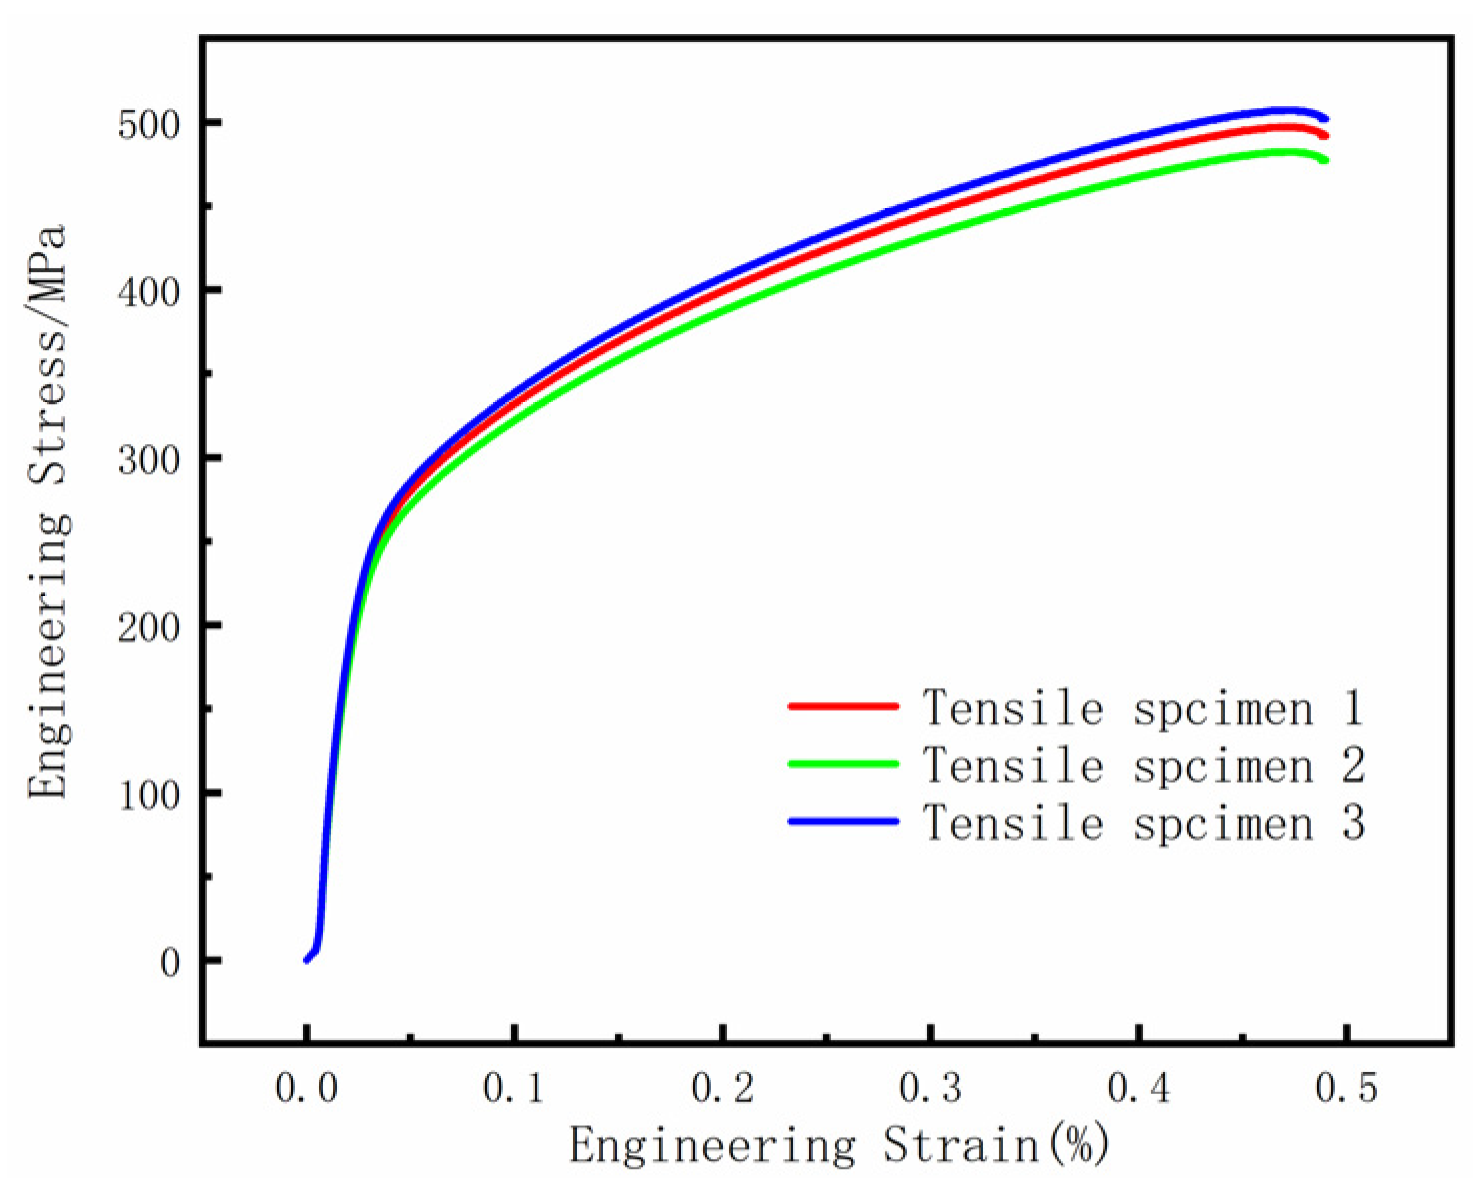
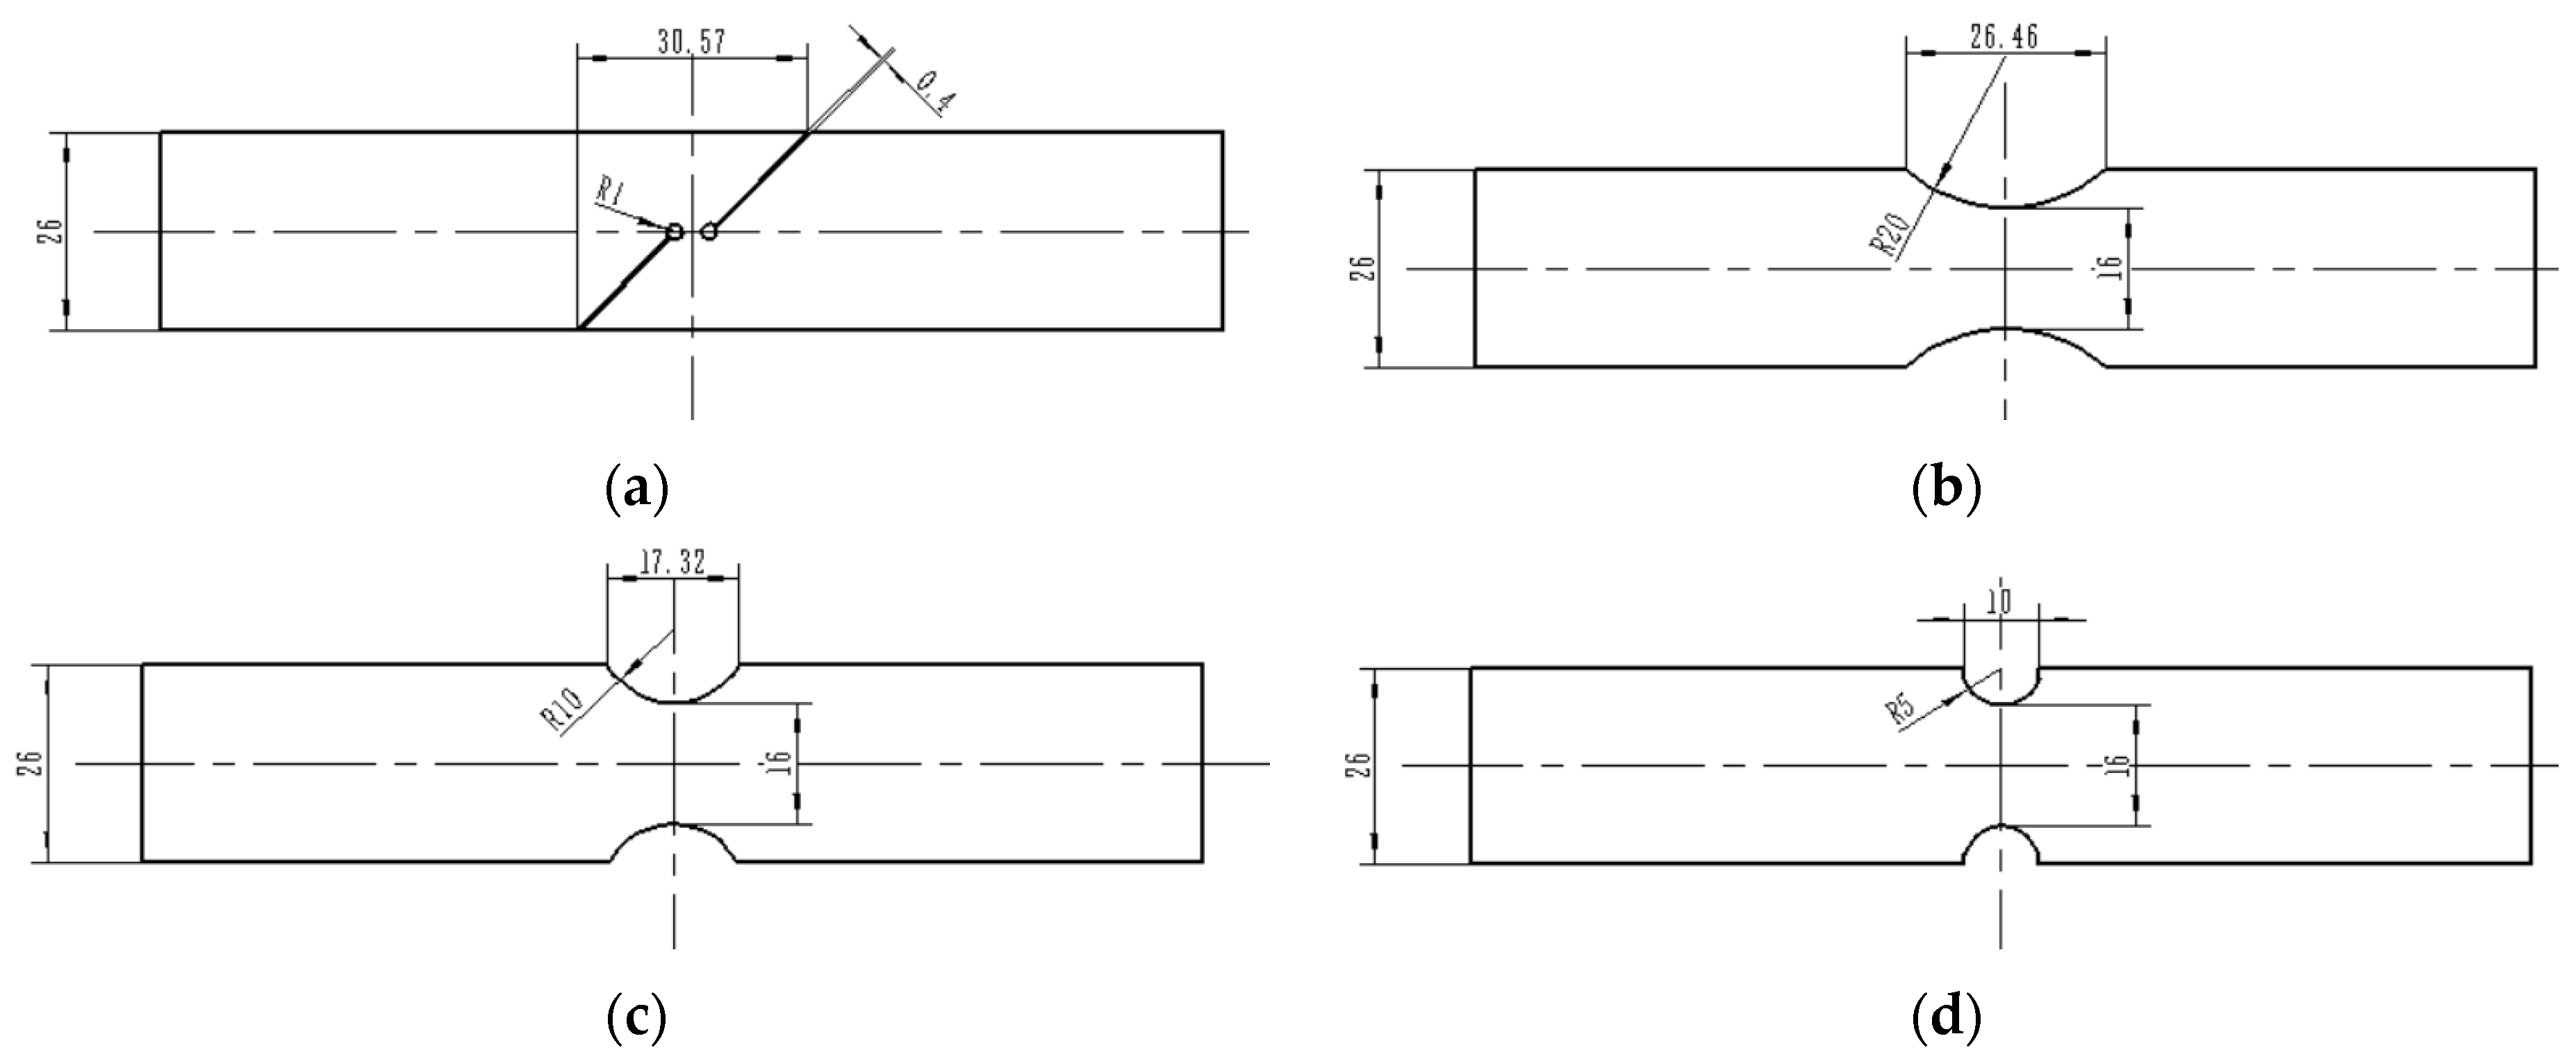
In this paper, the universal tensile tester was used to conduct quasi-static tensile tests on notched specimens with various radii. During the stretching process, the temperature was 20 °C and the tensile speed was 2.4 mm/min. The notch radii of the specimens were 1 mm, 5 mm, 10 mm, and 20 mm, and the specimen was 140 mm in length and 3 mm in thickness. The shape and the size of the specimens are shown in
Figure 12. By conducting the tensile tests, the displacement–load curves and the fracture data for different notched tensile specimens were eventually obtained.
Models of notched tensile specimens in different radii were built in ABAQUS to simulate the process of quasi-static tensile test, and the fracture strains were obtained for notched tensile specimens with different radii. The shapes and sizes of the built simulation models are shown in
Figure 12. The mesh type of the built model was C3D8R, and the elastic behavior of the material follows Hooke’s law, where the modulus of elasticity
E = 20,9581 MPa and Poisson’s ratio
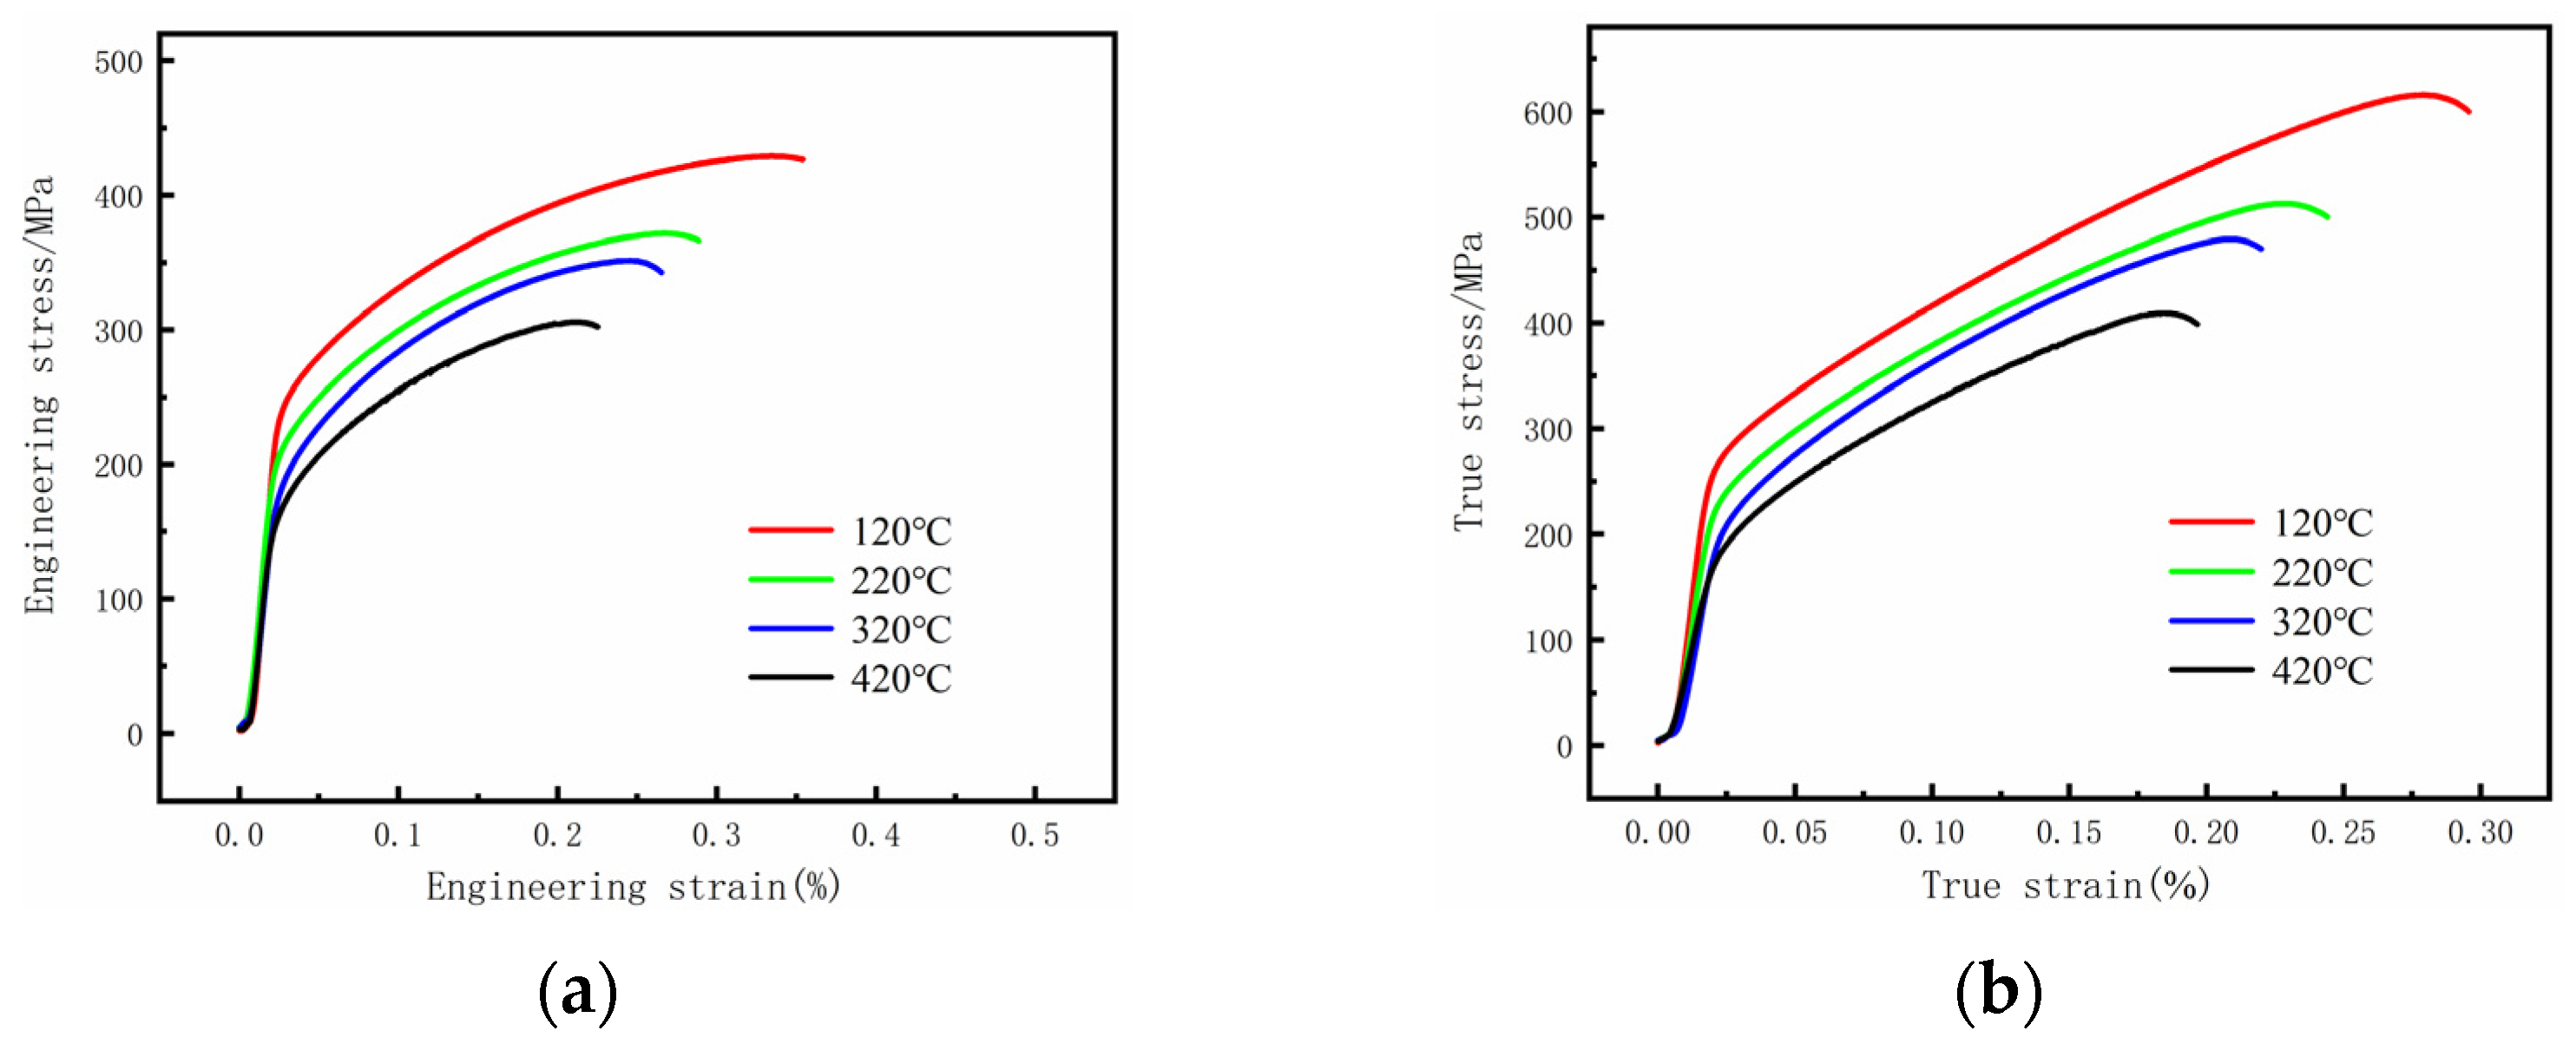
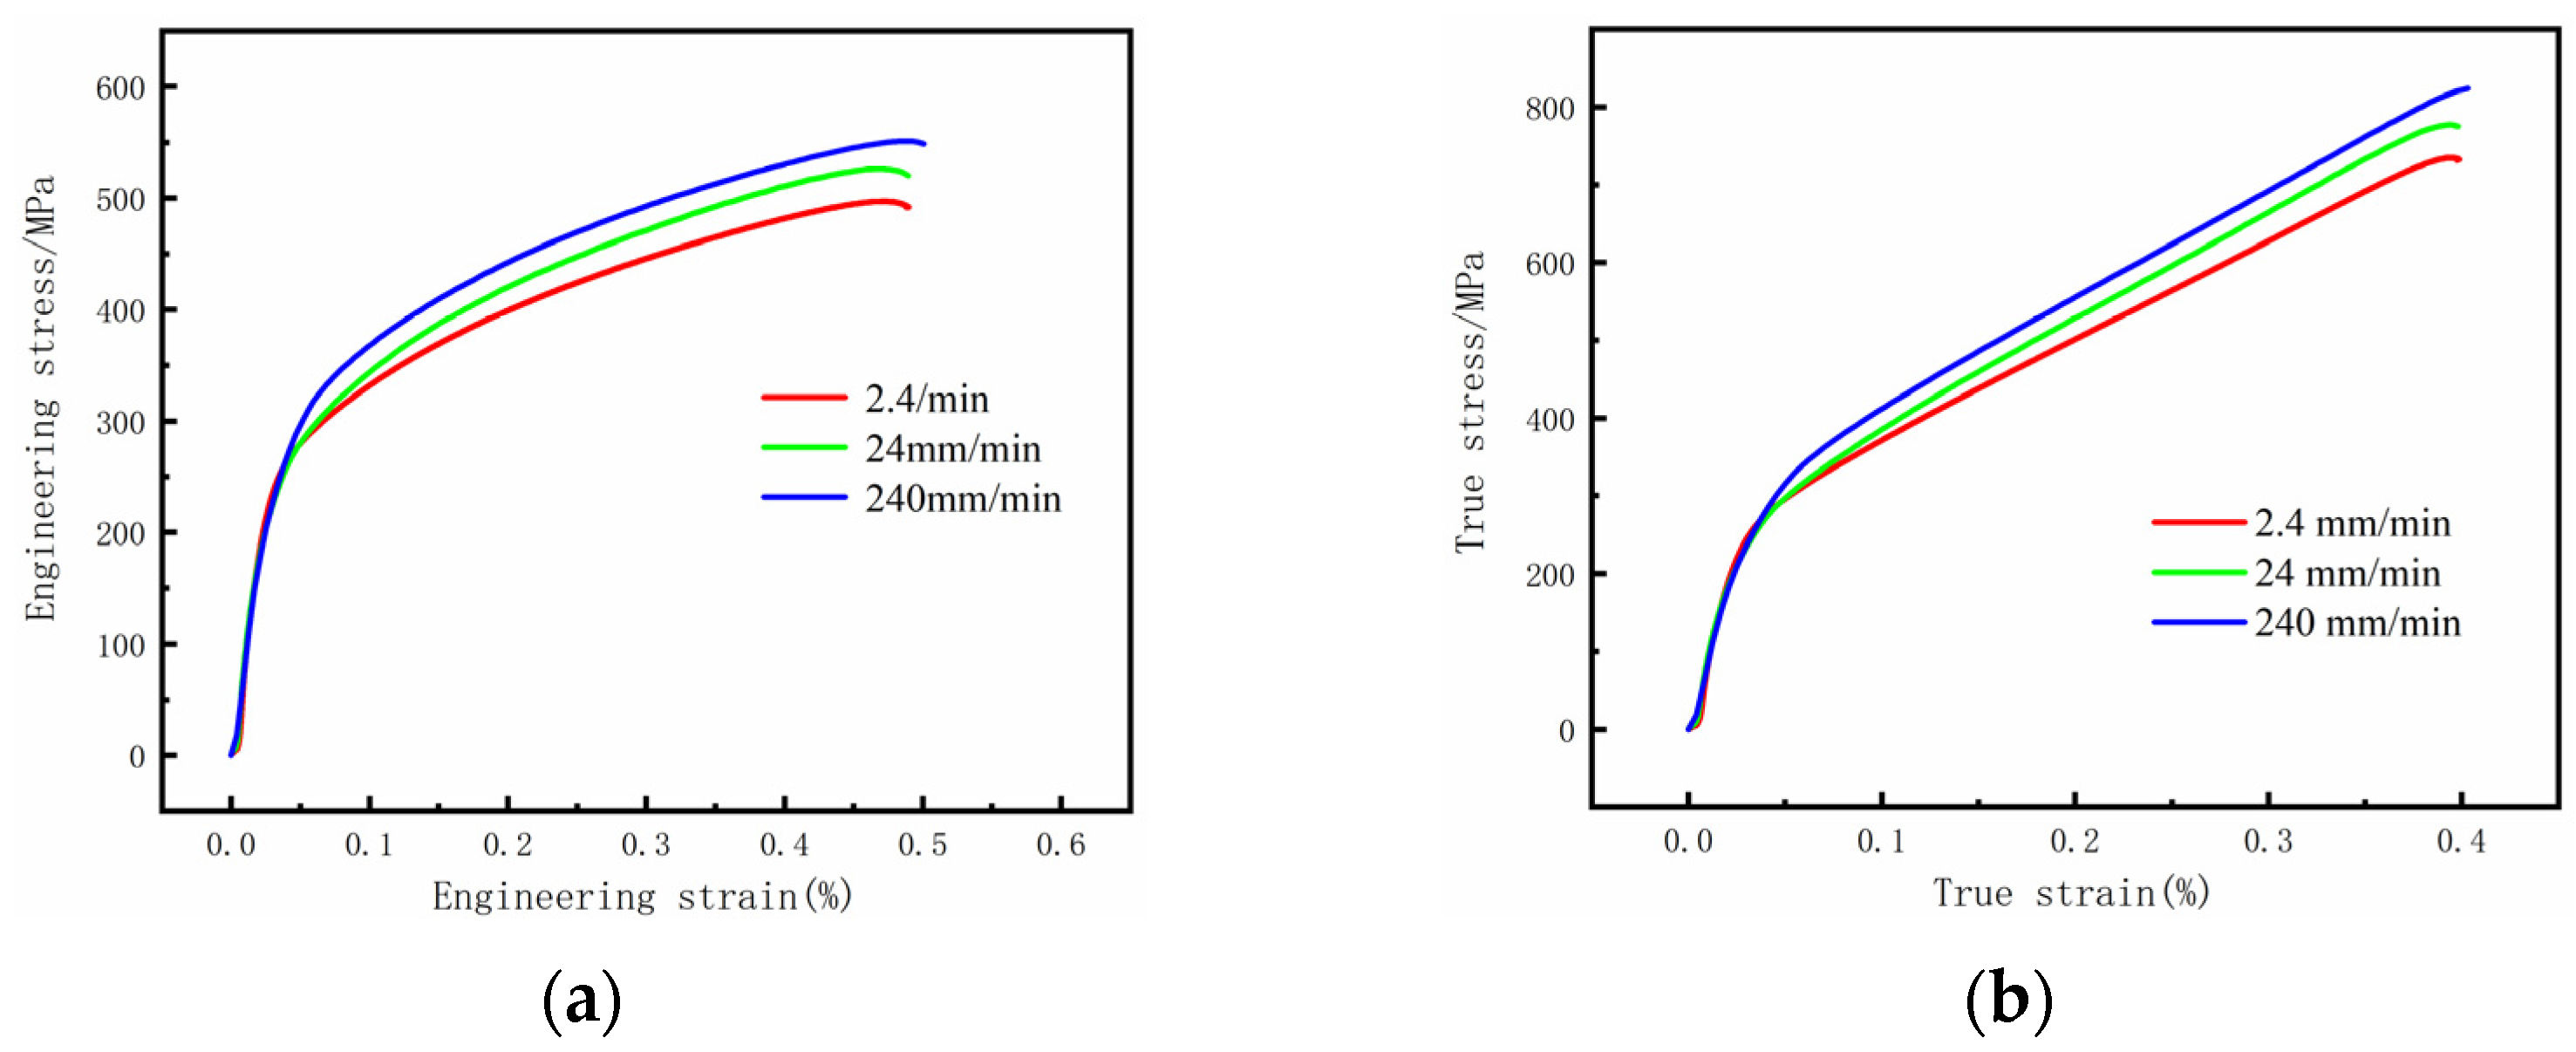
μ = 0.29. The elastic–plastic response parameters were determined using the J–C constitutive model parameters from this study, which are
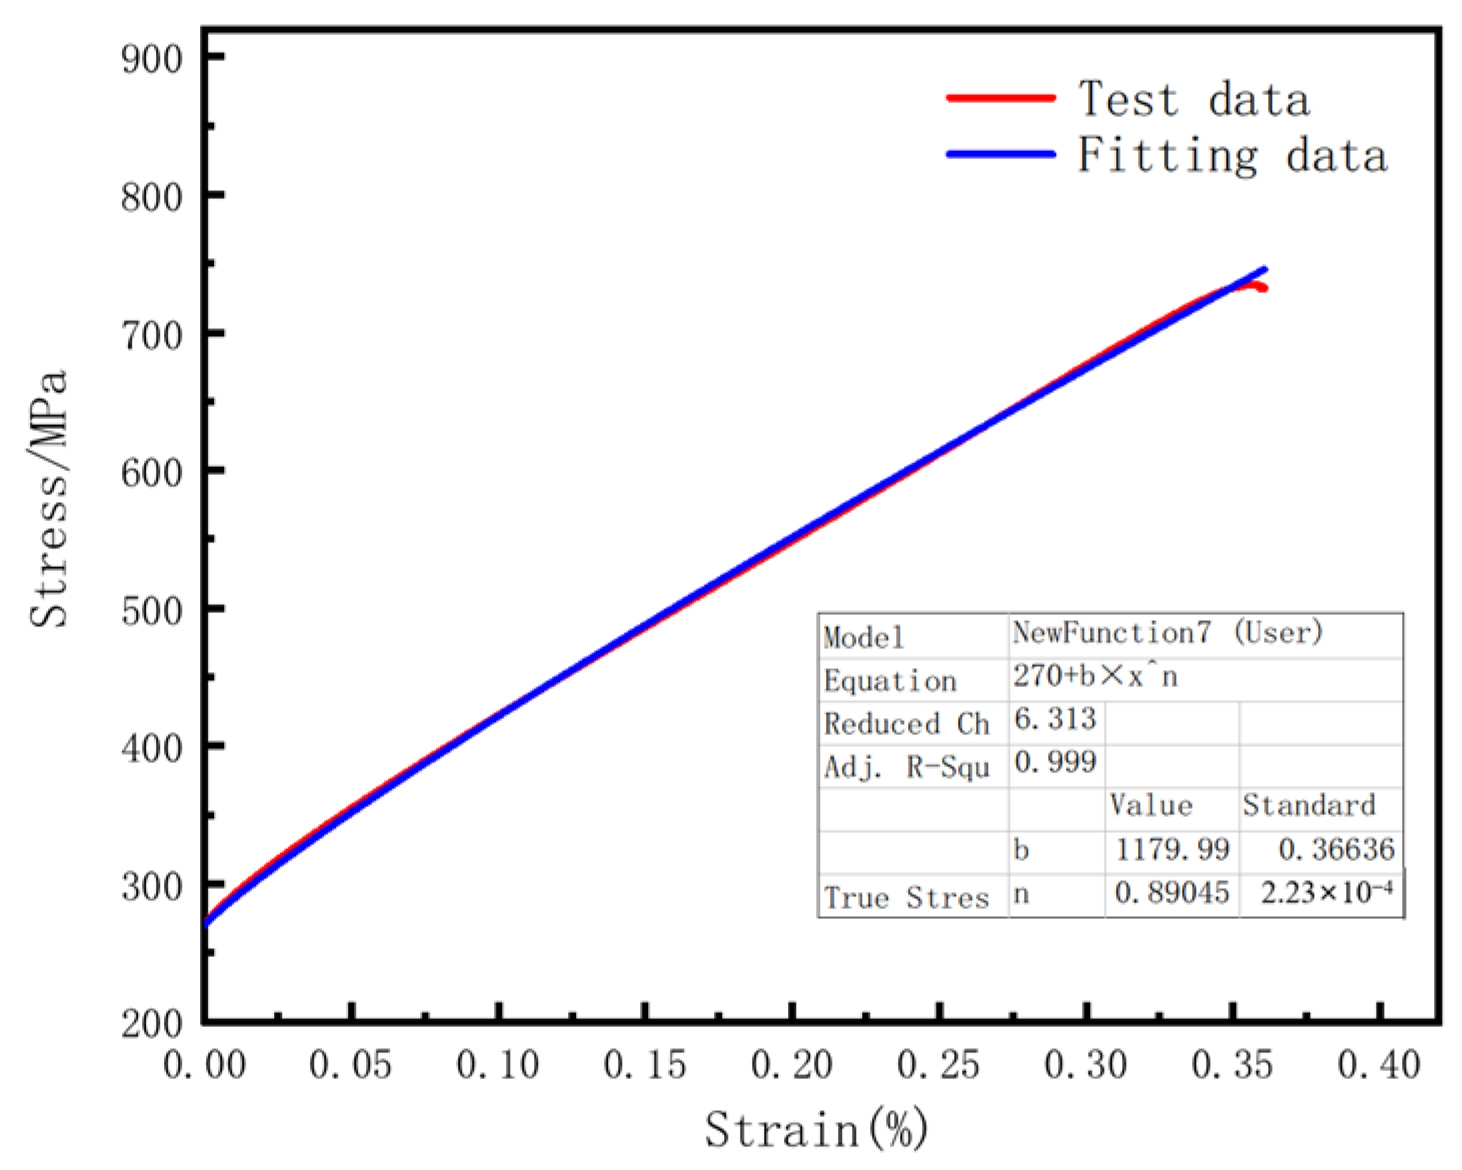
A = 270,
B = 1179.9987,
n = 0.89045,
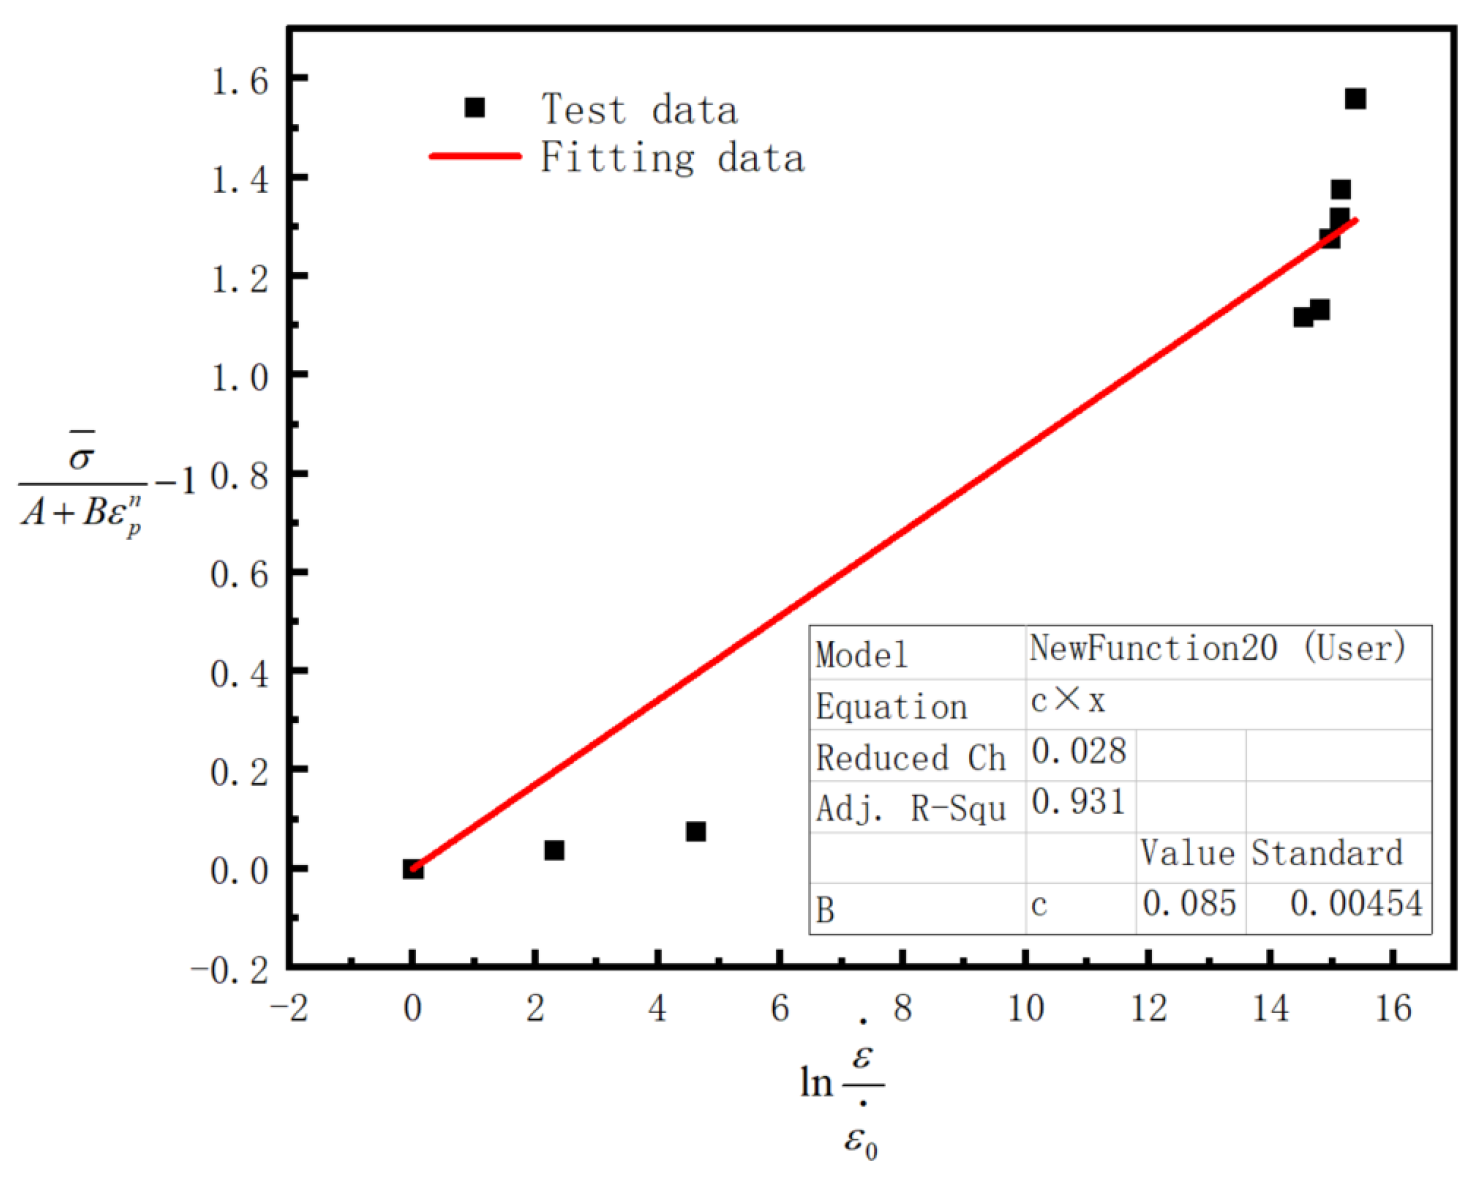
C = 0.08539, and
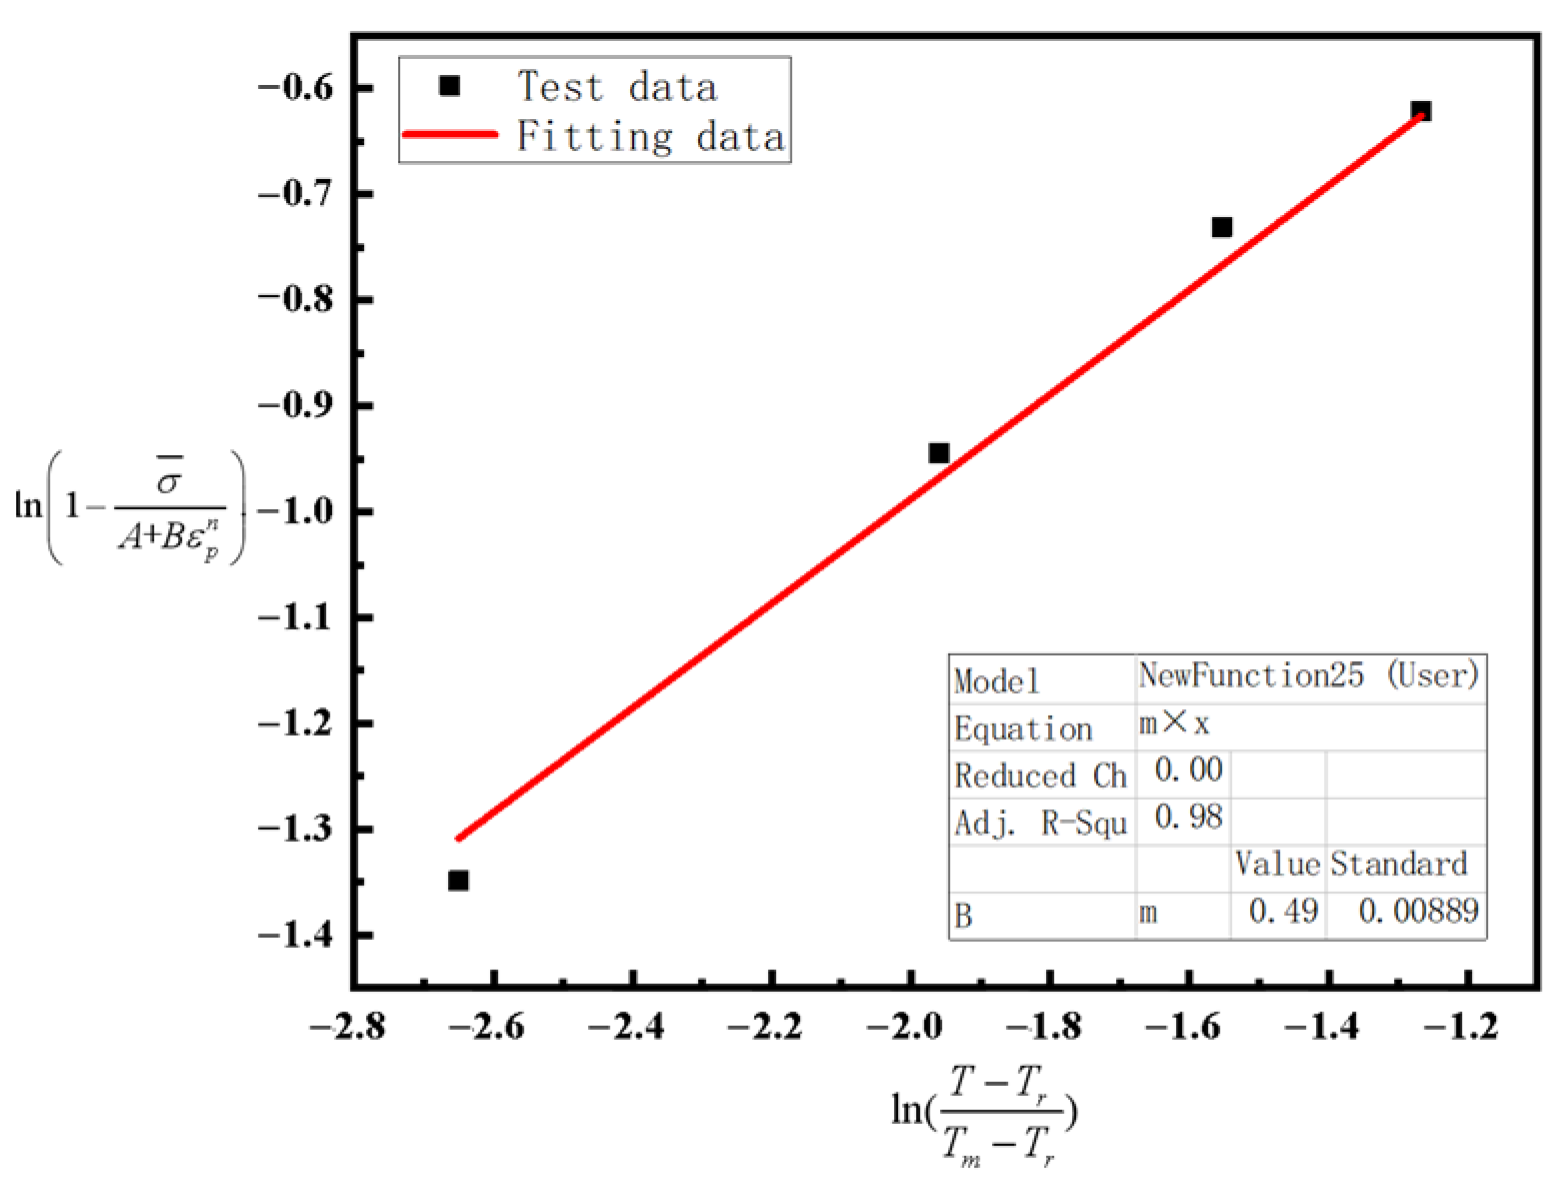
m = 0.4937. To ensure the accuracy of the simulation and test, the loading conditions of the simulation model were the same as the actual load of the quasi-static tensile test, which was that one side of the tensile specimen was fixed and the other side was set a tensile load of 2.4 mm/min. The analysis step was set at the same time as the corresponding pull-off time for the different tensile specimens, and the strain at the moment of fracture for the different specimens could be obtained in this way. The simulation results depicting the fracture strain of various specimens at the moment of fracture are illustrated in
Figure 13.
3.2. Determination of Fracture Parameters D1–D5
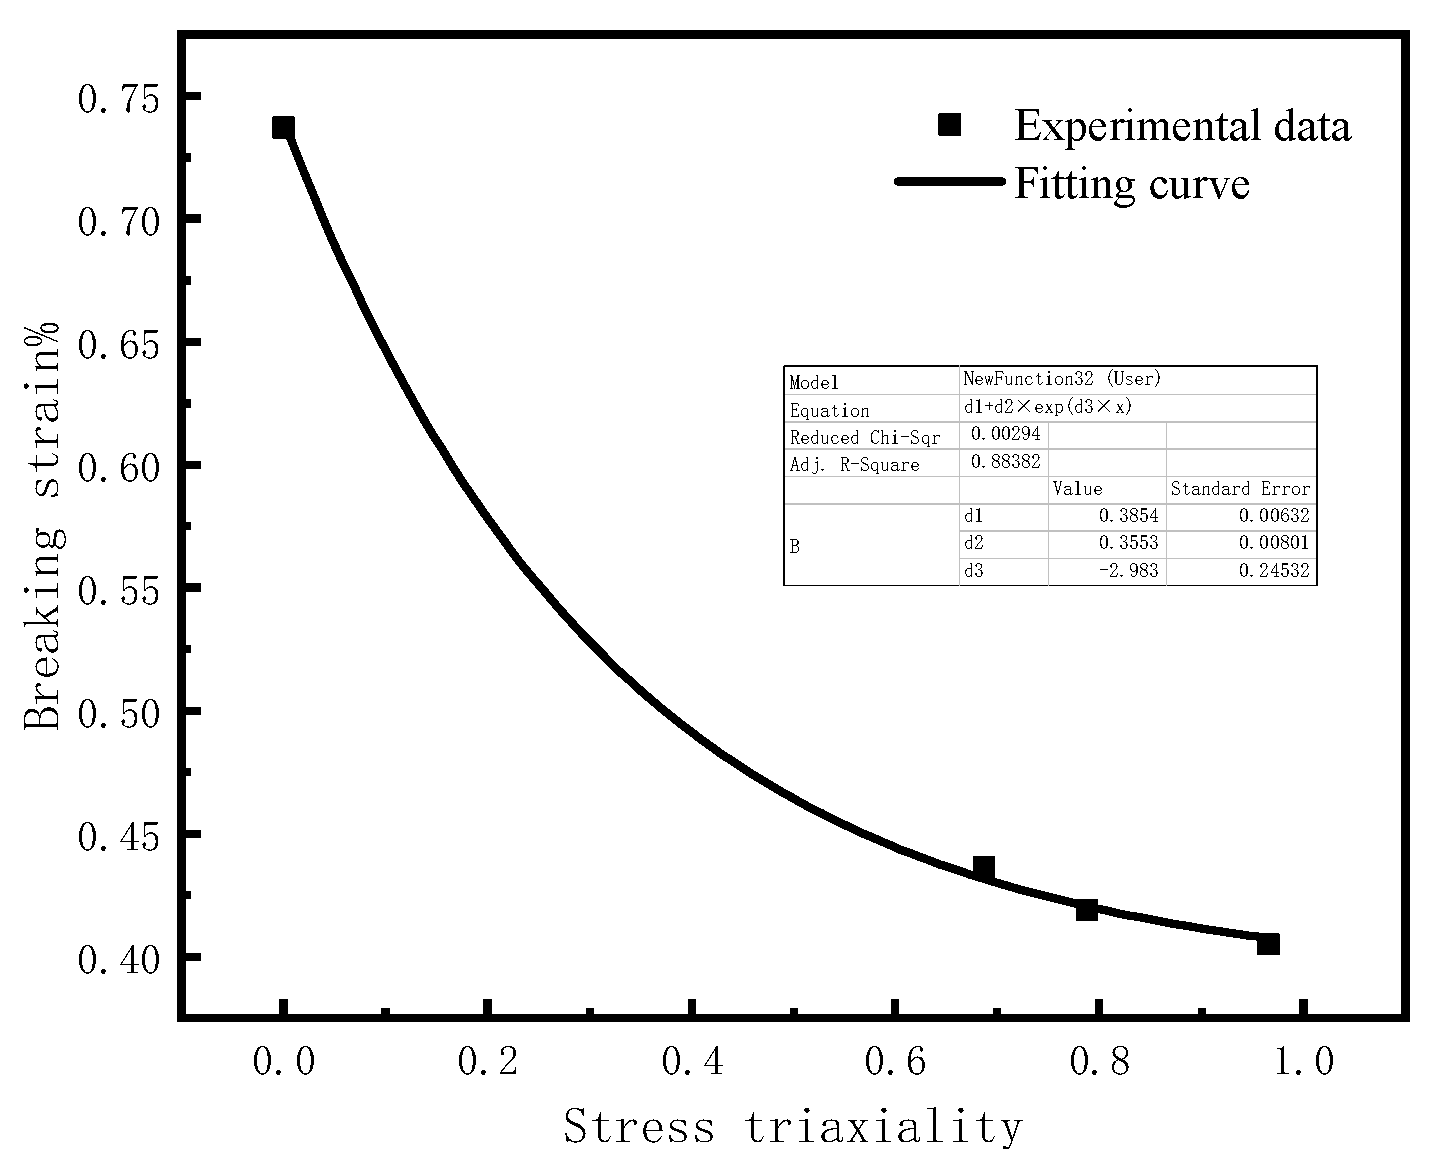
The stress triaxiality and corresponding fracture strain data for different notched specimens could be obtained by conducting static notched tensile simulations and room temperature quasi-static notched tensile tests. Based on Equation (15), the resulting fracture data could be fitted, and the fracture failure fitting parameters
D1–
D5 could be determined by fitting. The fitting results are shown in
Figure 14. The fracture failure fitting parameters
D1 = 0.385,
D2 = 0.355, and
D3 = −2.98 could be obtained from the fitting. Meanwhile, by bringing the resulting fracture failure parameters
D1–
D3 into Equation (16) and Equation (17), the strain rate sensitive parameter
D4 and temperature sensitive parameter
D5 could be determined, which are
D4 = 0.066 and
D5 = 1.599.
In summary, the parameters of the J–C failure model parameters for the weld material are D1 = 0.38549, D2 = 0.35535, D3 = −2.98347, D4 = 0.06632, and D5 = 1.59996.
4. Multi-Grain Grinding Simulation and Experimental Verification
To validate the effectiveness of the parameters determined for the 06Cr18Ni11Ti steel weld, the combination of FEM and experiment were employed. First, a FEM simulation model was built by using the determined parameters of J–C constitutive model and the J–C failure model. Then, a multi-grain grinding simulation model was built based on the W-M fractal dimension to analyze the influence of the grinding process parameters on the grinding effect; the simulation results using the determined material parameters were obtained. Finally, grinding experiments were conducted to verify the validity of the built simulation model and the parameters of the weld material.
4.1. Establishment of the Multi-Grain Grinding Simulation Model
4.1.1. Establishment of Grinding Wheel
The Alicona infinite focus G5 surface morphometer was used to measure the surface roughness of the grinding wheel, the mentioned equipment is shown in
Figure 15a. The overall grain size of the grinding wheel is consistent with the distribution pattern of the grains; therefore, the side of the grinding wheel was chosen for measurement. The surface morphology of the grinding wheel obtained from the measurement is shown in
Figure 15b. From
Figure 15b it can be seen that the surface roughness of the grinding wheel is relatively large, and the measured morphology exits a large distorted area, which complicates the reverse modeling process. Therefore, the W-M fractal dimension is used to construct a multi-grain grinding wheel. By measuring the surface roughness of the grinding wheel, it can be seen the surface roughness of the grinding wheel is
Ra 11.7 μm. The surface roughness measure result is shown in
Figure 15c.
Subsequently, using a scale factor of 0.04 for the W-M fractal dimension, the generated rough surface roughness is close to the surface roughness of the grinding wheel. Therefore, random spline curves were generated with a scale factor of 0.04 and a rough solid model was generated in 3D modeling software. Eventually, the rough solid model was imported into the finite element simulation software and transformed into the finite element simulation model. After cutting, a multi-grain grinding wheel with overall dimensions of 1 mm × 0.125 mm × 0.1 mm was generated. The mesh size of the grinding wheel is 0.02 mm, and the mesh element type is C3D4T. The establishing process of the grinding wheel is shown in
Figure 16.
4.1.2. Establishment of the Grinding Simulation
To ensure the accuracy of the simulation results, the arc length distance at different grinding depths is calculated by using Equation (18). The calculation results indicate that the corresponding arc length distances for grinding depths of 5 μm, 10 μm, and 15 μm are 0.948 mm, 1.34 mm, and 1.64 mm, respectively. Consequently, three sizes of weld specimen model were established, each with uniform dimensions of 0.2 mm in width and 0.8 mm in height, and lengths of 0.948 mm, 1.34 mm, and 1.64 mm for respective specimens.
where
l is the arc length of the grain;
ap is the grinding depth of the grain; and
ds is the diameter of the grinding wheel.
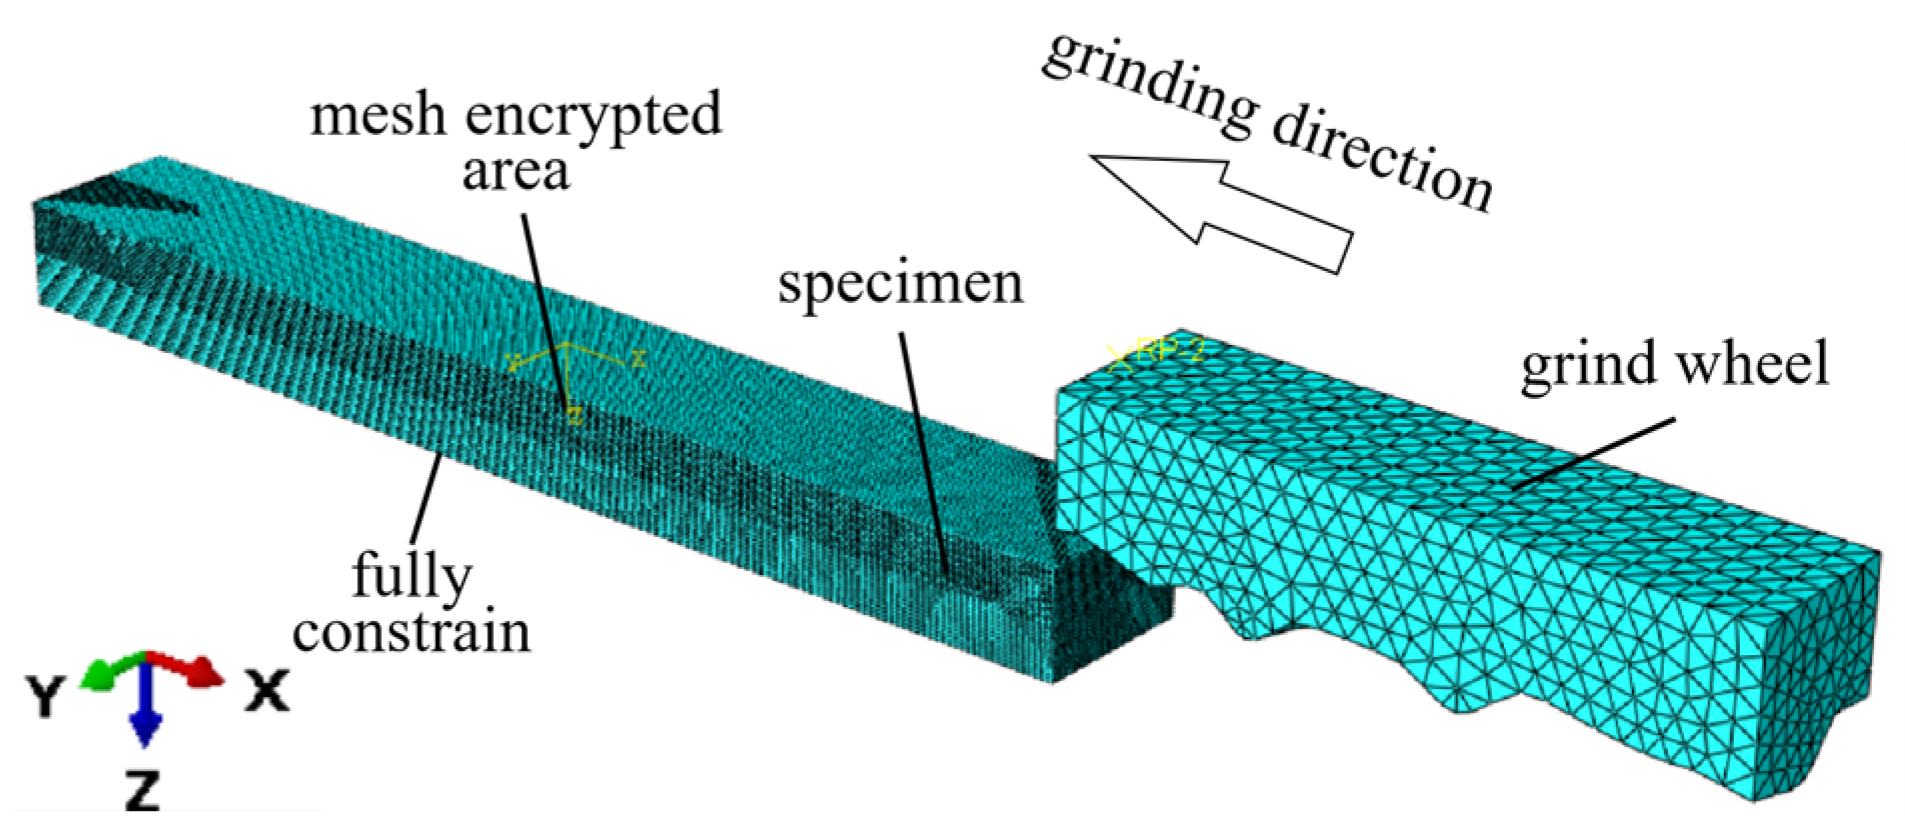
The mesh size of the area 0.1 mm deep from the specimen surface (mesh encrypted area) was 0.002 mm, and the mesh size of the remaining area was 0.004 mm. The mesh element type of specimen was C3D8RT.
In the simulation model, the grinding simulation process was simplified by only considering the material removal process, ignoring the problems in the grinding process such as wheel blockage. The grinding wheel was set to be a rigid body, ignoring the problem of wheel dropout and deformation. During the grinding process, the grinding wheel contacts the specimen, causing the material to deform and dislodge, thereby facilitating the removal of material. The contact between the grinding wheel and the removed region of the specimen was set as “surface-surface contact”. During the grinding process, assuming that the coefficient of friction at the contact surface between the grinding wheel and the specimen is uniform, it was set to 0.2 based on the relevant literature [
37]. Grinding heat was mainly generated by the friction between the grinding wheel and the specimen, shear forces, and the process of material plastic deformation. The bottom surface of the specimen was fully constrained. The grinding simulation model is illustrated in
Figure 17.
4.1.3. Model Material Parameters
The J–C constitutive model is mainly used to describe the mechanical behavior of materials at high temperatures and high strain rates. During the grinding process, material deformation and removal as well as high temperatures are generated, so the J–C constitutive model was used in the built simulation model [
38,
39]. The parameters of the weld material are based on the J–C constitutive model parameters determined in this paper, which are shown in
Table 1 and
Table 2.
In addition, considering the influence of the grinding temperature on the material parameters during the grinding process, to avoid and ignore the effect of temperature parameters, Jmatpro was used to calculate the thermal property parameters of the material as the thermal property parameters for the simulation, as shown in
Table 3.
The material of the multi-grain grinding wheel is white corundum, and the material parameters are shown in
Table 4.
4.2. The Design of Grinding Experiments
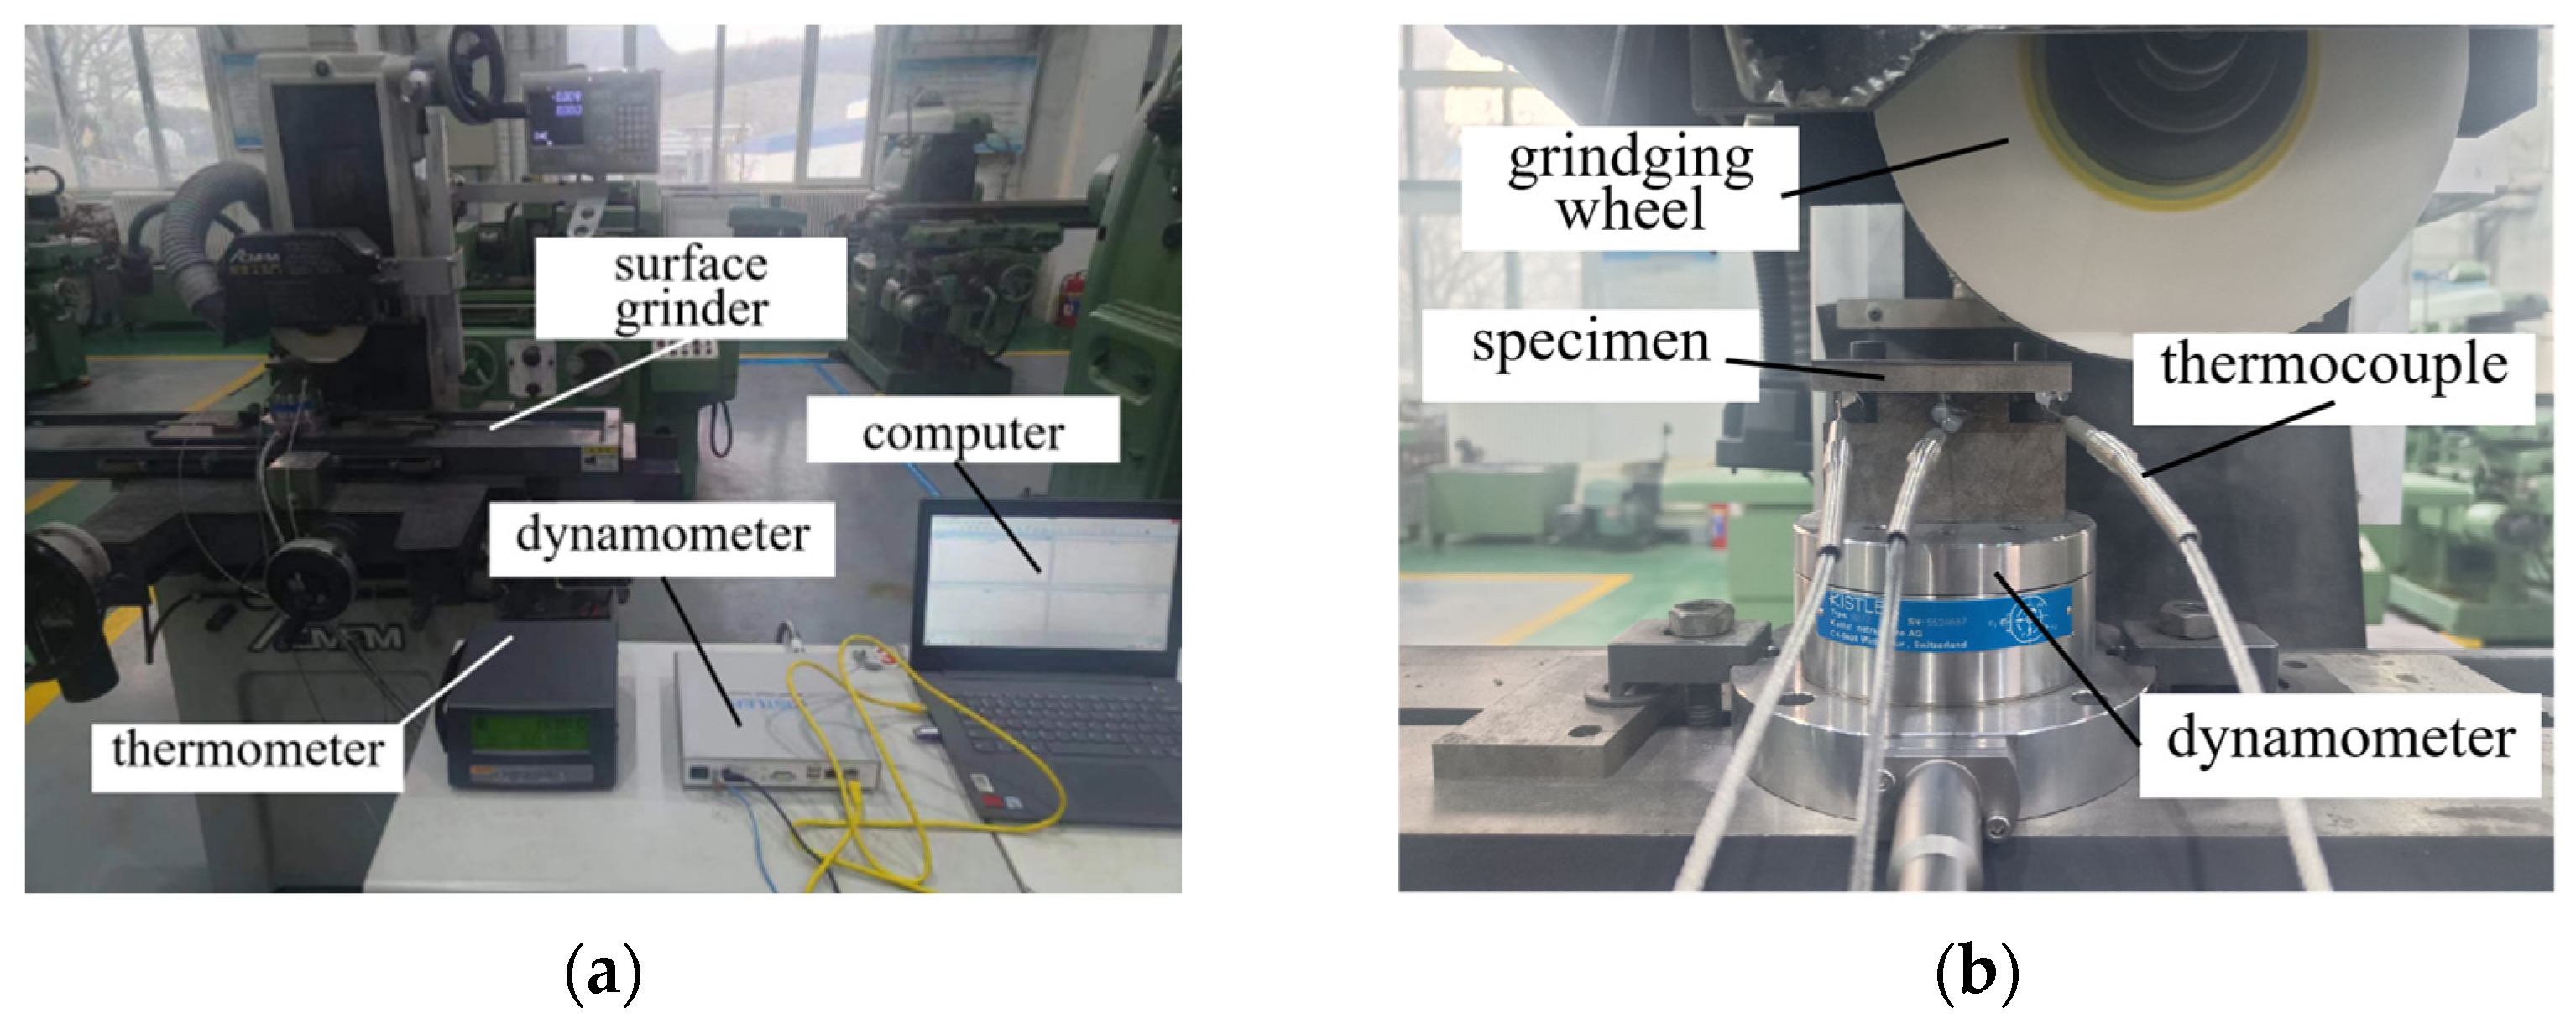
To validate the established simulation model and the determined parameters of the J–C constitutive model and J–C failure model, the grinding experiments were conducted on the 06Cr18Ni11Ti weld using a 120-mesh grinding wheel. The chosen grinding wheel is a flat grinding wheel, the binder of the grinding wheel is ceramic, and the material of the grinding wheel is white corundum, with a grain size of 100–125 μm, the grinding wheel is medium density. During the experiments, the temperature and grinding force were monitored using a thermometer and a dynamometer, respectively, with data recorded and stored via computer. The experimental devices are shown in
Figure 18a.
Before the grinding process, specimens were cut to the appropriate size using wire-cutting, and these cut specimens were fixed on the thermometer and dynamometer. The type of dynamometer is Kistler 9272 (Kistler, Winterthur, Switzerland), which is mounted on the grinding machine, and the specimen is fixed to the upper surface of the dynamometer using a fixture. The type of thermometer is a 1529 Chub-E4 (Fluke Calibration, Everett, WA, USA), and the measuring end was a KPS-2520-K thermocouple (Jiangsu Kaipusen Energy Co., Ltd., Lianyungang, China). Due to the limitation of the shape of the specimen and to prevent the thermocouples from being damaged during the grinding process, three sets of thermocouples were fixed at the bottom surface of the specimen at a distance of 10 mm from the surface of the specimen during measurement. As assembly method is shown in
Figure 18b.
In this paper, three grinding speeds (10 m/s, 15 m/s, and 20 m/s) and three grinding depths (5 μm, 10 μm, and 15 μm) were selected for combination to investigate the effects of different grinding process parameters on temperatures and grinding forces. The specific combinations of process parameters are detailed in
Table 5.
4.3. Analysis of Grinding Experimental Results
4.3.1. Analysis of Grinding Temperature
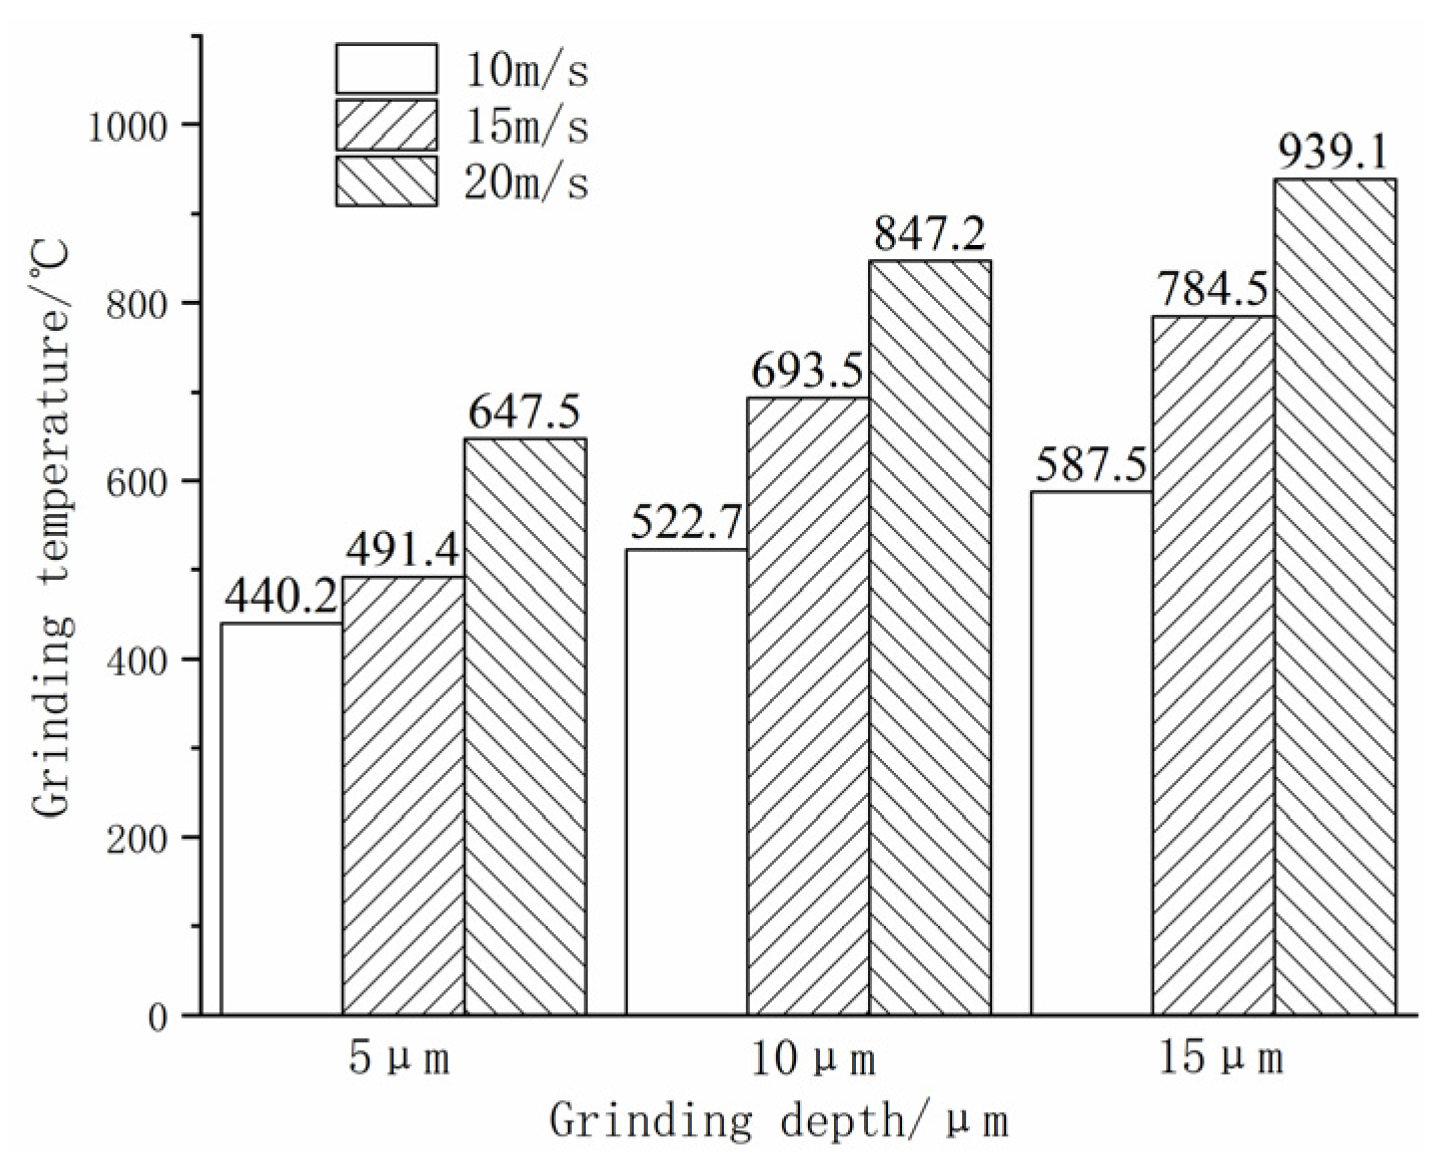
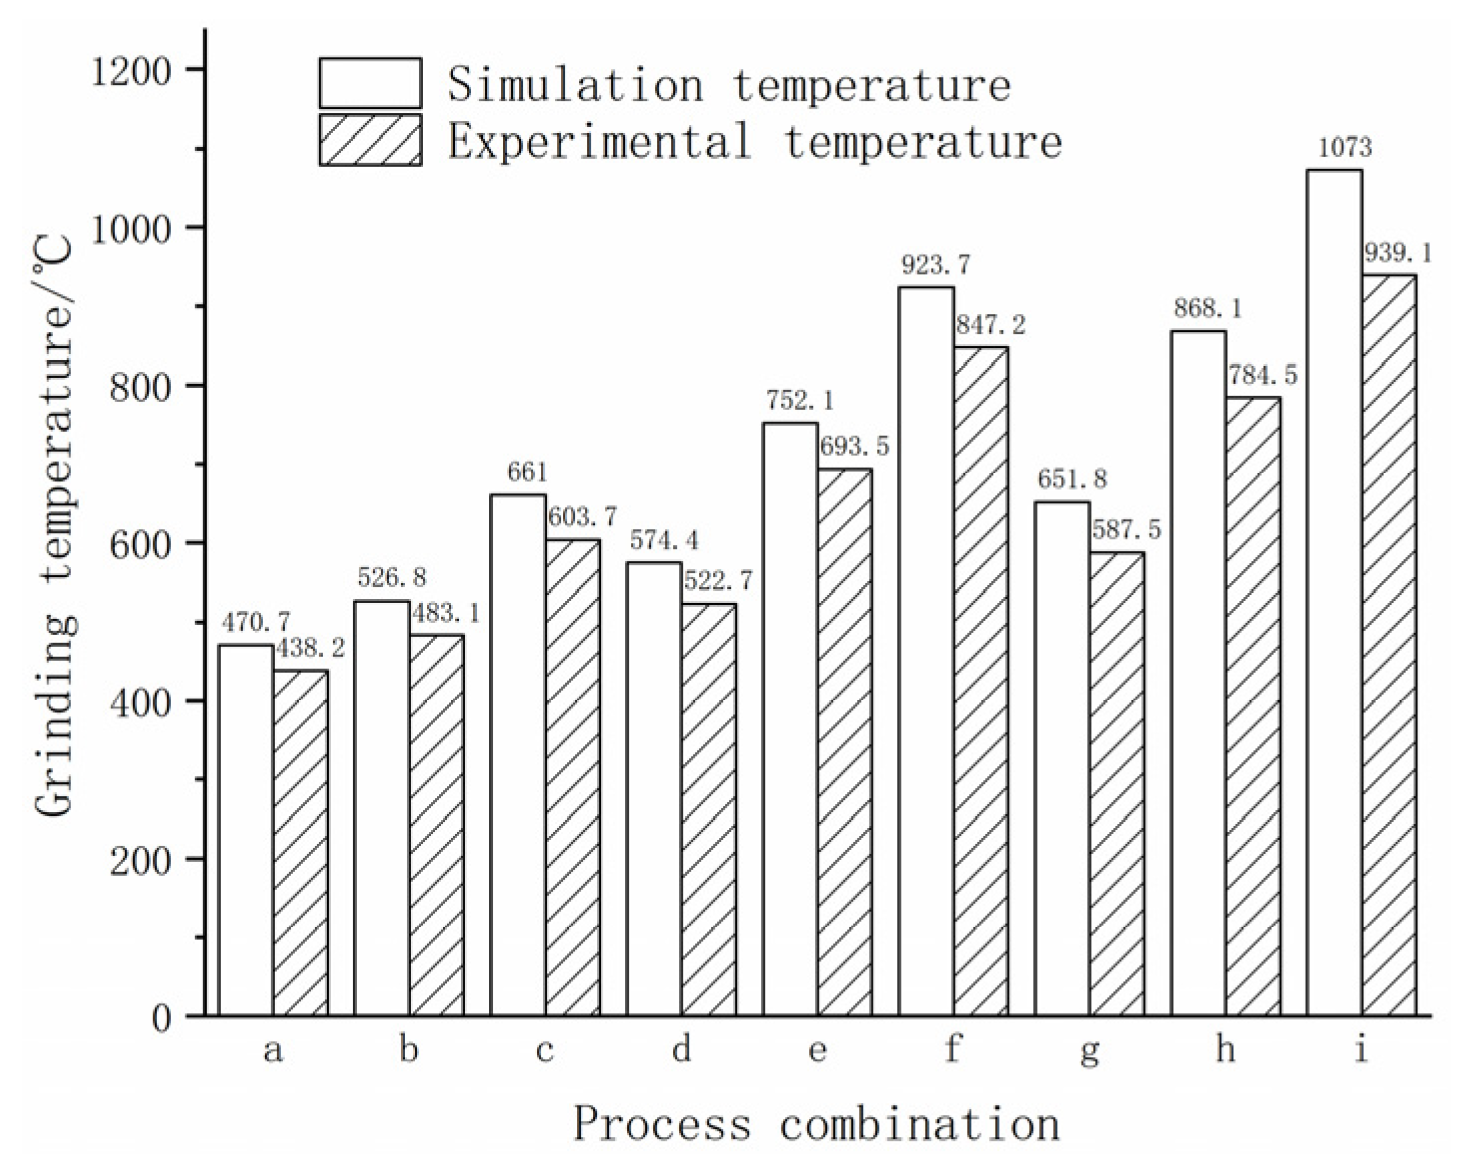
The results of the detection of the grinding heat generated by grinding with different process parameters are shown in
Figure 19. As can be seen in
Figure 18, the grinding heat tends to increase with increasing grinding depth. Under the same grinding speed conditions, the rate of temperature increase tends to be fast at first and then slower. Under the same grinding depth condition, the grinding temperature increases with the grinding speed. At the same time, when the grinding depth is 5 μm, the grinding temperature increases by 51.2 °C and 126.1 °C, respectively; with the increase in grinding speed, the grinding temperature increases faster; when the grinding speed increases from 10 m/s to 15 m/s, the grinding heat increases from 440.2 °C to 617.5 °C with a relative increase of 40.28%, which is the smallest in temperature increase among three grinding depth.
This is mainly because of the increase in relative motion speed between the grinding wheel and weld specimen as the grinding speed increases. This results in a greater number of grains participating in the grinding process of the weld material per unit of time, thereby enhancing the production of frictional heat between the specimen surface and the grains, consequently accelerating heat accumulation. Furthermore, the contact time between grains and the weld specimen surface is relatively shortened with the increase in grinding speed, leading to less effective conduction of the generated heat by contact with grains, causing the grinding heat to mainly flow into the specimen. Furthermore, the contact time of grains and the weld specimen surface is relatively shortened with the increase in grinding speed, leading to less effective conduction of the generated heat by contact with grains, causing the grinding heat to mainly flow into the specimen. However, the volume of generated abrasive dust increases with the number of effective grains per unit of time, which increases the efficiency of the thermal dissipation of the abrasive dust. Moreover, the rate of heat dissipation from the material is considerably smaller than the rate of heat accumulation, ultimately resulting in an increase in the temperature on the weld surface as the grinding speed increases during the grinding process. In addition, the amount of material deformation, material removal, and friction heat produced by grinding is also relatively small due to the small grinding depth. Therefore, the grinding temperature rises the least with the increase in grinding speed from 10 m/s to 15 m/s with a grinding depth of 5 μm.
When the grinding depth is 10 μm and 15 μm, with the increase in grinding speed, the grinding temperature rises from 522.7 °C to 847.2 °C and from 587.5 °C to 939.1 °C, respectively, with a relative increase of 62.08% and 59.85%. The temperature elevation is similar between the two grinding depths. As the grinding speed increases with the same grinding depth, the amount of material removed per unit of time increases, resulting in more pronounced material deformation due to plowing. The aforementioned effects increase the heat generation per unit of time, which leads to more heat transfer into the grinding region, resulting in a higher temperature in the material’s surface area. Meanwhile, with the further deepening of the grinding depth, the contact area and contact time period between the grains and the specimen surface all increase, which enhances the friction between the grains and the material, so that more frictional heat is generated on the surface of the specimen, which further leads to an increase in the heat inflow into the surface of the processed specimen. Although the contact area between the processed material and the grains increases, the heat transfer performance of the processed specimen and the grain material is limited, and the heat generated during the grinding process could not be rapidly dissipated into the surrounding environment, resulting in a significant increase in the temperature of the processed weld material. Additionally, due to the sharp increase in the surface temperature of the weld material, the thermal softening property of the material improves, reduces the yield strength, and enhances the cutting performance, which results in the decrease in grinding force during the process, and the generated grinding heat would also relatively decrease. Therefore, when the grinding depth is 10 μm and 15 μm, the temperature elevation is relatively similar with an increase in grinding speed. When the grinding speed is the same, the grinding temperature increases with the grinding depth, and the rate at which the grinding temperature increases shows a tendency to change first rapidly and then slowly.
4.3.2. Analysis of Grinding Force
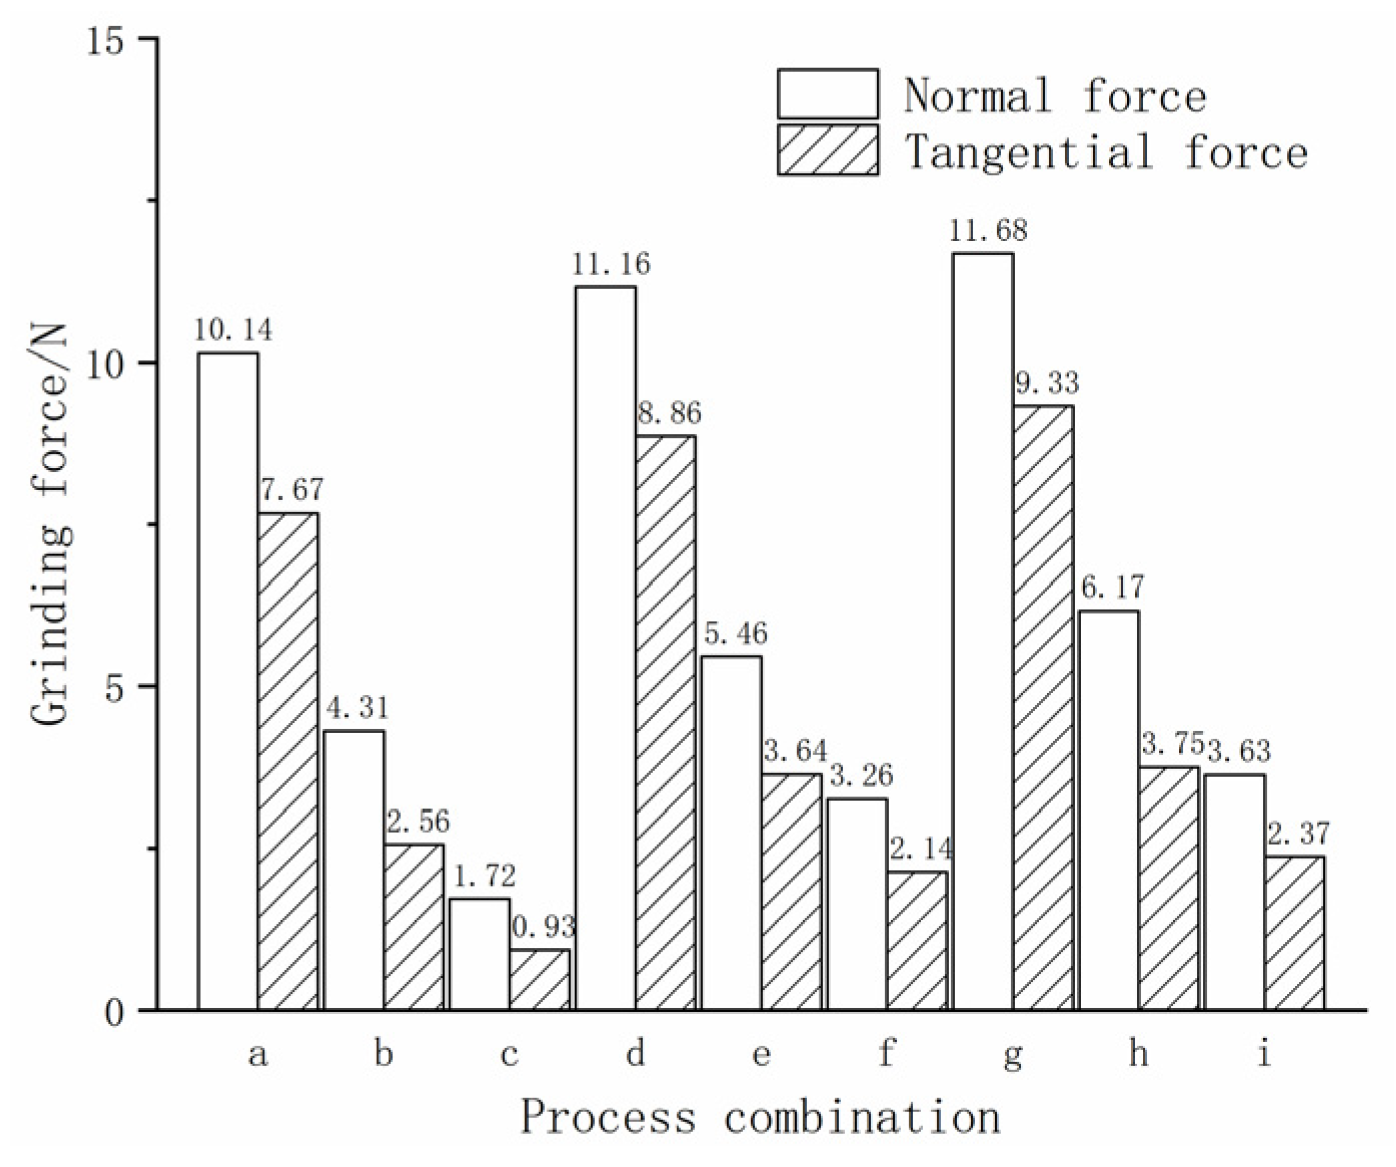
The test results for the grinding force generated by grinding with different process parameter combinations are shown in
Figure 20. As can be seen in
Figure 20, the grinding force shows a tendency to increase as the grinding depth increases. At the constant grinding depth, the grinding force decreases significantly with the increase in grinding speed. At a grinding speed of 10 m/s (a, d, g three groups), the grinding force is the max at different grinding depths. When the grinding depth is 5 μm (a, b, c three groups), the grinding force decreases significantly with the increase in the grinding speed, in which the normal grinding force decreases from 10.14 N to 1.72 N, with a decrease of 83.0%, and the tangential grinding force decreases from 7.67 N to 0.93 N, with a decrease of 87.9%. When the grinding depth is 10 μm and 15 μm, the reduced magnitude of grinding stress reduces from that of the grinding depth of 5 μm, where the max reduction in normal grinding force is 68.92%, and the max reduction in tangential grinding force is 74.59%. This is because under the same grinding depth, with the increase in grinding speed, the relative speed between the grinding wheel and the surface of the specimen also increases and the friction coefficient also decreases, which weakens the surface frictional action experienced by the grinding wheel against the material. In addition, due to the increased grinding speed, the number of grains involved in grinding per unit of time increases and the average grinding volume of a single grain decreases. Meanwhile, the grinding temperature also increases with the increase in grinding speed, which enhances the thermal softening of the material and decreases the material’s yield strength, and the machinability is also enhanced. By combination of the aforementioned reasons, the grinding force decreases with increasing grinding speed at the same grinding depth.
When the grinding speed is 20 m/s (c, f, and i three groups), with the increase in grinding depth, the grinding force increases obviously. At the same time, the normal grinding force increased from 1.72 N to 3.63 N, with an increase of 111.04%, and the tangential grinding force increased from 2.14 N to 2.37 N, with an increase of 10.75%. This is mainly because the volume of the material removed by grains in a single pass increases with the increase in the grinding depth, and the volume of the removed material in unit time also increases, which requires the grinding wheel to provide a larger grinding force to overcome the resistance of material removal deformation. Meanwhile, as the contact area of grinding increases, the friction generated during the grinding process also increases, which would also increase the grinding force generated by the grinding wheel during grinding.
4.4. Discussion of the Validity of the Simulation Model
From the analysis of the test results, it can be seen that the grinding force generated during the grinding process is affected by the grinding process parameters and the grain distribution. The test results can also have significant errors due to objective factors such as vibrations from the processing device. Therefore, the grinding force could not effectively evaluate the validity of the built simulation model and the determined constitutive parameters of the weld material that are influenced by the combined effects of the grinding temperature and the material parameters. Moreover, the temperature measurement is less affected by objective factors in the machining process, which could objectively reflect the true state of grinding. Therefore, the grinding temperature was chosen as the evaluation index to verify the validity of the built simulation model and the determined constitutive parameters of the weld material by comparing the results of the simulation and experiment.
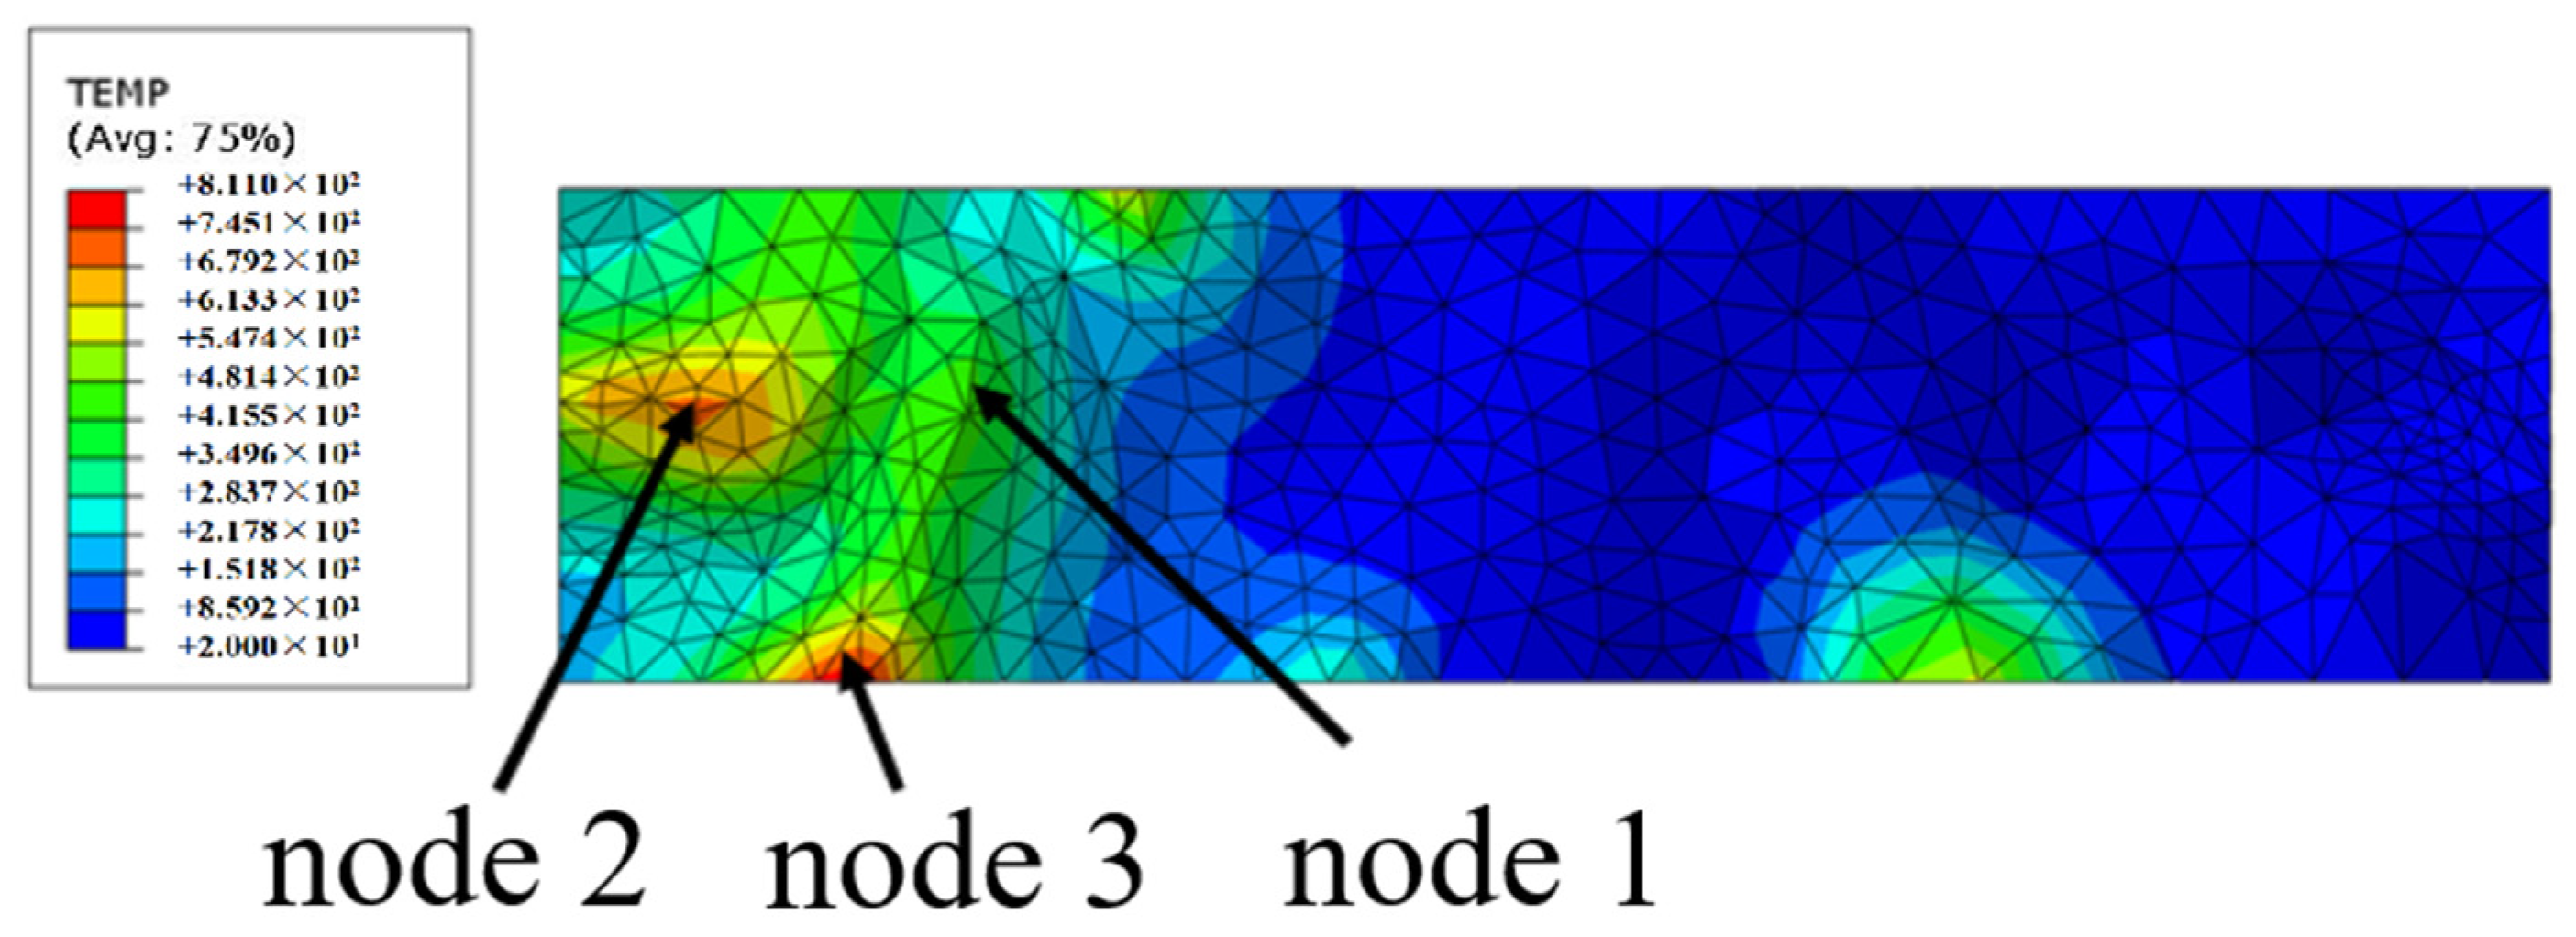
During the grinding simulation process, the presence of a relatively large number of grinding grains significantly affects the temperature distribution on the surface of the specimen, resulting in an uneven temperature distribution on the surface of the weld. Meanwhile, there are several singularities of higher temperature on the surface of the weld material. The reasons mentioned above could lead to significant discrepancies between the simulation and the experimental results. Additionally, since the simulation process only considers the heat transfer occurs between the grinding wheel and the specimen, it could be assumed that the temperature on the surface of the grinding wheel is consistent with that on the surface of the specimen. Therefore, the temperatures at the nodes on the surface of the grinding wheel were selected as the focus for analysis in the paper.
The height and distribution of grains on the surface of the grinding wheel exhibit a certain degree of randomness and inhomogeneity, which would lead to a corresponding inhomogeneity in temperature distribution on the grinding wheel surface during the grinding process, that is, the temperature of the regions near the specimen is higher than that of the regions far from the specimen. The multi-grain grinding wheel model built in this paper has similar randomness and inhomogeneity with the grinding wheel, and the simulation effect is shown in
Figure 21. By analyzing the simulation results shown in
Figure 21, it can be seen that the temperatures at node 2 and node 3 are relatively high, while the temperature at node 1 is relatively low. However, the position of node 1 is relatively low on the surface of the grinding wheel, and node 3 is too close to the edge of the grinding wheel, which means there is uncertainty in the temperature at both nodes. Therefore, node 2 was selected as the target for analyzing the grinding temperature, and the simulation results at this node are used for further analysis.
The grinding temperatures measured by simulation and experiment for different processing parameters are shown in
Figure 22. From
Figure 22, it can be seen that the trends of the variation in the simulation and experimental temperatures are similar, and the simulation temperature is higher than the experimental temperature. This is mainly due to fact that the simulation process only considered the temperature variation in the specimen and that the grinding heat could only be transferred through the abrasive dust, the processed specimen, and the grinding wheel three ways. The process of heat dissipation of grinding heat in the surrounding air was neglected, which results in a deviation in the process of heat dissipation in the simulation from the actual machining process.
Meanwhile, although the external conditions during the temperature measurement process have a low impact on the temperature measurement results, there are still several factors that affect the accuracy of the temperature measurement during the grinding process, such as the fact that, due to the limitations of the test device, the thermocouple for testing temperature is not fixed directly on the surface of the specimen, and the actual testing temperature is the temperature of the base point at a certain distance from the grinding surface, resulting in a lower temperature than the temperature at the grinding surface due to the loss of heat conduction. Furthermore, during the actual grinding process, the airflow rate has a severe effect on the dissipation of grinding heat, resulting in a large temperature reduction during the grinding process. The combination of the mentioned factors contributes to experimental temperature being consistently lower than simulation results.
Moreover, by comparison, it is evident that the error between the simulated and measured temperatures increases with the grinding depth. Specifically, analysis reveals that at a grinding depth of 5 μm (a, b, c three groups), the errors between simulation and experiment are 6.97%, 7.20%, and 7.04%, respectively. At a grinding depth of 10 μm (d, e, f three groups), the errors between simulation and experiment are 9.89%, 8.45%, and 8.99%, respectively. And at a grinding depth of 15 μm (g, h, and i three groups) the errors between simulation and experiment are 10.94%, 10.66%, and 14.2%, respectively. From the analysis of the 9 groups of results, it can be seen that the error values between simulation and experiment are fall within the range of 6.97% to 14.2%, with an average error of 9.37%. The relatively small error values indicate that the grinding simulation model built in this paper could efficiently simulate the grinding process. What’s more, small error values demonstrate that the parameters determined for the J–C constitutive model and the J–C failure model are all accurate.


