Abstract
Hydrostatic bearings are frequently used for moving large structures smoothly and precisely. In such applications, difficulties with manufacturing, transportation, and assembly arise. The safety and precision of the entire supported structure depend on the accuracy of the hydrostatic bearing alignment. There are several suitable methods for its alignment, yet it is not clear which method can achieve the highest bearing precision. This study provides a comparative experimental assessment of the three methods. The measurements were performed on a hydrostatic bearing test rig with independent positioning of the pads. Conventional measuring devices, a pressure distribution alignment method, and an optical method, OCMM (optical coordinate measuring machine), were compared. The accuracy of the selected methods and the difficulty of the aligning process were included in the comparison. The OCMM method was able to achieve an accuracy 1.6 times higher relative to the pressure method and 6 times higher compared to conventional measuring devices. This method is versatile and can be applied for a wide range of bearing sizes.
1. Introduction
Hydrostatic bearings were first introduced by the engineer L. D. Girard in 1851 [1]. The original bearing was driven by pressurized water and was used in railway transport. This pioneering innovation was publicly unveiled at the prestigious Industrial Exhibition in Paris in 1878 [2]. The hydrostatic bearing working principle is based on a complete separation of the sliding surfaces by a lubricating film [3,4,5,6,7,8]. The external pressurized lubricant supply allows for operation even at zero speed [9]. Hydrostatic bearings are often used in combination with hydrodynamic bearings to increase safety and stability during start and stop phases [2,10]. Compared to hydrodynamic bearings, hydrostatic bearings operate with a relatively thick lubricating film [11].
Hydrostatic bearings exhibit exceptional load-carrying capacity [12] and a high degree of stiffness, thereby ensuring the precision and stability requisite for accurate machinery [13]. Additionally, the movement is performed with minimal frictional losses and extremely low wear [14]. They are often used in applications with low rotational speeds, unlike in the case of hydrodynamic bearings.
On the contrary, hydrostatic bearings require higher initial cost. The design of the bearing involves consideration of the hydraulic system and its components [15]. While the bearings themselves experience minimal energy losses [8], the hydraulic pump demands a continuous energy supply to deliver pressurized lubricant to the bearing. At the same time, the hydraulic system is, in part, more prone to failure. Despite these limitations, hydrostatic bearings find extensive utility in various fields such as spindles [16], tables and guides [3], machine tools, antennas, and telescopes [17], where the advantages outweigh the disadvantages.
In the case of large-scale bearings reaching sizes up to tens of meters, it is not possible for some parts to be created in one piece or to secure desirable machining precision. Moreover, they are difficult to transport and assemble [18]. Still, the sliding surface of the bearing requires very high geometric accuracy [19].
One way to achieve higher precision is creating parts, such as a pad and slider, separately in substantial proportions. While this approach enhances the precision of the sliding surfaces and facilitates transportation, it introduces a new challenge of aligning the separate pads, what is in the literature [6,20] known as a multi-pad bearing (Figure 1). In the case of large bearings, it is necessary to ensure that the bearing pads are accurately aligned [21]. Incorrect positioning of the sliding surfaces can result in a failure of the lubricating film thickness or a direct collision of the sliding surfaces [22,23].
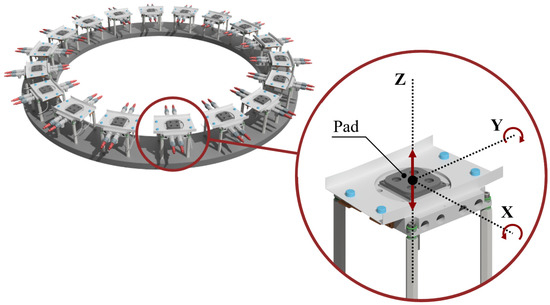
Figure 1.
Scheme of multi-pad construction of hydrostatic bearing.
It is possible to use a compliant bearing pad support. This configuration allows the sliding surface to adapt its position, including height and tilt, to compensate misalignments within the deformations of the compliant member [24]. While this approach reduces the impact of manufacturing and assembly inaccuracies on the bearing structure, it significantly decreases the bearing’s stiffness, rendering it unsuitable for high-precision applications [25].
In this case, where the stiffness of the bearing is crucial (machining centres, telescopes, etc.), compliant support cannot be used. In this case, the importance of accurate pad alignment is essential and directly affects the bearing precision and safety. Nonetheless, there is very limited knowledge of large-scale hydrostatic bearing pad alignment processes in the literature. The practical limits of the alignment methods are unknown; therefore, it is not clear which method should be chosen. There are three possible pad alignment methods, and each of them have advantages and disadvantages:
- Leveling using straightedge [26,27,28] and spirit level. This method is the simplest one and does not need any specialized equipment, which is an advantage. The disadvantage of this method is its complicated use on large scales.
- Leveling the pads using information about pressure from bearing recesses. The advantage of this method is that it can work online. The disadvantage is that the alignment is carried out based on indirect information and an estimation of the film thickness and could be compromised by the precision of machined sliding surfaces and pressure sensors.
- Leveling based on the coordinate measurement machine (CMM). Such systems are accurate (as the only method, its accuracy could be certified), but not portable, mainly in the case of large scales, and the leveling process can be time-consuming. Optical coordinate measurement machines can overcome the problem associated with portability and flexibility, ensuring sufficient accuracy [29]. Such methods offer the potential for greater alignment accuracy [30].
Although these advantages and disadvantages are straightforward, the evaluation of their real capabilities is not. The leveling of a large hydrostatic bearing several meters in diameter, with the desired accuracy in tenths of millimeters, or less, is a complicated task. Moreover, the accuracy of the first two methods is not clear. In this study, the question of which alignment method provides the highest precision for large-scale hydrostatic bearings was investigated by comparing these possible methods head-to-head.
2. Materials and Methods
In this section, a comprehensive overview of the experimental setup used in the presented paper is provided, along with the alignment methods used. A detailed description of the experimental device is discussed, detailing the instruments and sensors used.
2.1. Prediction of Lubricating Film Thickness
Analytical prediction of the lubricating film thickness was used to verify the proper design of the hydrostatic bearing pad geometry. This prediction was also used to evaluate the suitability of the selected alignment methods. The prediction follows the circular shape of a four-recessed pad,
where h is the thickness of the lubricating film, Q is the flow of the lubricant through the bearing, A is the projected area of the pad, μ is the dynamic viscosity of the used lubricant, F is the loading force, and is the flow factor. The recess pressure was again taken from the prediction relationship. The pressure prediction determines the carrying load capability of the hydrostatic bearing.
The equation involves the recess pressure , pressure coefficient , force per pad F, and the projected area of the pad A. The coefficients and correspond to the geometry of the pad. These coefficients are read from the graph [31].
2.2. Experimental Hydrostatic Bearing Device
The experimental hydrostatic bearing device (Figure 2) consisted of two pads, a load frame and a hydraulic unit. The pad geometry was designed with four circular recesses. Each of the recesses had a restrictor of the type throttling valve before the inlet. The lubricating film thickness measurement () was provided by contactless inductive proximity sensors with a precision of ±0.01 mm and a range of 3 mm. The pressure in the recess () was measured with a precision of ±0.56 bar. The load () was applied by tightening four threaded rods, at the end of which a force sensor with a precision of ±0.003 kN was mounted, and the load can be applied up to 60 kN. The hydraulic unit was designed to supply a flow rate () of up to 10 L/min at a pressure of 100 bar. The flow rate was measured by a flow meter with a precision of ±0.2 L/min.

Figure 2.
(A) Scheme of the experimental device 2PAD; (B) top view of experimental device 2PAD.
Prior to the actual measurement, elements generating errors in measured data were identified. The collective errors of the measuring elements are shown in the following table (Table 1) together with the measurement range.

Table 1.
Errors of the sensors used on the experimental device 2PAD.
There were also other errors in terms of calculation and manufacturing. Since the calculation consists of the reading coefficients from the graph, an 8% reading error was considered. At the same time, the pads were manufactured to a dimension with a certain tolerance. This tolerance affected the projected bearing area, which further affected the bearing load capacity. To determine the effect of the error on thickness and pressure, the maximum and minimum were entered into the corresponding prediction equation. Finally, the total measurement error was taken for the worst-case scenario. The sum of the calculated errors was determined using the raw data (the values displayed in the table were rounded after the calculation). Lubricating film thickness and recess pressure were selected as the most important hydrostatic bearing parameters to be assessed. The distribution of both thickness and pressure determined the safety of the bearing. Therefore, the influence of the defined errors on the thickness and pressure was considered (Table 2).

Table 2.
Effect of error on thickness and pressure from highest influence to lowest.
2.3. Conventional Measurement Instruments
Commonly available precise measuring devices were used for comparison. The instruments were needed to detect the relative tilt and relative height of the pads. To align the sliding surfaces, a straightedge made of an I-shaped profile with a length of 1 m was used. This shape guaranteed high stiffness in the direction perpendicular to the measured plane. The contacting surfaces were machined and grinded to an accuracy of 0.01 on both sides.
The tilt of the runner was measured in two axes with a precision spirit level. This spirit level had a magnetic seating surface, which ensured contact between the spirit level and the straightedge. The precision of the spirit level equated to 0.02 /. The first part of the alignment consisted of leveling (Figure 3) the outer edges of the pads. This helped to simplify the whole measurement. Then, the remaining two inner edges of the pads had to be adjusted in height. The angle in the two axes was constantly monitored, along with the contact of the straightedge with the pad surface.

Figure 3.
(A) Initial phase of planar aligning of the pad edges; (B) final state of the alignment by straightedge.
2.4. Pressure Method
The second pad alignment method assumes that the lubricating film thickness was distributed evenly across the bearing pad; the pressure in the recess must also be equally distributed. If a pressure decrease occurs in a recess, the sliding surfaces are likely to contact. Flow control device restrictors were mounted at each pad inlet, securing the same flow; thus, even pressure is expected in each recess.
Alignment was then carried out by adjusting the corner height of the pad until the recess pressures (Figure 4) were equalized (within the accuracy of the sensors). If there was a pressure difference, the pad was recalibrated. For this reason, it was necessary to know the recess pressure information and the lubricating film thickness from at least 3 places on the pad. Therefore, the recess inlets needed to be equipped with pressure gauges and proximity sensors needed to be placed on the sides of the pad. Pressure gauges with a precision of ±0.56 bar were used.
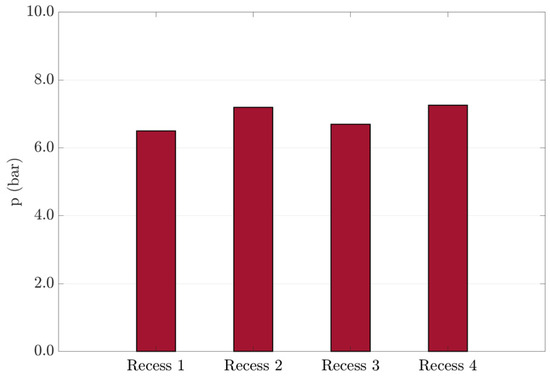
Figure 4.
Resulting pressure distribution of pad B after setting.
2.5. Optical Measurement
The alignment of the bearing pads can be assessed using a multi-point optical coordinate measurement machine (OCMM). The measurement result of such a system was 3D coordinates of special circular targets that adhered to the object’s surface which were, in this case, the corners of the pad. A plane, representing an ideal planar surface of the slider, was fitted into these corner points using the best-fit method (Figure 5), and their deviations were calculated. These deviations were used to correct the position of pads.
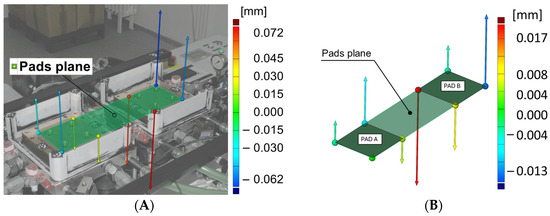
Figure 5.
(A) Measurement setup of OCMM method; (B) final iteration–measured deviations.
The OCMM measurement includes imaging the scene with a digital camera from different angles, making it possible to accurately triangulate circular targets. Such photogrammetric measurement systems are accurate, portable, and can be used to measure a wide range of measurement volumes, up to the order of meters. This makes the method suitable for both small and large bearings. Moreover, no dedicated sensors on the bearing are needed, which makes this option also economical. A disadvantage could be the lack of online pad alignment control.
In this work, the GOM TRITOP (Zeiss, Oberkochen, Germany) multi-point OCMM was used. It was based on a Nikon D300s camera (Nikon, Tokyo, Japan) equipped with a 24 mm Titanar objective (Schneider Kreuznach, Bad Kreuznach, Germany). The employed version of the TRITOP software was 7.5. Carbon fiber scale bars with approx. 1000 length and 3 mm targets were used. According to the quality indicators of the measurement project, the average distance of the image points to the respective reference points varied between 0.011 and 0.012 .
As the purpose of this work was to reveal the suitability of the alignment methods for hydrostatic bearings, there was a difference in the preparation phase of the experimental setup according to the respective method. The start-up phase of the bearing together with the data recording were already common. Thus, it will be possible to evaluate the change in the thickness with respect to the bearing initial condition and to determine the behavior of the bearing with manufacturing errors during operation. Also, the ambient conditions were unified to a total load of 20 and a total flow rate of 6 . After setting up each method, the slider was moved to predefined positions. There were 4 positions defined in this way. The starting position for alignment included sliding 50 mm in the direction of pad A, sliding 50 mm in the direction of pad B, and returning to the starting position. Since the slider moves in a real situation, this movement reflects the actual conditions and ensures the repeatability of the measurements.
3. Results and Discussion
The average lubricating film thickness and average recess pressure were evaluated for each series of measurements using a particular method (Figure 6). The first series of results showed a comparison of pad A and pad B relative to the reference value (red line). In all cases, the error intervals are taken as the cumulative error of the measurement, sensing, and data logging. The OCMM method was able to achieve thicknesses of 0.136 and 0.141 . Such bearing film thicknesses agreed with the predicted thickness value of 0.155 . The deviation was due to manufacturing inaccuracies of the pocket and slider, which were not included in the analytical prediction of the ideal condition. Further, the pressure method set the bearing to a lubricating film thickness of 0.133 and 0.128 . From a safety point of view, the bearing is at a lower lubricating film thickness but still in agreement with the prediction. In contrast, the method using conventional measuring devices had the largest variation in lubricating film thickness. Despite the relatively high thickness value of 0.144 , the bearing had the worst thickness distribution between the pads. Pad B was more heavily loaded, resulting in a low average thickness value of 0.109 due to unsuitable load distribution.
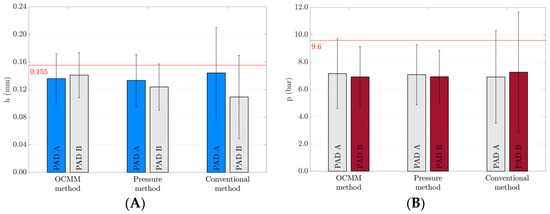
Figure 6.
(A) Distribution of the average lubricating film thickness; (B) average pressure distribution.
The second set of data is focused on pressures that are generally dependent on the carried load by the hydrostatic bearing. From this point of view, the pressure values were at the same level since the load was the same in all cases. However, compared to the analytical prediction (9.6 bar line), there is a significant difference. The fact that the prediction does not consider inputs other than force, pressure coefficient, and bearing area may play a major role. Effects such as the type of restrictor used and manufacturing tolerances are not included at all. In addition, the biggest influence on the error rate in the pressure prediction calculation comes from reading the pressure coefficient from the graph.
The alignment of the pads is crucial for even lubricating film thickness distribution and thus for overall bearing precision; the methods were also compared from this point of view. The deviation of the measured values is plotted in the graph (Figure 7). The smallest error range was achieved using the OCMM method. Here, it can be concluded that the possible compensation of the irregularity by lubricating film will not have a fatal effect on the bearing operation. A similar result was achieved with the pressure method, although there was already a greater dispersion of thickness values over the surface. Hydrostatic bearing aligned with conventional measuring instruments shows the greatest differences in film thickness. The risk of lubricating film failure is greater in a hydrostatic bearing aligned using this method. Important aspects are selected in the table (Table 3). In the case of maximum deviations, the worst-case situation is taken, where such an unfortunate combination of errors can occur.
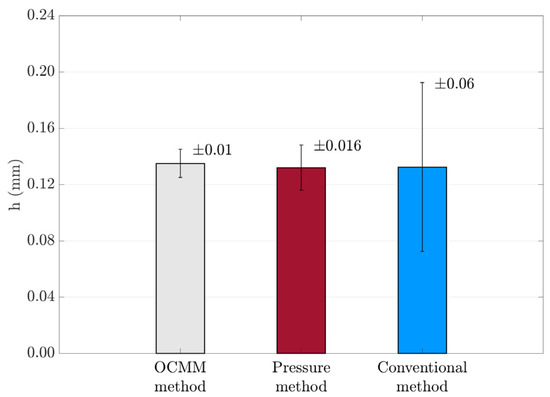
Figure 7.
Comparison of film thickness distribution over pad area.

Table 3.
Comparison of leveling methods.
Based on the obtained results, we can conclude that using the OCMM method can allow for the most precise bearing alignment from the selected methods to be achieved. This method aligned the bearing to an accuracy of ±0.01 mm. This degree of accuracy is particularly important in applications requiring high precision and high stiffness. One of the key benefits of the OCMM method is that the lubrication film thickness achieves the highest average values. This ensures that the bearing operates in an optimal mode, which not only increases its lifetime but also secures a high precision. A uniform distribution of the lubricating film thickness is desirable in cases where there are some errors in the system (manufacturing, assembly), and this contributes to the overall reliability of the bearing. The OCMM method uses sensors as a verification element. This use of sensors is associated with ensuring the consistency of the measurement. However, it is important to note that the OCMM method itself does not require the acquisition of information from sensors to perform. Bearing leveling included five measurement leveling iterations. In each iteration, the bearing was measured and fixed according to the result (using the assembly personnel estimation). The reason why so many iterations were needed was the four-support pad mounting system, which was statically indeterminate. Therefore, it was not clear how the shift in support influenced the overall position of the pad. However, in the future, the pad mounting system can be created with only three supports to reduce the number of iterations.
The pressure method is a different approach used to achieve relatively accurate bearing alignment. This method focuses on monitoring two key parameters: lubricating film thickness and pressure. To monitor these parameters, it is necessary to equip the bearing with sensors that allow for continuous data collection. The sensors allow for the actual lubrication film thickness and pressure to be monitored, allowing operators to react more accurately to changes and make necessary adjustments. This minimizes the risk of unwanted bearing wear or other lubrication-related problems. However, it must be considered that the pressure method is subject to sensor measurement errors. Inaccuracies in sensing lubricating film thickness or pressure can affect the accuracy of the entire process. This means that in addition to the advantages, this method can be sensitive to the quality and calibration of the sensors used.
The method of alignment using conventional measuring instruments enabled the bearing to be aligned to a sufficient condition. The lubricating film thickness reached positive values in all the measured points. However, there was a large variation in the lubricating film thickness values. Despite the theoretically good accuracy of the measuring instruments, the main limitation is the influence of the human factor. Significant thickness variations contribute to the instability of the whole bearing. Particularly in areas with lower film thicknesses, potential collisions and disruptions can occur. To minimize these uncertainties and achieve the highest degree of accuracy, the entire measurement procedure was repeated, with each repetition producing different results.
4. Conclusions
This study presents an experimental evaluation and assessment of alignment methods used for large hydrostatic bearings. The results indicate that it is possible to align the bearing using all the selected methods with a relatively high accuracy yet with different precision. This means that the averaged resulting film thickness values measured after the alignment are very similar, but the standard deviation from the average value differs significantly. The OCMM method showed the best results from the selected three approaches. It exhibited the best agreement with the predicted film thickness and recess pressure while maintaining minimal film thickness variation across the pad area. This method does not require pressure or proximity sensors for alignment and is versatile for various hydrostatic bearing sizes. The pressure alignment method offers a way to achieve acceptable alignment precision; nonetheless, it requires information about pressure and film thickness. This relates to the necessity of equipping many sensors on the bearing and subsequent processing and evaluation of the obtained data. The alignment of pads using conventional methods is greatly influenced by the human factor during the performance of the aligning procedure. Its final precision was six times lower than that of the OCMM method. As the results show, the error magnitude was close to the range of the film thickness; thus, it is not satisfactory. Additionally, the size of the measuring instruments and the complexity of manipulation increase with the bearing size accordingly. Therefore, conventional measurement devices can be used for initial bearing alignment. For the further exploration of alignment methods, optical methods appear to be a promising approach. This approach effectively considers any manufacturing or assembly errors in bearing alignment. Hydrostatic bearing precision can be further improved by implementing feedback control, which can effectively handle any residual misalignment.
Author Contributions
Conceptualization, J.F. and P.S.; methodology, J.F.; software, J.H.; validation, J.F., J.H. and M.M.; formal analysis, M.M.; investigation, J.F., J.H. and M.M.; resources, J.F.; data curation, J.F.; writing—original draft preparation, J.F.; writing—review and editing, M.M.; visualization, J.H.; supervision, P.S., I.K. and M.H.; project administration, P.S.; funding acquisition, P.S. All authors have read and agreed to the published version of the manuscript.
Funding
This research was carried out under the project FW03010357 with financial support from the state budget by the Technology Agency of the Czech Republic and the Ministry of Industry and Trade within the TREND Programme. The research was co-funded by Faculty of Mechanical Engineering, Brno University of Technology internal specific project FSI-S-23–8340.
Data Availability Statement
The data presented in this study are available on request from the corresponding author.
Conflicts of Interest
The authors declare no conflict of interest.
References
- Girard, L.D. Hydraulique Appliquée: Nouveau Système de Locomotion sur les Chemins de Fer; Bachelier: Paris, France, 1852. [Google Scholar]
- Rowe, W.B. Advances in Hydrostatic asnd Hybrid Bearing Technology. Proc. Inst. Mech. Eng. Part C Mech. Eng. Sci. 1989, 203, 225–242. [Google Scholar] [CrossRef]
- Rowe, W.B. Application of Hydrostatic Bearings. In Hydrostatic and Hybrid Bearing Design; Elsevier: Amsterdam, The Netherlands, 1983. [Google Scholar] [CrossRef]
- Bernstein, R.A.; McCarthy, P.J.; Raybould, K.; Bigelow, B.C.; Bouchez, A.H.; Filgueira, J.M.; Jacoby, G.; Johns, M.; Sawyer, D.; Shectman, S.; et al. Overview and status of the Giant Magellan Telescope project. In Ground-Based and Airborne Telescopes V; SPIE: Bellingham, WA, USA, 2014; ISBN 9780819496133. [Google Scholar] [CrossRef]
- Wasilczuk, M. Friction and Lubrication of Large Tilting-Pad Thrust Bearings. Lubricants 2015, 3, 164–180. [Google Scholar] [CrossRef]
- Rippel, H.C. Cast Bronze Hydrostatic Bearing Design Manual; Cast Bronze Bearing Institute: Cleveland, OH, USA, 1969. [Google Scholar]
- Loeb, A.M. The Determination of the Characteristics of Hydrostatic Bearings through the use of the Electric Analog Field Plotter. ASLE Trans. 1958, 1, 217–224. [Google Scholar] [CrossRef]
- Michalec, M.; Ondra, M.; Svoboda, M.; Chmelík, J.; Zeman, P.; Svoboda, P.; Jackson, R.L. A Novel Geometry Optimization Approach for Multi-Recess Hydrostatic Bearing Pad Operating in Static and low-Speed Conditions Using CFD Simulation. Tribol. Lett. 2023, 71, 52. [Google Scholar] [CrossRef]
- Wang, Y.; Liu, Z.; Cheng, Q.; Zhao, Y.; Wang, Y.; Cai, L. Analysis and optimization of nonlinear carrying performance of hydrostatic ram based on finite difference method and Runge–Kutta method. Adv. Mech. Eng. 2019, 11, 1687814019856128. [Google Scholar] [CrossRef]
- Bouyer, J.; Wodtke, M.; Fillon, M. Experimental research on a hydrodynamic thrust bearing with hydrostatic lift pockets: Influence of lubrication modes on bearing performance. Tribol. Int. 2022, 165, 107253. [Google Scholar] [CrossRef]
- Wen, S.; Huang, P. Principles of Tribology; Wiley: Hoboken, NJ, USA, 2012; ISBN 9781119214892. [Google Scholar]
- Bassani, R.; Piccigallo, B. Hydrostatic Lubrication; Elsevier: Amsterdam, The Netherlands, 1992; ISBN 044488498. [Google Scholar]
- Neichel, B.; Mouillet, D.; Gendron, E.; Correia, C.; Sauvage, J.F.; Fusco, T. Overview of the Eu-ropean Extremely Large Telescope and its instrument suite. arXiv 2018, arXiv:1812.06639. [Google Scholar]
- Stachowiak, G.; Batchelor, A.W. Engineering Tribology, 3rd ed.; Butterworth-Heinemann: Oxford, UK, 2006. [Google Scholar]
- Hamrock, B.J.; Schmid, S.R.; Jacobson, B.O. Fundamentals of Fluid Film Lubrication, 2nd ed.; CRC Press: Boca Raton, FL, USA, 2004; ISBN 0824753712. [Google Scholar]
- Fang, C.; Huo, D.; Huang, X. A comprehensive analysis of factors affecting the accuracy of the precision hydrostatic spindle with mid-thrust bearing layout. Int. J. Adv. Manuf. Technol. 2021, 114, 949–967. [Google Scholar] [CrossRef]
- Marchiori, G.; Rampini, F.; Ghedin, L.; Bressan, R. ELT design status: The most powerful ground telescope. In Ground-Based and Airborne Telescopes VII; SPIE: Bellingham, WA, USA, 2018; Volume 10700, ISSN 1996756X. [Google Scholar] [CrossRef]
- Michalec, M.; Svoboda, P.; Křupka, I.; Hartl, M. A review of the design and optimization of large-scale hydrostatic bearing systems. Eng. Sci. Technol. Int. J. 2021, 24, 936–958. [Google Scholar] [CrossRef]
- Zhang, P.; Chen, Y.; Zhang, C.; Zha, J.; Wang, T. Influence of geometric errors of guide rails and table on motion errors of hydrostatic guideways under quasi-static condition. Int. J. Mach. Tools Manuf. 2018, 125, 55–67. [Google Scholar] [CrossRef]
- Khonsari, M.M.; Booser, E.R. Applied Tribology; Wiley: Hoboken, NJ, USA, 2017; ISBN 9781118637241. [Google Scholar] [CrossRef]
- Jang, J.Y.; Khonsari, M.M. On the Characteristics of Misaligned Journal Bearings. Lubricants 2015, 3, 27–53. [Google Scholar] [CrossRef]
- Andre’s, L.S. Effects of Misalignment on Turbulent Flow Hybrid Thrust Bearings. J. Tribol. 2002, 124, 212–219. [Google Scholar] [CrossRef]
- Dhanola, A.; Garg, H.C. Tribological challenges and advancements in wind turbine bearings: A review. Eng. Fail. Anal. 2020, 118, 104885. [Google Scholar] [CrossRef]
- Van Beek, A.; Segal, A. Rubber supported hydrostatic thrust bearings with rigid bearing surfaces. Tribol. Int. 1997, 30, 47–52. [Google Scholar] [CrossRef]
- Michalec, M.; Polnický, V.; Foltýn, J.; Svoboda, P.; Šperka, P.; Hurník, J. The prediction of large-scale hydrostatic bearing pad misalignment error and its compensation using compliant support. Precis. Eng. 2022, 75, 67–79. [Google Scholar] [CrossRef]
- Yang, Y.; Wang, T.; Dai, L. Research on straightness calibration method of straight edge working face based on electronic level. In Proceedings of the MATEC Web Confernces: 5th International Conference on Advances in Materials, Machinery, Electronics (AMME 2022), Dali, China, 13–15 May 2022; Volume 363, p. 01013. [Google Scholar] [CrossRef]
- Elmelegy, A.; Zahwi, S. Comparative study of error determination of machine tools. Int. J. Adv. Manuf. Technol. 2023, 124, 4575–4602. [Google Scholar] [CrossRef]
- Gunnels, S. The Giant Magellan Telescope (GMT): Hydrostatic Constraints. In Ground-Based and Airborne Telescopes III; Stepp, L.M., Gilmozzi, R., Hall, H.J., Eds.; SPIE: Bellingham, WA, USA, 2010; Volume 7733. [Google Scholar] [CrossRef]
- Michalec, M.; Hurník, J.; Foltýn, J.; Svoboda, P. Contactless measurement of hydrostatic bearing lubricating film using optical point tracking method. Proc. Inst. Mech. Eng. Part J J. Eng. Tribol. 2023, 237, 76–84. [Google Scholar] [CrossRef]
- Zha, J.; Xue, F.; Chen, Y. Straightness error modeling and compensation for gantry type open hydrostatic guideways in grinding machine. Int. J. Mach. Tools Manuf. 2017, 112, 1–6. [Google Scholar] [CrossRef]
- Loeb, A.M.; Rippel, H.C. Determination of Optimum Proportions for Hydrostatic Bearings. ASLE Trans. 1958, 1, 241–247. [Google Scholar] [CrossRef]
Disclaimer/Publisher’s Note: The statements, opinions and data contained in all publications are solely those of the individual author(s) and contributor(s) and not of MDPI and/or the editor(s). MDPI and/or the editor(s) disclaim responsibility for any injury to people or property resulting from any ideas, methods, instructions or products referred to in the content. |
© 2024 by the authors. Licensee MDPI, Basel, Switzerland. This article is an open access article distributed under the terms and conditions of the Creative Commons Attribution (CC BY) license (https://creativecommons.org/licenses/by/4.0/).