Review

The Generation, Measurement, Prediction, and Prevention of Residual Stress in Nickel-Based Superalloys: A Review

1
School of Mechanical Engineering, Xi’an Jiaotong University, Xi’an 710049, China
2
State Key Laboratory for Manufacturing Systems Engineering, Xi’an Jiaotong University, Xi’an 710049, China
3
Science and Technology on Plasma Dynamics Laboratory, Air Force Engineering University, Xi’an 710038, China
*
Author to whom correspondence should be addressed.
Machines 2024, 12(10), 715; https://doi.org/10.3390/machines12100715
Submission received: 30 August 2024 / Revised: 20 September 2024 / Accepted: 6 October 2024 / Published: 9 October 2024
(This article belongs to the Section Material Processing Technology)

Abstract

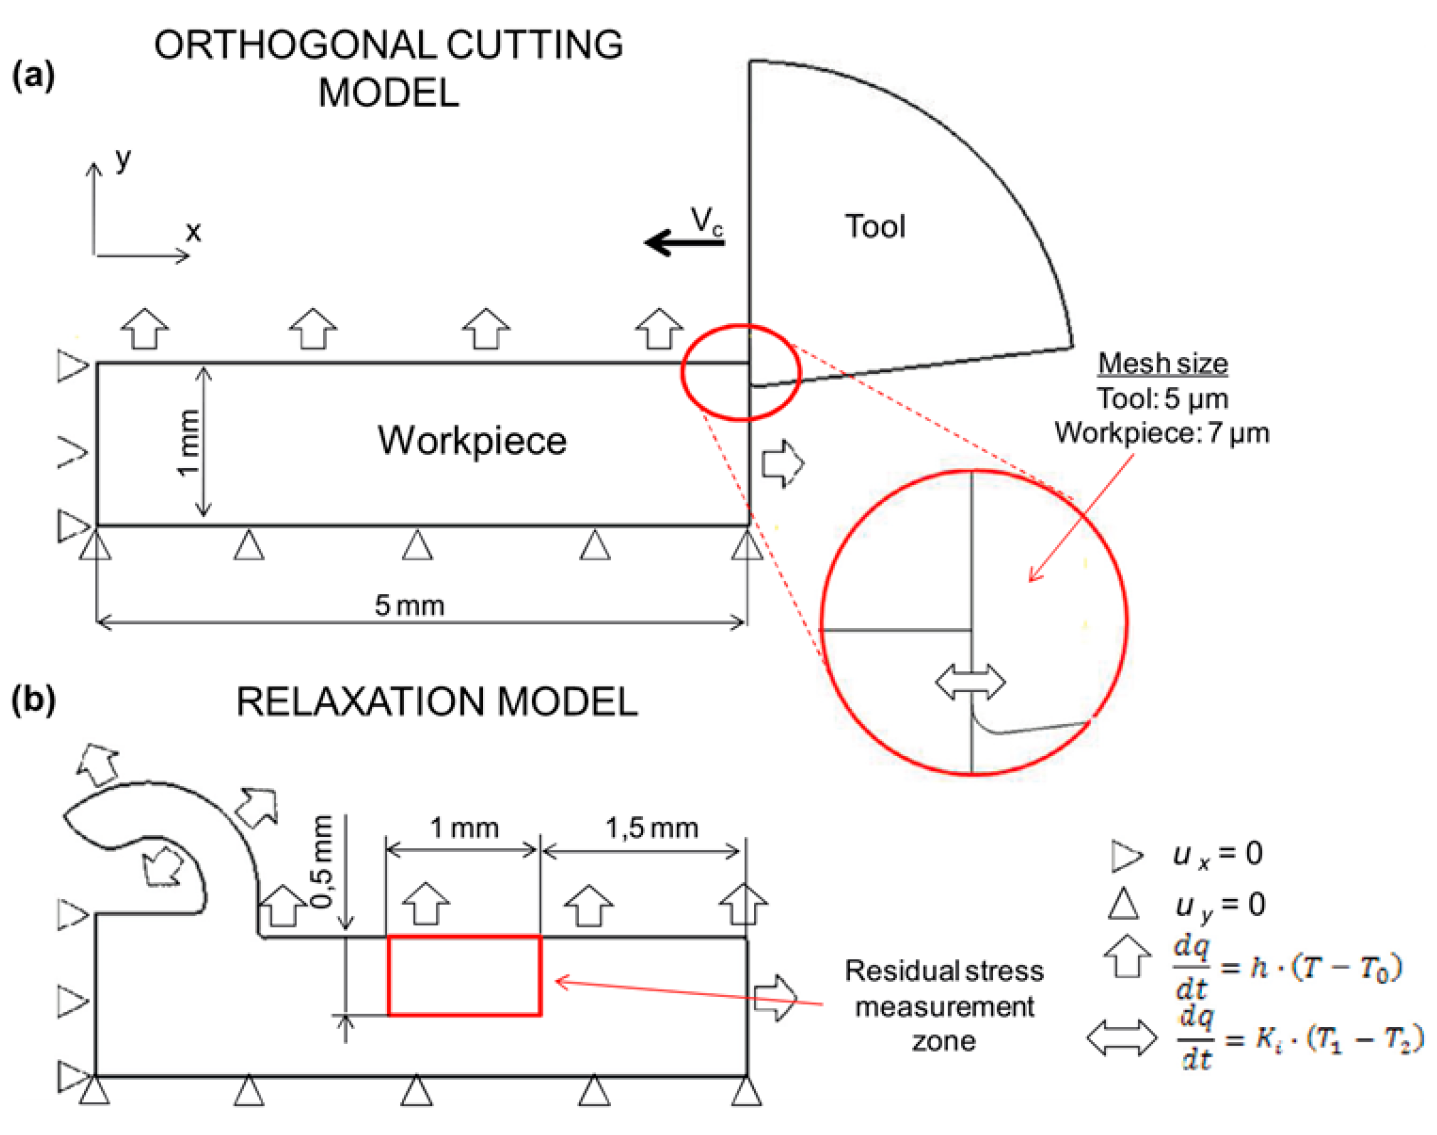
:
As a crucial high-performance material, nickel-based superalloys inevitably generate residual stresses during processing, manufacturing, and usage. The mechanical properties of nickel-based superalloys are significantly reduced by residual stress, which becomes one of the important factors restricting material reliability. The systematic analysis of residual stresses in nickel-based superalloys throughout the entire manufacturing and usage processes is insufficient. The residual stress generation factors, measurement methods, prediction models, and control methods in nickel-based superalloys in recent years are summarized in this paper. The current challenge and future development trends in the research process of nickel-based superalloy residual stress are also presented. A theoretical reference for further research on residual stresses in nickel-based superalloys can be provided in this review.

1. Introduction

Nickel-based superalloys are extensively employed in the manufacturing of advanced aerospace products, such as turbine blades and combustion chamber nozzles, owing to their outstanding corrosion resistance and mechanical performance at elevated temperatures [1,2,3]. Among the primary challenges encountered by nickel-based superalloys in these applications are the residual stresses that develop during the manufacturing and operational processes. The residual stress state from a prior stage can significantly influence the redistribution of stresses in subsequent phases, markedly affecting the performance of the components [4]. Consequently, the precise measurement and control of residual stresses are essential to ensure the reliability of these components.
Residual stresses refer to the internal stress state that arises within a material in the absence of external loads due to non-uniform plastic deformation or phase transformations during processes such as casting, mechanical processing, heat treatment, and additive manufacturing [5]. In nickel-based superalloys, the strong elastic anisotropy has a significant impact on the generation of residual stress. Clausen et al. [6] demonstrated that elastic anisotropy leads to inconsistent elastic responses in different crystallographic directions, which plays a key role in the formation and redistribution of residual stress. During plastic deformation, this anisotropy causes different orientations of grains to undergo varying degrees of strain, resulting in strain redistribution and intergranular residual stress. Uneven lattice distortion between grains further exacerbates this effect. Wagner et al. [7] further emphasized that grain orientation and microstructure, along with temperature changes, can significantly affect the accumulation of intergranular strain. Under high-temperature conditions, thermal activation accelerates plastic deformation, leading to a redistribution of stress between grains. This phenomenon underscores the importance of elastic anisotropy in stress measurement, as stress values obtained through X-ray diffraction can vary across different crystal planes, potentially affecting measurement accuracy. Thus, selecting the appropriate crystal plane for characterizing stress distribution is crucial for obtaining reliable data.
Residual stresses may exist on the surface of a material or be distributed within its volume or deep structural layers and can be classified into detrimental tensile stress and beneficial compressive stress [8]. The presence of residual tensile stresses accelerates the initiation and propagation of fatigue cracks and diminishes the service life of the specimen [9]. Conversely, residual compressive stresses can significantly enhance the surface hardness, corrosion resistance, and fatigue resistance of the workpiece while mitigating structural distortion and improving the overall stability of the workpiece.
Currently, several studies are focusing on the use of surface treatment technologies to mitigate the residual tensile stresses and induce residual compressive stresses in nickel-based superalloy workpieces, including ultrasonic rolling [10,11], laser shock peening [12,13], and shot peening [14,15]. The capability to modulate the characteristics of residual stresses and effectuate microstructural modifications on the workpiece surface of the surface treatment technologies is demonstrated in these results. The overall performance of the workpiece is substantially enhanced by the dual action. Accordingly, the rational application of these surface treatment techniques has become a crucial determinant for performance optimization.
Residual stress is inherently a tensorial quantity, meaning it has multiple components that vary depending on the direction and location within a material. Therefore, research on quantifying residual stresses in nickel-based superalloys has traditionally focused on experimental studies and simulation predictions to capture these stress components. In recent years, characterization techniques have advanced toward quantifying the full stress tensor, providing a more comprehensive understanding of stress distribution within components. This shift is crucial for complex materials like nickel-based superalloys, where anisotropic mechanical behavior and multi-axial stress states often arise during manufacturing and service. Traditionally, relaxation-based methods (e.g., hole-drilling and contour methods) have been employed to measure internal residual stresses by locally relieving stresses through material removal. Although these methods provide highly accurate measurements, they result in some material damage. Due to the demanding operational conditions of nickel-based superalloys and the need to maintain component integrity, non-destructive and minimally invasive techniques are increasingly favored. Techniques such as X-ray diffraction [16,17,18,19], neutron diffraction [20,21,22], and ultrasonic methods [23,24,25,26] allow for accurate residual stress measurements while preserving the structural integrity of components. Additionally, nanoindentation [27,28,29], a minimally invasive method, provides valuable localized measurements of mechanical properties and residual stresses with minimal material damage, making it essential for analyzing surface and near-surface properties of nickel-based superalloys. To address the challenges of high experimental costs and insufficient data availability, predictive models for residual stresses have been developed, including empirical models [30,31,32,33], finite element models [34,35,36], and machine learning models [37,38,39]. These models allow for the prediction of residual stress in a shorter timeframe compared to experimental approaches, enabling the simulation of changes in the distribution and magnitude of residual stresses in nickel-based superalloys under different working conditions [40]. Furthermore, techniques such as X-ray diffraction and neutron diffraction have been advanced to simultaneously measure multiple components of the residual stress tensor. When combined with numerical simulations, such as finite element modeling, these techniques enable a more accurate prediction and understanding of stress distributions under various working conditions. This holistic approach allows for the prediction of residual stress evolution throughout the entire lifecycle of nickel-based high-temperature alloys, facilitating more reliable performance evaluations.
In this paper, a systematic overview of the current residual stresses in nickel-based superalloys is presented in Figure 1. To enable the reader to clarify the sources of residual stresses in nickel-based superalloys quickly, the causes and influence factors of residual stresses during manufacturing are described in Section 2. An overview of measurement techniques for the residual stresses is provided in Section 3, including X-ray diffraction and ultrasonic method. The techniques for predicting residual stresses are summarized in Section 4. Section 5 outlines the techniques for controlling residual stresses and explains their advantages and disadvantages. Section 6 summarizes this paper and discusses the current challenges in the study of residual stresses in nickel-based superalloys as well as future research trends. This review provides a comprehensive foundation and guidance for the future exploration of residual stress in nickel-based superalloys.

2. The Source of Residual Stresses

Residual stresses mainly originate from non-uniformity and deformation during material preparation, heat treatment, and machining. The internal stress state directly affects the performance and stability of the material and may trigger fatigue cracks, deformation, and failure, especially in extreme operating environments. The causes and influencing factors of residual stresses in nickel-based superalloys are introduced during casting, heat treatment, and machining in this section.

2.1. Investment Casting

The precision casting process is an advanced casting method used to manufacture high-precision and complex parts with a superior surface finish and reduced welding and joining processes. This makes it one of the preferred processes for manufacturing high-performance nickel-based superalloys parts in the aerospace, aviation, energy, and chemical industries. The precision casting processes include various forms, such as investment casting, silicone sol casting, and precision sand casting. Investment casting is typically used in nickel-based superalloys. In this process, a soluble wax model is used to prepare a mold, and then molten alloy is injected into the mold. Finally, the wax model is melted and eliminated, and a part with a precise shape is left. The surface roughness of high-precision castings made by investment casting can reach Ra 0.4 μm~1.6 μm.
In the process of investment casting of nickel-based superalloys, uneven cooling shrinkage within the material due to temperature gradients, solid-state phase changes in the alloy material, and uneven cooling rates in different parts of the part may result in the generation of residual stresses. To reduce the effect of residual stresses, measures such as designing accurate molds, optimizing the cooling process, and improving process parameters are usually taken. Due to the complexity of the investment casting process and the difficulty of obtaining high-temperature experimental data, numerical simulations are often used to model and understand the effects of temperature gradients, solidification processes, and other factors on residual stresses, thus guiding the optimization of process parameters. Afazov et al. [41] used the finite element method to simulate the process of directional cooling investment casting of nickel-based superalloys high-pressure turbine blades in Bridgman furnace and predicted the changes of the residual stresses at the withdrawal velocities of 0.06 and 0.6 mm/s, respectively. It was found that the residual stresses in the thinner part of the blade were greater at the withdrawal speed of 0.6 mm/s, while the residual stresses in the remaining part of the blade were similar at both withdrawal velocities. Similarly, Afazov et al. [42] utilized two finite element methods, ABAQUS and ProCAST, to simulate the equiaxial cooling investment casting of the bottom core vane (BCV) in an aircraft engine, aiming to predict the distribution and magnitude of residual stresses during the production process (Figure 2). The residual stresses of the two models are shown in Figure 2a,b. It can be observed that the stress distribution in the upper part of the BCV is similar in both the ABAQUS and ProCAST models, while the stress distribution in the lower part is different. The peak stress at node A is 1252 MPa. The peak von Mises stress node stress value for both models is 1252 MPa, and node A is at the same location.

2.2. Heat Treatment

Nickel-based superalloys contain strengthening phases like γ′ and carbides, uniformly distributed in their lattice structure, enhancing creep and fatigue resistance [43,44]. Residual stresses generated by uneven cooling and solidification during casting affect the uniformity of the microstructure and overall properties. Heat treatment is a key method to adjust the microstructure of nickel-based superalloys by controlling the temperature and realizing the release of residual stresses. By improving the lattice arrangement, the distribution of reinforcing phases, and the redistribution of internal stresses, heat treatment can effectively reduce or eliminate residual stresses and enhance the uniformity and overall performance of the alloy [45].
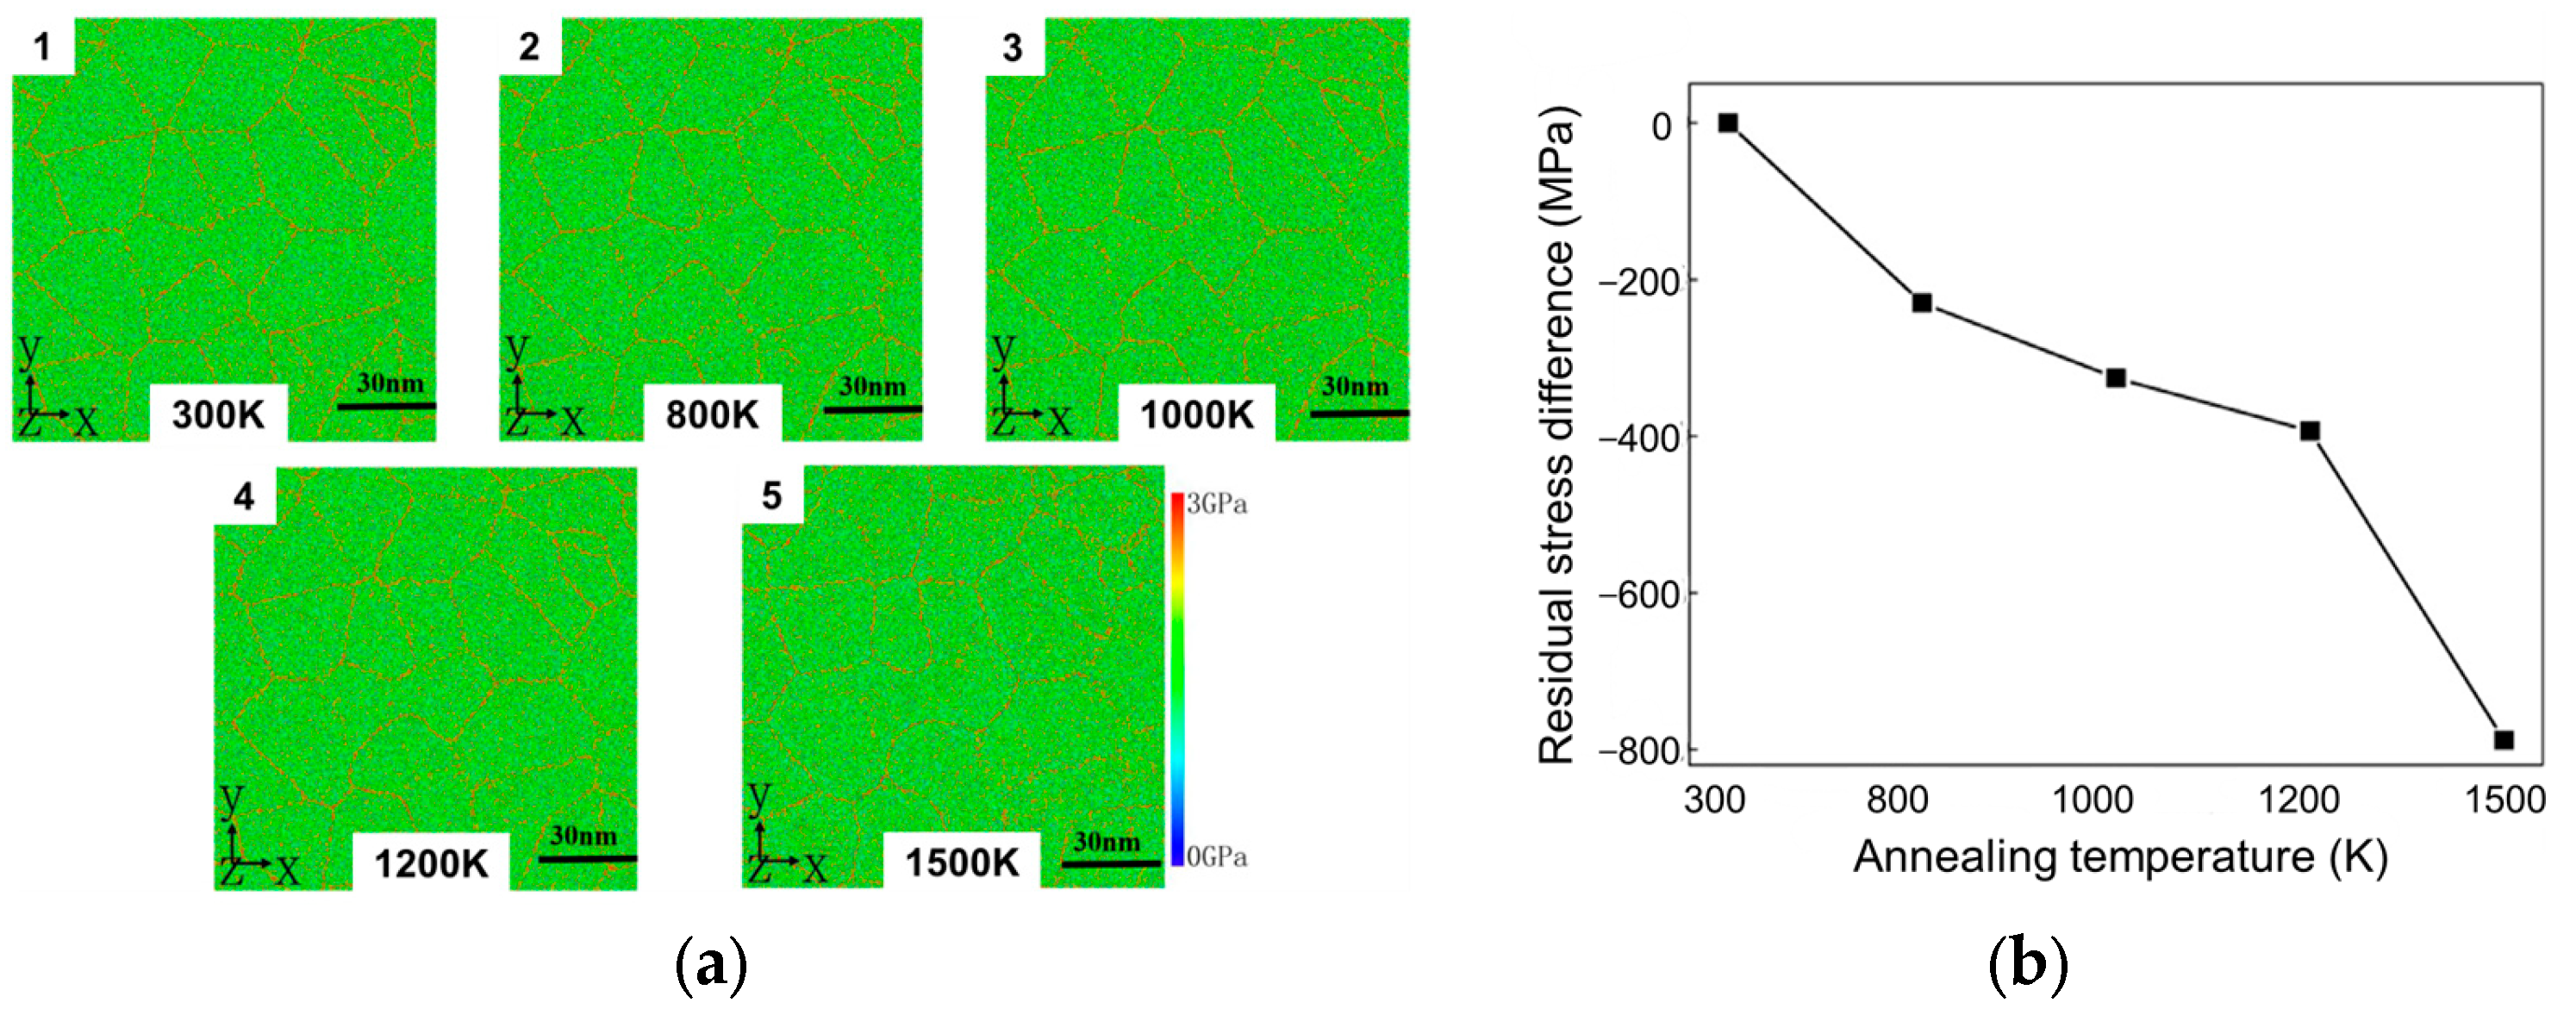
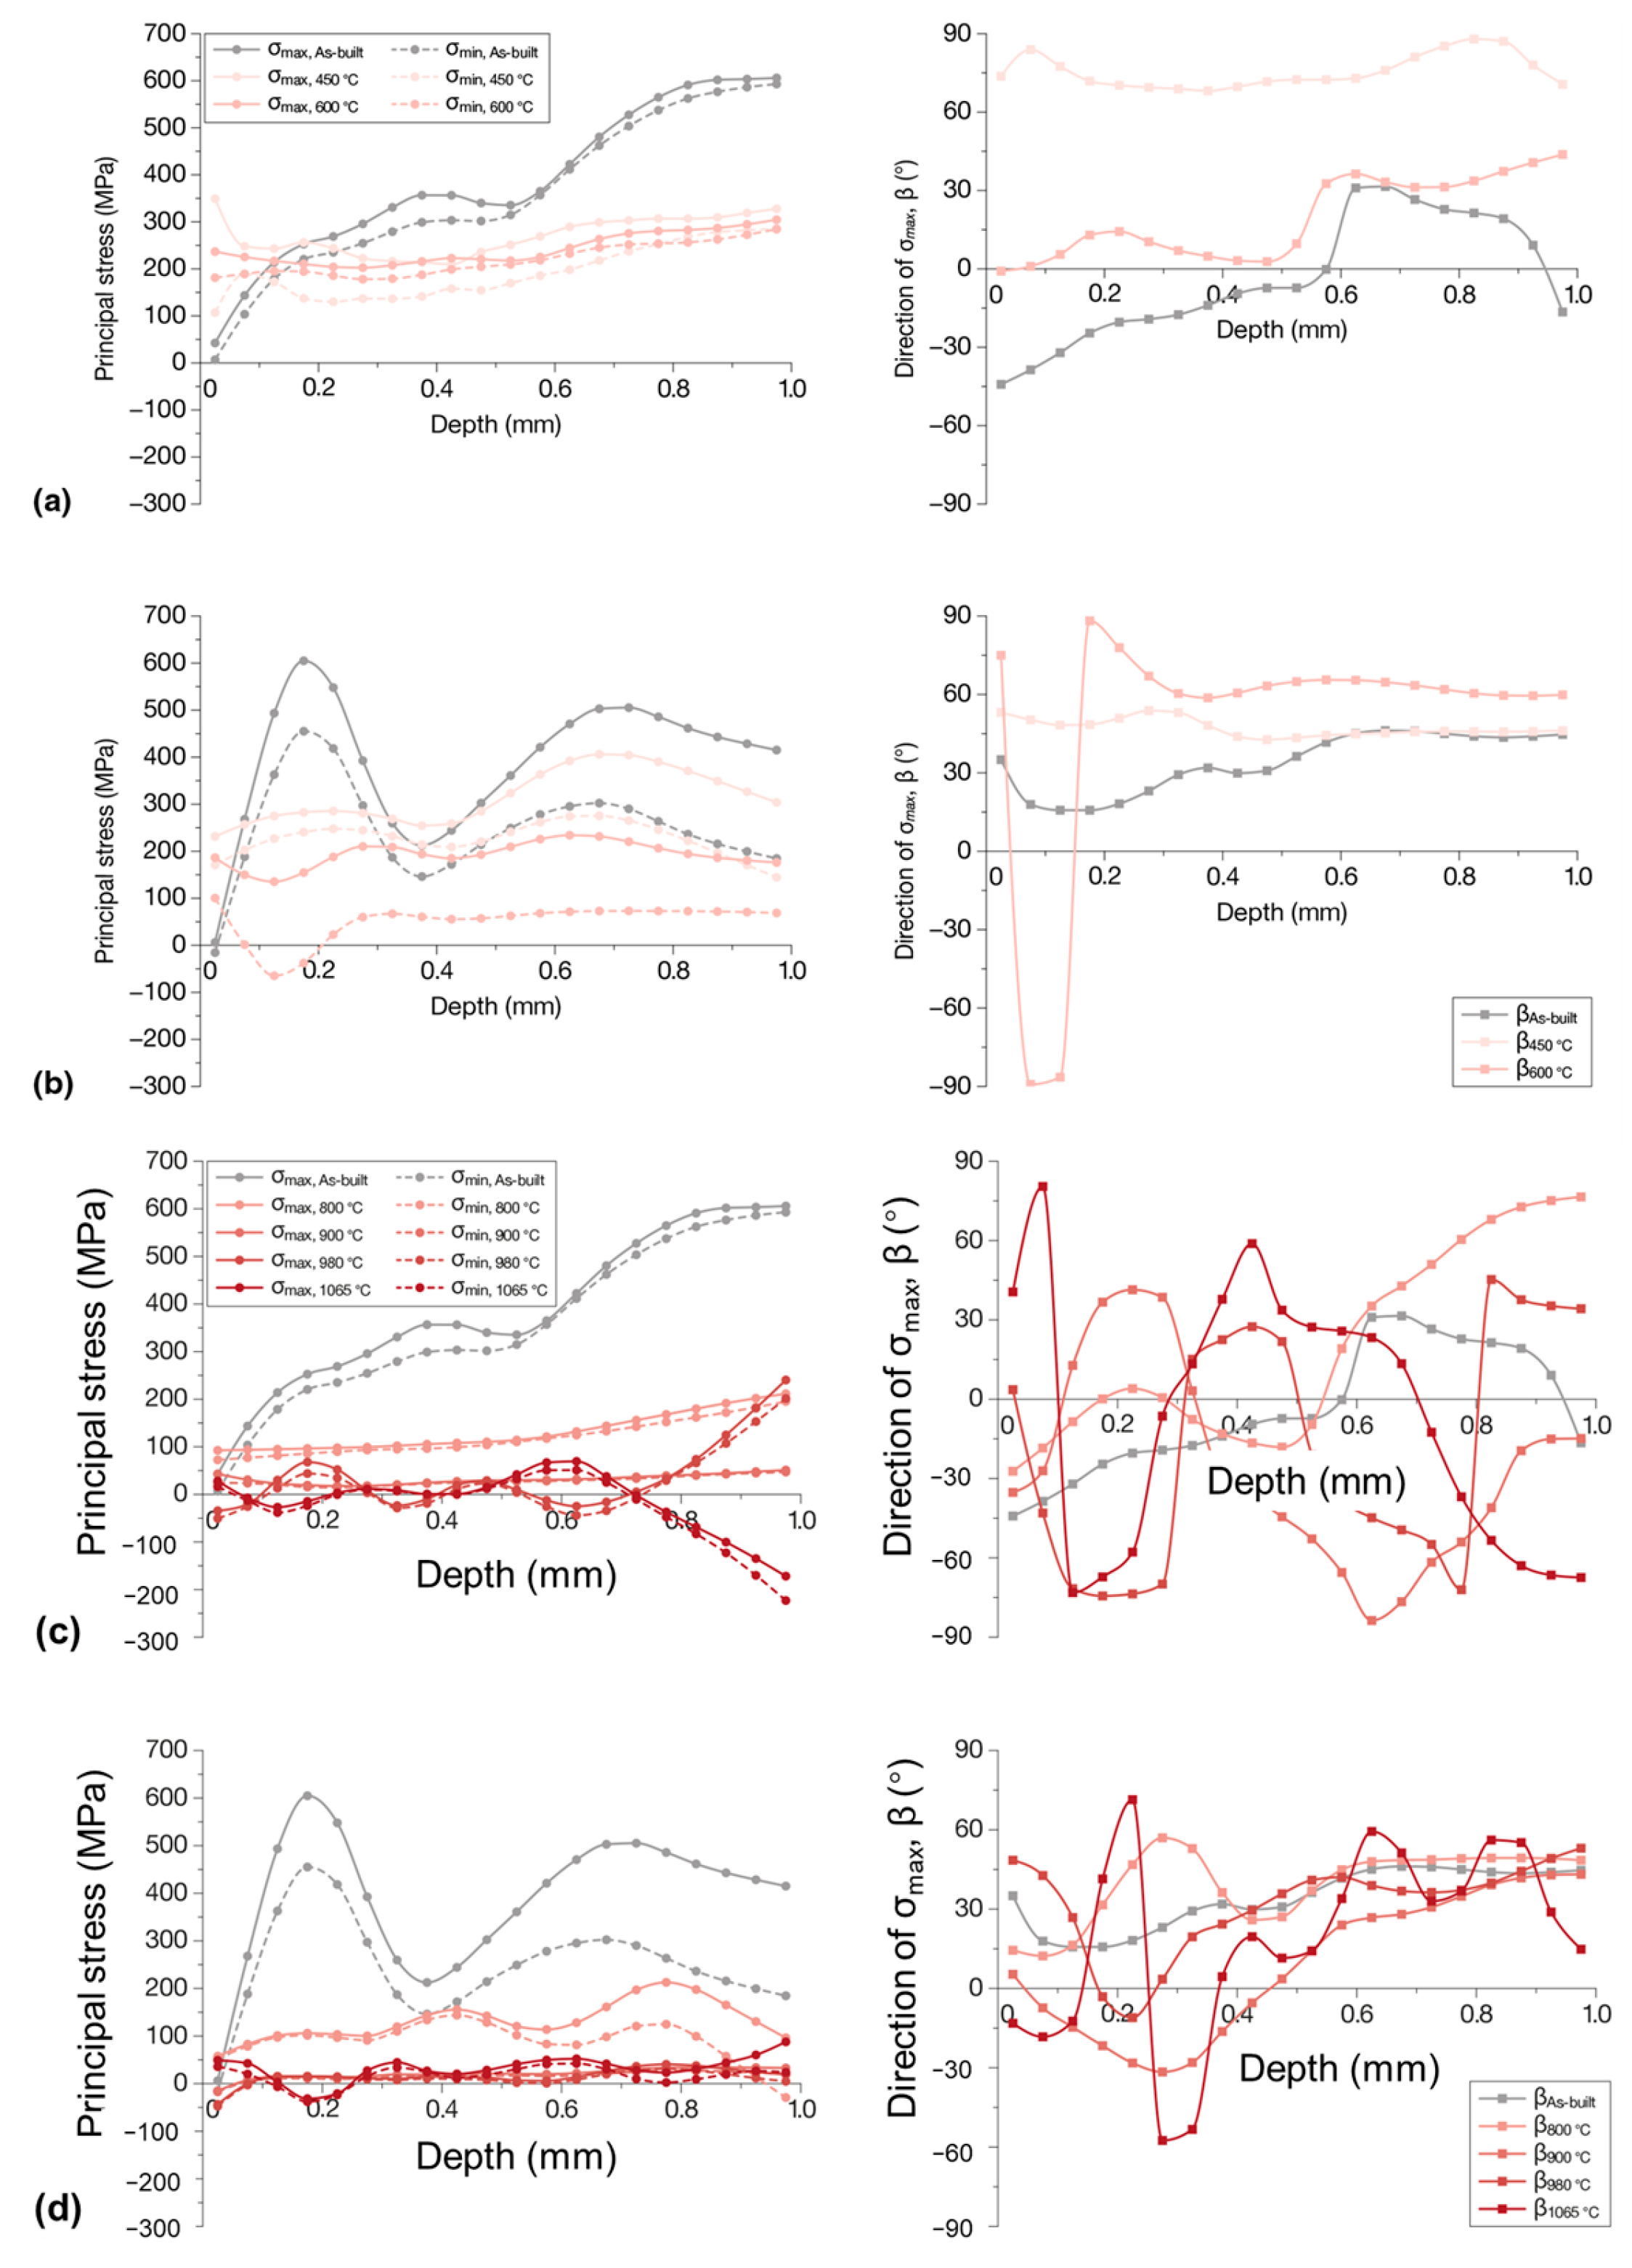
The temperature during heat treatment plays a crucial role in influencing the residual stresses within materials, significantly affecting their microstructure, mechanical properties, and, in some cases, the behavior of coated surfaces. Shrestha et al. [46] mainly explored the impact of heat treatment on the residual stresses in IN625 and IN718 coated specimens, respectively, and it was found that the heat treatment reduced the porosity level of the sub-surface region of the coating under tensile stress, resulting in a decrease in residual stresses. Kim et al. [47] observed an increase in residual compressive stress within nickel-based superalloy coatings as the heat treatment temperature rose. Xie et al. [48] verified simultaneously by molecular dynamics atomistic simulations and theoretical modeling that the residual compressive stresses in nickel-based superalloys increase with increasing annealing temperature. As the annealing temperature rises from 300 K to 1500 K, the disparity in residual stress can reach 800 MPa. (Figure 3). In addition, Marchese et al. [49] investigated the variation of residual stresses in IN718 in different heat treatment temperature ranges, respectively. The results are displayed in Figure 4. The residual stresses at the top and lateral surfaces of the workpiece decreased only slightly with heat treatments at 450 °C and 600 °C, with further control at 800 °C, and with almost complete elimination of the residual stresses at 900, 980, and 1065 °C.

2.3. Machining

Mechanical machining is broadly used in the processing of nickel-based superalloy components, which can process complex shapes and provide extremely high dimensional accuracy and surface smoothness. Two primary factors contribute to the generation of residual stress during mechanical processes such as milling, turning, and grinding: (i) thermal stress caused by material expansion and contraction due to frictional heat and (ii) plastic deformation of material surface and subsurface caused by cutting force. Therefore, controlling and optimizing processing parameters and tool characteristics can be employed to reduce thermal stress and plastic deformation, thus diminishing residual stress.

2.3.1. Milling

Milling is one of the most commonly used mechanical processing methods for nickel-based superalloys, excels when used for machining parts with complex shapes and curved surfaces, and is characterized by high precision and efficiency [50,51,52,53,54].
Wang et al. [55] provided a detailed account of the impact of cutting conditions on residual stresses during the ball end milling process of Inconel 718, including cutting speed, cooling conditions, width of cut, depth of cut, feed rate, lead angles, and tilt angles. The study results showed that the thermal effects in the machining process primarily produce tensile stress, whereas mechanical effects predominantly result in compressive stress. It was also observed that smaller process parameters do not necessarily result in better control of residual stress. Lu et al. [2] obtained a trend in residual stresses along the feed direction, which initially increased, then decreased, and finally increased again with the per-tooth feed rate. The trend exhibited a reversal in the direction perpendicular to the feed. Apinwall et al. [56] explored how surface residual stress is affected by the orientation of the cutter and the tilt angle of the workpiece during high-speed milling. It was discovered that the maximum residual compressive stress can be generated when using a worn tool with a horizontal feed direction and a 0° workpiece tilt angle (Figure 5). Zhuang et al. [57] observed a reduction in residual tensile stress on the workpiece surface during Frank milling of IN718 with increasing feed rate and cutting speed.
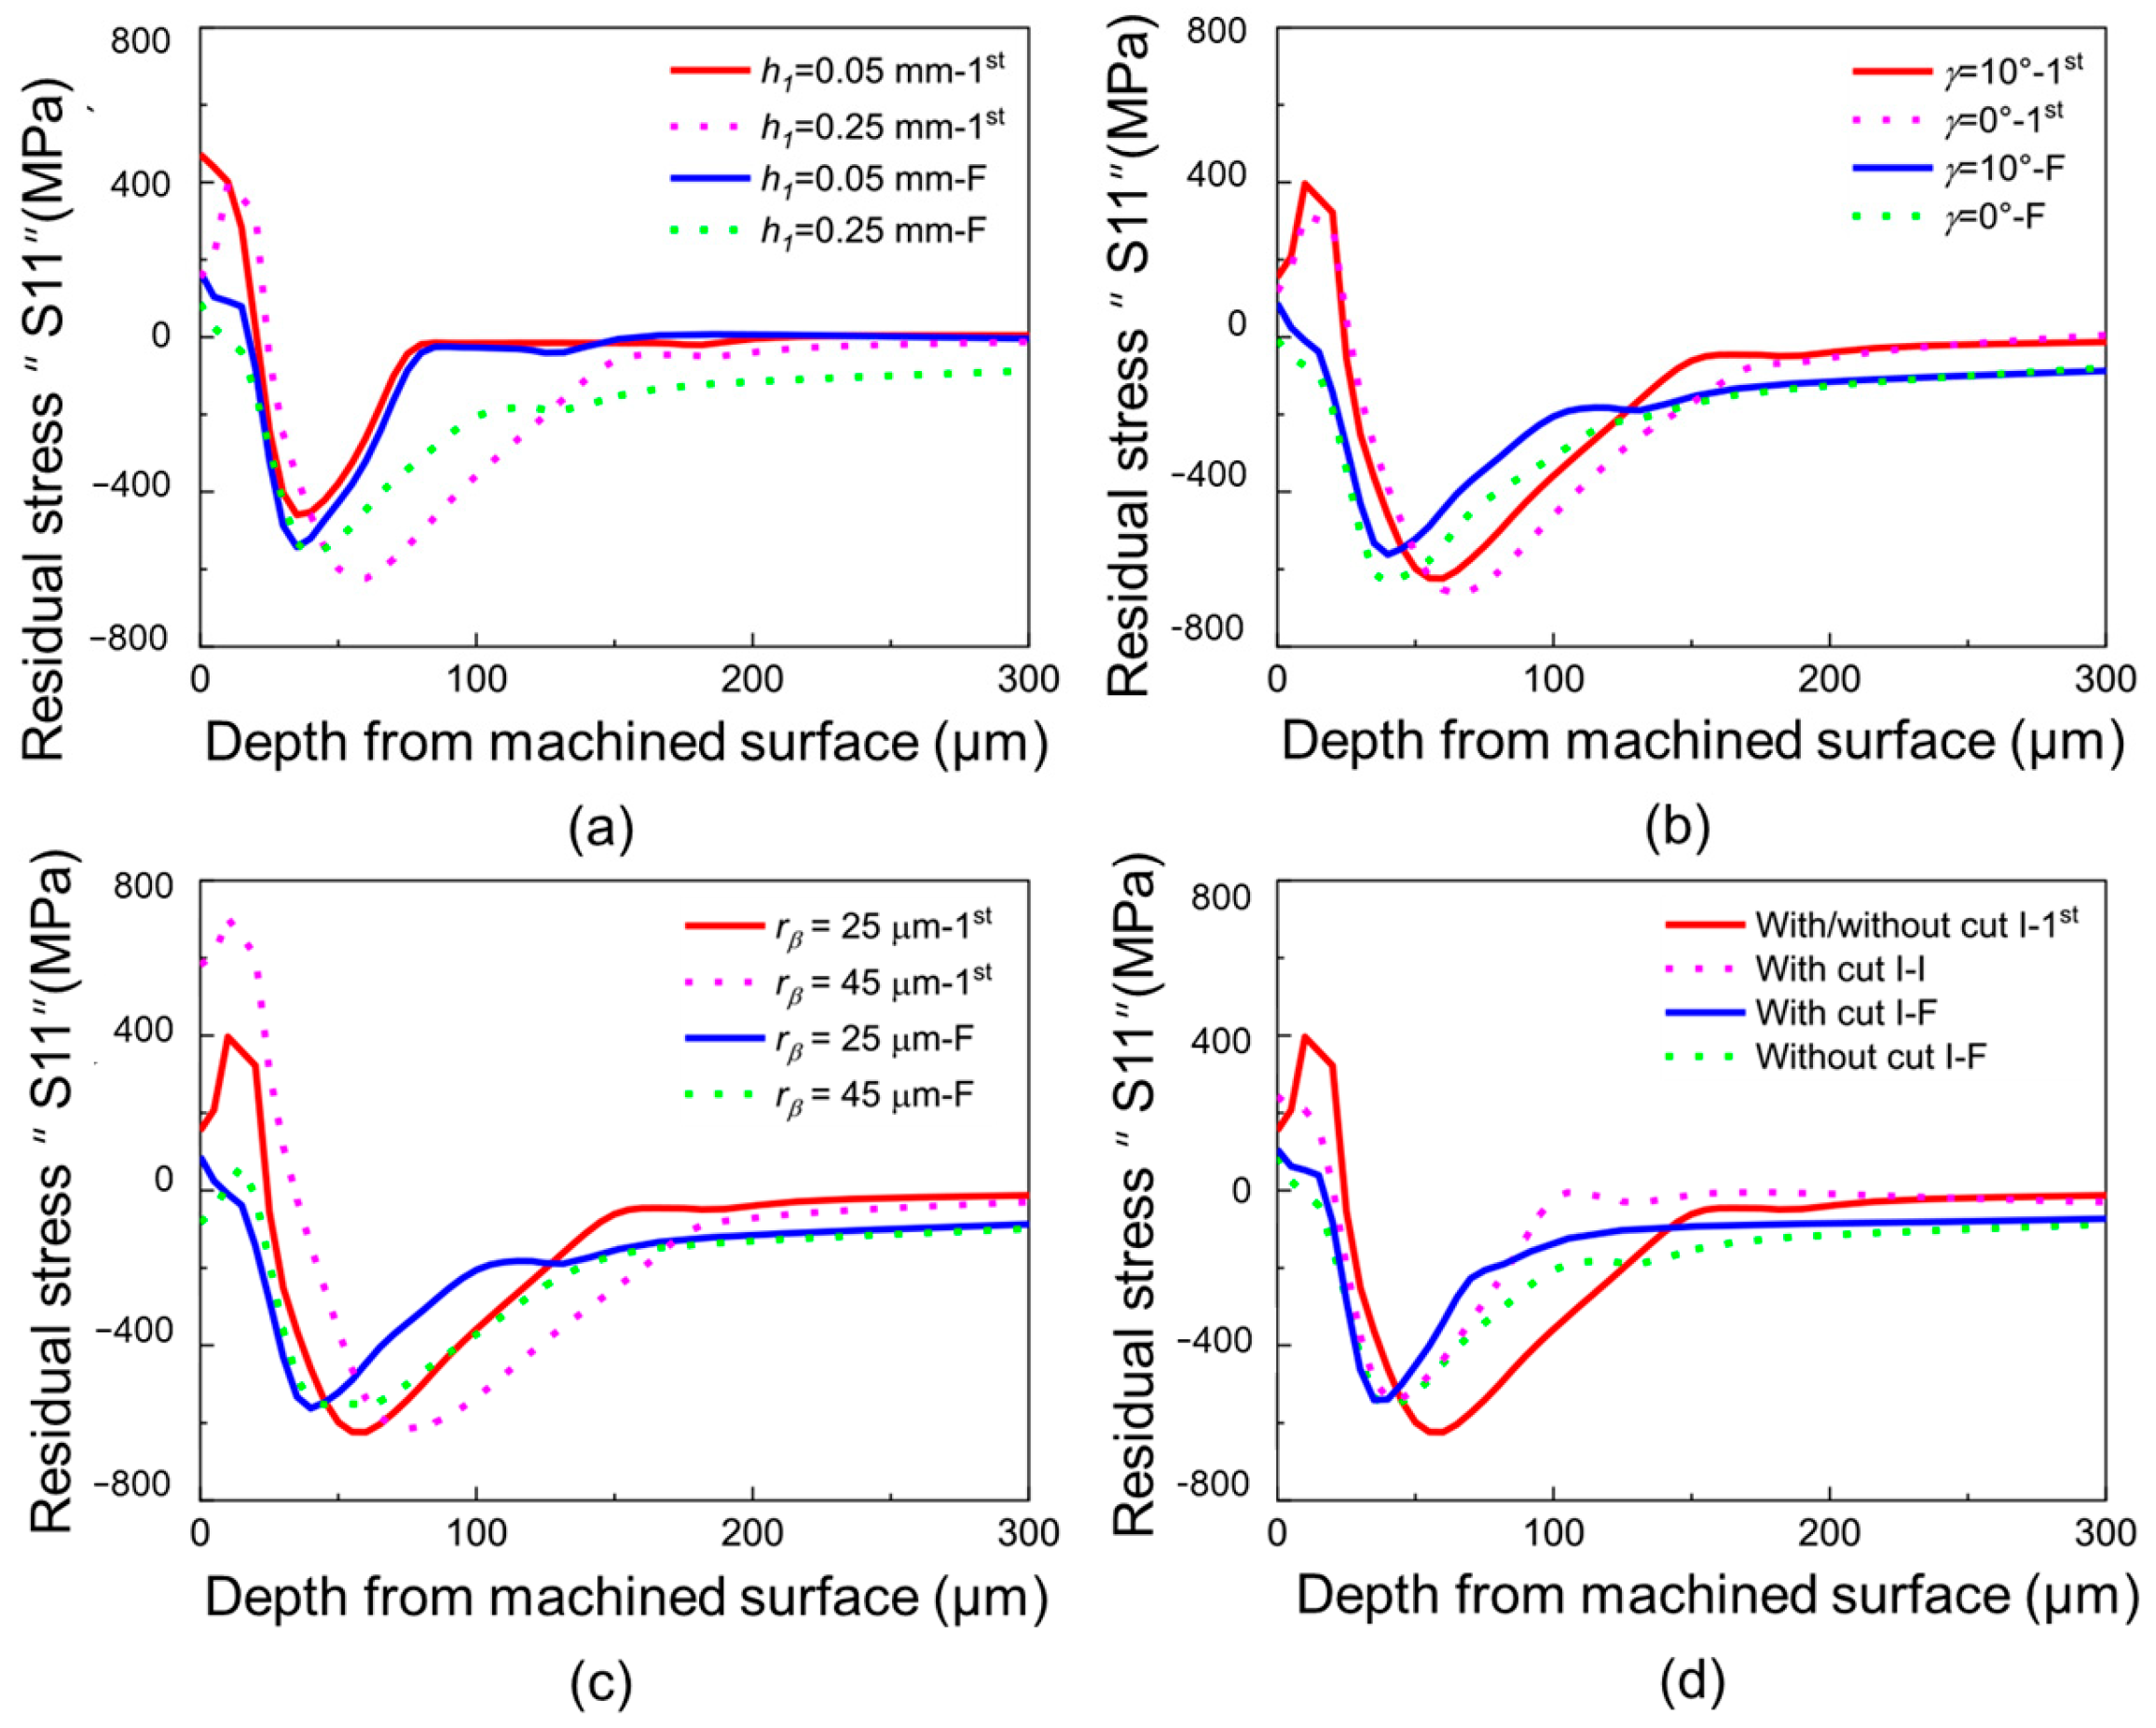
Most of the above research focuses on the impact of the process on residual stresses under a single cutting, but in the actual processing process, the final surface of the sample is generated after multi-cutting. The stress, strain, and temperature generated in the previous cutting process will be carried into the subsequent cutting process and affect the subsequent processing. Liu et al. [58] combined experimental and simulation analyses to investigate the effects of prior cutting on surface residual stress during multiple cutting of IN718, considering tool geometry, cutting parameters, and cutting procedures. Due to the effect of the previous cuts, an increased magnitude and depth of the residual compressive stresses were generated in the finished sample, and this was more obvious when the previous cutting was performed with a larger edge radius tool, a more negative rake angle or a greater thickness of uncut chips (Figure 6). Therefore, optimizing the parameters of the preceding cutting process allows for the control of residual stress levels. This observed pattern of residual stress evolution was similarly confirmed in micro-end milling, where an increase in the cutting cycle corresponded to an increase in the magnitude and depth of the compressive residual stresses [59].

2.3.2. Turning

Turning is a common metal machining method used to cut and shape workpieces. Different turning parameters [60,61,62,63], tool materials and shapes [64,65,66], and coating materials [67,68] may introduce a complex stress field during the turning process and have a significant impact on the properties and life of nickel-based superalloys [69,70,71,72].
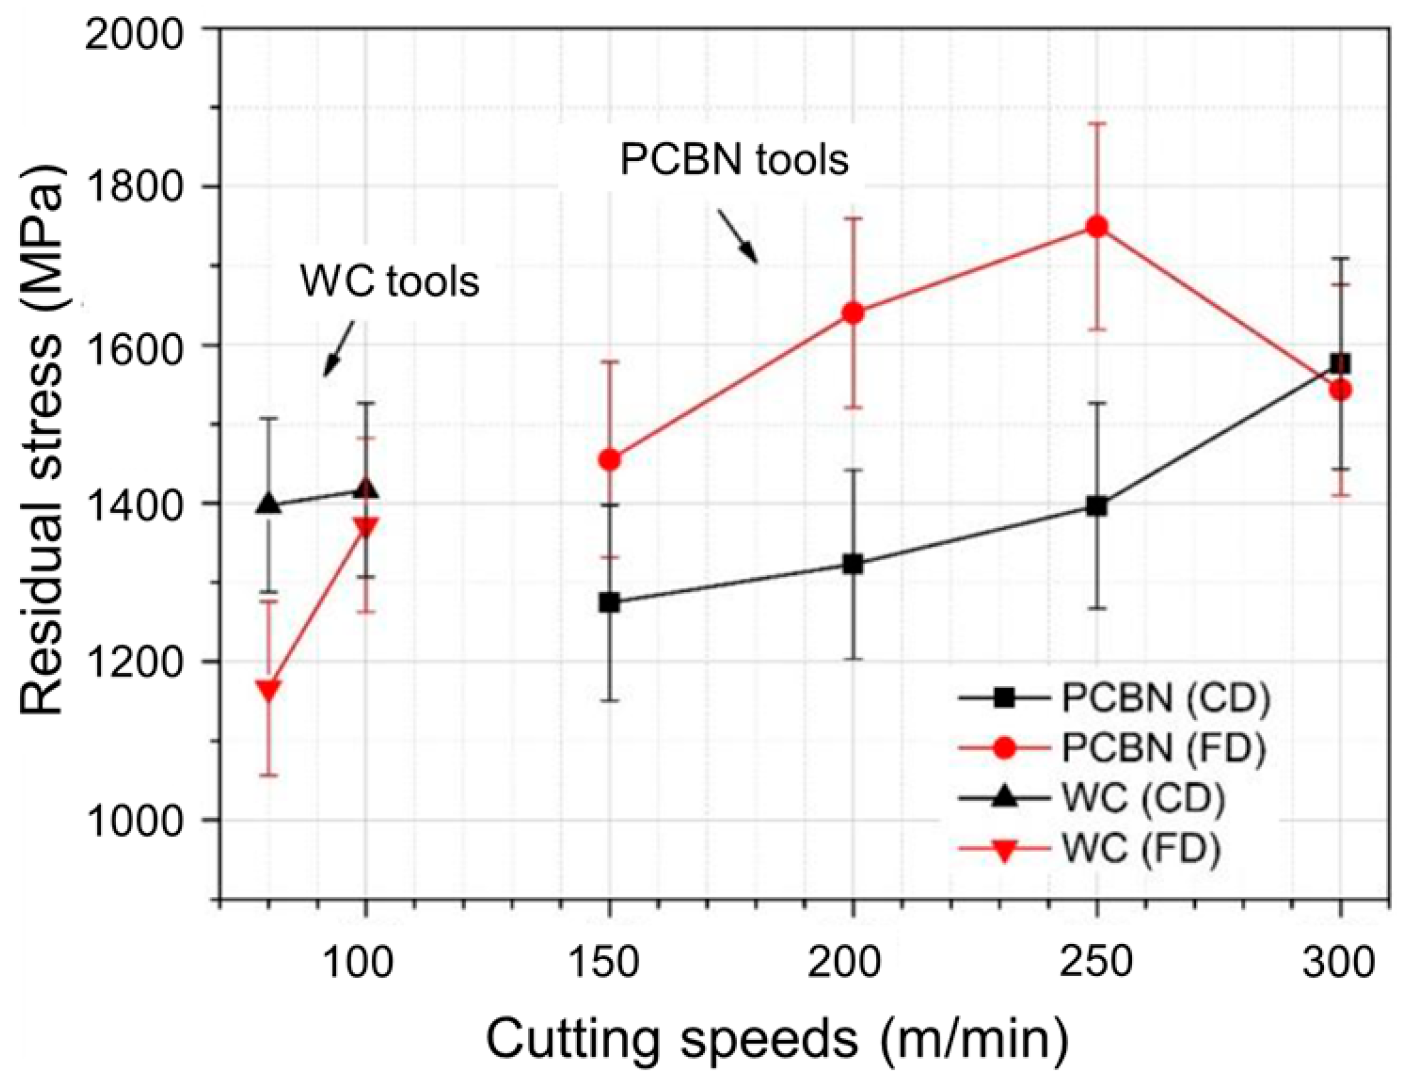
Pawade [73] found during the research of the IN718 turning process that with the change of cutting edge geometry from 30° chamfer to 20° chamfer, the state of residual stress on the workpiece surface changed from high tension to compression. Additionally, with the increase in cutting depth from 0.75 mm to 1 mm, the compressive residual stress increased further. Chen et al. [74] discussed the effect of utilizing coated tungsten carbide (WC) tools and polycrystalline cubic boron nitride (PCBN) tools at different turning speeds on the residual stress of AD730™. As the cutting speed increased, the surface temperature of the workpiece rose sharply, and the thermal residual stresses became dominant, tending to be tensile and isotropic. The PCBN tool produced less tensile stress in the cutting direction (CD) compared to the feeding direction (FD), whereas the measurement results for WC tools indicated the opposite effect (Figure 7). Hua et al. [75] showed that high cutting speed and feed rate led to an increase in tensile residual stress in the IN718 sample and emphasized the importance of optimizing processing conditions to effectively manage residual stress. Axinte et al. [76] observed that during the turning process, owning to the higher level of energy consumed in the cutting direction, the residual stress generated in the hoop direction of the sample is greater than that in the radial direction. Sharman [64] evaluated the impacts of different cutting tool materials, operating parameters, wear level, and geometry on the residual stress of IN718, and the findings showed that tool wear exerted the most pronounced influence on residual stress. As the tool wear increased, the friction temperature and plastic deformation generated by rubbing the tool flank on the sample surface increased, leading to a notable rise in the residual tensile stress on the material surface, forming a more extensive and deeper compressive stress layer.
To address residual tensile stress induced by cutting nickel-based superalloys, the pre-stressed cutting methods can be adopted to enable proactive control of residual stress [77], increase the magnitude of compressive stresses, and reduce the surface roughness for optimal machined surface integrity.

2.3.3. Grinding

Grinding is one of the important machining processes required for manufacturing high-surface integrity and high-precision workpieces, which is usually used as the final step in workpiece surface shaping [78,79]. The residual stresses introduced by grinding largely determine the wear resistance, corrosion resistance, fatigue strength, and creep performance of nickel-based superalloy workpieces [80]. Residual stresses generated in the process of grinding typically stem from several factors: (i) expansion or contraction of the workpiece due to thermal effects during the grinding process, (ii) phase transformations induced by elevated grinding temperatures, and (iii) plastic deformation caused by material removal by abrasive grains of grinding wheel [81]. Ding et al. [82] comprehensively delineated the relationships of formation causes, influencing factors, modeling and simulation, and measurement of residual stresses during grinding.
The intricate relationship between grinding parameters and the induced residual stresses highlights the necessity for precise control of the grinding process to optimize material properties. Wang et al. [83] demonstrated that the residual compressive stress along the grinding direction X was lower than the material flowing direction Y generated by Inconel 718 at different grinding speeds. With a constant grinding speed, the residual stress initially decreased and then increased with the rise in grinding force. At lower grinding forces, the grinding speed had minimal impact on the residual stress. Nevertheless, when the grinding force surpassed 240 KPa, the residual stress showed an increasing trend in correlation with the grinding speed. Zeng et al. [84] found through the comparative experiment of external grinding and plain grinding that surface grinding easily caused residual tensile stress, while cylindrical grinding was more likely to generate residual compressive stress. This was because the surface grinding makes it easy to accumulate a large amount of heat on the grinding surface due to poor thermal diffusion conditions. For surface grinding, the residual stress profiles within the thin subsurface layer consistently exhibited tensile stresses, with the highest tensile stress concentration occurring at the surface. As the cutting depth increased, the residual tensile stress and thickness of the subsurface zone, where residual stress prevailed, also increased accordingly. In addition to optimizing the process parameters, the residual stress generated in the grinding process can also be eliminated by using the annealing process [85,86].

2.4. Additive Manufacturing

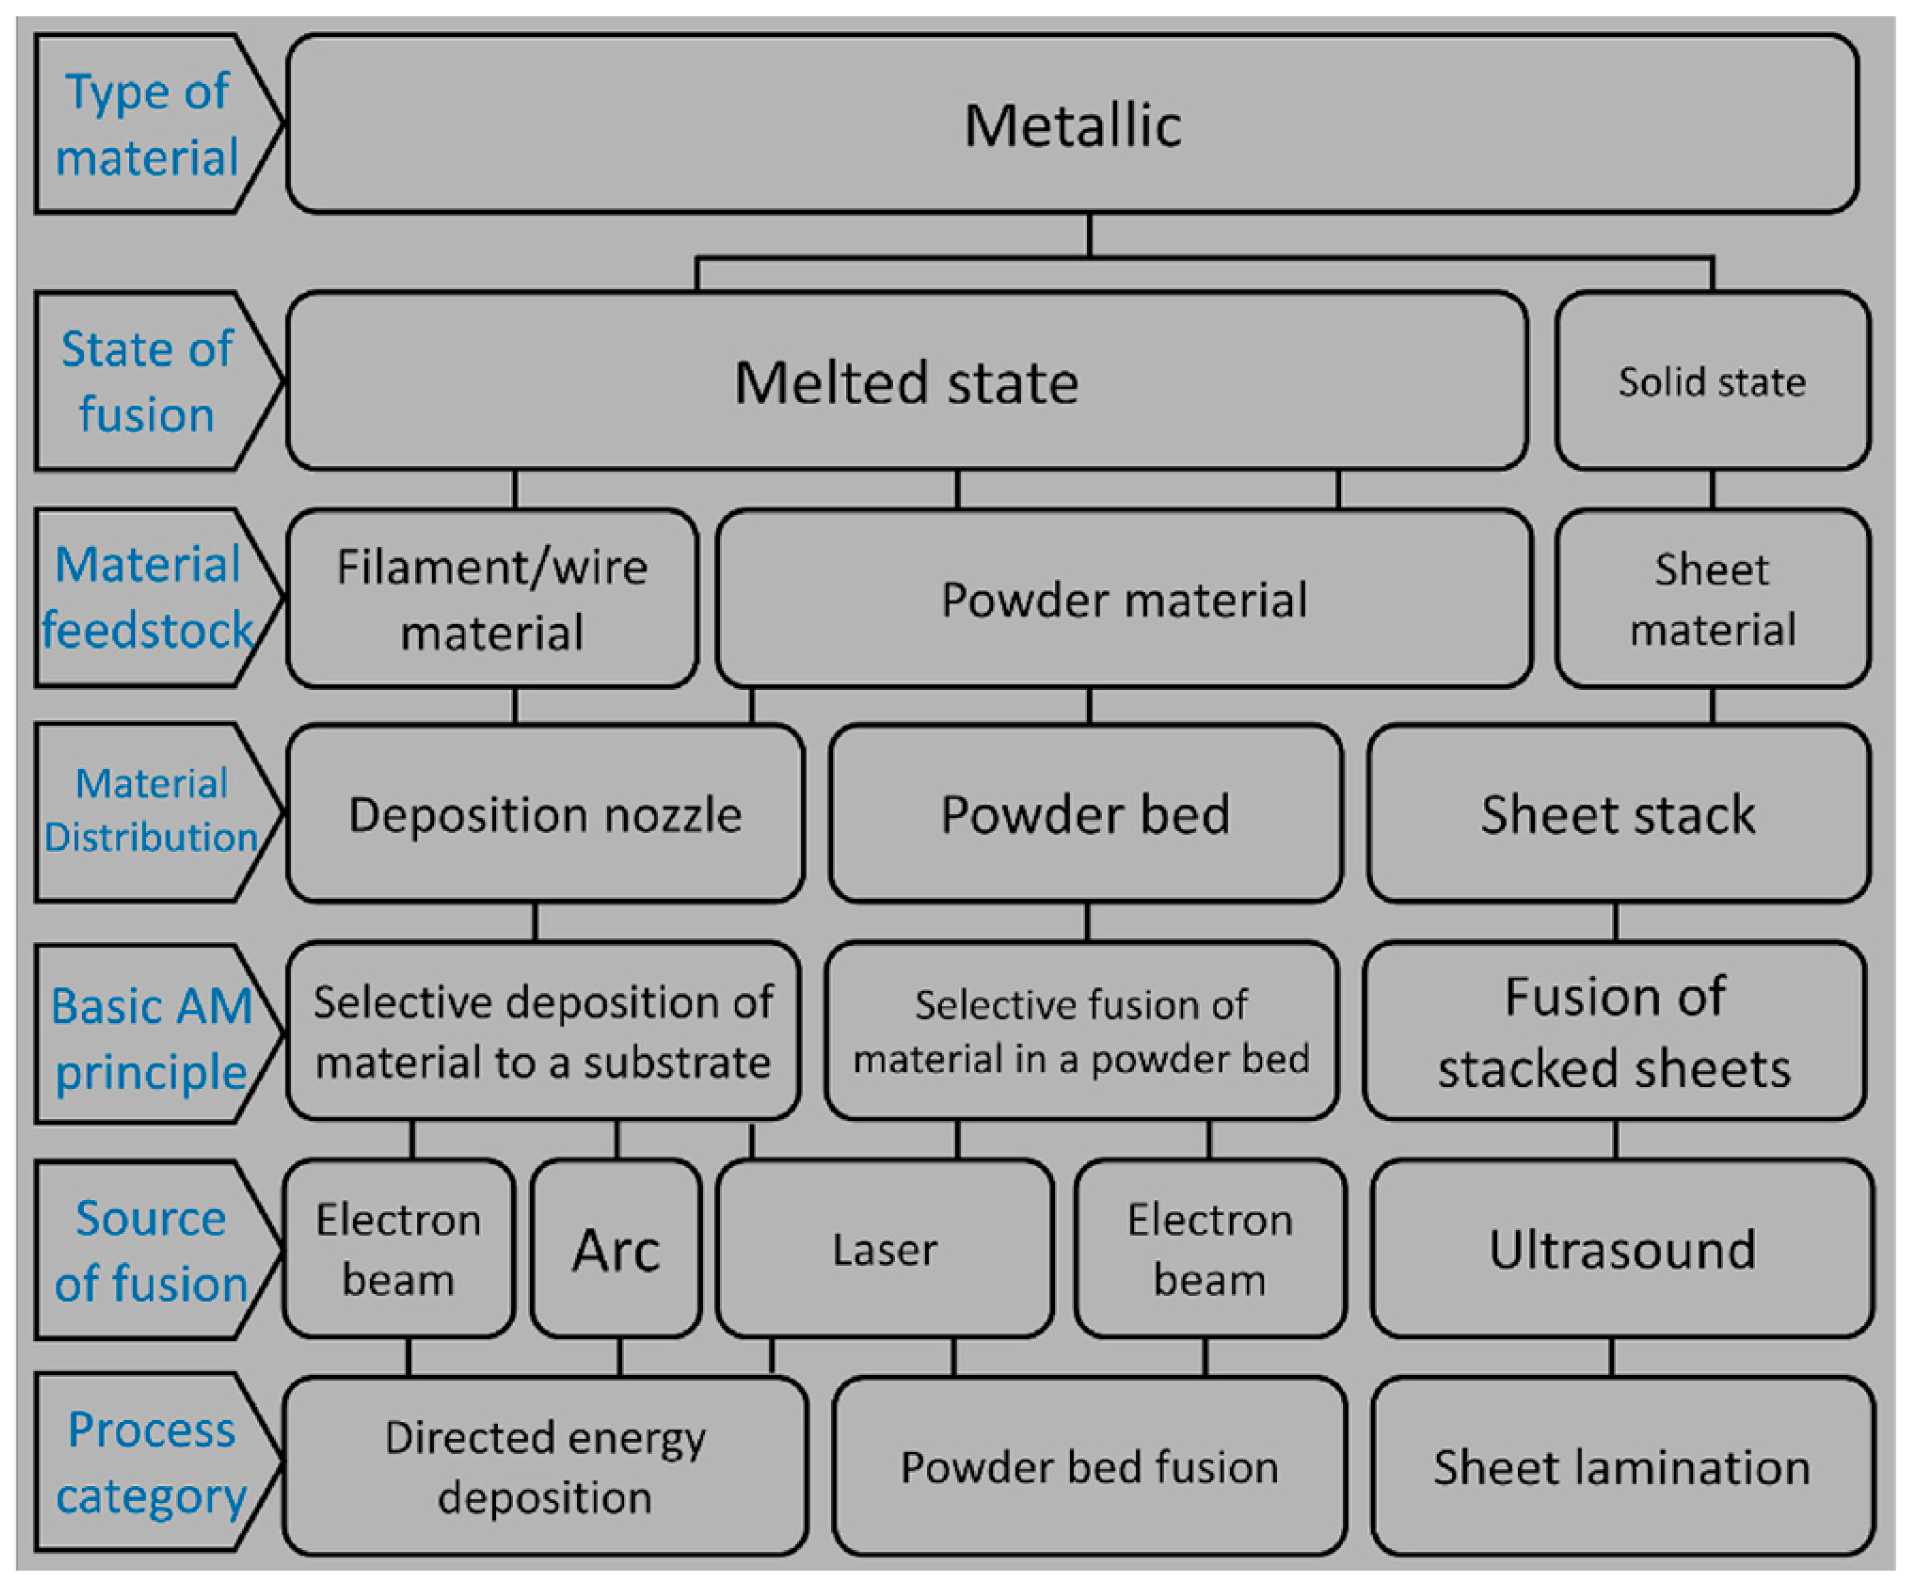
Additive manufacturing (AM) is an advanced manufacturing technology that constructs complex components through the layer-by-layer deposition of materials [87]. AM is capable of creating more complex structures with higher material utilization and production flexibility than traditional manufacturing processes. For nickel-based superalloys, AM can accurately control the microstructure, such as realizing directional solidification, which in turn improves the mechanical properties of the material. A variety of metal additive manufacturing methods are shown in Figure 8. All of these methods can be used for the fabrication of nickel-based superalloy materials.
In the AM process, residual stresses mainly originate from the following areas: (i) thermal stresses due to thermal gradients, (ii) volume changes due to phase transitions, (iii) cumulative effects of layer-by-layer buildup, and (iv) plastic deformation and uneven cooling of materials. Mercelis et al. [89] used a temperature gradient mechanism (TGM) model to understand the mechanism of residual stress formation, involving a unique thermal cycle of melting, solidification, and remelting. During fabrication, a high-intensity heat source causes the localized material to increase in temperature and expand but is limited by the surrounding low-temperature material, creating compressive stresses. As the heated zone cools, its contraction is also limited by the surrounding material, culminating in permanent tensile residual stresses. Singh et al. [90] adopted the finite element method to simulate the evolution of residual stresses in the alloy.

3. The Measurement of Residual Stresses

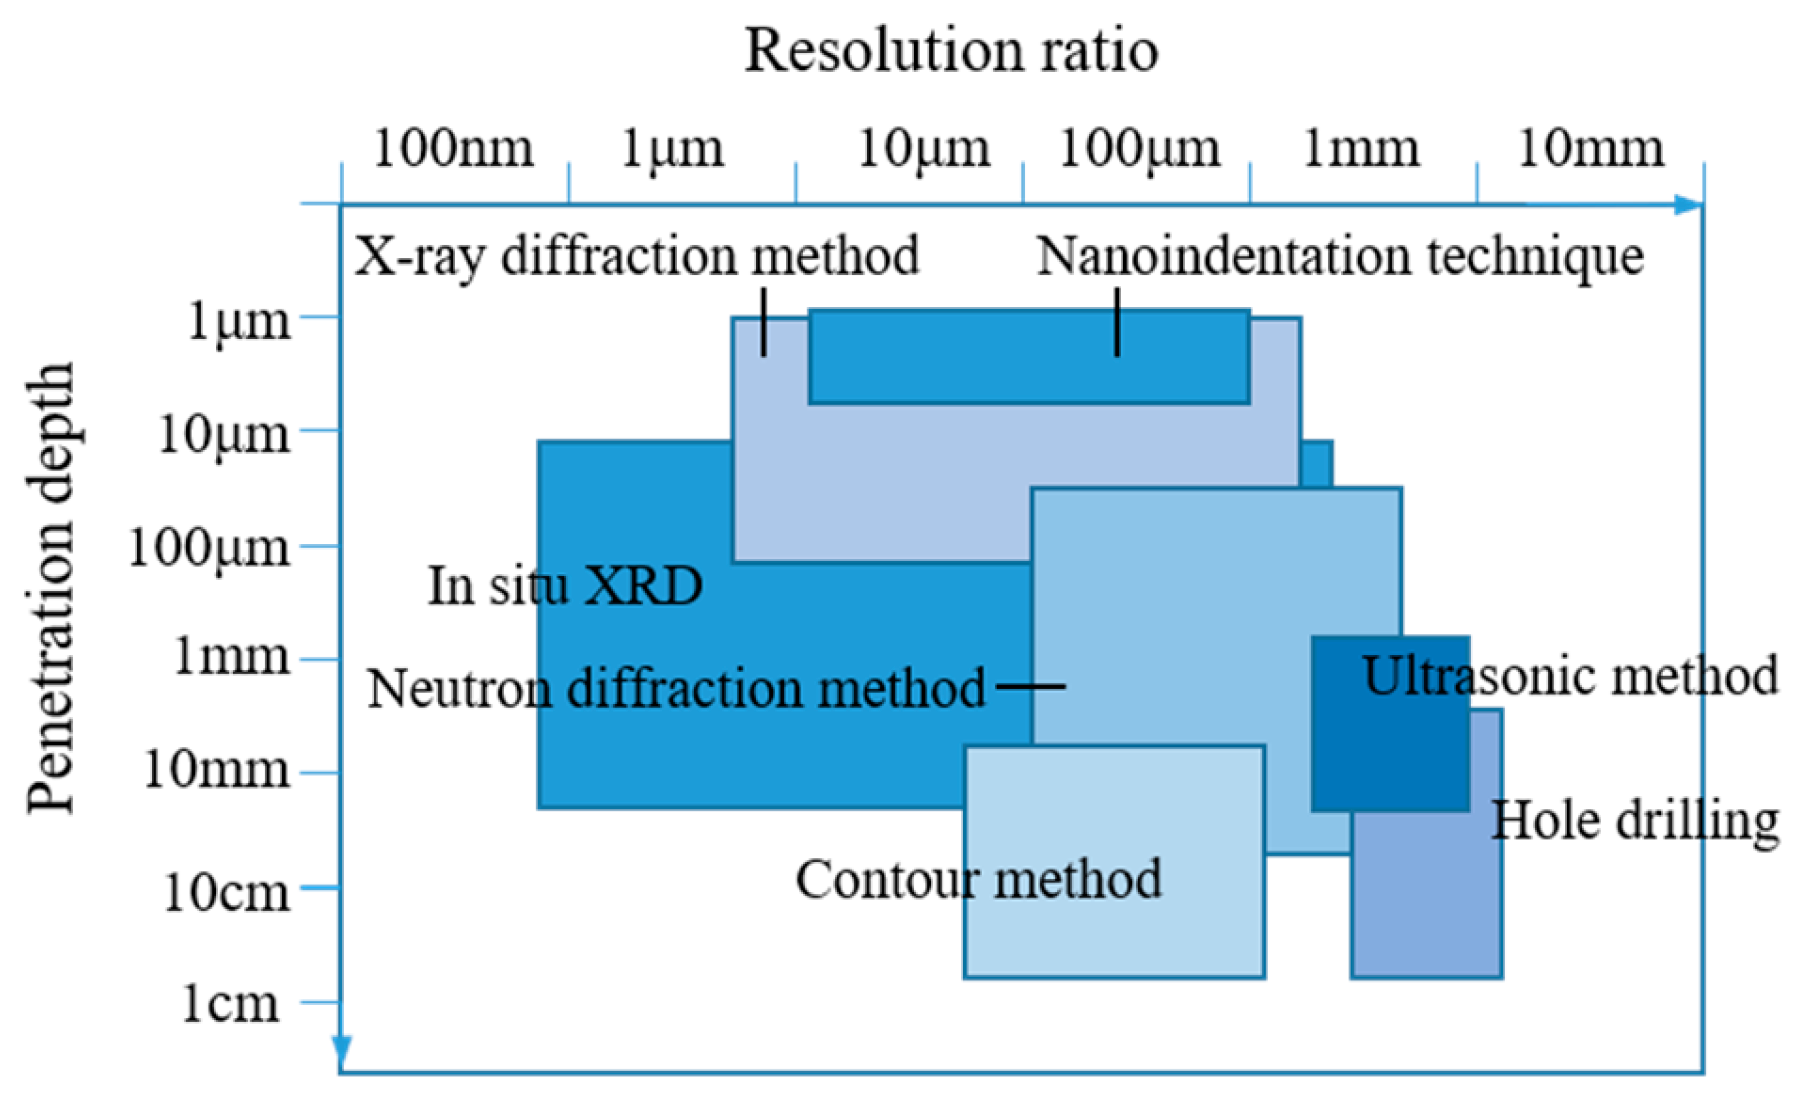
Accurate measurement of residual stress is essential for evaluating the distribution of residual stress, optimizing the manufacturing process, and predicting workpiece failure. At present, residual stress testing is mainly divided into destructive testing and non-destructive testing technology [91]. At present, residual stress testing is mainly divided into destructive testing and non-destructive testing technology [91]. Non-destructive techniques, such as X-ray diffraction and neutron diffraction, are often preferred for maintaining the structural integrity of components. Nanoindentation, while classified as a minimally invasive or quasi-non-destructive technique, provides valuable insights into surface and near-surface properties by causing localized plastic deformation. In contrast, relaxation-based techniques, such as hole-drilling and crack compliance, are considered destructive as they remove material to relieve internal stresses, providing deeper stress analysis. Figure 9 illustrates the depth of penetration and resolution of several detection methods for nickel-based superalloys [92,93].

3.1. X-ray Diffraction Method

In the early 20th century, X-ray was first used in residual stress measurement. The diffraction method for measuring residual stresses is mainly based on determining the angle at which the crystal sample exhibits the maximum diffracted intensity under X-ray irradiation and obtaining the lattice spacing of the corresponding diffraction planes by Bragg law. If there is residual stress in the sample, the lattice spacing will be different from that of an unstressed condition [94]. The relationship between lattice strain and residual stress is not simply proportional due to the tensorial nature of stress and strain and the elastic and plastic anisotropy of crystals [95]. While Hooke’s law provides a linear approximation in isotropic materials, this relationship becomes more complex in anisotropic materials like nickel-based single-crystal superalloys. X-ray diffraction (XRD) is one of the most common residual stress detection methods. Over many years of development, the technology has gradually matured and can be employed to measure residual stress in multiple process occasions [96].
Shrestha et al. [46] measured the changes in the residual stress of heat-treated IN625 and IN718 alloys by XRD, which proved the universality of XRD in different superalloy compositions. Arrazola et al. [97] measured the residual stresses in IN718 due to machining using XRD. Ortiz et al. [19] utilized XRD to assess alterations in the residual stress profile at the surface of nickel-based superalloys induced by severe plastic deformation. Madariaga [98] studied the development of residual stress resulting from the machining of IN718 under static load at room temperature. The surface residual stress was measured using XRD in both the initial state and under various loading conditions. Soroush [99] measured the residual stress by XRD and finally obtained the relationship between the state and distribution of residual stress and deformation. Maleki [100] used X-ray diffraction technology to measure the residual stress of IN718 samples with different surface treatment methods, including ultrasonic nanocrystal surface modification, severe shot peening, shot peening, and laser shot peening.
In addition to surface stress measurements, laboratory-based XRD techniques have been developed to measure residual stress distributions along the depth of a material. By sequentially removing material layers through mechanical or electrochemical means, the stress profile can be obtained at various depths [101]. However, real-time measurements of dynamic stresses under actual working conditions cannot be performed with traditional XRD, limiting its application in complex environments such as high temperatures and high strains. To address these limitations, in situ X-ray diffraction, particularly using synchrotron radiation, has emerged as an advanced technique. In situ XRD with synchrotron radiation provides the ability to capture real-time stress evolution at multiple depths and directions. Synchrotron sources offer high photon flux and fast data acquisition, making them particularly useful for studying dynamic processes such as machining, deep rolling, and welding. Meyer et al. [102,103] demonstrated the use of in situ XRD to analyze stress evolution during deep rolling and orthogonal cutting processes, allowing for the reconstruction of full 2D strain and stress maps. These maps are essential for understanding internal material loads and the resulting residual stresses in real time. Similarly, Wang et al. [104] investigated the micromechanical behavior of FGH96 nickel-based superalloy during room-temperature compression using in situ synchrotron radiation high-energy X-ray diffraction. They demonstrated the evolution of lattice strain during deformation, revealing insights into the stress distribution mechanisms of differently oriented grains and phases.

3.2. Neutron Diffraction Method

XRD generally provides higher spatial resolution than neutron diffraction, particularly when using synchrotron sources. XRD can resolve surface and near-surface stress distributions with a spatial resolution in the range of a few microns, making it suitable for detailed surface stress analysis. In contrast, neutron diffraction offers superior penetration depth, reaching several millimeters to centimeters into the material, which is crucial for bulk stress analysis in thicker components. However, the spatial resolution of neutron diffraction is typically lower, in the millimeter range, making it less suitable for high-resolution surface stress measurements [105,106].
Smith et al. [107] measured the residual stress along the weld between polycrystalline and nickel-based single-crystal superalloys using neutron diffraction and studied the impact of pretreatment and post-treatment on the residual stress of single-crystal superalloys. Chen [108] utilized neutron diffraction mapping to measure the residual stress distribution in the IN718 workpiece, exploring different quenching and aging heat processes. Additionally, real-time monitoring of residual stress relaxation at the center of the workpiece was achieved through in situ time-of-flight neutron diffraction. Liu [109] characterized the distributions of the three-dimensional residual stress of the IN718 sample under quenching conditions in different media (water, air, oil, and insulation) by the neutron diffraction method. Although neutron diffraction offers strong penetration capabilities, it also faces several challenges, such as high equipment costs and the need for special neutron sources, which limit its widespread application.

3.3. Ultrasonic Method

The ultrasonic method is a new non-destructive testing technology based on the acoustic elastic effect, which determines the stress state by measuring the propagation speed of ultrasonic waves in materials. The residual stress within the material affects the wave speed, allowing for the deduction of internal stress conditions through changes in the sound wave velocity. This method has superior applicability in the residual stress assessment of complex geometry and large-scale parts. Compared with X-ray diffraction and neutron diffraction methods, the ultrasonic method has significant advantages in eliminating the risk of radiation exposure. In addition, it provides faster processing speed and enhances its practicability in various industrial applications.
Three waveforms commonly used in ultrasonic testing methods are critical refraction longitudinal waves (LCR), birefringent shear waves, and ultrasonic Rayleigh waves [110]. LCR waves have limited penetration ability and are primarily used for measuring residual stress in bulk materials. Moreover, the accuracy of measurement is affected by temperature and the grain shape of the sample, which makes LCR waves unsuitable for measuring residual stress in nickel-based superalloys. The refraction characteristics of birefringent shear waves make the signal complex, which requires more complex instruments and data analysis. For some materials with uneven surface states, the signal is unstable and difficult to interpret. Rayleigh waves propagate along the surface of the workpiece without radiation loss and are highly sensitive to stress components parallel or perpendicular to their direction of propagation. Therefore, Rayleigh waves are widely adopted in the non-destructive testing of residual stresses in nickel-based superalloys. Choi et al. [111] used the ultrasonic minimum reflection measurement method with Rayleigh waves to evaluate the residual stress of IN718 shot-peened specimens, and the results were highly consistent with the XRD experimental results. Pan et al. [112] used self-developed laser ultrasonic testing equipment to detect the residual stress of GH4169 (Figure 10a) and compared the laser ultrasonic detection results with XRD, which showed that the two residual stress trends remain consistent (Figure 10b). At present, the research on laser ultrasonic detection of residual stress in superalloys is limited.

3.4. Nanoindentation Technique

Nanoindentation technology can directly measure the mechanical properties of materials, such as elastic modulus and hardness, and indirectly infer residual stress [113]. Residual stress affects hardness and elastic modulus, which can be identified by analyzing changes in the stress–strain curve of the indentation. Due to the presence of residual stress, the response of the material is affected by changes in the depth of the indentation so that the magnitude of the residual stresses can be inferred from the change in the curve.
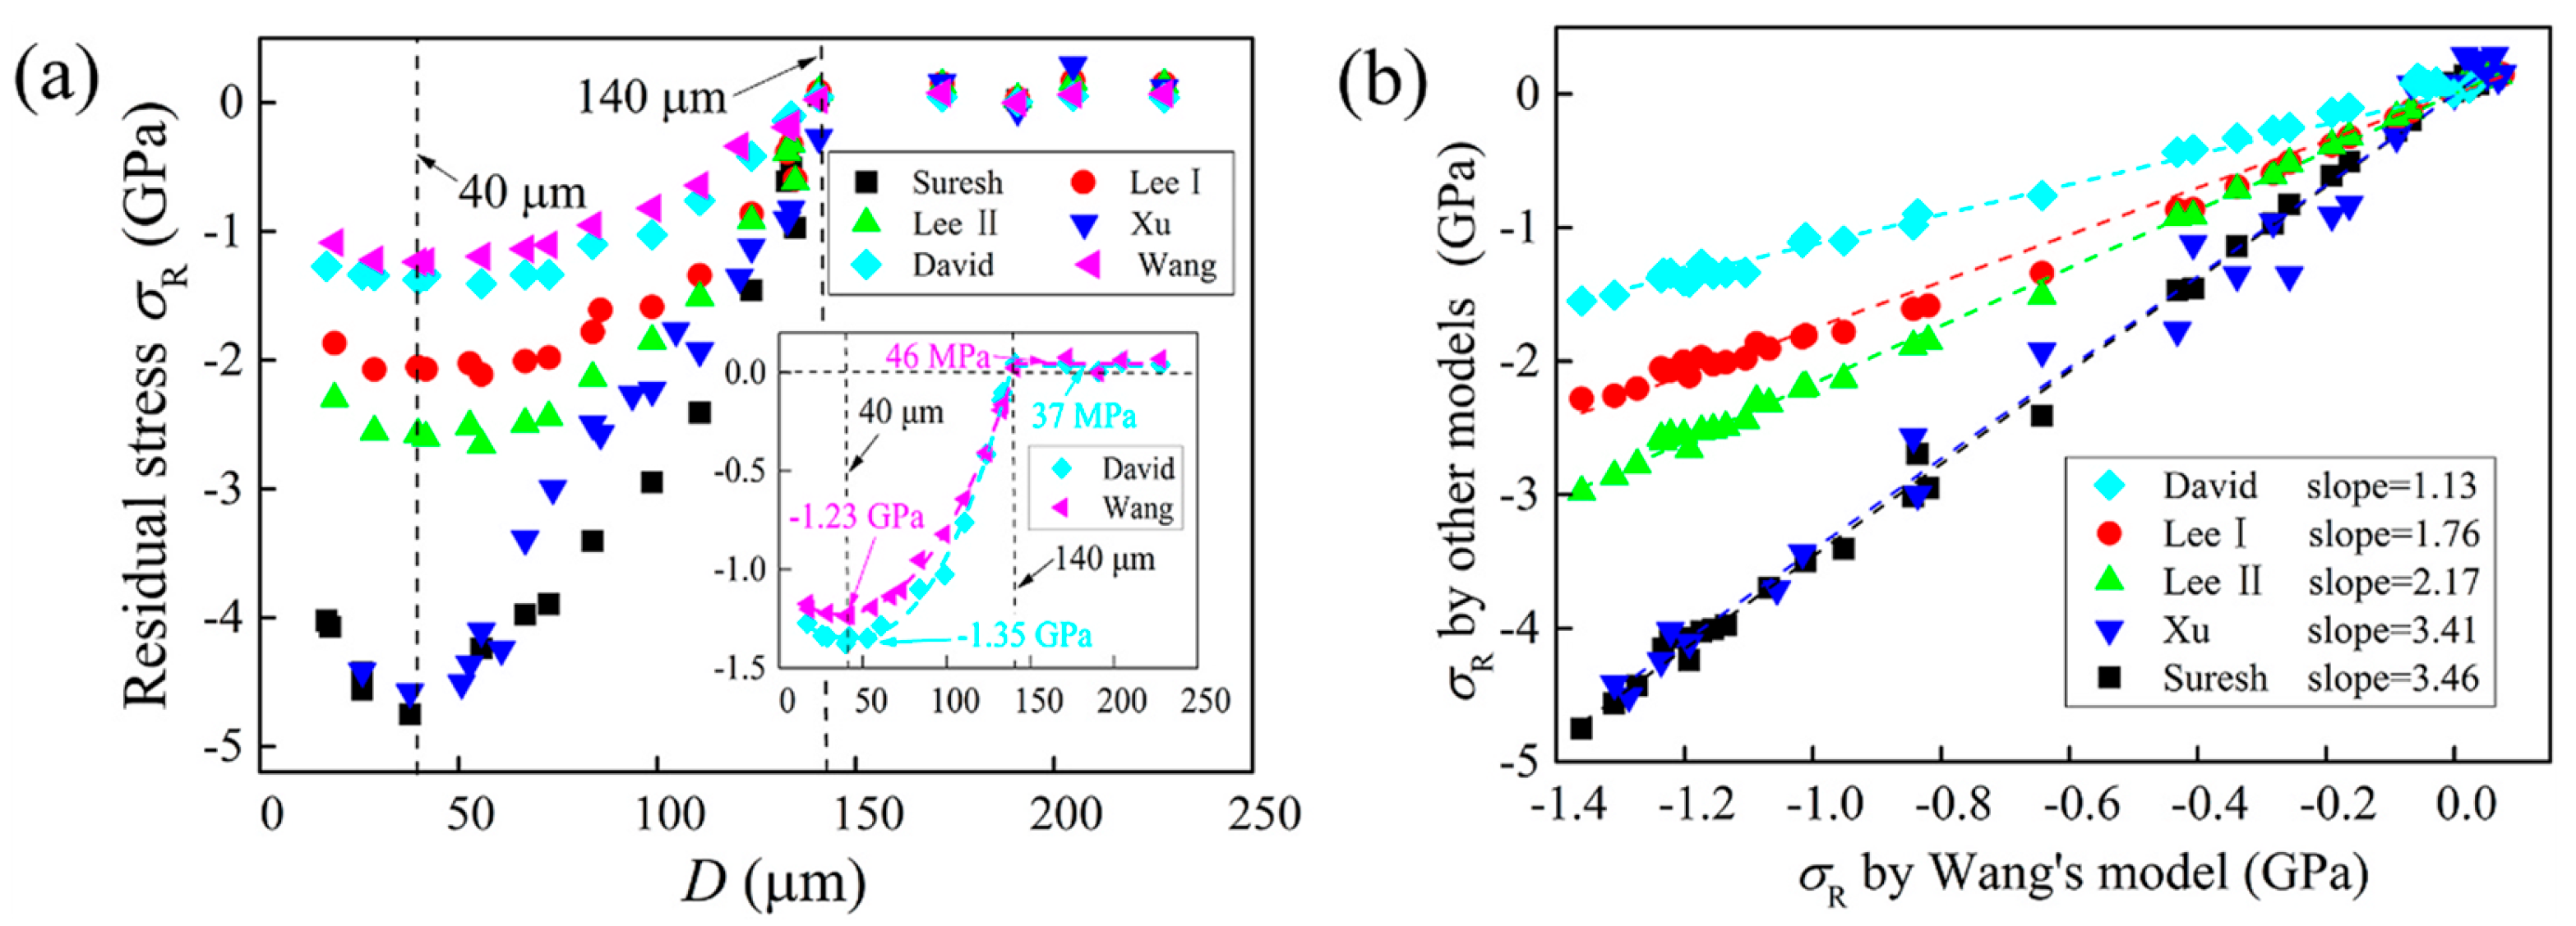
Liu et al. [114] obtained the residual stress, hardness, yield strength, and elastic modulus in the shot-peened layer of DD6 through a nanoindentation experiment and identified the model most suitable for describing shot-peening through analysis and comparison to calculate the residual stress. The residual stress of DD6 calculated by different models changes similarly with the distance from the shot-peened surface; although the values were different, there was still a proportional relationship (Figure 11). From the stress–strain curve, many models have been proposed to calculate the residual stress. Xiao et al. [115] compared the accuracy of the four different models (Suresh model [116], Carlsson model [117], Lee model [118], and Wang model [119]) for calculating residual stresses and found that when the correction factor geometric factor was introduced, all these models could be expressed as the extended form of Suresh model.

3.5. Destructive Method

In addition to non-destructive techniques, relaxation-based methods have played a crucial role in the accurate measurement of residual stresses in materials like nickel-based single-crystal superalloys. Among these methods, the hole-drilling method and the contour method are widely used. The hole-drilling method measures residual stress by introducing a small hole into the material, which locally relieves stress around the hole. The resulting strain around the hole is then measured, and the residual stress is calculated from the strain relaxation using appropriate calibration coefficients. This technique, while introducing some local damage, has been highly effective in providing accurate internal stress measurements, especially for near-surface stresses [101].
The contour method, on the other hand, is designed to measure residual stress by making a cut through the material and mapping the deformation of the cut surface. The deformed contour of the surface is then used to back-calculate the original residual stress in the material. This method is particularly effective for measuring complex stress distributions, such as those found in nickel-based superalloys, where multi-axial stress states often develop during manufacturing processes like casting, welding, and machining. Prime et al. [120] demonstrated the successful application of the contour method to measure residual stresses in a nickel-based superalloy turbine disk, revealing detailed internal stress profiles.
While relaxation-based methods like hole-drilling and the contour method result in localized material removal, they provide crucial insights into the internal residual stress states, especially in situations where non-destructive methods may not penetrate deep enough or provide sufficient resolution for complex stress fields [121]. These techniques are complementary to non-destructive methods, enabling a more comprehensive analysis of residual stresses in nickel-based superalloys, particularly in components subjected to harsh thermal and mechanical environments.

4. The Prediction of Residual Stress

The behavior of residual stress changes significantly impacts the performance, stability, and service life of nickel-based superalloy components. To address the challenge of detecting residual stress in superalloys when operating in harsh environments, scholars usually have employed predictive models to assess the changes in residual stress within the workpieces, including the empirical model, finite element model, and machine learning model [122]. The advantages and disadvantages of these three empirical models are summarized in Table 1.

4.1. Empirical Model

The empirical model for predicting residual stress is usually based on extensive experimental data and empirical laws rather than the traditional strict digital model based on physical principles. The empirical models are usually limited by specific materials, processing technology, and experimental conditions, with their predictive accuracy being influenced by the quality of data and the generalization capability of the model. In practical application, it is crucial to verify and adjust these models to adapt to different conditions and materials. In addition, considering the complexity of residual stress, the combination of an empirical model and modeling method based on physical principles may offer a more comprehensive and accurate methodology [33,123].
Farshid [32] predicted the residual stresses at different cutting depths during the machining process of IN718 alloy using elastoplastic analysis. The experimental data revealed that the calculated results of the residual stress and the depth of the recrystallized layer were in good agreement with the numerical results, which verified the accuracy of the model. Peng et al. [124] provided a novel semi-empirical model for predicting residual stress in turned IN718. This method employed a bimodal Lorentzian function to represent the distribution of residual stress. Subsequently, a statistical model was established utilizing random forest regression to establish a correlation between cutting parameters and the coefficients of the bimodal Lorentz function to predict the distribution of residual stress along the depth direction (Figure 12). The high predictive accuracy of the model has been verified by comparing the predicted results of the residual stress model with the actual experimental outcomes. Ulutan et al. [125] used the sinusoidal decay function to empirically model the residual stress profile of turning nickel-based superalloy workpieces. According to the previous experimental data, the sinusoidal decay function parameters were modified, and the model was optimized by the Particle Swarm Optimization method. Finally, the prediction accuracy of the fitting model reached R2 = 91% (Figure 13).

4.2. Finite Element Method

The finite element method (FEM) has become one of the effective means to evaluate the amplitude and distribution of residual stress in the sample at a low cost [126]. However, the accuracy of predictions is influenced by various factors, including model construction, material parameters, and process parameters [127]. The selection of these parameters is crucial for the accurate assessment of residual stress through FEM.
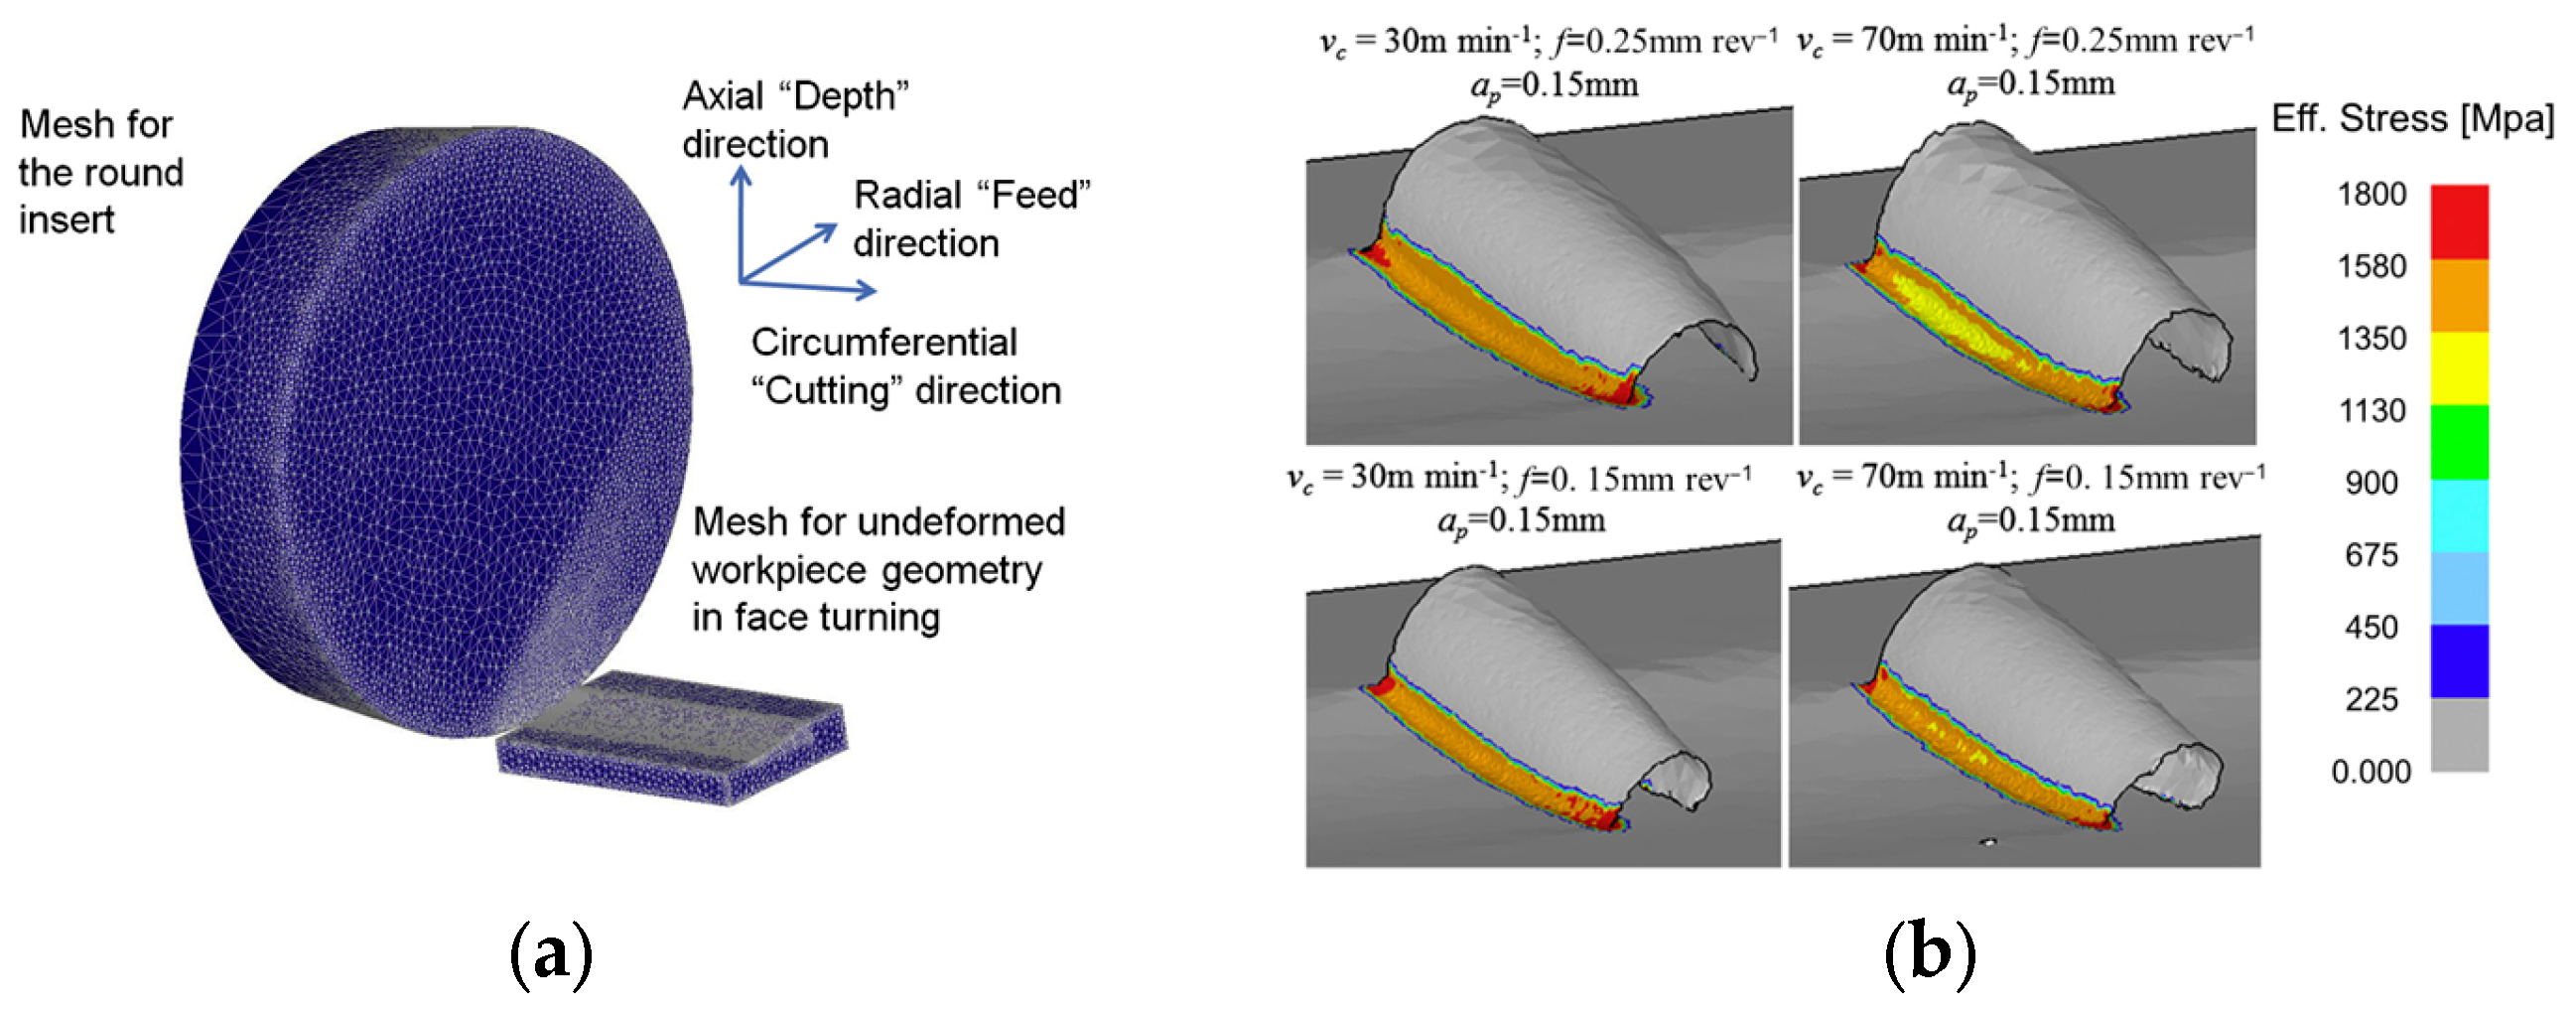
Seddik et al. [128] established the finite element model of Waspaloy material during the shot-peening process and analyzed residual stress profiles in depth. The calculated value was compared with the experimental results, showing a good correlation and verifying the accuracy of the model. Goulmy et al. [129] developed a three-dimensional finite element model considering the elasto-visco-plastic behavior during shot peening to predict the residual stress changes in IN618 materials caused by shot peening. Arrazola et al. [97] used a three-dimensional finite element model to predict the change of residual stress introduced by cutting in IN718 (Figure 14). The effects of the friction coefficient and different material model parameters on the amplitude and distribution of residual stress under high and low cutting speeds were discussed. The results were compared with XRD experimental data, and it was found that at lower cutting speeds, the experimental results were in better agreement with the simulated residual stress. Kortabarria et al. [130] used the 2D finite element model of orthogonal cutting and carried out a sensitivity analysis to assess the impact of input data on the prediction of the residual stress of IN718 alloy in machining in the model, including material constitutive law, thermal expansion, elastic modulus, and conductivity (Figure 15). The results of the sensitivity analysis indicated that the prediction of residual stress was primarily affected by the material constitutive law.

4.3. Machine Learning Model

Machine learning (ML) is a computational method that involves systematic learning through data and algorithms to deduce patterns and make predictions or decisions on new data. This prediction process depends on a substantial amount of known data, and its accuracy increases with the volume of data. Machine learning excels in processing large amounts of data, complex relationships, and high-dimensional features. The effects of nonlinear relationships between various factors of residual stress formation in nickel-based superalloys can be efficiently simulated and identified by ML models.
Wu et al. [131] predicted the residual stress generated during the laser shock process in GH4169 by an artificial neural network (ANN). In the ANN model, laser power density, depth, and overlap ratio were used as input parameters, while the output parameter was residual stress. Through extensive data training, the coefficient of determination R2 for the testing set was 0.9931. In the prediction of residual stress, depth is the most influential among the input parameters, while overlap rate has the least impact. Similarly, Wu et al. [132] set the laser energy, impact times, laser profile, and depth as input parameters and the residual stress as output parameter to predict the residual stress of the FGH4095 superalloy workpiece during laser shock processing using ANN and finally obtained the test datasets R2 = 0.9871, and further obtained the ranking importance of various factors on the prediction accuracy (Figure 16).

5. Methods of Mitigating Residual Stress

In the second section, the effect of process parameter optimization on the residual stress in the manufacturing process is discussed. Although the adverse effects of residual stresses can be mitigated by optimizing process parameters, the limitations of residual stresses on machining quality remain. Consequently, surface treatment techniques, including ultrasonic rolling, laser shock peening, and shot peening, are proposed to control residual stresses. The residual compressive stress generated by surface treatment techniques significantly enhances the fatigue resistance and corrosion resistance of the material. The advantages and disadvantages of these mitigation methods are summarized in Table 2. Table 3 summarizes some recent research work on controlling residual stress through surface treatment technologies.

5.1. Shot Peening

Shot peening (SP) [133,150] is a common surface treatment method that employs high-speed metallic or ceramic particles to impact the surface of a material. The residual compressive stress and plastic deformation on the material surface is induced to inhibit the initiation of cracks and enhance the surface hardness, fatigue resistance, corrosion resistance, and wear resistance of the material [151,152,153,154]. Shot peening is widely used in nickel-based superalloys due to its low cost and adjustable blasting angles.
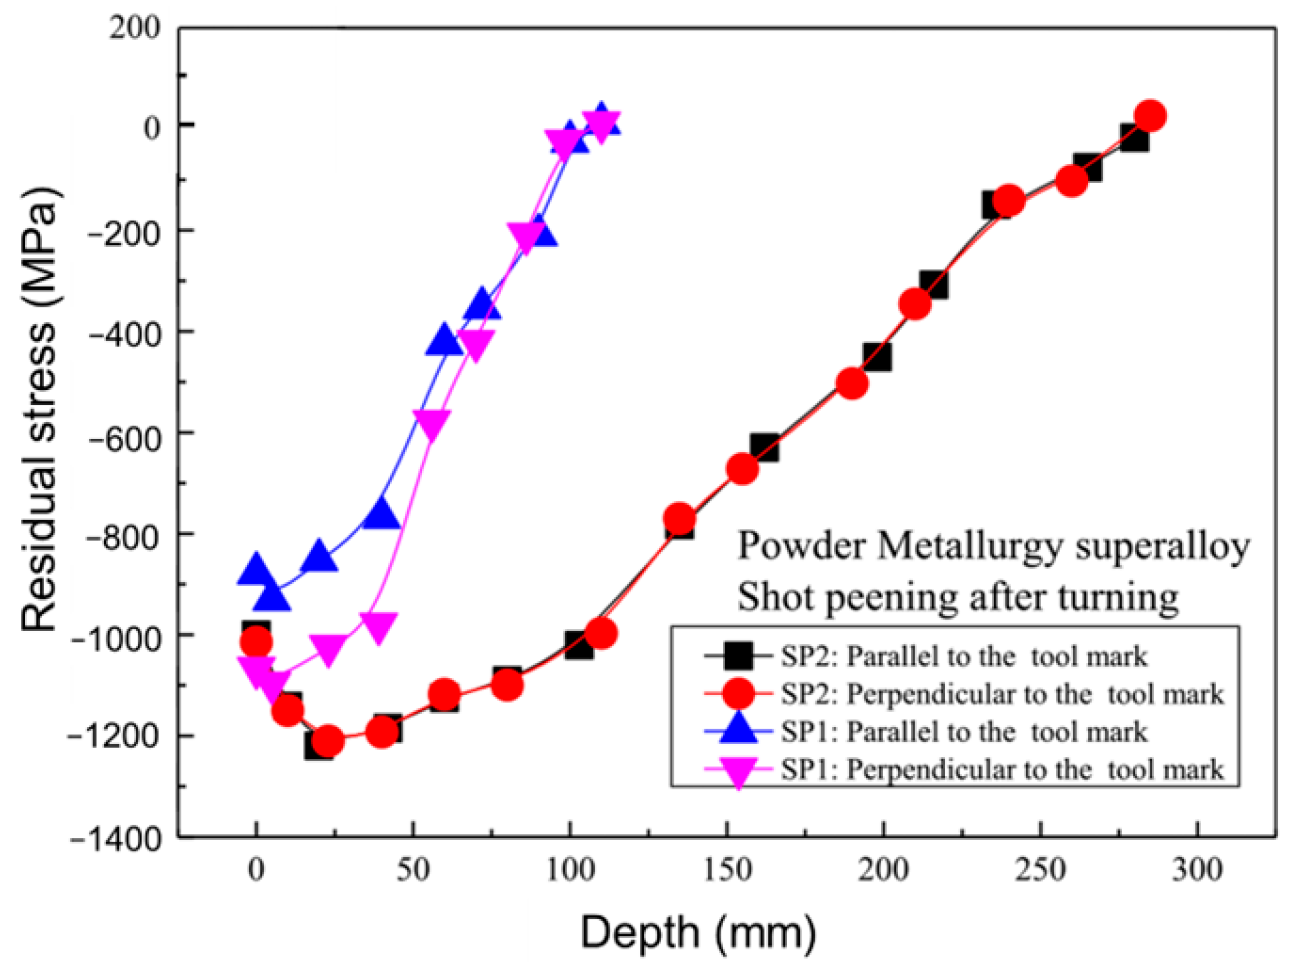
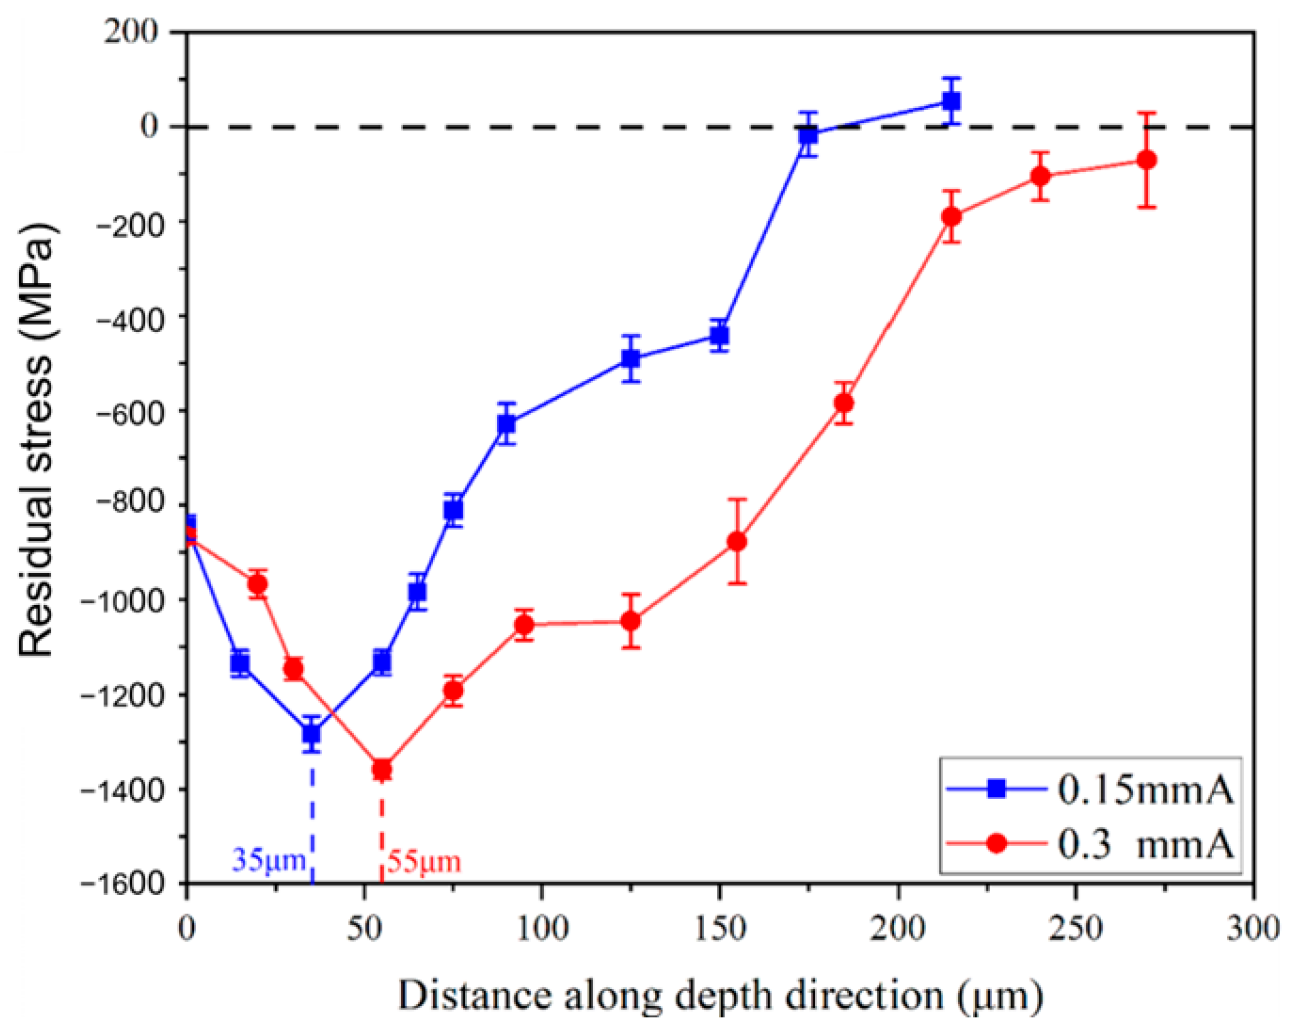
The effects of shot peening parameters, such as processing time, shot media, and intensity, play a crucial role in determining the distribution and magnitude of residual stresses. Chen et al. [134] studied the effect of shot peening processing time (10, 30, 60, 120 s) on the residual stress of DD3 alloy. Around 10 s- processing, the residual compressive stress was introduced to the sample, and the value was increased as the shot peening processing time increased. The distribution of surface residual compressive stress exhibited a fluctuating pattern as the measurement directions changed, reflecting the pronounced anisotropy of residual stress within the sample. Wang et al. [149] investigated the effects of different shot media, including compound shot peening and ceramic bead peening, on the surface residual stress of the FGH96 PM. The results showed that the maximum residual stress and surface residual stress induced by composite shot peening (SP2) were greater than those induced by ceramic shot peening (SP1) (Figure 17). Qin et al. [155] investigated the shot-peened GH4169 superalloy samples with two different intensities (0.15 mmA and 0.3 mmA) and found that the introduced residual stresses followed a trend of initial increase followed by a decrease (Figure 18). The maximum compressive residual stresses and the surface residual compressive stresses introduced by shot peening with 0.3 mmA intensities were 1358 MPa and 867 MPa, respectively. In contrast, the maximum compressive residual stresses and the surface residual compressive stresses introduced by 0.15 mmA intensities were 1284 MPa and 847 MPa, respectively. Increasing the intensity of shot peening enhances the compressive residual stress, shifting the location of the maximum residual stress to a deeper position below the surface of the material.

5.2. Laser Shock Peening

Laser shock peening (LSP) stands out as a predominant and promising advanced surface-strengthening technology due to its utilization of high-energy laser technology. [156]. It introduces residual compressive stress by generating high-energy laser pulses on the surface of a material to enhance the fatigue resistance and corrosion resistance of the material and reduce crack propagation. Compared with the traditional shot peening process, LSP has higher machining accuracy and stronger programming control ability. The precise positioning ability and non-contact characteristics of LSP make it easier to strengthen the nickel-based superalloy parts.
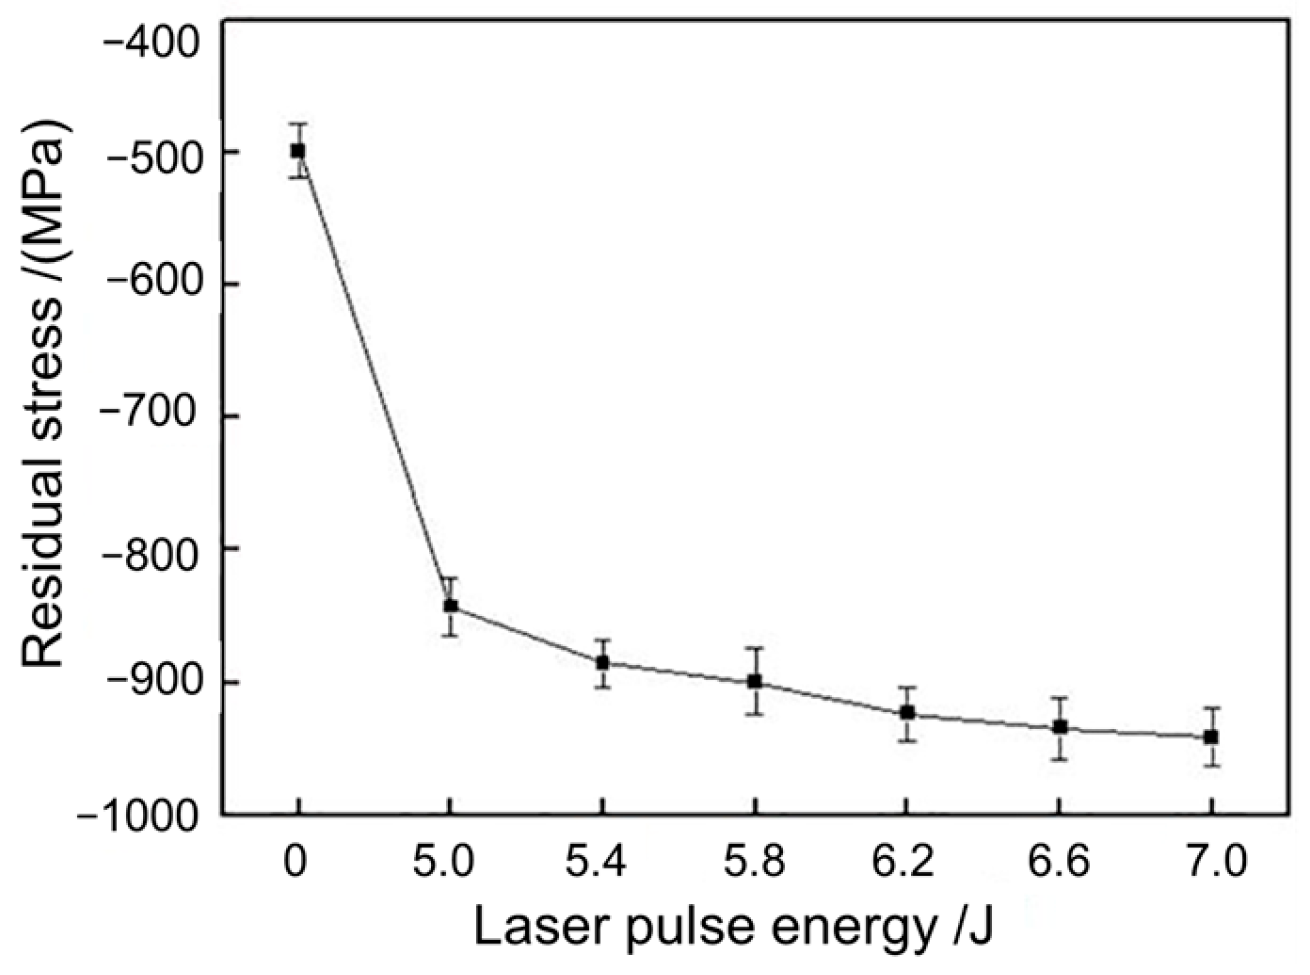
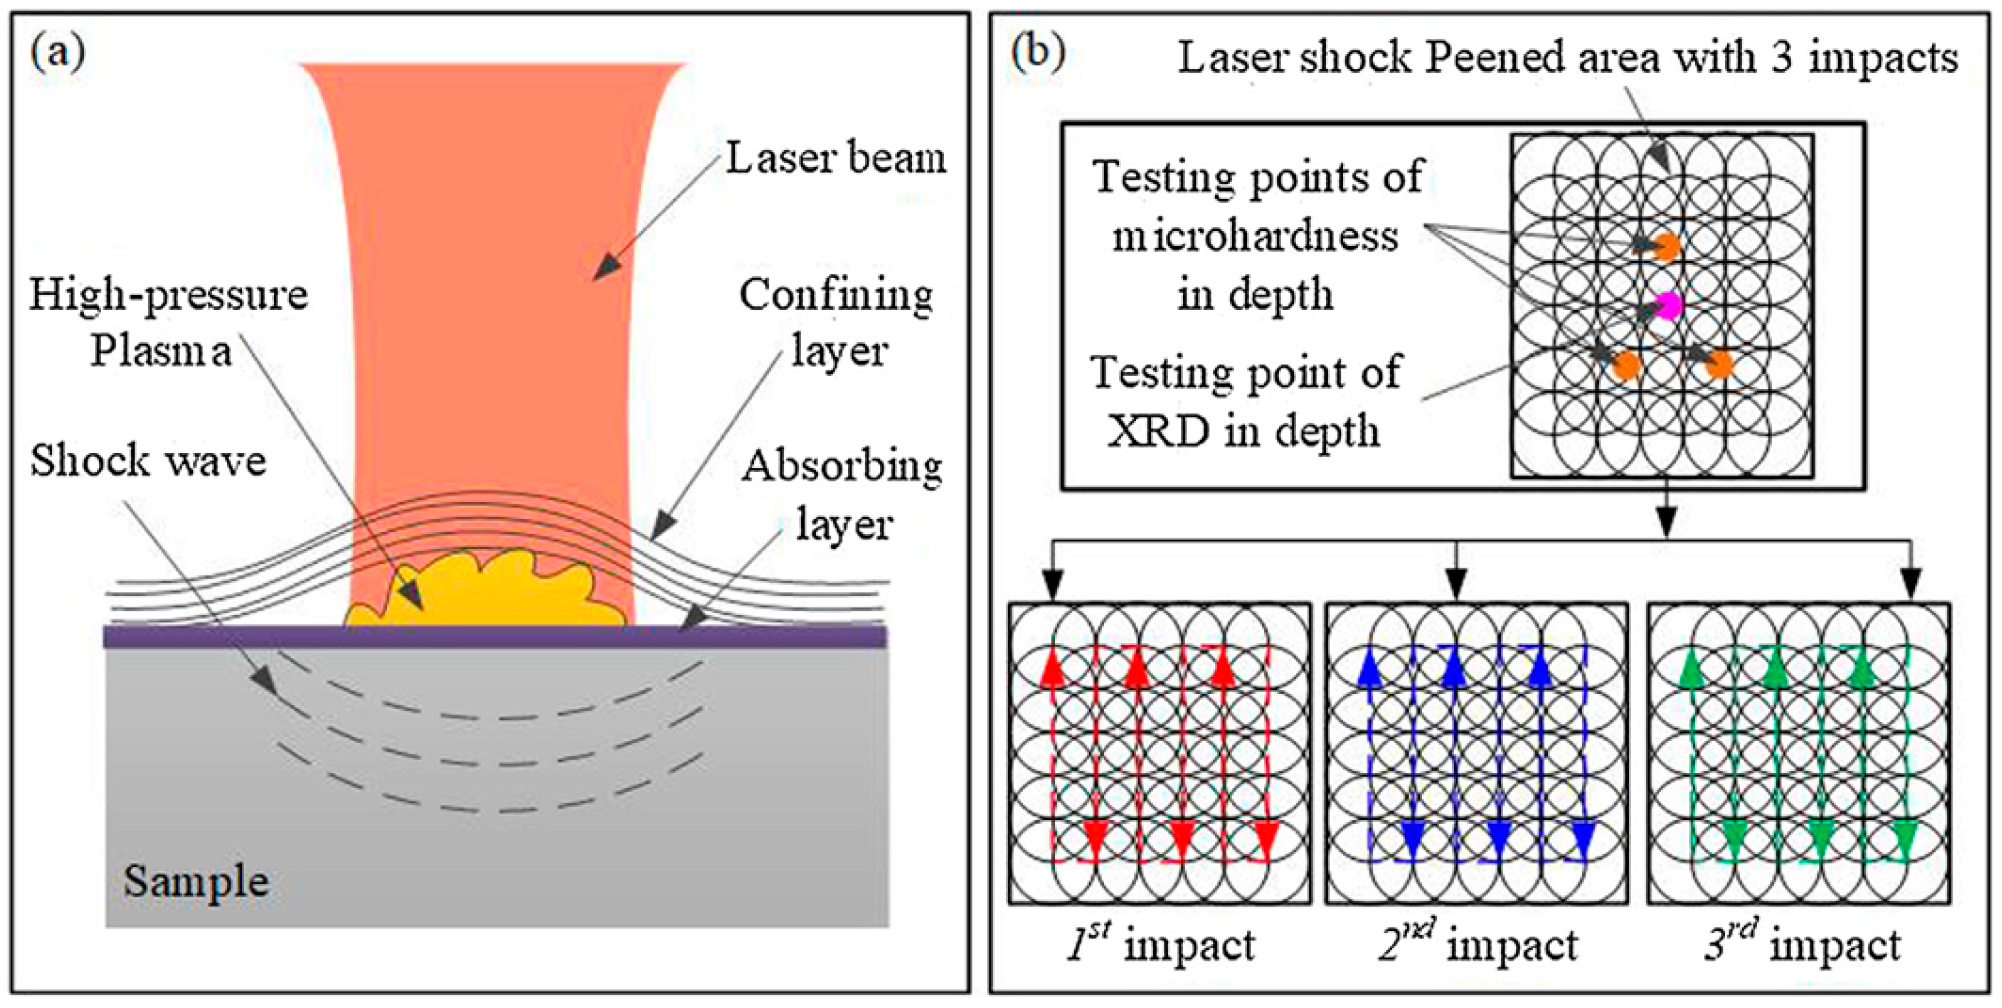
Different processing parameters of LSP have a significant effect on the induced residual stress. Hu et al. [142] used LSP with a laser energy of 5–7 J to conduct single-point treatment on SRR99 samples. The results showed that when the laser energy increases to 7 J, the residual compressive stress of the sample increases from 498 MPa to 843 MPa compared with the laser energy of 5 J (Figure 19). Karthik et al. [157] researched the impact of pulse density on the residual stress of the Inconel 600 sample. When the pulse density was 2500 and 3500 pulses cm−2, the residual compressive stress of 180 and 214 MPa were induced on the surface of the sample, respectively. Geng et al. [158] used multiple LSP treatments on nickel-based single-crystal materials. The LSP treatment process and scanning path are shown in Figure 20. The research results showed that after multiple LSP treatments, the residual compressive stress in the sample changed gradients along the depth direction, gradually decreased from the surface to the inner layer, and stabilized at a certain depth, with a maximum value reaching 600 MPa.
The residual compressive stress generated by LSP is prone to relaxation under mechanical loads or high temperatures [138,143,159,160]. The reasons for the relaxation phenomenon can be summarized as follows: (i) mechanical load overload, (ii) cyclic loads close to or above the durability limit, and (iii) exposure and thermal expansion. It has been found that residual stress in LSP may rapidly decrease by more than 50% in the high-temperature environment or cyclic load of the engine [161]. Pu et al. [162] first proposed the Warm Laser Shock Peening technology to solve the problems faced by LSP. WLSP combines the benefits of LSP, dynamic precipitation (DP), and dynamic strain aging (DSA) [163], which improves the residual compressive stress in the surface-hardened layer of the material while maintaining the same strengthening effect under high-temperature cyclic loading [147,164], effectively addressing the issue of residual stress relaxation in LSP technology at high temperatures [165].
The amplitude and distribution of residual stress under WLSP technology are mainly determined by factors such as temperature, laser energy density, and number of impacts. Tang et al. [143] measured the residual stress of DD6 samples treated with WLSP and LSP at different temperatures. The results are shown in Figure 21. At the same depth, the residual compressive stress generated by WLSP was significantly greater than that introduced by LSP, and the residual compressive stress generated by WLSP increased with the increase in temperature. Additionally, Tang et al. [138] also observed that at the same depth, as the number of WLSP impacts increased, the residual compressive stress of IN718 gradually increased. Lu et al. [140] verified through experiments that the release rate of residual stress induced by WLSP during post-aging was lower than that induced by LSP, indicating that samples treated with WLSP are more stable than those treated with LSP.

5.3. Ultrasonic Surface Rolling Process

Deep rolling is a well-established surface treatment method known for its effectiveness in improving material properties through the introduction of compressive residual stresses [166,167,168,169]. This process involves using hard rollers to exert high-pressure contact on the material surface, which not only reduces tensile residual stresses but also enhances surface hardness and fatigue resistance. Deep rolling has been widely applied to various materials, including nickel-based superalloys, due to its ability to significantly extend fatigue life and improve surface integrity. However, while deep rolling provides substantial benefits, there are inherent limitations in terms of the depth and uniformity of the induced compressive residual stresses and the refinement of the surface microstructure. To address these limitations, the Ultrasonic Surface Rolling Process (USRP) has been developed. USRP builds upon the principles of deep rolling and integrates the advantages of ultrasonic impact peening; the dislocation density and grain refinement are improved, and the stronger and deeper gradient nanocrystalline layers and compressive residual stress layers are induced [148,170]. The working diagram is shown in Figure 22 [171,172]. Additionally, USRP can significantly eliminate micro-cracks and improve the fatigue resistance, wear resistance, and surface hardness of nickel-based superalloys [173].
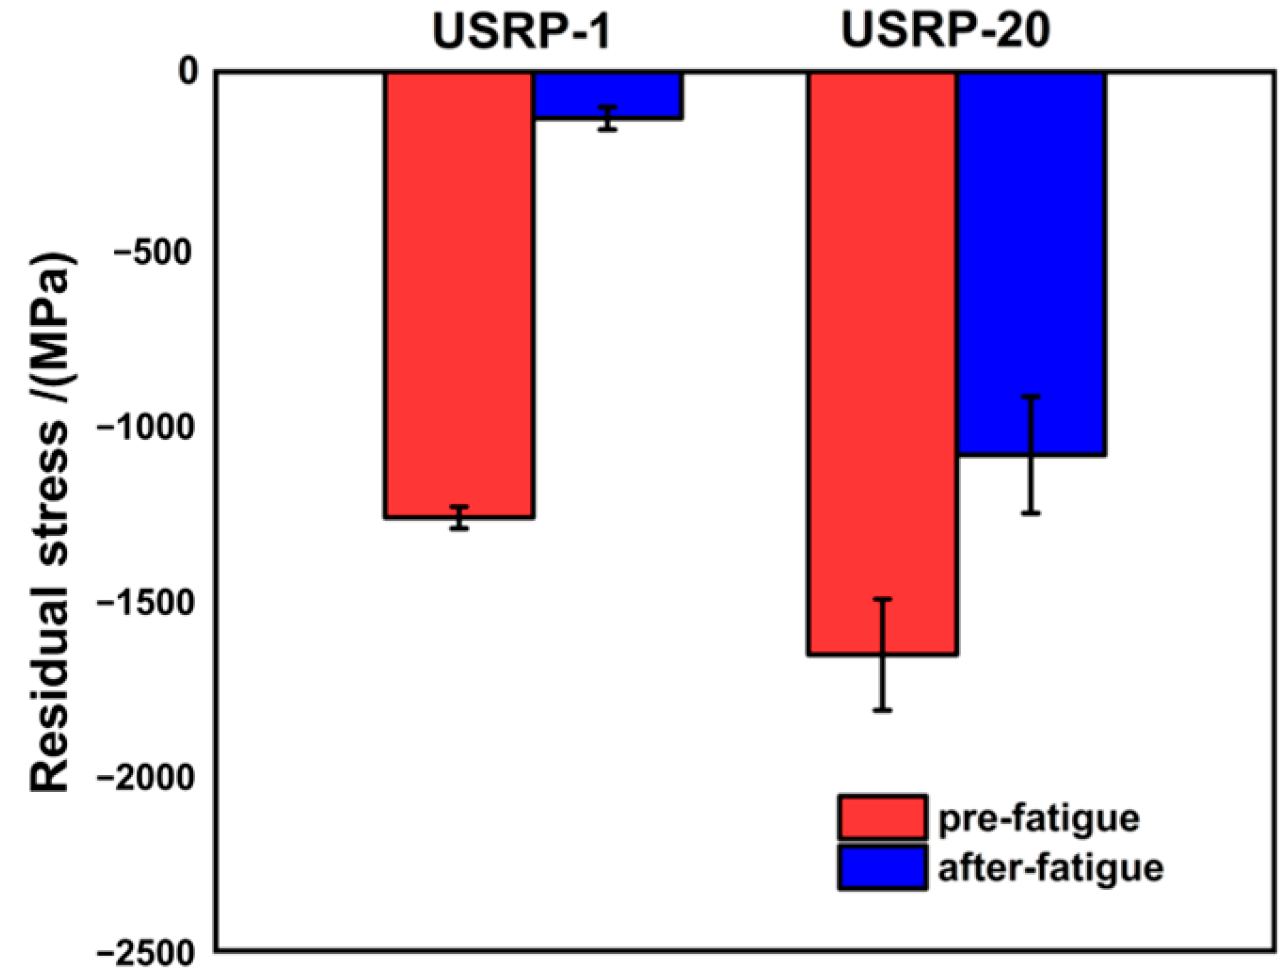
The number of rolling treatments is a crucial parameter in the process. Yu et al. [174] obtained the impact of rolling times on the residual stress of GH4169 combined with finite element simulations and experiments. Compared with untreated samples (BM), conducting one USRP treatment (USRP-1) and four treatments (USRP-4) on the sample introduced deeper residual compressive stress. The axial residual stress value gradually decreased as the distance from the surface increased, while the circumferential residual compressive stress first rose and then fell. The USRP-1 treatment increased surface axial residual compressive stress by 209%, while the USRP-4 treatment increased residual compressive stress by 234%. Yang et al. [148] compared the value and the stability at high temperatures of residual compressive stress generated by GH4169 under one USRP treatment (USRP-1) and 20 USRP treatments (USRP-20). The maximum compressive residual stress observed at a depth of 38 μm for USRP-1 was −1725 MPa, while for USRP-20, the maximum compressive residual stress observed at a depth of 57 μm was −2439 MPa. Two samples were placed in an environment of 600 °C, and it was found that the residual stress of the USRP-20 sample dropped from 1658 MPa to 1090 MPa over 1.25 × 10⁶ cycles, while in the USRP-1 specimen decreased from 1268 MPa to 130.9 MPa over 8 × 10⁴ cycles (Figure 23). This proved that the compressive residual stress stability is associated with the number of treatments.

5.4. Composite Surface Treatment Technology

For nickel-based superalloys facing high-temperature conditions and frequent stress cycles, employing a single surface treatment method often proves challenging in comprehensively meeting their specific requirements. Therefore, composite surface treatment technology has been proposed to address more complex strengthening needs. This treatment can be used on the same sample surface using a variety of strengthening methods [175] to achieve a variety of performance enhancements and deal with complex high-temperature working conditions to provide a more comprehensive and reliable solution [176].
The ultrasonic–electrical pulse composite processing technique couples two energy transfer modes, ultrasonic vibration and electrical pulse [177,178], to induce microstructural changes through ultrasonic vibration, while at the same time, the electro-plastic effect of the electrical pulse produces instantaneous abrupt changes in the material surface [179]. Localized heating and cooling of the material is induced by this process, inducing surface phase transformations and generating residual stresses [180,181]. Ji et al. [182] successfully prepared an average surface grain size of 25.8 nm on IN718 by applying a combined electric pulse and ultrasonic treatment (CEPUT), and a nanocrystalline layer of more than 40 μm thick was formed. During the preparation process, when there was no electric pulse peak current applied, indicating that the workpiece underwent solely an ultrasonic treatment, resulting in a residual compressive stress of 281 MPa. With the increase in the peak current, the electro-plastic effect was enhanced, leading to the generation of residual compressive stress reaching 581 MPa (Figure 24).
The combined treatment approach of LSP and WLSP represents a new form of composite processing technology. In LSP, laser-generated pulses form laser shock waves on the material surface, inducing grain refinement, plastic deformation, and the generation of residual stresses. WLSP, on the other hand, introduces water jets on top of LSP, where the laser creates a water-laser shock under the action of the water jets, resulting in a more uniform treatment. At the same time, the temperature is controlled, and the heat-affected area is reduced by the cooling effect of water. Tang et al. [183] treated DD6 with three forms (WLSP+LSP, LSP+LSP, and WLSP+WLSP) and found that the residual compressive stresses generation by WLSP+LSP were the largest, while the residual compressive stresses generation by LSP+LSP were the smallest for all three conditions.
Currently, the most widely used composite surface treatment techniques include the electro-ultrasonic vibration-assisted field (EUVAF) and the electromagnetic ultrasonic vibration composite field (EMUCF). However, existing studies on the effects of these two methods are more extensive on residual stress in materials such as stainless steel and titanium alloys [184,185,186,187,188], whereas relatively little has been explored in nickel-based superalloys. There remains a knowledge gap in this area of research, and more in-depth studies are needed to fully understand the specific effects of these composite treatment techniques on residual stresses in nickel-based superalloys.

6. Conclusions and Future Research Trends

As an internal state, residual stress directly affects the fatigue performance, corrosion resistance, and overall structural stability of nickel-based superalloys. Understanding and minimizing the impact of residual tensile stress is of great significance for ensuring the stable and reliable operation of the workpiece under various extreme conditions. In this paper, the generation mechanism, measurement method, prediction method, and control technology of residual stress in nickel-based superalloys are summarized. However, with the enhanced complexity of the application environment of nickel-based superalloys, the detection, prediction, and control of residual stress are facing more challenges. The future development trends are as follows:
(1)
Although a variety of mature detection techniques are available, such as neutron diffraction and X-ray diffraction, the accuracy and portability of these techniques should be focused on improving in the future. In addition, the development of new non-invasive, high-resolution detection technologies, such as detection systems based on advanced sensors and artificial intelligence algorithms, will be an important research direction.
(2)
More accurate and practical residual stress prediction models need to be developed using computer simulation and machine learning techniques, which can accurately simulate the effects of different processing conditions, material states, and environmental factors on residual stress.
(3)
The microscopic generation mechanisms of residual stress in nickel-based superalloys need to be further explored, including the microstructural and stress distribution of the nickel-based superalloys in an extreme environment, which helps develop more effective stress control and mitigation strategies. Hence, the adaptability of the new residual stress control techniques to optimize the stress state of nickel-based superalloys can be improved.
(4)
The connection between residual stress research and practical industrial applications needs to be strengthened, especially in key industries such as aerospace, nuclear energy, and automotive manufacturing. The research on the application of new detection, prediction, and control technologies to practical manufacturing and maintenance processes to improve the performance and reliability of materials is the future.

Author Contributions

Conceptualization, G.W. and X.N.; methodology, Y.Z.; software, Y.Z.; investigation, Y.Z., L.L. and X.Q.; resources, Y.Z. and B.H.; data curation, Y.S.; writing—original draft preparation, Y.Z. and Z.Z. (Zhanling Zhang); writing—review and editing, Y.Z.; visualization, Z.Z. (Zhifen Zhang); supervision, G.W.; project administration, Z.L.; funding acquisition, G.W. All authors have read and agreed to the published version of the manuscript.

Funding

This research was funded by the National Science and Technology Major Project, grant number 2019-VII-0019-0161.

Data Availability Statement

Data are contained within the article.

Conflicts of Interest

The authors declare no conflicts of interest.

References

  1. Sun, S.; Li, L.; Hu, C.; Li, Q.; Yuan, T. Tribological behavior of a shot-peened nickel-based single crystal superalloy at high temperature. Tribol. Lett. 2022, 70, 100. [Google Scholar] [CrossRef]
  2. Lu, X.; Lu, Y.; Wang, F.; Zhao, C.; Gao, L.; Si, L. Research on surface residual stress of micro-milling nickel-based superalloy Inconel 718. Int. J. Nanomanuf. 2016, 12, 82–92. [Google Scholar] [CrossRef]
  3. Pan, L.; Wu, Z.; Fang, L.; Song, Y. Investigation of surface damage and roughness for nickel-based superalloy GH4169 under hard turning processing. Proc. Inst. Mech. Eng. Part B J. Eng. Manuf. 2020, 234, 679–691. [Google Scholar]
  4. Yong, L.; Wanni, G.; Wenbin, Z.; Dongsheng, L. Review on residual stress and its effects on manufacturing of aluminium alloy structural panels with typical multi-processes. Chin. J. Aeronaut. 2023, 36, 96–124. [Google Scholar]
  5. Jiang, G.; Haiyang, F.; Bo, P.; Renke, K. Recent progress of residual stress measurement methods: A review. Chin. J. Aeronaut. 2021, 34, 54–78. [Google Scholar]
  6. Clausen, B.; Lorentzen, T.; Leffers, T. Self-consistent modelling of the plastic deformation of fcc polycrystals and its implications for diffraction measurements of internal stresses. Acta Mater. 1998, 46, 3087–3098. [Google Scholar]
  7. Wagner, J.; Hofmann, M.; Wimpory, R.; Krempaszky, C.; Stockinger, M. Microstructure and temperature dependence of intergranular strains on diffractometric macroscopic residual stress analysis. Mater. Sci. Eng. A 2014, 618, 271–279. [Google Scholar]
  8. Jafarian, F.; Amirabadi, H.; Sadri, J.; Banooie, H.R. Simultaneous optimizing residual stress and surface roughness in turning of Inconel718 superalloy. Mater. Manuf. Process. 2014, 29, 337–343. [Google Scholar]
  9. Jiang, X.; Wei, Y.; Zhou, J.; Zhan, K.; Ding, Z.; Liang, S.Y. Residual stress generation and evaluation in milling: A review. Int. J. Adv. Manuf. Technol. 2023, 126, 3783–3812. [Google Scholar]
  10. Yin, M.-g.; Cai, Z.-b.; Zhang, Z.-x.; Yue, W. Effect of ultrasonic surface rolling process on impact-sliding wear behavior of the 690 alloy. Tribol. Int. 2020, 147, 105600. [Google Scholar] [CrossRef]
  11. Liu, J.; Zhang, X.; Cui, Z.; Ahmad, T.; Wang, C.; Hong, N.; Liang, T.; Yang, B. Effects of ultrasonic surface rolling processing and plasma nitriding on the fretting wear behavior of Inconel 690TT. Surf. Coat. Technol. 2020, 402, 126312. [Google Scholar] [CrossRef]
  12. Fortunato, A.; Orazi, L.; Cuccolini, G.; Ascari, A. Laser shock peening and warm laser shock peening: Process modeling and pulse shape influence. In Proceedings of the High-Power Laser Materials Processing: Lasers, Beam Delivery, Diagnostics, and Applications II, San Francisco, CA, USA, 5–7 February 2013; pp. 136–143. [Google Scholar]
  13. Zhou, W.; Ren, X.; Yang, Y.; Tong, Z.; Chen, L. Tensile behavior of nickel with gradient microstructure produced by laser shock peening. Mater. Sci. Eng. A 2020, 771, 138603. [Google Scholar] [CrossRef]
  14. Gibson, G.; Perkins, K.; Gray, S.; Leggett, A. Influence of shot peening on high-temperature corrosion and corrosion-fatigue of nickel based superalloy 720Li. Mater. High Temp. 2016, 33, 225–233. [Google Scholar] [CrossRef]
  15. Messé, O.; Stekovic, S.; Hardy, M.; Rae, C. Characterization of plastic deformation induced by shot-peening in a Ni-base superalloy. JOM 2014, 66, 2502–2515. [Google Scholar] [CrossRef]
  16. Yuan, T.; Dou, M.; Liu, L.; Li, L.; Sun, S.; Hu, C. Improving high temperature fretting fatigue performance of nickel-based single crystal superalloy by shot peening. Int. J. Fatigue 2023, 171, 107563. [Google Scholar] [CrossRef]
  17. Yu, Y.; Zhou, L.; Li, M.; Cai, Z.; Luo, S.; He, W.; Fang, X. Research on fretting regime transition of DD6 single-crystal superalloy via femtosecond laser-induced asperity and hardened layer. Appl. Surf. Sci. 2023, 610, 155392. [Google Scholar] [CrossRef]
  18. Yao, C.; Luo, J.; Tan, L.; Cui, M.; Sun, Y.; Gao, X.; Zhang, Y. Experimental investigation on surface integrity and fatigue of nickel-based single-crystal superalloy DD6 during grinding-shot peening composite manufacturing. Int. J. Adv. Manuf. Technol. 2023, 125, 3449–3463. [Google Scholar] [CrossRef]
  19. Ortiz, A.; Tian, J.; Villegas, J.; Shaw, L.; Liaw, P. Interrogation of the microstructure and residual stress of a nickel-base alloy subjected to surface severe plastic deformation. Acta Mater. 2008, 56, 413–426. [Google Scholar] [CrossRef]
  20. Staron, P.; Cihak, U.; Clemens, H.; Stockinger, M.; Schreyer, A. Characterization of Residual Stresses in 718 Turbine Discs by Neutron Diffraction and Finite Element Modelling. Adv. Mater. Res. 2011, 278, 102–107. [Google Scholar] [CrossRef]
  21. Rist, M.; James, J.; Tin, S.; Roder, B.; Daymond, M. Residual stresses in a quenched superalloy turbine disc: Measurements and modeling. Metall. Mater. Trans. A 2006, 37, 459–467. [Google Scholar] [CrossRef]
  22. Qin, H.; Bi, Z.; Li, D.; Zhang, R.; Lee, T.L.; Feng, G.; Dong, H.; Du, J.; Zhang, J. Study of precipitation-assisted stress relaxation and creep behavior during the ageing of a nickel-iron superalloy. Mater. Sci. Eng. A 2019, 742, 493–500. [Google Scholar] [CrossRef]
  23. Vangi, D.; Virga, A. A practical application of ultrasonic thermal stress monitoring in continuous welded rails. Exp. Mech. 2007, 47, 617–623. [Google Scholar] [CrossRef]
  24. Palanichamy, P.; Vasudevan, M.; Jayakumar, T. Measurement of residual stresses in austenitic stainless steel weld joints using ultrasonic technique. Sci. Technol. Weld. Join. 2009, 14, 166–171. [Google Scholar] [CrossRef]
  25. Javadi, Y.; Najafabadi, M.A.; Akhlaghi, M. Residual stress evaluation in dissimilar welded joints using finite element simulation and the L CR ultrasonic wave. Russ. J. Nondestruct. Test. 2012, 48, 541–552. [Google Scholar] [CrossRef]
  26. Javadi, Y.; Pirzaman, H.S.; Raeisi, M.H.; Najafabadi, M.A. Ultrasonic inspection of a welded stainless steel pipe to evaluate residual stresses through thickness. Mater. Des. 2013, 49, 591–601. [Google Scholar] [CrossRef]
  27. Long, X.; Shen, Z.; Li, J.; Dong, R.; Liu, M.; Su, Y.; Chen, C. Size effect of nickel-based single crystal superalloy revealed by nanoindentation with low strain rates. J. Mater. Res. Technol. 2024, 29, 2437–2447. [Google Scholar] [CrossRef]
  28. Orozco-Caballero, A.; Gutierrez, C.; Gan, B.; Molina-Aldareguia, J.M. High-throughput nanoindentation mapping of cast IN718 nickel-based superalloys: Influence of the Nb concentration. J. Mater. Res. 2021, 36, 2213–2222. [Google Scholar] [CrossRef]
  29. Song, Y.; Pan, Z.; Li, Y.; Jin, W.; Gao, Z.; Wu, Z.; Ma, Y. Nanoindentation characterization on the temperature-dependent fracture mechanism of Chinese 316H austenitic stainless steel under creep-fatigue interaction. Mater. Charact. 2022, 186, 111806. [Google Scholar] [CrossRef]
  30. Dong, P.; Peng, H.; Cheng, X.; Xing, Y.; Tang, W.; Zhou, X. Semi-empirical prediction of residual stress profiles in machining IN718 alloy using bimodal Gaussian curve. Materials 2019, 12, 3864. [Google Scholar] [CrossRef]
  31. Feng, Y.; Hung, T.-P.; Lu, Y.-T.; Lin, Y.-F.; Hsu, F.-C.; Lin, C.-F.; Lu, Y.-C.; Liang, S.Y. Residual stress prediction in laser-assisted milling considering recrystallization effects. Int. J. Adv. Manuf. Technol. 2019, 102, 393–402. [Google Scholar] [CrossRef]
  32. Jafarian, F. 3D modeling of recrystallized layer depth and residual stress in dry machining of nickel-based alloy. J. Braz. Soc. Mech. Sci. Eng. 2019, 41, 198. [Google Scholar] [CrossRef]
  33. Kortabarri, A.; Madariag, A.; Fernandez, E.; Esnaol, J.; Arrazola, P.J. A comparative study of residual stress profiles on Inconel 718 induced by dry face turning. Procedia Eng. 2011, 19, 228–234. [Google Scholar] [CrossRef]
  34. Careri, F.; Imbrogno, S.; Umbrello, D.; Outeiro, J.C.; Batista, A.C. A residual stress prediction of machining IN718 produced by direct energy deposition. Procedia CIRP 2021, 102, 13–18. [Google Scholar] [CrossRef]
  35. Chen, Y.; Liu, Y.; Chen, H.; Wu, Y.; Chen, J.; Xiong, J.; Ren, L.; Qian, J. Multi-scale residual stress prediction for selective laser melting of high strength steel considering solid-state phase transformation. Opt. Laser Technol. 2022, 146, 107578. [Google Scholar] [CrossRef]
  36. Fan, Y.; Wang, T.; Hao, Z.; Liu, X.; Gao, S.; Li, R. Surface residual stress in high speed cutting of superalloy Inconel718 based on multiscale simulation. J. Manuf. Process. 2018, 31, 480–493. [Google Scholar] [CrossRef]
  37. Karataş, C.; Sozen, A.; Dulek, E. Modelling of residual stresses in the shot peened material C-1020 by artificial neural network. Expert Syst. Appl. 2009, 36, 3514–3521. [Google Scholar] [CrossRef]
  38. Sembiring, J.; Amanov, A.; Pyun, Y. Artificial neural network-based prediction model of residual stress and hardness of nickel-based alloys for UNSM parameters optimization. Mater. Today Commun. 2020, 25, 101391. [Google Scholar] [CrossRef]
  39. Silva, D.P.; Bastos, I.N.; Fonseca, M.C. Influence of surface quality on residual stress of API 5L X80 steel submitted to static load and its prediction by artificial neural networks. Int. J. Adv. Manuf. Technol. 2020, 108, 3753–3764. [Google Scholar] [CrossRef]
  40. Cheng, M.; Jiao, L.; Yan, P.; Feng, L.; Qiu, T.; Wang, X.; Zhang, B. Prediction of surface residual stress in end milling with Gaussian process regression. Measurement 2021, 178, 109333. [Google Scholar] [CrossRef]
  41. Afazov, S.; Becker, A.; Hyde, T. FE modelling of investment casting of a high pressure turbine blade under directional cooling. Mater. Manuf. Eng. J 2011, 12, 6–12. [Google Scholar]
  42. Afazov, S.; Becker, A.; Hyde, T. FE prediction of residual stresses of investment casting in a Bottom Core Vane under equiaxed cooling. J. Manuf. Process. 2011, 13, 30–40. [Google Scholar] [CrossRef]
  43. Hao, Z.; Tian, T.; Peng, S.; Ge, C.; Li, X.; Jia, C.; Guo, C.; Zhu, Q. Effect of heat treatment on microstructure and properties of FGH4096M superalloy processed by selective laser melting. Met. Mater. Int. 2020, 26, 1270–1285. [Google Scholar] [CrossRef]
  44. Lei, Y.; Li, X.; Sun, R.; Tang, Y.; Niu, W. Effect of sintering temperature and heat treatment on microstructure and properties of nickel-based superalloy. J. Alloys Compd. 2020, 818, 152882. [Google Scholar] [CrossRef]
  45. Wang, A.; Lv, J.; Chen, C.; Xu, W.; Zhang, L.; Mao, Y.; Zhao, Y. Effects of heat treatment on microstructure and high-temperature tensile properties of nickel-based single-crystal superalloys. Mater. Res. Express 2019, 6, 126527. [Google Scholar] [CrossRef]
  46. Shrestha, D.; Azarmi, F.; Tangpong, X. Effect of heat treatment on residual stress of cold sprayed nickel-based superalloys. J. Therm. Spray Technol. 2022, 31, 197–205. [Google Scholar] [CrossRef]
  47. Kim, S.Y.; Luzin, V.; Sesso, M.L.; Thornton, J.; Gulizia, S. The effect of low temperature range heat treatment on the residual stress of cold gas dynamic sprayed Inconel 718 coatings via neutron diffraction. J. Therm. Spray Technol. 2020, 29, 1477–1497. [Google Scholar] [CrossRef]
  48. Xie, B.; Li, L.; Fang, Q.; Li, J.; Liu, B.; Huang, Z.; Tan, L. Evolution of residual stress and its impact on Ni-based superalloy. Int. J. Mech. Sci. 2021, 202, 106494. [Google Scholar] [CrossRef]
  49. Marchese, G.; Atzeni, E.; Salmi, A.; Biamino, S. Microstructure and residual stress evolution of laser powder bed fused Inconel 718 under heat treatments. J. Mater. Eng. Perform. 2021, 30, 565–574. [Google Scholar] [CrossRef]
  50. Zhang, H.; Gong, Y.; Liang, C.; Sun, Y.; Zhao, J. Study on milling material removal mechanism and surface integrity of nickel-based single crystal superalloy DD5. Int. J. Adv. Manuf. Technol. 2023, 125, 2323–2338. [Google Scholar] [CrossRef]
  51. Gong, Y.; Li, Q.; Li, J.; Liu, Y.; Sun, Y. Tool wear performance and surface integrity studies for milling DD5 Ni-based single crystal superalloy. Sci. China Technol. Sci. 2018, 61, 522–534. [Google Scholar] [CrossRef]
  52. Cai, X.; Qin, S.; Li, J.; An, Q.; Chen, M. Experimental investigation on surface integrity of end milling nickel-based alloy—Inconel 718. Mach. Sci. Technol. 2014, 18, 31–46. [Google Scholar] [CrossRef]
  53. Li, Q.; Gong, Y.-d.; Sun, Y.; Liu, Y.; Liang, C.-x. Milling performance optimization of DD5 Ni-based single-crystal superalloy. Int. J. Adv. Manuf. Technol. 2018, 94, 2875–2894. [Google Scholar] [CrossRef]
  54. Kwong, J.; Axinte, D.; Withers, P. The sensitivity of Ni-based superalloy to hole making operations: Influence of process parameters on subsurface damage and residual stress. J. Mater. Process. Technol. 2009, 209, 3968–3977. [Google Scholar] [CrossRef]
  55. Wang, J.; Zhang, D.; Wu, B.; Luo, M. Residual stresses analysis in ball end milling of nickel-based superalloy Inconel 718. Mater. Res. 2017, 20, 1681–1689. [Google Scholar] [CrossRef]
  56. Aspinwall, D.; Dewes, R.; Ng, E.-G.; Sage, C.; Soo, S. The influence of cutter orientation and workpiece angle on machinability when high-speed milling Inconel 718 under finishing conditions. Int. J. Mach. Tools Manuf. 2007, 47, 1839–1846. [Google Scholar] [CrossRef]
  57. Zhuang, K.; Zhang, X.; Ding, H. Evaluation of Cutting Forces and Surface Integrity in Flank Milling of Heat-Resistant-Super-Alloys with Coated Cemented Carbide Tools. In Proceedings of the Intelligent Robotics and Applications: 8th International Conference, ICIRA 2015, Portsmouth, UK, 24–27 August 2015; Proceedings, Part II 8. pp. 651–663. [Google Scholar]
  58. Liu, Y.; Xu, D.; Agmell, M.; Ahadi, A.; Stahl, J.-E.; Zhou, J. Investigation on residual stress evolution in nickel-based alloy affected by multiple cutting operations. J. Manuf. Process. 2021, 68, 818–833. [Google Scholar] [CrossRef]
  59. Zeng, H.; Yan, R.; Peng, F.; Zhou, L.; Deng, B. An investigation of residual stresses in micro-end-milling considering sequential cuts effect. Int. J. Adv. Manuf. Technol. 2017, 91, 3619–3634. [Google Scholar] [CrossRef]
  60. Sun, J.; Wang, T.; Su, A.; Chen, W. Surface integrity and its influence on fatigue life when turning nickel alloy GH4169. Procedia CIRP 2018, 71, 478–483. [Google Scholar] [CrossRef]
  61. Wu, D.; Zhang, D.; Yao, C. Effect of turning and surface polishing treatments on surface integrity and fatigue performance of nickel-based alloy GH4169. Metals 2018, 8, 549. [Google Scholar] [CrossRef]
  62. Schlauer, C.; Peng, R.L.; Odén, M. Residual stresses in a nickel-based superalloy introduced by turning. In Proceedings of the Materials Science Forum, Linkoping, Sweden, 2–5 September 2002; pp. 173–178. [Google Scholar]
  63. Schlauer, C.; Odén, M. Residual stress evolution and near-surface microstructure after turning of the nickel-based superalloy Inconel 718. Int. J. Mater. Res. 2022, 96, 385–392. [Google Scholar]
  64. Sharman, A.; Hughes, J.; Ridgway, K. An analysis of the residual stresses generated in Inconel 718™ when turning. J. Mater. Process. Technol. 2006, 173, 359–367. [Google Scholar] [CrossRef]
  65. Sharman, A.; Hughes, J.; Ridgway, K. The effect of tool nose radius on surface integrity and residual stresses when turning Inconel 718™. J. Mater. Process. Technol. 2015, 216, 123–132. [Google Scholar] [CrossRef]
  66. Madariaga, A.; Esnaola, J.; Fernandez, E.; Arrazola, P.; Garay, A.; Morel, F. Analysis of residual stress and work-hardened profiles on Inconel 718 when face turning with large-nose radius tools. Int. J. Adv. Manuf. Technol. 2014, 71, 1587–1598. [Google Scholar] [CrossRef]
  67. Zou, B.; Chen, M.; Li, S. Study on finish-turning of NiCr20TiAl nickel-based alloy using Al2O3/TiN-coated carbide tools. Int. J. Adv. Manuf. Technol. 2011, 53, 81–92. [Google Scholar] [CrossRef]
  68. Loureiro, D.; Diniz, A.E.; Farina, A.B.; Delijaicov, S. The influence of turning parameters on surface integrity of nickel alloy 625. Proc. Inst. Mech. Eng. Part B J. Eng. Manuf. 2018, 232, 1837–1847. [Google Scholar] [CrossRef]
  69. Thakur, A.; Gangopadhyay, S. State-of-the-art in surface integrity in machining of nickel-based super alloys. Int. J. Mach. Tools Manuf. 2016, 100, 25–54. [Google Scholar] [CrossRef]
  70. Maurya, R.K.; Niranjan, M. Experimental investigations of effect of tempering on residual stresses developed during the turning operation. Mater. Today Proc. 2021, 47, 3852–3858. [Google Scholar]
  71. Hosseini, E.; Rehman, S.; Alimoradi, A. Surface integrity of fatigue strength of nickel based super alloy in turning by wire electrical discharge process. Proc. Inst. Mech. Eng. Part B J. Eng. Manuf. 2022, 236, 135–145. [Google Scholar] [CrossRef]
  72. Ulutan, D.; Ozel, T. Machining induced surface integrity in titanium and nickel alloys: A review. Int. J. Mach. Tools Manuf. 2011, 51, 250–280. [Google Scholar] [CrossRef]
  73. Pawade, R.; Joshi, S.S.; Brahmankar, P. Effect of machining parameters and cutting edge geometry on surface integrity of high-speed turned Inconel 718. Int. J. Mach. Tools Manuf. 2008, 48, 15–28. [Google Scholar]
  74. Chen, Z.; Zhou, J.; Peng, R.L.; M’Saoubi, R.; Gustafsson, D.; Palmert, F.; Moverare, J. Plastic deformation and residual stress in high speed turning of AD730™ nickel-based superalloy with PCBN and WC tools. Procedia CIRP 2018, 71, 440–445. [Google Scholar] [CrossRef]
  75. Hua, Y.; Liu, Z. Experimental investigation of principal residual stress and fatigue performance for turned nickel-based superalloy Inconel 718. Materials 2018, 11, 879. [Google Scholar] [CrossRef] [PubMed]
  76. Axinte, D.; Andrews, P.; Li, W.; Gindy, N.; Withers, P.; Childs, T. Turning of advanced Ni based alloys obtained via powder metallurgy route. CIRP Ann. 2006, 55, 117–120. [Google Scholar] [CrossRef]
  77. Peng, R.; Liu, K.; Tang, X.; Liao, M.; Hu, Y. Effect of prestress on cutting of nickel-based superalloy GH4169. Int. J. Adv. Manuf. Technol. 2019, 100, 813–825. [Google Scholar] [CrossRef]
  78. Gupta, S.N.; Chak, S.K. Grinding temperature and its consequences on induced residual stresses during grinding of nickel-based superalloys: A review. Eng. Res. Express 2023, 4, 042002. [Google Scholar] [CrossRef]
  79. Ming, C.; Yadong, G.; Yao, S.; Shuoshuo, Q.; Yin, L.; Yuying, Y. Experimental study on grinding surface properties of nickel-based single crystal superalloy DD5. Int. J. Adv. Manuf. Technol. 2019, 101, 71–85. [Google Scholar] [CrossRef]
  80. Hamdi, H.; Zahouani, H.; Bergheau, J.-M. Residual stresses computation in a grinding process. J. Mater. Process. Technol. 2004, 147, 277–285. [Google Scholar] [CrossRef]
  81. Curtis, D.; Krain, H.; Winder, A.; Novovic, D. Impact of grinding wheel specification on surface integrity and residual stress when grinding Inconel 718. Proc. Inst. Mech. Eng. Part B J. Eng. Manuf. 2021, 235, 1668–1681. [Google Scholar] [CrossRef]
  82. Ding, W.; Zhang, L.; Li, Z.; Zhu, Y.; Su, H.; Xu, J. Review on grinding-induced residual stresses in metallic materials. Int. J. Adv. Manuf. Technol. 2017, 88, 2939–2968. [Google Scholar] [CrossRef]
  83. Wang, J.; Xu, J.; Wang, X.; Zhang, X.; Song, X.; Chen, X. A comprehensive study on surface integrity of nickel-based superalloy Inconel 718 under robotic belt grinding. Mater. Manuf. Process. 2019, 34, 61–69. [Google Scholar] [CrossRef]
  84. Zeng, Q.; Liu, G.; Liu, L.; Qin, Y. Investigation into grindability of a superalloy and effects of grinding parameters on its surface integrity. Proc. Inst. Mech. Eng. Part B J. Eng. Manuf. 2015, 229, 238–250. [Google Scholar] [CrossRef]
  85. Gong, Y.; Zhou, Y.; Wen, X.; Cheng, J.; Sun, Y.; Ma, L. Experimental study on micro-grinding force and subsurface microstructure of nickel-based single crystal superalloy in micro grinding. J. Mech. Sci. Technol. 2017, 31, 3397–3410. [Google Scholar] [CrossRef]
  86. Zhou, Y.; Ma, L.; Gong, Y.; Zhang, L.; Yin, G.; Sun, Y. Study on the mechanism of chip forming and the microhardness of micro-grinding nickel-based single-crystal superalloy. Int. J. Adv. Manuf. Technol. 2019, 103, 281–295. [Google Scholar] [CrossRef]
  87. Oliveira, J.; Santos, T.; Miranda, R. Revisiting fundamental welding concepts to improve additive manufacturing: From theory to practice. Prog. Mater. Sci. 2020, 107, 100590. [Google Scholar] [CrossRef]
  88. Guo, C.; Li, G.; Li, S.; Hu, X.; Lu, H.; Li, X.; Xu, Z.; Chen, Y.; Li, Q.; Lu, J. Additive manufacturing of Ni-based superalloys: Residual stress, mechanisms of crack formation and strategies for crack inhibition. Nano Mater. Sci. 2023, 5, 53–77. [Google Scholar] [CrossRef]
  89. Mercelis, P.; Kruth, J.P. Residual stresses in selective laser sintering and selective laser melting. Rapid Prototyp. J. 2006, 12, 254–265. [Google Scholar] [CrossRef]
  90. Singh, U.P.; Swaminathan, S.; Phanikumar, G. Thermo-mechanical approach to study the residual stress evolution in part-scale component during laser additive manufacturing of alloy 718. Mater. Des. 2022, 222, 111048. [Google Scholar] [CrossRef]
  91. Withers, P.J.; Bhadeshia, H. Residual stress. Part 1–measurement techniques. Mater. Sci. Technol. 2001, 17, 355–365. [Google Scholar] [CrossRef]
  92. Shi, J.; Geng, C.; Xing, P.; Wang, Y.; Wang, G. Test and Analysis on Residual Stress of Aeroengine Components Based on Neutron Diffraction. Aeroengine 2020, 46, 59–65. [Google Scholar]
  93. Rossini, N.; Dassisti, M.; Benyounis, K.; Olabi, A.-G. Methods of measuring residual stresses in components. Mater. Des. 2012, 35, 572–588. [Google Scholar] [CrossRef]
  94. Anderoglu, O. Residual Stress Measurement Using X-ray Diffraction. Ph.D. Thesis, Texas A&M University, College Station, TX, USA, 2005. [Google Scholar]
  95. Hauk, V. Structural and Residual Stress Analysis by Nondestructive Methods: Evaluation-Application-Assessment; Elsevier: Amsterdam, The Netherlands, 1997. [Google Scholar]
  96. Morancais, A.; Fevre, M.; François, M.; Kanoute, P.; Kruch, S.; Longuet, A. Impact of shot-peening on a single crystal nickel-based superalloy. Adv. Mater. Res. 2014, 996, 70–75. [Google Scholar] [CrossRef]
  97. Arrazola, P.J.; Kortabarria, A.; Madariaga, A.; Esnaola, J.; Fernandez, E.; Cappellini, C.; Ulutan, D.; Özel, T. On the machining induced residual stresses in IN718 nickel-based alloy: Experiments and predictions with finite element simulation. Simul. Model. Pract. Theory 2014, 41, 87–103. [Google Scholar] [CrossRef]
  98. Madariaga, A.; Arrazola, P.J.; Esnaola, J.A.; Ruiz-Hervias, J.; Muñoz, P. Evolution of residual stresses induced by machining in a nickel based alloy under static loading at room temperature. Procedia CIRP 2014, 13, 175–180. [Google Scholar] [CrossRef]
  99. Masoudi, S.; Amini, S.; Saeidi, E.; Eslami-Chalander, H. Effect of machining-induced residual stress on the distortion of thin-walled parts. Int. J. Adv. Manuf. Technol. 2015, 76, 597–608. [Google Scholar] [CrossRef]
  100. Maleki, E.; Unal, O.; Guagliano, M.; Bagherifard, S. The effects of shot peening, laser shock peening and ultrasonic nanocrystal surface modification on the fatigue strength of Inconel 718. Mater. Sci. Eng. A 2021, 810, 141029. [Google Scholar] [CrossRef]
  101. Schajer, G. Practical Residual Stress Measurement Methods; John Wiley & Sons: Hoboken, NJ, USA, 2013. [Google Scholar]
  102. Meyer, H.; Epp, J. In Situ x-ray diffraction analysis of stresses during deep rolling of steel. Quantum Beam Sci. 2018, 2, 20. [Google Scholar] [CrossRef]
  103. Meyer, H.; Epp, J. Spatial Internal Material Load and Residual Stress Distribution Evolution in Synchrotron In Situ Investigations of Deep Rolling. Quantum Beam Sci. 2020, 4, 3. [Google Scholar] [CrossRef]
  104. Wang, H.; Tong, R.; Liu, G.; Sha, A.; Song, L.; Zhang, T. In-Situ Synchrotron HEXRD Study on the Micro-Stress Evolution Behavior of a Superalloy during Room-Temperature Compression. Materials 2023, 16, 3761. [Google Scholar] [CrossRef]
  105. Tanaka, K.; Akiniwa, Y. Diffraction Measurements of Residual Macrostress and Microstress Using X-rays, Synchrotron and Neutrons. JSME Int. J. Ser. A Solid Mech. Mater. Eng. 2004, 47, 252–263. [Google Scholar] [CrossRef]
  106. Allen, A.; Hutchings, M.; Windsor, C.; Andreani, C. Neutron diffraction methods for the study of residual stress fields. Adv. Phys. 1985, 34, 445–473. [Google Scholar] [CrossRef]
  107. Smith, T.; Carter, R.; An, K.; Chen, Y.; Locci, I.; Pawlik, R.; Gabb, T.; Telesman, I.; Evans, L. Residual Stress Measurements of Ni-base Superalloys through Neutron Diffraction; Glenn Research Center: Cleveland, OH, USA, 2020. Available online: https://ntrs.nasa.gov/citations/20205008113 (accessed on 29 October 2020).
  108. Chen, Y.; Cernatescu, I.; Venkatesh, V.; Stoica, A.D.; An, K. On the residual stress relaxation in Inconel 718 superalloys at high temperature by real-time neutron diffraction. Mater. Des. 2023, 232, 112135. [Google Scholar] [CrossRef]
  109. Liu, X.; Luzin, V.; Qin, H.; Bi, Z.; Li, M.; Liu, Y.; Sun, K.; Chen, D. Mapping of three-dimensional residual stresses by neutron diffraction in nickel-based superalloy discs prepared under different quenching conditions. Mater. Today Commun. 2022, 32, 103876. [Google Scholar] [CrossRef]
  110. Pereira, P.; Santos, A. Influence of anisotropy generated by rolling on the stress measurement by ultrasound in 7050 T7451 aluminum. Exp. Mech. 2013, 53, 415–425. [Google Scholar] [CrossRef]
  111. Choi, Y.-W.; Lee, T.-G.; Yeom, Y.-T.; Kwon, S.-D.; Kim, H.-H.; Lee, K.-Y.; Kim, H.-J.; Song, S.-J. Nondestructive Evaluation of Residual Stress in Shot Peened Inconel Using Ultrasonic Minimum Reflection Measurement. Materials 2023, 16, 5075. [Google Scholar] [CrossRef]
  112. Zongxing, P.; Junkai, S.; Yukui, G. Residual Stress Measurement of GH4169 Superalloy Based on Laser Ultrasonic Method. Chin. Q. Mech. 2021, 42, 98. [Google Scholar]
  113. Liu, M.; Zheng, Q.; Wang, X.; Xu, C. Characterization of Distribution of Microstructure and Micro-mechanical Properties of Nickel-Based Single Crystal Superalloy Within the Shot-Peened Layer. Met. Mater. Int. 2023, 29, 2257–2286. [Google Scholar] [CrossRef]
  114. Liu, M.; Zheng, Q.; Wang, X.; Xu, C. Characterization of distribution of residual stress in shot-peened layer of nickel-based single crystal superalloy DD6 by nanoindentation technique. Mech. Mater. 2022, 164, 104143. [Google Scholar] [CrossRef]
  115. Xiao, L.; Ye, D.; Chen, C. A further study on representative models for calculating the residual stress based on the instrumented indentation technique. Comput. Mater. Sci. 2014, 82, 476–482. [Google Scholar] [CrossRef]
  116. Suresh, S.; Giannakopoulos, A. A new method for estimating residual stresses by instrumented sharp indentation. Acta Mater. 1998, 46, 5755–5767. [Google Scholar] [CrossRef]
  117. Carlsson, S.; Larsson, P.-L. On the determination of residual stress and strain fields by sharp indentation testing: Part I: Theoretical and numerical analysis. Acta Mater. 2001, 49, 2179–2191. [Google Scholar] [CrossRef]
  118. Lee, Y.-H.; Kwon, D. Measurement of residual-stress effect by nanoindentation on elastically strained (100) W. Scr. Mater. 2003, 49, 459–465. [Google Scholar] [CrossRef]
  119. Wang, Q.; Ozaki, K.; Ishikawa, H.; Nakano, S.; Ogiso, H. Indentation method to measure the residual stress induced by ion implantation. Nucl. Instrum. Methods Phys. Res. Sect. B Beam Interact. Mater. At. 2006, 242, 88–92. [Google Scholar] [CrossRef]
  120. Prime, M.B. Residual stress measurement by successive extension of a slot: The crack compliance method. Appl. Mech. Rev. 1999, 52, 75–96. [Google Scholar] [CrossRef]
  121. Withers, P.; Webster, P. Neutron and synchrotron x-ray strain scanning. Strain 2001, 37, 19–33. [Google Scholar] [CrossRef]
  122. Zhang, C.; Wang, L.; Meng, W.; Zu, X.; Zhang, Z. A novel analytical modeling for prediction of residual stress induced by thermal-mechanical load during orthogonal machining. Int. J. Adv. Manuf. Technol. 2020, 109, 475–489. [Google Scholar] [CrossRef]
  123. Hua, Y.; Liu, Z.; Wang, B.; Jiang, J. Residual stress regenerated on low plasticity burnished Inconel 718 surface after initial turning process. J. Manuf. Sci. Eng. 2019, 141, 121004. [Google Scholar] [CrossRef]
  124. Peng, H.; Dong, P.; Cheng, X.; Zhang, C.; Tang, W.; Xing, Y.; Zhou, X. Semi-empirical prediction of residual stress distributions introduced by turning Inconel 718 alloy based on Lorentz function. Materials 2020, 13, 4341. [Google Scholar] [CrossRef]
  125. Ulutan, D.; Arisoy, Y.; Özel, T.; Mears, L. Empirical modeling of residual stress profile in machining nickel-based superalloys using the sinusoidal decay function. Procedia CIRP 2014, 13, 365–370. [Google Scholar] [CrossRef]
  126. Nagesha, B.; Kumar, S.A.; Vinodh, K.; Pathania, A.; Barad, S. A thermo–Mechanical modelling approach on the residual stress prediction of SLM processed HPNGV aeroengine part. Mater. Today Proc. 2021, 44, 4990–4996. [Google Scholar] [CrossRef]
  127. Wang, F.; Men, X.; Liu, Y.; Fu, X. Experiment and simulation study on influence of ultrasonic rolling parameters on residual stress of Ti-6Al-4V alloy. Simul. Model. Pract. Theory 2020, 104, 102121. [Google Scholar] [CrossRef]
  128. Seddik, R.; Ben Sghaier, R.; Fathallah, R. A numerical–analytical approach to predict the effects of shot peening on the fatigue performance of the nickel-based super alloy Waspaloy. Proc. Inst. Mech. Eng. Part L J. Mater. Des. Appl. 2019, 233, 128–140. [Google Scholar] [CrossRef]
  129. Goulmy, J.-P.; Boyer, V.; Retraint, D.; Kanoute, P.; Toualbi, L.; Rouhaud, E. Modeling of the shot peening of a nickel alloy with the consideration of both residual stresses and work hardening. Int. J. Solids Struct. 2023, 264, 112120. [Google Scholar] [CrossRef]
  130. Kortabarria, A.; Armentia, I.; Arrazola, P. Sensitivity analysis of material input data influence on machining induced residual stress prediction in Inconel 718. Simul. Model. Pract. Theory 2016, 63, 47–57. [Google Scholar] [CrossRef]
  131. Wu, J.; Liu, X.; Qiao, H.; Zhao, Y.; Hu, X.; Yang, Y.; Zhao, J. Using an artificial neural network to predict the residual stress induced by laser shock processing. Appl. Opt. 2021, 60, 3114–3121. [Google Scholar] [CrossRef]
  132. Wu, J.; Li, Y.; Zhao, J.; Qiao, H.; Lu, Y.; Sun, B.; Hu, X.; Yang, Y. Prediction of residual stress induced by laser shock processing based on artificial neural networks for FGH4095 superalloy. Mater. Lett. 2021, 286, 129269. [Google Scholar] [CrossRef]
  133. Chen, Y.; Jiang, C.; Wang, Z.; Zhan, K. Influence of shot peening on surface-layer characteristics of a monocrystalline nick-el-based superalloy. Powder Diffr. 2010, 25, 355–358. [Google Scholar] [CrossRef]
  134. Chen, Y.; Jiang, C. Effect of shot peening on surface characteristics of Ni-based single-crystal superalloy. Mater. Trans. 2013, 54, 1894–1897. [Google Scholar] [CrossRef]
  135. Kumar, D.; Idapalapati, S.; Wei, W. Microstructural response and strain hardening in deep cold rolled nickel-based superalloy for aerospace application. Procedia CIRP 2018, 71, 374–379. [Google Scholar] [CrossRef]
  136. Hu, T.; Li, S.; Qiao, H.; Lu, Y.; Sun, B.; Wu, J. Effect of warm laser shock peening on microstructure and properties of GH4169 superalloy. IOP Conf. Ser. Mater. Sci. Eng. 2018, 423, 012054. [Google Scholar] [CrossRef]
  137. Yang, J.; Liu, D.; Zhang, X.; Liu, M.; Zhao, W.; Liu, C. The effect of ultrasonic surface rolling process on the fretting fatigue property of GH4169 superalloy. Int. J. Fatigue 2020, 133, 105373. [Google Scholar] [CrossRef]
  138. Tang, Z.; Wang, K.; Dong, X.; Duan, W.; Mei, X. Effect of warm laser shock peening on the low-cycle fatigue behavior of DD6 nickel-based single-crystal superalloy. J. Mater. Eng. Perform. 2021, 30, 2930–2939. [Google Scholar] [CrossRef]
  139. Tang, Z.; Wang, K.; Geng, Y.; Dong, X.; Duan, W.; Sun, X.; Mei, X. An investigation of the effect of warm laser shock peening on the surface modifications of [001]-oriented DD6 superalloy. Int. J. Adv. Manuf. Technol. 2021, 113, 1973–1988. [Google Scholar] [CrossRef]
  140. Lu, Y.; Yang, Y.; Zhao, J.; Yang, Y.; Qiao, H.; Hu, X.; Wu, J.; Sun, B. Impact on mechanical properties and microstructural response of nickel-based superalloy GH4169 subjected to warm laser shock peening. Materials 2020, 13, 5172. [Google Scholar] [CrossRef] [PubMed]
  141. Sheng, J.; Zhang, H.; Hu, X.; Huang, S. Influence of laser peening on the high-temperature fatigue life and fracture of Inconel 718 nickel-based alloy. Theor. Appl. Fract. Mech. 2020, 109, 102757. [Google Scholar] [CrossRef]
  142. Hu, X.; Yang, Y.; Zhao, J.; Lu, Y.; Wu, J.; Qiao, H. Surface integrity evolution of a Ni-based single crystal superalloy by laser shock peening. Appl. Surf. Sci. Adv. 2021, 6, 100183. [Google Scholar] [CrossRef]
  143. Tang, Z.; Dong, X.; Geng, Y.; Wang, K.; Duan, W.; Gao, M.; Mei, X. The effect of warm laser shock peening on the thermal stability of compressive residual stress and the hot corrosion resistance of Ni-based single-crystal superalloy. Opt. Laser Technol. 2022, 146, 107556. [Google Scholar] [CrossRef]
  144. Zhou, Z.; Yao, C.-F.; Zhao, Y.; Wang, Y.; Tan, L. Effect of ultrasonic impact treatment on the surface integrity of nickel alloy 718. Adv. Manuf. 2021, 9, 160–171. [Google Scholar] [CrossRef]
  145. Yao, C.; Zhou, Z.; Zhao, Y.; Tan, L.; Cui, M.; Wang, Y. Experimental study on surface integrity changes during turning-ultrasonic impact of nickel alloy 718. Int. J. Adv. Manuf. Technol. 2021, 112, 1359–1371. [Google Scholar] [CrossRef]
  146. Chen, M.; Xing, S.; Li, J.; He, J.; Lu, Y.; Jiang, C.; Ji, V. Surface residual stress and microstructure evolutions of Hastelloy X alloy after severe shot peening. Vacuum 2021, 187, 110136. [Google Scholar] [CrossRef]
  147. Liu, Y.; Wang, L.; Yang, K.; Song, X. Characteristics of microstructure evolution of surface treated IN718 superalloy by warm laser shock peening during long-term aging at high temperatures. Mater. Charact. 2022, 193, 112261. [Google Scholar] [CrossRef]
  148. Yang, J.; Liu, D.; Fan, K.; Liu, Y.; Ren, Z.; Liu, D.; Xu, X.; Jia, T.; Zhang, H.; Ye, C. Designing a gradient structure in a Ni-based superalloy to improve fretting fatigue resistance at elevated temperatures through an ultrasonic surface rolling process. Int. J. Fatigue 2023, 168, 107397. [Google Scholar] [CrossRef]
  149. Wang, X.; Xu, C.; Wang, X.; Hu, D.; Ma, S.; Tang, Z. Turning/Shot peening of Nickel-based powder metallurgy superalloy: Effect on surface integrity and high-temperature low-cycle fatigue properties. Int. J. Fatigue 2023, 166, 107291. [Google Scholar] [CrossRef]
  150. Zhang, Z.; Zhao, Y.; Shan, J.; Wu, A.; Sato, Y.S.; Tokita, S.; Kadoi, K.; Inoue, H.; Gu, H.; Tang, X. The role of shot peening on liquation cracking in laser cladding of K447A nickel superalloy powders over its non-weldable cast structure. Mater. Sci. Eng. A 2021, 823, 141678. [Google Scholar] [CrossRef]
  151. Foss, B.; Gray, S.; Hardy, M.; Stekovic, S.; McPhail, D.; Shollock, B.A. Analysis of shot-peening and residual stress relaxation in the nickel-based superalloy RR1000. Acta Mater. 2013, 61, 2548–2559. [Google Scholar] [CrossRef]
  152. Zhao, X.; Zhou, H.; Liu, Y. Effect of shot peening on the fatigue properties of nickel-based superalloy GH4169 at high temperature. Results Phys. 2018, 11, 452–460. [Google Scholar] [CrossRef]
  153. Li, Y.; Cockings, H.; Mignanelli, P.; Whittaker, M.; Cockings, B.; Buckingham, R.; Bache, M. High temperature corrosion-fatigue behavior of a shot peened nickel based superalloy. Corros. Sci. 2022, 207, 110577. [Google Scholar] [CrossRef]
  154. Lesyk, D.; Dzhemelinskyi, V.; Martinez, S.; Mordyuk, B.; Lamikiz, A. Surface shot peening post-processing of inconel 718 alloy parts printed by laser powder bed fusion additive manufacturing. J. Mater. Eng. Perform. 2021, 30, 6982–6995. [Google Scholar] [CrossRef]
  155. Qin, Z.; Li, B.; Chen, R.; Zhang, H.; Xue, H.; Yao, C.; Tan, L. Effect of shot peening on high cycle and very high cycle fatigue properties of Ni-based superalloys. Int. J. Fatigue 2023, 168, 107429. [Google Scholar] [CrossRef]
  156. Sihai, L.; Weifeng, H.; Liucheng, Z.; Xiangfan, N.; Yinghong, L. Aluminizing mechanism on a nickel-based alloy with surface nanostructure produced by laser shock peening and its effect on fatigue strength. Surf. Coat. Technol. 2018, 342, 29–36. [Google Scholar] [CrossRef]
  157. Karthik, D.; Swaroop, S. Laser shock peening enhanced corrosion properties in a nickel based Inconel 600 superalloy. J. Alloys Compd. 2017, 694, 1309–1319. [Google Scholar] [CrossRef]
  158. Geng, Y.; Dong, X.; Wang, K.; Mei, X.; Tang, Z.; Duan, W. Evolutions of microstructure, phase, microhardness, and residual stress of multiple laser shock peened Ni-based single crystal superalloy after short-term thermal exposure. Opt. Laser Technol. 2020, 123, 105917. [Google Scholar] [CrossRef]
  159. Liao, Y.; Ye, C.; Cheng, G.J. A review: Warm laser shock peening and related laser processing technique. Opt. Laser Technol. 2016, 78, 15–24. [Google Scholar] [CrossRef]
  160. Chin, K.; Idapalapati, S.; Ardi, D. Thermal stress relaxation in shot peened and laser peened nickel-based superalloy. J. Mater. Sci. Technol. 2020, 59, 100–106. [Google Scholar] [CrossRef]
  161. Yang, Y.; Zhao, J.; Qiao, H.; Wun, J.; Hu, X. The research progress on strengthen property and mechanism of warm laser shock peening. In Proceedings of the 24th National Laser Conference & Fifteenth National Conference on Laser Technology and Optoelectronics, Shanghai, China, 17–20 October 2020; pp. 104–114. [Google Scholar]
  162. Ye, C.; Liao, Y.; Cheng, G.J. Warm laser shock peening driven nanostructures and their effects on fatigue performance in aluminum alloy 6160. Adv. Eng. Mater. 2010, 12, 291–297. [Google Scholar] [CrossRef]
  163. Lu, Y.; Zhao, J.; Qiao, H.; Hu, T.; Sun, B.; Wu, J. A study on the surface morphology evolution of the GH4619 using warm laser shock peening. Aip Adv. 2019, 9, 085030. [Google Scholar] [CrossRef]
  164. Tani, G.; Orazi, L.; Fortunato, A.; Ascari, A.; Campana, G. Warm laser shock peening: New developments and process optimization. CIRP Ann. 2011, 60, 219–222. [Google Scholar] [CrossRef]
  165. Liao, Y.; Ye, C.; Kim, B.-J.; Suslov, S.; Stach, E.A.; Cheng, G.J. Nucleation of highly dense nanoscale precipitates based on warm laser shock peening. J. Appl. Phys. 2010, 108, 063518. [Google Scholar] [CrossRef]
  166. Nagarajan, B.; Kumar, D.; Fan, Z.; Castagne, S. Effect of deep cold rolling on mechanical properties and microstructure of nickel-based superalloys. Mater. Sci. Eng. A 2018, 728, 196–207. [Google Scholar] [CrossRef]
  167. Oevermann, T.; Wegener, T.; Liehr, A.; Hübner, L.; Niendorf, T. Evolution of residual stress, microstructure and cyclic performance of the equiatomic high-entropy alloy CoCrFeMnNi after deep rolling. Int. J. Fatigue 2021, 153, 106513. [Google Scholar] [CrossRef]
  168. Kuschel, S.; Kinner-Becker, T.; Zmich, R.; Sölter, J.; Meyer, D. Modelling and Simulation of Mechanical Loads and Residual Stresses in Deep Rolling at Elevated Temperature. J. Manuf. Mater. Process. 2021, 5, 76. [Google Scholar] [CrossRef]
  169. Kinner-Becker, T.; Hettig, M.; Sölter, J.; Meyer, D. Analysis of internal material loads and Process Signature Components in deep rolling. CIRP J. Manuf. Sci. Technol. 2021, 35, 400–409. [Google Scholar] [CrossRef]
  170. Jiang, W.; Xu, P.; Li, Y.; Wang, H.; Cai, Z.; Li, J.; Liang, Y.; Liang, Y. Effect of a gradient structure on the mechanical performance of Inconel 718 Ni-based superalloy at elevated temperatures. J. Mater. Res. Technol. 2023, 23, 2031–2042. [Google Scholar] [CrossRef]
  171. Hao, J.; Niu, Q.; Ji, H.; Liu, H. Effect of ultrasonic rolling on the organization and properties of a high-speed laser cladding IN 718 superalloy coating. Crystals 2023, 13, 1214. [Google Scholar] [CrossRef]
  172. John, M.; Ralls, A.M.; Dooley, S.C.; Thazhathidathil, A.K.V.; Perka, A.K.; Kuruveri, U.B.; Menezes, P.L. Ultrasonic surface rolling process: Properties, characterization, and applications. Appl. Sci. 2021, 11, 10986. [Google Scholar] [CrossRef]
  173. Wu, D.; Lv, H.; Wang, H.; Yu, J. Surface micro-morphology and residual stress formation mechanisms of near-net-shaped blade produced by low-plasticity ultrasonic rolling strengthening process. Mater. Des. 2022, 215, 110513. [Google Scholar] [CrossRef]
  174. Yu, W.; Wu, J.; Li, Y.; An, Q.; Ming, W.; Chen, D.; Wang, H.; Chen, M. Investigations on surface modification of nickel-based superalloy subjected to ultrasonic surface rolling process. Int. J. Adv. Manuf. Technol. 2023, 129, 1473–1488. [Google Scholar] [CrossRef]
  175. Luan, X.; Zhao, W.; Liang, Z.; Xiao, S.; Liang, G.; Chen, Y.; Zou, S.; Wang, X. Experimental study on surface integrity of ultra-high-strength steel by ultrasonic hot rolling surface strengthening. Surf. Coat. Technol. 2020, 392, 125745. [Google Scholar] [CrossRef]
  176. Zhao, R.; Zhang, D.; Wan, M. A review of strengthening mechanisms and applications of the multifield-coupled manufacturing process. J. Mater. Process. Technol. 2023, 320, 118128. [Google Scholar] [CrossRef]
  177. Ji, R.; Zheng, Q.; Liu, Y.; To, S.; Yip, W.S.; Yang, Z.; Jin, H.; Wang, H.; Cai, B.; Cheng, W. An investigation of mechanical-thermal coupling treatment on material properties, surface roughness, and cutting force of Inconel 718. Int. J. Adv. Manuf. Technol. 2019, 105, 1917–1931. [Google Scholar] [CrossRef]
  178. Sun, Z.; Ye, Y.; Xu, J.; Hu, T.; Ren, S.; Li, B. Effect of electropulsing on surface mechanical behavior and microstructural evolution of inconel 718 during ultrasonic surface rolling process. J. Mater. Eng. Perform. 2019, 28, 6789–6799. [Google Scholar] [CrossRef]
  179. Yan, J.; Zhao, R.; Wan, M.; Meng, B. Coupled effect of pulsed current and ultrasonic vibration on deformation behavior of Inconel 718 sheet: Phenomena and modeling. J. Mater. Res. Technol. 2023, 25, 5538–5560. [Google Scholar] [CrossRef]
  180. Ji, R.; Liu, Y.; To, S.; Jin, H.; Yip, W.S.; Yang, Z.; Zheng, C.; Cai, B. Efficient fabrication of gradient nanostructure layer on surface of commercial pure copper by coupling electric pulse and ultrasonics treatment. J. Alloys Compd. 2018, 764, 51–61. [Google Scholar] [CrossRef]
  181. Liu, Y.; Meng, B.; Du, M.; Wan, M. Electroplastic effect and microstructural mechanism in electrically assisted deformation of nickel-based superalloys. Mater. Sci. Eng. A 2022, 840, 142975. [Google Scholar] [CrossRef]
  182. Ji, R.; Yang, Z.; Jin, H.; Liu, Y.; Wang, H.; Zheng, Q.; Cheng, W.; Cai, B.; Li, X. Surface nanocrystallization and enhanced surface mechanical properties of nickel-based superalloy by coupled electric pulse and ultrasonic treatment. Surf. Coat. Technol. 2019, 375, 292–302. [Google Scholar] [CrossRef]
  183. Tang, Z.; Dong, X.; Wang, K.; Geng, Y.; Gao, M.; Mei, X. An investigation on the effect of change in experimental sequence of warm laser shock peening and laser shock peening on the performance of DD6 nickel-based single-crystal superalloy. Surf. Coat. Technol. 2023, 464, 129450. [Google Scholar] [CrossRef]
  184. Ye, Y.; Kure-Chu, S.-Z.; Sun, Z.; Li, X.; Wang, H.; Tang, G. Nanocrystallization and enhanced surface mechanical properties of commercial pure titanium by electropulsing-assisted ultrasonic surface rolling. Mater. Des. 2018, 149, 214–227. [Google Scholar] [CrossRef]
  185. Ye, Y.; Kuang, J.; Kure-Chu, S.-Z.; Song, G.; Sun, Z.; Tang, G. Improvement of microstructure and surface behaviors of welded S50C steel components under electropulsing assisted ultrasonic surface modification. J. Mater. Res. 2016, 31, 2125–2135. [Google Scholar] [CrossRef]
  186. Duan, C.; Qu, S.; Hu, X.; Jia, S.; Li, X. Microstructures and fatigue behaviors of 25CrNi2MoV steel under electropulsing-assisted ultrasonic surface rolling. Int. J. Fatigue 2022, 158, 106733. [Google Scholar] [CrossRef]
  187. Qu, S.; Ren, Z.; Hu, X.; Lai, F.; Sun, F.; Li, X.; Yang, C. The effect of electric pulse aided ultrasonic rolling processing on the microstructure evolution, surface properties, and fatigue properties of a titanium alloy Ti5Al4Mo6V2Nb1Fe. Surf. Coat. Technol. 2021, 421, 127408. [Google Scholar] [CrossRef]
  188. Wang, Z.; Liu, Z.; Gao, C.; Wong, K.; Ye, S.; Xiao, Z. Modified wear behavior of selective laser melted Ti6Al4V alloy by direct current assisted ultrasonic surface rolling process. Surf. Coat. Technol. 2020, 381, 125122. [Google Scholar] [CrossRef]
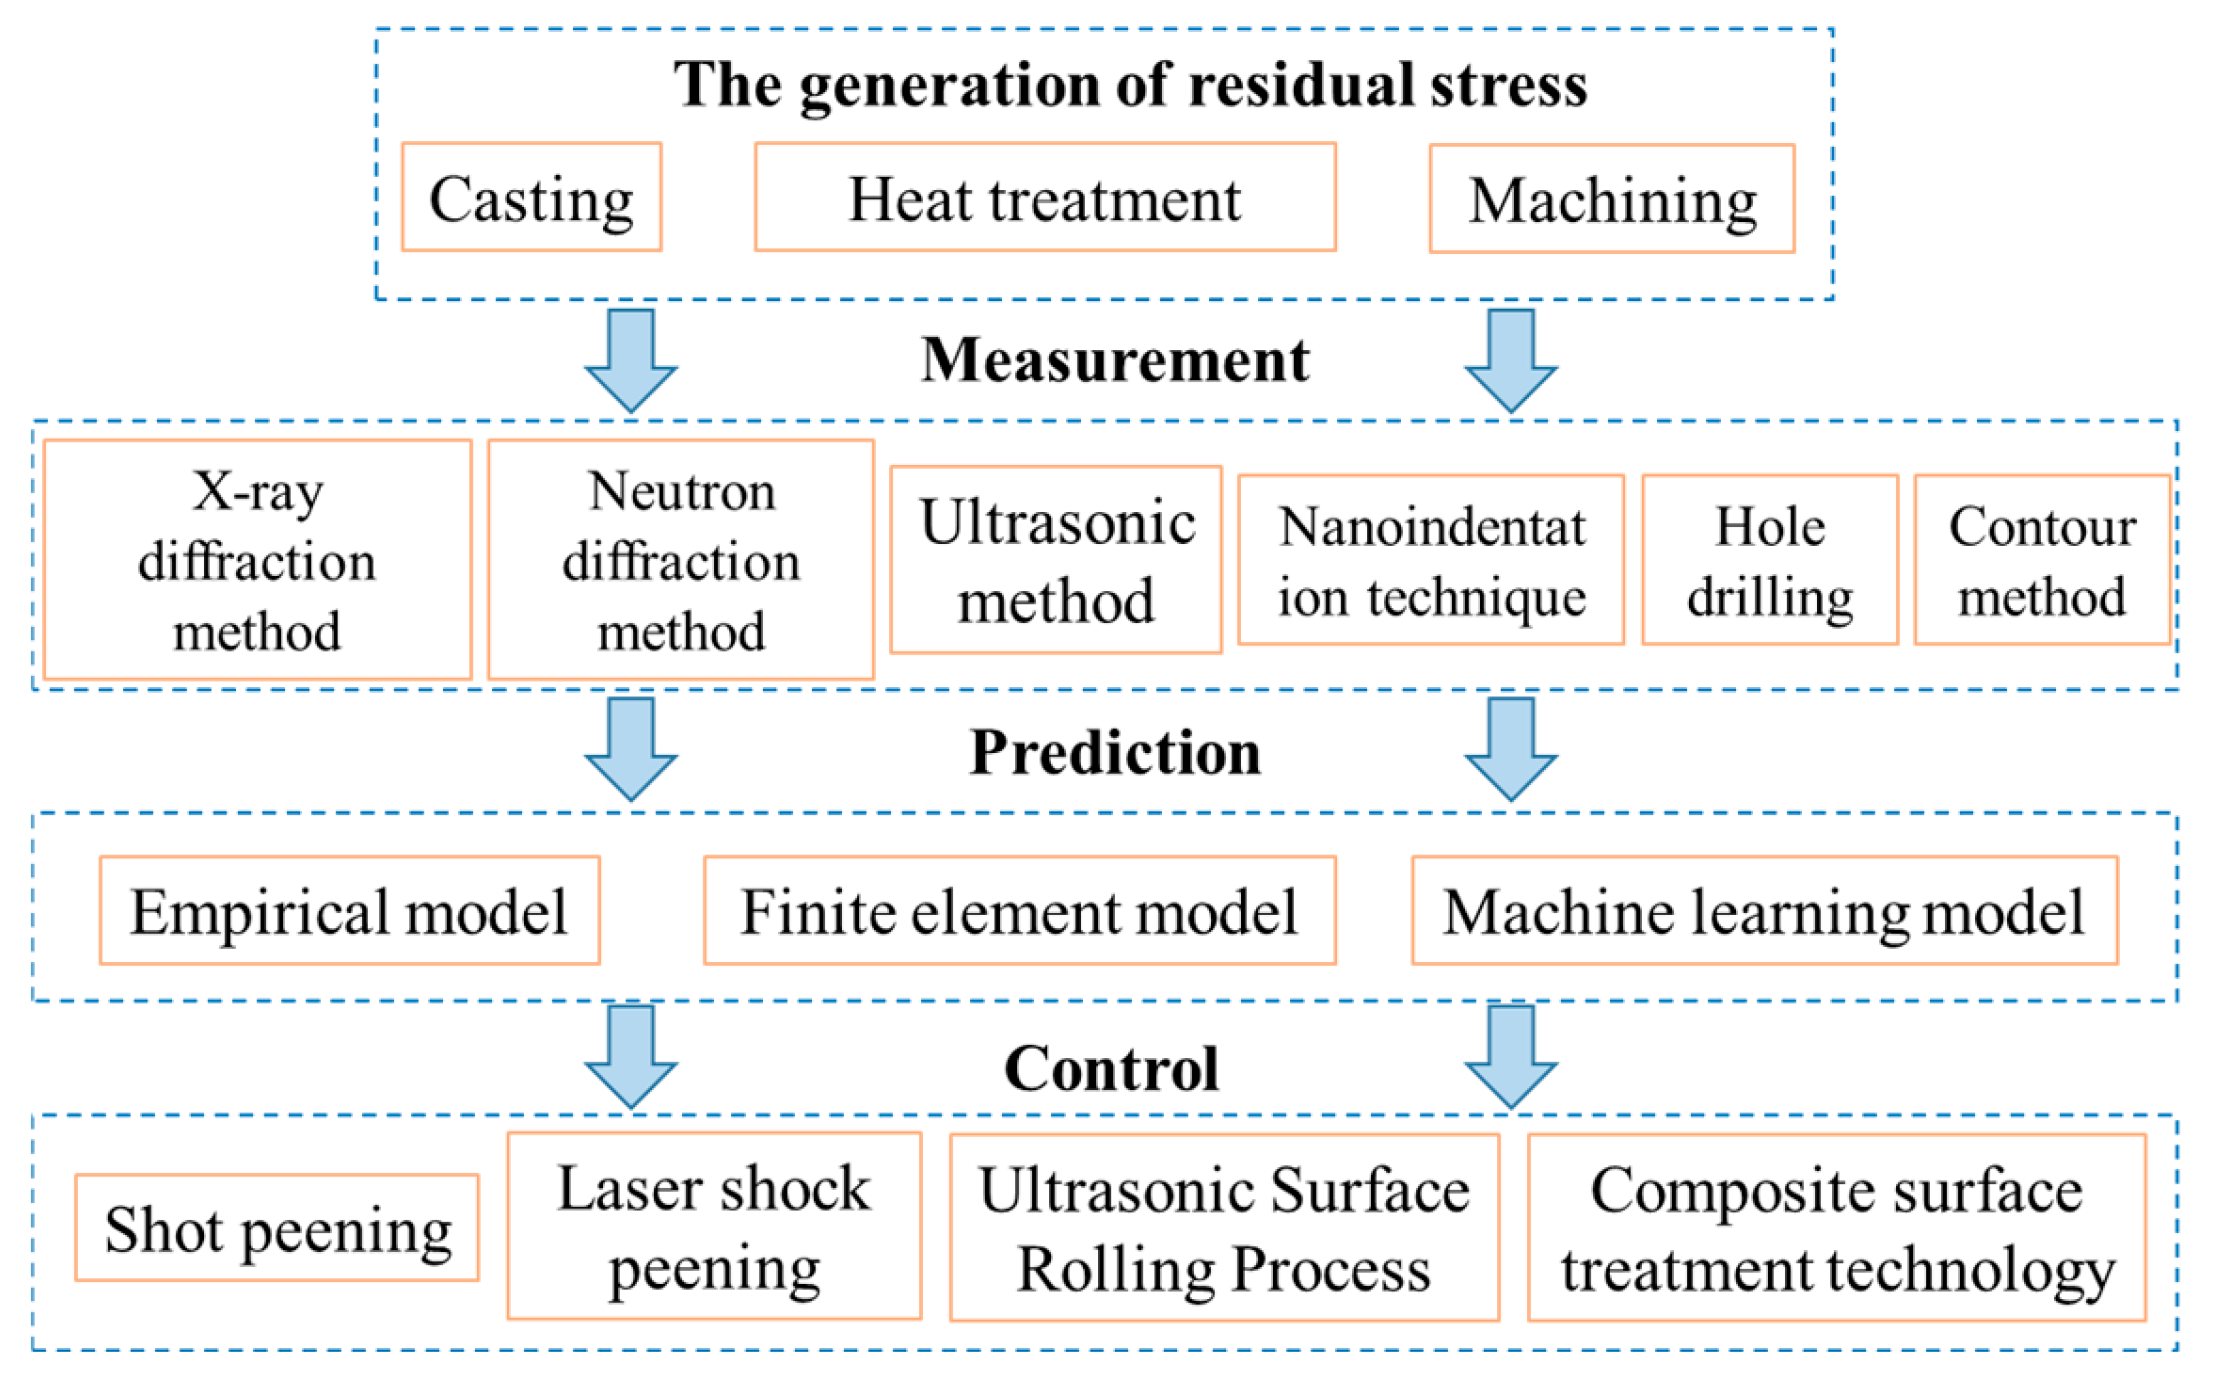
Figure 1. Main points of this review.
Machines 12 00715 g001
Figure 2. (a) Geometry of the BCV. (b) Residual stresses in Pa obtained in ABAQUS. (c) Residual stresses in Pa obtained in ProCAST [42].
Machines 12 00715 g002
Figure 3. (a) The residual stress distribution at different annealing temperatures. (b) The variation in residual stress between 300 K and other annealing temperatures [48].
Machines 12 00715 g003
Figure 4. Residual stress profiles. (a) Heat treatment of the top surface at 450 and 600 °C for 1 h and (b) heat treatment of the lateral side at 450 and 600 °C for 1 h. (c) Heat treatment of the top surface at 800, 900, 980, and 1065 °C for 1 h. (d) Heat treatment of the lateral side at 800, 900, 980, and 1065 °C for 1 h of the L-PBF IN 718 samples [49].
Machines 12 00715 g004
Figure 5. Comparison of residual stress under different cutting tools parameters [56].
Machines 12 00715 g005
Figure 6. Impact of prior cuts on the development of residual stress during multiple cutting operations: (a) uncut chip thickness, (b) rake angle, (c) edge radius, and (d) intermediate cut [58].
Machines 12 00715 g006
Figure 7. Effect of tool material and cutting speed on the development of surface residual stresses [74].
Machines 12 00715 g007
Figure 8. Classification of metal additive manufacturing methods [88].
Machines 12 00715 g008
Figure 9. Penetration depth and resolution of residual stress testing method.
Machines 12 00715 g009
Figure 10. (a) Laser ultrasound experimental system. (b) Comparison of experimental results between ultrasonic and XRD [112].
Machines 12 00715 g010
Figure 11. The residual stress obtained by different models: (a) the variation with the distance from the peened surface; (b) the scaling relationships [114].
Machines 12 00715 g011
Figure 12. The main steps of residual stress prediction [124].
Machines 12 00715 g012
Figure 13. Validation of the predictive model [125].
Machines 12 00715 g013
Figure 14. (a) 3D FE model for machining. (b) Effective stress distribution in chips obtained by 3D finite element simulation [97].
Machines 12 00715 g014
Figure 15. The prediction model for residual stress: (a) orthogonal cutting model and (b) relaxation model [130].
Machines 12 00715 g015
Figure 16. (a) Results by ANN method in test datasets. (b) Ranking importance of input parameters [132].
Machines 12 00715 g016
Figure 17. Profiles of the surface residual stress under different shot media [149].
Machines 12 00715 g017
Figure 18. Residual stress distribution at varying intensities of shot peening along the depth direction in specimens [155].
Machines 12 00715 g018
Figure 19. Surface residual stress under different laser pulse energy in LSP-ed sample [142].
Machines 12 00715 g019
Figure 20. Schematic of (a) the process of LSP and (b) scanning patterns [158].
Machines 12 00715 g020
Figure 21. Depth-wise residual stress distribution in the samples subjected to LSP and WLSP [143].
Machines 12 00715 g021
Figure 22. Schematic diagram of USRP [172].
Machines 12 00715 g022
Figure 23. The surface residual stress in USRP-1 and USRP-20 before and after experiencing high-temperature fretting fatigue [148].
Machines 12 00715 g023
Figure 24. Distribution of residual compressive stress in samples subjected to CEPUT at varying peak currents (a) 0A, (b) 600A, (c) 1000A [182].
Machines 12 00715 g024
Table 1. The advantages and disadvantages of prediction models.
MethodAdvantagesDisadvantages
Empirical models(1) Clear formulas and easy calculations.
(2) Low demand for computing resources.
(3) For prediction under known operating conditions.
(1) Limited scope of application.
(2) Lack of physical basis and reliance on empirical data.
(3) Limited accuracy in nonlinear or complex situations.
Finite element models(1) Capable of simulating complex stress distributions and residual stress fields.
(2) Works under a wide range of loads and boundary conditions.
(3) Predicts spatial distribution of stress.
(1) High computational cost.
(2) Complex model setup, with demanding pre-processing and validation.
(3) Strong reliance on material models.
Machine learning models(1) Strong generalization ability.
(2) Excellent predictive ability for nonlinear problems.
(3) Automatically learns parameters without pre-defined models.
(1) Requires large datasets for training.
(2) “Black box” nature: difficult to interpret the physical meaning of the model parameters.
(3) Sensitive to data quality, may lead to overfitting.
Table 2. The advantages and disadvantages of mitigation methods.
MethodAdvantagesDisadvantages
Shot Peening(1) Low cost
(2) Easily applied to large-scale industrial applications
Residual compressive stresses are introduced at a limited depth and usually act only in the surface layer, making it difficult to adapt to deep strengthening needs
Laser Shock Peening(1) Ability to introduce compressive residual stresses deep in the material
(2) Low impact on surface roughness
(1) Higher costs and complex equipment requirements
(2) Slower processing speed, not suitable for mass production
Deep Rolling(1) Relatively mature and stable process
(2) Reduced surface roughness
(1) Lower adaptability to complex shaped parts
(2) The improvement in surface microstructure was lower compared to USRP
Ultrasonic Surface Rolling Process(1) Stronger residual compressive stresses can be induced while refining the surface grains and improving the surface microstructure
(2) Improved surface finish
(1) Limited applicability to complex shaped parts
(2) Specialized equipment is required, and the operation process is more complicated
Composite Surface Treatment Technology(1) The comprehensive enhancement effects can be realized
(2) Meet the needs of different working conditions
(1) Complex and costly treatment process
(2) Difficult to standardize production
Table 3. Summary of study work on surface treatment for residual stress control.
YearWorkpieceMethodSchemeMeasurement MethodEffect of Residual StressReference
2010 DD3SPShot media: ceramicXRDOverlapping rate ↑, residual stress ↑[133]
Shot media diameter: 0.2 mm
Overlapping rate: 80%, 200%, 400%
Almen intensity: 0.6 mmA
Shot peening distance: 100 mm
2013DD3SPShot media: Al2O3
Shot media diameter: 0.3 mm
Jet pressure: 0.3 MPa
Almen intensity: 0.13 mmA
Treatment time: 10\30\60\120 s
XRDPeening time ↑, residual compressive stress ↑[134]
2018Udimet 720LiDeep Cold RolledHydrostatic tool: 6 mm
Hydraulic pressures: 10\30\50 MPa
Speed: 1 m/min
Stepover: 0.06 mm
XRDHydraulic pressures ↑, residual compressive stress ↑[135]
2018GH4169LSP
WLSP
Pulse energy: 5 J
Wavelength: 1064 nm
Overlapping rate: 50%
Spot diameter: 2 mm
Pulse width: 14 ns
XRDWLSP > LSP; WLSP: temperature ↑, residual stress first ↑, then ↑[136]
2019GH4169USRPStatic load: 900 N
Spindle speed: 100 r/min
Ultrasonic frequency: 20 kHz
Amplitude: 12 μm
Feed rate: 0.08 mm/r
Treatment times: 1 and 3
XRDTreatment times ↑, residual stress ↑[137]
2020DD6WLSPPulse energy: 7 J
Wavelength: 1064 nm
Overlapping rate: 50%
Spot diameter: 3 mm
Pulse width: 20 ns
Pulse frequency: 1 Hz
Number of shocks ↑, residual stress ↑[138]
2020DD6WLSPSpot diameter: 3 mm
Overlapping rate: 30%
Pulse energy: 7 J
Pulse width: 20 ns
Pulse frequency: 1 Hz
ANSYS/LS-DYNATemperature ↑, residual stress ↑[139]
2020GH4169LSP
WLSP
Pulse energy: 5 J
Wavelength: 1064 nm
Overlapping rate: 50%
Spot diameter: 2 mm
Pulse width: 14 ns
Pulse frequency: 2 Hz
XRDExposure time ↑, residual compressive stress: WLSP > LSP[140]
2020IN718LPPulse energy: 4.6 J, 5.0 J, 5.6 J
Wavelength: 1064 nm
Overlapping rate:50%
Spot diameter: 2.2 mm
Pulse width:15 ns
Pulse frequency: 1 Hz
Laser power densities: 6.05\6.58\7.37 GW/cm2
XRDLaser power densities ↑, residual compressive stress ↑[141]
2021SRR99LSPWavelength: 1064 nm
Spot diameter: 2.6 mm
Pulse energy: 5–7 J
Overlapping rate: 50%
Pulse width: 14 ns
Pulse frequency: single point
XRDPulse energy ↑, residual compressive stress ↑[142]
2021DD6WLSPPulse energy: 7 J
Wavelength: 1064 nm
Overlapping rate: 50%
Spot diameter: 3 mm
Pulse width: 20 ns
Pulse frequency: 1 Hz
XRDTemperature ↑, residual compressive stress ↑; WLSP > LSP[143]
2021IN718Ultrasonic impact treatmentUltrasonic frequency: 34 kHz
Amplitude: 6 μm
Pre-extrusion depth: 0.01–0.025 mm
Feed rate: 0.05–0.2 mm/r
Linear velocity: 2.83–5.65 m/min
XRDRank the impact for RS: feed rate > pre-extrusion depth > linear velocity[144]
2021IN718Ultrasonic impact treatmentUltrasonic frequency: 34 kHz
Amplitude: 6 μm
Feed rate: 0.08 mm/r
Spindle speed: 60 r/min
Pre-extrusion depth:0.01 mm
XRDTurning surface roughness ↑, residual stress ↑[145]
2021Hastelloy X alloySSP, SPShot media: S230 steel
Shot media diameter: 0.3 mm
Overlapping rate: 100%, 1500%
Almen intensity: 0.2, 0.5 mmA
Air pressure: 0.1, 0.3 MPa
XRDResidual compressive stress: SSP > SP[146]
2022IN718LSP
WLSP
Spot diameter: 2.5 mm
Pulse energy: 7 J
Pulse width: 15 ns
Overlapping rate: 60%
XRDWLSP > LSP[147]
2022GH4169USRPStatic load: 300 N
Spindle speed: 60 rev/min
Ultrasonic frequency: 25 kHz
Amplitude: 10 μm
Feed rate: 0.08 mm/r
Workpiece speed: 200 r/min
Treatment times: 1 and 20
XRDTreatment times ↑, residual stress ↑, residual stress becomes more stable in high-temperature environments[148]
2022FGH96 PMSPShot media: Ceramic beads AZB300 and cast iron shot ASH110
Shot media diameter: 0.3 mm
Almen intensity: 0.08–0.13 mmA and 0.25–0.33 mmA
XRDResidual compressive stress: Ceramic bead peening < Ceramic bead
peening
[149]
Disclaimer/Publisher’s Note: The statements, opinions and data contained in all publications are solely those of the individual author(s) and contributor(s) and not of MDPI and/or the editor(s). MDPI and/or the editor(s) disclaim responsibility for any injury to people or property resulting from any ideas, methods, instructions or products referred to in the content.